Описание
Тренер: Баранцев Алексей, участник команды разработки инструмента Selenium
Если Вы попали на эту страницу — значит, нет смысла рассказывать Вам про популярность Selenium и убеждать в необходимости его изучения, Вы это и так уже понимаете. Вопрос не в том, изучать или нет, а в том, как именно изучать.
Чтобы помочь вам определиться с выбором, мы решили рассказать, на каких принципах построен этот учебный курс, чем он отличается от наших предыдущих тренингов и от того, что предлагают другие учебные центры.
1. Selenium во главе угла
Достаточно часто можно встретить “тренинги по Selenium”, программа которых содержит всё, что пришло в голову автору учебного курса — основы программирования, XML, SQL, JUnit, Maven, Jenkins, Git, ну и немного про Selenium.
Это, конечно, выглядит привлекательно — на одном тренинге выучить сразу всё. Но в итоге получается в точности наоборот — ни одна из тем не покрывается достаточно полно.
В нашем тренинге главным будет Selenium.
Это не означает, что смежные темы совсем не будут рассматриваться. Целое занятие будет посвящено настройке инфраструктуры. Говоря о поиске элементов, нельзя обойти стороной XPath и CSS. При обсуждении способов запуска тестов попутно поговорим про Docker. Разговор о шаблоне проектирования PageObject и его альтернативах тесно связан с вопросом о том, как вообще строить архитектуру тестов.
Но про Selenium мы расскажем всё и с подробностями, а всё остальное — по касательной, со ссылками для дальнейшего самостоятельного изучения.
2. Полнота материала
Ни на каком другом тренинге и ни в одной книге Вы не найдёте более полной информации о Selenium 3.0.
3. Мультиязычность
Основные принципы и приёмы использования Selenium, рассматриваемые в тренинге, будут сопровождаться примерами на пяти языках, которые “официально” поддерживаются разработчиками Selenium: Java, C#, Python, Ruby, JavaScript.
Selenium это языковонезависимый стандарт, описывающий набор команд для управления браузером. Реализации этого стандарта для разных языков программирования похожи друг на друга, и это неудивительно — они реализуют один и тот же набор команд.
Вместе с тем, особенности каждого языка, его стиль, накладывают отпечаток на реализацию Selenium для этого языка. Поэтому в тренинге будут специальные модули, посвящённые именно таким особенностям.
Даже если какой-то язык для вас “неродной” — мы всё равно рекомендуем смотреть “чужие” модули. Может быть после этого вы решите сменить язык 
4. Selenide, Protractor, PageObjects и другие модные темы
Отдельное занятие будет посвящено разнообразным надстройкам над Selenium.
Их много, они решают разные задачи, некоторые из них более популярны, другие не так известны, но ничуть не хуже.
Каждая надстройка добавляет что-то к функциональности Selenium, поэтому их удобно рассматривать не как самостоятельные инструменты, а именно в сравнении с Selenium — чем именно каждая из них отличается от общего “базиса”.
Подробную программу курса смотрите чуть ниже.
Но сначала мы должны предупредить, что есть три условия, без которых вы вряд ли сможете успешно пройти этот курс.
Это курс для тех, кто умеет программировать. Если не умеете — тогда посмотрите наши тренинги “Программирование для тестировщиков”, есть версии для Java, C# и Python. Впрочем, можно пройти любой другой тренинг или научиться программировать самостоятельно. Если не хотите учиться программировать — обратите внимание на курс “Selenium: стартовый уровень”, в нём рассматривается инструмент Selenium IDE, который не требует умения писать код.
Насколько хорошо надо уметь программировать, чтобы без проблем пройти этот курс? Посмотрите программу упомянутых выше тренингов по программированию. Если Вы считаете, что знаете и умеете всё то, о чём идёт речь в первых четырёх занятиях — этого вполне достаточно.
Необходимо понимать, как работает браузер. Слова HTML, CSS, JavaScript, DOM, HTTP не должны звучать как незнакомая и непонятная абракадабра.
Нужно будет выполнять домашние задания. Для успешного применения инструмента недостаточно получить информацию о нём, нужно выработать навыки. Это происходит только путём тренировки, самостоятельного решения сначала простых, а потом более сложных задач. Выполнение домашних заданий потребует в среднем около 4 часов в неделю. Смотреть лекции недостаточно. Придётся работать руками и головой. Будьте готовы к этому.
Подробная программа курса
1. Общая информация
- Что такое Selenium
- Краткая история развития
- Принцип работы Selenium WebDriver
- Стандарт W3C WebDriver
- Сравнение с конкурентами
- Источники информации
2. Первые шаги: пробежимся по верхам
- Необходимая инфраструктура
- Подготовка инфраструктуры для Java, C#, Python, Ruby, JavaScript
- Запуск и останов браузера
- Открытие страниц и ожидание загрузки страницы
- Поиск элементов на странице
- Действия: click и sendKeys
- Свойства элементов: getText и getAttribute
3. Запуск браузеров
- Исполняемые файлы-посредники
- Выбор «правильной» версии браузера
- Особенности запуска на разных операционных системах
- Capabilities
- Cookies, чистый и грязный запуск
- Подробнее про каждый браузер (Chrome, Firefox, Internet Explorer, Edge, Safari, другие)
- Работа с несколькими браузерами одновременно
- WebDriverFactory
4. Поиск элементов
- Типы локаторов
- Какие локаторы лучше всех?
- Отладка локаторов
- Надёжные и ненадёжные локаторы
- Списки элементов
- Поиск внутри элемента
- Неявные ожидания
- Стратегии ожидания загрузки страницы
- Поиск при помощи executeScript
5. Получение свойств элементов
- Атрибуты и свойства
- Текст
- Видимость
- Размер и положение
- Стили
6. Действия с элементами
- Простые
- click
- sendKeys
- clear
- submit
- Сложные
- Наведение мыши
- Перетаскивание
- Правая кнопка мыши
- Управление по координатам
- Модификаторы (ctrl, shift)
7. Ожидания (WebDriverWait)
- Ожидание появления
- Ожидание видимости
- Ожидание исчезновения
- Ожидание свойств элемента
- Ожидание нужного количества элементов
- Произвольные условия ожидания
- StaleElementReferenceException и борьба с ним
- Неудачные попытки как альтернатива ожиданиям
8. Окна и диалоги
- Alerts
- Uploading files
- Downloading files
- Окна и вкладки
- Фреймы
9. Удалённый запуск
- Selenium Server
- Selenium Grid
- Selenium Grid Extras
- Облачные сервисы
10. Протоколирование
- EventFiringWebDriver
- Доступ к логам браузера
- Снятие скриншотов
- Запись видео
- Запись трафика
11. PageObjects и другие шаблоны проектирования
- Откуда “ноги растут” у этого шаблона проектирования?
- Разделение зон ответственности в тестах
- Различные реализации PageObjects
- Альтернативные шаблоны проектирования (PageBocks, Services)
12. Расширения и обёртки
- Драйверы (Appium, Winium, Windows Application Driver)
- Альтернативные API (Watir, Selenide, FluentSelenium)
- BDD и другие альтернативные стили (RobotFramework, Serenity, Capybara, Geb, ScalaTest)
Отзывы
Шмыга Алексей
Очень понравился курс! Действительно очень полная информация и хорошая ее подача. Хоть я и имею не малый опыт в автоматизации все равно нашел для себя много интересного. Курс однозначно стоит своих денег. Так же отдельно хотелось бы отметить подачу материала — пройдя множество различных курсов и тренингов (не только по автоматизации) могу смело заявить что Алексей один из лучших преподавателей материала. Рассказывает очень понятно, хорошо систематизирует информацию и всегда дает хорошие ответы на вопросы. Из того что можно было бы улучшить это наверное домашние задания — было бы хорошо сделать каждое задание меньше в объеме и увеличить охват материала прошедшей лекции (например после лекции локаторов давать задание на все типы локаторов(именно что бы человек должен был использовать каждый тип) но что бы написать их нужно было скажем для одной страницы), это задание можно разбить на несколько (задание на xpath, отдельно на css, еще одно на id-name-class…) Не у всех хватает после работы времени на выполнение длинного задания и человек начинает отставать из-за нехватки времени. Если бы задания были меньше в объеме то можно было бы их выполнять каждый день и по немногу. Однако так же подчеркну что в текущем виде домашние задания все равно хороши — они соответствуют уровню подаваемого материала и заставляют думать что есть хорошо для усвоения материала Еще раз спасибо!
Голубков Александр
Курс оказался полезнее, чем я ожидал.
Как и многие, мои коллеги, оставившие отзывы выше, я не ждал от курса сюрпризов, принимая во внимание ранее изученный курс «Разработка тестов на JAVA с использованием Selenium 2.0» и постоянную практику использования этого инструмента.
Однако курс оказался довольно насыщенным и (местами) напряженным. Довольно много свежей информации, нюансов, секретов.
Информация отлично структурирована и удобна для освоения. Всегда можно пересмотреть нужный кусок лекции, если о чем-то забыл.
Некоторые домашние задания переделывал, ибо, несмотря на опыт, не всегда с первого раза удавалось отладить тест.
Занятия два раза в неделю отлично держат в тонусе, хотя бывает тяжело совмещать с работой.
В плане улучшений, возможно имеет смысл (особенно для людей слабо владеющих языками программирования) давать в СДО наименования разделов, рекомендуемых к обучению (например — Списки, Множества, Массивы и т.д.).
В Скайп-чате много вопросов по реализации на языке программирования тех или иных подходов, продемонстрированных в лекции.
Курс позволяет с первых лекций начать применять Selenium в работе, что очень и очень важно!
Спасибо!
Oleksandra Huzenko, Exigen Services, QA
Курс очень полезный. Все рассказано доступно и максимально полно. Да, основы программирования знать надо, но без каких-то сверх знаний и навыков по программированию можно освоить этот курс вполне успешно. Как обычно, прекрасно работают тренеры. Все вопросы отвечаются практически мгновенно, домашки проверяются в срок (или даже быстрее), все очень оперативно, включая всякие орг моменты напрямую не связанные с курсом, которые возникали у людей, все решалось быстро.
Второй момент. Гораздо лучше, что тренинг выкладывался по два занятия в неделю. По небольшим кускам гораздо легче (ИМХО) осваивать материал.
Посмотреть все отзывы
Продолжительность
12:34:27
Количество уроков
85 Видео
Дата добавления
03/05/2017
Дата обновления
31/01/2019
Этот курс — самый полный в русскоязычном интернете по Selenium WebDriver. Вы не найдете более полного и лучшего курса, которые расскрывает данную тему. Вместе с автором курса вы пройдетесь по Selenium 3.0 . Вы будете изучать селениум по примерам основных пяти языков — Java, C#, Python, Ruby, JavaScript. Также не пройдете мимо разнообразных надстроек селениума, такие как Selenide, Protractor, PageObjects и другие. Этот курс предпологает что вы уже чуть разбираетеся в теме, тоесть немного умеете программировать. Приятного просмотра.
Давным-давно, в 2012 году, мы перевели руководство пользователя Selenium. Мы благодарны всем добровольцам и спонсорам, которые принимали участие в переводе, их труд много лет приносил пользу людям.
Но с тех пор Selenium сильно изменился, документация безнадёжно устарела, поэтому мы решили убрать её с сайта, так как неактуальная информация больше вредит, чем помогает.
Сейчас в рамках проекта Selenium разрабатывается новое руководство пользователя. Оно уже переведено на несколько языков. Русского среди них, увы, пока нет, но когда такой перевод появится – он будет опубликован именно там, на официальном сайте Selenium.
Selenium WebDriver has been very popular since the time of its inception. It was one of the biggest changes in the Selenium suite of tools. In our previous blog, we discussed what made Selenium WebDriver popular. In this article, we’ll be learning Selenium WebDriver by taking a deep dive.
Selenium Webdriver Architecture
So first let’s take a look at how Selenium Webdriver API interacts with real browsers using browser drivers and understand major blocks that comprise the Selenium WebDriver architecture. Well, Selenium WebDriver is comprised of four major blocks:
- Selenium Client Libraries
- JSON Wire Protocol
- Browser Drivers
- Browsers

Let’s get to know each one of them in detail and what they help us with:
1. Selenium Client Libraries
Developers and Software testers use the language they are comfortable with to write automation scripts. There are various languages available like C#, Java, Python, Perl, etc in which one can write a script, so this can make the task difficult. However, Selenium client library or Selenium language binding facilitates the capability of multi-language support. You can use the language you are comfortable with to write your automation script and Selenium will do the rest. To understand this more, let’s take an example if you want to write automation script in PHP language, you would require PHP client libraries and the rest of the task will be done. You can download all the Selenium binding from Selenium official website.
2. JSON Wire Protocol
JSON (JavaScript Object Notation) Wire Protocol facilitates the capability of transferring the data between the Client and Server on the web. It is a REST (Representational State Transfer) API which provides a transport mechanism and defines a RESTful web service using JSON over HTTP.
3. Browser Drivers
Browser Drivers are used for interacting with browsers and relaying automation script instructions to the browsers. Browser drivers take care of loss of any internal logic of browser functionalities. Each browser has its specific Browser Webdriver.
Following are the steps involved in running automation script using specific Browser driver:
- HTTP request gets generated for every Selenium command and sent to browser driver.
- Specific browser driver receives the HTTP request through the HTTP server.
- HTTP Server sends all the steps to perform a function which are executed on the browser.
- Test execution report is sent back to server and HTTP server sends it to the Automation script.
4. Browsers
The best part about Selenium Webdriver is that it supports all the major browsers like Google Chrome, Mozilla Firefox, Internet Explorer and Safari. Every browser has specific Webdriver for executing automation scripts.
Types of Browser specific Web Drivers
There are various drivers like HtmlUnit driver, Chrome Driver, Firefox driver, Internet Explorer Driver, Opera Driver which are required in order to run automation scripts. Let’s get to learn each one of them in detail:
1. HtmlUnit Driver
As the name suggests, this is based upon HtmlUnit and is one of the most lightweight and fast implementations of WebDriver. If you’re using a language binding (other than Java) in that case, you’ll need to have this driver.
Command lines to use in your code for using HtmlUnit Driver:
- java
WebDriver driver = new HtmlUnitDriver();
- csharp
IWebDriver driver = new RemoteWebDriver(new Uri("http://127.0.0.1:4444/wd/hub"),
DesiredCapabilities.HtmlUnit());
- python
driver = webdriver.Remote("http://localhost:4444/wd/hub", webdriver.DesiredCapabilities.HTMLUNIT.copy())
- ruby
driver = Selenium::WebDriver.for :remote, :url => "http://localhost:4444/wd/hub", :desired_capabilities => :htmlunit
- perl
my $driver = Selenium::Remote::Driver->new(browser_name => 'htmlunit', remote_server_addr => 'localhost
2. Firefox Driver
As the name suggests, Firefox Driver is used to control firefox browser while running automation script.
Commands to use in your code for using Firefox Driver:
java
WebDriver driver = new FirefoxDriver();
csharp
IWebDriver driver = new FirefoxDriver();
python
driver = webdriver.Firefox()
ruby
driver = Selenium::WebDriver.for :firefox
perl
my $driver = Selenium::Remote::Driver->new;
3. Internet Explorer Driver
Internet Explorer Driver is used to run automation scripts on internet explorer. It supports IE7,8,9,10, and 11. Earlier it used to support IE6 as well however it dropped supported for it in 2014.
Command lines to use in your code for using Internet Explorer Driver:
java
WebDriver driver = new InternetExplorerDriver();
csharp
IWebDriver driver = new InternetExlorerDriver();
python
driver = webdriver.Ie()
ruby
driver = Selenium::WebDriver.for :ie
perl
my $driver = Selenium::Remote::Driver->new(browser_name => 'internet explorer');
4. ChromeDriver
Chrome Driver works with Chrome Browser to help automate test automation scripts. For the WebDriver to discover ChromeDriver, you need to enter ChromeDriver’s path into the test script.
Command lines to use in your code for using ChromeDriver:
java
WebDriver driver = new ChromeDriver();
csharp
IWebDriver driver = new ChromeDriver();
python
driver = webdriver.Chrome()
ruby
driver = Selenium::WebDriver.for :chrome
perl
my $driver = Selenium::Remote::Driver->new(browser_name => 'chrome');
Features of Selenium Webdriver
We know that Selenium WebDriver is one of the best choices for developers and we need to understand what makes it stand out of the crowd. Let’s have a look at some of the top features of Selenium WebDriver:
Selenium WebDriver with Java -Basics to Advanced+Frameworks
Multi-Browser Compatibility
Selenium Webdriver interacts with the website and its web elements in a browser just like a real user with use of browser’s native support to hit direct calls without the need of any intermittent software or device. It supports all modern web browsers like Chrome, Firefox, Opera, Safari and Internet Explorer. You can launch any browser with easy commands. For example Chrome Browser
WebDriver driver = new ChromeDriver();
Selenium web driver also supports AndroidDriver, HtmlUnitDriver, and IPhoneDriver.

Multiple Language Support
It supports most of the commonly used programming languages like Java, Javascript, Python, PHP, Ruby, C#, Perl etc. It provides us the freedom to choose any of the programming languages to write our automation scripts.
It also allows using more efficient way of writing automation scripts like using the switch statement, conditional statements, decision making statements to strengthen the automation script and make capable of handling all the situations.
Speed and Performance
Selenium Webdriver executes test script faster when compared to the other tools of the Selenium suite. Unlike Selenium RC, it directly communicates with the browser without the need of any intermediate server.

1. Better Handling of Dynamic Web Elements
Handling dynamic web elements is one of the most common challenges while performing automation testing. Selenium Webdriver knows how to handle dynamic web elements better like checkboxes, dropdowns, and alerts etc. It is very easy to locate the web elements with XPath or ID in case of static elements, but if the element’s XPath or ID keeps changing, it becomes very difficult to handle.
Selenium uses some of the following methods to handle dynamic elements:
- Absolute XPath: This is the most often used Xpath to handle dynamic elements and it contains the complete path of the web UI element starting from the root node.
- Contains(): This function has the ability to find an element with partial text and can be used to handle dynamic elements.
- Starts-with(): This function is based on finding and matching the starting text of the supplied attribute with the attribute of dynamic elements.
2. Easy to Identify and Use Web Elements
Selenium WebDriver has a set of locators that can be helpful in finding web elements on the webpage. With this, it becomes easier to implement those elements in the test automation suite. Following are the few most used locators:
- Name
- ClassName
- ID
- TagName
- LinkText
- PartialLinkText
- Xpath
- CSS Selector
- DOM
Selenium Webdriver vs Selenium RC
Selenium RC had some restrictions which eventually led to the development of Selenium WebDriver. Selenium web driver comes with an enhanced version of Selenium RC. Let’s look into what Selenium Webdriver has got in comparison to Selenium RC.
Architecture
Selenium Webdriver architecture is very simple, precise and more efficient. It controls the web browsers like Chrome, Firefox etc directly from OS level. All you need is your IDE for writing Selenium automation script and a browser.
While Selenium RC architecture includes one more intermediate server named as Selenium Remote Control Server which acts as a middle layer between your automation script and a web browser. Selenium RC server injects a Javascript code to the browser to fetch the instruction from RC server and execute them in the browser. Then, it relays the browser response to RC server and RC displays the results to you.

Speed
As Selenium Webdriver directly interacts with the browser, it is much faster and has better performance than Selenium RC which requires an intermediate Javascript program to reach the browser.
Real life interaction
Selenium Webdriver acts like a real person while interacting with a web browser. For example, Selenium Webdriver can not enter any value to the textbox field if you have disabled the textbox.
While Selenium RC can access any disabled element just like any other Javascript program. Software testers have reported issues in RC to able to access disabled fields.
Differences in API
Selenium Webdriver API is simpler than Selenium RC as it does not contain unnecessary and baffling commands. While Selenium RC’s API is brimming with redundant and confusing commands. For example: Most of the time software testers are confused whether to use type or typeKeys, or whether to use click, mouseDown, or mouseDownAt.
And the worst part is every browser interprets each command in a different way.
Browser Support
Selenium Webdriver supports headless HtmlUnit browser. It is a very fast browser as it does not need to wait for page elements to load. This invisible browser can accelerate your test execution cycles. However, Selenium RC does not support HtmlUnit browser and it is a bit time taking as compared to Selenium WebDriver.
Setting up a Selenium Webdriver project
Configuring Selenium Webdriver on your local system involves following steps:
1. Download and Install Java 8 and setup the Environment variables in your local System
Since I am going to use Java as a programming language to write Automation script, I will need Java configured in my system to run and execute Java codes in eclipse.
- You can download the latest version of JDK (Java Development Kit) from http://www.oracle.com/technetwork/java/javase/downloads/index.html
- Set up the Environment variable in your local system. Follow these steps to get it done:Go to My Computer properties -> Advanced System Settings-> environment variables -> new tab of user variable -> write path in variable name -> write path of the bin folder of Java in variable value -> ok -> ok -> ok
- Now check if Java configured successfully or not. You can check it by running a command ( javac ) in command prompt.
If you get all the list of Java commands and operations in your command prompt, you are all set with Java environment in your system.
2. Download and Configure Integrated Development Environment (I am using Eclipse for this article)
- Download the latest version of Eclipse for Java developers from this link: https://www.eclipse.org/downloads/
- Double click on the Eclipse application file and install it in your system.
- Now give a directory to set up the workspace and hit launch button to open up Eclipse IDE. Now you are all set to write an automation test suite.
3. Download and Configure Selenium WebDriver Java Client
- Download Java client Selenium web driver from https://docs.seleniumhq.org/download/
- The downloaded Java binding would be in zipped format. Extract the file in a folder. It contains the essential jar files required to configure Selenium WebDriver in Eclipse IDE.
- Let’s start creating a project in Eclipse and configure Selenium Webdriver in it.
- Name the new project and click on Finish button to get started with a new project.
- Now create a public class in the created project.
- It is a time to add Selenium jar files in the Test suite (Hackr-Test). Open up properties of the created project.
- Click on Java Build path and add external Jar files.
- Add Selenium Webdriver jar files
- Now add Selenium files under libs folder and you are all set with Selenium Webdriver configuration in Eclipse IDE and now you can write Selenium Automation script and run it in Webdriver.
4. Download and Configure Browser Specific Webdriver in your local system
Since I am going to use Chrome browser specific Webdriver, I’ll explain to you how to download and configure Chrome Webdriver in Eclipse IDE.
- Open up this page to download the latest version of Chrome Webdriver from http://chromedriver.chromium.org/downloads
- Download Chrome Webdriver as per your operating system.
- Unpack the Chrome Webdriver zip file and copy the path of the directory.
- It’s time to set the Chrome driver path in your Automation Script.
We are all set with Selenium dependencies and Chrome Webdriver configured in Eclipse IDE and ready to run a sample automation script.
Live Example with Chrome Selenium-WebDriver and running Automation script in the local Chrome browser
Here is the sample automation script which can be run to automate the web browser using Selenium Webdriver.
import org.openqa.selenium.By;
import org.openqa.selenium.WebDriver;
import org.openqa.selenium.WebElement;
import org.openqa.selenium.chrome.ChromeDriver;
import org.openqa.selenium.interactions.Actions;
import org.openqa.selenium.support.ui.ExpectedCondition;
import org.openqa.selenium.support.ui.ExpectedConditions;
import org.openqa.selenium.support.ui.WebDriverWait;
import org.openqa.selenium.remote.DesiredCapabilities;
import org.openqa.selenium.JavascriptExecutor;
import java.util.ArrayList;
import org.openqa.selenium.WebDriverException;
import java.util.List;
import java.util.concurrent.TimeUnit;
import org.openqa.selenium.Dimension;
public class Test1 {
public static void main(String[] args){
System.setProperty("webdriver.chrome.driver","D:\Chrome-Webdriver\chromedriver.exe"); // give your driver path here
WebDriver driver= new ChromeDriver();
driver.get("http://www.lambdatest.com");
try {
driver.manage().window().maximize();
WebElement sign = driver.findElement(By.xpath("//*[@id="bs-example-navbar-collapse-1"]/ul/li[6]/a"));
sign.click();
WebElement TextBox = driver.findElement(By.xpath("//*[@id="app"]/section/form/div/div/input[1]"));
TextBox.sendKeys("saifs@lambdatest.com");
WebElement Password = driver.findElement(By.xpath("//*[@id="app"]/section/form/div/div/input[2]"));
Password.sendKeys("$@!f@4155441018");
WebElement login = driver.findElement(By.xpath("//*[@id="app"]/section/form/div/div/button"));
login.click();
WebElement menu = driver.findElement(By.xpath("//*[@id="Layer_1"]"));
menu.click();
// WebElement Rts = driver.findElement(By.xpath("//*[@id="myApp"]/nav/div[1]/ul/li[2]/a"));
//Rts.click();
WebElement UrlF = driver.findElement(By.xpath("//*[@id="input-text"]"));
UrlF.sendKeys("https://hackr.io/blog");
// WebDriverWait WaitToLoadElement = new WebDriverWait(driver, 30 );
Thread.sleep(30000);
WebElement Bttn = driver.findElement(By.xpath("/html/body/app-root/app-console/app-header/section/app-test-detail/div[1]/div[1]/div/div[1]/form/div[3]/button"));
Bttn.click();
Thread.sleep(30000);
WebElement ensession = driver.findElement(By.xpath("//*[@id="drog-nav"]/div[2]/ul/li[8]/a"));
ensession.click();
WebElement ensessions = driver.findElement(By.xpath("//*[@id="terminate-session-popup"]/div/div/div[1]"));
ensessions.click();
// Thread.sleep(200000);
WebDriverWait lwait = new WebDriverWait(driver, 40);
lwait.until(ExpectedConditions.visibilityOfElementLocated(By.xpath("//div[@class='mCSB_container']/ul [@class='list-unstyled real-browser-test__list-browser text-center']/li")));
// WebDriverWait waitO= new WebDriverWait(driver, 80);
//waitO.until(ExpectedConditions.visibilityOfElementLocated(By.xpath("//div[@class='mCSB_container']/ul [@class='list-unstyled real-browser-test__list-os']/li")));
driver.manage().timeouts().implicitlyWait(15, TimeUnit.SECONDS);
((JavascriptExecutor)driver).executeScript("window.open()");
ArrayList tabs = new ArrayList (driver.getWindowHandles());
driver.switchTo().window(tabs.get(1)); //switches to new tab
driver.get("https://hackr.io");
WebElement blog = driver.findElement(By.xpath("//*[@id="programming"]/ul/li[5]/a/span/img"));
sign.click();
WebElement blog1 = driver.findElement(By.xpath("//*[@id="post-2789"]/div[3]/div[2]/a"));
sign.click();
}
catch (Exception e) {
System.out.println(e.getMessage());
}
}
}
This code will launch LambdaTest website and click on the login button to sign in with registered email and password. And then it will run a Real-time test by giving an input URL https://hackr.io and selecting browser and operating system. And finally, it will close the session by clicking on the End session button. After that, the script will launch https://hackr.io website in a new tab and then redirect to the blog page by finding the blog element.
Running Selenium Script Using Remote WebDriver(optional)
Selenium-WebDriver API Commands and Operations
Let’s have a quick look at most used Selenium web driver commands and operations. Since I am using Java language to write automation test suit, I will be mentioned most of the frequently used commands written using Java Syntax.
1. Fetching a web page
This is a first and foremost command to write in an automation script. This command is used to fetch and open a web page on the browser.
Java: driver.get(«http://www.google.com»);
csharp: driver.Url = «http://www.google.com»;
Ruby: driver.get «http://www.google.com»
Python: driver.get(«http://www.google.com»)
Perl: $driver->get(‘http://www.google.com’)
Javascript: driver.get(‘http://www.google.com’);
2. Locating web elements
These commands are used to find the web UI elements to add in Selenium Automation script. These are the elements that are fetched by Find Element or Find elements method of most of the language bindings.
Following are the web element locators:
- By ID
This is the most efficient way to locate an element on web page. Using this method, class names will be taken as element id to add in automation scripts.WebElement element = driver.findElement(By.id("coolestWidgetEvah"));
- By Class Name
Web elements can be identified by the attribute on the DOM element.List cheeses = driver.findElements(By.className("cheese"));
- By Xpath
Webdriver uses browser’s native Xpath to find the webUI elements at higher level.List inputs = driver.findElements(By.xpath("//input"));
- Using Javascript You can also execute Javascript to get the Web UI element to add in automation script.
WebElement element = (WebElement) ((JavascriptExecutor)driver).executeScript("return $('.cheese')[0]");
- By Link Text
You can find the web element using matching visible text.WebElement cheese = driver.findElement(By.linkText("cheese"));
3. Fetching text values
Developers and testers always want to retrieve the innerText of a web element. This command returns the visible text value.
WebElement element = driver.findElement(By.id("elementID"));
element.getText();
4. Switching Between Windows and Frames
Selenium Webdriver supports switching between multiple frames and tabs. Most of the web application have multiple frames and windows to make it more usable. This Webdriver command can help you switching multiple windows easily.
driver.switchTo().window("windowName");
5. Navigation: History and Location
Common commands for navigating to the webpages.
driver.navigate().to("http://www.example.com");
driver.navigate().forward();
driver.navigate().back();
6. Drag And Drop
Commands to perform drag and drop action.
WebElement element = driver.findElement(By.name("source"));
WebElement target = driver.findElement(By.name("target"));
(new Actions(driver)).dragAndDrop(element, target).perform();
To Sum Up
Selenium WebDriver is one of the most loved choices when it comes to automating a cross-browser script because of the ease of use it offers, the flexibility of language choices and its architecture. It supports various languages, browsers, and operating systems. Also, it is open source which proves to be an icing on the top.
Hope you liked our article. Do let us know your thoughts in the comments section below.
People are also reading:
- What is Selenium IDE?
- Best Selenium Testing Interview Questions
- Best Web Development IDE
- Security Testing Tools
- Best Software Testing Courses
- What is Software Testing Life Cycle?
- Types of Software Testing
- Manual Testing Interview Questions
- Security Testing Tools
- Best Software Testing Certifications
- Best Penetration Testing Certifications
- Best Blockchain Courses
When it comes to web automation testing, there are a number of frameworks like Selenium, Cypress, PlayWright, Puppeteer, etc., that make it to the ‘preferred list’ of frameworks. The choice of test automation framework depends on a range of parameters like type, complexity, scale, along with the framework expertise available within the team. However, it’s no surprise that Selenium is still the most preferred framework among developers and QAs.
For starters, Selenium WebDriver is the core of the Selenium automation framework. In this Selenium WebDriver tutorial, I deep dive into the integral aspects of Selenium WebDriver along with touching upon the Selenium WebDriver architecture.
Here’s this complete Selenium WebDriver Tutorial series that will help you learn everything you need to know while performing Selenium automation testing with real-time use cases and examples.
By the end of this Selenium WebDriver tutorial, you will be in a better position to know what is selenium grid, know how to run Selenium WebDriver tests on local Selenium Grid and cloud Selenium Grid.
TABLE OF CONTENTS
- What is Selenium?
- What is WebDriver?
- What are the components of Selenium?
- Selenium WebDriver architecture
- Benefits of Selenium WebDriver
- Limitations of Selenium WebDriver
- Selenium WebDriver: Installation and set up
- How to setup Eclipse for Selenium WebDriver
- Running test automation script using Selenium WebDriver
- Automated browser testing using cloud Selenium Grid
- What’s new in Selenium WebDriver 4?
What is Selenium?
Selenium is one of the most widely used open-source Web UI (User Interface) automation testing frameworks. It enables testers to execute tests across different browsers, platforms, and languages.
During my QA career, I had the fortune to try out and use a number of test automation frameworks. So far, none of the frameworks come close to the Selenium automation framework in terms of framework features, supported languages, CI/CD integrations, and more. Nevertheless, as per a survey, Selenium automation testing is still the most preferred mode for realizing web automation testing.

Source
One of the major advantages of Selenium WebDriver over other test automation frameworks, is it’s support for all popular programming languages like Python, Java, JavaScript, C#, PHP, and Ruby. Therefore, referring to individual Selenium language tutorials like the Selenium Python tutorial can be a good starting point to make the most out of Selenium and Python for web automation testing.
What is WebDriver?
WebDriver is one of the components of the whole Selenium framework that helps in overall browser based test automation. WebDriver is the remote control interface component that allows programs to interact and instruct browsers, manipulate DOM elements in a web document, and control the behavior of the User Agent. WebDriver’s is language neutral protocols, i.e. protocols that is not dependent on any one language, is leveraged by Selenium framework to automate testing steps. So in nutshell WebDriver is the bridge between the Selenium framework and the end browser over which the test is being executed.
Today Selenium and Webdriver are usually spoken together and are even used interchangeably to identify the same framework, Selenium WebDriver. However that has not been the case always. In the beginning Selenium and WebDriver were separate open source projects, however in 2008 both teams came together to create a joint project which in turn helped eliminate inherent issues of then Selenium RC version.
Shown below is the evolution of the Selenium automation framework:
Apart from Selenium WebDriver, Selenium IDE and Selenium Grid are other key components of the Selenium framework. Selenium 4 is the latest Selenium version at the time of writing this blog. If you are curious about Selenium 4, you can further deep-dive into our blog on what is new in Selenium 4.
Also, you can follow the LambdaTest YouTube Channel and stay updated with the latest tutorials around Selenium testing, Cypress testing, CI/CD, and more.
Features of Selenium automation framework
Now that we have covered the basics about what is Selenium, lets me walk you through some of the major features of the Selenium automation framework in this section of the Selenium WebDriver tutorial:
- Selenium supports popular programming languages like Java, Python, C#, JavaScript, Ruby, PHP, and Perl; through the use of specific browser drivers.
- Selenium is also a platform-agnostic test automation framework. For example, running Selenium tests on macOS is very much similar to running Selenium tests on Windows OS.
- Selenium tests can be executed across multiple browsers (e.g., Firefox, Chrome, IE, Safari, etc.) and multiple operating systems (e.g., Windows 10, macOS, etc.). Running Selenium tests in IE is still relevant even in 2021 🙂
- Parallel testing in Selenium using the Selenium Grid helps achieve improved browser and test coverage. This eventually helps in expediting the time to market.
- Selenium integration with test automation frameworks supported by Python, Java, JavaScript, etc., helps make the most out of Selenium and the corresponding test automation framework. For example, the TestNG framework for Selenium helps achieve the best out of Selenium and TestNG frameworks.
- Selenium and Continuous Integration lets QA engineers run Selenium automation tests as a part of the CI/CD pipeline. For example, Selenium Continuous Integration with Jenkins helps run Selenium automation tests as a part of Jenkins pipelines.
- Selenium integration with reporting platforms like Extent, Allure, etc., helps generate and manage test reports. In addition, reporting tools in Selenium provide information about the overall behavior of tests, which helps improve the quality of tests.
- Running Selenium tests in Docker containers cuts down the test execution time and minimizes the differences that might arise among different test environments (e.g., staging, production, etc.)
Now that you already know what is Selenium, let’s deep dive into various components of Selenium in the next section of this Selenium WebDriver tutorial.
Lambdatest offers Selenium Test Automation on MicrosoftEdge 86! You can now run tests in parallel on all MicrosoftEdge versions, including MicrosoftEdge 86.

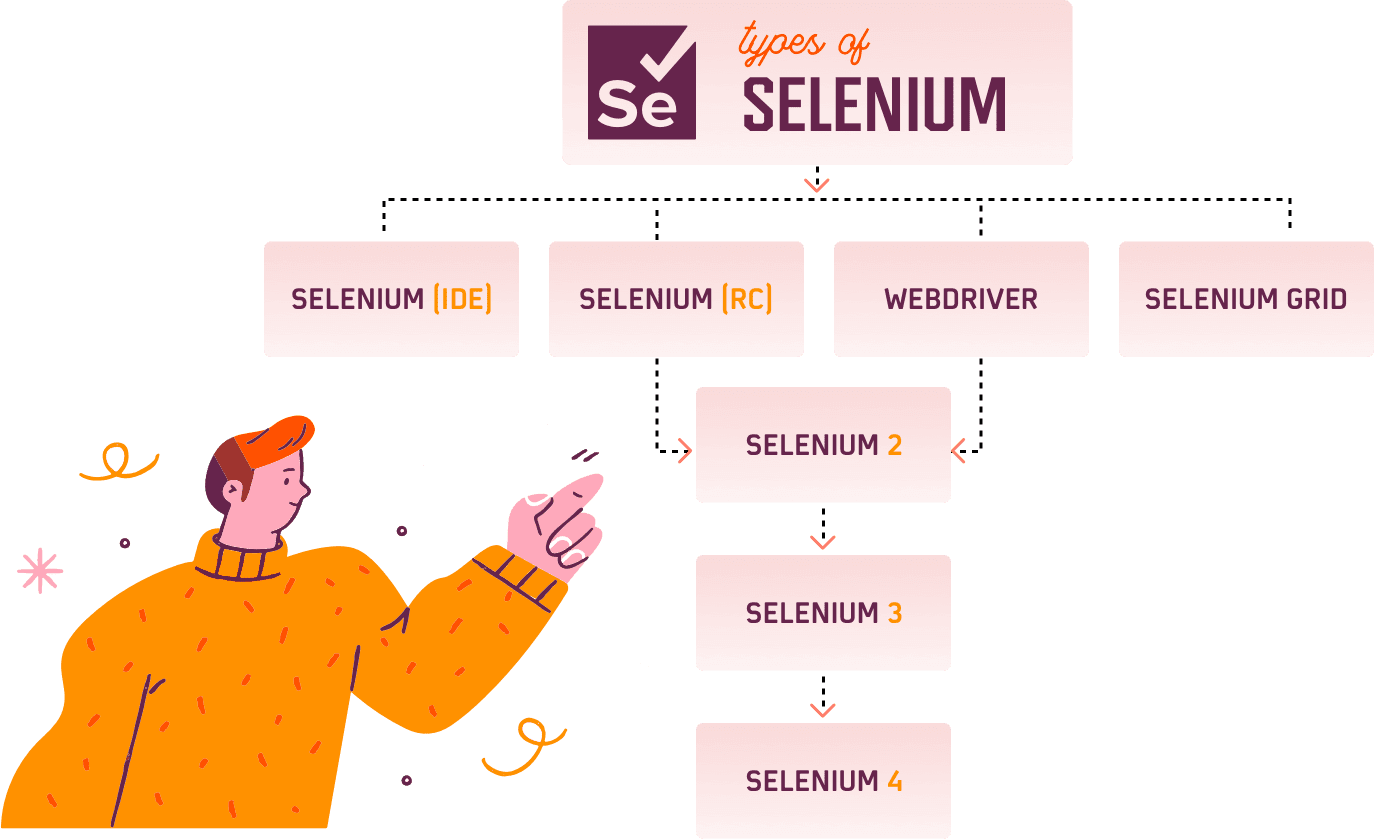
What are the components of Selenium?
As already stated, Selenium is a framework (i.e., it is not a single software but a suite composed of different components).
Selenium is composed of the following components:
- Selenium IDE
- Selenium WebDriver
- Selenium Grid
It’s important to understand these main components in depth before getting started with a hands-on in this Selenium WebDriver tutorial.
Selenium IDE
Selenium IDE is basically a Record/Run tool that is available as a browser plugin for Mozilla Firefox and Google Chrome. You need not have any programming language experience to work with the IDE.
It follows a record-and-playback approach wherein you can record your test steps and export the tests in the preferred Selenium-supported programming language. These exported tests can then be used with Selenium WebDriver.
Selenium IDE in Selenium 4 is more than a playback & recording tool, the features of which can be leveraged to make the most out of Selenium automation testing.
Also read our comprehensive Selenium IDE Tutorial
Selenium WebDriver
Selenium WebDriver is an enhanced version of Selenium RC and overcomes the limitations faced in Selenium RC. It controls the browser by direct communication. It has a faster execution time as compared to IDE and RC.
Selenium RC and WebDriver were merged into one single unit known as Selenium WebDriver 2.0. Over time it has been enhanced for more features and functionalities. In Selenium 3, the JSON Wire protocol was the primary mode of communication between the test code and web browser.
With Selenium 4, JSON Wire protocol is replaced with W3C protocol, which means that encoding and decoding of test requests are no longer required in WebDriver W3C protocol. Therefore, as QA engineers, we can expect less flaky tests with W3C WebDriver Protocol in Selenium 4.
Selenium Grid
Selenium Grid enables the users to perform parallel test execution. It is used along with Selenium RC to run parallel tests across different browsers and machines.
Users can run simultaneous tests in multiple environments, thereby saving a lot of time and expediting the time to market.
Selenium Grid is based on the Hub-Node concept. Until Selenium 3, the Hub and Node jars had to be started separately. With Selenium 4, all the necessary dependencies are available in a single Jar file. Therefore, to use the Selenium Grid on Selenium 4, you need not start the Hub and Node separately.
That’s not all. Selenium Grid on Selenium 4 supports different operating modes like Standalone Mode, Hub & Node Mode, and Fully-Distributed Mode.
Also read – Selenium Grid set up tutorial
Selenium WebDriver architecture
In this Selenium WebDriver tutorial so far, we have covered the basics of Selenium and its components. Now, let’s try to understand Selenium WebDriver in a detailed manner.
As mentioned earlier, Selenium WebDriver is an enhanced version of Selenium RC. It is a web framework that helps us in executing cross browser tests. It also allows us to choose a programming language to create the test scripts.
Selenium WebDriver architecture in Selenium 3
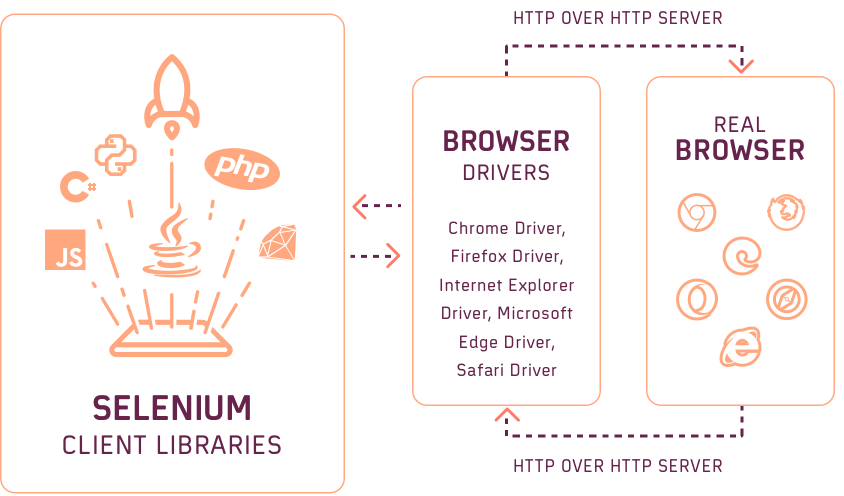
The Selenium WebDriver architecture in Selenium 3 constitutes of four major components:
- Selenium Client Libraries/ Language Bindings
- JSON Wire Protocol
- Browser Drivers
- Real Browsers
Selenium Client Libraries
In order to support multiple languages, Selenium developers have built the language bindings. For example, if you are writing your tests in Java, you can use the Java bindings. Client libraries can be downloaded from the official Selenium website.
JSON Wire Protocol
JSON is an abbreviated form of JavaScript Object Notation. It transfers the data between client and server. It provides support for data structures like objects and arrays, hence doing data reading and writing easier.
It acts as a REST(Representational State Transfer) API to transfer information between the HTTP servers.

Selenium WebDriver Architecture in Selenium 3
Browser Drivers
In order to develop a secure connection with the browser, Selenium uses Drivers. Each browser has its own driver that hides the internal logic of the browser’s functionality.
In addition, each automation language has a corresponding browser driver. The following series of actions are performed when a Selenium automation test is triggered:
- Every Selenium command generates a corresponding HTTP request, which is sent to the browser driver.
- This request is routed through the HTTP Server.
- The HTTP Server now drives the instruction execution on the browser.
- The browser sends back the status to the HTTP Server, which forwards it to the automation script.
Some of the browser drivers are ChromeDriver, GeckoDriver, MicrosoftEdge driver, etc.
Browsers
Browsers are the end-point of our test execution. Selenium supports all major browsers like Firefox, Chrome, Safari, Edge, etc.
Selenium WebDriver architecture in Selenium 4
One of the major differences between Selenium 3 and Selenium 4 is that Selenium WebDriver in Selenium 4 is W3C Compliant. As seen in the WebDriver architecture in Selenium 3, encoding and decoding of API requests had to be done due to the involvement of the JSON Wire protocol.
Selenium WebDriver Architecture in Selenium 4
With W3C WebDriver in Selenium 4, the tests can directly communicate with the web browser. Since the Selenium WebDriver and web browsers are on the same page (as far as W3C protocol is concerned), you can expect less flakiness and more consistency as far as Selenium automation testing is concerned.
This certification is ideal for testing professionals who want to acquire advanced, hands-on knowledge in Selenium automation testing.
Here’s a short glimpse of the Selenium Advanced certification from LambdaTest:
Benefits of Selenium WebDriver
Now that we know about the entire architecture of Selenium WebDriver, let’s take a quick look at its advantages in this part of the Selenium WebDriver tutorial.
Here are the major advantages of Selenium WebDriver:
- It supports multiple operating systems like Windows, Mac, Linux, etc.
- It supports multiple programming languages like Java, Python, JavaScript, PHP, C#, etc.
- It is compatible with all modern browsers like Chrome, Firefox, Opera, Safari, and Microsoft Edge. It is also compatible with the near-retiring Internet Explorer (IE) browser.
- It provides faster completion of test scripts as compared to other tools.
Limitations of Selenium WebDriver
The advantages of Selenium WebDriver outnumber its shortcomings. However, as a QA engineer, it is important to make an informed choice before choosing the best-suited framework for the project.
Here are some of the potential shortcomings of Selenium WebDriver:
- It does not support the automation of Windows-based applications.
- It does not have any in-built reporting mechanism.
- There is no test tool integration for test management in Selenium.
- Out of the box, Selenium WebDriver does not support parallel testing, which makes it very challenging to run larger and complex test suites. If you wish to perform parallel testing with Selenium, then you need to use the Selenium Grid.
However, you can eliminate the above-mentioned drawbacks by adopting cloud Selenium Grid for test automation where Selenium tests can securely run at scale, that too at a rapid pace! Cross browser testing platforms like LambdaTest provide a secure, scalable, and reliable online Selenium Grid that lets you run Selenium tests in parallel on 2,000+ browser and platform configurations.
In the latter sections of this Selenium WebDriver tutorial, we will deep dive into how to run Selenium tests in parallel on LambdaTest cloud Selenium Grid.
Selenium WebDriver: Installation and set up
In this section of the Selenium WebDriver tutorial, we look at setting up Selenium WebDriver for the Windows Operating System with Java as the programming language.
For demonstration, I have used the Eclipse IDE. However, you can choose to use the IDE of your choice. Now we are about to get our hands dirty with some code 🙂
Starting with the prerequisites:
- Install Java
- Install Eclipse IDE
- Install Selenium WebDriver
Install Java
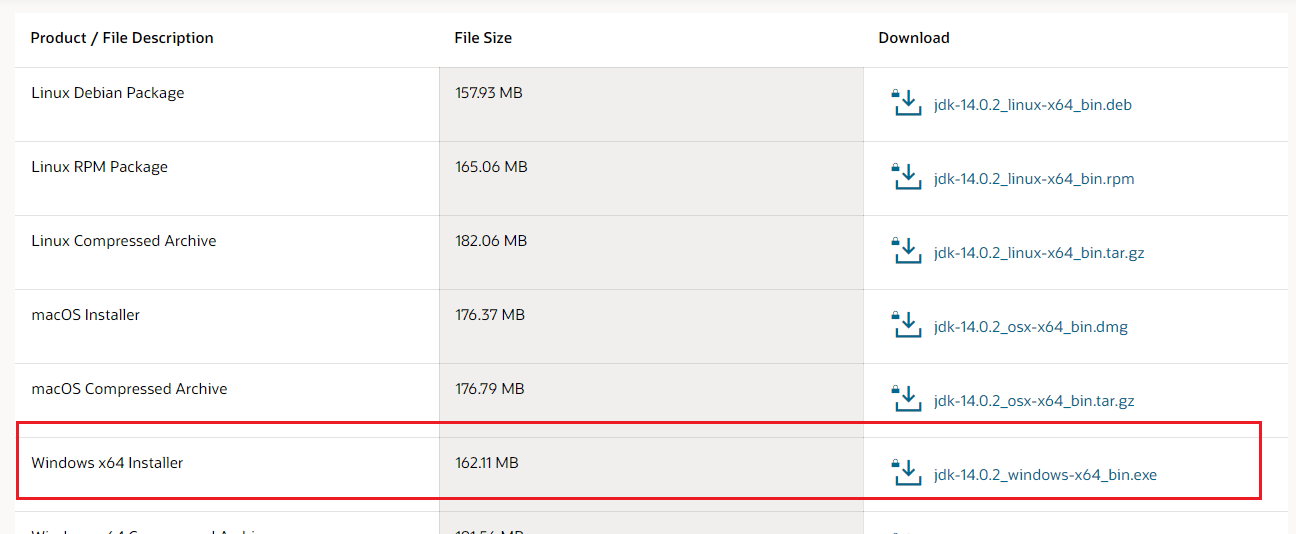
Step 1: Go to the official Java Downloads website and download the JDK for Windows x64 Installer.
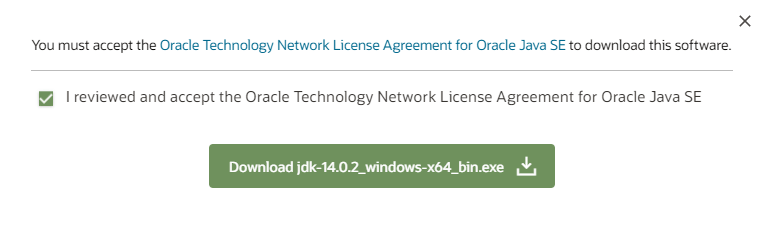
Step 2: Accept the license agreement in the pop-up next and click on Download.
Step 3: Once the download is done, navigate to the Downloads folder and double click the executable so that Java is installed in your system.
Set Up Environment Variables
Step 1: Open your PC settings and select ‘Advanced system settings’ from the System dialog window.
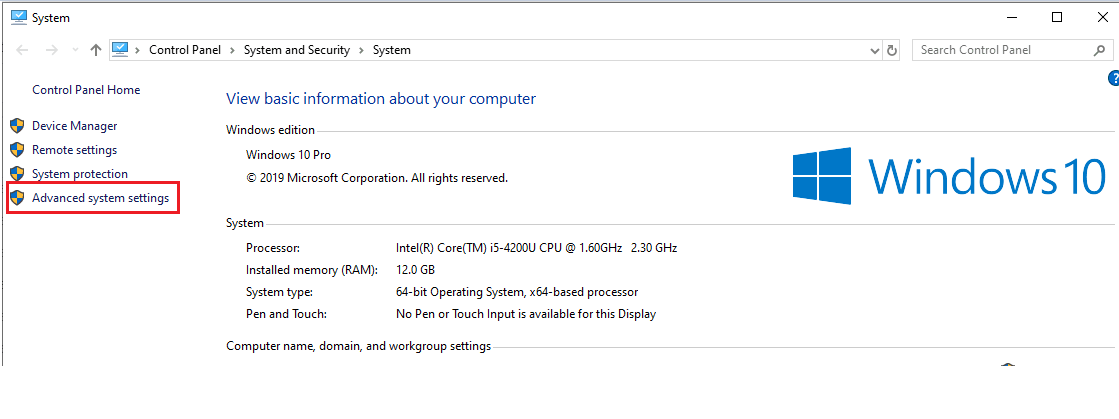
Step 2: Click on the Environment Variables button on the next window.
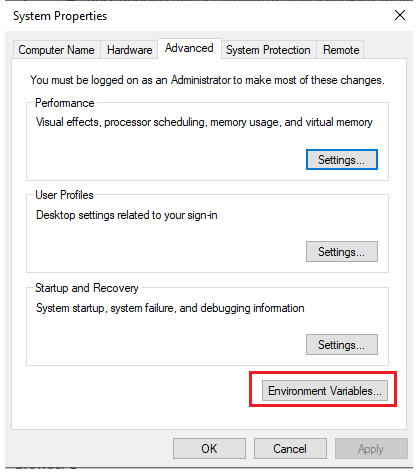
Step 3: Now, under the System variables, double-click on Path.
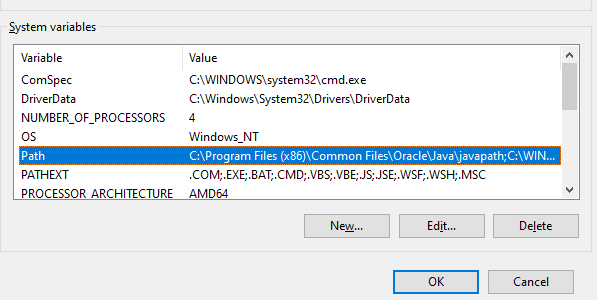
Step 4: Add the complete path of the Java installation directory as per your system location and click OK.

Step 5: That’s it. You can now see the topmost path in the screenshot is the Java path in my system.
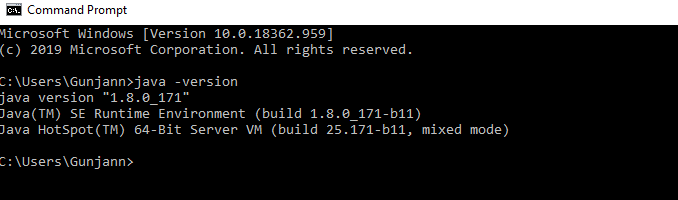
To verify that the Java is installed and variables are set correctly, open Command Prompt and type: java -version. You will see the Java version installed in your system.
And there you go, your first prerequisite is fulfilled. The next step is installing Eclipse.
Install Eclipse
Step 1: Download Eclipse IDE for Java Developers from the official Eclipse website. I would suggest downloading the last stable release. Select the download based on your system architecture. I am using eclipse Mars, but you can choose any of the latest versions.
Step 2: Once the download is complete, extract the zip file at a location at your convenience.
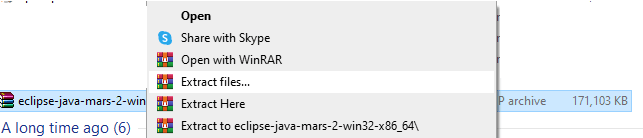
Step 3: Now open the extracted folder and double click on eclipse.exe.
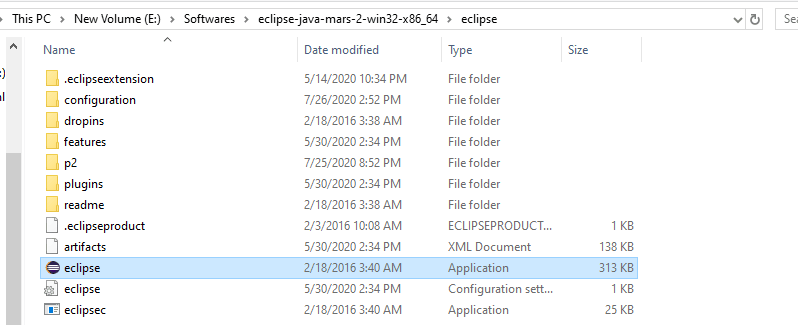
The Eclipse will open up, and there you are done with your second prerequisite of this Selenium WebDriver tutorial.
Install Selenium WebDriver
The last step in this Selenium WebDriver tutorial is to install the Selenium Standalone Server, which is shown in the steps below:
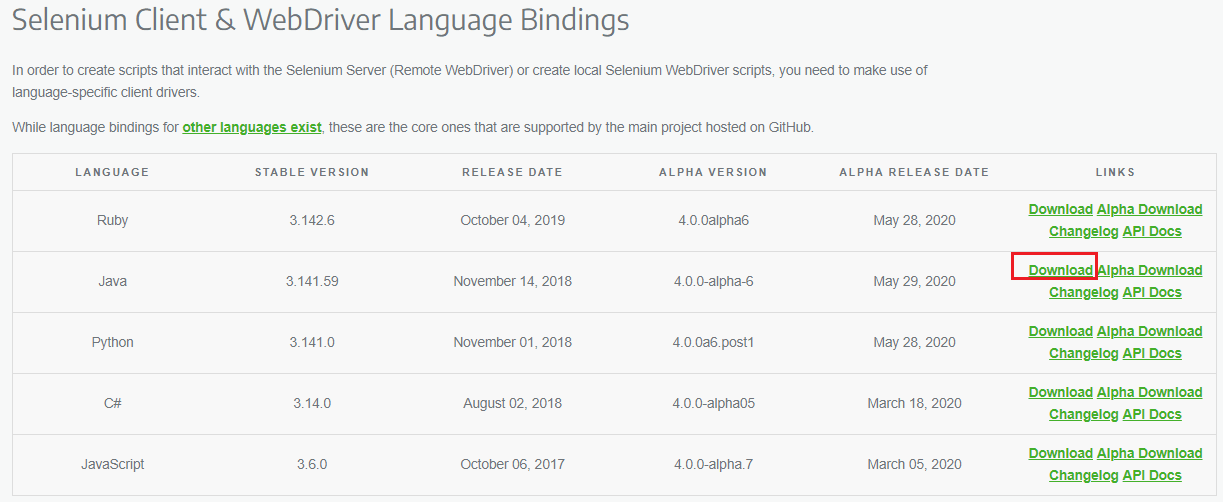
Step 1: Download Selenium Client & WebDriver Language Bindings from the Selenium website. You can download the client libraries corresponding to your language preference. We will be working with Java Client Bindings in this blog.
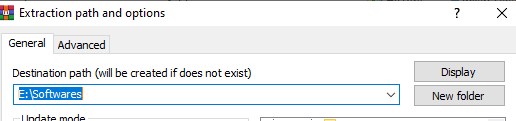
Step 2: Once the file is downloaded, extract it to a folder of your choice from where you can use it later.

Step 3: You can now see the corresponding extracted file at the selected destination folder.

Step 4: On opening the folder, you will be able to see the jar files, a libs folder(which contains some more jar files), and a CHANGELOG file.

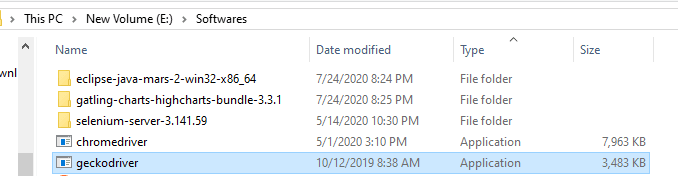
Step 5: Next, you need to download the browser drivers that will help you instantiate the browser. Below are the links to download the drivers for some major browsers:
- GeckoDriver(Firefox)
- InternetExplorerDriver
- ChromeDriver
There is a difference between WebDriver and Remote WebDriver since there is no necessity to download browser drivers when running Selenium tests on a cloud Selenium Grid.
Step 6: Next, simply extract the downloaded driver and store it at a location where you can use it.
Now we are done with setting up the prerequisites, let’s look at how to configure Eclipse with the Selenium Libraries that we have just installed.

How to setup Eclipse for Selenium WebDriver
The following steps in this Selenium WebDriver tutorial will guide you in configuring and installing the Eclipse IDE:
Step 1: Launch eclipse.exe that was saved in the steps to install Eclipse.
Step 2: Select your workspace manually, or let the default location be there and click on OK.

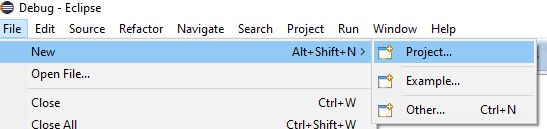
Step 3: Create a New Project by navigating to File > New > Java Project.
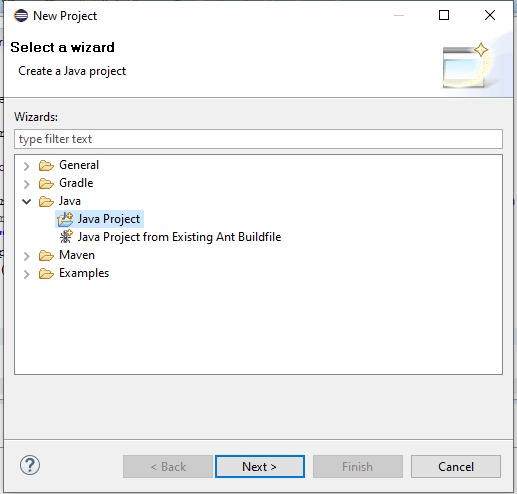
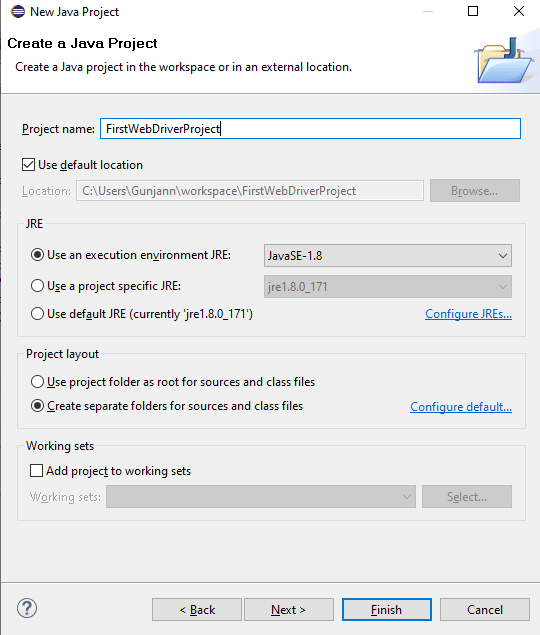
Step 4: Click on Next and give a name to the Project. Click on Finish.
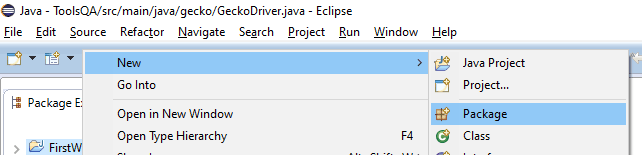
Step 5: Now that your project is created, Right-click on the project and select New > Package.
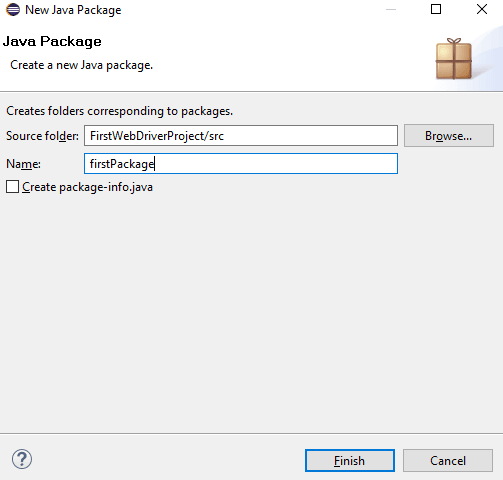
Step 6: Enter the package name in the New Java Package dialog box and click on Finish.
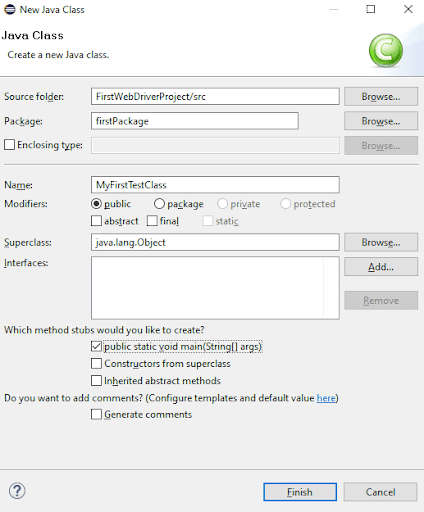
Step 7: You need to create a class under the package now. To do so, right-click on the package name, go to New > Class.

Step 8: In the New Java Class dialog box, enter a name for your class, select a method stub viz, public static void main(String[] args) and click on Finish.
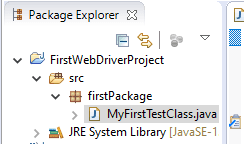
Your Explorer would look like below:
Step 9: Now that we have created an outline for our test project, we need to import the libraries we installed for the Selenium WebDriver tutorial in the section above.
To start with, right-click on the project and go to Build Path > Configure Build Path.
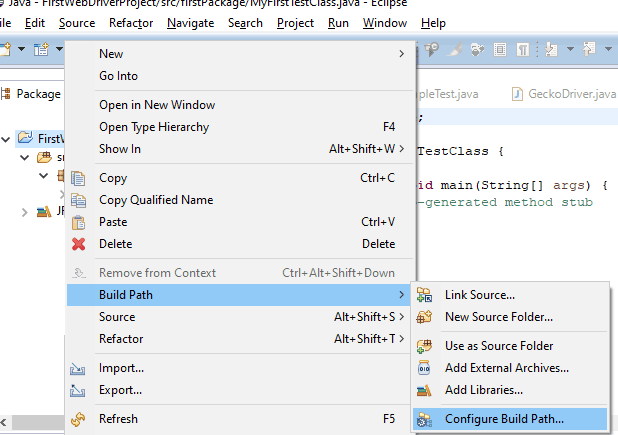
Step 10: Click on Add External JARs and navigate to the location where your downloaded JARs were saved.
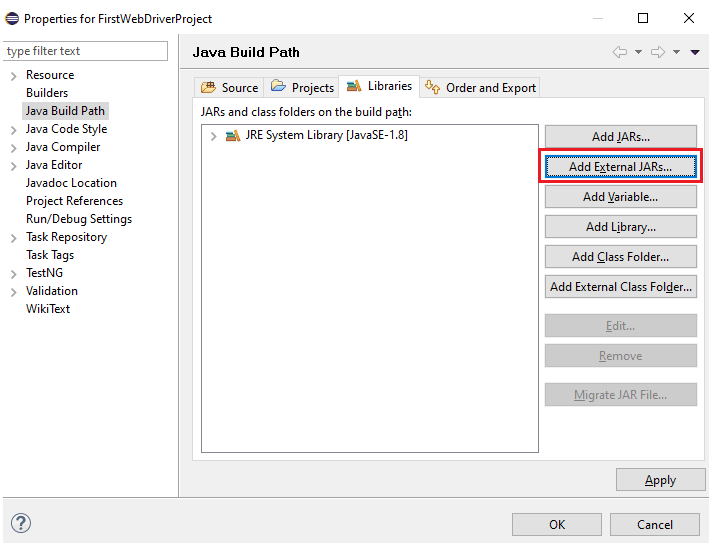
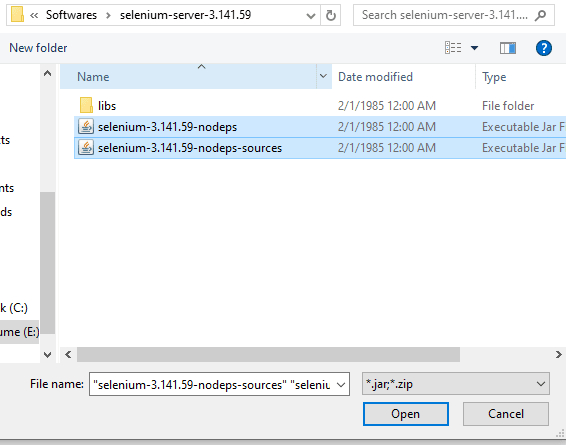
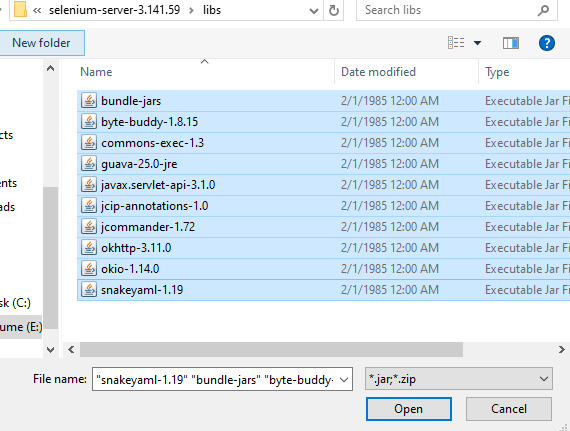
Step 11: Select the two jars installed in the Selenium Client folder and the jars under the libs folder.
Step 12: Once added, you will see the jar files under the Libraries:
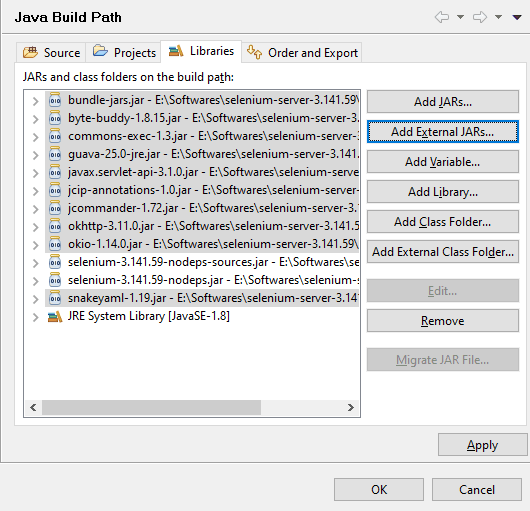
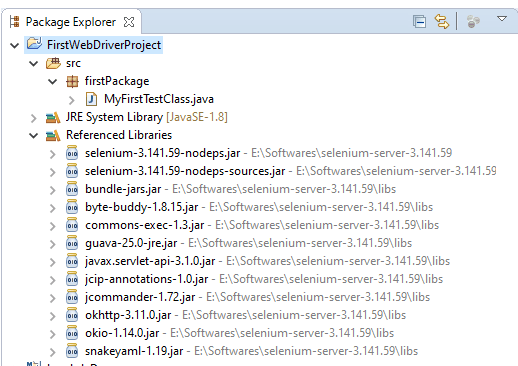
Step 13: Click on Apply and then OK. You can now see the Referenced Libraries populated in the package explorer.
We have now configured Selenium WebDriver in our Eclipse Project and are good to write our first test script.
Watch this video to learn about collecting performance metrics in Selenium 4 using the Chrome DevTools Protocol on the LambdaTest platform.
Running test automation script using Selenium WebDriver
Now that I have touched upon Selenium Webdriver and its architecture, let’s write our first automation script using Selenium Webdriver in this section of the Selenium WebDriver tutorial.
Problem Statement
To demonstrate the usage of Selenium WebDriver, I will perform the following use case:
- Launch Chrome browser.
- Open LambdaTest sign up page.
- Click on the Sign In button.
- Close the web browser.
Implementation
You will need the below pom.xml for importing the necessary dependencies.
And the below testng.xml file will be needed for running the test case.
Code Walkthrough
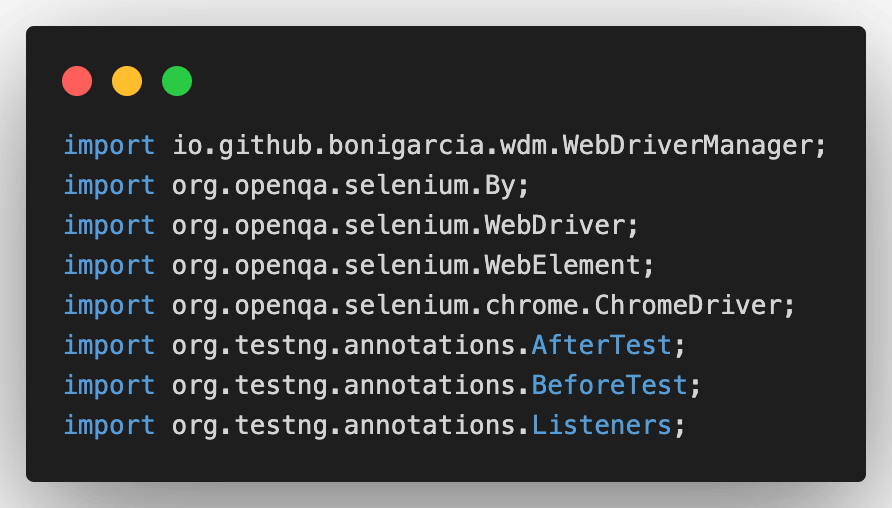
Import Dependencies: Here, we have imported all the necessary classes for using WebDriver, ChromeDriver, and the related annotations in TestNG.
@BeforeTest: Typically, for running any Selenium test script, you will need a browser driver, and to use it, you need to set the browser driver executable path explicitly. After that, you need to instantiate the driver instance and proceed with the test case.

However, managing the browser driver can become cumbersome over time as their versions keep changing, and you need to keep updating the drivers. Hence, to overcome the same, I have used the WebDriverManagerClass.

Here, WebDriverManager.chromedriver.setup() checks for the latest version of the specified web driver binary. If the binaries are not present, it will download them and later instantiate the Selenium WebDriver instance with the ChromeDriver. Isn’t it easy? 🙂
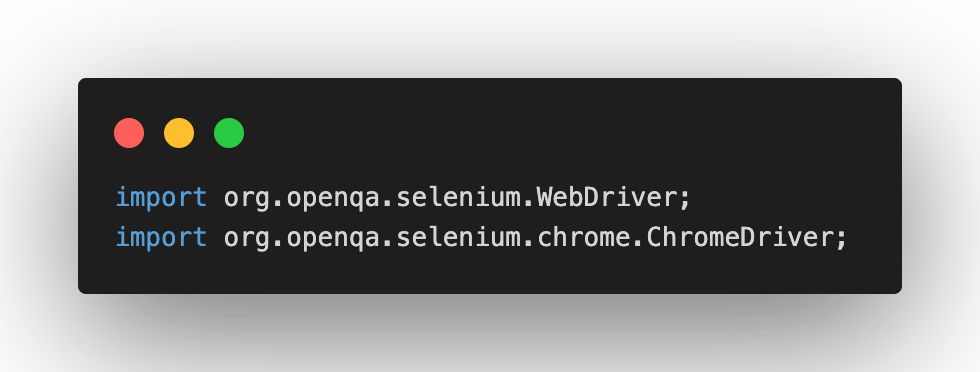
The below two classes will help you in using WebDriver and ChromeDriver.
@Test(firstTestCase): In the test case, I opened the LambdaTest sign up page in the Chrome browser using the driver.get() statement. The findElement method in Selenium is used for locating the SignIn WebElement.
Here, I have used XPath in Selenium for locating the ‘Sign In’ button. To investigate the XPath of any element, you can simply right-click on it and click on Inspect. You will be able to spot the locator in the Elements tab. The click method in Selenium is used for clicking on the Sign In button.

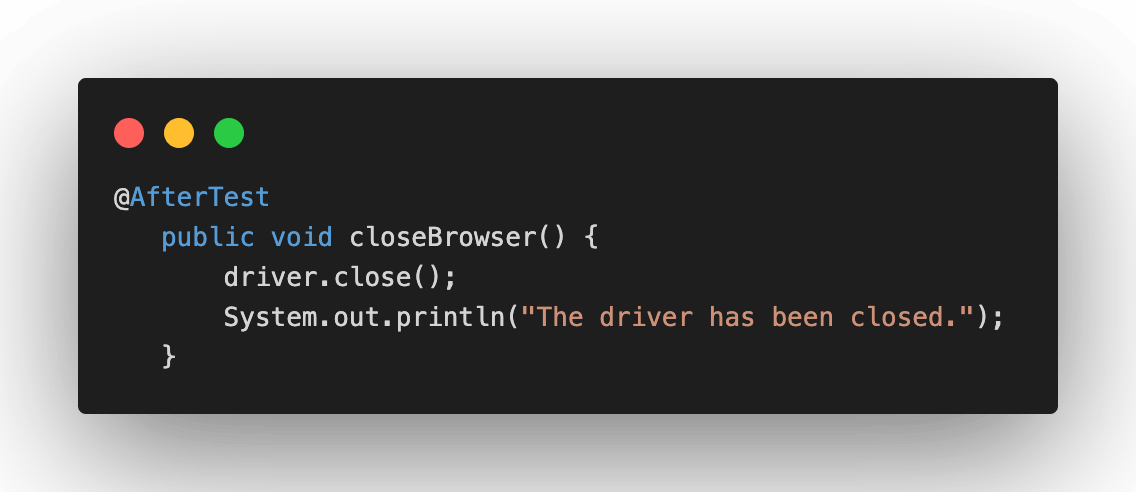
@AfterTest: In the AfterTest method, close the browser using the driver.close() method.
Read – Parallel Test Execution in Selenium using TestNG
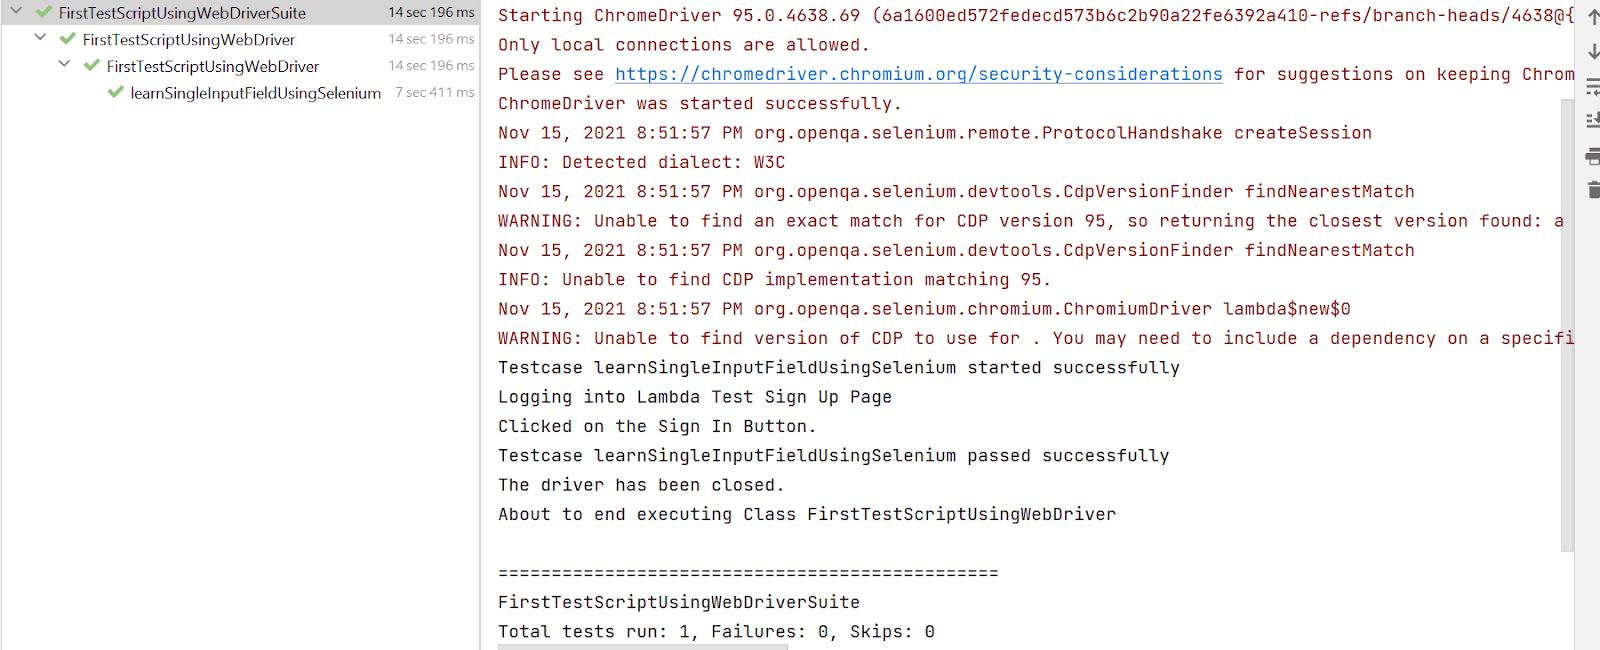
Test Execution
You will see the below output once you run the testng.xml file.
Automated browser testing using cloud Selenium Grid
So far, in this Selenium WebDriver tutorial, I used the local Selenium WebDriver to run a particular test case. Now, as the number of test cases increases, running them parallel with a higher number of threads on a single VM would start giving automation failures.
However, a realistic scenario is where a single test case (or multiple test cases) has to be run across different browser and OS combinations. This is where the Selenium Grid comes into the picture. Selenium Grid eases our setup-related woes, along with helping us run tests at scale on a local (or cloud) grid setup.
Selenium Grid makes parallel execution possible by sending commands to remote Web Browser instances from a hub server.
Selenium testing tools like LambdaTest offer a cloud Selenium Grid that lets you run parallel tests across 3000+ different browsers and operating systems. All you need to do is instantiate the remote Selenium WebDriver instead of the local Selenium WebDriver.
With LambdaTest, you don’t have to worry about downloading and configuring hundreds of browsers on your machine as they are readily available on the online Selenium Grid. Instead, all you need to do is register on LambdaTest for free and claim your 100 free automation testing minutes.
Now that I have covered the basics of cloud Selenium Grid, let’s implement the same example using LambdaTest Selenium Grid.
Problem Statement
In the below example, I am running the same test case on Chrome (latest) + Windows 10 combination.
- Launch Chrome browser on Windows 10
- Open LambdaTest sign up page.
- Click on the Sign In button.
- Close the web browser.
Implementation
Code Walkthrough
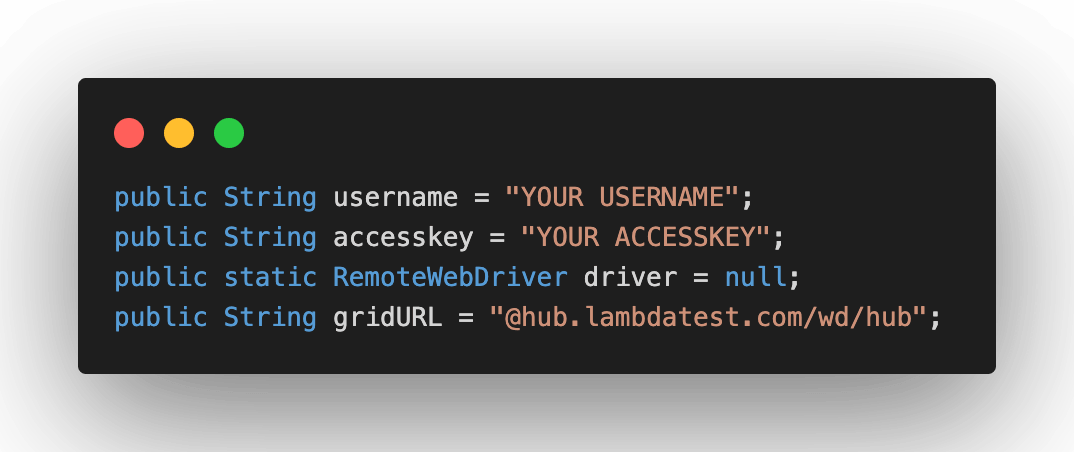
Global Variables: As tests have to be run on LambdaTest cloud Selenium Grid, we would be using the below-shown variables.
Here, you can populate the values for your corresponding username and access key, which can be collected by logging into your LamdaTest Profile Section. However, the gridURL will remain the same.
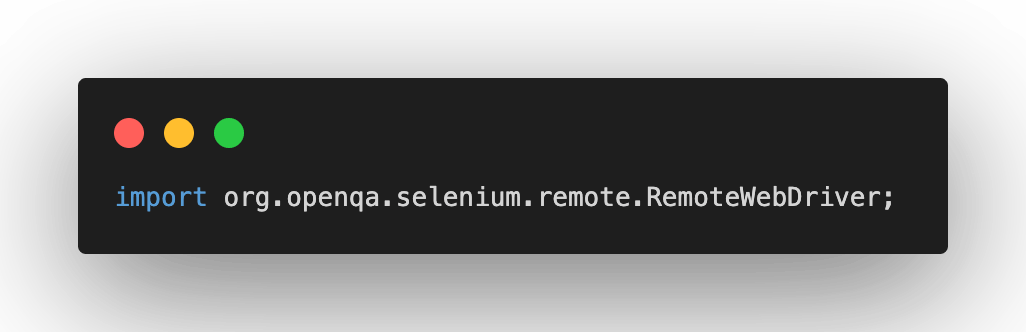
@BeforeTest(Setup Method): In Selenium, the RemoteWebDriver class implements the WebDriver interface to execute test scripts through the RemoteWebDriver server on a remote machine.
The below-imported class will help you in using the RemoteWebDriver class.
Here, I have used the LambdaTest Desired Capabilities Generator and have set the necessary capabilities of browser name, version, platform, etc.

The implementation under @Test and @AfterTest annotations remain unchanged since only the end-point of execution have changed from Selenium Grid’s load to cloud Selenium Grid.
Execution
Log on to LambdaTest Automation Dashboard to check the status of the test execution on LambdaTest.

Read – Parallel Testing in Selenium using JUnit 5
What’s new in Selenium WebDriver 4?
So far, in this Selenium WebDriver tutorial, I have covered the essentials of Selenium WebDriver and its architecture in Selenium 3 and Selenium 4. However, as a QA engineer, the innumerable features offered by Selenium 4 fascinate me a lot!
🚨 Release 🚨
🎉🎉 Selenium 4.0 is here! 🎉🎉
Read all about in our blog post:https://t.co/E8ntH7OdaB
We hope you enjoy Selenium 4, and we can’t wait to see what you do with it!#selenium4
— Selenium (@SeleniumHQ) October 13, 2021
Apart from the renewed Selenium WebDriver architecture, here are some of the other major enhancements in Selenium 4:
W3C Standardization
A significant change in Selenium 4 is the complete W3C compliance of the WebDriver APIs. This eliminates the need for encoding and decoding the API requests by the JSON wire protocol responsible for communication between browsers and test scripts.
The implementation of this standardization means the WebDriver will now interact directly with the target browser.
Enhanced Selenium Grid
The earlier versions of Selenium Grid were complex to set up and maintain. However, the new Selenium Grid is easy to set up as there is no need to maintain Hub and Node separately.
The Grid even has an improved GUI, and the support for Docker helps the developers (and testers) to use it on Virtual Machines(VMs). The Grid can also be deployed now on Kubernetes. Running Selenium tests in Docker is now a cakewalk with the Selenium Grid setup on Selenium 4!
Relative Locators in Selenium 4
Relative locators (or Friendly locators) help locate WebElements relative to a particular WebElement. For example, the required element could be near to, left of, right of, above, or below a specified element.
Relative locators in Selenium 4 can help save a lot of time when locating tricky WebElements. Above, Below, To Right Of, To Left Of, and Near are some of the relative locators that can be leveraged to reduce the lines of code when it comes to locating WebElements.
Better Browser and Tab Management
Selenium 4 provides a new API newWindow that lets you create a new window (or tab) and switch to it without creating a new WebDriver object.
Opening a new Window in Selenium 4
|
driver.get(«https://www.google.com/»); // Opens a new window and switches to new window driver.switchTo().newWindow(WindowType.WINDOW); // Opens LambdaTest homepage in the newly opened window driver.navigate().to(«https://www.lambdatest.com/»); |
Opening a new Tab in Selenium 4
|
driver.get(«https://www.google.com/»); // Opens a new window and switches to new window driver.switchTo().newWindow(WindowType.TAB); // Opens LambdaTest homepage in the newly opened tab driver.navigate().to(«https://www.lambdatest.com/»); |
Deprecation Of Desired Capabilities
In Selenium 4, Desired Capabilities are getting replaced with Options, and we need to create an Options object to use the Driver class.
The below-mentioned Options objects will be used in Selenium 4 for defining the browser-specific capabilities.
- Chrome – ChromeOptions
- Firefox – FirefoxOptions
- Safari – SafariOptions
- Internet Explorer (IE) – InternetExplorerOptions
- Microsoft Edge – EdgeOptions
Chrome DevTools Protocol (CDP)
Chrome DevTools Protocol is the new addition in Selenium 4. The new feature provides Chrome and Microsoft Edge’s debugging protocol for debugging, simulating poor network conditions, and emulating geolocation for automation testing.
Geolocation testing with Selenium helps in mocking browser’s geolocation for the purpose of web browser testing. This feature in Selenium 4 can be leveraged to test the website’s functionalities by mocking different geographical locations.
Conclusion
In this Selenium WebDriver tutorial, I deep-dived into the basics of Selenium WebDriver, its components, and Selenium WebDriver architecture. I also implemented test scenarios using WebDriver as well as cloud Selenium Grid. In the end, we also glanced upon the new and improved features which Selenium 4 offers. I believe you are now all geared up to start on your Selenium automation journey.
Happy testing! 🙂
Frequently Asked Questions
What is Selenium WebDriver used for?
Selenium WebDriver is an open-source software to automate web testing by controlling browsers based on your test scripts. Selenium WebDriver is compatible with every major programming language such as Java, JavaScript, C#, Python, Ruby, PHP, etc.
How can I learn Selenium testing?
Selenium testing requires a basic understanding of any prominent programming language such as Java, C#, Perl, Python, PHP, and Ruby to get started. Start your journey of learning Selenium by following our readily available resources:
- LambdaTest Learning Hub
- Video Tutorials
- Top 17 Resources to Learn Test Automation
Is Selenium easy to learn?
Learning Selenium is the same as learning a new skill. It will require discipline and a learning mindset. To make the process fast, you should focus on these four things – Java, Selenium WebDriver, Frameworks, and TestNg. Get started with your journey of learning Selenium with the help of our complete Selenium WebDriver Tutorial.
What are the advantages of using Selenium?
Using Selenium for automation testing holds many advantages:
- Open Source
- Works Across Multiple OS
- Cross-Browser Compatibility Testing
- Supports Multiple Frameworks and Languages
- Huge Community Support
- Easy to Implement
- Add-Ons and Reusability
- Mouse Cursor and Keyboard Simulation
- Server Starting Not Required
- Advanced Browser Interactions
Why is Selenium so popular?
Selenium is popular for the following reasons –
- Free and open-source framework
- Has huge community support
- Provides a basis for creating other browsers
- Has great demand in the market
Is Selenium considered a code?
Selenium is an open-source framework consisting of automation tools for browser testing. This framework is compatible with all the prominent programming languages and allows users to use any language they are comfortable with to create test scripts. Selenium WebDriver is considered an advancement over the Selenium RC as it overcomes a few limitations.
What are the pros and cons of Selenium?
Selenium is the leading open-source automation framework for realizing automation of interactions with the elements in the DOM. It allows you to automate cross-browser tests with six major Selenium-supported programming languages. However, Selenium cannot extend support to any platform other than the web. For example, Selenium cannot be used to write mobile automation codes or desktop applications, as it can only work with web applications.
Is Selenium still the best automation tool?
Selenium is one of the best and most exciting tools in the QA industry. Despite being open-source, it offers a wider range of features, including recording and replaying your actions in a browser. It has multiple uses, ranging from functional testing to performance testing and everything in between.
What cannot be automated using Selenium?
Some of the actions that cannot be automated using Selenium WebDriver includes
Bitmap comparison, automating Captcha, reading bar code, etc. These can also be considered as the Selenium bad practices.
What are some of the best Selenium practices?
Some of the best Selenium practices include testing early and often, using a BDD framework, using Page Object Model (POM), setting up Selenium test automation reports, using parameterization, and more.
What is the difference between Selenium 3 and Selenium 4?
The introduction of the WebDriver W3C protocol and the retirement of JSON Wire Protocol is one of the major architectural changes that redefine Selenium 4. Further, Selenium 4 provides for better web-driver testing than Selenium 3 by including features such as relative locators, support for the CDP protocol, and optimization of the Selenium Grid.
What are relative locators in Selenium 4?
Selenium 4.0 boasts a slew of new features that make coding a breeze. One new feature is a family of friendly locators or relative locators that let you track down elements relative to their position with other elements on the page. (above, below, toLeftOf, toRightOf, and near)
What is the timeline of stable release of Selenium 4?
Selenium 4 is currently in the RC-1 (Release Candidate) stage and should be released soon. Like you, we are awaiting the public release of Selenium 4!
Where is Selenium tool used?
Selenium is used to automate web browsers and ensure high-quality applications – whether they are responsive, progressive, or static. It is extensively used by QA professionals to make sure websites are properly functioning across different browsers and OS combinations.
Does Selenium testing require coding?
Yes, Selenium testing does require coding for setting it up and maintaining it, along with some third-party integrations for executing multiple testing processes. However, Selenium provides many great features, such as an open-source web framework for automated cross-browser testing.
Do I need to learn Java for Selenium?
Selenium does not require learning Java necessarily, as it allows you to use any programming language you are comfortable with. If you’re not comfortable with programming languages, you can also rely on Selenium IDE’s codeless automation.

Ria Dayal
A Senior Quality Engineer By Profession, an automation enthusiast and loves to anchor. Her expertise revolves around Selenium, Java, Rest Assured, and Jenkins. Shell scripting too interests her a lot.
Ria enjoys reading novels and writing is her comfort zone.