- Manuals
- Brands
- Brother Manuals
- Sewing Machine
- XL5020
Manuals and User Guides for Brother XL5020. We have 3 Brother XL5020 manuals available for free PDF download: Instruction Manual, Service Manual
Brother XL5020 Instruction Manual (83 pages)
Brother Sewing Machine Instruction Manual
Brand: Brother
|
Category: Sewing Machine
|
Size: 1.27 MB
Table of Contents
-
Contents
2
-
Important Safety Instructions
2
-
Sewing Light Switch
5
-
Connecting Plugs and Main Power
5
-
Table of Contents
6
-
Principal Parts
9
-
Accessories
11
-
Operating Your Sewing Machine
13
-
Connecting Plugs
13
-
Main Power and Sewing Light Switches
14
-
Foot Controller
14
-
Inserting the Needle
15
-
Checking the Needle
15
-
Changing the Presser Foot
16
-
Converting to Free-Arm Style
17
-
Steadying the Machine
17
-
Various Controls
18
-
Pattern Selection Dial
18
-
Recommended Widths and Lengths for Stitches
19
-
Stitch Length Dial
28
-
Stretch Stitching
29
-
Reverse Sewing Lever
30
-
Drop Feed Lever (When the Machine Is Equipped with a Drop Feed Lever)
30
-
Threading the Machine
31
-
Winding the Bobbin
31
-
Lower Threading
32
-
Upper (Needle) Threading
33
-
Using the Needle Threader (When the Machine Is Equipped with a Needle Threader)
35
-
Quick Thread-Setting System FAST START BOBBIN (When the Machine Is Equipped with a Quick Thread-Setting System)
37
-
Drawing up Lower Thread
38
-
Twin-Needle Sewing
39
-
Thread Tension
40
-
Chart of Sewing Fabrics, Needles and Thread Combinations
42
-
Straight Stitching
44
-
Zigzag Stitching
47
-
Blind Hem Stitching
48
-
Shell Tuck Stitching
49
-
Elastic Stitching
50
-
Scallop Stitching
51
-
Overedge Stitching
52
-
Feather Stitching
53
-
Triple Zigzag Stretch Stitching
54
-
Decorative Stitching
54
-
Making a Buttonhole (XL5030 and XL5020 Only)
55
-
Making a Buttonhole (XL5010 Only)
57
-
Buttonhole Fine Adjustment
60
-
Button Sewing
62
-
Zipper Inserting
64
-
Gathering
64
-
Darning
66
-
Appliques
67
-
Monogramming and Embroidering
68
-
Changing the Bulb
70
-
Oiling
71
-
Cleaning
72
-
Performance Checklist
73
-
Repacking the Machine
79
-
-
Índice del Contenido
10
-
Elementos Principales
10
-
Parti Principali
10
-
Accesorios
11
-
Funcionamiento de la Máquina de Coser
13
-
Conexión de Los Enchufes
13
-
Interruptor Principal y de Luz
14
-
Pedal
14
-
Inserción de la Aguja
15
-
Comprobación de la Aguja
15
-
Cambio del Prensatelas
16
-
Conversión en Modalidad de Brazo Libre
17
-
Para Estabilizar la Máquina
17
-
Distintos Mandos
18
-
Selector de Puntadas
18
-
Anchos y Largos de Puntadas Recomendados
22
-
Selector de Largo de Puntada
28
-
Puntada Elástica
29
-
Palanca de Retroceso
30
-
Palanca de Alimentación de Bajada (cuando la Máquina Está Equipada con una Palanca de Alimentación de Bajada)
30
-
Enhebrado de la Máquina
31
-
Bobinado de la Canilla
31
-
Enhebrado Inferior
32
-
Enhebrado Superior (de la Aguja)
34
-
Uso del Enhebrador (cuando la Máquina Está Equipada con una Enhebradora de Hilo)
36
-
Sistema Rápido de Colocación del Hilo BOBINA de INICIO RÁPIDO
37
-
(Cuando la Máquina Está Equipada con un Sistema Rápido de Colocación del Hilo)
37
-
Para Sacar el Hilo de la Canilla
38
-
Costura con Aguja Doble
39
-
Tensión de Los Hilos
41
-
Tabla de Combinaciones entre Tejidos, Agujas y Hilos
42
-
Para Coser Ojales (solo XL5030 y XL5020)
56
-
Para Coser Ojales (solo XL5010)
57
-
Ajuste Fino de Los Ojales
61
-
Costura de Botones
63
-
Inserción de Cremalleras
65
-
Fruncido
65
-
Zurcido
66
-
Aplicaciones
67
-
Monogramas y Bordados
68
-
Cambio de la Bombilla
70
-
Engrasado
71
-
Limpieza
72
-
Listado de Posibles Incidencias
75
-
Embalaje de la Máquina
79
-
-
Sommario
13
-
Funzionamento Della Macchina da Cucire
13
-
Collegamento Elettrico
13
-
Interruttore Principale E Lampadina
14
-
Inserimento Dell’ago
15
-
Controllo Dell’ago
15
-
Sostituzione del Piedino Premistoffa
16
-
Cucitura a Braccio Libero
17
-
Stabilizzazione Della Macchina
17
-
Dispositivi DI Controllo
18
-
Selettore Dei Punti
18
-
Ampiezze E Lunghezze Dei Punti Consigliate
25
-
Selettore Della Lunghezza del Punto
28
-
Cucitura con Punti Elastici
29
-
Leva DI Cucitura DI Ritorno
30
-
Procedure DI Infilatura
31
-
Avvolgimento Della Spoletta
31
-
Infilatura Inferiore
32
-
Infilatura Superiore (Ago)
34
-
FAST START BOBBIN (When the Machine Is Equipped with a Quick Thread-Setting System)
37
-
AVVIAMENTO RAPIDO (Se la Macchina È Equipaggiata con un Sistema Rapido DI Posizionamento del Filo)
37
-
Raccolta del Filo Inferiore
38
-
Cucitura con Ago Gemello
39
-
Regolazione Della Tensione del Filo
41
-
Tabella Delle Combinazioni DI Tessuto Ago E Filo
43
-
Punto a Piuma
53
-
Punto Decorativo
54
-
Esecuzione DI Asole (solo Mod. XL5030 E XL5020)
56
-
Esecuzione DI Asole (solo Mod. XL5010)
57
-
Cucitura DI Bottoni
63
-
Monogrammi E Ricami
68
-
Reimballaggio Della Macchina
79
-
-
Puntadas Rectas y Zigzag
44
-
Puntadas Rectas
44
-
Punto Diritto
44
-
Puntadas Zigzag
47
-
Punto Zigzag
47
-
Puntadas Invisibles
48
-
Puntada Alforza Derefuerzo
49
-
Punto Orlo Conchiglia
49
-
Puntada Elástica
50
-
Punto Elastico
50
-
Puntada Festón
51
-
Punto Smerlo
51
-
Puntada por Encima de la Orilla
52
-
Rifinitura a Sopraggitto
52
-
Puntada Pluma
53
-
Puntada Triple Zigzag Elástica
54
-
Puntada Decorativa
54
-
Punto Zigzag Stretch Triplo
54
-
Regolazione Della Densità Dei Punti Dell’asola
61
-
Arricciature
65
-
Rammendo
66
-
Applicazioni
67
-
Sostituzione Della Lampadina
70
-
Lubrificazione
71
-
Pulizia
72
-
Tabella DI Controllo del Funzionamento
77
-
Advertisement
Brother XL5020 Instruction Manual (82 pages)
Brother Sewing Machine Instruction Manual
Brand: Brother
|
Category: Sewing Machine
|
Size: 1.53 MB
Table of Contents
-
Contents
2
-
Important Safety Instructions
2
-
Sewing Light Switch
5
-
Connecting Plugs and Main Power
5
-
Table of Contents
6
-
Principal Parts
9
-
Accessories
11
-
Operating Your Sewing Machine
13
-
Connecting Plugs
13
-
Main Power and Sewing Light Switches
14
-
Foot Controller
14
-
Inserting the Needle
15
-
Checking the Needle
15
-
Changing the Presser Foot
16
-
Converting to Free-Arm Style
17
-
Steadying the Machine
17
-
Various Controls
18
-
Pattern Selection Dial
18
-
Recommended Widths and Lengths for Stitches
19
-
Stitch Length Dial
28
-
Stretch Stitching
29
-
Reverse Sewing Lever
30
-
Drop Feed Lever (When the Machine Is Equipped with a Drop Feed Lever)
30
-
Threading the Machine
31
-
Winding the Bobbin
31
-
Lower Threading
32
-
Upper (Needle) Threading
33
-
Using the Needle Threader (When the Machine Is Equipped with a Needle Threader)
35
-
Quick Thread-Setting System FAST START BOBBIN (When the Machine Is Equipped with a Quick Thread-Setting System)
37
-
Drawing up Lower Thread
38
-
Twin-Needle Sewing
39
-
Thread Tension
40
-
Chart of Sewing Fabrics, Needles and Thread Combinations
42
-
Straight Stitching
44
-
Zigzag Stitching
47
-
Blind Hem Stitching
48
-
Shell Tuck Stitching
49
-
Elastic Stitching
50
-
Scallop Stitching
51
-
Overedge Stitching
52
-
Feather Stitching
53
-
Triple Zigzag Stretch Stitching
54
-
Decorative Stitching
54
-
Making a Buttonhole (XL5030 and XL5020 Only)
55
-
Making a Buttonhole (XL5010 Only)
57
-
Buttonhole Fine Adjustment
60
-
Button Sewing
62
-
Zipper Inserting
64
-
Gathering
64
-
Darning
66
-
Appliques
67
-
Monogramming and Embroidering
68
-
Changing the Bulb
70
-
Oiling
71
-
Cleaning
72
-
Performance Checklist
73
-
Repacking the Machine
79
-
-
Índice del Contenido
10
-
Elementos Principales
10
-
Accesorios
11
-
Funcionamiento de la Máquina de Coser
13
-
Conexión de Los Enchufes
13
-
Interruptor Principal y de Luz
14
-
Pedal
14
-
Inserción de la Aguja
15
-
Comprobación de la Aguja
15
-
Cambio del Prensatelas
16
-
Conversión en Modalidad de Brazo Libre
17
-
Para Estabilizar la Máquina
17
-
Distintos Mandos
18
-
Selector de Puntadas
18
-
Anchos y Largos de Puntadas Recomendados
22
-
Selector de Largo de Puntada
28
-
Puntada Elástica
29
-
Palanca de Retroceso
30
-
Palanca de Alimentación de Bajada (cuando la Máquina Está Equipada con una Palanca de Alimentación de Bajada)
30
-
Enhebrado de la Máquina
31
-
Bobinado de la Canilla
31
-
Enhebrado Inferior
32
-
Enhebrado Superior (de la Aguja)
34
-
Uso del Enhebrador (cuando la Máquina Está Equipada con una Enhebradora de Hilo)
36
-
Sistema Rápido de Colocación del Hilo BOBINA de INICIO RÁPIDO
37
-
(Cuando la Máquina Está Equipada con un Sistema Rápido de Colocación del Hilo)
37
-
Para Sacar el Hilo de la Canilla
38
-
Costura con Aguja Doble
39
-
Tensión de Los Hilos
41
-
Tabla de Combinaciones entre Tejidos, Agujas y Hilos
42
-
Para Coser Ojales (solo XL5030 y XL5020)
56
-
Para Coser Ojales (solo XL5010)
57
-
Ajuste Fino de Los Ojales
61
-
Costura de Botones
63
-
Inserción de Cremalleras
65
-
Fruncido
65
-
Zurcido
66
-
Aplicaciones
67
-
Monogramas y Bordados
68
-
Cambio de la Bombilla
70
-
Engrasado
71
-
Limpieza
72
-
Listado de Posibles Incidencias
75
-
Embalaje de la Máquina
79
-
-
Sommario
10
-
Parti Principali
10
-
Funzionamento Della Macchina da Cucire
13
-
Collegamento Elettrico
13
-
Interruttore Principale E Lampadina
14
-
Inserimento Dell’ago
15
-
Controllo Dell’ago
15
-
Sostituzione del Piedino Premistoffa
16
-
Cucitura a Braccio Libero
17
-
Stabilizzazione Della Macchina
17
-
Dispositivi DI Controllo
18
-
Selettore Dei Punti
18
-
Ampiezze E Lunghezze Dei Punti Consigliate
25
-
Selettore Della Lunghezza del Punto
28
-
Cucitura con Punti Elastici
29
-
Leva DI Cucitura DI Ritorno
30
-
Procedure DI Infilatura
31
-
Avvolgimento Della Spoletta
31
-
Infilatura Inferiore
32
-
Infilatura Superiore (Ago)
34
-
FAST START BOBBIN (When the Machine Is Equipped with a Quick Thread-Setting System)
37
-
AVVIAMENTO RAPIDO (Se la Macchina È Equipaggiata con un Sistema Rapido DI Posizionamento del Filo)
37
-
Raccolta del Filo Inferiore
38
-
Cucitura con Ago Gemello
39
-
Regolazione Della Tensione del Filo
41
-
Tabella Delle Combinazioni DI Tessuto Ago E Filo
43
-
Punto Diritto
44
-
Punto Zigzag
47
-
Punto Orlo Conchiglia
49
-
Punto Elastico
50
-
Punto Smerlo
51
-
Rifinitura a Sopraggitto
52
-
Punto a Piuma
53
-
Punto Zigzag Stretch Triplo
54
-
Punto Decorativo
54
-
Esecuzione DI Asole (solo Mod. XL5030 E XL5020)
56
-
Esecuzione DI Asole (solo Mod. XL5010)
57
-
Regolazione Della Densità Dei Punti Dell’asola
61
-
Cucitura DI Bottoni
63
-
Arricciature
65
-
Rammendo
66
-
Applicazioni
67
-
Monogrammi E Ricami
68
-
Sostituzione Della Lampadina
70
-
Lubrificazione
71
-
Pulizia
72
-
Tabella DI Controllo del Funzionamento
77
-
Reimballaggio Della Macchina
79
-
-
Puntadas Rectas y Zigzag
44
-
Puntadas Rectas
44
-
Puntadas Zigzag
47
-
Puntadas Invisibles
48
-
Puntada Alforza Derefuerzo
49
-
Puntada Elástica
50
-
Puntada Festón
51
-
Puntada por Encima de la Orilla
52
-
Puntada Pluma
53
-
Puntada Triple Zigzag Elástica
54
-
Puntada Decorativa
54
-
Brother XL5020 Service Manual (31 pages)
Zigzag Stitch Sewing Machines
Brand: Brother
|
Category: Sewing Machine
|
Size: 0.69 MB
Table of Contents
-
Table of Contents
3
-
Removing Order of Covers
4
-
Clearance between the Needle and the Shuttle Hook Point
5
-
Clearance between the Shuttle Driver and the Race Way
6
-
Needle Swing (Parabola)
7
-
Needle Position on Zigzag to the Needle Plate
8
-
Loop Lift
9
-
Height of the Needle Bar
10
-
Tension of the Timing Belt
11
-
Height of the Feed Dogs
12
-
Height of the Presser Bar
13
-
Stitch Length for Forward and Backwards Stitching
14
-
Maximum Stitch Width When Set at Straight (Left) and Zigzag Stitch (XL5300, XL5200, XL5030, XL5020, PX300, PX200)
15
-
Buttonhole Bead Width (XL5100, XL5010, PX100)
16
-
Buttonhole Forward and Reverse Feeding
17
-
Bar Tack Density
18
-
Buttonhole Length
19
-
Buttonhole Lever Torque (XL5300, XL5200, XL5030, XL5020, PX300, PX200)
20
-
Maximum Stitch Width When Set at Buttonhole and Zigzag Stitch (XL5300, XL5200, XL5030, XL5020, PX300, PX200)
21
-
Forward and Reverse Sewing for Stretch Stitch
22
-
Adjustment of Thread Tension Dial
23
-
Bobbin Winding
24
-
Needle Threader
26
-
Exchange of Needle Threader
27
-
Adjustment of Lower Thread Tension
28
-
Positioning of Stitch Selector Stitch Displays (PX300, PX200, PX100)
29
-
Positioning of Feed Dial (PX300, PX200, PX100)
30
Advertisement
Advertisement
Related Products
-
Brother XL-5012
-
Brother XL-5032
-
Brother XL-5051
-
Brother XL-5060
-
Brother XL-5061
-
Brother XL-5070
-
Brother XL-5071
-
Brother XL5050
-
Brother XL5010
-
Brother XL5030
Brother Categories
Sewing Machine
![]()
All in One Printer
![]()
Printer
Label Maker
Fax Machine
More Brother Manuals
Если у вас отсутствует техническая возможность для скачивания Инструкция по эксплуатации для Brother XL5020
вы можете прочесть документ прямо на нашем сайте или
Скачать Brother XL5020 Инструкция по эксплуатации

- 1
- 2
- 3
- 4
- 5
- 6
- 7
- 8
- 9
- 10
- 11
- 12
- 13
- 14
- 15
- 16
- 17
- 18
- 19
- 20
- 21
- 22
- 23
- 24
- 25
- 26
- 27
- 28
- 29
- 30
- 31
- 32
- 33
- 34
- 35
- 36
- 37
- 38
- 39
- 40
- 41
- 42
- 43
- 44
- 45
- 46
- 47
- 48
- 49
- 50
- 51
- 52
- 53
- 54
- 55
- 56
- 57
- 58
- 59
- 60
- 61
- 62
- 63
- 64
- 65
- 66
- 67
- 68
- 69
- 70
- 71
- 72
- 73
- 74
- 75
- 76
- 77
- 78
- 79
- 80
- 81
- 82
- 83
Инструкции для прочих Brother Швейные машинки
Инструкции для прочих Brother
Посмотреть инструкция для Brother XL-5020 бесплатно. Руководство относится к категории швейные машины, 1 человек(а) дали ему среднюю оценку 5.7. Руководство доступно на следующих языках: английский. У вас есть вопрос о Brother XL-5020 или вам нужна помощь? Задайте свой вопрос здесь
Не можете найти ответ на свой вопрос в руководстве? Вы можете найти ответ на свой вопрос ниже, в разделе часто задаваемых вопросов о Brother XL-5020.
Какой размер иглы лучше всего использовать?
Какой срок службы у швейной иглы?
Что может повредить иглу при шитье?
Инструкция Brother XL-5020 доступно в русский?
Не нашли свой вопрос? Задайте свой вопрос здесь

Instruction Manual Manual de instrucciones Manuale d’istruzione

“IMPORTANT SAFETY INSTRUCTIONS”
When using the sewing machine, basic safety precautions should always be followed, including the following:
“Read all instructions before using.”
DANGER –To reduce the risk of electric shock:
1.The sewing machine should never be left unattended when plugged in. Always unplug this sewing machine from the electrical outlet immediately after using and before cleaning.
2.Always unplug before changing the light bulb. Replace bulb with same type rated 15 watts.
WARNING –To reduce the risk of burns, fire, electric shock, or injury to persons:
1.Do not allow this machine to be used as a toy. Close attention is necessary when the sewing machine is used by or near children.
2.Use this sewing machine only for its intended use as described in this manual. Use only accessories recommended by the manufacturer as contained in this manual.
3.Never operate this sewing machine if it has a damaged cord or plug, if it is not working properly, if it has been dropped or damaged, or dropped into water. Return the sewing machine to the nearest authorized dealer or service center for examination, repair, electrical or mechanical adjustment.
4.Never operate the sewing machine with any of the air openings blocked. Keep the ventilation openings of the sewing machine and foot controller free from the accumulation of lint, dust and loose cloth.
5.Never drop or insert any object into any openings.
6.Do not use this machine outdoors.
7.Do not operate this machine where aerosol (spray) products are being used or where oxygen is being administered.
8.To disconnect, turn the main switch to the symbol “O” position which represents off, then remove plug from outlet.
9.Do not unplug by pulling on the cord. To unplug, grasp the plug and pull, not the cord.
10.Keep fingers away from all moving parts. Special care is required around the sewing machine needle.
11.Always use the proper needle plate. The wrong plate can cause the needle to break.
12.Do not use a bent needle.
13.Do not pull or push the fabric while stitching. It may deflect the needle causing it to break.
14.Switch the sewing machine to the off, symbol “O” position when making any adjustments in the needle area, such as threading the needle, changing the needle, threading the bobbin, or changing the presser foot.
15.Always unplug the sewing machine from the electrical outlet when removing covers, lubricating, or when making any other user service adjustments mentioned in this instruction manual.
16.Appliance (220V – 240V) is provided with double insulation. Use only identical replacement parts. See instructions for Servicing
Double Insulated appliances.
17.This sewing machine is not intended for use by young children or infirm persons without supervision.
18.Young children should be supervised to ensure that they do not play with this sewing machine.
Servicing double-insulated products (220V – 240V)
In a double-insulated product, two systems of insulation are provided instead of grounding. No grounding means is provided on a doubleinsulated product nor should a means for grounding be added to the product. Servicing a double-insulated product requires extreme care and knowledge of the system and should only be done by qualified service personnel. Replacement parts for a double-insulated product must be identical to those parts in the product.
The symbol 

 is marked on the double-insulated product.
“SAVE THESE INSTRUCTIONS”
“This sewing machine is intended for household use.”

“IMPORTANTES INSTRUCCIONES DE
SEGURIDAD”
Cuando se usa una máquina de coser, debe seguirse unas precauciones básicas y que se detallan a continuación. “Leer todas las instrucciones antes de usarla”
PELIGRO –Para reducir el riesgo de una descarga eléctrica.
1.La máquina no debe dejarse nunca desatendida mientras esté conectada. Desconectar la máquina de la red cuando se termine de usar y antes de limpiarla.
2.Desconectar la máquina de la red antes de cambiar la bombilla. Colocar una bombilla del mismo tipo con una potencia de 15 vatios.
CUIDADO –Para reducir el riesgo de quemaduras, fuego, descargas eléctricas o causar daño a las personas.
1.No usar la máquina como un juguete.
Hay que prestar atención si la máquina la usan los niños o se trabaja cerca de ellos.
2.Usar la máquina de coser solamente como se describe en este manual.
Usar únicamente los accesorios recomendados por el fabricante y que vienen especificados en este manual.
3.Nunca haga funcionar la máquina de coser si el cordón de alimentación o la clavija están deteriorados, si no funciona correctamente, si se ha caído o si se ha mojada. Entregar la máquina de coser al centro de servicio autorizado más cercano para que la examinen, la reparen o hagan los ajustes eléctricos o mecánicos que correspondan.
4.No usar la máquina con los orificios de ventilación bloqueados. Mantener los orificios de ventilación de la máquina de coser y el pedal sin acumulacíon de polvo. Suciedad y restos de tejido.
5.No introducir ni insertar objetos en los orificios de ventilación.
6.No usar al, aire libre.
7.No trabajar con la máquina si se estén utilizando productos aerosoles (spray) o en lugares donde se esté administrando oxígeno.
8.Para desconectar, girar el interruptor hasta la posición del símbolo “O” que representa off, luego desconectar el enchufe de la red.
9.No desconectar el enchufe tirando del cable. Para desconectar, tirar de la clavija, no del cable.
10.Mantener los dedos alejados de todas las partes movibles de la máquina. Tener un cuidado especial con la aguja.
11.Usar siempre la placa de agujas apropiada. Una placa de agujas impropia puede producir la rotura de la aguja.
12.No usar agujas despuntadas.
13.No presionar ni tirar del tejido mientras se está cosiendo. Esto podría doblar la aguja y romperla.
14.Situar el interruptor principal de la máquina en posición “O” cuando se realice algún ajuste en el área de la aguja como enhebrara, cambiar la aguja, cambiar la canilla, cambiar la pata prensatelas y similares.
15.Desconectar siempre la máquina de la red eléctrica cuando se retiren las tapas, para lubricar, o cuando se realice algún otro tipo de ajuste mecánico mencionado en el manual de instrucciones.
16.Se proporciona un aparato (220 V-240 V) con un doble aislamiento. Utilice únicamente repuestos originales. Vea las instrucciones de aparatos de reparación de doble aislamiento.
REPARACIÓN DE PRODUCTOS DE DOBLE
AISLAMIENTO (220 V-240 V)
Un producto de doble aislamiento dispone de dos sistemas de aislamiento en lugar de una conexión a tierra. Se proporciona un dispositivo de no conexión a tierra en un producto de doble aislamiento. Por consiguiente, no debe incorporarse al producto un dispositivo de conexión a tierra. La reparación de un producto de doble aislamiento requiere un especial cuidado y conocimiento del sistema y debe ser realizado únicamente por personal de mantenimiento cualificado. Los repuestos de los productos de doble aislamiento deben ser originales.
|
El símbolo |
aparece marcado en productos de doble aislamiento. |
“CONSERVE ESTE MANUAL DE
INSTRUCCIONES”
“Esta máquina de coser es para uso doméstico”

“IMPORTANTI ISTRUZIONI DI SICUREZZA”
Quando usate la macchina per cucire, rispettate sempre le precauzioni di sicurezza, incluso quanto qui di seguito specificato.
“Leggete tutte le istruzioni prima dell’uso.”
PERICOLO –Per ridurre il rischio di shock elettrico.
1.La macchina per cucire non deve essere mai lasciata abbandonata quando la spina È inserita. Rimuovete sempre la spina della macchina per cucire subito dopo avere finito di lavorare e prima di procedere alla sua pulizia.
2.Rimuovete sempre le spina della macchina per cucire prima di procedere alla sostituzione della lampadina. Usare una lampadina dello stesso tipo da 15 watt.
ATTENZIONE –Per ridurre il rischio di bruciature, incendi, shock elettrico o danni alle persone.
1.Non permettete che venga usata come un giocattolo. Fare molta attenzione quando la macchina viene usata vicino a bambini.
2.Usate questa macchina per cucire solo per l’uso cui È destinata, come descritto all’interno del manuale. Usare solo accessori consigliati dal produttore, come specificato qui di seguito.
3.Non usate mai questa macchina per cucire nel caso abbia la spina o il cavo di alimentazione danneggiata, se non dovesse funzionare bene, se fosse caduta o danneggiata, o caduta nell’acqua. Riportare la macchina per cucire al piu vicino rivenditore o centro assistenza autorizzati per un esame, la riparazione, o la regolazione elettrica o meccanica.
4.Non usate la macchina per cucire con le aperture dell’aria bloccate. Mantenere le aperture di ventilazione della macchina per cucire ed il reostato privi di fili, polvere o stoffa.
5.Non far cadere né inserire alcun oggetto in nessuna delle aperture.
6.Non usate la macchina all’aperto.
7.Non fate funzionare la macchina nel caso vengano usati prodotti aerosol (spray) o ossigeno.
8.Per scollegare, girate l’interruttore principale in posizione “O” (che significa OFF = spento), quindi toglieri la spina dalla presa di corrente.
9.Non scollegate tirando il cavo. Per togliere la spina, tenete la spina stessa e non tirate il cavo.
10.Tenete le dita lontano da tutte le parti in movimento, specialmente attorno all’ago della macchina per cucire.
11.Usate sempre la placca appropriata all’ago in uso. Una placca sbagliata potrebbe provocare la rottura dell’ago.
12.Non usate aghi piegati.
13.Non tirate o spingete il tessuto mentre cucite, poiché ciò potrebbe far piegare l’ago e quindi romperlo.
14.Mettete l’interruttore della macchina su “O” quando effettuate regolazioni in prossimità dell’ago, come per esempio durante l’infilatura, la sostituzione dell’ago, l’infilatura della spolina o la sostituzione del piedino premistoffa.
15.Staccate sempre la macchina per cucire dalla presa elettrica quando togliete i coperchi, la lubrificate o quando effettuate una delle operazioni di manutenzione citate nel manuale d’istruzioni.
16.Gli apparecchi (220V — 240V) sono dotati di un doppio isolamento elettrico. Usate esclusivamente parti di ricambio identiche. Vedere le istruzioni per la Manutenzione di apparecchi a doppio isolamento elettrico.
Manutenzione di prodotti a doppio isolamento elettrico (220V — 240V)
Gli apparecchi a doppio isolamento elettrico dispongono di due sistemi di isolamento al posto della messa a terra. Tali apparecchi non sono dotati di alcun dispositivo di messa a terra e non devono essere equipaggiati con alcuno di questi dispositivi. La manutenzione degli apparecchi a doppio isolamento richiede estrema cautela ed una conoscenza del sistema, e dovrà essere eseguita esclusivamente da tecnici qualificati. Le parti di ricambio di un apparecchio a doppio isolamento elettrico devono essere identiche a quelle installate nel prodotto.
Gli apparecchi a doppio isolamento elettrico sono contrassegnati dal simbolo 

 .
.
“CONSERVATE QUESTE ISTRUZIONI”
“La presente macchina per cucire È destinata all’uso domestico.”
FOR USERS IN THE UK, EIRE, MALTA AND CYPRUS ONLY.
If your sewing machine is fitted with a 3 pin non-rewireable BS plug then please read the following.
IMPORTANT
If the available socket outlet is not suitable for the plug supplied with this equipment, it should be cut off and an appropriate three pin plug fitted. With alternative plugs an approved fuse must be fitted in the plug.
NOTE: The plug severed from the main leads must be destroyed as a plug with bared flexible cords is hazardous if engaged in a live socket outlet. In the event of replacing the plug fuse, use a fuse approved by ASTA to BS 1362, i.e. carrying the ASA mark, rating as marked on plug.
Always replace the fuse cover. Never use plugs with the fuse cover removed.
WARNING: DO NOT CONNECT EITHER WIRE TO THE EARTH TERMINAL WHICH IS MARKED WITH THE LETTER ‘E’, BY THE EARTH SYMBOL  OR COLOURED GREEN OR YELLOW.
The wires in these main leads are coloured in accordance with the following code:
As the colours of the wiring in the main lead of this appliance may not correspond with the coloured markings identifying the terminals in your plug, proceed as follows:
The wire which is coloured blue must be connected to the terminal which is marked with the letter ‘N’ or coloured black or blue.
The wire which is coloured brown must be connected to the terminal which is marked with the letter ‘L’ or coloured red or brown.
Connecting Plugs and Main Power / Sewing Light Switch
1
2
1.Connect the three-prong plug into the machine.
2.Connect the electrical supply plug into a wall outlet.
—When leaving the sewing machine unattended, the main switch of the machine must be switched off or the plug must be removed from the socket outlet.
Turn on or off the switch for the main power and sewlight.
1 Turn on
2 Turn off
—When servicing the sewing machine, or when removing covers or changing lamps, the machine or the electrical set must be disconnected from the supply by removing the plug from the socket outlet.
CONTENTS
|
KNOWING YOUR SEWING MACHINE |
|
|
PRINCIPAL PARTS ……………………………………………………. |
1 |
|
ACCESSORIES ………………………………………………………….. |
3 |
|
OPERATING YOUR SEWING MACHINE …………………….. |
5 |
|
Connecting Plugs………………………………………………. |
5 |
|
Main Power and Sewing Light Switches ……………….. |
6 |
|
Foot Controller …………………………………………………. |
6 |
|
Inserting the Needle ………………………………………….. |
7 |
|
Checking the Needle …………………………………………. |
7 |
|
Changing the Presser Foot ………………………………….. |
8 |
|
Converting to Free-Arm Style ………………………………. |
9 |
|
Steadying the Machine ………………………………………. |
9 |
|
VARIOUS CONTROLS …………………………………………….. |
10 |
|
Pattern Selection Dial ………………………………………. |
10 |
|
RECOMMENDED WIDTHS AND LENGTHS |
|
|
FOR STITCHES ……………………………………………….. |
11 |
|
Stitch Length Dial ……………………………………………. |
20 |
|
Stretch Stitching………………………………………………. |
21 |
|
Reverse Sewing Lever ………………………………………. |
22 |
|
Drop Feed Lever (When the machine is equipped |
|
|
with a drop feed lever)……………………………………… |
22 |
|
THREADING THE MACHINE …………………………………… |
23 |
|
Winding the Bobbin ………………………………………… |
23 |
|
Lower Threading …………………………………………….. |
24 |
|
Upper (Needle) Threading ………………………………… |
25 |
|
Using the Needle Threader (when the machine is |
|
|
equipped with a needle threader) ………………………. |
27 |
|
Quick Thread-setting System |
|
|
FAST START BOBBIN (when the machine is |
|
|
equipped with a quick thread-setting system) ………. |
29 |
|
Drawing Up Lower Thread ……………………………….. |
30 |
|
Twin-Needle Sewing………………………………………… |
31 |
|
Thread Tension ……………………………………………….. |
32 |
|
CHART OF SEWING FABRICS, NEEDLES AND |
|
|
THREAD COMBINATIONS ………………………………. |
34 |
|
STRAIGHT AND ZIGZAG STITCHING |
|
|
Straight Stitching……………………………………………… |
36 |
|
Zigzag Stitching ………………………………………………. |
39 |
|
BUILT-IN STITCHES |
|
|
Blind Hem Stitching ………………………………………… |
40 |
|
Shell Tuck Stitching …………………………………………. |
41 |
|
Elastic Stitching ………………………………………………. |
42 |
|
Scallop Stitching ……………………………………………… |
43 |
|
Overedge Stitching ………………………………………….. |
44 |
|
Feather Stitching ……………………………………………… |
45 |
|
Triple Zigzag Stretch Stitching ……………………………. |
46 |
|
Decorative Stitching ………………………………………… |
46 |
|
BUTTONHOLE AND BUTTON SEWING |
|
|
Making a Buttonhole (XL5030 and XL5020 only) …. |
47 |
|
Making a Buttonhole (XL5010 only) …………………… |
49 |
|
Buttonhole Fine Adjustment ……………………………… |
52 |
|
Button Sewing ………………………………………………… |
54 |
|
USING ATTACHMENTS AND APPLICATIONS |
|
|
Zipper Inserting ………………………………………………. |
56 |
|
Gathering ………………………………………………………. |
56 |
|
Darning …………………………………………………………. |
58 |
|
Appliques ………………………………………………………. |
59 |
|
Monogramming and Embroidering …………………….. |
60 |
|
MAINTENANCE |
|
|
Changing the Bulb …………………………………………… |
62 |
|
Oiling ……………………………………………………………. |
63 |
|
Cleaning ………………………………………………………… |
64 |
|
Performance Checklist ……………………………………… |
65 |
|
Repacking the Machine ……………………………………. |
71 |
|
INDEX |
|
CONTENTS |
|
|
MACHINE SEWING |
YOUR KNOWING |
|
STITCHING ZIGZAG |
AND STRAIGHT |
|
STITCHES IN-BUILT |
|
|
SEWING BUTTON |
AND BUTTONHOLE |
|
APPLICATIONS AND |
ATTACHMENTS USING |
|
MAINTENANCE |
INDEX
ÍNDICE DEL CONTENIDO
|
CONOZCA SU MÁQUINA DE COSER |
|
|
ELEMENTOS PRINCIPALES …………………………………….. |
2 |
|
ACCESORIOS …………………………………………………………. |
3 |
|
FUNCIONAMIENTO DE LA MÁQUINA DE COSER ……… |
5 |
|
Conexión de los enchufes …………………………………. |
5 |
|
Interruptor principal y de luz ………………………………. |
6 |
|
Pedal ……………………………………………………………… |
6 |
|
Inserción de la aguja ………………………………………… |
7 |
|
Comprobación de la aguja …………………………………. |
7 |
|
Cambio del prensatelas …………………………………….. |
8 |
|
Conversión en modalidad de brazo libre ……………… |
9 |
|
Para estabilizar la máquina ……………………………….. |
9 |
|
DISTINTOS MANDOS …………………………………………….. |
10 |
|
Selector de puntadas ……………………………………… |
10 |
|
ANCHOS Y LARGOS DE PUNTADAS |
|
|
RECOMENDADOS ………………………………………… |
14 |
|
Selector de largo de puntada …………………………… |
20 |
|
Puntada elástica …………………………………………….. |
21 |
|
Palanca de retroceso ………………………………………. |
22 |
|
Palanca de alimentación de bajada |
|
|
(cuando la máquina está equipada con una |
|
|
palanca de alimentación de bajada) …………………. |
22 |
|
ENHEBRADO DE LA MÁQUINA ……………………………… |
23 |
|
Bobinado de la canilla …………………………………….. |
23 |
|
Enhebrado inferior ………………………………………….. |
24 |
|
Enhebrado superior (de la aguja) ……………………… |
26 |
|
Uso del enhebrador |
|
|
(cuando la máquina está equipada con una |
|
|
enhebradora de hilo) ……………………………………… |
28 |
|
Sistema rápido de colocación del hilo |
|
|
BOBINA DE INICIO RÁPIDO |
|
|
(cuando la máquina está equipada con un sistema |
|
|
rápido de colocación del hilo) ………………………….. |
29 |
|
Para sacar el hilo de la canilla ………………………….. |
30 |
|
Costura con aguja doble ………………………………….. |
31 |
|
Tensión de los hilos ………………………………………… |
33 |
|
TABLA DE COMBINACIONES ENTRE TEJIDOS, |
|
|
AGUJAS Y HILOS ………………………………………….. |
34 |
|
PUNTADAS RECTAS Y ZIGZAG |
|
|
Puntadas rectas ……………………………………………… |
36 |
|
Puntadas zigzag …………………………………………….. |
39 |
|
PUNTADAS INCORPORADAS |
|
|
Puntadas invisibles …………………………………………. |
40 |
|
Puntada alforza derefuerzo ……………………………… |
41 |
|
Puntada elástica …………………………………………….. |
42 |
|
Puntada festón ………………………………………………. |
43 |
|
Puntada por encima de la orilla ………………………… |
44 |
|
Puntada pluma ………………………………………………. |
45 |
|
Puntada triple zigzag elástica …………………………… |
46 |
|
Puntada decorativa …………………………………………. |
46 |
|
OJALES Y COSTURA DE BOTONES |
|
|
Para coser ojales (Solo XL5030 y XL5020) ………… |
48 |
|
Para coser ojales (Solo XL5010) ………………………. |
49 |
|
Ajuste fino de los ojales …………………………………… |
53 |
|
Costura de botones ………………………………………… |
55 |
|
USO DE ACCESORIOS Y APLICACIONES |
|
|
Inserción de cremalleras …………………………………. |
57 |
|
Fruncido ………………………………………………………… |
57 |
|
Zurcido………………………………………………………….. |
58 |
|
Aplicaciones ………………………………………………….. |
59 |
|
Monogramas y bordados …………………………………. |
60 |
|
MANTENIMIENTO |
|
|
Cambio de la bombilla …………………………………….. |
62 |
|
Engrasado …………………………………………………….. |
63 |
|
Limpieza ……………………………………………………….. |
64 |
|
Listado de posibles incidencias ………………………… |
67 |
|
Embalaje de la máquina ………………………………….. |
71 |
|
ÍNDICE |

SOMMARIO
|
CONOSCERE LA MACCHINA DA CUCIRE |
|
|
PARTI PRINCIPALI ……………………………………………………….. |
2 |
|
ACCESSORI …………………………………………………………………… |
3 |
|
FUNZIONAMENTO DELLA MACCHINA DA CUCIRE … |
5 |
|
Collegamento elettrico ………………………………………………. |
5 |
|
Interruttore principale e lampadina ……………………………… |
6 |
|
Reostato a pedale ……………………………………………………… |
6 |
|
Inserimento dell’ago …………………………………………………. |
7 |
|
Controllo dell’ago …………………………………………………….. |
7 |
|
Sostituzione del piedino premistoffa ……………………………. |
8 |
|
Cucitura a braccio libero ……………………………………………. |
9 |
|
Stabilizzazione della macchina …………………………………… |
9 |
|
DISPOSITIVI DI CONTROLLO …………………………………… |
10 |
|
Selettore dei punti …………………………………………………… |
10 |
|
AMPIEZZE E LUNGHEZZE DEI PUNTI |
|
|
CONSIGLIATE ……………………………………………………… |
17 |
|
Selettore della lunghezza del punto …………………………… |
20 |
|
Cucitura con punti elastici ……………………………………….. |
21 |
|
Leva di cucitura di ritorno ………………………………………… |
22 |
|
Leva abbassa-trasportatore |
|
|
(se la macchina è equipaggiata con la leva abbassa- |
|
|
trasportatore) …………………………………………………………. |
22 |
|
PROCEDURE DI INFILATURA …………………………………… |
23 |
|
Avvolgimento della spoletta ……………………………………… |
23 |
|
Infilatura inferiore …………………………………………………… |
24 |
|
Infilatura superiore (ago) …………………………………………. |
26 |
|
Uso dell’infila-ago |
|
|
(se la macchina è equipaggiata con un infilatore) ………… |
28 |
|
Sistema di infilatura rapido SPOLINA AD |
|
|
AVVIAMENTO RAPIDO (se la macchina è equipaggiata |
|
|
con un sistema rapido di posizionamento del filo) ………. |
29 |
|
Raccolta del filo inferiore ………………………………………… |
30 |
|
Cucitura con ago gemello ………………………………………… |
31 |
|
Regolazione della tensione del filo ……………………………. |
33 |
|
TABELLA DELLE COMBINAZIONI DI TESSUTO, |
|
|
AGO E FILO ………………………………………………………….. |
35 |
|
CUCITURA CON PUNTO DIRITTO E ZIGZAG |
|
|
Punto diritto …………………………………………………………… |
36 |
|
Punto zigzag …………………………………………………………… |
39 |
|
PUNTI INCORPORATI |
|
|
Orli a punto invisibile ……………………………………………… |
40 |
|
Punto orlo conchiglia ………………………………………………. |
41 |
|
Punto elastico …………………………………………………………. |
42 |
|
Punto smerlo ………………………………………………………….. |
43 |
|
Rifinitura a sopraggitto ……………………………………………. |
44 |
|
Punto a piuma ………………………………………………………… |
45 |
|
Punto zigzag stretch triplo ……………………………………….. |
46 |
|
Punto decorativo …………………………………………………….. |
46 |
|
ASOLE E BOTTONI |
|
|
Esecuzione di asole (solo mod. XL5030 e XL5020) |
……. 48 |
|
Esecuzione di asole (solo mod. XL5010) …………………… |
49 |
|
Regolazione della densità dei punti dell’asola …………….. |
53 |
|
Cucitura di bottoni ………………………………………………….. |
55 |
|
GUARNIZIONI E APPLICAZIONI |
|
|
Applicazione di cerniere ………………………………………….. |
57 |
|
Arricciature ……………………………………………………………. |
57 |
|
Rammendo …………………………………………………………….. |
58 |
|
Applicazioni …………………………………………………………… |
59 |
|
Monogrammi e ricami …………………………………………….. |
60 |
|
MANUTENZIONE |
|
|
Sostituzione della lampadina ……………………………………. |
62 |
|
Lubrificazione ………………………………………………………… |
63 |
|
Pulizia …………………………………………………………………… |
64 |
|
Tabella di controllo del funzionamento ……………………… |
69 |
|
Reimballaggio della macchina ………………………………….. |
71 |
|
INDICE |
3 4 6 2 1
0

 8
8
5
7
C  B
B
D F
E
G
PRINCIPAL PARTS
1Bobbin winding assembly
Winds the thread onto the bobbin to be used for the lower thread.
2Spool pin
Holds the spool of thread.
3 Bobbin winding tension disc and thread guide
4 Thread take-up lever
5 Thread cutter
6Upper tension control dial
Controls the tension of the upper thread.
7Pattern selection dial
Turn in either direction to select the desired stitch.
8Stitch length dial
Controls the length of the stitches.
9Reverse sewing lever
Push for stitching in the reverse direction.
0 Buttonhole fine-adjustment screw
A Buttonhole lever (XL5030 and XL5020 only)
B Handle
CBalance wheel
Turn toward you (counterclockwise) to raise and lower the needle.
DMain power/sewing light switch
Turns the main power and sewing light on and off.
EFoot controller receptacle
Insert the foot controller plug for operation.
FPresser foot lever
Raises and lowers the presser foot.
GFoot controller
Used to control sewing speed start and stop.
|
CONTENTS |
|
|
MACHINE SEWING |
YOUR KNOWING |
|
STITCHING ZIGZAG |
AND STRAIGHT |
|
STITCHES IN-BUILT |
|
|
SEWING BUTTON |
AND BUTTONHOLE |
|
APPLICATIONS AND |
ATTACHMENTS USING |
|
MAINTENANCE |
INDEX
1

ELEMENTOS PRINCIPALES
1Porta bobinas
Hace bobina para la canilla que va a ser utilizada como hilo inferior.
2Porta carretes
Soporta el carrete del hilo
3 Guía de hilos y disco de tensión de bobinado de la canilla
4 Palanca tirahilos
5 Cortador de hilo
6Disco de control de la tensión superior
Controla la tensión del hilo superior.
7Selector de puntadas
Gírelo en cualquier dirección para seleccionar la puntada deseada.
8Selector de largo de puntada
Controla el largo de las puntadas.
9Palanca de retroceso
Presione la palanca para que la puntada se realice en la dirección contraria.
: Tornillo de ajuste fino de los ojales
A Palanca del ojal (sólo XL5030 y XL5020)
B Asa
CRuedecilla
Gírela hacia usted (en el sentido contrario de las manecillas de un reloj) para levantar y bajar la aguja.
DInterruptor principal y de luz
Apaga y enciende la alimentación principal así como la luz de costura.
EConectar el pedal
Insertar la clavija del pedal para conectarlo.
FPalanca de elevación del prensatelas
Levanta y baja el prensatelas.
GPedal
Sirve para controlar la velocidad de costura, el arranque y la parada.
PARTI PRINCIPALI
1Dispositivo di avvolgimento spoletta
Avvolge sulla spoletta il filo da impiegare come filo inferiore.
2Porta-rocchetto
Sostiene il rocchetto di filo da cucito.
3 Disco di tensione avvolgimento spoletta e guidafilo
4 Leva tendifilo
5 Tagliafilo
6Regolatore di tensione superiore
Consente di controllare la tensione del filo superiore
7Selettore dei punti
Ruotarlo nei due sensi per selezionare il punto desiderato.
8Selettore della lunghezza del punto
Consente di regolare la lunghezza del punto.
9Leva di cucitura di ritorno
Premerla per eseguire cuciture a marcia indietro.
< Vite di regolazione fine dei punti asola
A Levetta dell’asola (solo mod. XL5030 e XL5020)
B Maniglia
CVolantino
Ruotarlo verso se stessi (in senso antiorario) per alzare e abbassare l’ago.
DInterruttore principale/luce area di lavoro
Accende e spegne la macchina da cucire e la luce dell’area di lavoro.
EPresa del reostato
Inserirvi la spina del reostato a pedale per mettere in funzione la macchina da cucire.
FLeva del piedino premistoffa
Permette di alzare ed abbassare il piedino premistoffa.
GReostato a pedale
Consente di controllare la velocità di cucitura e di avviare ed arrestare la macchina da cucire.
|
CONTENTS |
|
|
MACHINE SEWING |
YOUR KNOWING |
|
STITCHING ZIGZAG |
AND STRAIGHT |
|
STITCHES IN-BUILT |
|
|
SEWING BUTTON |
AND BUTTONHOLE |
|
APPLICATIONS AND |
ATTACHMENTS USING |
|
MAINTENANCE |
INDEX
2
![]()
|
1 XA4911151 |
2 X59370-051 3 X59375-051 |
|
4 129583-001 |
5 X57521-001 |
6 X52800-050 |
8 130920-051
7 X55467-051
|
9 X54243-001 |
0 XA3442-151 |
ACCESORIOS
XL5030/5020
1 Prensatelas para ojales (1 pza.)
2 Prensatelas cremalleras (1 pza.)
3 Prensatelas para costura de botones (1 pza.)
4 Paquete de agujas (agujas simples normales HA × 130) (3 pzas.)
5 Aguja doble (1 pza.)
6 Canilla (3 pzas.)
7 Destornillador (1 pza.)
8 Porta carretes extra (1 pza.)
9 Cortador especial
<Placa de zurcido (1 pza.) (cuando la máquina no está equipada con alimentación de bajada)
Código del prensatelas para la puntada en zigzag: 138135-052 Pedal: X57319-051 (zona con 110/120 V)
XA6422-021 (zona con 220/240 V) XA6412-021 (Reino Unido) XA6414-021 (Australia, Nueva Zelanda)
Los accesorios mencionados arriba se encuentran en la bolsa de accesorios, dentro del soporte de accesorios. Han sido concebidos para poder realizar la mayoría de las operaciones de costura.
ACCESSORIES
XL5030/5020
1 Buttonhole foot (1 pc.)
2 Zipper foot (1 pc.)
3 Button sewing foot (1 pc.)
4 Needle pack (regular single needle HA × 130) (3 pcs.) 5 Twin needle (1 pc.)
6 Bobbins (3 pcs.)
7 Screwdriver (1 pc.)
8 Extra spool pin (1 pc.)
9 Seam ripper
0Darning plate (1pc.) (When the machine is not equipped with a Drop Feed.)
Parts code for zigzag presser foot: 138135-052 Foot controller: X57319-051 (110/120V areas)
XA6422-021 (220/240V areas) XA6412-021 (U.K.)
XA6414-021 (Australia, New Zealand)
The above accessories are stored in the accessory bag inside the extension table. These accessories have been designed to help complete most sewing tasks.
ACCESSORI
XL5030/5020
1 Piedino per asole (1 pz.)
2 Piedino per cerniere (1 pz.)
3 Piedino per bottoni (1 pz.)
4 Confezione di aghi (ago singolo normale HA × 130) (3 pz.)
5 Ago gemello (1 pz.)
6 Spolette (3 pz.)
7 Cacciavite (1 pz.)
8 Porta-rocchetto ausiliario (1 pz.)
9 Taglia-asole
<Placca da rammendo (1 pz.) (se la macchina non è equipaggiata con la leva abbassa-trasportatore)
Codice parte del piedino zigzag: 138135-052
Reostato: X57319-051 (paesi con corrente elettrica a 110/120V) XA6422-021 (paesi con corrente elettrica a 220/240V) XA6412-021 (Regno Unito)
XA6414-021 (Australia, Nuova Zelanda)
Gli accessori a corredo della macchina sono situati nell’apposita borsa al- l’interno del piano di lavoro. Essi sono stati studiati per consentire l’esecuzione della maggior parte dei lavori di cucito.
|
CONTENTS |
|
|
MACHINE SEWING |
YOUR KNOWING |
|
STITCHING ZIGZAG |
AND STRAIGHT |
|
STITCHES IN-BUILT |
|
|
SEWING BUTTON |
AND BUTTONHOLE |
|
APPLICATIONS AND |
ATTACHMENTS USING |
|
MAINTENANCE |
INDEX
3

|
1 X59369-251 |
2 X59370-051 3 X59375-051 |
|
4 129583-001 |
5 X57521-001 |
6 X52800-050 |
|
7 X55467-051 |
8 130920-051 |
|
9 X54243-001 |
0 XA3442-151 |
XL5010
1 Buttonhole foot (1 pc.)
2 Zipper foot (1 pc.)
3 Button sewing foot (1 pc.)
4 Needle pack (regular single needle HA × 130) (3 pcs.) 5 Twin needle (1pc.)
6 Bobbins (3 pcs.)
7 Screwdriver (1 pc.)
8 Extra spool pin (1pc.)
9 Seam ripper
0Darning plate (1pc.) (When the machine is not equipped with a Drop Feed.)
Parts code for zigzag presser foot: 138135-052 Foot controller: X57319-051 (110/120V areas)
XA6422-021 (220/240V areas) XA6412-021 (U.K.)
XA6414-021 (Australia, New Zealand)
The above accessories are stored in the accessory bag inside the extension table. These accessories have been designed to help complete most sewing tasks.
XL5010
1 Prensatelas para ojales (1 pza.)
2 Prensatelas cremalleras (1 pza.)
3 Prensatelas para costura de botones (1 pza.)
4 Paquete de agujas (agujas simples normales HA × 130) (3 pzas.)
5 Aguja doble (1 pza.)
6 Canilla (3 pzas.)
7 Destornillador (1 pza.)
8 Porta carretes extra (1 pza.)
9 Cortador especial
<Placa de zurcido (1 pza.) (cuando la máquina no está equipada con alimentación de bajada)
Código del prensatelas para la puntada en zigzag: 138135-052
Pedal: X57319-051 (zona con 110/120 V) XA6422-021 (zona con 220/240 V) XA6412-021 (Reino Unido)
XA6414-021 (Australia, Nueva Zelanda)
Los accesorios mencionados arriba se encuentran en la bolsa de accesorios, dentro del soporte de accesorios. Han sido concebidos para poder realizar la mayoría de las operaciones de costura.
XL5010
1 Piedino per asole (1 pz.)
2 Piedino per cerniere (1 pz.)
3 Piedino per bottoni (1 pz.)
4 Confezione di aghi (ago singolo normale HA × 130) (3 pz.)
5 Ago gemello (1 pz.)
6 Spolette (3 pz.)
7 Cacciavite (1 pz.)
8 Porta-rocchetto ausiliario (1 pz.)
9 Taglia-asole
<Placca da rammendo (1 pz.) (se la macchina non è equipaggiata con la leva abbassa-trasportatore)
Codice parte del piedino zigzag: 138135-052
Reostato: X57319-051 (paesi con corrente elettrica a 110/120V) XA6422-021 (paesi con corrente elettrica a 220/240V) XA6412-021 (Regno Unito)
XA6414-021 (Australia, Nuova Zelanda)
Gli accessori a corredo della macchina sono situati nell’apposita borsa al- l’interno del piano di lavoro. Essi sono stati studiati per consentire l’esecuzione della maggior parte dei lavori di cucito.
|
CONTENTS |
|
|
MACHINE SEWING |
YOUR KNOWING |
|
STITCHING ZIGZAG |
AND STRAIGHT |
|
STITCHES IN-BUILT |
|
|
SEWING BUTTON |
AND BUTTONHOLE |
|
APPLICATIONS AND |
ATTACHMENTS USING |
|
MAINTENANCE |
INDEX
4
FUNCIONAMIENTO DE LA MÁQUINA DE COSER
Conexión de los enchufes
1.Conecte el enchufe a la máquina, el cordón, se encuentra situado entre el pedal y el enchufe destinado a la alimentación de corriente.
2.Conecte el enchufe de alimentación a una toma de corriente.
ATENCIÓN:
1.Cuando se cambia una aguja, la canilla o la bombilla de luz, o cuando se deja la máquina sin funcionar, se recomienda siempre retirar el enchufe de la toma de corriente para evitar choques eléctricos.
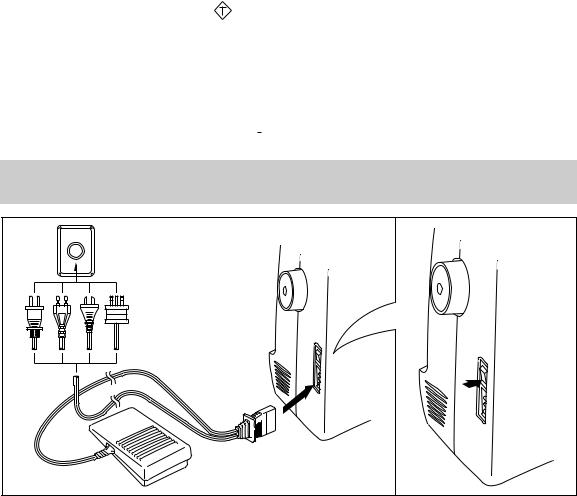
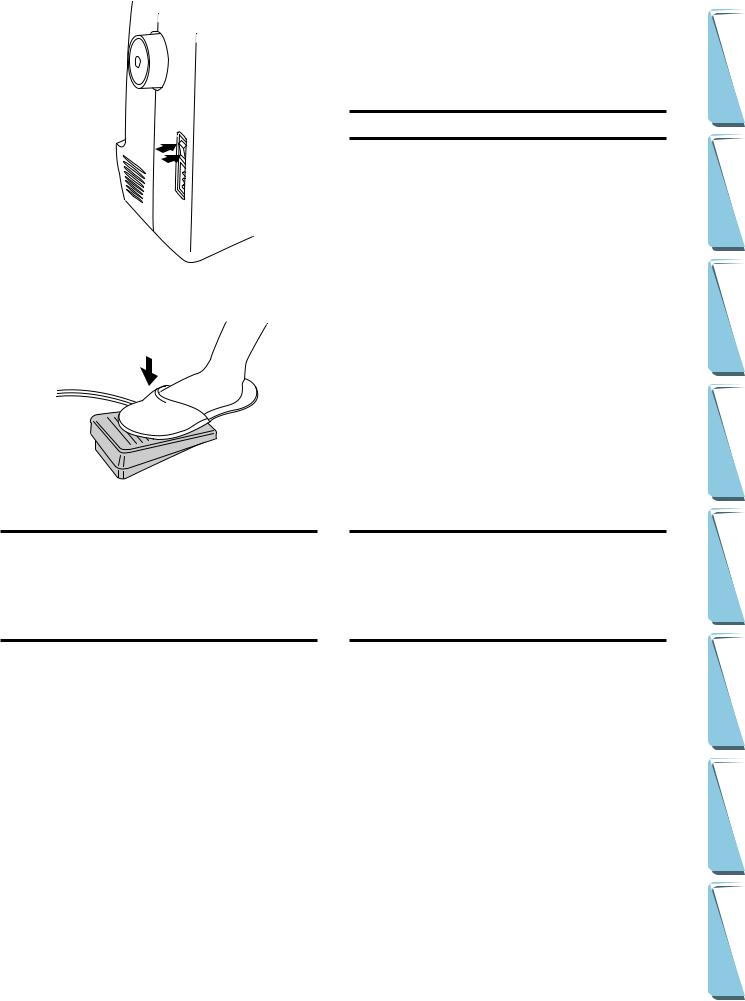
OPERATING YOUR SEWING
MACHINE
Connecting Plugs
1.Insert the foot controller plug, located between the foot controller and the power supply plug on the cord, into the jack on the machine.
2.Insert the power supply plug into an electrical outlet.
CAUTION:
1.When changing the light bulb or when the sewing machine is not in use, the power supply plug must be disconnected from the wall socket to avoid electrical hazards.
FUNZIONAMENTO DELLA MACCHINA DA CUCIRE
Collegamento elettrico
1.Identificare lungo il cavo la presa a tre poli collegata tra il reostato a pedale e la spina di alimentazione e inserirla nella macchina.
2.Inserire la spina di alimentazione in una presa elettrica a muro.
ATTENZIONE:
1.Per evitare rischi di scosse elettriche o partenze accidentali della macchina, si raccomanda di disinserire la spina di alimentazione dalla presa elettrica prima di sostituire l’ago, la spouna o la lampadina oppure nei periodi di inattività della macchina.
|
CONTENTS |
|
|
MACHINE SEWING |
YOUR KNOWING |
|
STITCHING ZIGZAG |
AND STRAIGHT |
|
STITCHES IN-BUILT |
|
|
SEWING BUTTON |
AND BUTTONHOLE |
|
APPLICATIONS AND |
ATTACHMENTS USING |
|
MAINTENANCE |
INDEX
5
|
A |
Main Power and Sewing Light Switches |
|
|
This switch turns the main power and sewing light on or off. (See fig. |
||
|
A.) |
||
|
1 |
Turn on (toward the “I” mark) |
|
|
2 |
Turn off (toward the “O” mark) |
Foot Controller |
|
|
1 |
When the foot controller is depressed lightly, the machine will run at a |
|
2 |
low speed. When the pressure on the foot controller is increased, the |
machine’s speed will increase. When pressure on the foot controller is released, the machine will stop. Care should be taken that nothing is placed on the foot controller when the machine is not in use. (See fig. B.)
B
|
Interruptor principal y de luz |
Interruttore principale e lampadina |
|||
|
Este interruptor permite apagar y encender la máquina y la luz. (Ver |
Questo interruttore accende e spegne sia la macchina che la lampadina. (Vedi |
|||
|
fig. A.) |
fig. A.) |
|||
|
1 |
Encender (hacia la marca “I”) |
1 |
Acceso (verso il simbolo “I”) |
|
|
2 |
Apagar (hacia la marca “O”) |
2 |
Spento (verso il simbolo “O”) |
|
Pedal |
Reostato a pedale |
|
|
Al presionar ligeramente el pedal, la máquina funcionará a baja ve- |
Premendo leggermente sul reostato, la macchina funzionerà a bassa veloci- |
|
|
locidad. Al aumentar la presión, se incrementa también la velocidad |
tà. Aumentando la pressione sul reostato, la velocità della macchina aumen- |
|
|
de la máquina. Al soltar el pedal, la máquina se para. Asegúrese |
terà. Sollevando il piede dal reostato, la macchina si fermerà. Si raccoman- |
|
|
siempre de no poner ningún objeto sobre el pedal cuando la máqui- |
da di non appoggiare nessun oggetto sul reostato quando la macchina è |
|
|
na no se utilire. (Ver fig. B.) |
inattiva. (Vedi fig. B.) |
|
CONTENTS |
|
|
MACHINE SEWING |
YOUR KNOWING |
|
STITCHING ZIGZAG |
AND STRAIGHT |
|
STITCHES IN-BUILT |
|
|
SEWING BUTTON |
AND BUTTONHOLE |
|
APPLICATIONS AND |
ATTACHMENTS USING |
|
MAINTENANCE |
INDEX
6
A
11
B
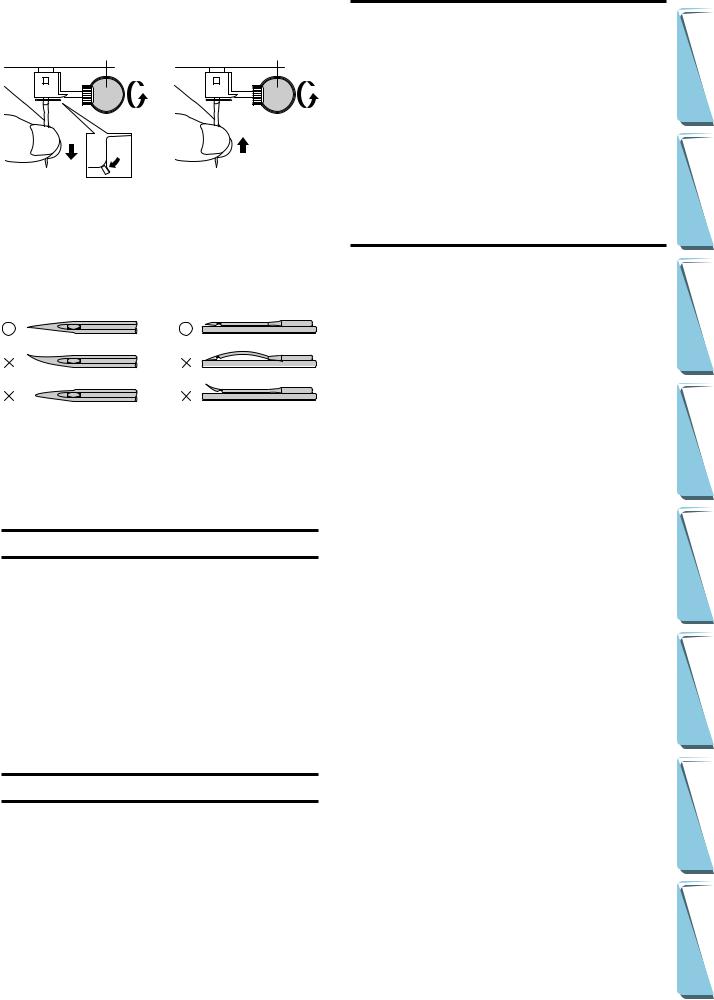
Inserción de la aguja
Desenchufar la máquina, interruptor principale a “O”.
1. Retire el enchufe de alimentación de la toma de corriente.
2. Levante la barra de la aguja a su posición más alta.
3. Baje el prensatelas.
4. En caso de que ya esté una aguja instalada, retírela aflojando el tornillo con una moneda y tirando hacia abajo. (Ver fig. A.)
5. Introduzca una nueva aguja con la parte plana hacia atrás, lo más adentro posible hasta que llegue a su tope.
6. Vuelva a apretar el tornillo de la aguja.
1 Moneda
Comprobación de la aguja
1.La aguja siempre ha de estar bien recta y afilada para un perfecto cosido.
2.Para comprobar que la aguja no está doblada, coloque la parte plana de la aguja hacia abajo como se muestra en el dibujo. (Ver fig. B.)
3.Cambie la aguja si está doblada o gastada.
Inserting the Needle |
||||
|
Turn power switch to “O”. |
CONTENTS |
|||
|
1. |
Remove the power supply plug from the electrical outlet. |
|||
|
2. |
Raise the needle bar to its highest position. |
|||
|
3. |
Lower the presser foot. |
|||
|
4. |
If a needle is already installed, remove it by loosening the needle |
|||
|
clamp with a coin and pulling the needle down. (See fig. A.) |
||||
|
5. |
With the flat side toward the back, insert the new needle as far as |
MACHINESEWING |
YOURKNOWING |
|
|
possible up against the needle stopper. |
||||
|
6. |
Tighten the needle clamp. |
|||
|
1 Coin |
Checking the Needle
|
STITCHINGZIGZAG |
ANDSTRAIGHT |
||||
|
1. |
The sewing needle must always be straight and sharp for smooth |
||||
|
sewing. |
|||||
|
2. |
To check if the needle is bent, place the flat side of the needle |
||||
|
down as shown in the illustration. (See fig. B.) |
|||||
|
3. |
Replace the needle if it is bent or dull. |
||||
|
STITCHES IN-BUILT |
|||||
|
SEWINGBUTTON |
ANDBUTTONHOLE |
||||
|
2. |
Far salire la barra dell’ago fino alla posizione più alta. |
||||
|
Inserimento dell’ago |
|||||
|
Mettere l’interruttore principale su “O”. |
|||||
|
1. |
Disinserire la spina di alimentazione dalla presa elettrica. |
||||
|
3. |
Abbassare il piedino premistoffa. |
||||
|
4. |
Se è già montato un ago, rimuoverlo allentando il morsetto dell’ago con |
APPLICATIONSAND |
ATTACHMENTSUSING |
||
|
una moneta e tirando l’ago verso il basso. (Vedi fig. A.) |
|||||
|
5. |
Con la parte piatta dell’ago rivolta indietro, inserire il nuovo ago spin- |
||||
|
gendolo il più in alto possibile contro il ferma-ago. |
|||||
|
6. |
Stringere il morsetto dell’ago. |
||||
|
1 Moneta |
|||||
|
MAINTENANCE |
|||||
|
Controllo dell’ago |
|||||
|
1. |
Per ottenere una cucitura perfetta, l’ago utilizzato deve essere sempre |
||||
|
ben diritto ed appuntito. |
|||||
|
2. |
Per controllare se l’ago è piegato, appoggiarlo su un piano con la parte |
||||
|
piatta come illustrato dal disegno. (Vedi fig. B.) |
|||||
|
3. |
Sostituire l’ago se risulta piegato o spuntato. |
||||
|
INDEX |
7

Cambio del prensatelas
Según sus necesidades de costura, puede ser necesario cambiar el prensatelas.
Modelo a presión
Desenchufar la máquina, interruptor principale a “O”.
1.Levante la aguja a su posición más alta, girando la ruedecilla hacia usted (en el sentido contrario al de las manecillas de un reloj) y levante la palanca del prensatelas.
2.Suelte el prensatelas levantando la palanca que hay en la parte trasera del soporte.
3.Coloque otro prensatelas en la placa de agujas de tal forma que la barra del prensatelas quede alineada con la ranura del soporte del prensatelas.
4.Baje la palanca del prensatelas y fije el prensatelas en el soporte. Si el prensatelas está bien colocado, la barra debe engancharse en su lugar correspondiente.
Changing the Presser Foot
It may be necessary to change the presser foot according to your sewing needs.
SNAP-ON TYPE
Turn power switch to “O”.
1.Raise the needle to its highest position by turning the balance wheel toward you (counterclockwise) and raise the presser foot lever.
2.Release the foot by raising the lever located at the back of the presser foot holder assembly.
3.Place a different presser foot on the needle plate so that the bar on the presser foot is in line with the slot in the presser foot holder.
4.Lower the presser foot lifter and fix the presser foot onto the holder. If the presser foot is in the correct location, the bar should snap into place.
Sostituzione del piedino premistoffa
In base alle esigenze del lavoro da eseguire, può rendersi necessario sostituire il piedino premistoffa.
Piedino con innesto automatico
Mettere l’interruttore principale su “O”.
1.Far salire l’ago fino alla sua posizione più alta girando il volantino verso se stessi (in senso antiorario) e sollevare la leva del piedino premistoffa.
2.Staccare il piedino premendo la levetta situata dietro al gruppo supporto del piedino premistoffa.
3.Collocare il nuovo piedino premistoffa sulla placca dell’ago in modo che il perno del piedino sia allineato alla scanalatura sul supporto del piedino premistoffa.
4.Abbassare la leva del piedino premistoffa ed innestare il piedino nel supporto. Se il piedino è applicato nella posizione corretta, il perno scatterà in posizione.
|
CONTENTS |
|
|
MACHINE SEWING |
YOUR KNOWING |
|
STITCHING ZIGZAG |
AND STRAIGHT |
|
STITCHES IN-BUILT |
|
|
SEWING BUTTON |
AND BUTTONHOLE |
|
APPLICATIONS AND |
ATTACHMENTS USING |
|
MAINTENANCE |
INDEX
8
A
1
B
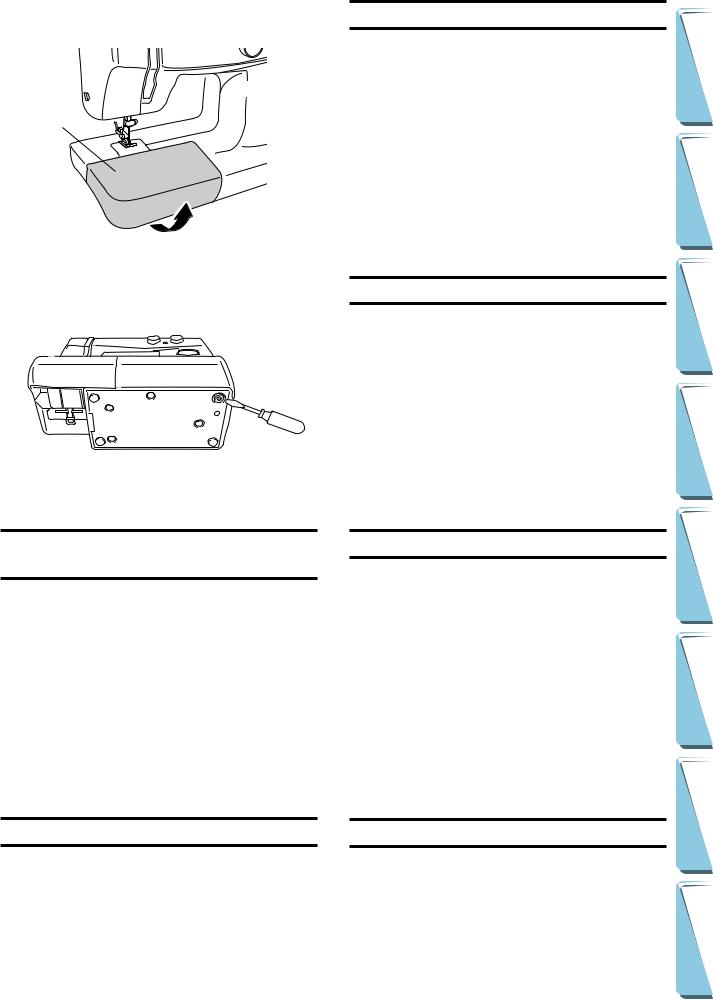
Conversión en modalidad de brazo libre
La costura con brazo libre es práctica para coser en redondo y en partes del tejido de dificil acceso. Para transformar su máquina en esa modalidad, sólo hace falta levantar el soporte de los accesorios y sacarlo tirando de él. (Ver fig. A.)
1 Levante la parte inferior del soporte de accesorios hacia usted.
2 Tíre hacia afuera para sacarlo.
1 Soporte de accesorios
Para estabilizar la máquina
Si se instala la máquina de coser en una superficie desigual, puede ajustar su altura girando el cojinete de goma que se encuentra en la parte anterior izquierda de la placa de base hasta que la máquina quede estable. (Ver fig. B.)
Converting to Free-Arm Style
Free-arm sewing is convenient for sewing tubular and hard-to-reach areas on garments. To change your machine to the free-arm style, lift up on the extension table and pull it out. (See fig. A.)
1 Lift the bottom of the extension table up toward you. 2 Pull the extension table out to remove it.
1 Extension table
Steadying the Machine
When the sewing machine is placed on an uneven surface, turn the rubber cushion on the front right-hand side of the base plate to adjust its height until the sewing machine is stable. (See fig. B.)
Cucitura a braccio libero
L’utilizzo della macchina a braccio libero è ideale per eseguire cuciture di tessuti tubolari e di parti di tessuto altrimenti difficili da raggiungere. Per passare alla cucitura a braccio libero, sollevare il piano di lavoro ed estrarlo. (Vedi fig. A.)
1 Sollevare il fondo del piano di lavoro in fuori verso se stessi.
2 Estrarre il piano di lavoro tirandolo in fuori.
1 Piano di lavoro
Stabilizzazione della macchina
Quando la macchina da cucire viene collocata su una superficie irregolare, girare il cuscinetto di gomma posto davanti a sinistra sul fondo della macchina per regolarne l’altezza fino a rendere la macchina stabile. (Vedi fig. B.)
|
CONTENTS |
|
|
MACHINE SEWING |
YOUR KNOWING |
|
STITCHING ZIGZAG |
AND STRAIGHT |
|
STITCHES IN-BUILT |
|
|
SEWING BUTTON |
AND BUTTONHOLE |
|
APPLICATIONS AND |
ATTACHMENTS USING |
|
MAINTENANCE |
INDEX
9
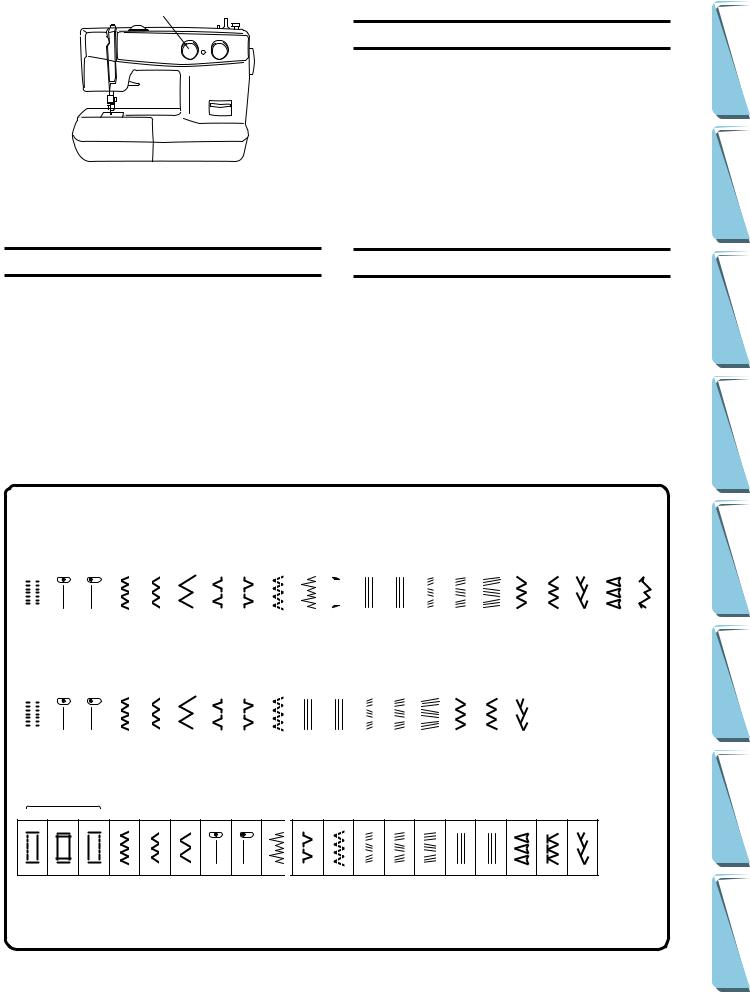
VARIOUS CONTROLS
1
Pattern Selection Dial
To select a stitch, simply turn the pattern selection dial in either direction. Stitch widths and lengths are shown on the following pages.
1 Pattern selection dial
NOTE:
Continuing to turn the pattern selection dial counterclockwise selects each pattern in order until the last pattern (“17” on the XL5010, “17” on the XL5020, and “21” on the XL5030) is selected, then returns to the first pattern.
DISTINTOS MANDOS
Selector de puntadas
Para seleccionar una puntada, sólo hace falta girar el disco en cualquier dirección. En las siguientes páginas, encontrará los largos y anchos de puntadas.
1 Selector de puntadas
NOTA:
DISPOSITIVI DI CONTROLLO
Selettore dei punti
Per selezionare un punto è sufficiente ruotare verso sinistra o destra il selettore dei punti. Le pagine seguenti mostrano le ampiezze e le lunghezze dei vari punti.
1 Selettore dei punti
NOTA:
|
Si continua girando el selector de puntadas en el sentido contrario a |
Continuando a ruotare il selettore dei punti in senso antiorario, viene sele- |
|
las manecillas de un reloj, se selecciona cada puntada en orden |
zionato un punto dopo l’altro in sequenza finché il selettore non raggiunge |
|
hasta que se seleccione la última puntada (“17” en XL5010, “17” en |
l’ultimo punto (“17” sul mod. XL5010, “17” sul mod. XL5020, e “21” sul |
|
XL5020, y “21” en XL5030) y luego vuelve a la primera puntada. |
mod. XL5030) e quindi ritorna sul primo. |
XL5030
|
1 |
2 |
3 |
4 |
5 |
6 |
7 |
8 |
9 |
10 |
11 |
12 |
13 |
14 |
15 |
16 |
17 |
18 |
19 |
20 |
21 |
|||||||||||||||||
XL5020
|
1 |
2 |
3 |
4 |
5 |
6 |
7 |
8 |
9 |
10 |
11 |
12 |
13 |
14 |
15 |
16 |
17 |
|||||||||
|
XL5010 |
||||||||||||||||||
|
1 |
||||||||||||||||||
|
B |
A/C |
D |
2 |
3 |
4 |
5 |
6 |
7 |
8 |
9 |
10 |
11 |
12 |
13 |
14 |
15 |
16 |
17 |
|
B |
||||||||||||||||||
|
A |
|
CONTENTS |
|
|
MACHINE SEWING |
YOUR KNOWING |
|
STITCHING ZIGZAG |
AND STRAIGHT |
|
STITCHES IN-BUILT |
|
|
SEWING BUTTON |
AND BUTTONHOLE |
|
APPLICATIONS AND |
ATTACHMENTS USING |
|
MAINTENANCE |
INDEX
10
RECOMMENDED WIDTHS AND LENGTHS FOR STITCHES
XL5030
|
PATTERN |
STITCH NAME |
PRESET WIDTH |
RECOMMENDED |
PAGE IN |
|
[mm (inch)] |
LENGTH |
INSTRUCTIONS |
||
|
[mm (inch)] |
||||
|
1 |
BUTTONHOLE |
5 |
-1.5 |
47 |
|
(13/64) |
(1/64-1/16) |
|||
|
2 |
STRAIGHT STITCH |
– |
-4 |
36 |
|
(CENTER) |
(1/64-5/32) |
|||
|
3 |
STRAIGHT STITCH |
– |
-4 |
36 |
|
(LEFT) |
(1/64-5/32) |
|||
|
4 |
ZIGZAG STITCH |
1.7 |
-4 |
39 |
|
(1/16) |
(1/64-5/32) |
|||
|
5 |
ZIGZAG STITCH |
3.5 |
-4 |
39 |
|
(9/64) |
(1/64-5/32) |
|||
|
6 |
ZIGZAG STITCH |
5 |
-4 |
39 |
|
(13/64) |
(1/64-5/32) |
|||
|
7 |
BLIND HEM STITCH |
3 |
-2 |
40 |
|
(1/8) |
(1/64-5/64) |
|||
|
8 |
SHELL TUCK STITCH |
5 |
-3 |
41 |
|
(13/64) |
(1/64-1/8) |
|||
|
9 |
ELASTIC STITCH |
5 |
-2.5 |
42 |
|
(13/64) |
(1/64-3/32) |
|||
|
10 |
STRETCH BLIND STITCH |
5 |
-1.5 |
40 |
|
(13/64) |
(1/64-1/16) |
|||
|
11 |
SCALLOP STITCH |
5 |
-1.5 |
43 |
|
(13/64) |
(1/64-1/16) |
|||
|
12 |
TRIPLE STRETCH STITCH |
– |
Fixed |
36 |
|
(CENTER) |
2.5 (3/32) |
|||
|
13 |
TRIPLE STRETCH STITCH |
– |
Fixed |
36 |
|
(LEFT) |
2.5 (3/32) |
|||
|
14 |
TRIPLE ZIGZAG STRETCH STITCH |
1.7 |
Fixed |
46 |
|
(1/16) |
2.5 (3/32) |
|||
|
15 |
TRIPLE ZIGZAG STRETCH STITCH |
3.5 |
Fixed |
46 |
|
(9/64) |
2.5 (3/32) |
|||
|
16 |
TRIPLE ZIGZAG STRETCH STITCH |
5 |
Fixed |
46 |
|
(13/64) |
2.5 (3/32) |
|||
|
17 |
STRETCH OVERLOCK STITCH |
3 |
Fixed |
44 |
|
(1/8) |
2.5 (3/32) |
|||
|
18 |
ELASTIC OVERLOCK STITCH |
5 |
Fixed |
44 |
|
(13/64) |
2.5 (3/32) |
|||
|
19 |
FEATHER STITCH |
5 |
Fixed |
45 |
|
(13/64) |
2.5 (3/32) |
|||
|
20 |
ARROW HEAD STITCH |
5 |
Fixed |
44 |
|
(13/64) |
2.5 (3/32) |
|||
|
21 |
DECORATIVE STITCH |
5 |
Fixed |
46 |
|
(13/64) |
2.5 (3/32) |
|||
|
CONTENTS |
|
|
MACHINE SEWING |
YOUR KNOWING |
|
STITCHING ZIGZAG |
AND STRAIGHT |
|
STITCHES IN-BUILT |
|
|
SEWING BUTTON |
AND BUTTONHOLE |
|
APPLICATIONS AND |
ATTACHMENTS USING |
|
MAINTENANCE |
INDEX
11
XL5020
|
PATTERN |
STITCH NAME |
PRESET WIDTH |
RECOMMENDED |
PAGE IN |
|
[mm (inch)] |
LENGTH |
INSTRUCTIONS |
||
|
[mm (inch)] |
||||
|
1 |
BUTTONHOLE |
5 |
-1.5 |
47 |
|
(13/64) |
(1/64-1/16) |
|||
|
2 |
STRAIGHT STITCH |
– |
-4 |
36 |
|
(CENTER) |
(1/64-5/32) |
|||
|
3 |
STRAIGHT STITCH |
– |
-4 |
36 |
|
(LEFT) |
(1/64-5/32) |
|||
|
4 |
ZIGZAG STITCH |
1.7 |
-4 |
39 |
|
(1/16) |
(1/64-5/32) |
|||
|
5 |
ZIGZAG STITCH |
3.5 |
-4 |
39 |
|
(9/64) |
(1/64-5/32) |
|||
|
6 |
ZIGZAG STITCH |
5 |
-4 |
39 |
|
(13/64) |
(1/64-5/32) |
|||
|
7 |
BLIND HEM STITCH |
3 |
-2 |
40 |
|
(1/8) |
(1/64-5/64) |
|||
|
8 |
SHELL TUCK STITCH |
5 |
-3 |
41 |
|
(13/64) |
(1/64-1/8) |
|||
|
9 |
ELASTIC STITCH |
5 |
-2.5 |
42 |
|
(13/64) |
(1/64-3/32) |
|||
|
10 |
TRIPLE STRETCH STITCH |
– |
Fixed |
36 |
|
(CENTER) |
2.5 (3/32) |
|||
|
11 |
TRIPLE STRETCH STITCH |
– |
Fixed |
36 |
|
(LEFT) |
2.5 (3/32) |
|||
|
12 |
TRIPLE ZIGZAG STRETCH STITCH |
1.7 |
Fixed |
46 |
|
(1/16) |
2.5 (3/32) |
|||
|
13 |
TRIPLE ZIGZAG STRETCH STITCH |
3.5 |
Fixed |
46 |
|
(9/64) |
2.5 (3/32) |
|||
|
14 |
TRIPLE ZIGZAG STRETCH STITCH |
5 |
Fixed |
46 |
|
(13/64) |
2.5 (3/32) |
|||
|
15 |
STRETCH OVERLOCK STITCH |
3 |
Fixed |
44 |
|
(1/8) |
2.5 (3/32) |
|||
|
16 |
ELASTIC OVERLOCK STITCH |
5 |
Fixed |
44 |
|
(13/64) |
2.5 (3/32) |
|||
|
17 |
FEATHER STITCH |
5 |
Fixed |
45 |
|
(13/64) |
2.5 (3/32) |
|||
|
CONTENTS |
|
|
MACHINE SEWING |
YOUR KNOWING |
|
STITCHING ZIGZAG |
AND STRAIGHT |
|
STITCHES IN-BUILT |
|
|
SEWING BUTTON |
AND BUTTONHOLE |
|
APPLICATIONS AND |
ATTACHMENTS USING |
|
MAINTENANCE |
INDEX
12
![]()
XL5010
|
PATTERN |
STITCH NAME |
PRESET WIDTH |
RECOMMENDED |
PAGE IN |
|
[mm (inch)] |
LENGTH |
INSTRUCTIONS |
||
|
[mm (inch)] |
||||
|
1 (A-B-C-D) |
BUTTONHOLE |
5 |
-1.5 |
49 |
|
(13/64) |
(1/64-1/16) |
|||
|
2 |
ZIGZAG STITCH |
1.7 |
-4 |
39 |
|
(1/16) |
(1/64-5/32) |
|||
|
3 |
ZIGZAG STITCH |
3.5 |
-4 |
39 |
|
(9/64) |
(1/64-5/32) |
|||
|
4 |
ZIGZAG STITCH |
5 |
-4 |
39 |
|
(13/64) |
(1/64-5/32) |
|||
|
5 |
STRAIGHT STITCH |
– |
-4 |
36 |
|
(CENTER) |
(1/64-5/32) |
|||
|
6 |
STRAIGHT STITCH |
– |
-4 |
36 |
|
(LEFT) |
(1/64-5/32) |
|||
|
7 |
STRETCH BLIND STITCH |
5 |
-1.5 |
40 |
|
(13/64) |
(1/64-1/16) |
|||
|
8 |
SHELL TUCK STITCH |
5 |
-3 |
41 |
|
(13/64) |
(1/64-1/8) |
|||
|
9 |
ELASTIC STITCH |
5 |
-2.5 |
42 |
|
(13/64) |
(1/64-3/32) |
|||
|
10 |
TRIPLE ZIGZAG STRETCH STITCH |
1.7 |
Fixed |
46 |
|
(1/16) |
2.5 (3/32) |
|||
|
11 |
TRIPLE ZIGZAG STRETCH STITCH |
3.5 |
Fixed |
46 |
|
(9/64) |
2.5 (3/32) |
|||
|
12 |
TRIPLE ZIGZAG STRETCH STITCH |
5 |
Fixed |
46 |
|
(13/64) |
2.5 (3/32) |
|||
|
13 |
TRIPLE STRETCH STITCH |
– |
Fixed |
36 |
|
(CENTER) |
2.5 (3/32) |
|||
|
14 |
TRIPLE STRETCH STITCH |
– |
Fixed |
36 |
|
(LEFT) |
2.5 (3/32) |
|||
|
15 |
ARROWHEAD STITCH |
5 |
Fixed |
44 |
|
(13/64) |
2.5 (3/32) |
|||
|
16 |
ELASTIC OVERLOCK STITCH |
5 |
Fixed |
44 |
|
(13/64) |
2.5 (3/32) |
|||
|
17 |
FEATHER STITCH |
5 |
Fixed |
45 |
|
(13/64) |
2.5 (3/32) |
|||
|
CONTENTS |
|
|
MACHINE SEWING |
YOUR KNOWING |
|
STITCHING ZIGZAG |
AND STRAIGHT |
|
STITCHES IN-BUILT |
|
|
SEWING BUTTON |
AND BUTTONHOLE |
|
APPLICATIONS AND |
ATTACHMENTS USING |
|
MAINTENANCE |
INDEX
13

ANCHOS Y LARGOS DE PUNTADAS RECOMENDADOS
XL5030
|
PUNTADA |
NOMBRE |
ANCHO |
LARGO |
PÁGINA DEL |
|
PREAJUSTADO |
RECOMENDADO |
MANUAL |
||
|
[mm (pulgadas)] |
[mm (pulgadas)] |
|||
|
1 |
OJAL |
5 |
-1,5 |
48 |
|
(13/64) |
(1/64-1/16) |
|||
|
2 |
PUNTADA RECTA |
– |
-4 |
36 |
|
(CENTRO) |
(1/64-5/32) |
|||
|
3 |
PUNTADA RECTA |
– |
-4 |
36 |
|
(IZQUIRDA) |
(1/64-5/32) |
|||
|
4 |
PUNTADA ZIGZAG |
1,7 |
-4 |
39 |
|
(1/16) |
(1/64-5/32) |
|||
|
5 |
PUNTADA ZIGZAG |
3,5 |
-4 |
39 |
|
(9/64) |
(1/64-5/32) |
|||
|
6 |
PUNTADA ZIGZAG |
5 |
-4 |
39 |
|
(13/64) |
(1/64-5/32) |
|||
|
7 |
PUNTADA INVISIBLE |
3 |
-2 |
40 |
|
(1/8) |
(1/64-5/64) |
|||
|
8 |
PUNTADA ALFORZA |
5 |
-3 |
41 |
|
DEREFUERZO |
(13/64) |
(1/64-1/8) |
||
|
9 |
PUNTADA ELÁSTICA |
5 |
-2,5 |
42 |
|
(13/64) |
(1/64-3/32) |
|||
|
10 |
PESPUNTO INVISIBLE |
5 |
-1,5 |
40 |
|
(13/64) |
(1/64-1/16) |
|||
|
11 |
PUNTADA FESTÓN |
5 |
-1,5 |
43 |
|
(13/64) |
(1/64-1/16) |
|||
|
12 |
PUNTADA TRIPLE ELÁSTICA |
– |
Fija |
36 |
|
(CENTRO) |
2,5 (3/32) |
|||
|
13 |
PUNTADA TRIPLE ELÁSTICA |
– |
Fija |
36 |
|
(IZQUIRDA) |
2,5 (3/32) |
|||
|
14 |
PUNTADA TRIPLE |
1,7 |
Fija |
46 |
|
ZIGZAG ELÁSTICA |
(1/16) |
2,5 (3/32) |
||
|
15 |
PUNTADA TRIPLE |
3,5 |
Fija |
46 |
|
ZIGZAG ELÁSTICA |
(9/64) |
2,5 (3/32) |
||
|
16 |
PUNTADA TRIPLE |
5 |
Fija |
46 |
|
ZIGZAG ELÁSTICA |
(13/64) |
2,5 (3/32) |
||
|
17 |
PUNTADA OVERLOCK |
3 |
Fija |
44 |
|
(1/8) |
2,5 (3/32) |
|||
|
18 |
PUNTADA OVERLOCK |
5 |
Fija |
44 |
|
ELÁSTICA |
(13/64) |
2,5 (3/32) |
||
|
19 |
PUNTADA PLUMA |
5 |
Fija |
45 |
|
(13/64) |
2,5 (3/32) |
|||
|
20 |
PUNTADA PUNTA DE FLECHA |
5 |
Fija |
44 |
|
(13/64) |
2,5 (3/32) |
|||
|
21 |
PUNTADA DECORATIVA |
5 |
Fija |
46 |
|
(13/64) |
2,5 (3/32) |
|||
|
CONTENTS |
|
|
MACHINE SEWING |
YOUR KNOWING |
|
STITCHING ZIGZAG |
AND STRAIGHT |
|
STITCHES IN-BUILT |
|
|
SEWING BUTTON |
AND BUTTONHOLE |
|
APPLICATIONS AND |
ATTACHMENTS USING |
|
MAINTENANCE |
INDEX
14

XL5020
|
PUNTADA |
NOMBRE |
ANCHO |
LARGO |
PÁGINA DEL |
|
PREAJUSTADO |
RECOMENDADO |
MANUAL |
||
|
[mm (pulgadas)] |
[mm (pulgadas)] |
|||
|
1 |
OJAL |
5 |
-1,5 |
48 |
|
(13/64) |
(1/64-1/16) |
|||
|
2 |
PUNTADA RECTA |
– |
-4 |
36 |
|
(CENTRO) |
(1/64-5/32) |
|||
|
3 |
PUNTADA RECTA |
– |
-4 |
36 |
|
(IZQUIRDA) |
(1/64-5/32) |
|||
|
4 |
PUNTADA ZIGZAG |
1,7 |
-4 |
39 |
|
(1/16) |
(1/64-5/32) |
|||
|
5 |
PUNTADA ZIGZAG |
3,5 |
-4 |
39 |
|
(9/64) |
(1/64-5/32) |
|||
|
6 |
PUNTADA ZIGZAG |
5 |
-4 |
39 |
|
(13/64) |
(1/64-5/32) |
|||
|
7 |
PUNTADA INVISIBLE |
3 |
-2 |
40 |
|
(1/8) |
(1/64-5/64) |
|||
|
8 |
PUNTADA ALFORZA |
5 |
-3 |
41 |
|
DEREFUERZO |
(13/64) |
(1/64-1/8) |
||
|
9 |
PUNTADA ELÁSTICA |
5 |
-2,5 |
42 |
|
(13/64) |
(1/64-3/32) |
|||
|
10 |
PUNTADA TRIPLE ELÁSTICA |
– |
Fija |
36 |
|
(CENTRO) |
2,5 (3/32) |
|||
|
11 |
PUNTADA TRIPLE ELÁSTICA |
– |
Fija |
36 |
|
(IZQUIRDA) |
2,5 (3/32) |
|||
|
12 |
PUNTADA TRIPLE |
1,7 |
Fija |
46 |
|
ZIGZAG ELÁSTICA |
(1/16) |
2,5 (3/32) |
||
|
13 |
PUNTADA TRIPLE |
3,5 |
Fija |
46 |
|
ZIGZAG ELÁSTICA |
(9/64) |
2,5 (3/32) |
||
|
14 |
PUNTADA TRIPLE |
5 |
Fija |
46 |
|
ZIGZAG ELÁSTICA |
(13/64) |
2,5 (3/32) |
||
|
15 |
PUNTADA OVERLOCK |
3 |
Fija |
44 |
|
(1/8) |
2,5 (3/32) |
|||
|
16 |
PUNTADA OVERLOCK ELÁSTICA |
5 |
Fija |
44 |
|
(13/64) |
2,5 (3/32) |
|||
|
17 |
PUNTADA PLUMA |
5 |
Fija |
45 |
|
(13/64) |
2,5 (3/32) |
|||
|
CONTENTS |
|
|
MACHINE SEWING |
YOUR KNOWING |
|
STITCHING ZIGZAG |
AND STRAIGHT |
|
STITCHES IN-BUILT |
|
|
SEWING BUTTON |
AND BUTTONHOLE |
|
APPLICATIONS AND |
ATTACHMENTS USING |
|
MAINTENANCE |
INDEX
15

XL5010
|
PUNTADA |
NOMBRE |
ANCHO |
LARGO |
PÁGINA DEL |
|
PREAJUSTADO |
RECOMENDADO |
MANUAL |
||
|
[mm (pulgadas)] |
[mm (pulgadas)] |
|||
|
1 (A-B-C-D) |
OJAL |
5 |
-1,5 |
49 |
|
(13/64) |
(1/64-1/16) |
|||
|
2 |
PUNTADA ZIGZAG |
1,7 |
-4 |
39 |
|
(1/16) |
(1/64-5/32) |
|||
|
3 |
PUNTADA ZIGZAG |
3,5 |
-4 |
39 |
|
(9/64) |
(1/64-5/32) |
|||
|
4 |
PUNTADA ZIGZAG |
5 |
-4 |
39 |
|
(13/64) |
(1/64-5/32) |
|||
|
5 |
PUNTADA RECTA |
– |
-4 |
36 |
|
(CENTRO) |
(1/64-5/32) |
|||
|
6 |
PUNTADA RECTA |
– |
-4 |
36 |
|
(IZQUIRDA) |
(1/64-5/32) |
|||
|
7 |
PUNTADA INVISIBLE |
5 |
-1,5 |
40 |
|
ELÁSTICA |
(13/64) |
(1/64-1/16) |
||
|
8 |
PUNTADA ALFORZA |
5 |
-3 |
41 |
|
DEREFUERZO |
(13/64) |
(1/64-1/8) |
||
|
9 |
PUNTADA ELÁSTICA |
5 |
-2,5 |
42 |
|
(13/64) |
(1/64-3/32) |
|||
|
10 |
PUNTADA TRIPLE |
1,7 |
Fija |
46 |
|
ZIGZAG ELÁSTICA |
(1/16) |
2,5 (3/32) |
||
|
11 |
PUNTADA TRIPLE |
3,5 |
Fija |
46 |
|
ZIGZAG ELÁSTICA |
(9/64) |
2,5 (3/32) |
||
|
12 |
PUNTADA TRIPLE |
5 |
Fija |
46 |
|
ZIGZAG ELÁSTICA |
(13/64) |
2,5 (3/32) |
||
|
13 |
PUNTADA TRIPLE ELÁSTICA |
– |
Fija |
36 |
|
(CENTRO) |
2,5 (3/32) |
|||
|
14 |
PUNTADA TRIPLE ELÁSTICA |
– |
Fija |
36 |
|
(IZQUIRDA) |
2,5 (3/32) |
|||
|
15 |
PUNTADA PUNTA DE FLECHA |
5 |
Fija |
44 |
|
(13/64) |
2,5 (3/32) |
|||
|
16 |
PUNTADA OVERLOCK ELÁSTICA |
5 |
Fija |
44 |
|
(13/64) |
2,5 (3/32) |
|||
|
17 |
PUNTADA PLUMA |
5 |
Fija |
45 |
|
(13/64) |
2,5 (3/32) |
|||
|
CONTENTS |
|
|
MACHINE SEWING |
YOUR KNOWING |
|
STITCHING ZIGZAG |
AND STRAIGHT |
|
STITCHES IN-BUILT |
|
|
SEWING BUTTON |
AND BUTTONHOLE |
|
APPLICATIONS AND |
ATTACHMENTS USING |
|
MAINTENANCE |
INDEX
16

AMPIEZZE E LUNGHEZZE DEI PUNTI CONSIGLIATE
XL5030
|
PUNTO |
NOME PUNTO |
LARGHEZZA |
LUNGHEZZA |
PAGINA DEL |
|
PREFISSATA |
CONSIGLIATA |
MANUALE |
||
|
[mm] |
[mm] |
|||
|
1 |
ASOLA |
5 |
-1,5 |
48 |
|
(13/64) |
(1/64-1/16) |
|||
|
2 |
PUNTO DIRITTO |
– |
-4 |
36 |
|
(CENTRO) |
(1/64-5/32) |
|||
|
3 |
PUNTO DIRITTO |
– |
-4 |
36 |
|
(SINISTRO) |
(1/64-5/32) |
|||
|
4 |
PUNTO ZIGZAG |
1,7 |
-4 |
39 |
|
(1/16) |
(1/64-5/32) |
|||
|
5 |
PUNTO ZIGZAG |
3,5 |
-4 |
39 |
|
(9/64) |
(1/64-5/32) |
|||
|
6 |
PUNTO ZIGZAG |
5 |
-4 |
39 |
|
(13/64) |
(1/64-5/32) |
|||
|
7 |
PUNTO ORLO INVISIBILE |
3 |
-2 |
40 |
|
(1/8) |
(1/64-5/64) |
|||
|
8 |
PUNTO ORLO CONCHIGLIA |
5 |
-3 |
41 |
|
(13/64) |
(1/64-1/8) |
|||
|
9 |
PUNTO ELASTICO |
5 |
-2,5 |
42 |
|
(13/64) |
(1/64-3/32) |
|||
|
10 |
PUNTO STRETCH INVISIBILE |
5 |
-1,5 |
40 |
|
(13/64) |
(1/64-1/16) |
|||
|
11 |
PUNTO SMERLO |
5 |
-1,5 |
43 |
|
(13/64) |
(1/64-1/16) |
|||
|
12 |
PUNTO STRETCH TRIPLO |
– |
Fissa |
36 |
|
(CENTRO) |
2,5 (3/32) |
|||
|
13 |
PUNTO STRETCH TRIPLO |
– |
Fissa |
36 |
|
(SINISTRO) |
2,5 (3/32) |
|||
|
14 |
PUNTO ZIGZAG |
1,7 |
Fissa |
46 |
|
STRETCH TRIPLO |
(1/16) |
2,5 (3/32) |
||
|
15 |
PUNTO ZIGZAG |
3,5 |
Fissa |
46 |
|
STRETCH TRIPLO |
(9/64) |
2,5 (3/32) |
||
|
16 |
PUNTO ZIGZAG |
5 |
Fissa |
46 |
|
STRETCH TRIPLO |
(13/64) |
2,5 (3/32) |
||
|
17 |
PUNTO SOPRAGGITTO STRETCH |
3 |
Fissa |
44 |
|
(1/8) |
2,5 (3/32) |
|||
|
18 |
PUNTO SOPRAGGITTO ELASTICO |
5 |
Fissa |
44 |
|
(13/64) |
2,5 (3/32) |
|||
|
19 |
PUNTO A PIUMA |
5 |
Fissa |
45 |
|
(13/64) |
2,5 (3/32) |
|||
|
20 |
PUNTO A FRECCIA |
5 |
Fissa |
44 |
|
(13/64) |
2,5 (3/32) |
|||
|
21 |
PUNTO DECORATIVO |
5 |
Fissa |
46 |
|
(13/64) |
2,5 (3/32) |
|||
|
CONTENTS |
|
|
MACHINE SEWING |
YOUR KNOWING |
|
STITCHING ZIGZAG |
AND STRAIGHT |
|
STITCHES IN-BUILT |
|
|
SEWING BUTTON |
AND BUTTONHOLE |
|
APPLICATIONS AND |
ATTACHMENTS USING |
|
MAINTENANCE |
INDEX
17
 Loading…