![]()
ШВЕЙНАЯ МАШИНА «SINGER»
ИНСТРУКЦИЯ ПО ЭКСПЛУАТАЦИИ
МОДЕЛЬ 2802 2808 2818
РЕКОМЕНДАЦИИ ПО ТЕХНИКЕ БЕЗОПАСНОСТИ
1.Перед заменой деталей (например, лапки, иглы или игольной пластины) или в случае оставления машины без присмотра необходимо вынуть штепсельную вилку из розетки. Это предохранит Вашу машину от случайного включения.
2.Перед заменой шпульного колпачка необходимо вынуть штепсельную вилку из розетки.
3.Во избежание получения травмы от движущейся иглы будьте внимательны и соблюдайте осторожность в процессе работы.
4.Не тяните материал во время шитья. Это может привести к изгибу и поломке иглы и повреждению игольной пластины.
5.Перед чисткой машины не забудьте вынуть штепсельную вилку из розетки.
6.Не пытайтесь самостоятельно отрегулировать натяжение приводного ремня. В случае необходимости такой регулировки обратитесь в ближайшую мастерскую.
7.Перед заменой осветительной лампы необходимо отключить машину от сети. После замены лампы не забудьте установить на место фронтальную крышку.
8.Используйте только лампы накаливания мощностью 15 Ватт.
9.Для ремонта машины следует использовать только оригинальные запасные части.
Данная машина не вызывает радио и телевизионных помех и соответствует предписаниям Международной Электротехнической Комиссии CISPR.
СОДЕРЖАНИЕ
Знакомство с швейной машиной
Основные части Принадлежности Подключение машины Запуск машины Регулятор длины стежка Выбор и замена иглы
Замена прикручиваемой прижимной лапки Замена подошвы прижимной лапки Установка двигателя ткани
Подготовка машины к шитью
Намотка шпульки Установка шпульки Заправка верхней нити Извлечение челночной нити
Начало строчки
Регулировка натяжения нити Таблица выбора ниток и иглы в зависимости от материала Подготовка шва
Прямые строчки, зиг-заг и другие строчки
Начало строчки Направление изделия Прямые строчки Регулировка длины зиг-зага Образцы строчек Потайной шов Ракушечный шов
Обработка петли и пришивание пуговиц
Пришивание пуговиц Обработка петли Балансировка сторон петли
Функции машины
Пришивание молнии Использование прямой строчки
Шитье на рукавной платформе
Рукава и пуговицы Монограммы и вышивка
Снятие установка и шпульного колпачка
Чистка машины Замена лампочки Смазка машины Устранение неполадок
5

6
ЗНАКОМСТВО С ШВЕЙНОЙ МАШИНОЙ
ОСНОВНЫЕ ЧАСТИ
1.Маховое колесо
2.Шпуленамотчик
3.Горизонтальный бобинодержатель
4.Нитенаправитель
5.Регулятор натяжения нити для шпуленамотчика
6.Нитенаправитель с прорезью
7.Нитепритягиватель
8.Фронтальная крышка
9.Регулятор натяжения верхней нити
10.Быстросъемная лапка
11.Игольная пластина
12.Съемная платформа
13.Игольный зажим
14.Нитенаправители
15.Кнопка шитья в обратном направлении
16.Регулятор длины стежка
17.Регулятор выбора образца строчки
18.Рычаг подъема лапки
19.Ниткообрезатель
20.Двигатель ткани
21.Задвижная пластина
22.Педаль
23.Штепсельная вилка
24.Штепсельный разъем
25.Основной выключатель двигателя
26.Переключатель холостого хода для наматывания шпульки
7
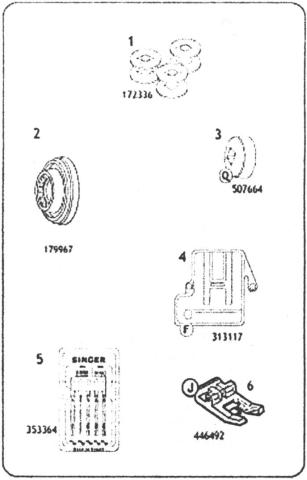
ПРИНАДЛЕЖНОСТИ
Набор принадлежностей к Вашей машине облегчит Вам выполнение различных швейных операций.
1.Прозрачные шпульки позволяют легко определить количество оставшихся ниток.
2.Большая шайба для схождения нити, предназначена для больших катушек.
3.Малая шайба для схождения нити, предназначена для маленьких катушек.
4.Крышка двигателя материала закрывает зубчатую рейку при вышивке, штопке и пришивании пуговиц.
5.Комплект игл различной толщины для различных видов тканей.
6.Специальная лапка для декоративных и зигзагообразных строчек.
8
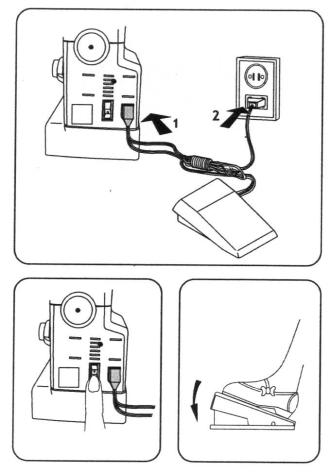
ПОДКЛЮЧЕНИЕ МАШИНЫ
Вставьте штепсельный разъем в гнездо (1), расположенное на правой стороне машины. Затем вставьте вилку в розетку электросети.
ЗАПУСК МАШИНЫ
Для того чтобы включить машину и свет, нажмите основной выключатель в верхнее положение «I». Чтобы выключить машину и свет, нажмите выключатель в нижнее положение «О». Для начала шитья, нажмите на педаль. Для увеличения скорости нажмите на педаль посильнее. Чтобы остановить машину отпустите педаль.
ВНИМАНИЕ: Не шейте на машине без материала во избежание повреждения двигателя ткани и прижимной лапки
9
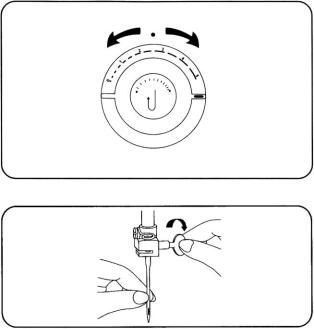
РЕГУЛЯТОР ДЛИНЫ СТЕЖКА
Этот регулятор устанавливает расстояние между проколами иглы (рисунок 1). Точка — это индикатор. Чем больше цифра, тем больше длина стежка. Проверьте рекомендуемые установки, чтобы подобрать наиболее подходящую длину стежка для Вашей работы.
ВЫБОР И ЗАМЕНА ИГЛЫ
1.Поднимите иглу в самое высокое положение
2.Освободите иглодержатель и выньте иглу.
3.Установите новую иглу в иглодержатель до упора плоской стороной колбы назад.
4.Закрутите винт иглодержателя
10
ЗАМЕНА СТОЙКИ ПРИЖИМНОЙ ЛАПКИ
(для некоторых дополнительных прижимных лапок)
1.Поднимите иглу и прижимную лапку
2.Снимите иглу
3.Открутите винт прижимной лапки (1) и снимите прижимную лапку со стойкой (2).
4.Замените лапку со стойкой, зацепив стойку вокруг держателя прижимной лапки, и закрутите винт прижимной лапки.
5.Установите иглу.
11
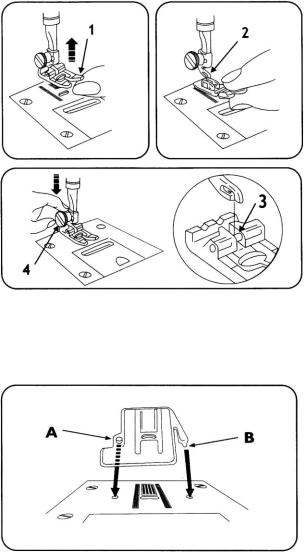
ЗАМЕНА ПОДОШВЫ ПРИЖИМНОЙ ЛАПКИ
1.Поднимите иглу в самое высоко положение, повернув маховик на себя
2.Поднимите прижимную лапку с помощью рычага, расположенного сзади машины.
3.Нажмите на подошву прижимной лапки (1), пока она не отцепится от стержня (2)
4.Снимите подошву прижимной лапки,
5.Поместите новую подошву в центр под стержень
6.Опустите рычаг прижимной лапки, так чтобы стержень попал в паз подошвы (3)
7.Нажмите на винт (4) вниз, чтобы подошва встала на место.
УСТАНОВКА КРЫШКИ ДВИГАТЕЛЯ ТКАНИ
1.Поверните маховик, пока игла не займет ее высшее положение, и поднимите прижимную лапку.
2.Откройте задвижную пластину
3.Поместите крышку двигателя ткани на игольную пластину, совместив штыри (А) и (В) с отверстиями в игольной пластине
4.Закройте задвижную пластину.
5.Чтобы снять крышку двигателя ткани, откройте задвижную пластину и поднимите передний край крышки двигателя ткани и снимите её.
6.Протяните нитку сквозь отверстие в крышке двигателя ткани, следуя так же как при заправке нитки и замене шпульки.
12
![]()
ПОДГОТОВКА МАШИНЫ К ШИТЬЮ
НАМОТКА ШПУЛЬКИ
Намотка шпульки — пройдет легко и просто, если Вы будете следовать инструкциям, приведенным ниже. Всегда наматывайте шпульку перед заправкой верхней нити в машину и иглу.
1.Нажмите на углубление (1), расположенное на маховом колесе. Это отключит движение иглы.
2.Поместите катушку с нитками на бобинодержатель.
3.Наденьте плотно шайбу для схождения нити (2) на катушку, чтобы предотвратить запутывание нитки.
4.Проведите нитку с катушки и зафиксируйте ее в нитенаправителе
(3).
5.Обведите нитку по часовой стрелке вокруг диска натяжения нитки для шпуленамотчика (4).
6.Вденьте конец нитки в отверстие шпульки изнутри наружу.
7.Поместите шпульку на шпуледержатель и нажмите ее вправо.
8.Придерживая нитку, нажмите на педаль. Когда шпулька намотается полностью, шпуленамотчик остановится автоматически.
9.Обрежьте нитку, отожмите шпульку влево и снимите ее с шпуледержателя.
10.Обрежьте нитку сверху шпульки.
11.Нажмите на углубление (1), расположенное на маховом колесе, чтобы вернуть машину в режим шитья. Обязательно поверните маховое колесо рукой, на себя для проверки.
13
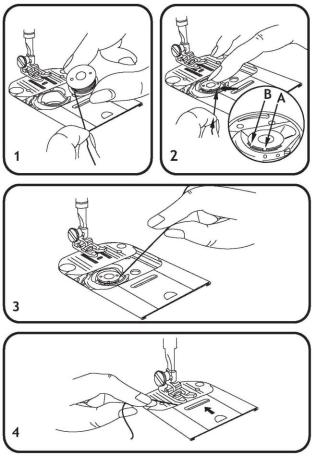
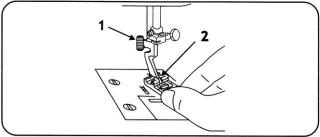
УСТАНОВКА ШПУЛЬКИ
Поднимите прижимную лапку. Поверните маховое колесо к себе, пока игла не займет крайнее верхнее положение.
Откройте задвижную пластину и выньте пустую шпульку
1.Протяните примерно 10 см нитки с новой шпульки и вставьте нитку в шпульный колпачок (рисунок 1). Внимание: Если Вы потяните за нитку, то шпулька должна поворачиваться справа налево (против часовой стрелки).
2.Проведите нитку в паз (А) (рисунок
2)и затем вниз в щель и проведите вокруг в паз (В) (рисунок 3). Это очень важно — правильно поместить нитку. Неправильное выполнение этой операции приведет к неправильному натяжению нитки.
3.Вытяните несколько сантиметров нитки назад под лапку.
4.Придерживая нитку, закройте задвижную, следя, чтобы нитка проходила сквозь зазор между задвижной пластиной и игольной пластиной (рисунок 4).
14
 Loading…
PDF инструкция · 76 страниц(ы) английский
инструкцияSinger 2808

PartNumber//358378-001PièceNº.
PrintedinBrazil/ImpresoenelBrasil
ImpriméauBrésil—Eng./Spa./Fren.
InstructionBook Manueld’Instructions
Посмотреть инструкция для Singer 2808 бесплатно. Руководство относится к категории швейные машины, 18 человек(а) дали ему среднюю оценку 8.8. Руководство доступно на следующих языках: английский. У вас есть вопрос о Singer 2808 или вам нужна помощь? Задайте свой вопрос здесь
Главная
Не можете найти ответ на свой вопрос в руководстве? Вы можете найти ответ на свой вопрос ниже, в разделе часто задаваемых вопросов о Singer 2808.
Какой размер иглы лучше всего использовать?
Какой срок службы у швейной иглы?
Что может повредить иглу при шитье?
Инструкция Singer 2808 доступно в русский?
Не нашли свой вопрос? Задайте свой вопрос здесь
- Manuals
- Brands
- Singer Manuals
- Sewing Machine
- 2808
- Instruction book
-
Contents
-
Table of Contents
-
Bookmarks
Available languages
-
EN
-
FR
Quick Links
Instruction Book
Manuel d’Instructions
Related Manuals for Singer 2808
Summary of Contents for Singer 2808
-
Page 1
Instruction Book Manuel d’Instructions… -
Page 2
Refer toillustrationforlocationofserialnumberonyourmachine. Consultezl’illustrationpourconnaitrel’emplacementdunumérodesériesurvotremachine. DearCustomer:We recommend Nous vous recommandons thatfor future reference you d’inscrire le numérode série de record the serial number ofyour votre machine à coudre dans sewingmachineinthespace l’espace à cet effet, cidessous provided (down). en cas de besoin. -
Page 3
2808 Instruction Book ®AregisteredtrademarkoftheSingerCompanyLimited. ®UnemarqueregistreèdeTheSingerCompanyLimited. Copyright©2004SingerSewingMachineCompany Copyright©2004SingerSewingMachineCompany Allrightsreservedthroughouttheworld. Tousdroitsrèservésdansl’ensembledumonde… -
Page 4
Congratulations AstheownerofanewSINGERsewingmachine, youareabouttobeginanexcitingadventurein creativity.Fromthemomentyoufirstuseyour machine, youwillknowyouaresewingonone of the easiest to use sewing machines ever made. May werecommend that, before you startto use your sewing machine, you discover the manyadvantagesandtheeaseofoperationby going through this Instruction Book, step by step,seatedatyourmachine. To ensure that you are always provided with the most modern sewing capabilities, the manufacturer reservestherighttochangethe appearance, design or accessories of this… -
Page 5
Félicitations En tant que propriétaire d’une nouvelle machine à coudre SINGER, vous êtes à même d’initier une aventure en créativité. Dès le premier moment où vous utiliserez votre machine,voussaurezquevousêtesentrainde coudre sur une des machines de plus facile opération. Avant de commencer à coudre, nous vous recommendons de découvrir les plusieurs… -
Page 6: Important Safety Instructions
Important Safety Instructions Do not attempt to adjust the motor b e l t . ContactyournearestauthorizedSINGERService Centershouldanyadjustmentberequired. When sewing, keep fingers away from all movingparts.Special care is required t o a v o i d accidentswithneedlewhileinmovement. Donotpullorpushfabricfirmlywhilestitching. Itmaydeflecttheneedlecausingittobreak. Never o p e r a t e t h e m a c h i n e w i t h a n y air openingsblocked.Keepventilationopeningsof the machine and foot control pedal f r e e from theaccumulationoflintanddust.
-
Page 8
Instructions importantes de sécurité N’essayezpasd’ajusterlacourroiedumoteur.Aucasoù un ajustement serait nécessaire, demandez-le à un technicienduRéseaudesServicesAutorisésSINGER. Encouturant, maintenezvos doigts eloignés de toutes lespiècesenmouvement.Une précautionspécialeest nécessaire, pour éviter des dommages autour de l’aiguilleenmouvement. Nepastroptirezoupoussezletissuencouturant.Cela peutécarterl’aiguille,occasionnantsarupture. Jamais actionnez la machine avec les passages d’air bloqués.Maintenezlescouverturesdeventilationdela machine et du pédale contrôleur de vitesse dégagés d’accumulationd’éfilochesetpoussière. -
Page 9: Table Of Contents
Table of contents Getting toknowyourmachine Patternselection……….42 Parts…………11 Blindhem………….46 Accessories ……….. 14 Shellhem…………. 46 Connectingthemachine……..16 Runningthemachine……..16 Buttonholesand buttons Stitch lengthselector……..18 Attaching a button………. 48 Choosing andchangingneedles……18 Buttonhole…………50 Removingtheneedleplate………20 Changingscrew-onpresserfoot……20 Functions of the machine Changingsnap-onpresserf oot ……22 Attachingthefeedcover……..22 Insertingazipper……….. 52 Applicationswithstraightstitching……
-
Page 11
Table des matières Faites connaissancede votre machine Sélecteur delongueurdepointpourcouture dezig-zag………….43 Pièces …………13 Sélectiondepoints……….43 Accessoires……….. 15 Point invisible……….47 Branchementde lamachine…….17 Ourletdelacoquille……..47 Miseenmarchedelamachine……17 Sélecteur delongueurdupoint……19 Boutonnièreet boutons Choisir etchangerl’aiguille……19 Coudredesboutons………49 Commentchangerlaplaqueàaiguille….21 Boutonnière ……….51 Commentchangerlespiedpresseurs….21 Commentchangerlespiedspresseursà Fonctions de lamachine enclenchementdirect…….. -
Page 12
P/N362095… -
Page 13: Getting Toknowyourmachine
Getting to know your machine Parts 1. Hand wheel 13. Needleclamp 2. Bobbinwinderpin 14. Threadguides 3. Horizontalspoolpin 15. Reverse pushbutton 4. Threadguide 16. Stitchlengthdial 5. Bobbinwindertensiondisc 17. Patternselector dial 6. Threadguide 18. Presserfootlifter 7. Take-uplever 19. Threadcutter 8. Faceplate 20. Feedsystem 9.
-
Page 15: Faites Connaissancede Votre Machine
Faites connaissance avec votre machine Pièces Volant 13. Visdefixationdel’aiguille Devidoir 14. Guide-fil Porte-bobine horizontal 15. Bouton demarche arrière Guide-fil 16. Sélecteurdelongueurdepoint Ressortdetensiondufil 17. Sélecteurdepoint Guide-fil 18. Releveurdupiedpresseur Releveurdefil 19. Coupe fil Plaquede face 20. Griffes Sélecteurdetension 21. Plaqueglissière 10. Piedd’usage général 22.
-
Page 16: Accessories
Accessories The following accessories furnished with your sewing machinearedesignedtosimplifyyoursewingprojectsand increasetheversatilityofyourmachine. 172336 The letter in a circle adjacent to the illustrated part is reproduced on the part itself to help you select the correctattachmentforthetypeofworkyouaredoing. 1. Bobbins(3units) 179967 2. Spool pinholder(large) 3. Spool pinholder(small)(Q) 507664 4.
-
Page 17: Accessoires
Accessoires Lesaccessoiressuivantssontfournisavecvotremachine pourfaciliterlacoutureetaugmenterlespossibilitésde votremachine. Lalettre quevousvoyezillustréesetrouvesurlapièce elle-même e t vouspermetdesélectionnerrapidement l’accessoirecorrespondantàvosbesoins. 1. Bobines(3unités) 2. Grandétrier 3. Petitétrier(Q) 4. Couvre-griffes(F) 5. Assortimentd’aiguilles…
-
Page 18: Connectingthemachine
Connecting the machine Pushplugintothereceptacle(1)attherightendofthe machine.Thenconnectplug(2)toyoursocketoutlet. ForNorthAmerica “Thisappliancehasapolarized(onebladewiderthanthe other). To reduce the riskofelectric shock, this plug is intendedtofitinapolarizedoutletonlyoneway.Ifthe plugdoesnotfitfullyintheoutlet,reversetheplug.Ifit stilldoesnotfit,contactaqualifiedelectriciantoinstall theproperoutlet.Donotmodifythepluginanyway”. 362095 Running the machine Toturnonmachineandsewinglight,pressupperportion “ ” ofpowerswitch.Toturnoffmachineandlight,press lowerportion “ ” ofpowerswitch. To run the machine and control speed, press the foot controlwith your foot.Theharderyoupress,thefaster themachinewillsew.Tostopmachine,removefootfrom control.
-
Page 19: Branchementde Lamachine
Branchement de la machine Introduisezlafichedebranchementdurhéostatdansla prise(1)àdroitedelamachine,puisbranchezlamachine àl’aidedelaprise(2). Pour L’Amérique duNord “Cetappareilauneprisepolarisée(unelamepluslarge quel’autre).Afinderéduirelerisquededéchargeélec- trique, cette prise est conçue pour ne pouvoir être branchée que dans le bon sens avec des connecteurs murauxpolarisés.Silaprisenepeutêtreinséréecom- plètement dansleconnecteur mural, inversez la. Si le problème persiste, vousdevezconsulterunelectricien qualifiéquivousinstalleralesupportmuraladapté.
-
Page 20: Stitch Lengthselector
Stitch length selector Thisselectoradjustsspacebetweenstitches (illustration1).Thedot(markinrelief)isthe indicator. Thehigherthenumber,themoreseparate thestitch willbe. Check RECOMMENDEDSETTINGS checkthemostadequatestitchlengthforyour sewing. Choosing and changing needles 1. Raiseneedletoitshighestposition. 2. Loosenneedleclampscrewandremoveneedle. 3. Withflatsideofneedletotheback,insertnewneedle upintoclampasfarasitwillgo. 4. Tightenneedleclampscrewsecurely.
-
Page 21: Sélecteur Delongueurdupoint
Sélecteur de longueur du point Cesélecteurcontrôlel’espaceentrelespoints (fig.1) . L a marque en relief estl’indicateur. Le chiffre plusélevé donnera le point plus écarté. Consultez les AJUSTEMENTS RECOMMANDÉS pour connaître la longueurdupointlaplusindiquéepourvotrecouture. Choisir et changer l’aiguille 1. Soulevezl’aiguilleenpositionhaute. 2. Dévissezlavisdupince-aiguilleetretirezl’aiguille. 3. Insérez la nouvelle aiguille à fond dans le pince- aiguille,lecôtéplatdutalonàl’arrière.
-
Page 22: Removingtheneedleplate
Changing screw-on presser feet with shank (for some optionalpresserfeet) 1. Raiseneedleandpresserfoot. 2. Removetheneedle. 3. Loosen presser foot screw(1)andremovepresserfoot withshank(2),guidingittowardyouandtotheright. 4. To replace presser foot with shank, hook shank around the presser barandtightenpresserfootscrewwiththe useofacoin. 5. Replacetheneedle.
-
Page 23: Commentchangerlaplaqueàaiguille
Comment changer les pied presseurs (pour quelques pied presseurs facultatifs) 1. Relevezl’aiguilleetlepiedpresseur. 2. Retirezlaaiguille. 3. Desserrezlavis(1)etretirezlepiedavecletalon(2) enlafaisantpivoterversladroite. 4. Pour remettre en place un pied presseur à tige, accrochezlatigeautourdelabarredupiedpresseur etresserrezlavisàl’aided’unepiècedemonnaie. 5. Replacezlaaiguille.
-
Page 24: Changingsnap-Onpresserf Oot
Changing snap-on presser foot 1. Raise needle to its highest position by turning hand wheeltowardyou. 2. Raise presser footusingpresserfootlifteratbackof machine. 3. Push toe of presser foot (1)up,untilitsnapsoffthe shank(2). 4. Removefootfrommachine. 5. Placenewfootundercenterofshank. 6. Lower presser foot lifter, fitting shank over presser footpin(3).
-
Page 25: Commentchangerlespiedspresseursà Enclenchementdirect
Comment changer les semelles à enclenchement direct 1. Relevezl’aiguilleàsapositionhaute. 2. Relevez la semelle en la soulevant de l’avant vers l’arrière. 3. Appuyez sur la semelle (1) jusqu’à ce qu’elle se détache(2). 4. Retirez-la. 5. Placezlanouvellesemelleenlacentrantsouslatige. 6. Baissezlereleveurdupiedpresseurpourengagerla tigedanslatraversedelasemelle(3). 7. Nevissezpasmaisappuyezfermementsurlavis(4) jusqu’àenclenchement.
-
Page 26: Windingabobbin
Winding a bobbin Windinga bobbin isquickandeasywhenyoufollowthe directionsbelow.Alwayswindthebobbinbeforethreading themachineandneedle. 1. Pushinindent(1)onhandwheeldisc.Thiswillstopthe needlefrommoving. 2. Placespoolofthreadonspoolpin. 3. Slide spool pinholder(2)firmlyoverrimofspoolto preventthreadfromtangling. 4. Leadthreadfromspoolandsnapintothreadguidepost (3). 5. Windthreadclockwisearoundfrontofbobbinwinder tensiondisc(4). 6. Pass threadend,frominside,throughsmallholeinrim ofbobbin. 7. Place bobbinonbobbinwinderpinandpushittothe right. 8. Holding thread end, step on speed controller to run machine until desired amount of thread is wound.
-
Page 27: Remplissage Delabobine
Remplissage de la bobine En suivantlesconseilsci-dessous, ilestaiséderemplir une bobine. Confectionnez toujours la canette avant d’enfilerlamachine. 1. Appuyezsurlesiglededébrayage(1)pourarrêterle mouvementdel’aiguille. 2. Mettezenplacelabobinedefilsurleporte-bobine. 3. Bloquezlabobineàl’aidedel’étrier(2)pouréviter quelefils’emmêle. 4. Tirezlefiletenclenchez-ledansleguide-fil(3). 5. Passezlefilentrelesdisquesdetensiondudévidoir (4)enlecroisantdanslesensmontréparlesflèches. 6. Passezl’extrémitédufilàtraversundestrousdela bobine,del’intérieurversl’extérieur. 7. Engagez la bobine sur le support du dévidoir et poussez-laversladroite.
-
Page 28: Insertingabobbin
Inserting a bobbin • Raisepresserfoot. • Turn hand wheel toward you until needle is in its highestposition. • Openslideplateandremoveemptybobbin. 1. Pull approximately 4” (10 cm) of thread from replacement bobbin and insert bobbin into case (illustration1). Note: Whileunwinding,thebobbinshouldturnfromright toleft. 2. Holding bobbin in place, guide thread into notch ( ) (illustration2)andthendowntheslottotheleftand guide around i n t o n o t c h ( ) (illustration 3).
-
Page 29: Miseenplacedelabobine
Mise en place de la bobine • Relevezlepiedpresseur. • Relevezl’aiguilleenpositionhaute. • Ouvrezlaplaqueglissièreetretirezlabobinevide. 1. Liberez environ 1 0 c m d e f i l d e n o u v e l l e b o b i n e et posez la bobine dans son support comme illustré…
-
Page 30: Threadingthe Machine
Threading the machine 1. Raise take-uplevertohighest position by turninghandwheeltowardyou. 2. Raise presser foot to release thread tension. 3. Place spool of thread on spool pin. Use adequate spool pin holder to hold spool firmlyinplace. 4. Slide spool pin holder firmly over rim of spooltopreventthreadfromhangling.
-
Page 31: Enfilage Delamachine
Enfilage de la machine 1. En tournant le volantàlamain,relevezenposition hautelereleveurdefil. 2. Relevez le releveurdupiedpresseurpourlibérerla tension. 3. Placezlabobinedefilsurleporte-bobine.Bloquez-la bobineàl’aidedel’etrier. 4. Bloquezlabobineàl’aidedel’étrierafind’eviterque lefilnes’emmèle. 5. Passezlefildelabobinedansleguide-fil(1).Touten tenantlefildecharquecôtéduguide-filsupérieur,à l’aide desdeuxmains,introduisez-led’uncoup sec dansceguide-fil(2). 6. Enfilez le bloc tension en passant le fil entre les disques d e t e n s i o n e t d a n s l e r e s s o r t d e t e n s i o n ( 3) commeillustré.Pendantcetteopération,mainte-nez légèrementlefildelabobine.
-
Page 32: Raisingthebobbinthread
Raising the bobbin thread 1. Holdneedlethreadlooselywithlefthand(illustration1). • Turnhandwheelslowlytowardyou,loweringneedle intoholeinplate. 2. Continuetodothisuntilneedlerisesaboveneedleplate (illustration2). • Pull gently on needle thread and bring up bobbin thread in a loop. 3. Open loop with fingers to find end of bobbin thread (illustration3). 4. Draw needle threadthrough leftsideopeninginpresser foot(illustration4).
-
Page 33: Remonterlefildelabobine
Remonter le fil de la bobine 1. Tenez avec la main gauche légèrement le fil d’aiguille(fig.1). • Tournez le volant à la main lentement vers vous et faites descendre l’aiguille dans le troudelaplaqueàaiguille. 2. Continuez à tourner le volant jusqu’à ce que l’aiguille remonte au-dessus de laplaque à…
-
Page 34: Adjustingthreadtension
Adjusting thread tension Thecorrecttensionisanimportantfactorbecausetoo little tension or too much tension will cause loose stitchesorwillcausetheclothtopucker.Makeateston asampleofclothandthreadthatyouintendtouse. Aperfect,well-balancedstitch(illustration )willhave locksbetweenthetwolayersoffabricwithnoloopson toporbottomandnopuckering. Forstraightstitching To reduce tension, turn the dial to a lower number. Littletensionwillproducealoosestitch(illustration2), withloopsinyourseam.Toincreasetension,turnthe dialtoahighernumber.Toomuchtensionwillcausethe fabrictopucker(i llustration3). Forzigzagstitching The correct tension setting will produce smooth and even stitches with the needle and bobbin threads lockingtheendsofthezigzagstitches(illustration4).
-
Page 35: Réglage Delatension
Réglage de la tension Unetensionbonneestimportantepuisqueunetension faibleou tropforte produiraunecouturefragileou froncera le tissu. Faites avant u n essai avec un échantillondutissuetdufilquevousvoulezutiliser. Unpointparfaitetbienuniforme(fig. ) a u r a l e n o e u d placé entre les deux tissus, sans avoir des noeuds visiblesoudes fronces.
-
Page 36: Fabric,Threadandneedletable
Velours,Microfibre weight. Gabardine,Tweed, Medium- Cotton-wrappedpolyester Canvas,Duck,Denim, 100%polyester mercerized#40* heavy Gingham Note: Be sure to use original SINGER 2020 needles. Do not used deflected 16/100 needles or made by other ma- Gabardine,Tweed, nufacturer. We do not recom- Moyen Cotonmélangépolyester Cotonnine,Noyale, Lourd 100%Polyester Mercerisé40*…
-
Page 37: Tableaudetissus,Filsetaiguilles
Lestissuspeuventavoirn’importequeltypedefibre: coton, lin, soie, laine, synthétique, rayon o u m i x t e . Lestissusfigurentsurletableauselonleurpoids. Note: Employez seulement les aiguilles originales Singer.N’utilisezpasdesaiguillesfabriquéspar ou d’autresfabricants.Nousnerecommandons pasl’usagedestissus imperméablesoumétalli- ques. Les fils métalliques peuvent rendre inférieure laqualitédelacoutureetentraîner ledépérissementprématurédevotremachineà coudre.
-
Page 38: Preparingaseam
Preparing a seam Youcansewseamseasilyandaccuratelywhenyoufollow thesuggestionsbelow. Placing fabric underfoot Most fabrics can be placedunderthefootbyraisingthe pesserfootlifter(1)toitsnormal“Up”position(2),where itlocksinplace. When using bulky fabric, multiple fabric layers or an embroideryhoop,raisetheliftertothehighriseposition (3), thus increasing the space between the foot a n d t h e needleplate. •…
-
Page 39: Préparaciond’unecouture
Préparacion d’une couture Pour assembler rapidement une couture, nous vous conseillonslaméthodesuivante. Comment positionner le tissu sous le pied presseur La plupart des tissus peuvent être placés sous le pied presseurensoulevantlereleveurdupiedpresseur(1)en position(2).Quandvouscousezdutissuépaisouplusieurs épaisseursdetissus,ouencoreaucercleàbroder,relevez lepiedenposition(3).Cettepositionaugmentel’espace entrelepiedetlaplaqueàaiguille. • Avantdecommenceràcoudre,baisseztoujoursle piedpresseur. Bâtir Pourpréparerlacouture,vouspouvezbâtiràlamainmais lebâtiauxépinglesestunemanièreaiséedeprocéder. •…
-
Page 40: Starting A Seam
Starting a seam Placefabricunderpresserfoot1/2”(12mm)fromrearof fabric.Lowerthepresserfoot. Backstitchtotheedgeofthefabricforreinforcementby pushing in the reverse button located in center of the stitch length dial. Hold button inuntilstitching reaches edgeoffabric. Releasepushbuttonforforwardstitching. Guiding and supporting fabric • For tricot, and other similar synthetic knits, apply gentletension byholding the fabric atthefrontand backofpresserfootasyousew.Donotpullfabric.
-
Page 41: Commencement De La Couture
Commencement de la couture Positionnezletissusouslepiedpresseur. Baissezlepied presseur. Appuyezsurleboutondemarchearrièresituéaucentre dusélecteurdelongueurdepoint.Piquezjusqu’aubord dutissuenmarchearrièrepourrenforcerledépartdela couture. Relâchezleboutondemarchearrièreetpiquezenavant. Guider et tenir le tissu • Pour le tricot et des tissus similares, jerseys, synthétiques, maintenez-les à l’avant et à l’arrière dupiedpresseursanstirernipousserletissu. • Pour des tissus fins ou n’ayant pas beaucoup d’élasticité, tels que le helanca ou le lycra, tenez fermementdevant et derrière tant le tissu que les fils,pourcommencerlacouture.Ainsi,lacouturene…
-
Page 42: Straight Stitching
Straight stitching Straightstitching is idealforlockingfabrics,darning, backstitching,bastingstitch,insertingazipper,among others. RECOMMENDEDSETTINGS Pattern:A Stitchlength:2-3 Foot:GeneralPurpose(B) . Sew about 1/2”( cm) by pressing thefootcontrol pedal. 2. Toreinforce,pressthereversebutton(illustration )sewingmore1/2”( cm) andreleasingthereverse button. Keep sewing until the end of fabric (illustration2). 3. To r e i n f o r c e t h e e n d o f a s e a m , p u s h i n t h e r e v e r s e buttonandbackstitch3-4stitches.
-
Page 43: Couturedroite
Costura recta Couture droite Lepointdroitestappropriéepourcouturereprisage, points-arrières, faufilures, pose de fermetures glissières,entreautres. AJUSTEMENTS RECOMMANDÉS Sélecteur:A Longueurdupoint:2-3 Pied:usagegénéral(B) . Couturezenviron cm enappuyantlerhéostat. 2. Faiteslafinitionenappuyantleboutondemarche- arrière.(fig. ).Cousezjusqu’àlafindutissu(fig. 3. Pour la fin de la couture,appuyez le bouton de marchearrièreetavancez3-4pointsenarrière. 4. Relevezl’aiguilleetlepiedpresseuretenlevezle tissu. 5. C o u p e z l e f i l s u r l e c o u p e — f i l , e n l a b a r r e d u p i e d presseur.
-
Page 44: Adjusting Zig-Zagstitchlength
Adjusting zigzag stitch length Anystitchlengthsettingfrom1to5willgiveyouanopen zig-zagstitch. Thehigherthenumber,themoreopen,orfurtherapart yourstitcheswillbe. The area between 0 and 1 o n t h e d i a l i s u s e d f o r s a t i n stitching, a seriesofcloselyspacedplainzig-zagstitches thatformasmoothsatin-likesurface.
-
Page 45: Sélecteur Delongueurdepointpourcouture
Sélecteur de longueur de point pour couture zigzag Selonlalongueurdepointchoisie,de1à5,lezigzagsera plusoumoinsouvert. Lechiffreleplusélevédonneralezig-zagleplusouvert. La position dusélecteurentre 0 et 1 sera utilisée pour fairelepointdebourdon. Dans cette zone, les points de zig-zag seront très rapprochésetformerontunesurfaceunieetsatinée. Sélection des points Lesélecteurrotatif,danslepanneaudevotremachine, vouspermetlechoixdepoints.Levezl’aiguillejusqu’àsa plushauteposition. Celaferaquelesélecteurdutypedupointmarcheplus facilement.Poursélectionnerlespointsdésiré,tournez lesélecteurjusqu’àlalettrecorrespondant. Réglez lalongueurdupoint d’aprèsl’indication pourle chaquetypedebroderie(de0,5à2,5).
-
Page 46: Stitch Patterns
Stitch patterns Patternselector Stitch Application Foot PATTERN length General Straightstitch Generalsewing setting purpose Stretchsewing, General Zig-zagstitch embroideryandButtonholer setting purpose General Stretchsewingand Zig-zagstitch setting purpose embroidery General Stretchsewing, Zig-zagstitch setting purpose embroideryandButtonholer General 1,5to2,5 Blindhemstitch Finishinghems purpose General Multi zig-zag 1,0to2,0 Bartacking purpose stitch…
-
Page 47
Selectordebordados Prensatelas Aplicación PUNTO Cualquer Costurageneral Puntadarecta General posición Cosidoelástico Cualquer Puntozig-zag general,bordadosyojales General posición Cosidoelástico Puntozig-zag 1,5 a 2 , 5 generalybordados General Cosidoelástico Puntozig-zag 1,5 a 2 , 5 General general,bordadosyojales Puntada Acabadode 1,5 a 2 , 5 invisible General dobladillos… -
Page 48: Blindhem
Blind Hem Blind hemingprovidesadurablehemfinishthatcanbeused onavarietyofdifferentweightfabrics.Blindstitchingtakesa littlepractice,however,somakeatestsamplefirst. Recommendedsettings StitchSelection: Blindstitch“E” Stichlength:1,5to2,5 Foot: General purpose or blindstich hem guide (Blindstitch hemguide-availableatSewingCenters). Preparethehembyfoldingitandpressingitintheusualway. Youmaywanttobastethehemtoholditinplace,asshown.If so,besuretoplacethebastingatleast12mmbelowthetop edge of the hem allowance. With the wrong side of fabric uppermost,turnthehem under,asshown,creatingasoftfold from the top edge of hem. Pin or baste all three layers togetherinplace.
-
Page 49: Point Invisible
Point invisible Le pointinvisible vouspermet de coudre lesourletsde tissus moyens épais et jersey. Coudre au point caché requiertunpeudepratique.Faitesunexercice. Réglagesrecommandés Sélecteur depoint:Pointcaché“E” Longueurdepoint:1,5a2,5 Piedpresseur: Universelavecleguidepourpointcaché. (Guidepourpointcaché:Disponibleenlesmagasinsde articlesdecouture). Préparez le pliage de l’ourlet etrepassezlégèrement. Mieux vaut bâtir l’ourlet pour le maintenir en place (comme illustré).
-
Page 50: Attaching A Button
Attaching a button Recommendedsettings StitchSelection: ZigZagStitch StitchWidth: Pattern“B”or“C”accordingtothebutton holesdistance. Foot: ButtonSewing(H)availableatyourlocalSewing Center. 1. Raisethebobbinthreadandpullboththreadstothe backofthepresserfoot(illustration1). 2. Place the fabric andbuttonunderthe presserfoot. Turn hand wheel toward your direction observing if needleintheleftsideofzig-zagentersthecenterof theleftholeofthebutton(illustration2),continueto turn the handwheel toward complete the stitchand continueobservingifneedleintherightsideofzig-zag enters the center of the right hole of the button (illustration3).
-
Page 51: Coudredesboutons
Coudre des boutons RéglagesRecommandés: Sélecteurdepoint:PointZigZag Largeurdepoint:»B»ou»C»selonladistancedelestrous Piedpresseur:Piedbouton(H)disponibleàvotrecentre àcoudre 1.Eleverlefildelacanetteettirerlesdeuxfilsenarrière dupiedpresseur(fig.1). 2. Placer le tissu et le bouton sous le pied presseur. Tournerlevolant versvotredirectionpourobserversi l’aiguilledanslecôtégauchedezig-zagentrelecentre dutrougauchedubouton(fig.2).Continueràtourner le volantverscomplète point zigzagenvérifiantsi l’aiguilledanslecôtédroitdezig-zagentrelecentre dutroudroitdubouton(fig.3). 3. Baissez le pied presseur et faites qualques points (fig.4).
-
Page 52: Buttonhole
Buttonhole Stitchwidth:(Seeillustration) Foot: specialpurpose(J) Stitchlength:between0and1 Note: Forbestresultsusethebuttonholefootavailable forpurchaseatyourlocalSewingCenter. 1. SideStitching:Selectpattern(B),positionneedlein fabric at point 1. Lower foot and stitch to end of marking at point 2, turn handwheel toward your directionuntiltheneedleisoutofthefabric.Select pattern(A),continuetoturnhadwheeluntilneedle infabricatpoint3.Leaveneedleinfabricatpoint3, Raise foot and pivot clockwise work on needle. Lowerfoot.
-
Page 53: Boutonnière
Boutonnière Largeurdepoint:(Voirl’illustration) Longueurdepoint:0à1 Piedpresseur:Spécial(J) Note: Pourlesmeilleursrésultatsutiliselepiedpour boutonnièredisponiblepourl’achatàvotrecentre àcoudre. 1. Couturedelepremièrecôté:Tournezleselecteurde points pour choisir la position (B). Placez l’aiguille dansletissuaupoint1.Descendezlepiedpresseuret brodezjusqu’àlepoint2.Tournezlevolantversvotre direction jusqu’à ce que l’aiguille est hors du tissu. Tournezleselecteurdepoints pourchoisirlaposition (A).Continueràtournerlevolantjusqu’àl’aiguillece justaupoint3.Laisserl’aiguilledansletissuàlepoint 3, relevez le piedpresseur et tournez le travail a la droite.Bassezlepiedpresseur.
-
Page 54: Insertingazipper
Inserting a zipper Recommendedsettings Pattern: Straightstitch(A) StitchLenght: 2-5 Foot: Zipper (E) — (Zipper foot — available at Sewing Centers) Adjustingthezipperfoot When the zipper teeth are to the left of the needle (illustration1): • Slidetheadjustingblock(A)acrosstotheright. • Snap-onthefoottotheleftsideofthepin. Whenthe zipper teeth are totherightoftheneedle (illustration2): •…
-
Page 55: Posedúnefermetureglissière
Pose d’une fermeture glissière Réglagesrecommandés Point: Couturedroite(A) Longueurdepoint: 2-5 Piedpresseur: Ganseur(E)(Piedganseur:Disponibleen lesmagasinsdearticlesdecouture). Fixation dupiedganseur Si les mailles de la fermeture sont à gauche de l’aiguille (fig.1): • Glissez la semelle du pied fermeture le long de la goupilleversladroite(A). • Enclenchezlecôtégauchedelasemellesurlajambedu piedpresseur.
-
Page 56: Applicationswithstraightstitching
Applications with straight stitching Darning Recommendedsettings StitchSelection: Straight Stitch(A) StitchLenght: Anysettings Foot: Removefootandshank Attachfeedcover(page22). Frame:Notsupplied Reversestitchbutton Thereversestitchbutton,withthe( )symbol,islocated inthecenterofthestitchlengthselector(illustrarion1). • Forreversestitching,pushinthebuttonandholdin place.Themachinewillstitchinreverseonlyaslongas youkeepthebuttonpushedin. Sewinginreverse Toneatentheendofaseam,pushinthereversebuttonand backstitch 3-4 stitches (illustration 2). Raise needle and presserfootandremovefabricbydrawingittothebackand left.Cutthreadonthreadcutteronpresserbar.
-
Page 57: Applicationsaveclepointdroit
Applications avec le point droit Repriser Réglages recommandés Pointutilisé: Couturedroit(A) Longueurdepoint: N’importequelrèglage Piedpresseur: Retirezlepiedpresseuretlatige. Installezlaplaquecouvre-griffes(page23). Métieràbroder:Nonlivrée Marchearrière Latouche ( )aucentredusélecteurdelongueurde pointpermetdecoudreenmarchearrière(Fig.1). • Pourarrêterlescoutures,appuyezsurlebouton.Tant quevouslemaintiendrezenplace,lamachinecoudre enmarchearrière. Couture enmarchearrière Pourrenforcerlafindelacouture,appuyezsurlebouton demarchearrière(Fig.2).Relevezl’aiguilleetlepied presseuretdégagezletissuenletirantversl’arrièresur lagauche.Coupezlefilàl’aideducoupe-filencastréen labarredupiedpresseur.
-
Page 58: Free-Armsewing
Free-arm sewing Removingtheextension table Tochangemachineforfree-armsewing,liftrightedge(1)of extensiontable,slideittotheleftandoffthemachine(2). Toreplacetheextensiontable,slideittotherightkeepingit evenwiththefree-arm,untilthetabsontherightlockinto place. Fabric handling, when sewing tubular and hard reach garmentareas,issimplifiedandmadeeasierwhenyouuse thefree-armsewingcapabilityofyoursewingmachine. Applications Sleeves • Free-armsewingtakesthedifficultyoutoftopstitching, sleeves,finishing waistbands and trouser legs rotate smoothlyundertheneedle,aroundthearm,allowingyou toplaceyourstitchingaccurately. Buttons • Sewingbuttonsonacufforneckbandiseasywithfree- arm sewing.Thesewingarmallowsroomforcuffstoslip onto withoutbeingstretchedoutofshape,andyoucan alsosee andhandlethestitchingareamoreeasily.
-
Page 59: Coutureaveclebras-Libre
Couture avec le bras-libre Pour enlever l’extension de la base Pour transformer votre machine plateau e n m a c h i n e à bras-libre,soulevezleborddroit(1)duplateauetglissez verslagauchepourleretirer(2). Pour remettre en place le plateau, glissez-le vers la droitedepartetd’autredubras-librejusqu’àcequela pattededroitesoitenplace. Votrecoutureserasimplifiéeenutilisantlebras-librede votremachinepourlesouvragestubulaires. Applications Manches •…
-
Page 60: Monogramandembroidering
Monogram and Embroidering You will be able to produce beautiful monograms and embroideringwithjustalittleofpractice,creativityanda frame (not supplied), giving a personal touch to your works. RECOMMENDEDSETTINGS Pattern: Zigzag(Monogram)and/or StraightStitch(Embroidering) Stitchlength:0-1 1. Draw the letters (Monograms) and drawings (for Embroidering)ontherightsideofthefabric. 2. Removepresserfoot. ttachthefeedcover(seepage 3.
-
Page 61: Monogrammes Et Broderie
Monogrammes et broderie Avecunpeud’habilité,decréativitéetuncerceau(non livrée), onpeutfairedebeauxmonogrammesetdes broderies,enpersonnifiant noscréations. AJUSTEMENTSRECOMMENDÉS Typedepoint: zigzag(monogramme)ou couturedroite (broderie) Longueurdupoint:0-1 1. Dessinezleslettres(pourunmonogramme)et les dessins (pourlabroderie)surlecôtédroitdutissu. 2. Enlevezlepiedpresseur. nstallezlaplaquecouvre-griffes(page 3. Placerletissudanslecerceau avecledessinoules lettresdans soncentre. 4. Avecdesmouvementscirculaires,etàunevitesse constante, remplissez les monogrammes et les dessins.
-
Page 62: Removing Andreplacingbobbincase
Removing and replacing bobbin case To remove bobbin case 1. Openslideplateandremovebobbin. 2.Removetheneedleplate. With a small screwdriver, turn and take hold of the bobbincaseretainingplatetotherearasfarasitwill go(illustration2). 4. Lifttheleftsideofthebobbincaseandslideitoutto theleftandoutfromthemachine(illustration1). 5. Loosenslightlythebobbincaseretainingplateuntilits initialposition(illustration4). Replacing the bobbin case With a small screwdriver, the bobbin case retaining platetothebackasfarasitwillgo(illustration2).
-
Page 63: Retirer Etreplacerlesupportdebobine
Retirer et replacer le support de bobine Pour retirer le support de bobine 1. Ouvrezlaplaque glissièreetenlevezlabobine. 2. Enlevéelaplaqueàaguille(pag. ). 3. A l’aide d’un petit tournevis, tournez et tenez le loquet du support de bobine totalement vers l’arrière(fig.2). 4. Soulevez le côté gauche du support de bobine et glissez-le vers la gauche et hors de la machine (fig.1).
-
Page 64: Cleaningthemachine
Take-uplever,threadguidesandneedlethreadten- siondial. Presserbarandneedlebar. Bobbincaseandneedleplatearea. Note: DONOTremovethepositioningplate .Ifarea under positioning plate needs cleaning, take your machine to an authorized Singer Service Center. YOUR MACHINE MUST BE PERIODICALLY CHECKED BY YOUR LOCAL SINGER AUTHORIZED SERVICE CENTERFORWEAR.
-
Page 65: Nettoyagede Lamachine
Le support de la bobine et la région de plaque à aiguille. Ne retirez jamais la plaque de positionnement .Aucasoùlarégionsouscetteplaqueaurait besoin d’unnettoyage, confiez votre machine à un technicien du Réseau de Services Autorisés Singer. VOTREMACHINE DOIT ETRE REVISE PERIODI- QUEMENT PAR UN TECHNICIEN DU RESEAU DE SERVICES AUTORISES SINGER.
-
Page 66: Changingthelightbulb
Changing the light bulb BEFORECHANGINGLIGHTBULB,UNPLUGMACHINE FROMSOCKETOUTLET. UseoriginalSINGERlightbulbsonly( code988076 Removinglight bulb (illustration 2) 1. Remove screw (A) located on face plate andremove platepullingitdownandtotheright. 2. Donotattempttounscrewthelightbulb.Pushbulbup into the socket and at the same time, turn it to the direction indicated (clockwise) to unlock bulb pin (illustration2).
-
Page 67: Changer L’ampoule
Changer l’ampoule Utilisez seulement deslampes originelles Singer (code 988076). Enlever l’ampoule(fig.2) . Dévissez la vis de la plaque de face. Retirez la plaqueenlatirantparsonbordinférieur,verslebas etversla droite(fig.1). 2. N’essayez pas de dévisser l’ampoule. Poussez l’am- poule vers le haut dans la douille et, en même temps, tournez-la dans le sens indiqué, pour la…
-
Page 68: Lubricatingthemachine
Your sewing machineshallbelubricatedaccordingtothis useofwhereitisstored.Ifyouuseitafewtimesamonth, lubricatingthemachineonceayearisenough.Ifyouuseit frequently,lubricateitatleastonceamonth. When lubricating, apply only SINGER oil at the points shown. SINGER oil is specially prepared and does not contain harmful deposits that can interfere with the operationofprecisionparts. To determine which connections move and need lubrication,turnthehandwheelslowlybyhand,whileface placeisremoved.
-
Page 69: Lubrification Delamachine
Si vous l’utilisez quelques fois par mois, il suffitdelalubrifierunefoisparan.Sivousl’utilisez fréquemment,lubrifiezaumoinsunefoisparmois. Pour la lubrification, utilisez seulement l’huile lubrifiant SINGER sur tous les endroits indiqués. L’huile SINGER est spécialement préparé n’ayant pas derésidusnocifspouvantinterférersurlemouvement despièces de précision. Pour déterminerquellespiècesontbesoindelubrifi- cation,retirezlaplaquedefaceettournezlentement levolantversvous.
-
Page 70: Performance Checklist
Performance checklist Needle does notmove Upperthreadbreaks Is machineconnectedtoelectricalsupply? Ismachine properly threaded? Is thepowerandlightswitchedon? Isthread freely unwinding from spool? Is speedcontrolpedalconnected? Isupperthreadtension tootight? Is thebobbinwindingindentengaged? Isbobbin caseproperlyinserted? Isbobbin rim freeofnicks? Needle moves butstitch is notformed Lowerthreadbreaks Is needledefective? Is needlefullyinsertedintoneedleclamp? Isbobbin correctly wound? Arebobbinandneedlecorrectlythreaded? Isbobbin correctly insertedintobobbin case? Isbobbincorrectlyinsertedintobobbincase?
-
Page 72: Guidepourlavérificationdesdéfauts
Guide pour la vérification des problèmes L’aiguille ne bouge pas Le fil supérieur casse Avez-vousbranchezlamachine? Lamachineest-ellebienenfilée? L’intérrupteur est-il connecté? Lefilsedéroule-illibrementdelabobine? Lerhéostat est-il branché? Lagrosseurdel’aiguilleest-elleadaptéeàlagrosseur L’isolateurd’aiguille est-ilactionné? du fil utilisé? Latensiondufilsupérieurest-elletropélevée? L’aiguille bouge mais elle ne fait pas le point Lesupportdecanetteest-ilbienenplace? Les bordsdelabobineont-ilsdesbourres? L’aiguilleest-elleendommagée? L’aiguilleest-elleentièrementenplacedanslepince-…
-
Page 76
PrintedinBrazil/ImpresoenelBrasil ImpriméauBrésil- E n g . / S p a . / F r e n . Part Number/ PièceNº. 358378-001…
Швейная машина Singer 2808 — инструкция пользователя по применению, эксплуатации и установке на русском языке. Мы надеемся, она поможет вам решить возникшие у вас вопросы при эксплуатации техники.
Вы можете скачать инструкцию к Singer 2808 по ссылке ниже, если не хотите ждать загрузки. Если остались вопросы, задайте их в комментариях после инструкции.
«Загружаем инструкцию», означает, что нужно подождать пока файл загрузится и можно будет его читать онлайн. Некоторые инструкции очень большие и время их появления зависит от вашей скорости интернета.
Остались вопросы?
Не нашли свой ответ в руководстве или возникли другие проблемы? Задайте свой вопрос в форме ниже с подробным описанием вашей ситуации, чтобы другие люди и специалисты смогли дать на него ответ. Если вы знаете как решить проблему другого человека, пожалуйста, подскажите ему


Часто задаваемые вопросы

Как посмотреть инструкцию к Singer 2808?
Необходимо подождать полной загрузки инструкции в сером окне на данной странице или скачать кликнув по специальной кнопке.
Руководство на русском языке?
Все наши руководства представлены на русском языке или схематично, поэтому вы без труда сможете разобраться с вашей моделью
Как можно распечатать инструкцию?
Скачайте ее по специальной кнопке над формой чтения на ваше устройства и отправьте на печать.
Перейти к контенту
Швейные машинки Singer

- Размер инструкции: 2.27 Мб
- Формат файла: pdf
Если вы потеряли инструкцию от швейной машинки Singer 2808, можете скачать файл для просмотра на компьютере или печати.
Инструкция для швейной машинки Singer 2808 на русском языке. В руководстве описаны возможности и полезные функции, а также правила эксплуатации. Перед использованием внимательно ознакомьтесь с инструкцией.
Чтобы не читать всю инструкцию вы можете выполнить поиск по содержимому внутри инструкции и быстро найти необходимую информацию. Рекомендации по использованию помогут увеличить срок службы швейной машинки Singer 2808. Если у вас появилась проблема, то найдите раздел с описанием неисправностей и способами их решения. В нем указаны типичные поломки и способы их решения.