Настройка сканера штрих-кода происходит быстро и легко, путём считывания служебных штрих кодов со страниц мануала, достаточно следовать пунктам. Но тем не менее она часто вызывает ряд вопросов как у обычных пользователей, решивших автоматизировать свой магазин, так и у некоторых системных администраторов.
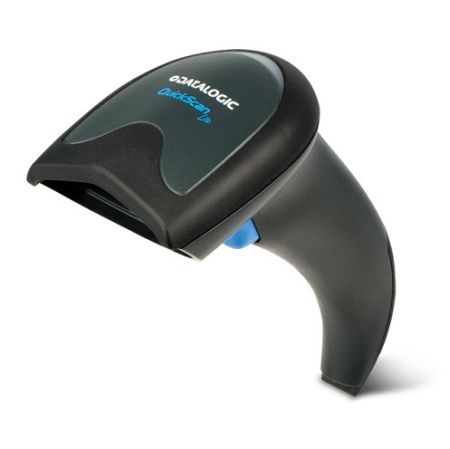
Рассмотрим пример по настройке сканера штрих-кода Datalogic Quickscan Lite QW2100. Данная модель наиболее распространена, она представляет собой идеальное соотношение цена/качество. Со сканером в комплекте идёт так же подставка.
Итак, вы купили сканер и хотите подключить его к своей 1С Предприятие 8: Управление торговлей 11, для того чтобы заносить позиции в накладную сканируя товар.
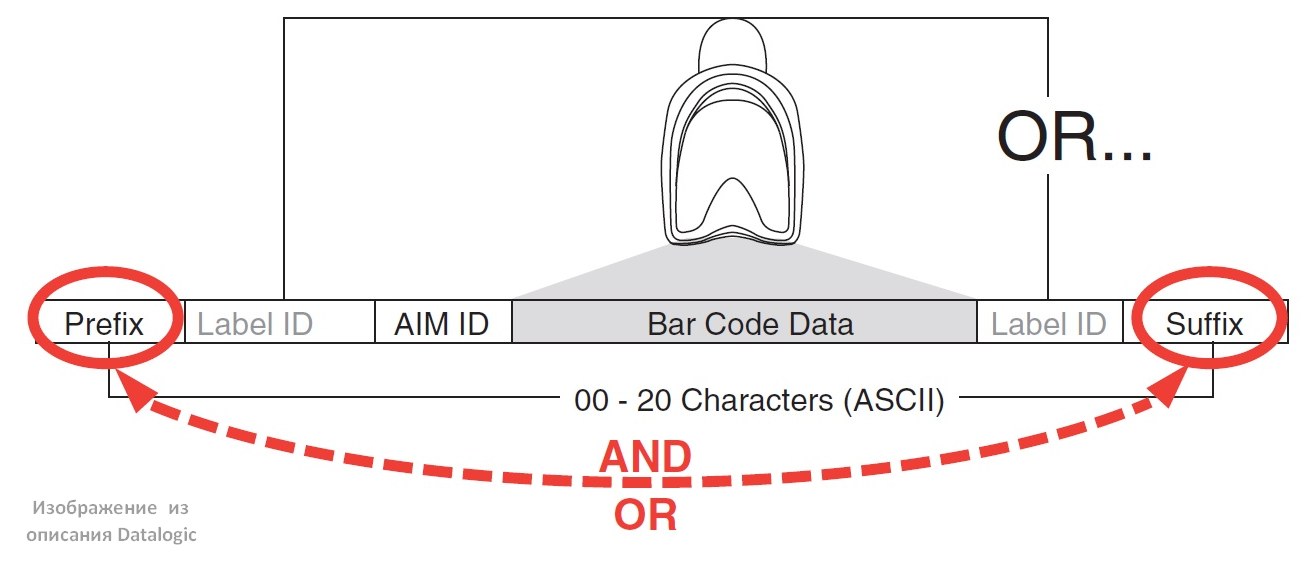
По сути, сканер – это вводное устройство как клавиатура, только он вводит числовой код который получает расшифровкой полос штрих-кода. Можно считать код и сканер будет вводить его в блокнот или в ворд, в общем куда угодно. Но для того чтобы заполнять позиции товарной накладной в 1С нужно чтобы сканер мог перед считыванием эмулировать нажатие клавиши «F7», а после считывания штрих кода нажатие клавиши «Enter». То есть префикс и суффикс.
Для этого качаем мануал по сканерам Datalogic отсюда.
На странице 68 находятся служебные штрихкоды по активации установки префикса и суффикса.
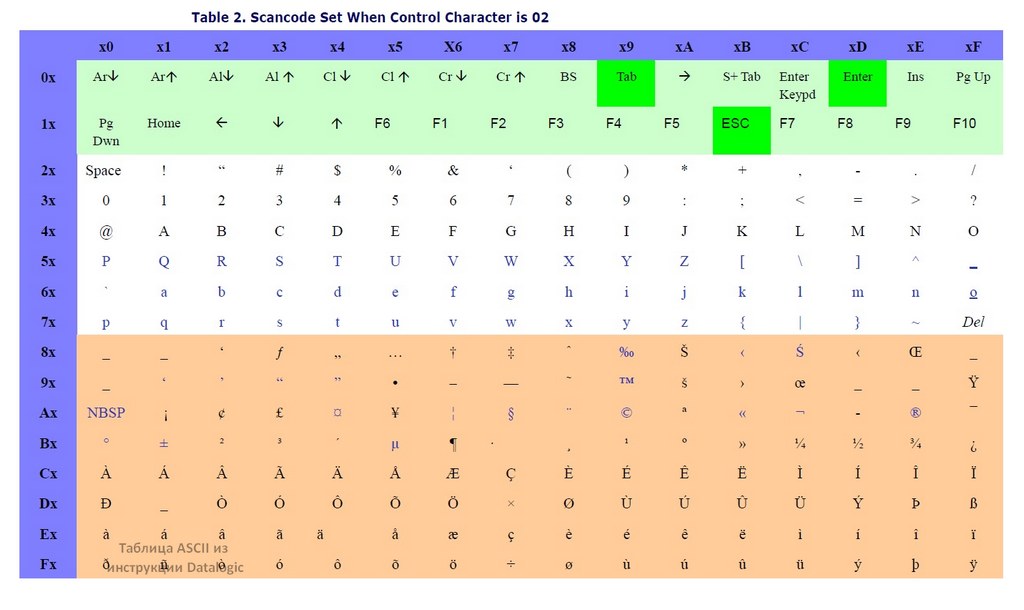
Сами префиксы и суффиксы вводятся в виде кода ASCII, выбранного по таблице для конкретного случая.
Сам процесс описан на странице 260 манула.
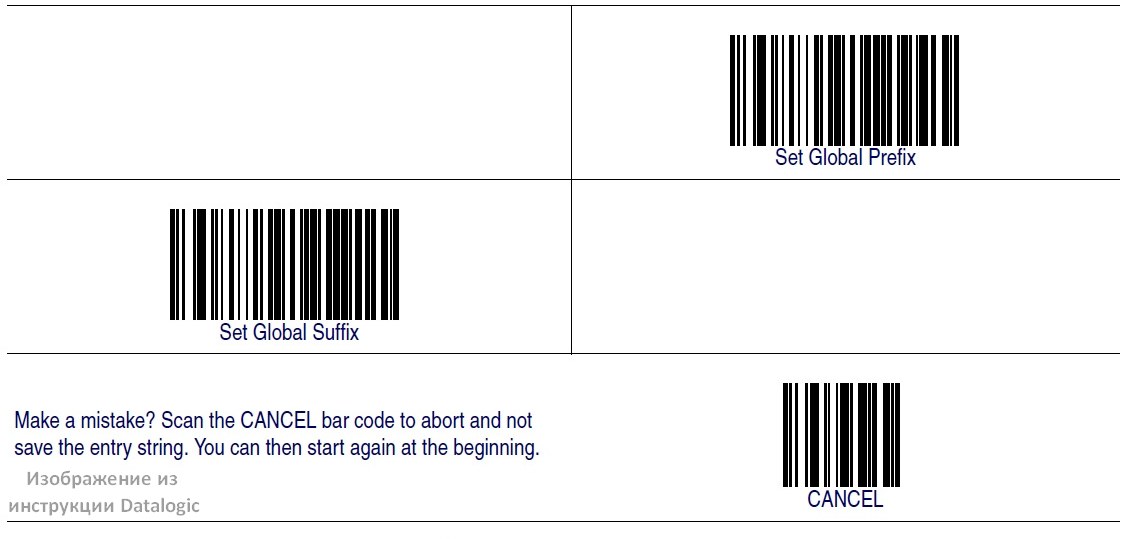
- Сканируем штрих код ENTER/EXIT PROGRAMMING MODE для входа в режим программирования.
- Сканируем штрих код Set Global Pefix
- Сканируем последовательно цифры и буквы, которые подобрали по таблице ASCII для соответствующего символа. (Для F7 это 8B)
- Сканируем штрих код ENTER/EXIT PROGRAMMING MODE для выхода из режима программирования.
Всё. Префикс настроен. Суффикс настраивается аналогично, только на втором шаге сканируется код Set Global Suffix.
Таким образом, к ряду чисел кода можно добавлять ещё различные служебные команды или знаки типа $.
Если у Вас после прочтения данной статьи всё же не получилось настроить сканер, то это не проблема – позвоните нам и наш мастер приедет к вам и всё сделает.
Сканеры штрих-кода других производителей настраиваются аналогично, так же у некоторых (например, Intermec) разработаны специальные программы для настройки, которые её значительно облегчают!
Добавить комментарий
Нажимая кнопку отправить, вы даете согласие на обработку персональных данных
Преимущества сервиса Port
Авторизованный сервисный центр для 22 производителей
Услуги по монтажу, настройке, ремонту всего спектра оборудования
Аккредитованные специалисты
Доставка оборудования в сервисный центр
БОЛЬШЕ О СЕРВИСНОМ ЦЕНТРЕ
Обязательная гарантия на услуги
Наша компания является авторизованным сервисным центром, поэтому мы всегда следим за качеством своего обслуживания.Воспользовавшись нашими услугами вы получаете:
Штат специалистов, готовый ответить на вопросы
Бесплатный выезд специалиста
Актуальную документацию по обслуживанию оборудования
БОЛЬШЕ О СЕРВИСНОМ ЦЕНТРЕ
Вам могут быть интересны:
Подключение и настройка сканера ШК Datalogic DLS QS Lite QW2100 к программе ОПСУРТ Вы приобрели сканер штрих кода Datalogic DLS QS Lite QW2100, открыли, распаковали и подключили к своему ПК или ноутбуку. Запустили программу, зашли в документ продажи и отсканировали свой товар. Программа или не нашла товар или нашла товар, добавила его продажу, но строка для поиска товара не очистилась. Это означает, что сканер настроен в режиме USB-HID, то есть он работает как обычная клавиатура. Это на первый взгляд — мелочь, но она доставит Вам много неудобств (например, после каждого сканирования надо будет очищать строку поиска). Для удобной работы в программе ОПСУРТ, необходимо настроить сканер в режим работы через виртуальный com-порт.
Пошаговая инструкция настройки сканера:
- Подключаем сканер ШК с ПК.
- Он определяется как стандартное устройство ввода или USB/HID клавиатура. Для проверки можете открыть любой текстовый редактор, например, БЛОКНОТ. И попробуйте просканировать Ваш товар. В итоге Вы должны увидеть в блокноте цифры штрихкода. Если все так и есть, то сканер определился в системе. Переходим к следующему пункту.
- Необходимо скачать файл настроек. необходимо разархивировать и распечатать скачанный файл
- Сканируем ШК из распечатанного файла
- Отключаем сканер от ПК
- Устанавливаем драйвер (скачать для 32-bit или скачать для 64-bit)
- Распаковываем скачанный архив и устанавливаем драйвер
- Подключаем сканер к ПК
- Сканер устанавливается как устройство «com-порт» и ему будет присвоен номер com-порта, например com4(необходимо запомнить номер порта). Если этого не произошло, и появляется окно с требованием установить драйвер, то следует выбрать ручную установку драйвера и указать путь к файлу драйвера.
Теперь сканер настроен и можно переходить к настройке его в программе ОПСУРТ
- Перезапускаем программу ОПСУРТ (если она была запущена)
- Войдите в настройки сканера ШК, нажав на кнопку с изображением сканера штрих кода
- Должно появится окно настройки сканера ШК. Здесь установите флажок «Устройство используется» и выберите используемый устройством COM-порт(тот который запомнили ранее)
-
Contents
-
Table of Contents
-
Troubleshooting
-
Bookmarks
Quick Links
TM
QuickScan
Lite QW2100
General Purpose Corded
Handheld Linear Imager Bar Code Reader
Quick Reference Guide
Related Manuals for Datalogic QuickScan Lite QW2100
Summary of Contents for Datalogic QuickScan Lite QW2100
-
Page 1
QuickScan Lite QW2100 General Purpose Corded Handheld Linear Imager Bar Code Reader Quick Reference Guide… -
Page 2
An Unpublished Work — All rights reserved. No part of the contents of this docu- mentation or the procedures described therein may be reproduced or transmitted in any form or by any means without prior written permission of Datalogic ADC, Inc. or its subsidiaries or affiliates («Datalogic» or «Datalogic ADC»). Owners of Datalogic products are hereby granted a non-exclusive, revocable license to reproduce and transmit this documentation for the purchaser’ s own internal business purposes. -
Page 3
Agreement. If you do not intend to be bound to the terms of this Agreement, Datalogic is not willing to license the Software to you, you may not use the Datalogic Product or the Software, and you must contact the party from whom you acquired the Datalogic Product for instructions. -
Page 4
Inc., Legal Department, 959 Terry Street, Eugene, OR 97402. 7.2 In the defense or settlement of any such claim, Datalogic may, at its option, 1) procure for End User the right to continue using the Datalogic Product, 2) modify the Datalogic Product so that it… -
Page 5
Computer Software clause at DFARS 252.227-7013(c)(1)(ii), whichever is applicable. 9.2 If End User is using the Datalogic Product outside of the United States, End User must comply with the applicable local laws of the country in which the Datalogic Product is used, with U.S. -
Page 6
Software Product Policy Datalogic reserves the right to ship its products with the latest version of software/firmware available. This provides our cus- tomers with the very latest in Datalogic software technology. The only exception to this policy is when the buyer has a signed… -
Page 7
Hands Free Stand/Holder Figure 1. Adjusting the Stand Quick Reference Guide… -
Page 8
Connect/Disconnect Cable Connect Host Interface Keyboard Wedge Interface RS-232 Interface USB Interface QuickScan Lite QW2100… -
Page 9
Aim and Scan Aim and Scan 012345 012345 65° 65° Quick Reference Guide… -
Page 10
Parts of the Reader 1. LED 3. Scan Window 2. Cable Release Hole 4. Trigger QuickScan Lite QW2100… -
Page 11: Programming Bar Codes
Programming Bar Codes Programming Bar Codes For your convenience, this guide includes the programming bar codes required to configure the reader for use with different in- terface (terminal/host) types. See the Product Reference Guide (PRG) for more complete in- formation about programming and configurable features. You can download the latest version of the PRG and any other avail- able publications for the reader from the website listed on the back cover of this manual.
-
Page 12
RS-232 Interface To use an RS-232 interface, scan the bar code for the desired RS-232 host type. Select RS-232 Standard Select RS-232 Wincor Nixdorf Select RS-232 OPOS (for use with OPOS/UPOS/JavaPOS) QuickScan Lite QW2100… -
Page 13
USB and defaults to the USB Keyboard interface. Select USB-COM-STD (simulates RS-232 standard interface) Select USB Keyboard (with standard key encoding) Select USB Alternate Keyboard (with alternate key encoding) Select USB OEM Download the correct USB Com driver from www.datalogic.com. Quick Reference Guide… -
Page 14
Keyboard Wedge Interface To use a Keyboard Wedge interface, scan the bar code for the desired keyboard type. Select KBD-AT (AT, PS/2 25-286, 30-286, 50, 50Z, 60, 70, 80, 90 & 95 w/Standard Key Encoding) Select KBD-AT-NK (IBM AT PS2 with standard key encoding but without external kbd.) Select KBD-AT-ALT (AT, PS/2 25-286, 30-286, 50, 50Z, 60, 70, 80, 90 &… -
Page 15: Scanning Modes
Scanning Modes Scanning Modes If the interface type is changed, scanner configu- ration may be automatically reset to a different Scanning Mode. NOTE The reader can operate in one of several scanning modes: When the trigger is pulled, scanning is activated Trigger Single —…
-
Page 16
, except that a trigger pull is required to activate the decod- Mode Scan Mode = Trigger Single Scan Mode = Trigger Hold Multiple Scan Mode = Trigger Pulse Multiple Scan Mode = Flashing Scan Mode = Always On ® Scan Mode = Autosense Stand Mode Scan Mode = Trigger Object Sense… -
Page 17: Troubleshooting
Troubleshooting Troubleshooting Problem Possible Cause Possible Solutions Check system power. Nothing happens when No power to the Ensure power supply is the trigger is pulled. reader. connected. Interface or power Ensure all cable connec- cables are loose. tions are secure. Ensure reader is pro- grammed to read the Reader not pro-…
-
Page 18
LED and Beeper Indications The reader’s beeper sounds and its LED illuminates to indicate various functions or errors on the reader. A “Green Spot” also lights to indicate a good read. The tables below list these indi- cations. One exception to the behaviors listed in the tables is that the reader’s functions are programmable, and may or may not be turned on. -
Page 19: Ergonomic Recommendations
Datalogic could void the user’s authority to operate the equipment. Power Supply Use only a power supply approved by Datalogic for this prod- uct and model. Models require either a Listed class II or class III with a Limited Power Source(LPS) which supplies power di- rectly to the reader.
-
Page 20
Radio Frequency Interference Requirements This equipment has been tested and found to comply with the limits for a Class B digital de- Tested to comply with FCC Standards vice, pursuant to Part 15 of the FCC rules. FOR HOME OR OFFICE USE These limits are designed to provide reason- able protection against harmful interference in a residential in- stallation. -
Page 21: Reader Labeling
Reader Labeling Warranty Datalogic warrants to Customer that Datalogic’s products will be free from defects in materi- als and workmanship for a period of 3 years from product shipment. Datalogic ADC Limited Factory Warranty Warranty Coverage Datalogic ADC (“Datalogic”) hardware products are warranted against defects in material and workmanship under normal and proper use.
-
Page 22
DAMAGES. Risk of Loss Customer shall bear risk of loss or damage for product in transit to Datalogic. Da- talogic shall assume risk of loss or damage for product in Datalogic’s possession. In the absence of specific written instructions for the return of product to Custom- er, Datalogic will select the carrier, but Datalogic shall not thereby assume any liability in connection with the return shipment. -
Page 23
German Informationen zur Entsorgung von Elektro- und Elektronik- Alt- geräten (WEEE) erhalten Sie auf der Webseite www.datalogic.com. Spanish Si desea información acerca de los procedimientos para el desecho de los residuos del equipo eléctrico y electrónico (WEEE), visite la página Web www.datalogic.com. -
Page 24
China RoHS QuickScan Lite QW2100… -
Page 25
China RoHS — Power Supply China RoHS — Power Supply Quick Reference Guide… -
Page 26
Cleaning When needed, gently clean the scan window using a lens cloth or lint-free cleaning tissues dampened with a nonabrasive, mild, water-based glass cleaner. The other surfaces can also be cleaned using the same cleaning agents. Do not allow fluids to flow into the internal parts of the scanner. -
Page 27
959 Terry St. Eugene, OR 97402 USA La presente dichiarazione di conformità è rilasciata sotto la responsabilità esclusiva di Datalogic ADC, Inc. per: This Declaration of Conformity is issued under the sole responsibility of Datalogic ADC, Inc. for: Cette déclaration de conformité est établie sous la seule responsabilité de Datalogic ADC, Inc: Diese Konformitätserklärung wird unter der alleinigen Verantwortung des Datalogic ADC, Inc. -
Page 28
© 2011-2014 Datalogic ADC, Inc. • All rights reserved. • Datalogic and the Datalogic logo are registered trademarks of Datalogic S.p.A. in many countries, including the U.S.A. and the E.U. Datalogic ADC, Inc. 959 Terry Street Eugene |OR 97402…
инструкцияDatalogic QuickScan Lite QW2100

QuickScan
TM
Lite QW2100
General Purpose Corded Handheld
Linear Imager Bar Code Reader
Product Reference Guide
Посмотреть инструкция для Datalogic QuickScan Lite QW2100 бесплатно. Руководство относится к категории сканеры штрих-кода, 9 человек(а) дали ему среднюю оценку 8.8. Руководство доступно на следующих языках: английский. У вас есть вопрос о Datalogic QuickScan Lite QW2100 или вам нужна помощь? Задайте свой вопрос здесь
- Chapter 1. Introduction
- About this Guide ………….1
- Manual Overview …………1
- Manual Conventions ……2
- References …………………….2
- Technical Support ………..3
- Datalogic Website Support
- Reseller Technical Support
- Telephone Technical Support
- Chapter 2. Getting Started
- About the Reader …………5
- Unpacking …………………….5
- Setting Up the Reader …6
- Install the Interface Cable
- Hands Free Stand ..7
- Programming ………8
- Using the Programming Bar Codes
- Select the Interface Type
- Configure Interface Settings
- Configure Other Features
- Software Version Transmission
- Resetting the Product Configuration to Defaults
- Chapter 3. Interfaces
- Interface Selection ……. 11
- Configuring the Interface
- Global Interface Features
- Host Commands — Obey/Ignore
- USB Suspend Mode
- Chapter 4. General Features
- Double Read Timeout
- Label Gone Timeout … 19
- Power Save Mode …….. 20
- Sleep Mode Timeout .. 21
- LED and Beeper Indicators
- Power On Alert …. 22
- Good Read: When to Indicate
- Good Read Beep Type
- Good Read Beep Frequency
- Good Read Beep Length
- Illumination Control
- Good Read Beep Volume
- Good Read LED Duration
- Scanning Features ……. 30
- Scan Mode ………… 30
- Stand Mode Triggered Timeout
- Scanning Active Time
- Stand Mode Flash
- Flash On Time …… 34
- Flash Off Time …….34
- Stand Mode Sensitivity ………………………………………………………………………….35
- Green Spot Duration …36
- Chapter 5. RS-232 ONLY Interface
- Introduction ……………….37
- RS-232 Standard Factory Settings
- Baud Rate ……………………37
- Data Bits ………………………39
- Stop Bits ………………………39
- Parity ……………………………40
- Handshaking Control ..41
- Chapter 6. RS-232/USB-Com Interfaces
- Introduction ……………….43
- Standard Factory Settings
- Intercharacter Delay ….44
- Beep On ASCII BEL ……..45
- Beep On Not on File …..45
- ACK NAK Options ……….46
- ACK Character ……47
- NAK Character ……47
- ACK NAK Timeout Value
- ACK NAK Retry Count
- ACK NAK Error Handling
- Indicate Transmission Failure
- Disable Character ………51
- Enable Character ………..52
- Chapter 7. Keyboard Interface
- Introduction ……………….53
- Standard Factory Settings
- Scancode Tables ………..53
- Country Mode …………….54
- Caps Lock State ………….57
- Numlock ………………………58
- Keyboard Numeric Keypad
- Keyboard Send Control Characters
- Wedge Quiet Interval ..60
- Intercharacter Delay ….61
- Intercode Delay ………….62
- USB Keyboard Speed …63
- Chapter 8. USB-OEM Interface
- Introduction ……………….65
- Standard Factory Settings
- USB-OEM Device Usage
- USB-OEM Interface Options
- Chapter 9. Data Editing
- Data Editing Overview
- Please Keep In Mind… .68
- Global Prefix/Suffix ……68
- Global AIM ID ……………..69
- GS1-128 AIM ID ………….69
- Label ID ……………………….70
- Label ID: Pre-loaded Sets
- Label ID: Set Individually Per Symbology
- Label ID Control …71
- Label ID Symbology Selection
- Set Global Mid Label ID Character(s)
- Case Conversion ……….. 81
- Character Conversion . 82
- Chapter 10. Symbologies
- Introduction ………………. 83
- Symbologies …….. 83
- Standard Factory Settings for Symbologies
- Disable All Symbologies
- Coupon Control ………… 84
- UPC-A …………………………. 85
- UPC-A Enable/Disable
- UPC-A Check Character Transmission
- Expand UPC-A to EAN-13
- UPC-A Number System Character Transmission
- In-Store Minimum Reads
- UPC-E ………………………….. 88
- UPC-E Enable/Disable
- UPC-E Check Character Transmission
- Expand UPC-E to EAN-13
- Expand UPC-E to UPC-A
- UPC-E Number System Character Transmission
- UPC-E Minimum Reads
- EAN 13 ………………………… 91
- EAN 13 Enable/Disable
- EAN 13 Check Character Transmission
- EAN-13 Flag 1 Character
- EAN-13 ISBN Conversion
- ISSN Enable/Disable
- EAN 13 Minimum Reads
- EAN 8 ………………………….. 94
- EAN 8 Enable/Disable
- EAN 8 Check Character Transmission
- Expand EAN 8 to EAN 13
- EAN 8 Both Guards Substitution
- EAN 8 Guard Insertion
- EAN 8 Guard Substitution
- EAN 8 Minimum Segment Length Block
- EAN 8 Minimum Reads
- EAN 8 Stitch Exact Label Halves
- EAN 8 Stitch Unlike Label Halves
- EAN Two Label ………… 101
- EAN Two Label Enable/Disable
- EAN Two Label Combined Transmission
- EAN Two Label Minimum Reads
- UPC/EAN Global Settings
- UPC/EAN Decoding Level
- UPC/EAN Correlation
- UPC/EAN Price Weight Check
- UPC-A Minimum Reads
- UPC/EAN Guard Insertion
- UPC/EAN Stitch Exact Label Halves
- UPC/EAN Stitch Unlike Label Halves
- UPC/EAN Minimum Segment Length
- Add-Ons …………………… 111
- Optional Add-ons
- Optional Add-On Timer
- P2 Add-Ons Minimum Reads
- P5 Add-Ons Minimum Reads
- GS1-128 Add-Ons Minimum Reads
- GS1 DataBarTM
- GS1 DataBar Omnidirectional Enable/Disable
- GS1 DataBar Omnidirectional GS1-128 Emulation
- GS1 DataBar Omnidirectional Minimum Reads
- GS1 DataBarTM
- GS1 DataBar Expanded Enable/Disable
- GS1 DataBar Expanded GS1-128 Emulation
- GS1 DataBar Expanded Minimum Reads
- GS1 DataBar Expanded Length Control
- GS1 DataBar Expanded Set Length 1
- GS1 DataBar Expanded Set Length 2
- GS1 DataBarTM
- GS1 DataBar Limited Enable/Disable
- GS1 DataBar Limited GS1-128 Emulation
- GS1 DataBar Limited Minimum Reads
- Code 39 ……………………. 127
- Code 39 Enable/Disable
- Code 39 Check Character Calculation
- Code 39 Check Character Transmission
- Code 39 Start/Stop Character Transmission
- Code 39 Full ASCII
- Code 39 Quiet Zones
- Code 39 Minimum Reads
- Code 39 Decoding Level
- Code 39 Length Control
- Code 39 Set Length 1
- Code 39 Set Length 2
- Code 39 Interdigit Ratio
- Code 39 Character Correlation
- Code 39 Stitching
- Code 32 (Italian Pharmaceutical)
- Code 32 Enable/Disable
- Code 32 Feature Setting Exceptions
- Code 32 Check Character Transmission
- Code 32 Start/Stop Character Transmission
- Code 39 CIP (French Pharmaceutical)
- Code 39 CIP Enable/Disable
- Code 128 ………………….. 142
- Code 128 Enable/Disable
- Expand Code 128 to Code 39
- Code 128 Check Character Transmission
- Code 128 Function Character Transmission
- Code 128 Sub-Code Change Transmission
- Code 128 Quiet Zones
- Code 128 Minimum Reads
- Code 128 Decoding Level
- Code 128 Length Control
- Code 128 Set Length 1
- Code 128 Set Length 2
- Code 128 Character Correlation
- Code 128 Stitching
- GS1-128 ……………………. 152
- GS1-128 Enable
- Interleaved 2 of 5 (I 2 of 5)
- I 2 of 5 Enable/Disable
- I 2 of 5 Check Character Calculation
- I 2 of 5 Check Character Transmission
- I 2 of 5 Minimum Reads
- I 2 of 5 Decoding Level
- I 2 of 5 Length Control
- I 2 of 5 Set Length 1
- I 2 of 5 Set Length 2
- I 2 of 5 Character Correlation
- I 2 of 5 Zero Pattern
- I 2 of 5 Stitching
- Interleaved 2 of 5 CIP HR
- Interleaved 2 of 5 CIP HR Enable/Disable
- Datalogic 2 of 5 ……….. 163
- Datalogic 2 of 5 Enable/Disable
- Datalogic 2 of 5 Check Character Calculation
- Datalogic 2 of 5 Check Character Transmission
- Datalogic 2 of 5 Minimum Reads
- Datalogic 2 of 5 Decoding Level
- Datalogic 2 of 5 Length Control
- Datalogic 2 of 5 Set Length 1
- Datalogic 2 of 5 Set Length 2
- Datalogic 2 of 5 Interdigit Maximum Ratio
- Datalogic 2 of 5 Character Correlation
- Datalogic 2 of 5 Stitching
- Codabar ……………………. 172
- Codabar Enable/Disable
- Codabar Check Character Calculation
- Codabar Check Character Transmission
- Codabar Start/Stop Character Transmission
- Codabar Start/Stop Character Set
- Codabar Start/Stop Character Match
- Codabar Quiet Zones
- Codabar Minimum Reads
- Codabar Decoding Level
- Codabar Length Control
- Codabar Set Length 1
- Codabar Set Length 2
- Codabar Interdigit Ratio
- Codabar Character Correlation
- Codabar Stitching
- ABC Codabar ……………. 185
- ABC Codabar Enable/Disable
- ABC Codabar Concatenation Mode
- ABC Codabar Dynamic Concatenation Timeout
- ABC Codabar Force Concatenation
- Code 11 …………………….. 187
- Code 11 Enable/Disable
- Code 11 Check Character Calculation
- Code 11 Check Character Transmission
- Code 11 Minimum Reads
- Code 11 Length Control
- Code 11 Set Length 1
- Code 11 Set Length 2
- Code 11 Interdigit Ratio
- Code 11 Decoding Level
- Code 11 Character Correlation
- Code 11 Stitching
- Standard 2 of 5 ………… 197
- Standard 2 of 5 Enable/Disable
- Standard 2 of 5 Check Character Calculation
- Standard 2 of 5 Check Character Transmission
- Standard 2 of 5 Minimum Reads
- Standard 2 of 5 Decoding Level
- Standard 2 of 5 Length Control
- Standard 2 of 5 Set Length 1
- Standard 2 of 5 Set Length 2
- Standard 2 of 5 Character Correlation
- Standard 2 of 5 Stitching
- Industrial 2 of 5 ……….. 203
- Industrial 2 of 5 Enable/Disable
- Industrial 2 of 5 Check Character Calculation
- Industrial 2 of 5 Check Character Transmission
- Industrial 2 of 5 Length Control
- Industrial 2 of 5 Set Length 1
- Industrial 2 of 5 Set Length 2
- Industrial 2 of 5 Minimum Reads
- Industrial 2 of 5 Stitching
- Industrial 2 of 5 Character Correlation
- IATA ………………………….. 209
- IATA Enable/Disable
- IATA Check Character Transmission
- ISBT 128 ……………………. 210
- ISBT 128 Concatenation
- ISBT 128 Concatenation Mode
- ISBT 128 Dynamic Concatenation Timeout
- ISBT 128 Force Concatenation
- ISBT 128 Advanced Concatenation Options
- MSI ……………………………. 213
- MSI Enable/Disable
- MSI Check Character Calculation
- MSI Check Character Transmission
- MSI Length Control
- MSI Set Length 1
- MSI Set Length 2
- MSI Minimum Reads
- MSI Decoding Level
- Code 93 ……………………. 219
- Code 93 Enable/Disable
- Code 93 Check Character Calculation
- Code 93 Check Character Transmission
- Code 93 Length Control
- Code 93 Set Length 1
- Code 93 Set Length 2
- Code 93 Minimum Reads
- Code 93 Decoding Level
- Code 93 Quiet Zones
- Code 93 Stitching
- Code 93 Character Correlation
- Codablock F …………….. 227
- Codablock F Enable/Disable
- Codablock F EAN Enable/Disable
- Codablock F AIM Check
- Codablock F Length Control
- Codablock F Set Length 1
- Codablock F Set Length 2
- Code 4 ………………………. 231
- Code 4 Enable/Disable
- Code 4 Check Character Transmission
- Code 4 Hex to Decimal Conversion
- Code 5 ………………………. 232
- Code 5 Enable/Disable
- Code 5 Check Character Transmission
- Code 5 Hex to Decimal Conversion
- Code 4 and Code 5 Common Configuration Items
- Code 4 and 5 Decoding Level
- Code 4 and Code 5 Minimum Reads
- Follett 2 of 5 …………….. 236
- Follett 2 of 5 Enable/Disable
- BC412 ……………………….. 236
- BC412 Enable/Disable
- BC412 Check Character Calculation
- BC412 Minimum Reads
- BC412 Decoding Level
- BC412 Length Control
- BC412 Set Length 1
- BC412 Set Length 2
- Chapter 11. References
- Label Gone Timeout .244
- Good Read LED Duration
- Scan Mode ……………….. 246
- Scanning Active Time
- Flash On Time ………….. 248
- Flash Off Time ………….. 249
- Intercharacter Delay .250
- ACK Character …………. 251
- NAK Character …………. 252
- ACK NAK Timeout Value
- ACK NAK Retry Count
- Disable Character ……. 255
- Enable Character …….. 256
- Wedge Quiet Interval
- Intercharacter Delay .258
- Intercode Delay ………. 259
- Global Prefix/Suffix …. 260
- Example: Setting a Prefix
- Global AIM ID …………… 261
- Label ID: Pre-loaded Sets
- Label ID: Set Individually Per Symbology
- Character Conversion
- Decoding Levels ……… 267
- Set Length 1 …………….. 268
- Set Length 2 …………….. 269
- Appendix A. Technical Specifications
- Standard Cable Pinouts
- Appendix B. Standard Defaults
- Default Exceptions …. 285
- Appendix C. LED and Beeper Indications
- LED and Beeper Indications
- Error Codes ………………. 291
- Appendix D. Sample Bar Codes
- Interleaved 2 of 5 …293
- Codabar ……………….. 294
- Code 11 ……………….. 294
- GS1 DataBar (RSS) …… 295
- Appendix E. Keypad
- Appendix F. Scancode Tables
- Control Character Emulation
- Interface Type PC AT PS/2 or USB-Keyboard
- Interface type PC AT PS/2 Alt Mode or USB-Keyboard Alt Mode
- Digital Interface ………. 306
- IBM XT ………………………. 308
- Microsoft Windows Codepage 1252
- Index
- Chapter 1, Introduction
- Chapter 2, Getting Started
- Chapter 9, Data Editing
- Chapter 4, General Features
- Chapter 7, Keyboard Interface
- Chapter 5, RS-232 ONLY Interface
- Chapter 8, USB-OEM Interface
- Chapter 10, Symbologies
- Chapter 3, Interfaces
- Chapter 6, RS-232/USB-Com Interfaces
- Chapter 11, References
- Figure 2.
- Figure 2.
- Figure 4. The stand can optionally be attached to a
- Interfaces on page 11
- RS-232 ONLY Interface, starting on page 37
- Keyboard Interface, starting on page 53
- USB-OEM Interface, starting on page 65
- RS-232/USB-Com Interfaces, starting on page 43
- tion to Defaults on page 10, require only the scan of thatsingle label to enact the change.
- on page 264
- Code 93
- Interleaved 2 of 5 (I 2 of 5)
- Interleaved 2 of 5 CIP HR
- EAN 13
- Datalogic 2 of 5
- EAN 8
- GS1 DataBarTM Omnidirectional
- GS1 DataBarTM Expanded
- Code 11
- GS1 DataBarTM Limited
- Standard 2 of 5
- Code 39
- Industrial 2 of 5
- Code 32 (Italian Pharmaceutical)
- Code 128
- ISBT 128
- GS1-128
- Code 4
- Code 5
- Follett 2 of 5
- BC412
- EAN 13
- Code 39 CIP (French Pharmaceutical)
- Set Length 2 on page 269
- GS1 DataBarTM Expanded — cont.
- GS1 DataBar Expanded Length Con-
- . Length 2 is the maximum label length if in
- Set Length 2 on page 269
- Code 39 — cont.
- Code 39 Length Control. Length 2 is the
- Code 39 — cont.
- Code 39 Quiet Zones on page 131
- Code 39 Minimum Reads on page 132
- Code 39 Decoding Level on page 133
- Code 39 Interdigit Ratio on page 137
- Code 39 Character Correlation on page 139
- Code 39 Stitching on page 139
- Code 32 (Italian Pharmaceutical) — cont.
- Set Length 2 on page 269
- Code 128 — cont.
- Code 128 Length Control. Length 2 is
- Code 128 — cont.
- Set Length 2 on page 269
- Interleaved 2 of 5 (I 2 of 5) — cont.
- I 2 of 5 Length Control. Length 2 is the
- Interleaved 2 of 5 (I 2 of 5) — cont.
- Set Length 2 on page 269
- Datalogic 2 of 5 — cont.
- Datalogic 2 of 5 Length Control.
- Set Length 2 on page 269
- Codabar Length Control. Length 2 is
- Set Length 2 on page 269
- Code 11 — cont.
- Code 11 Length Control. Length 2 is the
- Code 11 — cont.
- Set Length 2 on page 269
- Standard 2 of 5 — cont.
- Standard 2 of 5 Length Control. Length
- Set Length 2 on page 269
- Industrial 2 of 5 — cont.
- Industrial 2 of 5 Length Control. Length
- Set Length 2 on page 269
- MSI Length Control. Length 2 is the
- Set Length 2 on page 269
- Code 93 — cont.
- Code 93 Length Control. Length 2 is the
- Code 93 — cont.
- Set Length 2 on page 269
- Codablock F Length Control. Length 2
- Set Length 2 on page 269
- BC412 — cont.
- BC412 Length Control. Length 2 is the
- Table 4
- Table 9
- Table 6
- Table 13
- Table 2
- Control on page 71
- 297. f you make a mistake
- GS1-128 AIM ID
- Expand UPC-A to EAN-13
- Expand UPC-E to EAN-13
- EAN 13 Enable/Disable
- EAN 13 Check Character Transmission
- EAN-13 Flag 1 Character
- EAN 8 Both Guards Substitution
- EAN-13 ISBN Conversion
- EAN 13 Minimum Reads
- EAN 8 Enable/Disable
- EAN 8 Check Character Transmission
- Expand EAN 8 to EAN 13
- EAN 8 Minimum Reads
- EAN 8 Guard Insertion
- EAN 8 Guard Substitution
- EAN 8 Minimum Segment Length Block
- EAN 8 Stitch Exact Label Halves
- GS1-128 Add-Ons Minimum Reads
- GS1 DataBar Omnidirectional Enable/
- GS1 DataBar Expanded Enable/Disable
- GS1 DataBar Limited Enable/Disable
- Code 39 Enable/Disable
- Code 39 Stitching
- Code 32 Enable/Disable
- Code 39 CIP Enable/Disable
- Code 128 Enable/Disable
- GS1-128 Enable
- I 2 of 5 Enable/Disable
- Interleaved 2 of 5 CIP HR Enable/Disable
- Datalogic 2 of 5 Enable/Disable
- Code 11 Enable/Disable
- Standard 2 of 5 Enable/Disable
- Industrial 2 of 5 Enable/Disable
- Industrial 2 of 5 Length Control
- ISBT 128 Concatenation
- Code 93 Enable/Disable
- BC412 Enable/Disable
- Code 93 Decoding Level
- Code 4 Enable/Disable
- Code 5 Enable/Disable
- Code 4 and 5 Decoding Level
- Follett 2 of 5 Enable/Disable
- Table 3
Главная
| Datalogic | |
| QuickScan Lite QW2100 | QW2120-BKK1-10 | |
| сканер штрих-кода | |
| 32017020344, 4016138960518, 4016138960525, 4054318470976, 5712505145807, 5712505163245 | |
| английский | |
| Руководство пользователя (PDF) |
Сканирование
| Тип сенсора | Лазерная |
| Поддерживаемые линейные (1D) штрих-коды | EAN 5, EAN-13, EAN-8, GS1-128 (UCC/EAN-128) |
| Поддерживаемые двухмерные штрих-коды | Не поддерживается |
| Скорость чтения (макс) | 400 считываний/с |
| Длина волны | 650 nm |
| Угол крена при считывании | -45 — 45 ° |
| Угол тангажа при считывании | -65 — 65 ° |
| Угол рыскания при считывании | -70 — 70 ° |
| Тип | Переносной считыватель штрих-кода |
Порты и интерфейсы
| Технология подключения | Проводная |
| Стандартные интерфейсы | USB |
Энергопитание
| Тип источника питания | Постоянный ток |
| Входное напряжение | 5 V |
| Потребляемая мощность | 340 mA |
Производительность
| Цвет товара | Черный |
| Материал корпуса | — |
| International Protection (IP) код | IP42 |
Вес и размеры
| Ширина | 170 mm |
| Глубина | 65 mm |
| Высота | 70 mm |
| Вес | 119 g |
Условия эксплуатации
| Диапазон температур при эксплуатации | 0 — 50 °C |
| Диапазон температур при хранении | -40 — 70 °C |
| Диапазон относительной влажности при эксплуатации | 5 — 95 % |
Данные об упаковке
Логистические данные
| Код гармонизированной системы описания (HS) | 84716070 |
показать больше
Не можете найти ответ на свой вопрос в руководстве? Вы можете найти ответ на свой вопрос ниже, в разделе часто задаваемых вопросов о Datalogic QuickScan Lite QW2100.
Какой вес Datalogic QuickScan Lite QW2100?
Какая высота Datalogic QuickScan Lite QW2100?
Какая ширина Datalogic QuickScan Lite QW2100?
Какая толщина Datalogic QuickScan Lite QW2100?
Инструкция Datalogic QuickScan Lite QW2100 доступно в русский?
Не нашли свой вопрос? Задайте свой вопрос здесь