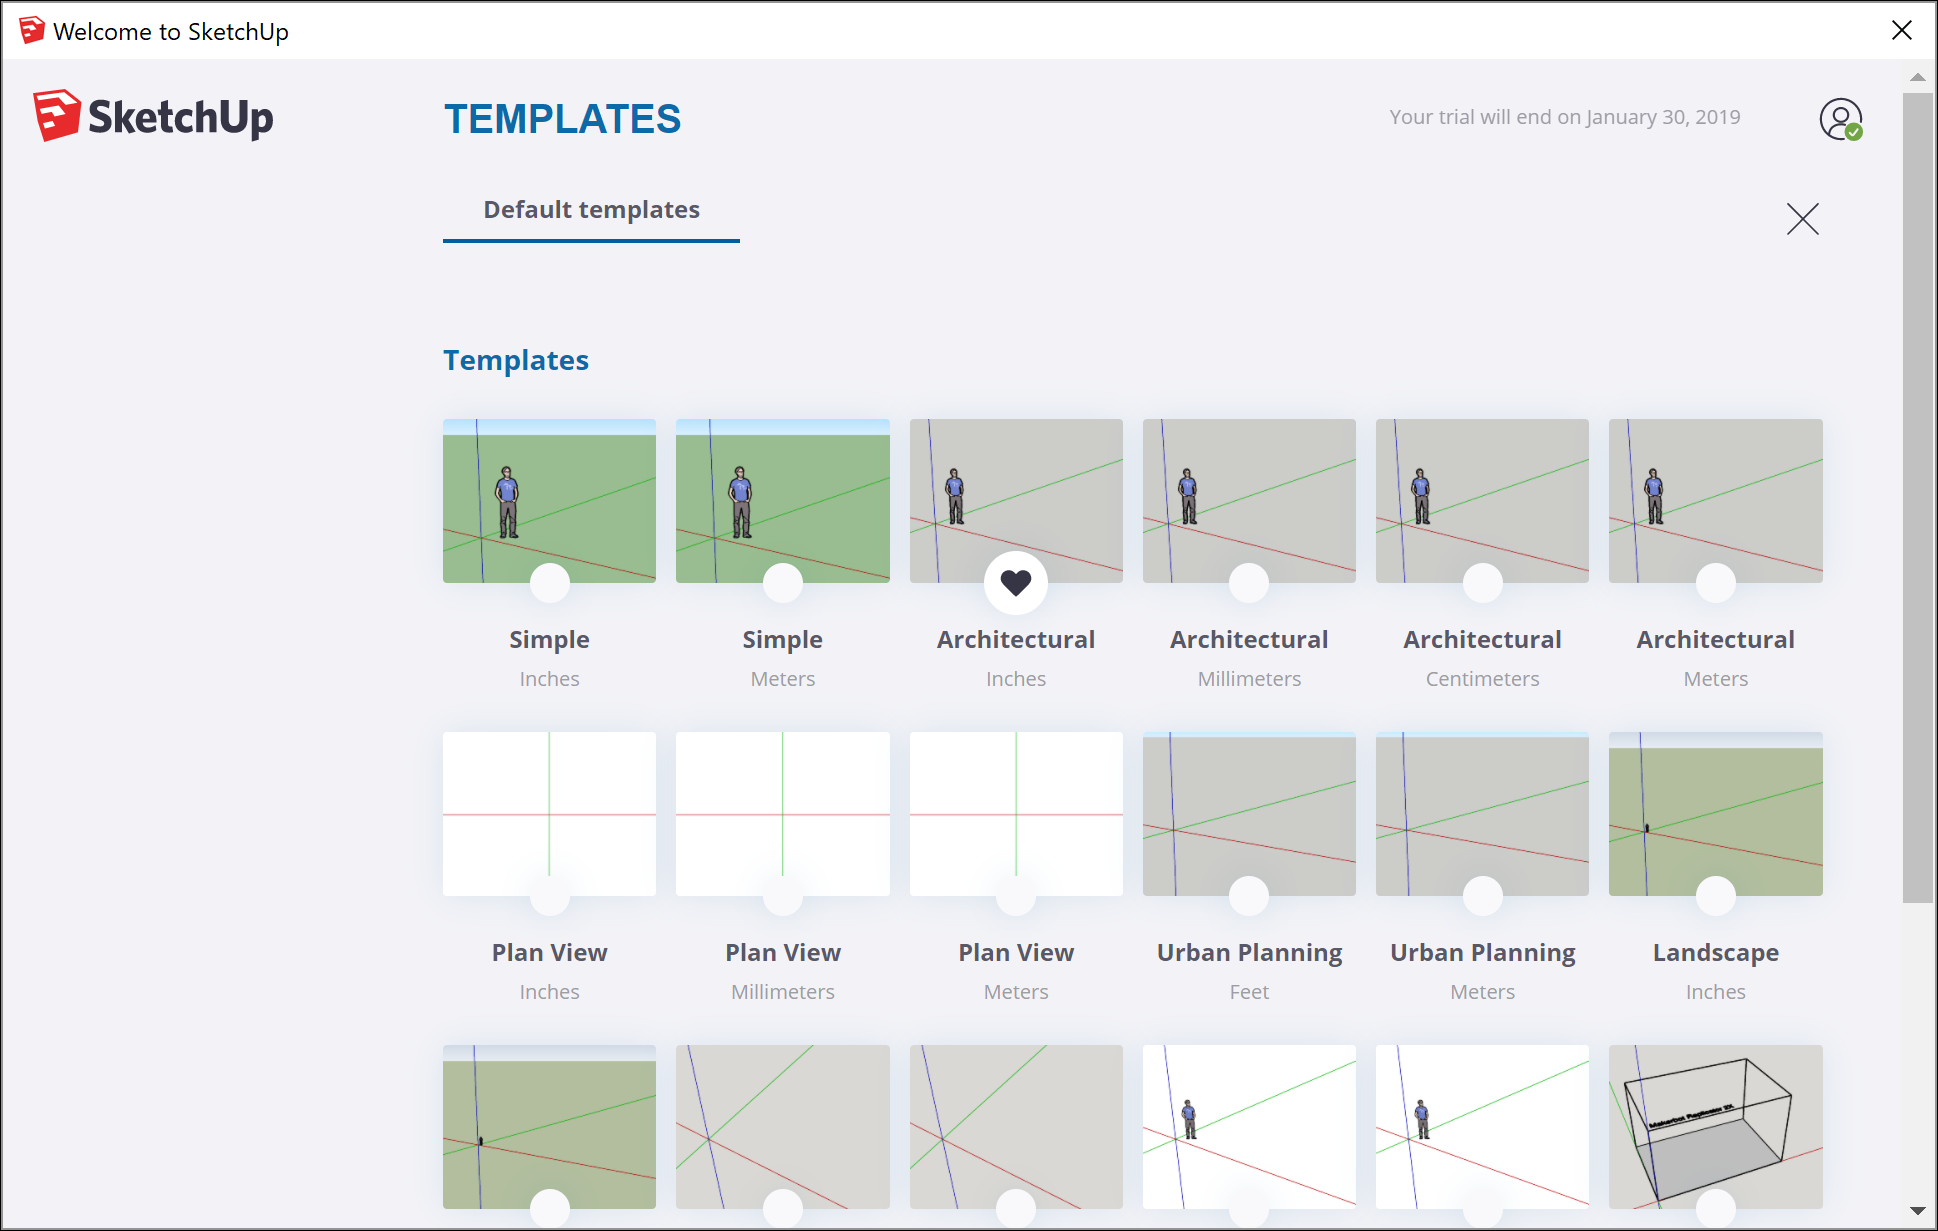
The first time you use SketchUp, you need to sign in to activate your trial or subscription. After you’re signed in, the Welcome to SketchUp dialog box appears, as shown here. This dialog box is your starting point for creating a model and appears every time you start SketchUp (unless you choose to turn it off in the SketchUp Preferences dialog box).
In the Welcome to SketchUp dialog box, you can; choose a template for your model, set the default template, open recent files, browse for an existing file, or license a copy of SketchUp Pro (see Understanding Your License for details), and learn more about SketchUp.
Tip: If you’re new to SketchUp, this article is a great place to warm up your 3D modeling skills. You find an overview of how to select a template, move around the SketchUp interface, create a basic model, and save your model.
Table of Contents
- Selecting a template
- Exploring the SketchUp interface
- Learning how to use SketchUp tools
- Viewing the Quick Reference Card
- Creating your first 3D model in SketchUp
- Saving and reopening a model
- Backing up a SketchUp file or restoring a recovered file
Selecting a template
Every model in SketchUp is based on a template, which has predefined settings for your model’s background and units of measurement. When you begin a new model, selecting a template with the correct unit of measurement makes modeling easier.
Here’s how to select a template in the Welcome to SketchUp dialog box:
- On the Files panel, which is selected by default in the left-hand sidebar, select one of the templates shown (such as Architectural Inches or Woodworking Inches).
- (Optional) If you don’t see the template you want, select More Templates in the upper right. You see additional options, as shown in the following figure. The bold text describes the type of work for which the preset was created. The units appear below the style name. After you select a template, the modeling window appears with your selected template applied.
Tip: While you’re working in SketchUp, you can access the Welcome to SketchUp window anytime. On the menu bar, simply select Help > Welcome to SketchUp. After you become comfortable creating 3D models in SketchUp, you can create a custom template that reflects your preferences.
Exploring the SketchUp interface
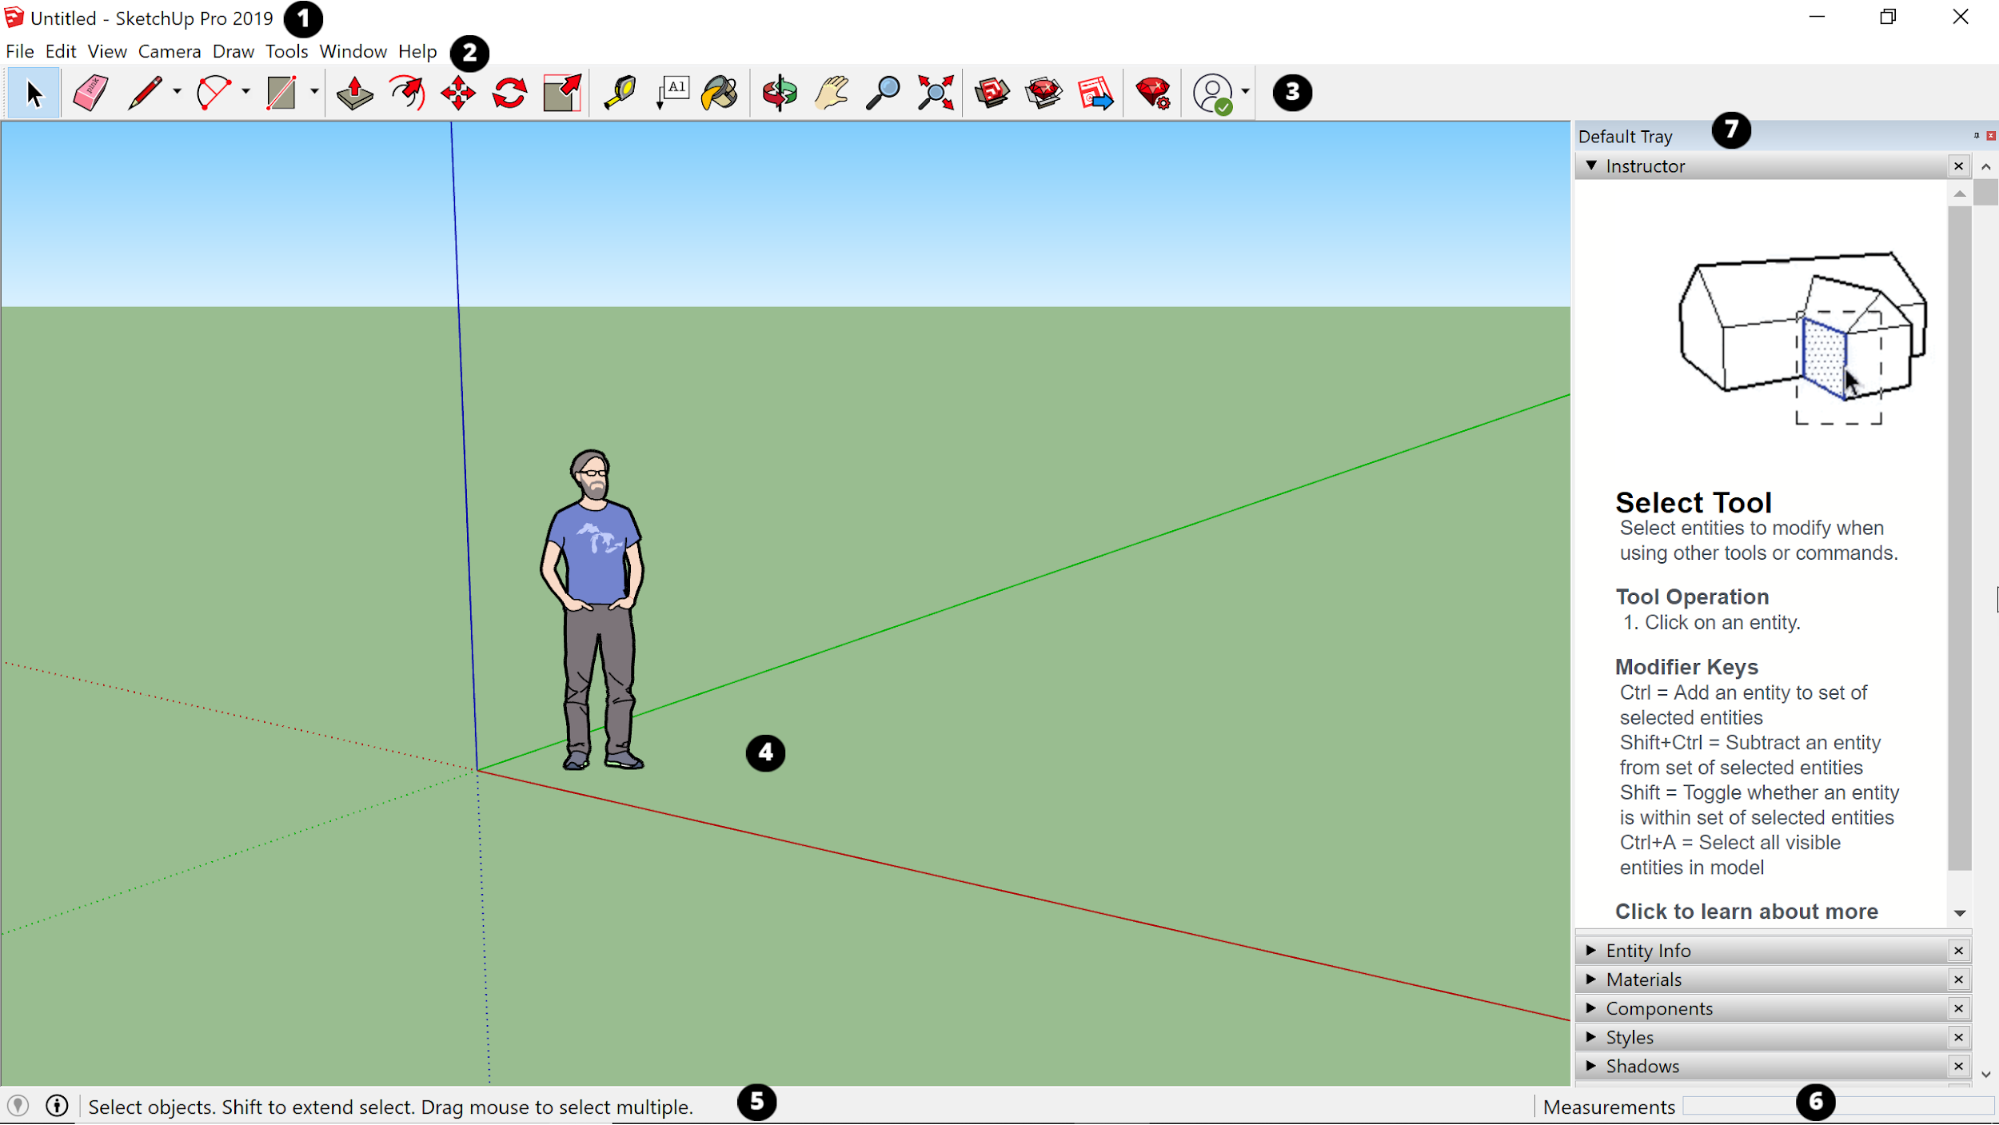
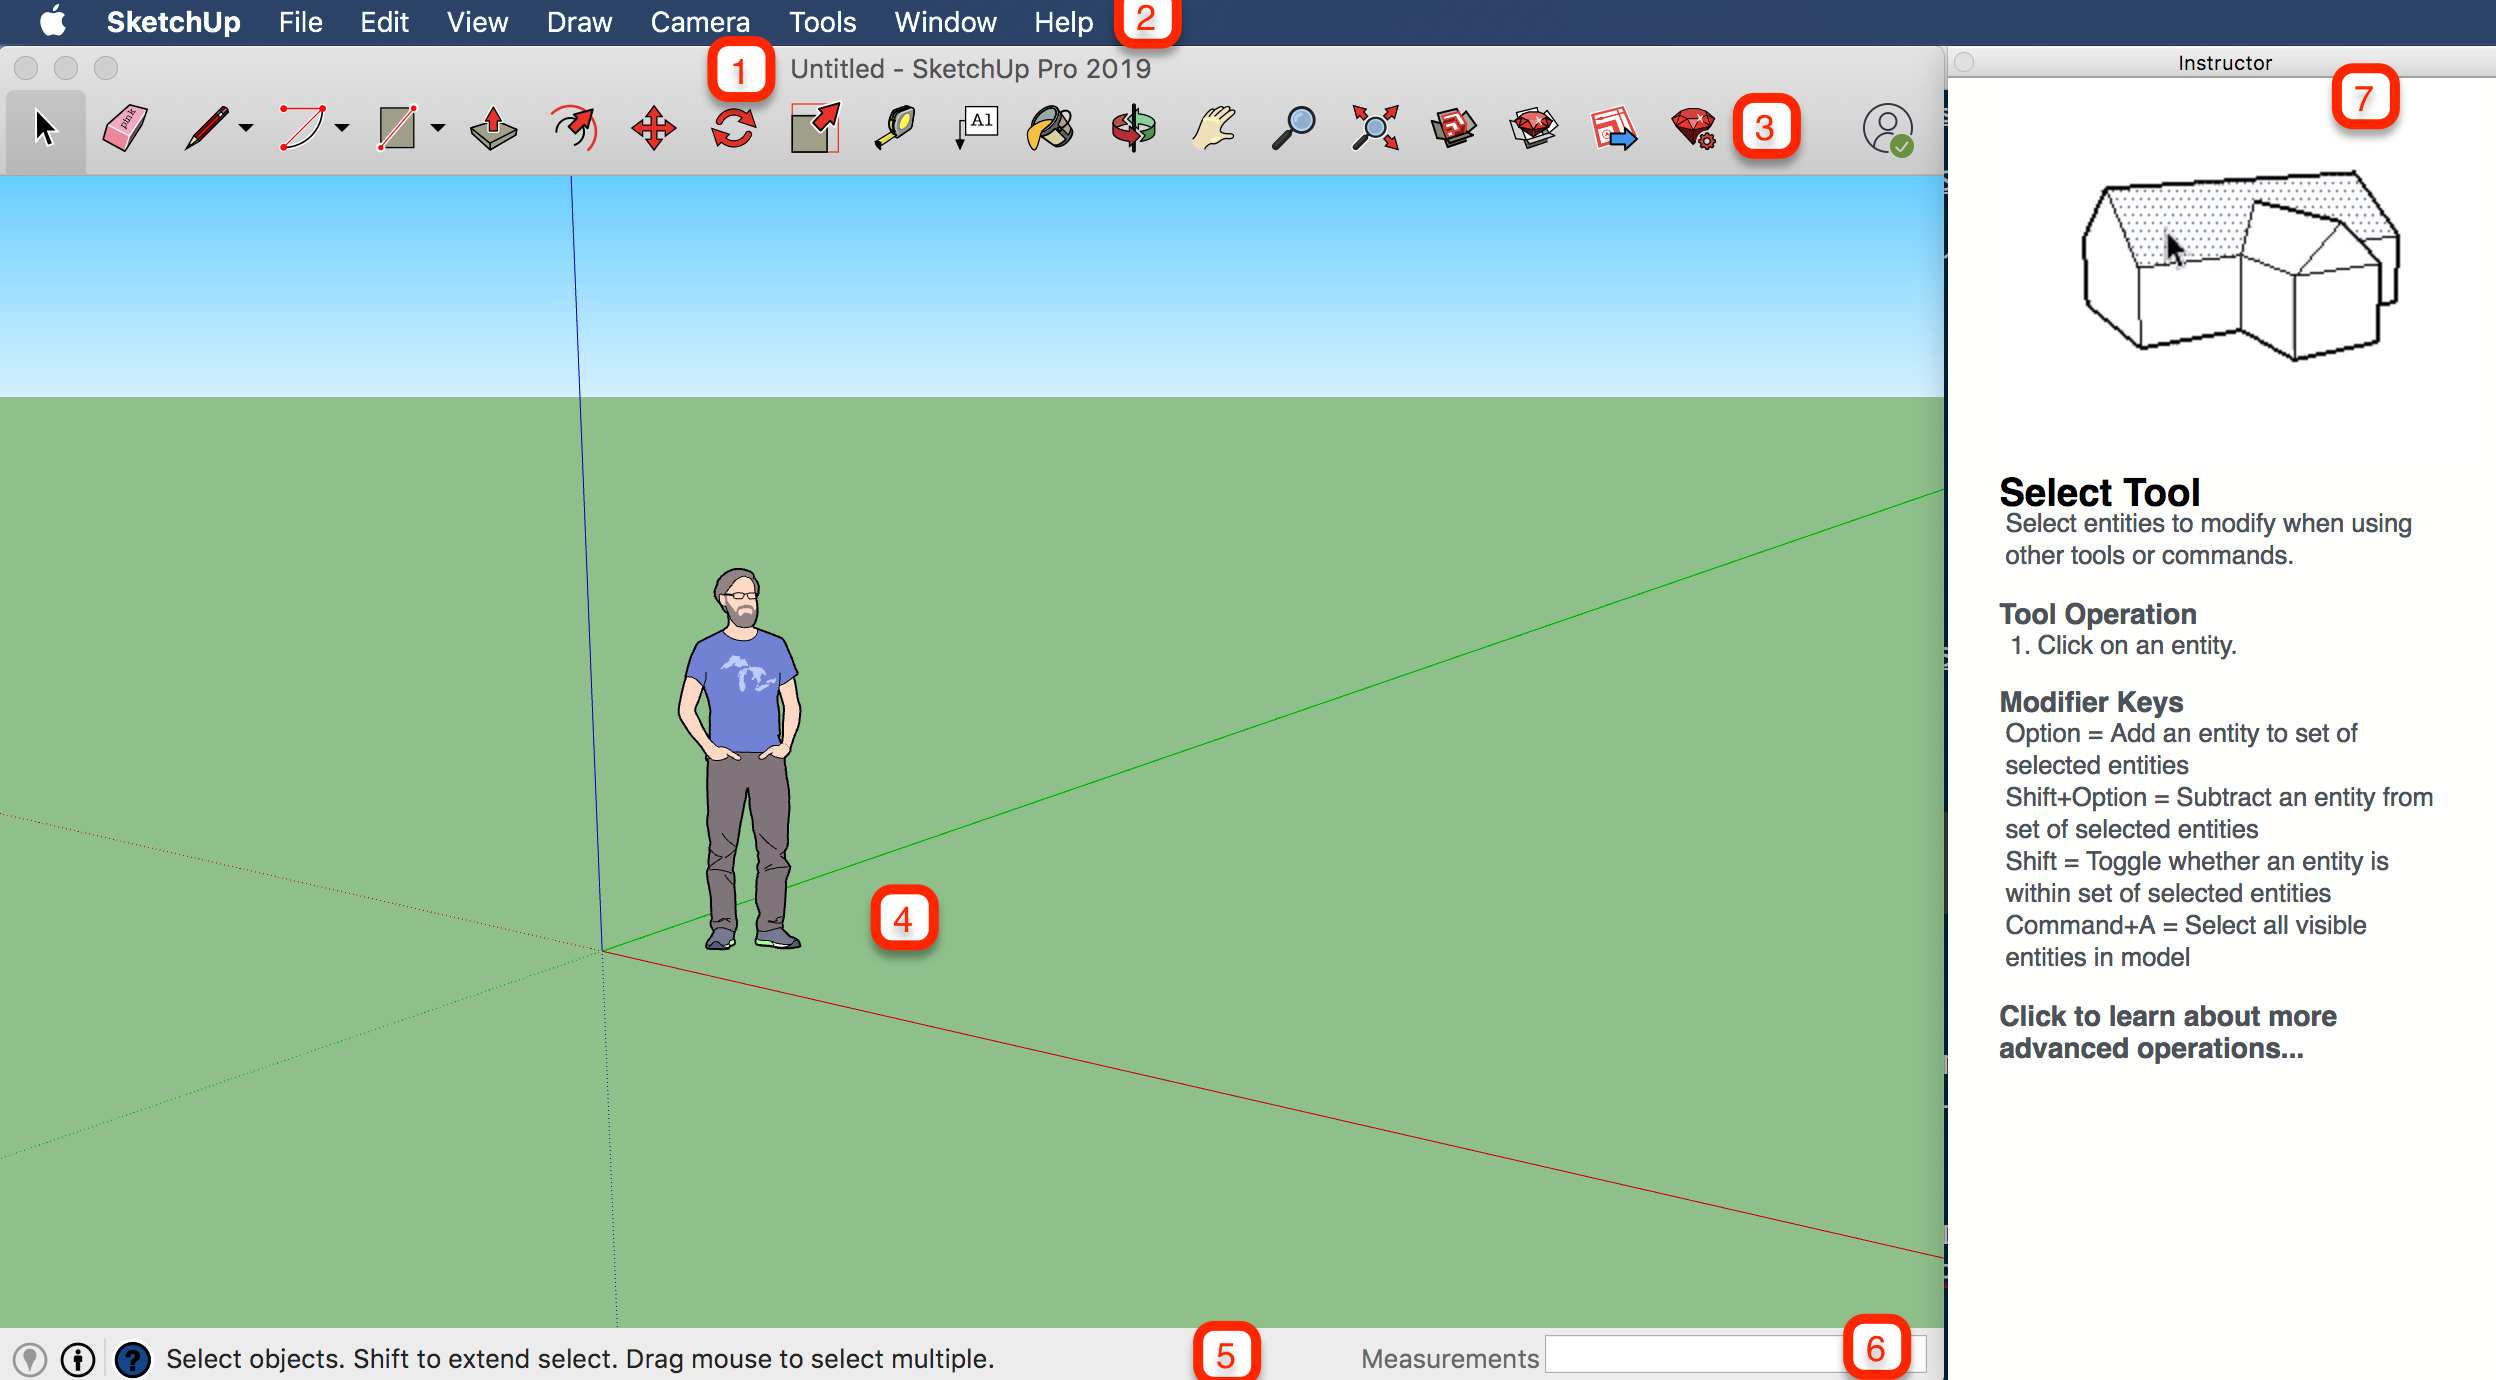
When SketchUp opens, ready for you to start creating a 3D model, you see a screen that includes the following:
- Title bar
- Menu bar
- Getting Started toolbar
- Drawing area
- Status bar
- Measurements box
- Default panels
Title bar
The title bar contains the standard window controls (close, minimize, and maximize) and the name of the currently open file. When you start SketchUp, the name of the currently open file is Untitled, indicating that you have not yet saved your work.
The majority of SketchUp tools, commands, and settings are available within the menus on the menu bar. The menus are: SketchUp (Mac only), File, Edit, View, Camera, Draw, Tools, Window, and Help.
Getting Started toolbar
When you begin using SketchUp, the Getting Started toolbar is the one you see by default. It contains the basic tools you need to begin creating 3D models.
To display additional toolbars, select View > Toolbars. In the Toolbars dialog box that opens, select the toolbars you want to see and click Close. In macOS, you can display tool palettes by selecting View > Tool Palettes. (Learn more about the toolbars and how to customize them in the Customizing SketchUp section of the Help Center.)
Tip: This article introduces you to a few basic tools. As you continue learning how to create 3D models in SketchUp, the Instructor can teach you (or remind you) how to use each tool. See Learning how to use SketchUp tools for details.
Drawing area
The drawing area is where you create your model. The 3D space of the drawing area is identified visually by the drawing axes, which provide a sense of direction in 3D space while you work.
The drawing area might also contain a simple model of a person to give you a sense of 3D space.
Status bar
When you’re getting started with SketchUp, the two important elements on the status bar are the tips in the middle and the Measurements box on the right:
- Tips for using the tools: In the middle area of the status bar, click the question mark icon to display the Instructor window, which offers basic information about using whatever tool you select in the toolbar. The middle area also displays a brief sentence about using the selected tool. This area is helpful when you’re not sure how a tool works.
- Measurements box: This box is a critical tool for creating accurate models. The box displays dimensions as you draw. You can also use this box to manipulate currently selected entities (such as creating a line that’s a specific length) or to create evenly spaced copies of entities (such as columns, fencing, or housing blocks in a post-industrial dystopia).
Tip: Did the Measurements box disappear? The most likely reason is that your SketchUp window size is larger than your available screen viewing area. To recover your view of the Measurements box, click the Maximize button in the title bar.
If you’re a Windows user and enable the Auto-Hide the taskbar option, the Measurements box can slip behind the taskbar when you have the taskbar displayed. In this case, the Measurements box reappears when you’re done using the taskbar.
Note: On the left side of the status bar, you find buttons to geolocate and claim credit. These options help you work with advanced SketchUp features that are beyond the scope of this article.
Default panels
Windows Interface: On the right side of the screen, you see a tray of panels, including the Instructor, Materials, Styles, and so on. The Default Tray appears when you open SketchUp, but you can close the Default Tray of panels by click the Close button in the upper right. Toggle the tray so it’s visible or hidden via the Window > Default Tray submenu.
MacOS Interface: On the right side of the screen, you see a tray of panels, including the Instructor, Materials, Styles, and so on. The Default Tray appears when you open SketchUp, but you can close any tray by clicking its Close button. To reopen a tray, select it from the Window menu.
As you use SketchUp, the Instructor and the status bar give you pointers on using each tool.
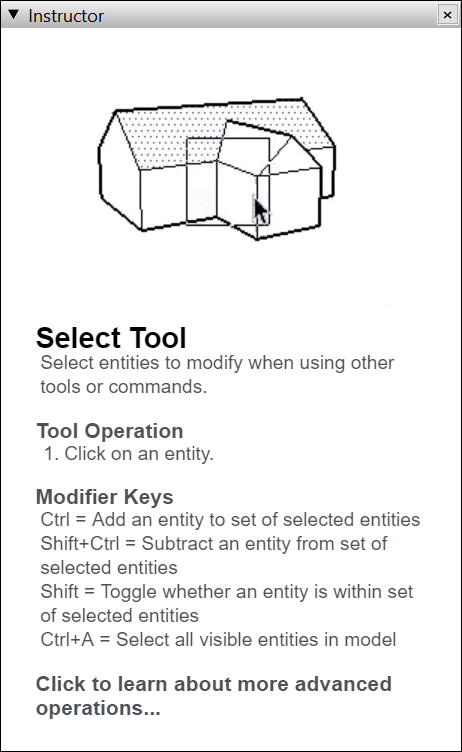
Windows Interface: The Instructor teaches you how to use the currently selected tool. To turn on the Instructor, shown here, select Window > Instructor, which you find in the Default Tray. Here’s what the Instructor has to offer:
MacOS Interface: The Instructor teaches you how to use the currently selected tool. To turn on the Instructor, shown here, select Window > Instructor. Here’s what the Instructor has to offer:
- An animation that shows basic use of the selected tool
- A description of what the tool does
- Steps for using the tool, which correspond to the animation
- Modifier keys that enable the tool perform additional functions
- A link to Help Center articles about advanced functions of the tool
If the Instructor offers more detail that you need, remember that the status bar also offers tips on using the selected tool. See the Status bar section earlier in this article for details.
Viewing the SketchUp Quick Reference Card
The Quick Reference Card is an easy-to-print guide to all the SketchUp tools and their modifier keys. Keep it handy as you start using SketchUp and you’ll learn to model quickly and efficiently. Here’s what the Quick Reference card looks like:
To download a PDF of the Quick Reference card, click the link that corresponds to your operating system:
- Microsoft Windows
- MacOS
Note: Looking for the LayOut quick reference cards? Click here.
Creating your first 3D model in SketchUp
If you’ve never created a 3D model in SketchUp (or any other modeling program), the following steps offer a quick overview the basics:
- Select the person, context-click the selection, and select Erase in the context menu that appears.
- In the Getting Started toolbar, select the Rectangle tool (
).
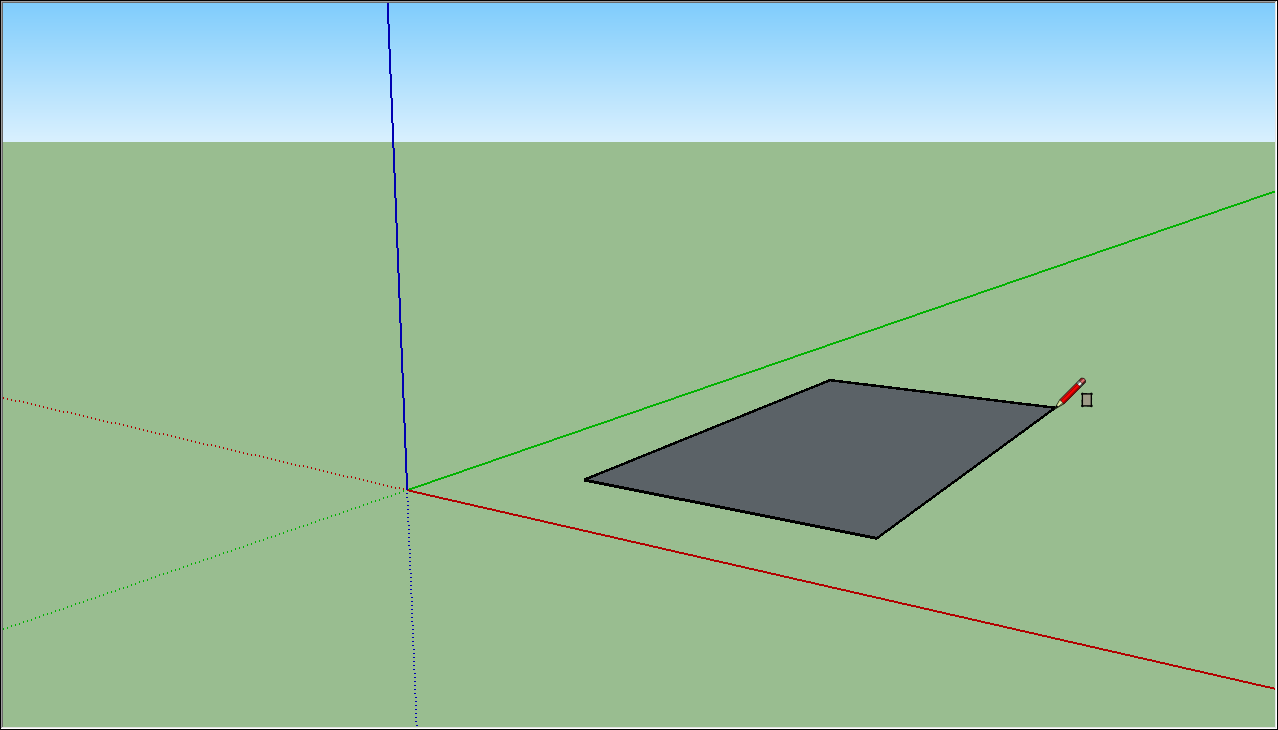
- On the ground plane, in the space between the red and green axis, click the Rectangle tool cursor (
). Then move your cursor to the right and click again. A rectangle appears on the ground, as shown here.
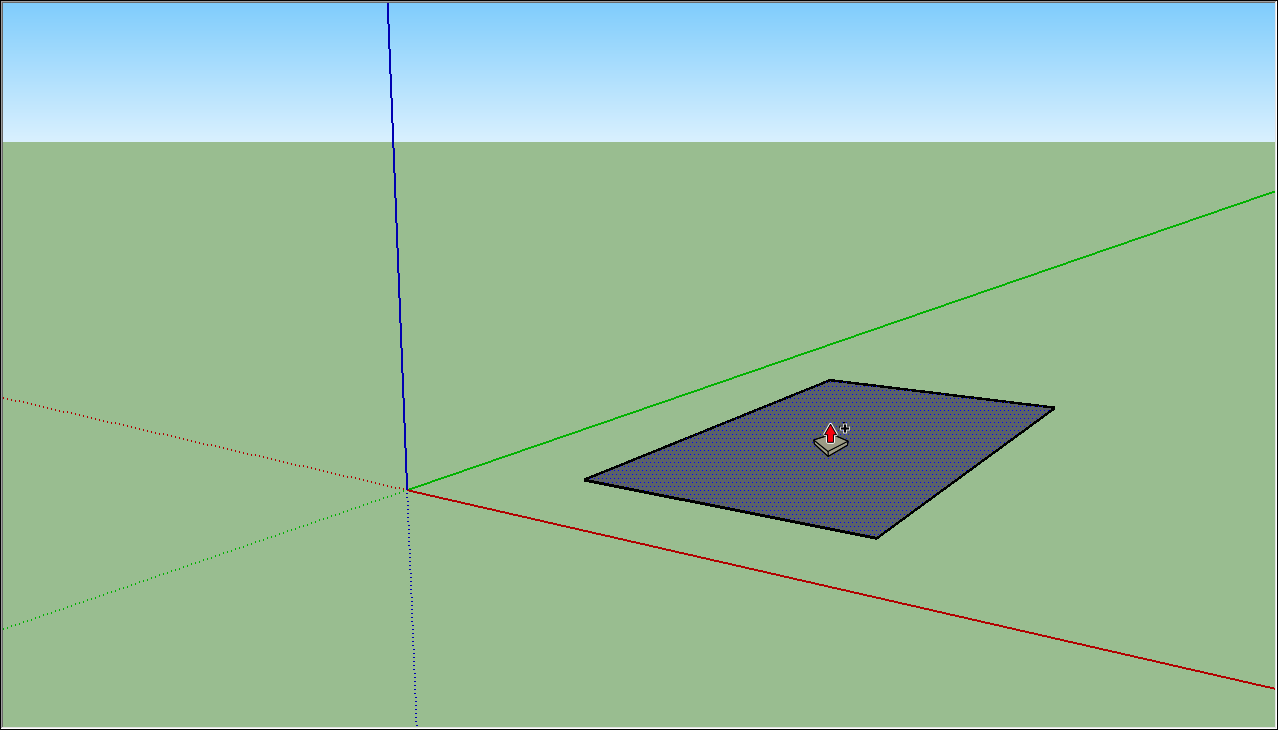
- On the Getting Started toolbar, select the Push/Pull tool (
), and place the Push/Pull cursor over the rectangle you just created, as shown in the following figure.
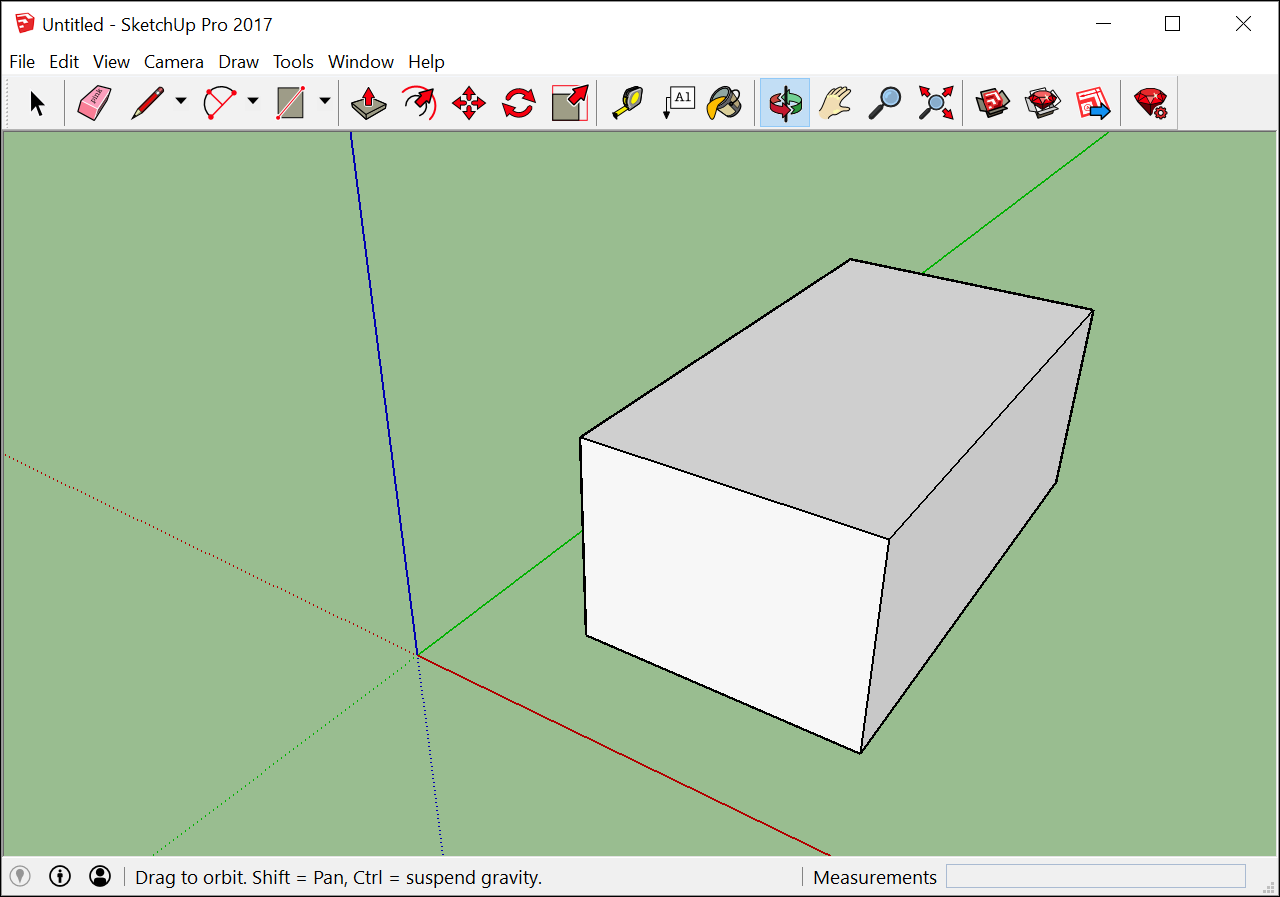
- Click and drag your rectangle up into a 3D shape. Keep an eye on the Measurements box and release the cursor when your shape is about 5 feet tall.
- Without clicking or selecting anything, simply type 6’ and press Enter. Notice how the height of your shape changed to exactly 6 feet tall, and the value you entered appears in the Measurements box.
- In the Getting Started toolbar, select the Orbit tool (
). Place the Orbit cursor above your shape. Then click and hold while you move the mouse down. Notice how the view of your shape changes, as shown in the following figure. Practice clicking and dragging with the Orbit tool as much as you like. It’s a pretty fun tool!
- In the Getting Started toolbar, click the Zoom Extents button (
). If you orbit around until you lose track of where you are in your model, the Zoom Extents button is a handy way to reorient yourself.
- If you have a scroll-wheel mouse, scroll down to zoom out a bit. Working in SketchUp is much easier with a scroll-wheel mouse. However, if your mouse lacks a scroll wheel, click the Zoom tool (
) and you can zoom in and out that way, too.
Tip: No matter what tool is selected, holding down the scroll wheel activates the Orbit tool until you release the scroll wheel.
- In the Getting Started toolbar, click the Paint Bucket tool (
).
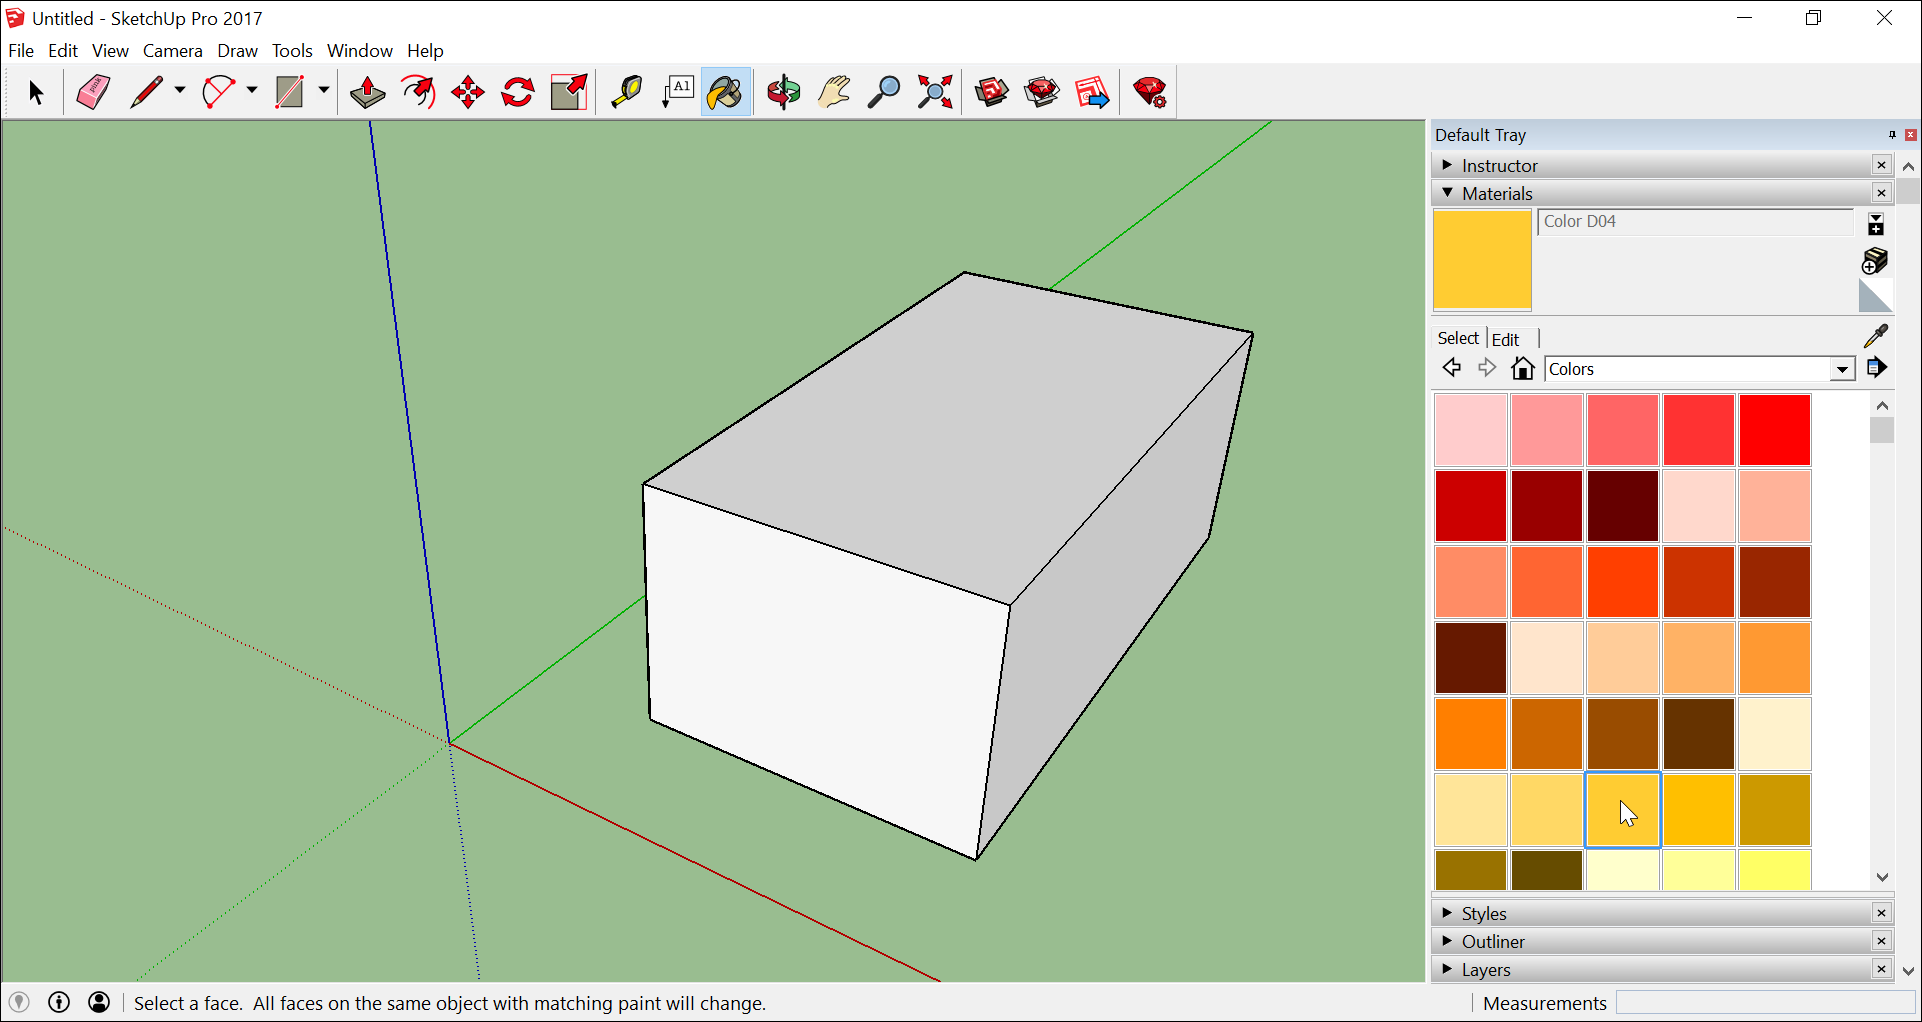
- In the Materials panel that appears, select Colors from the drop-down menu, as shown here. Then select a color from the options that appear on the Select tab.
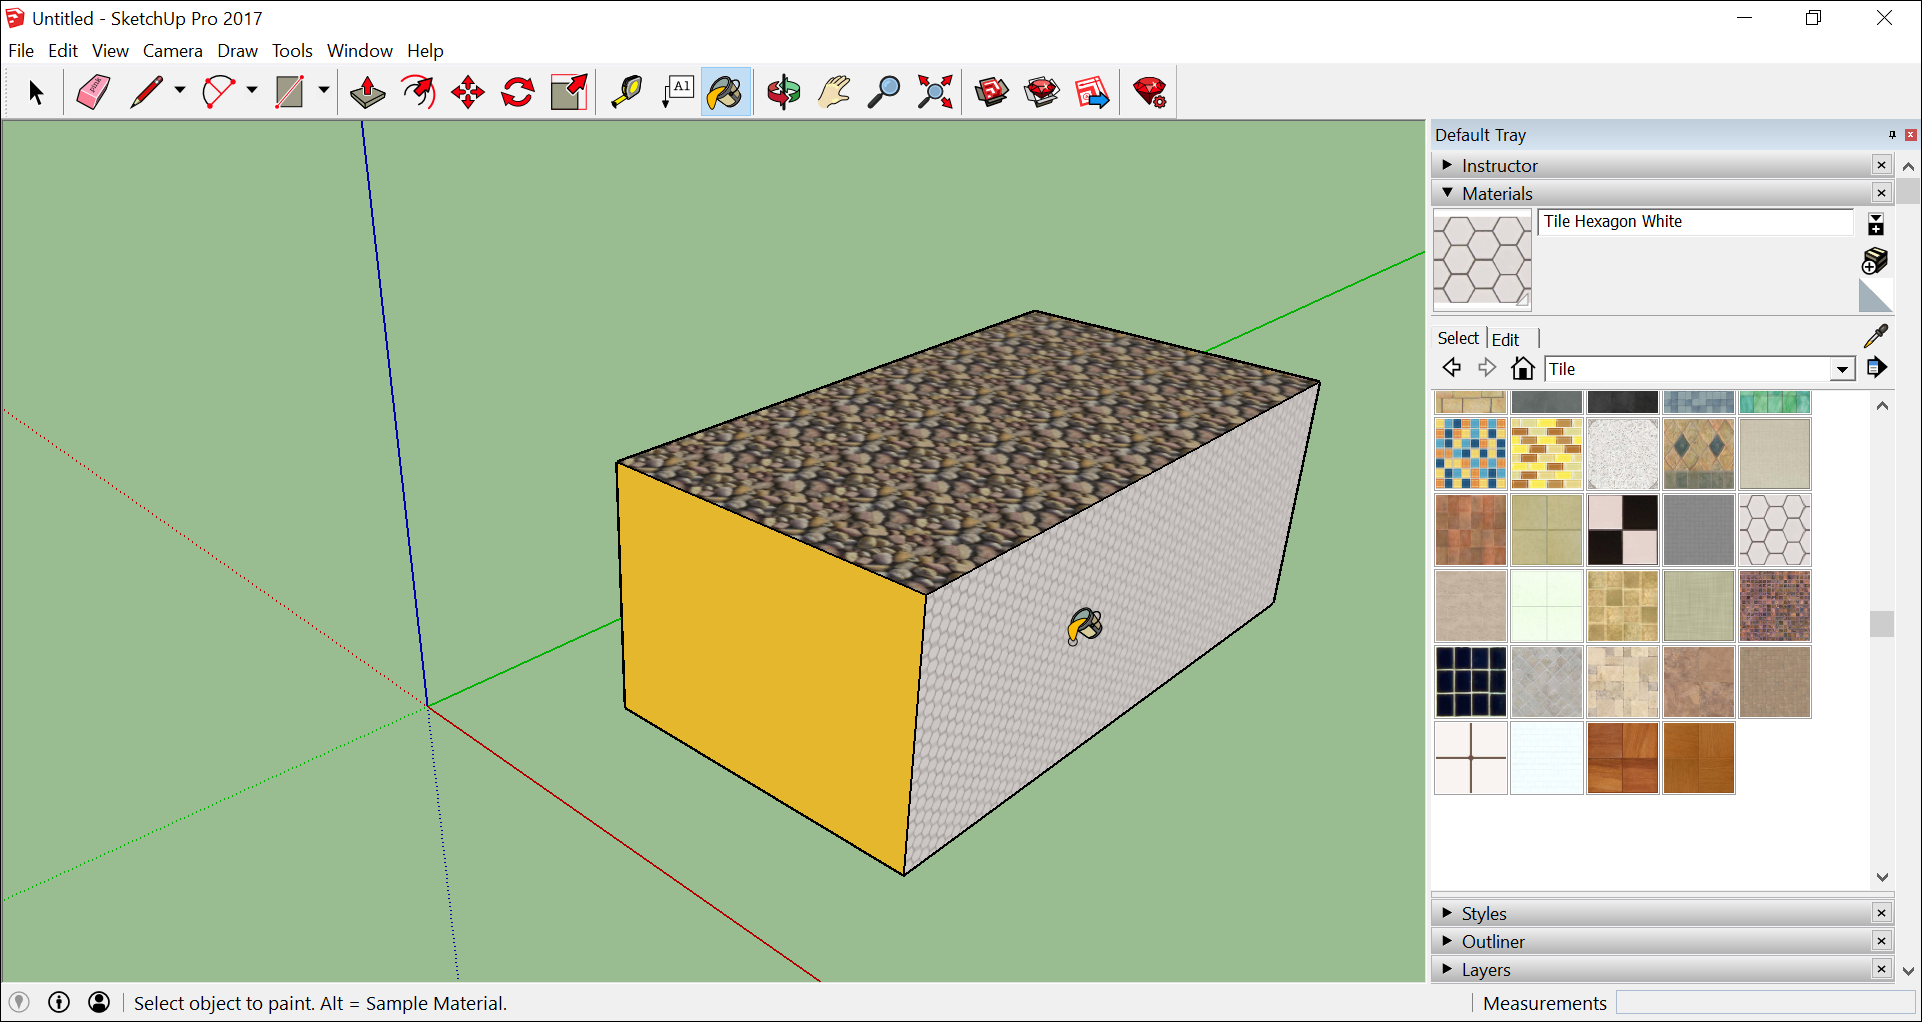
- Click one side of your model with the Paint Bucket cursor to apply your selected color. Experiment a bit with the different options in the drop-down menu if you like. For example, select Landscaping, Fencing, and Vegetation from the drop-down menu and apply pebbles to your model. Select Tile from the drop-down menu and apply a tile pattern that you like. Orbit around and apply different materials to each side of your model, as shown here.
- Close the Materials panel and select Window > Styles. Windows ONLY: The Styles appear in the Default Tray.
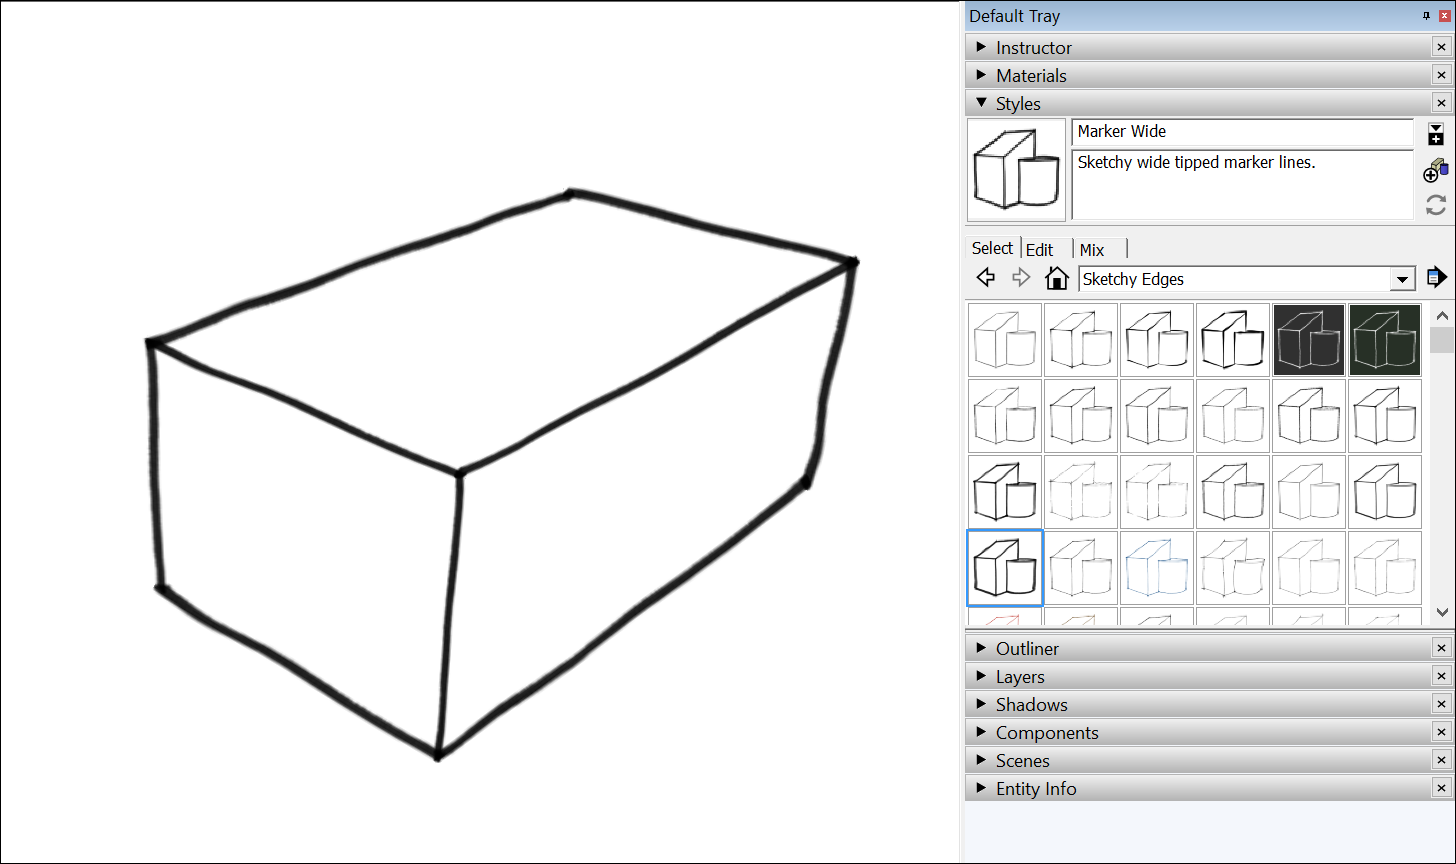
- From the drop-down menu, select Sketchy Edges and then select a style option. In the following figure, Marker Wide is selected. Notice that the style completely overrides all the materials and colors applied. To see them again, select In Model from the drop-down menu and then select the Simple Style option.
Saving and reopening a model
To save your model, follow these steps:
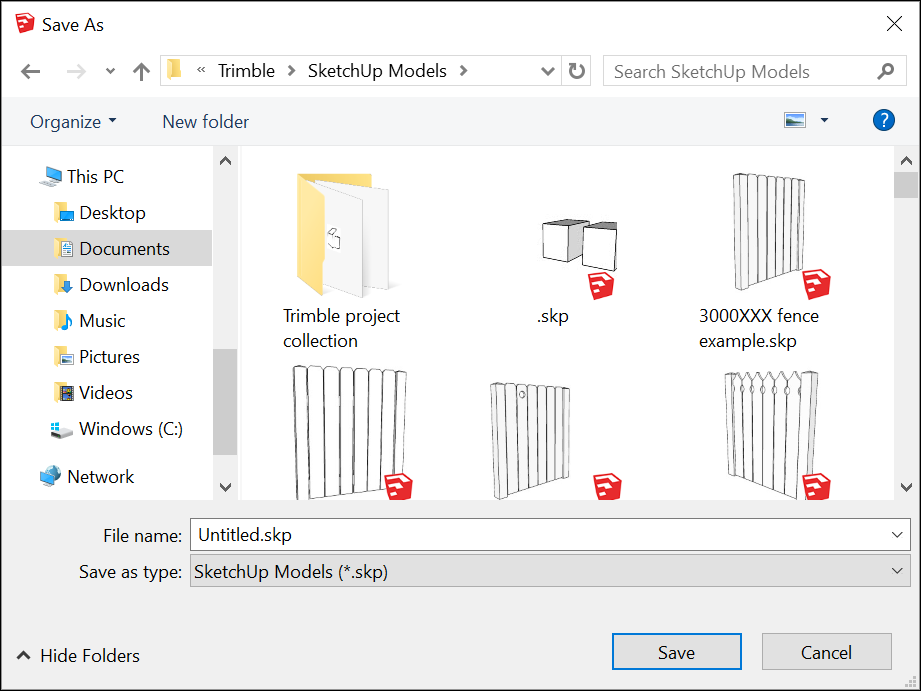
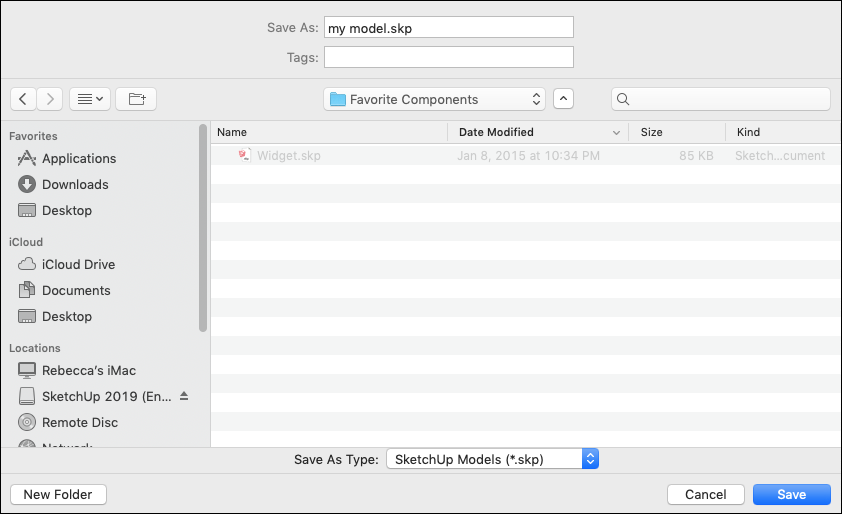
- On the menu bar, select File > Save. If this is the first time you’re saving a model, the Save As dialog box appears, as shown here. To save an already saved model with a new name, select File > Save As.
- Choose where you’d like to save your model.
- Windows Interface: In the File Name box, type a name for your model. SketchUp model files end with the
.skpfile extension. - MacOS Interface: In the Save As box, type a name for your model. SketchUp model files end with the
.skpfile extension. - (Optional) If you’d like your model to be compatible with earlier versions of SketchUp, select a version from the Save As Type drop-down list.
- Click the Save button.
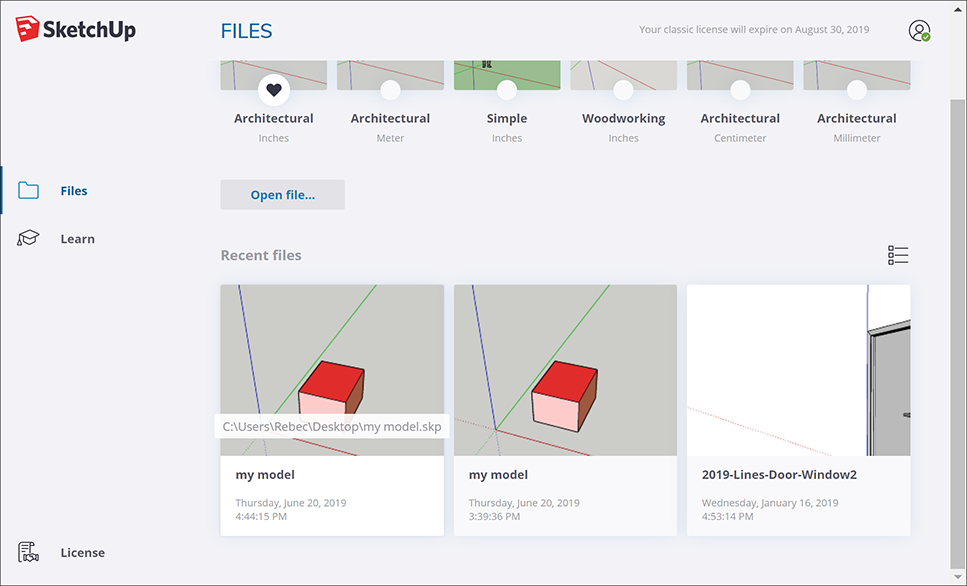
Tip: After you save a model, you can reopen it later and continue working on it. (Simply double-click the file wherever you’ve saved it, or in SketchUp, select File > Open.) If you’re not sure where a file is saved, hover over the file in the Welcome to SketchUp window, and you can see the path to the file, as shown in the following figure. Or if your model is complete, you can show it off by exporting it as a graphic or creating a virtual walk-through.
Backing up a SketchUp file or restoring an Auto-save file
SketchUp creates a backup file the second time you successfully save your SketchUp file and any subsequent saves. This file is an exact copy of the previously saved version of the file. The backup file uses the naming convention FILENAME.skb on Windows and FILENAME~.skp on macOS, and it’s located in the same folder as the original file.
If SketchUp crashes while you’re working on a model, the recovered file is not deleted. By default, SketchUp automatically saves your files every five minutes while you’re actively working. You can recover your work from the point the last automatic save was performed by opening the recovered file. To find and open a recovered file, open the Welcome to SketchUp window, select the Files tab, and select the file you want to recover from the Recent list.
Уроки Скетчап для начинающих
Содержание
- Урок для начинающих: видео уроки на русском
- Обучение создания проекта дома
- Как создать динамический компонент
- Как узнать объем
- Интерьер
- Как копировать
- Анимация
- Техника выделения
- 3d модели вархаус (warehouse)
- Привязки
- Как сделать шар
- Как задать размер
- Как поменять единицы измерения
- Моделирование мебели: стеллаж
- Как добавить материалы
- Как задать размер
- Как сделать фаску
- Как отзеркалить
- Работа со слоями
- Как сделать развертку
- Как сделать разрез
- Как перемещаться
- Как установить плагины
- Где хранятся компоненты
Урок для начинающих: видео уроки на русском
Посмотрите как пользоваться данным софтом:
Обучение создания проекта дома
Проектирование каркасного дома:
Как создать динамический компонент
Как узнать объем
Интерьер
Как копировать
Анимация
Техника выделения
3d модели вархаус (warehouse)
Там вы можете скачать различные модели:
деревья, холодильник, офисную мебель, окна, двери, модели машин.
Привязки
Как сделать шар
Как задать размер
Как поменять единицы измерения
Моделирование мебели: стеллаж
Как добавить материалы
Как задать размер
Как сделать фаску
Как отзеркалить
Работа со слоями
Как сделать развертку
Как сделать разрез
Как перемещаться
Как установить плагины
Где хранятся компоненты
Загрузить PDF
Загрузить PDF
Google SketchUp – это замечательная программа! Для желающих узнать, как ею пользоваться, здесь представлены пошаговые инструкции.
Шаги
-
1
-
2
Действуйте согласно инструкциям. Прочитайте их внимательно, так как в зависимости от типа вашего компьютера, инструкции могут меняться.
-
3
Запустите программу. Вы увидите три перпендикулярных оси, что сразу же создаст ощущение трехмерного пространства. Ознакомьтесь с набором инструментов. В нем есть такие инструменты, как Линия, Окружность и Многоугольник. Каждый из них предоставляет вам разнообразные возможности создания необходимых вам форм.
-
4
Ознакомьтесь с основными функциями навигации программы:
- Первое, что вам нужно знать о программе Google SketchUp, это наличие в ней 10 простых инструментов, которые пригодятся вам в создании модели. В первую группу входят такие инструменты, как: Орбита, Панорамирование и Масштабирование. Вы можете использовать их для перемещения по чертежу и рассматривания его с различных ракурсов. В этом описании вы найдете краткое объяснение назначения данных инструментов.
- Для того чтобы сдвинуть весь экран, одновременно нажимайте на центральную кнопку мышки и удерживайте клавишу Shift на клавиатуре.
- Чтобы удалить объект, воспользуйтесь кнопкой Выбрать (с изображением стрелки) из набора инструментов. Когда объект выделен, он будет подсвечен синим. Для удаления выбранного объекта нажмите клавишу Delete на клавиатуре.
- Чтобы сохранить свою работу, выберите опцию «Save As» (сохранить как) в меню «File» (в левом верхнем углу). Выберите папку, в которой файл будет храниться. Введите имя файла и нажмите «Save» (сохранить). Ваш файл будет сохранен с расширением .SKP.
- Первое, что вам нужно знать о программе Google SketchUp, это наличие в ней 10 простых инструментов, которые пригодятся вам в создании модели. В первую группу входят такие инструменты, как: Орбита, Панорамирование и Масштабирование. Вы можете использовать их для перемещения по чертежу и рассматривания его с различных ракурсов. В этом описании вы найдете краткое объяснение назначения данных инструментов.
-
5
Начертите несколько линий. Режим Линия установлен по умолчанию, когда вы запускаете программу SketchUp. Этот режим, очевидно, позволяет чертить линии. Попробуйте его и посмотрите, что получится, просто чтобы ознакомиться со способом нанесения линий. Помните при этом, что линя обладает только одним измерением, так что прикрепить ее к оси не удастся.
-
6
Начертите фигуры. Кроме линий, вы также можете создавать двухмерные фигуры, используя соответствующие инструменты. Чтобы потренироваться в этом, начертите какие-нибудь прямоугольники, окружности и многоугольники. Все что для этого нужно — это выбрать соответствующий инструмент, нажав на его иконку в меню.
- Принимая во внимание, что это программа для создания трехмерных изображений, вы увидите, что двухмерные фигуры располагаются в горизонтальной плоскости. А если существует нижележащая поверхность, то фигура будет к ней прикреплена.
-
7
Перейдите к созданию трехмерных объектов. Этого можно достичь, если «выдавить» или «вдавить» двухмерную фигуру из/в трехмерную форму. Воспользуйтесь инструментом Вдавить/Выдавить и воздействуйте им на уже созданные двухмерные фигуры. Наблюдайте, что происходит.
- Выберите инструмент Вдавить/Выдавить:
- Нажмите кнопкой мыши на фигуру, которую вы хотите превратить в трехмерную форму путем вдавливания или выдавливания.
- Нажав, создайте требуемую форму и затем нажмите кнопку мышки еще раз.
- Увеличьте объект до требуемых размеров. Добавьте другие объекты.
- Поэкспериментируйте с объектом, добавляя дыры или другие элементы посредством вырезания фигур из уже созданной трехмерной формы.
- Выберите инструмент Вдавить/Выдавить:
-
8
Научитесь пользоваться панорамированием и орбитой. В любой программе обработки трехмерных изображений необходимо иметь возможность рассматривать созданные объекты с разного ракурса, и у SketchUp такая возможность тоже есть. Режим панорамирования позволяет вам сдвигать чертеж вправо, влево, вверх и вниз. Можно также комбинировать эти методы. Режим орбиты позволяет вам вращаться вокруг созданного объекта, чтобы рассмотреть его со всех сторон. Таким образом, меняя проекцию, можно увидеть объект под любым углом.
- Для поворота вокруг изображения пользуйтесь центральной кнопкой прокрутки вашей мышки. С этой же целью можно также воспользоваться кнопкой Орбита в верхней панели инструментов (на этой кнопке изображены две красные стрелки).
-
9
Двигайте и вращайте объекты. Это самоочевидно и весьма полезно, так как дает вам возможность изменить позицию созданных объектов. Поэкспериментируйте с режимами Двигать и Вращать, чтобы убедиться, что вы умеете менять положение объектов.
-
10
Раскрасьте объект. Законченный объект обычно раскрашен в серо-голубой цвет. Если объект находится в стадии создания, раскрасить его нельзя. Используя режим Раскрашивания, объектам можно придавать цвет или текстуру. Если вы выберете текстуру, то программа SketchUp сама выровняет ее по поверхности, облегчая вашу работу и делая ее более интересной.
- Чтобы добавить цвет, нажмите на иконку инструмента Банка с краской. Выберите одну из категорий, например, Декоративное покрытие или Выбор цвета по названию. Выберите нужный цвет или текстуру, а затем нажмите на область фигуры, которую вы хотите раскрасить.
- Чтобы изобразить окна, выберите категорию Светопрозрачных цветов.
- Чтобы избавиться от ненужных граней, используйте инструмент Ластик.
- Чтобы добавить цвет, нажмите на иконку инструмента Банка с краской. Выберите одну из категорий, например, Декоративное покрытие или Выбор цвета по названию. Выберите нужный цвет или текстуру, а затем нажмите на область фигуры, которую вы хотите раскрасить.
-
11
Научитесь пользоваться возможностью масштабирования. Этот инструмент позволит вам увеличивать или уменьшать масштаб изображения создаваемых форм, а также рассматривать формы более подробно. Если на вашей мышке есть колесо прокрутки, то вы обнаружите, что поворачивая его в одном направлении вы увеличиваете масштаб, а поворачивая в другом – уменьшаете его.
-
12
Исследуйте модели, встроенные в программу SketchUp. Существует много таких моделей. Если вы найдете в этом наборе подходящую вам модель, то вам не придется ее изобретать заново. Коллекция трехмерных объектов предлагает на выбор объекты в областях архитектуры, ландшафтного дизайна, строительства, изображения людей, игровых площадок и транспорта. Рекомендуется воспользоваться этой библиотекой готовых компонентов, чтобы решить, если какие-нибудь их них представляют для вас интерес и могут быть использованы в вашей работе.
-
13
Научитесь пользоваться контрольными линиями. Программа SketchUp позволяет вам разместить контрольные линии в любом месте вашего чертежа. Затем вы сможете использовать их для выравнивания объектов. Контрольные линии отображаются пунктирными линями на вашем чертеже.
-
14
Когда вы научитесь пользоваться стандартными инструментами, изучите более сложные инструменты программы SketchUp. Сюда входят: Изменение размера, Пропорциональное изменение размера, Следуй за мной, Дуга, Текст, Угол и Рулетка.
- «Инструмент Изменение размера»: чтобы воспользоваться этим инструментом, выберите объект и потяните за один из маленьких кубиков, расположенных в углах и на поверхностях объекта, чтобы придать объекту любой размер. Таким способом вы можете создавать широкие, высокие, короткие или низкие объекты.
- « Инструмент Следуй за мной»: этот инструмент позволяет вам создать новый объект, двигая уже созданный объект по определенному пути.
- «Инструмент Пропорциональное изменение размера»: если нажать на поверхность объекта с помощью этого инструмента, то создастся в точности такая же поверхность. Вы можете увеличить или уменьшить эту поверхность, в зависимости от того, как далеко вы потянете за курсор.
- «Инструмент Дуга»: этот инструмент работает так же, как и Линия. Единственное отличие заключается в том, что если вы создадите линию и потяните ее в сторону, то в результате получится дуга.
- «Инструмент Текст»: этот инструмент позволит вам добавить надпись на поверхность объекта. Инструмент Угол поможет вам развернуть объект, если вы нажмете на поверхность объекта и развернете его курсором.
- «Инструмент Рулетка»: этот инструмент позволит вам определять размеры объекта, а также создавать одинаковые секции форм посредством внесения значений в специальное окно в правом нижнем углу экрана.
-
15
Попытайтесь создать что-нибудь с помощью программы SketchUp. В wikiHow вы найдете много инструкций, которые помогут вам создавать здания, конструкции и другие объекты.
Реклама
Советы
- В этой программе есть инструмент Поверхность для создания простых поверхностей (стороны или поверхности формы). Для того чтобы ремонтировать испорченные поверхности, пользуйтесь инструментом Линия.
- Вы можете импортировать изображения из программы Google Earth, а затем чертить на них.
Реклама
Предупреждения
- Иногда удалив одну линю в своей трехмерной модели, можно потерять целую поверхность. Не пугайтесь, просто выберите из меню «Редактировать — отменить» или одновременно нажмите кнопки CTRL и Z.
- Иногда созданный вами объект выглядит пропорциональным спереди или сбоку, но при вращении оказывается искаженным.
- Компьютер
- Программа SketchUp
- Мышка с тремя кнопками (с центральной кнопкой прокрутки) лучше всего подходит для использования инструмента Орбита
- Соединение с интернетом (для загрузки программы SketchUp)
Реклама
Об этой статье
Эту страницу просматривали 49 624 раза.



 ).
). ). Then move your cursor to the right and click again. A rectangle appears on the ground, as shown here.
 ), and place the Push/Pull cursor over the rectangle you just created, as shown in the following figure.
 ). Place the Orbit cursor above your shape. Then click and hold while you move the mouse down. Notice how the view of your shape changes, as shown in the following figure. Practice clicking and dragging with the Orbit tool as much as you like. It’s a pretty fun tool!
 ). If you orbit around until you lose track of where you are in your model, the Zoom Extents button is a handy way to reorient yourself.
 ) and you can zoom in and out that way, too.
 ).
).