перейти к содержанию
ИКЕА СМАКСАК Микроволновая печь и духовой шкаф с принудительной подачей воздуха из нержавеющей стали

ИНСТРУКЦИЯ ПО

КАК ИСПОЛЬЗОВАТЬ


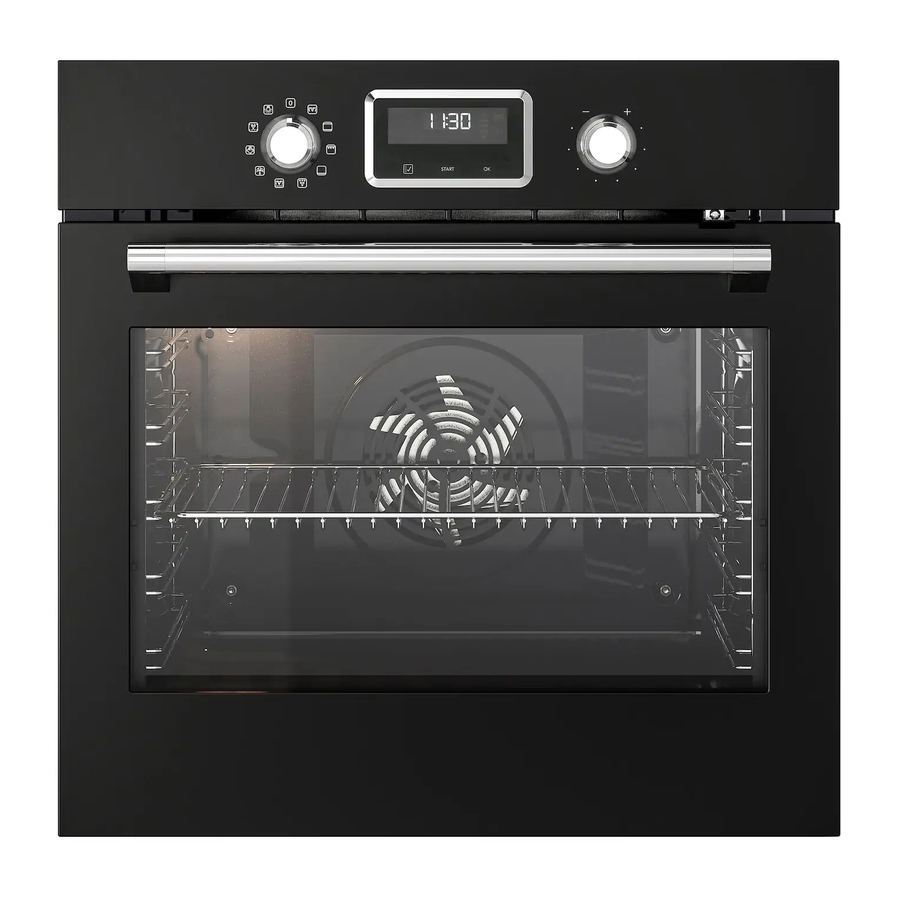
Общий заview

- Панель управления
- Ручка для функций нагрева
- Монитор
- Ручка управления
- Нагревательный элемент
- Генератор СВЧ
- Lamp
- Вентилятор
- Полкодержатель, съемный
- Положения на полках
Кнопки

Монитор

- A. Таймер/температура/мощность микроволн
- B. Индикатор нагрева и остаточного тепла
- C. Микроволновой режим
- D. Датчик еды (только в некоторых моделях)
- E. Дверной замок (только в некоторых моделях)
- F. Часы/минуты
- G. Демонстрационный режим (только для некоторых моделей)
- H. Функции часов
Функции нагрева


Посуда и материалы, подходящие для микроволновой печи
Для микроволновой печи используйте только подходящую посуду и материалы. Используйте приведенную ниже таблицу в качестве справки.
Перед использованием проверьте спецификацию посуды/материала.

Решение Проблем
Если вы столкнулись с проблемой, связанной с вашим устройством, обратитесь к главе «Устранение неполадок» в полной версии руководства пользователя, доступной по адресу: www.ikea.com.
|
Размеры (внутренние) |
Ширина высота
глубина |
480 мм
217 мм 411 мм |
| Полезные объемы | 43 | |
| Площадь противня | 1424 см² | |
| Верхний нагревательный элемент | 1900 W | |
| Нижний нагревательный элемент | 1000 W | |
| гриль | 1900 W | |
| кольцо | 1650 W | |
| Общий рейтинг | 3000 W | |
| Voltage | 230 — 240 V | |
| частота | 50 Гц | |
| Количество функций | 10 |
Документы / Ресурсы
Рекомендации

Эй! Добро пожаловать в ИКЕА Глобал
- Manuals
- Brands
- IKEA Manuals
- Oven
- SMAKSAK
- Manual
-
Contents
-
Table of Contents
-
Troubleshooting
-
Bookmarks
Quick Links
Related Manuals for IKEA SMAKSAK
Summary of Contents for IKEA SMAKSAK
-
Page 1
SMAKSAK… -
Page 2
ENGLISH Please refer to the chapter IKEA GUARANTEE for contact details of the after sales customer service centre. -
Page 3
ENGLISH… -
Page 4: Table Of Contents
Control panel Technical data Before first use Environmental concerns Daily use IKEA guarantee Clock functions Subject to change without notice. Safety information Before the installation and use of the appliance, carefully read the supplied instructions. The manufacturer is not responsible if an incorrect installation and use causes injuries and damages.
-
Page 5
ENGLISH Keep children and pets away from the appliance when it • operates or when it cools down. Accessible parts are hot. If the appliance has a child safety device, it should be • activated. Children shall not carry out cleaning and user maintenance of •… -
Page 6
ENGLISH Do not heat liquids and other foods in sealed containers. • They are liable to explode. Metallic containers for food and beverages are not allowed • during microwave cooking. This requirement is not applicable if the manufacturer specifies size and shape of metallic containers suitable for microwave cooking. -
Page 7: Conditions Of Use
ENGLISH Conditions of Use • By clients in serviced apartments, holiday This appliance is intended to be used in apartments and other residential type household and similar applications such as: environments. • Farm houses Safety instructions Should the mains cable need to be Installation replaced, this must be carried out by our Warning! Only a qualified…
-
Page 8
ENGLISH • Do not let the appliance stay unattended • If the appliance is installed behind a during operation. furniture panel (e.g. a door) make sure • Deactivate the appliance after each use. the door is never closed when the •… -
Page 9: Installation
ENGLISH pieces may be extremely sharp and appliances only. Do not use it for house difficult to locate. lighting. • Do not place hot glassware on a wet or • Before replacing the lamp, disconnect cool surface, directly on countertop or the appliance from the power supply.
-
Page 10: Product Description
ENGLISH This oven is only supplied with a main Total power (W) Section of the cable cable. (mm²) Cable maximum 1380 3 x 0.75 Cable types applicable for installation or maximum 2300 3 x 1 replacement: maximum 3680 3 x 1.5 H07 RN-F, H05 RN-F, H05 RRF, H05 VV-F, H05 V2V2-F (T90), H05 BB-F The earth cord (green / yellow cable) must…
-
Page 11: Control Panel
ENGLISH Control panel Buttons Sensor field / Button Function Description OPTIONS To set the clock functions, microwave power. To check the oven temperature. Use only while a heating function oper- ates. START + 30sec To start a heating function. Press to ex- tend Microwave function duration for 30 seconds.
-
Page 12: Daily Use
ENGLISH 1. Pull and hold the child lock handle up as microwave bottom glass plate must be shown in the picture. removed. 1. Set the function and the maximum temperature. 2. Let the oven operate for 1 hour. 3. Set the function and set the maximum temperature.
-
Page 13
ENGLISH Heating Application Heating Application function function Microwave Combi — function Microwave function at medi- with MW boost that acceler- um power (300 — 700 W). ates cooking. To heat pre-prepared meals. Conven- Reheating To bake and roast food on Creates the heat directly in tional one shelf position. -
Page 14: Clock Functions
ENGLISH temperature. Turn the control knob to 4. Press again and again to change: Duration and microwave power. Turn set the value and press to confirm. the control knob to set the value and Around 5 degrees before the set temperature is reached the signal press to confirm.You can also press…
-
Page 15
ENGLISH Setting the DURATION function Clock function Application 1. Set a heating function. Press Use to set a countdown confirm. time. This function has no MINUTE 2. Press again and again until effect on the operation of MINDER starts to flash. the oven. -
Page 16: Using The Accessories
ENGLISH 3. Turn the control knob to set the minutes Setting the MINUTE MINDER for DURATION time and press Minute minder can be both set when the confirm. Turn the control knob to set the oven is turned on and off. hours for DURATION time and press 1.
-
Page 17: Additional Functions
ENGLISH Put the accessory on the bottom of the cavity. Put the food on the microwave bottom glass plate. Always use the microwave bottom glass plate when the microwave function is on. It is necessary for heating food or liquids. Warning! The microwave bottom glass plate can become hot when Wire shelf and baking tray together:…
-
Page 18: Hints And Tips
ENGLISH Residual heat indicator The Automatic switch-off does not work with the functions: Light, When you turn off the oven, the display Duration, End. shows the residual heat indicator if the temperature in the oven is more than 40 Cooling fan °C.Turn the control knob left or right to When the oven operates, the cooling fan check the oven temperature.
-
Page 19
ENGLISH Microwave cooking To prevent too much smoke in the oven Cook food covered. If you want to keep a during roasting, add some water into the crust cook food without a cover. deep pan. To prevent the smoke condensation, add water each time after it Do not overcook the dishes by setting the dries up. -
Page 20
ENGLISH Cookware / Material Microwave function Microwave Combi Defrosting Heating, Cooking function e.g. Non-ovenproof glass and porcelain without any silver, gold, platinum or other metal decorations Glass and glass ceramic made of ovenproof / frost-proof material Ceramic and earthenware without any quartz or metal components and glazes which contain metal Ceramic, porcelain and earthenware… -
Page 21
ENGLISH Microwave defrosting Food Power (Watts) Time (min) Standing time (min) Steak (0.2 kg) 5 — 7 5 — 10 Minced meat (0.5 kg) 8 — 12 5 — 10 Chicken (1 kg) 30 — 35 10 — 20 Chicken breast (0.15 kg) 5 — 9 10 — 15 Chicken legs (0.15 kg) -
Page 22
ENGLISH Food Power (Watts) Time (min) Standing time (min) Convenience food (0.5 6 — 9 2 — 5 Frozen ready meals (0.5 10 — 15 2 — 5 Milk (200 ml) 1000 1 — 1:30 Water (200 ml) 1000 1:30 — 2 Sauce (200 ml) 1 — 3 Soup (300 ml) -
Page 23
ENGLISH Microwave Combi function Use this function to cook food in a shorter time and to brown it. Food Function Power Tempera- Time Shelf Comments (Watts ture (°C) (min) posi- tion Potato Grilling + MW 180 — 190 40 — 45 Turn the container Gratin (1.1 around halfway… -
Page 24
ENGLISH Cooking/Defrosting Possible cause Remedy results The food is still not The time was too short. Set a longer time. Do not increase the defrosted, hot or microwave power. cooked after the end of cooking time. The food is overhea- The power was too high. -
Page 25
ENGLISH Power setting • 1000 Watt Heating liquids • 900 Watt Searing at the start of the cooking process • 800 Watt Cooking vegetables • 700 Watt • 600 Watt Defrosting and heating frozen meals • 500 Watt Heating one-plate meals Simmering stews Cooking egg dishes •… -
Page 26: Care And Cleaning
ENGLISH Food Power Quantity Shelf posi- Time (min) Comments (Watts) (kg) tion Meat de- Bottom 8 — 12 Turn the meat upside frosting down halfway through the cooking time. 1) Use wire shelf unless otherwise specified. Microwave Combi function Tests according to IEC 60705. Food Function Power…
-
Page 27
ENGLISH Clean all accessories after each use and let them dry. Use a soft cloth with warm water and a cleaning agent. Do not clean the accessories in the dishwasher. Clean stubborn dirt with a special oven cleaner. If you have nonstick accessories, do not clean them using aggressive agents, sharp- 2. -
Page 28: Troubleshooting
ENGLISH Troubleshooting Warning! Refer to Safety chapters. What to do if… Problem Possible cause Remedy The oven does not heat up. The oven is deactivated. Activate the oven. The oven does not heat up. The clock is not set. Set the clock. The oven does not heat up.
-
Page 29: Technical Data
ENGLISH the front frame of the oven cavity. Do not Service data remove the rating plate from the oven If you cannot find a solution to the problem cavity. yourself, contact an Authorised Service Centre. The necessary data for the service centre is on the rating plate.
-
Page 30: Environmental Concerns
IKEA Service Office original date of purchase of Your appliance L1 Clock Tower, 630 Princes Highway at IKEA Pty Ltd, ABN 84006270757 or at Tempe, NSW 2044 Cebas Pty Ltd, ABN 15 009 156 003 (Both Trading as IKEA). The original sales receipt Contact — IKEA Customer Service at is required as proof of purchase.
-
Page 31
• Repairs not carried out by our appointed Australia. service providers and/or an authorized What will IKEA do to correct the problem? service contractual partner or where non-original parts have been used. IKEA appointed service provider will exam- •… -
Page 32
Our goods come with guarantees that 3. Ask for clarification on user manual con- cannot be excluded under the Australian tents and specifications of the IKEA ap- Consumer Law (ACL). You are entitled to a pliance. replacement or refund for a major failure… -
Page 33
It is your proof of purchase and required for the guarantee to apply. Note that the receipt reports also the IKEA article name and number (8 digit code) for each of the appliances you have purchased. -
Page 34
ENGLISH… -
Page 35
ENGLISH… -
Page 36
21552 © Inter IKEA Systems B.V. 2018 AA-2048717-1…
- Manuals
- Brands
- IKEA Manuals
- Oven
- SMAKSAK
- Manual
-
Contents
-
Table of Contents
-
Troubleshooting
-
Bookmarks
Available languages
-
EN
-
RU
Quick Links
Related Manuals for IKEA SMAKSAK
Summary of Contents for IKEA SMAKSAK
-
Page 1
SMAKSAK… -
Page 2
На последней странице данного руководства указан полный перечень авторизованных сервисных центров IKEA и соответствующие телефонные номера в различных странах. ENGLISH Please refer to the last page of this manual for the full list of IKEA appointed After Sales Service Provider and relative national phone numbers. -
Page 3
РУССКИЙ ENGLISH… -
Page 4: Table Of Contents
Технические данные Ежедневное использование Энергоэффективность Функции часов Охрана окружающей среды Использование дополнительных ГАРАНТИЯ IKEA принадлежностей Право на изменения сохраняется. Сведения по технике безопасности Перед установкой и эксплуатацией прибора внимательно ознакомьтесь с приложенным руководством. Производитель не несет ответственности за травмы и повреждения, полученные/вызванные…
-
Page 5
РУССКИЙ Детям в возрасте от 3 до 8 лет, а также лицам с ярко • выраженными и комплексными нарушениями здоровья запрещается находиться рядом с прибором, если только за ними не обеспечивается постоянный надзор. Детям младше 3 лет запрещается находиться рядом с •… -
Page 6: Указания По Безопасности
РУССКИЙ Не эксплуатируйте прибор до его установки в мебель, в • которую он должен быть встроен. Не используйте пароочистители для очистки прибора. • Не используйте жесткие абразивные чистящие средства • или острые металлические скребки для чистки стеклянной дверцы, так как ими можно поцарапать его поверхность, в результате…
-
Page 7
РУССКИЙ после установки прибора к вилке Транспортировка и хранение электропитания имеется свободный • Изделие следует транспортировать в доступ. оригинальной упаковке и в • Не подключайте прибор к розетке вертикальном положении. электропитания, если она плохо • Во время транспортировки и хранения закреплена… -
Page 8
РУССКИЙ Может произойти высвобождение Соки из фруктов могут вызывать горячего воздуха. появление пятен, удалить которые • При использовании прибора не будет невозможно. касайтесь его мокрыми руками; не • Данный прибор предназначен только касайтесь прибора, если на него для приготовления пищи. Его не следует попала… -
Page 9
РУССКИЙ указаниям по безопасности на его исходящим от всех духовых шкафов, упаковке. оснащенных функцией • Не извлекайте кнопки из прибора. пиролитической очистки. – Во время первого нагрева прибора Пиролитическая очистка до максимальной рабочей температуры, а также во время и Существует опасность после… -
Page 10: Установка
РУССКИЙ • Используйте только лампы той же • Удалите дверцу, чтобы предотвратить спецификации. риск ее запирания при попадании внутрь прибора детей и домашних Сервис животных. • Упаковочные материалы: • Для ремонта прибора обратитесь в Упаковочные материалы пригодны для авторизованный сервисный центр. вторичной…
-
Page 11: Описание Изделия
РУССКИЙ проводов фазы и нейтрали (синий и коричневый провода). Описание изделия Общий обзор Панель управления Ручка выбора режимов нагрева Дисплей Ручка управления Нагревательный элемент Гнездо для термощупа Лампа освещения Вентилятор Выемка духового шкафа Съемная направляющая для противня Табличка с техническими данными Положение…
-
Page 12: Перед Первым Использованием
РУССКИЙ Сенсор / Кнопка Функция Описание НАЧНИТЕ Включение режима нагрева. Для подтверждения. Дисплей A. Таймер / Температура B. Индикация нагрева / остаточного тепла C. Термощуп (только для отдельных моделей) D. Блокировка дверцы (только в ряде моделей) E. Часы/минуты F. Деморежим (только в ряде моделей) G.
-
Page 13: Ежедневное Использование
РУССКИЙ 2. Откройте дверцу. Аксессуары могут нагреться сильнее Закройте дверцу духового шкафа, не обычного. Из духового шкафа могут вытягивая замок от детей. появиться неприятные запахи или дым. Чтобы снять замок от детей, откройте Убедитесь, что в помещении имеется дверцу духового шкафа и отвинтите его с достаточная…
-
Page 14
РУССКИЙ Режим на- Применение Режим на- Применение грева грева Выпекание и жарка продук- Размораживание продуктов тов на одном уровне духо- (овощей и фруктов). Время вого шкафа. размораживания зависит от Тради- Размора- объема и размеров замо- ционный живание роженных продуктов. При режим… -
Page 15
РУССКИЙ Лампа включается, когда духовой шкаф Режим на- Применение работает. грева 3. Для выключения духового шкафа поверните ручку выбора режима в Данная функция специаль- положение «Выкл». но разработана для обес- Ручки управления позволяют менять печения экономии электроэ- Эко кон- температуру в ходе приготовления. Для нергии. -
Page 16: Функции Часов
РУССКИЙ 2. Поместите продукты в духовой шкаф Индикация нагрева и закройте дверцу духового шкафа. При работе данной функции на дисплее См. Главу «Указания и рекомендации». одна за другой загораются полоски по 3. Выберите в меню: Direct Steam мере того, как температура духового 4.
-
Page 17
РУССКИЙ Для изменения времени суток нажимайте Функция часов Применение на до тех пор, пока не замигает 00:00 Если никакая иная индикатор времени суток ТАЙМЕР ПРЯ- функция часов не зада- МОГО ОТ- на, «ТАЙМЕР ПРЯМОГО Установка функции СЧЕТА ОТСЧЕТА» автоматиче- «ПРОДОЛЖИТЕЛЬНОСТЬ» ски… -
Page 18
РУССКИЙ Позже духовой шкаф автоматически минут и нажмите для включится, проработает в течение подтверждения. времени, заданного функцией В момент, заданный функцией «ПРОДОЛЖИТЕЛЬНОСТЬ» и завершит «Окончание», в течение двух минут работу во время, заданное функцией выдается звуковой сигнал. На дисплее «ОКОНЧАНИЕ». при… -
Page 19: Использование Дополнительных
РУССКИЙ выдается звуковой сигнал. «На ТАЙМЕР ПРЯМОГО ОТСЧЕТА дисплее мигают «00:00» и « ». Для Многократным нажатием на кнопку отключения звукового сигнала добейтесь отображения на дисплее достаточно нажать любую кнопку. показаний времени без любых символов. Использование дополнительных принадлежностей Одновременная установка решетки и ВНИМАНИЕ! См.
-
Page 20
РУССКИЙ • Температуру внутри продукта. См. умолчанию температуру внутри рекомендуемые значения в Таблице. продукта при помощи ручки управления. На дисплее отображается символ Рекомендуемые температуры внутри продукта: термощупа и температура внутри продукта по умолчанию. 50°C С кровью 4. Нажмите на для сохранения новой температуры… -
Page 21: Дополнительные Функции
РУССКИЙ температуры внутри продукта, которое каждые 5 секунд сменяется значением фактической °C °C температуры внутри продукта. • два нажатия вызывают отображение текущей температуры духового шкафа, которое каждые 5 секунд сменяется значением заданной температуры духового шкафа. • три нажатия вызывают Полностью Установите…
-
Page 22: Полезные Советы
РУССКИЙ Для выключения функции «Защита от Чтобы снова включить духовой шкаф детей» повторите действие 2. после автоматического отключения, нажмите на любую кнопку. Индикация остаточного тепла Автоматическое отключение не Если после выключения духового шкафа работает со следующими температура внутри духового шкафа функциями: Термощуп, превышает…
-
Page 23
РУССКИЙ сократить время приготовления и минут перед тем, как разрезать его – потребление электроэнергии до тогда оно останется сочным. минимума. Во избежание образования чрезмерного Во время приготовления внутри прибора количества дыма при жарке мяса налейте или на стеклянных панелях дверцы немного… -
Page 24
РУССКИЙ Продукты Аксессуары Температура Положение Время (мин) (°C) противня Шоколадный эмалированный проти- 25 — 30 торт вень или поддон Суфле, 6 шт. керамические формоч- 25 — 30 ки на решетке Бискв. осн. для форма для осн. откр. 15 — 25 откр. -
Page 25
РУССКИЙ Продукты Аксессуары Температура Положение Время (мин) (°C) противня Отварн. овощи, эмалированный проти- 35 — 45 0,4 кг вень или поддон Вегетариан- сковорода для пиццы на 25 — 30 ский омлет решетке Овощи, среди- эмалированный проти- 25 — 30 земноморск., вень… -
Page 26
РУССКИЙ Продукты Функция Аксессуа- Поло- Темпе- Время (мин) Комментарии ры жение ратура про- (°C) тивня Неболь- Традицион- Эмали- 20 — 30 Поместите 20 шт шой торт ный режим рован- мелкого печенья приготовле- ный про- на эмалирован- ния (верх- тивень ный противень ний… -
Page 27
РУССКИЙ Продукты Функция Аксессуа- Поло- Темпе- Время (мин) Комментарии ры жение ратура про- (°C) тивня Нежир- Режим при- Решетка 40 — 50 Используйте ный бис- нудитель- форму для вы- квит ной конвек- печки (диамет- ции ром 26 см). Предварительно разогрейте духо- вой… -
Page 28: Уход И Очистка
техническими данными на передней приготовления пищи находятся в Книге рамке внутренней камеры духового рецептов, которую можно найти на веб- шкафа. сайте www.ikea.com. Для выбора Уход и очистка Для очистки металлических поверхностей ВНИМАНИЕ! См. главы, используйте специальное чистящее содержащие Сведения по…
-
Page 29
РУССКИЙ После каждого использования все Очистка выемки внутренней камеры аксессуары духового шкафа следует Процедура очистки удаляет из выемки очистить и просушить. Используйте для камеры известковый налет, оставшийся этого мягкую тряпку, смоченную в теплой после приготовления с использованием воде с моющим средством. Не мойте пара. -
Page 30
РУССКИЙ 2. Когда на дисплее отобразится «P1», нажмите на кнопку для запуска процедуры. Чтобы отложить начало процесса очистки, выберите функцию «Окончание». Во время работы функции «Пирол.чистка» лампа освещения Установите извлеченные аксессуары в духового шкафа отключена. обратном порядке. Продолжительность процедуры: 1 час 30 мин. -
Page 31
РУССКИЙ Напоминание о чистке гаснет: • по окончании работы функции «Пирол.чистка». • если одновременно нажать на и , в то время как на дисплее мигает PYR. Снятие и установка дверцы 3. Прикройте дверцу наполовину до В дверце духового шкафа имеются три первого… -
Page 32
РУССКИЙ 8. Вымойте стеклянные панели водой с мылом. Тщательно вытрите стеклянные панели. Не мойте стеклянные панели в посудомоечной машине. После окончания очистки установите стеклянные панели, рамку дверцы и дверцу духового шкафа и закройте рычажки обеих петель. Убедитесь, что стекла (А и В) вставлены в Проверьте, чтобы… -
Page 33: Поиск И Устранение
РУССКИЙ 3. Чтобы снять плафон, поверните его ПРЕДУПРЕЖДЕНИЕ Всегда против часовой стрелки. держите галогеновую лампу в 4. Очистите стеклянный плафон от грязи. перчатках или тканью, чтобы 5. При необходимости замены лампы не оставить на лампе жировые используйте лампу для духовых следы, которые…
-
Page 34
РУССКИЙ Неисправность Возможная причина Решение Лампа не горит. Лампа перегорела. Замените лампу освеще- ния. Не работает термощуп. Штекер термощупа не Вставьте штекер термощу- вставлен в свое гнездо на- па в гнездо до упора. длежащим образом. Пар и конденсат ос- Блюда находились в духо- По… -
Page 35
РУССКИЙ Неисправность Возможная причина Решение • Выключите и снова На дисплее отображается Имел место сбой электро- включите духовой шкаф код ошибки, не указанный ники. с помощью предохрани- в данной Таблице. теля домашней электро- проводки или предохра- нительного выключателя на электрощите. •… -
Page 36: Технические Данные
Продуктовый номер (PNC) ……… Серийный номер (S.N.) ……… Технические данные Технические данные BOVP SMAK 595 SS — Встраивае- мый духовой шкаф — SMAKSAK Идентификатор модели BOVP SMAK 595 BL — Встраивае- мый духовой шкаф — SMAKSAK Ширина 480 мм Размеры (внутренние) Высота…
-
Page 37: Энергоэффективность
РУССКИЙ Энергоэффективность Экономия электроэнергии вентилятор, чтобы сберечь электроэнергию. Данный духовой шкаф Остаточное тепло оснащен несколькими В ряде функций духового шкафа при функциями, позволяющими использовании программ, для которых экономить электроэнергию во была выбрана опция время приготовления. «Продолжительность» или «Окончание», Общие рекомендации а…
-
Page 38: Охрана Окружающей Среды
ООО “ИКЕА ДОМ”, Россия, 141400, Московская область, г. Химки, Микрорайон «ИКЕА», корп. 1; тел.: +7 (495) 666-2929, www.ikea.ru Изготовлено в Италии ГАРАНТИЯ IKEA Срок действия гарантии ИКЕА Пожалуйста, сохраняйте чек как подтверждение факта и даты покупки. Гарантийный срок для данного изделия…
-
Page 39
РУССКИЙ обращения, обусловленные Техобслуживание выполняется невнимательностью, несоблюдением сервисным центром, авторизованным инструкций по эксплуатации, компанией IKEA. неправильной установкой или Что покрывает данная гарантия? подключением к электрической сети с напряжением, не соответствующим Данная гарантия покрывает техническим требованиям прибора; неисправности изделия, обусловленные повреждения, вызванные химическими… -
Page 40
РУССКИЙ организациями либо Гарантия, предоставляемая ИКЕА, неавторизованными сервис- полностью покрывает или даже партнерами, а так же с превышает все требования местного использованием неоригинальных законодательства, которые могут запасных частей. отличаться в разных странах. • На ремонт вследствие неправильной Зона действия для техники, купленной в установки. -
Page 41
РУССКИЙ 3. За разъяснением функций и правил По всем дополнительным вопросам, не эксплуатации техники, купленной в касающимся гарантийного обслуживания, магазине ИКЕА обращайтесь в отдел обслуживания Для получения оптимального результата покупателей ближайшего магазина просим вас тщательно изучить ИКЕА. Пожалуйста, тщательно изучите сопроводительные… -
Page 42: Safety Information
Before first use Energy efficiency Daily use Environmental concerns Clock functions IKEA guarantee Using the accessories Subject to change without notice. Safety information Before the installation and use of the appliance, carefully read the supplied instructions. The manufacturer is not responsible if an incorrect installation and use causes injuries and damages.
-
Page 43
ENGLISH Keep children and pets away from the appliance when it • operates or when it cools down. Accessible parts are hot. If the appliance has a child safety device, it should be • activated. Children shall not carry out cleaning and user maintenance of •… -
Page 44: Safety Instructions
ENGLISH Safety instructions • Make sure not to cause damage to the Installation mains plug and to the mains cable. Warning! Only a qualified Should the mains cable need to be person must install this replaced, this must be carried out by our appliance.
-
Page 45
ENGLISH • Deactivate the appliance after each use. the door is never closed when the • Be careful when you open the appliance appliance is in operation. Heat and door while the appliance is in operation. moisture can build up behind a closed Hot air can release. -
Page 46: Installation
ENGLISH • Keep children away from the appliance infants or persons with medical while the Pyrolytic cleaning is in conditions. operation. Internal lighting The appliance becomes very hot and hot air is released from the front cooling Warning! Risk of electric shock. vents.
-
Page 47: Product Description
ENGLISH For the section of the cable refer to the total Electrical installation power on the rating plate. You can also Warning! Only a qualified refer to the table: person must do the electrical installation. Total power (W) Section of the cable (mm²) The manufacturer is not maximum 1380…
-
Page 48: Control Panel
ENGLISH For shelves and trays. Control panel Buttons Sensor field / Button Function Description OPTIONS To set the clock functions. To check the oven temperature. Use only while a heat- ing function operates. START To start a heating function. To confirm. Display A.
-
Page 49: Daily Use
ENGLISH 2. Open the door. 3. Set the function . Set the maximum Close the oven door without pulling the temperature. child lock. 4. Let the oven operate for 15 minutes. To remove the child lock, open the oven 5. Turn off the oven and let it cool down. door and remove the child lock with the torx Accessories can become hotter than usual.
-
Page 50
ENGLISH Heating Application Heating Application function function To bake and roast food on This function is designed to one shelf position. save energy during cooking. For the cooking instructions Conven- Eco Fan refer to «Hints and tips» tional (Top Cooking chapter, Eco Fan Cooking. -
Page 51: Clock Functions
ENGLISH Caution! Do not refill the function during cooking and press cavity embossment during confirm. cooking or when the oven is Setting the function: Direct Steam hot. 2. Put food in the oven and close the oven This function increases humidity during door.
-
Page 52
ENGLISH Setting the DURATION function Clock function Application 1. Set a heating function. Press Use to set a countdown confirm. time. This function has no MINUTE 2. Press again and again until effect on the operation of MINDER starts to flash. the oven. -
Page 53: Using The Accessories
ENGLISH Turn the knobs to the off positions to stop 2. Press again and again until the TIME DELAY function. starts to flash. 3. Turn the control knob to set the minutes Setting the MINUTE MINDER for DURATION time and press confirm.
-
Page 54
ENGLISH • the oven temperature. Push the baking tray / deep pan between • the core temperature. Refer to the values the guide bars of the shelf support. in the table. Recommended core temperatures 50 °C Rare 60 °C Medium 70 °C Well done Caution! Only use the core… -
Page 55
ENGLISH The display shows the symbol of the core changes every 5 seconds to the set oven temperature. temperature sensor and the default • three times — the display shows the core temperature. set oven temperature. 4. Press to save the new core 2. -
Page 56: Additional Functions
ENGLISH Additional functions Using the Child Lock Temperature (°C) Switch-off time (h) When the Child Lock is on the oven cannot 120 — 195 be turned on accidentally. 200 — 245 1. Ensure the knob for the oven functions is in the off position.
-
Page 57
ENGLISH inside and crusty outside. It decreases the To prevent too much smoke in the oven cooking time and energy consumption to a during roasting, add some water into the minimum. deep pan. To prevent the smoke condensation, add water each time after it Moisture can condense in the oven or on dries up. -
Page 58
ENGLISH Food Accessories Temperature Shelf posi- Time (min) (°C) tion Sponge flan flan base tin on wire shelf 180 15 — 25 base Victoria Sand- baking dish on wire shelf 40 — 50 wich Poached fish, baking tray or dripping 20 — 25 0.3 kg Whole fish, 0.2… -
Page 59
ENGLISH absorption than the light colour and Eco Fan Cooking — recommended reflective dishes. accessories Use the dark and non-reflective tins and containers. They have better heat Accessories Size Picture Pizza pan, dark, non-re- 28 cm diameter flective Baking dish, dark, non-re- 26 cm diameter flective Ramekins, ceramic… -
Page 60
ENGLISH Food Function Accesso- Shelf Tem- Time (min) Comments ries posi- pera- tion ture (°C) Small Forced Air Baking 2 and 150 — 20 — 35 Put 20 small cakes cake Cooking tray per one baking tray. Apple pie Convention- Wire 70 — 90 Use 2 tins (20 cm… -
Page 61: Care And Cleaning
For additional cooking tables please refer frame of the oven cavity. to the Recipe Book which you can find on the website www.ikea.com. To find the Care and cleaning and a cleaning agent. Do not clean the Warning! Refer to Safety accessories in the dishwasher.
-
Page 62
ENGLISH Stainless steel or aluminium ovens Clean the oven door with a damp cloth or sponge only. Dry it with a soft cloth. Do not use steel wool, acids or abrasive materials as they can damage the oven surface. Clean the oven control panel with the same precautions. -
Page 63
ENGLISH The oven door may close if you 2. When the display shows P1, press start the procedure. try to remove the glass panels You can use the End function to delay before you remove the oven the start of the cleaning. door. -
Page 64
ENGLISH 6. Pull the door trim to the front to remove 7. Hold the door glass panels by their top edge and carefully pull them out one by one. Start from the top panel. Make sure the glass slides out of the supports completely. -
Page 65: Troubleshooting
ENGLISH 4. Clean the glass cover. 6. Install the glass cover. 5. Replace the oven light bulb with a 40 W, 230 V (50 Hz), 350 °C heat resistant oven light bulb (connection type: G9). Troubleshooting Warning! Refer to Safety chapters.
-
Page 66
ENGLISH Problem Possible cause Remedy The display shows «C2». You want to start the Pyroly- Remove the core tempera- sis or Defrost function, but ture sensor plug from the you did not remove the core socket. temperature sensor plug from the socket. The display shows «C3». -
Page 67: Technical Data
We recommend that you write the data here: Model (MOD.) ……… Product number (PNC) ……… Serial number (S.N.) ……… Technical data Technical data BOVP SMAK 595 SS — Built In Oven — SMAKSAK Model identification BOVP SMAK 595 BL — Built In Oven — SMAKSAK…
-
Page 68: Energy Efficiency
ENGLISH Width 480 mm Dimensions (internal) Height 361 mm Depth 416 mm Area of baking tray 1438 cm² Top heating element 2300 W Bottom heating element 1000 W Grill 2300 W Ring 2400 W Total rating 3490 W Voltage 220 — 240 V Frequency 50 — 60 Hz Number of functions…
-
Page 69: Environmental Concerns
84512345 means that the product is made at the forty-fifth week of the year 2018. Manufacturer: IKEA of Sweden AB, Box 702, 343 81 Älmhult, Sweden The entity authorized by the manufacturer to take actions in Russia for assessment of the conformity of products: OOO Electrolux Rus, Kozhevnicheskiy proezd 1, 115114, Moskva;…
-
Page 70
• Repairs not carried out by our appointed IKEA. service providers and/or an authorized service contractual partner or where What will IKEA do to correct the problem? non-original parts have been used. IKEA appointed service provider will • Repairs caused by improper installation. -
Page 71
2. ask for clarification on installation of the this guarantee. IKEA appliance in the dedicated IKEA • The conditions for the installation of IKEA kitchen furniture. The service won’t appliances, except for the cases when provide clarifications related to: installation is required due to repairs or •… -
Page 72
Do you need extra help? For any additional questions not related to After Sale service, please contact our nearest IKEA store call Centre. We recommend you read the appliance documentation carefully before contacting The service life of this item is 10 years. -
Page 73
061 998 0549 Belföldi díjszabás Hétköznap 8 és 10 óra között 0900 — 235 45 32 ma-vr: 8.00 — 21.00 Nederland (0900-BEL IKEA) Geen extra kosten. zat: 9.00 — 21.00 Alleen lokaal tarief. 0031 — 50 316 8772 Luxembourg zon / pub. vakantie: 10.00 — 18.00… -
Page 76
21552 © Inter IKEA Systems B.V. 2019 AA-2048984-1…
-
manualzz.com
- Home
- Domestic appliances
- Small kitchen appliances
- Microwaves
Инструкции и Руководства для IKEA SMAKSACMX.
Мы нашли 13
инструкции доступные для бесплатного скачивания:
Инструкция по установке, Руководство пользователя

IKEA SMAKSACMB User Manual
Бренд:
IKEA
Категория:
Microwaves
Размер:
737 KB
Страниц:
72
Язык(и):
Английский, Русский
Открыть в новой вкладке

IKEA SMAKSACMX User Manual
Бренд:
IKEA
Размер:
401 KB
Страниц:
36
Язык(и):
Английский
Открыть в новой вкладке
IKEA SMAKSAK 00416947 ръководство за инсталиране
Бренд:
IKEA
Размер:
3 MB
Страниц:
32
Язык(и):
Болгарский, Итальянский, Словенский
Открыть в новой вкладке

IKEA KULINACMX ръководство за инсталиране
Бренд:
IKEA
Размер:
3 MB
Страниц:
32
Язык(и):
Болгарский, Итальянский, Словенский
Открыть в новой вкладке
IKEA EFTERMWB Vodič za instalaciju
Бренд:
IKEA
Размер:
3 MB
Страниц:
32
Язык(и):
Хорватский, Итальянский, Словенский
Открыть в новой вкладке

IKEA SMAKSACMX User Manual
Бренд:
IKEA
Размер:
395 KB
Страниц:
36
Язык(и):
Английский
Открыть в новой вкладке

IKEA SMAKSACMX ユーザーマニュアル
Бренд:
IKEA
Размер:
1001 KB
Страниц:
28
Язык(и):
zh
Открыть в новой вкладке
IKEA SMAKSACMX 사용자 설명서
Бренд:
IKEA
Размер:
471 KB
Страниц:
28
Язык(и):
Корейский
Открыть в новой вкладке

IKEA SMAKSACMX User Manual
Бренд:
IKEA
Категория:
Microwaves
Размер:
350 KB
Страниц:
32
Язык(и):
Английский
Открыть в новой вкладке

IKEA SMAKSACMX User Manual
Бренд:
IKEA
Категория:
Microwaves
Размер:
350 KB
Страниц:
32
Язык(и):
Английский
Открыть в новой вкладке

IKEA SMAKSACMX ユーザーマニュアル
Бренд:
IKEA
Размер:
942 KB
Страниц:
28
Язык(и):
zh
Открыть в новой вкладке
IKEA SAMKSACMX User Manual
Бренд:
IKEA
Категория:
Microwaves
Размер:
350 KB
Страниц:
32
Язык(и):
Английский
Открыть в новой вкладке
IKEA SMAKSACMX Panduan pengguna
Бренд:
IKEA
Размер:
996 KB
Страниц:
56
Язык(и):
Индонезийский, zh
Открыть в новой вкладке
инструкцияIkea SMAKSAK

OVEN HARNESS
ASSY
KLICKSON THERMOLIMITER
LATERAL GRID
TELERUNNER
LATERAL GRID
SUPPORT
GRID CHROME
BAKING TRAY
FAT PAN
HINGE RECEIVER
SIDE PANEL
BACK PANEL
TOP PANEL
WIRING CABLE HOLDER
SIDE PANEL
BOTTOM PANEL
ROUND HEATING
ELEMENT
UPPER
HEATING
ELEMENT
INSULATION
WRAPPER
BOTTOM HEATING
CAVITY ASSY
BACK INSULATION
WRAPPER
SPACER OVEN
ENAMELED
BAFFLE
CHILD LOCK
CAVITY GASKET
COVER LAMP
HALOGEN LAMP
HALOGEN
LAMP ASSY
CAVITY FAN
FAN NUT
CAVITY MOTOR
MOTOR BRACKET SUPPORT
(DISASSEMBLY INFORMATION FOR DISMANTLING AND RECYCLING PURPOSE)
IKEA
OVEN 904.117.28 SMAKSAK frcd air ov black
OVEN 404.118.77 SMAKSAK frcd air ov black CH
OVEN 204.118.78 SMAKSAK frcd air ov black GB
OVEN 004.118.79 SMAKSAK frcd air ov black RU
OVEN 304.116.89 SMAKSAK frcd air ov stainless steel
OVEN 804.118.56 SMAKSAK frcd air ov stainless steel CH
OVEN 604.118.57 SMAKSAK frcd air ov stainless steel GB
OVEN 404.118.58 SMAKSAK frcd air ov stainless steel RU
OVEN 304.132.40 SMAKSAK frcd air ov stainless steel AU
SELECTOR
THERMOSTAT
KNOB
CONTROL PANEL
CONTROL PANEL
GLASS
CONTROL PANEL
FRAME
ELECTRONIC PROGRAMMER SUPPORT
ELECTRONIC PROGRAMMER
ELECTRONIC BOARD
TOP VENTILATION CHANNEL
PIN BOARD SUPPORT
COMPONENT CARRIER
THERMOSTAT
BULB
THERMOSTAT
BULB SUPPORT
CABLE TERMINAL
AIR COOLING FAN PLATE
AIR COOLING FAN
AIR COOLING MOTOR SUPPORT
AIR COOLING MOTOR
EXTERNAL
GLASS
COVER DEFLECTOR
RUBBER HANDLE
EXTERNAL PANEL
HINGE
OVEN DOOR
DOOR LATERAL COLUM
SUPPORT
INTERNAL GLASS
HANDLE
Посмотреть инструкция для Ikea SMAKSAK бесплатно. Руководство относится к категории uunit, 23 человек(а) дали ему среднюю оценку 8.4. Руководство доступно на следующих языках: Suomalainen. У вас есть вопрос о Ikea SMAKSAK или вам нужна помощь? Задайте свой вопрос здесь
Главная
| Ikea | |
| SMAKSAK | |
| uuni | |
| Suomalainen | |
| Руководство пользователя (PDF), Инструкция/сборка (PDF) |
Не можете найти ответ на свой вопрос в руководстве? Вы можете найти ответ на свой вопрос ниже, в разделе часто задаваемых вопросов о Ikea SMAKSAK.
Не нашли свой вопрос? Задайте свой вопрос здесь