Notes
[*] Caution: We do not recommend you to flash the preloader.bin file using the SP MultiPort Tool as it may brick the device. Therefore, always untick the preloader.bin option before Starting the Flashing Process.
[*] Alternative Tool: SP Flash Tool and BirdA Flash Tool are the best alternatives to SP MultiPort Tool. Both allows you to Flash scatter based Firmware on the Mediatek Devices.
[*] Mediatek USB Driver: If you are looking for the original Mediatek USB Driver, then head over to the MTK Driver AutoInstaller page.
[*] Credits: SP MultiPort Tool is created and distributed by Mediatek, Inc. So, full credit goes to them for sharing the Application for free.
This is a step-by-step tutorial on how to flash stock rom to a Mediatek device using SP Multiport Download tool.
Requirements
- A Windows PC
- USB Cord
- Manually install Mediatek VCOM drivers on the PC
- Stock ROM / Firmware (You can download the stock rom or firmware for your phone )
- Download a recent version of SP Multiport Download Tool
If you get any error in SP Multiport Download tool before or during flashing then we have a comprehensive list of SP Multiport Download Tool errors to help you resolve the error message
Follow the steps below to learn how to flash stock rom using SP Multiport Download Tool (SP_MDT)
See the video tutorial below or @ https://youtu.be/yslH3ito2lQ
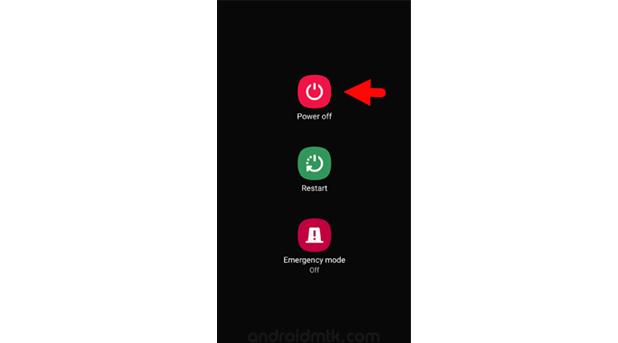
- Remove the battery from the phone and slot it back in without booting the phone (If the battery is inbuilt then simply switch if off)
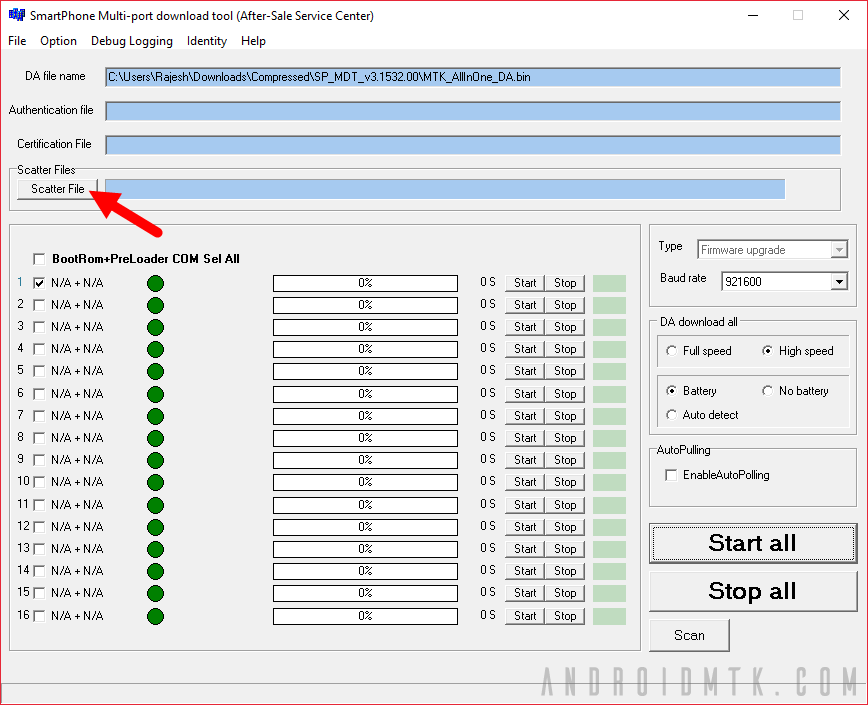
- Launch SP Multiport Download tool
![[Image: How-to-use-SP-Multiport-Download-Tool-1.jpg]](data:image/svg+xml,%3Csvg%20xmlns='http://www.w3.org/2000/svg'%20viewBox='0%200%200%200'%3E%3C/svg%3E)
- Click on «Scatter file» by the left hand side
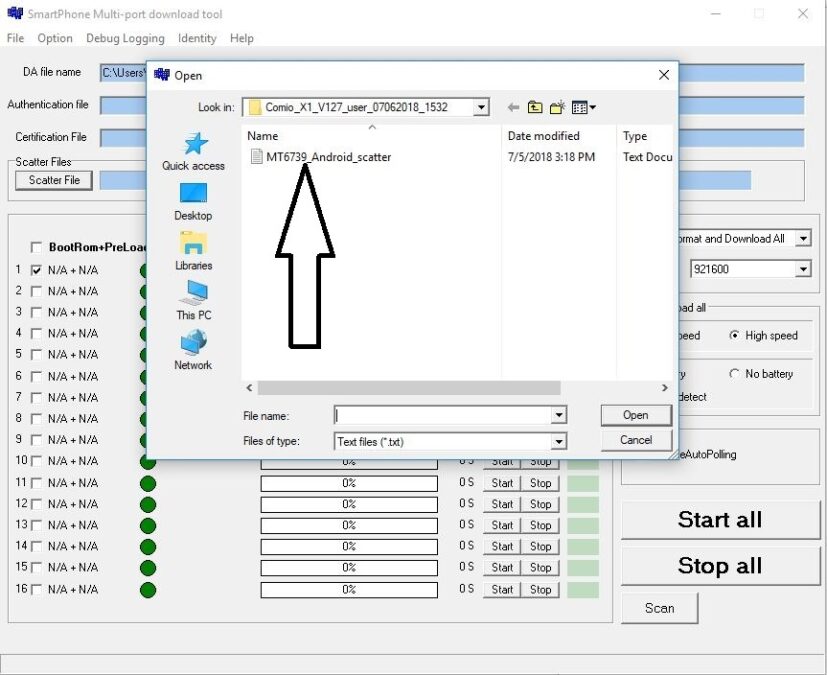
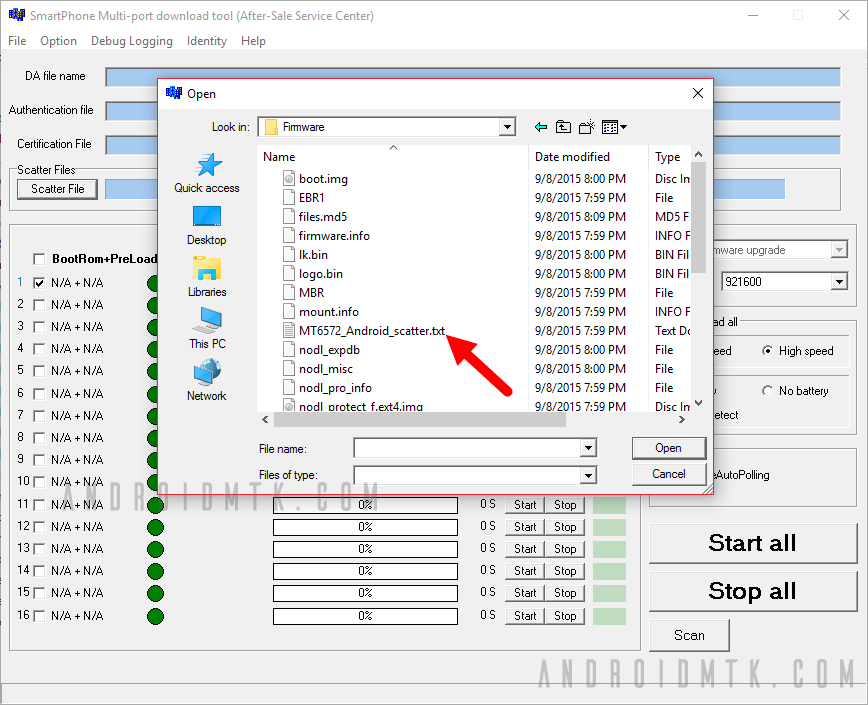
- In the window that pops up, navigate to select the scatter file for your phone model then click Open (scatter file is a text file with the word «scatter» in its name )
- You can change the flash settings at the right hand side [this is optional, in my case using HIGH SPEED threw out an error while trying to flash so i selected FULL SPEED]
- Click on Scan
- The tool will prompt to reset all selected comport, Click Yes
- Connect the switched off phone (with battery inside) to the PC via USB cord without holding any button
- You should see a green bar and a «Scan Success» message [This indicates the tool was able to successfully detected your device]
- Disconnect the phone
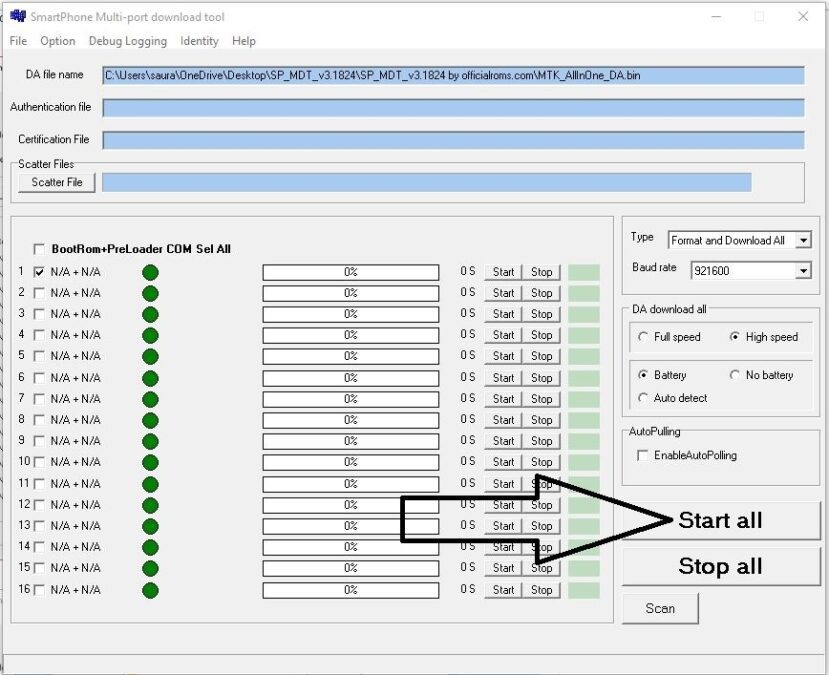
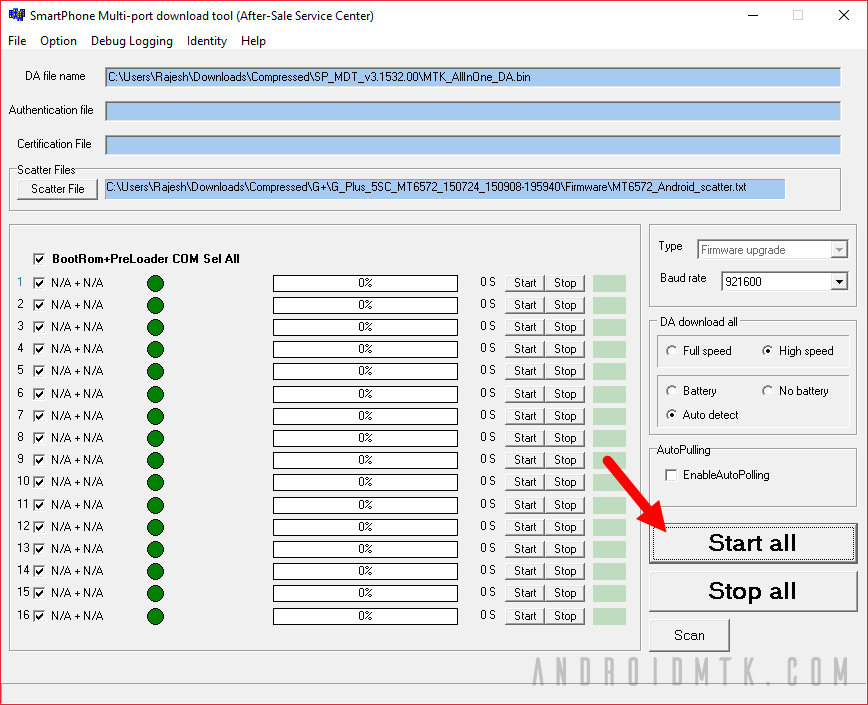
- Click on Start
- re-Connect the switched off phone (with battery inside) to the PC via USB cord without holding any button
- Wait while the tool flashes the ROM onto your device
- Once successful, you should see a «DL OK» and «PASS» message
- Disconnect the phone, remove the battery for 15 seconds (if removable), slot it back in then power up the phone
- Ensure to do a factory reset in recovery mode to clear any stuck at boot / bootloop errors
![[Image: How-to-use-SP-Multiport-Download-Tool-1.jpg]](https://www.hovatek.com/blog/bpyeki/uploads/2018/06/How-to-use-SP-Multiport-Download-Tool-1.jpg)
![[Image: How-to-use-SP-Multiport-Download-Tool-2.jpg]](https://www.hovatek.com/blog/bpyeki/uploads/2018/06/How-to-use-SP-Multiport-Download-Tool-2.jpg)
![[Image: How-to-use-SP-Multiport-Download-Tool-3.jpg]](https://www.hovatek.com/blog/bpyeki/uploads/2018/06/How-to-use-SP-Multiport-Download-Tool-3.jpg)
![[Image: How-to-use-SP-Multiport-Download-Tool-4.jpg]](https://www.hovatek.com/blog/bpyeki/uploads/2018/06/How-to-use-SP-Multiport-Download-Tool-4.jpg)
![[Image: How-to-use-SP-Multiport-Download-Tool-5.jpg]](https://www.hovatek.com/blog/bpyeki/uploads/2018/06/How-to-use-SP-Multiport-Download-Tool-5.jpg)
![[Image: How-to-use-SP-Multiport-Download-Tool-6.jpg]](https://www.hovatek.com/blog/bpyeki/uploads/2018/06/How-to-use-SP-Multiport-Download-Tool-6.jpg)
![[Image: How-to-use-SP-Multiport-Download-Tool-7.jpg]](https://www.hovatek.com/blog/bpyeki/uploads/2018/06/How-to-use-SP-Multiport-Download-Tool-7.jpg)
![[Image: How-to-use-SP-Multiport-Download-Tool-8.jpg]](https://www.hovatek.com/blog/bpyeki/uploads/2018/06/How-to-use-SP-Multiport-Download-Tool-8.jpg)
![[Image: How-to-use-SP-Multiport-Download-Tool-9.jpg]](https://www.hovatek.com/blog/bpyeki/uploads/2018/06/How-to-use-SP-Multiport-Download-Tool-9.jpg)
![[Image: How-to-use-SP-Multiport-Download-Tool-10.jpg]](https://www.hovatek.com/blog/bpyeki/uploads/2018/06/How-to-use-SP-Multiport-Download-Tool-10.jpg)
Important Notice
- SP Multiport Download tool can flash upto 16 devices simutaneously but best you keep it to a minimum of 8 devices. All devices connect must be compatible with the firmware you’re trying to flash
- SP Multiport Download tool can not be used to flash single files such as recovery.img for that, you must use SP flash tool
- Once SP Multiport Download tool has detected your device, avoid disconnecting till the task is complete as this might cause the phone to go dead
- If you accidentally interrupted flashing and the phone went dead, follow this guide to revive the phone
- SP Multiport Download tool requires a scatter file but not an internet connection. Scatter files are usually named something like MTxxxx_Android_scatter and are basically maps which contain addresses to which each file in your firmware should be flashed to.
- Do not mistake scatter file for firmware / stock rom / flash file. A firmware contains several files, scatter file is just one of them so do not format when you have only a scatter file
- Depending on the option you select in SP flash tool, you can flash with the battery inside the phone or removed (if removable). The default flash setting is with battery inside
- SP Multiport Download tool is for flashing only scatter format firmware. It will not flash an OTA update.zip (even though that contains a scatter file) or a custom rom in flashable zip format.
- Using a Miracle Box scatter file in SP flash tool might give an error. If your scatter file is from Miracle Box then use Miracle Box to flash. Scatter files made from other tools like Infinity Chinese Miracle 2, Wwr_MTK and NCK Pro box work fine
- If you can, backup your firmware before flashing with SP Multiport Download tool. While trying to flash an incompatible firmware should give you an error, you might be unlucky enough to successfully flash the firmware for the wrong variant, resulting in a bricked phone
- Avoid using a random scatter file (even though its for your chipset). Just because a scatter file is for your chipset doesn’t mean it contains the same partition info. Force-flashing with a wrong scatter file could result in an overlap error or corrupted partition table.
- If you do not wish to generate a Checksum file as requested by the tool then disable checksum under Option > DA Checksum > Disable Checksum
Video Transcript
Quote:In this video tutorial, I’ll be explaining how to flash a Mediatek Android device using Smartphone Multiport download tool. First off, you need to have a Mediatek phone which you intend to flash. You also need to have the Smartphone Multiport Download tool. I have mine downloaded here.
You of course need to have the firmware which You intend to flash, I also have that here. Now, I should mention that you’ll need to generate a checksum file for your firmware. We have a guide on how to do that so check it out. The reason why you need this checksum file is because the SP Multiport tool requires a checksum file to flash. Alright! So just generate the checksum file and make sure the checksum file is placed in the same directory as your other files OK?
Finally you need to have installed your Mediatek USB VCOM drivers. We have a guide on how to do that and also a video so make sure you check out our YouTube channel or our Forum and follow that guide. Now, once you have all these in place, the next thing You want to do is to launch the SP Multiport flash tool and you wait for the dashboard to come up okay? Great!
Now, usually you would find that this field is blank. I already loaded my scatter file so I’m going to walk you through that again. Now, this field is going to be blank so what You want to do is to click on Scatter File. Now, You navigate to the location of your firmware, You open the firmware folder and you select the scatter file and You click Open. That’s going to load the scatter file.
Now, the next thing You want to do is to run a scan. That is to ensure that this tool can detect the device. OK, so You leave only this first item checked, You leave the rest unchecked and then You come down here and You click on Scan and then You click on Yes. Now, what You want to do is to power off the device, still with battery in it, don’t hold any button then You connect it to the PC via a USB cord.
You’re waiting for a Scan success message. Alright! So we have a detection. I’m going to disconnect the device. Now, I’m getting ready for flash. Now, the next thing You’ll want to do at this point is to select your flash option. I’m going to go with Firmware Upgrade. You can select any option you want here. I’ll just go with Firmware Upgrade. Its very important You understand that the Format Only option(s) just wipe they don’t write so Firmware Upgrade will wipe and write.
Format and Download will wipe and write okay? so I’ll just go with Firmware Upgrade. Alright! So I think I can leave all other settings here in place. So now the next thing You’ll want to do is to click on Start and then You’re going to reconnect the phone via a USB cord and then you just wait for the tool to flash okay? it’s very important you do not interrupt the flashing process because if You do interrupt, the device could go dead and then You are going to have to keep charging till the phone comes up.
Now, if you happen to have a device with an inbuilt battery then you just have to keep charging because you can’t easily remove the battery okay? But For someone like me who’s using a removable battery, I can just take out the battery, re-insert and I’m good to go okay? But it could be quite a lengthy process (You know) getting your phone back up so to avoid having to go through that stress, just avoid interrupting the flashing process okay?
So just sit back and let SP Multiport do the flashing and once flashing is done you can disconnect and then You power up the device I should also mention that after you flash, you might have to do a factory reset on some devices. You might run into maybe the device being stuck at logo or something.
You might just have to do a factory reset anyway so just boot into recovery mode, wipe data & cache and then you can reboot. So I’m just going to wait for this tool to finish flashing okay? Yes! while I’m waiting (I also remembered another thing) Now, under this DA download all, for some people, they get errors when they use High Speed okay? So if you have or encounter an error when you’re using High Speed, just tick Full Speed alright?
So I’m at 84% and fingers crossed should be rounding up anytime soon Alright! That’s done so you can disconnect the device and power up. Don’t forget to do the factory reset. So that’s basically how to flash firmware to a Mediatek Android device using Smartphone Multiport Download tool
(This post was last modified: 04-10-2019, 11:56 PM by X3non.)
![]()
Posts: 137
Threads: 51
Joined: Jun 2016
Reputation:
1
I downloaded up to 3 SP Multiport Download Tool it us to complain invalid scatter file or scatter files isn’t found in selected folder please what is the solution
![]()
Posts: 49,464
Threads: 1,451
Joined: Oct 2013
Reputation:
432
(01-07-2018, 08:29 AM)isyrecord Wrote: I downloaded up to 3 SP Multiport Download Tool it us to complain invalid scatter file or scatter files isn’t found in selected folder please what is the solution
Try v3.1820 @ https://www.hovatek.com/forum/thread-15612.html
Note!
We have a reply schedule for Free Support. Please upgrade to Private Support if you can’t wait.
![]()
Alex5
Enthusiastic Member
Posts: 7
Threads: 2
Joined: Aug 2018
Reputation:
0
Hello. I want to repair my smartphone Ritmix RMP-391. I have no file «Checksum». When I click on «Scan» there is an inscription “Do not support scan comport by preloader. Please use empty device or press download key.” What I need to do?
![]()
X3non
Recognized Contributor
![]()
![]()
![]()
![]()
![]()
Posts: 22,062
Threads: 571
Joined: Jul 2014
Reputation:
332
(21-08-2018, 12:17 PM)Alex5 Wrote: Hello. I want to repair my smartphone Ritmix RMP-391. I have no file «Checksum». When I click on «Scan» there is an inscription “Do not support scan comport by preloader. Please use empty device or press download key.” What I need to do?
you’ll find fixes to the two errors at https://www.hovatek.com/forum/thread-23312.html
![]()
Alex5
Enthusiastic Member
Posts: 7
Threads: 2
Joined: Aug 2018
Reputation:
0
(21-08-2018, 08:04 PM)X3non Wrote:
(21-08-2018, 12:17 PM)Alex5 Wrote: Hello. I want to repair my smartphone Ritmix RMP-391. I have no file «Checksum». When I click on «Scan» there is an inscription “Do not support scan comport by preloader. Please use empty device or press download key.” What I need to do?
you’ll find fixes to the two errors at https://www.hovatek.com/forum/thread-23312.html
I have made as you have advised and there was a new error (see screenshot). But I don’t see in the folder 2 identical files «recovery», though the program indicates it.
(This post was last modified: 21-08-2018, 11:35 PM by Alex5.)
![]()
Posts: 8,285
Threads: 191
Joined: Jun 2015
Reputation:
95
(21-08-2018, 10:50 PM)Alex5 Wrote:
(21-08-2018, 08:04 PM)X3non Wrote:
(21-08-2018, 12:17 PM)Alex5 Wrote: Hello. I want to repair my smartphone Ritmix RMP-391. I have no file «Checksum». When I click on «Scan» there is an inscription “Do not support scan comport by preloader. Please use empty device or press download key.” What I need to do?
you’ll find fixes to the two errors at https://www.hovatek.com/forum/thread-23312.html
I have made as you have advised and there was a new error (see screenshot). But I don’t see in the folder 2 identical files «recovery», though the program indicates it.
cut ramdisk-recovery.img out of the folder and retry generating the checksum.ini.
![]()
Alex5
Enthusiastic Member
Posts: 7
Threads: 2
Joined: Aug 2018
Reputation:
0
(22-08-2018, 11:20 AM)innagee Wrote:
(21-08-2018, 10:50 PM)Alex5 Wrote:
(21-08-2018, 08:04 PM)X3non Wrote:
(21-08-2018, 12:17 PM)Alex5 Wrote: Hello. I want to repair my smartphone Ritmix RMP-391. I have no file «Checksum». When I click on «Scan» there is an inscription “Do not support scan comport by preloader. Please use empty device or press download key.” What I need to do?
you’ll find fixes to the two errors at https://www.hovatek.com/forum/thread-23312.html
I have made as you have advised and there was a new error (see screenshot). But I don’t see in the folder 2 identical files «recovery», though the program indicates it.
cut ramdisk-recovery.img out of the folder and retry generating the checksum.ini.
Yes, I have made this. The file «Checksum» has been created. But when I click on «Start» everything freezes (see sreenshot). Why?
(This post was last modified: 22-08-2018, 01:08 PM by Alex5.)
![]()
Posts: 49,464
Threads: 1,451
Joined: Oct 2013
Reputation:
432
(22-08-2018, 12:48 PM)Alex5 Wrote: Yes, I have made this. The file «Checksum» has been created. But when I click on «Start» everything freezes (see sreenshot). Why?
Please, create a new thread so we focus on it
see https://www.hovatek.com/forum/thread-514.html for how to create a thread
Note!
We have a reply schedule for Free Support. Please upgrade to Private Support if you can’t wait.
![]()
Posts: 2
Threads: 0
Joined: May 2019
Reputation:
0
Содержание
- Download MTK SP Multi Port Download Tool (all versions)
- Features of MTK SP Multi Port Download Tool
- Download SP Multi Port Download Tool
- SmartPhone Multi-port download tool — инструкция по прошивке
- Smartphone multi port download tool для windows 10
MTK SP Multi Port Download Tool is a small application for Windows Computer, which allows you to flash or install scatter-based firmware (ROM) on the devices powered by MediaTek Chipset.
Here on this page, we have shared the latest version of the SP Multi Port Download Tool and the previous versions.

Flash Firmware:
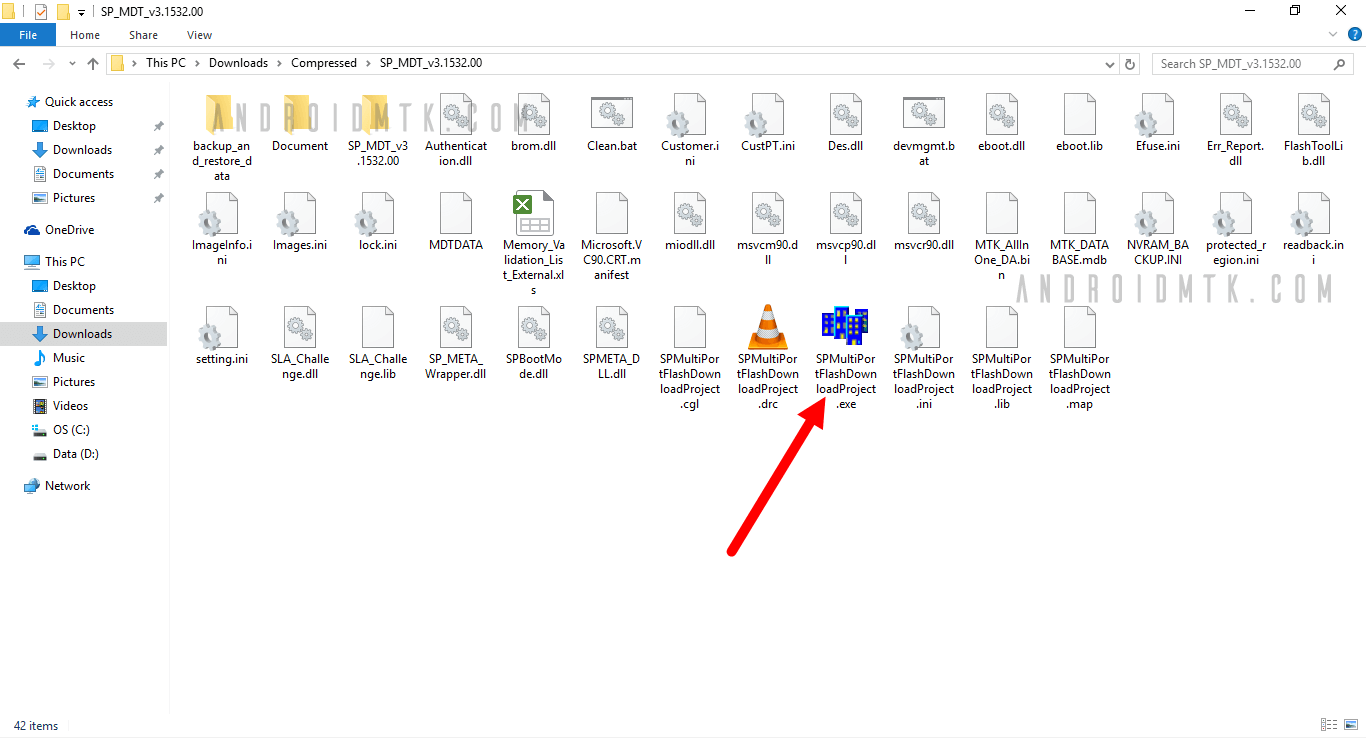
It allows you to flash or install scatter-based firmware (ROM) on mobile devices powered by MediaTek Chipset. Download and extract the tool> Open SPMultiPortFlashDownloadProject.exe > Load the scatter file and click Flash to begin the flashing or installation process.
Format Bootloader:
It allows you to format or delete the bootloader on your mobile device (be careful while formatting the bootloader, as it may cause a bootloop on the device).
Set Flashing Speed:
There are two options available, i.e., High Speed and Full Speed. The High Speed will give you quick flashing results over the full speed.
Detect your Device with or without Battery:
SP Multi Port Download Tool allows you to Auto Detect your mobile device with Battery or without Battery.
Other Features:
It allows you to delete NVRAM backup data (only for RID), remove the OTP lock, or perform an OTP format.
SP Multi Port Download Tool is compatible with all versions of Windows OS, including Windows XP to Windows 10 (x32 or x64 bit). If in case you were looking for the latest version of the tool, then use the following links to get it on the computer:

Внимание! Все действия вы производите на ваш страх и риск. В процессе прошивки существует небольшая вероятность того, что вы можете испортить смартфон, и не будет возможности его восстановить, потому внимательно следуйте всем инструкциям. Перед прошивкой сохраните всю информацию, которая Вам необходима, т.к в процессе прошивания все данные будут удалены!
1. Установите все драйвера, необходимые для прошивания устройства.
Если устройство предложит Вам выбрать драйвер самостоятельно, то установите его в зависимости от Вашей ОС (например, для ХР) или запустите программу для автоматической установки драйверов.

2. Включите программу прошивальщик SmartPhone Multi-port download tool (After-Sale Service Center) для этого запустите в папке прошивальщика 
Вы увидите перед собой следующий интерфейс:

3. Нажмите клавишу Scatter-File и подгрузите прошивку.

4. В папке с прошивкой нужно выбрать файл с названием MT6737_Android_scatter.txt, например:

5. Нажмите клавишу Scan и подключите телефон в выключенном состоянии к ПК для определения прошивальщиком порта.

6. После данных действий вы увидите, что прошивальщик обнаружил устройство

7. После успешного обнаружения порта, через который будет прошиваться ваше устройство, отключите телефон от ПК и нажмите кнопку Start all.

8. Вы увидите, как прошивальщик обрабатывает прошивку перед загрузкой на ваше устройство.

9. После завершения процесса обработки прошивки подключите ваш смартфон в выключенном состоянии к ПК, после данных действий прошивка должна запуститься автоматически, в строке состояния отобразится процесс загрузки прошивки.

10. После успешного завершения процесса прошивания в интерфейсе программы вы увидите что прошивка загружена на 100%, можете отключить смартфон от ПК и включить его (первое включение после обновления прошивки немного дольше чем обычно, далее все будет работать в стандартном режиме).
i9220 pad — Прошивки
 MeePad E-Note I5250 / KK i9220 / Star i9220 Note
Описание | Обсуждение » | Прошивка »
MIUI OS
Прошивка MIUI 10.12.2012 для модификации 9p017 Скачать Зеркало
Прошивать из Recovery Mode. Автор отзовись. Народ должен знать своих героев.
Другие модифицированные
Прошивка на основе 03.07.2012 для модификации 9p017 Скриншоты Скачать Зеркало
Прошивать из Recovery Mode. Автор отзовись. Народ должен знать своих героев.
Прошивка (универсальная) на основе 03.07.2012 для модификаций 9p017,5640,5647 Скачать Зеркало
Прошивать через SP MDT v3.1220.00_A2012.05.29. При прошивке необходимо выбрать правильные драйверы устройств. См. инструкцию.Автор отзовись. Народ должен знать своих героев.
Дампы стоковых
Дамп стоковой прошивки 13.07.2012 для модификации 9p017 Скачать Зеркало
Прошивать через Flash Tool. Автор bazygin.
Дамп стоковой прошивки 01.05.2013 для модификации 5647 Скачать Зеркало
Прошивать через Flash Tool. Автор отзовись. Народ должен знать своих героев.
Юзабилити
Патч для улучшения чувствительности микрофона и громкости разговорного динамика Скачать Зеркало
Устанавливать из Recovery Mode. Автор патча Batya_zt
Патч для корректировки поиска спутников в разных странах:
Украина Скачать Зеркало
Россия Скачать Зеркало
Беларусь Скачать Зеркало
Европа Скачать Зеркало
Азия Скачать Зеркало
Казахстан Скачать Зеркало
Устанавливать из Recovery Mode.Спасибо Batya_zt и B0@tswain
Root
Патч для получения прав суперпользователя Скачать Зеркало
Устанавливать из Recovery Mode. Спасибо за ссылку Urusai
Recovery mode
Патч для установки Team Win Recovery project v.2.5.0.0 ( TWRP ) для модификации 9p017 Скачать Зеркало
Патч для установки Team Win Recovery project v.2.5.0.0 ( TWRP ) для модификации 5640 Скачать Зеркало
Патч для установки Team Win Recovery project v.2.5.0.0 ( TWRP ) для модификации 5647 Скачать Зеркало
Устанавливать из Recovery Mode. Спасибо Batya_zt, автор модификации B0@tswain
Порядок прошивки:
1. Скачать и распаковать архив с SP Flash Tool (лучше в корень диска C), запустить его.
2. Распаковать прошивку (лучше в корень диска C).
3. Выключаем телефон и отсоединяем кабель
4. Вынимаем батарею
5. В Flash Tools cправа в окне жмем Scatter-loading, идем в ту папку, куда распаковали прошивку, выбираем файл MT6575_Android_scatter_emmc.txt
6. Вверху жмем Download
7. Вставляем батарею и подсоединяем кабель
Повторюсь, вставлять батарею и подключать кабель только после нажатия Download
Должна начаться прошивка. Если в системе не установлены нужные драйверы, то при подсоединении кабеля будет найдено неизвестное устройство, ловим его в диспетчере устройств и устанавливаем драйверы.
Windows может ругаться на драйверы, что они неподписанные, все равно соглашаемся и устанавливаем.
После окончания прошивки, отсоединяем кабель, вытаскиваем и вставляем батарею и сразу же заходим в рекавери (см выше как это сделать). Ставим рут и остальные патчи (по желанию)
За инструкцию, патчи говорим спасибо Resquer на чина форуме : http://forum.china-iphone.ru/viewtopic.php?f=46&t=19264
Хоть и трудно получить кирпич на аппарате с МТК, предупреждаю: неоднократно подумайте, нужно ли вам прошивать исправно работающий девайс. Все действия проводите на свой страх и риск.
Спасибо corvin-08
Перед тем, как приступить к прошивке, прочтите «Возможные проблемы при прошивке и их решения».
Прошивка с помощью SPMultiPortFlashDownloadProject (SP_MDT) — это основной метод прошивки смартфона i9220 Note MT6575. Этот метод рекомендован компанией AGold. AGold — это компания, которая разрабатывает шасси для многих MT6575 устройств (в частности все 5″ устройства на MT6575 разработаны ею) и прошивки для этих устройств. Все фабрики (которые делают устройства на базе шаси AGold) прошивают устройства именно этим методом.
1). Программа SP_MDT.
2). Драйвера Drv_MediaTekUSB_VCOM_Driver_XP_Vista_7_32_64bit для прошивки.
3). Сама прошивка для вашего смартфона. Для i9220 Note MT6575 >Прошивка c модифицированным рекавери (он же CWMR) Setup data source file и указываем файл MTK_DATABASE.mdb (он лежит в папке SP_MDT).
7). Выбираем меню File > Open Download Agent File и указываем файл MTK_AllInOneDA.bin (он лежит в папке SP_MDT).
8). Нажимаем Scatter File и выбираем файл MT6575_Android_scatter_emmc.txt (он лежит в папке с прошивкой).
9). (САМЫЙ ВАЖНЫЙ ПУНКТ). Многие жалуются, что после прошивки телефона на базе MT6575 «отваливаются» камеры (передняя или задняя), некорректно работает дисплей (ничего не показывает, перекошен, неверная яркость, неверная цветопередача и пр.). Всё дело в том, что производитель изменяет устройства со временем. В разных партиях устройств могут быть установлены разные матрицы камер, разные контроллеры дисплея. Чтобы учесть эти ситуации в uboot файле прошивки внесены все возможные драйвера (на момент выхода прошивки) для камер и дисплея конкретного устройства. Всё, что нужно сделать — это указать верные сенсоры задней и передней камеры и верный контроллер дисплея (см. скриншот в конце руководства).
НЕ ПРОПИСЫВАЙТЕ НАЗВАНИЯ СЕНСОРОВ ВРУЧНУЮ, ТОЛЬКО ВЫБИРАЙТЕ НУЖНОЕ ЧЕРЕЗ КНОПКУ УСТАНОВКИ СЕНСОРОВ. Для i9220 Note в 99% случаев нужно выбрать один из двух вариантов:
mt9p017_raw (задняя камера), hi704_yuv (передняя),RX_50NT_401B (дисплей)
или
0v5640_yuv (задняя камера), hi704_yuv (передняя), RX_50NT_401B(дисплей)
Ничего страшного, если вы ошибетесь в этих параметрах. Просто прошейтесь еще раз с нужными параметрами.
Если оба варианта не подойдут, то… Если некорректно работает дисплей — подбирайте верный контроллер дисплея из доступных для выбора. Если не работает передняя или задняя камера (или обе сразу), подбирайте верный сенсор для соответствующей камеры. Работоспособность камер легко проверить, запустив стандартную программу Камера.
10). Остальные параметры выставляйте, как на скриншоте в конце руководства.
11). Нажимаем «Start all».
12). Подключаем телефон к компьютеру кабелем. Программа должна его увидеть и начать прошивку. Если телефон не обнаружен, то отключите его от компьютеры, вытащите и вставьте батарею и заново подключите к компьютеру.
13). После окончания прошивки (напротив порта будет стоить WR OK) нажимаем Stop all и отключаем телефон.
14). Готово.
Уменьшено на 61%
Прикрепленное изображение
1010 x 768 (212.97 КБ)
Спасибо Urusai
Необходимо загрузить файл CWM-SuperSU-v0.93.zip и, не распаковывая, положить его на SD-карту (не на внутреннюю память телефона).
Заходим в recovery — на выключенном аппарате нажимаем и держим Power (кнопка питания) + Volume Up (кнопка увеличения громкости).[/*]
Выбираем пункт «install zip from sdcard».
Выбираем пункт «choose zip from sdcard».
Выбираем «CWM-SuperSU-v0.93.zip».
Подтверждаем.
Готово.
Перезагружаем телефон и радуемся правам администратора.
Спасибо Urusai
Приносим свои извинения. Раздел в процессе наполнения.
Пользоваться поиском. Спасибо за понимание :thank_you:
Коротко о главном
Не работает камера, 8 битный экран, что делать? Читаем тут и тут
Сообщение отредактировал vaalf — 06.08.16, 21:04
Прошивка для i9220 PAD, модель e1809c_v75_gq1008_9p017
В прошивке уже заменен рекавери на модифицированный. Внешняя SD теперь монтируется как /mnt/sdcard, а не /mnt/sdcard2, как ранее. Исправлен тихий звонок при входящем вызове. Улучшена яркость дисплея, улучшена работа WiFi.
Сразу после прошивки можно зайти в модрекавери ( на выключенном теле , удерживая клавишу громкость и кнопку включения до появления «вскрытого робота») и применить патчи:
— circle_battery_I9220PAD_04.06.2012, заменяет иконку батареи с % оставшегося заряда. Скачать: http://clck.ru/d/cGmYX6Lw1CXwB
— root_MTK6575_4.0.3 , получение рута. Скачать : http://clck.ru/d/h1nuNBh21CXxB
— tweaks_Sony_BRAVIA_and_other , улучшение отображения медиафлов и небольшие фиксы. Скачать : http://clck.ru/d/oUh8SMHD1CXxL
— Repartition_I9220PAD.signed , переразмечает память в смарте. Получаем 2Gb для установки софта и 500Mb под пользовательские данные. Кеш и систем — без изменений. Благодаря этому патчу перенес все проги в тело и не парюсь на случай глюка внешней флешки. Скачать : http://clck.ru/d/cOO8irSX1CY59
Порядок прошивки:
1. Скачать и распаковать архив с SP Flash Tool (лучше в корень диска C), запустить его.
2. Распаковать прошивку (лучше в корень диска C).
3. Выключаем телефон и отсоединяем кабель
4. Вынимаем батарею
5. В Flash Tools cправа в окне жмем Scatter-loading, идем в ту папку, куда распаковали прошивку, выбираем файл MT6575_Android_scatter_emmc.txt
6. Вверху жмем Download
7. Вставляем батарею и подсоединяем кабель
Повторюсь, вставлять батарею и подключать кабель только после нажатия Download
Должна начаться прошивка. Если в системе не установлены нужные драйверы, то при подсоединении кабеля будет найдено неизвестное устройство, ловим его в диспетчере устройств и устанавливаем драйверы.
Windows может ругаться на драйверы, что они неподписанные, все равно соглашаемся и устанавливаем.
После окончания прошивки, отсоединяем кабель, вытаскиваем и вставляем батарею и сразу же заходим в рекавери (см выше как это сделать). Ставим рут и остальные патчи (по желанию)
Хоть и трудно получить кирпич на аппарате с МТК, предупреждаю: неоднократно подумайте, нужно ли вам прошивать исправно работающий девайс. Все действия проводите на свой страх и риск.
Сообщение отредактировал corvin-08 — 18.06.12, 13:12
У меня курьер чуть было не привез мне N8000 мой отдал другим а N8000 повез ко мне, правда это быстро выяснили и потребовали замену. Я из за этого день потерял, Курьер ко мне не успел. Пришлось ему из Москвы в Домодедово переться. Девайсы и вправду очень похожи. Надо сказать мне предложили этот девайс. Но я всеже выбрал i9220. Основная причина, по нему информации больше.
Кто нибудь подскажите порядок получения root. Там правда достаточно файл скачать, через рекавери его поставить и перезапуститься? Просто оч хочеться проверить не решит ли чайник проблем с Gameloft играми.:)
А то, я на ZP 200 в обзоре N.O.V.A видел. Там сказали, что его через чайник запустили.
Сообщение отредактировал Agasferus — 20.06.12, 17:04
Agasferus, тут есть прошивка (и драйверы и патчи) с описанием процесса. Можно не прошиваться полностью, а только модрекавери. Во флештуле снять со всех файлов галочки, кроме recovery. Хотя лучше прошиться полностью — и дисплей стал ярче и Wi-Fi стабильней работает. И в antutu на 120 попугаев больше набрал, чем на апрельской прошивке. Только убедитесь, что модель та, а не очередная копия.
Сообщение отредактировал _mayday_ — 12.10.12, 17:25
Home » How to use SP MultiPort Download Tool
These are the instructions to flash the Stock Rom or any custom rom using SP MultiPort Download Tool on Windows Computer.
Requirements: Your Android smartphone should have at least 20-30 percent of battery to perform the flashing process.
Flash Stock Rom using SP MultiPort Download Tool
Step 1: Download and install Android USB Drivers on your Computer. In case you have already installed the USB Drivers for your Android Phone then SKIP this step.
Click Here To Start Download
Step 2: Power Off your Android Smartphone and remove the battery.
Step 3: Download Stock Rom or any Custom ROM which is compatible with SP Multi Port Download Tool.
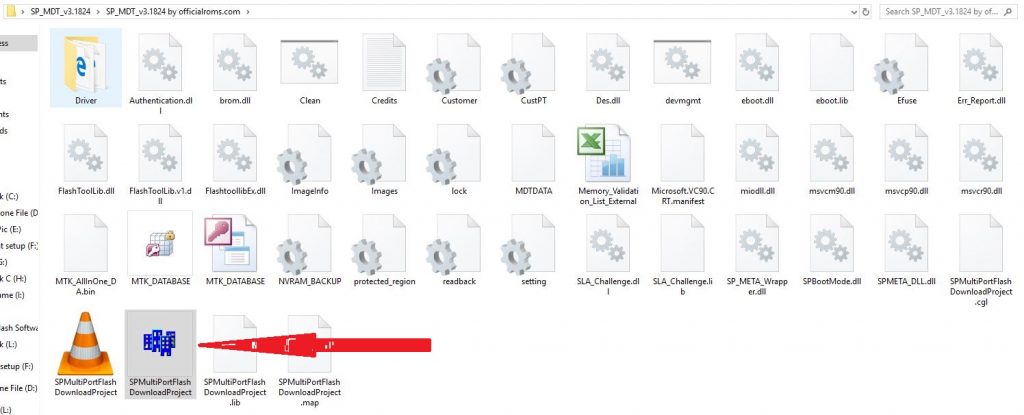
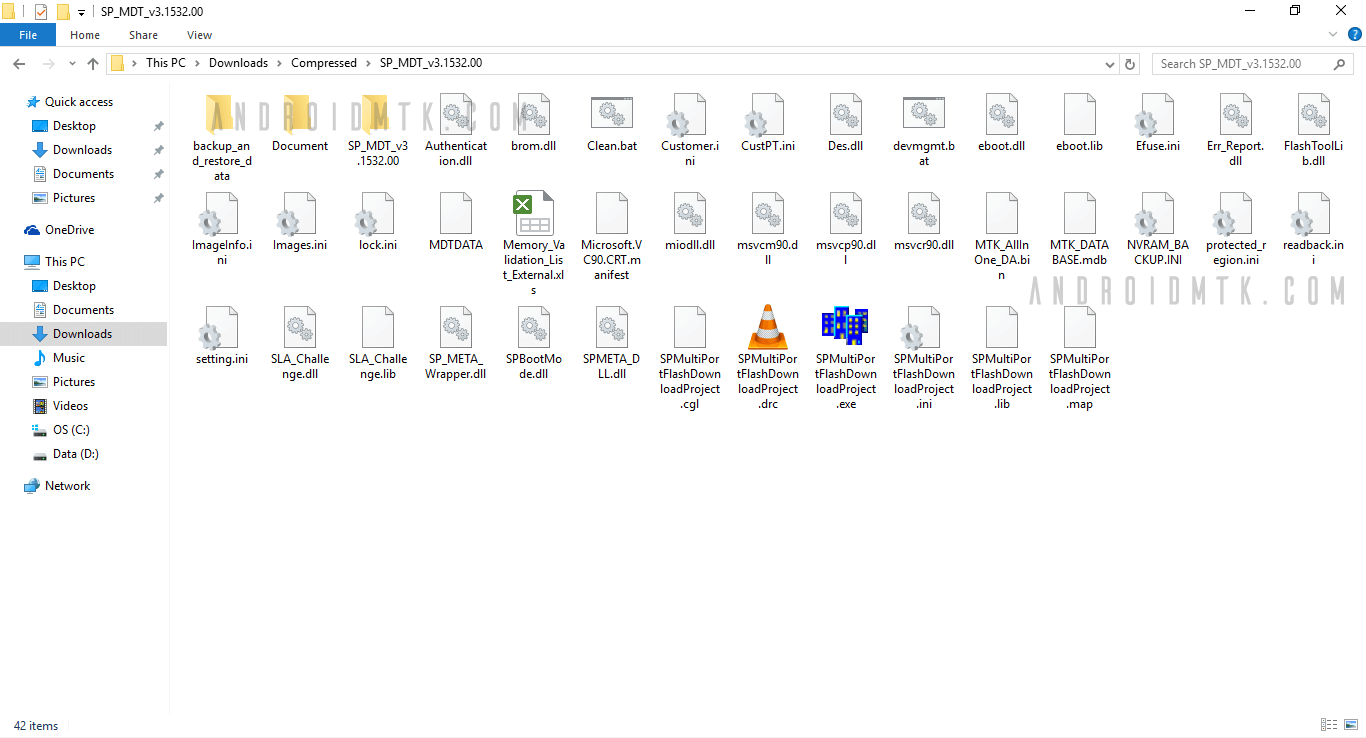
Step 4: Download and extract SP MultiPort Download Tool on your Computer. After Extracting you will be able to see the following files:
Step 5: Now Open SP Multi Port Download Tool.
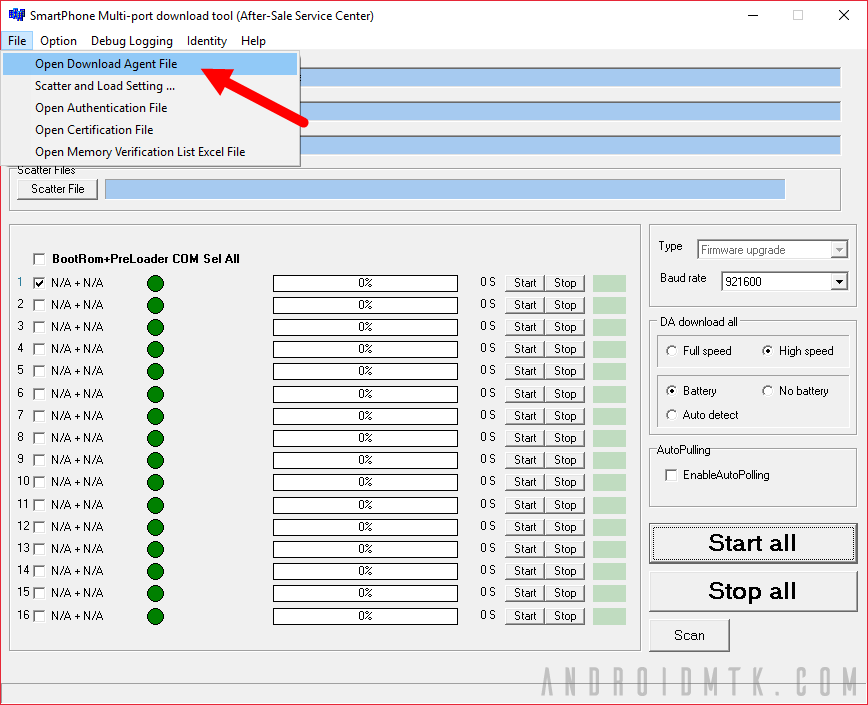
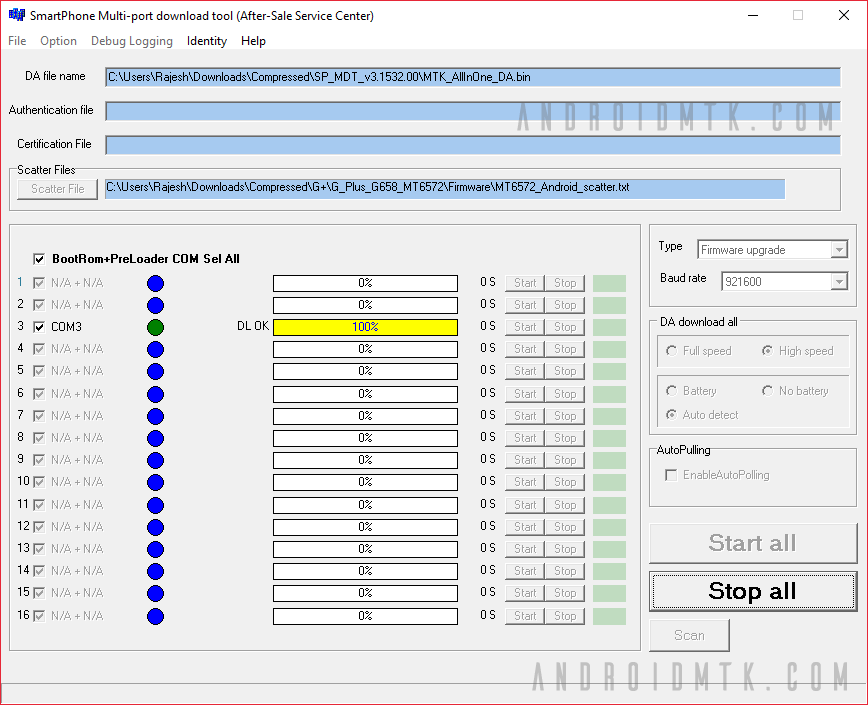
Step 6: Once, SP Multi Port Download Tool is launched you will be able to see the following screen:
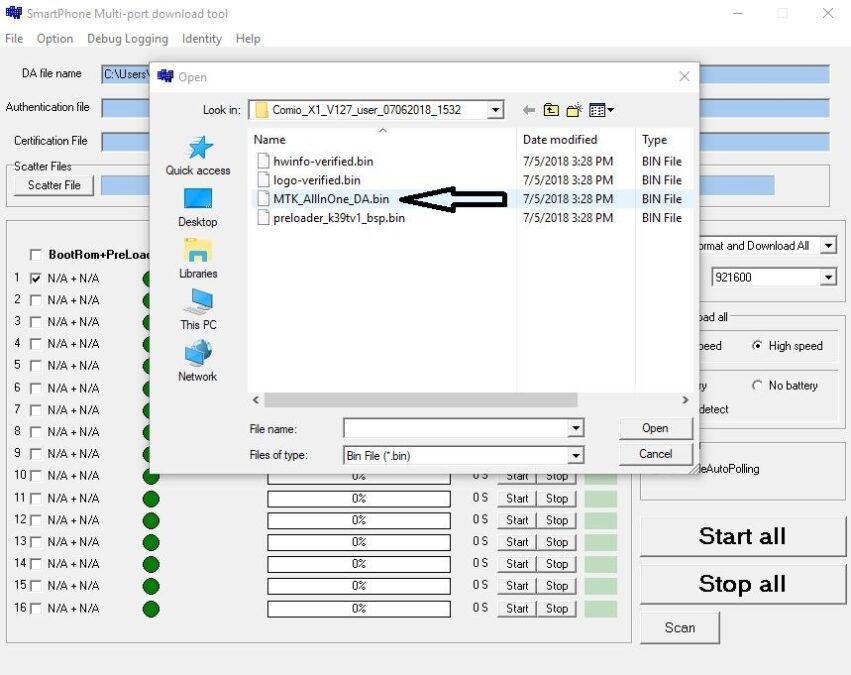
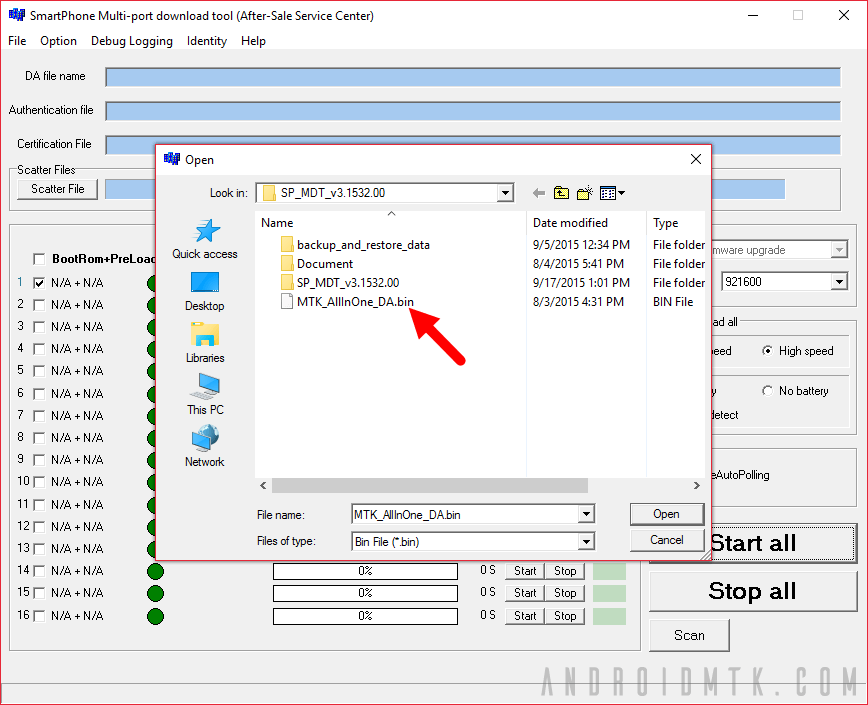
Step 7: Now, Click on File Menu and Select Open Download Agent File.
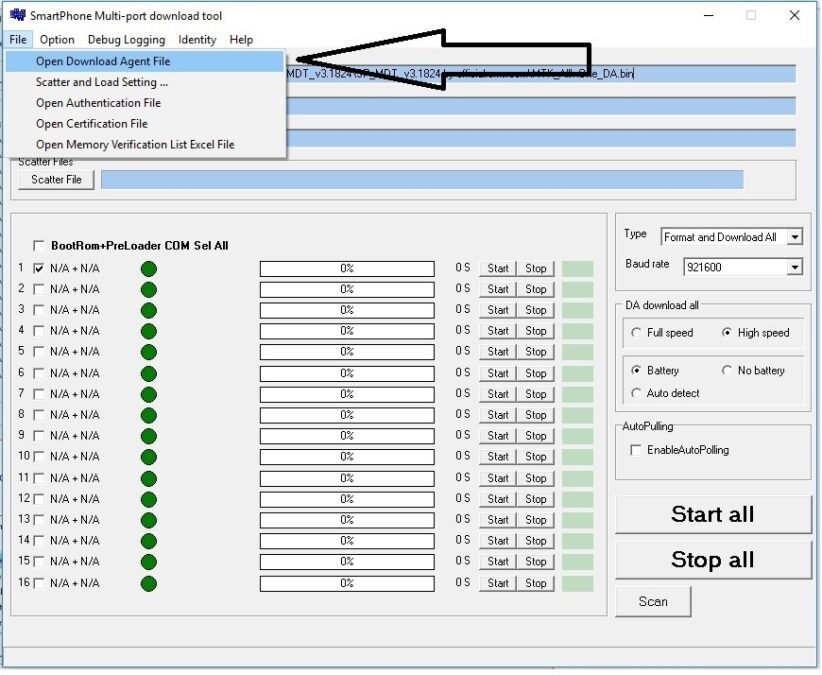
Now, locate the MTK_AllInOne_DA.bin file from the SP MultiPort Download Tool Folder.
Step 8: Now, Click on Select File Button and locate the Scatter File from the Firmware Folder.
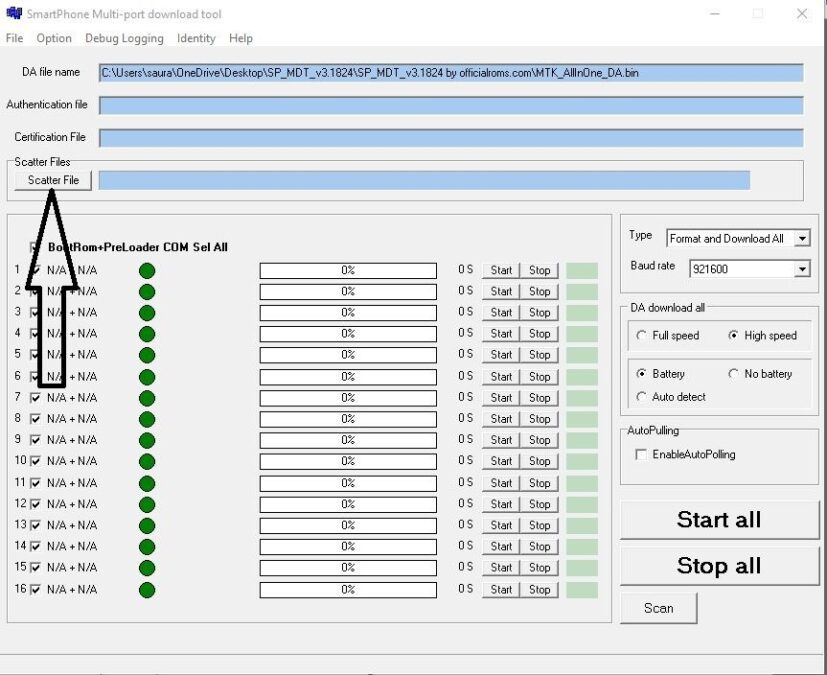
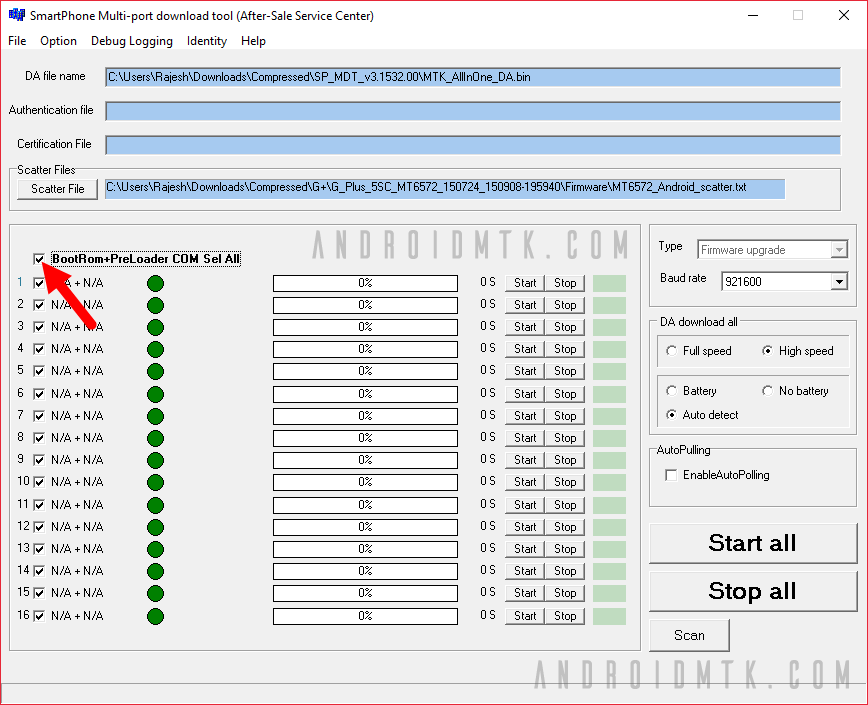
Step 9: Now, Tick BootRom+PreLoader COM Sel All.
Step 10: Now, Click on Start All Button to Begin the Flashing Process.
Step 11: Now, Press and Hold Volume UP Button on your Device and Connect it to the Computer using the USB cable.
Step 10: Now, SP MultiPort will automatically detect your device and start the Flashing Process.
Step 11: Once Flashing Process is completed you will be able to see Green DL OK.
Readme Once:
[*] Caution: Flashing Stock Firmware or Custom Firmware using SP MultiPort Tool will delete your personal data from the device. So, take a backup of your important data before using the tool.
[*] Download Firmware: If you are looking for Stock Firmware for your MediaTek Smartphone or Tablet then check it on officialroms website.
[*] Alternative Tool: SP Flash Tool is the best Alternative Tool, that also allows you to Flash Stock Firmware on MediaTek Dvices.
[*] Credits: SP MultiPort Download Tool is created by Mediatek Inc. So, full credits goes to them for sharing the tool for free.
How to use SP MultiPort Download Tool
On this page, you will find the instructions to flash the Stock ROM (firmware) on Mediatek Devices using SP MultiPort Download Tool (SP MDT Tool) on Windows Computer.
Requirements: Your Mediatek Device should have at least 20-30 percent of battery to perform the flashing process.
Flash Stock ROM using SP MultiPort Download Tool (SP MDT)


Congratulations! You Just learned to flash or install Stock Firmware on Mediatek Devices using SP MDT.
Readme once
[*] Recommend: : We do not recommend you to flash the preloader.bin file using the SP MultiPort Tool as it may brick the device. Therefore, always untick the preloader.bin option before Starting the Flashing Process.
[*] Caution : Take a backup of your important data before using the SP MDT Tool, as your personal data will be deleted after flashing the Stock firmware using SP MDT Tool.
[*] Credits : SP MultiPort Tool is created and distributed by Mediatek, Inc. So, full credit goes to them for sharing the Application for free.
[*] Alternative Tool : : There are several alternative tools are available that allows you to flash stock firmware on your MadiaTek Device including SP Flash Tool, BirdA Tool, CM2 MTK, Avenger MTK and NCK MTK .