-
Contents
-
Table of Contents
-
Troubleshooting
-
Bookmarks
Quick Links
Digital HD Video Camera
Recorder
Operating Guide
HXR-NX3
4-477-121-12(1)
Table of Contents
Getting Started
Recording
Playback
Editing
Using the Menu
Connecting with another
device
Troubleshooting
Additional Information
Related Manuals for Sony NXCAM HXR-NX3
Summary of Contents for Sony NXCAM HXR-NX3
-
Page 1
4-477-121-12(1) Digital HD Video Camera Table of Contents Recorder Getting Started Recording Operating Guide Playback Editing Using the Menu Connecting with another device Troubleshooting Additional Information HXR-NX3… -
Page 2: Read This First
Read this first Before operating this unit, please read this • The LCD screen is manufactured using manual thoroughly, and retain it for future extremely high-precision technology, so reference. over 99.99% of the pixels are operational for effective use. However, there may be some tiny black points and/or bright Notes on use points (white, red, blue, or green in color)
-
Page 3
On recording DVD media recorded with high definition image quality (HD) • In order to stabilize memory card operation, it is recommended that you DVD media recorded with high definition format the memory card when you use it image quality (HD) can be played back with your camcorder for the first time. -
Page 4
Read this first (Continued) About the operation of the camcorder You can operate the camcorder using the SEL/PUSH EXEC dial (p. 23, 81), V/v/B/ b/EXEC buttons (p. 81), and the touch panel. However, you cannot use the touch panel* to make some settings such as the MENU items. -
Page 5: Identifying Parts And Controls
Identifying parts and controls Body The numbers in ( ) are reference pages. A Hook for shoulder strap H Zoom lever B ASSIGN 6/FOCUS MAGNIFIER I Tripod receptacles button (62) For 1/4-20UNC screws For attaching a tripod with a screw shorter C Accessory shoe receptacles (22) than 5.5 mm (sold separately).
-
Page 6
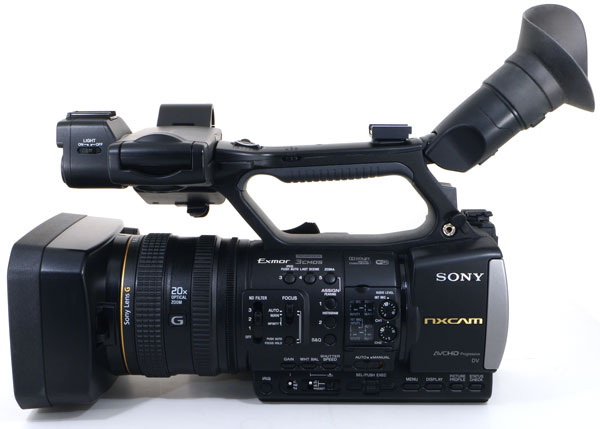
Identifying parts and controls (Continued) A Lens (21) T PUSH AUTO/FOCUS HOLD button (32) B Lens hood with lens cover (21) U FOCUS switch (32) C Front recording lamp (100) V ND FILTER switch (40) The recording lamp flashes if the remaining capacity of recording media or battery is low. -
Page 7
A VIDEO OUT/AUDIO OUT jacks (71, About the cable clamp 104) The cable clamp provides a more secure B HDMI OUT jack (71) connection for the power cord (mains lead) or HDMI cable. However, some HDMI C (USB) jack (102) cables may not fit properly in the clamp. -
Page 8
Identifying parts and controls (Continued) A Hook for shoulder strap To attach a shoulder strap B Focus ring (32) Attach a shoulder strap (sold separately) to the hooks for a shoulder strap. C Lens cover lever (21) D Zoom ring (31) E Iris ring (38) F GAIN button (39) G WHT BAL button* (41) -
Page 9
A RESET button S Illuminance sensor If you press the RESET button, all settings T VOLUME buttons* (64) including the clock setting (except the picture U TC/U-BIT button profile settings) return to the default. Switches between time code and user bit to B VISUAL INDEX button (64) display on the LCD screen. -
Page 10: Wireless Remote Commander
Wireless Remote Commander may shorten, or the Wireless G DISPLAY button (69) Remote Commander may not function properly. In this case, replace the battery with a Sony H Transmitter CR2025 lithium battery. Use of another battery I START/STOP button (27) may present a risk of fire or explosion.
-
Page 11: Screen Indicators
Screen indicators Indicator Meaning Center Upper right Recording media Upper left REC STBY Recording status (27) Warning (112) Playback indicator (64) Processing Relay recording Bottom Upper left Upper right Indicator Meaning Indicator Meaning 100% Remaining battery 0min Estimated remaining recording time INTELLIGENT AUTO Recording/playback (face detection/scene…
-
Page 12
Screen indicators (Continued) Indicator Meaning White balance (41) HISTOGRAM (93) AUDIO LEVEL DISPLAY (95) z Tips • Indicators may look different or appear at different positions. Data code during recording The recording date, time and condition are recorded automatically on the recording media. -
Page 13: Table Of Contents
Table of Contents Read this first ……………….2 Identifying parts and controls …………..5 Body…………………. 5 Wireless Remote Commander …………10 Screen indicators ………………11 Getting Started Step 1: Checking supplied accessories ……….17 Step 2: Charging the battery pack …………18 Step 3: Attaching the microphone and the lens hood with lens cover ..20 Step 4: Attaching the accessory shoe …………22 Step 5: Turning on the camcorder and setting the date and time ..22 Setting the date and time …………..
-
Page 14
Table of Contents (Continued) Audio setup ……………….. 43 Using the internal microphone …………43 Recording sound from an external audio device …….. 43 Adjusting the volume…………….44 Setting the headphone sound …………. 45 Useful functions ………………45 Recording in dim places (Video light)……….45 Selecting the suitable setting automatically for the recording situation (AUTO MODE setting) …………….. -
Page 15
Repairing the image database file …………80 Using the Menu Operating the menu …………….81 Menu items …………………83 (CAMERA SET) menu …………..86 Settings to adjust your camcorder to the recording conditions (GAIN SET/ STEADYSHOT, etc.) (REC/OUT SET) menu …………..89 Recording settings, input and output settings (REC SET/VIDEO OUT, etc.) (AUDIO SET) menu …………….91 Settings for the audio recording ( AUDIO FORMAT/XLR SET, etc.) -
Page 16
Table of Contents (Continued) Maintenance and precautions ………….. 119 About the AVCHD format …………..119 About the memory card…………..119 About the “InfoLITHIUM” battery pack……….120 About handling of your camcorder ……….. 122 Specifications ………………125 Index ………………..130… -
Page 17: Getting Started
When the unit is used with a PC connection, download device drivers, plug- ins, and application software, where Power cord (mains lead) (1) (p. 18) applicable, from the Sony Professional products web site. Sony Professional products web site homepage: U.S.A.
-
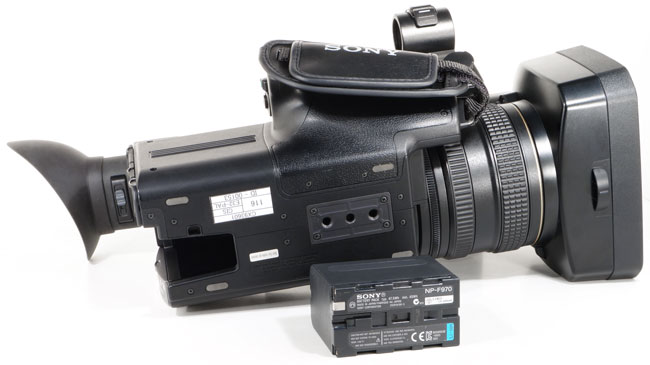
Page 18: Step 2: Charging The Battery Pack
Step 2: Charging the battery pack You can charge the “InfoLITHIUM” battery pack (L series) with the supplied With the B mark on the DC plug AC Adaptor facing outwards, connect the DC plug to the DC IN jack on your b Notes camcorder.
-
Page 19
To remove the battery pack Set the POWER switch to OFF. Slide the POWER switch to OFF. Push the The CHG lamp lights up and charging BATT RELEASE (battery release) button starts. and slide the battery pack in the direction of the arrow. -
Page 20: Step 3: Attaching The Microphone And The Lens Hood With Lens Cover
Charger AC-VL1 1-487-539- (sold separately), you can use the video light while using the camcorder on AC power. To purchase these products, consult your local authorized Sony service facility. On the AC Adaptor • Do not short-circuit the DC plug of the AC Adaptor or battery terminal with any metallic objects.
-
Page 21
To remove the lens hood with lens Connect the plug of the cover microphone to the INPUT 1 jack Turn the lens hood in the opposite direction to the arrow 2 in the illustration while pressing the PUSH (lens hood release) button. -
Page 22: Step 4: Attaching The Accessory Shoe
Step 4: Attaching the Step 5: Turning on the accessory shoe camcorder and setting the date and When attaching an accessory other than the handle, attach the accessory shoe plate to time the accessory shoe. To mount the accessory shoe Turning on the camcorder Mount the accessory shoe on the accessory Slide the POWER switch to ON while…
-
Page 23: Setting The Date And Time
Setting the date and time Set [SUMMERTIME], [Y] (year), [M] (month), [D] (day), hour and Set the date and time when you use your minute, by turning the SEL/PUSH camcorder for the first time. EXEC dial, then press the dial. z Tips •…
-
Page 24: Step 6: Adjusting The Lcd Screen And Viewfinder
Step 6: Adjusting the LCD screen and viewfinder z Tips Using the LCD screen • You can adjust the brightness of the viewfinder backlight from [VF BACKLIGHT] (p. 96). The LCD screen can be rotated in the range as illustrated below, allowing a person other When the picture in the viewfinder is than the camera operator to see the image.
-
Page 25: Step 7: Preparing The Recording Media
Step 7: Preparing the recording media connecting equipment is supporting the exFAT Memory card file system. If you connect equipment not supporting the exFAT file system and the Types of memory cards you can use in format screen appears, do not perform the format.
-
Page 26
Step 7: Preparing the recording media (Continued) Selecting the memory card slot to be used for recording Press the A or B button of the memory card slot where the memory card you want to record on is inserted. You can confirm the selected slot on the screen. -
Page 27: Recording
Recording Recording Front recording lamp Handle record button Rear recording lamp Lens hood with lens cover POWER switch Record button Recording movies Your camcorder records movies on a memory card. The factory setting of recording movies is high definition image quality (HD). Do the following steps to record movies. Open the shutter of the lens hood with lens cover.
-
Page 28
Recording (Continued) Press the record button or the handle record button. [STBY] t [REC] The recording lamps light up during recording. To stop the movie recording, press the record button or the handle record button again. b Notes • When the access lamp is lit or flashing in red, your camcorder is reading or writing data on recording media. -
Page 29: Changing The Setting Of The Record Button/Handle Record Button
Insert a recordable memory card. Small space Start REC: Recording Small space b Notes • Do not eject the memory card that is currently being used for recording. Replace only the memory card whose slot lamp is off. • Even if you press the memory card slot button, A or B, while recording movies, you cannot switch the slot currently being used.
-
Page 30
Recording (Continued) To change the setting Press MENU t select (REC/OUT SET) t [REC SET] t [REC BUTTON SET] with the SEL/PUSH EXEC dial. [REC BUTTON:] setting Button and recording media REC BUTTON: Recording on both the memory card A and the memory card B HANDLE REC BUTTON: starts and stops at the same time when either record button is pressed. -
Page 31: Adjusting The Zoom
z Tips Adjusting the zoom • The minimum distance required between your camcorder and the subject for focus is about 1 cm (about 13/32 in.) for wide angle and about 80 cm (about 2 5/8 feet) for telephoto. • The focus may not be adjusted at certain zoom positions if the subject is within 80 cm (about 2 5/8 feet) from your camcorder.
-
Page 32: Adjusting The Focus
Adjusting the focus To restore automatic adjustment You can adjust the focus manually for different recording conditions. Set the FOCUS switch B to AUTO. Use this function in the following cases. disappears and the automatic focus – To record a subject behind a window covered adjustment is restored.
-
Page 33: Using The Expanded Focus (Expanded Focus)
To return to manual focus mode, release the Using the expanded focus FOCUS switch B. This function enables (Expanded focus) you to set focus on a distant subject even when the focus is automatically set on a The selected area on the LCD screen is close subject.
-
Page 34: Focusing On A Detected Face (Face Detection)
Adjusting the focus (Continued) To cancel the priority face Focusing on a detected face Move the selection cursor (orange colored (Face detection) frame) onto the frame (double frame) on the priority face, using the SEL/PUSH EXEC The camcorder detects the face and focuses dial E, then press the dial.
-
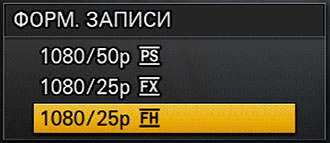
Page 35: Changing The Recording Setting
Changing the recording setting • Image size Selecting the recording format PS: 1,920×1,080 for high definition image quality FX: 1,920×1,080/1,280×720 FH: 1,920×1,080/1,280×720 (HD) HQ: 1,440×1,080/1,280×720 LP: 1,440×1,080 You can select the recording format (bit- • Frame rate rate, image size, frame rate, scanning NTSC model: Either 60 or 30 or 24 system).
-
Page 36: Recording Mp4 Movies
Changing the recording setting (Continued) Functions not available during MP4 Recording MP4 movies movie recording You can record an MP4 movie • DV mode simultaneously while recording a high • COLOR BAR definition (HD) movie. • DATE REC • S&Q MOTION •…
-
Page 37
Menu items which cannot be used in DV mode (REC/OUT SET) – REC FORMAT (AUDIO SET) – AUDIO FORMAT b Notes • When you select DV mode, [ AUDIO FORMAT] is fixed to [LINEAR PCM], and LPCM] is not displayed on the screen. When the camcorder is set to DV mode, the following items can be used. -
Page 38: Adjusting The Brightness
Adjusting the brightness You can adjust the image brightness by adjusting the iris, gain or shutter speed, or Press the IRIS button E. by adjusting the light volume with the ND next to the iris value filter disappears. Iris value Adjust the iris with the iris ring The volume of the light increases the more that you open the aperture…
-
Page 39: Adjusting The Gain
Adjusting the gain Adjusting the shutter speed You can use this if you do not want to You can adjust and fix the shutter speed increase the value by AGC (automatic gain manually. You can make a moving subject control). look still or emphasize the movement of a subject by adjusting the shutter speed.
-
Page 40: Adjusting The Exposure
Adjusting the brightness (Continued) 4 When the last setting of the exposure is set to MANUAL, and any item in 2 is set Press the SEL/PUSH EXEC dial to AUTO. G to lock the shutter speed. To readjust the shutter speed, repeat b Notes steps from 2.
-
Page 41: Adjusting The Color Tone
Adjusting the color tone Adjusting the white balance Set the white balance memory switch B to any one of PRESET/A/B. x Setting the A/B value Select A or B for recording with the white balance setting stored in memory A or B. See page 42 on how to store the adjusted value.
-
Page 42
Adjusting the color tone (Continued) To adjust the white balance z Tips automatically • You can change the outdoor white balance setting by setting an offset value. Press Press the WHT BAL button A. (one push) button C while (outdoor) is selected and turn the SEL/PUSH EXEC dial E b Notes to select an offset value from -7 (bluish) to 0… -
Page 43: Audio Setup
Audio setup The following jacks, switches and dials Using the internal microphone allow you to set the sound to be recorded. See page 20 for details on attaching the The sound will be recorded in stereo when microphone. using the internal microphone. Set the CH1 (INT MIC/INPUT1) and CH2 (INT MIC/INPUT1/INPUT2) switches to INT MIC.
-
Page 44: Adjusting The Volume
Audio setup (Continued) • When there is no audio device connected to When the CH1 switch is set to INPUT 1 an INPUT jack, set the INPUT switch of that jack to LINE to prevent noise. Input source and recorded switch channel setting…
-
Page 45: Setting The Headphone Sound
Useful functions Recording in dim places (Video To restore automatic adjustment light) Set the AUTO/MAN switch (G) of the manually adjusted channel to AUTO. Slide the LIGHT switch to ON. Setting the headphone sound Video light When you select CH1 or CH2, the respective channel’s (input) sound is output b Notes to the headphones.
-
Page 46: Selecting The Suitable Setting Automatically For The Recording Situation (Auto Mode Setting)
You can make optimal recordings in separately), you can use the video light various situations. while using the camcorder on AC power. To purchase these products, consult your local authorized Sony service facility. To the wall outlet (wall socket) Power cord (mains lead)
-
Page 47: What You Can Do With The Wi-Fi Function Of The Camcorder
b Notes Setting Recording conditions • When you select [INTELLIGENT AUTO], Brings out the subject, such [STEADYSHOT] is set to [ACTIVE], and the Portrait as people or flowers, while angle of view shifts 1.08 times toward the ([PORTRAIT]) creating a soft background. telephoto side.
-
Page 48: Downloading «Playmemories Mobile
For the latest information and functional Android smartphone equipped detail, refer to the following website. with the NFC function using http://www.sony.net/pmm/ One-touch Select [Settings] on the smartphone, then select [More…] Android OS and place a checkmark next to [NFC].
-
Page 49: Using A Smartphone As A Remote Controller
Using a smartphone as a remote Touch the smartphone on the controller camcorder. The smartphone connects to the You can control some of the camcorder’s camcorder, “PlayMemories Mobile” is movie shooting functions remotely with a activated and [CTRL W/ smartphone. SMARTPHONE] starts on the To start [CTRL W/SMARTPHONE] using camcorder.
-
Page 50: Transferring Images To A Smartphone
Useful functions (Continued) • Iris adjustment While the smartphone is connected to the Operate the camcorder by the camcorder, CLOSE cannot be selected. smartphone. b Notes • You cannot perform other operations during Movie start/stop touch focus. button • Zoom speed operates according to the [SPEED ZOOM] setting.
-
Page 51: Connecting Without Using The Nfc Function (Android)
Connecting without using the NFC function (Android) Start “PlayMemories Mobile” on your smartphone. b Notes • Images to be transferred cannot be checked beforehand. • You cannot transfer high definition image quality (HD) images. • Once the connection is established, the recording media cannot be selected.
-
Page 52: Connecting Without Using The Nfc Function (Iphone/Ipad)
Useful functions (Continued) Input the password displayed on Input the password displayed on the camcorder (first time only). the camcorder (first time only). The smartphone connects to the camcorder. Confirm connection to the SSID displayed on the camcorder. Connecting without using the NFC function (iPhone/iPad) Select [Settings] on the iPhone or iPad, then select [Wi-Fi] and the…
-
Page 53: Customizing The Picture Quality (Picture Profile)
Picture profile Customizing the picture quality Example setting number (Picture profile) Example settings of natural color tone with [ITU-709] gamma Example settings of a color tone that is faithful to [ITU-709] Example settings of pictures recorded on cinema color negative film Example settings of pictures screened with cinema color print film…
-
Page 54
Useful functions (Continued) 2 Select the PICTURE PROFILE number with the SEL/PUSH EXEC dial A, then press the dial. 3 Select [SETTING] with the SEL/PUSH EXEC dial A, then press the dial. 4 Select an item to be adjusted with the SEL/PUSH EXEC dial A, then press the dial. -
Page 55
BLACK LEVEL To set the black level. Item Description and settings Sets the black level. -15 to +15 GAMMA To select a gamma curve. Item Description and settings [STANDARD] Standard gamma curve [STILL] Gamma curve to create the tone of a still image. [CINEMATONE1] Gamma curve 1 for producing tone of film camera images [CINEMATONE2]… -
Page 56
[CINEMATONE2] : Film camera image-like colors good with [GAMMA] set to [CINEMATONE2]. [PRO] : Similar color tones to the standard image quality of Sony professional cameras (when combined with ITU-709) [ITU709 MATRIX]: Colors corresponding to ITU-709 [LEVEL] Sets a level of coloring difference between the standard color and the selected color, when you set [TYPE] to a setting other than [STANDARD]. -
Page 57
COLOR LEVEL To set the color level. Item Description and settings -8: black and white, -7 (light) to +7 (dark) COLOR PHASE To set the color phase. Item Description and settings -7 (greenish) to +7 (reddish) COLOR DEPTH To set the color depth for each color phase. This function is more effective for chromatic colors and less effective for achromatic colors. -
Page 58
Useful functions (Continued) DETAIL To set items for the detail. Item Description and settings [LEVEL] Sets the detail level. -7 to +7 [MANUAL SET] [ON/OFF] : Turns on and off the manual detail adjustment. Set to [ON] to enable the manual detail adjustment (automatic optimization will not be performed). -
Page 59: Setting Time Data
To copy the picture profile setting to Presetting the time code another picture profile number 1 Press the MENU button, select See page 53 for the location of the buttons. (TC/UB SET) t [TC PRESET] 1 Press the PICTURE PROFILE button with the SEL/PUSH EXEC dial, then press the dial.
-
Page 60: Recording With The Slow & Quick Motion Function
Useful functions (Continued) 5 Select [OK] with the SEL/PUSH EXEC PAL model dial, then press the dial. REC FORMAT FRAME RATE To reset the user bit 1080/25p 1080/50p 50% slow 100% (standard) You can reset the user bit (00 00 00 00). Select [RESET] in step 2 of “Presetting 100% (standard) 200% quick the user bit.”…
-
Page 61: Reviewing The Most Recently Recorded Scene (Last Scene Review)
To cancel Slow & Quick Motion • After you press the button to stop recording, your camcorder continues recording till it recording completes writing of the minimum unit of data (0.5 seconds of replay time). Press the S&Q button or the MENU button during standby.
-
Page 62: Assigning The Functions To The Assign Buttons
Assigning the Useful functions (Continued) functions to the ASSIGN buttons Right after you stop recording, press Some functions can be assigned to the the LAST SCENE button. ASSIGN buttons for use. You can assign a The camcorder plays from the top to the single function to any one of the ASSIGN 1 end of the most recently recorded scene, to 6 buttons.
-
Page 63
• SMARTPHONE CONNECT (p. 50) Select the ASSIGN button to ASSIGN 3-5 which you want to assign a buttons function with the SEL/PUSH ASSIGN 1, 2 EXEC dial A, then press the dial. buttons • [———] appears if no function is assigned to the ASSIGN button. -
Page 64: Playback
Playback Playback VISUAL INDEX button VOLUME buttons Playing back movies Slide the POWER switch, START/STOP button to ON while pressing the green button. Press the VISUAL INDEX button. The VISUAL INDEX screen appears after a few seconds. Recording media Playback mode Previous Thumbnail (movie)
-
Page 65
Play back movies. 1 Touch the recording media you want to play back. : Memory card A : Memory card B 2 Touch the playback mode, and select the desired image quality of movies. Playback mode 3 Touch twice the thumbnail of the movie you want to play back. You can also select the movie to be played back by pressing B/b/V/v buttons followed by pressing the EXEC button. -
Page 66
Playback (Continued) Your camcorder starts playing the selected movie. Stop Next Previous Slow/Fast forward Play/Pause Slow/Fast reverse b Notes • If you touch the thumbnail and press the PLAY button, the most recently recorded or played scene is played back. •… -
Page 67: Playing Back Still Images
Playing back still images Touch the recording media you want to view on the VISUAL INDEX screen. : Memory card A : Memory card B Touch the playback mode, then select (still image). Playback mode Touch twice the thumbnail of the still image you want to view. The first touch of the thumbnail will show the information on the still image at the lower part of the LCD screen.
-
Page 68
Playback (Continued) Your camcorder displays the selected still image. Next Previous To enlarge Touch (playback zoom) when playing back a still image. You can adjust the zoom with , or with the power zoom lever. When you touch the enlarged image, the touched point will be displayed at the center of the screen. -
Page 69: Changing/Checking The Settings In Your Camcorder
Changing/checking the settings in your camcorder Displaying recording data (Data code) You can display information, including date, time and camera data automatically stored during recording on the screen during playback. Press the DATA CODE button A during playback or pause. The screen changes in the order, date and time display t camera data display t no display with each press of the button.
-
Page 70: Checking The Settings In Your Camcorder (Status Check)
Changing/checking the settings in your camcorder (Continued) b Notes Press the STATUS CHECK button • When you play back the memory card on other devices, the camera data may be displayed incorrectly. Confirm the correct camera data on your camcorder. Checking the settings in your camcorder (Status check) You can check the settings of the following…
-
Page 71: Connecting A Monitor Or A Tv
Connecting a monitor or a TV Playback image quality depends on the type of monitor or TV, or the jacks used to make the connection. Monitor/TV To video input jack Video cable (sold separately) To audio input jacks Audio cable (sold separately) To HDMI input jack…
-
Page 72
No output b Notes • It is recommended that you use an authorized cable with HDMI logo or a Sony HDMI cable. • Images are not output from the HDMI OUT jack of your camcorder, if copyright protection signals are recorded in the movies. -
Page 73
• If you display the edit screen while outputting signals to a monitor or TV, the menu may not be displayed correctly. • This camcorder is not compatible with “BRAVIA” sync. -
Page 74: Editing
Editing Protecting movies and Dividing a movie still images (Protect) Protect movies and still images to avoid You can divide a movie at a designated deleting them by mistake. point. Press the MENU button when the Press the MENU button while VISUAL INDEX screen is playing back movies.
-
Page 75: Deleting Movies And Still Images
Deleting movies and still images z Tips You can free media space by deleting movies and still images from recording • Only simple editing is available on this media. camcorder. Use commercially available editing software for more advanced editing. b Notes •…
-
Page 76: Copying Movies And Still Images
Copying movies and Deleting movies and still images (Continued) still images You can copy images recorded on a memory card inserted in the memory card slot A or B, between the memory card in Touch the movies or still images slot A and B or to external recording media.
-
Page 77: Capturing Still Images From A Movie
Capturing still images from a movie You can save a selected frame from a Touch the movies or still images recorded movie as a still image. to be copied. is displayed on the selected image. Press the MENU button while playing back movies.
-
Page 78: Formatting The Recording Media
Formatting the Capturing still images from a movie (Continued) recording media Formatting deletes all data from the recording media to recover recordable free • If the movie you are capturing from has no data space. code, the recording date and time of the still image will be the date and time you captured b Notes from the movie.
-
Page 79: Preventing Data On Recording Media From Being Recovered
Preventing data on recording media from being recovered Touch [Empty] t Unintelligible data can be written on recording media. Thus, it may become more difficult to recover any original data. It is impossible to delete all data b Notes completely, even if you format the •…
-
Page 80: Repairing The Image Database File
Repairing the image database file This function checks the database information and the consistency of movies and still images on the recording media, and repairs if any inconsistencies found. b Notes • Connect your camcorder to the wall outlet (wall socket) using the supplied AC Adaptor to prevent your camcorder from running out of power during the operation.
-
Page 81: Using The Menu
Using the Menu Operating the menu You can change various settings or make detailed adjustments using the menu items Turn the SEL/PUSH EXEC dial displayed on the LCD screen. until the icon of the desired menu is highlighted, then press the dial MENU button to select the menu.
-
Page 82
Operating the menu (Continued) Turn the SEL/PUSH EXEC dial until the desired setting is highlighted, then press the dial to confirm the setting. Press the MENU button to hide the menu screen. To return to the previous screen, select RETURN]. b Notes •… -
Page 83: Menu Items
Menu items The function and setting value of each menu item are as follows. The default settings are marked with B. S&Q MOTION REC FORMAT NTSC model: (CAMERA SET) (p. 86) 1080/60p PS, GAIN SET 1080/30p FX, -6dB — 30dB 1080/30p FH, (B18dB) B1080/24p FX,…
-
Page 84
Menu items (Continued) DV MODE (REC/OUT SET) (p. 89) WIDE REC BOFF, ON REC SET REC FORMAT NTSC model: CANCEL DV MODE B1080/60i FX, VIDEO OUT HDMI 1080/60i FH, NTSC model: 1080/60i HQ, 1080p/480i, 1080/60i LP, 720p/480i, 1080/60p PS, B1080i/480i, 720/60p FX, 480p, 480i 720/60p FH,… -
Page 85: Audio Set
MARKER ON/OFF BOFF, ON (AUDIO SET) (p. 91) CENTER AUDIO FORMAT BLINEAR PCM, BON, OFF DOLBY DIGITAL AUDIO LIMIT BOFF, ON ASPECT BOFF, 4:3, 13:9, BSTEREO, MONO HEADPHONE OUT 14:9, 15:9, 1.66:1, INT MIC SET INT MIC SENS 1.85:1, 2.35:1 BNORMAL, HIGH SAFETY ZONE INT MIC WIND…
-
Page 86: (Camera Set) Menu
(CAMERA SET) Menu items (Continued) menu Settings to adjust your camcorder to the recording conditions (GAIN SET/ STEADYSHOT, etc.) (OTHERS) (p. 99) The default settings are marked with B. CAMERA PROFILE MEMORY CARD A, MEMORY CARD B See page 81 for details on selecting menu items.
-
Page 87
ON[CLEAR IMAGE ZOOM] WB OUTDOOR LEVEL You can use the clear image zoom in addition to the optical zoom. You can set an offset value to adjust the You can zoom up to 40×, which includes outdoor white balance when you set [WB 20×… -
Page 88
Press the MENU button t select (CAMERA SET) with the SEL/PUSH EXEC dial. OFF ( SPOT METER Does not use SteadyShot. This setting is recommended when you use a tripod. You can adjust the brightness for the selected subject automatically. b Notes •… -
Page 89: (Rec/Out Set) Menu
(REC/OUT SET) menu Recording settings, input and output b Notes settings (REC SET/VIDEO OUT, etc.) • This function is automatically set to [OFF] when you switch the format, perform the function by the MENU button, or turn off the The default settings are marked with B. camcorder.
-
Page 90
Press the MENU button t select (REC/OUT SET) with the SEL/PUSH EXEC dial. 720p/480i LETTER BOX(16:9) Outputs a vertically compressed image B 1080i/480i while maintaining its original aspect ratio. 480p EDGE CROP 480i Outputs the central portion of the original image by cropping its right and left edges. -
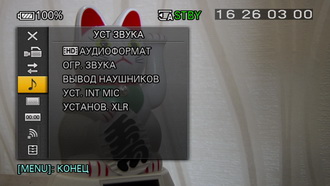
Page 91: (Audio Set) Menu
(AUDIO SET) menu Settings for the audio recording AUDIO FORMAT/XLR SET, etc.) b Notes • When you select [STEREO] and the internal The default settings are marked with B. microphone for both CH1 and CH2 (CH1: INT See page 81 for details on selecting MIC, CH2: INT MIC), during shooting or menu items.
-
Page 92
Press the MENU button t select (AUDIO SET) with the SEL/PUSH EXEC dial. b Notes • If you set INPUT TRIM too far to the minus side, the microphone volume becomes too low, • This function is available when the CH1 and resulting in a poor signal to noise ratio. -
Page 93: (Display Set) Menu
(DISPLAY SET) menu Display settings (MARKER/DISPLAY ZEBRA OUTPUT, etc.) You can display a zebra pattern as a guide The default settings are marked with B. for adjusting brightness. See page 81 for details on selecting ON/OFF menu items. B OFF Press the MENU button t select Does not display the zebra pattern.
-
Page 94
Press the MENU button t select (DISPLAY SET) with the SEL/PUSH EXEC dial. z Tips • You can focus more easily using this function in combination with the expanded focus function GUIDEFRAME (p. 33). • You can assign [ON/OFF] to an ASSIGN button B OFF (p. -
Page 95
CAMERA DATA DISPLAY Does not display the audio level meters. z Tips display the iris, gain and Does not • You can assign this function to an ASSIGN shutter speed settings button (p. 62). B ON Constantly displays the iris, gain and ZOOM DISPLAY shutter speed settings on the LCD screen. -
Page 96
Press the MENU button t select (DISPLAY SET) with the SEL/PUSH EXEC dial. B NORMAL – With a frame rate of 24 selected in REC FORMAT], when the shutter BRIGHT speed is 1/24, the shutter angle is 360 degrees. DISPLAY OUTPUT •… -
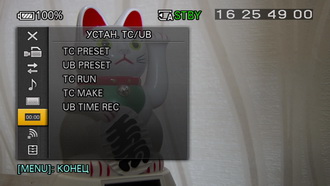
Page 97: (Tc/Ub Set) Menu
(TC/UB SET) menu Time code settings (TC PRESET/UB PRESET/TC FORMAT, etc.) TC RUN The default settings are marked with B. You can select how the time code advances. See page 81 for details on selecting menu items. B REC RUN Press the MENU button t select Advances the time code only during recording.
-
Page 98: (Network Set) Menu
(NETWORK SET) menu Settings for the Wi-Fi function (SEND TO Screen items Functions SMARTPHONE/CTRL W/SMARTPHONE, 1 Switch Characters switch between etc.) character alphabetical letters, numerals type and symbols. The default settings are marked with B. Characters are displayed in the See page 81 for details on selecting Keyboard order they are touched.
-
Page 99: (Others) Menu
(OTHERS) menu Settings while recording or other basic settings (AREA SET/BEEP, etc.) SAVE You can save the camera profile. The default settings are marked with B. 1 Select [NEW FILE] or an existing See page 81 for details on selecting profile name with the SEL/PUSH menu items.
-
Page 100
Press the MENU button t select (OTHERS) with the SEL/PUSH EXEC dial. REC LAMP[F] (Recording lamp Sets the summertime. [front]) B ON LANGUAGE Turns on the front camera recording You can select the language to be used on lamp the LCD screen. Turns off the front camera recording lamp. -
Page 101
USB CONNECT Select this item when [USB CONNECT] does not appear on the LCD screen by connecting the camcorder to another device with the USB cable. OPERATION TIME Displays the total hours of operation in 10- hour increments. VERSION DISPLAY Displays the current version of your camcorder. -
Page 102: Connecting With Another Device
• Operation is not assured with every device satisfying requirements for operating. • For details on available external media devices, go to the Sony support website in your country/ region.
-
Page 103
You can make menu settings of the external media device such as deleting images. Select [MEMORY CARD A] or Press the MENU button and select the [MEMORY CARD B] that contains (EDIT) menu. the images you want to save. Images that have not yet been saved on an external media device are saved on the connected media device at this time. -
Page 104: Creating A Standard Definition Image Quality (Dv) Disc With A Recorder, Etc
Creating a standard definition image quality (DV) disc with a recorder, etc. You can copy images on your camcorder onto a disc or video cassette, by connecting Connect your camcorder to the your camcorder to a disc recorder with the recording device (a disc recorder, A/V connecting cable (sold separately).
-
Page 105: Troubleshooting
3 Press the RESET button (p. 9) with a pointed object, then turn on your camcorder. This operation will reset the date, time and area settings. 4 Consult your Sony dealer or local authorized Sony service facility. • Power sources/LCD screen/Wireless Remote Commander···p. 105 •…
-
Page 106
Troubleshooting (Continued) The battery pack discharges too quickly. • Ambient temperature is too high or low, or the battery pack has not been charged enough. This is not a malfunction. • Fully charge the battery again. If the problem persists, the battery may be worn-out. Replace it with a new one (p. -
Page 107
Images on the recording media cannot be deleted. • You can select no more than 100 images to be deleted on the edit screen. • The images are protected. Unprotect the images (p. 74). Recording The recording does not start when you press the record button. •… -
Page 108
Troubleshooting (Continued) There is a time difference between the point when the record button is pressed and the point that the recording movie is started or stopped actually. • On your camcorder, there may be a slight time difference between the point where you press the record button and the actual point that recording movie starts/stops. -
Page 109
Black bands appear when you record a TV screen or computer screen. • This can be improved by adjusting the shutter speed (p. 39). Fine patterns flicker, diagonal lines look jagged. • Adjust [DETAIL] to the negative side (p. 58). The time code is not recorded in sequence. -
Page 110
Troubleshooting (Continued) appears on the LCD screen. • This appears when you play back movies recorded with 5.1ch surround sound. 5.1ch surround sound is down-mixed to 2ch stereo and played back on your camcorder. Connecting to TV Neither image nor sound is played back on the TV connected with the HDMI cable. -
Page 111
Copy cannot be done correctly using the HDMI cable. • You cannot copy movies using the HDMI cable. Connecting to a computer The computer does not recognize the camcorder. • Disconnect the cable from the computer, then connect it again securely. •… -
Page 112: Warning Indicators And Messages
(Warning indicator the symptoms yourself. If the problem pertaining to memory cards) persists even after you have tried a couple of times, contact your Sony dealer or local Slow flashing authorized Sony service facility. • Free spaces for recording images are running out.
-
Page 113
(Warning indicator pertaining to Inconsistencies found in the image the external media device) database file. Back up and recover. Recover, then import using the • The image database file may be included PC software. damaged (p. 80). • Inconsistencies occur in the image •… -
Page 114
• Use a memory card recommended for your camcorder (p. 25). • You can select only 100 images at one time for: • Contact your Sony dealer. – Deleting movies/photos – Protecting movies/photos, or Do not eject the memory card during releasing the protection writing. -
Page 115: Additional Information
Additional Information Recording time of movies and the number of recordable photos Playing time Estimated time of recording and playback with each battery pack (unit: minute) Battery pack Approximate time available when you use a NP-F770 fully charged battery pack. NP-F970 Recording time Estimated recording time of…
-
Page 116
70 (70) 32 GB 140 (140) 64 GB 280 (280) • When using Sony memory card. b Notes • The recordable time may vary depending on the recording conditions, subjects, and [REC SET] (p. 89). • The number in ( ) is the minimum recordable… -
Page 117: Using Your Camcorder Abroad
Using your camcorder abroad Power supply You can use your camcorder in any country/region using the AC Adaptor supplied with your camcorder within the AC 100 V to 240 V, 50 Hz/60 Hz range. Viewing on TV Countries /regions that require NTSC color system Bahama Islands, Bolivia, Canada, Central America, Chile, Colombia, Ecuador,…
-
Page 118: File/Folder Structure On The Recording Media
File/folder structure on the recording media The file/folder structure is shown below. You do not usually need to acknowledge the file/ folder structure, when recording/playing back movies and still images on the camcorder. E DV movie management information * “Memory Stick PRO Duo” media folder **SD memory card, SDHC memory card, SDXC memory card…
-
Page 119: Maintenance And Precautions
Maintenance and precautions About the AVCHD format About the memory card • A memory card formatted by a computer What is the AVCHD format? (Windows OS/Mac OS) does not have guaranteed compatibility with your camcorder. The AVCHD format is a high definition •…
-
Page 120: About The «Infolithium» Battery Pack
Maintenance and precautions (Continued) On image data compatibility About the “InfoLITHIUM” • Image data files recorded on a memory card by battery pack your camcorder conform to the “Design rule for Camera File system” universal standard Your camcorder operates only with an established by the JEITA (Japan Electronics and “InfoLITHIUM”…
-
Page 121
About battery life • Be sure to set the POWER switch to OFF when not recording or playing back on your • Battery capacity decreases over time and camcorder. The battery pack is also consumed through repeated use. If decreased usage time when your camcorder is in recording standby or between charges becomes significant, it is playback pause. -
Page 122: About Handling Of Your Camcorder
Sony dealer before operating it • When you bring your camcorder from a ski any further.
-
Page 123
How to avoid moisture condensation b Notes When you bring your camcorder from a cold place • If you did not press the right spot, try the into a warm place, put your camcorder in a plastic calibration again. bag and seal it tightly. Remove the bag when the •… -
Page 124
Maintenance and precautions (Continued) Charging the pre-installed rechargeable battery Your camcorder has a pre-installed rechargeable battery to retain the date, time, and other settings even when the POWER switch is set to OFF. The pre-installed rechargeable battery is always charged while your camcorder is connected to the wall outlet (wall socket) via the AC Adaptor or while the battery pack is attached. -
Page 125: Specifications
Specifications System Lens G Lens Video signal 20 × (Optical) NTSC color, EIA standards Approx. 40 × (including clear image HDTV 1080/60i, 1080/60p, 720/60p zoom) specification (models with the NTSC Approx. 320 × (including digital zoom) color system) f=4.1 mm — 82.0 mm (3/16 in. — 3 1/4 PAL color, CCIR standards in.) HDTV 1080/50i, 1080/50p, 720/50p…
-
Page 126
Specifications (Continued) AUDIO OUT jacks During camera recording using the Pin connectors LCD with normal brightness. -10 dBu (at load impedance 47 kΩ NTSC model: Approx. 6.9 W (kilohms)), Output impedance with less PAL model: Approx. 6.7 W than 2.2 kΩ (kilohms) (With an optional XLR Microphone) (0 dBu = 0.775 Vrms) Operating temperature… -
Page 127
On trademarks Storage temperature -20 °C to +60 °C (-4 °F to +140 °F) • “NXCAM” logo is a trademark of Sony Dimensions (approx.) Corporation. 48 mm × 29 mm × 81 mm • “AVCHD Progressive” and “AVCHD Progressive” logotype are trademarks of (1 15/16 in. -
Page 128
Specifications (Continued) Notes on the License • Adobe, the Adobe logo, and Adobe Acrobat are either registered trademarks or trademarks of ANY USE OF THIS PRODUCT OTHER THAN Adobe Systems Incorporated in the United CONSUMER PERSONAL USE IN ANY States and/or other countries. MANNER THAT COMPLIES WITH THE •… -
Page 129
GPL/LGPL. Source code is provided on the web. Use the following URL to download it. When downloading the source code, select HXR-NX3 as the model for your camcorder. http://www.sony.net/Products/Linux/ We would prefer you do not contact us about the contents of source code. -
Page 130: Index
Additional Information Index Connect GUIDEFRAME….94 External media device AC Adaptor ……18 ……..102 Accessory shoe …..22 Recorder ….. 104 Handle record button …. 29 Accessory shoe plate ….22 TV……… 71 Handle zoom ……31 AE SHIFT…..87, 108 CONVERSION LENS..88 Handle zoom lever ….
-
Page 131
Memory card….25, 119 Push auto focus ….32 SUMMERTIME ….99 Insert/Eject…..25 Supplied accessories …..17 “Memory Stick” media S&Q button……60 ……….120 REC BUTTON SET….. 29 S&Q MOTION …..61 “Memory Stick PRO Duo” REC LAMP[F] ….100 media ……..120 REC LAMP[R] ….100 Menu ……..83 REC RUN …… -
Page 132
Index (Continued) Wide angle……31 Wi-Fi ……..47 Wireless Remote Commander ……….10 XLR AGC LINK ….91 XLR SET……91 ZEBRA ……93, 108 Zoom ……..31 ZOOM DISPLAY ….95 ZOOM SET ……87… -
Page 136
© 2014 Sony Corporation Printed in Japan…
Посмотреть инструкция для Sony HXR-NX3 бесплатно. Руководство относится к категории видеокамеры, 1 человек(а) дали ему среднюю оценку 7.5. Руководство доступно на следующих языках: английский. У вас есть вопрос о Sony HXR-NX3 или вам нужна помощь? Задайте свой вопрос здесь
Не можете найти ответ на свой вопрос в руководстве? Вы можете найти ответ на свой вопрос ниже, в разделе часто задаваемых вопросов о Sony HXR-NX3.
Что означает аббревиатура MП?
Инструкция Sony HXR-NX3 доступно в русский?
Не нашли свой вопрос? Задайте свой вопрос здесь
One-touch remote with
your NFC-equipped device.
Smart Remote Control
Built-in LED video light*
A built-in LED video light is provided just above the
camcorder’s built-in microphone, providing convenient,
bright illumination for a wide range of shooting
situations and minimizing the need to carry external
lighting equipment. Illumination is approximately 200
lux/1m (approx. 800 lux/0.5m) with a beam angle of 30°
and a color temperature of approximately 5500K.
* An external microphone connected via the XLR connector may
cast a shadow if used simultaneously with the built-in LED light.
Wi-Fi file transfer and remote control*
1
Low-bitrate MP4 files (720p, 3 Mbps) recorded
simultaneously with AVCHD files can be wirelessly
transferred to a smartphone or tablet computer and
then uploaded directly to cloud servers or social
networking sites for preview by editing staff or public
viewing.*
2
One-touch authentication is also possible with
smartphones that offer NFC*
3
connectivity. Remote
control features include monitoring of camera material
on the smartphone display, record start/stop, zoom, iris,
and touch AF. The required PlayMemories Mobile*
4
smartphone application can be downloaded from the
Google Play Store or App Store.*
5
*1 Wi-Fi operation cannot be guaranteed with all smartphones and
tablet computers.
*2 MP4 recording is not available when AVCHD (1080 50p) is
selected. Only MP4 files can be transferred wirelessly. Timecode is
not included in MP4 files. Uploading to web servers/sites must be
done via separate applications installed on the smartphone or
tablet computer.
*3 NFC, or Near Field Communication, allows close-range wireless
communication between the HXR-NX3 and an NFC equipped
smartphone or tablet computer.
*4 PlayMemories Mobile is a free Sony mobile application that
allows Wi-Fi communication with Handycam camcorders and
other imaging devices.
*5 iOS 4.3 through 7.0 or Android 2.3 through 4.3 currently supported.
Timecode and
HDMI embedded timecode output
Timecode and user bit settings are important features
for professional applications. Timecode is essential for
efficient non-linear editing of live footage from multiple
NXCAM camcorders. Like other Sony NXCAM camcorders,
HXR-NX3 timecode can be reset from the supplied infrared
remote control unit, and this allows multiple cameras to be
reset simultaneously for easy synchronization. For extra
sync versatility, timecode and user bits can also be output
via the camcorder’s HDMI jack.
Intelligent Auto (iAUTO)
The iAUTO feature makes it easy to capture beautiful
images in a wide variety of shooting situations. This
handy feature automatically selects the optimum scene
setting from three groups of ten scenes. For example,
iAUTO can detect that the user is walking while shooting,
for example, and automatically select the “Walk” setting
from the group that incudes the “Walk” and “Tripod”
settings to ensure that optimum image quality is
achieved.
Scene Selection
Scene Selection provides professional users with seven
presets optimized for a variety of shooting situations.
There’s the Sunrise & Sunset preset, for example, that
instantly optimizes the camcorder settings for brilliant
reproduction of sunset or sunrise colors. Or the Spotlight
preset that makes it easy to capture subjects lit by
spotlights and stage lighting without blown highlights.
Scene selection is just one more way that the HXR-NX3
offers extra shooting convenience.
SCENE group
FACE group
Camera-shake group
landscape
backlight
twilight
spotlight
low light
macro
portrait
baby
walk
tripod
Замечательная сложилась традиция: после того, как все любительские видеокамеры линеек текущего года изучены, мы приступаем к знакомству с устройствами посерьезнее. По счастью, новые модели полупрофессиональных камер активно разрабатываются и выпускаются, словно бы назло разного рода чревовещателям, ежегодно прогнозирующим скоротечную гибель видеокамер как отдельного класса аппаратуры. Сегодня мы познакомимся с очередной новинкой от Sony — полупрофессиональной, типично репортажной «рабочей лошадкой».
- Конструкция, технические характеристики
- Видео/фотосъемка
- Программное обеспечение
- Сравнительное тестирование
- Выводы
Конструкция, технические характеристики
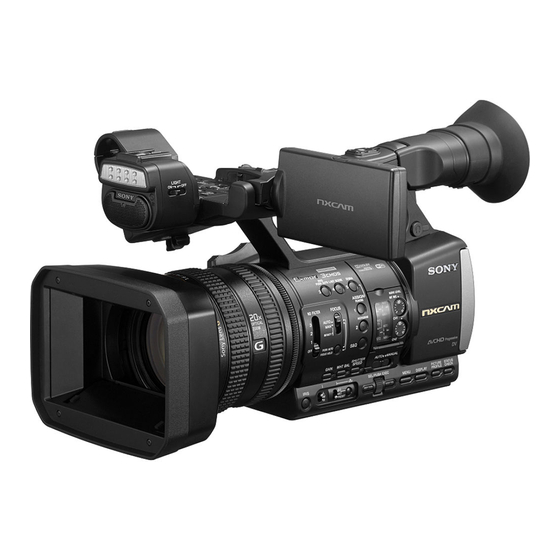
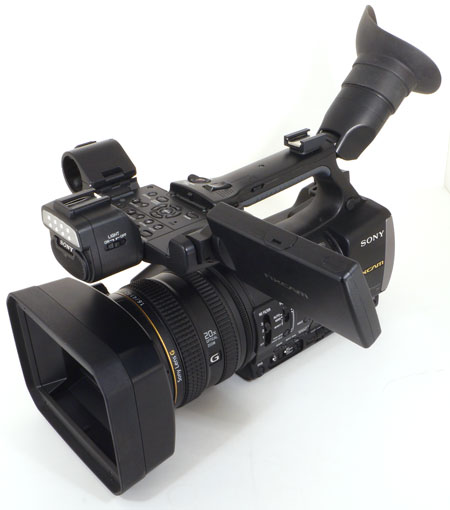
Этот «донаплечный» формфактор видеокамер удобен тем, что, в отличие от камер с еще бо́льшими габаритами, позволяет свободно маневрировать при съемке. Здесь имеется два варианта удержания камеры: за верхнюю рукоятку, либо боковую ручку, как держат обычную малогабаритную любительскую, которым часто дают язвительные определения. Однако данный аппарат «наладошкой» никак не назовешь: почти 40 сантиметров в длину и два с половиной килограмма в полной «умолчальной» комплектации, с аккумулятором, видоискателем и блендой.
Под поворотно-откидным экраном находится панель с уймой кнопок — это пульт управления воспроизведением и настройками камеры. С помощью данных органов управления можно оперативно, на месте, отсмотреть снятый материал.
Корпус из прочного пластика имеет множество вставок, различных углублений и вынесенных несъемных модулей. Все это не дизайна ради, а для обеспечения заложенной функциональности: вынесенный вперед блок микрофонов и светодиодной подсветки, крепление для внешнего микрофона-«пушки», две площадки для установки дополнительного накамерного света, профессиональные XLR-аудиовходы, аналоговые и цифровые выходы, пульты управления подключением и микшированием звука, переключатели предустановок, программируемые и стандартные кнопки.
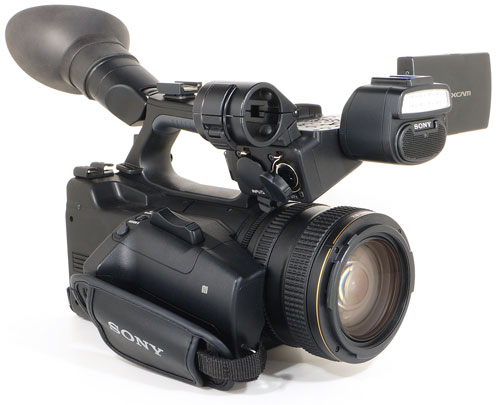
Съемный видоискатель снабжен удобным наглазником с переменной толщиной стенок. Основные разъемы находятся с тыльной стороны корпуса, они прикрыты пластиковыми откидывающимися дверцами: композитный видеовыход с двумя RCA-аудиовыходами, HDMI выход с полноразмерным разъемом, mini-USB порт, и вход для подключения адаптера питания. Если разъемы для подключения микрофонов найти несложно — они расположены ближе к объективу на вынесенном блоке — то разъем для наушников сходу и не заметишь. Он, прикрытый резиновой заглушкой, спрятался в одном из оснований рукоятки, которое находится ближе к торцу камеры.
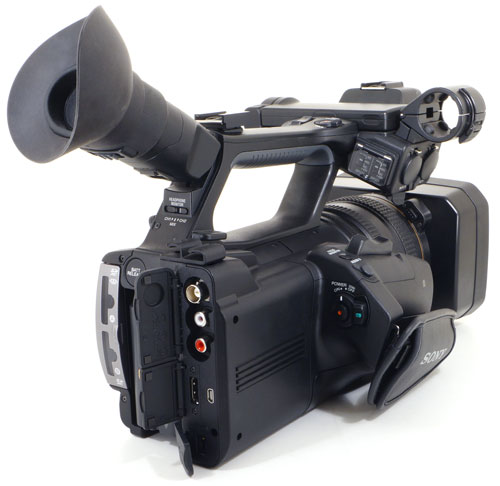
Два слота для карт памяти находятся также на торце корпуса, их прикрывает дверца с прозрачными окошками. Камера может записывать сразу на обе карты памяти, также разрешается вести запись в эстафетном режиме (в меню камеры этот режим называется «релейным»).
Основные органы управления традиционно расположены на левой стороне камеры. Здесь имеется быстрый доступ к переключателю трех встроенных нейтральных фильтров и управлению фокусировкой. Также на боковой панели расположены пять программируемых кнопок, функции которых можно изменить, блок управления уровнями аудио, прикрытый крышкой с прозрачным оконцем, кнопки быстрого доступа к настройкам усиления, баланса белого и скорости затвора, переключатель Auto/Manual. Нижняя панель, идущая вдоль всего основания камеры, также занята управляющими элементами: кнопка настройки значения диафрагмы, трехрежимный переключатель заранее заданных предустановок усиления и такой же переключатель с кнопкой для выбора и измерения баланса белого, две кнопки с колесиком между ними для навигации по служебному меню или быстрого изменения скорости затвора, кнопка вызова меню, изменения режима вывода служебной информации на дисплей или видоискатель.
В основании объектива имеется три кольца: первое, самое широкое, управляет фокусировкой; второе служит для изменения фокусного расстояния (зум), а третьим кольцом регулируется значение диафрагмы.
В основании камеры находится вмонтированная в корпус площадка из металлического сплава, в которой расположены два резьбовых отверстия для крепления камеры к штативу. Аппарат комплектуется аккумуляторной батареей Sony NP-F970, имеющей емкость 6300 мАч. С такой батареей камера в состоянии вести беспрерывную съемку в течение 435 минут в режиме AVCHD HQ (AVCHD 1920×1080 50i 12 Мбит/с). А это, между прочим, более семи часов! Неплохо — не то слово. Если приобрести еще хотя бы один такой аккумулятор, то беспрерывная съемка целого свадебного праздничного дня обеспечена.
Кстати, зарядка данного аккумулятора (в камере, а не с помощью зарядного устройства) производится очень долго. Назвать точное время мы затрудняемся, но что-то около восьми часов, а возможно, и дольше. Быть может, при использовании зарядного устройства это время как-то сокращается?
Основные технические характеристики видеокамеры приведены в следующей таблице:
| фокусное расстояние |
f=4,1 мм – 82,0 мм |
| эквивалент 35 мм |
f=28,8 мм — 576 мм (16:9) |
| диапазон диафрагм |
F1,6 – F11 |
| диаметр фильтра |
72 мм |
|
|
| Габариты, масса |
|
| Время работы от батареи, входящей в комплект |
до 435 минут беспрерывной видеозаписи с работающим ЖК-экраном в режиме AVCHD HQ (AVCHD 1920×1080 50i 12 Мбит/с) |
| Носитель |
Карты памяти:
Поддержка одновременной/эстафетной записи |
| Форматы видео |
AVCHD (H.264) *.MTS + звук AC3 стерео либо PCM стерео + текст PGS
AVI DV + PCM стерео
|
| Оптический трансфокатор |
20х |
| Интерфейсы |
|
| Прочие характеристики |
|
| Средняя цена по данным price.ru |
Н/Д(0) |
| Средняя цена по данным Яндекс.Маркет |
T-10801065 |
| Предложения по данным Яндекс.Маркет |
L-10801065-10 |
Видео/фотосъемка
Наглядно представить разницу в детализации и характере картинки, которые дают разные режимы записи, можно с помощью следующих стоп-кадров и оригинальных роликов:
|
|
|||
| 1080 50i, 20 Мбит/с | 1080 50i, 14 Мбит/с | 1080 50i, 12 Мбит/с | 1080 50i, 6 Мбит/с |
|
|
|
|
|
| Скачать ролик | Скачать ролик | Скачать ролик | Скачать ролик |
| 1080 50p, 24 Мбит/с | 720 50p, 18 Мбит/с | 720 50p, 14 Мбит/с | 720 50p, 12 Мбит/с |
|
|
|
|
|
| Скачать ролик | Скачать ролик | Скачать ролик | Скачать ролик |
| 1080 25p, 18 Мбит/с | 1080 25p, 14 Мбит/с | DV 720×576 50i 4:3 | DV 720×576 50i 16:9 |
|
|
|
|
|
| Скачать ролик | Скачать ролик | Скачать ролик | Скачать ролик |


Эта съемка производилась в автоматическом режиме — самом, казалось бы, беспроигрышно-правильном для сцены данного типа. Прежде всего хотелось бы предупредить возникновение замечаний типа «пора бы научиться работе с фокусом». Нет, с фокусом все в порядке. И вазелином стекло объектива никто не покрывал. И тумана не видать — обычная переменная облачность, характерная для средней полосы России. Трудно сказать, с чем связана такая нерезкость картинки. Ручные настройки профилей картинки (Picture Profile) позволяют изменить параметры уровня черного, гаммы, изгиба, цветового режима, уровня, фазы и глубины цвета, смещения баланса белого и, наконец, детализации. Несложный опыт дает понять, что при съемке в автоматическом режиме уровень детализации равняется нулю:

Впрочем, как можно видеть, если детализация и увеличивается, то лишь за счет повышения контрастности, более резкого очерчивания краев объектов. В то время как действительная (реальная) разрешающая способность остается прежней. Что совсем неудивительно.
Следующий аспект — конечно, стабилизатор. Формфактор камеры словно бы говорит: пользуйся рукояткой, снимай без сторонних стабилизирующих инструментов. А мы и проверим.
Для просмотра в большем размере нажмите кнопку Оригинальный размер
Стабилизатор неплох, да. Но до уровня «снимай без использования сторонних средств» все же не дотягивает. Абсолютно ровную проводку камерой сделать крайне сложно. Скорее, невозможно. Стабилизатор камеры не способен погасить естественные колебания, возникающие при ходьбе оператора. Без стедикама или иного стабилизирующего устройства тут никак не обойтись, при всем старании.
Но и стедикам не панацея. Вот если бы в нагрузку к нему можно было купить умение обращаться с этим устройством…
Кстати, активный режим стабилизации немного уменьшает угол обзора камеры. Совсем чуть-чуть, но это следует иметь в виду:
Для просмотра в большем размере нажмите кнопку Оригинальный размер
Камера оснащена оптической системой с 20-кратным зумом. Присутствует здесь и обычный электронный зум, но его мы традиционно не рассматриваем. С некоторых пор многие видеокамеры стали также оснащаться еще одним «зумом». Предполагается, что в его работе используется чуть большая площадь матрицы плюс продвинутый алгоритм обработки изображения, за счет чего при таком зуммировании четкость картинки не падает. Такой зум, вдвое увеличивающий видимую кратность, имеется и в нашей камере. Он называется «Clear image zoom», а в русскоязычном варианте — «Увел. Четк. Изобр». Ну, смысл понятен — увеличение с четким изображением. Для краткости назовем этот зум «улучшенным».

Разумеется, каждый отдает себе отчет, что при таком способе зуммирования разрешающая способность камеры так или иначе падает, чудес ведь не бывает. Если оптическая система достигает предела кратности зума, то для еще большего увеличения необходимо задействовать электронику. А если мы читаем «электроника», то подразумеваем программную обработку изображения. Но с помощью какой программной обработки можно вдвое увеличить размер картинки? Разумеется, только апскейлом. Пусть и грамотным, аккуратным. Посмотрим, как это получается у нашей камеры.
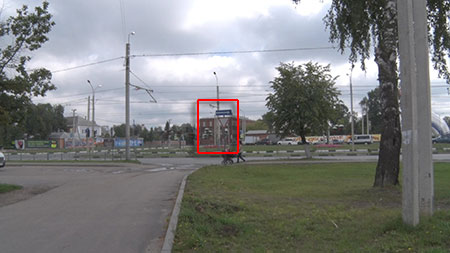
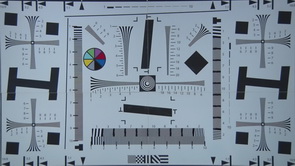
Выяснить, насколько изменяется разрешающая способность камеры в режиме улучшенного зума, можно только одним способом: произвести съемку тестовой таблицы в двух режимах, с полным и правильным заполнением кадра. При съемке в режиме улучшенного зума штатив с камерой камеру отодвинуть от таблицы метров этак на 15-20. Хорошо, что погода безветренная попалась, иначе таблицу в кадре мотало бы так, что наша затея окончилась бы пшиком.
Стоит ли комментировать? Ограничимся простой констатацией: разрешающая способность камеры на полном улучшенном зуме составляет 450 условных ТВ-линий по горизонтали, в то время как на полном оптическом зуме эта цифра увеличивается до 800 линий. Использовать или не использовать подобный способ увеличения картинки — решать пользователю.
Управление зумом может осуществляться двумя качалками на выбор, и также средним кольцом объектива. Скорость и вариативность ускорения зуммирования настраивается в служебном меню. По умолчанию скорость зуммирования кольцом невысока, ее может не хватить для полного «наезда». Чтобы выкрутить зум полностью, оператор будет вынужден перехватить кольцо рукой. А это — потеря времени и неизбежная тряска в кадре. В то же время, слишком высокая скорость зуммирования снижает точность и повышает риск утери фокуса, но это уже дело самого оператора. Все зависит от его аккуратности, и, конечно, практики.
Рассматриваемая камера, как и все нынешние аппараты, оснащена CMOS матрицей. Это означает всенепременное наличие роллинг шаттера (подробнее см. в материале Роллинг шаттер в видеосъемке — описание дефекта, примеры, пояснения). Жаль, что ввиду большого веса и габаритов камеры, мы не можем сделать тестовые покатушки на электроавтомобильчике — он попросту не потянет такую махину. Считаем, достаточно будет сказать, что за время тестирования и при изучении снятого материала мы не заметили сколь-нибудь существенного уровня роллинг шаттера. Если, конечно, не считать съемку быстро перемещающихся объектов. Например, из окна автомобиля, движущегося на высокой скорости.
Для просмотра в большем размере нажмите кнопку Оригинальный размер
Второе известное следствие роллинг шаттера возникает из-за срабатывании фотовспышки во время видеосъемки. Выглядит такой дефект как горизонтальные пересвеченные полосы в кадре. Данный дефект, увы, неизбежен, какой бы скоростью считывания ни обладала матрица.
Кстати, в этом ролике заметен небольшой цветной шум, проявляющийся при съемке в условиях недостаточной освещенности. Шум усиливается при использовании зума, что, в общем-то, естественно.
Камера не терпит безграмотных действий со стороны оператора. Например, резких движений, так называемого «мотыляния». Картинка при этом не просто смазывается, но еще и рассыпается на ярко выраженные блоки-квадраты. Данный дефект кодирования может также проявиться при случайном резком движении камеры во время съемки на зуме, когда оператора толкнет в плечо кто-то из присутствующих. Что и произошло в этой первосентябрьской сутолоке:
Быть может, такая пикселизация — следствие недостаточности битрейта? Проверим предположение с помощью съемки фонтана.
Субъективно — подчеркиваем, субъективно — кажется, что при съемке в режиме 25 кадров в секунду пикселизация кадра не так ярко выражена, как в 50-кадровом видео. И это несмотря на существенную разницу в битрейтах: 24 Мбит/с в 1080 25p и 28 Мбит/с в 1080 50p.
Следует уточнить: подобные артефакты сжатия в моменты большого движения в кадре свойственны немалой части видеокамер. Эти примеры приводятся здесь лишь с целью показать, что в мире кодирования видео все остается по-прежнему, без особых изменений.
При съемке в стандартных условиях при достаточном уровне освещенности камера четко и точно определяет тип текущей сцены, выставляя правильные настройки. Следующие ролики сняты попеременно в автоматическом режиме и режиме выбора сцены (использовалась сцена Пейзаж). Увидеть какую-то разницу между ними чрезвычайно сложно.
Для просмотра в большем размере нажмите кнопку Оригинальный размер
В камере имеется возможность настроить и сохранить несколько предустановок-профилей, о чем говорилось ранее. В последующем данные установки можно быстро вызвать и активировать, для чего на корпусе камеры имеется одноименная кнопка. Настройки профилей поражают количеством изменяемых параметров и глубиной этих изменений.
|
|
|
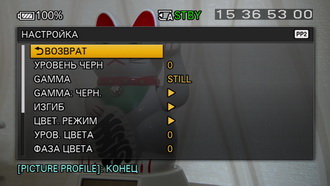
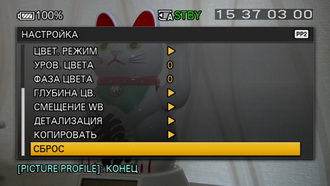
Благодаря данным настройкам, можно добиться существенной разницы при съемке одного и того же сюжета. Для наглядности приведем несколько роликов, снятых с разными установками Picture Profile, имевшимися в камере по умолчанию:
Для просмотра в большем размере нажмите кнопку Оригинальный размер
| Автоматические настройки | Profile 1 |
|
|
|
| Скачать ролик | Скачать ролик |
| Profile 1 | Profile 1 |
|
|
|
| Скачать ролик | Скачать ролик |


Наконец, о чувствительности камеры. Аппарат оснащен встроенными ND фильтрами (нейтральный фильтр, используется для уменьшения потока света, входящего в объектив). В связи с этим данные настройки позволяют вести съемку со следующими установками фильтра: Clear, 1/4ND, 1/16ND, 1/64ND. В автоматическом режиме переключать ND фильтр не имеет смысла: камера тут же изменит значение диафрагмы, а по достижении «потолка» включит и станет увеличивать усиление:
Для просмотра в большем размере нажмите кнопку Оригинальный размер
Кстати, об усилении — аналоге фотоаппаратного ISO. В видеокамерах усиление выражается в децибелах, а рассматриваемая модель способна изменять усиление в диапазоне −6 дБ — 30 дБ. Следующий ролик снят с полностью открытой диафрагмой и скоростью затвора, равной количеству кадров в секунде видео).
Нельзя сказать, что максимальный уровень усиления годен на что-то кроме обычного ориентирования на местности при слабом освещении, этакий аналог ПНВ, причем слабый. Количество цветного шума, возникающего на больших значениях dB, не располагает к дальнейшему использованию такой картинки.
Имеющийся в камере встроенный фонарь подсветки, состоящий из восьми ярких белых светодиодов, является серьезным подспорьем. Фонарь этот эффективен на расстоянии 1-2 метра, это расстояние увеличивается соответственно уровню усиления.
Программное обеспечение
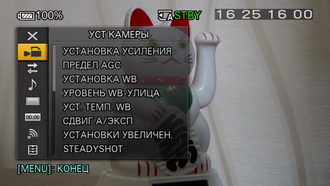
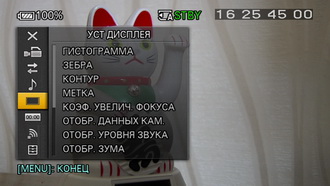
Для навигации по служебному меню, изменения настроек камеры следует пользоваться только механическими органами управления: либо панелью кнопок, которая находится на вынесенном блоке с дисплеем и микрофонами, либо кнопками и нажимающимся колесиком, расположенными в нижней панели, ближе к торцу. С помощью сенсорного экрана путешествовать по меню не получится — слишком здесь много пунктов и мелкий текст.
| Установки камеры | Настройки дисплея |
|
|
|
| Настройки таймкода | Установки звука |
|
|
|
В камере имеется режим ускоренной и замедленной съемки. Но организован этот режим совсем не так, как это обычно делает Sony. Данная съемка в нашем случае — это фактически интервальная съемка. Звук во время такой съемки не записывается.
| Выбор формата записи | Выбор частоты кадров (1—50) |
|
|
|

Исходя из несложных расчетов, получается, что максимальная скорость замедления, которой можно добиться — это 2х. Но и то лишь в случае съемки с частотой 25 кадров в секунду. Непонятно, зачем такой режим вообще нужен, если в любом видеоредакторе 50p легко замедлить вдвое.
Другое дело — интервальная запись, предназначенная для съемки каких-то длительных событий. Ниже можно увидеть пример такой записи, сделанной в формате 50p, но частотой фиксации 1 раз в секунду.
Wi-Fi-функция камеры ограничивается управлением камерой со смартфона или планшета. Мобильное приложение, которое для этого используется, носит название PlayMemories Mobile. Из функций, которые доступны в данном приложении в связке с рассматриваемой камерой, доступны лишь старт-стоп записи, зум, и настройка диафрагменного числа:

Сравнительное тестирование в одинаковых условиях
Данное тестирование проводится согласно опубликованной методике в целях установления чувствительности видеокамеры в неизменяемых условиях, а также для определения относительной четкости выдаваемой картинки.
|
|
|
| Видео, 700 люкс | Видео, 260 люкс |
|
|
|
| Видео, 20 люкс | Видео, 5 люкс |
|
|
 |
| Видео, <1 люкс | Видео |
Съемка в тестовом боксе была проведена с полностью автоматическими настройками. Из полученных кадров можно сделать вывод, что при освещенности, равной пяти люксам, рассматриваемая видеокамера дает вполне приличную, нешумную картинку. Правда, детализация при таком освещении чуток хромает, но это неизбежный результат работы механизма шумоподавления. Разрешающая способность камеры достигает 850 условных ТВ-линий по горизонтали.
Выводы
Основные, наиважнейшие положительные качества рассмотренной камеры касаются ее формфактора, наличия широкого выбора органов управления, глубоких многоуровневых настроек, касающихся буквально каждого аспекта, а также великолепной автономности. Что касается характера изображения, получаемого с помощью этого аппарата — здесь камера напоминает холст, нетронутый художником. Снимать этой камерой на автоматических настройках — то же, что махать кистью, завязав перед этим глаза. Несмотря на умную автоматику, правильно определяющую характер и тип снимаемой сцены, видится необходимым ручное управление параметрами съемки, хотя бы частично. С помощью неисчислимого количества установок, с микроскопической точностью изменяющих тот или иной параметр (уровень цвета, детализация, смещение баланса белого и т.д. и т.п.), опытный пользователь сумеет получить именно тот результат, который ему требуется. Так, коррекция «умолчальных» настроек позволит получить более сочную, более контрастную и детализированную картинку.
Что касается надежности видеокамеры — об этом можно говорить только по прошествии нескольких месяцев регулярной эксплуатации аппарата. Впрочем, нет никаких причин сомневаться в стойкости видеокамеры, выпущенной под заслуженным и давно привычным брендом.