-
Инструкции по эксплуатации
6
Языки:

SONY STR-DE497 инструкция по эксплуатации
(2 страницы)
- Языки:Датский, Португальский, Русский, Финский
-
Тип:
PDF -
Размер:
198.2 KB
Просмотр

SONY STR-DE497 инструкция по эксплуатации
(51 страница)
- Языки:Английский
-
Тип:
PDF -
Размер:
1.78 MB
Просмотр

SONY STR-DE497 инструкция по эксплуатации
(52 страницы)
- Языки:Французский
-
Тип:
PDF -
Размер:
1.91 MB
Просмотр

SONY STR-DE497 инструкция по эксплуатации
(52 страницы)
- Языки:Испанский
-
Тип:
PDF -
Размер:
1.87 MB
Просмотр

SONY STR-DE497 инструкция по эксплуатации
(2 страницы)
- Языки:Немецкий
-
Тип:
PDF -
Размер:
183.47 KB
Просмотр

SONY STR-DE497 инструкция по эксплуатации
(2 страницы)
- Языки:Итальянский, Нидерландский, Польский, Шведский
-
Тип:
PDF -
Размер:
192.2 KB
Просмотр
На NoDevice можно скачать инструкцию по эксплуатации для SONY STR-DE497. Руководство пользователя необходимо для ознакомления с правилами установки и эксплуатации SONY STR-DE497. Инструкции по использованию помогут правильно настроить SONY STR-DE497, исправить ошибки и выявить неполадки.
-
Contents
-
Table of Contents
-
Troubleshooting
-
Bookmarks
Quick Links
4-252-084-13(1)
FM Stereo
FM/AM Receiver
Operating Instructions
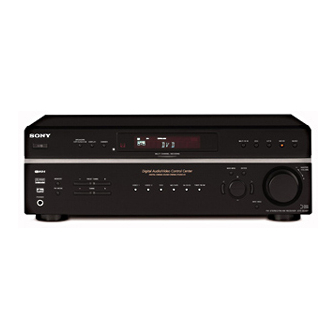
STR-DE497
©2004 Sony Corporation
Related Manuals for Sony STR-DE497
Summary of Contents for Sony STR-DE497
-
Page 1
4-252-084-13(1) FM Stereo FM/AM Receiver Operating Instructions STR-DE497 ©2004 Sony Corporation… -
Page 2
Don’t throw away batteries with general house waste; dispose of them correctly as chemical waste. Except for customers in Europe NERGY mark. As an E Sony Corporation has determined that this product meets the E ® guidelines for energy efficiency. ®… -
Page 3: About This Manual
About This Manual • The instructions in this manual are for model STR-DE497. Check your model number by looking at the lower right corner of the front panel. • The instructions in this manual describe the controls on the receiver. You can also use the controls on the supplied remote if they have the same or similar names as those on the receiver.
-
Page 4: Table Of Contents
Table of Contents Getting Started 1: Check how to hookup your components… 5 1a: Connecting components with digital audio output jacks … 7 1b: Connecting components with multi channel output jacks… 10 1c: Connecting components with only analog audio jacks … 12 2: Connecting the antennas …
-
Page 5: 1: Check How To Hookup Your Components
Getting Started 1: Check how to hookup your components Steps 1a through 1c beginning on page 7 describe how to hook up your components to this receiver. Before you begin, refer to “Connectable components” below for the pages which describe how to connect each component.
-
Page 6: Required Cords
Required cords The hookup diagrams on the subsequent pages assume the use of the following optional connection cords (A to F) (not supplied). A Audio cord White (L) Red (R) B Audio/video cord Yellow (video) White (L/audio) Red (R/audio) C Video cord Yellow Notes •…
-
Page 7: 1A: Connecting Components With Digital Audio Output Jacks
1a: Connecting components with digital audio output jacks Hooking up a DVD player or satellite tuner For details on the required cords (A 1 Connect the audio jacks. OUTPUT DIGITAL COAXIAL DIGITAL OPTICAL VIDEO 2 SA-CD/ DVD IN COAXIAL FRONT SURROUND MULTI CH IN OUTPUT DIGITAL…
-
Page 8: Dvd Player
2 Connect the video jacks. DIGITAL OPTICAL VIDEO 2 SA-CD/ DVD IN COAXIAL FRONT SURROUND MULTI CH IN Satellite tuner OUTPUT VIDEO ANTENNA VIDEO IN VIDEO IN VIDEO OUT VIDEO IN CENTER AUDIO IN AUDIO IN WOOFER SA-CD/CD MD/TAPE VIDEO 2 OUTPUT OUTPUT VIDEO…
-
Page 9
Hooking up a Super Audio CD/CD player For details on the required cords (A Super Audio CD/CD player DIGITAL OPTICAL DIGITAL OPTICAL VIDEO 2 SA-CD/ DVD IN COAXIAL FRONT SURROUND MULTI CH IN All the digital audio jacks are compatible with 32 kHz, 44.1 kHz, 48 kHz and 96 kHz sampling frequencies. Note The sound is not output when you play a Super Audio CD on the Super Audio CD player connected to the SA-CD/ CD OPTICAL IN jack on this receiver. -
Page 10: 1B: Connecting Components With Multi Channel Output Jacks
1b: Connecting components with multi channel output jacks 1 Connect the audio jacks. If your DVD or Super Audio CD player is equipped with multi channel output jacks, you can connect it to this receiver’s MULTI CH IN jacks to enjoy the multi channel sound. Alternatively, the multi channel input jacks can be used to connect an external multi channel decoder.
-
Page 11
2 Connect the video jacks. DIGITAL ANTENNA OPTICAL VIDEO 2 SA-CD/ DVD IN COAXIAL CENTER FRONT SURROUND WOOFER MULTI CH IN DVD player TV monitor OUTPUT VIDEO MONITOR VIDEO IN VIDEO IN VIDEO OUT VIDEO IN VIDEO OUT AUDIO AUDIO IN AUDIO IN AUDIO OUT AUDIO IN… -
Page 12: 1C: Connecting Components With Only Analog Audio Jacks
1c: Connecting components with only analog audio jacks Hooking up audio components For details on the required cords (A F), see page 6. – DIGITAL ANTENNA OPTICAL VIDEO 2 SA-CD/ DVD IN COAXIAL CENTER FRONT SURROUND WOOFER MD/TAPE SA-CD/CD MULTI CH IN OUTPUT LINE Super Audio CD/CD…
-
Page 13
Hooking up video components If you connect your TV to the MONITOR VIDEO OUT jack, you can watch the video from the selected input (page 21). For details on the required cords (A DIGITAL OPTICAL VIDEO 2 SA-CD/ DVD IN COAXIAL CENTER FRONT SURROUND… -
Page 14: 2: Connecting The Antennas
2: Connecting the antennas Connect the supplied AM loop antenna and FM wire antenna. OPTICAL VIDEO 2 SA-CD/ DVD IN COAXIAL The shape of the connector varies depending on the area code. Notes • To prevent noise pickup, keep the AM loop antenna away from the receiver and other components. •…
-
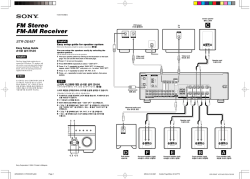
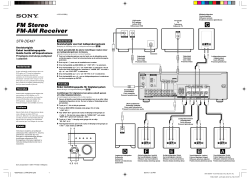
Page 15: 3: Connecting Speakers
3: Connecting speakers Connect your speakers to the receiver. This receiver allows you to use a 5.1 channel speaker system. To fully enjoy theater-like multi channel surround sound requires five speakers (two front speakers, a center speaker, and two surround speakers) and a sub woofer (5.1 channel). Example of 5.1 channel speaker system configuration Center speaker Front speaker (Right)
-
Page 16
Required cords A Speaker cords (not supplied) (–) Surround speaker (Right) MONITOR VIDEO OUT AUDIO WOOFER INPUT AUDIO * If you have an additional front speaker system, connect them to the SPEAKERS FRONT B terminals. You can select the front speakers you want to use with the SPEAKERS (OFF/A/B/A+B) button. For details, see “Selecting the speaker system”… -
Page 17: 4: Connecting The Ac Power Cord
4: Connecting the AC power cord Setting the voltage selector If your receiver has a voltage selector on the rear panel, check that the voltage selector is set to the local power supply voltage. If not, use a screwdriver to set the selector to the correct position before connecting the AC power cord to a wall outlet.
-
Page 18: 5: Setting Up The Speakers
5: Setting up the speakers You can use the SET UP menu to set the size, distance and location of the speakers connected to this receiver. Press ?/1 to turn on the receiver. Press MAIN MENU repeatedly to select “ SET UP ”. Press repeatedly to select the parameter you want to adjust.
-
Page 19
• NO If you did not connect a center speaker, select “NO”. The sound of the center channel will be output from the front speakers. XXXXX (SURROUND) (Surround speaker size) • LARGE If you connect large speakers that will effectively reproduce bass frequencies, select “LARGE”. -
Page 20: 6: Adjusting The Speaker Levels And Balance
The receiver lets you to input the speaker position in terms of distance. However, it is not possible to set the center speaker further than the front speakers. Also, the center speaker cannot be set more that 1.5 meters closer than the front speakers. Likewise, the surround speakers cannot be set further away from the listening position than the front speakers.
-
Page 21: Amplifier Operation
Amplifier Operation Selecting the component Press input buttons to select the input. To select the Press VIDEO 1 or VIDEO 2 Satellite tuner VIDEO 2 DVD player MD or tape deck MD/TAPE Super Audio CD or SA-CD/CD CD player Built-in tuner (FM/AM) TUNER FM/AM The selected input appears in the display.
-
Page 22: Listening To Fm/Am Radio
Listening to FM/AM radio You can listen to FM and AM broadcasts through the built-in tuner. Before operation, make sure you have connected the FM and AM antennas to the receiver (see page 14). The tuning scale differs depending on the area code as shown in the following table.
-
Page 23: Storing Fm Stations Automatically
Storing FM stations automatically — AUTOBETICAL (Models of area code CEL, CEK only) This function lets you store up to 30 FM and FM RDS stations in alphabetical order without redundancy. Additionally, it only stores the stations with the clearest signals. If you want to store FM or AM stations one by one, see “Presetting radio stations”.
-
Page 24: Using The Radio Data System (Rds)
Tuning to preset stations Press TUNER FM/AM repeatedly to select the FM or AM band. The last received station is tuned in. Press PRESET TUNING + or PRESET TUNING – repeatedly to select the preset station you want. Each time you press the button, you can select the preset station as follows: tA1yA2y…yA0yB1yB2y…yB0T tC0y…yC2yC1T…
-
Page 25: Displaying Rds Information
Displaying RDS information While receiving an RDS station, press DISPLAY repeatedly. Each time you press the button, RDS information on the display changes cyclically as follows: Program Service name t Frequency t Program Type indication t Radio Text t Current Time indication (in 24- indication hour system) t Sound field currently applied Type of program being broadcast (see page 25).
-
Page 26: Changing The Display
Changing the display Changing the information in the display You can check the sound field etc. by changing the information in the display. Press DISPLAY repeatedly. Each time you press DISPLAY, the display will change cyclically as follows. Index name of the input Sound field currently applied When the tuner is selected Program Service name…
-
Page 27: About The Indications In The Display
About the indications in the display L F E SP A DIGITAL SP B SLEEP OPT COAX A SW: Lights up when sub woofer selection is set to “YES” (page 18) and audio signal is output from the SUB WOOFER jack. B LFE: Lights up when the disc being played back contains the LFE (Low Frequency Effect) channel and the LFE channel signal is…
-
Page 28: Enjoying Surround Sound
Enjoying Surround Sound Using only the front speakers In this mode, the receiver outputs the sound from the front left/right speakers only. There is no sound from the sub woofer. Listening to 2 channel stereo sources (2CH STEREO) Standard 2 channel stereo sources completely bypass the sound field processing and multi channel surround formats are downmixed to 2 channel.
-
Page 29: Selecting A Sound Field
D C S marks use DCS technology. DCS is the concept name of the surround technology for home theater developed by Sony. DCS uses the DSP (Digital Signal Processor) technology to reproduce the sound characteristics of an actual cinema cutting studio in Hollywood.
-
Page 30
C.ST.EX C (CINEMA STUDIO EX C) Reproduces the sound characteristics of the Sony Pictures Entertainment scoring stage. This mode is ideal for watching musicals or films where orchestra music is featured in the soundtrack. About CINEMA STUDIO EX modes CINEMA STUDIO EX modes are suitable for watching motion picture DVDs (etc.), with… -
Page 31: Advanced Adjustments And Settings
Advanced Adjustments and Settings Switching the audio input mode for digital components — INPUT MODE You can switch the audio input mode for components which have digital audio input jacks. Press input buttons to select the input. Press INPUT MODE repeatedly to select the audio input mode.
-
Page 32: Resetting Sound Fields To The Initial Settings
x CTR XXX dB (Center speaker level) x SUR.L. XXX dB (Surround speaker (left) level) x SUR.R. XXX dB (Surround speaker (right) level) x S.W. XXX dB (Sub woofer level) Initial setting: 0 dB You can adjust from –10 dB to +10 dB in 1 dB steps. COMP.
-
Page 33: Adjusting The Tone
Adjusting the tone You can adjust the tonal quality (bass, treble level) of the front speakers using the TONE menu. Start playing a source encoded with multi channel surround effects (DVD, etc.). Press MAIN MENU repeatedly to select “ TONE ”. Press repeatedly to select the parameter you want to adjust.
-
Page 34
x DUAL XXX (Digital broadcast language selection) Lets you select the language you want to listen to during digital broadcast. This feature only functions for Dolby Digital sources. • M/S (Main/Sub) Sound of the main language will be output through the front left speaker and sound of the sub language will be output through the front right speaker simultaneously. -
Page 35: Other Operations
Other Operations Naming preset stations and inputs You can enter a name of up to 8 characters for preset stations and inputs selected with input buttons, and display it in the receiver’s display. Use the buttons on the receiver for the operation. To index a preset station Press TUNER FM/AM repeatedly to select the FM or AM band, then tune in…
-
Page 36: Using The Sleep Timer
Using the Sleep Timer You can set the receiver to turn off automatically at a specified time. Use the remote for the operation. Press SLEEP repeatedly while the power is Each time you press SLEEP, the display changes cyclically as follows: 2-00-00 t 1-30-00 t 1-00-00 t 0-30-00 t While using Sleep Timer, “SLEEP”…
-
Page 37: Recording
Recording Before you begin, make sure you have connected all components properly. Recording on an audio tape or MiniDisc You can record on a cassette tape or MiniDisc using the receiver. See the operating instructions of your cassette deck or MD deck if you need help.
-
Page 38: Operations Using The Remote Rm-U306B
Operations Using the Remote RM-U306B You can use the remote RM-U306B to operate the components in your system. Before you use your remote Inserting batteries into the remote Insert R6 (size-AA) batteries with the + and – properly oriented in the battery compartment. When using the remote, point it at the remote sensor on the receiver.
-
Page 39
SYSTEM Receiver/TV/ Turns off the receiver STANDBY VCR/Satellite and other Sony audio/ (Press AV tuner/ video components. ?/1 ea and CD player/ ?/1 e; at VCD player/ the same LD player/… -
Page 40
Remote Operations Button TUNER wj Receiver TV CH +/– qg TV/VIDEO TV VOL +/– qf VIDEO 1 3 Receiver VIDEO 2 2 Receiver 0-9 wh Receiver CD player/ VCD player/ LD player/ MD deck/ DAT deck TV/VCR/ Satellite tuner 2CH q; Receiver >10 5 CD player/… -
Page 41: Changing The Factory Setting Of An Input Button
VCR (command mode VTR 3*) DSS (Digital Satellite Receiver) DVD player VCD player *Sony VCRs are operated with a VTR 1, 2 or 3 setting. These correspond to Beta, 8mm and VHS respectively. Now you can use the MD/TAPE button to control the tape deck.
-
Page 42: Additional Information
Do not use any type of abrasive pad, scouring powder or solvent such as alcohol or benzine. If you have any question or problem concerning your receiver, please consult your nearest Sony dealer.
-
Page 43: Troubleshooting
Troubleshooting If you experience any of the following difficulties while using the receiver, use this troubleshooting guide to help you remedy the problem. There is no sound or only a very low-level sound no matter which component is selected. • Check that the speakers and components are connected securely and correctly.
-
Page 44: Remote Control
• Make sure you select the correct input on the remote. Irregular current is output from the speakers. The receiver will automatically turn off after a few seconds. Check the speaker connection and turn on the power again. If this problem persists, consult your nearest Sony dealer. on the…
-
Page 45: Specifications
If the problem persist Consult your nearest Sony dealer. Reference sections for clearing the receiver’s memory To clear All memorized settings…
-
Page 46
Models of other area code Rated Power Output at Stereo Mode (8 ohms 1 kHz, THD 0.7%) Reference Power Output (8 ohms 1 kHz, THD 10%) FRONT CENTER SURR 1) Measured under the following conditions: Area code SP, CEL, CEK, KR E2/E3, AU 2) Depending on the sound field settings and the source, there may be no sound output. -
Page 47
AM tuner section Tuning range Models of area code E2/E3 With 10-kHz tuning scale: 530 – 1,610 kHz With 9-kHz tuning scale: 531 – 1,602 kHz Models of area code CEL, CEK, SP, AU, TW, KR With 9-kHz tuning scale: 531 – 1,602 kHz Antenna Loop antenna Intermediate frequency… -
Page 48: List Of Button Locations And Reference Pages
List of button locations and reference pages How to use page 48 and 49 Use this page to find the location of buttons that are mentioned in the text. Main unit ALPHABETICAL ORDER A — L A.F.D. (button/indicator) qs (28, 29, 30, 43) DIMMER 4 (26) DISPLAY 3 (25, 26, 44)
-
Page 49
9 q; qa qs qd qf… -
Page 50: Index
Index Adjusting CUSTOMIZE parameters 33 LEVEL parameters 31 SET UP parameters 18 speaker levels and balance 20 TONE parameters 33 Automatic tuning 22 Changing display 26 Clearing receiver’s memory 17 CUSTOMIZE menu 33 Digital Cinema Sound 29 Direct tuning 22 Dual Mono 34 Dubbing.
-
Page 51
Sony Corporation Printed in Malaysia…
-
manualzz.com
- Computers & electronics
- Audio & home theatre
- Audio tuners
Инструкции и Руководства для Sony STR-DE497.
Мы нашли 12
инструкции доступные для бесплатного скачивания:
Инструкция по применению, Инструкция по установке, Инструкция по эксплуатации, Руководство пользователя

Sony STR-DE497 Руководство по установке
Бренд:
Sony
Размер:
198 KB
Страниц:
2
Язык(и):
Датский, Эстонский, Финский, Португальский, Русский
Открыть в новой вкладке
Sony STR-DE497 User manual
Бренд:
Sony
Категория:
Audio tuners
Размер:
1 MB
Страниц:
51
Язык(и):
Английский
Открыть в новой вкладке
Sony STR-DE497 Installationsanleitung
Бренд:
Sony
Размер:
183 KB
Страниц:
2
Язык(и):
Немецкий, Английский, Испанский, Французский
Открыть в новой вкладке
Sony STR-DE497 Guide d’installation
Бренд:
Sony
Размер:
225 KB
Страниц:
2
Язык(и):
Английский, Испанский, Французский
Открыть в новой вкладке
Sony STR-DE497 Installation guide
Бренд:
Sony
Размер:
566 KB
Страниц:
2
Язык(и):
Английский
Открыть в новой вкладке
Sony STR-DE497 Οδηγίες χρήσης
Бренд:
Sony
Размер:
1 MB
Страниц:
108
Язык(и):
Греческий, Португальский
Открыть в новой вкладке
Sony STR-DE497 Mode d’emploi
Бренд:
Sony
Размер:
1 MB
Страниц:
52
Язык(и):
Открыть в новой вкладке
Sony STR-DE497 Manuale di installazione
Бренд:
Sony
Категория:
Coffee making accessories
Размер:
192 KB
Страниц:
2
Язык(и):
Африкаанс, Итальянский, Голландский, Польский, Шведский
Открыть в новой вкладке

Sony STR-DE497 Käyttöohjeet
Бренд:
Sony
Размер:
2 MB
Страниц:
104
Язык(и):
Датский, Эстонский
Открыть в новой вкладке
Sony STR-DE497 Instrucciones de funcionamiento
Бренд:
Sony
Размер:
1 MB
Страниц:
52
Язык(и):
Открыть в новой вкладке
Sony STR-DE497 Instruções de Funcionamento
Бренд:
Sony
Размер:
1 MB
Страниц:
52
Язык(и):
Португальский
Открыть в новой вкладке
Sony STR-DE497 使用說明書
Бренд:
Sony
Размер:
1 MB
Страниц:
48
Язык(и):
zh
Открыть в новой вкладке
Инструкцию для Sony STR-DE497/B на русском языке, в формате pdf можно скачать с нашего сайта. Наш каталог предоставляем Вам инструкцию производителя фирмы Sony, которая была взята из открытых источников. Ознакомившись с руководством по эксплуатации от Sony, Вы на все 100% и правильно сможете воспользоваться всеми функциями устройства.
Для сохранения инструкции «Ресивер Sony STR-DE497/B» на русском языке на вашем компьютере либо телефоне, нажмите кнопку «Скачать инструкцию». Если активна кнопка «Инструкция онлайн», то Вы можете просмотреть документ (manual), в своём браузере онлайн.
Если у Вас нет возможности скачать инструкцию по эксплуатации либо просмотреть её, Вы можете поделиться ссылкой на эту страницу в социальных сетях и при удобном моменте скачать инструкцию. Либо добавьте эту страницу в закладки Вашего браузера, нажав кнопку «Добавить страницу в закладки браузера».
В представленном списке руководства для конкретной модели Усилителя — Sony STR-DE497. Вы можете скачать инструкции к себе на компьютер или просмотреть онлайн на страницах сайта бесплатно или распечатать.
В случае если инструкция на русском не полная или нужна дополнительная информация по этому устройству, если вам нужны
дополнительные файлы: драйвера, дополнительное руководство пользователя (производители зачастую для каждого
продукта делают несколько различных документов технической помощи и руководств), свежая версия прошивки, то
вы можете задать вопрос администраторам или всем пользователям сайта, все постараются оперативно отреагировать
на ваш запрос и как можно быстрее помочь. Ваше устройство имеет характеристики:Тип: ресивер, 5.1, Количество каналов: 5, Мощность фронтальных каналов: 100 Вт (8 Ом), Воспроизводимый диапазон частот: 10 — 70000 Гц, Коэффициент гармоник: 0.09 %, Отношение сигнал/шум: 100 дБ, полные характеристики смотрите в следующей вкладке.
Для многих товаров, для работы с Sony STR-DE497 могут понадобиться различные дополнительные файлы: драйвера, патчи, обновления, программы установки. Вы можете скачать онлайн эти файлы для конкретнй модели Sony STR-DE497 или добавить свои для бесплатного скачивания другим посетителями.
Если вы не нашли файлов и документов для этой модели то можете посмотреть интсрукции для похожих товаров и моделей, так как они зачастую отличаются небольшим изменениями и взаимодополняемы.
Обязательно напишите несколько слов о преобретенном вами товаре, чтобы каждый мог ознакомиться с вашим отзывом или вопросом. Проявляйте активность что как можно бльше людей смогли узнать мнение настоящих людей которые уже пользовались Sony STR-DE497.

Афанасий
2018-02-18 00:36:43
ресивер в общем то неплохой, звук достаточно хорош…шумы и помехи практически отсутствуют… но, из моей практики при прослушивании музыки нужно все таки использовать функцию 2 канала + саб… в остальных случаях — кино или футбол — несомненно 5,1. для домашнего использования достаточно серьёзный аппарат!
Ефремов вадим николаевич
2018-05-02 23:21:15
ресивер в общем то неплохой, звук достаточно хорош…шумы и помехи практически отсутствуют… но, из моей практики при прослушивании музыки нужно все таки использовать функцию 2 канала + саб… в остальных случаях — кино или футбол — несомненно 5,1. для домашнего использования достаточно серьёзный аппарат!
Валентин
2018-05-23 10:06:28
Как в ручную настроить станции fm
Максим
2018-08-13 19:20:51
Норм аппарат
Игорь
2018-08-19 14:32:30
Через 10 секунд после включения ресивер переходит в режим PROTECT, но не всегда.
Из-за чего?
Очень неплохой ресивер
Андрей Асауляк
2018-09-29 18:15:51
Пытаюсь найти правильное подключение колонок к сам буферу и усилителю
Очень неплохой ресивер
Yuriy Strelchuk
2019-02-11 19:42:57
Великолепный аппарат, купил для домашнего использования. на 2019 год до сих пор не уступает по качеству современным аналогам
gidrodanek Channel
2019-03-24 22:45:57
Вах
Вячеслав
2019-03-30 11:41:16
Рессивер приобрёл давно,очень доволен. Качество звука великолепное. Пользоваться очень удобно.
сломан
Евгений Архипов
2019-04-02 21:00:47
Аппарат достойный
юрков виктор петрович
2019-04-23 18:19:52
звук достаточно хорош…шумы и помехи практически отсутствуют… но, из моей практики при прослушивании музыки нужно все таки использовать функцию 2 канала + саб… в остальных случаях — кино или футбол — несомненно 5,1. для домашнего использования достаточно серьёзный аппарат!
юрков виктор петрович
2019-04-30 21:21:57
только что купил с рук пытаюсь разобраться. звук нравится, но не хватает информации.
Очень неплохой ресивер
Роман
2019-06-22 23:15:52
Мені подобається даний пристрій. Кум назвав його «офігенним комбайном» 
Руслан
2019-06-29 13:20:43
Аппарат на все сто. Ещё даст фору многим новичкам!
vaasa4
2019-07-03 14:50:51
хороший сайт
ВСЕ НОРМАЛЬНО
ВСЕ ПУТЕМ
ресивер в общем то неплохой, звук достаточно хорош…шумы и помехи практически отсутствуют… но, из моей практики при прослушивании музыки нужно все таки использовать функцию 2 канала + саб… в остальных случаях — кино или футбол — несомненно 5,1. для домашнего использования достаточно серьёзный аппарат!
Пока ничего не могу сказать
Дон Хуан
2019-11-14 13:05:20
при массе в 7.5 кг он не может выдать 100 ватт на канал, аналоги от ямахи весят по 12 — 15 кг при той же мощи
николай
2019-12-06 13:44:22
звук хороший мне нравиться
Игорь
2019-12-18 17:55:15
Хорошая вещь
михаил
2020-02-09 13:40:04
хороший аппарат
Швец Александр Анатольевич
2020-03-01 13:27:41
Нормальный аппарат
Александр
2020-03-01 13:29:17
нормальный
Denis Komissarov
2020-04-02 15:25:57
Нормальный аппара
Алексей
2020-09-13 16:54:37
Нормальный ресивер
ВВеПрь
2020-11-14 00:55:30
Отличный аппарат
ВВеПрь
2020-11-14 00:56:38
Классный аппарат!
Основные и самые важные характеристики модели собраны из надежных источников и по характеристикам можно найти похожие модели.
| Общие характеристики | |
| Тип | ресивер, 5.1 |
| Количество каналов | 5 |
| Параметры усилителя | |
| Мощность фронтальных каналов | 100 Вт (8 Ом) |
| Воспроизводимый диапазон частот | 10 — 70000 Гц |
| Коэффициент гармоник | 0.09 % |
| Отношение сигнал/шум | 100 дБ |
| Регулировки | |
| Регулировка тембра | есть |
| Цифровая обработка звука | |
| DSP | есть |
| Частота дискретизации аудио ЦАП | 96 кГц |
| Разрядность аудио ЦАП | 24 бит |
| Количество предустановок DSP | 10 |
| Интерфейсы | |
| Входы | композитный x3, коаксиальный x1, оптический x2, линейный x5 |
| Выходы | сабвуфер x1, композитный x2, наушники x1, линейный x2 |
| Декодеры | |
| Dolby Digital | есть |
| Dolby Pro Logic | есть |
| Dolby Pro Logic II | есть |
| DTS | есть |
| Тюнер | |
| Тип тюнера | цифровой |
| Функции | RDS |
| Питание | |
| Блок питания | встроенный |
| Тип трансформатора | Ш-образный |
| Конструкция | |
| Дисплей | есть |
| Цветовое оформление | черный, серебристый |
| Размеры (ШхВхГ) | 430x145x311 мм |
| Вес | 7.5 кг |
| Дополнительная информация | |
| Пульт ДУ | есть |
Здесь представлен список самых частых и распространенных поломок и неисправностей у Усилителей. Если у вас такая поломка то вам повезло, это типовая неисправность для Sony STR-DE497 и вы можете задать вопрос о том как ее устранить и вам быстро ответят или же прочитайте в вопросах и ответах ниже.
| Название поломки | Описание поломки | Действие |
|---|---|---|
| Перегорают Защитные Предохранители | ||
| Автоусилитель Уходит В Защиту | ||
| При Включении Усилителя Загорается Красный Светодиод | ||
| Усилитель Включается, Но Звука Нет | ||
| Str-De698 | При Включении На Дисплее Protect | |
| После Сбоя При Обновлении Не Работает Кнопка Menu | Во Время Обновления Произошел Сбой В Эл/Сети И Процесс Обновления Был Нарушен. После Включения Ресивера Перестала Работать Кнопка Меню. Причем Сделать Сброс Удалось, Зажав И Удерживая Одновременно Кнопки Power И Menu. Но Это Не Помогло. Всё Остальное — Зв | |
| Не Работает Вход По Usb. | Усилитель Работает Нормально. При Подключении В Качестве Цап Компьютер Не Реагирует На Подключение Юсб Устройства, С Телефона Нет Вывода Сигнала. Другой Цап С Телефоном Работает Без Проблем. Е18 Был Куплен На Тайване, Под Воздействием Пары Пива В Надежде | |
| Туго Вращается Регулятор Громкости На Yamaha Rx-V459 | Очень Туго Вращается Регулятор Громкости На Yamaha Rx-V459. Пластиковая Ручка Просто Прокручивается … Невольно Хочется Смазать Как Ось Вращения | |
| Тюнер Работает. Все Остальные Входы:hdmi, Опто, Видео Не Работают | ||
| Нет Выхода Hdmi | На Hdmi Выходе Нет Сигнала. Иногда Проскакивает Изображение На Зеленом Фоне. Сильно Греется Микросхема Is 3850 (Adv 7322). Не Могу Найти Прошивку. | |
| Не Работают Каналы Мощности На Фронтальные Колонки | При Включении Усилителя Не Работают Фронтальные Колонки, При Запуске Теста Выдает Code 33 | |
| Vsx 520 K | Не Включается. Ничего Не Сгорели Не Щелкнет | |
| При Ресивер | ||
| Хлопок В Колонках После Включения Усилителя Musical Fidelity M6Si | После Включения Усилителя Musical Fidelity M6Si Примерно Через Минуту Слышен Сильный Хлопок В Колонках . После Этого Усилительработае Хорошо . Это Происходит Не Каждый День . Один Раз В Три Дня . Но Это Не Всегда . Иногда При Каждом Включении В Тот Же Ден |
В нашей базе сейчас зарегестрированно 18 353 сервиса в 513 города России, Беларусии, Казахстана и Украины.

PHILIPS
⭐
⭐
⭐
⭐
⭐
Адресс:
Профсоюзная д.12
Телефон:
74999630148
Сайт:
n/a
Время работы
Время работы не указано
ЛАБОРАТОРИЯ РЕМОНТА НА ЭЛЕКТРОЗАВОДСКОЙ
⭐
⭐
⭐
⭐
⭐
Адресс:
пл. Журавлева, 10
Телефон:
74951333909
Сайт:
n/a
Время работы
Будни: с 1000 до 2000
Суббота: с 1200 до 1700
Воскресенье: с 1200 до 1700
СЕРВИС ЦЕНТР MUSIC-FIX MUSIC-FIX.RU
⭐
⭐
⭐
⭐
⭐
Адресс:
Южнопортовая 7
Телефон:
74993905854
Сайт:
n/a
Время работы
Будни: с 1000 до 2100
Суббота: с 1400 до 1900
Воскресенье: с 1400 до 1900
Сеть сервисных центров «РЕМОНТ ТЕЛЕФОНОВ, ПЛАНШЕТОВ, НОУТБУКОВ, ФОТОАППАРАТОВ»
⭐
⭐
⭐
⭐
⭐
Адресс:
Проспект Буденного, дом 53, стр. 2
Телефон:
79252430101
Сайт:
n/a
Время работы
Будни: с 0800 до 0800
Суббота: с 1000 до 1900
Воскресенье: с 1000 до 1900
РАКЕТА
⭐
⭐
⭐
⭐
⭐
Адресс:
Авиамоторная 20/17
Телефон:
79153657000
Сайт:
n/a
Время работы
Будни: с 0900 до 1900
Суббота: с 1200 до 1600
Воскресенье: выходной