The Basics
- Creating Your First Project
- Create a new Project from Templates
- Cloning a Git Repo
- Import a ZIP file
- Creating a Lab from Templates
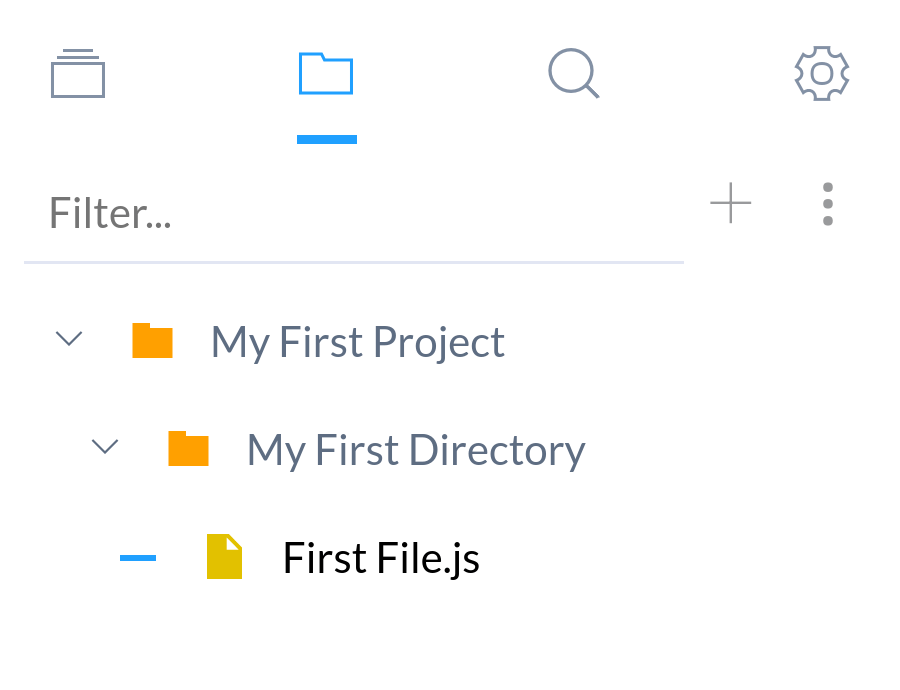
- Adding Files
- File
- Folder
- Upload Files
- Previewing
- Preview Markdown
- Preview HTML
- Preview HTML in Tablet Mode
- Resize Preview Window
- Setting Default File
Advanced Topics
- Files
- Cut/Paste Files
- Moving File
- Duplicate File
- Editing
- Arrow Keys
- Extra Keyboard
- Emmet Key
- Copy/Paste
- Go to Next Error
- Autoformat/Reformat Code
- Viewing Syntax Errors
- Diff Editing
- Toggle Code Folding
- Reverting Edits
Mobile App Links
![]()
Creating Your First Project
There are a few ways to create a new project in Spck Editor. These include:
- Create a new Project from Templates
- Cloning a Git Repo
- Import a ZIP file
- Creating a Lab from Templates
Create New Project
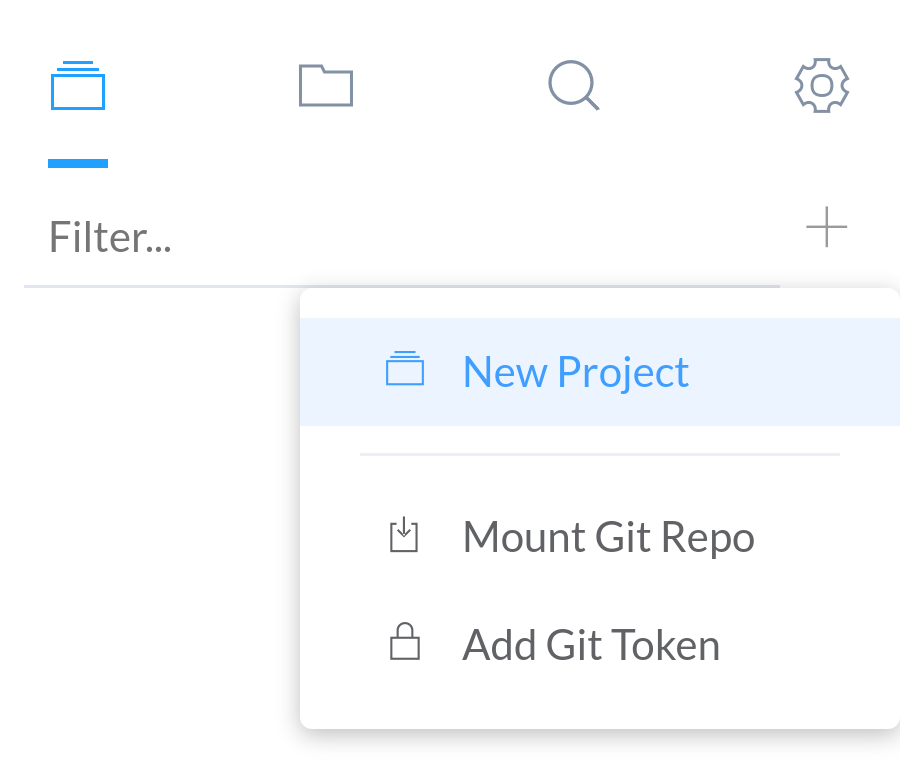
To create a new project from a list of predefined templates, go to the Projects tab menu, click the + Icon and select New Project.
List of frameworks currently available:
-
JavaScript
- Angular
- AngularJS
- React
- D3
- Vue
-
CSS
- Bootstrap
- Bulma
- Material Design Lite
- Semantic UI
- UIkit
Back to Top
Cloning a Git Repo
From the Projects tab menu, click on the GIT icon and select Clone Repo. This will bring up the GIT clone modal. Enter in a GIT repo HTTPS URL and click OK to begin cloning. For more information on GIT cloning, please visit the GIT Guide
Back to Top
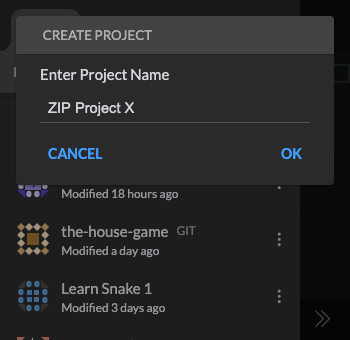
Import a ZIP file
Simple ZIP files can be imported into Spck Editor. ZIP Archives offer a way to archive and export/import projects that does not rely on GIT. Archives offer a simple way to share small projects. To import a ZIP archive, follow the steps below:
-
Open the Projects menu tab, click on the + icon and select Import ZIP.

-
This should open up a system dialog to select a ZIP file depending on what system you are using. Select a ZIP file to import. Note: ZIP files do not store file encodings in the archive, it is assume that the file encoding is UTF-8, which might not be the case if the ZIP file was generated on an older Windows computer or using external tools. There is no way for the editor to detect what encoding the ZIP file is using, so other encodings may result in data corruption or an import error.
-
The import process should begin, and a new project name prompt will show before the project is imported. Enter a project name for the ZIP file.

Back to Top
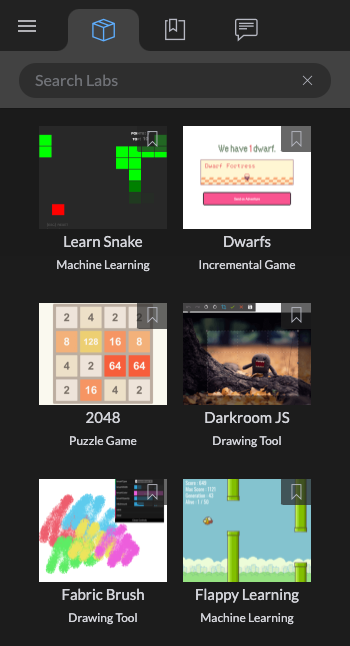
Creating a Lab
Labs offer a neat way to learn from other projects created by other devs and programmers. There are labs using D3, Three.js that range from simple games to machine learning demos. To create a lab, follow the steps below.
-
Open the Projects menu tab, click the + icon, and select View Labs. This will bring you to the Labs gallery page where you can choose from all of the labs available.
-
Click on any lab to create a project that duplicates the code as a local project.
Back to Top
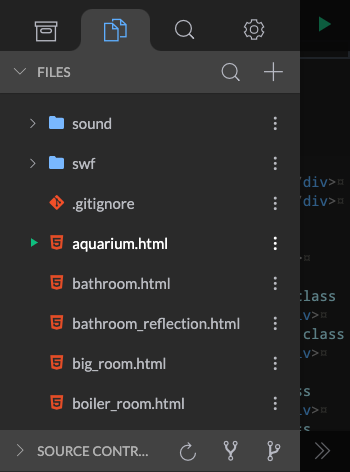
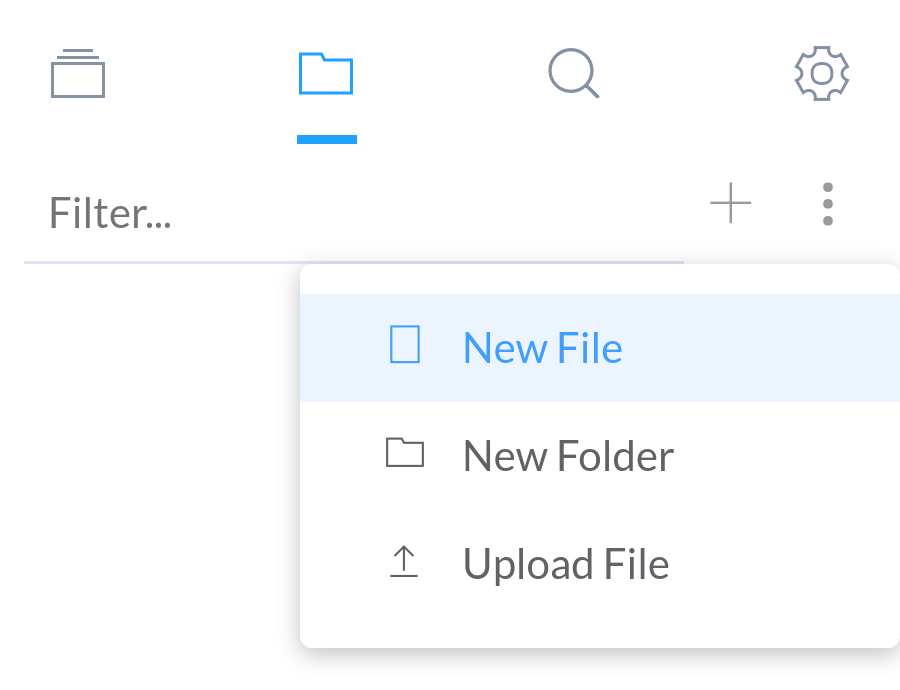
Adding Files
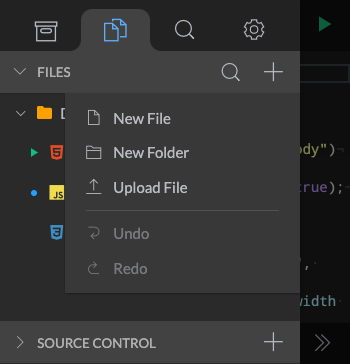
File
To create a new file you need to have created and open a project first. To add a file to the project, follow the steps below.
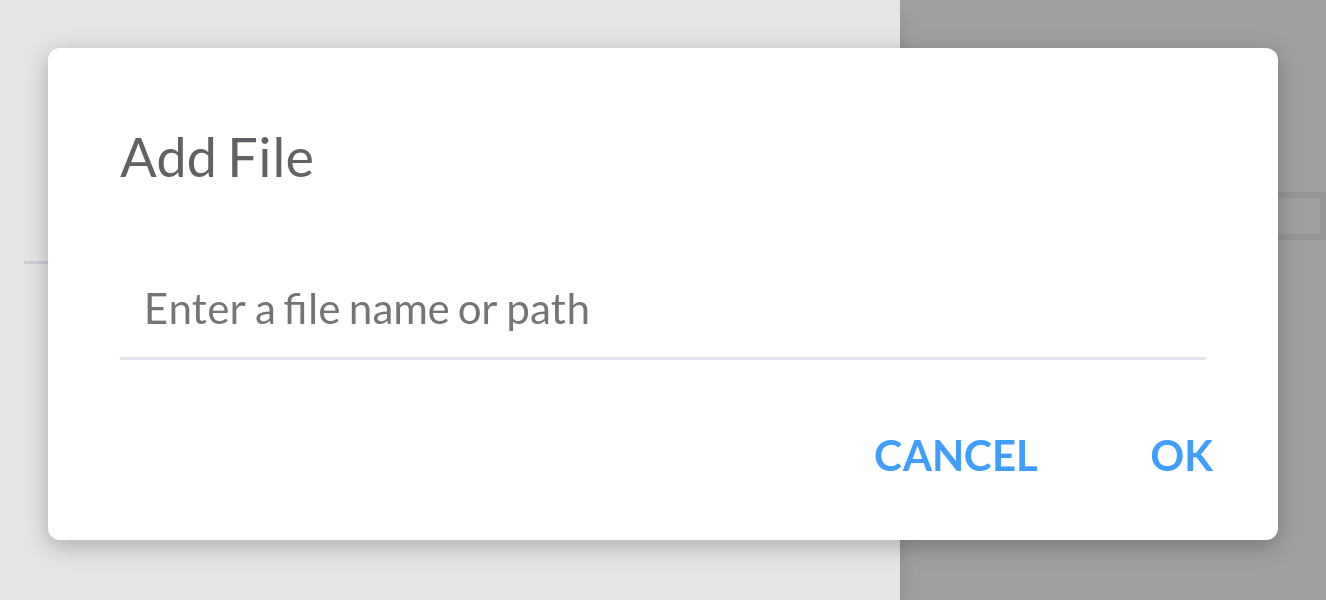
-
Open the File tab menu, click the + icon and select New File.
-
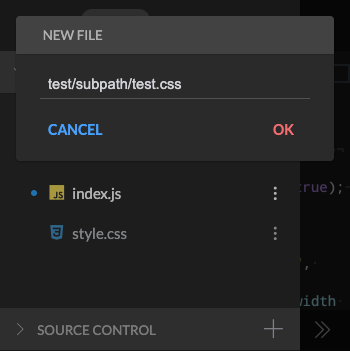
Enter a file name or file path into the prompt and press «OK«. File paths use ‘/’ as the path separator.
Back to Top
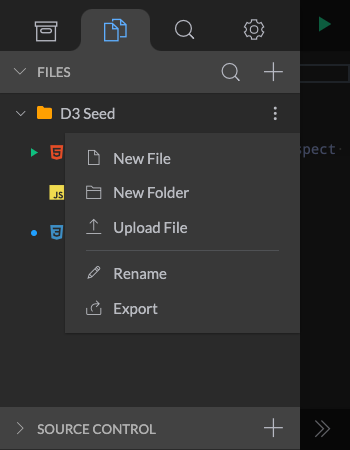
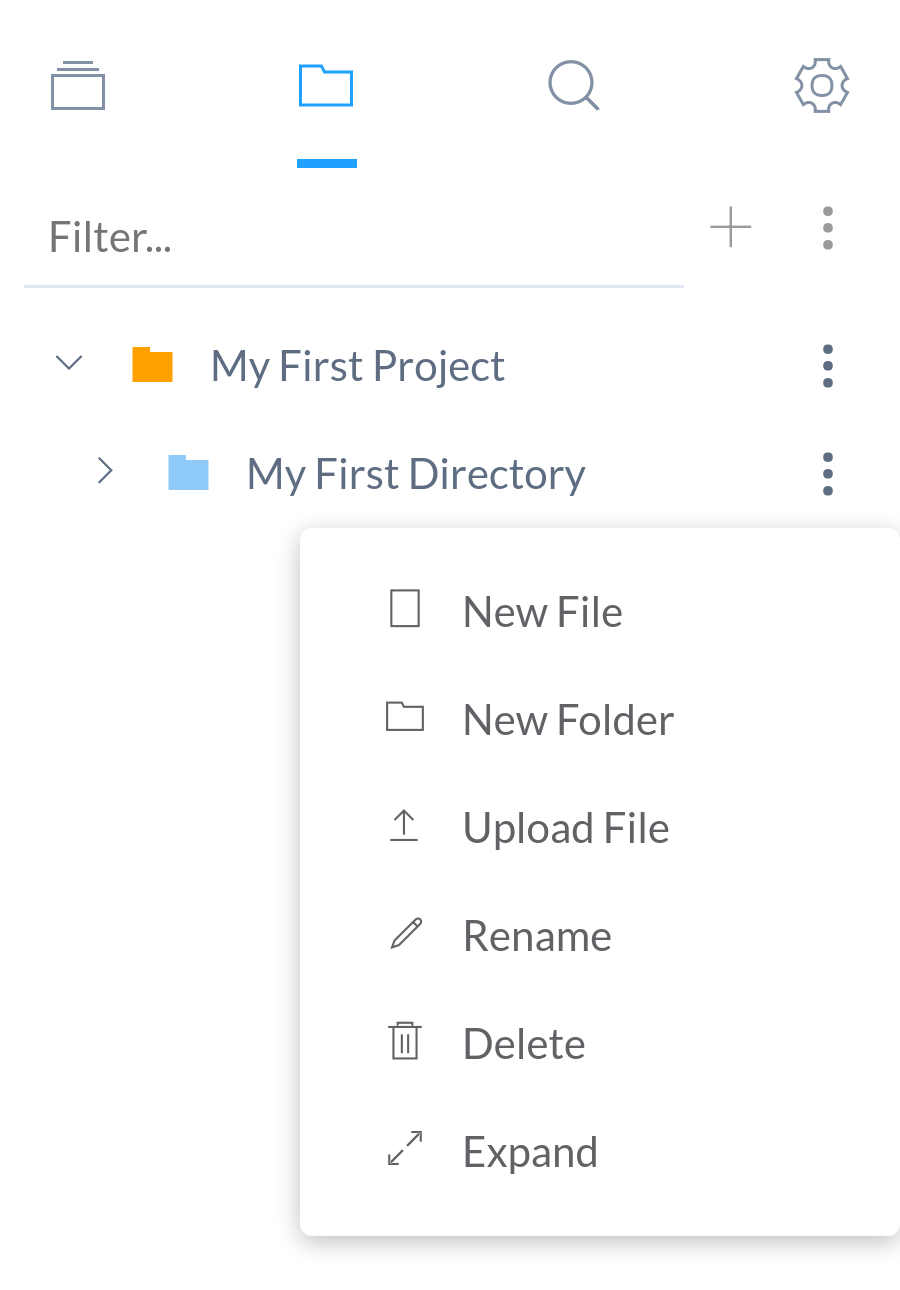
Folder
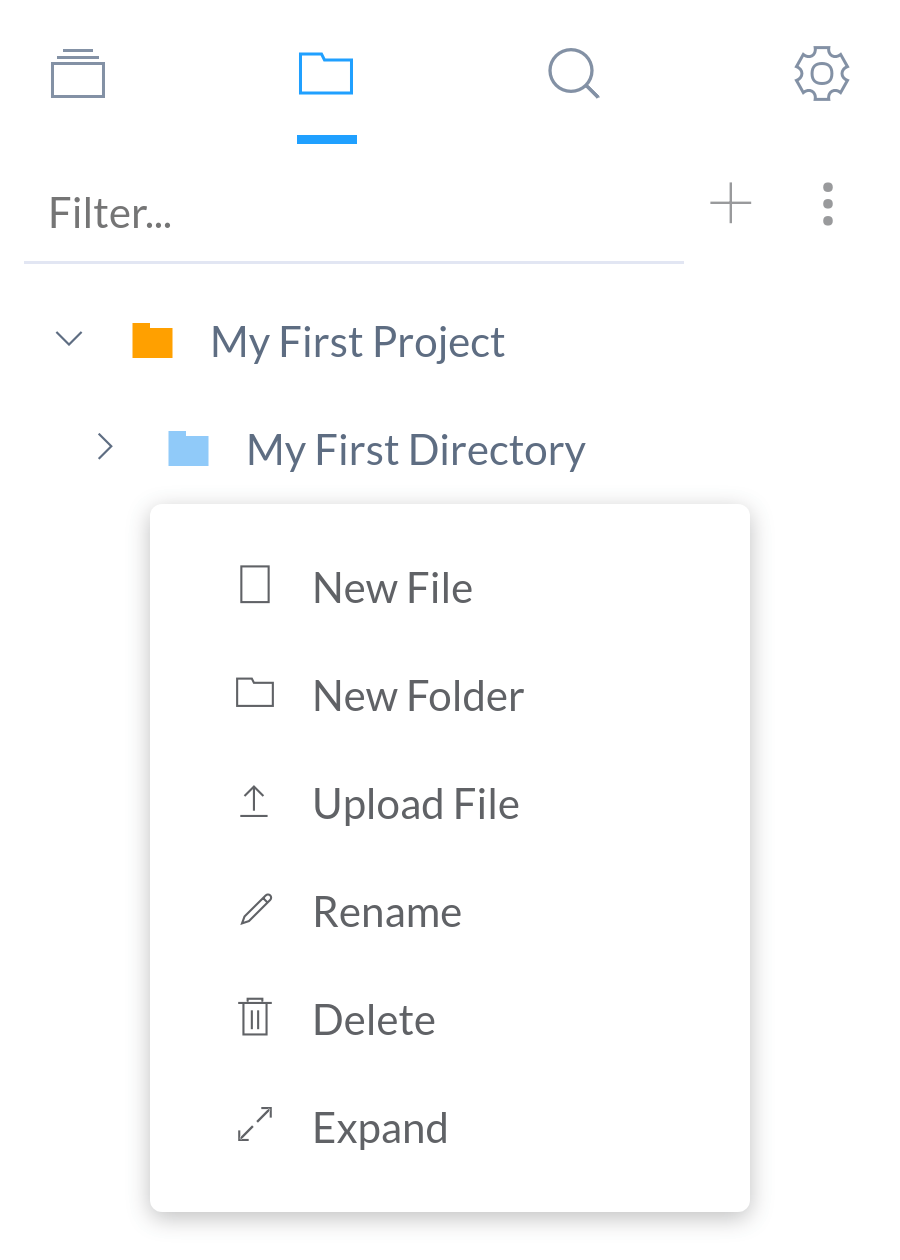
To create a new folder you need to have created a and opened a project first. To add a folder to the project, follow the steps below.
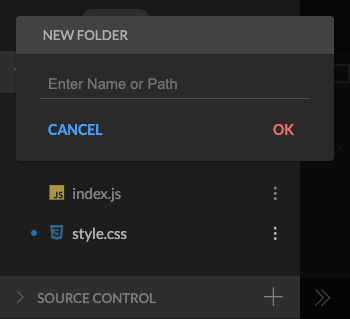
-
Open the File tab menu, click the + icon and select New Folder.
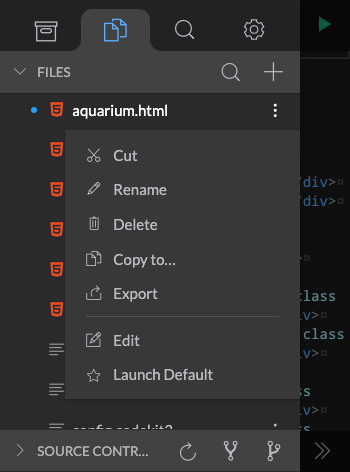
b. Alternatively, you can right click the folder you want to create folder under. This will open up the following menu:
-
Enter a folder name or folder path into the prompt and press «OK«. If the folder path’s directory does not exist, then the directory will be created automatically.
Back to Top
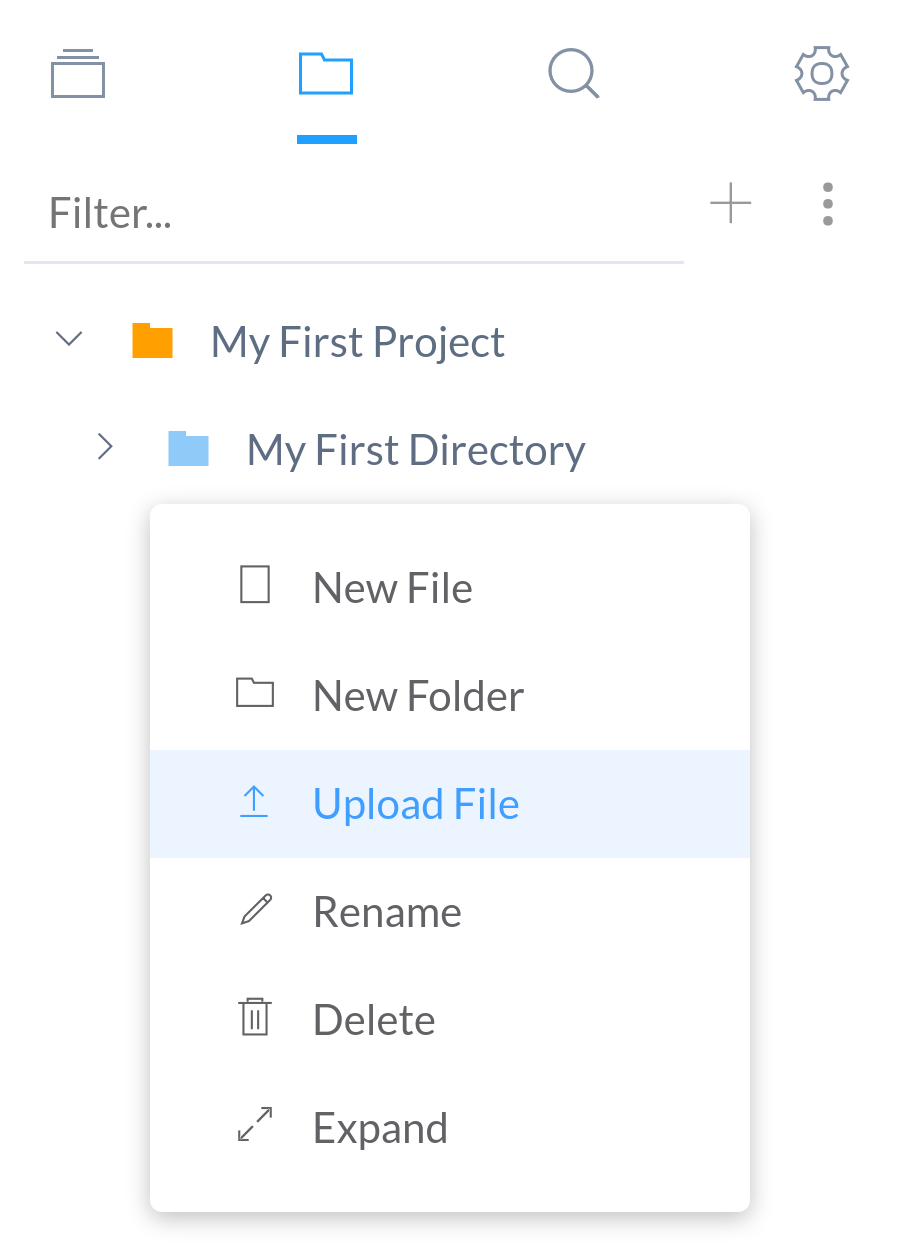
Upload Files
You can choose existing files on your device to upload to your project. To upload a file you need to have created a and opened a project first.
-
Open the File tab menu, click the + icon and select Upload File.
b. Alternatively, you can right click the folder you want to upload under. This will open up the following menu:
-
Select the file that you want to upload. After selecting, the file should appear under the folder you selected or under the project root folder.
Back to Top
Previewing
The editor allows for previewing of HTML pages and Markdown files. Additional file types and languages are planned to be supported in the future.
Preview Markdown
Previewing markdown .md files can be done following the steps below.
-
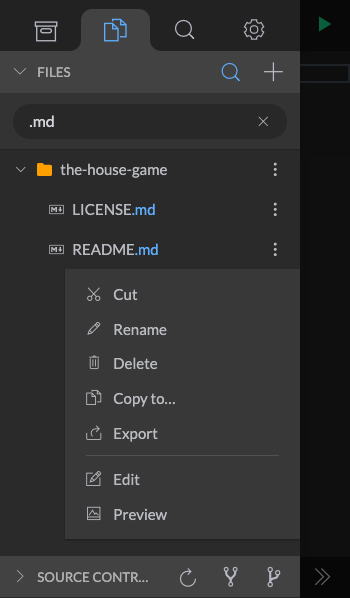
Click on the Menu icon next to the file and select Preview option.

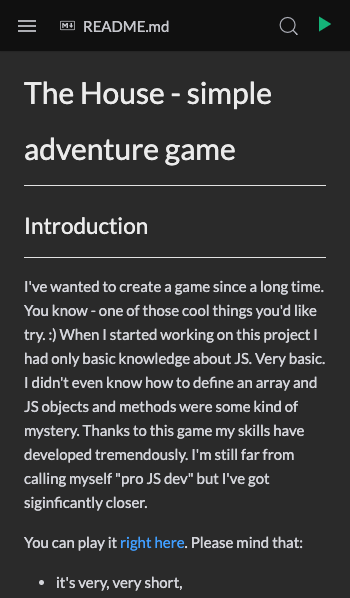
Preview of the Markdown file, shown in the editor view.
Back to Top
Preview HTML
Previewing HTML .html is the default when you click the Play ▷ button. By default, the project will preview the current HTML file (one being edited) before looking for any index.html in the project root. The priority of the HTML file to preview is as follows:
- Current Editing HTML File
- Default HTML File (See Setting Default Launch File)
- Any
.htmlin the project root - Any
.htmlin subdirectories
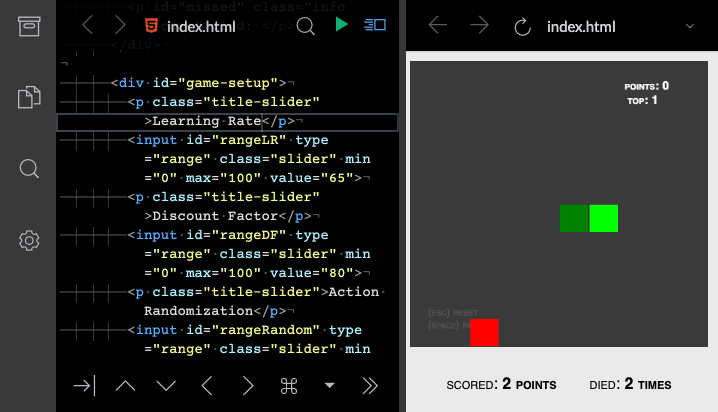
To preview HTML files on mobile, click the Play ▷ button in the main view:
![]()
Preview HTML in Tablet Mode
In Tablet Mode (only for Tablets or wide-screen devices), a second preview option is available. This option does not launch a separate window for the preview, but instead offer a side-by-side preview next to the editor. Follow the steps below to launch side-by-side Preview.
-
Turn on Tablet Mode (if available) in the Settings menu tab. See Tablet Mode for more details.
-
There should now be a Side Preview icon next to the default Play icon. Click on the new icon to launch Side Preview.
-
The preview should open to the right. The size of the preview window can be adjusted by dragging the resize bar between the editor and the preview area.
Resize Preview Window
The size of the Preview window can be adjusted when in Tablet mode and using the side preview window. To adjust the preview window size, use the bar between the Editor and the Preview window.
Back to Top
Setting Default Launch File
The default HTML file to preview upon clicking the Play ▷ button can be changed. To change the default file to preview, right-click any HTML file and select the Launch Default option.
The default launch file will be marked by a green Play icon. The default launch file will not have priority above any currently editing HTML file. Please see Preview HTML for the priority of preview files.
Back to Top
Files
These are more advanced features that will be covered for Spck Editor. For the basics, please visit the section above on Creating a Project, Adding Files, and Previewing.
Cut/Paste Files
If you need to move files between folders within a project, then use the Cut & Paste feature. To Cut & Paste a file or folder, follow the steps below.
Back to Top
Moving File
To move files or folders within a project, you can use the Cut/Paste method described above. To move files outside of the project to another project, you can use the «Copy to…» feature and then deleting of the file after successfully copying.
Duplicate File
You can also duplicate files using the technique described above in Moving File. Simply use the Copy to feature on the same project to create a duplicate of the file or folder.
Back to Top
Editing
There are various editing features that are not covered in this section that can be found in the Editor Settings page. For example, switching to using real Tab characters or showing invisibles can be managed through the Editor settings.
This section covers some basics as well as some useful, but perhaps hard to find features of the editor such as Code Formatting, and jumping to the Next Error.
Arrow Keys
The arrow keys offer the useful way to navigate code. The arrow keys are part of the Touch keyboard that is available on mobile devices. On iOS the Touch keyboard placement is at the top of the screen to prevent being covered by the software keyboard.
The arrow keys also provide useful navigation function when using autocomplete. Simply use the the Up and Down arrows to change Autocomplete selection and use the Tab key to complete it.
Back to Top
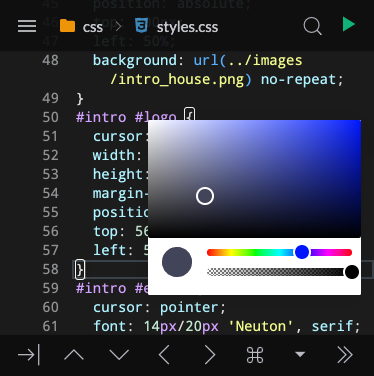
The extra keyboard provides additional keys that may not be readily available on your mobile keyboard. This helps reduce the about of keyboard switching needed to code. There are different key configurations for HTML, CSS, JS and the keys shown will depend upon the file extension as well as the context. Below is an example showing how the extra keyboard switches between HTML, JS, CSS mode depending on the HTML tag.
The extra keyboard also provides a color selector when in CSS mode as well as an Emmet key when in HTML or in CSS modes. See Emmet Key for more details on Emmet.
Back to Top
Emmet Key
Emmet is a shorthand syntax to reduce typing when editing HTML or CSS files. Emmet tries to emulate CSS selector syntax, a brief guide on Emmet can be found here
https://docs.emmet.io/cheat-sheet/.
Back to Top
Copy/Paste
Copy and Pasting can be done in 2 ways. One way is to use the Touch Keyboard extra section. Click on the >> Key on the Touch Keyboard to access additional keys for Copy & Paste.

To select text, use a long press to begin selection. You can use the cursor keys provided with the selection to adjust the selection. An action bar will appear with keys to Cut and Paste.
Back to Top
Go to Next Error
From the extra section of the Touch keyboard (To access click on the >> Key) there is the useful feature to jump to the next syntax error in the file. To use this feature follow the steps below.
-
From the Touch Keyboard, click the + key to expand additional features.
-
Click Next Error to jump to the next syntax error that the editor finds.
Back to Top
Autoformat/Reformat Code
The extra menu in the Touch keyboard also provides the option to reformat the code using jsbeautify. This reformatting works for all HTML, CSS, JS files. See the example below on using this feature.
Back to Top
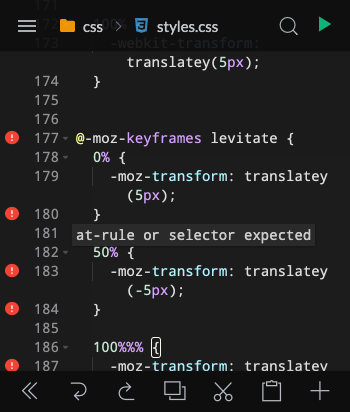
Viewing Syntax Errors
Within the line number gutter, there will be icons to show syntax errors, warnings, or bad practices. To access the information reported by the syntax validation feature, click on the icon to see the message. Please note that both the Autocomplete/Check Syntax and Line Number settings must be enabled to use this feature. See Editor Settings for more details.
Back to Top
Diff Editing
The diff editor is only available to projects using a GIT backed repository. For information on how to create a GIT repository, please visit the GIT Guide page.
Back to Top
Toggle Code Folding
When using the diff editor, parts of the code that are not changed will not be highlighted. For long sections of the code that are not changed and are not important for the purpose of comparing changes, they are hidden (folded) by default. To see the lines of code hidden, click on the «Toggle Fold» text above certain lines to expand and collapse the hidden code.
Back to Top
Reverting Edits
The diff editor can also be used to revert individual edits (line-by-line reverting). This is a useful feature to get rid of edits that caused some sort of error, or to undo any mistakes in the editing. To use this feature, click on the «Revert» text above changed lines to revert it back to the original.
You can use the Undo/Redo buttons located at the bottom of the diff editor to undo/redo any reverts done on the file.
Back to Top
Getting started with a new editor can be a challenging experience for a beginner, but even more so for a well-experienced coder. It was certainly a challenging experience for me to learn IDEs like Eclipse and XCode. That being said, thats where this guide comes in. Here, you will learn the basics of creating a new project, adding files to your project, and previewing your project in the browser.
As a side note, if you are using the editor on a mobile device it is encouraged to try the mobile app for the editor:
![]()
Table of Contents
- Creating Your First Project
- Create a New Project
- Import a Github Repo
- Adding Files
- Basics
- Folders
- Upload Files
- Previewing
Creating Your First Project
There are two ways to create projects:
* Create a new seed project with templates
* Import a project from an existing Github repo
Create a New Project
To create a new project from templates, go to the «Projects» tab in the side menu. Open the add dropdown, and select the «New Project» option below.
This will open up the project creation prompt. Here, you can choose from a list of JavaScript & CSS framework options. To create an empty project, select «No Framework» to proceed.
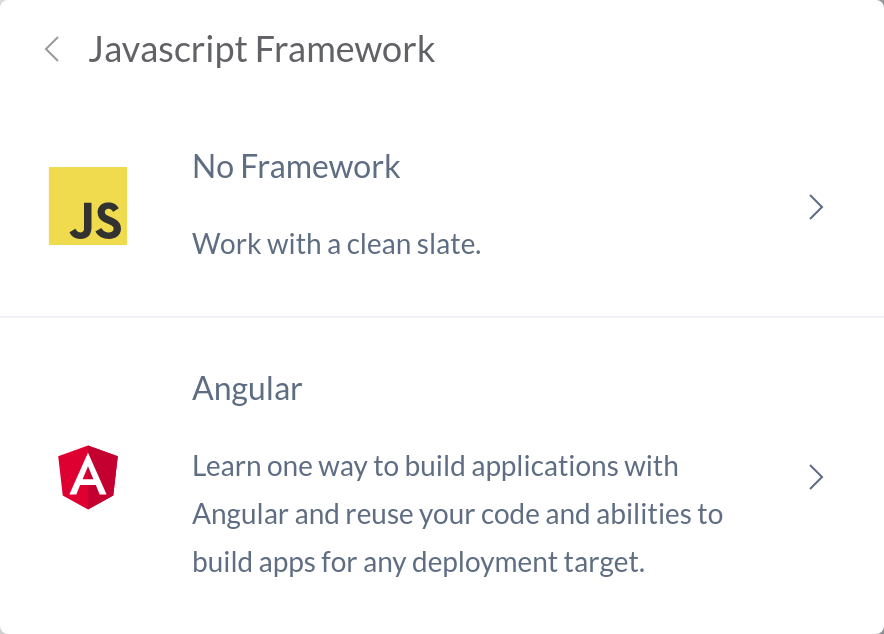
List of frameworks currently available:
-
JavaScript
- Angular
- AngularJS
- React
- D3
- Vue
-
CSS
- Bootstrap
- Material Design Lite
- UIkit
Enter your project name and click «Create«.
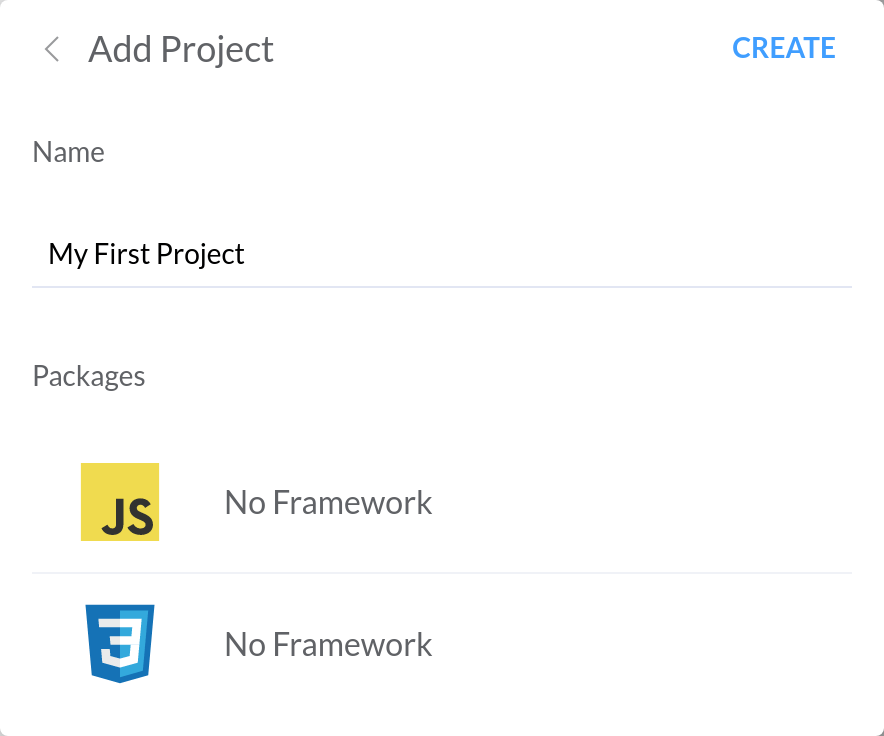
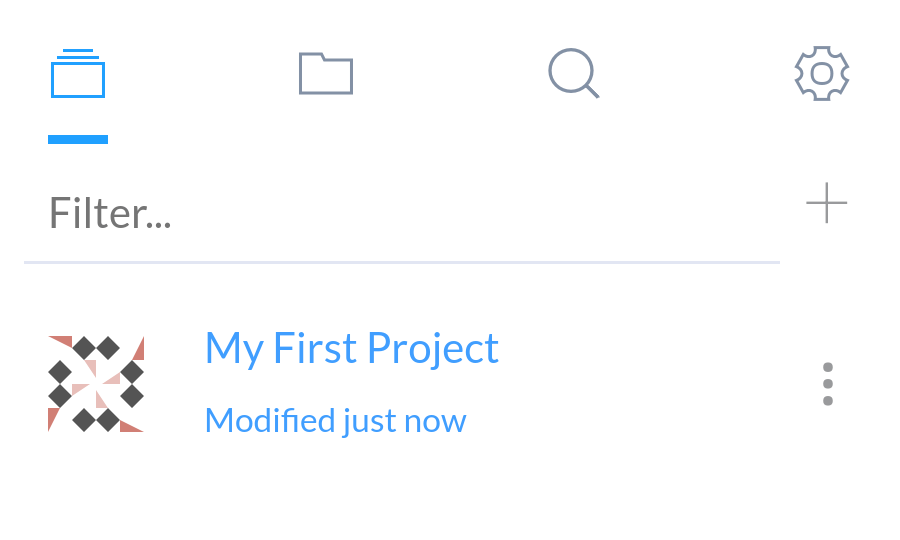
Your new project should be created in the «Projects» tab.
Import a Github Repo
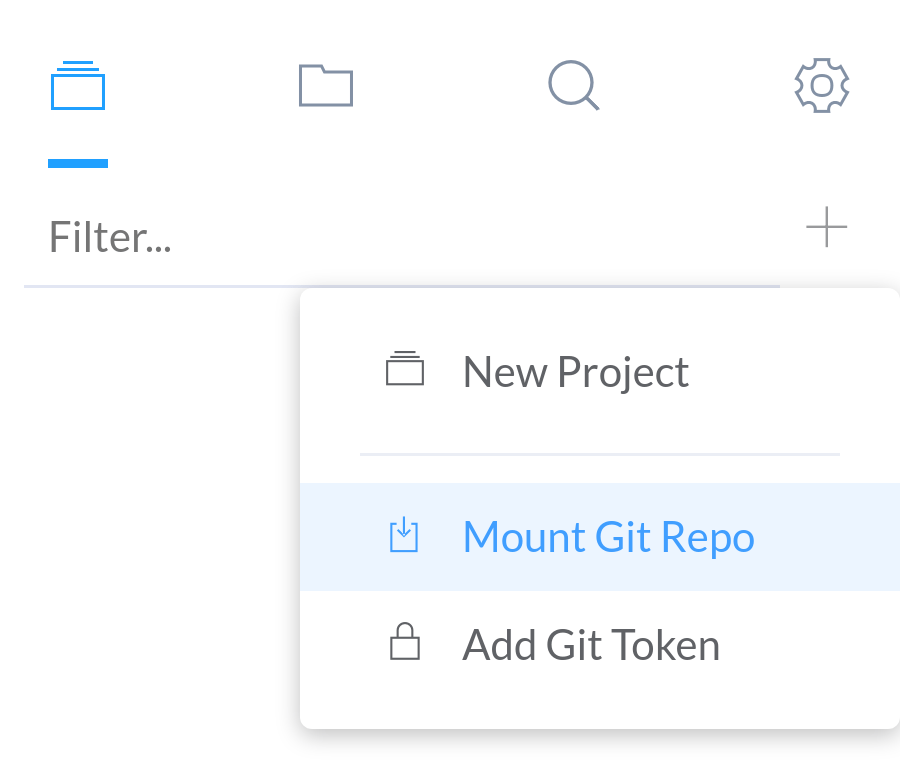
To import a repository from Github into the editor, first select the «Mount Git Repo» option from the «Projects» tab menu.
You will be presented with a prompt to enter the url of the repository to import.
If you are importing a large project with more than ~20 or so files, please add a Github token. Github API limits will prevent the project from being imported! To add a Github token please see the section Adding a Personal Github Token.
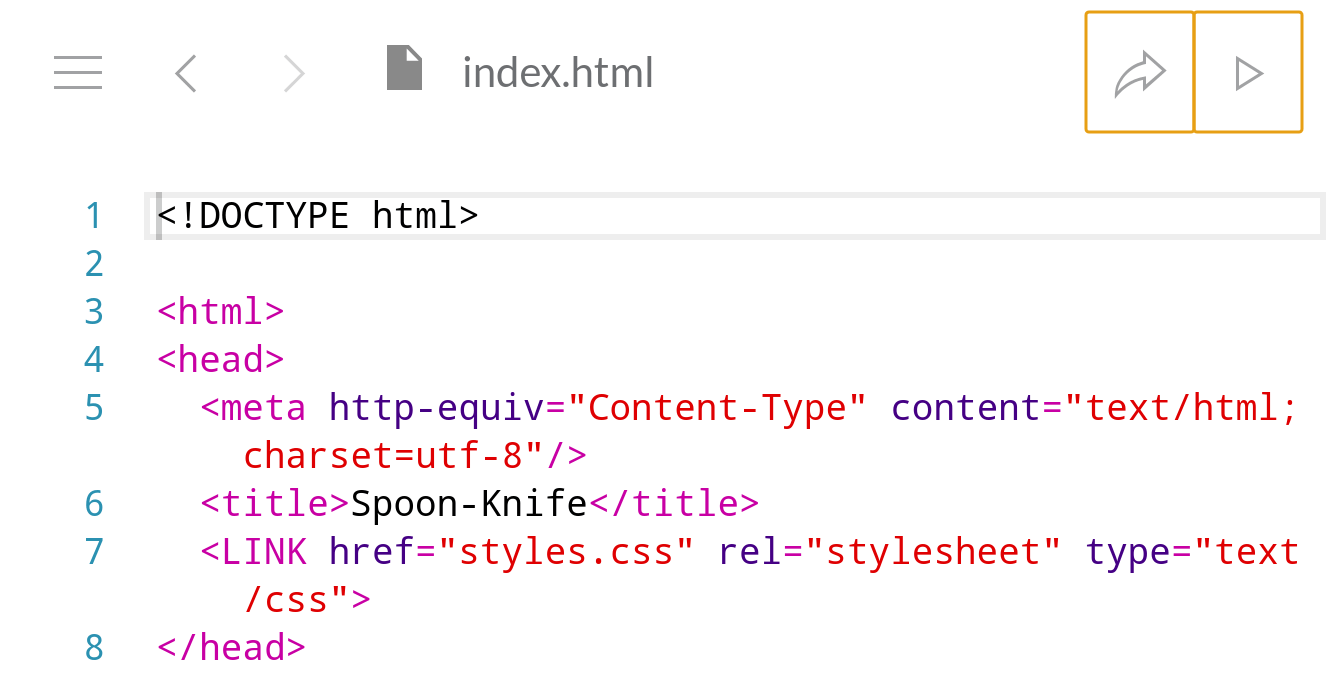
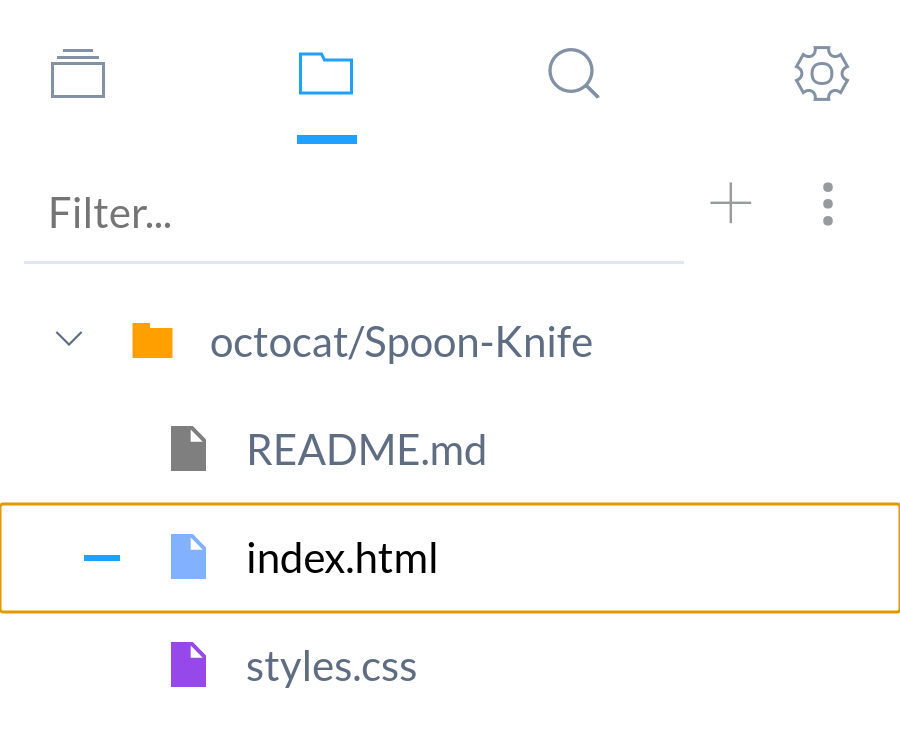
In the example, we are using the Spoon Knife repository (https://github.com/octocat/Spoon-Knife).
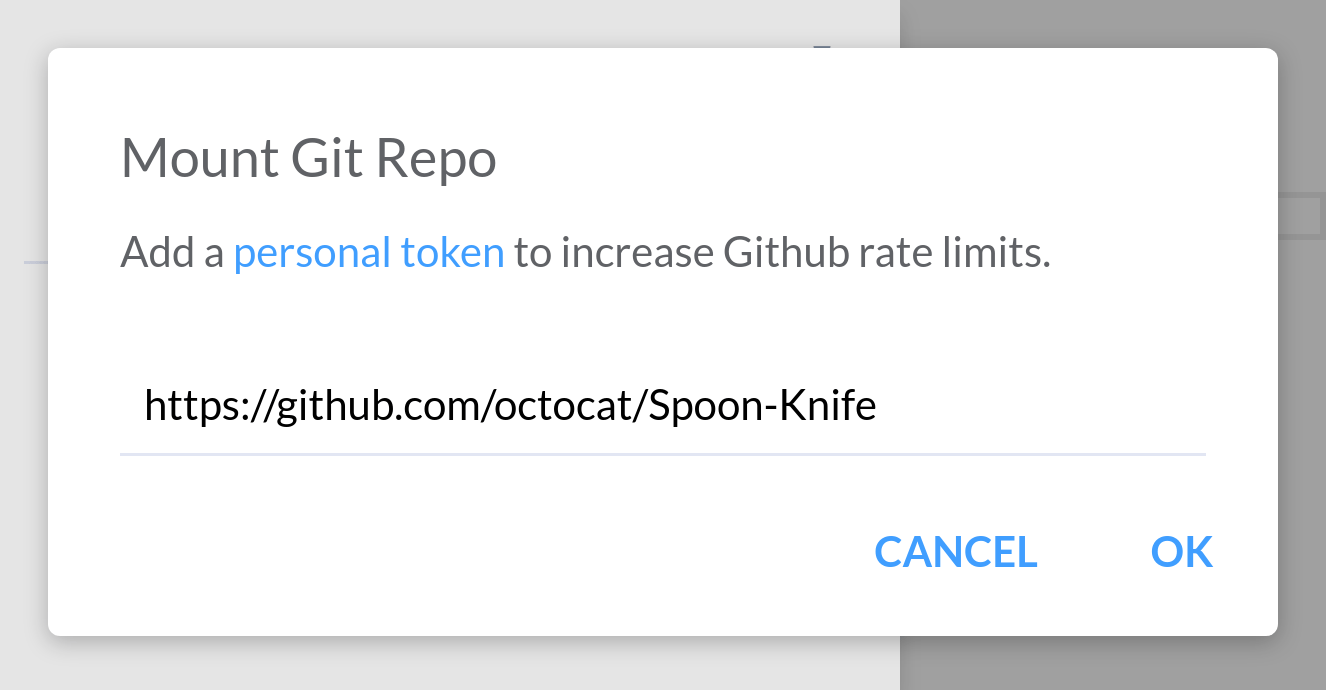
Click «OK» to proceed to fetch the latest copy of the branch from Github. Note this will not clone the entire repository. Instead only the latest commit tree of the branch will be downloaded to the editor.
If you get an error, it probably means you have exceeded your Github API limit usage. You can add your personal Github token following the instructions here.

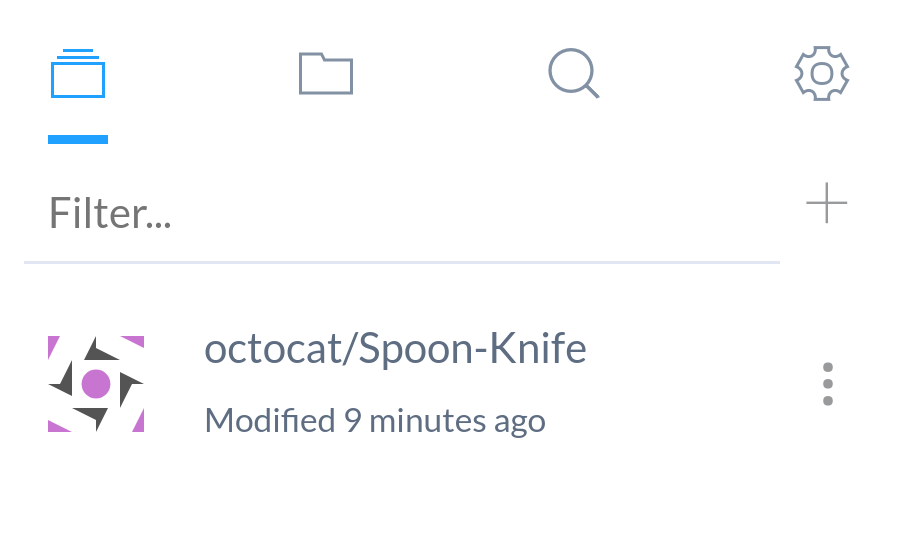
Your cloned Github Repo should appear in the «Projects» tab.
You can switch branches as well. To see details on how to do that, please refer to the section Changing Git Branches.
Adding Files
Basics
To add a file in your newly created project, select the «File» option in the «Files» tab.
Enter a file name or file path into the prompt and press «OK«.
File paths use ‘/’ as the path separator.
If the file path’s directory does not exist, then the directory will be created automatically.
Your file should be created in the «Files» tab. Note that you can use spaces or almost any other characters in the file path.
Folders
By default, using the add menu will put files and folders in the project root directory.
Alternatively, you can right click the folder you want to create resources under. This will open up the following menu:
On mobile, the menu will open by clicking on the more options icon.
Upload Files
You can choose files from your computer to be uploaded. Select «Upload File» and choose one or more files to be uploaded to the folder.
Previewing
There are two options for previewing:
-
You can launch a new browser showing the index.html page of the project. (This window is separate from the editor and does not respond to live preview.)
-
You can launch a side preview frame on larger screens, which works with live preview. You can also change which HTML file to preview from the top bar.
Pressing the «Play» button will launch a side window, while the «Launch button» will open a new browser.
On the mobile version, only the launch option is available. The launch feature is more streamlined for mobile and carries additional features like integrated JavaScript console on Android.
Setting Default Launch File
The default file to preview upon clicking «Launch» can be changed. To change the default file, right-click any HTML file and select the «Launch Default» option.
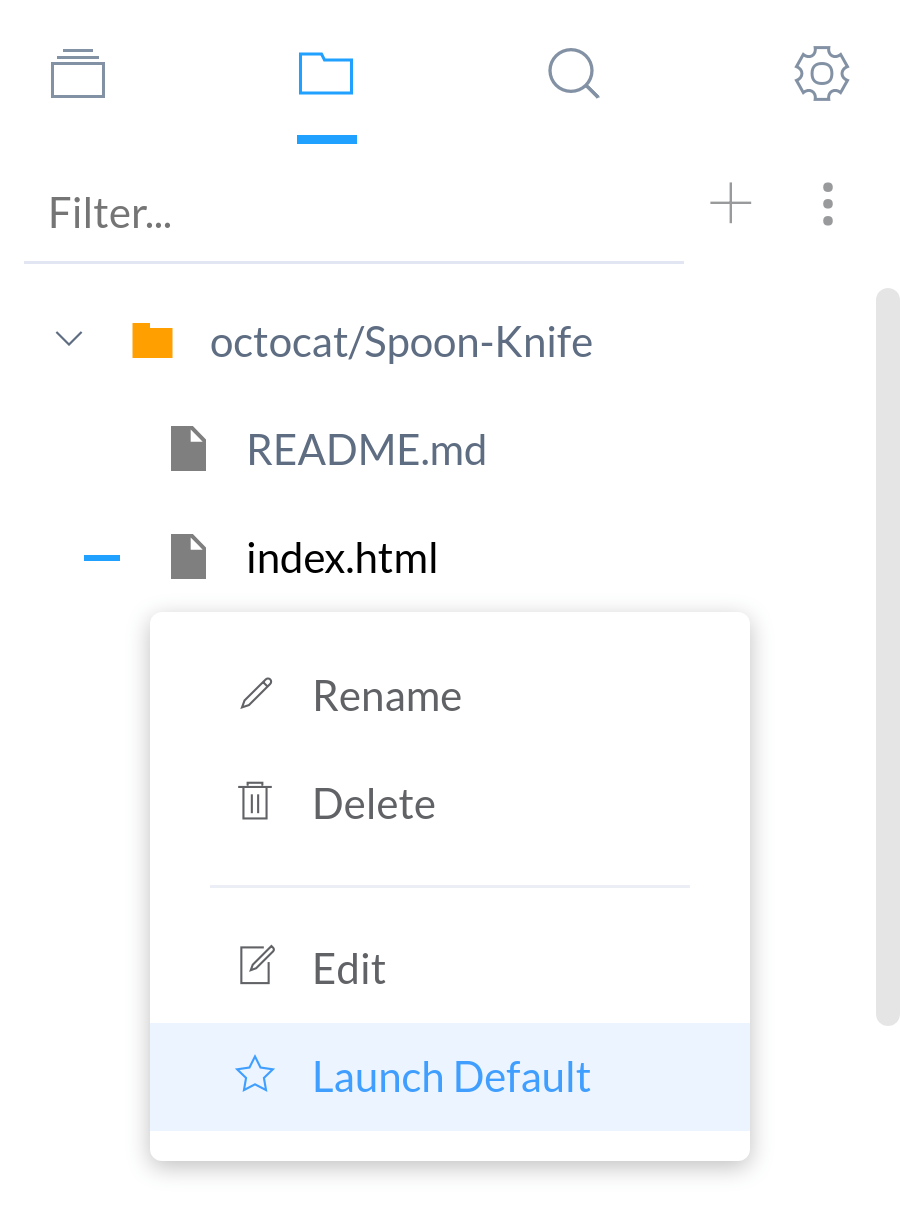
A blue file icon next to any HTML file indicates the current project’s default file.
Не могу писать код на Python с редактора кода sick editor
Пожалуйста помогите
-
Вопрос задан26 июл. 2022
-
587 просмотров
Комментировать
Пригласить эксперта
Ответы на вопрос 1

Spck Editor – это среда разработки для Javascript
Попробуйте скачать IDE предназначенные для написания на Python
Например Pydroid 3
Если вам нужен гит, то можно скачать Acode
Комментировать
Похожие вопросы
-
Показать ещё
Загружается…
20 мая 2023, в 22:41
100 руб./за проект
20 мая 2023, в 22:30
500 руб./за проект
20 мая 2023, в 22:27
9000 руб./за проект
Минуточку внимания
Documentation guide for Spck Editor
Home Page:https://spckio.github.io/spck-documentation/
Geek Repo:Geek Repo
Github PK Tool:Github PK Tool
Spck Editor Documetation
Spck Code Editor is an online code editor and sandbox that lets you create, edit, test, and commit code.
Features include:
- Context-based code hints and code completions
- Manage multiple projects
- Basic Github integration with diffing
- Search & Replace
- Mobile app for Android
For more info please visit the documentation page.
About
Documentation guide for Spck Editor
https://spckio.github.io/spck-documentation/
zebzhao / spck-documentation
Goto Github
PK
View Code? Open in Web Editor
NEW
This project forked from spckio/spck-documentation
1.0
0.0
5.23 MB
Documentation guide for Spck Editor
Home Page: https://spckio.github.io/spck-documentation/
spck-documentation’s Introduction
Spck Editor Documetation
Spck Code Editor is an online code editor and sandbox that lets you create, edit, test, and commit code.
Features include:
- Context-based code hints and code completions
- Manage multiple projects
- Basic Github integration with diffing
- Search & Replace
- Mobile app for Android
For more info please visit the documentation page.
spck-documentation’s People
Contributors

Watchers
Recommend Projects
-

React
A declarative, efficient, and flexible JavaScript library for building user interfaces.
-
Vue.js
🖖 Vue.js is a progressive, incrementally-adoptable JavaScript framework for building UI on the web.
-
Typescript
TypeScript is a superset of JavaScript that compiles to clean JavaScript output.
-
TensorFlow
An Open Source Machine Learning Framework for Everyone
-
Django
The Web framework for perfectionists with deadlines.
-
Laravel
A PHP framework for web artisans
-
D3
Bring data to life with SVG, Canvas and HTML. 📊📈🎉
Recommend Topics
-
javascript
JavaScript (JS) is a lightweight interpreted programming language with first-class functions.
-
web
Some thing interesting about web. New door for the world.
-
server
A server is a program made to process requests and deliver data to clients.
-
Machine learning
Machine learning is a way of modeling and interpreting data that allows a piece of software to respond intelligently.
-
Visualization
Some thing interesting about visualization, use data art
-
Game
Some thing interesting about game, make everyone happy.
Recommend Org
-
Facebook
We are working to build community through open source technology. NB: members must have two-factor auth.
-
Microsoft
Open source projects and samples from Microsoft.
-
Google
Google ❤️ Open Source for everyone.
-
Alibaba
Alibaba Open Source for everyone
-
D3
Data-Driven Documents codes.
-
Tencent
China tencent open source team.
✔ Наш обзор
1. A simple, yet feature-filled code editor that lets you access your projects from Github, Bitbucket, Gitlab, and more! With Spck Editor, you can edit, commit, checkout, push, and run simple JavaScript projects.
Скриншоты

загрузить и установить Spck Editor на вашем персональном компьютере и Mac
Проверить совместимые приложения для ПК или альтернативы
Или следуйте инструкциям ниже для использования на ПК
Выберите версию для ПК:
- Windows 7-10
- Windows 11
Если вы хотите установить и использовать Spck Editor на вашем ПК или Mac, вам нужно будет загрузить и установить эмулятор Desktop App для своего компьютера. Мы усердно работали, чтобы помочь вам понять, как использовать app для вашего компьютера в 4 простых шагах ниже:
Шаг 1: Загрузите эмулятор Android для ПК и Mac
Хорошо. Прежде всего. Если вы хотите использовать приложение на своем компьютере, сначала посетите магазин Mac или Windows AppStore и найдите либо приложение Bluestacks, либо Приложение Nox . Большинство учебных пособий в Интернете рекомендуют приложение Bluestacks, и у меня может возникнуть соблазн рекомендовать его, потому что вы с большей вероятностью сможете легко найти решения в Интернете, если у вас возникнут проблемы с использованием приложения Bluestacks на вашем компьютере. Вы можете загрузить программное обеспечение Bluestacks Pc или Mac here .
Шаг 2: установите эмулятор на ПК или Mac
Шаг 3: Spck Editor для ПК — Windows 7/8 / 10/ 11
Теперь откройте приложение Emulator, которое вы установили, и найдите его панель поиска. Найдя его, введите Spck Editor в строке поиска и нажмите «Поиск». Нажмите на Spck Editorзначок приложения. Окно Spck Editor в Play Маркете или магазине приложений, и он отобразит Store в вашем приложении эмулятора. Теперь нажмите кнопку «Установить» и, например, на устройстве iPhone или Android, ваше приложение начнет загрузку. Теперь мы все закончили.
Вы увидите значок под названием «Все приложения».
Нажмите на нее, и она перенесет вас на страницу, содержащую все установленные вами приложения.
Вы должны увидеть . Нажмите на нее и начните использовать приложение.
Спасибо за чтение этого урока. Хорошего дня!
Получить совместимый APK для ПК
| Скачать | Разработчик | Рейтинг | Score | Текущая версия | Совместимость |
|---|---|---|---|---|---|
| Проверить APK → | Zeb Zhao | 11 | 3.63636 | 2.2.3 | 4+ |
Скачать Android
Spck Editor На iTunes
| Скачать | Разработчик | Рейтинг | Score | Текущая версия | Взрослый рейтинг |
|---|---|---|---|---|---|
| Бесплатно На iTunes | Zeb Zhao | 11 | 3.63636 | 2.2.3 | 4+ |
Шаги по настройке компьютера и загрузке приложения Spck Editor в Windows 11:
Чтобы использовать мобильные приложения в Windows 11, необходимо установить Amazon Appstore. Как только он будет настроен, вы сможете просматривать и устанавливать мобильные приложения из кураторского каталога. Если вы хотите запускать приложения Android на своей Windows 11, это руководство для вас..
- Проверьте, совместим ли ваш компьютер: Вот минимальные требования:
- RAM: 8GB (минимум), 16GB (рекомендованный)
- Хранение: SSD
- Processor:
- Intel Core i3 8th Gen (минимум или выше)
- AMD Ryzen 3000 (минимум или выше)
- Qualcomm Snapdragon 8c (минимум или выше)
- Processor Architecture: x64 or ARM64
- Проверьте, имеет ли Spck Editor собственную версию Windows. Сделай это здесь ». Если собственная версия отсутствует, перейдите к шагу 3.
Подробнее ❯
Особенности и описания
Explore fun JavaScript labs on-the-go with Spck Editor. A simple, yet feature-filled code editor that lets you access your projects from Github, Bitbucket, Gitlab, and more! With Spck Editor, you can edit, commit, checkout, push, and run simple JavaScript projects.
This tiny editor is packed with useful features from powerful, intelligent code completion of HTML, JavaScript, and CSS. Other features include:
— Local file access
— Project-wide searching (with file filters)
— Code snippets
— Keyword completion to 20+ languages
— Advance code completion for JavaScript/TypeScript & CSS
— Context-sensitive hinting for JS/TS
— Syntax Validation
— Light/Dark Theme
— Integrated JS Console
— Git repo cloning, commits, checkout, push/pull
— Git branches, logs, and remotes interfaces
— Extra keyboard for code navigation
— Dynamic keyboard for JS/HTML/CSS editing
заявка рецензия
-
Прекрасный бесплатный редактор
Есть проблемы с переводом, но приложение лучшее из всех бесплатных аналогов, на мой взгляд.
-
Наилучший редактор
Самый наилучший редактор кода который я когда либо видел!
Может уже заменить кодинг на компьютере! -
Недоделка
Не работает вставка текста
-
Непонятно как обновиться до proверсии
Часть шаблонов доступны только в pro версии, но как до неё обновиться непонятно.