Spring Security — Form Login with Database
Contents
- Introduction and Overview
- Basic components of Spring Security
- AuthenticationFilter
- AuthenticationManager
- AuthenticationProvider
- UserDetailsService
- PasswordEncoder
- Spring Security Context
- Form Login
- Login with a Database
- Login Attempts Limit
- Getting Started (Practical Guide)
Introduction and Overview
In addition to providing various inbuilt authentication and authorization options, Spring Security allows us to customize our authentication process as much as we want. Starting from a custom login page to our very own customized authentication providers and authentication filters, we can pretty much customize every aspect of the authentication process. We can define our own authentication process which can range from basic authentication using a username and a password to a complex one such as two-factor authentication using tokens and OTP’s. Also, we can use various databases – both relational and non-relational, use various password encoders, lock malicious users out of their accounts, and so on.
Today, we are going to discuss three such customizations, namely – custom form-login, a database provided authentication, and limiting login attempts. Though these are pretty basic use-cases, yet these still will let us have a closer look into Spring Security’s authentication and authorization process. We are also going to set up a registration page through which the users will be able to register themselves with our application.
First of all, let’s take a look at the architecture of Spring Security. It starts with servlet filters. These filters intercept requests, perform operations on them, and then pass the requests on to next filters in the filter chain or request handlers or block them if they do not meet certain conditions. It is during this process that Spring Security can authenticate requests and perform various authentication checks on the requests. It can also prevent unauthenticated or malicious requests from accessing our protected resources by not allowing them to pass through. Thus our application and resources stay protected.
Components of Spring Security Architecture
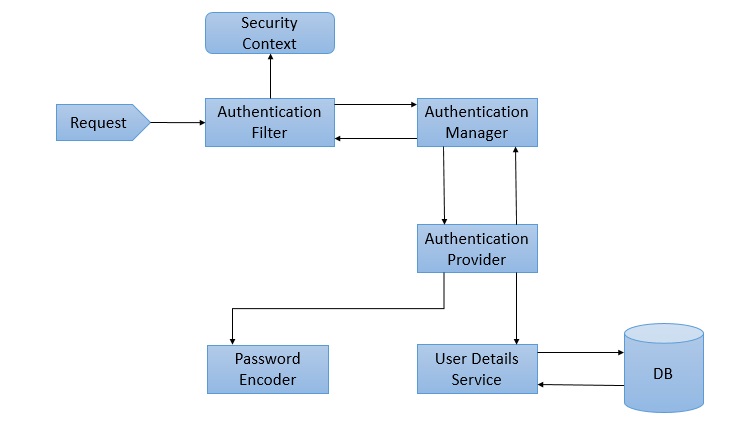
The basic components of Spring Security, as we can see in the above diagram are given below. We shall discuss them briefly as we go along. We shall also discuss their roles in the authentication and authorization process.
AuthenticationFilter
This is the filter that intercepts requests and attempts to authenticate it. In Spring Security, it converts the request to an Authentication Object and delegates the authentication to the AuthenticationManager.
AuthenticationManager
It is the main strategy interface for authentication. It uses the lone method authenticate() to authenticate the request. The authenticate() method performs the authentication and returns an Authentication Object on successful authentication or throw an AuthenticationException in case of authentication failure. If the method can’t decide, it will return null. The process of authentication in this process is delegated to the AuthenticationProvider which we will discuss next.
AuthenticationProvider
The AuthenticationManager is implemented by the ProviderManager which delegates the process to one or more AuthenticationProvider instances. Any class implementing the AuthenticationProvider interface must implement the two methods – authenticate() and supports(). First, let us talk about the supports() method. It is used to check if the particular authentication type is supported by our AuthenticationProvider implementation class. If it is supported it returns true or else false. Next, the authenticate() method. Here is where the authentication occurs. If the authentication type is supported, the process of authentication is started. Here is this class can use the loadUserByUsername() method of the UserDetailsService implementation. If the user is not found, it can throw a UsernameNotFoundException.
On the other hand, if the user is found, then the authentication details of the user are used to authenticate the user. For example, in the basic authentication scenario, the password provided by the user may be checked with the password in the database. If they are found to match with each other, it is a success scenario. Then we can return an Authentication object from this method which will be stored in the Security Context, which we will discuss later.
UserDetailsService
It is one of the core interfaces of Spring Security. The authentication of any request mostly depends on the implementation of the UserDetailsService interface. It is most commonly used in database backed authentication to retrieve user data. The data is retrieved with the implementation of the lone loadUserByUsername() method where we can provide our logic to fetch the user details for a user. The method will throw a UsernameNotFoundException if the user is not found.
PasswordEncoder
Until Spring Security 4, the use of PasswordEncoder was optional. The user could store plain text passwords using in-memory authentication. But Spring Security 5 has mandated the use of PasswordEncoder to store passwords. This encodes the user’s password using one its many implementations. The most common of its implementations is the BCryptPasswordEncoder. Also, we can use an instance of the NoOpPasswordEncoder for our development purposes. It will allow passwords to be stored in plain text. But it is not supposed to be used for production or real-world applications.
Spring Security Context
This is where the details of the currently authenticated user are stored on successful authentication. The authentication object is then available throughout the application for the session. So, if we need the username or any other user details, we need to get the SecurityContext first. This is done with the SecurityContextHolder, a helper class, which provides access to the security context. We can use the setAuthentication() and getAuthentication() methods for storing and retrieving the user details respectively.
Moving on, let’s now discuss the three custom implementations we are going to use for our application.
Form Login
When we add Spring Security to an existing Spring application it adds a login form and sets up a dummy user. This is Spring Security in auto-configuration mode. In this mode, it also sets up the default filters, authentication-managers, authentication-providers, and so on. This setup is an in-memory authentication setup. We can override this auto-configuration to set up our own users and authentication process. We can also set up our custom login method like a custom login form. Spring Security only has to made aware of the details of the login form like – the URI of the login form, the login processing URL, etc.. It will then render our login form for the application and carry out the process of authentication along with the other provided configurations or Spring’s own implementation.
This custom form setup will only have to abide by certain rules to be integrated with Spring Security. We need to have a username parameter and a password parameter and the parameter names should be “username” and “password” since those are the default names. In case, we use our own parameter names for these fields in the custom we have to inform Spring Security of those changes using the usernameParameter() and passwordParameter() methods. Similarly, for every change we do to the login form or the form login method, we will have to inform Spring Security of those changes with appropriate methods so that it can integrate them with the authentication process.
Login with a Database
As we discussed, Spring Security automatically provides an in-memory authentication implementation by default. We can override this by authenticating users whose details are stored in a database. In this case, while authenticating a user, we can verify the credentials provided by the user against those in the database for authentication. We can also let new users register in our application and store their credentials in the same database. Also, we can provide methods to change or update their passwords or roles or other data. As a result, this provides us with persistent user data which can be used for longer periods of time.
Login Attempts Limit
To limit login attempts in our application we can use Spring Security’s isAccountNonLocked property. Spring Security’s UserDetails provides us with that property. We can set up an authentication method wherein, if any user or someone else provides incorrect credentials for more than a certain number of times, we can lock their account. Spring Security disables authentication for a locked user even if the user provides correct credentials. This is an in-built feature provided by Spring Security. We can store the number of incorrect login attempts in our database. Then against each incorrect authentication attempt, we can update and check with the database table. When the number of such attempts exceeds a given number, we can lock the user out of their account. Consequently, the user will not be able to log in again until their account is unlocked.
Getting Started (Practical Guide)
Let’s start with our application now. The tools we will be needing for this application are listed below −
-
A Java IDE − preferable STS 4, but Eclipse, IntelliJ Idea or any other IDE will do.
-
MySql Server Community Edition − We need to download and install MySql Community Server in our system. We can go to the official website by clicking here.
-
MySql Workbench − It is a GUI tool that we can use to interact with MySql databases.
Database Setup
Let’s set up the database first. We will use a MySql database instance for this application. MySql Server Community Edition is available for free download and use. We will use MySql Workbench to connect with our MySql Server and create a database called “spring” to use with our application.
Then we will create two tables – users and attempts– to persist our users and login attempts. As mentioned earlier, the details of the users registering with our application will be stored in the users table. The number of login attempts by any user will be stored in the attempts table against his username. This way we can track the attempts and take necessary action.
Let’s take a the look at the SQL to setup our users table and attempts table.
CREATE TABLE users (
   username VARCHAR(45) NOT NULL , password VARCHAR(45) NOT NULL ,
   account_non_locked TINYINT NOT NULL DEFAULT 1 ,
   PRIMARY KEY (username)
);
CREATE TABLE attempts (
   id int(45) NOT NULL AUTO_INCREMENT,
   username varchar(45) NOT NULL, attempts varchar(45) NOT NULL, PRIMARY KEY (id)
);
We can now add a dummy user to our application.
INSERT INTO users(username,password,account_non_locked)
VALUES ('user','12345', true);
Project Setup
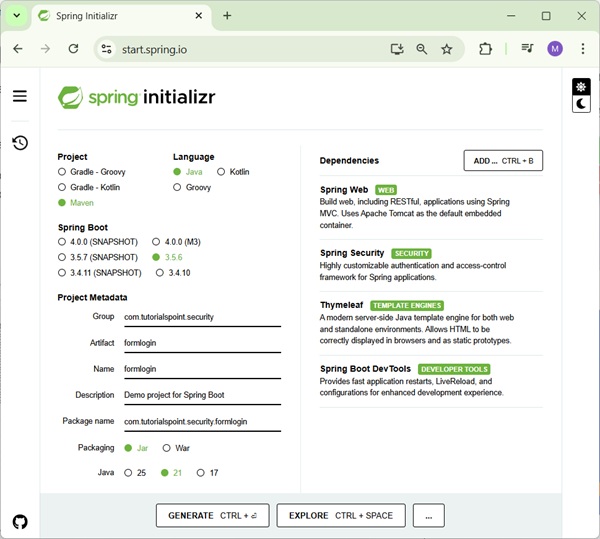
As usual, we will use the Spring Initializer to setup our project. We are going to create a Maven project, with Spring Boot version 2.3.2. Let’s name our project formlogin(we can choose any name we want) and group id as com.tutorial.spring.security. Furthermore, we will use Java version 8 for this project.
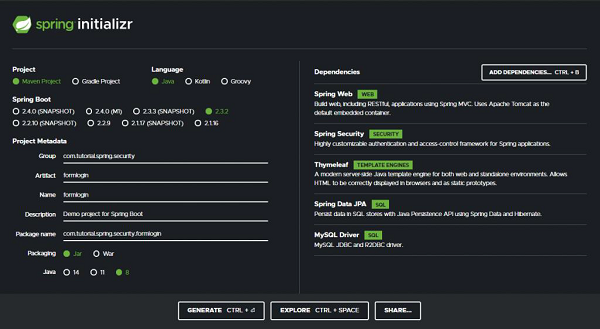
Dependencies
Now, coming to the dependencies, we are going to keep our application as simple as possible for this demo. We will keep our focus on the features we want to explore today. So we will choose the minimum number of dependencies that will help us set up our application and get it up and running quickly. Let’s go through the dependencies −
-
Spring Web − It bundles all dependencies related to web development including Spring MVC, REST, and an embedded Tomcat Server.
-
Spring Security − For the implementation of security features provided by Spring Security.
-
Thymeleaf − A server-side Java template engine for HTML5/XHTML/XML.
-
Spring Data JPA − In addition to using all features defined by JPA specification, Spring Data JPA adds its own features such as the no-code implementation of the repository pattern and the creation of database queries from the method name.
-
Mysql Driver − For the MySQL database driver.
With these five dependencies, we can set up our project now. Let’s click on the generate button. This will download our project as a zip file. We can extract it to a folder of our choice. Then we open the project in our IDE. We will be using Spring Tool Suite 4 for this. example.
Let’s load our project into STS. It will take a little time for our IDE to download the dependencies and validating them. Let’s take a look at our pom.xml file.
pom.xml
<?xml version="1.0" encoding="ISO-8859-1"?>
<project xsi:schemaLocation="http://maven.apache.org/POM/4.0.0
   https://maven.apache.org/xsd/maven-4.0.0.xsd"
   xmlns:xsi="http://www.w3.org/2001/XMLSchema-instance"
   xmlns="http://maven.apache.org/POM/4.0.0">
   <modelVersion>4.0.0</modelVersion>
   <parent>
      <groupId>org.springframework.boot</groupId>
      <artifactId>spring-boot-starter-parent</artifactId>
      <version>2.3.1.RELEASE</version>
      <relativePath/>
      <!-- lookup parent from repository -->
   </parent>
   <groupId>com.tutorial.spring.security</groupId>
   <artifactId>formlogin</artifactId>
   <version>0.0.1-SNAPSHOT</version>
   <name>formlogin</name>
   <description>Demo project for Spring Boot</description>
   <properties> <java.version>1.8</java.version>
   </properties>
   <dependencies>
      <dependency>
         <groupId>org.springframework.boot</groupId>
         <artifactId>spring-boot-starter-data-jpa</artifactId>
      </dependency>
      <dependency>
         <groupId>org.springframework.boot</groupId>
         <artifactId>spring-boot-starter-security</artifactId>
      </dependency>
      <dependency>
         <groupId>org.springframework.boot</groupId>
         <artifactId>spring-boot-starter-thymeleaf</artifactId>
      </dependency>
      <dependency>
         <groupId>org.springframework.boot</groupId>
         <artifactId>spring-boot-starter-web</artifactId>
      </dependency>
      <dependency>
         <groupId>org.springframework.boot</groupId>
         <artifactId>spring-boot-devtools</artifactId>
         <scope>runtime<scope> <optional>true</optional>
      </dependency>
      <dependency>
      <groupId>mysql</groupId>
      <artifactId>mysql-connector-java</artifactId>
      <scope>runtime</scope> </dependency>
      <dependency>
         <groupId>org.springframework.boot</groupId>
         <artifactId>spring-boot-starter-test</artifactId>
         <scope>test</scope>
         <exclusions>
         <exclusion>
         <groupId>org.junit.vintage</groupId>
         <artifactId>junit-vintage-engine</artifactId>
         </exclusion>
         </exclusions>
      </dependency>
      <dependency>
         <groupId>org.springframework.security</groupId>
         <artifactId>spring-security-test<artifactId>
         <scope>test</scope>
      </dependency>
   </dependencies>
   <build>
      <plugins>
         <plugin>
            <groupId>org.springframework.boot</groupId>
            <artifactId>spring-boot-maven-plugin</artifactId>
         </plugin>
      </plugins>
   </build>
</project>
We can see that our project details along with our dependencies are enlisted here.
Data Source
We will configure our data source in the application.properties file. As we will be using our local MySQL DB as the data source, so we provide the url, username, and password of our local DB instance here. We have named our database as “spring”.
spring.datasource.url=jdbc:mysql://localhost:3306/spring
spring.datasource.username=root
spring.datasource.password=root
Entities
Let’s create our entities now. We start with the User entity which contains three fields – username, password, and accountNonLocked. This User class also implements the UserDetails interface of Spring Security. This class provides core user information. It is used to store user data which can be later encapsulated into Authentication objects. It is not recommended to implement the interface directly. But for our case, since this is a simple application to demonstrate the login with a database, we have implemented this interface directly here to keep thingssimple. We can implement this interface by using a wrapper class around our User entity.
User.java
package com.tutorial.spring.security.formlogin.model;

import java.util.Collection;
import java.util.List;
import javax.persistence.Column;
import javax.persistence.Entity;
import javax.persistence.Id;
import javax.persistence.Table;
import org.springframework.security.core.GrantedAuthority;
import org.springframework.security.core.userdetails.UserDetails;

@Entity
@Table(name = "users")
public class User implements UserDetails {

   /**
   *
   */
   private static final long serialVersionUID = 1L;

   @Id
   private String username;
   private String password; @Column(name = "account_non_locked")
   private boolean accountNonLocked;

   public User() {
   }
   public User(String username, String password, boolean accountNonLocked) {
      this.username = username;
      this.password = password;
      this.accountNonLocked = accountNonLocked;
   }
   @Override
   public Collection< extends GrantedAuthority> getAuthorities() {
      return List.of(() -> "read");
   }
   @Override
   public String getPassword() {
      return password;
   }
   public void setPassword(String password) {
      this.password = password;
   }
   @Override
   public String getUsername() {
      return username;
   }
   public void setUsername(String username) {
      this.username = username;
   }
   @Override
   public boolean isAccountNonExpired() {
      return true;
   }
   @Override
   public boolean isAccountNonLocked() {
      return accountNonLocked;
   }
   @Override public boolean isCredentialsNonExpired() {
      return true;
   }
   @Override public boolean isEnabled() {
   return true;
   }

   public void setAccountNonLocked(Boolean accountNonLocked) {
      this.accountNonLocked = accountNonLocked;
   }
   public boolean getAccountNonLocked() {
      return accountNonLocked;
   }
}
The accountNonLocked field is to be noted here. Every User in Spring Security has the account unlocked by default. To override that property and to lock the users out of their accounts once they exceed the permissible number of attempts, we shall be using this property. If the user exceeds the number of invalid attempts permissible, we shall use this property to lock him out of his account. Also, during every authentication attempt, we shall be checking this property with the isAccountNonLocked() method along with the credentials to authenticate the user. Any user with a locked account will not be allowed to authenticate into the application.
For the other methods of the UserDetails interface, we can simply provide an implementation that returns true for now as we shall not be exploring these properties for this application.
For the list of authorities for this user, let’s assign him a dummy role for now. We shall not be using this property either for this application.
Attempts.java
Moving on, let’s create our Attempts entity to persist our invalid attempts count. As created in the database, we will have the three fields here – username, an integer named attempts to keep counts of the number of attempts, and an identifier.
package com.tutorial.spring.security.formlogin.model;

import javax.persistence.Entity;
import javax.persistence.GeneratedValue;
import javax.persistence.GenerationType;
import javax.persistence.Id;

@Entity
public class Attempts {
   @Id
   @GeneratedValue(strategy = GenerationType.IDENTITY)
   private int id;
   private String username;
   private int attempts;

   /**
   * @return the id
   */
   public int getId() {
      return id;
   }
   /**
   * @param id the id to set
   */
   public void setId(int id) {
      this.id = id;
   }
   /**
   * @return the username
   */
   public String getUsername() {
      return username;
   }
   /**
   * @param username the username to set
   */
   public void setUsername(String username) {
      this.username = username;
   }
   /**
   * @return the attempts
   */
   public int getAttempts() {
      return attempts;
   }
   /**
   * @param attempts the attempts to set
   */
   public void setAttempts(int attempts) {
      this.attempts = attempts;
   }
}
Repositories
We have created the entities, let’s create the repositories to store and retrieve data. We will have two repositories, one for each entity class. For both the repository interfaces, we will extend the JpaRepository which provides us with in-built implementations to save and retrieve data from the database configured in our application.properties file. We can also add our methods or queries here in addition to the provided ones.
UserRepository.java
package com.tutorial.spring.security.formlogin.repository;

import java.util.Optional;
import org.springframework.data.jpa.repository.JpaRepository;
import org.springframework.stereotype.Repository;
import com.tutorial.spring.security.formlogin.model.User;

@Repository public interface UserRepository extends JpaRepository<User, String> {
   Optional<User> findUserByUsername(String username);
}
As discussed, we have added our method to retrieve a user by username here. This will return our user details including username, password and account locked status.
AttemptsRepository.java
package com.tutorial.spring.security.formlogin.repository;

import java.util.Optional;
import org.springframework.data.jpa.repository.JpaRepository;
import org.springframework.stereotype.Repository;
import com.tutorial.spring.security.formlogin.model.Attempts;

@Repository
public interface AttemptsRepository extends JpaRepository<Attempts, Integer> {
   Optional<Attempts> findAttemptsByUsername(String username);
}
Similarly, for the Attempts, in our AttemptsRepository, we have added a custom method findAttemptsByUsername(String username) to get data about user attempts using the username. This will return us an Attempts object with the username and the number of failed authentication attempts the user has made.
Configuration
Since we are going to use a custom login form, we have to override the default configuration of Spring Security. To do this we create our configuration class which extends the WebSecurityConfigurerAdapter class of Spring Security.
package com.tutorial.spring.security.formlogin.config;

import org.springframework.context.annotation.Bean;
import org.springframework.context.annotation.Configuration;
import org.springframework.security.config.annotation.web.builders.HttpSecurity;
import org.springframework.security.config.annotation.web.configuration.WebSecurityConfigurerAdapter;
import org.springframework.security.crypto.bcrypt.BCryptPasswordEncoder;
import org.springframework.security.crypto.password.PasswordEncoder;
@Configuration
public class ApplicationConfig extends WebSecurityConfigurerAdapter {
   @Bean
   public PasswordEncoder passwordEncoder() {
      return new BCryptPasswordEncoder();
   }
   @Override
   protected void configure(HttpSecurity http) throws Exception {
      http
      .csrf().disable()
      .authorizeRequests().antMatchers("/register**")
      .permitAll() .anyRequest().authenticated()
      .and()
      .formLogin() .loginPage("/login")
      .permitAll()
      .and()
      .logout() .invalidateHttpSession(true)
      .clearAuthentication(true) .permitAll();
   }
}
Here we did two things−
- First, we have specified the implementation of the PasswordEncoder interface that we are going to use. We have used an instance of BCryptPasswordEncoder to encode our passwords for this example. The PasswordEncoder interface has many implementations and we can use any of them. We have chosen BCryptPasswordEncoder here as it the most commonly used implementation. It uses the very strong BCrypt hashing algorithm to encode the passwords. It does so by incorporating a salt to protect against rainbow table attacks. In addition to this, bcrypt is an adaptive function: over time, the iteration count can be increased to make it slower, so it remains resistant to brute-force search attacks even with increasing computation power.
- Secondly, we have overridden the configure() method to provide our implementation of the login method.
- Whenever we use a custom form for authentication in place of the one provided by Spring Security, we have to inform Spring Security of it using the formLogin() method.
- We then also specify our login URL – /login. We will map the URL to our custom login page in our Controller later.
- We have also specified that the endpoints starting with /register, /login and the logout page need not be protected. We did so using the permitAll() method. This allows everyone to access these endpoints. Other than these endpoints, all endpoints are to be authenticated(). That is to say, users must be logged in to access all the other endpoints.
- On logout, we have specified that the session is to be invalidated and authentication stored in the application’s SecurityContext be cleared.
Security Setup
Now, we will setup our authentication process. We are going to setup authentication using a database and locking of user accounts.
Let’s create our implementation of UserDetailsService first. As we have discussed before, we need to provide our custom implementation for authentication using a database. This is because, Spring Security, as we know, only provides an in-memory authentication implementation by default. Therefore, we need to override that implementation with our database based process. To do so, we need to override the loadUserByUsername() method of UserDetailsService.
UserDetailsService
package com.tutorial.spring.security.formlogin.security;

import java.util.Optional;
import org.springframework.beans.factory.annotation.Autowired;
import org.springframework.security.core.userdetails.UserDetails;
import org.springframework.security.core.userdetails.UserDetailsService;
import org.springframework.security.core.userdetails.UsernameNotFoundException;
import org.springframework.security.provisioning.UserDetailsManager;
import org.springframework.stereotype.Service;
import com.tutorial.spring.security.formlogin.model.User;
import com.tutorial.spring.security.formlogin.repository.UserRepository;

@Service
public class SecurityUserDetailsService implements UserDetailsService {
   @Autowired
   private UserRepository userRepository;

   @Override
   public UserDetails loadUserByUsername(String username)
   throws UsernameNotFoundException {
      User user = userRepository.findUserByUsername(username)
         .orElseThrow(() -< new UsernameNotFoundException("User not present"));
         return user;
   }
   public void createUser(UserDetails user) {
      userRepository.save((User) user);
   }
}
As we can see here, we have implemented the loadUserByUsername() method here. Here we are fetching the user from our database using the UserRepository interface. If the user is not found it throws UsernameNotFoundException.
We also have a createUser() method. We will use this method to add users to our database who have registered in our application using UserRepository.
Authentication Provider
We will now implement our custom authentication provider. It will implement the AuthenticationProvider interface. We have two methods here that we have to override and implement.
package com.tutorial.spring.security.formlogin.security;

import java.util.Optional;
import org.springframework.beans.factory.annotation.Autowired;
import org.springframework.security.authentication.AuthenticationProvider;
import org.springframework.security.authentication.BadCredentialsException;
import org.springframework.security.authentication.LockedException;
import org.springframework.security.authentication.UsernamePasswordAuthenticationToken;
import org.springframework.security.core.Authentication;
import org.springframework.security.core.AuthenticationException;
import org.springframework.security.crypto.password.PasswordEncoder;
import org.springframework.stereotype.Component;

import com.tutorial.spring.security.formlogin.model.Attempts;
import com.tutorial.spring.security.formlogin.model.User;
import com.tutorial.spring.security.formlogin.repository.AttemptsRepository;
import com.tutorial.spring.security.formlogin.repository.UserRepository;

@Component public class AuthProvider implements AuthenticationProvider {
   private static final int ATTEMPTS_LIMIT = 3;

   @Autowired
   private SecurityUserDetailsService userDetailsService;
   @Autowired private PasswordEncoder passwordEncoder;
   @Autowired private AttemptsRepository attemptsRepository;
   @Autowired private UserRepository userRepository;
   @Override
   public Authentication authenticate(Authentication authentication)
   throws AuthenticationException {
      String username = authentication.getName();

import com.tutorial.spring.security.formlogin.repository.UserRepository;

@Component public class AuthProvider implements AuthenticationProvider {
   private static final int ATTEMPTS_LIMIT = 3;
   @Autowired private SecurityUserDetailsService userDetailsService;
   @Autowired private PasswordEncoder passwordEncoder;
   @Autowired private AttemptsRepository attemptsRepository;
   @Autowired private UserRepository userRepository;
   @Override
   public Authentication authenticate(Authentication authentication)
   throws AuthenticationException {
      String username = authentication.getName();
      Optional<Attempts>
      userAttempts = attemptsRepository.findAttemptsByUsername(username);
      if (userAttempts.isPresent()) {
         Attempts attempts = userAttempts.get();
         attempts.setAttempts(0); attemptsRepository.save(attempts);
      }
   }
   private void processFailedAttempts(String username, User user) {
      Optional<Attempts>
      userAttempts = attemptsRepository.findAttemptsByUsername(username);
      if (userAttempts.isEmpty()) {
         Attempts attempts = new Attempts();
         attempts.setUsername(username);
         attempts.setAttempts(1);
         attemptsRepository.save(attempts);
      } else {
         Attempts attempts = userAttempts.get();
         attempts.setAttempts(attempts.getAttempts() + 1);
         attemptsRepository.save(attempts);

         if (attempts.getAttempts() + 1 >
         ATTEMPTS_LIMIT) {
            user.setAccountNonLocked(false);
            userRepository.save(user);
            throw new LockedException("Too many invalid attempts. Account is locked!!");
         }
      }
   }
   @Override public boolean supports(Class<?> authentication) {
      return true;
   }
}
- authenticate() − This method returns a fully authenticated object including credentials on successful authentication. This object is then stored in the SecurityContext. To perform authentication we will use the loaduserByUsername() method of the SecurityUserDetailsService class of our Application. Here we perform multiple things −
- First, we extract the user credentials from the Authentication request object which is passed as a parameter to our function. This authentication object was prepared by the AuthenticationFilter class and passed down the AuthenticationProvider through the AuthenticationManager.
- We also fetch the user details from the database using the loadUserByUsername() method.
- Now, first, we check if the user account has been locked due to previous failed authentication attempts. If we find that the account is locked, we throw a LockedException, and the user will be unable to authenticate unless the account is unlocked again.
- If the account is not locked, we match the provided password along with the one stored against the user in the database. This is done using the matches() method of the PasswordEncoder interface.
- If the passwords match, and the account has not been locked by then, we return a fully authenticated object. Here we have used an instance UsernamePasswordAuthenticationToken class (as it is a username-password authentication) that implements Authentication. Meanwhile, we also reset the attempts counter to 0.
- On the other hand, if the password doesn’t match, we check for a few conditions −
- If it is the user’s first attempt, then, probably his name would not be in the database. We check for this using the method findAttemptsByUsername() from the AttemptsRepository.
- If not found, we make an entry for the user in the database, with the number of attempts set to one.
- If a user is found, then we increase the number of attempts by 1.
- We then check against the maximum number of failed attempts allowed, using a constant value we defined earlier.
- If the number is more than the allowed number of attempts, then the user is locked our of the application and a LockedException is thrown.
- supports() − We also have the supports method that checks if our authentication type is supported by our AuthenticationProvider implementation class. It returns true, false, or null if it matches, doesn’t match, or if it can’t decide respectively. We have hardcoded it to be true for now.
Controller
Now let’s create our controller package. It will contain our HelloController class. Using this controller class we will map our views to the endpoints and serve those views when the respective endpoints are hit. We will also autowire the PasswordEncoder and the UserDetailsService classes in this component. These injected dependencies will be used in creating our user. Let’s now create our endpoints.
package com.tutorial.spring.security.formlogin.controller;

import java.util.Map;
import javax.servlet.http.HttpServletRequest;
import javax.servlet.http.HttpSession;
import org.springframework.beans.factory.annotation.Autowired;
import org.springframework.http.MediaType;
import org.springframework.security.authentication.BadCredentialsException;
import org.springframework.security.authentication.LockedException;
import org.springframework.security.crypto.password.PasswordEncoder;
import org.springframework.stereotype.Controller;
import org.springframework.web.bind.annotation.GetMapping;
import org.springframework.web.bind.annotation.PostMapping;
import org.springframework.web.bind.annotation.RequestParam;
import com.tutorial.spring.security.formlogin.model.User;
import com.tutorial.spring.security.formlogin.security.SecurityUserDetailsService;
@Controller
public class HelloController {
   @Autowired private SecurityUserDetailsService userDetailsManager;
   @Autowired
   private PasswordEncoder passwordEncoder;

   @GetMapping("/")
   public String index() {
      return "index";
   }
   @GetMapping("/login")
   public String login(HttpServletRequest request, HttpSession session) {
      session.setAttribute(
         "error", getErrorMessage(request, "SPRING_SECURITY_LAST_EXCEPTION")
      );
      return "login";
   }
   @GetMapping("/register")
   public String register() {
      return "register";
   }
   @PostMapping(
      value = "/register",
      consumes = MediaType.APPLICATION_FORM_URLENCODED_VALUE, produces = {
      MediaType.APPLICATION_ATOM_XML_VALUE, MediaType.APPLICATION_JSON_VALUE }
   )
   public void addUser(@RequestParam Map<String, String> body) {
      User user = new User(); user.setUsername(body.get("username"));
      user.setPassword(passwordEncoder.encode(body.get("password")));
      user.setAccountNonLocked(true); userDetailsManager.createUser(user);
   }
   private String getErrorMessage(HttpServletRequest request, String key) {
      Exception exception = (Exception) request.getSession().getAttribute(key);
      String error = "";
      if (exception instanceof BadCredentialsException) {
         error = "Invalid username and password!";
      } else if (exception instanceof LockedException) {
         error = exception.getMessage();
      } else {
         error = "Invalid username and password!";
      }
      return error;
   }
}
- index («/») – This endpoint will serve the index page of our application. As we have configured earlier, we shall be protecting this page and allow only authenticated users will be able to access this page.
- login («/login») – This will be used to serve our custom login page, as mentioned earlier. Any unauthenticated user will be redirected to this endpoint for authentication.
- register(«/register») (GET) – We will have two “register” endpoints for our application. One will be to serve the registration page. The other one will be to handle the registration process. So, the former one will use an Http GET and the latter will be a POST endpoint.
- register(«/register») (POST) – We will use this endpoint to handle the user registration process. We will get the user name and password from the parameters. Then we will encode the password using the passwordEncoder that we have @Autowired into this component. We also set user account as unlocked at this point. We will then save this user data in our users table with the createUser() method.
In addition to the above, we have the getErrorMessage() method. It is used to determine the last thrown exception to add a message in our login template. This way, we can be aware of authentication errors and display proper messages.
Resources
We have created our endpoints, the only thing left is to create our views.
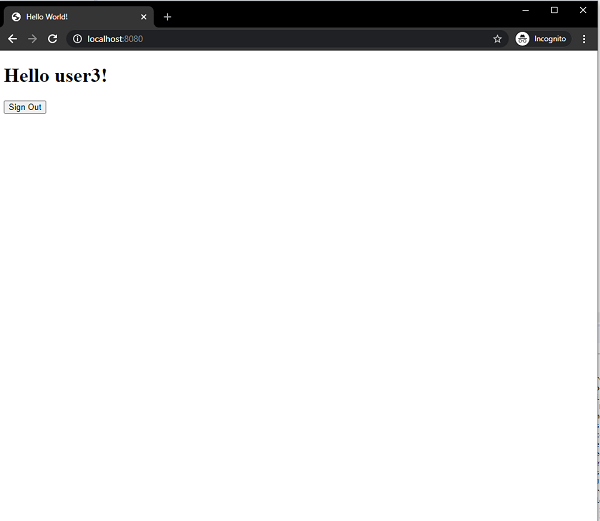
First, we will create our index page. This page will be accessible to users only on successful authentication. This page has access to the Servlet request object using which we can display the user name of the logged in user.
<!DOCTYPE html>
<html xmlns="http://www.w3.org/1999/xhtml" xmlns:th="https://www.thymeleaf.org" xmlns:sec="https://www.thymeleaf.org/thymeleaf-extras-springsecurity3">
   <head>
      <title>
         Hello World!
      </title>
   </head>
   <body>
      <h1 th:inline="text">Hello [[${#httpServletRequest.remoteUser}]]!</h1>
      <form th:action="@{/logout}" method="post">
         <input type="submit" value="Sign Out"/>
         </form>
   </body>
<html>
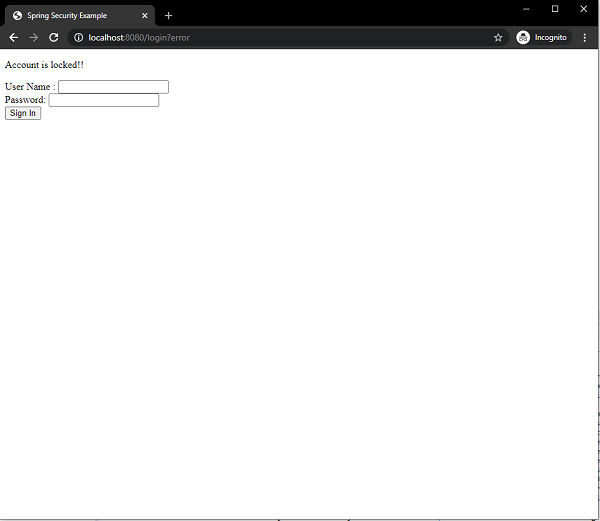
Next, we create our login view. This display our custom login form with the username and password fields. This view will also be rendered in case of a logout or failed authentication and will display appropriate messages for each case.
<!DOCTYPE html>
<html xmlns="http://www.w3.org/1999/xhtml"      xmlns:th="https://www.thymeleaf.org" xmlns:sec="https://www.thymeleaf.org/thymeleaf-extras-springsecurity3">
   <head>
      <title>Spring Security Example</title>
   </head>
   <body>
   <div th:if="${param.error}">
      <p th:text="${session.error}" th:unless="${session == null}">[...]</p>
   </div>
   <div th:if="${param.logout}">You have been logged out.</div>
   <form th:action="@{/login}" method="post>
   <div>
      <label> User Name : <input type="text" name="username" /> </label>
   </div>
   <div>
   <label> Password: <input type="password" name="password" /> </label>
   </div>
   <div>
      <input type="submit" value="Sign In" /> </div>
      </form>
   </body>
</html>
Moving, we create our required view, the register view. This view will let users register themselves with the application. This user data will be stored in the database which will then be used for authentication.
<!DOCTYPE html>
<html>
   <head>
      <meta charset="ISO-8859-1">
      <title>Insert title here</title>
   </head>
   <body>
      <form action="/register" method="post">
         <div class="container">
            <h1>Register</h1>
            <p>Please fill in this form to create an account.</p>
            <hr>

            <label for="username">
            <b>Username</b>
            </label>
            <input type="text" placeholder="Enter Username" name="username" id="username" required>

            <label for="password"><b>Password</b></label>
            <input type="password" placeholder="Enter Password" name="password" id="password" required>

            <button type="submit" class="registerbtn">Register</button>
         </div>

      </form>
   </body>
</html>
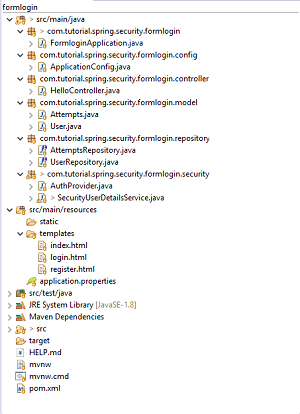
Final Project Structure
Our final project structure should look something similar to this.
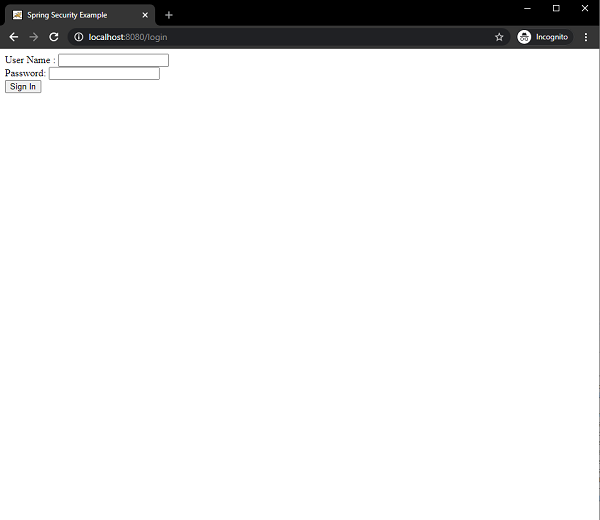
Running the Application
We can then run the application as a SpringBootApp. When we go localhost:8080 on our browser it will redirect us back to the login page.
On successful authentication it will take us the index view with a greeting.
Since, we have allowed only three failed attempts before the account gets locked, so on the third failed authentication the user get locked and the message is displayed on the screen.
On hitting the /register endpoint we can also register a new user.

Conclusion
From today’s article, we have learned how to use a custom form for login using a database using an annotation-based configuration. We have also learned how to prevent multiple failed login attempts. While doing we have seen how we can implement our own AuthenticationProvider and UserDetailsService to authenticate users using our custom authentication process.
Spring Security — Form Login, Remember Me and Logout
Contents
- Introduction and Overview
- Getting Started (Practical Guide)
Introduction and Overview
Spring Security comes with a ton of built-in features and tools for our convenience. In this example, we are going to discuss three of those interesting and useful features −
- Form-login
- Remember Me
- Logout
Form Login
Form-based login is one form of Username/password authentication that Spring Security provides support for. This is provided through an Html form.
Whenever a user requests a protected resource, Spring Security checks for the authentication of the request. If the request is not authenticated/authorized, the user will be redirected to the login page. The login page must be somehow rendered by the application. Spring Security provides that login form by default.
Moreover, any other configuration, if needed, must be explicitly provided as given below −
protected void configure(HttpSecurity http) throws Exception {
http
   // ...
   .formLogin(
      form -> form       .loginPage("/login")
      .permitAll()
   );
}
This code requires a login.html file to be present in the templates folder which would be returned on hitting the /login. This HTML file should contain a login form. Furthermore, the request should be a post request to /login. The parameter names should be “username” and “password” for username and password respectively. In addition to this, a CSRF Token also needs to be included with the form.
The above code snippet will be clearer once we are done with code exercise.
Remember Me
This type of authentication requires a remember-me cookie to be sent to the browser. This cookie stores user information/authentication principal and it is stored in the browser. So, the website can remember the identity of the user next time when the session is started. Spring Security has the necessary implementations in place for this operation. One uses hashing to preserve the security of cookie-based tokens while the other uses a database or other persistent storage mechanism to store the generated tokens.
Logout
The default URL /logout logs the user out by−
- Invalidating the HTTP Session
- Cleaning up any RememberMe authentication that was configured
- Clearing the SecurityContextHolder
- Redirect to /login?logout
WebSecurityConfigurerAdapter automatically applies logout capabilities to the Spring Boot application.
Getting Started (Practical Guide) As usual, we shall start by going to start.spring.io. Here we choose a maven project. We name the project “formlogin” and choose the desired Java version. I am choosing Java 8 for this example. We also go on to add the following dependencies −
- Spring Web
- Spring Security
- Thymeleaf
- Spring Boot DevTools
Thymeleaf is a templating engine for Java. It allows us to quickly develop static or dynamic web pages for rendering in the browser. It is extremely extensible and allows us to define and customize the processing of our templates in fine detail. In addition to this, we can learn more about Thymeleaf by clicking this link.
Let’s move on to generate our project and download it. We then extract it to a folder of our choice and use any IDE to open it. I shall be using Spring Tools Suite 4. It is available for free downloading from the https://spring.io/tools website and is optimized for spring applications.
Let’s take a look at our pom.xml file. It should look something similar to this −
<?xml version="1.0" encoding="UTF-8"?>
<project xmlns="http://maven.apache.org/POM/4.0.0"    xmlns:xsi="http://www.w3.org/2001/XMLSchema-instance"
   xsi:schemaLocation="http://maven.apache.org/POM/4.0.0 https://maven.apache.org/xsd/maven-4.0.0.xsd">
   <modelVersion>4.0.0</modelVersion>
   <parent>
      <groupId>org.springframework.boot</groupId>
      <artifactId>spring-boot-starter-parent</artifactId>
      <version>2.3.1.RELEASE</version>
      <relativePath />
      <!-- lookup parent from repository -->
   </parent>
   <groupId>            com.spring.security</groupId>
   <artifactId>formlogin</artifactId>
   <version>0.0.1-SNAPSHOT</version>
   <name>formlogin</name>
   <description>Demo project for Spring Boot</description>

   <properties>
      <java.version>1.8</java.version>
   </properties>

   <dependencies>
      <dependency>
         <groupId>org.springframework.boot</groupId>
         <artifactId>spring-boot-starter-security</artifactId>
      </dependency>
   <dependency>
      <groupId>org.springframework.boot</groupId>
      <artifactId>spring-boot-starter-web</artifactId>
   </dependency>
   <dependency>
      <groupId>org.springframework.boot</groupId>
      <artifactId>spring-boot-starter-thymeleaf</artifactId>
   </dependency>
   <dependency>
      <groupId>org.springframework.boot</groupId>
      <artifactId>spring-boot-devtools</artifactId>
   </dependency>
   <dependency>
   <groupId>org.springframework.boot</groupId>
   <artifactId>spring-boot-starter-test</artifactId>
   <scope>test</scope>
   <exclusions>
      <exclusion>
         <groupId>org.junit.vintage</groupId>
         <artifactId>junit-vintage-engine</artifactId>
      </exclusion>
   </exclusions>
   </dependency>
   <dependency>
      <groupId>org.springframework.security</groupId>
      <artifactId>spring-security-test</artifactId>
      <scope>test</scope>
   </dependency>
   </dependencies>

   <build>
      <plugins>
         <plugin>
            <groupId>org.springframework.boot</groupId>
            <artifactId>spring-boot-maven-plugin</artifactId>
         </plugin>
      </plugins>
   </build>
</project>
Let’s create a package in our folder /src/main/java under the default package. We shall be naming it as config as we would place all our configuration classes here. So, the name should look something similar to this – com.tutorial.spring.security.formlogin.config.
The Configuration Class
package com.tutorial.spring.security.formlogin.config;

import java.util.List;
import org.springframework.beans.factory.annotation.Autowired;
import org.springframework.context.annotation.Bean;
import org.springframework.context.annotation.Configuration;
import org.springframework.security.config.annotation.web.builders.HttpSecurity;
import org.springframework.security.config.annotation.web.configuration.WebSecurityConfigurerAdapter;
import org.springframework.security.core.userdetails.User;
import org.springframework.security.core.userdetails.UserDetails;
import org.springframework.security.core.userdetails.UserDetailsService;
import org.springframework.security.crypto.bcrypt.BCryptPasswordEncoder;
import org.springframework.security.crypto.password.NoOpPasswordEncoder;
import org.springframework.security.crypto.password.PasswordEncoder;
import org.springframework.security.provisioning.InMemoryUserDetailsManager; import org.springframework.security.provisioning.UserDetailsManager;
import org.springframework.security.web.authentication.UsernamePasswordAuthenticationFilter;
import org.springframework.security.web.util.matcher.AntPathRequestMatcher;

import com.spring.security.formlogin.AuthFilter;

@Configuration
public class WebSecurityConfig extends WebSecurityConfigurerAdapter {

   @Bean
   protected UserDetailsService userDetailsService() {
   UserDetailsManager userDetailsManager = new InMemoryUserDetailsManager();
   UserDetails user = User.withUsername("abby")
   .password(passwordEncoder().encode("12345"))
      .authorities("read") .build();
      userDetailsManager.createUser(user);
      return userDetailsManager;

   }
   @Bean
   public PasswordEncoder passwordEncoder() {
      return new BCryptPasswordEncoder(); };
      @Override
      protected void configure(HttpSecurity http) throws Exception {
      http.csrf().disable() .authorizeRequests().anyRequest()
      .authenticated() .and()
      .formLogin()
      .and()
      .rememberMe()
      .and() .logout() .logoutUrl("/logout")
      .logoutSuccessUrl("/login") .deleteCookies("remember-me");
   }
}
Code Breakdown
Inside of our config package, we have created the WebSecurityConfig class. This class extends the WebSecurityConfigurerAdapter of Spring Security. We shall be using this class for our security configurations, so let’s annotate it with an @Configuration annotation. As a result, Spring Security knows to treat this class a configuration class. As we can see, configuring applications have been made very easy by Spring.
Let’s take a look at our configuration class.
- First, we shall create a bean of our UserDetailsService class by using the userDetailsService() method. We shall be using this bean for managing our users for this application. Here, to keep things simple, we shall use an InMemoryUserDetailsManager instance to create a user. This user, along with our given username and password, will contain a simple “read” authority.
- Now, let’s look at our PasswordEncoder. We shall be using a BCryptPasswordEncoder instance for this example. Hence, while creating the user, we used the passwordEncoder to encode our plaintext password like this
.password(passwordEncoder().encode("12345"))
- After the above steps, we move on to our next configuration. Here, we override the configure method of WebSecurityConfigurerAdapter class. This method takes HttpSecurity as a parameter. We shall be configuring this to use our form login and logout, as well as a remember-me function.
Http Security Configuration
We can observe that all these functionalities are available in Spring Security. Let’s study the below section in detail −
http.csrf().disable()
   .authorizeRequests().anyRequest().authenticated()
   .and()
   .formLogin()
   .and()
   .rememberMe()
   .and()
   .logout()
   .logoutUrl("/logout") .logoutSuccessUrl("/login") .deleteCookies("remember-me");
There are a few points to note here −
- We have disabled csrf or Cross-Site Request Forgery protection As this is a simple application only for demonstration purposes, we can safely disable this for now.
- Then we add configuration which requires all requests to be authenticated. As we shall see later, we will have a single “/” endpoint for the index page of this application, for simplicity.
- After that, we shall be using the formLogin() functionality of Spring Security as mentioned above. This generates a simple login page.
- Then, we use the rememberMe() functionality of Spring Security. This will perform two things.
- Firstly, it will add a “Remember Me” checkbox to our default login form that we generated using formLogin().
- And, secondly, ticking the checkbox generates the remember-me cookie. The cookie stores the identity of the user and the browser stores it. Spring Security detects the cookie in future sessions to automate the login.
- And lastly, we have the logout() functionality. For this too, a default functionality has been provided by Spring security. Here it performs two important functions −
- Invalidates the Http session, and unbinds objects bound to the session.
- It clears the remember-me cookie.
- Removes the authentication from Spring’s Security context.
As a result, the user can access the application again without logging in again.
We also, provided a logoutSuccessUrl(), so that the application comes back to the login page after logout. This completes our application configuration.
The Protected Content (Optional)
We shall now create a dummy index page now for the user to view when he logs in. It will also contain a logout button.
In our /src/main/resources/templates, we add a index.html file.Then add some Html content to it.
<!doctype html>
<html lang="en">
   <head>
      <!-- Required meta tags -->
      <meta charset="utf-8">
      <meta name="viewport" content="width=device-width, initial-scale=1, shrink-to-fit=no">
      <!-- Bootstrap CSS -->
      <link rel="stylesheet" href="https://stackpath.bootstrapcdn.com/bootstrap/4.5.0/css/bootstrap.min.css" integrity="sha384-9aIt2nRpC12Uk9gS9baDl411NQApFmC26EwAOH8WgZl5MYYxFfc+NcPb1dKGj7Sk" crossorigin="anonymous">
      <title>Hello, world!</title>
   </head>
   <body>
      <h1>Hello, world!</h1> <a href="logout">logout</a>
      <!-- Optional JavaScript -->
      <!-- jQuery first, then Popper.js, then Bootstrap JS -->
      <script src="https://code.jquery.com/jquery-3.5.1.slim.min.js" integrity="sha384-DfXdz2htPH0lsSSs5nCTpuj/zy4C+OGpamoFVy38MVBnE+IbbVYUew+OrCXaRkfj" crossorigin="anonymous"></script>
      <script src="https://cdn.jsdelivr.net/npm/popper.js@1.16.0/dist/umd/popper.min.js" integrity="sha384-Q6E9RHvbIyZFJoft+2mJbHaEWldlvI9IOYy5n3zV9zzTtmI3UksdQRVvoxMfooAo" crossorigin="anonymous"></script>
      <script src="https://stackpath.bootstrapcdn.com/bootstrap/4.5.0/js/bootstrap.min.js"
      integrity="sha384-OgVRvuATP1z7JjHLkuOU7Xw704+h835Lr+6QL9UvYjZE3Ipu6Tp75j7Bh/kR0JKI" crossorigin="anonymous"></script>
   </body>
</html>
This content is from Bootstrap 4 getting started template.
We also add
<a href="logout">logout</a>
to our file, so as the user can log out of the application using this link.
The Resource Controller
We have created the protected resource, we now add the controller to serve this resource.
package com.tutorial.spring.security.formlogin.controllers;
import org.springframework.stereotype.Controller;
import org.springframework.web.bind.annotation.GetMapping;
@Controller public class AuthController {
   @GetMapping("/") public String home() { return "index"; }
}
As we can see, it is a very simple controller. It only has a get endpoint which serves our index.html file when the start our application.
Running the application
Let’s run the application as a Spring Boot Application. We can go to http://localhost:8080 on our browser when the application starts. It should ask us for username and password. Additionally, we shall also be able to see the remember-me checkbox.
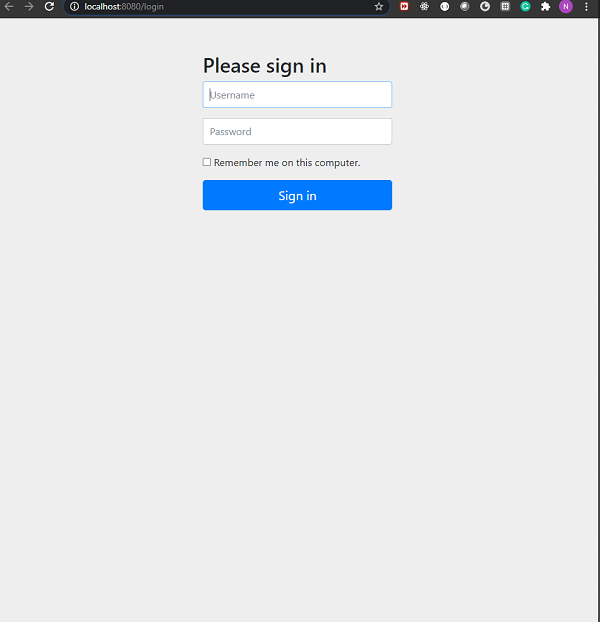
Login Page
Now, if we provide the user information as we had configured in our WebSecurity config file, we shall be able to log in. Also, if we tick the remember-me checkbox, we shall be able to see the remember-me cookie in our browser’s developer tools section.
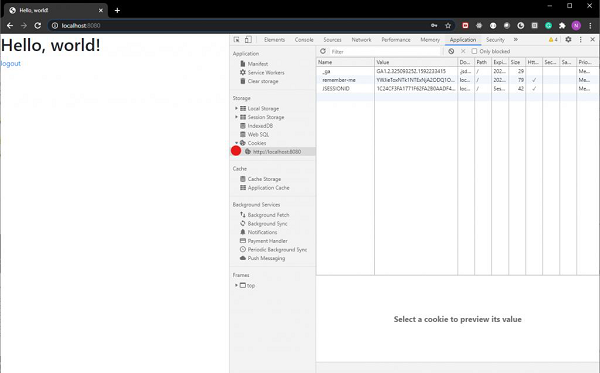
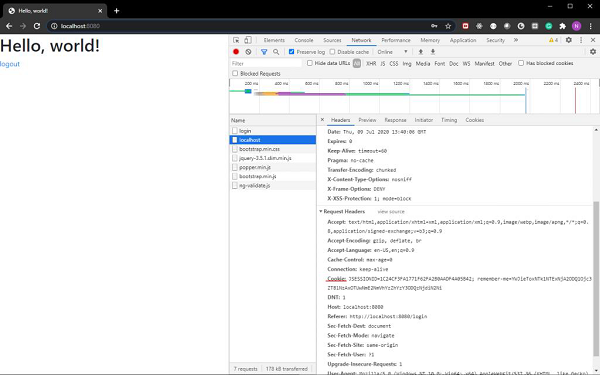
As we can see the cookie is sent along with our login request.
Also, included in the web page is a link for log out. On clicking the link, we shall be logged out of our application and sent back to our login page.
Spring Security — Taglib
Contents
- Introduction and Overview
- Spring Security Tags
- The authorize Tag
- The authentication tag
- The csrfInput Tag
- The csrfMetaTags Tag
- Getting Started (Practical Guide)
Introduction and Overview
In Spring MVC applications using JSP, we can use the Spring Security tags for applying security constraints as well as for accessing security information. Spring Security Tag library provides basic support for such operations. Using such tags, we can control the information displayed to the user based on his roles or permissions. Also, we can include CSRF protection features in our forms.
To use Spring security tags, we must have the security taglib declared in our JSP file.
<%@ taglib prefix="sec" uri="http://www.springframework.org/security/tags" %>
Now, we can use Spring Security tags with the “sec” prefix. Let’s now see the usage of the tags.
The authorize Tag
The first tag we will be discussing is the authorize tag. Let’s check out some usage examples.
<sec:authorize access="!isAuthenticated()"> Login </sec:authorize>
<sec:authorize access="isAuthenticated()"> Logout </sec:authorize>
<sec:authorize access="hasRole('ADMIN')"> Hello Admin. </sec:authorize>
As we can see, we can use this tag to hide or show sections of information based on access or roles. To evaluate roles or access we also use the following Spring Security Expressions −
-
hasRole(“ADMIN”) − evaluates to true if the current user has the admin role.
-
hasAnyRole(‘ADMIN’,’USER’) − evaluates to true if the current user has any of the listed roles
-
isAnonymous() − evaluates to true if the current user is an anonymous user
-
isRememberMe() − evaluates to true if the current user is a remember-me user
-
isFullyAuthenticated() − evaluates to true if the user is authenticated and is neither anonymous nor a remember-me user
As we can see, the access attribute is where the web-security expression is specified. Then, Spring Security evaluates the expression The evaluation is generally delegated to SecurityExpressionHandler<FilterInvocation>, which is defined in the application context. If it returns true, then the user can get access to the information given in that section.
If we use the authorize tag with Spring Security ‘s Permission Evaluator, we can also check user permissions as given below −
<sec:authorize access="hasPermission(#domain,'read') or hasPermission(#domain,'write')">
   This content is visible to users who have read or write permission.
</sec:authorize>
We can also allow or restrict the user from clicking on certain links within our content.
<sec:authorize url="/admin">
   This content will only be visible to users who are authorized to send requests to the "/admin" URL.
</sec:authorize>
The authentication tag
When we want access to the current Authentication object stored in the Spring Security Context, we can use the authentication tag. Then we can use it to render properties of the object directly in our JSP page. For example, if we want to render the principal property of the Authentication object in our page, we can do it as follows −
<sec:authentication property="principal.username" />
The csrfInput Tag
We can use the csrfInput tag to insert a hidden form field with the correct values for the CSRF protection token when CSRF protection is enabled. If CSRF protection is not enabled, this tag outputs nothing.
We can place the tag within the HTML <form></form> block along with other input fields. However, we must not place the tag within the <form:form></form:form> block as Spring Security automatically inserts a CSRF form field within those tags and also takes care of Spring forms automatically.
<form method="post" action="/do/something">
   <sec:csrfInput />
   Username:<br />
   <input type="text" username="username" />
   ...
</form>
The csrfMetaTags Tag
We can use this tag to insert meta tags which contain the CSRF protection token form field and header names and CSRF protection token value. These meta tags can be useful for employing CSRF protection within Javascript in our application. However, this tag only works when we have enabled CSRF protection in our application, otherwise, this tag outputs nothing.
<html>
   <head>
      <title>CSRF Protection in Javascript</title>
      <sec:csrfMetaTags />
      <script type="text/javascript" language="javascript">
         var csrfParam = $("meta[name='_csrf_param']").attr("content");
         var csrfToken = $("meta[name='_csrf']").attr("content");
      </script>
   </head>
   <body>
      ...
   </body>
</html>
Getting Started (Practical Guide)
Now that we have discussed the tags, let’s build an application to demonstrate the usage of the tags. We shall be using Spring Tool Suite 4 as our IDE. Additionally, we shall be using the Apache Tomcat server to serve our application. So, let’s get started.
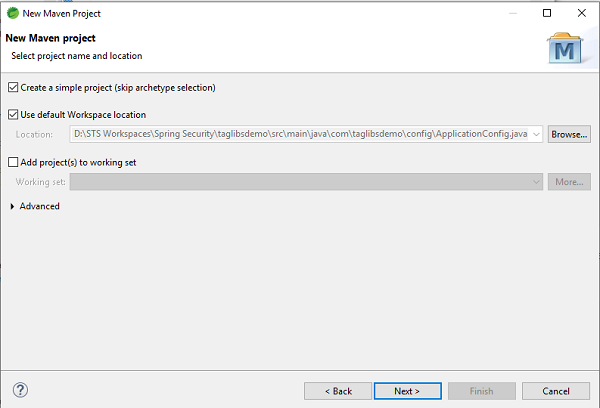
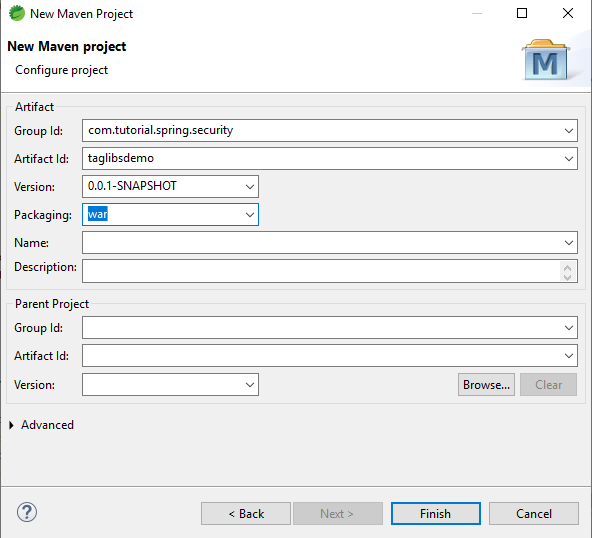
Setting up the Application
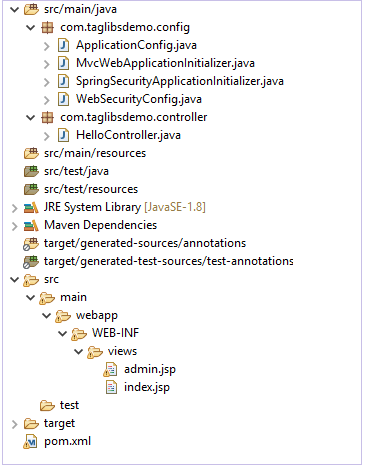
Let’s create a simple Maven Project in STS. We can name our application as taglibsdemo, and package it as a .war file.
When we have finished setting up our application it should have a structure similar to this.
The pom.xml file
We shall add these following dependencies to our application −
- Spring Web MVC
- Spring-Security-Web
- Spring-Security-Core
- Spring-Security-Taglibs
- Spring-Security-Config
- Javax Servlet Api
- JSTL
After adding these dependencies, our pom.xml should look similar to this −
<project xmlns="http://maven.apache.org/POM/4.0.0"
   xmlns:xsi="http://www.w3.org/2001/XMLSchema-instance"
   xsi:schemaLocation="http://maven.apache.org/POM/4.0.0
   https://maven.apache.org/xsd/maven-4.0.0.xsd">
   <modelVersion>4.0.0</modelVersion>
   <groupId>com.tutorial.spring.security</groupId>
   <artifactId>taglibsdemo</artifactId>
   <version>0.0.1-SNAPSHOT</version>
   <packaging>war</packaging>
   <properties>
      <maven.compiler.target>1.8</maven.compiler.target>
      <maven.compiler.source>1.8</maven.compiler.source>
   </properties>
   <dependencies>
      <dependency>
         <groupId>org.springframework</groupId>
         <artifactId>spring-webmvc</artifactId>
         <version>5.0.2.RELEASE</version>
      </dependency>
      <dependency>
         <groupId>org.springframework.security</groupId>
         <artifactId>spring-security-web</artifactId>
         <version>5.0.0.RELEASE</version>
      </dependency>
      <dependency>
         <groupId>org.springframework.security</groupId>
         <artifactId>spring-security-core</artifactId>
         <version>5.0.4.RELEASE</version>
      </dependency>
      <dependency>
         <groupId>org.springframework.security</groupId>
         <artifactId>spring-security-taglibs</artifactId>
         <version>5.0.4.RELEASE</version>
      </dependency>
      <dependency>
         <groupId>org.springframework.security</groupId>
         <artifactId>spring-security-config</artifactId>
         <version>5.0.4.RELEASE</version>
      </dependency>
      <dependency>
         <groupId>javax.servlet</groupId>
         <artifactId>javax.servlet-api</artifactId>
         <version>3.1.0</version>
         <scope>provided</scope>
         </dependency> <dependency>
         <groupId>javax.servlet</groupId>
         <artifactId>jstl</artifactId>
         <version>1.2</version>
      </dependency>
   </dependencies>
   <build>
      <plugins>
         <plugin>
            <groupId>org.apache.maven.plugins</groupId>
            <artifactId>maven-war-plugin</artifactId>
            <version>2.6</version>
            <configuration>
            <failOnMissingWebXml>false</failOnMissingWebXml>
            </configuration>
         </plugin>
      </plugins>
   </build>
</project>
Let’s create our base package for the application. We can name it com.taglibsdemo. Within the package, let’s create another package for our configuration files. Since, it will be holding the configuration files, we can name it config.
ApplicationConfig.java
Let’s create our first configuration class ApplicationConfig.java.
package com.taglibsdemo.config;

import org.springframework.context.annotation.Bean;
import org.springframework.context.annotation.ComponentScan;
import org.springframework.context.annotation.Configuration;
import org.springframework.web.servlet.config.annotation.EnableWebMvc;
import org.springframework.web.servlet.view.InternalResourceViewResolver;
import org.springframework.web.servlet.view.JstlView;

@EnableWebMvc
@Configuration @ComponentScan({ "com.taglibsdemo.controller"} )
public class ApplicationConfig {
   @Bean
   public InternalResourceViewResolver viewResolver() {
      InternalResourceViewResolver
      viewResolver = new InternalResourceViewResolver();
      viewResolver.setViewClass(JstlView.class);
      viewResolver.setPrefix("/WEB-INF/views/");
      viewResolver.setSuffix(".jsp"); return viewResolver;
   }
}
Let’s break down the code here −
- @EnableWebMvc − We use @EnableWebMvc to enable Spring MVC. So, we add this annotation to an @Configuration class to import the Spring MVC configuration from WebMvcConfigurationSupport. WebMvcConfigurationSupport is the main class that provides the configuration for the MVC Java config. Not using this annotation may result in things like content-type and accept header, generally content negotiation not working. @EnableWebMvc registers a RequestMappingHandlerMapping, a RequestMappingHandlerAdapter, and an ExceptionHandlerExceptionResolver among others in support of processing requests with annotated controller methods using annotations such as @RequestMapping , @ExceptionHandler, and others.
- @Configuration − This annotation indicates that the class declares one or more @Bean methods and may be processed by the Spring IoC container to generate bean definitions and service requests for those beans at runtime. A @Configuration class is typically bootstrapped using either AnnotationConfigApplicationContext or its web-capable variant, AnnotationConfigWebApplicationContext.
- @ComponentScan − @ComponentScan annotation is used to tell Spring the packages to scan for annotated components. @ComponentScan also used to specify base packages and base package classes using thebasePackageClasses or basePackages attributes of @ComponentScan.
- InternalResourceViewResolver − To resolve the provided URI to the actual URI in the format prefix + viewname + suffix.
- setViewClass() − To set the view class that should be used to create views.
- setPrefix() − To set the prefix that gets prepended to view names when building a URL.
- setSuffix() − To set the suffix that gets appended to view names when building a URL.
WebSecurityConfig.java
Next we shall create our WebSecurityConfig class which will extend the familiar WebSecurityConfigurerAdapter class of Spring Security.
package com.taglibsdemo.config;

import org.springframework.context.annotation.Bean;
import org.springframework.context.annotation.ComponentScan;
import org.springframework.security.config.annotation.web.builders.HttpSecurity;
import org.springframework.security.config.annotation.web.configuration.EnableWebSecurity;
import org.springframework.security.config.annotation.web.configuration.WebSecurityConfigurerAdapter;
import org.springframework.security.core.userdetails.UserDetailsService;
import org.springframework.security.provisioning.InMemoryUserDetailsManager;
import org.springframework.security.web.util.matcher.AntPathRequestMatcher;
import org.springframework.security.core.userdetails.User;
import org.springframework.security.core.userdetails.User.UserBuilder;
@EnableWebSecurity @ComponentScan("com.taglibsdemo")
public class WebSecurityConfig extends WebSecurityConfigurerAdapter {
   @SuppressWarnings("deprecation") @Bean
   public UserDetailsService userdetailsService() {
      UserBuilder users = User.withDefaultPasswordEncoder();
      InMemoryUserDetailsManager manager = new InMemoryUserDetailsManager();
      manager.createUser(users.username("rony").password("rony123").roles("USER").build());
      manager.createUser(users.username("admin").password("admin123").roles("ADMIN").build());
      return manager;
   }
   @Override protected void configure(HttpSecurity http) throws Exception {
      http.authorizeRequests() .antMatchers("/index", "/").permitAll()
      .antMatchers("/admin", "/user").authenticated() .and() .formLogin()
      .and() .logout() .logoutRequestMatcher(
         new AntPathRequestMatcher("/logout")
      );
   }
}
Let’s break the code down here −
- WebSecurityConfigurerAdapter − The abstract class that implements WebSecurityConfigurer WebSecurityConfigurer and allows us to override methods for security configuration.
- @EnableWebSecurity − It enables Spring to automatically find and apply the @Configuration class to the global WebSecurity.
- We then create a UserDetailsService Bean using the method to create users using the InMemoryUserDetailsManager instance. We create two users – one with role “USER” and another with role “ADMIN” and add them to Spring Security.
- After that, we override the configure method with HttpSecurity as a parameter. We make our home page or index page accessible to all and admin page to be accessible when the user is authenticated. Next, we add Spring Security form login and logout.
So, with those steps our security configuration is complete. Now, we are ready to move on to the next step.
SpringSecurityApplicationInitializer.java
Moving on, now we shall create the SpringSecurityApplicationInitializer.java class which extends the AbstractSecurityWebApplicationInitializer class of Spring Security.
package com.taglibsdemo.config;
import org.springframework.security.web.context.AbstractSecurityWebApplicationInitializer;
public class SpringSecurityApplicationInitializer extends
AbstractSecurityWebApplicationInitializer { }
AbstractSecurityWebApplicationInitializer is an abstract class that implements Spring’s WebApplicationInitializer. So, SpringServletContainerInitializer will initialize the concrete implementations of this class if the classpath contains spring-web module.
MvcWebApplicationInitializer.java
package com.taglibsdemo.config;
import org.springframework.web.servlet.support.AbstractAnnotationConfigDispatcherServletInitializer;
public class MvcWebApplicationInitializer extends
AbstractAnnotationConfigDispatcherServletInitializer {
   @Override protected Class</?>[] getRootConfigClasses() {
      return new Class[] {WebSecurityConfig.class};
   }
   @Override protected Class</?>[] getServletConfigClasses() {
      return null;
   }
   @Override protected String[] getServletMappings() {
      return new String[] {"/"};
   }
}
- AbstractAnnotationConfigDispatcherServletInitializer − This class extends WebApplicationInitializer. We need this class as a base class for initializing a Spring application in Servlet container environment.As a result, the subclass of AbstractAnnotationConfigDispatcherServletInitializer will provide the classes annotated with @Configuration, Servlet config classes and DispatcherServlet mapping pattern.
- getRootConfigClasses() − This method must be implemented by the class extending AbstractAnnotationConfigDispatcherServletInitializer. It provides “root” application context configuration.
- getServletConfigClasses() − This method too, must be implemented to provide DispatcherServlet application context configuration.
- getServletMappings() − This method is used specify the servlet mapping(s) for the DispatcherServlet.
We have set up the configuration classes. Now , we shall create our controller to serve the JSP pages.
HelloController.java
package com.taglibsdemo.controller;
import org.springframework.stereotype.Controller;
import org.springframework.web.bind.annotation.GetMapping;
@Controller public class HelloController {
@GetMapping("/")
   public String index() { return "index"; }
   @GetMapping("/user")
   public String user() { return "admin"; }
   @GetMapping("/admin")
   public String admin() { return "admin"; }
}
Here, we have created three endpoints – “/”, “/user”, and “/admin”. As specified in our configuration previously, we will allow unauthorized access to the index page
“/”. On the other hand, the “/user” and “/admin” endpoints would be authorized only access.
Secure Content to serve
Moving on, we shall now create the JSP pages which are to be served on hitting the specific endpoints.
For this, inside our src/main folder we create a folder called webapp. Inside this folder, we create our WEB-INF folder and further as in ApplicationConfig.java class we add the views folder. Here, in this folder we shall be adding the views.
Let’s add our home page, i.e., index.jsp first.
<%@ page language="java" contentType="text/html;
   charset=ISO-8859-1" pageEncoding="ISO-8859-1"%>
<!DOCTYPE html>
<html>
   <head>
      <meta charset="ISO-8859-1">
      <title>Home Page</title>
   </head>
   <body>
      <a href="user">User</a>
      <a href="admin">Admin</a>
      <br>
      <br> Welcome to the Application!
   </body>
</html>
Then we shall create our admin.jsp file. Let’s add it.
<%@ page language="java" contentType="text/html;
   charset=ISO-8859-1" pageEncoding="ISO-8859-1"%>
<%@ taglib uri="http://www.springframework.org/security/tags" prefix="security"%>
<!DOCTYPE html>
<html>
   <head>
      <meta charset="ISO-8859-1">
      <meta http-equiv="Content-Type" content="text/html; charset=UTF-8">
      <title>Insert title here</title>
   </head>
   <body> Welcome to Admin Page! <a href="logout"> Logout </a>
      <br>
      <br>
      <security:authorize access="hasRole('ADMIN')"> Hello Admin!
      </security:authorize>
   </body>
</html>
here, we have added <%@ taglib uri=»http://www.springframework.org/security/tags» prefix=»security»%>. This is going to let us the Spring security tag libs as discussed before. As we can see, we have the added the “authorize” tag around the content. This content is will be only accessible by our admin. Any other user accessing this page will not be able to view this content.
Running the application
We now right click on the project and choose Run On Server. When the server starts and our application is running we can go to localhost:8080/taglibsdemo/ on our browser to view the page.
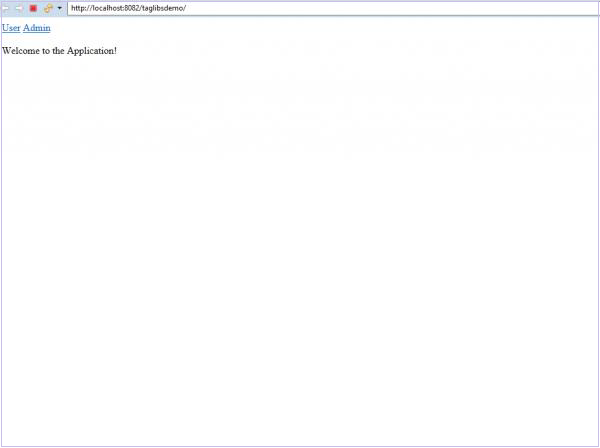
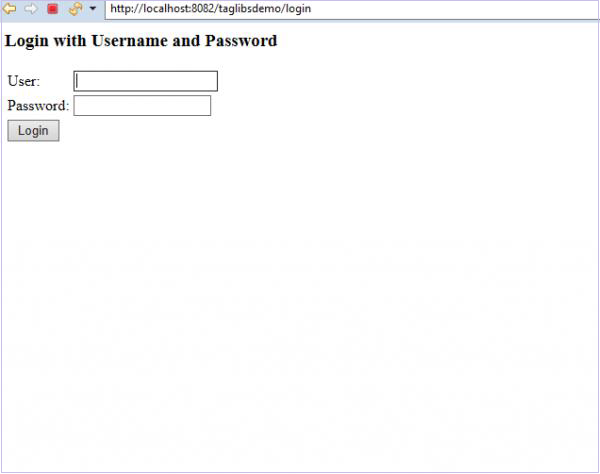
Login page
Now, if we click on the User link in our application, we shall be asked to log in.
Here, as we can see in our controller, we are serving the admin page for bothe the user and admin links. But our user, if he is not an admin cannot view the content which is protected by our “authorize”tag.
Let’s log in as the user first.

We can see that the “Hello Admin!” content is not visible to us. This is because the current user doesn’t have the admin role.
Let’s logout and log in as admin now.

We are now able to see the protected content “Hello Admin!” as the current user has the admin role.
Conclusion
We have learnt how we can use the Spring Security tag library to protect our content and get access to the current Authentication object in Our Spring Security Context.
Spring Security — XML Configuration
Contents
- Fundamentals
- Getting started (Practical Guide)
Fundamentals
In this we are going to discuss how to configure Spring Security with XML configuration. We shall be developing a simple Spring application with Spring Security. While doing so, we will discuss in details about each component that we are using.
Authentication and Authorization
- Authentication − Authentication is ensuring the user or the client is who they claim to be. There are many ways in which Spring Security enables us to perform authentication. Spring Security supports Basic Authentication, LDAP authentication, JDBC authentication, etc.
- Authorization − Ensuring if the user has permission for the action. If our application is a complex one, with different kinds of users such as admins, regular users, other less privileged users, we need to maintain access control in our application. For example, a guest user should not be able to access admin content. So, to control access to various resources within our application, we need to check if a user has permission to access that resource.
The above topics are the two main components of Spring Security. Spring security provided us with various in-built features to implement authentication and authorization in our application. We can use these features with our changes to secure an application very quickly. In addition to this, Spring Security also allows plenty of customizations to the features mentioned before to implement our own complex authentications and authorizations.
Getting Started (Practical Guide)
Let’s look at a basic example using in-built Spring Security features. In this example, we shall be securing our application with options provided out-of-box by Spring security. This is will give us an idea of the various components of Spring Security and how we can use them for our application. We shall be using XML to configure our application’s Security features.
The tools we shall be using for our application will be Spring Tool Suite 4 and Apache Tomcat Server 9.0. They are both available for free download and use.
First, let’s start a new simple Maven Project in STS. We can choose group id, artifact id as per our choice. After that, we click on Finish. As a result, we have added our project to our workspace. Let’s give STS some time to build and validate our project.
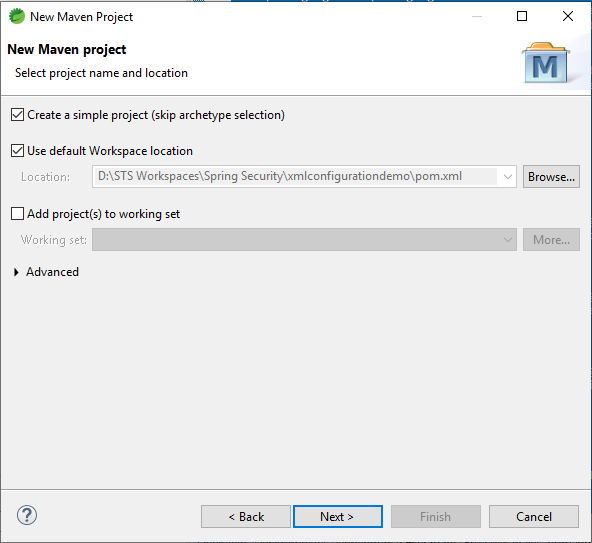
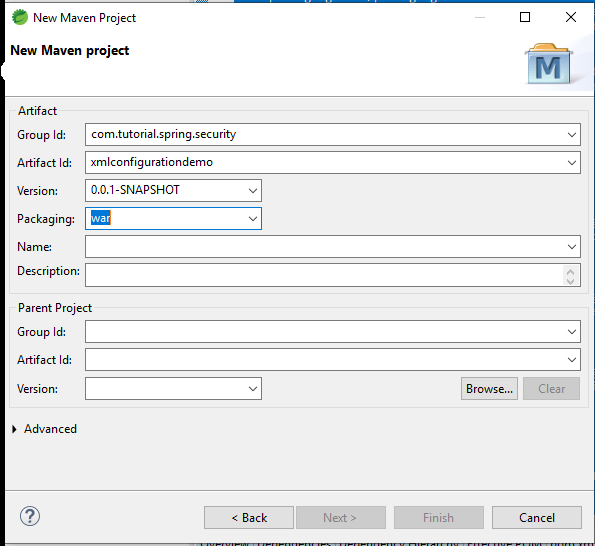
Our project structure would finally look similar to this.
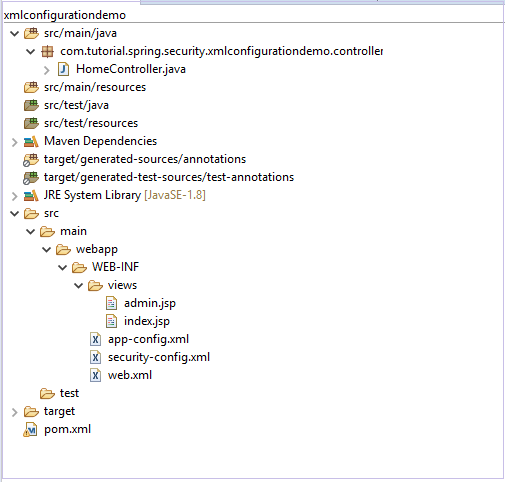
Next, let’s add the dependencies. We are going to choose the following dependencies.
- Spring Web MVC
- Spring-Security-Web
- Spring-Security-Core
- Spring-Security-Config
- Javax Servlet API
pom.xml
With these dependencies added, we are ready to configure our project. Let’s take a look at our pom.xml file.
<project xmlns="http://maven.apache.org/POM/4.0.0"
   xmlns:xsi="http://www.w3.org/2001/XMLSchema-instance"
   xsi:schemaLocation="http://maven.apache.org/POM/4.0.0
   https://maven.apache.org/xsd/maven-4.0.0.xsd>
   <modelVersion>4.0.0</modelVersion>
   <groupId>com.tutorial.spring.security</groupId>
      <artifactId>xmlconfigurationdemo</artifactId>
      <version>0.0.1-SNAPSHOT</version>
      <packaging>war</packaging>
      <name>Spring Security with XML configuration</name> <description>Spring Security with XML configuration</description>
      <properties>
      <maven.compiler.target>1.8</maven.compiler.target> <maven.compiler.source>1.8</maven.compiler.source> </properties>
      <dependencies>
      <dependency>
         <groupId>org.springframework</groupId>
         <artifactId>spring-webmvc</artifactId>
         <version>5.0.2.RELEASE<version>
         </dependency> <dependency>
         <groupId>org.springframework.security</groupId>
         <artifactId>spring-security-web</artifactId>
         <version>5.0.0.RELEASE</version>
      </dependency>
      <dependency>
         <groupId>org.springframework.security</groupId>
         <artifactId>spring-security-core</artifactId>
         <version>5.0.0.RELEASE</version>
      </dependency>
      <dependency>
         <groupId>org.springframework.security</groupId>
         <artifactId>spring-security-config</artifactId>
         <version>5.0.0.RELEASE</version>
      </dependency>
      <dependency>
         <groupId>javax.servlet</groupId>
         <artifactId>javax.servlet-api</artifactId>
         <version>3.1.0</version>
         <scope>provided</scope>
      </dependency>
      </dependencies>
      <build>
         <plugins>
            <plugin>
            <groupId>org.apache.maven.plugins</groupId>
            <artifactId>maven-war-plugin</artifactId>
            <version>2.6</version>
            <configuration>
               <failOnMissingWebXml>false</failOnMissingWebXml>
            </configuration>
         </plugin>
      </plugins>
   </build>
</project>
Controller and views
First, We are going to create our controller. So, let’s create a package called controller and add our HomeController class to the package.
package com.tutorial.spring.security.xmlconfigurationdemo.controller;
import org.springframework.stereotype.Controller;
import org.springframework.web.bind.annotation.RequestMapping;
import org.springframework.web.bind.annotation.RequestMethod;
@Controller public class HomeController { @GetMapping("/")
public String index() { return "index"; }
@GetMapping("/admin")
public String admin() { return "admin"; } }
Here, we have two endpoints – “index” and “admin”. While the index page is will be accessible to all, we will protect our “admin” page.
Since, we have created the routes, let’s also add the pages.
In our /src/main/webapp folder, let’s create a folder called WEB-INF. Then inside it, we will create a folder called views where we will create our views.
Let’s create our first view−
<%@ page language="java" contentType="text/html;
charset=ISO-8859-1" pageEncoding="ISO-8859-1"%>
<!DOCTYPE html>
<html>
   <head>
      <meta charset="ISO-8859-1"> <title>Insert title here</title>
   </head>
   <body>
      <h2>Welcome to Spring Security!</h2>
   </body>
</html>
Then we create our admin view.
<%@ page language="java" contentType="text/html; charset=ISO-8859-1" pageEncoding="ISO-8859-1"%>
<DOCTYPE html>
<html>
   <head>
      <meta charset="ISO-8859-1"> <title>Insert title here</title>
   </head>
   <body>
      Hello Admin
   </body>
</html>
Moving on, let’s configure our application.
Configurations.
web.xml
Now, let’s add our first xml file – the web.xml file.
<?xml version="1.0" encoding="UTF-8"?>
<!DOCTYPE xml>
<web-app xmlns="http://xmlns.jcp.org/xml/ns/javaee"
   xmlns:xsi="http://www.w3.org/2001/XMLSchema-instance"
   xsi:schemaLocation="http://xmlns.jcp.org/xml/ns/javaee
   http://xmlns.jcp.org/xml/ns/javaee/web-app_3_1.xsd" version="3.1"> <servlet>
   <servlet-name>spring</servlet-name>
   <servlet-class>org.springframework.web.servlet.DispatcherServlet</servlet-class>
   <init-param>
      <param-name>contextConfigLocation</param-name>
      <param-value>/WEB-INF/app-config.xml</param-value>
   </init-param>
   <load-on-startup>1</load-on-startup>
   </servlet>
   <servlet-mapping>
   <servlet-name>spring</servlet-name>
   <url-pattern>/</url-pattern>
   </servlet-mapping>
   <listener>
      <listener-class>org.springframework.web.context.ContextLoaderListener</listener-class>
   </listener>
   <context-param>
      <param-name>contextConfigLocation</param-name>
      <param-value> /WEB-INF/security-config.xml </param-value>
   </context-param>
   <filter>
      <filter-name>springSecurityFilterChain</filter-name>
      <filter-class>org.springframework.web.filter.DelegatingFilterProxy</filter-class>
   </filter>
   <filter-mapping>
      <filter-name>springSecurityFilterChain</filter-name>
      <url-pattern>/*</url-pattern>
   </filter-mapping>
</web-app>
Code breakdown
- Dispatcher Servlet − The first servlet we have declared here is the Dispatcher servlet. The dispatcher servlet is the entry point of any Spring MVC application and is at the core of the entire Spring MVC framework design. It intercepts all HTTP requests and dispatches them to registered handlers for processing a web request. It also provides convenient mapping and exception handling facilities. The order in which servlets are loaded depends on “load-on-startup” value. Servlets with a lower value of “load-on-startup” are loaded before the ones with a higher value.
- contextConfigLocation − It is a string that indicates where context(s) can be found. This string represents a path to a file where our configurations can be loaded.
- servlet-mapping − We use Servlet Mapping to tell Spring Container which request to route to which servlet. In our case, we are routing all our requests to our “spring” Dispatcher servlet.
- listener − The classes that listen to certain types of events, and trigger an appropriate functionality when that event occurs. Each listener is bound to an event. In our case, we will create a root web-application context for the web-application with the ContextLoaderListener. This is then put in the ServletContext that can be used to load and unload the spring-managed beans.
- filter − Spring uses Filters to process requests before handing them over to the Dispatcher Servlet and also used to process responses after they are dispatched. The DelegatingFilterProxy links the application context to the web.xml file. The requests that are coming to this application will pass through our filter which we named “spring SecurityFilterChain” before they reach their controllers. This is where Spring Security can take over the request and perform operations on it before passing it on to the next set of filters or handlers.
security-config.xml
Next we will create our security-config.xml file.
<?xml version="1.0" encoding="UTF-8"?>
<beans:beans xmlns="http://www.springframework.org/schema/security"
xmlns:beans="http://www.springframework.org/schema/beans"
xmlns:xsi="http://www.w3.org/2001/XMLSchema-instance"
xsi:schemaLocation="http://www.springframework.org/schema/beans
http://www.springframework.org/schema/beans/spring-beans.xsd
http://www.springframework.org/schema/security
http://www.springframework.org/schema/security/spring-security.xsd">
<http auto-config="true">
<intercept-url pattern="/admin"
access="hasRole('ROLE_ADMIN')" /> </http>
<authentication-manager>
<authentication-provider>
   <user-service>
   <user name="admin" password="{noop}1234" authorities="ROLE_ADMIN" />
   </user-service>
   </authentication-provider> </authentication-manager>
   <beans:bean id ="passwordEncoder"
      class = "org.springframework.security.crypto.password.NoOpPasswordEncoder"
      factory-method = "getInstance">
   </beans:bean>
</beans:beans>
Code breakdown
- http element − The parent of all web-related namespace functionality. Here, we can configure which URLs to intercept, what permissions are required, which type of login to use, and all such configuration.
- auto-config − Setting this attribute to true automatically sets up form-login, basic login, and logout functionalities. Spring Security generates them by using standard values and the features enabled.
- intercept-url − It sets the pattern of the URLs that we want to protecte, using the access attribute.
- access − It specifies which users are permitted to access the URL specified by the pattern attribute. It is done on the basis of the roles and permissions of a user. We can use SPEL with this attribute.
- authentication-manager − The <authentication-manager> is used to configure users, their passwords, and roles in the application. These users will be one who can access the protected parts of the application given they have the appropriate roles. A DaoAuthenticationProvider bean will be created by the <authentication-provider< and the <user-service< element will create an InMemoryDaoImpl. All authentication-provider elements will allow the users to be authenticated by providing the user information to the authentication-manager.
- password-encoder − This will register a password encoder bean. To keep things simple here we have used the NoOpPasswordEncoder.
Moving on we create out last configuration file – the app-config file. Here we are going to add our view resolver code and define our base package.
app-config.xml
<?xml version="1.0" encoding="UTF-8"?>
<beans xmlns="http://www.springframework.org/schema/beans"
   xmlns:xsi="http://www.w3.org/2001/XMLSchema-instance"
   xmlns:mvc="http://www.springframework.org/schema/mvc"
   xmlns:context="http://www.springframework.org/schema/context" xsi:schemaLocation="
   http://www.springframework.org/schema/mvc
   http://www.springframework.org/schema/mvc/spring-mvc.xsd
   http://www.springframework.org/schema/beans
   http://www.springframework.org/schema/beans/spring-beans.xsd
   http://www.springframework.org/schema/context
   http://www.springframework.org/schema/context/spring-context.xsd">
   <mvc:annotation-driven />
   <context:component-scan
      base-package="com.tutorial.spring.security.xmlconfigurationdemo.controller">
   </context:component-scan>
   <context:annotation-config>
   </context:annotation-config>
   <bean class="org.springframework.web.servlet.view.InternalResourceViewResolver">
      <property name="prefix" value="/WEB-INF/views/"></property>
      <property name="suffix" value=".jsp"></property>
   </bean>
</beans>
Here, as we can see we are registering our views that we created earlier. For this, we are using the InternalResourceViewResolver class which will map the provided URI to the actual URI.
For example, using the above configuration, if we request the URI “/admin“, DispatcherServlet will forward the request to the
prefix + viewname + suffix = /WEB-INF/views/admin.jsp view.
Running the application
With this simple configuration, we have our application ready to be served. We can right-click on the project and choose Run on Server. We can choose our Tomcat server. When the server starts, we can go to localhost:8080/xmlconfigurationdemo to interact with our application.
If, we enter the correct credentials we shall be able to login and see our desired content.
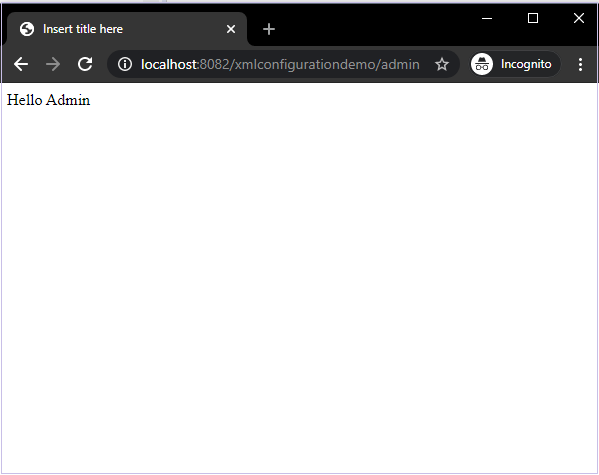
Spring Security — OAuth2
Contents
- OAuth2.0 Fundamentals
- OAuth2.0 Getting started(Practical Guide)
OAuth 2.0 Fundamentals
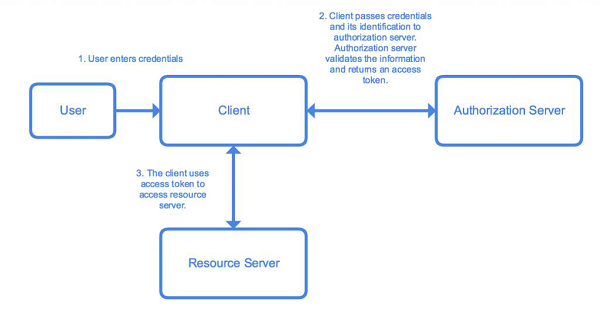
OAuth 2.0 was developed by IETF OAuth Working Group and published in October of 2012. It serves as an open authorization protocol for enabling a third party application to get limited access to an HTTP service on behalf of the resource owner. It can do so while not revealing the identity or the long-term credentials of the user. A third-party application itself can also use it on its behalf. The working principle of OAuth consists of the delegation of user authentication to a service hosting the user account and authorizing the third-party application access to the account of the user.
Let us consider an example. Let us say we want to login to a website “clientsite.com”. We can sign in via Facebook, Github, Google or Microsoft. We select any options of the options given above, and we are redirected to the respective website for login. If login is successful, we are asked if we want to give clientsite.com access to the specific data requested by it. We select our desired option and we are redirected to clientsite.com with an authorization code or error code and our login is successful or not depending on our action in the third-party resource. This is the basic working principle of OAuth 2.
There are five key actors involved in an OAuth system. Let’s list them out −
-
User / Resource Owner − The end-user, who is responsible for the authentication and for providing consent to share resources with the client.
-
User-Agent − The browser used by the User.
-
Client − The application requesting an access token.
-
Authorization Server − The server that is used to authenticate the user/client. It issues access tokens and tracks them throughout their lifetime.
-
Resource Server − The API that provides access to the requested resource. It validates the access tokens and provides authorization.
Getting Started
We will be developing a Spring Boot Application with Spring Security and OAuth 2.0 to illustrate the above. We will be developing a basic application with an in-memory database to store user credentials now. The application will make it easy for us to understand the workings of OAuth 2.0 with Spring Security.
Let’s use the Spring initializer to create a maven project in Java 8. Let’s start by going to start.spring.io. We generate an application with the following dependencies−
- Spring Web
- Spring Security
- Cloud OAuth2
- Spring Boot Devtools
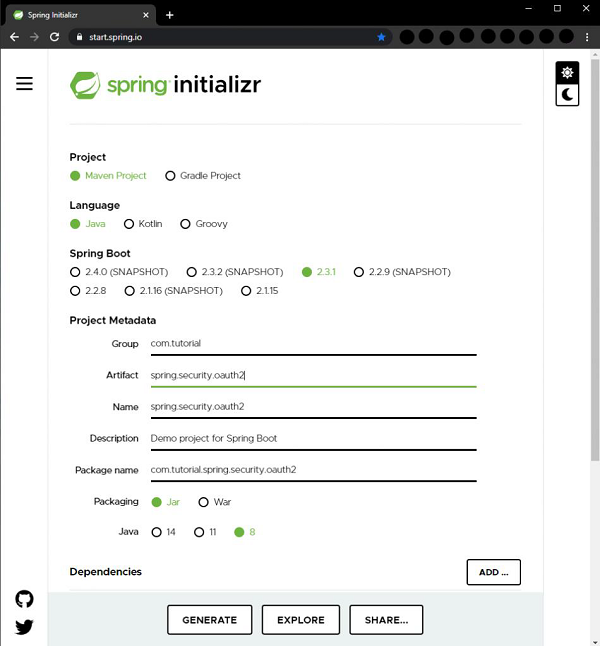

With the above configuration, we click on the Generate button to generate a project. The project will be downloaded in a zip file. We extract the zip to a folder. We can then open the project in an IDE of our choice. I am using Spring Tools Suite here as it is optimized for spring applications. We can also use Eclipse or IntelliJ Idea as we wish.
So, we open the project in STS, let the dependencies get downloaded. Then we can see the project structure in our package explorer window. It should resemble the screenshot below.
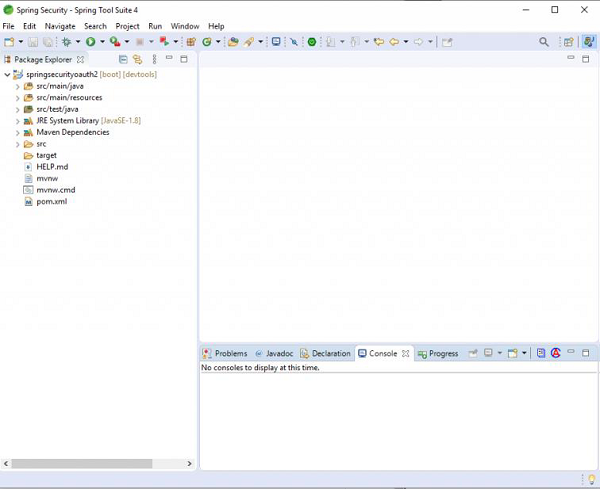
If we open the pom.xml file we can view the dependencies and other details related to the project. It should look something like this.
<?xml version="1.0" encoding="UTF-8"?>
<project xmlns="http://maven.apache.org/POM/4.0.0"
   xmlns:xsi="http://www.w3.org/2001/XMLSchema-instance"
   xsi:schemaLocation="http://maven.apache.org/POM/4.0.0
   https://maven.apache.org/xsd/maven-4.0.0.xsd">
   <modelVersion>4.0.0</modelVersion>
   <parent>
      <groupId>org.springframework.boot</groupId>
      <artifactId>spring-boot-starter-parent</artifactId>
      <version>2.3.1.RELEASE</version>
      <relativePath/> <!-- lookup parent from repository -->
   </parent>
   <groupId>com.tutorial</groupId>
   <artifactId>spring.security.oauth2</artifactId>
   <version>0.0.1-SNAPSHOT</version>
   <name>spring.security.oauth2</name>
   <description>Demo project for Spring Boot</description>
   <properties>
      <java.version>1.8</java.version>
      <spring-cloud.version>Hoxton.SR6</spring-cloud.version>
   </properties>
   <dependencies>
      <dependency>
         <groupId>org.springframework.boot<groupId>
         <artifactId>spring-boot-starter-security</artifactId>
      </dependency>
      <dependency>
         <groupId>org.springframework.boot</groupId>
         <artifactId>spring-boot-starter-web</artifactId>
      </dependency>
      <dependency>
         <groupId>org.springframework.cloud</groupId>
         <artifactId>spring-cloud-starter-oauth2</artifactId>
      </dependency>
      <dependency>
         <groupId>org.springframework.boot<groupId>
         <artifactId>spring-boot-devtools</artifactId>
         <scope>runtime</scope>
         <optional>true</optional>
      </dependency>
      <dependency>
         <groupId>org.springframework.boot</groupId>
         <artifactId>spring-boot-starter-test</artifactId>
         <scope>test</scope> <exclusions>    <exclusion>
            <groupId>org.junit.vintage</groupId>
            <artifactId>junit-vintage-engine</artifactId>
            </exclusion>
         </exclusions>
      <dependency>
      <dependency>
         <groupId>org.springframework.security</groupId>
         <artifactId>spring-security-test</artifactId>
         <scope>test</scope>
      </dependency>
   </dependencies>
      <dependencyManagement>
   <dependencies>
      <dependency>
         <groupId>org.springframework.cloud</groupId>
         <artifactId>spring-cloud-dependencies</artifactId>
         <version>${spring-cloud.version}</version>
         <type>pom</type>
         <scope>import</scope>
      </dependency>
   </dependencies>
   </dependencyManagement><build>
   <plugins>
      <plugin>
         <groupId>org.springframework.boot</groupId>
         <artifactId>spring-boot-maven-plugin</artifactId>
      </plugin>
   </plugins>
   </build>
</project>
Now, to the base package of our application, i.e., com.tutorial.spring.security.oauth2, let’s add a new package named config where we shall add our configuration classes.
Let’s create our first configuration class, UserConfig which extends the WebSecurityConfigurerAdapter class of Spring Security to manage the users of the client application. We annotate the class with @Configuration annotation to tell Spring that it is a configuration class.
package com.tutorial.spring.security.oauth2.config;
import org.springframework.context.annotation.Bean;
import org.springframework.context.annotation.Configuration;
import org.springframework.security.authentication.AuthenticationManager;
import org.springframework.security.config.annotation.web.builders.HttpSecurity;
import org.springframework.security.config.annotation.web.configuration.WebSecurityConfigurerAdapter;
import org.springframework.security.core.userdetails.User;
import org.springframework.security.core.userdetails.UserDetails;
import org.springframework.security.core.userdetails.UserDetailsService;
import org.springframework.security.crypto.password.NoOpPasswordEncoder;
import org.springframework.security.crypto.password.PasswordEncoder;
import org.springframework.security.provisioning.InMemoryUserDetailsManager;
import org.springframework.security.provisioning.UserDetailsManager;
@Configuration public class UserConfig extends WebSecurityConfigurerAdapter {
   @Bean
   public UserDetailsService userDetailsService() {
      UserDetailsManager userDetailsManager = new InMemoryUserDetailsManager();
      UserDetails user = User.withUsername("john")
         .password("12345") .authorities("read")
      .build(); userDetailsManager.createUser(user); return userDetailsManager;
   }
   @Bean
   public PasswordEncoder passwordEncoder() {
      return NoOpPasswordEncoder.getInstance();
   }
   @Override
   @Bean
   public AuthenticationManager authenticationManagerBean() throws Exception {
      return super.authenticationManagerBean();
   }
}
We then add a bean of the UserDetailsService to retrieve the user details for authentication and authorization. To put it in the Spring context we annotate it with @Bean. To keep this tutorial simple and easy to understand, we use an InMemoryUserDetailsManager instance. For a real-world application, we can use other implementations like JdbcUserDetailsManager to connect to a database and so on. To be able to create users easily for this example we use the UserDetailsManager interface which extends the UserDetailsService and has methods like createUser(), updateUser() and so on. Then, we create a user using the builder class. We give him a username, password and a “read” authority for now. Then, using the createUser() method, we add the newly created user and return the instance of UserDetailsManager thus putting it in the Spring context.
To be able to use the UserDetailsService defined by us, it is necessary to provide a PasswordEncoder bean in the Spring context. Again, to keep it simple for now we use the NoOpPasswordEncoder. The NoOpPasswordEncoder should not be used otherwise for real-world applications for production as it is not secure. NoOpPasswordEncoder does not encode the password and is only useful for developing or testing scenarios or proof of concepts. We should always use the other highly secure options provided by Spring Security, the most popular of which is the BCryptPasswordEncoder, which we will be using later in our series of tutorials. To put it in the Spring context we annotate the method with @Bean.
We then override the AuthenticationManager bean method of WebSecurityConfigurerAdapter, which returns the authenticationManagerBean to put the authentication manager into the Spring context.
Now, to add the client configurations we add a new configuration class named AuthorizationServerConfig which extends AuthorizationServerConfigurerAdapter class of Spring Security. The AuthorizationServerConfigurerAdapter class is used to configure the authorization server using the spring security oauth2 module. We annotate this class with @Configuration as well. To add the authorization server functionality to this class we need to add the @EnableAuthorizationServer annotation so that the application can behave as an authorization server.
package com.tutorial.spring.security.oauth2.config;
import org.springframework.beans.factory.annotation.Autowired;
import org.springframework.context.annotation.Configuration;
import org.springframework.security.authentication.AuthenticationManager;
import org.springframework.security.oauth2.config.annotation.configurers.ClientDetailsServiceConfigurer;
import org.springframework.security.oauth2.config.annotation.web.configuration.AuthorizationServerConfigurerAdapter;
import org.springframework.security.oauth2.config.annotation.web.configuration.EnableAuthorizationServer;
import org.springframework.security.oauth2.config.annotation.web.configurers.AuthorizationServerEndpointsConfigurer; @Configuration @EnableAuthorizationServer
public class AuthorizationServerConfig extends AuthorizationServerConfigurerAdapter {
   @Autowired private AuthenticationManager authenticationManager;
   @Override
   public void configure(ClientDetailsServiceConfigurer clients) throws Exception {
      clients.inMemory() .withClient("oauthclient1") .secret("oauthsecret1") .scopes("read") .authorizedGrantTypes("password") }
   @Override
   public void configure(AuthorizationServerEndpointsConfigurer endpoints) throws Exception {
      endpoints.authenticationManager(authenticationManager);
   }
}
For checking oauth tokens, Spring Security oauth exposes two endpoints – /oauth/check_token and /oauth/token_key. These endpoints are protected by default behind denyAll(). tokenKeyAccess() and checkTokenAccess() methods open these endpoints for use.
We autowire the AuthenticationManager bean we configured in the UserConfig class as a dependency here which we shall be using later.
We then override two of the configure() methods of the AuthorizationServerConfigurerAdapter to provide an in-memory implementation of the client details service. The first method which uses the ClientDetailsServiceConfigurer as a parameter, as the name suggests, allows us to configure the clients for the authorization server. These clients represent the applications that will be able to use the functionality of this authorization server. Since this is a basic application for learning the implementation of OAuth2, we will keep things simple for now and use an in-memory implementation with the following attributes −
-
clientId − the id of the client. Required.
-
secret − the client secret, required for trusted clients
-
scope − the limiting scope of the client, in other words, client permissions. If left empty or undefined, the client is not limited by any scope.
-
authorizedGrantTypes − the grant types that the client is authorized to use. The grant type denotes the way by which the client obtains the token from the authorization server. We will be using the “password” grant type as it is the simplest. Later, we shall be using another grant type for another use-case.
In “password” authorization grant type, the user needs to provide his/her username, password and scope to our client application, which then uses those credentials along with its credentials for the authorization server we want the tokens from.
The other configure() method that we overrode, uses AuthorizationServerEndpointsConfigurer as a parameter, is used to attach the AuthenticationManager to authorization server configuration.
With these basic configurations, our Authorization server is ready to use. Let’s go ahead and start it and use it. We will be using Postman ( https://www.postman.com/downloads/ ) for making our requests.
When using STS, we can launch our application and start seeing see the logs in our console. When the application starts, we can find the oauth2 endpoints exposed by our application in the console. Of those endpoints, we will be using the following the below token for now −
/oauth/token – for obtaining the token.
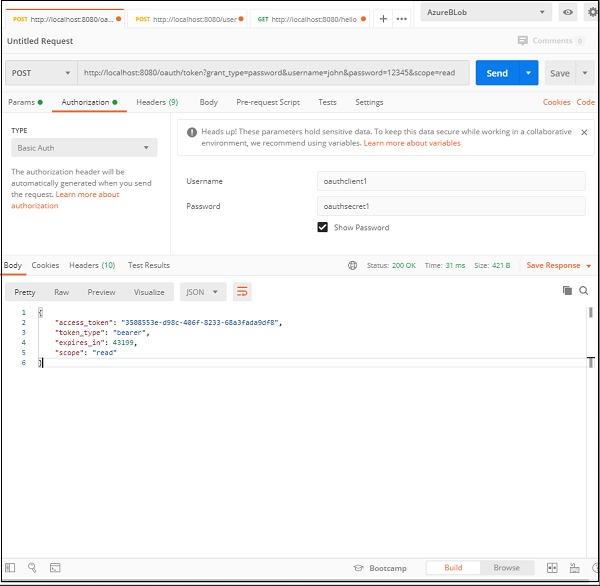
If we check the postman snapshot here, we can notice a few things. Let’s list them down below.
- The URL − Our Spring Boot Application is running at port 8080 of our local machine, so the request is pointed to http://localhost:8080. The next part is /oauth/token, which we know, is the endpoint exposed by OAuth for generating the token.
- The query params− Since this is a “password” authorization grant type, the user needs to provide his/her username, password and scope to our client application, which then uses those credentials along with its credentials to the authorization server we want the tokens from.
- Client Authorization − The Oauth system requires the client to be authorized to be able to provide the token. Hence, under the Authorization header, we provide the client authentication information, namely username and password that we configured in our application.
Let’s take a closer look at the query params and the authorization header −
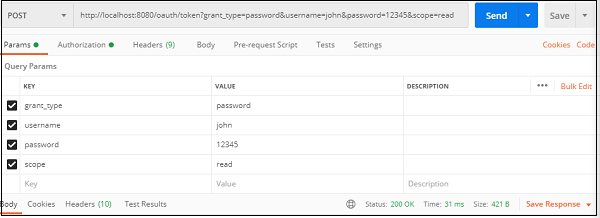
The query params
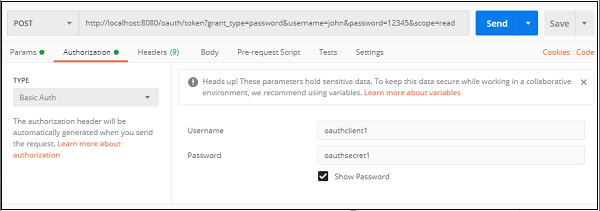
Client credentials
If everything is correct, we shall be able to see our generated token in the response along with a 200 ok status.
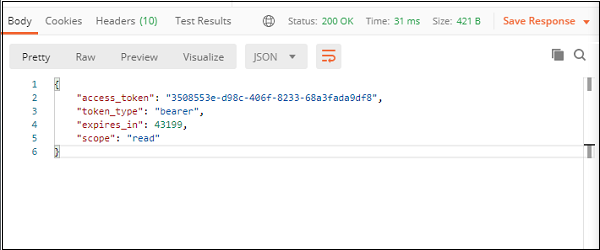
The response
We can test our server, by putting wrong credentials or no credentials, and we will get back an error which would say the request is unauthorized or has bad credentials.
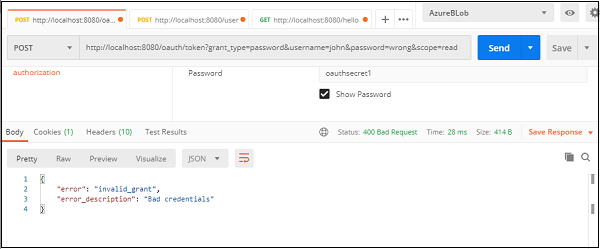
This is our basic oauth authorization server, that uses the password grant type to generate and provide a password.
Next, let’s implement a more secure, and a more common application of the oauth2 authentication, i.e. with an authorization code grant type. We will update our current application for this purpose.
The authorization grant type is different from the password grant type in the sense that the user doesn’t have to share his credentials with the client application. He shares them with the authorization server only and in return authorization code is sent to the client which it uses to authenticate the client. It is more secure than the password grant type as user credentials are not shared with the client application and hence the user’s information stays safe. The client application doesn’t get access to any important user information unless approved by the user.
In a few simple steps, we can set up a basic oauth server with an authorization grant type in our application. Let’s see how.
package com.tutorial.spring.security.oauth2.config;
import org.springframework.beans.factory.annotation.Autowired;
import org.springframework.context.annotation.Configuration;
import org.springframework.security.authentication.AuthenticationManager;
import org.springframework.security.oauth2.config.annotation.configurers.ClientDetailsServiceConfigurer;
import org.springframework.security.oauth2.config.annotation.web.configuration.AuthorizationServerConfigurerAdapter;
import org.springframework.security.oauth2.config.annotation.web.configuration.EnableAuthorizationServer;
import org.springframework.security.oauth2.config.annotation.web.configurers.AuthorizationServerEndpointsConfigurer;
@Configuration
@EnableAuthorizationServer
public class AuthorizationServerConfig extends AuthorizationServerConfigurerAdapter {
   @Autowired private AuthenticationManager authenticationManager;
   @Override
   public void configure(ClientDetailsServiceConfigurer clients) throws Exception {
      clients.inMemory()
      .withClient("oauthclient1")
      .secret("oauthsecret1")
      .scopes("read") .authorizedGrantTypes("password")
      .and() .withClient("oauthclient2") .secret("oauthsecret2")
      .scopes("read") .authorizedGrantTypes("authorization_code")
      .redirectUris("http://locahost:9090");
   }
   @Override public void configure(AuthorizationServerEndpointsConfigurer endpoints) throws Exception {
      endpoints.authenticationManager(authenticationManager);
   }
}
Let’s add a second client for this operation oauthclient2 for this operation with a new secret and read scope. Here we have changed the grant type to authorization code for this client. We also added a redirect URI so that the authorization server can callback the client. So, basically the redirect URI is the URI of the client.
Now, we have to establish a connection between the user and the authorization server. We have to set an interface for the authorization server where the user can provide the credentials. We use the formLogin() implementation of Spring Security to achieve that functionality while keeping things simple. We also make sure that all requests are authenticated.
package com.tutorial.spring.security.oauth2.config;
import org.springframework.context.annotation.Bean;
import org.springframework.context.annotation.Configuration;
import org.springframework.security.authentication.AuthenticationManager;
import org.springframework.security.config.annotation.web.builders.HttpSecurity;
import org.springframework.security.config.annotation.web.configuration.WebSecurityConfigurerAdapter;
import org.springframework.security.core.userdetails.User;
import org.springframework.security.core.userdetails.UserDetails;
import org.springframework.security.core.userdetails.UserDetailsService;
import org.springframework.security.crypto.password.NoOpPasswordEncoder;
import org.springframework.security.crypto.password.PasswordEncoder;
import org.springframework.security.provisioning.InMemoryUserDetailsManager;
import org.springframework.security.provisioning.UserDetailsManager;
@SuppressWarnings("deprecation") @Configuration
public class UserConfig extends WebSecurityConfigurerAdapter {
   @Bean
   public UserDetailsService userDetailsService() {
      UserDetailsManager userDetailsManager = new InMemoryUserDetailsManager();
         UserDetails user = User.withUsername("john")
      .password("12345") .authorities("read") .build();
      userDetailsManager.createUser(user); return userDetailsManager;
   }
   @Bean public PasswordEncoder passwordEncoder() {
      return NoOpPasswordEncoder.getInstance();
    }
   @Override
   @Bean
   public AuthenticationManager authenticationManagerBean() throws Exception {
      return super.authenticationManagerBean();
   }
   @Override protected void configure(HttpSecurity http) throws Exception {
      http.formLogin(); http.authorizeRequests().anyRequest().authenticated();
   }
}
This completes our setup for the authorization grant type. Now to test our setup and launch our application. We launch our browser at http://localhost:8080/oauth/authorize?response_type=code&client_id=oauthclient2&scope=read. We will redirected to the default form login page of Spring Security.
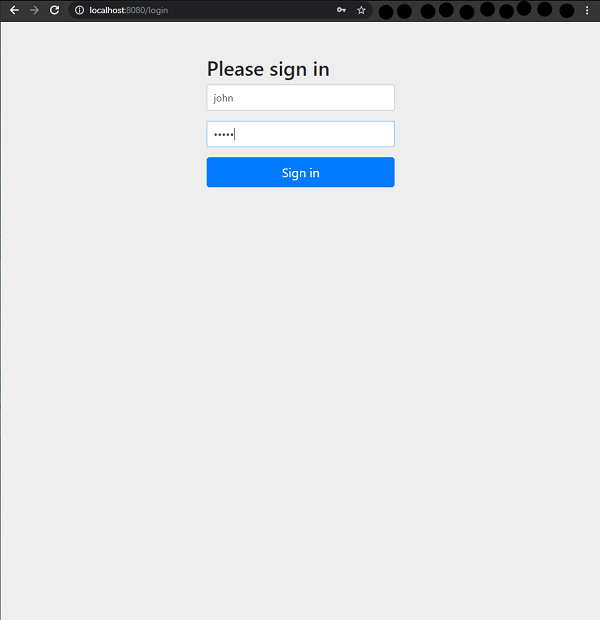
Here, the response type code implies that the authorization server will return an access code which will be used by the client to log in. When we use the user credentials we will be asked if I want to grant the permissions asked by the client, in a similar screen as shown below.
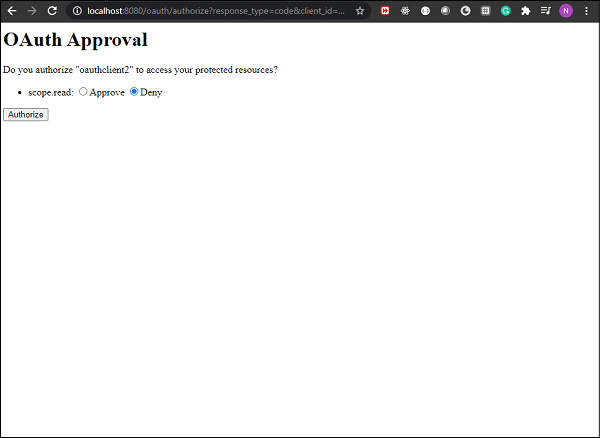
If we approve and click Authorize we shall see we are redirected to our given redirect url along with the access code. In our case the we are redirected to http://locahost:9090/?code=7Hibnw, as we specified in the application. We can use the code now as a client in Postman to login to the authorization server.

As we can see here, we have used the code received from the authorization server in our URL, and the grant_type as authorization_code and scope as read. We acted as the client and provided the client credentials as configured in our application. When we make this request we get back our access_token which we can use further.
So, we have seen how we can configure Spring Security with OAuth 2.0. The application is pretty simple and easy to understand and helps us understand the process fairly easily. We have used two kinds of authorization grant types and seen how we can use them to acquire access tokens for our client application.
Spring Security — JWT
Contents
- JWT Introduction and overview
- Getting started with Spring Security using JWT(Practical Guide)
JWT Introduction and overview
JSON Web Token or JWT, as it is more commonly called, is an open Internet standard (RFC 7519) for securely transmitting trusted information between parties in a compact way. The tokens contain claims that are encoded as a JSON object and are digitally signed using a private secret or a public key/private key pair. They are self-contained and verifiable as they are digitally signed. JWT’s can be signed and/or encrypted. The signed tokens verify the integrity of the claims contained in the token, while the encrypted ones hide the claims from other parties.
JWT’s can also be used for the exchange of information though they more commonly used for authorization as they offer a lot of advantages over session management using in-memory random tokens. The biggest of them being the enabling the delegation of authentication logic to a third-party server like AuthO etc.
A JWT token is divided into 3 parts namely – header, payload, and signature in the format of
[Header].[Payload].[Signature]
-
Header − The Header of a JWT token contains the list cryptographic operations that are applied to the JWT. This can be the signing technique, metadata information about the content-type and so on. The header is presented as a JSON object which is encoded to a base64URL. An example of a valid JWT header would be
{ "alg": "HS256", "typ": "JWT" }
Here, “alg” gives us information about the type of algorithm used and “typ gives us the type of the information.
-
Payload − The payload part of JWT contains the actual data to be transferred using the token. This part is also known as the “claims” part of the JWT token. The claims can be of three types – registered, public and private.
-
The registered claims are the ones which are recommended but not mandatory claims such as iss(issuer), sub(subject), aud(audience) and others.
-
Public claims are those that are defined by those using the JWTs.
-
Private claims or custom claims are user-defined claims created for the purpose of sharing the information between the concerned parties.
Example of a payload object could be.
{ "sub": "12345", "name": "Johnny Hill", "admin": false }
The payload object, like the header object is base64Url encoded as well and this string forms the second part of the JWT.
-
Signature− The signature part of the JWT is used for the verification that the message wasn’t changed along the way. If the tokens are signed with private key, it also verifies that the sender is who it says it is. It is created using the encoded header, encoded payload, a secret and the algorithm specified in the header. An example of a signature would be.
HMACSHA256( base64UrlEncode(header) + "." + base64UrlEncode(payload), secret)
If we put the header, payload and signature we get a token as given below.
eyJhbGciOiJSUzI1NiIsInR5cCI6IkpXVCJ9.eyJzdWIiOiIxMjM0NTY3ODkwIiwibmFtZSI6I
kpvaG4gRG9lIiwiYWRtaW4iOmZhbHNlfQ.gWDlJdpCTIHVYKkJSfAVNUn0ZkAjMxskDDm-5Fhe
WJ7xXgW8k5CllcGk4C9qPrfa1GdqfBrbX_1x1E39JY8BYLobAfAg1fs_Ky8Z7U1oCl6HL63yJq_
wVNBHp49hWzg3-ERxkqiuTv0tIuDOasIdZ5FtBdtIP5LM9Oc1tsuMXQXCGR8GqGf1Hl2qv8MCyn
NZJuVdJKO_L3WGBJouaTpK1u2SEleVFGI2HFvrX_jS2ySzDxoO9KjbydK0LNv_zOI7kWv-gAmA
j-v0mHdJrLbxD7LcZJEGRScCSyITzo6Z59_jG_97oNLFgBKJbh12nvvPibHpUYWmZuHkoGvuy5RLUA
Now, this token can be used in the Authorization header using the Bearer schema as.
Authorization − Bearer <token>
The use of JWT token for authorization is the most common of its applications. The token is usually generated in the server and sent to the client where it is stored in the session storage or local storage. To access a protected resource the client would send the JWT in the header as given above. We will see the JWT implementation in Spring Security in the section below.
Getting Started with Spring Security using JWT
The application we are going to develop will handle basic user authentication and authorization with JWT’s. Let’s get started by going to start.spring.io where we will create a Maven application with the following dependencies.
- Spring Web
- Spring Security
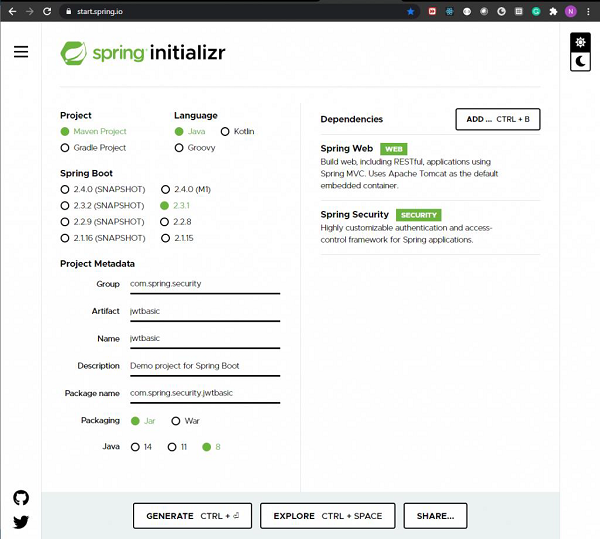
We generate the project and when it is downloaded, we extract it to a folder of our choice. We can then use any IDE of our choice. I am going to use Spring Tools Suite 4 as it is most optimized for Spring applications.
Apart from the above-mentioned dependencies we are also going to include the jwt dependency from io.jsonwebtoken from the Maven central repository as it is not included in the spring initializer. This dependency takes care of all operations involving the JWT including building the token, parsing it for claims and so on.
<dependency>
   <artifactId>jjwt</artifactId>
   <version>0.9.1</version>
</dependency>
Our pom.xml file should now look similar to this.
<?xml version="1.0" encoding="UTF-8"?>
<project xmlns="http://maven.apache.org/POM/4.0.0"
   xmlns:xsi="http://www.w3.org/2001/XMLSchema-instance"
   xsi:schemaLocation="http://maven.apache.org/POM/4.0.0
   https://maven.apache.org/xsd/maven-4.0.0.xsd">
   <modelVersion>4.0.0</modelVersion>
   <parent>
      <groupId>org.springframework.boot</groupId>
      <artifactId>spring-boot-starter-parent</artifactId>
      <version>2.3.1.RELEASE<version>
      <relativePath />
      <!-- lookup parent from repository -->
   </parent>
   <groupId>com.spring.security</groupId>
   <artifactId>jwtbasic</artifactId>
   <version>0.0.1-SNAPSHOT</version>
   <name>jwtbasic</name>
   <description>Demo project for Spring Boot</description>
   <properties>
      <java.version>1.8</java.version>
   </properties>
   <dependencies>
      <dependency>
         <groupId>org.springframework.boot</groupId>
         <artifactId>spring-boot-starter-security</artifactId>
      </dependency>
      <dependency>
         <groupId>org.springframework.boot</groupId>
         <artifactId>spring-boot-starter-web</artifactId>
      </dependency>
      <dependency>
         <groupId>io.jsonwebtoken</groupId>
         <artifactId>jjwt</artifactId>
         <version>0.9.1</version>
      </dependency>
      <dependency>
         <groupId>javax.xml.bind</groupId>
         <artifactId>jaxb-api</artifactId>
      </dependency>
      <dependency>
         <groupId>org.springframework.boot</groupId>
         <artifactId>spring-boot-starter-test</artifactId>
         <scope>test</scope>
         <exclusions>
      <exclusion>
         <groupId>org.junit.vintage</groupId>
         <artifactId>junit-vintage-engine</artifactId>
         </exclusion>
      </exclusions>
      </dependency>
      <dependency>
      <groupId>org.springframework.security</groupId>
      <artifactId>spring-security-test</artifactId>
      <scope>test<scope>
      <dependency>
   </dependencies>
      <build>
      <plugins>
         <plugin>
         <groupId>org.springframework.boot</groupId>
         <artifactId>spring-boot-maven-plugin</artifactId>
         </plugin>
      </plugins>
   </build>
</project>
Now that our project is set up we are going to create our controller class Hello Controller which exposes a Get endpoint.
package com.spring.security.jwtbasic.controllers;
import org.springframework.web.bind.annotation.GetMapping;
import org.springframework.web.bind.annotation.RestController;
@RestController
public class HelloController {
   @GetMapping("/hello")
   public String hello() {
      return "hello";
   }
}
Now we are going to create a package called config where we add the configuration class that extends the WebSecurityConfigurerAdapter class of Spring Security. This will provide us with all the required functions and definitions for project configuration and security of our application. For now, we provide the BcryptPasswordEncoder instance by implementing a method that generates the same. We annotate the method with @Bean to add to our Spring Context.
package com.spring.security.jwtbasic.config;
import org.springframework.beans.factory.annotation.Autowired;
import org.springframework.context.annotation.Bean;
import org.springframework.context.annotation.Configuration;
import org.springframework.security.authentication.AuthenticationManager;
import org.springframework.security.config.annotation.authentication.builders.AuthenticationManagerBuilder;
import org.springframework.security.config.annotation.web.builders.HttpSecurity;
import org.springframework.security.config.annotation.web.configuration.WebSecurityConfigurerAdapter;
import org.springframework.security.config.http.SessionCreationPolicy;
import org.springframework.security.core.userdetails.UserDetailsService;
import org.springframework.security.crypto.bcrypt.BCryptPasswordEncoder;
import org.springframework.security.crypto.password.PasswordEncoder;
import org.springframework.security.web.authentication.UsernamePasswordAuthenticationFilter;
import com.spring.security.jwtbasic.jwtutils.JwtAuthenticationEntryPoint;
import com.spring.security.jwtbasic.jwtutils.JwtFilter;
@Configuration
public class WebSecurityConfig extends WebSecurityConfigurerAdapter {
   @Bean
   public PasswordEncoder passwordEncoder() {
      return new BCryptPasswordEncoder();
   }
}
The JWT includes a secret which we will define in our application.properties file as given below.
secret=somerandomsecret
Now let’s create a package called jwtutils. This package is going to contain all classes and interface related to JWT operations, which will include.
- Generating token
- Validating token
- Checking the signature
- Verifying claims and permissions
In this package, we create our first class called Token Manager. This class will be responsible for the creation and validation of tokens using io.jsonwebtoken.Jwts.
package com.spring.security.jwtbasic.jwtutils;
import java.io.Serializable;
import java.util.Base64;
import java.util.Date;
import java.util.HashMap;
import java.util.Map;
import org.springframework.beans.factory.annotation.Value;
import org.springframework.security.core.userdetails.UserDetails;
import org.springframework.stereotype.Component;
import io.jsonwebtoken.Claims; import io.jsonwebtoken.Jwts;
import io.jsonwebtoken.SignatureAlgorithm;
@Component
public class TokenManager implements Serializable {
   /**
   *
   */
   private static final long serialVersionUID = 7008375124389347049L; public static final long TOKEN_VALIDITY = 10 * 60 * 60; @Value("${secret}")
   private String jwtSecret;
   public String generateJwtToken(UserDetails userDetails) {
      Map<String, Object> claims = new HashMap<>();
      return Jwts.builder().setClaims(claims).setSubject(userDetails.getUsername())
         .setIssuedAt(new Date(System.currentTimeMillis()))
         .setExpiration(new Date(System.currentTimeMillis() + TOKEN_VALIDITY * 1000))
         .signWith(SignatureAlgorithm.HS512, jwtSecret).compact();
   }
   public Boolean validateJwtToken(String token, UserDetails userDetails) {
      String username = getUsernameFromToken(token);
      Claims claims = Jwts.parser().setSigningKey(jwtSecret).parseClaimsJws(token).getBody();
      Boolean isTokenExpired = claims.getExpiration().before(new Date());
      return (username.equals(userDetails.getUsername()) && !isTokenExpired);
   }
   public String getUsernameFromToken(String token) {
      final Claims claims = Jwts.parser().setSigningKey(jwtSecret).parseClaimsJws(token).getBody();
      return claims.getSubject();
   }
}
Here, as all tokens should have an expiration date, we start with a token validity constant. Here, we want our token to be valid for 10 minutes after generation. We will use this value when we generate our token. Then we extract the value of our singing key from the application.properties file into our jwtSecret field using the @Value annotation.
We have two methods here −
- generateJwtToken() − This method is used to generate a token on successful authentication by the user. To create the token here we use the username, issue date of token and the expiration date of the token. This will form the payload part of the token or claims as we had discussed earlier. To generate the token we use the builder() method of Jwts. This method returns a new JwtBuilder instance that can be used to create compact JWT serialized strings.
To set the claims we use the setClaims() method and then set each of the claims. For this token we have setSubject(username), issue date and expiration date. We can also put our custom claims as we had discussed above. This can be any value we want which might include user role, user authorities and so on.
Then we set the signature part of the token. This is done using the signWith() method, we set the hashing algorithm we prefer to use and the secret key. Then we use thecompact() method that builds the JWT and serializes it to a compact, URL-safe string according to the JWT Compact Serialization rules.
-
validateJwtToken() − Now that the generation of the token is taken care of, we should focus on the process of validation of the token when it comes as a part of requests. To validate the token means to verify the request is an authenticated one and that the token is the one that was generated and sent to the user. Here, we need to parse the token for the claims such as username, roles, authorities, validity period etc.
To validate the token we need to parse it first. This is done using the parser() method of Jwts. We then need to set the signing key that we used to generate the token and then use parseClaimsJws() method on the token to parse the compact serialized JWS string based on the builder’s current configuration state and return the resulting Claims JWS instance. The getBody() method is then used to return the claims instance that was used while generating the token.
From this obtained claims instance, we extract the subject and the expiry date to verify the validity of the token. The username should be the username of the user and the token should not be expired. If both these conditions are met, we return true, which signifies that the token is valid.
The next class we would be creating is the JwtUserDetailsService. This class will extend the UserDetailsService of Spring security and we will implement the loadUserByUsername() method as given below −
package com.spring.security.jwtbasic.jwtutils;
import java.util.ArrayList;
import org.springframework.security.core.userdetails.User;
import org.springframework.security.core.userdetails.UserDetails;
import org.springframework.security.core.userdetails.UserDetailsService;
import org.springframework.security.core.userdetails.UsernameNotFoundException;
import org.springframework.stereotype.Service;
@Service
public class JwtUserDetailsService implements UserDetailsService {
   @Override
   public UserDetails loadUserByUsername(String username) throws UsernameNotFoundException {
      if ("randomuser123".equals(username)) {
         return new User("randomuser123",
            "$2a$10$slYQmyNdGzTn7ZLBXBChFOC9f6kFjAqPhccnP6DxlWXx2lPk1C3G6",
            new ArrayList<>());
      } else {
         throw new UsernameNotFoundException("User not found with username: " + username);
      }
   }
}
Here, since this is a basic application for the sole purpose of the demonstration of JWT authentication, we have resorted to a set of our user details, instead of using a database. We have given the username as “randomuser123” and encoded the password, which is “password” as “$2a$10$slYQmyNdGzTn7ZLBXBChFOC9f6kFjAqPhccnP6DxlWXx2lPk1C3G6” for our convenience.
Next, we create classes for our Request and Response models. These models determine how our request and response formats would be for authentication. The first snapshot given below is the request model. As we can see, we shall be accepting two properties – username and password in our request.
package com.spring.security.jwtbasic.jwtutils.models;
import java.io.Serializable;
public class JwtRequestModel implements Serializable {
   /**
   *
   */
   private static final long serialVersionUID = 2636936156391265891L;
   private String username;
   private String password;
   public JwtRequestModel() {
   }
   public JwtRequestModel(String username, String password) {
      super();
      this.username = username; this.password = password;
   }
   public String getUsername() {
      return username;
   }
   public void setUsername(String username) {
      this.username = username;
   }
   public String getPassword() {
      return password;
   }
   public void setPassword(String password) {
      this.password = password;
   }
}
Below is the code for response model on successful authentication. As we can see, we will be sending the token back to the user on successful authentication.
package com.spring.security.jwtbasic.jwtutils.models;
import java.io.Serializable;
public class JwtResponseModel implements Serializable {
   /**
   *
   */
   private static final long serialVersionUID = 1L;
   private final String token;
   public JwtResponseModel(String token) {
      this.token = token;
   }
   public String getToken() {
      return token;
   }
}
For authentication now, let’s create a controller as given below.
package com.spring.security.jwtbasic.jwtutils;
import org.springframework.beans.factory.annotation.Autowired;
import org.springframework.http.ResponseEntity;
import org.springframework.security.authentication.AuthenticationManager;
import org.springframework.security.authentication.BadCredentialsException;
import org.springframework.security.authentication.DisabledException;
import org.springframework.security.authentication.UsernamePasswordAuthenticationToken;
import org.springframework.security.core.userdetails.UserDetails;
import org.springframework.web.bind.annotation.CrossOrigin;
import org.springframework.web.bind.annotation.PostMapping;
import org.springframework.web.bind.annotation.RequestBody;
import org.springframework.web.bind.annotation.RestController;
import com.spring.security.jwtbasic.jwtutils.models.JwtRequestModel;
import com.spring.security.jwtbasic.jwtutils.models.JwtResponseModel;
@RestController
@CrossOrigin
public class JwtController {
   @Autowired
   private JwtUserDetailsService userDetailsService;
   @Autowired
   private AuthenticationManager authenticationManager;
   @Autowired
   private TokenManager tokenManager;
   @PostMapping("/login")
   public ResponseEntity<> createToken(@RequestBody JwtRequestModel
   request) throws Exception {
      try {
         authenticationManager.authenticate(
            new
            UsernamePasswordAuthenticationToken(request.getUsername(),
            request.getPassword())
         );
      } catch (DisabledException e) {
         throw new Exception("USER_DISABLED", e);
      } catch (BadCredentialsException e) {
         throw new Exception("INVALID_CREDENTIALS", e);
      }
      final UserDetails userDetails = userDetailsService.loadUserByUsername(request.getUsername());
      final String jwtToken = tokenManager.generateJwtToken(userDetails);
      return ResponseEntity.ok(new JwtResponseModel(jwtToken));
   }
}
If we go through the code we can see that, we have autowired three dependencies namely, JwtUserDetailsService, AuthenticationManager and TokenManager. While we have already seen the implementation of JwtUserDetailsService and TokenManager classes above, the authentication manager bean is one we shall be creating in our WebSecurityConfig class.
AuthenticationManager class will take care of our authentication. We shall be using the UsernamePasswordAuthenticationToken model for authentication of the request. If authentication succeeds we shall generate a JWT for the user, which can be sent in the Authorization header of the subsequent requests to get any resource.
As we can see, we are using the loadUserByUsername() method of our JwtUserDetailsService class and the generateJwtToken() from TokenManager class.
This generated JWT is sent to the user as a response on successful authentication as mentioned above.
Now it’s time we created our Filter. The filter class will be used to track our requests and detect if they contain the valid token in the header. If the token is valid we let the request proceed otherwise we send a 401 error (Unauthorized).
package com.spring.security.jwtbasic.jwtutils;
import java.io.IOException;
import javax.servlet.FilterChain;
import javax.servlet.ServletException;
import javax.servlet.http.HttpServletRequest;
import javax.servlet.http.HttpServletResponse;
import org.springframework.beans.factory.annotation.Autowired;
import org.springframework.security.authentication.UsernamePasswordAuthenticationToken;
import org.springframework.security.core.context.SecurityContextHolder;
import org.springframework.security.core.userdetails.UserDetails;
import org.springframework.security.web.authentication.WebAuthenticationDetailsSource;
import org.springframework.stereotype.Component;
import org.springframework.web.filter.OncePerRequestFilter;
import io.jsonwebtoken.ExpiredJwtException;
@Component
public class JwtFilter extends OncePerRequestFilter {
   @Autowired
   private JwtUserDetailsService userDetailsService;
   @Autowired
   private TokenManager tokenManager;
   @Override
   protected void doFilterInternal(HttpServletRequest request,
      HttpServletResponse response, FilterChain filterChain)
      throws ServletException, IOException {

      String tokenHeader = request.getHeader("Authorization");
      String username = null;
      String token = null;
      if (tokenHeader != null && tokenHeader.startsWith("Bearer ")) {
         token = tokenHeader.substring(7);
         try {
            username = tokenManager.getUsernameFromToken(token);
         } catch (IllegalArgumentException e) {
            System.out.println("Unable to get JWT Token");
         } catch (ExpiredJwtException e) {
            System.out.println("JWT Token has expired");
         }
      } else {
         System.out.println("Bearer String not found in token");
      }
      if (null != username &&SecurityContextHolder.getContext().getAuthentication() == null) {
         UserDetails userDetails = userDetailsService.loadUserByUsername(username);
         if (tokenManager.validateJwtToken(token, userDetails)) {
            UsernamePasswordAuthenticationToken
            authenticationToken = new UsernamePasswordAuthenticationToken(
            userDetails, null,
            userDetails.getAuthorities());
            authenticationToken.setDetails(new
            WebAuthenticationDetailsSource().buildDetails(request));
            SecurityContextHolder.getContext().setAuthentication(authenticationToken);
         }
      }
      filterChain.doFilter(request, response);
   }
}
As we can see above, we have autowired the JwtUserDetailsService and TokenManager classes here as well. We have extended the OncePerRequestFilter of SpringSecurity which makes sure the filter is run for every request. We have provided our implementation to the overridden method doFilterInternal() of the OncePerRequestFilter class.
The method here extracts the token from the header and validates it with the help of validateJwtToken() method of our TokenManager class. During validation, it checks for the username and the expiration date. If both the values are valid, we save the authentication in our Spring Security context and let the code proceed to the next filter in our filter chain. If any of the validation fails or there is an issue with the token or if the token is not found we throw the appropriate exceptions and send back an appropriate response while blocking the request from moving ahead.
Having created the filter for our requests, we now create the JwtAutheticationEntryPoint class. This class extends Spring’s AuthenticationEntryPoint class and rejects every unauthenticated request with an error code 401 sent back to the client. We have overridden the commence() method of AuthenticationEntryPoint class to do that.
package com.spring.security.jwtbasic.jwtutils;
import java.io.IOException;
import java.io.Serializable;
import javax.servlet.ServletException;
import javax.servlet.http.HttpServletRequest;
import javax.servlet.http.HttpServletResponse;
import org.springframework.security.core.AuthenticationException;
import org.springframework.security.web.AuthenticationEntryPoint;
import org.springframework.stereotype.Component;
@Component
public class JwtAuthenticationEntryPoint implements AuthenticationEntryPoint,
Serializable {
   @Override
   public void commence(HttpServletRequest request, HttpServletResponse
   response,
   AuthenticationException authException) throws
   IOException, ServletException {
      response.sendError(HttpServletResponse.SC_UNAUTHORIZED,
   "Unauthorized");
      }
}
Now, let’s get back to our WebSecurityConfig class and finish the rest of our configuration. If we remember, we are going to require our AuthenticationManager bean for our Jwt controller class and add the filter we just created to our configuration. We are also going to configure which requests are to be authenticated and which are not to be. We shall also add the AuthenticationEntryPoint to our requests to send back the 401 error response. Since, we also do not need to maintain session variables while using jwt we can make our session STATELESS.
package com.spring.security.jwtbasic.config;
import org.springframework.beans.factory.annotation.Autowired;
import org.springframework.context.annotation.Bean;
import org.springframework.context.annotation.Configuration;
import org.springframework.security.authentication.AuthenticationManager;
import org.springframework.security.config.annotation.authentication.builders.AuthenticationManagerBuilder;
import org.springframework.security.config.annotation.web.builders.HttpSecurity;
import org.springframework.security.config.annotation.web.configuration.WebSecurityConfigurerAdapter;
import org.springframework.security.config.http.SessionCreationPolicy;
import org.springframework.security.core.userdetails.UserDetailsService;
import org.springframework.security.crypto.bcrypt.BCryptPasswordEncoder;
import org.springframework.security.crypto.password.PasswordEncoder;
import org.springframework.security.web.authentication.UsernamePasswordAuthenticationFilter;
import com.spring.security.jwtbasic.jwtutils.JwtAuthenticationEntryPoint;
import com.spring.security.jwtbasic.jwtutils.JwtFilter;
@Configuration
public class WebSecurityConfig extends WebSecurityConfigurerAdapter {
   @Autowired
   private JwtAuthenticationEntryPoint authenticationEntryPoint;
   @Autowired
   private UserDetailsService userDetailsService;
   @Autowired
   private JwtFilter filter;
   @Bean
   public PasswordEncoder passwordEncoder() {
      return new BCryptPasswordEncoder();
   }
   @Override
   protected void configure(AuthenticationManagerBuilder auth) throws Exception {
      auth.userDetailsService(userDetailsService).passwordEncoder(passwordEncoder());
   }
   @Bean
   @Override
   public AuthenticationManager authenticationManagerBean() throws
   Exception {
      return super.authenticationManagerBean();
   }
   @Override
   protected void configure(HttpSecurity http) throws Exception {
      http.csrf().disable()
      .authorizeRequests().antMatchers("/login").permitAll()
      .anyRequest().authenticated()
      .and()
      .exceptionHandling().authenticationEntryPoint(authenticationEntryPoint)
      .and()
      .sessionManagement().sessionCreationPolicy(SessionCreationPolicy.STATELESS);
      http.addFilterBefore(filter, UsernamePasswordAuthenticationFilter.class);
   }
}
As we can see, we have done all of that, and now our application is ready to go. Let’s start the application and use postman for making our requests.
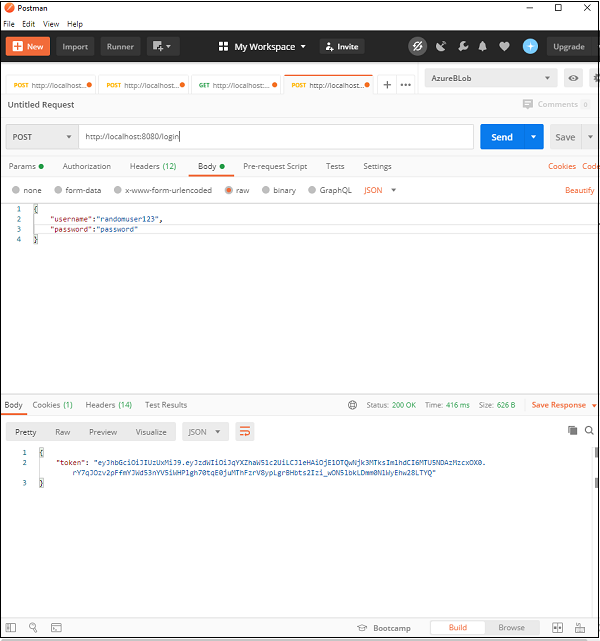
Here we have made our first request to get the token, and as we can see on providing the correct username/password combination we get back our token.
Now using that token in our header, let’s call the /hello endpoint.
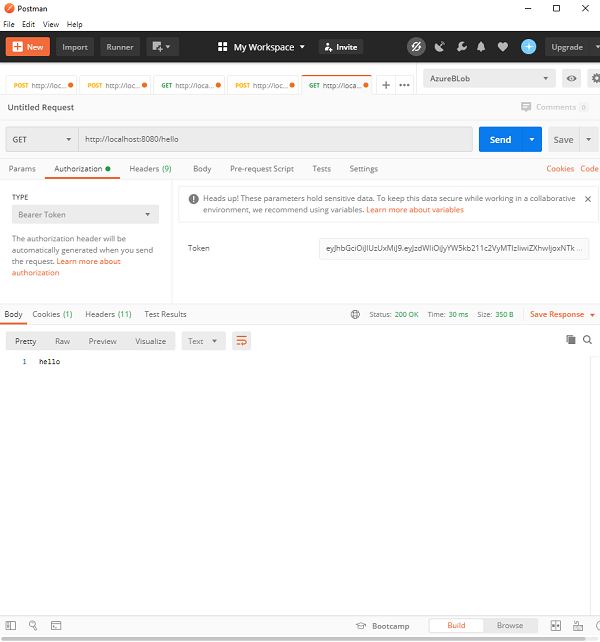
As we can see, since the request is authenticated, we get the desired response back. Now, if we tamper with the token or do not send the Authorization header, we will get a 401 error as configured in our application. This ensures that the protection our request using the JWT.
| tags | projects |
|---|---|
|
security |
spring-security |
Understanding Spring Security
Table of Contents
- Authentication and Access Control
- Authentication
- Customizing Authentication Managers
- Authorization or Access Control
- Web Security
- Creating and Customizing Filter Chains
- Request Matching for Dispatch and Authorization
- Combining Application Security Rules with Actuator Rules
- Method Security
- Working with Threads
- Processing Secure Methods Asynchronously
This guide is a primer for Spring Security, offering insight into the
design and basic building blocks of the framework. We cover only the
very basics of application security. However, in doing so, we can clear up
some of the confusion experienced by developers who use Spring
Security. To do this, we take a look at the way security is applied in
web applications by using filters and, more generally, by using method
annotations. Use this guide when you need a high-level understanding
of how a secure application works, how it can be customized, or
if you need to learn how to think about application security.
This guide is not intended as a manual or recipe for solving more than
the most basic problems (there are other sources for those), but it
could be useful for beginners and experts alike. Spring Boot is also
often referenced, because it provides some default behavior for a
secure application, and it can be useful to understand how that fits in
with the overall architecture.
|
Note |
All of the principles apply equally well to applications that do not use Spring Boot. |
Authentication and Access Control
Application security boils down to two more or less independent
problems: authentication (who are you?) and authorization (what are
you allowed to do?). Sometimes people say “access control” instead of
«authorization», which can get confusing, but it can be helpful to
think of it that way because “authorization” is overloaded in other
places. Spring Security has an architecture that is designed to
separate authentication from authorization and has strategies and
extension points for both.
Authentication
The main strategy interface for authentication is
AuthenticationManager, which has only one method:
public interface AuthenticationManager {

  Authentication authenticate(Authentication authentication)
    throws AuthenticationException;
}
An AuthenticationManager
can do one of 3 things in its authenticate() method:
-
Return an
Authentication(normally withauthenticated=true) if it can verify that the input represents a valid principal. -
Throw an
AuthenticationExceptionif it believes that the input represents an invalid principal. -
Return
nullif it cannot decide.
AuthenticationException is a runtime exception. It is usually
handled by an application in a generic way, depending on the style or
purpose of the application. In other words, user code is not normally
expected to catch and handle it. For example, a web UI might render a
page that says that the authentication failed, and a backend HTTP
service might send a 401 response, with or without a WWW-Authenticate
header depending on the context.
The most commonly used implementation of AuthenticationManager is
ProviderManager, which delegates to a chain of
AuthenticationProvider instances. An AuthenticationProvider is a
bit like an AuthenticationManager, but it has an extra method to
allow the caller to query whether it supports a given Authentication
type:
public interface AuthenticationProvider {

	Authentication authenticate(Authentication authentication)
			throws AuthenticationException;

	boolean supports(Class<?> authentication);
}
The Class<?> argument in the supports() method is really Class<? (it is only ever asked if it supports
extends Authentication>
something that is passed into the authenticate() method). A
ProviderManager can support multiple different authentication
mechanisms in the same application by delegating to a chain of
AuthenticationProviders. If a ProviderManager does not recognize a
particular Authentication instance type, it is skipped.
A ProviderManager has an optional parent, which it can consult if
all providers return null. If the parent is not available, a
null Authentication results in an AuthenticationException.
Sometimes, an application has logical groups of protected resources
(for example, all web resources that match a path pattern, such as /api/**), and
each group can have its own dedicated AuthenticationManager. Often,
each of those is a ProviderManager, and they share a parent. The
parent is then a kind of “global” resource, acting as a fallback for
all providers.

Figure 1. An AuthenticationManager hierarchy using ProviderManager
Customizing Authentication Managers
Spring Security provides some configuration helpers to quickly get
common authentication manager features set up in your application. The
most commonly used helper is the AuthenticationManagerBuilder, which
is great for setting up in-memory, JDBC, or LDAP user details or for
adding a custom UserDetailsService. The following example shows an
application that configures the global (parent) AuthenticationManager:
@Configuration
public class ApplicationSecurity extends WebSecurityConfigurerAdapter {

   ... // web stuff here

  @Autowired
  public void initialize(AuthenticationManagerBuilder builder, DataSource dataSource) {
    builder.jdbcAuthentication().dataSource(dataSource).withUser("dave")
      .password("secret").roles("USER");
  }

}
This example relates to a web application, but the usage of
AuthenticationManagerBuilder is more widely applicable (see Web Security
for more detail on how web application security is implemented). Note
that the AuthenticationManagerBuilder is @Autowired into a method
in a @Bean — that is what makes it build the global (parent)
AuthenticationManager. In contrast, consider the following example:
@Configuration
public class ApplicationSecurity extends WebSecurityConfigurerAdapter {

  @Autowired
  DataSource dataSource;

   ... // web stuff here

  @Override
  public void configure(AuthenticationManagerBuilder builder) {
    builder.jdbcAuthentication().dataSource(dataSource).withUser("dave")
      .password("secret").roles("USER");
  }

}
If we had used an @Override of a method in the configurer, the
AuthenticationManagerBuilder would be used only to build a “local”
AuthenticationManager, which would be a child of the global one. In a
Spring Boot application, you can @Autowired the global one into
another bean, but you cannot do that with the local one unless you
explicitly expose it yourself.
Spring Boot provides a default global AuthenticationManager (with
only one user) unless you pre-empt it by providing your own bean of
type AuthenticationManager. The default is secure enough on its own
for you not to have to worry about it much, unless you actively need a
custom global AuthenticationManager. If you do any configuration
that builds an AuthenticationManager, you can often do it locally to
the resources that you are protecting and not worry about the global
default.
Authorization or Access Control
Once authentication is successful, we can move on to authorization,
and the core strategy here is AccessDecisionManager. There are three
implementations provided by the framework and all three delegate to a
chain of AccessDecisionVoter instances, a bit like the ProviderManager
delegates to AuthenticationProviders.
An AccessDecisionVoter considers an Authentication (representing a
principal) and a secure Object, which has been decorated with
ConfigAttributes:
boolean supports(ConfigAttribute attribute);

boolean supports(Class<?> clazz);

int vote(Authentication authentication, S object,
        Collection<ConfigAttribute> attributes);
The Object is completely generic in the signatures of the
AccessDecisionManager and AccessDecisionVoter. It represents
anything that a user might want to access (a web resource or a method
in a Java class are the two most common cases). The ConfigAttributes
are also fairly generic, representing a decoration of the secure
Object with some metadata that determines the level of permission
required to access it. ConfigAttribute is an interface. It
has only one method (which is quite generic and returns a String), so these
strings encode in some way the intention of the owner of the resource,
expressing rules about who is allowed to access it. A typical
ConfigAttribute is the name of a user role (like ROLE_ADMIN or
ROLE_AUDIT), and they often have special formats (like the ROLE_
prefix) or represent expressions that need to be evaluated.
Most people use the default AccessDecisionManager, which is
AffirmativeBased (if any voters return affirmatively, access is granted). Any
customization tends to happen in the voters, either by adding new ones
or modifying the way that the existing ones work.
It is very common to use ConfigAttributes that are Spring Expression
Language (SpEL) expressions — for example, isFullyAuthenticated() &&. This is supported by an
hasRole('user')AccessDecisionVoter that
can handle the expressions and create a context for them. To extend
the range of expressions that can be handled requires a custom
implementation of SecurityExpressionRoot and sometimes also
SecurityExpressionHandler.
Web Security
Spring Security in the web tier (for UIs and HTTP back ends) is based
on Servlet Filters, so it is helpful to first look at the role of
Filters generally. The following picture shows the typical
layering of the handlers for a single HTTP request.

The client sends a request to the application, and the container decides which
filters and which servlet apply to it based on the path of the request
URI. At most, one servlet can handle a single request, but filters form
a chain, so they are ordered. In fact, a filter can veto the rest
of the chain if it wants to handle the request itself. A filter can
also modify the request or the response used in the downstream
filters and servlet. The order of the filter chain is very important,
and Spring Boot manages it through two mechanisms: @Beans
of type Filter can have an @Order or implement Ordered, and
they can be part of a FilterRegistrationBean that
itself has an order as part of its API. Some off-the-shelf filters
define their own constants to help signal what order they like to be
in relative to each other (for example, the SessionRepositoryFilter from
Spring Session has a DEFAULT_ORDER of Integer.MIN_VALUE + 50,
which tells us it likes to be early in the chain, but it does not rule
out other filters coming before it).
Spring Security is installed as a single Filter in the chain, and
its concrete type is FilterChainProxy, for reasons that we cover
soon. In a Spring Boot application, the security filter is a @Bean
in the ApplicationContext, and it is installed by default so that it
is applied to every request. It is installed at a position defined by
SecurityProperties.DEFAULT_FILTER_ORDER, which in turn is anchored
by FilterRegistrationBean.REQUEST_WRAPPER_FILTER_MAX_ORDER (the
maximum order that a Spring Boot application expects filters to have if they
wrap the request, modifying its behavior). There is more to it than
that, though: From the point of view of the container, Spring Security
is a single filter, but, inside of it, there are additional filters, each
playing a special role. The following image shows this relationship:

Figure 2. Spring Security is a single physical Filter but delegates processing to a chain of internal filters
In fact, there is even one more layer of indirection in the security
filter: It is usually installed in the container as a
DelegatingFilterProxy, which does not have to be a Spring
@Bean. The proxy delegates to a FilterChainProxy, which is always a
@Bean, usually with a fixed name of springSecurityFilterChain. It
is the FilterChainProxy that contains all the security logic
arranged internally as a chain (or chains) of filters. All the filters
have the same API (they all implement the Filter interface from the
Servlet specification), and they all have the opportunity to veto the rest of
the chain.
There can be multiple filter chains all managed by Spring Security in
the same top level FilterChainProxy and all are unknown to the
container. The Spring Security filter contains a list of filter
chains and dispatches a request to the first chain that matches
it. The following picture shows the dispatch happening based on matching
the request path (/foo/** matches before /**). This is very
common but not the only way to match a request. The most important
feature of this dispatch process is that only one chain ever handles a
request.

Figure 3. The Spring Security FilterChainProxy dispatches requests to the first chain that matches.
A vanilla Spring Boot application with no custom security
configuration has a several (call it n) filter chains, where usually
n=6. The first (n-1) chains are there just to ignore static resource
patterns, like /css/** and /images/**, and the error view:
/error. (The paths can be controlled by the user with
security.ignored from the SecurityProperties configuration
bean.) The last chain matches the catch-all path (/**) and is more
active, containing logic for authentication, authorization, exception
handling, session handling, header writing, and so on. There are a total of
11 filters in this chain by default, but normally it is not necessary
for users to concern themselves with which filters are used and when.
|
Note |
The fact that all filters internal to Spring Security are unknown to the container is important, especially in a Spring Boot application, where, by default, all @Beans of type Filter are registeredautomatically with the container. So if you want to add a custom filter to the security chain, you need to either not make it be a @Bean or wrap it in a FilterRegistrationBean that explicitlydisables the container registration. |
Creating and Customizing Filter Chains
The default fallback filter chain in a Spring Boot application (the one with
the /** request matcher) has a predefined order of
SecurityProperties.BASIC_AUTH_ORDER. You can switch it off
completely by setting security.basic.enabled=false, or you can use
it as a fallback and define other rules with a lower order. To do
the latter, add a @Bean of type WebSecurityConfigurerAdapter (or
WebSecurityConfigurer) and decorate the class with @Order, as follows:
@Configuration
@Order(SecurityProperties.BASIC_AUTH_ORDER - 10)
public class ApplicationConfigurerAdapter extends WebSecurityConfigurerAdapter {
  @Override
  protected void configure(HttpSecurity http) throws Exception {
    http.antMatcher("/match1/**")
     ...;
  }
}
This bean causes Spring Security to add a new filter chain and
order it before the fallback.
Many applications have completely different access rules for one set
of resources compared to another. For example, an application that
hosts a UI and a backing API might support cookie-based authentication
with a redirect to a login page for the UI parts and token-based
authentication with a 401 response to unauthenticated requests for the
API parts. Each set of resources has its own
WebSecurityConfigurerAdapter with a unique order and its own
request matcher. If the matching rules overlap, the earliest ordered
filter chain wins.
Request Matching for Dispatch and Authorization
A security filter chain (or, equivalently, a
WebSecurityConfigurerAdapter) has a request matcher that is used to
decide whether to apply it to an HTTP request. Once the decision is
made to apply a particular filter chain, no others are applied. However,
within a filter chain, you can have more fine-grained control of
authorization by setting additional matchers in the HttpSecurity
configurer, as follows:
@Configuration
@Order(SecurityProperties.BASIC_AUTH_ORDER - 10)
public class ApplicationConfigurerAdapter extends WebSecurityConfigurerAdapter {
  @Override
  protected void configure(HttpSecurity http) throws Exception {
    http.antMatcher("/match1/**")
      .authorizeRequests()
        .antMatchers("/match1/user").hasRole("USER")
        .antMatchers("/match1/spam").hasRole("SPAM")
        .anyRequest().isAuthenticated();
  }
}
One of the easiest mistakes to make when configuring Spring Security
is to forget that these matchers apply to different processes. One is
a request matcher for the whole filter chain, and the other is only to
choose the access rule to apply.
Combining Application Security Rules with Actuator Rules
If you use the Spring Boot Actuator for management endpoints,
you probably want them to be secure, and, by default, they are. In
fact, as soon as you add the Actuator to a secure application, you get
an additional filter chain that applies only to the actuator
endpoints. It is defined with a request matcher that matches only
actuator endpoints and it has an order of
ManagementServerProperties.BASIC_AUTH_ORDER, which is 5 fewer than
the default SecurityProperties fallback filter, so it is consulted
before the fallback.
If you want your application security rules to apply to the actuator
endpoints, you can add a filter chain that is ordered earlier than the actuator
one and that has a request matcher that includes all actuator
endpoints. If you prefer the default security settings for the
actuator endpoints, the easiest thing is to add your own filter
later than the actuator one, but earlier than the fallback
(for example, ManagementServerProperties.BASIC_AUTH_ORDER + 1), as follows:
@Configuration
@Order(ManagementServerProperties.BASIC_AUTH_ORDER + 1)
public class ApplicationConfigurerAdapter extends WebSecurityConfigurerAdapter {
  @Override
  protected void configure(HttpSecurity http) throws Exception {
    http.antMatcher("/foo/**")
     ...;
  }
}
|
Note |
Spring Security in the web tier is currently tied to the Servlet API, so it is only really applicable when running an application in a servlet container, either embedded or otherwise. It is not, however, tied to Spring MVC or the rest of the Spring web stack, so it can be used in any servlet application — for instance, one using JAX-RS. |
Method Security
As well as support for securing web applications, Spring Security
offers support for applying access rules to Java method
executions. For Spring Security, this is just a different type of
“protected resource”. For users, it means the access rules are declared
using the same format of ConfigAttribute strings (for example, roles or
expressions) but in a different place in your code. The first step is
to enable method security — for example, in the top level configuration
for our application:
@SpringBootApplication
@EnableGlobalMethodSecurity(securedEnabled = true)
public class SampleSecureApplication {
}
Then we can decorate the method resources directly:
@Service
public class MyService {

  @Secured("ROLE_USER")
  public String secure() {
    return "Hello Security";
  }

}
This example is a service with a secure method. If Spring creates a
@Bean of this type, it is proxied and callers have to
go through a security interceptor before the method is actually
executed. If access is denied, the caller gets an
AccessDeniedException instead of the actual method result.
There are other annotations that you can use on methods to enforce
security constraints, notably @PreAuthorize and @PostAuthorize,
which let you write expressions containing references to method
parameters and return values, respectively.
|
Tip |
It is not uncommon to combine Web security and method security. The filter chain provides the user experience features, such as authentication and redirect to login pages and so on, and the method security provides protection at a more granular level. |
Working with Threads
Spring Security is fundamentally thread-bound, because it needs to make
the current authenticated principal available to a wide variety of
downstream consumers. The basic building block is the
SecurityContext, which may contain an Authentication (and when a
user is logged in it is an Authentication that is explicitly
authenticated). You can always access and manipulate the
SecurityContext through static convenience methods in
SecurityContextHolder, which, in turn, manipulate a
ThreadLocal. The following example shows such an arrangement:
SecurityContext context = SecurityContextHolder.getContext();
Authentication authentication = context.getAuthentication();
assert(authentication.isAuthenticated);
It is not common for user application code to do this, but it can be
useful if you, for instance, need to write a custom authentication
filter (although, even then, there are base classes in Spring Security
that you can use so that you could avoid needing to use the
SecurityContextHolder).
If you need access to the currently authenticated user in a web
endpoint, you can use a method parameter in a @RequestMapping, as follows:
@RequestMapping("/foo")
public String foo(@AuthenticationPrincipal User user) {
  ... // do stuff with user
}
This annotation pulls the current Authentication out of the
SecurityContext and calls the getPrincipal() method on it to yield
the method parameter. The type of the Principal in an
Authentication is dependent on the AuthenticationManager used to
validate the authentication, so this can be a useful little trick to get a type-safe reference to your user data.
If Spring Security is in use, the Principal from the
HttpServletRequest is of type Authentication, so you can also
use that directly:
@RequestMapping("/foo")
public String foo(Principal principal) {
  Authentication authentication = (Authentication) principal;
  User = (User) authentication.getPrincipal();
  ... // do stuff with user
}
This can sometimes be useful if you need to write code that works when
Spring Security is not in use (you would need to be more defensive
about loading the Authentication class).
Processing Secure Methods Asynchronously
Since the SecurityContext is thread-bound, if you want to do any
background processing that calls secure methods (for example, with @Async),
you need to ensure that the context is propagated. This boils down to
wrapping the SecurityContext with the task (Runnable,
Callable, and so on) that is executed in the background. Spring Security
provides some helpers to make this easier, such as wrappers for
Runnable and Callable. To propagate the SecurityContext to
@Async methods, you need to supply an AsyncConfigurer and ensure
the Executor is of the correct type:
@Configuration
public class ApplicationConfiguration extends AsyncConfigurerSupport {

  @Override
  public Executor getAsyncExecutor() {
    return new DelegatingSecurityContextExecutorService(Executors.newFixedThreadPool(5));
  }

}
Last updated: December 29, 2022
I just announced the new Learn Spring Security course, including the full material focused on the new OAuth2 stack in Spring Security 5:
>> CHECK OUT THE COURSE
I just announced the new Learn Spring Security course, including the full material focused on the new OAuth2 stack in Spring Security 5:
>> CHECK OUT THE COURSE
Comments are closed on this article!
Disclaimer: Spring Security 5+ has released OAuth JWT support. Using the latest version of OAuth for JWT support is recommended over the use of custom security or filters.
Spring is considered a trusted framework in the Java ecosystem and is widely used. It’s no longer valid to refer to Spring as a framework, as it’s more of an umbrella term that covers various frameworks. One of these frameworks is Spring Security, which is a powerful and customizable authentication and authorization framework. It is considered the de facto standard for securing Spring-based applications, so if you’re looking to implement a Spring JWT token solution, it makes sense to base it on Spring Security.
Despite its popularity, I must admit that when it comes to single-page applications, Spring’s not simple and straightforward to configure. I suspect the reason is that it started more as an MVC application-oriented framework, where webpage rendering happens on the server-side and communication is session-based.
If the back end is based on Java and Spring, it makes sense to use Spring Security with JWT for authentication/authorization and configure it for stateless communication. While there are a lot of articles explaining how this is done, for me, it was still frustrating to set it up for the first time, and I had to read and sum up information from multiple sources. That’s why I decided to write this Spring Security tutorial, where I will try to summarize and cover all the required subtle details and foibles you may encounter during the configuration process.
Defining Terminology
Before diving into the technical details, I want to explicitly define the terminology used in the Spring Security context just to be sure that we all speak the same language.
These are the terms we need to address:
- Authentication refers to the process of verifying the identity of a user, based on provided credentials. A common example is entering a username and a password when you log in to a website. You can think of it as an answer to the question Who are you?.
- Authorization refers to the process of determining if a user has proper permission to perform a particular action or read particular data, assuming that the user is successfully authenticated. You can think of it as an answer to the question Can a user do/read this?.
- Principle refers to the currently authenticated user.
- Granted authority refers to the permission of the authenticated user.
- Role refers to a group of permissions of the authenticated user.
Creating a Basic Spring Application
Before moving to the configuration of the Spring Security framework, let’s create a basic Spring web application. For this, we can use a Spring Initializr and generate a template project. For a simple web application, only a Spring web framework dependency is enough:
<dependencies>
    <dependency>
        <groupId>org.springframework.boot</groupId>
        <artifactId>spring-boot-starter-web</artifactId>
    </dependency>
</dependencies>
Once we have created the project, we can add a simple REST controller to it as follows:
@RestController @RequestMapping("hello")
public class HelloRestController {

    @GetMapping("user")
    public String helloUser() {
        return "Hello User";
    }

    @GetMapping("admin")
    public String helloAdmin() {
        return "Hello Admin";
    }

}
After this, if we build and run the project, we can access the following URLs in the web browser:
-
http://localhost:8080/hello/userwill return the stringHello User. -
http://localhost:8080/hello/adminwill return the stringHello Admin.
Now, we can add the Spring Security framework to our project, and we can do this by adding the following dependency to our pom.xml file:
<dependencies>
    <dependency>
      <groupId>org.springframework.boot</groupId>
      <artifactId>spring-boot-starter-security</artifactId>
    </dependency>
</dependencies>
Adding other Spring framework dependencies doesn’t normally have an immediate effect on an application until we provide the corresponding configuration, but Spring Security is different in that it does have an immediate effect, and this usually confuses new users. After adding it, if we rebuild and run the project and then try to access one of the aforementioned URLs instead of viewing the result, we will be redirected to http://localhost:8080/login. This is default behavior because the Spring Security framework requires authentication out of the box for all URLs.
To pass the authentication, we can use the default username user and find an auto-generated password in our console:
Using generated security password: 1fc15145-dfee-4bec-a009-e32ca21c77ce
Please remember that the password changes each time we rerun the application. If we want to change this behavior and make the password static, we can add the following configuration to our application.properties file:
spring.security.user.password=Test12345_
Now, if we enter credentials in the login form, we will be redirected back to our URL and we will see the correct result. Please note that the out-of-the-box authentication process is session-based, and if we want to log out, we can access the following URL: http://localhost:8080/logout
This out-of-the-box behavior may be useful for classic MVC web applications where we have session-based authentication, but in the case of single-page applications, it’s usually not useful because in most use cases, we have client-side rendering and JWT-based stateless authentication. In this case, we will have to heavily customize the Spring Security framework, which we will do in the remainder of the article.
As an example, we will implement a classic bookstore web application and create a back end that will provide CRUD APIs to create authors and books plus APIs for user management and authentication.
Spring Security Architecture Overview
Before we start customizing the configuration, let’s first discuss how Spring Security authentication works behind the scenes.
The following diagram presents the flow and shows how authentication requests are processed:
Spring Security Architecture
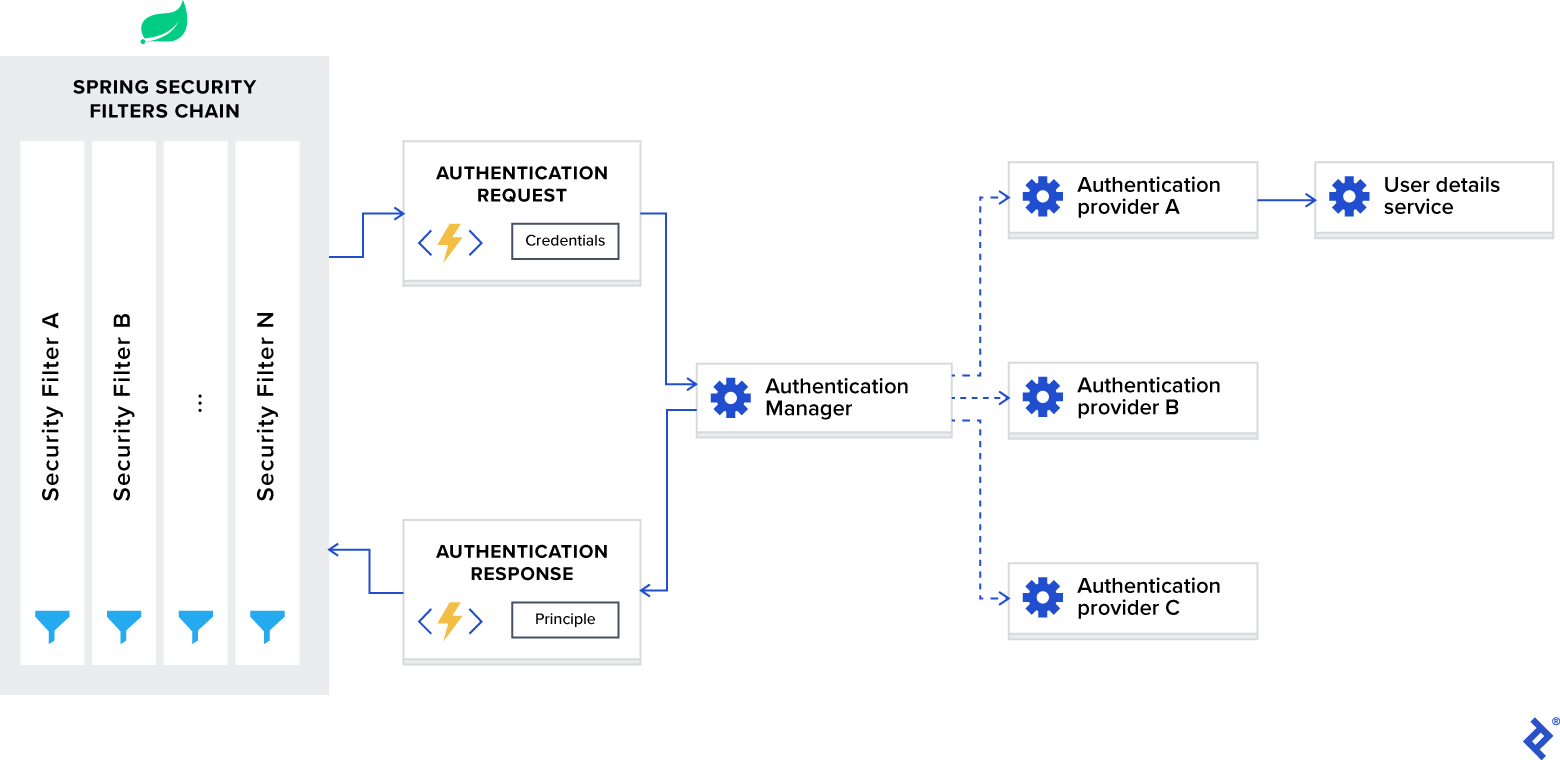
Now, let’s break down this diagram into components and discuss each of them separately.
Spring Security Filters Chain
When you add the Spring Security framework to your application, it automatically registers a filters chain that intercepts all incoming requests. This chain consists of various filters, and each of them handles a particular use case.
For example:
- Check if the requested URL is publicly accessible, based on configuration.
- In case of session-based authentication, check if the user is already authenticated in the current session.
- Check if the user is authorized to perform the requested action, and so on.
One important detail I want to mention is that Spring Security filters are registered with the lowest order and are the first filters invoked. For some use cases, if you want to put your custom filter in front of them, you will need to add padding to their order. This can be done with the following configuration:
spring.security.filter.order=10
Once we add this configuration to our application.properties file, we will have space for 10 custom filters in front of the Spring Security filters.
AuthenticationManager
You can think of AuthenticationManager as a coordinator where you can register multiple providers, and based on the request type, it will deliver an authentication request to the correct provider.
AuthenticationProvider
AuthenticationProvider processes specific types of authentication. Its interface exposes only two functions:
-
authenticateperforms authentication with the request. -
supportschecks if this provider supports the indicated authentication type.
One important implementation of the interface that we are using in our sample project is DaoAuthenticationProvider, which retrieves user details from a UserDetailsService.
UserDetailsService
UserDetailsService is described as a core interface that loads user-specific data in the Spring documentation.
In most use cases, authentication providers extract user identity information based on credentials from a database and then perform validation. Because this use case is so common, Spring developers decided to extract it as a separate interface, which exposes the single function:
-
loadUserByUsernameaccepts username as a parameter and returns the user identity object.
Authentication Using JWT with Spring Security
After discussing the internals of the Spring Security framework, let’s configure it for stateless authentication with a JWT token.
To customize Spring Security for JWT use, we need a configuration class annotated with @EnableWebSecurity annotation in our classpath. Also, to simplify the customization process, the framework exposes a WebSecurityConfigurerAdapter class. We will extend this adapter and override both of its functions so as to:
- Configure the authentication manager with the correct provider
- Configure web security (public URLs, private URLs, authorization, etc.)
@EnableWebSecurity
public class SecurityConfig extends WebSecurityConfigurerAdapter {

    @Override
    protected void configure(AuthenticationManagerBuilder auth) throws Exception {
        // TODO configure authentication manager
    }

    @Override
    protected void configure(HttpSecurity http) throws Exception {
        // TODO configure web security
    }

}
In our sample application, we store user identities in a MongoDB database, in the users collection. These identities are mapped by the User entity, and their CRUD operations are defined by the UserRepo Spring Data repository.
Now, when we accept the authentication request, we need to retrieve the correct identity from the database using the provided credentials and then verify it. For this, we need the implementation of the UserDetailsService interface, which is defined as follows:
public interface UserDetailsService {

    UserDetails loadUserByUsername(String username)
            throws UsernameNotFoundException;

}
Here, we can see that it is required to return the object that implements the UserDetails interface, and our User entity implements it (for implementation details, please see the sample project’s repository). Considering the fact that it exposes only the single-function prototype, we can treat it as a functional interface and provide implementation as a lambda expression.
@EnableWebSecurity
public class SecurityConfig extends WebSecurityConfigurerAdapter {

    private final UserRepo userRepo;

    public SecurityConfig(UserRepo userRepo) {
        this.userRepo = userRepo;
    }

    @Override
    protected void configure(AuthenticationManagerBuilder auth) throws Exception {
        auth.userDetailsService(username -> userRepo
            .findByUsername(username)
            .orElseThrow(
                () -> new UsernameNotFoundException(
                    format("User: %s, not found", username)
                )
            ));
    }

    // Details omitted for brevity

}
Here, the auth.userDetailsService function call will initiate the DaoAuthenticationProvider instance using our implementation of the UserDetailsService interface and register it in the authentication manager.
Along with the authentication provider, we need to configure an authentication manager with the correct password-encoding schema that will be used for credentials verification. For this, we need to expose the preferred implementation of the PasswordEncoder interface as a bean.
In our sample project, we will use the bcrypt password-hashing algorithm.
@EnableWebSecurity
public class SecurityConfig extends WebSecurityConfigurerAdapter {

    private final UserRepo userRepo;

    public SecurityConfig(UserRepo userRepo) {
        this.userRepo = userRepo;
    }

    @Override
    protected void configure(AuthenticationManagerBuilder auth) throws Exception {
        auth.userDetailsService(username -> userRepo
            .findByUsername(username)
            .orElseThrow(
                () -> new UsernameNotFoundException(
                    format("User: %s, not found", username)
                )
            ));
    }

    @Bean
    public PasswordEncoder passwordEncoder() {
        return new BCryptPasswordEncoder();
    }

    // Details omitted for brevity

}
Having configured the authentication manager, we now need to configure web security. We are implementing a REST API and need stateless authentication with a JWT token; therefore, we need to set the following options:
- Enable CORS and disable CSRF.
- Set session management to stateless.
- Set unauthorized requests exception handler.
- Set permissions on endpoints.
- Add JWT token filter.
This configuration is implemented as follows:
@EnableWebSecurity
public class SecurityConfig extends WebSecurityConfigurerAdapter {

    private final UserRepo userRepo;
    private final JwtTokenFilter jwtTokenFilter;

    public SecurityConfig(UserRepo userRepo,
                          JwtTokenFilter jwtTokenFilter) {
        this.userRepo = userRepo;
        this.jwtTokenFilter = jwtTokenFilter;
    }

    // Details omitted for brevity

    @Override
    protected void configure(HttpSecurity http) throws Exception {
        // Enable CORS and disable CSRF
        http = http.cors().and().csrf().disable();

        // Set session management to stateless
        http = http
            .sessionManagement()
            .sessionCreationPolicy(SessionCreationPolicy.STATELESS)
            .and();

        // Set unauthorized requests exception handler
        http = http
            .exceptionHandling()
            .authenticationEntryPoint(
                (request, response, ex) -> {
                    response.sendError(
                        HttpServletResponse.SC_UNAUTHORIZED,
                        ex.getMessage()
                    );
                }
            )
            .and();

        // Set permissions on endpoints
        http.authorizeRequests()
            // Our public endpoints
            .antMatchers("/api/public/**").permitAll()
            .antMatchers(HttpMethod.GET, "/api/author/**").permitAll()
            .antMatchers(HttpMethod.POST, "/api/author/search").permitAll()
            .antMatchers(HttpMethod.GET, "/api/book/**").permitAll()
            .antMatchers(HttpMethod.POST, "/api/book/search").permitAll()
            // Our private endpoints
            .anyRequest().authenticated();

        // Add JWT token filter
        http.addFilterBefore(
            jwtTokenFilter,
            UsernamePasswordAuthenticationFilter.class
        );
    }

    // Used by Spring Security if CORS is enabled.
    @Bean
    public CorsFilter corsFilter() {
        UrlBasedCorsConfigurationSource source =
            new UrlBasedCorsConfigurationSource();
        CorsConfiguration config = new CorsConfiguration();
        config.setAllowCredentials(true);
        config.addAllowedOrigin("*");
        config.addAllowedHeader("*");
        config.addAllowedMethod("*");
        source.registerCorsConfiguration("/**", config);
        return new CorsFilter(source);
    }

}
Please note that we added the JwtTokenFilter before the Spring Security internal UsernamePasswordAuthenticationFilter. We’re doing this because we need access to the user identity at this point to perform authentication/authorization, and its extraction happens inside the JWT token filter based on the provided JWT token. This is implemented as follows:
@Component
public class JwtTokenFilter extends OncePerRequestFilter {

    private final JwtTokenUtil jwtTokenUtil;
    private final UserRepo userRepo;

    public JwtTokenFilter(JwtTokenUtil jwtTokenUtil,
                          UserRepo userRepo) {
        this.jwtTokenUtil = jwtTokenUtil;
        this.userRepo = userRepo;
    }

    @Override
    protected void doFilterInternal(HttpServletRequest request,
                                    HttpServletResponse response,
                                    FilterChain chain)
            throws ServletException, IOException {
        // Get authorization header and validate
        final String header = request.getHeader(HttpHeaders.AUTHORIZATION);
        if (isEmpty(header) || !header.startsWith("Bearer ")) {
            chain.doFilter(request, response);
            return;
        }

        // Get jwt token and validate
        final String token = header.split(" ")[1].trim();
        if (!jwtTokenUtil.validate(token)) {
            chain.doFilter(request, response);
            return;
        }

        // Get user identity and set it on the spring security context
        UserDetails userDetails = userRepo
            .findByUsername(jwtTokenUtil.getUsername(token))
            .orElse(null);

        UsernamePasswordAuthenticationToken
            authentication = new UsernamePasswordAuthenticationToken(
                userDetails, null,
                userDetails == null ?
                    List.of() : userDetails.getAuthorities()
            );

        authentication.setDetails(
            new WebAuthenticationDetailsSource().buildDetails(request)
        );

        SecurityContextHolder.getContext().setAuthentication(authentication);
        chain.doFilter(request, response);
    }

}
Before implementing our login API function, we need to take care of one more step — we need access to the authentication manager. By default, it’s not publicly accessible, and we need to explicitly expose it as a bean in our configuration class.
This can be done as follows:
@EnableWebSecurity
public class SecurityConfig extends WebSecurityConfigurerAdapter {

    // Details omitted for brevity

    @Override @Bean
    public AuthenticationManager authenticationManagerBean() throws Exception {
        return super.authenticationManagerBean();
    }

}
And now, we are ready to implement our login API function:
@Api(tags = "Authentication")
@RestController @RequestMapping(path = "api/public")
public class AuthApi {

    private final AuthenticationManager authenticationManager;
    private final JwtTokenUtil jwtTokenUtil;
    private final UserViewMapper userViewMapper;

    public AuthApi(AuthenticationManager authenticationManager,
                   JwtTokenUtil jwtTokenUtil,
                   UserViewMapper userViewMapper) {
        this.authenticationManager = authenticationManager;
        this.jwtTokenUtil = jwtTokenUtil;
        this.userViewMapper = userViewMapper;
    }

    @PostMapping("login")
    public ResponseEntity<UserView> login(@RequestBody @Valid AuthRequest request) {
        try {
            Authentication authenticate = authenticationManager
                .authenticate(
                    new UsernamePasswordAuthenticationToken(
                        request.getUsername(), request.getPassword()
                    )
                );

            User user = (User) authenticate.getPrincipal();

            return ResponseEntity.ok()
                .header(
                    HttpHeaders.AUTHORIZATION,
                    jwtTokenUtil.generateAccessToken(user)
                )
                .body(userViewMapper.toUserView(user));
        } catch (BadCredentialsException ex) {
            return ResponseEntity.status(HttpStatus.UNAUTHORIZED).build();
        }
    }

}
Here, we verify the provided credentials using the authentication manager, and in case of success, we generate the JWT token and return it as a response header along with the user identity information in the response body.
In the previous section, we set up a Spring JWT authentication process and configured public/private URLs. This may be enough for simple applications, but for most real-world use cases, we always need role-based access policies for our users. In this chapter, we will address this issue and set up a role-based authorization schema using the Spring Security framework.
In our sample application, we have defined the following three roles:
-
USER_ADMINallows us to manage application users. -
AUTHOR_ADMINallows us to manage authors. -
BOOK_ADMINallows us to manage books.
Now, we need to apply them to the corresponding URLs:
-
api/publicis publicly accessible. -
api/admin/usercan access users with theUSER_ADMINrole. -
api/authorcan access users with theAUTHOR_ADMINrole. -
api/bookcan access users with theBOOK_ADMINrole.
The Spring Security framework provides us with two options to set up the authorization schema:
- URL-based configuration
- Annotation-based configuration
First, let’s see how URL-based configuration works. It can be applied to the web security configuration as follows:
@EnableWebSecurity
public class SecurityConfig extends WebSecurityConfigurerAdapter {

    // Details omitted for brevity

    @Override
    protected void configure(HttpSecurity http) throws Exception {
        // Enable CORS and disable CSRF
        http = http.cors().and().csrf().disable();

        // Set session management to stateless
        http = http
            .sessionManagement()
            .sessionCreationPolicy(SessionCreationPolicy.STATELESS)
            .and();

        // Set unauthorized requests exception handler
        http = http
            .exceptionHandling()
            .authenticationEntryPoint(
                (request, response, ex) -> {
                    response.sendError(
                        HttpServletResponse.SC_UNAUTHORIZED,
                        ex.getMessage()
                    );
                }
            )
            .and();

        // Set permissions on endpoints
        http.authorizeRequests()
            // Our public endpoints
            .antMatchers("/api/public/**").permitAll()
            .antMatchers(HttpMethod.GET, "/api/author/**").permitAll()
            .antMatchers(HttpMethod.POST, "/api/author/search").permitAll()
            .antMatchers(HttpMethod.GET, "/api/book/**").permitAll()
            .antMatchers(HttpMethod.POST, "/api/book/search").permitAll()
            // Our private endpoints
            .antMatchers("/api/admin/user/**").hasRole(Role.USER_ADMIN)
            .antMatchers("/api/author/**").hasRole(Role.AUTHOR_ADMIN)
            .antMatchers("/api/book/**").hasRole(Role.BOOK_ADMIN)
            .anyRequest().authenticated();

        // Add JWT token filter
        http.addFilterBefore(
            jwtTokenFilter,
            UsernamePasswordAuthenticationFilter.class
        );
    }

    // Details omitted for brevity

}
As you can see, this approach is simple and straightforward, but it has one downside. The authorization schema in our application can be complex, and if we define all the rules in a single place, it will become very big, complex, and hard to read. Because of this, I usually prefer to use annotation-based configuration.
The Spring Security framework defines the following annotations for web security:
-
@PreAuthorizesupports Spring Expression Language and is used to provide expression-based access control before executing the method. -
@PostAuthorizesupports Spring Expression Language and is used to provide expression-based access control after executing the method (provides the ability to access the method result). -
@PreFiltersupports Spring Expression Language and is used to filter the collection or arrays before executing the method based on custom security rules we define. -
@PostFiltersupports Spring Expression Language and is used to filter the returned collection or arrays after executing the method based on custom security rules we define (provides the ability to access the method result). -
@Secureddoesn’t support Spring Expression Language and is used to specify a list of roles on a method. -
@RolesAlloweddoesn’t support Spring Expression Language and is the JSR 250’s equivalent annotation of the@Securedannotation.
These annotations are disabled by default and can be enabled in our application as follows:
@EnableWebSecurity
@EnableGlobalMethodSecurity(
    securedEnabled = true,
    jsr250Enabled = true,
    prePostEnabled = true
)
public class SecurityConfig extends WebSecurityConfigurerAdapter {

    // Details omitted for brevity

}
securedEnabled = true enables @Secured annotation.
jsr250Enabled = true enables @RolesAllowed annotation.
prePostEnabled = true enables @PreAuthorize, @PostAuthorize, @PreFilter, @PostFilter annotations.
After enabling them, we can enforce role-based access policies on our API endpoints like this:
@Api(tags = "UserAdmin")
@RestController @RequestMapping(path = "api/admin/user")
@RolesAllowed(Role.USER_ADMIN)
public class UserAdminApi {

	// Details omitted for brevity

}

@Api(tags = "Author")
@RestController @RequestMapping(path = "api/author")
public class AuthorApi {

	// Details omitted for brevity

	@RolesAllowed(Role.AUTHOR_ADMIN)
	@PostMapping
	public void create() { }

	@RolesAllowed(Role.AUTHOR_ADMIN)
	@PutMapping("{id}")
	public void edit() { }

	@RolesAllowed(Role.AUTHOR_ADMIN)
	@DeleteMapping("{id}")
	public void delete() { }

	@GetMapping("{id}")
	public void get() { }

	@GetMapping("{id}/book")
	public void getBooks() { }

	@PostMapping("search")
	public void search() { }

}

@Api(tags = "Book")
@RestController @RequestMapping(path = "api/book")
public class BookApi {

	// Details omitted for brevity

	@RolesAllowed(Role.BOOK_ADMIN)
	@PostMapping
	public BookView create() { }

	@RolesAllowed(Role.BOOK_ADMIN)
	@PutMapping("{id}")
	public void edit() { }

	@RolesAllowed(Role.BOOK_ADMIN)
	@DeleteMapping("{id}")
	public void delete() { }

	@GetMapping("{id}")
	public void get() { }

	@GetMapping("{id}/author")
	public void getAuthors() { }

	@PostMapping("search")
	public void search() { }

}
Please note that security annotations can be provided both on the class level and the method level.
The demonstrated examples are simple and do not represent real-world scenarios, but Spring Security provides a rich set of annotations, and you can handle a complex authorization schema if you choose to use them.
Role Name Default Prefix
In this separate subsection, I want to emphasize one more subtle detail that confuses a lot of new users.
The Spring Security framework differentiates two terms:
-
Authorityrepresents an individual permission. -
Rolerepresents a group of permissions.
Both can be represented with a single interface called GrantedAuthority and later checked with Spring Expression Language inside the Spring Security annotations as follows:
-
Authority: @PreAuthorize(“hasAuthority(‘EDIT_BOOK’)”) -
Role: @PreAuthorize(“hasRole(‘BOOK_ADMIN’)”)
To make the difference between these two terms more explicit, the Spring Security framework adds a ROLE_ prefix to the role name by default. So, instead of checking for a role named BOOK_ADMIN, it will check for ROLE_BOOK_ADMIN.
Personally, I find this behavior confusing and prefer to disable it in my applications. It can be disabled inside the Spring Security configuration as follows:
@EnableWebSecurity
public class SecurityConfig extends WebSecurityConfigurerAdapter {

    // Details omitted for brevity

    @Bean
    GrantedAuthorityDefaults grantedAuthorityDefaults() {
        return new GrantedAuthorityDefaults(""); // Remove the ROLE_ prefix
    }

}
Testing Our Spring Security JWT Solution
To test our endpoints with unit or integration tests when using the Spring Security framework, we need to add spring-security-test dependency along with the spring-boot-starter-test. Our pom.xml build file will look like this:
<dependency>
    <groupId>org.springframework.boot</groupId>
    <artifactId>spring-boot-starter-test</artifactId>
    <scope>test</scope>
    <exclusions>
        <exclusion>
            <groupId>org.junit.vintage</groupId>
            <artifactId>junit-vintage-engine</artifactId>
        </exclusion>
    </exclusions>
</dependency>

<dependency>
    <groupId>org.springframework.security</groupId>
    <artifactId>spring-security-test</artifactId>
    <scope>test</scope>
</dependency>
This dependency gives us access to some annotations that can be used to add security context to our test functions.
These annotations are:
-
@WithMockUsercan be added to a test method to emulate running with a mocked user. -
@WithUserDetailscan be added to a test method to emulate running withUserDetailsreturned from theUserDetailsService. -
@WithAnonymousUsercan be added to a test method to emulate running with an anonymous user. This is useful when a user wants to run a majority of tests as a specific user and override a few methods to be anonymous. -
@WithSecurityContextdetermines whatSecurityContextto use, and all three annotations described above are based on it. If we have a specific use case, we can create our own annotation that uses@WithSecurityContextto create anySecurityContextwe want. Its discussion is outside the scope of our Spring Security tutorial, and please refer to the Spring Security documentation for further details.
The easiest way to run the tests with a specific user is to use the @WithMockUser annotation. We can create a mock user with it and run the test as follows:
@Test @WithMockUser(username="customUsername@example.io", roles={"USER_ADMIN"})
public void test() {
	// Details omitted for brevity
}
This approach has a couple of drawbacks, though. First, the mock user doesn’t exist, and if you run the integration test, which later queries the user information from the database, the test will fail. Second, the mock user is the instance of the org.springframework.security.core.userdetails.User class, which is the Spring framework’s internal implementation of the UserDetails interface, and if we have our own implementation, this can cause conflicts later, during test execution.
If previous drawbacks are blockers for our application, then the @WithUserDetails annotation is the way to go. It is used when we have custom UserDetails and UserDetailsService implementations. It assumes that the user exists, so we have to either create the actual row in the database or provide the UserDetailsService mock instance before running tests.
This is how we can use this annotation:
@Test @WithUserDetails("customUsername@example.io")
public void test() {
	// Details omitted for brevity
}
This is a preferred annotation in our sample project’s integration tests because we have custom implementations of the aforementioned interfaces.
Using @WithAnonymousUser allows running as an anonymous user. This is especially convenient when you wish to run most tests with a specific user but a few tests as an anonymous user. For example, the following will run test1 and test2 test cases with a mock user and test3 with an anonymous user:
@SpringBootTest
@AutoConfigureMockMvc
@WithMockUser
public class WithUserClassLevelAuthenticationTests {

    @Test
    public void test1() {
        // Details omitted for brevity
    }

    @Test
    public void test2() {
        // Details omitted for brevity
    }

    @Test @WithAnonymousUser
    public void test3() throws Exception {
        // Details omitted for brevity
    }
}
Conquering the Spring Security JWT Learning Curve
In the end, I would like to mention that the Spring Security framework probably won’t win any beauty contest and it definitely has a steep learning curve. I have encountered many situations where it was replaced with some homegrown solution due to its initial configuration complexity. But once developers understand its internals and manage to set up the initial configuration, it becomes relatively straightforward to use.
In this Spring Security tutorial, I tried to demonstrate all the subtle details of the configuration, and I hope you will find the examples useful. For complete code examples, please refer to the Git repository of my sample Spring Security project.
Understanding the basics
-
What is Spring Security?
Spring Security is a powerful and highly customizable authentication and authorization framework. It is the de facto standard for securing Spring-based applications.
-
How do I use Spring Security with REST API?
Out of the box, Spring Security comes with session-based authentication, which is useful for classic MVC web applications, but we can configure it to support JWT-based stateless authentication for REST APIs.
-
How secure is Spring Security?
Spring Security is quite secure. It integrates easily with Spring-based applications, supports many types of authentication out of the box, and is capable of declarative security programming.
-
Why is Spring Security used?
Because it integrates seamlessly with other Spring ecosystems, and many developers prefer to reuse existing solutions rather than reinvent the wheel.
-
What is JWT?
JSON Web Token (JWT) is a standard for encoding information that may be securely transmitted as a JSON object.
-
How does JWT work with Spring Security?
We expose a public POST API for the authentication, and upon passing the correct credentials, it will generate a JWT. If a user tries to access the protected API, it will allow access only if a request has a valid JWT. Validation will happen in the filter registered in the Spring Security filter chain.
You can use this guide to understand what Spring Security is and how its core features like authentication, authorization or common exploit protection work. Also, a comprehensive FAQ.
(Editor’s note: At ~6500 words, you probably don’t want to try reading this on a mobile device. Bookmark it and come back later.)
Introduction
Sooner or later everyone needs to add security to his project and in the Spring ecosystem you do that with the help of the Spring Security library.
So you go along, add Spring Security to your Spring Boot (or plain Spring) project and suddenly…
-
…you have auto-generated login-pages.
-
…you cannot execute POST requests anymore.
-
…your whole application is on lockdown and prompts you to enter a username and password.
Having survived the subsequent mental breakdown, you might be interested in how all of this works.
What is Spring Security and how does it work?
The short answer:
At its core, Spring Security is really just a bunch of servlet filters that help you add authentication and authorization to your web application.
It also integrates well with frameworks like Spring Web MVC (or Spring Boot), as well as with standards like OAuth2 or SAML. And it auto-generates login/logout pages and protects against common exploits like CSRF.
Now, that doesn’t really help, does it?
Luckily, there’s also a long answer:
The remainder of this article.
Web Application Security: 101
Before you become a Spring Security Guru, you need to understand three important concepts:
-
Authentication
-
Authorization
-
Servlet Filters
Parental Advice: Don’t skip this section, as it is the basis for everything that Spring Security does. Also, I’ll make it as interesting as possible.
1. Authentication
First off, if you are running a typical (web) application, you need your users to authenticate. That means your application needs to verify if the user is who he claims to be, typically done with a username and password check.
User: «I’m the president of the United States. My username is: potus!»
Your webapp: «Sure sure, what’s your password then, Mr. President?»
User: «My password is: th3don4ld».
Your webapp: «Correct. Welcome, Sir!»
2. Authorization
In simpler applications, authentication might be enough: As soon as a user authenticates, she can access every part of an application.
But most applications have the concept of permissions (or roles). Imagine: customers who have access to the public-facing frontend of your webshop, and administrators who have access to a separate admin area.
Both type of users need to login, but the mere fact of authentication doesn’t say anything about what they are allowed to do in your system. Hence, you also need to check the permissions of an authenticated user, i.e. you need to authorize the user.
User: «Let me play with that nuclear football….»
Your webapp: «One second, I need to check your permissions first…..yes Mr. President, you have the right clearance level. Enjoy.»
User: «What was that red button again…??»
3. Servlet Filters
Last but not least, let’s have a look at Servlet Filters. What do they have to do with authentication and authorization? (If you are completely new to Java Servlets or Filters, I advise you to read the old, but still very valid Head First Servlets book.)
Why use Servlet Filters?
Think back to my other article, where we found out that basically any Spring web application is just one servlet: Spring’s good old DispatcherServlet, that redirects incoming HTTP requests (e.g. from a browser) to your @Controllers or @RestControllers.
The thing is: There is no security hardcoded into that DispatcherServlet and you also very likely don’t want to fumble around with a raw HTTP Basic Auth header in your @Controllers. Optimally, the authentication and authorization should be done before a request hits your @Controllers.
Luckily, there’s a way to do exactly this in the Java web world: you can put filters in front of servlets, which means you could think about writing a SecurityFilter and configure it in your Tomcat (servlet container/application server) to filter every incoming HTTP request before it hits your servlet.
+-------------------------------+           +-----------------------------------+
| Browser                       |           | SecurityFilter (Tomcat)           |
|-------------------------------|           |-----------------------------------|
|                               |           |                                   |
| https://my.bank/account       |  -------> | Check if user is authenticated/   |
|                               |           |    1. authenticated               |
|                               |           |    2. authorized                  |
|                               |           |                                   |
|                               |           | -- if false: HTTP 401/403         |  ---------> +-----------------------------------+
|                               |           | -- if true:  continue to servlet  |             | DispatcherServlet (Tomcat)        |
|                               |           |                                   |             | @RestController/@Controller       |
|                               |           +-----------------------------------+             +-----------------------------------+
+-------------------------------+
Enter fullscreen mode
Exit fullscreen mode
A naive SecurityFilter
A SecurityFilter has roughly 4 tasks and a naive and overly-simplified implementation could look like this:
    import javax.servlet.*;
    import javax.servlet.http.HttpFilter;
    import javax.servlet.http.HttpServletRequest;
    import javax.servlet.http.HttpServletResponse;
    import java.io.IOException;

    public class SecurityServletFilter extends HttpFilter {

        @Override
        protected void doFilter(HttpServletRequest request, HttpServletResponse response, FilterChain chain) throws IOException, ServletException {

            UsernamePasswordToken token = extractUsernameAndPasswordFrom(request);

            if (notAuthenticated(token)) {
                // either no or wrong username/password
                // unfortunately the HTTP status code is called "unauthorized", instead of "unauthenticated"
                response.setStatus(HttpServletResponse.SC_UNAUTHORIZED); // HTTP 401.
                return;
            }

            if (notAuthorized(token, request)) {
                // you are logged in, but don't have the proper rights
                response.setStatus(HttpServletResponse.SC_FORBIDDEN); // HTTP 403
                return;
            }

            // allow the HttpRequest to go to Spring's DispatcherServlet
            // and @RestControllers/@Controllers.
            chain.doFilter(request, response);
        }

        private UsernamePasswordToken extractUsernameAndPasswordFrom(HttpServletRequest request) {
            // Either try and read in a Basic Auth HTTP Header, which comes in the form of user:password
            // Or try and find form login request parameters or POST bodies, i.e. "username=me" & "password="myPass"
            return checkVariousLoginOptions(request);
        }


        private boolean notAuthenticated(UsernamePasswordToken token) {
            // compare the token with what you have in your database...or in-memory...or in LDAP...
            return false;
        }

        private boolean notAuthorized(UsernamePasswordToken token, HttpServletRequest request) {
           // check if currently authenticated user has the permission/role to access this request's /URI
           // e.g. /admin needs a ROLE_ADMIN , /callcenter needs ROLE_CALLCENTER, etc.
           return false;
        }
    }
Enter fullscreen mode
Exit fullscreen mode
-
First, the filter needs to extract a username/password from the request. It could be via a Basic Auth HTTP Header, or form fields, or a cookie, etc.
-
Then the filter needs to validate that username/password combination against something, like a database.
-
The filter needs to check, after successful authentication, that the user is authorized to access the requested URI.
-
If the request survives all these checks, then the filter can let the request go through to your DispatcherServlet, i.e. your @Controllers.
FilterChains
Reality Check: While the above code works compiles, it would sooner or later lead to one monster filter with a ton of code for various authentication and authorization mechanisms.
In the real-world, however, you would split this one filter up into multiple filters, that you then chain together.
For example, an incoming HTTP request would…
-
First, go through a LoginMethodFilter…
-
Then, go through an AuthenticationFilter…
-
Then, go through an AuthorizationFilter…
-
Finally, hit your servlet.
This concept is called FilterChain and the last method call in your filter above is actually delegating to that very chain:
chain.doFilter(request, response);
Enter fullscreen mode
Exit fullscreen mode
With such a filter (chain) you can basically handle every authentication or authorization problem there is in your application, without needing to change your actual application implementation (think: your @RestControllers / @Controllers).
Armed with that knowledge, let’s find out how Spring Security makes use of this filter magic.
FilterChain & Security Configuration DSL
We’ll start covering Spring Security a bit unconventionally, by going in the reverse direction from the previous chapter, starting with Spring Security’s FilterChain.
Spring’s DefaultSecurityFilterChain
Let’s assume you set up Spring Security correctly and then boot up your web application. You’ll see the following log message:
2020-02-25 10:24:27.875 INFO 11116 --- [ main] o.s.s.web.DefaultSecurityFilterChain : Creating filter chain: any request, [org.springframework.security.web.context.request.async.WebAsyncManagerIntegrationFilter@46320c9a, org.springframework.security.web.context.SecurityContextPersistenceFilter@4d98e41b, org.springframework.security.web.header.HeaderWriterFilter@52bd9a27, org.springframework.security.web.csrf.CsrfFilter@51c65a43, org.springframework.security.web.authentication.logout.LogoutFilter@124d26ba, org.springframework.security.web.authentication.UsernamePasswordAuthenticationFilter@61e86192, org.springframework.security.web.authentication.ui.DefaultLoginPageGeneratingFilter@10980560, org.springframework.security.web.authentication.ui.DefaultLogoutPageGeneratingFilter@32256e68, org.springframework.security.web.authentication.www.BasicAuthenticationFilter@52d0f583, org.springframework.security.web.savedrequest.RequestCacheAwareFilter@5696c927, org.springframework.security.web.servletapi.SecurityContextHolderAwareRequestFilter@5f025000, org.springframework.security.web.authentication.AnonymousAuthenticationFilter@5e7abaf7, org.springframework.security.web.session.SessionManagementFilter@681c0ae6, org.springframework.security.web.access.ExceptionTranslationFilter@15639d09, org.springframework.security.web.access.intercept.FilterSecurityInterceptor@4f7be6c8]|
Enter fullscreen mode
Exit fullscreen mode
If you expand that one line into a list, it looks like Spring Security does not just install one filter, instead it installs a whole filter chain consisting of 15 (!) different filters.
So, when an HTTPRequest comes in, it will go through all these 15 filters, before your request finally hits your @RestControllers. The order is important, too, starting at the top of that list and going down to the bottom.
+----------------------------------+           +----------------------------------------+          +---------------------------------------+
| Browser HTTP Request             |---------> | SecurityContextPersistenceFilter       | -------> | HeaderWriterFilter                    | ----->
+----------------------------------+           +----------------------------------------+          +---------------------------------------+

+----------------------------------+           +----------------------------------------+          +---------------------------------------+
| CsrfFilter                       |---------> |            LogoutFilter                | -------> | UsernamePasswordAuthenticationFilter  | ----->
+----------------------------------+           +----------------------------------------+          +---------------------------------------+

+----------------------------------+           +----------------------------------------+          +--------------------------------------+
| DefaultLoginPageGeneratingFilter |---------> | DefaultLogoutPageGeneratingFilter      | -------> | BasicAuthenticationFilter            | ----->
+----------------------------------+           +----------------------------------------+          +--------------------------------------+

+----------------------------------+           +----------------------------------------+          +--------------------------------------+
| RequestCacheAwareFilter          |---------> | SecurityContextHolderAwareRequestFilter| -------> | AnonymousAuthenticationFilter        | ----->
+----------------------------------+           +----------------------------------------+          +--------------------------------------+

+----------------------------------+           +----------------------------------------+          +--------------------------------------+
| SessionManagementFilter          |---------> | ExceptionTranslationFilter             | -------> | FilterSecurityInterceptor            | ----->
+----------------------------------+           +----------------------------------------+          +--------------------------------------+

+----------------------------------+
| your @RestController/@Controller |
+----------------------------------+
Enter fullscreen mode
Exit fullscreen mode
Analyzing Spring’s FilterChain
It would go too far to have a detailed look at every filter of this chain, but here’s the explanations for a few of those filters. Feel free to look at Spring Security’s source code to understand the other filters.
-
BasicAuthenticationFilter: Tries to find a Basic Auth HTTP Header on the request and if found, tries to authenticate the user with the header’s username and password.
-
UsernamePasswordAuthenticationFilter: Tries to find a username/password request parameter/POST body and if found, tries to authenticate the user with those values.
-
DefaultLoginPageGeneratingFilter: Generates a login page for you, if you don’t explicitly disable that feature. THIS filter is why you get a default login page when enabling Spring Security.
-
DefaultLogoutPageGeneratingFilter: Generates a logout page for you, if you don’t explicitly disable that feature.
-
FilterSecurityInterceptor: Does your authorization.
So with these couple of filters, Spring Security provides you a login/logout page, as well as the ability to login with Basic Auth or Form Logins, as well as a couple of additional goodies like the CsrfFilter, that we are going to have a look at later.
Half-Time Break: Those filters, for a large part, are Spring Security. Not more, not less. They do all the work. What’s left for you is to configure how they do their work, i.e. which URLs to protect, which to ignore and what database tables to use for authentication.
Hence, we need to have a look at how to configure Spring Security, next.
How to configure Spring Security: WebSecurityConfigurerAdapter
With the latest Spring Security and/or Spring Boot versions, the way to configure Spring Security is by having a class that:
-
Is annotated with @EnableWebSecurity.
-
Extends WebSecurityConfigurer, which basically offers you a configuration DSL/methods. With those methods, you can specify what URIs in your application to protect or what exploit protections to enable/disable.
Here’s what a typical WebSecurityConfigurerAdapter looks like:
    @Configuration
    @EnableWebSecurity
    public class WebSecurityConfig extends WebSecurityConfigurerAdapter {

      @Override
      protected void configure(HttpSecurity http) throws Exception {
          http
            .authorizeRequests()
              .antMatchers("/", "/home").permitAll()
              .anyRequest().authenticated()
              .and()
           .formLogin()
             .loginPage("/login")
             .permitAll()
             .and()
          .logout()
            .permitAll()
            .and()
          .httpBasic();
      }
    }
Enter fullscreen mode
Exit fullscreen mode
-
A normal Spring @Configuration with the @EnableWebSecurity annotation, extending from WebSecurityConfigurerAdapter.
-
By overriding the adapter’s configure(HttpSecurity) method, you get a nice little DSL with which you can configure your FilterChain.
-
All requests going to
/and/homeare allowed (permitted) — the user does not have to authenticate. You are using an antMatcher, which means you could have also used wildcards (*, **, ?) in the string. -
Any other request needs the user to be authenticated first, i.e. the user needs to login.
-
You are allowing form login (username/password in a form), with a custom loginPage (
/login, i.e. not Spring Security’s auto-generated one). Anyone should be able to access the login page, without having to log in first (permitAll; otherwise we would have a Catch-22!). -
The same goes for the logout page
-
On top of that, you are also allowing Basic Auth, i.e. sending in an HTTP Basic Auth Header to authenticate.
How to use Spring Security’s configure DSL
It takes some time getting used to that DSL, but you’ll find more examples in the FAQ section: AntMatchers: Common Examples.
What is important for now, is that THIS configure method is where you specify:
-
What URLs to protect (authenticated()) and which ones are allowed (permitAll()).
-
Which authentication methods are allowed (formLogin(), httpBasic()) and how they are configured.
-
In short: your application’s complete security configuration.
Note: You wouldn’t have needed to immediately override the adapter’s configure method, because it comes with a pretty reasonable implementation — by default. This is what it looks like:
    public abstract class WebSecurityConfigurerAdapter implements
            WebSecurityConfigurer<WebSecurity> {

        protected void configure(HttpSecurity http) throws Exception {
                http
                    .authorizeRequests()
                        .anyRequest().authenticated()
                        .and()
                    .formLogin().and()
                    .httpBasic();
            }
    }
Enter fullscreen mode
Exit fullscreen mode
-
To access any URI (
anyRequest()) on your application, you need to authenticate (authenticated()). -
Form Login (
formLogin()) with default settings is enabled. -
As is HTTP Basic authentication (
httpBasic()).
This default configuration is why your application is on lock-down, as soon as you add Spring Security to it. Simple, isn’t it?
Summary: WebSecurityConfigurerAdapter’s DSL configuration
We learned that Spring Security consists of a couple of filters that you configure with a WebSecurityConfigurerAdapter @Configuration class.
But there’s one crucial piece missing. Let’s take Spring’s BasicAuthFilter for example. It can extract a username/password from an HTTP Basic Auth header, but what does it authenticate these credentials against?
This naturally leads us to the question of how authentication works with Spring Security.
Authentication with Spring Security
When it comes to authentication and Spring Security you have roughly three scenarios:
-
The default: You can access the (encrypted) password of the user, because you have his details (username, password) saved in e.g. a database table.
-
Less common: You cannot access the (encrypted) password of the user. This is the case if your users and passwords are stored somewhere else, like in a 3rd party identity management product offering REST services for authentication. Think: Atlassian Crowd.
-
Also popular: You want to use OAuth2 or «Login with Google/Twitter/etc.» (OpenID), likely in combination with JWT. Then none of the following applies and you should go straight to the OAuth2 chapter.
Note: Depending on your scenario, you need to specify different @beans to get Spring Security working, otherwise you’ll end up getting pretty confusing exceptions (like a NullPointerException if you forgot to specify the PasswordEncoder). Keep that in mind.
Let’s have a look at the top two scenarios.
1. UserDetailsService: Having access to the user’s password
Imagine you have a database table where you store your users. It has a couple of columns, but most importantly it has a username and password column, where you store the user’s encrypted(!) password.
create table users (id int auto_increment primary key, username varchar(255), password varchar(255));
Enter fullscreen mode
Exit fullscreen mode
In this case Spring Security needs you to define two beans to get authentication up and running.
-
A UserDetailsService.
-
A PasswordEncoder.
Specifying a UserDetailsService is as simple as this:
    @Bean
    public UserDetailsService userDetailsService() {
        return new MyDatabaseUserDetailsService();
    }
Enter fullscreen mode
Exit fullscreen mode
- MyDatabaseUserDetailsService implements UserDetailsService, a very simple interface, which consists of one method returning a UserDetails object:
    public class MyDatabaseUserDetailsService implements UserDetailsService {

        UserDetails loadUserByUsername(String username) throws UsernameNotFoundException {
             // 1. Load the user from the users table by username. If not found, throw UsernameNotFoundException.
             // 2. Convert/wrap the user to a UserDetails object and return it.
            return someUserDetails;
        }
    }

    public interface UserDetails extends Serializable {

        String getUsername();

        String getPassword();

        // <3> more methods:
        // isAccountNonExpired,isAccountNonLocked,
        // isCredentialsNonExpired,isEnabled
    }
Enter fullscreen mode
Exit fullscreen mode
-
A UserDetailsService loads UserDetails via the user’s username. Note that the method takes only one parameter: username (not the password).
-
The UserDetails interface has methods to get the (encrypted!) password and one to get the username.
-
UserDetails has even more methods, like is the account active or blocked, have the credentials expired or what permissions the user has — but we won’t cover them here.
So you can either implement these interfaces yourself, like we did above, or use existing ones that Spring Security provides.
Off-The-Shelf Implementations
Just a quick note: You can always implement the UserDetailsService and UserDetails interfaces yourself.
But, you’ll also find off-the-shelf implementations by Spring Security that you can use/configure/extend/override instead.
-
JdbcUserDetailsManager, which is a JDBC(database)-based UserDetailsService. You can configure it to match your user table/column structure.
-
InMemoryUserDetailsManager, which keeps all userdetails in-memory and is great for testing.
-
org.springframework.security.core.userdetail.User, which is a sensible, default UserDetails implementation that you could use. That would mean potentially mapping/copying between your entities/database tables and this user class. Alternatively, you could simply make your entities implement the UserDetails interface.
Full UserDetails Workflow: HTTP Basic Authentication
Now think back to your HTTP Basic Authentication, that means you are securing your application with Spring Security and Basic Auth. This is what happens when you specify a UserDetailsService and try to login:
-
Extract the username/password combination from the HTTP Basic Auth header in a filter. You don’t have to do anything for that, it will happen under the hood.
-
Call your MyDatabaseUserDetailsService to load the corresponding user from the database, wrapped as a UserDetails object, which exposes the user’s encrypted password.
-
Take the extracted password from the HTTP Basic Auth header, encrypt it automatically and compare it with the encrypted password from your UserDetails object. If both match, the user is successfully authenticated.
That’s all there is to it. But hold on, how does Spring Security encrypt the password from the client (step 3)? With what algorithm?
PasswordEncoders
Spring Security cannot magically guess your preferred password encryption algorithm. That’s why you need to specify another @Bean, a PasswordEncoder.
If you want to, say, use BCrypt encryption (Spring Security’s default) for all your passwords, you would specify this @Bean in your SecurityConfig.
    @Bean
    public BCryptPasswordEncoder bCryptPasswordEncoder() {
        return new BCryptPasswordEncoder();
    }
Enter fullscreen mode
Exit fullscreen mode
What if you have multiple password encryption algorithms, because you have some legacy users whose passwords were stored with MD5 (don’t do this), and newer ones with Bcrypt or even a third algorithm like SHA-256? Then you would use the following encoder:
    @Bean
    public PasswordEncoder passwordEncoder() {
        return PasswordEncoderFactories.createDelegatingPasswordEncoder();
    }
Enter fullscreen mode
Exit fullscreen mode
How does this delegating encoder work? It will look at the UserDetail’s encrypted password (coming from e.g. your database table), which now has to start with a {prefix}. That prefix, is your encryption method! Your database table would then look like this:
|
username |
password |
|
|
john@doe.com |
{bcrypt}$2y$12$6t86Rpr3llMANhCUt26oUen2WhvXr/A89Xo9zJion8W7gWgZ/zA0C |
|
|
my@user.com |
{sha256}5ffa39f5757a0dad5dfada519d02c6b71b61ab1df51b4ed1f3beed6abe0ff5f6 |
Users Table
Spring Security will:
-
Read in those passwords and strip off the prefix ( {bcrypt} or {sha256} ).
-
Depending on the prefix value, use the correct PasswordEncoder (i.e. a BCryptEncoder, or a SHA256Encoder)
-
Encrypt the incoming, unencrypted password with that PasswordEncoder and compare it with the stored one.
That’s all there is to PasswordEncoders.
Summary: Having access to the user’s password
The takeaway for this section is: if you are using Spring Security and have access to the user’s password, then:
-
Specify a UserDetailsService. Either a custom implementation or use and configure one that Spring Security offers.
-
Specify a PasswordEncoder.
That is Spring Security authentication in a nutshell.
2. AuthenticationProvider: Not having access to the user’s password
Now, imagine that you are using Atlassian Crowd for centralized identity management. That means all your users and passwords for all your applications are stored in Atlassian Crowd and not in your database table anymore.
This has two implications:
-
You do not have the user passwords anymore in your application, as you cannot ask Crowd to just give you those passwords.
-
You do, however, have a REST API that you can login against, with your username and password. (A POST request to the
/rest/usermanagement/1/authenticationREST endpoint).
If that is the case, you cannot use a UserDetailsService anymore, instead you need to implement and provide an AuthenticationProvider @Bean.
        @Bean
        public AuthenticationProvider authenticationProvider() {
            return new AtlassianCrowdAuthenticationProvider();
        }
Enter fullscreen mode
Exit fullscreen mode
An AuthenticationProvider consists primarily of one method and a naive implementation could look like this:
    public class AtlassianCrowdAuthenticationProvider implements AuthenticationProvider {

            Authentication authenticate(Authentication authentication)
                    throws AuthenticationException {
                String username = authentication.getPrincipal().toString();
                String password = authentication.getCredentials().toString();

                User user = callAtlassianCrowdRestService(username, password);
                if (user == null) {
                    throw new AuthenticationException("could not login");
                }
                return new UserNamePasswordAuthenticationToken(user.getUsername(), user.getPassword(), user.getAuthorities());
            }
            // other method ignored
    }
Enter fullscreen mode
Exit fullscreen mode
-
Compared to the UserDetails load() method, where you only had access to the username, you now have access to the complete authentication attempt, usually containing a username and password.
-
You can do whatever you want to authenticate the user, e.g. call a REST-service.
-
If authentication failed, you need to throw an exception.
-
If authentication succeeded, you need to return a fully initialized UsernamePasswordAuthenticationToken. It is an implementation of the Authentication interface and needs to have the field authenticated be set to true (which the constructor used above will automatically set). We’ll cover authorities in the next chapter.
Full AuthenticationProvider Workflow: HTTP Basic Authentication
Now think back to your HTTP Basic Authentication, that means you are securing your application with Spring Security and Basic Auth. This is what happens when you specify an AuthenticationProvider and try to login:
-
Extract the username/password combination from the HTTP Basic Auth header in a filter. You don’t have to do anything for that, it will happen under the hood.
-
Call your AuthenticationProvider (e.g. AtlassianCrowdAuthenticationProvider) with that username and password for you to do the authentication (e.g. REST call) yourself.
There is no password encryption or similar going on, as you are essentially delegating to a third-party to do the actual username/password check. That’s AuthenticationProvider authentication in a nutshell!
Summary: AuthenticationProvider
The takeaway for this section is: if you are using Spring Security and do not have access to the user’s password, then implement and provide an AuthenticationProvider @Bean.
Authorization with Spring Security
So far, we have only talked about authentication, e.g. username and password checks.
Let’s now have a look at permissions, or rather roles and authorities in Spring Security speak.
What is Authorization?
Take your typical e-commerce web-shop. It likely consists of the following pieces:
-
The web-shop itself. Let’s assume its URL is
www.youramazinshop.com. -
Maybe an area for callcenter agents, where they can login and see what a customer recently bought or where their parcel is. Its URL could be
www.youramazinshop.com/callcenter. -
A separate admin area, where administrators can login and manage callcenter agents or other technical aspects (like themes, performance, etc.) of the web-shop. Its URL could be
www.youramazinshop.com/admin.
This has the following implications, as simply authenticating users is not enough anymore:
-
A customer obviously shouldn’t be able to access the callcenter or admin area. He is only allowed to shop in the website.
-
A callcenter agent shouldn’t be able to access the admin area.
-
Whereas an admin can access the web-shop, the callcenter area and the admin area.
Simply put, you want to allow different access for different users, depending on their authorities or roles.
What are Authorities? What are Roles?
Simple:
-
An authority (in its simplest form) is just a string, it can be anything like: user, ADMIN, ROLE_ADMIN or 53cr37_r0l3.
-
A role is an authority with a
ROLE_prefix. So a role calledADMINis the same as an authority calledROLE_ADMIN.
The distinction between roles and authorities is purely conceptual and something that often bewilders people new to Spring Security.
Why is there a distinction between roles and authorities?
Quite honestly, I’ve read the Spring Security documentation as well as a couple of related StackOverflow threads on this very question and I can’t give you a definitive, good answer.
What are GrantedAuthorities? What are SimpleGrantedAuthorities?
Of course, Spring Security doesn’t let you get away with just using Strings. There’s a Java class representing your authority String, a popular one being SimpleGrantedAuthority.
    public final class SimpleGrantedAuthority implements GrantedAuthority {

        private final String role;

        @Override
        public String getAuthority() {
            return role;
        }
    }
Enter fullscreen mode
Exit fullscreen mode
(Note: There’s other authority classes as well, that let you store additional objects (e.g. the principal) alongside your string, I won’t cover them here. For now, we will go with SimpleGrantedAuthority, only.)
1. UserDetailsService: Where to store and get authorities?
Assuming you are storing the users in your own application (think: UserDetailsService), you are going to have a Users table.
Now, you would simply add a column called «authorities» to it. For this article I chose a simple string column here, though it could contain multiple, comma-separated values. Alternatively I could also have a completely separate table AUTHORITIES, but for the scope of this article this will do.
Note: Referring back to section_title: You save authorities, i.e. Strings, to the database. It so happens that these authorities start with the ROLE_ prefix, so, in terms of Spring Security these authorities are also roles.
The only thing that’s left to do is to adjust your UserDetailsService to read in that authorities column.
    public class MyDatabaseUserDetailsService implements UserDetailsService {

      UserDetails loadUserByUsername(String username) throws UsernameNotFoundException {
         User user = userDao.findByUsername(username);
         List<SimpleGrantedAuthority> grantedAuthorities = user.getAuthorities().map(authority -> new SimpleGrantedAuthority(authority)).collect(Collectors.toList());
         return new org.springframework.security.core.userdetails.User(user.getUsername(), user.getPassword(), grantedAuthorities);
      }

    }
Enter fullscreen mode
Exit fullscreen mode
-
You simply map whatever is inside your database column to a list of SimpleGrantedAuthorities. Done.
-
Again, we’re using Spring Security’s base implementation of UserDetails here. You could also use your own class implementing UserDetails here and might not even have to map then.
2. AuthenticationManager: Where to store and get authorities?
When the users comes from a third-party application, like Atlassian Cloud, you’ll need to find out what concept they are using to support authorities. Atlassian Crowd had the concepts of «roles», but deprecated it in favour of «groups».
So, depending on the actual product you are using, you need to map this to a Spring Security authority, in your AuthenticationProvider.
    public class AtlassianCrowdAuthenticationProvider implements AuthenticationProvider {

        Authentication authenticate(Authentication authentication)
                throws AuthenticationException {
            String username = authentication.getPrincipal().toString();
            String password = authentication.getCredentials().toString();

            atlassian.crowd.User user = callAtlassianCrowdRestService(username, password);
            if (user == null) {
                throw new AuthenticationException("could not login");
            }
            return new UserNamePasswordAuthenticationToken(user.getUsername(), user.getPassword(), mapToAuthorities(user.getGroups()));
        }
            // other method ignored
    }
Enter fullscreen mode
Exit fullscreen mode
-
Note: This is not actual Atlassian Crowd code, but serves its purpose. You authenticate against a REST service and get back a JSON User object, which then gets converted to an atlassian.crowd.User object.
-
That user can be a member of one or more groups, which are assumed to be just strings here. You can then simply map these groups to Spring’s «SimpleGrantedAuthority».
Revisiting WebSecurityConfigurerAdapter for Authorities
So far, we talked a lot about storing and retrieving authorities for authenticated users in Spring Security. But how do you protect URLs with different authorities with Spring Security’s DSL? Simple:
    @Configuration
    @EnableWebSecurity
    public class WebSecurityConfig extends WebSecurityConfigurerAdapter {

        @Override
        protected void configure(HttpSecurity http) throws Exception {
            http
              .authorizeRequests()
                .antMatchers("/admin").hasAuthority("ROLE_ADMIN")
                .antMatchers("/callcenter").hasAnyAuthority("ROLE_ADMIN", "ROLE_CALLCENTER")
                .anyRequest().authenticated()
                .and()
             .formLogin()
               .and()
             .httpBasic();
        }
    }
Enter fullscreen mode
Exit fullscreen mode
-
To access the
/adminarea you (i.e. the user) need to be authenticated AND have the authority (a simple string) ROLE_ADMIN. -
To access the
/callcenterarea you need to be authenticated AND have either the authority ROLE_ADMIN OR ROLE_CALLCENTER. -
For any other request, you do not need a specific role but still need to be authenticated.
Note, that the above code (1,2) is equivalent to the following:
      http
        .authorizeRequests()
          .antMatchers("/admin").hasRole("ADMIN")
          .antMatchers("/callcenter").hasAnyRole("ADMIN", "CALLCENTER")
Enter fullscreen mode
Exit fullscreen mode
-
Instead of calling «hasAuthority», you now call «hasRole». Note: Spring Security will look for an authority called
ROLE_ADMINon the authenticated user. -
Instead of calling «hasAnyAuthority», you now call «hasAnyRole». Note: Spring Security will look for an authority called
ROLE_ADMINorROLE_CALLCENTERon the authenticated user.
hasAccess and SpEL
Last, but not least, the most powerful way to configure authorizations, is with the access method. It lets you specify pretty much any valid SpEL expressions.
      http
        .authorizeRequests()
          .antMatchers("/admin").access("hasRole('admin') and hasIpAddress('192.168.1.0/24') and @myCustomBean.checkAccess(authentication,request)")
Enter fullscreen mode
Exit fullscreen mode
- You are checking that the user has ROLE_ADMIN, with a specific IP address as well as a custom bean check.
To get a full overview of what’s possible with Spring’s Expression-Based Access Control, have a look at the official documentation.
Common Exploit Protections
There is a variety of common attacks that Spring Security helps you to protect against. It starts with timing attacks (i.e. Spring Security will always encrypt the supplied password on login, even if the user does not exist) and ends up with protections against cache control attacks, content sniffing, click jacking, cross-site scripting and more.
It is impossible to go into the details of each of these attacks in the scope of this guide. Hence, we will only look at the one protection that throws most Spring Security newbies off the most: Cross-Site-Request-Forgery.
Cross-Site-Request-Forgery: CSRF
If you are completely new to CSRF, you might want to watch this YouTube video to get up to speed with it. However, the quick takeaway is, that by default Spring Security protects any incoming POST (or PUT/DELETE/PATCH) request with a valid CSRF token.
What does that mean?
CSRF & Server-Side Rendered HTML
Imagine a bank transfer form or any form (like a login form) for that matter, that gets rendered by your @Controllers with the help of a templating technology like Thymeleaf or Freemarker.
    <form action="/transfer" method="post">  <!-- 1 -->
      <input type="text" name="amount"/>
      <input type="text" name="routingNumber"/>
      <input type="text" name="account"/>
      <input type="submit" value="Transfer"/>
    </form>
Enter fullscreen mode
Exit fullscreen mode
With Spring Security enabled, you won’t be able to submit that form anymore. Because Spring Security’s CSRFFilter is looking for an additional hidden parameter on any POST (PUT/DELETE) request: a so-called CSRF token.
It generates such a token, by default, per HTTP session and stores it there. And you need to make sure to inject it into any of your HTML forms.
CSRF Tokens & Thymeleaf
As Thymeleaf has good integration with Spring Security (when used together with Spring Boot), you can simply add the following snippet to any form and you’ll get the token injected automatically, from the session, into your form. Even better, if you are using «th:action» for your form, Thymeleaf will automatically inject that hidden field for you, without having to do it manually.
    <form action="/transfer" method="post">  <!-- 1 -->
      <input type="text" name="amount"/>
      <input type="text" name="routingNumber"/>
      <input type="text" name="account"/>
      <input type="submit" value="Transfer"/>
      <input type="hidden" name="${_csrf.parameterName}" value="${_csrf.token}"/>
    </form>

    <!-- OR -->

    <form th:action="/transfer" method="post">  <!-- 2 -->
      <input type="text" name="amount"/>
      <input type="text" name="routingNumber"/>
      <input type="text" name="account"/>
      <input type="submit" value="Transfer"/>
    </form>
Enter fullscreen mode
Exit fullscreen mode
-
Here, we are adding the CSRF parameter manually.
-
Here, we are using Thymeleaf’s form support.
Note: For more information on Thymeleaf’s CSRF support, see the official documentation.
CSRF & Other Templating Libraries
I cannot cover all templating libraries in this section, but as a last resort, you can always inject the CSRFToken into any of your @Controller methods and simply add it to the model to render it in a view or access it directly as HttpServletRequest request attribute.
    @Controller
    public class MyController {
        @GetMaping("/login")
        public String login(Model model, CsrfToken token) {
            // the token will be injected automatically
            return "/templates/login";
        }
    }
Enter fullscreen mode
Exit fullscreen mode
CSRF & React or Angular
Things are a bit different for a Javascript app, like a React or Angular single page app. Here’s what you need to do:
-
Configure Spring Security to use a CookieCsrfTokenRepository, which will put the CSRFToken into a cookie «XSRF-TOKEN» (and send that to the browser).
-
Make your Javascript app take that cookie value, and send it as an «X-XSRF-TOKEN» header with every POST(/PUT/PATCH/DELETE) request.
For a full copy-and-paste React example, have a look at this great blog post: https://developer.okta.com/blog/2018/07/19/simple-crud-react-and-spring-boot.
Disabling CSRF
If you are only providing a stateless REST API where CSRF protection does not make any sense, you would completely disable CSRF protection. This is how you would do it:
    @EnableWebSecurity
    @Configuration
    public class WebSecurityConfig extends
       WebSecurityConfigurerAdapter {

      @Override
      protected void configure(HttpSecurity http) throws Exception {
        http
          .csrf().disable();
      }
    }
Enter fullscreen mode
Exit fullscreen mode
OAuth2
Badum-tish! This section is just a teaser for the next article: Spring Security & OAuth2. Why?
Because Spring Security’s OAuth2 integration is actually a complex topic and enough for another 7,000-10,000 words, which do not fit into the scope of this article.
Stay tuned.
Spring Integrations
Spring Security & Spring Framework
For most of this article, you only specified security configurations on the web tier of your application. You protected certain URLs with antMatcher or regexMatchers with the WebSecurityConfigurerAdapter’s DSL. That is a perfectly fine and standard approach to security.
In addition to protecting your web tier, there’s also the idea of «defense in depth». That means in addition to protecting URLs, you might want to protect your business logic itself. Think: your @Controllers, @Components, @Services or even @Repositories. In short, your Spring beans.
Method Security
That approach is called method security and works through annotations that you can basically put on any public method of your Spring beans. You also need to explicitly enable method security by putting the @EnableGlobalMethodSecurity annotation on your ApplicationContextConfiguration.
    @Configuration
    @EnableGlobalMethodSecurity(
      prePostEnabled = true,
      securedEnabled = true,
      jsr250Enabled = true)
    public class YourSecurityConfig extends WebSecurityConfigurerAdapter{
    }
Enter fullscreen mode
Exit fullscreen mode
-
The prePostEnabled property enables support for Spring’s
@PreAuthorizeand@PostAuthorizeannotations. Support means, that Spring will ignore this annotation unless you set the flag to true. -
The securedEnabled property enables support for the
@Securedannotation. Support means, that Spring will ignore this annotation unless you set the flag to true. -
The jsr250Enabled property enables support for the
@RolesAllowedannotation. Support means, that Spring will ignore this annotation unless you set the flag to true.
What is the difference between @PreAuthorize, @Secured and @RolesAllowed?
@Secured and @RolesAllowed are basically the same, though @Secured is a Spring-specific annotation coming with the spring-security-core dependency and @RolesAllowed is a standardised annotation, living in the javax.annotation-api dependency. Both annotations take in an authority/role string as value.
@PreAuthorize/@PostAuthorize are also (newer) Spring specific annotations and more powerful than the above annotations, as they can contain not only authorities/roles, but also any valid SpEL expression.
Lastly, all these annotations will raise an AccessDeniedException if you try and access a protected method with an insufficient authority/role.
So, let’s finally see these annotations in action.
    @Service
    public class SomeService {

        @Secured("ROLE_CALLCENTER")
        // == @RolesAllowed("ADMIN")
        public BankAccountInfo get(...) {

        }

        @PreAuthorize("isAnonymous()")
        // @PreAuthorize("#contact.name == principal.name")
        // @PreAuthorize("ROLE_ADMIN")
        public void trackVisit(Long id);

        }
    }
Enter fullscreen mode
Exit fullscreen mode
-
As mentioned, @Secured takes an authority/role as parameter. @RolesAllowed, likewise. Note: Remember that
@RolesAllowed("ADMIN")will check for a granted authorityROLE_ADMIN. -
As mentioned, @PreAuthorize takes in authorities, but also any valid SpEL expression. For a list of common built-in security expressions like
isAnonymous()above, as opposed to writing your own SpEL expressions, check out the official documentation.
Which annotation should I use?
This is mainly a matter of homogenity, not so much of tying yourself too much to Spring-specific APIs (an argument, that is often brought forward).
If using @Secured, stick to it and don’t hop on the @RolesAllowed annotation in 28% of your other beans in an effort to standardise, but never fully pull through.
To start off, you can always use @Secured and switch to @PreAuthorize as soon as the need arises.
Spring Security & Spring Web MVC
As for the integration with Spring WebMVC, Spring Security allows you to do a couple of things:
-
In addition to antMatchers and regexMatchers, you can also use mvcMatchers. The difference is, that while antMatchers and regexMatchers basically match URI strings with wildcards, mvcMatchers behave exactly like @RequestMappings.
-
Injection of your currently authenticated principal into a @Controller/@RestController method.
-
Injection of your current session CSRFToken into a @Controller/@RestController method.
-
Correct handling of security for async request processing.
    @Controller
    public class MyController {

        @RequestMapping("/messages/inbox")
        public ModelAndView findMessagesForUser(@AuthenticationPrincipal CustomUser customUser, CsrfToken token) {

        // .. find messages for this user and return them ...
        }
    }
Enter fullscreen mode
Exit fullscreen mode
-
@AuthenticationPrincipal will inject a principal if a user is authenticated, or null if no user is authenticated. This principal is the object coming from your UserDetailsService/AuthenticationManager!
-
Or you could inject the current session CSRFToken into each method.
If you are not using the @AuthenticationPrincipal annotation, you would have to fetch the principal yourself, through the SecurityContextHolder. A technique often seen in legacy Spring Security applications.
    @Controller
    public class MyController {

        @RequestMapping("/messages/inbox")
        public ModelAndView findMessagesForUser(CsrfToken token) {
             SecurityContext context = SecurityContextHolder.getContext();
             Authentication authentication = context.getAuthentication();

             if (authentication != null && authentication.getPrincipal() instanceof UserDetails) {
                 CustomUser customUser = (CustomUser) authentication.getPrincipal();
                 // .. find messages for this user and return them ...
             }

             // todo
        }
    }
Enter fullscreen mode
Exit fullscreen mode
Spring Security & Spring Boot
Spring Boot really only pre-configures Spring Security for you, whenever you add the spring-boot-starter-security dependency to your Spring Boot project.
Other than that, all security configuration is done with plain Spring Security concepts (think: WebSecurityConfigurerAdapter, authentication & authorization rules), which have nothing to do with Spring Boot, per se.
So, everything you read in this guide applies 1:1 to using Spring Security with Spring Boot. And if you do not understand plain Security, don’t expect to properly understand how both technologies work together.
Spring Security & Thymeleaf
Spring Security integrates well with Thymeleaf. It offers a special Spring Security Thymeleaf dialect, which allows you to put security expressions directly into your Thymeleaf HTML templates.
    <div sec:authorize="isAuthenticated()">
      This content is only shown to authenticated users.
    </div>
    <div sec:authorize="hasRole('ROLE_ADMIN')">
      This content is only shown to administrators.
    </div>
    <div sec:authorize="hasRole('ROLE_USER')">
      This content is only shown to users.
    </div>
Enter fullscreen mode
Exit fullscreen mode
For a full and more detailed overview of how both technologies work together, have a look at the official documentation.
FAQ
What is the latest Spring Security version?
As of April 2020, that is {springsecurityversion}.
Note that if you are using the Spring Security dependencies defined by Spring Boot, you might be on a slightly older Spring Security version, like 5.2.1.
Are older Spring Security versions compatible with the latest version?
Spring Security has been undergoing quite some heavy changes recently. You’ll therefore need to find the migration guides for your targeted versions and work through them:
-
Spring Security 3.x to 4.x → https://docs.spring.io/spring-security/site/migrate/current/3-to-4/html5/migrate-3-to-4-jc.html
-
Spring Security 4.x to 5.x(< 5.3) → https://docs.spring.io/spring-security/site/docs/5.0.15.RELEASE/reference/htmlsingle/#new (not a real guide, but a what’s new)
-
Spring Security 5.x to 5.3 → https://docs.spring.io/spring-security/site/docs/5.3.1.RELEASE/reference/html5/#new (not a real guide, but a what’s new)
What dependencies do I need to add for Spring Security to work?
Plain Spring Project
If you are working with a plain Spring project (not Spring Boot), you need to add the following two Maven/Gradle dependencies to your project:
    <dependency>
        <groupId>org.springframework.security</groupId>
        <artifactId>spring-security-web</artifactId>
        <version>5.2.2.RELEASE</version>
    </dependency>
    <dependency>
        <groupId>org.springframework.security</groupId>
        <artifactId>spring-security-config</artifactId>
        <version>5.2.2.RELEASE</version>
    </dependency>
Enter fullscreen mode
Exit fullscreen mode
You’ll also need to configure the SecurityFilterChain in your web.xml or Java config. See how to do it here.
Spring Boot Project
If you are working with a Spring Boot project, you need to add the following Maven/Gradle dependency to your project:
    <dependency>
        <groupId>org.springframework.boot</groupId>
        <artifactId>spring-boot-starter-security</artifactId>
    </dependency>
Enter fullscreen mode
Exit fullscreen mode
Everything else will automatically be configured for you and you can immediately start writing your WebSecurityConfigurerAdapter.
How do I programmatically access the currently authenticated user in Spring Security?
As mentioned in the article, Spring Security stores the currently authenticated user (or rather a SecurityContext) in a thread-local variable inside the SecurityContextHolder. You can access it like so:
    SecurityContext context = SecurityContextHolder.getContext();
    Authentication authentication = context.getAuthentication();
    String username = authentication.getName();
    Object principal = authentication.getPrincipal();
    Collection<? extends GrantedAuthority> authorities = authentication.getAuthorities();
Enter fullscreen mode
Exit fullscreen mode
Note, that Spring Security by default will set an AnonymousAuthenticationToken as authentication on the SecurityContextHolder, if you are not logged in. This leads to some confusion, as people would naturally expect a null value there.
AntMatchers: Common Examples
A non-sensical example displaying the most useful antMatchers (and regexMatcher/mvcMatcher) possibilities:
    @Override
    protected void configure(HttpSecurity http) throws Exception {
        http
          .authorizeRequests()
          .antMatchers("/api/user/**", "/api/ticket/**", "/index").hasAuthority("ROLE_USER")
          .antMatchers(HttpMethod.POST, "/forms/**").hasAnyRole("ADMIN", "CALLCENTER")
          .antMatchers("/user/**").access("@webSecurity.check(authentication,request)");
    }
Enter fullscreen mode
Exit fullscreen mode
How to use a custom login page with Spring Security?
    @Override
    protected void configure(HttpSecurity http) throws Exception {
      http
          .authorizeRequests()
              .anyRequest().authenticated()
              .and()
          .formLogin()
              .loginPage("/login")
              .permitAll();
    }
Enter fullscreen mode
Exit fullscreen mode
- The URL for your custom login page. As soon as you specify this, the automatically generated login page will disappear.
How to do a programmatic login with Spring Security?
    UserDetails principal = userDetailsService.loadUserByUsername(username);
    Authentication authentication = new UsernamePasswordAuthenticationToken(principal, principal.getPassword(), principal.getAuthorities());
    SecurityContext context = SecurityContextHolder.createEmptyContext();
    context.setAuthentication(authentication);
Enter fullscreen mode
Exit fullscreen mode
How to disable CSRF just for certain paths?
    @Override
        protected void configure(HttpSecurity http) throws Exception {
          http
           .csrf().ignoringAntMatchers("/api/**");
        }
Enter fullscreen mode
Exit fullscreen mode
Fin
If you have read this far, you should now have a pretty good understanding of the complexity of the Spring Security ecosystem, even without OAuth2. To sum things up:
-
It helps if you have a basic understanding of how Spring Security’s FilterChain works and what its default exploit protections are (think: CSRF).
-
Make sure to understand the difference between authentication and authorization. Also what @beans you need to specify for specific authentication workflows.
-
Make sure you understand Spring Security’s WebSecurityConfigurerAdapter’s DSL as well as the annotation-based method-security.
-
Last but not least, it helps to double-check the integration Spring Security has with other frameworks and libraries, like Spring MVC or Thymeleaf.
Enough for today, as that was quite a ride, wasn’t it? Thanks for reading!
Acknowledgments
A big «thank you» goes out to Patricio «Pato» Moschcovich, who not only did the proofreading for this article but also provided invaluable feedback!
More
You might also be interested in my newly announced
Spring Security exercise course, which will teach Spring Security & OAuth2 in a rather unique way.