Посмотреть инструкция для Zhiyun Crane 2 бесплатно. Руководство относится к категории без категории, 4 человек(а) дали ему среднюю оценку 8.1. Руководство доступно на следующих языках: русский. У вас есть вопрос о Zhiyun Crane 2 или вам нужна помощь? Задайте свой вопрос здесь
Не можете найти ответ на свой вопрос в руководстве? Вы можете найти ответ на свой вопрос ниже, в разделе часто задаваемых вопросов о Zhiyun Crane 2.
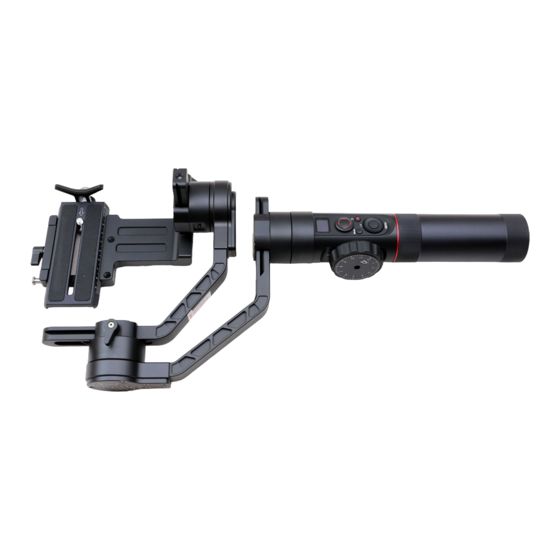
Какой вес Zhiyun Crane 2?
Какие сертификаты Zhiyun Crane 2 имеет?
Какая высота Zhiyun Crane 2?
Какая ширина Zhiyun Crane 2?
Какая толщина Zhiyun Crane 2?
Инструкция Zhiyun Crane 2 доступно в русский?
Не нашли свой вопрос? Задайте свой вопрос здесь
                    Содержание
■■Комплектация························ 1
■■Знакомство с CRANE 2 ·········· 4
■■Зарядка и установка батарей··· 6
■■Установка камеры·················· 10
■■Настройка баланса················· 14
■■Использование стабилизатора · 19
■■Использование мобильного при-
 ложения································ 36
■■Калибровка и обновление про-
 граммного обеспечения·········· 37
■■Использование аксессуаров ··· 43
■■Технические характеристики ··· 49
■■Использование аксессуаров···· 50
■■Условия гарантийного обслужива-
 ния······································· 60
■■Контактные данные производите-
 ля········································· 63
Стэдикам Crane 2, фотокамера Canon 750D нет управления от стабилизатора?
28.05.2019 10:36
Рафис
а где найти мануал для Zhiyun Tech Crane Plus?
насколько он отличается от Crane 2?
спасибо
26.05.2018 23:50
Дмитриев Игорь
Нажмите, пожалуйста на надпись: «Инструкция_Crane_2.pdf» — это ссылка.
23.05.2018 17:44
Gimballab
Где инструкция??? Хотелось бы видеть 😦
23.05.2018 11:58
Владимир
Где инструкция?
17.04.2018 08:38
Светлана
-
Contents
-
Table of Contents
-
Bookmarks
Quick Links
C R A N E 2
U s e r
G u i d e
Related Manuals for Zhiyun CRANE 2
Summary of Contents for Zhiyun CRANE 2
-
Page 1
C R A N E 2 U s e r G u i d e… -
Page 2: Table Of Contents
Contents Packing List ···································· 1 ■ Get to Know CRANE 2 ······················ 4 ■ Preparing and Charging the Batteries ··· 6 ■ Installation ······································ 8 ■ Balance Adjustment ·························· 11 ■ How to Use ····································· 14 ■ APP Operations ······························· 23 ■…
-
Page 3: Packing List
Packing List The product package comes with the following items. In case that any item is found missing, please contact ZHIYUN or your local selling agent. CRANE 2 Three-axis Gimbal Stabilizer 18650 Li-ion Battery Canon Camera Control Cable ZW-Mini-002 Panasonic Camera Control Cable…
-
Page 4: Zw-Micro
Packing List Tripod Battery Charger Canon Camera Control Cable ZW-Micro-002 Sony Camera Control Cable ZW-MULTI-002 Storage Case User Guide…
-
Page 5
Packing List Follow Focus Motor Support Rod ZW-Micro-004 Data Cable Follow Focus Ring Allen Key… -
Page 6: Get To Know Crane 2
Get to Know CRANE 2 Get to Know CRANE 2 ❸ ❹ ❺ ⓮ ❿ ❻ ⓯ ❼ ⓫ ⓰ ⓱ ⓲ ⓬ ❽ ❶ ⓳ ⓭ ❷ ❾ ❶ ⓫ Micro USB port Camera Mounting Screw ❷ ⓬ DC 8.0 V Power Outlet…
-
Page 7
Get to Know CRANE 2 CRANE 2 Interface Description Output Input Port Function Note Voltage Current The Micro USB port can only be used for firmware upgrade, and ❶ Micro USB can neither be used for power input nor output. -
Page 8: Preparing And Charging The Batteries
Preparing and Charging the Batteries For the first use of CRANE 2, please use the dedicated charging device contained in the package to fully charge and activate the batteries to ensure the normal use of the product. Charger & Battery Description…
-
Page 9
2. The stabilizer comes standard with three high-discharge-rate dedicated batteries. Please use and charge batteries provided or approved by ZHIYUN only. 3. Please make sure all three batteries are fully charged. Either under charged battery can lead to the failure of the stabilizer. -
Page 10: Installation
Battery Installation Unscrew the battery compartment and insert the three IMR 18650 batteries in the right direction (positive/negative end), then tighten the battery compartment. Please use and charge batteries provided or approved by ZHIYUN only, in case of accidents. Tripod Get the tripod ready and tighten it to the 1/4″-3/8″…
-
Page 11
Installation Installing Camera 1. Loosen mounting plate thumb screw, then press and hold the safety lock while sliding out the quick release plate (to the opposite direction of the arrow mark on it). 2. Install the lens to quick release plate, then tighten the 1/4’’ screw at its bottom (as shown above) 3. -
Page 12
Please make sure the stabilizer is powered off or in standby mode when connecting the camera control cable in case of malfunctioned rotation. Zhiyun Camera Control Cable Function Table Camera brand Canon… -
Page 13: Balance Adjustment
Balance Adjustment Please make sure the camera is properly mounted and balanced, otherwise the stabilizer may fail to start or operate normally. Level Adjustment on Tilt Axis Loosen the thumb screw on the quick release plate so that it can slide forward or backward.
-
Page 14
Balance Adjustment The balance status of the stabilizer will greatly affect the run time. Balance Adjustment on Tilt Axis Loosen the thumb screw (rotate about 3 times); Adjust the tilt axis until the camera can stay still with the lens facing up (i.e. the camera stays still and vertical to the ground), complete this step by tightening up thumb screw. -
Page 15
( 1 0 0 g ) provided by ZHIYUN and install it under the camera mounting plate to finish balance installation. -
Page 16: How To Use
How to Use Control Panel Description ❶ ❿ ❷ ❸ ⓫ ❹ ❺ ❻ ❽ ❼ ❾ ❶ OLED Display Stabilizer status and camera parameters display (see more on page 16). ❷ Joystick Four-way direction control of the camera/lens. ❸ ON/OFF&Video* •…
-
Page 17
• Quadruple press to reset tilt axis and roll axis position “*” marked functions are only available for Canon and Nikon cameras properly connected to the stabilizer. See more at Zhiyun Camera Control Cable Function Table on page 10. ZHIYUN- Panasonic Camera Control Function Description Please refer to the instruction on Camera Control Cable Configuration on page 18 to choose the right option for your camera. -
Page 18
Following Mode Photo Mode Locking Mode Video Mode Aperture Value Bluetooth Connection Time Value Battery Level (stabilizer) Pan Following Mode Point of View Mode CRANE 2 — Canon Controllability Table Options Photo Video Camera Mode AV (A) √ √ √… -
Page 19
Fine tune on roll axis motor motor angle) about Information on firmware versions “1” AB point settings are only available when connecting to Zhiyun Servo Follow Focus correctly; “2” External control refers to the Bluetooth or cable controls that are external to the handle. -
Page 20
How to Use Motor Force Adjustment The motor force of the stabilizer needs to be adjusted (3 levels) to adapt the stabilizer to cameras and lens of different weight for ideal use. 1. Single press Menu and rotate the 2. Rotate the dial to choose the dial to “motor”, then press right to appropriate motor force (3 levels), enter the “motor”… -
Page 21
How to Use Control Mode Description • Single Press of Mode Button Pan Following Locking Mode Mode Switch between pan following mode and locking mode. • Double Press of Mode Button Following Mode Point of View Mode (POV Mode) Switch between following mode and POV mode. Triple Press of Mode Button The pan axis rotates 180°… -
Page 22
How to Use Tilt Axis Tilt Axis Roll Axis Roll Axis Pan Axis Pan Axis Pan Following Mode (PF): Locking Mode (L): The camera pans left/right following This mode locks movement of all three the movement of the stabilizer while axes to keep the camera fixed on a the tilt and roll axes are locked. -
Page 23
How to Use Bottom up Mode Operation Top Down Mode Bottom Up Mode Please ensure balanced installation of the camera under top down mode and do not rotate or shake the handle while initiating the bottom up mode (as seen in graph). -
Page 24
How to Use DC 8.0 V Power Outlet Usage The DC 8.0 V power outlet on the side of the stabilizer can be used for charging the Canon 5D camera through a DC connector DR-E6 (purchase separately). Charging 5D3/5D4 camera: Powering on: 1. -
Page 25: App Operations
(Android 5.0 above or iOS9.0 above required) to download. iOS or Android users can download the APP by searching «ZY Play» in APP Store. The ZHIYUN APP is subject to regular update, try out now to discover more functions. Connecting the Stabilizer to Smartphone 1.
-
Page 26: Calibration And Firmware Upgrade
Calibration and Firmware Upgrade When do you need to calibrate the stabilizer? Please calibrate the stabilizer when necessary to ensure normal use. When a) Slight deviation is found in the tilt angle of the camera in level position after startup. b) Slight deviation is found in the roll angle of the camera in Initialize the level position after startup.
-
Page 27
Calibration and Firmware Upgrade Six-side Calibration Six-side calibration 1. Power on the stabilizer and enter the standby mode, press menu, rotate the dial to “calibration” option, press Right to enter the option. 2. As seen below, conduct the six-side calibration following the 6 steps shown in the graphs, finish by pressing any button to exit the menu. -
Page 28
Calibration and Firmware Upgrade STEP 4 STEP 5 STEP 6 Six-side calibration through APP Connect the stabilizer to “ZY Play”. Enter “Calibration” and finish the six-side calibration following the APP instruction. Six-side calibration is to make all six sides of the camera mounting plate vertical to the level surface. -
Page 29
3. Power on the stabilizer and long press mode button to enter standby mode. 4. Enter the downloaded “Zhiyun Gimbal Tools” and upgrade firmware following the instructions indicated in the Firmware Upgrade Tutorial. -
Page 30: Usage Of Main Accessories
(sold separately) ZW-B03 Motion Sensor Remote Control with Follow Focus is designed exclusively for CRANE 2. Through Bluetooth or cable connection to CRANE 2, you can realize comprehensive control on CRANE 2. The G-Mode and Motion mode exclusive to this product can bring more inspiration to your operation on CRANE 2.
-
Page 31
❻ Joystick ❸ Bluetooth Indicator ❼ Power Level Indicator CRANE-EH002 CRANE 2 Extended Handle (sold separately) Operating CRANE 2 with the Extended Handle is less physically demanding and more flexible with both hands on. Top down gesture Bottom up gesture… -
Page 32
1/4 Thread Metal Holder with Flexible Pipe The Flexible Pipe can be installed on CRANE 2 handle easily and its 1/4 thread hole can be mounted to 5.5″ Mini Camera Monitor, supplement lamps or other camera equipment. The flexible pipe enables angle adjustment easily. -
Page 33
Designed for Crane series, Mini Dual Handle Grip enables a more convenient operation on CRANE 2. Using the Grip allows you to hold CRANE 2 easily in dif- ferent shooting environment and get a smooth sports footage. The Grip can be mounted to a monitor and a supplement lamp, which give you more possibilities in creating footage. -
Page 34
The Bracket is widely used in outdoors filming, wedding filming, live- streaming and movie making. Telescopic Monopod (sold separately) Zhiyun Telescopic Monopod is designed to optimize Crane series. Mounted to CRANE 2, it allows you to move CRANE 2 with greater flexibility while saving effort. -
Page 35: Product Specifications
Product Specifications Product model: CRA02 Min. Standard Max. Remarks Input Vol. 9.8V 11.1V 12.6V Operation Current 110mA 6000mA Operation -10°C 25°C 45°C Temperature Tested under static Operation Time operation after proper balancing Charging Time 2.5h Charging current 2400mA Weight 1250g Excluding batteries Tilt Angle Range -135°…
-
Page 36: Disclaimer And Warning
Important. Warnings CRANE 2 is a sophisticated product. It must be operated with caution and safe knowledge and requires some basic hands-on ability. Read the ENTIRE instruction to be familiar with the features of this product before use. This product is not intended for use by children.
-
Page 37
CAUTION: 1. CRANE 2 is a high-precision control device. Damage may be caused to CRANE 2 if it is dropped or subject to external force, and this may result in malfunction. 2. Make sure the rotation of the gimbal axes is not blocked by external force when CRANE 2 is turned on. -
Page 38
2. Do not attach the batteries to a wall outlet or car charger socket directly. Always use a ZHIYUN approved adapter for charging. ZHIYUN takes no responsibility if the battery is charged using a non-ZHIYUN charger. -
Page 39: Warranty Terms
1. Customers are entitled to replacement or free repair service in case of quality defect(s) found in the product within 15 days upon receipt of the product. 2. Customers are entitled to free repair service from ZHIYUN for any product proven defective in material or workmanship that results in product failure during normal consumer usage and conditions within the valid warranty period, which is 12 months counting from the date of delivery.
-
Page 40: Contact Card
Contact Card Search and follow “Zhiyun Tech” on Facebook, Instagram, Twitter, YouTube and Vimeo to connect with us. Tel: +86 (0) 773-3561275 USA Hotline: +1 808-319-6137,9:00-18:00 GMT-7,Mon-Fri Europe Hotline: +49 (0)6101 8132 180,10:00-17:00 GMT+1,Mon-Fri Web: www.zhiyun-tech.com E-mail: service@zhiyun-tech.com Address: 6th floor Building No.13 Creative Industrial Park, GuiMo Road, Qixing…