Здравствуйте. Родители купили стиральную машину BEKO WTE5511 BO. Хотел скачать для них мануал на русском языке, но ничего не нашел. Возможно Вы можете подсказать может есть инструкция для подобной модели (ну там цифры/буквы отличаются типа другая модификация) на русском. Спасибо.
Ответ мастера
Сергей, добрый день!
BEKO WTE 5511 B0 — отдельно стоящая стиральная машина с фронтальной загрузкой до 5 кг и электронным управлением, с отжимом до 1000 оборотов. Для вашей стиральной машины вы не сможете найти инструкцию на русском языке, т.к. машинка не предполагается к продаже в России, эта машинка для продаж в Евросоюзе, поэтому инструкция только на английском (и на болгарском окончание «B0»). Не получится найти аналог, стиральные машины продающиеся в разных регионах не просто на букву отличаются, а все остальное одинаковое, а отличаются они кардинально.
Инструкция во вложении.
Ответить
![]()
Washing Machine
User Manual
Пральна машина
Посібник користувача
WTE 5511 BO
EN / BG
Document Number : 2820526114_EN / 11-08-20.(11:36)

This product was manufactured using the latest technology in environmentally friendly conditions.

1 General safety instructions
This section includes security instructions which may help prevent the injuries and material damage risks. All kinds of warranties shall be invalid if these instructions are not observed.
1.1 Life and property safety
u Never place the product on a carpet-covered floor. Electrical parts will get overheated since air cannot circulate from under the device. This will cause problems with your product.
u Unplug the product if it is not in use.
u Always have the installation and repairing procedures carried out by the Authorised Service Agent. The manufacturer shall not be held liable for damages that may arise from procedures carried out by unauthorised persons.
u The water supply and draining hoses must be securely fastened and remain undamaged. Otherwise, water leak may occur.
u While there is still water inside the product, never open the loading door or remove the filter. Otherwise, risk of flooding and injury from hot water will occur.
u Do not force open the locked loading door. Door can be opened a few minutes after the washing cycle ends. In case of forcing the loading door to open, the door and the lock mechanism may get damaged.
u Use detergents, softeners and supplements suitable for automatic washing machines only.
u Follow the instructions on the label of textiles and the detergent package.
1.2 Children’s safety
u This product can be used by the children who are at the age of 8 and over and the people whose physical, sensory or mental skills are not fully developed or who do not have necessary required experience and knowledge as long as they are supervised or trained about the safe use of the product and its risks. Children should not play with the device. Cleaning and maintenance works should not be performed by children unless they are supervised by someone. Children of less than 3 years should be kept away unless continuously supervised.
u Packaging materials may be dangerous for the children. Keep packaging materials in a safe place away from reach of the children.
|
Washing Machine / User’s Manual |
3 / EN |

uElectrical products are dangerous for the children. Keep the children away from the product when it is in use. Do not allow them to play with the product. Use child lock to prevent children from intervening with the product.
uDo not forget to close the loading door when leaving the room where the product is located.
uStore all detergents and additives in a safe place away from the reach of the children by closing the cover of the detergent container or sealing the detergent package.
1.3Electrical safety
uIf the product has a failure, it should not be operated unless it is repaired by the Authorised Service Agent. Risk of electric shock!
uThis product is designed to resume operating in the event of powering on after a power interruption. If you wish to cancel the programme, see «Cancelling the programme» section.
uPlug the product into a grounded outlet protected by a 16 A fuse. Do not neglect to have the grounding installation made by a qualified electrician. Our company shall not be liable for any damages that will arise when the product is used without grounding in accordance with the local regulations.
uDo not wash the product by spraying or pouring water onto it! Risk of electric shock!
uNever touch the power cable plug with wet hands! Do not grab the power cord to unplug the machine, always unplug it by holding the socket with one hand, and pulling the plug with the other hand.
uProduct should be unplugged during installation, maintenance, cleaning and repair procedures.
uIf the power cable is damaged, it must be replaced by the manufacturer, after sales service or a similarly qualified person (preferably an electrician) or someone designated by the importer in order to avoid possible risks.
1.4Hot surface safety
While washing the laundry at high temperatures, the loading door glass will get hot. Considering this fact, during washing operation keep the children away from the loading door of the product to prevent them touching it.
|
4 / EN |
Washing Machine / User’s Manual |

2 Important instructions for environment
2.1 Compliance with WEEE Directive
This product complies with EU WEEE Directive (2012/19/EU). This product bears a classification symbol for waste electrical and electronic equipment (WEEE).
This product has been manufactured with high quality parts and materials which can be reused and are suitable for recycling. Do not dispose of the waste product with normal domestic and other wastes at the end of its service life. Take it to the collection center for the recycling of electrical and electronic equipment. Please consult your local authorities to learn about these collection centers.
Compliance with RoHS Directive:
The product you have purchased complies with EU RoHS Directive (2011/65/EU). It does not contain harmful and prohibited materials specified in the Directive.
2.2 Package information
Packaging materials of the product are manufactured from recyclable materials in accordance with our National Environment Regulations. Do not dispose of the packaging materials together with the domestic or other wastes. Take them to the packaging material collection points designated by the local authorities.
3 Intended use
• This product has been designed for domestic use. It is not for commercial purposes or it should not be used out of its intended use.
• The product must only be used for washing and rinsing of laundry that are marked accordingly.
• The manufacturer waives any responsibility arisen from incorrect usage or transportation.
• The service life of your product is 10 years. During this period, original spare parts will be available to operate the appliance properly.
• This appliance is intended to be used in household and similar applications such as:
– staff kitchen areas in shops, offices and other working environments;
– farm houses;
– by clients in hotels, motels and other residential type environments;
– bed and breakfast type environments;
– areas for communal use in blocks of flats or in launderettes.
|
Washing Machine / User’s Manual |
5 / EN |

|
4 |
Technical specifications |
|||
|
Complying Commission Delegated Regulation (EU) No 1061/2010 |
||||
|
Supplier name or trademark |
Beko |
|||
|
Model name |
WTE 5511 B0 |
|||
|
Rated capacity (kg) |
5 |
|||
|
Energy efficiency class / Scale from A+++ (Highest Efficiency) to D (Lowest Efficiency) |
A++ |
|||
|
Annual Energy Consumption (kWh) (1) |
148 |
|||
|
Energy consumption of the standard 60°C cotton programme at full load (kWh) |
0.700 |
|||
|
Energy consumption of the standard 60°C cotton programme at partial load |
(kWh) |
0.685 |
||
|
Energy consumption of the standard 40°C cotton programme at partial load |
(kWh) |
0.550 |
||
|
Power consumption in ‘off-mode’ (W) |
0.250 |
|||
|
Power consumption in ‘left-on mode’ (W) |
0.750 |
|||
|
Annual Water Consumption (l) (2) |
9899 |
|||
|
Spin-drying efficiency class / Scale from A (Highest Efficiency) to G (Lowest Efficiency) |
C |
|||
|
Maximum spin speed (rpm) |
1000 |
|||
|
Remaining moisture Content (%) |
62 |
|||
|
Standard cotton programme (3) |
Cotton Eco 60°C and 40°C |
|||
|
Programme time of the standard 60°C cotton programme at full load (min) |
199 |
|||
|
Programme time of the standard 60°C cotton programme at partial load (min) |
175 |
|||
|
Programme time of the standard 40°C cotton programme at partial load (min) |
155 |
|||
|
Duration of the left-on mode (min) |
N/A |
|||
|
Airborne acoustical noise emissions washing/spinning (dB) |
60/77 |
|||
|
Built-in |
No |
|||
|
Height (cm) |
84 |
|||
|
Width (cm) |
60 |
|||
|
Depth (cm) |
44 |
|||
|
Net weight (±4 kg.) |
55 |
|||
|
Single Water inlet / Double Water inlet |
• / — |
|||
|
• Available |
||||
|
Electrical input (V/Hz) |
230 V / 50Hz |
|||
|
Total current (A) |
10 |
|||
|
Total power (W) |
1550 |
|||
|
Main model code |
9213 |
(1)Energy Consumption based on 220 standard washing cycles for cotton programmes at 60°C and 40°C at full and partial load, and the consumption of the low-power modes. Actual energy consumption will depend on how the appliance is used.
(2)Water consumption based on 220 standard washing cycles for cotton programmes at 60°C and 40°C at full and partial load. Actual water consumption will depend on how the appliance is used.
(3)“Standard 60°C cotton programme” and the “standard 40°C cotton programme” are the standard washing programmes to which the information in the label and the fiche relates and these programmes are suitable to clean normally soiled cotton laundry and that they are the most efficient programmes in terms of combined energy and water consumption.
Technical specifications may be changed without prior notice to improve the quality of the product.
|
6 / EN |
Washing Machine / User’s Manual |
4.1 Installation
•Apply to the nearest authorised service agent for the installation of your product.
•Preparation of the location and electrical, tap water and waste water installations at the place of installation is under customer’s responsibility.
•Make sure that the water inlet and discharge hoses as well as the power cable are not folded, pinched or crushed while pushing the product into its place after installation or cleaning procedures.
•Make sure that the installation and electrical connections of the product are performed by authorised service. Manufacturer shall not be held liable for damages that may arise from procedures carried out by unauthorised persons.
•Prior to installation, visually check if the product has any defects on it. If so, do not have it installed. Damaged products cause risks for your safety.
4.1.1Appropriate installation location
•Place the product on a hard and level floor. Do not put it onto a carpet with high pile or other similar surfaces.
•When the washing machine and dryer are placed on top of each other, their total weight –when loaded– amounts to 180 kilograms. Place the product on a solid and flat floor that has sufficient load carrying capacity!
•Do not place the product on the power cable.
•Do not install the product in the environments where the temperature falls below 0 ºC.
•Leaving a gap at the sides of the machine is suggested to reduce vibration and noise
•On a graduated floor, do not place the product next to the edge or on a platform.
•Do not place heat sources such as Hobs, Irons, Ovens, etc. on the washing machine and do not use them on the product.
4.1.2Removing packaging reinforcement
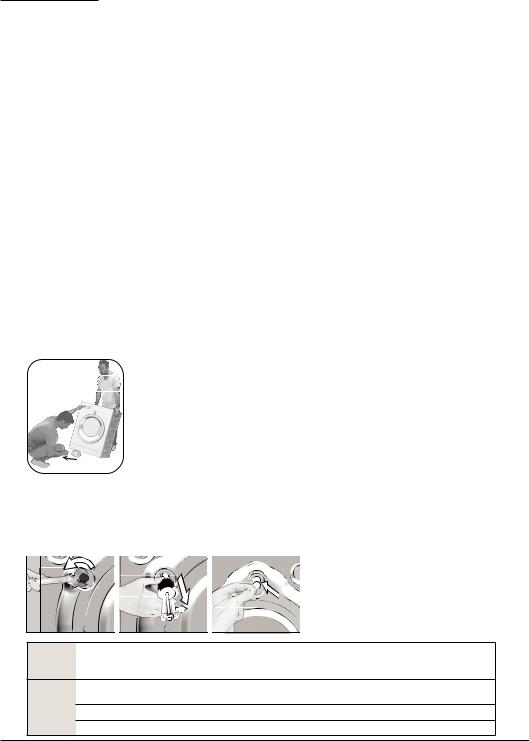
Tilt the machine backwards to remove the packaging reinforcement. Remove the packaging reinforcement by pulling the ribbon. Do not make this operation alone by yourself.
4.1.3 Removing the transportation locks
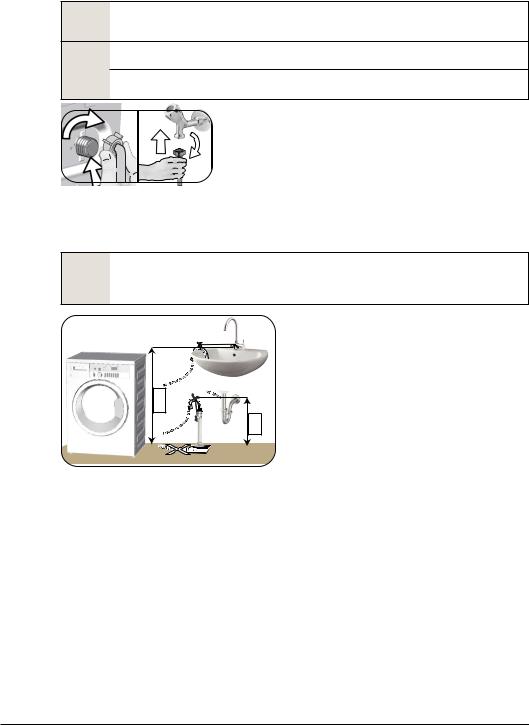
1Loosen all bolts with an appropriate wrench until they turn freely.
2Remove the transport safety bolts by turning them slightly.
3Insert the plastic covers in the bag containing the user manual to the openings on the rear panel.
A CAUTION: Remove the transportation safety bolts before operating the washing machine! Otherwise, the product will be damaged.
C Keep the transportation safety bolts in a safe place to reuse when the washing machine needs to be moved again in the future.
Install the transport safety bolts in reverse order of the disassembly procedure.
Never move the product without the transportation safety bolts properly fixed in place!
|
Washing Machine / User’s Manual |
7 / EN |
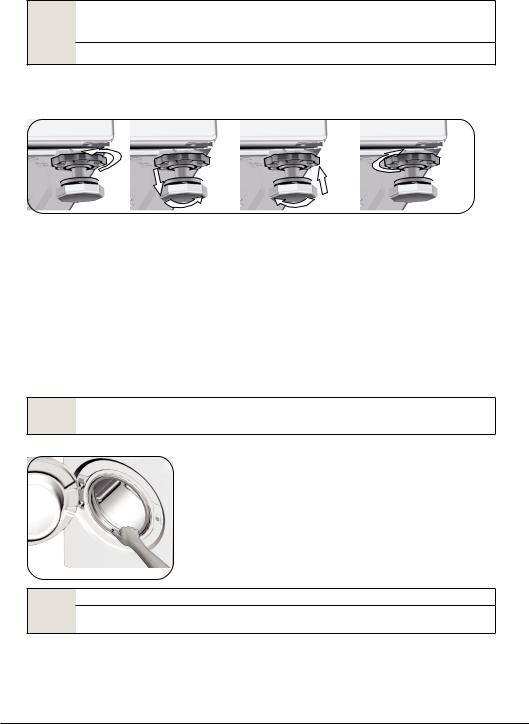
4.1.4 Connecting water supply
C The water supply pressure required to run the product is between 1 to 10 bars (0.1 – 1 MPa). It is necessary to have 10 – 80 liters of water flowing from the fully open tap in one minute to have your machine run smoothly. Attach a pressure reducing valve if water pressure is higher.
A CAUTION: Models with a single water inlet should not be connected to the hot water tap. In such a case the laundry will get damaged or the product will switch to protection mode and will not operate.
CAUTION: Do not use old or used water inlet hoses on the new product. It may cause stains on your laundry.
1Tighten the nuts of the hose by hand. Never use a tool when tightening the nuts.
2When hose connection is completed, check whether there is leak problems at the connection points by opening the taps fully. If any leaks occur, turn off the tap and remove the nut.
Retighten the nut carefully after checking the seal. In order to prevent the water leaks and resultant damages, keep the taps closed when you do not use the product.
4.1.5Connecting the drain hose to the drain
•Attach the end of the drain hose directly to waste water drain, lavatory or bathtub.
A CAUTION: Your drain house will be flooded if the hose comes out of its housing during water discharge. Moreover, there is risk of scalding due to high washing temperatures! In order to prevent such situations and make sure that the machine performs water intake and discharge processes without any problem, fix the drain hose securely.
<![if ! IE]>
<![endif]>100 cm 40 cm
•Connect the drain hose to a minimum height of 40 cm and a maximum height of 100 cm.
•In case the drain hose is elevated after laying it on the floor level or close to the ground (less than 40 cm above the ground), water discharge becomes more difficult and the laundry may come out excessively wet. Therefore, follow the heights described in the figure.
•To prevent the waste water to go back into the machine again and to ensure easy drainage, do not immerse the end of the hose into the waste water or do not insert it into the drain for more than 15 cm. If it is too long, cut it short.
•The end of the hose should not be bent, it should not be stepped on and the hose must not be pinched between the drain and the machine.
•If the length of the hose is too short, use it by adding an original extension hose. Length of the hose may not be longer than 3.2 m. To avoid water leak failures, the connection between the extension hose and the drain hose of the product must be fitted well with an appropriate clamp as not to come off and leak.
|
8 / EN |
Washing Machine / User’s Manual |
4.1.6 Adjusting the feet
A CAUTION: In order to ensure that the product operates more silently and vibration-free, it must stand level and balanced on its feet. Balance the machine by adjusting the feet. Otherwise, the product may move from its place and cause crushing and vibration problems.
CAUTION: Do not use any tools to loosen the lock nuts. Otherwise, they will get damaged.
1 Loosen the lock nuts on the feet by hand.
2 Adjust the feet until the product stands in a stable and balanced way. 3. Tighten all lock nuts by hand again.
4.1.7 Electrical connection
Connect the product to a grounded outlet protected by a 16 A fuse. Our company shall not be liable for any damages that will arise when the product is used without grounding in accordance with the local regulations.
• Connection must comply with national regulations.
• The wiring for the electrical outlet circuit must be sufficient to meet the appliance requirements. Use of a Groud Fault Circuit Interrupter (GFCI) is recommended.
• Power cable plug must be within easy reach after installation.
• If the current value of the fuse or breaker in the house is less than 16 Amps, have a qualified electrician install a 16 Amp fuse.
• The voltage specified in the «Technical specifications» section must be equal to your mains voltage.
• Do not make connections via extension cables or multi-plugs.
B CAUTION: Damaged power cables must be replaced by the Authorised Service Agents.
4.1.8 Initial use
Before starting to use the product make sure that the preparations are made which are in line with the “Important Safety and Environment Instructions” and the instructions in the “Installation” section.
To prepare the product for washing laundry, perform first operation in Drum Cleaning programme. If this program is not available in your machine, apply the method which is described in the section 4.4.2.
C Use an anti-limescale suitable for the washing machines.
Some water might have remained in the product due to the quality control processes in the production. It is not harmful for the product.
|
Washing Machine / User’s Manual |
9 / EN |

4.2 Preparation
4.2.1 Sorting the laundry
* Sort laundry according to type of fabric, color, and degree of soiling and allowable water temperature.
* Always obey the instructions given on the garment tags.
4.2.2 Preparing laundry for washing
• Laundry items with metal attachments such as, underwired bras, belt buckles or metal buttons will damage the machine. Remove the metal pieces or wash the clothes by putting them in a laundry bag or pillow case.
• Take out all substances in the pockets such as coins, pens and paper clips, and turn pockets inside out and brush. Such objects may damage the product or cause noise problem.
• Put small size clothes such as infant’s socks and nylon stockings in a laundry bag or pillow case.
• Place curtains in without compressing them. Remove curtain attachment items.
• Fasten zippers, sew loose buttons and mend rips and tears.
• Wash “machine washable” or “hand washable” labeled products only with an appropriate programme.
• Do not wash colours and whites together. New, dark coloured cottons release a lot of dye. Wash them separately.
• Tough stains must be treated properly before washing. If unsure, check with a dry cleaner.
• Only use the dyes / color changers and descaling agents which are appropriate to machine wash. Always follow the instructions on the package.
• Wash trousers and delicate laundry turned inside out.
• Keep laundry items made of Angora wool in the freezer for a few hours before washing. This will reduce pilling.
• Laundry that are subjected to materials such as flour, lime dust, milk powder, etc. intensely must be shaken off before placing into the machine. Such dusts and powders on the laundry may build up on the inner parts of the machine in time and can cause damage.
4.2.3 Things to be done for energy saving
Following information will help you use the product in an ecological and energy-efficient manner.
• Operate the product in the highest capacity allowed by the programme you have selected, but do not overload; see, «Programme and consumption table». See, “Programme and consumption table»
• Always follow the instructions on the detergent packaging.
• Wash slightly soiled laundry at low temperatures.
• Use faster programmes for small quantities of lightly soiled laundry.
• Do not use prewash and high temperatures for laundry that is not heavily soiled or stained.
• If you plan to dry your laundry in a dryer, select the highest spin speed recommended during washing process.
• Do not use more detergent than the recommended amount specified on its package.
4.2.4Loading the laundry
1.Open the laundry cover.
2.Put the laundry items into the machine in a loose manner.
3.Push and close the loading cover until you hear the locking sound. Ensure that no items are caught in the door. The loading door is locked while a programme is running. The door can only be opened a while after the programme comes to an end.
4.2.5 Correct load capacity
The maximum load capacity depends on the type of laundry, the degree of soiling and the washing programme desired.
Machine automatically adjusts the water amount according to the weight of the laundry put inside it.
A WARNING: Follow the information in the “Programme and consumption table”. When overloaded, machine’s washing performance will drop. Moreover, noise and vibration problems may occur.
|
10 / EN |
Washing Machine / User’s Manual |
![]()
4.2.6 Using detergent and softener
C When using detergent, softener, starch, fabric dye, bleacher and decolorant, descaling agents; read the manufacturer’s instructions written on the package and follow the dosages specified. Use measuring cup if available.
2  3 1
3 1
 The detergent drawer is composed of three compartments:
–(1) for prewash
–(2) for main wash
–(3) for softener
–( ) in addition, there is a siphon piece in the softener compartment.
|
Detergent, softener and other cleaning agents |
||
|
• Add detergent and softener before starting the washing programme. |
||
|
• |
While the washing cycle is in progress, do not leave the detergent dispenser open! |
|
|
• When using a programme without prewash, do not put any detergent into the prewash |
||
|
compartment (compartment nr. «1»). |
||
|
• In a programme with prewash, do not put liquid detergent into the prewash compartment |
||
|
(compartment nr. «1»). |
||
|
• Do not select a programme with prewash if you are using a detergent bag or dispensing ball. Place |
||
|
the detergent bag or the dispensing ball directly among the laundry in the machine. |
||
|
If you are using liquid detergent, do not forget to place the liquid detergent container into the main |
||
|
wash compartment (compartment number “2”). |
||
|
Choosing the detergent type |
||
|
Detergent type to be used depends on the fabric type and color. |
||
|
• Use different detergents for coloured and white laundry. |
||
|
• Wash your delicate clothes only with special detergents (liquid detergent, wool shampoo, etc.) |
||
|
• |
used solely for delicate clothes. |
|
|
When washing dark coloured clothes and quilts, it is recommended to use liquid detergent. |
||
|
• |
Wash woolens with special detergent made specifically for woolens. |
|
|
A |
CAUTION: Use only detergents manufactured specifically for washing machines. |
|
|
CAUTION: Do not use soap powder. |
||
Adjusting detergent amount
The amount of washing detergent to be used depends on the amount of laundry, the degree of soiling and water hardness.
• Do not use amounts exceeding the dosage quantities recommended on the detergent package to avoid problems of excessive foam, poor rinsing, financial savings and finally, environmental protection.
• Use lesser detergent for small amounts or lightly soiled clothes.
Using softeners
Pour the softener into the softener compartment of the detergent drawer.
• Do not exceed the (>max<) level sign on the softener compartment.
• If the softener has lost its fluidity, dilute it with water before putting it in the detergent drawer.
Using liquid detergents
|
Washing Machine / User’s Manual |
11 / EN |

If the product contains a liquid detergent cup:
2
•Put the liquid detergent container into the compartment no “2”.
•If the liquid detergent lost its fluidity, dilute it with water before putting it into the detergent container.
If the product is equipped with a liquid detergent part:
• When you want to use liquid detergent, pull the apparatus towards yourself. The part that falls down will serve as a barrier for the liquid detergent.
• If required, clean the apparatus with water when it is in place or by removing it.
• If you will use powder detergent, the apparatus must be secured at top position.
If the product does not contain a liquid detergent cup:
• Do not use liquid detergent for the prewash in a programme with prewash.
• Liquid detergent stains your clothes when used with Delayed Start function. If you are going to use the Delayed Start function, do not use liquid detergent.
Using gel and tablet detergent
• If the gel detergent thickness is fluidal and your machine does not contain a special liquid detergent cup, put the gel detergent into the main wash detergent compartment during first water intake. If your machine contains a liquid detergent cup, fill the detergent into this cup before starting the programme.
• If the gel detergent thickness is not fluidal or in the shape of capsule liquid tablet, put it directly into the drum before washing.
• Put tablet detergents into the main wash compartment (compartment nr. «2») or directly into the drum before washing.
Using starch
• Put the liquid soda, powder soda or the fabric dye into the softener compartment. Do not use softener and starch together in a washing cycle.
Wipe the inside of the machine with a damp and clean cloth after using starch.
Using limescale remover
• When required, use limescale removers manufactured specifically for washing machines only.
Using bleaches
• Add the bleach at the beginning of the washing cycle by selecting a prewash program. Do not put detergent in the prewash compartment. As an alternative application, select a programme with extra rinse and add the bleaching agent while the machine is taking water from the detergent compartment during first rinsing step.
• Do not use bleaching agent and detergent by mixing them.
• Use just a little amount (approx. 50 ml) of bleaching agent and rinse the clothes very well as it causes skin irritation. Do not pour the bleach onto the laundry and do not use it with the colored items.
• When using oxygen-based decolorant, select a program which washes the laundry at a low temperature.
• Oxygen-based decolorant can be used with the detergent; however, if it is not at the same consistence, first put detergent in the compartment number “2” in the detergent dispenser and wait for the machine to flush the detergent when taking in water. While the machine continues taking in water, add decolorant in the same compartment.
|
12 / EN |
Washing Machine / User’s Manual |

4.2.7 Tips for efficient washing
<![if ! IE]>
<![endif]>Soiling Level
|
Clothes |
|||||||
|
Light Colours and |
Colours |
Black/Dark |
Delicates/ |
||||
|
Whites |
Colours |
Woolens/Silks |
|||||
|
(Recommended |
(Recommended |
(Recommended |
(Recommended |
||||
|
temperature range based |
temperature range |
temperature range |
|||||
|
temperature range based |
|||||||
|
on soiling level: 40-90 |
o |
C) |
on soiling level: cold -40 |
based on soiling |
based on soiling |
||
|
oC) |
level: cold -40 oC) |
level: cold -30 oC) |
|||||
|
It may be necessary to pre- |
Powder and liquid |
||||||
|
treat the stains or perform |
detergents recommended |
Prefer liquid |
|||||
|
Heavily |
prewash. Powder and liquid |
for colors can be used at |
Liquid detergents |
||||
|
detergents |
|||||||
|
Soiled |
detergents recommended |
dosages recommended |
suitable for |
produced for |
|||
|
for whites can be used at |
for heavily soiled clothes. |
colors and dark |
|||||
|
dosages recommended |
It is recommended to use |
colors can be |
delicate clothes. |
||||
|
(difficult stains |
Woolen and silk |
||||||
|
for heavily soiled clothes. |
powder detergents to |
used at dosages |
|||||
|
such as grass, |
It is recommended to use |
clean clay and soil stains |
recommended |
clothes must |
|||
|
coffee, fruits |
powder detergents to |
and the stains that are |
for heavily soiled |
be washed with |
|||
|
and blood.) |
clean clay and soil stains |
sensitive to bleaches. |
clothes. |
special woolen |
|||
|
and the stains that are |
Use detergents without |
detergents. |
|||||
|
sensitive to bleaches. |
bleach. |
||||||
|
Normally |
Powder and liquid |
Powder and liquid |
Liquid detergents |
Prefer liquid |
|||
|
Soiled |
detergents recommended |
suitable for |
detergents |
||||
|
detergents recommended |
for colors can be used at |
colors and dark |
produced for |
||||
|
(For example, |
for whites can be used at |
dosages recommended |
colors can be |
delicate clothes. |
|||
|
stains caused |
dosages recommended |
for normally soiled |
used at dosages |
Woolen and silk |
|||
|
by body on |
for normally soiled |
clothes. Detergents which |
recommended for |
clothes must be |
|||
|
collars and |
clothes. |
do not contain bleach |
normally soiled |
washed with special |
|||
|
cuffs) |
should be used. |
clothes. |
woolen detergents. |
||||
|
Powder and liquid |
Liquid detergents |
Prefer liquid |
|||||
|
Lightly |
Powder and liquid |
detergents recommended |
suitable for |
detergents |
|||
|
Soiled |
detergents recommended |
for colors can be used at |
colors and dark |
produced for |
|||
|
dosages recommended |
colors can be |
delicate clothes. |
|||||
|
for whites can be used at |
for lightly soiled clothes. |
used at dosages |
Woolen and silk |
||||
|
(No visible |
dosages recommended |
||||||
|
Detergents which do not |
recommended |
clothes must be |
|||||
|
stains exist.) |
for lightly soiled clothes. |
contain bleach should |
for lightly soiled |
washed with special |
|||
|
be used. |
clothes. |
woolen detergents. |
|||||
|
Washing Machine / User’s Manual |
13 / EN |
4.3 Operating the product
4.3.1 Control panel
|
1 |
|
|
Daily Xpress |
|
|
Shirts 40° |
|
|
Woollens 40° |
|
|
Hand Wash 40° |
|
|
40º |
|
|
Synthetics |
20º |
|
Down Wear 40º |
|
|
Drum Clean |
|
|
Spin+Drain |
|
2 |
3 |
4 |
5 |
6 |
|
|
20º |
WTE 5511 B0 |
||||
|
Cottons |
1000 |
End |
|||
|
40º |
Cancel |
||||
|
800 |
Spin |
||||
|
40º |
600 |
9 |
Rinse |
||
|
60º |
Cottons Eco |
400 |
6 |
Wash |
|
|
3 |
Time Delay |
||||
|
60° |
|||||
|
90º |
Cottons |
||||
|
Rinse |
|
9 |
8 |
7 |
|
|
1 — Programme Selection knob (Uppermost |
6 |
— Programme Follow-up LEDs |
|
|
position On / Off) |
7 — Start / Pause Button |
||
|
2 |
— Spin Speed Indicator LEDs |
8 — Delayed Start Setting Button |
|
|
3 |
— Child Lock Enabled LED |
9 |
— Spin Speed Adjustment button |
|
4 — Door Lock Enabled LED |
|||
|
5 |
— Delayed Start Indicator LEDs |
4.3.2 Preparing the machine
1.Make sure that the hoses are connected tightly. 2.Plug in your machine.
3.Turn the tap on completely. 4.Place the laundry in the machine. 5.Add detergent and fabric softener.
4.3.3 Programme selection and tips for efficient washing
1.Select the programme suitable for the type, quantity and soiling degree of the laundry in accordance with the «Programme and consumption table» and the temperature table below.
2.Select the desired programme with the Programme Selection knob.
Indicative values for Synthetics programmes (EN)
| <![if ! IE]>
<![endif]>Load (kg) |
<![if ! IE]>
<![endif]>Water Consumption (l) |
<![if ! IE]>
<![endif]>Energy Consumption (kWh) |
<![if ! IE]>
<![endif]>Programme Duration (min) * |
|
|
Synthetics 40 |
2.5 |
66 |
0.75 |
105/130 |
|
Synthetics 20 |
2.5 |
66 |
0.25 |
105/130 |
|
Remaining Moisture |
Remaining Moisture |
|
Content (%) ** |
Content (%) ** |
|
≤ 1000 rpm |
> 1000 rpm |
|
45 |
40 |
|
45 |
40 |
*You can see the washing time of the programme you have selected on the display of the machine. It is normal that small differences may occur between the time shown on the display and the real washing time.
**Remaining moisture content values may differ according to the selected spin speed.
|
14 / EN |
Washing Machine / User’s Manual |

4.3.4 Programme and consumption table
|
EN |
2 |
||||||
|
Programme |
<![if ! IE]>
<![endif]>(kg)LoadMax. |
<![if ! IE]>
<![endif]>DurationProgramme(~min) |
<![if ! IE]>
<![endif]>ConsumptionWater(l) |
<![if ! IE]>
<![endif]>ConsumptionEnergy(kWh) |
<![if ! IE]>
<![endif]>Speed***Max. |
||
|
90 |
5 |
180 |
82 |
1.75 |
1000 |
||
|
Cottons |
40 |
5 |
180 |
80 |
0.90 |
1000 |
|
|
20 |
5 |
180 |
80 |
0.50 |
1000 |
||
|
Cottons 60° with Prewash |
60 |
5 |
200 |
90 |
1.60 |
1000 |
|
|
60** |
5 |
199 |
47.4 |
0.70 |
1000 |
||
|
Cottons Eco |
60** |
2,5 |
175 |
45 |
0,685 |
1000 |
|
|
40** |
2.5 |
155 |
41.4 |
0.55 |
1000 |
||
|
Synthetics |
40 |
2.5 |
120 |
66 |
0.75 |
1000 |
|
|
20 |
2.5 |
120 |
66 |
0.25 |
1000 |
||
|
Daily Xpress |
30 |
5 |
28 |
59 |
0.15 |
1000 |
|
|
Woollens / Hand Wash |
40 |
1.5 |
65 |
45 |
0.45 |
1000 |
|
|
Down Wear |
40 |
1.5 |
105 |
85 |
0.80 |
1000 |
|
|
Shirts |
40 |
2.5 |
80 |
42 |
0.60 |
800 |
|
|
Drum Clean |
90 |
— |
160 |
67 |
2.10 |
600 |
|
** : Energy Label programme (EN 60456 Ed.3)
***: If maximum spin speed of the machine is lower then this value, you can only select up to the maximum spin speed. — : See the programme description for maximum load.
|
** «Cotton Economic 40°C and Cotton Economic 60°C are standard programmes.» These programmes are known as ’40°C |
|||
|
cotton standard programme’ and ’60°C cotton standard programme’ and indicated with the |
symbols on the |
||
|
panel. |
|||
|
C |
Water and power consumption may vary subject to the changes in water pressure, water hardness and temperature, |
||
|
ambient temperature, type and amount of laundry, spin speed, and changes in electric voltage. |
|||
|
Depending on the amount of laundry you have loaded into your machine, there may be a difference of 1-1.5 hours |
|||
|
between the duration shown in the Programme and consumption table and the actual washing duration. Duration will |
|||
|
be automatically updated soon after the washing starts. |
|
Washing Machine / User’s Manual |
15 / EN |
4.3.5 Main programmes
Depending on the type of fabric, use the following main programmes.
• Cottons
Use this programme for your cotton laundry (sheets, bedlinen, towels, bathrobes, underwear etc.). Your laundry will be washed with vigorous washing action for a longer washing cycle.
• Synthetics
Use to wash your synthetic clothes (shirts, blouses, synthetic/cotton blends, etc.). Your laundry will be washed with a gentle action for a shorter washing cycle when compared to the Cottons programme. For curtains and tulle, it is recommended to use Synthetics 20˚C or 40˚C programme.
• Woollens / Hand Wash
Use to wash your woolen/delicate laundry. Your laundry will be washed with a very gentle washing action in order not to damage the clothes.
4.3.6 Additional programmes
For special cases, additional programmes are available in the machine.
C Additional programmes may differ according to the model of the machine.
• Cottons Eco
Use this programme to wash your laundry washable in cottons programme for a longer time, still with a very good performance for saving purposes.
C Cotton Eco programme consumes less energy compared to other cotton programmes.
• Cottons 60º with Prewash
Use this programme only for heavily soiled cotton clothes. Add detergent into the prewash compartment.
• Daily Xpress
Use this programme to wash your lightly soiled cotton clothes in a short time.
• Shirts
This programme is used to wash the shirts made from cotton, synthetic and synthetic blended fabrics altogether. It reduces wrinkles. Pre-treatment algorithm is executed.
• Apply the pre-treatment chemical on your garments directly or add it together with detergent when the machine starts to take water from the main washing compartment. Thus the machine will wash them in a short period of time and expected lifespan of your shirts will extend.
• Down Wear
Use this programme to wash your coats, vest, jackets etc. containing feathers with a «machinewashable» label on them. Thanks to special spinning profiles, it is ensured that the water reaches the air gaps amongst the feathers.
• Drum Clean
Use regularly (once in every 1-2 months) to clean the drum and provide the required hygiene. Operate the programme while the machine is completely empty. To obtain better results, put powder lime-scale remover for washing machines into the detergent compartment no. “2”. When the programme is over, leave the loading door ajar so that the inside of the machine gets dry.
C This is not a washing programme. It is a maintenance programme.
Do not run the programme when there is something in the machine. If you try to do so, the machine detects that there is load inside and aborts the programme.
|
16 / EN |
Washing Machine / User’s Manual |

4.3.7 Special programmes
For specific applications, select any of the following programmes.
• Rinse
Use when you want to rinse or starch separately.
• Spin+Drain
You can use this function to remove the water on the garment of drain the water in the machine. Before selecting this programme, select the desired spin speed and press Start / Pause button. First, the machine will drain the water inside of it. Then, it will spin the laundry with the set spin speed and drain the water coming out of them.
If you wish to drain only the water without spinning your laundry, select the Pump+Spin programme and then select the No Spin function with the help of Spin Speed Adjustment button. Press Start / Pause button.
C Use a lower spin speed for delicate laundries.
4.3.8 Speed selection
Whenever a new programme is selected, the recommended spin speed of the selected programme is displayed on the spin speed indicator.
To decrease the spin speed, press the Spin Speed Adjustment button. Spin speed decreases gradually. Then, depending on the model of the product, «Rinse Hold» and «No Spin» options appear on the display. When «No Spin» is selected, the rinse level indicator lights will not turn on.
Rinse hold
If you are not going to unload your clothes immediately after the programme completes, you can use rinse hold function to keep your laundry in the final rinsing water in order to prevent them from getting wrinkled when there is no water in the machine. Press Start / Pause button after this process if you want to drain the water without spinning your laundry. Programme will resume and complete after draining the water.
If you want to spin the laundry held in water, adjust the Spin Speed and press Start / Pause button. The programme will resume. Water is drained, laundry is spun and the programme is completed.
C If the programme has not reached the spinning step, you can change the speed without switching the machine to Pause mode.
|
Washing Machine / User’s Manual |
17 / EN |
 Loading…

Нажмите, чтобы увеличить фото
Описание
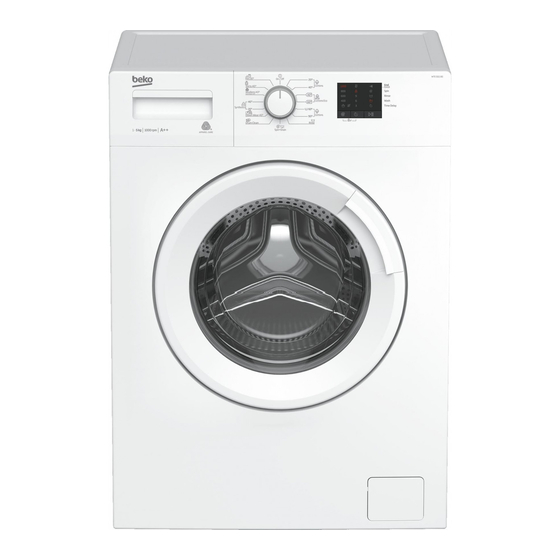
Стиральная машина Beko WTE 5511 B0. Очень распространённая модель — неприхотливая и долговечная. В настоящий момент снята с производства. Цена указана на бывшую в употреблении.
Характеристики
Вес загружаемого белья: 5-5.9 кг;
Высота-Ширина-Глубина: 85-60-45;
Тип загрузки белья: Фронтальная;
Конструкция: Отдельно стоящая;
Цена (2020 год): 10000 руб.
Как пользоваться
Отзывы покупателей из интернета
Инструкция по применению на русском
Игорь
- Достоинства:
- Цена хорошая. Относительно не шумная для своего класса
- Недостатки:
- Качество стирки очень плохое. Нет индикации продолжительности стирки. Режимы стирки длинные, кроме ежедневного.
- Комментарий:
- По мне это полоскательная машина предназначена только для полоскания носков и потных вещей в режиме короткой ежедневной стирки. С этим она справляется на 5 (быстро и достаточно тихо) . Остальные режимы не дождешься когда они закончатся, да и не видно этого на псевдо дисплее. Грязные вещи просто полоскаются в порошке. До этой модели был настоящий кореец DAEWOO и древний Б/У BOSСH – прекрасные, безупречные аппараты были. Стираем очень много и очень грязные вещи в связи с родом работы. Интересно на сколько ее хватит.
Inline Feedbacks
Посмотреть все комментарии
Помогите друзьям, отправьте им эту подборку!
- Manuals
- Brands
- Beko Manuals
- Washer
- WTE 5511 BW
Manuals and User Guides for Beko WTE 5511 BW. We have 1 Beko WTE 5511 BW manual available for free PDF download: User Manual
- Manuals
- Brands
- Beko Manuals
- Washer
- WTE 5511 BW
- User manual
-
Contents
-
Table of Contents
-
Troubleshooting
-
Bookmarks
Quick Links
Washing Machine
User’s Manual
EN / DE / FR
Document Number=
Waschmaschine
Bedienungsanleitung
Lave-linge
Manuel d’utilisation
WTE 5511 BW
2820526118_EN / 24-07-17.(9:21)
Related Manuals for Beko WTE 5511 BW
Summary of Contents for Beko WTE 5511 BW
-
Page 1: Washing Machine
Washing Machine User’s Manual Waschmaschine Bedienungsanleitung Lave-linge Manuel d‘utilisation WTE 5511 BW EN / DE / FR 2820526118_EN / 24-07-17.(9:21) Document Number=…
-
Page 2
This product was manufactured using the latest technology in environmentally friendly conditions. -
Page 3: General Safety Instructions
General safety instructions This section includes security instructions which may help prevent the injuries and material damage risks. All kinds of warranties shall be invalid if these instructions are not observed. 1.1 Life and property safety Never place the product on a carpet-covered floor. Electrical parts will get overheated since air cannot circulate from under the device.
-
Page 4: Electrical Safety
Electrical products are dangerous for the children. Keep the children away from the product when it is in use. Do not allow them to play with the product. Use child lock to prevent children from intervening with the product. Do not forget to close the loading door when leaving the room where the product is located.
-
Page 5: Important Instructions For Environment
Important instructions for environment 2.1 Compliance with WEEE Directive This product complies with EU WEEE Directive (2012/19/EU). This product bears a classification symbol for waste electrical and electronic equipment (WEEE). This product has been manufactured with high quality parts and materials which can be reused and are suitable for recycling.
-
Page 6: Technical Specifications
Complying Commission Delegated Regulation (EU) No 1061/2010 Supplier name or trademark Beko Model name WTE 5511 BW Rated capacity (kg) Energy efficiency class / Scale from A+++ (Highest Efficiency) to D (Lowest Efficiency) Annual Energy Consumption (kWh) Energy consumption of the standard 60°C cotton programme at full load (kWh) 0,700 Energy consumption of the standard 60°C cotton programme at partial load (kWh)
-
Page 7: Appropriate Installation Location
4.1 Installation • Apply to the nearest authorised service agent for the installation of your product. • Preparation of the location and electrical, tap water and waste water installations at the place of installation is under customer’s responsibility. • Make sure that the water inlet and discharge hoses as well as the power cable are not folded, pinched or crushed while pushing the product into its place after installation or cleaning procedures.
-
Page 8: Connecting Water Supply
4.1.4 Connecting water supply The water supply pressure required to run the product is between 1 to 10 bars (0.1 – 1 MPa). It is necessary to have 10 – 80 liters of water flowing from the fully open tap in one minute to have your machine run smoothly. Attach a pressure reducing valve if water pressure is higher.
-
Page 9: Adjusting The Feet
4.1.6 Adjusting the feet CAUTION: In order to ensure that the product operates more silently and vibration-free, it must stand level and balanced on its feet. Balance the machine by adjusting the feet. Otherwise, the product may move from its place and cause crushing and vibration problems.
-
Page 10: Sorting The Laundry
4.2 Preparation 4.2.1 Sorting the laundry * Sort laundry according to type of fabric, color, and degree of soiling and allowable water temperature. * Always obey the instructions given on the garment tags. 4.2.2 Preparing laundry for washing • Laundry items with metal attachments such as, underwired bras, belt buckles or metal buttons will damage the machine.
-
Page 11: Using Detergent And Softener
4.2.6 Using detergent and softener When using detergent, softener, starch, fabric dye, bleacher and decolorant, descaling agents; read the manufacturer’s instructions written on the package and follow the dosages specified. Use measuring cup if available. The detergent drawer is composed of three compartments: –…
-
Page 12
Using liquid detergents If the product contains a liquid detergent cup: • Put the liquid detergent container into the compartment no “2”. • If the liquid detergent lost its fluidity, dilute it with water before putting it into the detergent container. If the product does not contain a liquid detergent cup: •… -
Page 13: Tips For Efficient Washing
4.2.7 Tips for efficient washing Clothes Delicates/ Light Colours and Black/Dark Colours Woolens/ Whites Colours Silks (Recommended (Recommended (Recommended temperature (Recommended temperature temperature range temperature range range based on soiling level: range based on soiling level: based on soiling level: based on soiling 40-90 cold -40…
-
Page 14: Preparing The Machine
4.3 Operating the product 4.3.1 Control panel WTE 5511 BW 20º 1000 40º 40º 40º 60º 20º 60° 90º 1 — Programme Selection knob (Uppermost 6 — Programme Follow-up LEDs position On / Off) 7 — Start / Pause Button…
-
Page 15: Programme And Consumption Table
4.3.4 Programme and consumption table Programme 1,75 1000 Cottons 0,90 1000 0,50 1000 Prewash-Cottons 1,60 1000 60** 47,4 0,70 1000 Cottons Eco 60** 0,685 1000 40** 41,4 0,55 1000 0,75 1000 Synthetics 0,25 1000 Mini 0,15 1000 Wool / Hand Wash 0,45 1000 Down Wear…
-
Page 16: Main Programmes
Indicative values for Synthetics programmes (EN) Remaining Moisture Remaining Moisture Content (%) ** Content (%) ** ≤ 1000 rpm > 1000 rpm 0,75 105/130 Synthetics 40 0.25 105/130 Synthetics 20 * You can see the washing time of the programme you have selected on the display of the machine. It is normal that small differences may occur between the time shown on the display and the real washing time.
-
Page 17: Special Programmes
• Down Wear Use this programme to wash your coats, vest, jackets etc. containing feathers with a «machine- washable» label on them. Thanks to special spinning profiles, it is ensured that the water reaches the air gaps amongst the feathers. •…
-
Page 18: Delayed Start
4.3.9 Delayed Start With the Delayed Start function the startup of the programme may be delayed up to 3, 6 or 9 hours. Do not use liquid detergents when you set Delayed Start! There is the risk of staining of the clothes. 1.
-
Page 19: Progress Of Programme
To deactivate the Child Lock: Press and hold Speed and Delayed Start buttons for 3 seconds while any programme is running. While you are holding for 3 seconds, the «Child Lock Enabled LED» will flash. You can release the buttons when the LED turns off completely. In addition to the method above, to deactivate the Child Lock, switch the Programme Selection knob to On / Off position when no programme is running, and select another programme.
-
Page 20: Cancelling The Programme
Adding or taking out laundry You can load/unload laundry when a programme is running if the water level is appropriate to open the door. To do this: 1. Press Start / Pause button to switch the machine to pause mode. The programme follow-up light of the relevant step during which the machine was switched into the pause mode will flash.
-
Page 21: Maintenance And Cleaning
4.4 Maintenance and cleaning Service life of product extends and frequently experienced problems will be reduced if it is cleaned at regular intervals. 4.4.1 Cleaning the detergent drawer Clean the detergent drawer at regular intervals (every 4-5 washing cycles) as shown below in order to prevent accumulation of powder detergent in time.
-
Page 22: Draining Remaining Water And Cleaning The Pump Filter
4.4.5 Draining remaining water and cleaning the pump filter The filter system in your machine prevents solid items such as buttons, coins and fabric fibers clogging the pump impeller during discharge of washing water. Thus, the water will be discharged without any problem and the service life of the pump will extend.
-
Page 23: Troubleshooting
Troubleshooting Problem Reason Solution Program does not start after Start / Pause / Cancel button was not pressed. • *Press the Start / Pause / Cancel button. closing the door. It may be difficult to close the loading door in case •…
-
Page 24
Problem Reason Solution Washing takes longer time than Water pressure is low. • Machine waits until taking in adequate specified in the manual.(*) amount of water to prevent poor washing quality due to the decreased amount of water. Therefore, the washing time extends. Voltage might be low. -
Page 25
Problem Reason Solution Washing performance is poor: Regular drum cleaning is not applied. • Clean the drum regularly. For this, please Oily stains appeared on the see 4.4.2. laundry. (**) Washing performance is poor: Odours and bacteria layers are formed on the •… -
Page 26
Problem Reason Solution Too much foam forms in the Improper detergents for the washing machine are • Use detergents appropriate for the washing machine. (**) being used. machine. Excessive amount of detergent is used. • Use only sufficient amount of detergent. Detergent was stored under improper conditions. -
Page 27
Waschmaschine Bedienungsanleitung WTE 5511 BW Dokument Nummer= 2820526118_DE/ 24-07-17.(9:38) -
Page 28: Allgemeine Sicherheitshinweise
Allgemeine Sicherheitshinweise Dieser Abschnitt enthält Sicherheitsanweisungen, die bei der Verhinderung von Verletzungen und Materialschäden helfen können. Alle Arten von Garantien erlöschen, falls diese Anweisungen nicht beachtet werden. 1.1 Vermeidung von Personen- und Sachschäden Stellen Sie das Produkt niemals auf einen Teppichboden. Elektrische Teile überhitzen, da Luft nicht unter dem Gerät zirkulieren kann.
-
Page 29: Sicherheit Von Kindern
1.2 Sicherheit von Kindern Dieses Produkt kann von Kindern im Alter von mindestens 8 Jahren sowie von Personen, deren physische, sensorische oder geistige Fähigkeiten vermindert sind oder die einen Mangel an Erfahrung und Kenntnissen aufweisen, verwendet werden, sofern sie beaufsichtigt bzw. über den sicheren Umgang mit dem Gerät und den damit verbundenen Gefahren unterrichtet wurden.
-
Page 30
Schließen Sie das Gerät an eine durch eine 16-A-Sicherung geschützte geerdete Steckdose an. Die Installation der Schutzerde muss grundsätzlich von einem qualifizierten Elektriker ausgeführt werden. Wir haften nicht für jegliche Schäden, die durch mangelhafte, nicht den örtlichen Vorschriften entsprechende, Erdung entstehen. Sprühen Sie niemals Wasser oder andere Flüssigkeiten direkt auf das Gerät! Es besteht Stromschlaggefahr! Berühren Sie den Netzstecker niemals mit feuchten oder gar… -
Page 31: Bestimmungsgemäßer Gebrauch
Wichtige Hinweise zur Umwelt 2.1 Konformität mit WEEE-Richtlinie Dieses Produkt stimmt mit der WEEE-Richtlinie der Europäischen Gemeinschaft (2012/19/EG) überein. Dieses Produkt trägt ein Klassifizierungssymbol für elektrische und elektronische Altgeräte (WEEE). Dieses Produkt wurde mit hochwertigen Teilen und Materialein gefertigt, die recyclingfähig sind und wiederverwertet werden können.
-
Page 32: Technische Daten
Gemäß Verordnung der Kommission (EU) Nr. 1061/2010 Herstellername oder Marken Beko Modellname WTE 5511 BW Nennkapazität (kg) Energieeffizienzklasse / Skala von A+++ (höchste Effizienz) bis D (niedrigste Effizienz) Jährlicher Energieverbrauch (kWh) Energieverbrauch des 60 °C-Buntwäsche Eco standardprogramms bei voller Beladung (kWh) 0,700 Energieverbrauch des 60 °C-Buntwäsche Eco standardprogramms bei teilweiser Beladung (kWh)
-
Page 33: Installation
4.1 Installation • Lassen Sie Ihr Gerät vom autorisierten Kundendienst in Ihrer Nähe installieren. • Die Vorbereitung des Aufstellungsortes, der Wasserzu- und -ableitung sowie des elektrischen Anschlusses sind Sache des Kunden. • Achten Sie darauf, dass Wasserzulauf- und -ablaufschläuche sowie das Netzkabel nicht geknickt und nicht anderweitig beschädigt werden, wenn Sie das Gerät nach dem Anschluss an Ort und Stelle rücken oder es reinigen.
-
Page 34: Transportsicherungen Entfernen
4.1.3 Transportsicherungen entfernen Lösen Sie alle Sicherungen mit einem geeigneten Schlüssel, bis sie sich frei drehen lassen. Entfernen Sie die Transportsicherungen, indem Sie diese vorsichtig herausdrehen. Setzen Sie die Kunststoffabdeckungen (diese finden Sie in der Tüte mit der Bedienungsanleitung) in die Löcher an der Rückwand ein. ACHTUNG: Entfernen Sie die Transportsicherungen vor der Inbetriebnahme der Waschmaschine! Andernfalls kann das Produkt beschädigt werden.
-
Page 35
4.1.5 Ablaufschlauch an Ablauf anschließen • Schließen Sie das Ende des Ablaufschlauchs direkt an den Wasserablauf (Abfluss), ein WC oder eine Badewanne an. ACHTUNG: Ansonsten kann es zu Überschwemmungen kommen, falls sich der Ablaufschlauch beim Abpumpen des Wassers lösen sollte. Bei hohen Waschtemperaturen besteht Verbrühungsgefahr! Sie können solche Situationen verhindern und sicherstellen, dass Wasserzulauf und Abpumpen problemlos funktionieren, indem Sie den Ablaufschlauch sicher fixieren. -
Page 36: Füße Einstellen
4.1.6 Füße einstellen ACHTUNG: Damit Ihre Maschine leise und vibrationsfrei arbeiten kann, muss sie absolut gerade und ausbalanciert stehen. Sie balancieren die Maschine aus, indem Sie die Füße entsprechend einstellen. Sollte das Gerät nicht fest und gerade stehen, kann es sich im Betrieb bewegen, stark vibrieren und gegen andere Gegenstände oder Möbelstücke stoßen.
-
Page 37: Erste Benutzung
4.1.8 Erste Benutzung Bevor Sie Ihr neues Gerät zum ersten Mal benutzen, machen Sie sich unbedingt mit Abschnitt „Wichtige Hinweise zu Sicherheit und Umwelt“ und den Anweisungen im Abschnitt „Installation/Aufstellung“ vertraut. Bereiten Sie die Maschine entsprechend vor, indem Sie zuerst das Trommelreinigung-Programm ausführen. Falls dieses Programm an Ihrer Maschine nicht verfügbar ist, wenden Sie die in Abschnitt 4.4.2 beschriebene Methode Verwenden Sie nur für Waschmaschinen geeignete Kalkentferner.
-
Page 38
4.2 Vorbereitung 4.2.1 Wäsche sortieren * Sortieren Sie die Wäsche nach Textilientyp, Farbe, Verschmutzungsgrad und zulässiger Waschtemperatur. * Halten Sie sich grundsätzlich an die Angaben auf den Pflegeetiketten. 4.2.2 Wäsche vorbereiten • Wäsche mit Metallteilen wie Büstenhalter, Gürtelschnallen und Metallknöpfe beschädigen die Maschine. -
Page 39: Wäsche In Die Maschine Geben
• Waschen Sie leicht verschmutzte Wäsche bei niedrigen Temperaturen. • Nutzen Sie schnelle Programme, wenn Sie nur geringe Mengen leicht verschmutzter Wäsche waschen. • Verzichten Sie bei nur leicht verschmutzter Wäsche auf Vorwäsche und hohe Temperaturen. • Wenn Sie Ihre Wäsche in einem Wäschetrockner trocknen möchten, wählen Sie beim Waschen die höchstmögliche Schleudergeschwindigkeit.
-
Page 40
• Wenn Sie Waschmittel im Säckchen oder in einer Dosierkugel zur Wäsche geben, sollten Sie grundsätzlich auf eine Vorwäsche verzichten. Geben Sie das Waschmittelsäckchen oder die Dosierkugel direkt zur Wäsche in die Maschine. Wenn Sie Flüssigwaschmittel verwenden, vergessen Sie nicht, den Flüssigwaschmittelbehälter in das Hauptwaschmittelfach (Fach II) zu geben. -
Page 41
Flüssigwaschmittel, ohne Flüssigwaschmittelbehälter: • Benutzen Sie Flüssigwaschmittel nicht als Vorwaschmittel. • Flüssigwaschmittel können Flecken in der Kleidung verursachen, wenn Sie solche Waschmittel in Kombination mit der Zeitverzögerungsfunktion benutzen. Verzichten Sie daher grundsätzlich auf Flüssigwaschmittel, wenn Sie mit der Zeitverzögerung arbeiten. Gel- und Tab-Waschmittel •… -
Page 42
4.2.7 Nützliche Tipps zum Waschen Kleidung Helle Farben und Schwarzes/ Pflegeleicht/ Farben Weißwäsche Dunkles Wolle/Seide (Empfohlene (Empfohlene (Empfohlene (Empfohlene Temperaturen je nach Temperaturen je nach Temperaturen je nach Temperaturen je nach Verschmutzungsgrad: Verschmutzungsgrad: Verschmutzungsgrad: Verschmutzungsgrad: 40 – 90 °C) Kalt – 40 °C) Kalt –… -
Page 43: Bedienung
4.3 Bedienung 4.3.1 Bedienfeld WTE 5511 BW 20º 1000 40º 40º 40º 60º 20º 60° 90º 1 — Programmauswahlknopf (oberste 6 — Programmfolge-LEDs Position: Ein/Aus) 7 — Start/Pause-Taste 2 — Schleuderdrehzahlanzeige-LEDs 8 — Zeitverzögerungseinstelltaste 3 — Kindersicherungs-LED 9 — Schleuderdrehzahl-Einstelltaste 4 — Türverriegelungs-LED…
-
Page 44: Programm- Und Verbrauchstabelle
4.3.4 Programm- und Verbrauchstabelle Programm 1,75 1000 Koch-/Buntwäsche 0,90 1000 0,50 1000 Koch-/Buntwäsche mit Vorwäsche 1,60 1000 60** 47,4 0,70 1000 Buntwäsche Eco 60** 0,685 1000 40** 41,4 0,55 1000 0,75 1000 Pflegeleicht 0,25 1000 Mini 0,15 1000 Wolle / Handwäsche 0,45 1000 Daunen…
-
Page 45: Zusätzliche Programme
Richtwerte für Synthetik-Programme (DE) Restfeuchtigkeit (%) ** Restfeuchtigkeit (%) ** ≤ 1000 rpm > 1000 rpm Pflegeleicht 40 0,75 105/130 Pflegeleicht 20 0,25 105/130 * Die Dauer des ausgewählten Programms erscheint im Display der Maschine. Dabei kann es durchaus zu kleinen Abweichungen zwischen der angezeigten und der tatsächlichen Dauer kommen.
-
Page 46
• Mini Dieses Programm eignet sich zum schnellen Waschen leicht verschmutzter Baumwolltextilien. • Hemden Dieses Programm eignet sich zum gemeinsamen Waschen von Hemden aus Baumwolle, Synthetik und Mischfasern. Es hält die Faltenbildung gering. Der Vorbehandlungsalgorithmus wird ausgeführt. • Wenden Sie das Vorbehandlungsmittel direkt auf die Wäsche an oder geben Sie es gemeinsam mit dem Waschmittel in das Hauptwäschefach der Maschine, wenn die Maschine Wasser einlässt. -
Page 47
4.3.8 Geschwindigkeit auswählen Nachdem ein Programm ausgewählt wurde, wird die empfohlene Schleuderdrehzahl des gewählten Programms in der Schleuderdrehzahlanzeige dargestellt. Drücken Sie zum Verringern der Schleuderdrehzahl die Schleuderdrehzahltaste. Die Schleuderdrehzahl wird Schritt für Schritt vermindert. Anschließend werden je nach Modell die Optionen „Spülstopp“ und „Nicht schleudern“ angezeigt. Wurde „Nicht schleudern“ gewählt, leuchtet die Schleuderstufenleuchte nicht. -
Page 48: Programm Starten
Verzögerungszeit ändern Wenn Sie die Zeit bei laufendem Countdown ändern möchten, müssen Sie das Programm abbrechen und die Verzögerungszeit erneut einstellen. Zeitverzögerung aufheben Wenn Sie die Zeitverzögerung aufheben und das Waschprogramm sofort starten möchten: 1. Wählen Sie mit dem Programmauswahlknopf ein beliebiges Programm. Dadurch wird die Zeitverzögerung aufgehoben.
-
Page 49: Änderungen Nach Programmstart
Sie können Geschwindigkeitseinstellungen ändern, ohne ein laufendes Programm zuvor stoppen zu müssen. Damit dies funktioniert, darf der jeweilige Programmschritt natürlich noch nicht erreicht sein. Falls keine Änderung möglich ist, blinkt die entsprechende Leuchte dreimal. Falls die Maschine nicht schleudern sollte, ist eventuell die Spülstopp-Funktion aktiv – oder die Wäsche ist so ungleichmäßig in der Trommel verteilt, dass Schleudern nicht ratsam wäre.
-
Page 50: Programme Abbrechen
4.3.15 Programme abbrechen Zum Abbrechen eines Programms wählen Sie einfach ein anderes Programm mit dem Programmauswahlknopf. Das zuvor aktive Programm wird abgebrochen. Die Ende/ Abbrechen-Leuchte blinkt und zeigt an, dass das vorherige Programm abgebrochen wurde. Wenn Sie den Programmauswahlknopf drehen, wechselt die Maschine zu einem anderen Programm, allerdings wird das Wasser nicht aus der Maschine abgepumpt.
-
Page 51: Reinigung Und Wartung
4.4 Reinigung und Wartung Viele Probleme lassen sich vermeiden, wenn Sie Ihre Waschmaschine in regelmäßigen Abständen reinigen; zusätzlich verlängern Sie die Lebensdauer Ihres neuen Gerätes. 4.4.1 Waschmittelschublade reinigen Reinigen Sie die Waschmittelschublade regelmäßig (jeweils nach 4 – 5 Wäschen), damit sich im Laufe der Zeit keine Waschmittelreste ansammeln.
-
Page 52: Wasserzulauffilter Reinigen
4.4.4 Wasserzulauffilter reinigen Am Endstück jedes Wasserzulaufventils an der Rückseite der Maschine sowie am Ende der Wasserzulaufschläuche (dort, wo diese an den Wasserhahn angeschlossen werden) befindet sich ein Filter. Diese Filter verhindern, dass Fremdkörper und Schmutz mit dem Wasser in die Waschmaschine gelangen. Die Filter sollten bei Verschmutzung gereinigt werden.
-
Page 53
So lassen Sie das Wasser ab und reinigen einen verschmutzten Filter: 1 Trennen Sie das Gerät vollständig von der Stromversorgung, indem Sie den Netzstecker ziehen. ACHTUNG: Die Wassertemperatur im Inneren der Maschine kann bis zu 90 °C erreichen. Reinigen Sie den Filter zur Vermeidung von Verbrennungsgefahr, nachdem sich das Wasser in der Maschine abgekühlt hat. -
Page 54: Problemlösung
Problemlösung Problem Ursache Lösung Programm startet nach Start/Pause/Abbrechen-Taste wurde nicht • Drücken Sie die Start/Pause/Abbrechen- gedrückt. Taste. Schließen der Tür nicht. Möglicherweise lässt sich die Gerätetür bei • Reduzieren Sie die Wäschemenge und übermäßiger Beladung nur schwer schließen. stellen Sie sicher, dass die Gerätetür richtig schließt.
-
Page 55
Problem Ursache Lösung Die Waschmaschinentür Die Türsperre ist aktiv, da das Wasser recht • Entfernen Sie das Wasser mit dem hoch in der Maschine steht. Abpumpen- oder Schleudern-Programm. lässt sich nicht öffnen. Die Maschine heizt gerade das Wasser auf • Warten Sie, bis das Programm oder befindet sich im Schleudergang. -
Page 56
Problem Ursache Lösung Die Waschleistung ist Über längere Zeit wurde zu wenig Waschmittel • Benutzen Sie die für Wasserhärte und benutzt. Wäsche empfohlene Waschmittelmenge. schlecht: Die Wäsche wird Über längere Zeit wurde bei niedrigen • Wählen Sie die zur Wäsche passende grau. -
Page 57
Problem Ursache Lösung Die Wäsche wird nach Zu wenig Waschmittel. • Bei hoher Wasserhärte kann die Wäsche mit der Zeit steif werden, wenn Sie zu dem Waschen steif. (**) wenig Waschmittel benutzen. Verwenden Sie eine an die Wasserhärte angepasste Waschmittelmenge. Das Waschmittel wurde in das falsche Fach •… -
Page 58
Problem Ursache Lösung Zu starke Schaumbildung Ein falsches, eventuell nicht für • Nutzen Sie ein für Waschmaschinen Waschmaschinen geeignetes, Waschmittel geeignetes Waschmittel. in der Maschine. (**) wurde benutzt. Zu viel Waschmittel. • Benutzen Sie lediglich die erforderliche Waschmittelmenge. Das Waschmittel wurde falsch gelagert. •… -
Page 59: Manuel D’utilisation
Lave-linge Manuel d‘utilisation WTE 5511 BW Numéro de document = 2820526118_FR/ 24-07-17.(9:00)
-
Page 60
Consignes générales de sécurité Cette section contient des instructions de sécurité qui permettent d’éviter les blessures et les dégâts matériels. Tous les types de garanties ne sont pas valables si ces instructions ne sont pas respectées. 1.1 Sécurité des personnes et des biens N’installez jamais la machine sur un sol couvert de moquette. -
Page 61: Sécurité Des Enfants
Seuls les lessives, les adoucissants et les suppléments appropriés pour les lave-linge automatiques peuvent être utilisés. Suivez les instructions inscrites sur l’étiquette de textiles et l’emballage du détergent. 1.2 Sécurité des enfants Ce produit peut être utilisé par des enfants âgés de 8 ans et plus, par des personnes dont les capacités physiques, sensorielles et mentales sont réduites ainsi que par les personnes étrangères à…
-
Page 62: Sécurité Électrique
1.3 Sécurité électrique Si l’appareil tombe en panne, évitez de l’utiliser à moins qu’il ait été réparé par l’agent de service agréé. Risque d’électrocution ! Cet appareil été conçu pour reprendre son fonctionnement en cas de mise sous tension après une coupure d’alimentation électrique.
-
Page 63: Conformité Avec La Directive Deee
Consignes importantes pour l’environnement 2.1 Conformité avec la Directive DEEE Ce produit est conforme à la Directive européenne DEEE (2012/19/UE). Ce produit porte un symbole de classement pour les déchets d’équipements électriques et électroniques (DEEE). Cette machine a été fabriquée avec des pièces et des matériaux de haute qualité…
-
Page 64: Caractéristiques Techniques
Nom du fournisseur ou marque déposée Beko Nom du modèle WTE 5511 BW Masse maximale de linge sec (kg) Classe d’efficacité énergétique / Échelle de A+++ (Efficacité la plus élevée) à D (Efficacité la plus faible) Consommation énergétique annuelle (kWh) Consommation énergétique du programme coton 60°C standard à…
-
Page 65: Emplacement D’installation Approprié
4.1 Installation • Contactez l’agent de service agréé le plus proche pour l’installation de votre produit. • La préparation de l’emplacement ainsi que des installations liées à l’électricité, au robinet d’eau et aux eaux usées sur le site de l’installation relèvent de la responsabilité du client.
-
Page 66: Raccordement De L’arrivée D’eau
4.1.3 Retrait des sécurités de transport Dévissez tous les boulons à l’aide d’une clé appropriée jusqu’à ce qu’ils tournent librement. Enlevez les vis de sécurité en les tournant doucement. Placez les couvercles en plastique, fournis dans le sac contenant le manuel d’utilisation, sur les ouvertures situées à…
-
Page 67: Raccordement Du Conduit D’évacuation
4.1.5 Raccordement du conduit d’évacuation • Fixez l’extrémité du tuyau de vidange directement à la conduite d’évacuation d’eau, aux toilettes ou à la baignoire. MISE EN GARDE : Votre maison sera inondée si le tuyau de vidange sort de son logement pendant la vidange.
-
Page 68: Branchement Électrique
4.1.7 Branchement électrique Branchez la machine à une prise équipée d’une mise à la terre et protégée par un fusible de 16 A. Notre entreprise ne pourra être tenue responsable des dommages liés à une utilisation de l’appareil sans prise de terre en conformité avec la réglementation locale. •…
-
Page 69
4.2 Préparation 4.2.1 Trier le linge * Triez le linge par type de textile, couleur, degré de saleté et température d’eau autorisée. * Respectez toujours les instructions inscrites sur les étiquettes de vos vêtements. 4.2.2 Préparation du linge pour le lavage •… -
Page 70: Chargement Du Linge
• Utilisez des programmes plus rapides pour de petites quantités de linge ou pour du linge peu sale. • N’utilisez pas le prélavage et des températures élevées pour le linge qui n’est pas très sale. • Si vous prévoyez de sécher votre linge dans un sèche-linge, sélectionnez la vitesse d’essorage recommandée la plus élevée pendant le processus de lavage.
-
Page 71
• N’utilisez pas de programme avec prélavage si vous utilisez un sachet de lessive ou une boule de diffusion de lessive. Vous pouvez placer ces éléments directement dans le linge contenu dans votre machine. Si vous utilisez une lessive liquide, pensez à mettre le réservoir de lessive liquide dans le compartiment de lavage principal (compartiment n°«… -
Page 72
Utilisation du gel et de la lessive sous forme de pastilles • Si l’aspect de la lessive en gel est fluide et votre machine ne contient aucun réservoir pour lessive liquide spéciale, versez la lessive en gel dans le compartiment à produits de lavage principal pendant la première admission d’eau. -
Page 73
4.2.7 Astuces pour un lavage efficace Vêtements Couleurs Claires et Couleurs noire Délicats/ Couleurs Blanc ou sombre Laine/Soies (Températures (Températures (Températures (Températures recommandées recommandées en recommandées en recommandées en en fonction du fonction du degré de fonction du degré de fonction du degré… -
Page 74: Fonctionnement De L’appareil
4.3 Fonctionnement de l’appareil 4.3.1 Bandeau de commande WTE 5511 BW 20º 1000 40º 40º 40º 60º 20º 60° 90º 1 — Sélecteur de programmes (Position la 5 — Témoins d’indicateur de départ plus élevée « Marche/Arrêt ») différé 2 — Témoins d’indicateur de vitesse 6 — Témoins de déroulement du…
-
Page 75
4.3.4 Tableau des programmes et de consommation Programme 1,75 1000 Coton 0,90 1000 0,50 1000 Prélavage-Coton 1,60 1000 60** 47,4 0,70 1000 Coton Eco 60** 0,685 1000 40** 41,4 0,55 1000 0,75 1000 Synthétique 0,25 1000 Mini 0,15 1000 Laine / Lavage Main 0,45 1000 Doudoune… -
Page 76
Valeurs indicatives destinées aux fibres synthétiques (FR) Humidité résiduelle ( %) ** Humidité résiduelle ( %) ** ≤ 1000 rpm > 1000 rpm 0,75 105/130 Synthétique 40 0,25 105/130 Synthétique 20 * Le temps de lavage du programme que vous avez sélectionné s’affiche à l’écran de la machine. Il est tout à fait normal qu’il existe de petites différences entre le temps indiqué… -
Page 77: Programmes Spéciaux
• Chemises Ce programme sert à laver simultanément les chemises en coton, en fibres synthétiques et en tissus mélangés. Il élimine les plis. L’algorithme de prétraitement est exécuté. • Appliquez le produit de traitement chimique directement sur vos vêtements ou ajoutez-le au détergent lorsque la machine commence à…
-
Page 78: Sélection De La Vitesse
4.3.8 Sélection de la vitesse Chaque fois qu’un nouveau programme est sélectionné, la vitesse d’essorage recommandée du programme sélectionné s’affiche sur l’indicateur de vitesse d’essorage. Pour réduire la vitesse d’essorage, appuyez sur le bouton de réglage de la vitesse d’essorage. Cette vitesse décroît graduellement. Ensuite, en fonction du modèle du produit, les options «…
-
Page 79: Sécurité Enfant
Changement de la période de départ différé Si vous souhaitez modifier la durée pendant le compte à rebours, vous devrez annuler le programme et régler à nouveau la durée. Annulation de la fonction de départ différé Si vous souhaitez annuler le compte à rebours du départ différé et commencer le programme immédiatement : 1.
-
Page 80
4.3.12 Déroulement du programme Le déroulement d’un programme en cours d’exécution peut être suivi à partir de l’indicateur de suivi du programme. Au début de chaque nouvelle étape du programme, le voyant correspondant s’allume et celui de l’étape précédente s’éteint. Vous pouvez modifier les réglages de vitesse sans toutefois interrompre le déroulement du programme une fois que ce dernier est activé. -
Page 81: Fin Du Programme
4. Fermez la porte de chargement. 5. Effectuez des modifications dans les réglages de vitesse, si cela est nécessaire. 6. Appuyez sur le bouton Démarrer/Pause pour mettre la machine en marche. 4.3.15 Annulation du programme Pour annuler le programme, utilisez le sélecteur de programmes pour choisir un autre programme.
-
Page 82: Entretien Et Nettoyage
4.4 Entretien et nettoyage La durée de vie de l’appareil augmente et les problèmes fréquemment rencontrés seront réduits s’il est nettoyé à des intervalles réguliers. 4.4.1 Nettoyage du bac à produits Nettoyage le bac à produits à intervalles réguliers (tous les 4 à…
-
Page 83: Nettoyage Des Filtres D’arrivée D’eau
4.4.4 Nettoyage des filtres d’arrivée d’eau Un filtre se trouve à l’extrémité de chaque vanne d’arrivée d’eau, située au dos de la machine et à l’extrémité de chaque tuyau d’admission d’eau, où ils sont raccordés au robinet. Ces filtres empêchent les corps étrangers et la saleté qui se trouve dans l’eau de pénétrer dans le lave-linge.
-
Page 84
Pour nettoyer le filtre sale et évacuer l’eau: 1 Débranchez la machine afin de couper l’alimentation électrique. MISE EN GARDE : La température de l’eau contenue dans la machine peut monter jusqu’à 90 ºC. Pour éviter tout risque de brûlure, nettoyage le filtre après que l’eau qui se trouve dans la machine ait refroidi. -
Page 85: Dépannage
Dépannage Problème Cause Solution Le programme ne Vous n’avez pas appuyé sur la touche • *Appuyez sur la touche Démarrer / Pause / Annuler. Démarrer / Pause / Annuler. démarre pas après la En cas de chargement excessif, il vous sera •…
-
Page 86
Problème Cause Solution Le hublot ne s’ouvre pas. Le verrouillage de la porte est activé à cause • Vidangez l’eau de la machine en lançant le du niveau d’eau dans la machine. programme Pompage ou Essorage. La machine chauffe l’eau ou se trouve au cycle •… -
Page 87
Problème Cause Solution La machine ne passe pas Il se peut que la machine contient une charge • Un système de détection automatique non équilibrée. d’une charge non équilibrée pourrait être à la phase d’essorage. (*) activé en raison d’une répartition inégale du linge dans le tambour. -
Page 88
Problème Cause Solution Le rinçage ne se fait pas La quantité de détergent, la marque, et les • Utilisez un détergent approprié pour le conditions de conservation utilisées ne sont lave-linge et votre linge. Conservez les bien. pas appropriées. détergents fermés dans un environnement sans humidité… -
Page 89
Problème Cause Solution Une quantité excessive de Un détergent inapproprié pour le lave-linge est • Utilisez un détergent adapté pour le lave- en train d’être utilisé. linge. mousse se forme dans la La quantité de détergent utilisée est excessive. • N’utilisez qu’une quantité suffisante de machine. -
Page 92
www.beko.com…

Данная инструкция на русском языке предназначена для стиральной машины
Beko WRS5511BWW, описывает принцип работы и основные моменты эксплуатации устройства.
Производитель настойчиво рекомендует перед включением стиральной машины
внимательно изучить настоящую инструкцию.
Инструкция для стиральной машины
представлена в формате PDF. Все современные браузеры уже поддерживают данный формат и сложностей с открытием файла возникнуть не должно.
Но если открыть инструкцию все же не удается, то необходимо установить на компьютер программу для чтения PDF файлов, например, Acrobat Reader. Если у вас возникли сложности с открытием инструкции на смартфоне под управлением Android, нужно установить, например, Adobe Acrobat Reader.
Комментарии (0)
Комментарии про другие Стиральные машины
Другие Стиральные машины Beko
Отличная компания. Так держать торговый уровень.
Молодецы.
Достоинства: Отличный стирает. 15 программ. Защита от детей есть. Все здорово.
Оперативная доставка в течении суток, четко в установленный интервал времени. Без опоздания.
Граммотные консультанты в торговых залах магазина.
Недостатки: Нет в паспорте инструкции на русском языке. Выдают отдельно скачинну с интернета. Шрифт мелкий, расплывчатый приходится всматриваться. На панели машины информация на английском языке или можно приклеить на турецком языке.