Samsung и Cookies
На этом сайте используются файлы cookie. Нажимая ПРИНЯТЬ или продолжая просмотр сайта, вы разрешаете их использование.
Подробнее
Выберите ваш регион или язык.
В настоящий момент товары недоступны для заказа на samsung.com/ru
В настоящий момент товары недоступны для заказа на samsung.com/ru

- Решения и советы
- Руководства и загрузки
- Interactive Guide
- Полезные ссылки
- Дополнительная информация
-
СВЯЖИТЕСЬ
С НАМИ
- ru
- PS43D450A2WXMS
- PS43D450A2W
- 107
- 1
- 999
- page-support-detail
- support product detail
Решения и советы
Фильтр
Закрыть
-
TV_Прочее -
Аксессуары -
Звук -
Изображение -
Использование -
Каналы -
Питание -
Приложения Samsung -
Программное обеспечение -
Сеть / Интернет -
Технические характеристики -
Установка / Подключение
-
Каналы
Как найти и настроить эфирные и кабельные каналы на телевизоре SamsungЧасто задаваемые вопросы о технике Телевизоры Samsung. Узнайте подробнее о ‘Как найти и настроить эфирные и кабельные каналы на телевизоре Samsung’ с помощью службы поддержки Samsung.
-
Установка / Подключение
Что делать, если нет сигнала при подключении по HDMI на телевизоре SamsungЧасто задаваемые вопросы о технике Телевизоры Samsung. Узнайте подробнее о ‘Что делать, если нет сигнала при подключении по HDMI на телевизоре Samsung’ с помощью службы поддержки Samsung.
-
Использование
Как использовать HDMI ARC в телевизорах Samsung Smart TVЧасто задаваемые вопросы о телевизорах Samsung. Обратитесь в службу поддержки Samsung, чтобы получить дополнительную информацию о том, как использовать HDMI ARC в телевизорах Samsung Smart TV.
-
Использование
Как включить игровой режим на телевизоре Samsung?Часто задаваемые вопросы о технике Телевизоры Samsung. Узнайте подробнее о ‘Как включить игровой режим на телевизоре Samsung?’ с помощью службы поддержки Samsung.
-
Использование
Как правильно подключить CAM-модуль к телевизоруЧасто задаваемые вопросы о технике Телевизоры Samsung. Узнайте подробнее о ‘Как правильно подключить CAM-модуль к телевизору’ с помощью службы поддержки Samsung.
-
Аксессуары
Как подключить интеллектуальный пульт к телевизору SamsungЧасто задаваемые вопросы о технике Телевизоры Samsung. Узнайте подробнее о ‘Как подключить интерактивный пульт Smart Touch Control к телевизору Samsung’ с помощью службы поддержки Samsung.
-
Сеть / Интернет
Как подключить телевизор Samsung к интернету по Wi-FiЧасто задаваемые вопросы о технике Телевизоры Samsung. Узнайте подробнее о ‘Как подключить телевизор Samsung к интернету по Wi-Fi’ с помощью службы поддержки Samsung.
-
Сеть / Интернет
Как подключить телевизор Samsung к интернету по кабелю (проводу)Часто задаваемые вопросы о технике Телевизоры Samsung. Узнайте подробнее о ‘Как подключить телевизор Samsung к интернету по кабелю (проводу)’ с помощью службы поддержки Samsung.
-
Изображение
Размытое, нечеткое изображение на экране телевизора SamsungРазмытое изображение на телевизоре Samsung? Пошаговая инструкция от производителя в этой статье.
-
Изображение
Линии, полосы, темные пятна, разводы на экране телевизора SamsungРекомендации, если на экране телевизора Samsung линии, полосы, темные пятна, разводы
-
Питание
Что делать, если телевизор Samsung не включаетсяТелевизор Samsung не включается? Читайте рекомендации от производителя в этой статье
-
Питание
Загорается экран на выключенном телевизоре Samsung. Телевизор сам включаетсяЧасто задаваемые вопросы о технике Телевизоры Samsung. Узнайте подробнее о ‘Загорается экран на выключенном телевизоре Samsung. Телевизор сам включается’ с помощью службы поддержки Samsung.
-
Изображение
Что делать, если искажаются цвета на телевизоре SamsungЧасто задаваемые вопросы о технике Телевизоры Samsung. Узнайте подробнее о ‘Что делать, если искажаются цвета на телевизоре Samsung’ с помощью службы поддержки Samsung.
-
Изображение
Что делать, если мерцает изображение на телевизоре SamsungЧасто задаваемые вопросы о технике Телевизоры Samsung. Узнайте подробнее о ‘Что делать, если мерцает изображение на телевизоре Samsung’ с помощью службы поддержки Samsung.
-
Каналы
Что делать, если телевизор Samsung не видит CAM-модульЧасто задаваемые вопросы о Бытовой технике Samsung. Узнайте подробнее о ‘Что делать, если телевизор Samsung не видит CAM-модуль’ с помощью службы поддержки Samsung.
-
TV_Прочее
Что делать, если не работает пульт от телевизора Samsung?Часто задаваемые вопросы о технике Мобильные устройства Samsung. Узнайте подробнее о ‘Что делать, если не работает пульт от телевизора Samsung?’ с помощью службы поддержки Samsung.
-
Использование
Как создать учетную запись (Samsung Account) на телевизоре SamsungЧасто задаваемые вопросы об аудио и видео технике Samsung. Узнайте подробнее о ‘Как создать учетную запись на телевизоре Samsung’ с помощью службы поддержки Samsung.
-
Использование
Как включить субтитры на цифровых каналах на телевизоре SamsungЧасто задаваемые вопросы об аудио и видео технике Samsung. Узнайте подробнее о ‘Как включить субтитры на цифровых каналах на телевизоре Samsung’ с помощью службы поддержки Samsung.
-
Приложения Samsung
Что делать, если не хватает памяти при установке приложения на телевизоре SamsungЧасто задаваемые вопросы об аудио и видео технике Samsung. Узнайте подробнее о ‘Как установить приложение для телевизора Samsung на USB-накопитель’ с помощью службы поддержки Samsung.
-
Программное обеспечение
Где скачать прошивку для телевизора SamsungЧасто задаваемые вопросы о технике Телевизоры Samsung. Узнайте подробнее о ‘Где скачать прошивку для телевизора Samsung’ с помощью службы поддержки Samsung.
-
Использование
Как настроить управление голосом через Google Assistant на телевизоре SamsungЧасто задаваемые вопросы о технике Телевизоры Samsung. Узнайте подробнее о ‘Как показывать часы и уведомления на экране блокировки Samsung Galaxy’ с помощью службы поддержки Samsung.
-
Установка / Подключение
Как подключить внешнее устройство через тюльпаны (RCA) к телевизору SamsungЧасто задаваемые вопросы о технике Мобильные устройства Samsung. Узнайте подробнее о ‘Как подключить внешнее устройство через тюльпаны (RCA) к телевизору Samsung’ с помощью службы поддержки Samsung.
-
Установка / Подключение
Как подключить ТВ-приставку (ресивер) кабелем HDMI к телевизору SamsungЧасто задаваемые вопросы о технике Мобильные устройства Samsung. Узнайте подробнее о ‘Как подключить приставку (ресивер) кабелем HDMI к телевизору Samsung’ с помощью службы поддержки Samsung.
-
Звук
Что делать, если прерывается звук на телевизоре SamsungЧасто задаваемые вопросы о SmartThings. Узнайте подробнее о ‘Что делать, если прерывается звук на телевизоре Samsung’ с помощью службы поддержки Samsung.
-
Сеть / Интернет
Как посмотреть MAC-адрес на телевизоре SamsungЧасто задаваемые вопросы о технике Телевизоры Samsung. Узнайте подробнее о ‘Как посмотреть MAC-адрес на телевизоре Samsung’ с помощью службы поддержки Samsung.
-
Звук
Как настроить или отключить звуковые сигналы на телевизоре SamsungЧасто задаваемые вопросы о технике Телевизоры Samsung. Узнайте подробнее о ‘Как настроить или отключить звуковые сигналы на телевизоре Samsung’ с помощью службы поддержки Samsung.
-
Программное обеспечение
Как обновить прошивку Smart-телевизора Samsung через интернетЧасто задаваемые вопросы о технике Телевизоры Samsung. Узнайте подробнее о ‘Как обновить прошивку телевизора Samsung через интернет’ с помощью службы поддержки Samsung.
-
Программное обеспечение
Как обновить прошивку на телевизоре Samsung через флешку (по USB)Часто задаваемые вопросы о технике Телевизоры Samsung. Узнайте подробнее о ‘Как обновить прошивку на телевизоре Samsung через флешку (по USB)’ с помощью службы поддержки Samsung.
-
Каналы
Как удалить ненужные каналы на телевизоре SamsungЧасто задаваемые вопросы о технике Телевизоры Samsung. Узнайте подробнее о ‘Как удалить ненужные каналы на телевизоре Samsung’ с помощью службы поддержки Samsung.
-
Использование
Как сделать сброс настроек на телевизоре SamsungЧасто задаваемые вопросы о технике Телевизоры Samsung. Узнайте подробнее о ‘Как сделать сброс настроек на телевизоре Samsung’ с помощью службы поддержки Samsung.
-
Использование
Как настроить дату и время на телевизоре SamsungЧасто задаваемые вопросы о технике Телевизоры Samsung. Узнайте подробнее о ‘Как настроить дату и время на телевизоре Samsung’ с помощью службы поддержки Samsung.
-
Использование
Как подключить беспроводной сабвуфер к саундбаруЧасто задаваемые вопросы о технике Мобильные устройства Samsung. Узнайте подробнее о ‘Как подключить беспроводной сабвуфер к саундбару’ с помощью службы поддержки Samsung.
-
Каналы
Как записывать ТВ программы на телевизоре SamsungИщете инструкцию по записи каналов на телевизоре Samsung? Подробная информация от производителя в этой статье.
-
TV_Прочее
Что делать, если забыл PIN-код от телевизора SamsungЧасто задаваемые вопросы о технике Телевизоры Samsung. Узнайте подробнее о ‘Что делать, если забыл пин-код от телевизора Samsung’ с помощью службы поддержки Samsung.
-
Изображение
Что делать, если на телевизоре Samsung появляется реклама и изменяются настройкиЧасто задаваемые вопросы о технике Телевизоры Samsung. Узнайте подробнее о ‘Что делать, если на телевизоре Samsung появляется реклама и изменяются настройки’ с помощью службы поддержки Samsung.
-
Использование
Что делать, если не воспроизводятся видео с USB на телевизоре SamsungЧасто задаваемые вопросы о технике Телевизоры Samsung. Узнайте подробнее о ‘Что делать, если не воспроизводятся видео с USB на телевизоре Samsung’ с помощью службы поддержки Samsung.
-
Использование
Как сделать изображение с проектора Samsung The Freestyle четчеЧасто задаваемые вопросы о проекторах Samsung. Узнайте подробнее о ‘Как сделать изображение с проектора Samsung The Freestyle четче’ с помощью службы поддержки Samsung.
-
Использование
Как использовать внешний аккумулятор для проектора Samsung The FreestyleЧасто задаваемые вопросы о проекторах Samsung. Узнайте подробнее о ‘Как использовать внешний аккумулятор для проектора Samsung The Freestyle’ с помощью службы поддержки Samsung.
-
Использование
Как подключить смартфон или планшет к ТВ Samsung через функцию Screen MirroringЧасто задаваемые вопросы о технике Телевизоры Samsung. Узнайте подробнее о ‘Как подключить смартфон или планшет к ТВ Samsung через функцию Screen Mirroring’ с помощью службы поддержки Samsung.
-
Использование
Как дублировать изображение с телевизора на проектор SamsungЧасто задаваемые вопросы об аудио и видео технике Samsung. Узнайте подробнее о ‘Как дублировать изображение с телевизора на проектор Samsung’ с помощью службы поддержки Samsung.
-
Использование
Как очистить экран телевизора SamsungЧасто задаваемые вопросы об аудио и видео технике Samsung. Узнайте подробнее о ‘Как очистить экран телевизора Samsung’ с помощью службы поддержки Samsung.
-
Использование
Как дублировать экран iOS-устройства на телевизор Samsung по AirPlay 2Часто задаваемые вопросы о телевизорах Samsung. Узнайте подробнее о «Как дублировать экран iOS-устройства на телевизор Samsung по AirPlay 2» с помощью службы поддержки Samsung.
-
Установка / Подключение
Как снять подставку на телевизоре Samsung K-серии (2016)Часто задаваемые вопросы о телевизорах Samsung. Узнайте подробнее о ‘Как снять подставку на телевизоре Samsung K-серии (2016)’ с помощью службы поддержки Samsung.
-
Использование
Как добавить телевизор в приложение SmartThingsЧасто задаваемые вопросы о SmartThings. Узнайте подробнее о ‘Как добавить телевизор в приложение SmartThings’ с помощью службы поддержки Samsung.
-
Установка / Подключение
Как подключить Samsung Galaxy к телевизору Samsung через приложение SmartThingsЧасто задаваемые вопросы о SmartThings. Узнайте подробнее о ‘Как подключить Samsung Galaxy к телевизору Samsung через приложение SmartThings’ с помощью службы поддержки Samsung.
-
TV_Прочее
Что делать, если слышен писк от телевизора SamsungЧасто задаваемые вопросы о технике Телевизоры Samsung. Узнайте подробнее о ‘Слышен шум, свист, гудение, гул, писк из телевизора Samsung’ с помощью службы поддержки Samsung.
- ru
- PS43D450A2WXMS
- PS43D450A2W
- {«softwares»:[{«description»:»Eco Design Information»,»fileName»:»PDP450.490Series_Environment_Information.pdf»,»fileModifiedDate»:»2012″,»fileModifiedDateCalendar»:1333660800000,»fileVersion»:»»,»fileSize»:»1.21″,»contentsTypeCode»:»EC»,»filePath»:»EC/201204/20120406151759054/PDP450.490Series_Environment_Information.pdf»,»fileID»:3896347,»viewCount»:0,»downloadUrl»:»https://org.downloadcenter.samsung.com/downloadfile/ContentsFile.aspx?CDSite=UNI_RU&OriginYN=N&ModelType=N&ModelName=PS43D450A2W&CttFileID=3896347&CDCttType=EC&VPath=EC%2F201204%2F20120406151759054%2FPDP450.490Series_Environment_Information.pdf»,»osList»:null,»areaList»:[{«code»:»AC»,»orgCode»:»AC»}],»languageList»:[{«code»:»EN»,»orgCode»:»EN»,»name»:»ENGLISH»}]},{«description»:»Файл с обновлением (USB тип)»,»fileName»:»T-MST4DEUC_1029.0.exe»,»fileModifiedDate»:»2013″,»fileModifiedDateCalendar»:1362768300000,»fileVersion»:»T-MST4DEUC-1029.0″,»fileSize»:»32.25″,»contentsTypeCode»:»FM»,»filePath»:»FM/201303/20130309124432402/T-MST4DEUC_1029.0.exe»,»fileID»:3960751,»viewCount»:0,»downloadUrl»:»https://org.downloadcenter.samsung.com/downloadfile/ContentsFile.aspx?CDSite=UNI_RU&OriginYN=N&ModelType=N&ModelName=PS43D450A2W&CttFileID=3960751&CDCttType=FM&VPath=FM%2F201303%2F20130309124432402%2FT-MST4DEUC_1029.0.exe»,»osList»:[{«code»:»010″,»orgCode»:»010″,»name»:»All OS»}],»areaList»:[{«code»:»EU»,»orgCode»:»EU»},{«code»:»CB»,»orgCode»:»CB»},{«code»:»RS»,»orgCode»:»RS»},{«code»:»MB»,»orgCode»:»MB»},{«code»:»AT»,»orgCode»:»AT»},{«code»:»BA»,»orgCode»:»BA»},{«code»:»BE»,»orgCode»:»BE»},{«code»:»BG»,»orgCode»:»BG»},{«code»:»CH»,»orgCode»:»CH»},{«code»:»CZ»,»orgCode»:»CZ»},{«code»:»DE»,»orgCode»:»DE»},{«code»:»DK»,»orgCode»:»DK»},{«code»:»ES»,»orgCode»:»ES»},{«code»:»FI»,»orgCode»:»FI»},{«code»:»FR»,»orgCode»:»FR»},{«code»:»GB»,»orgCode»:»GB»},{«code»:»GR»,»orgCode»:»GR»},{«code»:»HR»,»orgCode»:»HR»},{«code»:»HU»,»orgCode»:»HU»},{«code»:»IT»,»orgCode»:»IT»},{«code»:»LU»,»orgCode»:»LU»},{«code»:»MK»,»orgCode»:»MK»},{«code»:»NL»,»orgCode»:»NL»},{«code»:»NO»,»orgCode»:»NO»},{«code»:»PL»,»orgCode»:»PL»},{«code»:»PT»,»orgCode»:»PT»},{«code»:»SE»,»orgCode»:»SE»},{«code»:»SI»,»orgCode»:»SI»},{«code»:»SZ»,»orgCode»:»SZ»},{«code»:»TR»,»orgCode»:»TR»},{«code»:»SK»,»orgCode»:»SK»},{«code»:»EE»,»orgCode»:»EE»},{«code»:»KZ»,»orgCode»:»KZ»},{«code»:»LT»,»orgCode»:»LT»},{«code»:»RU»,»orgCode»:»RU»},{«code»:»UZ»,»orgCode»:»UZ»},{«code»:»LV»,»orgCode»:»LV»},{«code»:»UA»,»orgCode»:»UA»}],»languageList»:[{«code»:»EN»,»orgCode»:»EN»,»name»:»ENGLISH»}]},{«description»:»Файл с обновлением (USB тип)»,»fileName»:»T-MSV4DEUC_1011.0.exe»,»fileModifiedDate»:»2013″,»fileModifiedDateCalendar»:1362768300000,»fileVersion»:»T-MSV4DEUC-1011.0″,»fileSize»:»32.06″,»contentsTypeCode»:»FM»,»filePath»:»FM/201303/20130309124432402/T-MSV4DEUC_1011.0.exe»,»fileID»:4592073,»viewCount»:0,»downloadUrl»:»https://org.downloadcenter.samsung.com/downloadfile/ContentsFile.aspx?CDSite=UNI_RU&OriginYN=N&ModelType=N&ModelName=PS43D450A2W&CttFileID=4592073&CDCttType=FM&VPath=FM%2F201303%2F20130309124432402%2FT-MSV4DEUC_1011.0.exe»,»osList»:[{«code»:»010″,»orgCode»:»010″,»name»:»All OS»}],»areaList»:[{«code»:»EU»,»orgCode»:»EU»},{«code»:»CB»,»orgCode»:»CB»},{«code»:»RS»,»orgCode»:»RS»},{«code»:»MB»,»orgCode»:»MB»},{«code»:»AT»,»orgCode»:»AT»},{«code»:»BA»,»orgCode»:»BA»},{«code»:»BE»,»orgCode»:»BE»},{«code»:»BG»,»orgCode»:»BG»},{«code»:»CH»,»orgCode»:»CH»},{«code»:»CZ»,»orgCode»:»CZ»},{«code»:»DE»,»orgCode»:»DE»},{«code»:»DK»,»orgCode»:»DK»},{«code»:»ES»,»orgCode»:»ES»},{«code»:»FI»,»orgCode»:»FI»},{«code»:»FR»,»orgCode»:»FR»},{«code»:»GB»,»orgCode»:»GB»},{«code»:»GR»,»orgCode»:»GR»},{«code»:»HR»,»orgCode»:»HR»},{«code»:»HU»,»orgCode»:»HU»},{«code»:»IL»,»orgCode»:»IL»},{«code»:»IT»,»orgCode»:»IT»},{«code»:»LU»,»orgCode»:»LU»},{«code»:»MK»,»orgCode»:»MK»},{«code»:»NL»,»orgCode»:»NL»},{«code»:»NO»,»orgCode»:»NO»},{«code»:»PL»,»orgCode»:»PL»},{«code»:»PT»,»orgCode»:»PT»},{«code»:»SE»,»orgCode»:»SE»},{«code»:»SI»,»orgCode»:»SI»},{«code»:»SZ»,»orgCode»:»SZ»},{«code»:»TR»,»orgCode»:»TR»},{«code»:»SK»,»orgCode»:»SK»},{«code»:»EE»,»orgCode»:»EE»},{«code»:»KZ»,»orgCode»:»KZ»},{«code»:»LT»,»orgCode»:»LT»},{«code»:»RU»,»orgCode»:»RU»},{«code»:»UZ»,»orgCode»:»UZ»},{«code»:»LV»,»orgCode»:»LV»},{«code»:»UA»,»orgCode»:»UA»}],»languageList»:[{«code»:»EN»,»orgCode»:»EN»,»name»:»ENGLISH»}]},{«description»:»Файл с обновлением (USB тип)»,»fileName»:»T-MST4DEUC_1029.0.exe»,»fileModifiedDate»:»2013″,»fileModifiedDateCalendar»:1386695100000,»fileVersion»:»1029.0″,»fileSize»:»32.25″,»contentsTypeCode»:»FM»,»filePath»:»FM/201312/20131211110529097/T-MST4DEUC_1029.0.exe»,»fileID»:5599354,»viewCount»:0,»downloadUrl»:»https://org.downloadcenter.samsung.com/downloadfile/ContentsFile.aspx?CDSite=UNI_RU&OriginYN=N&ModelType=N&ModelName=PS43D450A2W&CttFileID=5599354&CDCttType=FM&VPath=FM%2F201312%2F20131211110529097%2FT-MST4DEUC_1029.0.exe»,»osList»:[{«code»:»010″,»orgCode»:»010″,»name»:»All OS»}],»areaList»:[{«code»:»EU»,»orgCode»:»EU»},{«code»:»RS»,»orgCode»:»RS»},{«code»:»MB»,»orgCode»:»MB»},{«code»:»AT»,»orgCode»:»AT»},{«code»:»BA»,»orgCode»:»BA»},{«code»:»BE»,»orgCode»:»BE»},{«code»:»BG»,»orgCode»:»BG»},{«code»:»CH»,»orgCode»:»CH»},{«code»:»CZ»,»orgCode»:»CZ»},{«code»:»DE»,»orgCode»:»DE»},{«code»:»DK»,»orgCode»:»DK»},{«code»:»ES»,»orgCode»:»ES»},{«code»:»FI»,»orgCode»:»FI»},{«code»:»FR»,»orgCode»:»FR»},{«code»:»GB»,»orgCode»:»GB»},{«code»:»GR»,»orgCode»:»GR»},{«code»:»HR»,»orgCode»:»HR»},{«code»:»HU»,»orgCode»:»HU»},{«code»:»IT»,»orgCode»:»IT»},{«code»:»LU»,»orgCode»:»LU»},{«code»:»MK»,»orgCode»:»MK»},{«code»:»NL»,»orgCode»:»NL»},{«code»:»NO»,»orgCode»:»NO»},{«code»:»PL»,»orgCode»:»PL»},{«code»:»PT»,»orgCode»:»PT»},{«code»:»SE»,»orgCode»:»SE»},{«code»:»SI»,»orgCode»:»SI»},{«code»:»SZ»,»orgCode»:»SZ»},{«code»:»TR»,»orgCode»:»TR»},{«code»:»SK»,»orgCode»:»SK»}],»languageList»:[{«code»:»ST»,»orgCode»:»ST»,»name»:»MULTI LANGUAGE»}]}],»manuals»:[{«description»:»Краткое руководство»,»fileName»:»[PD450-RU]BN68-03491G-01L04-0218.pdf»,»fileModifiedDate»:»2011″,»fileModifiedDateCalendar»:1300818960000,»fileVersion»:»1.0″,»fileSize»:»11.16″,»contentsTypeCode»:»EM»,»filePath»:»EM/201103/20110323124034408/[PD450-RU]BN68-03491G-01L04-0218.pdf»,»fileID»:3847617,»viewCount»:0,»downloadUrl»:»https://org.downloadcenter.samsung.com/downloadfile/ContentsFile.aspx?CDSite=UNI_RU&OriginYN=N&ModelType=N&ModelName=PS43D450A2W&CttFileID=3847617&CDCttType=EM&VPath=EM%2F201103%2F20110323124034408%2F%5BPD450-RU%5DBN68-03491G-01L04-0218.pdf»,»osList»:null,»areaList»:[{«code»:»AM»,»orgCode»:»AM»},{«code»:»AZ»,»orgCode»:»AZ»},{«code»:»BY»,»orgCode»:»BY»},{«code»:»GE»,»orgCode»:»GE»},{«code»:»KG»,»orgCode»:»KG»},{«code»:»KZ»,»orgCode»:»KZ»},{«code»:»MD»,»orgCode»:»MD»},{«code»:»MN»,»orgCode»:»MN»},{«code»:»MY»,»orgCode»:»MY»},{«code»:»RU»,»orgCode»:»RU»},{«code»:»TJ»,»orgCode»:»TJ»},{«code»:»TM»,»orgCode»:»TM»},{«code»:»UA»,»orgCode»:»UA»}],»languageList»:[{«code»:»EN»,»orgCode»:»EN»,»name»:»ENGLISH»},{«code»:»KK»,»orgCode»:»KK»,»name»:»KAZAKH»},{«code»:»RU»,»orgCode»:»RU»,»name»:»RUSSIAN»},{«code»:»UK»,»orgCode»:»UK»,»name»:»UKRAINIAN»}]},{«description»:»Инструкция по использованию»,»fileName»:»01_PX5DVBEU1A_ENG_0106-web.pdf»,»fileModifiedDate»:»2012″,»fileModifiedDateCalendar»:1326764520000,»fileVersion»:»1.0″,»fileSize»:»5.45″,»contentsTypeCode»:»UM»,»filePath»:»UM/201201/20120117193146391/01_PX5DVBEU1A_ENG_0106-web.pdf»,»fileID»:3847416,»viewCount»:0,»downloadUrl»:»https://org.downloadcenter.samsung.com/downloadfile/ContentsFile.aspx?CDSite=UNI_RU&OriginYN=N&ModelType=N&ModelName=PS43D450A2W&CttFileID=3847416&CDCttType=UM&VPath=UM%2F201201%2F20120117193146391%2F01_PX5DVBEU1A_ENG_0106-web.pdf»,»osList»:null,»areaList»:[{«code»:»SI»,»orgCode»:»SI»},{«code»:»LT»,»orgCode»:»LT»},{«code»:»TR»,»orgCode»:»TR»},{«code»:»BY»,»orgCode»:»BY»},{«code»:»US»,»orgCode»:»US»},{«code»:»MN»,»orgCode»:»MN»},{«code»:»MG»,»orgCode»:»MG»},{«code»:»CH»,»orgCode»:»CH»},{«code»:»CZ»,»orgCode»:»CZ»},{«code»:»RE»,»orgCode»:»RE»},{«code»:»ES»,»orgCode»:»ES»},{«code»:»AD»,»orgCode»:»AD»},{«code»:»RS»,»orgCode»:»RS»},{«code»:»IS»,»orgCode»:»IS»},{«code»:»GE»,»orgCode»:»GE»},{«code»:»CA»,»orgCode»:»CA»},{«code»:»IT»,»orgCode»:»IT»},{«code»:»EE»,»orgCode»:»EE»},{«code»:»FR»,»orgCode»:»FR»},{«code»:»PF»,»orgCode»:»PF»},{«code»:»LU»,»orgCode»:»LU»},{«code»:»BE»,»orgCode»:»BE»},{«code»:»DZ»,»orgCode»:»DZ»},{«code»:»MA»,»orgCode»:»MA»},{«code»:»KG»,»orgCode»:»KG»},{«code»:»AM»,»orgCode»:»AM»},{«code»:»CY»,»orgCode»:»CY»},{«code»:»GR»,»orgCode»:»GR»},{«code»:»FI»,»orgCode»:»FI»},{«code»:»MD»,»orgCode»:»MD»},{«code»:»HR»,»orgCode»:»HR»},{«code»:»TJ»,»orgCode»:»TJ»},{«code»:»NA»,»orgCode»:»NA»},{«code»:»MY»,»orgCode»:»MY»},{«code»:»HU»,»orgCode»:»HU»},{«code»:»NO»,»orgCode»:»NO»},{«code»:»LV»,»orgCode»:»LV»},{«code»:»GP»,»orgCode»:»GP»},{«code»:»GY»,»orgCode»:»GY»},{«code»:»PT»,»orgCode»:»PT»},{«code»:»SE»,»orgCode»:»SE»},{«code»:»IE»,»orgCode»:»IE»},{«code»:»DK»,»orgCode»:»DK»},{«code»:»ME»,»orgCode»:»ME»},{«code»:»GB»,»orgCode»:»GB»},{«code»:»DE»,»orgCode»:»DE»},{«code»:»AT»,»orgCode»:»AT»},{«code»:»RO»,»orgCode»:»RO»},{«code»:»BA»,»orgCode»:»BA»},{«code»:»RU»,»orgCode»:»RU»},{«code»:»MT»,»orgCode»:»MT»},{«code»:»BG»,»orgCode»:»BG»},{«code»:»MK»,»orgCode»:»MK»},{«code»:»LI»,»orgCode»:»LI»},{«code»:»BJ»,»orgCode»:»BJ»},{«code»:»PL»,»orgCode»:»PL»},{«code»:»SM»,»orgCode»:»SM»},{«code»:»MQ»,»orgCode»:»MQ»},{«code»:»UA»,»orgCode»:»UA»},{«code»:»TM»,»orgCode»:»TM»},{«code»:»XK»,»orgCode»:»XK»},{«code»:»NL»,»orgCode»:»NL»},{«code»:»SK»,»orgCode»:»SK»},{«code»:»KZ»,»orgCode»:»KZ»},{«code»:»AZ»,»orgCode»:»AZ»},{«code»:»MU»,»orgCode»:»MU»},{«code»:»GH»,»orgCode»:»GH»}],»languageList»:[{«code»:»EN»,»orgCode»:»EN»,»name»:»ENGLISH»}]},{«description»:»CE DoC»,»fileName»:»X5_CE_DOC-Eng-0705.pdf»,»fileModifiedDate»:»2012″,»fileModifiedDateCalendar»:1326764520000,»fileVersion»:»1.0″,»fileSize»:»0.28″,»contentsTypeCode»:»UM»,»filePath»:»UM/201107/20110713190711203/X5_CE_DOC-Eng-0705.pdf»,»fileID»:4272727,»viewCount»:0,»downloadUrl»:»https://org.downloadcenter.samsung.com/downloadfile/ContentsFile.aspx?CDSite=UNI_RU&OriginYN=N&ModelType=N&ModelName=PS43D450A2W&CttFileID=4272727&CDCttType=UM&VPath=UM%2F201107%2F20110713190711203%2FX5_CE_DOC-Eng-0705.pdf»,»osList»:null,»areaList»:[{«code»:»SI»,»orgCode»:»SI»},{«code»:»LT»,»orgCode»:»LT»},{«code»:»TR»,»orgCode»:»TR»},{«code»:»BY»,»orgCode»:»BY»},{«code»:»US»,»orgCode»:»US»},{«code»:»MN»,»orgCode»:»MN»},{«code»:»MG»,»orgCode»:»MG»},{«code»:»CH»,»orgCode»:»CH»},{«code»:»CZ»,»orgCode»:»CZ»},{«code»:»RE»,»orgCode»:»RE»},{«code»:»ES»,»orgCode»:»ES»},{«code»:»AD»,»orgCode»:»AD»},{«code»:»RS»,»orgCode»:»RS»},{«code»:»IS»,»orgCode»:»IS»},{«code»:»GE»,»orgCode»:»GE»},{«code»:»CA»,»orgCode»:»CA»},{«code»:»IT»,»orgCode»:»IT»},{«code»:»EE»,»orgCode»:»EE»},{«code»:»FR»,»orgCode»:»FR»},{«code»:»PF»,»orgCode»:»PF»},{«code»:»LU»,»orgCode»:»LU»},{«code»:»BE»,»orgCode»:»BE»},{«code»:»DZ»,»orgCode»:»DZ»},{«code»:»MA»,»orgCode»:»MA»},{«code»:»KG»,»orgCode»:»KG»},{«code»:»AM»,»orgCode»:»AM»},{«code»:»CY»,»orgCode»:»CY»},{«code»:»GR»,»orgCode»:»GR»},{«code»:»FI»,»orgCode»:»FI»},{«code»:»MD»,»orgCode»:»MD»},{«code»:»HR»,»orgCode»:»HR»},{«code»:»TJ»,»orgCode»:»TJ»},{«code»:»NA»,»orgCode»:»NA»},{«code»:»MY»,»orgCode»:»MY»},{«code»:»HU»,»orgCode»:»HU»},{«code»:»NO»,»orgCode»:»NO»},{«code»:»LV»,»orgCode»:»LV»},{«code»:»GP»,»orgCode»:»GP»},{«code»:»GY»,»orgCode»:»GY»},{«code»:»PT»,»orgCode»:»PT»},{«code»:»SE»,»orgCode»:»SE»},{«code»:»IE»,»orgCode»:»IE»},{«code»:»DK»,»orgCode»:»DK»},{«code»:»ME»,»orgCode»:»ME»},{«code»:»GB»,»orgCode»:»GB»},{«code»:»DE»,»orgCode»:»DE»},{«code»:»AT»,»orgCode»:»AT»},{«code»:»RO»,»orgCode»:»RO»},{«code»:»BA»,»orgCode»:»BA»},{«code»:»RU»,»orgCode»:»RU»},{«code»:»MT»,»orgCode»:»MT»},{«code»:»BG»,»orgCode»:»BG»},{«code»:»MK»,»orgCode»:»MK»},{«code»:»LI»,»orgCode»:»LI»},{«code»:»BJ»,»orgCode»:»BJ»},{«code»:»PL»,»orgCode»:»PL»},{«code»:»SM»,»orgCode»:»SM»},{«code»:»MQ»,»orgCode»:»MQ»},{«code»:»UA»,»orgCode»:»UA»},{«code»:»TM»,»orgCode»:»TM»},{«code»:»XK»,»orgCode»:»XK»},{«code»:»NL»,»orgCode»:»NL»},{«code»:»SK»,»orgCode»:»SK»},{«code»:»KZ»,»orgCode»:»KZ»},{«code»:»AZ»,»orgCode»:»AZ»},{«code»:»MU»,»orgCode»:»MU»},{«code»:»GH»,»orgCode»:»GH»}],»languageList»:[{«code»:»EN»,»orgCode»:»EN»,»name»:»ENGLISH»}]},{«description»:»Инструкция по использованию»,»fileName»:»26_PX5DVBEU1A_RUS_0106-web.pdf»,»fileModifiedDate»:»2012″,»fileModifiedDateCalendar»:1326764520000,»fileVersion»:»1.0″,»fileSize»:»5.99″,»contentsTypeCode»:»UM»,»filePath»:»UM/201201/20120117193146391/26_PX5DVBEU1A_RUS_0106-web.pdf»,»fileID»:3847443,»viewCount»:0,»downloadUrl»:»https://org.downloadcenter.samsung.com/downloadfile/ContentsFile.aspx?CDSite=UNI_RU&OriginYN=N&ModelType=N&ModelName=PS43D450A2W&CttFileID=3847443&CDCttType=UM&VPath=UM%2F201201%2F20120117193146391%2F26_PX5DVBEU1A_RUS_0106-web.pdf»,»osList»:null,»areaList»:[{«code»:»SI»,»orgCode»:»SI»},{«code»:»LT»,»orgCode»:»LT»},{«code»:»TR»,»orgCode»:»TR»},{«code»:»BY»,»orgCode»:»BY»},{«code»:»US»,»orgCode»:»US»},{«code»:»MN»,»orgCode»:»MN»},{«code»:»MG»,»orgCode»:»MG»},{«code»:»CH»,»orgCode»:»CH»},{«code»:»CZ»,»orgCode»:»CZ»},{«code»:»RE»,»orgCode»:»RE»},{«code»:»ES»,»orgCode»:»ES»},{«code»:»AD»,»orgCode»:»AD»},{«code»:»RS»,»orgCode»:»RS»},{«code»:»IS»,»orgCode»:»IS»},{«code»:»GE»,»orgCode»:»GE»},{«code»:»CA»,»orgCode»:»CA»},{«code»:»IT»,»orgCode»:»IT»},{«code»:»EE»,»orgCode»:»EE»},{«code»:»FR»,»orgCode»:»FR»},{«code»:»PF»,»orgCode»:»PF»},{«code»:»LU»,»orgCode»:»LU»},{«code»:»BE»,»orgCode»:»BE»},{«code»:»DZ»,»orgCode»:»DZ»},{«code»:»MA»,»orgCode»:»MA»},{«code»:»KG»,»orgCode»:»KG»},{«code»:»AM»,»orgCode»:»AM»},{«code»:»CY»,»orgCode»:»CY»},{«code»:»GR»,»orgCode»:»GR»},{«code»:»FI»,»orgCode»:»FI»},{«code»:»MD»,»orgCode»:»MD»},{«code»:»HR»,»orgCode»:»HR»},{«code»:»TJ»,»orgCode»:»TJ»},{«code»:»NA»,»orgCode»:»NA»},{«code»:»MY»,»orgCode»:»MY»},{«code»:»HU»,»orgCode»:»HU»},{«code»:»NO»,»orgCode»:»NO»},{«code»:»LV»,»orgCode»:»LV»},{«code»:»GP»,»orgCode»:»GP»},{«code»:»GY»,»orgCode»:»GY»},{«code»:»PT»,»orgCode»:»PT»},{«code»:»SE»,»orgCode»:»SE»},{«code»:»IE»,»orgCode»:»IE»},{«code»:»DK»,»orgCode»:»DK»},{«code»:»ME»,»orgCode»:»ME»},{«code»:»GB»,»orgCode»:»GB»},{«code»:»DE»,»orgCode»:»DE»},{«code»:»AT»,»orgCode»:»AT»},{«code»:»RO»,»orgCode»:»RO»},{«code»:»BA»,»orgCode»:»BA»},{«code»:»RU»,»orgCode»:»RU»},{«code»:»MT»,»orgCode»:»MT»},{«code»:»BG»,»orgCode»:»BG»},{«code»:»MK»,»orgCode»:»MK»},{«code»:»LI»,»orgCode»:»LI»},{«code»:»BJ»,»orgCode»:»BJ»},{«code»:»PL»,»orgCode»:»PL»},{«code»:»SM»,»orgCode»:»SM»},{«code»:»MQ»,»orgCode»:»MQ»},{«code»:»UA»,»orgCode»:»UA»},{«code»:»TM»,»orgCode»:»TM»},{«code»:»XK»,»orgCode»:»XK»},{«code»:»NL»,»orgCode»:»NL»},{«code»:»SK»,»orgCode»:»SK»},{«code»:»KZ»,»orgCode»:»KZ»},{«code»:»AZ»,»orgCode»:»AZ»},{«code»:»MU»,»orgCode»:»MU»},{«code»:»GH»,»orgCode»:»GH»}],»languageList»:[{«code»:»RU»,»orgCode»:»RU»,»name»:»RUSSIAN»}]}]}
- https://org.downloadcenter.samsung.com/downloadfile/ContentsFile.aspx
Руководства и загрузки
-
{{file.description}}
- Версия {{file.fileVersion}}
- {{file.fileSize}} MB
- {{file.fileModifiedDate}}
- {{file.osNames}}
{{file.languageName}}
{{file.allLanguageNames}}
ДОПОЛНИТЕЛЬНАЯ ИНФОРМАЦИЯ
Информация о гарантии
Узнайте, что входит в гарантийные обязательства


Индивидуальная поддержка
Получите помощь от официальных центров поддержки


Новости и уведомления
Обьявления о важных продуктах и услугах


Контакты
Онлайн
Есть несколько способов связаться с нами через чат, мессенджеры и т.д.
Позвонить
Поговорить с одним из наших экспертов
Сервисные центры
Независимо от того, находится ли ваш продукт на гарантии или нет, мы всегда готовы помочь
Сервисная поддержка на жестовом языке
Сервисная поддержка на жестовом языке с 8:00 до 20:00 (МСК)
Служба поддержки клиентов по вопросам приложений и услуг
Samsung Health Monitor : 8-800-555-55-55
Samsung Pay : 8-800-555-55-55
Показать больше
 12:15
12:15
что внутри телевизора SAMSUNG / ремонт диагностика
 12:53
12:53
Если не велючается плазмы samsung ps43d4xx (диагностика на слух)
 07:22
07:22
Ремонт плазменного телевизора SAMSUNG PS43D490A1W типовая неисправность
 12:10
12:10
SAMSUNG PS43D450A2W — не включается , ремонт.
 04:42
04:42
Samsung PS43D490A1W Не включается
 16:00
16:00
Ремонт телевизоров Samsung ps43d450a2w выключается после 10 мин, работы
 08:50
08:50
Ремонт плазмы Samsung PS51D452A5W
 05:05
05:05
Samsung PS43d450a2w Темные пятна и цветной шум .
E-MANUAL
удивительные возможности
Благодарим за приобретение данного
устройства Samsung. Для наилучшего
обслуживания зарегистрируйте свое
устройство по адресу:
www.samsung.com/register
Модель______ Серийный номер _______


Канал, Использование кнопки info, Текущая и следующая программы)
Страница 3
- Изображение
- Текст
▶
Русский
❑
Использование кнопки INFO (Текущая и следующая программы)
На дисплее отображается номер текущего канала и состояние некоторых настроек аудио
и видео.
В окне текущей и следующей программы отображаются ежедневно обновляемые
сведения о телепрограммах, идущих на всех каналах в определенное время.
●
Чтобы найти нужную программу на текущем канале, воспользуйтесь кнопками
l
,
r
.
●
Чтобы просмотреть информацию по другим каналам, воспользуйтесь кнопками
u
,
d
.
Если необходимо перейти на выбранный канал, нажмите кнопку
ENTER
E
.
,
Life On Venus Avenue
Без классификации
No Detaild Information
a
Информация
18:11 Чт 6 Янв
18:00 ~ 6:00
abc1
DTV-ант.
15
Канал

◀
▶
Русский
❑
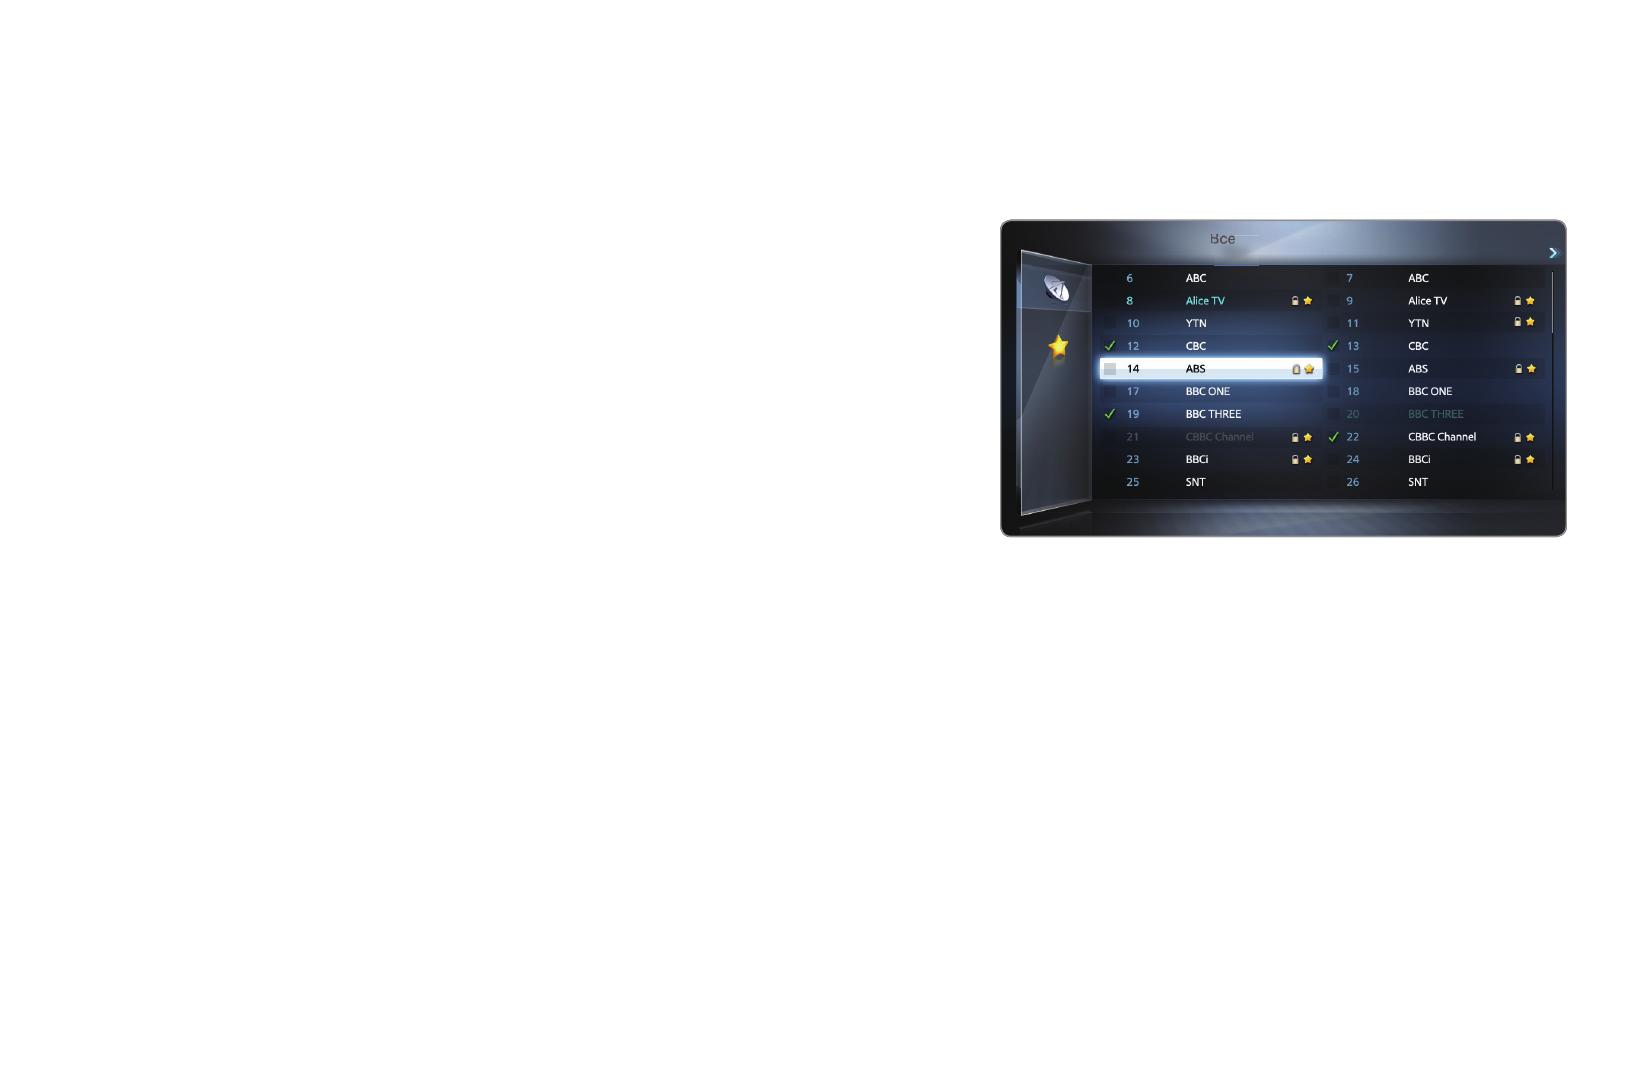
Использование меню каналов
O
MENU
m
→
Поддержка
→
Дом. стр. содержим.
→
ENTER
E
Нажмите кнопку
CONTENT
, чтобы выбрать
Просмотр ТВ
, а затем выберите меню,
которое необходимо использовать. Отобразятся все экраны.
● Представленное здесь изображение может отличаться в
зависимости от модели устройства.
Просмотр ТВ
Гид
Диспетчер расписания
Список каналов
Диспетчер каналов
Мое содержимое
Источник

◀
▶
Русский
■
Гид
Сведения о программах в электронном телегиде (EPG) предоставляются вещательными
компаниями.
Используя программу телепередач, составленную вещательной компанией, можно
заранее выбрать программы для просмотра, чтобы в указанное время телевизор
автоматически переключился на нужный канал. В зависимости от от состояния канала
сведения о программах могут быть устаревшими или не отображаться вовсе.

◀
▶
Русский
Использование функции просмотра каналов
a
Красный (
Дисп. расп
): Отображение
экрана
Диспетчер расписания
.
b
Зеленый (
-24 часа
): Просмотр списка
программ, которые будут транслироваться
в ближайшие 24 часа.
{
Желтый (
+24 часа
): просмотр списка
программ, которые будут транслироваться
через 24 часа.
● Представленное здесь изображение может
отличаться в зависимости от модели устройства.
a
ДДДД. Mgr
{
+24 ДДДД
}
ДДД.ДДД. ; ДДДДДДДДДД k ДДДДДДДД E ДДДДДДДД
DTV Антенна 05.1 Globo HD
TELA QUENTE (HD)
10:05 pm — 12:10 pm
10
DESVENTURAS EM SERIE (HD)
Сегодня
16:00
16:30
17:00
17:30
Гид
16:02 Вт 19 Июл
Просм. канал. — Все каналы
Programmes resume at 06:00
Home and…
Нет информации
QVC Selection
Нет информации
04 Globo HD
05 DiscoveryH&L
06 TV GloboSD
07 price-drop.tv
08 QVC
09 R4DTT
Tine Team
Fiv…
Нет информации
Dark Angel
American Chopper

: выбор типа каналов, которые будут отображаться в окне …
Страница 7
- Изображение
- Текст
◀
▶
Русский
}
Синий (
Реж.кан.
): выбор типа каналов, которые будут отображаться в окне “Просм.
канал.”.
;
Информация
: просмотр сведений о выбранной программе.
k
Страница
: переход к предыдущей или следующей странице.
E
Просмотр
/
Расписание
: если выбрана текущая программа, она начинает
воспроизводиться. / если выбрана следующая программа, ее можно зарезервировать.

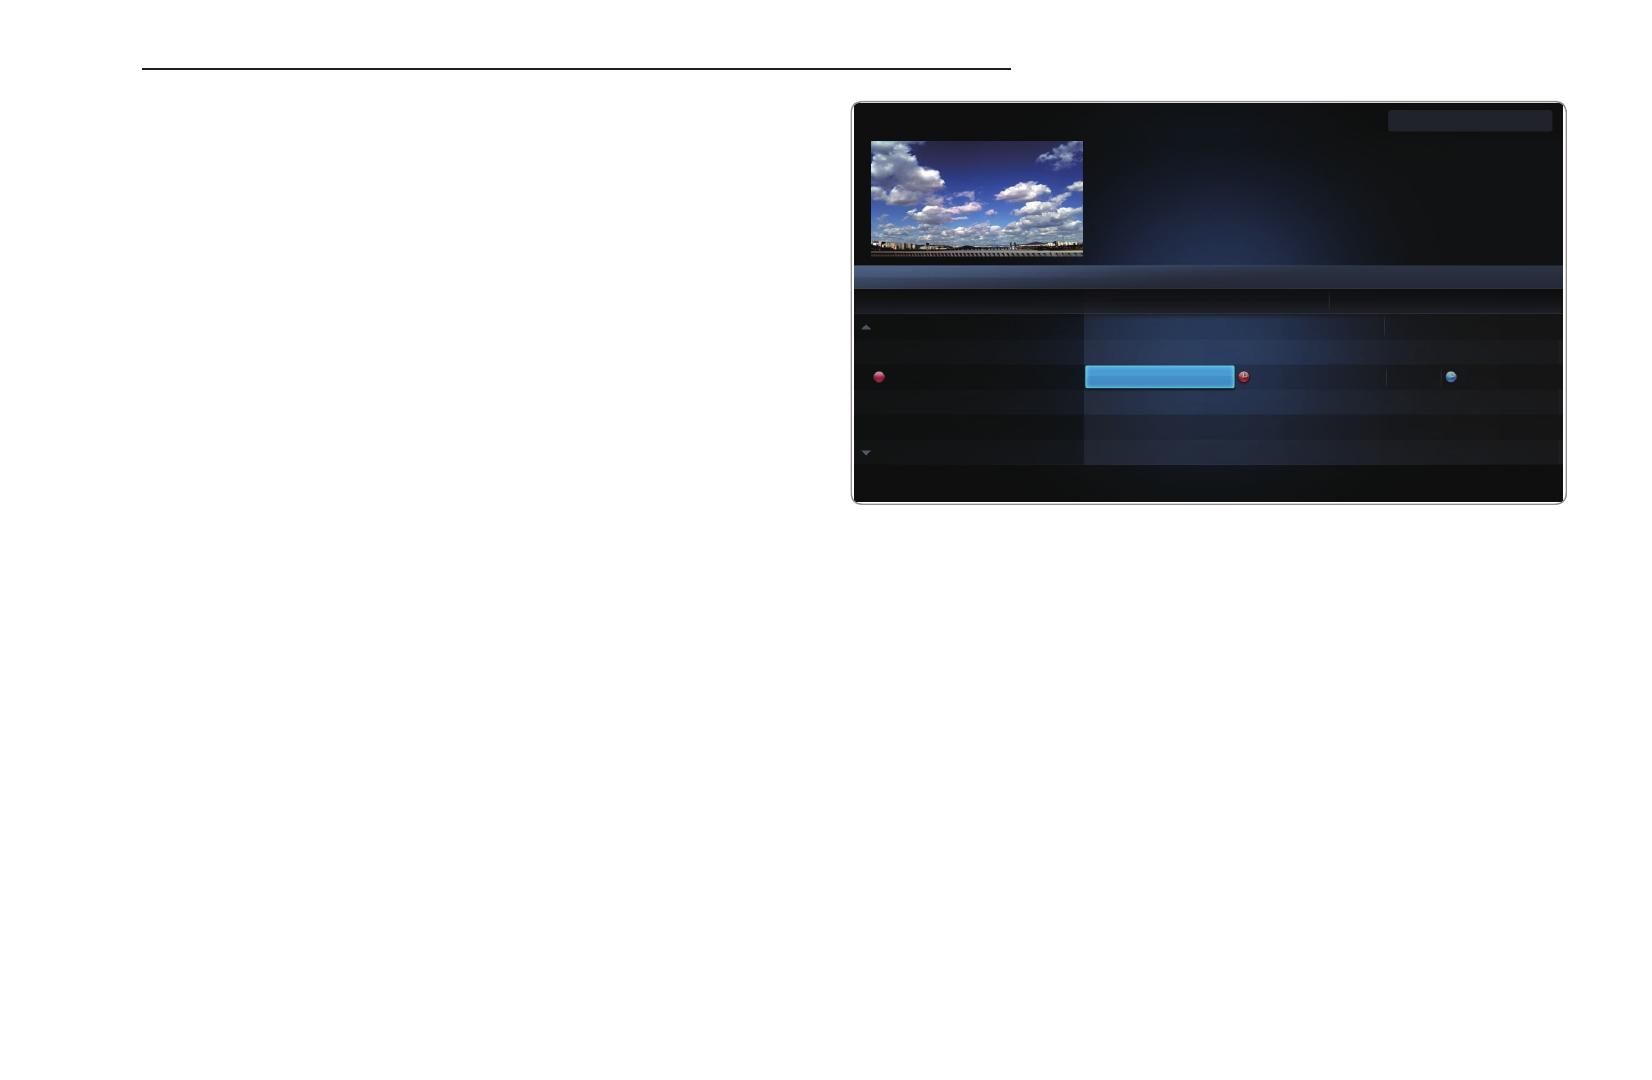
Диспетчер расписания, Использование функции просмотр по таймеру
Страница 8
- Изображение
- Текст
◀
▶
Русский
■
Диспетчер расписания
O
CONTENT
→
Диспетчер расписания
→
ENTER
E
Можно просматривать, изменять или удалять каналы, сохраненные для просмотра.
Использование функции
Просмотр по таймеру
Можно настроить автоматическое включение нужного канала в заданное время. Сначала
необходимо настроить текущее время.
1. Нажмите кнопку
ENTER
E
, чтобы выбрать
Диспетчер расписания
.
2. Нажмите кнопку
ENTER
E
, чтобы добавить ручное резервирование. Появится экран
Просмотр по таймеру
.

◀
▶
Русский
3. С помощью кнопок
l
/
r
/
u
/
d
задайте значения параметров
Антенна
,
Канал
,
Повтор
,
Дата
или
Время начала
.
●
Антенна
: выберите необходимый источник сигнала телевещания.
●
Канал
: выберите нужный канал.
●
Повтор
: по своему усмотрению выберите одно из значений –
Один раз
,
Ручной
,
Сб-
Вс
,
Пн-Пт
или
Ежедневно
. Если выбрано значение
Ручной
, можно задать конкретный
день включения данной функции.
N
Метка
c
указывает на то, что дата выбрана.
●
Дата
: можно установить нужную дату.
N
Этот параметр доступен при выборе значения
Один раз
для параметра
Повтор
.

Время начала : можно установить нужное время начала. N На…
Страница 10
- Изображение
- Текст
◀
▶
Русский
●
Время начала
: можно установить нужное время начала.
N
Нажмите кнопку
INFO
для перехода на экран
Подробные сведения
. На экране
Подробные
сведения можно изменить или отменить резервирование.
●
Отмена расписаний
: отмена программы, запланированной для просмотра.
●
Правка
: изменение программы, запланированной для просмотра.
●
Возврат
: возврат к предыдущему экрану.

Комментарии
Посмотреть инструкция для Samsung PS43D450A2W бесплатно. Руководство относится к категории телевизоры, 5 человек(а) дали ему среднюю оценку 8.6. Руководство доступно на следующих языках: английский. У вас есть вопрос о Samsung PS43D450A2W или вам нужна помощь? Задайте свой вопрос здесь
Не можете найти ответ на свой вопрос в руководстве? Вы можете найти ответ на свой вопрос ниже, в разделе часто задаваемых вопросов о Samsung PS43D450A2W.
Какое расстояние наиболее оптимально для просмотра телевизора Samsung?
Пропал сигнал телевизора, что делать?
Каковы размеры экрана телевизор?
Могут ли устройства разных марок подключаться друг к другу при помощи Bluetooth?
Какой вес Samsung PS43D450A2W?
Какой размер экрана Samsung PS43D450A2W?
Какая высота Samsung PS43D450A2W?
Какое разрешение экрана дисплея Samsung PS43D450A2W?
Какая ширина Samsung PS43D450A2W?
Какая толщина Samsung PS43D450A2W?
Инструкция Samsung PS43D450A2W доступно в русский?
Не нашли свой вопрос? Задайте свой вопрос здесь

E-MANUAL
удивительные возможности
Благодарим за приобретение данного
устройства Samsung. Для наилучшего
обслуживания зарегистрируйте свое
устройство по адресу:
www.samsung.com/register
Модель______ Серийный номер _______

Содержание
Канал
• Использование кнопки INFO
(Текущая и следующая программы) 3
• Использование меню каналов 4
• Использование диспетчера каналов 14
• Сохранение каналов в памяти 20
• Использование списка каналов
(Спутник) 27
• Сохранение каналов в памяти
(спутниковых) 32
• Другие операции 47
Основные операции
• Изменение предварительно
настроенного режима изображения 49
• Настройка параметров изображения 50
• Изменение размера изображения 51
• Изменение параметров изображения 55
• Настройка подключения
телевизора к компьютеру 62
• Изменение предварительно
настроенного режима звучания 66
• Настройка параметров звука 67
Предпочтение
• Подключение к проводной сети 77
• Настройка сети 81
• Подключение к беспроводной сети 88
• Установка времени 112
• Блокировка программ 120
• Решения для экономии
электроэнергии 123
• Картинка в картинке (PIP) 125
• Другие операции 128
• Меню Поддержка 139
Дополнительные операции
• Использование 3D-функции 147
• О программе AllShare™ 159
• Настройка AllShare™ 161
• Настройка Anynet+ 165
• Anynet+ 167
• Переключение между устройствами,
поддерживающими функцию Anynet+ 172
• Использование
цифрового аудиовыхода 174
• Устранение неполадок в устройствах с
поддержкой Anynet+ 176
• Использование функции
“Мое содержимое” 179
• Подключение устройства USB 180
• Элементы, отображаемые на экране 185
• Видео 186
• Музыка 192
• Фотографии 195
• Мое содержимое
– дополнительные функции 197
Прочее
• Функция Телетекст 201
• Устранение неполадок 206
• Подключение через
гнездо common interface 217
• Замок Kensington
для защиты от краж 220
• Лицензия 222

▶
Русский
❑
Использование кнопки INFO (Текущая и следующая программы)
На дисплее отображается номер текущего канала и состояние некоторых настроек аудио
и видео.
В окне текущей и следующей программы отображаются ежедневно обновляемые
сведения о телепрограммах, идущих на всех каналах в определенное время.
●
Чтобы найти нужную программу на текущем канале, воспользуйтесь кнопками
l
,
r
.
●
Чтобы просмотреть информацию по другим каналам, воспользуйтесь кнопками
u
,
d
.
Если необходимо перейти на выбранный канал, нажмите кнопку ENTER
E
.
,
Life On Venus Avenue
Без классификации
No Detaild Information
a
Информация
18:11 Чт 6 Янв
18:00 ~ 6:00
abc1
DTV-ант.
15
Канал
◀ ▶
Русский
❑
Использование меню каналов
O
MENU
m
→
Поддержка
→
Дом. стр. содержим.
→
ENTER
E
Нажмите кнопку CONTENT, чтобы выбрать Просмотр ТВ, а затем выберите меню,
которое необходимо использовать. Отобразятся все экраны.
● Представленное здесь изображение может отличаться в
зависимости от модели устройства.
Просмотр ТВ
Гид
Диспетчер расписания
Список каналов
Диспетчер каналов
Мое содержимое Источник

◀ ▶
Русский
■
Гид
Сведения о программах в электронном телегиде (EPG) предоставляются вещательными
компаниями.
Используя программу телепередач, составленную вещательной компанией, можно
заранее выбрать программы для просмотра, чтобы в указанное время телевизор
автоматически переключился на нужный канал. В зависимости от от состояния канала
сведения о программах могут быть устаревшими или не отображаться вовсе.
◀ ▶
Русский
Использование функции просмотра каналов
a
Красный (Дисп. расп): Отображение
экрана Диспетчер расписания.
b
Зеленый (-24 часа): Просмотр списка
программ, которые будут транслироваться
в ближайшие 24 часа.
{
Желтый (+24 часа): просмотр списка
программ, которые будут транслироваться
через 24 часа.
● Представленное здесь изображение может
отличаться в зависимости от модели устройства.
a
ДДДД. Mgr
{
+24 ДДДД
}
ДДД.ДДД.
;
ДДДДДДДДДД
k
ДДДДДДДД
E
ДДДДДДДД
DTV Антенна 05.1 Globo HD
TELA QUENTE (HD)
10:05 pm — 12:10 pm
10
DESVENTURAS EM SERIE (HD)
Сегодня 16:00 16:30 17:00 17:30
Гид
16:02 Вт 19 Июл
Просм. канал. — Все каналы
Programmes resume at 06:00
Home and…
Нет информации
QVC Selection
Нет информации
04 Globo HD
05 DiscoveryH&L
06 TV GloboSD
07 price-drop.tv
08 QVC
09 R4DTT
Tine Team
Fiv…Нет информации Dark Angel
American Chopper

◀ ▶
Русский
}
Синий (Реж.кан.): выбор типа каналов, которые будут отображаться в окне “Просм.
канал.”.
;
Информация: просмотр сведений о выбранной программе.
k
Страница: переход к предыдущей или следующей странице.
E
Просмотр / Расписание: если выбрана текущая программа, она начинает
воспроизводиться. / если выбрана следующая программа, ее можно зарезервировать.

◀ ▶
Русский
■
Диспетчер расписания
O
CONTENT
→
Диспетчер расписания
→
ENTER
E
Можно просматривать, изменять или удалять каналы, сохраненные для просмотра.
Использование функции Просмотр по таймеру
Можно настроить автоматическое включение нужного канала в заданное время. Сначала
необходимо настроить текущее время.
1. Нажмите кнопку ENTER
E
, чтобы выбрать Диспетчер расписания.
2. Нажмите кнопку ENTER
E
, чтобы добавить ручное резервирование. Появится экран
Просмотр по таймеру.

◀ ▶
Русский
3. С помощью кнопок
l
/
r
/
u
/
d
задайте значения параметров Антенна, Канал, Повтор,
Дата или Время начала.
●
Антенна: выберите необходимый источник сигнала телевещания.
●
Канал: выберите нужный канал.
●
Повтор: по своему усмотрению выберите одно из значений – Один раз, Ручной, Сб-
Вс, Пн-Пт или Ежедневно. Если выбрано значение Ручной, можно задать конкретный
день включения данной функции.
N
Метка
c
указывает на то, что дата выбрана.
●
Дата: можно установить нужную дату.
N
Этот параметр доступен при выборе значения Один раз для параметра Повтор.

◀ ▶
Русский
●
Время начала: можно установить нужное время начала.
N
Нажмите кнопку INFO для перехода на экран Подробные сведения. На экране
Подробные сведения можно изменить или отменить резервирование.
●
Отмена расписаний: отмена программы, запланированной для просмотра.
●
Правка: изменение программы, запланированной для просмотра.
●
Возврат: возврат к предыдущему экрану.

◀ ▶
Русский
■
Список каналов
Можно просмотреть все найденные каналы.
O
При нажатии кнопки CH LIST на пульте
дистанционного управления сразу отобразится
экран Список каналов.
O
Использование функциональных кнопок при
работе с экраном Список каналов.
●
a
Красная кнопка (Антенна): выберите
необходимый источник сигнала телевещания.
N
Параметр может отличаться в зависимости от
страны.
●
{
Желтая кнопка (Просм.прогр. / Просм.канал.): отображение программы при
выборе цифрового канала. Возврат к экрану просмотра каналов.
● Представленное здесь изображение может
отличаться в зависимости от модели
устройства.
Список каналов
Все
a
Антенна
{
Просм.прогр.
L
Реж. кан.
E
Просмотр
k
Страница
Антенна
6 M6
9 W9
W9 MUSIC
11 NT1
800 24H TVE
801 arte
802 ATV
803 BBC
804 BBC
805 BBC

◀ ▶
Русский
●
l r
Реж.кан. / Канал: переход к типу каналов, которые необходимо отобразить на
экране Список каналов / Переключение каналов.
N
Параметр может отличаться в зависимости от страны.
●
E
Просмотр / Информация: просмотр выбранных каналов / просмотр сведений о
выбранной программе.
●
k
Страница: переход к предыдущей или следующей странице.

◀ ▶
Русский
Использование функции “Просм. по тайм.” в списке каналов (только для
цифровых каналов)
Если параметр Просмотр по таймеру задан на экране Список каналов, программу можно
настроить только в режиме Просм.прогр..
1. Нажмите кнопку CH LIST, чтобы выбрать нужный цифровой канал.
2. Нажмите кнопку
{
(Просм.прогр.).
3. С помощью кнопок
u
/
d
выберите нужную программу, затем нажмите
E
Информация.
4. Выберите пункт Просм. по тайм., затем нажмите кнопку ENTER
E
.
N
Если требуется отменить Просм. по тайм., выполните шаги с 1 по 3. Выберите пункт
Отмена расписаний.
◀ ▶
Русский
❑
Использование диспетчера каналов
■
Диспетчер каналов
O
CONTENT
→
Диспетчер каналов
→
ENTER
E
Изменение избранного канала и настройка каналов
с помощью параметров Удалить, Отменить все
или Выбрать все. Можно изменять названия
только аналоговых каналов.
● Представленное здесь изображение может
отличаться в зависимости от модели
устройства.
Диспетчер каналов
Все
Выбранные элем-ты: 4 Номер канала
2/3 Страница
a
Антенна
}
Сортиров.
k
Страница
E
Выбор
T
Сервис
R
Возврат
Антенна

◀ ▶
Русский
●
(
) Каналы: Выбор канала в списке Все, ТВ, Радио, Данные/др. и Аналоговые.
Изменение настроек антенны или каналов с помощью меню в правом верхнем углу
экрана.
●
(
) Избранное 1-5: отображение избранных каналов.
N
Использование цветных кнопок в окне Диспетчер каналов
●
a
Красная кнопка (Антенна): выберите необходимый источник сигнала
телевещания.
●
}
Синяя кнопка (Сортиров.): сортировка списка по номеру или имени.

◀ ▶
Русский
Значки состояния каналов
Значок Значение
a
Аналоговый канал.
c
Выбранный канал.
F
Канал, добавленный в список избранных.
Меню параметров диспетчера каналов
t
Настройте все каналы с помощью меню параметров Диспетчер каналов (Просмотр,
Добавить в избранное / Изм. избранное, Блок. / разблок., Изменение имени канала,
Изм. номера канала, Удалить, Выбрать все / Отменить все). Набор элементов в меню
параметров может варьироваться в зависимости от состояния канала.

◀ ▶
Русский
1. Выберите канал и нажмите кнопку TOOLS.
2. Выберите функ
ци
ю и измените ее настройки.
●
Просмотр: просмотр выбранного канала.
●
Добавить в избранное / Изм. избранное: указание часто просматриваемых каналов как
избранных / обавление или удаление канала в списке Избранное 1-5.
1. Выберите Добавить в избранное / Изм. избранное, а затем нажмите кнопку
ENTER
E
.
N
Если канал уже добавлен в список избранных каналов, будет отображаться
параметр Изм. избранное.

◀ ▶
Русский
2. Нажмите кнопку ENTER
E
для выбора Избранное 1-5, затем нажмите кнопку OK.
N
Один избранный канал можно добавить в несколько групп Избранное, входящих в
список Избранное 1-5.
●
Блок. / Разблок.: заблокированные каналы нельзя выбирать и просматривать.
N
Эта функция доступна, только если включен параметр Блокировка канала.

◀ ▶
Русский
●
Изменить название канала (только для аналоговых каналов): присвоение каналу нового
имени.
N
В некоторых регионах эта функция может не поддерживаться.
●
Изм. номера канала (только для цифровых каналов): ввод нового номера с помощью
цифровых кнопок.
N
В некоторых регионах эта функция может не поддерживаться.
●
Удалить: удаление канала, чтобы отобразить необходимые каналы.
●
Выбрать все: выбор всех каналов в списке каналов.

◀ ▶
Русский
❑
Сохранение каналов в памяти
O
MENU
m
→
Канал
→
ENTER
E
■
Антенна
t
N
Параметр может отличаться в зависимости от страны.
Для сохранения в памяти доступных каналов сначала следует указать тип источника
сигнала, подключенного к телевизору.
- Manuals
- Brands
- Samsung Manuals
- Plasma TV
- PS43D450A2W
- E-manual
-
Contents
-
Table of Contents
-
Troubleshooting
-
Bookmarks
Quick Links
E-MANUAL
imagine the possibilities
Thank you for purchasing this Samsung
product. To receive more complete service,
please register your product at
www.samsung.com/register
Model __________ Serial No. ____________
Related Manuals for Samsung PS43D450A2W
Summary of Contents for Samsung PS43D450A2W
-
Page 1
E-MANUAL imagine the possibilities Thank you for purchasing this Samsung product. To receive more complete service, please register your product at www.samsung.com/register Model __________ Serial No. ____________… -
Page 2: Table Of Contents
Contents Channel • Using the INFO button (Now & Next guide) • Using the Channel Menu • Using the Channel • Memorising Channels • Using the Channel (for Satellite TV) • Memorising Channels (for Satellite TV) • Other Features Basic Features • Changing the Preset Picture Mode • Adjusting Picture Settings • Changing the Picture Size…
-
Page 3: Channel
❑ Using the INFO button (Now & Next guide) The display identifies the current channel and the status of certain audio-video settings. The Now & Next guide shows daily TV programme information for each channel according to the broadcasting time. ●…
-
Page 4: Using The Channel Menu
❑ Using the Channel Menu → → → MENUm Support Contents Home ENTERE Press the CONTENT button to select Watch TV, and then select the menu you want to use. Each screen will be displayed. Watch TV Guide Schedule Manager ◀…
-
Page 5
Guide ■ The EPG (Electronic Programme Guide) information is provided by broadcasters. Using programme schedules provided by broadcasters, you can specify programmes you want to watch in advance so that the channel automatically changes to the selected programme channel at the specified time. Programme entries may appear blank or out of date depending on a channel status. -
Page 6
Using Channel View (Sche. Mgr): Displays the Schedule Manager. Green (-24 Hours): Viewing the list of programmes to be broadcasted before 24 hours. Yellow (+24 Hours): Viewing the list of programmes to be broadcasted ◀ after 24 hours. Guide DTV Air 05.1 Globo HD TELA QUENTE (HD) 10:05 pm — 12:10 pm DESVENTURAS EM SERIE (HD) -
Page 7
Blue (Ch.Mode): Select the type of channels you want to display on the Channel View window. Information: Displays details of the selected programme. Page: Move to next or previous page. Watch / Schedule: When selecting the current programme, you can watch the selected programme. -
Page 8
Schedule Manager ■ → CONTENT You can view, modify or delete a channel you have reserved to watch. Using the Timer Viewing You can set a desired channel to be displayed automatically at the intended time. Set the current time first to use this function. 1. -
Page 9
3. Press the Start Time. ● Antenna: Select the desired antenna source. ● Channel: Select the desired channel. ● Repeat: Select Once, Manual, Sat~Sun, convenience. If you select Manual, you can set the day you want. mark indicates the date is selected. ●… -
Page 10
● Start Time: You can set the start time you want. Press INFO to enter screen, you can change or cancel a reserved information. ● Cancel Schedules: Cancel a show you have reserved to watch. ● Edit: Change a show you have reserved to watch. ●… -
Page 11: Channel List
Channel List ■ You can view all the channel searched. When you press the remote control, displayed at once. Using the operation buttons with the Channel List. ● Red (Antenna): Select the desired ◀ antenna source. The option may differ depending on country. ●…
-
Page 12
● Ch. Mode Channel List The option may differ depending on country. ● Watch / Information: Watches the channel you select / Displays details of the selected programme. ● Page: Move to next or previous page. ◀ / Channel: Move to the type of channels you want to display on screen / Change channels. -
Page 13
How to use Timer Viewing in Channel List (digital channels only) When you set the Timer Viewing Programme View. 1. Press the CH LIST 2. Press the (Programme 3. Press the ENTERE Information ◀ 4. Select Viewing, then press the Timer If you want to cancel Schedules. -
Page 14: Using The Channel
❑ Using the Channel Channel Manager ■ → CONTENT ENTERE Edit the favourite channel and set the channels to Delete, Deselect All can edit the channel name only for analogue channels. ◀ → Channel Manager Select All. You English Channel Manager Seclected item: 4 Antenna Sorting…
-
Page 15
● ) Channels: Select a channel in the All, TV, Radio, Data/Other, screen. Change the antenna, or channel settings using the menus in the top right corner of the screen. ● Favourites 1 to Using the colour buttons with the ●… -
Page 16
Channel Status Display Icons Icon Operations An analogue channel. A channel selected. A channel set as a favourite. Channel Manager Option Menu ◀ Set each channel using the Favourites Edit Favourites, Number, Delete, Select All on the channel status. Channel Manager menu options (Watch, Lock / Unlock,… -
Page 17
1. Select a channel and press the 2. Select a function and change its settings. ● Watch: Watch the selected channel. ● Add to Favourites favourites / Add or Delete the selected channel in 1. Select the Add to Favourites button. -
Page 18
2. Press the ENTERE button. One favourite channel can be added in several of Favourites 1 to ● Lock / Unlock: Lock a channel so that the channel cannot be selected and viewed. This function is available only when the ◀… -
Page 19
● Edit Channel Name This function may not support depending on the region. ● Number: Edit the number by pressing the number buttons desired. Edit Channel This function may not support depending on the region. ● Delete: Delete a channel to display the channels you want. ●… -
Page 20: Memorising Channels
❑ Memorising Channels → MENUm Channel Antenna ■ The option may differ depending on country. Before your television can begin memorizing the available channels, you must specify the type of signal source that is connected to the TV. ◀ → ENTERE English ▶…
-
Page 21
Country (depending on the country) ■ The PIN input screen appears. Enter your 4 digit PIN number. Select your country so that the TV can correctly auto-tune the broadcasting channels. ● Digital Channel: Change the country for digital channels. ● Channel: Change the country for analogue channels. -
Page 22
● Antenna Source: Select the antenna source to memorise. The option may differ depending on country. ● Digital & Analogue memorise. When selecting value to scan for cable channels. ● Search Mode (Full broadcast stations and stores them in the TV. If you select Quick, you can set up the ◀… -
Page 23
● Network ID: When numeric buttons. ● Frequency: Displays the frequency for the channel. (differs in each country) ● Modulation: Displays available modulation values. ● Symbol Rate: Displays available symbol rates. Cable Search Option ■ (depending on the country) ◀ Sets additional search options such as the frequency and symbol rate for a cable network search. -
Page 24
Manual Tuning ■ Scans for a channel manually and stores in the TV. If a channel is locked using the appears. ● Digital Channel 1. Press the When selecting ◀ When selecting Rate Channel Lock Tuning: Scans for a digital channel. button to select New. -
Page 25
2. Press the channel is updated in the channel list. ● Analogue Channel 1. Press the 2. Set the Programme, Search. 3. Press the is updated in the channel list. ◀ button to select Search. When scanning has finished, a Tuning: Scans for a analogue channel. -
Page 26
Channel mode ● (programme mode): When tuning is complete, the broadcasting stations in your area have been assigned to position numbers from P0 to P99. You can select a channel by entering the position number in this mode. ● (aerial channel mode) / you to select a channel by entering the assigned number for each aerial broadcasting station or cable channel. -
Page 27: Using The Channel (For Satellite Tv)
❑ Using the Channel (for Satellite TV) Channel Manager ■ → CONTENT ENTERE Edit the favourite channel and set the channels to Delete, Deselect All can edit the channel name only for analogue channels. ◀ → Channel Manager Select All. You English for PDP 570 Channel Manager…
-
Page 28
● ) Channels: Select a channel in the All, TV, Radio, Data/Other, screen. Change the antenna, or channel settings using the menus in the top right corner of the screen. ● Favourites 1 to Using the colour buttons with the ●… -
Page 29
Channel Status Display Icons Icon Operations An analogue channel. A channel selected. A channel set as a favourite. Channel Manager Option Menu ◀ Set each channel using the Favourites Edit Favourites, Number, Delete, Select All on the channel status. Channel Manager menu options (Watch, / Unlock, Lock… -
Page 30
1. Select a channel and press the 2. Select a function and change its settings. ● Watch: Watch the selected channel. ● Add to Favourites favourites. 1. Select the Add to Favourites button. If the channel is already added to favourite channel, ◀… -
Page 31
2. Press the ENTERE button. One favourite channel can be added in several of Favourites 1 to ● Delete: Delete a channel to display the channels you want. ● Select All: Select all the channels in the channel list. ◀ button to select Favourites 1 to English… -
Page 32: Memorising Channels (For Satellite Tv)
❑ Memorising Channels (for Satellite TV) → MENUm Channel Antenna ■ The option may differ depending on country. Before your television can begin memorizing the available channels, you must specify the type of signal source that is connected to the TV. ◀…
-
Page 33
Country ■ The PIN input screen appears. Enter your 4 digit PIN number. Select your country so that the TV can correctly auto-tune the broadcasting channels. ● Digital Channel: Change the country for digital channels. ● Channel: Change the country for analogue channels. Analogue ◀… -
Page 34
Auto Tuning ■ ● Auto Tuning Scans for a channel automatically and stores in the TV. Automatically allocated programme numbers may not correspond to actual or desired programme numbers. If a channel is locked using the function, the PIN input window appears. ●… -
Page 35
● Digital & Analogue memorise. When selecting value to scan for cable channels. ● Search Mode (Full broadcast stations and stores them in the TV. If you select Quick, you can set up the Network, Modulation, and control. ◀ ● Network (Auto Manual. -
Page 36
● Frequency: Displays the frequency for the channel. (differs in each country) ● Modulation: Displays available modulation values. ● Symbol Rate: Displays available symbol rates. Cable Search Option ■ (depending on the country) Sets additional search options such as the frequency and symbol rate for a cable network search. -
Page 37
– Start frequency each country) – Symbol Rate: Displays available symbol rates. – Modulation: Displays available modulation values. ● Standby Auto Store (Off is in standby mode. ● Wake-up Timer (1 hour later : Selects the schedule timer to turn the TV on and scan channels 14:00) for Italy ◀… -
Page 38
Manual Tuning ■ Scans for a channel manually and stores in the TV. If a channel is locked using the appears. ● Transponder: Selects the transponder using the up/down buttons. ● Mode: Selects either free or all channels to store. Scan ●… -
Page 39
● Signal Quality: Display the current status of broadcasting signal. Information on a satellite and its transponder is subject to change depending on the broadcasting conditions. When setting is completed, move to Channel scan is started. ◀ Search and press the English ENTERE button. -
Page 40
Satellite System ■ The PIN input screen appears. Enter your 4 digit PIN number. is available when Antenna Satellite System. Then channel scan is run normally. ● Satellite Selection: You can choose the satellites for this TV. ● LNB Power (Off ◀… -
Page 41
● Settings: Configures the outdoor equipment. – Transponder: Selects the transponder using the up/down buttons. – DiSEqC Mode: Selects DiSEqC mode for the selected LNB. – Lower LNB – Upper LNB – Tone 22 kHz (Off LNB type. For a universal LNB it should be Auto. ◀… -
Page 42
● SatCR/Unicable This function may not support depending on the region. – SatCR/Unicable: Enables or disable single cable installation support. – Slot Number: Select the SatCR user slot number for this receiver. – Slot Frequency: Enter the appropriate frequency to receive the signal from SatCR. -
Page 43
● Positioner Settings: Configures the antenna positioner. Positioner (On Positioner Type (USALS DiSEqC 1.2 and USALS (Universal Satellite Automatic Location System). – Longitude: Sets the longitude for my location. – Latitude: Sets the latitude for my location. – Satellite Longitude ◀… -
Page 44
User Mode: Sets the position of satellite antenna according to each satellite. If you store the current position of satellite antenna according to a certain satellite, when the signal of that satellite is needed, the satellite antenna can be moved to pre-populated position. –… -
Page 45
– Go to Stored – Position: Adjusts and stores the antenna position for the selected Antenna satellite. – Store Current limit. – Signal Quality: Display the current status of broadcasting signal. ◀ Position: Rotates the antenna to the stored satellite position. Position: Stores current position as the selected positioner English ▶… -
Page 46
Installer Mode: Sets limits to the scope of movement of satellite antenna or reset the position. Generally, installation guide uses this function. – Limit Position (East – Antenna Position: Adjusts and stores the antenna position for the selected satellite. – Store Current positioner Limit. -
Page 47: Other Features
❑ Other Features → MENUm Channel Fine Tune ■ (analogue channels only) If the reception is clear, you do not have to fine tune the channel, as this is done automatically during the search and store operation. If the signal is weak or distorted, fine tune the channel manually.
-
Page 48
Settings are applied to the channel you’re currently watching. Fine tuned channels that have been saved are marked with an asterisk “*” on the right-hand side of the channel number in the channel banner. To reset the fine-tuning, select Reset. Transfer Channel List ■… -
Page 49: Basic Features
❑ Changing the Preset Picture Mode → MENUm Picture Picture Mode ■ Select your preferred picture type. When connecting a PC, the Entertain. ● Dynamic: Suitable for a bright room. ◀ ● Standard: Suitable for a normal environment. ● Movie: Suitable for watching movies in a dark room. ●…
-
Page 50: Adjusting Picture Settings
❑ Adjusting Picture Settings → MENUm Picture Cell Light Contrast ■ Your television has several setting options for picture quality control. When you make changes to Colour Tint (G/R) When connecting a PC, you can only make changes to ◀ and Sharpness.
-
Page 51: Changing The Picture Size
❑ Changing the Picture Size → MENUm Picture Screen Adjustment ■ ● Picture Size: Your cable box / satellite receiver may have its own set of screen sizes as well. However, we highly recommend you use 16:9 mode most of the time.
-
Page 52
Zoom: Magnifies the 16:9 wide pictures vertically to fit the screen size. Adjusts the 4:3: Sets the picture to basic (4:3) mode. Do not watch in 4:3 format for a long time. Traces of borders displayed on the left, right and centre of the screen may cause image retention (screen burn) which are not covered by the warranty. -
Page 53
NOTE ● Depending on the input source, the picture size options may vary. ● The available items may differ depending on the selected mode. ● When connecting a PC, only ● Settings can be adjusted and stored for each external device connected to an input on the TV. -
Page 54
● 4:3 Screen Size (16:9 Wide Zoom Zoom / 4:3): Available only when picture size is set to Wide. You can determine the desired picture size at the 4:3 Auto WSS (Wide Screen Service) size or the original size. Each European country requires different picture size. -
Page 55: Changing The Picture Options
❑ Changing the Picture Options Advanced Settings ■ → MENUm Picture (Advanced Settings Compared to previous models, new Samsung TVs have a more precise picture. When connecting a PC, you can only make changes to Balance. ◀ → Advanced Settings are available in…
-
Page 56
● Black Tone (Off Select the black level to adjust the screen depth. ● Dynamic Contrast (Off High): Adjust the screen contrast. ● Gamma: Adjust the primary colour intensity. ◀ Dark Darker / Darkest): Medium English Advanced Settings Black Tone : Off Dynamic Contrast : Medium… -
Page 57
● RGB Only Mode (Off colour for making fine adjustments to the hue and saturation. Blue ● Colour Space (Auto the image. ● White Balance: Adjust the colour temperature for a more natural picture. R-Offset G-Offset darkness. R-Gain G-Gain ◀ Reset: Resets the White Balance to it’s default settings. -
Page 58
● Flesh Tone: Emphasize pink “Flesh Tone”. ● Edge Enhancement (Off ● Motion Lighting (Off When changing a setting value of Contrast, Off. ◀ / On): Emphasize object boundaries. / On): Reduce power consumption by brightness control. English Motion Lightning will be set to ▶… -
Page 59: Picture Options
Picture Options ■ → MENUm Picture When connecting a PC, you can only make changes to the ● Colour Tone (Cool Warm2) Warm1 Warm2 when the picture mode is Dynamic. ◀ Settings can be adjusted and stored for each external device connected to an input on the TV.
-
Page 60
● Digital Noise Filter (Off If the broadcast signal received by your TV is weak, you can activate the feature to reduce any static and ghosting that may appear on the Noise Filter screen. When the signal is weak, try other options until the best picture is displayed. ●… -
Page 61
● HDMI Black Level (Low adjust the screen depth. Available only in HDMI mode. ● Film Mode (Off the TV to automatically sense and processes film signals from all sources and adjusts the picture for optimum quality. The activated when HDMI 24Hz signal is inputted. Available in TV, AV, COMPONENT (480i / 1080i) and HDMI (1080i). -
Page 62: Setting Up The Tv With Your Pc
❑ Setting up the TV with Your PC Select the input source to PC. Auto Adjustment ■ → MENUm Picture Frequency values / position and fine tune are adjusted automatically. Not available when connecting with an HDMI to DVI cable. ◀…
-
Page 63
PC Screen Adjustment ■ → MENUm Picture ENTERE ● Coarse / Fine: Removes or reduces picture noise. If the noise is not removed by Fine-tuning alone, then adjust the frequency as best as possible (Coarse) and Fine-tune again. After the noise has been reduced, readjust the picture so that it is aligned to the centre of screen. -
Page 64
Depending on the version of Windows and the video card, the actual screens on your PC may differ in which case the same basic set-up information will almost always be applied. (If not, contact your computer manufacturer or Samsung Dealer.) 1. Click on “Control Panel” on the Windows start menu. -
Page 65
4. Navigate to the “Settings” tab on the display dialog-box. ● If a vertical-frequency option exists on your display settings dialog box, the correct value is “60” or “60 Hz”. Otherwise, just click “OK” and exit the dialog box. ◀ ▶… -
Page 66: Changing The Preset Sound Mode
❑ Changing the Preset Sound Mode Sound Mode ■ ● Standard: Selects the normal sound mode. ● Music: Emphasizes music over voices. ● Movie: Provides the best sound for movies. ● Clear Voice: Emphasizes voices over other sounds. ● Amplify: Increases the intensity of high-frequency sound to allow a better ◀…
-
Page 67: Adjusting Sound Settings
❑ Adjusting Sound Settings → MENUm Sound Sound Effect ■ ● SRS TruSurround HD (Off (standard sound mode only) This function provides a virtual 5.1 channel surround sound experience through a pair of speakers using HRTF (Head Related Transfer Function) technology. ◀…
-
Page 68
● SRS TruDialog (Off / On) (standard sound mode only) This function allows you to increase the intensity of a voice over background music or sound effects so that dialog can be heard more clearly. Speaker Select is set to External Speaker, SRS TruDialog… -
Page 69
● Equalizer Adjusts the sound mode (standard sound mode only). – Balance L/R: Adjusts the balance between the right and left speaker. – 100Hz 300Hz level of specific bandwidth frequencies. – Reset: Resets the equalizer to its default settings. Speaker Select ◀… -
Page 70
Broadcast Audio Options ■ ● Audio Language (digital channels only) Change the default value for audio languages. The available language may differ depending on the broadcast. ● Audio Format (digital channels only) ◀ When sound is emitted from both the main speaker and the audio receiver, a sound echo may occur due to the decoding speed difference between the main speaker and the audio receiver. -
Page 71
Audio Format digital sound is only available when connecting an external speaker through an optical cable. ● Audio Description (not available in all locations) (digital channels only) This function handles the Audio Stream for the AD (Audio Description) which is sent along with the Main audio from the broadcaster. -
Page 72
Additional Settings ■ (digital channels only) ● DTV Audio Level (MPEG disparity of a voice signal (which is one of the signals received during a digital TV broadcast) to a desired level. According to the type of broadcast signal, adjusted between -10dB and 0dB. To increase or decrease the volume, adjust between the range 0 and -10 ◀… -
Page 73
● SPDIF Output: SPDIF (Sony Philips Digital InterFace) is used to provide digital sound, reducing interference going to speakers and various digital devices such as a DVD player. Audio Format: You can select the Digital Audio output (SPDIF) format. The available Digital Audio output (SPDIF) format may differ depending on the input source. -
Page 74
● Dolby Digital Comp (Line between a dolby digital signal and a voice signal (i.e. MPEG Audio, HE-AAC, ATV Sound). Select Line to obtain dynamic sound, and RF to reduce the difference between loud and soft sounds at night time. Line: Set the output level for signals greater or less than -31dB (reference) to either -20dB or -31dB. -
Page 75
Speaker Settings ■ ● Speaker Select (External Speaker due to a difference in decoding speed between the main speaker and the audio receiver. In this case, set the TV to When Speaker Select buttons will not operate and the sound settings will be limited. When Speaker Select ●… -
Page 76
When Speaker Select ● Speaker: On, If there is no video signal, both speakers will be mute. ● Auto Volume (Off channel, set to Normal. Night: This mode provides an improved sound experience compared to Normal mode, making almost no noise. It is useful at night. ◀… -
Page 77: Preference
Preference ❑ Connecting to a Wired Network for PDP 550 and 570 Series You can attach your TV to your LAN using cable in three ways: ● You can attach your TV to your LAN by connecting the LAN port on the back of your TV to an external modem using a LAN cable.
-
Page 78
● You can attach your TV to your LAN by connecting the LAN port on the back of your TV to a IP Sharer which is connected to an external modem. Use LAN cable for the connection. See the diagram below. The Modem Port on the Wall External Modem… -
Page 79
● Depending on how your network is configured, you may be able to attach your TV to your LAN by connecting the LAN port on the back of your TV directly to a network wall outlet using a LAN cable. See the diagram below. Note that the wall outlet is attached to a modem or router elsewhere in your house. -
Page 80
● If you have a Dynamic Network, you should use an ADSL modem or router that supports Dynamic Host Configuration Protocol (DHCP). Modems and routers that support DHCP automatically provide the IP address, subnet mask, gateway, and DNS values your TV needs to access the Internet so you do not have to enter them manually. -
Page 81: Setting The Network
❑ Setting the Network Network Settings ■ → MENUm Network Set the network connection to use various Internet services such as AllShare™ and perform software upgrade. Network Status ■ → ◀ MENUm Network You can check the current network and Internet status. for PDP 550 and 570 Series →…
-
Page 82
AllShare Settings ■ → MENUm Network Selects whether to use media functions on the network. Network Settings ■ Use the Automatic Network Settings when connecting your TV to a network that supports DHCP. To set up your TV’s cable network connection automatically, follow these steps: ◀… -
Page 83
How to set up automatically 1. Go to Network Settings follow the directions of 2. Select the Wired. 3. The network test screen appears, and network setting is done. ◀ screen. To enter it, Network Settings. English Network Settings Select the network connection type. Wired Wireless(general) Connect to the network using a LAN cable. -
Page 84
If it fails to set automatically, check the connection of LAN port. If you cannot find network connection values or if you want to set connection manually, set it to Manual. Refer to following “How to set up manually”. ◀ Wired network and Internet connection completed. -
Page 85
Network Settings ■ Use the Manual Network Setup when connecting your TV to a network that requires a Static IP address. Getting the Network Connection Values To get the Network connection values on most Windows computers, follow these steps: 1. Right click the Network icon on the bottom right of the screen. ◀… -
Page 86
How to set up manually To set up your TV’s cable network connection manually, follow these steps: 1. Follow Steps 1 through 2 in the “How to set up automatically” procedure. 2. Select the IP Settings screen. 3. Set IP Mode to Manual. -
Page 87
5. Enter the Address, the number buttons on your remote to enter numbers and the arrow buttons to move from one entry field to another. 6. When done, select the OK. 7. The network test screen appears, and network setting is done. ◀… -
Page 88: Connecting To A Wireless Network
PDP 550 and 570 Series To connect your TV to your network wireless, you need a wireless router or modem and a Samsung Wireless LAN adapter (WIS09ABGN, WIS09ABGN2, WIS10ABGN), which you connect to your TV’s back or side panel USB port. See the illustration below.
-
Page 89
Samsung’s Wireless LAN adapter is sold separately and is offered by selected retailers, Ecommerce sites and Samsungparts.com. Samsung’s Wireless LAN adapter supports the IEEE 802.11a/b/g and n communication protocols. Samsung recommends using IEEE 802.11n. When you play video over a network connection, the video may not be played smoothly. -
Page 90
● To use a wireless network, your TV must be connected to a wireless IP sharer (either a router or a modem). If the wireless IP sharer supports DHCP, your TV can use a DHCP or static IP address to connect to the wireless network. ●… -
Page 91
● If Pure High-throughput (Greenfield) 802.11n mode is selected and the Encryption type is set to WEP, TKIP or TKIP AES (WPS2Mixed) for your AP, Samsung TVs will not support a connection in compliance with new Wi-Fi certification specifications. ●… -
Page 92
● Ensure the TV is turned on before you connect the Samsung Wireless LAN adapter. ● Connection Methods: You can setup the wireless network connection on six ways. – Auto Setup (Using the Auto Network Search function) – Manual Setup –… -
Page 93
● The Samsung Wireless LAN adapter may not be recognized when using a connection via a USB hub or via a USB extension cable other than the cable supplied. Network Settings ■ Most wireless networks have an optional security system that requires devices that access the network to transmit an encrypted security code called an Access or Security Key. -
Page 94
How to set up automatically 1. Go to Network Settings follow the directions of 2. Select the Wireless. ◀ screen. To enter it, Select the network connection type. Network Settings. ● The displayed image may differ depending on the English Network Settings Wired Wireless(general) -
Page 95
3. The Network function searches for available wireless networks. When done, it displays a list of the available networks. 4. In the list of networks, press the press the ENTERE If the wireless router is set to Hidden (Invisible), you have to select Network and enter the correct establish the connection. -
Page 96
6. If the wireless router has security, enter the Security key (Security or PIN), then select Done. When you enter the Security key (Security or PIN), use buttons on your remote to select number/characters. You should be able to find the Pass Phrase on one of the set up screens you used to set up your router or ◀… -
Page 97
7. The network connection screen appears, and network setting is done. If it fails to set Security key (Security or PIN), select If you want to set connection manually, select the following “How to set up manually”. ◀ Reset Settings. Refer to English Settings. -
Page 98
Network Setup (Manual) ■ Use the Manual Network Setup when connecting your TV to a network that requires a Static IP address. Getting the Network Connection Values To get the Network connection values on most Windows computers, follow these steps: 1. -
Page 99
3. On the dialog that appears, click the Support tab. 4. On the Support Tab, click the Details button. The Network connection values are displayed. How to set up manually To set up your TV’s cable network connection manually, follow these steps: 1. -
Page 100
4. Press the button on your remote to go to the IP Address. 5. Enter the Address, the number buttons on your remote to enter numbers and the arrow buttons to move from one entry field to another. 6. When done, select the OK. 7. -
Page 101: Network Settings
Network Setup (WPS(PBC)) ■ How to set up using WPS(PBC) If your router has a WPS(PBC) button, follow these steps: 1. Go to Network Setting follow the directions of 2. Select the WPS(PBC). 3. Press the WPS(PBC) ◀ within 2 minutes. Your TV automatically acquires all the network setting values it needs and connects to your network.
-
Page 102
Network Settings (One Foot ■ One Foot Connection wireless router by placing samsung wireless router within 1 foot(25cm) from samsung TV. If your wireless router does not support must connect using one of the other methods. You can check for equipment that supports samsung.com. -
Page 103
1. Go to Network Settings follow the directions of 2. Select the One Foot 3. Place the wireless router in parallel with the Samsung Wireless LAN adapter giving a gap no larger than 25cm. ◀ screen. To enter it, Network Settings. -
Page 104
If you want to try using again, reset the wireless router, disconnect the One Foot Connection Samsung Wireless LAN adapter and then try again from Step 1. You can also choose one of the other connection setup methods. ◀ ▶… -
Page 105
4. The network connection screen appears, and network setting is done. 5. Place the wireless Router to a desired location. If the wireless Router settings change or you install a new wireless Router, you must perform the ◀ One Foot Connection procedure again, beginning from Step English ▶… -
Page 106
◀ Turn on the power of wireless router and TV. 1. Insert USB memory stick into our Samsung wireless router and checking wireless router’s LED status (Blinking → On). 2. Then take USB memory out and insert it into Samsung TV. -
Page 107
If you want to try using Samsung Wireless LAN adapter and then try again from Step 1. You can also choose one of the other connection setup methods. 4. The network connection screen appears, and network setting is done. -
Page 108
Samsung wireless Router is optimized HD AV streaming for Samsung DTV This is our product’s distinctive function. Samsung wireless Router can be connected with many devices, such as laptop, mobile phone, BD player etc. In case of connecting Samsung TV to Samsung wireless Router while other devices are connected, Samsung wireless Router will give Samsung TV a priority ◀… -
Page 109
Network Setup (Ad ■ You can connect to a mobile device supporting Ad-hoc without an wireless router through the “Samsung Wireless LAN adapter”. When connecting mobile device, you can use files on device or connect internet using AllShare or Multimedia function. -
Page 110
3. When finished searching a mobile device, set the Security key of the device, and then connect the network. If network does not operate normally, check the Security key again. An incorrect Security key may cause a malfunction. If a device is connected once, it is displayed in Network Setting list. When you connect it again, you can find it in network setting list. -
Page 111
If Your TV Fails to Connect to the Internet Your TV may not be able to connect to the Internet because your ISP has permanently reg- istered the MAC address (a unique identifying number) of your PC or modem, which it then authenticates each time you connect to the Internet as a way of preventing unauthorized access. -
Page 112: Setting The Time
❑ Setting the Time → MENUm System Time ■ ● Clock: Setting the clock is for using various timer features of the TV. The current time will appear every time you press the If you disconnect the power cord, you have to set the clock again. –…
-
Page 113
The antenna must be connected in order to set the time automatically. Manual: Set the current time manually. Depending on the broadcast station and signal, the auto time set up may not be correct. In this case, set the time manually. –… -
Page 114
Using the Sleep Timer → MENUm System ● Sleep Timer t: Automatically shuts off the TV after a preset period of time (30, 60, 90, 120, 150 and 180 minutes). To cancel Sleep ◀ → → Time Sleep Timer Timer, select Off. English →… -
Page 115
Setting the On / Off Timer → MENUm System ● On Timer 1 On Timer 2 Three different on timer settings can be made. You must set the clock first. Setup: Select Off, Once, Everyday, Mon~Fri, Mon~Sat, to set at you convenience. If you select ◀… -
Page 116
Time: Set the hour and minute. Volume: Set the desired volume level. Source: Select content to be played when the TV is turned on automatically. (USB can be selected only when a USB device is connected to the TV) Antenna (when the Source is set to TV): Select the desired antenna source. -
Page 117
Auto Power Off TV will be automatically turned off after 4 hours of being left idle to prevent overheating. NOTE ● If there is no music file on the USB device or the folder containing a music file is not selected, the Timer function does not operate correctly. ●… -
Page 118
● Each USB you use is assigned its own folder. When using more than one of the same type of USB, make sure the folders assigned to each USB have different names. ● It is recommended that you use a USB memory stick and a multi card reader when using with USB devices with a built-in battery, MP3 players, or PMPs made by some manufacturers because these devices take a long time to be… -
Page 119: Off Timer
● Off Timer 1 Off Timer 2 Off Timer Off Timer 1 Three different off timer settings can be Setup Once made. You must set the clock first. Off Time Setup: Select Off, Once, Everyday, Mon~Fri, Mon~Sat, Sat~Sun Manual L Move U Adjust E Enter R Return…
-
Page 120: Locking Programmes
❑ Locking Programmes → MENUm System Security ■ The PIN input screen appears, Enter your 4 digit PIN number. ● Channel Lock (Off unauthorized users, such as children, from watching unsuitable programme. Available only when the ◀ → → Security ENTERE / On): Lock channels in Channel…
-
Page 121
● Programme Rating Lock users, such as children, from watching unsuitable programme with a user- defined 4-digit PIN code. If the selected channel is locked, the “” symbol will be displayed. The items of ● Change PIN: Change your personal ID number required to set up the TV. ●… -
Page 122
How to watch a restricted channel If the TV is tuned to a restricted channel, the will block Programme Rating Lock it. The screen will go blank and the following message will appear: This channel is blocked by Programme Rating Lock. -
Page 123: Economical Solutions
❑ Economical Solutions Eco Solution ■ → MENUm System ● Energy Saving (Off adjusts the brightness of the TV in order to reduce power consumption. If you select Picture any button except volume button to turn on the screen. ◀ ●…
-
Page 124
If you adjust the Light: When Min Cell be adjusted manually. Eco Sensor darker or brighter) depending on the surrounding light intensity. ● No-Signal Power Off (Off energy consumption, set how long you want the TV to remain on if it’s not receiving a signal. -
Page 125: Picture In Picture (Pip)
❑ Picture In Picture (PIP) → MENUm System ■ You can watch the TV tuner and one external video source simultaneously. (Picture-in-Picture) does not function in the same mode. ◀ → → ENTERE English ▶…
-
Page 126
● PIP (Off / On): Activate or deactivate the PIP function. ● Channel: Select the channel for the sub-screen. ● Size (õ / ã): Select a size for the sub-picture. ● Position (ã ● Sound Select (Main mode. ◀ / œ): Select a position for the sub-picture. –… -
Page 127
NOTE ● For PIP sound, refer to the ● If you turn the TV off while watching in PIP mode, the PIP window will disappear. ● You may notice that the picture in the PIP window becomes slightly unnatural when you use the main screen to view a game or karaoke. ●… -
Page 128: Other Features
❑ Other Features → MENUm System Language ■ ● Menu Language: Set the menu language. ● Teletext Language: Set a desired language for teletext. English is the default in cases where the selected language is unavailable in the broadcast. ◀ ●…
-
Page 129
Subtitle ■ Use this menu to set the ● Subtitle (Off / On): Switches subtitles on or off. ● Subtitle Mode (Normal ● Subtitle Language: Sets the subtitle language. If the programme you are watching does not support the function, Preferred mode is selected. -
Page 130
Digital Text (Disable / Enable) ■ for U.K If the programme broadcasts with digital text, this feature is enabled. MHEG (Multimedia and Hypermedia Information Coding Experts Group): An International standard for data encoding systems used in multimedia and hypermedia. This is at a higher level than the MPEG system which includes data- linking hypermedia such as still images, character service, animation, graphic and video files as well as multimedia data. -
Page 131
Screen Burn Protection ■ To reduce the possibility of screen burn, this unit is equipped with screen burn prevention technology. The Time setting allows you to programme the time between movement of the picture in minutes. ● Pixel Shift (Off PDP in horizontal or vertical direction to minimize after image on the screen. -
Page 132
Pixel Shift mode. This function is not available in the ● Auto Protection Time (Off remains idle with a still image for a certain period of time defined by the user, the screen saver is activated to prevent the formation of ghost images on the screen. -
Page 133
The after-image removal function has to be executed for a long time (approximately 1 hour) to effectively remove after-images on the screen. If the after-image is not removed after performing the function, repeat the function again. Press any key on the remote control to cancel this feature. ●… -
Page 134
General ■ ● Game Mode (Off PlayStation™ or Xbox™, you can enjoy a more realistic gaming experience by selecting game mode. Precautions and limitations for game mode – To disconnect the game console and connect another external device, Game Mode –… -
Page 135
Standard / Dark): Set the Transparency of the menu. / On): Display Samsung logo when the TV is turned on. : Sets the TV name so you can find it easily on Input, you can type on the TV using the OSK (On Screen… -
Page 136
Anynet+ (HDMI-CEC) ■ For details on set up options, refer to the “What is Anynet+?” instructions. DivX® Video On Demand ■ Shows the registration code authorized for the TV. If you connect to the DivX web site and register, you can download the VOD registration file. If you play the VOD registration using For more information on DivX®… -
Page 137
Common Interface ■ ● Menu: This enables the user to select from the CAM-provided menu. Select the CI Menu based on the menu PC Card. ● Application Info: View information on the CAM inserted into the CI slot and on the “CI or CI+ CARD”… -
Page 138
■ for PDP 550 and 570 Series Turn on / off or give permission to Samsung mobile phones devices. You must have a Samsung Mobile phone / device which supports Network Remote Control. For more details, refer to each device’s manual.PIP Settings ◀… -
Page 139: Support Menu
❑ Support Menu e-Manual ■ → MENUm Support You can read the introduction and instructions about the TV features stored in your For the detailed information about e-Manual Screen, refer to “How to view the e-Manual” in User Manual. ◀ →…
-
Page 140
Test: Use to check for picture problems. Yes: If the test pattern does not appear or there is noise in the test pattern, select Yes. There may be a problem with the TV. Contact Samsung’s Call Centre for assistance. ◀… -
Page 141
The melody will be heard during the test even if External Speaker Yes: If you can hear sound only from one speaker or not at all during the sound test, select Yes. There may be a problem with the TV. Contact Samsung’s Call Centre for assistance. ◀… -
Page 142
Adjust your antenna to increase signal strength. ● Troubleshooting: If the TV seems to have a problem, refer to this description. If none of these troubleshooting tips apply, contact the Samsung customer service centre. ◀ English… -
Page 143
Software Upgrade ■ Software Upgrade can be performed by network connection or downloading the latest firmware from “www.samsung.com.” to a USB memory device. Current Version the software already installed in the TV. Software is represented as ‘Year / Month / Day_Version’. -
Page 144
● USB: Insert a USB drive containing the firmware upgrade file, downloaded from “www.samsung.com,” into the TV. Please be careful not to disconnect the power or remove the USB drive until upgrades are complete. The TV will be turned off and on ●… -
Page 145
● By Online for PDP 550 and 570 Series First, configure your network. For detailed procedures on using the Network Setup, refer to the If the internet connection doesn’t operate properly, the connection may be broken. Please retry downloading. If the problem persists, download by USB and upgrade. -
Page 146
This phenomenon may continue for more than 1 hour until the software upgrade is complete. ◀ Contact Samsung ■ View this information when your TV does not work properly or when you want to upgrade the software. -
Page 147: Advanced Features
This exciting new feature enables you to view 3D content. In order to fully enjoy this feature, you must purchase a pair of Samsung 3D Active Glasses to view 3D video. Samsung 3D Active Glasses are sold separately. For more detailed purchasing information, contact the retailer where you purchased this TV.
-
Page 148
IMPORTANT HEALTH AND SAFETY INFORMATION FOR 3D PICTURES. Read and understand the following safety information before using the TV’s 3D function. WARNING ● Some viewers may experience discomfort while viewing 3D TV such as dizziness, nausea and headaches. If you experience any such symptom, stop viewing 3D TV, remove 3D Active Glasses and rest. -
Page 149
● A responsible adult should frequently check on children who are using the 3D function. If there are any reports of tired eyes, headaches, dizziness, or nausea, have the child stop viewing 3D TV and rest. ● Do not use the 3D Active Glasses for other purposes (such as general eyeglasses, sunglasses, protective goggles, etc.) ●… -
Page 150
● Mode: Select the 3D input format. If you want to feel the 3D effect fully, please wear the 3D Active Glasses first, and then select 3D Mode from the list below that provides the best 3D viewing experience. When watching 3D images, turn on 3D Active Glasses. 3D Mode ◀… -
Page 151
Some file format may not supported the “2D → 3D.” “Side by Side” and “Top & Bottom” are available when the resolution is 720p, 1080i and 1080p in DTV, HDMI and USB mode or when set to PC and the PC is connected through an HDMI/DVI cable. ●… -
Page 152
Resolution supported for HDMI PC mode The resolution for HDMI PC mode is optimized to 1920 x 1080 input. An input resolution other than 1920 x 1080 may not be displayed properly in 3D display or full screen mode. ◀ ▶… -
Page 153
How to watch the 3D image Some 3D modes may not be available depending on the format of the image source. To watch in 3D, wear 3D Active Glasses and press the power button on the glasses. 1. Press the MENU button to select Picture, and then press the… -
Page 154
3. Use the then press the 4. Using the select the 3D Mode view. ◀ button to select Mode, and button. ENTERE buttons on your remote control, of the image you want to English 3D Mode Move Enter Return ● The displayed image may differ depending on the model. -
Page 155
Supported formats and operating specifications for Standard HDMI 3D The 3D formats indicated below are recommended by the HDMI association and must be supported. Source signal format 1920 x 1080p @ 24 Hz x 2 1280 x 720p @ 50 Hz x 2 ◀… -
Page 156
Before using 3D function… NOTE ● 3D Mode is set to functions. ● 3D Mode is set to memorised configuration value automatically, when changing the input source. ● Some Picture ◀ ● is not supported in automatically when accessing functions are disabled in mode. -
Page 157
● 3D Active Glasses from Samsung’s previous product (IR type) or other manufacturers may not be supported. ● When the TV is initially powered on, may take some time until the 3D display is optimized. ● The 3D Active Glasses may not work properly if there is any other 3D product or electronic devices turned on near the glasses or TV. -
Page 158
● Some files are not supported in the 2D to 3D function. ● Be sure to stay within the viewing angle and optimum TV viewing distance when watching 3D pictures. ● Otherwise, you may not be able to enjoy proper 3D effects. ●… -
Page 159: About Allshare
❑ About AllShare™ AllShare™ connects your TV and compatible Samsung mobile phones / devices through a network. You can play media contents including videos, photos and music saved on your mobile phones or the other devices (such as your PC) by controlling them on the TV via the network.
-
Page 160
If your Samsung TV connects to a non-Samsung DLNA server, a compatibility issue may occur during video playback. By connecting your Samsung TV to a network via AllShare™, you can use Samsung’s original functions as follows: – Playback of various video formats (DivX, MP4, 3GPP, AVI, ASF, MKV, etc.) –… -
Page 161: Setting Up Allshare
❑ Setting Up AllShare™ → MENUm Network AllShare Settings ■ ● Media (On / Off): Enables or disables the media function. When the media function is on, Media contents play can be controlled by a mobile phone or other devices that support DLNA DMC.
-
Page 162
Media ■ Shows a list of mobile phones or connected devices which have been set up with this TV for using the The Media function is available in all devices which support DLNA DMC. ● Allowed / Denied: Allows/Blocks the the devices. ●… -
Page 163
Using the Media Function An alarm window appears informing the user that the media contents (videos, photos, music) sent from a mobile phone will be displayed on your TV. The contents are played automatically 3 seconds after the alarm window appears. If you press the button when the alarm window appears, the media contents are not played. -
Page 164
● To turn off the media contents transmission from the mobile phone, set in the AllShare ● Contents may not be played on your TV depending on their resolution and format. ● ENTERE media content. ● Using the mobile device, you can control the media playing. For details, refer to each mobile’s user’s guide. -
Page 165: Setting Up Anynet
❑ Setting Up Anynet+ → MENUm System Anynet+ (HDMI-CEC) (Off ■ To use the Anynet+ Function, When the Anynet+ (HDMI-CEC) operations are deactivated. ◀ → Anynet+ (HDMI-CEC) / On) Anynet+ (HDMI-CEC) function is disabled, all the Anynet+ related English → ENTERE must be set to On.
-
Page 166
Auto Turn Off (No ■ Setting an Anynet+ Device to turn off automatically when the TV is turned off. Auto Turn Off time as the TV powers off. May not be enabled depending on the device. ◀ / Yes) is set to Yes, running external devices will turn off at the same English ▶… -
Page 167
What is Anynet+? Anynet+ is a function that enables you to control all connected Samsung devices that support Anynet+ with your Samsung TV’s remote. The Anynet+ system can be used only with Samsung devices that have the Anynet+ feature. To be sure your Samsung device has this feature, check if there is an Anynet+ logo on it. -
Page 168
For the method of connecting external devices , refer to the supported user manual. NOTE ● Connect the Optical cable between the on your TV and the Digital Audio Input on the Home Theatre. ● When following the connection above, the Optical jack only outputs 2 channel audio. -
Page 169
● You can connect only one Home Theatre. ● You can connect an Anynet+ device using the HDMI cable. Some HDMI cables may not support Anynet+ functions. ● Anynet+ works when the AV device supporting Anynet+ is in the standby or on status. -
Page 170
Anynet+ Menu The Anynet+ menu changes depending on the type and status of the Anynet+ devices connected to the TV. Anynet+ Menu View TV Device List (device_name) MENU ◀ (device_name) Tools Description Changes Anynet+ mode to TV broadcast mode. Shows the Anynet+ device list. Shows the connected device menus. -
Page 171
Description Anynet+ Menu (device_name) Shows the title menu of the connected device. E.g. If a DVD recorder is Title Menu connected, the title menu of the DVD recorder will appear. Depending on the device, this menu may not be available. Receiver Sound is played through the receiver. -
Page 172: Switching Between Anynet+ Devices
❑ Switching between Anynet+ Devices 1. Press the TOOLS ENTERE button to select If you cannot find a device you want, press the 2. Select a device and press the selected device. Device List in the ◀ button to select Anynet+ Device List.
-
Page 173
● Switching to the selected device may take up to 2 minutes. You cannot cancel the operation during the switching operation. ● If you have selected external input mode by pressing the you cannot use the Anynet+ function. Make sure to switch to an Anynet+ device by using the ◀… -
Page 174: Listening Through A Receiver
❑ Listening through a Receiver You can listen to sound through a receiver (i.e Home Theatre) instead of the Speaker. 1. Select Receiver 2. Press the EXIT If your receiver supports audio only, it may not appear in the device list. The receiver will work when you have properly connected the optical in jack ◀…
-
Page 175
When the receiver (i.e Home Theatre) is set to On, you can hear sound output from the TV’s Optical jack. When the TV is displaying a DTV (aerial) signal, the TV will send out 5.1 channel sound to the receiver. When the source is a digital component such as a DVD and is connected to the TV via HDMI, only 2 channel sound will be heard from the receiver. -
Page 176: Troubleshooting For Anynet
❑ Troubleshooting for Anynet+ Problem Anynet+ does not work. ◀ Possible Solution • Check if the device is an Anynet+ device. The Anynet+ system supports Anynet+ devices only. • Only one receiver (home theatre) can be connected. • Check if the Anynet+ device power cord is properly connected. •…
-
Page 177
Problem I want to start Anynet+. I want to exit Anynet+. The message “Connecting to Anynet+ device…” appears on ◀ the screen. The Anynet+ device does not play. Possible Solution • Check if the Anynet+ device is properly connected to the TV and check if the Anynet+ (HDMI-CEC) Setup menu. -
Page 178
Problem The connected device is not displayed. ◀ The TV sound is not output through the receiver. Possible Solution • Check whether or not the device supports Anynet+ functions. • Check whether or not the HDMI cable is properly connected. •… -
Page 179: Using The My Downloads
❑ Using the My Downloads Enjoy photos, music and / or movie files saved on a USB Mass Storage Class (MSC) 1. Press the CONTENT 2. Press the desired menu Videos, Photos, press the ENTERE ◀ button. button to select Music then button.
-
Page 180: Connecting A Usb Device
❑ Connecting a USB Device 1. Turn on your TV. 2. Connect a USB device containing photo, music and/or movie files to the the side of the TV. 3. When USB is connected to the TV, popup window appears. Then you can select device connected.
-
Page 181
It might not work properly with unlicensed multimedia files. Need-to-Know List before using ● MTP (Media Transfer Protocol) is not supported. ● The file system supports FAT16, FAT32 and NTFS. ● Certain types of USB Digital camera and audio devices may not be compatible with this TV. -
Page 182
● Before connecting your device to the TV, please back up your files to prevent them from damage or loss of data. SAMSUNG is not responsible for any data file damage or data loss. ● Do not disconnect the USB device while it is loading. -
Page 183
● MP3 files with DRM that have been downloaded from a non-free site cannot be played. Digital Rights Management (DRM) is a technology that supports the creation, distribution and management of the content in an integrated and comprehensive way, including the protection of the rights and interests of the content providers, the prevention of the illegal copying of contents, as well as managing billings and settlements. -
Page 184
● If the TV has been no input during time set in Screensaver will run. ● The power-saving mode of some external hard disk drives may be released automatically when connected to the TV. ● If a USB extension cable is used, the USB device may not be recognized or the files on the device may not be read. -
Page 185: Screen Display
❑ Screen Display Move to the desired file using the ENTERE � differ depending on the way to enter the screen. Information: Displays the selected content category (Music, for example), device (USB drive,for example), folder/file name, page, and sort criteria. ◀…
-
Page 186: Videos
Videos ■ Playing Video 1. Press the the desired video in the file list. 2. Press the ENTERE button. – The selected file name is displayed on ◀ the top with its playing time. – If video time information is unknown, play time and progress bar are not displayed.
-
Page 187
– During video playback, you can search using – You can use In this mode, you can enjoy movie clips contained on a Game, but you cannot play the Game itself. ● Supported Subtitle Formats Name MPEG-4 time-based text SAMI ◀… -
Page 188
● Supported Video Formats File Extension Container *.avi *.mkv *.asf ◀ *.wmv *.mp4 Video Codec Resolution DivX 3.11 / 4.x / 5.1 / 6.0 1920×1080 H.264 BP / MP / HP 1920×1080 MPEG4 SP / ASP 1920×1080 Motion JPEG 640×480 DivX 3.11 / 4.x / 5.1 / 6.0 1920×1080 H.264 BP / MP / HP… -
Page 189
File Extension Container *.3gp 3GPP *.vro *.mpg *.mpeg ◀ *.ts *.tp *.trp Video Codec Resolution H.264 BP / MP / HP 1920×1080 MPEG4 SP / ASP 1920×1080 MPEG1 1920×1080 MPEG2 1920×1080 MPEG1 1920×1080 MPEG2 1920×1080 H.264 1920×1080 MPEG2 1920×1080 H.264 1920×1080 1920×1080 English… -
Page 190
Video Decoder • Supports up to H.264, Level 4.1 • H.264 FMO / ASO / RS, VC1 SP / MP / AP L4 and AVCHD are not supported. • MPEG4 SP, ASP: − Below 1280 x 720: 60 frame max −… -
Page 191
Other Restrictions NOTE ● Video content will not play, or not play correctly, if there is an error in the content or the container. ● Sound or video may not work if the contents have a standard bitrate/frame rate above the compatible Frame / sec listed in the table above. ●… -
Page 192: Music
Music ■ Playing Music 1. Press the the desired Music in the file list. 2. Press the ENTERE button. – You can use ◀ buttons during playback. button to select button or (Play) � (REW) and (FF) � µ English Music E Pause L Page…
-
Page 193
Only displays the files with MP3 extension. Other file extensions are not displayed, even if they are saved on the same USB device. If the sound is abnormal when playing MP3 files, adjust the Sound menu. (An over-modulated MP3 file may cause a sound problem.) ◀… -
Page 194
Playing selected music 1. Press the (Edit 2. Select the desired music. mark appears to the left of the selected files. 3. Press the TOOLS You can select or deselect all music pressing the ◀ Mode) button. button and select Play Selected English Contents. -
Page 195: Photos
Photos ■ Viewing a Photo (or Slide Show) 1. Press the the desired photo in the file list. 2. Press the ENTERE ● When a selected photo is displayed, press the ENTERE ◀ slide show. ● During the slide show, all files in the file list will be displayed in order.
-
Page 196
Music files can be automatically played during the Slide Show if the Background Music Background Music loading. ◀ is set to On. cannot be changed until the BGM has finished English ▶… -
Page 197
My Downloads ❑ Videos / Music / Photos Play Option menu During playing a file, press the Category Title Search Time Search ◀ Shuffle Mode Repeat Mode Picture Size — Additional Functions TOOLS button. Operation You can move directly to another Title. -
Page 198
Category Picture Mode Sound Mode Subtitle Language Subtitle Setting ◀ Operation You can adjust the picture setting. You can adjust the sound setting. You can view a subtitle. You can select a specific language if the subtitle file contains multiple languages. -
Page 199
Category Audio Start Slide Show Pause Slide Show Slide Show Speed ◀ Background Music Background Music Setting Operation You can enjoy a video in one of the supported languages. The function is only enabled when you play stream-type files which support multiple audio formats. -
Page 200
Category Zoom Rotate Information ◀ Operation You can zoom into images in full screen mode. You can rotate images in full screen mode. You can see detailed information about the played file. English Videos Music Photos ▶… -
Page 201: Teletext Feature
❑ Teletext Feature The index page of the Teletext service gives you information on how to use the service. For Teletext information to be displayed correctly, channel reception must be stable. Otherwise, information may be missing or some pages may not be displayed.
-
Page 202
Activates the Teletext mode for the current channel. Press the button twice to overlap the Teletext mode with the current broadcasting screen. Press it one more time to exit (Teletext on / mix / teletext. off) Stores the Teletext pages. (store) Displays the teletext on the upper half of the screen in double-size. -
Page 203
Colour buttons (red, If the FASTEXT system is used by the broadcasting company, the different topics on a green, yellow, blue) Teletext page are colour-coded and can be selected by pressing the coloured buttons. Press the colour corresponding to the topic of your choice. A new colourcoded page is displayed. -
Page 204
Displays the previous Teletext page. (page down) Displays the index (contents) page at any time while you are viewing Teletext. (index) Displays the hidden text (answers to quiz games, for example). To display the normal screen, press it again. (reveal) Shrinks the Teletext display to overlap with the current broadcast. -
Page 205
Typical Teletext page Part Contents Selected page number. Broadcasting channel identity. ◀ Current page number or search indications. Date and time. Text. Status information. FASTEXT information. English ▶… -
Page 206: Troubleshooting
If you have any questions about the TV, first refer to this list. If none of these troubleshooting tips apply, please visit “www. samsung.com,” then click on Support, or contact the call centre listed on the back-cover of this manual.
-
Page 207
Issues The picture is distorted: macro block error, small block, dots, pixelization Colour is wrong or missing. ◀ There is poor colour or brightness. Solutions and Explanations • Compression of video contents may cause picture distortion especially in fast moving pictures such as sports and action movies. •… -
Page 208
Issues There is a dotted line on the edge of the screen. The picture is black and white. When changing channels, the picture freezes or is distorted or delayed. Sound Quality ◀ There is no sound or the sound is too low at maximum volume. Solutions and Explanations •… -
Page 209
Issues The picture is good but there is no sound. ◀ The speakers are making an inappropriate noise. Solutions and Explanations • Set the Speaker Select option to • If you are using an external device, make sure the audio cables are connected to the correct audio input jacks on the TV. -
Page 210
Issues No Picture, No Video The TV turns off automatically. RF (Cable / Antenna) Connection The TV is not receiving all ◀ channels. The picture is distorted: macro block error, small block, dots, pixelization. Solutions and Explanations • Ensure the Sleep Timer is set to •… -
Page 211
• If you are using an HDMI connection, check the audio output setting on your PC. • The Samsung Wireless USB dongle is required to use a wireless network. • Make sure the Network Connection is set to Wireless. •… -
Page 212
Issues Others The picture won’t display in full screen. Plasma TV is making humming noise. ◀ Solutions and Explanations • HD channels will have black bars on either side of the screen when displaying up scaled SD (4:3) contents. • Black bars on the top and bottom will appear during movies that have aspect ratios different from your TV. -
Page 213
Issues Image Retention (Burn In) Issue. A “Mode Not Supported” message appears. There is a plastic smell from the ◀ The TV Signal Information unavailable in the Self Diagnosis Test menu. The TV is tilted to the side. The channel menu is greyed out (unavailable). -
Page 214
Issues Your settings are lost after 30 minutes or every time the TV is turned off. You have intermittent loss of audio or video. ◀ You see small particles when you look closely at the edge of the frame of the TV. Solutions and Explanations •… -
Page 215
Issues The message “Scramble signal” or “Weak Signal / No Signal” appears. menu is not available. You turned the TV off 45 minutes ago, and it turned on again. ◀ There are recurrent picture sound issues. A reaction may occur between the rubber cushion pads on the base stand and the top finish of some furniture. -
Page 216
Some of above pictures and functions are available at specific models only. You can keep your TV as optimum condition to upgrade the latest firmware on web site (samsung.com → Support → Downloads) by USB. ◀ English ▶… -
Page 217: Connections Common Interface Slot
❑ CONNECTIONS COMMON INTERFACE Slot To watch paid channels, the “CI or CI+ CARD” must be inserted. ● If you don’t insert the “CI or CI+ CARD”, some channels will display the message “Scrambled Signal”. ● The pairing information containing a telephone number, the “CI or CI+ CARD”…
-
Page 218
NOTE ● You must obtain a “CI or CI+ CARD” from a local cable service provider. ● When removing the “CI or CI+ CARD”, carefully pull it out with your hands since dropping the “CI or CI+ CARD” may cause damage to it. ●… -
Page 219
● If you have any problems, please contact a service provider. ● Insert the “CI or CI+ CARD” that supports the current antenna settings. The screen will be distorted or will not be seen. ● When you are watching the satellite TV, remove the “CI or CI+ CARD” of terrestrial and cable. -
Page 220: Anti-Theft Kensington Lock
❑ Anti-theft Kensington Lock The Kensington Lock is not supplied by Samsung. It is a device used to physically fix the system when using it in a public place. The appearance and locking method may differ from the illustration depending on the manufacturer.
-
Page 221
To lock the product, follow these steps: 1. Wrap the Kensington Lock cable around a large, stationary object such as desk or chair. 2. Slide the end of the cable with the lock attached through the looped end of the Kensington Lock cable. -
Page 222: Licence
❑ Licence TheaterSound, SRS and symbol are trademarks of SRS Labs, Inc. TheaterSound technology is incorporated under licence from SRS Lab, Inc. Manufactured under licence from Dolby Laboratories. Dolby and the double-D symbol are trademarks of Dolby Laboratories. Manufactured under licence under U.S. Patent #’s: 5,451,942; 5,956,674; 5,974,380; 5,978,762;…
-
Page 223
DivX Certified® to play DivX® video up to HD 1080p, including premium content. DivX®, DivX Certified® and associated logos are trademarks of DivX, Inc. and are used under licence. ABOUT DIVX VIDEO: DivX® is a digital video format created by DivX, Inc. This is an official DivX Certified® device that plays DivX video.