Скачать файл PDF «GE twin set 21880 Инструкция по эксплуатации» (461 Kb)
Популярность:
1365 просмотры
Подсчет страниц:
40 страницы
Тип файла:
Размер файла:
461 Kb
-
Contents
-
Table of Contents
-
Bookmarks
Quick Links
21870
Digital Cordless Telephone
With Dual Mode Caller ID
User’s Guide
is a trademark of General Electric company and is under license by
Thomson Telecom, France.
Model: CE21870GEX-A
0007289 (Rev. 0
E)
06-38
Printed in China
Thomson Telecom
46, Quai Alphonse le Gallo,
92648 Boulogne Cedex
, France
Related Manuals for THOMSON GE 21870
Summary of Contents for THOMSON GE 21870
-
Page 1
With Dual Mode Caller ID User’s Guide Thomson Telecom 46, Quai Alphonse le Gallo, 92648 Boulogne Cedex , France is a trademark of General Electric company and is under license by Thomson Telecom, France. Model: CE21870GEX-A 0007289 (Rev. 0 06-38 Printed in China… -
Page 2: Precautions Of Use
It is recommended that you avoid using this device during electrical storms. Thomson Telecom hereby declares that the 21870 conforms to the essential requirements and other applicable provisions of European directive 1999/5/CE. IMPORTANT: Because cordless phones operate on electricity, you should have one phone in your home that isn’t cordless, in case the…
-
Page 3: Battery Safety Precautions
AC power outlet Phone jack CAUTION: Plug the adaptor to the socket outlet that near the equipment and shall be easily accessible. Use only the Thomson Telecom power supply that came with this unit. Using other power supplies may damage the unit.
-
Page 4
Getting Started Install and Charge the Battery Pack Insert two pieces AAA batteries in the compartment, ensuring correct polarity and close the compartment. Place the handset in the base station to charge for 14 hours prior for first use. If you don’t properly charge the phone, battery performance will be compromised. -
Page 5: Menu Structure (Handset)
Menu Structure (Handset) CALL LOG PHONE BOOK NEW ENTRY ENTER NUMBER ENTER NAME NORMAL RING LIST ENTRY VIP RING 1-10 EDIT ENTRY DELETE DELETE ALL CONFIRM? VOLUME [- — — — — ] HANDSET RINGER EXT RING MELODY 1-10 INT RING MELODY 1-10 HS NAME PREFIX MEM…
-
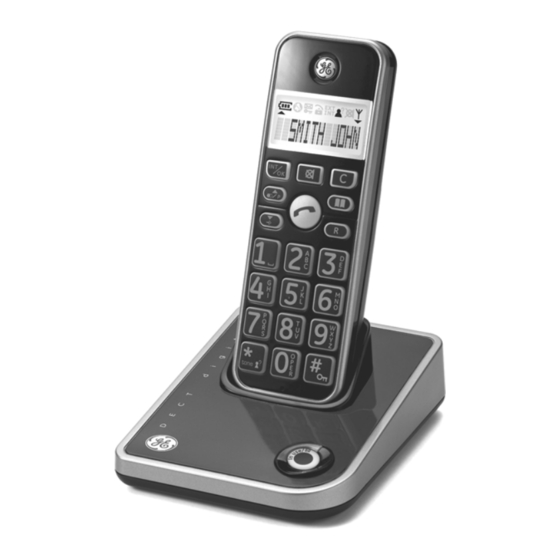
Page 6: Handset And Base Layouts
Handset and Base Layouts Menu / down key CID / Asterisk key INT / OK key Cancel key Mute key Redial / Pause /Up key External call key. Memory key Flash key Hash / lock key Page Paging key LED: Steady: when handset is connected to a call in the In Use / base station…
-
Page 7: Lcd Display
LCD Display Battery icon Phone icon External call icon Internal call icon CLI icon No ring icon Mute icon Key lock icon Aerial icon ▲ / ▼ Up / Down arrow Voice mail waiting indicator (VMWI icon) Using the Handset Telephone Using the telephone When the handset is inserted in the station charging unit, it starts to charge automatically.
-
Page 8: Call Log Operations
Press key to carry out the conversation. Press key to end the call. Taking Calls When an external call is received, all registered handsets and the base station ring. ‘EXT’ flashes in the handset display and, if subscribed, the telephone number of the caller appears (network depended). If the caller has been stored in your phone book, the name appears.
-
Page 9
Edit Call Log memory When browsing Call Log memory, Caller Line Identification (CLI) number can be edited before dial back. Amended CLI number will not overwrite the stored Call Log memory. Press “0-9” to add digits in front of CLI number. Press to remove entry or leftmost digit. -
Page 10: Handset Settings
tone. Entering a Dialling Pause (P) If the telephone is connected to a PABX system, it may be necessary to insert a dialing pause. To do this, press key after entering the relevant digit in the pre-dial buffer, e.g. 0, for an external line (0P….). A “P”…
-
Page 11
Changing the Ringer Melody (external / internal) Press key until the HANDSET menu appears. Press key twice. key to select the required submenu (EXT RING or INT RING) and press key. to select the required melody (1-10). Press key to confirm. Entering/Changing Handset Name It is possible to assign a name to each handset. -
Page 12
Key assignment Overview SPACE, 1 P, Q, R, S, 7 A, B, C, 2 T, U, V, 8 D, E, F, 3 W, X, Y, Z, 9 G, H, I, 4 +, -, 0 J, K, L, 5 [, ], * M, N, O, 6 ?, :, # Registering Additional Handsets… -
Page 13: Technical Specifications
Changing the Dialing Mode Press key until the BASE menu appears and press key. Press key to select the submenu DIAL MODE and press key. Press key to select the required dialing mode and press key. Changing the PIN Press key until the BASE menu appears and press key.
-
Page 14: General Product Care
General Product Care Simply wipe the base station with a damp cloth or an antistatic wipe. Never use a dry cloth as this can cause static discharge. Troubleshooting Guide When you forget base PIN, following the procedure to reset the units. ALL MEMORY AND SETTING WILL BE LOST.
– 5 –
Only use the connection cable supplied.
Phone jack
Corded unit rear side view
CAUTION:
Plug the adapter to the socket outlet that near the equipment
and shall be easily accessible. Use only the Thomson Telecom power
supply that came with this unit. Using other power supplies may
damage the unit.
Connecting the charging station
Insert the power plug in the socket on the rear side of the charging
station. Insert the power plug at the other end in the power outlet. The
charging station is now ready to operate.
AC power outlet