инструкцияVolkswagen Tiguan (2014)

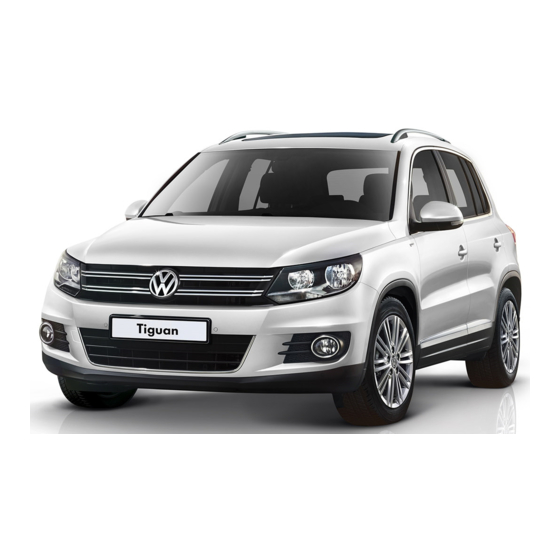
Side view
Fig. 1 Vehicle side overview.
Key to fig. 1:
(1) Fuel filler flap
(2) Roof antenna for:
(3) Outside door handles
(4) Outside mirror:
– Additional turn signal light
(5) Lift points for the jack
(6) Side marker light
(7) Roof rack
(8) Side window with integrated antenna
(9) Trailer hitch/ball mount receiver
Посмотреть инструкция для Volkswagen Tiguan (2014) бесплатно. Руководство относится к категории автомобили, 26 человек(а) дали ему среднюю оценку 8.6. Руководство доступно на следующих языках: английский. У вас есть вопрос о Volkswagen Tiguan (2014) или вам нужна помощь? Задайте свой вопрос здесь
Главная
| Volkswagen | |
| Tiguan (2014) | |
| автомобиль | |
| английский | |
| Руководство пользователя (PDF), Техническая спецификация (PDF) |
Не можете найти ответ на свой вопрос в руководстве? Вы можете найти ответ на свой вопрос ниже, в разделе часто задаваемых вопросов о Volkswagen Tiguan (2014).
Как перевести мили в километры?
Где я могу узнать идентификационный номер транспортного средства Volkswagen?
Что такое идентификационный номер транспортного средства (VIN)?
Когда транспортному средству Volkswagen требуется техническое обслуживание?
Когда следует заменять тормозную жидкость на Volkswagen?
В чем разница между топливом E10 и E5?
Одна или несколько дверей не открываются изнутри. Что мне делать?
Автомобильный радиоприемник не включается, что делать?
Инструкция Volkswagen Tiguan (2014) доступно в русский?
Не нашли свой вопрос? Задайте свой вопрос здесь
Комментарии
23
Войдите или зарегистрируйтесь, чтобы писать комментарии, задавать вопросы и участвовать в обсуждении.


Я езжу на Volkswagen Tiguan (1G)
Спасибо огромное! Живу в Чехии, купил себе этого немца, а мануал на чешском. Неделю мучился с «преводовками» и «дотыками», потом нашёл Ваш пост)))

Кто нибудь может скинуть руководство на новый Tiguan на почту, sa-egorov@mail.ru/ Никак не могу скачать. Спасибо
Файл можно получить по ссылке:
pps_552_tiguan_2017_vvedenie_rus.pdf
yadi.sk/i/Yh4-8BaX3PKZNu

Подскажи, это инструкция для нового Volkswagen Tiguan? Тот который в 2017 начали продавать?
Не, ну могу конечно помочь найти:) Но позже:)
Помоги, у меня не получается. Старый стал, мозги не те…
Такая у меня есть, мне бы ту которая в комплекте с машиной


ээ! не дает скачать только кнопка «пожаловаться» .
Все комментарии
- Manuals
- Brands
- Volkswagen Manuals
- Automobile
- Tiguan 2014
- Quick start manual
-
Contents
-
Table of Contents
-
Bookmarks
Quick Links
2014
Tiguan Quick-Start Guide
Related Manuals for Volkswagen Tiguan 2014
Summary of Contents for Volkswagen Tiguan 2014
-
Page 1
2014 Tiguan Quick-Start Guide… -
Page 2: Table Of Contents
*Do not text while driving. The information within this guide must be used in conjunction with the information in the Volkswagen Owner’s Manuals. Refer to your vehicle’s Owner’s Manual for all information and warnings. By using this guide, you acknowledge that you are aware of and have read the warnings and information provided in the Owner’s Manual on the topics in this guide and will use this information to augment that material.
-
Page 3: Bluetooth Technology
Bluetooth Technology ® Text PAIR12 38981 to watch the Bluetooth Pairing video. ® Pairing your phone Standard text and data rates apply. First, check your phone’s compatibility at The multifunction display will then show a PIN.** www.vw.com/bluetooth. Make sure the same PIN is displayed on your Start the ignition.
-
Page 4
Bluetooth Technology ® Dial by number Dial by number tips Press the microphone button on the multifunction steering wheel. • If the system repeats the number incorrectly, say, “Correct” and repeat the number. After the chime, your vehicle’s Bluetooth ® system will say, “Main menu”. -
Page 5: Premium Viii Audio
To navigate through your music, press the PLAY/PAUSE, SiriusXM ® Satellite Radio. New Volkswagen vehicles come with a PREVIOUS, and NEXT TRACK soft keys. three-month trial subscription to the Sirius Select package. Infrequently, tall buildings and tunnels may interrupt the satellite signal; this is NOTE: Premium VIII Audio is available on certain trim lines.
-
Page 6: Rns 315 Audio And Navigation
SiriusXM ® Satellite Radio. New Volkswagen vehicles come with a three-month trial subscription to the Sirius hard keys on the left side of the steering wheel. Select package. Infrequently, tall buildings and tunnels may interrupt the satellite signal; this is normal. The signal will refresh as you drive.
-
Page 7: Ipod Adapter
iPod Adapter ® To connect your device, here’s all you need to do Premium VIII RNS 315 First, note that your iPod music player must be Generation Four or newer. First, note that your iPod music ® ® player must be Generation Four or newer.
-
Page 8: Cruise Control
Cruise Control Set cruising speed Activate When you get to your cruising speed, press the rocker switch at the end of the cruise stalk towards SET/ –. The green CRUISE light will appear in the instrument cluster. 1. Locate the cruise control stalk on the lower left Rocker switch To increase your speed by 1 mph, press the rocker switch up, towards RES/ +.
-
Page 9: Manual Climate Control
Manual Climate Control Text CLIMATE12 38981 to watch Cool the interior Defrost the windshield the Cooling and Heating video. Standard text and data rates apply. Turn the temperature to MAX A/C. 1. Turn the temperature dial to HI. Turn the fan speed to 6. Heat the interior 2.
-
Page 10: Climatronic ® Heating And Cooling
Climatronic Heating and Cooling ® To cool or heat the interior Turn the temperature dial to 72. ° Press the AUTO button. Like a thermostat, the system will maintain the temperature. In extreme heat, press the MAX AC button. When a comfortable temperature has been reached, push the AUTO button again.
-
Page 11: Windshield Wipers
Windshield Wipers Use the rain-sensing wipers From the OFF position, move the wiper stalk one click up to activate the rain-sensing wipers. The rain sensor automatically turns on the wipers when it begins to rain, adjusting the wiper frequency in line with rainfall intensity.
-
Page 12: Keys
Keyless Entry Unlock Push button start Lock Make sure you have your key fob with you.* When starting the vehicle, the key fob must be in the Then slide hand behind door handle, wait for the vehicle cabin, otherwise the “Key not in range” door to unlock.
-
Page 13: Panoramic Sunroof
Panoramic Sunroof Open Close Using your sunshade To open the sunroof to the comfort position, which Turn the dial counterclockwise to the closed position. will help minimize variations in cabin pressure There are two arrow buttons inside the dial that and wind noise, turn the dial to the largest circle.
-
Page 14: Manual Seats
Manual Seats Text SEATS12 38981 to watch Adjust your seat forward or back the Manual Seat Operation video. Standard text and data rates apply. Lumbar support 1. Pull up on the handle under the driver’s seat. Adjust your seat height 2.
-
Page 15: Volkswagen Car-Net Tm
VW Car-Net™ includes services that may collect location information. See applicable Terms of Service available at www.vw.com/carnet for details. LEARN MORE AT knowingyourvw.com Important Safety Instructions and Warnings which you must read, are listed on the last panel under VOLKSWAGEN CAR-NET Volkswagen Car-Net…
-
Page 16: Volkswagen Doublecheck
LEARN MORE AT knowingyourvw.com *The Volkswagen Carefree Maintenance Program covers the vehicle’s scheduled maintenance for two years or 24,000 miles, whichever occurs first, only on Volkswagen 2014 models. This program does not apply to 2009-2013 models. Some restrictions apply. See dealer or vehicle maintenance program booklet for details.
-
Page 17
Wait until you have good authorized Volkswagen dealer or an authorized Volkswagen Service Facility to • Never leave children, disabled persons, or anyone who cannot help themselves visibility before driving off. -
Page 18
• “Destinations” functionality the handling of the vehicle and stopping ability. • Volkswagen Car-Net™ services can be used only where adequate cellular — Requires compatible factory installed navigation system. • Incorrect tire pressures and/or under inflation can also lead to sudden tire and GPS signals are available. -
Page 19
VW Car-Net™ settings through this website or the VW Car-Net™ considerably reduce visibility. mobile application. • Use clear water with a cleaning solution recommended by Volkswagen. • Pricing • If necessary, blend with a suitable windshield washer fluid antifreeze agent. -
Page 20
Notes… -
Page 21
Tiguan 2014 MY14-QSG-Tiguan-01 Volkswagen of America | knowingyourvw.com “Volkswagen”, “Das Auto”, and the Volkswagen logo are registered trademarks of Volkswagen AG. ©2013 Volkswagen of America, Inc.
View a manual of the Volkswagen Tiguan (2014) below. All manuals on ManualsCat.com can be viewed completely free of charge. By using the ‘Select a language’ button, you can choose the language of the manual you want to view.
Page: 1
Side view
Fig. 1 Vehicle side overview.
Key to fig. 1:
(1) Fuel filler flap
(2) Roof antenna for:
(3) Outside door handles
(4) Outside mirror:
– Additional turn signal light
(5) Lift points for the jack
(6) Side marker light
(7) Roof rack
(8) Side window with integrated antenna
(9) Trailer hitch/ball mount receiver
Page: 2
Front view
Fig. 2 Vehicle front overview.
Key to fig. 2:
(1) Sensor on mirror base for:
– Rain sensor
– Low-light sensor
(2) Windshield wipers
(3) Engine hood release
(4) Headlights (on both left and right) ,
(5) Fog lights/static cornering lights (on both left and right) ,
(6) Threaded hole for the front towing eye (behind cover)
Page: 3
Rear view
Fig. 3 Vehicle rear overview.
Key to fig. 3:
(1) Rear window:
– Rear window defroster
– Rear window wiper
(2) High-mounted brake light
(3) Taillights (on both left and right)
(4) Area of:
– Rear hatch release
– Rear View Camera system
(5) License plate lighting
(6) Threaded hole for the rear towing eye (behind cover)
(7) Roof antenna:
(8) Trailer hitch/ball mount receiver
(9) Backup lights and rear reflectors (on both left and right)
Page: 4
Driver door overview
Fig. 4 Overview of controls in the driver door.
Key to fig. 4:
(1) Door handle
(2) Power locking switch for locking and unlocking the vehicle
(3) Switch for adjusting the outside mirror:
– Adjusting outside mirrors
– Outside mirror heating
(4) Buttons for operating the power windows:
– Power windows
– Safety switch for rear power windows and electric child safety lock
(5) Indicator for power locking system (if equipped)
(6) Lever for releasing the engine hood
(7) Storage compartment
(8) Bottle holder
(9) Reflector
Page: 5
Driver side overview
Fig. 5 Driver side overview.
Key to fig. 5:
(1) Instrument cluster:
– Instruments
– Display
– Warning and indicator lights
(2) Headlight switch :
– Off position — —
– Low beams
– Fog lights
(3) Lever for:
– High beams
– Headlight flasher 1x
– Turn signal
– Cruise control – – – –
(4) Windshield wiper and washer lever:
– Windshield wiper –
– Intermittent operation for windshield wipers
– “One-tap wiping” x
– Windshield wiper
– Automatic wipe/wash for windshield
– Rear window wiper
– Automatic wipe/wash for rear window
– Lever with buttons for the Volkswagen Information System (Basic version) , /
(5) Multi-function steering wheel controls:
– Volume setting for radio programs, navigation system notifications, or telephone calls –
Page: 6
– Mute switching for radio or activation of voice control
– Display Phone main menu or accept telephone calls
– Audio, Navigation
– Control switches for the Volkswagen Information System #– –∃ – –
(6) Ignition switch (vehicles without Keyless Access)
(7) Dimmer control for the instrument cluster and switch illumination
(8) Lever for adjustable steering wheel
(9) Horn (only works when the ignition is switched on)
(10) Pedals
(11) Driver front airbag
(12) Air vents
(13) Storage compartment 210
(14) Tiptronic paddles for shifting down , shifting up and switching (if equipped)
Page: 7
Upper center console
Fig. 6 Overview of upper center console.
Key to fig. 6:
(1) Switch for emergency flashers
(2) PASSENGER AIR BAG light (front airbag for front seat passenger)
(3) Radio or Radio & Navigation system (factory-installed) ⇒Booklet Radio or
⇒Booklet Navigation system
(4) Controls for:
– Manual air conditioning
– Climatronic
(5) Air vent for indirect ventilation
(6) Seat heating buttons –
(7) Storage compartment
(8) Card holder
Page: 8
Lower center console
Fig. 7 Vehicles without Keyless Access: Overview of center console lower section.
Fig. 8 Vehicles with Keyless Access: Overview of center console lower section.
Key to fig. 7:
(1) Levers for:
– Manual transmission
– Automatic transmission
(2) Button for:
– Electronic parking brake
(3) Cup holders
(4) Storage compartment in the center console
(5) Storage compartment with 12 Volt socket
(6) Card holder
Page: 9
Key to fig. 8:
(1) Levers for:
– Manual transmission
– Automatic transmission
(2) Button for:
– Electronic parking brake
(3) Cup holders
(4) Storage compartment in the center console
(5) Starter button for Keyless Access with push button start –
(6) Card holder
(7) 12 Volt socket
Page: 10
Front passenger side overview
Fig. 10 Overview of the front passenger side.
Key to fig. 10:
(1) Passenger front airbag location in the instrument panel (approximate)
(2) Opening handle for the lockable glove compartment
(3) Air vents
Page: 11
Symbols on the roof console
Symbol Meaning
Interior and reading lights
• Power sunroof
3-button module for vehicles without Car-NetTM
⇒Booklet Mobile
Phone Package.
• • 3-button module for vehicles with Car-NetTM
Page: 12
Instrument cluster
Introduction
In this section you’ll find information about:
Instrument overview
Instrument overview
Displays
Displays
Compass
Service reminder display
More information:
Warning and indicator lights
Volkswagen Information System
Shifting
Service reminder information ⇒Booklet Warranty and Maintenance
WARNING
Driving on today’s roads demands the full attention of the driver at all times. Driver distrac-
tion causes accidents, collisions and serious personal injury!
Never use the buttons in the instrument cluster while driving.
Instrument overview
Fig. 11 Instrument cluster in the instrument panel.
Please first read and note the introductory information and heed the WARNINGS
Page: 13
Instrument explanations ⇒fig. 11:
(1) Speedometer.
(2) Tachometer (shows engine revolutions per minute in thousands). The red zone at the end of
the scale indicates maximum permissible engine rpm (revolutions per minute) for all gears after
the break-in period. Before reaching the red zone, select the next higher gear or selector level
position Drive (D), or ease your foot off the accelerator ⇒ .
(3) Displays
(4) Reset button for the trip odometer display trip.
– Push and hold the 0.0 / SET button about one second in order to reset to zero.
– Push and hold the 0.0 / SET button for more than 10 seconds to display the vehicle’s en-
gine code. You must do this when the ignition is on, but the engine is not running.
(5) Fuel gauge
(6) Button for setting the instrument cluster clock, the Radio or Radio & Navigation system
clock1
.
– With the ignition on, push the button to highlight the hour or the minutes in the clock
display.
– To advance the clock, push the 0.0 / SET button (4). Press and hold the button to fast for-
ward.
– Push the button again to finish setting the clock.
(7) Engine coolant temperature display
.
1
On appropriately equipped vehicles, the clocks can also be set via the Settings menu in the instrument
cluster display ⇒page Error! Bookmark not defined., Settings menu⇒page 29, Settings menu.
Page: 14
Displays
Fig. 13 In the instrument cluster display: A: Open engine hood, B: Open rear hatch, C: Open front driver side
door, D: Open rear passenger side door.
Please first read and note the introductory information and heed the WARNINGS
Depending on the vehicle model, different information may be shown in the instrument cluster display
⇒fig. 11 (3) ⇒fig. 12 (3).
Warning and information texts
Odometer displays
Time
Outside temperature
Compass display
Selector lever position
Gear recommendation (manual transmission)
Multi-Function Indicator (MFI) and menus for different settings
Service reminder display
Warning and information texts
The status of various vehicle functions and components is monitored when the ignition is switched on
and while driving. Malfunctions are indicated by red and yellow warning symbols with text messages in
the instrument cluster display (⇒Warning and indicator lights). In some cases, they may also be
signaled acoustically. The display can vary depending on the instrument cluster model.
Type of
notification
Symbol
color
Explanation
Page: 15
Type of
notification
Symbol
color
Explanation
Priority 1
warning
message
Red Symbol flashing or lit – sometimes with acoustic warnings.
Stop!
Check malfunction and take corrective action. Contact an authorized
Volkswagen dealer or an authorized Volkswagen Service Facility for assis-
tance if necessary.
Menus cannot be accessed when a priority 1 warning message is dis-
played. The warning message will turn off automatically after a few se-
conds. You can confirm and turn off some warning messages using the OK
button.
Priority 2
warning
message
Yellow Symbol flashing or continuously lit – sometimes with acoustic warnings.
Malfunctions or low operating fluid levels may cause vehicle damage and
vehicle breakdown ⇒ .
Check malfunction as soon as possible. Contact an authorized Volkswagen
dealer or an authorized Volkswagen Service Facility for assistance if nec-
essary.
Information
text
– Information about various vehicle situations.
Odometer displays
The odometer indicates the distance driven by the vehicle.
The trip odometer (trip) shows the distance driven since the last time the trip odometer was reset.
The last digit indicates 1/10 mile (100 meters).
Outside temperature display
At outside temperatures below about +39 °F (+4 °C), a “snowflake symbol” appears in the display. The
symbol flashes at first, then stays on until the outside temperature rises above +43 °F (+6 °C) ⇒ .
When the vehicle is not moving, is operating, or when you are driving at very low speeds, the tempera-
ture displayed may be slightly higher than the actual outside temperature.
The measurement range is from -40 °F (-40 °C) to +122 °F (+50 °C).
Compass display
On vehicles equipped with compass display, the current compass direction is indicated in the instru-
ment cluster display when the ignition and navigation system are switched on.
Selector lever positions
The selector lever position is shown both on the side of the selector lever and in the instrument cluster
display. The respective gear may also be shown in the instrument cluster display in Drive (D) and
Sport Drive (S), as well as in Tiptronic®
mode.
Gear recommendation (manual transmission)
While the vehicle is moving, a fuel economy gear recommendation is indicated in the instrument
cluster display ⇒ Shifting.
Page: 16
WARNING
Failure to heed warning lights and instrument cluster text messages can cause the vehicle to
break down in traffic and result in a collision and serious personal injury.
Never ignore warning lights or text WARNINGS.
Always stop the vehicle as soon as it is safe to do so.
Park the vehicle at a safe distance from moving traffic and where no part of the hot cata-
lytic converter and exhaust system can come into contact with flammable materials under the
vehicle, such as dry grass, brush, spilled fuel, etc.
A broken down vehicle presents a high accident risk for itself and others. Switch on
emergency flashers and set up a warning triangle to warn oncoming traffic.
WARNING
Roads and bridges may be dangerously icy even if the outside air temperature is above freez-
ing.
If you use the outside temperature display to tell you about frost conditions, remember
that roads can even ice over at temperatures above +39 °F (+4 °C). Always remember: even if
the “snowflake symbol” (ice warning) is not displayed, there could still be black ice on the
road.
Never rely exclusively on the outside temperature display.
NOTICE
Failure to heed warning lights or text WARNINGS can result in vehicle damage.
The instrument cluster displays and their arrangement may vary depending on the vehicle model
and engine. For displays without warning and information messages, malfunctions are only signaled
with indicator lights.
If there are multiple warning messages, the symbols are displayed for several seconds in order
of importance. The symbols are displayed until the cause has been corrected.
Page: 17
Compass
Fig. 15 Compass zones.
Please first read and note the introductory information and heed the WARNINGS
The compass does not need to be calibrated in vehicles with a factory-installed navigation system.
There is no Compass menu item in this case.
On vehicles without a factory-installed navigation system that have the Premium instrument cluster,
the compass is calibrated automatically. If electrical or metallic accessories are added to the vehicle,
the compass must be recalibrated.
Adjusting the compass zone
Switch on the ignition.
Select the Settings menu followed by the Compass and Zone menu items.
Select the compass zone according to the current location ⇒fig. 15.
Adjust and confirm compass zone (1-15) by using the arrow buttons.
Calibrating the compass
In order to calibrate the compass, you need a valid compass zone for the location and enough room to
drive in a circle.
Switch on the ignition.
Select the Settings menu followed by the Compass and Calibrate menu items.
Confirm the Please drive a full circle to calibrate message by pressing the OK
button on the multi-function steering wheel, and then drive in a complete circle at about 6 mph
(10 km/h).
During calibration, CAL is shown in the instrument cluster display. The calibration is complete when
the compass direction is displayed.
Page: 18
Service reminder display
Please first read and note the introductory information and heed the WARNINGS
The service appointment reminder is shown in the instrument cluster display.
For information on maintenance intervals, please see the ⇒Booklet Warranty and Maintenance.
For vehicles with time- or distance driven-dependent service, only fixed service intervals are dis-
played.
Service reminder
If service is due in the near future, a service reminder is displayed when the ignition is switched on.
For vehicles without text messages (Basic instrument cluster), a wrench symbol and a miles
(kilometers) indicator are shown in the instrument cluster display. The distance shown in miles
(kilometers) is the maximum distance the vehicle can be driven without having a service completed. A
clock symbol is also displayed and the number of days until the required service is shown. The display
switches off after a few seconds.
For vehicles with text messages (Premium instrument cluster), Oil change and Inspection are
shown in the instrument cluster display with the number of miles (km) and days remaining until service
is due.
Service event
For vehicles without text messages, a warning chime sounds when the ignition is switched on, and a
flashing wrench symbol is displayed for several seconds when service is due. For vehicles with
text messages, Oil change now! or Inspection now! is shown in the instrument cluster display.
Viewing service message
The current service message can be accessed when the ignition is switched on, the engine is
switched off, and the vehicle is stopped:
For vehicles without text messages: Push the button in the instrument cluster several times
until the wrench symbol appears.
For vehicles with text messages: Select the Settings menu.
In the Service submenu, select the Info menu item.
A minus sign in front of the number of miles (kilometers) or days means that service is overdue.
Resetting the oil change service reminder
If the service was not performed by an authorized Volkswagen dealer or an authorized Volkswagen
Service Facility, the oil change service reminder can be reset as follows:
Vehicles with Premium display:
1. Switch off the ignition.
2. Press and hold the . button in the instrument cluster.
3. Switch on the ignition.
4. Release the . button.
5. A confirmation message appears in the display. Confirm request with
the in the windshield wiper lever or the button on the multi-
function steering wheel.
Page: 19
Vehicles with Basic display:
1. Switch off the ignition.
2. Push the . button in the instrument cluster and hold down.
3. Switch on the ignition.
4. Release the . button and push the button in the instru-
ment cluster within about 20 seconds.
Resetting the inspection service reminder
If the service was not performed by an authorized Volkswagen dealer or an authorized Volkswagen
Service Facility, the inspection service reminder can be reset as follows:
Vehicles with Premium display:
1. Switch off the ignition.
2. Switch on the emergency flashers.
3. Press and hold the . button in the instrument cluster.
4. Switch on the ignition.
5. Release the . button.
6. A confirmation message appears in the display. Confirm request with
the in the windshield wiper lever or the button on the multi-
function steering wheel.
7. Switch off the emergency flashers.
Vehicles with Basic display:
1. Switch off the ignition.
2. Switch on the emergency flashers.
3. Push the . button in the instrument cluster and hold down.
4. Switch on the ignition.
5. Release the . button and push the button in the instru-
ment cluster within about 20 seconds.
Page: 20
Vehicles with Basic display:
6. Switch off the emergency flashers.
Do not reset the service reminder between service intervals; otherwise incorrect information will
be displayed.
The service reminder disappears after a few seconds or after the button on the wind-
shield wiper lever or the button on the multi-function steering wheel has been pushed.
Page: 21
Volkswagen Information System
Introduction
In this section you’ll find information about:
Using the instrument cluster menus: Basic version
Using the instrument cluster menus: Premium version with multi-function steering wheel
Using the instrument cluster menus: Premium version without multi-function steering wheel
Menu structure – overview: Basic version
Menu structure – overview: Basic version
Menu structure – overview: Premium version
Menu structure – overview: Premium version
Main menus: Premium version
MFI menu (Multi-Function Indicator): Premium version
Settings menu
Settings menu
Convenience sub-menu
Lights and Vision sub-menu
When the ignition is switched on, you can display different types of information in the instrument
cluster. The menu options vary depending on whether you have a Basic or Premium version of the
Volkswagen Information System. With the Premium instrument cluster display, you can also control
certain vehicle features.
Buttons on the windshield wiper lever operate the menus for Basic instrument cluster. The Premium
version has control buttons on the right side of the multi-function steering wheel.
The number of menus in the instrument cluster display depends on the electronics and equipment on
the vehicle.
An authorized Volkswagen dealer or an authorized Volkswagen Service Facility may be able to add or
modify functions depending on your vehicle’s equipment.
Some menu items can only be accessed when the vehicle is not moving.
As long as a priority 1 warning message is displayed, no menus can be accessed on vehicles with the
Premium instrument cluster. In order to display menus, acknowledge the warning by pressing the OK
button on the multi-function steering wheel.
More information:
Outside mirrors
Driver assistance systems
Radio or navigation system ⇒Booklet Radio or ⇒Chapter Navigation System
Mobile phone package ⇒Booklet Mobile phone package
WARNING
Driving on today’s roads demands the full attention of the driver at all times. Driver distrac-
tion causes accidents, collisions and serious personal injury!
Never access menus when the vehicle is moving.
Page: 22
Emergency starting and starting the engine with a very weak vehicle battery or after the vehicle
battery has been replaced may change or delete system settings (including time, date, personal con-
venience settings and programming). Check the settings and correct as necessary once the vehicle
battery has built up a sufficient charge.
Using the instrument cluster menus: Basic version
Fig. 16 Basic version (vehicles without menu control multi-function steering wheel): Control buttons 1 and 2
on the windshield wiper lever.
Please first read and note the introductory information and heed the WARNINGS
In the Basic version, the instrument cluster displays are controlled by the OK/RESET button and the
TRIP rocker switch on the windshield wiper lever (⇒fig. 16 (1) and (2)).
Switch on the ignition. The instrument cluster display is divided into 3 parts. The time (digital clock) is
displayed in the top part. The bottom part contains the odometer and the trip odometer “trip”. The
display in the middle part is selected by pushing the TRIP rocker switch (2) on the end of the wind-
shield wiper lever.
The available displays are as follows:
Fuel range estimate (estimated distance you can drive with the fuel remaining in the tank).
Trip memory 1 (single trip memory) and trip memory 2 (total trip memory).
▪ Push the OK/RESET button (1) on the windshield wiper lever to toggle between trip memories 1
and 2.
▪ Push and hold the OK/RESET button to reset a trip memory to 0.
▪ The function of the 2 trip memories is explained in ⇒ MFI menu (Multi-Function Indicator): Premi-
um version. The 2 trip memories are in addition to the trip odometer, which is displayed in the bot-
tom part of the instrument cluster and controlled using the 0.0/SET button on the right of the in-
strument panel ⇒fig. 11, ⇒fig. 12.
ø — mph (ø — km/h) shows the average speed on trips per trip memories 1 and 2.
▪ Push the OK/RESET button on the windshield wiper lever to toggle between the 2 average speed
figures.
— mph ( — km/h) or xx mph (xx km/h). Use this menu to set or disable the speed warning
feature.
▪ Push the OK/RESET button to toggle between — mph (— km/h) (speed warning disabled) and xx
mph (xx km/h).
▪ A warning chime will sound you if you reach the set speed; there may also be a visual message.
▪ The set speed will blink for a few seconds after you toggle to xx mph (xx km/h).
▪ Press the TRIP rocker switch (2) while the set speed is flashing to increase or decrease the speed.
Page: 23
Outside temperature.
Travel time since last reset of trip memories 1 and 2.
▪ Push the OK/RESET button to toggle between the 2 time figures.
— mpg (l/100 km) current fuel consumption.
ø — mpg (ø l/100 km) average fuel consumption of trips per trip memories 1 and 2.
▪ Push the OK/RESET button to toggle between the 2 figures.
Using the instrument cluster menus: Premium version with multi-
function steering wheel
Fig. 17 Premium version (vehicles with menu control multi-function steering wheel): Buttons on the right side
of the steering wheel.
Please first read and note the introductory information and heed the WARNINGS
On vehicles with menu control multi-function steering wheels (Premium version), the instrument cluster
menus are controlled with buttons on the right side of the steering wheel ⇒fig. 17.
Accessing the instrument cluster menus
Switch on the ignition. You will see the vehicle icon or a message in the instrument cluster display.
Push the OK button ⇒fig. 17 on the right side of the multi-function steering wheel until a main
menu appears in the instrument cluster display. For a list of main menus, see ⇒ Menu structure –
overview: Premium version, ⇒ Menu structure – overview: Premium version.
Push buttons # or ∃ to move to another main menu, and push the arrow up and down buttons
and to navigate inside the current main menu. For example, in the Settings main menu, press
the arrow down button to navigate to the MFI data sub-menu.
Displaying sub-items
Press the OK button ⇒fig. 17 to display sub-items located behind the items in a menu. For in-
stance, after scrolling to MFI data in the Settings main menu, press the OK button to display the
various MFI data sub-items (Travel time, curr. consum., etc.).
Selecting a setting
Some menus are used to select settings for certain features. Push the OK button (⇒fig. 17) to
select a setting. For example, the 2 settings under Mirror adjust (Settings > Convenience > Mirror
adjust) are Individually and Both mirrors. After navigating to these items, use the arrow up
and down buttons to highlight one and then push the OK button to select this setting.
Page: 24
Returning to the higher menu level
Use the arrow down button to select Back and then press the OK button or use the back arrow
button (⇒fig. 17) .
Using the instrument cluster menus: Premium version without multi-
function steering wheel
Fig. 18 Premium version (vehicles without menu control multi-function steering wheel): Control buttons 1 and
2 on the windshield wiper lever.
Please first read and note the introductory information and heed the WARNINGS
Your vehicle may be equipped with a premium instrument cluster in combination with a leather steer-
ing wheel without multi-function controls. In this case the instrument cluster menus are controlled with
buttons on the windshield wiper lever ⇒fig. 18.
Accessing the instrument cluster menus
Switch on the ignition. You will see the vehicle icon or a message in the instrument cluster display.
Push the OK/RESET button (1) on the windshield wiper lever until a main menu appears in the
instrument cluster display. For a list of main menus, see ⇒Menu structure – overview: Premium ver-
sion, ⇒Menu structure – overview: Premium version
Push and hold the middle part of the TRIP button (2) to move to another main menu. Then press
the upper or the lower part of the TRIP button (2) to navigate inside the current main menu. For
example, in the Settings main menu, press the middle part of the button to navigate to the MFI
data submenu.
Displaying sub-items
Push the OK/RESET button (1) to display sub-items located behind the items in a menu. For
instance, after scrolling to MFI data in the Settings main menu, press the OK/RESET button (1)
to display the various MFI data sub-items (Travel time, curr. consum., etc.).
Selecting a setting
Some menus are used to select settings for certain features:
Push the OK/RESET button (1) to select a setting. For example, the 2 settings under Mirror
adjust (Settings > Convenience > Mirror adjust) are Individually and Both mirrors. After
navigating to one of these items, push the OK/RESET button (1) to select this setting.
Returning to the higher menu level
Push and hold the middle part of the TRIP button (2) .
Page: 25
Menu structure – overview: Basic version
Please first read and note the introductory information and heed the WARNINGS
The instrument cluster display is divided into 3 parts. The time (digital clock) is displayed in the top
part. The bottom part contains the odometer and the trip odometer “trip”. You can select the following
displays for the middle part:
xx miles (fuel range estimate)
xx miles (trip memory 1 and 2)
ø — mph (average speed)
xx mph (current speed)
(speed warning)
—° F (outside temperature)
(travel time 1 and 2)
— mpg (current fuel consumption)
ø — mpg (average fuel consumption)
Menu structure – overview: Premium version
Please first read and note the introductory information and heed the WARNINGS
The instrument cluster display is divided into 3 parts. The time (digital clock) is displayed in the top
part. The bottom part contains the odometer and the trip odometer “trip”. You can select the following
displays for the middle part:
Multi-Function Indicator (MFI)
▪ Travel time
▪ Consumption —.- mpg (current fuel consumption)
▪ Av. consumption —.- mpg (average fuel consumption)
▪ Range
▪ Route
▪ Average speed
▪ — mph (digital speed display)
▪ Speed warning — mph
Audio ⇒Booklet Radio or ⇒Booklet Navigation system
Navigation ⇒Booklet Navigation system
Phone ⇒Booklet Mobile phone package
Assistants
▪ AFS
Vehicle status
Settings
▪ Language
▪ MFI data
– Travel time
– Curr. consum. (current fuel consumption)
– Av. consum. (average fuel consumption)
– Route
– Av. speed (average speed)
Page: 26
– Digital speed display
– Speed warn. (speed warning)
– Back
▪ Convenience
– ATA confirm
– Central locking
Auto unlock
Unlock doors
– Window op. (Window operation)
Off
All
Driver
Back
– Mirror adjust
Individually
Both mirrors
Mirror down (vehicles with memory seats)
Back
– Factory setting
▪ Lights / Vision
– Coming home
– Leaving home
– Footwell light
– Conv. turn sig. (convenience turn signal)
– Factory setting
– Back
▪ Time
– Hours
– Minutes
– 24 hr. mode
– Daylight save
– Back
▪ Snow tires (winter tires)
– On
– + 5 mph
– — 5 mph
– Back
▪ Compass (vehicles without navigation system)
– Zone
– Calibrate
– Back
▪ Units
– Temperature
– Consump./ dist.
– Back
▪ Tire pressure
– Store
Page: 27
– Back
▪ Service
– Info
– Back
▪ Factory setting
Main menus: Premium version
Please first read and note the introductory information and heed the WARNINGS
There are 6 main menus:
Main menus Function See
MFI Multi-Function Indicator (MFI) information.
Audio
Station indicator in radio mode.
Track display in CD mode.
Track display in media mode.
⇒Booklet Radio or
⇒Booklet Navigation
system
Navigation
Information displays on the navigation system:
When destination guidance is active, turn arrows and
proximity bars are shown. The illustration is similar to the
symbol display in the navigation system.
If destination guidance is inactive, driving direction
(compass function) and the current street name are
displayed.
⇒Booklet Navigation
system
Phone Information and settings of the mobile phone package.
⇒Booklet Mobile
Phone Package
Assistants
Turn the Adaptive Front Lighting System (AFS) on and off
(if applicable).
Vehicle
status
Current warning and information messages.
This menu item is only displayed when warning or
information messages are available. The number of
available messages is shown in the display. Example: 1/1
or 2/2.
Settings
Includes the Convenience and Lights & Vision sub-menus,
as well as many settings such as time, speed warning for
winter tires, language, units and “Display OFF”.
MFI menu (Multi-Function Indicator): Premium version
Please first read and note the introductory information and heed the WARNINGS
Page: 28
The MFI menu has 2 automatic trip memories: 1 – single trip memory and 2 – total trip memory.
The number of the memory is shown at the upper right of the display. The trip memories are in
addition to the trip odometer, which is displayed in the bottom part of the instrument cluster and
controlled using the 0.0/SET button on the right of the instrument panel ⇒fig. 11 (4), ⇒fig. 12 (4).
To display the distance driven on trips 1 and 2, select the Route item in the MFI menu (MFI >
Route). Press the OK button (⇒fig. 17) to toggle between Route 1 and Route 2 (trip 1 and trip 2).
Push and hold the OK button to manually reset a trip memory to 0.
1
Single trip
memory
The memory accumulates and stores information about distance driven and
fuel used from the time the ignition was switched on until the time it was
switched off.
If the ignition stays off for 2 hours or more, stored information is automatically
deleted. If the trip is continued within 2 hours after the ignition was switched
off, the new values are added.
2
Total trip
memory
The memory displays and stores the accumulated driving and fuel
consumption data of any number of single trips up to a total driving time of
99 hours and 59 minutes, and up to a total distance of 9999 miles (9999 km),
depending on the instrument cluster version. If one of the maximum values is
exceeded, then the memory is automatically cleared and starts again from 0.
Possible MFI menu displays
The following displays can be accessed in the MFI menu if enabled under Settings > MFI data.
Displays that are not enabled will not appear.
Display Function
Travel time Driving time in hours (h) and minutes (min) corresponding to trip
memories 1 and 2 (toggle).
Consumption
—.- mpg
Current fuel consumption in miles per gallon (l/100 km) while driving.
When units are set to miles, dashes appear instead of a number when
the engine is running and the vehicle is standing still.
When units are set to kilometers, the display shows liters consumed
per hour when the engine is running and the vehicle is standing still.
Consumption
—.- l/100 km
Av. consumption
—.- mpg
Average fuel consumption in miles per gallon (l/100 km) on trips per trip
memories 1 and 2 (toggle) is displayed once the vehicle has been
driven about 330 feet (100 m). Until then, dashes appear instead of a
number. The value displayed is updated every 5 seconds.
Av. consumption
—.- l/100 km
Range — mi Estimated distance in miles (km) that the vehicle can go with the fuel
left in the tank the way you are currently driving. Takes account of the
current fuel consumption, among other things.
Range — km
Route — mi Distance driven in miles (km) per trip memories 1 and 2 (toggle).
Route — km
Page: 29
Display Function
Average speed
— mph
Average speed on trips per trip memories 1 and 2 (toggle). Displayed
once the vehicle has been driven about 300 feet (100 m). Until then,
dashes may appear instead of a number. The value displayed is
updated every 5 seconds.
Average speed
— km/h
— mph Digital display of the current vehicle speed.
— km/h
Speed warning
— mph
When the set speed (from 20–155 mph or 30–250 km/h) is exceeded,
an acoustic warning sounds and a visual message may also appear in
the instrument cluster display.
Speed warning
— km/h
Switching between the displays
Use the arrow up and down buttons ( and ) on the multi-function steering wheel.
Storing speed for the speed warning
Navigate to MFI > Speed warning (Speed warning — mph or Speed warning — km/h)
display.
Press the button to save the current speed and to activate the warning.
If the speed is not right, press buttons or on the multi-function steering wheel to set a
different speed within about 5 seconds. Then press the button a second time or just wait a few
seconds. The speed is saved and the warning is activated.
To deactivate, toggle to — mph or — km/h and press the button. The set speed is deleted.
Manually erasing trip memory 1 or 2
Navigate to MFI > Route.
Select the memory to be erased.
Press the button for about 2 seconds.
Enabling and disabling displays
Use the Settings menu, submenu MFI data (Settings > MFI data) to enable displays you want to
be available under the MFI menu in the instrument cluster display. The units in which data is displayed
can also be changed ⇒ Settings menu
Settings menu
Please first read and note the introductory information and heed the WARNINGS
Settings menu Function
Language Set language for messages in the display and navigation system.
Page: 30
Settings menu Function
MFI Data Enable the features you want to be available under the MFI menu in the
instrument cluster display
Compass Calibrating the compass on vehicles without a factory-installed navigation
system. To calibrate, follow instructions in the instrument cluster display
Convenience Convenience function settings
Lights &
Vision
Vehicle lighting settings
Time Set hours and minutes for the instrument cluster clock and in the Radio
Navigation System clock. The digital clocks can be set to show the time in 12
or 24 hour format. Resetting clocks to daylight savings time or standard time.
Snow tires Set up visual and acoustic speed warning. Use the feature only when winter
tires are installed that have a speed rating less than top vehicle speed.
Units Set units for temperature, fuel consumption and distances should be displayed
(for example, whether to show distance driven in miles or kilometers).
Tire pressure Reset the tire pressure, for example after replacing tires.
Service Display service messages or reset service interval display.
Factory
setting
Resets the functions in the Settings menu to the default factory settings.
Convenience sub-menu
Please first read and note the introductory information and heed the WARNINGS
Convenience
menu
Function
ATA confirm
The horn beeps once when the vehicle is locked with the remote control vehicle
key if ATA confirm is checked
Central
locking
⇒page 53
Auto unlock
You can enable or disable Auto unlock. If Auto unlock is
enabled (box checked), the doors automatically unlock when
you switch off the ignition and open a door from inside the
vehicle. On vehicles with automatic transmission, the doors
will also unlock when the selector lever is in Park (P) or the
ignition is switched off.
Auto unlock works only if the vehicle has been automatically
locked after reaching a speed of 10 mph (15 km/h) ⇒page 53.
It unlocks the doors that would be unlocked if you pushed the
unlock button on the remote control vehicle key once.
Page: 31
Convenience
menu
Function
Unlock doors
Doors are unlocked as follows depending on the option
selected:
– All doors: Pushing the unlock button on the remote
control vehicle key, unlocks all doors and the rear hatch.
– Single door: Pushing the unlock button on the remote
control vehicle key unlocks only the driver door. To unlock all
doors and the rear hatch, push the unlock button on the
key a second time within about 5 seconds.
On vehicles with Keyless Access, touching the sensor surface
of the door handle on the side where the valid vehicle key is
located unlocks the respective door.
– Vehicle side: Pushing the unlock button on the
remote control vehicle key unlocks the doors on the driver
side of the vehicle. On vehicles with Keyless Access touching
the sensor surface of a door handle on the side where the
valid remote control vehicle key is located unlocks the doors
on that side of the vehicle
Window op.
Off
Manual unlocking/locking: No windows open or close when
the key is held in the unlocking or locking position
Keyless Access: No windows close when the locking sensor
on the door handle is pressed and held (convenience closing)
All
Manual unlocking/locking: All windows open or close when
the key is held in the unlocking or locking position.
Keyless Access: All windows close when the locking sensor
on the door handle is pressed and held.
Driver
Manual unlocking: The driver window opens when the key is
held in the unlocking position.
Manual locking: All windows close when the key is held in the
locking position.
Keyless Access: All windows close when the locking sensor
on the door handle is pressed and held.
Back The display switches back to the Convenience menu.
Mirror down
Tilts passenger mirror down when backing up so you can see the curb. Feature
only available on vehicles equipped with memory seats.
Mirror adjust
Individually Both outside mirrors are adjusted separately.
Both mirrors
The front passenger outside mirror is adjusted at the same
time as the driver outside mirror.
Back The display returns to the Convenience menu.
Factory
setting
Resets certain features in the Convenience sub-menu to the factory settings.
Back The display switches back to the Settings menu.
Page: 32
Lights and Vision sub-menu
Please first read and note the introductory information and heed the WARNINGS
Lights &
Vision menu
Function
Coming home Set how long the headlights and inside lights stay on after locking or unlocking
the vehicle. Feature can also be switched on or off
Leaving home
Footwell light Set footwell lighting brightness when the doors are open.
Conv. turn
sig.
Enable/disable lane change flash (convenience turn signal). When the feature
is enabled, the turn signal flashes at least 3 times when the turn signal is
tapped
Factory
setting
Resets the functions in the Light & Vision sub-menu back to the factory
settings.
Back The display switches back to the Settings menu.
Page: 33
Volkswagen Car-Net: Connecting you and your
vehicle
Introduction
In this section you’ll find information about:
Volkswagen Car-Net service
Features
Application software (“apps”)
3-button module
Volkswagen Car-Net services are provided by Verizon Telematics, Inc. (VzT) and are available only on
select models. Automatic Crash Notification (ACN) may be engaged for up to 6 months without
activating a trial or paid subscription; Manual Emergency Call service and all other Volkswagen Car-
Net services require a trial or paid subscription. Volkswagen Car-Net may collect location information.
See applicable Terms of Service and Privacy Policy available at www.vw.com/carnet for details.
Data Collection and Privacy
Vehicle location information is transmitted to Volkswagen and our Volkswagen Car-Net service
provider, Verizon Telematics, Inc. (VzT), anytime you press a Volkswagen Car-Net in-car button, when
an ACN event occurs or periodically in connection with the operation of Volkswagen Car-Net.
Unless Volkswagen Car-Net equipment is disabled in the vehicle, it is possible for Volkswagen and
VzT to determine the car’s location if required to do so by law, court order, subpoena or other legal
requirement. For more information, please contact the Volkswagen Car-Net Response Center at 1-
877-820-2290.
Calls may be monitored or recorded.
Volkswagen collects, processes, transmits, uses and shares information about you and your vehicle in
accordance with the Volkswagen Car-Net Terms of Service and Privacy Policy. See the Volkswagen
Car-Net Terms of Service and Privacy Policy at (http://www.vw.com/carnet) for more details.
More information:
Declaration of Compliance
WARNING
Application software and Volkswagen Car-Net services that are unsuitable or improperly
used can cause accidents, serious personal injury and vehicle damage.
Volkswagen Car-Net services can be used only where adequate cellular and GPS signals
are available
Volkswagen recommends using only services and application software that are provided
by Volkswagen or Verizon Telematics, Inc. (VzT) specifically for your vehicle.
Protect the mobile device and its application software from misuse.
Never modify application software and Volkswagen Car-Net services.
Always read and heed the operating instructions for the mobile device.
Page: 34
WARNING
Driver distraction causes accidents, collisions and serious personal injury! Using application
software and Volkswagen Car-Net services while driving can distract the driver from traffic.
Always drive attentively and responsibly.
Volkswagen Car-Net service
Please first read and note the introductory information and heed the WARNINGS
Your vehicle has equipment to enable Volkswagen Car-Net, a suite of connected vehicle services that
makes driving and owning a Volkswagen vehicle more convenient. Volkswagen Car-Net allows you to
seamlessly connect your car and your life by offering the following services:
Safe & Secure – Receive support and assistance in the moment of need.
Family Guardian – Keep track of family members driving your vehicle.
Remote Vehicle Access – Interact with your vehicle through your Volkswagen Car-Net iPhone®
or
Android®
app, computer or a Volkswagen Car-Net Customer Specialist (text and data rates apply).
Diagnostics & Maintenance – Manage your vehicle health with diagnostic checks and service
scheduling.
You can access Volkswagen Car-Net services via your Volkswagen Car-Net iPhone®
or Android®
app
(text and data rates apply) and the Volkswagen Car-Net website (http://www.vw.com/carnet). If you
have a question or would like to subscribe, please either press the • button in your vehicle or contact
the Volkswagen Car-Net Response Center at 1-877-820-2290. For more information or to log on to
your Volkswagen Car-Net account, visit http://www.vw.com/carnet.
Note: Please review the Volkswagen Car-Net Terms of Service and Privacy Policy at
http://www.vw.com/carnet.
Subscription required
Automatic Crash Notification (ACN) may be engaged for up to 6 months, starting from the date of new
vehicle sale, without activating a trial or paid subscription.
The Manual Emergency Call service and all other Volkswagen Car-Net features require a trial or paid
subscription. To begin your trial or paid subscription, authentication and activation are required. For
more information, please visit the website (http://www.vw.com/carnet), press the • button in the 3-
button module in your vehicle or contact the Volkswagen Car-Net Response Center at 1-877-820-
2290.
The LED light in the 3-button module will be green during the trial period and whenever you have an
active subscription. The LED light will go off if the trial period is over and the customer has not
subscribed to the Volkswagen Car-Net services. The LED light will be red only during a VW Car-Net
hardware malfunction or fault ⇒ 3-button module.
Once a trial or paid Volkswagen Car-Net subscription has been activated, please advise all who
use the vehicle that different kinds of data can be sent and received automatically by the
vehicle, including speed, location and more.
Page: 35
WARNING
Vehicle health reports do not replace the information provided by the vehicle warning and
indicator lights. Failure to heed warning lights and instrument cluster text messages can
cause the vehicle to break down in traffic and result in a collision and serious personal injury.
Never ignore warning lights or text WARNINGS.
Always stop the vehicle as soon as it is safe to do so.
Park the vehicle at a safe distance from moving traffic and where no part of the hot
catalytic converter and exhaust system can come into contact with flammable materials
under the vehicle, such as dry grass, brush, spilled fuel, etc.
A broken down vehicle presents a high accident risk for itself and others. Switch on
emergency flashers and set up a warning triangle to warn oncoming traffic.
Before opening the engine hood, always switch off the engine and let the engine cool
down.
Always be very careful when working in the engine compartment, which is a potentially
dangerous area in any motor vehicle and can cause serious personal injury.
NOTICE
Failure to heed warning lights or text WARNINGS can result in vehicle damage.
Volkswagen collects, processes, transmits, uses and shares information about you and your
vehicle in accordance with the Volkswagen Car-Net Terms of Service and Privacy Policy. See the
Volkswagen Car-Net Terms of Service and Privacy Policy at http://www.vw.com/carnet for more
details.
Volkswagen Car-Net services use a system based on a wireless communication network. If all
technical and other conditions are met and Volkswagen Car-Net still does not work properly, please try
using the service again later.
Features
Please first read and note the introductory information and heed the WARNINGS
The following listed features are available after Volkswagen Car-Net registration either through the 3-
button module ⇒ 3-button module, a mobile device ⇒ Application software (“apps”), the Volkswagen
Car-Net website (http://www.vw.com/carnet) or by contacting the Volkswagen Car-Net Response
Center at 1-877-820-2290. They are divided into 4 categories: Safe & Secure, Family Guardian,
Remote Vehicle Access and Diagnostics & Maintenance Services. Always refer to the Volkswagen
Car-Net website for the most up-to-date information regarding Volkswagen Car-Net services.
Safe & Secure:
Feature Description
Page: 36
Safe & Secure:
Feature Description
Automatic Crash
Notification (ACN)
Automatic Crash Notification is initiated in the event of airbag deployment or
rollover. When the feature is activated the Volkswagen Car-Net Response
Center is notified of your location and contacts your vehicle to determine the
risk of injury and to dispatch help. Help is dispatched even if the Volkswagen
Car-Net Response Center does not connect to the vehicle’s occupants.
Automatic Crash Notification may be engaged for up to 6 months without
activating a trial or paid subscription.
Manual Emergency
Call
In the case of an emergency, press the • button in the 3-button module: The
Volkswagen Car-Net device initiates a connection to the Volkswagen Car-Net
Response Center. The location of the vehicle and customer data for
identification is sent at the same time.
Roadside
Assistance
Press the button in the 3-button module: The vehicle will connect directly
to the Volkswagen Roadside Assistance Call Center. The vehicle’s location is
also transmitted in order to more quickly provide assistance.
Stolen Vehicle
Location
Assistance
For use by law
enforcement
authorities only.
See Terms of
Service at
www.vw.com/carnet
for details.
After you have reported your vehicle as stolen to law enforcement, you may
provide the case information to the Volkswagen Car-Net Response Center.
Once the information has been verified, the VW Car-Net Customer Specialist
will be able to provide law enforcement with vehicle location data sent by the
VW Car-Net module.
Family Guardian:
Feature Description
Boundary Alert
By logging on to your Volkswagen Car-Net account, you can designate an area
on a map as a “virtual fence.” The vehicle owner can then choose notification
channels (text message or email) for receiving alerts when the vehicle crosses
the defined boundary (texts and data rates apply).
Speed Alert
Volkswagen Car-Net can be configured to inform the vehicle owner whenever
the vehicle exceeds a speed set by the owner. The owner can select to be
informed through multiple channels, including text messages and email (text
and data rates apply).
Remote Vehicle Access:
Feature Description
Page: 37
Remote Vehicle Access:
Feature Description
Remote Door
Unlock
You can send a request to unlock the vehicle doors through your Volkswagen
Car-Net iPhone®
or Android®
app, the Volkswagen Car-Net website or by
calling the Volkswagen Car-Net Response Center (text and data rates apply). If
none of the vehicle doors are opened within about 30 seconds, the car will lock
again.
Remote Honk and
Flash
You can send a honk and flash signal to the car using the Volkswagen Car-Net
website or the VW Car-Net iPhone®
or Android®
app (text and data rates apply).
The car will honk the horn and blink the headlights and emergency flashers for
up to 10 seconds.
Last Parked
Location
You can locate your last parked location using your Volkswagen Car-Net
iPhone®
or Android®
app (text and data rates apply).
Destinations
Only applicable for
vehicles equipped
with a factory-
installed
navigation system.
Points of Interest (POIs) or other destinations can be imported remotely into the
factory-installed navigation system (if equipped) from a computer or the
Volkswagen Car-Net iPhone®
or Android®
app (text and data rates apply).
These destinations can be called up and used by the navigation system.
Destination
Download
Only applicable for
vehicles equipped
with a factory-
installed
navigation system.
Press the • button in the 3-button module: The vehicle will connect directly to
the Volkswagen Car-Net Response Center where a Volkswagen Car-Net
Customer Specialist will assist with destinations. The address of a dealer’s
location can also be sent by the Customer Specialist to your factory-installed
navigation system (if equipped).
Remote Status
Check
Current information about the vehicle can be viewed through a computer or
your Volkswagen Car-Net iPhone®
or Android®
app (text and data rates apply).
You can find out if the doors, luggage compartment and engine hood are open
or closed, whether the car lights are on or off, the level of fuel in the tank, when
the vehicle needs to be serviced next and more.
Diagnostics & Maintenance:
Feature Description
Dealer Scheduling
Press the • button in the 3-button module: The vehicle will initiate a call to the
Volkswagen Car-Net Response Center where a Volkswagen Car-Net Customer
Specialist will connect you with an authorized Volkswagen dealer to schedule
your service appointment. The address of the dealer’s location can also be sent
by the Customer Specialist to your factory-installed navigation system (if
equipped).
Vehicle Health
Report
View a vehicle health report to proactively manage maintenance and other
services and to receive up-to-date diagnostics in a monthly email report or by
immediate request.
Page: 38
WARNING
Refer to your vehicle’s warning and indicator lights for the most current diagnostic
information. Always consult this manual for maintenance guidelines. Failure to heed warning
lights and instrument cluster text messages can cause the vehicle to break down in traffic
and result in a collision and serious personal injury.
Never ignore warning lights or text WARNINGS.
Always stop the vehicle as soon as it is safe to do so.
Park the vehicle at a safe distance from moving traffic and where no part of the hot
catalytic converter and exhaust system can come into contact with flammable materials
under the vehicle, such as dry grass, brush, spilled fuel, etc.
A broken down vehicle presents a high accident risk for itself and others. Switch on
emergency flashers and set up a warning triangle to warn oncoming traffic.
The Volkswagen Car-Net website (http:// www.vw.com/carnet) contains the most up-to-date
information and instructions about Volkswagen Car-Net services.
Please regularly visit the website to learn about changes to services and new features.
Volkswagen Car-Net features can be modified, discontinued, deactivated, reactivated or expanded
without any further notice.
Application software (“apps”)
Please first read and note the introductory information and heed the WARNINGS
Many mobile devices are equipped to load application software (“apps”) into the device. Apps can
make it possible to display additional information on the factory-installed Radio or Navigation system
or activate, control or deactivate specific vehicle features.
Application software, its usage and the wireless connection required to use application software may
be billable services. Apps may be provided by third parties. Therefore you should refer to the terms of
use and privacy statements associated with the apps for information about how the apps collect, use
and share information about you, your vehicle or your mobile device.
The application software provided may be designed to be used for a variety of purposes and be
specific to your vehicle and country ⇒ . The content, range of software provided and application
software provider can vary. Some application software is also subject to the availability of services
provided by third parties. In order for some application software to work, wireless service reception
must be strong enough to handle the data exchange involved (text and data rates apply).
Application software descriptions may be provided by the service provider.
Due to the multitude of mobile devices and fast pace of software development, the application
software provided may not run on all mobile devices and their operating systems. This may even apply
for the same model of a mobile device. For example, application software may run on version 2 of the
device’s operating system but not on version 3.
Application software can be modified, discontinued, deactivated, reactivated or expanded without any
further notice.
In order for some application software to work, the wireless or cable connection between the factory-
installed Radio or Navigation system and a compatible, functioning mobile device must be strong
enough and uninterrupted.
Page: 39
NOTICE
Volkswagen is not responsible for vehicle damage caused by inferior-quality or malicious
application software, poorly programmed application software, insufficient wireless service
reception, data loss during transmission or misuse of mobile devices.
3-button module
Fig. 19 In the roof console: 3-button module to access Volkswagen Car-Net service operators
Please first read and note the introductory information and heed the WARNINGS
The buttons in the 3-button module provide access to several Volkswagen Car-Net features and
pressing a button will initiate a connection to the Volkswagen Car-Net Response Center. Calls may be
monitored or recorded. In general, the Volkswagen Car-Net Customer Specialist will end the call.
⇒fig. 19 Function
•
Press and hold for longer than 2 seconds: Connects to the Volkswagen Car-Net
Response Center and a Volkswagen Car-Net Customer Specialist.
Press again: End the call.
Press and hold for longer than 2 seconds: Assistance in the event of a breakdown by
connecting to the Volkswagen Roadside Provider.
Press again: End the call.
•
Press and hold for longer than 2 seconds: Activate emergency call.
Press again: End the call.
LED light in the 3-button module
The LED light in the 3-button module will be green during the trial period and whenever you have an
active subscription. The LED light will go off if the trial period is over and the customer has not
subscribed to the Volkswagen Car-Net Services. The LED light will be red only during a VW Car-Net
hardware malfunction or fault.
Page: 40
WARNING
Application software and Volkswagen Car-Net services that are unsuitable or improperly
used can cause accidents, serious personal injury and vehicle damage.
Volkswagen Car-Net services can be used only where adequate cellular and GPS signals
are available
Volkswagen recommends using only services and application software that are provided
by Volkswagen or Verizon Telematics, Inc. (VzT) specifically for your vehicle.
Protect the mobile device and its application software from misuse.
Never modify application software and Volkswagen Car-Net services.
Always read and heed the operating instructions for the mobile device.
WARNING
Driver distraction causes accidents, collisions and serious personal injury! Using application
software and Volkswagen Car-Net services while driving can distract the driver from traffic.
Always drive attentively and responsibly.
NOTICE
The system does not support simultaneous Volkswagen Car-Net and mobile phone calls via
the mobile phone package.
When a Volkswagen Car-Net service is accessed through the 3-button module call buttons
any calls on a mobile device connected to the vehicle’s mobile phone package will be
automatically disconnected.
Initiating or accepting a call on a mobile device connected to the vehicle’s mobile phone
package could end any connection to the Volkswagen Car-Net Response Center made through
the •, or • buttons.
Calls on a mobile device connected to the vehicle’s mobile phone package cannot be
accepted or initiated during an automated emergency connection to the Volkswagen Car-Net
Response Center; for example, because an airbag has deployed.
Page: 41
Driving checklists and warnings
Introduction
In this section you’ll find information about:
Getting ready and driving safely
Driving in other countries
Driving through water on roads
More information:
Sitting properly and safely
Transporting
Starting, shifting, parking
Saving fuel and helping the environment
Consumer information
WARNING
Driving under the influence of alcohol, illegal drugs, narcotics and some medications may
cause collisions and other accidents, severe personal injuries and even death.
Alcohol, illegal drugs, narcotics and some medications may severely affect perception,
reaction times and safe driving, which may result in the loss of vehicle control.
Getting ready and driving safely
Please first read and note the introductory information and heed the WARNINGS
Checklist
Observe the following points before and during every drive for your own safety, the safety of all
passengers and others ⇒ :
Check proper function of lights and turn signals.
Check tire pressure (⇒Tires and wheels) and fuel level (⇒Refueling).
Make sure that all windows are clean.
Make sure that the engine is not covered by blankets or other materials and that the engine air
intake is free of obstacles.
Store items and all luggage safely in the storage compartments, in the luggage compartment and,
where applicable, on the roof ⇒ Transporting.
Always make sure that nothing keeps the pedals from moving freely.
Make sure that children are properly secured by a restraint system appropriate for their size and
weight ⇒ Child safety and child restraints.
Properly adjust front seats, all head restraints and mirrors to the correct height ⇒ Adjusting the
seating position.
Wear shoes that give your feet a good grip and that give you a feel for the pedals.
Page: 42
Make sure that the floormat on the driver side is properly fastened and cannot interfere with the
pedals.
Assume a proper seating position before the vehicle starts to move and keep this position while
driving. Make sure that all passengers do the same ⇒ Adjusting the seating position.
Properly fasten your safety belt before driving the vehicle and wear your safety belt properly at all
times while driving. Make sure that all passengers do the same ⇒ Safety belts.
Only transport as many passengers as there are seats and safety belts available.
Never drive if your driving ability has been impaired, for example, by medication, alcohol, or illegal
drugs.
Never let passengers or phone calls distract you while driving and never take your attention off the
road while using vehicle software or adjusting vehicle equipment or accessories.
Always adapt your speed and driving style to visibility, weather, road, and traffic conditions.
Always obey traffic laws and speed limits.
On long trips make frequent rest stops – at least once every 2 hours.
Secure animals in the vehicle with a system that corresponds to their weight and size.
WARNING
Always observe traffic rules and posted speed limits and use common sense. Your good
judgment can mean the difference between arriving safely at your destination and being
seriously injured in a crash or other kind of accident.
Regular service and maintenance of your vehicle is important both for operational and driving
safety and to help prolong your vehicle’s service life. Always follow the scheduled maintenance
intervals in the ⇒Booklet Warranty and Maintenance, especially for changing the brake fluid. Hard
use, frequent stop-and-go driving, driving in very dusty areas, trailer towing, and other factors may
make it necessary to have the vehicle serviced more frequently. Ask an authorized Volkswagen dealer
or an authorized Volkswagen Service Facility for more information.
Driving in other countries
Please first read and note the introductory information and heed the WARNINGS
Checklist
Some countries have special safety standards and emissions requirements that your vehicle may not
meet. Before taking your vehicle to another country, Volkswagen therefore recommends that you ask
your authorized Volkswagen dealer or authorized Volkswagen Service Facility about the following
issues with regard to the country to which you would like to travel:
Should the vehicle be technically prepared for the trip abroad, such as masking or adjusting
headlights?
Are maintenance, repair facilities, necessary tools and testing equipment as well as spare parts
readily available for your vehicle?
Are there authorized Volkswagen dealers and authorized Volkswagen Service Facilities in the
countries where you will be driving?
For gasoline engines: Is unleaded fuel with the right octane rating readily available?
Page: 43
Are engine oil (⇒Engine oil) and other operating fluids that meet Volkswagen quality and
performance requirements available where you will be driving? For more information, please see
⇒Booklet Warranty and Maintenance.
Does the factory-installed navigation system work in the countries where you will be driving, and is
navigation data available?
Are special or heavy-duty tires necessary for the kind of driving expected?
NOTICE
Volkswagen is not responsible for mechanical damage that may result from substandard fuel
or service or the unavailability of Genuine Volkswagen parts.
Driving through water on roads
Please first read and note the introductory information and heed the WARNINGS
Note the following to help prevent vehicle damage when driving through water, for example on flooded
roads:
Check the depth of the water before driving through it. The water must not be any higher than
the bottom of the vehicle body ⇒ , see dimensions
Do not drive faster than walking speed.
Never stop the vehicle, and do not drive in Reverse (R) or switch the engine off when driving
through water.
Oncoming vehicles may create waves that raise the water level and make it too deep for your
vehicle to drive through safely.
WARNING
After driving through water, mud, sludge, etc., the brakes react slower and need longer
stopping distances.
Always dry the brakes and clean off any ice coatings with a few careful applications of the
brake. Make sure not to endanger other motorists or cyclists or disobey legal requirements.
Avoid abrupt or sudden braking maneuvers immediately after driving through water.
NOTICE
Vehicle components such as the engine, transmission, suspension or electrical system may
be severely damaged by driving through water.
Never drive through salt water. Salt causes vehicle corrosion. Thoroughly rinse with fresh
water all vehicle parts that were exposed to salt water.
Page: 44
Technical data
Introduction
In this section you’ll find information about:
Important vehicle labels
Engine data
Dimensions
Your vehicle’s engine type is shown on the vehicle identification label.
The specifications in this Manual refer to the base model. The stated values may vary, depending
upon different equipment or models, as well as with respect to special vehicles and vehicles exported
to different countries.
More information:
Transporting
Tires and wheels
Saving fuel and helping the environment
Fuel
Engine oil
Engine coolant
Consumer information
WARNING
Disregarding or exceeding stated values for weights, loads, dimensions and maximum speed
may result in accidents and serious personal injuries.
Important vehicle labels
Fig. 20 Vehicle identification label: Shown in the example with engine identification code CBFA 3.
Page: 45
Fig. 21 Vehicle identification number (VIN).
Please first read and note the introductory information and heed the WARNINGS
Factory-installed safety certificates, stickers, and signs containing important information regarding
vehicle operation can be found in the engine compartment and on certain vehicle components, such
as inside the fuel filler flap, on the passenger sun visor, in the driver door jamb, or on the luggage
compartment floor.
Do not remove, alter, or render unusable or illegible any safety certificates, stickers, and labels.
If vehicle components bearing safety certificates, stickers, or labels are replaced, make certain that
the firm doing the work attaches new conforming certificates, stickers, or labels to the same part of the
new components.
Vehicle identification number (VIN)
The vehicle identification number is on a plate on top of the instrument panel on the driver side, and is
visible from the outside through the windshield ⇒fig. 21 (arrow). The view window is on the side at the
bottom of the windshield. The vehicle identification number is also stamped into the top of the right drip
channel in the engine compartment. The drip channel is between the spring strut tower and the right
fender. Open the engine hood to read the vehicle identification number ⇒ Working in the engine
compartment.
Vehicle identification label
The vehicle identification label ⇒fig. 20 is affixed to the area of the spare wheel well underneath the
luggage compartment floor panel and contains the following information:
(1) Vehicle identification number (VIN)
(2) Vehicle type, engine output, and transmission
(3) Engine and transmission identification codes, paint number, and interior type. In the example,
the engine identification code is “CBFA” ⇒fig. 20.
(4) Optional equipment and part numbers
Safety Compliance Certification Label
A safety certificate affixed to the door jamb in the driver door confirms that at time of production all
necessary safety standards and requirements of the traffic safety agency of the respective country
were met. The month and year of production as well as the vehicle identification number may be listed
as well.
Radiator fan and high voltage warning sticker
A warning sticker about the radiator fan and the high voltage of the electrical system is located in the
engine compartment next to the engine hood release. The vehicle ignition system complies with the
Canadian standard ICES-002.
Page: 46
Tire inflation pressure label
A tire inflation pressure label is on the driver door jamb ⇒page 176, Tires and wheels.
Fuel grade sticker
An information sticker listing the correct fuel grade for your vehicle ⇒page 289, Refueling.
Engine data
Please first read and note the introductory information and heed the WARNINGS
Gasoline engine
Maximum power
output
Injection
technology
Engine
ID code
Maximum torque No. of cylinders
Displacement
200 hp at 5100 –
6000 rpm
147 kW at 5100 –
6000 rpm
TSI® CCTA
2.0L
207 ft-lbs at 1700 – 5000
rpm
280 Nm at 1700 – 5000 rpm
4 cylinders
121.1 CID
(1984 ccm)
Dimensions
Please first read and note the introductory information and heed the WARNINGS
Length 174.5 inches (4427 mm)
Width 71.2 inches (1809 mm)
Height (unloaded) 66.3 inches (1683 mm)
Wheelbase 102.5 inches (2605 mm)
Minimum turning circle diameter (wall to wall)2
39 feet (12 m)
Track2
front 61.8 inches (1570 mm)
Track2
rear 61.9 inches (1571 mm)
Ground clearance 6.9 inches (175 mm)3
2
Slight differences to these figures are possible, depending on wheel and tire size fitted and the level
selected.
3
Approx. figure for fully loaded standard vehicle; varies depending on your vehicle’s equipment (engine,
tires, wheels, tire inflation pressure, driving situation and other factors).
Page: 47
Approach angle
– Off-road
28 degrees
Departure angle 25 degrees
Ramp angle 21.3 degrees
Max. gradient 31 degrees
Fording depth 6.9 inches (175 mm)
NOTICE
Please be careful when parking your vehicle in areas with parking barriers or curbs. These
vary in height and could damage your bumper and related parts if the front of your vehicle hits
a barrier or curb that is too high while you are getting into or out of a parking spot.
Always be careful when you enter a driveway or drive up or down steep ramps or over
curbs or other obstacles. Parts of the vehicle close to the ground may be damaged (such as
bumper covers, spoilers, and parts of the engine, suspension, and exhaust systems).
Page: 48
Vehicle key set
Introduction
In this section you’ll find information about:
Remote control vehicle keys
Mechanical key
Indicator light in the remote control vehicle key
Replacing the remote control vehicle key battery
Synchronizing the remote control vehicle key
More information:
Volkswagen Information System
Power locking system
Starting and stopping the engine
Consumer information
Emergency closing and opening
DANGER
20 mm button cells and other lithium batteries will cause serious personal injury and even
death within a short time if swallowed.
Always keep remote control vehicle key fobs with batteries, spare batteries, as well as
dead button cell and larger 20 mm batteries out of the reach of children.
Get medical attention immediately if you suspect that a battery has been swallowed.
WARNING
Improper use of vehicle keys can result in serious personal injury.
Always take the key with you when you leave the vehicle. It can be used to start the engine
and operate vehicle systems such as the power windows, leading to serious personal injury.
Children or other unauthorized persons could also lock the doors and the luggage
compartment.
Never leave children, disabled persons, or anyone who cannot help themselves in the
vehicle. The doors can be locked with the remote control vehicle key. This could result in
people being trapped in the vehicle in an emergency. For example, depending on the time of
year, people trapped in the vehicle can be exposed to very high or very low temperatures.
Heat buildup in the passenger and luggage compartment of a parked vehicle can result in
temperatures in the vehicle that are much higher than the outside temperatures, particularly
in summer. Temperatures can quickly reach levels that can cause unconsciousness and
death, particularly to small children.
Never remove the key from the ignition switch while the vehicle is moving or rolling to a
stop. The steering wheel will lock and you will not be able to steer or control the vehicle.
Page: 49
Remote control vehicle keys
Fig. 22 Remote control vehicle key with panic button.
Please first read and note the introductory information and heed the WARNINGS
Remote control vehicle key
The remote control vehicle key can unlock and lock the vehicle from a distance ⇒ Power locking
system.
The remote transmitter and battery are inside the remote control vehicle key. The receiver is inside the
passenger compartment. The operating range of the remote control vehicle key for a fresh battery is
several yards (meters) around the vehicle.
If the remote control vehicle key will not lock or unlock your vehicle, you probably need to replace the
battery in the remote control vehicle key ⇒ Replacing the remote control vehicle key battery. If this is
not the problem, the key should be resynchronized by an authorized Volkswagen dealer, an
authorized Volkswagen Service Facility, or another qualified workshop. See also ⇒ Synchronizing the
remote control vehicle key.
Folding the key bit in or out
Pressing button ⇒fig. 22 (1) releases the key bit and folds it out.
To fold the key bit in press button (1) while pressing the key bit back until it clicks.
Panic button
Press the panic button (2) only in emergencies! After pushing the panic button, the horn will sound and
the turn signals will flash. Press the panic button again to switch off the panic feature.
Replacement vehicle keys
The vehicle identification number is required to get a replacement key or an additional remote control
vehicle key.
Depending on the model, up to 8 vehicle keys, each of which must be properly cut, coded,
programmed, and synchronized, can be used with your vehicle.
Each new vehicle key contains a microchip and must be coded with the data from the vehicle’s
electronic immobilizer. A vehicle key will not work if it does not contain a microchip or contains a chip
that is not coded, even if the key bit was cut correctly.
You can obtain additional or duplicate remote control vehicle keys from authorized Volkswagen
dealers, authorized Volkswagen Service Facilities, and from certain independent repair facilities and
locksmiths which are qualified to make remote control vehicle keys.
Each vehicle key must be programmed by an authorized Volkswagen dealer or an authorized
Volkswagen Service Facility in order for it to work with your vehicle.
Page: 50
To find the nearest qualified independent repair facility, locksmith, or Volkswagen dealer which can cut
and code replacement vehicle keys, call the VW Customer Care Hotline at 1-800-822-8987 or visit
http://www.vw.com and search for “replacement keys.”
Canadian customers can contact an authorized Volkswagen dealer or Volkswagen Service Facility or
call the Volkswagen Canada Customer CARE Center at 1-800-822-8987.
NOTICE
The remote control vehicle keys contain electrical components. Protect them from damage,
moisture and rough handling.
Do not press the buttons on the remote control vehicle key unless you actually want to use the
function in question. Since terrain and conditions vary, pressing a button on the remote control vehicle
key when it is not necessary may unlock the vehicle or set off the panic alarm, even if you think you
are out of range.
Remote control vehicle key functions can be temporarily disrupted by interference from
transmitters near the vehicle that use the same frequency range (such as radio equipment or mobile
phones).
Things between the remote control vehicle key and vehicle, bad weather, as well as a weak
battery can reduce the operating range.
If the remote control vehicle key buttons ⇒fig. 22 or the power locking buttons ⇒ Unlocking or
locking the vehicle from the inside are pushed repeatedly in quick succession, the power locking
system is switched off for a brief period to help keep it from being overloaded. The vehicle is then
unlocked for about 30 seconds. Unless a door or the rear hatch is opened in this span of time, the
vehicle is automatically locked afterwards.
Mechanical key
Fig. 23 Mechanical key.
Please first read and note the introductory information and heed the WARNINGS
The remote control vehicle key set includes a mechanical key ⇒fig. 23.
Use the mechanical key for:
Manually locking and unlocking the vehicle
Starting engine
Страницы 1
Чтобы отправить ответ, вы должны войти или зарегистрироваться
1 2015-12-23 08:38:42

- Информатор
- Администратор
- Неактивен

- Зарегистрирован: 2015-12-22
- Сообщений: 20
- Репутация : [ 0 | 0 ]
Тема: Руководство по эксплуатации VW Tiguan — скачать (PDF, 147 Mb)
Добрый день, Друзья! Теперь Вы можете скачать руководство по эксплуатации VW Tiguan в формате PDF и залить себе его на мобильный телефон или планшет. В руководстве предусмотрена функция поиска, что очень удобно.

Теперь можно быстрой найти информацию о том, как правильно менять в машине аккумулятор, или как правильно готовить машину к дальней поездке, или как самостоятельно производить замену колеса, лампочек накаливания или предохранителей!
Не секрет, что руководство к автомобилю мало кто читает. Думаю сейчас, имея электронный вариант руководства вы можете не только узнать больше о своём любимом автомобиле, но и оставлять заметки и закладки к тексту, чтобы в будущем быстро ориентироваться при возникновении каких-то экстренных ситуаций.
скачать: rukovodstvo_tiguan_info.pdf
2 Ответ от burak.andrij 2021-01-24 18:19:07
- burak.andrij
- Новичок
- Неактивен
- Зарегистрирован: 2021-01-24
- Сообщений: 1
- Репутация : [ 0 | 0 ]
Re: Руководство по эксплуатации VW Tiguan — скачать (PDF, 147 Mb)
Скачать руководство по эксплуатации vw tiguan
Страницы 1
Чтобы отправить ответ, вы должны войти или зарегистрироваться