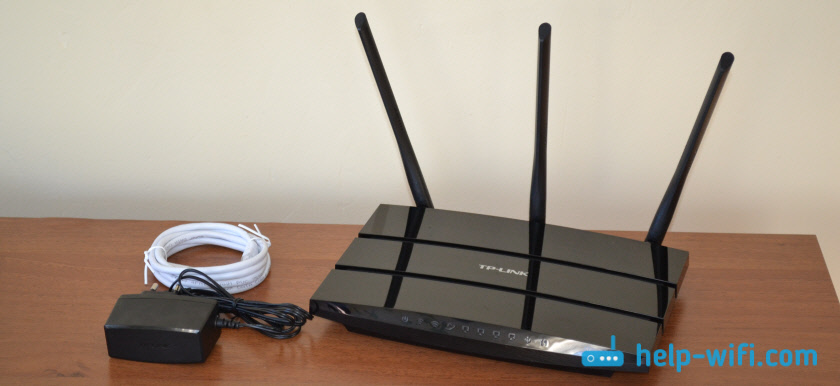
Недавно я делал обзор маршрутизатора TP-Link Archer C1200. Обзор можно почитать здесь. Там я рассказывал для каких целей стоит покупать этот маршрутизатор, чем он хорош, и какие имеет недостатки. Но вам скорее всего это не интересно, так как вы наверное уже приобрели Archer C1200, и все что вам нужно, это быстрее его настроить и начать пользоваться. Если я угадал, то вы зашли по адресу, так как сейчас я подробно продемонстрирую процесс настройки роутера TP-Link Archer C1200.
Мы его подключим, и скорее всего попробуем настроить с помощью мастера быстрой настройки, через панель управления. Конечно же, задать необходимые параметры для работы маршрутизатора можно в разных разделах web-интерфейса. Но, если есть простой мастер настройки, который позволяет шаг за шагом настроить маршрутизатор, то глупо им не воспользоваться. Ну а если что-то не получится, то покажу еще где в настройках этого маршрутизатора можно сменить самые важные и необходимые параметры.
Если вы уже знакомы с роутерами компании TP-Link, и настраивали их, то панель управления модели Archer C1200 скорее всего будет вам незнакома. Так как на старых моделях была панель управления в зеленых тонах. А сейчас, практически все новые модели сетевых устройств от TP-Link получают новую панель управления. Более современную. И как правило, новый web-интерфейс мультиязычный. Это значит, что можно сменить язык на русский, или украинский. Но в моем роутере был только английский язык. Возможно, другие локализации появляться с выходом новой версии прошивки. Но это не страшно, ведь по моим инструкциям можно настроить даже роутер от Xiaomi на китайском языке 🙂
Как подключить роутер TP-Link Archer C1200 и зайти в настройки?
Чтобы настроить маршрутизатор, нам нужно зайти в его панель управления. Это можно сделать практически с любого устройства: компьютре, ноутбук, смартфон, планшет. Если есть возможность, я советую настраивать именно с ПК, или ноутбука. Хотя бы потому, что так удобнее. И лучше подключится к маршрутизатору по сетевому кабелю (можно и по Wi-Fi). Так же, сразу в WAN порт подключите интернет (кабель, который в ваш дом проложил интернет-провайдер).
Можно подключится и к Wi-Fi сети, которая будет иметь заводское название. Пароль (PIN) для подключения к этой сети можно найти снизу роутера, на наклейке. Так как роутер у нас двухдиапазонный, то он сразу будет транслировать сеть в двух диапазонах 2.4GHz и 5GHz. Если вы собираетесь настраивать с планшета, или смартфона, то это можно сделать через обычный браузер, или с помощью фирменного приложения TP-LINK Tether.
Если вы, или кто-то другой уже питался настроить маршрутизатор, то сделайте сброс настроек. Зажав на 10 секунд утопленную в корпус кнопку Reset.
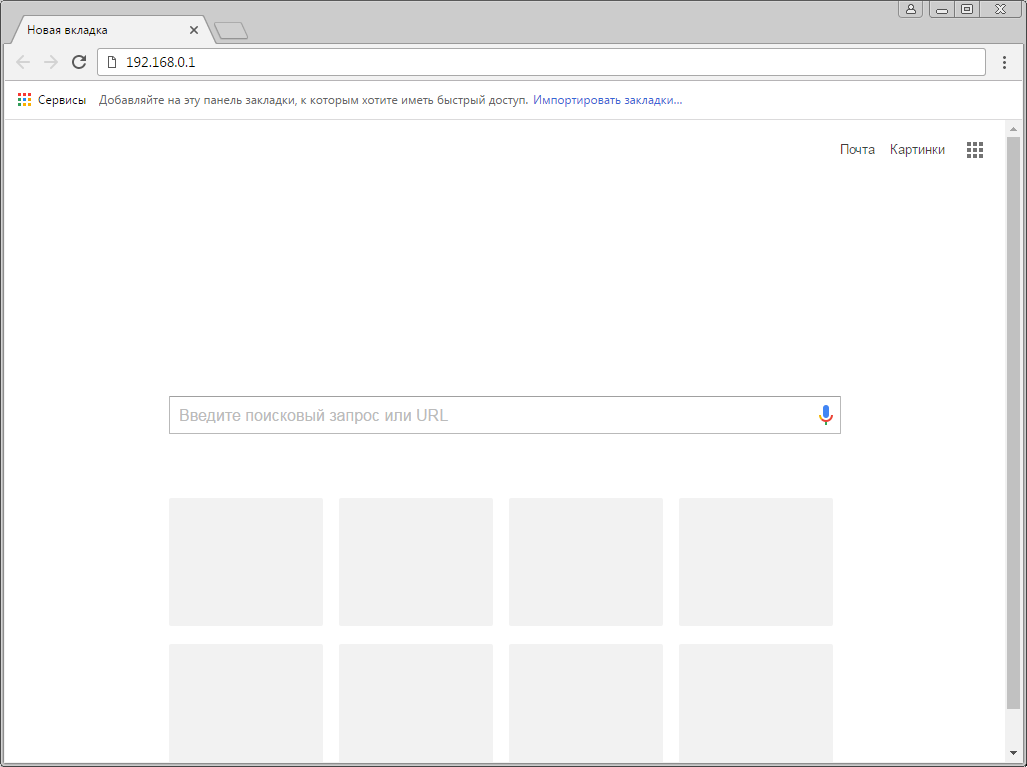
Заходим на tplinkwifi.net или 192.168.0.1
После того, как вы подключились к роутеру (обратите внимание, что интернет может не работать, это нормально), можно заходит в панель управления. Для этого откройте любой браузер (у меня Опера) и перейдите по адресу tplinkwifi.net, или 192.168.0.1. На всякий случай даю ссылку на подробную инструкцию: https://help-wifi.com/tp-link/kak-zajti-v-nastrojki-routera-tp-link/
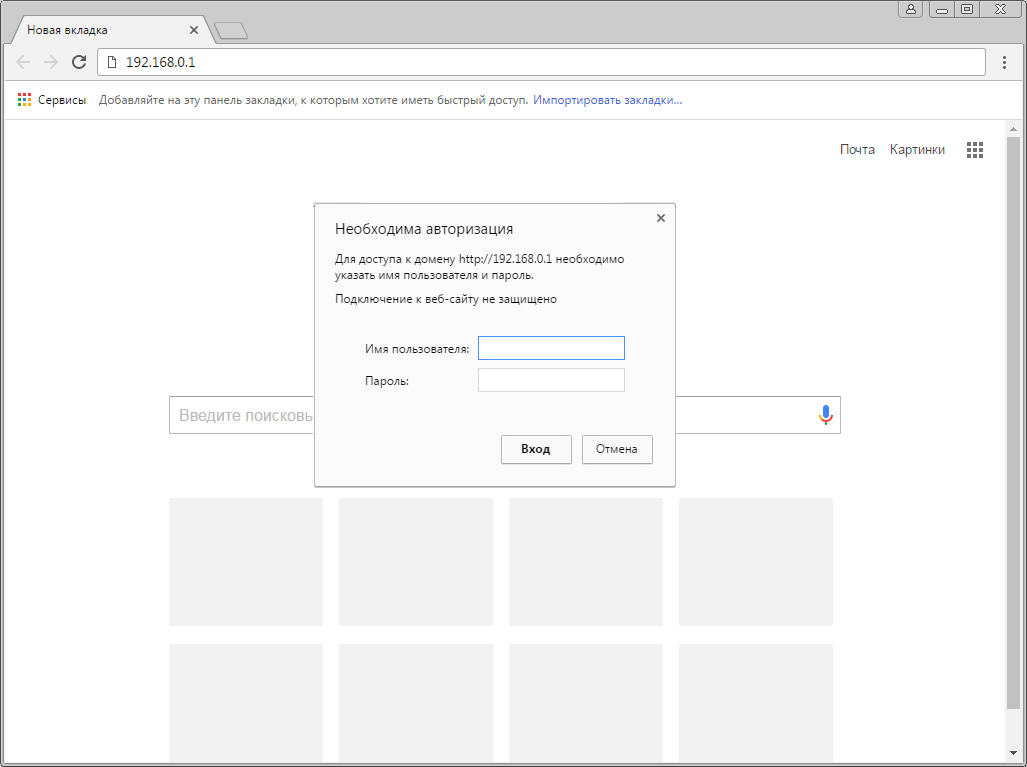
Роутер запросит логин и пароль. Заводские: admin и admin (указаны на наклейке снизу роутера, как и другая заводская информация).
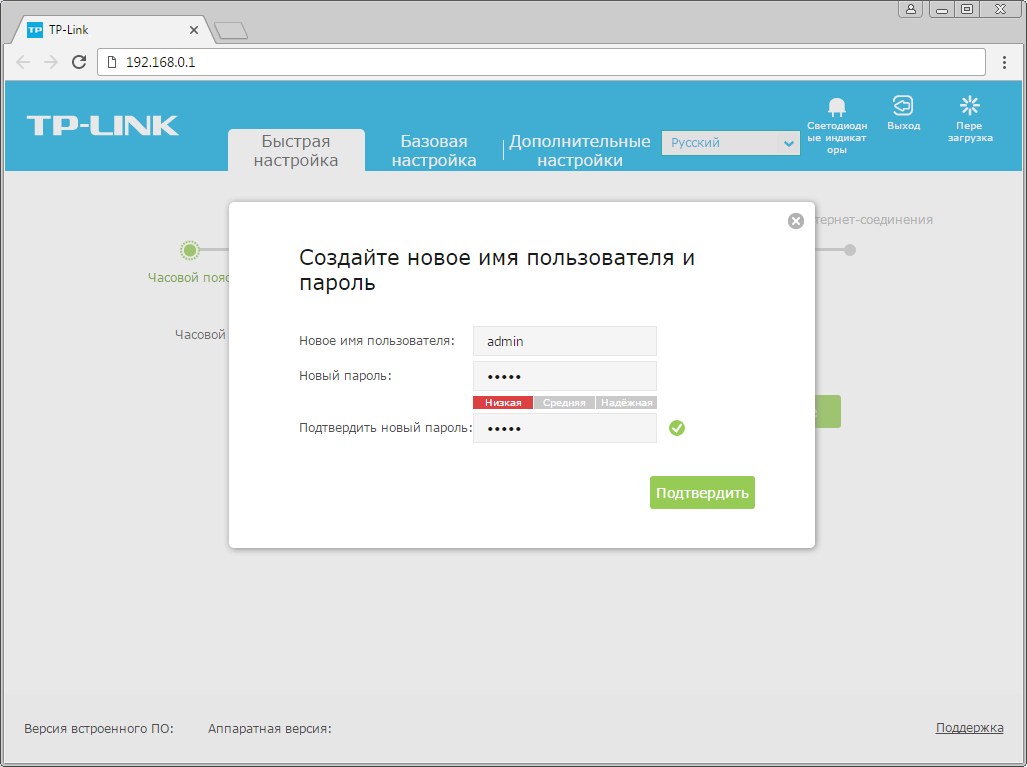
Роутре сразу предложит сменить заводские логин и пароль для входа в настройки (которые мы только что вводили). Меняем их. Логин можно оставить такой же, а пароль придумайте новый и пропишите два раза.
Только не забудьте пароль, который устанавливаете. Он понадобится при повторном входе в панель управления.
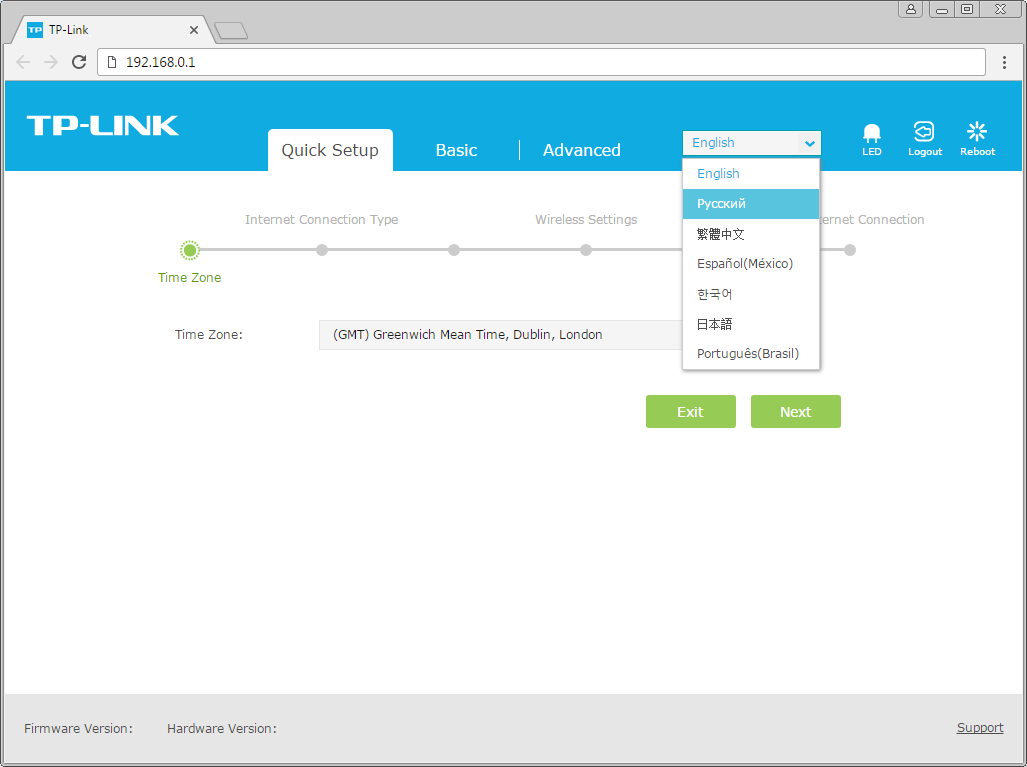
После этого откроется страница с настройками маршрутизатора Archer C1200. Сразу будет открыт мастер быстрой настройки. Можете еще попробовать сменит язык web-интерфейса. Может у вас будут другие варианты кроме английского.
Если не получилось зайти в настройки, то смотрим эту статью.
Настройка подключения к провайдеру и Wi-Fi сети
Именно эти настройки можно выполнить с помощью мастера быстрой настройки. И этого достаточно для нормальной работы маршрутизатора. Если он у вас не открылся сразу после входа в веб-интерфейс, то перейдите на вкладку «Quick Setup».
1
На первом шаге нам нужно выбрать свой часовой пояс.
2
Дальше настройки подключения к интернету. Это очень важный пункт. Если мы зададим неправильные настройки, то роутер не сможет подключится к интернету, и не будет его раздавать на ваши устройства.
Нужно выбрать свой тип подключения к интернету. Это может быть:
- Динамический IP – самый простой тип подключения, при использовании которого не нужно задавать никакие параметры. А интернет через TP-Link Archer C1200 должен заработать сразу после подключения кабеля в WAN порт. Если нет привязки по MAC-адресу.
- Статический IP – очень редко встречается.
- PPPoE – популярный тип подключения, который используют провайдеры Ростелеком, ТТК, Дом.ru, и другие. В процессе настройки нужно обязательно указать имя пользователь и пароль.
- PPTP и L2TP – так же нужно указать имя пользователя, пароль и еще адрес сервера.
Тип подключения и необходимые параметры вы можете узнать у своего провайдера.
Выбираем тип подключения и нажимаем «Next».
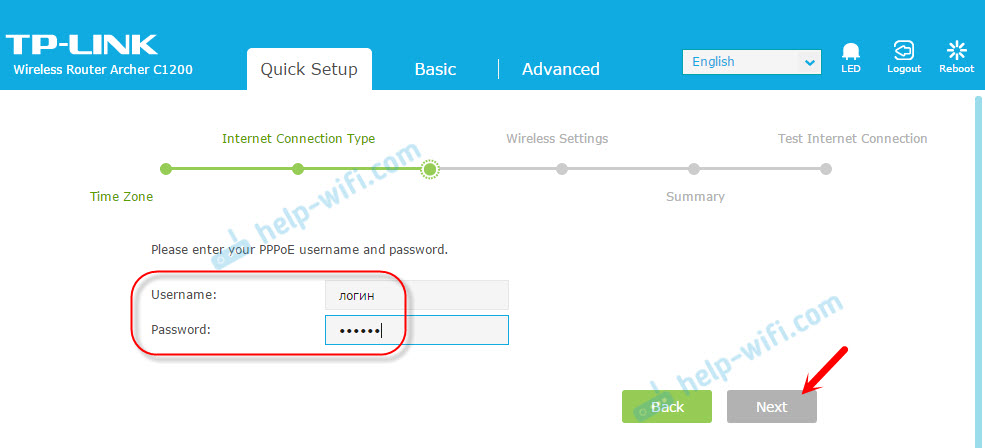
Я для примера выбрал PPPoE. Теперь задаем параметры, которые выдает провайдер и продолжаем.
Это я показал для примера. У меня провайдер использует тип подключения «Динамический IP». Выбрав его, в следующем окне роутер спросит, есть ли привязка по MAC-адресу, и предложит клонировать MAC-адрес с компьютера, к которому сейчас подключен роутер. Мой провайдер не делает привязку по MAC-адресу.
3
Следующий шаг – настройка Wi-Fi сети. Здесь нам нужно сменить название Wi-Fi сети для каждого диапазона, и сменить пароль Wi-Fi сети. Пароль можно делать одинаковым для обоих диапазонов. Если есть необходимость, можно отключить вещание Wi-Fi сети на одном из диапазонов, просто убрав соответствующую галочку.
4
Проверяем все заданные параметры и нажимаем кнопку «Save» для сохранения настроек.
Вы увидите полоску со статусом сохранение настроек. Ждем.
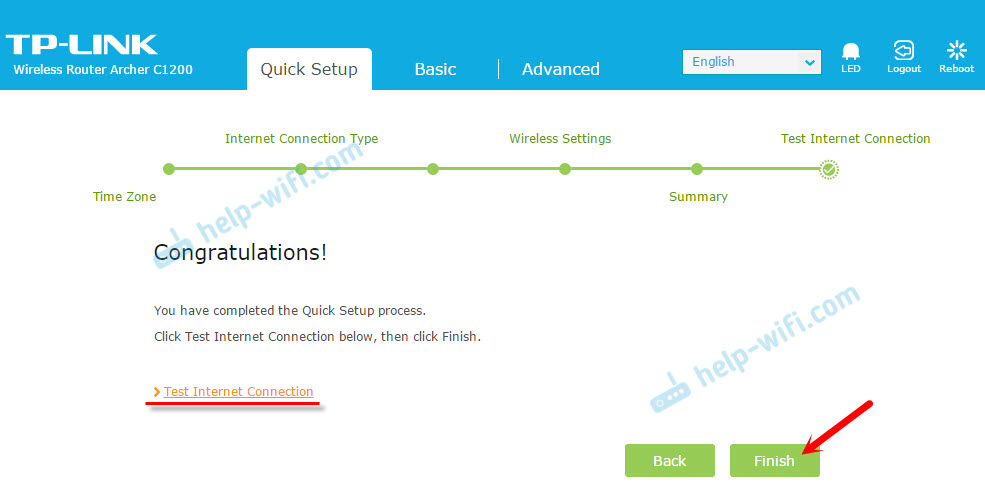
В следующем окне можно нажать на ссылку «Test Internet Connection». Если все хорошо, роутер подключился к интернету, то нажимаем на кнопку «Finish».
Если подключения к интернету нет, то скорее всего неправильно выбрали тип подключения, или неверное задали параметры для подключения. Индикатор WAN на роутере будет гореть оранжевым цветом (а должен зеленым).
Вернитесь обратно, или запустите «Quick Setup» заново, и повторите настройку.
Где находятся настройки интернета и Wi-Fi?
Все базовые настройки можно задать в разделе «Basic». А в разделе «Advanced» находится большое количество расширенных параметров.
Например, настройки интернета:
И расширенные настройки Wi-Fi сети (где можно сменить пароль, канал, режим работы, ширину канала и т. д.):
По смене пароля Wi-Fi сети у нас есть отдельная инструкция: https://help-wifi.com/tp-link/kak-ustanovit-ili-smenit-parol-wi-fi-seti-na-routere-tp-link/
Если у вас остались какие-то вопросы, или вы столкнулись с какой-то проблемой, то спрашивайте в комментариях. С радостью отвечу и постараюсь помочь!
инструкцияTP-Link Archer C1200

Quick Installation Guide
Wireless Router
www.tp-link.com
7106508531 REV2.3.0
Specications are subject to change without notice. is a registered trademark of TP-Link
Technologies Co., Ltd. Other brands and product names are trademarks or registered trademarks of
their respective holders.
No part of the specications may be reproduced in any form or by any means or used to make any
derivative such as translation, transformation, or adaptation without permission from TP-Link
Technologies Co., Ltd. Copyright © 2019 TP-Link Technologies Co., Ltd. All rights reserved.
*Image may dier from your actual product.
For technical support, the user guide and more information, please visit
https://www.tp-link.com/support.
Посмотреть инструкция для TP-Link Archer C1200 бесплатно. Руководство относится к категории маршрутизаторы (роутеры), 26 человек(а) дали ему среднюю оценку 8.4. Руководство доступно на следующих языках: русский, английский. У вас есть вопрос о TP-Link Archer C1200 или вам нужна помощь? Задайте свой вопрос здесь
- 7106508531_封面
- SOHO无线路由(欧二16国)_QIG_V1
Главная
| TP-Link | |
| Archer C1200 | ARCHER C1200 V2 | |
| маршрутизатор (роутер) | |
| 6935364096052, 6935364095895, 6935364098414 | |
| русский, английский | |
| Руководство пользователя (PDF), Инструкция по установке (PDF), Техническая спецификация (PDF) |
WAN подключение
| Ethernet WAN | Да |
| DSL WAN | Нет |
| Слот для SIM-карты | Нет |
| Совместимость с 3G / 4G USB модемом | Нет |
| Тип WAN соединения | RJ-45 |
Характеристики беспроводной LAN
| Wi-Fi диапазоны | Двухдиапазонный (2,4Ггц/5Ггц) |
| Основной стандарт Wi-Fi | Wi-Fi 5 (802.11ac) |
| Скорость передачи данных WLAN (макс) | 1167 Мбит/с |
| Wi-Fi стандартов | 802.11a, Wi-Fi 5 (802.11ac), 802.11b, 802.11g, Wi-Fi 4 (802.11n) |
| Скорость передачи данных WLAN (первая полоса) | 300 Мбит/с |
| Скорость передачи данных WLAN (вторая полоса) | 867 Мбит/с |
Сеть
| Подключение Ethernet | Да |
| Тип LAN Ethernet интерфейса | Гигабитный Ethernet |
| Скорость передачи данных Ethernet LAN | 10,100,1000 Мбит/с |
| Свивка кабеля | 10/100/1000Base-T(X) |
| Стандарты сети | IEEE 802.11a, IEEE 802.11ac, IEEE 802.11b, IEEE 802.11g, IEEE 802.11n |
| Поддержка VPN (виртуальной частной сети) | Open VPN, PPTP VPN, PPTP, L2TP, IPSec |
| Переадресация портов | Да |
| Чувствительность приемника | 5GHz: 11a 54M: -76dBmn 11ac HT20: -68dBmn 11ac HT40: -65dBmn 11ac HT80 : -62dBmn 11n HT20: -74dBmn 11n HT40: -71dBmn 2.4G: 11g 54M: -75dBmn 11n HT20: -72dBmn 11n HT40: -69dBm |
Порты и интерфейсы
| USB порт | Да |
| Количество портов Ethernet LAN ( RJ-45) | 4 |
| Количество портов USB 2.0 | 2 |
| Гнездо входа постоянного тока (DC) | Да |
| Слот(ы) для карты памяти | Нет |
Мобильная сеть
| 3G | Нет |
| 4G | Нет |
| Поколение сети мобильной связи | — |
| 5G | Нет |
Протоколы
| DHCP клиент | Да |
| DHCP сервер | Да |
| Universal Plug and Play (UPnP) | Да |
| Поддерживаемые сетевые протоколы | IPv4/IPv6 |
Антена
| Конструкция антенны | Внешний |
| Количество антенн | 3 |
| Мощность передачи | CE: <20dBm(2.4GHz), <23dBm(5GHz) dBmW |
Характеристики управления
| Управление через веб-интерфейс | Да |
| Кнопка сброса установок | Да |
| WPS кнопки | Да |
| Поддержка Quality of Service (QoS) | Да |
Безопасность
| Алгоритмы шифрования данных | 64-bit WEP, 128-bit WEP, WPA, WPA-PSK, WPA2, WPA2-PSK |
| Брандмауэр | Да |
| Защита с помощью брандмауэра | Domain Filter, IP Address Binding, MAC Address Binding |
| Гостевой доступ | Да |
| Защита от DoS атаки | Да |
| Фильтрация по IP адресу | Да |
| Фильтрация | Да |
| Инспекция пакетов с хранением состояния (SPI) | Да |
Дизайн
| Тип продукта | Настольный маршрутизатор |
| Цвет товара | Черный |
| Световой индикатор | Да |
| Вкл/Выкл переключатель | Да |
| Светодиодные индикаторы | LAN, Power, Status, WAN, WLAN |
| Настенный | Да |
Энергопитание
| Тип источника питания | Постоянный ток |
| Выходное напряжение | 12 V |
| Ток на выходе | 1 A |
Свойства
Условия эксплуатации
| Диапазон температур при эксплуатации | 0 — 40 °C |
| Диапазон температур при хранении | -40 — 70 °C |
| Диапазон относительной влажности при эксплуатации | 10 — 90 % |
| Диапазон относительной влажности при хранении | 5 — 90 % |
Вес и размеры
| Ширина | 243 mm |
| Глубина | 168 mm |
| Высота | 33 mm |
Содержимое упаковки
| Сетевой адаптер в комплекте | Да |
| Поставляемые кабели | LAN (RJ-45) |
| Краткая инструкция пользователя | Да |
Данные об упаковке
| Тип упаковки | Коробочная версия |
| Высота упаковки | 80 mm |
| Ширина упаковки | 330 mm |
| Масса брутто | 970 g |
| Глубина упаковки | 240 mm |
показать больше
Не можете найти ответ на свой вопрос в руководстве? Вы можете найти ответ на свой вопрос ниже, в разделе часто задаваемых вопросов о TP-Link Archer C1200.
Не нашли свой вопрос? Задайте свой вопрос здесь
-
Contents
-
Table of Contents
-
Bookmarks
Quick Links
User Guide
AC1200 Wireless Dual Band Gigabit Router
Archer C1200
REV2.0.0 1910012083
Related Manuals for TP-Link Archer C1200
Summary of Contents for TP-Link Archer C1200
-
Page 1
User Guide AC1200 Wireless Dual Band Gigabit Router Archer C1200 REV2.0.0 1910012083… -
Page 2: Table Of Contents
Chapter 5. TP-Link Cloud Service ……..20…
-
Page 3
7. 1. Access the USB Storage Device ……….32 7. -
Page 4
14. 7. Use WPS for Wireless Connection ……… . 79 14. -
Page 5
The Quick Installation Guide can be found where you find this guide or inside the package of the router. Specifications can be found on the product page at http://www.tp-link.com. A Technical Support Forum is provided for you to discuss our products at http://forum.tp-link.com. -
Page 6: About This Guide
Chapter Get to Know About Your Router This chapter introduces what the router can do and shows its appearance. It contains the following sections: • Product Overview • Panel Layout…
-
Page 7: Product Overview
Ethernet ports supply high-speed connection to your wired devices. Moreover, it is simple and convenient to set up and use the TP-Link router due to its intuitive web interface and the powerful Tether app.
-
Page 8
Chapter 1 Get to Know About Your Router LED Explanation Name Status Indication The system has started up successfully. The system is starting up or the firmware is being upgraded. Do Flashing (Power) not disconnect or power off your router. Power is off. -
Page 9: The Back Panel
Chapter 1 Get to Know About Your Router 1. 2. 2. The Back Panel The following parts (view from left to right) are located on the back panel. Item Description Power Port For connecting the router to a power socket via the provided power adapter. Power On/Off Button Press this button to power on or off the router.
-
Page 10: Chapter 2. Connect The Hardware
Chapter Connect the Hardware This chapter contains the following sections: • Position Your Router • Connect Your Router…
-
Page 11: Position Your Router
Chapter 2 Connect the Hardware 2. 1. Position Your Router • The product should not be located in a place where it will be exposed to moisture or excessive heat. • Place the router in a location where it can be connected to multiple devices as well as to a power source.
-
Page 12
Chapter 2 Connect the Hardware 5. Verify that the following LEDs are on and solid before continuing with the configuration. Power Internet 2.4G Note: If the 2.4G LED and 5G LED are off, please press the WPS/Wi-Fi On/Off button for 2 seconds and check the LEDs again a few seconds later. -
Page 13
WPS. 1 ) Tab the WPS icon on the device’s screen. Here we take an Android phone for instance. 2 ) Within two minutes, press the WPS/Wi-Fi On/Off button on your router. WLAN TP-Link Home Office close to TP-Link_123… -
Page 14: Chapter 3. Log In To Your Router
Chapter Log In to Your Router…
-
Page 15
• If the login window does not appear, please refer to the Section. • If you have registered a TP-Link ID and bound your cloud router to it, the login password you created here will be invalid. Please log in to the cloud router using your TP-Link ID. -
Page 16: Chapter 4. Set Up Internet Connection
Chapter Set Up Internet Connection This chapter introduces how to connect your router to the internet. The router is equipped with a web-based Quick Setup wizard. It has necessary ISP information built in, automates many of the steps and verifies that those steps have been successfully completed.
-
Page 17: Use Quick Setup Wizard
ISP. Follow the steps below to check or modify your internet connection settings. 1. Visit http://tplinkwifi.net, and log in with your TP-Link ID or the password you set for the router.
-
Page 18
Chapter 4 Set Up Internet Connection Note: If you are unsure of what your connection type is, click Auto Detect. Since different connection types require different cables and connection information, you can also refer to the demonstrations in Step 4 to determine your connection type. -
Page 19
Chapter 4 Set Up Internet Connection 3 ) If you choose PPPoE, enter the Username Password provided by your ISP. PPPoE users usually have DSL cable modems. 4 ) If you choose L2TP, enter the Username Password and choose the Secondary Connection provided by your ISP. -
Page 20
Chapter 4 Set Up Internet Connection 5 ) If you choose PPTP, enter the Username and Password, and choose the Secondary Connection provided by your ISP. Different parameters are needed according to the Secondary Connection you have chosen. 5. Click Save. 6. -
Page 21: Set Up An Ipv6 Internet Connection
Your ISP provides information about one of the following IPv6 internet connection types: PPPoE, Dynamic IP(SLAAC/DHCPv6), Static IP, 6to4 tunnel, Pass-Through (Bridge). 1. Visit http://tplinkwifi.net, and log in with your TP-Link ID or the password you set for the router.
-
Page 22
Chapter 4 Set Up Internet Connection Dynamic IP(SLAAC/DHCPv6): Click Advanced to input further information if your ISP requires. Click Save and then click Renew. PPPoE: By default, the router uses the IPv4 account to connect to the IPv6 server. Click Advanced to input further information if your ISP requires. -
Page 23
Chapter 4 Set Up Internet Connection 6to4 Tunnel: An IPv4 internet connection type is a prerequisite for this connection type (Manually Set Up Your Internet Connection). Click Advanced input further information if your ISP requires. Click Save and then click Connect. Pass-Through (Bridge): Click Save… -
Page 24
Chapter 4 Set Up Internet Connection 5. Configure LAN ports. Windows users are recommended to choose from the first two types. Fill in Address Prefix provided by your ISP, and click Save. Tips: Find Help on the web management page to know more about items. 6. -
Page 25: Chapter 5. Tp-Link Cloud Service
TP-Link Cloud service provides a better way to manage your cloud devices. Log in to your router with a TP-Link ID, and you can easily monitor and manage your home network when you are out and about via the Tether app on your smartphone or tablet. To ensure that your router stays new and gets better over time, the TP-Link Cloud will notify you when an important firmware upgrade is avaliable.
-
Page 26: Register A Tp-Link Id
IDs. • Once the router is bound to your TP-Link ID, you need to log in to the router with the TP-Link ID. • Once you have registered a TP-Link ID on the web management page, you can only register another TP-Link ID via the Tether APP.
-
Page 27: Manage The User Tp-Link Ids
2. Enter the current password, then a new password twice. And click Save. 5. 3. Manage the User TP-Link IDs The first TP-Link ID used to log in to the router for the first time will be automatically bound as the Admin account.
-
Page 28: Add Tp-Link Id To Manage The Router
3. Click , enter another TP-Link ID as needed and click Save. Note: If you need another TP-Link ID, please register a new one via the Tether app. Install Tether referring to Install the Tether App on Your Smartphones or Tablets.
-
Page 29: Manage The Router Via The Tp-Link Tether App
Locally Manage Your Router Using the Tether App 1. Connect your device to the router’s wireless network. 2. Launch the Tether app, select the model of your router and log in with your TP-Link ID or the password your set for the router.
-
Page 30: Remotely Manage Your Router Using The Tether App
• TP-Link Cloud router with the latest firmware. Refer to Upgrade the Firmware update your router to the latest firmware version. • A TP-Link ID bound to your router. If you don’t have a TP-Link ID, refer to Register a TP-Link ID to get one.
-
Page 31
Chapter 5 TP-Link Cloud Service 2. Enter the email address and the password of your TP-Link ID, and then tap Login. 3. Select the model of your router from the My Cloud Device list. -
Page 32
Chapter 5 TP-Link Cloud Service 4. On the home page, you can check your internet status and connected devices, or click to manage your router remotely as needed. -
Page 33: Chapter 6. Guest Network
Chapter Guest Network This function allows you to provide Wi-Fi access for guests without disclosing your main network. When you have guests in your house, apartment, or workplace, you can create a guest network for them. In addition, you can customize guest network options to ensure network security and privacy.
-
Page 34: Create A Network For Guests
Chapter 6 Guest Network 6. 1. Create a Network for Guests 1. Visit http://tplinkwifi.net, and log in with your TP-Link ID or the password you set for the router. 2. Go to Advanced > Guest Network. Locate the Wireless section.
-
Page 35: Customize Guest Network Options
Chapter 6 Guest Network 6. 2. Customize Guest Network Options 1. Visit http://tplinkwifi.net, and log in with your TP-Link ID or the password you set for the router. 2. Go to Advanced > Guest Network. Locate the Settings section. 3. Customize guest network options according to your needs.
-
Page 36: Chapter 7. Usb Settings
Chapter USB Settings This chapter describes how to use the USB ports to share files, media and a printer from the USB storage devices over your home network locally, or remotely through the internet. The router supports USB external flash drives, hard drives and USB printers. It contains the following sections: •…
-
Page 37: Access The Usb Storage Device
Chapter 7 USB Settings 7. 1. Access the USB Storage Device Insert your USB storage device into the router’s USB port and then access files stored there locally or remotely. Tips: • If you use USB hubs, make sure no more than 4 devices are connected to the router. •…
-
Page 38: Access The Usb Device Remotely
Chapter 7 USB Settings ¾ Method 2: Open the Windows Explorer (or go to Computer) and type the server address \tplinkwifi.net ftp://tplinkwifi.net in the address bar, then press Enter. Windows computer 1 ) Select > Connect to Server. 2 ) Type the server address smb://tplinkwifi.net. 3 ) Click Connect.
-
Page 39
If your ISP assigns a private WAN IP address (such as 192.168.x.x or 10.x.x.x), you cannot use this feature because private addresses are not routed on the Internet. Follow the steps below to configure remote access settings. 1. Visit http://tplinkwifi.net, and log in with your TP-Link ID or the password you set for the router. 2. Go to Advanced >… -
Page 40: Customize The Access Settings
1. Visit http://tplinkwifi.net, and log in with your TP-Link ID or the password you set for the router.
-
Page 41
Chapter 7 USB Settings 2. Now you can access the USB disk by visiting \MyShare (for Windows) or smb:// MyShare (for Mac). ¾ To only share specific content: 1. Focus on the Folder Sharing section. Click the button to disable Share All, then click to add a new sharing folder. -
Page 42
Chapter 7 USB Settings • Enable Authentication: Tick to enable authentication for this folder sharing, and you will be required to log in to the Sharing Account to access the USB disk. Refer to To set up authentication for data security: to learn more. -
Page 43
Chapter 7 USB Settings Note: For Windows users, do not set the sharing username the same as the Windows username. Otherwise, Windows credential mechanism may cause the following problems: • If the sharing password is also the same as the Windows password, authentication will not work since the Windows will automatically use its account information for USB access. -
Page 44: Media Sharing
7. 3. Printer Sharing The feature of Printer Sharing helps you share a printer with different computers connected to the router. Note: Printers unlisted on this page may be incompatible with the router: http://www.tp-link.com/common/compatible/print-server/. 1. Install the Driver of the Printer…
-
Page 45
USB LED becomes solid on. 3. Install the TP-Link USB Printer Controller Utility TP-Link USB Printer Controller Utility helps you access the shared printer. Download and Install the utility on each computer that needs printer service. 1 ) Visit http://www.tp-link.com/app/usb/. -
Page 46
Chapter 7 USB Settings 3 ) Click the Auto-Connect for printing tab to pull down a list, then select Set Auto- Connect Printer. Windows 4 ) Select the printer you share, then click Apply. Windows… -
Page 47
Windows Tips: The Print Server also allows different clients to share the scan feature of MFPs (Multi-Function Printers). To scan with TP-Link USB Printer Controller, right-click the printer and select Network Scanner. Then, a scanning window will pop up. Finish the scanning process by following on-screen instructions. -
Page 48: Chapter 8. Parental Controls
Chapter Parental Controls This function allows you to block inappropriate, explicit and malicious websites, and control access to specified websites at specified time.
-
Page 49
Wikipedia.org from 18:00 (6PM) to 22:00 (10PM) at the weekend and not other times. How can I 1. Visit http://tplinkwifi.net, and log in with your TP-Link ID or do that? the password you set for the router. 2. Go to Advanced >… -
Page 50
Chapter 8 Parental Controls 5. Enter a Description for the entry, tick the Enable This Entry checkbox, and then click OK. 6. Select Whitelist as the restriction policy. Tips: • With Blacklist selected, the controlled devices cannot access any websites containing the specified keywords during the Internet Access Time period. -
Page 51
Chapter 8 Parental Controls Done! Now you can control your children’s internet access as needed. -
Page 52: Chapter 9. Qos
Chapter This chapter introduces how to create a QoS (Quality of Service) rule to specify prioritization of traffic and minimize the impact caused when the connection is under heavy load. It contains the following sections: • Prioritize Internet Traffic with QoS •…
-
Page 53: Prioritize Internet Traffic With Qos
Internet for my phone. How can I 1. Enable QoS and set bandwidth allocation. do that? 1 ) Visit http://tplinkwifi.net, and log in with your TP-Link ID or the password you set for the router. 2 ) Go to Advanced >…
-
Page 54: Update The Database
This function can help to add or update the applications the router supports. If the applications you need are not listed in the Application list, you can try to download the new version and upgrade the datebase. New database versions are posted at www.tp-link.com and can be downloaded for free.
-
Page 55
Chapter 9 1. Download the latest QoS database from our website www.tp-link.com. 2. Visit http://tplinkwifi.net, and log in with your TP-Link ID or the password you set for the router. 3. Go to Advanced > > Database. Click Browse to select the database upgrade file, and then click Upgrade. -
Page 56: Chapter 10. Network Security
Chapter Network Security This chapter guides you on how to protect your home network from cyber attacks and unauthorized users by implementing these three network security functions. You can protect your home network against DoS (Denial of Service) attacks from flooding your network with server requests using DoS Protection, block or allow specific client devices to access your network using Access Control, or you can prevent ARP spoofing and ARP attacks using IP &…
-
Page 57: Protect The Network From Cyber Attacks
DoS Protection can protect your home network against DoS attacks from flooding your network with server requests. Follow the steps below to configure DoS Protection. 1. Visit http://tplinkwifi.net, and log in with your TP-Link ID or the password you set for the router.
-
Page 58: Access Control
Block or allow specific client devices to access my network (via wired or wireless). How can I 1. Visit http://tplinkwifi.net, and log in with your TP-Link ID or do that? the password you set for the router. 2. Go to Advanced >…
-
Page 59: Ip & Mac Binding
Chapter 10 Network Security 3 ) Click Block above the Online Devices table. The selected devices will be added to Devices in Blacklist automatically. To allow specific device(s): 1 ) Select Whitelist and click Save. 2 ) Click in the Devices in Whitelist section.
-
Page 60
Chapter 10 Network Security Prevent ARP spoofing and ARP attacks. I want to: How can I 1. Visit http://tplinkwifi.net, and log in with your TP-Link ID or do that? the password you set for the router. 2. Go to Advanced >… -
Page 61: Chapter 11. Nat Forwarding
The TP-Link router supports four forwarding rules. If two or more rules are set, the priority of implementation from high to low is Virtual Servers, Port Triggering, UPNP and DMZ.
-
Page 62: Share Local Resources On The Internet By Virtual Servers
How can I 1. Assign a static IP address to your PC, for example do that? 192.168.0.100. 2. Visit http://tplinkwifi.net, and log in with your TP-Link ID or the password you set for the router. 3. Go to Advanced >…
-
Page 63: Open Ports Dynamically By Port Triggering
VoIPs, video players and common applications including MSN Gaming Zone, Dialpad and Quick Time 4 players, etc. Follow the steps below to configure the Port Triggering rules: 1. Visit http://tplinkwifi.net, and log in with your TP-Link ID or the password you set for the router. 2. Go to Advanced >…
-
Page 64: Make Applications Free From Port Restriction By Dmz
Chapter 11 NAT Forwarding 3. Click View Existing Applications, and select the desired application. The Triggering Port, External Port Protocol will be automatically filled in. The following picture takes application MSN Gaming Zone as an example. 4. Click Save. Tips: •…
-
Page 65: Make Xbox Online Games Run Smoothly By Upnp
How can I 1. Assign a static IP address to your PC, for example do that? 192.168.0.100. 2. Visit http://tplinkwifi.net, and log in with your TP-Link ID or the password you set for the router. 3. Go to Advanced >…
-
Page 66
Therefore, you can play Xbox online games without a hitch. Internet XBOX Router If necessary, you can follow the steps to change the status of UPnP. 1. Visit http://tplinkwifi.net, and log in with your TP-Link ID or the password you set for the router. 2. Go to Advanced >… -
Page 67: Chapter 12. Vpn Server
Chapter VPN Server The VPN (Virtual Private Networking) Server allows you to access your home network in a secured way through internet when you are out of home. The router offers two ways to set up VPN connection: OpenVPN and PPTP (Point to Point Tunneling Protocol) VPN. OpenVPN is somewhat complex but with greater security and more stable.
-
Page 68: Use Openvpn To Access Your Home Network
VPN client software on the remote device. Please follow the steps below to set up an OpenVPN connection. 13. 1. 1. Step1. Set up OpenVPN Server on Your Router 1. Visit http://tplinkwifi.net, and log in with your TP-Link ID or the password you set for the router. 2. Go to Advanced >…
-
Page 69: Step 2. Configure Openvpn Connection On Your Remote Device
Chapter 13 VPN Server 6. Select your Client Access type. Select Home Network Only if you only want the remote device to access your home network; select Internet and Home Network you also want the remote device to access internet through the VPN Server. 7.
-
Page 70: Step 1. Set Up Pptp Vpn Server On Your Router
Chapter 13 VPN Server 13. 2. 1. Step 1. Set up PPTP VPN Server on Your Router 1. Visit http://tplinkwifi.net, and log in with your TP-Link ID or the password you set for the router. 2. Go to Advanced >…
-
Page 71: Step 2. Configure Pptp Vpn Connection On Your Remote Device
Chapter 13 VPN Server 1 ) Click Add. 2 ) Enter the Username Password to authenticate devices to the PPTP VPN Server. 3 ) Click Save. 13. 2. 2. Step 2. Configure PPTP VPN Connection on Your Remote Device The remote device can use the Windows built-in PPTP software or a third-party PPTP software to connect to PPTP Server.
-
Page 72
Chapter 13 VPN Server 3. Select Connect to a workplace and click Next. 4. Select Use my Internet connection (VPN). -
Page 73
Chapter 13 VPN Server 5. Enter the internet IP address of the router (for example: 218.18.1.73) in the Internet address field. Click Next. 6. Enter the User name Password you have set for the PPTP VPN server on your router, and click Connect. -
Page 74
Chapter 13 VPN Server 7. The PPTP VPN connection is created and ready to use. -
Page 75: Chapter 13. Customize Your Network Settings
Chapter Customize Your Network Settings This chapter guides you on how to configure advanced network features. It contains the following sections: • Change the LAN Settings • Configure to Support IPTV Service • Specify DHCP Server Settings • Set Up a Dynamic DNS Service Account •…
-
Page 76: Change The Lan Settings
If the IP address conflicts with another device on your local network or your network requires a specific IP subnet, you can change it. 1. Visit http://tplinkwifi.net, and log in with your TP-Link ID or the password you set for the router. 2. Go to Advanced >…
-
Page 77
Chapter 14 Customize Your Network Settings 2 ) Click Save. 3 ) After configuring IGMP proxy, IPTV can work behind your router now. You can connect your set-top box to any of the router’s Ethernet port. If IGMP is not the technology your ISP applies to provide IPTV service: 1 ) Tick Enable… -
Page 78: Specify Dhcp Server Settings
IP Address Pool. You can change the settings of the DHCP Server if necessary, and you can reserve LAN IP addresses for specified client devices. 1. Visit http://tplinkwifi.net, and log in with your TP-Link ID or the password you set for the router.
-
Page 79: Set Up A Dynamic Dns Service Account
Note: DDNS does not work if the ISP assigns a private WAN IP address (such as 192.168.1.x) to the router. 1. Visit http://tplinkwifi.net, and log in with your TP-Link ID or the password you set for the router. 2. Go to Advanced >…
-
Page 80
Chapter 14 Customize Your Network Settings Note: To enjoy TP-Link’s DDNS service, you have to log in with a TP-Link ID. If you have not logged in with one, click 4. Click Register in the Domain Name List if you have selected TP-Link, and enter the Domain Name as needed. -
Page 81: Create Static Routes
Chapter 14 Customize Your Network Settings 5. Click Login and Save. Tips: If you want to use a new DDNS account, please click Logout first, and then log in with a new account. 14. 5. Create Static Routes Static routing is a form of routing that is configured manually by a network administrator or a user by adding entries into a routing table.
-
Page 82
1. Change the routers’ LAN IP addresses to two different IP How can I do that? addresses on the same subnet. Disable Router B’s DHCP function. 2. Visit http://tplinkwifi.net, and log in with your TP-Link ID or the password you set for Router A. 3. Go to Network >… -
Page 83: Specify Wireless Settings
The preset SSID and password can be found on the label of the router. You can customize the wireless settings according to your needs. Visit http://tplinkwifi.net, and log in with your TP-Link ID or the password you set for the router.
-
Page 84: Use Wps For Wireless Connection
14. 7. Use WPS for Wireless Connection Wi-Fi Protected Setup (WPS) provides an easier approach to set up a security-protected Wi-Fi connection. 1. Visit http://tplinkwifi.net, and log in with your TP-Link ID or the password you set for the router. 2. Go to Advanced >…
-
Page 85: Use The Wps Wizard For Wi-Fi Connections
Chapter 14 Customize Your Network Settings • PIN (Personal Identification Number) is an eight-character identification number preset to each router. WPS supported devices can connect to your router with the PIN. The default PIN is printed on the label of the router. 14.
-
Page 86: Chapter 14. Manage The Router
Chapter Manage the Router This chapter will show you the configuration for managing and maintaining your router. It contains the following sections: • Set Up System Time • Control LEDs • Test the Network Connectivity • Upgrade the Firmware • Backup and Restore Configuration Settings •…
-
Page 87: Set Up System Time
Parental Controls. You can choose the way to obtain the system time as needed. 1. Visit http://tplinkwifi.net, and log in with your TP-Link ID or the password you set for the router.
-
Page 88: Control Leds
The router‘s LEDs indicate router’s activities and status. You can turn on or turn off the LEDs either from the web management page or by pressing the LED button. 1. Visit http://tplinkwifi.net, and log in with your TP-Link ID or the password you set for the router.
-
Page 89: Test The Network Connectivity
14. 3. Test the Network Connectivity Diagnostics is used to test the connectivity between the router and the host or other network devices. 1. Visit http://tplinkwifi.net, and log in with your TP-Link ID or the password you set for the router. 2. Go to Advanced >…
-
Page 90: Upgrade The Firmware
Do NOT turn off the router during the firmware upgrade. 14. 4. 1. Online Upgrade 1. Visit http://tplinkwifi.net, and log in with your TP-Link ID or the password you set for the router. 2. When the latest firmware is available for your router, the update icon will display in the top-right corner of the page.
-
Page 91: Manual Upgrade
Firmware Upgrade page. 14. 4. 2. Manual Upgrade 1. Download the latest firmware file for the router from www.tp-link.com. 2. Visit http://tplinkwifi.net, and log in with your TP-Link ID or the password you set for the router. 3. Go to Advanced >…
-
Page 92: Restore Interrupted Upgrade After Power Failure
Moreover, if necessary you can erase the current settings and reset the router to the default factory settings. 1. Visit http://tplinkwifi.net, and log in with your TP-Link ID or the password you set for the router.
-
Page 93: Change The Login Password
• During the resetting process, do not turn off the router. • After reset, you can still use the current login password or the TP-Link ID to log in to the web management page. ¾ To reset the router to factory default settings: 1.
-
Page 94: Password Recovery
This feature allows you to recover the login password you set for you router in case you forget it. Note: If you are using a TP-Link ID to log in to the web management page, the Password Recovery feature will be disabled. To manage the TP-Link ID, go to Basic >…
-
Page 95: Local Management
This feature allows you to limit the number of client devices on your LAN from accessing the router by using the MAC address-based authentication. 1. Visit http://tplinkwifi.net, and log in with your TP-Link ID or the password you set for the router.
-
Page 96: Remote Management
6. Click Save. 14. 9. Remote Management This feature allows you to control remote devices’ authority to manage the router. 1. Visit http://tplinkwifi.net, and log in with your TP-Link ID or the password you set for the router. 2. Go to Advanced >…
-
Page 97: System Log
When the router does not work normally, you can save the system log and send it to the technical support for troubleshooting. ¾ To save the system log locally: 1. Visit http://tplinkwifi.net, and log in your TP-Link ID or the password you set for the router. 2. Go to Advanced >…
-
Page 98
It would be great if the system logs could be sent to my mailbox at 8 a.m. every day. 1. Visit http://tplinkwifi.net, and log in with your TP-Link ID or the password you set for the router. -
Page 99: Monitor The Internet Traffic Statistics
The Traffic Statistics page displays the network traffic of the LAN, WAN and WLAN sent and received packets, allowing you to monitor the volume of internet traffic statistics. 1. Visit http://tplinkwifi.net, and log in with your TP-Link ID or the password you set for the router.
-
Page 100
Chapter 14 Manage the Router 3. Toggle on Traffic Statistics, and then you can monitor the traffic statistics in Traffic Statistics List section. Click Refresh to update the statistic information on the page. Click Reset All to reset all statistic values in the list to zero. Click Delete All to delete all statistic information in the list. -
Page 101: Faq
Q2. What should I do if I forget my web management password? • If you are using a TP-Link ID to log in, or you have enabled the Password Recovery feature of the router, click…
-
Page 102
4 ) Click LAN settings and deselect the following three options and click OK. 5 ) Go to Advanced > Restore advanced settings, click to save the settings. -
Page 103
Note: You’ll need to reconfigure the router to surf the internet once the router is reset. Q4. What should I do if I cannot access the internet even though the configuration is finished? 1. Visit http://tplinkwifi.net, and log in with your TP-Link ID or the password you set for the router. 2. Go to Advanced >… -
Page 104
• Your computer might not recognize any DNS server addresses. Please manually configure the DNS server. 1 ) Go to Advanced > Network > DHCP Server. 2 ) Enter 8.8.8.8 as Primary DNS, click Save. Tips: 8.8.8.8 is a safe and public DNS server operated by Google. •… -
Page 105
• Make sure the physical connection between the router and the modem is proper. • Clone the MAC address of your computer. 1 ) Visit http://tplinkwifi.net, and log in with your TP-Link ID or the password you set for the router. -
Page 106
• Modify the LAN IP address of the router. Note: Most TP-Link routers use 192.168.0.1/192.168.1.1 as their default LAN IP address, which may conflict with the IP range of your existing ADSL modem/router. If so, the router is not able to communicate with your modem and you can’t access the internet. -
Page 107
1 ) If you see the message Windows cannot configure this wireless connection, this is usually because windows configuration utility is disabled or you are running another wireless configuration tool to connect the wireless. 2 ) Exit the wireless configuration tool (the TP-Link Utility, for example). -
Page 108
3 ) Select and right click on My Computer on desktop, select Manage to open Computer Management window. 4 ) Expand Services and Applications > Services, find and locate Wireless Zero Configuration in the Services list on the right side. 5 ) Right click Wireless Zero Configuration, and then select Properties. -
Page 109
2 ) If you cannot find the PIN or PIN failed, you may choose Connecting using a security key instead, and then type in the Wireless Password/Network Security Key. 3 ) If it continues to show note of Network Security Key Mismatch, it is suggested to confirm the wireless password of your wireless router. -
Page 110
Specifications are subject to change without notice. is a registered trademark of TP-Link Technologies Co., Ltd. Other brands and product names are trademarks or registered trademarks of their respective holders. No part of the specifications may be reproduced in any form or by any means or used to make any derivative such as translation, transformation, or adaptation without permission from TP-Link Technologies Co., Ltd. -
Page 111
FCC STATEMENT This equipment has been tested and found to comply with the limits for a Class B digital device, pursuant to part 15 of the FCC Rules. These limits are designed to provide reasonable protection against harmful interference in a residential installation. This equipment generates, uses and can radiate radio frequency energy and, if not installed and used in accordance with the instructions, may cause harmful interference to radio communications. -
Page 112
&( 0DUN :DUQLQJ 5) ([SRVXUH ,QIRUPDWLRQ 7KLV GHYLFH PHHWV WKH (8 UHTXLUHPHQWV (& $UWLFOH D RQ WKH OLPLWDWLRQ RI H[SRVXUH RI WKH JHQHUDO SXEOLF WR HOHFWURPDJQHWLF ILHOGV E ZD RI KHDOWK SURWHFWLRQ 7KH GHYLFH FRPSOLHV ZLWK 5) VSHFLILFDWLRQV ZKHQ WKH GHYLFH XVHG DW FP IURP RXU ERG 5HVWULFWHG WR LQGRRU XVH &DQDGLDQ &RPSOLDQFH 6WDWHPHQW 7KLV GHYLFH FRPSOLHV ZLWK ,QGXVWU &DQDGD OLFHQVHH[HPSW 566V 2SHUDWLRQ LV VXEMHFW WR… -
Page 113
7KLV HTXLSPHQW FRPSOLHV ZLWK ,& UDGLDWLRQ H[SRVXUH OLPLWV VHW IRUWK IRU DQ XQFRQWUROOHG HQYLURQPHQW 7KLV HTXLSPHQW VKRXOG EH LQVWDOOHG DQG RSHUDWHG ZLWK PLQLPXP GLVWDQFH FP EHWZHHQ WKH UDGLDWRU RXU ERG ‘pFODUDWLRQ G
H[SRVLWLRQ DX[ UDGLDWLRQV &HW pTXLSHPHQW HVW FRQIRUPH DX[ OLPLWHV G
H[SRVLWLRQ DX[ UDRQQHPHQWV ,& pWDEOLHV SRXU XQ HQYLURQQHPHQW QRQ FRQWU{Op &HW pTXLSHPHQW GRLW rWUH LQVWDOOp HW XWLOLVp DYHF XQ PLQLPXP GH FP GH GLVWDQFH HQWUH OD VRXUFH GH UDRQQHPHQW HW YRWUH FRUSV ,QGXVWU &DQDGD 6WDWHPHQW… -
Page 114
6DIHW ,QIRUPDWLRQ :KHQ SURGXFW KDV SRZHU EXWWRQ WKH SRZHU EXWWRQ LV RQH RI WKH ZD WR VKXW RII WKH SURGXFW ZKHQ WKHUH LV QR SRZHU EXWWRQ WKH RQO ZD WR FRPSOHWHO VKXW RII SRZHU LV WR GLVFRQQHFW WKH SURGXFW RU WKH SRZHU DGDSWHU IURP WKH SRZHU VRXUFH ‘RQ¶W GLVDVVHPEOH WKH SURGXFW RU PDNH UHSDLUV RXUVHOI <RX UXQ WKH ULVN RI HOHFWULF VKRFN DQG YRLGLQJ WKH OLPLWHG ZDUUDQW ,I RX QHHG VHUYLFH SOHDVH FRQWDFW XV $YRLG ZDWHU DQG ZHW ORFDWLRQV…
Для ознакомления с инструкцией необходимо нажать на ссылку «ЗАГРУЗИТЬ», чтобы скачать pdf файл. Если есть кнопка «ПРОСМОТР», то можно просто посмотреть документ онлайн.
Для удобства, Вы можете сохранить данную страницу с файлом руководства по эксплуатации в свой список «избранное» прямо на сайте (доступно для зарегистрированных пользователей).
Смотрите инструкцию для похожих моделей:
Вы можете задать вопрос посетителям сайта по модели TP-LINK Archer C1200. Если Вы являетесь её пользователем, то пожалуйста оставьте, по возможности развёрнутый отзыв:
Шаг 1 из 14
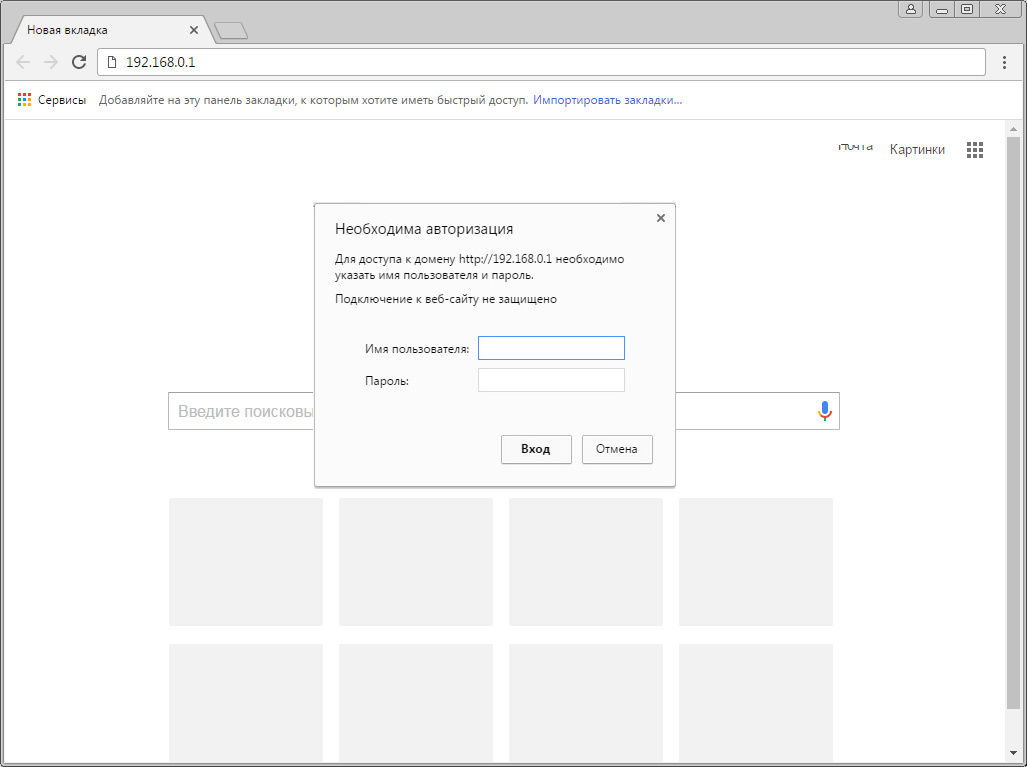
Открываем браузер, в адресной строке набираем адрес роутера, нажимаем Enter.
Шаг 2 из 14
Если открывается страница «Создайте новое имя пользователя и пароль» («Create new user and password»), в полях «Новое имя пользователя» («New user») и «Новый пароль» («New Password») придумываем и пишем имя пользователя и пароль, которые будут использоваться для дальнейшей авторизации в настройках роутера. Рекомендуем использовать имя пользователя admin, пароль также admin.
В поле «Подтвердить новый пароль» («Confirm new password») повторно пишем придуманный пароль.
Нажимаем кнопку «Подтвердить» («Confirm»).
Шаг 3 из 14
Если открывается страница авторизации роутера, вводим логин и пароль для доступа к роутеру, нажимаем Enter.
Шаг 4 из 14
Откроются настройки роутера.
Если интерфейс на английском, справа сверху проверяем наличие выпадающего списка с выбором языка. Если выпадающий список есть, выбираем «Русский».
Шаг 5 из 14
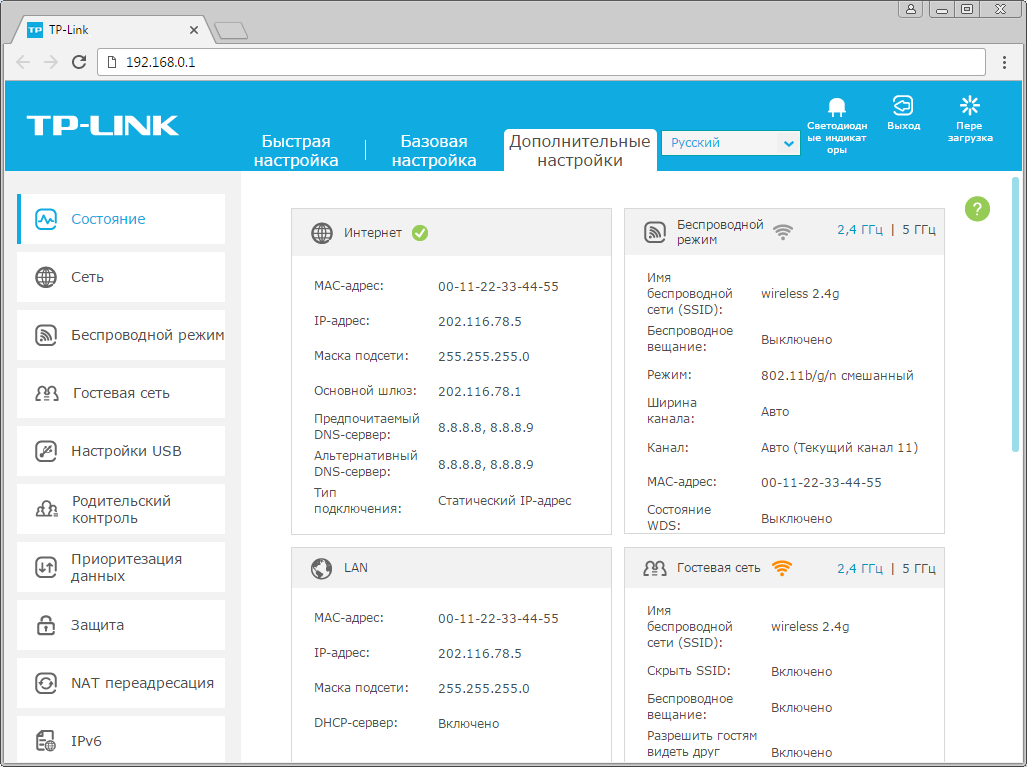
Выбираем вкладку «Дополнительные настройки» («Advanced»).
Откроется страница «Состояние» («Status»).
Шаг 6 из 14
В левом меню нажимаем на пункт «Сеть» («Network»).
Выбираем подпункт «Интернет» («WAN»). Откроется соответствующее окно.
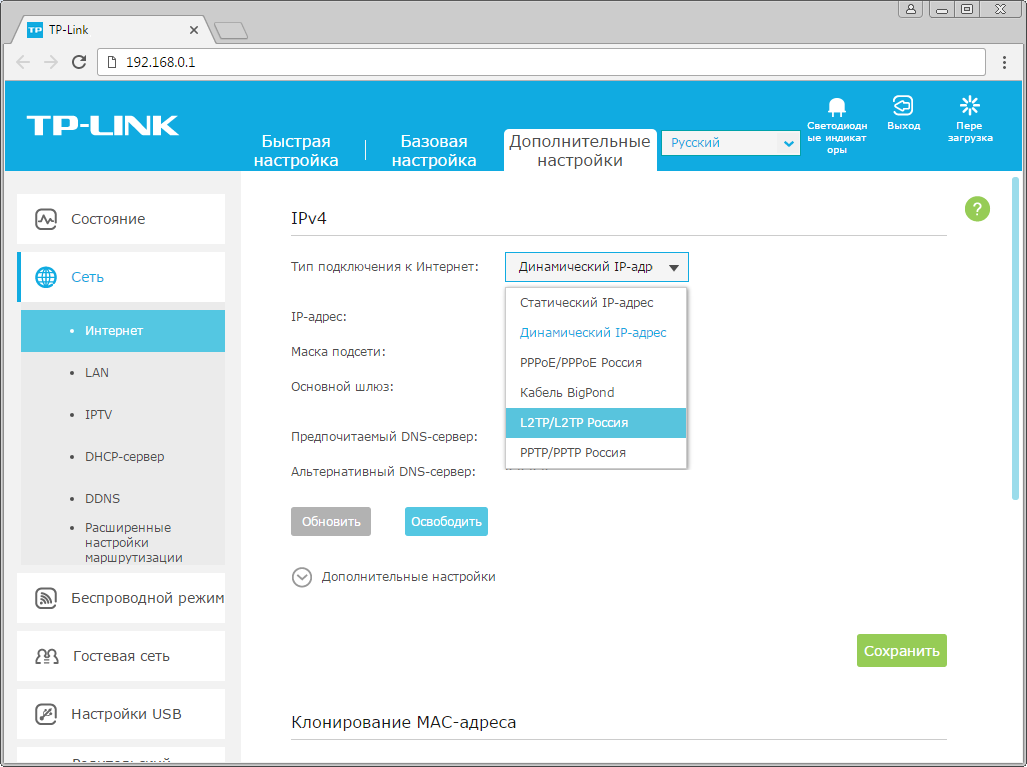
В блоке «IPv4» в пункте «Тип подключения к Интернет» («WAN Connection Type») из выпадающего списка выбираем «L2TP/L2TP Россия» («L2TP/Russia L2TP»).
Шаг 7 из 14
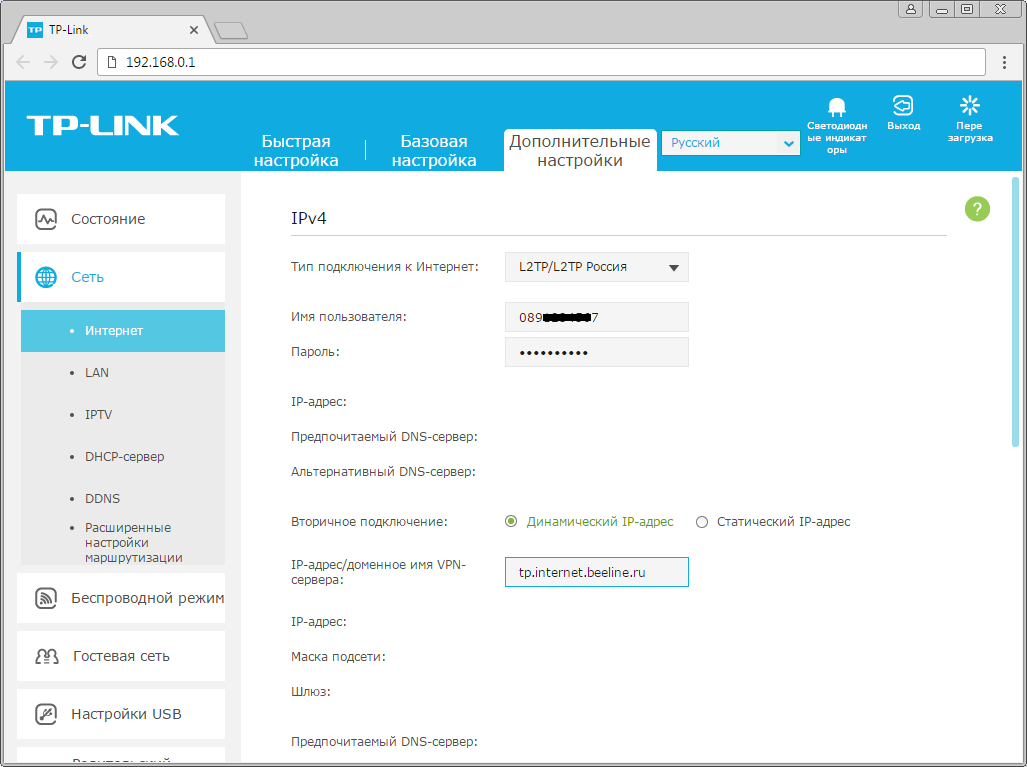
Появятся остальные поля для настройки L2TP.
В поле «Имя пользователя» («Username») вводим лицевой счет.
В поле «Пароль» («Password») вводим пароль от домашнего интернета.
Если есть поле «Подтвердить пароль» («Confirm Password»), в нем повторно вводим пароль от домашнего интернета.
Отмечаем пункт «Динамический IP-адрес» («Dynamic IP»).
В поле «IP-адрес/доменное имя VPN-сервера» («Server IP Address/Name») вводим tp.internet.beeline.ru.
Шаг 8 из 14
Листаем страницу вниз.
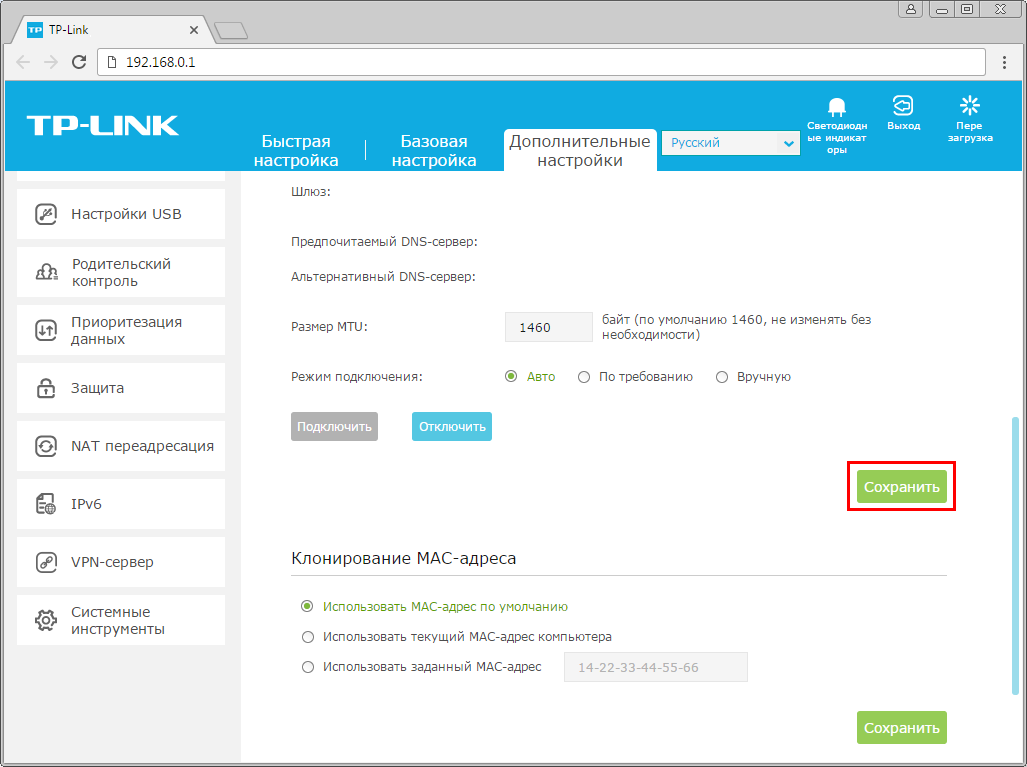
Убеждаемся, что в пункте «Размер MTU» («MTU Size») написано значение 1460.
В пункте «Режим подключения» («Connection Mode») отмечаем значение «Авто» («Connect Automatically»).
В правой нижней части текущего блока («IPv4») нажимаем кнопку «Сохранить» («Save»), ждем применения настроек.
Шаг 9 из 14
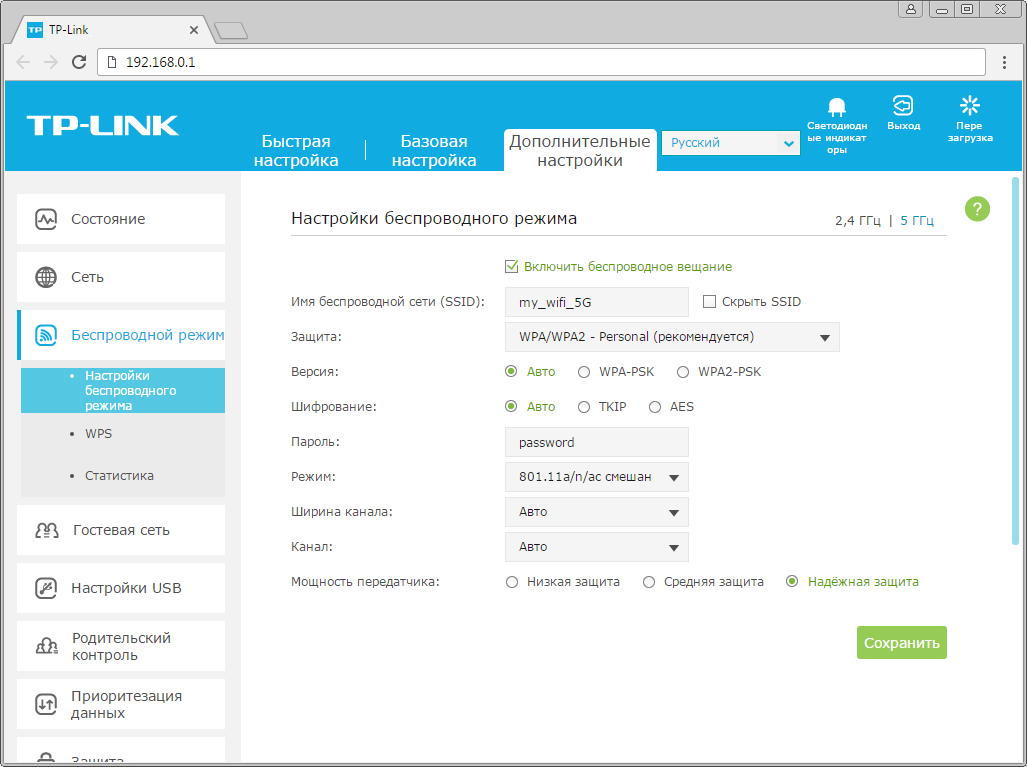
В левом меню нажимаем на пункт «Беспроводной режим» («Wireless»), далее выбираем подпункт «Настройки беспроводного режима» («Wireless settings»).
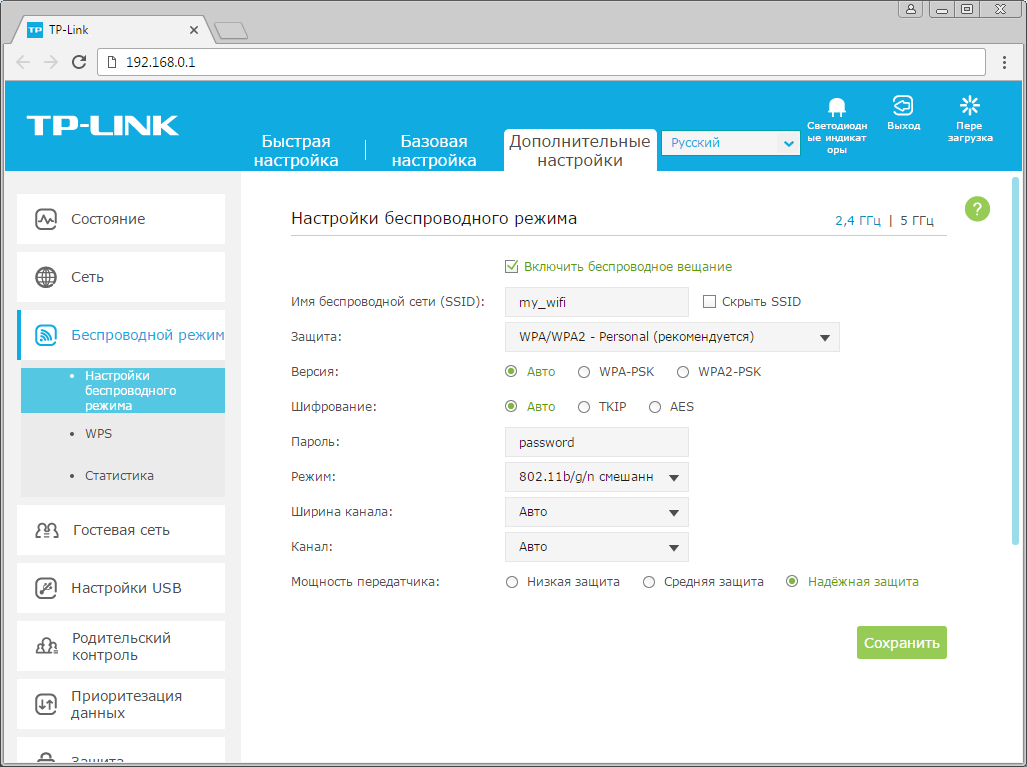
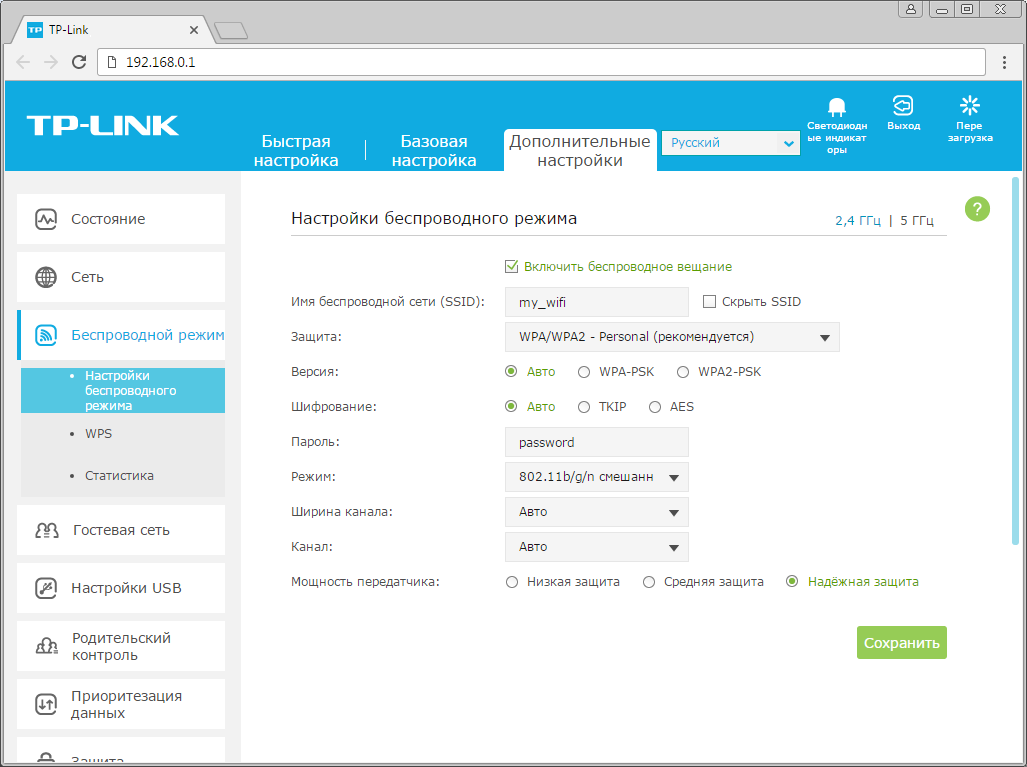
Откроется соответствующее окно, убеждаемся, что пункт «Включить беспроводное вещание» («Enable SSID Broadcast») отмечен.
В поле «Имя беспроводной сети» («Wireless Network Name») придумываем и пишем новое имя сети (достаточно изменить/добавить одну букву или цифру).
Нажимаем кнопку «Сохранить» («Save»), ждем применения настроек.
Шаг 10 из 14
Если в данном окне («Настройки беспроводного режима») есть пункты «Защита» («Security»), «Версия» («Version»), «Шифрование» («Encryption»), «Пароль» («Wireless Password / RADIUS Password») — заполняем их.
В поле «Защита» («Security») выбираем «WPA/WPA2-Personal».
В поле «Версия» («Version») отмечаем пункт «Авто» («Auto»).
В поле «Шифрование» («Encryption») также отмечаем пункт «Авто» («Auto»).
В поле «Пароль» («Wireless Password / RADIUS Password») придумываем и пишем новый пароль для Wi-Fi сети (не менее 8 символов, используя только английские буквы или цифры).
Нажимаем кнопку «Сохранить» («Save»), ждем применения настроек.
Шаг 11 из 14
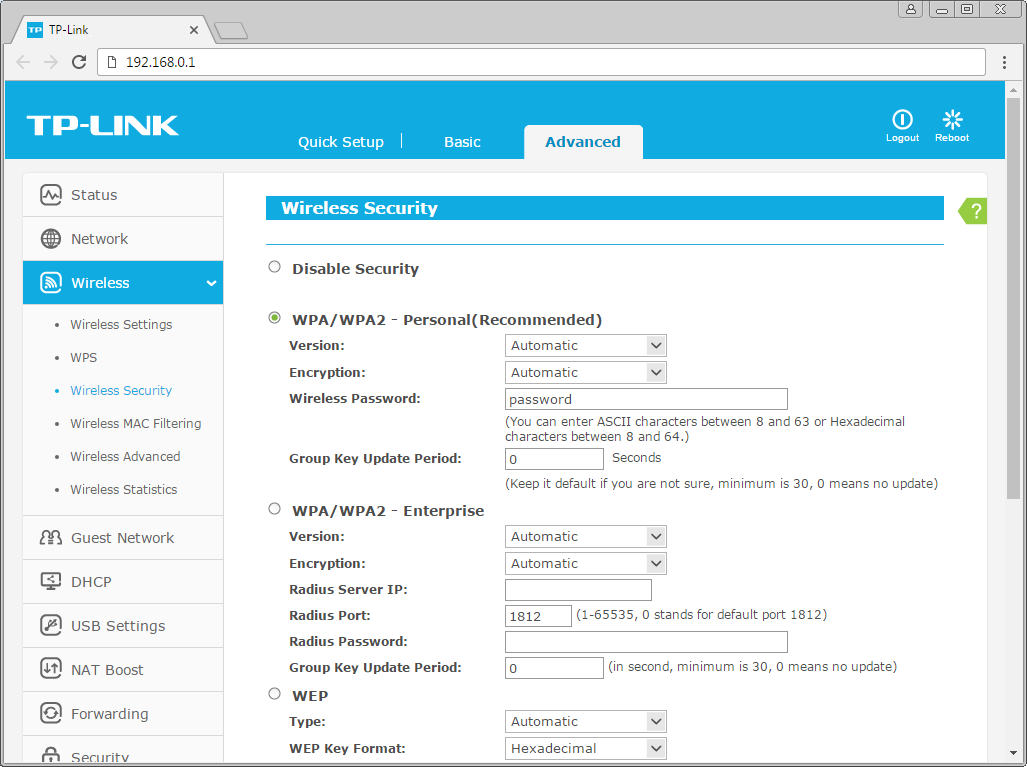
Если в окне «Настройки беспроводного режима» («Wireless settings») пунктов связанных с паролем/защитой не было — в левом меню нажимаем на пункт «Беспроводной режим» («Wireless»), далее выбираем подпункт «Безопасность» («Wireless Security»).
Отмечаем пункт «WPA/WPA2-Personal».
В поле «Версия» («Version») выбираем «Авто» («Auto»).
В поле «Шифрование» («Encryption») также выбираем пункт «Авто» («Auto»).
В поле «Пароль» («Wireless Password / RADIUS Password») придумываем и пишем новый пароль для Wi-Fi сети (не менее 8 символов, используя только английские буквы или цифры).
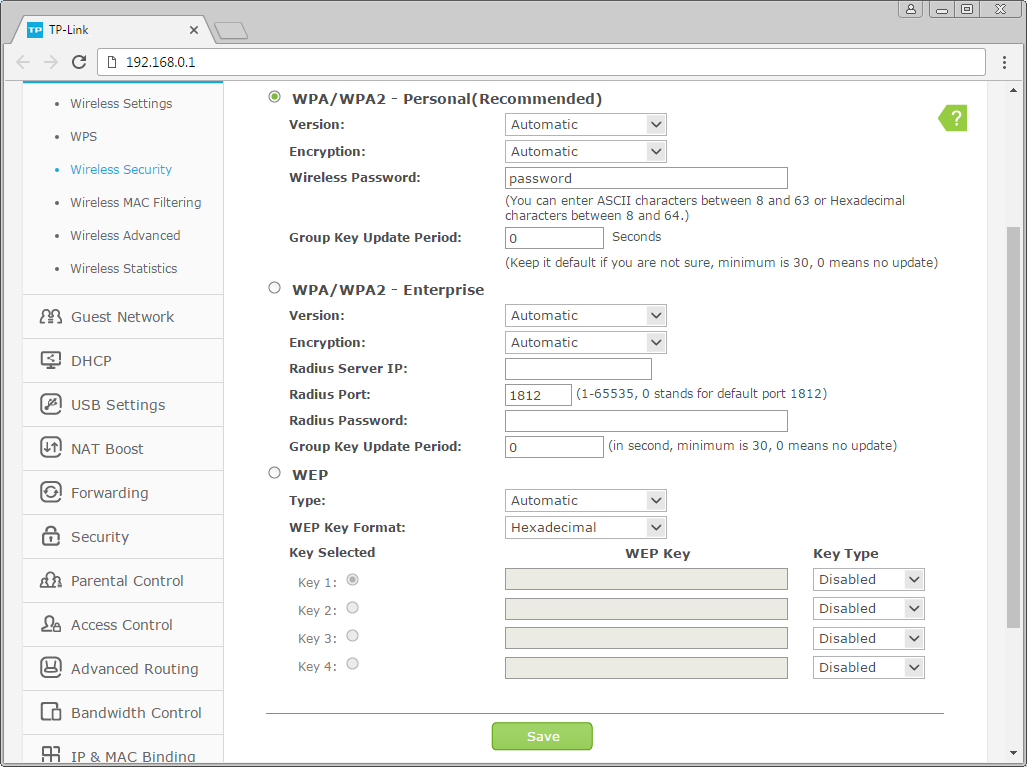
Шаг 12 из 14
Листаем страницу вниз, нажимаем кнопку «Сохранить» («Save»), ждем применения настроек.
Шаг 13 из 14
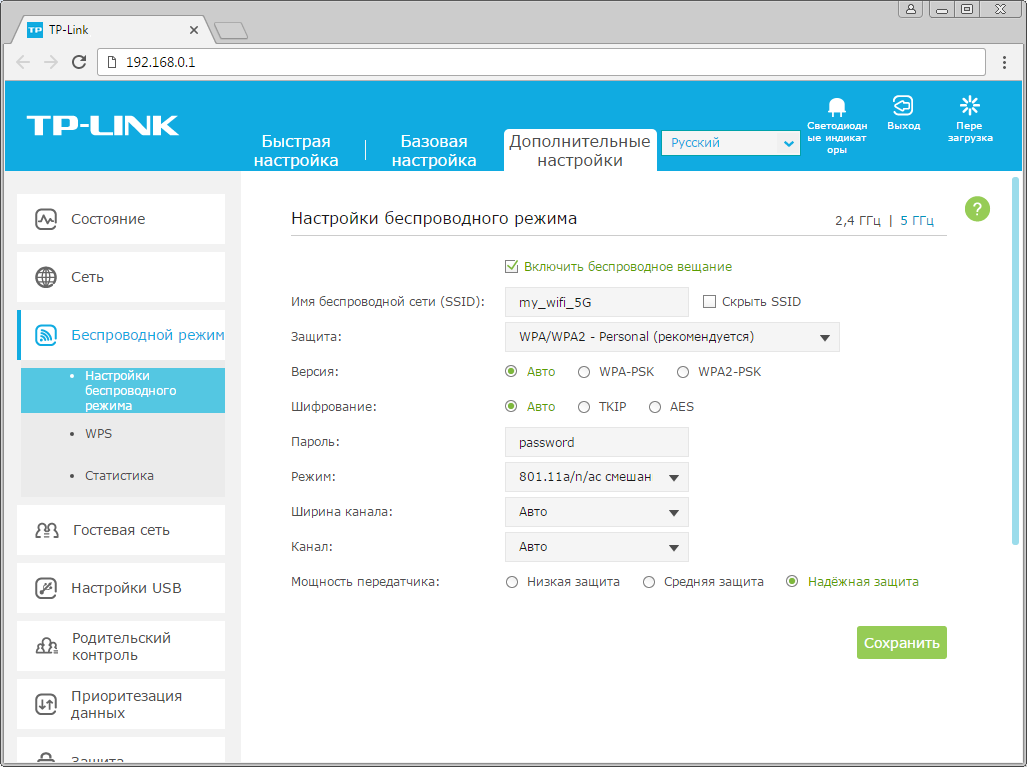
Если в окне («Настройки беспроводного режима») справа сверху есть пункты «2,4 ГГц / 5 ГГц», нажимаем на «5 ГГц», аналогично настраиваем сеть 5 ГГц. Убеждаемся, что пункт «Включить беспроводное вещание» («Enable SSID Broadcast») отмечен.
В поле «Имя беспроводной сети» («Wireless Network Name») придумываем и пишем новое имя сети (достаточно изменить/добавить одну букву или цифру).
Нажимаем кнопку «Сохранить» («Save»), ждем применения настроек.
Шаг 14 из 14
В данном окне («Настройки беспроводного режима 5 ГГц») в поле «Защита» («Security») выбираем «WPA/WPA2-Personal».
В поле «Версия» («Version») отмечаем пункт «Авто» («Auto»).
В поле «Шифрование» («Encryption») также отмечаем пункт «Авто» («Auto»).
В поле «Пароль» («Wireless Password / RADIUS Password») придумываем и пишем новый пароль для Wi-Fi сети (не менее 8 символов, используя только английские буквы или цифры).
Нажимаем кнопку «Сохранить» («Save»), ждем применения настроек.
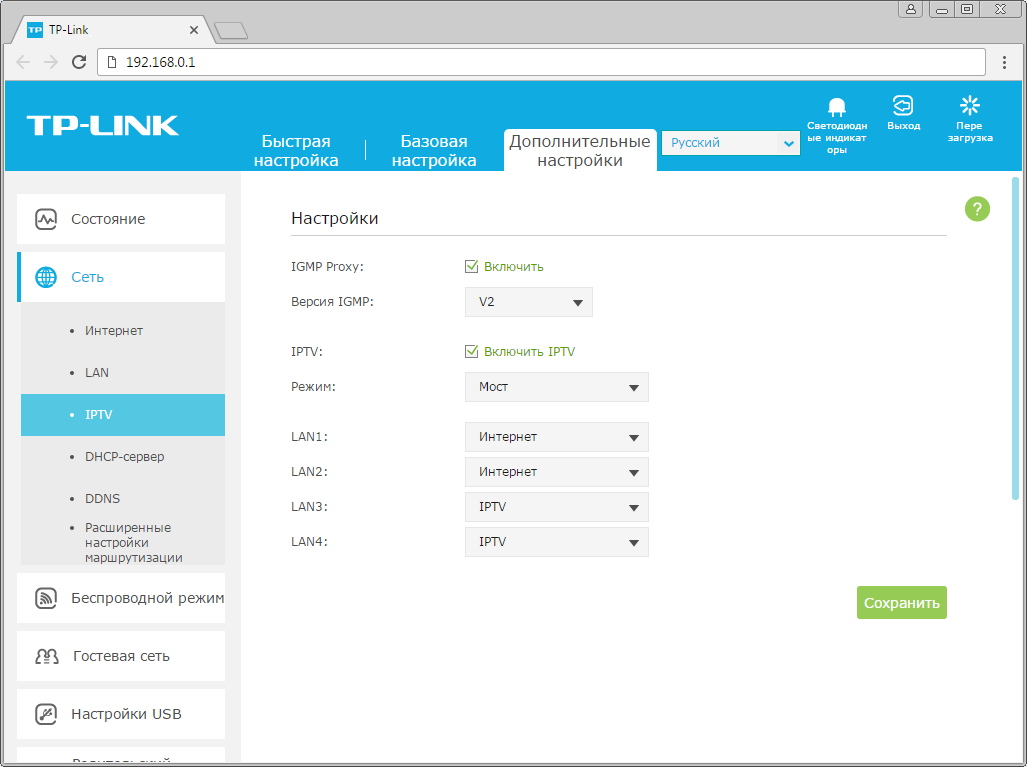
Шаг 1 из 2
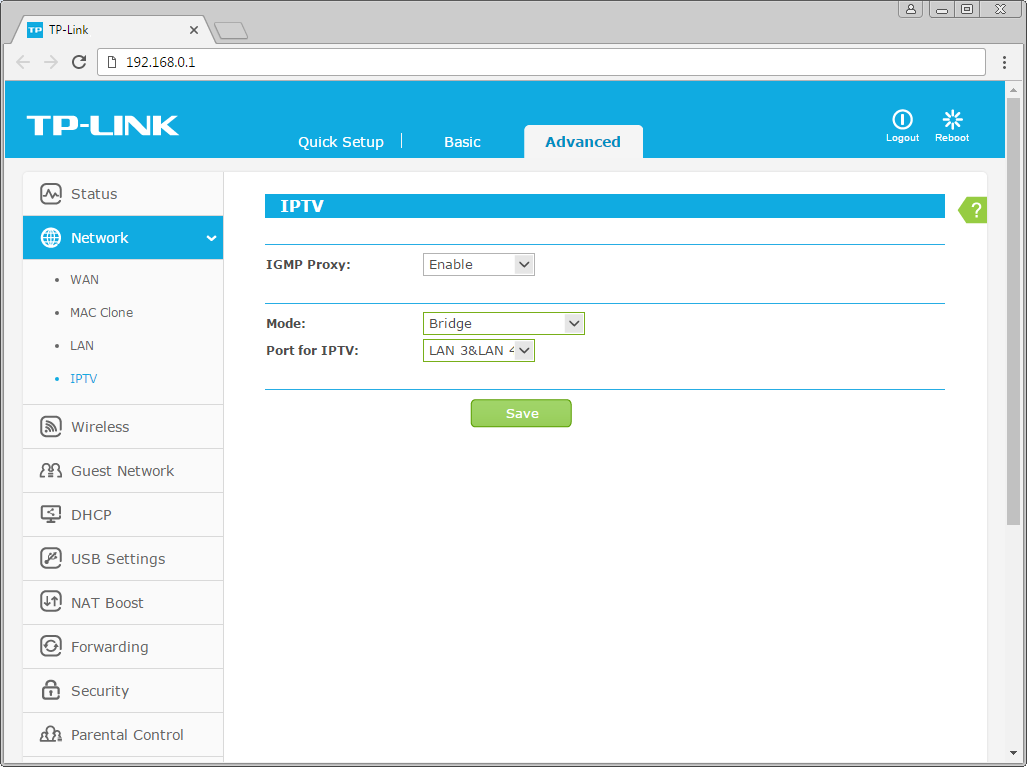
В левом меню нажимаем на пункт «Сеть» («Network»), далее выбираем подпункт «IPTV». Убеждаемся, что пункт «IGMP Proxy» отмечен. Если есть пункт «Режим» («Mode») и пункты выбора выделенного порта для домашнего телевидения, в поле «Режим» («Mode») выбираем «Мост» («Bridge»). Если выбор порта для IPTV представлен отдельными выпадающими списками — только для портов, к которым подключены ТВ-приставки, вместо значения «Интернет» («Internet») выбираем значение «IPTV.
Нажимаем кнопку «Сохранить» («Save»), ждем применения настроек.
Шаг 2 из 2
Если выбор порта для IPTV представлен единым выпадающем списком «Port for IPTV» — выбираем в нем номера портов, к которым подключены ТВ-приставки.
Нажимаем кнопку «Сохранить» («Save»), ждем применения настроек.
Будьте внимательны, выполняя инструкции в этом разделе. В случае ошибки в действиях потребуется визит в сервис-центр для восстановления устройства. Прошивать роутер рекомендуется, подключив кабель от ПК в любой из LAN-портов.
Прошивая роутер по Wi-Fi, есть риск получить неработоспособное устройство, восстанавливаемое только в сервис-центре, либо не восстанавливаемое вовсе.
Шаг 1 из 3
Скачайте прошивку.
Шаг 2 из 3
Открываем браузер, в адресной строке набираем адрес роутера, нажимаем Enter.
Откроется страница авторизации роутера.
Вводим логин и пароль для доступа к роутеру, нажимаем Enter.
Шаг 3 из 3
Перед вами откроется web-интерфейс роутера.
В левом меню нажмите на пункт “Системные инструменты” (“System Tools”).
Выберите подпункт “Обновление встроенного ПО” (“Firmware Upgrade”).
Напротив строки “Путь к файлу встроенного ПО” (“File”) – нажмите кнопку «Выберите файл», в открывшемся окне нужно найти файл с прошивкой. После этого нажимаем кнопку “Обновить” (“Upgrade”).
Подождите, пока роутер обновляет свою микропрограмму, обычно это занимает не более 15 минут, во время обновления не выключайте роутер из сети розетки. После того, как роутер обновит свою прошивку и перезагрузится, вы можете приступать к эксплуатации.

