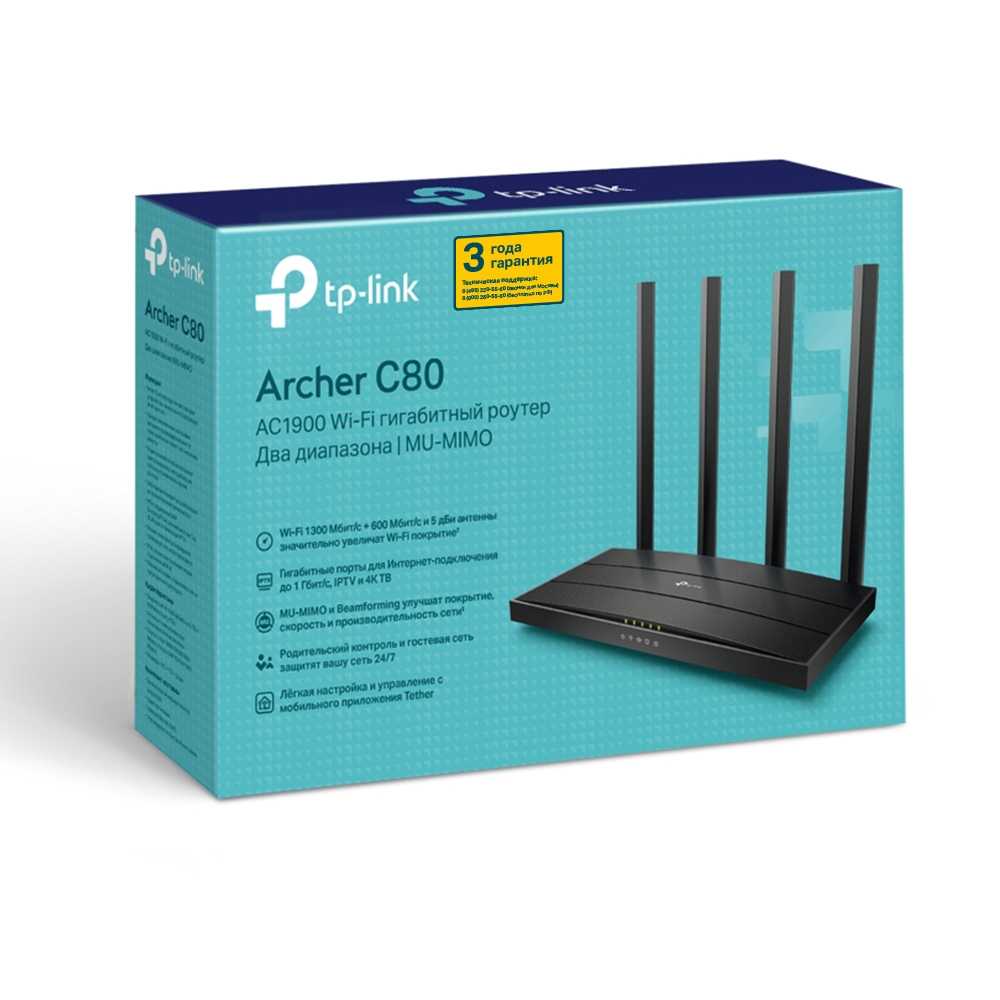
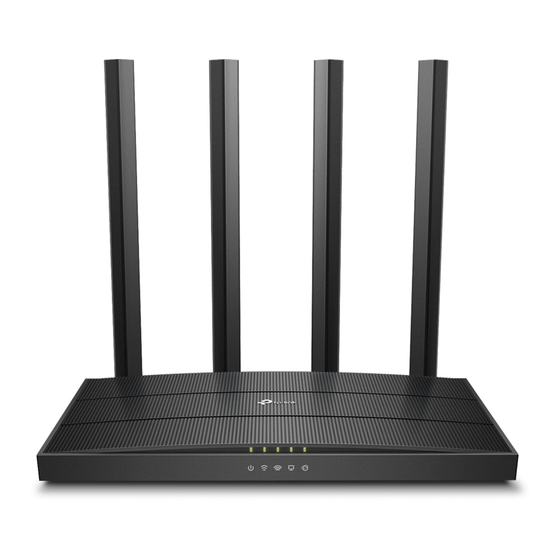
TP-Link Archer C80 — популярный высокопроизводительный и функциональный двухдиапазонный беспроводный роутер класса АС1900, который поддерживает WiFi 5 и обладает четырьмя антеннами, позволяющие максимально покрыть помещение качественной связью.
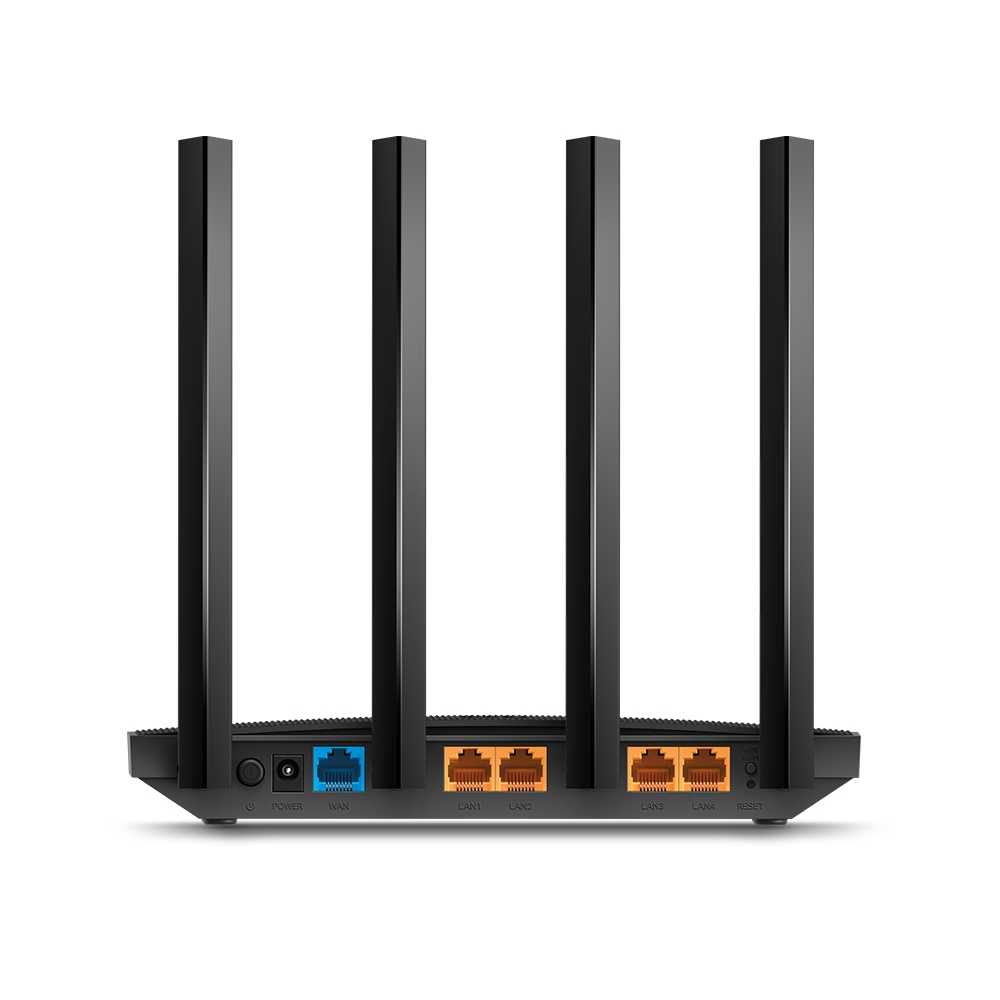
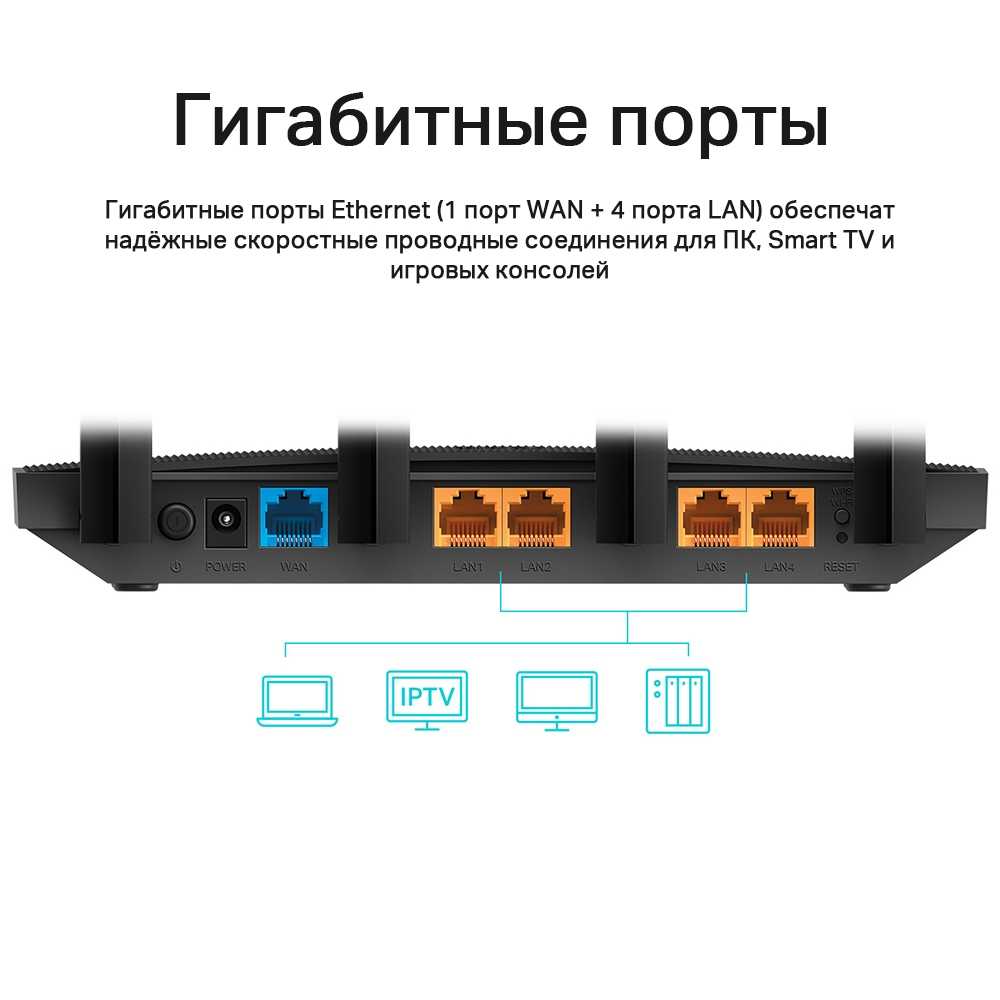
Маршрутизатор имеет Gigabit Ethernet Wan порт и 4 Gigabit LAN Port, который поможет реализовать потенциал гигабитного подключения к кабельной сети провайдера.
Как настроить интернет (PPPoE) на TP-LINK Archer C80
-
Для начала необходимо зайти в настройки роутера. Для этого в любом браузере вводим его IP-адрес — 192.168.0.1

-
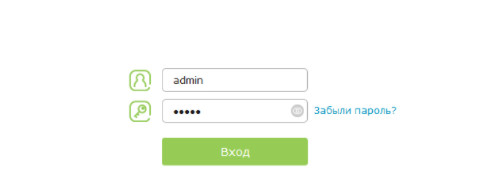
Затем вводим логин-пароль: admin-admin
-
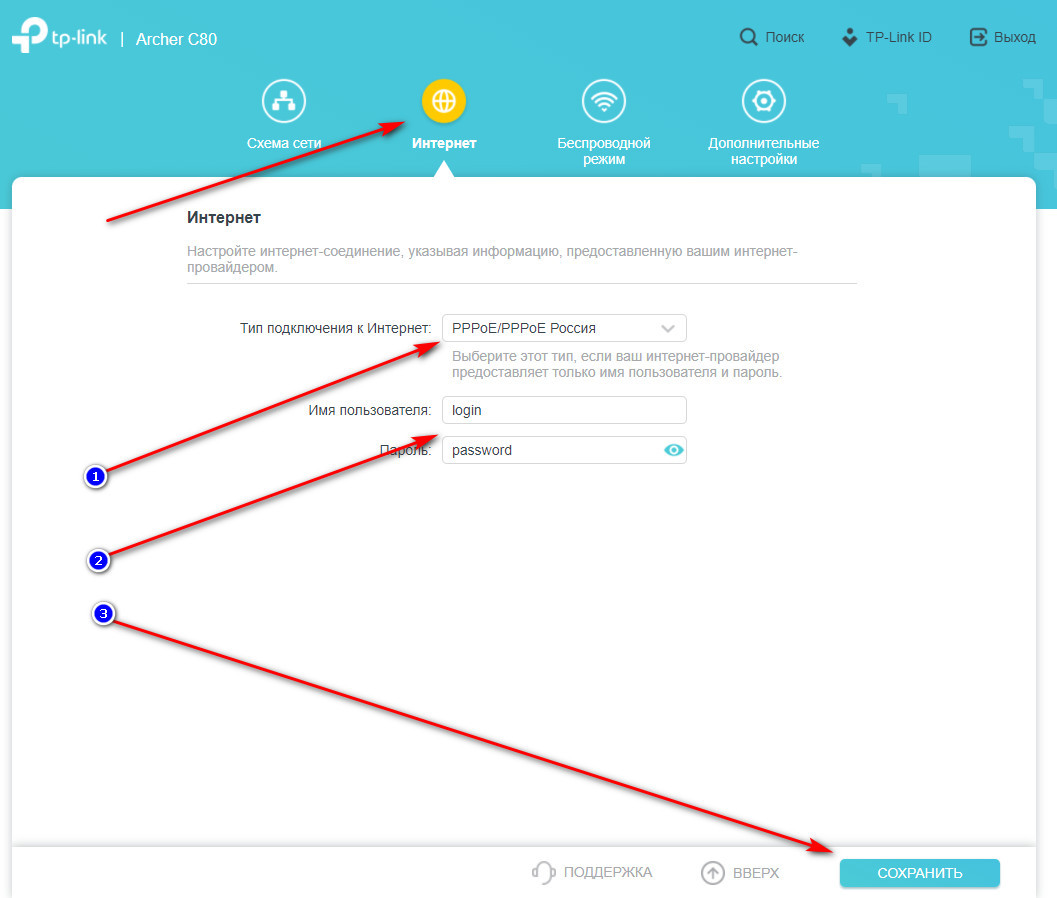
Выбираем вкладку — Интернет. (1) Указываем тип подключения — PPPoE. (2) Прописываем — Логин и Пароль, который предоставил Ваш провайдер. (3) Не забываем нажать кнопку — Сохранить.
-
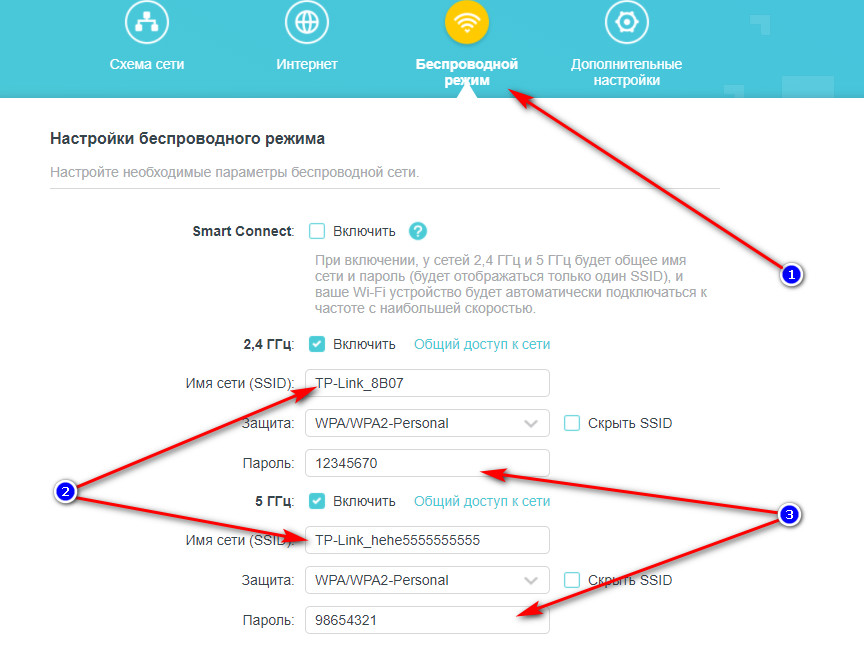
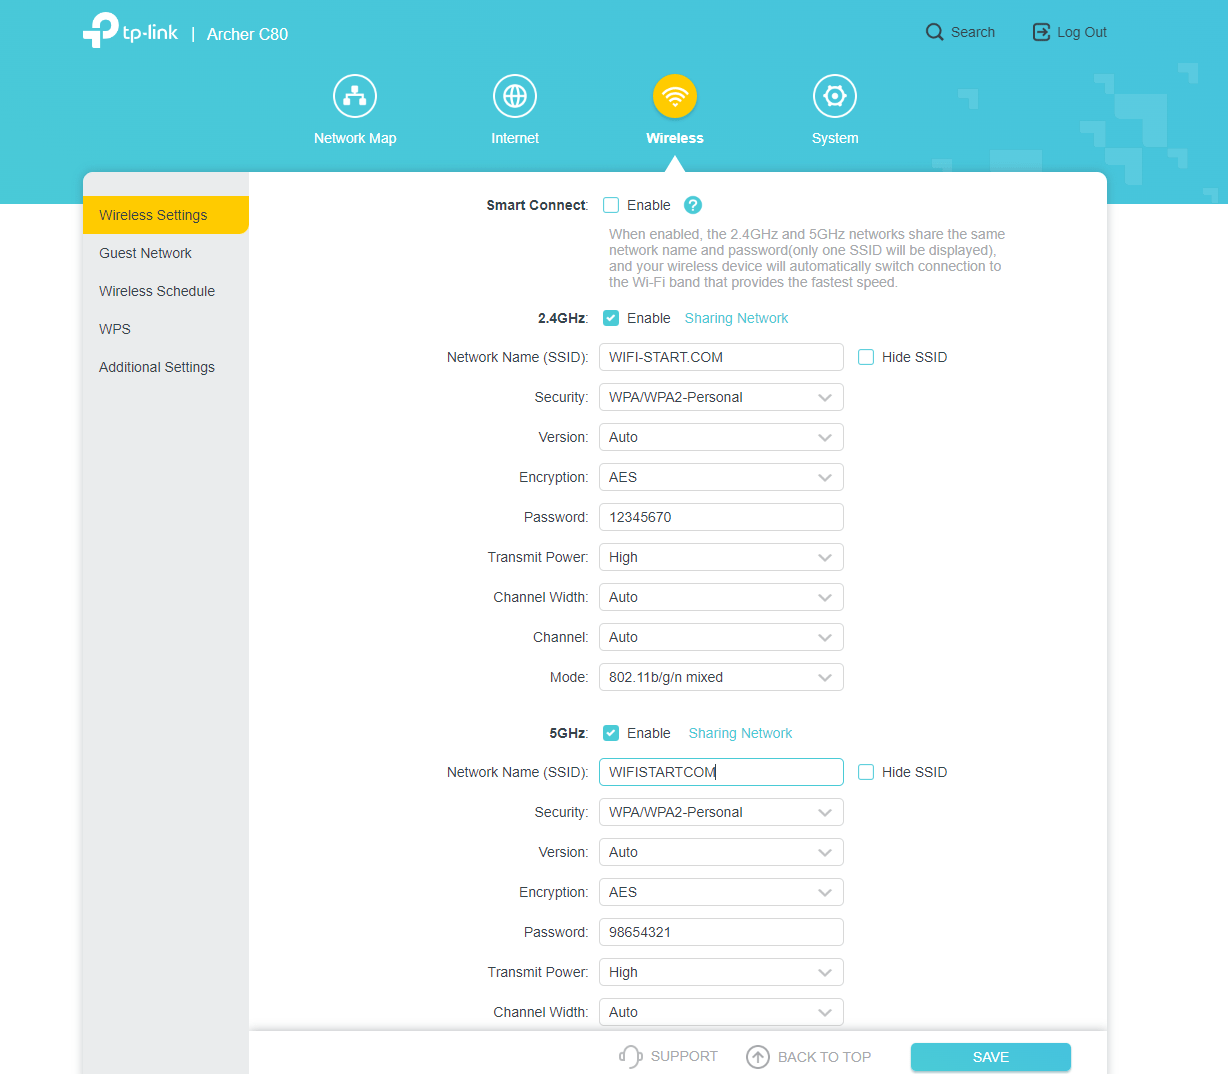
Также Вы можете сменить Имя роутера и Пароль безопасности. (1) Для этого необходимо во вкладке — «Беспроводной режим«, изменить (2) «Имя сети (SSID)» и (3) «Пароль». Нажать кнопку Сохранить.

Беспроводное подключение Wi-Fi
- Стандарты Wi-Fi — Wi-Fi 3 (802.11g), Wi-Fi 4 (802.11n), Wi-Fi 5 (802.11ac)
- Частотный диапазон — 2.4 ГГц, 5 ГГц
- Макс. скорость при 2.4 ГГц — 600 Мбит/с
- Макс. скорость при 5 ГГц — 1300 Мбит/с
Подключение и LAN
- WAN 1 порт — 1 Гбит/с
- LAN 4 порта — 1 Гбит/с
Антенна и передатчик
- Всего антенн — 4 шт
- Тип антенн — внешняя
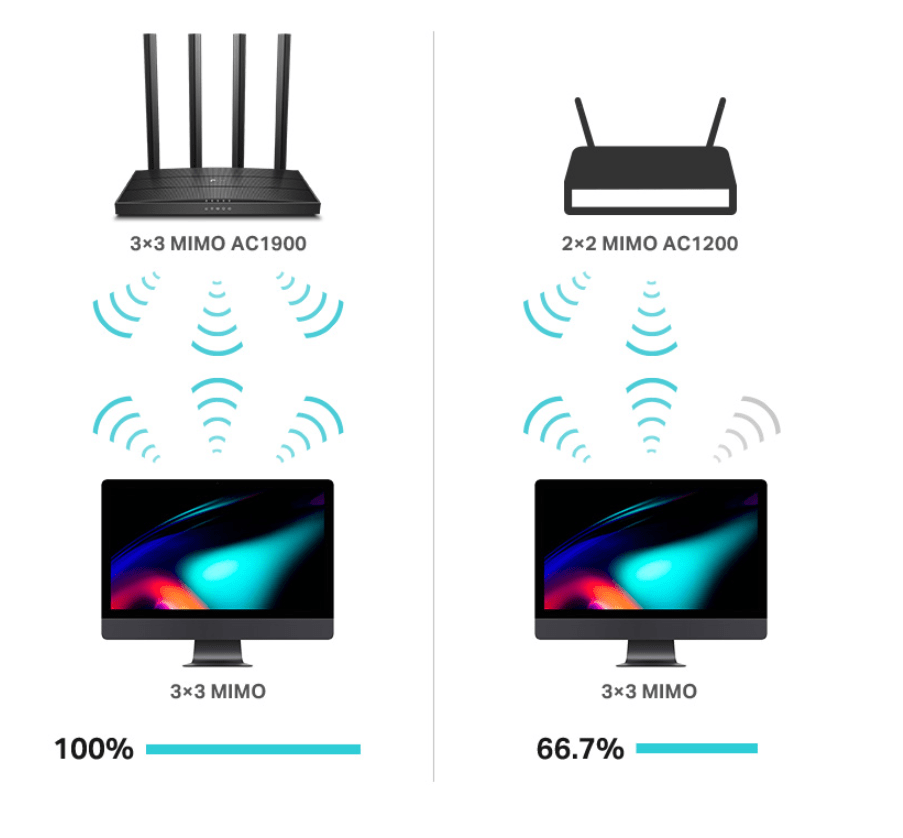
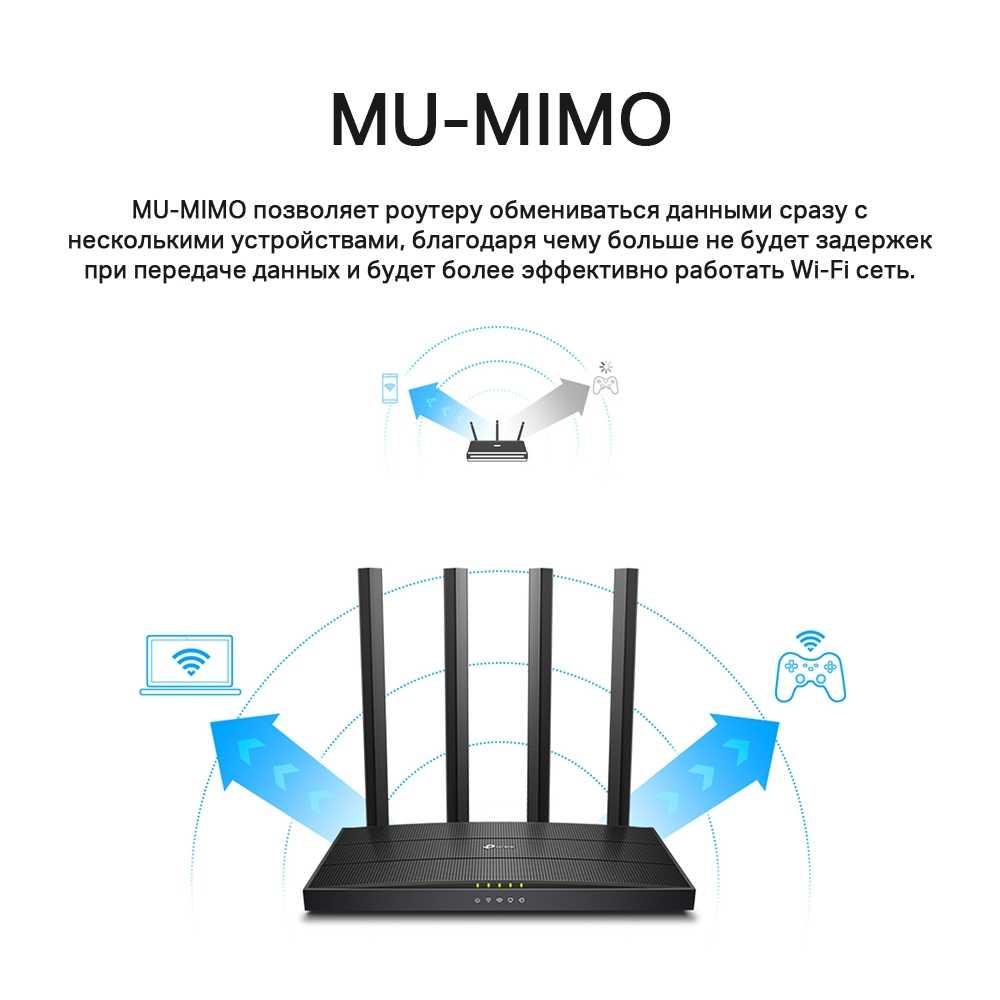
- MU-MIMO — есть
- Антенн на 2.4 ГГц — 4 шт
- Антенн на 5 ГГц — 4 шт
- Мощность передатчика — 23 dBm / FCC: 30 dBm /
- Мощность сигнала 2.4 ГГц — 20 dBm
- Мощность сигнала 5 ГГц — 23 dBm
Функции
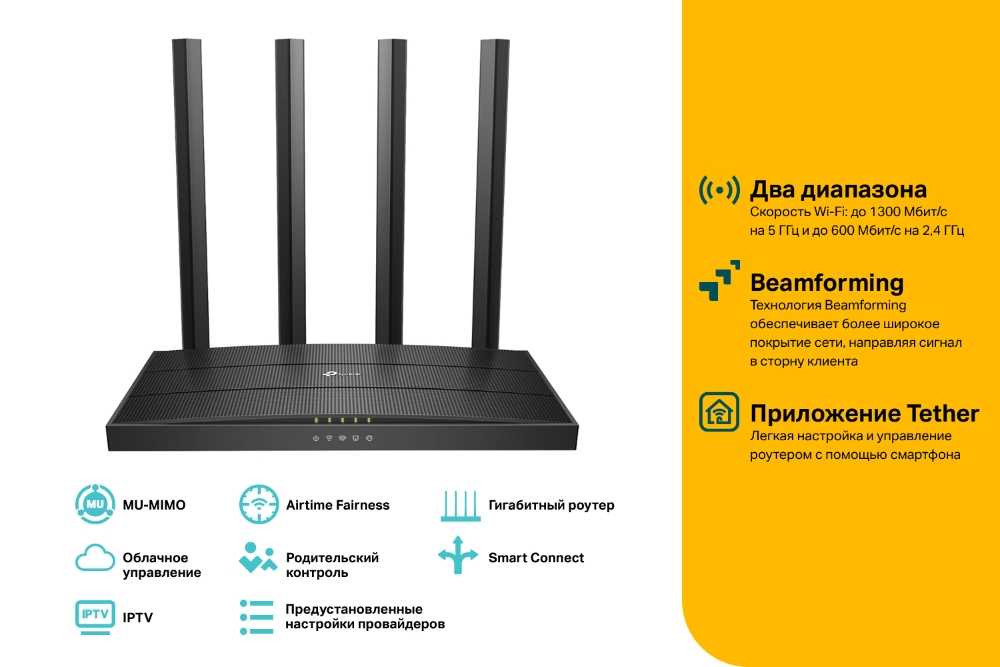
- Функции и возможности — NAT, Beamforming, сетевой экран (Firewall)
- Дополнительно — DHCP-сервер, поддержка VPN, поддержка DDNS, поддержка DMZ
- Стандарты безопасности — WPA, WEP, WPA2, 802.1x
Общее
- Рабочая температура — 0 °C ~ +40 °C
- Габариты — 215x117x32 мм
TP-Link Archer C80 — это мощный и доступный роутер Wi-Fi, предлагающий оптимальное соотношение цены и качества. В данной статье мы рассмотрим основные характеристики, функции, преимущества и недостатки данного устройства, а также дадим рекомендации по настройке и покупке.
Содержание
- Обзор роутера TP-Link Archer C80
- Цвет и материалы
- Форма и размеры
- Антенны
- Индикаторы и порты
- Технические характеристики
- Основные функции и возможности
- Плюсы и минусы модели
- Преимущества TP-Link Archer C80
- Недостатки TP-Link Archer C80
- Настройка TP-Link Archer C80 и подключение
- Логин и пароль для роутера TP-Link Archer C80
- Как прошить роутер самостоятельно?
- AC1900 и Archer C80 — обозначение
- Где купить и цена
- Сравнение с другими роутерами
- Ответы на вопросы
- Заключение
Обзор роутера TP-Link Archer C80
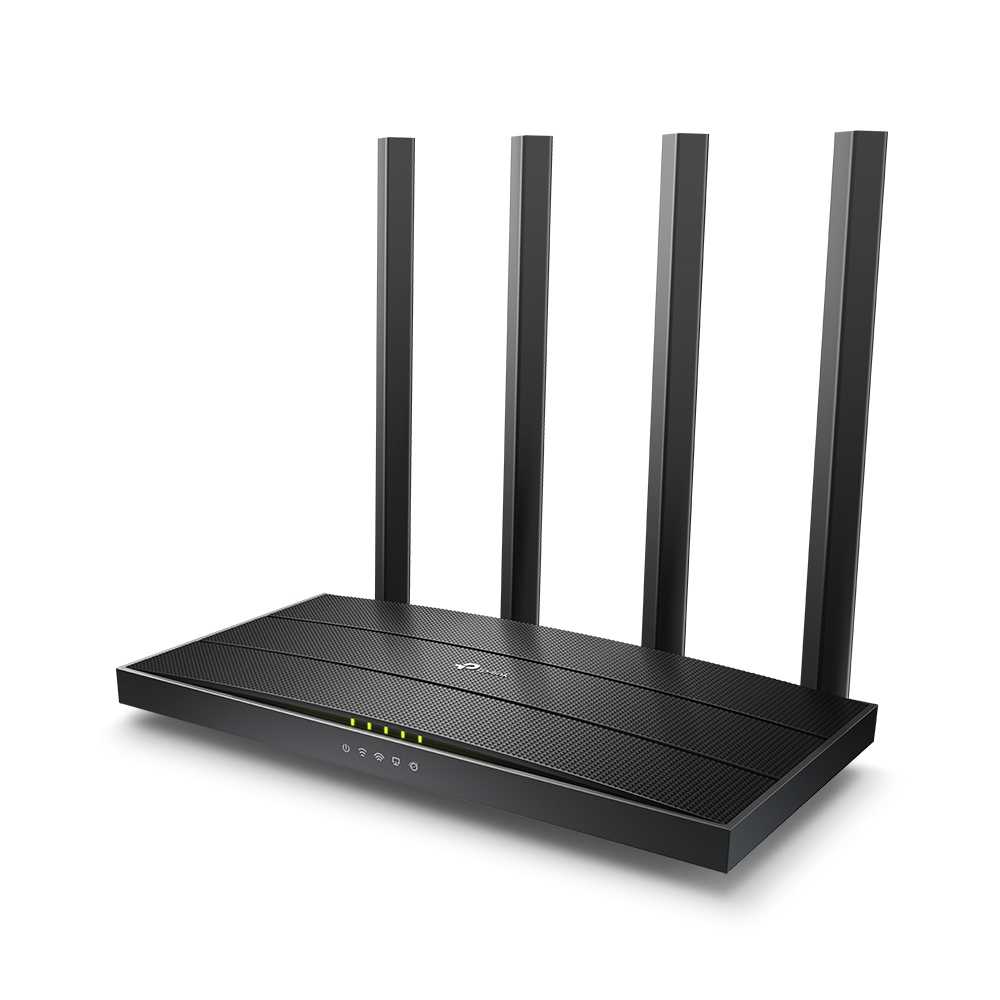
Дизайн TP-Link Archer C80 представляет собой современное и стильное решение, которое сочетает в себе функциональность и эстетику, делая его привлекательным для широкого круга пользователей.
Цвет и материалы
TP-Link Archer C80 выполнен в черном цвете, что придает ему солидный и универсальный вид, подходящий для большинства интерьеров. Роутер изготовлен из высококачественного пластика, который обеспечивает хорошую прочность и долговечность устройства.
Форма и размеры
Модель имеет компактные размеры, что позволяет легко разместить ее практически в любом месте вашего дома или офиса. Роутер имеет прямоугольную форму с закругленными углами и слегка заметным изгибом на верхней панели, что придает ему современный и элегантный вид.
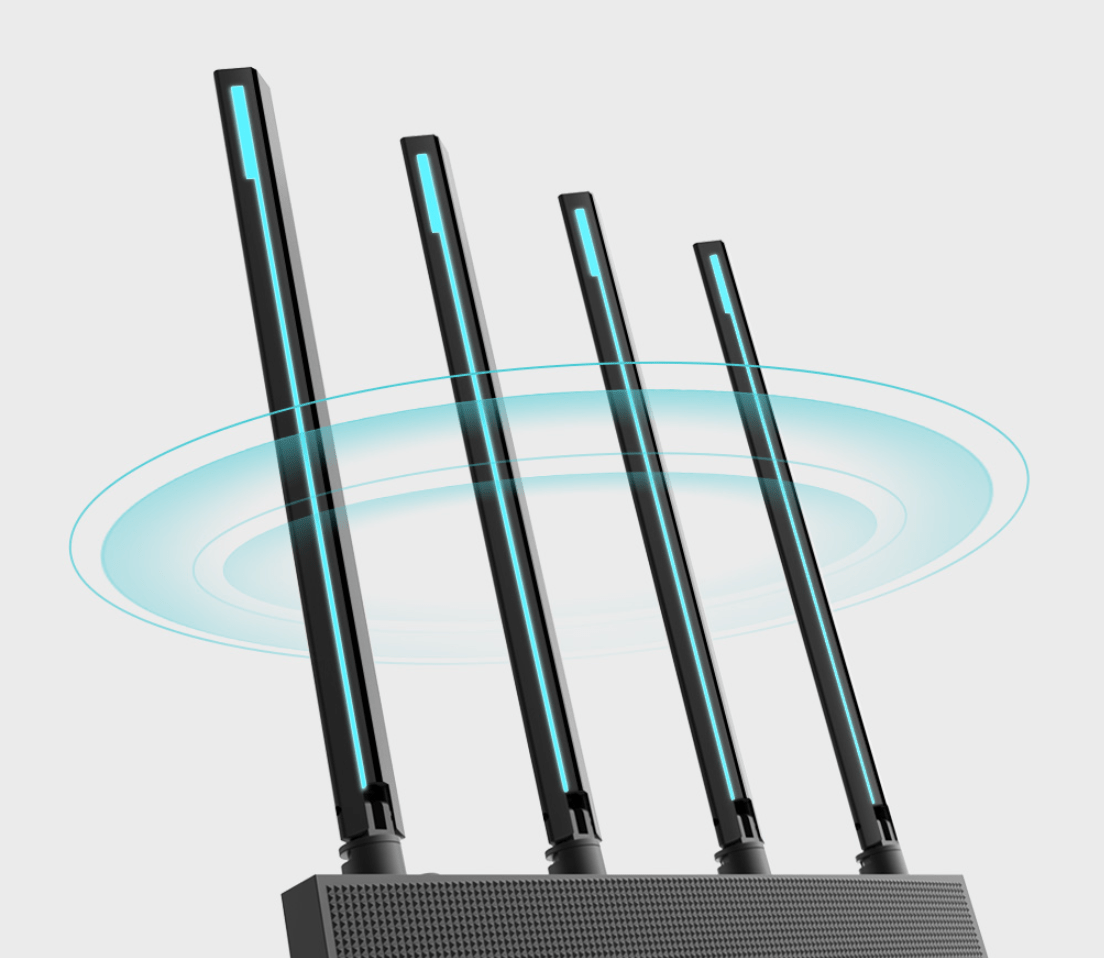
Антенны
На задней панели роутера расположены четыре внешние антенны. Они обеспечивают оптимальное покрытие и стабильность сигнала Wi-Fi во всем помещении. Антенны имеют регулируемые углы наклона, что позволяет настроить направление сигнала в соответствии с вашими потребностями.
Индикаторы и порты
На передней панели роутера расположены индикаторы состояния, которые обозначают работу устройства и состояние подключения. Они помогут вам легко определить, когда ваш роутер работает корректно и находится в рабочем режиме.
На задней панели находятся все необходимые порты, включая один порт WAN/Internet для подключения к модему и четыре порта LAN для подключения проводных устройств. Здесь же расположена кнопка WPS/Reset для быстрой настройки беспроводной связи или сброса настроек роутера.
В целом, дизайн TP-Link Archer C80 сочетает в себе стиль, функциональность и компактность. Это делает его привлекательным выбором для пользователей, которые ищут современный и надежный роутер для своего дома или офиса.
Технические характеристики
- Модель: TP-Link Archer C80
- Стандарты беспроводной связи: Wi-Fi 802.11ac (AC1900)
- Максимальная скорость: до 1900 Мбит/с
- Количество антенн: 4
- Протоколы безопасности: WEP, WPA, WPA2
- Размеры: 230 x 144 x 37 мм
- Вес: 330 г
Основные функции и возможности

- MU-MIMO технология, обеспечивающая улучшенное покрытие и скорость
- Простая настройка и управление через веб-интерфейс или мобильное приложение
- Родительский контроль и гостевой доступ
- Поддержка VPN
- Функция управления пропускной способностью (QoS)
Плюсы и минусы модели
Преимущества TP-Link Archer C80
- Высокая производительность и стабильность работы, благодаря чему пользователи могут наслаждаться быстрым и надежным интернетом.
- Простота настройки и использования, что делает этот роутер идеальным вариантом для новичков.
- Отзывы пользователей подтверждают высокое качество продукта и его надежность.
- Многофункциональность, включая поддержку MU-MIMO технологии, родительский контроль, гостевой доступ, поддержку VPN и функцию управления пропускной способностью (QoS).
- Доступная цена, что делает данную модель привлекательной для широкого круга покупателей.
Недостатки TP-Link Archer C80
- Отсутствие USB-порта, что ограничивает возможности подключения внешних устройств и использования функций, таких как общий доступ к файлам или принтеру.
- Не поддерживает стандарт Wi-Fi 6, что может снизить его привлекательность для пользователей, желающих использовать самые новые технологии беспроводной связи.
Настройка TP-Link Archer C80 и подключение
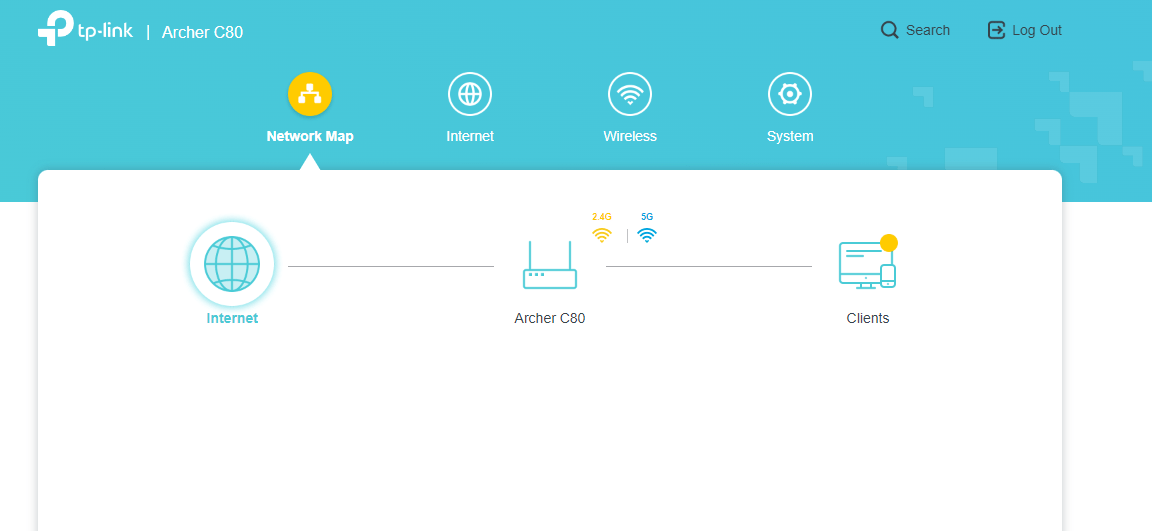

Настройка роутера TP-Link Archer C80 довольно проста. Подключите устройство к модему и компьютеру, затем зайдите в веб-интерфейс роутера через браузер, используя локальный адрес и пароль. Выполните настройку в соответствии с инструкциями, указанными в меню. Настройка также доступна через мобильное приложение. А для тех, кому нужен пошаговый процесс, внимательно читайте далее.
Настройка роутера TP-Link Archer C80 самостоятельно — не является сложным процессом. Следуйте этим пошаговым инструкциям для успешной настройки:
- Подготовка: Убедитесь, что ваш модем и роутер отключены от электросети. Также держите при себе Ethernet-кабель (обычно идет в комплекте с роутером).
- Подключение роутера к модему: Подключите один конец Ethernet-кабеля к порту WAN/Internet на задней панели роутера TP-Link Archer C80. Подключите другой конец кабеля к порту Ethernet на вашем модеме.
- Подключение роутера к компьютеру: Используйте другой Ethernet-кабель, чтобы подключить компьютер к одному из портов LAN на задней панели роутера (обычно обозначены цифрами 1-4).
- Включение устройств: Включите ваш модем и дождитесь, пока индикаторы стабилизируются. Затем включите роутер TP-Link Archer C80 и дождитесь, пока индикаторы Wi-Fi и Internet загорятся.
- Вход в веб-интерфейс роутера: Откройте веб-браузер на компьютере и введите адрес IP роутера в адресную строку (по умолчанию 192.168.0.1 или 192.168.1.1). Нажмите Enter.
- Ввод логина и пароля: Введите имя пользователя и пароль для доступа к веб-интерфейсу роутера. По умолчанию оба значения равны «admin». Нажмите кнопку «Войти» или «Login».
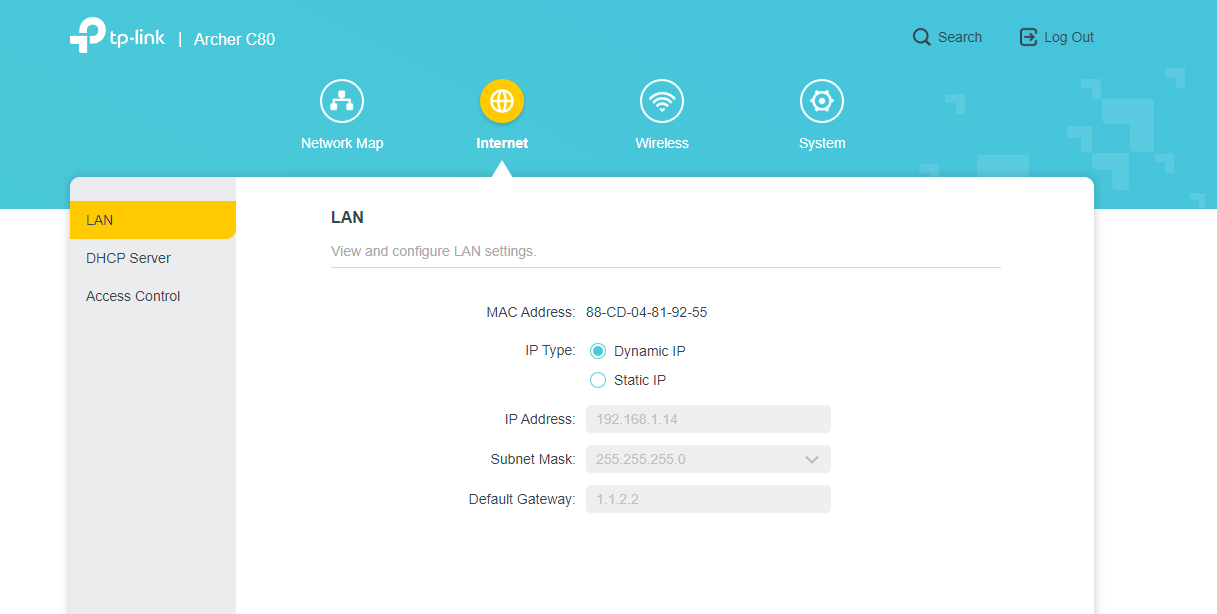
- Настройка подключения к интернету: В меню веб-интерфейса перейдите в раздел «Сеть» («Network») или «Интернет» («Internet»). Выберите тип подключения в соответствии с информацией, предоставленной вашим интернет-провайдером (например, PPPoE, Dynamic IP или Static IP). Введите необходимые данные, такие как имя пользователя, пароль или IP-адрес, и нажмите «Сохранить» («Save»).
- Настройка беспроводной сети: В меню веб-интерфейса перейдите в раздел «Беспроводная сеть» («Wireless» или «Wi-Fi»). Задайте имя сети (SSID) и пароль для защиты вашей беспроводной сети. Обычно рекомендуется использовать WPA2-PSK (AES) в качестве метода шифрования. Нажмите «Сохранить» («Save») для применения настроек.
- Изменение пароля администратора: В целях безопасности рекомендуется изменить пароль администратора роутера. В меню веб-интерфейса перейдите в раздел «Системные инструменты» («System Tools») или «Управление» («Administration»). Введите новый пароль в соответствующие поля и нажмите «Сохранить» («Save»).
- Обновление прошивки: Для обеспечения максимальной производительности и безопасности вашего роутера проверьте, есть ли доступные обновления прошивки. В меню веб-интерфейса перейдите в раздел «Системные инструменты» («System Tools») или «Обновление прошивки» («Firmware Upgrade»). Если есть доступное обновление, следуйте инструкциям на экране для загрузки и установки обновления.
- Проверка подключения: Проверьте, что ваш компьютер и другие устройства успешно подключаются к беспроводной сети и имеют доступ к интернету. Если все настроено правильно, вы должны видеть подключение к вашей беспроводной сети и доступ в Интернет на всех устройствах.
- Отключите Ethernet-кабель от компьютера: Теперь, когда ваша беспроводная сеть настроена и работает, вы можете отключить Ethernet-кабель от компьютера.
Поздравляем! Вы успешно настроили роутер TP-Link Archer C80 самостоятельно. Теперь вы можете наслаждаться стабильным и быстрым интернетом на всех ваших устройствах. Если возникнут дополнительные вопросы или проблемы, обратитесь к инструкции, поставляемой с роутером, или к службе поддержки TP-Link.
Логин и пароль для роутера TP-Link Archer C80
Для роутера TP-Link Archer C80, логин и пароль по умолчанию обычно следующие:
Логин: admin Пароль: admin
Эти данные используются для доступа к веб-интерфейсу роутера через веб-браузер. При первой настройке роутера рекомендуется изменить пароль администратора для обеспечения большей безопасности вашей сети.
Обратите внимание, что логин и пароль по умолчанию могут отличаться для разных прошивок и версий роутера. В таком случае, информация о логине и пароле должна быть указана на наклейке на корпусе роутера или в руководстве пользователя.
Как прошить роутер самостоятельно?
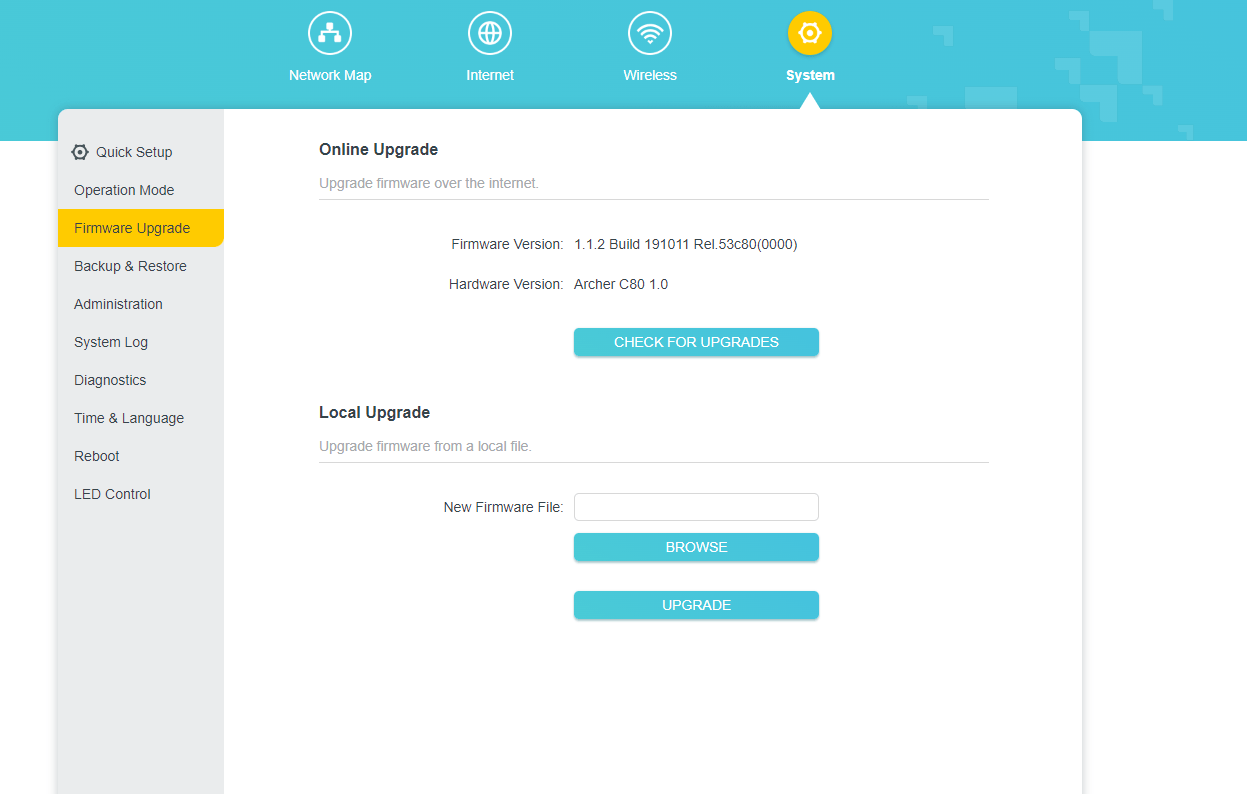
Прошивка TP-Link Archer C80 может быть обновлена для улучшения производительности, стабильности и безопасности устройства. Перед началом обновления убедитесь, что у вас есть стабильное подключение к Интернету и ваш компьютер подключен к роутеру с помощью Ethernet-кабеля. Вот пошаговое руководство по обновлению прошивки TP-Link Archer C80:
- Подготовка к обновлению: Перед обновлением рекомендуется сохранить настройки вашего роутера, так как обновление может сбросить их до заводских настроек. Войдите в веб-интерфейс роутера, перейдите в раздел «Системные инструменты» или «System Tools» и выберите «Сохранить/Загрузить конфигурацию» или «Backup & Restore». Сохраните текущую конфигурацию на вашем компьютере.
- Загрузка обновления: Посетите официальный сайт TP-Link (https://www.tp-link.com/) и перейдите в раздел «Поддержка» или «Support». Введите название вашей модели в строку поиска (Archer C80) и выберите ваш роутер из списка. Затем перейдите в раздел «Прошивка» или «Firmware» и скачайте актуальную версию прошивки для вашего устройства.
- Распаковка файла прошивки: Скачанный файл прошивки может быть в архивном формате (ZIP, RAR или 7z). Распакуйте архив с помощью программы, такой как WinRAR или 7-Zip, и сохраните файл прошивки (.bin) в удобное место на вашем компьютере.
- Вход в веб-интерфейс роутера: Откройте веб-браузер и введите IP-адрес роутера (обычно 192.168.0.1 или 192.168.1.1) в адресную строку. Введите логин и пароль (обычно «admin» и «admin») для доступа к веб-интерфейсу.
- Обновление прошивки: В меню веб-интерфейса перейдите в раздел «Системные инструменты» или «System Tools» и выберите «Обновление прошивки» или «Firmware Upgrade». Нажмите на кнопку «Обзор» или «Choose File» и найдите ранее сохраненный файл прошивки (.bin) на вашем компьютере. Выберите файл и нажмите на кнопку «Открыть» или «Open».
- Запуск обновления: Нажмите на кнопку «Обновить» или «Upgrade» для начала процесса обновления прошивки. Пожалуйста, не отключайте роутер от питания и не закрывайте веб-браузер во время обновления, так как это может повредить роутер или привести к его неработоспособности.
- Ожидание завершения обновления: Процесс обновления прошивки может занять несколько минут. Подождите, пока индикаторы роутера перестанут мигать и веб-интерфейс сообщит об успешном завершении обновления. Роутер автоматически перезагрузится после обновления прошивки.
- Проверка версии прошивки: После перезагрузки роутера войдите снова в веб-интерфейс и перейдите в раздел «Статус» или «Status». Убедитесь, что версия прошивки соответствует скачанному обновлению.
- Восстановление настроек (если необходимо): Если после обновления прошивки были сброшены настройки роутера, восстановите их из ранее сохраненного файла. В веб-интерфейсе перейдите в раздел «Системные инструменты» или «System Tools», выберите «Сохранить/Загрузить конфигурацию» или «Backup & Restore» и нажмите на кнопку «Загрузить» или «Restore». Загрузите ранее сохраненный файл настроек и подождите, пока роутер применит изменения.
Теперь ваш TP-Link Archer C80 обновлен до последней версии прошивки, и вы можете наслаждаться улучшенной стабильностью, безопасностью и производительностью вашего роутера. Проверяйте наличие новых версий прошивки регулярно и следуйте этому руководству для обновления, чтобы поддерживать ваш роутер в актуальном состоянии.
AC1900 и Archer C80 — обозначение
Идентификатор AC1900 относится к классификации скорости беспроводных роутеров и точек доступа, основанной на стандарте Wi-Fi 802.11ac. Это обозначение используется для того, чтобы указать максимальную теоретическую пропускную способность беспроводного соединения, которое устройство может обеспечить.
AC1900 разбивается на две составляющие:
- 600 Мбит/с: Эта скорость предоставляется на частоте 2,4 ГГц, которая поддерживает стандарты Wi-Fi 802.11b/g/n.
- 1300 Мбит/с: Эта скорость предоставляется на частоте 5 ГГц, которая поддерживает стандарт Wi-Fi 802.11ac.
Сумма этих двух значений (600 + 1300) составляет 1900, отсюда и обозначение AC1900.
Тем не менее, следует учитывать, что максимальная теоретическая скорость редко достигается в реальных условиях из-за различных факторов, таких как препятствия, расстояние между устройствами, помехи и качество сетевых адаптеров клиентских устройств.
Где купить и цена
TP-Link Archer C80 можно купить в магазинах электроники, а также онлайн, в том числе в Санкт-Петербурге. Цены на данный роутер могут варьироваться, но в среднем составляют около 4000-5000 рублей. Обязательно сравните предложения разных продавцов, чтобы найти наиболее выгодное.
Сравнение с другими роутерами
TP-Link Archer C80 является одной из лучших моделей в своем ценовом диапазоне. Однако, если вам нужны дополнительные функции, такие как USB-порт или поддержка стандарта Wi-Fi 6, вы можете рассмотреть другие модели, такие как TP-Link Archer AX20 или Asus RT-AX56U. Сравните характеристики, цены и отзывы, чтобы выбрать оптимальный вариант для себя.
Ответы на вопросы
Что такое TP-Link Archer C80?
TP-Link Archer C80 — это двухдиапазонный Wi-Fi роутер с поддержкой стандарта 802.11ac и максимальной теоретической пропускной способностью до 1900 Мбит/с.
Какие основные характеристики TP-Link Archer C80?
TP-Link Archer C80 имеет 4 внешние антенны, поддержку MU-MIMO, Beamforming, 4 гигабитных LAN-порта и один гигабитный WAN-порт.
Как настроить TP-Link Archer C80?
Для настройки TP-Link Archer C80, вам потребуется подключиться к его веб-интерфейсу через веб-браузер, введя IP-адрес роутера (обычно 192.168.0.1 или 192.168.1.1) и используя логин и пароль по умолчанию (обычно «admin» и «admin»).
Как обновить прошивку TP-Link Archer C80?
Для обновления прошивки TP-Link Archer C80, скачайте актуальную версию прошивки с официального сайта TP-Link, а затем выполните обновление через веб-интерфейс роутера, следуя инструкциям в разделе «Системные инструменты» или «System Tools».
Как изменить имя сети (SSID) и пароль Wi-Fi на TP-Link Archer C80?
В веб-интерфейсе роутера перейдите в раздел «Беспроводные настройки» или «Wireless Settings» и измените имя сети (SSID) и пароль для каждой из частот (2,4 ГГц и 5 ГГц), после чего сохраните изменения.
Как восстановить заводские настройки TP-Link Archer C80?
Для сброса TP-Link Archer C80 до заводских настроек, нажмите и удерживайте кнопку «Reset» на задней панели роутера на протяжении 10 секунд, пока индикаторы не начнут мигать. Роутер перезагрузится с заводскими настройками.
Как подключиться к VPN на TP-Link Archer C80?
Для подключения к VPN на TP-Link Archer C80, вам потребуется настроить соответствующий VPN-клиент в веб-интерфейсе роутера, используя предоставленные вашим VPN-провайдером данные для подключения (сервер, логин, пароль и прочие параметры).
Как настроить родительский контроль на TP-Link Archer C80?
Для настройки родительского контроля на TP-Link Archer C80, войдите в веб-интерфейс роутера и перейдите в раздел «Родительский контроль» или «Parental Controls». Здесь вы можете добавить устройства, для которых необходимо ограничить доступ к определенным сайтам или временные рамки доступа к Интернету.
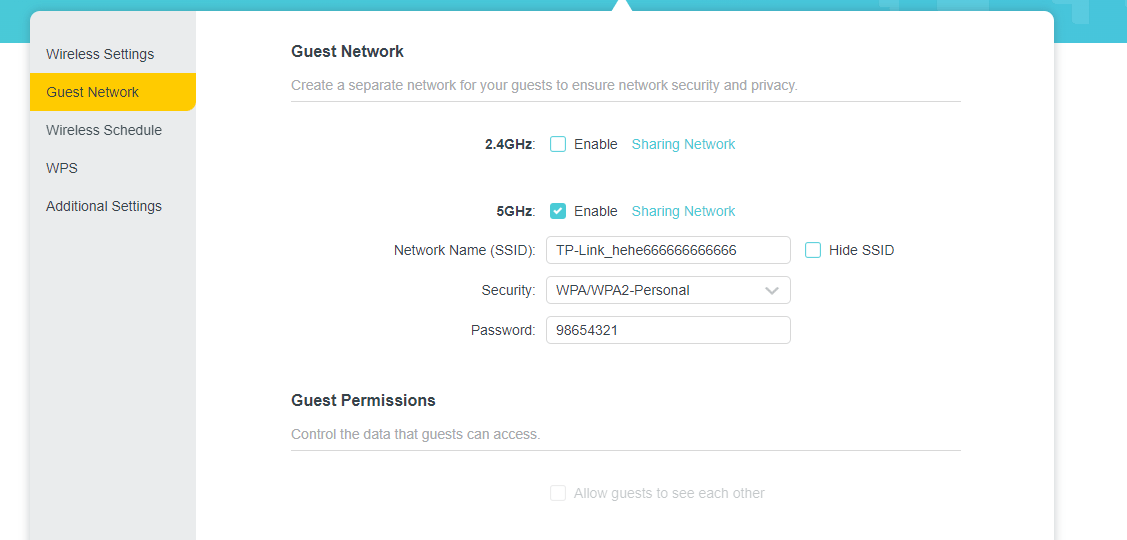
Как настроить гостевую сеть на TP-Link Archer C80?
Для настройки гостевой сети на TP-Link Archer C80, перейдите в раздел «Гостевая сеть» или «Guest Network» в веб-интерфейсе роутера. Включите гостевую сеть для желаемой частоты (2,4 ГГц или 5 ГГц), задайте имя сети (SSID) и пароль, а также определите параметры доступа и безопасности.
Как определить, какие устройства подключены к TP-Link Archer C80?
В веб-интерфейсе роутера TP-Link Archer C80 перейдите в раздел «Список клиентов» или «Client List» (может также называться «DHCP клиенты» или «DHCP Clients»). Здесь вы увидите список подключенных устройств с их IP-адресами, MAC-адресами и именами устройств.
Как изменить логин и пароль для входа в веб-интерфейс TP-Link Archer C80?
Чтобы изменить логин и пароль для доступа к веб-интерфейсу роутера, перейдите в раздел «Системные инструменты» или «System Tools», выберите «Управление паролем» или «Password Management» и задайте новый логин и пароль. Не забудьте сохранить изменения.
Можно ли подключить USB-накопитель или принтер к TP-Link Archer C80?
TP-Link Archer C80 не имеет USB-портов, поэтому подключение USB-накопителей или принтеров к этому роутеру невозможно.
Поддерживает ли TP-Link Archer C80 технологию IPv6?
Да, TP-Link Archer C80 поддерживает IPv6. В веб-интерфейсе роутера перейдите в раздел «IPv6» для настройки параметров протокола.
Заключение
TP-Link Archer C80 — это отличный выбор для тех, кто ищет доступный, но мощный роутер Wi-Fi. С его помощью вы сможете наслаждаться стабильным и быстрым интернетом в вашем доме или офисе. Простота настройки и использования, а также ряд полезных функций, делают данный роутер идеальным вариантом для новичков. В целом, TP-Link Archer C80 — это хороший выбор с прекрасным соотношением цены и качества.

![]()
+ 119 бонусов
Варианты получения заказа
Самовывоз из магазина
сегодня, бесплатно
Доставка в отделение Почты России
начиная с 23 мая, 220 ₽
Доставка курьером
завтра, 349 ₽
Курьер Яндекс
сегодня, 390 ₽
Видеоконсультация по товару
Получите видеообзор и ответы на вопросы по товару в онлайн-режиме от наших продавцов-консультантов.
Характеристики
Общие характеристики
Тип
роутер (маршрутизатор)
Стандарт беспроводной связи
5 (802.11ac), 4 (802.11n)
Макс. скорость беспроводного соединения
1900 Мбит/с
Скорость передачи данных
5 ГГц: до 1300 Мбит/с; 2,4 ГГц: до 600 Мбит/с
Количество разъемов RJ-45
4
Стандарты
802.11a/b/g/n/ac
Поддержка ОС
Android, Chrome OS, iOS, iPadOS, Linux, Mac OS, Windows, собственная ОС
Аппаратное шифрование
есть
Стандарт Wi-Fi 802.11
b, a, g, n, ac
Частотный диапазон устройств Wi-Fi
2.4 / 5 ГГц (одновременная работа)
Все характеристики
Не является публичной офертой
Информация о товаре носит справочный характер и не является публичной офертой. Характеристики, комплект поставки и внешний вид товара могут отличаться от указанных или быть изменены производителем без предварительного уведомления. Перед покупкой проверяйте информацию на официальном сайте производителя.
Если вы заметили ошибку или неточность в описании товара, пожалуйста, выделите часть текста с ошибкой и нажмите кнопку «Сообщить об ошибке».
5.0
5 звёзд
2
4 звезды
0
3 звезды
0
2 звезды
0
1 звезда
0
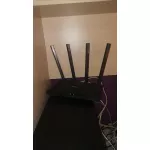
Фотографии покупателей
Достоинства
После покупки этого роутера интернет стал летать, сидим с 4 устройств, работает без нареканий, Интернет не глючит
Недостатки
Недостатков не выявил
Комментарий
Рекомендую к покупке

Дмитрий
Достоинства
Хорошая скорость, зона покрытия большая
Комментарий
Скорость wi-fi радует
Все отзывы
-
Contents
-
Table of Contents
-
Bookmarks
Quick Links
User Guide
AC1900 MU-MIMO Wi-Fi Router
Archer C80
REV1.0.1 1910012744
Related Manuals for TP-Link Archer C80
Summary of Contents for TP-Link Archer C80
-
Page 1
User Guide AC1900 MU-MIMO Wi-Fi Router Archer C80 REV1.0.1 1910012744… -
Page 2: Table Of Contents
5. 4. Manage the Router via the TP-Link Tether App ……25 Chapter 6 Guest Network 6.
-
Page 3
Chapter 9 Network Security 9. 1. Protect the Network from Cyber Attacks ……..36 9. -
Page 4: About This Guide
*Use of MU-MIMO requires clients to also support MU-MIMO. More Info • The latest software, management app and utility can be found at Download Center https://www.tp-link.com/support. • The Quick Installation Guide can be found where you find this guide or inside the package of the router.
-
Page 5
• Specifications can be found on the product page at https://www.tp-link.com. • A TP-Link Community is provided for you to discuss our products at https://community.tp-link.com. • Our Technical Support contact information can be found at the Contact Technical Support page at https://www.tp-link.com/support. -
Page 6: Chapter 1 Get To Know About Your Router
Chapter Get to Know About Your Router This chapter introduces what the router can do and shows its appearance. It chapter contains the following sections: • Product Overview • Appearance…
-
Page 7: Product Overview
Ethernet ports supply high-speed connection to your wired devices. Moreover, it is simple and convenient to set up and use the TP-Link router due to its intuitive web interface and the powerful Tether app.
-
Page 8
Chapter 1 Get to Know About Your Router LED Explanation • Router Mode Status Indication The system has started up successfully. The system is starting up or the firmware is being upgraded. Do Flashing (Power) not disconnect or power off your router. Power is off. -
Page 9: The Back Panel
Chapter 1 Get to Know About Your Router 1 2 2 The Back Panel The following parts (view from left to right) are located on the back panel. Button and Port Explanation Item Description Power On/Off Button Press this button to power on or off the router. Power Port For connecting the router to a power socket via the provided power adapter.
-
Page 10: Chapter 2 Connect The Hardware
Chapter Connect the Hardware This chapter contains the following sections: • Position Your Router • Connect Your Router…
-
Page 11: Position Your Router
Chapter 2 Connect the Hardware Position Your Router • The product should not be located in a place where it will be exposed to moisture or excessive heat. • Place the router in a location where it can be connected to multiple devices as well as to a power source.
-
Page 12
Chapter 2 Connect the Hardware 4. Connect the power adapter to the router and turn on the router. 5. Verify that the following LEDs are on and solid to confirm the hardware is connected. Power 2.4GHz 5GHz Internet Note: Note: If the 2.4GHz LED and 5GHz LED are off, press and hold the WPS/Wi-Fi button on the back for more than 5 seconds, then release the button. -
Page 13
WPS. 1 ) Tab the WPS icon on the device’s screen. Here we take an Android phone for instance. 2 ) Within two minutes, press the WPS button on your router. WLAN TP-Link MyHome David HomeNetwork TP-Link_Home… -
Page 14: Chapter 3 Log In To Your Router
Chapter Log In to Your Router…
-
Page 15
• If the login window does not appear, please refer to the Section. • If you have registered a TP-Link ID and bound your cloud router to it, the login password you created here will be invalid. Please log in to the cloud router using your TP-Link ID. -
Page 16: Chapter 4 Set Up Internet Connection
Furthermore, you can also set up an IPv6 connection if your ISP provides IPv6 service. It contains the following sections: • Use Quick Setup Wizard • Quick Setup Via TP-Link Tether App • Manually Set Up Your Internet Connection • Set Up the Router as an Access Point •…
-
Page 17: Use Quick Setup Wizard
• To learn more about the TP-Link Cloud service, please refer to the TP-Link Cloud Service section. • If you do not want to register a TP-Link ID now, you may click Skip to proceed. • If you have changed the preset wireless network name (SSID) and wireless password during the Quick Setup process,…
-
Page 18: Quick Setup Via Tp-Link Tether App
ISP. Follow the steps below to check or modify your internet connection settings. 1. Visit http://tplinkwifi.net, and log in with your TP-Link ID or the password you set for the router.
-
Page 19
Chapter 4 Set Up Internet Connection 2 ) If you choose Static IP, enter the information provided by your ISP in the corresponding fields. 3 ) If you choose PPPoE, enter the username password provided by your ISP. PPPoE users usually have DSL cable modems. -
Page 20
Chapter 4 Set Up Internet Connection 4 ) If you choose L2TP, enter the username password and choose the Secondary Connection provided by your ISP. Different parameters are needed according to the Secondary Connection you have chosen. 5 ) If you choose PPTP, enter the username and password, and choose the Secondary Connection… -
Page 21: Set Up The Router As An Access Point
Set Up the Router as an Access Point The router can work as an access point, transforming your existing wired network to a wireless one. 1. Visit http://tplinkwifi.net, and log in with your TP-Link ID or the password you set for the router. 2. Go to Advanced >…
-
Page 22
Chapter 4 Set Up Internet Connection 3. Select the mode provided by your ISP to enable IPv6 connection. Tips: If you do not know what your internet connection mode is, contact your ISP or judge according to the already known information provided by your ISP. -
Page 23
Chapter 4 Set Up Internet Connection 2 ) Configure the WAN connection. Notes: 1. If you do not know what your internet connection mode is, contact your ISP or judge according to the already known information provided by your ISP. 2. -
Page 24: Chapter 5 Tp-Link Cloud Service
TP-Link Cloud service provides a better way to manage your cloud devices. Log in to your router with a TP-Link ID, and you can easily monitor and manage your home network when you are out and about via the Tether app. To ensure that your router stays new and gets better over time, the TP-Link Cloud will notify you when an important firmware upgrade is available.
-
Page 25: Register A Tp-Link Id
App. • Once the router is bound to your TP-Link ID, you need to log in to the router with the TP-Link ID. • Once you have registered a TP-Link ID on the web management page, you can only register another TP-Link ID via the Tether APP.
-
Page 26: Manage The User Tp-Link Ids
Password. 2. Enter the current password, then a new password twice. And click Save. Manage the User TP-Link IDs The TP-Link ID used to log in to the router for the first time will be automatically bound as the Admin…
-
Page 27: Add Tp-Link Id To Manage The Router
3. Click , enter another TP-Link ID as needed and click Save. Note: If you need another TP-Link ID, please register a new one via the Tether app. Refer to Manage the Router via the TP-Link Tether App to install the app and register a new TP-Link ID.
-
Page 28: Manage The Router Via The Tp-Link Tether App
QR code to download and install the app. 2. Connect your device to the router’s wireless network. 3. Launch the Tether app, select the model of your router and log in with your TP-Link ID or the password you set for the router.
-
Page 29: Chapter 6 Guest Network
Chapter Guest Network This function allows you to provide Wi-Fi access for guests without disclosing your main network. When you have guests in your house, apartment, or workplace, you can create a guest network for them. In addition, you can customize guest network options to ensure network security and privacy.
-
Page 30: Create A Network For Guests
Chapter 6 Guest Network Create a Network for Guests 1. Visit http://tplinkwifi.net, and log in with your TP-Link ID or the password you set for the router. 2. Go to Advanced > Wireless > Guest Network or click Wireless on the top page. Locate Guest Network section.
-
Page 31: Customize Guest Network Options
Chapter 6 Guest Network Customize Guest Network Options 1. Visit http://tplinkwifi.net, and log in with your TP-Link ID or the password you set for the router. 2. Go to Advanced > Wireless >Guest Network. Locate the Guest Permissions section. 3. Customize guest network options according to your needs.
-
Page 32: Chapter 7 Parental Controls
Chapter Parental Controls This function allows you to block inappropriate, explicit and malicious websites, and control access to specified websites at specified time.
-
Page 33: Setting Up Access Restrictions
2 hours every day and block internet access during bed time (10 PM to 7 AM) on weekdays. How can I do that? 1 Visit http://tplinkwifi.net, and log in with your TP-Link ID or the password you set for the router. 2 Go to Advanced >…
-
Page 34
Chapter 7 Parental Controls 1 ) Enter a keyword (for example, “Facebook”) or a URL (for example, “www. facebook.com”). All websites containing the keywords will be blocked. 2 ) Click Next. 6 Set time restrictions on internet access. 1 ) Enable Time Limits on Monday to Friday and Saturday &… -
Page 35
Chapter 7 Parental Controls 2 ) Enable Bed Time and use the up/down arrows or enter times in the fields. Devices under this profile will be unable to access the internet during this time period. 3 ) Click Save. Done! The amount of time your child spends online is controlled and inappropriate content is blocked on their devices. -
Page 36: Chapter 8 Qos
Chapter This chapter introduces how to create a QoS (Quality of Service) rule to specify prioritization of traffic and minimize the impact caused when the connection is under heavy load.
-
Page 37
2 hours. How can I do that? 1 Enable QoS and set bandwidth allocation. 1 ) Visit http://tplinkwifi.net, and log in with your TP-Link ID or the password you set for the router. 2 ) Go to Advanced >… -
Page 38: Chapter 9 Network Security
Chapter Network Security This chapter guides you on how to protect your home network from cyber attacks and unauthorized users by implementing these three network security functions. You can protect your home network from cyber attacks, block or allow specific client devices to access your network using Access Control, or you can prevent ARP spoofing and ARP attacks using IP &…
-
Page 39: Protect The Network From Cyber Attacks
Block or allow specific client devices to access my network (via wired or wireless). How can I do that? 1 Visit http://tplinkwifi.net, and log in with your TP-Link ID or the password you set for the router. 2 Go to Advanced >…
-
Page 40
Chapter 9 Network Security 2 ) Click and select devices you want to be blocked and Click ADD. 3 ) The Operation Succeeded message will appear on the screen, which means the selected devices have been successfully added to the blacklist. To allow specific device(s): 1 ) Select Whitelist… -
Page 41: Ip & Mac Binding
Chapter 9 Network Security 3 ) The Operation Succeeded message will appear on the screen, which means the selected devices have been successfully added to the whitelist. • Add unconnected devices 1 ) Click Manually. 2 ) Enter the Device Name MAC Address of the device you want to be allowed and click ADD.
-
Page 42
Chapter 9 Network Security I want to: Prevent ARP spoofing and ARP attacks. How can I do that? 1 Visit http://tplinkwifi.net, and log in with your TP-Link ID or the password you set for the router. 2 Go to Advanced >… -
Page 43: Alg (Application Layer Gateway)
Chapter 9 Network Security To bind the unconnected device: 1 ) Click in the Binding List section. 2 ) Enter the MAC Address IP Address that you want to bind. Done! Now you don’t need to worry about ARP spoofing and ARP attacks! ALG (Application Layer Gateway) View your ALG (Application Layer Gateway) settings in this page.
-
Page 44: Chapter 10 Nat Forwarding
The TP-Link router supports four forwarding rules. If two or more rules are set, the priority of implementation from high to low is Port Forwarding, Port Triggering, UPNP and DMZ.
-
Page 45: Share Local Resources On The Internet By Port Forwarding
WAN: 218.18.232.154 How can I do that? 1 Assign a static IP address to your PC, for example 192.168.0.100. 2 Visit http://tplinkwifi.net, and log in with your TP-Link ID or the password you set for the router. 3 Go to Advanced >…
-
Page 46
Chapter 10 NAT Forwarding 5 Click VIEW COMMON SERVICES and select HTTP. The External Port, Internal Port Protocol will be automatically filled in. 6 Click VIEW CONNECTED DEVICES and select your home PC. The Device IP Address will be automatically filled in. Or enter the PC’s IP address manually in the Device IP Address field. -
Page 47: Open Ports Dynamically By Port Triggering
VoIPs, video players and common applications including MSN Gaming Zone, Dialpad and Quick Time 4 players, etc. Follow the steps below to configure the Port Triggering rules: 1. Visit http://tplinkwifi.net, and log in with your TP-Link ID or the password you set for the router. 2. Go to Advanced >…
-
Page 48: Make Xbox Online Games Run Smoothly By Upnp
Chapter 10 NAT Forwarding 4. Click SAVE. Tips: • You can add multiple port triggering rules according to your network need. • The triggering ports can not be overlapped. • If the application you need is not listed in the Existing Applications list, please enter the parameters manually. You should verify the external ports the application uses first and enter them into External Port field according to the…
-
Page 49: Make Applications Free From Port Restriction By Dmz
Chapter 10 NAT Forwarding Internet If necessary, you can follow the steps to change the status of UPnP. 1. Visit http://tplinkwifi.net, and log in with your TP-Link ID or the password you set for the router. 2. Go to Advanced >…
-
Page 50
Chapter 10 NAT Forwarding 3 Go to Advanced > NAT Forwarding > and tick to enable DMZ. 4 Click VIEW CONNECTED DEVICES and select your PC. The Device IP Address will be automatically filled in. Or enter the PC’s IP address 192.168.0.100 manually in the DMZ Host IP Address field. -
Page 51: Chapter 11 Customize Your Network Settings
Chapter Customize Your Network Settings This chapter guides you on how to configure advanced network features. It contains the following sections: • Change the LAN Settings • Configure to Support IPTV Service • Specify DHCP Server Settings • Set Up a Dynamic DNS Service Account •…
-
Page 52: Change The Lan Settings
If the IP address conflicts with another device on your local network or your network requires a specific IP subnet, you can change it. 1. Visit http://tplinkwifi.net, and log in with your TP-Link ID or the password you set for the router. 2. Go to Advanced >…
-
Page 53: Specify Dhcp Server Settings
IP Address Pool. You can change the settings of the DHCP Server if necessary, and you can reserve LAN IP addresses for specified client devices. 1. Visit http://tplinkwifi.net, and log in with your TP-Link ID or the password you set for the router.
-
Page 54
Chapter 11 Customize Your Network Settings 1. Tick the Enable checkbox. 2. Enter the starting and ending IP addresses in the IP Address Pool. 3. Enter other parameters if the ISP offers. The Default Gateway is automatically filled in and is the same as the LAN IP address of the router. 4. -
Page 55: Set Up A Dynamic Dns Service Account
NO-IP or DynDNS. If you don’t have a DDNS account, you have to register first by clicking Register Now. Note: To enjoy TP-Link’s DDNS service, you have to log in with a TP-Link ID. If you have not logged in with one, click 4. Click Register in the…
-
Page 56: Create Static Routes
Chapter 11 Customize Your Network Settings 5. Click LOGIN AND SAVE. Tips: If you want to use a new DDNS account, please click Logout first, and then log in with a new account. 11 5 Create Static Routes Static routing is a form of routing that is configured manually by a network administrator or a user by adding entries into a routing table.
-
Page 57
1 Change the routers’ LAN IP addresses to two different IP addresses on the same subnet. Disable Router B’s DHCP function. 2 Visit http://tplinkwifi.net, and log in with your TP-Link ID or the password you set for Router A. 3 Go to Advanced >… -
Page 58: Specify Wireless Settings
The preset SSID and password can be found on the label of the router. You can customize the wireless settings according to your needs. Visit http://tplinkwifi.net, and log in with your TP-Link ID or the password you set for the router.
-
Page 59
Chapter 11 Customize Your Network Settings • To use the Smart Connect function: The Smart Connect function lets you to enjoy a more high-speed network by assigning your devices to best wireless bands based on actual conditions to balance network demands. -
Page 60: Schedule Your Wireless Function
The wireless network can be automatically off at a specific time when you do not need the wireless connection. 1. Visit http://tplinkwifi.net, and log in with your TP-Link ID or the password you set for the router. 2. Go to Advanced >…
-
Page 61: Use Wps For Wireless Connection
Chapter 11 Customize Your Network Settings 11 8 1 Connect via the Client’s PIN Enter the PIN of your device and click Connect. Then your device will get connected to the router. 11 8 2 Connect via the Router’s PIN Select Router’s PIN Method 1…
-
Page 62: Advanced Wireless Settings
Chapter 11 Customize Your Network Settings 11 9 Advanced Wireless Settings Check advanced wireless settings for your device. 1. Visit http://tplinkwifi.net, and log in with your TP-Link ID or the password you set for the router. 2. Go to Advanced >…
-
Page 63
Chapter 11 Customize Your Network Settings • Short GI — It is recommended to enable this function, for it will increase the data capacity by reducing the guard interval time. • AP Isolation — This function isolates all connected wireless stations so that wireless stations cannot access each other through WLAN. -
Page 64: Chapter 12 Manage The Router
Chapter Manage the Router This chapter will show you the configuration for managing and maintaining your router. It contains the following sections: • Upgrade the Firmware • Backup and Restore Configuration Settings • Change the Login Password • Local Management •…
-
Page 65: Upgrade The Firmware
Do NOT turn off the router during the firmware upgrade. 12 1 1 Online Upgrade 1. Visit http://tplinkwifi.net, and log in with your TP-Link ID or the password you set for the router. 2. When the latest firmware is available for your router, the upgrade icon will display in the top-right corner of the page.
-
Page 66: Backup And Restore Configuration Settings
Moreover, if necessary you can erase the current settings and reset the router to the default factory settings. 1. Visit http://tplinkwifi.net, and log in with your TP-Link ID or the password you set for the router.
-
Page 67: Change The Login Password
Note: • During the resetting process, do not turn off the router. • After reset, you can still use the current login password or the TP-Link ID to log in to the web management page. • To reset the router to factory default settings: 1.
-
Page 68: Local Management
This feature allows you to limit the number of client devices on your LAN from accessing the router by using the MAC address-based authentication. 1. Visit http://tplinkwifi.net, and log in with your TP-Link ID or the password you set for the router.
-
Page 69: Remote Management
5. Click SAVE. 12 5 Remote Management This feature allows you to control remote devices’ authority to manage the router. 1. Visit http://tplinkwifi.net, and log in with your TP-Link ID or the password you set for the router. 2. Go to Advanced >…
-
Page 70
Chapter 12 Manage the Router • Allow all devices to manage the router remotely: 1. Tick the Enable checkbox of Remote Management. 2. Keep the HTTPS and HTTP port as default settings (recommended) or enter a value between 1024 and 65535. 3. -
Page 71: View System Log
When the router does not work normally, you can save the system log and send it to the technical support for troubleshooting. 1. Visit http://tplinkwifi.net, and log in your TP-Link ID or the password you set for the router. 2. Go to Advanced >…
-
Page 72: Test The Network Connectivity
Test the Network Connectivity Diagnostics is used to test the connectivity between the router and the host or other network devices. 1. Visit http://tplinkwifi.net, and log in with your TP-Link ID or the password you set for the router. 2. Go to Advanced >…
-
Page 73: Set Up System Time & Language
Parental Controls. You can choose the way to obtain the system time as needed. 1. Visit http://tplinkwifi.net, and log in with your TP-Link ID or the password you set for the router.
-
Page 74
Chapter 12 Manage the Router • To get time from the internet: 1. Enable 24-Hour Time if you want the time to display in a 24-hour way. 2. In the Set Time field, select Get from Internet. 3. Select your local Time Zone from the drop-down list. -
Page 75: Set The Router To Reboot Regularly
12 9 Set the Router to Reboot Regularly The Scheduled Reboot feature cleans the cache to enhance the running performance of the router. 1. Visit http://tplinkwifi.net, and log in with your TP-Link ID or the password you set for the router.
-
Page 76: Control The Led
The LED of the router indicates its activities and status. You can enable the Night Mode feature to specify a time period during which the LED is off. 1. Visit http://tplinkwifi.net, and log in with your TP-Link ID or the password you set for the router.
-
Page 77
Chapter 12 Manage the Router 4. Specify the LED off time, and the LED will be off during this period every day. 5. Click SAVE. -
Page 78
The default wireless password is printed on the label of the router. If the password has been altered: 1. Connect your computer to the router using an Ethernet cable. 2. Visit http://tplinkwifi.net, and log in with your TP-Link ID or the password you set for the router. 3. Go to Wireless to retrieve or reset your wireless password. -
Page 79
4 ) Click LAN settings and deselect the following three options and click OK. 5 ) Go to Advanced > Restore advanced settings, click to save the settings. -
Page 80
Note: You’ll need to reconfigure the router to surf the internet once the router is reset. Q4 What should I do if I can’t access the internet even though the configuration is finished? Visit http://tplinkwifi.net, and log in with your TP-Link ID or the password you set for the router. Go to Advanced>… -
Page 81
• Restart the modem and the router. 1 ) Power off your modem and router, and leave them off for 1 minute. 2 ) Power on your modem first, and wait about 2 minutes until it gets a solid cable or Internet light. -
Page 82
• Modify the LAN IP address of the router. Note: Most TP-Link routers use 192.168.0.1/192.168.1.1 as their default LAN IP address, which may conflict with the IP range of your existing ADSL modem/router. If so, the router is not able to communicate with your modem and you can’t access the internet. -
Page 83
• Double check the internet connection type. 1 ) Confirm your internet connection type, which can be learned from the ISP. 2 ) Visit http://tplinkwifi.net, and log in with your TP-Link ID or the password you set for the router. -
Page 84
2 ) Exit the wireless configuration tool (the TP-Link Utility, for example). 3 ) Select and right click on… -
Page 85
If you can find your wireless network but fail to connect, please follow the steps below: • Authenticating problem/password mismatch: 1 ) Sometimes you will be asked to type in a PIN number when you connect to the wireless network for the first time. This PIN number is different from the Wireless Password/Network Security Key, usually you can only find it on the label of your router. -
Page 86
• Check the wireless signal strength of your network. If it is weak (1~3 bars), please move the router closer and try again. • Change the wireless Channel of the router to 1, 6 or 11 to reduce interference from other networks. •… -
Page 87
Specifications are subject to change without notice. is a registered trademark of TP-Link Technologies Co., Ltd. Other brands and product names are trademarks or registered trademarks of their respective holders. No part of the specifications may be reproduced in any form or by any means or used to make any derivative such as translation, transformation, or adaptation without permission from TP-Link Technologies Co., Ltd. -
Page 88
Component Name Model I.T.E. Power T120150-2B1 Responsible party: TP-Link USA Corporation, d/b/a TP-Link North America, Inc. Address: 145 South State College Blvd. Suite 400, Brea, CA 92821 Website: http://www.tp-link.com/us/ Tel: +1 626 333 0234 Fax: +1 909 527 6803 E-mail: sales.usa@tp-link.com This equipment has been tested and found to comply with the limits for a Class B digital device, pursuant to part 15 of the FCC Rules. -
Page 89
We, TP-Link USA Corporation, has determined that the equipment shown as above has been shown to comply with the applicable technical standards, FCC part 15. There is no unauthorized change is made in the equipment and the equipment is properly maintained and operated. -
Page 90
Any changes or modifications not expressly approved by the party responsible for compliance could void the user’s authority to operate the equipment. We, TP-Link USA Corporation, has determined that the equipment shown as above has been shown to comply with the applicable technical standards, FCC part 15. -
Page 91
2400 MHz -2483.5 MHz(20dBm) 5150 MHz -5250 MHz(23dBm) EU declaration of conformity TP-Link hereby declares that the device is in compliance with the essential requirements and other relevant provisions of directives 2014/53/EU, 2009/125/ EC, 2011/65/EU and (EU)2015/863. The original EU declaration of conformity may be found at https://www.tp-link.com/en/ce… -
Page 92
L’émetteur/récepteur exempt de licence contenu dans le présent appareil est conforme aux CNR d’Innovation, Sciences et Développement économique Canada applicables aux appareils radio exempts de licence. L’exploitation est autorisée aux deux conditions suivantes : 1. l’appareil ne doit pas produire de brouillage; 2. -
Page 93
第十四條 低功率射頻電機之使用不得影響飛航安全及干擾合法通信;經發現有干 擾現象時,應立即停用,並改善至無干擾時方得繼續使用。前項合法通信,指依 電信規定作業之無線電信。低功率射頻電機需忍受合法通信或工業、科學以及醫 療用電波輻射性電機設備之干擾。 4.7.9.1 應避免影響附近雷達系統之操作。 4.7.9.2 高增益指向性天線只得應用於固定式點對點系統。 安全諮詢及注意事項 • 請使用原裝電源供應器或只能按照本產品注明的電源類型使用本產品。 • 清潔本產品之前請先拔掉電源線。請勿使用液體、噴霧清潔劑或濕布進行 清潔。 • 注意防潮,請勿將水或其他液體潑灑到本產品上。 • 插槽與開口供通風使用,以確保本產品的操作可靠並防止過熱,請勿堵塞 或覆蓋開口。 • 請勿將本產品置放於靠近熱源的地方。除非有正常的通風,否則不可放在 密閉位置中。 • 請不要私自打開機殼,不要嘗試自行維修本產品,請由授權的專業人士進 行此項工作。 限用物質含有情況標示聲明書 限用物質及其化學符號 鉛 鎘 汞 六價鉻 多溴聯苯 多溴二苯醚 產品元件名稱 CrVI PBDE ○ ○ ○ ○… -
Page 94
Safety Information • Keep the device away from water, fire, humidity or hot environments. • Do not attempt to disassemble, repair, or modify the device. • Do not use damaged charger or USB cable to charge the device. • Do not use any other chargers than those recommended •…