Решил подготовить небольшое руководство по настройке Wi-Fi роутера TP-Link Archer MR400. Если вы еще не знакомы с этим роутером, то рекомендую почитать мой обзор на эту модель. Так как Archer MR400 в основном покупают для того, чтобы подключаться к интернету через 3G/4G сеть, то я обязательно покажу, как подключить SIM-карту к этому роутеру и выполнить необходимые настройки подключения к интернету и Wi-Fi сети. Так же на всякий случай рассмотрим вариант подключения к интернету не через 3G/4G сеть, а Ethernet-кабель. Такая возможность в этом маршрутизаторе тоже есть.
В настройках доступно два режима работы: «3G/4G Router Mode» – когда роутер подключается к интернету через SIM-карту (3G/4G сеть). И «Wireless Router Mode» – когда интернет к роутеру мы подключаем по кабелю (напрямую от провайдера, или от модема) в WAN-порт. По умолчанию роутер работает в режиме «3G/4G Router Mode». Вставив SIM-карту в отдельный слот на роутере, он сразу подключается к сети мобильного оператора и начинает раздавать интернет. Настройки Wi-Fi сети и других функций на Archer MR400 практически ничем не отличаются от другим роутеров TP-Link. На этом роутере установлена новая версия веб-интерфейса.
Настройка TP-Link Archer MR400 с SIM-картой
В роутере слот под Micro SIM. Если у вас Nano SIM, то можно использовать переходник, который идет в комплекте с роутером.
Необходимо вставить карту в переходник и зафиксировать ее наклейкой с обратной стороны. После чего вставить SIM-карту в слот на роутере.
Включаем роутер и наблюдаем за индикаторами на передней панели. Примерно через минуту должен загореться индикатор уровня сигнала сотовой сети (деления, у меня на фото их три) и индикатор подключения к интернету. Это при условии, что роутер смог сам настроить подключение к интернету, есть покрытие 3G/4G сети и нет никаких ограничений со стороны нашего оператора.

Уже можно подключать устройства к роутеру и использовать подключение к интернету. Подключаться можно как по сетевому кабелю, так и по Wi-Fi. Заводское имя Wi-Fi сети (SSID) и пароль (Wirelles Password/PIN) можно найти на наклейке снизу TP-Link Archer MR400.

Нужно просто выбрать Wi-Fi сеть в списке доступных сетей на своем устройстве и указать пароль. Чтобы зайти в настройки роутера (например, для смены имени Wi-Fi сети и пароля), нужно сначала подключиться к самому роутеру. В настройки можно зайти через любой браузер. В том числе с телефона и планшета. Но на мобильных устройствах, для настройки и управления роутером Archer MR400 можно установить и использовать приложение TP-LINK Tether.
Через браузер в настройки зайти можно по адресу tplinkmodem.net, или 192.168.1.1. При первом входе в веб-интерфейс роутер попросит вас установить пароль администратора, который будет защищать настройки роутера. Нужно придумать и указать пароль (2 раза). Обязательно запишите его где-то.

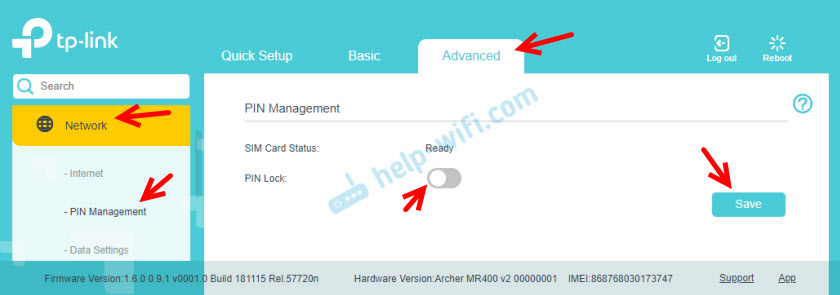
Все параметры, которые связаны с подключением к интернету через сеть мобильного оператора находятся на вкладке «Advanced», в разделе «Network». Если сразу появится сообщение связанное с PIN-кодом, значит SIM-карта заблокирована. Нужно перейти в раздел «Network» – «PIN Management» и ввести PIN-код (указан на карточке от SIM-карты, если вы его не меняли). Либо отключить блокировку PIN переключателем напротив «PIN Lock».
В разделе «Network» – «Internet» можно изменить параметры подключения к сотовой сети. Если это необходимо. У меня все настройки прописались автоматически.

Рекомендую обратить внимание на пункт «Network Mode» (режим сети). По умолчанию там стоит 4G Preferred (Предпочтительнее 4G). Это значит, что рутер будет подключаться к сети 4G, если есть покрытие. Если покрытия нет, то он будет подключаться к сети 3G. Менять настройки на «3G Only» (Только 3G) рекомендую лишь в том случае, когда покрытия 4G нет совсем. А «4G Only» – когда есть покрытие 4G, но роутер почему-то периодически переключается на 3G (при этом скорость в сети 4G выше по сравнению с 3G).
В разделе «USSD» можно отправлять USSD-запросы. Например, для проверки баланса, подключения каких-то тарифов и т. д. Управлять SMS сообщениями можно в отдельном разделе «SMS».
О настройке Wi-Fi сети я расскажу в одном из следующих разделов в этой статье. Просто прокрутите страницу ниже.
Настройка в режиме обычного маршрутизатора (интернет по кабелю)
Если вы хотите подключить к TP-Link Archer MR400 интернет по сетевому кабелю, то нужно для начала подключиться к роутеру с компьютера или мобильного устройства по кабелю или Wi-Fi, зайти в настройки и переключить его в соответствующий режим работы.
Выше я уже писал, что в настройки можно зайти по адресу http://tplinkmodem.net или http://192.168.1.1. На вкладке «Advanced», в разделе «Operation Mode» нужно поставить переключатель возле пункта «Wireless Router Mode» и нажать на кнопку «Save».

Подтверждаем смену режима работы. Ждем пока роутер будет перезагружен. После чего, если страница с настройка не кроется автоматически – открываем ее вручную.
К роутеру нужно подключить интернет. Кабель подключаем в порт LAN4/WAN.

В настройках (веб-интерфейсе) открываем раздел «Advanced» — «Network» — «Internet». Там сразу бросается в глаза переключатель «3G/4G Backup». Я так понимаю, если эта функция включена и к роутеру подключена SIM-карта, то при потере соединения с интернетом по кабелю, подключение через сотовую сеть будет использоваться как резервное.
Чтобы настроить подключение к интернет-провайдеру, нужно создать новый профиль (нажать на кнопку «Add»).

Сначала нужно правильно выбрать тип подключения к интернету (Internet Connection Type). Если вы не знаете какой тип подключения использует ваш провайдер, то нет смысла продолжать настройку. Обязательно выясните эту информацию у своего интернет-провайдера.

Во всех случаях кроме «Dynamic IP» (Динамический IP, DHCP) нужно прописывать настройки. Обратите внимание, что провайдер может делать еще и привязку по MAC-адресу. Если интернет не работает, то нужно выяснить это момент у поддержки. Для PPPoE нужно прописать имя пользователя и пароль. А для L2TP и PPTP еще и адрес сервера. Все эти адреса и пароли выдает провайдер.
Настройка PPPoE, для примера.

Сохраните настройки и смотрите на статус подключения. Если роутер не может подключится к интернету, то еще раз проверьте все параметры. Если необходимо – уточните их у провайдера. И выясните, нет ли ограничений с его стороны.
Настройка Wi-Fi сети на TP-Link Archer MR400
Все настройки беспроводной сети собраны в разделе «Advanced» — «Wireless» — «Wireless Settings». Так как роутер у нас двухдиапазонный, то там две вкладки: «2.4GHz» и «5GHz«. Каждая сеть настраивается отдельно. Нам нужно только сменить имя сети (Network Name (SSID)) и пароль (Password). Остальные настройки без необходимости не советую менять. Настраиваем сеть на 2.4GHz:

И 5GHz. Точно так же, меняем имя сети и пароль. Рекомендую задать другое имя сети. Пароль можно оставить такой же.

После сохранения настроек не забудьте заново подключить свои устройства к Wi-Fi сети. Если вы подключали их к сети со старым (заводским) именем и паролем.
Сброс настроек
Всегда можно восстановить заводские настройки на TP-Link Archer MR400 и начать процесс настройки заново. Для этого нужно нажать и примерно секунд 5 подержать кнопку WPS/Reset.

Начнет мигать индикатор питания. Еще через несколько секунд роутер будет перезагружен, а настройки сброшены до заводских.
инструкцияTP-Link Archer MR400

Quick Installation Guide
4G LTE Router
7106508105 REV3.0.0
Specifications are subject to change without notice. TP-Link is a registered trademark of TP-Link
Technologies Co., Ltd. Other brands and product names are trademarks or registered trademarks
of their respective holders.
No part of the specifications may be reproduced in any form or by any means or used to make
any derivative such as translation, transformation, or adaptation without permission from TP-Link
Technologies Co., Ltd. Copyright © 2018 TP-Link Technologies Co., Ltd. All rights reserved.
www.tp-link.com
For technical support, the user guide and more information, please visit https://www.tp-link.com/support.
Посмотреть инструкция для TP-Link Archer MR400 бесплатно. Руководство относится к категории маршрутизаторы (роутеры), 11 человек(а) дали ему среднюю оценку 7.4. Руководство доступно на следующих языках: русский, английский. У вас есть вопрос о TP-Link Archer MR400 или вам нужна помощь? Задайте свой вопрос здесь
Главная
| TP-Link | |
| Archer MR400 | ARCHER MR400 V3 | |
| маршрутизатор (роутер) | |
| 6935364080662, 6935364080679, 6935364086862 | |
| русский, английский | |
| Руководство пользователя (PDF), Техническая спецификация (PDF) |
Сеть
| Подключение Ethernet | Да |
| Скорость передачи данных Ethernet LAN | 10, 100 Мбит/с |
| Стандарты сети | IEEE 802.11a, IEEE 802.11ac, IEEE 802.11b, IEEE 802.11g, IEEE 802.11n |
| Диапазон частот | 2.4 — 5 GHz |
| Переадресация портов | Да |
| Подключение Ethernet | Да |
| Скорость передачи данных Ethernet LAN | 10, 100 Мбит/с |
| Стандарты сети | IEEE 802.11a, IEEE 802.11ac, IEEE 802.11b, IEEE 802.11g, IEEE 802.11n |
| Переадресация портов | Да |
| Поддержка VPN (виртуальной частной сети) | PPTP, L2TP, IPSec |
| Количество туннелей VPN | 10 |
| Тип LAN Ethernet интерфейса | Быстрый Ethernet |
| Чувствительность приемника | 5GHz: 11a 54M: -74dBmn11ac HT20: -67dBmn11ac HT40: -64dBmn11ac HT80 : -60dBmn11n HT20: -71dBmn11n HT40: -70dBmn2.4G: 11g 54M: -76dBmn11n HT20: -73dBmn11n HT40: -67dBm |
| Транзитная передача VPN | Да |
| Свивка кабеля | 10/100Base-T(X) |
| Динамический DNS | Да |
Порты и интерфейсы
| Количество портов Ethernet LAN ( RJ-45) | 3 |
| Количество портов Ethernet LAN ( RJ-45) | 3 |
| Гнездо входа постоянного тока (DC) | Да |
| USB порт | Нет |
| Слот(ы) для карты памяти | Нет |
Характеристики управления
| WPS кнопки | Да |
| Кнопка сброса установок | Да |
| Поддержка Quality of Service (QoS) | Да |
| Управление через веб-интерфейс | Да |
| WPS кнопки | Да |
| Кнопка сброса установок | Да |
| Поддержка Quality of Service (QoS) | Да |
| Управление через веб-интерфейс | Да |
Дизайн
| Цвет товара | Черный |
| Вкл/Выкл переключатель | Да |
| Цвет товара | Черный |
| Вкл/Выкл переключатель | Да |
| Тип продукта | Настольный маршрутизатор |
| Светодиодные индикаторы | LAN, Power, Status, WLAN |
| Настенный | Да |
Антена
| Тип антенны | Внутренний и внешний |
| Количество антенн | 5 |
| Диапазон передачи электроэнергии | 20 — 23 dBmW |
| Съемная антенна(ы) | Да |
| Конструкция антенны | Внутренний и внешний |
| Количество антенн | 2 |
| Мощность передачи | CE: <20dBm(2.4GHz), <23dBm(5GHz) dBmW |
| Съемная антенна(ы) | Да |
Энергопитание
| Тип источника питания | Постоянный ток |
| Выходное напряжение | 12 V |
| Ток на выходе | 1.5 A |
| Тип источника питания | Постоянный ток |
| Выходное напряжение | 12 V |
| Ток на выходе | 1.5 A |
Вес и размеры
| Ширина | 202 mm |
| Глубина | 141 mm |
| Высота | 33.6 mm |
| Ширина | 174 mm |
| Глубина | 124.5 mm |
| Высота | 33.5 mm |
Безопасность
| Алгоритмы шифрования данных | 64-bit WEP, 128-bit WEP, WPA, WPA-PSK, WPA2, WPA2-PSK |
| Поддержка VPN (виртуальной частной сети) | PPTP, L2TP, IPSec |
| Брандмауэр | Да |
| Защита с помощью брандмауэра | Denial-of-Service (DoS) protection, Stateful packet inspection (SPI) firewall |
| Количество туннелей VPN | 10 |
| Гостевой доступ | Да |
| Алгоритмы шифрования данных | 64-bit WEP, 128-bit WEP, WPA, WPA-PSK, WPA2, WPA2-PSK |
| Брандмауэр | Да |
| Гостевой доступ | Да |
| Защита от DoS атаки | Да |
| Инспекция пакетов с хранением состояния (SPI) | Да |
| Поддержка DMZ | Да |
| Список контроля доступа (ACL) | Да |
Мобильная сеть
| Поддерживаемые 4G частоты | 800,900,1800,2100,2600 MHz |
| Поддержка GSM частот | 850,900,1800,1900 MHz |
| Поддерживаемые UMTS частоты | 900,2100 MHz |
| Поддерживаемые 4G частоты | 800,900,1800,2100,2600 MHz |
| Поддержка GSM частот | 850,900,1800,1900 MHz |
| Поддерживаемые UMTS частоты | 900,2100 MHz |
| 3G | Да |
| 4G | Да |
| Стандарты 2G | EDGE, GPRS, GSM |
| Стандарты 3G | DC-HSPA+, HSPA, HSPA+, UMTS |
| Стандарт 4G | LTE |
| Поколение сети мобильной связи | 4G |
Протоколы
| DHCP клиент | Да |
| DHCP сервер | Да |
| Поддерживаемые сетевые протоколы | IPv4, IPv6 |
| DHCP клиент | Да |
| DHCP сервер | Да |
| Поддерживаемые сетевые протоколы | IPv4, IPv6 |
Свойства
| Сертификация | CE, RoHS |
| Поддерживаемые операционные системы Windows | Windows 2000, Windows 7, Windows 8, Windows 8.1, Windows 98SE, Windows NT, Windows Vista, Windows XP Home, Windows XP Home x64, Windows XP Professional, Windows XP Professional x64 |
| Поддерживаемые операционные системы Mac | Да |
| Поддерживаемые операционные системы Linux | Да |
| Сертификация | CE, RoHS |
Данные об упаковке
| Поставляемые кабели | LAN (RJ-45) |
| Сетевой адаптер в комплекте | Да |
| Краткое руководство по установке | Да |
| Тип упаковки | Коробочная версия |
| Тип упаковки | Коробочная версия |
| Глубина упаковки | 223 mm |
| Высота упаковки | 70 mm |
| Ширина упаковки | 307 mm |
Условия эксплуатации
| Диапазон температур при эксплуатации | 0 — 40 °C |
| Диапазон температур при хранении | -40 — 70 °C |
| Диапазон относительной влажности при эксплуатации | 10 — 90 % |
| Диапазон относительной влажности при хранении | 5 — 90 % |
| Диапазон температур при эксплуатации | 0 — 40 °C |
| Диапазон температур при хранении | -40 — 70 °C |
| Диапазон относительной влажности при эксплуатации | 10 — 90 % |
| Диапазон относительной влажности при хранении | 5 — 90 % |
Содержимое упаковки
| Поставляемые кабели | LAN (RJ-45) |
| Сетевой адаптер в комплекте | Да |
| Краткое руководство по установке | Да |
Системные требования
| Поддерживаемые операционные системы Windows | Windows 10, Windows 2000, Windows 7, Windows 8, Windows 8.1, Windows 98SE, Windows NT, Windows Vista, Windows XP Home, Windows XP Home x64, Windows XP Professional, Windows XP Professional x64 |
| Поддерживаемые операционные системы Mac | macOS |
| Поддерживаемые операционные системы Linux | Да |
| Совместимость с Mac | Да |
WAN подключение
| Ethernet WAN | Да |
| Слот для SIM-карты | Да |
| DSL WAN | Нет |
| Совместимость с 3G / 4G USB модемом | Нет |
| Тип WAN соединения | RJ-45 |
Характеристики беспроводной LAN
| Wi-Fi диапазоны | Двухдиапазонный (2,4Ггц/5Ггц) |
| Основной стандарт Wi-Fi | Wi-Fi 5 (802.11ac) |
| Скорость передачи данных WLAN (макс) | 867 Мбит/с |
| Wi-Fi стандартов | 802.11a, Wi-Fi 5 (802.11ac), 802.11b, 802.11g, Wi-Fi 4 (802.11n) |
| Скорость передачи данных WLAN (первая полоса) | 450 Мбит/с |
| Скорость передачи данных WLAN (вторая полоса) | 867 Мбит/с |
Логистические данные
| Код гармонизированной системы описания (HS) | 85176990 |
показать больше
Не можете найти ответ на свой вопрос в руководстве? Вы можете найти ответ на свой вопрос ниже, в разделе часто задаваемых вопросов о TP-Link Archer MR400.
Не нашли свой вопрос? Задайте свой вопрос здесь

-
Contents
-
Table of Contents
-
Bookmarks
Quick Links
User Guide
AC1350 Wireless Dual Band 4G LTE Router
Archer MR400
REV1.2.0
1910012197
Related Manuals for TP-Link Archer MR400
Summary of Contents for TP-Link Archer MR400
-
Page 1: User Guide
User Guide AC1350 Wireless Dual Band 4G LTE Router Archer MR400 REV1.2.0 1910012197…
-
Page 2: Table Of Contents
Contents About This Guide ………………….1 Chapter 1. Get to Know Your 4G LTE Router ……2 1.
-
Page 3
8. 5. SMS Settings …………. . . 33 Chapter 9. -
Page 4
12. 7. System Log…………..70 12. -
Page 5: About This Guide
In addition to this guide, a Quick Installation Guide is also released with each TP-Link router, you are suggested to configure your router for quick internet setup by following the published Quick Installation Guide before you get started with a further configuration.
-
Page 6: Chapter 1. Get To Know Your 4G Lte Router
Chapter Get to Know Your 4G LTE Router This chapter introduces what the router can do and shows its appearance. It contains the following sections: • Product Overview • Panel Layout…
-
Page 7: Product Overview
Product Overview What This Product Does The AC1350 Wireless Dual Band 4G LTE Router, Archer MR400, shares the latest generation 4G LTE network with multiple Wi-Fi devices, anywhere you want. It creates simultaneous dual band 802.11ac Wi-Fi, with speeds up to 450Mbps on 2.4GHz band and 867Mbps on 5GHz band.
-
Page 8: Led Explanation
Chapter 1 Get to Know Your 4G LTE Router The router’s LEDs (view from left to right) are located on the front panel. You can check the router’s working status by following the LED Explanation table. LED Explanation Name Status Indication Power is on..
-
Page 9: The Back Panel
Chapter 1 Get to Know Your 4G LTE Router 1. 2. 2. The Back Panel The following parts (view from left to right) are located on the rear panel. Item Description POWER Port For connecting the router to power socket via the provided power adapter. Press this button to power on or off the router.
-
Page 10: Chapter 2. Connect The Hardware
Chapter Connect the Hardware This chapter contains the following sections: • Requirements for Operation • Position Your 4G LTE Router • Connect Your 4G LTE Router…
-
Page 11: Requirements For Operation
Chapter 2 Connect the Hardware 2. 1. Requirements for Operation To connect and use the router for internet sharing, you must have the following: • SIM card with internet access enabled. • PCs with an active Ethernet Adapter and an Ethernet cable with RJ45 connectors. •…
-
Page 12
2. Connect your computer to the router. Method 1: Wired Connect your computer’s Ethernet port to one of the LAN ports on Archer MR400 via an Ethernet cable. Method 2: Wirelessly Use the default SSID (Wireless Network Name) and Wireless Password printed on the product label of the router to connect wirelessly. -
Page 13
Chapter 2 Connect the Hardware WLAN WLAN TP-Link_Home My Home My Network Home Network TP-Link_Network TP-Link_Test… -
Page 14: Chapter 3. Log In To Your 4G Lte Router
Chapter Log In to Your 4G LTE Router…
-
Page 15
Chapter 3 Log In to Your 4G LTE Router With a web-based management page, it is easy to configure and manage the Archer MR400 AC1350 Wireless Dual Band 4G LTE Router. The Web-based management page can be used on any Windows, Macintosh or UNIX OS with a web browser, such as Microsoft Internet Explorer, Mozilla Firefox or Apple Safari. -
Page 16: Chapter 4. Set Up Internet Connections
Chapter Set Up Internet Connections This chapter introduces how to connect your router to the internet. The router is equipped with a web-based Quick Setup wizard. It has many ISP information built in, automates many of the steps and verifies that those steps have been successfully completed.
-
Page 17: Use Quick Setup Wizard
Chapter 4 Set Up Internet Connections 4. 1. Use Quick Setup Wizard To set up your router with several easy steps quickly: 1. Visit http://tplinkmodem.net, and log in with the password you set for the router. 2. Click Quick Setup, after configuring your time zone, confirm the parameters with the information provided by your ISP in the part and click Next.
-
Page 18
Chapter 4 Set Up Internet Connections 3. Click Create Profile. 4. Specify the Profile Name, Username and Password. Select the Type, APN Type Authentication Type according to your ISP. 5. Click to make the settings effective and the new profile will be used to set up a new connection. -
Page 19: Test Internet Connectivity
Chapter 4 Set Up Internet Connections 4. 3. Test Internet Connectivity After manually set up the internet connection, you need to know the internet connectivity. The router provides a diagnostic tool to help you locate the malfunction. 1. Visit http://tplinkmodem.net, and log in with the password you set for the router. 2.
-
Page 20: Chapter 5. Bandwidth Control
Chapter Bandwidth Control The Bandwidth Control feature is used to fully utilize your limited bandwidth and optimize the load respectively. With this feature enabled, you can assign a specific minimum or maximum bandwidth for each computer, thus minimizing the impact caused when the connection is under heavy load.
-
Page 21
Chapter 5 Bandwidth Control I want to: Use an independent bandwidth and enjoy a good internet experience without being affected by other users who are sharing the same router. example, my roommate and I share 512Kbps Upstream Bandwidth and 4Mbps Downstream Bandwidth via this router, she likes to watch live show and play online games, which may take up much bandwidth. -
Page 22
Chapter 5 Bandwidth Control IP Range — Enter the IP address. The field can be single IP address or IP address range according to your demands. When you enter a single IP address, the computer with this IP address will get independent given bandwidth. When you enter an IP address range, all computers in the range will share the given bandwidth. -
Page 23
Chapter 5 Bandwidth Control Done! Now you and your roommate have an independent bandwidth. -
Page 24: Chapter 6. Network Security
Chapter Network Security This chapter guides you on how to protect your home network from unauthorized users by implementing these three network security functions. You can block or allow specific client devices to access your wireless network using MAC Filtering, or using Access Control for wired and wireless networks, or you can prevent ARP spoofing and ARP attacks using IP &…
-
Page 25: Firewall & Dos Protection
DoS Protection can protect your home network against DoS attacks from flooding your network with server requests. Follow the steps below to configure DoS Protection. 1. Visit http://tplinkmodem.net, and log in with your TP-Link ID or the password you set for the router.
-
Page 26: Service Filtering
With Service Filtering, you can prevent certain users from accessing the specified service, and even block internet access completely. 1. Visit http://tplinkmodem.net, and log in with your TP-Link ID or the password you set for the router. 2. Go to Advanced >…
-
Page 27: Access Control
Chapter 6 Network Security 5. Select a Service Type from the drop-down list and the following four fields will be auto-populated. Select Custom when your desired service type is not listed, and enter the information manually. 6. Specify the IP address(es) that this filtering rule will apply to. 7.
-
Page 28
Chapter 6 Network Security 3. Select the access mode to either block (recommended) or allow the device(s) in the list. To block specific device(s) 1 ) Select Blacklist and click Save. 2 ) Select the device(s) to be blocked in the Devices Online table. -
Page 29: Ip & Mac Binding
Chapter 6 Network Security Done! Now you can block or allow specific client devices to access your network (via wired or wireless) using the Blacklist or Whitelist. 6. 4. IP & MAC Binding IP & MAC Binding, namely, ARP (Address Resolution Protocol) Binding, is used to bind network device’s IP address to its MAC address.
-
Page 30
Chapter 6 Network Security 2 ) Enter the MAC address IP address that you want to bind. 3 ) Select the checkbox to enable the entry and click OK. Done! Now you don’t need to worry about ARP spoofing and other ARP attacks. -
Page 31: Chapter 7. Parental Controls
Chapter Parental Controls This function allows you to block inappropriate, explicit and malicious websites, and control access to specified websites at specified time.
-
Page 32
I want to allow my children’s devices (e.g. a computer or a tablet) to access only www.tp-link.com and wikipedia.org, from 18:00 (6PM) to 22:00 (10PM) on weekdays only. How can I 1. -
Page 33
Chapter 7 Parental Controls 4. Click View Existing Devices, and select the device to be controlled. Or, enter the Device Name MAC Address manually. 5. Click the icon to set the Internet Access Time. Drag the cursor over the appropriate cell(s) and click OK. 6. -
Page 34
Chapter 7 Parental Controls 1 ) Enter a web address (e.g. www.tp-link.com) or a web address keyword (e.g. wikipedia) to only allow or block access to the websites containing that keyword. 2 ) If you wish to block all internet browsing access, do not add any keyword to the Whitelist. -
Page 35: Chapter 8. Sms
Chapter This chapter introduces how to use the SMS functions to view and write messages, keep drafts and specify the message center number. You can easily monitor your data usage by sending a message to your carrier. This chapter includes the following sections: •…
-
Page 36: View Messages
Chapter 8 8. 1. View Messages 1. Visit http://tplinkmodem.net, and log in with the password you set for the router. 2. Go to Advanced > > Inbox page. 3. Click the icon to unfold and read the content of the message. Tips: indicates the message is read, while indicates the message is unread.
-
Page 37: View Sent Messages
Chapter 8 5. Click Send to send the message or click Save to save the message to the Drafts. 8. 3. View Sent Messages 1. Visit http://tplinkmodem.net, and log in with the password you set for the router. 2. Go to Advanced >…
-
Page 38
Chapter 8 1. Visit http://tplinkmodem.net, and log in with the password you set for the router. 2. Go to Advanced > > SMS Settings page and enable Message Center. 3. The Message Center Number is auto-populated. Change it according to your needs. -
Page 39: Chapter 9. Guest Network
Chapter Guest Network This function allows you to provide Wi-Fi access for guests without disclosing your main network. When you have guests in your house, apartment, or workplace, you can create a guest network for them. In addition, you can customize guest network options to ensure network security, privacy, and fluency.
-
Page 40: Create A Network For Guests
Chapter 9 Guest Network 9. 1. Create a Network for Guests 1. Visit http://tplinkmodem.net, and log in with the password you set for the router. 2. Go to Advanced > Guest Network. Locate the Wireless Settings section. 3. Create 2.4GHz and 5GHz guest network according to your needs. 1 ) Enable 2.4GHz Wireless 5GHz Wireless…
-
Page 41
Chapter 9 Guest Network • Allow guests to see each other Select this checkbox if you want to allow the wireless clients on your guest network to communicate with each other via methods such as network neighbors, Samba, Ping, and FTP. •… -
Page 42: Chapter 10. Nat Forwarding
TP-Link router includes four forwarding rules. If two or more rules are set, the priority of implementation from high to low is Virtual Servers, Port Triggering, UPnP and DMZ.
-
Page 43: Share Local Resources In The Internet By Virtual Server
Chapter 10 NAT Forwarding 10. 1. Share Local Resources in the Internet by Virtual Server When you build up a server in the local network and want to share it on the internet, Virtual Server can realize the service and provide it to the internet users. At the same time virtual server can keep the local network safe as other services are still invisible from the internet.
-
Page 44: Open Ports Dynamically By Port Triggering
Chapter 10 NAT Forwarding 4. Click View Existing Services, and choose HTTP. The external port, internal port and protocol will be auto-populated. Enter the PC’s IP address 192.168.1.100 in the Internal IP field. 5. Click to save the settings. Note: 1.
-
Page 45: Make Applications Free From Port Restriction By Dmz
Chapter 10 NAT Forwarding Follow the steps below to configure the port triggering rules: 1. Visit http://tplinkmodem.net, and log in with the password you set for the router. 2. Go to Advanced > NAT Forwarding > Port Triggering and click Add. 3.
-
Page 46: Make Xbox Online Games Run Smoothly By Upnp
Chapter 10 NAT Forwarding Note: DMZ is more applicable in the situation that users are not clear about which ports to open. When it is enabled, the DMZ host is totally exposed to the internet, which may bring some potential safety hazard. If DMZ is not in use, please disable it in time.
-
Page 47
Chapter 10 NAT Forwarding Tips: 1. UPnP is enabled by default in this router. 2. Only the application supporting UPnP protocol can use this feature. 3. UPnP feature needs the support of operating system (e.g. Windows Vista/ Windows 7/ Windows 8, etc. Some of operating system need to install the UPnP components). -
Page 48: Chapter 11. Specify Your Network Settings
Chapter Specify Your Network Settings This chapter introduces how to change the default settings or adjust the basic configuration of the router using the web-based management page. This chapter contains the following sections: • FAQUSSD • PIN Management • Data Settings •…
-
Page 49: Ussd
Chapter 11 Specify Your Network Settings 11. 1. USSD USSD (Unstructured Supplementary Service Data) is used to communicate with the service provider’s computer. You can query service data on this page. Follow the steps below to get service data. 1. Visit http://tplinkmodem.net, and log in with the password you set for the router.
-
Page 50: Data Settings
Chapter 11 Specify Your Network Settings • SIM Card Status — Displays the status of your SIM card. • PIN Lock — Toggle on to enable PIN Lock. Once it is enabled, every time you start the router with this SIM card inserted, you need to enter the PIN. •…
-
Page 51: Lan Settings
Chapter 11 Specify Your Network Settings 3. Enable Data Limit to set total/monthly data allowance and usage alert to prevent data overuse. 4. Enter the allowed amount of total/monthly data in the Total/Monthly Allowance field. When data usage exceeds the allowed level, the router will disconnect from the internet and notify you on the Basic >…
-
Page 52: Use The 4G Lte Router As A Dhcp Server
Chapter 11 Specify Your Network Settings 5. You can configure the router’s Second IP Subnet Mask for LAN interface through which you can also access the web management page. 6. Leave the rest of the default settings as they are. 7.
-
Page 53: Reserve Lan Ip Addresses
Chapter 11 Specify Your Network Settings 2. You can also appoint IP addresses within a specified range to devices of the same type by using Condition Pool feature. For example, you can assign IP addresses within the range (192.168.1.50 to192.168.1.80) to Camera devices, thus facilitating the network management.
-
Page 54: Wireless Settings
Chapter 11 Specify Your Network Settings 11. 5. Wireless Settings 11. 5. 1. Specify Basic Wireless Settings The router’s wireless network name (SSID) and password, and security option are preset in the factory. The preset SSID and password can be found on the product label. You can customize the wireless settings according to your needs.
-
Page 55: Use Wps For Wireless Connection
Chapter 11 Specify Your Network Settings • Mode — Select the desired mode. • 802.11n only — Select only if all of your wireless clients are 802.11n devices. • 802.11gn mixed — Select if you are using both 802.11g and 802.11n wireless clients.
-
Page 56
Chapter 11 Specify Your Network Settings Method 1 Use the Wi-Fi Protected Setup Button Use this method if your client device has a Wi-Fi Protected Setup button. 1. Press the WPS/RESET button on the back panel of the router for 1 second. 2. -
Page 57: Schedule Your Wireless Function
Chapter 11 Specify Your Network Settings Method 3 Enter the router’s PIN on your client device Use this method if your client device asks for the router’s PIN. 1. Visit http://tplinkmodem.net, and log in with the password you set for the router. 2.
-
Page 58: View Wireless Information
Chapter 11 Specify Your Network Settings 4. Click to set the Wireless Off Time, and click Save to save the settings. Note: 1. Please make sure that the time of the router is correct before using this function. For more details, refer to System Time.
-
Page 59: Advanced Wireless Settings
Chapter 11 Specify Your Network Settings Tips: You can also see the wrieless details by clicking the router icon on Basic > Network Map. ¾ To view the detailed information of the connected wireless clients: 1. Visit http://tplinkmodem.net, and log in with the password you set for the router. 2.
-
Page 60
Chapter 11 Specify Your Network Settings • Beacon Interval — Enter a value between 25 and 1000 in milliseconds to determine the duration between which beacon packets are broadcasted by the router to synchronize the wireless network. The default is 100 milliseconds. •… -
Page 61: Set Up A Dynamic Dns Service Account
Chapter 11 Specify Your Network Settings 11. 6. Set Up a Dynamic DNS Service Account Most ISPs (internet service providers) assign a dynamic IP address to the router and you can use this IP address to access your router remotely. However, the IP address can change any time and you don’t know when it changes.
-
Page 62
Chapter 11 Specify Your Network Settings example, in a small office, my PC can surf the internet, but I also want to visit my company’s server. Now I have a switch and another router. I connect the devices as shown in the following figure so that the physical connection between my PC and my company’s server is achieved. -
Page 63
Chapter 11 Specify Your Network Settings • Destination IP — The destination IP address that you want to assign to a static route. This IP address cannot be on the same subnet with the WAN IP or LAN IP of the router. In the example, the IP address of the company network is the destination IP address, so here enters 172.30.30.1. -
Page 64: Set Up A Vpn Connection
Chapter 11 Specify Your Network Settings 11. 8. Set up a VPN Connection VPN (Virtual Private Network) is a private network established across the public network, generally via the internet. However, the private network is a logical network without any physical network lines, so it is called Virtual Private Network.
-
Page 65
Chapter 11 Specify Your Network Settings 1 ) Visit http://tplinkmodem.net, and log in with the password you set for the router. 2 ) Go to Advanced > > IPSec VPN to open the configuration page. Click to set up a VPN tunnel. 3 ) In the IPSec Connection Name column, specify a name. -
Page 66
Chapter 11 Specify Your Network Settings Subnet Mask of Site B. 7 ) Select the Key Exchange Method for the policy. We select Auto(IKE) here. 8 ) Enter the Pre-Shared Key for IKE authentication. Then keep Perfect Forward Secrecy enabled. Note: Make sure Site A and Site B use the same key. -
Page 67
Chapter 11 Specify Your Network Settings c . If Ping proceeds successfully (gets replies from host in Site B), the IPSec connection is working properly now. Done! Now IPSec VPN is implemented to establish a connection. Note: 1. The product supports a maximum of ten simultaneous connections. 2. -
Page 68: Chapter 12. Administrate Your Network
Chapter Administrate Your Network This chapter introduces how to change the system settings and administrate your router’s network. This chapter contains the following sections: • Set System Time • Update the Firmware • Back up and Restore Configuration Settings • Change the Administrator Account •…
-
Page 69: Set System Time
Chapter 12 Administrate Your Network 12. 1. Set System Time System time is the time displayed while the router is running. The system time you configure here will be used for other time-based functions like Parental Controls and Wireless Schedule. You can manually set how to get the system time. Follow the steps below to set your system time.
-
Page 70: Update The Firmware
TP-Link is dedicated to improving and richening the product features, giving you a better network experience. We will inform you through the web management page if there’s any update firmware available for your router. Also, the latest firmware will be released at TP-Link official website, you can download it from the Support page of our website www.tp-link.com…
-
Page 71: Local Upgrade
4. Wait a few moments for the upgrading and rebooting. 12. 2. 2. Local Upgrade 1. Download the latest firmware file for the router from our website www.tp-link.com. 2. Visit http://tplinkmodem.net, and log in with the password you set for the router.
-
Page 72: Change The Administrator Account
Chapter 12 Administrate Your Network ¾ To restore configuration settings: 1. Visit http://tplinkmodem.net, and log in with the password you set for the router. 2. Click Advanced > System Tools > Backup & Restore page. 3. Click Browse to locate the previous backup configuration file, and click Restore.
-
Page 73: Local Management
Chapter 12 Administrate Your Network 3. Enter the old password. Enter the new password and enter again to confirm. 4. Click Save to make the settings effective. 12. 5. Local Management You can control the local devices’ authority to manage the router via the Local Management feature.
-
Page 74: System Log
Chapter 12 Administrate Your Network 3. Tick the checkbox to enable Remote Management. Keep the Port as the default setting. Leave the IP/MAC Address field blank. If you just want to allow a specific device to manage the router, you can enter the IP address of the remote device in IP/MAC Address field.
-
Page 75
Chapter 12 Administrate Your Network ¾ To view the system logs: 1. Select the log Type. Select to view all kinds of logs, or select DHCPD IGMP to view the specific logs. 2. Select the log Level and you will see the logs with the specific or higher levels. 3. -
Page 76: Monitor The Internet Traffic Statistics
Chapter 12 Administrate Your Network • Save Locally — Select this option to cache the system log to the router’s local memory, select the minimum level of system log to be saved from the drop-down list. The logs will be shown in the table in descending order on the System Log page. •…
-
Page 77
Chapter 12 Administrate Your Network • Enable CWMP — Toggle On to enable the CWMP (CPE WAN Management Protocol) feature. • Inform — Enable this feature to send an Inform message to the ACS (Auto Configuration Server) periodically. • Inform Interval — Enter the time in seconds when the Inform message will be sent to the ACS. -
Page 78: Snmp Settings
Chapter 12 Administrate Your Network • Connection Request Path — Enter the path for the ACS server to log in to the router. • Connection Request Port — Enter the port that connects to the ACS server. • Connection Request URL — Enter the URL that connects to the ACS server.
-
Page 79
Chapter 12 Administrate Your Network messages, sending responses to the SNMP manager, and triggering SNMP traps when an event occurs. • Read Community — Displays the default public community string that protects the router from unauthorized access. • Set Community — Displays the default read and write community string that protects the router from unauthorized changes. -
Page 80: Faq
Q1. How do I restore my router to its factory default settings? With the router powered on, press and hold the WPS/RESET button on the rear panel until all the LEDs except the Power LED turn on momentarily. Note: Once the router is reset, the current configuration settings will be lost and you will need to re-configure the router. Q2.
-
Page 81
3 ) Click Connections and select Never dial a connection. 4 ) Click settings, deselect the following three options and click OK; 5 ) Go to Advanced > Restore advanced settings, click to save the settings. -
Page 82
• Use another web browser or computer to log in again. • Reset the router to factory default settings and try again. If the login still fails, please contact the technical support. Note: You’ll need to reconfigure the router to surf the internet once the router is reset. Q4. -
Page 83
parameters are incorrect, click Create Profile and enter the correct parameters, then select the new profile from the Profile Name list. 6. Check the PIN settings: 1 ) Open a web browser and log in to the web management page. 2 ) Go to Advanced >… -
Page 84
Q6. How to use the router as a regular wireless router to share my internet ? The router support two operation modes, 3G/4G Router Mode and Wireless Router mode. If you already have a modem or your internet comes via an Ethernet cable from the wall, you can set up the router as a regular wireless router to share the internet. -
Page 85
Q7. What can I do if I cannot find my wireless network or I cannot connect the wireless network? ¾ If you fail to find any wireless network, please follow the steps below: 1. Make sure the wireless function is enabled if you’re using a laptop with built-in wireless adapter. -
Page 86
2 ) Exit the wireless configuration tool (the TP-Link Utility, for example); 3 ) Select and right click on… -
Page 87
5 ) Select Wireless Zero Configuration, right click it, and then select Properties; 6 ) Change Startup type to Automatic, click on Start button and make sure the Service status is Started. And then click OK. -
Page 88
7 ) Connect to wireless network. ¾ If you can find other wireless network except your own, please follow the steps below: 1. Check the WLAN LED indicator on your router; 2. Make sure your computer/device is still in the range of your router/modem, move closer if it is currently too far away;… -
Page 89
2 ) If you cannot find the PIN or PIN failed, you may choose Connecting using a security key instead, and then type in the Network Security Key/Wireless Password; 3 ) If it continues saying network security key mismatch, it is suggested to confirm the wireless password on your wireless router/modem;… -
Page 90
Specifications are subject to change without notice. is a registered trademark of TP-Link Technologies Co., Ltd. Other brands and product names are trademarks or registered trademarks of their respective holders. No part of the specifications may be reproduced in any form or by any means or used to make any derivative such as translation, transformation, or adaptation without permission from TP-Link Technologies Co., Ltd. -
Page 91: Rf Exposure Information
CE Mark Warning This is a class B product. In a domestic environment, this product may cause radio interference, in which case the user may be required to take adequate measures. Restricted to indoor use. RF Exposure Information This device meets the EU requirements (2014/53/EU Article 3.1a) on the limitation of exposure of the general public to electromagnetic fields by way of health protection.
-
Page 92: Safety Information
Продукт сертифіковано згідно с правилами системи УкрСЕПРО на відповідність вимогам нормативних документів та вимогам, що передбачені чинними законодавчими актами України. Safety Information • When product has power button, the power button is one of the way to shut off the product;…
перейти к содержанию
Маршрутизатор Archer MR400 4G LTE
Руководство по установке
Подключите оборудование

- Расположите антенны вертикально.
Примечание: Для некоторых маршрутизаторов необходимо сначала установить антенны вручную. - Вставьте SIM-карту в слот до щелчка.
- Включите роутер.
Примечание: Изображения предназначены только для демонстрации.![]() Наслаждайтесь Интернетом!
Наслаждайтесь Интернетом!
Подключите ваше устройство к роутеру (проводному или беспроводному).
SSID и пароль по умолчанию указаны на этикетке продукта в нижней части маршрутизатора.
Настройте маршрутизатор 4G LTE
- Убедитесь, что ваш компьютер подключен к маршрутизатору (через проводное или беспроводное соединение).
- Enter http://tplinkmodem.net or 192.168.1.1 в адресной строке web браузер. Исходя из фактических web Страница входа в систему управления: используйте администратора по умолчанию для имени пользователя и пароля или создайте новый пароль для входа в систему.
- Следуйте пошаговым инструкциям на странице быстрой настройки, чтобы завершить первоначальную настройку.
Примечание: Маршрутизатор также можно использовать (или настроить) в режиме беспроводного маршрутизатора для ADSL / кабельных соединений. Для получения дополнительной информации, пожалуйста, обратитесь к Руководству пользователя по адресу www.tp-link.com.
FAQ (Часто задаваемые вопросы)
Q1. Что делать, если страница входа не появляется?
– Убедитесь, что компьютер настроен на автоматическое получение IP-адреса от маршрутизатора.
— Подтвердите это http://tplinkmodem.net or 192.168.1.1 правильно введен в web браузер.
— Используйте другой web браузер и попробуйте еще раз.
– Перезагрузите маршрутизатор и повторите попытку.
– Отключите, а затем включите активный сетевой адаптер и повторите попытку.
Q2. Что мне делать, если я не могу получить доступ к Интернету?
– Убедитесь, что ваша SIM-карта является картой LTE или WCDMA.
– Убедитесь, что ваша SIM-карта находится в зоне обслуживания вашего интернет-провайдера.
– Убедитесь, что на вашей SIM-карте достаточно средств.
– Проверьте подключение к локальной сети:
Enter http://tplinkmodem.net or 192.168.1.1 в адресной строке web браузер. Если страница входа не появляется, обратитесь к FAQ> Q1 и попробуйте еще раз.
– Проверьте параметры вашего провайдера:
– 1. Откройте web браузер и войдите в web страница управления.
– 2. Убедитесь, что параметры, предоставленные вашим интернет-провайдером, введены правильно. Если параметры неверны, создайте новый profile с правильными параметрами.
– Проверьте настройки PIN-кода:
– 1 открыть web браузер и войдите в web страница управления.
– 2 Проверьте, требуется ли PIN-код. Если это так, введите правильный PIN-код, предоставленный вашим интернет-провайдером.
– Проверьте лимит данных:
– 1 открыть web браузер и войдите в web страница управления.
– 2 Проверить, не превышают ли общие использованные данные общий допуск. Если это так, исправьте общий допуск и установите общее количество используемых данных равным 0 или отключите ограничение данных.
– Проверьте мобильные данные:
– 1 открыть web браузер и войдите в web страница управления.
– 2 Включите мобильные данные для доступа в Интернет.
– Проверьте роуминг данных:
– 1. Уточните у своего интернет-провайдера, находитесь ли вы в зоне обслуживания роуминга. Если вы, откройте web браузер и войдите в web страница управления.
– 2. Включите роуминг данных для доступа в Интернет.
Q3. Как вернуть маршрутизатор к заводским настройкам по умолчанию?
– При включенном маршрутизаторе нажмите и удерживайте кнопку WPS/RESET на задней панели маршрутизатора, пока не начнет мигать индикатор питания. Маршрутизатор восстановится и перезагрузится автоматически.
— Войдите в web страницу управления маршрутизатором, чтобы восстановить заводские настройки маршрутизатора.
Q4. Что делать, если я забыл пароль от web страница управления?
– См. FAQ>Q3, чтобы восстановить маршрутизатор и использовать admin как для имени пользователя, так и для пароля, или создать новый пароль для входа в систему.
Q5. Что делать, если я забыл пароль к беспроводной сети?
– Пароль беспроводной сети по умолчанию напечатан на этикетке маршрутизатора.
– Если пароль беспроводной сети по умолчанию был изменен, войдите в web страницу управления и получите или сбросьте свой пароль.
Примечание: Для получения дополнительной помощи по устранению неполадок, пожалуйста, обратитесь к часто задаваемым вопросам на нашем webсайт: https://www.tp-link.com.
Настоящим TP-Link заявляет, что устройство соответствует основным требованиям и другим соответствующим положениям директив 2014/53/ЕС, 2009/125/ЕС, 2011/65/ЕС и (ЕС)2015/863.
Оригинал декларации соответствия ЕС можно найти на https://www.tp-link.com/en/support/ce/.
Информация по технике безопасности
- Держите устройство подальше от воды, огня, влажности или жарких сред.
- Не пытайтесь разбирать, ремонтировать или модифицировать устройство. Если вам нужна услуга, свяжитесь с нами.
- Не используйте поврежденное зарядное устройство или USB-кабель для зарядки устройства.
- Не используйте другие зарядные устройства, кроме рекомендованных.
- Не используйте устройство там, где использование беспроводных устройств запрещено.
- Адаптер должен быть установлен рядом с оборудованием и должен быть легко доступен.
Пожалуйста, прочтите и соблюдайте приведенную выше информацию по безопасности при работе с устройством. Мы не можем гарантировать отсутствие несчастных случаев или повреждений из-за неправильного использования устройства. Пожалуйста, используйте этот продукт осторожно и действуйте на свой страх и риск.
Документы / Ресурсы
Рекомендации
Файлы для провайдеров
Как выполнить обновление прошивки
Обновление программного обеспечения (прошивки) способно решить проблемы предыдущих версий прошивки и улучшить работу устройства. Во избежание возникновения проблем при обновлении ознакомьтесь со следующей информацией.
Проверьте соответствие аппаратной версии и версии прошивки — установка неверной версии может привести к неисправности устройства и аннулировать гарантию (обычно версия 1.x = версия 1). Как узнать аппаратную версию устройства?
Не рекомендуется устанавливать прошивку, предназначенную для другого региона. Нажмите здесь для выбора региона и загрузите последнюю версию прошивки.
Не отключайте питание во время обновления — это может привести к неисправности устройства.
Обновляйте прошивку роутера по Wi-Fi только тогда, когда это является единственно возможным способом.
Перед обновлением рекомендуется закрыть на компьютере все программы, для работы которых требуется интернет-подключение, или просто отсоединить сетевой кабель от устройства.
Перед выполнением обновления файл с прошивкой необходимо извлечь из архива с помощью архиватора (например, WinRAR или WinZIP).
Рекомендации по обновлению прошивки: Wi-Fi роутер, Wi-Fi роутер с модемом ADSL2+, усилитель Wi-Fi сигнала.
|
ISP_23021501 |
Загрузить | |
|---|---|---|
| Дата публикации: 2023-03-02 | Язык: Многоязычный | Размер файла: 149.69 KB |
|
Операционная система : Windows/Mac OS/Linux |
||
|
Изменения Примечания |
Видео по настройке
-
How to Set up TP-Link 4G WiFi Router
Как обновить прошивку
Обновление программного обеспечения (прошивки) способно решить проблемы предыдущих версий прошивки и улучшить работу устройства. Во избежание возникновения проблем при обновлении ознакомьтесь со следующей информацией.
Проверьте соответствие аппаратной версии и версии прошивки — установка неверной версии может привести к неисправности устройства и аннулировать гарантию (обычно версия 1.x = версия 1). Как узнать аппаратную версию устройства?
Не рекомендуется устанавливать прошивку, предназначенную для другого региона. Нажмите здесь для выбора региона и загрузите последнюю версию прошивки.
Отключение питания во время обновления может привести к неисправности устройства.
Обновляйте прошивку роутера по Wi-Fi только тогда, когда это является единственно возможным способом.
Перед обновлением рекомендуется закрыть на компьютере все программы, для работы которых требуется интернет-подключение, или просто отсоединить сетевой кабель от устройства.
Перед выполнением обновления файл с прошивкой необходимо извлечь из архива с помощью архиватора (например, WinRAR или WinZIP).
Рекомендации по обновлению прошивки: Wi-Fi роутер, Wi-Fi роутер с модемом ADSL2+, усилитель Wi-Fi сигнала.
Больше
Меньше
|
Archer_MR400(EU)_V4.2_210610 |
Загрузить | |
|---|---|---|
| Дата публикации: 2023-03-01 | Язык: Многоязычный | Размер файла: 53.32 MB |
|
Первая прошивка. |
Официальное программное обеспечение устройств TP-Link может быть заменено на стороннее, например, на DD-WRT. Компания TP-Link не обязана предоставлять сервисную или техническую поддержку для устройств со сторонним ПО и не гарантирует стабильность его работы. Ущерб, нанесённый устройству в результате использования стороннего ПО, приведёт к аннулированию гарантии.
Открытый исходный код для программистов (GPL)
Следующая информация предназначена для программистов и не представляет особой значимости для большинства конечных пользователей продукции TP-Link.
Продукция TP-Link содержит код, разработанный третьими лицами, включая код, разработанный в соответствии с универсальной общественной лицензией GNU (GPL) версий 1–3 или в соответствии со универсальной общественной лицензией ограниченного применения GNU (LGPL). Вы можете использовать соответствующее программное обеспечение на условиях лицензии GPL.
Ознакомиться, распечатать и загрузить соответствующие условия лицензии GPL можно здесь. В центре исходных кодов GPL можно скачать исходный код GPL соответствующего ПО, используемого в продукции TP-Link, а также прочую информацию, включая список ПО TP-Link, содержащего исходный код GPL.
Приложение

- TP-Link Tether
-
Приложение Tether компании TP‑Link обеспечивает удобное управление сетью через любое устройство, работающее на операционной системе Android или iOS. Ознакомьтесь с дополнительной информацией о приложении Tether и списком совместимых устройств.

Примечание: для работы приложения Tether необходимо обновить прошивку устройства TP-Link до последней версии.