Содержание
- 1 Технические характеристики
- 2 Комплектация
- 3 Дизайн
- 4 WEB-интерфейс
- 5 Мобильный софт
- 6 Заключение
- 7 Видео по теме
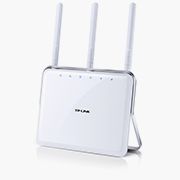
В 2021 году известный китайский бренд TP-Link выпустил новый маршрутизатор Арчер EC220-G5 ERT. Данный прибор производитель разработал для провайдеров интернета, чтобы они могли предоставлять своим клиентам доступ к таким сетям. Эта ориентация маршрутизаторов данной модели была связана с тем, что у них есть целый ряд полезных для поставщиков таких услуг функций. Среди которых главную роль играют возможность удаленного управления и пакетной настройки прибора. Однако это не означает, что его не могут использовать простые пользователи, чтобы организовать раздачу Wi-Fi сигнала. Данный аппарат вполне подойдет для организации беспроводной сети как в квартире, так и в офисе. Ведь у него достаточно высокая скорость передачи данных, которая составляет 12 Гбит/с. Далее в этой статье расскажем про характеристики, возможности и настройку Wi-Fi роутера TP-Link Archer EC220-G5 ERT. Данный прибор для сетей Wi-Fi 5 поколения точно будет интересен пользователям, ведь он имеет достаточно обширный функционал.
Технические характеристики
В таблице ниже можно увидеть краткие характеристики данного прибора ТП-Линк Archer EC220-G5 ERT. Полный список характеристик и описание данной модели на официальном сайте поможет посмотреть данная https://clck.ru/sKpVk.
| Название маршрутизатора | ТП-Линк EC220-G5 ERT |
| Альтернативное наименование | Двухчастотный гигабитный Вай-Фай маршрутизатор (AC1200) |
| Процессор | 1.5 ГГц |
| Электропитание | 12V, 1A |
| Габаритные размеры | 23×14.4×3.7 см (Ш×Д×В) |
| Количество и тип антенн | 4 внешние антенны |
| Сетевые порты | Четыре гигабитных порта (1×WAN-порт и 3×LAN-порта) |
| Стандарты беспроводных сетей | 802.11 b/g/n на частоте 2.4 ГГц
802.11 a/n/ac на частоте 5 ГГц |
| Радиочастоты | 2.4 GHz и 5 GHz |
| Скорость беспроводного соединения | 1167 Мбит/с — 300 Мбит/с (2.4 GHz) и 867 Мбит/с (5 GHz) |
| Cкорость проводного соединения | 1000 Мбит/с |
| Шифрование данных | WEP (64 и 128 бит), WPA, WPA2, WPA-PSK и WPA2-PSK |
| WAN-подключение | Динамический IP
Статический IP L2TP PPTP PPPoE |
| Рабочая температура
Температура хранения |
0 ÷ +40 градусов
-40 ÷ +70 градусов |
| Параметры влажности:
при эксплуатации при хранении |
10 ÷ 90% (без конденсата) 5 ÷ 90% (без конденсата) |
| Поддерживаемые ОС | Виндовс 98SE, NT, 2000, Vista, XP, 7, 8 и 10
Mac OS UNIX Линукс NetWare |
| Настройка и управление | Веб-интерфейс, мобильное приложение Tether, TR-069, TR-098 и TR-111 |
| Дополнительно | Virtual-сервер
Демилитаризованная зона Universal Plug and Play Перенаправление портов Родительский контроль DHCP-сервер Фильтрация по IP- и MAC-адресам QoS (приоритизация данных и контроль трафика) WDS-мост Статистика беспроводных сетей Резервирование IP-адресов IPv4 и IPv6 Встроенный файрвол WDS-мост |
| Количество одновременно подключаемых клиентов | до 50 |
| Площадь покрытия | 70 кв.м. |
| Вес прибора | 0.35 кг |
| Ориентировочная стоимость на момент написания статьи | от 2500 до 3000 рублей |
Комплектация
Данный роутер ТП-Линк Арчер EC220-G5 производитель поместил в стандартную квадратную коробку из картона. В этот раз TP-Link решил изменить дизайн коробки и сделал для нее новое оформление. На лицевой стороне коробки размещено теперь не так много информации. Здесь есть фотография самого двухчастотного роутера, название модели, информация о максимальной скорости передачи данных (1200 Mbps) и логотип бренда.
В комплект маршрутизатора входит следующее:
- блок питания (12V, 1A);
- патч-корд желтого цвета;
- инструкция по подключению и настройке аппарата.
Довольно стандартная комплектация для приборов данного типа. Нет никаких изысков и включено только то, что требуется для подключения и настройки прибора.
Дизайн
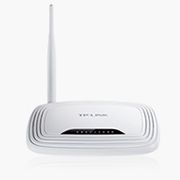
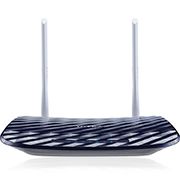
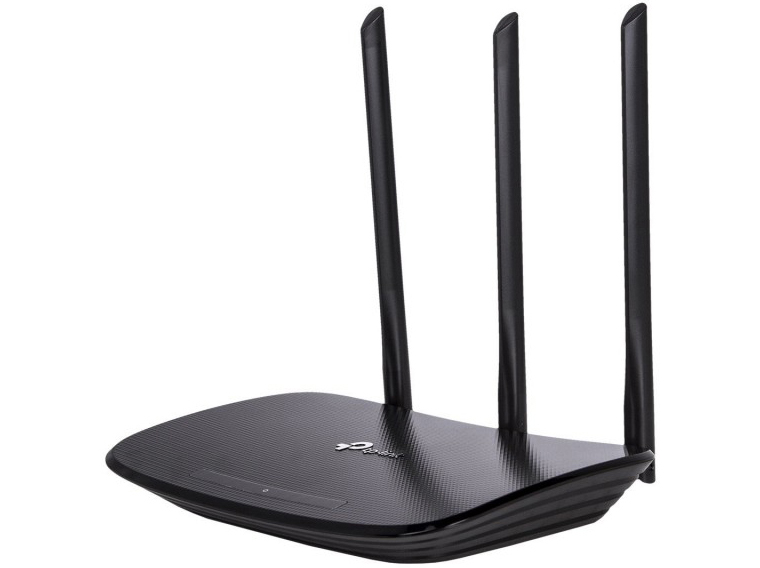
Если сказать честно, то данный роутер от ТП-Линк не может похвастаться каким-то уникальным дизайном. Производитель решил видать не заморачиваться и выпустил роутер EC220-G5 в стандартном корпусе, который свойственен практически всем приборам из серии Арчер. Единственный нюанс, который нельзя не отметить — применение практичных материалов для производства корпуса устройства. Для верхней крышки ранее использовали глянцевый рельефный пластик, который очень быстро загрязнялся. Теперь данную деталь корпуса решили сделать из обычного шероховатого пластика, который имеет мелкую рифленую текстуру.
Плюс такого дизайнерского решения заключается в том, что верхняя панель теперь не царапается. На белом фоне пыль не очень заметна, поэтому постоянно протирать прибор не потребуется. Серый шероховатый пластик использован для изготовления нижней части корпуса и антенн устройства.
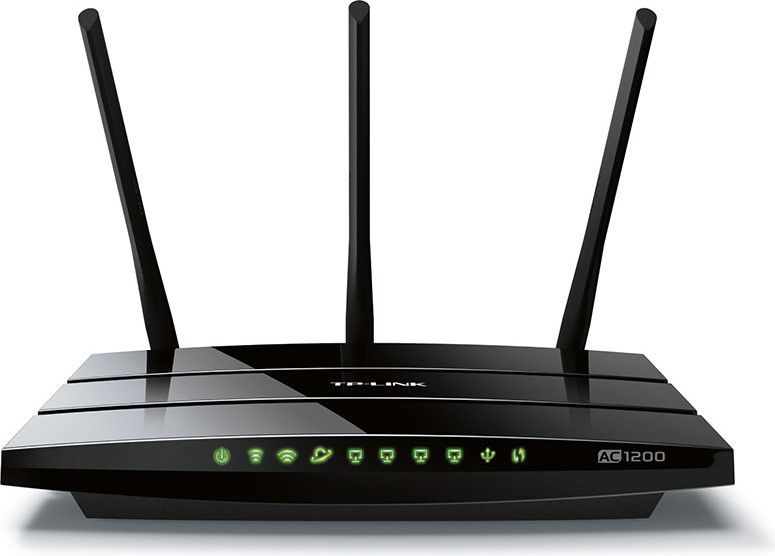
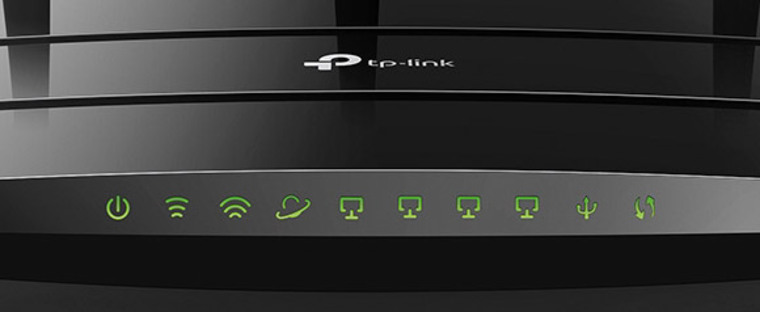
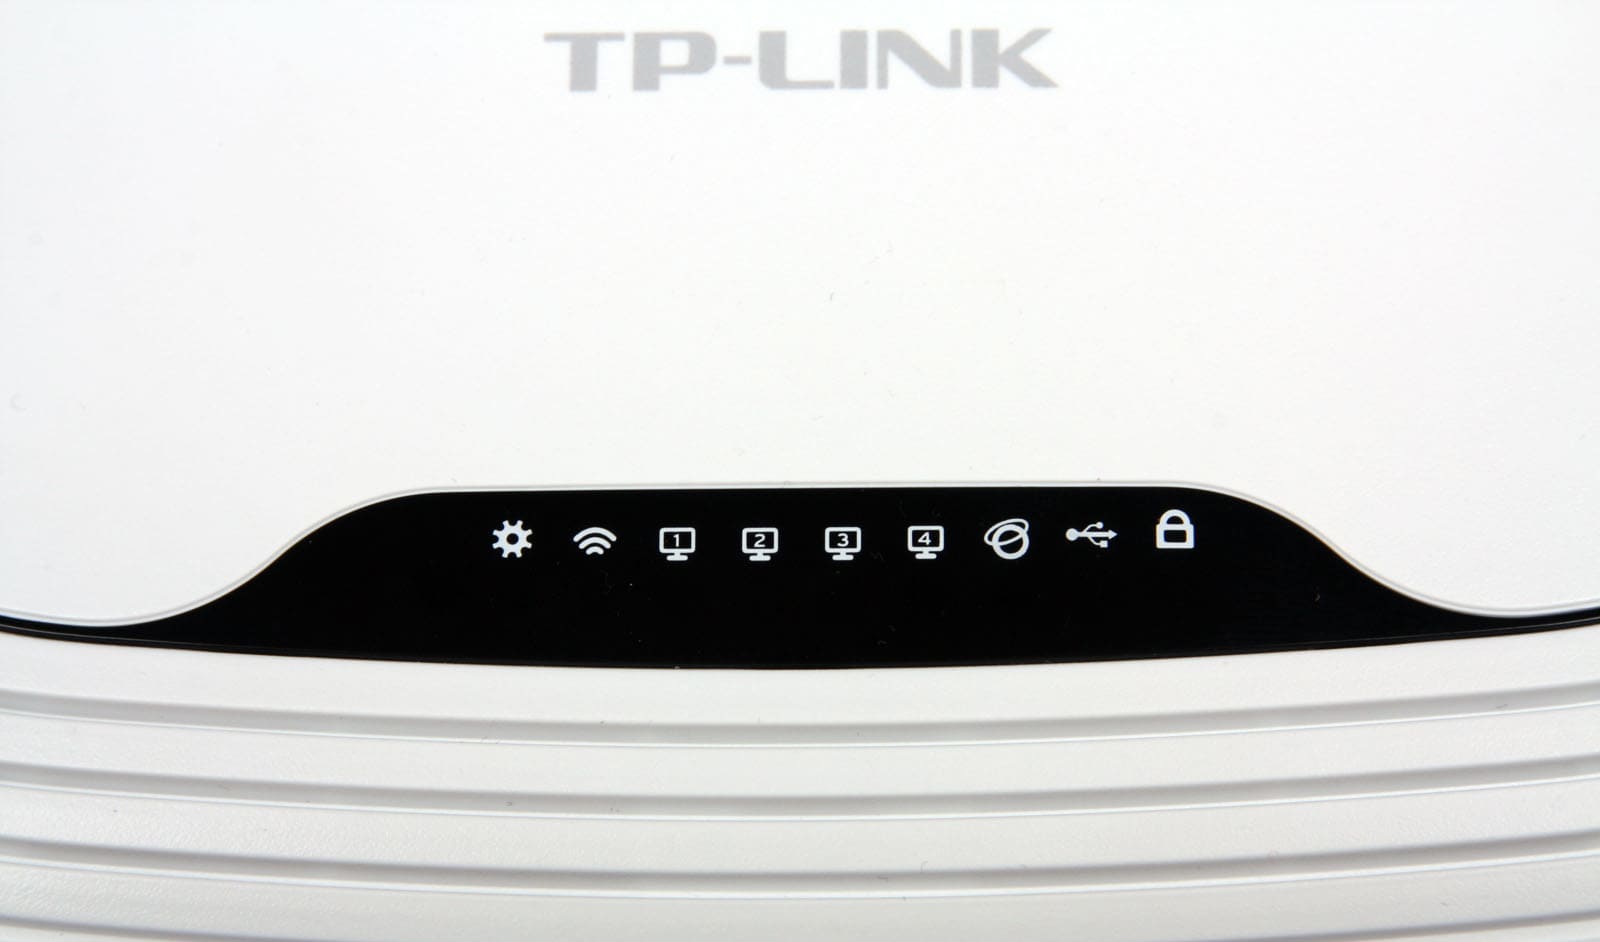
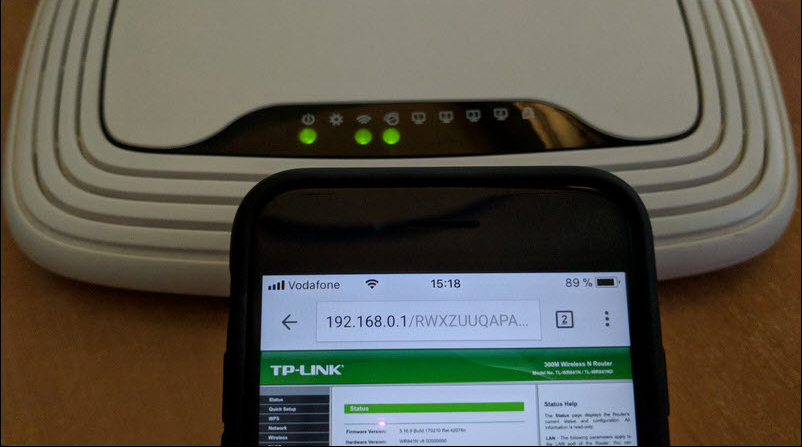
Вверху центральной части располагается серебристый значок ТП-Линк. Ближе к краю данной панели под логотипом размещены светоиндикаторы прибора. Размещены светоиндикаторы на серой прямоугольной полоске.
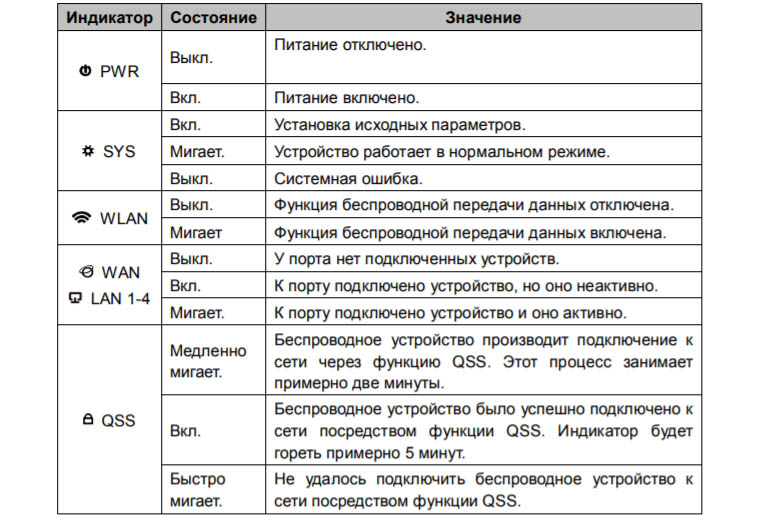
Здесь есть такие индикаторы:
- активность роутера;
- раздельные светодиоды для сетей 2.4 и 5 GHz;
- подсоединение к провайдерской интернет-сети;
- состояния сетевых портов;
- режим WPS.
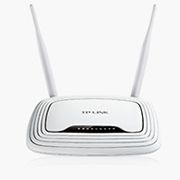
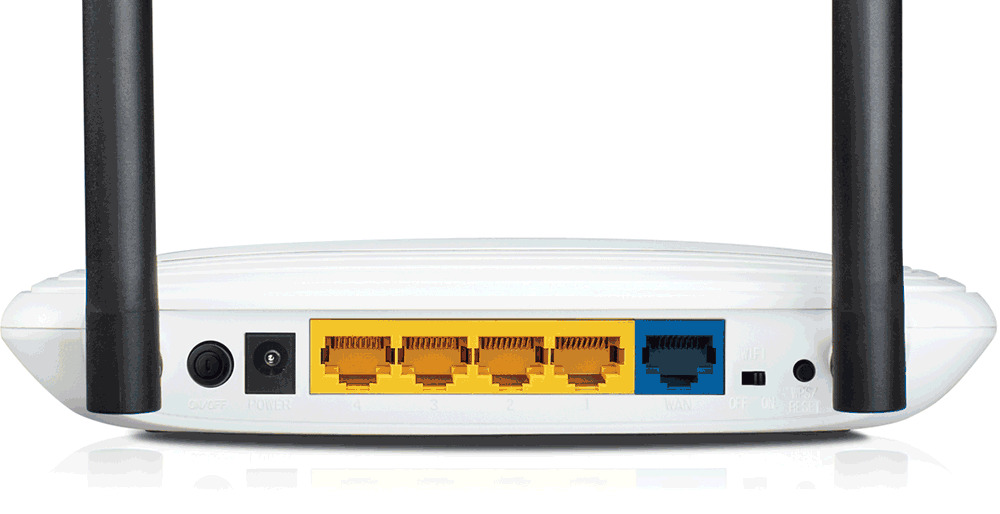
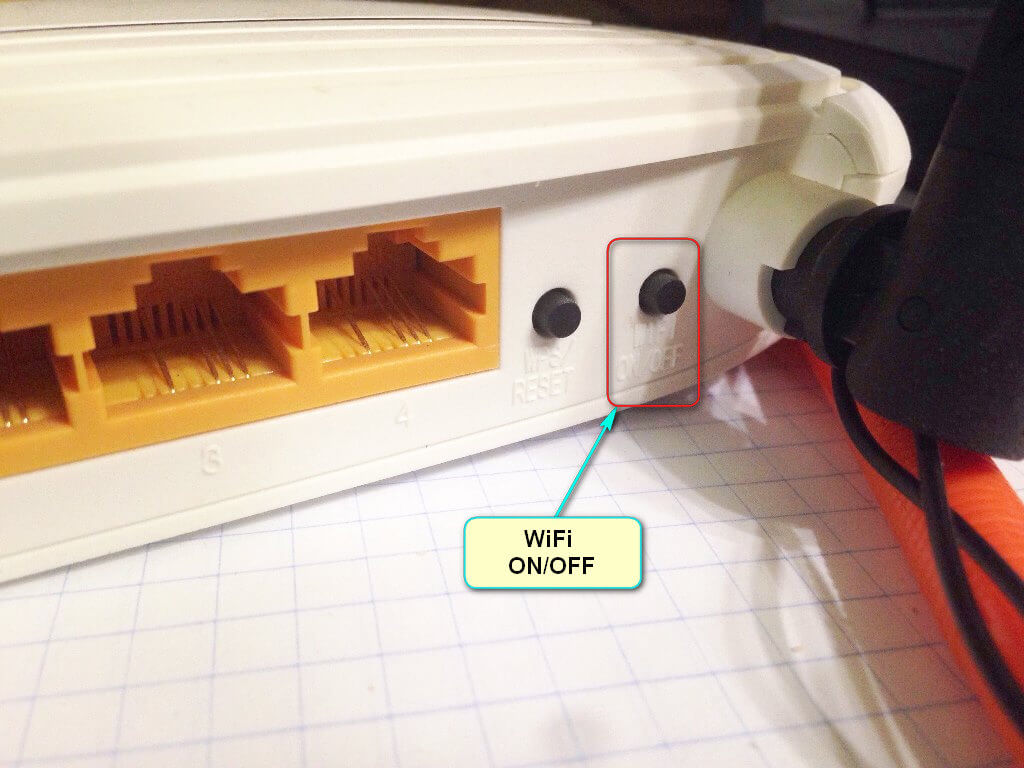
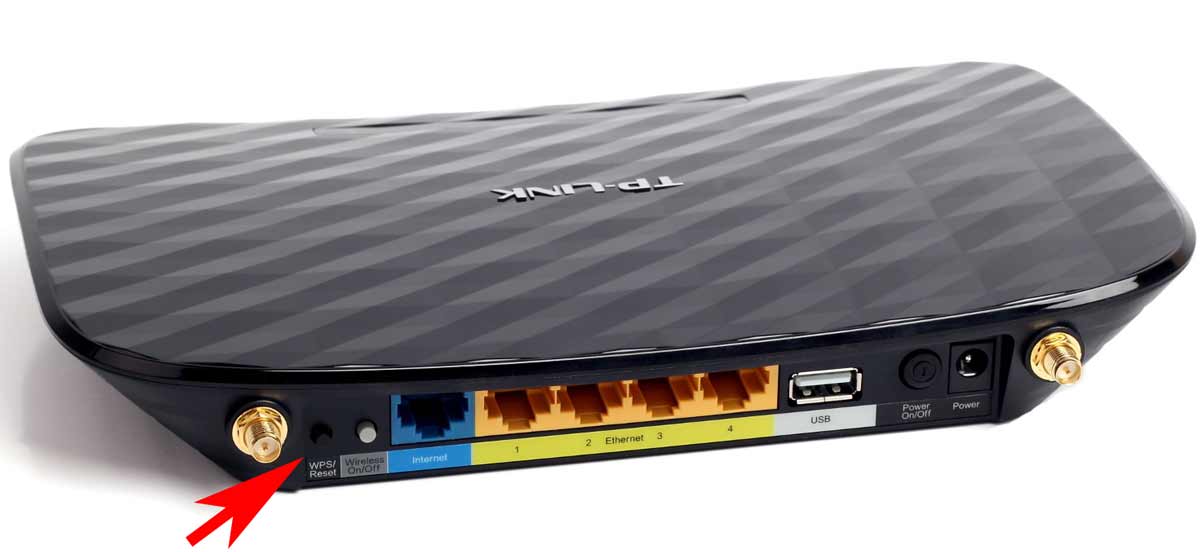
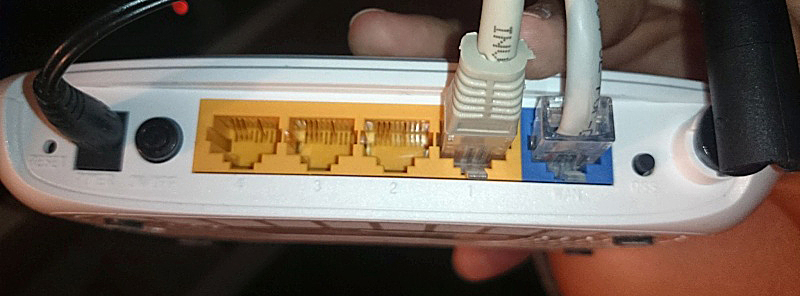
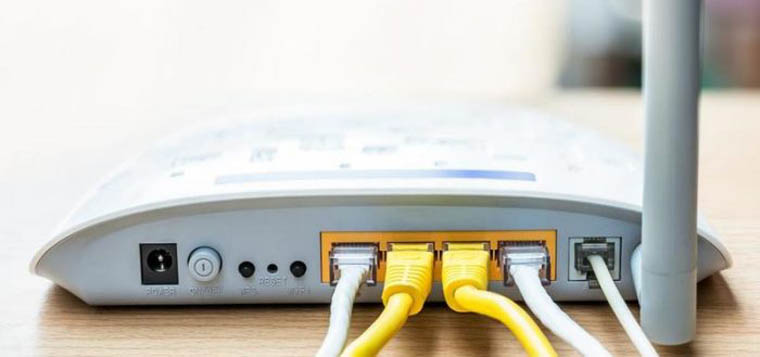
На боковых панелях устройства производитель разместил по 1 антенне, а две другие размещены на задней панели. Также на задней панели можно увидеть такие элементы — один WAN-разъем синего цвета, три LAN-разъема желтого цвета, комбинированная кнопка для включения/отключения Вай-Фай и режима WPS, углубленная клавиша «Reset», которая позволяет сбрасывать установки прибора, разъем для подключения электропитания «POWER».
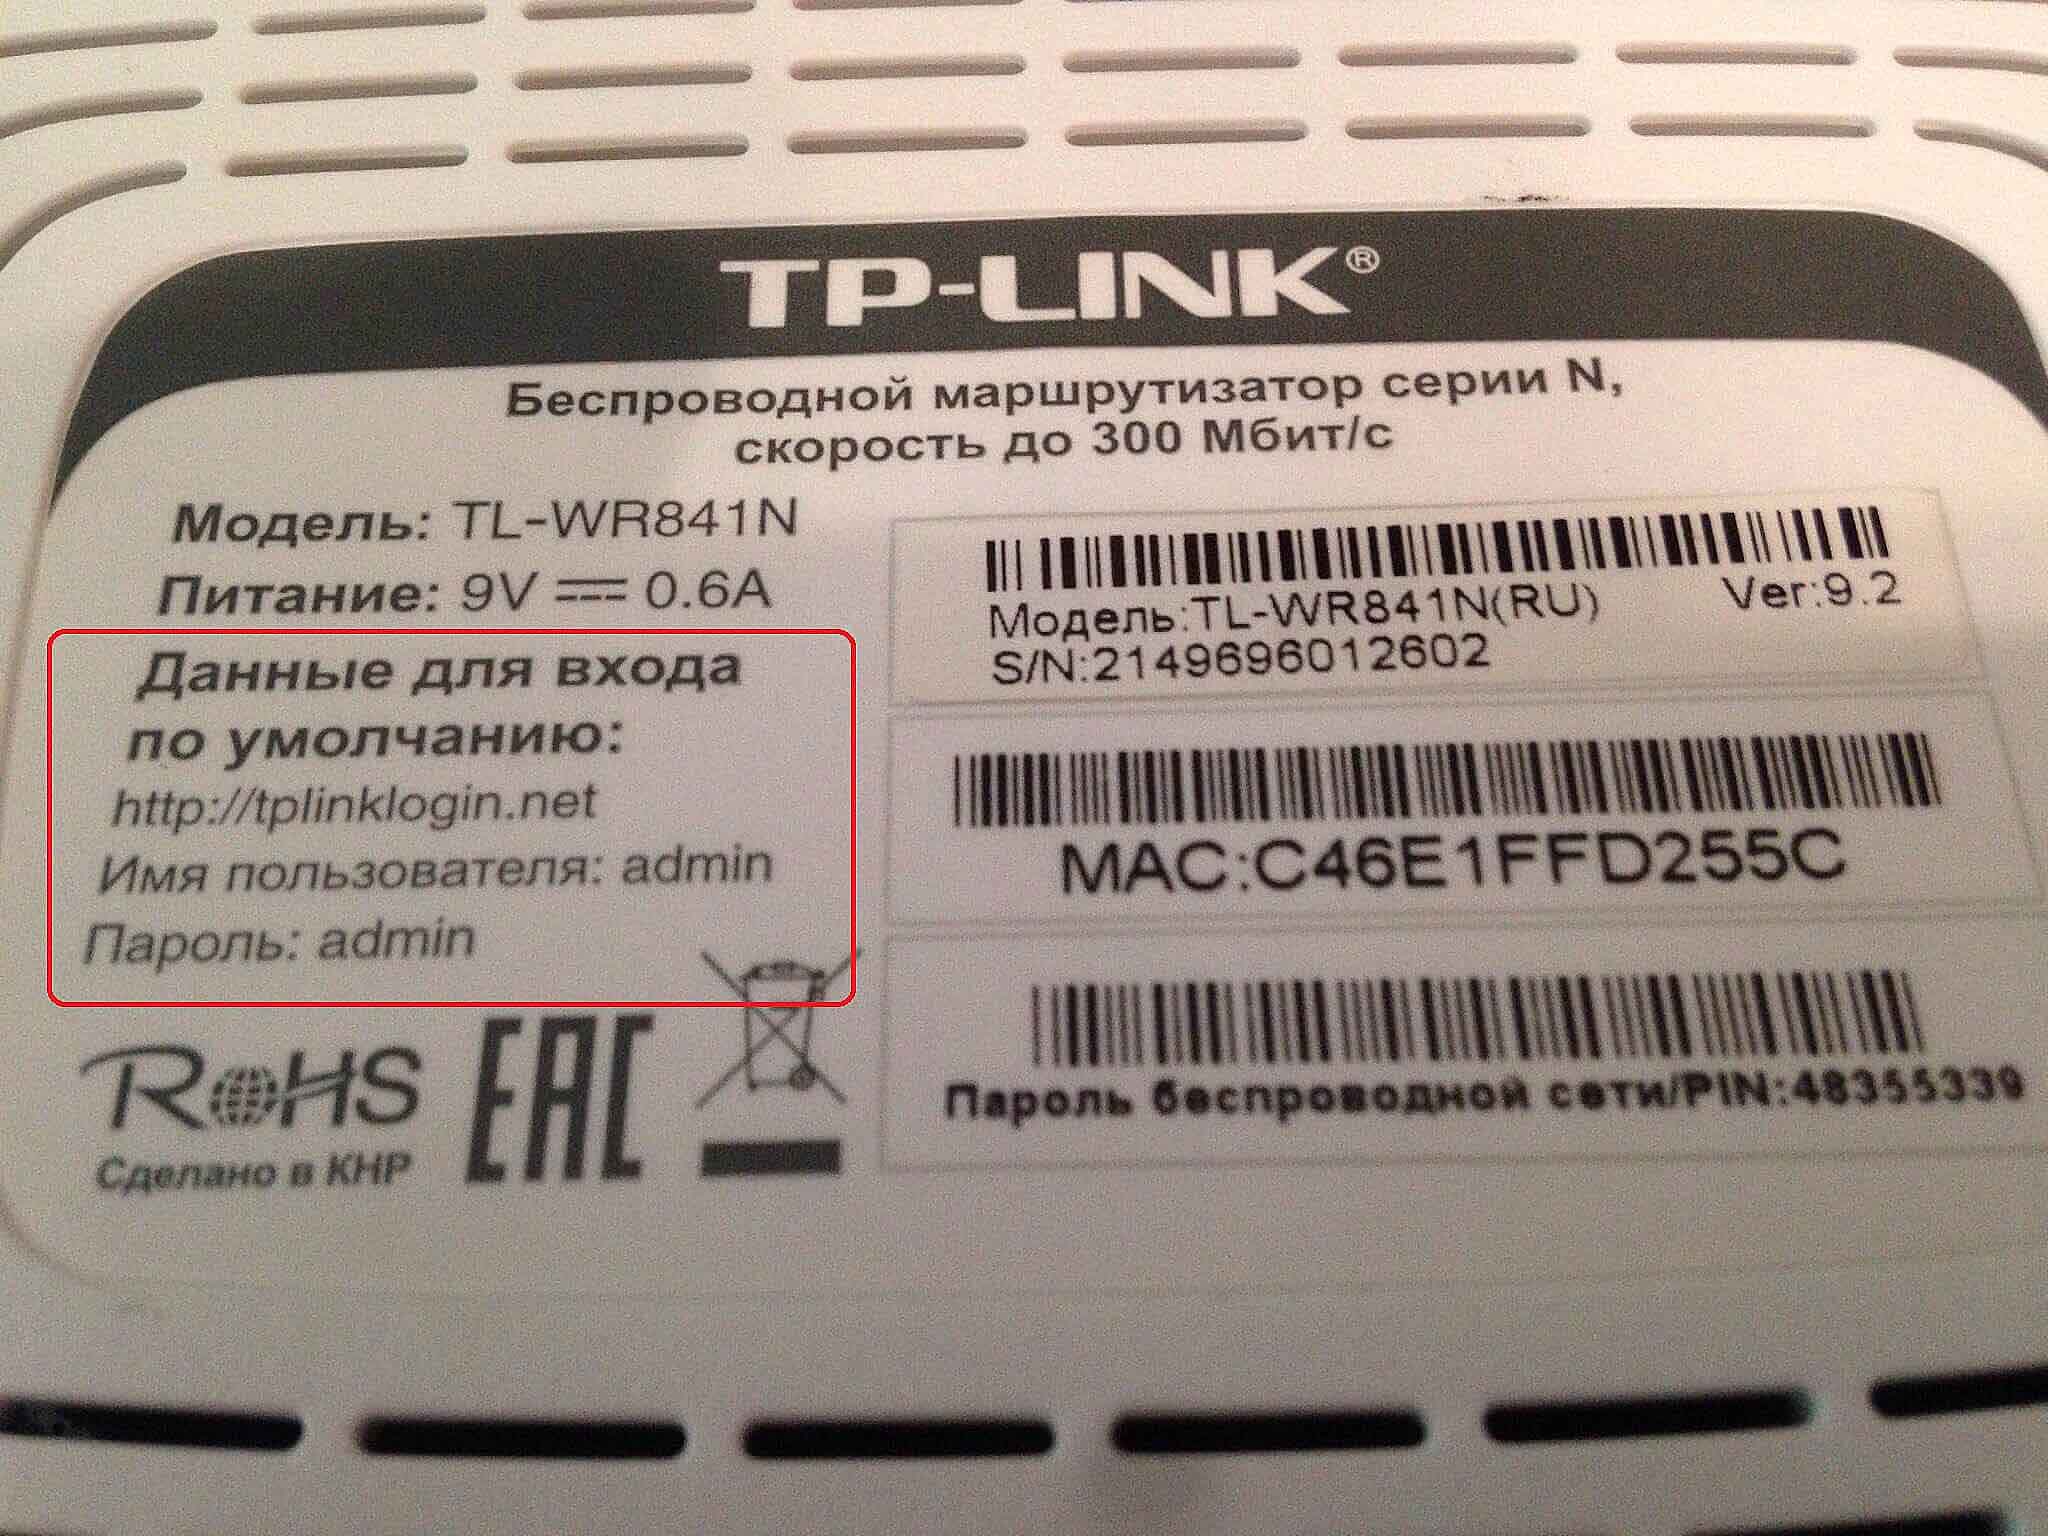
На нижней панели ТП-Линк Арчер EC220-G5 есть вентиляционные отверстия для охлаждения электронных компонентов, 4 ножки из пластика для установки прибора на ровных поверхностях и 2 отверстия, которые позволяют закрепить его на стенке. Так же внизу прибора можно увидеть информационную этикетку, на которой указано следующее: адрес панели управления прибором, его серийный номер и версия микропрограммного обеспечения, MAC-адрес, наименование Wi-Fi сетей (2.4 и 5 GHz) и ПИН-код, чтобы подключаться к ним.
WEB-интерфейс
Управлять роутером Арчер EC220-G5 ERT можно различными способами. Это можно делать при помощи веб-интерфейса на ПК или в мобильном приложении TP-Link Tether для девайсов под управлением различных ОС (Android и iOS). Надо сразу сказать, что мобильная программа не позволяет сделать быструю настройку аппарата. Разработчики пока не сказали, когда настройка данного маршрутизатора в мобильном приложении будет возможна. Поэтому настройка устройства пока возможна только через web-интерфейс на компьютере.
Для начала надо подключить Wi-Fi роутер к сети 220В, используя блок питания, который идет в стандартной комплектации. Потом подсоединить его к провайдерской сети при помощи сетевого кабеля. Для этого один конец кабеля вставляется в интернет-розетку, а другой в WAN-разъем маршрутизатора.
Во время настройки прибора через браузер, можно использовать несколько способов его подключения к ПК. Это может быть как проводное подключение, так и подсоединение при помощи сети Вай-Фай, которая создана самим маршрутизатором. Затем в любом удобном браузере надо набрать IP-адрес админки роутера http://tplinkwifi.net. При этом пароль для входа в админ-панель аппарата не потребуется, т.к. система попросит задать его при первом подключении к нему при помощи web-интерфейса. Данный пароль будет использоваться для всех последующих авторизаций в веб-интерфейсе роутера.
В текущий момент доступна только англоязычная версия админ-панели роутера. Изменить ее на другой язык невозможно. Далее система только во время первого подключения предложит сделать быструю настройку прибора. При последующих подключениях делать быструю настройку не потребуется.
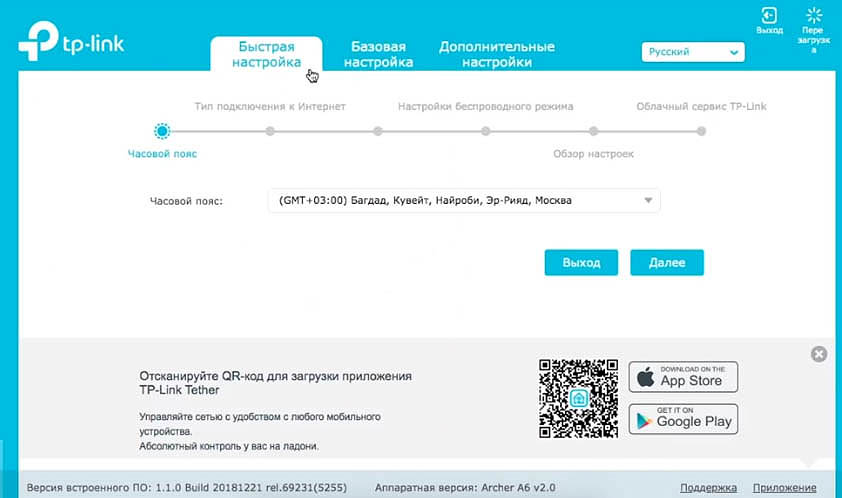
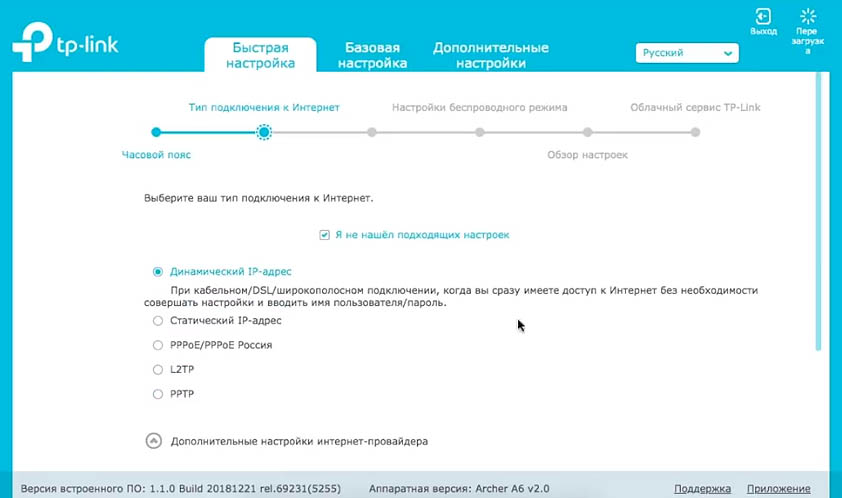
В первом окне надо будет выбрать тип подключения к сети провайдера услуг. Чаще всего используется вариант «Dynamic IP» («Динамический IP»), который отличается минимальным количеством настроек. Если используется другой вариант подключения, то надо будет прописывать параметры из договора с провайдером. Для перехода в следующее окно кликаем по Next, возврат в предыдущее при помощи клавиши Back.
Потом включаем функцию «VLAN ID», если требуется. В противном случае пропускаем данный этап и переходим на следующую страницу.
После этого прописываем параметры для Wi-Fi сетей на частотах 2.4 и 5 GHz. Здесь указывается имя каждой сети («SSID») и коды доступа. В данном окошке можно отключить передачу Wi-Fi на каждой радиочастоте. Для этого надо убрать галочку около пункта «Enable Wireless Radio».
Затем надо будет переподключиться к Wi-Fi сети при помощи новых параметров, если подключение на ПК осуществляется по беспроводному каналу. Иначе выбираем проводной вариант подключения к провайдерской сети.
Делаем проверку установленных параметров. Если все нормально, то сохраняем сделанные установки через клик по Save.
После этого лучше сделать проверку интернет-соединения и удостовериться, что настройка устройства сделана правильно и все работает нормально.
После завершения тестирования интернет-соединения нажимаем по Finish. Далее на экране система выдаст информационное сообщение, в котором уведомит пользователя о том, что настройка выполнена успешно. Чтобы вернуться в админ-панель и закрыть кликаем по OK.
Сама админ-панель поделена на 2 вкладки. В одной делаются базовые настройки («Basic»), а в другой — расширенные («Advanced»). Первый раздел меню «Network map» позволяет посмотреть карту сети и подключившихся к ней клиентов.
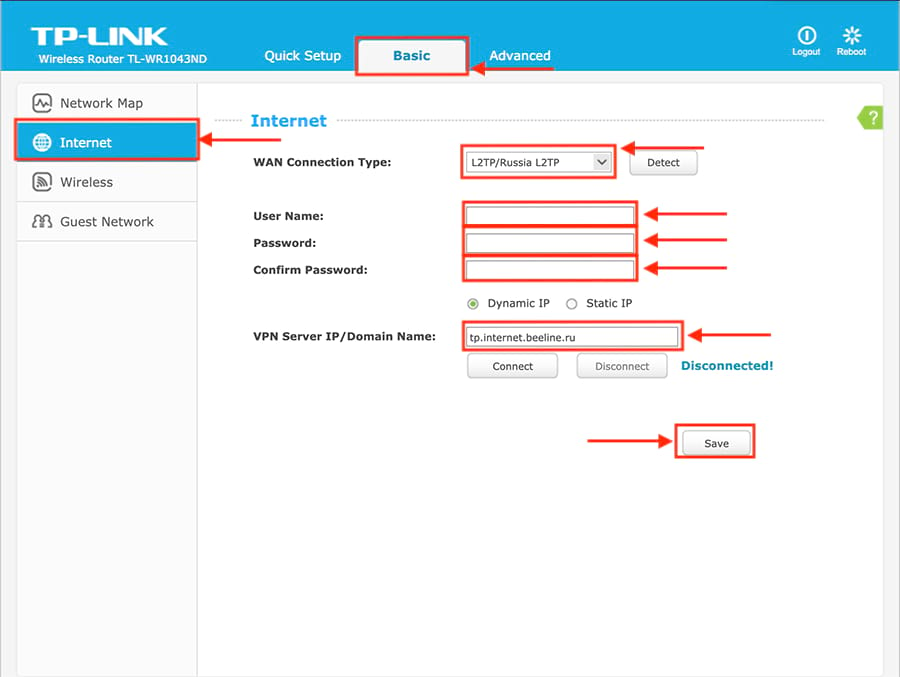
Следующий раздел меню называется «Internet». Здесь можно включить функцию VLAN и выбрать тип подключения.
Далее ниже располагается раздел меню «Wireless». Данный раздел позволяет настроить сети на частотах 2.4 и 5 ГГц. Он позволяет изменить имя сети (поле «SSID») и задать код доступа. Многие пользователи стараются устанавливать один и тот же пароль для всех сетей одного устройства, что однозначно нельзя назвать безопасным вариантом. Пункт «Enable» позволяет включить/выключить передачу радиосигнала для выбранной частоты. Также здесь есть пункт «Hide SSID», который позволяет скрыть выбранную сеть. Если данный пункт отмечен галочкой, то каждый раз придется делать поиск беспроводной сети и вводить пароль для подключения к ней. Система просто не будет запоминать и использовать введенный ранее пароль для такой сети.
Последний раздел меню — «Parental Controls». Родительский контроль один из полезных разделов, который позволяет ограничивать нахождение детей в интернете по времени на любом устройстве, если известен его MAC-адрес. Так же в этом разделе прописываются веб-сайты, посещать которые дети не смогут.
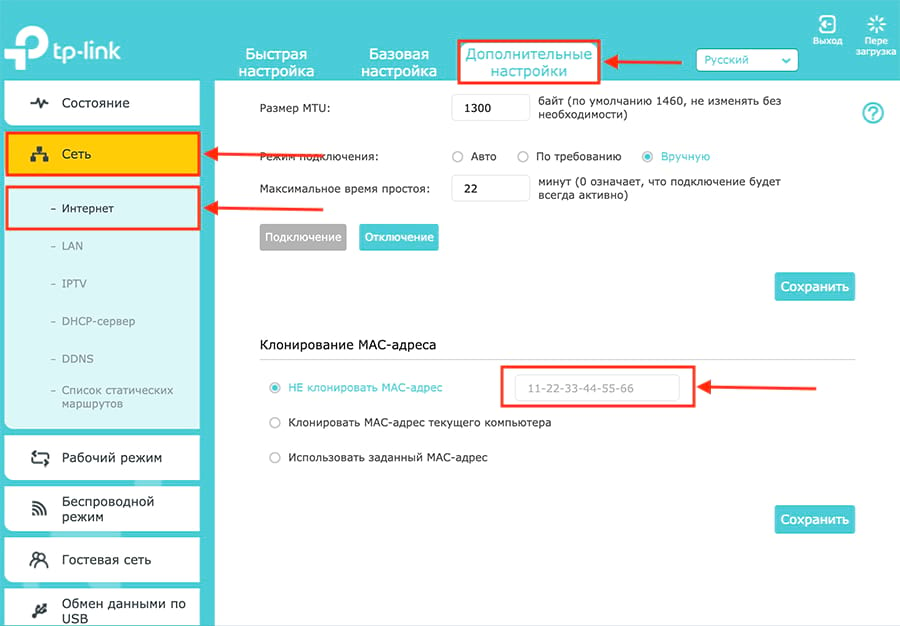
В базовых настройках и во время быстрой настройки устройства отсутствует клонирование MAC-адреса. Зачем разработчики решили так сделать, совсем непонятно. Ведь данный функционал довольно востребованный пользователями. Однако не стоит раньше времени паниковать, ведь сделать это можно через продвинутые настройки. Чтобы сделать клонирование MAC-адреса, надо будет сначала открыть вкладку «Advanced», потом выбрать раздел «Network» («Сеть»), а затем «Internet» («Интернет»). В данном месте надо найти строчку с нужной сетью и кликнуть по значку «Modify», чтобы изменить ее. Далее надо будет в открывшемся ниже окошке отметить чекбокс напротив строчки «Clone Current Computer MAC Address».
Продвинутые настройки позволяют увидеть детальную информацию о текущем состоянии Wi-Fi сети, просмотреть загрузку процессора и памяти аппарата, изменить рабочий режим.
При этом здесь можно будет сделать настройку и всех остальных параметров. Надо обязательно сказать про наличие межсетевого экрана, ВПН-сервера и защиты от различных атак.
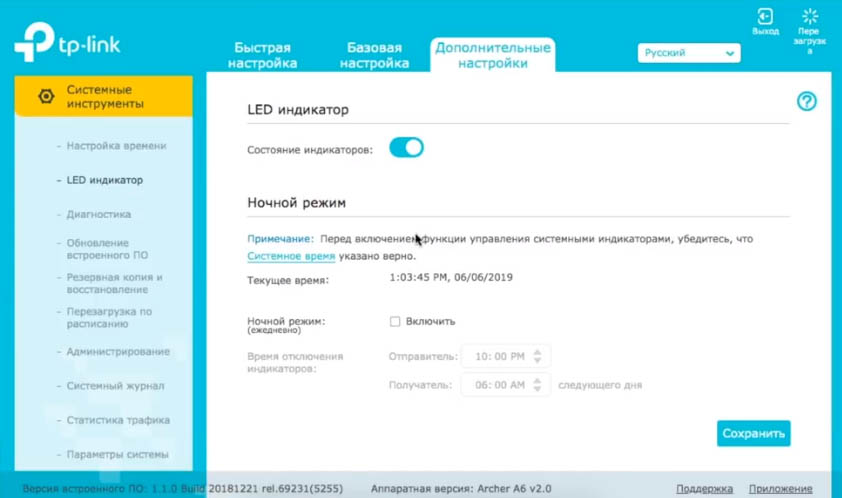
Раздел «System Tools» («Системные инструменты») позволяет задать время, сделать диагностику и перезагрузить устройство, обновить его прошивку, просмотреть детальную статистику и др.
Мобильный софт
Кратко расскажем про мобильную программу ТП-Линк Tether, которая позволяет управлять данным роутером. Сначала необходимо сделать скачку данного приложения в официальном магазине Google Play Market или AppStore. После установки приложения, подсоединиться к Wi-Fi сети маршрутизатора. Ранее уже отмечалось, что быстрая настройка в Tether отсутствует. Из-за этого изменять наименование Вай-Фай сетей и ПИН-кодов приходится делать вручную.
Программа Tether отличается наличием базового набора установок, которые позволяют посмотреть статус Вай-Фай сети и подключившиеся клиентские машины, изменить названия и пароли для подключения к сетям, вид подсоединения к интернету. Также здесь доступна настройка родительского контроля и рабочих режимов устройства. Нельзя не отметить, что полноценная настройка возможна в админпанели на компьютере. А вот набор доступных функций в мобильной программе для смартфонов довольно ограниченный.
Заключение
Все вышесказанное однозначно говорит о том, что маршрутизатор ТП-Линк Арчер EC220-G5 ERT все же является идеальным вариантом для провайдеров интернета. Поэтому получение его обычными юзерами возможно только через поставщиков таких услуг. Ведь у данного маршрутизатора есть такие фишки, которые позволят провайдерам предоставлять качественные интернет-услуги своим клиентам. Сам прибор отличается простой настройкой и обширным функционалом. Количество подключаемых клиентских устройств может достигать 50. При этом максимальная скорость передачи данных составляет около 1.2 Гбит/с. Поэтому его можно без проблем использовать для организации Wi-Fi сетей как в квартире, так и в офисе.
Видео по теме
-
Page 1
User Guide BBA Routers © 2022 TP-Link 1910020935 REV1.0.0… -
Page 2: Table Of Contents
Quick Setup Via TP-Link Aginet App ……..
-
Page 3
8. 4. Manage the Router via the TP-Link Aginet App ……76 Chapter 9 USB Settings 9. -
Page 4
10. 1. Set Up a EasyMesh Network ……….87 10. -
Page 5
17. 7. 1. Change the Login Password……..144 17. -
Page 6: About This Guide
The Quick Installation Guide can be found where you find this guide or inside the package of the router. Specifications can be found on the product page at https://www.tp-link.com. TP-Link Community is provided for you to discuss our products and share knowledge at https://community.tp-link.com. Our Technical Support contact information can be found at the…
-
Page 7
*Maximum wireless signal rates are the physical rates derived from IEEE Standard 802.11 specifications. Actual wireless data throughput and wireless coverage are not guaranteed and will vary as a result of 1) environmental factors, including building materials, physical objects, and obstacles, 2) network conditions, including local interference, volume and density of traffic, product location, network complexity, and network overhead, and 3) client limitations, including rated performance, location, connection, quality, and client condition. -
Page 8: Chapter 1 Get To Know About Your Router
Chapter Get to Know About Your Router This chapter introduces what the router can do and shows its appearance. It chapter contains the following sections: • Product Overview • Appearance…
-
Page 9: Product Overview
1024QAM improve throughput by 4 times and dramatically increase the whole network capacity and efficiency. It’s also backwards compatible with 802.11a/b/g/n/ac. Moreover, it is simple and convenient to set up and use the TP-Link router due to its intuitive web interface and the powerful Aginet app.
-
Page 10: The Back Panel
Chapter 1 Get to Know About Your Router Some Common LEDs Explanation Status Indication The system has started up successfully. Flashing The system is starting up or the firmware is being upgraded. Do slowly not disconnect or power off your router. (Power) Flashing WPS connection is in process.
-
Page 11
Chapter 1 Get to Know About Your Router The following parts (view from left to right) are located on the back panel. Some Common Buttons and Ports Explanation Item Description Power Port For connecting the router to a power socket via the provided power adapter. Power On/Off Button Press this button to power on or off the router. -
Page 12: Chapter 2 Connect The Hardware
Chapter Connect the Hardware This chapter contains the following sections: • Position Your Router • Connect Your Router…
-
Page 13: Position Your Router
Chapter 2 Connect the Hardware Position Your Router • The product should not be located in a place where it will be exposed to moisture or excessive heat. • Place the router in a location where it can be connected to multiple devices as well as to a power source.
-
Page 14
Chapter 2 Connect the Hardware Internet 1. Connect the modem to the router’s WAN port with an Ethernet cable. 2. Turn on the modem, and then wait about 2 minutes for it to restart. 3. Connect the power adapter to the router and turn on the router. 4. -
Page 15
Chapter 2 Connect the Hardware Computer Smart Device < Settings Wi-Fi Connections are available Wi-Fi Wireless Network Connection CHOOSE A NETWORK… TP-Link_XXXX TP-Link_XXXX_5G TP-Link_XXXX Connect automatically Connect TP-Link_XXXX_5G Other… • Method 3: Use the WPS button Wireless devices that support WPS, including Android phones, tablets, and most USB network cards, can be connected to your router through this method. -
Page 16: Chapter 3 Log In To Your Router
Chapter Log In to Your Router…
-
Page 17
Chapter 3 Log In to Your Router With a web-based utility, it is easy to configure and manage the router. The web-based utility can be used on any Windows, Mac OS or UNIX OS with a Web browser, such as Microsoft Internet Explorer, Mozilla Firefox or Apple Safari. -
Page 18: Chapter 4 Set Up Internet Connection
Furthermore, you can also set up an IPv6 connection if your ISP provides IPv6 service. It contains the following sections: • Use Quick Setup Wizard • Quick Setup Via TP-Link Aginet App • Manually Set Up Your Internet Connection • Set Up the Router as an Access Point •…
-
Page 19: Use Quick Setup Wizard
Then follow the step-by-step instructions to connect your router to the internet. 3. To enjoy a more complete service from TP-Link (remote management, TP-Link DDNS, and more.), log in with your TP-Link ID or click Sign Up Now to get one.
-
Page 20: Quick Setup Via Tp-Link Aginet App
• To learn more about the TP-Link Cloud service, please refer to the TP-Link Cloud Service section. • If you do not want to register a TP-Link ID now, you may click Skip to proceed. • If you have changed the preset wireless network name (SSID) and wireless password during the Quick Setup process, all your wireless devices must use the new SSID and password to connect to the router.
-
Page 21: Manually Set Up Your Internet Connection
ISP. Follow the steps below to check or modify your internet connection settings. 1. Visit http://tplinkwifi.net or http://192.168.0.1, and log in with your TP-Link ID or the password you set for the router. 2. Go to Basic >…
-
Page 22
Chapter 4 Set Up Internet Connection 4 ) If you choose L2TP, enter the username password and choose the Secondary Connection provided by your ISP. Different parameters are needed according to the Secondary Connection you have chosen. 5 ) If you choose PPTP, enter the username and password, and choose the Secondary Connection… -
Page 23: Set Up The Router As An Access Point
The router can work as an access point, transforming your existing wired network to a wireless one. 1. Visit http://tplinkwifi.net or http://192.168.0.1, and log in with your TP-Link ID or the password you set for the router. 2. Go to Advanced >…
-
Page 24: Set Up An Ipv6 Internet Connection
Your ISP provides information about one of the following IPv6 internet connection types: PPPoE(SLAAC/DHCPv6/AUTO/Passthrough), Dynamic IP(SLAAC/DHCPv6/ AUTO/Passthrough), Static IP. 1. Visit http://tplinkwifi.net or http://192.168.0.1, and log in with your TP-Link ID or the password you set for the router. 2. Go to Advanced >…
-
Page 25
Chapter 4 Set Up Internet Connection Dynamic IP(SLAAC/DHCPv6/AUTO/Passthrough): Click Advanced to input further information if your ISP requires. Click OK. -
Page 26
Chapter 4 Set Up Internet Connection PPPOE(SLAAC/DHCPv6/AUTO/Passthrouth): Click Advanced to input further information if your ISP requires. Click OK. -
Page 27
Chapter 4 Set Up Internet Connection 5. Configure LAN ports. Go to Advanced > Network > Settings. Fill in Site Prefix Type provided by your ISP, and click Save. 6. Click Advanced > Status to check whether you have successfully set up an IPv6 connection. -
Page 28: Ipv6 Tunnel
IPv6 and IPv4 run independently. 1. Visit http://tplinkwifi.net or http://192.168.0.1, and log in with your TP-Link ID or the password you set for the router. 2. Go to Advanced >…
-
Page 29
Chapter 4 Set Up Internet Connection 6rd: Fill in blanks and click OK. Select this tunneling mechanism if your ISP uses 6rd deployment for assigning address. 6to4: Fill in blanks and click OK. Select this tunneling mechanism if your ISP uses 6to4 deployment for assigning address. -
Page 30
Chapter 4 Set Up Internet Connection… -
Page 31: Chapter 5 Setup Your Network Via Tp-Link Aginet App
Setup Your Network via TP-Link Aginet App This chapter guides you on how to setup your router and mesh device via TP-Link Aginet app, as well as regulatory information. Features available in Aginet app may vary by model and software version. Aginet app availability may also vary by region or ISP.
-
Page 32: Set Up Your Router
Install the app on your Android or iOS smartphone or tablet. 2 Log in or sign up with TP-Link ID. Open the Aginet app. Use your TP-Link ID to log in. If you don’t have a TP-Link ID, tap Don’t have an account? and sign up first.
-
Page 33
Chapter 5 Setup Your Network via TP-Link Aginet App 4 Select a location. Select a location for this router. If its location is not listed, you can create a new one by choosing Custom. This will be the name of your router. -
Page 34
Chapter 5 Setup Your Network via TP-Link Aginet App 6 Create your Wi-Fi network. Set a network name and a password. These will be the name and password you use to connect your routers to Wi-Fi. 7 Connect to your Wi-Fi network. -
Page 35: Dashboard
Chapter 5 Setup Your Network via TP-Link Aginet App 8 Setup complete. Your network is now up. Connect all devices to the network. You can also Add Agent expand the Wi-Fi coverage. Dashboard After you successfully set up your mesh network, you will see the dashboard of the Aginet app.
-
Page 36
Chapter 5 Setup Your Network via TP-Link Aginet App to create family profiles. for more features. -
Page 37: Add More Mesh Devices
Chapter 5 Setup Your Network via TP-Link Aginet App Add More Mesh Devices After creating a mesh network, you can add more mesh devices to the network to expand the Wi-Fi coverage and manage them easily on your Aginet app.
-
Page 38: Check Mesh Device Status
Chapter 5 Setup Your Network via TP-Link Aginet App Check Mesh Device Status In Network, you can check the working status (online/offline) of all the mesh devices, check the details (speed/mesh device’s IP address & MAC address/connected clients) of each mesh device, change the mesh device’s location/name, and more.
-
Page 39
Chapter 5 Setup Your Network via TP-Link Aginet App 2. Tap a mesh device to check more details. 3. Check download/upload speed of the mesh device. -
Page 40
Chapter 5 Setup Your Network via TP-Link Aginet App 4. Tap and change or customize the location/name of the mesh device. 5. Check the clients connected to the mesh device. -
Page 41: Remove/Reboot Mesh Devices
Chapter 5 Setup Your Network via TP-Link Aginet App 6. Tap the client’s name. Change or customize client’s information. Remove/Reboot Mesh Devices You can reset your mesh device to factory default settings or reboot your mesh device to clear cache and enhance running performance easily in the Aginet app. Follow the steps below.
-
Page 42: Manage Connected Devices
Chapter 5 Setup Your Network via TP-Link Aginet App Note: If the LED light of mesh device does not turn flashing blue after tapping Remove, press and hold the Reset button for at least 5 second to reset it. Manage Connected Devices In Network, you can mange your connected devices easily, such as changing the device name and type.
-
Page 43: Create A New Network
Setup Your Network via TP-Link Aginet App Create a New Network In the Aginet app, you can create different mesh networks with your TP-Link ID and manage them conveniently from the Aginet app with one account. You can also help family or friends manage their networks with your Aginet app.
-
Page 44: Parental Controls
Chapter 5 Setup Your Network via TP-Link Aginet App 2. Then follow app instructions to complete the setup. Parental Controls Parental Controls helps you set time limits and filter content to flexibly control your kids when they’re online. 1. In Family, tap Create a Profile.
-
Page 45: Wi-Fi Settings
Chapter 5 Setup Your Network via TP-Link Aginet App Wi-Fi Settings You can change the network name and password of your main network at any time and share the network easily with family and friends. 1. In More, Tap Wi-Fi Settings.
-
Page 46: Guest Network
Chapter 5 Setup Your Network via TP-Link Aginet App 5 10 Guest Network You can create and share a separate network for guests to guarantee the security and privacy of your main network. 1. In More, Tap Guest Network. 2. Set a Wi-Fi name and password for the guest network.
-
Page 47: Internet Connection
Chapter 5 Setup Your Network via TP-Link Aginet App 5 11 Internet Connection In Internet Connection, You can modify WAN settings (IPv4 & IPv6), enable MAC Clone mode. 1. In More, Tap Internet Connection. 2. View IPv4 details or change the internet connection type.
-
Page 48
Chapter 5 Setup Your Network via TP-Link Aginet App 3. Enable IPv6 to set up an IPv6 internet connection. -
Page 49: Block List
Chapter 5 Setup Your Network via TP-Link Aginet App 4. Tap Advanced and enable MAC Clone as needed. Tip: For more about MAC Clone, refer to https://www.tp-link.com/support/faq/2925/ 5 12 Block List Add devices to the block list to prevent the devices from accessing your network, ensuring the safety of your personal information shared in the network.
-
Page 50: Upgrade Your Router
5 13 Upgrade Your Router TP-Link is dedicated to improving product features and providing a better customer experience. An up-to-date firmware provides better and more stable network performance. Always update your router to the latest firmware version when prompted in the Aginet app.
-
Page 51: Advanced Features
5 14 Advanced Features Additional features are available under the Advanced menu. You can control mesh device’s LED, enable reboot schedule, bind your TP-Link ID, change the operation mode, configure system settings. 1. In More, Tap Control.
-
Page 52
Chapter 5 Setup Your Network via TP-Link Aginet App 2. Toggle off to turn off the light on mesh device. Configure the LED Off Time turn off the LED light at bedtime only. 3. Enable Reboot Schedule as needed. -
Page 53
Chapter 5 Setup Your Network via TP-Link Aginet App 4. Bind your TP-Link 5. Change the Operation Mode as needed. -
Page 54
Chapter 5 Setup Your Network via TP-Link Aginet App… -
Page 55: Chapter 6 Customize Your Network Settings
Chapter Customize Your Network Settings This chapter introduces how to change the default settings or adjust the basic configuration of the router using the web management page. It contains the following sections: • Configure LAN Settings • Configure IPv6 LAN Settings •…
-
Page 56: Configure Lan Settings
Chapter 6 Customize Your Network Settings Configure LAN Settings 6 1 1 Change the LAN IP Address The router is preset with a default LAN IP 192.168.0.1, which you can use to log in to its web management page. The LAN IP address together with the Subnet Mask also defines the subnet that the connected devices are on.
-
Page 57: Use The Router As A Dhcp Server
Chapter 6 Customize Your Network Settings 6 1 2 Use the Router as a DHCP Server You can configure the router to act as a DHCP server to assign IP addresses to its clients. To use the DHCP server function of the router, you must configure all computers on the LAN to obtain an IP Address automatically.
-
Page 58: Reserve Lan Ip Addresses
Chapter 6 Customize Your Network Settings 6 1 3 Reserve LAN IP Addresses You can view and add a reserved address for a client. When you specify an IP address for a device on the LAN, that device will always receive the same IP address each time when it accesses the DHCP server.
-
Page 59: Configure The Radvd Address Type
Chapter 6 Customize Your Network Settings 6 2 1 Configure the RADVD Address Type Visit http://tplinkwifi.net or http://192.168.0.1, and log in with the password you set for the router. Go to Advanced > Network > Settings. Select IPv6 to configure IPv6 LAN parameters. 1 ) Select RADVD as the address type to make the router assign IPv6 address…
-
Page 60: Set Up A Dynamic Dns Service Account
Note: DDNS does not work if the ISP assigns a private WAN IP address (such as 192.168.1.x) to the router. To set up DDNS, please follow the instructions below: Visit http://tplinkwifi.net or http://192.168.0.1, and log in with the password you set for the router. Go to Advanced > Network > Dynamic DNS. Select the Service Provider (TP-Link/Dyndns/NO-IP).
-
Page 61: Create Static Routes
Chapter 6 Customize Your Network Settings Log in with your DDNS account, select a service provider. Enter the username, password and domain name of the account (such as lisa.ddns.net). Click Log in and Save. Tips: If you want to use a new DDNS account, please log out first, then log in with the new account. Create Static Routes A static route is a pre-determined path that network information must travel to reach a specific host or network.
-
Page 62
Chapter 6 Customize Your Network Settings Router A Router B Company’s Server WAN: 172.30.30.100 LAN: 192.168.0.1 LAN: 192.168.0.2 172.30.30.1 Switch My PC 192.168.0.100 How can I 1 Make sure the routers use different LAN IP addresses on the do that? same subnet. -
Page 63
Chapter 6 Customize Your Network Settings • Network Destination: The destination IP address that you want to assign to a static route. This IP address cannot be on the same subnet with the WAN IP or LAN IP of the Router A. In the example, the IP address of the company network is the destination IP address, so here we enter 172.30.30.1. -
Page 64: Rip Settings
‘Enabled’ checkbox. To stop RIP on the WAN Interface, uncheck the ‘Enabled’ checkbox. Click the ‘Save’ button to start/stop RIP and save the configuration. 1. Visit http://tplinkwifi.net or http://192.168.0.1, and log in with your TP-Link ID or the password you set for the router. 2. Go to Advanced >…
-
Page 65: Specify Wireless Settings
Chapter 6 Customize Your Network Settings Specify Wireless Settings 6 6 1 Change Basic Wireless Settings The router’s wireless network name (SSID) and password, and security option are preset in the factory. The preset SSID and password can be found on the product label. You can customize the wireless settings according to your needs.
-
Page 66
Chapter 6 Customize Your Network Settings Select the wireless network mode or channel and click Save to make the settings effective. Mode: Select the desired transmission mode. • 802.11b/g/n mixed: Select if you are using a mix of 802.11b, 11g, and 11n wireless clients. -
Page 67: Advanced Wireless Settings
Chapter 6 Customize Your Network Settings Click Save to make the settings effective. ¾ To enable network roaming: Network roaming helps devices choose better AP based on actual conditions to balance network demands. Go to Advanced > Wireless > Wireless Settings.
-
Page 68
Chapter 6 Customize Your Network Settings • RTS Threshold: Enter a value between 1 and 2347 to determine the packet size of data transmission through the router. By default, the RTS (Request to Send) Threshold size is 2347. If the packet size is greater than the preset threshold, the router sends Request to Send frames to a particular receiving station and negotiates the sending of a data frame, or else the packet will be sent immediately. -
Page 69
Chapter 6 Customize Your Network Settings ¾ To create multi-SSID network: The router supports additional up to three multi-SSID wireless networks for client access in each wireless band. You can specify the access and security settings to ensure network security and privacy according to your situation. Visit http://tplinkwifi.net or http://192.168.0.1, and log in with the password you set… -
Page 70: View Wireless Information
Chapter 6 Customize Your Network Settings 3 ) Enter a new Network Name (SSID) or use the default name, this field is case sensitive. Don‘t select Hide SSID unless you want your guests to manually input the SSID for Wi-Fi access. 4 ) Select the Security option for the multi-SSID network,…
-
Page 71: Schedule Your Wireless Function
Chapter 6 Customize Your Network Settings Tips: You can also see the wireless details by clicking the router icon on Basic> Network Map. ¾ To view the detailed information of the connected wireless clients: Visit http://tplinkwifi.net or http://192.168.0.1, and log in with the password you set for the router.
-
Page 72: Use Wps For Wireless Connection
Chapter 6 Customize Your Network Settings Click to set the Wireless Off Time, and click Save to make the settings effective. Note: 1. Make sure that the time of the router is correct before using this function. For details, refer to Set System Time.
-
Page 73
Chapter 6 Customize Your Network Settings When the WPS LED is on, the client device has successfully connected to the router. Method 2: Use the “Connect” button on the web management page Use this method if your client device has a WPS button. Visit http://tplinkwifi.net or http://192.168.0.1, and log in with the password you set… -
Page 74
Chapter 6 Customize Your Network Settings When the WPS LED is on, the client device has successfully connected to the router. Note: 1. The WPS LED on the router will light on for five minutes if the device has been successfully added to the network. 2. -
Page 75: Chapter 7 Multi-Ssid
Chapter Multi-SSID Multi-SSID function allows you to provide Wi-Fi access for your visitors without disclosing your main network. When you have guests in your house, apartment, or workplace, you can create a multi-SSID wireless network for them. In addition, you can customize the network settings to ensure your network security and privacy.
-
Page 76
Chapter 7 Multi-SSID ¾ To create a multi-SSID network: 1. Visit http://tplinkwifi.net or http://192.168.88.1, and log in with the password you set for the AP. 2. Go to Basic > Multi-SSID Advanced > Wireless > Multi-SSID. 3. Create the multi-SSID network as needed. 1 ) Select the Enable check box to create the corresponding multi-SSID network. -
Page 77: Chapter 8 Tp-Link Cloud Service
TP-Link Cloud service provides a better way to manage your cloud devices. Log in to your router with a TP-Link ID, and you can easily monitor and manage your home network when you are out and about via the Aginet app. To ensure that your router stays new and gets better over time, the TP-Link Cloud will notify you when an important firmware upgrade is available.
-
Page 78: Register A Tp-Link Id
Manage the User TP-Link IDs. • Once you have registered a TP-Link ID on the web management page, you can only register another TP-Link ID via the Aginet APP. Please refer to Manage the Router via the TP-Link Aginet App to install the app.
-
Page 79: Manage The User Tp-Link Ids
Password. 2. Enter the current password, then a new password twice. And click Save. Manage the User TP-Link IDs The TP-Link ID used to log in to the router for the first time will be automatically bound as the Admin…
-
Page 80: Add Tp-Link Id To Manage The Router
3. Click , enter another TP-Link ID as needed and click Save. Note: If you need another TP-Link ID, please register a new one via the Aginet app. Refer to Manage the Router via the TP-Link Aginet App to install the app and register a new TP-Link ID.
-
Page 81: Manage The Router Via The Tp-Link Aginet App
5. Manage your router as needed. Note: If you need to remotely access your router from your smart devices, you need to: • Log in with your TP-Link ID. If you don’t have one, refer to Register a TP-Link • Make sure your smartphone or tablet can access the internet with cellular data or a Wi-Fi network.
-
Page 82: Chapter 9 Usb Settings
Chapter USB Settings This chapter describes how to use the USB ports to share files and media from the USB storage devices over your home network locally, or remotely through the internet. The router supports USB external flash drives and hard drives. It contains the following sections: •…
-
Page 83: Access The Usb Storage Device
Chapter 9 USB Settings Access the USB Storage Device Insert your USB storage device into the router’s USB port and then access files stored there locally or remotely. Tips: • If you use USB hubs, make sure no more than 4 devices are connected to the router. •…
-
Page 84: Access The Usb Device Remotely
Chapter 9 USB Settings • Method 2: Open the Windows Explorer (or go to Computer) and type the server address tplinkwifi.net ftp://tplinkwifi.net in the address bar, then press Enter. Windows computer 1 ) Select > Connect to Server. 2 ) Type the server address smb://tplinkwifi.net. 3 ) Click Connect.
-
Page 85
Follow the steps below to configure remote access settings. Visit http://tplinkwifi.net or http://192.168.0.1, and log in with your TP-Link ID or the password you set for the router. Go to Advanced >… -
Page 86: Customize The Access Settings
Visit http://tplinkwifi.net or http://192.168.0.1, and log in with your TP-Link ID or the password you set for the router. Go to Advanced >…
-
Page 87
Chapter 9 USB Settings Now you can access the USB storage device by visiting MyShare (for Windows) or smb://MyShare (for Mac). • To Set Up Authentication for Data Security You can set up authentication for your USB storage device so that network clients will be required to enter username and password when accessing the USB storage device. -
Page 88: Media Sharing
USB storage device directly from DLNA-supported devices, such as your computer, tablet and PS2/3/4. Visit http://tplinkwifi.net or http://192.168.0.1, and log in with your TP-Link ID or the password you set for the router. Go to Advanced >…
-
Page 89: 3G/4G Settings
Time Machine backs up all files on your Mac computer to a USB storage device connected to your router. Visit http://tplinkwifi.net or http://192.168.0.1, and log in with your TP-Link ID or the password you set for the router. Go to Advanced >…
-
Page 90
Chapter 9 USB Settings Tick the checkbox to enable 3G/4G as a backup solution for Internet access. Tick the checkbox to set the Dial Number, APN, Username and Password manually. Note: The following Advanced settings will only display if you enable 3G/4G as the backup solution for Internet access. Click Save. -
Page 91: Chapter 10 Easymesh With Seamless Roaming
Chapter EasyMesh with Seamless Roaming This chapter introduces the TP-Link EasyMesh feature. It contains the following sections: • Set Up a EasyMesh Network • Manage Devices in the EasyMesh Network…
-
Page 92: Set Up A Easymesh Network
Aginet app or at your router’s web management page. 10 1 Set Up a EasyMesh Network 1. Visit http://tplinkwifi.net or http://192.168.0.1, and log in with your TP-Link ID or the password you set for the router. 1. Go to Basic >…
-
Page 93
The agent will be listed on the controller’s Mesh page. Note: To check full list of TP-Link EasyMesh devices, visit https://www.tp-link.com. 3. If you have set up the agent to join the EasyMesh network, it will be listed on the controller’s EasyMesh page. -
Page 94: Manage Devices In The Easymesh Network
• To view mesh devices and connected clients in the network: 1. Visit http://tplinkwifi.net or http://192.168.0.1, and log in with your TP-Link ID or the password you set for the router. 2. Go to Basic >…
-
Page 95
Chapter 10 EasyMesh with Seamless Roaming • To manage a EasyMesh device in the network: 1. Visit http://tplinkwifi.net or http://192.168.0.1, and log in with your TP-Link ID or the password you set for the router. 2. Go to Basic > Network Map. -
Page 96: Chapter 11 Guest Network
Chapter Guest Network This function allows you to provide Wi-Fi access for guests without disclosing your main network. When you have guests in your house, apartment, or workplace, you can create a guest network for them. In addition, you can customize guest network options to ensure network security and privacy.
-
Page 97: Create A Network For Guests
Chapter 11 Guest Network 11 1 Create a Network for Guests 1. Visit http://tplinkwifi.net or http://192.168.0.1, and log in with your TP-Link ID or the password you set for the router. 2. Go to Advanced > Guest Network. Locate the Wireless section.
-
Page 98
Chapter 11 Guest Network • Allow guests to see each other Tick this checkbox if you want to allow the wireless clients on your guest network to communicate with each other via methods such as network neighbors and Ping. 4. Click Save. Now you can ensure network security and privacy! -
Page 99: Chapter 12 Nat Forwarding
The TP-Link router supports four forwarding rules. If two or more rules are set, the priority of implementation from high to low is Port Forwarding, Port Triggering, UPNP and DMZ.
-
Page 100: Alg
SIP ALG. Visit http://tplinkwifi.net or http://192.168.0.1, and log in with your TP-Link ID or the password you set for the router. Go to Advanced >…
-
Page 101
Chapter 12 NAT Forwarding 4. Click View Existing Applications to select a service from the list to automatically populate the appropriate port number in the External Port Internal Port fields. If the service is not listed, enter the External Port number (e.g. 21) or a range of ports (e.g. -
Page 102: Open Ports Dynamically By Port Triggering
Zone, Dialpad and Quick Time 4 players, etc. Follow the steps below to configure the Port Triggering rules: 1. Visit http://tplinkwifi.net or http://192.168.0.1, and log in with your TP-Link ID or the password you set for the router. 2. Go to Advanced >…
-
Page 103
Chapter 12 NAT Forwarding 3. Click View Existing Applications, and select the desired application. The Triggering Port, Triggering Protocol External Port will be automatically filled in. The following picture takes application MSN Gaming Zone as an example. 4. Click OK. -
Page 104: Make Applications Free From Port Restriction By Dmz
How can I do that? 1 Assign a static IP address to your PC, for example 192.168.0.100. 1 Visit http://tplinkwifi.net or http://192.168.0.1, and log in with your TP-Link ID or the password you set for the router. 2 Go to Advanced >…
-
Page 105: Make Xbox Online Games Run Smoothly By Upnp
Therefore, you can play Xbox online games without a hitch. INTERNET If necessary, you can follow the steps to change the status of UPnP. 1. Visit http://tplinkwifi.net or http://192.168.0.1, and log in with your TP-Link ID or the password you set for the router.
-
Page 106
Chapter 12 NAT Forwarding 2. Go to Advanced > NAT Forwarding > UPnP and toggle on or off according to your needs. -
Page 107: Chapter 13 Parental Controls
Chapter Parental Controls This function allows you to block inappropriate, explicit and malicious websites, and control access to specified websites at specified time.
-
Page 108
For example, I want to allow my children’s devices (e.g. a computer or a tablet) to access only www.tp-link.com and Wikipedia.org from 18:00 (6 PM) to 22:00 (10 PM) on the weekdays and not other time. How can I 1 Visit http://tplinkwifi.net… -
Page 109
Chapter 13 Parental Controls 5 (Optional) Delete items from the Filter Content list, add items from the Available Categories list, or click Add a New Keyword to add a filter keyword (for example, “Facebook”) or URL. 6 Enable Time Limits for Mon to Fri and Sat & Sun, then set the daily internet time allowed. -
Page 110
Chapter 13 Parental Controls 7 Click Save. Done! Now you can control your children’s internet access as needed. Tips: • To monitor internet usage of a family member: 1. Find the profile of the family member, then click the Insights icon. 2. -
Page 111
Chapter 13 Parental Controls • To pause or resume internet access of a family member: Find the profile of the family member, then click the Pause/Play icon. -
Page 112: Chapter 14 Quality Of Service
Chapter Quality of Service This function allows you to specify the priority of traffic and minimizes the impact of network congestion.
-
Page 113
Quality of Service Chapter 14 The router allows you to configure the quality of service (QoS) for optimal throughput and performance when handling differentiated wireless traffic, such as Voiceover-IP (VoIP), other types of audio, video, streaming media, and traditional IP data. To configure QoS on the routers, you should set parameters on the transmission queues for different types of wireless traffic. -
Page 114
Quality of Service Chapter 14 (Optional) Enable IPTV QoS, then set the priority and reserved bandwidth of IPTV traffic. (Optional) Click Advanced and arrange the sliders to set the bandwidth percentage of each priority. -
Page 115
Quality of Service Chapter 14 Click Save to make the settings effective. To set up QoS for a specific device: 1 Visit http://tplinkwifi.net or http://192.168.88.1, and log in with the password you set for the router. 2 Go to Advanced >… -
Page 116
Quality of Service Chapter 14 4 In the QoS Rule window, click scan and click to choose a device, then click OK to add it to the rule. -
Page 117: Chapter 15 Network Security
Chapter Network Security This chapter guides you on how to protect your home network from unauthorized users by implementing network security functions. You can block or allow specific client devices to access your wireless network using MAC Filtering, or using Access Control for wired and wireless networks, or you can prevent ARP spoofing and ARP attacks by using IP &…
-
Page 118: Firewall & Dos Protection
Network Security Chapter 15 15 1 Firewall & DoS Protection The SPI (Stateful Packet Inspection) Firewall and DoS (Denial of Service) Protection protect the router from cyber attacks. The SPI Firewall can prevent cyber attacks and validate the traffic that is passing through the router based on the protocol.
-
Page 119: Service Filtering
Network Security Chapter 15 2. The protection will be triggered immediately when the number of packets exceeds the preset threshold value, and the vicious host will be displayed in the Blocked DoS Host List. 15 2 Service Filtering With Service Filtering, you can prevent certain users from accessing the specified service, and even block internet access completely.
-
Page 120: Access Control
Network Security Chapter 15 Select a Service Type from the drop-down list and the following four fields will be automatically filled in. Select Custom when your desired service type is not listed, and enter the information manually. Specify the IP address(es) that this filtering rule will apply to. Click Save to make the settings effective.
-
Page 121
Network Security Chapter 15 3 Select the access mode to either block (recommended) or allow the device(s) to access your network. To block specific device(s): 1 ) Select Blacklist and click Save. 2 ) Select the device(s) to be blocked in the Online Devices table (or click the under the… -
Page 122: Ip & Mac Binding
Network Security Chapter 15 3 ) Enter the Device Name Address. (You can copy and paste the information from Online Devices table if the device is connected to your network.) 4 ) Click Save. Done! Now you can block or allow specific client devices to access your network (via wired or wireless) by Blacklist or Whitelist.
-
Page 123
Network Security Chapter 15 3 Bind your device(s) according to your needs. To bind the connected device(s): 1 ) Select the device(s) to be bound in the List. 2 ) Click Bind to add to the Binding List. To bind the unconnected device: 1 ) Click in the Binding List… -
Page 124: Ipv6 Firewall
Network Security Chapter 15 15 5 IPv6 Firewall IPv6 Firewall protects your IPv6 network by preveting access from the internet. However, when you are hosting a service, such as a file sharing server in your local network, you can choose to allow access to the server from the internet by adding entries on this page.
-
Page 125
Network Security Chapter 15 Select the local host device running the service. Enter its global IPv6 address in the Global IPv6 Address field. Select a protocol for the service from the drop-down list. Select Enable This Entry. Click OK. Tips: •… -
Page 126: Chapter 16 Vpn Server&Client
Chapter VPN Server&Client The router offers several ways to set up VPN connections: VPN Server allows remote devices to access your home network in a secured way through the internet. The router supports three types of VPN Server: OpenVPN is somewhat complex but with higher security and more stability, suitable for restricted environments such as campus network and company intranet.
-
Page 127: Use Openvpn To Access Your Home Network
Router (VPN Server) Remote Devices Step1 Set up OpenVPN Server on Your Router 1. Visit http://tplinkwifi.net or http://192.168.0.1, and log in with your TP-Link ID or the password you set for the router. 2. Go to Advanced > > OpenVPN, and tick the box of Enable VPN Server.
-
Page 128: Use Pptp Vpn To Access Your Home Network
PPTP VPN connection. Step 1 Set up PPTP VPN Server on Your Router 1. Visit http://tplinkwifi.net or http://192.168.0.1, and log in with your TP-Link ID or the password you set for the router. 2. Go to Advanced >…
-
Page 129
Chapter 16 VPN Server&Client Note: Before you enable Server, we recommend you configure Dynamic DNS Service (recommended) or assign a static IP address for router’s WAN port and synchronize your System Time with internet. 3. In the Client IP Address field, enter the range of IP addresses (up to 10) that can be leased to the devices by the PPTP VPN server. -
Page 130
Chapter 16 VPN Server&Client 3. Select Connect to a workplace and click Next. 4. Select Use my Internet connection (VPN). -
Page 131
Chapter 16 VPN Server&Client 5. Enter the internet IP address of the router (for example: 218.18.1.73) in the Internet address field. Click Next. 6. Enter the User name Password you have set for the PPTP VPN server on your router, and click Connect. -
Page 132: Use Ipsec Vpn To Access Your Home Network
Chapter 16 VPN Server&Client 7. Click Connect Now when the VPN connection is ready to use. 16 3 Use IPSec VPN to Access Your Home Network IPSec VPN Server is used to create a IPSec VPN connection for remote devices to access your home network.
-
Page 133
Router (VPN Server) Remote Devices Step 1 Set up IPSec VPN Server on Your Router 1. Visit http://tplinkwifi.net or http://192.168.0.1, and log in with your TP-Link ID or the password you set for the router. 2. Go to Advanced >… -
Page 134
Chapter 16 VPN Server&Client 5. Configure the advanced settings according to the following explanation. We recommend that you keep the default settings. If you want to change these settings, make sure that both VPN server endpoints use the same Encryption Algorithm, Integrity Algorithm, Diffie-Hellman Group and Key Lifetime in both phase1 and phase2. -
Page 135
Chapter 16 VPN Server&Client 6. Click OK. Note: • For the comprehensive guide, please refer to the User Guide on the product’s support page. Step 2 Configure IPSec VPN Connection on Your Remote Device The remote device can use the Windows or Mac OS built-in IPSec software or a third- party IPSec software to connect to IPSec Server. -
Page 136
Chapter 16 VPN Server&Client 3. Select Connect to a workplace and click Next. 4. Select Use my Internet connection (VPN). -
Page 137
Chapter 16 VPN Server&Client 5. Enter the internet IP address of the router (for example: 218.18.1.73) in the Internet address field, and select the checkbox Don’t connect now; just set it up so I can connect later. Click Next. 6. Enter the User name Password you have set for the IPSec VPN server on your… -
Page 138
Chapter 16 VPN Server&Client 7. Click Close when the VPN connection is ready to use 8. Go to Network and Sharing Center and click Change adapter settings. -
Page 139
Chapter 16 VPN Server&Client 9. Find the VPN connection you created, then double-click it. 10. Enter the User name Password you have set for the IPSec VPN server on your router, and click Properties. -
Page 140
Chapter 16 VPN Server&Client 11. Switch to the Security tab, select Layer 2 Tunneling Protocol with IPsec (L2TP/ IPSec) and click Advanced settings. 12. Select Use preshared key for authentication and enter the IPSec Pre-Shared Key you have set for the IPSec VPN server on your router. Then click OK. Done! Click Connect to start VPN connection. -
Page 141: Vpn Connections
VPN Connections page displays the clients that are currently connected to the OpenVPN servers, PPTP VPN servers and IPSec VPN hosted on the router. 1. Visit http://tplinkwifi.net or http://192.168.0.1, and log in with your TP-Link ID or the password you set for the router. 2. Go to Advanced >…
-
Page 142: Chapter 17 Manage Your Router
Chapter Manage Your Router This chapter introduces how to change the system settings and administrate your router’s network. This chapter contains the following sections: • Set System Time • Control the LED • Test Internet Connectivity • Update the Firmware •…
-
Page 143: Set System Time
Chapter 17 Manage Your Router 17 1 Set System Time System time is the time displayed while the router is running. The system time you configure here will be used for other time-based functions like Parental Controls and Wireless Schedule. You can manually set how to get the system time. Follow the steps below to set your system time.
-
Page 144: Control The Led
The LED of the router indicates its activities and status. You can enable the Night Mode feature to specify a time period during which the LED is off. 1. Visit http://tplinkwifi.net or http://192.168.0.1, and log in with your TP-Link ID or the password you set for the router. 2. Go to Advanced >…
-
Page 145
Chapter 17 Manage Your Router ¾ To run ping and traceroute tools: 1 ) Locate the Diagnostic Tools section. 2 ) Select Ping Traceroute Nslookup as the diagnostic tool to test the connectivity. • Ping is used to test the connectivity between the router and the tested host, and measure the round-trip time. -
Page 146: Update The Firmware
2. If a new firmware is displayed, click Upgrade and click Yes when prompted, then the router will automatically download the latest firmware file and upgrade. ¾ Follow the steps below to manually update the firmware: 1. Download the latest firmware file for the router from our website www.tp-link.com. 2. Visit http://tplinkwifi.net or http://192.168.0.1, and log in with the password you set…
-
Page 147: Back Up And Restore Configuration Settings
Chapter 17 Manage Your Router 6. Wait a few minutes for the upgrading and rebooting. 17 5 Back Up and Restore Configuration Settings The configuration settings are stored as a configuration file in the router. You can back up the configuration file to your computer for future use and restore the router to a previous settings from the backup file when needed.
-
Page 148: Reboot The Router
Chapter 17 Manage Your Router 1 ) Locate the Factory Default Restore section, and click Factory Restore to reset the router. 2 ) Wait a few minutes for the resetting and rebooting. Note: 1. During the resetting process, do not turn off the router. 2.
-
Page 149: Administration Management
Chapter 17 Manage Your Router 3 ) Click Save to make the settings effective. Some settings of the router may take effect only after rebooting, including: • Change the LAN IP Address (system will reboot automatically). • Change the Operation Mode (system will reboot automatically). •…
-
Page 150: Local Management
Chapter 17 Manage Your Router Enter the old password and a new password twice (both case-sensitive). Click Save to make the settings effective. 17 7 2 Local Management You can control the local devices’ authority to manage the router via Local Management feature.
-
Page 151: Remote Management
Chapter 17 Manage Your Router Note: If you want all local devices can manage the router, just leave the IP/MAC Address field blank. 17 7 3 Remote Management By default, the remote devices are not allowed to manage the router from the internet. You can enable remote management over HTTP and/or HTTPS if needed.
-
Page 152: Http Referer Head Check
Chapter 17 Manage Your Router All devices or the specific device on the internet can log in to your router using the address displayed on the Manage This Router via the Address field to manage the router. Tips: 1. If you were warned about the certificate when visiting the web management page remotely, click Trust (or a similar option) to continue.
-
Page 153: Session Id
Chapter 17 Manage Your Router Specify the ICMP Ping reply options. • Remote: Select it if you want the computers on a public network to ping the router’s WAN IP address. • Local: Enabled by default, if enabled, the computers on a private network can ping the router’s LAN IP address.
-
Page 154
Chapter 17 Manage Your Router ¾ To view the system logs: You can view specific system logs by selecting the log type and level. Click Refresh to refresh the log list. ¾ To save the system logs: You can save the system logs to your local computer or a remote server. Click Save Log to save the logs in a txt file to your computer. -
Page 155: Cwmp Settings
Chapter 17 Manage Your Router 17 9 CWMP Settings The router supports CWMP (CPE WAN Management Protocol), also called TR-069. This collects information, performs diagnostics and configures the devices automatically via ACS (Auto-Configuration Server). Visit http://tplinkwifi.net or http://192.168.0.1, and log in with the password you set for the router.
-
Page 156: Snmp Settings
Chapter 17 Manage Your Router • ACS Username/Password: Enter the username/password to log in to the ACS server. • Interface used by TR-069 client: Select which interface to be used by the TR-069 client. • Display SOAP messages on serial console: Enable or disable this function.
-
Page 157
Chapter 17 Manage Your Router • SNMP Agent/SNMP Agent for WAN: Turn on to enable the built-in SNMP agent that allows the router to operate as the operational role in receiving and processing of SNMP messages, sending responses to the SNMP manager, and triggering SNMP traps when an event occurs. -
Page 158: Monitor The Internet Traffic Statistics
Chapter 17 Manage Your Router 17 11 Monitor the Internet Traffic Statistics The traffic statistics function allows you to monitor the volume of internet traffic statistics. You can view the network traffic of the LAN, WAN and WLAN sent and received packets.
-
Page 159
Chapter 17 Manage Your Router Enable Port Mirroring. Select a LAN port to mirror network packets of the WAN port. Set a Timeout duration after which Port Mirroring will disable automatically. If you set Timeout to 0 seconds, Port Mirroring will not disable automatically. Save the settings. -
Page 160: Faq
Q2 What should I do if I forget my web management password? • If you are using a TP-Link ID to log in, or you have enabled the Password Recovery feature of the router, click…
-
Page 161
4 ) Click LAN settings and deselect the following three options and click OK. 5 ) Go to Advanced > Restore advanced settings, click to save the settings. -
Page 162
Note: You’ll need to reconfigure the router to surf the internet once the router is reset. Q4 What should I do if I can’t access the internet even though the configuration is finished? Visit http://tplinkwifi.net, and log in with your TP-Link ID or the password you set for the router. Go to Advanced>… -
Page 163
• Restart the modem and the router. 1 ) Power off your modem and router, and leave them off for 1 minute. 2 ) Power on your modem first, and wait about 2 minutes until it gets a solid cable or Internet light. -
Page 164
• Modify the LAN IP address of the router. Note: Most TP-Link routers use 192.168.0.1/192.168.1.1 as their default LAN IP address, which may conflict with the IP range of your existing ADSL modem/router. If so, the router is not able to communicate with your modem and you can’t access the internet. -
Page 165
• Double check the internet connection type. 1 ) Confirm your internet connection type, which can be learned from the ISP. 2 ) Visit http://tplinkwifi.net, and log in with your TP-Link ID or the password you set for the router. -
Page 166
2 ) Exit the wireless configuration tool (the TP-Link Utility, for example). 3 ) Select and right click on… -
Page 167
2 ) If you cannot find the PIN or PIN failed, you may choose Connecting using a security key instead, and then type in the Wireless Password/Network Security Key. 3 ) If it continues to show note of Network Security Key Mismatch, it is suggested to confirm the wireless password of your wireless router. -
Page 168
Model Number: BBA Routers Component Name Model I.T.E. Power T120200-2B1 Responsible party: TP-Link USA Corporation Address: 10 Mauchly, Irvine, CA 92618 Website: http://www.tp-link.com/us/ Tel: +1 626 333 0234 Fax: +1 909 527 6804 E-mail: sales.usa@tp-link.com This equipment has been tested and found to comply with the limits for a Class B digital device, pursuant to part 15 of the FCC Rules. -
Page 169
We, TP-Link USA Corporation, has determined that the equipment shown as above has been shown to comply with the applicable technical standards, FCC part 15. There is no unauthorized change is made in the equipment and the equipment is properly maintained and operated. -
Page 170
Any changes or modifications not expressly approved by the party responsible for compliance could void the user’s authority to operate the equipment. We, TP-Link USA Corporation, has determined that the equipment shown as above has been shown to comply with the applicable technical standards, FCC part 15. -
Page 171
Canadian Compliance Statement This device contains licence-exempt transmitter(s)/receiver(s) that comply with Innovation, Science and Economic Development Canada’s licence-exempt RSS(s). Operation is subject to the following two conditions: 1. This device may not cause interference. 2. This device must accept any interference, including interference that may cause undesired operation of the device. -
Page 172
Industry Canada Statement CAN ICES-3 (B)/NMB-3(B) NCC Notice & BSMI Notice: 注意! 取得審驗證明之低功率射頻器材,非經核准,公司、商號或使用者均不得擅自變 更頻率、加大功率或變更原設計之特性及功能。 低功率射頻器材之使用不得影響飛航安全及干擾合法通信;經發現有干擾現象 時,應立即停用,並改善至無干擾時方得繼續使用。 前述合法通信,指依電信管理法規定作業之無線電通信。 低功率射頻器材須忍受合法通信或工業、科學及醫療用電波輻射性電機設備之干 擾。 應避免影響附近雷達系統之操作。 高增益指向性天線只得應用於固定式點對點系統。 安全諮詢及注意事項 • 安全諮詢及注意事項 • 請使用原裝電源供應器或只能按照本產品注明的電源類型使用本產品。 • 清潔本產品之前請先拔掉電源線。請勿使用液體、噴霧清潔劑或濕布進行清 潔。 • 注意防潮,請勿將水或其他液體潑灑到本產品上。 • 插槽與開口供通風使用,以確保本產品的操作可靠並防止過熱,請勿堵塞或 覆蓋開口。 • 請勿將本產品置放於靠近熱源的地方。除非有正常的通風,否則不可放在密 閉位置中。 • 不要私自拆開機殼或自行維修,如產品有故障請與原廠或代理商聯繫。 限用物質含有情況標示聲明書 設備名稱:AX3000 Gigabit Wi-Fi 6 Router 型號(型式):Archer AX3000 Pro Equipment name… -
Page 173
○ ○ ○ ○ ○ ○ 天線 備考1.〝超出0.1 wt %〞及〝超出0.01 wt %〞係指限用物質之百分比含量超出百分比含量基準值 Note 1:“Exceeding 0.1 wt %” and “exceeding 0.01 wt %” indicate that the percentage content of the restricted substance exceeds the reference percentage value of presence condition. 備考2.〝○〞係指該項限用物質之百分比含量未超出百分比含量基準值。 Note 2:“○”… -
Page 174
Symbol Explanation Polarity of output terminals Energy efficiency Marking Indoor use only Caution Operator’s manual RECYCLING This product bears the selective sorting symbol for Waste electrical and electronic equipment (WEEE). This means that this product must be handled pursuant to European directive 2012/19/ EU in order to be recycled or dismantled to minimize its impact on the environment.
Содержание
- Настройка Wi-Fi роутера для провайдера Дом.ру
- Настройка роутера Дом.ру
- Настройка роутера TP-Link на Дом.ру
- Настройка подключения к Дом.ru на роутере ASUS
- Настройка роутера D-Link для провайдера Domru
- Как настроить беспроводной маршрутизатор TP‑Link серии Archer для работы с DSL‑модемом (PPPoE, новый логотип)?
- Как использовать функцию WPS в роутерах TP‑Link?
- Подключение и настройка роутера Tp-Link: подробная инструкция
- Подключаем роутер Tp-Link к компьютеру
- Вход в настройки роутера
- Настраиваем wi-fi сеть
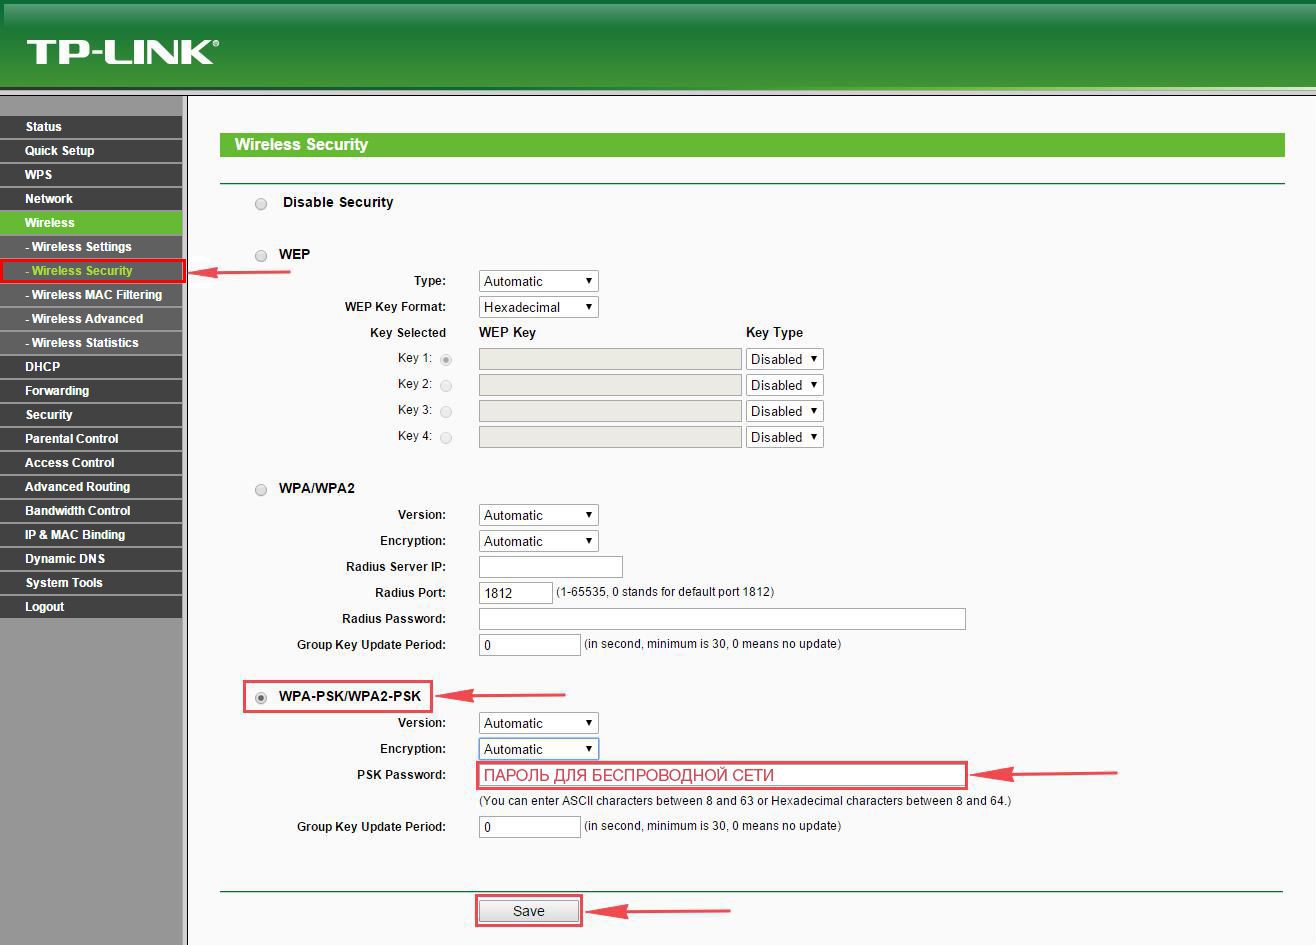
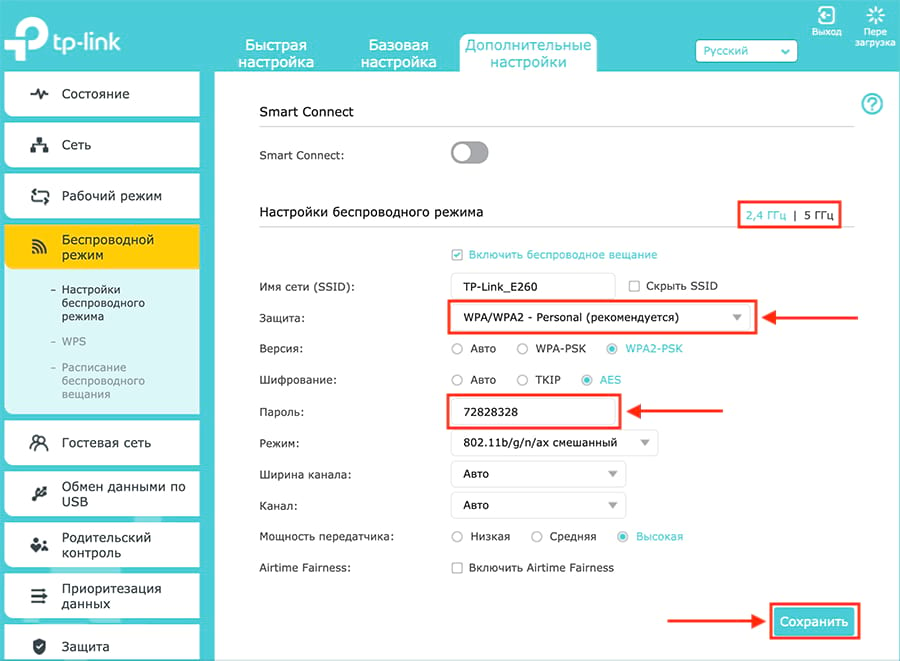
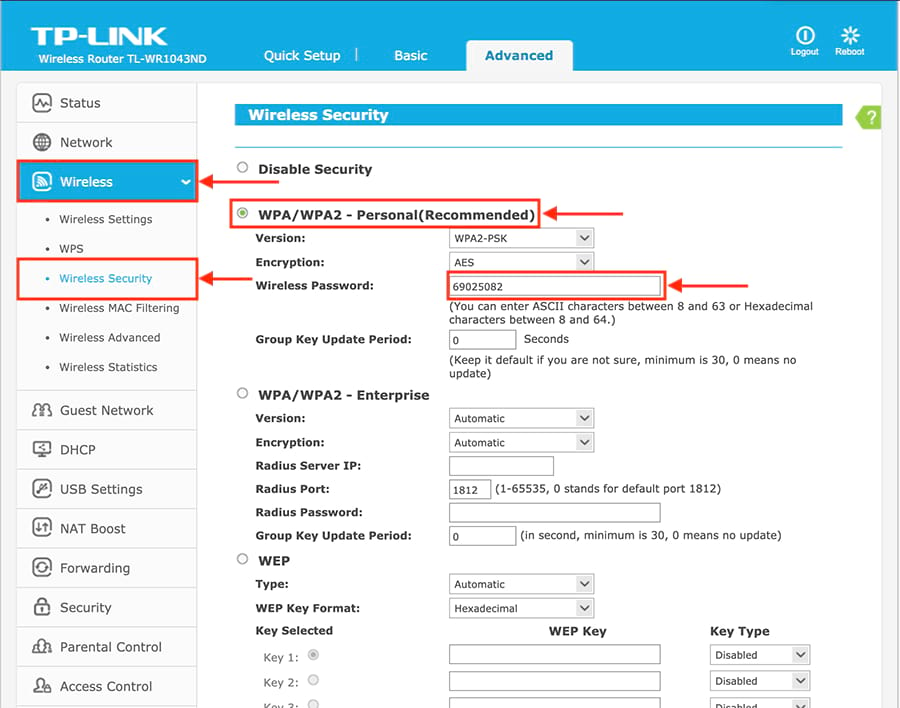
- Ставим пароль на wi-fi
- Настраиваем интернет
- Настраиваем интернет через DHCP
- Настраиваем PPPOE
- Настраиваем PPTP
- Настраиваем L2TP
- Ставим пароль на интерфейс роутера
Настройка Wi-Fi роутера для провайдера Дом.ру
Я написал уже много отдельных инструкций по настройке разных роутеров. Но в рамках одной статьи невозможно рассказать о том, как настроить какую-то определенную модель роутера для разных интернет-провайдеров. Их очень много. И даже если роутеры у многих одинаковые – провайдеры разные. А если в настройках роутера не указать, или неправильно указать параметры для подключения к провайдеру, то интернет через роутер работать просто не будет. Это самая популярная проблема.
Поэтому, в этой инструкции я решил показать процесс настройки Wi-Fi роутера для Дом.ru. Это один из самых популярных интернет-провайдеров в России. И он использует не самый простой тип подключения, из-за чего у многих возникают проблемы с настройкой оборудования. Клиенты Дом.ru могут использовать такое оборудование:
- Роутеры от самого провайдера Дом.ру, которые провайдер не редко устанавливает клиентам в процессе подключения к интернету. По сути это обычные роутеры D-Link, Sagemcom и TP-Link. Только с логотипом провайдера и фирменной прошивкой.
- Другие Wi-Fi роутеры, выбор которых сейчас очень большой. С провайдером Дом.ру может работать любой роутер.
В любом случае, отличие в настройке заключается лишь в расположении необходимых параметров в веб-интерфейсе определенного устройства. Сначала я покажу, как настроить маршрутизатор с фирменной прошивкой от Дом.ru, а затем покажу, как выполнить настройку некоторых роутеров от популярных производителей.
Не важно какой у вас роутер. Главная задача зайти в его настройки и в параметрах подключения к интернету выбрать тип подключения PPPoE. Затем ввести логин и пароль, которые вам выдал интернет-провайдер. Ну и задать параметры Wi-Fi сети.
Очень часто возникают проблемы с входом в настройки роутера. Поэтому, сразу оставляю ссылку на статью с решениями этой проблемы: https://help-wifi.com/oshibki-i-polomki/chto-delat-esli-ne-zaxodit-v-nastrojki-routera-na-192-168-0-1-ili-192-168-1-1/. Возможно, она вам не пригодится. Но пускай будет на всякий случай.
Настройка роутера Дом.ру
Сначала рассмотрим настройку роутера с фирменной прошивкой. Если у вас роутер с логотипом Дом.ру, то следуйте инструкции ниже.
Устройство, с которого мы будем выполнять настройку, должно быть подключено к роутеру по Wi-Fi, или с помощью сетевого кабеля. Дальше в браузере (рекомендую использовать стандартный браузер) нужно перейти по IP-адресу 192.168.0.1. Откроется страница с настройками маршрутизатора. Если появится запрос логина и пароля, то попробуйте ввести admin/admin.
В главном окне нужно перейти по ссылке «изменить настройки».
Сразу появится еще одно окно, в котором нужно задать необходимые настройки.
Самое важно – правильно прописать «Логин Дом.ru» и «Пароль». Этот логин и пароль выдает интернет-провайдер. Как правило, они указаны в договоре о подключении к интернету. Там же есть возможность сменить режим работы Wi-Fi сети, канал и шифрование. Но эти настройки без необходимости лучше не менять. Нажмите на кнопку «Сохранить».
После сохранения настроек роутер должен подключится к интернету. Статус соединения должен быть «Подключено». На главной странице можно посмотреть имя своей Wi-Fi сети (SSID) и пароль.
Так как прошивка на этих устройствах фирменная – она сильно урезанная. Скорее всего это сделано для того, чтобы пользователям было проще разобраться в самых необходимых настройках.
Дальше речь пойдет об обычных маршрутизаторах. Я имею введу те устройства, которые клиенты покупали сами. Они без фирменной прошивки (которую можно увидеть на скриншотах выше) и без логотипа провайдера.
Настройка роутера TP-Link на Дом.ру
Кабель от Дом.ру подключаем в WAN-порт маршрутизатора. Он может быть подписан Internet. Дальше подключаемся к роутеру по Wi-Fi, или LAN. И по инструкции как зайти в настройки роутера TP-Link открываем веб-интерфейс нашего роутера. Адрес может быть как 192.168.0.1, так и 192.168.1.1.
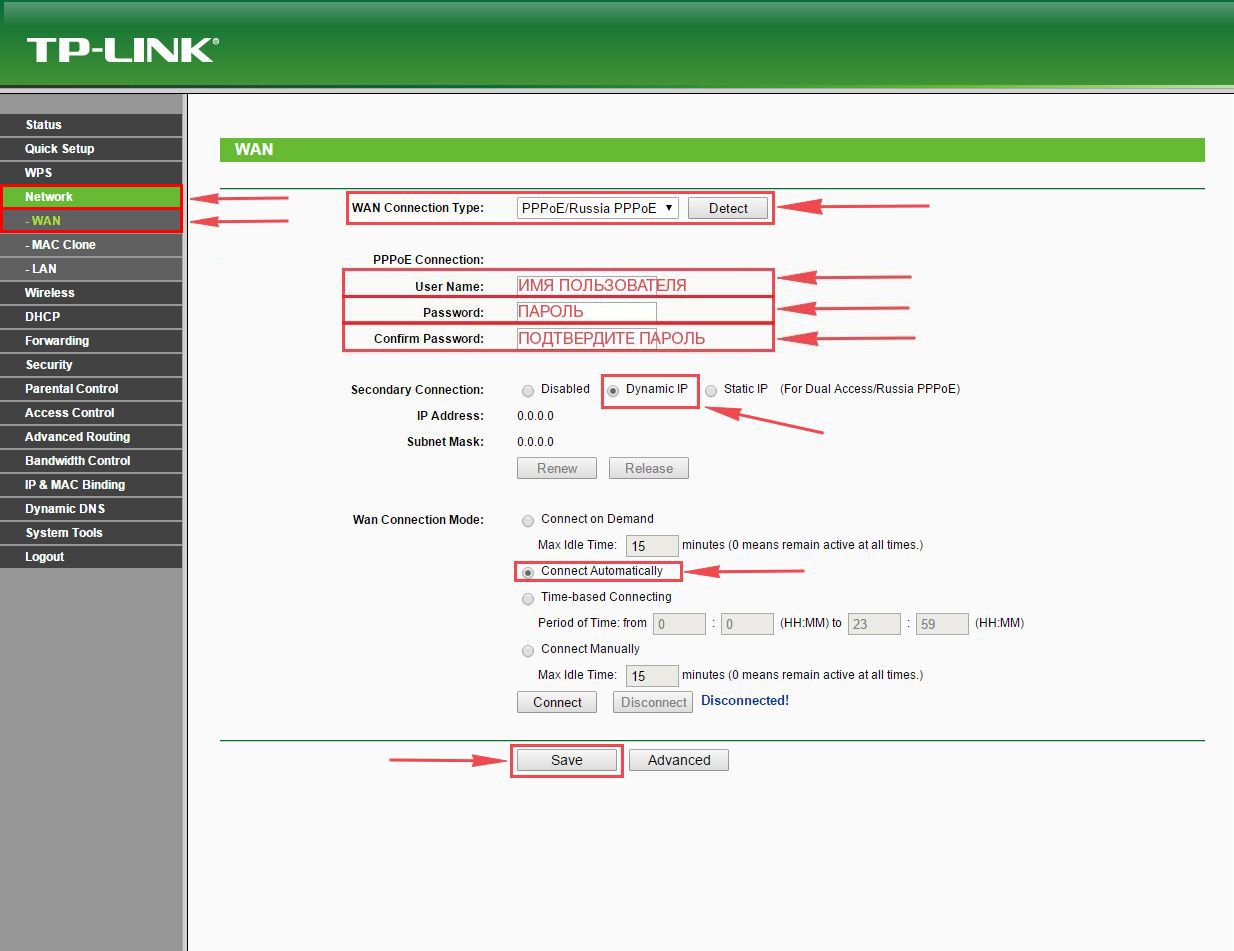
Дальше переходим в раздел с настройками подключения к интернету. Обычно это раздел «Сеть» – «WAN». В новом веб-интерфейсе: «Дополнительные настройки» – «Сеть» – «Интернет».
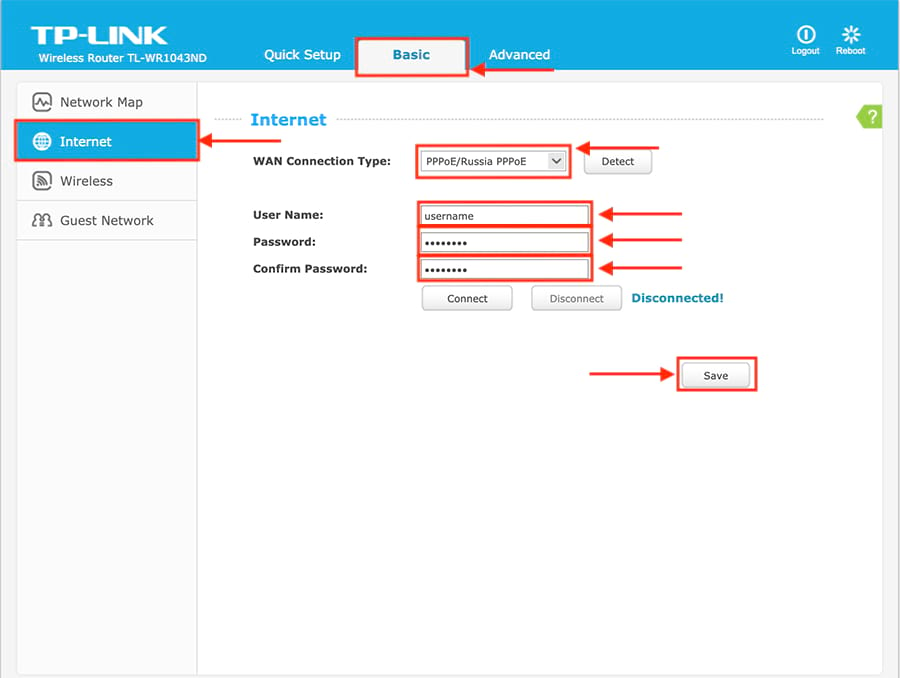
Выбираем в меню тип подключения PPPoE и прописываем логин и пароль от провайдера Дом.ру. Так же ставим переключатель возле «Подключить автоматически». Можно нажать на кнопку «Подключить». Если вы правильно задали все параметры, то роутер подключится к интернету. Сохраните настройки.
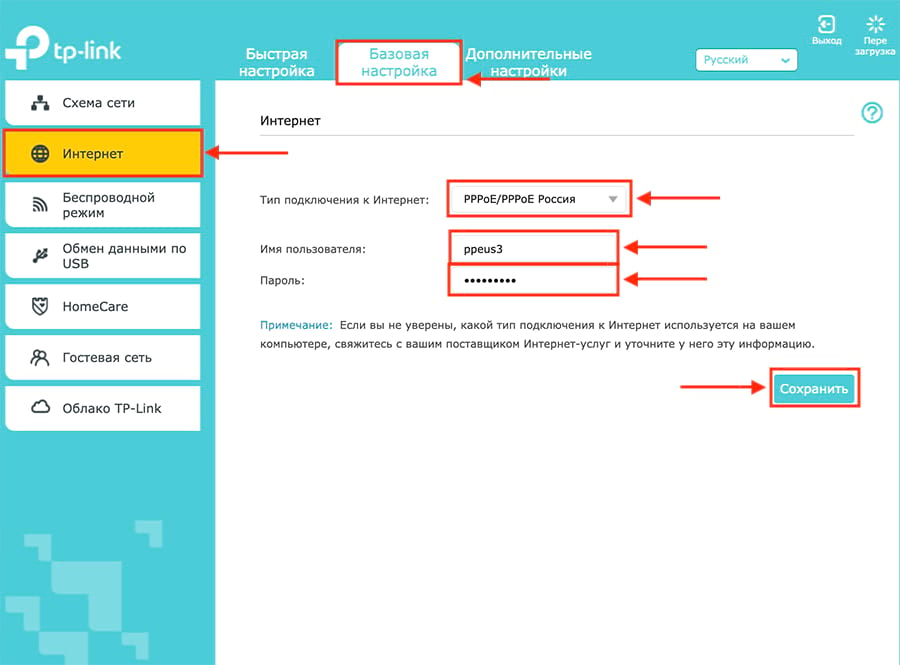
Если у вас новая страничка с настройками:
Wi-Fi сеть можно настроить в разделе Wireless (Беспроводной режим). Можете посмотреть на примере настройки популярной модели: TP-Link TL-WR841N.
Настройка подключения к Дом.ru на роутере ASUS
Подключаем к роутеру интернет, подключаем наше устройство и в браузере открываем IP-адрес: 192.168.1.1.
Сразу переходим в раздел «Интернет» и меняем тип подключения на PPPoE. Прописываем имя пользователя и пароль от Дом.ру. Сохраняем настройки кнопкой «Применить» внизу страницы.
Настройка Wi-Fi сети и пароля в разделе «Беспроводная сеть».
Настройка роутера D-Link для провайдера Domru
В настройки маршрутизаторов D-Link можно зайти по адресу 192.168.0.1. Вы всегда можете воспользоваться подробной инструкцией: как зайти в настройки роутера D-Link.
В разделе «Настройка соединения» – «WAN» нужно создать подключение.
Там все стандартно. Тип подключения – PPPoE. Заполняем поля «Имя пользователя» и «Пароль». Напомню, что эти данные выдает интернет-провайдер. В нашем случае это Дом.ру. Не забываем сохранить настройки.
Для настройки беспроводной сети перейдите в раздел «Wi-Fi».
Если в этой статье вы не нашли инструкцию для своего маршрутизатора, то можете задать вопрос в комментариях. Только обязательно укажите производителя и модель маршрутизатора. Подскажу, как настроить подключение к Дом.ру на устройствах от Netis, Tenda, ZyXEL, MikroTik, Xiaomi, Mercusys и т. д.
Источник
Как настроить беспроводной маршрутизатор TP‑Link серии Archer для работы с DSL‑модемом (PPPoE, новый логотип)?
Убедитесь, что у вас есть доступ в интернет через ваш DSL‑модем, в противном случае свяжитесь со своим интернет‑провайдером.
Эта статья подойдёт вам, если у вас DSL‑модем и тип подключения вашего интернет‑провайдера — PPPoE, который требует ввода имени пользователя и пароля.
Если у вас оптоволоконный/кабельный модем, нажмите здесь.
Если у вас DSL‑модем и тип подключения вашего интернет‑провайдера — Статический IP‑адрес, нажмите здесь.
Если у вас DSL‑модем и тип подключения вашего интернет‑провайдера — Динамический IP‑адрес, нажмите здесь.
Для подключения оборудования воспользуйтесь Руководством по быстрой настройке, идущем в комплекте с роутером.
В качестве примера взят интерфейс роутера Archer C7_V5.
Войдите в веб-интерфейс маршрутизатора.
Следуйте указаниям пошаговой инструкции для завершения Быстрой настройки.
На шаге настройки Тип подключения к Интернет выберите PPPoE / PPPoE Россия , затем нажмите Далее.
Введите предоставленные интернет‑провайдером Имя пользователя и Пароль. Нажмите Далее, чтобы завершить Быструю настройку.
Или зайдите на страницу Дополнительные настройки > Сеть > Интернет. Измените Тип подключения к Интернет на PPPoE/PPPoE Россия. Введите предоставленные интернет‑провайдером Имя пользователя и Пароль. Не изменяйте другие настройки, если в этом нет необходимости.
Подождите несколько минут. Если на странице Дополнительные настройки > Статус в разделе Интернет отображается IP‑адрес, значит, доступ в интернет настроен.
Чтобы получить подробную информацию о каждой функции и настройке оборудования, перейдите на страницу Загрузки для загрузки руководства пользователя к своей модели устройства.
Источник
Как использовать функцию WPS в роутерах TP‑Link?
В этой статье рассказывается о работе функции WPS в роутерах TP-Link.
WPS позволяет подключать устройства к роутеру без ввода пароля. Есть три способа подключения:
Способ 1: с помощью кнопки
Этим способом к роутеру можно подключить любые Wi-Fi устройства, поддерживающие WPS, будь то смартфоны на Android, планшеты или USB Wi-Fi адаптеры.
WPS не поддерживается устройствами iOS. Функция WPS не может быть использована, если выключено вещание сети роутера. Также функция WPS не может быть использована, если на роутере используется шифрование WEP. Убедитесь, включено ли вещание сети и используется ли подходящий тип шифрования для WPS.
1. Нажмите на иконку WPS на экране своего устройства. Ниже приведён пример для смартфона на Android.
2. Нажмите кнопку WPS, расположенную на корпусе роутера.
При входе в режим сопряжения, индикатор WPS начнёт мигать. Кроме того, при удерживании кнопки WPS дольше 5 секунд, функция вещания Wi-Fi сети роутера будет выключена.
Способ 2: с помощью PIN-кода
1. Войдите в веб интерфейс роутера TP-Link (инструкция).
2. Перейдите в Дополнительные настройки > Беспроводной режим > WPS > PIN-код маршрутизатора .
PIN-код маршрутизатора включён по умолчанию. Вы можете использовать PIN-код по умолчанию, либо создать собственный.
PIN-код — это заранее установленный восьмизначный идентификационный номер для каждого роутера, по которому к роутеру могут подключаться устройства с поддержкой WPS. PIN-код по умолчанию напечатан на заводской этикетке роутера.
Способ 3: с помощью Мастера настройки WPS
1. Перейдите в Дополнительные настройки > Беспроводной режим > WPS > Мастер настройки WPS .
С помощью кнопки WPS (рекомендуется): нажмите Подключить . В течение двух минут нажмите кнопку WPS на подключаемом устройстве.
С помощью PIN-кода: введите PIN-код подключаемого устройства, нажмите Подключить .
2. При успешном подключении клиентского устройства к роутеру на экране устройства появится соответствующее уведомление, и индикатор WPS на корпусе роутера будет гореть в течение пяти минут.
Включение и выключение функции WPS
Если вы хотите включить или выключить WPS, перейдите в Системные инструменты > Параметры системы > WPS , снимите или поставьте галочку Включить WPS .
Более подробное описание каждой функции и руководства доступны в центре загрузок .
Источник
Подключение и настройка роутера Tp-Link: подробная инструкция
Беспроводные технологии проникают в нашу жизнь все интенсивнее, и настройка роутера фирмы Tp-Link пользуется большой популярностью в поисковых системах интернета.
Я объясню вам, как правильно подключить и настроить роутер Tp-Link. Данная пошаговая инструкция, как для начинающих, для чайников как угодно, так и для тех, у кого есть небольшой опыт, у кого сбились или слетели настройки и хотел бы перенастроить маршрутизатор или проверить настройки на нем, в том числе и посмотреть пароль от wi-fi, если его забыли.
Все маршрутизаторы Tp-Link отличаются друг от друга, как правило, чем дороже, тем он мощнее. И поэтому нужно узнать, какая модель попала вам в руки. Производитель на коробке написал модель, ее также можно посмотреть на обратной стороне самого оборудования. Модели Tp-Link обычно начинаются с Archer, TL-WR.
Ниже в списке можете выбрать ваш маршрутизатор для дальнейшей настройки.
Подключаем роутер Tp-Link к компьютеру
Узнав точную модель, подключим wi-fi маршрутизатор Tp-Link к компьютеру.
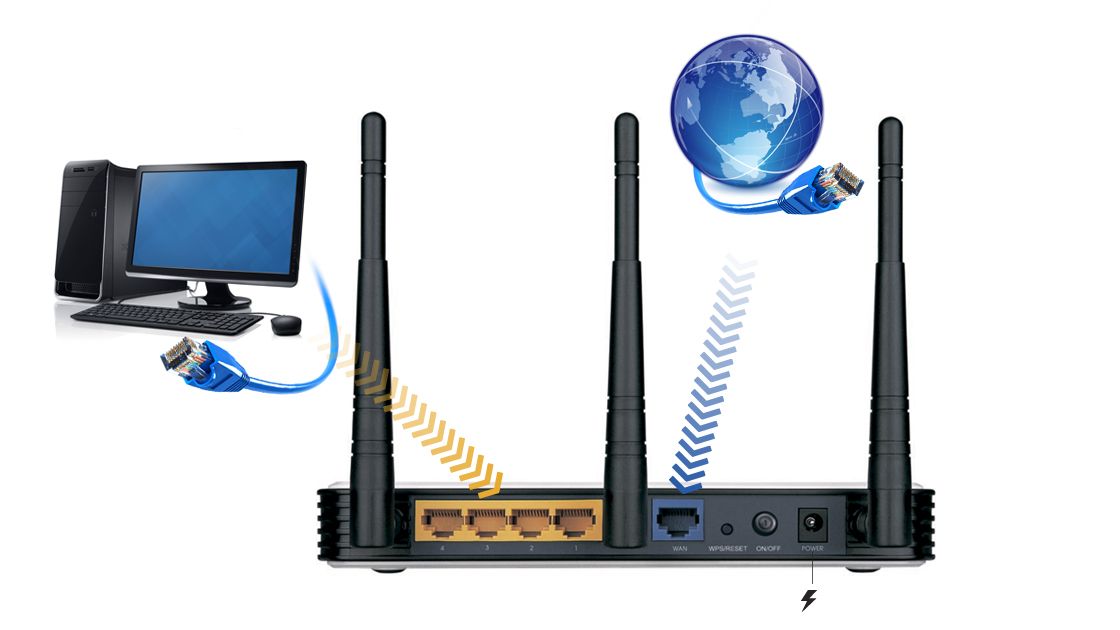
Подключим оборудование к электросети — 220 Вольт. Кабель, который заходит в помещение от оборудования провайдера подключаем к WAN порту роутера, порт обычно самый первый, выделен другим цветом и подписан. В коробке от оборудования обычно лежит сетевой кабель, обжатый с двух концов разъемами RJ-45 (8P8C) — это патч-корд, один его конец подключаем к компьютеру, другой к первому или любому другому порту маршрутизатора.
Есть вероятность столкнуться с такой проблемой, на ноутбуке нет разъема для подключения патч-корда, что делать? Подключаемся к маршрутизатору по wi-fi для его управления. Открываем беспроводные сети, ищем среди всех доступных сетей нашу, с названием Tp-Link и его модель, подключаемся, будет запрос пароля, его мы смотрим на обратной стороне маршрутизатора. Замечу, этот вариант только для тех, у кого новый роутер. На Б/у роутере, если вы не знаете пароль, нужно сбросить до заводских настроек через кнопку Reset, подробнее об этом написано здесь: https://inrouters.ru/tp-link/reset-router-tplink/
Вход в настройки роутера
Как зайти в настройки роутера или веб-интерфейс? Вход производится через любой браузер. В поле, где пишем адрес сайта вбиваем ip адрес роутера — 192.168.1.1 иногда он бывает 192.168.0.1, tplinkwifi.net или tplinklogin.net.
Открывается страница с авторизацией учетной записи, вводим стандартные для Tp-Link имя пользователя и пароль.
- Имя пользователя (Username) — admin
- Пароль (Password) — admin
Жмем «Log in» (Войти), попадаем на страницу настроек роутера Tp-Link.
Замечу, что если у вас не заходит, и маршрутизатор б/у, значит на нем меняли настройки и указали другие данные для входа. В этом случае восстановить пароль невозможно, придется сбросить настройки маршрутизатора до заводских, подробнее об этом написано здесь: https://inrouters.ru/tp-link/reset-router-tplink/
Настраиваем wi-fi сеть
Приступаем к настройке роутера. Можно применить мастер настроек или быструю настройку интернета в меню роутера, но давайте сделаем это по другому.
В меню роутера Tp-Link выбираем пункт «Wireless«, если интерфейс на русском языке, то «Беспроводной режим«. Ниже буду писать настройки одновременно на английский и русский интерфейсы, так как все идентично.
Замечу, что роутер может быть однодиапазонным или двухдиапазонным — 2,4 ГГц и 5 ГГц.
2,4 ГГц — именно с него начиналась эра домашних беспроводных технологий. Данный диапазон подвержен помехам от любой бытовой техники, особенно от Bluetooth, потому что частоты работ совпадают. Если в будущем заметите сбои в работе, одна из причин именно в этом.
5 ГГц — высокая пропускная способность, выражена в высокой скорости передач. Одним из минусов является маленькая дальность действия, но большой плюс — мало подвержен внешними воздействиями бытовой техники. Поэтому роутер лучше расположить ближе к устройствам, которыми пользуетесь.
При наличии двух диапазонов на роутере Tp-Link рекомендую настроить обе, это поможет пользоваться интернетом в диапазоне 2,4 ГГц, к примеру на улице на лавочке, когда диапазон 5 ГГц не виден устройству, или когда есть телефон, планшет и даже компьютер, который не поддерживает данный диапазон.
Поделимся видео о том, как запаролить wi-fi сеть на роутере Tp-Link
В поле «Wireless Network Name:» или на русском «Имя беспроводной сети:» выдумаем и напишем на латинице имя wi-fi сети, оно будет отображаться на телефоне, планшете, компьютере при подключении к wi-fi, к примеру назовем: «Kak_dela_sosed?». «Region» выбираем Russia.
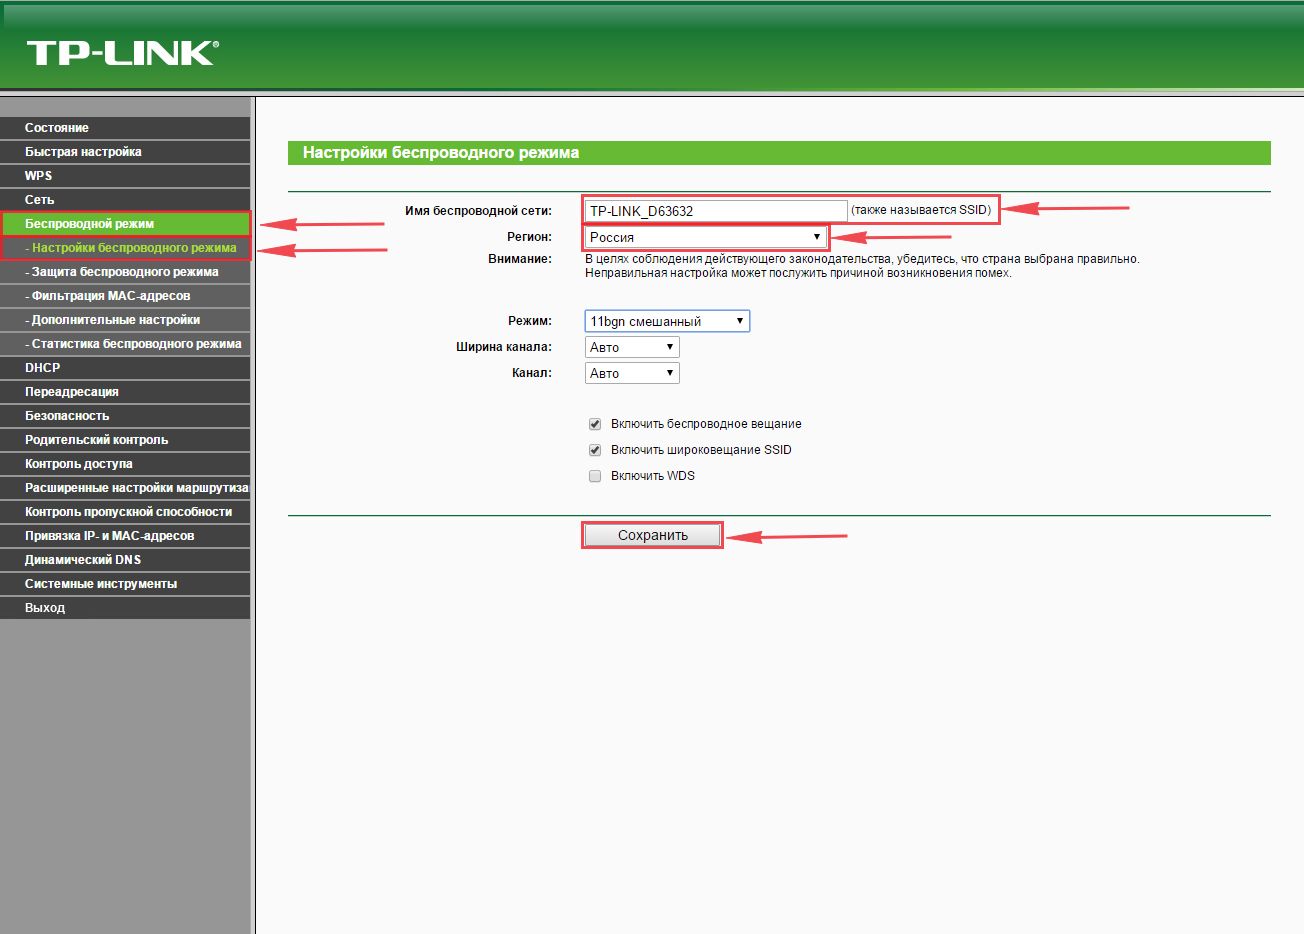
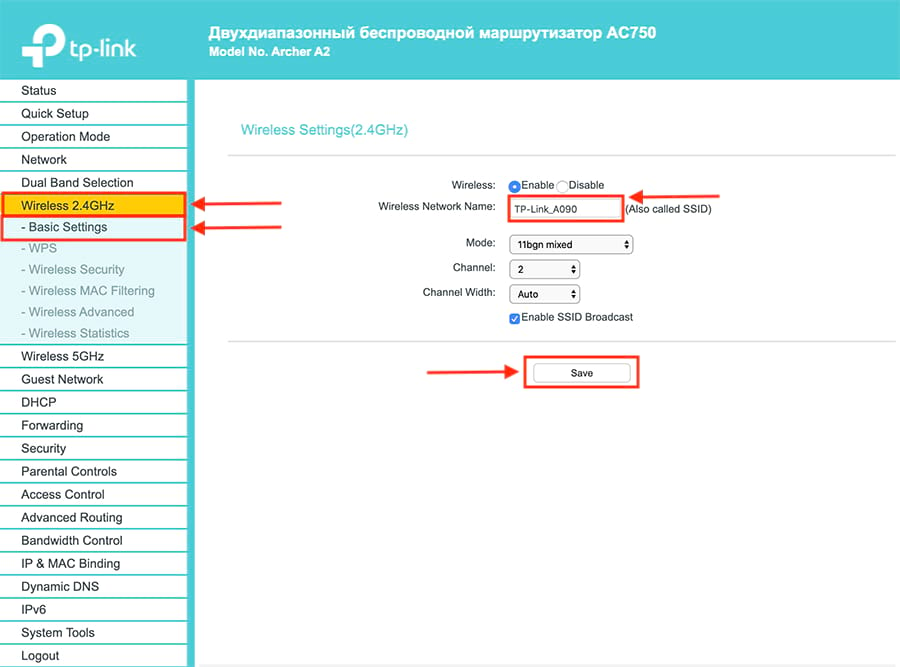
Ставим пароль на wi-fi
Теперь нам нужно обезопасить нашу сеть, поставить пароль на wi-fi, чтобы соседи не могли подключаться к нам.
Нужно перейти в меню «Wireless Security» или «Защита беспроводного режима«
Выберем тип шифрования «WPA-PSK/WPA2-PSK» или «WPA/WPA2-Personal(Рекомендуется)» на русском интерфейсе, в строке «PSK Password:» или «Пароль PSK» придумаем и установим пароль. Этот тот самый пароль, который нужен, чтобы подключиться в wifi. Те, кто перенастраивает маршрутизатор Tp-Link, здесь могут произвести смену пароля.
Жмем «Save» или «Сохранить«.
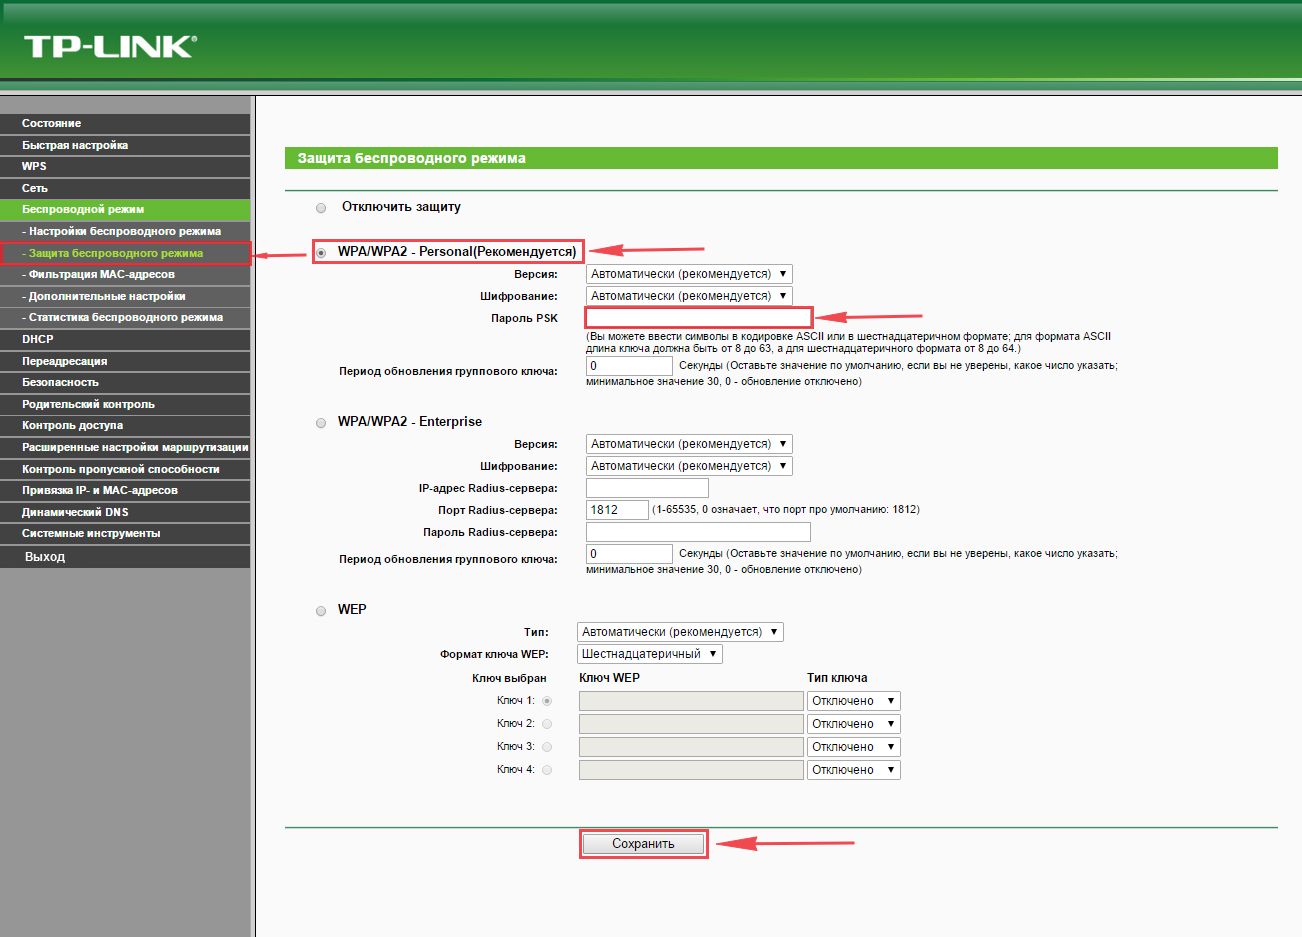
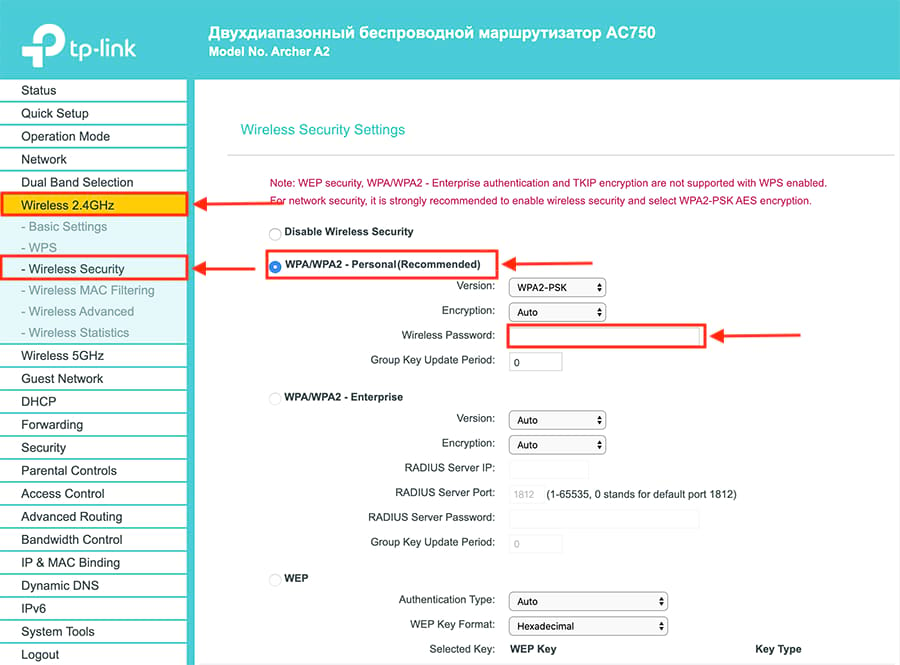
Если у вас двухдиапазонный маршрутизатор, проделываем настройки и для 5 ГГц.
В случае, если вы настраивали через wi-fi, без кабеля, нужно заново подключиться к вновь созданной сети для продолжения настройки.
Настраиваем интернет
Пожалуй самый важный момент при настройке, так как роутер Tp-Link подключается через сервер, которому нужно предоставить логин и пароль для входа в глобальную сеть. Существуют несколько типов подключения — PPPOE и два VPN протокола PPTP и L2TP. Поэтому нужно знать какой из этих типов у провайдера. Также у некоторых провайдеров доступ к интернету предоставляется без этих типов подключения, иными словами по DHCP или Динамическим IP, в этом случае на сервере регистрируется оборудование, его MAC адрес.
Настраиваем интернет через DHCP
Список провайдеров с DHCP подключением: Skynet (Скайнет), Байкал Телеком.
Для начала узнаем MAC адрес роутера TP-Link. Идем в меню во вкладку «Network» или на русском интерфейсе «Сеть«, далее «MAC Clone» или «Клонирование Mac-адреса«.
В строке «WAN MAC Address:» или «MAC-адрес сети WAN» видим нужный MAC адрес. Копируем его, идем в личный кабинет провайдера, находим там соответствующее меню по изменению MAC-адреса, меняем. Замечу, что возможно у некоторых провайдеров нет возможности поменять адрес через личный кабинет, в этом случае звоним провайдеру на горячую линию проси поменять его.
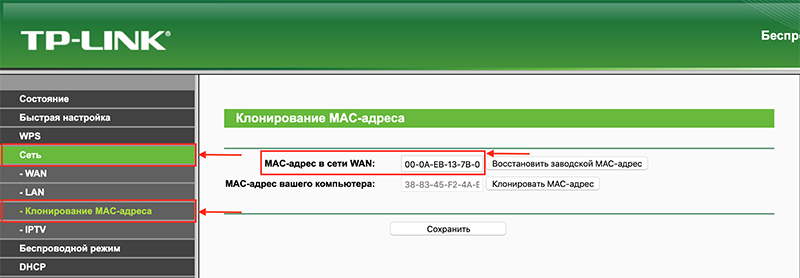
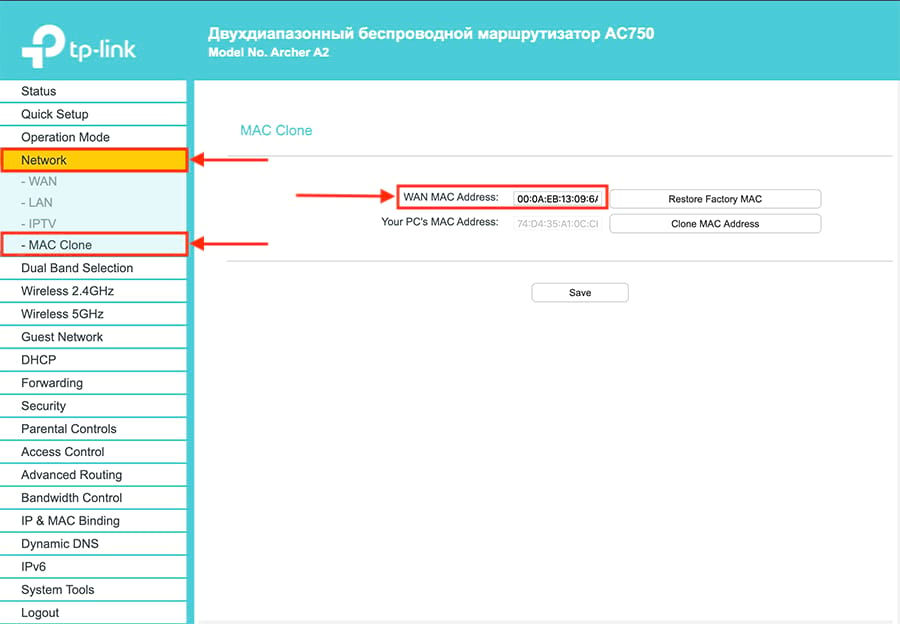
Настраиваем PPPOE
Список провайдеров с PPPOE подключением: Ростелеком (Аист, Башинформсвязь), Транстелеком (ТТК), МТС, Дом Ру, Нетбайнет, Уфанет, Megaline (Мега-Лайн).
Поделимся видео о том, как настраиваем PPPOE.
В меню Tp-Link нажимаем на вкладку «Network» или «Сеть«, попадаем в настройки «WAN«.
Правее видим «WAN Connection Type:» или «Тип подключения WAN:«, выставляем «PPPOE/Russia PPPOE» или «PPPoE/PPPoE Россия«.
Ниже пишем «User Name:» или «Имя пользователя:» и «Password:» или «Пароль:«, повторяем «Confirm Password:» или «Подтвердите пароль:«.
Откуда их взять. Они прописаны в договоре или в акте выполненных работ после подключения интернета, завели кабель в помещение, получите, распишитесь.
Если бумаги потеряны, вначале звоните на горячую линию провайдера, обычно они просят подойти в офис, так как неизвестно, кому предоставляют данные, но может повезет.
Ставим галочки «Dynamic IP» или «Динамический IP-адрес» и «Connect Automatically» или «Подключить автоматически«.
Замечу, что бывают Статические IP-адреса, они обычно прописываются у юр лиц, либо если подключена дополнительная услуга у физ лиц, если таковым являетесь ставите галочку «Static IP» или «Статический IP-адрес«, заполняете их. По умолчанию идет динамический ip адрес, поэтому оставляем как есть и идем дальше.
После внесения изменений жмем «Save» или «Сохранить«.
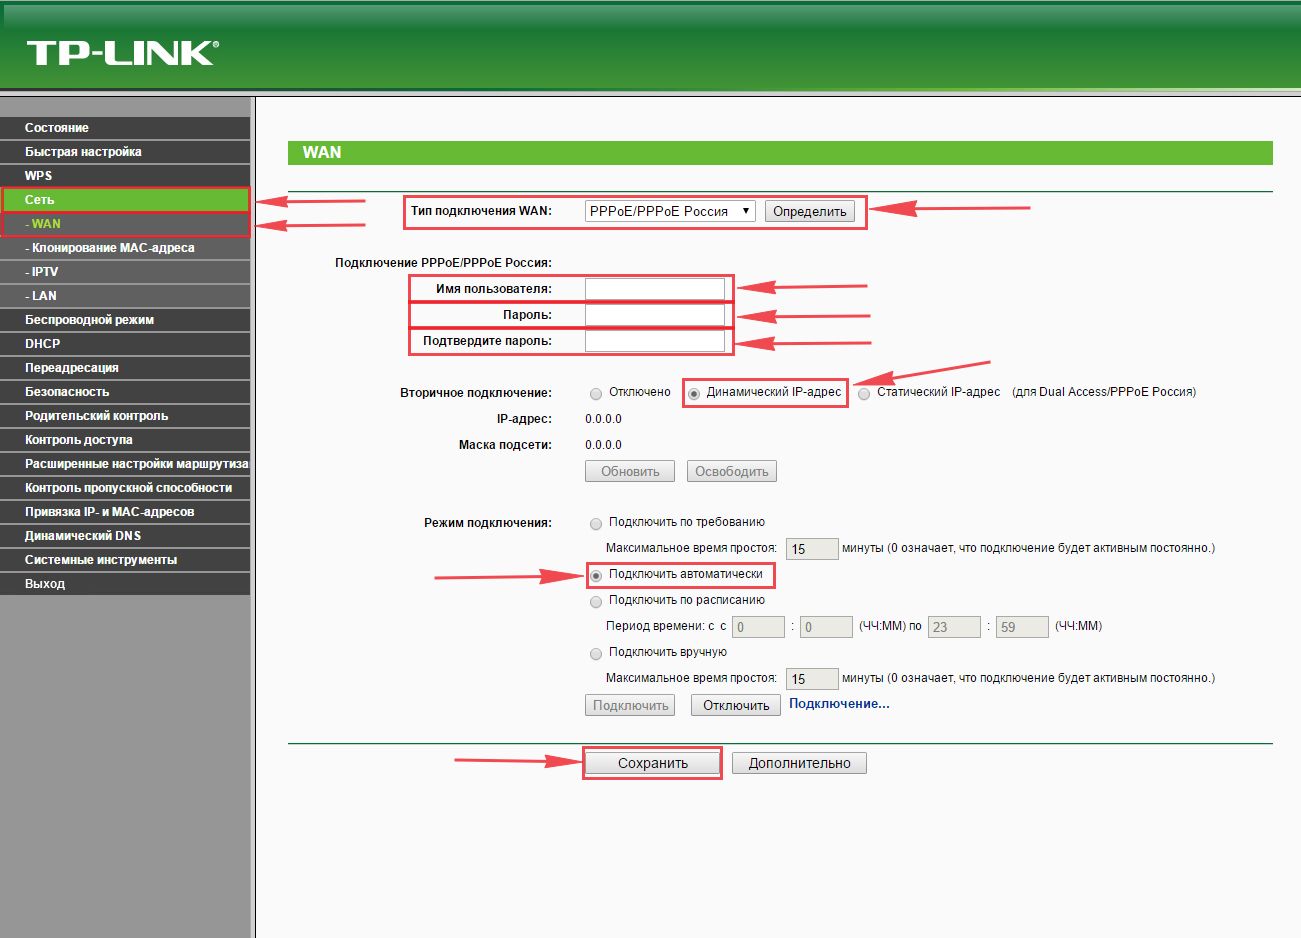
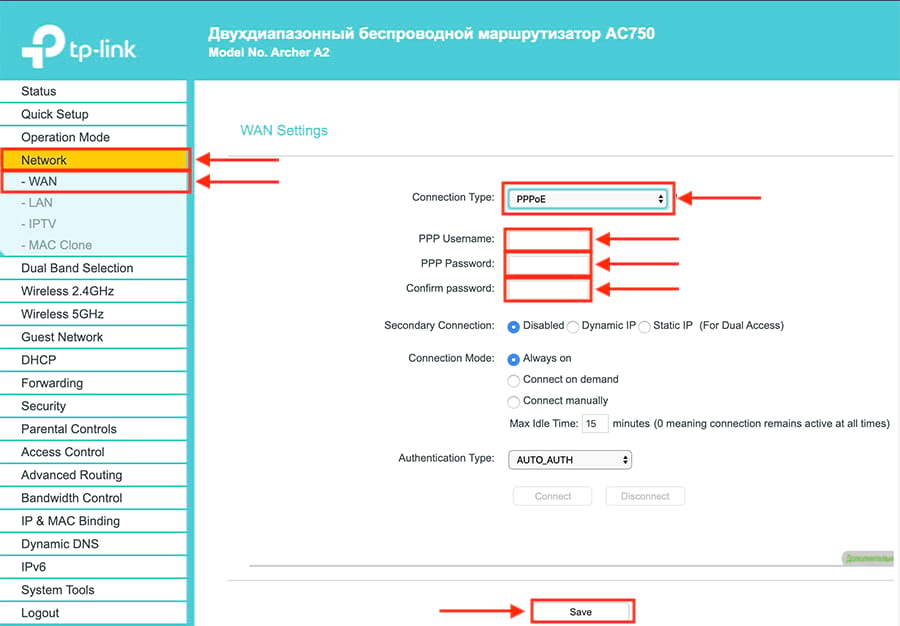
Настраиваем PPTP
Провайдер с PPTP подключением — Билайн (адрес сервера — vpn.internet.beeline.ru), Интерсвязь (адрес сервера — unlim.is74.ru).
Поделимся видео о том, как настраиваем PPTP.
В меню Tp-Link нажимаем на вкладку «Network» или «Сеть«, попадаем в настройки «WAN«.
Правее видим «WAN Connection Type:» или «Тип подключения WAN:«, выставляем «PPTP/Russia PPTP» или «PPTP/PPTP Россия«.
Ниже пишем «User Name:» или «Имя пользователя:» и «Password:» или «Пароль:«, повторяем «Confirm Password:» или «Подтвердите пароль:«. Указываем IP-адрес сервера «Server IP Address/Name:» или «IP-адрес/Имя сервера:«, например у Билайна адрес сервера — vpn.internet.beeline.ru, у Интерсвязи — unlim.is74.ru. Откуда взять эти данные? Они прописаны в договоре или в акте выполненных работ после подключения интернета, завели кабель в помещение, получите, распишитесь. Если бумаги потеряны, вначале звоните на горячую линию провайдера, обычно они просят подойти в офис, так как неизвестно, кому предоставляют данные, но может повезет.
Ставим галочки «Dynamic IP» или «Динамический IP-адрес» и «Connect Automatically» или «Подключить автоматически«.
Замечу, что бывают Статические IP-адреса, они обычно прописываются у юр лиц, либо если подключена дополнительная услуга у физ лиц, если таковым являетесь ставите галочку «Static IP» или «Статический IP-адрес«, заполняете их. По умолчанию идет динамический ip адрес, поэтому оставляем как есть и идем дальше.
После внесения изменений жмем «Save» или «Сохранить«.
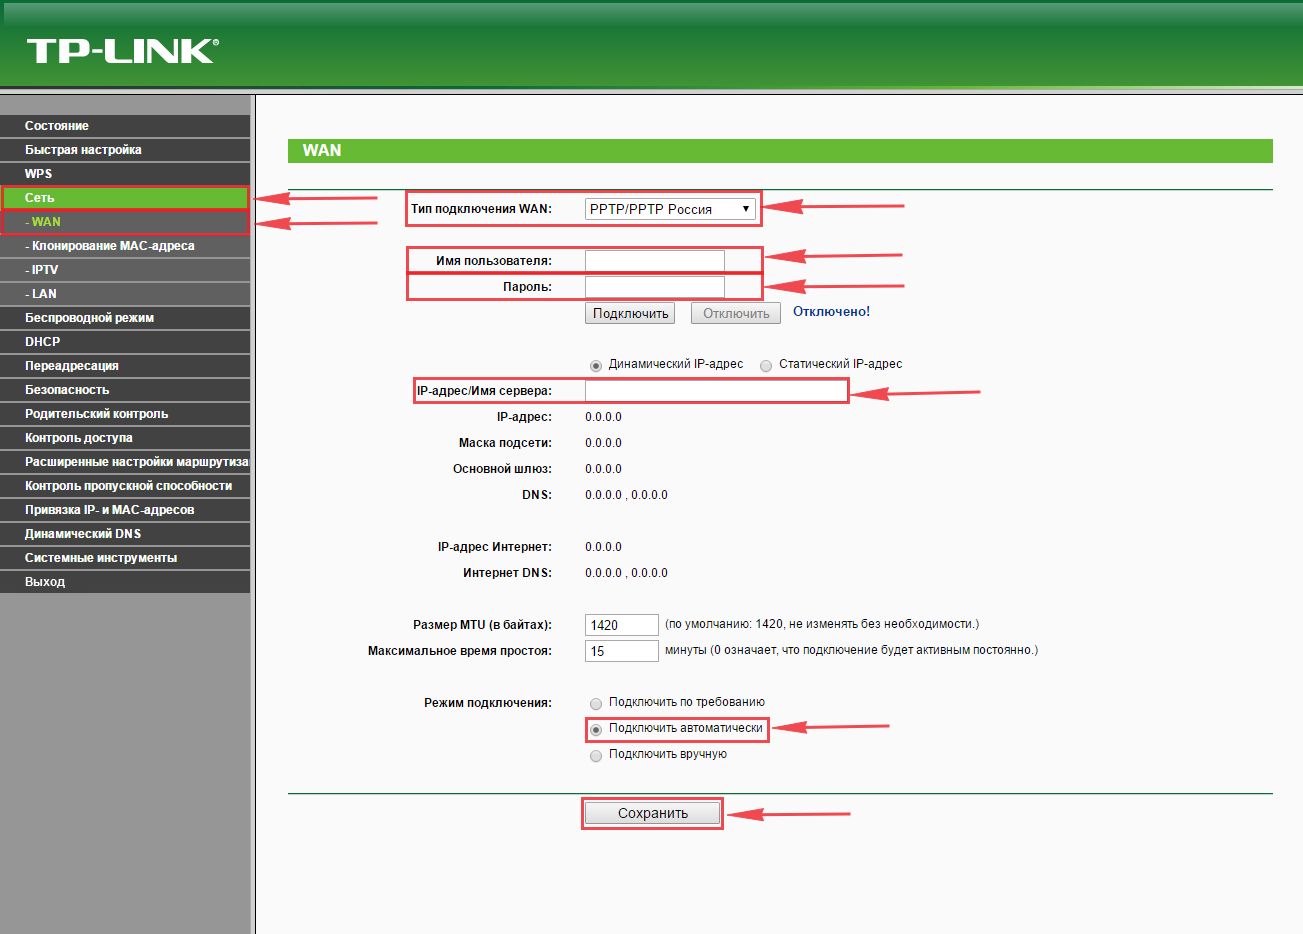
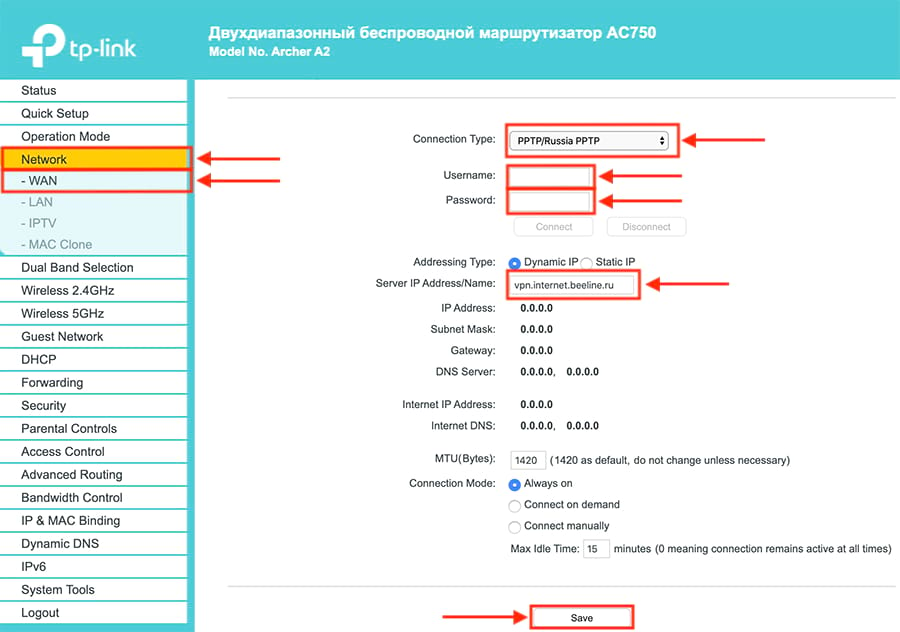
Настраиваем L2TP
Провайдер с L2TP подключением — Билайн (адрес сервера — tp.internet.beeline.ru).
В меню Tp-Link нажимаем на вкладку «Network» или «Сеть«, попадаем в настройки «WAN«.
Правее видим «WAN Connection Type:» или «Тип подключения WAN:«, выставляем «L2TP/Russia L2TP» или «L2TP/L2TP Россия«.
Ниже пишем «User Name:» или «Имя пользователя:» и «Password:» или «Пароль:«, повторяем «Confirm Password:» или «Подтвердите пароль:«. Указываем IP-адрес сервера «Server IP Address/Name:» или «IP-адрес/Имя сервера:«, например у Билайна адрес сервера — tp.internet.beeline.ru. Откуда взять эти данные? Они прописаны в договоре или в акте выполненных работ после подключения интернета, завели кабель в помещение, получите, распишитесь. Если бумаги потеряны, вначале звоните на горячую линию провайдера, обычно они просят подойти в офис, так как неизвестно, кому предоставляют данные, но может повезет.
Ставим галочки «Dynamic IP» или «Динамический IP-адрес» и «Connect Automatically» или «Подключить автоматически«.
Замечу, что бывают Статические IP-адреса, они обычно прописываются у юр лиц, либо если подключена дополнительная услуга у физ лиц, если таковым являетесь ставите галочку «Static IP» или «Статический IP-адрес«, заполняете их. По умолчанию идет динамический ip адрес, поэтому оставляем как есть и идем дальше.
После внесения изменений жмем «Save» или «Сохранить«.
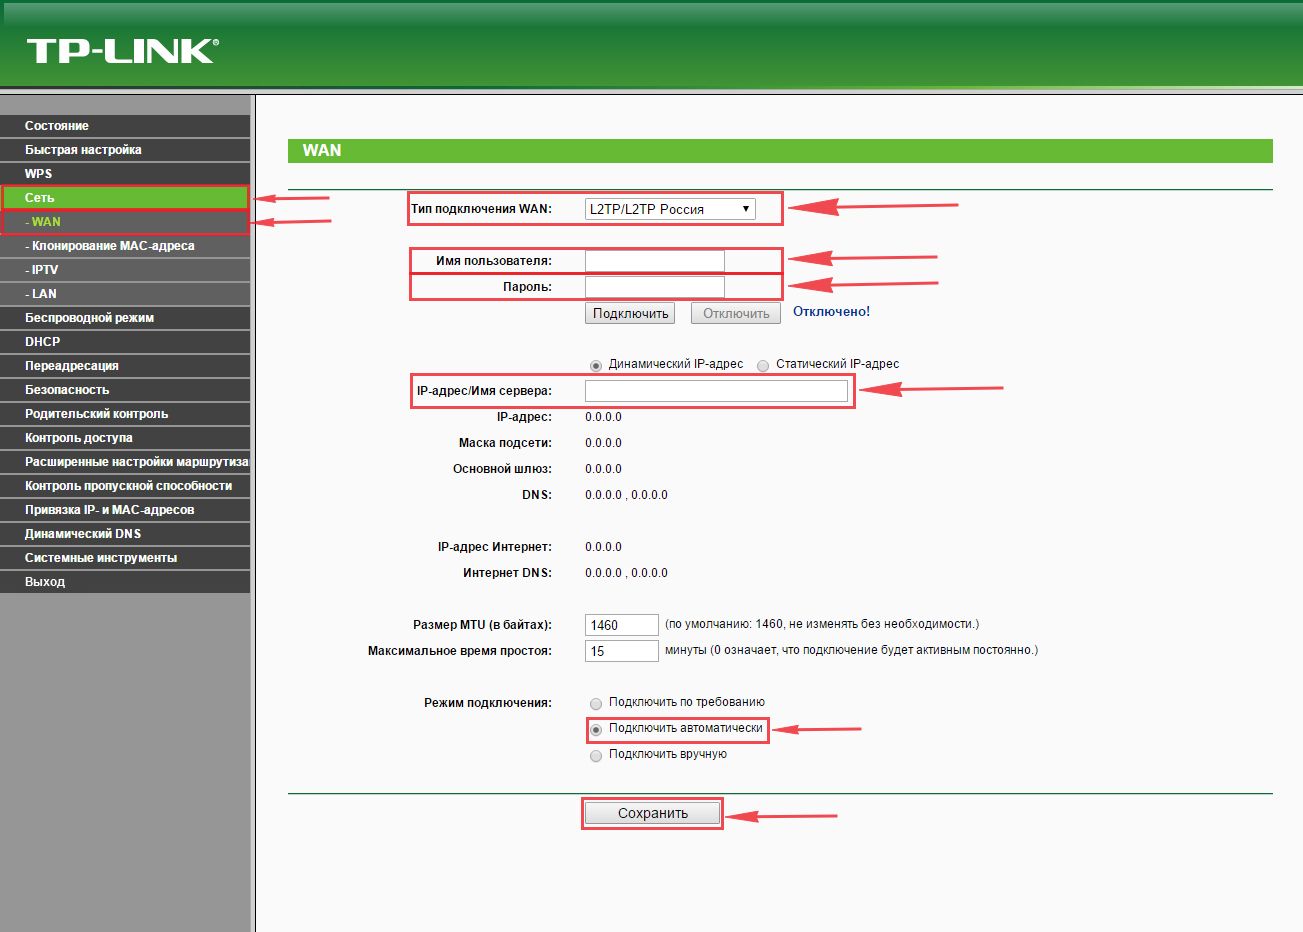
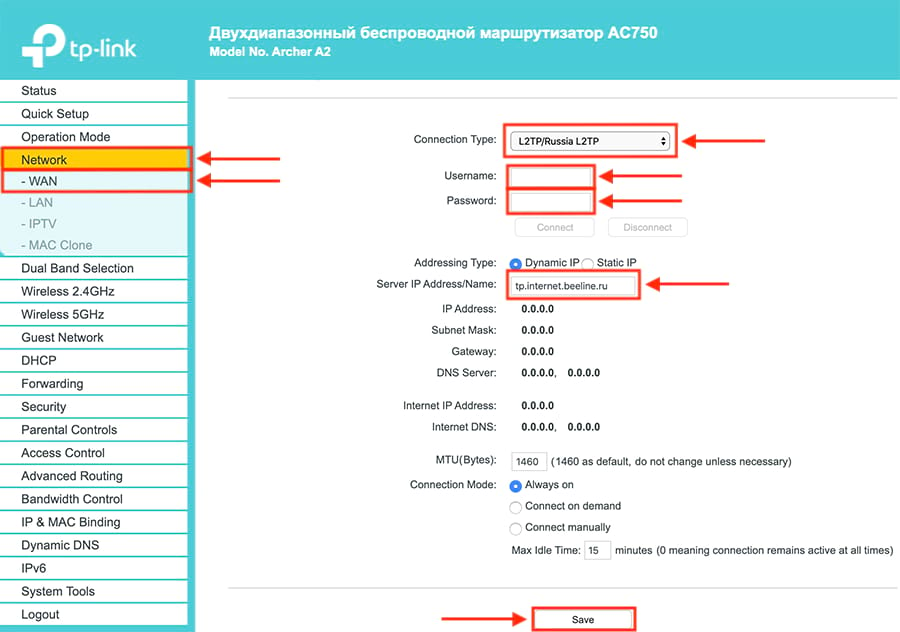
Ставим пароль на интерфейс роутера
Честно, не советовал бы ставить пароль на веб интерфейс маршрутизатор Tp-Link, то есть на страницу настроек. Многие забывают данные входа и не могут попасть на роутер, чтобы проверить настройки или перенастроить его, и появляется необходимость сбрасывать до заводских параметров. Если все таки задумали это, запишите эти данные на бумажку. Замечу что некоторые ищут информацию, как и вовсе отключить пароль при входе, сделать это невозможно.
Возвращаемся в меню, жмем на «System tools» или «Системные инструменты» на русском, переходим во вкладку «Password» или «Пароль«.
В правой стороне окна вначале заполняем прошлые учетные данные для входа в полях «Old User Name:» или «Предыдущее имя пользователя:» и «Old Password:» или «Предыдущий пароль:«
Ниже пишем новые данные в строках «New User Name:» или «Новое имя пользователя:» и «New Password:» или «Новый пароль:» повторяем «Confirm New Password:» или «Повторите Новый пароль:«, жмем «Сохранить«. Учетная запись изменена и при входе нужно будет указывать новые.
Источник
- Manuals
- Brands
- TP-Link Manuals
- Network Router
- EC220-F5
- User manual
-
Contents
-
Table of Contents
-
Bookmarks
Quick Links
User Guide
BBA Routers
© 2022 TP-Link
1910020935 REV1.0.0
Related Manuals for TP-Link EC220-F5
Summary of Contents for TP-Link EC220-F5
-
Page 1
User Guide BBA Routers © 2022 TP-Link 1910020935 REV1.0.0… -
Page 2: Table Of Contents
Quick Setup Via TP-Link Aginet App ……..
-
Page 3
8. 4. Manage the Router via the TP-Link Aginet App ……76 Chapter 9 USB Settings 9. -
Page 4
10. 1. Set Up a EasyMesh Network ……….87 10. -
Page 5
17. 7. 1. Change the Login Password……..144 17. -
Page 6: About This Guide
The Quick Installation Guide can be found where you find this guide or inside the package of the router. Specifications can be found on the product page at https://www.tp-link.com. TP-Link Community is provided for you to discuss our products and share knowledge at https://community.tp-link.com. Our Technical Support contact information can be found at the…
-
Page 7
*Maximum wireless signal rates are the physical rates derived from IEEE Standard 802.11 specifications. Actual wireless data throughput and wireless coverage are not guaranteed and will vary as a result of 1) environmental factors, including building materials, physical objects, and obstacles, 2) network conditions, including local interference, volume and density of traffic, product location, network complexity, and network overhead, and 3) client limitations, including rated performance, location, connection, quality, and client condition. -
Page 8: Chapter 1 Get To Know About Your Router
Chapter Get to Know About Your Router This chapter introduces what the router can do and shows its appearance. It chapter contains the following sections: • Product Overview • Appearance…
-
Page 9: Product Overview
1024QAM improve throughput by 4 times and dramatically increase the whole network capacity and efficiency. It’s also backwards compatible with 802.11a/b/g/n/ac. Moreover, it is simple and convenient to set up and use the TP-Link router due to its intuitive web interface and the powerful Aginet app.
-
Page 10: The Back Panel
Chapter 1 Get to Know About Your Router Some Common LEDs Explanation Status Indication The system has started up successfully. Flashing The system is starting up or the firmware is being upgraded. Do slowly not disconnect or power off your router. (Power) Flashing WPS connection is in process.
-
Page 11
Chapter 1 Get to Know About Your Router The following parts (view from left to right) are located on the back panel. Some Common Buttons and Ports Explanation Item Description Power Port For connecting the router to a power socket via the provided power adapter. Power On/Off Button Press this button to power on or off the router. -
Page 12: Chapter 2 Connect The Hardware
Chapter Connect the Hardware This chapter contains the following sections: • Position Your Router • Connect Your Router…
-
Page 13: Position Your Router
Chapter 2 Connect the Hardware Position Your Router • The product should not be located in a place where it will be exposed to moisture or excessive heat. • Place the router in a location where it can be connected to multiple devices as well as to a power source.
-
Page 14
Chapter 2 Connect the Hardware Internet 1. Connect the modem to the router’s WAN port with an Ethernet cable. 2. Turn on the modem, and then wait about 2 minutes for it to restart. 3. Connect the power adapter to the router and turn on the router. 4. -
Page 15
Chapter 2 Connect the Hardware Computer Smart Device < Settings Wi-Fi Connections are available Wi-Fi Wireless Network Connection CHOOSE A NETWORK… TP-Link_XXXX TP-Link_XXXX_5G TP-Link_XXXX Connect automatically Connect TP-Link_XXXX_5G Other… • Method 3: Use the WPS button Wireless devices that support WPS, including Android phones, tablets, and most USB network cards, can be connected to your router through this method. -
Page 16: Chapter 3 Log In To Your Router
Chapter Log In to Your Router…
-
Page 17
Chapter 3 Log In to Your Router With a web-based utility, it is easy to configure and manage the router. The web-based utility can be used on any Windows, Mac OS or UNIX OS with a Web browser, such as Microsoft Internet Explorer, Mozilla Firefox or Apple Safari. -
Page 18: Chapter 4 Set Up Internet Connection
Furthermore, you can also set up an IPv6 connection if your ISP provides IPv6 service. It contains the following sections: • Use Quick Setup Wizard • Quick Setup Via TP-Link Aginet App • Manually Set Up Your Internet Connection • Set Up the Router as an Access Point •…
-
Page 19: Use Quick Setup Wizard
Then follow the step-by-step instructions to connect your router to the internet. 3. To enjoy a more complete service from TP-Link (remote management, TP-Link DDNS, and more.), log in with your TP-Link ID or click Sign Up Now to get one.
-
Page 20: Quick Setup Via Tp-Link Aginet App
• To learn more about the TP-Link Cloud service, please refer to the TP-Link Cloud Service section. • If you do not want to register a TP-Link ID now, you may click Skip to proceed. • If you have changed the preset wireless network name (SSID) and wireless password during the Quick Setup process, all your wireless devices must use the new SSID and password to connect to the router.
-
Page 21: Manually Set Up Your Internet Connection
ISP. Follow the steps below to check or modify your internet connection settings. 1. Visit http://tplinkwifi.net or http://192.168.0.1, and log in with your TP-Link ID or the password you set for the router. 2. Go to Basic >…
-
Page 22
Chapter 4 Set Up Internet Connection 4 ) If you choose L2TP, enter the username password and choose the Secondary Connection provided by your ISP. Different parameters are needed according to the Secondary Connection you have chosen. 5 ) If you choose PPTP, enter the username and password, and choose the Secondary Connection… -
Page 23: Set Up The Router As An Access Point
The router can work as an access point, transforming your existing wired network to a wireless one. 1. Visit http://tplinkwifi.net or http://192.168.0.1, and log in with your TP-Link ID or the password you set for the router. 2. Go to Advanced >…
-
Page 24: Set Up An Ipv6 Internet Connection
Your ISP provides information about one of the following IPv6 internet connection types: PPPoE(SLAAC/DHCPv6/AUTO/Passthrough), Dynamic IP(SLAAC/DHCPv6/ AUTO/Passthrough), Static IP. 1. Visit http://tplinkwifi.net or http://192.168.0.1, and log in with your TP-Link ID or the password you set for the router. 2. Go to Advanced >…
-
Page 25
Chapter 4 Set Up Internet Connection Dynamic IP(SLAAC/DHCPv6/AUTO/Passthrough): Click Advanced to input further information if your ISP requires. Click OK. -
Page 26
Chapter 4 Set Up Internet Connection PPPOE(SLAAC/DHCPv6/AUTO/Passthrouth): Click Advanced to input further information if your ISP requires. Click OK. -
Page 27
Chapter 4 Set Up Internet Connection 5. Configure LAN ports. Go to Advanced > Network > Settings. Fill in Site Prefix Type provided by your ISP, and click Save. 6. Click Advanced > Status to check whether you have successfully set up an IPv6 connection. -
Page 28: Ipv6 Tunnel
IPv6 and IPv4 run independently. 1. Visit http://tplinkwifi.net or http://192.168.0.1, and log in with your TP-Link ID or the password you set for the router. 2. Go to Advanced >…
-
Page 29
Chapter 4 Set Up Internet Connection 6rd: Fill in blanks and click OK. Select this tunneling mechanism if your ISP uses 6rd deployment for assigning address. 6to4: Fill in blanks and click OK. Select this tunneling mechanism if your ISP uses 6to4 deployment for assigning address. -
Page 30
Chapter 4 Set Up Internet Connection… -
Page 31: Chapter 5 Setup Your Network Via Tp-Link Aginet App
Setup Your Network via TP-Link Aginet App This chapter guides you on how to setup your router and mesh device via TP-Link Aginet app, as well as regulatory information. Features available in Aginet app may vary by model and software version. Aginet app availability may also vary by region or ISP.
-
Page 32: Set Up Your Router
Install the app on your Android or iOS smartphone or tablet. 2 Log in or sign up with TP-Link ID. Open the Aginet app. Use your TP-Link ID to log in. If you don’t have a TP-Link ID, tap Don’t have an account? and sign up first.
-
Page 33
Chapter 5 Setup Your Network via TP-Link Aginet App 4 Select a location. Select a location for this router. If its location is not listed, you can create a new one by choosing Custom. This will be the name of your router. -
Page 34
Chapter 5 Setup Your Network via TP-Link Aginet App 6 Create your Wi-Fi network. Set a network name and a password. These will be the name and password you use to connect your routers to Wi-Fi. 7 Connect to your Wi-Fi network. -
Page 35: Dashboard
Chapter 5 Setup Your Network via TP-Link Aginet App 8 Setup complete. Your network is now up. Connect all devices to the network. You can also Add Agent expand the Wi-Fi coverage. Dashboard After you successfully set up your mesh network, you will see the dashboard of the Aginet app.
-
Page 36
Chapter 5 Setup Your Network via TP-Link Aginet App to create family profiles. for more features. -
Page 37: Add More Mesh Devices
Chapter 5 Setup Your Network via TP-Link Aginet App Add More Mesh Devices After creating a mesh network, you can add more mesh devices to the network to expand the Wi-Fi coverage and manage them easily on your Aginet app.
-
Page 38: Check Mesh Device Status
Chapter 5 Setup Your Network via TP-Link Aginet App Check Mesh Device Status In Network, you can check the working status (online/offline) of all the mesh devices, check the details (speed/mesh device’s IP address & MAC address/connected clients) of each mesh device, change the mesh device’s location/name, and more.
-
Page 39
Chapter 5 Setup Your Network via TP-Link Aginet App 2. Tap a mesh device to check more details. 3. Check download/upload speed of the mesh device. -
Page 40
Chapter 5 Setup Your Network via TP-Link Aginet App 4. Tap and change or customize the location/name of the mesh device. 5. Check the clients connected to the mesh device. -
Page 41: Remove/Reboot Mesh Devices
Chapter 5 Setup Your Network via TP-Link Aginet App 6. Tap the client’s name. Change or customize client’s information. Remove/Reboot Mesh Devices You can reset your mesh device to factory default settings or reboot your mesh device to clear cache and enhance running performance easily in the Aginet app. Follow the steps below.
-
Page 42: Manage Connected Devices
Chapter 5 Setup Your Network via TP-Link Aginet App Note: If the LED light of mesh device does not turn flashing blue after tapping Remove, press and hold the Reset button for at least 5 second to reset it. Manage Connected Devices In Network, you can mange your connected devices easily, such as changing the device name and type.
-
Page 43: Create A New Network
Setup Your Network via TP-Link Aginet App Create a New Network In the Aginet app, you can create different mesh networks with your TP-Link ID and manage them conveniently from the Aginet app with one account. You can also help family or friends manage their networks with your Aginet app.
-
Page 44: Parental Controls
Chapter 5 Setup Your Network via TP-Link Aginet App 2. Then follow app instructions to complete the setup. Parental Controls Parental Controls helps you set time limits and filter content to flexibly control your kids when they’re online. 1. In Family, tap Create a Profile.
-
Page 45: Wi-Fi Settings
Chapter 5 Setup Your Network via TP-Link Aginet App Wi-Fi Settings You can change the network name and password of your main network at any time and share the network easily with family and friends. 1. In More, Tap Wi-Fi Settings.
-
Page 46: Guest Network
Chapter 5 Setup Your Network via TP-Link Aginet App 5 10 Guest Network You can create and share a separate network for guests to guarantee the security and privacy of your main network. 1. In More, Tap Guest Network. 2. Set a Wi-Fi name and password for the guest network.
-
Page 47: Internet Connection
Chapter 5 Setup Your Network via TP-Link Aginet App 5 11 Internet Connection In Internet Connection, You can modify WAN settings (IPv4 & IPv6), enable MAC Clone mode. 1. In More, Tap Internet Connection. 2. View IPv4 details or change the internet connection type.
-
Page 48
Chapter 5 Setup Your Network via TP-Link Aginet App 3. Enable IPv6 to set up an IPv6 internet connection. -
Page 49: Block List
Chapter 5 Setup Your Network via TP-Link Aginet App 4. Tap Advanced and enable MAC Clone as needed. Tip: For more about MAC Clone, refer to https://www.tp-link.com/support/faq/2925/ 5 12 Block List Add devices to the block list to prevent the devices from accessing your network, ensuring the safety of your personal information shared in the network.
-
Page 50: Upgrade Your Router
5 13 Upgrade Your Router TP-Link is dedicated to improving product features and providing a better customer experience. An up-to-date firmware provides better and more stable network performance. Always update your router to the latest firmware version when prompted in the Aginet app.
-
Page 51: Advanced Features
5 14 Advanced Features Additional features are available under the Advanced menu. You can control mesh device’s LED, enable reboot schedule, bind your TP-Link ID, change the operation mode, configure system settings. 1. In More, Tap Control.
-
Page 52
Chapter 5 Setup Your Network via TP-Link Aginet App 2. Toggle off to turn off the light on mesh device. Configure the LED Off Time turn off the LED light at bedtime only. 3. Enable Reboot Schedule as needed. -
Page 53
Chapter 5 Setup Your Network via TP-Link Aginet App 4. Bind your TP-Link 5. Change the Operation Mode as needed. -
Page 54
Chapter 5 Setup Your Network via TP-Link Aginet App… -
Page 55: Chapter 6 Customize Your Network Settings
Chapter Customize Your Network Settings This chapter introduces how to change the default settings or adjust the basic configuration of the router using the web management page. It contains the following sections: • Configure LAN Settings • Configure IPv6 LAN Settings •…
-
Page 56: Configure Lan Settings
Chapter 6 Customize Your Network Settings Configure LAN Settings 6 1 1 Change the LAN IP Address The router is preset with a default LAN IP 192.168.0.1, which you can use to log in to its web management page. The LAN IP address together with the Subnet Mask also defines the subnet that the connected devices are on.
-
Page 57: Use The Router As A Dhcp Server
Chapter 6 Customize Your Network Settings 6 1 2 Use the Router as a DHCP Server You can configure the router to act as a DHCP server to assign IP addresses to its clients. To use the DHCP server function of the router, you must configure all computers on the LAN to obtain an IP Address automatically.
-
Page 58: Reserve Lan Ip Addresses
Chapter 6 Customize Your Network Settings 6 1 3 Reserve LAN IP Addresses You can view and add a reserved address for a client. When you specify an IP address for a device on the LAN, that device will always receive the same IP address each time when it accesses the DHCP server.
-
Page 59: Configure The Radvd Address Type
Chapter 6 Customize Your Network Settings 6 2 1 Configure the RADVD Address Type Visit http://tplinkwifi.net or http://192.168.0.1, and log in with the password you set for the router. Go to Advanced > Network > Settings. Select IPv6 to configure IPv6 LAN parameters. 1 ) Select RADVD as the address type to make the router assign IPv6 address…
-
Page 60: Set Up A Dynamic Dns Service Account
Note: DDNS does not work if the ISP assigns a private WAN IP address (such as 192.168.1.x) to the router. To set up DDNS, please follow the instructions below: Visit http://tplinkwifi.net or http://192.168.0.1, and log in with the password you set for the router. Go to Advanced > Network > Dynamic DNS. Select the Service Provider (TP-Link/Dyndns/NO-IP).
-
Page 61: Create Static Routes
Chapter 6 Customize Your Network Settings Log in with your DDNS account, select a service provider. Enter the username, password and domain name of the account (such as lisa.ddns.net). Click Log in and Save. Tips: If you want to use a new DDNS account, please log out first, then log in with the new account. Create Static Routes A static route is a pre-determined path that network information must travel to reach a specific host or network.
-
Page 62
Chapter 6 Customize Your Network Settings Router A Router B Company’s Server WAN: 172.30.30.100 LAN: 192.168.0.1 LAN: 192.168.0.2 172.30.30.1 Switch My PC 192.168.0.100 How can I 1 Make sure the routers use different LAN IP addresses on the do that? same subnet. -
Page 63
Chapter 6 Customize Your Network Settings • Network Destination: The destination IP address that you want to assign to a static route. This IP address cannot be on the same subnet with the WAN IP or LAN IP of the Router A. In the example, the IP address of the company network is the destination IP address, so here we enter 172.30.30.1. -
Page 64: Rip Settings
‘Enabled’ checkbox. To stop RIP on the WAN Interface, uncheck the ‘Enabled’ checkbox. Click the ‘Save’ button to start/stop RIP and save the configuration. 1. Visit http://tplinkwifi.net or http://192.168.0.1, and log in with your TP-Link ID or the password you set for the router. 2. Go to Advanced >…
-
Page 65: Specify Wireless Settings
Chapter 6 Customize Your Network Settings Specify Wireless Settings 6 6 1 Change Basic Wireless Settings The router’s wireless network name (SSID) and password, and security option are preset in the factory. The preset SSID and password can be found on the product label. You can customize the wireless settings according to your needs.
-
Page 66
Chapter 6 Customize Your Network Settings Select the wireless network mode or channel and click Save to make the settings effective. Mode: Select the desired transmission mode. • 802.11b/g/n mixed: Select if you are using a mix of 802.11b, 11g, and 11n wireless clients. -
Page 67: Advanced Wireless Settings
Chapter 6 Customize Your Network Settings Click Save to make the settings effective. ¾ To enable network roaming: Network roaming helps devices choose better AP based on actual conditions to balance network demands. Go to Advanced > Wireless > Wireless Settings.
-
Page 68
Chapter 6 Customize Your Network Settings • RTS Threshold: Enter a value between 1 and 2347 to determine the packet size of data transmission through the router. By default, the RTS (Request to Send) Threshold size is 2347. If the packet size is greater than the preset threshold, the router sends Request to Send frames to a particular receiving station and negotiates the sending of a data frame, or else the packet will be sent immediately. -
Page 69
Chapter 6 Customize Your Network Settings ¾ To create multi-SSID network: The router supports additional up to three multi-SSID wireless networks for client access in each wireless band. You can specify the access and security settings to ensure network security and privacy according to your situation. Visit http://tplinkwifi.net or http://192.168.0.1, and log in with the password you set… -
Page 70: View Wireless Information
Chapter 6 Customize Your Network Settings 3 ) Enter a new Network Name (SSID) or use the default name, this field is case sensitive. Don‘t select Hide SSID unless you want your guests to manually input the SSID for Wi-Fi access. 4 ) Select the Security option for the multi-SSID network,…
-
Page 71: Schedule Your Wireless Function
Chapter 6 Customize Your Network Settings Tips: You can also see the wireless details by clicking the router icon on Basic> Network Map. ¾ To view the detailed information of the connected wireless clients: Visit http://tplinkwifi.net or http://192.168.0.1, and log in with the password you set for the router.
-
Page 72: Use Wps For Wireless Connection
Chapter 6 Customize Your Network Settings Click to set the Wireless Off Time, and click Save to make the settings effective. Note: 1. Make sure that the time of the router is correct before using this function. For details, refer to Set System Time.
-
Page 73
Chapter 6 Customize Your Network Settings When the WPS LED is on, the client device has successfully connected to the router. Method 2: Use the “Connect” button on the web management page Use this method if your client device has a WPS button. Visit http://tplinkwifi.net or http://192.168.0.1, and log in with the password you set… -
Page 74
Chapter 6 Customize Your Network Settings When the WPS LED is on, the client device has successfully connected to the router. Note: 1. The WPS LED on the router will light on for five minutes if the device has been successfully added to the network. 2. -
Page 75: Chapter 7 Multi-Ssid
Chapter Multi-SSID Multi-SSID function allows you to provide Wi-Fi access for your visitors without disclosing your main network. When you have guests in your house, apartment, or workplace, you can create a multi-SSID wireless network for them. In addition, you can customize the network settings to ensure your network security and privacy.
-
Page 76
Chapter 7 Multi-SSID ¾ To create a multi-SSID network: 1. Visit http://tplinkwifi.net or http://192.168.88.1, and log in with the password you set for the AP. 2. Go to Basic > Multi-SSID Advanced > Wireless > Multi-SSID. 3. Create the multi-SSID network as needed. 1 ) Select the Enable check box to create the corresponding multi-SSID network. -
Page 77: Chapter 8 Tp-Link Cloud Service
TP-Link Cloud service provides a better way to manage your cloud devices. Log in to your router with a TP-Link ID, and you can easily monitor and manage your home network when you are out and about via the Aginet app. To ensure that your router stays new and gets better over time, the TP-Link Cloud will notify you when an important firmware upgrade is available.
-
Page 78: Register A Tp-Link Id
Manage the User TP-Link IDs. • Once you have registered a TP-Link ID on the web management page, you can only register another TP-Link ID via the Aginet APP. Please refer to Manage the Router via the TP-Link Aginet App to install the app.
-
Page 79: Manage The User Tp-Link Ids
Password. 2. Enter the current password, then a new password twice. And click Save. Manage the User TP-Link IDs The TP-Link ID used to log in to the router for the first time will be automatically bound as the Admin…
-
Page 80: Add Tp-Link Id To Manage The Router
3. Click , enter another TP-Link ID as needed and click Save. Note: If you need another TP-Link ID, please register a new one via the Aginet app. Refer to Manage the Router via the TP-Link Aginet App to install the app and register a new TP-Link ID.
-
Page 81: Manage The Router Via The Tp-Link Aginet App
5. Manage your router as needed. Note: If you need to remotely access your router from your smart devices, you need to: • Log in with your TP-Link ID. If you don’t have one, refer to Register a TP-Link • Make sure your smartphone or tablet can access the internet with cellular data or a Wi-Fi network.
-
Page 82: Chapter 9 Usb Settings
Chapter USB Settings This chapter describes how to use the USB ports to share files and media from the USB storage devices over your home network locally, or remotely through the internet. The router supports USB external flash drives and hard drives. It contains the following sections: •…
-
Page 83: Access The Usb Storage Device
Chapter 9 USB Settings Access the USB Storage Device Insert your USB storage device into the router’s USB port and then access files stored there locally or remotely. Tips: • If you use USB hubs, make sure no more than 4 devices are connected to the router. •…
-
Page 84: Access The Usb Device Remotely
Chapter 9 USB Settings • Method 2: Open the Windows Explorer (or go to Computer) and type the server address \tplinkwifi.net ftp://tplinkwifi.net in the address bar, then press Enter. Windows computer 1 ) Select > Connect to Server. 2 ) Type the server address smb://tplinkwifi.net. 3 ) Click Connect.
-
Page 85
Follow the steps below to configure remote access settings. Visit http://tplinkwifi.net or http://192.168.0.1, and log in with your TP-Link ID or the password you set for the router. Go to Advanced >… -
Page 86: Customize The Access Settings
Visit http://tplinkwifi.net or http://192.168.0.1, and log in with your TP-Link ID or the password you set for the router. Go to Advanced >…
-
Page 87
Chapter 9 USB Settings Now you can access the USB storage device by visiting \MyShare (for Windows) or smb://MyShare (for Mac). • To Set Up Authentication for Data Security You can set up authentication for your USB storage device so that network clients will be required to enter username and password when accessing the USB storage device. -
Page 88: Media Sharing
USB storage device directly from DLNA-supported devices, such as your computer, tablet and PS2/3/4. Visit http://tplinkwifi.net or http://192.168.0.1, and log in with your TP-Link ID or the password you set for the router. Go to Advanced >…
-
Page 89: 3G/4G Settings
Time Machine backs up all files on your Mac computer to a USB storage device connected to your router. Visit http://tplinkwifi.net or http://192.168.0.1, and log in with your TP-Link ID or the password you set for the router. Go to Advanced >…
-
Page 90
Chapter 9 USB Settings Tick the checkbox to enable 3G/4G as a backup solution for Internet access. Tick the checkbox to set the Dial Number, APN, Username and Password manually. Note: The following Advanced settings will only display if you enable 3G/4G as the backup solution for Internet access. Click Save. -
Page 91: Chapter 10 Easymesh With Seamless Roaming
Chapter EasyMesh with Seamless Roaming This chapter introduces the TP-Link EasyMesh feature. It contains the following sections: • Set Up a EasyMesh Network • Manage Devices in the EasyMesh Network…
-
Page 92: Set Up A Easymesh Network
Aginet app or at your router’s web management page. 10 1 Set Up a EasyMesh Network 1. Visit http://tplinkwifi.net or http://192.168.0.1, and log in with your TP-Link ID or the password you set for the router. 1. Go to Basic >…
-
Page 93
The agent will be listed on the controller’s Mesh page. Note: To check full list of TP-Link EasyMesh devices, visit https://www.tp-link.com. 3. If you have set up the agent to join the EasyMesh network, it will be listed on the controller’s EasyMesh page. -
Page 94: Manage Devices In The Easymesh Network
• To view mesh devices and connected clients in the network: 1. Visit http://tplinkwifi.net or http://192.168.0.1, and log in with your TP-Link ID or the password you set for the router. 2. Go to Basic >…
-
Page 95
Chapter 10 EasyMesh with Seamless Roaming • To manage a EasyMesh device in the network: 1. Visit http://tplinkwifi.net or http://192.168.0.1, and log in with your TP-Link ID or the password you set for the router. 2. Go to Basic > Network Map. -
Page 96: Chapter 11 Guest Network
Chapter Guest Network This function allows you to provide Wi-Fi access for guests without disclosing your main network. When you have guests in your house, apartment, or workplace, you can create a guest network for them. In addition, you can customize guest network options to ensure network security and privacy.
-
Page 97: Create A Network For Guests
Chapter 11 Guest Network 11 1 Create a Network for Guests 1. Visit http://tplinkwifi.net or http://192.168.0.1, and log in with your TP-Link ID or the password you set for the router. 2. Go to Advanced > Guest Network. Locate the Wireless section.
-
Page 98
Chapter 11 Guest Network • Allow guests to see each other Tick this checkbox if you want to allow the wireless clients on your guest network to communicate with each other via methods such as network neighbors and Ping. 4. Click Save. Now you can ensure network security and privacy! -
Page 99: Chapter 12 Nat Forwarding
The TP-Link router supports four forwarding rules. If two or more rules are set, the priority of implementation from high to low is Port Forwarding, Port Triggering, UPNP and DMZ.
-
Page 100: Alg
SIP ALG. Visit http://tplinkwifi.net or http://192.168.0.1, and log in with your TP-Link ID or the password you set for the router. Go to Advanced >…
-
Page 101
Chapter 12 NAT Forwarding 4. Click View Existing Applications to select a service from the list to automatically populate the appropriate port number in the External Port Internal Port fields. If the service is not listed, enter the External Port number (e.g. 21) or a range of ports (e.g. -
Page 102: Open Ports Dynamically By Port Triggering
Zone, Dialpad and Quick Time 4 players, etc. Follow the steps below to configure the Port Triggering rules: 1. Visit http://tplinkwifi.net or http://192.168.0.1, and log in with your TP-Link ID or the password you set for the router. 2. Go to Advanced >…
-
Page 103
Chapter 12 NAT Forwarding 3. Click View Existing Applications, and select the desired application. The Triggering Port, Triggering Protocol External Port will be automatically filled in. The following picture takes application MSN Gaming Zone as an example. 4. Click OK. -
Page 104: Make Applications Free From Port Restriction By Dmz
How can I do that? 1 Assign a static IP address to your PC, for example 192.168.0.100. 1 Visit http://tplinkwifi.net or http://192.168.0.1, and log in with your TP-Link ID or the password you set for the router. 2 Go to Advanced >…
-
Page 105: Make Xbox Online Games Run Smoothly By Upnp
Therefore, you can play Xbox online games without a hitch. INTERNET If necessary, you can follow the steps to change the status of UPnP. 1. Visit http://tplinkwifi.net or http://192.168.0.1, and log in with your TP-Link ID or the password you set for the router.
-
Page 106
Chapter 12 NAT Forwarding 2. Go to Advanced > NAT Forwarding > UPnP and toggle on or off according to your needs. -
Page 107: Chapter 13 Parental Controls
Chapter Parental Controls This function allows you to block inappropriate, explicit and malicious websites, and control access to specified websites at specified time.
-
Page 108
For example, I want to allow my children’s devices (e.g. a computer or a tablet) to access only www.tp-link.com and Wikipedia.org from 18:00 (6 PM) to 22:00 (10 PM) on the weekdays and not other time. How can I 1 Visit http://tplinkwifi.net… -
Page 109
Chapter 13 Parental Controls 5 (Optional) Delete items from the Filter Content list, add items from the Available Categories list, or click Add a New Keyword to add a filter keyword (for example, “Facebook”) or URL. 6 Enable Time Limits for Mon to Fri and Sat & Sun, then set the daily internet time allowed. -
Page 110
Chapter 13 Parental Controls 7 Click Save. Done! Now you can control your children’s internet access as needed. Tips: • To monitor internet usage of a family member: 1. Find the profile of the family member, then click the Insights icon. 2. -
Page 111
Chapter 13 Parental Controls • To pause or resume internet access of a family member: Find the profile of the family member, then click the Pause/Play icon. -
Page 112: Chapter 14 Quality Of Service
Chapter Quality of Service This function allows you to specify the priority of traffic and minimizes the impact of network congestion.
-
Page 113
Quality of Service Chapter 14 The router allows you to configure the quality of service (QoS) for optimal throughput and performance when handling differentiated wireless traffic, such as Voiceover-IP (VoIP), other types of audio, video, streaming media, and traditional IP data. To configure QoS on the routers, you should set parameters on the transmission queues for different types of wireless traffic. -
Page 114
Quality of Service Chapter 14 (Optional) Enable IPTV QoS, then set the priority and reserved bandwidth of IPTV traffic. (Optional) Click Advanced and arrange the sliders to set the bandwidth percentage of each priority. -
Page 115
Quality of Service Chapter 14 Click Save to make the settings effective. To set up QoS for a specific device: 1 Visit http://tplinkwifi.net or http://192.168.88.1, and log in with the password you set for the router. 2 Go to Advanced >… -
Page 116
Quality of Service Chapter 14 4 In the QoS Rule window, click scan and click to choose a device, then click OK to add it to the rule. -
Page 117: Chapter 15 Network Security
Chapter Network Security This chapter guides you on how to protect your home network from unauthorized users by implementing network security functions. You can block or allow specific client devices to access your wireless network using MAC Filtering, or using Access Control for wired and wireless networks, or you can prevent ARP spoofing and ARP attacks by using IP &…
-
Page 118: Firewall & Dos Protection
Network Security Chapter 15 15 1 Firewall & DoS Protection The SPI (Stateful Packet Inspection) Firewall and DoS (Denial of Service) Protection protect the router from cyber attacks. The SPI Firewall can prevent cyber attacks and validate the traffic that is passing through the router based on the protocol.
-
Page 119: Service Filtering
Network Security Chapter 15 2. The protection will be triggered immediately when the number of packets exceeds the preset threshold value, and the vicious host will be displayed in the Blocked DoS Host List. 15 2 Service Filtering With Service Filtering, you can prevent certain users from accessing the specified service, and even block internet access completely.
-
Page 120: Access Control
Network Security Chapter 15 Select a Service Type from the drop-down list and the following four fields will be automatically filled in. Select Custom when your desired service type is not listed, and enter the information manually. Specify the IP address(es) that this filtering rule will apply to. Click Save to make the settings effective.
-
Page 121
Network Security Chapter 15 3 Select the access mode to either block (recommended) or allow the device(s) to access your network. To block specific device(s): 1 ) Select Blacklist and click Save. 2 ) Select the device(s) to be blocked in the Online Devices table (or click the under the… -
Page 122: Ip & Mac Binding
Network Security Chapter 15 3 ) Enter the Device Name Address. (You can copy and paste the information from Online Devices table if the device is connected to your network.) 4 ) Click Save. Done! Now you can block or allow specific client devices to access your network (via wired or wireless) by Blacklist or Whitelist.
-
Page 123
Network Security Chapter 15 3 Bind your device(s) according to your needs. To bind the connected device(s): 1 ) Select the device(s) to be bound in the List. 2 ) Click Bind to add to the Binding List. To bind the unconnected device: 1 ) Click in the Binding List… -
Page 124: Ipv6 Firewall
Network Security Chapter 15 15 5 IPv6 Firewall IPv6 Firewall protects your IPv6 network by preveting access from the internet. However, when you are hosting a service, such as a file sharing server in your local network, you can choose to allow access to the server from the internet by adding entries on this page.
-
Page 125
Network Security Chapter 15 Select the local host device running the service. Enter its global IPv6 address in the Global IPv6 Address field. Select a protocol for the service from the drop-down list. Select Enable This Entry. Click OK. Tips: •… -
Page 126: Chapter 16 Vpn Server&Client
Chapter VPN Server&Client The router offers several ways to set up VPN connections: VPN Server allows remote devices to access your home network in a secured way through the internet. The router supports three types of VPN Server: OpenVPN is somewhat complex but with higher security and more stability, suitable for restricted environments such as campus network and company intranet.
-
Page 127: Use Openvpn To Access Your Home Network
Router (VPN Server) Remote Devices Step1 Set up OpenVPN Server on Your Router 1. Visit http://tplinkwifi.net or http://192.168.0.1, and log in with your TP-Link ID or the password you set for the router. 2. Go to Advanced > > OpenVPN, and tick the box of Enable VPN Server.
-
Page 128: Use Pptp Vpn To Access Your Home Network
PPTP VPN connection. Step 1 Set up PPTP VPN Server on Your Router 1. Visit http://tplinkwifi.net or http://192.168.0.1, and log in with your TP-Link ID or the password you set for the router. 2. Go to Advanced >…
-
Page 129
Chapter 16 VPN Server&Client Note: Before you enable Server, we recommend you configure Dynamic DNS Service (recommended) or assign a static IP address for router’s WAN port and synchronize your System Time with internet. 3. In the Client IP Address field, enter the range of IP addresses (up to 10) that can be leased to the devices by the PPTP VPN server. -
Page 130
Chapter 16 VPN Server&Client 3. Select Connect to a workplace and click Next. 4. Select Use my Internet connection (VPN). -
Page 131
Chapter 16 VPN Server&Client 5. Enter the internet IP address of the router (for example: 218.18.1.73) in the Internet address field. Click Next. 6. Enter the User name Password you have set for the PPTP VPN server on your router, and click Connect. -
Page 132: Use Ipsec Vpn To Access Your Home Network
Chapter 16 VPN Server&Client 7. Click Connect Now when the VPN connection is ready to use. 16 3 Use IPSec VPN to Access Your Home Network IPSec VPN Server is used to create a IPSec VPN connection for remote devices to access your home network.
-
Page 133
Router (VPN Server) Remote Devices Step 1 Set up IPSec VPN Server on Your Router 1. Visit http://tplinkwifi.net or http://192.168.0.1, and log in with your TP-Link ID or the password you set for the router. 2. Go to Advanced >… -
Page 134
Chapter 16 VPN Server&Client 5. Configure the advanced settings according to the following explanation. We recommend that you keep the default settings. If you want to change these settings, make sure that both VPN server endpoints use the same Encryption Algorithm, Integrity Algorithm, Diffie-Hellman Group and Key Lifetime in both phase1 and phase2. -
Page 135
Chapter 16 VPN Server&Client 6. Click OK. Note: • For the comprehensive guide, please refer to the User Guide on the product’s support page. Step 2 Configure IPSec VPN Connection on Your Remote Device The remote device can use the Windows or Mac OS built-in IPSec software or a third- party IPSec software to connect to IPSec Server. -
Page 136
Chapter 16 VPN Server&Client 3. Select Connect to a workplace and click Next. 4. Select Use my Internet connection (VPN). -
Page 137
Chapter 16 VPN Server&Client 5. Enter the internet IP address of the router (for example: 218.18.1.73) in the Internet address field, and select the checkbox Don’t connect now; just set it up so I can connect later. Click Next. 6. Enter the User name Password you have set for the IPSec VPN server on your… -
Page 138
Chapter 16 VPN Server&Client 7. Click Close when the VPN connection is ready to use 8. Go to Network and Sharing Center and click Change adapter settings. -
Page 139
Chapter 16 VPN Server&Client 9. Find the VPN connection you created, then double-click it. 10. Enter the User name Password you have set for the IPSec VPN server on your router, and click Properties. -
Page 140
Chapter 16 VPN Server&Client 11. Switch to the Security tab, select Layer 2 Tunneling Protocol with IPsec (L2TP/ IPSec) and click Advanced settings. 12. Select Use preshared key for authentication and enter the IPSec Pre-Shared Key you have set for the IPSec VPN server on your router. Then click OK. Done! Click Connect to start VPN connection. -
Page 141: Vpn Connections
VPN Connections page displays the clients that are currently connected to the OpenVPN servers, PPTP VPN servers and IPSec VPN hosted on the router. 1. Visit http://tplinkwifi.net or http://192.168.0.1, and log in with your TP-Link ID or the password you set for the router. 2. Go to Advanced >…
-
Page 142: Chapter 17 Manage Your Router
Chapter Manage Your Router This chapter introduces how to change the system settings and administrate your router’s network. This chapter contains the following sections: • Set System Time • Control the LED • Test Internet Connectivity • Update the Firmware •…
-
Page 143: Set System Time
Chapter 17 Manage Your Router 17 1 Set System Time System time is the time displayed while the router is running. The system time you configure here will be used for other time-based functions like Parental Controls and Wireless Schedule. You can manually set how to get the system time. Follow the steps below to set your system time.
-
Page 144: Control The Led
The LED of the router indicates its activities and status. You can enable the Night Mode feature to specify a time period during which the LED is off. 1. Visit http://tplinkwifi.net or http://192.168.0.1, and log in with your TP-Link ID or the password you set for the router. 2. Go to Advanced >…
-
Page 145
Chapter 17 Manage Your Router ¾ To run ping and traceroute tools: 1 ) Locate the Diagnostic Tools section. 2 ) Select Ping Traceroute Nslookup as the diagnostic tool to test the connectivity. • Ping is used to test the connectivity between the router and the tested host, and measure the round-trip time. -
Page 146: Update The Firmware
2. If a new firmware is displayed, click Upgrade and click Yes when prompted, then the router will automatically download the latest firmware file and upgrade. ¾ Follow the steps below to manually update the firmware: 1. Download the latest firmware file for the router from our website www.tp-link.com. 2. Visit http://tplinkwifi.net or http://192.168.0.1, and log in with the password you set…
-
Page 147: Back Up And Restore Configuration Settings
Chapter 17 Manage Your Router 6. Wait a few minutes for the upgrading and rebooting. 17 5 Back Up and Restore Configuration Settings The configuration settings are stored as a configuration file in the router. You can back up the configuration file to your computer for future use and restore the router to a previous settings from the backup file when needed.
-
Page 148: Reboot The Router
Chapter 17 Manage Your Router 1 ) Locate the Factory Default Restore section, and click Factory Restore to reset the router. 2 ) Wait a few minutes for the resetting and rebooting. Note: 1. During the resetting process, do not turn off the router. 2.
-
Page 149: Administration Management
Chapter 17 Manage Your Router 3 ) Click Save to make the settings effective. Some settings of the router may take effect only after rebooting, including: • Change the LAN IP Address (system will reboot automatically). • Change the Operation Mode (system will reboot automatically). •…
-
Page 150: Local Management
Chapter 17 Manage Your Router Enter the old password and a new password twice (both case-sensitive). Click Save to make the settings effective. 17 7 2 Local Management You can control the local devices’ authority to manage the router via Local Management feature.
-
Page 151: Remote Management
Chapter 17 Manage Your Router Note: If you want all local devices can manage the router, just leave the IP/MAC Address field blank. 17 7 3 Remote Management By default, the remote devices are not allowed to manage the router from the internet. You can enable remote management over HTTP and/or HTTPS if needed.
-
Page 152: Http Referer Head Check
Chapter 17 Manage Your Router All devices or the specific device on the internet can log in to your router using the address displayed on the Manage This Router via the Address field to manage the router. Tips: 1. If you were warned about the certificate when visiting the web management page remotely, click Trust (or a similar option) to continue.
-
Page 153: Session Id
Chapter 17 Manage Your Router Specify the ICMP Ping reply options. • Remote: Select it if you want the computers on a public network to ping the router’s WAN IP address. • Local: Enabled by default, if enabled, the computers on a private network can ping the router’s LAN IP address.
-
Page 154
Chapter 17 Manage Your Router ¾ To view the system logs: You can view specific system logs by selecting the log type and level. Click Refresh to refresh the log list. ¾ To save the system logs: You can save the system logs to your local computer or a remote server. Click Save Log to save the logs in a txt file to your computer. -
Page 155: Cwmp Settings
Chapter 17 Manage Your Router 17 9 CWMP Settings The router supports CWMP (CPE WAN Management Protocol), also called TR-069. This collects information, performs diagnostics and configures the devices automatically via ACS (Auto-Configuration Server). Visit http://tplinkwifi.net or http://192.168.0.1, and log in with the password you set for the router.
-
Page 156: Snmp Settings
Chapter 17 Manage Your Router • ACS Username/Password: Enter the username/password to log in to the ACS server. • Interface used by TR-069 client: Select which interface to be used by the TR-069 client. • Display SOAP messages on serial console: Enable or disable this function.
-
Page 157
Chapter 17 Manage Your Router • SNMP Agent/SNMP Agent for WAN: Turn on to enable the built-in SNMP agent that allows the router to operate as the operational role in receiving and processing of SNMP messages, sending responses to the SNMP manager, and triggering SNMP traps when an event occurs. -
Page 158: Monitor The Internet Traffic Statistics
Chapter 17 Manage Your Router 17 11 Monitor the Internet Traffic Statistics The traffic statistics function allows you to monitor the volume of internet traffic statistics. You can view the network traffic of the LAN, WAN and WLAN sent and received packets.
-
Page 159
Chapter 17 Manage Your Router Enable Port Mirroring. Select a LAN port to mirror network packets of the WAN port. Set a Timeout duration after which Port Mirroring will disable automatically. If you set Timeout to 0 seconds, Port Mirroring will not disable automatically. Save the settings. -
Page 160: Faq
Q2 What should I do if I forget my web management password? • If you are using a TP-Link ID to log in, or you have enabled the Password Recovery feature of the router, click…
-
Page 161
4 ) Click LAN settings and deselect the following three options and click OK. 5 ) Go to Advanced > Restore advanced settings, click to save the settings. -
Page 162
Note: You’ll need to reconfigure the router to surf the internet once the router is reset. Q4 What should I do if I can’t access the internet even though the configuration is finished? Visit http://tplinkwifi.net, and log in with your TP-Link ID or the password you set for the router. Go to Advanced>… -
Page 163
• Restart the modem and the router. 1 ) Power off your modem and router, and leave them off for 1 minute. 2 ) Power on your modem first, and wait about 2 minutes until it gets a solid cable or Internet light. -
Page 164
• Modify the LAN IP address of the router. Note: Most TP-Link routers use 192.168.0.1/192.168.1.1 as their default LAN IP address, which may conflict with the IP range of your existing ADSL modem/router. If so, the router is not able to communicate with your modem and you can’t access the internet. -
Page 165
• Double check the internet connection type. 1 ) Confirm your internet connection type, which can be learned from the ISP. 2 ) Visit http://tplinkwifi.net, and log in with your TP-Link ID or the password you set for the router. -
Page 166
2 ) Exit the wireless configuration tool (the TP-Link Utility, for example). 3 ) Select and right click on… -
Page 167
2 ) If you cannot find the PIN or PIN failed, you may choose Connecting using a security key instead, and then type in the Wireless Password/Network Security Key. 3 ) If it continues to show note of Network Security Key Mismatch, it is suggested to confirm the wireless password of your wireless router. -
Page 168
Model Number: BBA Routers Component Name Model I.T.E. Power T120200-2B1 Responsible party: TP-Link USA Corporation Address: 10 Mauchly, Irvine, CA 92618 Website: http://www.tp-link.com/us/ Tel: +1 626 333 0234 Fax: +1 909 527 6804 E-mail: sales.usa@tp-link.com This equipment has been tested and found to comply with the limits for a Class B digital device, pursuant to part 15 of the FCC Rules. -
Page 169
We, TP-Link USA Corporation, has determined that the equipment shown as above has been shown to comply with the applicable technical standards, FCC part 15. There is no unauthorized change is made in the equipment and the equipment is properly maintained and operated. -
Page 170
Any changes or modifications not expressly approved by the party responsible for compliance could void the user’s authority to operate the equipment. We, TP-Link USA Corporation, has determined that the equipment shown as above has been shown to comply with the applicable technical standards, FCC part 15. -
Page 171
Canadian Compliance Statement This device contains licence-exempt transmitter(s)/receiver(s) that comply with Innovation, Science and Economic Development Canada’s licence-exempt RSS(s). Operation is subject to the following two conditions: 1. This device may not cause interference. 2. This device must accept any interference, including interference that may cause undesired operation of the device. -
Page 172
Industry Canada Statement CAN ICES-3 (B)/NMB-3(B) NCC Notice & BSMI Notice: 注意! 取得審驗證明之低功率射頻器材,非經核准,公司、商號或使用者均不得擅自變 更頻率、加大功率或變更原設計之特性及功能。 低功率射頻器材之使用不得影響飛航安全及干擾合法通信;經發現有干擾現象 時,應立即停用,並改善至無干擾時方得繼續使用。 前述合法通信,指依電信管理法規定作業之無線電通信。 低功率射頻器材須忍受合法通信或工業、科學及醫療用電波輻射性電機設備之干 擾。 應避免影響附近雷達系統之操作。 高增益指向性天線只得應用於固定式點對點系統。 安全諮詢及注意事項 • 安全諮詢及注意事項 • 請使用原裝電源供應器或只能按照本產品注明的電源類型使用本產品。 • 清潔本產品之前請先拔掉電源線。請勿使用液體、噴霧清潔劑或濕布進行清 潔。 • 注意防潮,請勿將水或其他液體潑灑到本產品上。 • 插槽與開口供通風使用,以確保本產品的操作可靠並防止過熱,請勿堵塞或 覆蓋開口。 • 請勿將本產品置放於靠近熱源的地方。除非有正常的通風,否則不可放在密 閉位置中。 • 不要私自拆開機殼或自行維修,如產品有故障請與原廠或代理商聯繫。 限用物質含有情況標示聲明書 設備名稱:AX3000 Gigabit Wi-Fi 6 Router 型號(型式):Archer AX3000 Pro Equipment name… -
Page 173
○ ○ ○ ○ ○ ○ 天線 備考1.〝超出0.1 wt %〞及〝超出0.01 wt %〞係指限用物質之百分比含量超出百分比含量基準值 Note 1:“Exceeding 0.1 wt %” and “exceeding 0.01 wt %” indicate that the percentage content of the restricted substance exceeds the reference percentage value of presence condition. 備考2.〝○〞係指該項限用物質之百分比含量未超出百分比含量基準值。 Note 2:“○”… -
Page 174
Symbol Explanation Polarity of output terminals Energy efficiency Marking Indoor use only Caution Operator’s manual RECYCLING This product bears the selective sorting symbol for Waste electrical and electronic equipment (WEEE). This means that this product must be handled pursuant to European directive 2012/19/ EU in order to be recycled or dismantled to minimize its impact on the environment.
Если вы потеряли инструкцию к роутеру бренда TP-Link или не можете в ней разобраться, эта статья поможет вам понять базовые приемы подключения и настройки любого маршрутизатора этой фирмы. В инструкции мы с вами разберем назначение кнопок роутера, выясним, почему индикаторы могут мигать или светиться красным, а также детально рассмотрим шаги подключения и настройки роутера.
В этом разделе мы выясним, что обозначает тот или иной индикатор, разберемся с непонятными кнопками вроде WPS, QSS и тем, как их использовать на практике.
Почему на TP-Link индикатор мигает, не горит или стал красным (оранжевым)
Многих смущает, когда какой-то из индикаторов на роутере TP-Link вдруг начинает мигать, горит оранжевым цветом или вообще не активен. Но вы должны знать, что для некоторых индикаторов мигание или смена цвета является нормой. Чтобы понимать показания роутера, рассмотрим таблицу ниже, в которой представлены типичные обозначения индикаторов большинства моделей бренда TP-Link.
Как мы видим, индикатор «Система» в своем нормальном рабочем состоянии всегда должен мигать. Если мигают индикаторы WLAN, WAN или LAN, это говорит о том, что между подключенными устройствами происходит обмен данными (прием или передача). Мигать может и значок WPS, причем медленное мигание сообщает о процессе подключения устройств, а быстрое мигание говорит о том, что подключение не удалось.
Выключенный индикатор также не всегда означает проблему. Так, погасший индикатор питания говорит об отсутствии энергопотребления, если не горят индикаторы WAN, LAN или WLAN, то к соответствующим портам ничего не подключено или не подключены устройства по Wi-Fi. Однако погасший индикатор системы говорит о возникновении системной ошибки. Часто она исправляется при помощи обновления прошивки роутера.
Что касается красного или оранжевого индикатора интернета, то он появился в новых аппаратных версиях некоторых моделей TP-Link. Индикатор горит красным (оранжевым) в том случае, если кабель подключен, но доступа к интернету нет. Наиболее частыми причинами отсутствия доступа могут быть проблемы на стороне провайдера (авария, замена оборудования и пр.) или неверная настройка роутера (выбран не тот тип подключения WLAN, заданы ошибочные данные и пр.).
Зачем на TP-Link нужны кнопки Reset и Wi-Fi
Кнопка Reset пригодится вам в том случае, если нужно обнулить настройки роутера. Например, если вы поменяли пароль к панели управления, но вспомнить его не смогли. А также если купили маршрутизатор с рук, если сделали какие-то неудачные настройки, после которых пропал интернет, или в работе устройства произошел сбой. Во всех этих случаях можно вернуть роутер к заводским настройкам.
При этом для панели управления и вашей сети Wi-Fi вновь установятся имя и пароль, указанные на наклейке на корпусе вашего роутера. Остальные настройки также вернутся к тем, что были по умолчанию, а это потребует повторной настройки маршрутизатора. Поэтому перед использованием кнопки настоятельно рекомендуем вначале выполнить через панель управления резервное копирование. План действий здесь такой: создать резервную копию настроек (они сохранятся в файл на вашем компьютере), выполнить сброс, дождаться перезагрузки роутера и затем восстановить прежние настройки из сохраненного файла. Все действия выполняются в разделе «Системные инструменты», а сброс можно выполнить как через меню, так и кнопкой Reset, которая зажимается на 5-8 секунд до смены индикации.
С кнопкой Wi-Fi все намного проще. Нажав ее, вы выключите в доме сеть Wi-Fi, и ваши дети или гости быстрее отложат смартфоны и займутся другими делами. Эта кнопка может быть отдельной или совмещать две функции. Например, в модели Archer C20 она получила название Wireless (англ. — беспроводной), в модели Archer C6 она совмещена с функцией WPS, в моделях TL-WR940N и TL-WR941ND совмещена с функцией Reset. Длительность нажатия также во всех моделях разная: где-то Wi-Fi активируется коротким нажатием, где-то удержанием около трех секунд.
Зачем на TP-Link нужна кнопка WPS (QSS)
Самой сложной для понимания является кнопка WPS или QSS. Начнем с расшифровки этих понятий. Wi-Fi Protected Setup переводится как защищенная установка по Wi-Fi, а Quick Security Setup — быстрая настройка безопасности. За этими названиями скрывается одна и та же функция создания полуавтоматической беспроводной сети. Поясним это на примере. Если вам захотелось подключить к роутеру по Wi-Fi какое-то устройство, то вам нужно найти в списке доступных сетей сеть Wi-Fi-роутера и задать пароль от нее. Это не всегда удобно, так как многие из нас не помнят длинных паролей своих домашних сетей. Вместо вспоминания пароля можно нажать на роутере кнопку WPS (QSS), а затем нажать такую же кнопку на устройстве, которое мы хотим подключить. При этом роутер автоматически передаст этому устройству сгенерированный ключ шифрования. Таким образом, и устройства оказываются защищены, так как связаны сложным паролем, и прежний пароль знать не нужно. Но все же уточним, что хакеры могут взломать ключ и несанкционированно подключиться к вашему роутеру.
Как подключить Wi-Fi-роутер TP-Link
Как подготовить место и устройства
Некоторые игнорируют совет по выбору места для роутера, а затем страдают от того, что в каких-то местах дома сигнал слишком слабый или не ловится вовсе, а также вынуждены тянуть длинные провода. Поэтому не торопитесь и продумайте, какие устройства будете подключать к роутеру по проводу и по Wi-Fi. По проводу чаще всего подсоединяют компьютеры, TV-приставки, игровые консоли, разнообразные мультимедийные центры и другую технику с сетевым портом, для которой желателен мощный стабильный сигнал. По Wi-Fi вы сможете подключать телефоны, планшеты, роботы-пылесосы, веб-камеры и прочие гаджеты с Wi-Fi-модулем. Оцените, где находятся эти устройства, и расположите роутер по возможности в центре вашего Wi-Fi-пространства, а также подготовьте провода подходящей длины для всех проводных устройств.
Чтобы роутер раздавал интернет в вашем доме, вам нужны следующие устройства: модем (не требуется, если к вам в квартиру заходит кабель провайдера) и компьютер (мобильный телефон). ПК или смартфон необходимы для того, чтобы зайти в панель управления и ввести необходимые регистрационные данные, выданные вам провайдером. Для подключения к маршрутизатору компьютера и модема вам нужны соответствующие Ethernet-кабели, которые часто идут в комплекте с роутерами и модемами. Для подключения мобильного телефона провода не нужны, но рекомендуется скачать мобильное приложение Tether.
Как подключить роутер TP-Link к интернету
После подготовки всех устройств, проводов и выбора места, вам нужно подключить роутер к интернету. В случае кабеля интернет-провайдера все просто — вставьте его в порт WAN (обычно синего цвета) роутера. В случае модема соедините Ethernet-кабелем порт WAN роутера и порт LAN модема. Модем подключите к интернету, например, вставьте в порт модема телефонный провод. Все соединения делайте при выключенных устройствах.
Как подключить роутер TP-Link к компьютеру (ноутбуку) или телефону
Для соединения компьютера или ноутбука с роутером воспользуйтесь все таким же Ethernet-кабелем. Вставьте этот кабель одним концом в какой-либо порт LAN, а другим в подходящий порт компьютера. Возможен и такой вариант, когда ноутбук или ПК подключаются к роутеру по Wi-Fi (у них должен быть адаптер Wi-Fi). Этот же способ используется и для мобильного телефона. В этом случае на ПК или телефоне нужно включить Wi-Fi, построить список доступных сетей, найти в нем сеть, указанную на наклейке вашего роутера, и подключиться к ней (заводской пароль тоже прописан на наклейке).
Как настроить Wi-Fi-роутер TP-Link
Заход в панель управления
Настройка роутера с телефона или ПК не отличается по своей сути, так как в любом случае требуется вводить регистрационные данные через панель управления. Для захода в нее вам нужно знать адрес, имя и пароль администратора. Все эти сведения указаны на этикетке вашего роутера. Перейдите по адресу http://192.168.0.1 или http://tplinkwifi.net/ и введите имя и пароль пользователя. Чаще всего имя и пароль по умолчанию такие: admin и admin.
Сама админ-панель может иметь разный дизайн в зависимости от модели и версии прошивки роутера. Поэтому не смущайтесь, если вместо дизайна в зеленых тонах встретите голубой дизайн. Админ-панель последнего типа в чем-то удобнее «зеленой» версии, например в ней объединены в одно окно резервное копирование, восстановление и сброс и есть дополнительные функции вроде проверки последней версии обновления. Однако все базовые настройки выполняются примерно одинаково там и там.
Запуск быстрой настройки или самостоятельный ввод данных
Для настройки роутера в любой версии панели управления есть вариант запустить быструю настройку и ответить на все вопросы или задавать данные самостоятельно через разные разделы меню. С некоторыми роутерами TP-Link в комплекте идут установочные CD-диски, которые по сути заменяют быструю настройку через панель управления.
При запуске быстрой настройки или самостоятельном вводе данных важно не ошибиться с регистрационной информацией, полученной от провайдера. Вам необходимо верно выбрать тип подключения, задать соответствующие ему данные, настроить Wi-Fi-сеть (придумать ей имя и пароль) и сменить пароль к панели управления. Понять это вам помогут примеры настроек в статьях: «Инструкция к роутерам TP-Link TL-WR740N и TL-WR741ND», «Инструкция по настройке роутера TP-Link TL-WR840N», «Инструкция по настройке роутера TP-Link Archer C6».
Дополнительные настройки
Многие не используют дополнительные настройки, так как попросту не знают о них. В то же время во многих роутерах TP-Link есть возможность настраивать интернет для детей (запрещать некоторые сайты, задавать расписание и пр.), обустраивать гостевую сеть, задавать ночной режим работы роутера и другое. Изучите самостоятельно возможности вашего маршрутизатора и опробуйте те функции, которые вас заинтересовали. Но перед началом экспериментов советуем сделать резервную копию настроек, так как неправильные настройки могут привести к исчезновению доступа к интернету. Если это произойдет, выполните сброс роутера кнопкой Reset и восстановите файл через раздел восстановления панели управления.
Надеемся, что после выполнения шагов этой инструкции вас уже не будет смущать необходимость подключения роутера TP-Link. Поняв принципы настройки один раз, вы легко подключите другую модель маршрутизатора этой компании и быстрее освоитесь с роутерами других производителей.


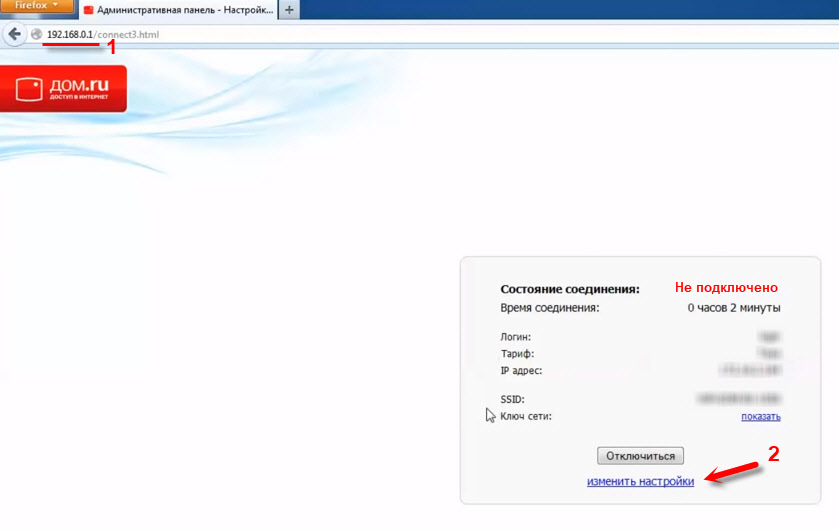

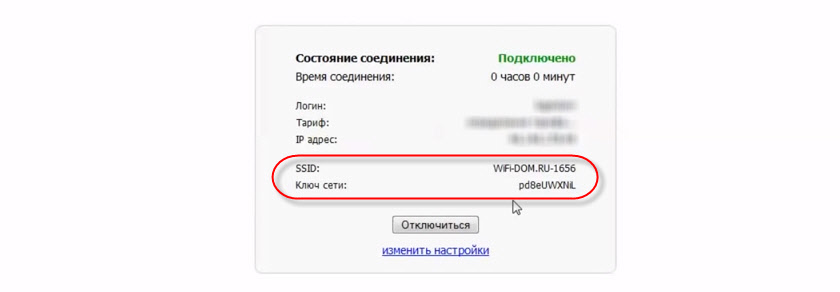


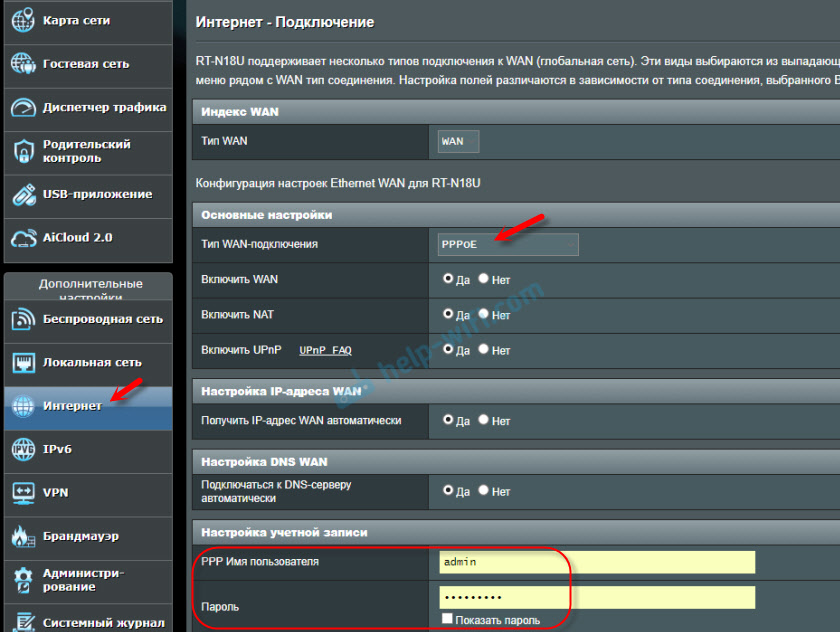

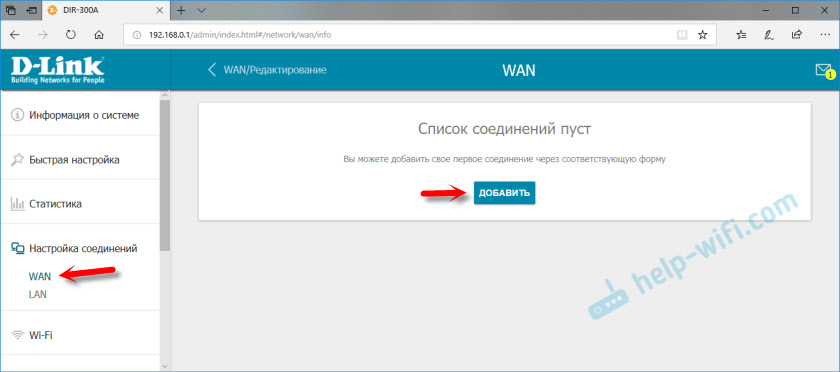
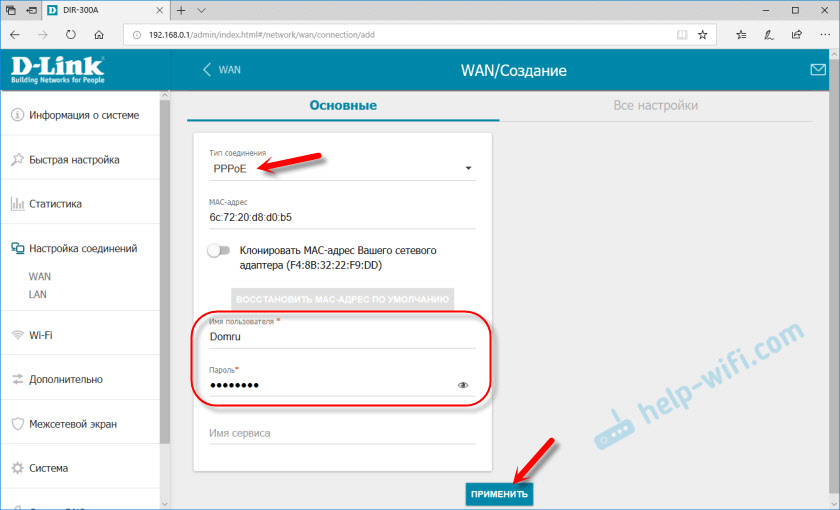
_1599744358947m.jpg)
_1599744372891u.jpg)
_1599744383516v.jpg)
_1599744393211a.jpg)


