
CONTENTS
English
··············································································
1
Azərbaycan dili ······························································
15
հայերեն··········································································
29
Қазақша
··········································································
43
Русский язык·····································································57
Українська мова ·······························································71
ქართული···········································································85
Всем привет! Сегодня очередной обзор в коллекцию нашего сайта. На этот раз я расскажу про точку доступа TP-Link TL-WA701ND. Это устройство обладает неплохими характеристиками при цене в 1200 рублей. Сначала я расскажу про особенности, а в конце будет информация по настройке.
Содержание
- Общая информация
- Характеристики
- Азы настройки
- Репитер и клиент
- Обновление прошивки
- Задать вопрос автору статьи
Общая информация
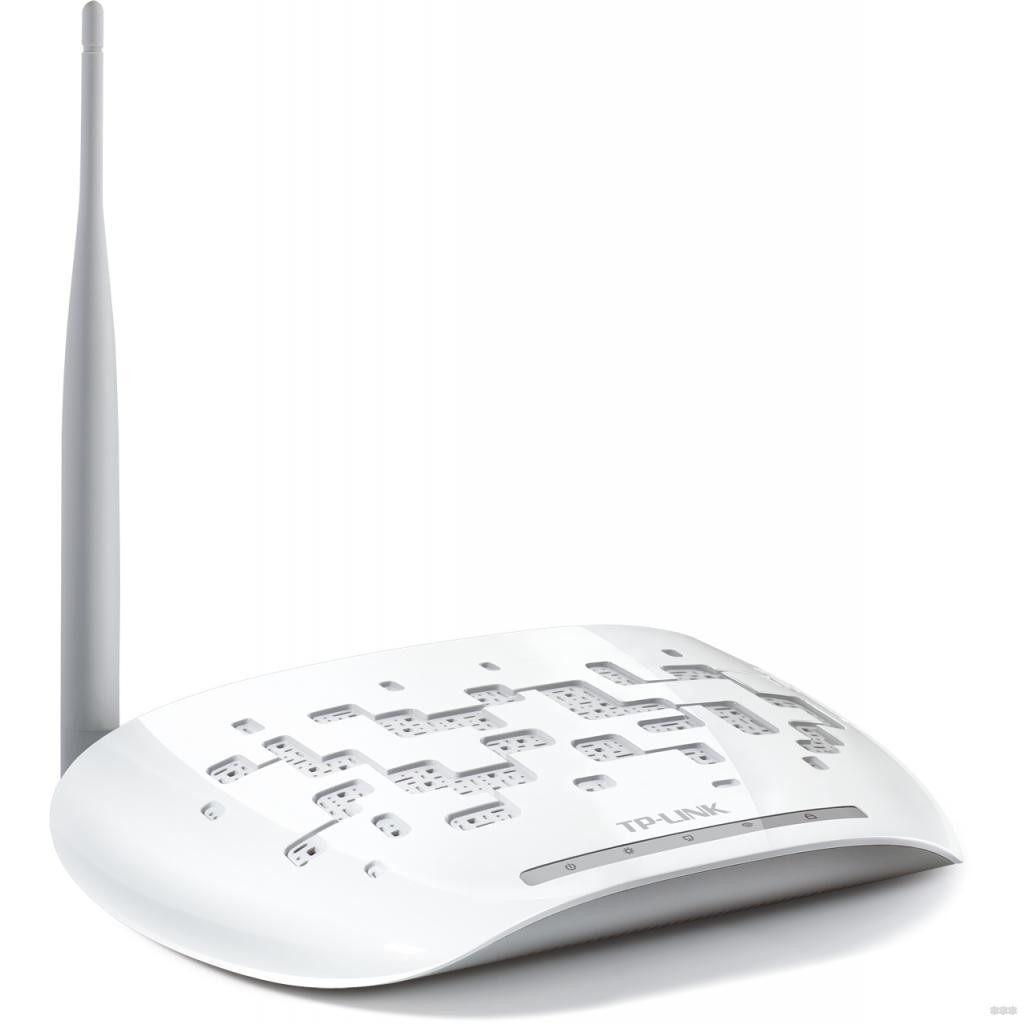
Точка доступа TP-Link TL-WA701ND – отличный вариант для обеспечения доступа к интернету, а также для расширения сети дома или на небольшом предприятии. Работает со стандартом 802.11n с максимальной скоростью 150 Мбит/с.
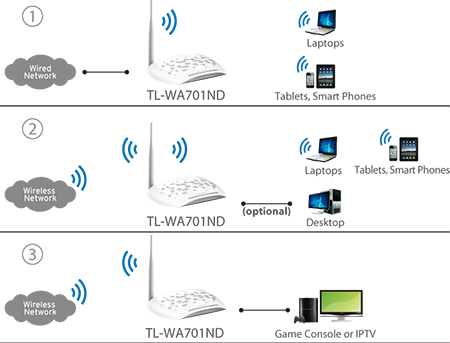
Это многофункциональное устройство, поддерживает следующие режимы работы:
- Точка доступа
- Гостевая сеть
- Репитер
- Клиент
- Беспроводной мост
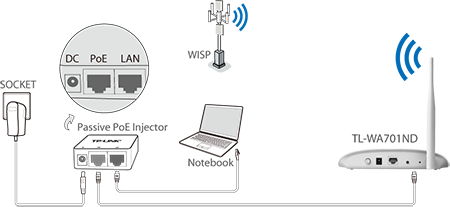
Есть возможность быстрого безопасного соединения благодаря технологии QSS. Кроме того, устройство поддерживает технологию PoE, которая позволяет передавать удаленному устройству электроэнергию по витой паре. Поэтому точку доступа реально установить там, где нет возможности протянуть электрический кабель (максимально на расстоянии до 30 м от источника питания).
Характеристики
А теперь о технических параметрах и дополнительных особенностях точки доступа TP-Link TL-WA701ND:
- Протоколы Wi-Fi, поддерживаемые устройством – 802.11n.
- Частота, на которой работает передатчик – 2,4 ГГц (работает в одном диапазоне).
- Предельная скорость общего потока данных – 150 Мбит/с.
- Мощность передатчика – 20 дБм.
- Поддержка методов шифрования для защиты передаваемых данных – WEP, WPA, WPA2.
- 1 внешняя съемная антенна с коэффициентом усиления 5 дБи.
- 1 LAN порт со скоростными показателями 10/100 Мбит/с.
Управление и настройка данной точки доступа осуществляется двумя способами:
- По протоколу SNMP.
- Через веб-интерфейс, доступный с браузера.
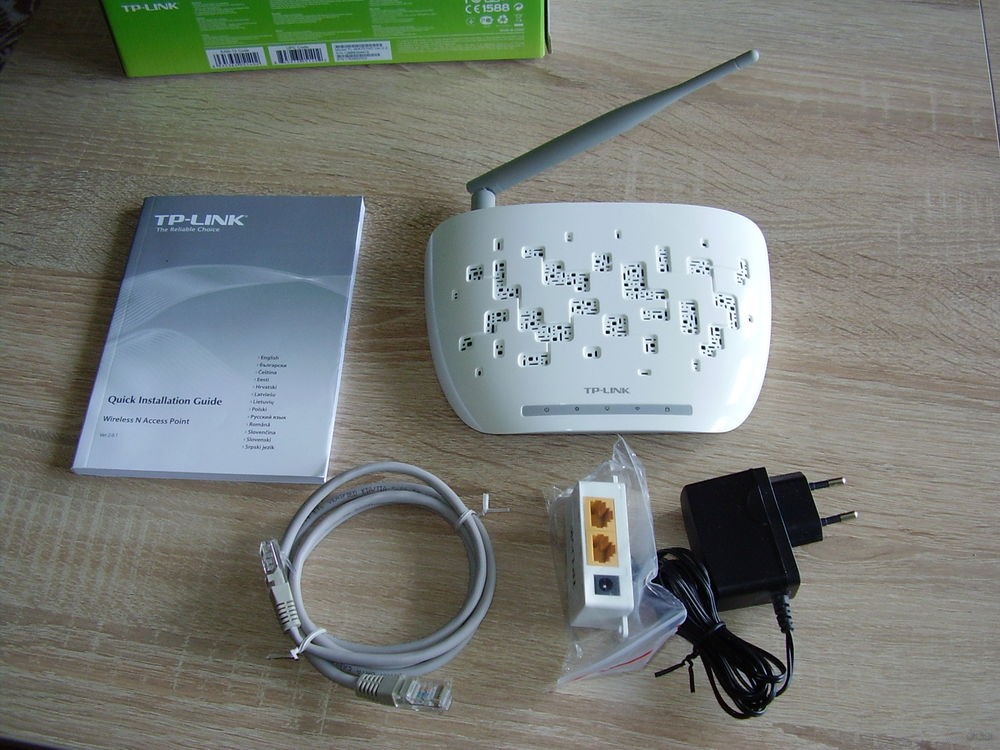
В комплектацию, кроме самого устройства, входят:
- Диск с программным обеспечением.
- PoE адаптер.
- Блок питания.
- Руководство пользователя.
- Антенна.
- Сетевой кабель.
Согласно отзывам, точка доступа без проблем покрывает зону площадью с двухкомнатную квартиру. Многие пользователи отмечают стабильную работу устройства, без перебоев и глюков.
Азы настройки
Инструкции по настройке точек доступа TP-Link смотрите тут:
Здесь я расскажу, как настроить TP-Link TL-WA701ND с помощью Мастера настройки через веб-интерфейс. Вот пошаговое руководство:
- Чтобы попасть в настройки, в адресной строке любого браузера набиваем IP адрес 192.168.0.254 и жмем Enter.
- Откроется окно авторизации, где нужно указать имя пользователя и пароль – по умолчанию это admin/admin, нажимаем «Вход».
- Откроется страница приветствия, где нужно выбрать «Next».
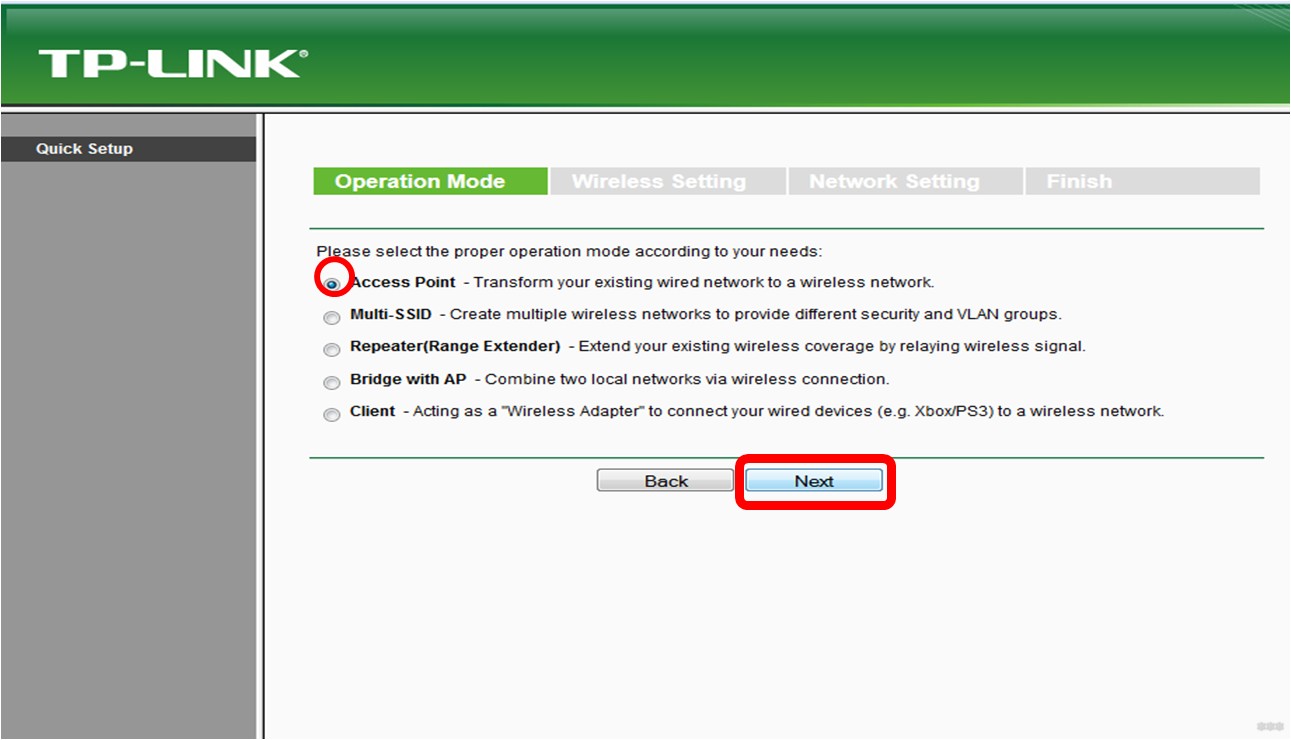
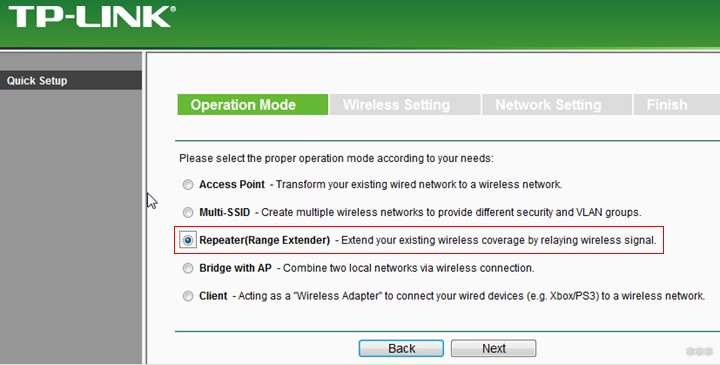
- Первый шаг – выбор режима (в нашем случае мы настраиваем точку доступа – это режим Access Point).
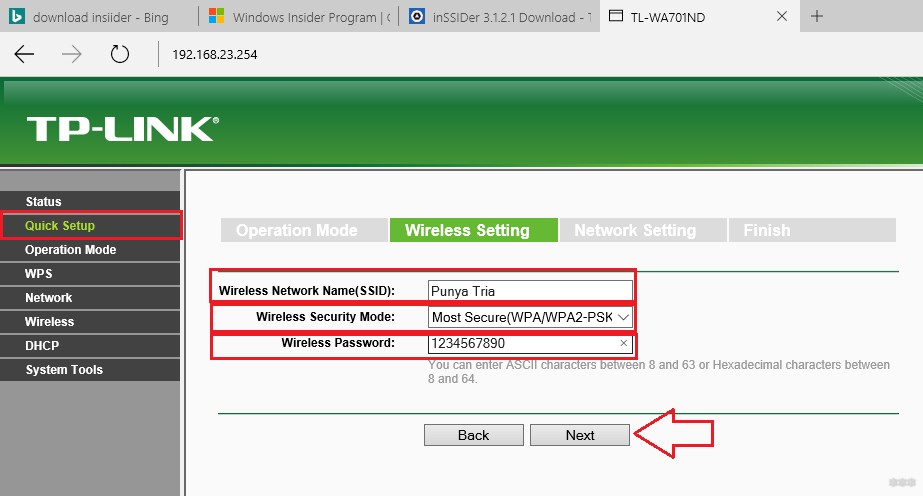
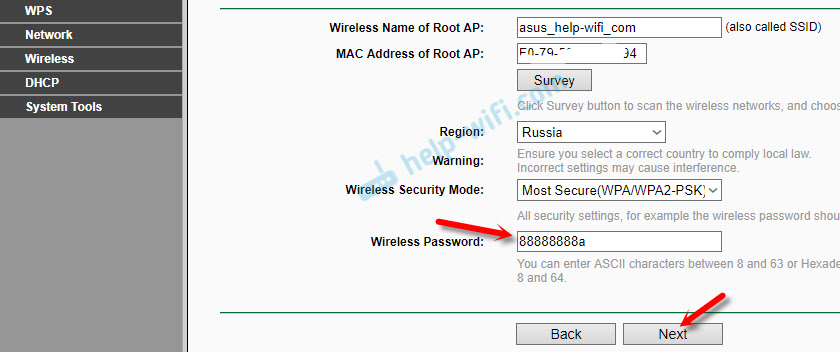
- Второй шаг – настраиваем сеть. Задаем имя сети SSID, выбираем тип шифрования (рекомендуется WPA2/PSK), придумываем пароль (не менее 8 символов).
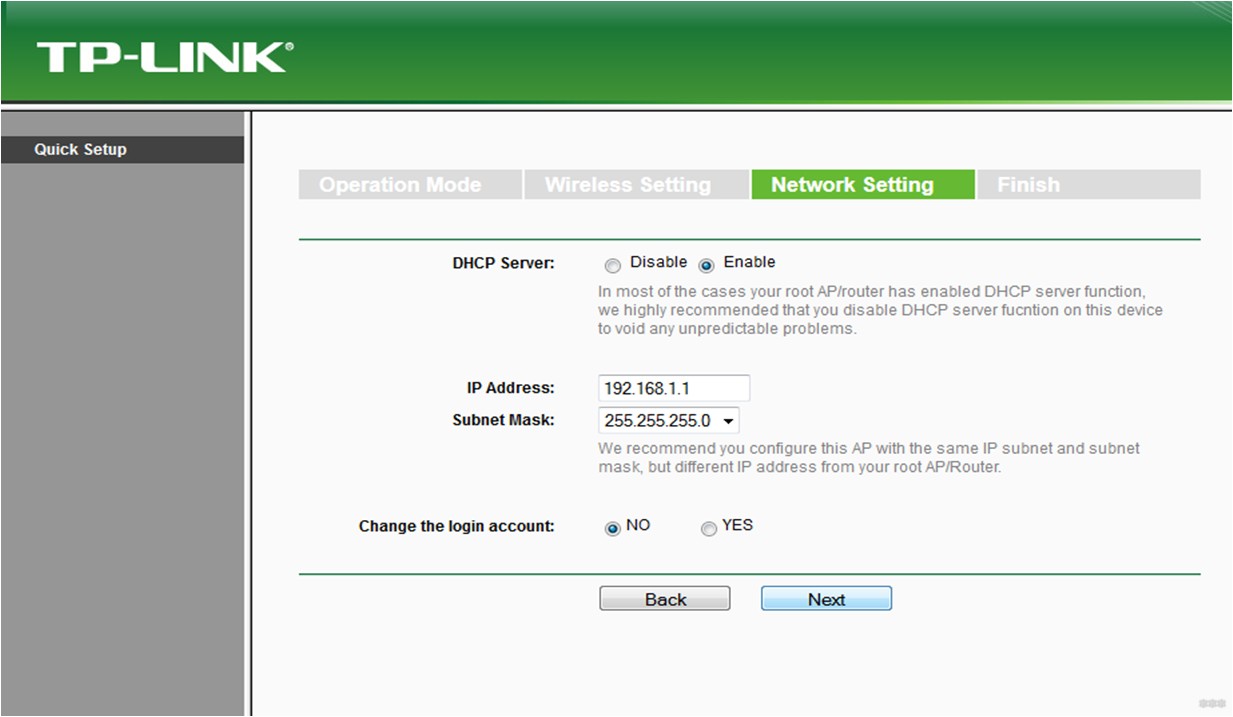
- Следующий шаг – настройка сетевых параметров. Здесь нужно указать IP адрес и маску подсети. В примечании сказано, что если в вашей сети используются адреса типа 192.168.0.xxx, то можно пропустить этот пункт настройки.
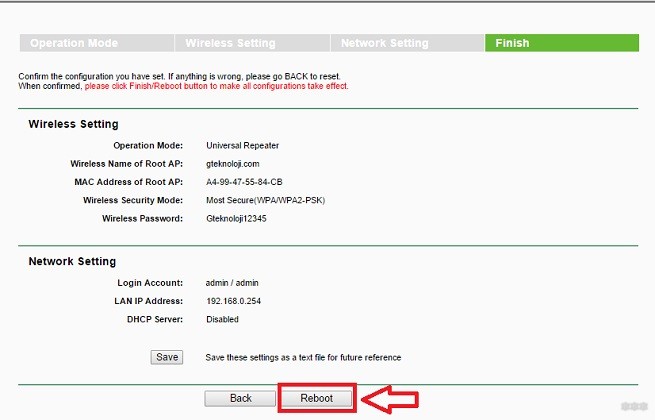
- Последним шагом нужно проверить введенные параметры, сохранить их и выполнить перезагрузку точки доступа.
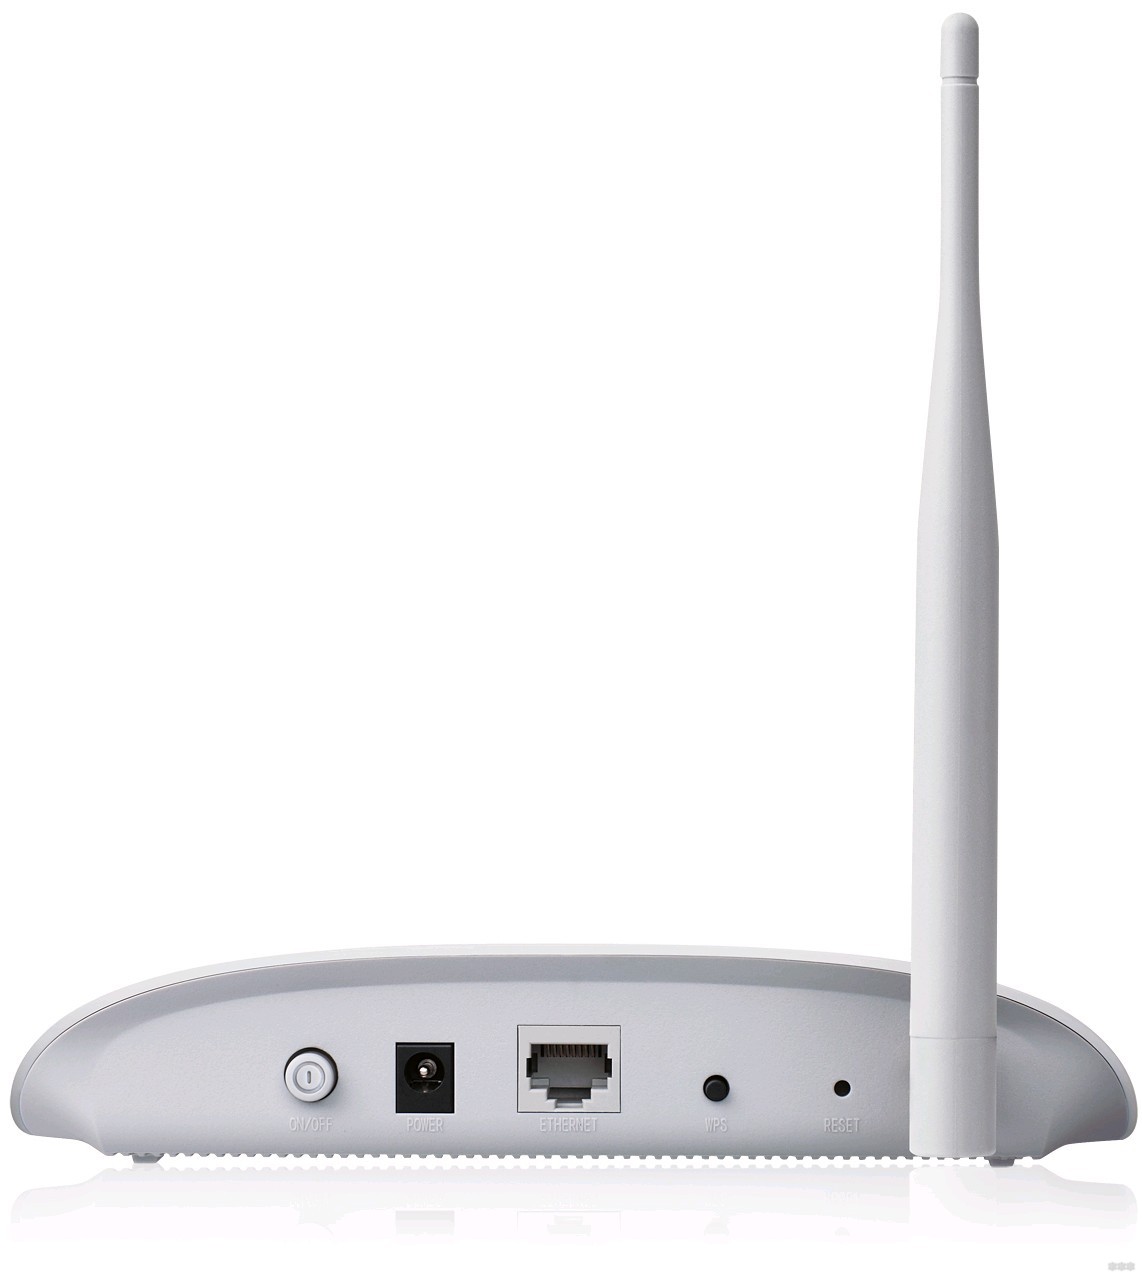
Если вдруг не получилось выполнить вход в веб-интерфейс, выполните сброс к заводским значениям. Для этого на корпусе устройства сзади есть кнопка Reset.
Репитер и клиент
Для подключения точки доступа к уже существующей сети для ее усиления нужно:
- Как и в прошлой инструкции зайти в настройки и выбрать нужный режим работы – здесь Repeater, жмем Next.
- На следующей странице выбираем Survey и в строке с названием своей сети кликаем Connect.

- Далее в строке «Wireless Password» вводим пароль от своей сети, жмем Next.
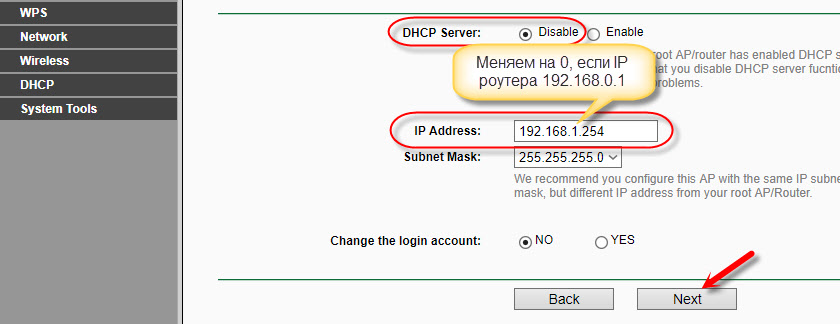
- Теперь проверяем, чтобы DHCP был отключен (значение Disable), указываем IP адрес и маску подсети (основной роутер и точка доступа должны быть в одной подсети), кликаем Next.
- Проверяем введенные данные и перезагружаем устройство (кнопка Reboot).
Для настройки режима клиента, нужно выбрать соответствующее значение в списке режимов работы. А далее выполнить настройки, как и с репитером. Здесь точка доступа будет принимать беспроводной сигнал, а передавать его по кабелю. Раздача Wi-Fi тут не работает.
Обновление прошивки
Это рекомендуется делать сразу перед настройкой точки доступа. Вот инструкция:
- После того, как зашли в настройки, на приветственной странице нажимаем Exit.
- Слева выбираем раздел «Status», где в строке «Firmware Version» указана версия прошивки, а следующей строке – версия устройства.
- Заходим на сайт tp-link.com, через поиск ищем точку доступа и выбираем вкладку «Поддержка».
- Выбираем аппаратную версию оборудования, переходим в раздел «Встроенное ПО» и скачиваем последнее актуальное обновление.
- Разархивируем папку и ищем файл с расширением .bin.
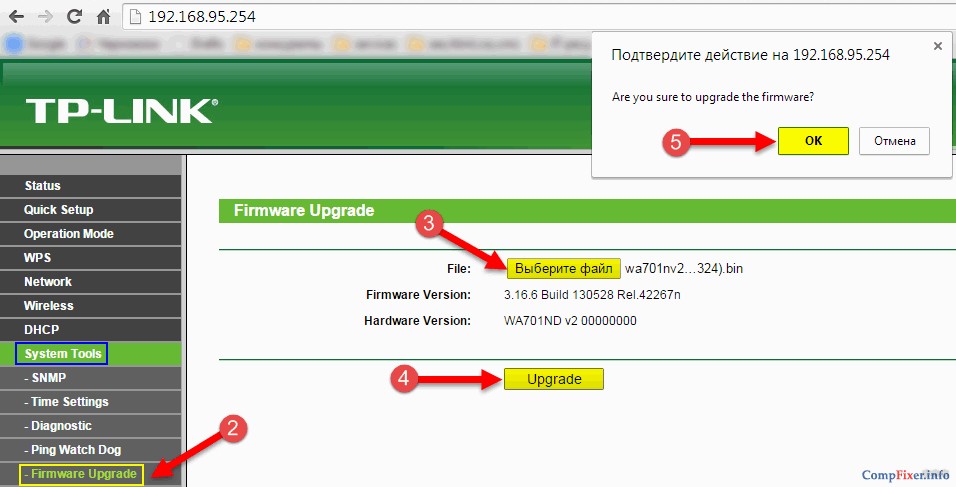
- Возвращаемся в настройки, заходим в раздел «System Tools», подраздел «Firmware Upgrade», выбираем bin-файл и нажимаем «Upgrade».
Дождитесь перезагрузки устройства. Теперь можно приступать к работе с точкой доступа. На этом можно заканчивать. Если будут вопросы, пишите в комментарии! До встречи.
Предназначение устройства
Беспроводная точка доступа TL-WA701ND предназначена для создания или расширения масштабируемой высокоскоростной сети Wi-Fi стандарта N, а также для её использования в качестве клиента для подключения к беспроводной сети таких устройств, как игровые консоли, принтеры или NAS. Устройство разработано с использованием технологии однопотоковой передачи данных Align™, обеспечивающей превосходную производительность вашей сети на скорости до 150 Мбит/с. Точка доступа поддерживает множество различных функций, которые обеспечат вам ещё более удобное использование беспроводной сети.

Беспроводная сеть стандарта N
Благодаря поддержке стандарта IEEE 802.11n точка доступа TL-WA701ND способна создавать беспроводную сеть, скорость которой в 9 раз превышает скорость устройств 11g, а зона покрытия — в 4 раза. С помощью технологии Align™, основанной на однопотоковой передаче данных, устройство способно показывать ещё большие показатели производительности.
Множество рабочих режимов
для построения сети WLAN
Устройство поддерживает множество рабочих режимов (точка доступа/Multi-SSID/клиент/универсальный/WDS ретранслятор, мост с точкой доступа), обеспечивая пользователям множество возможностей для применения устройства. Множество рабочих режимов также позволяет быстро создавать беспроводную сеть, устраняя мёртвые зоны.
Поддерка пассивного PoE
— гибкость подключения
Питание TL-WA701ND может производиться по кабелю Ethernet одновременно с передачей данных, при этом устройство может находиться на расстоянии 30 метров от источника питания. Это позволит вам устанавливать точку доступа в наиболее подходящем месте, например, на стене или под потолком вашего офиса.
-

WPS
Быстрая настройка беспроводного подключения нажатием кнопки WPS.
-
Простая настройка
Мастер быстрой настройки на компакт-диске позволит быстро и легко выполнить настройку устройства.


*Вся вышеуказанная информация применима ТОЛЬКО к TL-WA701ND версии 2.0.
Как узнать версию устройства TP-LINK?
Недавно я опубликовал статью о двух точках доступа от TP-Link. Можете почитать: TP-Link TL-WA701ND и TP-Link TL-WA801ND – точка доступа, репитер и Wi-Fi адаптер в одном устройстве. Там я рассказывал, что это за устройства, какие задачи они могут выполнять, и делал небольшой обзор. Так как это многофункциональные сетевые устройства, которые могут работать в разных режимах, то решил написать отдельную инструкцию по настройке TP-Link TL-WA801ND и TP-Link TL-WA701ND в режиме точки доступа, Wi-Fi приемника (клиента) и репитера (усилителя беспроводной сети).
Процесс настройки очень простой. Нужно только переключить режим работы, и подключить точку доступа, или подключится к основной Wi-Fi сети через панель управления. Так как это точки доступа, то первым делом мы рассмотрим процесс настройки именно в этом режиме. Так же настроим эти устройства в качестве ретранслятора, для усиления уже существующей Wi-Fi сети. Ну и рассмотрим настройку в режиме клиента. Он пригодится в том случае, если вы хотите использовать одно из этих устройств для подключения к Wi-Fi сети стационарного компьютера, телевизора и т. д. Устройство, в котором нет Wi-Fi модуля, и к интернету его можно подключить только по кабелю.
Один нюанс: скорее всего, панель управления у TL-WA801ND будет немного отличатся от TL-WA701ND. У старшей модели web-интерфейс более современный. Но только внешне. Разделы и все настройки практически одинаковые. Поэтому, я не стал делать две отдельные инструкции.
Как зайти в настройки и переключить режим работы?
Для входа в настройки точки доступа от TP-Link нужно сначала подключить к ней компьютер, ноутбук или смартфон. По сетевому кабелю, или по Wi-Fi сети, которая по умолчанию открыта (без пароля). А если закрыта, то пароль указан на наклейке снизу самого устройства (подписан как PIN).
Вся заводская информация: адрес для входа в панель управления, заводские логин и пароль, MAC-адрес, PIN – указаны на самой точке доступа.

Открываем любой браузере и переходим по IP-адресу: 192.168.0.254. Должна появится форма, в которой нужно указать имя пользователя и пароль. Как можно увидеть на фото выше, заводское имя пользователя и пароль: dmin и admin.

Откроется панель управления. Если точка доступа еще не настраивалась, то будет запущен мастер быстрой настройки. Можете попробовать настроить все с его помощью, а можете нажать на кнопку «Exit» и настроить по инструкции, которую найдете ниже.

Если что-то пошло не так и не заходит в настройки
Если не удается перейти по адресу 192.168.0.254, не подходит логин/пароль, или еще что-то, то первым делом сделайте сброс настроек точки доступа. Включите ее, и чем-то острым секунд на 15 зажмите кнопку Reset. Активно замигает индикатор в виде шестеренки, и погаснет. Тогда кнопку можно отпускать.

Если после этого настройки не будут открываться, то почитайте статью не заходит в настройки роутера. И по ней проверьте настройки на компьютере. Наша цель – зайти в web-интерфейс.
Меняем режим работы
По умолчанию стоит режим работы «Точка доступа». Сменить его можно в настройках, на вкладке «Operation Mode». Выбираем необходимый режим и сохраняем настройки.

Устройство будет перезагружена, после чего нужно снова войти в панель управления по адресу: 192.168.0.254.
Настройка точки доступа TP-Link
По умолчанию стоит режим точки доступа (Access Point). Можете зайти на вкладку «Operation Mode» и проверить. В этом режиме точка доступа получает интернет по кабелю от другого сетевого устройства (обычно это маршрутизатор) и раздает его по Wi-Fi сети.
Все что нужно сделать, это сменить настройки Wi-Fi сети в разделе «Wireless Settings», задать имя сети и выбрать свой регион. Затем сохраняем настройки нажав на кнопку «Save». Дальше, в разделе «Wireless Security» выбираем тип защиты, задаем пароль, и сохраняем настройки.

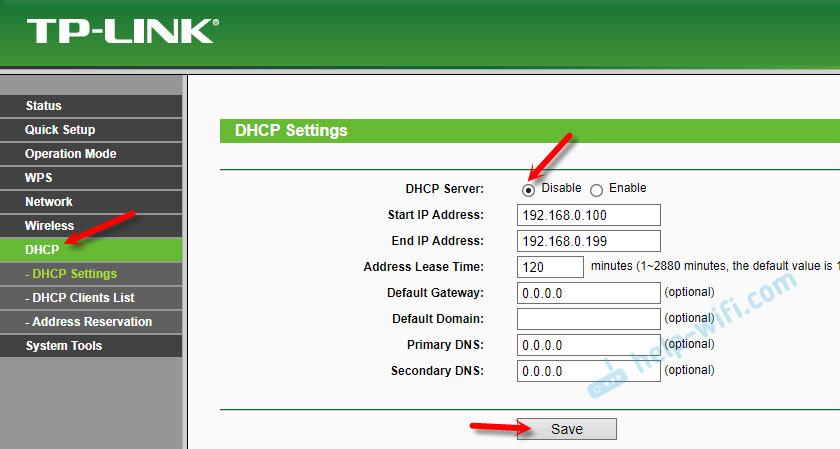
Дальше переходим в раздел «DHCP», отключаем «DHCP Server» поставив значение «Disable». Сохраняем настройки.
Перезагружаем нашу точку доступа.

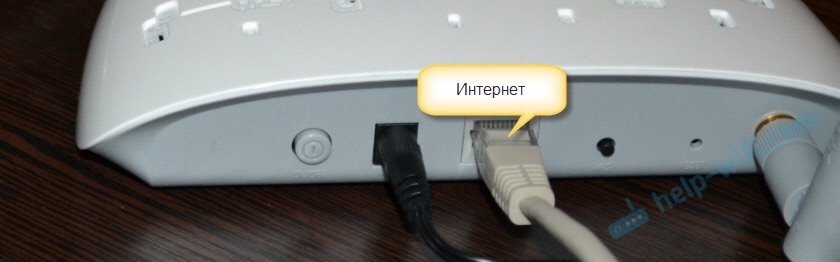
После этого просто подключаем сетевой кабель (интернет) в порт «Ethernet». Если он еще не подключен.
Чтобы снова зайти в настройки, проще всего сделать сброс настроек (показывал выше). Или в списке клиентов на главном маршрутизаторе посмотреть IP-адрес точки доступа и перейти по нему.
Настройка TP-Link TL-WA701ND (WA801ND) в режиме репитера
В этом режиме наше устройство будет по Wi-Fi подключаться к уже существующей сети и усиливать ее.
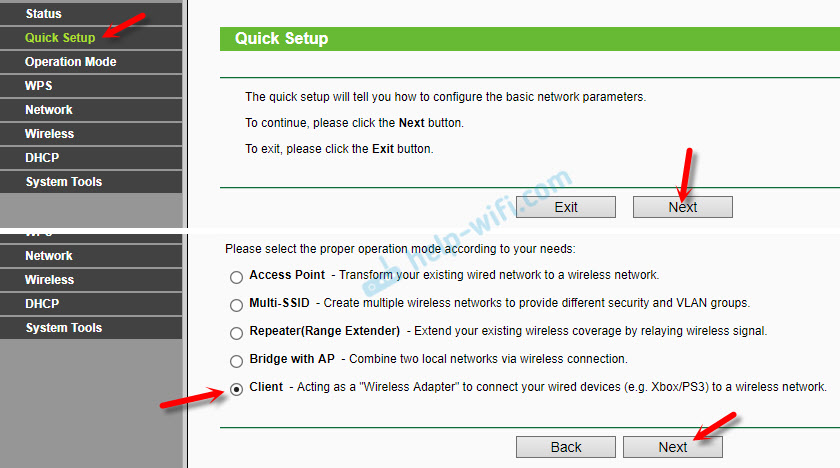
Лучше всего настраивать точку доступа в режиме репетира через мастер быстрой настройки. Откройте «Quick Setup» и нажмите «Next».
В следующем окне выбираем «Repeater (Range Extender)» и снова нажимаем кнопку «Next».

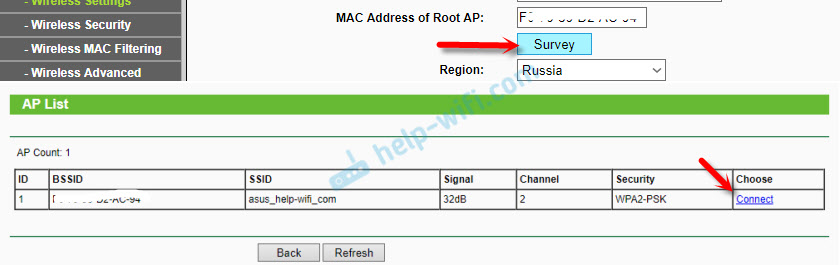
Нажимаем на кнопку «Survey» и напротив своей сети (которую нужно усилить) нажимаем на ссылку «Connect».
Вводим пароль от Wi-Fi сети к которой подключаемся, и нажимаем «Next».

DHCP-сервер должен быть отключен. Так же необходимо, чтобы репитер и основной роутер были в одной подсети. По умолчанию, в настройках указан IP-адрес 192.168.0.254. Если у вашего роутера IP 192.168.0.1 (можно посмотреть на самом роутере), то менять ничего не нужно. Но, если так как у меня, IP-адрес роутера 192.168.1.1, то «0» меняем на «1».

Нажимаем на кнопку «Reboot».
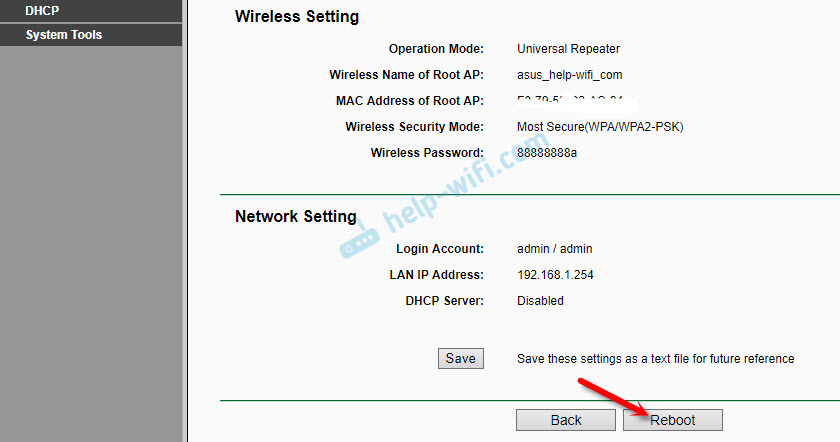
После перезагрузки будет одна Wi-Fi сеть усилена TP-Link TL-WA701ND, или TP-Link TL-WA801ND. Для входа в web-интерфейс используйте адрес, указанный в предпоследнем шаге.
Режим клиента (Wi-Fi адаптер)
В данном режиме наша точка доступа будет работать к приемник. Принимать интернет по Wi-Fi и передавать по сетевому кабелю. Wi-Fi раздавать не будет.
В разделе «Quick Setup» нужно нажать «Next» и выбрав режим «Client» продолжаем настройку.
Нажав на кнопку «Survey», появится список доступных сетей. Выбираем свою Wi-Fi сеть.

Указав пароль от своей Wi-Fi сети, нажимаем кнопку «Next».
Обратите внимание на IP-адрес. Он должен быть в одной подсети с вашим роутером. Предпоследняя цифра в настройках должна быть такая же, как в IP-адресе вашего маршрутизатора.
Нажимаем на кнопку «Reboot» и ждем пока точка доступа будет перезагружаться.
Все, адаптер готов.

С его помощью можно подключить к Wi-Fi сети свой стационарный компьютер, телевизор и т. д.
-
Contents
-
Table of Contents
-
Troubleshooting
-
Bookmarks
Quick Links
TL-WA701ND
150Mbps Wireless N Access Point
Rev: 3.0.0
1910010669
Related Manuals for TP-Link TL-WA701ND
Summary of Contents for TP-Link TL-WA701ND
-
Page 1
TL-WA701ND 150Mbps Wireless N Access Point Rev: 3.0.0 1910010669… -
Page 2
Specifications are subject to change without notice. is a registered trademark of TP-LINK TECHNOLOGIES CO., LTD. Other brands and product names are trademarks or registered trademarks of their respective holders. No part of the specifications may be reproduced in any form or by any means or used to make any derivative such as translation, transformation, or adaptation without permission from TP-LINK TECHNOLOGIES CO., LTD. -
Page 3: Fcc Statement
FCC STATEMENT This equipment has been tested and found to comply with the limits for a Class B digital device, pursuant to part 15 of the FCC Rules. These limits are designed to provide reasonable protection against harmful interference in a residential installation. This equipment generates, uses and can radiate radio frequency energy and, if not installed and used in accordance with the instructions, may cause harmful interference to radio communications.
-
Page 4: Industry Canada Statement
National restrictions This device is intended for home and office use in all EU countries (and other countries following the EU directive 1999/5/EC) without any limitation except for the countries mentioned below: Country Restriction Reason/remark General authorization required for outdoor use and Bulgaria None public service…
-
Page 5
Korea Warning Statements: 당해 무선설비는 운용중 전파혼신 가능성이 있음. NCC Notice: 經型式認證合格之低功率射頻電機,非經許可,公司、商號或使用者均不得擅自變更頻率、加大功 率或變更原設計之特性及功能。 低功率射頻電機之使用不得影響飛航安全及干擾合法通信;經發現有干擾現象時,應立即停用,並 改善至無干擾時方得繼續使用。前項合法通信,指依電信法規定作業之無線電通信。低功率射頻電 機須忍受合法通信或工業、科學及醫療用電波輻射性電機設備之干擾。 Продукт сертифіковано згідно с правилами системи УкрСЕПРО на відповідність вимогам нормативних документів та вимогам, що передбачені чинними законодавчими актами України. -
Page 6: Declaration Of Conformity
TP-LINK TECHNOLOGIES CO., LTD DECLARATION OF CONFORMITY For the following equipment: Product Description: 150Mbps Wireless N Access Point Model No.: TL-WA701ND Trademark: TP-LINK We declare under our own responsibility that the above products satisfy all the technical regulations applicable to the product within the scope of Council Directives:…
-
Page 7: Table Of Contents
CONTENTS Package Contents ………………..1 Chapter 1 Introduction………………. 2 Product Overview………………..2 Conventions …………………. 2 Main Features ………………..3 Appearance………………….. 3 1.4.1 The Front Panel ………………..3 1.4.2 The Rear Panel………………..4 Chapter 2 Hardware Installation …………….5 Before You Begin………………..5 Basic Requirements ………………
-
Page 8
4.9.3 Ping Watch Dog………………..58 4.9.4 Firmware Upgrade ……………….58 4.9.5 Factory Defaults………………..59 4.9.6 Backup & Restore………………..59 4.9.7 Reboot ………………….60 4.9.8 Password ………………….61 4.9.9 System Log………………….61 4.9.10 Statistics ………………….62 Appendix A: Application Example ……………. 65 Appendix B: Factory Defaults …………….68 Appendix C: Troubleshooting …………….69 Appendix D: Specifications………………. -
Page 9: Package Contents
One Power Injector Ethernet Cable One Power Adapter for TL-WA701ND 150Mbps Wireless N Access Point Quick Installation Guide One Resource CD for TL-WA701ND 150Mbps Wireless N Access Point, including: This User Guide Other helpful information Note: Make sure that the package contains the above items. If any of the listed items are damaged or…
-
Page 10: Chapter 1 Introduction
It supports an easy, web-based setup for installation and management. Even though you may not be familiar with the Access Point, you can easily configure it with the help of this Guide. Before installing the AP, please look through this Guide to get the full information of the TL-WA701ND 150Mbps Wireless N Access Point.
-
Page 11: Main Features
1.4.1 The Front Panel Figure 1-1 The front panel of the TL-WA701ND consists of several LED indicators, which is designed to indicate connections. View from left to right, Table 1-1 describes the LEDs on the front panel of the device.
-
Page 12: The Rear Panel
1.4.2 The Rear Panel Figure 1-2 Viewed from left to right, the following parts are located on the rear panel of TL-WA701ND. ON/OFF: The switch for the power. POWER: The power port connects to the power adapter provided with the TL-WA701ND 150Mbps Wireless N Access Point.
-
Page 13: Chapter 2 Hardware Installation
Web browser, such as Microsoft Internet Explorer 5.0 or above, Netscape Navigator 6.0 or above Operating temperature: 0℃~40℃ (32℉~104℉) Operating Humidity: 10%~90%RH, Non-condensing 2.3 Connecting the Device Figure 2-1 is an example of the typical application of TL-WA701ND in the infrastructure network. An Infrastructure network contains an access point or a wireless router.
-
Page 14
3. Adjust the direction of the antenna. Normally, upright is a good direction. 4. Connect the Ethernet Broadband Router to the TL-WA701ND Access Point. Power on the AP. 5. Then you can connect a desktop PC or laptop to your network. (Make sure your computer or laptop is equipped with a Wireless Adapter.) -
Page 15: Chapter 3 Quick Installation Guide
TL-WA701ND 150Mbps Wireless N Access Point easily with a Web-based utility. 3.1 Quick Setup With a Web-based utility, it is easy to configure and manage the TL-WA701ND 150Mbps Wireless N Access Point. The Web-based utility can be used on any Windows, Macintosh or UNIX OS with a Web browser, such as Microsoft Internet Explorer, Mozilla Firefox or Apple Safari.
-
Page 16
If you click Exit and choose to manually configure the AP on your own need, please note that the DHCP is enabled during the configuration, it is essential to disable DHCP when all the settings are finished. The Operation Mode page will appear then, shown in Figure 3-4. The TL-WA701ND supports up to five operation modes. -
Page 17
TL-WA701ND 150Mbps Wireless N Access Point User Guide Figure 3-4 Operation Mode In Access Point mode, the product will act as a wireless central hub for your wireless LAN clients, giving a wireless extension for your current wired network. In Multi-SSID mode, the product can be assigned up to four SSIDs to work with your VLAN. -
Page 18
TL-WA701ND 150Mbps Wireless N Access Point User Guide Click Next, you will then come to Network Setting page for furthers configuration. When you choose Multi-SSID mode, the Wireless Setting page will be shown in Figure 3-6. Figure 3-6 Wireless Settings – Multi-SSID mode You are suggested to implement Multi-SSID function with a switch that supports Tag VLAN feature. -
Page 19
TL-WA701ND 150Mbps Wireless N Access Point User Guide Select the Repeater Mode, for example Universal Repeater. Click Survey, then the window displaying a list of available SSIDs will appear in Figure 3-8. -
Page 20
TL-WA701ND 150Mbps Wireless N Access Point User Guide Figure 3-8 AP List… -
Page 21
TL-WA701ND 150Mbps Wireless N Access Point User Guide Find the SSID of the Access Point / Router or WISP, and click Connect in the corresponding row. You will then return to the previous page. Select the security mode and enter the password that is the same as on your router or access point in Figure 3-7. -
Page 22
TL-WA701ND 150Mbps Wireless N Access Point User Guide Note: If you do not select Use the same security settings for the local wireless network as the root AP, the page will be shown as below, you can then separately configure the security settings for the local wireless network. -
Page 23
TL-WA701ND 150Mbps Wireless N Access Point User Guide Click Survey, then the window displaying a list of available SSIDs will appear in Figure 3-8. Find the SSID of the Access Point / Router or WISP, and click Connect in the corresponding row. -
Page 24
TL-WA701ND 150Mbps Wireless N Access Point User Guide Figure 3-13 Quick Setup – Finish Click the Reboot button to make your wireless configuration to take effect and finish the Quick Setup. Wait until the device restarts successfully. Figure 3-14 Quick Setup – Finish If you don’t make any changes of the configuration, you will see the Finish page as shown in… -
Page 25
TL-WA701ND 150Mbps Wireless N Access Point User Guide Figure 3-15 Quick Setup – Finish… -
Page 26: Chapter 4 Configure The Device
150Mbps Wireless N Access Point User Guide Chapter 4 Configure the Device This Chapter describes how to configure your Access Point via the web-based management page. The TL-WA701ND 150Mbps Wireless N Access Point is easy to configure and manage with the ® Web-based (Internet Explorer, Netscape…
-
Page 27: Status
TL-WA701ND 150Mbps Wireless N Access Point User Guide 4.2 Status Selecting Status will enable you to view the AP’s current status and configuration, all of which is read-only. Figure 4-3 Device Status Firmware Version — This field displays the current firmware version of the AP.
-
Page 28: Quick Setup
TL-WA701ND 150Mbps Wireless N Access Point User Guide 4.3 Quick Setup Please refer to Section 3.1 Quick Setup for more details. 4.4 Operation Mode The Operation Mode option allows you to change the operation mode for your AP, shown in Figure 4-4.
-
Page 29: Wps
TL-WA701ND 150Mbps Wireless N Access Point User Guide Select the operation mode based on your need, then click the Save button. If the mode is changed, the Note Dialog will appear, shown as below. Click OK. 4.5 WPS WPS (Wi-Fi Protected Setup) can help you to quickly and securely connect to a network. This section will guide you to add a new wireless device to an existing network quickly by function.
-
Page 30
TL-WA701ND 150Mbps Wireless N Access Point User Guide Method One: Step 1: Press the WPS button on the rear panel of the device. Step 2: Press and hold the WPS button of the adapter directly for 2 or 3 seconds. -
Page 31
TL-WA701ND 150Mbps Wireless N Access Point User Guide The WPS Configuration Screen of Wireless Adapter Step 3: Wait for a while until the next screen appears. Click Finish to complete the WPS configuration. The WPS Configuration Screen of Wireless Adapter… -
Page 32
TL-WA701ND 150Mbps Wireless N Access Point User Guide Figure 4-6 Add A New Device Step 2: Choose “Press the button of the new device in two minutes” and click Connect. Step 3: For the configuration of the wireless adapter, please choose “Push the button on my access point or wireless router”… -
Page 33
TL-WA701ND 150Mbps Wireless N Access Point User Guide The WPS Configuration Screen of Wireless Adapter II. By PIN If the new device supports Wi-Fi Protected Setup and the PIN method, you can add it to the network by PIN with the following two methods. -
Page 34
TL-WA701ND 150Mbps Wireless N Access Point User Guide The WPS Configuration Screen of Wireless Adapter Note: In this example, the default PIN code of this adapter is 16952898 as the above figure shown. Method Two: Enter the PIN from my AP Step 1: Get the Current PIN code of the AP in Figure 4-5 (each AP has its unique PIN code. -
Page 35: Network
TL-WA701ND 150Mbps Wireless N Access Point User Guide You will see the following screen when the new device has successfully connected to the network. Note: 1. The WPS LED on the AP will light green for five minutes if the device has been successfully added to the network.
-
Page 36: Wireless
TL-WA701ND 150Mbps Wireless N Access Point User Guide Note: If you change the IP Address, you must use the new IP Address to log in the AP. 2. If the new LAN IP Address you set is not in the same subnet with the IP Address pool of DHCP sever, the IP Address pool will not take effect until it is re-configured accordingly.
-
Page 37
TL-WA701ND 150Mbps Wireless N Access Point User Guide 1) Access Point: This mode allows wireless stations to access this device. Figure 4-10 Wireless Settings in Access Point mode SSID (Set Service Identifier) — Identifies your wireless network name. Create a name up to 32 characters and make sure all wireless points in the wireless network with the same SSID. -
Page 38
TL-WA701ND 150Mbps Wireless N Access Point User Guide • 11bgn mixed — All 802.11b, 802.11g and 802.11n wireless stations can connect to the device. Channel Width — Determines the channel width to be used. It is unnecessary to change the default value unless required. -
Page 39
TL-WA701ND 150Mbps Wireless N Access Point User Guide VLANID (1-4) — Provide a number between 1 and 4095 for VLAN. This will cause the device to send packets with VLAN tags. The switch connecting with the device must support VLAN IEEE802.1Q frames. -
Page 40
The wireless STAs join to the network with the same VLAN ID can communicate with each other, for example, STA1 and STA3. All wireless STAs can log on to the Web management page of TL-WA701ND and manage the access point, for example, STA1, STA2, STA3 and STA4. -
Page 41
LAN port of TL-WA701ND. Configure the VLAN ID of the PC that can log on to the Web management page of TL-WA701ND via the LAN port equal to the PVID of port 5. Verify the communication status after the above configuration is completed. -
Page 42
150Mbps Wireless N Access Point User Guide Note: If the LAN port of TL-WA701ND is not connected to a switch but directly to a PC, 1. The PC can directly log on to the Web management page of TL-WA701ND and manage the access point. -
Page 43
TL-WA701ND 150Mbps Wireless N Access Point User Guide Figure 4-13 Wireless Settings in Repeater mode Repeater Mode — Select the mode based on your need. Universal Repeater — In Repeater mode, the AP with WDS enabled will relays data to an associated root AP. -
Page 44
TL-WA701ND 150Mbps Wireless N Access Point User Guide 5) Bridge with AP: This mode can bridge the AP and up to 4 APs also in bridge mode to connect two or more wired LANs. Figure 4-14 Wireless Settings in Bridge with AP mode… -
Page 45: Wireless Security
TL-WA701ND 150Mbps Wireless N Access Point User Guide the device in a region other than one of those specified in this field. If your country or region is not listed, please contact your local government agency for assistance. When you select your local region from the pull-down list, click the Save button, then the Note Dialog appears.
-
Page 46
TL-WA701ND 150Mbps Wireless N Access Point User Guide 1) Access Point Figure 4-15 Wireless Security — Access Point Disable Security — Check this box radio button to disable wireless security. If disabled, the wireless stations will be able to connect this device without encryption. It is strongly recommended that you choose one of the security types to enable security. -
Page 47
TL-WA701ND 150Mbps Wireless N Access Point User Guide WPA/WPA2-Enterprise — Select WPA/WPA2 based on Radius Server. • Version — You can select one of following versions. Automatic — Select WPA or WPA2 automatically based on the wireless station’s capability and request. -
Page 48
TL-WA701ND 150Mbps Wireless N Access Point User Guide Figure 4-16 Wireless Security – Multi-SSID Disable Security — Check this box radio button to disable wireless security. If disabled, the wireless stations will be able to connect this device without encryption. It is strongly recommended that you choose one of the security types to enable security. -
Page 49
TL-WA701ND 150Mbps Wireless N Access Point User Guide WPA2 — WPA version 2. • Encryption — You can select either Automatic, TKIP or AES. • Radius Server IP — Enter the IP address of the Radius Server. • Radius Port — Enter the port used by radius service. -
Page 50
TL-WA701ND 150Mbps Wireless N Access Point User Guide • Radius Server IP — Enter the IP address of the Radius Server. • Radius Port — Enter the port used by radius service. • Radius Password — Enter the password for the Radius Server. -
Page 51
TL-WA701ND 150Mbps Wireless N Access Point User Guide 4) Repeater (Range Extender) Figure 4-18 Wireless Security – Repeater Disable Security — Check this box radio button to disable wireless security. If disabled, the wireless stations will be able to connect this device without encryption. It is strongly recommended that you choose one of the security types to enable security. -
Page 52
TL-WA701ND 150Mbps Wireless N Access Point User Guide Open System — Select 802.11 Open System authentication. • WEP Key Format — You can select ASCII or Hexadecimal format. ASCII format stands for any combination of keyboard characters in the specified length. Hexadecimal format stands for any combination of hexadecimal digits (0-9, a-f, A-F) in the specified length. -
Page 53
TL-WA701ND 150Mbps Wireless N Access Point User Guide 5) Bridge with AP Figure 4-19 Wireless Security – Bridge with AP Disable Security — Check this box radio button to disable wireless security. If disabled, the wireless stations will be able to connect this device without encryption. It is strongly recommended that you choose one of the security types to enable security. -
Page 54: Wireless Mac Filtering
TL-WA701ND 150Mbps Wireless N Access Point User Guide WPA/WPA2-Enterprise — Select WPA/WPA2 based on Radius Server. • Version — You can select one of following versions. Automatic — Select WPA or WPA2 automatically based on the wireless station’s capability and request.
-
Page 55
TL-WA701ND 150Mbps Wireless N Access Point User Guide control wireless stations accessing the device, which depend on the station’s MAC address on the following screen as shown Figure 4-20. This function is not available when the operation is set to Client. -
Page 56
TL-WA701ND 150Mbps Wireless N Access Point User Guide button Deny the stations specified by any enabled entries in the list to access, otherwise, select the radio button Allow the stations specified by any enabled entries in the list to access. -
Page 57: Wireless Advanced
TL-WA701ND 150Mbps Wireless N Access Point User Guide Note: If you enable the function and select the “Allow the stations specified by any enabled entries in the list to access” for Filtering Rules, and there are not any enabled entries in the list, thus, no wireless stations can access the device.
-
Page 58: Antenna Alignment
TL-WA701ND 150Mbps Wireless N Access Point User Guide 4.7.5 Antenna Alignment Selecting Wireless > Antenna Alignment will show how remote AP’s signal strength changes Figure 4-23 while changing the antenna’s direction in the following screen shown in Figure 4-23 Antenna Alignment Remote RSSI — Remote AP’s signal strength value.
-
Page 59: Wireless Statistics
TL-WA701ND 150Mbps Wireless N Access Point User Guide Run Time — How long this function is running. Transmit — Wireless transmit rate information. Receive — Wireless receive rate information. Click the Start button to start wireless throughput monitor. Click the Stop button to stop wireless throughput monitor.
-
Page 60: Dhcp Settings
TL-WA701ND 150Mbps Wireless N Access Point User Guide the corresponding function. The detailed explanations for each submenu are provided below. Figure 4-26 The DHCP menu 4.8.1 DHCP Settings Selecting DHCP > DHCP Settings will enable you to set up the AP as a DHCP (Dynamic Host Configuration Protocol) server, which provides the TCP/IP configuration for all the PCs that are connected to the system on the LAN.
-
Page 61: Dhcp Clients List
TL-WA701ND 150Mbps Wireless N Access Point User Guide Primary DNS (optional) — Enter the DNS IP address provided by your ISP. Consult your ISP if you don’t know the DNS value. The factory default setting is 0.0.0.0. Secondary DNS (optional) — Enter the IP address of another DNS server if your ISP provides two DNS servers.
-
Page 62: System Tools
TL-WA701ND 150Mbps Wireless N Access Point User Guide Figure 4-29 Address Reservation MAC Address — Here displays the MAC address of the PC for which you want to reserve an IP address. Reserved IP Address — Here displays the IP address that the AP is reserved.
-
Page 63: Time Settings
TL-WA701ND 150Mbps Wireless N Access Point User Guide There are nine submenus under the System Tools menu (shown as Figure 4-30): Time Settings, Diagnostic, Ping Watch Dog, Firmware Upgrade, Factory Defaults, Backup & Restore, Reboot, Password, System Log and Statistics. Clicking any of them will enable you to configure the corresponding function.
-
Page 64: Diagnostic
TL-WA701ND 150Mbps Wireless N Access Point User Guide Select your local time zone. Enter the Date in Month/Day/Year format. Enter the Time in Hour/Minute/Second format. Click Save. For automatic time synchronization: Enter the address of the NTP Server Prior. Click the Get GMT button to get GMT from the Internet.
-
Page 65
TL-WA701ND 150Mbps Wireless N Access Point User Guide host or gateway. You can use ping to test both numeric IP address or domain name. If pinging the IP address is successful, but pinging the domain name is not, you might have a name resolution problem. -
Page 66: Ping Watch Dog
Figure 4-35. Figure 4-35 Firmware Upgrade New firmware versions are posted at http://www.tp-link.com and can be downloaded for free. Firmware Version — Here displays the current firmware version. Hardware Version — Here displays the current hardware version. The hardware version of the…
-
Page 67: Factory Defaults
TL-WA701ND 150Mbps Wireless N Access Point User Guide Note: 1. There is no need to upgrade the firmware unless the new firmware has a new feature you want to use. However, when experiencing problems caused by the device itself, you can try to upgrade the firmware.
-
Page 68: Reboot
TL-WA701ND 150Mbps Wireless N Access Point User Guide Figure 4-37 Save or Restore the Configuration Click Backup to save all configuration settings to your local computer as a file. To restore the device’s configuration, follow these instructions: • Click Browse… to find the configuration file which you want to restore.
-
Page 69: Password
TL-WA701ND 150Mbps Wireless N Access Point User Guide 4.9.8 Password Selecting System Tools > Password allows you to change the factory default user name and password of the device on the screen shown in Figure 4-39. Figure 4-39 Password It is strongly recommended that you change the factory default user name and password of the device.
-
Page 70: Statistics
TL-WA701ND 150Mbps Wireless N Access Point User Guide Figure 4-40 System Log The device can keep logs of all traffic. You can query the logs to find what happened to the device. Log Type — By selecting the log type, only logs of this type will be shown.
-
Page 71
TL-WA701ND 150Mbps Wireless N Access Point User Guide Figure 4-41 Statistics The Statistics page shows the network traffic of each PC on the LAN, including total traffic and the value of the last Packets Statistic interval in seconds. Current Statistics Status — Enabled or Disabled. The default value is disabled. To enable, click the Enable button. -
Page 72
TL-WA701ND 150Mbps Wireless N Access Point User Guide Packets — The total number of packets received and transmitted in the last Packets Statistics interval seconds. Bytes — The total number of bytes received and transmitted in the last Packets Statistics interval seconds. -
Page 73: Appendix A: Application Example
150Mbps Wireless N Access Point User Guide Appendix A: Application Example The TL-WA701ND allows you to connect a wireless device to the wired network. Providing that you want to connect your computer equipped with wireless adapter to a wired network wirelessly, you can take the following instructions.
-
Page 74
Enable to enable wireless network function. Right-click the wireless connection icon “ ” on the screen of the PC and then select View Available Wireless Networks. Highlight the SSID of the AP (Here is TP-LINK) and click Connect to add to the network. -
Page 75
TL-WA701ND 150Mbps Wireless N Access Point User Guide Then the following page will display, which indicates you have been successfully added to the network wirelessly. -
Page 76: Appendix B: Factory Defaults
TL-WA701ND 150Mbps Wireless N Access Point User Guide Appendix B: Factory Defaults Item Default Value Common Default Settings Username admin Password admin IP Address 192.168.0.254 Subnet Mask 255.255.255.0 Wireless SSID TP-LINK_XXXXXX Wireless Security Disable Wireless MAC Address Filtering Disable DHCP…
-
Page 77: Appendix C: Troubleshooting
TL-WA701ND 150Mbps Wireless N Access Point User Guide Appendix C: Troubleshooting T1. How do I restore my Access Point’s configuration to its factory default settings? With the Access Point powered on, use a pin to press and hold the RESET button on the rear panel for more than 8 seconds before releasing it.
-
Page 78
TL-WA701ND 150Mbps Wireless N Access Point User Guide Click Change adapter settings Right-click Local Area Connection, and Click Properties. -
Page 79
TL-WA701ND 150Mbps Wireless N Access Point User Guide Double-click Internet Protocol Version 4 (TCP/IPv4). Select Use the following IP address, enter the 192.168.0.100 into the IP address field, 255.255.255.0 into the Subnet mask field. -
Page 80
TL-WA701ND 150Mbps Wireless N Access Point User Guide Now, try to log on to the Web-based configuration page again after the above settings have been configured. If you still cannot access the configuration page, please restore your Access Point’s factory default settings and reconfigure your Access Point following the instructions of this QIG. -
Page 81: Appendix D: Specifications
TL-WA701ND 150Mbps Wireless N Access Point User Guide Appendix D: Specifications General Standards and Protocols IEEE 802.3, 802.3u, 802.11n, 802.11b and 802.11g, TCP/IP, DHCP Safety & Emission FCC、CE One 10/100M Auto-Negotiation LAN RJ45 port, supporting passive Ports 10BASE-T: UTP category 3, 4, 5 cable (maximum 100m) EIA/TIA-568 100Ω…
-
Page 82: Appendix E: Glossary
TL-WA701ND 150Mbps Wireless N Access Point User Guide Appendix E: Glossary 802.11b — The 802.11b standard specifies a wireless networking at 11 Mbps using direct-sequence spread-spectrum (DSSS) technology and operating in the unlicensed radio spectrum at 2.4GHz, and WEP encryption for security. 802.11b networks are also referred to as Wi-Fi networks.
-
Page 83
TL-WA701ND 150Mbps Wireless N Access Point User Guide provides an authentication alternative to an expensive RADIUS server. WPA-PSK is a simplified but still powerful form of WPA most suitable for home Wi-Fi networking. To use WPA-PSK, a person sets a static key or «passphrase» as with WEP. But, using TKIP, WPA-PSK automatically changes the keys at a preset time interval, making it much more difficult for hackers to find and exploit them.

CONTENTS
English ··············································································1
Azərbaycan dili ······························································
15
հայերեն··········································································
29
Қазақша··········································································43
Русский язык·····································································57
Українська мова ·······························································71
ქართული···········································································85
Installation
Note
1. The product model shown in this QIG is “TL-WA801ND”,as an example.
2. Information for technical support can be found in the last page.
English
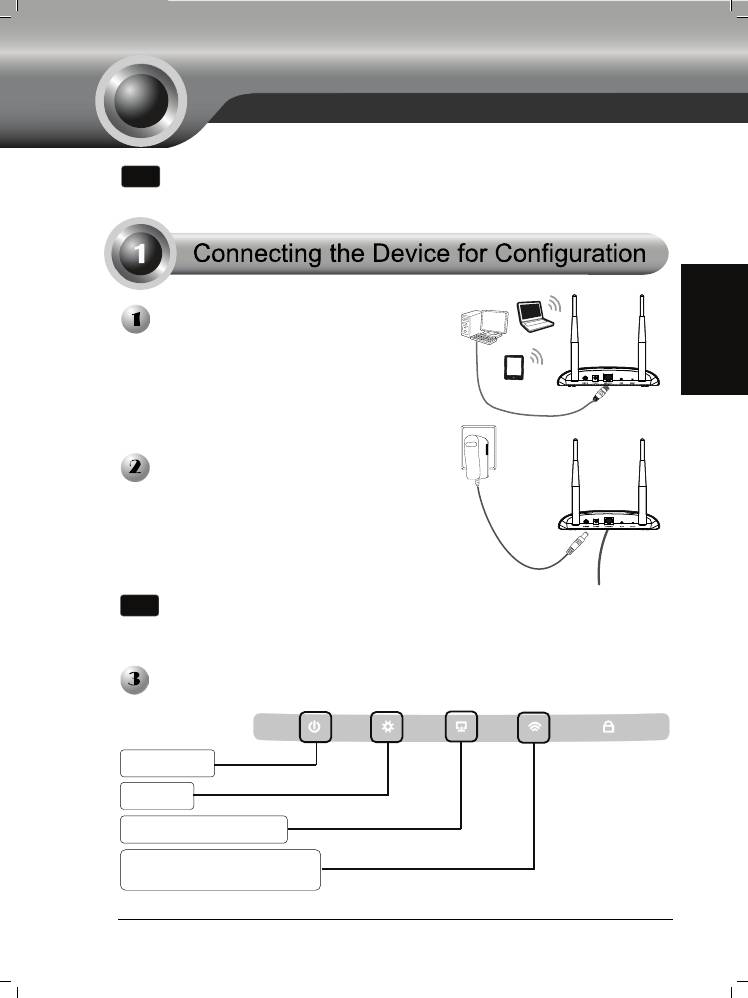
Connect to the Access Point with
the Ethernet cable or via wireless.
The default SSID of the Access
Point is TP-LINK_ XXXXXX. The
XXXXXX is the last 6 characters
of the Access Point’s MAC
address.
Plug the provided power adapter
into the power jack on the back of
the Access Point, and the other
end to a standard electrical wall
socket. Then press the ON/OFF
button to power on the device.
Note
If the distance between the outlet and the Access Point is too long to supply
the power, you can refer to the Power over Ethernet (PoE) solution in
Appendix: With PoE Setup on page 14.
Turn on all of your network devices and then check to see if the LEDs on the
Access Point display normally as the diagram below describes.
Solid light
Flashing
Solid light or flashing
Flashing if the Wireless
Radio function is enabled
1
Login
English
Wireless Settings
2
A
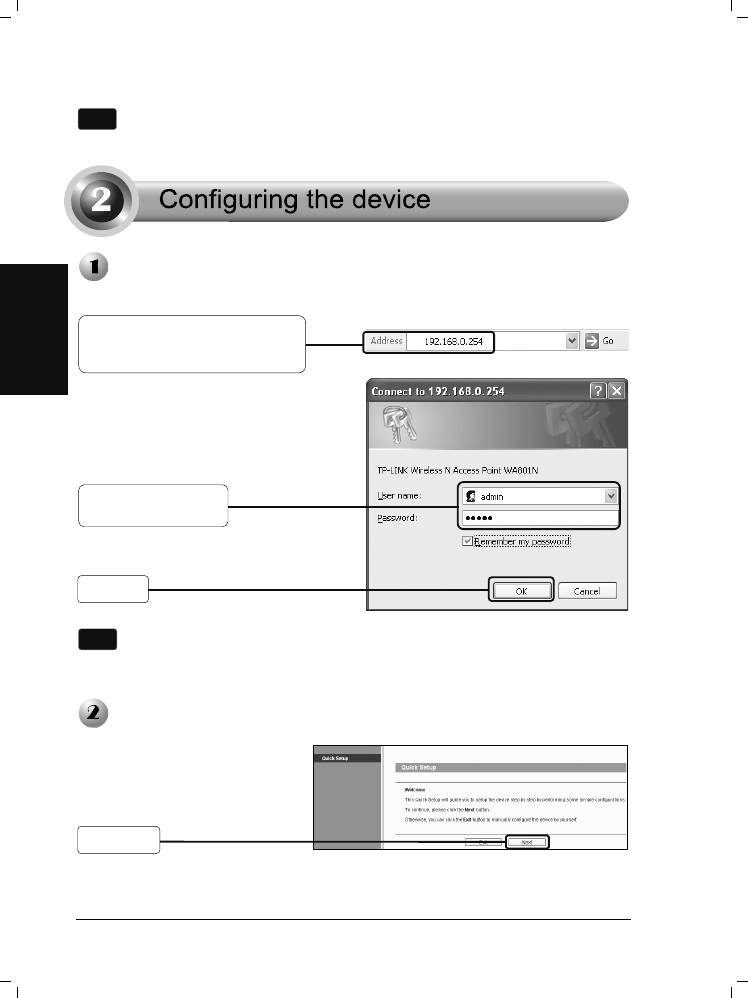
dialog box will prompt you for the
User name and Password.Ente
r
Note
If the LEDs display abnormally, please check to see if all the cable
connectors (power adapter and Ethernet cable) are well connected to you
the default values and click OK.
User name: admin
Password: admin
Click OK
Note
If the dialog box does not pop up, please refer to T3 in Troubleshooting on
page 11 to assign a static IP address 192.168.0.100 for your computer. T2
will give you some help if you forget the password.
r
device.
A
Open your web browser, type in
192.168.0.254 in the address
bar and press Enter.
fter successfully logging in, the
Quick Setup page will display.
Click Next
English
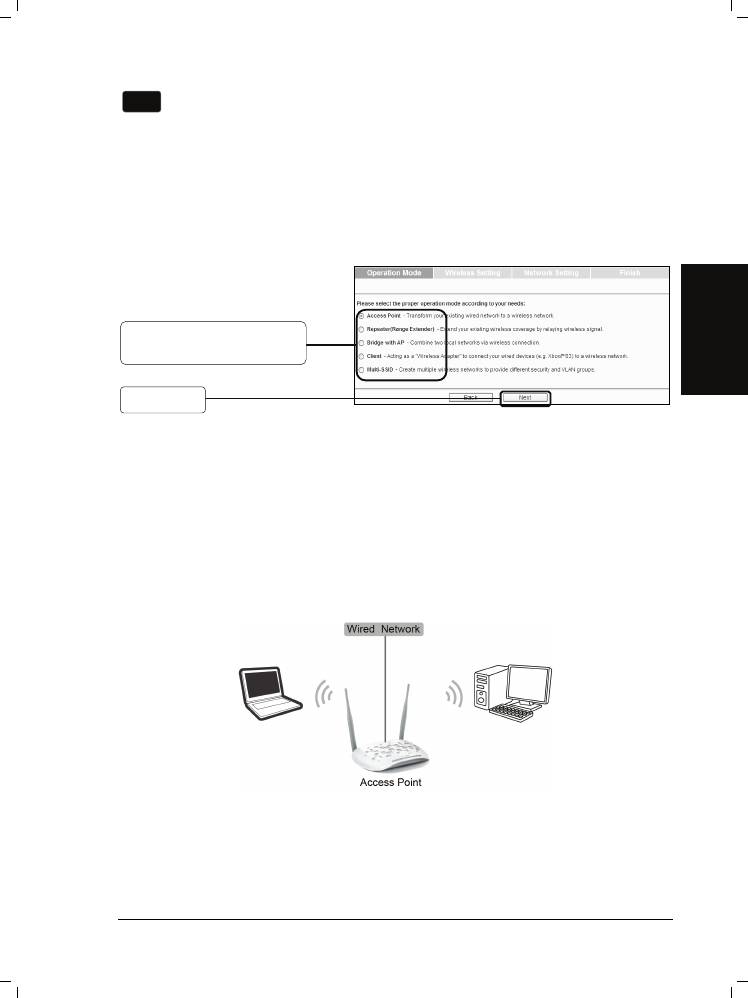
For Access Point mode, please refer to part
A. Access Point Mode
Introduction
In this mode, the product will act as a wireless central hub for your wireless LAN
clients, giving a wireless extension for your current wired network.
3
A
Note
If you click Exit and choose to manually configure the AP on your own need,
please note that the DHCP is enabled during the configuration, it is essential
to disable DHCP when all the settings are finished.
The Operation Mode page will appear then. The TL-WA801ND supports up to five
operation modes. You can refer to the HELP page to know more about the five
modes.
Select the operation mode
based on your need.
Click Next
on page 3.
For Repeater (Range Extender) mode, please refer to part B on page 4.
For Bridge with AP mode, please refer to part C on page 6.
For Client mode, please refer to part D on page 7.
For Multi-SSID mode, please refer to part E on page 8.
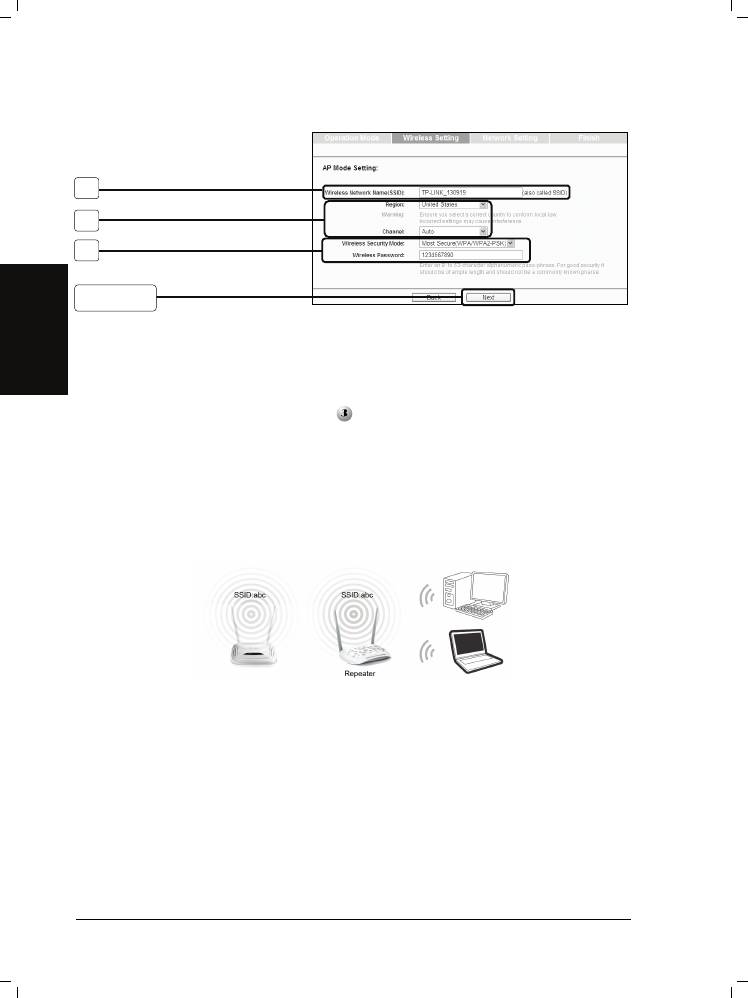
Settings
1
2
3
Click Next
1. Create an easy-to-remember name for your wireless network here.
2. Select Region and Channel for your device.
English
3. Select Most Secure (WPA/WPA2-PSK) mode and enter a wireless password
below to prevent unauthorized access to your AP.
After the settings above, please go to
Network Settings on page 9 to continue
the configuration.
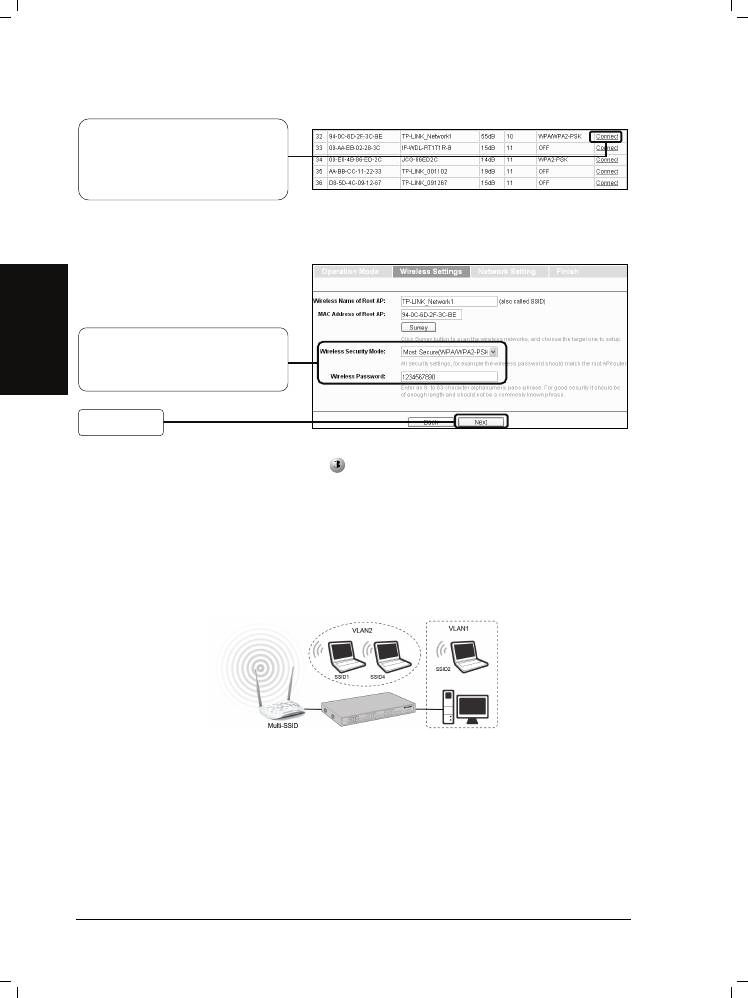
B. Repeater (Range Extender) Mode
Introduction
In this mode, the product can extend the coverage of another wireless Access Point
or Router. The universal repeater mode is for the wireless Access Point or Router
which does not support WDS function.
4
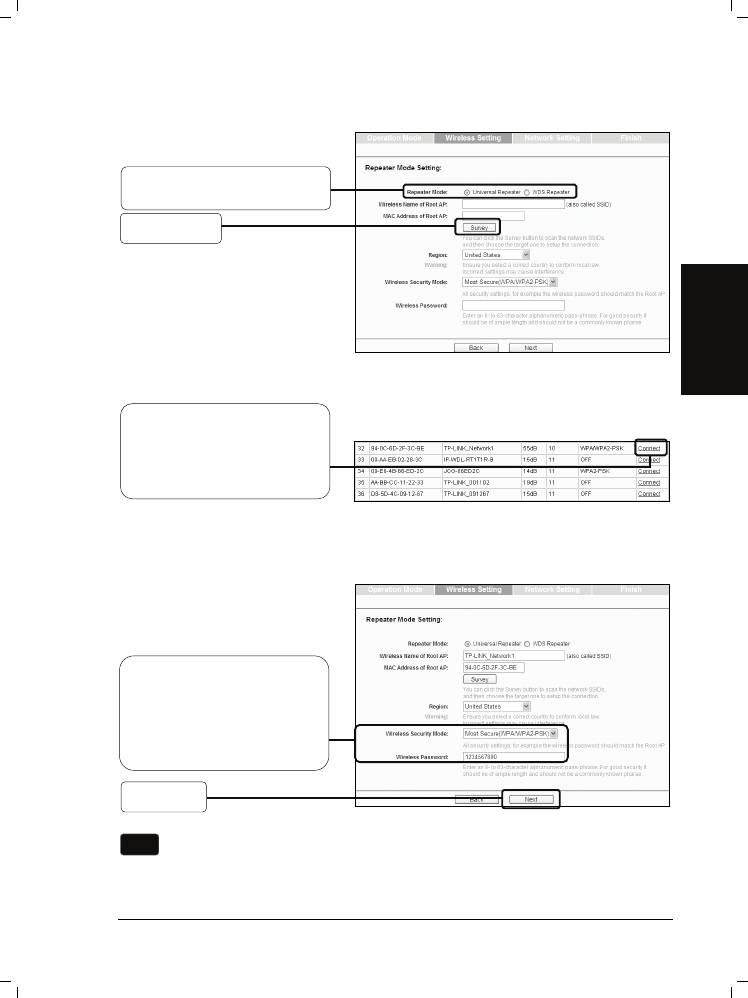
Settings
Select the repeater mode, for
example Universal Repeater.
Click Survey
English
The window displaying a list of available SSIDs will appear.
You will then return to the previous page.
The security mode will be
selected automatically,
please confirm it and enter
the password that is the
same as on your router or
access
5
p
oint.
Click Next
Note
The setup for WDS Repeater mode is similar to that of Universal Repeate
r
Find the SSID of the root
Access Point / Router that you
want to repeat, and then click
Connect in the corresponding
row.
mode.
After the settings above, please go to Network Settings on page 9 to continue
the configuration.
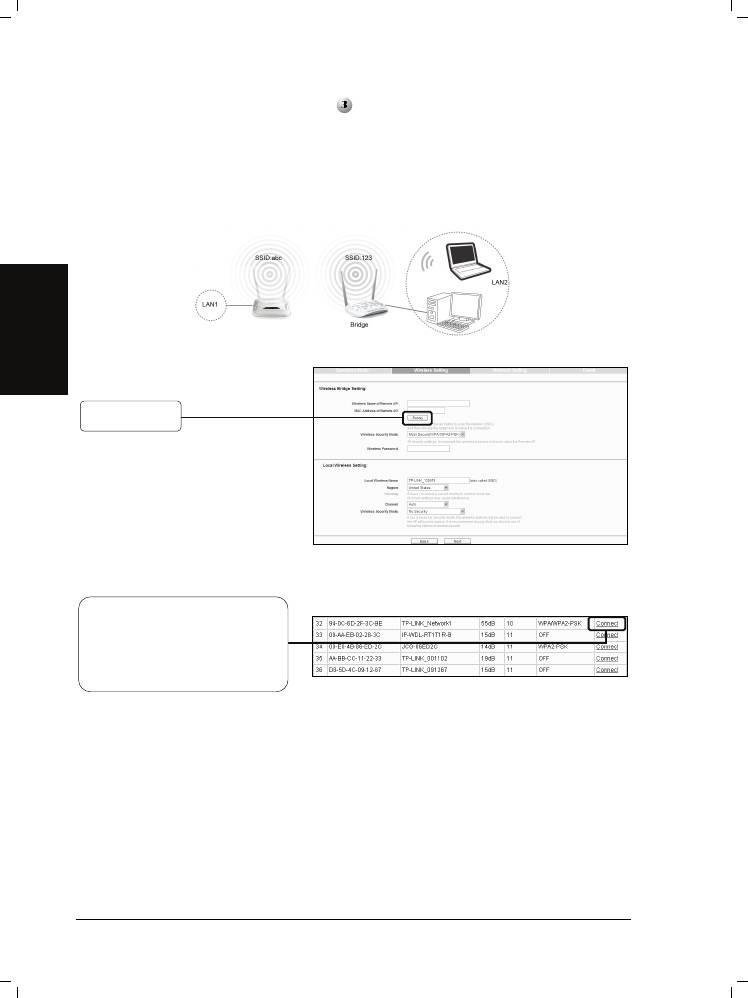
C. Bridge with AP mode
Introduction
In this mode, the product can wirelessly connect two or more remote LANs together.
Settings
English
Click Survey
The window displaying a list of available SSIDs will appear.
Find the SSID of the root
Access Point / Router that you
want to bridge, and then click
Connect in the corresponding
row.
You will then return to the previous page.
6
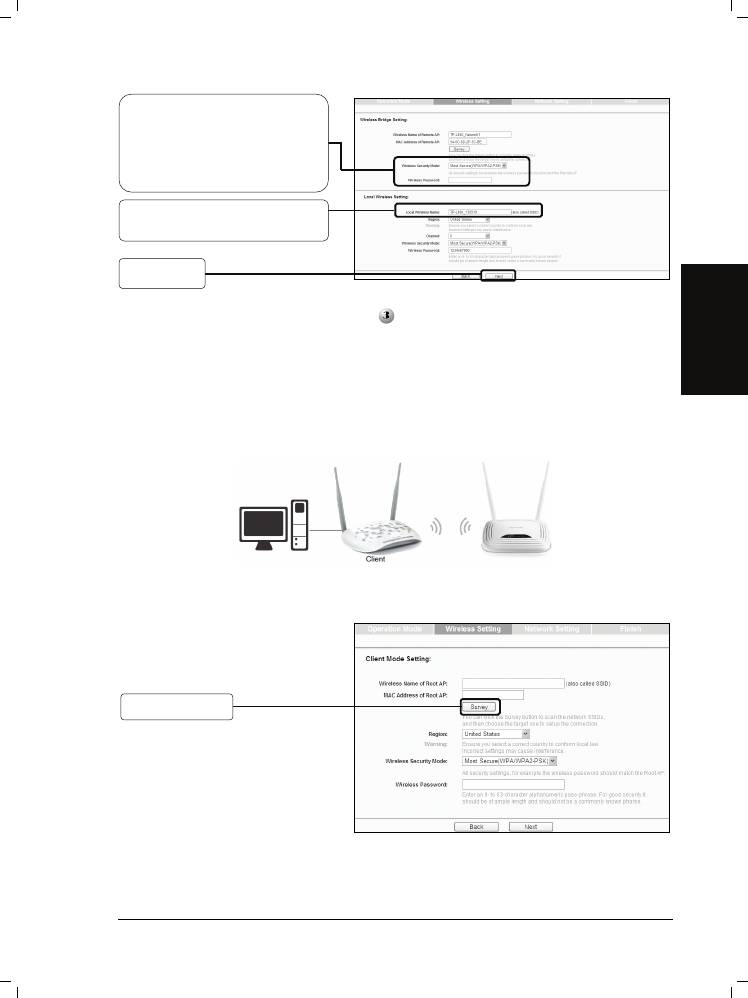
The security mode will be
selected automatically,
please confirm it and enter
the password that is the
same as on the remote AP.
Create a name for the Local
Wireless Network.
Click Next
English
After the settings above, please go to
Network Settings on page 9 to continue
the configuration.
D. Client Mode
Introduction
In this mode, the product will act as a wireless adapter to connect your wired devices
(eg. PC, Xbox, PS3, etc. ) to a wireless network.
Settings
Click Survey
The window displaying a list of available SSIDs will appear.
7
Find the SSID of the Access
Point / Router or WISP, and
click Connect in the
corresponding row.
You will then return to the previous page.
Select the security mode and
English
enter the password that is the
same as on the root AP.
Click Next
After the settings above, please go to
Network Settings on page 9 to continue
the configuration.
E. Multi-SSID Mode
Introduction
In this mode, the product can be assigned up to four SSIDs to work with your VLAN.
8
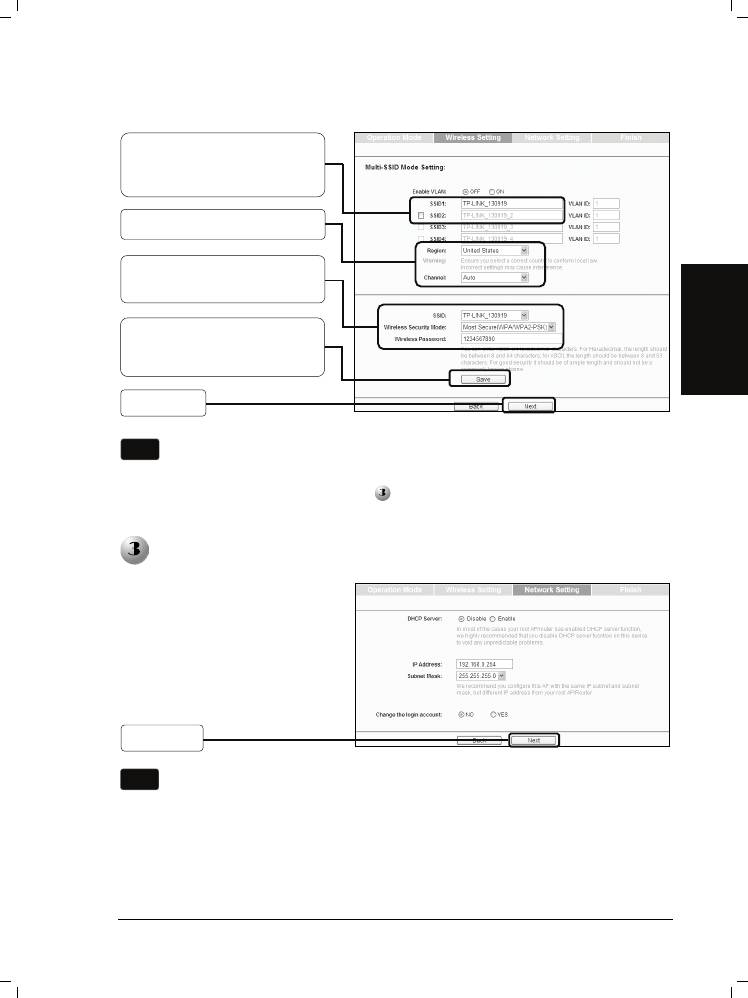
Settings
You can create up to 4
SSIDs and rename them
here.
Select Region and Channel.
Configure the wireless
security for each SSID here.
English
Click Save to apply the
current security settings for
the selected SSID.
Click Next
Note
For the configuration of VLAN, please refer to the User Guide on the
Resource CD.
After the settings above, please go to
Network Settings on page 9 to continue
the configuration.
Network Settings
The Network Setting page
will appear then. It is
recommended that you
keep the default settings
on this page.
Click Next
Note
For advanced configurations on this page, please refer to the User Guide on
the Resource CD.
9
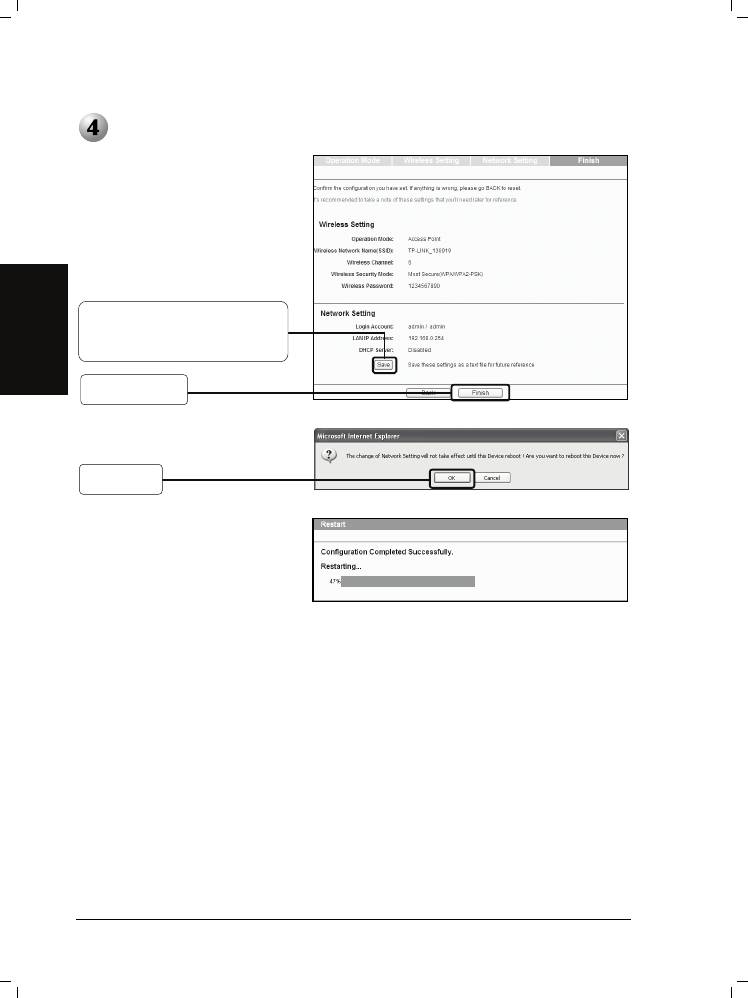
Finish
After Network Settings,
the Finish page will
appear. Here takes the
settings for Access Point
mode for example.
Check your settings and click
Save to save your settings for
future reference.
English
Click Finish
Click OK
Wait until the device
restarts successfully.
Congratulations! You have completed the setup.
10
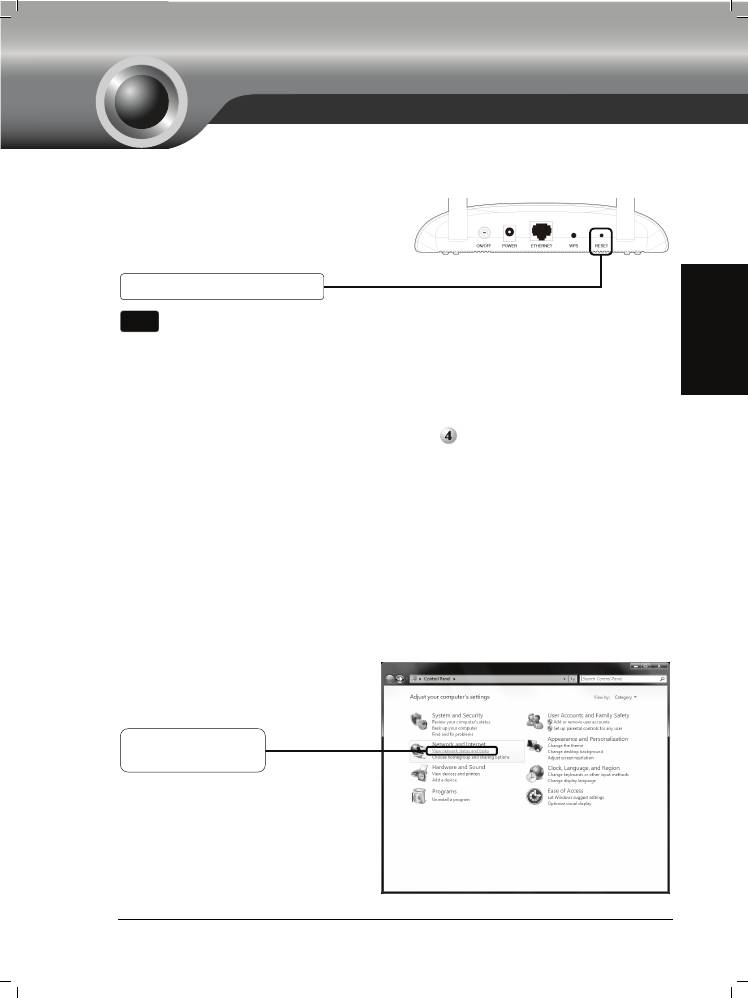
T1. How do I restore my Access Point’s configuration to its factory default settings?
With the Access Point powered on,
use a pin to press and hold the
RESET button on the rear panel fo
English
T2. What can I do if I forget my password?
1) Try to use the default user name and password: admin, admin;
2) Referring to the file that you have saved in
Finish last time you configured
the device, the file will show you the user name and password that you have
configured.
3) If the password is still not the correct one, then you can try to restore the Access
Point’s configuration to its factory default settings referring to previous section
T1 and try to reconfigure your AP by following the instructions of this QIG.
T3. What can I do if I cannot access the web-based configuration page?
Assign a static IP address 192.168.0.100 for your computer first before logging in the
management page. Here takes the procedures in Windows 7 for example.
11
r
Troubleshooting
Troubleshooting
5 to 8 seconds before releasing it.
Hold it in for 5 to 8 seconds
Note
Once the Access Point is reset, the current configuration settings will be lost
and you will need to reconfigure the Access Point.
Go to Start > Settings > Control
Panel, and then you will see the
following page.
Click View network
status and tasks
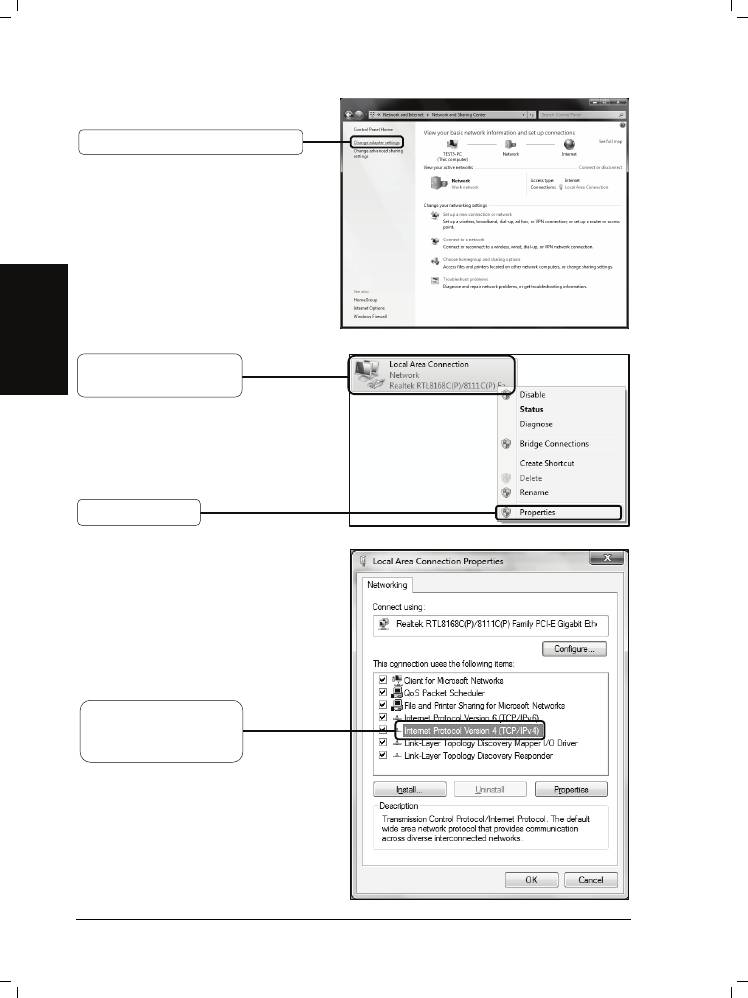
Click Change adapter settings
English
Right-click Local Area
Connection
Click Properties
Double-click Internet
Protocol Version 4
(TCP/IPv4)
12
English
Now, try to log on to the Web-based configuration page again after the above
settings have been configured. If you still cannot access the configuration page,
please restore your Access Point’s factory default settings and reconfigure your
Access Point following the instructions of this QIG. Please feel free to contact our
Technical Support if the problem persists.
Note
While the reconfiguration is done, you need to change the IP address
settings as below. Then, with the correct hardware connection, you can sur
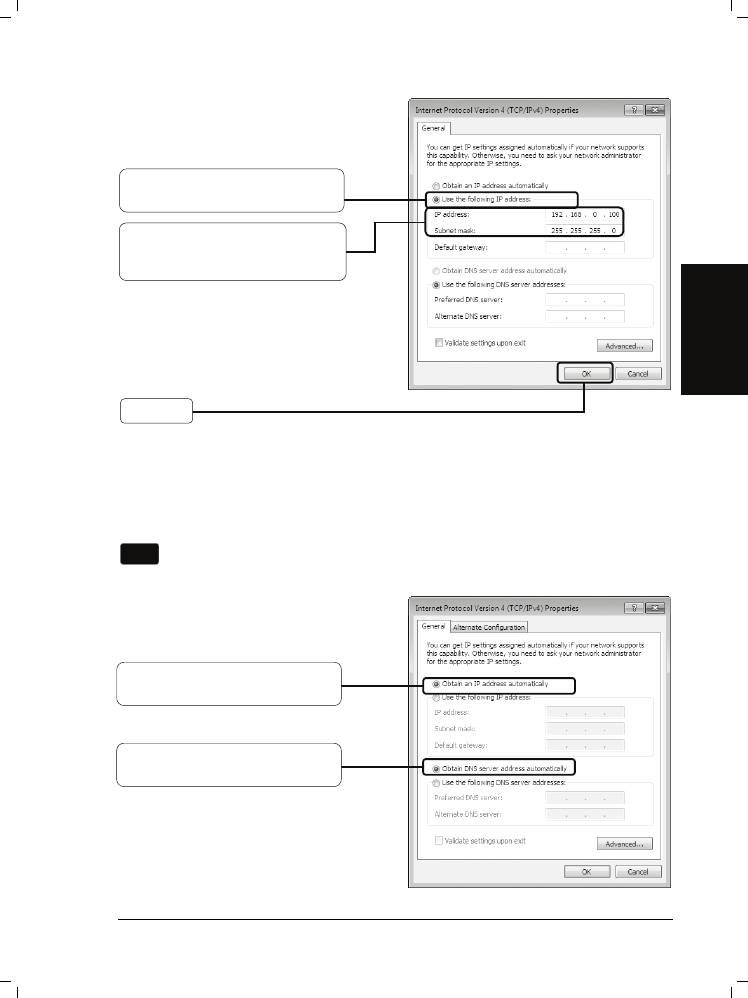
Select Obtain an IP address
automatically
Select Obtain DNS server
address automatically
13
f
Select Use the following IP
address
Enter the 192.168.0.100 into the
IP address field, 255.255.255.0
into the Subnet mask field
Click OK
the Internet successfully.

Turn off all your network devices,
including your computer(s), power
injector and the AP.
Connect your computer to the
LAN port on the power injector
with an Ethernet Cable.
Connect your AP to the PoE port
English
on the power injector with an
Ethernet Cable.
Plug the provided power adapte
Note
1. Passive PoE Injector supports a maximum cable length up to 30 meters
due to the environment.
2. For longer powered cable up to 100 meters, please choose TP-LINK’s
48V PoE adapters: TL-POE200 or TL-POE150S & TL-POE10R.
Product information can be found on our official website
http://www.tp-link.com.
14
r
into the DC jack on the powe
r
Appendix : With PoE Setup
Appendix : With PoE Setup
injector, and the other end to a
standard electrical wall socket.