-
Contents
-
Table of Contents
-
Troubleshooting
-
Bookmarks
Quick Links
TL-WA750RE
150Mbps Universal WiFi Range Extender
REV 1.0.0
1910010798
Related Manuals for TP-Link TL-WA750RE
Summary of Contents for TP-Link TL-WA750RE
-
Page 1
TL-WA750RE 150Mbps Universal WiFi Range Extender REV 1.0.0 1910010798… -
Page 2
Specifications are subject to change without notice. is a registered trademark of TP-LINK TECHNOLOGIES CO., LTD. Other brands and product names are trademarks or registered trademarks of their respective holders. No part of the specifications may be reproduced in any form or by any means or used to make any derivative such as translation, transformation, or adaptation without permission from TP-LINK TECHNOLOGIES CO., LTD. -
Page 3: Fcc Statement
FCC STATEMENT This equipment has been tested and found to comply with the limits for a Class B digital device, pursuant to part 15 of the FCC Rules. These limits are designed to provide reasonable protection against harmful interference in a residential installation. This equipment generates, uses and can radiate radio frequency energy and, if not installed and used in accordance with the instructions, may cause harmful interference to radio communications.
-
Page 4: Ce Mark Warning
CE Mark Warning This is a class B product. In a domestic environment, this product may cause radio interference, in which case the user may be required to take adequate measures. This device has been designed to operate with the antennas listed below, and having a maximum gain of 3 dBi.
-
Page 5: Safety Information
第十四條 低功率射頻電機之使用不得影響飛航安全及干擾合法通行;經發現有干擾現象時,應立 即停用,并改善至無干擾時方得繼續使用。前項合法通信,指依電信規定作業之無線電信。低功率 射頻電機需忍受合法通信或工業、科學以及醫療用電波輻射性電機設備之干擾。 安全諮詢及注意事項 ● 請使用原裝電源供應器或只能按照本產品注明的電源類型使用本產品。 ● 清潔本產品之前請先拔掉電源線。請勿使用液體、噴霧清潔劑或濕布進行清潔。 ● 注意防潮,請勿將水或其他液體潑灑到本產品上。 ● 插槽與開口供通風使用,以確保本產品的操作可靠並防止過熱,請勿堵塞或覆蓋開口。 ● 請勿將本產品置放於靠近熱源的地方。除非有正常的通風,否則不可放在密閉位置中。 ● 請不要私自打開機殼,不要嘗試自行維修本產品,請由授權的專業人士進行此項工作。 Продукт сертифіковано згідно с правилами системи УкрСЕПРО на відповідність вимогам нормативних документів та вимогам, що передбачені чинними законодавчими актами України. Safety Information When product has power button, the power button is one of the way to shut off the product; …
-
Page 6: Declaration Of Conformity
TP-LINK TECHNOLOGIES CO., LTD DECLARATION OF CONFORMITY For the following equipment: Product Description: 150Mbps Universal WiFi Range Extender Model No.: TL-WA750RE Trademark: TP-LINK We declare under our own responsibility that the above products satisfy all the technical regulations applicable to the product within the scope of Council Directives:…
-
Page 7: Table Of Contents
CONTENTS Package Contents ………………..1 Chapter 1 Introduction ………………. 2 Product Overview ………………..2 Main Features ………………..2 Appearance ………………….. 2 Chapter 2 Hardware Installation …………….4 Before You Begin ………………..4 Basic Requirements ………………5 Connecting the Device ………………5 Chapter 3 Quick Installation Guide ……………
-
Page 8: Package Contents
Conventions The Range Extender, the Device or TL-WA750RE mentioned in this User guide stands for TL-WA750RE 150Mbps Universal WiFi Range Extender without any explanations. Parameters provided in the pictures are just references for setting up the product, which may differ from the actual situation.
-
Page 9: Chapter 1 Introduction
Even though you may not be familiar with the Range Extender, you can easily configure it with the help of this Guide. Before installing the Range Extender, please look through this Guide to get the full information of the TL-WA750RE 150Mbps Universal WiFi Range Extender.
-
Page 10: Led Explanation
WPS or QSS button and then press the RANGE EXTENDER button to establish a secure connection between the Wireless router (or AP) and the Range Extender TL-WA750RE. RESET: This button is used to restore the Range Extender’s factory default settings.
-
Page 11: Chapter 2 Hardware Installation
RF (radio frequency) noise in your home or office. In order to optimize the performance of TL-WA750RE, please follow the instructions below to achieve an ideal location (please make sure it is always within the wireless coverage of the wireless router).
-
Page 12: Basic Requirements
To establish a typical connection of the Range Extender, please take the following steps: 1. Connect the Cable/DSL modem to a Wireless router with an Ethernet cable. 2. Plug your TL-WA750RE directly to a standard electrical wall socket, which is next to the Wireless router.
-
Page 13: Chapter 3 Quick Installation Guide
TL-WA750RE 150Mbps Universal WiFi Range Extender easily with a Web-based utility. With a Web-based utility, it is easy to configure and manage the TL-WA750RE 150Mbps Universal WiFi Range Extender. The Web-based utility can be used on any Windows, Macintosh or UNIX OS with a Web browser, such as Microsoft Internet Explorer, Mozilla Firefox or Apple Safari.
-
Page 14
TL-WA750RE 150Mbps Universal WiFi Range Extender User Guide After successful login, there will pop up the Quick Setup Start page. Click Next to get the quick setup started. Figure 3-3 Quick Setup Start Figure 3-4 will appear for you to choose the region. Then click Next to continue. -
Page 15
TL-WA750RE 150Mbps Universal WiFi Range Extender User Guide A list of available wireless networks will appear. Check the box before the SSID of your desired network, and then click Next. Figure 3-6 Quick Setup – Available Wireless Networks Note: If you could not find your wireless network name (SSID) in the list, you can click Rescan to redetect it or tick the checkbox before «Set SSID and MAC Manually»… -
Page 16
TL-WA750RE 150Mbps Universal WiFi Range Extender User Guide Double-check your wireless setting and network setting on the page as shown in Figure 3-8. If verified, click Finish to complete the Quick Setup. If there is anything wrong, click Back to return the previous pages and reconfigure it. -
Page 17: Chapter 4 Configure The Device
150Mbps Universal WiFi Range Extender User Guide Chapter 4 Configure the Device This Chapter describes how to configure your Range Extender via the web-based management page. The TL-WA750RE 150Mbps Universal WiFi Range Extender is easy to configure and ® manage with the Web-based (Internet Explorer, Netscape…
-
Page 18: Quick Setup
TL-WA750RE 150Mbps Universal WiFi Range Extender User Guide Firmware Version — This field displays the current firmware version of the Range Extender. Hardware Version — This field displays the current hardware version of the Range Extender. Connection Status to Existing Network — This part shows you the current information of the …
-
Page 19
TL-WA750RE 150Mbps Universal WiFi Range Extender User Guide Figure 4-2 WPS — Enabled Operation Mode — Displays the current operation mode of the device. WPS Status — To enable or disable the WPS function here. Current PIN — The current value of the device’s PIN is displayed here. The default PIN of the … -
Page 20
TL-WA750RE 150Mbps Universal WiFi Range Extender User Guide Method One: Push the button of the Range Extender and Wireless Adapter Keep the “WPS Status” as Enabled and click the Add Device button in Figure 4-2, then Step 1: the following screen will appear. -
Page 21
TL-WA750RE 150Mbps Universal WiFi Range Extender User Guide Step 4: Wait until the next screen appears. Click OK to complete the WPS configuration. Figure 4-5 The WPS Configuration Screen of Wireless Adapter Method Two: Enter the PIN into my Range Extender Step 1: Configure the wireless adapter. -
Page 22
TL-WA750RE 150Mbps Universal WiFi Range Extender User Guide Step 2: Configure the router. Keep the default “WPS Status” as Enabled and click the Add device button in Figure 4-2, then the following screen will appear. Figure 4-7 Step 3: Choose Enter the new device’s PIN and enter the PIN code of the wireless adapter in the field behind PIN in the previous figure. -
Page 23
TL-WA750RE 150Mbps Universal WiFi Range Extender User Guide Figure 4-9 The WPS Configuration Screen of Wireless Adapter Note: The default PIN code of the Range Extender can be found in its label or the WPS configuration screen as Figure 4-2. -
Page 24: Profile
TL-WA750RE 150Mbps Universal WiFi Range Extender User Guide 4.4 Profile Profile function can help you remember previously connected wireless networks. You can Edit, Delete or Add profiles in this page (as shown in Figure 4-11) for your convenient reconnection later on.
-
Page 25: Network
TL-WA750RE 150Mbps Universal WiFi Range Extender User Guide Profile Name — The name you give to your wireless networks. By default, it’s the same as root SSID, but you can change it to any other names that you can easily remember and distinguish.
-
Page 26: Wireless
TL-WA750RE 150Mbps Universal WiFi Range Extender User Guide Figure 4-15 LAN MAC Address — The physical address of the LAN port, as seen from the LAN. The value cannot be changed. Type — Several IP types are supported, including: (1) Static IP; (2) Smart IP (DHCP), and they …
-
Page 27: Wireless Settings
TL-WA750RE 150Mbps Universal WiFi Range Extender User Guide There are six submenus under the Wireless menu (shown in Figure 4-16): Wireless Settings, Wireless Security, Wireless MAC Filtering, Wireless Advanced, Wireless Statistics and Throughput Monitor. Click any of them, and you will be able to configure the corresponding function.
-
Page 28: Wireless Security
TL-WA750RE 150Mbps Universal WiFi Range Extender User Guide Wireless Name of Root AP — The SSID of the AP your device is going to connect to as a client. You can also use the search function to select the SSID to join.
-
Page 29
TL-WA750RE 150Mbps Universal WiFi Range Extender User Guide Figure 4-18 Wireless Security Operation Mode — Shows the current operation mode. Disable Security — Check this box radio button to disable wireless security. If disabled, the wireless stations will be able to connect this device without encryption. It is strongly recommended that you choose one of the security types to enable security. -
Page 30: Wireless Mac Filtering
TL-WA750RE 150Mbps Universal WiFi Range Extender User Guide Shared Key — Select 802.11 Shared Key authentication type. Open System — Select 802.11 Open System authentication type. WEP Key Format — You can select ASCII or Hexadecimal format. ASCII format stands •…
-
Page 31
TL-WA750RE 150Mbps Universal WiFi Range Extender User Guide Operation Mode — Shows the current operation mode. Wireless MAC Filtering — Click the Enable button to trigger the Wireless MAC Address Filtering function. The default setting is disabled. To Add a Wireless MAC Address filtering entry, click the Add New… button. The “Add or Modify Wireless MAC Address Filtering entry»… -
Page 32: Wireless Advanced
TL-WA750RE 150Mbps Universal WiFi Range Extender User Guide Click the Disable All button to make all entries disabled. Click the Delete All button to delete all entries Click the Next button to go to the next page and click the Previous button to return to the previous page.
-
Page 33: Wireless Statistics
TL-WA750RE 150Mbps Universal WiFi Range Extender User Guide Operation Mode — Shows the current Operation Mode. Transmit Power — Specifies the transmit power of the device. You can select High, Middle or Low which you would like. High is the default setting and is recommended.
-
Page 34: Throughput Monitor
TL-WA750RE 150Mbps Universal WiFi Range Extender User Guide Current Status — The connected wireless station’s running status, one of STA-AUTH / STA-ASSOC / STA-JOINED / WPA / WPA-PSK / WPA2 / WPA2-PSK / AP-UP / AP-DOWN / Disconnected. Received Packets — packets received by the station.
-
Page 35: Dhcp
TL-WA750RE 150Mbps Universal WiFi Range Extender User Guide Click the Start button to start wireless throughput monitor. Click the Stop button to stop wireless throughput monitor. 4.7 DHCP DHCP stands for Dynamic Host Configuration Protocol. The DHCP Server will automatically assign dynamic IP addresses to the computers on the network.
-
Page 36: Dhcp Client List
TL-WA750RE 150Mbps Universal WiFi Range Extender User Guide Figure 4-26 DHCP Settings – Enabled DHCP Server — Selecting the radio button before Disable/Enable will disable/enable the DHCP server on your Range Extender. The default setting is Enable. If you disable the Server, you must have another DHCP server within your network or else you must manually configure the computer.
-
Page 37: System Tools
TL-WA750RE 150Mbps Universal WiFi Range Extender User Guide Figure 4-27 DHCP Clients List ID — Here displays the index of the DHCP client. Client Name — Here displays the name of the DHCP client. MAC Address — Here displays the MAC address of the DHCP client.
-
Page 38: Factory Defaults
TL-WA750RE 150Mbps Universal WiFi Range Extender User Guide Figure 4-29 Firmware Upgrade New firmware versions are posted at http://www.tp-link.com and can be downloaded for free. Firmware Version — Here displays the current firmware version. Hardware Version — Here displays the current hardware version. The hardware version of the …
-
Page 39: Backup & Restore
TL-WA750RE 150Mbps Universal WiFi Range Extender User Guide Click Restore to reset all configuration settings to their default values. Default User Name: admin Default Password: admin Default IP Address: 192.168.0.254 Default Subnet Mask: 255.255.255.0 Note: Any settings you have saved will be lost when the default settings are restored.
-
Page 40: Password
TL-WA750RE 150Mbps Universal WiFi Range Extender User Guide Click the Reboot button to reboot the device. Some settings of the device will take effect only after rebooting, which include: Change LAN IP Address (System will reboot automatically). Change the Wireless configurations.
-
Page 41
TL-WA750RE 150Mbps Universal WiFi Range Extender User Guide Figure 4-34 System Log The device can keep logs of all traffic. You can query the logs to find what happened to the device. Log Type — By selecting the log type, only logs of this type will be shown. -
Page 42: Appendix A: Factory Defaults
TL-WA750RE 150Mbps Universal WiFi Range Extender User Guide Appendix A: Factory Defaults Item Default Value Common Default Settings Username admin Password admin IP Address 192.168.0.254 Subnet Mask 255.255.255.0 Domain http://tplinkextender.net Wireless SSID TP-LINK_Extender_XXXXXX Wireless Security Disabled Wireless MAC Address Filtering Disabled …
-
Page 43: Appendix B: Troubleshooting
There are TWO methods available to restore the factory defaults. Method 1: With the Range Extender TL-WA750RE powered on, use a pin to press and hold the RESET button on the rear panel for more than 8 seconds before releasing it.
-
Page 44
An easy way is to compare the signal strength of your target wireless network (identified by its SSID), with TL-WA750RE in operation vs. out of operation. Before comparison, you’d better make sure your computer can obtain an IP address from your target wireless network and thus access the Internet, either via TL-WA750RE or without. -
Page 45: Appendix C: Specifications
TL-WA750RE 150Mbps Universal WiFi Range Extender User Guide Appendix C: Specifications General Standards and Protocols IEEE 802.3, 802.3u, 802.11n, 802.11b and 802.11g, TCP/IP, DHCP Safety & Emission FCC, CE Ports One 10/100M Auto-Negotiation LAN RJ45 port Wireless Frequency Band 2.4~2.4835GHz 11n:up to 150Mbps(Automatic)…
-
Page 46: Appendix D: Glossary
TL-WA750RE 150Mbps Universal WiFi Range Extender User Guide Appendix D: Glossary 802.11b — The 802.11b standard specifies a wireless networking at 11 Mbps using direct-sequence spread-spectrum (DSSS) technology and operating in the unlicensed radio spectrum at 2.4GHz, and WEP encryption for security. 802.11b networks are also referred to as Wi-Fi networks.
-
Page 47
TL-WA750RE 150Mbps Universal WiFi Range Extender User Guide WPA (Wi-Fi Protected Access) — WPA is a security technology for wireless networks that improves on the authentication and encryption features of WEP (Wired Equivalent Privacy). In fact, WPA was developed by the networking industry in response to the shortcomings of WEP.
инструкцияTP-Link TL-WA750RE

Wi-Fi Range Extender
Quick
Installation
Guide
7106508578 REV3.0.0
For technical support, the user guide and other
information, please visit https://www.tp-link.com/support/,
or simply scan the QR code.
TP-Link Technologies Co., Ltd.
Specications are subject to change without notice. is a
registered trademark of TP-Link Technologies Co., Ltd. Other brands
and product names are trademarks or registered trademarks of their
respective holders.
No part of the specications may be reproduced in any form or by
any means or used to make any derivative such as translation,
transformation, or adaptation without permission from TP-Link
Technologies Co., Ltd. Copyright © 2020 TP-Link Technologies Co.,
Ltd. All rights reserved.
*Images may dier from actual products.
Посмотреть инструкция для TP-Link TL-WA750RE бесплатно. Руководство относится к категории wi-fi ретрансляторы, 7 человек(а) дали ему среднюю оценку 8.4. Руководство доступно на следующих языках: русский, английский. У вас есть вопрос о TP-Link TL-WA750RE или вам нужна помощь? Задайте свой вопрос здесь
Главная
| TP-Link | |
| TL-WA750RE | TL-WA750RE | |
| wi-fi ретранслятор | |
| 5052916746256, 6935364070649, 6935364070755, 845973070762, 9154401796282, 0845973070762, 4054842122617, 8459730707628, 0994377639171, 5054533246843, 5053086334298 | |
| русский, английский | |
| Руководство пользователя (PDF), Техническая спецификация (PDF) |
Производительность
| Тип | Сетевой передатчик и приемник |
| Максимальное расстояние передачи | — m |
| Скорость передачи данных | 150 Мбит/с |
| Поддерживаемые операционные системы Windows | Windows 2000, Windows 98SE, Windows NT, Windows Vista Business, Windows Vista Business x64, Windows Vista Enterprise, Windows Vista Enterprise x64, Windows Vista Home Basic, Windows Vista Home Basic x64, Windows Vista Home Premium, Windows Vista Home Premium x64, Windows Vista Ultimate, Windows Vista Ultimate x64, Windows XP Home, Windows XP Home x64, Windows XP Professional, Windows XP Professional x64 |
| Поддерживаемые операционные системы Mac | Да |
| Поддерживаемые операционные системы Linux | Да |
Дизайн
| Светодиодные индикаторы | Да |
| Цвет товара | Белый |
Сеть
| Свивка кабеля | 10/100Base-T(X) |
| Стандарты сети | IEEE 802.11b, IEEE 802.11g, IEEE 802.11n, IEEE 802.3, IEEE 802.3u |
| Wi-Fi | Да |
| Алгоритмы шифрования данных | WPA-PSK, WPA2-PSK |
| Wi-Fi стандартов | 802.11b, 802.11g, Wi-Fi 4 (802.11n) |
Порты и интерфейсы
| Количество портов Ethernet LAN ( RJ-45) | 1 |
Энергопитание
| Потребляемая мощность (в обычном режиме) | 3 W |
| Внешний адаптер питания | Нет |
Вес и размеры
| Ширина | 110 mm |
| Глубина | 65.8 mm |
| Высота | 75.2 mm |
Содержимое упаковки
| Поставляемые кабели | LAN (RJ-45) |
| Краткая инструкция пользователя | Да |
Прочие свойства
| Диапазон рабочих температур | 32 — 104 °F |
Условия эксплуатации
| Диапазон температур при эксплуатации | 0 — 40 °C |
| Диапазон температур при хранении | -40 — 70 °C |
| Диапазон относительной влажности при эксплуатации | 10 — 90 % |
| Диапазон относительной влажности при хранении | 5 — 90 % |
показать больше
Не можете найти ответ на свой вопрос в руководстве? Вы можете найти ответ на свой вопрос ниже, в разделе часто задаваемых вопросов о TP-Link TL-WA750RE.
Не нашли свой вопрос? Задайте свой вопрос здесь
Всем добрый день! Сегодня наш портал хочет рассказать вам о том, как подключить Вай-Фай усилитель от компании TP-Link. Статья предназначена практически для всех усилителей данного производителя. Также будут отдельно рассмотрены определённые ситуации, где в «штатном» режиме настройка пройти не может. Но обо всём по порядку.
Можно сразу отметить, что устанавливать Wi-Fi усилитель конкретно от TP-Link не будет сложным практически ни для кого.
Установка и подключение

Итак, подключается ретранслятор к маршрутизатору как через Ethernet, так и через Wi-Fi сеть (метод годится к использованию и в тех случаях, когда нет кнопок WPS на роутере и/или усилителе).
Начнём, пожалуй, с Ethernet.
- Подключение напрямую с помощью кабеля является одним из лучших вариантов для повторителей моделей TL-WA750RE, TL-WA850RE и TLWA855RE. Само подключение проходит достаточно просто: берём кабель Ethernet (в идеале, он идёт в комплекте с самим усилителем) и подключаем его сначала к ПК или ноутбуку, а потом и к самому репитеру.

- Проверьте несколько раз, отключились ли вы от какой-либо точки доступа, к которой, возможно, ваш компьютер подсоединён.
- Запустите любой браузер и сразу перейдите по одной из двух ссылок: tplinkrepeater.net или tplinkextender.net (обратите внимание, что адрес сайта зависит от того, какая версия и модель репитера у вас используется).
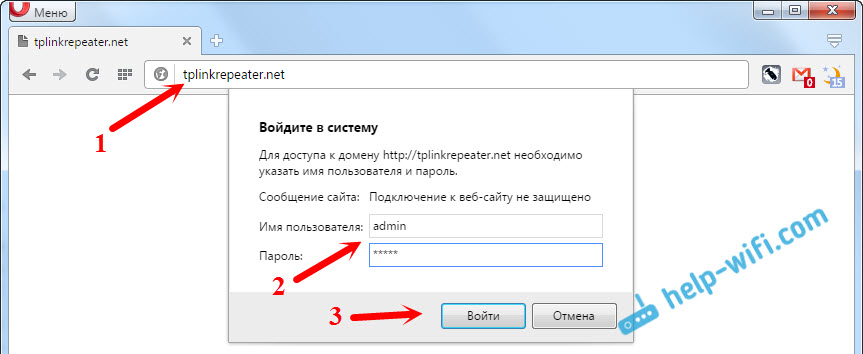
- Если переход по ссылке ознаменовался успехом, у вас должно появиться окошко, в котором вас попросят ввести имя пользователя и пароль. Достаточно просто в обеих строчках ввести волшебное слово «admin».
- Итак, нам удалось подключиться. И теперь перед нами появляется окно интерфейса (у всех усилителей любой модели окно абсолютно одинаково).
Если переход по ссылкам не удался, напишите в адресной строке следующий IP-адрес: 192.168.0.254 – он базовый для всех усилителей. Особых различий между переходом по ссылке и адресу не будет.
Руководство по установке репитера TP-LINK TL WA850RE можно посмотреть в видео-формате:
Настройка
Итак, теперь о том, как настроить ретранслятор от TP-Link. Просто нажимаем Next и выполняем все требования, что будут появляться в разных окошках.
Пошаговая настройка репитера от TP-Link:
- Подключаем роутер к ПК или ноутбуку напрямую, то есть, через Ethernet-кабель. Это мы уже сделали.
- Через «Панель управления» на ноутбуке нам нужно попасть в «Изменение параметров адаптера».
- Ищем «Подключение по локальной сети», кликаем ПКМ и жмем «Свойства».
- Теперь нам нужно «Протокол версии 4 (TCP/IPv4)» и «Свойства». Перепишите все данные локальной сети и выберите «Получить IP-адрес автоматически».

Теперь идем в админку репитера:
- Region – страна проживания (в нашем случае – РФ или Russian Federation).
- Выбираем беспроводную сеть, которая принадлежит непосредственно вам. НО! Если вы не нашли вашу сеть в списке, введите вручную SSID или MAC-адрес. Также есть вероятность того, что вы отключили широковещание SSID – тогда стоит включить его через настройки роутера.
- Указываем пароль от сети (если он есть).
- Примечание: в этом окне можно активировать функцию, при которой усилитель будет передавать сигнал под именем маршрутизатора. Также можно и самому написать имя, от которого будет сигнал.

- Перепроверяем введённые настройки и нажимаем FINISH.

Сразу после этого усилитель уйдёт в перезагрузку, во время которой будут выставляться новые настройки. Как можно определить, что всё настроено отлично:
- Светодиоды на ретрансляторе у пунктов RE и Wi-Fi работают.
- В окне веб-интерфейса поле Connection Status будет со значением Connected.
Стоит также отметить, что усилители от TP-Link имеют функцию поддержки настройки на сигнал уже работающей точки доступа без вмешательства человека. Но роутер также должен владеть такой функцией – для неё надо найти кнопку WPS или QSS.

Чтобы всё это провернуть, нам понадобится просто нажать на эти кнопки на маршрутизаторе и на раздатчике. И всё – должна начаться автоматическая настройка и раздача сигнала на большую площадь.
Беспроводное подключение
Настроить и подключить репитер можно и через беспроводную сеть. Для этого надо комп или ноут подключить к усилителю.
- Отключаем ПК от своей сети Wi-Fi и подключаем его к репитеру.

- Открываем любимый браузер и заходим в настройки усилителя (надеюсь, это вы помните наизусть).
- Теперь все по известному пути – подключаемся к основной сети Wi-Fi, вводим пароль, даем имя усилителю сигнала, жмем FINISH.
Посмотрите обзор, настройку и тестирование модели Tp-Link TL-WA855RE V3 (EU) в следующем видео:
Альтернативный способ
И ещё один интересный способ, как настроить усилитель без использования компьютера – это настройка посредством смартфона или планшета. Чтобы начать настройку с помощью гаджетов, включим ретранслятор и подключимся к нему с телефона.

После этого нам предлагается провести авторизацию – ввести, собственно, логин и пароль. Дабы не ошибиться, проверьте наклейку на репитере – там указывают логин и пароль, но по стандарту это всегда admin в обоих пунктах. После успешной авторизации повторяем все действия, упомянутые в начале статьи.
Двухдиапазонный репитер
В модельном ряде усилителей сигнала от TP-Link есть двухдиапазонные устройства, которые работают одновременно на 2 частотах – 2,4 и 5 ГГц. Включить такой ретранслятор можно также с помощью волшебной кнопочки WPS или через админку. Об этом подробнее.
- Известным нам путем идем в интерфейс устройства. Мы попадаем в быстрые настройки.

- Указываем свой регион.
- Повторитель найдет все сети в диапазоне 2,4 ГГц. Выбираем свою, указываем код безопасности от нее.
- Теперь наш усилитель ищет сети на другой частоте (5ГГц). Делаем тоже самое – ищем свою, пишем пароль.
- Репитер сам делает настройки, нам остается их только применить.
Решение проблем
Случается, что после установки ретранслятора возникают некоторые проблемы – не работает интернет или повторитель не хочет подключаться к беспроводной сети. Что можно посоветовать в подобной ситуации:
- Ставим ретранслятор ближе к роутеру, чтобы усилить сигнал от маршрутизатора.
- Сброс настроек на репитере и перезагрузка роутера могут помочь, если усилитель не хочет связываться с маршрутизатором.
- Если не удается подключение по WPS, пробуйте через настройки.
- На крайний случай могу посоветовать сделать перепрошивку репитера.
Если проблема не решится, пишите, будем думать вместе. Всем добра и удачной настройки!
1
Питание включено
Подключите усилитель беспроводного сигнала в
розетку рядом с вашим маршрутизатором и нажмите
кнопку «питание», если она присутствует.
2
Подключите ваш компьютер к
усилителю
Беспроводное подключение
Отключите ваше проводное соединение и
подключитесь к сети усилителя (например,
TP-Link_Extender или TP-Link_Extender_XXX).
Проводное подключение
есть порт Ethernet)
Отключите Wi-Fi соединение на вашем компьютере.
Подключите ваш компьютер к усилителя с помощью
кабеля Ethernet.
3
Настройка
1 Введите в адресной строке вашего браузера
http://tplinkrepeater.net или http://192.168.0.254.
Создайте пароль для последующего входа в
систему и нажмите Start (Начать).
2 Следуйте инструкциям на веб-странице для
завершения первоначальной настройки.
Русский язык
(если у данного усилителя
25
Дать ссылку друзьям:
Рейтинг: Пока без рейтинга
Наличие инструкции подключения и альтернативной прошивки: В наличии
Настройка подключения
На данной странице вы узнаете как подключить Wi-Fi маршрутизатор к компьютеру, а также сможете найти инструкцию по настройке на русском языке.
Сотрудники нашего информационного портала ежедневно обновляют официальные прошивки для той или иной модели устройства.
Настройка Вай-Фай
Пошаговая настройка роутера TP-LINK TL-WA750RE для Ростелеком, Билайн и других интернет провайдеров займет у Вас несколько минут и после этого вы сможете наслаждаться всеми достоинствами Wi-Fi точки доступа ТП-Линк.
Настройка IPTV
Если вы хотите получить последнюю версию официальной прошивки и инструкцию по подключению VPN или PPPOE и настройка IPTV телевидения для этого устройства на русском языке на ваш Email, то вам следует оставить полный, развернутый отзыв о той или иной модели Вай-Фай устройства.
Скачать прошивку для маршрутизатораЧтобы скачать прошивку для TP-LINK TL-WA750RE вам достаточно внимательно ознакомиться со страницей, на которой вы сейчас находитесь. Не забывайте оставлять свои отзывы (форма для добавления отзывов находится в нижней части страницы). Если вас не затруднит, то вы можете поделиться ссылкой на прошивку со своими друзьями. Также, если вы не нашли ответ на свой вопрос, то вы можете задать его воспользовавшись формой в нижней части сайта. У нас вы найдете последние версии драйверов для беспроводных устройств. Чтобы скачать новый драйвер, вам необходимо перейти по ссылке «Скачать прошивку», которая расположена чуть ниже.
Скачать прошивку Настройки роутера Видео-инструкция как настроить TP-LINK TL-WA750RE |
|
Не так давно я уже писал о настройке повторителя Wi-Fi сети TP-Link TL-WA850RE. А в этой статье мы будем настраивать репитер TP-Link AC750 RE200. Его основное отличие в том, что это двухдиапазонный усилитель Wi-Fi сети. То есть, он может одновременно расширять покрытие беспроводной сети на двух частотах 2.4GHz, и 5GHz. Модель AC750 RE200 подойдет в том случае, если у вас двухдиапазонный маршрутизатор, и вы одновременно используете есть на обоих частотах. Если же вы только собираетесь покупать повторитель, ищите хорошую модель, и у вас обычный роутер который раздает Wi-Fi на одной частоте (2.4GHz), то можете купить модель TL-WA850RE. Или RE200, с запасом на будущее, если поменяете роутер на двухдиапазонный.
Я настроил свой TP-Link AC750 RE200 за одну минуту. Ровно столько времени нужно для того, чтобы включить репитер в розетку, нажать кнопку WPS на роутере, и на самом репитере. После чего, этот ретранслятор сам подключается к роутеру, и начинает расширять беспроводную сеть. К тому же, у меня таким способом получилось усилить сигнал Wi-Fi сети в двух диапазонах 2.4GHz, и 5GHz. Есть информация, что через кнопку WPS не всегда получается настроить ретранслятор сразу для двух частот, нужно делать это через панель управления. Мы рассмотрим этот вариант в статье. Настраивал я этот репитер с двухдиапазонным роутером TP-Link Archer C20i.
Усиление сигнала Wi-Fi сети на частотах 2.4GHz, и 5GHz с помощью TP-Link RE200
Давайте сначала рассмотрим быструю настройку с помощью кнопки WPS. Скорее всего, на вашем маршрутизаторе есть такая кнопка. Если ее нет, или этот способ не сработает, то ниже я покажу как все настроить через панель управления самого ретранслятора.
Первым делом, включите повторитель в розетку, и подождите секунд 15, пока он загрузится. Затем, на роутере нажмите кнопку WPS. На моем TP-Link Archer C20i она выглядит вот так:

Важно! Не держите кнопку WPS на роутере нажатой слишком долго. Особенно, если она подписана «WPS/Reset». Примерно через 5 секунд после нажатия на кнопку, будут сброшены настройки роутера к заводским.
После нажатия на кнопку на маршрутизаторе, сразу идем, и нажимаем кнопку WPS на репитере TP-Link AC750 RE200.

Как вы можете увидеть на скриншоте выше, у меня загорелись индикаторы возле 5G, и 2.4G. Это значит, что ретранслятор уже усиливает беспроводную сеть в двух диапазонах. Если горит красный индикатор, то это значит, что сигнал от роутера очень слабый, и нужно установить репитер ближе к точке доступа. А если индикатор возле какой-то сети вообще не загорелся, но у вас роутер транслирует сеть на двух частотах, то это значит, что нужно попробовать настроить AC750 RE200 через панель управления. Так как подключится сразу к двум сетям через кнопку WPS, и усиливать их, не всегда получается.
Настройка TP-Link AC750 RE200 через панель управления
Включите репитер в розетку, и подключитесь к нему по Wi-Fi, или с помощью сетевого кабеля. Откройте браузер, и перейдите по адресу tplinkrepeater.net. Появится страница авторизации. Стандартный пароль и логин: admin и admin. Откроются настройки ретранслятора TP-Link AC750 RE200.
Скорее всего, перед вами сразу появится окно с мастером быстрой настройки (если нет, то перейдите на вкладку Wireless — Connect To Existing Network). Просто нажмите на кнопку «Next».
Выберите свой регион.

Дальше репитер выполнит поиск сетей на частоте 2.4ГГц. Выделите свою сеть, и нажмите кнопку «Next».

В следующем окне нужно только указать пароль от Wi-Fi сети, которую вы хотите расширить.

Дальше репитер начнет поиск сетей на частоте 5GHz.

Подключаемся к своей сети на другом диапазоне точно так же, как я показывал выше. Нужно только выбрать сеть, уже на частоте 5GHz и указать пароль к ней.
В итоге, роутер должен выдать информацию по всем настройкам, и нам нужно только нажать на кнопку «Finish».

Репитер перезагрузится, и начнет усиливать ваши Wi-Fi сети. Обратите только внимание на индикаторы на самом устройстве, которые возле 5G, и 2.4G. Они должны гореть зеленым цветом. Если горят красным, то установите репитер ближе к роутеру. Вообще, советую выбрать такое расположение усилителя, что бы он находился в зоне стабильного сигнала от маршрутизатора, и максимально покрывал сигналом нужную вам площадь.
Несколько полезных советов:
1
После настройки, вы сможете отключать TP-Link AC750 RE200, и включать его в другом месте. Повторно настройку выполнять не нужно, все будет работать. Главное, чтобы повторитель был в зоне покрытия Wi-Fi сети, которую вы хотите усилить.
2
На повторителе есть один Ethernet порт, а в комплекте есть сетевой кабель. Это значит, что вы можете подключить к интернету одно устройство по кабелю (игровую приставку, стационарный компьютер, Smart TV). Устройство, у которого нет возможности подключится к интернету по Wi-Fi.
3
Вы всегда можете сбросить настройки AC750 RE200 и выполнить его повторную настройку. Снизу есть кнопка Reset. Нажмите на нее чем-то острым, подержите примерно 10 секунд, и настройки повторителя будут сброшены к заводским.

4
Если вы заметил какие-то проблемы в работе этого ретранслятора, или у вас не получается что-то настроить, то попробуйте обновить прошивку. Достаточно скачать новую версию прошивки для модели AC750 RE200 с сайта TP-Link, зайти в настройки повторителя на вкладку System Tools — Firmware Upgrade, выбрать файл прошивки с расширением .bin, и запустить процесс обновления. Только смотрите, чтобы скачанная прошивка была для вашей аппаратной версии. Аппаратная версия указана на самом устройстве.
![]()
TL-WA750RE
150Mbps Universal WiFi Range Extender
REV 1.0.0 1910010798
COPYRIGHT & TRADEMARKS
Specifications are subject to change without notice.  is a registered trademark of TP-LINK TECHNOLOGIES CO., LTD. Other brands and product names are trademarks or registered trademarks of their respective holders.
No part of the specifications may be reproduced in any form or by any means or used to make any derivative such as translation, transformation, or adaptation without permission from TP-LINK TECHNOLOGIES CO., LTD. Copyright © 2013 TP-LINK TECHNOLOGIES CO., LTD.
All rights reserved.
http://www.tp-link.com

FCC STATEMENT
This equipment has been tested and found to comply with the limits for a Class B digital device, pursuant to part 15 of the FCC Rules. These limits are designed to provide reasonable protection against harmful interference in a residential installation. This equipment generates, uses and can radiate radio frequency energy and, if not installed and used in accordance with the instructions, may cause harmful interference to radio communications. However, there is no guarantee that interference will not occur in a particular installation. If this equipment does cause harmful interference to radio or television reception, which can be determined by turning the equipment off and on, the user is encouraged to try to correct the interference by one or more of the following measures:
•Reorient or relocate the receiving antenna.
•Increase the separation between the equipment and receiver.
•Connect the equipment into an outlet on a circuit different from that to which the receiver is connected.
•Consult the dealer or an experienced radio/ TV technician for help.
This device complies with part 15 of the FCC Rules. Operation is subject to the following two conditions:
1)This device may not cause harmful interference.
2)This device must accept any interference received, including interference that may cause undesired operation.
Any changes or modifications not expressly approved by the party responsible for compliance could void the user’s authority to operate the equipment.
Note: The manufacturer is not responsible for any radio or tv interference caused by unauthorized modifications to this equipment. Such modifications could void the user’s authority to operate the equipment.
FCC RF Radiation Exposure Statement
This equipment complies with FCC RF radiation exposure limits set forth for an uncontrolled environment. This device and its antenna must not be co-located or operating in conjunction with any other antenna or transmitter.
“To comply with FCC RF exposure compliance requirements, this grant is applicable to only Mobile Configurations. The antennas used for this transmitter must be installed to provide a separation distance of at least 20 cm from all persons and must not be co-located or operating in conjunction with any other antenna or transmitter.”

CE Mark Warning
This is a class B product. In a domestic environment, this product may cause radio interference, in which case the user may be required to take adequate measures.
This device has been designed to operate with the antennas listed below, and having a maximum gain of 3 dBi. Antennas not included in this list or having a gain greater than 3 dBi are strictly prohibited for use with this device. The required antenna impedance is 50 ohms.
To reduce potential radio interference to other users, the antenna type and its gain should be so chosen that the equivalent isotropically radiated power (e.i.r.p.) is not more than that permitted for successful communication.
Canadian Compliance Statement
This device complies with Industry Canada license-exempt RSS standard(s). Operation is subject to the following two conditions:
(1)This device may not cause interference, and
(2)This device must accept any interference, including interference that may cause undesired operation of the device.
Cet appareil est conforme aux norms CNR exemptes de licence d’Industrie Canada. Le fonctionnement est soumis aux deux conditions suivantes:
(1)cet appareil ne doit pas provoquer d’interférences et
(2)cet appareil doit accepter toute interférence, y compris celles susceptibles de provoquer un fonctionnement non souhaité de l’appareil.
Industry Canada Statement
Complies with the Canadian ICES-003 Class B specifications.
Cet appareil numérique de la classe B est conforme à la norme NMB-003 du Canada.
This device complies with RSS 210 of Industry Canada. This Class B device meets all the requirements of the Canadian interference-causing equipment regulations.
Cet appareil numérique de la Classe B respecte toutes les exigences du Règlement sur le matériel brouilleur du Canada.
Korea Warning Statements
.
NCC Notice & BSMI Notice
率、加大功率或變更原設計之特性或功能。

射頻電機需忍受合法通信或工業、科學以及醫療用電波輻射性電機設備之干擾。
Продукт сертифіковано згідно с правилами системи УкрСЕПРО на відповідність вимогам нормативних документів та вимогам, що передбачені чинними законодавчими актами України.
Safety Information
When product has power button, the power button is one of the way to shut off the product; when there is no power button, the only way to completely shut off power is to disconnect the product or the power adapter from the power source.
Don’t disassemble the product, or make repairs yourself. You run the risk of electric shock and voiding the limited warranty. If you need service, please contact us.
Avoid water and wet locations.
This product can be used in the following countries:
|
AT |
BG |
BY |
CA |
CZ |
DE |
DK |
EE |
|
ES |
FI |
FR |
GB |
GR |
HU |
IE |
IT |
|
LT |
LV |
MT |
NL |
NO |
PL |
PT |
RO |
|
RU |
SE |
SK |
TR |
UA |

TP-LINK TECHNOLOGIES CO., LTD
DECLARATION OF CONFORMITY
For the following equipment:
Product Description: 150Mbps Universal WiFi Range Extender Model No.: TL-WA750RE
Trademark: TP-LINK
We declare under our own responsibility that the above products satisfy all the technical regulations applicable to the product within the scope of Council Directives:
Directives 1999/5/EC, Directives 2004/108/EC, Directives 2006/95/EC, Directives 1999/519/EC, Directives 2011/65/EU
The above product is in conformity with the following standards or other normative documents
ETSI EN 300 328 V1.7.1: 2006
ETSI EN 301 489-1 V1.9.2:2011& ETSI EN 301 489-17 V2.1.1:2009 EN 55022:2010
EN 55024:2010
EN 61000-3-2:2006+A1:2009+A2:2009 EN 61000-3-3:2008
EN60950-1:2006+A11 2009+A1:2010+A12:2011
EN62311:2008
The product carries the CE Mark:
Person responsible for marking this declaration:
Yang Hongliang
Product Manager of International Business
Date of Issue: 2013
TP-LINK TECHNOLOGIES CO., LTD.
Building 24 (floors 1, 3, 4, 5), and 28 (floors 1-4) Central Science and Technology Park,
Shennan Rd, Nanshan, Shenzhen, China
|
CONTENTS |
|||
|
Package Contents ………………………………………………………………………………………. |
1 |
||
|
Chapter 1 |
Introduction………………………………………………………………………………. |
2 |
|
|
1.1 |
Product Overview…………………………………………………………………………………. |
2 |
|
|
1.2 |
Main Features ……………………………………………………………………………………… |
2 |
|
|
1.3 |
Appearance…………………………………………………………………………………………. |
2 |
|
|
Chapter 2 |
Hardware Installation ………………………………………………………………… |
4 |
|
|
2.1 |
Before You Begin…………………………………………………………………………………. |
4 |
|
|
2.2 |
Basic Requirements……………………………………………………………………………… |
5 |
|
|
2.3 |
Connecting the Device………………………………………………………………………….. |
5 |
|
|
Chapter 3 Quick Installation Guide…………………………………………………………….. |
6 |
||
|
Chapter 4 Configure the Device……………………………………………………………….. |
10 |
||
|
4.1 |
Status |
……………………………………………………………………………………………….. |
10 |
|
4.2 |
Quick ……………………………………………………………………………………….Setup |
11 |
|
|
4.3 |
WPS…………………………………………………………………………………………………. |
11 |
|
|
4.4 |
Profile……………………………………………………………………………………………….. |
17 |
|
|
4.5 |
Network…………………………………………………………………………………………….. |
18 |
|
|
4.6 |
Wireless ……………………………………………………………………………………………. |
19 |
|
|
4.6.1 ………………………………………………………………………………… |
Wireless Settings |
20 |
|
|
4.6.2 ………………………………………………………………………………… |
Wireless Security |
21 |
|
|
4.6.3 ………………………………………………………………………… |
Wireless MAC Filtering |
23 |
|
|
4.6.4 ……………………………………………………………………………… |
Wireless Advanced |
25 |
|
|
4.6.5 ……………………………………………………………………………….. |
Wireless Statistics |
26 |
|
|
4.6.6 …………………………………………………………………………….. |
Throughput Monitor |
27 |
|
|
4.7 |
DHCP……………………………………………………………………………………………….. |
28 |
|
|
4.7.1 ……………………………………………………………………………………. |
DHCP Settings |
28 |
|
|
4.7.2 …………………………………………………………………………………. |
DHCP Client List |
29 |
|
|
4.8 |
System ……………………………………………………………………………………..Tools |
30 |
|
|
4.8.1 ………………………………………………………………………………. |
Firmware Upgrade |
30 |
|
|
4.8.2 ………………………………………………………………………………….. |
Factory Defaults |
31 |
|
|
4.8.3 ……………………………………………………………………………….. |
Backup & Restore |
32 |
|
|
4.8.4 ………………………………………………………………………………………………. |
Reboot |
32 |
|
|
4.8.5 …………………………………………………………………………………………… |
Password |
33 |
|
|
4.8.6 ………………………………………………………………………………………… |
System Log |
33 |
|
|
Appendix A: Factory …………………………………………………………………….Defaults |
35 |
||
|
Appendix B: Troubleshooting……………………………………………………………………. |
36 |
||
|
Appendix C: Specifications……………………………………………………………………….. |
38 |
||
|
Appendix D: Glossary……………………………………………………………………………….. |
39 |

TL-WA750RE 150Mbps Universal WiFi Range Extender User Guide
Package Contents
The following items should be found in your package:
TL-WA750RE 150Mbps Universal WiFi Range Extender
Ethernet Cable
Quick Installation Guide
Resource CD for TL-WA750RE 150Mbps Universal WiFi Range Extender, including only this User Guide.
Note:
Make sure that the package contains the above items. If any of the listed items is damaged or missing, please contact your distributor.
Conventions
The Range Extender, the Device or TL-WA750RE mentioned in this User guide stands for TL-WA750RE 150Mbps Universal WiFi Range Extender without any explanations.
Parameters provided in the pictures are just references for setting up the product, which may differ from the actual situation. You can set the parameters according to your demand.
The power plug may differ from the picture illustrated in this UG due to different regional power specifications. Here we just take that of EU version for example.
1

TL-WA750RE 150Mbps Universal WiFi Range Extender User Guide
Chapter 1 Introduction
1.1Product Overview
The TL-WA750RE 150Mbps Universal WiFi Range Extender is dedicated to Small Office/Home Office (SOHO) wireless network solutions. It will enlarge your existing wireless network and mobility within your wireless network while also allowing you to connect a wired device to a wireless environment. Increased mobility and the absence of cabling will be beneficial for your network.
With using IEEE 802.11n wireless technology, this device can transmit wireless data at the rate of up to 150Mbps. With multiple protection measures, including wireless LAN 64/128/152-bit WEP encryption, Wi-Fi protected Access (WPA2-PSK, WPA-PSK), the TL-WA750RE 150Mbps Universal WiFi Range Extender delivers complete data privacy.
It supports an easy wireless connection to the root AP (equipped with WPS/QSS button) by pressing the RE button on the front panel. It also supports an easy, web-based setup for installation and management. Even though you may not be familiar with the Range Extender, you can easily configure it with the help of this Guide. Before installing the Range Extender, please look through this Guide to get the full information of the TL-WA750RE 150Mbps Universal WiFi Range Extender.
1.2 Main Features
Applies IEEE 802.11n wireless technology
Supports multiple encryption security types including: 64/128/152-bit WEP and WPA/WPA2-Personal
Supports built-in DHCP server
Supports two operating modes: Range Extender Mode 1 and Range Extender Mode 2 Supports firmware upgrade
Supports web management
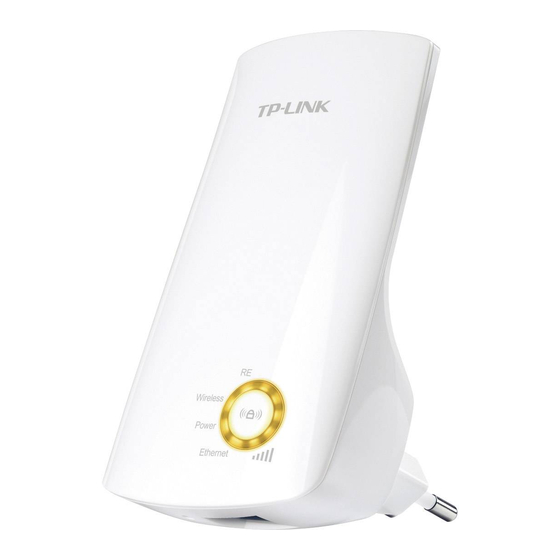
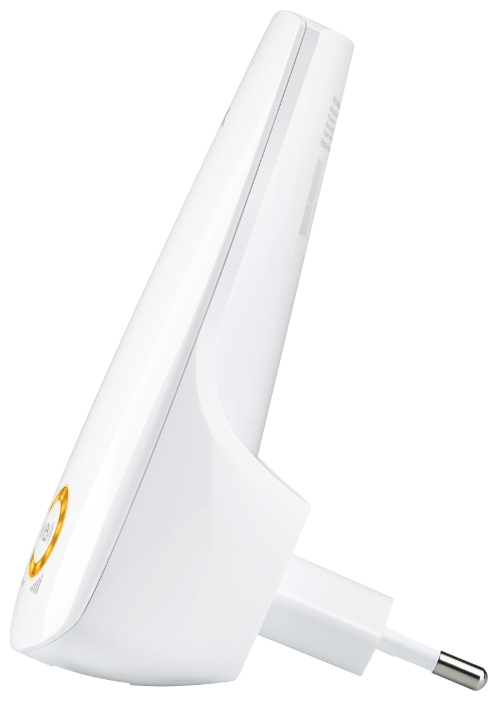
1.3 Appearance
Figure 1-1
2

TL-WA750RE 150Mbps Universal WiFi Range Extender User Guide
LED Explanation:
|
Name |
Status |
Indication |
|||||
|
On |
The Range Extender is connected the router successfully. |
||||||
|
RE |
Flashing |
The Range Extender is connecting the router. |
|||||
|
Off |
The Range Extender is not connected any router yet. |
||||||
|
Wireless |
Off |
The Wireless function is disabled. |
|||||
|
Flashing |
The Wireless function is enabled. |
||||||
|
Power |
Off |
No Power. |
|||||
|
On |
Power on. |
||||||
|
Off |
There is no device linked to the corresponding port. |
||||||
|
Ethernet |
On |
There is a device linked to the corresponding port but no activity. |
|||||
|
Flashing |
There is an active device linked to the corresponding port. |
||||||
|
Signal |
Off |
No signal at present. |
|||||
|
Strength |
Solid |
Signal is transferring. And it also shows the current signal strength |
|||||
|
the range extender received from the root AP after successful |
|||||||
|
(1~5) |
|||||||
|
connection. |
|||||||
|
Table 1-1 |


 (RANGE EXTENDER/WPS): If your Wireless router or AP supports WPS or QSS function, you can press the WPS or QSS button and then press the RANGE EXTENDER button to establish a secure connection between the Wireless router (or AP) and the Range Extender TL-WA750RE.
RESET: This button is used to restore the Range Extender’s factory default settings. There are two ways to reset the Range Extender’s factory defaults:
Method One: With the Range Extender powered on, use a pin to press and hold the RESET button (about 8 seconds) until the System LED becomes quick-flash from slow-flash. And then release the button and wait the Range Extender to reboot to its factory default settings.
Method Two: Restore the default settings from “System Tools > Factory Defaults” of the Range Extender’s Web-based management page.
ETHERNET: One 10/100Mbps RJ45 Ethernet port used to add wireless connectivity to an Ethernet-enabled device such as Internet TV, DVR, Gaming console and so on. Please note that this port is not allowed to be connected with router or AP.
3
![]()
TL-WA750RE 150Mbps Universal WiFi Range Extender User Guide
Chapter 2 Hardware Installation
2.1Before You Begin
Please read this User Guide carefully before installing and using the equipment. The operating distance range of your wireless connection can vary significantly depending on the physical position of the wireless devices. Factors that can weaken signals by getting in the way of your network’s radio waves are metal appliances or obstructions, and walls. Typical ranges vary based on the types of materials and background RF (radio frequency) noise in your home or office.
In order to optimize the performance of TL-WA750RE, please follow the instructions below to achieve an ideal location (please make sure it is always within the wireless coverage of the wireless router).
1)Half-way Between — Generally, the ideal location for TL-WA750RE is half-way between the Wireless router and Wireless Client. If the wireless signal is not satisfactory, you may place TL-WA750RE somewhat nearer to the Wireless router.
2)No Obstacles and Spacious — Clear obstacles in the way between TL-WA750RE and Wireless router. It’s better to locate it in a spacious place, such as near the corridors.
3)No Interference — Keep TL-WA750RE far away from wireless interference, which may come from electrical appliances that works in the same frequency band as TL-WA750RE, such as Blue tooth devices, cordless phones, microwave ovens, etc.
4)3 Signal Lights — You can also find an ideal location via the signal lights on the front panel of TL-WA750RE. These lights show the strength of signal your range extender receives from the root AP. It’s recommended that you choose a location where at least 3 signal lights light up, in order to guarantee a good performance.
Note:
TP-LINK recommends that you connect to the Range Extender when your home network connection is poor, or when you want a larger wireless coverage to eliminate “dead zones”. As in compliance with the wireless transmission protocol, all the Range Extender devices are set to work in half-duplex instead of full-duplex mode. In other words, the Range Extender has to process one-way communication between your root Wireless router (or AP) and the terminal clients; so the transmission time will be double-increased, while the speed will be decreased.
4

TL-WA750RE 150Mbps Universal WiFi Range Extender User Guide
2.2Basic Requirements
Place your Range Extender in a well-ventilated place far from direct sunlight, any heater or heating vent.
Leave at least 2 inches (5cm) space around the device for heat dissipation.
Turn off your Range Extender and unplug the power adapter in a lighting storm to avoid damage.
Use Web browser, such as Microsoft Internet Explorer 5.0 or above, Netscape Navigator 6.0 or above.
Operating temperature of the Range Extender should be 0 ~40 (32 ~104 ).
Operating humidity of the Range Extender should be 10%~90%RH (Non-condensing).
2.3Connecting the Device
Figure 2-1 Typical connection of TL-WA750RE
To establish a typical connection of the Range Extender, please take the following steps:
1.Connect the Cable/DSL modem to a Wireless router with an Ethernet cable.
2.Plug your TL-WA750RE directly to a standard electrical wall socket, which is next to the Wireless router.
3.Connect your Wireless Clients (such as notebook, pad, smart phone, etc.) to TL-WA750RE wirelessly. Or you can connect your PC to the sole LAN port of Range Extender via an Ethernet cable.
4.Log in the web-based management page of TL-WA750RE and complete the configurations. (Please refer to Chapter 3 Quick Installation Guide or Chapter 4 Configure the Device for the configurations, as you need.) Through the web page configuration you can successfully connect TL-WA750RE to the wireless router.
5.Adjust an ideal location for TL-WA750RE. (Please refer to Section 2.1 Before You Begin for detailed information about ideal location.)
5

TL-WA750RE 150Mbps Universal WiFi Range Extender User Guide
Chapter 3 Quick Installation Guide
This chapter will guide you to configure your PC to communicate with the Range Extender and to configure and manage the TL-WA750RE 150Mbps Universal WiFi Range Extender easily with a Web-based utility.
With a Web-based utility, it is easy to configure and manage the TL-WA750RE 150Mbps Universal WiFi Range Extender. The Web-based utility can be used on any Windows, Macintosh or UNIX OS with a Web browser, such as Microsoft Internet Explorer, Mozilla Firefox or Apple Safari.
1.To access the configuration utility, open a web-browser and type in the domain name http://tplinkextender.net in the address field of the browser.
Figure 3-1 Login to the Range Extender
After a moment, a login window will appear as shown in Figure 3-2. Enter admin for the User Name and Password (both in lower case letters). Then click OK or press Enter.
Figure 3-2 Login Windows
Note:
If the above screen does not prompt, it means that your web-browser has been set to a proxy. Go to Tools menu > Internet Options > Connections > LAN Settings, in the screen that appears, cancel the Using Proxy checkbox, and click OK to finish it.
6

TL-WA750RE 150Mbps Universal WiFi Range Extender User Guide
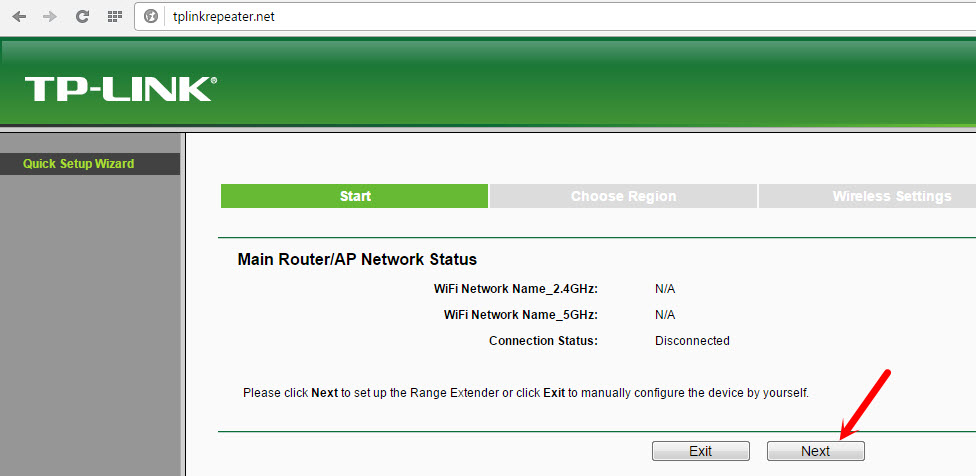
2.After successful login, there will pop up the Quick Setup Start page. Click Next to get the quick setup started.
Figure 3-3 Quick Setup Start
3.Figure 3-4 will appear for you to choose the region. Then click Next to continue.
Figure 3-4 Quick Setup – Choose Region
4.The device will detect the existing wireless networks. Please wait for a while.
Figure 3-5 Quick Setup – Detect Existing Networks
7

TL-WA750RE 150Mbps Universal WiFi Range Extender User Guide
5.A list of available wireless networks will appear. Check the box before the SSID of your desired network, and then click Next.
Figure 3-6 Quick Setup – Available Wireless Networks
Note:
If you could not find your wireless network name (SSID) in the list, you can click Rescan to redetect it or tick the checkbox before «Set SSID and MAC Manually» to manually configure the wireless settings.
6.Wireless Settings page will appear as shown in Figure 3-7. Please enter the Wireless Password of your selected target network and then click Next to continue.
Figure 3-7 Quick Setup – Wireless Settings
8
 Loading…