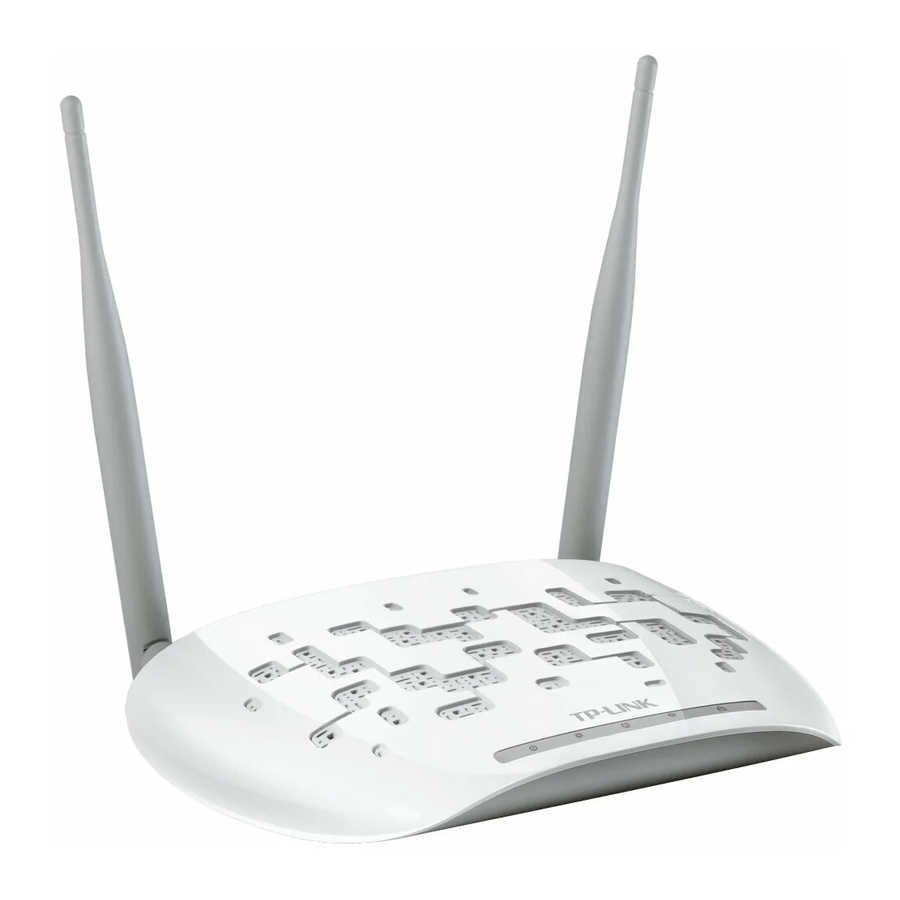
TP-Link TL-WA801ND – точка доступа средней ценовой категории, которая обладает множеством полезных функций. Это устройство работает как с проводными, так и с беспроводными сетями. Основной способ применения – точка доступа, однако, при необходимости можно приспособить для использования в качестве усилителя или Wi-Fi-адаптера.
Но как подключить и настроить оборудование? Зачем нужен тот или иной режим работы? О чем нужно помнить при осуществлении настройки? Ниже мы в деталях рассмотрим все эти вопросы. Данную статью можно рассматривать в качестве полноценного руководства пользователя для настройки точек доступа TP-Link TL–WA701ND и TL-WA801ND.
Содержание
- Первичная настройка
- Точка доступа
- Усилитель
- Беспроводной адаптер
- Заключение
- Задать вопрос автору статьи
Первичная настройка
Для работы необходимо сперва выполнить первичную настройку точки доступа TL WA801ND:
- Вставьте блок питания в соответствующий разъем на задней стороне устройства, а потом подключите его к розетке – должен загореться соответствующий индикатор.
- Кабель провайдера вставьте в разъем RJ-45 (обычно окрашен в синий цвет) – также должен загореться индикатор через пару секунд.
- Подключите патч-корд к сетевому разъему на своем компьютере с одной стороны и к LAN-гнезду на точке доступа, с другой стороны.
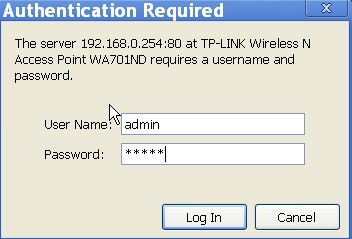
- Откройте любой браузер и введите в адресной строке адрес устройства. По умолчанию – 192.168.0.254. Если вы вбили это значение, а меню авторизации не открылось, то в таком случае нужно перевернуть прибор – на обратной стороне вы увидите наклейку, где будет указан корректный адрес.
- В открывшемся окне вбейте логин и пароль – по умолчанию это слова admin и admin для обеих строк. Иногда производитель указывает другие значения – в таком случае найдите верные данные на наклейке на обратной стороне.
Полное руководство пользователя (инструкцию по настройке) для TP-Link TL-WA801ND на разных языках, в том числе и русском, можно скачать ЗДЕСЬ.
Точка доступа
Режим позволяет домашним устройствам (ПК, телефоны, телевизоры и другие) подключаться к интернету беспроводным способом с помощью технологии Wi-Fi. Настройка TP-Link TL-WA801ND осуществляется следующим образом:
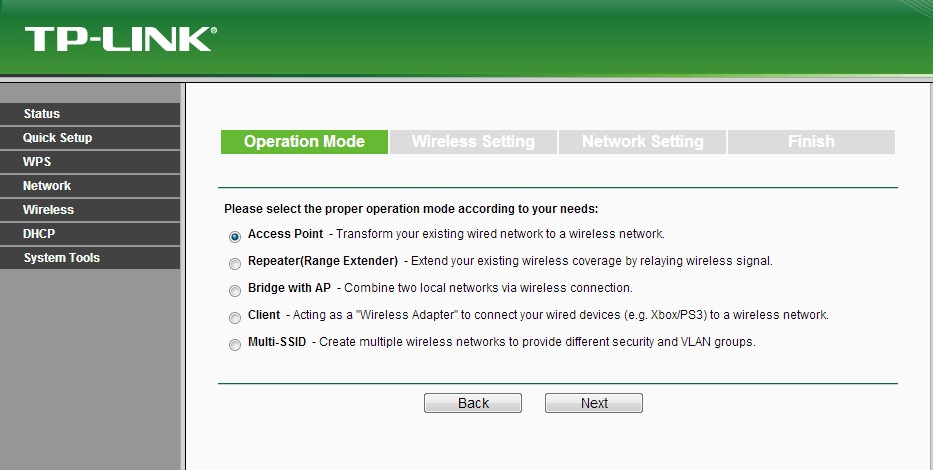
- Зайдите в консоль, выберите пункт Operation Mode, кликните по строке Access Point, сохраните настройки и дождитесь перезагрузки.
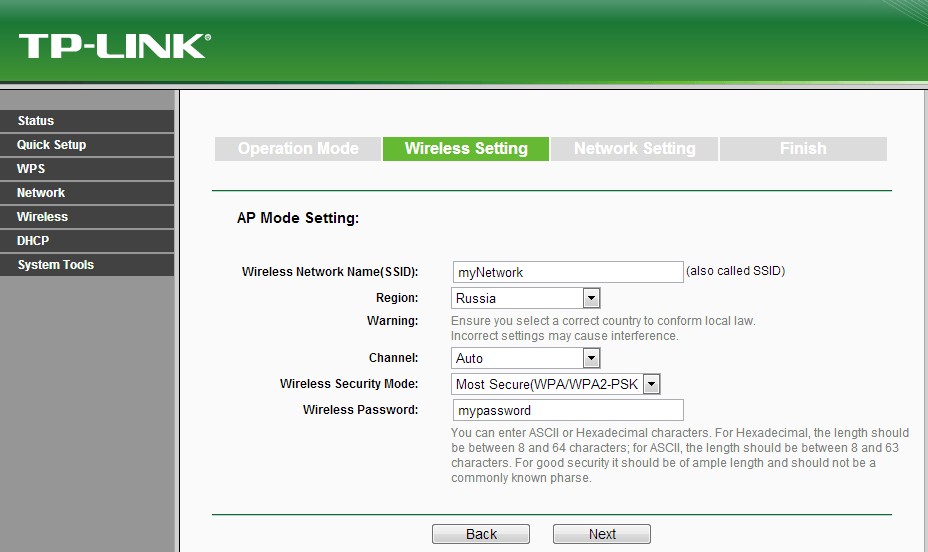
- Откройте вкладку Wireless Settings, укажите имя точки доступа в строке SSID и выберите регион Russia.
- На вкладке Wireless кликните по строке Security, выберите тип защиты (рекомендуется WPA2-PSK), придумайте пароль и укажите его в строке Password.
После запуска также рекомендуется активировать функцию DHCP, чтобы точка доступа автоматически назначала адреса всем подключенным устройствам. Для этого в консоли выберите пункт DHCP Settings и выполните настройку:
- Первая строка Server – укажите Enable.
- Пункт Start IP – укажите число в форме 192.168.0.XXX, где в качестве значения XXX укажите какое-либо число от 1 до 254.
- Пункт End IP – также укажите число в формате 192.168.0.XXX. При этом обратите внимание, что число XXX должно быть больше значения Start IP.
- Остальные строки можно не заполнять. В конце настройки обязательно нажмите кнопку Save для сохранения новых параметров работы.
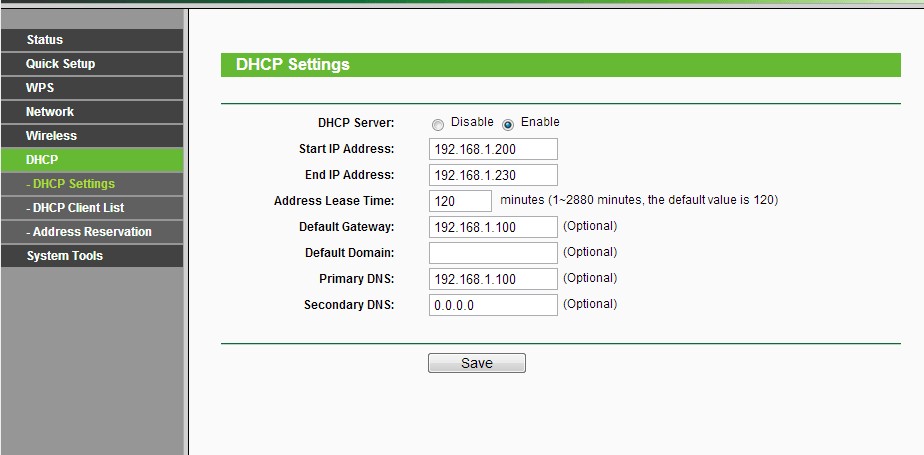
Обратите внимание, что после активации DHCP прибор будет автоматически присваивать внешним устройствам адреса в диапазоне значений от Start IP до End IP.
Усилитель
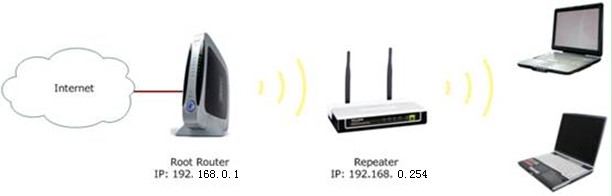
При таком режиме работы TP-Link TL-WA801ND будет подключаться к основному маршрутизатору, а затем нужно выполнить настройку режима. Инструкция:
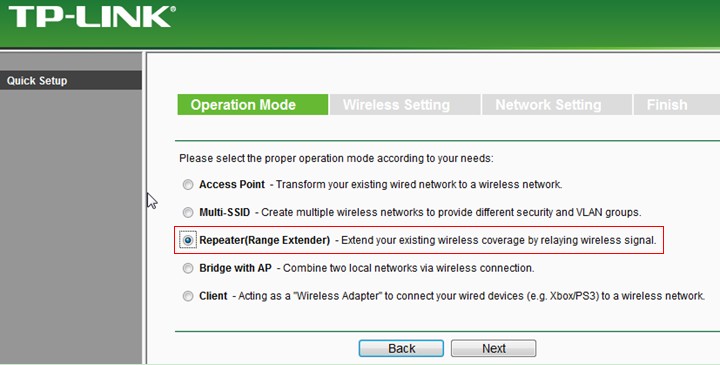
- Авторизуйтесь, зайдите в консоль управления, выберите Operation Mode и функцию Repeater, а потом нажмите кнопку Next.
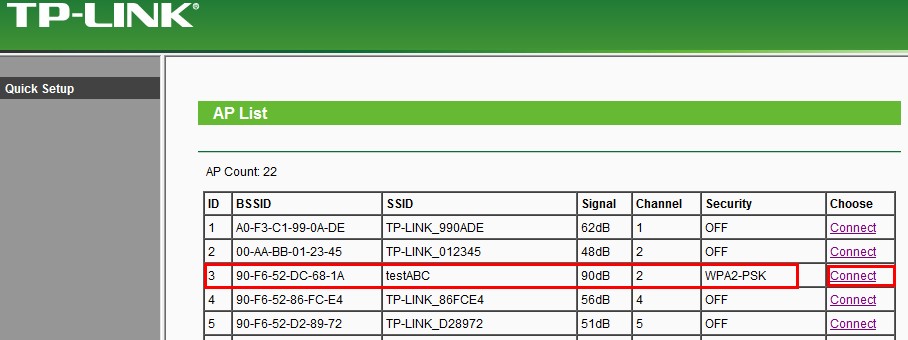
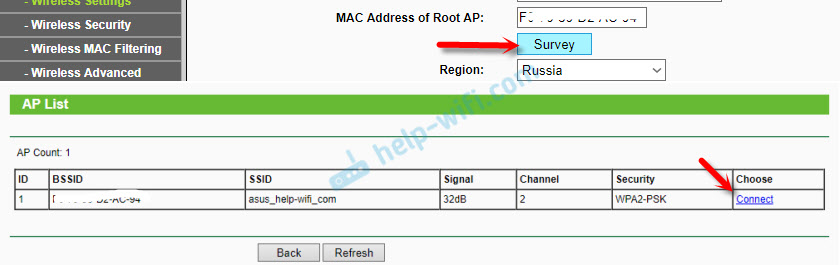
- В новом меню нажмите кнопку Survey – перед вами откроется окошко, где будут указаны все активные Wi-Fi-точки. Выберите свою сеть и нажмите кнопку Connect напротив нужного подключения.
- Вы вернетесь в обратное меню, в котором появится новая строка Password – вбейте в нее пароль от сети, а потом нажмите кнопку Next.
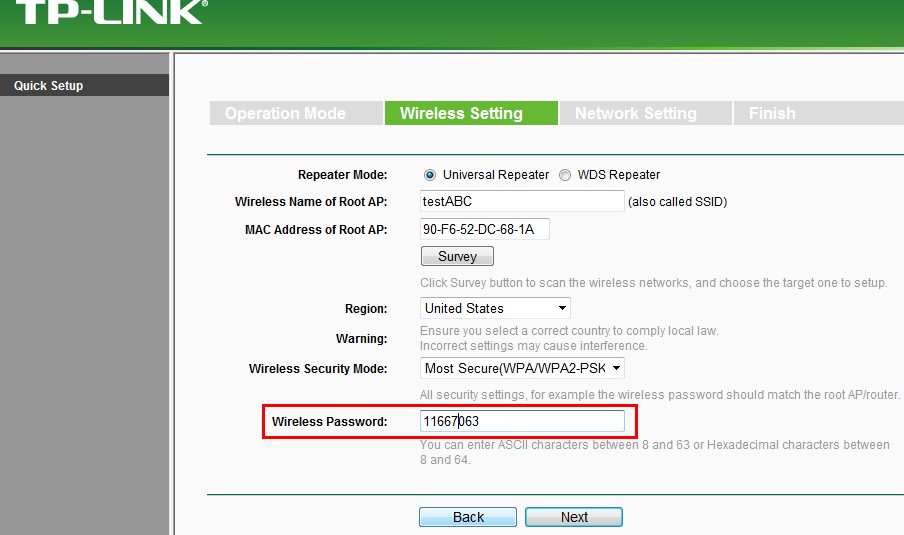
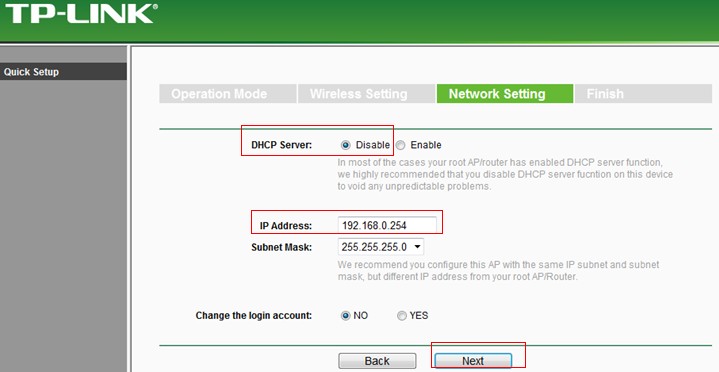
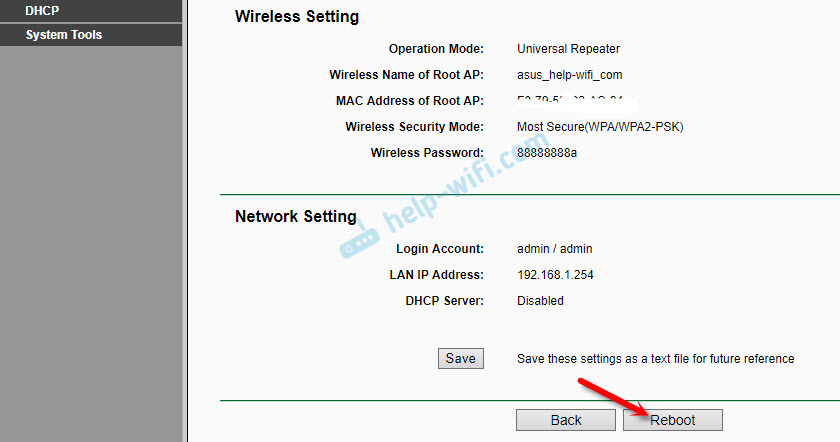
В конце откроется меню настройки DHCP – активировать эту функцию не нужно!
Настройка в режиме «Репитер» представлена в следующем видео:
Однако, обратите внимание на пункт IP Address – для корректной передачи данных оба устройства (основной маршрутизатор и наш усилитель) должны находиться в рамках одной подсети (то есть у них предпоследние цифры IP-адресов должны совпадать). Узнать адрес можно по наклейке на нижней части оборудования.
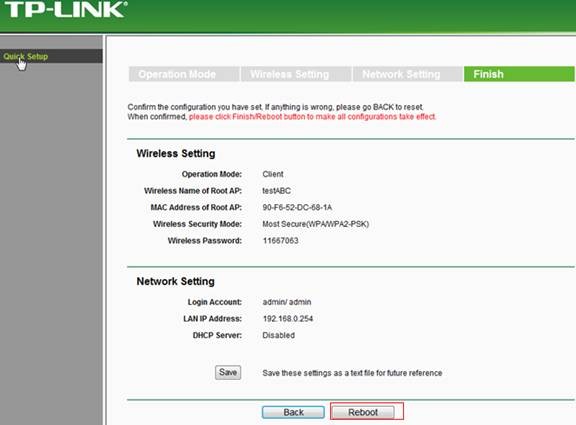
Если приборы используют разные адреса, то в меню IP Address необходимо вручную поменять соответствующее число, чтобы они совпали. Теперь нажмите Next, а потом активируйте функцию Reboot для перезагрузки.
Беспроводной адаптер
Как настроить точку доступа в режиме «Клиент» смотрите также в следующем видео:
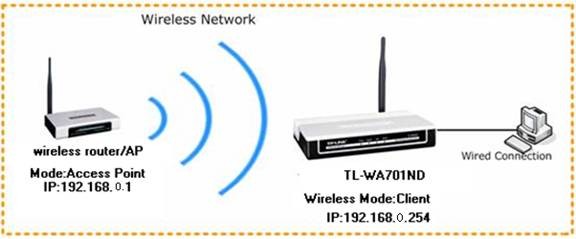
Схема технологии – TP-Link TL-WA801ND получает беспроводной сигнал и передает его по проводу на другие устройства. При этом обратите внимание, что во время работы точку доступа нельзя будет использовать для подключения к интернету по Wi-Fi (хотя к ней можно будет подключиться беспроводным способом для настроек).
Алгоритм действий практически полностью идентичен методу настройки усилителя:
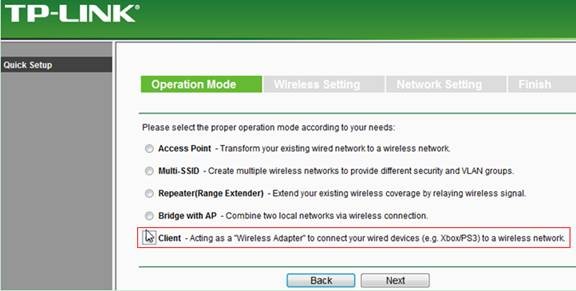
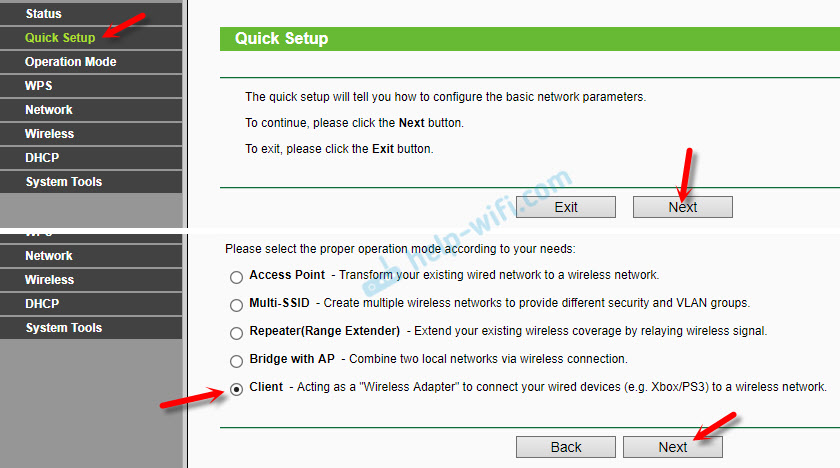
- Пройдите авторизацию, выберите Operation Mode и кликните по пункту Client, а потом нажмите кнопку Next.
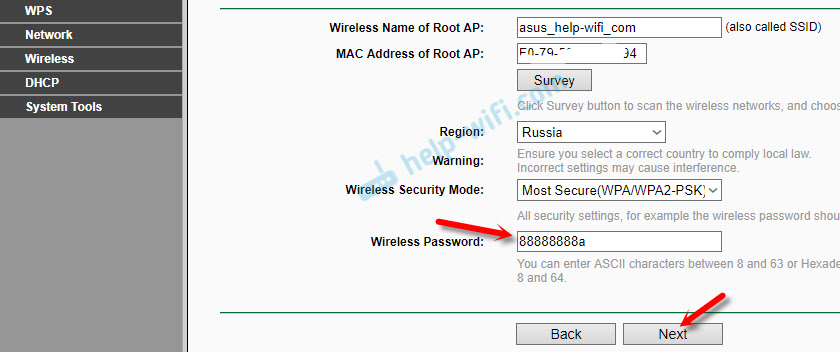
- Нажмите Survey, выберите доступную сеть, нажмите Connect и введите пароль доступа.

- Не включайте DHCP и убедитесь, что подсети основного маршрутизатора и адаптера совпадают. При необходимости измените IP-адрес вручную с помощью соответствующей строки, в конце нажмите Reboot для перезагрузки.
После запуска соедините нужное устройство (ПК, телевизор и т. д.) с точкой доступа с помощью коммутационного шнура (провод вставляется в любой разъем LAN).
Заключение
Подведем итоги. TP-Link TL-WA801ND может работать в нескольких режимах – точка доступа, усилитель, Wi-Fi-адаптер. Выбор режима осуществляется через консоль управления, получить доступ к которой можно с помощью компьютера.
инструкцияTP-Link TL-WA801ND

7106507509 REV1.1.0
TP-Link Technologies Co., Ltd.
Specifications are subject to change without notice. is a registered trademark of TP-Link
Technologies Co., Ltd. Other brands and product names are trademarks or registered trademarks of
their respective holders.
No part of the specifications may be reproduced in any form or by any means or used to make any
derivative such as translation, transformation, or adaptation without permission from
TP-Link Technologies Co., Ltd. Copyright © 2017 TP-Link Technologies Co., Ltd. All rights reserved.
www.tp-link.com
Quick Installation Guide
Wireless N Access Point
Посмотреть инструкция для TP-Link TL-WA801ND бесплатно. Руководство относится к категории точки доступа, 9 человек(а) дали ему среднюю оценку 8.4. Руководство доступно на следующих языках: русский, английский. У вас есть вопрос о TP-Link TL-WA801ND или вам нужна помощь? Задайте свой вопрос здесь
Главная
| TP-Link | |
| TL-WA801ND | TL-WA801ND V1 | |
| точка доступа | |
| 115970741669, 151902933474, 4050196362815, 5052916517535, 5053973919485, 6935364051419, 693536405144, 746320533650, 845973051419, 8459730514196, 0693536405144, 0151902933474, 0115970741669, 0722550156821, 0746320533650, 0014444453865, 0807030505884, 0521621394960, 5054484152927 | |
| русский, английский | |
| Руководство пользователя (PDF), Инструкция по установке (PDF), Техническая спецификация (PDF) |
Свойства
| Максимальная скорость передачи данных | 300 Мбит/с |
| Модуляция | 16-QAM, 64-QAM, CCK, DBPSK, DQPSK, OFDM |
| Чувствительность приемника | 270M: -68dBm@10% PERrn130M: -68dBm@10% PERrn108M: -68dBm@10% PERrn54M: -68dBm@10% PERrn11M: -85dBm@8% PERrn6M: -88dBm@10% PERrn1M: -90dBm@8% PER |
| Скорость передачи данных Ethernet LAN | 10, 100 Мбит/с |
| Полоса частот | 2.4 — 2.4835 GHz |
| Стандарты сети | IEEE 802.11b, IEEE 802.11g, IEEE 802.11n |
| Поддержка Quality of Service (QoS) | Да |
| 2,4 ГГц | Да |
| 5 ГГц | Нет |
| Свивка кабеля | 10/100Base-T(X) |
| 6 ГГц | Нет |
| Максимальная скорость передачи данных (2,4 ГГц) | 300 Мбит/с |
| Беспроводные мультимедийные расширения | Да |
Антена
| Коэффициент усиления антенны (макс) | 5 dBi |
| Количество антенн | 2 |
| Характеристика антенны | Отсоединяемая антенна |
| Тип разъема антенны | RP-SMA |
| Тип направленности антенны | Всенаправленный |
| Тип антенны | Внешний |
Порты и интерфейсы
| Количество портов Ethernet LAN ( RJ-45) | 1 |
| Количество портов USB 2.0 | — |
| Порт WAN | Ethernet (RJ-45) |
Энергопитание
| описание выходной мощности | 9VDC / 0.85A |
| Питание по Ethernet (PoE) | Да |
| Поддерживаемый тип Power over Ethernet (PoE) | Passive PoE |
| Выходное напряжение | 9 V |
| Ток на выходе | 0.6 A |
Прочие свойства
| Диапазон передачи электроэнергии | 0 — 20 dBmW |
Условия эксплуатации
| Диапазон относительной влажности при эксплуатации | 10 — 90 % |
| Диапазон температур при эксплуатации | 0 — 40 °C |
| Диапазон относительной влажности при хранении | 5 — 90 % |
| Диапазон температур при хранении | -40 — 70 °C |
Дизайн
| Внутренний | Нет |
| Сертификация | CE, FCC, RoHS |
| Светодиодные индикаторы | Да |
| Кнопка сброса установок | Да |
| Размещение | Стол |
| Цвет товара | — |
Безопасность
| Алгоритмы шифрования данных | 128-bit WEP, 152-bit WEP, 64-bit WEP, SSID, WPA, WPA-PSK, WPA2, WPA2-PSK, WPS |
| Фильтрация MAC-адресов | Да |
Вес и размеры
| Ширина | 181 mm |
| Глубина | 125 mm |
| Высота | 36 mm |
Протоколы
Производительность
| Совместимые операционные системы | Windows 98SE, NT, 2000, XP, Vista, 7rnMAC OSrnNetWarernUNIXrnLinux |
Содержимое упаковки
| Сетевой адаптер в комплекте | Да |
Данные об упаковке
| Ширина упаковки | 310 mm |
| Масса брутто | 600 g |
| Высота упаковки | 70 mm |
| Глубина упаковки | 223 mm |
показать больше
Не можете найти ответ на свой вопрос в руководстве? Вы можете найти ответ на свой вопрос ниже, в разделе часто задаваемых вопросов о TP-Link TL-WA801ND.
Не нашли свой вопрос? Задайте свой вопрос здесь
-
Contents
-
Table of Contents
-
Troubleshooting
-
Bookmarks
Quick Links
TL-WA801ND
300Mbps Wireless N Access Point
Rev: 2.0.0
1910010673
Related Manuals for TP-Link TL-WA801ND
Summary of Contents for TP-Link TL-WA801ND
-
Page 1
TL-WA801ND 300Mbps Wireless N Access Point Rev: 2.0.0 1910010673… -
Page 2
Specifications are subject to change without notice. is a registered trademark of TP-LINK TECHNOLOGIES CO., LTD. Other brands and product names are trademarks or registered trademarks of their respective holders. No part of the specifications may be reproduced in any form or by any means or used to make any derivative such as translation, transformation, or adaptation without permission from TP-LINK TECHNOLOGIES CO., LTD. -
Page 3: Fcc Statement
FCC STATEMENT This equipment has been tested and found to comply with the limits for a Class B digital device, pursuant to part 15 of the FCC Rules. These limits are designed to provide reasonable protection against harmful interference in a residential installation. This equipment generates, uses and can radiate radio frequency energy and, if not installed and used in accordance with the instructions, may cause harmful interference to radio communications.
-
Page 4: Industry Canada Statement
National restrictions This device is intended for home and office use in all EU countries (and other countries following the EU directive 1999/5/EC) without any limitation except for the countries mentioned below: Country Restriction Reason/remark General authorization required for outdoor use and Bulgaria None public service…
-
Page 5
Korea Warning Statements: 당해 무선설비는 운용중 전파혼신 가능성이 있음. NCC Notice: 經型式認證合格之低功率射頻電機,非經許可,公司、商號或使用者均不得擅自變更頻率、加大功 率或變更原設計之特性及功能。 低功率射頻電機之使用不得影響飛航安全及干擾合法通信;經發現有干擾現象時,應立即停用,並 改善至無干擾時方得繼續使用。前項合法通信,指依電信法規定作業之無線電通信。低功率射頻電 機須忍受合法通信或工業、科學及醫療用電波輻射性電機設備之干擾。 Продукт сертифіковано згідно с правилами системи УкрСЕПРО на відповідність вимогам нормативних документів та вимогам, що передбачені чинними законодавчими актами України. -
Page 6: Declaration Of Conformity
TP-LINK TECHNOLOGIES CO., LTD DECLARATION OF CONFORMITY For the following equipment: Product Description: 300Mbps Wireless N Access Point Model No.: TL-WA801ND Trademark: TP-LINK We declare under our own responsibility that the above products satisfy all the technical regulations applicable to the product within the scope of Council Directives:…
-
Page 7: Table Of Contents
CONTENTS Package Contents ………………..1 Chapter 1 Introduction………………. 2 Product Overview………………..2 Conventions …………………. 2 Main Features ………………..3 Appearance………………….. 3 1.4.1 The Front Panel ………………..3 1.4.2 The Rear Panel………………..4 Chapter 2 Hardware Installation …………….5 Before You Begin………………..5 Basic Requirements ………………
-
Page 8
4.8.5 Factory Defaults………………..59 4.8.6 Backup & Restore………………..59 4.8.7 Reboot ………………….60 4.8.8 Password ………………….60 4.8.9 System Log………………….61 Appendix A: Application Example ……………. 62 Appendix B: Factory Defaults …………….65 Appendix C: Troubleshooting …………….66 Appendix D: Specifications………………. 71 Appendix E: Glossary ……………….. 72… -
Page 9: Package Contents
One Power Injector Ethernet Cable One Power Adapter for TL-WA801ND 300Mbps Wireless N Access Point Quick Installation Guide One Resource CD for TL-WA801ND 300Mbps Wireless N Access Point, including: This User Guide Other helpful information Note: Make sure that the package contains the above items. If any of the listed items are damaged or…
-
Page 10: Chapter 1 Introduction
It supports an easy, web-based setup for installation and management. Even though you may not be familiar with the Access Point, you can easily configure it with the help of this Guide. Before installing the AP, please look through this Guide to get the full information of the TL-WA801ND 300Mbps Wireless N Access Point.
-
Page 11: Main Features
1.4.1 The Front Panel Figure 1-1 The front panel of the TL-WA801ND consists of several LED indicators, which is designed to indicate connections. View from left to right, Table 1-1 describes the LEDs on the front panel of the device.
-
Page 12: The Rear Panel
1.4.2 The Rear Panel Figure 1-2 Viewed from left to right, the following parts are located on the rear panel of TL-WA801ND. ON/OFF: The switch for the power. POWER: The power port connects to the power adapter provided with the TL-WA801ND 300Mbps Wireless N Access Point.
-
Page 13: Chapter 2 Hardware Installation
Web browser, such as Microsoft Internet Explorer 5.0 or above, Netscape Navigator 6.0 or above Operating temperature: 0℃~40℃ (32℉~104℉) Operating Humidity: 10%~90%RH, Non-condensing 2.3 Connecting the Device Figure 2-1 is an example of the typical application of TL-WA801ND in the infrastructure network. An Infrastructure network contains an access point or a wireless router.
-
Page 14
3. Adjust the direction of the antenna. Normally, upright is a good direction. 4. Connect the Ethernet Broadband Router to the TL-WA801ND Access Point. Power on the AP. 5. Then you can connect a desktop PC or laptop to your network. (Make sure your computer or laptop is equipped with a Wireless Adapter.) -
Page 15: Chapter 3 Quick Installation Guide
TL-WA801ND 300Mbps Wireless N Access Point easily with a Web-based utility. 3.1 Quick Setup With a Web-based utility, it is easy to configure and manage the TL-WA801ND 300Mbps Wireless N Access Point. The Web-based utility can be used on any Windows, Macintosh or UNIX OS with a Web browser, such as Microsoft Internet Explorer, Mozilla Firefox or Apple Safari.
-
Page 16
DHCP is enabled during the configuration, it is essential to disable DHCP when all the settings are finished. The Operation Mode page will appear then, shown in Figure 3-4. The TL-WA801ND supports up to five operation modes. Figure 3-4 Operation Mode In Access Point mode, the product will act as a wireless central hub for your wireless LAN clients, giving a wireless extension for your current wired network. -
Page 17
TL-WA801ND 300Mbps Wireless N Access Point User Guide Figure 3-5 Wireless Setting — Access Point mode Create an easy-to-remember name for your wireless network, write it into Wireless Network Name(SSID). Select Region and Channel for your device. Select Most Secure (WPA/WPA2-PSK) encryption mode and enter a password below to prevent unauthorized access to your AP. -
Page 18
TL-WA801ND 300Mbps Wireless N Access Point User Guide Select the Repeater Mode, for example Universal Repeater. Click Survey, then the window displaying a list of available SSIDs will appear in Figure 3-7. Figure 3-7 AP List Find the SSID of the Access Point / Router or WISP, and click Connect in the corresponding row. -
Page 19
TL-WA801ND 300Mbps Wireless N Access Point User Guide You can name the bridge AP in Local Wireless Name, and configure the Local Wireless Setting for the bridge AP. Click Next in Figure 3-8, and you will come to Network Setting page for furthers configuration. -
Page 20
TL-WA801ND 300Mbps Wireless N Access Point User Guide Figure 3-10 Wireless Setting – Multi-SSID mode You are suggested to implement Multi-SSID function with a switch that supports Tag VLAN feature. For advanced configuration of this step, please refer to explanations of this mode in 4.6.1… -
Page 21
TL-WA801ND 300Mbps Wireless N Access Point User Guide Note: 1. These settings are only for basic wireless parameters, for advanced settings, please refer 4.5 Network DHCP. 2. By selecting YES for Change the login account, you can modify your login user name and password. -
Page 22: Chapter 4 Configure The Device
300Mbps Wireless N Access Point User Guide Chapter 4 Configure the Device This Chapter describes how to configure your Access Point via the web-based management page. The TL-WA801ND 300Mbps Wireless N Access Point is easy to configure and manage with the ® Web-based (Internet Explorer, Netscape…
-
Page 23: Status
TL-WA801ND 300Mbps Wireless N Access Point User Guide 4.2 Status Selecting Status will enable you to view the AP’s current status and configuration, all of which is read-only. Figure 4-3 Device Status Firmware Version — This field displays the current firmware version of the AP.
-
Page 24: Quick Setup
TL-WA801ND 300Mbps Wireless N Access Point User Guide System Up Time — This filed displays the run time of the AP since it’s powered on or reset. Note: If you select Client mode in Figure 4-12, the wireless status in Figure 4-3 will change, similar to the…
-
Page 25
TL-WA801ND 300Mbps Wireless N Access Point User Guide Current PIN — The current value of the device’s PIN is displayed here. The default PIN of the device can be found in the label or User Guide. Restore PIN — Restore the PIN of the device to its default. -
Page 26
TL-WA801ND 300Mbps Wireless N Access Point User Guide The WPS Configuration Screen of Wireless Adapter Method Two: Step 1: Press the WPS button on the rear panel of the device. Step 2: For the configuration of the wireless adapter, please choose “Push the button on my access point”… -
Page 27
TL-WA801ND 300Mbps Wireless N Access Point User Guide The WPS Configuration Screen of Wireless Adapter Method Three: Step 1: Keep the default WPS Status as Enabled and click the Add device button in Figure 4-5, then the following screen will appear. -
Page 28
TL-WA801ND 300Mbps Wireless N Access Point User Guide The WPS Configuration Screen of Wireless Adapter Step 4: Wait for a while until the next screen appears. Click OK to complete the WPS configuration. The WPS Configuration Screen of Wireless Adapter II. -
Page 29
TL-WA801ND 300Mbps Wireless N Access Point User Guide Figure 4-7 Enter the PIN Step 2: Choose “Enter the new device’s PIN” and enter the PIN code (take 16952898 for example) of the wireless adapter in the field after PIN as shown in the figure above. Then click Connect. -
Page 30: Network
TL-WA801ND 300Mbps Wireless N Access Point User Guide the AP into the field after “Access Point PIN”. Then click Next. The WPS Configuration Screen of Wireless Adapter Note: The default PIN code of the AP can be found in its label or the WPS configuration screen as Figure 4-5 .
-
Page 31: Wireless
TL-WA801ND 300Mbps Wireless N Access Point User Guide Figure 4-8 Network MAC Address — The physical address of the AP. The value can’t be changed. Type — Select Dynamic IP(DHCP) to get IP address from DHCP server or select Static IP to configure IP address manually from the drop-down list.
-
Page 32: Wireless Settings
TL-WA801ND 300Mbps Wireless N Access Point User Guide Figure 4-9 Wireless menu 4.6.1 Wireless Settings Selecting Wireless > Wireless Settings will enable you to configure the basic settings for your wireless network on the screen below (Figure 4-10).This page allows you to configure the wireless mode for your device.
-
Page 33
TL-WA801ND 300Mbps Wireless N Access Point User Guide the device in a region other than one of those specified in this field. If your country or region is not listed, please contact your local government agency for assistance. Note: Limited by local law regulations, version for North America does not have region selection option. -
Page 34
TL-WA801ND 300Mbps Wireless N Access Point User Guide 2) Multi-SSID: This mode allows the device to support up to four SSIDs. Figure 4-11 Wireless Settings in Multi-SSID mode Enable VLAN — Check this box and then you can change the VLAN ID of each SSID. If you want to configure the Guest and Internal networks on VLAN, the switch you are using must support VLAN. -
Page 35
TL-WA801ND 300Mbps Wireless N Access Point User Guide Note: Limited by local law regulations, version for North America does not have region selection option. Channel — Determines the operating frequency to be used. It is not necessary to change the wireless channel unless you notice interference problems with another nearby access point. -
Page 36
The wireless STAs join to the network with the same VLAN ID can communicate with each other, for example, STA1 and STA3. All wireless STAs can log on to the Web management page of TL-WA801ND and manage the access point, for example, STA1, STA2, STA3 and STA4. -
Page 37
LAN port of TL-WA801ND. Configure the VLAN ID of the PC that can log on to the Web management page of TL-WA801ND via the LAN port equal to the PVID of port 5. Verify the communication status after the above configuration is completed. -
Page 38
300Mbps Wireless N Access Point User Guide Note: If the LAN port of TL-WA801ND is not connected to a switch but directly to a PC, 1. The PC can directly log on to the Web management page of TL-WA801ND and manage the access point. -
Page 39
TL-WA801ND 300Mbps Wireless N Access Point User Guide Enable Wireless Radio — Select or deselect this check box to allow or deny wireless stations to access the device. Click the Survey button to detect the SSIDs in the local area. -
Page 40
TL-WA801ND 300Mbps Wireless N Access Point User Guide Channel — Determines the operating frequency to be used. It is not necessary to change the wireless channel unless you notice interference problems with another nearby access point. Mode — Select the desired wireless mode. The options are: •… -
Page 41
TL-WA801ND 300Mbps Wireless N Access Point User Guide Wireless Name of Root AP — If you select the radio button before Wireless Name of Root AP, the AP client will connect to the AP according to SSID. Enter the SSID of AP that you want to access. -
Page 42
TL-WA801ND 300Mbps Wireless N Access Point User Guide 6) Bridge with AP: This mode can bridge the AP and up to 4 APs also in bridge mode to connect two or more wired LANs. Figure 4-15 Wireless Settings in Bridge with AP mode… -
Page 43: Wireless Security
TL-WA801ND 300Mbps Wireless N Access Point User Guide Local Wireless Name — Name for the AP. Region — Select your region from the pull-down list. This field specifies the region where the wireless function of the device can be used. It may be illegal to use the wireless function of the device in a region other than one of those specified in this field.
-
Page 44
TL-WA801ND 300Mbps Wireless N Access Point User Guide 1) Access Point Figure 4-16 Wireless Security — Access Point Disable Security — Check this box radio button to disable wireless security. If disabled, the wireless stations will be able to connect this device without encryption. It is strongly recommended that you choose one of the security types to enable security. -
Page 45
TL-WA801ND 300Mbps Wireless N Access Point User Guide • Group Key Update Period — Specify the group key update interval in seconds. The value can be either 0 or at least 30. Enter 0 to disable the update. WPA/WPA2-Enterprise — Select WPA/WPA2 based on Radius Server. -
Page 46
TL-WA801ND 300Mbps Wireless N Access Point User Guide 2) Multi-SSID Figure 4-17 Wireless Security – Multi-SSID You can choose which SSID to configure wireless security settings for in the blank behind Operation Mode. Disable Security — Check this box radio button to disable wireless security. If disabled, the wireless stations will be able to connect this device without encryption. -
Page 47
TL-WA801ND 300Mbps Wireless N Access Point User Guide Automatic — Select WPA or WPA2 automatically based on the wireless station’s capability and request. WPA — Wi-Fi Protected Access. WPA2 — WPA version 2. • Encryption — You can select either Automatic, TKIP or AES. -
Page 48
TL-WA801ND 300Mbps Wireless N Access Point User Guide Automatic(Recommended) — Select WPA-Personal or WPA2-Personal automatically based on the wireless station’s capability and request. WPA-PSK — Pre-shared key of WPA. WPA2-PSK — Pre-shared key of WPA2. • Encryption — You can select either Automatic(Recommended), TKIP or AES. -
Page 49
TL-WA801ND 300Mbps Wireless N Access Point User Guide 4) WDS Repeater Figure 4-19 Wireless Security – Repeater Disable Security — Check this box radio button to disable wireless security. If disabled, the wireless stations will be able to connect this device without encryption. It is strongly recommended that you choose one of the security types to enable security. -
Page 50
TL-WA801ND 300Mbps Wireless N Access Point User Guide Shared Key — Select 802.11 Shared Key authentication type. Open System — Select 802.11 Open System authentication. • WEP Key Format — You can select ASCII or Hexadecimal format. ASCII format stands for any combination of keyboard characters in the specified length. -
Page 51
TL-WA801ND 300Mbps Wireless N Access Point User Guide Disable Security — Check this box radio button to disable wireless security. If disabled, the wireless stations will be able to connect this device without encryption. It is strongly recommended that you choose one of the security types to enable security. -
Page 52
TL-WA801ND 300Mbps Wireless N Access Point User Guide 6) Bridge with AP Figure 4-21 Wireless Security – Bridge with AP Disable Security — Check this box radio button to disable wireless security. If disabled, the wireless stations will be able to connect this device without encryption. It is strongly recommended that you choose one of the security types to enable security. -
Page 53
TL-WA801ND 300Mbps Wireless N Access Point User Guide • Group Key Update Period — Specify the group key update interval in seconds. The value can be either 0 or at least 30. Enter 0 to disable the update. WPA/WPA2-Enterprise — Select WPA/WPA2 based on Radius Server. -
Page 54: Wireless Mac Filtering
TL-WA801ND 300Mbps Wireless N Access Point User Guide 4.6.3 Wireless MAC Filtering Selecting Wireless > Wireless MAC Filtering will allow you to set up some filtering rules to control wireless stations accessing the device, which depend on the station’s MAC address on the following screen as shown Figure 4-22.
-
Page 55
TL-WA801ND 300Mbps Wireless N Access Point User Guide Status — Select a status for this entry, either Enabled or Disabled. To set up an entry, follow these instructions: First, you must decide whether the unspecified wireless stations can access the device or not. If… -
Page 56: Wireless Advanced
TL-WA801ND 300Mbps Wireless N Access Point User Guide Note: If you enable the function and select the “Allow the stations specified by any enabled entries in the list to access” for Filtering Rules, and there are not any enabled entries in the list, thus, no wireless stations can access the device.
-
Page 57: Wireless Statistics
TL-WA801ND 300Mbps Wireless N Access Point User Guide Enable AP Isolation — Isolates all connected wireless stations so that wireless stations cannot access each other through WLAN. This function will be disabled if WDS/Bridge is enabled. 4.6.5 Wireless Statistics Selecting Wireless > Wireless Statistics will allow you to see the wireless transmission information in the following screen shown in Figure 4-25.
-
Page 58: Dhcp
TL-WA801ND 300Mbps Wireless N Access Point User Guide Figure 4-26 Throughput Monitor Rate — The Throughput unit. Run Time — How long this function is running. Transmit — Wireless transmit rate information. Receive — Wireless receive rate information. Click the Start button to start wireless throughput monitor.
-
Page 59: Dhcp Settings
TL-WA801ND 300Mbps Wireless N Access Point User Guide 4.7.1 DHCP Settings Selecting DHCP > DHCP Settings will enable you to set up the AP as a DHCP (Dynamic Host Configuration Protocol) server, which provides the TCP/IP configuration for all the PCs that are connected to the system on the LAN.
-
Page 60: Dhcp Clients List
TL-WA801ND 300Mbps Wireless N Access Point User Guide Note: 1. When the device is working on Dynamic IP mode, the DHCP Server function will be disabled. 2. To use the DHCP server function of the device, you should configure all computers in the LAN as «Obtain an IP Address automatically»…
-
Page 61: System Tools
TL-WA801ND 300Mbps Wireless N Access Point User Guide MAC Address — Here displays the MAC address of the PC for which you want to reserve an IP address. Reserved IP Address — Here displays the IP address that the AP is reserved.
-
Page 62: Snmp
TL-WA801ND 300Mbps Wireless N Access Point User Guide There are nine submenus under the System Tools menu (shown as Figure 4-31): Time Settings, Diagnostic, Ping Watch Dog, Firmware Upgrade, Factory Defaults, Backup & Restore, Reboot, Password, System Log and Statistics. Clicking any of them will enable you to configure the corresponding function.
-
Page 63: Diagnostic
TL-WA801ND 300Mbps Wireless N Access Point User Guide SNMP Agent — Select the radio button before Enable will enable this function if you want to have remote control through SNMPv1/v2 agent with MIB-II. Select the radio button before Disable will disable this function. The default setting is Disable.
-
Page 64
TL-WA801ND 300Mbps Wireless N Access Point User Guide Figure 4-33 Diagnostic Diagnostic Tools — Click the radio button to select one diagnostic tool • Ping — This diagnostic tool troubleshoots connectivity, reachability, and name resolution to a given host or gateway by using the Internet Control Message Protocol (ICMP) protocol’s mandatory Echo Request datagram to elicit an ICMP Echo Response from a host or gateway. -
Page 65: Ping Watch Dog
TL-WA801ND 300Mbps Wireless N Access Point User Guide IP Address — Enter the IP Address (such as 202.108.22.5) of the PC whose connection you wish to diagnose. Ping Count — Specifies the number of Echo Request messages sent. The default is 4.
-
Page 66: Firmware Upgrade
Figure 4-36. Figure 4-36 Firmware Upgrade New firmware versions are posted at http://www.tp-link.com and can be downloaded for free. Firmware Version — Here displays the current firmware version. Hardware Version — Here displays the current hardware version. The hardware version of the upgrade file must accord with the current hardware version.
-
Page 67: Factory Defaults
TL-WA801ND 300Mbps Wireless N Access Point User Guide 4.8.5 Factory Defaults Selecting System Tools > Factory Defaults allows you to restore the factory default settings for the device on the screen shown in Figure 4-37. Figure 4-37 Restore Factory Defaults Click Restore to reset all configuration settings to their default values.
-
Page 68: Reboot
TL-WA801ND 300Mbps Wireless N Access Point User Guide 4.8.7 Reboot Selecting System Tools > Reboot allows you to reboot the device on the screen shown in Figure 4-39. Figure 4-39 Reboot the device Click the Reboot button to reboot the device.
-
Page 69: System Log
TL-WA801ND 300Mbps Wireless N Access Point User Guide Click Save when finished. Click Clear All to clear all. 4.8.9 System Log Selecting System Tools > System Log allows you to query the Logs of the device on the screen shown in Figure 4-41.
-
Page 70: Appendix A: Application Example
300Mbps Wireless N Access Point User Guide Appendix A: Application Example The TL-WA801ND allows you to connect a wireless device to the wired network. Providing that you want to connect your computer equipped with wireless adapter to a wired network wirelessly, you can take the following instructions.
-
Page 71
Enable to enable wireless network function. Right-click the wireless connection icon “ ” on the screen of the PC and then select View Available Wireless Networks. Highlight the SSID of the AP (Here is TP-LINK) and click Connect to add to the network. -
Page 72
TL-WA801ND 300Mbps Wireless N Access Point User Guide Then the following page will display, which indicates you have been successfully added to the network wirelessly. -
Page 73: Appendix B: Factory Defaults
TL-WA801ND 300Mbps Wireless N Access Point User Guide Appendix B: Factory Defaults Item Default Value Common Default Settings Username admin Password admin IP Address 192.168.0.254 Subnet Mask 255.255.255.0 Wireless SSID TP-LINK_XXXXXX Wireless Security Disable Wireless MAC Address Filtering Disable DHCP…
-
Page 74: Appendix C: Troubleshooting
TL-WA801ND 300Mbps Wireless N Access Point User Guide Appendix C: Troubleshooting T1. How do I restore my Access Point’s configuration to its factory default settings? With the Access Point powered on, use a pin to press and hold the RESET button on the rear panel for more than 8 seconds before releasing it.
-
Page 75
TL-WA801ND 300Mbps Wireless N Access Point User Guide Click Change adapter settings Right-click Local Area Connection, and Click Properties. -
Page 76
TL-WA801ND 300Mbps Wireless N Access Point User Guide Double-click Internet Protocol Version 4 (TCP/IPv4). -
Page 77
TL-WA801ND 300Mbps Wireless N Access Point User Guide Select Use the following IP address, enter the 192.168.0.100 into the IP address field, 255.255.255.0 into the Subnet mask field. Now, try to log on to the Web-based configuration page again after the above settings have… -
Page 78
TL-WA801ND 300Mbps Wireless N Access Point User Guide been configured. If you still cannot access the configuration page, please restore your Access Point’s factory default settings and reconfigure your Access Point following the instructions of this UG. Please feel free to contact our Technical Support if the problem persists. -
Page 79: Appendix D: Specifications
TL-WA801ND 300Mbps Wireless N Access Point User Guide Appendix D: Specifications General Standards and Protocols IEEE 802.3, 802.3u, 802.11n, 802.11b and 802.11g, TCP/IP, DHCP Safety & Emission FCC、CE One 10/100M Auto-Negotiation LAN RJ45 port, supporting passive Ports 10BASE-T: UTP category 3, 4, 5 cable (maximum 100m) EIA/TIA-568 100Ω…
-
Page 80: Appendix E: Glossary
TL-WA801ND 300Mbps Wireless N Access Point User Guide Appendix E: Glossary 802.11n — 802.11n builds upon previous 802.11 standards by adding MIMO (multiple-input multiple-output). MIMO uses multiple transmitter and receiver antennas to allow for increased data throughput via spatial multiplexing and increased range by exploiting the spatial diversity, perhaps through coding schemes like Alamouti coding.
-
Page 81
TL-WA801ND 300Mbps Wireless N Access Point User Guide key technologies behind WPA is the Temporal Key Integrity Protocol (TKIP). TKIP addresses the encryption weaknesses of WEP. Another key component of WPA is built-in authentication that WEP does not offer. With this feature, WPA provides roughly comparable security to VPN tunneling with WEP, with the benefit of easier administration and use.
Недавно я опубликовал статью о двух точках доступа от TP-Link. Можете почитать: TP-Link TL-WA701ND и TP-Link TL-WA801ND – точка доступа, репитер и Wi-Fi адаптер в одном устройстве. Там я рассказывал, что это за устройства, какие задачи они могут выполнять, и делал небольшой обзор. Так как это многофункциональные сетевые устройства, которые могут работать в разных режимах, то решил написать отдельную инструкцию по настройке TP-Link TL-WA801ND и TP-Link TL-WA701ND в режиме точки доступа, Wi-Fi приемника (клиента) и репитера (усилителя беспроводной сети).
Процесс настройки очень простой. Нужно только переключить режим работы, и подключить точку доступа, или подключится к основной Wi-Fi сети через панель управления. Так как это точки доступа, то первым делом мы рассмотрим процесс настройки именно в этом режиме. Так же настроим эти устройства в качестве ретранслятора, для усиления уже существующей Wi-Fi сети. Ну и рассмотрим настройку в режиме клиента. Он пригодится в том случае, если вы хотите использовать одно из этих устройств для подключения к Wi-Fi сети стационарного компьютера, телевизора и т. д. Устройство, в котором нет Wi-Fi модуля, и к интернету его можно подключить только по кабелю.
Один нюанс: скорее всего, панель управления у TL-WA801ND будет немного отличатся от TL-WA701ND. У старшей модели web-интерфейс более современный. Но только внешне. Разделы и все настройки практически одинаковые. Поэтому, я не стал делать две отдельные инструкции.
Как зайти в настройки и переключить режим работы?
Для входа в настройки точки доступа от TP-Link нужно сначала подключить к ней компьютер, ноутбук или смартфон. По сетевому кабелю, или по Wi-Fi сети, которая по умолчанию открыта (без пароля). А если закрыта, то пароль указан на наклейке снизу самого устройства (подписан как PIN).
Вся заводская информация: адрес для входа в панель управления, заводские логин и пароль, MAC-адрес, PIN – указаны на самой точке доступа.

Открываем любой браузере и переходим по IP-адресу: 192.168.0.254. Должна появится форма, в которой нужно указать имя пользователя и пароль. Как можно увидеть на фото выше, заводское имя пользователя и пароль: dmin и admin.

Откроется панель управления. Если точка доступа еще не настраивалась, то будет запущен мастер быстрой настройки. Можете попробовать настроить все с его помощью, а можете нажать на кнопку «Exit» и настроить по инструкции, которую найдете ниже.

Если что-то пошло не так и не заходит в настройки
Если не удается перейти по адресу 192.168.0.254, не подходит логин/пароль, или еще что-то, то первым делом сделайте сброс настроек точки доступа. Включите ее, и чем-то острым секунд на 15 зажмите кнопку Reset. Активно замигает индикатор в виде шестеренки, и погаснет. Тогда кнопку можно отпускать.

Если после этого настройки не будут открываться, то почитайте статью не заходит в настройки роутера. И по ней проверьте настройки на компьютере. Наша цель – зайти в web-интерфейс.
Меняем режим работы
По умолчанию стоит режим работы «Точка доступа». Сменить его можно в настройках, на вкладке «Operation Mode». Выбираем необходимый режим и сохраняем настройки.

Устройство будет перезагружена, после чего нужно снова войти в панель управления по адресу: 192.168.0.254.
Настройка точки доступа TP-Link
По умолчанию стоит режим точки доступа (Access Point). Можете зайти на вкладку «Operation Mode» и проверить. В этом режиме точка доступа получает интернет по кабелю от другого сетевого устройства (обычно это маршрутизатор) и раздает его по Wi-Fi сети.
Все что нужно сделать, это сменить настройки Wi-Fi сети в разделе «Wireless Settings», задать имя сети и выбрать свой регион. Затем сохраняем настройки нажав на кнопку «Save». Дальше, в разделе «Wireless Security» выбираем тип защиты, задаем пароль, и сохраняем настройки.

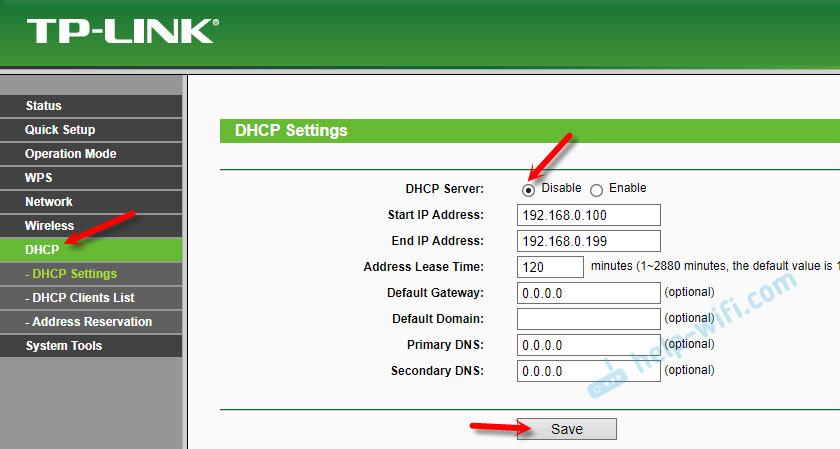
Дальше переходим в раздел «DHCP», отключаем «DHCP Server» поставив значение «Disable». Сохраняем настройки.
Перезагружаем нашу точку доступа.

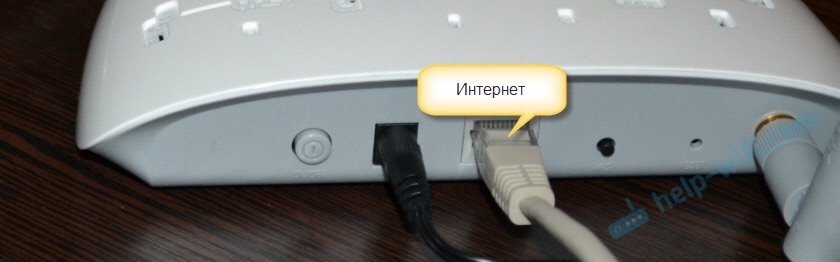
После этого просто подключаем сетевой кабель (интернет) в порт «Ethernet». Если он еще не подключен.
Чтобы снова зайти в настройки, проще всего сделать сброс настроек (показывал выше). Или в списке клиентов на главном маршрутизаторе посмотреть IP-адрес точки доступа и перейти по нему.
Настройка TP-Link TL-WA701ND (WA801ND) в режиме репитера
В этом режиме наше устройство будет по Wi-Fi подключаться к уже существующей сети и усиливать ее.
Лучше всего настраивать точку доступа в режиме репетира через мастер быстрой настройки. Откройте «Quick Setup» и нажмите «Next».
В следующем окне выбираем «Repeater (Range Extender)» и снова нажимаем кнопку «Next».

Нажимаем на кнопку «Survey» и напротив своей сети (которую нужно усилить) нажимаем на ссылку «Connect».
Вводим пароль от Wi-Fi сети к которой подключаемся, и нажимаем «Next».

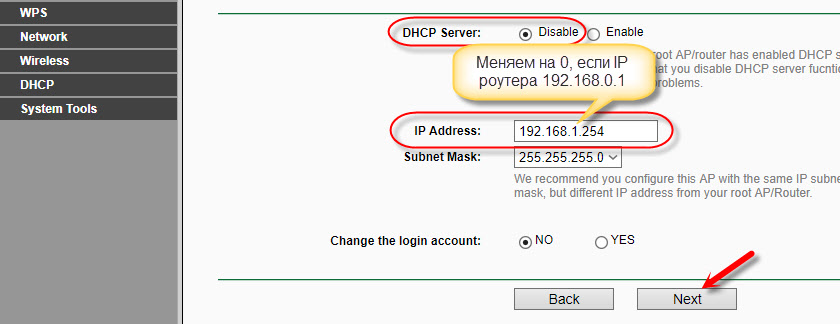
DHCP-сервер должен быть отключен. Так же необходимо, чтобы репитер и основной роутер были в одной подсети. По умолчанию, в настройках указан IP-адрес 192.168.0.254. Если у вашего роутера IP 192.168.0.1 (можно посмотреть на самом роутере), то менять ничего не нужно. Но, если так как у меня, IP-адрес роутера 192.168.1.1, то «0» меняем на «1».

Нажимаем на кнопку «Reboot».
После перезагрузки будет одна Wi-Fi сеть усилена TP-Link TL-WA701ND, или TP-Link TL-WA801ND. Для входа в web-интерфейс используйте адрес, указанный в предпоследнем шаге.
Режим клиента (Wi-Fi адаптер)
В данном режиме наша точка доступа будет работать к приемник. Принимать интернет по Wi-Fi и передавать по сетевому кабелю. Wi-Fi раздавать не будет.
В разделе «Quick Setup» нужно нажать «Next» и выбрав режим «Client» продолжаем настройку.
Нажав на кнопку «Survey», появится список доступных сетей. Выбираем свою Wi-Fi сеть.

Указав пароль от своей Wi-Fi сети, нажимаем кнопку «Next».
Обратите внимание на IP-адрес. Он должен быть в одной подсети с вашим роутером. Предпоследняя цифра в настройках должна быть такая же, как в IP-адресе вашего маршрутизатора.
Нажимаем на кнопку «Reboot» и ждем пока точка доступа будет перезагружаться.
Все, адаптер готов.

С его помощью можно подключить к Wi-Fi сети свой стационарный компьютер, телевизор и т. д.
-
Инструкции по эксплуатации
1

TP-LINK TL-WA 801 ND инструкция по эксплуатации
(100 страниц)
- Языки:Русский
-
Тип:
PDF -
Размер:
3.53 MB -
Описание:
Маршрутизатор
Просмотр
На NoDevice можно скачать инструкцию по эксплуатации для TP-LINK TL-WA 801 ND. Руководство пользователя необходимо для ознакомления с правилами установки и эксплуатации TP-LINK TL-WA 801 ND. Инструкции по использованию помогут правильно настроить TP-LINK TL-WA 801 ND, исправить ошибки и выявить неполадки.