Welcome to this tutorial on driving the SD40-2, GP38-2 and GP40-2, featured in the Sand Patch Grade (SD40-2 & GP38-2), NEC: New York (GP38-2), Peninsula Corridor (GP38-2) and CN Oakville Subdivision (GP38-2) routes as well as the GP40-2 locomotive dlc. All images are from the GP40-2 locomotive. Any questions about this tutorial can be asked in the comments section at the bottom of the page.
The SD40-2 and GP38-2 are featured in the base game, whilst the GP40-2 is a separate add-on, which can also be bought as part of the Digital Deluxe Edition.
Driving the Locomotive[]
This section of the tutorial covers driving the locomotive when it has already been started. This is how the locomotive starts in services and some scenarios.
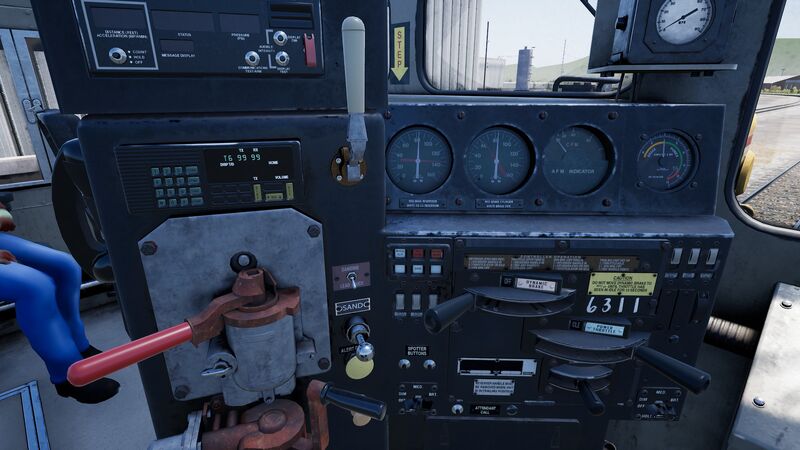
Firstly, move the independent brake to the release position, the independent brake is the black handle in the bottom left of the image. Secondly move the automatic brake, the red handle above the independent brake into the release position. The reverser is the small handle in the bottom right of the image, move this into either the forward or reverse position. Then move the throttle, which is located above the reverser into the notch 1 position. Your train should now start moving.
To stop the locomotive, move the throttle into the idle position and then apply the automatic brake. Be careful not to apply the automatic brake beyond the ‘full service’ position. The dynamic brake may also be used to slow the locomotive down.
Starting the Locomotive[]
This section of the tutorial covers a cold start of the locomotives. Firstly, apply the hanbrake which is shown in the image to the right. In the GP40-2 and GP38-2 it is a handle like in the image whereas in the SD40-2 it is a wheel.
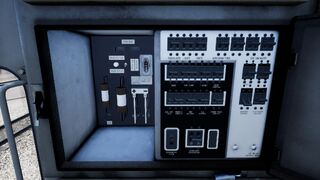
Secondly, open the fuse box, which is located behind the driver’s seat and is shown in the second image. Then check that the main breaker and all of the fuses are set to the on position. Then close the fuse box door.
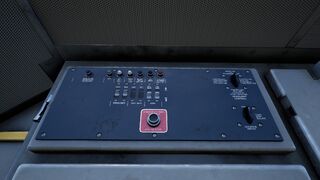
Then set the start-run switch located above the fuse box on the panel shown in the left image. Set this switch to the Start position.
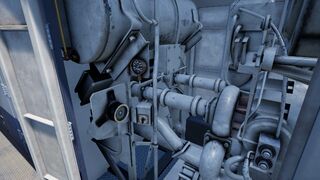
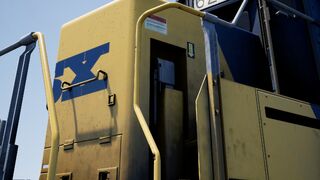
Then open the engine room doors on the long hood. The engine room will appear as shown in the image to the right. Hold the Prime/Start switch to the left position for 5 seconds. This switch is located in the centre right of the engine room. Then move it to the right to start the engine. After the engine has started, close the engine room doors. Then return to the cab and set the start-run switch to the Run position.

Sit in the engineer’s seat and set the Engine Run, Field Generator and Control & Fuel Pump to the on position. These switches are located in the top right of the control console shown in the image to the left. Turn the ditch lights and gauge lights which are located to the left of the dynamic brake to the on position. Then set the headlights, which is located in the bottom right of the console, to the bright position. Then turn the Cut-off valve to the Freight position. Then set the MU-2A valve to the Lead or Dead position. Keeping the reverser in the neutral position, set the throttle to notch 1 and wait for the main reservoir to reach 140psi. Then check the independent brake is set to the maximum setting. Then release the automatic brake and wait for the equalising reservoir pressure andn the main reservoir to reach 90psi. Move the throttle back to notch 0 and release the handbrake. Now the locomotive has been started, you can now drive the locomotive.
Multiple Unit Working[]
As MU Lead[]
Ensure the locomotives have been fully set up as per the locomotive start-up instructions if required. Once the locomotives are operational then you can set them up for Multiple Unit working.
The start-up instructions will set the locomotive up to be suitable for leading a consist or being the sole locomotive in a consist.
The key settings to be aware of, should you need to change a locomotive from trailing back to lead are as shown below.
These three switches enable the power controllers (e.g. Throttle) to work:
Engine Run: ON
Generator Field: ON
Control & Fuel Pump: ON
These three valves control whether the brake handles operate the brakes on the train:
Brake Cut-off Valve: FREIGHT
MU-2A Valve: LEAD OR TRAIL
As MU Trail[]
When setting up the locomotive in a non-lead position you have several options depending on which role you want it to play in the consist:
No Power, No brakes or “Dead in Tow”[]
This is useful if you are towing a completely cold and dark locomotive. In this instance, set the control stand up as follows:
Engine Run: ON
Generator Field: ON
Control & Fuel Pump: ON
Brake Cut-off Valve: CUT-OUT
MU-2A Valve: LEAD OR TRAIL
Note: If the locomotive engine is not started then the first three switches are not important. However, if the engine is running and you just want it to sit in idle, then setting them to ON means they will ignore all signals from the lead locomotive and remain in idle.
No Power, Full Brakes[]
Engine Run: ON
Generator Field: ON
Control & Fuel Pump: ON
Brake Cut-off Valve: CUT-OUT
MU-2A Valve: TRAIL 6 OR 26
In this configuration, the power controls in the locomotive have control over the engine so the lead unit will not be able to operate it remotely. This will mean that it remains at idle and does not contribute any power to the consist. The brake settings cut out the brake handle and set it up to be driven by a connected unit in the “Lead or Trail” configuration (which your lead unit should be set to). This means the locomotive will supply additional brake force to your train.
Power and Full Brakes[]
Engine Run: OFF
Generator Field: OFF
Control & Fuel Pump: OFF
Brake Cut-off Valve: CUT-OUT
MU-2A Valve: TRAIL 6 OR 26
In this configuration, we disable the control stand for the power controls which will allow the lead unit to have full control over the power on this locomotive. As the lead unit applies throttle positions so the internal electronics of this locomotive’s stand will do the same. Brakes are also set up to be managed by the lead unit.
Distributed Power[]
When you have a consist set up with locomotives that are not directly connected, such as when you have a locomotive set at the front and another set at the rear. This requires a slightly different configuration to ensure that all locomotives function correctly in the consist. The Radio is therefore used to operate the rear locomotive.
If you have an example consist with a pair of locomotives at the front and a pair of locomotives at the rear, you would need to set up as follows:
Front Pair[]
Lead Unit: Set up as Lead and ensure the radio fuse and the Banking Comms are on
Trailing Unit: Set up as Trail
Rear Pair[]
Lead Unit: Set up as Lead and ensure the radio fuse is on
Trailing Unit: Set up as Trail
In this configuration when the engineer makes a throttle or brake change on the front pair lead unit, the front trailing unit will respond because it is physically connected. At the same time, a radio message is sent (this is not audible to the player) which the rear pair lead unit will react to and will follow the same settings. This will then be automatically reflected on the rear pair trailing unit through its direct connection. This system is intended to mimic the behaviour of a second engineer in the rear pair leading unit that is following the actions of the lead engineer.
When set up in this way, the engineer at the front of the train has full control over all four locomotives simultaneously.
Correct Lighting[]
When driving a locomotive, the headlights should be set to the Bright position. How to do this is already covered in the above sections. Below is a list of procedures for headlights when in multiple unit operation.
The locomotive has a switch on the wall behind the engineer’s seat that has four settings. These allow you to set up the way the headlights will work on the other locomotives in the consist.
Single Unit or Intermediate Unit[]
In this setting, the locomotive will not react to headlight instructions coming from other locomotives in the consist. The headlights, if required, must be set up using the normal switches on the control stand.
Controlling with Unit Coupled at Long Hood End[]
Use this setting if this locomotive is the controlling unit for the lighting configuration (usually this would be the lead locomotive), and the next unit in the consist is coupled to this locomotive’s long hood end.
Controlling with Unit Coupled at Short Hood End[]
Use this setting if this locomotive is the controlling unit for the lighting configuration (usually this would be the lead locomotive), and the next unit in the consist is coupled to this locomotive’s short hood end.
Controller from Another Unit Coupled at Either End[]
If this unit should respond to lighting commands from a controlling unit then use this setting.
Resetting PCS Application[]
When the Pneumatic Control Switch (or PCS) is open, the train brakes cannot be released and the throttle controls are deactivated. To operate your train again you must reset the PCS.
You can tell if it is activated by looking for the PCS OPEN light being illuminated.
If there is an alarm such as the Alerter sounding, acknowledge it (Q Key, B button on your controller).
Once the train has come to a complete stop, follow these steps:
- Set the Throttle to Idle
- Set the Reverser to Neutral
- Set the Independent Brake to Full Service
- Set the Automatic Brake to Emergency
- Wait for 60 seconds
- Release the Automatic Brake and wait for the Equalising Reservoir / Brake Pipe to return to 90psi
While the Automatic Brake is releasing, you will need to put the Throttle in to Notch 1 so that the compressor can recharge the Main Reservoir.
Once the Equalising Reservoir and Brake Pipe needles have returned to 90psi, and the main reservoir has recharged to 140psi, put the Throttle back to Idle.
You should now be able to release the Independent Brake, set the Reverser and apply Throttle.
| Guides | |
|---|---|
| Game Basics | Switching/Shunting — Loading Coal |
| American Locomotive Guides | SD40-2, GP38-2 and GP40-2 — AC4400CW — ACS-64 — ES44C4 |
| British Locomotive Guides | BR Class 43 — BR Class 66 — BR Class 101 — BR Class 166 — BR Class 377 |
| German Locomotive Guides | DB BR 1442 |
| Collectibles | CSX Collectibles — GWE Collectibles — RT Collectibles — NEC Collectibles |
| Safety Systems | The Alerter — PZB |
-

XEPMETKOB
- Ветеран
- Сообщения: 3228
- Зарегистрирован: 25 май 2010
- Откуда: Москва
- Репутация: 4118
- Контактная информация:
-


Train Sim World 2: руководство машиниста
С недавних пор разработчики опубликовывают на ютубе небольшие видеоролики, в которых рассказывается о том, как управлять в игре конкретным ПС. Возможно, постепенно наберется целая серия обучающих видео.
Первое видео касалось электропоезда DB BR 406 ICE 3M
-
XEPMETKOB
- Ветеран
- Сообщения: 3228
- Зарегистрирован: 25 май 2010
- Откуда: Москва
- Репутация: 4118
- Контактная информация:
-
Train Sim World 2: руководство машиниста
Сообщение
XEPMETKOB » 21 янв 2021, 20:41
Второе видео — электропоезд DB BR 442 Talent 2
-
Forza Gamer 777
- Профессор

- Сообщения: 1317
- Зарегистрирован: 11 мар 2020
- Откуда: Россия
- Репутация: 1030
-

Train Sim World 2: руководство машиниста
Сообщение
Forza Gamer 777 » 22 янв 2021, 14:10
YuriA писал(а): ↑22 янв 2021, 06:58
На слух тяжело понять чего говорят.
Ну кому как, тут уже гайд по именно этому поезду по-сути повторяет почти все слова в обучении, поэтому я не понимаю эти гайды. В них, по-сути, даже про работу сигнализаций не говорят, только про включение их
На поддержку:
https://yoomoney.ru/to/4100116624646292
https://qiwi.com/n/FORZAGAMER777
-
XEPMETKOB
- Ветеран
- Сообщения: 3228
- Зарегистрирован: 25 май 2010
- Откуда: Москва
- Репутация: 4118
- Контактная информация:
-
-
pavelspb85
- Профессор
- Сообщения: 1015
- Зарегистрирован: 03 июл 2011
- Откуда: Санкт-Петербург
- Репутация: 458
- Контактная информация:
-
Train Sim World 2: руководство машиниста
Сообщение
pavelspb85 » 31 янв 2022, 22:51
Anton_07RUS писал(а): ↑31 янв 2022, 21:36
как тормозить на клавишах BR Class 313.Помогите позязя.
Язык не менял(раскладку) во время игры?
Ща они починили,не обязательно британскую раскладку ставить,но если стоял английский,а во время игры переключить на русский(на паузе) то не работают тормоза пока обратно не переключишь.
![]()
-
pavelspb85
- Профессор
- Сообщения: 1015
- Зарегистрирован: 03 июл 2011
- Откуда: Санкт-Петербург
- Репутация: 458
- Контактная информация:
-
- Topics
- tsw2020, train sim, train simulator, tsw 2020, trainsim, tsw 2020, train simulator 2020, manual
- Collection
- manuals_contributions; manuals; additional_collections
- Language
- English
Train Sim World 2020 Starter’s Guide, Tutorial, Manual
- Addeddate
- 2020-05-28 11:11:27
- Identifier
- tsw-train-sim-world-starters-guide
- Identifier-ark
- ark:/13960/t5kb20c31
- Ocr
- ABBYY FineReader 11.0 (Extended OCR)
- Page_number_confidence
- 98.55
- Ppi
- 600
- Scanner
- Internet Archive HTML5 Uploader 1.6.4
plus-circle Add Review
plus-circle Add Review
comment
Reviews
There are no reviews yet. Be the first one to
write a review.
TABLE OF CONTENTS
- Train Sim World 3 — What You Need To Know
- Manual
- Dovetail Live
- Creating a Profile
- Privacy Policy
- How Would You Like To Start?
- The Main Menu
- To The Trains
- Training Center
- Creators Club
- Store
- My Profile
- Dovetail Live
- Settings
- Timetable Mode
- Selecting a Loco
- Selecting a Service
- Customizing Weather
- Using the Pause Menu
- Options
- HUD Guide
- Control Guide
- Overview
- Map
- Schedule
- Message Log
- Common Issues
- Official Video Guides
- Community Video Guides
Whether you are new to Train Sim World 3 or the series as a whole, this guide will help you get the most out of the opening hours of the game.
Train Sim World 3 — What You Need To Know
An article has been created to which outlines everything you need to know about Train Sim World 3’s launch, early access, and how legacy add-ons and updates will be rolled out.
TRAIN SIM WORLD 3 – WHAT YOU NEED TO KNOW
Manual
Throughout your experience with Train Sim World 3 you may find it useful to refer back to the manual linked below.
- Train Sim World 3 Manual — English
- Train Sim World 3 Manual — German
Dovetail Live
After the opening screens of Train Sim World 3 you will be presented with the option to Register for a Dovetail Live Account, Sign into your Account, or Skip the process entirely.
Reasons why you may want to use Dovetail Live included access to Mastery Rewards, Railfan Shots, Creators Club, and Community Challenges. However, this is completely optional is you wish to skip to the next step.
When you register for a new Dovetail Live account, please check your email client for the verification email. If the verification link has expired, please contact Dovetail Support.

Creating a Profile
Next, you will be given a choice of characters (This will be your in-game avatar) to select and asked to give your profile a name.

Privacy Policy
On this page, you will be required to confirm that you have read and understood the privacy policies and have the option to enable real-world advertisements in-game. You can read the privacy polices by clicking on the links below the description.

How Would You Like To Start?
Then, you will be given the option to start off with basic training or go straight to the main menu. If you are new to the game, it would be recommended to start with the training.
If you chose to start with training, you will be taken to the Navigation & Interaction training module. Once you have completed this module, you can choose to carry on with your training or return to the main menu.
The Main Menu
On the main menu, you can navigate through the pages on the top menu by clicking on them or using the shoulder buttons on your controller (L1/R2 or LB/RB).

To The Trains
From here, you can access
- Trains/Routes — Pick a train or route, then jump into one of the game modes below.
- Timetable (Choose a Route to Explore on Foot)
- Scenarios
- Training Modules
- Rail Journeys — Select a route to be taken on a guided experience on the content available.
- Quick Play — Jump straight into something you have yet to play in short or long form.
Training Center
- Fundamentals — Carry on with your basic training.
- Training — Come here to learn more about locomotive operation, signalling and route introductions.
- Explore On Foot — Take a walk around the Training Center and see what you can find.
- Video Tutorials — This will open our YouTube channel in a web browser, where we have playlists full of useful videos.
Creators Club
- Online Sharing Hub — Come here to share and download liveries and scenarios from the community.
- Livery Designer — Create custom designs for a range of rolling stock.
- Scenario Planner — Create a scenario using a combination of any train with, any route in «Off the Rails» mode.
Store
The store will allow you to browse through the many add-ons available for Train Sim World 3. If you see something you like, click on Buy Now to be taken to your platforms Store Front (e.g. Steam, Epic Games Store, PlayStation Store or the Xbox Store) to complete your purchase.
My Profile
Here you will be able to take a look at your overall completion statistics and Switch Profile if you want to use multiple profiles.
Dovetail Live
This is your link to Dovetail Live if you chose to sign in earlier.
- Mastery — Complete specific in-game tasks to unlock rewards.
- Creators Club — Access the Online Sharing Hub, Livery Designer and Scenario Planner.
- Mastery Rewards — Completing certain mastery challenges will unlock «Overlays» which can be enabled here to add unique scenery to some routes.
- News — Read the latest articles from https://live.dovetailgames.com
- Railfan TV — Watch the latest streams and videos on our YouTube Channel in a web browser.
Settings
Customise your game by changing various settings. For an explanation of the options available, head over to support article Train Sim World 3 Settings Explained.

Timetable Mode can be accessed in by selecting either a Route or a Train first.

Selecting a Loco
- Selecting a Loco is made easier with use of the Search Box, Filters and the Sort option.
- Once you have selected a loco, you will be able to select a Livery from the following categories.
- Official — These liveries will come with the game or add-on your loco belongs to.
- Personal — These will be liveries you have made in the Livery Editor.
- Creators Club — These liveries have been download from the Online Sharing Hub.
- Below the categories, you will see a list of liveries to choose from.
- Next, select a Route if you haven’t already done so.

Selecting a Service
The following example of a service demonstrates the information that in being provided in the service selection table.
Example:
Service Name — Start Time — Estimated Duration — Medal Achieved
5G85 Gillingham Depot to Gillingham (Part 1) — 05:14 — 00:02 — No Medal
- Select a service from the table on the left, or use the Search Box to find one.

Customizing Weather
Starting from the top and moving down, here is how you can customize the weather in Timetable Mode.
- Dynamic Weather/Custom Weather (fig 1) — Dynamic Weather will naturally change throughout a service. Custom Weather will stay the same throughout.
- Date (fig 2) — Changing the date will have an impact on the ambient temperate, rain and snow.
- Weather Preset (fig 3) — In Dynamic Weather mode, changing the weather preset will change the starting weather. In Custom Weather mode, the preset will set the weather throughout.
- Weather Values (fig 4) — In Custom Weather mode, you can manually adjust the weather values.
When you are done customizing the weather, press Get Started to load into the service.

When pausing the game, you are presented with an assortment of options and information we will cover below. To navigate through the different tabs of the pause menu, use the mouse or the shoulder buttons on your controller (L1/R2 or LB/RB).

Options
- Main Menu — Abandon the current scenario and return to the main menu.
- Restart — Restart the current scenario.
- Settings — Access the setting menu, explained here.
- Exit Game — Abandon the current scenario and return to the desktop.
HUD Guide
A useful reminder of what each element of the HUD represents. HUD guides are available for normal operations and Steam powered locos.

Control Guide
View the controls for the current input device and switch between the various control layouts. If you have a controller connected, controller mapping will be displayed for the currently selected control scheme. However, the control scheme and keyboard bindings can be changed from the Settings menu.
Overview
The top graph represents your speed vs the speed limit on the Y-Axis, over distance covered on the X-Axis.

The lower graph represent changes in gradient over distance. Being aware of upcoming changes can help you adapt to the given situation.

In the bottom left of the overview tab, you are presented with stats about your current train.

Map
The map tab shows a scale version of the route with station names. The driver icon represents your location, while the target icon represents your destination.

Selecting the full map icon allow you to view the full scale version of the route with traffic, signals and switches.
Please note that while switches can be toggled in the pause menu, they will not physically change until the game is unpaused. For this reason, you may wish to use the real-time map for switch operation. ("9" Key, Touchpad or View button)
Schedule
This tab will list the objectives which make up your current scenario.
Message Log
This tab will keep a record of any instructions you have been given.
Common Issues
To help players troubleshoot common gameplay issues, we have put together the following support articles, based on each route.
- Cajon Pass: US Freight Locomotives Gameplay Guide
- Schnellfahrstrecke: Kassel — Würzburg:
- Southeastern High Speed: Southeastern High Speed Gameplay Guide
- Spirit of Steam: Liverpool — Crewe: Spirit of Steam: Gameplay Guide
Official Video Guides
- DB ICE 1 Tutorial
- BR Class 395 Tutorial
Gameplay
- Setup and Importing TSW2 Profiles
- Importing TSW2 Profiles After Initial Setup
- Raildriver Controller Setup & Calibration
- Training Center Introduction
- Selecting Trains & Routes
- Creating a Scenario
Southeastern High Speed
- Class 395 Power Changeover
- Class 465 Setup
- Class 395 Setup (Spanish)
- Class 395 Power Changeover (Spanish)
- Class 395 Tutorial (German)
Schnellfahrstrecke: Kassel — Wurzburg
- ICE 1 BR 401 Tutorial
- ICE 3 BR 403 Tutorial
- BR 185.2 Tutorial
- PZB Tutorial
- ICE 1 BR 401 Tutorial (German)
- ICE 3 BR 403 Tutorial (German)
- BR 185.2 Tutorial (German)
- ICE 1 BR 401 Tutorial & LZB (Spanish)
Cajon Pass
- ES44AC Tutorial
- Cajon Pass Driving Guide
Прежде чем отправиться на рельсы в Train Sim World 3, убедитесь, что вы полностью готовы к путешествию.
- Всегда начинайте с быстрой игры
- Всегда находите время, чтобы пройтись по следам
- Настройте свой локомотив в конструкторе окраски
- Избегайте льда
- Попробуйте свои силы в режиме планировщика сценариев
- ДАЛЕЕ: Симуляторы ходьбы в фантастических условиях
Train Sim World 3 имеет все основные компоненты, необходимые для создания одного из самых захватывающих дух симуляторов путешествий в мире. То есть при условии, что вы можете окунуться в множество элементов управления, маршрутов и различных типов локомотивов, которые он использует. Для тех, кто еще не участвовал в серии симуляторов, изучение тонкостей этих вещей может быть немного пугающим, и часто может заставить потенциальных проводников бежать в горы, прежде чем даже нажать на газ.
К счастью, в Train Sim World 3 также есть немало учебных пособий и основных ступеней, что означает, что вы можете почувствовать рельсы, прежде чем отправиться в какое-либо дальнее путешествие. Но что еще вам нужно знать, прежде чем подняться на борт и дать свисток?

ВИДЕО ИГРОКА ДНЯ
Содержание
- Сначала посетите учебный центр
- Всегда начинайте с A Быстрая игра
- Всегда находите время, чтобы пройтись по следам
- Настроить Ваш локомотив в дизайнере окраски
- Избегайте льда< /h2>
It #39;не секрет, что перемещение по рельсам может быть довольно опасным, особенно если вы не примете необходимых мер предосторожности перед отъездом со станции. Принимая во внимание, что холодный климат также может сильно повлиять на ваши путешествия и даже привести к тому, что вы сойдете с рельсов, вам обязательно нужно попытаться держаться подальше от ледяных мест, хотя бы в течение первых нескольких часов игры. p>
Как вы со временем поймете, работая над маршрутными заданиями, лед является частью игры, нравится вам это или нет, и может потребоваться много времени, чтобы справиться с ним вовремя. . <сильный>Научиться эффективно ускоряться и тормозить будет ключом к навигации по более холодным трассам, поэтому обязательно проведите достаточно времени в Учебном центре, чтобы заранее привыкнуть к рычагам, циферблатам, кнопкам и переключателям.
Попробуйте свои силы в режиме планировщика сценариев
В то время как Train Sim World 3 может похвастаться огромным выбором сцен, испытаний и маршрутов для вас, нет ничего лучше, чем создание собственного сценария. К счастью, в игре используется режим Планировщика сценариев, который позволяет вам создавать собственные маршруты и украшать их различными косметическими средствами. Таким образом, вы можете добавить немного остроты заранее подготовленному приключению, что, конечно же, даст вам еще один стимул вернуться.
Как и в конструкторе раскрасок, пользовательские сценарии можно загружать в Клуб авторов, из которого другие пользователи могут просматривать, играть и делиться своими мыслями о них. Вы также можете загружать другие проигрыватели’ сценарии и получить представление об их творениях, что также может дать вам представление о функциях, которые вы могли или не могли пропустить при создании собственного сценария. Поэтому определенно стоит потратить некоторое время, хотя бы для того, чтобы вдохновить вас в будущем.
- Попробуйте свои силы в режиме планировщика сценариев
Сначала посетите учебный центр
Как бы ни было заманчиво отправиться в путешествие по Европе с момента запуска игры, на самом деле в этом нет особого смысла, если вы уже не знаете, на каком поезде будете путешествовать. В частности, его элементы управления, макеты, а также ручки и шестеренки, которые заставляют его двигаться. Самый простой способ получить базовые знания о поездах и их множестве механизмов — посетить Учебный центр, доступ к которому можно получить из Главного меню. p>
Учебный центр служит базовым учебным пособием, и проведет вас через практически все важные шаги, которые вам нужно знать, прежде чем отправиться в открытый путь. Благодаря углубленному обучению у вас будет возможность опробовать различные локомотивы, изучить их инструменты и поэкспериментировать с различными уникальных средах.
Рекомендуем ознакомится с другими гайдами на популярные игры tattoo-mall.ru. Расскажем про секреты и хитрости, которые можно использовать в играх со своей выгодой. А также про полезные и интересные историй в видеоиграх.
Наконец, вы также можете просмотреть архив обучающих видео в Интернете, что поможет вам получить более четкое представление о мире, в котором вы скоро будете путешествовать. Само собой разумеется, что вам обязательно нужно освежить в памяти эти разделы Учебного центра, прежде чем идти дальше.
Всегда начинайте с A Быстрая игра
Когда при загрузке Train Sim World 3 вам будут представлены четыре варианта: Train Depot, Choose a Route, Quick Play и и железнодорожные путешествия.. Режим перехода, в котором вы будете стрелять после освежения основ, будет «Выбор маршрута». До тех пор, однако, вы должны стремиться начать с сеанса быстрой игры, так как он познакомит вас с рядом игровых механик и проведет вас через ваши первые шаги. Выбор этой опции также позволит обойти многие предварительные меню, что может стать головной болью для новичков самостоятельно.
Если вам не терпится отправиться в более длительное путешествие, вам нужно принять во внимание, что типичный маршрут может занять где угодно от от 20 до 30 минут, в зависимости от множества факторов, включая уровень навыков, сложность задачи и местность, на которой вы находитесь. поеду дальше. Сеанс Quick Play, с другой стороны, сжат до гораздо более короткого опыта, что дает вам небольшое представление о том, что произойдет, как только вы усвоите основы.
Всегда находите время, чтобы пройтись по следам
Это может показаться немного утомительным, но на самом деле вы можете совершить любое путешествие из < strong>вне поезда. Прогуливаясь по дорожкам и осматривая различные достопримечательности, вы можете получить представление о маршруте и его целях, прежде чем отправиться на рельсы по-настоящему. Вы также можете изучить повороты, остановки и туннели, что даст вам полное представление о том, когда вы, в конце концов, начнете выполнять одну из самых сложных миссий.
Обучение Sim World 3 разбит на несколько маршрутных заданий., которые имеют индивидуальные уровни сложности, локомотивы и цели. Если вы сможете освоить каждый соответствующий маршрут до того, как приступить к выполнению каждого маршрутного задания, то вы, по сути, сможете пройти карты и выполнить больше задач за долю времени, которое обычно у вас уходит. Это может показаться немного скучным, но это определенно стоит сделать, чтобы получить ментальный план.
Настроить Ваш локомотив в дизайнере окраски
Дано тот факт, что маршрутные задачи могут занять до 30 минут., стоит подумать о том, чтобы перекрасить свои локомотивы в специальную окраску, хотя бы для того, чтобы у вас было на что больше смотреть при пересечении бесплодных холмов. Вы можете сделать это в Конструкторе раскрасок, который в основном служит настраиваемым набором для игроков, чтобы разблокировать их внутренние креативы.
< /сильный>
Дизайнер ливрей можно использовать для разных целей. Однако по своей сути он используется для добавления свежей краски к тусклым и бесцветным локомотивам. И, к счастью, в Train Sim World 3 есть множество настраиваемых элементов, с которыми вы можете поиграть, в том числе раскраски, узоры и индивидуальные детали. Вы можете загрузить любой из понравившихся дизайнов в Клуб авторов, область, которая также служит общим центром для игроков как в автономном, так и в онлайн-режиме.
Вы также можете загрузить широкий выбор локомотивов для собственной игры с помощью конструктора раскрасок. Чтобы получить доступ к дизайнеру окраски, просто перейдите в Главное меню.и выберите соответствующую вкладку. Отсюда вы сможете пролистать некоторые из самых трендовых и популярных скинов, а также найти любой дизайн, в частности.
Избегайте льда< /h2>
It #39;не секрет, что перемещение по рельсам может быть довольно опасным, особенно если вы не примете необходимых мер предосторожности перед отъездом со станции. Принимая во внимание, что холодный климат также может сильно повлиять на ваши путешествия и даже привести к тому, что вы сойдете с рельсов, вам обязательно нужно попытаться держаться подальше от ледяных мест, хотя бы в течение первых нескольких часов игры. p>
Как вы со временем поймете, работая над маршрутными заданиями, лед является частью игры, нравится вам это или нет, и может потребоваться много времени, чтобы справиться с ним вовремя. . <сильный>Научиться эффективно ускоряться и тормозить будет ключом к навигации по более холодным трассам, поэтому обязательно проведите достаточно времени в Учебном центре, чтобы заранее привыкнуть к рычагам, циферблатам, кнопкам и переключателям.
Попробуйте свои силы в режиме планировщика сценариев
В то время как Train Sim World 3 может похвастаться огромным выбором сцен, испытаний и маршрутов для вас, нет ничего лучше, чем создание собственного сценария. К счастью, в игре используется режим Планировщика сценариев, который позволяет вам создавать собственные маршруты и украшать их различными косметическими средствами. Таким образом, вы можете добавить немного остроты заранее подготовленному приключению, что, конечно же, даст вам еще один стимул вернуться.
Как и в конструкторе раскрасок, пользовательские сценарии можно загружать в Клуб авторов, из которого другие пользователи могут просматривать, играть и делиться своими мыслями о них. Вы также можете загружать другие проигрыватели’ сценарии и получить представление об их творениях, что также может дать вам представление о функциях, которые вы могли или не могли пропустить при создании собственного сценария. Поэтому определенно стоит потратить некоторое время, хотя бы для того, чтобы вдохновить вас в будущем.
На чтение 3 мин Просмотров 2к. Опубликовано 6 сентября, 2022
Пришло время переключиться с переменного тока на постоянный на линии пантографа!
Train Sim World 3 — это третья версия одного из самых популярных симуляторов поездов, в котором вы можете научиться и овладеть искусством вождения любимых поездов по живописным маршрутам.
В рамках Юго-восточного высокоскоростного маршрута вам нужно будет водить культовый класс 395 «Джавелин». на переменный ток и наоборот, чтобы продолжить движение на некоторых участках маршрута.
Это руководство расскажет вам, как выполнить переключение мощности в классе 395 Javelin.
Содержание
- Учебное пособие по переключению мощности ( Класс 395) в Train Sim World 3
- Как это сделать. переход с постоянного тока на переменный
- Как перейти с переменного тока на постоянный
Учебное пособие по переключению мощности ( Класс 395) в Train Sim World 3
Чтобы продолжить путешествие дальше по маршруту, вам нужно будет изменить питание с переменного тока на постоянный в Ebbsfleet Domestic и Ashford International.
Как это сделать. переход с постоянного тока на переменный
Первое, что вам нужно сделать, это полностью остановить поезд, а затем установить реверс в нейтральное положение.

Затем вам нужно удерживать кнопку CTRL (Channel Tunnel Rail Link) в кабине в течение нескольких секунд.
Кнопка постоянного тока рядом с ней в настоящее время подсвечивается, указывая на то, что поезд работает на постоянном токе.

Также читайте:
Train Sim World 3: Учебное пособие по настройке класса 465

При этом загорится кнопка CTRL, а также кнопка автоматического выключателя MCB/VCB.

Чтобы это исправить, дважды нажмите кнопку «Переместить башмаки вниз».

При этом загорится кнопка Line Voltage на приборной панели.

Теперь, когда вы переключитесь на внешний вид, вы заметите, что задний пантограф поезда поднялся, указывая на то, что он переключился на питание переменного тока.

Установите реверс в положение «Вперед» и подайте мощность, чтобы начать движение.
Вы также заметите, что спидометр теперь изменился с имперских единиц на метрические, так как скорость теперь отображается в км/ч, а не в милях. /h.
Как перейти с переменного тока на постоянный

На другом конце платформы Ebbsfield вам нужно будет переключиться с переменного тока в воздушных проводах на постоянный ток.

Войдите в кабину и установите реверс в нейтральное положение.

Вы заметите, что кнопка CTRL (Channel Tunnel Rail Link) подсвечивается, поэтому вам нужно удерживать кнопку DC на приборной панели в течение нескольких секунд, пока она не загорится.


Затем вам нужно один раз нажать кнопку Pan Up Shoes Down, при этом загорится кнопка Line Volt, что означает, что теперь у вас есть питание.

Установите реверс в переднее положение, а затем включите питание, чтобы начать движение . Вы заметите, что спидометр снова переключился на имперские единицы с метрических единиц, а скорость отображается в милях в час.
Вот и все, теперь переходите к переключению мощности, чтобы продолжить свое путешествие!
 Train Sim World 3: Гайд по настройке класса 465Читать далее >