Руководство пользователя приложения Tuya Smart
Что в коробке
- Устройство управления домом xl
- Руководство пользователя x 1
Основная кнопка выбора

Включить/выключить устройство
Может использоваться как кнопка восстановления. Нажмите и удерживайте, чтобы восстановить (убедитесь, что вы действительно решили это сделать).
параметры
- Тип беспроводной сети: Wi-Fi 2.4 ГГц 802.11b / g / n
- Влажность:
- Состав: ABS + PC
- Номинальный объемtage: AC 100-240V
- Номинальный ток: 10А/13А/16А (макс.)
- Рабочая температура: -20 ° С — + 50 ° С
Установите приложение «Smart Life» или «Tuya Smart».
- Вы можете найти приложение «Smart Life» или «Tuya Smart» в магазине приложений Apple, Google Play или отсканировать QR-код ниже и установить его;
- Войдите в интерфейс регистрации / входа, введите номер телефона для получения кода подтверждения для регистрации учетной записи.
- Приложение Smart Life

- Приложение Tuya Smart

- Приложение Smart Life


Бесплатное приложение «Smart Life» или «Tuya Smart» совместимо с мобильными устройствами, поддерживающими iOS 8.0 и выше, Android 4.4 и выше.
Подключение вашего устройства к приложению
A. Простой режим (рекомендуется)
- Сначала убедитесь, что устройство подключено к электричеству, затем откройте приложение «Smart Life» или «Tuya Smart», нажмите «ДОБАВИТЬ УСТРОЙСТВА» или «» в правом верхнем углу страницы и выберите «Соответствующее устройство».
- Нажмите и удерживайте кнопку включения/выключения устройства в течение 5 секунд, пока индикатор быстро не мигнет, страница интерфейса уже перешла на страницу «Добавить устройство», как указано выше;
- Убедитесь, что индикатор быстро мигает, и подтвердите это в приложении;
- Выберите локальный WIFI и введите правильный пароль и подтвердите; 5. Дождитесь завершения настройки, затем нажмите «Готово».
Б. Режим AP
- Перейдите в «Режим AP», если не удалось подключиться в «Простом режиме». Режим AP находится в правом верхнем углу страницы «ДОБАВИТЬ УСТРОЙСТВО».
- Нажмите и удерживайте кнопку включения / выключения, пока индикатор не начнет медленно мигать;
- Убедитесь, что индикатор медленно мигает, и подтвердите это в приложении;
- Выберите локальный WIFI, введите правильный пароль и подтвердите;
- Нажмите «Подключиться сейчас», выберите точку доступа WIFI с именем «SmartLife xxx», затем вернитесь к приложению «Smart Life» или «Tuya Smart»;
- Дождитесь успешной настройки, затем нажмите «Готово».
Знакомство с приложением «Smart Life» или «Tuya Smart»
А. Устройства
Вы можете добавить устройства в список, нажав «+» в правом верхнем углу этой страницы.
- Коммутаторы
Переключатели позволяют включать и выключать устройство в любом месте. Пока у вас есть подключение к Интернету, вы можете управлять устройством в своем доме. Коснитесь значка в правом верхнем углу страницы, вы сможете изменить имя устройства или даже создать группу (если у вас несколько устройств), что означает, что вы можете включать или выключать несколько устройств одновременно. - Таймер
С помощью этой функции вы можете включить или выключить устройства через определенное время по вашему желанию. - Обратный отсчет
С функцией таймера обратного отсчета вы можете автоматически включать / выключать работающую бытовую технику. - Показатели
Здесь вы можете проверить энергопотребление в реальном времени и за прошлые периоды, если ваше устройство оснащено функцией мониторинга энергопотребления.
B.Сцены
С помощью этой функции вы можете создать свою характеристику по своему усмотрению.
С. Проfile
Profile это вход для пользователей, чтобы управлять личной информацией, в основном отображать следующую информацию:
Информация по технике безопасности
Устройство рекомендуется использовать только в помещении и в сухом месте, розетка должна использоваться в пределах номинала розетки, указанного в инструкции.
Пожалуйста, свяжитесь с продавцом для замены, если есть какие-либо повреждения, вызванные транспортировкой.
Пожалуйста, соответствующее устройство в надлежащем состоянии и вдали от детей. Пожалуйста, используйте соответствующее устройство полностью во время использования из соображений безопасности.
Пожалуйста, не разбирайте и не устанавливайте устройство, в противном случае это может привести к повреждению продукта или угрозе безопасности.
Использование Amazon Echo: Краткое руководство
Что вам понадобится…
Приложение и учетная запись Amazon Alexa
Приложение и учетная запись «Smart Life» или «Tuya Smart»
(Пользователи должны зарегистрировать свою учетную запись, выбрать регион как «США») Echo, Echo Dot, Tap или другие голосовые устройства Amazon.
Связанное устройство
Наконечник: После успешной настройки переименуйте устройство. В названии устройства рекомендуется использовать удобное произношение английских слов.
(Amazon Echo временно поддерживает только английский язык)
Установите свой эхо-динамик с помощью приложения Alexa
- Войдите с помощью учетной записи Alexa и пароля (если вы не зарегистрированы, сначала зарегистрируйтесь); После входа в систему щелкните меню в левом верхнем углу, затем нажмите «Настройки» и выберите «Настроить новое устройство»;
- Выберите устройство (например,ampле, Эхо). Когда появится нужная страница, нажмите и удерживайте маленькую точку на устройстве Echo, пока индикатор не станет желтым. Затем нажмите «Продолжить» в приложении.
(Примечание: в настоящее время мобильный телефон не может открывать различные программы VPN)
- Выберите пользовательский WIFI и подождите несколько минут.
- После вступительного видео нажмите «Следующий шаг», и он автоматически перейдет на «Главную» страницу. Теперь Echo успешно подключено к приложению Alexa через WiFi.

Включите наши навыки в приложении Alexa
- Выберите «Навыки» на панели параметров, а затем найдите «Smart Life» или «Tuya Smart» APP в строке поиска; Выберите «Smart Life» или «Tuya Smart» APP в результатах поиска, а затем нажмите «Включить».
- Введите имя пользователя и пароль, которые вы ранее зарегистрировали (поддерживается только учетная запись в США); Когда вы видите правильную страницу, это означает, что учетная запись Alexa связана с учетной записью приложения «Smart Life» или «Tuya Smart».


После предыдущей операции вы можете управлять сокетом через Echo.
- Обнаружение устройств: Во-первых, пользователи должны сказать Echo: «Echo (или Alexa), откройте для себя мои устройства».
Echo начнет находить устройства, которые добавлены в приложение Smart Life, для отображения результата потребуется около 20 секунд. Или вы можете нажать «Обнаружить устройства» в приложении Alexa, оно покажет устройства, которые были успешно найдены.
Примечание: «Эхо» — это одно из имен пробуждения, которое может быть любым из этих трех имен (настроек): Alexa/Echo/Amazon. - Список навыков поддержки. Пользователь может управлять устройствами, следуя приведенным ниже инструкциям:
Алекса, включи розетку холодильника]
Алекса, выключи [холодильник]
Внимание: Название устройства должно соответствовать приложению «Smart Life» или «Tuya Smart».
Гарантия
На это устройство распространяется ограниченная гарантия от первоначального покупателя, которая распространяется на дефекты изготовления и материалов в течение 12 месяцев с даты покупки (повреждения в результате повреждения, изменения, неправильного использования, небрежного обращения, несчастного случая, обслуживания кем-либо, кроме авторизованный сервисный центр или Бог не включены).
В течение гарантийного срока и при обнаружении дефектов этот продукт будет заменен при возврате надлежащего подтверждения покупки.![]()
Спасибо за покупку!
Документы / Ресурсы
 |
Tuya Smart App [pdf] Руководство пользователя Умное приложение, умное, приложение |
This topic describes how to use the Smart Life app .
Download the app
Search for Smart Life in Apple’s App Store and other major app stores or scan the following QR code to download the Smart Life app.

User accounts
Register an account
-
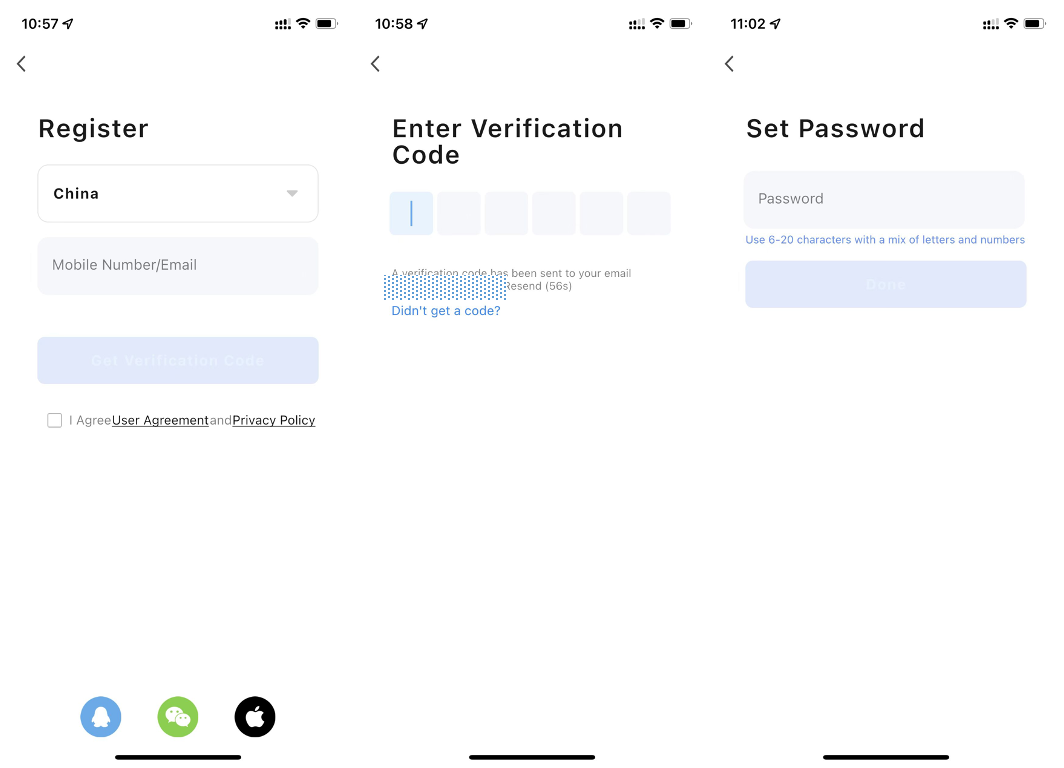
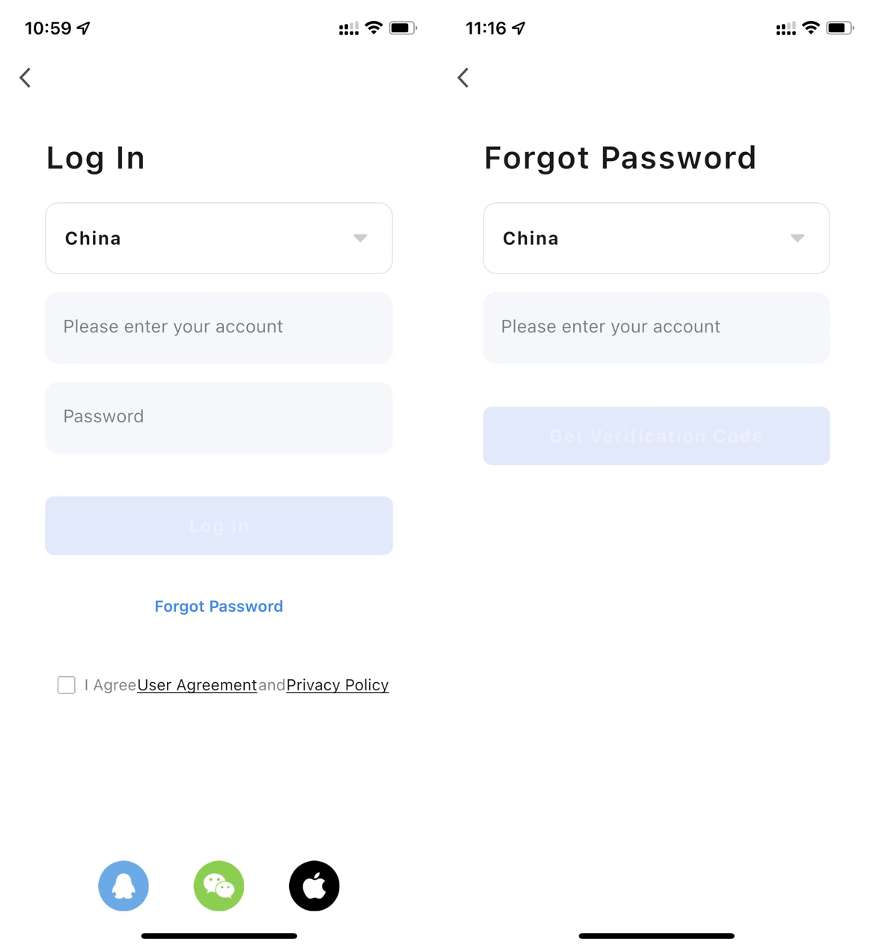
Tap Sign Up and carefully read and agree on the User Agreement and Privacy Policy to go to the Register page.

-
Register an account with an email address or mobile phone number. The State/Region field value is automatically specified and can also be manually changed. However, after the account is registered, this field value cannot be changed. Tap Get Verification Code.
-
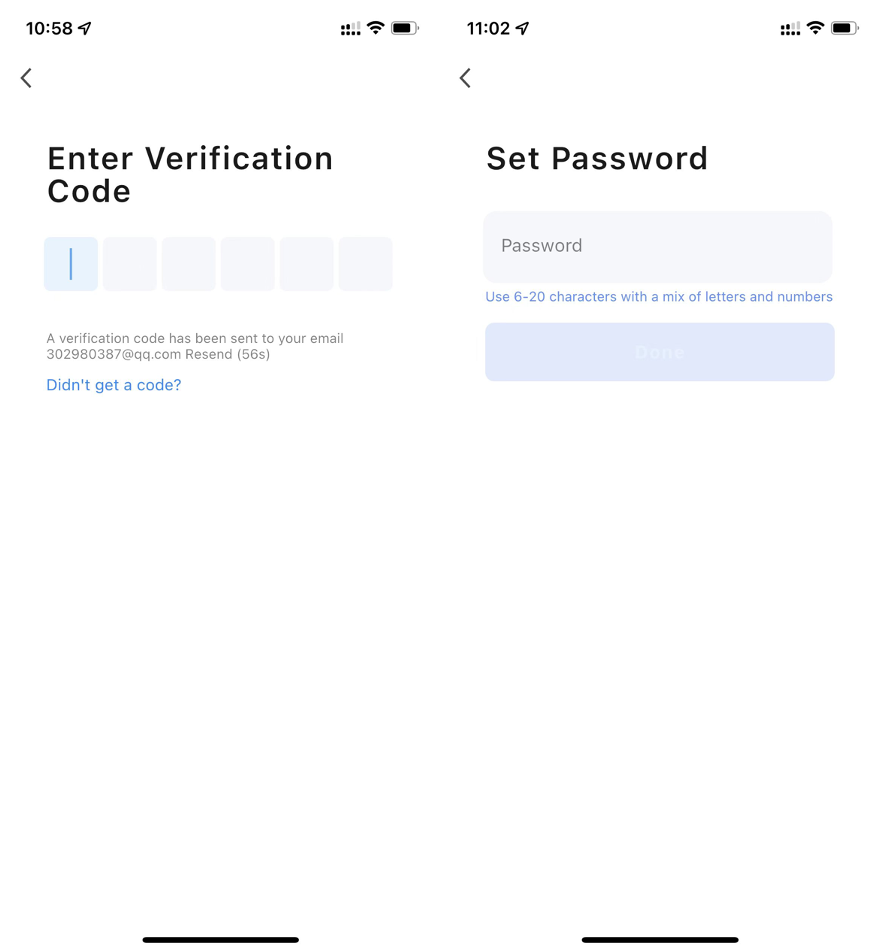
Enter the returned verification code to navigate to the password setting page. Set a password as required and tap Done.

Log in with the app account or third-party account
Log in with the app account
-
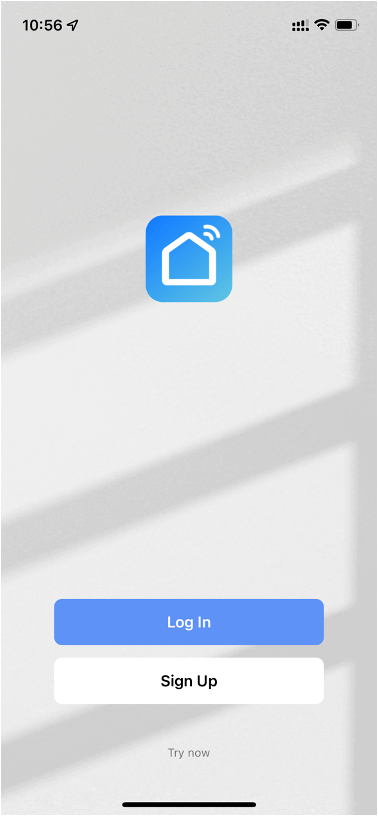
Open the app. If you have registered an account of the app, tap Log In to go to the login page.
-
The State/Region field value is automatically specified and can also be manually changed.
-
Enter the registered mobile phone number or email address and the password and tap Log In.
Log in with third-party account
-
If WeChat or Tencent QQ is installed on the mobile phone and a WeChat or Tencent QQ account is created, tap the WeChat or Tencent QQ icon on the login page.
-
On the authorization page that appears, enable authorized login with the WeChat or Tencent QQ account. For an iPhone, an Apple ID can also be used for login.
-
If a LINE app account is created, it can also be authorized for login.

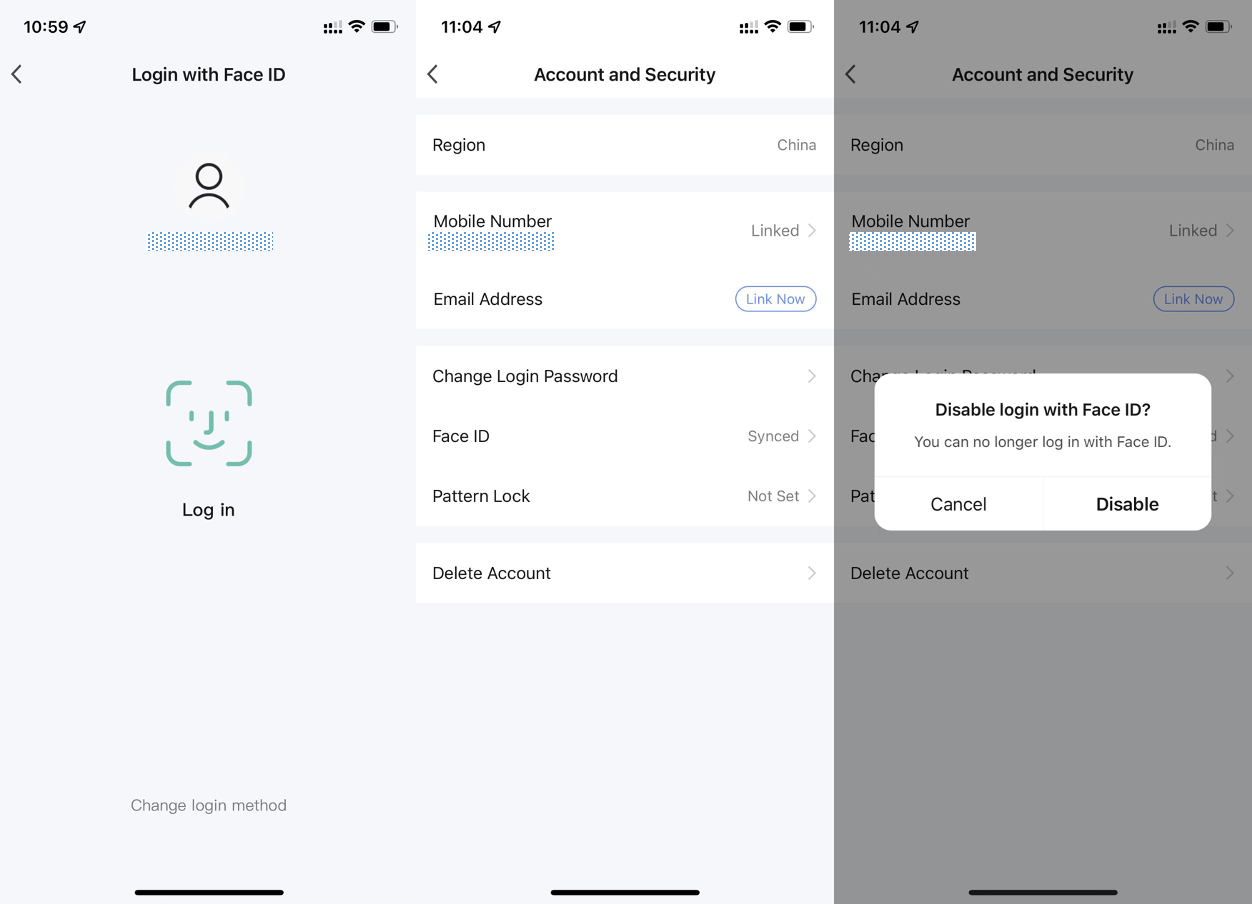
Configure biometric login
The biometric login feature makes login more convenient and secure. The app for iOS supports Face ID, and the app for Android supports Touch ID. During biometric login, the user does not need to enter the account and password, or perform other login operations. Login can be enabled even if the password is forgotten. On the Account and Security page, the user can enable or disable login with the face ID.
Change an account
-
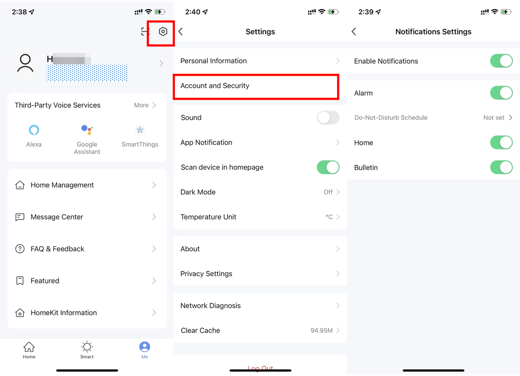
After login to the app, tap Me and then the Settings icon.
-
On the Settings page, tap Account and Security.
-
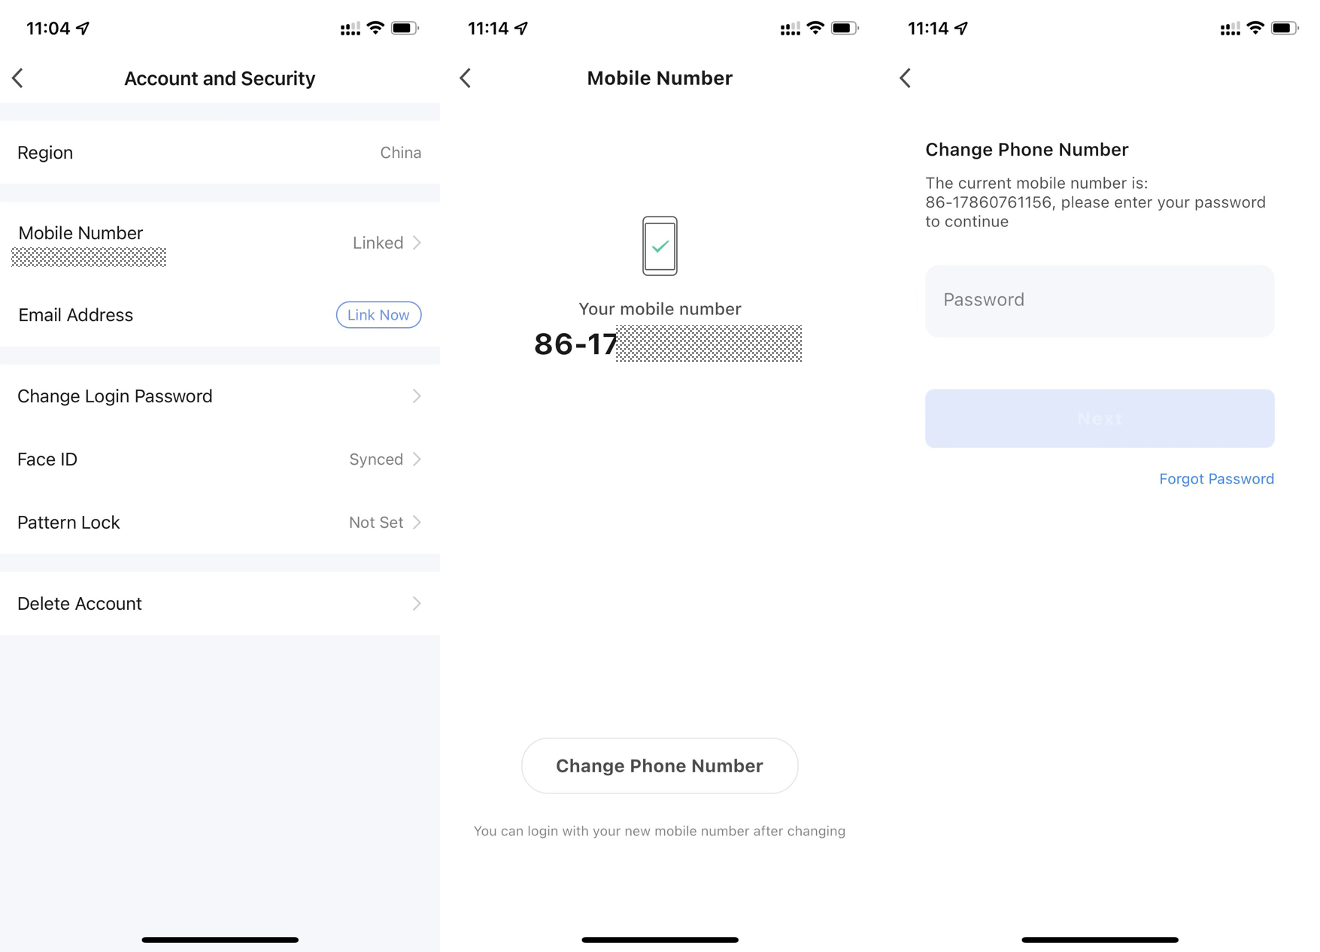
Tap Mobile Number to change the mobile phone number, or Email Address to change the email address.
-
To change the mobile phone number, choose Mobile Number > Change Phone Number.
-
On the page that appears, enter your password and tap Next. On the Bind Mobile Number page, enter a new mobile phone number and tap Get Verification Code. On the Enter Verification Code page, enter the returned verification code.

Reset a password
If the login password is forgotten, the user can reset the password based on the following steps:
-
On the Log In page, tap Forgot Password.
-
The State/Region field value is automatically specified and can also be manually changed. For the account registered with a mobile phone, this field must be the registered country or region.
-
Enter the registered mobile phone number or email address and tap Get Verification Code.

-
Enter the code that was sent to the mobile phone number or email address.
-
On the page that appears, enter a new password and tap Done. Then, the password is reset, and the app is automatically logged in.
-
For security concerns, the app detects risks in the user’s phone system during login. If the app detects a root or jailbreaking risk, a security reminder is displayed. The user can determine whether to exit the app or not. It is disabled by default.
Try out the app
-
Open the app and tap Try now.
-
A dialog box appears, indicating that cloud storage, third-party voice control, and device sharing are not supported in trial mode.
-
Tap Continue. The Home page appears.
-
Complete account information to try out all available features of the app.

Use the app
Manage homes and home members
-
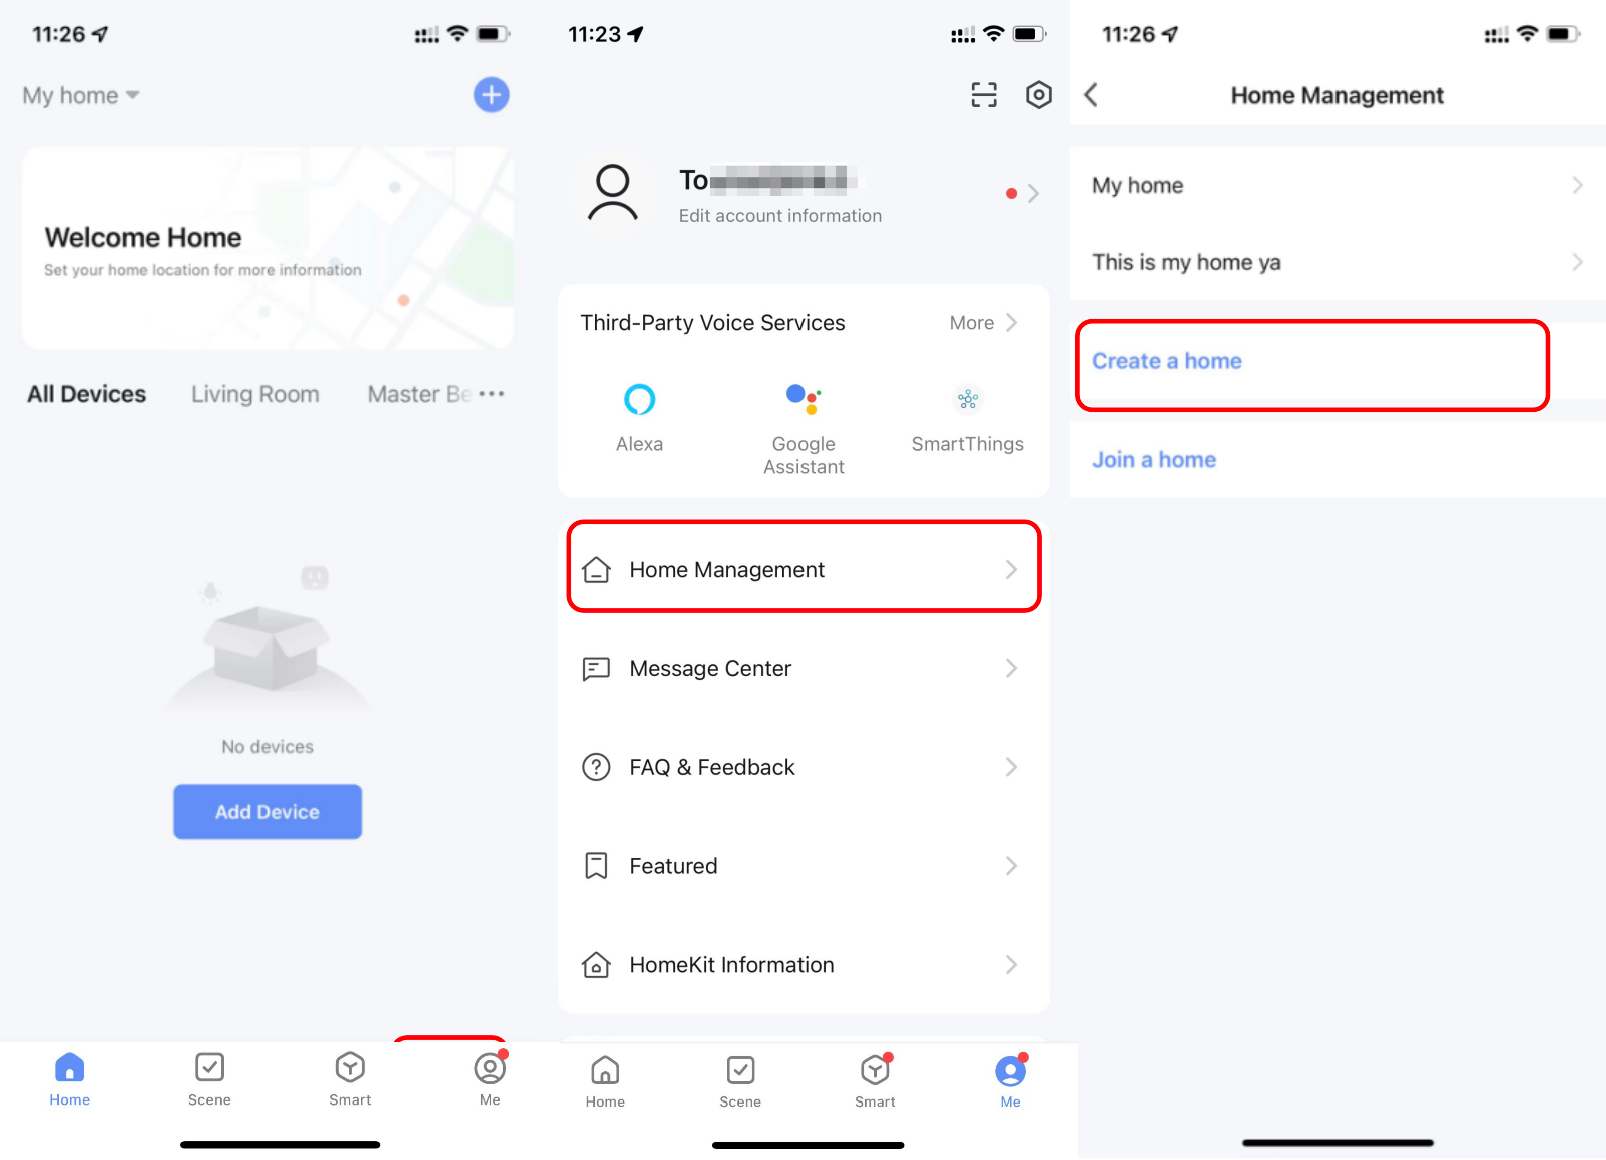
After login to the app as a new user, the Home page where devices are listed appears. The user’s avatar is displayed in the top-left corner of the page. Before home information is completed, the Home page does not display environment or room information.
-
In the bottom navigation bar, tap Me > Home Management to go to the Home Management page.
-
After the new user taps Home Management, the user can edit the information about adding a home on the page that appears.
-
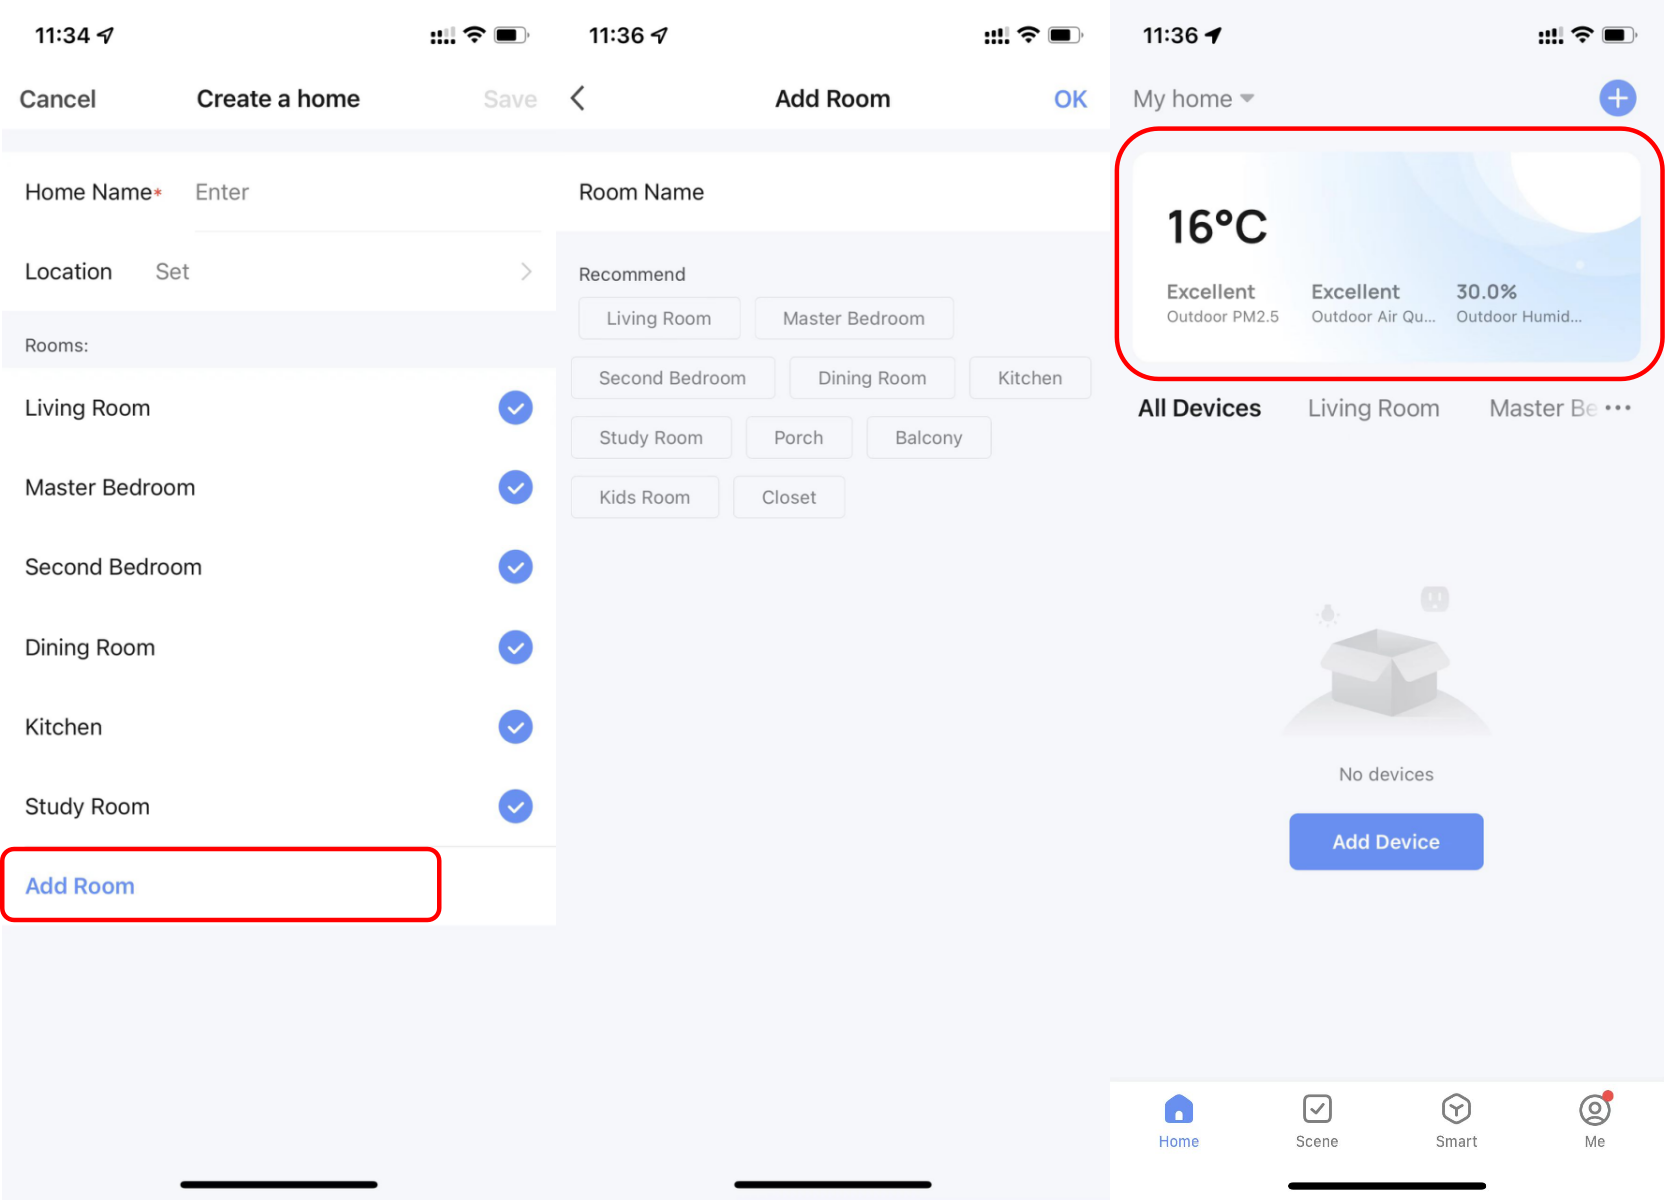
If a home has already been added, tap Create a home on the Home Management page to go to the Create a home page.
-
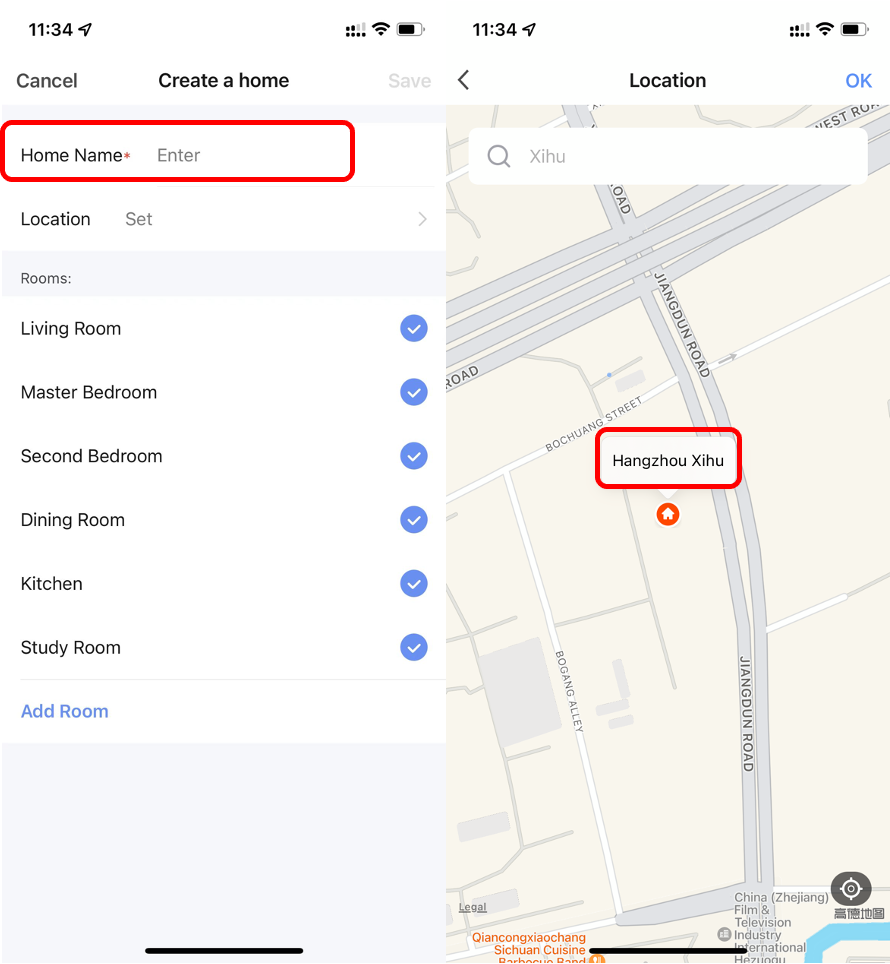
Enter a name for the home in the Home Name field. A maximum of 25 characters is allowed.
-
Tap Location. On the Location page, verify that the location is correct and tap OK in the top right corner of the page. The location is set based on the phone location. The user can also change the location by setting the coordinate.
-
Select rooms in the Rooms section. The user can use the default room names on the app or tap Add Room to customize a room name. A maximum of 25 characters is allowed for a room name.
-
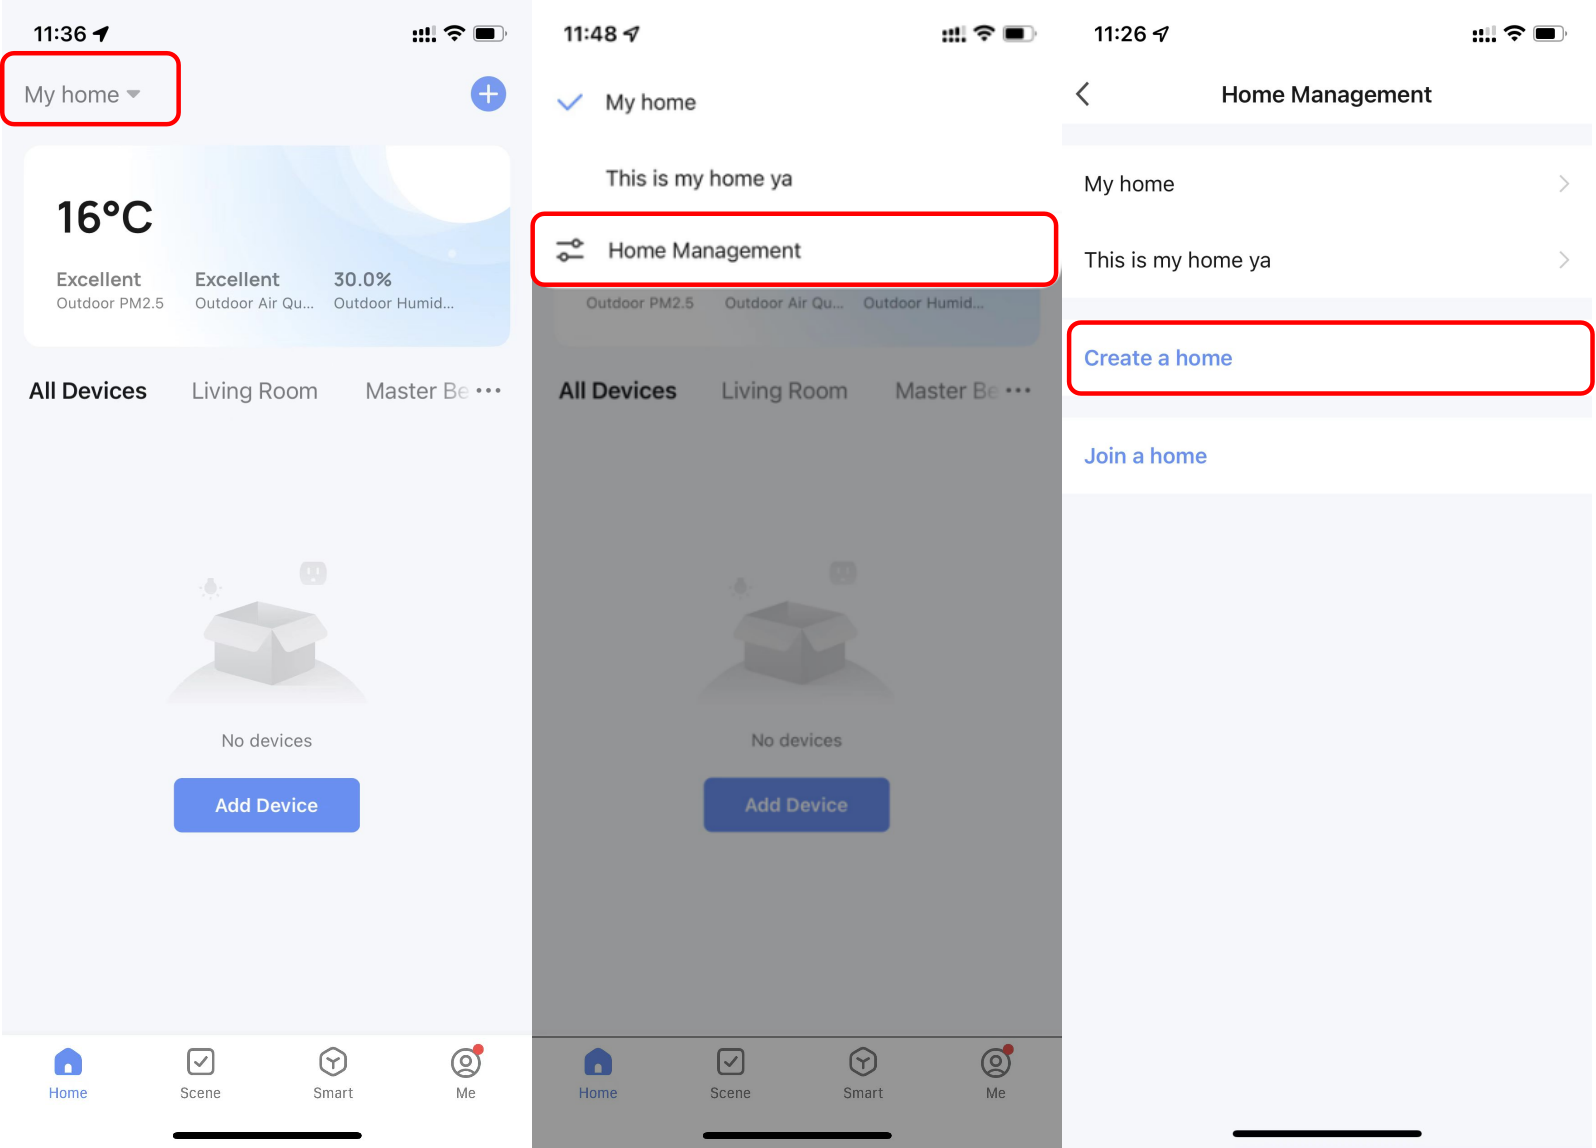
After the home information is completed, go back to the Home page. The information, such as the weather, temperature, and room names, is displayed. If more than one home is added, tap the home name in the top left corner of the page to switch between and manage homes.
-
In the drop-down list, tap Home Management to manage homes, create a home, or join a home. An account can be used to control multiple homes. The smart devices in different homes are independent of each other.
-
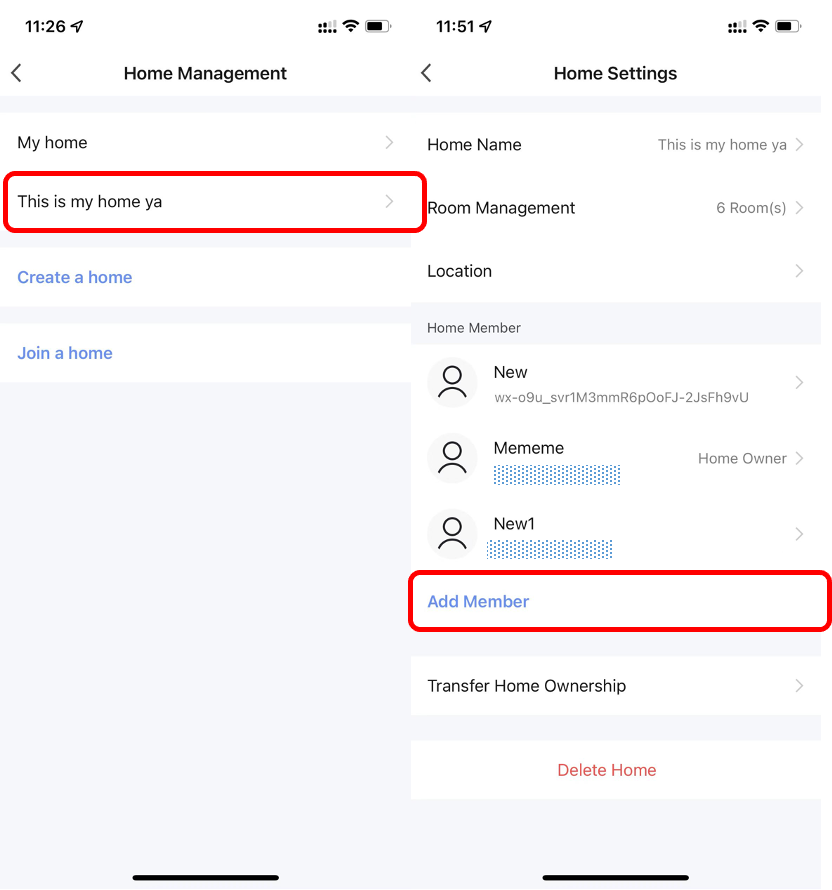
Tap a home name, such as This is my home ya, and select Home Management from the drop-down list. On the Home Management page, tap the home name to go to the Home Settings page.
-
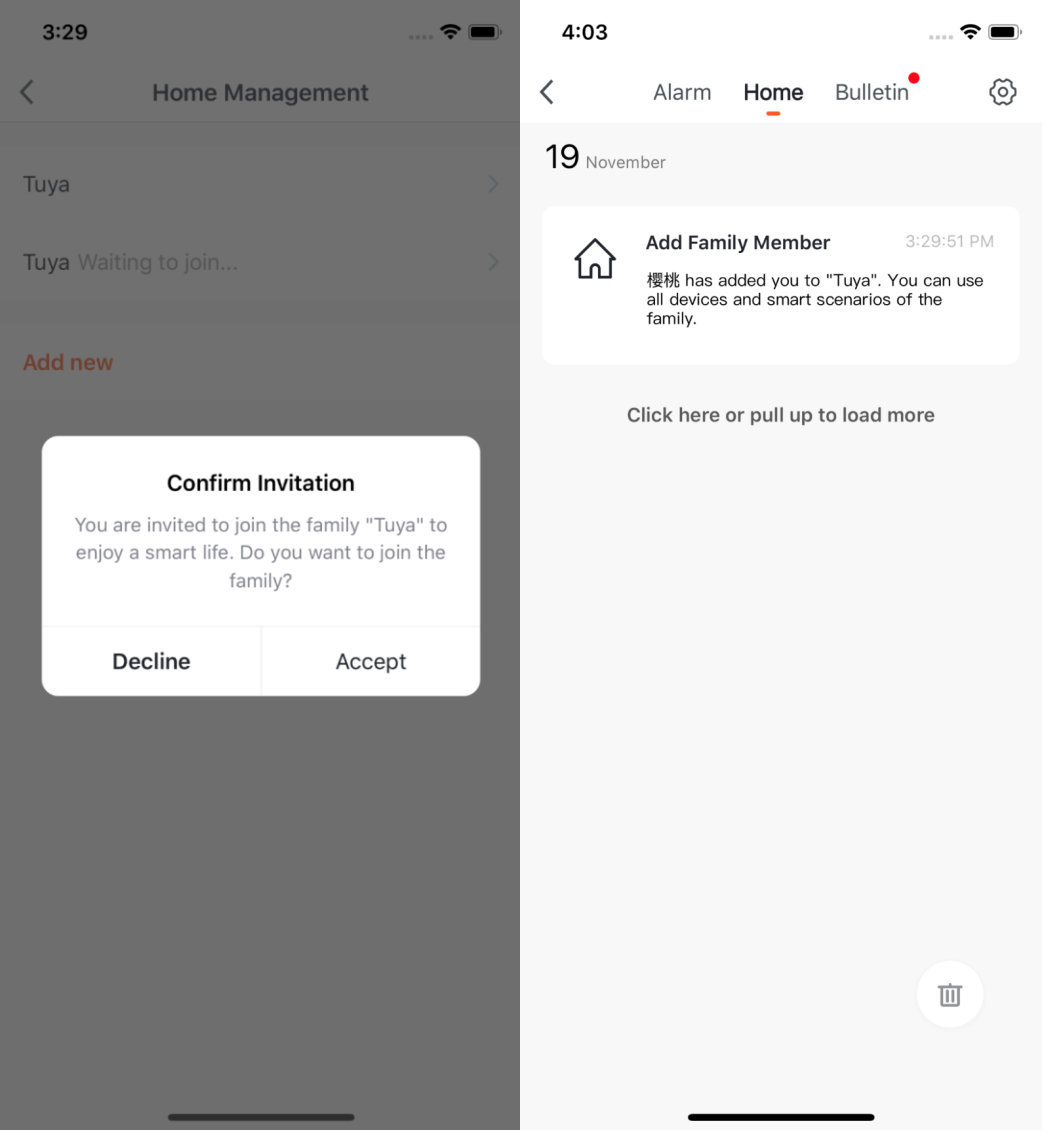
If a user is invited to join a home, the user will receive a notification on the app. The user will also receive a notification in the message center.
View environment information
-
After the home information and location are completed, the weather and environment information appears on the Home page. Tap the weather and environment information section to view more details.
-
If environmental sensors have been added to the app, for example, the air purifier, hygrometer, and thermometer, the app displays the environmental information provided by these devices.
-
On the detail page, the homeowner or administrator can drag and sort the displayed items.

Add a device
Tap Add Device or the plus icon (+) in the top right corner on the Home page to go to the device adding page. On the Add Device tab that appears, devices can be automatically found or manually added. To automatically add devices, the app must be granted Wi-Fi and Bluetooth permissions.
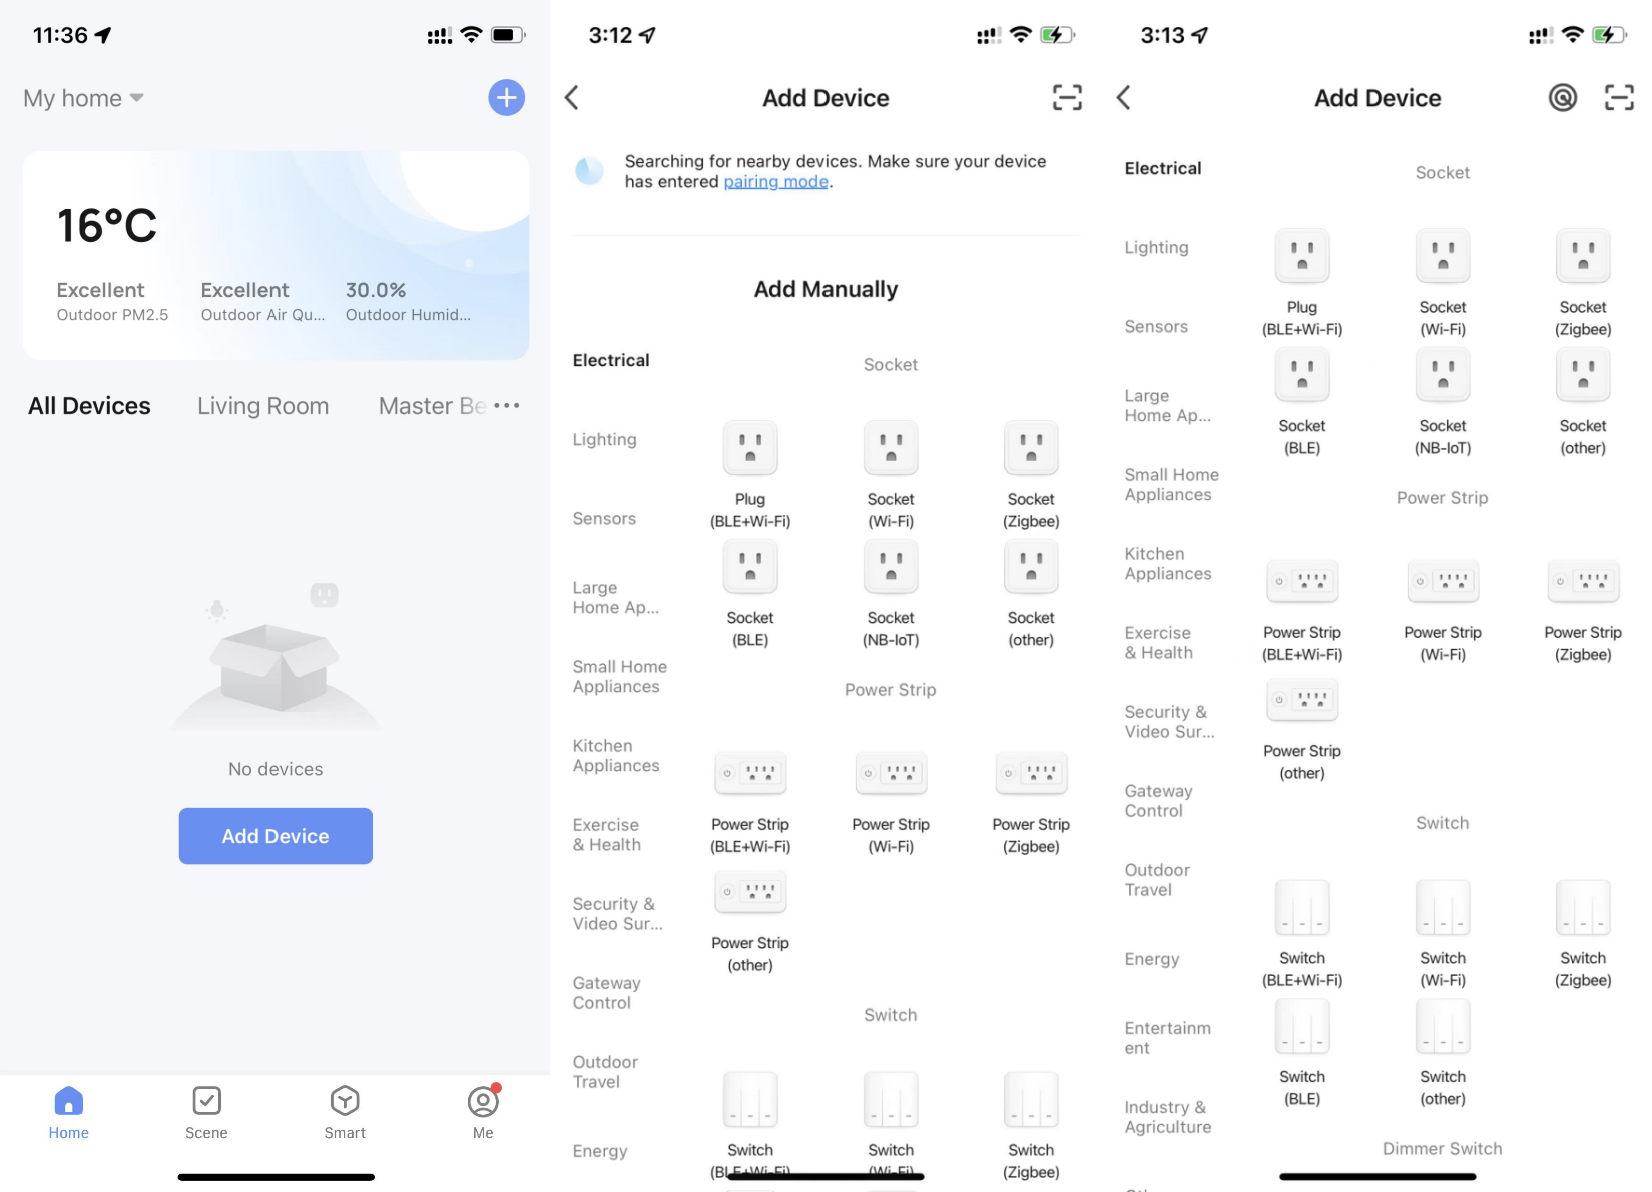
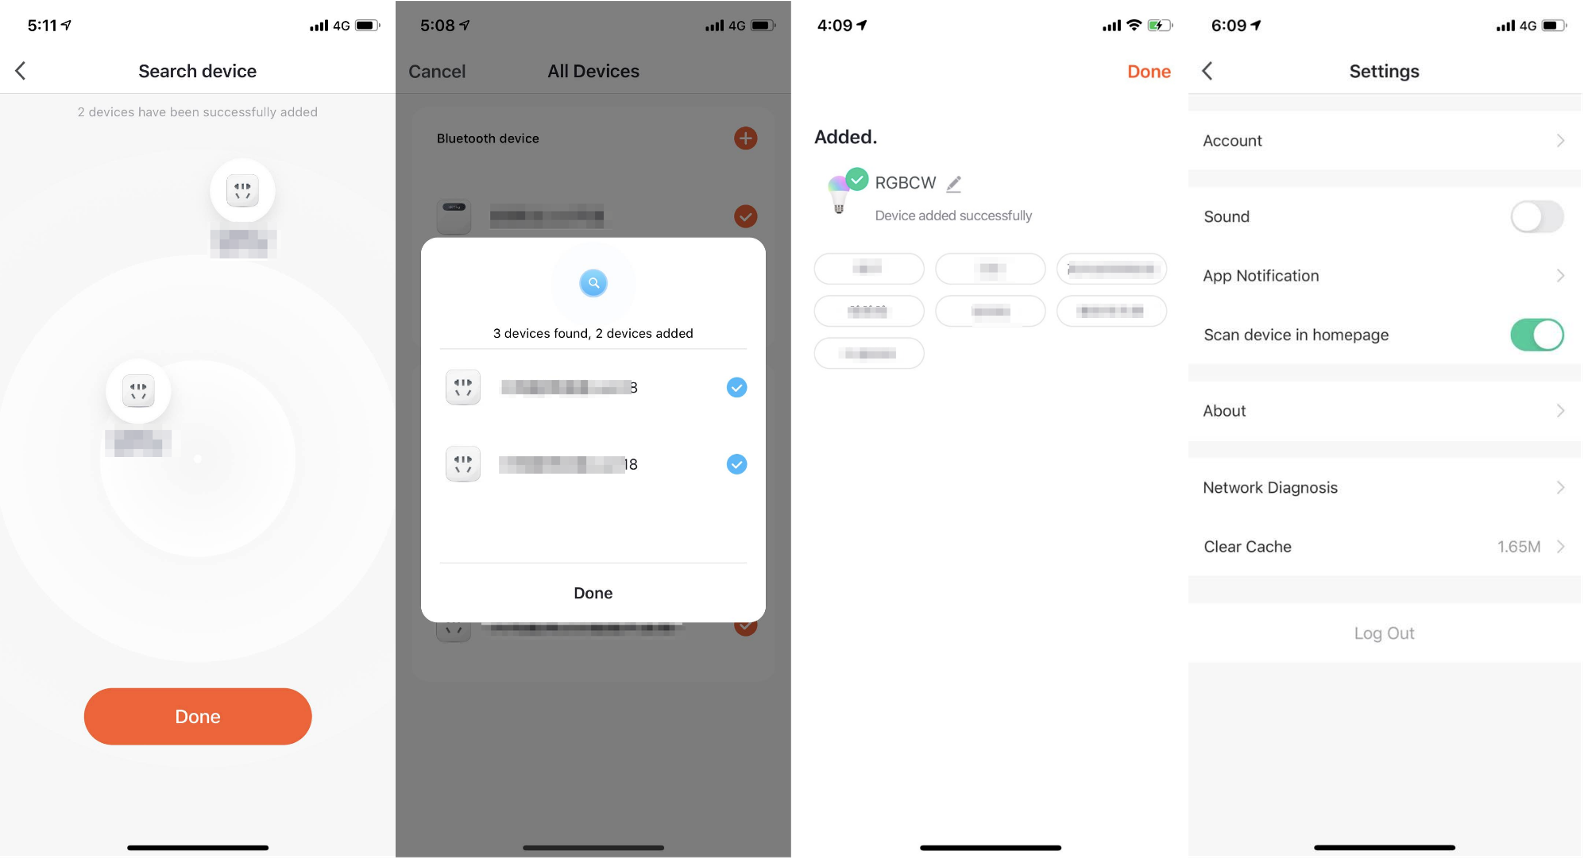
Automatically add devices
-
This method enables simultaneously searching for multiple devices, including Wi-Fi devices, Bluetooth gateways, Bluetooth mesh devices, Zigbee gateways, and Zigbee devices connected to the gateway. All devices found can be added with one tap.
-
If the search times out and no devices are found, follow the instructions to troubleshoot the issue and try again, or try to manually add devices.
-
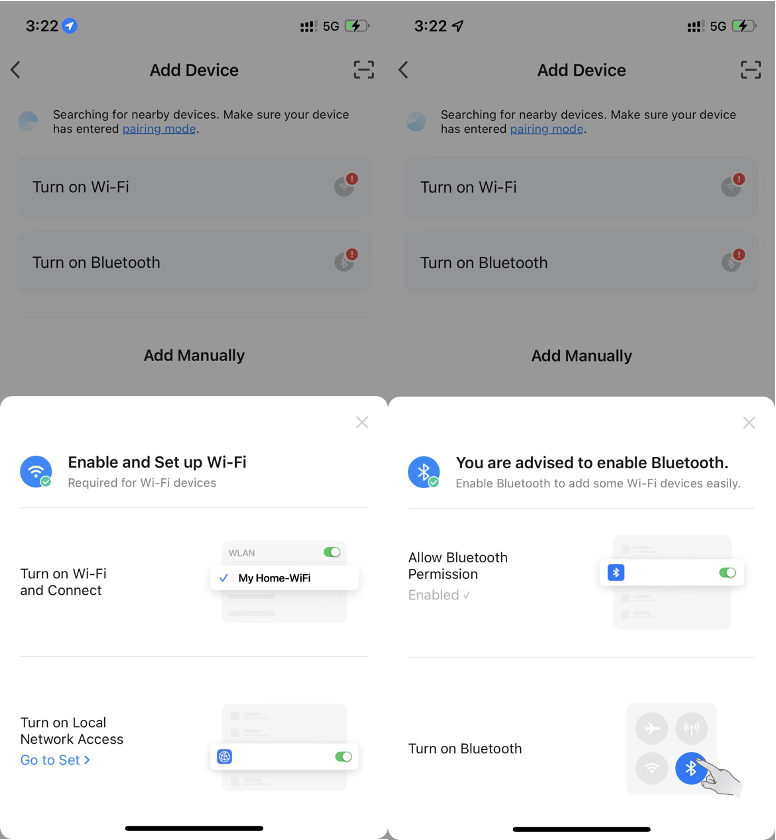
In this mode, enable Wi-Fi and Bluetooth for searching for devices. Wi-Fi devices can be found only when Wi-Fi is enabled. Nearby Bluetooth devices can be found only when Bluetooth is enabled.
-
Tap Turn on Wi-Fi or Turn on Bluetooth to enable Wi-Fi or Bluetooth as instructed.
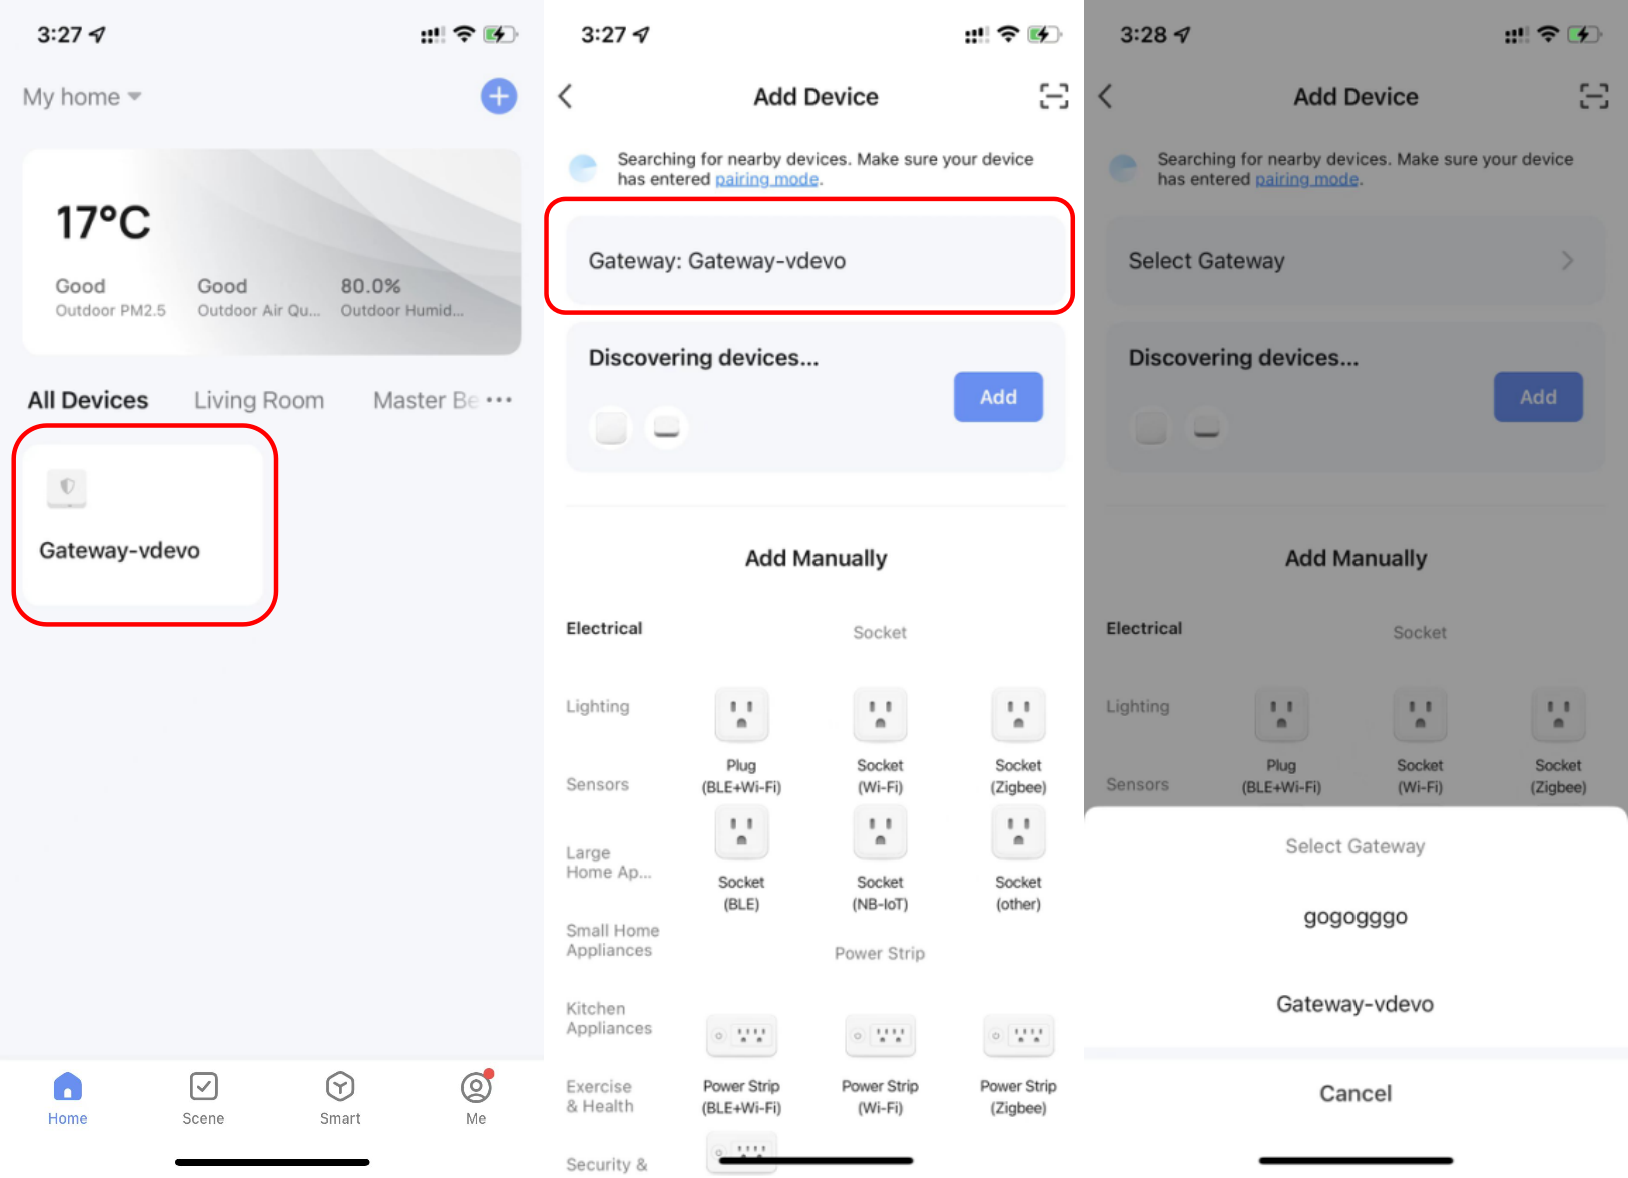
-
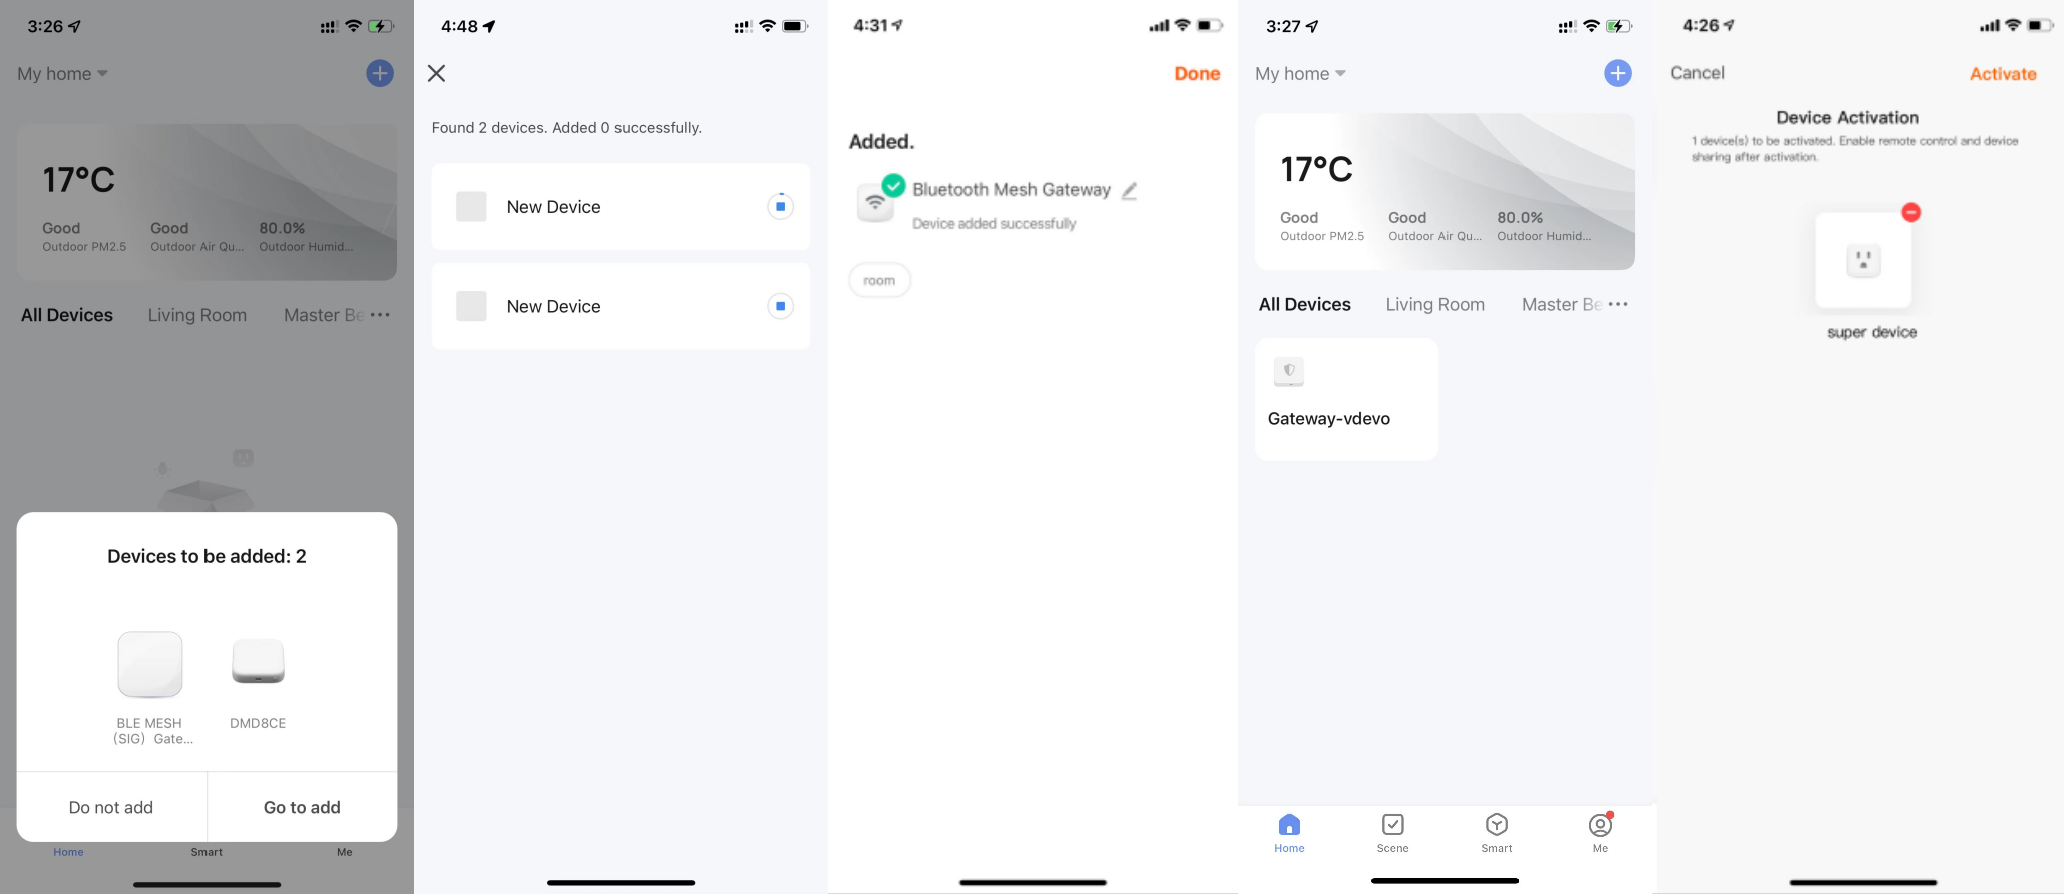
If a gateway has been added to the app, it can be automatically recognized to pair associated sub-devices. If multiple gateways exist, a dialog box appears for the user to choose among these gateways.
-
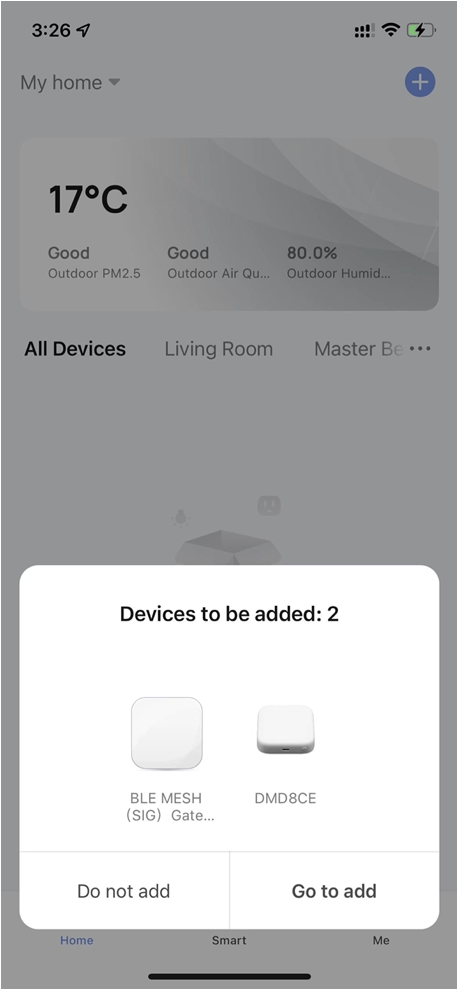
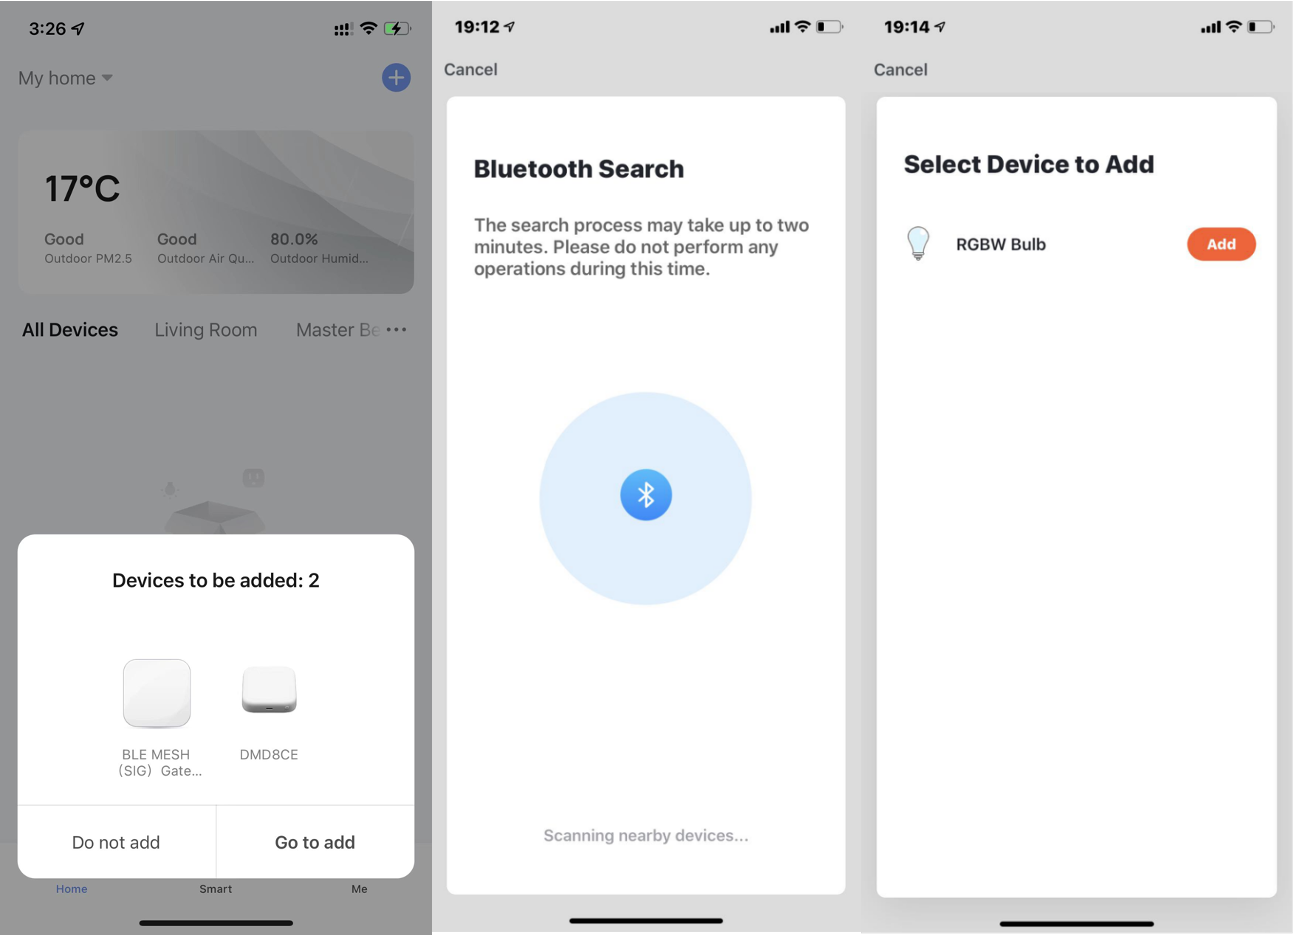
To accelerate pairing with Bluetooth devices, the app supports the automatic discovery of nearby Bluetooth devices. Once the Home page is opened, the app automatically searches for Bluetooth devices pending pairing and shows discovered Bluetooth devices in a dialog box.
-
The user can choose Do not add or Go to add to determine whether to add these Bluetooth devices. Make sure that Bluetooth is enabled and the Bluetooth devices are pending pairing during scanning.
-
When the indicators on Narrowband Internet of Things (NB-IoT), Wi-Fi, and Bluetooth devices are blinking quickly, these devices can be added in the Auto Scan method. To use this method, prepare a Wi-Fi network. Only 2.4 GHz Wi-Fi networks are supported.

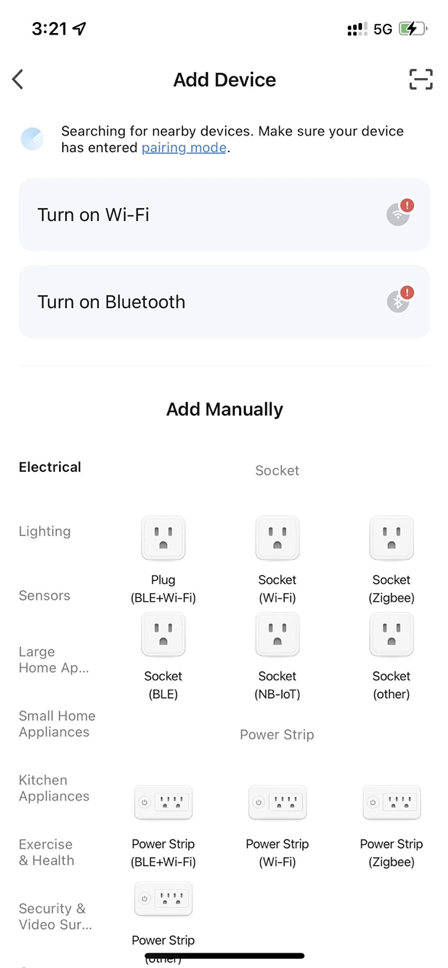
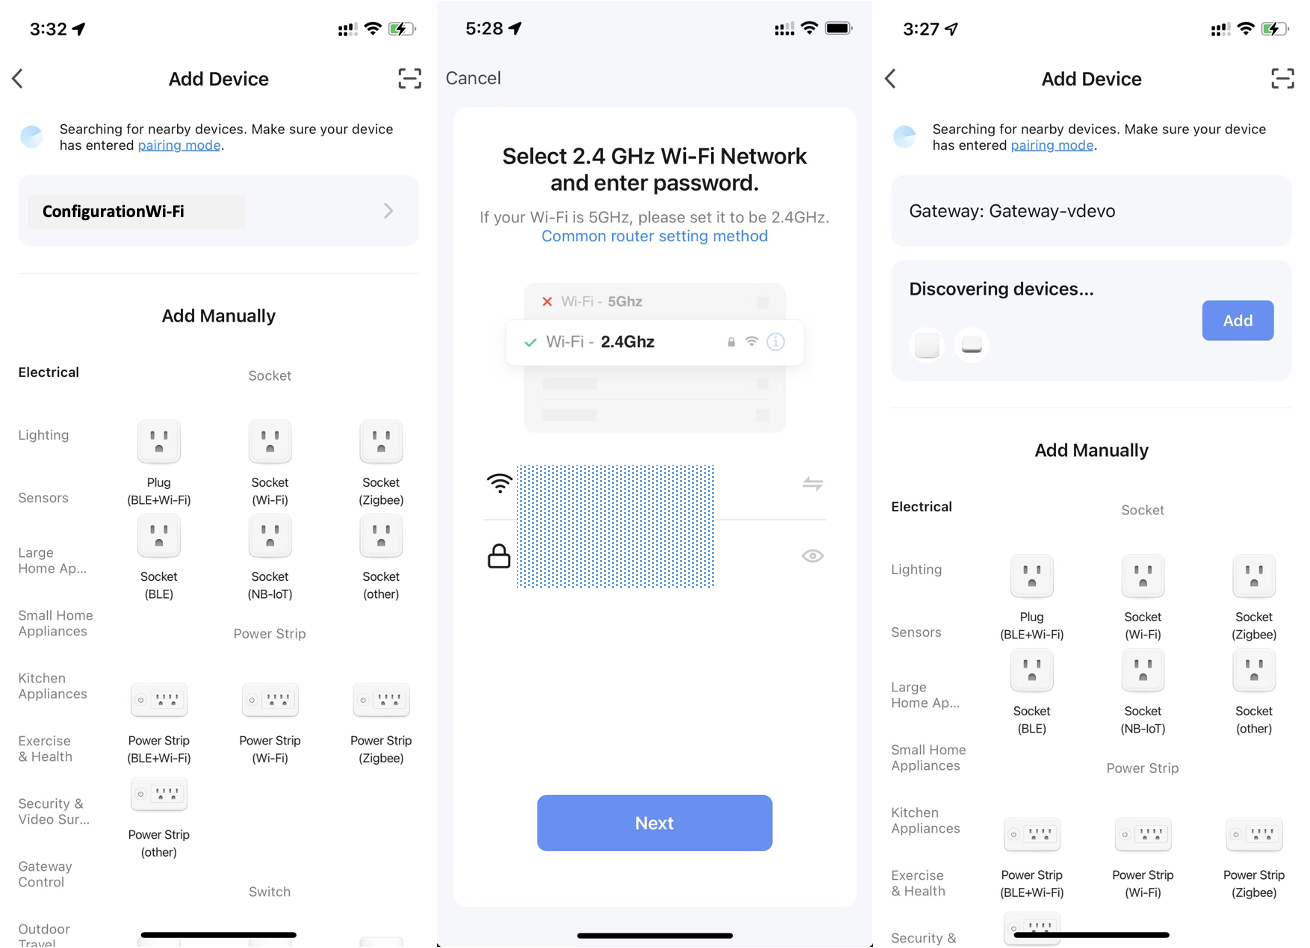
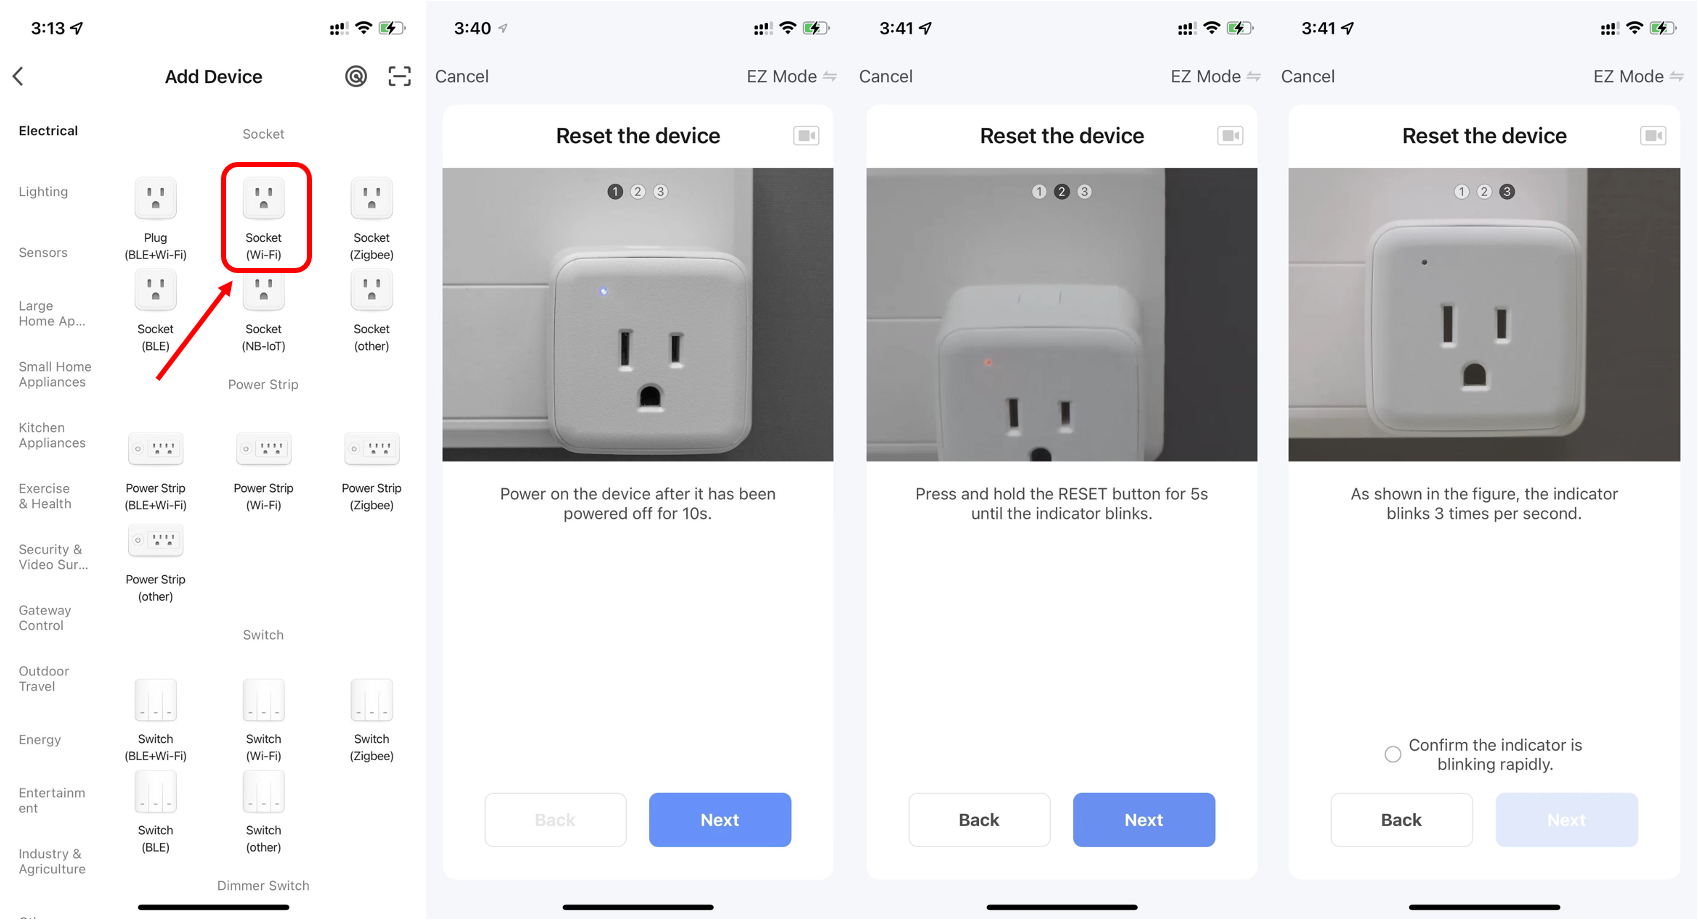
Manually add Wi-Fi devices
-
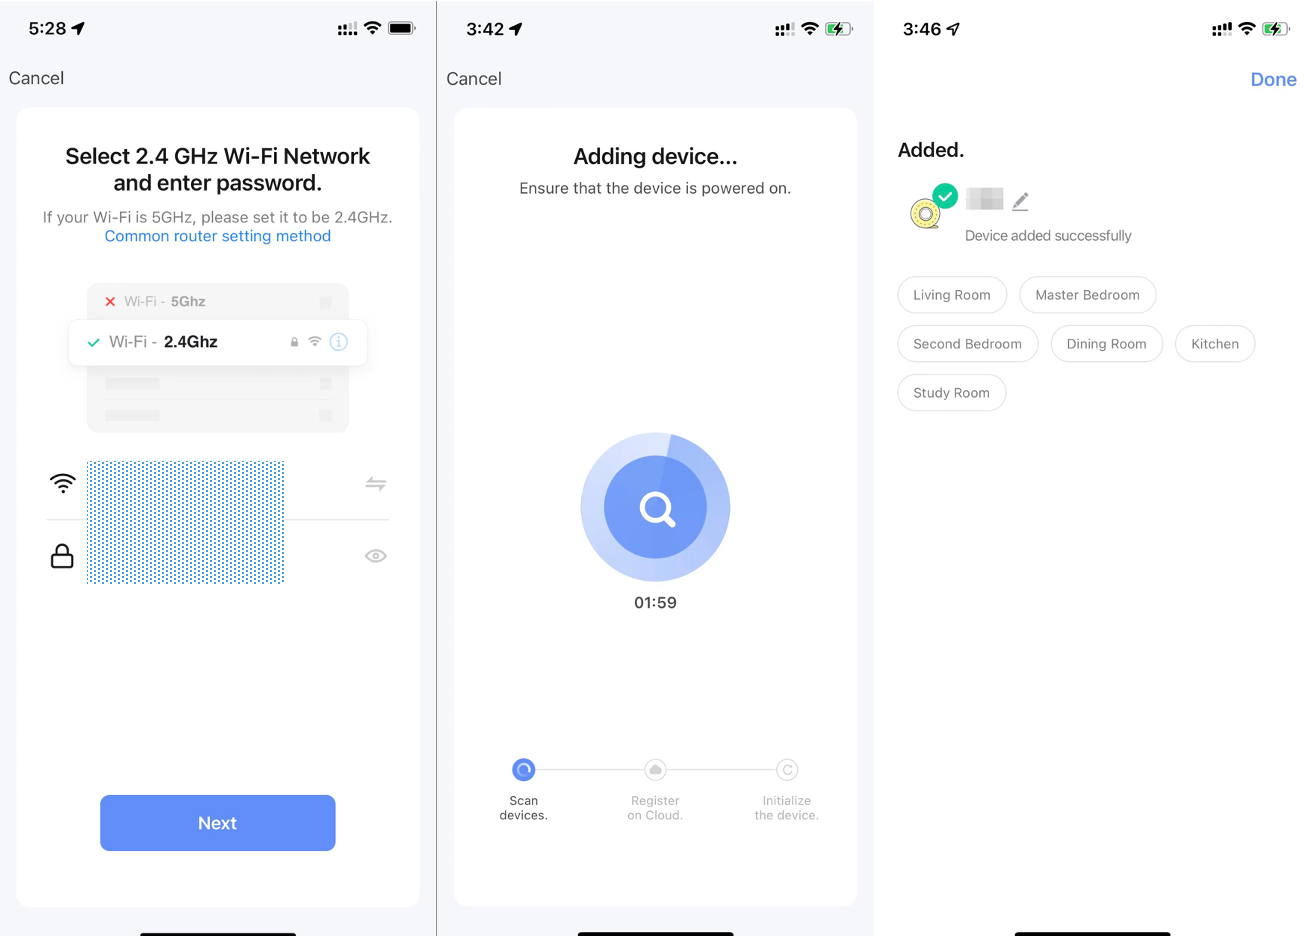
Select a device type. On the page that appears, enter the password for connecting to the 2.4 GHz Wi-Fi network. The location permission must be granted to automatically find Wi-Fi networks.
-
Two pairing modes are provided in the app. The Wi-Fi Easy Connect (EZ) mode is the default mode, and the access point (AP) mode is the compatible mode. The user can tap the pairing mode drop-down list in the top-right corner of the page to switch between the pairing modes. The user can also tap the camera icon in the top right corner of the Reset the device dialog box to view the video tutorial.

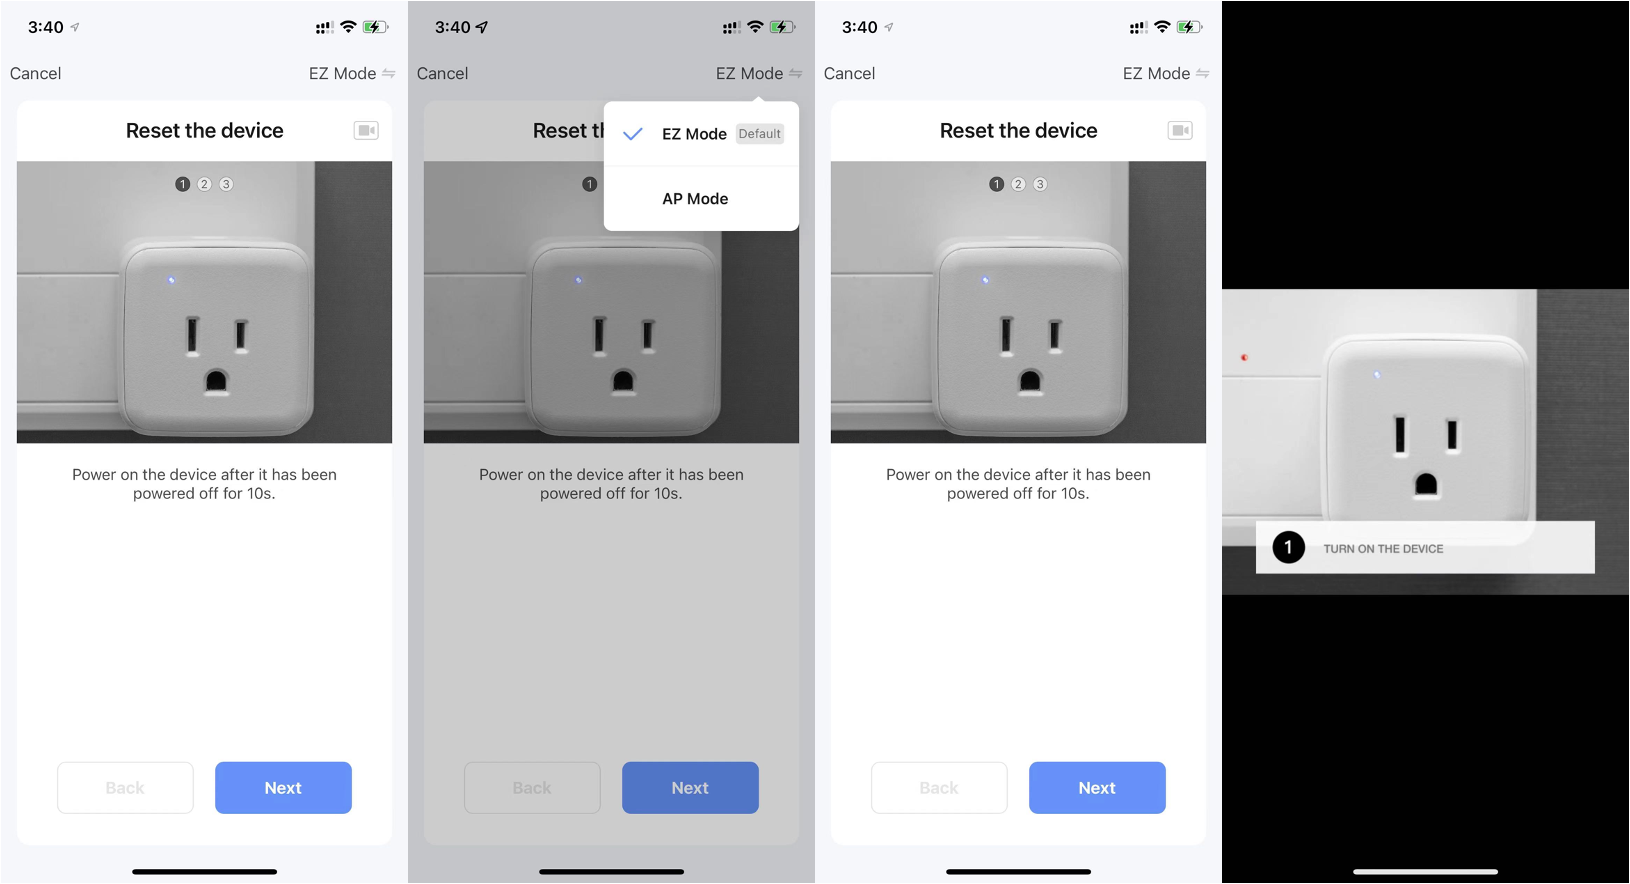
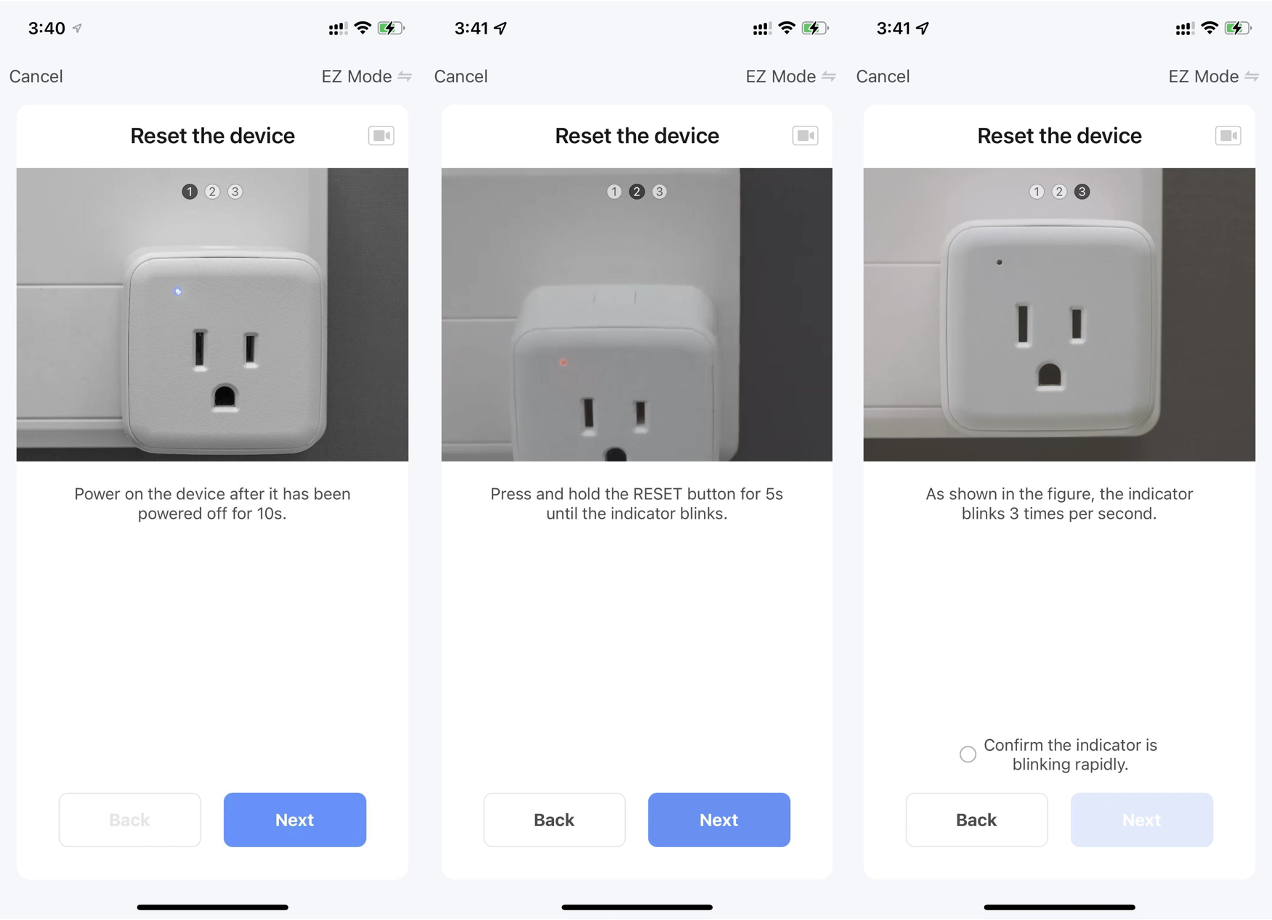
Manually add Wi-Fi devices in EZ mode
-
In EZ mode, follow the instructions to enable the indicator to blink quickly.
-
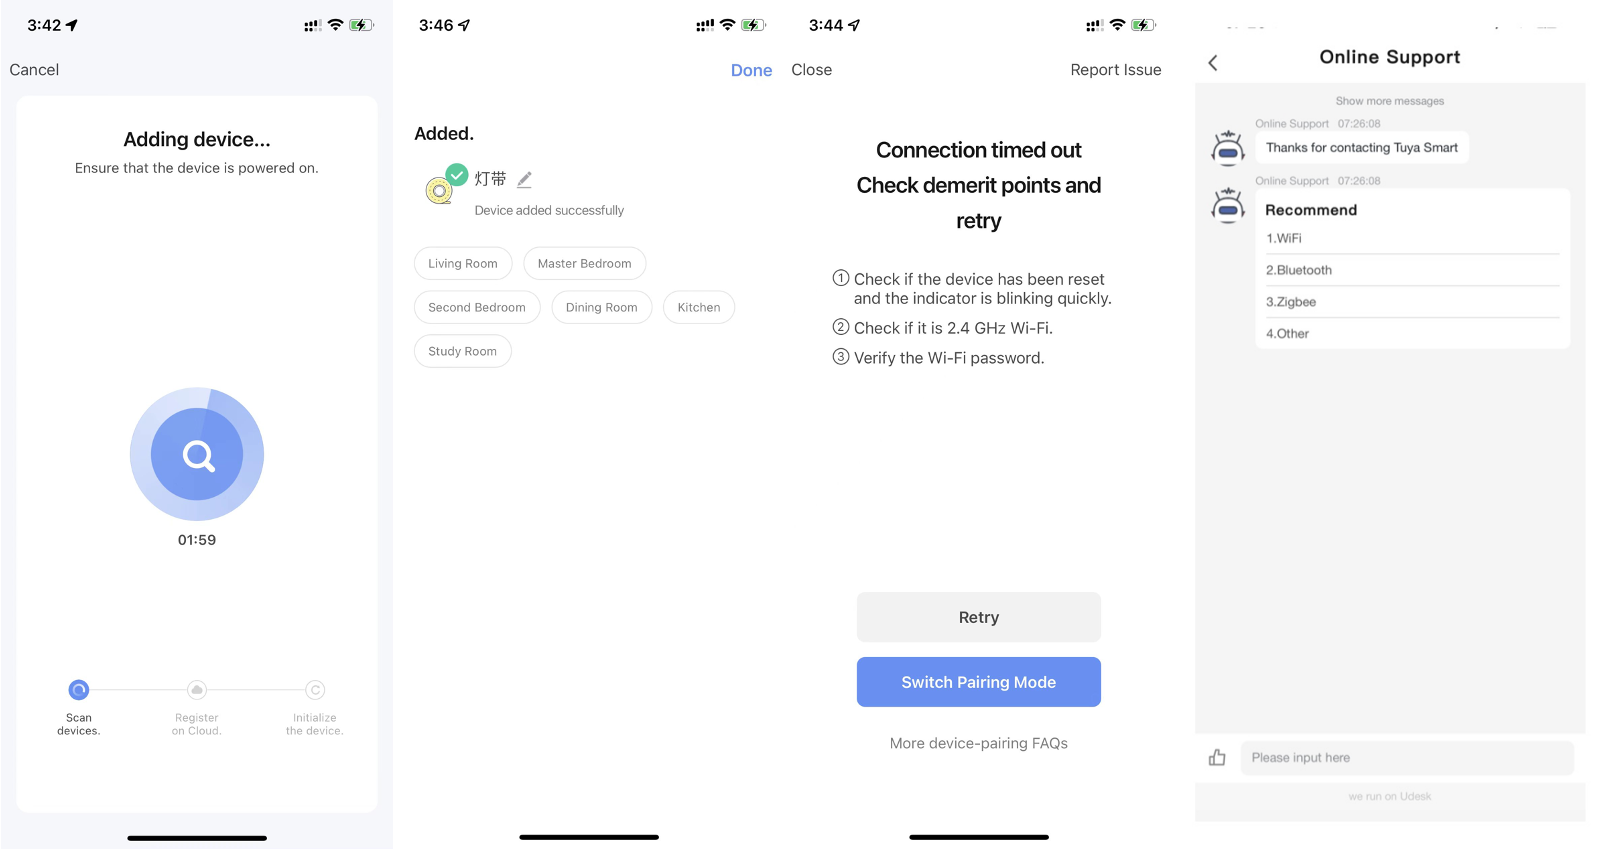
Select Confirm the indicator is blinking rapidly and tap Next. The following first two figures from the left show the pairing process. The user can customize the names of added devices and specify the room where the devices are located. A device name can contain a maximum of 64 characters.
-
If pairing fails, apply the tips in the following third figure from the left to troubleshoot the issues. Online customer services are available to support troubleshooting.
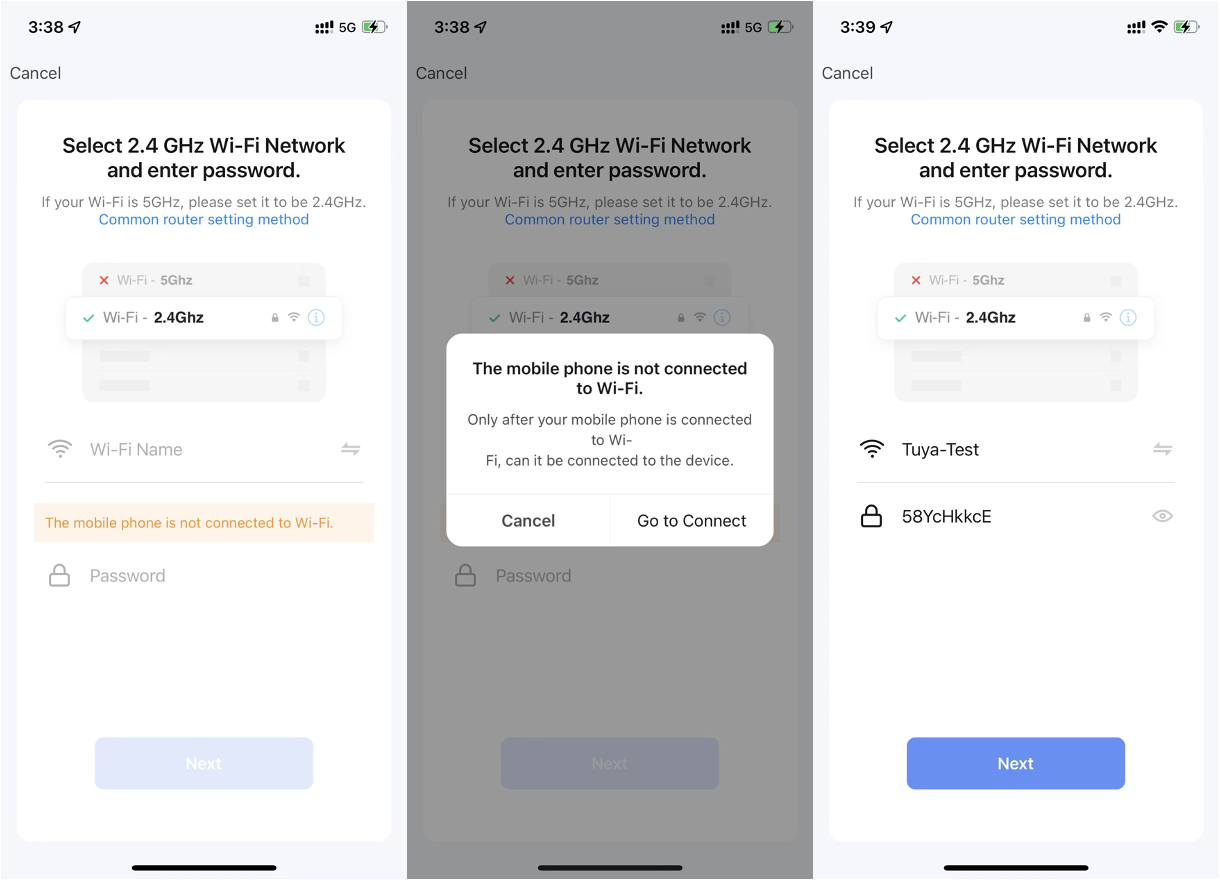
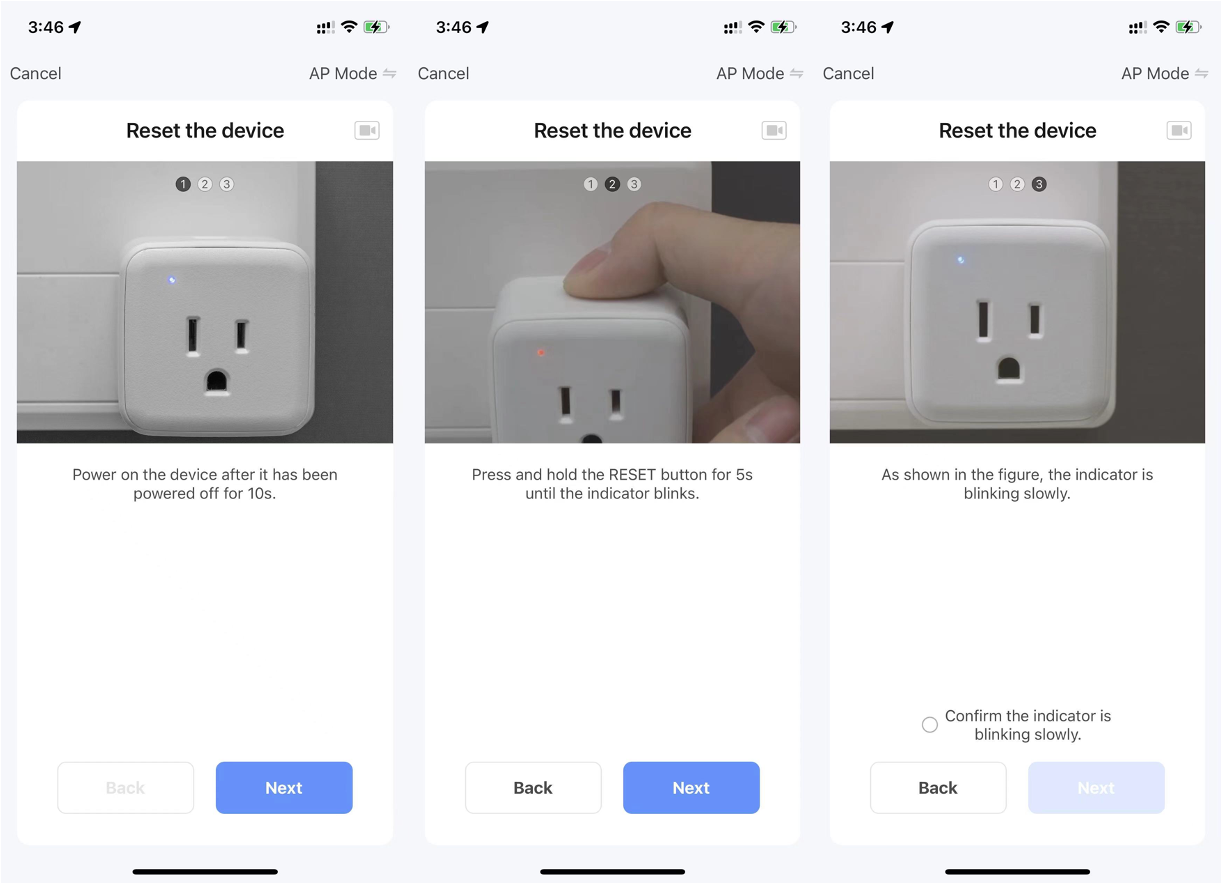
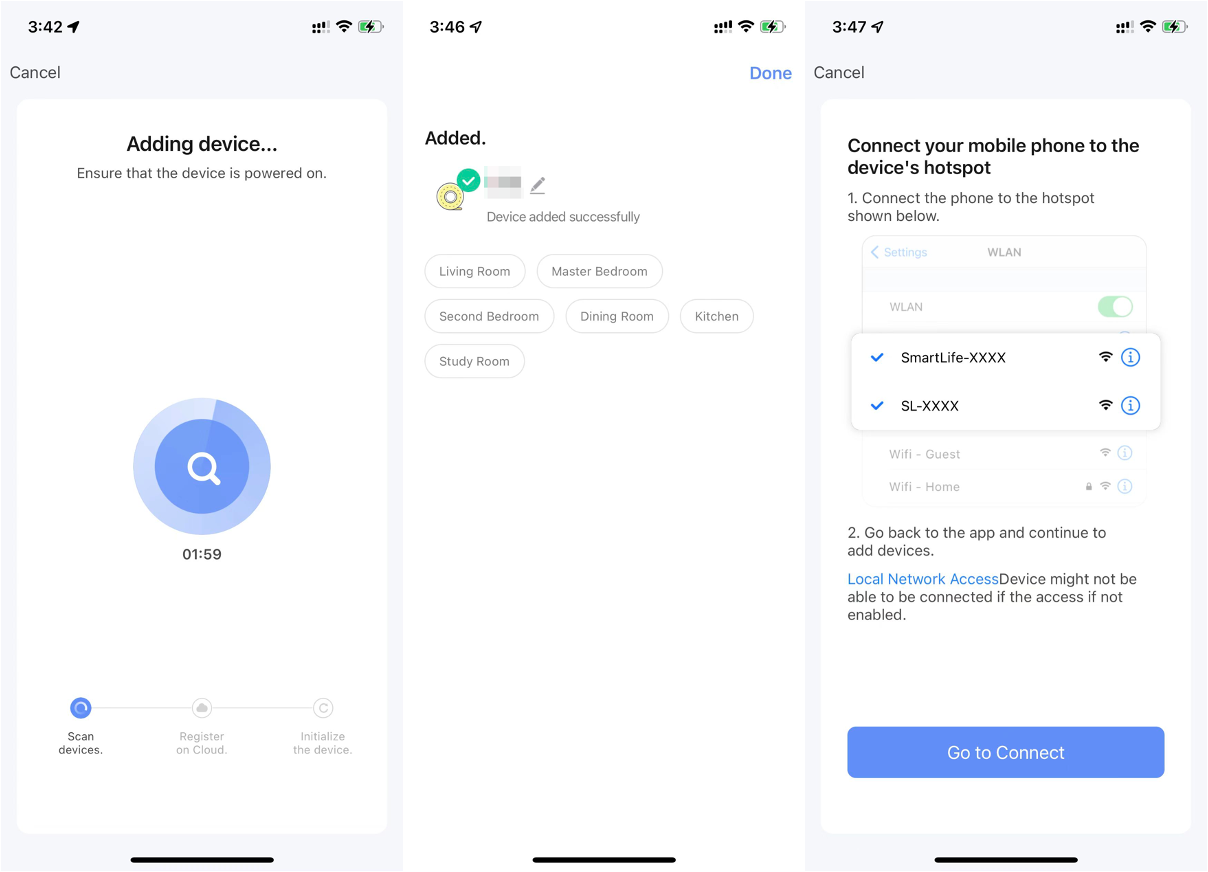
Manually add Wi-Fi devices in AP mode
-
If a dual-band network that supports both 2.4 GHz and 5 GHz bands is used, the AP mode can be used to add devices.
-
In AP mode, follow the instructions to enable the indicator to blink slowly, select Confirm the indicator is blinking slowly, and then tap Next.
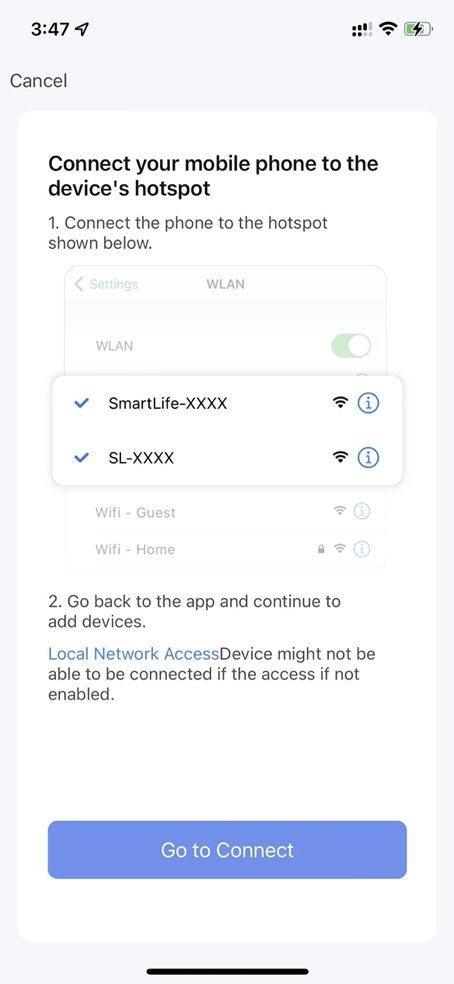
-
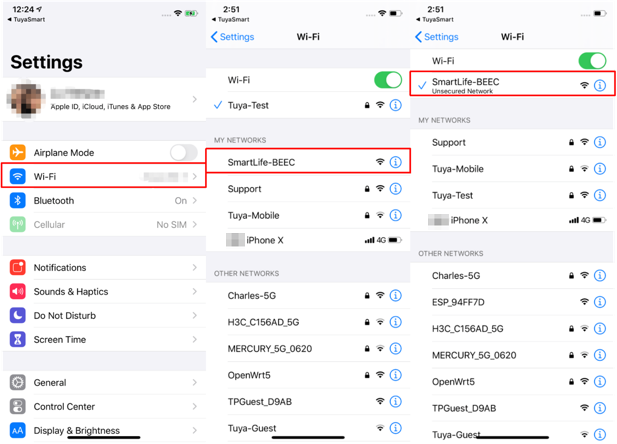
In AP mode, on the Wi-Fi setting page of the mobile phone, find the Wi-Fi hotspot starting with SmartLife.
-
Tap the Wi-Fi hotspot to connect the mobile phone to it.
-
After a successful connection, go back to the app to start pairing. The Wi-Fi hotspots of certain devices might use a custom name. The mobile phone must be connected to a 2.4 GHz Wi-Fi network.
-
The device pairing page on the app appears again and the pairing process continues. After the device is added, the user can customize the device name and specify the room where the device is located. A device name can contain a maximum of 64 characters.
-
If pairing fails, apply the tips in the following third figure from the left to troubleshoot the issues.
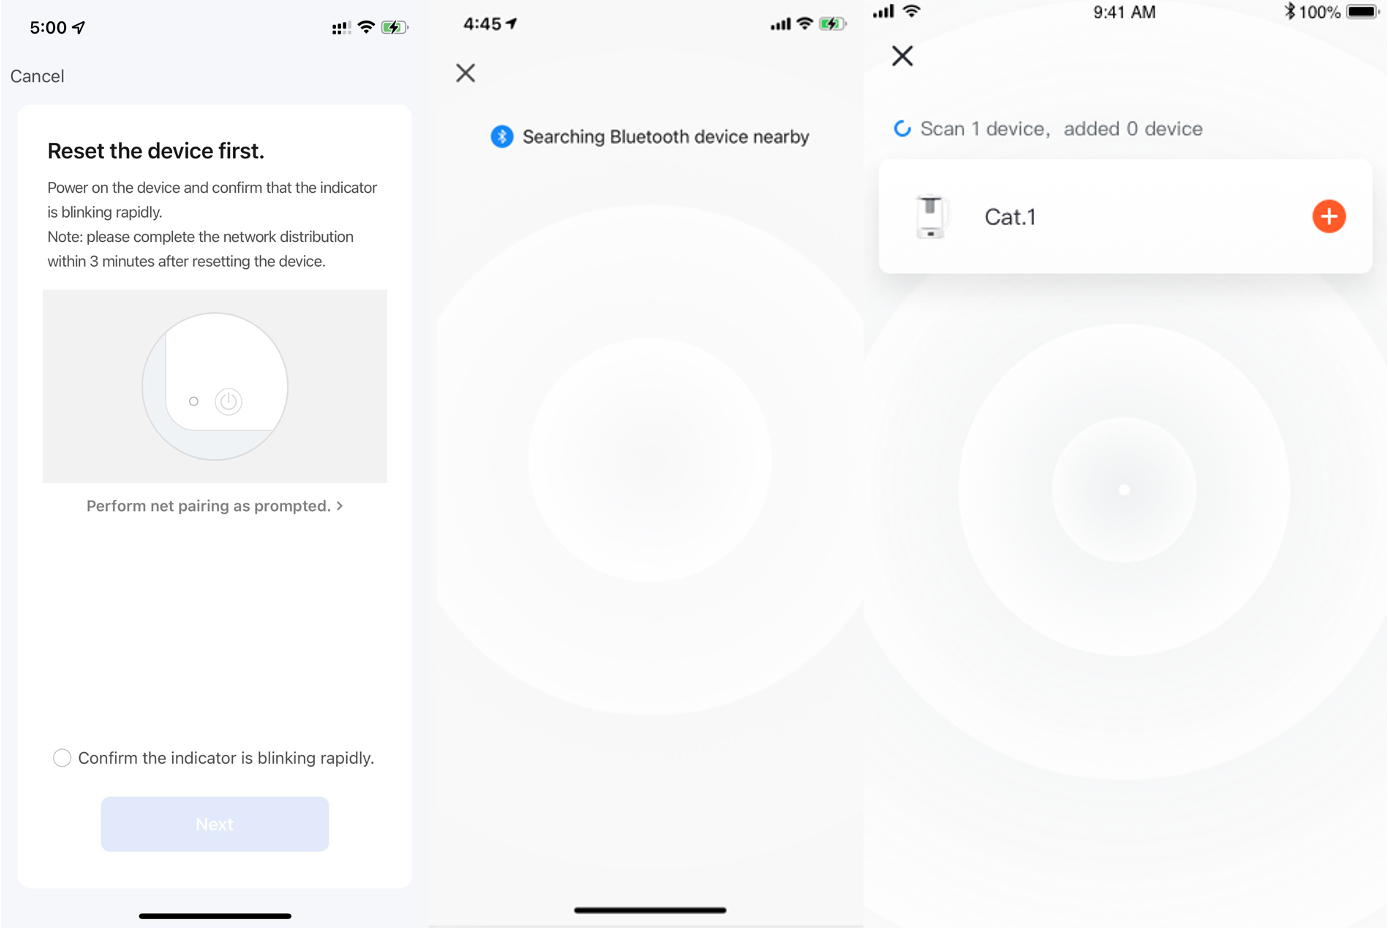
Manually add Bluetooth devices or devices over Wi-Fi and Bluetooth LE combo
-
For Bluetooth devices or devices over Wi-Fi and Bluetooth Low Energy (Bluetooth LE) combo, power on the device first. Then, enable Bluetooth on the mobile phone and open the app. The devices that are ready for pairing will be displayed on the app.
Support for beacon protocols is added to Bluetooth devices. The beacon broadcast solution applies to smart devices that require optimal price performance and moderate security.
Bluetooth devices support the extended firmware OTA mode. Different firmware versions of the same product can be managed separately through different channel numbers. This improves the portability and flexibility of OTA updates for Bluetooth devices.
-
Select the device to be added. On the Wi-Fi setting page, enter the password for connecting to the 2.4 GHz Wi-Fi network. Wait for the device to automatically complete pairing.
-
To skip the Bluetooth feature on the mobile phone, go to the Add Manually tab. Select a device type that supports Wi-Fi pairing. In EZ mode, follow the instructions in the figures to enable the indicator to blink quickly, select Confirm the indicator is blinking quickly, and then tap Next.
-
If the Wi-Fi network is unavailable or Wi-Fi pairing failed, the device that supports Wi-Fi and Bluetooth LE combo can be paired over Bluetooth.
-
Wait for the device to complete pairing. After the device is added, the user can customize the device name and specify the room where the device is used.
-
Compared with ordinary single-mode devices, the devices that support Wi-Fi and Bluetooth LE can be connected to the mobile phone over Bluetooth. Perform the following steps:
-
On the Add Device tab, select a device type that supports Bluetooth pairing. On the page that appears, follow the guide to enable the indicator to blink quickly, select Confirm the light has flashed, and then tap Next.
-
After the app detects the device, tap Add. After the device is added, tap Done.
-
If a dual-band network that supports both 2.4 GHz and 5 GHz bands is used, the AP mode can be used to add devices.
-
To add a device in AP mode, follow the instructions to enable the indicator to blink slowly, select Confirm indicator slowly blink, and then tap Next. Then, follow the instructions on subsequent pages to add the device.
-

Manually add Zigbee devices
-
A gateway must be added before Zigbee devices are added. To add a gateway, tap Add Device on the Home page. On the page that appears, tap Gateway Control in the left-side navigation pane and select a gateway.
-
Power on the gateway and use an Ethernet cable to connect it to a router.
-
Make sure that the mobile phone and the gateway run over the same local area network (LAN). The mobile phone must be connected to a 2.4 GHz Wi-Fi network.
-
After the gateway is added, a Zigbee device that is connected to the gateway can be added.
-
To add a Zigbee device that is connected to the gateway, go to the gateway page and tap Add subdevice. The remaining steps to add the Zigbee device are the same as adding Wi-Fi devices and Bluetooth devices.
-
The latest version of the app supports the automatic discovery of nearby Zigbee devices. This allows the user to add multiple devices to the gateway in bulk.
-
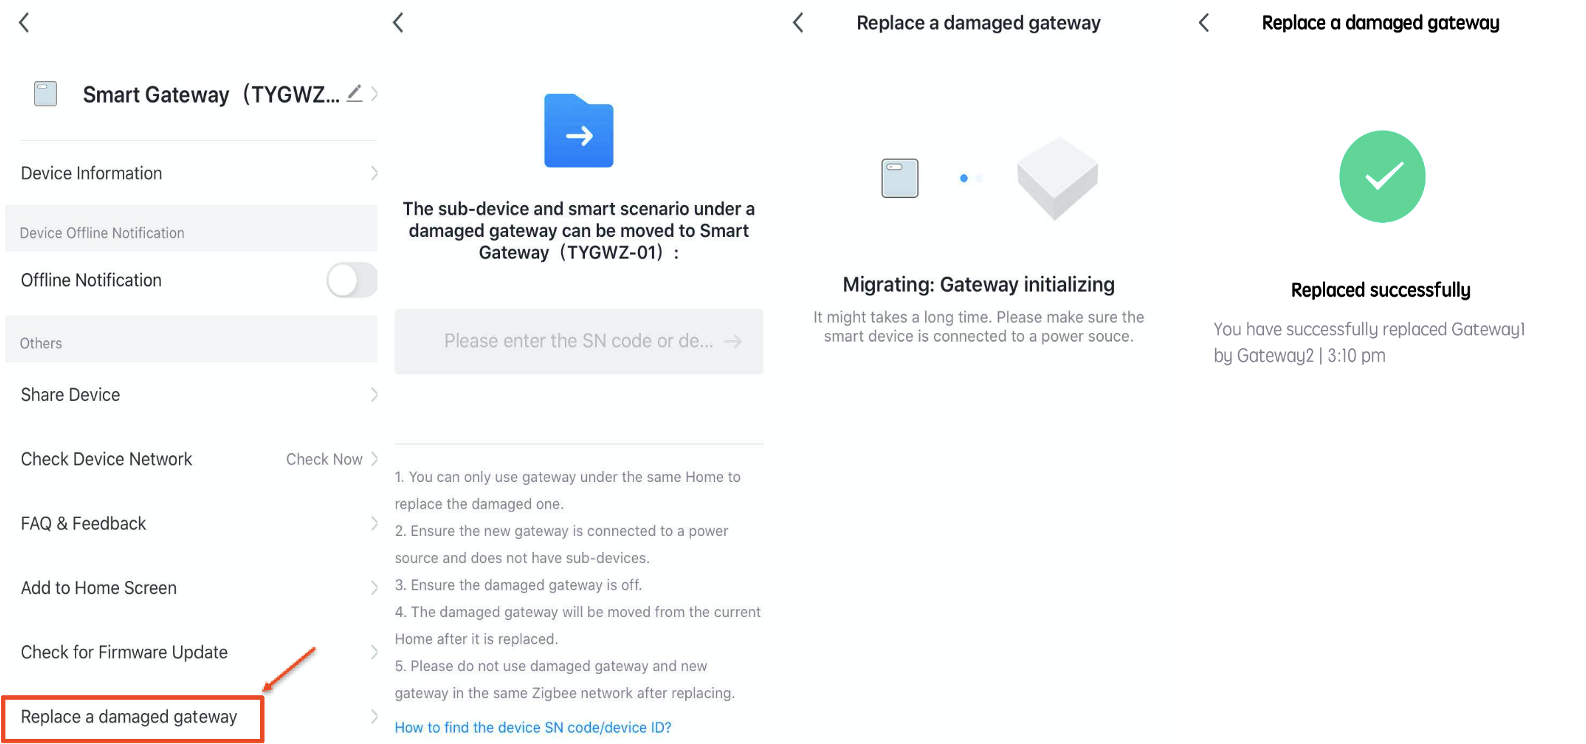
If the gateway has faults, replace it with a new gateway, with all devices and scenes configured for the damaged gateway synchronized to the new gateway. To replace a damaged gateway, tap Replace a damaged gateway on the management page for the faulty gateway. On the page that appears, enter the SN code or device ID of the new gateway.

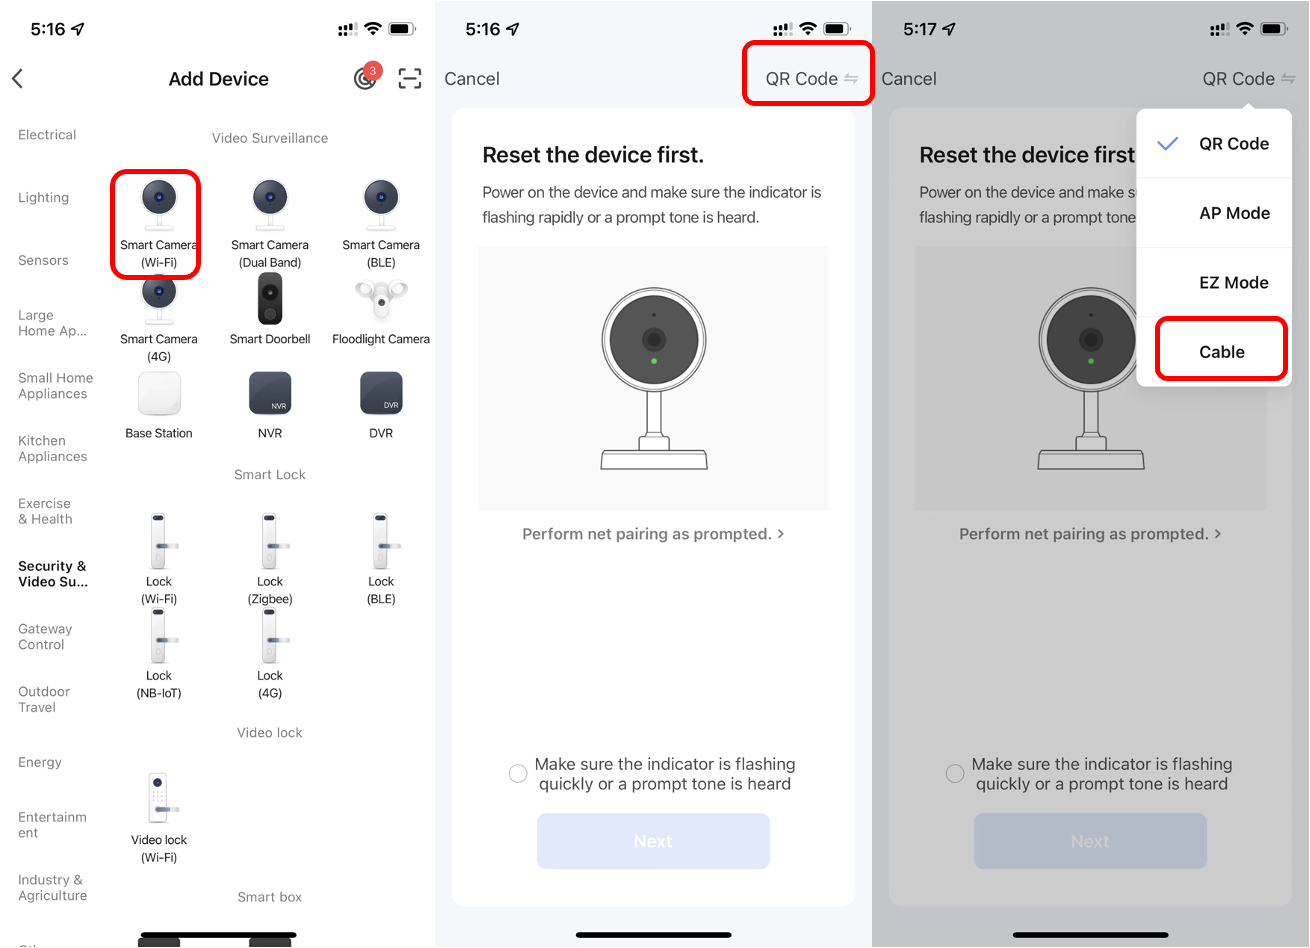
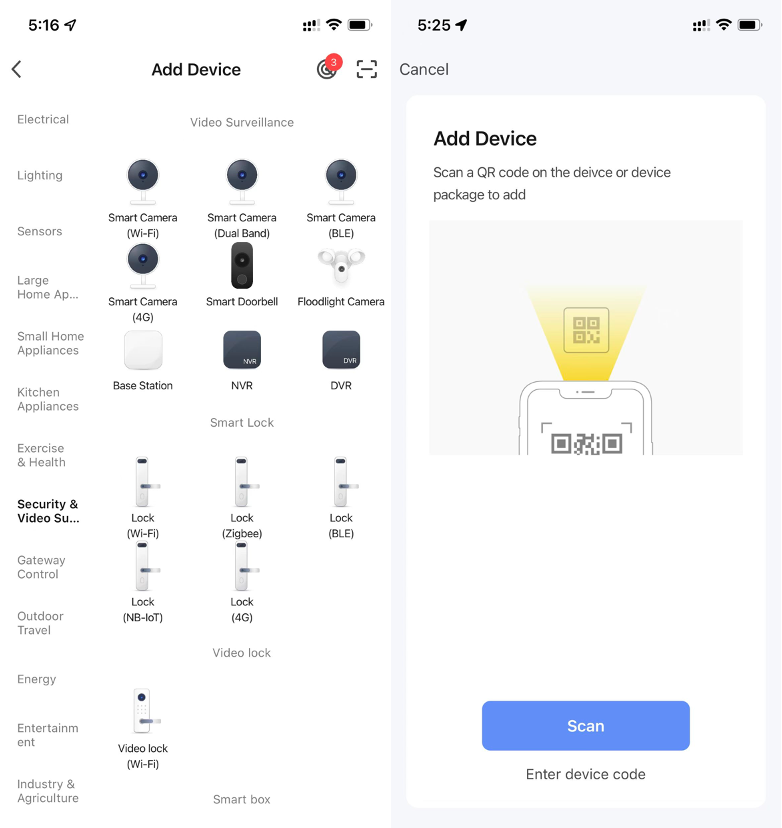
Manually add IPCs in QR code mode
In addition to the EZ mode (default) and the AP mode, certain devices, such as IP cameras (IPCs) and gateways, can also be manually added in QR code mode. To add an IPC to the network by using a QR code, perform the following steps:
-
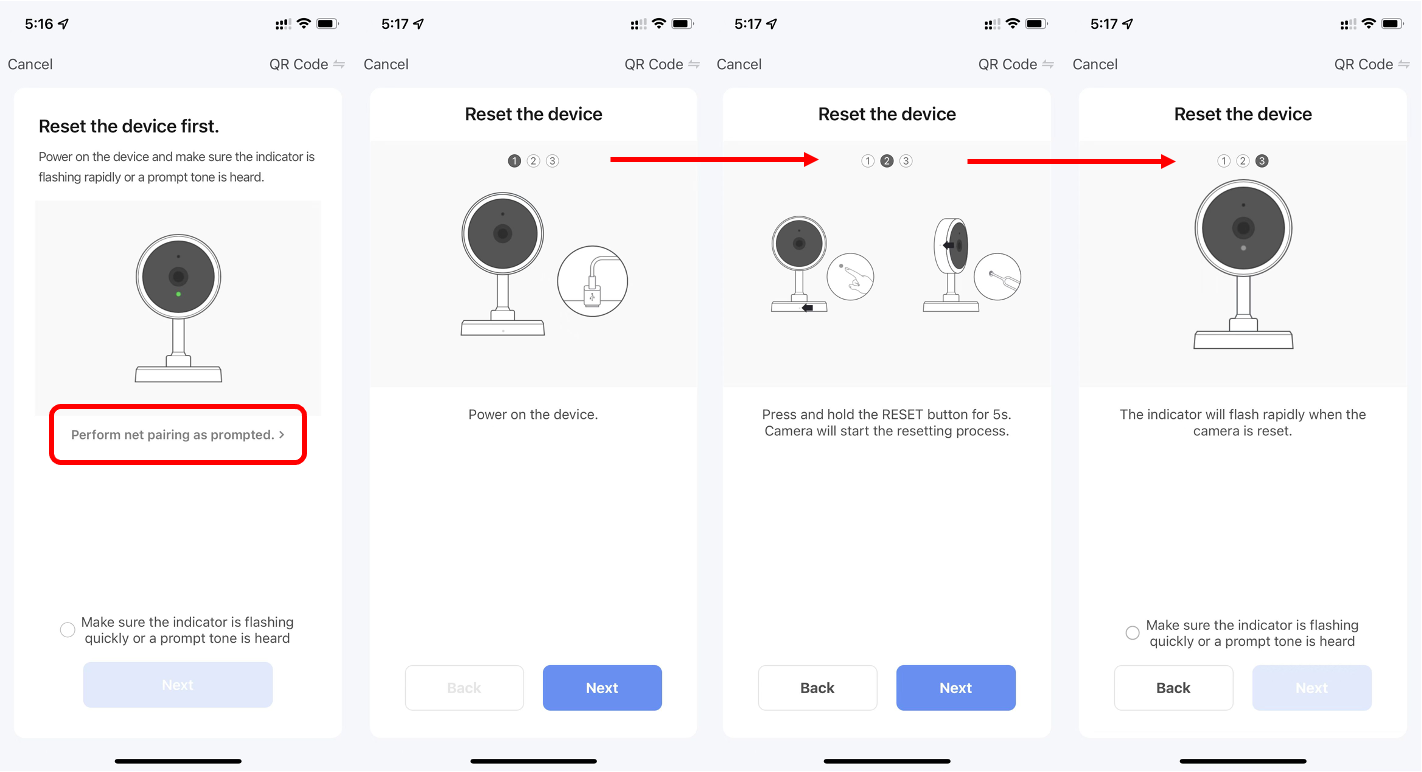
Reset the IPC. For more information about how to reset the IPC, tap the Perform net pairing as prompted button on the page. When the camera is reset, it flashes quickly or emits a prompt tone.
-
After the camera is reset, select Make sure the indicator is flashing quickly or a prompt tone is heard and tap Next on the page.
-
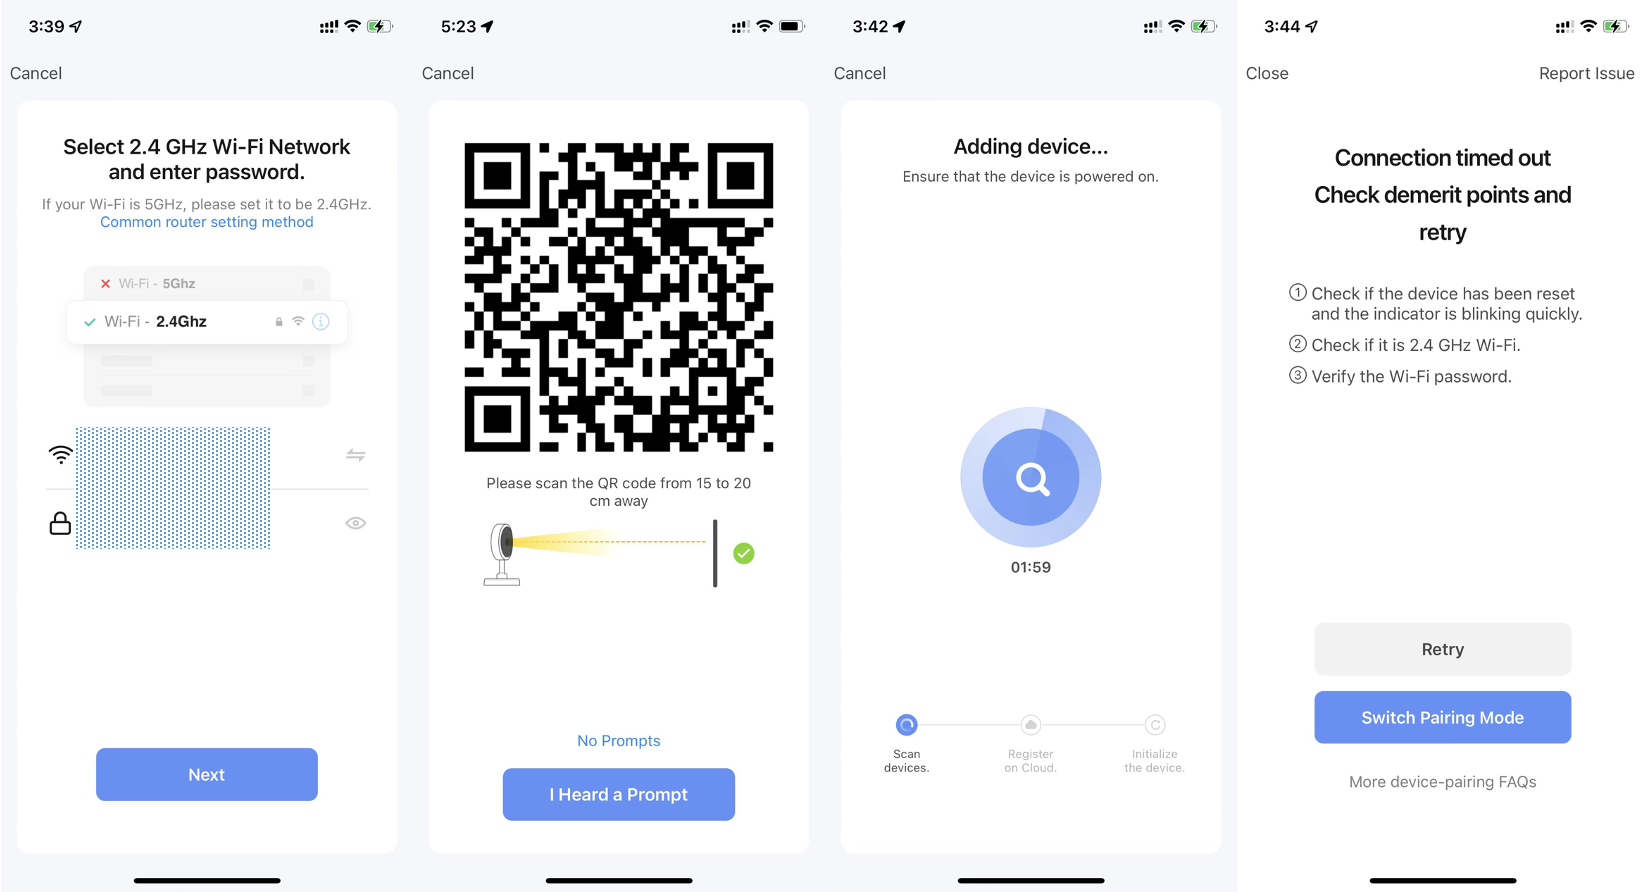
The user will be directed to the page to enter the Wi-Fi password.
-
After the Wi-Fi password is entered, tap Next. Point the QR code on the screen at the IPC within a distance of 15 cm to 20 cm, until the camera emits a prompt tone.
-
Tap I Heard a Prompt. Then, the app initiates the device pairing process.
-
If the device fails to be added, follow the tips to troubleshoot the problem.
Scan QR codes or enter device IDs to add NB-IoT devices
Add an NB-IoT device by scanning the device’s QR code or entering the International Mobile Equipment Identity (IMEI) number on the device label. Grant the app access to the camera on the phone to scan the QR code.
Add devices by scanning QR codes
To add the QR code-based pairing mode, go to Tuya IoT Development Platform > Product > Development > Product Configuration > Network Connections Guides > Custom Mode, select Scan Code, and then click OK. To pair the app with a device that supports QR code-based pairing, use the app to scan the QR code on the device or the outer packaging.

Add devices in Pegasus pairing mode
The Pegasus pairing mode is different from the EZ mode. When the Pegasus pairing mode is enabled, the app automatically scans for nearby devices that support Pegasus pairing and connect them to the network. Wi-Fi information is not required throughout the process, making pairing faster and more reliable.
LTE Cat.1 communication
LTE Cat.1 communication applies to outdoor products and supports QR code and Bluetooth pairing modes. The devices powered by this communication technology support generic features, such as group management, device sharing, OTA updates, scheduled tasks, tap-to-run scenes, and automation scenes.
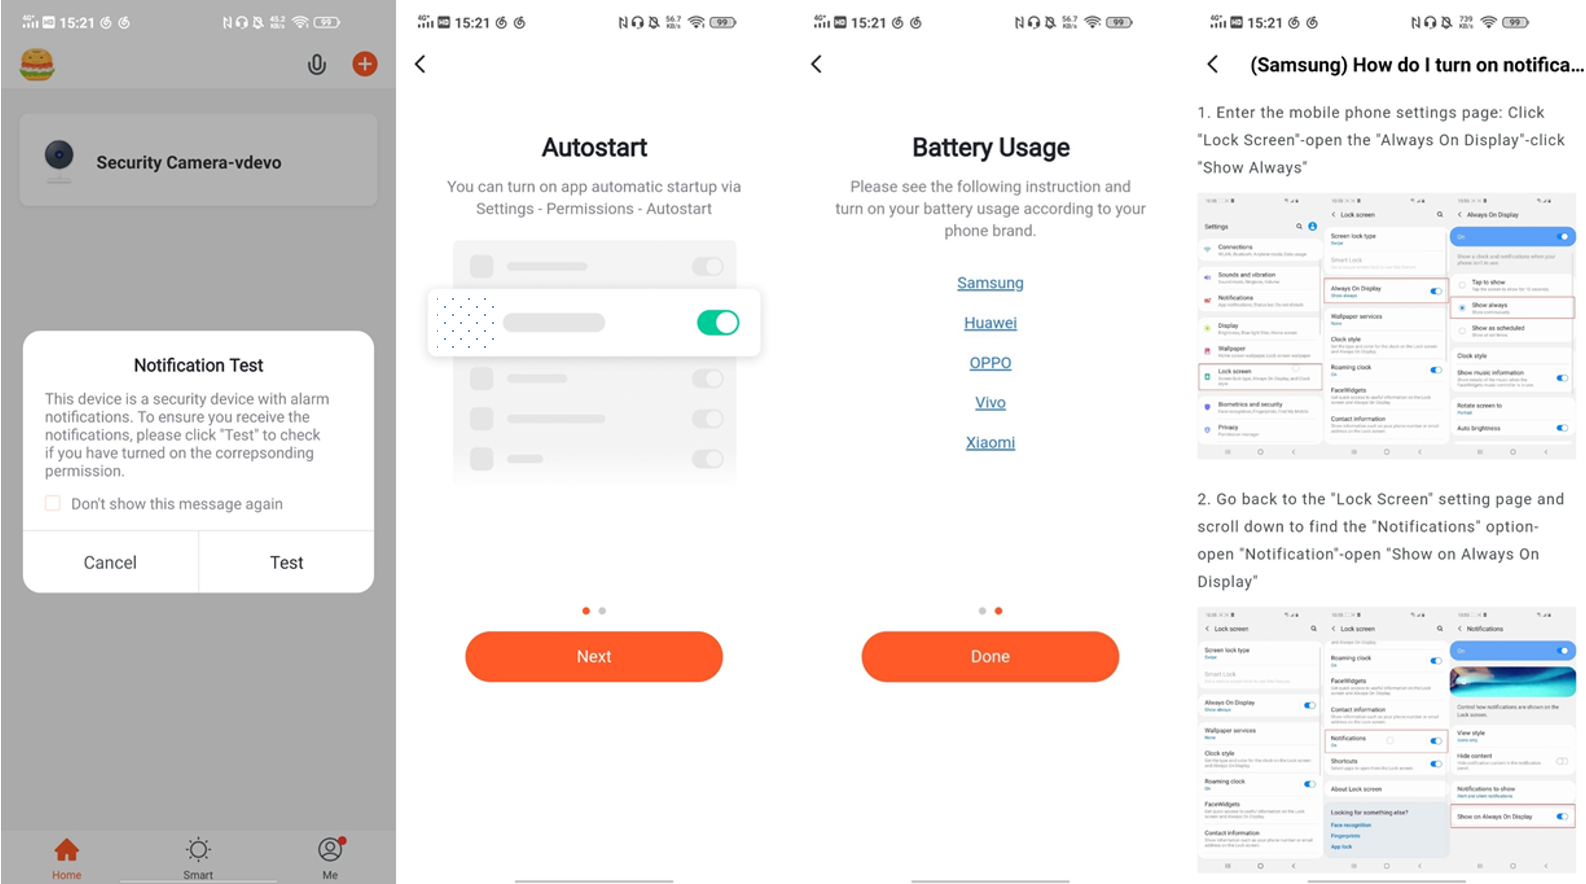
Grant autostart and battery usage permissions to the app
A Notification Test message appears when security devices are added to the app on Android mobile phones. To ensure that notifications can be received, tap Test and follow the tips to make sure the autostart and battery usage detection permissions are granted to the app.
Manage lists of devices and rooms
View devices
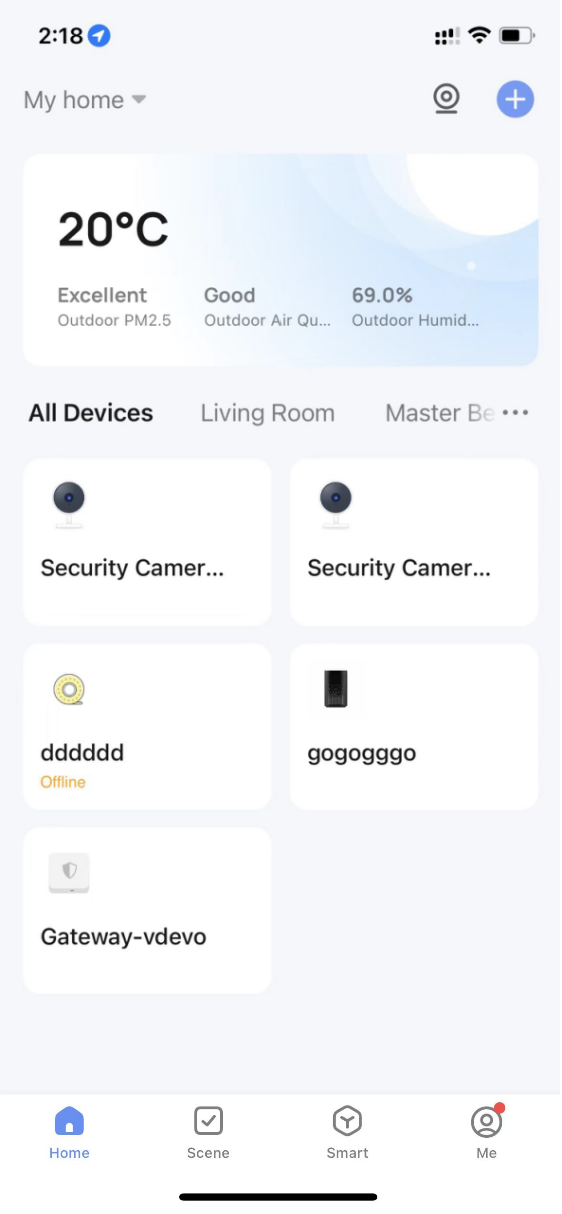
On the Home page, the user can view all devices or view devices by room.
Tap the More icon (…) on the right side of the page. On the menu that appears, view devices in a list view or a grid view.
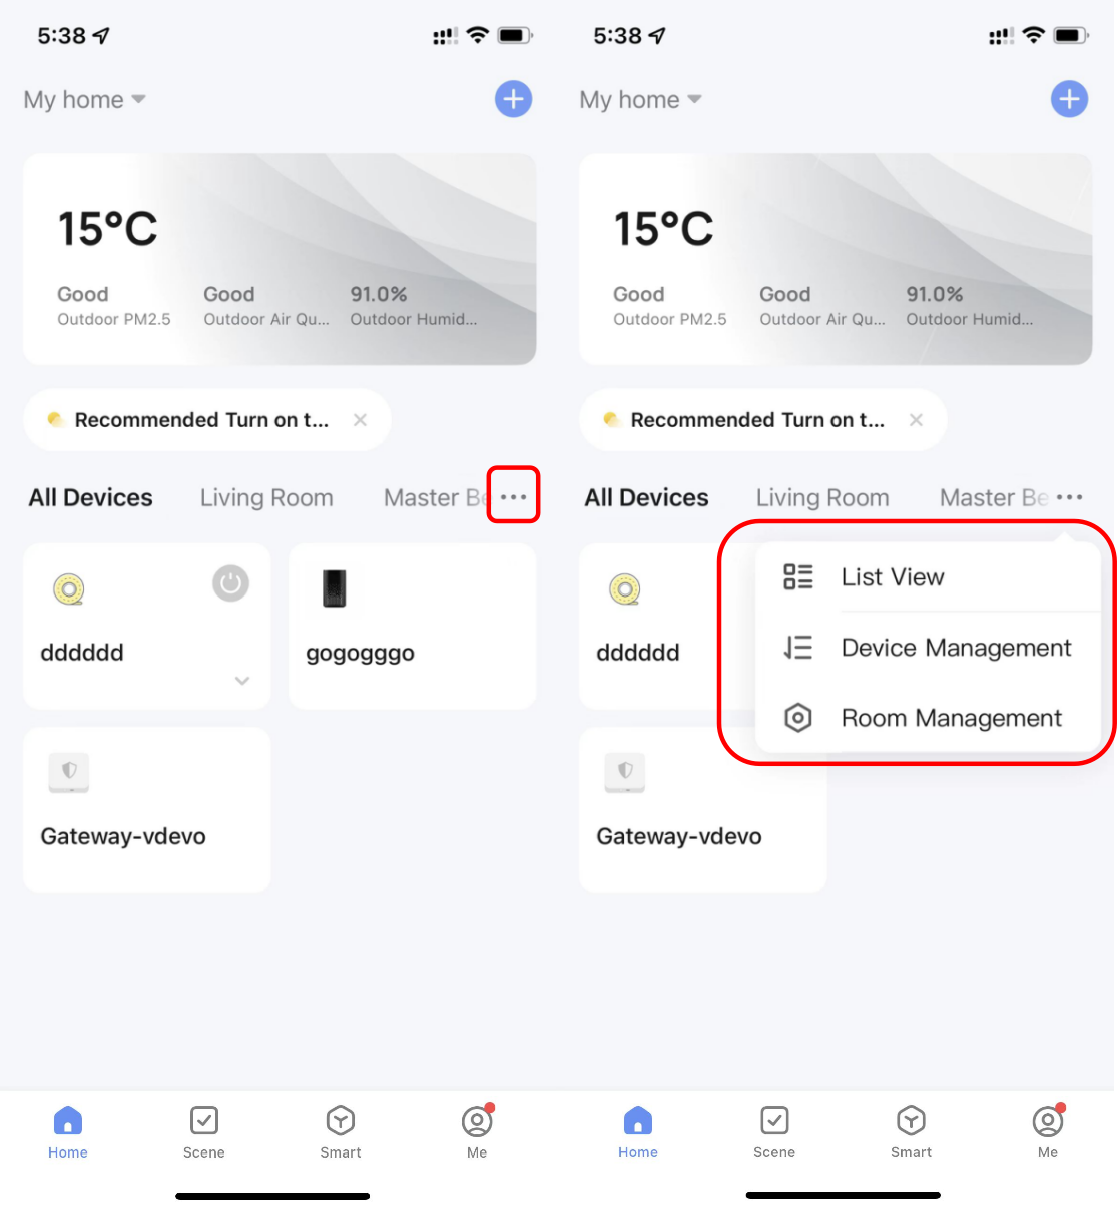
Manage devices and rooms
-
To manage devices, tap the More icon (…) next to the devices on the Home page. Tap Device Management. On the page that appears, a device icon can be dragged to sort the display order of the devices. The user can also press and hold press a device on the Home page to navigate to the page for device management. Multiple devices can be selected and deleted in the same operation.
-
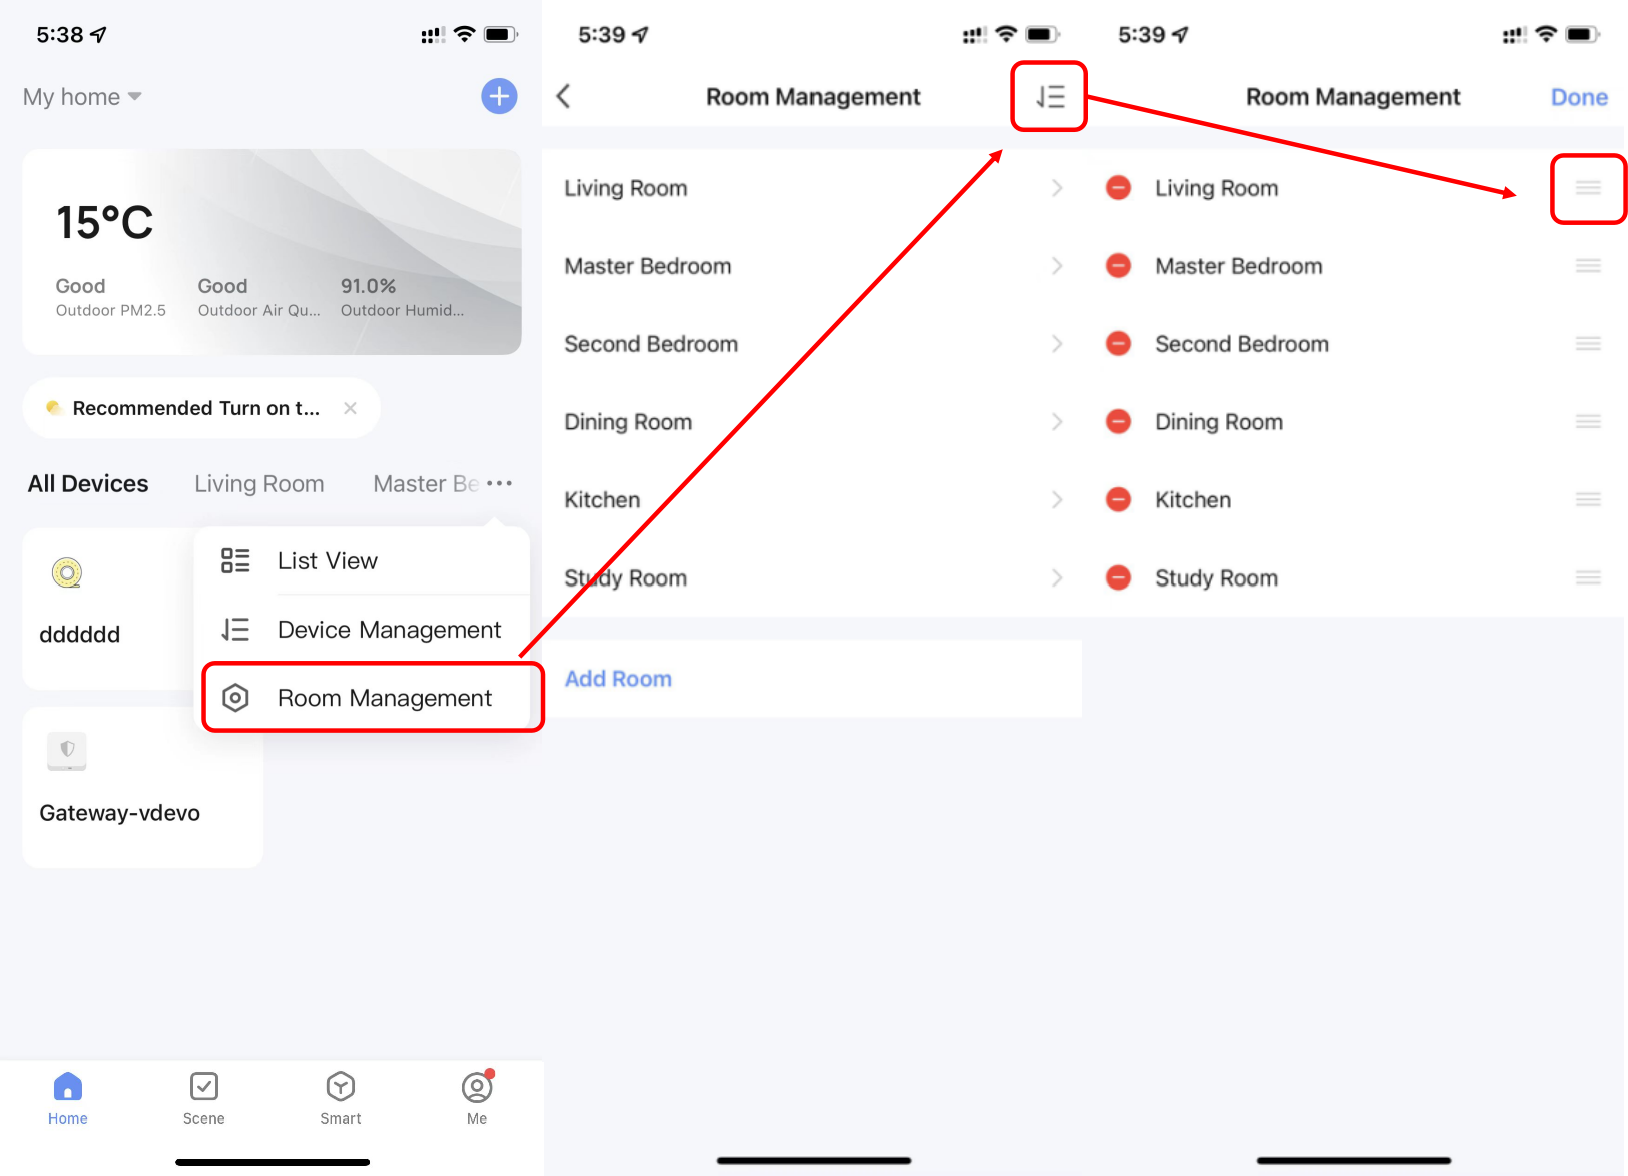
To manage rooms, tap the More icon (…) next to the devices on the Home page. Tap Room Management. On the page that appears, tap the management icon in the top right corner of the page. To sort the display order of a room, drag the hamburger button (≡) on the right side of the room name. To remove a room, tap the minus icon (—) before the room.
-
In the device list, if a device is grayed out, the device is offline. Otherwise, the device is online.

Quickly use common features
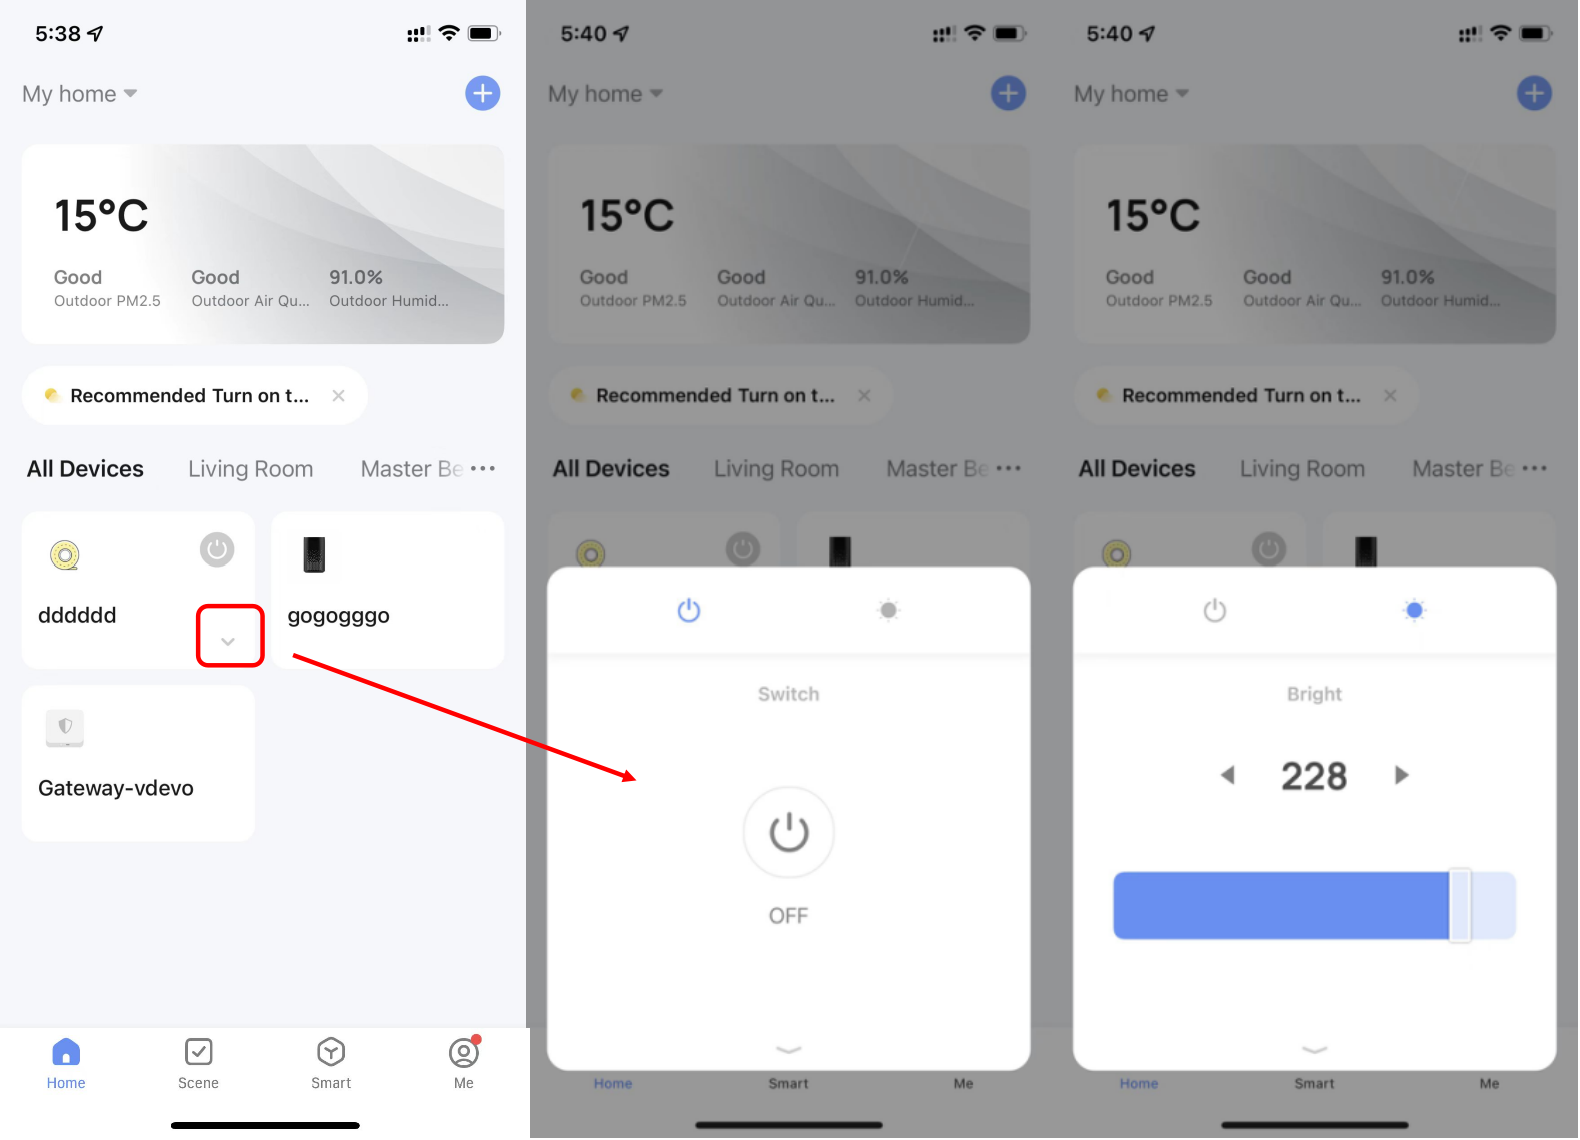
-
When the devices are displayed in a grid view, tap the small arrow in the bottom right corner of a device to access the extension functions of the device. For example, tap the switch icon to switch on or off strip lights or drag the slider to adjust the brightness.
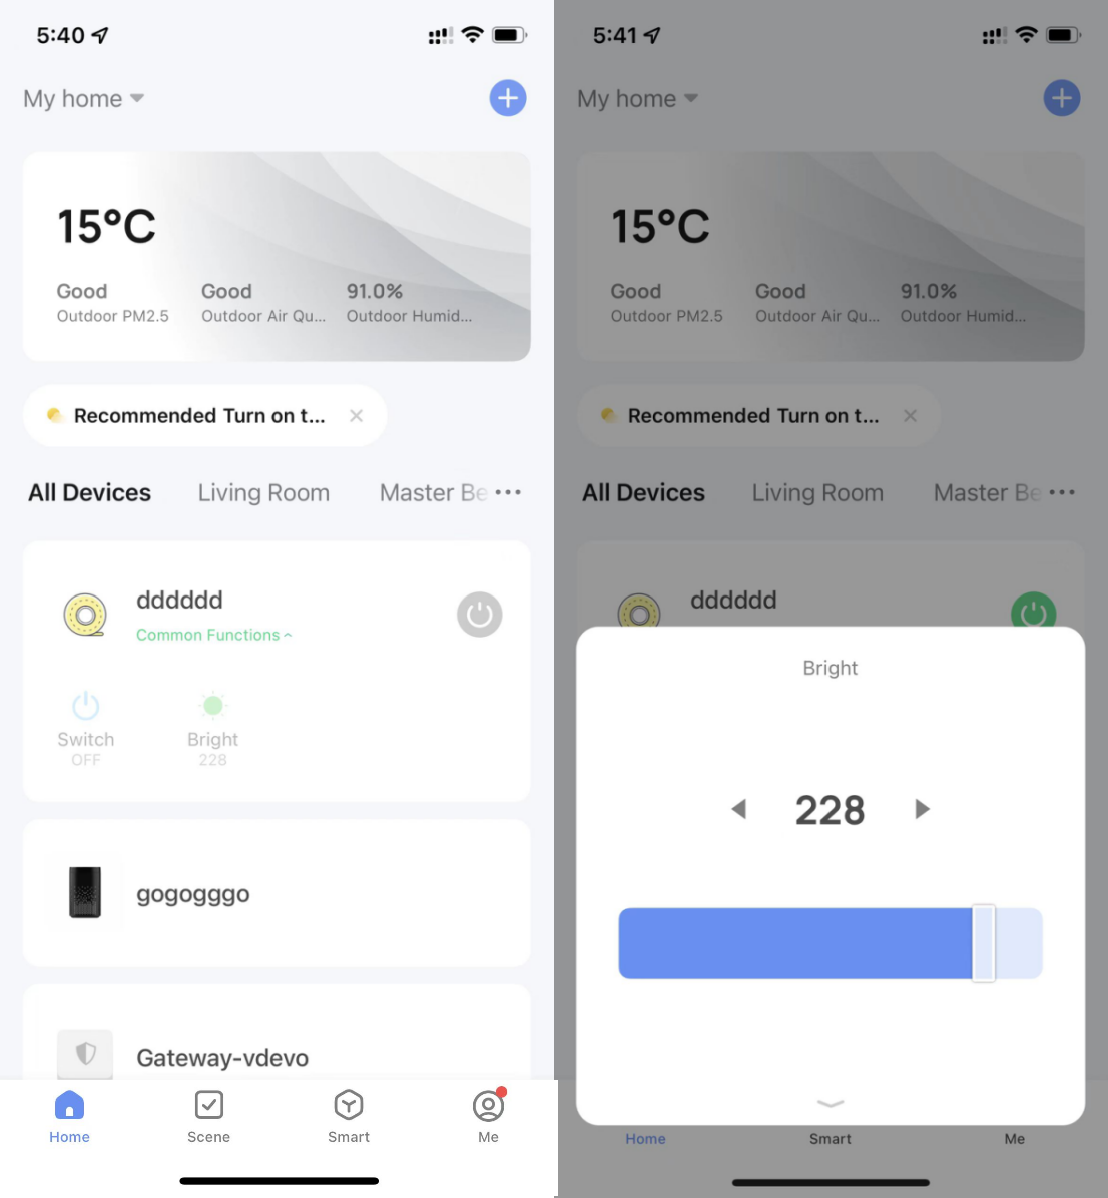
-
When the devices are displayed in a list view, tap Common Functions under the device name to quickly control the device. In this case, certain common functions are also available in the dialog box of extension functions.
-
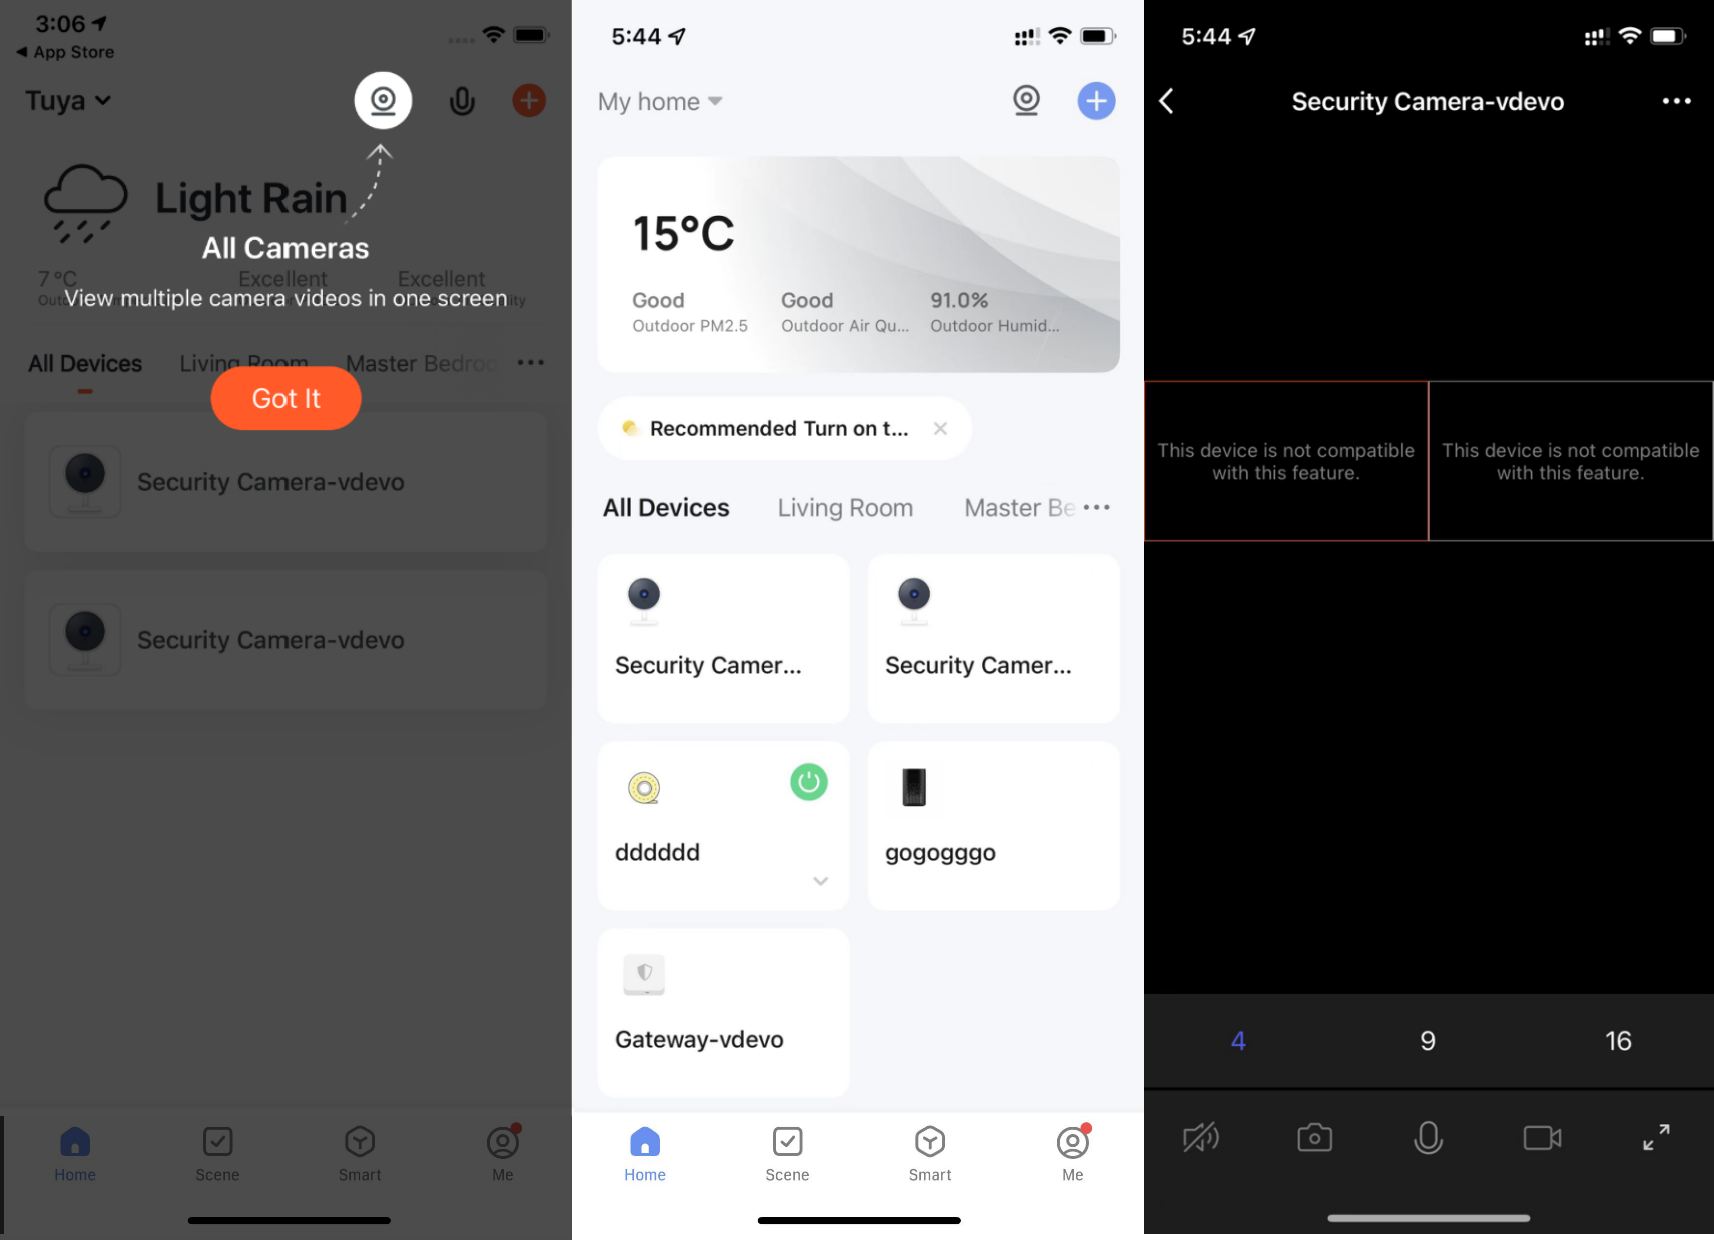
After more than two smart cameras are added, tap the camera icon in the top right corner of the Home page to view multiple camera videos.
-
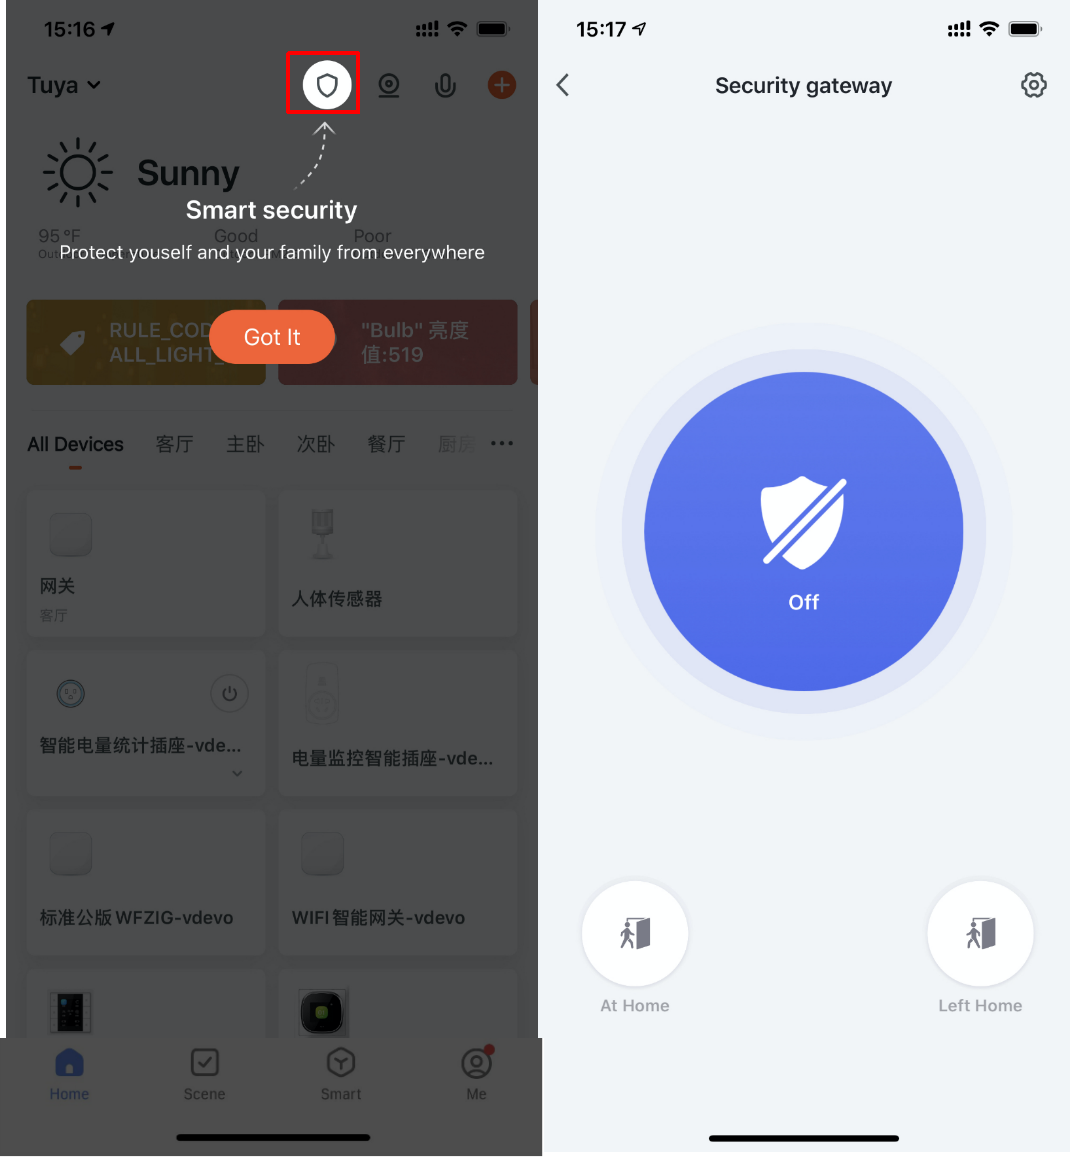
After at least one security gateway is added, tap the shield icon in the top right corner of the Home page to activate the security gateway. The current app version supports the basic arming and disarming features.
-
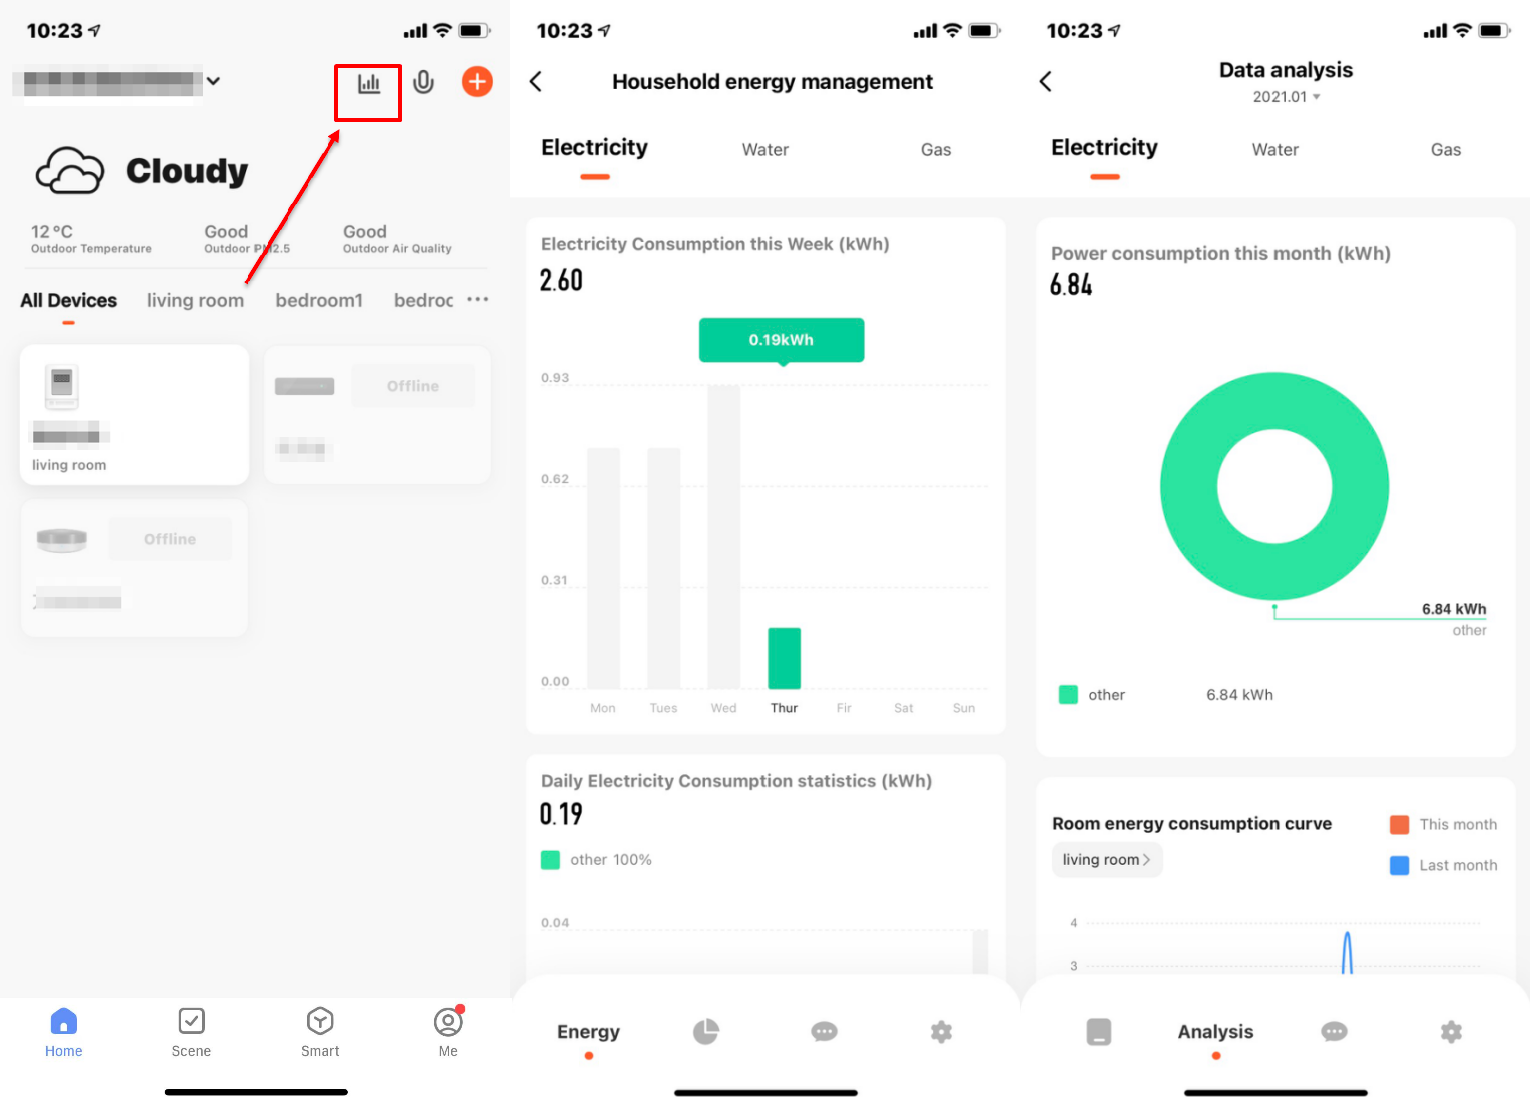
After at least one device that can meter energy consumption is added, tap the chart icon in the top right corner of the Home page to view energy usage information of the devices.
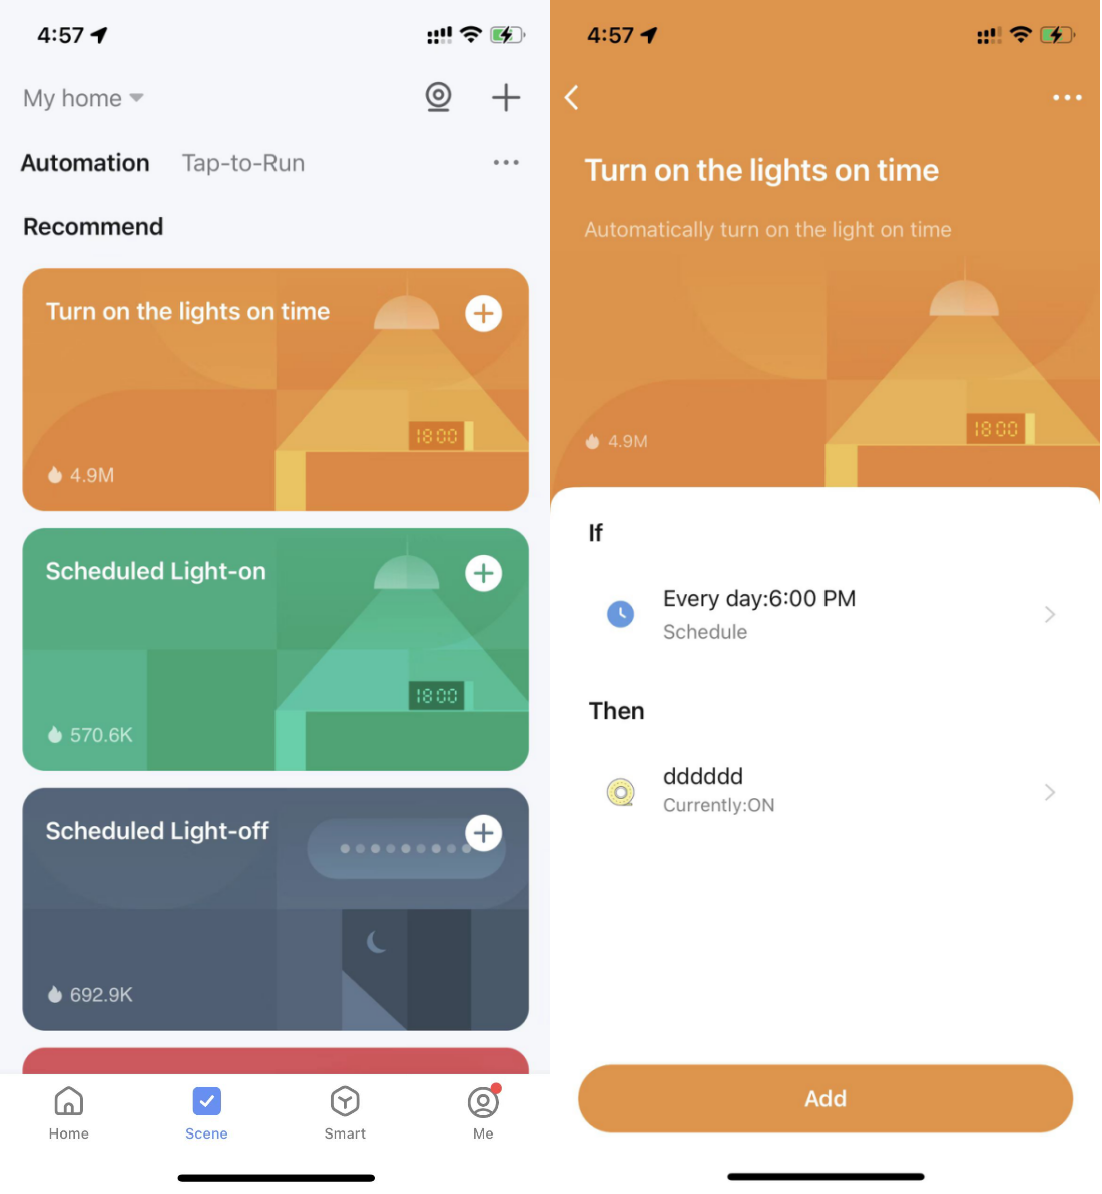
Recommend scenes for new devices
After new devices are paired, the system automatically recommends the matching scenes. The user can check and select the recommended scenes as preferred and quickly get started with smart life.

Control devices
Use control panels
-
After a smart device is added, a device tile that contains the device icon appears in the device section on the Home page. Tap the device tile to enter the control panel of the smart device. The control panel might vary from device to device.
-
If the device gets offline, the Offline state is shown in the device tile. In this case, the device cannot be controlled on the control panel.
-
Features available on the control panel also depend on the device status. For example, only the countdown and scheduling features are available when a light is turned off. Features such as scene setting, color adjustment, and brightness adjustment are also available when the light is turned on. Tap the edit icon in the top right corner of the control panel to manage the device.
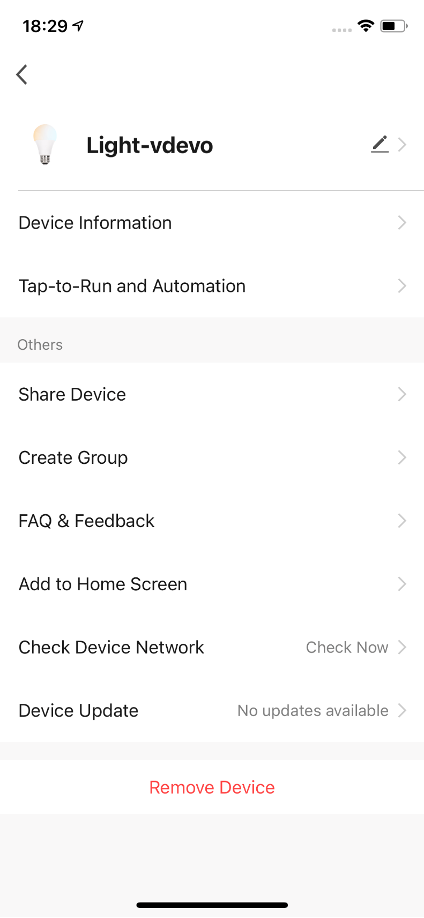
Manage devices
-
On the device management page, the device settings and information can be managed: To change the device icon, device name, and location information, tap the edit icon next to the device icon.
-
To view the device ID, IP address, MAC address, time zone, and online/offline status, tap Device Information.
-
To enable or disable the automation feature or modify the automation settings, tap Tap-to-Run and Automation.
-
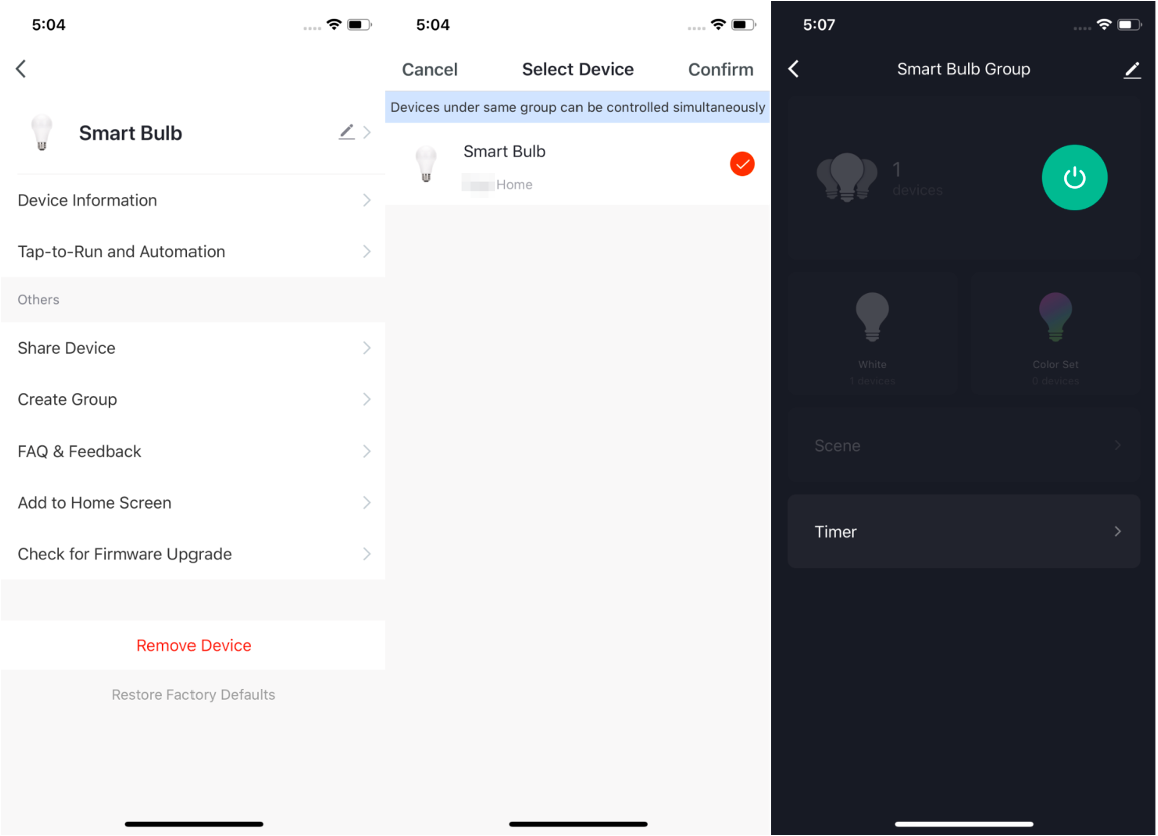
To share the device with a home member, tap Share Device. On the page that appears, enter the email address or mobile phone number that is bound with the app account of a home member.
-
To create a device group for easy group control, tap Create Group. On the page that appears, all devices that have the same model as the current device under the current account are displayed. The devices to be added to the group must have the same firmware version.
-
To view FAQs related to the device or send feedback, tap FAQ & Feedback.
-
To add a shortcut of the device control panel to the home screen of the mobile phone, tap Add to Home Screen. Then, the user can tap this shortcut to enter the control panel of the device.
-
To check the device connection status, tap Check Device Network.
-
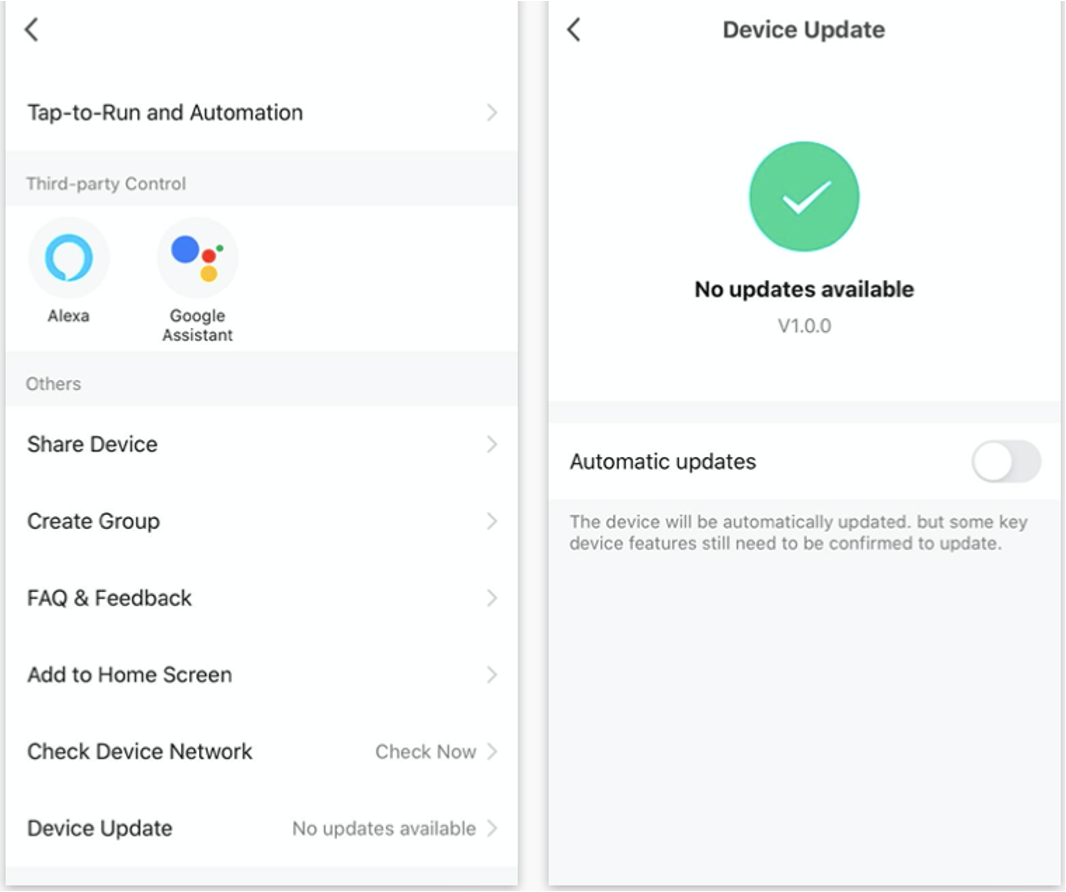
To check whether any firmware updates are available, tap Device Update.
-
To remove the device, tap Remove Device. Two options appear: Disconnect and Disconnect and wipe data. If Disconnect is tapped, the device is removed from the device list and automation scenes and tap-to-run scenes that are related to the device become unavailable.
-
If Disconnect and wipe data is tapped, the device is removed from the device list and all data related to the device is erased.
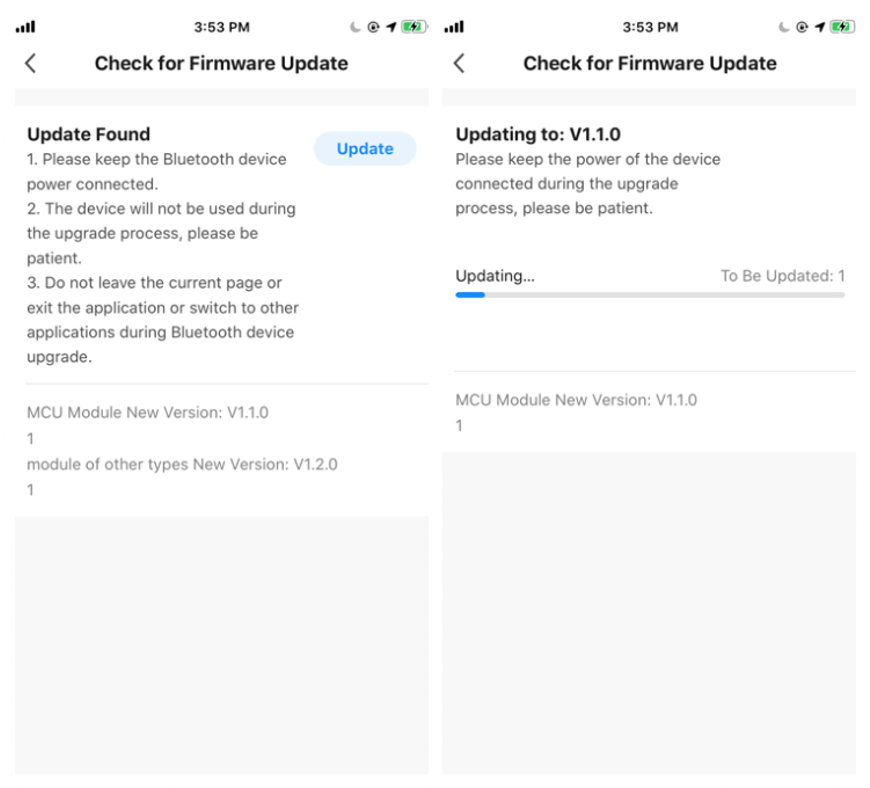
Automatically update firmware
-
Tap Device Update on the device management page.
-
Enable Automatic updates.
-
Then, the device will be automatically updated when it remains idle or when no operations are performed on the device.
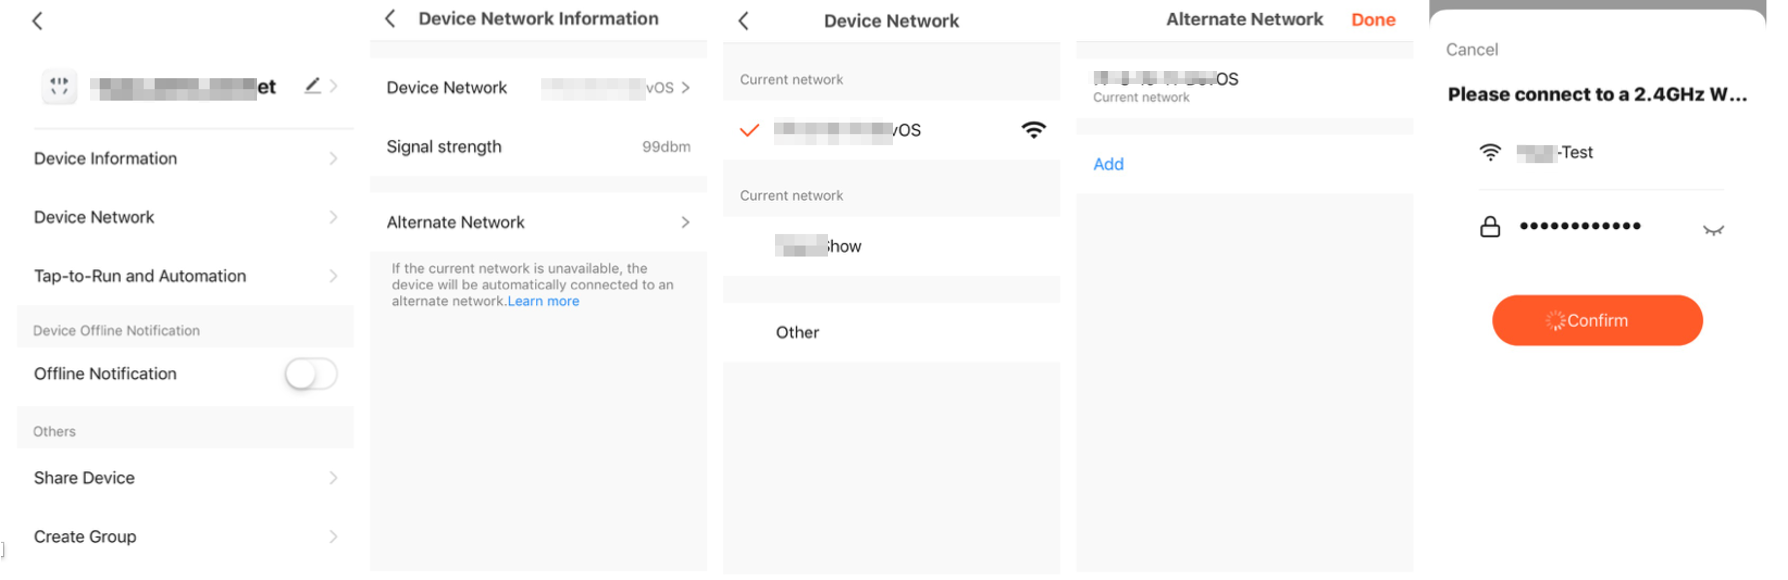
Change networks
-
Tap Device Network on the device management page. On the Device Network Information page, tap Alternate Network.
-
Select the alternate network to be used, enter the Wi-Fi password, and tap Confirm.
-
If the current network is unavailable, the device will be automatically connected to the alternate network.
This feature only applies to Wi-Fi devices. The firmware must be updated to the latest version before this option is available on the device management page. The firmware is being developed and will be supported in the near future.

Review devices
The control panel of a specific device supports device reviews. Comments and suggestions on the device can be submitted to improve the device. This feature only applies to certain product categories, such as air purifiers.

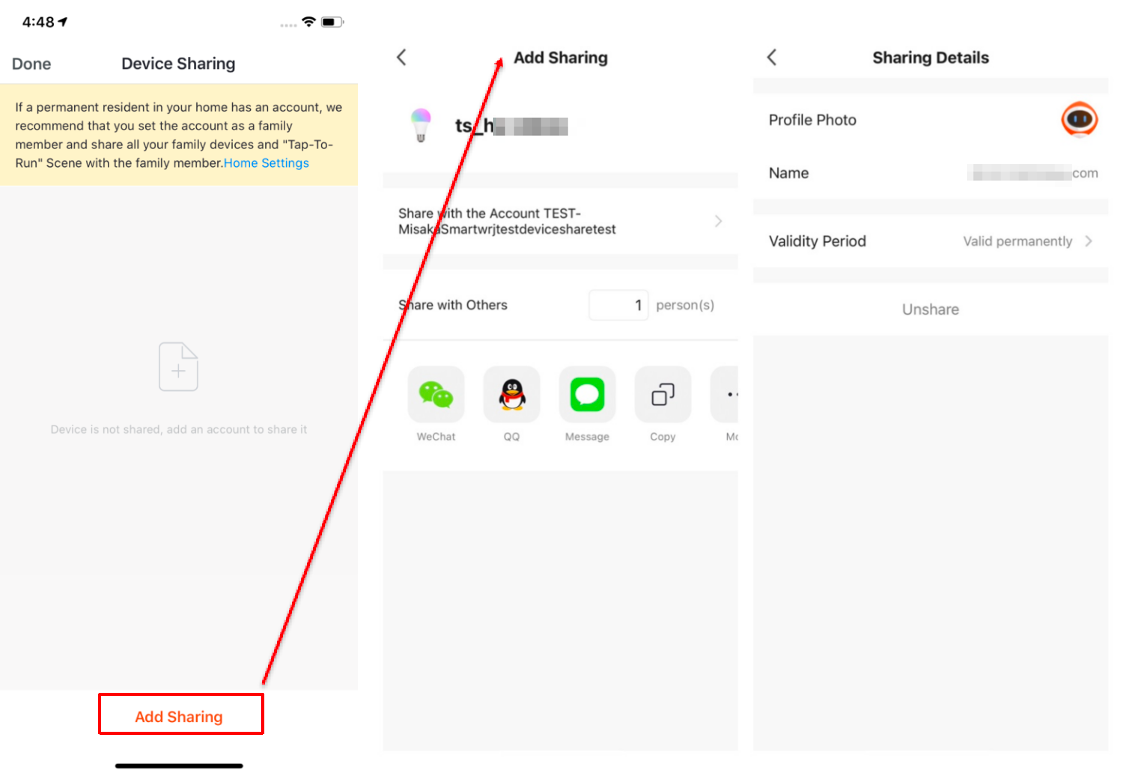
Share devices
-
Tap Share Device on the device management page to enter the Device Sharing page.
-
Tap Add Sharing. On the page that appears, enter the account with which the devices will be shared, and tap Done. Devices can be shared through multiple channels, such as LINE, WhatsApp, or WeChat, shared only once or multiple times, or shared within a period of validity or permanently. This enables device sharing for various categories in different scenarios.
-
NB-IoT devices can be shared to extend the device usage scope.
-
To stop sharing devices with an account, perform the following steps to delete the account: On Android, press and hold the account name and tap Delete. On iOS, press and hold the account name, swipe left, and then tap Delete.
Control groups
-
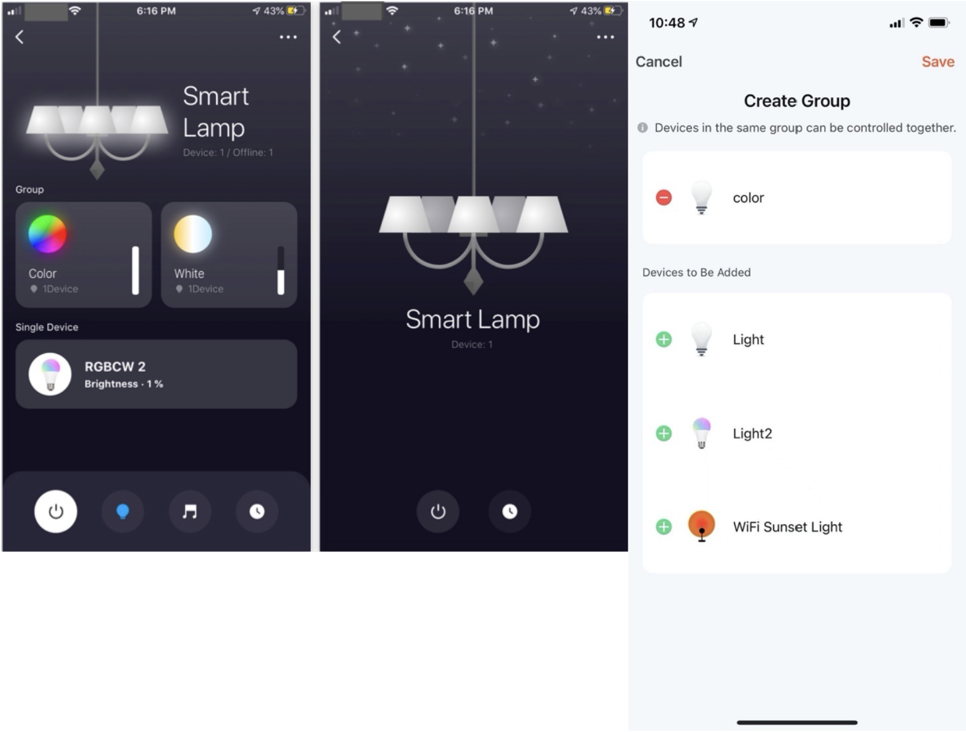
Tap Create Group on the management page of a selected device.
-
On the Select Device page, select devices to be added to the control group and tap Save. Enter a group name, and tap Confirm. The Select Device page shows all devices of the same model as the selected device.
-
After the group is created, the app automatically displays the group control panel, where the devices can be controlled in groups.
-
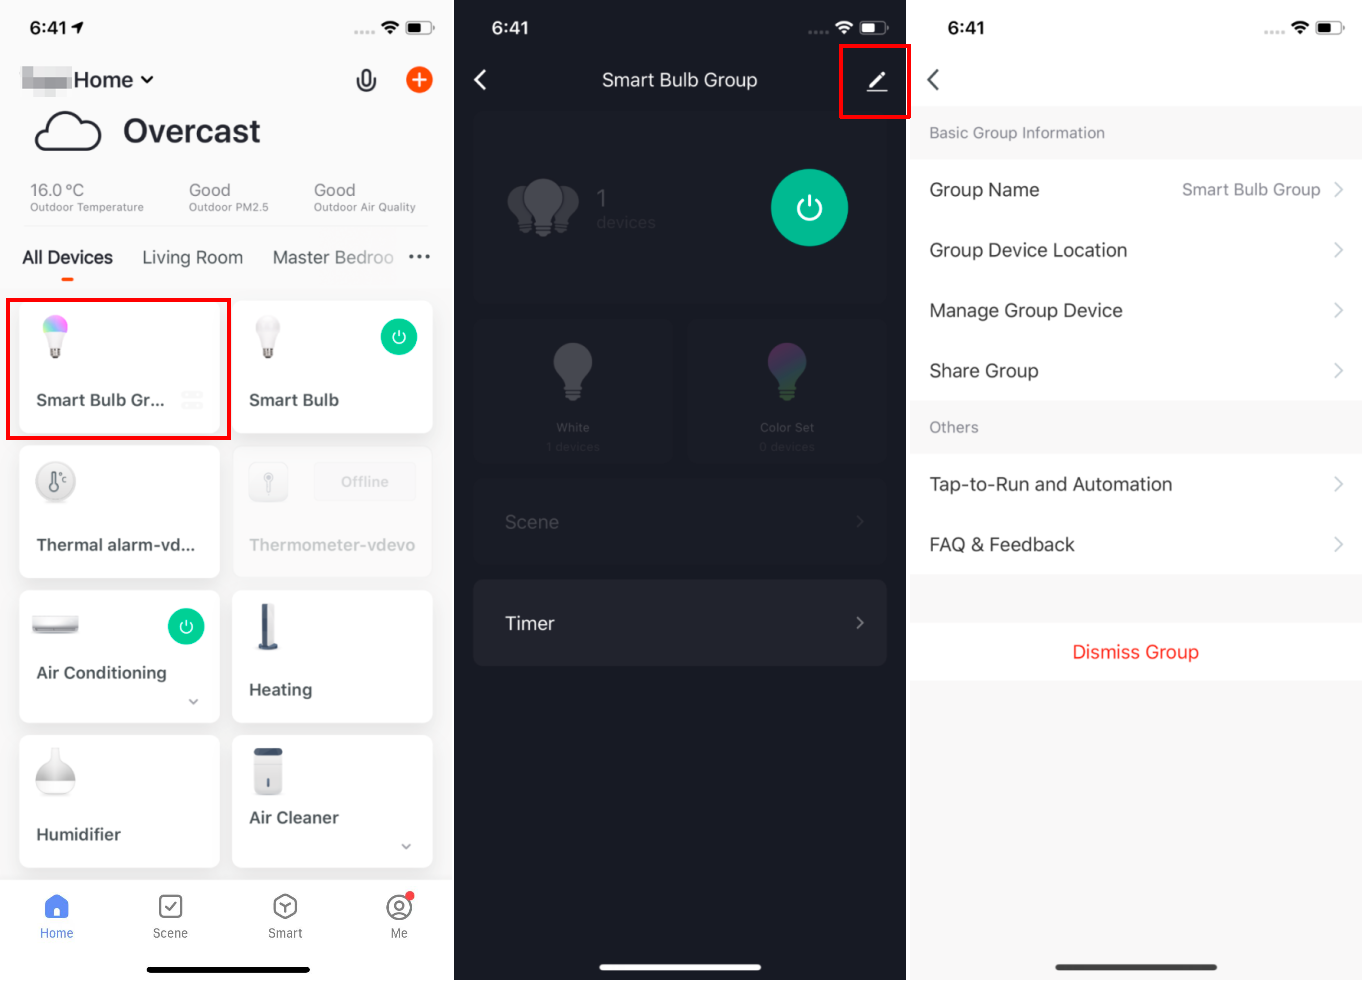
On the Home page, the created group can be viewed and the devices in the group can be controlled.
-
On the group control page, tap the edit icon in the top right corner of the page to manage the group, or tap Dismiss Group to dismiss the group.
-
Standard groups of Bluetooth mesh devices are supported to achieve centralized control of Bluetooth mesh groups.
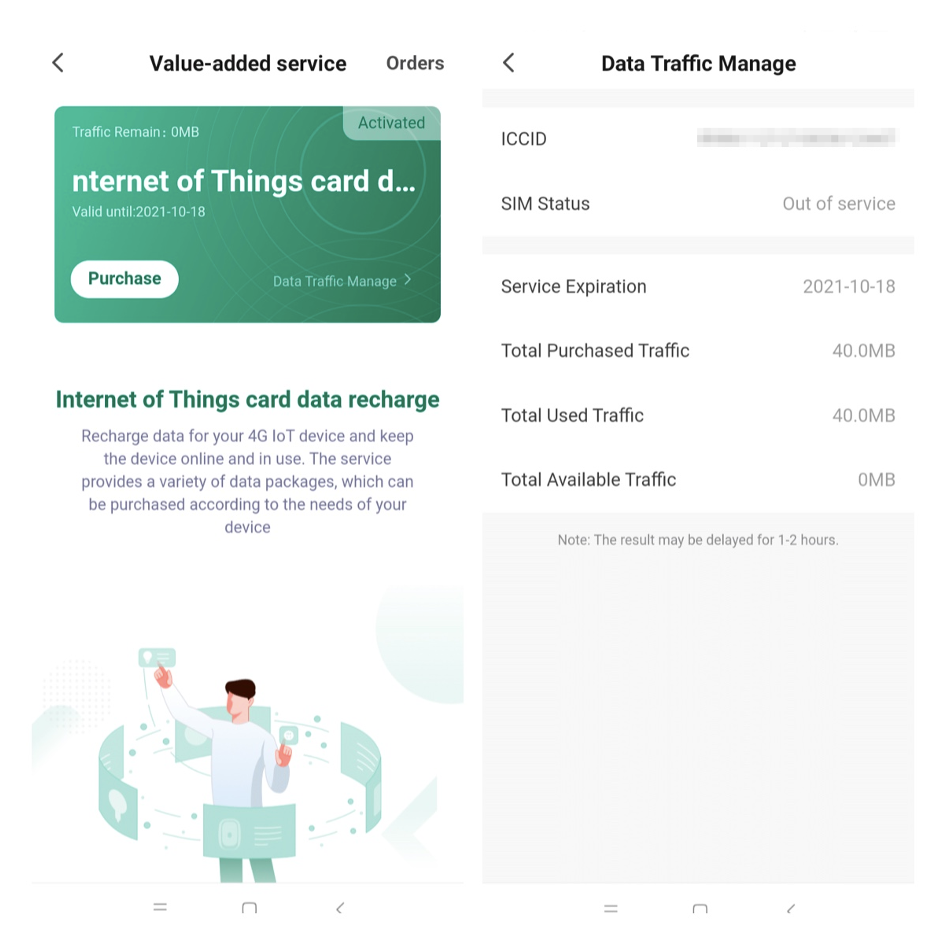
Manage data traffic
For NB-IoT, LET Cat.1, 4G cameras, and other types of devices with built-in SIM cards, the value-added service Data Traffic Manage is available. This feature allows users to purchase, query, and calculate data traffic.
Manage automation and tap-to-run scenes
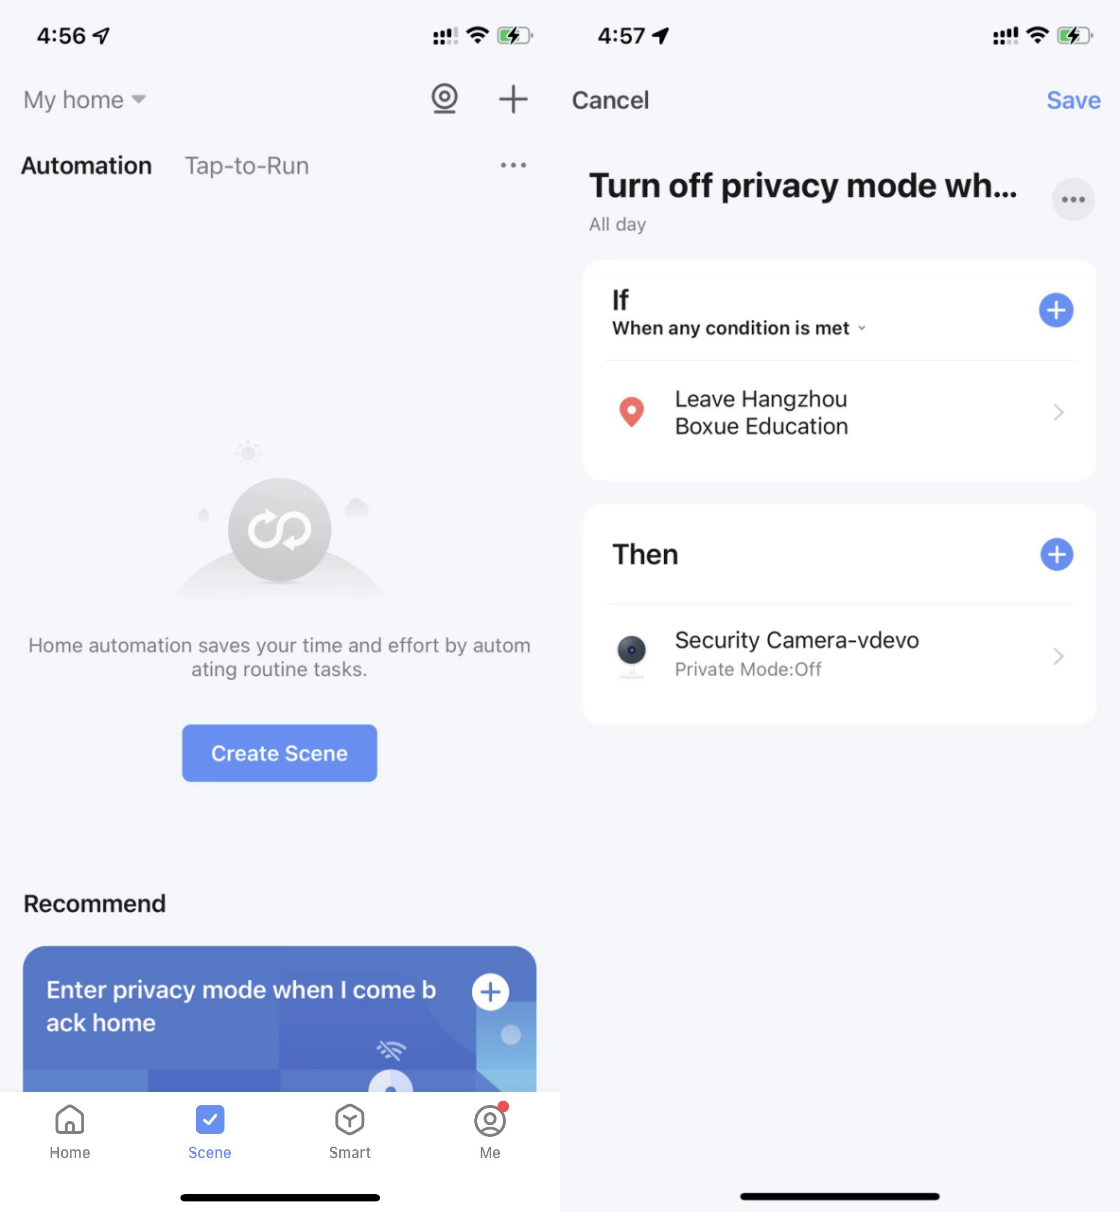
Automation
-
In the bottom navigation bar, tap Smart > Automation > Create Scene, or tap the plus icon (+) in the top right corner of the Automation tab to enter the page for smart scene settings.
-
Tap Add Condition to add one or more conditions. If Launch Tap-to-Run is selected, only the current condition can be added. Tap Add Task to add one or more tasks. Multiple Tap-to-Run and Enable or Disable Automation tasks can be added. Tap Name to specify the name of the automation. Tap Effective Period to set a time during which the created automation scenes are effective.
-
Recommend smart scenes: Simplify the procedure to add the smart scenes recommended with bright colors and eye-catching device elements, and improve the visual effect and user experience of smart scenes.
-
Support voice and SMS notifications of important events when specific conditions are met to ensure home security.
-
Recommend devices for purchase to implement scene linkage.
Add automation scenes
-
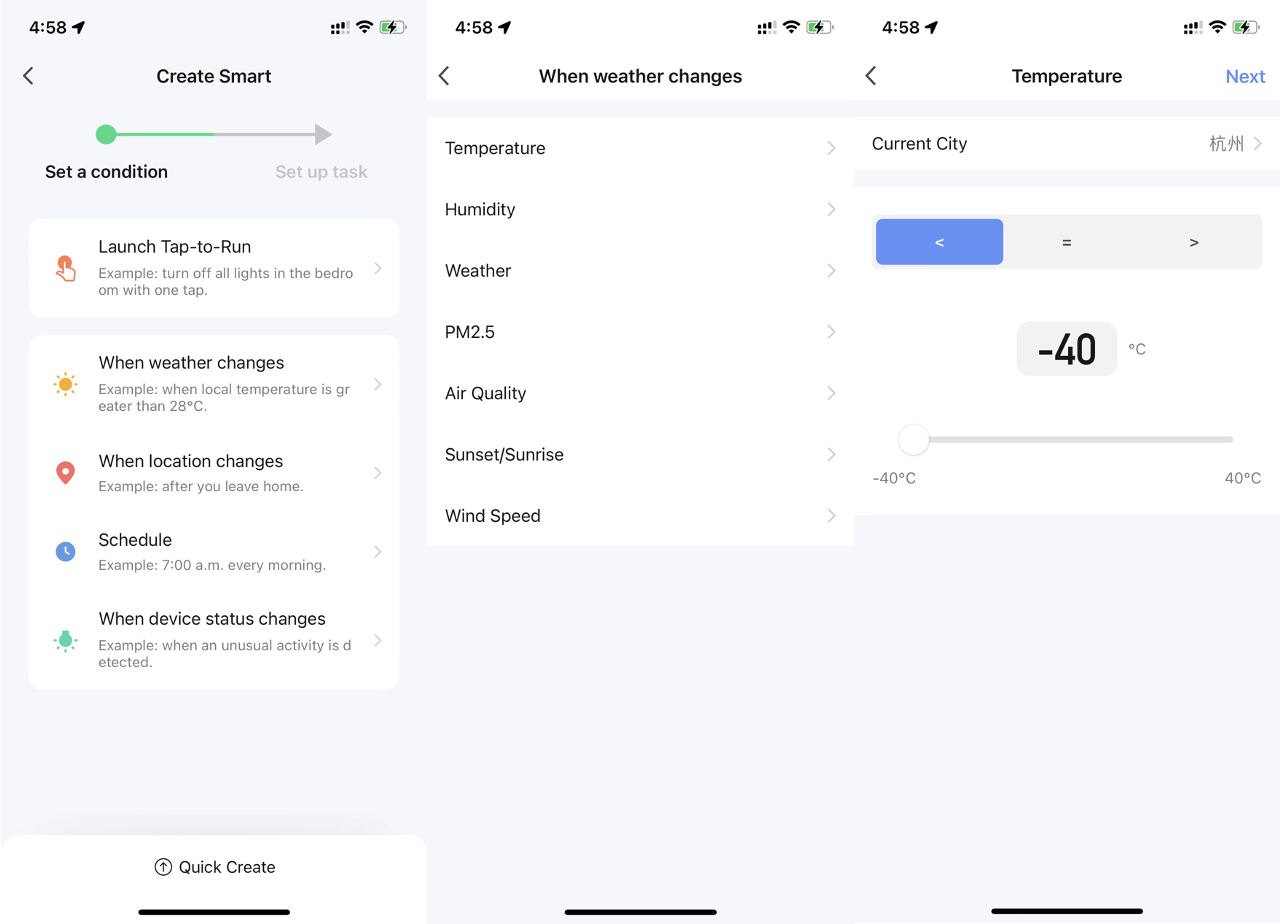
On the Automation tab, tap Create Scene to open the Create Smart wizard.
-
In the Set a condition step, select a trigger condition. In this example, When weather changes is selected.
-
Select a specific condition such as Temperature on the When weather changes page.
-
On the Temperature page, set a temperature value and tap Next. The Set up task step appears.
-
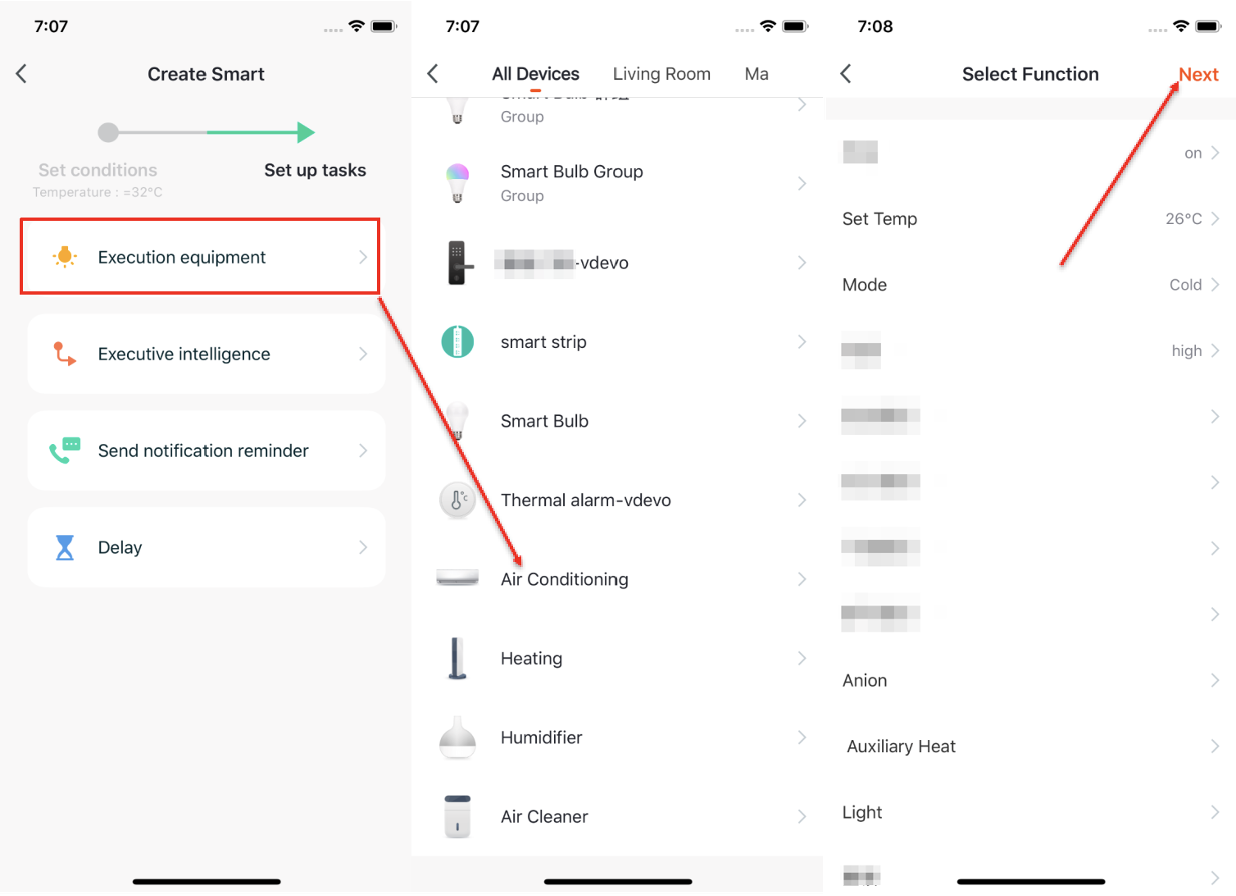
Select a task, such as Execution equipment.
-
Select a device, such as an air conditioner.
-
Set one or more functions on the Select Function page. In this example, the device is set to on, the temperature is set to 26°C, the working mode is set to Cold, and the wind speed is set to high. Tap Next.
-
On the page that appears, tap Save to save the condition and task settings.
-
To add more conditions, tap the plus icon (+) in the top right corner of the page.
-
These options are supported by Add Condition: Launch Tap-to-Run, When weather changes, Schedule, and When device status changes.

Set sunrise and sunset conditions
-
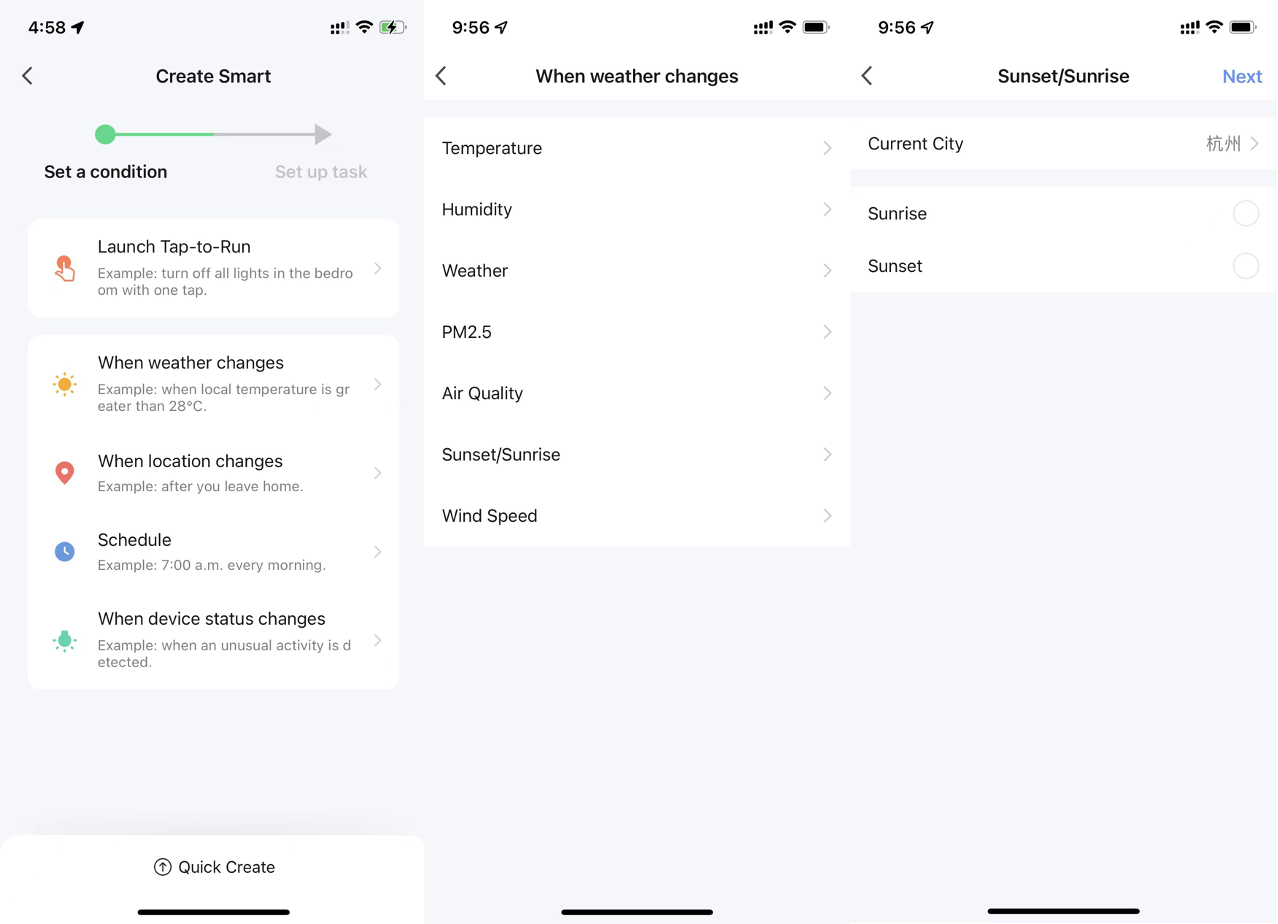
On the Automation tab, tap Create Scene to open the Create Smart wizard.
-
In the Set a condition step, select a trigger condition. In this example, When weather changes is selected.
-
Select a specific condition such as Sunset/Sunrise on the When weather changes page.
-
On the Sunset/Sunrise page, select Sunset or Sunrise, and set a time offset to the sunset or sunrise. Tap Next.
-
The Set up task step appears.
Set task when location changes
-
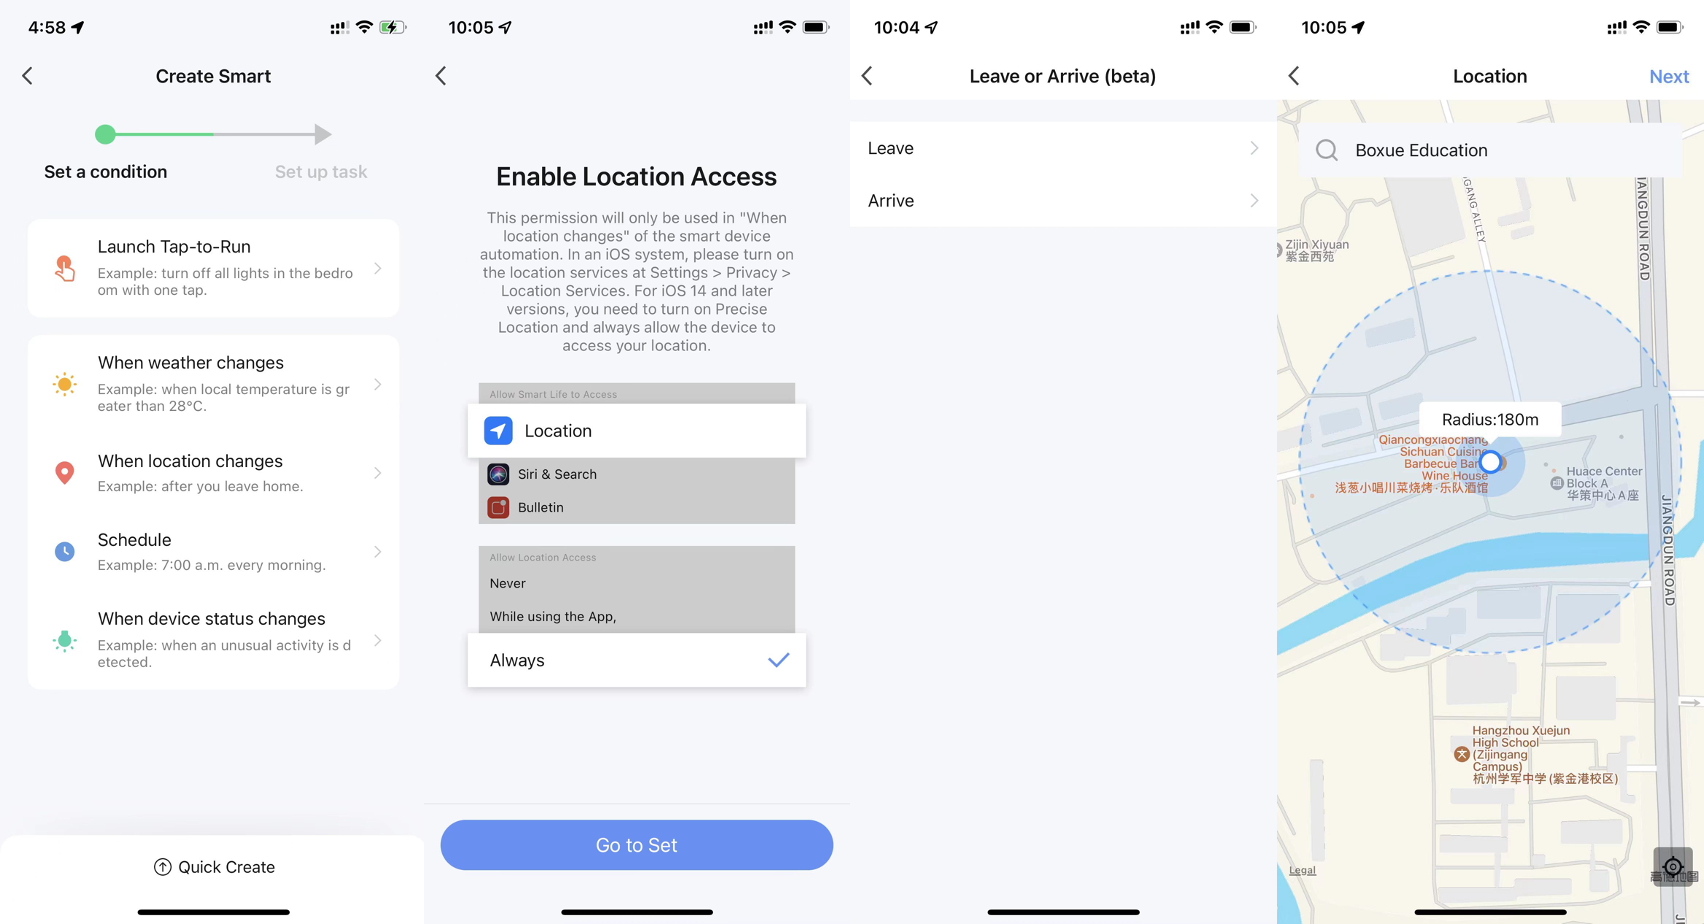
Select a task, such as When location changes.
-
On the Leave or Arrive (beta) page, set the Leave or Arrive condition to trigger specified actions when the user arrives at or leaves a place. To set the condition, the app must be authorized to always use the geographic location. Currently, this feature is unavailable on Android phones.
-
Set a location and tap Next. This feature can be used to control devices 110 meters to 1,023 meters away from the location to run preset tasks.
Quickly create smart scenes
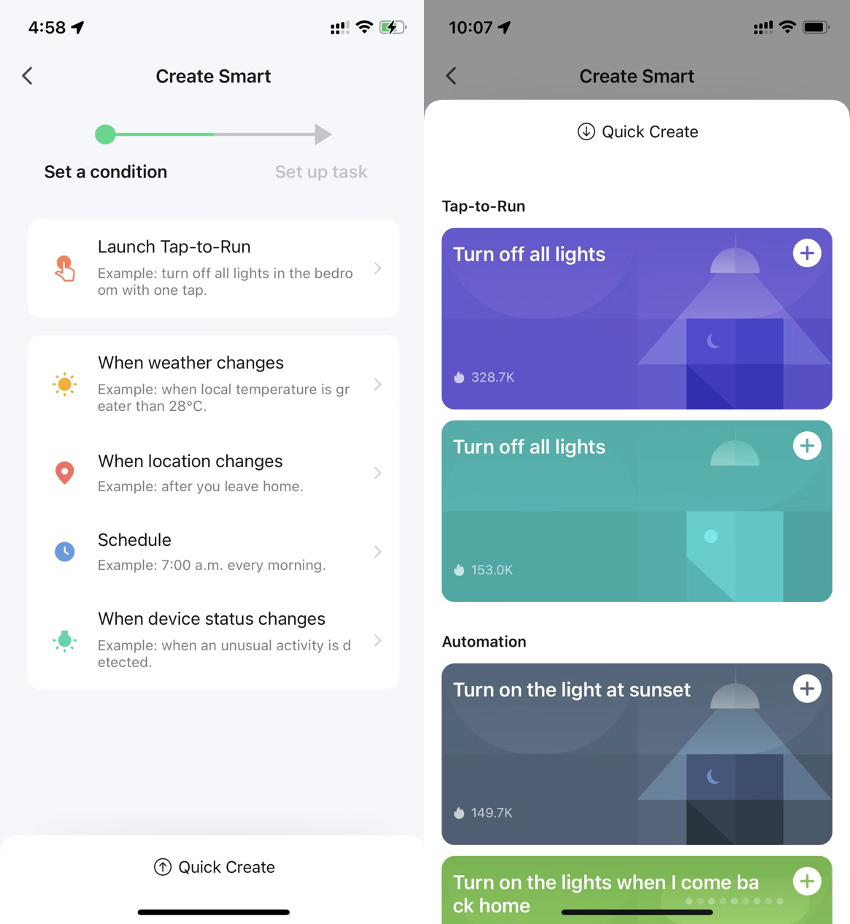
-
The app recommends out-of-box automation and tap-to-run scenes based on the paired devices. This simplifies device control.
-
To quickly create a scene, tap Quick Create on the Create Smart page. Set recommended smart scenes.
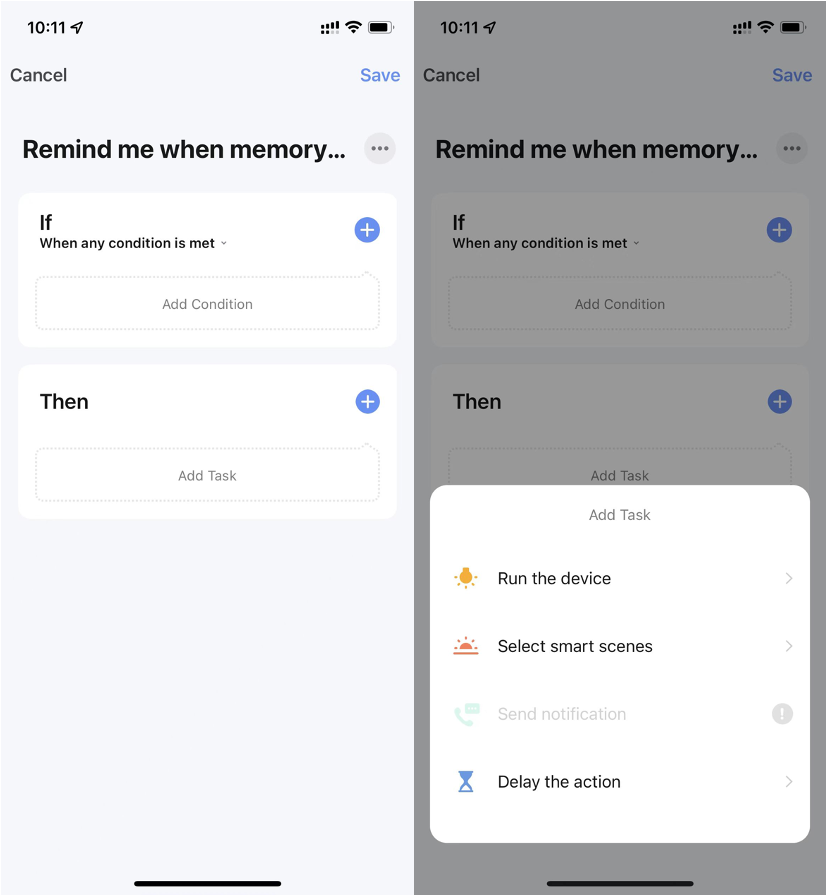
Add tasks
-
To add a task, on the smart scene settings page, tap Add Task or the plus icon (+) in the Task section.
-
A task can be set to a switch of a device in certain conditions or to running an automation scene.
These task options are supported: Run the device, Select smart scenes, Send notification, and Delay the action.
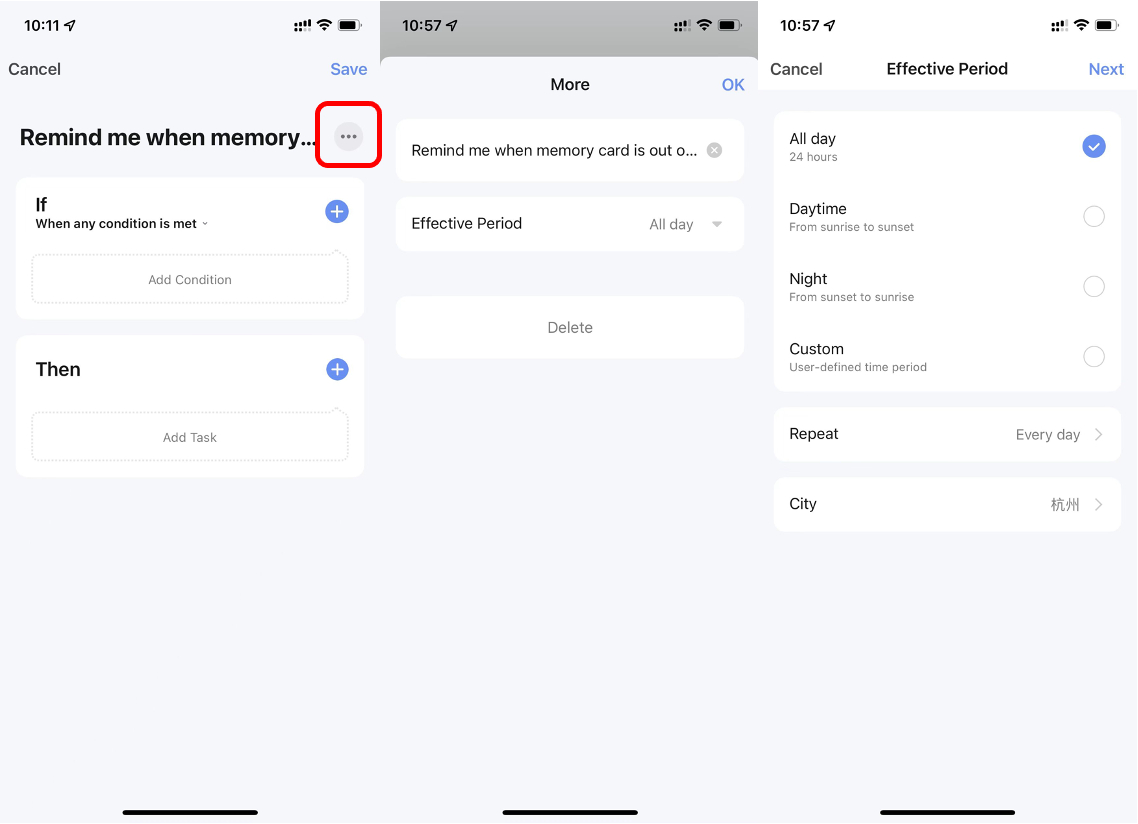
Set effective periods
Set a period during which specific smart scenes are effective.
For example, if a scene is defined that the nightlight is automatically turned on when the human motion sensor detects the presence of humans, Night can be specified as the effective period. In this case, the nightlight will not be automatically turned on in the daytime.
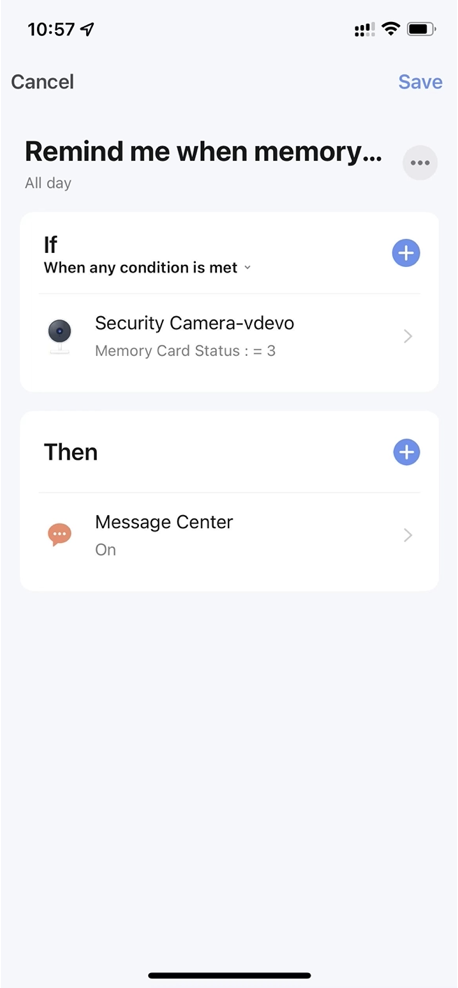
Create automation scenes
Create an automation scene to implement automated device control. The following figure shows an example automation scene with conditions and tasks set.
The app supports four automation types:
-
Linkage among devices: For example, when the air conditioner is switched on, the diffuser and air purifier are automatically switched on.
-
Linkage between external environmental conditions and devices: For example, when the ambient temperature is higher than 29°C, the air conditioner is automatically switched on.
-
Scheduled tasks: For example, the curtains are opened automatically at 8:00 every morning.
-
Geofencing: Specific tasks are triggered when the user arrives at or leaves a place. For example, the air conditioner and water heater are automatically turned on when the user arrives home.
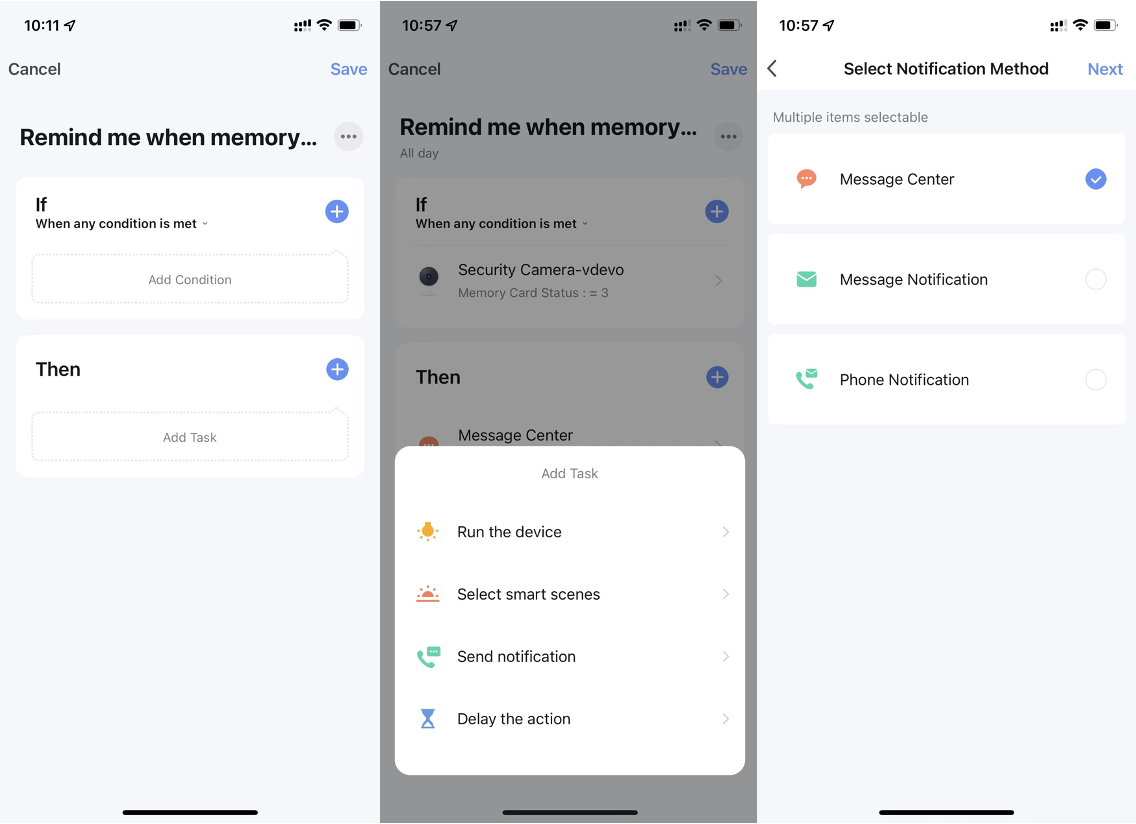
Select notification methods
To select notification methods, perform the following steps:
-
On the Smart page, tap the plus (+) icon in the top right corner of the page. In the Set up task step, tap Send notification. The Select Notification Method page appears. Select one or more available notification methods: Message Center, Message Notification, and Phone Notification. If the Message Notification and Phone Notification services are not subscribed to, only Message Center can be selected.
-
Selected notification methods and trigger conditions are displayed together on the Automation tab.
Support tap-to-run scenes by a local gateway
The new version of the Zigbee gateway supports locally running automation scenes. If all tasks and devices involved in an automation scene use the new Zigbee gateway, the tasks and devices can run based on scene settings, even if the network connection fails. This way, if the internet is not available at home, all devices and tasks that are bound with the new version of the Zigbee gateway will still perform device automation as specified before the disconnection on the app.
Manage tap-to-run scenes
-
On the Tap-to-Run tab, tap Add Tap-to-Run or the plus icon (+) in the top right corner of the page to open the Create Smart wizard.
-
In the Set a condition step, tap Launch Tap-to-Run.
-
In the Set up task step, Send notification and Select Tap-to-Run are unavailable.
-
Preset automation is required if Select Automation is selected as the task during the scene setting.
-
If Select Automation is tapped, a list of available automation scenes appears. Enable or disable a scene by tapping it. Tap Next, enter the scene name, and then tap Save. The Effective Period field is unavailable for tap-to-run scenes. For more information, see Help Center.
Create backups of and restore Zigbee gateway linkage data
The app supports Zigbee gateway linkage data backup and recovery. This means that even if the Zigbee gateway is removed, the information about the previous linkage scenes is automatically reserved. After the devices are reconnected to the network by normal pairing or automatic pairing, the linkage information is recovered.
Add, modify, and delete scenes
-
On the Smart page, select the Automation or Tap-to-Run tab. In the top right corner of the tab, tap More (…) > Manage to edit and sort the automation or tap-to-run scenes.
-
On the page that appears, sort automation or tap-to-run scenes. To delete a scene, swipe the scene to the left and tap Delete. On the Smart Life app for iOS, tap the minus icon (—) next to a scene name to delete the scene.
-
On the Automation or Tap-to-Run tab, tap the More icon (…) in the top right corner of an existing scene module to enter the Edit page.
-
Tap and hold a condition or task and swipe left to delete it.
-
Tap the plus icon (+) beside If or Then to add a condition or task.
-
To delete the scene, tap Delete at the bottom of the Edit page.
-
Tap an automation scene module to edit or delete the scene in the dialog box.

Add tap-to-run scenes to Siri
-
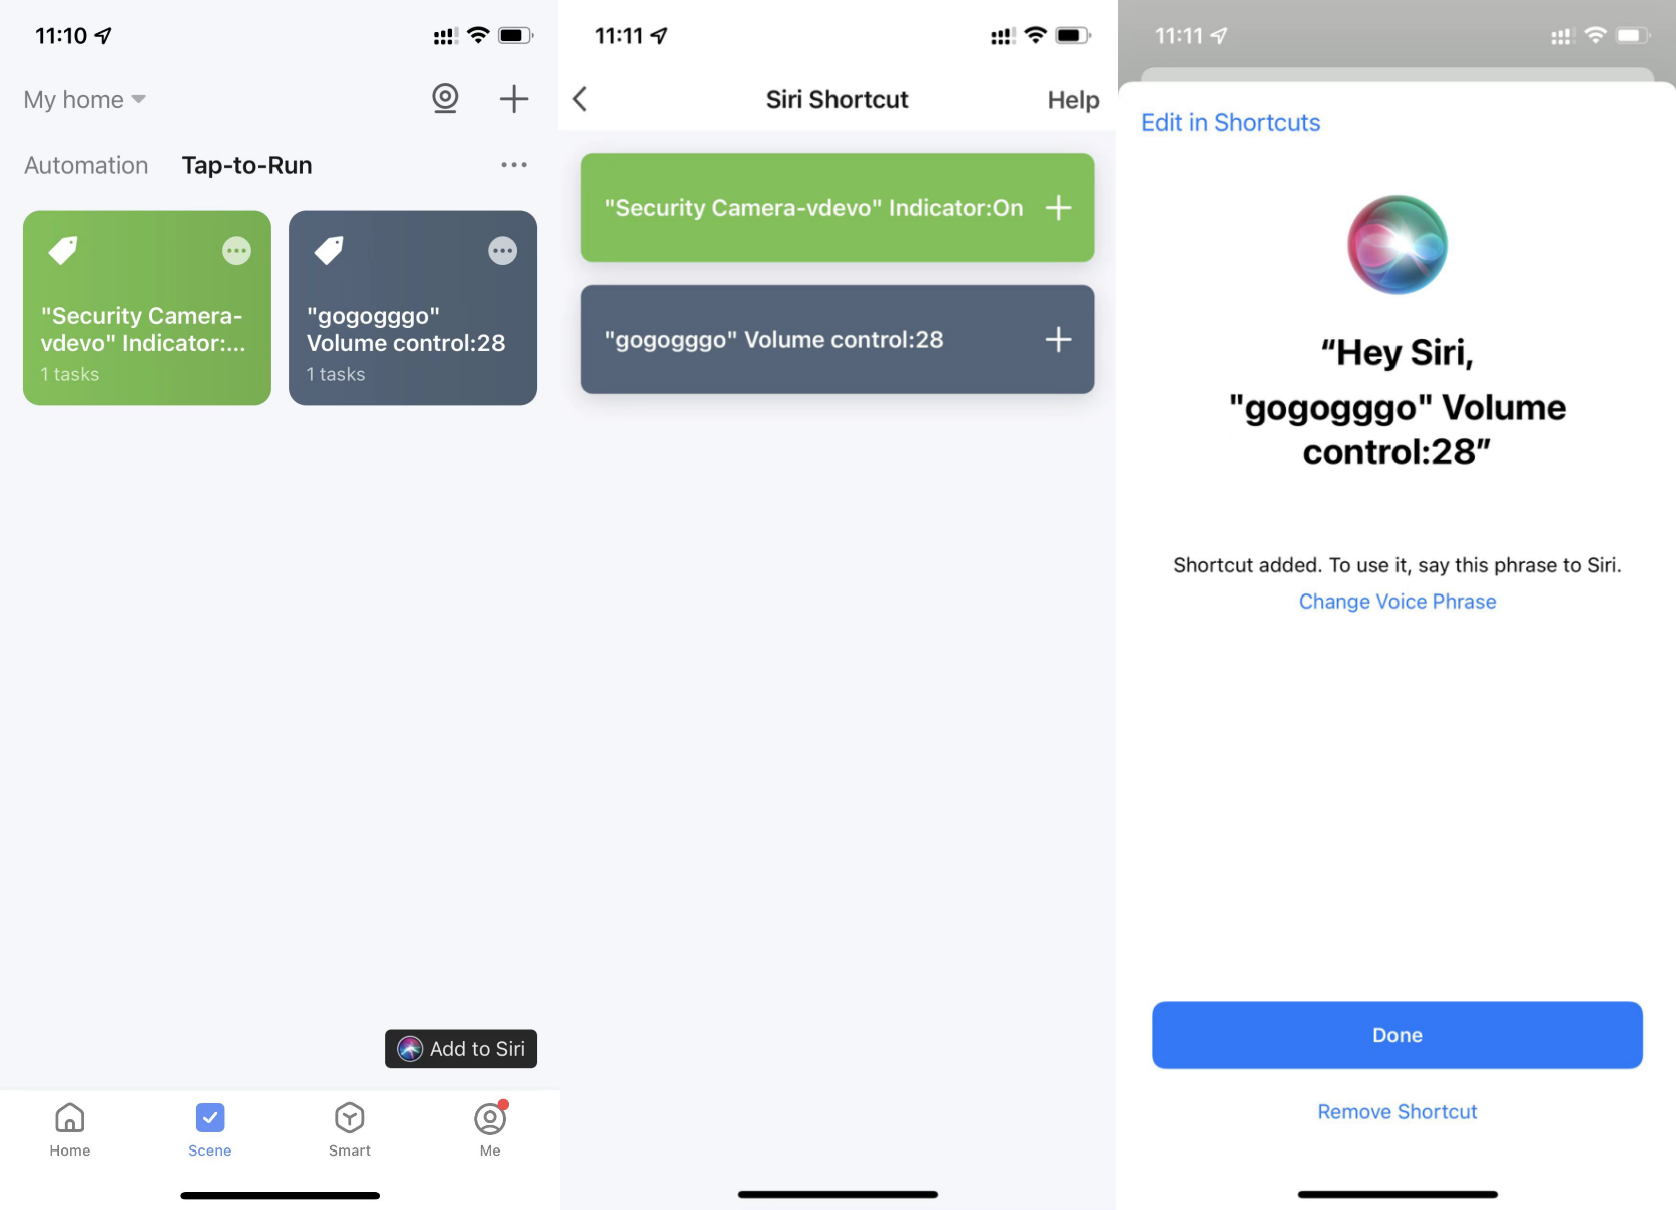
On the Smart page, tap Add to Siri in the bottom right corner of the page. The Siri Shortcut page appears, displaying all supported tap-to-run scenes.
-
Select a tap-to-run scene to be triggered by Siri.
-
On the settings page for the tap-to-run scene, specify trigger words and tap Add to Siri. When the trigger words are said to Siri, Siri tells the app to trigger a tap-to-run scene.
The Add to Siri feature is supported only on iOS 12.0 or later.
View scene logs
-
On the Smart page, select the Automation or Tap-to-Run tab. In the top right corner of the tab, tap More (…) > Logs in the top right corner of the page.
-
The Logs page appears, displaying the scene-related logs in the last seven days in reverse time order.
-
Tap a log to go to the Edit page, where the scene settings can be modified.
-
Logs help to monitor device status. If a device fails to function based on the scene automation settings, an alarm message is sent to the notification center and the failure log is stored. The failure log can be viewed to check devices that fail to be automated based on the scene settings.

Run scene tasks on a LAN
When devices involved in scenes are connected to a LAN but not the internet and the scene conditions are met, automation tasks in the scenes run in the specified sequence to control the involved devices on the LAN.
Home
On the Home page, the user can perform the following operations:
-
Tap the microphone icon and use voice commands to control devices.
-
Tap the home name in the top left corner of the page to switch between homes or add a home.
-
Tap the weather and environment information section to go to the detailed weather and environment information page, where the weather and environment indicators can be sorted. The Home page only displays the first three weather and environment indicators.
-
Tap the plus icon (+) to add devices.
-
Tap a tap-to-run scene to trigger a scene.
-
Tap a room name to view the status of smart devices in the room.
-
Access energy and security resources to easily view their usage.
-
Provide interstitial screens, banners, and more entries to automatically track operation events. Display different content depending on varied user requirements to accurately reach users.
Smart
Smart services involve multiple features, such as energy efficiency for energy management, comfortable space for space environment management, and smart protection for security scenarios.
Me (account information)
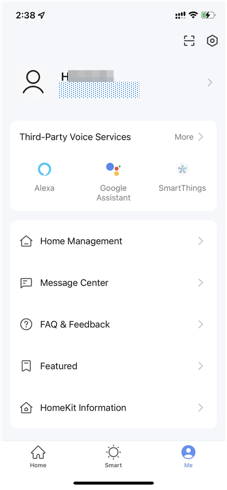
The following sections and icon are displayed on the Me page:
-
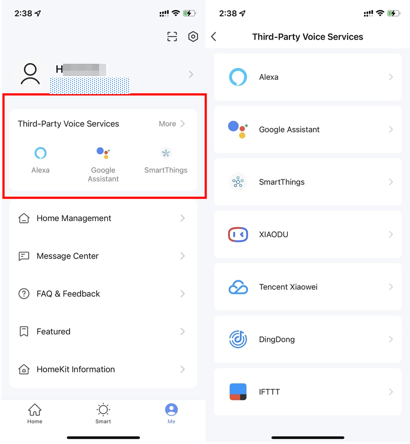
Third-Party Integration: The app supports seven third-party voice assistants.
-
Home Management: Tap Home Management to manage homes and home members.
-
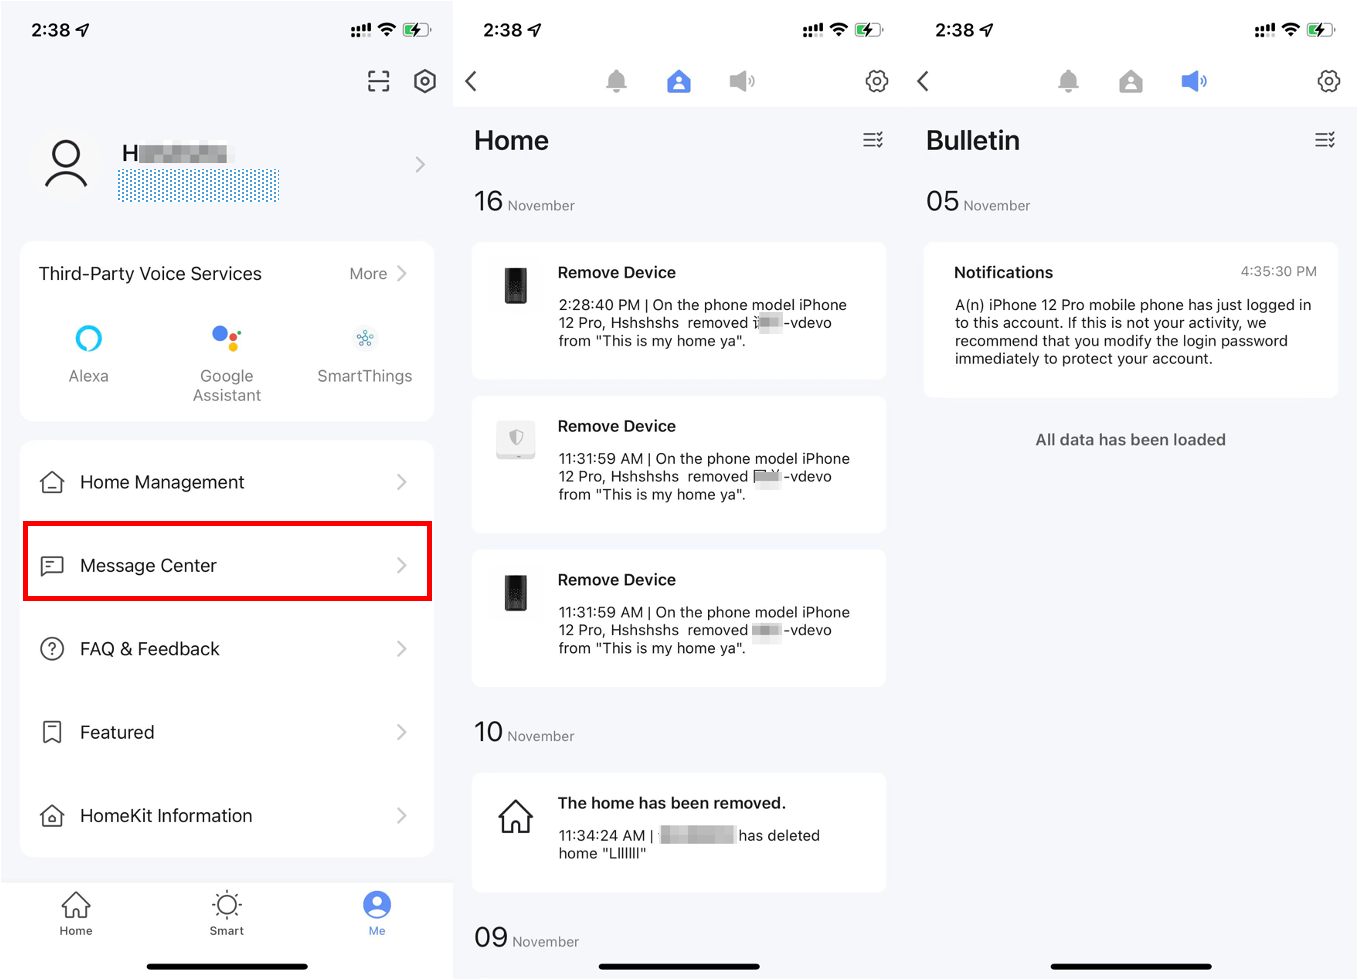
Message Center: Three types of messages are displayed in Message Center, including Alarm, Home, and Bulletin. Specify a do-not-disturb period for these messages.
-
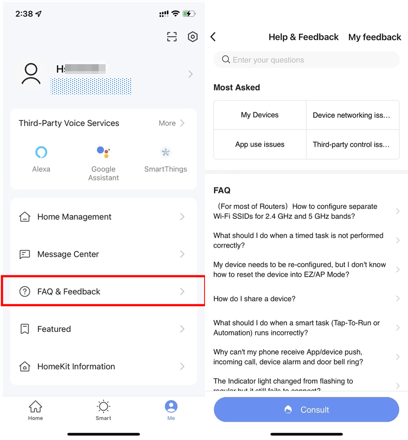
FAQ & Feedback: Tap FAQ & Feedback to show the FAQs & Feedback page. On this page, tap My feedback in the top right corner of the page to view feedback records, view FAQs and FAQ categories, report issues, and enter keywords to search for FAQs.
-
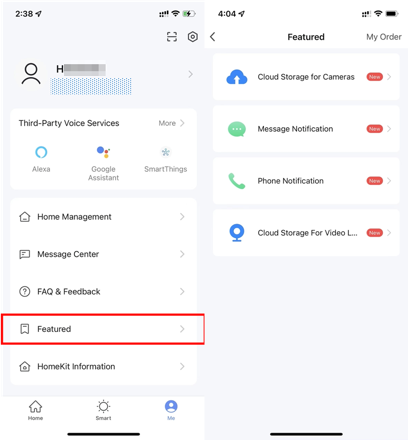
Featured: The featured services include Cloud Storage for Cameras, Phone Notification, and Message Notification.
-
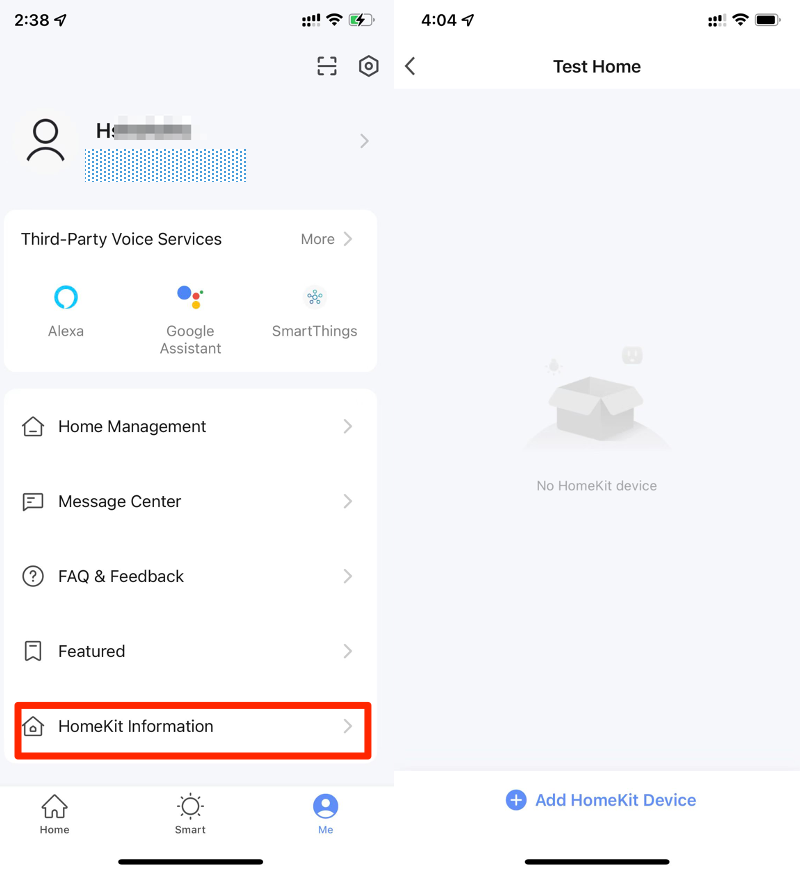
HomeKit Information: HomeKit-compatible devices can also be controlled with the app.
-
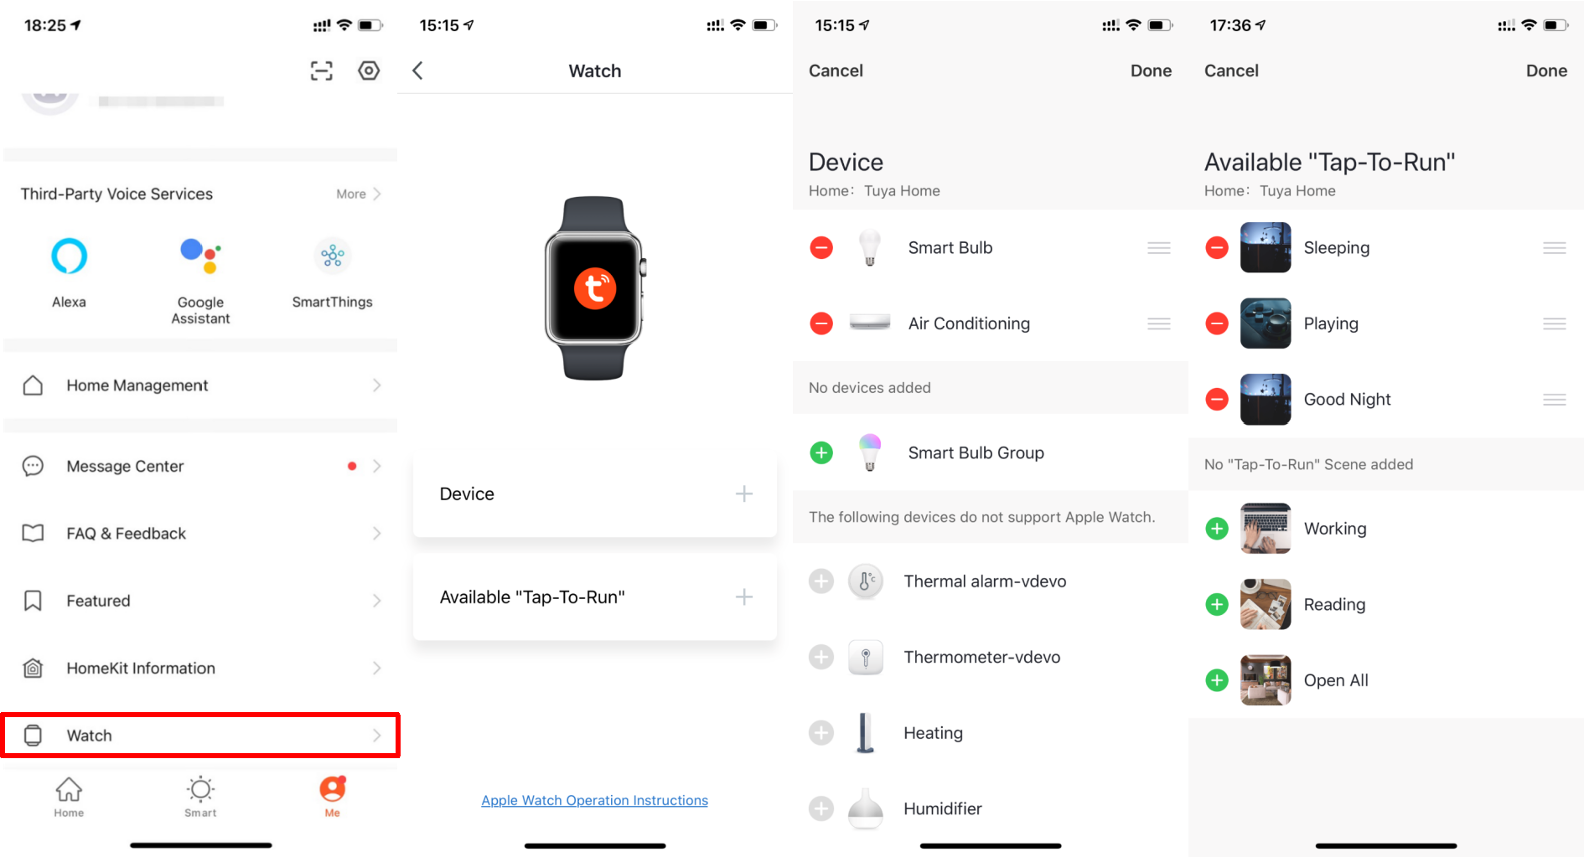
Watch: Tap Watch to check available devices and tap-to-run scenes. The Watch section appears on the app only when an Apple Watch is bound with the user’s iPhone.
-
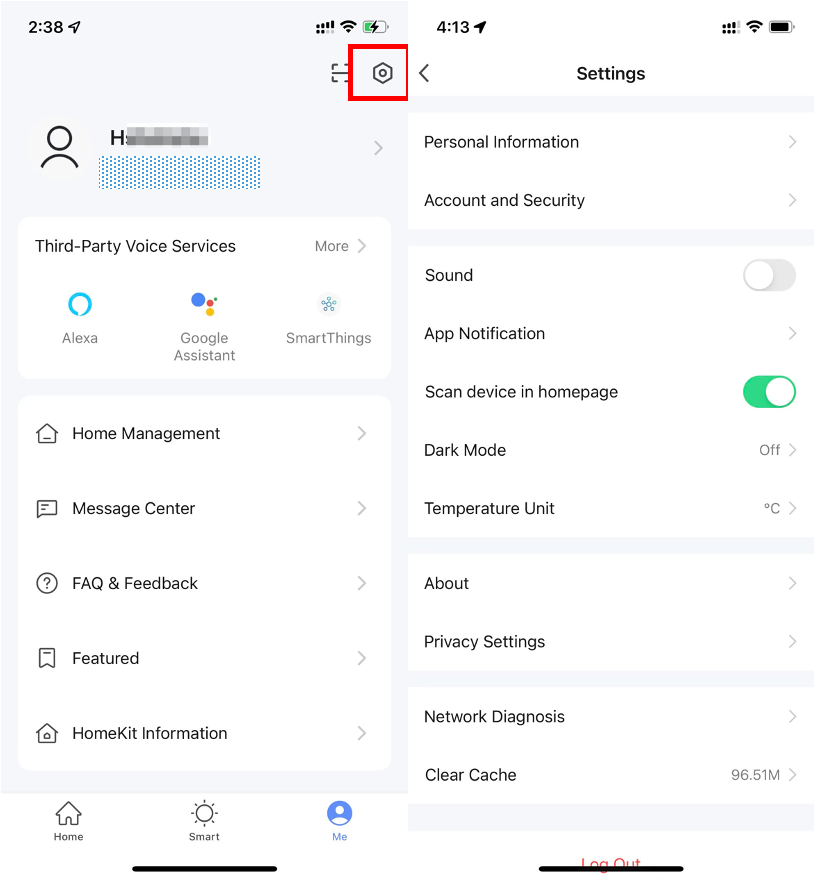
On the Me page, tap the Settings icon to go to the Settings page. The following options are available: Personal Information, Account and Security, Sound, App Notification, Scan device in homepage, Dark Mode, Temperature Unit, About, Privacy Settings, Network Diagnosis, Clear Cache, and Log Out.
Third-party voice services
Choose Me > Third-Party Voice Services > More. On the page that appears, bind the app with a third-party voice assistant.
Message center
-
Three types of messages are displayed in Message Center: Alarm, Home, and Bulletin. Alarms include device alarms, automation-related notifications, and alarms of scheduled execution failures.
-
Home-related messages include messages about adding or removing home members, removing a home, setting a home member as the administrator, adding devices, and sharing devices.
-
Bulletins include messages about status updates of user feedback and other push notifications from the app. The app messages of the IoT backend operation section newly support H5 links. The messages will be highlighted in the message center of the app. The user can tap on the link to view more content.
-
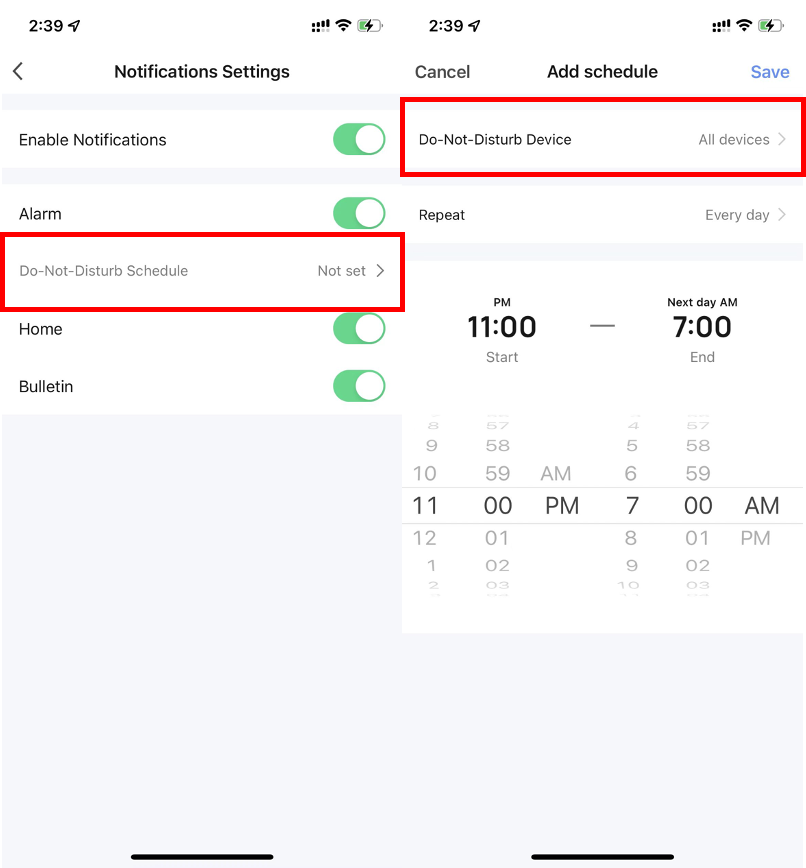
The do-not-disturb feature can be enabled for a specified period. Perform the following steps:
-
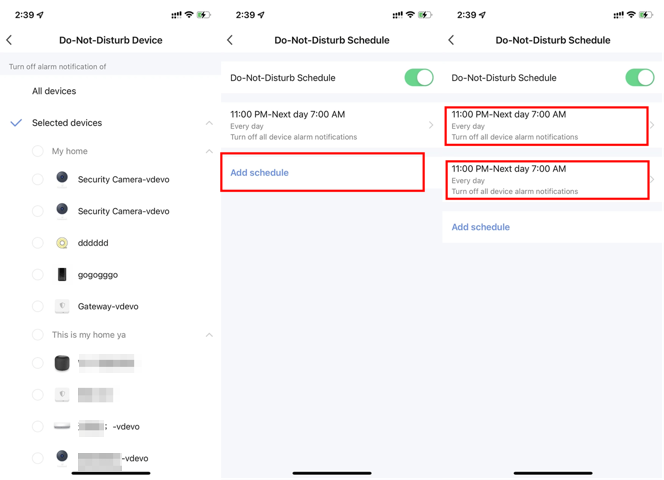
Tap Do-Not-Disturb Schedule on the Notification Settings page to go to the Add schedule page. If this feature is enabled for the first time, tap Do-Not-Disturb Device and select the devices for which the notification feature is disabled.
-
Tap the left arrow icon (<) in the top left corner of the page to go back to the Add schedule page. Set the repetition mode, specify a period, and then tap Save in the top right corner of the page. Then, the Do-Not-Disturb Schedule page appears. Enable the Do-Not-Disturb Schedule feature on this page.
-
To add another do-not-disturb schedule, tap Add schedule on the Do-Not-Disturb Schedule page. Set the repetition mode, specify desired devices and a period, and then tap Save.
-
Push notification settings
-
The following two methods can be used to go to the Notification Settings page:
-
Method 1: On the Me page, tap the Settings icon in the top right corner. Then, tap App Notification.
-
Method 2: On the Me page, tap Message Center to go to the message center. Tap the Settings icon in the top right corner of the page.
-
-
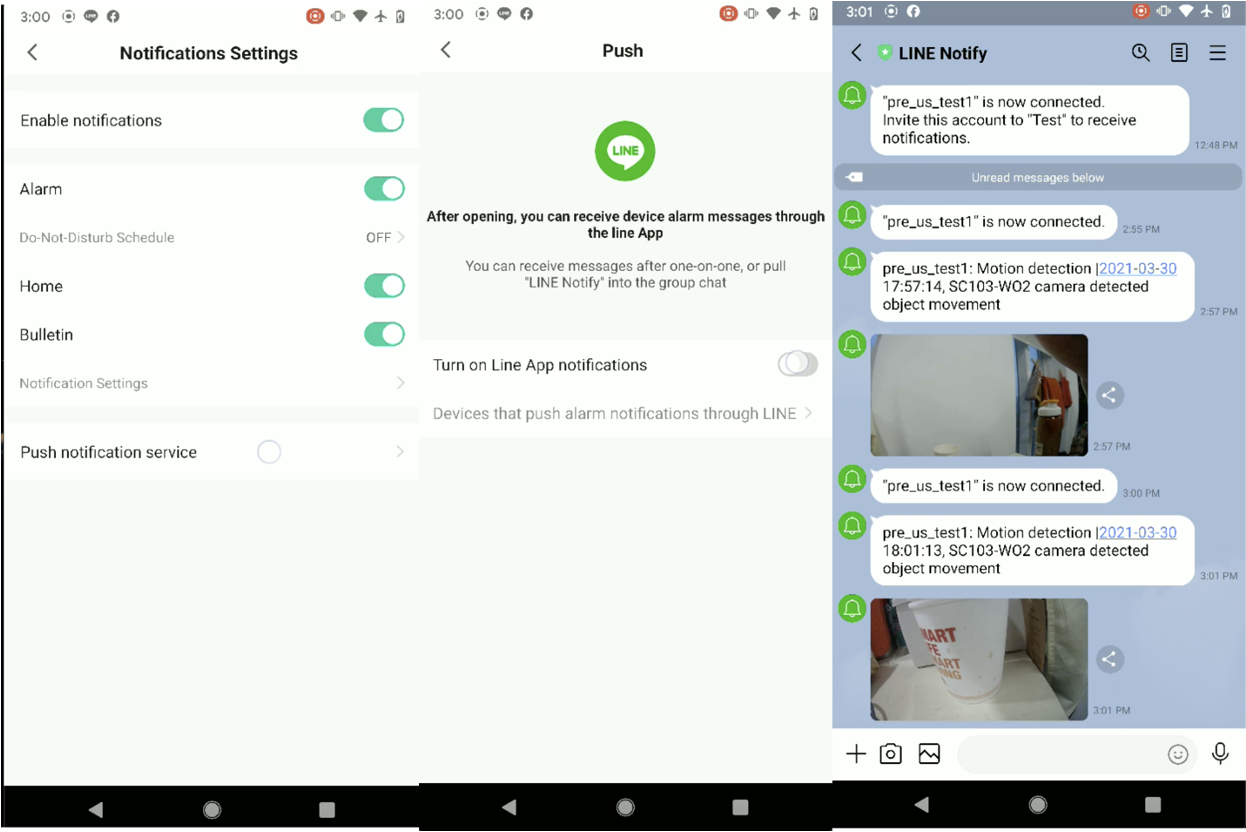
If Enable Notifications is disabled, the messages in the Alarm, Home, and Bulletin categories will not be received. If Enable Notifications is enabled, the user can separately specify whether to receive Alarm, Home, and Bulletin messages.
-
LINE push notifications are supported. Important alarms can be sent as messages through the LINE channel.


Health center
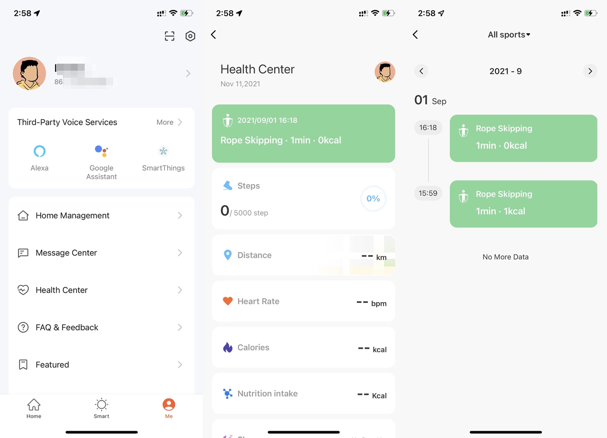
On the Me page, tap Health Center to view the health data of the app.
FAQ & feedback
-
To view FAQs or send feedback to the app, choose Me > FAQ & Feedback to go to the Help & Feedback page.
-
To view Tuya’s responses to the feedback, tap My feedback in the top right corner of the page.
-
In the FAQ section, FAQs that might help the use of the app are available.
-
In the Most Asked section, filter FAQs by device, device networking issue, app use issue, and third-party control issue.
-
To report an issue, tap Report Issue at the bottom of the FAQs & Feedback page. To report an issue, enter the issue and contact information, specify the issue type and the time when the issue occurred, and then upload related images.
-
Enter keywords in the search box to search for solutions to a specific problem.
Featured services
-
To use the featured services, choose Me > Featured.
-
The following three value-added services are available on the Featured page:
-
Cloud Storage for Cameras: After this service is subscribed to, video recordings are encrypted and uploaded to the cloud server. The uploaded video footage can be viewed with the app at any time. To use this service, one or more smart cameras must be added to the app. Previously uploaded videos cannot be downloaded.
-
Message Notification: After this service is subscribed to and an event notification condition is triggered, an SMS message is sent to indicate the event and ensure home security.
Phone calls can be made only to the phone number that is used to register the app account. If an email address is used for account registration, a phone number must be added to receive phone calls.
-
Phone Notification: After this service is subscribed to and an event notification condition is triggered, a phone call will be made to indicate the event and ensure home security.
Phone calls can be made only to the phone number that is used to register the app account. If an email address is used for account registration, a phone number must be added to receive phone calls.
-
HomeKit information
-
Only certain smart devices support Apple HomeKit. Devices that support Apple HomeKit carry the HomeKit badge on their packages.
-
This feature is used to add devices that support Apple HomeKit to the Smart Life app. This way, these devices can be controlled together with other devices that are added to the app based on scene linkages.
-
After HomeKit-compatible devices are added to the Smart Life app, these devices can be added again to the Home app for iOS.
-
After HomeKit-compatible devices are removed from the Smart Life app, these devices are not removed from the Home app for iOS.
-
The only way to remove a device that is added to both the Smart Life app and the Home app is to press the reset button on the device.
-
If a HomeKit-compatible device is added to the Home app for iOS first, the device cannot be detected by the Smart Life app for Android and pairing cannot be completed.
-
HomeKit-enabled Bluetooth devices can be added to both Tuya’s all-in-one app and the Home app.
Watch
-
Choose Me > Watch to go to the Watch page.
-
Tap Device to show all smart devices added to the app. A plus icon (+) before a device means that the device can be controlled with Apple Watch and is to be added to the device list. Devices that cannot be controlled with Apple Watch are displayed in the The following devices do not support Apple Watch section.
-
Tap Available “Tap-To-Run” to show all available tap-to-run scenes. Tap the plus icon (+) preceding a tap-to-run scene to add the scene to the available tap-to-run scene list.
-
All messages in Message Center of the app will also be pushed to Apple Watch.
Settings
On the Me page, tap the Settings icon to go to the Settings page. The following options are available: Personal Information, Account and Security, Sound, App Notification, Scan device in homepage, Dark Mode, Temperature Unit, About, Privacy Settings, Network Diagnosis, Clear Cache, and Log Out. The Upload Log module is only available for iOS.
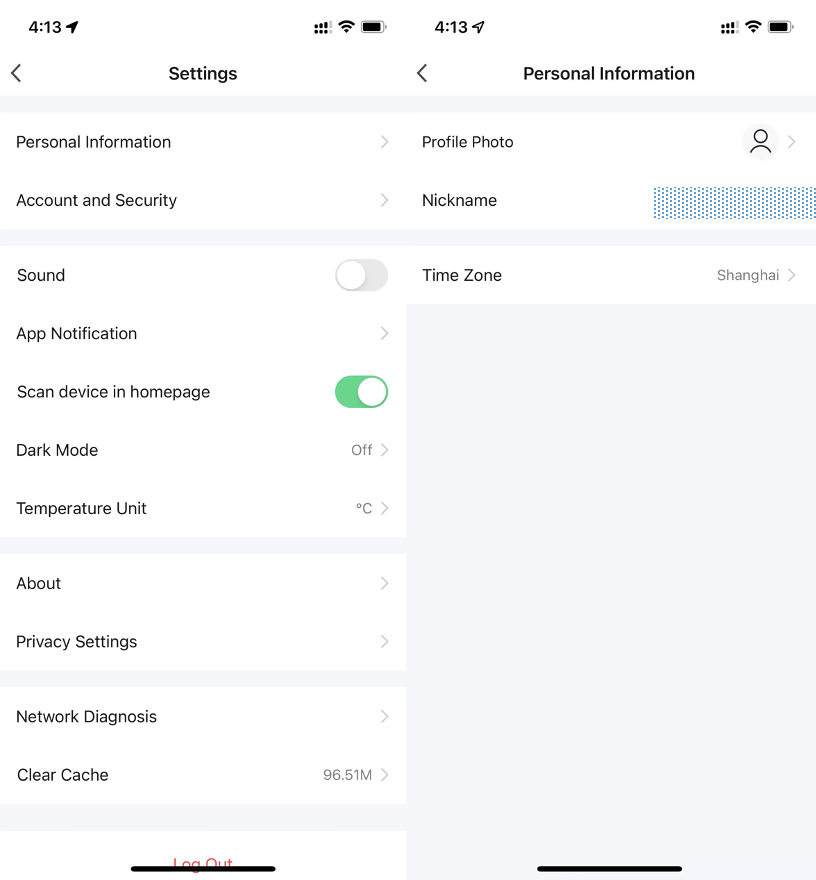
Profile information
-
On the Me page, tap the Settings icon and select Personal Information to go to the Personal Information page.
-
On this page, the user can view the account information, and change the profile photo, nickname, temperature scale, and time zone.
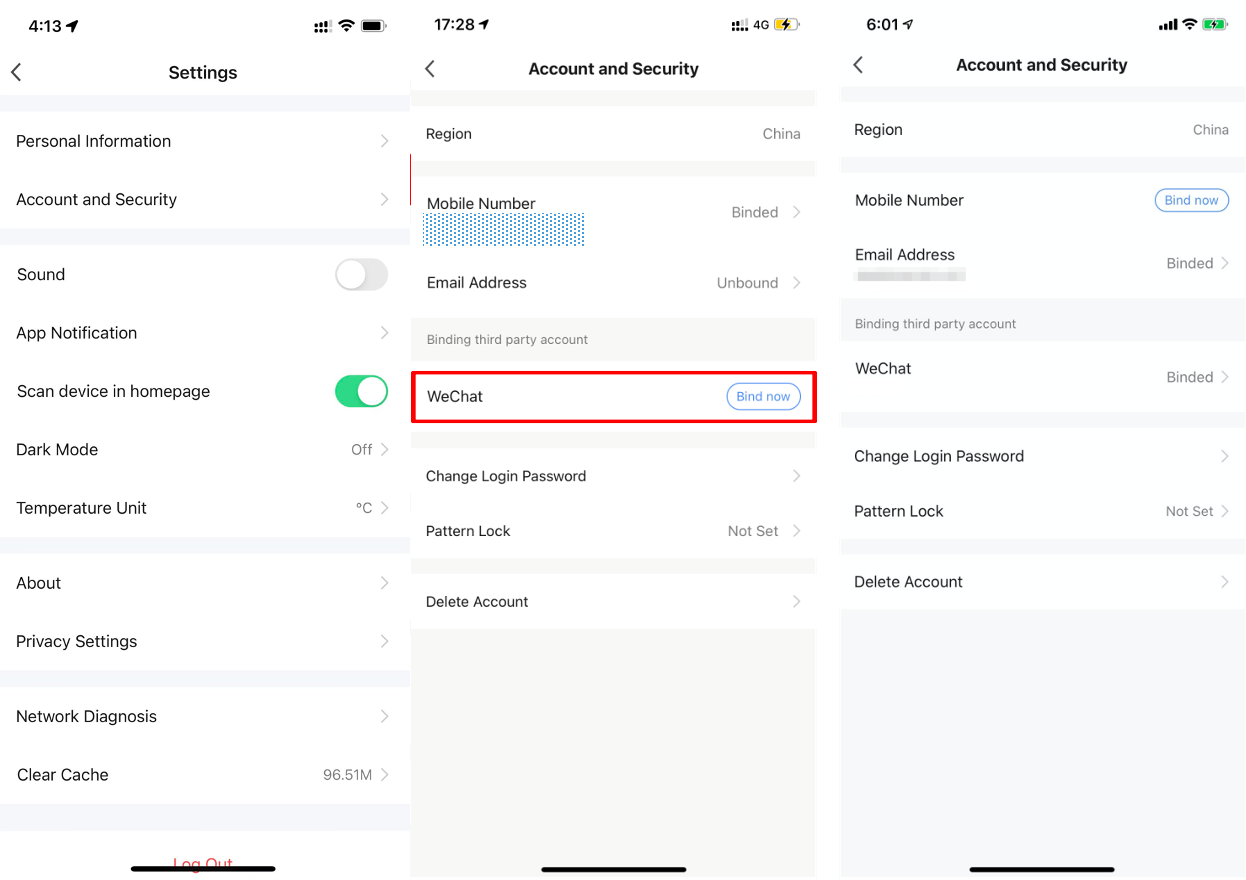
Account and security
-
On the Me page, tap the Settings icon and select Account and Security to go to the Account and Security page.
-
On this page, the user can view and change the mobile number, email address, or third-party account such as the WeChat account bound with the app, and check the region in which the app service is deployed. The user can also change the login password, set a gesture password, or delete the account.
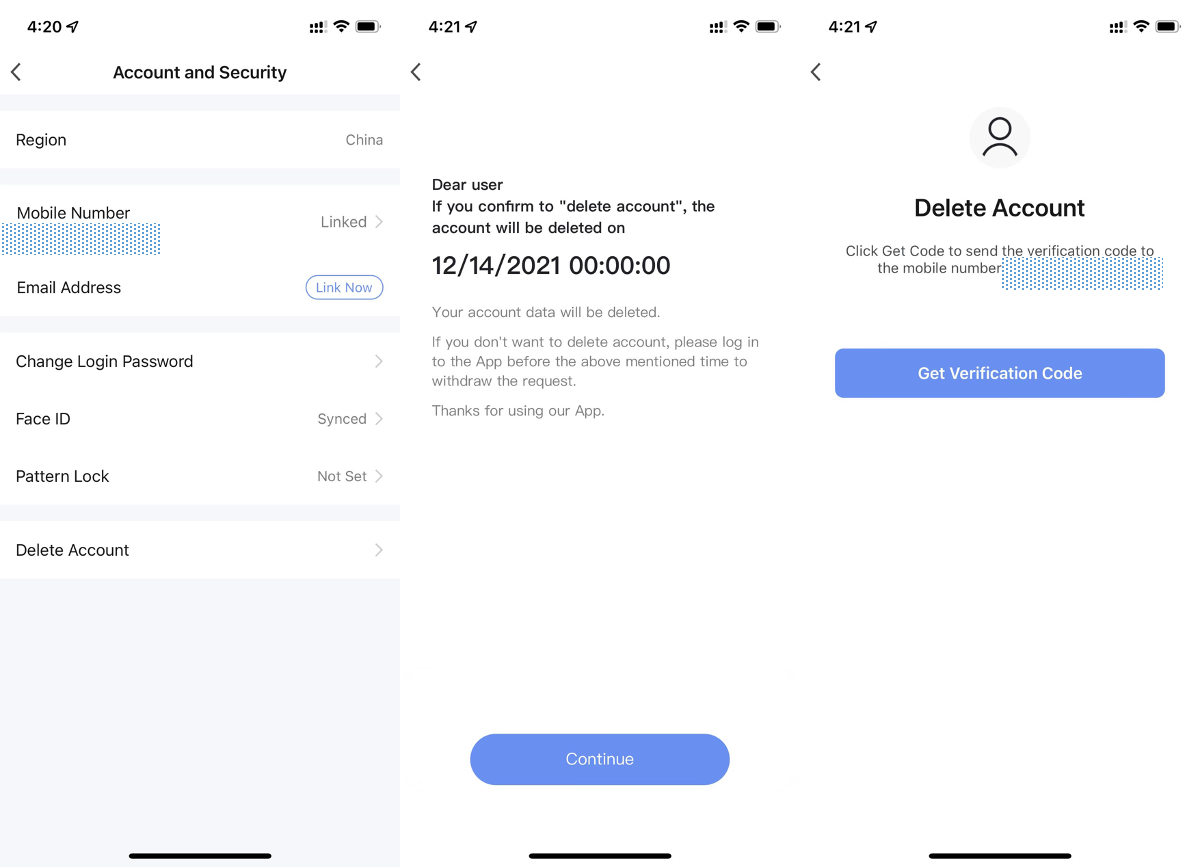
Account deletion
To delete the current account, perform the following steps:
-
On the Me page, tap the Settings icon and select Account and Security to go to the Account and Security page.
-
Tap Delete Account > Continue. On the page that appears, tap Get Verification Code to get a verification code. Enter the returned verification code and tap Delete. The account will be deleted after seven days, and all data related to the account is also deleted.
-
If the app is logged in with the account within seven days after the preceding steps, account deletion is terminated.
Pattern lock
-
Tap Pattern Lock on the Account and Security page and create a gesture password to enable the Pattern Lock feature. Then, the gesture password must be used to open the app.
-
If the gesture password is forgotten, tap Forgot Pattern Lock at the bottom of the unlocking page. In the dialog box that appears, tap Re-login, log in to the app again, and then create a gesture password again.
-
If the gesture password is entered incorrectly five times in a row, the current account will be logged out. Then, the account password must be used to verify the identity and reset the gesture password.

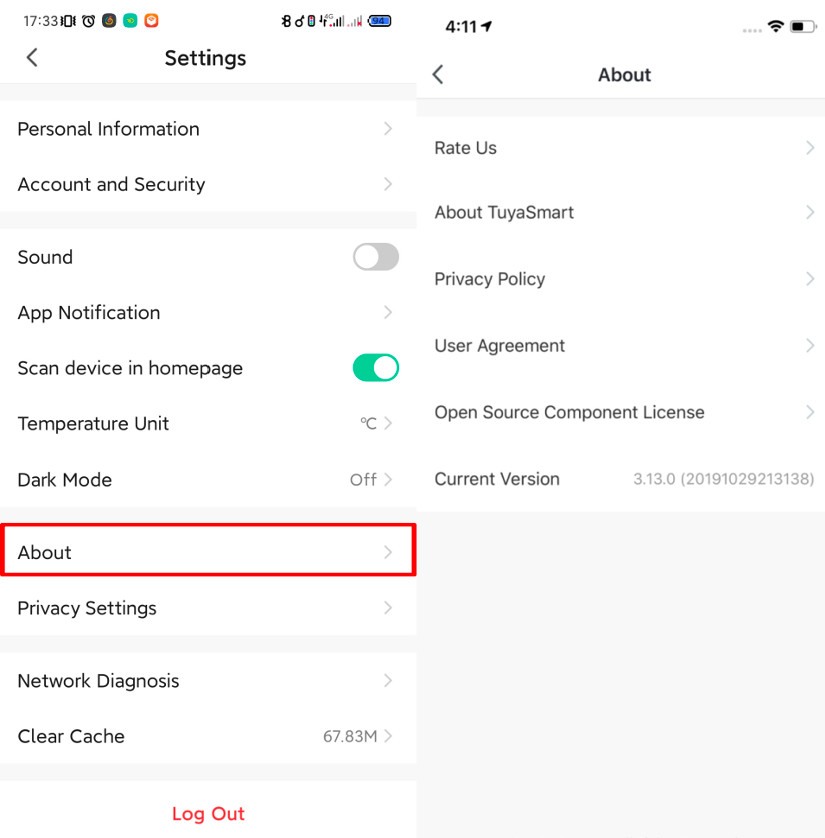
About
-
Tap the Settings icon in the top right corner of the Me page and tap About to show information about the app.
-
To rate the app in the app store, tap Rate Us.
-
To check the licenses of open source components, tap Open Source Component License.
-
To check the current version of the app, view the version number in the Current Version section.
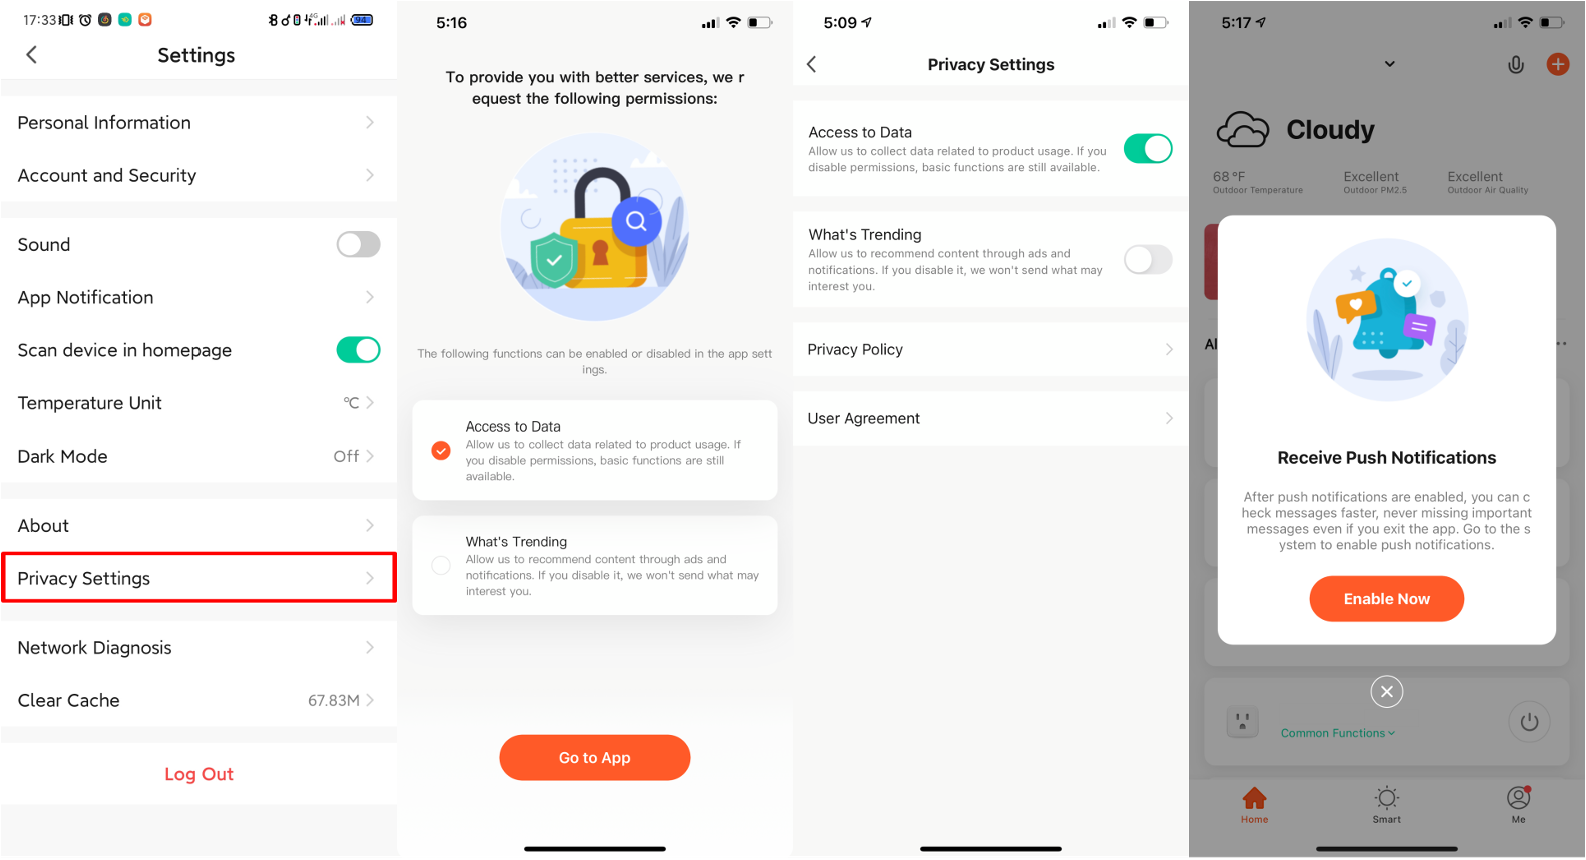
Privacy settings
-
On the Me page, tap the Settings icon and select Privacy Settings to go to the Privacy Settings page. On this page, the profile photo, nickname, temperature unit, and time zone can be changed.
-
The authorization page is added to manage authorizations and check the privacy policy and user agreement.
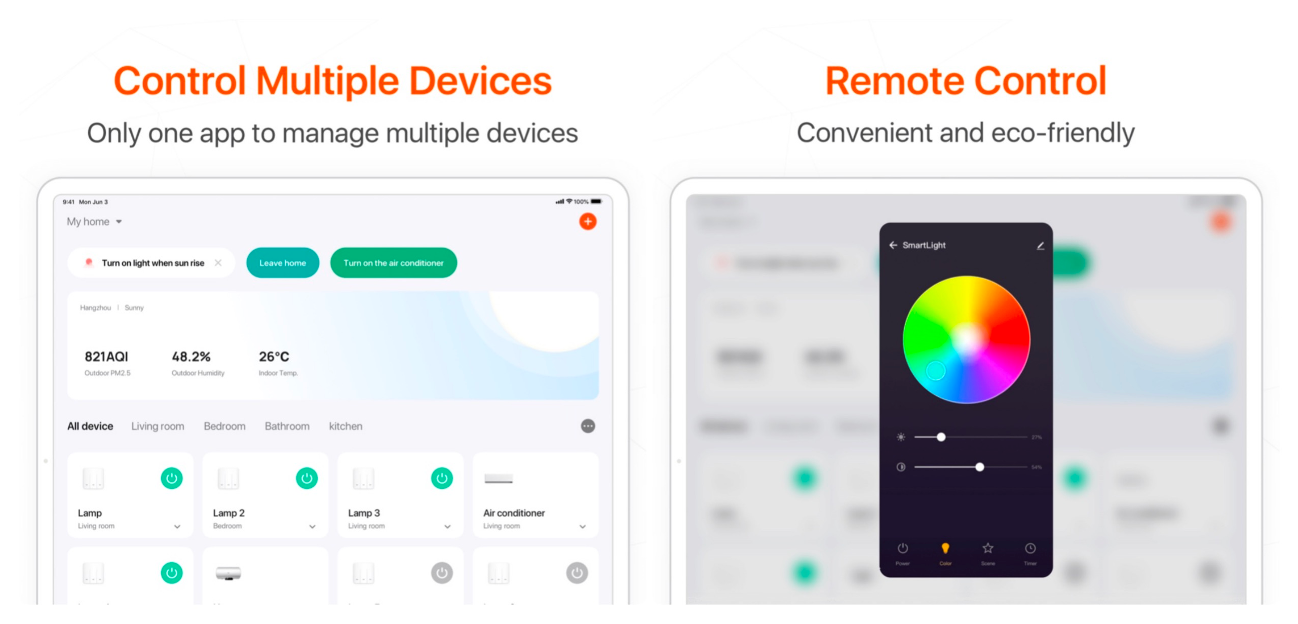
App for tablets
Extend the support for more terminals and add compatibility with tablets. Certain features on mobile phones are launched for this version. Stay tuned for more features and integration with OEM apps.
Для работы проектов iXBT.com нужны файлы cookie и сервисы аналитики.
Продолжая посещать сайты проектов вы соглашаетесь с нашей
Политикой в отношении файлов cookie
Приветствую друзья
Мне много раз писали в комментариях на моих Youtube и Telegram каналах, люди, которые имеют желание внедрить у себя некоторые технологии умного дома. При этом, по разным объективным причинам, они не хотят сильно погружаться в эту тему, инсталлировать альтернативные системы управления, вроде Home Assistant, приверженцем которого я являюсь. И действительно для многих простых бытовых задач — хватает и штатного функционала.
Исторически сложилось что в наших широтах, наибольшую известность и популярность приобрела система умного дома от Xiaomi — mihome, но она не единственная из доступных. Сегодня мы поговорим про Tuya Smart, экосистему умного дома, которая совершенно незаслуженно обходится вниманием, при этом что она объединяет десятки производителей и сотни различных устройств, и во многих моментах превосходит mihome.
В этом обзоре я рассмотрю один из вариантов стартовых наборов — zigbee шлюз и три датчика для Tuya Smart, от Alfawise. Но показанное мной не имеет привязки к бренду — ровно тоже самое будет делать набор, например от Moes или ZemiSmart — здесь роль производителя сводится в основном к внешнему оформлению, логическая часть общая для всех.
Содержание
- Где купить?
- Поставка
- Шлюз Zigbee
- Приложение управления
- Датчик температуры и влажности
- Датчик движения
- Датчик открытия
- Взаимодействие устройств умного дома
- Мгновенный сценарий
- Автоматизации
- Свет по движению
- Увлажнение воздуха
- Открытие окна
- Заключение
- Видеоверсия обзора
Где купить?
Набор из видео — цена на дату публикации $91,37
Аналог от Zemismart — цена на дату публикации $76,80 (c проводным шлюзом)
Аналог от Moes — цена на дату публикации $99,99 (c проводным шлюзом)
Аналог от Lonsonho — шлюз цена на дату публикации $20,99 датчики — от $11,99
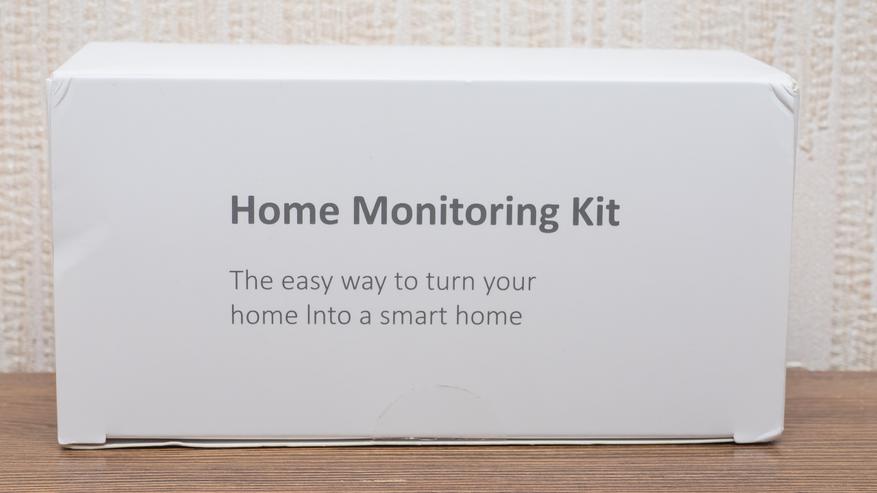
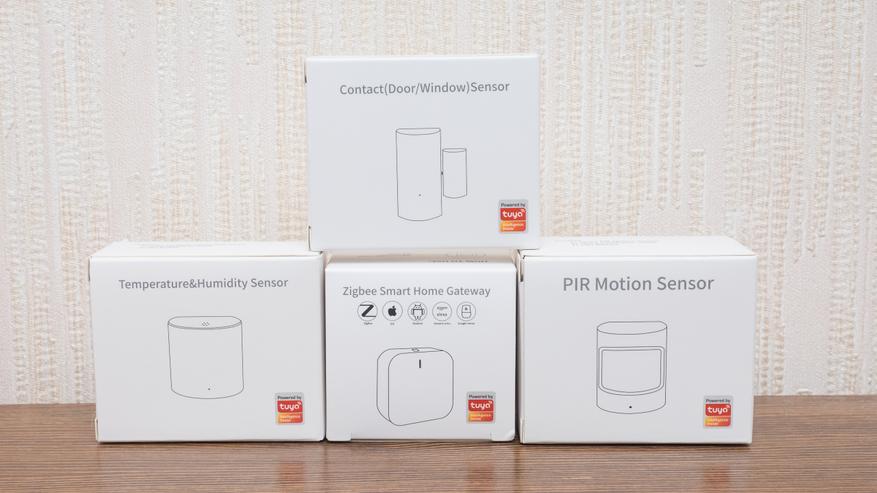
Поставка
Как я уже сказал мне достался стартовый набор 4 в 1. По сути 4 устройства сложили в одну общую коробку. В зависимости от производителя — внешний вид и компоновка будет отличаться.
Производитель, а точнее заказчик моего набора — Alfawise, бренд принадлежащий магазину Gearbest. В набор входит Zigbee шлюз и датчики температуры и влажности, открытия и движения.
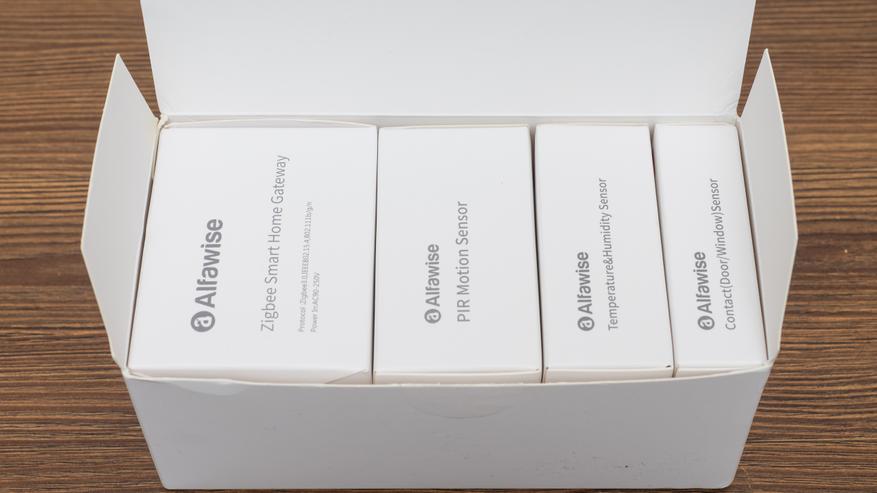
На всех коробках стоит отметка о том, что датчики предназначены под экосистему Tuya Smart. К слову сказать многие датчики от разных брендов — совершенно идентичны не только по аппаратной части но и даже внешне.
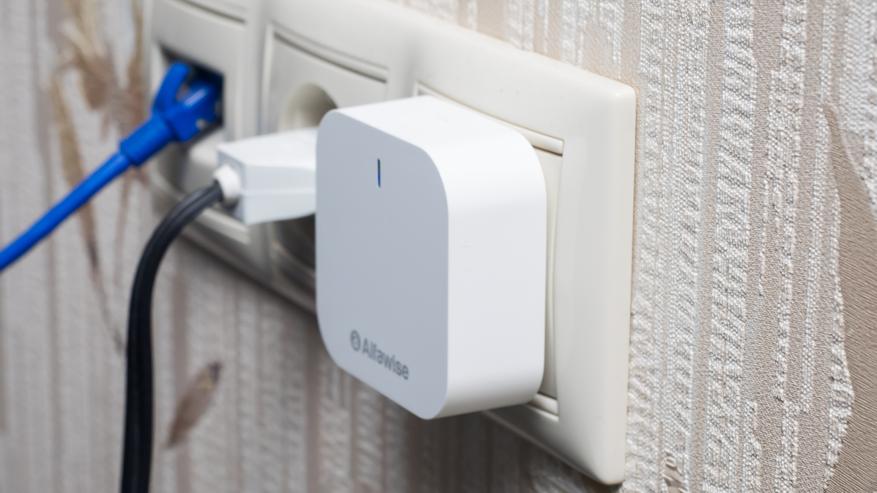
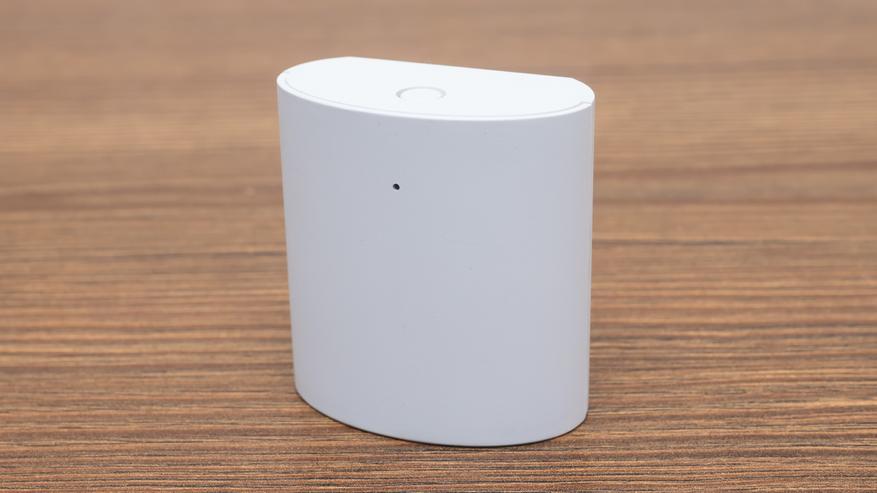
Шлюз Zigbee
Начнем с шлюза. Главная его задача — обеспечивать взаимосвязь между устройствами с беспроводным интерфейсом Zigbee. Кроме него у шлюза есть и wi-fi, с помощью которого он подключается к домашней сети и держит связь с облаком.
ZigBee — спецификация сетевых протоколов верхнего уровня — уровня приложений APS (англ. application support sublayer) и сетевого уровня NWK, — использующих сервисы нижних уровней — уровня управления доступом к среде MAC и физического уровня PHY, регламентированных стандартом IEEE 802.15.4. ZigBee и IEEE 802.15.4 описывают беспроводные персональные вычислительные сети (WPAN). Спецификация ZigBee ориентирована на приложения, требующие гарантированной безопасной передачи данных при относительно небольших скоростях и возможности длительной работы сетевых устройств от автономных источников питания (батарей).
Кроме шлюза в его коробке еще нашлась небольшая инструкция на английском.

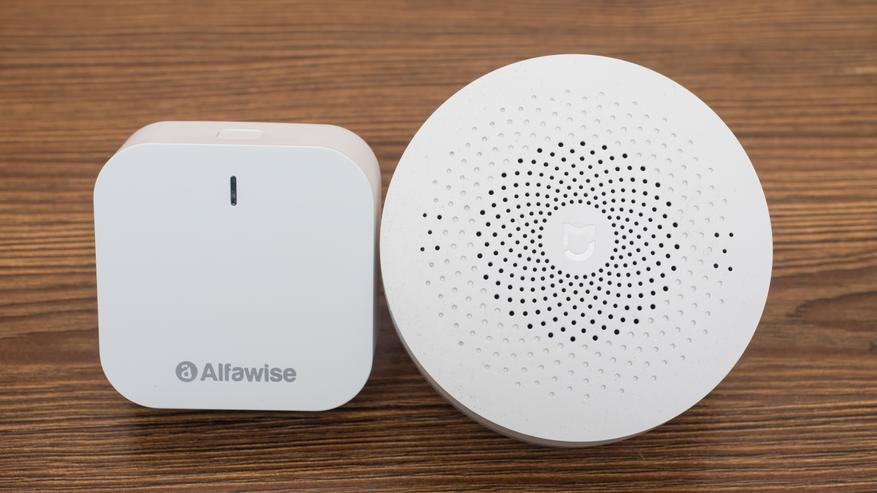
Размер в сравнении с круглым шлюзом Xiaomi. Кстати его основная задача — ровно такая-же, работать мостом между основной транспортной сетью wi-fi и энергоэффективной ячеистой сетью zigbee, в которую соединены датчики, сенсоры и исполнительные устройства умного дома.
Для этого шлюза не нужно никаких переходников — он оснащен нормальной вилкой европейского образца. Никаких других разъемов или соединителей на корпусе больше нет.
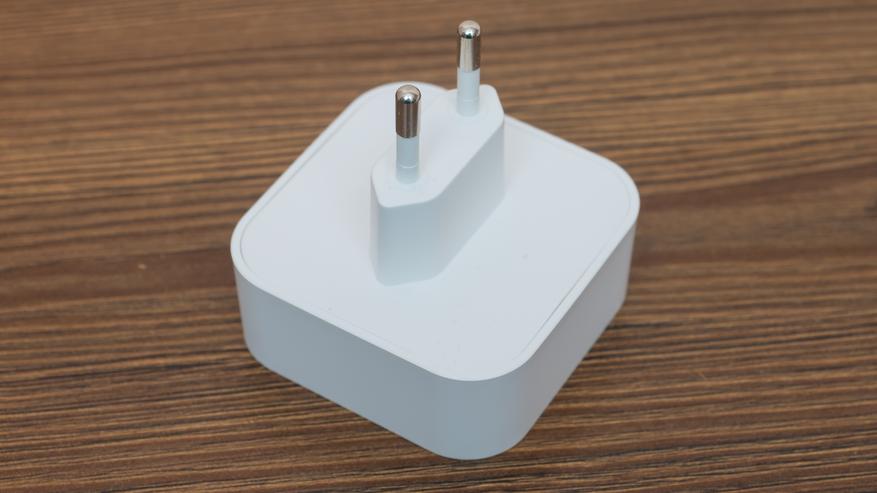
Из управляющих элементов — имеется одна кнопка, которая имеет несколько вариантов нажатий в зависимости от желаемого результата.
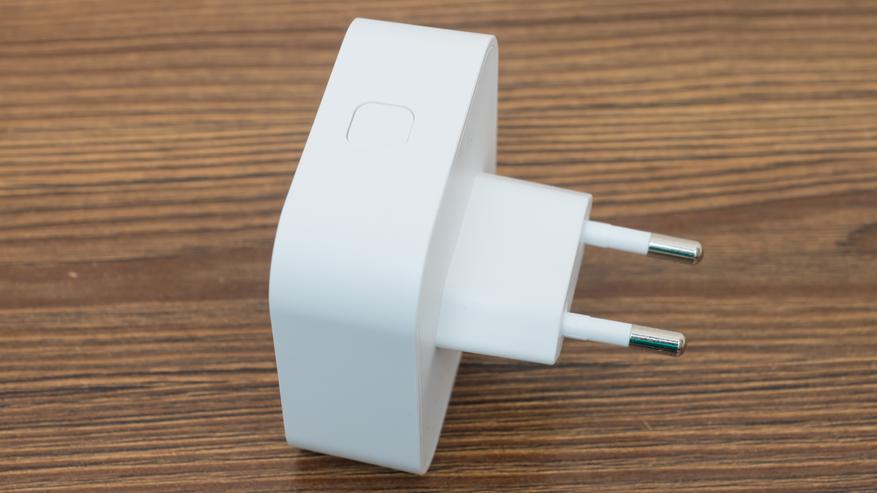
Шлюз подключается в розетку, он достаточно компактный и не мешает соседним устройствам. После первого подключения он автоматически переходит в режим сопряжения, о чем свидетельствует мерцание светодиода на фронтальной стороне.
Приложение управления
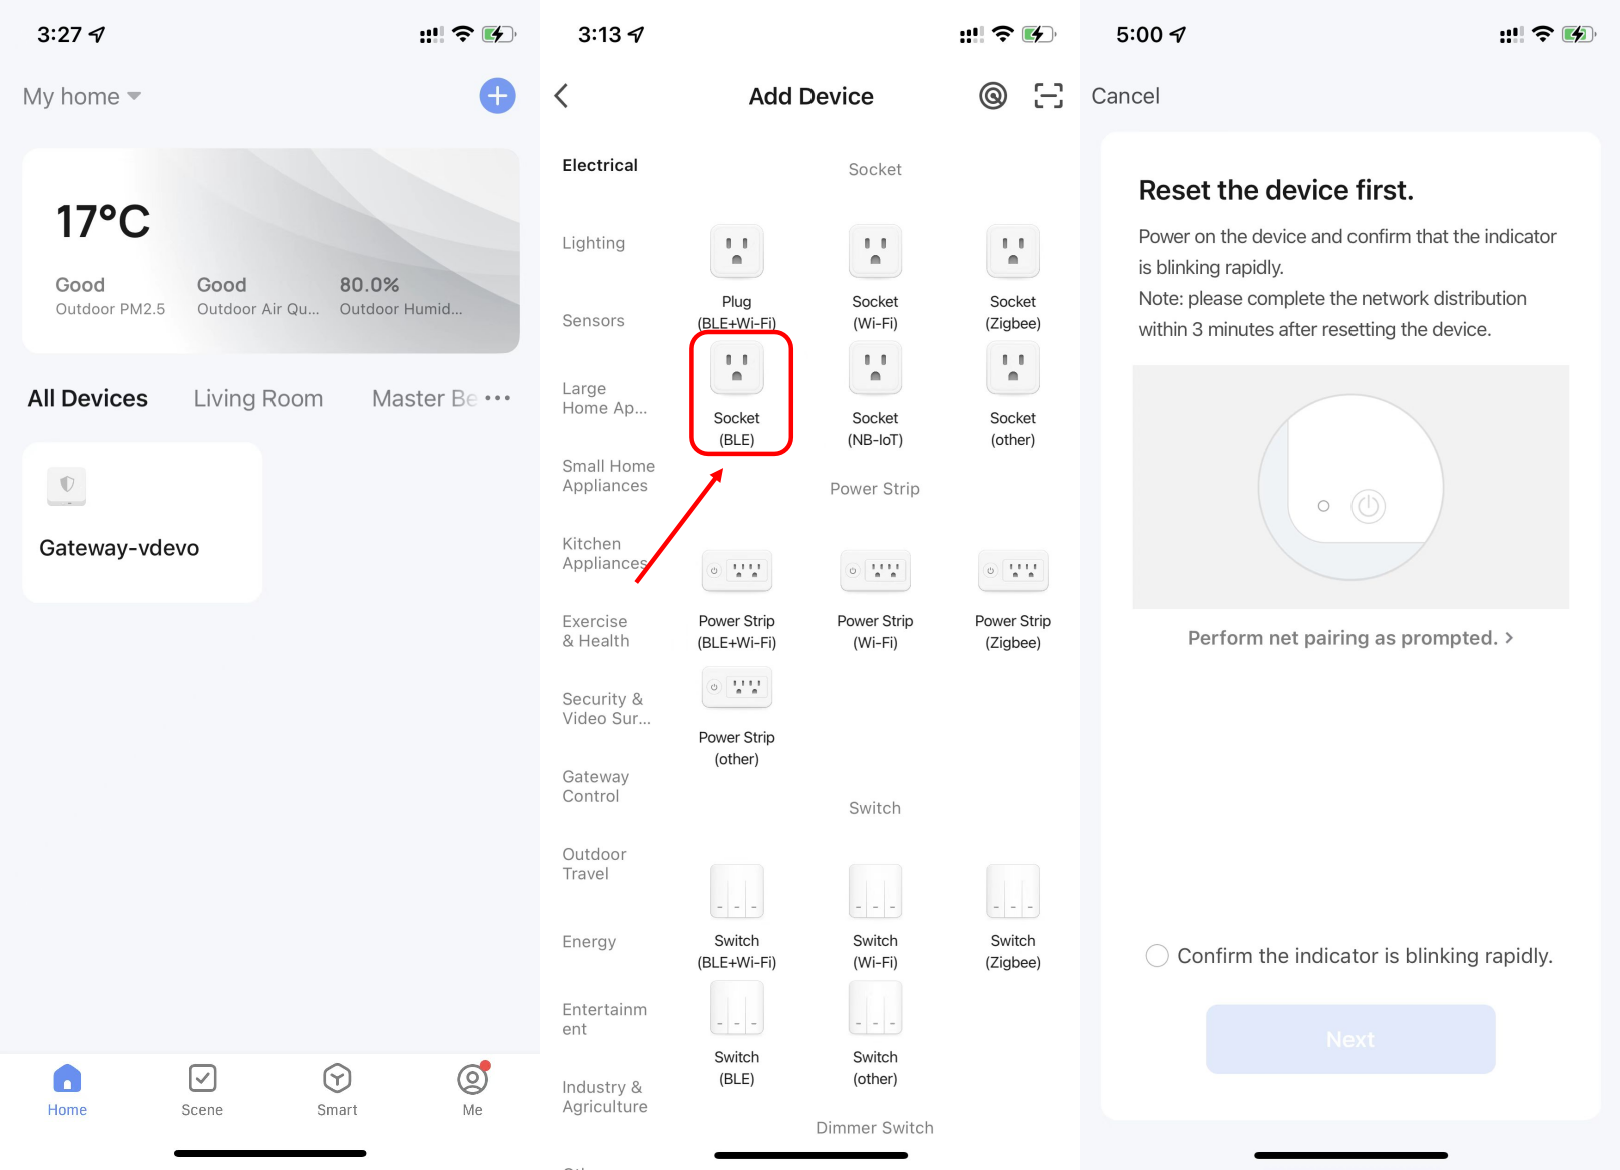
Базовыми приложениями для этой экосистемы являются Tuya Smart и его клон — Smart Life. Кроме этого, ряд производителей — например Blitzwolf, выпустили свои клоны, рассчитанные только под собственные устройства. Я предпочитаю оригинал — Tuya Smart, оно понимает любые устройства экосистемы, у меня сейчас подключено три, работающие по wi-fi — розетка Alfawise, потолочный светильник Utorch и настольная лампа Nous.
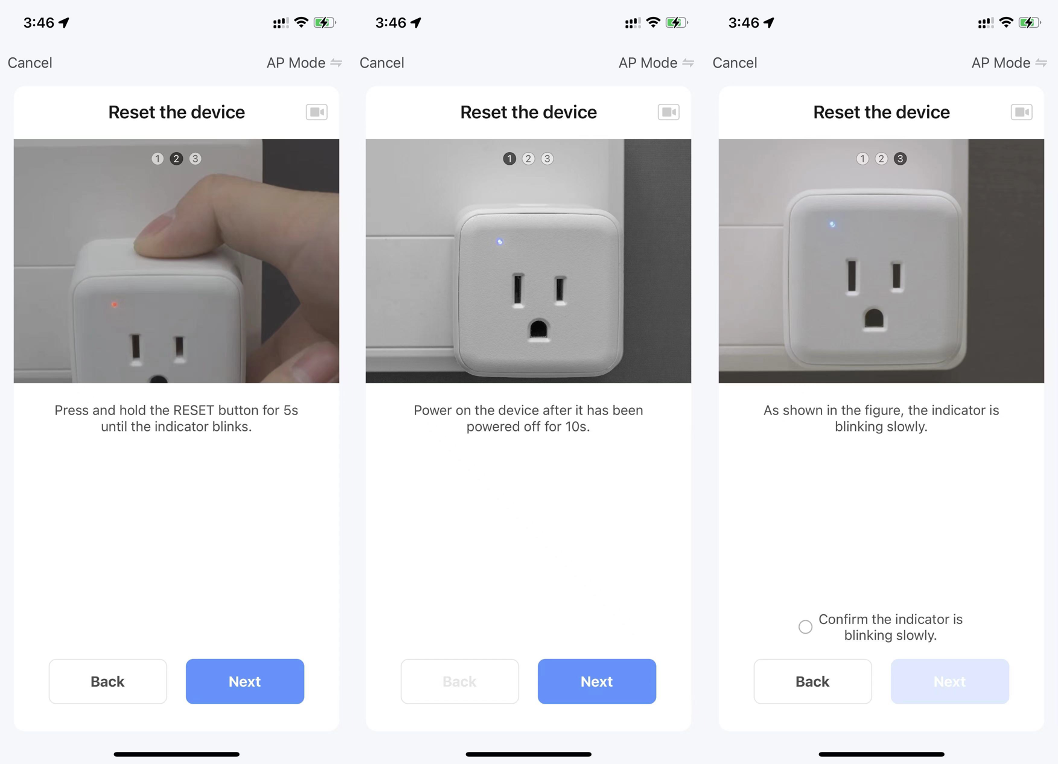
При добавлении нового устройства приложение показывает ряд предупреждений — о том что используется диапазон 2,4 ГГц, в внимательности при вводе пароля для сети, о необходимости выдачи разрешений приложению Tuya для использования различных интерфейсов и о том что устройство запускает режим сопряжения на три минуты после первого включения или сброса в заводские настройки.
Переходим в раздел добавления устройств, управление шлюзами и выбираем Zigbee шлюз. Тут их несколько вариантов, не страшно если ошибетесь сначала, он просто не найдется. Приложение напишет если ему будет не хватать каких-то разрешений и доступов. Когда все разрешения будут выданы — оно перейдет к процедуре поиска устройства.
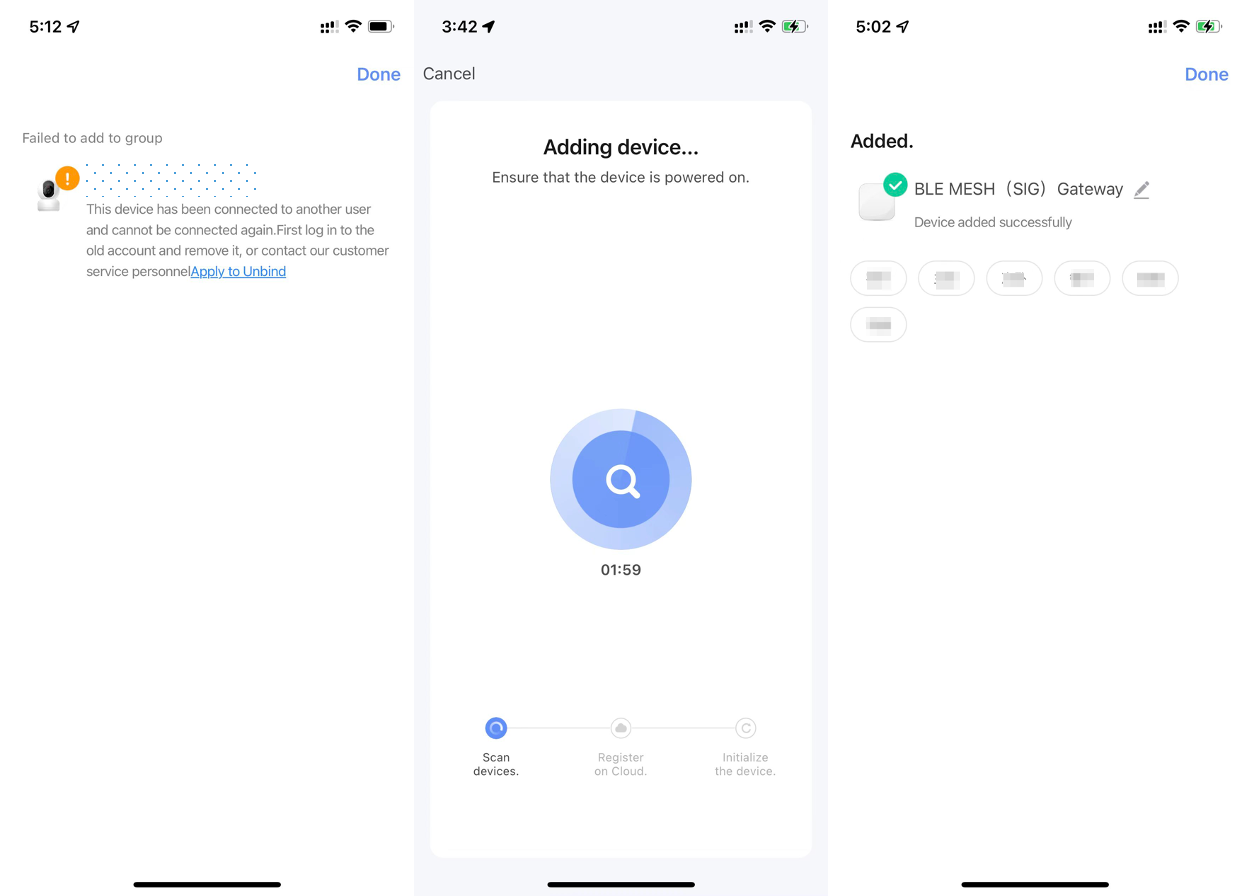
Сначала надо проверить находится ли шлюз в состоянии сопряжения, по мерцанию диодов, если все ок на следующем этапе смартфон начнет поиск шлюза — по имени точки доступа, которую тут создает при первом включении или сбросе, далее он подключается к шлюзу, передает параметры подключения, выполняет регистрацию в аккаунте и на финальном шаге остается задать имя устройства и место его расположения.
Шлюз появился в общем списке устройств, он автоматически обновляет свою прошивку, причем может это сделать несколько раз подряд. После этого он готов для подключения zigbee устройств — кроме этого он никаких действий, как например шлюз сяоми — световые и звуковые сигналы, производить не может.
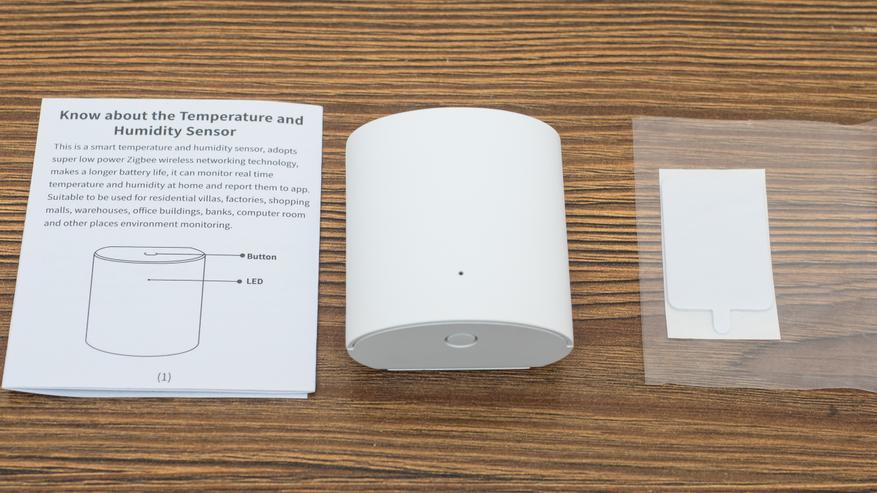
Датчик температуры и влажности
Теперь перейдем к дочерним устройствам шлюза — первым рассмотрим датчик температуры и влажности. Он поставляется с такой же лаконичной инструкцией и куском двустороннего скотча для крепления на стене.
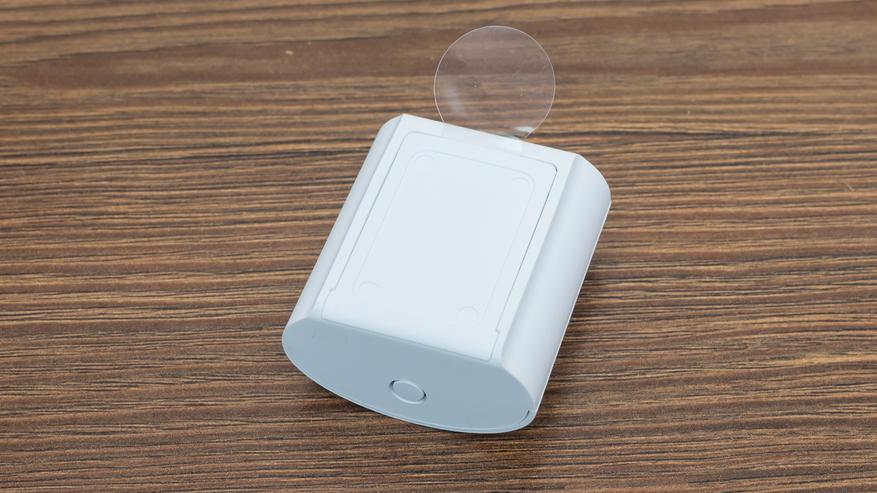
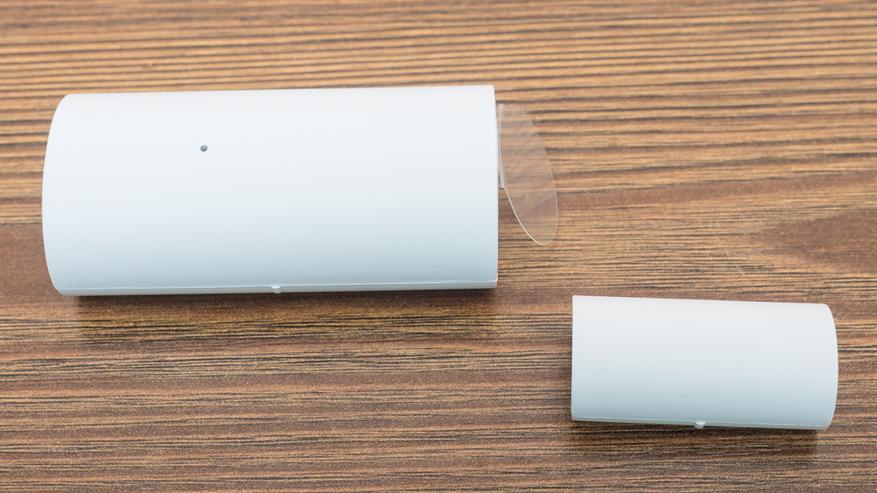
Датчик чем то напоминает спичечный коробок с закругленной стороной, на нижнем торце — на слайде он сверху, находятся отверстия для забора воздуха.

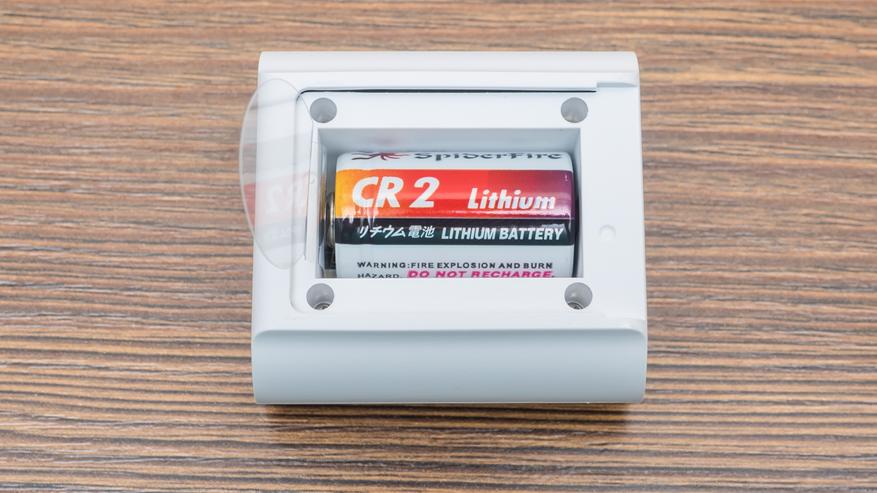
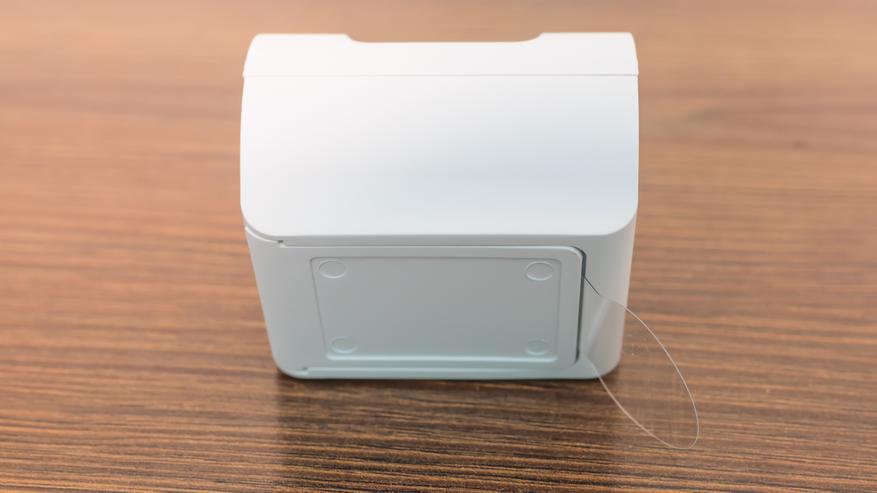
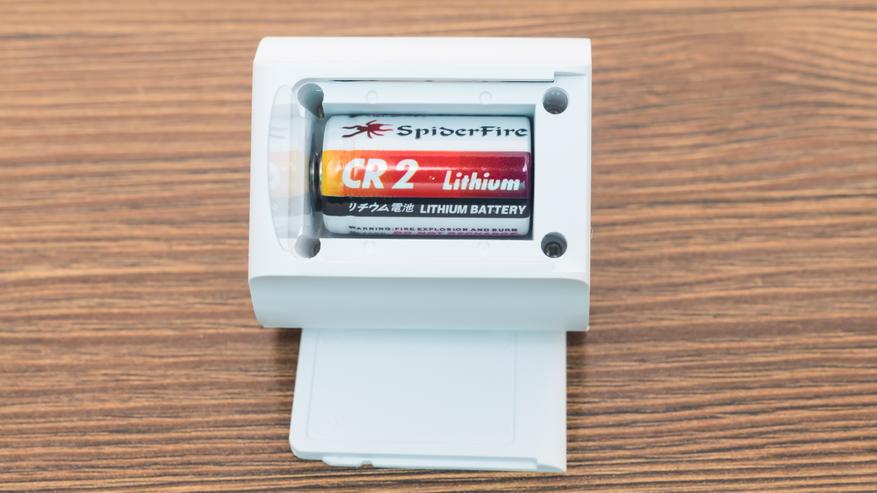
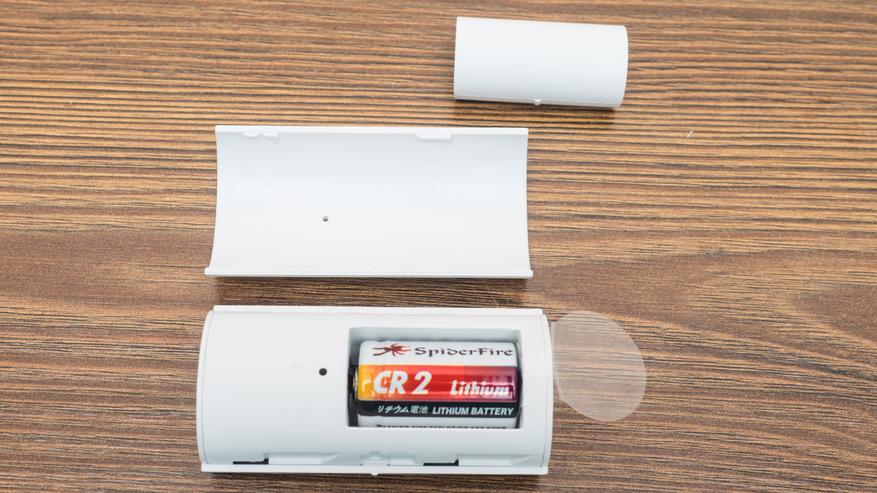
Сзади — отсек для элемента питания, чтобы он не разряжался в дороге, установлен специальный пластиковый предохранитель.
В отличии от аналогичных датчиков Xiaomi или Aqara, где используется плоская батарейка CR2032 — тут установили литиевую батарейку CR2 гораздо большей емкости.
На верхнем торце датчика находится единственная кнопка, которая будет необходима для его перевода в режим сопряжения.
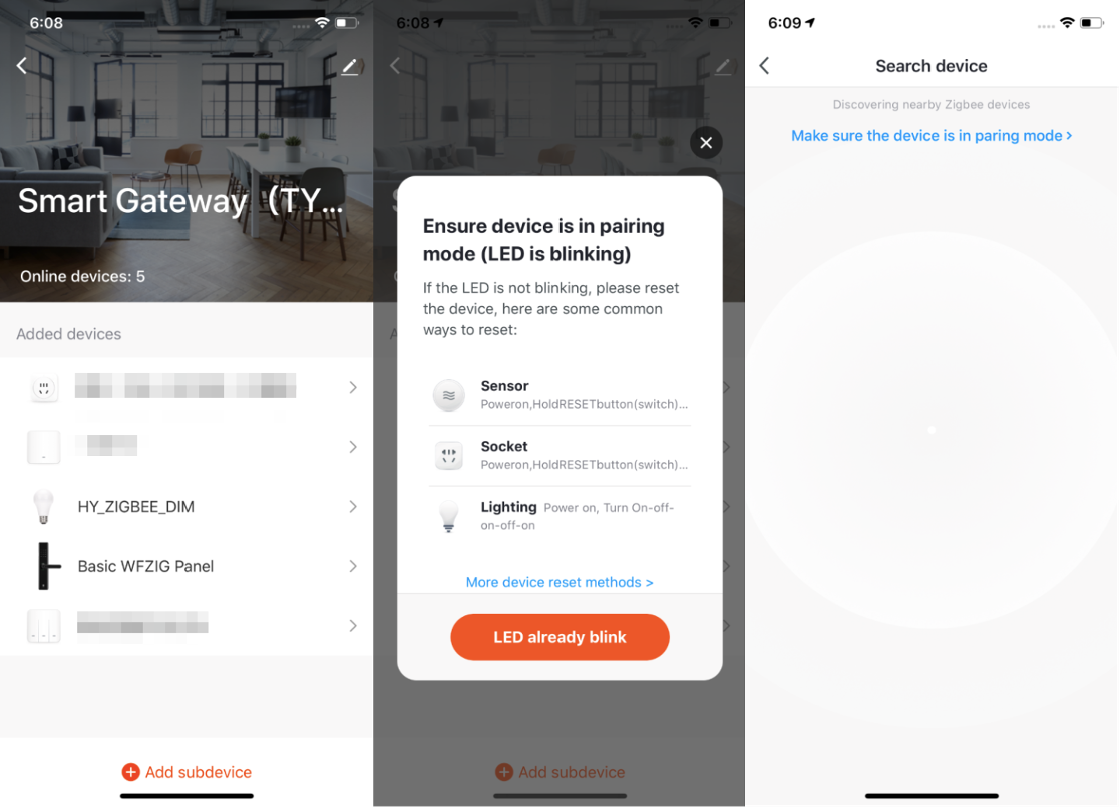
Заходим в плагин шлюза и нажимаем добавить подустройство. Согласно подсказке зажимаем на датчике кнопку на 5-7 секунд пока не начнет мерцать светодиод и переходим к шагу поиска. Через несколько секунд шлюз обнаруживает устройство и показывает его имя. Для завершения подключения — нажимаем на него и указываем его имя и месторасположение.
В общем списке — появляется новое устройство, причем данные о температуры и влажности видны сразу в строке датчика. Здесь мы встречаемся с трудностями перевода, причем не последний раз, в плагине шлюза он гордо именуется как датчик температуры и шума. Такие особенности мы будем встречать в самых неожиданных местах.
Датчик имеет свой плагин в котором отображается текущие значения этих параметров, а в нижней части окна есть исторические данные в виде графика по их изменениям. Слева посередине изображен уровень заряда аккумулятора, слово высокий — очевидно о нем.
А вот слово высокий справа — это вызов меню уведомлений датчика, оно кстати встречается у всех подобных сенсоров. Датчик может отправлять уведомления по показаниям температуры, но мне не удалось выяснить порог срабатывания и по низкому заряду батарейки.
Датчик также может участвовать в автоматизациях, о них мы тоже поговорим в этих обзорах. Он может служить условием срабатывания автоматизаций по трем видам показаний — жужжание, аккумулятор и температура.
Жужжание, как догадались самые продвинутые зрители — это не обнаружение роя пчел или ос, а влажность. И тут есть три условия сработки — меньше заданного значения, равно указанному значения и больше заданного значения. Именно для этого датчика актуальны условия больше и меньше, причем значения могут задаваться вплоть до сотых долей %.
С температурой никаких интриг нет — это действительно именно температура. Те же три условия — больше, меньше и равно. Лично меня заинтриговал возможный предел установок — от — 40 до плюс 200 С, особенно с учетом того что это датчик для внутреннего, комнатного размещения.
Третий тип показаний — аккумулятор, это очень полезно, например чтобы отправлять уведомление о необходимости замены батарейки и тут этот параметр можно настраивать в отличии от уведомления из плагина датчика.
Датчик движения
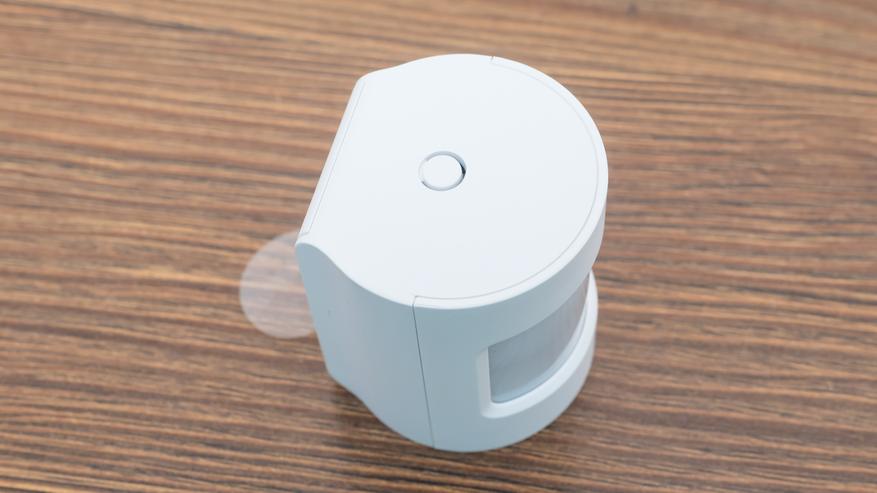
Следующим будет датчик движения. Он также поставляется с кусочком скотча и небольшой инструкцией. Внешне — это совершенно типичный датчик движения с окошком сенсора на фронтальной части.
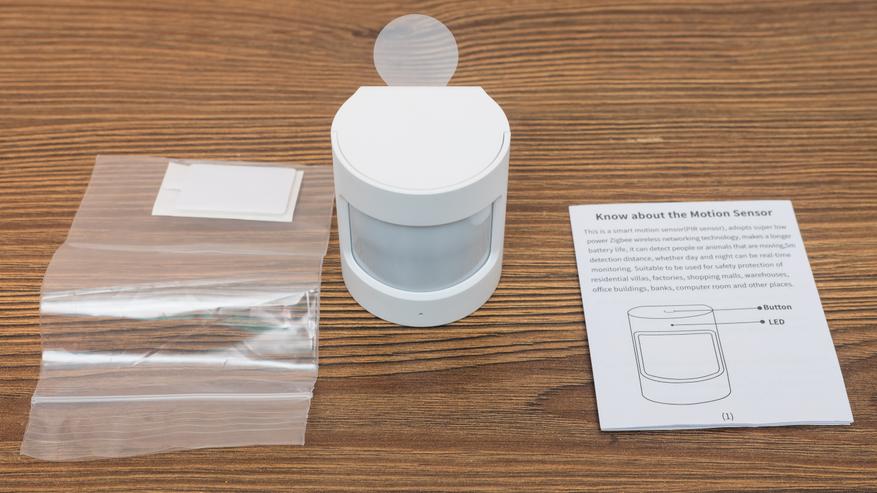
Сзади — отсек для элемента питания тоже с предохранителем. Мелочь, но ее не всегда учитывают, например в зигби устройствах xiaomi, тех что рассчитаны на внутренний рынок, их не ставят.
Кнопка сопряжения находится на верхнем торце датчика. По ней кстати можно и определять где верх, а где низ.
Элемент питания — тут тоже CR2. Насколько хватит — не знаю, но у датчиков Xiaomi плоской хватает на годы, тут должно быть как минимум столько же.
Процесс добавления аналогичен уже рассмотренному — зажимаем кнопку, запускаем сканирование, задаем имя и локацию. С датчиком движения — не намудрили, он так и называется.
В плагине датчика, сверху отображается его текущее состояние — есть движение или нет. Когда оно обнаруживается, приложение считает что “кто-то переехал” но мы уже знаем про особенности перевода. Переход в состояние нет движения происходит ровно через минуту после его последней регистрации. В нижней части окна — лог срабатываний. Тут тоже есть индикатор заряда и меню уведомлений, тут оно названо как установить будильник, видимо от слова alarm.
Тут есть два условия срабатывания — если датчик регистрирует движения и по уровню заряда батарейки. Это проверить легко, и действительно уведомление прилетает на телефон когда датчик отслеживает движение.
Это действие считается тревожным срабатыванием и кроме лога в самом плагине — будет отображаться в журнале тревог приложения Tuya Smart. Сюда будут попадать аналогичные события от других датчиков.
В автоматизациях датчик может быть условием, есть два типа событий, про батарейку мы уже знаем, тут тоже самое, остается событие — государство, видимо так перевели английское state. Состояний у датчика может быть два — есть движение и нет движения.
Кроме этого есть два производных события — наличие или отсутствие движения в течении заданного времени, интервал можно задать от 1 секунды до 5 часов.
Датчик открытия
И последний из набора — датчик открытия. Комплект поставки тоже включает в себя датчик, небольшую инструкцию, она в кадр не попала, и двусторонний скотч для крепления.

Физически датчик разделен на две части — собственно сам сенсор, который реагирует на состояние геркона, это микровыключатель, который замыкается и размыкается при приближении к нему магнита. И сам магнит — который и воздействует на геркон. На их корпусах есть метки которые и нужно совмещать.
Элемент питания тут также CR2 — предварительно я это отношу к плюсам, так как использование емких батарей должно повысить автономность работы.
Подключение устройства — аналогично, зажимаем кнопку, шлюз находит и сопрягается с датчиком, называем его и указываем локацию. Вот так в плагине выглядят все датчики из стартового набора. Этот датчик именуется контактным.
Этот датчик, как и датчик движения, может иметь только два состояния — открыт или закрыт. Поэтому такие датчики относятся к классу бинарных сенсоров. В плагине отображается текущий статус — открыто или закрыто, в нижней части — лог. Тут тоже есть статус батарейки, а меню уведомление называется сигнализация.
Сигнализировать он может о своих состояниях — открыто или закрыто и об уровне заряда аккумулятора. Забегая вперед скажу что это все лучше настраивать автоматизациями.
А в автоматизациях, кстати тут вообще не заморочились с переводом, датчик открытия тоже служит условием. С уровнем заряда батареи, а это она скрывается под иероглифами, мы знакомы, а меню state — это его состояние. Открыто, закрыто или находится в одном из этих состояний в течении заданного времени — от секунды до 5 часов.
Взаимодействие устройств умного дома
В этой части мы поговорим об автоматизациях — все устройства умного дома взаимодействуют именно таким образом. Тема сама по себе огромная и в одном обзоре ее охватить невозможно, но базовые принципы мы рассмотрим.
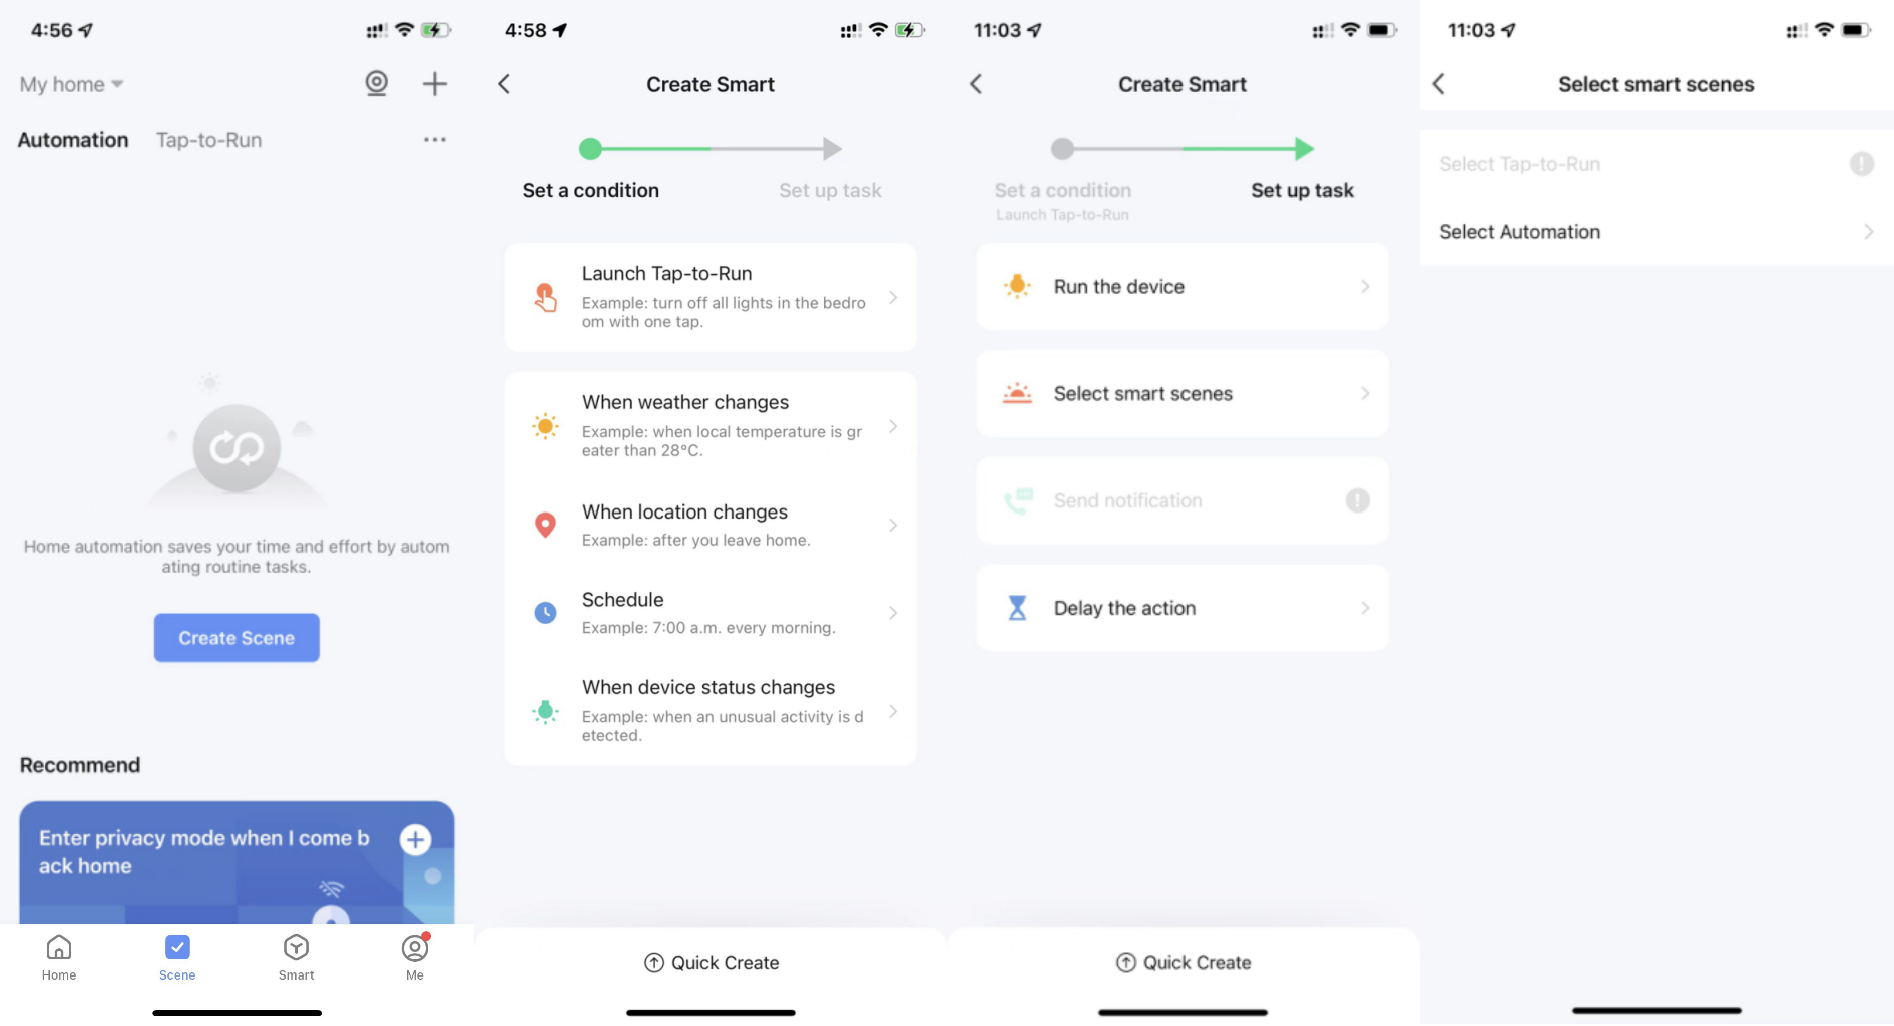
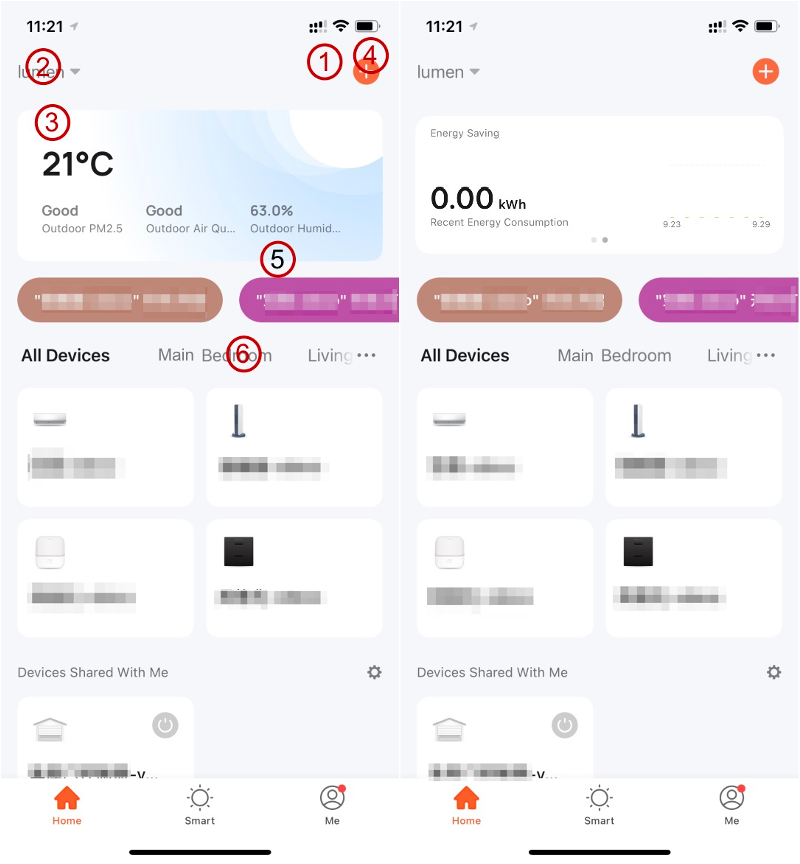
Первый экран приложение представляет собой список подключенных устройств. Сценарии находятся на втором экране — кнопка внизу в центре. Он в свою очередь делятся на мгновенные сценарии и автоматизации. Чем же они отличаются друг от друга? Нажмем на оранжевый плюс в правом верхнем углу.
Мгновенный сценарий
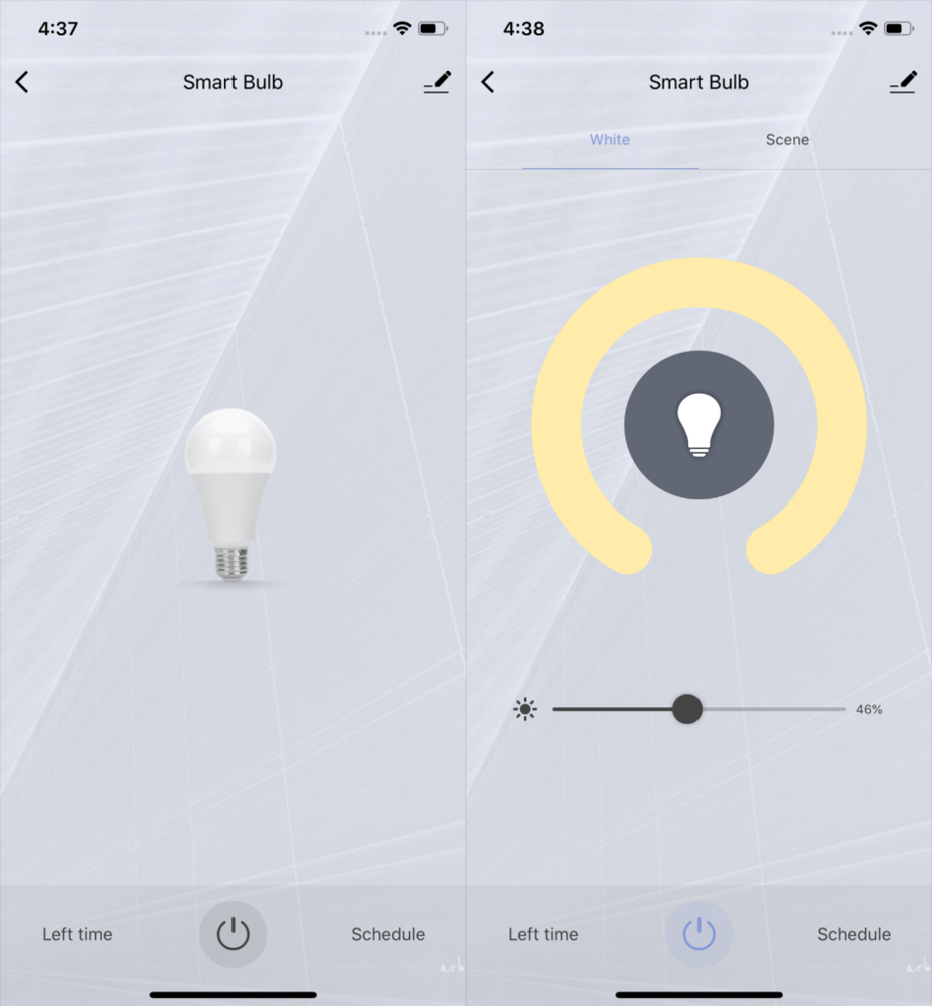
Это запустит мастер создания сценариев, он общий. Что это будет — мгновенный сценарий или автоматизация — зависит от условия, первое, которое называется “Коснитесь для запуска” — это и есть мгновенный сценарий, последовательность действий которое будет запускаться вручную. С него и начнем. После выбора ручного запуска, открывается меню выбора действий, первое это действия с устройствами. В моем случае показано три устройства которые могут выполнять какие-то действия но по факту их два, так как датчик температуры и влажности ничего делать не может.
Если выбрать лампу — то откроется следующее меню — все доступные действия, в данном случае включение и выключение, настройки яркости и цветовой температуры.
Можно выбрать одно из этих действий — это позволит не просто включать или выключать но и устанавливать желаемую яркость и цветовой тон, например в зависимости от времени суток.
Выбрав нужное действие, в данном случае включение, нажимаем далее и видим основу будущего сценария. Условием является ручной запуск, в этом случае оно может быть единственным, а действий может быть много — пока тут включение люстры. Чуть ниже имя сценария, оно задается автоматически, для удобства назовем его более понятно
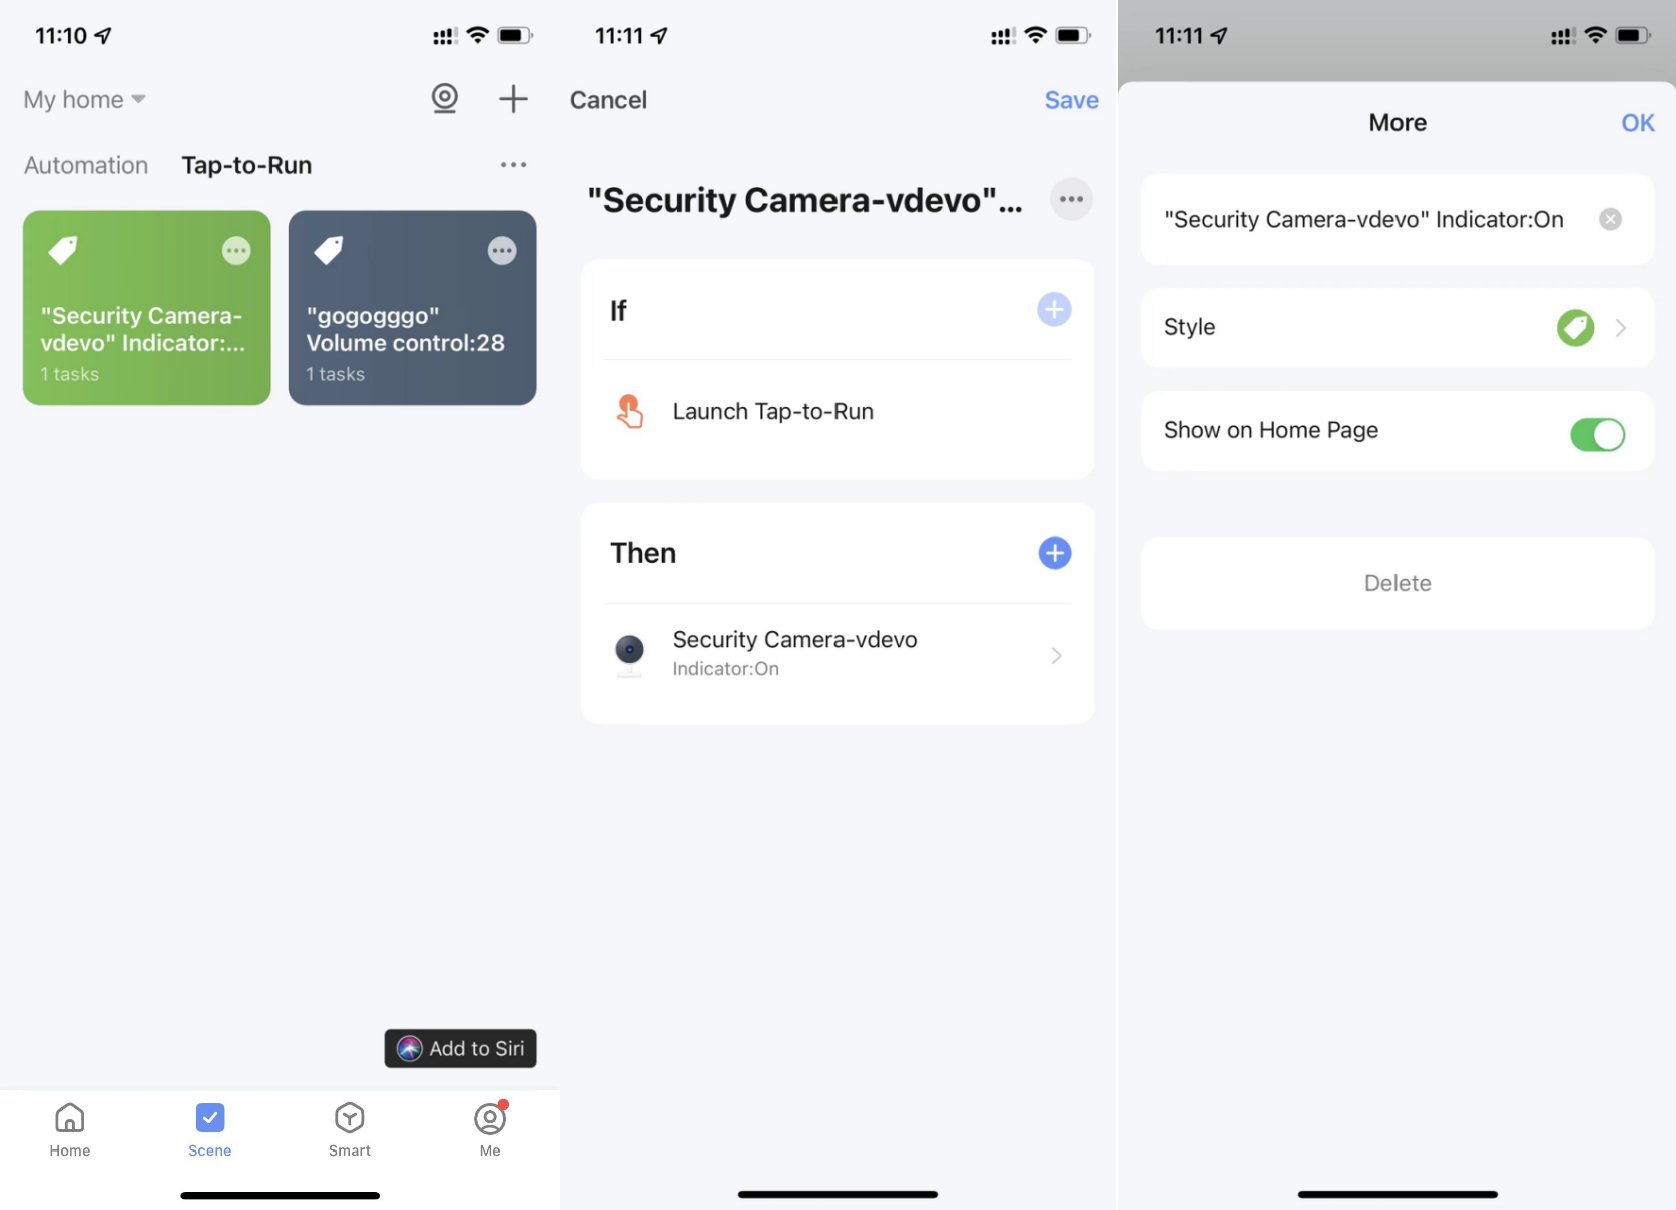
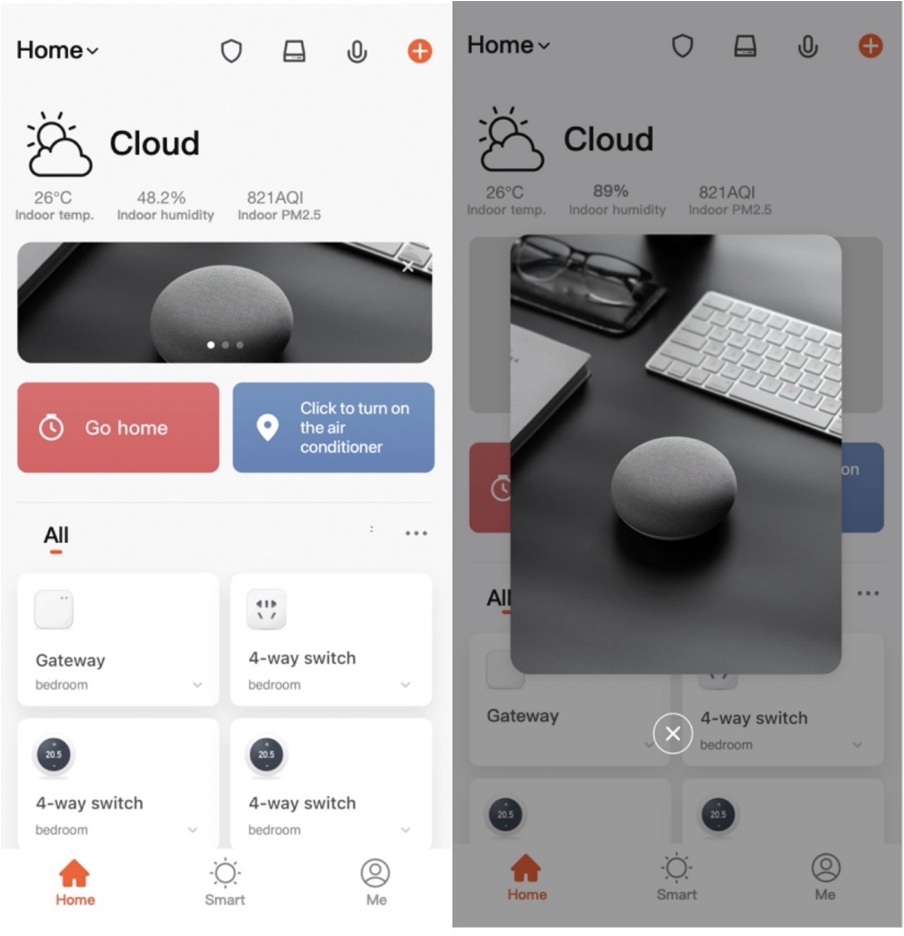
Нажав на плюсик в списке действий, они тут называются задачами, выбираем и добавляем еще одно — максимальную яркость, тут она задается в диапазоне от 0 до 255. Подобрать можно экспериментально. При необходимости добавляем дополнительные действия, например включение целой группы светильников с заданными параметрами. Перейдем в меню стиль
Тут можно выбрать оформление сценария — то как он будет отображаться в интерфейсе приложения — это либо фоновый цвет с иконкой либо картинка из числа доступных.
Если включить переключатель — показать на домашней странице, то после сохранения сценария он будет доступен не только из меню мгновенных сценариев но и на главной странице с списком устройств. Если нажать на него — запускается выполнение всех прописанных в нем действий.
Автоматизации
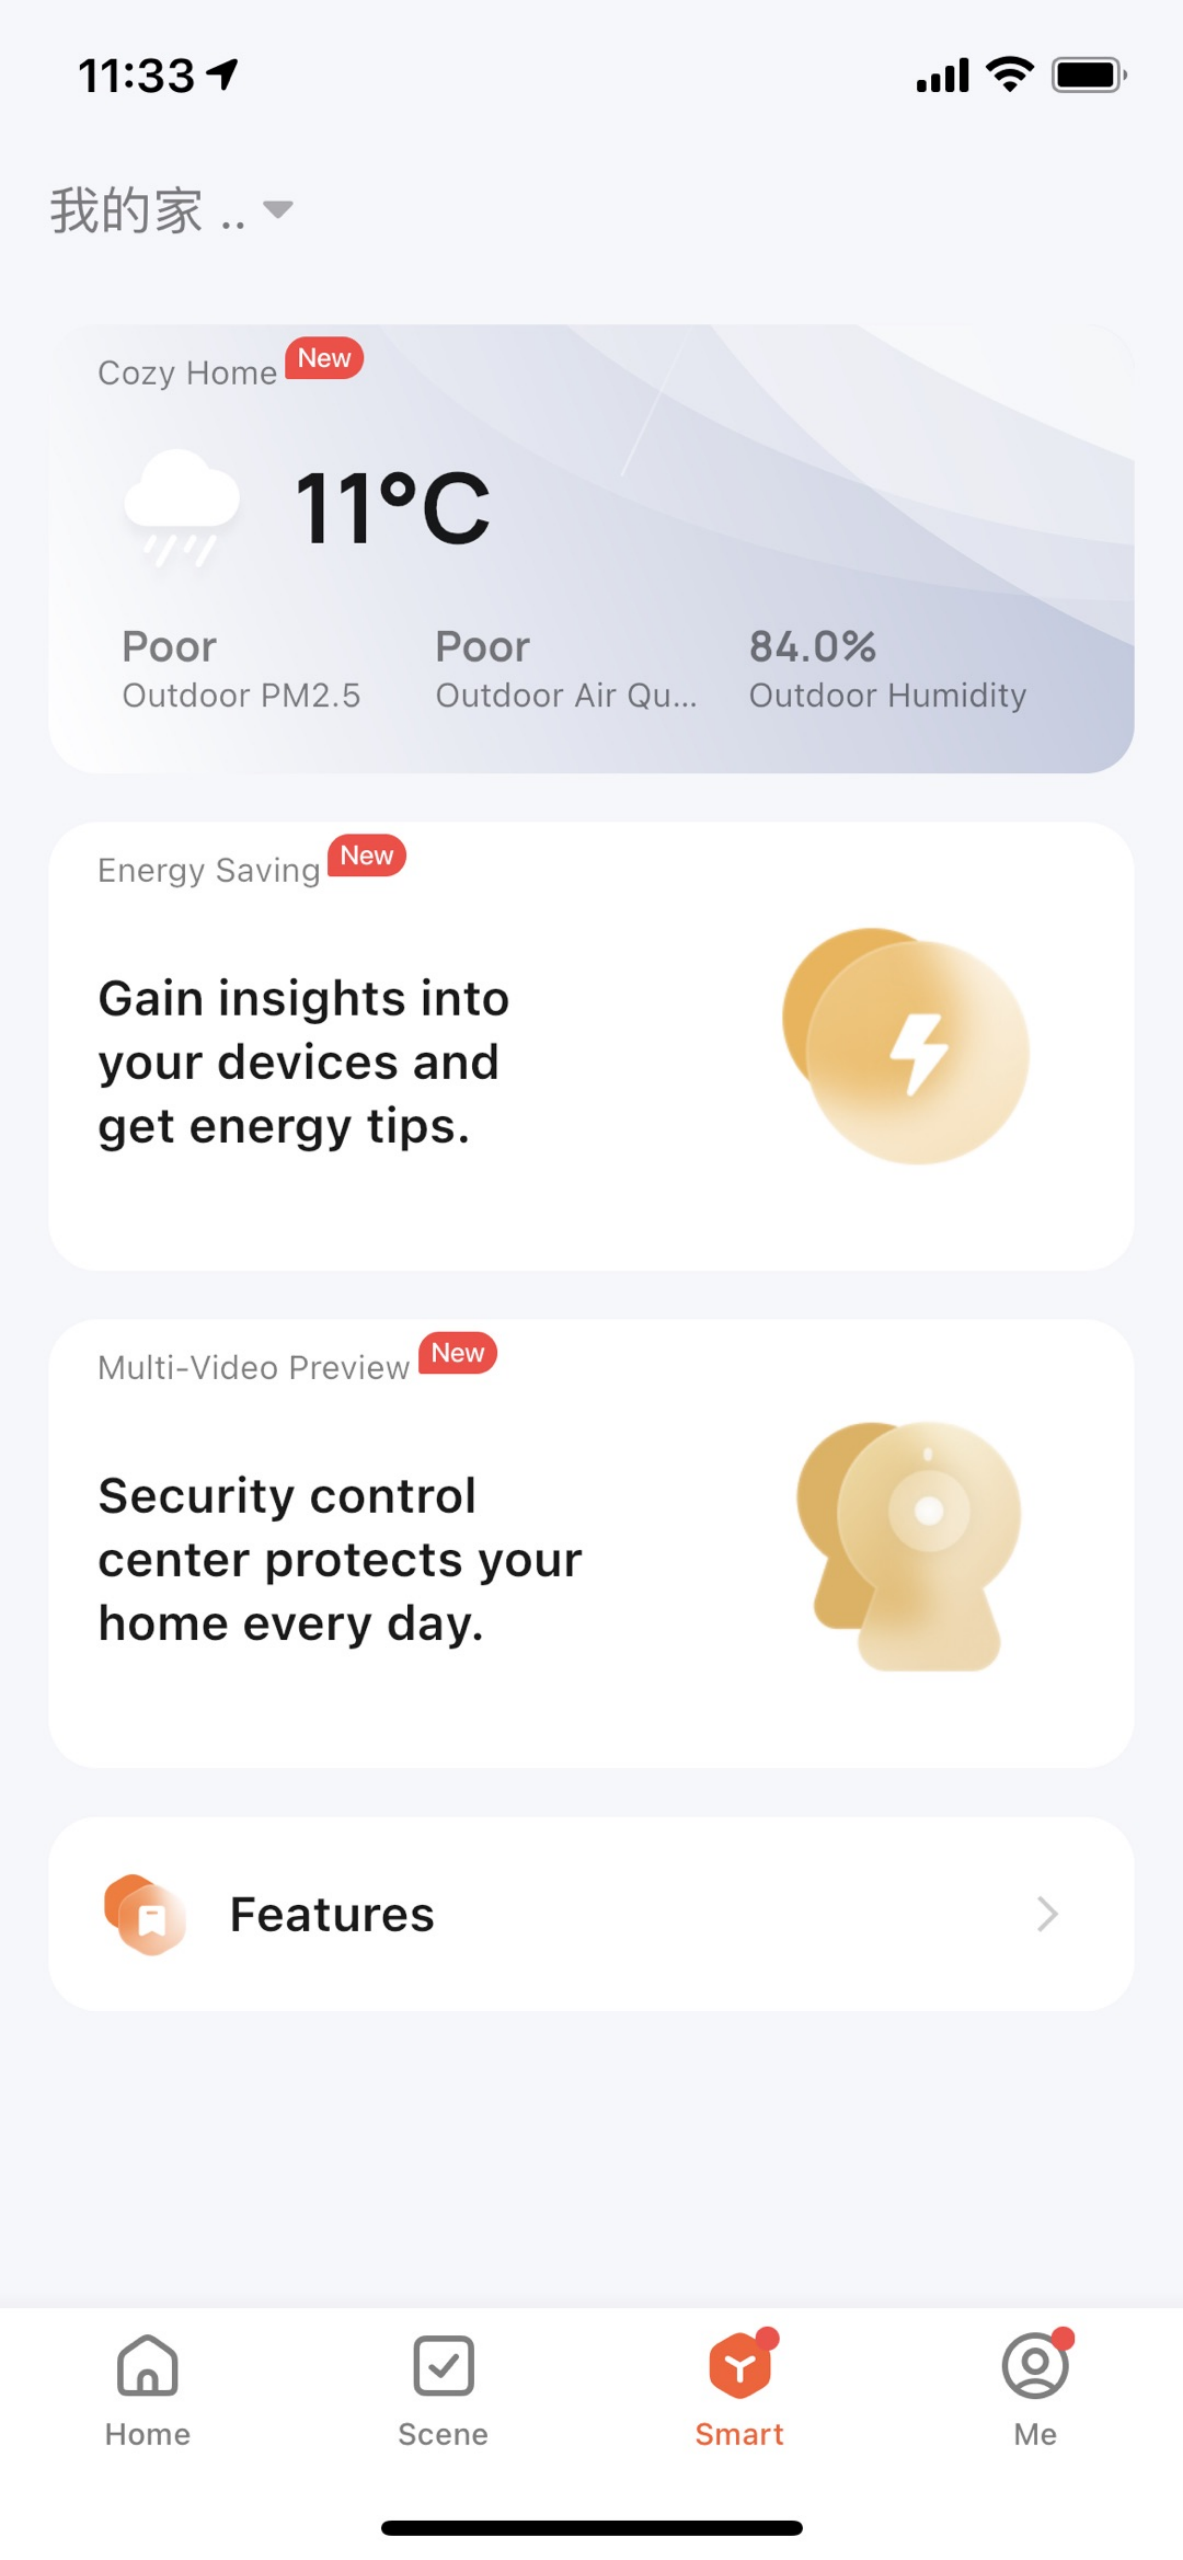
Вернемся к мастеру созданий сценариев. Все пункты ниже ручного запуска который мы уже рассмотрели — относятся к автоматизациям, действия в них будут выполнятся в зависимости от каких-то факторов, но не вручную. Доступны следующие опции — погодные условия, они берутся из прогноза в привязке к местности, такие как температура.
Влажность — тут нет выбора цифровых значений, уровни разделены на три диапазона, погода — например дождь или снегопад, кроме этого доступны события восход или закат. Есть даже скорость ветра, возможно для автоматизации закрытием и открытием окон.
Приложение имеет доступ к геолокации, поэтому есть возможность отрабатывать сценарии по выходу и входу из определенной зоны, которую можно отметить на карте, с радиусом от 100 метров до 1 километра.
Запуск автоматизаций можно привязать к конкретному времени, причем с возможностью выбора дней недели когда они будут активны. И, наконец, условиями для запуска автоматизаций могут служить состояния устройств. Давайте рассмотрим несколько практических примеров.
Свет по движению
Для начала возьмем датчик движения и выберем одно из доступных условий — определение движения. После выбора условия для запуска автоматизации переходим к выбору действий — в отличии от мгновенного сценария тут доступны все варианты включая уведомление.
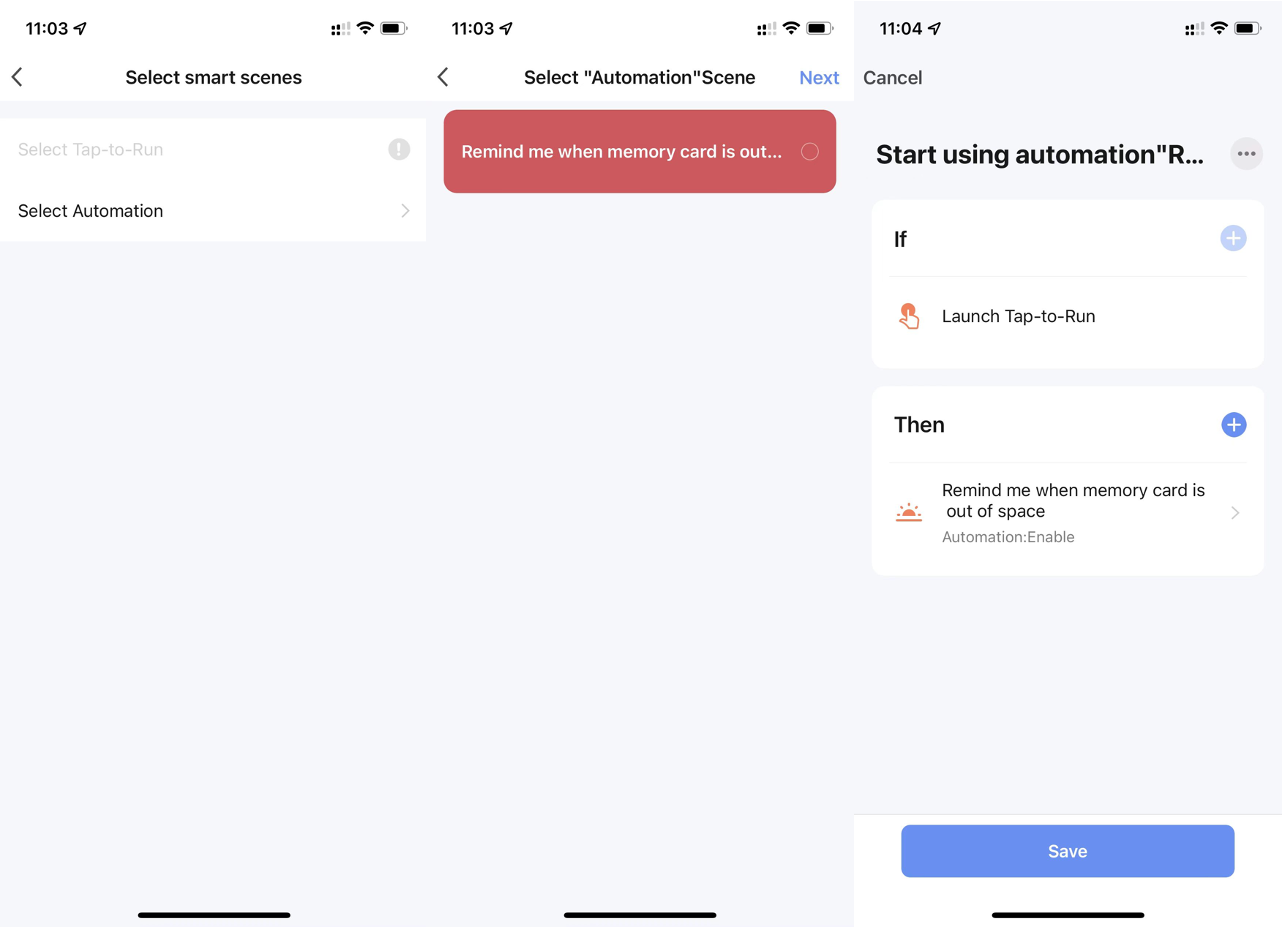
Можно выбрать действие с устройствами — доступные все те же что и для ручного запуска, можно запустить мгновенный сценарий или управлять состояниями автоматизаций (об этом чуть далее). В сценариях — уже доступен созданный нами ранее.
Остальные опции — это отправка уведомления на смартфон при выполнении автоматизации и задержка которую можно задавать между выполнениями действий автоматизации.
В качестве действия используем уже созданный нами мгновенный сценарий по включению люстры, вместо того, чтобы создавать аналогичный порядок действий и здесь. Задаем удобное имя для нее.
Теперь переходим в меню срока действия, это время когда автоматизация будет действовать — это либо полный день, день и ночь — это время от рассвета и заката и наоборот и заданный вручную интервал времени.
Кроме этого задаются и дни недели, когда автоматизация будет отрабатываться.
В данном случае включать люстру по движению будем только в ночное время суток. При желании меняем стиль оформления автоматизации и сохраняем ее. После сохранения автоматизация готова к работе и видна в меню. При помощи переключателя на ней — ее можно отключать и включать.
При необходимости любая автоматизация может быть отредактирована или удалена. Например в условие можно добавить еще один или несколько датчиков, а в действия — новые устройства, задержки и уведомления.
Сделаем обратный сценарий — выключение света при отсутствии движения. В условиях выбираем нет человека продолжительность, ставим нужное время, например 5 минут, а в действиях — выбираем выключение светильника.
В этом сценарии логичнее оставить продолжительность полный день — на тот случай если светильник будет включен вручную, сохраняем и активируем его
Увлажнение воздуха
Рассмотрим еще один сценарий — управление розеткой, в которую можно включить увлажнитель воздуха с механическим управлением, в зависимости от показаний влажности. Влажность в условиях у меня именуется жужжанием. Для включения будет использоваться условие — жужжание, простите, влажность менее 40%. Действие — включение розетки, тут оно обозначено как НА, перевод английского слова on.
Время выполнения — с 9 утра до 9 вечера, чтобы не гудело ночью, выбираем желаемый стиль оформления и сохраняем его.
Делаем обратный сценарий — отключение увлажнителя при превышении уровня влажности — я поставил 60 %. На розетке выбираем действие выключить, время действия ставим аналогичное автоматизации включения.
Сохраняем и активируем автоматизацию. Кстати в этом случае нужно добавить к условиям автоматизации еще и таймер, который будет отключать вечером работающий увлажнитель не дожидаясь показания датчика влажности.
Открытие окна
При проветривании — когда окно открыто, есть смысл отключать увлажнитель и для этого можем сделать автоматизацию по датчику открытия. Тут лучше ставить задержку, чтобы система не реагировала на случайные или короткие открытия — закрытия, например поставим открыто в течении 1 минуты. Далее выбираем действия с автоматизациями.
Тут доступны все уже созданные нами автоматизации, выбираем ту, которая отвечает на включение увлажнителя и отключаем ее. В этом состоянии она отрабатываться не будет. Дополнительно добавляем в действия отключение розетки с увлажнителем и сохраняем автоматизацию.
Аналогично делаем обратную автоматизацию — через минуту после его закрытия — восстанавливаем работу автоматизации включения и включаем розетку с увлажнителем.
Заключение
Надеюсь базовые принципы построения сценариев показанные в этом уроке — помогут вам в создании автоматизаций под собственные нужды. Еще хотел бы добавить, что по лично моим наблюдениям работа приложения и автоматизаций Tuya Smart — заметно быстрее чем в Mihome. А именно проблемы с скоростью и задержки привели меня в свое время к изучению альтернативных систем управления. Это конечно моя субъективная оценка, но если оценивать Tuya Smart и Mihome по быстродействию, победу я отдам Tuya.
Что касается других критериев — база устройств обоих экосистем более менее сравнима, и в одной и в другой имеются свои эксклюзивные решения, но устройства mihome обычно более доступны по цене.
Интерфейс и локализация намного лучше у mihome, Tuya как мы с вами убедились — есть еще куда расти. Логика автоматизаций очень похожа, но mihome имеет более широкие возможности для их настройки.
Но при этом всем, как бы ни была красиво построена автоматизация, если она выполняется с большой задержкой из-за проблем связи с облачным сервисом — она никуда не годится. И в этом отношении, по моим наблюдениям, Tuya выигрывает у Mihome. Тормозов практически никогда нет — а если есть то они скорее всего связаны с локальными проблемами — роутером или провайдером, приложение и автоматизации работают быстро.
Видеоверсия обзора
Introduction: Tuya Smart: Smart Home Automation
In search of new IoT platforms similar to Blynk and RemoteMe, I stumbled upon Tuya. An IoT platform for industrial products. In this Instructable, I will share how to set up and use a smart switch using the Tuya IoT platform. So without any further delay, let’s get started.
Supplies
- Hardware Requirements:
-
Arduino UNO Rev 3 (Amazon IN / Amazon US / Banggood)
-
Wemos D1 Mini (Amazon IN / Amazon US / Banggood)
-
Breadboard Kit (Amazon IN / Amazon US / Banggood)
-
- Software Requirement:
-
Arduino IDE
-
Tuya account
-
Active Internet Connection ;p
-
Step 1: Making a Device on Tuya.
First things first, we need to create an account on Tuya’s IoT platform. To do that, head over to Tuya.com and sign up to create your account. Once you have created an account, log into it and follow the steps given below.
You will be greeted by an overview page. On the top, you will notice a “Create” button. This click on it to create a new device.
1. You will be greeted by an overview page. On the top, you will notice a “Create” button. This click on it to create a new device.
2. Then in the Standard category, select Electrical and then select Switch. As we are making a smart switch here.
3. Now select the Custom solution and click on the available Switch.
4. Now fill in the product information.
- First, give your product a unique name.
- The product model is optional. You can leave it empty.
- The protocol is the communication method. As we are using ESP8266, select WiFi (WiFi and Bluetooth for ESP32).
5. Soon as you click create, a popup will appear for selecting switch functions. Here you can select the number of switches you need for your application. As we are going to toggle only one LED/Relay, select one switch and click ok.
6. You will notice 6 tabs namely Function Definition, Device Panel, Hardware Development, Product Configuration, Device Debugging, and Testing Service. We will skip the device panel for now as we will be using Tuya’s smartphone app to make the panel.
7. Moving further, you first need to get a token to activate your device, to do that copy the PID and send it to dev@tuya.com. Make sure you send the mail from the email account you used to register with the Tuya platform.
With that being done, all the device setup is now ready. It’s now time to activate the device through Tuya PMS.
Step 2: Activation on Tuya PMS.
You will receive a token from the developers from Tuya. Copy this token, and head over to the Tuya PMS site, and create an account there. Once an account is created, log in to your account. Follow the steps:
1. On the Sidebar go to Production Management >> Work Order Management >> Activation Code Verification. Paste the token here and click on Confirm.
2. You will get a popup of successful activation. This indicates your device is registered.
3. Now download the TYDA app for burning the Firmware.
Step 3: Burning Firmware on ESP8266.
Now it’s time to work with the code. But don’t worry, you don’t have to be an expert at it. Follow these steps and you should be good to go.
1. Download and unzip the Tuya burning authorization package. You will find two files in it.
2. First, install the CP210x driver as it will allow your ESP boards to communicate with your PC. Then install the TYDA application. Just like any software, follow the onscreen instructions.
3. After successfully installing the TYDA app, launch it and you will be greeted with a home screen that might be in Chinese. But don’t worry, it is very easy to switch languages. Refer to the image above.
4. Now that the app is set in English, first, go to File >> Setup and check of the baud rates are set as in the image.
5. After that, click on the Enter token button. Here make sure that the download firmware box is checked and in the workstation dropdown, you have selected “Burning Authorization”.
6.The next step is to connect your ESP8266 board (in this case Wemos D1 mini) to the computer using a USB cable. Now click on the COM port menu and select the COM port available for your ESP.
(If you have multiple COM ports and don’t know which one to use, just disconnect the ESP board and restart the TYDA app. Now check the list of COM ports and then connect the ESP board to see which new port appears. This will be the Port you need to burn firmware).
7.Click on the Run button on the top right. And wait for a few seconds. This might take a couple of minutes sometimes. Do not unplug the board from your computer until you get a success message.
After a successful burning process, you should see the Yellow colour of the TYDA app turn green indicating the burning process has been completed. Now unplug your ESP and move to the Arduino.
Step 4: Programming the Arduino.
Now comes the Arduino part, many of you might be familiar with the Arduino IDE, but for beginners, Arduino IDE is software used to develop and burn Codes into an Arduino microcontroller.
1. Download and install Arduino IDE if you don’t have it already.
2. After installing the IDE, you need to install a library by Tuya. It is very easy to install a library in Arduino IDE. First, open the IDE and click on Tools >> Manage Libraries. This will open a pop-up window, in this window type in the search bar “Tuya” and hit enter. Install the library marked in the image above. This will take just a few seconds, after it is installed, close the window and restart the IDE.
3. Now click on File >> Example >> Tuya_WiFi_MCU_SDK >> Start. This will open a pre-built sketch.
4. Next, connect your Arduino UNO to the PC. If you are using a clone board, make sure you install the CH341 USB driver. Then click on Tools and make sure you have selected the right port.
5. When the port is selected, you can now click on the upload button on the top left side below the menu indicated by the right arrow. Wait patiently as the uploading process completes, after successful upload, you will see the message “uploaded” at the bottom left.
With that, the Arduino is programmed and ready to be used. The next step is to make the right connections.
Step 5: Connections.
The connections for this project are very simple. All you will need is 4 male-to-male jumper wires, ESP8266, and Arduino UNO. Follow the connections given in the diagram below. But make sure you disconnect the boards before.
After the connections are made, let’s proceed to the app which will control the LED.
Step 6: Making the App.
1. Head over to the Play Store or App Store and download the Tuya Smart app.
2. Click on Add Device button. This will take you to the next page where we will create a switch.
3. In the switches section, Select Switch(Wi-Fi).
4. Next, enter your WiFi credentials. Make sure it is a 2.4GHz network. 5Ghz does NOT work.
5. Now for this step, Power the Arduino and connect Pin 7 to GND for 3-4Sec. This will put the board in pairing mode. You will see the onboard LED blink rapidly. Now click on “Confirm the indicator is blinking” Radio button and click on Next.
6. Now the device adding will take a couple of minutes. So wait patiently for the process to complete. Once the connection is established. Click on Done.
7. Refer to the image above for the final look of the app. You can toggle the LED using the button at the bottom.
Step 7: Testing and Conclusion.
The device works seamlessly without any lags or delays. What you can do now is replace the LED with a relay to control appliances.
In the future, I will share more projects based on this amazing platform and maybe design a commercial product with it. If you like this instructable, check more projects on ProjectHub.in
If you are looking for custom projects, product design, PCB design, manufacturing, or sourcing. Contact us at Contact@projecthub.in
Шлюзы, концентраторы, хабы, Getwey для экосистемы Tuya находятся ПО ЭТОЙ ССЫЛКЕ.
Tuya Smart – это целая экосистема умного дома от компании TUYA, перечень подключаемых устройств которых постоянно увеличивается с каждым днём. В программном комплексе уже заложены приборы, которых ещё нет, но которые планируется к выпуску и адаптации.
Tuya Smart полностью адоптирован под российского пользователя, отлично сконструированы интуитивные меню. Почти любой пользователь сможет прописать новый прибор или нужный сценарий работы устройств.
Как выглядит интерфейс и с чего начать в Tuya Smart
После входа в программу Tuya Smart первым делом нам потребуется зайти в «Профиль». Во вкладке «Управление домом» на нужно создать новый дом.
В новом меню заполняем информацию
- Название дома – это может быть любое удобное вам название (дом, квартира, квартира для аренды, дача …) Количество домов, которые вы можете создать не ограничено.
- Место нахождения – Нажав на ссылку вам откроется карта, на которой вы указываете место вашего дома. Это потребуется в дальнейшем для полного функционирования программы. Например, (Чтоб не заморозить систему в ваше отсутствие вам необходимо чтобы включилось питание подогрева уличного водопровода при температуре воздуха -1 и выключилось после достижения температуры +2. Или вы хотите, чтобы шторы сами отрывались утром, если на улице нет солнца. Но в солнечную погоду чтоб они не открывались. И многое другое) Для этого и нужна геопозиция дома, чтобы часть данных система брала из интернета и могла интегрироваться к вашей автоматизации.
- Во вкладке «Помещения» прописываем все комнаты вашего дома, в которые планируем ставить оборудование. В дальнейшем это потом вам поможет не запутаться в установленных устройствах, а также необходимо при голосовом наборе. Например, вы с помощью Google ассистента скажите: «Выключить свет в спальне» и система уже поймёт какое исполнительное устройство требуется выключить. Количество создаваемых комнат тоже не ограничено. Их можно прописать все разом или по мере необходимости потом добавлять в состав вашего «Дома».
На этом минимальный настройки завершены. Возвращаемся в главное меню «Дом» и выбираем нами созданный дом.
Добавление устройств в Tuya Smart
В отличии от многих других эко систем умных домов, вы сразу увидите большой список оборудования, по разным системам, которые можно интегрировать в TUYA SVART.
- Электрика
- Освещение
- Безопасность
- Крупная бытовая техника
- Мелкая бытовая техника
- Кухонные приборы
- Здоровье и спорт
- Видеокамеры и замки (СКУД)
- Управление шлюзами
- Путешествия на открытом воздухе
- Энергия
- Развлечения
- Промышленность
- Другое.
Еще раз повторюсь что система продумана для обычных людей без технического образования и поэтому при добавлении нового устройства программа сама начинает искать новое ещё не подключенное оборудование. Если система не смогла найти новый прибор не стоит отчаиваться. Подробные инструкции по подключению прикладываются к каждому прибору.
Разберём теперь поэтапно, что входит в каждую группу оборудования.
TUYA SMART Электрика

- Розетки (модификации BLUETOOTH / WI-FI / ZigBee / NB-IoT)
- Удлинитель (модификации BLUETOOTH / WI-FI / ZigBee / NB-IoT)
- Выключатель (модификации BLUETOOTH / WI-FI / ZigBee / NB-IoT)
- Выключатель карниза (модификации BLUETOOTH / WI-FI / ZigBee)
- Выключатель вентилятора (модификации BLUETOOTH / WI-FI)
- Сценарии выключателя (модификации BLUETOOTH / WI-FI / ZigBee)
- Беспроводной выключатель (модификации BLUETOOTH / WI-FI / ZigBee)
- Беспроводной дверной звонок WI-FI
- Модуль выключения (модификации BLUETOOTH / WI-FI / ZigBee)
- Адаптер (модификации BLUETOOTH / WI-FI / ZigBee)
- Контроллер гаража (модификации BLUETOOTH / WI-FI / ZigBee)
- Обогреватель-репеллент от комаров (модификации BLUETOOTH / WI-FI)
- Сценарии розетки светильника WI-FI
- Ассистент кондиционера WI-FI
- Водяной насос (модификации BLUETOOTH / WI-FI / 4G)
- Аккумуляторная батарея BLUETOOTH
TUYA SMART Освещение

- Источник света (модификации BLUETOOTH / WI-FI / ZigBee)
- Полосы света (модификации BLUETOOTH / WI-FI / ZigBee)
- Воздушная лампа (модификации BLUETOOTH / WI-FI)
- Потолочное освещение (модификации BLUETOOTH / WI-FI / ZigBee)
- Гирлянда (модификации BLUETOOTH / WI-FI / ZigBee)
- Индукционный свет (модификации BLUETOOTH / WI-FI / ZigBee)
- Screen Sync Controller – Контроллер синхронизации экрана
- Контроллер синхронизации экрана камеры WI-FI
- Потолочный вентилятор (модификации BLUETOOTH / WI-FI / ZigBee)
- Фонарь на солнечные батареи BLUETOOTH
- Лампы накаливания (модификации BLUETOOTH / WI-FI / ZigBee)
- Панельный свет (модификации BLUETOOTH / WI-FI / ZigBee)
- Уличное освещение (модификации LTE Cat.1/ NB-IoT)
- Настольные лампы (модификации BLUETOOTH / WI-FI / ZigBee)
- Дистанционное освещение (модификации BLUETOOTH / ZigBee)
- Модулятор света (модификации BLUETOOTH / WI-FI / ZigBee)
TUYA SMART Безопасность и доступ

- Distance finder – Дальномер BLUETOOTH
- Датчик (модификации BLUETOOTH / WI-FI / ZigBee / NB-IoT)
- Сигнализация (модификации BLUETOOTH / WI-FI / ZigBee / NB-IoT)
- Устройства пассивного ИК (ИК датчики) (модификации BLUETOOTH / WI-FI / ZigBee / NB-IoT)
- Датчик двери, окон (СМК) магнито-контактный (модификации BLUETOOTH / WI-FI / ZigBee / NB-IoT)
- Датчик температуры и влажности (модификации BLUETOOTH / WI-FI / ZigBee / NB-IoT)
- Детектор затопления (модификации BLUETOOTH / WI-FI / ZigBee / NB-IoT)
- Детектор задымления (модификации WI-FI / ZigBee / NB-IoT)
- Детектор газа (модификации WI-FI / ZigBee / NB-IoT)
- Детектор CH4 (модификации WI-FI / ZigBee)
- Детектор СО (модификации WI-FI / ZigBee)
- Датчик голоса / освещённости
- Сирена (модификации WI-FI / ZigBee)
- Датчик голоса / освещённости NB-IoT
- Аварийная / тревожная кнопка
- Тревожная кнопка (модификации WI-FI / ZigBee)
- Аварийная кнопка NB-IoT
- Датчик освещённости (модификации BLUETOOTH / WI-FI / ZigBee / NB-IoT)
- Датчик частиц PM5 (модификации WI-FI / ZigBee)
- Детектор формальдегида
- Детектор СО2 (модификации BLUETOOTH / WI-FI / ZigBee)
- Датчик вибрации (модификации WI-FI / ZigBee)
- Датчик давления (модификации WI-FI / ZigBee / NB-IoT)
- Датчик качества воздуха (ЛОС) другое
- Тепловой датчик (модификации / WI-FI / ZigBee)
TUYA SMART Крупная бытовая техника
- Кондиционер
- Холодильник
- Нагреватель водs (бойлер)
- Настенный котёл
- Тепловентилятор
- Стиральная машинка
- Сушилка для белья
TUYA SMART Мелкая бытовая техника

- Обогреватели и охладители
- Обогреватель (модификации BLUETOOTH / WI-FI / ZigBee)
- Масленый нагреватель WI-FI
- Электрическое одеяло (модификации BLUETOOTH / WI-FI / ZigBee)
- Электрический камин (модификации BLUETOOTH / WI-FI / ZigBee)
- Плинтус обогреватель BLUETOOTH+WI-FI
- Электрический нагревательный стол (модификации WI-FI / ZigBee)
- Вентилятор (модификации BLUETOOTH / WI-FI / ZigBee)
- Охладитель воздуха (модификации BLUETOOTH / WI-FI)
- Очиститель воздуха (модификации BLUETOOTH / WI-FI / ZigBee)
- Увлажнитель воздуха (модификации BLUETOOTH / WI-FI / ZigBee)
- Осушитель WI-FI
- Вентиляционный блок WI-FI
- Уборка
- Робот пылесос (модификации BLUETOOTH / WI-FI / ZigBee / IPC)
- Робот для мытья окон (модификации BLUETOOTH / WI-FI / ZigBee)
- Косилка WI-FI
- Ручной пылесос BLUETOOTH
- HVAC
- Термостат (модификации BLUETOOTH / WI-FI / ZigBee)
- Система вентиляции (модификации BLUETOOTH / WI-FI / ZigBee)
- Отопление вентиляция и кондиционирование WI-FI
- Клапан контроля температуры
- MOTOR
- Штора / карниз (модификации BLUETOOTH / WI-FI / ZigBee)
- Двигатель для карниза (шариковая цепь) BLUETOOTH
- Двигатель для занавеса / карниза ZigBee
- Сушилка бельевая (модификации WI-FI / ZigBee)
- Проветривание открытие окна WI-FI
- Для домашних животных
- Метатель мячей для питомцев WI-FI
- Кормушка для домашних питомцев (модификации BLUETOOTH / WI-FI / ZigBee)
- Поилка для питомцев WI-FI
- Кошачий туалет WI-FI
- Средство для удаления запаха домашних животных BLUETOOTH
- Сушилка для домашних животных BLUETOOTH / WI-FI
- Забавный мяч для домашних животных BLUETOOTH / WI-FI
- Дом для домашних животных BLUETOOTH / WI-FI
- Сумка для домашних животных BLUETOOTH
- Поводок для домашних животных BLUETOOTH
- Аквариум BLUETOOTH / WI-FI
- Кормушка для аквариума BLUETOOTH / WI-FI
- Нагревательный стержень для аквариума BLUETOOTH / WI-FI
- Водяной насос для аквариума BLUETOOTH / WI-FI
- Розетка для аквариума BLUETOOTH / WI-FI
- Baby
- Молокоотсос BLUETOOTH / WI-FI
- Диспенсер для молока WI-FI
- Подогреватель бутылочек WI-FI
- Умный подогреватель для молока WI-FI
- Мини кухня WI-FI
- Стерилизатор WI-FI
- Детское кресло качалка WI-FI
- Детская кроватка WI-FI
- Ванная комната
- Нагреватель в ванной WI-FI
- Вешалка для полотенец BLUETOOTH / WI-FI
- Умное сидение для унитаза WI-FI
- Другое
- Умный цветочный горшок WI-FI
- Стерилизатор для обуви BLUETOOTH / WI-FI
- Обувная коробка BLUETOOTH / WI-FI
- Машинка для ухода за одеждой BLUETOOTH / WI-FI
- Москитная лампа WI-FI
- Метеостанция WI-FI
TUYA SMART Кухонные приборы

- Kitchen Electric
- Встроенная кухня
- Печь
- Газовая плита
- Микроволновая печь
- Дезинфекционный шкаф
- Посудомоечная машина
- Кухонная вытяжка
- Паровая печь
- Kitchen Small Electric
- Машина для сухофруктов
- Ледогенератор
- Крышка фритюрницы
- Мороженица
- Плитка
- Индукционная плита
- Рисоварка
- Машина для приготовления соевого молока
- Аэрогриль
- Кухонный комбайн
- Тостер
- Вакуумная машина
- Блендер
- Соковыжималка
- Brewing
- Очиститель воды WI-FI / ZigBee
- Чайная машина WI-FI
- Умный чайник WI-FI
- Кофе машина WI-FI / BLUETOOTH
- Другое
- Пищевой зонд WI-FI
- Машина для мойки овощей
- Винный шкаф BLUETOOTH / WI-FI
- Измельчитель пищевых отходов
- Мусорная корзина WI-FI
TUYA SMART Здоровье и спорт

- Спорт
- Весы с анализатором жировой ткани WI-FI / BLUETOOTH
- Умная скакалка BLUETOOTH
- Умная ракетка для бадминтона BLUETOOTH
- Умная ракетка для тенниса BLUETOOTH
- Гантель BLUETOOTH
- Гребной тренажер BLUETOOTH
- Хула-хуп BLUETOOTH
- Экспандер BLUETOOTH
- Мяч для запястья BLUETOOTH
- Ходьба / беговая дорожка WI-FI / BLUETOOTH
- Вело тренажёр BLUETOOTH
- Wearable – переносные устройства
- Часы / браслет BLUETOOTH
- Термометр для лба BLUETOOTH
- Измерение кровяного давления BLUETOOTH
- Окси метр BLUETOOTH
- Sleep – Сон
- Трекер сна BLUETOOTH
- Умный будильник WI-FI / BLUETOOTH
- Умная лампа для сна WI-FI
- Монитор сна WI-FI
- Умная подушка WI-FI / BLUETOOTH
- Умная кровать BLUETOOTH / WI-FI / ZigBee
- Умный комплекс для наблюдения за ребёнком WI-FI
- Персональные устройства
- Зубная щётка BLUETOOTH
- Отоскоп для удаления ушной серы WI-FI
- Умное очищающее средство WI-FI / BLUETOOTH
- Инструмент для пополнения воды BLUETOOTH
- Другое
- Массажное кресло WI-FI
- Ванна для ног WI-FI / BLUETOOTH
- Умный диван WI-FI
- Фитнес монитор
- Устройство физиотерапии
- Умная чашка для воды LUETOOTH
Видео камеры и замки TUYA SMART
- Видеокамеры
- Умные smart камеры BLUETOOTH / 4G / WI-FI / 2-х диапазонный WI-FI
- Видео глазок
- Видео домофон
- Камера и ИК подсветкой
- Базовая станция
- NVR — видеорегистратор
- DVR – видеорегистратор
- Замки BLUETOOTH / WI-FI / ZigBee / NB-IoT / 4G
- Блокировка видео WI-FI
- Сейфы WI-FI / BLUETOOTH
Управление шлюзами TUYA SMART
- Шлюзы
- Беспроводной шлюз ZigBee
- Шлюз ZigBee
- Шлюз BLUETOOTH
- Многомодовый шлюз BLUETOOTH / ZigBee
- Маршрутизатор
- Сетевое оборудование
- Концентратор ZigBee
- Повторитель WI-FI
TUYA SMART Путешествия на открытом воздухе
- Транспортные средства
- Скутер
- Ховерборд
- Умный электромобиль BLUETOOTH / GPRS
- Электо велосипед BLUETOOTH
- Электрическая инвалидная коляска BLUETOOTH
- Позиционирование
- Автомобильный GPS трекер
- Анти-потеря BLUETOOTH
- Охранная сигнализация GPRS
- Трекер
- Локатор
- WI-FI рекордер
- 4G камера
Энергия TUYA SMART
- Автомат на DIN рейку (модификации BLUETOOTH / WI-FI / ZigBee / NB-IoT / 4G)
- Умный электросчётчик BLUETOOTH / WI-FI / ZigBee / NB-IoT / 4G
- Портативный блок питания BLUETOOTH / WI-FI
- Умный счётчик воды BLUETOOTH / WI-FI / ZigBee / NB-IoT / 4G
- Станция зарядки WI-FI / 4G
- Умный счётчик газа BLUETOOTH / WI-FI / ZigBee / NB-IoT / 4G
- Инвертор WI-FI
- Трансформатор питания BLUETOOTH / WI-FI
Развлечения TUYA SMART
- Телевидение
- Облачная фоторамка
- Графический принтер WI-FI
- 3D принтер WI-FI
- Электронная книга
Промышленность и инженерное оборудование TUYA SMART
- Окружающая среда
- Монитор растений BLUETOOTH
- Контроллер водяного клапана BLUETOOTH / WI-FI / ZigBee
- Орошение
- Ирригатор BLUETOOTH / WI-FI
- Оросители BLUETOOTH / WI-FI / ZigBee
Прочее оборудование TUYA SMART
- Коннектор WI-FI
- Универсальный пульт дистанционного управления BLUETOOTH / WI-FI
- Умный динамик
- Планшет для конференций
Как видите количество возможных прибор очень велико. Наверное, не многие Умные дома смогут похвастаться таким перечнем. С компанией TUYA работают десятки разных заводов производя оборудование в своей ниши.
В следующих материалах мы будем описывать работу этих устройств, их настройку и интеграцию в систему умного дома с прописыванием сценариев на их автоматическую работу.