-
Contents
-
Table of Contents
-
Troubleshooting
-
Bookmarks
Quick Links
Operating Instructions
Original Operating Instructions
Cubis
®
MCA Models
High-capacity Precision Balances
1000047974
Related Manuals for Sartorius Cubis MCA Series
Summary of Contents for Sartorius Cubis MCA Series
-
Page 1
Operating Instructions Original Operating Instructions Cubis ® MCA Models High-capacity Precision Balances 1000047974… -
Page 3: Table Of Contents
Contents Contents 1 About these Instructions . . . . . . . . . . . . . . . . . . . . . . . . . . . 6 Buttons in the Operating Display .
-
Page 4
Contents Descriptions of Interface Protocols 7.7.22 Parameters in the “Device and Website Certificates ….50 Settings / minUSP” Menu… . . 68 Parameter List . -
Page 5
17 Sartorius Service . . . . . . . . . . . . . . . . . . . -
Page 6: About These Instructions
About these Instructions About these Instructions Scope These instructions are part of the device. These instructions apply to the device in the following versions: Device Model High-capacity precision balance MCA11201S-… | MCA20201S-… | with a rectangular weighing pan MCA36200S-… | MCA36201P-… | MCA36201S-…
-
Page 7: Other Symbols
About these Instructions 1.2.2 Other Symbols Required action: Describes actions which must be carried out. Result: Describes the result of the actions carried out. Text inside brackets refers to control and display items. Text inside brackets indicates status, warning, and error messages.
-
Page 8: Safety Instructions
The safety of the device may be impaired or the quality marks may lose their validity. We recommend that any repair work, even that not covered by the warranty, is carried out by Sartorius Service or after consulting with Sartorius Service. Operating Instructions Cubis ®…
-
Page 9: Personnel Qualification
A damaged device or worn parts may lead to malfunctions or cause hazards which are difficult to recognize. Only operate the device when it is safe and in perfect working order. Have any damage repaired immediately by Sartorius Service. Safety Information on the Device Symbols, e.g. warnings, safety stickers, are safety information for the handling of the device.
-
Page 10: Electrical Equipment
2.6.2 Working on the Device‘s Electrical Equipment Only Sartorius Service personnel may work on or modify the electrical equipment of the device. The device may only be opened by Sartorius Service personnel. 2.6.3 Power Supply Unit and Power Supply Cable Serious injury can result, e.g.
-
Page 11: Accessories, Consumables
− Risk of injury to persons − Damage to the device − Device malfunctions − Device failure Only use approved accessories and spare parts supplied by Sartorius. Only use accessories, consumables, and spare parts that are in proper working order. Glass Breakage Glass components can break if they fall or are handled incorrectly.
-
Page 12: Device Description
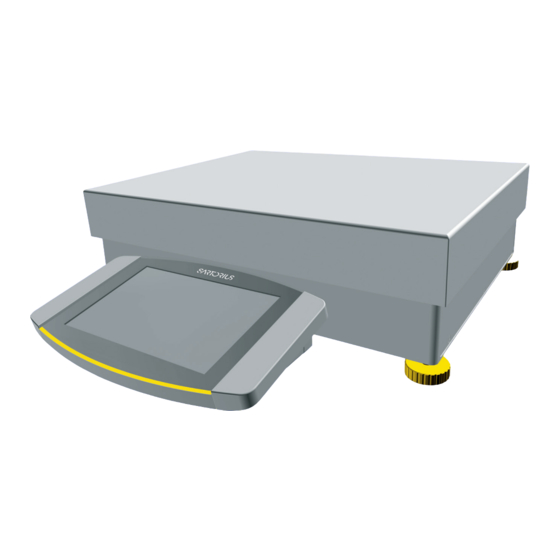
Device Description Device Description Device Overview Fig. 1: High-capacity precision balance with a rectangular weighing pan (example) Pos . Name Description Manufacturer’s ID label Not depicted Leveling foot Not adjustable, is screwed in for leveling. Weighing module Leveling foot Manually adjustable Control unit Operating display Touchscreen…
-
Page 13: Weighing Pan
Device Description Weighing Pan and Associated Components Fig. 2: High-capacity precision balance with a round weighing pan (example) Pos . Name Description Weighing pan Rectangular or round Shield frame Pan support Pan retainer Operating Instructions Cubis ®…
-
Page 14: Connections And Components
Fig. 3: Connections to the weighing module (example) Pos . Name Description Power supply For connection to the power supply Peripheral connection For connecting Sartorius accessories Slot For attaching a “Kensington” anti-theft device Level Access switch Protects the device from changes to the device settings. Is sealed for conformity-assessed devices.
-
Page 15: Connections On The Control Unit
Device Description Connections on the Control Unit Fig. 4: Connections on the display and control unit (example) Pos . Name Description USB-C connection For USB mass storage USB-A connection For USB accessories, e.g. printers, USB mass storage devices, barcode scanners Ethernet connection For connecting an Ethernet cable Safety Equipment…
-
Page 16: Conformity-Assessed Devices
Device Description Conformity-assessed Devices Some settings of conformity-assessed models are protected against user changes, e.g. “external calibration” for devices in accuracy class II. This measure is intended to ensure the suitability of the devices for use in legal metrology. Symbols on the Device Fig.
-
Page 17: Operating Design
Operating Design Operating Design Operating Elements in the Main Menu Fig. 1: Operating elements in the main menu (example) Pos . Name Description Navigation and function bar − Enables navigation and searching in menus and lists. − In the “Settings” Menu: Displays the name of the menu. Available tasks Displays all tasks available for the active user.
-
Page 18: Operating Elements In Task Management
Operating Design Operating Elements in Task Management Fig. 2: Operating elements in Task Management (example) Pos . Name Description Navigation and function bar − Enables navigation and searching in menus and lists. − Enables the addition of tasks. − Opens the QAPP Center. −…
-
Page 19: In The Weighing Display
Operating Design Operating Elements in the Weighing Display Fig. 3: Weighing display (example) Pos . Name Description Application symbol Displays the symbol for the active application. Task name Displays the name of the active task. Date display Displays the current date. User name Displays the name of the active user profile.
-
Page 20: Advanced Operator Guidance
Operating Design Advanced Operator Guidance Advanced applications have advanced operator guidance. Fig. 4: Advanced operator guidance (example) Pos . Name Description Weighing display with operator guidance Advanced operator guidance Guides the user through the active task. Includes 2 or 3 convertible displays depending on the selected application: −…
-
Page 21: Messages
Operating Design Messages Fig. 5: Error message (example) Pos . Name Description Description Specifies the cause. Remedy Specifies the measures necessary to eliminate the cause of the message. Confirm Confirms and closes the message. Message type Indicates that the message is a status message, warning message, or an error message.
-
Page 22: Status Center
Operating Design Status Center Fig. 6: Status Center (example) Pos . Name Description Messages Displays information, warning, and error messages. Leveling status Displays the status of the level. Status for the device Displays the general device information. Calibration and adjustment report Displays the data for the last adjustment and calibration.
-
Page 23: Keypad
Operating Design Keypad The keypad is used for entering values in entry fields. If an entry field is activated: The alphanumeric keypad or numerical keypad appears. Fig. 7: Alphanumeric keypad and numerical keypad (example) Pos . Name Description Input field Input assistance Indicates which values can be entered in the entry field, e.g. only numbers.
-
Page 24: Buttons In The Operating Display
Operating Design Buttons in the Operating Display 4.9.1 Buttons for Navigation or Organization in Displays Symbol Name Description [Menu] button Quits the active task and opens the main menu. [Back] button − Returns to the previous display. − In the main menu: Accesses the last-performed task. [Search] button Displays options for browsing tasks and list elements.
-
Page 25: Buttons For Editing
Operating Design Symbol Name Description [10 Positions Right] button Jumps 10 positions to the right in tasks or list elements. [Service Information] button Opens the “Settings” / “Device Service Settings” / “Device Information” / “Service” menu. Information [Status Archive] button Opens an overview of all status messages, warning Archive messages, and error messages.
-
Page 26: Buttons For Weighing, Printing
Operating Design Symbol Name Description [Deselect All] button Deselects the selection for all elements of a list. [Cancel] button − Cancels the current process without saving the changed settings or values. − In the display for editing the print memory: Marks the selected value as invalid.
-
Page 27
Operating Design Symbol Name Description [Tare 1] Stores the current weight value in the tare 1 memory. Tare 1 [Enter Tare 1] Opens an entry field for manually entering the tare 1 value. 0.00 g [Delete Tare 1] Deletes the tare 1 memory. [Start] button Starts the selected application. -
Page 28: Displays In The Operating Display
Operating Design 4.10 Displays in the Operating Display Symbol Name Description [Leveling] display Indicates that the device is not leveled. [Print memory] display Indicates that elements are located in the print memory. [Unit symbol] display Indicates the set weight unit, e.g. [g] for “grams”. [Result] display Indicates whether the weight value being displayed is Gross…
-
Page 29: User Management
Operating Design 4.11 User Management 4.11.1 User Profiles In the factory, four user profiles are created for the device. One role is assigned to each user profile. Each role has rights to operate the device. The rights assigned to each role depend on which device functions the user has to use.
-
Page 30: Menu Structure
Operating Design 4.14 Menu Structure 4.14.1 Main Menu Navigating in menus (see Chapter 4.15, page 37). Level 1 Level 2 Level 3 Description Task Displays all available tasks. management Opens a summary of the properties for the displayed task. QAPP Center QAPP package −…
-
Page 31: Settings» Menu
Display the period until the next maintenance scheduled maintenance. Maintenance cycle Display the maintenance cycle. Website Display the website for Sartorius Service. Device qualification Display the qualification date. View data Display, filter, or browse the contents storage device of the data storage device.
-
Page 32
Operating Design Level 1 Level 2 Level 3 Description Device View audit trail If an audit trail license has been purchased: information Display, filter, browse, or export the contents of the audit trail memory. Software licenses Display the list of all open source software modules used. -
Page 33
Operating Design Level 1 Level 2 Level 3 Description Weighing and Weighing List of available weighing Display all available weighing profiles. Print Profiles profiles Edit, create or delete the weighing profiles. YDP30 List of available print Display all available print profiles. profiles Edit, create or delete the print profiles. -
Page 34
Operating Design Level 1 Level 2 Level 3 Description Connections Certificates Trusted certification Display and export the trusted authorities certification authorities (CA). Device certificates Display and export the device certificates. Trust unknown Specifies the security for unknown certification authorities certification authorities. Interfaces Serial communication Display and edit the profile for the… -
Page 35
Operating Design Level 1 Level 2 Level 3 Description Device settings Preload Set preload Sets a preload for technical equipment that needs to be constantly on the device. In this case the maximum capacity is reduced by the set preload. Delete preload Deletes the set preload. -
Page 36
Operating Design Level 1 Level 2 Level 3 Description Device settings Display settings Display brightness Define the brightness of the operating display. On | off switch Activate or deactivate the “energy saving” function. Color scheme Define the settings for the operating display color scheme if this extension has been configured in the QAPP Center. -
Page 37: Navigating The Menus
Operating Design 4.15 Navigating the Menus Procedure To open a menu from the main menu: Tap on the desired menu button in the function bar. The menu opens and the name of the open menu is displayed in the navigation bar. To return to the main menu from other displays: Press the [Menu] button or press the [Back] button (multiple times) until the main menu is displayed.
-
Page 38
Operating Design If a value needs to be selected from a list: Scroll to the desired value in the display. In order to do so, swipe the display upwards or downwards. Press the desired value. To confirm the selection: Press the [OK] button. The selected value is saved and the list closes. -
Page 39: Installation
Installation Installation Scope of Delivery Item Quantity Device Weighing pan High-capacity precision balance with a round weighing pan: Shield frame High-capacity precision balance with a round weighing pan: Pan support Power supply unit Country-specific power supply cable with test seal USB connection cable In-use dust cover for control unit Selecting an Installation Site…
-
Page 40: Unpacking The Device
Installation Unpacking the Device Procedure Unpack the device at the intended installation location. Lift the device in the Styrofoam padding out of the packaging. Place the device in the Styrofoam padding on its side. Lift the Styrofoam padding off the device. Place the device on its base.
-
Page 41: Connecting The Ethernet Cable
Installation Pull the connection cable (1) between the control unit and the weighing module out of the control unit’s retainer and unroll it. Turn the device over and place it on an even surface. Connecting the Ethernet Cable Material: 1 Ethernet cable 1 soft support base Requirements The weighing pan and all associated components are not placed…
-
Page 42
Installation Tool: 1 suitable screwdriver Material: 1 hook for below-balance weighing, available as an accessory from Sartorius 1 soft support base 1 draft protection shield 1 weighing table with recess Requirements The weighing pan and all associated components are not placed on the device. -
Page 43: Positioning The Weighing Pan
Installation Positioning the Weighing Pan and Associated Components Install Device with a Rectangular Weighing Pan Procedure Place the weighing pan on the weighing module. Install Device with a Round Weighing Pan Procedure Place the shield frame (2) on the weighing module. Place the weighing pan (1) onto the pan support (3).
-
Page 44: Getting Started
Getting Started Getting Started Procedure NOTICE Improper connection may damage the device! If the device is connected using electronic components, e.g. printer, PC: The device must be disconnected from the power supply. Ensure that the device is disconnected from the power supply. Connect the device using electronic components (see electronic components instructions).
-
Page 45: Connecting The Power Supply
WARNING Severe injuries caused by using a defective power supply cable! Check the power supply cable for damage, e.g., cracks in the insulation. If required: Contact Sartorius Service. Check whether the country-specific power plug matches the power connections at the installation site.
-
Page 46: System Settings
System Settings System Settings Performing System Settings Default settings can be adjusted for the device and the applications in order to align with the ambient conditions and individual operating requirements. The following settings are necessary to operate the device together with connected components: −…
-
Page 47: Assigning A Password
System Settings Assigning a Password Procedure Log into the device using the user profile for which a password needs to be assigned. Open the “Settings / User Management” menu. Press the [Lock] button. The user password input field is displayed. Enter the desired password in the entry field and confirm with the [OK] button.
-
Page 48: Setting Up Device For Network Printer Via Independent Wi-Fi Network
System Settings − The device communicates with a company network via Wi-Fi. The network printer is connected to the company network. All the device’s network functions can be used in the entire company network. This configuration has 2 restrictions: − The company network must have a DHCP server. −…
-
Page 49
System Settings 7.5.3 Setting Up Device for Network Printer via Company Network Requirements − The device administrator or service rights are activated via user management. − The company network has a DHCP server. − The network printer is connected to the company network. Procedure Open the “Settings / Connections / Network / Wi-Fi”… -
Page 50: Configuring Print Profiles
A description on installation for a website certificate is available as a PDF file in English entitled “Installation Instructions for Website Certificate”. These PDF files are available to download under “Cubis II MCA Firmware” ® via the Sartorius website www.sartorius.com. Operating Instructions Cubis ®…
-
Page 51: Parameter List
[User Activated] button. Language Set the language for the user profile. User color profile Sartorius Standard* If the QAPP extension “Color Scheme” has been activated: Define a user color for the user profile. Login method Determine whether the user password is saved locally on the device or provided by an LDAP network server.
-
Page 52: Parameters In The «Timer-Controlled Actions» Menu
System Settings 7.7.3 Parameters in the “Timer-controlled Actions” Menu Parameter Setting Values Explanation Start task Execution date Activates the date and time for starting the task. Repeat period Repeats in minutes, hours, days, months, or years. Name Saves a name for the timer-controlled action. Action execution Sets the action execution to cancelable or not cancelable.
-
Page 53: Parameters In The «Weighing And Print Profiles / Weighing» Menu
System Settings 7.7.4 Parameters in the “Weighing and Print Profiles / Weighing” Menu Parameter Setting Values Explanation Ambient Very stable Sets the ambient conditions to “very stable”: Activates a fast conditions change in the weight values in the event of a load change with a high output rate.
-
Page 54
System Settings Parameter Setting Values Explanation Stability delay Very short Sets the stability delay to “very short”: The stability symbol is displayed after the stability criterion is reached. Short* Sets the stability delay to “short”: The stability symbol only appears after a short delay in order to provide a reliable result despite fluctuations. -
Page 55: Parameters In The «Weighing And Print Profiles / Ydp30, Pc Direct
System Settings Parameter Setting Values Explanation Available units bat – baht The device displays the weight in baht. MS – mesghals The device displays the weight in mesghals. N – newtons The device displays the weight in newtons. Available All digits on* “All digits on”: All digits are shown in the display.
-
Page 56
System Settings Parameter Setting Values Explanation Weight value print Standard elements − Adds or deletes print elements: Dashed line, date | time elements of application, space line, horizontal line, time zone, and user name. − Changes the sequence of the individual elements. Device information −… -
Page 57: Parameters In The «Weighing And Print Profiles / Pdf Or Csv» Menu
System Settings Parameter Setting Values Explanation Profile name Printer YDP30 Saves a name assigned for the print profile, (assigned print (only weight values) e.g., “Printer YDP30”. profiles for YDP30, Printer YDP30 Saves a name assigned for the print profile, PC direct, and SBI (GLP print, all data) e.g., “Printer YDP30”.
-
Page 58: Connectors» Menu
System Settings Parameter Setting Values Explanation Weight value Standard elements − Adds or deletes print elements: Dashed line, date | time print elements of application, space line, horizontal line, time zone, and user name. − Changes the sequence of the individual elements. Device information Adds or deletes the print element “Serial number”.
-
Page 59: Network» Menu
System Settings Parameter Setting Values Explanation Network printer Connector name Saves the entered name for a network printer. IP or host Enter the IP or host address for the printer. Protocol Define the protocol for the printer: Socket*, IPP, HTTP, or LDP Connector name If the QAPP extension “Windows File Server”…
-
Page 60: Parameters In The «Connections / Website / Web Services» Menu
System Settings Parameter Setting Values Explanation Wi-Fi Wi-Fi SSID Saves the name of the WI-FI SSID. Wi-Fi password Saves a password for Wi-Fi access. IPv4 method Sets the method to DHCP, Manual or Off. IPv4 address If “Manual” has been selected for the IP method: Saves the number of an IP address.
-
Page 61: Parameters In The «Connections / Interfaces / Serial Communication Over Network» (Ethernet) Menu
System Settings 7.7.10 Parameters in the “Connections / Certificates” Menu Parameter Setting Values Explanation Trusted List of certification Activates a trusted certification authority (CA), in order certification authorities to identify trusted servers, e.g., “GlobalSign”. authorities Loading certification Imports a certification authority, e.g., from a network server authorities from a or USB stick.
-
Page 62
System Settings 7.7.12 Parameters in the “Connections / Interfaces / COM-RS232 Interface” Menu Parameter Setting Values Explanation Protocol Off* Deactivates the RS232 connection. Enables SBI communication. The data is output to a PC or control unit. Enables the use of ESC commands from a PC to control the basic balance functions with ASCII protocol. -
Page 63: Parameters In The «Connections / Interfaces / Usb-B Interface» Menu
System Settings Parameter Setting Values Explanation Handshake Software Sets the handshake protocol to software handshake. Hardware* Sets the handshake protocol to hardware handshake. None Does not set a handshake protocol. * Factory setting 7.7.13 Parameters in the “Connections / Interfaces / USB-B Interface” Menu Parameter Setting Values Explanation…
-
Page 64: Sbi Protocol» Menu
System Settings 7.7.14 Parameters in the “Connections / SBI Protocol” Menu Parameter Setting Values Explanation Format Value without header The data output only exports the measured value without ID code. Value (with header)* The data output exports the measured value with ID codes. Date &…
-
Page 65: Parameters In The «Connections / Climate Modules» Menu
System Settings 7.7.15 Parameters in the “Connections / Climate Modules” Menu Parameter Setting Values Explanation Climate modules Display of connected Activates climate modules if they are connected to the device. climate module 7.7.16 Parameters in the “Connections / Connected Devices / Motion Sensor” Menu (only for connected motion sensors) Parameter Setting Values…
-
Page 66: Date And Time» Menu
System Settings 7.7.18 Parameters in the “Device Settings / Date and Time” Menu Parameter Setting Values Explanation NTP configuration NTP operating status Activates or deactivates the time synchronization with the NTP server. Server IP Saves the entered server ID for the NTP server. Set the date Date format Sets the date display format to DD|MM|YYYY, MM|DD|YYYY,…
-
Page 67: Parameters In The «Device Settings / Preload» Menu
System Settings Parameter Setting Values Explanation Safety level Deactivates the message for leveling or executing isoCAL at the start of the task. The execution of the leveling or isoCAL function can be triggered manually via the respective button in the display. Warning* If the isoCAL function or the leveling must be carried out: The device displays a message.
-
Page 68: Parameters In The «Device Settings / Minusp» Menu
System Settings 7.7.22 Parameters in the “Device Settings / minUSP” Menu Parameter Setting Values Explanation minUSP function Off* If this extension has been activated in the QAPP Center: Deactivates the minimum initial weight. If this extension has been activated in the QAPP Center: Activates the minimum initial weight.
-
Page 69: Device Id» Menu
System Settings Parameter Setting Values Explanation Process Enter factor If this extension has been activated in the QAPP Center: accuracy factor Saves the entry for the process accuracy factor. Summand a(1) Enter summand If this extension has been activated in the QAPP Center: Saves the entries for range 1.
-
Page 70: Parameters In The «Device Settings / Display Properties» Menu
ON key. Color scheme Sartorius Standard* If the QAPP extension has been activated: Selects the color scheme for the “Sartorius Standard” operating display. Additional color schemes can be unlocked via the QAPP Center. * Factory setting 7.7.28 Parameters in the “Device Settings / Sound (Loudspeaker)”…
-
Page 71: Parameters In The «Device Maintenance» Menu
System Settings 7.7.29 Parameters in the “Device Maintenance” Menu Parameter Setting Values Explanation Update firmware List of connectors and − Starts a firmware update. then list of firmware − Not for conformity-assessed devices. Install List of connectors and Updates the QAPP Center using the selected connector. QAPP Center then list of QAPP Centers Install customized…
-
Page 72: Operation
Operation Operation Switching the Device On and Off The device only delivers accurate values if it has reached the necessary operating temperature. The warm-up time after switching the device on must therefore be complied with. If the device is being switched on for the first time or if the device is switched on after being reset to factory settings: The Setup Wizard opens.
-
Page 73: Logging Users In And Out
Operation Logging Users In and Out Procedure If the name of the desired user profile is displayed in the entry field (1) of the login display: Press the [Login] button. If the name of the desired user profile is not displayed in the entry field of the login display: Tap on the entry field in the login display.
-
Page 74: Activating Applications And Adding A Task
Operation Activating Applications and Adding a Task 8.4.1 Activating Applications All applications from the QAPP package “Essentials” are activated for the device at the factory. Additional applications may be activated in the QAPP center. These applications and QAPP packages can be tested for 30 days free of charge, and after that require a license.
-
Page 75: Adding An Application To A Task
Operation 8.4.2 Adding an Application to a Task Applications must be added to a task so that they can run. Procedure Open Task Management. Press the [New] button. A list of all activated applications is displayed. To select an application: Press the desired application. The wizard for creating a new task starts.
-
Page 76: Weighing
Operation Weighing NOTICE Chemicals may damage the device or accessories! Chemicals can attack the device or the connected accessories internally and externally. This may damage the device and accessories. Use appropriate containers when weighing chemicals. Procedure Start a task with weighing function. Zero the device.
-
Page 77: Adjusting With The Isocal Function
Operation Adjusting with the isoCAL Function The device can be automatically internally calibrated and adjusted using the isoCAL function. Requirements − The device is not located in the menu. − Alphanumeric inputs are not active. − The load on the weighing pan remains unchanged for 2 minutes. −…
-
Page 78: Internally Calibrating
Operation 8.10 Internally Calibrating and Adjusting the Device Requirements The weighing pan is unloaded. Procedure Open the main menu. Press the “Internal Adjustment” task. The internal calibration | adjustment function is executed. If the calibration | adjustment function is complete: The device confirms the completion of the calibration | adjustment process with an acoustic signal, and the calibration report is displayed.
-
Page 79: Marking Saved Values As Invalid
Operation Scan or type the lot ID into the entry field. Press the [OK] button. The [Print memory] button appears in the operating display. The weight value and entered IDs are saved. If additional values are to be saved: Remove the sample being weighed. Place the next sample on the weighing pan and press the [Confirm] button.
-
Page 80: Exiting The Task
Operation 8.11.5 Exiting the Task Procedure Press the [Exit] or [Menu] button. If additional values are to be saved in the print memory: A dialog for prematurely ending the task appears. To return to the weighing display and print the saved values: Tap on the [Yes] button and print the saved values.
-
Page 81: Running The «Statistics» Application
Operation Procedure Start the desired task. Press the [Unit change] button. All units defined in the weighing profile for the active task are displayed in a list. All resolutions for the weight value defined in the weighing profile for the active task are displayed in a list. Press the desired unit.
-
Page 82: Cleaning And Maintenance
Cleaning and Maintenance Cleaning and Maintenance Preparing the Device Procedure Turn the device off. Disconnect the device from the power supply. To do so, disconnect the power supply cable from the wall outlet. Remove weighing pan and all associated components from the weighing module, e.g.
-
Page 83: Assembling And Connecting The Device
− The USB mass storage device is formatted with file system “FAT32”. Procedure Download the software update from the Sartorius website onto the USB mass storage device. If this relates to a zip file: Unzip the software update on the stick.
-
Page 84: Performing A Qapp Center Update
− The USB mass storage device is formatted with file system “FAT32”. Procedure Download the QAPP center update from the Sartorius website onto the USB mass storage device. If this relates to a zip file: Unzip the QAPP center update on the stick.
-
Page 85: Malfunctions
If the problem occurs again: 17, 98 Contact Sartorius Service. 10.2 Troubleshooting Fault Cause Remedy Chapter, page The operating display is blank. The device is disconnected.
-
Page 86: Decommissioning
Decommissioning Decommissioning 11.1 Decommissioning the Device Procedure Turn the device off. Disconnect the device from the power supply. Disconnect the device from all connected devices and all accessories, e.g. printer. Clean the device (see Chapter 9.2, page 82). If below-balance weighing has been set up: Turn over the device and place on a soft surface.
-
Page 87: Storage And Shipping
Store the device according to the ambient conditions (see Chapter 15.3, page 90). 13.2 Returning Device and Parts Defective devices or device components can be returned to Sartorius. Returned devices must be clean, decontaminated, and properly packed, e.g. in the original packaging.
-
Page 88: Disposal
WARNING Risk of injury due to contaminated devices! Devices contaminated with hazardous materials (NBC contamination) will not be accepted by Sartorius for repair or disposal. 14.2 Disposing of Device and Parts 14.2.1 Information on Disposal The device and the device accessories must be disposed of properly by disposal facilities.
-
Page 89: Technical Data
444 × 400 × 159 Weighing pan size 400 × 300 Ø 233 Weight, approx. 15.8 17.1 15.2 Power Supply 15.2.1 Device Only by Sartorius AC adapter YEPS03-15V0 15.2.2 Power Supply Unit Unit Value Item No. YEPS03-15V0 Primary AC voltage 100–240 (± 10%) Frequency 50–60 (±…
-
Page 90: Safety Of Electrical Equipment
Technical Data Unit Value Temperature In operation °C 0 – +40 During storage and transport °C -20 – +80 Connector for mains connection according to IEC 60320-1 / C14: 3-pin Power supply cable Power supply cable according to IEC 60320-1 / C14: Country-specific, 3-pin, two-sided plug Other data: See label on AC adapter 15.2.3 Safety of Electrical Equipment…
-
Page 91: For The Isocal Function
Technical Data Unit Value Relative humidity At temperatures of up to 31°C Then linear decrease from 80% at 31°C to 50% at 40°C No heat from heating systems or direct sunlight No drafts from open windows, AC systems, or doors No vibrations No “heavy traffic”…
-
Page 92: Metrological Data
Technical Data 15.7 Metrological Data 15.7.1 Models MCA32202P | MCA70201S | MCA50201S | MCA36201S MCA32202P MCA70201S MCA50201S MCA36201S Unit Value Value Value Value Scale interval (d) 0.01 | 0.1 Maximum capacity (Max) 4200 | 32200 70200 50200 36200 Repeatability at 5% load Standard deviation of the load values, 0.04 tolerance…
-
Page 93: Mca36200S
Technical Data 15.7.2 Models MCA36201P | MCA20201S | MCA11201S | MCA70200S | MCA36200S 36201P 20201S 11201S 70200S 36200S Unit Value Value Value Value Value Scale interval (d) 0.1 | 1 Maximum capacity (Max) 10200 | 20200 11200 70200 36200 36200 Repeatability at 5% load Standard deviation of the load values, tolerance…
-
Page 94: Recommended Calibration Weight
Technical Data 15.8 Recommended Calibration Weight MCA32202P MCA70201S MCA50201S MCA36201S Unit Value Value Value Value External test weight Recommended accuracy class MCA36201P MCA20201S MCA11201S MCA70200S Unit Value Value Value Value External test weight Recommended accuracy class MCA36200S Unit Value External test weight Recommended accuracy class 15.9 isoCAL Function 15.9.1 Models MCA32202P | MCA70201S | MCA50201S | MCA70200S…
-
Page 95: Data Storage Device
Pin 8: Request to Send (RTS) Pin 9: Not assigned 15.11.2 Specifications for the USB-A Interface Communication USB host (master) Connectable devices Sartorius printers, USB memory sticks, USB barcode scanners, USB keyboards 15.11.3 Specifications for the USB-B Interface Communication USB device (slave) Type of interface Virtual serial interface (virtual COM-port, VCP)
-
Page 96: Accessories
Accessories 16 Accessories 16.1 Accessories This table contains an excerpt of the accessories that can be ordered. For information on other products, contact Sartorius. 16.1.1 Printers and Communication Item Quantity Order number Thermal transfer | thermal printer for YDP30 GLP | GMP printouts on continuous paper…
-
Page 97: Displays And Input | Output Elements
Accessories 16.1.2 Displays and Input | Output Elements Item Quantity Order number MCE operating display with color TFT display 69MS0128 and touch screen Motion sensor for triggering a maximum YHS02MS of 4 functions via gesture control, selection via menu 16.1.3 Weighing Tables Item Quantity Order number Weighing table Made from synthetic stone,…
-
Page 98: Sartorius Service
Sartorius Service 17 Sartorius Service Sartorius Service is available for queries regarding the device. For information about the service addresses, services provided, or to contact a local representative, please visit the Sartorius website (www.sartorius.com). When contacting Sartorius Service with questions about the system or in the event of malfunctions, be sure to have the device information,…
-
Page 99
Conformity Documents Original EG-/EU-Konformitätserklärung EC / EU Declaration of Conformity Hersteller Sartorius Lab Instruments GmbH & Co. KG 37070 Goettingen, Germany Manufacturer erklärt in alleiniger Verantwortung, dass das Betriebsmittel declares under sole responsibility that the equipment Geräteart Elektronische Präzisions-, Milligramm-, Analysen-, Semimikro-, Mikro-Klein- und Hochlastwaage Netzgerät… -
Page 100: Declaration Of Conformity
Conformity Documents 18.2 UK Declaration of Conformity Operating Instructions Cubis ®…
-
Page 101: Certificate Of Compliance
Project: 70185847 Date Issued: 2018-09-24 Issued to: Sartorius Lab Instruments GmbH & Co. KG Otto-Brenner-Strasse 20 Goettingen, Niedersachsen 37079 GERMANY The products listed below are eligible to bear the CSA Mark shown with adjacent indicators ‘C’ and ‘US’ for Canada and US or with adjacent indicator ‘US’ for US only or without either indicator for Canada only.
-
Page 102
Conformity Documents Certificate: Master Contract: 167555 70185847 Project: 70185847 Date Issued: 2018-09-24 APPLICABLE REQUIREMENTS CSA Standards: CAN/CSA-C22.2 No. 61010-1-12 Safety Requirements for Electrical Equipment for Measurement, Control, and Laboratory Use, Part 1: General Requirements UL Standards: UL Std. No. 61010-1 (3 Edition) — Safety Requirements for Electrical Equipment for Measurement, Control, and Laboratory Use — Part 1: General Requirements… -
Page 103
Sartorius Lab Instruments GmbH & Co. KG Otto-Brenner-Strasse 20 37079 Goettingen, Germany Phone: +49 551 308 0 www.sartorius.com The information and figures contained in these instructions correspond to the version date specified below. Sartorius reserves the right to make changes to the technology, features, specifications and design of the equipment without notice.
- Manuals
- Brands
- Sartorius Manuals
- Scale
- BP 110-0CE
Manuals and User Guides for Sartorius BP 110-0CE. We have 1 Sartorius BP 110-0CE manual available for free PDF download: Installation And Operating Instructions Manual
Sartorius Master series User Manual
Download Operation & user’s manual of Sartorius AC 121S-00MS Scale, Scales for Free or View it Online on All-Guides.com. This version of Sartorius AC 121S-00MS Manual compatible with such list of devices, as: LC 12001S-00MS, LC 34000 P-00MS, LC 4201S-00MS, LC 6201S-00MS, LC 621P-00MS
Brand:
Sartorius
Category:
Scale
, Scales
Type:
Operation & user’s manual
Model:
Sartorius AC 121S-00MS
, Sartorius AC 211P-00MS
, Sartorius AC 211S-00MS
, Sartorius LC 12001S-00MS
, Sartorius LC 1201S-00MS
, Sartorius LC 16000 S-00MS
, Sartorius LC 2201P-00MS
, Sartorius LC 2201S-00MS
, Sartorius LC 221S-00MS
, Sartorius LC 3201D-00MS
, Sartorius LC 34-00MS
, Sartorius LC 34000 P-00MS
, Sartorius LC 4201-00MS
, Sartorius LC 4201S-00MS
, Sartorius LC 421-00MS
, Sartorius LC 4801P-00MS
, Sartorius LC 6201-00MS
, Sartorius LC 6201S-00MS
, Sartorius LC 621P-00MS
, Sartorius LC 621S-00MS
, Sartorius LC 821-00MS
, Sartorius Master series
Pages: 122
Download Sartorius AC 121S-00MS Operation & user’s manual

1

2

3

4

5

6

7

8

9

10

11

12

13

14

15

16

17

18

19

20

21

22

23

24

25

26

27

28

29

30

31

32

33

34

35

36

37

38

39

40

41

42

43

44

45

46

47

48

49

50

51

52

53

54

55

56

57

58

59

60

61

62

63

64

65

66

67

68

69

70

71

72

73

74

75

76

77

78

79

80

81

82

83

84

85

86

87

88

89

90

91

92

93

94

95

96

97

98

99

100

101

102

103

104

105

106

107

108

109

110

111

112

113

114

115

116

117

118

119

120

121

122

98648-004-03
Sartorius Master Series
Electronic Weighing Instruments
Accuracy Class k or K
Analytical and Precision Balances
Installation and Operating Instructions
for Standard Models
and EC-Approved Models Acceptable
for Legal Metrological Verification
Modification: 25 April 2023
Инструкция по эксплуатации, методика поверки (Instruction manual, calibration) на Весы Adventurer series прецизионные (Ohaus Europe);
")
Инструкция по эксплуатации (Operation (Instruction) manual) на Весы AJ-СE/AJH-СE (лабораторные) (Vibra);
Руководство пользователя (Users guide) на Весы GR-120, GR-200, GR-300, GR-202;
Инструкция по эксплуатации (Operation (Instruction) manual) на Весы Hemotek 2 (Delcon);
 manual на Весы Hemotek 2 (Delcon)")
Руководство по установке и эксплуатации (Installation & Maintenance Manual) на Весы Sartorius Basic plus;

Инструкция по эксплуатации (Operation (Instruction) manual) на Весы Scout (Ohaus);
 manual на Весы Scout (Ohaus)")
Инструкция пользователя (User manual) на Весы Seca 374;

Методика настройки (Setup Methods) на Весы Seca 664, 767, 780, 954;

Инструкция по эксплуатации (Operation (Instruction) manual) на Весы Seca 665;
 manual на Весы Seca 665")
Инструкция пользователя (User manual) на Весы Seca 684;

Инструкция по эксплуатации (Operation (Instruction) manual) на Весы Seca 704/703;
 manual на Весы Seca 704/703")
Инструкция по эксплуатации (Operation (Instruction) manual) на Весы Seca 725;
 manual на Весы Seca 725")
Инструкция по эксплуатации (Operation (Instruction) manual) на Весы Seca 727;
 manual на Весы Seca 727")
Инструкция пользователя (User manual) на Весы Seca 952;

Инструкция пользователя (User manual) на Весы Seca 984;

Инструкция пользователя (User manual) на Весы Seca 984 1321 364;

Инструкция по эксплуатации (Operation (Instruction) manual) на Весы TB-300, THB-600 (лабораторные);
Инструкция по обслуживанию и ремонту (Adjustment instructions) на Весы В1-15 «Саша»;

Инструкция по эксплуатации (Operation (Instruction) manual) на Весы Весы-помешиватели для сбора донорской крови АЕ-500А (Presvac);
 manual на Весы Весы-помешиватели для сбора донорской крови АЕ-500А (Presvac)")
Инструкция по ремонту (схема электрическая) (Repair Instructions (circuitry)) на Весы ВК-150, ВК-300, ВК-600, ВК-1500, ВК-3000 (лабораторные);
, Repair Instructions (circuitry) на Весы ВК-150, ВК-300, ВК-600, ВК-1500, ВК-3000 (лабораторные)")
Паспорт, инструкция по эксплуатации (Passport user manual) на Весы ВЛКТ-500г-М, ВЛКТ-2кг-М (лабораторные);
")
Инструкция по ремонту (схема электрическая) (Repair Instructions (circuitry)) на Весы ВМ 2/3, ВМ 2/6, ВНУ 2/15-1 (Мера);
, Repair Instructions (circuitry) на Весы ВМ 2/3, ВМ 2/6, ВНУ 2/15-1 (Мера)")
Инструкция по эксплуатации (Operation (Instruction) manual) на Весы ВМ-150 (ВМ-150М) (Масса-К);
Паспорт (Passport) на Весы ВМ-150 (ВМ-150М) (Масса-К);
 (Масса-К)")
Инструкция по эксплуатации (Operation (Instruction) manual) на Весы ВМЭ-1-15;
Инструкция по ремонту (схема электрическая) (Repair Instructions (circuitry)) на Весы ВМЭ-1-15М (Масса-К);
, Repair Instructions (circuitry) на Весы ВМЭ-1-15М (Масса-К)")
Паспорт (Passport) на Весы ВМЭ-1-15М (Масса-К);
")
Инструкция по эксплуатации (Operation (Instruction) manual) на Весы ВМЭ-1-15М (Масса-К);
 manual на Весы ВМЭ-1-15М (Масса-К)")
Инструкция по ремонту (схема электрическая) (Repair Instructions (circuitry)) на Весы ВМЭН-150, РЭП (РЭС), ДМЭР, КЭП;
, Repair Instructions (circuitry) на Весы ВМЭН-150, РЭП (РЭС), ДМЭР, КЭП")
Инструкция по ремонту (схема электрическая) (Repair Instructions (circuitry)) на Весы ВНТ, ВНТР, ВЭУ-А, ВБЭН-А, ВЭНд (2005);
, Repair Instructions (circuitry) на Весы ВНТ, ВНТР, ВЭУ-А, ВБЭН-А, ВЭНд (2005)")
Инструкция по ремонту (схема электрическая) (Repair Instructions (circuitry)) на Весы ВНУ 2/15 (МЕРА);
, Repair Instructions (circuitry) на Весы ВНУ 2/15 (МЕРА)")
Инструкция по ремонту (схема электрическая) (Repair Instructions (circuitry)) на Весы ВР4149 BS11;
, Repair Instructions (circuitry) на Весы ВР4149 BS11")
Инструкция по ремонту (схема электрическая) (Repair Instructions (circuitry)) на Весы ВР4149 St001, 002, 007;
, Repair Instructions (circuitry) на Весы ВР4149 St001, 002, 007")
Инструкция по ремонту (схема электрическая) (Repair Instructions (circuitry)) на Весы ВР4149 St010;
, Repair Instructions (circuitry) на Весы ВР4149 St010")
Инструкция по ремонту (схема электрическая) (Repair Instructions (circuitry)) на Весы ВУ 3/30 (Мера);
, Repair Instructions (circuitry) на Весы ВУ 3/30 (Мера)")
Инструкция по ремонту (схема электрическая) (Repair Instructions (circuitry)) на Весы ВУ-3/150 ПВ 300 и ПВ 600 (Мера);
Инструкция по ремонту (схема электрическая) (Repair Instructions (circuitry)) на Весы ВЭНд-01-15-…- И -РЭ-A, «МАЛЫШ», СП-У (2006);
, Repair Instructions (circuitry) на Весы ВЭНд-01-15-…- И -РЭ-A, «МАЛЫШ», СП-У (2006)")
Инструкция по ремонту (схема электрическая) (Repair Instructions (circuitry)) на Весы ВЭНд-01-15-…- И -РЭ-A, «МАЛЫШ», СП-У (2009);
, Repair Instructions (circuitry) на Весы ВЭНд-01-15-…- И -РЭ-A, «МАЛЫШ», СП-У (2009)")
Инструкция по ремонту (схема электрическая) (Repair Instructions (circuitry)) на Весы ВЭУ, ВМЭН, ВЭНд (Малыш);
, Repair Instructions (circuitry) на Весы ВЭУ, ВМЭН, ВЭНд (Малыш)")
Инструкция по ремонту (схема электрическая) (Repair Instructions (circuitry)) на Весы ВЭУ, ВЭП, ВЭНд (Малыш) BS08-04;
, Repair Instructions (circuitry) на Весы ВЭУ, ВЭП, ВЭНд (Малыш) BS08-04")
Инструкция по ремонту (схема электрическая) (Repair Instructions (circuitry)) на Весы ВЭУ-А, ВБЭН-А, ВНТ, ВЭНд, РЭП-1, ДЭР (2007);
, Repair Instructions (circuitry) на Весы ВЭУ-А, ВБЭН-А, ВНТ, ВЭНд, РЭП-1, ДЭР (2007)")
Инструкция по эксплуатации (Operation (Instruction) manual) на Весы РП-150МГ;
 manual на Весы РП-150МГ")
Паспорт (Passport) на Весы Устройство измерения роста и веса «ГОВОРЯЩИЕ ВЕСЫ»;

Архив технической документации медицинского оборудования © 2006 … 2023