VK56VD — 5.6-литровый силовой агрегат от компании Nissan. Производится на заводе Иокогама с 2010-го и до сих пор устанавливается на наиболее большие машины бренда. Встречается на Nissan Patrol / Armada, а также ряде моделей Infinity. Имеет несколько вариаций, предназначенных для крупных и спортивных автомобилей.
Владельцы машин с таким мотором должны знать его технические характеристики, слабые и сильные стороны, возможности модернизации и ремонта. От этого зависит срок службы, расход топлива и надежность в эксплуатации.
Описание устройства двигателя VK56VD
Разработка двигателя VK56DE/VD завершена в 2009-м, а уже в следующем году силовой агрегат стал устанавливаться на многих автомобилях. Его особенностью было появление непосредственного впрыска и изменение высоты подъема клапанов вида VVEL.
В остальном это бензиновый силовой агрегат с блоком цилиндром из алюминия и гильзами из чугуна. Вращение элементов ГРМ осуществляется с помощью мощной цепи, а распределение фаз с применением системы CVTCS.
Особенности VK56VD:
Уменьшенный вес двигателя. Благодаря применению алюминиевых элементов, параметр удалось уменьшить до 225 кг.
Увеличенный блок цилиндров с ходом поршня на 92 мм и большей высотой цилиндра.
Прирост объема до 5.6 л, что важно для крупных внедорожников.
Особая система распределения фаз.
Наличие стандартной и спортивной версии, отличающейся мощностью и степенью сжатия (10.8 или 11.5).
Установка пары компрессионных и одного контрольного кольца. При этом длина шатуна находится на уровне 154.5 мм.
В сравнении с прошлой модификацией разработчики улучшили блок цилиндров, поставили цилиндры большего размера и предусмотрели цепной ГРМ. Работы позволили увеличить компрессию, добавить мощности и улучшить эксплуатационные качества.

Технические характеристики
Первое, что стоит изучить в инструкции к VK56VD, — параметры силового агрегата:
- вид — V-образный;
- число цилиндров — 4;
- ход поршня — 92 мм;
- точный объем — 5.552 л;
- диаметр цилиндра — 98 мм;
- тип питания — непосредственный впрыск;
- момент — 530-560 Н*м;
- мощность — от 390 до 405 лошадиных сил;
- степень сжатия — 10.8 к 1;
- вид горючего — АИ-95;
- экологическая норма — Euro-5;
- материал блока цилиндров — алюминий.
Версия для спортивных автомобилей немного отличаются. Такие моторы VK56VD имеют мощность от 408 до 420 «лошадей», крутящий момент в пределах 550-565 Н*м и степень сжатия 11.5 к 1. В обоих случаях вес силового агрегата составляет 225 кг.

Расход топлива
Потребление горючего в двигателе VK56 VD во многом зависит от того, на какой марке/модели он установлен, типа кузова, коробки передач, режима вождения, качества бензина и иных факторов. Для примера приведем этот параметр на машине Ниссан Патрол 2015 года с АКПП. Ее расход топлива, л/100 км:
- городской режим — 20.6 л;
- трасса — 11 л;
- смешанный — 14.5 л.
Более точную информацию о расходе VK56VD можно получить в мануале к своему автомобилю.

На какие машины ставится силовой агрегат
Мотор Nissan VK56DE/VK56VD и другие модификации можно встретить на Patrol Y62, Infiniti QX (QX56, QX80), Q70, на моделях M56, Q70, Armada, Titan, а также на ряде машин Honda. Чтобы избежать путаницы, приведем автомобили с мотором VK56VD в таблицу ниже.
| Марка | Модель | Год выпуска |
| Инфинити | QX56 2 | 2010 – 2013 |
| M 4 | 2010 – 2013 | |
| QX80 1 | 2013 – наше время | |
| Q70 1 | 2013 – 2019 | |
| Ниссан | Armada 2 | 2016 – наше время |
| Titan 2 | 2015 — наше время | |
| Patrol 6 | 2010 – наше время |


Плюсы и минусы, ресурс
Двигатель VK56VD считается одним из наиболее удачных в линейке, поэтому до сих пор устанавливается на многих автомобилях.
Преимущества:
увеличенный объем;
возможность установки на большие машины;
повышенная мощность;
больший крутящий момент;
улучшенная динамика;
отсутствие трудностей в ремонте;
надежный цепной ГРМ;
улучшенная система изменения фаз CVTCS.
проблема с задирами;
риск растяжения ГРМ и смещения меток;
высокие требования к качеству топлива;
отсутствие гидрокомпенсаторов;
низкая надежность ТНВД;
вероятность снижения тяги или скачков при загрязнении катализатора.
При правильном обслуживании ресурс двигателя (тыс. км) составляет 400 000 км.
Возможность тюнинга
Для автомобилей с двигателем VK56VD мастера рекомендуют следующие варианты:
- Покупка распределительных валов JWT 256/256, замена пружин, установка дроссельной заслонки на 90 мм, 2 пауков и «прямотока». Дополнительно стоит поставить компрессор кит от Стиллен, что позволит увеличить мощность до 450 «лошадей». Отметим, что такая разница небольшая и почти незаметная.
- Увеличение поршневого хода позволяет добиться прироста мощности на 10-15 процентов. Параллельно повышается крутящий момент, и растет объем.
При тюнинге VK56VD нужно учесть, что характеристики будут меняться незначительно из-за особенностей мотора. Расходы на оптимизацию часто превышают результат ожиданий.
Регламент обслуживания мотора VK56VD
Срок службы VK56VD без капитального ремонта зависит от правильности обслуживания силового агрегата. Главный момент — замена масла, которая должна проводиться каждые 10 000 км. Для работ применяются смазки 5W-30, 5W-40.
Объем масла в двигателе составляет 8 л, но для обновления хватит и 6.5 л. В спортивной версии силового агрегата количество рабочей жидкости на 500 мл меньше.
Другие нюансы обслуживания VK56VD:
- замена ГРМ — 120 000 км;
- регулирование клапанов — раз в 100 тыс. км по данным завода;
- размеры зазоров впуска/выпуска — 0.26-0.34 / 0.29-0.37 мм;
- масляный/воздушный фильтр — 10 000 / 30 000 км;
- свечи — 30 000 км;
- дополнительный ремень — 120 000 км;
- антифриз — 90 000 км или раз в 5 лет.


Недостатки поломки и проблемы ДВС VK56VD
Моторы VK56VD сложно назвать идеальными, а их эксплуатация позволяет выделить ряд слабых мест:
- Задиры в цилиндрах. Наиболее распространенная неисправность, которая приводит к увеличению потребления масла и появлению характерного стука. Причина – попадание в рабочую камеру разрушенных элементов катализатора или элементов износа ТНВД. По этой причине на рынке США было отозвано много моторов VK56VD.
- Повреждение ТНВД. Причиной неисправности в большинстве случаев является применение горючего низкого качества, быстрого износа толкателя, а также разнесение мусора по системе ДВС.
- Растяжение цепи газораспределительного механизма. Нередко проявляется через 100 тысяч километров пробега. По этой причине многие двигатели VK56VD были отозваны даже после окончания гарантия. Последствием ситуации является нарушение фаз газораспределения и даже механическое повреждение.
- Перегрев. При эксплуатации мотора важно следить за системой охлаждения. Это связано высокой вероятностью нагрева силового агрегата VK56VD выше допустимой нормы.
- Разбитие седел форсунок. Такое возможно через 200-250 тысяч пробега.
- Отказ правильной корректировки высоты подъема VVEL-клапанов.


Способы ремонта силовой установки VK56VD
При выявлении неисправности двигателя можно пойти 2 путями — сделать работу самому или обратиться в сервис. Второй вариант особенно актуален, если речь идет о серьезной неисправности и отсутствии опыта.
В обоих случаях проводится диагностика, считываются ошибки. После этого выполняется разборка и дефектовка двигателя, меняются изношенные детали. На завершающем этапе проводится сборка с тестированием VK56VD на ошибки.
Способ ремонта зависит от вида неисправности. К примеру, при шуме мотора может потребоваться замена ГРМ вместе с ТНВД.
Неровная работа силового агрегата часто свидетельствует о повреждении катализатора. В этом случае может потребоваться замена двигателя. При износе коленчатого вала или повреждении элемента двигателя требуется установка новых деталей.
Чтобы отложить капитальный ремонт VK56VD как можно дальше, рекомендуется заливать качественный бензин и масло, периодически проверять воздушный фильтр, чистить радиатор и избегать экстремальные режимы вождения. Также важно проводить работы, указанные в руководстве к вашему Engine VK56VD.
В комментариях расскажите об опыте эксплуатации автомобиля с двигателем VK56VD, возникающих сложностях и особенностях ремонта. Сохраните материал в закладках, чтобы в любой момент к нему вернуться.
С момента приобретения авто я проехал 60 000 км, для кого-то это годовой пробег, кто-то его 6 лет накатывает. У меня примерно 13-15 тыс. в год. Так вот в последний год двигатель стал потреблять масло как-то не гуманно и не предсказуемо: мог проехать тысячу километров и долить 200 грамм, а мог съездить в соседний (50 км) город, вернуться без 0,5 литра! Поэтому последняя поездка на рыбалку в Астрахань (750км в одну сторону) была подстрахована 10 литрами ZIC, назад приехали 8 литров — повезло.
С учетом того, что проблемы длились целый год, то я потихоньку подкупал запчасти (прокладки, опоры двигателя, сальники, помпу) то что устанавливается без замеров. Итак, прежде чем начать ремонт надо понимать что ты к нему готов, прежде всего морально! Я трезво осознавал, что капиталка может затянуться, но не представлял на сколько и по каким причинам! Поэтому, по моему мнению, основные критерии готовности к капиталке двигателя (если у Вас много денег, то можете пропустить эти пункты):
— наличие второй машины в семье (на ходу, конечно);
— наличие средств измерений (контроля размеров) или доступ к ним;
— умение ими правильно пользоваться и принимать по итогам замеров правильные решения;
— умение пользоваться каталогами запчастей и находить качественные дешевые (иногда не совместимые между собой понятия) запчасти;
— чуть не забыл — нужен достаточной площади гараж;
— необходим хорошего качества инструмент, в т.ч. динамометрические ключи или доступ к ним (кстати, я бы не доверял динамометрическим ключам, имеющим большую наработку, если их хозяин периодически их не поверяет/калибрует — можно нарваться на такую брехню по усилиям затяжки);
— обязательно нужна литература, желательно несколько источников — при сборке из-за противоречий в разных источниках и поиске истины, я потерял много времени. В итоге англоязычный мануал был принят после нескольких аналитических решений как догма. Т.е. отечественная книга по ремонту фиников откровенно иногда прибрехивает, но без нее тяжело — все-таки написано по русски.
— наличие в округе СТО, имеющее специальное оборудование для расточки и обязательно плосковершинной хонинговки (алмазной), в моем случае это фирма МЕХАНИКА, филиал в Краснодаре (не реклама, просто факт)! То что предлагают большинство СТО, это расточка, хонинговка абразивами и затирание «нулевкой» острых кромок, образованных грубыми хонами — это, извините, из 20-го века технологии «жигулей». Про возможность ремонта головок цилиндров, я вообще молчу — об этом позже распишу;
— да, наличие опыта ремонта двигателей попроще — типа 4-х цилиндровых рядников, или V6;
— наличие хороших грамотных друзей на СТО для совета и помощи;
— наличие крепких нервов или … много пива, самогонки …;
— и самое главное — наличие свободного ВРЕМЕНИ! Ты что-то начал делать, рассчитал, установил — уехал в командировку, потом во вторую, потом стало сильно холодно, вернулся к мотору — и все забыл что делал, почему именно так, даже записи, которые делал на всякий случай, не хотят помогать…
В общем, если я Вас не испугал, то постараюсь максимально точно описать весь процесс капремонта двигателя с момента его разборки, до его первого запуска. Я не претендую на оригинальность или догму, я буду описывать как все делал я, какие были ошибки, какие достижения. Кто меня поправит, только буду благодарен, да и другие читатели тоже останутся в плюсе, если замечание правильное. У кого хватило сил дочитать, идем дальше!
Машину разбирал у товарища на СТО — он любезно уехал отдыхать в Турцию на две недели, а я вечерами после работы разбирал морду машины и захламлял этим второй его гараж (сколько места занимают бампер, радиатор, телевизор и т.п. в гараже!). Моей ошибкой при снятии двигателя было то, что я не снял жабо, мне друг подсказал позже, и дело пошло! Для начала открутил все навесное: генератор, компрессор — чтобы добраться до опор двигателя и выпускных коллекторов. Кстати, после того как один из них не стал откручиваться от головки цилиндров, я открутил ее от двигателя и снял вместе с ним.
Уже позже подумал, что надо было обе так снять — быстрее бы вышло! Специального крана у меня не было для выемки двигателя, поэтому я его открутив от опор и АКПП сдвинул вперед по подложенным на раму доскам, разобрал по максимуму, чтобы потом, зацепив лебедкой, стащить на пол, отогнав машину.
Затем на эвакуатор знакомого погрузили все снятое с машины, отвезли в мой гараж, ниссана на буксире отвезли на мойку, помыл подкапотное пространство и загнали в другой мой гараж ждать капиталку.
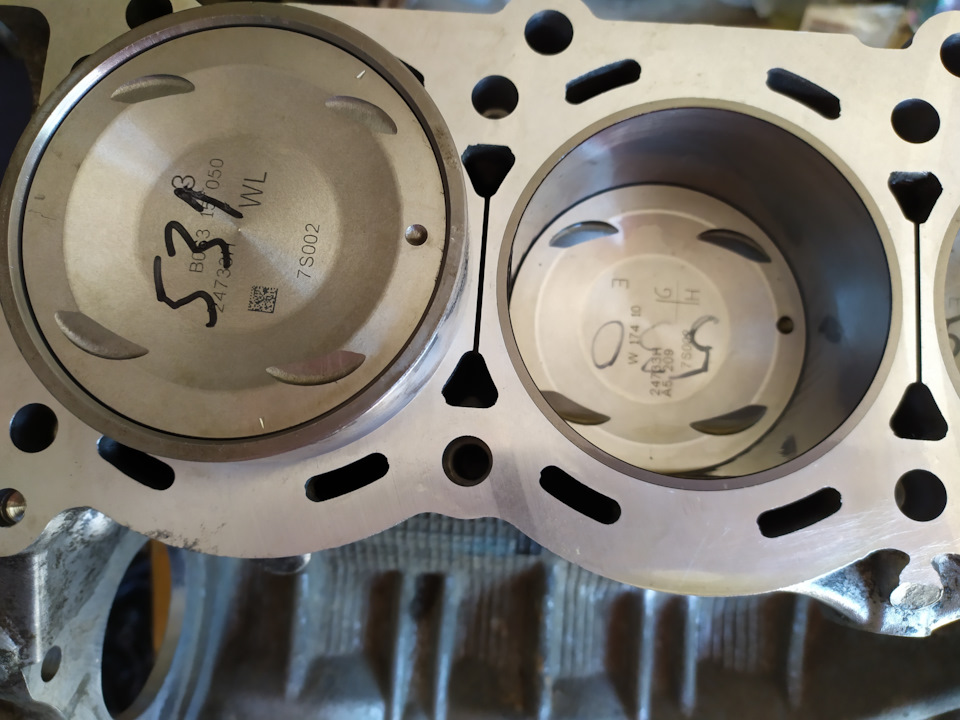
Чтобы рассказ не был скучно-длинным, в этой части я расскажу о работах с блоком цилиндров и поршневой группой. Что показала разборка?! Мотор стоял не знаю, родной нет, но то что в него лазили, похоже перед сдачей по трейд-ину, это точно. При чем этому мастеру, я бы ту трубу, с которой он все закручивал, засунул бы в интимное место! Были болты, которые так и не смогли открутить на двигателе — уже позже грели. Замеры цилиндров показали, что первый-седьмой в пределах износа (0,07-0,08мм по диаметру), а восьмой цилиндр аж целых 0,17мм! Т.е. если бы можно было пройтись просто хоном по цилиндрам, для его восстановления, то 1-7й имели бы превышение от номинала 0,1мм, что допустимо и можно было бы только колечки новые подкинуть (ну это в самом бюджетном варианте), то 8-й цилиндр уже бы имел отклонение 0,2 мм по диаметру цилиндра, а это уже предел его полного износа!
Получается перед продажей подкинули новые колечки и их хватило на 50 тыс км. В принципе, я не испытывал особых иллюзий при покупке авто и был готов к любым ремонтам.
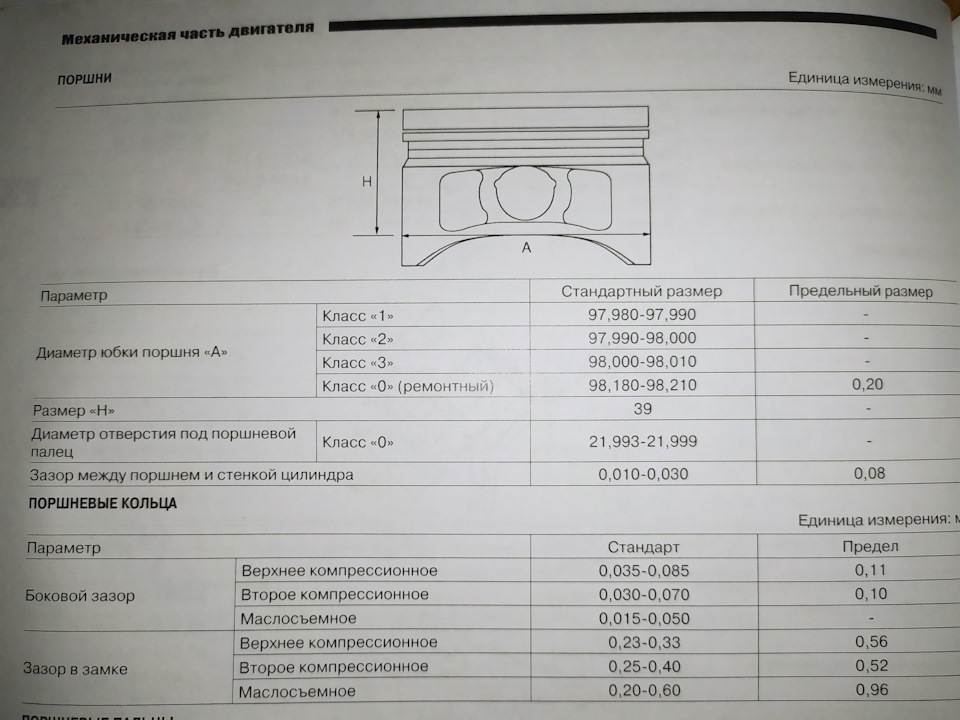
Что мы имеем: необходимость расточки блока цилиндров. Вопрос — на сколько? Какие есть варианты у производителя? А ни каких! Только 3 стандартных класса 1,2,3 — это видно из картинки выше. Есть интересная тема по применению поршней с более позднего VK56VD — там вроде как есть официально ремонтные на 0,2, НО! Об этом я узнал позже, и оказывается, народ думает как наоборот на VK56VD поставить поршни от VK56DE, как более надежные в плане пары поршень-кольца. Ну и ключевой момент — цена вопроса!
Короче, перерыв все возможные варианты по альтернативным изготовителям поршневой группы, я остановился на фирме Timken, имеющей не плохую репутацию и которую при капитальном ремонте моторов, в основном, используют именитые СТО. Увеличение диаметра на 0,5мм. Однако, эти «сволочи» не прилагают к комплекту поршневые кольца! Поэтому выбор пал на Японского производителя NPR — поставщика на конвейер тоеты.
Заодно прикупил клещи для одевания колец на поршень — такое говно! Выкинул это «Дело техники».
Далее, был перепроверен микрометром коленвал — мне не сказанно повезло, что диметр что шатунных, что коренных шеек был практически на минимуме допуска — всего одна сотка отделяла их от минималки. Поэтому, мне не пришлось мудрить с таблицей по подбору вкладышей (а там разные верхние и нижние и т.п.) и я заказал все самые толстые.
Кстати, тут я промухал и заказал их в два раза меньше, только потом точнее глянул каталог и понял, что одна позиция — это один вкладыш, а их надо два на шатун.
Надо отдать должное инженерам Ниссана — они меня ввели в ступор. Если глянуть таблицу зазоров в сопряжении коленвал-вкладыш, то они допускают минимальный зазор в 0,001 мм что в Отечественном издании, что в англоязычном! По моему мнению, какой-то бред!
Попробуй проверни вал на пяти опорах с таким зазором! При этом, в качестве проверки правильности зазора они предлагают комплект пластичных полосок у которых при максимальном расплющивании пятна контакта рассчетно показывается зазор что-то около 0, 02мм.
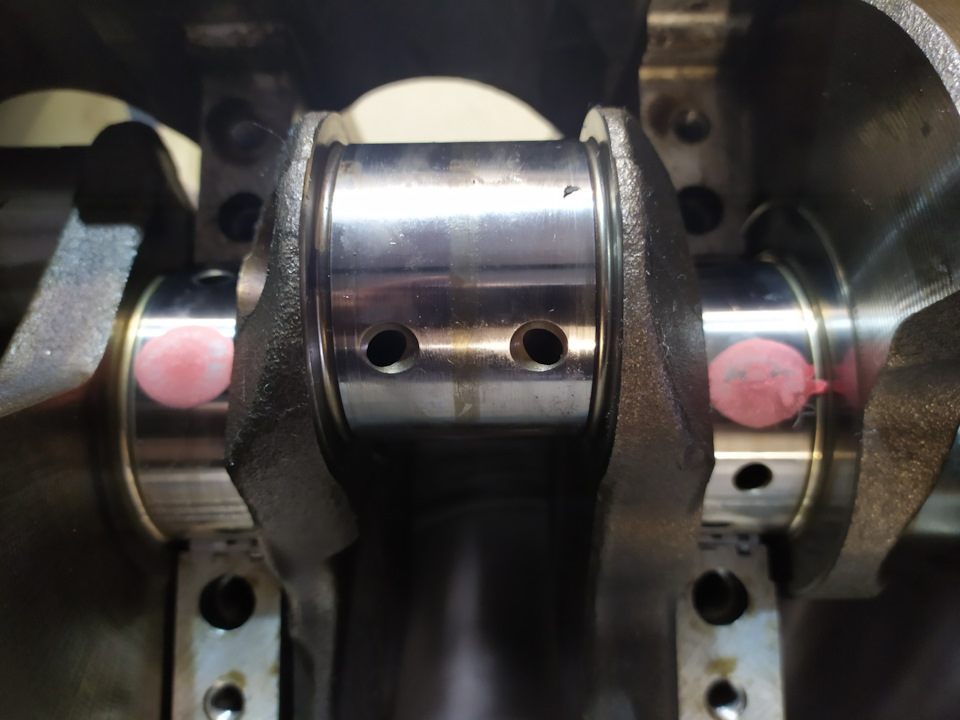
Полный размер
Вот пятно контакта, после контрольной сборки к/вала на блоке, соответствующее примерно 0,02мм
Так решено было и оставить, тем более, что толще вкладышей не бывает, только ремонтные и к/вал в норме.
А так, это целый процесс, но, как я понимаю, для его реализации нужен новый коленвал (не изношенный), а он стоит ого-го! Да и поиск нужных вкладышей по доступной цене — еще то удовольствие!
Вот таблицы подбора!
Да, кстати, сейчас выложу фото книги!
Полный размер
Что финик, что Армада — близнецы братья
Забыл — коленвал конечно проверили на прогиб и т.д. После вскрытия шатунов, оказалось что часть вкладышей изношены не равномерно, верхний атифрикционный слой стерся и видны пятна основы из цветного металла. Оказалось что шатуны эти кривые. Пришлось править, спустя время перепроверил — все нормально, ровные.
Почему-то, при проверке массы шатунов первые 4 были легче чем с 5-8 цилиндров на 10 грамм каждый?! Порывшись в интернете, нашел толковое видео, взвесил правильно верхние и нижние головки шатунов, и оказалось, что у всех 8-ми шатунов верхние головки примерно одинаковой массы, а нижние как раз и отличаются. Мудрить не стал с подгонкой массы, а просто запаровал на одну шейку коленвала один тяжелый и один легкий шатун, т.к. они крепятся совместно. Т.е. на всех 4-х шейках коленвала закреплено по одной тяжелой нижней головке шатуна и по одной легкой. В среднем все одинаково по массе. Поршни в сборе с пальцами имели примерно равную массу.
Итак, оставалось отвезти блок на расточку с необходимым зазором между поршнем и цилиндром. Как это вычисляется: замеряем диаметр поршня Timken в районе специальных приливов. Или правильнее — на поршне в середине покрытой антифрикционным слоем юбки есть лысинка — пятно, где нет покрытия, специально оставлено для контроля размера. Необходимый зазор производитель указывает на упаковке.
В данном случае 0,030мм.
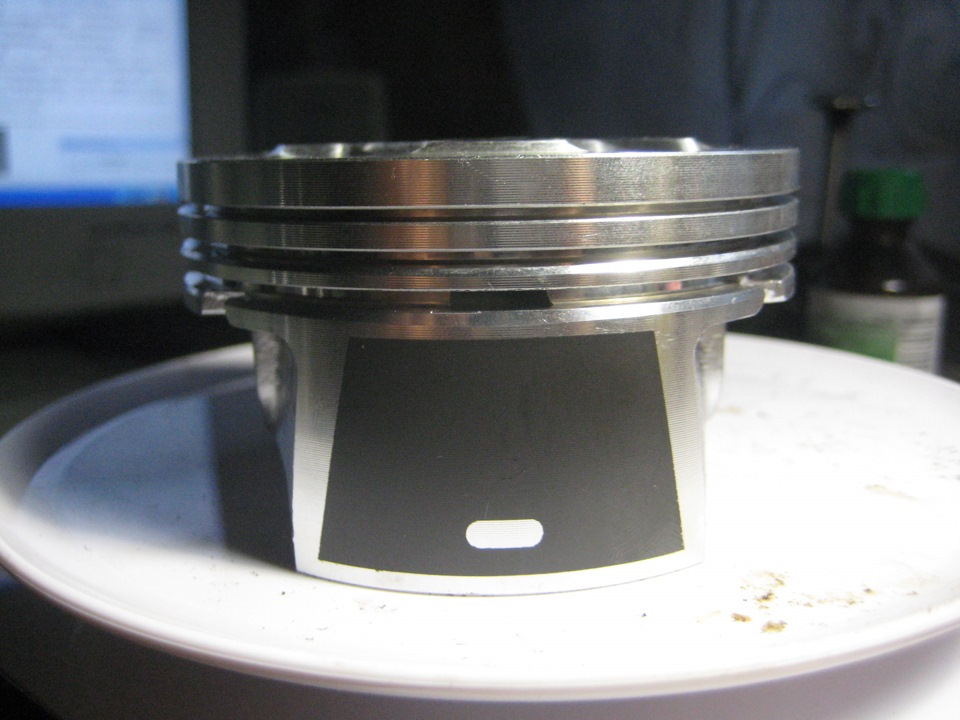
Вот пример поршня с такой меткой
Кстати, ниссан в оригинале дает зазор между стенкой цилиндра от 0,01 до 0,03мм! Представляете на сколько уверен в стабильности параметров своих поршней, хотя палку перегибают — о чем свидетельствуют частые задиры на VK56VD.
Итак, все комплектующие готовы, поршни сидят на шатунах в соответствии с указаниями в книге, кольца на поршнях, все смазано. Осталась сборка — фигня вопрос! Ко мне вызвался помочь товарищ с СТО, собравший не один десяток моторов, он принес собой приспособление для стяжки колец на поршне.

типа такой
Что ты будешь мучаться один, мы сейчас быстро…ушатаем блок цилиндров!

Полный размер
Вот так мы продрали 3 цилиндра
Все шло как обычно: зажимаем приспособой кольца и обратной стороной молотка потихоньку забиваем поршень в цилиндр. Но оказалось, что из-за большого диаметра поршня мы не углядели что поршень шел с не большим перекосом из оправки, соответственно тоненькое маслосъемное кольцо одним краем вышло чуть раньше чем надо, его надломило(скололо), а мы постукиваем, загоняем поршень, ссылаясь на не привычно большое усилие большим диаметром поршня и усилием затяжки колец к нему. Загнав третий поршень, решили крутануть коленвал — не тут то было, от былой легкости ничего не осталось. Все разобрав, я пошлел с горя…
Позже, перерыв интернет, я нашел информацию, что много кто так обжегся при сборке. Легко работая с малыми диаметрами поршней, попытка собрать мотор с большими поршнями данным приспособлением приводила к фиаско.
Данный блок был отставлен на неопределенное время. Точить его на 0,75 рисково. Поэтому был куплен блок б/у со следами хона, на фотографии в объявлении это было видно. Когда пришел блок, то оказалось что он уже гильзованный и нормально поездил. Т.е. гильзовка выполнена качественно. Замеры цилиндров меня обрадовали — если подправить хонинговку, то можно выйти на третий заводской диаметр цилиндра — т.е. 98,02-98,03мм.
Считай новый мотор! Но вот не задача, поршни тоже нужны третьего размера (класса).
Полный размер
Кстати, класс ремонтный даже у официалов ни кто не знает
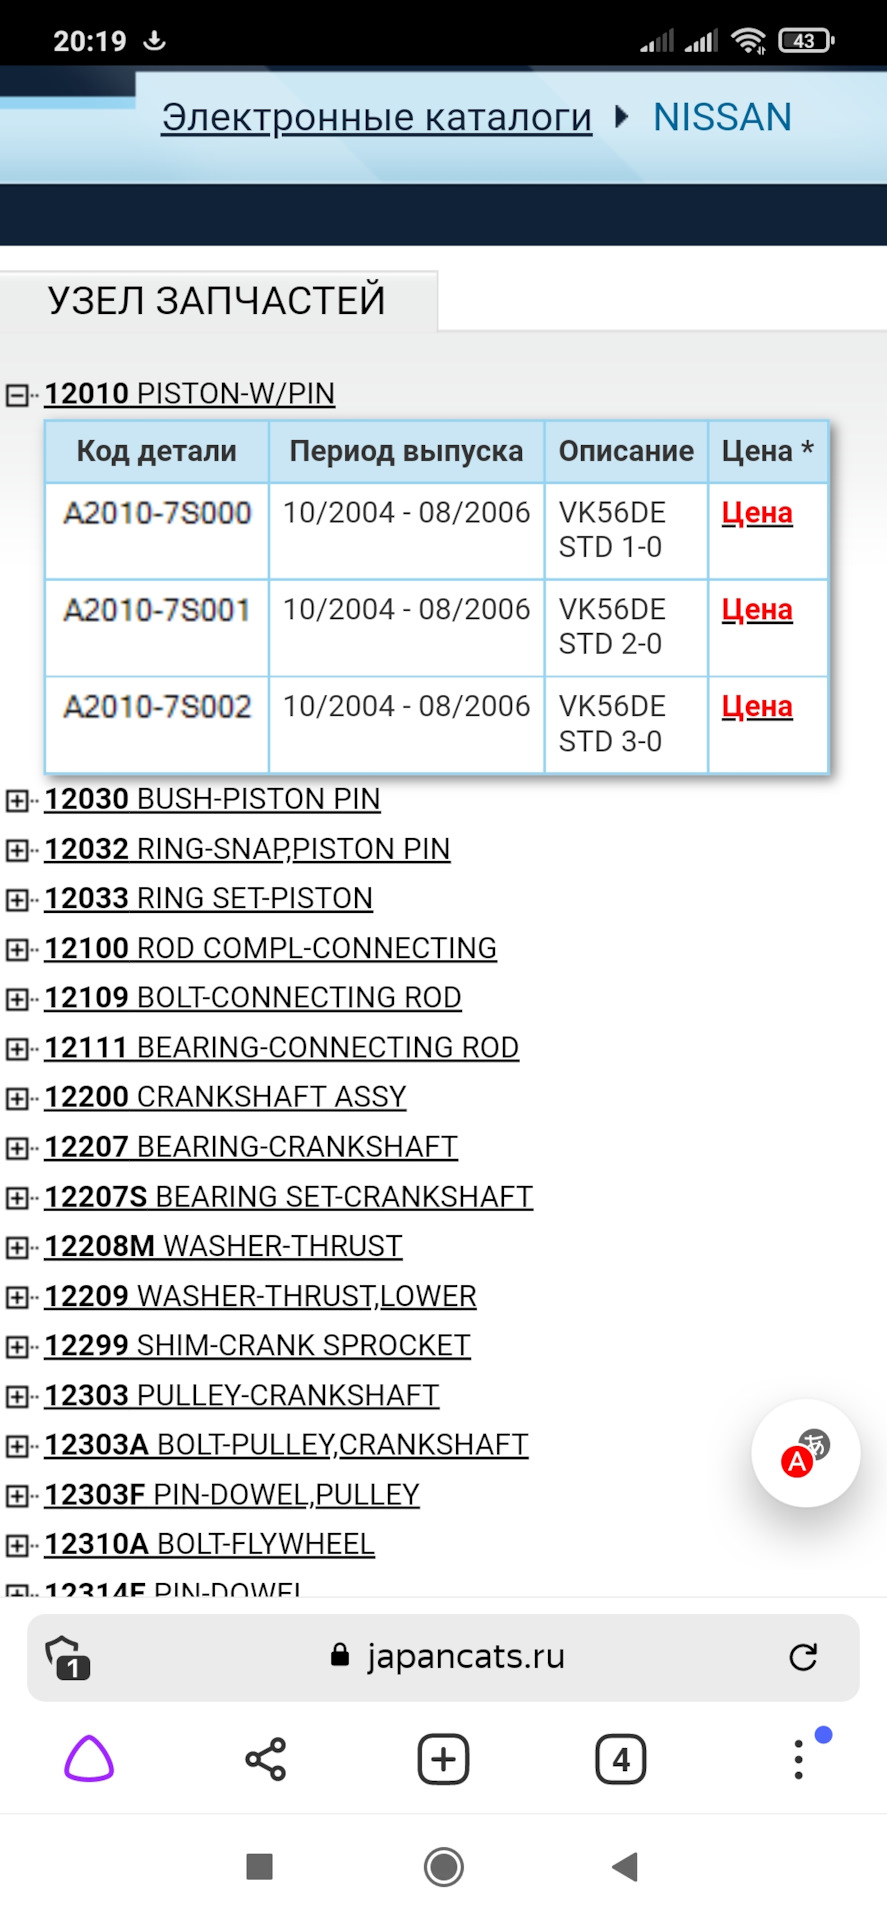
Наш искомый шифр A2010-7S002
или 120107S002, чуть более поздних годов.
Но ведь оригинал по цене — это совсем другой бюджет! Да и закажешь сразу все 8 под эти шифром, а вдруг они все просто номинал, а эти отличия в шифре ничего не значат!
Нашел в Москве фирму где продавался один поршень в наличии… Кому он нужен один при 8-ми цилиндрах-то?! Хорошо сын в Москве учится, перевел ему деньги, он поехал его купил, пофотографировал со всех сторон и в соседнем магазине инструмента замерял его диаметр — 98,04мм. Блин, думаю, как — по мануалу поршень третьего класса должен быть 98,000-98,010мм, а мой на 0,03мм полнее. Ну да ладно, толще не тоньше! Теперь давай искать кто же ине продаст 7 поршней вместо 8-ми?! Тут нахожу контору в Краснодаре, по приятной цене, но с большим сроком доставки и на складе 7 поршней! Я скидываю заказ, а они мне: а на хрена тебе 7 поршней? Я им в ответ — а че вы их только 7 продаете?! Так и договорились:)) В общем долго шли поршни, а я ломал голову почему мой поршень тоще чем надо и на сколько растачивать цилиндры под них. Начитавшись профильных форумов, получив от тамошних ГУРУ люлей за «деревенские» знания, выяснил вот что. Если на поршне с нанесенным антифрикционным покрытием имеется специальная площадка для замеров диаметра (смотрите фото выше), то диаметр поршня меряют строго по ней и от этого размера задают зазор между поршнем и цилиндром. Если такой площадки нет, то замер поршня ведут с учетом толщины антифрикционного покрытия в точках, указанных производителем (например 6мм от нижней части юбки).

Полный размер
вот пример поршня без метки
С учетом того, что тощина антифрикционного слоя примерно 0,02-0,03мм на сторону, то получается: диаметр купленного мной поршня 98,04мм минус 2х0,02мм покрытия, то истинный диаметр поршня составит 98,00мм — как в мануале. Чтобы не рисковать с зазорами, я попросил расточить цилиндры по максимуму т.е. 98,03мм. Соответственно поршень при сборке у меня заходил с натягом в 0,01мм. Да с натягом! Как на профильных сайтах сказали ГУРУ — антифрикционный слой где надо быстро сотрется, зато в остальных местах будет лучше прилегать и правильней работать. Ну кольца тоже взял оригинал. Можно я не буду учить как правильно кольца надевать на поршни?! Теоретически избежать их поломки не опытному мастеру можно с помощью спец щипцов, как я взял — но эти просто уродство с люфтами. Если есть возможность взять путячие, то может оно и к лучшему. А так одевал раздвигая пальцами, придерживая где надо имитируя эти щипцы (сильнее не могу объяснить).
Теперь как я вставлял поршень с кольцами в цилиндр? Выточил переходное кольцо внутренним диаметром равным цилиндру с пологой заходной фаской. Толщина кольца не много больше размера на поршне, определенного для поршневых колец. В обще — все на фото. Только смажьте все сначала.
Полный размер
Надеваем кольцо на поршень, при этом за чет пологой фаски кольца элементарно заправляются тоненькой отверточкой и кольцо легко одевается от руки

Полный размер
Поршень юбкой заходит в цилиндр, упирается кольцом и от руки легко задавливается поршень в цилиндр
Не забываем правильно перед сборкой сориентировать поршень на шатуне, потом поршень в цилиндре. Перед посадкой шатунов на к/вал, все смазал специальной смазкой для предварительной сборки двигателя. Да, на шатунах есть масляные форсунки — обязательно при установке вкладышей проверьте проволочкой не перекрылось ли отверстие форсунки. Моменты затяжки строго соблюдайте. До этого момента сборки мотора книга меня не подводила — данные совпадали с английской версией мануала. Не забываем при установке к/вала в постели тоже смазывать и установить упорные полукольца.
На сегодня все, устал)) Всем спасибо кто дочитал, жду замечаний!
Вы не робот?
Мы зарегистрировали подозрительный траффик, исходящий из вашей сети.
С помощью этой страницы мы сможем определить, что запросы отправляете именно вы, а не робот.
Поставьте отметку, чтобы продолжить.
Если вдруг что-то пойдет не так, попробуйте другой вариант.
Nissan Patrol: Модели Y62 выпуска с 2010 г. Устройство, техническое обслуживание и ремонт
Тема в разделе «Разное», создана пользователем Vjubkmobr, 7 май 2013.
-
Nissan Patrol: Модели Y62 выпуска с 2010 г. Устройство, техническое обслуживание и ремонт
![[IMG]](data:image/svg+xml,%3Csvg%20xmlns='http://www.w3.org/2000/svg'%20viewBox='0%200%200%200'%3E%3C/svg%3E)
Издательство: Легион-Автодата
Жанр: Техническое обслуживание, ремонт, тюнингКачество: Хорошее
Страниц: 384
Формат: pdf, fb2, epubВ издании представлено руководство по техническому обслуживанию и ремонту автомобиля Nissan Patrol модели Y62 выпуска с 2010 года с бензиновым двигателем VK56VD. Издание содержит руководство по эксплуатации, подробные инструкции по обслуживанию, диагностике, ремонту и регулировке элементов систем двигателя (смазки, охлаждения, запуска, зарядки, системы впрыска топлива), 7-ступенчатой автоматической коробки передач, раздаточной коробки, тормозной системы (включая антиблокировочную систему тормозов (ABS)), рулевого управления и т.д. Представлены подробные электросхемы и описания проверок электрооборудования. Имеющаяся в руководстве информация позволит автовладельцам самостоятельно проводить грамотное обслуживание автомобиля и не доводить его состояние до дорогостоящего ремонта. В случае ремонта, данное руководство послужит незаменимым средством по выявлению и устранению неисправностей во всех компонентах автомобиля. Пошаговое и наглядное описание ремонтных процедур, изобилие рисунков, обширные справочные ремонтные данные позволят квалифицированно подобрать варианты замены запчастей, произвести соответствующие регулировки, правку кузова и т.д. Книга предназначена для персонала СТО, ремонтных мастерских и автовладельцев.
Вложения:
-
Спасибо-спасибо-спасибо!!!!!
-
Чуть выше, если что, есть кнопочка Спасибо. Можно на нее нажать.
![[IMG]](http://piratebooks.ru/attachments/nissan-patrol-2.jpg)
Поделиться этой страницей
Factory Workshop Manual
Make
Infiniti
Model
Qx56 Rwd
Engine and year
V8-5.6L (VK56VD) (2011)
Please navigate through the PDF using the options
provided by OnlyManuals.com on the sidebar.
This manual was submitted by
Anonymous
Date
1st January 2018
Infiniti Qx56 Rwd Workshop Manual (V8-5.6L (VK56VD) (2011))
Infiniti Workshop Manuals > Relays and Modules > Relays and Modules — Accessories and Optional Equipment >
Navigation Module > Component Information > Technical Service Bulletins > All Technical Service Bulletins for Navigation
Module: > 10-066B > Apr > 11 > Navigation/Bluetooth(R) — Voice Recognition Issues
Navigation Module: All Technical Service Bulletins Navigation/Bluetooth(R) — Voice Recognition
Issues
Classification: EL10-042B
Reference: ITB10-066B
Date: April 20, 2011
NAVIGATION / BLUETOOTH / VOICE RECOGNITION FUNCTION ISSUES
This bulletin has been amended. Several items throughout the bulletin have been revised. Please
discard all previous versions.
APPLIED VEHICLES: 2010-2011 EX35 (J50) — with Navigation 2010-2011 FX35/FX50 (S51) — with
Navigation 2010-2011 G37 Coupe Convertible Sedan (C/H/V36) — with Navigation 2011 M37/M56
(Y51) — with Navigation 2011 QX56 (Z62) — with Navigation
APPLIED DATES: Vehicles built before May 1, 2011
IF YOU CONFIRM
One or more of the following is occurring on an Applied Vehicle:
^ Audio streaming via Bluetooth is «choppy» or «clipped».
^ «Calculating Route» takes an extended period of time (2-5 minutes) to complete.
^ «Could not find a route» displays when attempting to calculate a route.
^ Voice Recognition sequence takes too many steps.
^ Voice Recognition has difficulty recognizing voicetags.
^ The Navigation system reboots.
^ XM NavTraffic is slow to report.
^ «Handset Phonebook» access is slow.
^ When a hands-free call via Bluetooth is in progress and another call comes in («all waiting») there
is no function available to answer the incoming call.
NOTE:
The original specification for 2010 and some 2011 Applied Vehicles did not include the call waiting
feature. To ensure a high level of customer satisfaction Nissan has enhanced the Infotainment
system in many 2011 Applied Vehicles to add the call waiting feature. Nissan is making available
this same enhancement for all Applied Vehicles by offering the call waiting feature as part of the
Reprogramming Software DVD update listed in the Parts Information section.
^ Caller ID is not available when a hands-free call via Bluetooth is in progress and another call
comes in.
IMPORTANT:
The purpose of «ACTION» is to give you a quick idea of the work you will be performing. You MUST
closely follow the entire Service Procedure as it contains information that is essential to
successfully completing this repair.
ACTION
1. Perform steps 1-6 of Confirm Navigation Program Version in the Service Procedure to verify
whether or not this bulletin applies.
2. If this bulletin applies, load the Reprogramming Software DVD referenced in the Parts
Information section.
PARTS INFORMATION
Infiniti Qx56 Rwd Workshop Manual (V8-5.6L (VK56VD) (2011))
Infiniti Workshop Manuals > Relays and Modules > Relays and Modules — Accessories and Optional Equipment >
Navigation Module > Component Information > Technical Service Bulletins > All Technical Service Bulletins for Navigation
Module: > 10-066B > Apr > 11 > Navigation/Bluetooth(R) — Voice Recognition Issues > Page 12
^ Each dealer has been mailed one NTB10-125b/ITB10-066b Reprogramming Software DVD free
of charge from Clarion.
^ Should you require an additional NTB10-125b/ITB10-066b Reprogramming Software DVD due to
loss or damage it can be ordered free of charge by
contacting Clarion toll free at 1-800-347-8933.
^ Discard the previous version of this Reprogramming Software DVD (NTB10-125/ITB10-066).
CLAIMS INFORMATION
SERVICE PROCEDURE
NOTE:
This procedure will take 10-15 minutes with the ignition ON. Before starting make sure to attach a
battery charger to the vehicle battery and set it to a low charge rate (trickle charge).
Confirm Navigation Program Version
1. Set the parking brake.
2. Turn the ignition ON and keep the transmission in Park or Neutral.
^ The Navigation start-up screen should display.
^ If the Navigation start-up screen is not displayed: turn the ignition OFF, wait 10 seconds and then
turn the ignition ON again.
3. Wait more than 1 minute.
4. Press the «INFO» button on the switch panel.
5. Select Navigation Version on the display screen.
Infiniti Qx56 Rwd Workshop Manual (V8-5.6L (VK56VD) (2011))
Infiniti Workshop Manuals > Relays and Modules > Relays and Modules — Accessories and Optional Equipment >
Navigation Module > Component Information > Technical Service Bulletins > All Technical Service Bulletins for Navigation
Module: > 10-066B > Apr > 11 > Navigation/Bluetooth(R) — Voice Recognition Issues > Page 13
NOTE:
On some vehicles you will first need to select Others to find Navigation Version.
6. Check the Program Version.
If the Program Version is:
^ X1U62024 or lower
OR
^ X1U72001
….continue with Step 7 below.
If the Program Version is:
^ X1U62025 or higher — except X1U72001
….this bulletin does not apply. Refer to ASIST for further diagnostic information.
7. Check the Map Version.
^ If the Map Version is not 09.10 MAP No. 1 continue with the next section of the Service
Procedure («Load Reprogramming Software DVD»).
Infiniti Qx56 Rwd Workshop Manual (V8-5.6L (VK56VD) (2011))
Infiniti Workshop Manuals > Relays and Modules > Relays and Modules — Accessories and Optional Equipment >
Navigation Module > Component Information > Technical Service Bulletins > All Technical Service Bulletins for Navigation
Module: > 10-066B > Apr > 11 > Navigation/Bluetooth(R) — Voice Recognition Issues > Page 14
^ If the Map Version is 09.10 MAP No. 1 first perform the procedure in ITB10-031. Once complete
continue with the next section of the Service
Procedure («Load Reprogramming Software DVD»).
Load Reprogramming Software DVD
1. Make sure there is not a disc in the in-dash CD/DVD player.
2. Insert the Reprogramming Software DVD into the in-dash CD/DVD player slot.
IMPORTANT:
Once reprogramming has started:
^ Do not eject the DVD while it is loading.
^ Do not change the ignition position until the DVD has been loaded.
3. Wait for the program to load (a progress bar will display).
4. When the program has finished loading:
^ The Reprogramming Software DVD will automatically eject.
^ «Program loading is completed» will display.
5. The Navigation system will automatically restart.
6. Make sure the new program has loaded.
a. Press the «INFO» button on the switch panel.
b. Select Navigation Version on the display screen.
Infiniti Qx56 Rwd Workshop Manual (V8-5.6L (VK56VD) (2011))
Infiniti Workshop Manuals > Relays and Modules > Relays and Modules — Accessories and Optional Equipment >
Navigation Module > Component Information > Technical Service Bulletins > All Technical Service Bulletins for Navigation
Module: > 10-066B > Apr > 11 > Navigation/Bluetooth(R) — Voice Recognition Issues > Page 15
c. The Program Version should be X1U62025.
^ If the Program Version is not X1U62025 perform the Load Reprogramming Software DVD
procedure again.
7. The procedure is complete. Turn OFF the ignition.
Infiniti Qx56 Rwd Workshop Manual (V8-5.6L (VK56VD) (2011))
Infiniti Workshop Manuals > Relays and Modules > Relays and Modules — Accessories and Optional Equipment >
Navigation Module > Component Information > Technical Service Bulletins > All Technical Service Bulletins for Navigation
Module: > 10-017A > Dec > 10 > Navigation Radio — Configuration After Replacement
Navigation Module: All Technical Service Bulletins Navigation Radio — Configuration After
Replacement
Classification: EL10-009a
Reference: ITB0-017a
Date: December 1, 2010
AV CONTROL UNIT REPLACEMENT REQUIRES CONSULT-III CONFIGURATION
This bulletin has been amended. Several items have been revised. Please discard previous
versions.
APPLIED VEHICLES: 2010-2011 EX35 (J50) 2010-2011 FX35/FX50 (S51) 2010-2011 G37 Coupe
Convertible Sedan (C/H/V36) 2011 M37/M56 (Y51) 2011 QX56 (Z62)
SERVICE INFORMATION
If the AV Control Unit needs to be replaced on an Applied Vehicle for any reason follow the steps in
the Service Procedure to configure the Multi AV system.
NOTE:
The original AV Control Unit must be installed in the vehicle while performing part of this procedure.
DO NOT remove the original AV Control Unit until instructed.
SERVICE PROCEDURE
Before starting make sure your ASIST has been freshly synchronized and all CONSULT-III
upgrades have been installed.
Parts of the Procedure
1. Make sure the shift selector is in Park.
2. Connect the C-III VI to the vehicle.
3. Turn ON the ignition.
NOTE:
You may want to start the engine to keep the battery charged during this procedure.
4. Open/start ASIST on the C-III computer then select CONSULT Utilities > CONSULT III.
5. Perform the usual C-III start-up selections:
a. Wait for the Detecting VI/MI in progress message to clear.
Infiniti Qx56 Rwd Workshop Manual (V8-5.6L (VK56VD) (2011))
Infiniti Workshop Manuals > Relays and Modules > Relays and Modules — Accessories and Optional Equipment >
Navigation Module > Component Information > Technical Service Bulletins > All Technical Service Bulletins for Navigation
Module: > 10-017A > Dec > 10 > Navigation Radio — Configuration After Replacement > Page 20
b. Select the detected VI from the list.
c. Select Connect.
d. Wait for the Checking the firmware version message to clear.
e. Select the vehicle and model year.
f. Select Select.
g. Make sure the correct vehicle is displayed on the confirmation screen.
h. Select Confirm.
6. Select Repair.
7. Select EL Repair.
Infiniti Qx56 Rwd Workshop Manual (V8-5.6L (VK56VD) (2011))
Infiniti Workshop Manuals > Relays and Modules > Relays and Modules — Accessories and Optional Equipment >
Navigation Module > Component Information > Technical Service Bulletins > All Technical Service Bulletins for Navigation
Module: > 10-017A > Dec > 10 > Navigation Radio — Configuration After Replacement > Page 21
8. Select MULTI AV.
9. Select OK.
10. Select Configuration
11. Select OK.
Infiniti Qx56 Rwd Workshop Manual (V8-5.6L (VK56VD) (2011))
Infiniti Workshop Manuals > Relays and Modules > Relays and Modules — Accessories and Optional Equipment >
Navigation Module > Component Information > Technical Service Bulletins > All Technical Service Bulletins for Navigation
Module: > 10-017A > Dec > 10 > Navigation Radio — Configuration After Replacement > Page 22
^ It is OK to execute this function.
^ Perform only the tasks indicated in the next steps.
12. Select READ CONFIGURATION.
13. Select Next.
14. Write down the values shown on the C-III.
15. Select Save. Close C-Ill.
16. Replace the AV Control Unit as instructed in the appropriate Electronic Service Manual (ESM).
PART 2:
Write Configuration Using the Config File
Infiniti Qx56 Rwd Workshop Manual (V8-5.6L (VK56VD) (2011))
Infiniti Workshop Manuals > Relays and Modules > Relays and Modules — Accessories and Optional Equipment >
Navigation Module > Component Information > Technical Service Bulletins > All Technical Service Bulletins for Navigation
Module: > 10-017A > Dec > 10 > Navigation Radio — Configuration After Replacement > Page 23
17. Repeat steps 1-11.
18. Select WRITE CONFIGURATION — Config file.
19. Select Next.
After performing step 19
If an error message does not display:
^ Proceed to PART 5: Confirm Multi AV System Is Operational.
If an error message does display:
^ Proceed to PART 3: Perform Multi AV Initialization.
PART 3 (if needed):
Perform Multi AV Initialization
20. Leave ON C-III and the VI connected while performing Multi AV initialization.
21. Turn OFF the audio system.
NOTE:
The ignition should still be ON.
Infiniti Qx56 Rwd Workshop Manual (V8-5.6L (VK56VD) (2011))
Infiniti Workshop Manuals > Relays and Modules > Relays and Modules — Accessories and Optional Equipment >
Navigation Module > Component Information > Technical Service Bulletins > All Technical Service Bulletins for Navigation
Module: > 10-017A > Dec > 10 > Navigation Radio — Configuration After Replacement > Page 24
22. Put the AV system into Self Diagnostic Mode.
a. Press and hold the SETTING button.
b. While holding the SETTING button turn the volume control knob 40 clicks or more.
^ The volume control knob can be turned either direction.
^ When the system goes into the Self Diagnostic Menu the screen in Figure 11 will display.
23. Select Confirmation/Adjustment.
24. Select Initialize Settings.
NOTE:
Use the scroll arrow to find Initialize Settings.
Infiniti Qx56 Rwd Workshop Manual (V8-5.6L (VK56VD) (2011))
Infiniti Workshop Manuals > Relays and Modules > Relays and Modules — Accessories and Optional Equipment >
Navigation Module > Component Information > Technical Service Bulletins > All Technical Service Bulletins for Navigation
Module: > 10-017A > Dec > 10 > Navigation Radio — Configuration After Replacement > Page 25
25. Select Accessory Number Initialization.
26. Select Yes.
27. Select Yes.
28. The screen in Figure 16 will display while initializing.
Infiniti Qx56 Rwd Workshop Manual (V8-5.6L (VK56VD) (2011))
Infiniti Workshop Manuals > Relays and Modules > Relays and Modules — Accessories and Optional Equipment >
Navigation Module > Component Information > Technical Service Bulletins > All Technical Service Bulletins for Navigation
Module: > 10-017A > Dec > 10 > Navigation Radio — Configuration After Replacement > Page 26
29. The screen in Figure 17 will display when initializing is complete.
30. Reboot the Multi AV system as follows:
a. Turn OFF the ignition.
b. Wait 10 seconds.
c. Turn ON the ignition.
Proceed to PART 4: Write Configuration Using Manual Settings.
PART 4 Write Configuration Using Manual Settings
31. Select MULTI AV.
32. Select OK.
Infiniti Qx56 Rwd Workshop Manual (V8-5.6L (VK56VD) (2011))
Infiniti Workshop Manuals > Relays and Modules > Relays and Modules — Accessories and Optional Equipment >
Navigation Module > Component Information > Technical Service Bulletins > All Technical Service Bulletins for Navigation
Module: > 10-017A > Dec > 10 > Navigation Radio — Configuration After Replacement > Page 27
33. Select Configuration.
34. Select OK.
^ It is OK to execute this function.
^ Perform only the tasks indicated in the next steps.
35. Select WRITE CONFIGURATION — Manual setting.
Infiniti Qx56 Rwd Workshop Manual (V8-5.6L (VK56VD) (2011))
Infiniti Workshop Manuals > Relays and Modules > Relays and Modules — Accessories and Optional Equipment >
Navigation Module > Component Information > Technical Service Bulletins > All Technical Service Bulletins for Navigation
Module: > 10-017A > Dec > 10 > Navigation Radio — Configuration After Replacement > Page 28
36. Select Next.
37. Set the configuration values.
^ Use the values you wrote down in Step 14. DO NOT select ALL.
^ Use the menu arrow to view selections.
^ If no values are displayed proceed to step 38.
38. Select SETTING.
Infiniti Qx56 Rwd Workshop Manual (V8-5.6L (VK56VD) (2011))
Infiniti Workshop Manuals > Relays and Modules > Relays and Modules — Accessories and Optional Equipment >
Navigation Module > Component Information > Technical Service Bulletins > All Technical Service Bulletins for Navigation
Module: > 10-017A > Dec > 10 > Navigation Radio — Configuration After Replacement > Page 29
39. Select OK.
40. Press the BACK arrow 3 times to go to the screen in Figure 26.
41. Select Ecu Identification.
Infiniti Qx56 Rwd Workshop Manual (V8-5.6L (VK56VD) (2011))
Infiniti Workshop Manuals > Relays and Modules > Relays and Modules — Accessories and Optional Equipment >
Navigation Module > Component Information > Technical Service Bulletins > All Technical Service Bulletins for Navigation
Module: > 10-017A > Dec > 10 > Navigation Radio — Configuration After Replacement > Page 30
42. Confirm the ECU part number is displayed.
43. Close the C-III software and disconnect the VI from the vehicle.
PART 5:
Confirm Multi AV System Is Operational
44. Put your foot on the brake start the engine and move the shift selector to R (reverse).
45. If equipped make sure the rear view monitor is working correctly.
46. Put the shift selector back into Park.
47. Turn ON the radio.
48. Turn the volume knob and make sure the audio volume responds to movement of the knob.
Disclaimer
Infiniti Qx56 Rwd Workshop Manual (V8-5.6L (VK56VD) (2011))
Infiniti Workshop Manuals > Relays and Modules > Relays and Modules — Accessories and Optional Equipment >
Navigation Module > Component Information > Technical Service Bulletins > Customer Interest: > 10-066B > Apr > 11 >
Navigation/Bluetooth(R) — Voice Recognition Issues
Navigation Module: Customer Interest Navigation/Bluetooth(R) — Voice Recognition Issues
Classification: EL10-042B
Reference: ITB10-066B
Date: April 20, 2011
NAVIGATION / BLUETOOTH / VOICE RECOGNITION FUNCTION ISSUES
This bulletin has been amended. Several items throughout the bulletin have been revised. Please
discard all previous versions.
APPLIED VEHICLES: 2010-2011 EX35 (J50) — with Navigation 2010-2011 FX35/FX50 (S51) — with
Navigation 2010-2011 G37 Coupe Convertible Sedan (C/H/V36) — with Navigation 2011 M37/M56
(Y51) — with Navigation 2011 QX56 (Z62) — with Navigation
APPLIED DATES: Vehicles built before May 1, 2011
IF YOU CONFIRM
One or more of the following is occurring on an Applied Vehicle:
^ Audio streaming via Bluetooth is «choppy» or «clipped».
^ «Calculating Route» takes an extended period of time (2-5 minutes) to complete.
^ «Could not find a route» displays when attempting to calculate a route.
^ Voice Recognition sequence takes too many steps.
^ Voice Recognition has difficulty recognizing voicetags.
^ The Navigation system reboots.
^ XM NavTraffic is slow to report.
^ «Handset Phonebook» access is slow.
^ When a hands-free call via Bluetooth is in progress and another call comes in («all waiting») there
is no function available to answer the incoming call.
NOTE:
The original specification for 2010 and some 2011 Applied Vehicles did not include the call waiting
feature. To ensure a high level of customer satisfaction Nissan has enhanced the Infotainment
system in many 2011 Applied Vehicles to add the call waiting feature. Nissan is making available
this same enhancement for all Applied Vehicles by offering the call waiting feature as part of the
Reprogramming Software DVD update listed in the Parts Information section.
^ Caller ID is not available when a hands-free call via Bluetooth is in progress and another call
comes in.
IMPORTANT:
The purpose of «ACTION» is to give you a quick idea of the work you will be performing. You MUST
closely follow the entire Service Procedure as it contains information that is essential to
successfully completing this repair.
ACTION
1. Perform steps 1-6 of Confirm Navigation Program Version in the Service Procedure to verify
whether or not this bulletin applies.
2. If this bulletin applies, load the Reprogramming Software DVD referenced in the Parts
Information section.
PARTS INFORMATION
Infiniti Qx56 Rwd Workshop Manual (V8-5.6L (VK56VD) (2011))
Infiniti Workshop Manuals > Relays and Modules > Relays and Modules — Accessories and Optional Equipment >
Navigation Module > Component Information > Technical Service Bulletins > Customer Interest: > 10-066B > Apr > 11 >
Navigation/Bluetooth(R) — Voice Recognition Issues > Page 36
^ Each dealer has been mailed one NTB10-125b/ITB10-066b Reprogramming Software DVD free
of charge from Clarion.
^ Should you require an additional NTB10-125b/ITB10-066b Reprogramming Software DVD due to
loss or damage it can be ordered free of charge by
contacting Clarion toll free at 1-800-347-8933.
^ Discard the previous version of this Reprogramming Software DVD (NTB10-125/ITB10-066).
CLAIMS INFORMATION
SERVICE PROCEDURE
NOTE:
This procedure will take 10-15 minutes with the ignition ON. Before starting make sure to attach a
battery charger to the vehicle battery and set it to a low charge rate (trickle charge).
Confirm Navigation Program Version
1. Set the parking brake.
2. Turn the ignition ON and keep the transmission in Park or Neutral.
^ The Navigation start-up screen should display.
^ If the Navigation start-up screen is not displayed: turn the ignition OFF, wait 10 seconds and then
turn the ignition ON again.
3. Wait more than 1 minute.
4. Press the «INFO» button on the switch panel.
5. Select Navigation Version on the display screen.
Infiniti Qx56 Rwd Workshop Manual (V8-5.6L (VK56VD) (2011))
Infiniti Workshop Manuals > Relays and Modules > Relays and Modules — Accessories and Optional Equipment >
Navigation Module > Component Information > Technical Service Bulletins > Customer Interest: > 10-066B > Apr > 11 >
Navigation/Bluetooth(R) — Voice Recognition Issues > Page 37
NOTE:
On some vehicles you will first need to select Others to find Navigation Version.
6. Check the Program Version.
If the Program Version is:
^ X1U62024 or lower
OR
^ X1U72001
….continue with Step 7 below.
If the Program Version is:
^ X1U62025 or higher — except X1U72001
….this bulletin does not apply. Refer to ASIST for further diagnostic information.
7. Check the Map Version.
^ If the Map Version is not 09.10 MAP No. 1 continue with the next section of the Service
Procedure («Load Reprogramming Software DVD»).
Infiniti Qx56 Rwd Workshop Manual (V8-5.6L (VK56VD) (2011))
Infiniti Workshop Manuals > Relays and Modules > Relays and Modules — Accessories and Optional Equipment >
Navigation Module > Component Information > Technical Service Bulletins > Customer Interest: > 10-066B > Apr > 11 >
Navigation/Bluetooth(R) — Voice Recognition Issues > Page 38
^ If the Map Version is 09.10 MAP No. 1 first perform the procedure in ITB10-031. Once complete
continue with the next section of the Service
Procedure («Load Reprogramming Software DVD»).
Load Reprogramming Software DVD
1. Make sure there is not a disc in the in-dash CD/DVD player.
2. Insert the Reprogramming Software DVD into the in-dash CD/DVD player slot.
IMPORTANT:
Once reprogramming has started:
^ Do not eject the DVD while it is loading.
^ Do not change the ignition position until the DVD has been loaded.
3. Wait for the program to load (a progress bar will display).
4. When the program has finished loading:
^ The Reprogramming Software DVD will automatically eject.
^ «Program loading is completed» will display.
5. The Navigation system will automatically restart.
6. Make sure the new program has loaded.
a. Press the «INFO» button on the switch panel.
b. Select Navigation Version on the display screen.
Infiniti Qx56 Rwd Workshop Manual (V8-5.6L (VK56VD) (2011))
Infiniti Workshop Manuals > Relays and Modules > Relays and Modules — Accessories and Optional Equipment >
Navigation Module > Component Information > Technical Service Bulletins > Customer Interest: > 10-066B > Apr > 11 >
Navigation/Bluetooth(R) — Voice Recognition Issues > Page 39
c. The Program Version should be X1U62025.
^ If the Program Version is not X1U62025 perform the Load Reprogramming Software DVD
procedure again.
7. The procedure is complete. Turn OFF the ignition.
Infiniti Qx56 Rwd Workshop Manual (V8-5.6L (VK56VD) (2011))
Infiniti Workshop Manuals > Relays and Modules > Relays and Modules — Accessories and Optional Equipment >
Navigation Module > Component Information > Technical Service Bulletins > All Other Service Bulletins for Navigation
Module: > 10-017A > Dec > 10 > Navigation Radio — Configuration After Replacement
Navigation Module: All Technical Service Bulletins Navigation Radio — Configuration After
Replacement
Classification: EL10-009a
Reference: ITB0-017a
Date: December 1, 2010
AV CONTROL UNIT REPLACEMENT REQUIRES CONSULT-III CONFIGURATION
This bulletin has been amended. Several items have been revised. Please discard previous
versions.
APPLIED VEHICLES: 2010-2011 EX35 (J50) 2010-2011 FX35/FX50 (S51) 2010-2011 G37 Coupe
Convertible Sedan (C/H/V36) 2011 M37/M56 (Y51) 2011 QX56 (Z62)
SERVICE INFORMATION
If the AV Control Unit needs to be replaced on an Applied Vehicle for any reason follow the steps in
the Service Procedure to configure the Multi AV system.
NOTE:
The original AV Control Unit must be installed in the vehicle while performing part of this procedure.
DO NOT remove the original AV Control Unit until instructed.
SERVICE PROCEDURE
Before starting make sure your ASIST has been freshly synchronized and all CONSULT-III
upgrades have been installed.
Parts of the Procedure
1. Make sure the shift selector is in Park.
2. Connect the C-III VI to the vehicle.
3. Turn ON the ignition.
NOTE:
You may want to start the engine to keep the battery charged during this procedure.
4. Open/start ASIST on the C-III computer then select CONSULT Utilities > CONSULT III.
5. Perform the usual C-III start-up selections:
a. Wait for the Detecting VI/MI in progress message to clear.
Infiniti Qx56 Rwd Workshop Manual (V8-5.6L (VK56VD) (2011))
Infiniti Workshop Manuals > Relays and Modules > Relays and Modules — Accessories and Optional Equipment >
Navigation Module > Component Information > Technical Service Bulletins > All Other Service Bulletins for Navigation
Module: > 10-017A > Dec > 10 > Navigation Radio — Configuration After Replacement > Page 45
b. Select the detected VI from the list.
c. Select Connect.
d. Wait for the Checking the firmware version message to clear.
e. Select the vehicle and model year.
f. Select Select.
g. Make sure the correct vehicle is displayed on the confirmation screen.
h. Select Confirm.
6. Select Repair.
7. Select EL Repair.
Infiniti Qx56 Rwd Workshop Manual (V8-5.6L (VK56VD) (2011))
Infiniti Workshop Manuals > Relays and Modules > Relays and Modules — Accessories and Optional Equipment >
Navigation Module > Component Information > Technical Service Bulletins > All Other Service Bulletins for Navigation
Module: > 10-017A > Dec > 10 > Navigation Radio — Configuration After Replacement > Page 46
8. Select MULTI AV.
9. Select OK.
10. Select Configuration
11. Select OK.
Infiniti Qx56 Rwd Workshop Manual (V8-5.6L (VK56VD) (2011))
Infiniti Workshop Manuals > Relays and Modules > Relays and Modules — Accessories and Optional Equipment >
Navigation Module > Component Information > Technical Service Bulletins > All Other Service Bulletins for Navigation
Module: > 10-017A > Dec > 10 > Navigation Radio — Configuration After Replacement > Page 47
^ It is OK to execute this function.
^ Perform only the tasks indicated in the next steps.
12. Select READ CONFIGURATION.
13. Select Next.
14. Write down the values shown on the C-III.
15. Select Save. Close C-Ill.
16. Replace the AV Control Unit as instructed in the appropriate Electronic Service Manual (ESM).
PART 2:
Write Configuration Using the Config File
Infiniti Qx56 Rwd Workshop Manual (V8-5.6L (VK56VD) (2011))
Infiniti Workshop Manuals > Relays and Modules > Relays and Modules — Accessories and Optional Equipment >
Navigation Module > Component Information > Technical Service Bulletins > All Other Service Bulletins for Navigation
Module: > 10-017A > Dec > 10 > Navigation Radio — Configuration After Replacement > Page 48
17. Repeat steps 1-11.
18. Select WRITE CONFIGURATION — Config file.
19. Select Next.
After performing step 19
If an error message does not display:
^ Proceed to PART 5: Confirm Multi AV System Is Operational.
If an error message does display:
^ Proceed to PART 3: Perform Multi AV Initialization.
PART 3 (if needed):
Perform Multi AV Initialization
20. Leave ON C-III and the VI connected while performing Multi AV initialization.
21. Turn OFF the audio system.
NOTE:
The ignition should still be ON.
Infiniti Qx56 Rwd Workshop Manual (V8-5.6L (VK56VD) (2011))
Infiniti Workshop Manuals > Relays and Modules > Relays and Modules — Accessories and Optional Equipment >
Navigation Module > Component Information > Technical Service Bulletins > All Other Service Bulletins for Navigation
Module: > 10-017A > Dec > 10 > Navigation Radio — Configuration After Replacement > Page 49
22. Put the AV system into Self Diagnostic Mode.
a. Press and hold the SETTING button.
b. While holding the SETTING button turn the volume control knob 40 clicks or more.
^ The volume control knob can be turned either direction.
^ When the system goes into the Self Diagnostic Menu the screen in Figure 11 will display.
23. Select Confirmation/Adjustment.
24. Select Initialize Settings.
NOTE:
Use the scroll arrow to find Initialize Settings.
Infiniti Qx56 Rwd Workshop Manual (V8-5.6L (VK56VD) (2011))
Infiniti Workshop Manuals > Relays and Modules > Relays and Modules — Accessories and Optional Equipment >
Navigation Module > Component Information > Technical Service Bulletins > All Other Service Bulletins for Navigation
Module: > 10-017A > Dec > 10 > Navigation Radio — Configuration After Replacement > Page 50
25. Select Accessory Number Initialization.
26. Select Yes.
27. Select Yes.
28. The screen in Figure 16 will display while initializing.
Infiniti Qx56 Rwd Workshop Manual (V8-5.6L (VK56VD) (2011))
Infiniti Workshop Manuals > Relays and Modules > Relays and Modules — Accessories and Optional Equipment >
Navigation Module > Component Information > Technical Service Bulletins > All Other Service Bulletins for Navigation
Module: > 10-017A > Dec > 10 > Navigation Radio — Configuration After Replacement > Page 51
29. The screen in Figure 17 will display when initializing is complete.
30. Reboot the Multi AV system as follows:
a. Turn OFF the ignition.
b. Wait 10 seconds.
c. Turn ON the ignition.
Proceed to PART 4: Write Configuration Using Manual Settings.
PART 4 Write Configuration Using Manual Settings
31. Select MULTI AV.
32. Select OK.
Infiniti Qx56 Rwd Workshop Manual (V8-5.6L (VK56VD) (2011))
Infiniti Workshop Manuals > Relays and Modules > Relays and Modules — Accessories and Optional Equipment >
Navigation Module > Component Information > Technical Service Bulletins > All Other Service Bulletins for Navigation
Module: > 10-017A > Dec > 10 > Navigation Radio — Configuration After Replacement > Page 52
33. Select Configuration.
34. Select OK.
^ It is OK to execute this function.
^ Perform only the tasks indicated in the next steps.
35. Select WRITE CONFIGURATION — Manual setting.
Infiniti Qx56 Rwd Workshop Manual (V8-5.6L (VK56VD) (2011))
Infiniti Workshop Manuals > Relays and Modules > Relays and Modules — Accessories and Optional Equipment >
Navigation Module > Component Information > Technical Service Bulletins > All Other Service Bulletins for Navigation
Module: > 10-017A > Dec > 10 > Navigation Radio — Configuration After Replacement > Page 53
36. Select Next.
37. Set the configuration values.
^ Use the values you wrote down in Step 14. DO NOT select ALL.
^ Use the menu arrow to view selections.
^ If no values are displayed proceed to step 38.
38. Select SETTING.
Infiniti Qx56 Rwd Workshop Manual (V8-5.6L (VK56VD) (2011))
Infiniti Workshop Manuals > Relays and Modules > Relays and Modules — Accessories and Optional Equipment >
Navigation Module > Component Information > Technical Service Bulletins > All Other Service Bulletins for Navigation
Module: > 10-017A > Dec > 10 > Navigation Radio — Configuration After Replacement > Page 54
39. Select OK.
40. Press the BACK arrow 3 times to go to the screen in Figure 26.
41. Select Ecu Identification.
Infiniti Qx56 Rwd Workshop Manual (V8-5.6L (VK56VD) (2011))
Infiniti Workshop Manuals > Relays and Modules > Relays and Modules — Accessories and Optional Equipment >
Navigation Module > Component Information > Technical Service Bulletins > All Other Service Bulletins for Navigation
Module: > 10-017A > Dec > 10 > Navigation Radio — Configuration After Replacement > Page 55
42. Confirm the ECU part number is displayed.
43. Close the C-III software and disconnect the VI from the vehicle.
PART 5:
Confirm Multi AV System Is Operational
44. Put your foot on the brake start the engine and move the shift selector to R (reverse).
45. If equipped make sure the rear view monitor is working correctly.
46. Put the shift selector back into Park.
47. Turn ON the radio.
48. Turn the volume knob and make sure the audio volume responds to movement of the knob.
Disclaimer
Infiniti Qx56 Rwd Workshop Manual (V8-5.6L (VK56VD) (2011))
Infiniti Workshop Manuals > Relays and Modules > Relays and Modules — Brakes and Traction Control > Electronic Brake
Control Module > Component Information > Technical Service Bulletins > ABS/TCS — CAN Diagnostic Information
Electronic Brake Control Module: Technical Service Bulletins ABS/TCS — CAN Diagnostic
Information
Classification: BR10-012
Reference: ITB10-074
Date: December 15, 2010
ABS / VDC CAN DIAGNOSIS INFORMATION
APPLIED VEHICLES: All 2005 — 2011 Infiniti vehicles with ABS and/or VDC
SERVICE INFORMATION
When diagnosing a vehicle with an ABS or VDC / SLIP warning light on with DTCs stored in the
ABS / VDC actuator control unit perform DTC diagnosis first.
^ Do not replace the ABS / VDC actuator control unit without being supported by the DTC
diagnosis.
^ Do not erase DTCS before performing DTC diagnosis.
^ Always fully diagnose before performing any repairs.
When DTC U1000 (CAN COMM CIRCUIT) is the only DTC stored in the ABS / VDC actuator
control unit use the REPAIR FLOW CHART shown below. This will assist in proper diagnosis
results and repairs in addition to using diagnostic information in the Electronic Service Manual
(ESM).
^ If DTC U1000 is found stored in other systems refer to NTB10-066 and the applicable ESM.
^ If other DTCs are found stored in ABS / VDC along with U1000 follow the diagnosis steps for
those DTCs in the applicable ESM.
CLAIMS INFORMATION
Refer to the current Infiniti Warranty Flat Rate Manual and use the appropriate claims coding for
repairs performed.
Infiniti Qx56 Rwd Workshop Manual (V8-5.6L (VK56VD) (2011))
Infiniti Workshop Manuals > Relays and Modules > Relays and Modules — Brakes and Traction Control > Electronic Brake
Control Module > Component Information > Technical Service Bulletins > ABS/TCS — CAN Diagnostic Information > Page
61
Infiniti Qx56 Rwd Workshop Manual (V8-5.6L (VK56VD) (2011))
Infiniti Workshop Manuals > Relays and Modules > Relays and Modules — Brakes and Traction Control > Electronic Brake
Control Module > Component Information > Technical Service Bulletins > ABS/TCS — CAN Diagnostic Information > Page
62
Repair Flow Chart
Infiniti Qx56 Rwd Workshop Manual (V8-5.6L (VK56VD) (2011))
Infiniti Workshop Manuals > Relays and Modules > Relays and Modules — Brakes and Traction Control > Traction Control
Module > Component Information > Technical Service Bulletins > ABS/TCS — CAN Diagnostic Information
Traction Control Module: Technical Service Bulletins ABS/TCS — CAN Diagnostic Information
Classification: BR10-012
Reference: ITB10-074
Date: December 15, 2010
ABS / VDC CAN DIAGNOSIS INFORMATION
APPLIED VEHICLES: All 2005 — 2011 Infiniti vehicles with ABS and/or VDC
SERVICE INFORMATION
When diagnosing a vehicle with an ABS or VDC / SLIP warning light on with DTCs stored in the
ABS / VDC actuator control unit perform DTC diagnosis first.
^ Do not replace the ABS / VDC actuator control unit without being supported by the DTC
diagnosis.
^ Do not erase DTCS before performing DTC diagnosis.
^ Always fully diagnose before performing any repairs.
When DTC U1000 (CAN COMM CIRCUIT) is the only DTC stored in the ABS / VDC actuator
control unit use the REPAIR FLOW CHART shown below. This will assist in proper diagnosis
results and repairs in addition to using diagnostic information in the Electronic Service Manual
(ESM).
^ If DTC U1000 is found stored in other systems refer to NTB10-066 and the applicable ESM.
^ If other DTCs are found stored in ABS / VDC along with U1000 follow the diagnosis steps for
those DTCs in the applicable ESM.
CLAIMS INFORMATION
Refer to the current Infiniti Warranty Flat Rate Manual and use the appropriate claims coding for
repairs performed.
Infiniti Qx56 Rwd Workshop Manual (V8-5.6L (VK56VD) (2011))
Infiniti Workshop Manuals > Relays and Modules > Relays and Modules — Brakes and Traction Control > Traction Control
Module > Component Information > Technical Service Bulletins > ABS/TCS — CAN Diagnostic Information > Page 67
Infiniti Qx56 Rwd Workshop Manual (V8-5.6L (VK56VD) (2011))
Infiniti Workshop Manuals > Relays and Modules > Relays and Modules — Brakes and Traction Control > Traction Control
Module > Component Information > Technical Service Bulletins > ABS/TCS — CAN Diagnostic Information > Page 68
Repair Flow Chart
Infiniti Qx56 Rwd Workshop Manual (V8-5.6L (VK56VD) (2011))
Infiniti Workshop Manuals > Relays and Modules > Relays and Modules — Cruise Control > Cruise Control Module >
Component Information > Technical Service Bulletins > All Technical Service Bulletins for Cruise Control Module: > 11-020
> Mar > 11 > Engine, A/T Controls — Hesitation/A/T Shift Issues
Technical Service Bulletin # 11-020 Date: 110310
Engine, A/T Controls — Hesitation/A/T Shift Issues
Classification: AT 11-004
Reference: ITB11-020
Date: March 10, 2011
2011 QX56; TRANSMISSION SHIFT ISSUES AND HESITATION ISSUES
APPLIED VEHICLES: 2011 QX56 (Z62)
IF YOU CONFIRM
Any of the following symptoms:
^ Gear hunting or excessive downshifting when using the Intelligent Cruise Control (ICC)
and/or
^ The feel of the transmission shifting from Neutral to Drive (may be described as «bump» feel from
the rear) while stopped with the transmission in
Drive
and/or
^ A slight hesitation when accelerating from a stop,
and/or
^ A slight vehicle shudder/vibration during light acceleration,
ACTIONS
1. Perform ECM reprogramming.
^ Refer to Step 3 under ECM reprogramming in the Service Procedure to confirm ECM
reprogramming applies and is needed for the vehicle you are working on.
2. Perform TCM reprogramming.
^ Refer to Step 3 under TCM reprogramming in the Service Procedure to confirm TCM
reprogramming applies and is needed for the vehicle you are working on.
3. If equipped with Intelligent Cruise Control (ICC) perform ICC reprogramming.
^ Refer to Step 3 under ICC reprogramming in the Service Procedure to confirm ICC
reprogramming applies and is needed for the vehicle you are working on.
4. Test drive the vehicle and confirm the incident is resolved.
IMPORTANT:
The purpose of ACTIONS (above) is to give you a quick idea of the work you will be performing.
You MUST closely follow the entire SERVICE PROCEDURE as it contains information that is
essential to successfully completing this repair.
Infiniti Qx56 Rwd Workshop Manual (V8-5.6L (VK56VD) (2011))
Infiniti Workshop Manuals > Relays and Modules > Relays and Modules — Cruise Control > Cruise Control Module >
Component Information > Technical Service Bulletins > All Technical Service Bulletins for Cruise Control Module: > 11-020
> Mar > 11 > Engine, A/T Controls — Hesitation/A/T Shift Issues > Page 78
CLAIMS INFORMATION
Service Procedure
SERVICE PROCEDURE
ECM Reprogramming
1. Prepare the vehicle for the reprogramming procedure.
Reprogramming Caution
Infiniti Qx56 Rwd Workshop Manual (V8-5.6L (VK56VD) (2011))
Infiniti Workshop Manuals > Relays and Modules > Relays and Modules — Cruise Control > Cruise Control Module >
Component Information > Technical Service Bulletins > All Technical Service Bulletins for Cruise Control Module: > 11-020
> Mar > 11 > Engine, A/T Controls — Hesitation/A/T Shift Issues > Page 79
2. Navigate C-III to the ECM Reprogramming screen shown in Figure 1.
^ Use the «Reprogramming / Programming» selection.
^ Do not use Direct Diagnosis > Reprogramming.
3. On your C-III screen, look at the Part Number column (see Figure 1 example):
^ If there is no Engine part number listed, then ECM reprogramming does not apply; go to TCM
reprogramming.
^ If an Engine Part Number is listed, write it on the Repair Order.
4. Compare the Part Number you wrote down to the numbers in the Current ECM P/N column in
Table A above.
^ If there is a match this reprogramming applies. Continue with the reprogramming procedure.
NOTE:
If there are two Engine lines (two ECM reprogramming options) on your C-III screen, use the one
that does not have the message «Caution! Use ONLY with ITBXX-XXX».
^ If there is not a match, this reprogramming does not apply; go to TCM reprogramming below.
Infiniti Qx56 Rwd Workshop Manual (V8-5.6L (VK56VD) (2011))
Infiniti Workshop Manuals > Relays and Modules > Relays and Modules — Cruise Control > Cruise Control Module >
Component Information > Technical Service Bulletins > All Technical Service Bulletins for Cruise Control Module: > 11-020
> Mar > 11 > Engine, A/T Controls — Hesitation/A/T Shift Issues > Page 80
5. When ECM reprogramming is complete, the screen in Figure 2 displays.
NOTE:
If the screen in Figure 2 does NOT display (reprogramming does NOT complete).
6. Make sure to erase DTCs from all Systems.
^ During reprogramming DTCs will set in several systems and must be erased before TCM
reprogramming.
7. Go to TCM Reprogramming below.
TCM Reprogramming
1. Restart the C-III session by selecting the «Home» icon in the upper left corner of the C-III screen.
^ Make sure to erase DTCs from all systems.
^ TCM initialization is not needed for 7 speed A/T reprogramming.
Reprogramming Caution
Infiniti Qx56 Rwd Workshop Manual (V8-5.6L (VK56VD) (2011))
Infiniti Workshop Manuals > Relays and Modules > Relays and Modules — Cruise Control > Cruise Control Module >
Component Information > Technical Service Bulletins > All Technical Service Bulletins for Cruise Control Module: > 11-020
> Mar > 11 > Engine, A/T Controls — Hesitation/A/T Shift Issues > Page 81
2. Navigate C-III to the reprogramming screen shown in Figure 1A example above.
NOTE:
^ Do not use the «Reprogramming / Programming» selection.
^ Select the Model and Model Year and then navigate to Direct Diagnosis > Reprogramming.
^ TCM initialization is not needed for 7 Speed A/T reprogramming.
3. On your C-III screen look for a Transmission Part Number in the Part Number column (see
Figure 1A example).
^ If there is no Transmission Part Number listed, this reprogramming does not apply; go to ICC
reprogramming.
^ If a Transmission Part Number is listed write it on the Repair Order.
4. Compare the P/N you wrote down to the numbers in the Current TCM P/N column in Table A-1
above.
^ If there is a match this reprogramming applies. Continue with the reprogramming procedure.
^ If there is not a match this reprogramming does not apply; go to ICC reprogramming below.
Infiniti Qx56 Rwd Workshop Manual (V8-5.6L (VK56VD) (2011))
Infiniti Workshop Manuals > Relays and Modules > Relays and Modules — Cruise Control > Cruise Control Module >
Component Information > Technical Service Bulletins > All Technical Service Bulletins for Cruise Control Module: > 11-020
> Mar > 11 > Engine, A/T Controls — Hesitation/A/T Shift Issues > Page 82
5. If you have performed TCM reprogramming; when reprogramming is complete, the screen in
Figure 2A displays.
6. Erase DTCs in all systems.
^ During TCM reprogramming, DTCs will set in several systems and must be erased before ICC
reprogramming.
7. Go to ICC Reprogramming below.
ICC Reprogramming
1. Restart the C-III session by selecting the Home icon in the upper left corner of the C-III screen.
NOTE:
^ The steps for reprogramming the Intelligent Cruise Control (ICC) are the same as the steps for
reprogramming the TCM.
Reprogramming Caution
Infiniti Qx56 Rwd Workshop Manual (V8-5.6L (VK56VD) (2011))
Infiniti Workshop Manuals > Relays and Modules > Relays and Modules — Cruise Control > Cruise Control Module >
Component Information > Technical Service Bulletins > All Technical Service Bulletins for Cruise Control Module: > 11-020
> Mar > 11 > Engine, A/T Controls — Hesitation/A/T Shift Issues > Page 83
2. Navigate C-III to the reprogramming screen shown in Figure 1B example above.
NOTE:
^ Do not use the Reprogramming / Programming selection.
^ Select the Model and Model Year and then navigate to Direct Diagnosis > Reprogramming.
3. On your C-III screen, look for an ICC/ADAS Part Number in the Part Number column (see Figure
1B example).
^ If there is no ICC/ADAS Part Number listed, this reprogramming is not needed.
^ If an ICC/ADAS Part Number is listed, write it on the Repair Order.
4. Compare the P/N you wrote down to the numbers in the Current ICC/ADAS P/N column in Table
A-2 above.
^ If there is a match, this reprogramming applies. Continue with the reprogramming procedure.
^ If there is not a match, this reprogramming is not needed.
Infiniti Qx56 Rwd Workshop Manual (V8-5.6L (VK56VD) (2011))
Infiniti Workshop Manuals > Relays and Modules > Relays and Modules — Cruise Control > Cruise Control Module >
Component Information > Technical Service Bulletins > All Technical Service Bulletins for Cruise Control Module: > 11-020
> Mar > 11 > Engine, A/T Controls — Hesitation/A/T Shift Issues > Page 84
5. If you have performed ICC reprogramming; when reprogramming is complete the screen in
Figure 2B displays.
6. Erase DTCs in all systems.
^ During ICC reprogramming, DTCs will set in several systems and must be erased.
Infiniti Qx56 Rwd Workshop Manual (V8-5.6L (VK56VD) (2011))
Infiniti Workshop Manuals > Relays and Modules > Relays and Modules — Cruise Control > Cruise Control Module >
Component Information > Technical Service Bulletins > Customer Interest for Cruise Control Module: > 11-020 > Mar > 11 >
Engine, A/T Controls — Hesitation/A/T Shift Issues
Technical Service Bulletin # 11-020 Date: 110310
Engine, A/T Controls — Hesitation/A/T Shift Issues
Classification: AT 11-004
Reference: ITB11-020
Date: March 10, 2011
2011 QX56; TRANSMISSION SHIFT ISSUES AND HESITATION ISSUES
APPLIED VEHICLES: 2011 QX56 (Z62)
IF YOU CONFIRM
Any of the following symptoms:
^ Gear hunting or excessive downshifting when using the Intelligent Cruise Control (ICC)
and/or
^ The feel of the transmission shifting from Neutral to Drive (may be described as «bump» feel from
the rear) while stopped with the transmission in
Drive
and/or
^ A slight hesitation when accelerating from a stop,
and/or
^ A slight vehicle shudder/vibration during light acceleration,
ACTIONS
1. Perform ECM reprogramming.
^ Refer to Step 3 under ECM reprogramming in the Service Procedure to confirm ECM
reprogramming applies and is needed for the vehicle you are working on.
2. Perform TCM reprogramming.
^ Refer to Step 3 under TCM reprogramming in the Service Procedure to confirm TCM
reprogramming applies and is needed for the vehicle you are working on.
3. If equipped with Intelligent Cruise Control (ICC) perform ICC reprogramming.
^ Refer to Step 3 under ICC reprogramming in the Service Procedure to confirm ICC
reprogramming applies and is needed for the vehicle you are working on.
4. Test drive the vehicle and confirm the incident is resolved.
IMPORTANT:
The purpose of ACTIONS (above) is to give you a quick idea of the work you will be performing.
You MUST closely follow the entire SERVICE PROCEDURE as it contains information that is
essential to successfully completing this repair.
Infiniti Qx56 Rwd Workshop Manual (V8-5.6L (VK56VD) (2011))
Infiniti Workshop Manuals > Relays and Modules > Relays and Modules — Cruise Control > Cruise Control Module >
Component Information > Technical Service Bulletins > Customer Interest for Cruise Control Module: > 11-020 > Mar > 11 >
Engine, A/T Controls — Hesitation/A/T Shift Issues > Page 90
CLAIMS INFORMATION
Service Procedure
SERVICE PROCEDURE
ECM Reprogramming
1. Prepare the vehicle for the reprogramming procedure.
Reprogramming Caution
Infiniti Qx56 Rwd Workshop Manual (V8-5.6L (VK56VD) (2011))
Infiniti Workshop Manuals > Relays and Modules > Relays and Modules — Cruise Control > Cruise Control Module >
Component Information > Technical Service Bulletins > Customer Interest for Cruise Control Module: > 11-020 > Mar > 11 >
Engine, A/T Controls — Hesitation/A/T Shift Issues > Page 91
2. Navigate C-III to the ECM Reprogramming screen shown in Figure 1.
^ Use the «Reprogramming / Programming» selection.
^ Do not use Direct Diagnosis > Reprogramming.
3. On your C-III screen, look at the Part Number column (see Figure 1 example):
^ If there is no Engine part number listed, then ECM reprogramming does not apply; go to TCM
reprogramming.
^ If an Engine Part Number is listed, write it on the Repair Order.
4. Compare the Part Number you wrote down to the numbers in the Current ECM P/N column in
Table A above.
^ If there is a match this reprogramming applies. Continue with the reprogramming procedure.
NOTE:
If there are two Engine lines (two ECM reprogramming options) on your C-III screen, use the one
that does not have the message «Caution! Use ONLY with ITBXX-XXX».
^ If there is not a match, this reprogramming does not apply; go to TCM reprogramming below.
Infiniti Qx56 Rwd Workshop Manual (V8-5.6L (VK56VD) (2011))
Infiniti Workshop Manuals > Relays and Modules > Relays and Modules — Cruise Control > Cruise Control Module >
Component Information > Technical Service Bulletins > Customer Interest for Cruise Control Module: > 11-020 > Mar > 11 >
Engine, A/T Controls — Hesitation/A/T Shift Issues > Page 92
5. When ECM reprogramming is complete, the screen in Figure 2 displays.
NOTE:
If the screen in Figure 2 does NOT display (reprogramming does NOT complete).
6. Make sure to erase DTCs from all Systems.
^ During reprogramming DTCs will set in several systems and must be erased before TCM
reprogramming.
7. Go to TCM Reprogramming below.
TCM Reprogramming
1. Restart the C-III session by selecting the «Home» icon in the upper left corner of the C-III screen.
^ Make sure to erase DTCs from all systems.
^ TCM initialization is not needed for 7 speed A/T reprogramming.
Reprogramming Caution
Infiniti Qx56 Rwd Workshop Manual (V8-5.6L (VK56VD) (2011))
Infiniti Workshop Manuals > Relays and Modules > Relays and Modules — Cruise Control > Cruise Control Module >
Component Information > Technical Service Bulletins > Customer Interest for Cruise Control Module: > 11-020 > Mar > 11 >
Engine, A/T Controls — Hesitation/A/T Shift Issues > Page 93
2. Navigate C-III to the reprogramming screen shown in Figure 1A example above.
NOTE:
^ Do not use the «Reprogramming / Programming» selection.
^ Select the Model and Model Year and then navigate to Direct Diagnosis > Reprogramming.
^ TCM initialization is not needed for 7 Speed A/T reprogramming.
3. On your C-III screen look for a Transmission Part Number in the Part Number column (see
Figure 1A example).
^ If there is no Transmission Part Number listed, this reprogramming does not apply; go to ICC
reprogramming.
^ If a Transmission Part Number is listed write it on the Repair Order.
4. Compare the P/N you wrote down to the numbers in the Current TCM P/N column in Table A-1
above.
^ If there is a match this reprogramming applies. Continue with the reprogramming procedure.
^ If there is not a match this reprogramming does not apply; go to ICC reprogramming below.
Infiniti Qx56 Rwd Workshop Manual (V8-5.6L (VK56VD) (2011))
Infiniti Workshop Manuals > Relays and Modules > Relays and Modules — Cruise Control > Cruise Control Module >
Component Information > Technical Service Bulletins > Customer Interest for Cruise Control Module: > 11-020 > Mar > 11 >
Engine, A/T Controls — Hesitation/A/T Shift Issues > Page 94
5. If you have performed TCM reprogramming; when reprogramming is complete, the screen in
Figure 2A displays.
6. Erase DTCs in all systems.
^ During TCM reprogramming, DTCs will set in several systems and must be erased before ICC
reprogramming.
7. Go to ICC Reprogramming below.
ICC Reprogramming
1. Restart the C-III session by selecting the Home icon in the upper left corner of the C-III screen.
NOTE:
^ The steps for reprogramming the Intelligent Cruise Control (ICC) are the same as the steps for
reprogramming the TCM.
Reprogramming Caution
Infiniti Qx56 Rwd Workshop Manual (V8-5.6L (VK56VD) (2011))
Infiniti Workshop Manuals > Relays and Modules > Relays and Modules — Cruise Control > Cruise Control Module >
Component Information > Technical Service Bulletins > Customer Interest for Cruise Control Module: > 11-020 > Mar > 11 >
Engine, A/T Controls — Hesitation/A/T Shift Issues > Page 95
2. Navigate C-III to the reprogramming screen shown in Figure 1B example above.
NOTE:
^ Do not use the Reprogramming / Programming selection.
^ Select the Model and Model Year and then navigate to Direct Diagnosis > Reprogramming.
3. On your C-III screen, look for an ICC/ADAS Part Number in the Part Number column (see Figure
1B example).
^ If there is no ICC/ADAS Part Number listed, this reprogramming is not needed.
^ If an ICC/ADAS Part Number is listed, write it on the Repair Order.
4. Compare the P/N you wrote down to the numbers in the Current ICC/ADAS P/N column in Table
A-2 above.
^ If there is a match, this reprogramming applies. Continue with the reprogramming procedure.
^ If there is not a match, this reprogramming is not needed.
Infiniti Qx56 Rwd Workshop Manual (V8-5.6L (VK56VD) (2011))
Infiniti Workshop Manuals > Relays and Modules > Relays and Modules — Cruise Control > Cruise Control Module >
Component Information > Technical Service Bulletins > Customer Interest for Cruise Control Module: > 11-020 > Mar > 11 >
Engine, A/T Controls — Hesitation/A/T Shift Issues > Page 96
5. If you have performed ICC reprogramming; when reprogramming is complete the screen in
Figure 2B displays.
6. Erase DTCs in all systems.
^ During ICC reprogramming, DTCs will set in several systems and must be erased.
Infiniti Qx56 Rwd Workshop Manual (V8-5.6L (VK56VD) (2011))
Infiniti Workshop Manuals > Relays and Modules > Relays and Modules — Lighting and Horns > Headlamp Control Module >
Component Information > Technical Service Bulletins > Lighting — Xenon Headlamp Service Info.
Headlamp Control Module: Technical Service Bulletins Lighting — Xenon Headlamp Service Info.
Classification: EL10-022A
Reference: ITB10-027A
Date: June 29, 2010
XENON HEAD LAMP SERVICE
This bulletin has been amended. The Parts Information has been updated. Please discard previous
versions of this bulletin.
APPLIED VEHICLES: 2005 — 2011 Infiniti with xenon headlamps
IF YOU CONFIRM
A xenon headlamp is not functioning because of an issue inside the headlamp assembly (an
internal issue),
ACTION
Refer to the appropriate Service Manual, follow the diagnostic and repair information for xenon
headlamps.
NOTE:
^ In most cases, replacement of a bulb or HID control unit will solve the incident.
^ Do not replace the entire xenon headlamp assembly when a bulb or HID control unit is available
to solve the incident, if one should occur.
CLAIMS INFORMATION
^ Reference the current Nissan Flat Rate Manual and use the appropriate claims coding for the
repair performed.
^ For HID control unit replacement use Operation Code RJ36AA.
PARTS INFORMATION
Infiniti Qx56 Rwd Workshop Manual (V8-5.6L (VK56VD) (2011))
Infiniti Workshop Manuals > Relays and Modules > Relays and Modules — Lighting and Horns > Headlamp Control Module >
Component Information > Technical Service Bulletins > Lighting — Xenon Headlamp Service Info. > Page 102
NOTE:
^ The HID control unit includes a starter (xenon bulb socket). For some models, the starter is not
replaceable. In this case, replace only the HID control
unit using the old starter.
^ Torque specification for the screw that holds the starter to the HID control unit is:
^ 1.3 — 1.7 Nm (0.13 — 0.17 k-gm, 12 — 15 in-lb)
Infiniti Qx56 Rwd Workshop Manual (V8-5.6L (VK56VD) (2011))
Infiniti Workshop Manuals > Relays and Modules > Relays and Modules — Powertrain Management > Relays and Modules Computers and Control Systems > Body Control Module > Component Information > Technical Service Bulletins > Antitheft
System — NATS Security VBC Logic
Body Control Module: Technical Service Bulletins Antitheft System — NATS Security VBC Logic
Classification: EL10-029
Reference: ITB10-059
Date: September 10, 2010
NATS SECURITY — VBC LOGIC
APPLIED VEHICLE: 2009-2011 All Infiniti with NATS/Immobilizer System
SERVICE INFORMATION
All model year 2009 — 2011 Infiniti vehicles equipped with NATS/Immobilizer system have the new
VBC (Validate Before Crank) starter relay logic.
VBC (Validate Before Crank) Logic:
^ The BCM will make sure that a valid (registered) key is being used before engaging the starter
relay. If the key is not authenticated the starter will not
operate.
^ If the engine cranks the issue is not related to NATS. Do not replace NATS components (BCM
I-Key FOB Reader or RF Receiver). Refer to ASIST
for further diagnostic information as needed.
Infiniti Qx56 Rwd Workshop Manual (V8-5.6L (VK56VD) (2011))
Infiniti Workshop Manuals > Relays and Modules > Relays and Modules — Powertrain Management > Relays and Modules Computers and Control Systems > Engine Control Module > Component Information > Technical Service Bulletins > All
Technical Service Bulletins for Engine Control Module: > 11-020 > Mar > 11 > Engine, A/T Controls — Hesitation/A/T Shift
Issues
Technical Service Bulletin # 11-020 Date: 110310
Engine, A/T Controls — Hesitation/A/T Shift Issues
Classification: AT 11-004
Reference: ITB11-020
Date: March 10, 2011
2011 QX56; TRANSMISSION SHIFT ISSUES AND HESITATION ISSUES
APPLIED VEHICLES: 2011 QX56 (Z62)
IF YOU CONFIRM
Any of the following symptoms:
^ Gear hunting or excessive downshifting when using the Intelligent Cruise Control (ICC)
and/or
^ The feel of the transmission shifting from Neutral to Drive (may be described as «bump» feel from
the rear) while stopped with the transmission in
Drive
and/or
^ A slight hesitation when accelerating from a stop,
and/or
^ A slight vehicle shudder/vibration during light acceleration,
ACTIONS
1. Perform ECM reprogramming.
^ Refer to Step 3 under ECM reprogramming in the Service Procedure to confirm ECM
reprogramming applies and is needed for the vehicle you are working on.
2. Perform TCM reprogramming.
^ Refer to Step 3 under TCM reprogramming in the Service Procedure to confirm TCM
reprogramming applies and is needed for the vehicle you are working on.
3. If equipped with Intelligent Cruise Control (ICC) perform ICC reprogramming.
^ Refer to Step 3 under ICC reprogramming in the Service Procedure to confirm ICC
reprogramming applies and is needed for the vehicle you are working on.
4. Test drive the vehicle and confirm the incident is resolved.
IMPORTANT:
The purpose of ACTIONS (above) is to give you a quick idea of the work you will be performing.
You MUST closely follow the entire SERVICE PROCEDURE as it contains information that is
essential to successfully completing this repair.
Infiniti Qx56 Rwd Workshop Manual (V8-5.6L (VK56VD) (2011))
Infiniti Workshop Manuals > Relays and Modules > Relays and Modules — Powertrain Management > Relays and Modules Computers and Control Systems > Engine Control Module > Component Information > Technical Service Bulletins > All
Technical Service Bulletins for Engine Control Module: > 11-020 > Mar > 11 > Engine, A/T Controls — Hesitation/A/T Shift
Issues > Page 117
CLAIMS INFORMATION
Service Procedure
SERVICE PROCEDURE
ECM Reprogramming
1. Prepare the vehicle for the reprogramming procedure.
Reprogramming Caution
Infiniti Qx56 Rwd Workshop Manual (V8-5.6L (VK56VD) (2011))
Infiniti Workshop Manuals > Relays and Modules > Relays and Modules — Powertrain Management > Relays and Modules Computers and Control Systems > Engine Control Module > Component Information > Technical Service Bulletins > All
Technical Service Bulletins for Engine Control Module: > 11-020 > Mar > 11 > Engine, A/T Controls — Hesitation/A/T Shift
Issues > Page 118
2. Navigate C-III to the ECM Reprogramming screen shown in Figure 1.
^ Use the «Reprogramming / Programming» selection.
^ Do not use Direct Diagnosis > Reprogramming.
3. On your C-III screen, look at the Part Number column (see Figure 1 example):
^ If there is no Engine part number listed, then ECM reprogramming does not apply; go to TCM
reprogramming.
^ If an Engine Part Number is listed, write it on the Repair Order.
4. Compare the Part Number you wrote down to the numbers in the Current ECM P/N column in
Table A above.
^ If there is a match this reprogramming applies. Continue with the reprogramming procedure.
NOTE:
If there are two Engine lines (two ECM reprogramming options) on your C-III screen, use the one
that does not have the message «Caution! Use ONLY with ITBXX-XXX».
^ If there is not a match, this reprogramming does not apply; go to TCM reprogramming below.
Infiniti Qx56 Rwd Workshop Manual (V8-5.6L (VK56VD) (2011))
Infiniti Workshop Manuals > Relays and Modules > Relays and Modules — Powertrain Management > Relays and Modules Computers and Control Systems > Engine Control Module > Component Information > Technical Service Bulletins > All
Technical Service Bulletins for Engine Control Module: > 11-020 > Mar > 11 > Engine, A/T Controls — Hesitation/A/T Shift
Issues > Page 119
5. When ECM reprogramming is complete, the screen in Figure 2 displays.
NOTE:
If the screen in Figure 2 does NOT display (reprogramming does NOT complete).
6. Make sure to erase DTCs from all Systems.
^ During reprogramming DTCs will set in several systems and must be erased before TCM
reprogramming.
7. Go to TCM Reprogramming below.
TCM Reprogramming
1. Restart the C-III session by selecting the «Home» icon in the upper left corner of the C-III screen.
^ Make sure to erase DTCs from all systems.
^ TCM initialization is not needed for 7 speed A/T reprogramming.
Reprogramming Caution
Infiniti Qx56 Rwd Workshop Manual (V8-5.6L (VK56VD) (2011))
Infiniti Workshop Manuals > Relays and Modules > Relays and Modules — Powertrain Management > Relays and Modules Computers and Control Systems > Engine Control Module > Component Information > Technical Service Bulletins > All
Technical Service Bulletins for Engine Control Module: > 11-020 > Mar > 11 > Engine, A/T Controls — Hesitation/A/T Shift
Issues > Page 120
2. Navigate C-III to the reprogramming screen shown in Figure 1A example above.
NOTE:
^ Do not use the «Reprogramming / Programming» selection.
^ Select the Model and Model Year and then navigate to Direct Diagnosis > Reprogramming.
^ TCM initialization is not needed for 7 Speed A/T reprogramming.
3. On your C-III screen look for a Transmission Part Number in the Part Number column (see
Figure 1A example).
^ If there is no Transmission Part Number listed, this reprogramming does not apply; go to ICC
reprogramming.
^ If a Transmission Part Number is listed write it on the Repair Order.
4. Compare the P/N you wrote down to the numbers in the Current TCM P/N column in Table A-1
above.
^ If there is a match this reprogramming applies. Continue with the reprogramming procedure.
^ If there is not a match this reprogramming does not apply; go to ICC reprogramming below.
Infiniti Qx56 Rwd Workshop Manual (V8-5.6L (VK56VD) (2011))
Infiniti Workshop Manuals > Relays and Modules > Relays and Modules — Powertrain Management > Relays and Modules Computers and Control Systems > Engine Control Module > Component Information > Technical Service Bulletins > All
Technical Service Bulletins for Engine Control Module: > 11-020 > Mar > 11 > Engine, A/T Controls — Hesitation/A/T Shift
Issues > Page 121
5. If you have performed TCM reprogramming; when reprogramming is complete, the screen in
Figure 2A displays.
6. Erase DTCs in all systems.
^ During TCM reprogramming, DTCs will set in several systems and must be erased before ICC
reprogramming.
7. Go to ICC Reprogramming below.
ICC Reprogramming
1. Restart the C-III session by selecting the Home icon in the upper left corner of the C-III screen.
NOTE:
^ The steps for reprogramming the Intelligent Cruise Control (ICC) are the same as the steps for
reprogramming the TCM.
Reprogramming Caution
Infiniti Qx56 Rwd Workshop Manual (V8-5.6L (VK56VD) (2011))
Infiniti Workshop Manuals > Relays and Modules > Relays and Modules — Powertrain Management > Relays and Modules Computers and Control Systems > Engine Control Module > Component Information > Technical Service Bulletins > All
Technical Service Bulletins for Engine Control Module: > 11-020 > Mar > 11 > Engine, A/T Controls — Hesitation/A/T Shift
Issues > Page 122
2. Navigate C-III to the reprogramming screen shown in Figure 1B example above.
NOTE:
^ Do not use the Reprogramming / Programming selection.
^ Select the Model and Model Year and then navigate to Direct Diagnosis > Reprogramming.
3. On your C-III screen, look for an ICC/ADAS Part Number in the Part Number column (see Figure
1B example).
^ If there is no ICC/ADAS Part Number listed, this reprogramming is not needed.
^ If an ICC/ADAS Part Number is listed, write it on the Repair Order.
4. Compare the P/N you wrote down to the numbers in the Current ICC/ADAS P/N column in Table
A-2 above.
^ If there is a match, this reprogramming applies. Continue with the reprogramming procedure.
^ If there is not a match, this reprogramming is not needed.
Infiniti Qx56 Rwd Workshop Manual (V8-5.6L (VK56VD) (2011))
Infiniti Workshop Manuals > Relays and Modules > Relays and Modules — Powertrain Management > Relays and Modules Computers and Control Systems > Engine Control Module > Component Information > Technical Service Bulletins > All
Technical Service Bulletins for Engine Control Module: > 11-020 > Mar > 11 > Engine, A/T Controls — Hesitation/A/T Shift
Issues > Page 123
5. If you have performed ICC reprogramming; when reprogramming is complete the screen in
Figure 2B displays.
6. Erase DTCs in all systems.
^ During ICC reprogramming, DTCs will set in several systems and must be erased.
Infiniti Qx56 Rwd Workshop Manual (V8-5.6L (VK56VD) (2011))
Infiniti Workshop Manuals > Relays and Modules > Relays and Modules — Powertrain Management > Relays and Modules Computers and Control Systems > Engine Control Module > Component Information > Technical Service Bulletins >
Customer Interest for Engine Control Module: > 11-020 > Mar > 11 > Engine, A/T Controls — Hesitation/A/T Shift Issues
Technical Service Bulletin # 11-020 Date: 110310
Engine, A/T Controls — Hesitation/A/T Shift Issues
Classification: AT 11-004
Reference: ITB11-020
Date: March 10, 2011
2011 QX56; TRANSMISSION SHIFT ISSUES AND HESITATION ISSUES
APPLIED VEHICLES: 2011 QX56 (Z62)
IF YOU CONFIRM
Any of the following symptoms:
^ Gear hunting or excessive downshifting when using the Intelligent Cruise Control (ICC)
and/or
^ The feel of the transmission shifting from Neutral to Drive (may be described as «bump» feel from
the rear) while stopped with the transmission in
Drive
and/or
^ A slight hesitation when accelerating from a stop,
and/or
^ A slight vehicle shudder/vibration during light acceleration,
ACTIONS
1. Perform ECM reprogramming.
^ Refer to Step 3 under ECM reprogramming in the Service Procedure to confirm ECM
reprogramming applies and is needed for the vehicle you are working on.
2. Perform TCM reprogramming.
^ Refer to Step 3 under TCM reprogramming in the Service Procedure to confirm TCM
reprogramming applies and is needed for the vehicle you are working on.
3. If equipped with Intelligent Cruise Control (ICC) perform ICC reprogramming.
^ Refer to Step 3 under ICC reprogramming in the Service Procedure to confirm ICC
reprogramming applies and is needed for the vehicle you are working on.
4. Test drive the vehicle and confirm the incident is resolved.
IMPORTANT:
The purpose of ACTIONS (above) is to give you a quick idea of the work you will be performing.
You MUST closely follow the entire SERVICE PROCEDURE as it contains information that is
essential to successfully completing this repair.
Infiniti Qx56 Rwd Workshop Manual (V8-5.6L (VK56VD) (2011))
Infiniti Workshop Manuals > Relays and Modules > Relays and Modules — Powertrain Management > Relays and Modules Computers and Control Systems > Engine Control Module > Component Information > Technical Service Bulletins >
Customer Interest for Engine Control Module: > 11-020 > Mar > 11 > Engine, A/T Controls — Hesitation/A/T Shift Issues >
Page 129
CLAIMS INFORMATION
Service Procedure
SERVICE PROCEDURE
ECM Reprogramming
1. Prepare the vehicle for the reprogramming procedure.
Reprogramming Caution
Infiniti Qx56 Rwd Workshop Manual (V8-5.6L (VK56VD) (2011))
Infiniti Workshop Manuals > Relays and Modules > Relays and Modules — Powertrain Management > Relays and Modules Computers and Control Systems > Engine Control Module > Component Information > Technical Service Bulletins >
Customer Interest for Engine Control Module: > 11-020 > Mar > 11 > Engine, A/T Controls — Hesitation/A/T Shift Issues >
Page 130
2. Navigate C-III to the ECM Reprogramming screen shown in Figure 1.
^ Use the «Reprogramming / Programming» selection.
^ Do not use Direct Diagnosis > Reprogramming.
3. On your C-III screen, look at the Part Number column (see Figure 1 example):
^ If there is no Engine part number listed, then ECM reprogramming does not apply; go to TCM
reprogramming.
^ If an Engine Part Number is listed, write it on the Repair Order.
4. Compare the Part Number you wrote down to the numbers in the Current ECM P/N column in
Table A above.
^ If there is a match this reprogramming applies. Continue with the reprogramming procedure.
NOTE:
If there are two Engine lines (two ECM reprogramming options) on your C-III screen, use the one
that does not have the message «Caution! Use ONLY with ITBXX-XXX».
^ If there is not a match, this reprogramming does not apply; go to TCM reprogramming below.
Infiniti Qx56 Rwd Workshop Manual (V8-5.6L (VK56VD) (2011))
Infiniti Workshop Manuals > Relays and Modules > Relays and Modules — Powertrain Management > Relays and Modules Computers and Control Systems > Engine Control Module > Component Information > Technical Service Bulletins >
Customer Interest for Engine Control Module: > 11-020 > Mar > 11 > Engine, A/T Controls — Hesitation/A/T Shift Issues >
Page 131
5. When ECM reprogramming is complete, the screen in Figure 2 displays.
NOTE:
If the screen in Figure 2 does NOT display (reprogramming does NOT complete).
6. Make sure to erase DTCs from all Systems.
^ During reprogramming DTCs will set in several systems and must be erased before TCM
reprogramming.
7. Go to TCM Reprogramming below.
TCM Reprogramming
1. Restart the C-III session by selecting the «Home» icon in the upper left corner of the C-III screen.
^ Make sure to erase DTCs from all systems.
^ TCM initialization is not needed for 7 speed A/T reprogramming.
Reprogramming Caution
Infiniti Qx56 Rwd Workshop Manual (V8-5.6L (VK56VD) (2011))
Infiniti Workshop Manuals > Relays and Modules > Relays and Modules — Powertrain Management > Relays and Modules Computers and Control Systems > Engine Control Module > Component Information > Technical Service Bulletins >
Customer Interest for Engine Control Module: > 11-020 > Mar > 11 > Engine, A/T Controls — Hesitation/A/T Shift Issues >
Page 132
2. Navigate C-III to the reprogramming screen shown in Figure 1A example above.
NOTE:
^ Do not use the «Reprogramming / Programming» selection.
^ Select the Model and Model Year and then navigate to Direct Diagnosis > Reprogramming.
^ TCM initialization is not needed for 7 Speed A/T reprogramming.
3. On your C-III screen look for a Transmission Part Number in the Part Number column (see
Figure 1A example).
^ If there is no Transmission Part Number listed, this reprogramming does not apply; go to ICC
reprogramming.
^ If a Transmission Part Number is listed write it on the Repair Order.
4. Compare the P/N you wrote down to the numbers in the Current TCM P/N column in Table A-1
above.
^ If there is a match this reprogramming applies. Continue with the reprogramming procedure.
^ If there is not a match this reprogramming does not apply; go to ICC reprogramming below.
Infiniti Qx56 Rwd Workshop Manual (V8-5.6L (VK56VD) (2011))
Infiniti Workshop Manuals > Relays and Modules > Relays and Modules — Powertrain Management > Relays and Modules Computers and Control Systems > Engine Control Module > Component Information > Technical Service Bulletins >
Customer Interest for Engine Control Module: > 11-020 > Mar > 11 > Engine, A/T Controls — Hesitation/A/T Shift Issues >
Page 133
5. If you have performed TCM reprogramming; when reprogramming is complete, the screen in
Figure 2A displays.
6. Erase DTCs in all systems.
^ During TCM reprogramming, DTCs will set in several systems and must be erased before ICC
reprogramming.
7. Go to ICC Reprogramming below.
ICC Reprogramming
1. Restart the C-III session by selecting the Home icon in the upper left corner of the C-III screen.
NOTE:
^ The steps for reprogramming the Intelligent Cruise Control (ICC) are the same as the steps for
reprogramming the TCM.
Reprogramming Caution
Infiniti Qx56 Rwd Workshop Manual (V8-5.6L (VK56VD) (2011))
Infiniti Workshop Manuals > Relays and Modules > Relays and Modules — Powertrain Management > Relays and Modules Computers and Control Systems > Engine Control Module > Component Information > Technical Service Bulletins >
Customer Interest for Engine Control Module: > 11-020 > Mar > 11 > Engine, A/T Controls — Hesitation/A/T Shift Issues >
Page 134
2. Navigate C-III to the reprogramming screen shown in Figure 1B example above.
NOTE:
^ Do not use the Reprogramming / Programming selection.
^ Select the Model and Model Year and then navigate to Direct Diagnosis > Reprogramming.
3. On your C-III screen, look for an ICC/ADAS Part Number in the Part Number column (see Figure
1B example).
^ If there is no ICC/ADAS Part Number listed, this reprogramming is not needed.
^ If an ICC/ADAS Part Number is listed, write it on the Repair Order.
4. Compare the P/N you wrote down to the numbers in the Current ICC/ADAS P/N column in Table
A-2 above.
^ If there is a match, this reprogramming applies. Continue with the reprogramming procedure.
^ If there is not a match, this reprogramming is not needed.
Infiniti Qx56 Rwd Workshop Manual (V8-5.6L (VK56VD) (2011))
Infiniti Workshop Manuals > Relays and Modules > Relays and Modules — Powertrain Management > Relays and Modules Computers and Control Systems > Engine Control Module > Component Information > Technical Service Bulletins >
Customer Interest for Engine Control Module: > 11-020 > Mar > 11 > Engine, A/T Controls — Hesitation/A/T Shift Issues >
Page 135
5. If you have performed ICC reprogramming; when reprogramming is complete the screen in
Figure 2B displays.
6. Erase DTCs in all systems.
^ During ICC reprogramming, DTCs will set in several systems and must be erased.
Infiniti Qx56 Rwd Workshop Manual (V8-5.6L (VK56VD) (2011))
Infiniti Workshop Manuals > Relays and Modules > Relays and Modules — Steering and Suspension > Relays and Modules Wheels and Tires > Tire Pressure Monitor Receiver / Transponder > Component Information > Technical Service Bulletins >
Tire Monitor System — Components Are Not Interchangeable
Tire Pressure Monitor Receiver / Transponder: Technical Service Bulletins Tire Monitor System Components Are Not Interchangeable
Classification: WT10-004a
Reference: ITB10-050a
Date: November 11 2010
TPMS COMPONENTS NOT INTERCHANGEABLE
This bulletin has been amended. Applied Vehicles, VINs, and Dates have been updated, and
changes have been made to the Service Information. Please discard previous versions.
APPLIED VEHICLES:
2010 — 2011 EX35 (J50)
2010 — 2011 FX35/FX50 (S51)
2010 — 2011 G37 Coupe Convertible and Sedan (CV36 HV36 and V36)
2010 M351M45 ~50)
2011 M37IM56~51)
2010 QX56 (JA60)
2011 QX56(Z62)
APPLIED DATES:
See Detail of Applied Dates and VINs at the end of this bulletin.
APPLIED VINs
See Detail of Applied Dates and VINs at the end of this bulletin.
SERVICE INFORMATION
^ Recent design changes have been made to the Tire Pressure Monitoring System (1PMS) sensor
receiver and control units (new style TPMS components).
^ These changes were applied as follows:
^ These changes do not affect the overall function of the TPMS.
^ These changes do affect the interchangeability of parts. For example:
> Full wheel assemblies (wheel and tire assemblies with TPMS) cannot be swapped between old
style sensor-equipped and new style sensor-equipped vehicles.
CAUTION:
^ New style and old style TPMS components are not compatible and cannot be interchanged.
^ Swapping of new style and old style components will cause the TPMS to stop operating correctly.
Infiniti Qx56 Rwd Workshop Manual (V8-5.6L (VK56VD) (2011))
Infiniti Workshop Manuals > Relays and Modules > Relays and Modules — Steering and Suspension > Relays and Modules Wheels and Tires > Tire Pressure Monitor Receiver / Transponder > Component Information > Technical Service Bulletins >
Tire Monitor System — Components Are Not Interchangeable > Page 142
If further confirmation of the TPMS sensor part number is required review the part number of the
originally installed equipment before replacement.
To confirm the latest part numbers, always consult the appropriate parts catalog when replacing or
exchanging TPMS sensors, receivers, or control modules.
NOTE:
^ An update is now available for the Signal Tech II to support the new style TPMS components.
The update can be found in ASIST > INFO Tool Box > Signal Tech II.
^ For 2010 models built after February 28 2010 a Signal Tech II menu selection «2010.5» has been
added.
Detail of Applied Dates and VINs
Infiniti Qx56 Rwd Workshop Manual (V8-5.6L (VK56VD) (2011))
Infiniti Workshop Manuals > Relays and Modules > Relays and Modules — Steering and Suspension > Relays and Modules Wheels and Tires > Tire Pressure Monitor Receiver / Transponder > Component Information > Technical Service Bulletins >
Tire Monitor System — Components Are Not Interchangeable > Page 143
Installation at the factory of the new style TPMS components began with the following VINs and
Dates:
NOTE:
All 2011 Infiniti vehicles are equipped with the new style TPMS components.
Disclaimer
Infiniti Qx56 Rwd Workshop Manual (V8-5.6L (VK56VD) (2011))
Infiniti Workshop Manuals > Relays and Modules > Relays and Modules — Transmission and Drivetrain > Relays and
Modules — A/T > Control Module, A/T > Component Information > Technical Service Bulletins > All Technical Service
Bulletins for Control Module: > 11-020 > Mar > 11 > Engine, A/T Controls — Hesitation/A/T Shift Issues
Technical Service Bulletin # 11-020 Date: 110310
Engine, A/T Controls — Hesitation/A/T Shift Issues
Classification: AT 11-004
Reference: ITB11-020
Date: March 10, 2011
2011 QX56; TRANSMISSION SHIFT ISSUES AND HESITATION ISSUES
APPLIED VEHICLES: 2011 QX56 (Z62)
IF YOU CONFIRM
Any of the following symptoms:
^ Gear hunting or excessive downshifting when using the Intelligent Cruise Control (ICC)
and/or
^ The feel of the transmission shifting from Neutral to Drive (may be described as «bump» feel from
the rear) while stopped with the transmission in
Drive
and/or
^ A slight hesitation when accelerating from a stop,
and/or
^ A slight vehicle shudder/vibration during light acceleration,
ACTIONS
1. Perform ECM reprogramming.
^ Refer to Step 3 under ECM reprogramming in the Service Procedure to confirm ECM
reprogramming applies and is needed for the vehicle you are working on.
2. Perform TCM reprogramming.
^ Refer to Step 3 under TCM reprogramming in the Service Procedure to confirm TCM
reprogramming applies and is needed for the vehicle you are working on.
3. If equipped with Intelligent Cruise Control (ICC) perform ICC reprogramming.
^ Refer to Step 3 under ICC reprogramming in the Service Procedure to confirm ICC
reprogramming applies and is needed for the vehicle you are working on.
4. Test drive the vehicle and confirm the incident is resolved.
IMPORTANT:
The purpose of ACTIONS (above) is to give you a quick idea of the work you will be performing.
You MUST closely follow the entire SERVICE PROCEDURE as it contains information that is
essential to successfully completing this repair.
Infiniti Qx56 Rwd Workshop Manual (V8-5.6L (VK56VD) (2011))
Infiniti Workshop Manuals > Relays and Modules > Relays and Modules — Transmission and Drivetrain > Relays and
Modules — A/T > Control Module, A/T > Component Information > Technical Service Bulletins > All Technical Service
Bulletins for Control Module: > 11-020 > Mar > 11 > Engine, A/T Controls — Hesitation/A/T Shift Issues > Page 154
CLAIMS INFORMATION
Service Procedure
SERVICE PROCEDURE
ECM Reprogramming
1. Prepare the vehicle for the reprogramming procedure.
Reprogramming Caution
Infiniti Qx56 Rwd Workshop Manual (V8-5.6L (VK56VD) (2011))
Infiniti Workshop Manuals > Relays and Modules > Relays and Modules — Transmission and Drivetrain > Relays and
Modules — A/T > Control Module, A/T > Component Information > Technical Service Bulletins > All Technical Service
Bulletins for Control Module: > 11-020 > Mar > 11 > Engine, A/T Controls — Hesitation/A/T Shift Issues > Page 155
2. Navigate C-III to the ECM Reprogramming screen shown in Figure 1.
^ Use the «Reprogramming / Programming» selection.
^ Do not use Direct Diagnosis > Reprogramming.
3. On your C-III screen, look at the Part Number column (see Figure 1 example):
^ If there is no Engine part number listed, then ECM reprogramming does not apply; go to TCM
reprogramming.
^ If an Engine Part Number is listed, write it on the Repair Order.
4. Compare the Part Number you wrote down to the numbers in the Current ECM P/N column in
Table A above.
^ If there is a match this reprogramming applies. Continue with the reprogramming procedure.
NOTE:
If there are two Engine lines (two ECM reprogramming options) on your C-III screen, use the one
that does not have the message «Caution! Use ONLY with ITBXX-XXX».
^ If there is not a match, this reprogramming does not apply; go to TCM reprogramming below.
Infiniti Qx56 Rwd Workshop Manual (V8-5.6L (VK56VD) (2011))
Infiniti Workshop Manuals > Relays and Modules > Relays and Modules — Transmission and Drivetrain > Relays and
Modules — A/T > Control Module, A/T > Component Information > Technical Service Bulletins > All Technical Service
Bulletins for Control Module: > 11-020 > Mar > 11 > Engine, A/T Controls — Hesitation/A/T Shift Issues > Page 156
5. When ECM reprogramming is complete, the screen in Figure 2 displays.
NOTE:
If the screen in Figure 2 does NOT display (reprogramming does NOT complete).
6. Make sure to erase DTCs from all Systems.
^ During reprogramming DTCs will set in several systems and must be erased before TCM
reprogramming.
7. Go to TCM Reprogramming below.
TCM Reprogramming
1. Restart the C-III session by selecting the «Home» icon in the upper left corner of the C-III screen.
^ Make sure to erase DTCs from all systems.
^ TCM initialization is not needed for 7 speed A/T reprogramming.
Reprogramming Caution
Infiniti Qx56 Rwd Workshop Manual (V8-5.6L (VK56VD) (2011))
Infiniti Workshop Manuals > Relays and Modules > Relays and Modules — Transmission and Drivetrain > Relays and
Modules — A/T > Control Module, A/T > Component Information > Technical Service Bulletins > All Technical Service
Bulletins for Control Module: > 11-020 > Mar > 11 > Engine, A/T Controls — Hesitation/A/T Shift Issues > Page 157
2. Navigate C-III to the reprogramming screen shown in Figure 1A example above.
NOTE:
^ Do not use the «Reprogramming / Programming» selection.
^ Select the Model and Model Year and then navigate to Direct Diagnosis > Reprogramming.
^ TCM initialization is not needed for 7 Speed A/T reprogramming.
3. On your C-III screen look for a Transmission Part Number in the Part Number column (see
Figure 1A example).
^ If there is no Transmission Part Number listed, this reprogramming does not apply; go to ICC
reprogramming.
^ If a Transmission Part Number is listed write it on the Repair Order.
4. Compare the P/N you wrote down to the numbers in the Current TCM P/N column in Table A-1
above.
^ If there is a match this reprogramming applies. Continue with the reprogramming procedure.
^ If there is not a match this reprogramming does not apply; go to ICC reprogramming below.
Infiniti Qx56 Rwd Workshop Manual (V8-5.6L (VK56VD) (2011))
Infiniti Workshop Manuals > Relays and Modules > Relays and Modules — Transmission and Drivetrain > Relays and
Modules — A/T > Control Module, A/T > Component Information > Technical Service Bulletins > All Technical Service
Bulletins for Control Module: > 11-020 > Mar > 11 > Engine, A/T Controls — Hesitation/A/T Shift Issues > Page 158
5. If you have performed TCM reprogramming; when reprogramming is complete, the screen in
Figure 2A displays.
6. Erase DTCs in all systems.
^ During TCM reprogramming, DTCs will set in several systems and must be erased before ICC
reprogramming.
7. Go to ICC Reprogramming below.
ICC Reprogramming
1. Restart the C-III session by selecting the Home icon in the upper left corner of the C-III screen.
NOTE:
^ The steps for reprogramming the Intelligent Cruise Control (ICC) are the same as the steps for
reprogramming the TCM.
Reprogramming Caution
Infiniti Qx56 Rwd Workshop Manual (V8-5.6L (VK56VD) (2011))
Infiniti Workshop Manuals > Relays and Modules > Relays and Modules — Transmission and Drivetrain > Relays and
Modules — A/T > Control Module, A/T > Component Information > Technical Service Bulletins > All Technical Service
Bulletins for Control Module: > 11-020 > Mar > 11 > Engine, A/T Controls — Hesitation/A/T Shift Issues > Page 159
2. Navigate C-III to the reprogramming screen shown in Figure 1B example above.
NOTE:
^ Do not use the Reprogramming / Programming selection.
^ Select the Model and Model Year and then navigate to Direct Diagnosis > Reprogramming.
3. On your C-III screen, look for an ICC/ADAS Part Number in the Part Number column (see Figure
1B example).
^ If there is no ICC/ADAS Part Number listed, this reprogramming is not needed.
^ If an ICC/ADAS Part Number is listed, write it on the Repair Order.
4. Compare the P/N you wrote down to the numbers in the Current ICC/ADAS P/N column in Table
A-2 above.
^ If there is a match, this reprogramming applies. Continue with the reprogramming procedure.
^ If there is not a match, this reprogramming is not needed.
Infiniti Qx56 Rwd Workshop Manual (V8-5.6L (VK56VD) (2011))
Infiniti Workshop Manuals > Relays and Modules > Relays and Modules — Transmission and Drivetrain > Relays and
Modules — A/T > Control Module, A/T > Component Information > Technical Service Bulletins > All Technical Service
Bulletins for Control Module: > 11-020 > Mar > 11 > Engine, A/T Controls — Hesitation/A/T Shift Issues > Page 160
5. If you have performed ICC reprogramming; when reprogramming is complete the screen in
Figure 2B displays.
6. Erase DTCs in all systems.
^ During ICC reprogramming, DTCs will set in several systems and must be erased.
Infiniti Qx56 Rwd Workshop Manual (V8-5.6L (VK56VD) (2011))
Infiniti Workshop Manuals > Relays and Modules > Relays and Modules — Transmission and Drivetrain > Relays and
Modules — A/T > Control Module, A/T > Component Information > Technical Service Bulletins > Customer Interest for
Control Module: > 11-020 > Mar > 11 > Engine, A/T Controls — Hesitation/A/T Shift Issues
Technical Service Bulletin # 11-020 Date: 110310
Engine, A/T Controls — Hesitation/A/T Shift Issues
Classification: AT 11-004
Reference: ITB11-020
Date: March 10, 2011
2011 QX56; TRANSMISSION SHIFT ISSUES AND HESITATION ISSUES
APPLIED VEHICLES: 2011 QX56 (Z62)
IF YOU CONFIRM
Any of the following symptoms:
^ Gear hunting or excessive downshifting when using the Intelligent Cruise Control (ICC)
and/or
^ The feel of the transmission shifting from Neutral to Drive (may be described as «bump» feel from
the rear) while stopped with the transmission in
Drive
and/or
^ A slight hesitation when accelerating from a stop,
and/or
^ A slight vehicle shudder/vibration during light acceleration,
ACTIONS
1. Perform ECM reprogramming.
^ Refer to Step 3 under ECM reprogramming in the Service Procedure to confirm ECM
reprogramming applies and is needed for the vehicle you are working on.
2. Perform TCM reprogramming.
^ Refer to Step 3 under TCM reprogramming in the Service Procedure to confirm TCM
reprogramming applies and is needed for the vehicle you are working on.
3. If equipped with Intelligent Cruise Control (ICC) perform ICC reprogramming.
^ Refer to Step 3 under ICC reprogramming in the Service Procedure to confirm ICC
reprogramming applies and is needed for the vehicle you are working on.
4. Test drive the vehicle and confirm the incident is resolved.
IMPORTANT:
The purpose of ACTIONS (above) is to give you a quick idea of the work you will be performing.
You MUST closely follow the entire SERVICE PROCEDURE as it contains information that is
essential to successfully completing this repair.
Infiniti Qx56 Rwd Workshop Manual (V8-5.6L (VK56VD) (2011))
Infiniti Workshop Manuals > Relays and Modules > Relays and Modules — Transmission and Drivetrain > Relays and
Modules — A/T > Control Module, A/T > Component Information > Technical Service Bulletins > Customer Interest for
Control Module: > 11-020 > Mar > 11 > Engine, A/T Controls — Hesitation/A/T Shift Issues > Page 166
CLAIMS INFORMATION
Service Procedure
SERVICE PROCEDURE
ECM Reprogramming
1. Prepare the vehicle for the reprogramming procedure.
Reprogramming Caution
Infiniti Qx56 Rwd Workshop Manual (V8-5.6L (VK56VD) (2011))
Infiniti Workshop Manuals > Relays and Modules > Relays and Modules — Transmission and Drivetrain > Relays and
Modules — A/T > Control Module, A/T > Component Information > Technical Service Bulletins > Customer Interest for
Control Module: > 11-020 > Mar > 11 > Engine, A/T Controls — Hesitation/A/T Shift Issues > Page 167
2. Navigate C-III to the ECM Reprogramming screen shown in Figure 1.
^ Use the «Reprogramming / Programming» selection.
^ Do not use Direct Diagnosis > Reprogramming.
3. On your C-III screen, look at the Part Number column (see Figure 1 example):
^ If there is no Engine part number listed, then ECM reprogramming does not apply; go to TCM
reprogramming.
^ If an Engine Part Number is listed, write it on the Repair Order.
4. Compare the Part Number you wrote down to the numbers in the Current ECM P/N column in
Table A above.
^ If there is a match this reprogramming applies. Continue with the reprogramming procedure.
NOTE:
If there are two Engine lines (two ECM reprogramming options) on your C-III screen, use the one
that does not have the message «Caution! Use ONLY with ITBXX-XXX».
^ If there is not a match, this reprogramming does not apply; go to TCM reprogramming below.
Infiniti Qx56 Rwd Workshop Manual (V8-5.6L (VK56VD) (2011))
Infiniti Workshop Manuals > Relays and Modules > Relays and Modules — Transmission and Drivetrain > Relays and
Modules — A/T > Control Module, A/T > Component Information > Technical Service Bulletins > Customer Interest for
Control Module: > 11-020 > Mar > 11 > Engine, A/T Controls — Hesitation/A/T Shift Issues > Page 168
5. When ECM reprogramming is complete, the screen in Figure 2 displays.
NOTE:
If the screen in Figure 2 does NOT display (reprogramming does NOT complete).
6. Make sure to erase DTCs from all Systems.
^ During reprogramming DTCs will set in several systems and must be erased before TCM
reprogramming.
7. Go to TCM Reprogramming below.
TCM Reprogramming
1. Restart the C-III session by selecting the «Home» icon in the upper left corner of the C-III screen.
^ Make sure to erase DTCs from all systems.
^ TCM initialization is not needed for 7 speed A/T reprogramming.
Reprogramming Caution
Infiniti Qx56 Rwd Workshop Manual (V8-5.6L (VK56VD) (2011))
Infiniti Workshop Manuals > Relays and Modules > Relays and Modules — Transmission and Drivetrain > Relays and
Modules — A/T > Control Module, A/T > Component Information > Technical Service Bulletins > Customer Interest for
Control Module: > 11-020 > Mar > 11 > Engine, A/T Controls — Hesitation/A/T Shift Issues > Page 169
2. Navigate C-III to the reprogramming screen shown in Figure 1A example above.
NOTE:
^ Do not use the «Reprogramming / Programming» selection.
^ Select the Model and Model Year and then navigate to Direct Diagnosis > Reprogramming.
^ TCM initialization is not needed for 7 Speed A/T reprogramming.
3. On your C-III screen look for a Transmission Part Number in the Part Number column (see
Figure 1A example).
^ If there is no Transmission Part Number listed, this reprogramming does not apply; go to ICC
reprogramming.
^ If a Transmission Part Number is listed write it on the Repair Order.
4. Compare the P/N you wrote down to the numbers in the Current TCM P/N column in Table A-1
above.
^ If there is a match this reprogramming applies. Continue with the reprogramming procedure.
^ If there is not a match this reprogramming does not apply; go to ICC reprogramming below.
Infiniti Qx56 Rwd Workshop Manual (V8-5.6L (VK56VD) (2011))
Infiniti Workshop Manuals > Relays and Modules > Relays and Modules — Transmission and Drivetrain > Relays and
Modules — A/T > Control Module, A/T > Component Information > Technical Service Bulletins > Customer Interest for
Control Module: > 11-020 > Mar > 11 > Engine, A/T Controls — Hesitation/A/T Shift Issues > Page 170
5. If you have performed TCM reprogramming; when reprogramming is complete, the screen in
Figure 2A displays.
6. Erase DTCs in all systems.
^ During TCM reprogramming, DTCs will set in several systems and must be erased before ICC
reprogramming.
7. Go to ICC Reprogramming below.
ICC Reprogramming
1. Restart the C-III session by selecting the Home icon in the upper left corner of the C-III screen.
NOTE:
^ The steps for reprogramming the Intelligent Cruise Control (ICC) are the same as the steps for
reprogramming the TCM.
Reprogramming Caution
Infiniti Qx56 Rwd Workshop Manual (V8-5.6L (VK56VD) (2011))
Infiniti Workshop Manuals > Relays and Modules > Relays and Modules — Transmission and Drivetrain > Relays and
Modules — A/T > Control Module, A/T > Component Information > Technical Service Bulletins > Customer Interest for
Control Module: > 11-020 > Mar > 11 > Engine, A/T Controls — Hesitation/A/T Shift Issues > Page 171
2. Navigate C-III to the reprogramming screen shown in Figure 1B example above.
NOTE:
^ Do not use the Reprogramming / Programming selection.
^ Select the Model and Model Year and then navigate to Direct Diagnosis > Reprogramming.
3. On your C-III screen, look for an ICC/ADAS Part Number in the Part Number column (see Figure
1B example).
^ If there is no ICC/ADAS Part Number listed, this reprogramming is not needed.
^ If an ICC/ADAS Part Number is listed, write it on the Repair Order.
4. Compare the P/N you wrote down to the numbers in the Current ICC/ADAS P/N column in Table
A-2 above.
^ If there is a match, this reprogramming applies. Continue with the reprogramming procedure.
^ If there is not a match, this reprogramming is not needed.
Infiniti Qx56 Rwd Workshop Manual (V8-5.6L (VK56VD) (2011))
Infiniti Workshop Manuals > Relays and Modules > Relays and Modules — Transmission and Drivetrain > Relays and
Modules — A/T > Control Module, A/T > Component Information > Technical Service Bulletins > Customer Interest for
Control Module: > 11-020 > Mar > 11 > Engine, A/T Controls — Hesitation/A/T Shift Issues > Page 172
5. If you have performed ICC reprogramming; when reprogramming is complete the screen in
Figure 2B displays.
6. Erase DTCs in all systems.
^ During ICC reprogramming, DTCs will set in several systems and must be erased.
Infiniti Qx56 Rwd Workshop Manual (V8-5.6L (VK56VD) (2011))
Infiniti Workshop Manuals > Sensors and Switches > Sensors and Switches — Brakes and Traction Control > Wheel Speed
Sensor > Component Information > Technical Service Bulletins > ABS/TCS — Wheel Speed Sensor Diagnostics
Wheel Speed Sensor: Technical Service Bulletins ABS/TCS — Wheel Speed Sensor Diagnostics
Classification: BR10-008
Reference: ITB10-056
Date: August 24, 2010
INFINITI; ABS/VDC WHEEL SPEED SENSOR DIAGNOSIS
APPLIED VEHICLES: 2007-2011 Infiniti vehicles equipped with ABS/VDC
SERVICE INFORMATION
This bulletin is being released to assist in accurate diagnosis when DTC:
^ C1101-C1104 [Wheel Speed Sensor 1] And/or
^ C1105-C1108 [Wheel Speed Sensor 2] is stored in the related ECU.
See below for additional diagnostic information.
Use of CONSULT-III and/or Wheel Sensor Tester Essential Tool J-45741 is recommended for
more efficient diagnosis.
IMPORTANT:
> ALWAYS fully diagnose the code before performing any repairs.
> DO NOT replace a sensor based on DTC alone without confirming a specific issue.
To diagnose a potential wheel speed sensor incident these basic steps should be followed.
1. Check the codes from the control unit and determine whether there is a wheel speed sensor
DTC and which wheel it is from. Check the sensor outputs using CONSULT-III DATA MONITOR
where applicable.
2. Go to the sensor and rotor at issue. Check for damage debris contamination and the electrical
connection.
3. With key off, disconnect the sensor and check the connector for any damage, including
damaged terminal, terminal «push-out», female terminal «Spread-open», and any oxidation or dirt.
4. Check the wheel speed sensor output signal directly at the sensor. This is done with Wheel
Sensor Tester Essential Tool J-45741. Make sure the key is off before disconnecting any
connectors. While checking signal output move around the wires to see if movement produces an
interruption.
NOTE:
^ Use the Tester. DO NOT test a wheel speed sensor with a «continuity» (test) light.
^ A good result from the Tester will most likely remove any concern of an incident with the wheel
speed sensor itself.
5. Check continuity of circuits. Use the applicable Electronic Service Manual to find the wheel
speed sensor circuit being inspected at the control unit. Check pin to pin continuity from the control
unit connector to the wheel speed sensor connector-wire harness side.
CAUTION:
Do not damage the connectors.
After checking continuity on each individual circuit pin to pin:
^ Check continuity between the two separate wheel speed sensor circuits to ensure there is no
continuity across (between) the two separate circuits.
^ Check each circuit to ensure there is no continuity to ground.
The steps above are general diagnostic guidelines. Always consult the applicable Electronic
Service Manual for specific instructions on the diagnosis and repair of DTCs.
Infiniti Qx56 Rwd Workshop Manual (V8-5.6L (VK56VD) (2011))
Infiniti Workshop Manuals > Sensors and Switches > Sensors and Switches — Steering and Suspension > Sensors and
Switches — Wheels and Tires > Tire Pressure Sensor > Component Information > Technical Service Bulletins > Tire Monitor
System — Components Are Not Interchangeable
Tire Pressure Sensor: Technical Service Bulletins Tire Monitor System — Components Are Not
Interchangeable
Classification: WT10-004a
Reference: ITB10-050a
Date: November 11 2010
TPMS COMPONENTS NOT INTERCHANGEABLE
This bulletin has been amended. Applied Vehicles, VINs, and Dates have been updated, and
changes have been made to the Service Information. Please discard previous versions.
APPLIED VEHICLES:
2010 — 2011 EX35 (J50)
2010 — 2011 FX35/FX50 (S51)
2010 — 2011 G37 Coupe Convertible and Sedan (CV36 HV36 and V36)
2010 M351M45 ~50)
2011 M37IM56~51)
2010 QX56 (JA60)
2011 QX56(Z62)
APPLIED DATES:
See Detail of Applied Dates and VINs at the end of this bulletin.
APPLIED VINs
See Detail of Applied Dates and VINs at the end of this bulletin.
SERVICE INFORMATION
^ Recent design changes have been made to the Tire Pressure Monitoring System (1PMS) sensor
receiver and control units (new style TPMS components).
^ These changes were applied as follows:
^ These changes do not affect the overall function of the TPMS.
^ These changes do affect the interchangeability of parts. For example:
> Full wheel assemblies (wheel and tire assemblies with TPMS) cannot be swapped between old
style sensor-equipped and new style sensor-equipped vehicles.
CAUTION:
^ New style and old style TPMS components are not compatible and cannot be interchanged.
^ Swapping of new style and old style components will cause the TPMS to stop operating correctly.
Infiniti Qx56 Rwd Workshop Manual (V8-5.6L (VK56VD) (2011))
Infiniti Workshop Manuals > Sensors and Switches > Sensors and Switches — Steering and Suspension > Sensors and
Switches — Wheels and Tires > Tire Pressure Sensor > Component Information > Technical Service Bulletins > Tire Monitor
System — Components Are Not Interchangeable > Page 185
If further confirmation of the TPMS sensor part number is required review the part number of the
originally installed equipment before replacement.
To confirm the latest part numbers, always consult the appropriate parts catalog when replacing or
exchanging TPMS sensors, receivers, or control modules.
NOTE:
^ An update is now available for the Signal Tech II to support the new style TPMS components.
The update can be found in ASIST > INFO Tool Box > Signal Tech II.
^ For 2010 models built after February 28 2010 a Signal Tech II menu selection «2010.5» has been
added.
Detail of Applied Dates and VINs
Infiniti Qx56 Rwd Workshop Manual (V8-5.6L (VK56VD) (2011))
Infiniti Workshop Manuals > Sensors and Switches > Sensors and Switches — Steering and Suspension > Sensors and
Switches — Wheels and Tires > Tire Pressure Sensor > Component Information > Technical Service Bulletins > Tire Monitor
System — Components Are Not Interchangeable > Page 186
Installation at the factory of the new style TPMS components began with the following VINs and
Dates:
NOTE:
All 2011 Infiniti vehicles are equipped with the new style TPMS components.
Disclaimer
Infiniti Qx56 Rwd Workshop Manual (V8-5.6L (VK56VD) (2011))
Infiniti Workshop Manuals > Maintenance > Alignment > System Information > Technical Service Bulletins > All Technical
Service Bulletins for Alignment: > 04-021C > Apr > 11 > Steering/Suspension — Wheel Alignment Info.
Technical Service Bulletin # 04-021C Date: 110406
Steering/Suspension — Wheel Alignment Info.
Classification: WT04-005C
Reference: ITB04-021C
Date: April 6, 2011
WHEEL ALIGNMENT INFORMATION
This bulletin has been amended to correct some typographical errors in SERVICE INFORMATION.
No other changes have been made. Discard all previous versions of this bulletin.
APPLIED VEHICLES: All Infiniti
Warranty Claim Information:
In order to properly document any warranty alignment claim the following item MUST be attached
to the Repair Order:
^ A copy of the alignment machine printout showing the BEFORE and AFTER alignment readings.
IMPORTANT:
If you do not attach the above item to the Repair Order the claim may be denied (rejected or
charged back).
ALSO: A copy of the yearly alignment machine calibration certification must be held on file in the
Service Dept.
Service Information
SERVICE INFORMATION
^ When performing a wheel alignment it is important that you read and follow all of the instructions
supplied with your alignment equipment.
^ The information in this bulletin is not intended to be complete wheel alignment instructions.
^ Use the information in this bulletin as a supplement to the instructions for your equipment.
General Information and Recommendations
1. Four-Wheel Thrust Alignment should always be performed.
^ This type of alignment is recommended for all Infiniti vehicles.
^ The four-wheel thrust process ensures that the vehicle is properly aligned and helps ensure
proper «centering» of the steering wheel.
2. Use the right alignment machine.
^ You must use a quality alignment machine that will give accurate results when performing
alignment checks.
^ Refer to the Infiniti TECH-MATE Service Equipment Catalog for recommended alignment
equipment.
^ The alignment rack itself should be capable of accepting any Infiniti vehicle.
^ The rack should be checked to ensure that it is level.
3. Make sure the alignment machine is properly calibrated.
^ Your alignment equipment should be regularly calibrated in order to give accurate readings.
^ If any instrument that is part of the alignment machine is dropped or damaged calibration should
be checked immediately.
^ Check with the manufacturer of your specific equipment for their recommended
service/calibration schedule.
NOTE:
Infiniti Qx56 Rwd Workshop Manual (V8-5.6L (VK56VD) (2011))
Infiniti Workshop Manuals > Maintenance > Alignment > System Information > Technical Service Bulletins > All Technical
Service Bulletins for Alignment: > 04-021C > Apr > 11 > Steering/Suspension — Wheel Alignment Info. > Page 196
In order to properly document any warranty alignment claim the following item MUST be attached
to the Repair Order:
A copy of the alignment machine printout showing the BEFORE and AFTER alignment readings.
IMPORTANT:
If you do not attach the above item to the Repair Order the claim may be denied (rejected or
charged back).
ALSO: A copy of the yearly alignment machine calibration certification must be held on file in the
Service Dept.
4. Make sure the «turn plates» and «slide plates» are in good working order:
^ The surface of the front turn plates must be level with (the same height as) the rack surface.
If height is not the same; have the equipment repaired before performing any alignments.
Infiniti Qx56 Rwd Workshop Manual (V8-5.6L (VK56VD) (2011))
Infiniti Workshop Manuals > Maintenance > Alignment > System Information > Technical Service Bulletins > All Technical
Service Bulletins for Alignment: > 04-021C > Apr > 11 > Steering/Suspension — Wheel Alignment Info. > Page 197
^ Make sure the front turn plates:
> Do not wobble (no up/down movement).
> Operate (slide and turn) smoothly in all directions.
If there is any issue with the turn plate operation — have the equipment repaired before performing
any alignments.
^ Make sure the rear slide plates:
> Do not wobble (no up/down movement).
> Operate (slide) smoothly in all directions.
Infiniti Qx56 Rwd Workshop Manual (V8-5.6L (VK56VD) (2011))
Infiniti Workshop Manuals > Maintenance > Alignment > System Information > Technical Service Bulletins > All Technical
Service Bulletins for Alignment: > 04-021C > Apr > 11 > Steering/Suspension — Wheel Alignment Info. > Page 198
If there is any issue with the slide plate operation — have the equipment repaired before performing
any alignments.
5. Make sure the lock pins for the front «turn plates» and rear «slide plates» are in place.
NOTE:
Lock pins should remain in place until caster sweep.
The Alignment Process
IMPORTANT:
Use only the alignment specifications listed in the appropriate Service Manual when adjusting the
alignment.
1. Make sure the vehicle is straight on the alignment rack.
^ Vehicle must be straight (in line) with the alignment rack before entering the rack as shown in
Figure 4.
^ Do not straighten the vehicle while on the rack (see Figure 5).
^ If the vehicle needs to be straightened exit the alignment rack straighten the vehicle and then
re-enter the rack.
^ Once the vehicle is straight on the rack do not turn/center the steering wheel-keep the front
wheels straight.
2. Position vehicle on the front turn plates as follows:
Infiniti Qx56 Rwd Workshop Manual (V8-5.6L (VK56VD) (2011))
Infiniti Workshop Manuals > Maintenance > Alignment > System Information > Technical Service Bulletins > All Technical
Service Bulletins for Alignment: > 04-021C > Apr > 11 > Steering/Suspension — Wheel Alignment Info. > Page 199
^ Stop vehicle just behind the turn plates.
^ Center the turn plates to the tires.
Infiniti Qx56 Rwd Workshop Manual (V8-5.6L (VK56VD) (2011))
Infiniti Workshop Manuals > Maintenance > Alignment > System Information > Technical Service Bulletins > All Technical
Service Bulletins for Alignment: > 04-021C > Apr > 11 > Steering/Suspension — Wheel Alignment Info. > Page 200
^ Move the vehicle onto the turn plates by turning/pushing the rear wheel.
DO NOT push/pull on the vehicle body.
^ Center the front wheels on the turn plates.
Infiniti Qx56 Rwd Workshop Manual (V8-5.6L (VK56VD) (2011))
Infiniti Workshop Manuals > Maintenance > Alignment > System Information > Technical Service Bulletins > All Technical
Service Bulletins for Alignment: > 04-021C > Apr > 11 > Steering/Suspension — Wheel Alignment Info. > Page 201
^ Chock the left rear wheel.
Preliminary Checks:
3. Perform pre-alignment checks.
^ Tire condition (wear partial wear flaws etc.)
^ Road wheel condition (damage and deformation)
^ Tire pressure
^ Inspect for visible damage to any suspension components
^ Wheel bearing axial play
^ Ball joints of suspension arms
^ Shock absorber operation and visual check for oil leakage
^ Condition of axle and suspension (check for bushing cracks and slack)
^ Vehicle weight
> Empty — no cargo luggage or passengers
> Fuel level is full
> Engine coolant and lubricating oils at specified levels
> Spare tire, jack hand tools and floor mats in designated positions
NOTE:
Refer to the appropriate Service Manual for information about any of the above checks and
inspections.
4. Check the target mounts.
^ If there is any visual damage (bent worn cracked etc) have the equipment repaired before
performing any alignments.
Infiniti Qx56 Rwd Workshop Manual (V8-5.6L (VK56VD) (2011))
Infiniti Workshop Manuals > Maintenance > Alignment > System Information > Technical Service Bulletins > All Technical
Service Bulletins for Alignment: > 04-021C > Apr > 11 > Steering/Suspension — Wheel Alignment Info. > Page 202
^ Make sure the target mounts are properly adjusted and configured (see Figure 11).
NOTE:
The target mount example shown in Figure 11 is for Hunter «camera type» alignment machines.
Follow the operation manual for your specific equipment.
Infiniti Qx56 Rwd Workshop Manual (V8-5.6L (VK56VD) (2011))
Infiniti Workshop Manuals > Maintenance > Alignment > System Information > Technical Service Bulletins > All Technical
Service Bulletins for Alignment: > 04-021C > Apr > 11 > Steering/Suspension — Wheel Alignment Info. > Page 203
5. Make sure the targets are mounted correctly.
^ Mount the top claws first.
^ Claws must be flush against the wheel as shown in Figure 13.
Infiniti Qx56 Rwd Workshop Manual (V8-5.6L (VK56VD) (2011))
Infiniti Workshop Manuals > Maintenance > Alignment > System Information > Technical Service Bulletins > All Technical
Service Bulletins for Alignment: > 04-021C > Apr > 11 > Steering/Suspension — Wheel Alignment Info. > Page 204
^ Target must be flush against the center support as shown in Figure 14.
^ Make sure the targets are positioned with the arrow UP or level.
IMPORTANT:
Once you have set the target position DO NOT reset it at anytime during the alignment process.
Infiniti Qx56 Rwd Workshop Manual (V8-5.6L (VK56VD) (2011))
Infiniti Workshop Manuals > Maintenance > Alignment > System Information > Technical Service Bulletins > All Technical
Service Bulletins for Alignment: > 04-021C > Apr > 11 > Steering/Suspension — Wheel Alignment Info. > Page 205
6. Begin the alignment procedure.
^ Follow all of the instructions for your particular equipment.
^ Refer to the Service Manual for alignment specifications.
If your equipment requires «rolling compensation». follow these additional tips:
Infiniti Qx56 Rwd Workshop Manual (V8-5.6L (VK56VD) (2011))
Infiniti Workshop Manuals > Maintenance > Alignment > System Information > Technical Service Bulletins > All Technical
Service Bulletins for Alignment: > 04-021C > Apr > 11 > Steering/Suspension — Wheel Alignment Info. > Page 206
^ DO NOT push or pull on the vehicle body.
IMPORTANT:
After performing «rolling compensation», DO NOT reset the target position.
When performing «caster sweep». follow these tips:
^ Apply the brakes as shown.
^ Start the engine to allow brake boost.
^ Turn the engine OFF.
Infiniti Qx56 Rwd Workshop Manual (V8-5.6L (VK56VD) (2011))
Infiniti Workshop Manuals > Maintenance > Alignment > System Information > Technical Service Bulletins > All Technical
Service Bulletins for Alignment: > 04-021C > Apr > 11 > Steering/Suspension — Wheel Alignment Info. > Page 207
^ Remove all lock pins — front «turn plates» and rear «slide plates».
^ Make sure the bridge plate will not interfere with movement of the turn plate.
Put the bridge plate in the down position.
^ Perform caster sweep by turning the steering wheel from outside the vehicle.
Infiniti Qx56 Rwd Workshop Manual (V8-5.6L (VK56VD) (2011))
Infiniti Workshop Manuals > Maintenance > Alignment > System Information > Technical Service Bulletins > All Technical
Service Bulletins for Alignment: > 04-021C > Apr > 11 > Steering/Suspension — Wheel Alignment Info. > Page 208
^ DO NOT push/pull on the tire to perform the caster sweep.
7. Make sure the steering wheel is centered when performing toe-in measurements and
adjustments.
NOTE:
If you are using a Hunter alignment machine equipped with the WinToe-(R) Alignment Adjustment
System:
^ There is no need to lock the steering wheel. The WinToe(R) system is not affected by steering
system movement during the adjustment process.
^ Bumping the tire or re-centering the steering wheel when adjusting «near frozen» tie rods is not
necessary. This makes the adjustment process faster
and easier.
^ WinToe(R) eliminates the effect of lash in the steering system.
If you are using a John Bean alignment machine equipped with EZ Toe:
^ There is no need to lock the steering wheel. The EZ Toe system is not affected by steering
system movement during the adjustment process.
^ This software routine is an improved method of setting front toe making it easier to obtain a
centered steering wheel.
^ With EZ Toe it is possible to adjust toe with the steering wheel turned at any angle left or right.
This is helpful when setting toe on engine wall
mounted rack and pinion units.
IMPORTANT:
If during the alignment process the vehicle was lifted off of the rack; after lowering, make sure to
jounce (bounce) the vehicle before confirming adjustments are correct.
After you have checked and adjusted vehicle alignment
8. Print the BEFORE and AFTER measurements and attach them to the Repair Order.
9. Road test the vehicle to make sure the steering wheel is «centered» when driving on a straight
flat road.
Infiniti Qx56 Rwd Workshop Manual (V8-5.6L (VK56VD) (2011))
Infiniti Workshop Manuals > Maintenance > Alignment > System Information > Technical Service Bulletins > All Technical
Service Bulletins for Alignment: > 08-046C > Apr > 11 > Steering/Tires — Pull/Drift/Steering Wheel Off-Center
Alignment: All Technical Service Bulletins Steering/Tires — Pull/Drift/Steering Wheel Off-Center
Classification: ST08-002C
Reference: ITB08-046C
Date: April 5, 2011
DIAGNOSIS OF VEHICLE PULL (DRIFT) AND STEERING WHEEL OFF CENTER
This bulletin has been amended. Changes have been made throughout the complete bulletin.
Please discard previous versions of this bulletin.
APPLIED VEHICLES: All Infititi
SERVICE INFORMATION
If a customers reports their «vehicle pulls» or the «steering wheel is off-center» use the Diagnostic
Flow Chart below and the other information in this bulletin to diagnose and correct the issue
Diagnostic Flow Chart
Infiniti Qx56 Rwd Workshop Manual (V8-5.6L (VK56VD) (2011))
Infiniti Workshop Manuals > Maintenance > Alignment > System Information > Technical Service Bulletins > All Technical
Service Bulletins for Alignment: > 08-046C > Apr > 11 > Steering/Tires — Pull/Drift/Steering Wheel Off-Center > Page 213
Road Test
Determine if the vehicle has a pull or steering wheel off-center issue that requires repair.
IMPORTANT:
^ If the vehicle has any tire issues such as:
> Tires that are different sizes (except when specified from the factory)
> Significant difference in the amount of wear between any of the tires
> Any other tire irregularity or damage to any tire
Replace the tire(s) or use known good tires from another vehicle for all road tests and diagnostics
in this bulletin.
^ Make sure tire pressure is set to the correct specification.
1. Install the following measuring tools on the vehicle:
^ Steering Wheel Offset Gauge
^ Road Crown Gauge
NOTE:
Refer to Special Tools for a description of these tools and an explanation of their use.
2. Obtain a watch with a second hand (preferably a stopwatch) to use during the road test.
3. Take the vehicle for a road test and confirm the customers concern.
^ Select a flat road where the vehicle can be driven in a straight line at a preferred speed of 60
mph.
^ During the road test make sure the vehicle is pointing straight. Don’t worry about steering wheel
position during the road test.
NOTE:
^ If you adjusted the tire pressure or changed the tires before the road test the issue may have
been resolved.
^ If there are cross winds strong enough to affect the vehicle straight line movement then diagnosis
cannot be performed.
4. Determine the vehicles issue — refer to the definitions of «Pull» and Steering Wheel «Off-center»
below.
5. When the road test is completed remove the Road Crown Gauge; leave the Steering Wheel
Off-Set Gauge in place until the Service Procedure is complete.
6. Refer to the Flow Chart for the next step.
Other Service Information
Infiniti Qx56 Rwd Workshop Manual (V8-5.6L (VK56VD) (2011))
Infiniti Workshop Manuals > Maintenance > Alignment > System Information > Technical Service Bulletins > All Technical
Service Bulletins for Alignment: > 08-046C > Apr > 11 > Steering/Tires — Pull/Drift/Steering Wheel Off-Center > Page 214
Customers may report that their vehicle’s steering wheel is «Off-center» because the steering wheel
spokes are tilted to the left or right when the vehicle continues straight ahead on a straight flat road
(see example in Figure 1).
If a vehicle’s steering wheel spokes are slightly off center while driving straight it may be the normal
result of road crown. Most roads in the United States are built with a «crown» to help rain water
drain from the road surface. The slope of the road crown varies from place to place.
Vehicles have a natural tendency to drift to the low side of the crown. The greater the slope of the
crown the faster the vehicle will drift in that direction.
Tires and vehicles are designed to counteract the effect of typical road crown but may not fully
counteract the effect of a highly crowned road.
Some freeways slope to both the left and right from the center. When driving on a freeway that
slopes in both directions a vehicle may exhibit a small amount of drift to the left when driving in the
left lane and a small amount of drift to the right when driving in the right lane.
This bulletin does not address road crown issues because they are not vehicle related, although
the customer may incorrectly perceive them to be.
Description/Definition of Steering Wheel «Off-center» Condition
The steering wheel spokes are tilted to the left or right 2 mm or more (see example in Figure 2)
when driving straight ahead on a straight flat road.
^ When driving straight on a highly crowned road the steering wheel may be turned (off-center) to
counteract the affect of the road crown. When road
testing for an off-center condition the vehicle should be driven on a straight flat road.
^ Although the vehicle does not pull in either direction the customer may perceive that the vehicle
pulls because it will respond if he or she tries to bring
the steering wheel back to center. This condition can occur if the tie rod length is uneven (not
adjusted correctly) from side to side.
Description/Definition of a Vehicle «Pull» Condition
The vehicle consistently drifts to one side while driving at a constant speed on a straight flat road.
Infiniti Qx56 Rwd Workshop Manual (V8-5.6L (VK56VD) (2011))
Infiniti Workshop Manuals > Maintenance > Alignment > System Information > Technical Service Bulletins > All Technical
Service Bulletins for Alignment: > 08-046C > Apr > 11 > Steering/Tires — Pull/Drift/Steering Wheel Off-Center > Page 215
^ A vehicle is said to pull if it completes a lane change in less than 7 seconds (with no steering
correction from the driver) when driving at 60 MPH on a
road with less than 2 degrees of road crown slope. All four wheels must pass into the other lane
during this time (7 seconds).
Infiniti Qx56 Rwd Workshop Manual (V8-5.6L (VK56VD) (2011))
Infiniti Workshop Manuals > Maintenance > Alignment > System Information > Technical Service Bulletins > All Technical
Service Bulletins for Alignment: > 08-046C > Apr > 11 > Steering/Tires — Pull/Drift/Steering Wheel Off-Center > Page 216
SPECIAL TOOLS
Infiniti Qx56 Rwd Workshop Manual (V8-5.6L (VK56VD) (2011))
Infiniti Workshop Manuals > Maintenance > Alignment > System Information > Technical Service Bulletins > By Symptom: >
08-046C > Apr > 11 > Steering/Tires — Pull/Drift/Steering Wheel Off-Center
Alignment: By Symptom Steering/Tires — Pull/Drift/Steering Wheel Off-Center
Classification: ST08-002C
Reference: ITB08-046C
Date: April 5, 2011
DIAGNOSIS OF VEHICLE PULL (DRIFT) AND STEERING WHEEL OFF CENTER
This bulletin has been amended. Changes have been made throughout the complete bulletin.
Please discard previous versions of this bulletin.
APPLIED VEHICLES: All Infititi
SERVICE INFORMATION
If a customers reports their «vehicle pulls» or the «steering wheel is off-center» use the Diagnostic
Flow Chart below and the other information in this bulletin to diagnose and correct the issue
Diagnostic Flow Chart
Infiniti Qx56 Rwd Workshop Manual (V8-5.6L (VK56VD) (2011))
Infiniti Workshop Manuals > Maintenance > Alignment > System Information > Technical Service Bulletins > By Symptom: >
08-046C > Apr > 11 > Steering/Tires — Pull/Drift/Steering Wheel Off-Center > Page 222
Road Test
Determine if the vehicle has a pull or steering wheel off-center issue that requires repair.
IMPORTANT:
^ If the vehicle has any tire issues such as:
> Tires that are different sizes (except when specified from the factory)
> Significant difference in the amount of wear between any of the tires
> Any other tire irregularity or damage to any tire
Replace the tire(s) or use known good tires from another vehicle for all road tests and diagnostics
in this bulletin.
^ Make sure tire pressure is set to the correct specification.
1. Install the following measuring tools on the vehicle:
^ Steering Wheel Offset Gauge
^ Road Crown Gauge
NOTE:
Refer to Special Tools for a description of these tools and an explanation of their use.
2. Obtain a watch with a second hand (preferably a stopwatch) to use during the road test.
3. Take the vehicle for a road test and confirm the customers concern.
^ Select a flat road where the vehicle can be driven in a straight line at a preferred speed of 60
mph.
^ During the road test make sure the vehicle is pointing straight. Don’t worry about steering wheel
position during the road test.
NOTE:
^ If you adjusted the tire pressure or changed the tires before the road test the issue may have
been resolved.
^ If there are cross winds strong enough to affect the vehicle straight line movement then diagnosis
cannot be performed.
4. Determine the vehicles issue — refer to the definitions of «Pull» and Steering Wheel «Off-center»
below.
5. When the road test is completed remove the Road Crown Gauge; leave the Steering Wheel
Off-Set Gauge in place until the Service Procedure is complete.
6. Refer to the Flow Chart for the next step.
Other Service Information
Infiniti Qx56 Rwd Workshop Manual (V8-5.6L (VK56VD) (2011))
Infiniti Workshop Manuals > Maintenance > Alignment > System Information > Technical Service Bulletins > By Symptom: >
08-046C > Apr > 11 > Steering/Tires — Pull/Drift/Steering Wheel Off-Center > Page 223
Customers may report that their vehicle’s steering wheel is «Off-center» because the steering wheel
spokes are tilted to the left or right when the vehicle continues straight ahead on a straight flat road
(see example in Figure 1).
If a vehicle’s steering wheel spokes are slightly off center while driving straight it may be the normal
result of road crown. Most roads in the United States are built with a «crown» to help rain water
drain from the road surface. The slope of the road crown varies from place to place.
Vehicles have a natural tendency to drift to the low side of the crown. The greater the slope of the
crown the faster the vehicle will drift in that direction.
Tires and vehicles are designed to counteract the effect of typical road crown but may not fully
counteract the effect of a highly crowned road.
Some freeways slope to both the left and right from the center. When driving on a freeway that
slopes in both directions a vehicle may exhibit a small amount of drift to the left when driving in the
left lane and a small amount of drift to the right when driving in the right lane.
This bulletin does not address road crown issues because they are not vehicle related, although
the customer may incorrectly perceive them to be.
Description/Definition of Steering Wheel «Off-center» Condition
The steering wheel spokes are tilted to the left or right 2 mm or more (see example in Figure 2)
when driving straight ahead on a straight flat road.
^ When driving straight on a highly crowned road the steering wheel may be turned (off-center) to
counteract the affect of the road crown. When road
testing for an off-center condition the vehicle should be driven on a straight flat road.
^ Although the vehicle does not pull in either direction the customer may perceive that the vehicle
pulls because it will respond if he or she tries to bring
the steering wheel back to center. This condition can occur if the tie rod length is uneven (not
adjusted correctly) from side to side.
Description/Definition of a Vehicle «Pull» Condition
The vehicle consistently drifts to one side while driving at a constant speed on a straight flat road.
Infiniti Qx56 Rwd Workshop Manual (V8-5.6L (VK56VD) (2011))
Infiniti Workshop Manuals > Maintenance > Alignment > System Information > Technical Service Bulletins > By Symptom: >
08-046C > Apr > 11 > Steering/Tires — Pull/Drift/Steering Wheel Off-Center > Page 224
^ A vehicle is said to pull if it completes a lane change in less than 7 seconds (with no steering
correction from the driver) when driving at 60 MPH on a
road with less than 2 degrees of road crown slope. All four wheels must pass into the other lane
during this time (7 seconds).
Infiniti Qx56 Rwd Workshop Manual (V8-5.6L (VK56VD) (2011))
Infiniti Workshop Manuals > Maintenance > Alignment > System Information > Technical Service Bulletins > By Symptom: >
08-046C > Apr > 11 > Steering/Tires — Pull/Drift/Steering Wheel Off-Center > Page 225
SPECIAL TOOLS
Infiniti Qx56 Rwd Workshop Manual (V8-5.6L (VK56VD) (2011))
Infiniti Workshop Manuals > Maintenance > Alignment > System Information > Technical Service Bulletins > Customer
Interest: > 08-046C > Apr > 11 > Steering/Tires — Pull/Drift/Steering Wheel Off-Center
Alignment: Customer Interest Steering/Tires — Pull/Drift/Steering Wheel Off-Center
Classification: ST08-002C
Reference: ITB08-046C
Date: April 5, 2011
DIAGNOSIS OF VEHICLE PULL (DRIFT) AND STEERING WHEEL OFF CENTER
This bulletin has been amended. Changes have been made throughout the complete bulletin.
Please discard previous versions of this bulletin.
APPLIED VEHICLES: All Infititi
SERVICE INFORMATION
If a customers reports their «vehicle pulls» or the «steering wheel is off-center» use the Diagnostic
Flow Chart below and the other information in this bulletin to diagnose and correct the issue
Diagnostic Flow Chart
Infiniti Qx56 Rwd Workshop Manual (V8-5.6L (VK56VD) (2011))
Infiniti Workshop Manuals > Maintenance > Alignment > System Information > Technical Service Bulletins > Customer
Interest: > 08-046C > Apr > 11 > Steering/Tires — Pull/Drift/Steering Wheel Off-Center > Page 231
Road Test
Determine if the vehicle has a pull or steering wheel off-center issue that requires repair.
IMPORTANT:
^ If the vehicle has any tire issues such as:
> Tires that are different sizes (except when specified from the factory)
> Significant difference in the amount of wear between any of the tires
> Any other tire irregularity or damage to any tire
Replace the tire(s) or use known good tires from another vehicle for all road tests and diagnostics
in this bulletin.
^ Make sure tire pressure is set to the correct specification.
1. Install the following measuring tools on the vehicle:
^ Steering Wheel Offset Gauge
^ Road Crown Gauge
NOTE:
Refer to Special Tools for a description of these tools and an explanation of their use.
2. Obtain a watch with a second hand (preferably a stopwatch) to use during the road test.
3. Take the vehicle for a road test and confirm the customers concern.
^ Select a flat road where the vehicle can be driven in a straight line at a preferred speed of 60
mph.
^ During the road test make sure the vehicle is pointing straight. Don’t worry about steering wheel
position during the road test.
NOTE:
^ If you adjusted the tire pressure or changed the tires before the road test the issue may have
been resolved.
^ If there are cross winds strong enough to affect the vehicle straight line movement then diagnosis
cannot be performed.
4. Determine the vehicles issue — refer to the definitions of «Pull» and Steering Wheel «Off-center»
below.
5. When the road test is completed remove the Road Crown Gauge; leave the Steering Wheel
Off-Set Gauge in place until the Service Procedure is complete.
6. Refer to the Flow Chart for the next step.
Other Service Information
Infiniti Qx56 Rwd Workshop Manual (V8-5.6L (VK56VD) (2011))
Infiniti Workshop Manuals > Maintenance > Alignment > System Information > Technical Service Bulletins > Customer
Interest: > 08-046C > Apr > 11 > Steering/Tires — Pull/Drift/Steering Wheel Off-Center > Page 232
Customers may report that their vehicle’s steering wheel is «Off-center» because the steering wheel
spokes are tilted to the left or right when the vehicle continues straight ahead on a straight flat road
(see example in Figure 1).
If a vehicle’s steering wheel spokes are slightly off center while driving straight it may be the normal
result of road crown. Most roads in the United States are built with a «crown» to help rain water
drain from the road surface. The slope of the road crown varies from place to place.
Vehicles have a natural tendency to drift to the low side of the crown. The greater the slope of the
crown the faster the vehicle will drift in that direction.
Tires and vehicles are designed to counteract the effect of typical road crown but may not fully
counteract the effect of a highly crowned road.
Some freeways slope to both the left and right from the center. When driving on a freeway that
slopes in both directions a vehicle may exhibit a small amount of drift to the left when driving in the
left lane and a small amount of drift to the right when driving in the right lane.
This bulletin does not address road crown issues because they are not vehicle related, although
the customer may incorrectly perceive them to be.
Description/Definition of Steering Wheel «Off-center» Condition
The steering wheel spokes are tilted to the left or right 2 mm or more (see example in Figure 2)
when driving straight ahead on a straight flat road.
^ When driving straight on a highly crowned road the steering wheel may be turned (off-center) to
counteract the affect of the road crown. When road
testing for an off-center condition the vehicle should be driven on a straight flat road.
^ Although the vehicle does not pull in either direction the customer may perceive that the vehicle
pulls because it will respond if he or she tries to bring
the steering wheel back to center. This condition can occur if the tie rod length is uneven (not
adjusted correctly) from side to side.
Description/Definition of a Vehicle «Pull» Condition
The vehicle consistently drifts to one side while driving at a constant speed on a straight flat road.
Infiniti Qx56 Rwd Workshop Manual (V8-5.6L (VK56VD) (2011))
Infiniti Workshop Manuals > Maintenance > Alignment > System Information > Technical Service Bulletins > Customer
Interest: > 08-046C > Apr > 11 > Steering/Tires — Pull/Drift/Steering Wheel Off-Center > Page 233
^ A vehicle is said to pull if it completes a lane change in less than 7 seconds (with no steering
correction from the driver) when driving at 60 MPH on a
road with less than 2 degrees of road crown slope. All four wheels must pass into the other lane
during this time (7 seconds).
Infiniti Qx56 Rwd Workshop Manual (V8-5.6L (VK56VD) (2011))
Infiniti Workshop Manuals > Maintenance > Alignment > System Information > Technical Service Bulletins > Customer
Interest: > 08-046C > Apr > 11 > Steering/Tires — Pull/Drift/Steering Wheel Off-Center > Page 234
SPECIAL TOOLS
Infiniti Qx56 Rwd Workshop Manual (V8-5.6L (VK56VD) (2011))
Infiniti Workshop Manuals > Maintenance > Alignment > System Information > Technical Service Bulletins > All Other
Service Bulletins for Alignment: > 04-021C > Apr > 11 > Steering/Suspension — Wheel Alignment Info.
Technical Service Bulletin # 04-021C Date: 110406
Steering/Suspension — Wheel Alignment Info.
Classification: WT04-005C
Reference: ITB04-021C
Date: April 6, 2011
WHEEL ALIGNMENT INFORMATION
This bulletin has been amended to correct some typographical errors in SERVICE INFORMATION.
No other changes have been made. Discard all previous versions of this bulletin.
APPLIED VEHICLES: All Infiniti
Warranty Claim Information:
In order to properly document any warranty alignment claim the following item MUST be attached
to the Repair Order:
^ A copy of the alignment machine printout showing the BEFORE and AFTER alignment readings.
IMPORTANT:
If you do not attach the above item to the Repair Order the claim may be denied (rejected or
charged back).
ALSO: A copy of the yearly alignment machine calibration certification must be held on file in the
Service Dept.
Service Information
SERVICE INFORMATION
^ When performing a wheel alignment it is important that you read and follow all of the instructions
supplied with your alignment equipment.
^ The information in this bulletin is not intended to be complete wheel alignment instructions.
^ Use the information in this bulletin as a supplement to the instructions for your equipment.
General Information and Recommendations
1. Four-Wheel Thrust Alignment should always be performed.
^ This type of alignment is recommended for all Infiniti vehicles.
^ The four-wheel thrust process ensures that the vehicle is properly aligned and helps ensure
proper «centering» of the steering wheel.
2. Use the right alignment machine.
^ You must use a quality alignment machine that will give accurate results when performing
alignment checks.
^ Refer to the Infiniti TECH-MATE Service Equipment Catalog for recommended alignment
equipment.
^ The alignment rack itself should be capable of accepting any Infiniti vehicle.
^ The rack should be checked to ensure that it is level.
3. Make sure the alignment machine is properly calibrated.
^ Your alignment equipment should be regularly calibrated in order to give accurate readings.
^ If any instrument that is part of the alignment machine is dropped or damaged calibration should
be checked immediately.
^ Check with the manufacturer of your specific equipment for their recommended
service/calibration schedule.
NOTE:
Infiniti Qx56 Rwd Workshop Manual (V8-5.6L (VK56VD) (2011))
Infiniti Workshop Manuals > Maintenance > Alignment > System Information > Technical Service Bulletins > All Other
Service Bulletins for Alignment: > 04-021C > Apr > 11 > Steering/Suspension — Wheel Alignment Info. > Page 240
In order to properly document any warranty alignment claim the following item MUST be attached
to the Repair Order:
A copy of the alignment machine printout showing the BEFORE and AFTER alignment readings.
IMPORTANT:
If you do not attach the above item to the Repair Order the claim may be denied (rejected or
charged back).
ALSO: A copy of the yearly alignment machine calibration certification must be held on file in the
Service Dept.
4. Make sure the «turn plates» and «slide plates» are in good working order:
^ The surface of the front turn plates must be level with (the same height as) the rack surface.
If height is not the same; have the equipment repaired before performing any alignments.
Infiniti Qx56 Rwd Workshop Manual (V8-5.6L (VK56VD) (2011))
Infiniti Workshop Manuals > Maintenance > Alignment > System Information > Technical Service Bulletins > All Other
Service Bulletins for Alignment: > 04-021C > Apr > 11 > Steering/Suspension — Wheel Alignment Info. > Page 241
^ Make sure the front turn plates:
> Do not wobble (no up/down movement).
> Operate (slide and turn) smoothly in all directions.
If there is any issue with the turn plate operation — have the equipment repaired before performing
any alignments.
^ Make sure the rear slide plates:
> Do not wobble (no up/down movement).
> Operate (slide) smoothly in all directions.
Infiniti Qx56 Rwd Workshop Manual (V8-5.6L (VK56VD) (2011))
Infiniti Workshop Manuals > Maintenance > Alignment > System Information > Technical Service Bulletins > All Other
Service Bulletins for Alignment: > 04-021C > Apr > 11 > Steering/Suspension — Wheel Alignment Info. > Page 242
If there is any issue with the slide plate operation — have the equipment repaired before performing
any alignments.
5. Make sure the lock pins for the front «turn plates» and rear «slide plates» are in place.
NOTE:
Lock pins should remain in place until caster sweep.
The Alignment Process
IMPORTANT:
Use only the alignment specifications listed in the appropriate Service Manual when adjusting the
alignment.
1. Make sure the vehicle is straight on the alignment rack.
^ Vehicle must be straight (in line) with the alignment rack before entering the rack as shown in
Figure 4.
^ Do not straighten the vehicle while on the rack (see Figure 5).
^ If the vehicle needs to be straightened exit the alignment rack straighten the vehicle and then
re-enter the rack.
^ Once the vehicle is straight on the rack do not turn/center the steering wheel-keep the front
wheels straight.
2. Position vehicle on the front turn plates as follows:
Infiniti Qx56 Rwd Workshop Manual (V8-5.6L (VK56VD) (2011))
Infiniti Workshop Manuals > Maintenance > Alignment > System Information > Technical Service Bulletins > All Other
Service Bulletins for Alignment: > 04-021C > Apr > 11 > Steering/Suspension — Wheel Alignment Info. > Page 243
^ Stop vehicle just behind the turn plates.
^ Center the turn plates to the tires.
Infiniti Qx56 Rwd Workshop Manual (V8-5.6L (VK56VD) (2011))
Infiniti Workshop Manuals > Maintenance > Alignment > System Information > Technical Service Bulletins > All Other
Service Bulletins for Alignment: > 04-021C > Apr > 11 > Steering/Suspension — Wheel Alignment Info. > Page 244
^ Move the vehicle onto the turn plates by turning/pushing the rear wheel.
DO NOT push/pull on the vehicle body.
^ Center the front wheels on the turn plates.
Infiniti Qx56 Rwd Workshop Manual (V8-5.6L (VK56VD) (2011))
Infiniti Workshop Manuals > Maintenance > Alignment > System Information > Technical Service Bulletins > All Other
Service Bulletins for Alignment: > 04-021C > Apr > 11 > Steering/Suspension — Wheel Alignment Info. > Page 245
^ Chock the left rear wheel.
Preliminary Checks:
3. Perform pre-alignment checks.
^ Tire condition (wear partial wear flaws etc.)
^ Road wheel condition (damage and deformation)
^ Tire pressure
^ Inspect for visible damage to any suspension components
^ Wheel bearing axial play
^ Ball joints of suspension arms
^ Shock absorber operation and visual check for oil leakage
^ Condition of axle and suspension (check for bushing cracks and slack)
^ Vehicle weight
> Empty — no cargo luggage or passengers
> Fuel level is full
> Engine coolant and lubricating oils at specified levels
> Spare tire, jack hand tools and floor mats in designated positions
NOTE:
Refer to the appropriate Service Manual for information about any of the above checks and
inspections.
4. Check the target mounts.
^ If there is any visual damage (bent worn cracked etc) have the equipment repaired before
performing any alignments.
Infiniti Qx56 Rwd Workshop Manual (V8-5.6L (VK56VD) (2011))
Infiniti Workshop Manuals > Maintenance > Alignment > System Information > Technical Service Bulletins > All Other
Service Bulletins for Alignment: > 04-021C > Apr > 11 > Steering/Suspension — Wheel Alignment Info. > Page 246
^ Make sure the target mounts are properly adjusted and configured (see Figure 11).
NOTE:
The target mount example shown in Figure 11 is for Hunter «camera type» alignment machines.
Follow the operation manual for your specific equipment.
Infiniti Qx56 Rwd Workshop Manual (V8-5.6L (VK56VD) (2011))
Infiniti Workshop Manuals > Maintenance > Alignment > System Information > Technical Service Bulletins > All Other
Service Bulletins for Alignment: > 04-021C > Apr > 11 > Steering/Suspension — Wheel Alignment Info. > Page 247
5. Make sure the targets are mounted correctly.
^ Mount the top claws first.
^ Claws must be flush against the wheel as shown in Figure 13.
Infiniti Qx56 Rwd Workshop Manual (V8-5.6L (VK56VD) (2011))
Infiniti Workshop Manuals > Maintenance > Alignment > System Information > Technical Service Bulletins > All Other
Service Bulletins for Alignment: > 04-021C > Apr > 11 > Steering/Suspension — Wheel Alignment Info. > Page 248
^ Target must be flush against the center support as shown in Figure 14.
^ Make sure the targets are positioned with the arrow UP or level.
IMPORTANT:
Once you have set the target position DO NOT reset it at anytime during the alignment process.
Infiniti Qx56 Rwd Workshop Manual (V8-5.6L (VK56VD) (2011))
Infiniti Workshop Manuals > Maintenance > Alignment > System Information > Technical Service Bulletins > All Other
Service Bulletins for Alignment: > 04-021C > Apr > 11 > Steering/Suspension — Wheel Alignment Info. > Page 249
6. Begin the alignment procedure.
^ Follow all of the instructions for your particular equipment.
^ Refer to the Service Manual for alignment specifications.
If your equipment requires «rolling compensation». follow these additional tips:
Infiniti Qx56 Rwd Workshop Manual (V8-5.6L (VK56VD) (2011))
Infiniti Workshop Manuals > Maintenance > Alignment > System Information > Technical Service Bulletins > All Other
Service Bulletins for Alignment: > 04-021C > Apr > 11 > Steering/Suspension — Wheel Alignment Info. > Page 250
^ DO NOT push or pull on the vehicle body.
IMPORTANT:
After performing «rolling compensation», DO NOT reset the target position.
When performing «caster sweep». follow these tips:
^ Apply the brakes as shown.
^ Start the engine to allow brake boost.
^ Turn the engine OFF.
Infiniti Qx56 Rwd Workshop Manual (V8-5.6L (VK56VD) (2011))
Infiniti Workshop Manuals > Maintenance > Alignment > System Information > Technical Service Bulletins > All Other
Service Bulletins for Alignment: > 04-021C > Apr > 11 > Steering/Suspension — Wheel Alignment Info. > Page 251
^ Remove all lock pins — front «turn plates» and rear «slide plates».
^ Make sure the bridge plate will not interfere with movement of the turn plate.
Put the bridge plate in the down position.
^ Perform caster sweep by turning the steering wheel from outside the vehicle.
Infiniti Qx56 Rwd Workshop Manual (V8-5.6L (VK56VD) (2011))
Infiniti Workshop Manuals > Maintenance > Alignment > System Information > Technical Service Bulletins > All Other
Service Bulletins for Alignment: > 04-021C > Apr > 11 > Steering/Suspension — Wheel Alignment Info. > Page 252
^ DO NOT push/pull on the tire to perform the caster sweep.
7. Make sure the steering wheel is centered when performing toe-in measurements and
adjustments.
NOTE:
If you are using a Hunter alignment machine equipped with the WinToe-(R) Alignment Adjustment
System:
^ There is no need to lock the steering wheel. The WinToe(R) system is not affected by steering
system movement during the adjustment process.
^ Bumping the tire or re-centering the steering wheel when adjusting «near frozen» tie rods is not
necessary. This makes the adjustment process faster
and easier.
^ WinToe(R) eliminates the effect of lash in the steering system.
If you are using a John Bean alignment machine equipped with EZ Toe:
^ There is no need to lock the steering wheel. The EZ Toe system is not affected by steering
system movement during the adjustment process.
^ This software routine is an improved method of setting front toe making it easier to obtain a
centered steering wheel.
^ With EZ Toe it is possible to adjust toe with the steering wheel turned at any angle left or right.
This is helpful when setting toe on engine wall
mounted rack and pinion units.
IMPORTANT:
If during the alignment process the vehicle was lifted off of the rack; after lowering, make sure to
jounce (bounce) the vehicle before confirming adjustments are correct.
After you have checked and adjusted vehicle alignment
8. Print the BEFORE and AFTER measurements and attach them to the Repair Order.
9. Road test the vehicle to make sure the steering wheel is «centered» when driving on a straight
flat road.
Infiniti Qx56 Rwd Workshop Manual (V8-5.6L (VK56VD) (2011))
Infiniti Workshop Manuals > Maintenance > Alignment > System Information > Technical Service Bulletins > All Other
Service Bulletins for Alignment: > 04-021C > Apr > 11 > Steering/Suspension — Wheel Alignment Info. > Page 258
In order to properly document any warranty alignment claim the following item MUST be attached
to the Repair Order:
A copy of the alignment machine printout showing the BEFORE and AFTER alignment readings.
IMPORTANT:
If you do not attach the above item to the Repair Order the claim may be denied (rejected or
charged back).
ALSO: A copy of the yearly alignment machine calibration certification must be held on file in the
Service Dept.
4. Make sure the «turn plates» and «slide plates» are in good working order:
^ The surface of the front turn plates must be level with (the same height as) the rack surface.
If height is not the same; have the equipment repaired before performing any alignments.
Infiniti Qx56 Rwd Workshop Manual (V8-5.6L (VK56VD) (2011))
Infiniti Workshop Manuals > Maintenance > Alignment > System Information > Technical Service Bulletins > All Other
Service Bulletins for Alignment: > 04-021C > Apr > 11 > Steering/Suspension — Wheel Alignment Info. > Page 259
^ Make sure the front turn plates:
> Do not wobble (no up/down movement).
> Operate (slide and turn) smoothly in all directions.
If there is any issue with the turn plate operation — have the equipment repaired before performing
any alignments.
^ Make sure the rear slide plates:
> Do not wobble (no up/down movement).
> Operate (slide) smoothly in all directions.
Infiniti Qx56 Rwd Workshop Manual (V8-5.6L (VK56VD) (2011))
Infiniti Workshop Manuals > Maintenance > Alignment > System Information > Technical Service Bulletins > All Other
Service Bulletins for Alignment: > 04-021C > Apr > 11 > Steering/Suspension — Wheel Alignment Info. > Page 260
If there is any issue with the slide plate operation — have the equipment repaired before performing
any alignments.
5. Make sure the lock pins for the front «turn plates» and rear «slide plates» are in place.
NOTE:
Lock pins should remain in place until caster sweep.
The Alignment Process
IMPORTANT:
Use only the alignment specifications listed in the appropriate Service Manual when adjusting the
alignment.
1. Make sure the vehicle is straight on the alignment rack.
^ Vehicle must be straight (in line) with the alignment rack before entering the rack as shown in
Figure 4.
^ Do not straighten the vehicle while on the rack (see Figure 5).
^ If the vehicle needs to be straightened exit the alignment rack straighten the vehicle and then
re-enter the rack.
^ Once the vehicle is straight on the rack do not turn/center the steering wheel-keep the front
wheels straight.
2. Position vehicle on the front turn plates as follows:
Infiniti Qx56 Rwd Workshop Manual (V8-5.6L (VK56VD) (2011))
Infiniti Workshop Manuals > Maintenance > Alignment > System Information > Technical Service Bulletins > All Other
Service Bulletins for Alignment: > 04-021C > Apr > 11 > Steering/Suspension — Wheel Alignment Info. > Page 261
^ Stop vehicle just behind the turn plates.
^ Center the turn plates to the tires.
Infiniti Qx56 Rwd Workshop Manual (V8-5.6L (VK56VD) (2011))
Infiniti Workshop Manuals > Maintenance > Alignment > System Information > Technical Service Bulletins > All Other
Service Bulletins for Alignment: > 04-021C > Apr > 11 > Steering/Suspension — Wheel Alignment Info. > Page 262
^ Move the vehicle onto the turn plates by turning/pushing the rear wheel.
DO NOT push/pull on the vehicle body.
^ Center the front wheels on the turn plates.
Infiniti Qx56 Rwd Workshop Manual (V8-5.6L (VK56VD) (2011))
Infiniti Workshop Manuals > Maintenance > Alignment > System Information > Technical Service Bulletins > All Other
Service Bulletins for Alignment: > 04-021C > Apr > 11 > Steering/Suspension — Wheel Alignment Info. > Page 263
^ Chock the left rear wheel.
Preliminary Checks:
3. Perform pre-alignment checks.
^ Tire condition (wear partial wear flaws etc.)
^ Road wheel condition (damage and deformation)
^ Tire pressure
^ Inspect for visible damage to any suspension components
^ Wheel bearing axial play
^ Ball joints of suspension arms
^ Shock absorber operation and visual check for oil leakage
^ Condition of axle and suspension (check for bushing cracks and slack)
^ Vehicle weight
> Empty — no cargo luggage or passengers
> Fuel level is full
> Engine coolant and lubricating oils at specified levels
> Spare tire, jack hand tools and floor mats in designated positions
NOTE:
Refer to the appropriate Service Manual for information about any of the above checks and
inspections.
4. Check the target mounts.
^ If there is any visual damage (bent worn cracked etc) have the equipment repaired before
performing any alignments.
Infiniti Qx56 Rwd Workshop Manual (V8-5.6L (VK56VD) (2011))
Infiniti Workshop Manuals > Maintenance > Alignment > System Information > Technical Service Bulletins > All Other
Service Bulletins for Alignment: > 04-021C > Apr > 11 > Steering/Suspension — Wheel Alignment Info. > Page 264
^ Make sure the target mounts are properly adjusted and configured (see Figure 11).
NOTE:
The target mount example shown in Figure 11 is for Hunter «camera type» alignment machines.
Follow the operation manual for your specific equipment.
Infiniti Qx56 Rwd Workshop Manual (V8-5.6L (VK56VD) (2011))
Infiniti Workshop Manuals > Maintenance > Alignment > System Information > Technical Service Bulletins > All Other
Service Bulletins for Alignment: > 04-021C > Apr > 11 > Steering/Suspension — Wheel Alignment Info. > Page 265
5. Make sure the targets are mounted correctly.
^ Mount the top claws first.
^ Claws must be flush against the wheel as shown in Figure 13.
Infiniti Qx56 Rwd Workshop Manual (V8-5.6L (VK56VD) (2011))
Infiniti Workshop Manuals > Maintenance > Alignment > System Information > Technical Service Bulletins > All Other
Service Bulletins for Alignment: > 04-021C > Apr > 11 > Steering/Suspension — Wheel Alignment Info. > Page 266
^ Target must be flush against the center support as shown in Figure 14.
^ Make sure the targets are positioned with the arrow UP or level.
IMPORTANT:
Once you have set the target position DO NOT reset it at anytime during the alignment process.
Infiniti Qx56 Rwd Workshop Manual (V8-5.6L (VK56VD) (2011))
Infiniti Workshop Manuals > Maintenance > Alignment > System Information > Technical Service Bulletins > All Other
Service Bulletins for Alignment: > 04-021C > Apr > 11 > Steering/Suspension — Wheel Alignment Info. > Page 267
6. Begin the alignment procedure.
^ Follow all of the instructions for your particular equipment.
^ Refer to the Service Manual for alignment specifications.
If your equipment requires «rolling compensation». follow these additional tips:
Infiniti Qx56 Rwd Workshop Manual (V8-5.6L (VK56VD) (2011))
Infiniti Workshop Manuals > Maintenance > Alignment > System Information > Technical Service Bulletins > All Other
Service Bulletins for Alignment: > 04-021C > Apr > 11 > Steering/Suspension — Wheel Alignment Info. > Page 268
^ DO NOT push or pull on the vehicle body.
IMPORTANT:
After performing «rolling compensation», DO NOT reset the target position.
When performing «caster sweep». follow these tips:
^ Apply the brakes as shown.
^ Start the engine to allow brake boost.
^ Turn the engine OFF.
Infiniti Qx56 Rwd Workshop Manual (V8-5.6L (VK56VD) (2011))
Infiniti Workshop Manuals > Maintenance > Alignment > System Information > Technical Service Bulletins > All Other
Service Bulletins for Alignment: > 04-021C > Apr > 11 > Steering/Suspension — Wheel Alignment Info. > Page 269
^ Remove all lock pins — front «turn plates» and rear «slide plates».
^ Make sure the bridge plate will not interfere with movement of the turn plate.
Put the bridge plate in the down position.
^ Perform caster sweep by turning the steering wheel from outside the vehicle.
Infiniti Qx56 Rwd Workshop Manual (V8-5.6L (VK56VD) (2011))
Infiniti Workshop Manuals > Maintenance > Alignment > System Information > Technical Service Bulletins > All Other
Service Bulletins for Alignment: > 04-021C > Apr > 11 > Steering/Suspension — Wheel Alignment Info. > Page 270
^ DO NOT push/pull on the tire to perform the caster sweep.
7. Make sure the steering wheel is centered when performing toe-in measurements and
adjustments.
NOTE:
If you are using a Hunter alignment machine equipped with the WinToe-(R) Alignment Adjustment
System:
^ There is no need to lock the steering wheel. The WinToe(R) system is not affected by steering
system movement during the adjustment process.
^ Bumping the tire or re-centering the steering wheel when adjusting «near frozen» tie rods is not
necessary. This makes the adjustment process faster
and easier.
^ WinToe(R) eliminates the effect of lash in the steering system.
If you are using a John Bean alignment machine equipped with EZ Toe:
^ There is no need to lock the steering wheel. The EZ Toe system is not affected by steering
system movement during the adjustment process.
^ This software routine is an improved method of setting front toe making it easier to obtain a
centered steering wheel.
^ With EZ Toe it is possible to adjust toe with the steering wheel turned at any angle left or right.
This is helpful when setting toe on engine wall
mounted rack and pinion units.
IMPORTANT:
If during the alignment process the vehicle was lifted off of the rack; after lowering, make sure to
jounce (bounce) the vehicle before confirming adjustments are correct.
After you have checked and adjusted vehicle alignment
8. Print the BEFORE and AFTER measurements and attach them to the Repair Order.
9. Road test the vehicle to make sure the steering wheel is «centered» when driving on a straight
flat road.
Infiniti Qx56 Rwd Workshop Manual (V8-5.6L (VK56VD) (2011))
Infiniti Workshop Manuals > Maintenance > Tune-up and Engine Performance Checks > System Information > Service
Precautions
Tune-up and Engine Performance Checks: Service Precautions
TUNE-UP SERVICE PRECAUTIONS
— Tag or mark vacuum hoses before disconnecting them. After completing a job, double check that
the vacuum hoses are properly connected.
— To disconnect vacuum hoses, pull on the end, not the middle of the hose.
— To pull apart electrical connectors, pull on the connector itself, not the wires.
— Before disconnecting pressurized fuel lines, always perform Fuel Pressure Release procedure in
order to reduce the risk of fire and personal injury.
— When replacing fuel filters, always check all affected lines and fittings for leaks.
— Never drain or store gasoline or diesel fuel in an open container, due to the possibility of fire or
explosion.
— To prevent serious burns: Avoid contact with hot metal parts.
— Do not remove the radiator cap when the engine is hot.
Infiniti Qx56 Rwd Workshop Manual (V8-5.6L (VK56VD) (2011))
Infiniti Workshop Manuals > Maintenance > Tune-up and Engine Performance Checks > System Information > Service
Precautions > Page 274
— Before servicing the vehicle: Protect fenders, upholstery and carpeting with appropriate covers.
— Take caution that keys, buckles, or buttons do not scratch paint.
— Do not operate the engine indoors without proper ventilation.
— Do not smoke while working on the vehicle.
Infiniti Qx56 Rwd Workshop Manual (V8-5.6L (VK56VD) (2011))
Infiniti Workshop Manuals > Maintenance > Filters > System Information > Service Precautions
Filters: Service Precautions
SAFETY PRECAUTIONS
WARNING: Prolonged and repeated contact with used engine oil may cause skin cancer.
Avoid prolonged and repeated contact with oils, particularly used engine oils.
— Wear protective clothing, including impervious gloves where practicable.
— Do not put oily rags in pockets.
— Avoid contaminating clothes, particularly underpants, with oil.
— Heavily soiled clothing and oil-impregnated footwear should not be worn. Overalls must be
cleaned regularly.
— First Aid treatment should be obtained immediately for open cuts and wounds.
— Use barrier creams, applying them before each work period, to help the removal of oil from the
skin.
— Wash with soap and water to ensure all oil is removed (skin cleansers and nail brushes will help).
Preparations containing lanolin replace the natural skin oils which have been removed.
— Do not use gasoline, kerosine, diesel fuel, gas oil, thinner or solvents for cleaning skin.
— If skin disorders develop, obtain medical advice without delay.
— Where practicable, degrease components prior to handling.
— Where there is a risk of eye contact, eye protection should be worn, for example, chemical
goggles or face shields; in addition an eye wash facility should be provided.
WARNING: Brake fluid may be irritating to the skin or eyes. In case of contact, take the following
actions:
— Eye Contact — rinse eyes thoroughly with water.
— Skin Contact — wash skin with soap and water.
Infiniti Qx56 Rwd Workshop Manual (V8-5.6L (VK56VD) (2011))
Infiniti Workshop Manuals > Maintenance > Hoses > System Information > Service Precautions
Hoses: Service Precautions
SERVICE PRECAUTIONS
To prevent vehicle damage, always observe the following precautions: After servicing a hose, check for leaks before and after test driving the vehicle.
— Always use the correct size hose. Do not use standard sized hose in place of metric hose or vice
versa.
Always use the correct type of hose. Never use vacuum hose in place of fuel hose. Never use
heater hose in place of PCV hose.
— When replacing hoses which are attached to the engine on one end and the frame or body on the
other end, always leave sufficient length to compensate for engine movement (from torque).
Infiniti Qx56 Rwd Workshop Manual (V8-5.6L (VK56VD) (2011))
Infiniti Workshop Manuals > Maintenance > Fluids > Coolant > Component Information > Technical Service Bulletins >
Cooling System — Long Life Coolant Information
Coolant: Technical Service Bulletins Cooling System — Long Life Coolant Information
Classification: EM09-002A
Reference: ITB09-029A
Date: May 14, 2010
NEW BLUE NISSAN LONG LIFE ANTIFREEZE/COOLANT
This bulletin has been amended. The Service Information has been updated. Please discard
previous versions of this bulletin.
SERVICE INFORMATION
In calendar year 2009, Infiniti began filling some vehicles at the factory with a NEW Nissan Long
Life Antifreeze/Coolant (LLC) that is blue in color.
NOTE: LLC = Long Life Antifreeze/Coolant
The transition to this new Blue LLC continued though MY 2010. Beginning with MY 2011, all Infiniti
vehicles are filled at the factory with the Blue LLC.
^ MY 2009 and 2010: Some vehicles are filled at the factory with Blue LLC.
^ MY 2011: All vehicles are filled at the factory with Blue LLC. Blue LLC is designed to have a
service life of 7 years/105,000 miles for the factory fill,
and 5 years/75,000 miles for subsequent replacement fills.
Nissan Blue Super LLC is available through the Nissan Direct Ship Chemical Care Product
Program, Website order link via dealer portal or order direct www.NissanChemicals.com.
^ Blue LLC one gallon pre-diluted:
P/N 999MP — LP25500P
> The one gallon containers are pre-diluted with 50% antifreeze and 50% distilled water.
> Do not add additional water when using pre-diluted Blue LLC.
Infiniti Qx56 Rwd Workshop Manual (V8-5.6L (VK56VD) (2011))
Infiniti Workshop Manuals > Maintenance > Fluids > Coolant > Component Information > Technical Service Bulletins >
Cooling System — Long Life Coolant Information > Page 286
^ Blue LLC one quart concentrate:
P/N 999MP — L255QTP
> The one quart concentrate containers are intended for extreme cold weather application.
> Use the concentrate without mixing (do not add water).
> Add directly to the cooling system in specific amounts as directed on the container label.
Additional Information for using Blue LLC
Blue LLC and Green-colored Nissan LLC (P/N 999MP-AF000P) are compatible with each other:
^ Blue can be mixed/added with Green
^ Green can be mixed/added with Blue
CAUTION:
^ Adding Green LLC to Blue LLC will reduce/shorten the life expectancy of the Blue LLC to that of
the Green LLC (4 years / 60,000 miles).
^ LLC must always be used with demineralized or distilled water, otherwise the life expectancy of
the LLC (Blue or Green) will be degraded and
cooling system damage may occur.
Infiniti Qx56 Rwd Workshop Manual (V8-5.6L (VK56VD) (2011))
Infiniti Workshop Manuals > Maintenance > Fluids > Coolant > Component Information > Specifications > Capacity
Specifications
Coolant: Capacity Specifications
Engine Coolant Capacity
With reservoir at MAX level …………………………………………………………………………………………………..
…………………………………………….. 15 1/4 qt (14.4L)
Infiniti Qx56 Rwd Workshop Manual (V8-5.6L (VK56VD) (2011))
Infiniti Workshop Manuals > Maintenance > Fluids > Coolant > Component Information > Specifications > Capacity
Specifications > Page 289
Coolant: Fluid Type Specifications
Engine Coolant
Type ………………………………………. 50% Genuine NISSAN Long Life Antifreeze/Coolant (blue) or
equivalent and 50% Demineralized or distilled water.
Infiniti Qx56 Rwd Workshop Manual (V8-5.6L (VK56VD) (2011))
Infiniti Workshop Manuals > Maintenance > Fluids > Fluid — A/T > Component Information > Specifications > Capacity
Specifications
Fluid — A/T: Capacity Specifications
Automatic Transmission Fluid
Capacity* ……………………………………………………………………………………………………………………………
………………………………………………. 10 5/8 qt (10.0L)
*The fluid capacity is the reference value.
Infiniti Qx56 Rwd Workshop Manual (V8-5.6L (VK56VD) (2011))
Infiniti Workshop Manuals > Maintenance > Fluids > Fluid — A/T > Component Information > Specifications > Capacity
Specifications > Page 294
Fluid — A/T: Fluid Type Specifications
Automatic Transmission Fluid
Type …………………………………………………………………………………………………………………………………..
………………………… Genuine NISSAN Matic S ATF*
* If Genuine NISSAN Matic S ATF is not available, Genuine NISSAN Matic J ATF may also be
used. Using automatic transmission fluid other than Genuine NISSAN Matic S ATF or Matic J ATF
will cause deterioration in driveability and automatic transmission durability, and may damage the
automatic transmission, which is not covered by the INFINITI new vehicle limited warranty.
Infiniti Qx56 Rwd Workshop Manual (V8-5.6L (VK56VD) (2011))
Infiniti Workshop Manuals > Maintenance > Fluids > Fluid — Differential > Component Information > Specifications >
Capacity Specifications
Fluid — Differential: Capacity Specifications
Rear Differential Fluid
Capacity ……………………………………………………………………………………………………………………………..
………………………………………………… 3 3/4 pt (1.75L)
Infiniti Qx56 Rwd Workshop Manual (V8-5.6L (VK56VD) (2011))
Infiniti Workshop Manuals > Maintenance > Fluids > Fluid — Differential > Component Information > Specifications >
Capacity Specifications > Page 299
Fluid — Differential: Fluid Type Specifications
Rear Differential Fluid
Type ………………………………………………… Genuine NISSAN Differential Oil Synthetic 75W-90 or
API GL-5 Synthetic Gear Oil Viscosity SAE 75W-90
Infiniti Qx56 Rwd Workshop Manual (V8-5.6L (VK56VD) (2011))
Infiniti Workshop Manuals > Maintenance > Fluids > Engine Oil > Component Information > Specifications > Capacity
Specifications
Engine Oil: Capacity Specifications
Engine Oil Capacity
With filter …………………………………………………………………………………………………………………………….
…………………………………………………. 6 7/8 qt (6.5L) Without filter ………………………………………………
…………………………………………………………………………………………………………………………… 6 1/2 qt
(6.2L) Dry engine (engine overhaul) ……………………………………………………………………………………….
…………………………………………………………………. 8 qt (7.6L)
Infiniti Qx56 Rwd Workshop Manual (V8-5.6L (VK56VD) (2011))
Infiniti Workshop Manuals > Maintenance > Fluids > Engine Oil > Component Information > Specifications > Capacity
Specifications > Page 304
Engine Oil: Fluid Type Specifications
Engine Oil
Type …………………………………………………………………………………………………………………………………..
………………………………………. API Certification mark Viscosity ……………………………………………………
………………………………………………………………………………………………………………………………. SAE
5W-30
Infiniti recommends using Nissan Ester Engine Oil.
Infiniti Qx56 Rwd Workshop Manual (V8-5.6L (VK56VD) (2011))
Infiniti Workshop Manuals > Maintenance > Fluids > Power Steering Fluid > Component Information > Specifications
Power Steering Fluid: Specifications
Power Steering Fluid
Type …………………………………………………………………………………………………………………………………..
…………………. Genuine NISSAN PSF or equivalent*
* DEXRON VI type ATF may also be used.
Infiniti Qx56 Rwd Workshop Manual (V8-5.6L (VK56VD) (2011))
Infiniti Workshop Manuals > Maintenance > Fuses and Circuit Breakers > System Information > Service Precautions
Fuses and Circuit Breakers: Service Precautions
FUSE AND CIRCUIT BREAKER PRECAUTIONS
When replacing a blown fuse or defective circuit breaker, it is important to use only a fuse or circuit
breaker having the correct amperage rating. The use of a fuse or circuit breaker with a rating other
than indicated may result in a dangerous electrical system overload. If a properly rated fuse or
circuit breaker continues to blow or trip, it indicates a problem in the circuit that must be corrected.
Infiniti Qx56 Rwd Workshop Manual (V8-5.6L (VK56VD) (2011))
Infiniti Workshop Manuals > Maintenance > Service Reminder Indicators > Maintenance Required Lamp/Indicator >
Component Information > Service and Repair
Maintenance Required Lamp/Indicator: Service and Repair
Resetting The Distance For Changing The Engine Oil
Infiniti Qx56 Rwd Workshop Manual (V8-5.6L (VK56VD) (2011))
Infiniti Workshop Manuals > Maintenance > Service Reminder Indicators > Maintenance Required Lamp/Indicator >
Component Information > Service and Repair > Page 315
Switches for the trip computer are located on the right side of the combination meter panel. To
operate the trip computer, push the switches as shown above.
When the ignition switch is pushed to the ON position, modes of the trip computer can be selected
by pushing switch A.
Switch A and switch B are used in the setting mode to select and decide a menu.
Push switch A to move to the warning check mode. Push switch B to select other menus.
There are 5 submenus under the maintenance menu.
Select the OIL submenu to set or reset the distance for changing the engine oil.
Infiniti Qx56 Rwd Workshop Manual (V8-5.6L (VK56VD) (2011))
Infiniti Workshop Manuals > Maintenance > Wheels and Tires > Relays and Modules — Wheels and Tires > Tire Pressure
Monitor Receiver / Transponder > Component Information > Technical Service Bulletins > Tire Monitor System Components Are Not Interchangeable
Tire Pressure Monitor Receiver / Transponder: Technical Service Bulletins Tire Monitor System Components Are Not Interchangeable
Classification: WT10-004a
Reference: ITB10-050a
Date: November 11 2010
TPMS COMPONENTS NOT INTERCHANGEABLE
This bulletin has been amended. Applied Vehicles, VINs, and Dates have been updated, and
changes have been made to the Service Information. Please discard previous versions.
APPLIED VEHICLES:
2010 — 2011 EX35 (J50)
2010 — 2011 FX35/FX50 (S51)
2010 — 2011 G37 Coupe Convertible and Sedan (CV36 HV36 and V36)
2010 M351M45 ~50)
2011 M37IM56~51)
2010 QX56 (JA60)
2011 QX56(Z62)
APPLIED DATES:
See Detail of Applied Dates and VINs at the end of this bulletin.
APPLIED VINs
See Detail of Applied Dates and VINs at the end of this bulletin.
SERVICE INFORMATION
^ Recent design changes have been made to the Tire Pressure Monitoring System (1PMS) sensor
receiver and control units (new style TPMS components).
^ These changes were applied as follows:
^ These changes do not affect the overall function of the TPMS.
^ These changes do affect the interchangeability of parts. For example:
> Full wheel assemblies (wheel and tire assemblies with TPMS) cannot be swapped between old
style sensor-equipped and new style sensor-equipped vehicles.
CAUTION:
^ New style and old style TPMS components are not compatible and cannot be interchanged.
^ Swapping of new style and old style components will cause the TPMS to stop operating correctly.
Infiniti Qx56 Rwd Workshop Manual (V8-5.6L (VK56VD) (2011))
Infiniti Workshop Manuals > Maintenance > Wheels and Tires > Relays and Modules — Wheels and Tires > Tire Pressure
Monitor Receiver / Transponder > Component Information > Technical Service Bulletins > Tire Monitor System Components Are Not Interchangeable > Page 322
If further confirmation of the TPMS sensor part number is required review the part number of the
originally installed equipment before replacement.
To confirm the latest part numbers, always consult the appropriate parts catalog when replacing or
exchanging TPMS sensors, receivers, or control modules.
NOTE:
^ An update is now available for the Signal Tech II to support the new style TPMS components.
The update can be found in ASIST > INFO Tool Box > Signal Tech II.
^ For 2010 models built after February 28 2010 a Signal Tech II menu selection «2010.5» has been
added.
Detail of Applied Dates and VINs
Infiniti Qx56 Rwd Workshop Manual (V8-5.6L (VK56VD) (2011))
Infiniti Workshop Manuals > Maintenance > Wheels and Tires > Relays and Modules — Wheels and Tires > Tire Pressure
Monitor Receiver / Transponder > Component Information > Technical Service Bulletins > Tire Monitor System Components Are Not Interchangeable > Page 323
Installation at the factory of the new style TPMS components began with the following VINs and
Dates:
NOTE:
All 2011 Infiniti vehicles are equipped with the new style TPMS components.
Disclaimer
Infiniti Qx56 Rwd Workshop Manual (V8-5.6L (VK56VD) (2011))
Infiniti Workshop Manuals > Maintenance > Wheels and Tires > Sensors and Switches — Wheels and Tires > Tire Pressure
Sensor > Component Information > Technical Service Bulletins > Tire Monitor System — Components Are Not
Interchangeable
Tire Pressure Sensor: Technical Service Bulletins Tire Monitor System — Components Are Not
Interchangeable
Classification: WT10-004a
Reference: ITB10-050a
Date: November 11 2010
TPMS COMPONENTS NOT INTERCHANGEABLE
This bulletin has been amended. Applied Vehicles, VINs, and Dates have been updated, and
changes have been made to the Service Information. Please discard previous versions.
APPLIED VEHICLES:
2010 — 2011 EX35 (J50)
2010 — 2011 FX35/FX50 (S51)
2010 — 2011 G37 Coupe Convertible and Sedan (CV36 HV36 and V36)
2010 M351M45 ~50)
2011 M37IM56~51)
2010 QX56 (JA60)
2011 QX56(Z62)
APPLIED DATES:
See Detail of Applied Dates and VINs at the end of this bulletin.
APPLIED VINs
See Detail of Applied Dates and VINs at the end of this bulletin.
SERVICE INFORMATION
^ Recent design changes have been made to the Tire Pressure Monitoring System (1PMS) sensor
receiver and control units (new style TPMS components).
^ These changes were applied as follows:
^ These changes do not affect the overall function of the TPMS.
^ These changes do affect the interchangeability of parts. For example:
> Full wheel assemblies (wheel and tire assemblies with TPMS) cannot be swapped between old
style sensor-equipped and new style sensor-equipped vehicles.
CAUTION:
^ New style and old style TPMS components are not compatible and cannot be interchanged.
^ Swapping of new style and old style components will cause the TPMS to stop operating correctly.
Infiniti Qx56 Rwd Workshop Manual (V8-5.6L (VK56VD) (2011))
Infiniti Workshop Manuals > Maintenance > Wheels and Tires > Sensors and Switches — Wheels and Tires > Tire Pressure
Sensor > Component Information > Technical Service Bulletins > Tire Monitor System — Components Are Not
Interchangeable > Page 329
If further confirmation of the TPMS sensor part number is required review the part number of the
originally installed equipment before replacement.
To confirm the latest part numbers, always consult the appropriate parts catalog when replacing or
exchanging TPMS sensors, receivers, or control modules.
NOTE:
^ An update is now available for the Signal Tech II to support the new style TPMS components.
The update can be found in ASIST > INFO Tool Box > Signal Tech II.
^ For 2010 models built after February 28 2010 a Signal Tech II menu selection «2010.5» has been
added.
Detail of Applied Dates and VINs
Infiniti Qx56 Rwd Workshop Manual (V8-5.6L (VK56VD) (2011))
Infiniti Workshop Manuals > Maintenance > Wheels and Tires > Sensors and Switches — Wheels and Tires > Tire Pressure
Sensor > Component Information > Technical Service Bulletins > Tire Monitor System — Components Are Not
Interchangeable > Page 330
Installation at the factory of the new style TPMS components began with the following VINs and
Dates:
NOTE:
All 2011 Infiniti vehicles are equipped with the new style TPMS components.
Disclaimer
Infiniti Qx56 Rwd Workshop Manual (V8-5.6L (VK56VD) (2011))
Infiniti Workshop Manuals > Maintenance > Wheels and Tires > Tire Monitoring System > Tire Pressure Monitor Receiver /
Transponder > Component Information > Technical Service Bulletins > Tire Monitor System — Components Are Not
Interchangeable
Tire Pressure Monitor Receiver / Transponder: Technical Service Bulletins Tire Monitor System Components Are Not Interchangeable
Classification: WT10-004a
Reference: ITB10-050a
Date: November 11 2010
TPMS COMPONENTS NOT INTERCHANGEABLE
This bulletin has been amended. Applied Vehicles, VINs, and Dates have been updated, and
changes have been made to the Service Information. Please discard previous versions.
APPLIED VEHICLES:
2010 — 2011 EX35 (J50)
2010 — 2011 FX35/FX50 (S51)
2010 — 2011 G37 Coupe Convertible and Sedan (CV36 HV36 and V36)
2010 M351M45 ~50)
2011 M37IM56~51)
2010 QX56 (JA60)
2011 QX56(Z62)
APPLIED DATES:
See Detail of Applied Dates and VINs at the end of this bulletin.
APPLIED VINs
See Detail of Applied Dates and VINs at the end of this bulletin.
SERVICE INFORMATION
^ Recent design changes have been made to the Tire Pressure Monitoring System (1PMS) sensor
receiver and control units (new style TPMS components).
^ These changes were applied as follows:
^ These changes do not affect the overall function of the TPMS.
^ These changes do affect the interchangeability of parts. For example:
> Full wheel assemblies (wheel and tire assemblies with TPMS) cannot be swapped between old
style sensor-equipped and new style sensor-equipped vehicles.
CAUTION:
^ New style and old style TPMS components are not compatible and cannot be interchanged.
^ Swapping of new style and old style components will cause the TPMS to stop operating correctly.
Infiniti Qx56 Rwd Workshop Manual (V8-5.6L (VK56VD) (2011))
Infiniti Workshop Manuals > Maintenance > Wheels and Tires > Tire Monitoring System > Tire Pressure Monitor Receiver /
Transponder > Component Information > Technical Service Bulletins > Tire Monitor System — Components Are Not
Interchangeable > Page 336
If further confirmation of the TPMS sensor part number is required review the part number of the
originally installed equipment before replacement.
To confirm the latest part numbers, always consult the appropriate parts catalog when replacing or
exchanging TPMS sensors, receivers, or control modules.
NOTE:
^ An update is now available for the Signal Tech II to support the new style TPMS components.
The update can be found in ASIST > INFO Tool Box > Signal Tech II.
^ For 2010 models built after February 28 2010 a Signal Tech II menu selection «2010.5» has been
added.
Detail of Applied Dates and VINs
Infiniti Qx56 Rwd Workshop Manual (V8-5.6L (VK56VD) (2011))
Infiniti Workshop Manuals > Maintenance > Wheels and Tires > Tire Monitoring System > Tire Pressure Monitor Receiver /
Transponder > Component Information > Technical Service Bulletins > Tire Monitor System — Components Are Not
Interchangeable > Page 337
Installation at the factory of the new style TPMS components began with the following VINs and
Dates:
NOTE:
All 2011 Infiniti vehicles are equipped with the new style TPMS components.
Disclaimer
Infiniti Qx56 Rwd Workshop Manual (V8-5.6L (VK56VD) (2011))
Infiniti Workshop Manuals > Maintenance > Wheels and Tires > Tire Monitoring System > Tire Pressure Sensor >
Component Information > Technical Service Bulletins > Tire Monitor System — Components Are Not Interchangeable
Tire Pressure Sensor: Technical Service Bulletins Tire Monitor System — Components Are Not
Interchangeable
Classification: WT10-004a
Reference: ITB10-050a
Date: November 11 2010
TPMS COMPONENTS NOT INTERCHANGEABLE
This bulletin has been amended. Applied Vehicles, VINs, and Dates have been updated, and
changes have been made to the Service Information. Please discard previous versions.
APPLIED VEHICLES:
2010 — 2011 EX35 (J50)
2010 — 2011 FX35/FX50 (S51)
2010 — 2011 G37 Coupe Convertible and Sedan (CV36 HV36 and V36)
2010 M351M45 ~50)
2011 M37IM56~51)
2010 QX56 (JA60)
2011 QX56(Z62)
APPLIED DATES:
See Detail of Applied Dates and VINs at the end of this bulletin.
APPLIED VINs
See Detail of Applied Dates and VINs at the end of this bulletin.
SERVICE INFORMATION
^ Recent design changes have been made to the Tire Pressure Monitoring System (1PMS) sensor
receiver and control units (new style TPMS components).
^ These changes were applied as follows:
^ These changes do not affect the overall function of the TPMS.
^ These changes do affect the interchangeability of parts. For example:
> Full wheel assemblies (wheel and tire assemblies with TPMS) cannot be swapped between old
style sensor-equipped and new style sensor-equipped vehicles.
CAUTION:
^ New style and old style TPMS components are not compatible and cannot be interchanged.
^ Swapping of new style and old style components will cause the TPMS to stop operating correctly.
Infiniti Qx56 Rwd Workshop Manual (V8-5.6L (VK56VD) (2011))
Infiniti Workshop Manuals > Maintenance > Wheels and Tires > Tire Monitoring System > Tire Pressure Sensor >
Component Information > Technical Service Bulletins > Tire Monitor System — Components Are Not Interchangeable > Page
342
If further confirmation of the TPMS sensor part number is required review the part number of the
originally installed equipment before replacement.
To confirm the latest part numbers, always consult the appropriate parts catalog when replacing or
exchanging TPMS sensors, receivers, or control modules.
NOTE:
^ An update is now available for the Signal Tech II to support the new style TPMS components.
The update can be found in ASIST > INFO Tool Box > Signal Tech II.
^ For 2010 models built after February 28 2010 a Signal Tech II menu selection «2010.5» has been
added.
Detail of Applied Dates and VINs
Infiniti Qx56 Rwd Workshop Manual (V8-5.6L (VK56VD) (2011))
Infiniti Workshop Manuals > Maintenance > Wheels and Tires > Tire Monitoring System > Tire Pressure Sensor >
Component Information > Technical Service Bulletins > Tire Monitor System — Components Are Not Interchangeable > Page
343
Installation at the factory of the new style TPMS components began with the following VINs and
Dates:
NOTE:
All 2011 Infiniti vehicles are equipped with the new style TPMS components.
Disclaimer
Infiniti Qx56 Rwd Workshop Manual (V8-5.6L (VK56VD) (2011))
Infiniti Workshop Manuals > Maintenance > Wheels and Tires > Tires > Component Information > Technical Service
Bulletins > Tires — Mounting Information/Precautions
Technical Service Bulletin # 11-022 Date: 110321
Tires — Mounting Information/Precautions
Classification: WT 11-004
Reference: ITB11-022
Date: March 21, 2011
TIRE MOUNTING INFORMATION
APPLIED VEHICLES: All Infiniti
SERVICE INFORMATION
^ When mounting tires to wheels it is important that the tire bead is seated correctly.
^ A tire bead that is not seated correctly may cause a vehicle vibration.
^ High performance tires and tires with shorter sidewalls (low aspect tires) may require more care
to make sure the tire bead is seated correctly.
^ Follow the Tire Mounting Tips in this bulletin.
Tire Mounting Tips:
NOTE:
These tips are not intended to be a complete instruction for mounting tires to wheels. Make sure to
read and follow the instruction for your specific tire service equipment.
1. Clean the tire bead with an approved rubber cleaning fluid.
^ Rubber cleaning fluid is a locally sourced common product used in the tire service process.
2. Clean the wheel (flange and bead seat area), see Figure 2. Make sure to clean off all rust and
corrosion.
Infiniti Qx56 Rwd Workshop Manual (V8-5.6L (VK56VD) (2011))
Infiniti Workshop Manuals > Maintenance > Wheels and Tires > Tires > Component Information > Technical Service
Bulletins > Tires — Mounting Information/Precautions > Page 348
3. Apply an approved tire lubricant to the tire and wheel in the areas shown in Figures 1 and 2.
^ Tire lubricant is a locally sourced common product used in the tire service process.
Tire:
^ Apply lube to the inner bead only, of both beads.
^ Do not apply lube to the flange area (outer bead area)
NOTE:
Too much tire lubricant may allow the tire to slip on the rim while driving. If this occurs, the tire may
become un-balanced.
Wheel:
^ Apply lube to the Safety Humps and Bead Sealing area.
^ Do not apply lube to the flange area.
4. Before inflating the tire:
^ If there are «match-mount» marks on the tire and rim, align the marks.
Infiniti Qx56 Rwd Workshop Manual (V8-5.6L (VK56VD) (2011))
Infiniti Workshop Manuals > Maintenance > Wheels and Tires > Tires > Component Information > Technical Service
Bulletins > Tires — Mounting Information/Precautions > Page 349
^ Make sure the tire is evenly positioned on the lower safety humps.
5. WARNING: Do not exceed the tire manufactures recommended bead seating inflation pressure.
Generally this is 40psi.
If the bead does not seat with the appropriate pressure:
a. Break down the tire/rim assembly.
b. Re-apply lubricant as shown in Figures 1 and 2 above.
c. Remount the tire.
6. After inflating the tires inspect the bead area.
^ Make sure bead is seated uniformly (the same) around the entire circumference of the wheel.
NOTE:
Many tires have Aligning Rings that will help confirm the bead is uniformly seated.
If uniform; bead is seated correctly.
If not uniform;
1. Break down the tire/rim assembly.
2. Re-apply lubricant as shown in Figures 1 and 2.
3. Remount the tire.
Infiniti Qx56 Rwd Workshop Manual (V8-5.6L (VK56VD) (2011))
Infiniti Workshop Manuals > Maintenance > Wheels and Tires > Tires > Component Information > Technical Service
Bulletins > Tires — Mounting Information/Precautions > Page 350
7. After the tire/wheel is balanced, apply an index mark to the tire at the location of the valve stem
(see Figure 6).
^ This index mark will allow you to tell if the tire has slipped on the rim (see Figure 7).
Tire to Rim Slippage:
^ Too much tire lubricant may allow the tire to slip on the rim while driving. If this occurs, the tire
may become un-balanced.
^ Overtime the tire lubricate will dry, eliminating the lubricant as a cause of tire slippage.
^ Some tire lubricants may require up to 24 hours to completely dry.
^ If slippage occurs, the tire/wheel will need to be re-balanced.
Infiniti Qx56 Rwd Workshop Manual (V8-5.6L (VK56VD) (2011))
Infiniti Workshop Manuals > Maintenance > Wheels and Tires > Tires > Component Information > Technical Service
Bulletins > Tires — Mounting Information/Precautions > Page 351
Infiniti Qx56 Rwd Workshop Manual (V8-5.6L (VK56VD) (2011))
Infiniti Workshop Manuals > Maintenance > Wheels and Tires > Tires > Component Information > Technical Service
Bulletins > Tires — Mounting Information/Precautions > Page 352
Tires: Technical Service Bulletins Tires — Preventing Tire Flat Spotting
Classification: WT11-002
Reference: ITB11-021
Date: March 10, 2011
NEW VEHICLE TIRE FLAT SPOTTING
APPLIED VEHICLES: New unsold Infiniti dealer in-stock units
SERVICE INFORMATION
Temporary tire Flat Spotting is common on New Dealer In-Stock vehicles that have not been
occasionally moved.
Flat Spotting can occur after the vehicle has been parked (not moved) for a few days or longer. In
most cases it is temporary. In extreme cases it can be permanent.
As instructed in the Assurance Products Resource Manual vehicles should be moved 12 inches in
one direction only every 30 days to prevent tire Flat Spotting.
New vehicle inventory vibration incidents related to storage Flat Spotting are not considered
warrantable repairs.
If tire Flat Spotting has occurred it can cause a vibration or shimmy condition that may be
noticeable for the first several miles of driving.
Factors that can influence Flat Spotting:
^ Long storage time without moving the vehicle may result in permanent flat spots.
^ High performance and high speed rated tires are more prone to flat spotting due to the internal
construction and nylon use in these tires.
^ Shorter sidewall tires do not absorb irregularities (flat spots) as well as taller sidewall tires.
^ In colder temperature tires are stiffer which increases the tendency to have flat spots and
increases the drive time needed to remove them.
Refer to the Service Procedure below if you have tires with Flat Spotting.
SERVICE PROCEDURE
^ It is important to remove any temporary Flat Spotting prior to performing tire balance, tire run out,
and/or tire road force checks.
^ If the Flat Spotting is not removed it can result in incorrect measurements.
^ Temporary flat spots will return to original (near uniform) condition after driving for approximately
15 miles at highway speeds.
1. Drive the vehicle at highway speeds until the vibration (Flat Spotting) is eliminated.
NOTE:
^ In most cases flat spot vibrations will be eliminated within 15 minutes (about 15 miles) of driving.
^ If the vehicle has been stored without moving for an extended time it may be necessary to drive
the vehicle up to 30 minutes (about 30 miles) at
highway speeds.
^ If the vibration goes away during the test drive no further action is required.
^ If the vibration is not completely eliminated during the test drive go to step 2.
2. Within 10 minutes after driving the vehicle lift the vehicle so there is no load on the tries.
3. Check the tire/wheel assemblies for balance run-out and road force variation. Correct as
necessary.
Infiniti Qx56 Rwd Workshop Manual (V8-5.6L (VK56VD) (2011))
Infiniti Workshop Manuals > Maintenance > Wheels and Tires > Tires > Component Information > Technical Service
Bulletins > Tires — Mounting Information/Precautions > Page 353
Tires: Technical Service Bulletins Tire Monitor System — Tire Pressure Information
Classification: WT08-004B
Reference: ITB08-015B
Date: January 25, 2011
TIRE PRESSURE INFORMATION FOR VEHICLES WITH TPMS
This bulletin has been amended. Information has been updated on each page. Please discard
previous versions of this bulletin.
APPLIED VEHICLES: All Infiniti vehicles with Tire Pressure Monitor System (TPMS)
SERVICE INFORMATION
The Low Tire Pressure Warning Lamp will illuminate (steady not flashing) if the tire pressure is low
in any of the four road tires.
^ This is not an indication of a malfunction. Rather it is a signal to the driver that the tire pressure in
the vehicle must be adjusted.
Tire pressure must be adjusted/corrected at or above the pressure shown on the TIRE AND
LOADING INFORMATION label before the Low Tire Pressure Warning Light will go OFF.
^ Regular tire pressure maintenance such as described in this bulletin is not covered under the
warranty.
The air pressure inside a tire can change due to several factors such as:
^ Seasonal temperature change
^ Tire temperature change due to driving
^ Natural pressure loss over time
Compensate for the above temperature factors when adjusting and setting tire pressure.
Each vehicle is equipped from the factory with a TIRE AND LOADING INFORMATION label.
This label lists the COLD tire pressure setting for the original tires on the specific vehicle.
NOTE: Tires are considered COLD after the vehicle has been parked for 3 or more hours or driven
less than 1 mile at moderate speeds.
When setting / adjusting tire pressure, make sure to use an accurate tire pressure gauge.
Use the following information for reference:
Infiniti Qx56 Rwd Workshop Manual (V8-5.6L (VK56VD) (2011))
Infiniti Workshop Manuals > Maintenance > Wheels and Tires > Tires > Component Information > Technical Service
Bulletins > Tires — Mounting Information/Precautions > Page 354
Temperature:
^ Tire pressure changes approximately 0.8 psi for every 10°F of temperature change. As
temperature decreases, pressure decreases.
^ Tire pressure may change 3 — 5 psi between a Cold reading and a reading taken just after the
vehicle has been driven for several miles.
^ Seasonal temperature change can result in tire pressure that is low enough to turn on the Low
Tire Pressure Warning Light.
Example 1 — Seasonal Temperature Change:
^ The temperature of the vehicle is 70°F after sitting in the shop.
^ Ambient temperature outside the shop is 30°F or will soon fall to 30°F due to seasonal change.
^ Recommended pressure on the TIRE AND LOADING INFORMATION label is 35 psi.
^ The tire pressure should be compensated an additional +3 psi and adjusted to 38 psi to avoid
dropping below the label value when the vehicle
experiences cooler ambient air temperature.
^ Compensation should also be used in the PDI process as needed.
Example 2 — WARM Tires:
^ A vehicle arrives to the dealer after being driven across town.
^ The WARM tire pressure reading is 32 psi.
^ Recommended COLD tire pressure on the TIRE AND LOADING INFORMATION label is 35 psi.
^ The tire pressure should be compensated an additional +3 psi and adjusted to 38 psi to avoid
dropping below the label value when the tires cool.
Natural tire pressure loss overtime:
^ Vehicle tire pressure can naturally decrease by approximately 1.0 — 1.5 psi per month. This will
vary due to seasonal temperature change.
^ After 6 to 8 months tire pressure may be low enough to turn ON the Low Tire Pressure Warning
Light.
High Altitude
^ At high altitude locations a standard tire pressure gauge may show the tire pressure higher than
the TPMS system. If the gauge reading is not
accounted for this could result in turning ON the Low Tire Pressure Warning Light.
Infiniti Qx56 Rwd Workshop Manual (V8-5.6L (VK56VD) (2011))
Infiniti Workshop Manuals > Maintenance > Wheels and Tires > Tires > Component Information > Technical Service
Bulletins > Tires — Mounting Information/Precautions > Page 355
^ Standard tire pressure gauge readings increase about 1.0 psi for every 2,200 ft of altitude
increase above sea level (up to 10,000 ft). See Graph 3.
^ For example if the TIRE AND LOADING INFORMATION label reads 33 psi then at an elevation
of 5,280 ft, the cold inflation pressure using a
gauge should be increased 2.5 psi to 35.5 psi.»
NOTE:
In the above example, C-III, Signal Tech II, or the vehicle information display (if equipped) would
show a tire pressure of 33 psi. If needed use C-III or Signal Tech-II to confirm tire pressure.
NOTE:
^ After correcting the tire pressure the vehicle may need to be driven at speeds above 16 mph to
activate the TPMS and turn off the low tire pressure
warning light.
^ If pressure compensation for temperature is used, the pressure should be re-checked and
adjusted at a later time when the tires are cold.
^ If after turning the ignition ON, the TPMS light flashes for one minute and then turns solid, refer to
ITB10-023 or ITB09-050.
Infiniti Qx56 Rwd Workshop Manual (V8-5.6L (VK56VD) (2011))
Infiniti Workshop Manuals > Maintenance > Wheels and Tires > Wheels > Component Information > Technical Service
Bulletins > Tires — Mounting Information/Precautions
Technical Service Bulletin # 11-022 Date: 110321
Tires — Mounting Information/Precautions
Classification: WT 11-004
Reference: ITB11-022
Date: March 21, 2011
TIRE MOUNTING INFORMATION
APPLIED VEHICLES: All Infiniti
SERVICE INFORMATION
^ When mounting tires to wheels it is important that the tire bead is seated correctly.
^ A tire bead that is not seated correctly may cause a vehicle vibration.
^ High performance tires and tires with shorter sidewalls (low aspect tires) may require more care
to make sure the tire bead is seated correctly.
^ Follow the Tire Mounting Tips in this bulletin.
Tire Mounting Tips:
NOTE:
These tips are not intended to be a complete instruction for mounting tires to wheels. Make sure to
read and follow the instruction for your specific tire service equipment.
1. Clean the tire bead with an approved rubber cleaning fluid.
^ Rubber cleaning fluid is a locally sourced common product used in the tire service process.
2. Clean the wheel (flange and bead seat area), see Figure 2. Make sure to clean off all rust and
corrosion.
Infiniti Qx56 Rwd Workshop Manual (V8-5.6L (VK56VD) (2011))
Infiniti Workshop Manuals > Maintenance > Wheels and Tires > Wheels > Component Information > Technical Service
Bulletins > Tires — Mounting Information/Precautions > Page 360
3. Apply an approved tire lubricant to the tire and wheel in the areas shown in Figures 1 and 2.
^ Tire lubricant is a locally sourced common product used in the tire service process.
Tire:
^ Apply lube to the inner bead only, of both beads.
^ Do not apply lube to the flange area (outer bead area)
NOTE:
Too much tire lubricant may allow the tire to slip on the rim while driving. If this occurs, the tire may
become un-balanced.
Wheel:
^ Apply lube to the Safety Humps and Bead Sealing area.
^ Do not apply lube to the flange area.
4. Before inflating the tire:
^ If there are «match-mount» marks on the tire and rim, align the marks.
Infiniti Qx56 Rwd Workshop Manual (V8-5.6L (VK56VD) (2011))
Infiniti Workshop Manuals > Maintenance > Wheels and Tires > Wheels > Component Information > Technical Service
Bulletins > Tires — Mounting Information/Precautions > Page 361
^ Make sure the tire is evenly positioned on the lower safety humps.
5. WARNING: Do not exceed the tire manufactures recommended bead seating inflation pressure.
Generally this is 40psi.
If the bead does not seat with the appropriate pressure:
a. Break down the tire/rim assembly.
b. Re-apply lubricant as shown in Figures 1 and 2 above.
c. Remount the tire.
6. After inflating the tires inspect the bead area.
^ Make sure bead is seated uniformly (the same) around the entire circumference of the wheel.
NOTE:
Many tires have Aligning Rings that will help confirm the bead is uniformly seated.
If uniform; bead is seated correctly.
If not uniform;
1. Break down the tire/rim assembly.
2. Re-apply lubricant as shown in Figures 1 and 2.
3. Remount the tire.
Infiniti Qx56 Rwd Workshop Manual (V8-5.6L (VK56VD) (2011))
Infiniti Workshop Manuals > Maintenance > Wheels and Tires > Wheels > Component Information > Technical Service
Bulletins > Tires — Mounting Information/Precautions > Page 362
7. After the tire/wheel is balanced, apply an index mark to the tire at the location of the valve stem
(see Figure 6).
^ This index mark will allow you to tell if the tire has slipped on the rim (see Figure 7).
Tire to Rim Slippage:
^ Too much tire lubricant may allow the tire to slip on the rim while driving. If this occurs, the tire
may become un-balanced.
^ Overtime the tire lubricate will dry, eliminating the lubricant as a cause of tire slippage.
^ Some tire lubricants may require up to 24 hours to completely dry.
^ If slippage occurs, the tire/wheel will need to be re-balanced.
Infiniti Qx56 Rwd Workshop Manual (V8-5.6L (VK56VD) (2011))
Infiniti Workshop Manuals > Maintenance > Wheels and Tires > Wheels > Component Information > Technical Service
Bulletins > Tires — Mounting Information/Precautions > Page 363
Infiniti Qx56 Rwd Workshop Manual (V8-5.6L (VK56VD) (2011))
Infiniti Workshop Manuals > Maintenance > Wheels and Tires > Wheel Bearing > Component Information > Technical
Service Bulletins > Steering/Suspension — Wheel Bearing Collision Damage
Wheel Bearing: Technical Service Bulletins Steering/Suspension — Wheel Bearing Collision
Damage
Classification: FA10-007
Reference: ITB10-067
Date: October 21, 2010
WHEEL BEARING COLLISION DAMAGE
APPLIED VEHICLES: All Infiniti
SERVICE INFORMATION
Impacts to wheel bearings (such as a collision or other suspension damage) may create slight
indents in the bearing surfaces. These indents may not be visible but can cause bearing noise.
NOTE:
Hub/bearing replacement due to impact (collision or other suspension damage) is not a
warrantable repair.
If a vehicle has visible wheel or suspension damage due to impact (collision or other suspension
damage) it is recommended that the wheel bearing assembly be inspected as follows:
1. Remove the hub/bearing assembly from the vehicle.
2. Hold the hub/bearing assembly with both hands.
3. Rotate the hub/bearing assembly in both directions (clockwise and counterclockwise).
4. If any gritty or rough feeling is detected in the bearing replace it with a new one.
Infiniti Qx56 Rwd Workshop Manual (V8-5.6L (VK56VD) (2011))
Infiniti Workshop Manuals > Maintenance > Wheels and Tires > Wheel Hub > Component Information > Technical Service
Bulletins > Steering/Suspension — Wheel Bearing Collision Damage
Wheel Hub: Technical Service Bulletins Steering/Suspension — Wheel Bearing Collision Damage
Classification: FA10-007
Reference: ITB10-067
Date: October 21, 2010
WHEEL BEARING COLLISION DAMAGE
APPLIED VEHICLES: All Infiniti
SERVICE INFORMATION
Impacts to wheel bearings (such as a collision or other suspension damage) may create slight
indents in the bearing surfaces. These indents may not be visible but can cause bearing noise.
NOTE:
Hub/bearing replacement due to impact (collision or other suspension damage) is not a
warrantable repair.
If a vehicle has visible wheel or suspension damage due to impact (collision or other suspension
damage) it is recommended that the wheel bearing assembly be inspected as follows:
1. Remove the hub/bearing assembly from the vehicle.
2. Hold the hub/bearing assembly with both hands.
3. Rotate the hub/bearing assembly in both directions (clockwise and counterclockwise).
4. If any gritty or rough feeling is detected in the bearing replace it with a new one.
Infiniti Qx56 Rwd Workshop Manual (V8-5.6L (VK56VD) (2011))
Infiniti Workshop Manuals > Engine, Cooling and Exhaust > Engine > Engine Lubrication > Engine Oil > Component
Information > Specifications > Capacity Specifications
Engine Oil: Capacity Specifications
Engine Oil Capacity
With filter …………………………………………………………………………………………………………………………….
…………………………………………………. 6 7/8 qt (6.5L) Without filter ………………………………………………
…………………………………………………………………………………………………………………………… 6 1/2 qt
(6.2L) Dry engine (engine overhaul) ……………………………………………………………………………………….
…………………………………………………………………. 8 qt (7.6L)
Infiniti Qx56 Rwd Workshop Manual (V8-5.6L (VK56VD) (2011))
Infiniti Workshop Manuals > Engine, Cooling and Exhaust > Engine > Engine Lubrication > Engine Oil > Component
Information > Specifications > Capacity Specifications > Page 379
Engine Oil: Fluid Type Specifications
Engine Oil
Type …………………………………………………………………………………………………………………………………..
………………………………………. API Certification mark Viscosity ……………………………………………………
………………………………………………………………………………………………………………………………. SAE
5W-30
Infiniti recommends using Nissan Ester Engine Oil.
Infiniti Qx56 Rwd Workshop Manual (V8-5.6L (VK56VD) (2011))
Infiniti Workshop Manuals > Engine, Cooling and Exhaust > Engine > Tune-up and Engine Performance Checks > System
Information > Service Precautions
Tune-up and Engine Performance Checks: Service Precautions
TUNE-UP SERVICE PRECAUTIONS
— Tag or mark vacuum hoses before disconnecting them. After completing a job, double check that
the vacuum hoses are properly connected.
— To disconnect vacuum hoses, pull on the end, not the middle of the hose.
— To pull apart electrical connectors, pull on the connector itself, not the wires.
— Before disconnecting pressurized fuel lines, always perform Fuel Pressure Release procedure in
order to reduce the risk of fire and personal injury.
— When replacing fuel filters, always check all affected lines and fittings for leaks.
— Never drain or store gasoline or diesel fuel in an open container, due to the possibility of fire or
explosion.
— To prevent serious burns: Avoid contact with hot metal parts.
— Do not remove the radiator cap when the engine is hot.
Infiniti Qx56 Rwd Workshop Manual (V8-5.6L (VK56VD) (2011))
Infiniti Workshop Manuals > Engine, Cooling and Exhaust > Engine > Tune-up and Engine Performance Checks > System
Information > Service Precautions > Page 383
— Before servicing the vehicle: Protect fenders, upholstery and carpeting with appropriate covers.
— Take caution that keys, buckles, or buttons do not scratch paint.
— Do not operate the engine indoors without proper ventilation.
— Do not smoke while working on the vehicle.
Infiniti Qx56 Rwd Workshop Manual (V8-5.6L (VK56VD) (2011))
Infiniti Workshop Manuals > Engine, Cooling and Exhaust > Cooling System > Coolant > Component Information >
Technical Service Bulletins > Cooling System — Long Life Coolant Information
Coolant: Technical Service Bulletins Cooling System — Long Life Coolant Information
Classification: EM09-002A
Reference: ITB09-029A
Date: May 14, 2010
NEW BLUE NISSAN LONG LIFE ANTIFREEZE/COOLANT
This bulletin has been amended. The Service Information has been updated. Please discard
previous versions of this bulletin.
SERVICE INFORMATION
In calendar year 2009, Infiniti began filling some vehicles at the factory with a NEW Nissan Long
Life Antifreeze/Coolant (LLC) that is blue in color.
NOTE: LLC = Long Life Antifreeze/Coolant
The transition to this new Blue LLC continued though MY 2010. Beginning with MY 2011, all Infiniti
vehicles are filled at the factory with the Blue LLC.
^ MY 2009 and 2010: Some vehicles are filled at the factory with Blue LLC.
^ MY 2011: All vehicles are filled at the factory with Blue LLC. Blue LLC is designed to have a
service life of 7 years/105,000 miles for the factory fill,
and 5 years/75,000 miles for subsequent replacement fills.
Nissan Blue Super LLC is available through the Nissan Direct Ship Chemical Care Product
Program, Website order link via dealer portal or order direct www.NissanChemicals.com.
^ Blue LLC one gallon pre-diluted:
P/N 999MP — LP25500P
> The one gallon containers are pre-diluted with 50% antifreeze and 50% distilled water.
> Do not add additional water when using pre-diluted Blue LLC.
Infiniti Qx56 Rwd Workshop Manual (V8-5.6L (VK56VD) (2011))
Infiniti Workshop Manuals > Engine, Cooling and Exhaust > Cooling System > Coolant > Component Information >
Technical Service Bulletins > Cooling System — Long Life Coolant Information > Page 389
^ Blue LLC one quart concentrate:
P/N 999MP — L255QTP
> The one quart concentrate containers are intended for extreme cold weather application.
> Use the concentrate without mixing (do not add water).
> Add directly to the cooling system in specific amounts as directed on the container label.
Additional Information for using Blue LLC
Blue LLC and Green-colored Nissan LLC (P/N 999MP-AF000P) are compatible with each other:
^ Blue can be mixed/added with Green
^ Green can be mixed/added with Blue
CAUTION:
^ Adding Green LLC to Blue LLC will reduce/shorten the life expectancy of the Blue LLC to that of
the Green LLC (4 years / 60,000 miles).
^ LLC must always be used with demineralized or distilled water, otherwise the life expectancy of
the LLC (Blue or Green) will be degraded and
cooling system damage may occur.
Infiniti Qx56 Rwd Workshop Manual (V8-5.6L (VK56VD) (2011))
Infiniti Workshop Manuals > Engine, Cooling and Exhaust > Cooling System > Coolant > Component Information >
Specifications > Capacity Specifications
Coolant: Capacity Specifications
Engine Coolant Capacity
With reservoir at MAX level …………………………………………………………………………………………………..
…………………………………………….. 15 1/4 qt (14.4L)
Infiniti Qx56 Rwd Workshop Manual (V8-5.6L (VK56VD) (2011))
Infiniti Workshop Manuals > Engine, Cooling and Exhaust > Cooling System > Coolant > Component Information >
Specifications > Capacity Specifications > Page 392
Coolant: Fluid Type Specifications
Engine Coolant
Type ………………………………………. 50% Genuine NISSAN Long Life Antifreeze/Coolant (blue) or
equivalent and 50% Demineralized or distilled water.
Infiniti Qx56 Rwd Workshop Manual (V8-5.6L (VK56VD) (2011))
Infiniti Workshop Manuals > Powertrain Management > Relays and Modules — Powertrain Management > Relays and
Modules — Computers and Control Systems > Body Control Module > Component Information > Technical Service Bulletins
> Antitheft System — NATS Security VBC Logic
Body Control Module: Technical Service Bulletins Antitheft System — NATS Security VBC Logic
Classification: EL10-029
Reference: ITB10-059
Date: September 10, 2010
NATS SECURITY — VBC LOGIC
APPLIED VEHICLE: 2009-2011 All Infiniti with NATS/Immobilizer System
SERVICE INFORMATION
All model year 2009 — 2011 Infiniti vehicles equipped with NATS/Immobilizer system have the new
VBC (Validate Before Crank) starter relay logic.
VBC (Validate Before Crank) Logic:
^ The BCM will make sure that a valid (registered) key is being used before engaging the starter
relay. If the key is not authenticated the starter will not
operate.
^ If the engine cranks the issue is not related to NATS. Do not replace NATS components (BCM
I-Key FOB Reader or RF Receiver). Refer to ASIST
for further diagnostic information as needed.
Infiniti Qx56 Rwd Workshop Manual (V8-5.6L (VK56VD) (2011))
Infiniti Workshop Manuals > Powertrain Management > Relays and Modules — Powertrain Management > Relays and
Modules — Computers and Control Systems > Engine Control Module > Component Information > Technical Service
Bulletins > All Technical Service Bulletins for Engine Control Module: > 11-020 > Mar > 11 > Engine, A/T Controls Hesitation/A/T Shift Issues
Technical Service Bulletin # 11-020 Date: 110310
Engine, A/T Controls — Hesitation/A/T Shift Issues
Classification: AT 11-004
Reference: ITB11-020
Date: March 10, 2011
2011 QX56; TRANSMISSION SHIFT ISSUES AND HESITATION ISSUES
APPLIED VEHICLES: 2011 QX56 (Z62)
IF YOU CONFIRM
Any of the following symptoms:
^ Gear hunting or excessive downshifting when using the Intelligent Cruise Control (ICC)
and/or
^ The feel of the transmission shifting from Neutral to Drive (may be described as «bump» feel from
the rear) while stopped with the transmission in
Drive
and/or
^ A slight hesitation when accelerating from a stop,
and/or
^ A slight vehicle shudder/vibration during light acceleration,
ACTIONS
1. Perform ECM reprogramming.
^ Refer to Step 3 under ECM reprogramming in the Service Procedure to confirm ECM
reprogramming applies and is needed for the vehicle you are working on.
2. Perform TCM reprogramming.
^ Refer to Step 3 under TCM reprogramming in the Service Procedure to confirm TCM
reprogramming applies and is needed for the vehicle you are working on.
3. If equipped with Intelligent Cruise Control (ICC) perform ICC reprogramming.
^ Refer to Step 3 under ICC reprogramming in the Service Procedure to confirm ICC
reprogramming applies and is needed for the vehicle you are working on.
4. Test drive the vehicle and confirm the incident is resolved.
IMPORTANT:
The purpose of ACTIONS (above) is to give you a quick idea of the work you will be performing.
You MUST closely follow the entire SERVICE PROCEDURE as it contains information that is
essential to successfully completing this repair.
Infiniti Qx56 Rwd Workshop Manual (V8-5.6L (VK56VD) (2011))
Infiniti Workshop Manuals > Powertrain Management > Relays and Modules — Powertrain Management > Relays and
Modules — Computers and Control Systems > Engine Control Module > Component Information > Technical Service
Bulletins > All Technical Service Bulletins for Engine Control Module: > 11-020 > Mar > 11 > Engine, A/T Controls Hesitation/A/T Shift Issues > Page 408
CLAIMS INFORMATION
Service Procedure
SERVICE PROCEDURE
ECM Reprogramming
1. Prepare the vehicle for the reprogramming procedure.
Reprogramming Caution
Infiniti Qx56 Rwd Workshop Manual (V8-5.6L (VK56VD) (2011))
Infiniti Workshop Manuals > Powertrain Management > Relays and Modules — Powertrain Management > Relays and
Modules — Computers and Control Systems > Engine Control Module > Component Information > Technical Service
Bulletins > All Technical Service Bulletins for Engine Control Module: > 11-020 > Mar > 11 > Engine, A/T Controls Hesitation/A/T Shift Issues > Page 409
2. Navigate C-III to the ECM Reprogramming screen shown in Figure 1.
^ Use the «Reprogramming / Programming» selection.
^ Do not use Direct Diagnosis > Reprogramming.
3. On your C-III screen, look at the Part Number column (see Figure 1 example):
^ If there is no Engine part number listed, then ECM reprogramming does not apply; go to TCM
reprogramming.
^ If an Engine Part Number is listed, write it on the Repair Order.
4. Compare the Part Number you wrote down to the numbers in the Current ECM P/N column in
Table A above.
^ If there is a match this reprogramming applies. Continue with the reprogramming procedure.
NOTE:
If there are two Engine lines (two ECM reprogramming options) on your C-III screen, use the one
that does not have the message «Caution! Use ONLY with ITBXX-XXX».
^ If there is not a match, this reprogramming does not apply; go to TCM reprogramming below.
Infiniti Qx56 Rwd Workshop Manual (V8-5.6L (VK56VD) (2011))
Infiniti Workshop Manuals > Powertrain Management > Relays and Modules — Powertrain Management > Relays and
Modules — Computers and Control Systems > Engine Control Module > Component Information > Technical Service
Bulletins > All Technical Service Bulletins for Engine Control Module: > 11-020 > Mar > 11 > Engine, A/T Controls Hesitation/A/T Shift Issues > Page 410
5. When ECM reprogramming is complete, the screen in Figure 2 displays.
NOTE:
If the screen in Figure 2 does NOT display (reprogramming does NOT complete).
6. Make sure to erase DTCs from all Systems.
^ During reprogramming DTCs will set in several systems and must be erased before TCM
reprogramming.
7. Go to TCM Reprogramming below.
TCM Reprogramming
1. Restart the C-III session by selecting the «Home» icon in the upper left corner of the C-III screen.
^ Make sure to erase DTCs from all systems.
^ TCM initialization is not needed for 7 speed A/T reprogramming.
Reprogramming Caution
Infiniti Qx56 Rwd Workshop Manual (V8-5.6L (VK56VD) (2011))
Infiniti Workshop Manuals > Powertrain Management > Relays and Modules — Powertrain Management > Relays and
Modules — Computers and Control Systems > Engine Control Module > Component Information > Technical Service
Bulletins > All Technical Service Bulletins for Engine Control Module: > 11-020 > Mar > 11 > Engine, A/T Controls Hesitation/A/T Shift Issues > Page 411
2. Navigate C-III to the reprogramming screen shown in Figure 1A example above.
NOTE:
^ Do not use the «Reprogramming / Programming» selection.
^ Select the Model and Model Year and then navigate to Direct Diagnosis > Reprogramming.
^ TCM initialization is not needed for 7 Speed A/T reprogramming.
3. On your C-III screen look for a Transmission Part Number in the Part Number column (see
Figure 1A example).
^ If there is no Transmission Part Number listed, this reprogramming does not apply; go to ICC
reprogramming.
^ If a Transmission Part Number is listed write it on the Repair Order.
4. Compare the P/N you wrote down to the numbers in the Current TCM P/N column in Table A-1
above.
^ If there is a match this reprogramming applies. Continue with the reprogramming procedure.
^ If there is not a match this reprogramming does not apply; go to ICC reprogramming below.
Infiniti Qx56 Rwd Workshop Manual (V8-5.6L (VK56VD) (2011))
Infiniti Workshop Manuals > Powertrain Management > Relays and Modules — Powertrain Management > Relays and
Modules — Computers and Control Systems > Engine Control Module > Component Information > Technical Service
Bulletins > All Technical Service Bulletins for Engine Control Module: > 11-020 > Mar > 11 > Engine, A/T Controls Hesitation/A/T Shift Issues > Page 412
5. If you have performed TCM reprogramming; when reprogramming is complete, the screen in
Figure 2A displays.
6. Erase DTCs in all systems.
^ During TCM reprogramming, DTCs will set in several systems and must be erased before ICC
reprogramming.
7. Go to ICC Reprogramming below.
ICC Reprogramming
1. Restart the C-III session by selecting the Home icon in the upper left corner of the C-III screen.
NOTE:
^ The steps for reprogramming the Intelligent Cruise Control (ICC) are the same as the steps for
reprogramming the TCM.
Reprogramming Caution
Infiniti Qx56 Rwd Workshop Manual (V8-5.6L (VK56VD) (2011))
Infiniti Workshop Manuals > Powertrain Management > Relays and Modules — Powertrain Management > Relays and
Modules — Computers and Control Systems > Engine Control Module > Component Information > Technical Service
Bulletins > All Technical Service Bulletins for Engine Control Module: > 11-020 > Mar > 11 > Engine, A/T Controls Hesitation/A/T Shift Issues > Page 413
2. Navigate C-III to the reprogramming screen shown in Figure 1B example above.
NOTE:
^ Do not use the Reprogramming / Programming selection.
^ Select the Model and Model Year and then navigate to Direct Diagnosis > Reprogramming.
3. On your C-III screen, look for an ICC/ADAS Part Number in the Part Number column (see Figure
1B example).
^ If there is no ICC/ADAS Part Number listed, this reprogramming is not needed.
^ If an ICC/ADAS Part Number is listed, write it on the Repair Order.
4. Compare the P/N you wrote down to the numbers in the Current ICC/ADAS P/N column in Table
A-2 above.
^ If there is a match, this reprogramming applies. Continue with the reprogramming procedure.
^ If there is not a match, this reprogramming is not needed.
Infiniti Qx56 Rwd Workshop Manual (V8-5.6L (VK56VD) (2011))
Infiniti Workshop Manuals > Powertrain Management > Relays and Modules — Powertrain Management > Relays and
Modules — Computers and Control Systems > Engine Control Module > Component Information > Technical Service
Bulletins > All Technical Service Bulletins for Engine Control Module: > 11-020 > Mar > 11 > Engine, A/T Controls Hesitation/A/T Shift Issues > Page 414
5. If you have performed ICC reprogramming; when reprogramming is complete the screen in
Figure 2B displays.
6. Erase DTCs in all systems.
^ During ICC reprogramming, DTCs will set in several systems and must be erased.
Infiniti Qx56 Rwd Workshop Manual (V8-5.6L (VK56VD) (2011))
Infiniti Workshop Manuals > Powertrain Management > Relays and Modules — Powertrain Management > Relays and
Modules — Computers and Control Systems > Engine Control Module > Component Information > Technical Service
Bulletins > Customer Interest for Engine Control Module: > 11-020 > Mar > 11 > Engine, A/T Controls — Hesitation/A/T Shift
Issues
Technical Service Bulletin # 11-020 Date: 110310
Engine, A/T Controls — Hesitation/A/T Shift Issues
Classification: AT 11-004
Reference: ITB11-020
Date: March 10, 2011
2011 QX56; TRANSMISSION SHIFT ISSUES AND HESITATION ISSUES
APPLIED VEHICLES: 2011 QX56 (Z62)
IF YOU CONFIRM
Any of the following symptoms:
^ Gear hunting or excessive downshifting when using the Intelligent Cruise Control (ICC)
and/or
^ The feel of the transmission shifting from Neutral to Drive (may be described as «bump» feel from
the rear) while stopped with the transmission in
Drive
and/or
^ A slight hesitation when accelerating from a stop,
and/or
^ A slight vehicle shudder/vibration during light acceleration,
ACTIONS
1. Perform ECM reprogramming.
^ Refer to Step 3 under ECM reprogramming in the Service Procedure to confirm ECM
reprogramming applies and is needed for the vehicle you are working on.
2. Perform TCM reprogramming.
^ Refer to Step 3 under TCM reprogramming in the Service Procedure to confirm TCM
reprogramming applies and is needed for the vehicle you are working on.
3. If equipped with Intelligent Cruise Control (ICC) perform ICC reprogramming.
^ Refer to Step 3 under ICC reprogramming in the Service Procedure to confirm ICC
reprogramming applies and is needed for the vehicle you are working on.
4. Test drive the vehicle and confirm the incident is resolved.
IMPORTANT:
The purpose of ACTIONS (above) is to give you a quick idea of the work you will be performing.
You MUST closely follow the entire SERVICE PROCEDURE as it contains information that is
essential to successfully completing this repair.
Infiniti Qx56 Rwd Workshop Manual (V8-5.6L (VK56VD) (2011))
Infiniti Workshop Manuals > Powertrain Management > Relays and Modules — Powertrain Management > Relays and
Modules — Computers and Control Systems > Engine Control Module > Component Information > Technical Service
Bulletins > Customer Interest for Engine Control Module: > 11-020 > Mar > 11 > Engine, A/T Controls — Hesitation/A/T Shift
Issues > Page 420
CLAIMS INFORMATION
Service Procedure
SERVICE PROCEDURE
ECM Reprogramming
1. Prepare the vehicle for the reprogramming procedure.
Reprogramming Caution
Infiniti Qx56 Rwd Workshop Manual (V8-5.6L (VK56VD) (2011))
Infiniti Workshop Manuals > Powertrain Management > Relays and Modules — Powertrain Management > Relays and
Modules — Computers and Control Systems > Engine Control Module > Component Information > Technical Service
Bulletins > Customer Interest for Engine Control Module: > 11-020 > Mar > 11 > Engine, A/T Controls — Hesitation/A/T Shift
Issues > Page 421
2. Navigate C-III to the ECM Reprogramming screen shown in Figure 1.
^ Use the «Reprogramming / Programming» selection.
^ Do not use Direct Diagnosis > Reprogramming.
3. On your C-III screen, look at the Part Number column (see Figure 1 example):
^ If there is no Engine part number listed, then ECM reprogramming does not apply; go to TCM
reprogramming.
^ If an Engine Part Number is listed, write it on the Repair Order.
4. Compare the Part Number you wrote down to the numbers in the Current ECM P/N column in
Table A above.
^ If there is a match this reprogramming applies. Continue with the reprogramming procedure.
NOTE:
If there are two Engine lines (two ECM reprogramming options) on your C-III screen, use the one
that does not have the message «Caution! Use ONLY with ITBXX-XXX».
^ If there is not a match, this reprogramming does not apply; go to TCM reprogramming below.
Infiniti Qx56 Rwd Workshop Manual (V8-5.6L (VK56VD) (2011))
Infiniti Workshop Manuals > Powertrain Management > Relays and Modules — Powertrain Management > Relays and
Modules — Computers and Control Systems > Engine Control Module > Component Information > Technical Service
Bulletins > Customer Interest for Engine Control Module: > 11-020 > Mar > 11 > Engine, A/T Controls — Hesitation/A/T Shift
Issues > Page 422
5. When ECM reprogramming is complete, the screen in Figure 2 displays.
NOTE:
If the screen in Figure 2 does NOT display (reprogramming does NOT complete).
6. Make sure to erase DTCs from all Systems.
^ During reprogramming DTCs will set in several systems and must be erased before TCM
reprogramming.
7. Go to TCM Reprogramming below.
TCM Reprogramming
1. Restart the C-III session by selecting the «Home» icon in the upper left corner of the C-III screen.
^ Make sure to erase DTCs from all systems.
^ TCM initialization is not needed for 7 speed A/T reprogramming.
Reprogramming Caution
Infiniti Qx56 Rwd Workshop Manual (V8-5.6L (VK56VD) (2011))
Infiniti Workshop Manuals > Powertrain Management > Relays and Modules — Powertrain Management > Relays and
Modules — Computers and Control Systems > Engine Control Module > Component Information > Technical Service
Bulletins > Customer Interest for Engine Control Module: > 11-020 > Mar > 11 > Engine, A/T Controls — Hesitation/A/T Shift
Issues > Page 423
2. Navigate C-III to the reprogramming screen shown in Figure 1A example above.
NOTE:
^ Do not use the «Reprogramming / Programming» selection.
^ Select the Model and Model Year and then navigate to Direct Diagnosis > Reprogramming.
^ TCM initialization is not needed for 7 Speed A/T reprogramming.
3. On your C-III screen look for a Transmission Part Number in the Part Number column (see
Figure 1A example).
^ If there is no Transmission Part Number listed, this reprogramming does not apply; go to ICC
reprogramming.
^ If a Transmission Part Number is listed write it on the Repair Order.
4. Compare the P/N you wrote down to the numbers in the Current TCM P/N column in Table A-1
above.
^ If there is a match this reprogramming applies. Continue with the reprogramming procedure.
^ If there is not a match this reprogramming does not apply; go to ICC reprogramming below.
Infiniti Qx56 Rwd Workshop Manual (V8-5.6L (VK56VD) (2011))
Infiniti Workshop Manuals > Powertrain Management > Relays and Modules — Powertrain Management > Relays and
Modules — Computers and Control Systems > Engine Control Module > Component Information > Technical Service
Bulletins > Customer Interest for Engine Control Module: > 11-020 > Mar > 11 > Engine, A/T Controls — Hesitation/A/T Shift
Issues > Page 424
5. If you have performed TCM reprogramming; when reprogramming is complete, the screen in
Figure 2A displays.
6. Erase DTCs in all systems.
^ During TCM reprogramming, DTCs will set in several systems and must be erased before ICC
reprogramming.
7. Go to ICC Reprogramming below.
ICC Reprogramming
1. Restart the C-III session by selecting the Home icon in the upper left corner of the C-III screen.
NOTE:
^ The steps for reprogramming the Intelligent Cruise Control (ICC) are the same as the steps for
reprogramming the TCM.
Reprogramming Caution
Infiniti Qx56 Rwd Workshop Manual (V8-5.6L (VK56VD) (2011))
Infiniti Workshop Manuals > Powertrain Management > Relays and Modules — Powertrain Management > Relays and
Modules — Computers and Control Systems > Engine Control Module > Component Information > Technical Service
Bulletins > Customer Interest for Engine Control Module: > 11-020 > Mar > 11 > Engine, A/T Controls — Hesitation/A/T Shift
Issues > Page 425
2. Navigate C-III to the reprogramming screen shown in Figure 1B example above.
NOTE:
^ Do not use the Reprogramming / Programming selection.
^ Select the Model and Model Year and then navigate to Direct Diagnosis > Reprogramming.
3. On your C-III screen, look for an ICC/ADAS Part Number in the Part Number column (see Figure
1B example).
^ If there is no ICC/ADAS Part Number listed, this reprogramming is not needed.
^ If an ICC/ADAS Part Number is listed, write it on the Repair Order.
4. Compare the P/N you wrote down to the numbers in the Current ICC/ADAS P/N column in Table
A-2 above.
^ If there is a match, this reprogramming applies. Continue with the reprogramming procedure.
^ If there is not a match, this reprogramming is not needed.
Infiniti Qx56 Rwd Workshop Manual (V8-5.6L (VK56VD) (2011))
Infiniti Workshop Manuals > Powertrain Management > Relays and Modules — Powertrain Management > Relays and
Modules — Computers and Control Systems > Engine Control Module > Component Information > Technical Service
Bulletins > Customer Interest for Engine Control Module: > 11-020 > Mar > 11 > Engine, A/T Controls — Hesitation/A/T Shift
Issues > Page 426
5. If you have performed ICC reprogramming; when reprogramming is complete the screen in
Figure 2B displays.
6. Erase DTCs in all systems.
^ During ICC reprogramming, DTCs will set in several systems and must be erased.
Infiniti Qx56 Rwd Workshop Manual (V8-5.6L (VK56VD) (2011))
Infiniti Workshop Manuals > Powertrain Management > Tune-up and Engine Performance Checks > System Information >
Service Precautions
Tune-up and Engine Performance Checks: Service Precautions
TUNE-UP SERVICE PRECAUTIONS
— Tag or mark vacuum hoses before disconnecting them. After completing a job, double check that
the vacuum hoses are properly connected.
— To disconnect vacuum hoses, pull on the end, not the middle of the hose.
— To pull apart electrical connectors, pull on the connector itself, not the wires.
— Before disconnecting pressurized fuel lines, always perform Fuel Pressure Release procedure in
order to reduce the risk of fire and personal injury.
— When replacing fuel filters, always check all affected lines and fittings for leaks.
— Never drain or store gasoline or diesel fuel in an open container, due to the possibility of fire or
explosion.
— To prevent serious burns: Avoid contact with hot metal parts.
— Do not remove the radiator cap when the engine is hot.
Infiniti Qx56 Rwd Workshop Manual (V8-5.6L (VK56VD) (2011))
Infiniti Workshop Manuals > Powertrain Management > Tune-up and Engine Performance Checks > System Information >
Service Precautions > Page 430
— Before servicing the vehicle: Protect fenders, upholstery and carpeting with appropriate covers.
— Take caution that keys, buckles, or buttons do not scratch paint.
— Do not operate the engine indoors without proper ventilation.
— Do not smoke while working on the vehicle.
Infiniti Qx56 Rwd Workshop Manual (V8-5.6L (VK56VD) (2011))
Infiniti Workshop Manuals > Powertrain Management > Computers and Control Systems > Body Control Module >
Component Information > Technical Service Bulletins > Antitheft System — NATS Security VBC Logic
Body Control Module: Technical Service Bulletins Antitheft System — NATS Security VBC Logic
Classification: EL10-029
Reference: ITB10-059
Date: September 10, 2010
NATS SECURITY — VBC LOGIC
APPLIED VEHICLE: 2009-2011 All Infiniti with NATS/Immobilizer System
SERVICE INFORMATION
All model year 2009 — 2011 Infiniti vehicles equipped with NATS/Immobilizer system have the new
VBC (Validate Before Crank) starter relay logic.
VBC (Validate Before Crank) Logic:
^ The BCM will make sure that a valid (registered) key is being used before engaging the starter
relay. If the key is not authenticated the starter will not
operate.
^ If the engine cranks the issue is not related to NATS. Do not replace NATS components (BCM
I-Key FOB Reader or RF Receiver). Refer to ASIST
for further diagnostic information as needed.
Infiniti Qx56 Rwd Workshop Manual (V8-5.6L (VK56VD) (2011))
Infiniti Workshop Manuals > Powertrain Management > Computers and Control Systems > Engine Control Module >
Component Information > Technical Service Bulletins > All Technical Service Bulletins for Engine Control Module: > 11-020
> Mar > 11 > Engine, A/T Controls — Hesitation/A/T Shift Issues
Technical Service Bulletin # 11-020 Date: 110310
Engine, A/T Controls — Hesitation/A/T Shift Issues
Classification: AT 11-004
Reference: ITB11-020
Date: March 10, 2011
2011 QX56; TRANSMISSION SHIFT ISSUES AND HESITATION ISSUES
APPLIED VEHICLES: 2011 QX56 (Z62)
IF YOU CONFIRM
Any of the following symptoms:
^ Gear hunting or excessive downshifting when using the Intelligent Cruise Control (ICC)
and/or
^ The feel of the transmission shifting from Neutral to Drive (may be described as «bump» feel from
the rear) while stopped with the transmission in
Drive
and/or
^ A slight hesitation when accelerating from a stop,
and/or
^ A slight vehicle shudder/vibration during light acceleration,
ACTIONS
1. Perform ECM reprogramming.
^ Refer to Step 3 under ECM reprogramming in the Service Procedure to confirm ECM
reprogramming applies and is needed for the vehicle you are working on.
2. Perform TCM reprogramming.
^ Refer to Step 3 under TCM reprogramming in the Service Procedure to confirm TCM
reprogramming applies and is needed for the vehicle you are working on.
3. If equipped with Intelligent Cruise Control (ICC) perform ICC reprogramming.
^ Refer to Step 3 under ICC reprogramming in the Service Procedure to confirm ICC
reprogramming applies and is needed for the vehicle you are working on.
4. Test drive the vehicle and confirm the incident is resolved.
IMPORTANT:
The purpose of ACTIONS (above) is to give you a quick idea of the work you will be performing.
You MUST closely follow the entire SERVICE PROCEDURE as it contains information that is
essential to successfully completing this repair.
Infiniti Qx56 Rwd Workshop Manual (V8-5.6L (VK56VD) (2011))
Infiniti Workshop Manuals > Powertrain Management > Computers and Control Systems > Engine Control Module >
Component Information > Technical Service Bulletins > All Technical Service Bulletins for Engine Control Module: > 11-020
> Mar > 11 > Engine, A/T Controls — Hesitation/A/T Shift Issues > Page 444
CLAIMS INFORMATION
Service Procedure
SERVICE PROCEDURE
ECM Reprogramming
1. Prepare the vehicle for the reprogramming procedure.
Reprogramming Caution
Infiniti Qx56 Rwd Workshop Manual (V8-5.6L (VK56VD) (2011))
Infiniti Workshop Manuals > Powertrain Management > Computers and Control Systems > Engine Control Module >
Component Information > Technical Service Bulletins > All Technical Service Bulletins for Engine Control Module: > 11-020
> Mar > 11 > Engine, A/T Controls — Hesitation/A/T Shift Issues > Page 445
2. Navigate C-III to the ECM Reprogramming screen shown in Figure 1.
^ Use the «Reprogramming / Programming» selection.
^ Do not use Direct Diagnosis > Reprogramming.
3. On your C-III screen, look at the Part Number column (see Figure 1 example):
^ If there is no Engine part number listed, then ECM reprogramming does not apply; go to TCM
reprogramming.
^ If an Engine Part Number is listed, write it on the Repair Order.
4. Compare the Part Number you wrote down to the numbers in the Current ECM P/N column in
Table A above.
^ If there is a match this reprogramming applies. Continue with the reprogramming procedure.
NOTE:
If there are two Engine lines (two ECM reprogramming options) on your C-III screen, use the one
that does not have the message «Caution! Use ONLY with ITBXX-XXX».
^ If there is not a match, this reprogramming does not apply; go to TCM reprogramming below.
Infiniti Qx56 Rwd Workshop Manual (V8-5.6L (VK56VD) (2011))
Infiniti Workshop Manuals > Powertrain Management > Computers and Control Systems > Engine Control Module >
Component Information > Technical Service Bulletins > All Technical Service Bulletins for Engine Control Module: > 11-020
> Mar > 11 > Engine, A/T Controls — Hesitation/A/T Shift Issues > Page 446
5. When ECM reprogramming is complete, the screen in Figure 2 displays.
NOTE:
If the screen in Figure 2 does NOT display (reprogramming does NOT complete).
6. Make sure to erase DTCs from all Systems.
^ During reprogramming DTCs will set in several systems and must be erased before TCM
reprogramming.
7. Go to TCM Reprogramming below.
TCM Reprogramming
1. Restart the C-III session by selecting the «Home» icon in the upper left corner of the C-III screen.
^ Make sure to erase DTCs from all systems.
^ TCM initialization is not needed for 7 speed A/T reprogramming.
Reprogramming Caution
Infiniti Qx56 Rwd Workshop Manual (V8-5.6L (VK56VD) (2011))
Infiniti Workshop Manuals > Powertrain Management > Computers and Control Systems > Engine Control Module >
Component Information > Technical Service Bulletins > All Technical Service Bulletins for Engine Control Module: > 11-020
> Mar > 11 > Engine, A/T Controls — Hesitation/A/T Shift Issues > Page 447
2. Navigate C-III to the reprogramming screen shown in Figure 1A example above.
NOTE:
^ Do not use the «Reprogramming / Programming» selection.
^ Select the Model and Model Year and then navigate to Direct Diagnosis > Reprogramming.
^ TCM initialization is not needed for 7 Speed A/T reprogramming.
3. On your C-III screen look for a Transmission Part Number in the Part Number column (see
Figure 1A example).
^ If there is no Transmission Part Number listed, this reprogramming does not apply; go to ICC
reprogramming.
^ If a Transmission Part Number is listed write it on the Repair Order.
4. Compare the P/N you wrote down to the numbers in the Current TCM P/N column in Table A-1
above.
^ If there is a match this reprogramming applies. Continue with the reprogramming procedure.
^ If there is not a match this reprogramming does not apply; go to ICC reprogramming below.
Infiniti Qx56 Rwd Workshop Manual (V8-5.6L (VK56VD) (2011))
Infiniti Workshop Manuals > Powertrain Management > Computers and Control Systems > Engine Control Module >
Component Information > Technical Service Bulletins > All Technical Service Bulletins for Engine Control Module: > 11-020
> Mar > 11 > Engine, A/T Controls — Hesitation/A/T Shift Issues > Page 448
5. If you have performed TCM reprogramming; when reprogramming is complete, the screen in
Figure 2A displays.
6. Erase DTCs in all systems.
^ During TCM reprogramming, DTCs will set in several systems and must be erased before ICC
reprogramming.
7. Go to ICC Reprogramming below.
ICC Reprogramming
1. Restart the C-III session by selecting the Home icon in the upper left corner of the C-III screen.
NOTE:
^ The steps for reprogramming the Intelligent Cruise Control (ICC) are the same as the steps for
reprogramming the TCM.
Reprogramming Caution
Infiniti Qx56 Rwd Workshop Manual (V8-5.6L (VK56VD) (2011))
Infiniti Workshop Manuals > Powertrain Management > Computers and Control Systems > Engine Control Module >
Component Information > Technical Service Bulletins > All Technical Service Bulletins for Engine Control Module: > 11-020
> Mar > 11 > Engine, A/T Controls — Hesitation/A/T Shift Issues > Page 449
2. Navigate C-III to the reprogramming screen shown in Figure 1B example above.
NOTE:
^ Do not use the Reprogramming / Programming selection.
^ Select the Model and Model Year and then navigate to Direct Diagnosis > Reprogramming.
3. On your C-III screen, look for an ICC/ADAS Part Number in the Part Number column (see Figure
1B example).
^ If there is no ICC/ADAS Part Number listed, this reprogramming is not needed.
^ If an ICC/ADAS Part Number is listed, write it on the Repair Order.
4. Compare the P/N you wrote down to the numbers in the Current ICC/ADAS P/N column in Table
A-2 above.
^ If there is a match, this reprogramming applies. Continue with the reprogramming procedure.
^ If there is not a match, this reprogramming is not needed.
Infiniti Qx56 Rwd Workshop Manual (V8-5.6L (VK56VD) (2011))
Infiniti Workshop Manuals > Powertrain Management > Computers and Control Systems > Engine Control Module >
Component Information > Technical Service Bulletins > All Technical Service Bulletins for Engine Control Module: > 11-020
> Mar > 11 > Engine, A/T Controls — Hesitation/A/T Shift Issues > Page 450
5. If you have performed ICC reprogramming; when reprogramming is complete the screen in
Figure 2B displays.
6. Erase DTCs in all systems.
^ During ICC reprogramming, DTCs will set in several systems and must be erased.
Infiniti Qx56 Rwd Workshop Manual (V8-5.6L (VK56VD) (2011))
Infiniti Workshop Manuals > Powertrain Management > Computers and Control Systems > Engine Control Module >
Component Information > Technical Service Bulletins > Customer Interest for Engine Control Module: > 11-020 > Mar > 11
> Engine, A/T Controls — Hesitation/A/T Shift Issues
Technical Service Bulletin # 11-020 Date: 110310
Engine, A/T Controls — Hesitation/A/T Shift Issues
Classification: AT 11-004
Reference: ITB11-020
Date: March 10, 2011
2011 QX56; TRANSMISSION SHIFT ISSUES AND HESITATION ISSUES
APPLIED VEHICLES: 2011 QX56 (Z62)
IF YOU CONFIRM
Any of the following symptoms:
^ Gear hunting or excessive downshifting when using the Intelligent Cruise Control (ICC)
and/or
^ The feel of the transmission shifting from Neutral to Drive (may be described as «bump» feel from
the rear) while stopped with the transmission in
Drive
and/or
^ A slight hesitation when accelerating from a stop,
and/or
^ A slight vehicle shudder/vibration during light acceleration,
ACTIONS
1. Perform ECM reprogramming.
^ Refer to Step 3 under ECM reprogramming in the Service Procedure to confirm ECM
reprogramming applies and is needed for the vehicle you are working on.
2. Perform TCM reprogramming.
^ Refer to Step 3 under TCM reprogramming in the Service Procedure to confirm TCM
reprogramming applies and is needed for the vehicle you are working on.
3. If equipped with Intelligent Cruise Control (ICC) perform ICC reprogramming.
^ Refer to Step 3 under ICC reprogramming in the Service Procedure to confirm ICC
reprogramming applies and is needed for the vehicle you are working on.
4. Test drive the vehicle and confirm the incident is resolved.
IMPORTANT:
The purpose of ACTIONS (above) is to give you a quick idea of the work you will be performing.
You MUST closely follow the entire SERVICE PROCEDURE as it contains information that is
essential to successfully completing this repair.
Infiniti Qx56 Rwd Workshop Manual (V8-5.6L (VK56VD) (2011))
Infiniti Workshop Manuals > Powertrain Management > Computers and Control Systems > Engine Control Module >
Component Information > Technical Service Bulletins > Customer Interest for Engine Control Module: > 11-020 > Mar > 11
> Engine, A/T Controls — Hesitation/A/T Shift Issues > Page 456
CLAIMS INFORMATION
Service Procedure
SERVICE PROCEDURE
ECM Reprogramming
1. Prepare the vehicle for the reprogramming procedure.
Reprogramming Caution
Infiniti Qx56 Rwd Workshop Manual (V8-5.6L (VK56VD) (2011))
Infiniti Workshop Manuals > Powertrain Management > Computers and Control Systems > Engine Control Module >
Component Information > Technical Service Bulletins > Customer Interest for Engine Control Module: > 11-020 > Mar > 11
> Engine, A/T Controls — Hesitation/A/T Shift Issues > Page 457
2. Navigate C-III to the ECM Reprogramming screen shown in Figure 1.
^ Use the «Reprogramming / Programming» selection.
^ Do not use Direct Diagnosis > Reprogramming.
3. On your C-III screen, look at the Part Number column (see Figure 1 example):
^ If there is no Engine part number listed, then ECM reprogramming does not apply; go to TCM
reprogramming.
^ If an Engine Part Number is listed, write it on the Repair Order.
4. Compare the Part Number you wrote down to the numbers in the Current ECM P/N column in
Table A above.
^ If there is a match this reprogramming applies. Continue with the reprogramming procedure.
NOTE:
If there are two Engine lines (two ECM reprogramming options) on your C-III screen, use the one
that does not have the message «Caution! Use ONLY with ITBXX-XXX».
^ If there is not a match, this reprogramming does not apply; go to TCM reprogramming below.
Infiniti Qx56 Rwd Workshop Manual (V8-5.6L (VK56VD) (2011))
Infiniti Workshop Manuals > Powertrain Management > Computers and Control Systems > Engine Control Module >
Component Information > Technical Service Bulletins > Customer Interest for Engine Control Module: > 11-020 > Mar > 11
> Engine, A/T Controls — Hesitation/A/T Shift Issues > Page 458
5. When ECM reprogramming is complete, the screen in Figure 2 displays.
NOTE:
If the screen in Figure 2 does NOT display (reprogramming does NOT complete).
6. Make sure to erase DTCs from all Systems.
^ During reprogramming DTCs will set in several systems and must be erased before TCM
reprogramming.
7. Go to TCM Reprogramming below.
TCM Reprogramming
1. Restart the C-III session by selecting the «Home» icon in the upper left corner of the C-III screen.
^ Make sure to erase DTCs from all systems.
^ TCM initialization is not needed for 7 speed A/T reprogramming.
Reprogramming Caution
Infiniti Qx56 Rwd Workshop Manual (V8-5.6L (VK56VD) (2011))
Infiniti Workshop Manuals > Powertrain Management > Computers and Control Systems > Engine Control Module >
Component Information > Technical Service Bulletins > Customer Interest for Engine Control Module: > 11-020 > Mar > 11
> Engine, A/T Controls — Hesitation/A/T Shift Issues > Page 459
2. Navigate C-III to the reprogramming screen shown in Figure 1A example above.
NOTE:
^ Do not use the «Reprogramming / Programming» selection.
^ Select the Model and Model Year and then navigate to Direct Diagnosis > Reprogramming.
^ TCM initialization is not needed for 7 Speed A/T reprogramming.
3. On your C-III screen look for a Transmission Part Number in the Part Number column (see
Figure 1A example).
^ If there is no Transmission Part Number listed, this reprogramming does not apply; go to ICC
reprogramming.
^ If a Transmission Part Number is listed write it on the Repair Order.
4. Compare the P/N you wrote down to the numbers in the Current TCM P/N column in Table A-1
above.
^ If there is a match this reprogramming applies. Continue with the reprogramming procedure.
^ If there is not a match this reprogramming does not apply; go to ICC reprogramming below.
Infiniti Qx56 Rwd Workshop Manual (V8-5.6L (VK56VD) (2011))
Infiniti Workshop Manuals > Powertrain Management > Computers and Control Systems > Engine Control Module >
Component Information > Technical Service Bulletins > Customer Interest for Engine Control Module: > 11-020 > Mar > 11
> Engine, A/T Controls — Hesitation/A/T Shift Issues > Page 460
5. If you have performed TCM reprogramming; when reprogramming is complete, the screen in
Figure 2A displays.
6. Erase DTCs in all systems.
^ During TCM reprogramming, DTCs will set in several systems and must be erased before ICC
reprogramming.
7. Go to ICC Reprogramming below.
ICC Reprogramming
1. Restart the C-III session by selecting the Home icon in the upper left corner of the C-III screen.
NOTE:
^ The steps for reprogramming the Intelligent Cruise Control (ICC) are the same as the steps for
reprogramming the TCM.
Reprogramming Caution
Infiniti Qx56 Rwd Workshop Manual (V8-5.6L (VK56VD) (2011))
Infiniti Workshop Manuals > Powertrain Management > Computers and Control Systems > Engine Control Module >
Component Information > Technical Service Bulletins > Customer Interest for Engine Control Module: > 11-020 > Mar > 11
> Engine, A/T Controls — Hesitation/A/T Shift Issues > Page 461
2. Navigate C-III to the reprogramming screen shown in Figure 1B example above.
NOTE:
^ Do not use the Reprogramming / Programming selection.
^ Select the Model and Model Year and then navigate to Direct Diagnosis > Reprogramming.
3. On your C-III screen, look for an ICC/ADAS Part Number in the Part Number column (see Figure
1B example).
^ If there is no ICC/ADAS Part Number listed, this reprogramming is not needed.
^ If an ICC/ADAS Part Number is listed, write it on the Repair Order.
4. Compare the P/N you wrote down to the numbers in the Current ICC/ADAS P/N column in Table
A-2 above.
^ If there is a match, this reprogramming applies. Continue with the reprogramming procedure.
^ If there is not a match, this reprogramming is not needed.
Infiniti Qx56 Rwd Workshop Manual (V8-5.6L (VK56VD) (2011))
Infiniti Workshop Manuals > Powertrain Management > Computers and Control Systems > Engine Control Module >
Component Information > Technical Service Bulletins > Customer Interest for Engine Control Module: > 11-020 > Mar > 11
> Engine, A/T Controls — Hesitation/A/T Shift Issues > Page 462
5. If you have performed ICC reprogramming; when reprogramming is complete the screen in
Figure 2B displays.
6. Erase DTCs in all systems.
^ During ICC reprogramming, DTCs will set in several systems and must be erased.
Infiniti Qx56 Rwd Workshop Manual (V8-5.6L (VK56VD) (2011))
Infiniti Workshop Manuals > Powertrain Management > Computers and Control Systems > Relays and Modules Computers and Control Systems > Body Control Module > Component Information > Technical Service Bulletins > Antitheft
System — NATS Security VBC Logic
Body Control Module: Technical Service Bulletins Antitheft System — NATS Security VBC Logic
Classification: EL10-029
Reference: ITB10-059
Date: September 10, 2010
NATS SECURITY — VBC LOGIC
APPLIED VEHICLE: 2009-2011 All Infiniti with NATS/Immobilizer System
SERVICE INFORMATION
All model year 2009 — 2011 Infiniti vehicles equipped with NATS/Immobilizer system have the new
VBC (Validate Before Crank) starter relay logic.
VBC (Validate Before Crank) Logic:
^ The BCM will make sure that a valid (registered) key is being used before engaging the starter
relay. If the key is not authenticated the starter will not
operate.
^ If the engine cranks the issue is not related to NATS. Do not replace NATS components (BCM
I-Key FOB Reader or RF Receiver). Refer to ASIST
for further diagnostic information as needed.
Infiniti Qx56 Rwd Workshop Manual (V8-5.6L (VK56VD) (2011))
Infiniti Workshop Manuals > Powertrain Management > Computers and Control Systems > Relays and Modules Computers and Control Systems > Engine Control Module > Component Information > Technical Service Bulletins >
Customer Interest for Engine Control Module: > 11-020 > Mar > 11 > Engine, A/T Controls — Hesitation/A/T Shift Issues
Technical Service Bulletin # 11-020 Date: 110310
Engine, A/T Controls — Hesitation/A/T Shift Issues
Classification: AT 11-004
Reference: ITB11-020
Date: March 10, 2011
2011 QX56; TRANSMISSION SHIFT ISSUES AND HESITATION ISSUES
APPLIED VEHICLES: 2011 QX56 (Z62)
IF YOU CONFIRM
Any of the following symptoms:
^ Gear hunting or excessive downshifting when using the Intelligent Cruise Control (ICC)
and/or
^ The feel of the transmission shifting from Neutral to Drive (may be described as «bump» feel from
the rear) while stopped with the transmission in
Drive
and/or
^ A slight hesitation when accelerating from a stop,
and/or
^ A slight vehicle shudder/vibration during light acceleration,
ACTIONS
1. Perform ECM reprogramming.
^ Refer to Step 3 under ECM reprogramming in the Service Procedure to confirm ECM
reprogramming applies and is needed for the vehicle you are working on.
2. Perform TCM reprogramming.
^ Refer to Step 3 under TCM reprogramming in the Service Procedure to confirm TCM
reprogramming applies and is needed for the vehicle you are working on.
3. If equipped with Intelligent Cruise Control (ICC) perform ICC reprogramming.
^ Refer to Step 3 under ICC reprogramming in the Service Procedure to confirm ICC
reprogramming applies and is needed for the vehicle you are working on.
4. Test drive the vehicle and confirm the incident is resolved.
IMPORTANT:
The purpose of ACTIONS (above) is to give you a quick idea of the work you will be performing.
You MUST closely follow the entire SERVICE PROCEDURE as it contains information that is
essential to successfully completing this repair.
Infiniti Qx56 Rwd Workshop Manual (V8-5.6L (VK56VD) (2011))
Infiniti Workshop Manuals > Powertrain Management > Computers and Control Systems > Relays and Modules Computers and Control Systems > Engine Control Module > Component Information > Technical Service Bulletins >
Customer Interest for Engine Control Module: > 11-020 > Mar > 11 > Engine, A/T Controls — Hesitation/A/T Shift Issues >
Page 476
CLAIMS INFORMATION
Service Procedure
SERVICE PROCEDURE
ECM Reprogramming
1. Prepare the vehicle for the reprogramming procedure.
Reprogramming Caution
Infiniti Qx56 Rwd Workshop Manual (V8-5.6L (VK56VD) (2011))
Infiniti Workshop Manuals > Powertrain Management > Computers and Control Systems > Relays and Modules Computers and Control Systems > Engine Control Module > Component Information > Technical Service Bulletins >
Customer Interest for Engine Control Module: > 11-020 > Mar > 11 > Engine, A/T Controls — Hesitation/A/T Shift Issues >
Page 477
2. Navigate C-III to the ECM Reprogramming screen shown in Figure 1.
^ Use the «Reprogramming / Programming» selection.
^ Do not use Direct Diagnosis > Reprogramming.
3. On your C-III screen, look at the Part Number column (see Figure 1 example):
^ If there is no Engine part number listed, then ECM reprogramming does not apply; go to TCM
reprogramming.
^ If an Engine Part Number is listed, write it on the Repair Order.
4. Compare the Part Number you wrote down to the numbers in the Current ECM P/N column in
Table A above.
^ If there is a match this reprogramming applies. Continue with the reprogramming procedure.
NOTE:
If there are two Engine lines (two ECM reprogramming options) on your C-III screen, use the one
that does not have the message «Caution! Use ONLY with ITBXX-XXX».
^ If there is not a match, this reprogramming does not apply; go to TCM reprogramming below.
Infiniti Qx56 Rwd Workshop Manual (V8-5.6L (VK56VD) (2011))
Infiniti Workshop Manuals > Powertrain Management > Computers and Control Systems > Relays and Modules Computers and Control Systems > Engine Control Module > Component Information > Technical Service Bulletins >
Customer Interest for Engine Control Module: > 11-020 > Mar > 11 > Engine, A/T Controls — Hesitation/A/T Shift Issues >
Page 478
5. When ECM reprogramming is complete, the screen in Figure 2 displays.
NOTE:
If the screen in Figure 2 does NOT display (reprogramming does NOT complete).
6. Make sure to erase DTCs from all Systems.
^ During reprogramming DTCs will set in several systems and must be erased before TCM
reprogramming.
7. Go to TCM Reprogramming below.
TCM Reprogramming
1. Restart the C-III session by selecting the «Home» icon in the upper left corner of the C-III screen.
^ Make sure to erase DTCs from all systems.
^ TCM initialization is not needed for 7 speed A/T reprogramming.
Reprogramming Caution
Infiniti Qx56 Rwd Workshop Manual (V8-5.6L (VK56VD) (2011))
Infiniti Workshop Manuals > Powertrain Management > Computers and Control Systems > Relays and Modules Computers and Control Systems > Engine Control Module > Component Information > Technical Service Bulletins >
Customer Interest for Engine Control Module: > 11-020 > Mar > 11 > Engine, A/T Controls — Hesitation/A/T Shift Issues >
Page 479
2. Navigate C-III to the reprogramming screen shown in Figure 1A example above.
NOTE:
^ Do not use the «Reprogramming / Programming» selection.
^ Select the Model and Model Year and then navigate to Direct Diagnosis > Reprogramming.
^ TCM initialization is not needed for 7 Speed A/T reprogramming.
3. On your C-III screen look for a Transmission Part Number in the Part Number column (see
Figure 1A example).
^ If there is no Transmission Part Number listed, this reprogramming does not apply; go to ICC
reprogramming.
^ If a Transmission Part Number is listed write it on the Repair Order.
4. Compare the P/N you wrote down to the numbers in the Current TCM P/N column in Table A-1
above.
^ If there is a match this reprogramming applies. Continue with the reprogramming procedure.
^ If there is not a match this reprogramming does not apply; go to ICC reprogramming below.
Infiniti Qx56 Rwd Workshop Manual (V8-5.6L (VK56VD) (2011))
Infiniti Workshop Manuals > Powertrain Management > Computers and Control Systems > Relays and Modules Computers and Control Systems > Engine Control Module > Component Information > Technical Service Bulletins >
Customer Interest for Engine Control Module: > 11-020 > Mar > 11 > Engine, A/T Controls — Hesitation/A/T Shift Issues >
Page 480
5. If you have performed TCM reprogramming; when reprogramming is complete, the screen in
Figure 2A displays.
6. Erase DTCs in all systems.
^ During TCM reprogramming, DTCs will set in several systems and must be erased before ICC
reprogramming.
7. Go to ICC Reprogramming below.
ICC Reprogramming
1. Restart the C-III session by selecting the Home icon in the upper left corner of the C-III screen.
NOTE:
^ The steps for reprogramming the Intelligent Cruise Control (ICC) are the same as the steps for
reprogramming the TCM.
Reprogramming Caution
Infiniti Qx56 Rwd Workshop Manual (V8-5.6L (VK56VD) (2011))
Infiniti Workshop Manuals > Powertrain Management > Computers and Control Systems > Relays and Modules Computers and Control Systems > Engine Control Module > Component Information > Technical Service Bulletins >
Customer Interest for Engine Control Module: > 11-020 > Mar > 11 > Engine, A/T Controls — Hesitation/A/T Shift Issues >
Page 481
2. Navigate C-III to the reprogramming screen shown in Figure 1B example above.
NOTE:
^ Do not use the Reprogramming / Programming selection.
^ Select the Model and Model Year and then navigate to Direct Diagnosis > Reprogramming.
3. On your C-III screen, look for an ICC/ADAS Part Number in the Part Number column (see Figure
1B example).
^ If there is no ICC/ADAS Part Number listed, this reprogramming is not needed.
^ If an ICC/ADAS Part Number is listed, write it on the Repair Order.
4. Compare the P/N you wrote down to the numbers in the Current ICC/ADAS P/N column in Table
A-2 above.
^ If there is a match, this reprogramming applies. Continue with the reprogramming procedure.
^ If there is not a match, this reprogramming is not needed.
Infiniti Qx56 Rwd Workshop Manual (V8-5.6L (VK56VD) (2011))
Infiniti Workshop Manuals > Powertrain Management > Computers and Control Systems > Relays and Modules Computers and Control Systems > Engine Control Module > Component Information > Technical Service Bulletins >
Customer Interest for Engine Control Module: > 11-020 > Mar > 11 > Engine, A/T Controls — Hesitation/A/T Shift Issues >
Page 482
5. If you have performed ICC reprogramming; when reprogramming is complete the screen in
Figure 2B displays.
6. Erase DTCs in all systems.
^ During ICC reprogramming, DTCs will set in several systems and must be erased.
Infiniti Qx56 Rwd Workshop Manual (V8-5.6L (VK56VD) (2011))
Infiniti Workshop Manuals > Powertrain Management > Computers and Control Systems > Relays and Modules Computers and Control Systems > Engine Control Module > Component Information > Technical Service Bulletins > All
Technical Service Bulletins for Engine Control Module: > 11-020 > Mar > 11 > Engine, A/T Controls — Hesitation/A/T Shift
Issues
Technical Service Bulletin # 11-020 Date: 110310
Engine, A/T Controls — Hesitation/A/T Shift Issues
Classification: AT 11-004
Reference: ITB11-020
Date: March 10, 2011
2011 QX56; TRANSMISSION SHIFT ISSUES AND HESITATION ISSUES
APPLIED VEHICLES: 2011 QX56 (Z62)
IF YOU CONFIRM
Any of the following symptoms:
^ Gear hunting or excessive downshifting when using the Intelligent Cruise Control (ICC)
and/or
^ The feel of the transmission shifting from Neutral to Drive (may be described as «bump» feel from
the rear) while stopped with the transmission in
Drive
and/or
^ A slight hesitation when accelerating from a stop,
and/or
^ A slight vehicle shudder/vibration during light acceleration,
ACTIONS
1. Perform ECM reprogramming.
^ Refer to Step 3 under ECM reprogramming in the Service Procedure to confirm ECM
reprogramming applies and is needed for the vehicle you are working on.
2. Perform TCM reprogramming.
^ Refer to Step 3 under TCM reprogramming in the Service Procedure to confirm TCM
reprogramming applies and is needed for the vehicle you are working on.
3. If equipped with Intelligent Cruise Control (ICC) perform ICC reprogramming.
^ Refer to Step 3 under ICC reprogramming in the Service Procedure to confirm ICC
reprogramming applies and is needed for the vehicle you are working on.
4. Test drive the vehicle and confirm the incident is resolved.
IMPORTANT:
The purpose of ACTIONS (above) is to give you a quick idea of the work you will be performing.
You MUST closely follow the entire SERVICE PROCEDURE as it contains information that is
essential to successfully completing this repair.
Infiniti Qx56 Rwd Workshop Manual (V8-5.6L (VK56VD) (2011))
Infiniti Workshop Manuals > Powertrain Management > Computers and Control Systems > Relays and Modules Computers and Control Systems > Engine Control Module > Component Information > Technical Service Bulletins > All
Technical Service Bulletins for Engine Control Module: > 11-020 > Mar > 11 > Engine, A/T Controls — Hesitation/A/T Shift
Issues > Page 488
CLAIMS INFORMATION
Service Procedure
SERVICE PROCEDURE
ECM Reprogramming
1. Prepare the vehicle for the reprogramming procedure.
Reprogramming Caution
Infiniti Qx56 Rwd Workshop Manual (V8-5.6L (VK56VD) (2011))
Infiniti Workshop Manuals > Powertrain Management > Computers and Control Systems > Relays and Modules Computers and Control Systems > Engine Control Module > Component Information > Technical Service Bulletins > All
Technical Service Bulletins for Engine Control Module: > 11-020 > Mar > 11 > Engine, A/T Controls — Hesitation/A/T Shift
Issues > Page 489
2. Navigate C-III to the ECM Reprogramming screen shown in Figure 1.
^ Use the «Reprogramming / Programming» selection.
^ Do not use Direct Diagnosis > Reprogramming.
3. On your C-III screen, look at the Part Number column (see Figure 1 example):
^ If there is no Engine part number listed, then ECM reprogramming does not apply; go to TCM
reprogramming.
^ If an Engine Part Number is listed, write it on the Repair Order.
4. Compare the Part Number you wrote down to the numbers in the Current ECM P/N column in
Table A above.
^ If there is a match this reprogramming applies. Continue with the reprogramming procedure.
NOTE:
If there are two Engine lines (two ECM reprogramming options) on your C-III screen, use the one
that does not have the message «Caution! Use ONLY with ITBXX-XXX».
^ If there is not a match, this reprogramming does not apply; go to TCM reprogramming below.
Infiniti Qx56 Rwd Workshop Manual (V8-5.6L (VK56VD) (2011))
Infiniti Workshop Manuals > Powertrain Management > Computers and Control Systems > Relays and Modules Computers and Control Systems > Engine Control Module > Component Information > Technical Service Bulletins > All
Technical Service Bulletins for Engine Control Module: > 11-020 > Mar > 11 > Engine, A/T Controls — Hesitation/A/T Shift
Issues > Page 490
5. When ECM reprogramming is complete, the screen in Figure 2 displays.
NOTE:
If the screen in Figure 2 does NOT display (reprogramming does NOT complete).
6. Make sure to erase DTCs from all Systems.
^ During reprogramming DTCs will set in several systems and must be erased before TCM
reprogramming.
7. Go to TCM Reprogramming below.
TCM Reprogramming
1. Restart the C-III session by selecting the «Home» icon in the upper left corner of the C-III screen.
^ Make sure to erase DTCs from all systems.
^ TCM initialization is not needed for 7 speed A/T reprogramming.
Reprogramming Caution
Infiniti Qx56 Rwd Workshop Manual (V8-5.6L (VK56VD) (2011))
Infiniti Workshop Manuals > Powertrain Management > Computers and Control Systems > Relays and Modules Computers and Control Systems > Engine Control Module > Component Information > Technical Service Bulletins > All
Technical Service Bulletins for Engine Control Module: > 11-020 > Mar > 11 > Engine, A/T Controls — Hesitation/A/T Shift
Issues > Page 491
2. Navigate C-III to the reprogramming screen shown in Figure 1A example above.
NOTE:
^ Do not use the «Reprogramming / Programming» selection.
^ Select the Model and Model Year and then navigate to Direct Diagnosis > Reprogramming.
^ TCM initialization is not needed for 7 Speed A/T reprogramming.
3. On your C-III screen look for a Transmission Part Number in the Part Number column (see
Figure 1A example).
^ If there is no Transmission Part Number listed, this reprogramming does not apply; go to ICC
reprogramming.
^ If a Transmission Part Number is listed write it on the Repair Order.
4. Compare the P/N you wrote down to the numbers in the Current TCM P/N column in Table A-1
above.
^ If there is a match this reprogramming applies. Continue with the reprogramming procedure.
^ If there is not a match this reprogramming does not apply; go to ICC reprogramming below.
Infiniti Qx56 Rwd Workshop Manual (V8-5.6L (VK56VD) (2011))
Infiniti Workshop Manuals > Powertrain Management > Computers and Control Systems > Relays and Modules Computers and Control Systems > Engine Control Module > Component Information > Technical Service Bulletins > All
Technical Service Bulletins for Engine Control Module: > 11-020 > Mar > 11 > Engine, A/T Controls — Hesitation/A/T Shift
Issues > Page 492
5. If you have performed TCM reprogramming; when reprogramming is complete, the screen in
Figure 2A displays.
6. Erase DTCs in all systems.
^ During TCM reprogramming, DTCs will set in several systems and must be erased before ICC
reprogramming.
7. Go to ICC Reprogramming below.
ICC Reprogramming
1. Restart the C-III session by selecting the Home icon in the upper left corner of the C-III screen.
NOTE:
^ The steps for reprogramming the Intelligent Cruise Control (ICC) are the same as the steps for
reprogramming the TCM.
Reprogramming Caution
Infiniti Qx56 Rwd Workshop Manual (V8-5.6L (VK56VD) (2011))
Infiniti Workshop Manuals > Powertrain Management > Computers and Control Systems > Relays and Modules Computers and Control Systems > Engine Control Module > Component Information > Technical Service Bulletins > All
Technical Service Bulletins for Engine Control Module: > 11-020 > Mar > 11 > Engine, A/T Controls — Hesitation/A/T Shift
Issues > Page 493
2. Navigate C-III to the reprogramming screen shown in Figure 1B example above.
NOTE:
^ Do not use the Reprogramming / Programming selection.
^ Select the Model and Model Year and then navigate to Direct Diagnosis > Reprogramming.
3. On your C-III screen, look for an ICC/ADAS Part Number in the Part Number column (see Figure
1B example).
^ If there is no ICC/ADAS Part Number listed, this reprogramming is not needed.
^ If an ICC/ADAS Part Number is listed, write it on the Repair Order.
4. Compare the P/N you wrote down to the numbers in the Current ICC/ADAS P/N column in Table
A-2 above.
^ If there is a match, this reprogramming applies. Continue with the reprogramming procedure.
^ If there is not a match, this reprogramming is not needed.
Infiniti Qx56 Rwd Workshop Manual (V8-5.6L (VK56VD) (2011))
Infiniti Workshop Manuals > Powertrain Management > Computers and Control Systems > Relays and Modules Computers and Control Systems > Engine Control Module > Component Information > Technical Service Bulletins > All
Technical Service Bulletins for Engine Control Module: > 11-020 > Mar > 11 > Engine, A/T Controls — Hesitation/A/T Shift
Issues > Page 494
5. If you have performed ICC reprogramming; when reprogramming is complete the screen in
Figure 2B displays.
6. Erase DTCs in all systems.
^ During ICC reprogramming, DTCs will set in several systems and must be erased.
Infiniti Qx56 Rwd Workshop Manual (V8-5.6L (VK56VD) (2011))
Infiniti Workshop Manuals > Powertrain Management > Emission Control Systems > Evaporative Emissions System >
System Information > Technical Service Bulletins > Emissions — EVAP DTC Leak Diagnostics
Evaporative Emissions System: Technical Service Bulletins Emissions — EVAP DTC Leak
Diagnostics
Classification: EC09-002C
Reference: ITB09-012C
Date: April 6, 2011
EVAP LEAK DTC DIAGNOSIS
This bulletin has been amended. The REPAIR FLOW CHART and CLAIMS INFORMATION have
been amended. Please discard all previous copies.
APPLIED VEHICLES: 2007 — 2011 Infiniti vehicles
SERVICE INFORMATION
If one or more DTCs listed below related to EVAP system leaks is found stored in Self Diagnosis
use the REPAIR FLOW CHART. Use the EVAP system diagram for reference.
^ DTCs: P0442, P0455 and P0456.
^ This Service Procedure can be used in addition to the procedure(s) outlined in the applicable
Service Manual and other bulletins applicable to specific
EVAP leak DTCs when necessary.
^ If a «Smoke» (Leak Detection) Machine is available and preferred the REPAIR FLOW CHART can
still be used. This tool would be used in place of
watching for pressure drop and spraying with soapy water. Refer to the Machine’s Operator’s
Manual for proper use.
CAUTION:
Use Essential Tool J-42909 (sent out to dealers September 1997) or equivalent to pressurize the
EVAP system. Do not pressurize over the amount specified in the applicable Service Manual. Do
NOT use shop air pressure.
IMPORTANT NOTE:
If an EVAP system DTC(s) not related to EVAP leaks is/are found stored in Self Diagnosis this
bulletin does not apply. Refer to ASIST and the appropriate Service Manual for diagnostic
procedure(s) as needed.
Infiniti Qx56 Rwd Workshop Manual (V8-5.6L (VK56VD) (2011))
Infiniti Workshop Manuals > Powertrain Management > Emission Control Systems > Evaporative Emissions System >
System Information > Technical Service Bulletins > Emissions — EVAP DTC Leak Diagnostics > Page 500
Infiniti Qx56 Rwd Workshop Manual (V8-5.6L (VK56VD) (2011))
Infiniti Workshop Manuals > Powertrain Management > Emission Control Systems > Evaporative Emissions System >
System Information > Technical Service Bulletins > Emissions — EVAP DTC Leak Diagnostics > Page 501
Infiniti Qx56 Rwd Workshop Manual (V8-5.6L (VK56VD) (2011))
Infiniti Workshop Manuals > Powertrain Management > Emission Control Systems > Evaporative Emissions System >
System Information > Technical Service Bulletins > Emissions — EVAP DTC Leak Diagnostics > Page 502
Infiniti Qx56 Rwd Workshop Manual (V8-5.6L (VK56VD) (2011))
Infiniti Workshop Manuals > Powertrain Management > Emission Control Systems > Evaporative Emissions System >
System Information > Technical Service Bulletins > Emissions — EVAP DTC Leak Diagnostics > Page 503
REPAIR FLOW CHART
Infiniti Qx56 Rwd Workshop Manual (V8-5.6L (VK56VD) (2011))
Infiniti Workshop Manuals > Powertrain Management > Emission Control Systems > Evaporative Emissions System >
System Information > Technical Service Bulletins > Emissions — EVAP DTC Leak Diagnostics > Page 504
DIAGRAM OF TYPICAL EVAP SYSTEM
Infiniti Qx56 Rwd Workshop Manual (V8-5.6L (VK56VD) (2011))
Infiniti Workshop Manuals > Powertrain Management > Emission Control Systems > Evaporative Emissions System >
System Information > Technical Service Bulletins > Emissions — EVAP DTC Leak Diagnostics > Page 505
Infiniti Qx56 Rwd Workshop Manual (V8-5.6L (VK56VD) (2011))
Infiniti Workshop Manuals > Powertrain Management > Emission Control Systems > Evaporative Emissions System >
System Information > Technical Service Bulletins > Emissions — EVAP DTC Leak Diagnostics > Page 506
CLAIMS INFORMATION
Infiniti Qx56 Rwd Workshop Manual (V8-5.6L (VK56VD) (2011))
Infiniti Workshop Manuals > Powertrain Management > Fuel Delivery and Air Induction > Fuel Pump > Component
Information > Service Precautions
Fuel Pump: Service Precautions
FUEL SAFETY PRECAUTIONS
WARNING: Adhere to the following procedures any time the fuel system is being worked on in
order to reduce the risk of fire and personal injury:
— Keep a dry chemical (Class B) fire extinguisher near the work area.
— Place a «CAUTION FLAMMABLE» sign in the work area.
— Work in a well-ventilated area. Do not smoke, and keep sparks and open flames away.
— Wear eye protection.
— Use caution when working near the catalytic converter to prevent the possibility of burns or fire.
(The temperatures within the converter can exceed 537 degrees C (1000 degrees F).)
— Relieve the fuel system pressure prior to disconnecting fuel system components.
— Disconnect the negative battery cable except for tests where battery voltage is required.
— Use a suitable container to store or catch fuel.
— Do not replace fuel pipe with fuel hose.
— Plug all disconnected fuel line fittings and hoses.
— After making any fuel system repairs ALWAYS inspect for fuel leaks.
Infiniti Qx56 Rwd Workshop Manual (V8-5.6L (VK56VD) (2011))
Infiniti Workshop Manuals > Powertrain Management > Fuel Delivery and Air Induction > Fuel Tank > Component
Information > Service Precautions
Fuel Tank: Service Precautions
FUEL SAFETY PRECAUTIONS
WARNING: Adhere to the following procedures any time the fuel system is being worked on in
order to reduce the risk of fire and personal injury:
— Keep a dry chemical (Class B) fire extinguisher near the work area.
— Place a «CAUTION FLAMMABLE» sign in the work area.
— Work in a well-ventilated area. Do not smoke, and keep sparks and open flames away.
— Wear eye protection.
— Use caution when working near the catalytic converter to prevent the possibility of burns or fire.
(The temperatures within the converter can exceed 537 degrees C (1000 degrees F).)
— Relieve the fuel system pressure prior to disconnecting fuel system components.
— Disconnect the negative battery cable except for tests where battery voltage is required.
— Use a suitable container to store or catch fuel.
— Do not replace fuel pipe with fuel hose.
— Plug all disconnected fuel line fittings and hoses.
— After making any fuel system repairs ALWAYS inspect for fuel leaks.
Infiniti Qx56 Rwd Workshop Manual (V8-5.6L (VK56VD) (2011))
Infiniti Workshop Manuals > Powertrain Management > Transmission Control Systems > Relays and Modules Transmission and Drivetrain > Relays and Modules — A/T > Control Module, A/T > Component Information > Technical
Service Bulletins > All Technical Service Bulletins for Control Module: > 11-020 > Mar > 11 > Engine, A/T Controls Hesitation/A/T Shift Issues
Technical Service Bulletin # 11-020 Date: 110310
Engine, A/T Controls — Hesitation/A/T Shift Issues
Classification: AT 11-004
Reference: ITB11-020
Date: March 10, 2011
2011 QX56; TRANSMISSION SHIFT ISSUES AND HESITATION ISSUES
APPLIED VEHICLES: 2011 QX56 (Z62)
IF YOU CONFIRM
Any of the following symptoms:
^ Gear hunting or excessive downshifting when using the Intelligent Cruise Control (ICC)
and/or
^ The feel of the transmission shifting from Neutral to Drive (may be described as «bump» feel from
the rear) while stopped with the transmission in
Drive
and/or
^ A slight hesitation when accelerating from a stop,
and/or
^ A slight vehicle shudder/vibration during light acceleration,
ACTIONS
1. Perform ECM reprogramming.
^ Refer to Step 3 under ECM reprogramming in the Service Procedure to confirm ECM
reprogramming applies and is needed for the vehicle you are working on.
2. Perform TCM reprogramming.
^ Refer to Step 3 under TCM reprogramming in the Service Procedure to confirm TCM
reprogramming applies and is needed for the vehicle you are working on.
3. If equipped with Intelligent Cruise Control (ICC) perform ICC reprogramming.
^ Refer to Step 3 under ICC reprogramming in the Service Procedure to confirm ICC
reprogramming applies and is needed for the vehicle you are working on.
4. Test drive the vehicle and confirm the incident is resolved.
IMPORTANT:
The purpose of ACTIONS (above) is to give you a quick idea of the work you will be performing.
You MUST closely follow the entire SERVICE PROCEDURE as it contains information that is
essential to successfully completing this repair.
Infiniti Qx56 Rwd Workshop Manual (V8-5.6L (VK56VD) (2011))
Infiniti Workshop Manuals > Powertrain Management > Transmission Control Systems > Relays and Modules Transmission and Drivetrain > Relays and Modules — A/T > Control Module, A/T > Component Information > Technical
Service Bulletins > All Technical Service Bulletins for Control Module: > 11-020 > Mar > 11 > Engine, A/T Controls Hesitation/A/T Shift Issues > Page 525
CLAIMS INFORMATION
Service Procedure
SERVICE PROCEDURE
ECM Reprogramming
1. Prepare the vehicle for the reprogramming procedure.
Reprogramming Caution
Infiniti Qx56 Rwd Workshop Manual (V8-5.6L (VK56VD) (2011))
Infiniti Workshop Manuals > Powertrain Management > Transmission Control Systems > Relays and Modules Transmission and Drivetrain > Relays and Modules — A/T > Control Module, A/T > Component Information > Technical
Service Bulletins > All Technical Service Bulletins for Control Module: > 11-020 > Mar > 11 > Engine, A/T Controls Hesitation/A/T Shift Issues > Page 526
2. Navigate C-III to the ECM Reprogramming screen shown in Figure 1.
^ Use the «Reprogramming / Programming» selection.
^ Do not use Direct Diagnosis > Reprogramming.
3. On your C-III screen, look at the Part Number column (see Figure 1 example):
^ If there is no Engine part number listed, then ECM reprogramming does not apply; go to TCM
reprogramming.
^ If an Engine Part Number is listed, write it on the Repair Order.
4. Compare the Part Number you wrote down to the numbers in the Current ECM P/N column in
Table A above.
^ If there is a match this reprogramming applies. Continue with the reprogramming procedure.
NOTE:
If there are two Engine lines (two ECM reprogramming options) on your C-III screen, use the one
that does not have the message «Caution! Use ONLY with ITBXX-XXX».
^ If there is not a match, this reprogramming does not apply; go to TCM reprogramming below.
Infiniti Qx56 Rwd Workshop Manual (V8-5.6L (VK56VD) (2011))
Infiniti Workshop Manuals > Powertrain Management > Transmission Control Systems > Relays and Modules Transmission and Drivetrain > Relays and Modules — A/T > Control Module, A/T > Component Information > Technical
Service Bulletins > All Technical Service Bulletins for Control Module: > 11-020 > Mar > 11 > Engine, A/T Controls Hesitation/A/T Shift Issues > Page 527
5. When ECM reprogramming is complete, the screen in Figure 2 displays.
NOTE:
If the screen in Figure 2 does NOT display (reprogramming does NOT complete).
6. Make sure to erase DTCs from all Systems.
^ During reprogramming DTCs will set in several systems and must be erased before TCM
reprogramming.
7. Go to TCM Reprogramming below.
TCM Reprogramming
1. Restart the C-III session by selecting the «Home» icon in the upper left corner of the C-III screen.
^ Make sure to erase DTCs from all systems.
^ TCM initialization is not needed for 7 speed A/T reprogramming.
Reprogramming Caution
Infiniti Qx56 Rwd Workshop Manual (V8-5.6L (VK56VD) (2011))
Infiniti Workshop Manuals > Powertrain Management > Transmission Control Systems > Relays and Modules Transmission and Drivetrain > Relays and Modules — A/T > Control Module, A/T > Component Information > Technical
Service Bulletins > All Technical Service Bulletins for Control Module: > 11-020 > Mar > 11 > Engine, A/T Controls Hesitation/A/T Shift Issues > Page 528
2. Navigate C-III to the reprogramming screen shown in Figure 1A example above.
NOTE:
^ Do not use the «Reprogramming / Programming» selection.
^ Select the Model and Model Year and then navigate to Direct Diagnosis > Reprogramming.
^ TCM initialization is not needed for 7 Speed A/T reprogramming.
3. On your C-III screen look for a Transmission Part Number in the Part Number column (see
Figure 1A example).
^ If there is no Transmission Part Number listed, this reprogramming does not apply; go to ICC
reprogramming.
^ If a Transmission Part Number is listed write it on the Repair Order.
4. Compare the P/N you wrote down to the numbers in the Current TCM P/N column in Table A-1
above.
^ If there is a match this reprogramming applies. Continue with the reprogramming procedure.
^ If there is not a match this reprogramming does not apply; go to ICC reprogramming below.
Infiniti Qx56 Rwd Workshop Manual (V8-5.6L (VK56VD) (2011))
Infiniti Workshop Manuals > Powertrain Management > Transmission Control Systems > Relays and Modules Transmission and Drivetrain > Relays and Modules — A/T > Control Module, A/T > Component Information > Technical
Service Bulletins > All Technical Service Bulletins for Control Module: > 11-020 > Mar > 11 > Engine, A/T Controls Hesitation/A/T Shift Issues > Page 529
5. If you have performed TCM reprogramming; when reprogramming is complete, the screen in
Figure 2A displays.
6. Erase DTCs in all systems.
^ During TCM reprogramming, DTCs will set in several systems and must be erased before ICC
reprogramming.
7. Go to ICC Reprogramming below.
ICC Reprogramming
1. Restart the C-III session by selecting the Home icon in the upper left corner of the C-III screen.
NOTE:
^ The steps for reprogramming the Intelligent Cruise Control (ICC) are the same as the steps for
reprogramming the TCM.
Reprogramming Caution
Infiniti Qx56 Rwd Workshop Manual (V8-5.6L (VK56VD) (2011))
Infiniti Workshop Manuals > Powertrain Management > Transmission Control Systems > Relays and Modules Transmission and Drivetrain > Relays and Modules — A/T > Control Module, A/T > Component Information > Technical
Service Bulletins > All Technical Service Bulletins for Control Module: > 11-020 > Mar > 11 > Engine, A/T Controls Hesitation/A/T Shift Issues > Page 530
2. Navigate C-III to the reprogramming screen shown in Figure 1B example above.
NOTE:
^ Do not use the Reprogramming / Programming selection.
^ Select the Model and Model Year and then navigate to Direct Diagnosis > Reprogramming.
3. On your C-III screen, look for an ICC/ADAS Part Number in the Part Number column (see Figure
1B example).
^ If there is no ICC/ADAS Part Number listed, this reprogramming is not needed.
^ If an ICC/ADAS Part Number is listed, write it on the Repair Order.
4. Compare the P/N you wrote down to the numbers in the Current ICC/ADAS P/N column in Table
A-2 above.
^ If there is a match, this reprogramming applies. Continue with the reprogramming procedure.
^ If there is not a match, this reprogramming is not needed.
Infiniti Qx56 Rwd Workshop Manual (V8-5.6L (VK56VD) (2011))
Infiniti Workshop Manuals > Powertrain Management > Transmission Control Systems > Relays and Modules Transmission and Drivetrain > Relays and Modules — A/T > Control Module, A/T > Component Information > Technical
Service Bulletins > All Technical Service Bulletins for Control Module: > 11-020 > Mar > 11 > Engine, A/T Controls Hesitation/A/T Shift Issues > Page 531
5. If you have performed ICC reprogramming; when reprogramming is complete the screen in
Figure 2B displays.
6. Erase DTCs in all systems.
^ During ICC reprogramming, DTCs will set in several systems and must be erased.
Infiniti Qx56 Rwd Workshop Manual (V8-5.6L (VK56VD) (2011))
Infiniti Workshop Manuals > Powertrain Management > Transmission Control Systems > Relays and Modules Transmission and Drivetrain > Relays and Modules — A/T > Control Module, A/T > Component Information > Technical
Service Bulletins > Customer Interest for Control Module: > 11-020 > Mar > 11 > Engine, A/T Controls — Hesitation/A/T Shift
Issues
Technical Service Bulletin # 11-020 Date: 110310
Engine, A/T Controls — Hesitation/A/T Shift Issues
Classification: AT 11-004
Reference: ITB11-020
Date: March 10, 2011
2011 QX56; TRANSMISSION SHIFT ISSUES AND HESITATION ISSUES
APPLIED VEHICLES: 2011 QX56 (Z62)
IF YOU CONFIRM
Any of the following symptoms:
^ Gear hunting or excessive downshifting when using the Intelligent Cruise Control (ICC)
and/or
^ The feel of the transmission shifting from Neutral to Drive (may be described as «bump» feel from
the rear) while stopped with the transmission in
Drive
and/or
^ A slight hesitation when accelerating from a stop,
and/or
^ A slight vehicle shudder/vibration during light acceleration,
ACTIONS
1. Perform ECM reprogramming.
^ Refer to Step 3 under ECM reprogramming in the Service Procedure to confirm ECM
reprogramming applies and is needed for the vehicle you are working on.
2. Perform TCM reprogramming.
^ Refer to Step 3 under TCM reprogramming in the Service Procedure to confirm TCM
reprogramming applies and is needed for the vehicle you are working on.
3. If equipped with Intelligent Cruise Control (ICC) perform ICC reprogramming.
^ Refer to Step 3 under ICC reprogramming in the Service Procedure to confirm ICC
reprogramming applies and is needed for the vehicle you are working on.
4. Test drive the vehicle and confirm the incident is resolved.
IMPORTANT:
The purpose of ACTIONS (above) is to give you a quick idea of the work you will be performing.
You MUST closely follow the entire SERVICE PROCEDURE as it contains information that is
essential to successfully completing this repair.
Infiniti Qx56 Rwd Workshop Manual (V8-5.6L (VK56VD) (2011))
Infiniti Workshop Manuals > Powertrain Management > Transmission Control Systems > Relays and Modules Transmission and Drivetrain > Relays and Modules — A/T > Control Module, A/T > Component Information > Technical
Service Bulletins > Customer Interest for Control Module: > 11-020 > Mar > 11 > Engine, A/T Controls — Hesitation/A/T Shift
Issues > Page 537
CLAIMS INFORMATION
Service Procedure
SERVICE PROCEDURE
ECM Reprogramming
1. Prepare the vehicle for the reprogramming procedure.
Reprogramming Caution
Infiniti Qx56 Rwd Workshop Manual (V8-5.6L (VK56VD) (2011))
Infiniti Workshop Manuals > Powertrain Management > Transmission Control Systems > Relays and Modules Transmission and Drivetrain > Relays and Modules — A/T > Control Module, A/T > Component Information > Technical
Service Bulletins > Customer Interest for Control Module: > 11-020 > Mar > 11 > Engine, A/T Controls — Hesitation/A/T Shift
Issues > Page 538
2. Navigate C-III to the ECM Reprogramming screen shown in Figure 1.
^ Use the «Reprogramming / Programming» selection.
^ Do not use Direct Diagnosis > Reprogramming.
3. On your C-III screen, look at the Part Number column (see Figure 1 example):
^ If there is no Engine part number listed, then ECM reprogramming does not apply; go to TCM
reprogramming.
^ If an Engine Part Number is listed, write it on the Repair Order.
4. Compare the Part Number you wrote down to the numbers in the Current ECM P/N column in
Table A above.
^ If there is a match this reprogramming applies. Continue with the reprogramming procedure.
NOTE:
If there are two Engine lines (two ECM reprogramming options) on your C-III screen, use the one
that does not have the message «Caution! Use ONLY with ITBXX-XXX».
^ If there is not a match, this reprogramming does not apply; go to TCM reprogramming below.
Infiniti Qx56 Rwd Workshop Manual (V8-5.6L (VK56VD) (2011))
Infiniti Workshop Manuals > Powertrain Management > Transmission Control Systems > Relays and Modules Transmission and Drivetrain > Relays and Modules — A/T > Control Module, A/T > Component Information > Technical
Service Bulletins > Customer Interest for Control Module: > 11-020 > Mar > 11 > Engine, A/T Controls — Hesitation/A/T Shift
Issues > Page 539
5. When ECM reprogramming is complete, the screen in Figure 2 displays.
NOTE:
If the screen in Figure 2 does NOT display (reprogramming does NOT complete).
6. Make sure to erase DTCs from all Systems.
^ During reprogramming DTCs will set in several systems and must be erased before TCM
reprogramming.
7. Go to TCM Reprogramming below.
TCM Reprogramming
1. Restart the C-III session by selecting the «Home» icon in the upper left corner of the C-III screen.
^ Make sure to erase DTCs from all systems.
^ TCM initialization is not needed for 7 speed A/T reprogramming.
Reprogramming Caution
Infiniti Qx56 Rwd Workshop Manual (V8-5.6L (VK56VD) (2011))
Infiniti Workshop Manuals > Powertrain Management > Transmission Control Systems > Relays and Modules Transmission and Drivetrain > Relays and Modules — A/T > Control Module, A/T > Component Information > Technical
Service Bulletins > Customer Interest for Control Module: > 11-020 > Mar > 11 > Engine, A/T Controls — Hesitation/A/T Shift
Issues > Page 540
2. Navigate C-III to the reprogramming screen shown in Figure 1A example above.
NOTE:
^ Do not use the «Reprogramming / Programming» selection.
^ Select the Model and Model Year and then navigate to Direct Diagnosis > Reprogramming.
^ TCM initialization is not needed for 7 Speed A/T reprogramming.
3. On your C-III screen look for a Transmission Part Number in the Part Number column (see
Figure 1A example).
^ If there is no Transmission Part Number listed, this reprogramming does not apply; go to ICC
reprogramming.
^ If a Transmission Part Number is listed write it on the Repair Order.
4. Compare the P/N you wrote down to the numbers in the Current TCM P/N column in Table A-1
above.
^ If there is a match this reprogramming applies. Continue with the reprogramming procedure.
^ If there is not a match this reprogramming does not apply; go to ICC reprogramming below.
Infiniti Qx56 Rwd Workshop Manual (V8-5.6L (VK56VD) (2011))
Infiniti Workshop Manuals > Powertrain Management > Transmission Control Systems > Relays and Modules Transmission and Drivetrain > Relays and Modules — A/T > Control Module, A/T > Component Information > Technical
Service Bulletins > Customer Interest for Control Module: > 11-020 > Mar > 11 > Engine, A/T Controls — Hesitation/A/T Shift
Issues > Page 541
5. If you have performed TCM reprogramming; when reprogramming is complete, the screen in
Figure 2A displays.
6. Erase DTCs in all systems.
^ During TCM reprogramming, DTCs will set in several systems and must be erased before ICC
reprogramming.
7. Go to ICC Reprogramming below.
ICC Reprogramming
1. Restart the C-III session by selecting the Home icon in the upper left corner of the C-III screen.
NOTE:
^ The steps for reprogramming the Intelligent Cruise Control (ICC) are the same as the steps for
reprogramming the TCM.
Reprogramming Caution
Infiniti Qx56 Rwd Workshop Manual (V8-5.6L (VK56VD) (2011))
Infiniti Workshop Manuals > Powertrain Management > Transmission Control Systems > Relays and Modules Transmission and Drivetrain > Relays and Modules — A/T > Control Module, A/T > Component Information > Technical
Service Bulletins > Customer Interest for Control Module: > 11-020 > Mar > 11 > Engine, A/T Controls — Hesitation/A/T Shift
Issues > Page 542
2. Navigate C-III to the reprogramming screen shown in Figure 1B example above.
NOTE:
^ Do not use the Reprogramming / Programming selection.
^ Select the Model and Model Year and then navigate to Direct Diagnosis > Reprogramming.
3. On your C-III screen, look for an ICC/ADAS Part Number in the Part Number column (see Figure
1B example).
^ If there is no ICC/ADAS Part Number listed, this reprogramming is not needed.
^ If an ICC/ADAS Part Number is listed, write it on the Repair Order.
4. Compare the P/N you wrote down to the numbers in the Current ICC/ADAS P/N column in Table
A-2 above.
^ If there is a match, this reprogramming applies. Continue with the reprogramming procedure.
^ If there is not a match, this reprogramming is not needed.
Infiniti Qx56 Rwd Workshop Manual (V8-5.6L (VK56VD) (2011))
Infiniti Workshop Manuals > Powertrain Management > Transmission Control Systems > Relays and Modules Transmission and Drivetrain > Relays and Modules — A/T > Control Module, A/T > Component Information > Technical
Service Bulletins > Customer Interest for Control Module: > 11-020 > Mar > 11 > Engine, A/T Controls — Hesitation/A/T Shift
Issues > Page 543
5. If you have performed ICC reprogramming; when reprogramming is complete the screen in
Figure 2B displays.
6. Erase DTCs in all systems.
^ During ICC reprogramming, DTCs will set in several systems and must be erased.
Infiniti Qx56 Rwd Workshop Manual (V8-5.6L (VK56VD) (2011))
Infiniti Workshop Manuals > Powertrain Management > PROM — Programmable Read Only Memory > Component
Information > Technical Service Bulletins > All Technical Service Bulletins for PROM — Programmable Read Only Memory: >
11-020 > Mar > 11 > Engine, A/T Controls — Hesitation/A/T Shift Issues
Technical Service Bulletin # 11-020 Date: 110310
Engine, A/T Controls — Hesitation/A/T Shift Issues
Classification: AT 11-004
Reference: ITB11-020
Date: March 10, 2011
2011 QX56; TRANSMISSION SHIFT ISSUES AND HESITATION ISSUES
APPLIED VEHICLES: 2011 QX56 (Z62)
IF YOU CONFIRM
Any of the following symptoms:
^ Gear hunting or excessive downshifting when using the Intelligent Cruise Control (ICC)
and/or
^ The feel of the transmission shifting from Neutral to Drive (may be described as «bump» feel from
the rear) while stopped with the transmission in
Drive
and/or
^ A slight hesitation when accelerating from a stop,
and/or
^ A slight vehicle shudder/vibration during light acceleration,
ACTIONS
1. Perform ECM reprogramming.
^ Refer to Step 3 under ECM reprogramming in the Service Procedure to confirm ECM
reprogramming applies and is needed for the vehicle you are working on.
2. Perform TCM reprogramming.
^ Refer to Step 3 under TCM reprogramming in the Service Procedure to confirm TCM
reprogramming applies and is needed for the vehicle you are working on.
3. If equipped with Intelligent Cruise Control (ICC) perform ICC reprogramming.
^ Refer to Step 3 under ICC reprogramming in the Service Procedure to confirm ICC
reprogramming applies and is needed for the vehicle you are working on.
4. Test drive the vehicle and confirm the incident is resolved.
IMPORTANT:
The purpose of ACTIONS (above) is to give you a quick idea of the work you will be performing.
You MUST closely follow the entire SERVICE PROCEDURE as it contains information that is
essential to successfully completing this repair.
Infiniti Qx56 Rwd Workshop Manual (V8-5.6L (VK56VD) (2011))
Infiniti Workshop Manuals > Powertrain Management > PROM — Programmable Read Only Memory > Component
Information > Technical Service Bulletins > All Technical Service Bulletins for PROM — Programmable Read Only Memory: >
11-020 > Mar > 11 > Engine, A/T Controls — Hesitation/A/T Shift Issues > Page 552
CLAIMS INFORMATION
Service Procedure
SERVICE PROCEDURE
ECM Reprogramming
1. Prepare the vehicle for the reprogramming procedure.
Reprogramming Caution
Infiniti Qx56 Rwd Workshop Manual (V8-5.6L (VK56VD) (2011))
Infiniti Workshop Manuals > Powertrain Management > PROM — Programmable Read Only Memory > Component
Information > Technical Service Bulletins > All Technical Service Bulletins for PROM — Programmable Read Only Memory: >
11-020 > Mar > 11 > Engine, A/T Controls — Hesitation/A/T Shift Issues > Page 553
2. Navigate C-III to the ECM Reprogramming screen shown in Figure 1.
^ Use the «Reprogramming / Programming» selection.
^ Do not use Direct Diagnosis > Reprogramming.
3. On your C-III screen, look at the Part Number column (see Figure 1 example):
^ If there is no Engine part number listed, then ECM reprogramming does not apply; go to TCM
reprogramming.
^ If an Engine Part Number is listed, write it on the Repair Order.
4. Compare the Part Number you wrote down to the numbers in the Current ECM P/N column in
Table A above.
^ If there is a match this reprogramming applies. Continue with the reprogramming procedure.
NOTE:
If there are two Engine lines (two ECM reprogramming options) on your C-III screen, use the one
that does not have the message «Caution! Use ONLY with ITBXX-XXX».
^ If there is not a match, this reprogramming does not apply; go to TCM reprogramming below.
Infiniti Qx56 Rwd Workshop Manual (V8-5.6L (VK56VD) (2011))
Infiniti Workshop Manuals > Powertrain Management > PROM — Programmable Read Only Memory > Component
Information > Technical Service Bulletins > All Technical Service Bulletins for PROM — Programmable Read Only Memory: >
11-020 > Mar > 11 > Engine, A/T Controls — Hesitation/A/T Shift Issues > Page 554
5. When ECM reprogramming is complete, the screen in Figure 2 displays.
NOTE:
If the screen in Figure 2 does NOT display (reprogramming does NOT complete).
6. Make sure to erase DTCs from all Systems.
^ During reprogramming DTCs will set in several systems and must be erased before TCM
reprogramming.
7. Go to TCM Reprogramming below.
TCM Reprogramming
1. Restart the C-III session by selecting the «Home» icon in the upper left corner of the C-III screen.
^ Make sure to erase DTCs from all systems.
^ TCM initialization is not needed for 7 speed A/T reprogramming.
Reprogramming Caution
Infiniti Qx56 Rwd Workshop Manual (V8-5.6L (VK56VD) (2011))
Infiniti Workshop Manuals > Powertrain Management > PROM — Programmable Read Only Memory > Component
Information > Technical Service Bulletins > All Technical Service Bulletins for PROM — Programmable Read Only Memory: >
11-020 > Mar > 11 > Engine, A/T Controls — Hesitation/A/T Shift Issues > Page 555
2. Navigate C-III to the reprogramming screen shown in Figure 1A example above.
NOTE:
^ Do not use the «Reprogramming / Programming» selection.
^ Select the Model and Model Year and then navigate to Direct Diagnosis > Reprogramming.
^ TCM initialization is not needed for 7 Speed A/T reprogramming.
3. On your C-III screen look for a Transmission Part Number in the Part Number column (see
Figure 1A example).
^ If there is no Transmission Part Number listed, this reprogramming does not apply; go to ICC
reprogramming.
^ If a Transmission Part Number is listed write it on the Repair Order.
4. Compare the P/N you wrote down to the numbers in the Current TCM P/N column in Table A-1
above.
^ If there is a match this reprogramming applies. Continue with the reprogramming procedure.
^ If there is not a match this reprogramming does not apply; go to ICC reprogramming below.
Infiniti Qx56 Rwd Workshop Manual (V8-5.6L (VK56VD) (2011))
Infiniti Workshop Manuals > Powertrain Management > PROM — Programmable Read Only Memory > Component
Information > Technical Service Bulletins > All Technical Service Bulletins for PROM — Programmable Read Only Memory: >
11-020 > Mar > 11 > Engine, A/T Controls — Hesitation/A/T Shift Issues > Page 556
5. If you have performed TCM reprogramming; when reprogramming is complete, the screen in
Figure 2A displays.
6. Erase DTCs in all systems.
^ During TCM reprogramming, DTCs will set in several systems and must be erased before ICC
reprogramming.
7. Go to ICC Reprogramming below.
ICC Reprogramming
1. Restart the C-III session by selecting the Home icon in the upper left corner of the C-III screen.
NOTE:
^ The steps for reprogramming the Intelligent Cruise Control (ICC) are the same as the steps for
reprogramming the TCM.
Reprogramming Caution
Infiniti Qx56 Rwd Workshop Manual (V8-5.6L (VK56VD) (2011))
Infiniti Workshop Manuals > Powertrain Management > PROM — Programmable Read Only Memory > Component
Information > Technical Service Bulletins > All Technical Service Bulletins for PROM — Programmable Read Only Memory: >
11-020 > Mar > 11 > Engine, A/T Controls — Hesitation/A/T Shift Issues > Page 557
2. Navigate C-III to the reprogramming screen shown in Figure 1B example above.
NOTE:
^ Do not use the Reprogramming / Programming selection.
^ Select the Model and Model Year and then navigate to Direct Diagnosis > Reprogramming.
3. On your C-III screen, look for an ICC/ADAS Part Number in the Part Number column (see Figure
1B example).
^ If there is no ICC/ADAS Part Number listed, this reprogramming is not needed.
^ If an ICC/ADAS Part Number is listed, write it on the Repair Order.
4. Compare the P/N you wrote down to the numbers in the Current ICC/ADAS P/N column in Table
A-2 above.
^ If there is a match, this reprogramming applies. Continue with the reprogramming procedure.
^ If there is not a match, this reprogramming is not needed.
Infiniti Qx56 Rwd Workshop Manual (V8-5.6L (VK56VD) (2011))
Infiniti Workshop Manuals > Powertrain Management > PROM — Programmable Read Only Memory > Component
Information > Technical Service Bulletins > All Technical Service Bulletins for PROM — Programmable Read Only Memory: >
11-020 > Mar > 11 > Engine, A/T Controls — Hesitation/A/T Shift Issues > Page 558
5. If you have performed ICC reprogramming; when reprogramming is complete the screen in
Figure 2B displays.
6. Erase DTCs in all systems.
^ During ICC reprogramming, DTCs will set in several systems and must be erased.
Infiniti Qx56 Rwd Workshop Manual (V8-5.6L (VK56VD) (2011))
Infiniti Workshop Manuals > Powertrain Management > PROM — Programmable Read Only Memory > Component
Information > Technical Service Bulletins > Customer Interest for PROM — Programmable Read Only Memory: > 11-020 >
Mar > 11 > Engine, A/T Controls — Hesitation/A/T Shift Issues
Technical Service Bulletin # 11-020 Date: 110310
Engine, A/T Controls — Hesitation/A/T Shift Issues
Classification: AT 11-004
Reference: ITB11-020
Date: March 10, 2011
2011 QX56; TRANSMISSION SHIFT ISSUES AND HESITATION ISSUES
APPLIED VEHICLES: 2011 QX56 (Z62)
IF YOU CONFIRM
Any of the following symptoms:
^ Gear hunting or excessive downshifting when using the Intelligent Cruise Control (ICC)
and/or
^ The feel of the transmission shifting from Neutral to Drive (may be described as «bump» feel from
the rear) while stopped with the transmission in
Drive
and/or
^ A slight hesitation when accelerating from a stop,
and/or
^ A slight vehicle shudder/vibration during light acceleration,
ACTIONS
1. Perform ECM reprogramming.
^ Refer to Step 3 under ECM reprogramming in the Service Procedure to confirm ECM
reprogramming applies and is needed for the vehicle you are working on.
2. Perform TCM reprogramming.
^ Refer to Step 3 under TCM reprogramming in the Service Procedure to confirm TCM
reprogramming applies and is needed for the vehicle you are working on.
3. If equipped with Intelligent Cruise Control (ICC) perform ICC reprogramming.
^ Refer to Step 3 under ICC reprogramming in the Service Procedure to confirm ICC
reprogramming applies and is needed for the vehicle you are working on.
4. Test drive the vehicle and confirm the incident is resolved.
IMPORTANT:
The purpose of ACTIONS (above) is to give you a quick idea of the work you will be performing.
You MUST closely follow the entire SERVICE PROCEDURE as it contains information that is
essential to successfully completing this repair.
Infiniti Qx56 Rwd Workshop Manual (V8-5.6L (VK56VD) (2011))
Infiniti Workshop Manuals > Powertrain Management > PROM — Programmable Read Only Memory > Component
Information > Technical Service Bulletins > Customer Interest for PROM — Programmable Read Only Memory: > 11-020 >
Mar > 11 > Engine, A/T Controls — Hesitation/A/T Shift Issues > Page 564
CLAIMS INFORMATION
Service Procedure
SERVICE PROCEDURE
ECM Reprogramming
1. Prepare the vehicle for the reprogramming procedure.
Reprogramming Caution
Infiniti Qx56 Rwd Workshop Manual (V8-5.6L (VK56VD) (2011))
Infiniti Workshop Manuals > Powertrain Management > PROM — Programmable Read Only Memory > Component
Information > Technical Service Bulletins > Customer Interest for PROM — Programmable Read Only Memory: > 11-020 >
Mar > 11 > Engine, A/T Controls — Hesitation/A/T Shift Issues > Page 565
2. Navigate C-III to the ECM Reprogramming screen shown in Figure 1.
^ Use the «Reprogramming / Programming» selection.
^ Do not use Direct Diagnosis > Reprogramming.
3. On your C-III screen, look at the Part Number column (see Figure 1 example):
^ If there is no Engine part number listed, then ECM reprogramming does not apply; go to TCM
reprogramming.
^ If an Engine Part Number is listed, write it on the Repair Order.
4. Compare the Part Number you wrote down to the numbers in the Current ECM P/N column in
Table A above.
^ If there is a match this reprogramming applies. Continue with the reprogramming procedure.
NOTE:
If there are two Engine lines (two ECM reprogramming options) on your C-III screen, use the one
that does not have the message «Caution! Use ONLY with ITBXX-XXX».
^ If there is not a match, this reprogramming does not apply; go to TCM reprogramming below.
Infiniti Qx56 Rwd Workshop Manual (V8-5.6L (VK56VD) (2011))
Infiniti Workshop Manuals > Powertrain Management > PROM — Programmable Read Only Memory > Component
Information > Technical Service Bulletins > Customer Interest for PROM — Programmable Read Only Memory: > 11-020 >
Mar > 11 > Engine, A/T Controls — Hesitation/A/T Shift Issues > Page 566
5. When ECM reprogramming is complete, the screen in Figure 2 displays.
NOTE:
If the screen in Figure 2 does NOT display (reprogramming does NOT complete).
6. Make sure to erase DTCs from all Systems.
^ During reprogramming DTCs will set in several systems and must be erased before TCM
reprogramming.
7. Go to TCM Reprogramming below.
TCM Reprogramming
1. Restart the C-III session by selecting the «Home» icon in the upper left corner of the C-III screen.
^ Make sure to erase DTCs from all systems.
^ TCM initialization is not needed for 7 speed A/T reprogramming.
Reprogramming Caution
Infiniti Qx56 Rwd Workshop Manual (V8-5.6L (VK56VD) (2011))
Infiniti Workshop Manuals > Powertrain Management > PROM — Programmable Read Only Memory > Component
Information > Technical Service Bulletins > Customer Interest for PROM — Programmable Read Only Memory: > 11-020 >
Mar > 11 > Engine, A/T Controls — Hesitation/A/T Shift Issues > Page 567
2. Navigate C-III to the reprogramming screen shown in Figure 1A example above.
NOTE:
^ Do not use the «Reprogramming / Programming» selection.
^ Select the Model and Model Year and then navigate to Direct Diagnosis > Reprogramming.
^ TCM initialization is not needed for 7 Speed A/T reprogramming.
3. On your C-III screen look for a Transmission Part Number in the Part Number column (see
Figure 1A example).
^ If there is no Transmission Part Number listed, this reprogramming does not apply; go to ICC
reprogramming.
^ If a Transmission Part Number is listed write it on the Repair Order.
4. Compare the P/N you wrote down to the numbers in the Current TCM P/N column in Table A-1
above.
^ If there is a match this reprogramming applies. Continue with the reprogramming procedure.
^ If there is not a match this reprogramming does not apply; go to ICC reprogramming below.
Infiniti Qx56 Rwd Workshop Manual (V8-5.6L (VK56VD) (2011))
Infiniti Workshop Manuals > Powertrain Management > PROM — Programmable Read Only Memory > Component
Information > Technical Service Bulletins > Customer Interest for PROM — Programmable Read Only Memory: > 11-020 >
Mar > 11 > Engine, A/T Controls — Hesitation/A/T Shift Issues > Page 568
5. If you have performed TCM reprogramming; when reprogramming is complete, the screen in
Figure 2A displays.
6. Erase DTCs in all systems.
^ During TCM reprogramming, DTCs will set in several systems and must be erased before ICC
reprogramming.
7. Go to ICC Reprogramming below.
ICC Reprogramming
1. Restart the C-III session by selecting the Home icon in the upper left corner of the C-III screen.
NOTE:
^ The steps for reprogramming the Intelligent Cruise Control (ICC) are the same as the steps for
reprogramming the TCM.
Reprogramming Caution
Infiniti Qx56 Rwd Workshop Manual (V8-5.6L (VK56VD) (2011))
Infiniti Workshop Manuals > Powertrain Management > PROM — Programmable Read Only Memory > Component
Information > Technical Service Bulletins > Customer Interest for PROM — Programmable Read Only Memory: > 11-020 >
Mar > 11 > Engine, A/T Controls — Hesitation/A/T Shift Issues > Page 569
2. Navigate C-III to the reprogramming screen shown in Figure 1B example above.
NOTE:
^ Do not use the Reprogramming / Programming selection.
^ Select the Model and Model Year and then navigate to Direct Diagnosis > Reprogramming.
3. On your C-III screen, look for an ICC/ADAS Part Number in the Part Number column (see Figure
1B example).
^ If there is no ICC/ADAS Part Number listed, this reprogramming is not needed.
^ If an ICC/ADAS Part Number is listed, write it on the Repair Order.
4. Compare the P/N you wrote down to the numbers in the Current ICC/ADAS P/N column in Table
A-2 above.
^ If there is a match, this reprogramming applies. Continue with the reprogramming procedure.
^ If there is not a match, this reprogramming is not needed.
Infiniti Qx56 Rwd Workshop Manual (V8-5.6L (VK56VD) (2011))
Infiniti Workshop Manuals > Powertrain Management > PROM — Programmable Read Only Memory > Component
Information > Technical Service Bulletins > Customer Interest for PROM — Programmable Read Only Memory: > 11-020 >
Mar > 11 > Engine, A/T Controls — Hesitation/A/T Shift Issues > Page 570
5. If you have performed ICC reprogramming; when reprogramming is complete the screen in
Figure 2B displays.
6. Erase DTCs in all systems.
^ During ICC reprogramming, DTCs will set in several systems and must be erased.
Infiniti Qx56 Rwd Workshop Manual (V8-5.6L (VK56VD) (2011))
Infiniti Workshop Manuals > Transmission and Drivetrain > Automatic Transmission/Transaxle > Control Module, A/T >
Component Information > Technical Service Bulletins > All Technical Service Bulletins for Control Module: > 11-020 > Mar >
11 > Engine, A/T Controls — Hesitation/A/T Shift Issues
Technical Service Bulletin # 11-020 Date: 110310
Engine, A/T Controls — Hesitation/A/T Shift Issues
Classification: AT 11-004
Reference: ITB11-020
Date: March 10, 2011
2011 QX56; TRANSMISSION SHIFT ISSUES AND HESITATION ISSUES
APPLIED VEHICLES: 2011 QX56 (Z62)
IF YOU CONFIRM
Any of the following symptoms:
^ Gear hunting or excessive downshifting when using the Intelligent Cruise Control (ICC)
and/or
^ The feel of the transmission shifting from Neutral to Drive (may be described as «bump» feel from
the rear) while stopped with the transmission in
Drive
and/or
^ A slight hesitation when accelerating from a stop,
and/or
^ A slight vehicle shudder/vibration during light acceleration,
ACTIONS
1. Perform ECM reprogramming.
^ Refer to Step 3 under ECM reprogramming in the Service Procedure to confirm ECM
reprogramming applies and is needed for the vehicle you are working on.
2. Perform TCM reprogramming.
^ Refer to Step 3 under TCM reprogramming in the Service Procedure to confirm TCM
reprogramming applies and is needed for the vehicle you are working on.
3. If equipped with Intelligent Cruise Control (ICC) perform ICC reprogramming.
^ Refer to Step 3 under ICC reprogramming in the Service Procedure to confirm ICC
reprogramming applies and is needed for the vehicle you are working on.
4. Test drive the vehicle and confirm the incident is resolved.
IMPORTANT:
The purpose of ACTIONS (above) is to give you a quick idea of the work you will be performing.
You MUST closely follow the entire SERVICE PROCEDURE as it contains information that is
essential to successfully completing this repair.
Infiniti Qx56 Rwd Workshop Manual (V8-5.6L (VK56VD) (2011))
Infiniti Workshop Manuals > Transmission and Drivetrain > Automatic Transmission/Transaxle > Control Module, A/T >
Component Information > Technical Service Bulletins > All Technical Service Bulletins for Control Module: > 11-020 > Mar >
11 > Engine, A/T Controls — Hesitation/A/T Shift Issues > Page 581
CLAIMS INFORMATION
Service Procedure
SERVICE PROCEDURE
ECM Reprogramming
1. Prepare the vehicle for the reprogramming procedure.
Reprogramming Caution
Infiniti Qx56 Rwd Workshop Manual (V8-5.6L (VK56VD) (2011))
Infiniti Workshop Manuals > Transmission and Drivetrain > Automatic Transmission/Transaxle > Control Module, A/T >
Component Information > Technical Service Bulletins > All Technical Service Bulletins for Control Module: > 11-020 > Mar >
11 > Engine, A/T Controls — Hesitation/A/T Shift Issues > Page 582
2. Navigate C-III to the ECM Reprogramming screen shown in Figure 1.
^ Use the «Reprogramming / Programming» selection.
^ Do not use Direct Diagnosis > Reprogramming.
3. On your C-III screen, look at the Part Number column (see Figure 1 example):
^ If there is no Engine part number listed, then ECM reprogramming does not apply; go to TCM
reprogramming.
^ If an Engine Part Number is listed, write it on the Repair Order.
4. Compare the Part Number you wrote down to the numbers in the Current ECM P/N column in
Table A above.
^ If there is a match this reprogramming applies. Continue with the reprogramming procedure.
NOTE:
If there are two Engine lines (two ECM reprogramming options) on your C-III screen, use the one
that does not have the message «Caution! Use ONLY with ITBXX-XXX».
^ If there is not a match, this reprogramming does not apply; go to TCM reprogramming below.
Infiniti Qx56 Rwd Workshop Manual (V8-5.6L (VK56VD) (2011))
Infiniti Workshop Manuals > Transmission and Drivetrain > Automatic Transmission/Transaxle > Control Module, A/T >
Component Information > Technical Service Bulletins > All Technical Service Bulletins for Control Module: > 11-020 > Mar >
11 > Engine, A/T Controls — Hesitation/A/T Shift Issues > Page 583
5. When ECM reprogramming is complete, the screen in Figure 2 displays.
NOTE:
If the screen in Figure 2 does NOT display (reprogramming does NOT complete).
6. Make sure to erase DTCs from all Systems.
^ During reprogramming DTCs will set in several systems and must be erased before TCM
reprogramming.
7. Go to TCM Reprogramming below.
TCM Reprogramming
1. Restart the C-III session by selecting the «Home» icon in the upper left corner of the C-III screen.
^ Make sure to erase DTCs from all systems.
^ TCM initialization is not needed for 7 speed A/T reprogramming.
Reprogramming Caution
Infiniti Qx56 Rwd Workshop Manual (V8-5.6L (VK56VD) (2011))
Infiniti Workshop Manuals > Transmission and Drivetrain > Automatic Transmission/Transaxle > Control Module, A/T >
Component Information > Technical Service Bulletins > All Technical Service Bulletins for Control Module: > 11-020 > Mar >
11 > Engine, A/T Controls — Hesitation/A/T Shift Issues > Page 584
2. Navigate C-III to the reprogramming screen shown in Figure 1A example above.
NOTE:
^ Do not use the «Reprogramming / Programming» selection.
^ Select the Model and Model Year and then navigate to Direct Diagnosis > Reprogramming.
^ TCM initialization is not needed for 7 Speed A/T reprogramming.
3. On your C-III screen look for a Transmission Part Number in the Part Number column (see
Figure 1A example).
^ If there is no Transmission Part Number listed, this reprogramming does not apply; go to ICC
reprogramming.
^ If a Transmission Part Number is listed write it on the Repair Order.
4. Compare the P/N you wrote down to the numbers in the Current TCM P/N column in Table A-1
above.
^ If there is a match this reprogramming applies. Continue with the reprogramming procedure.
^ If there is not a match this reprogramming does not apply; go to ICC reprogramming below.
Infiniti Qx56 Rwd Workshop Manual (V8-5.6L (VK56VD) (2011))
Infiniti Workshop Manuals > Transmission and Drivetrain > Automatic Transmission/Transaxle > Control Module, A/T >
Component Information > Technical Service Bulletins > All Technical Service Bulletins for Control Module: > 11-020 > Mar >
11 > Engine, A/T Controls — Hesitation/A/T Shift Issues > Page 585
5. If you have performed TCM reprogramming; when reprogramming is complete, the screen in
Figure 2A displays.
6. Erase DTCs in all systems.
^ During TCM reprogramming, DTCs will set in several systems and must be erased before ICC
reprogramming.
7. Go to ICC Reprogramming below.
ICC Reprogramming
1. Restart the C-III session by selecting the Home icon in the upper left corner of the C-III screen.
NOTE:
^ The steps for reprogramming the Intelligent Cruise Control (ICC) are the same as the steps for
reprogramming the TCM.
Reprogramming Caution
Infiniti Qx56 Rwd Workshop Manual (V8-5.6L (VK56VD) (2011))
Infiniti Workshop Manuals > Transmission and Drivetrain > Automatic Transmission/Transaxle > Control Module, A/T >
Component Information > Technical Service Bulletins > All Technical Service Bulletins for Control Module: > 11-020 > Mar >
11 > Engine, A/T Controls — Hesitation/A/T Shift Issues > Page 586
2. Navigate C-III to the reprogramming screen shown in Figure 1B example above.
NOTE:
^ Do not use the Reprogramming / Programming selection.
^ Select the Model and Model Year and then navigate to Direct Diagnosis > Reprogramming.
3. On your C-III screen, look for an ICC/ADAS Part Number in the Part Number column (see Figure
1B example).
^ If there is no ICC/ADAS Part Number listed, this reprogramming is not needed.
^ If an ICC/ADAS Part Number is listed, write it on the Repair Order.
4. Compare the P/N you wrote down to the numbers in the Current ICC/ADAS P/N column in Table
A-2 above.
^ If there is a match, this reprogramming applies. Continue with the reprogramming procedure.
^ If there is not a match, this reprogramming is not needed.
Infiniti Qx56 Rwd Workshop Manual (V8-5.6L (VK56VD) (2011))
Infiniti Workshop Manuals > Transmission and Drivetrain > Automatic Transmission/Transaxle > Control Module, A/T >
Component Information > Technical Service Bulletins > All Technical Service Bulletins for Control Module: > 11-020 > Mar >
11 > Engine, A/T Controls — Hesitation/A/T Shift Issues > Page 587
5. If you have performed ICC reprogramming; when reprogramming is complete the screen in
Figure 2B displays.
6. Erase DTCs in all systems.
^ During ICC reprogramming, DTCs will set in several systems and must be erased.
Infiniti Qx56 Rwd Workshop Manual (V8-5.6L (VK56VD) (2011))
Infiniti Workshop Manuals > Transmission and Drivetrain > Automatic Transmission/Transaxle > Control Module, A/T >
Component Information > Technical Service Bulletins > Customer Interest for Control Module: > 11-020 > Mar > 11 >
Engine, A/T Controls — Hesitation/A/T Shift Issues
Technical Service Bulletin # 11-020 Date: 110310
Engine, A/T Controls — Hesitation/A/T Shift Issues
Classification: AT 11-004
Reference: ITB11-020
Date: March 10, 2011
2011 QX56; TRANSMISSION SHIFT ISSUES AND HESITATION ISSUES
APPLIED VEHICLES: 2011 QX56 (Z62)
IF YOU CONFIRM
Any of the following symptoms:
^ Gear hunting or excessive downshifting when using the Intelligent Cruise Control (ICC)
and/or
^ The feel of the transmission shifting from Neutral to Drive (may be described as «bump» feel from
the rear) while stopped with the transmission in
Drive
and/or
^ A slight hesitation when accelerating from a stop,
and/or
^ A slight vehicle shudder/vibration during light acceleration,
ACTIONS
1. Perform ECM reprogramming.
^ Refer to Step 3 under ECM reprogramming in the Service Procedure to confirm ECM
reprogramming applies and is needed for the vehicle you are working on.
2. Perform TCM reprogramming.
^ Refer to Step 3 under TCM reprogramming in the Service Procedure to confirm TCM
reprogramming applies and is needed for the vehicle you are working on.
3. If equipped with Intelligent Cruise Control (ICC) perform ICC reprogramming.
^ Refer to Step 3 under ICC reprogramming in the Service Procedure to confirm ICC
reprogramming applies and is needed for the vehicle you are working on.
4. Test drive the vehicle and confirm the incident is resolved.
IMPORTANT:
The purpose of ACTIONS (above) is to give you a quick idea of the work you will be performing.
You MUST closely follow the entire SERVICE PROCEDURE as it contains information that is
essential to successfully completing this repair.
Infiniti Qx56 Rwd Workshop Manual (V8-5.6L (VK56VD) (2011))
Infiniti Workshop Manuals > Transmission and Drivetrain > Automatic Transmission/Transaxle > Control Module, A/T >
Component Information > Technical Service Bulletins > Customer Interest for Control Module: > 11-020 > Mar > 11 >
Engine, A/T Controls — Hesitation/A/T Shift Issues > Page 593
CLAIMS INFORMATION
Service Procedure
SERVICE PROCEDURE
ECM Reprogramming
1. Prepare the vehicle for the reprogramming procedure.
Reprogramming Caution
Infiniti Qx56 Rwd Workshop Manual (V8-5.6L (VK56VD) (2011))
Infiniti Workshop Manuals > Transmission and Drivetrain > Automatic Transmission/Transaxle > Control Module, A/T >
Component Information > Technical Service Bulletins > Customer Interest for Control Module: > 11-020 > Mar > 11 >
Engine, A/T Controls — Hesitation/A/T Shift Issues > Page 594
2. Navigate C-III to the ECM Reprogramming screen shown in Figure 1.
^ Use the «Reprogramming / Programming» selection.
^ Do not use Direct Diagnosis > Reprogramming.
3. On your C-III screen, look at the Part Number column (see Figure 1 example):
^ If there is no Engine part number listed, then ECM reprogramming does not apply; go to TCM
reprogramming.
^ If an Engine Part Number is listed, write it on the Repair Order.
4. Compare the Part Number you wrote down to the numbers in the Current ECM P/N column in
Table A above.
^ If there is a match this reprogramming applies. Continue with the reprogramming procedure.
NOTE:
If there are two Engine lines (two ECM reprogramming options) on your C-III screen, use the one
that does not have the message «Caution! Use ONLY with ITBXX-XXX».
^ If there is not a match, this reprogramming does not apply; go to TCM reprogramming below.
Infiniti Qx56 Rwd Workshop Manual (V8-5.6L (VK56VD) (2011))
Infiniti Workshop Manuals > Transmission and Drivetrain > Automatic Transmission/Transaxle > Control Module, A/T >
Component Information > Technical Service Bulletins > Customer Interest for Control Module: > 11-020 > Mar > 11 >
Engine, A/T Controls — Hesitation/A/T Shift Issues > Page 595
5. When ECM reprogramming is complete, the screen in Figure 2 displays.
NOTE:
If the screen in Figure 2 does NOT display (reprogramming does NOT complete).
6. Make sure to erase DTCs from all Systems.
^ During reprogramming DTCs will set in several systems and must be erased before TCM
reprogramming.
7. Go to TCM Reprogramming below.
TCM Reprogramming
1. Restart the C-III session by selecting the «Home» icon in the upper left corner of the C-III screen.
^ Make sure to erase DTCs from all systems.
^ TCM initialization is not needed for 7 speed A/T reprogramming.
Reprogramming Caution
Infiniti Qx56 Rwd Workshop Manual (V8-5.6L (VK56VD) (2011))
Infiniti Workshop Manuals > Transmission and Drivetrain > Automatic Transmission/Transaxle > Control Module, A/T >
Component Information > Technical Service Bulletins > Customer Interest for Control Module: > 11-020 > Mar > 11 >
Engine, A/T Controls — Hesitation/A/T Shift Issues > Page 596
2. Navigate C-III to the reprogramming screen shown in Figure 1A example above.
NOTE:
^ Do not use the «Reprogramming / Programming» selection.
^ Select the Model and Model Year and then navigate to Direct Diagnosis > Reprogramming.
^ TCM initialization is not needed for 7 Speed A/T reprogramming.
3. On your C-III screen look for a Transmission Part Number in the Part Number column (see
Figure 1A example).
^ If there is no Transmission Part Number listed, this reprogramming does not apply; go to ICC
reprogramming.
^ If a Transmission Part Number is listed write it on the Repair Order.
4. Compare the P/N you wrote down to the numbers in the Current TCM P/N column in Table A-1
above.
^ If there is a match this reprogramming applies. Continue with the reprogramming procedure.
^ If there is not a match this reprogramming does not apply; go to ICC reprogramming below.
Infiniti Qx56 Rwd Workshop Manual (V8-5.6L (VK56VD) (2011))
Infiniti Workshop Manuals > Transmission and Drivetrain > Automatic Transmission/Transaxle > Control Module, A/T >
Component Information > Technical Service Bulletins > Customer Interest for Control Module: > 11-020 > Mar > 11 >
Engine, A/T Controls — Hesitation/A/T Shift Issues > Page 597
5. If you have performed TCM reprogramming; when reprogramming is complete, the screen in
Figure 2A displays.
6. Erase DTCs in all systems.
^ During TCM reprogramming, DTCs will set in several systems and must be erased before ICC
reprogramming.
7. Go to ICC Reprogramming below.
ICC Reprogramming
1. Restart the C-III session by selecting the Home icon in the upper left corner of the C-III screen.
NOTE:
^ The steps for reprogramming the Intelligent Cruise Control (ICC) are the same as the steps for
reprogramming the TCM.
Reprogramming Caution
Infiniti Qx56 Rwd Workshop Manual (V8-5.6L (VK56VD) (2011))
Infiniti Workshop Manuals > Transmission and Drivetrain > Automatic Transmission/Transaxle > Control Module, A/T >
Component Information > Technical Service Bulletins > Customer Interest for Control Module: > 11-020 > Mar > 11 >
Engine, A/T Controls — Hesitation/A/T Shift Issues > Page 598
2. Navigate C-III to the reprogramming screen shown in Figure 1B example above.
NOTE:
^ Do not use the Reprogramming / Programming selection.
^ Select the Model and Model Year and then navigate to Direct Diagnosis > Reprogramming.
3. On your C-III screen, look for an ICC/ADAS Part Number in the Part Number column (see Figure
1B example).
^ If there is no ICC/ADAS Part Number listed, this reprogramming is not needed.
^ If an ICC/ADAS Part Number is listed, write it on the Repair Order.
4. Compare the P/N you wrote down to the numbers in the Current ICC/ADAS P/N column in Table
A-2 above.
^ If there is a match, this reprogramming applies. Continue with the reprogramming procedure.
^ If there is not a match, this reprogramming is not needed.
Infiniti Qx56 Rwd Workshop Manual (V8-5.6L (VK56VD) (2011))
Infiniti Workshop Manuals > Transmission and Drivetrain > Automatic Transmission/Transaxle > Control Module, A/T >
Component Information > Technical Service Bulletins > Customer Interest for Control Module: > 11-020 > Mar > 11 >
Engine, A/T Controls — Hesitation/A/T Shift Issues > Page 599
5. If you have performed ICC reprogramming; when reprogramming is complete the screen in
Figure 2B displays.
6. Erase DTCs in all systems.
^ During ICC reprogramming, DTCs will set in several systems and must be erased.
Infiniti Qx56 Rwd Workshop Manual (V8-5.6L (VK56VD) (2011))
Infiniti Workshop Manuals > Transmission and Drivetrain > Automatic Transmission/Transaxle > Fluid — A/T > Component
Information > Specifications > Capacity Specifications
Fluid — A/T: Capacity Specifications
Automatic Transmission Fluid
Capacity* ……………………………………………………………………………………………………………………………
………………………………………………. 10 5/8 qt (10.0L)
*The fluid capacity is the reference value.
Infiniti Qx56 Rwd Workshop Manual (V8-5.6L (VK56VD) (2011))
Infiniti Workshop Manuals > Transmission and Drivetrain > Automatic Transmission/Transaxle > Fluid — A/T > Component
Information > Specifications > Capacity Specifications > Page 604
Fluid — A/T: Fluid Type Specifications
Automatic Transmission Fluid
Type …………………………………………………………………………………………………………………………………..
………………………… Genuine NISSAN Matic S ATF*
* If Genuine NISSAN Matic S ATF is not available, Genuine NISSAN Matic J ATF may also be
used. Using automatic transmission fluid other than Genuine NISSAN Matic S ATF or Matic J ATF
will cause deterioration in driveability and automatic transmission durability, and may damage the
automatic transmission, which is not covered by the INFINITI new vehicle limited warranty.
Infiniti Qx56 Rwd Workshop Manual (V8-5.6L (VK56VD) (2011))
Infiniti Workshop Manuals > Transmission and Drivetrain > Automatic Transmission/Transaxle > Relays and Modules — A/T
> Control Module, A/T > Component Information > Technical Service Bulletins > All Technical Service Bulletins for Control
Module: > 11-020 > Mar > 11 > Engine, A/T Controls — Hesitation/A/T Shift Issues
Technical Service Bulletin # 11-020 Date: 110310
Engine, A/T Controls — Hesitation/A/T Shift Issues
Classification: AT 11-004
Reference: ITB11-020
Date: March 10, 2011
2011 QX56; TRANSMISSION SHIFT ISSUES AND HESITATION ISSUES
APPLIED VEHICLES: 2011 QX56 (Z62)
IF YOU CONFIRM
Any of the following symptoms:
^ Gear hunting or excessive downshifting when using the Intelligent Cruise Control (ICC)
and/or
^ The feel of the transmission shifting from Neutral to Drive (may be described as «bump» feel from
the rear) while stopped with the transmission in
Drive
and/or
^ A slight hesitation when accelerating from a stop,
and/or
^ A slight vehicle shudder/vibration during light acceleration,
ACTIONS
1. Perform ECM reprogramming.
^ Refer to Step 3 under ECM reprogramming in the Service Procedure to confirm ECM
reprogramming applies and is needed for the vehicle you are working on.
2. Perform TCM reprogramming.
^ Refer to Step 3 under TCM reprogramming in the Service Procedure to confirm TCM
reprogramming applies and is needed for the vehicle you are working on.
3. If equipped with Intelligent Cruise Control (ICC) perform ICC reprogramming.
^ Refer to Step 3 under ICC reprogramming in the Service Procedure to confirm ICC
reprogramming applies and is needed for the vehicle you are working on.
4. Test drive the vehicle and confirm the incident is resolved.
IMPORTANT:
The purpose of ACTIONS (above) is to give you a quick idea of the work you will be performing.
You MUST closely follow the entire SERVICE PROCEDURE as it contains information that is
essential to successfully completing this repair.
Infiniti Qx56 Rwd Workshop Manual (V8-5.6L (VK56VD) (2011))
Infiniti Workshop Manuals > Transmission and Drivetrain > Automatic Transmission/Transaxle > Relays and Modules — A/T
> Control Module, A/T > Component Information > Technical Service Bulletins > All Technical Service Bulletins for Control
Module: > 11-020 > Mar > 11 > Engine, A/T Controls — Hesitation/A/T Shift Issues > Page 614
CLAIMS INFORMATION
Service Procedure
SERVICE PROCEDURE
ECM Reprogramming
1. Prepare the vehicle for the reprogramming procedure.
Reprogramming Caution
Infiniti Qx56 Rwd Workshop Manual (V8-5.6L (VK56VD) (2011))
Infiniti Workshop Manuals > Transmission and Drivetrain > Automatic Transmission/Transaxle > Relays and Modules — A/T
> Control Module, A/T > Component Information > Technical Service Bulletins > All Technical Service Bulletins for Control
Module: > 11-020 > Mar > 11 > Engine, A/T Controls — Hesitation/A/T Shift Issues > Page 615
2. Navigate C-III to the ECM Reprogramming screen shown in Figure 1.
^ Use the «Reprogramming / Programming» selection.
^ Do not use Direct Diagnosis > Reprogramming.
3. On your C-III screen, look at the Part Number column (see Figure 1 example):
^ If there is no Engine part number listed, then ECM reprogramming does not apply; go to TCM
reprogramming.
^ If an Engine Part Number is listed, write it on the Repair Order.
4. Compare the Part Number you wrote down to the numbers in the Current ECM P/N column in
Table A above.
^ If there is a match this reprogramming applies. Continue with the reprogramming procedure.
NOTE:
If there are two Engine lines (two ECM reprogramming options) on your C-III screen, use the one
that does not have the message «Caution! Use ONLY with ITBXX-XXX».
^ If there is not a match, this reprogramming does not apply; go to TCM reprogramming below.
Infiniti Qx56 Rwd Workshop Manual (V8-5.6L (VK56VD) (2011))
Infiniti Workshop Manuals > Transmission and Drivetrain > Automatic Transmission/Transaxle > Relays and Modules — A/T
> Control Module, A/T > Component Information > Technical Service Bulletins > All Technical Service Bulletins for Control
Module: > 11-020 > Mar > 11 > Engine, A/T Controls — Hesitation/A/T Shift Issues > Page 616
5. When ECM reprogramming is complete, the screen in Figure 2 displays.
NOTE:
If the screen in Figure 2 does NOT display (reprogramming does NOT complete).
6. Make sure to erase DTCs from all Systems.
^ During reprogramming DTCs will set in several systems and must be erased before TCM
reprogramming.
7. Go to TCM Reprogramming below.
TCM Reprogramming
1. Restart the C-III session by selecting the «Home» icon in the upper left corner of the C-III screen.
^ Make sure to erase DTCs from all systems.
^ TCM initialization is not needed for 7 speed A/T reprogramming.
Reprogramming Caution
Infiniti Qx56 Rwd Workshop Manual (V8-5.6L (VK56VD) (2011))
Infiniti Workshop Manuals > Transmission and Drivetrain > Automatic Transmission/Transaxle > Relays and Modules — A/T
> Control Module, A/T > Component Information > Technical Service Bulletins > All Technical Service Bulletins for Control
Module: > 11-020 > Mar > 11 > Engine, A/T Controls — Hesitation/A/T Shift Issues > Page 617
2. Navigate C-III to the reprogramming screen shown in Figure 1A example above.
NOTE:
^ Do not use the «Reprogramming / Programming» selection.
^ Select the Model and Model Year and then navigate to Direct Diagnosis > Reprogramming.
^ TCM initialization is not needed for 7 Speed A/T reprogramming.
3. On your C-III screen look for a Transmission Part Number in the Part Number column (see
Figure 1A example).
^ If there is no Transmission Part Number listed, this reprogramming does not apply; go to ICC
reprogramming.
^ If a Transmission Part Number is listed write it on the Repair Order.
4. Compare the P/N you wrote down to the numbers in the Current TCM P/N column in Table A-1
above.
^ If there is a match this reprogramming applies. Continue with the reprogramming procedure.
^ If there is not a match this reprogramming does not apply; go to ICC reprogramming below.
Infiniti Qx56 Rwd Workshop Manual (V8-5.6L (VK56VD) (2011))
Infiniti Workshop Manuals > Transmission and Drivetrain > Automatic Transmission/Transaxle > Relays and Modules — A/T
> Control Module, A/T > Component Information > Technical Service Bulletins > All Technical Service Bulletins for Control
Module: > 11-020 > Mar > 11 > Engine, A/T Controls — Hesitation/A/T Shift Issues > Page 618
5. If you have performed TCM reprogramming; when reprogramming is complete, the screen in
Figure 2A displays.
6. Erase DTCs in all systems.
^ During TCM reprogramming, DTCs will set in several systems and must be erased before ICC
reprogramming.
7. Go to ICC Reprogramming below.
ICC Reprogramming
1. Restart the C-III session by selecting the Home icon in the upper left corner of the C-III screen.
NOTE:
^ The steps for reprogramming the Intelligent Cruise Control (ICC) are the same as the steps for
reprogramming the TCM.
Reprogramming Caution
Infiniti Qx56 Rwd Workshop Manual (V8-5.6L (VK56VD) (2011))
Infiniti Workshop Manuals > Transmission and Drivetrain > Automatic Transmission/Transaxle > Relays and Modules — A/T
> Control Module, A/T > Component Information > Technical Service Bulletins > All Technical Service Bulletins for Control
Module: > 11-020 > Mar > 11 > Engine, A/T Controls — Hesitation/A/T Shift Issues > Page 619
2. Navigate C-III to the reprogramming screen shown in Figure 1B example above.
NOTE:
^ Do not use the Reprogramming / Programming selection.
^ Select the Model and Model Year and then navigate to Direct Diagnosis > Reprogramming.
3. On your C-III screen, look for an ICC/ADAS Part Number in the Part Number column (see Figure
1B example).
^ If there is no ICC/ADAS Part Number listed, this reprogramming is not needed.
^ If an ICC/ADAS Part Number is listed, write it on the Repair Order.
4. Compare the P/N you wrote down to the numbers in the Current ICC/ADAS P/N column in Table
A-2 above.
^ If there is a match, this reprogramming applies. Continue with the reprogramming procedure.
^ If there is not a match, this reprogramming is not needed.
Infiniti Qx56 Rwd Workshop Manual (V8-5.6L (VK56VD) (2011))
Infiniti Workshop Manuals > Transmission and Drivetrain > Automatic Transmission/Transaxle > Relays and Modules — A/T
> Control Module, A/T > Component Information > Technical Service Bulletins > All Technical Service Bulletins for Control
Module: > 11-020 > Mar > 11 > Engine, A/T Controls — Hesitation/A/T Shift Issues > Page 620
5. If you have performed ICC reprogramming; when reprogramming is complete the screen in
Figure 2B displays.
6. Erase DTCs in all systems.
^ During ICC reprogramming, DTCs will set in several systems and must be erased.
Infiniti Qx56 Rwd Workshop Manual (V8-5.6L (VK56VD) (2011))
Infiniti Workshop Manuals > Transmission and Drivetrain > Automatic Transmission/Transaxle > Relays and Modules — A/T
> Control Module, A/T > Component Information > Technical Service Bulletins > Customer Interest for Control Module: >
11-020 > Mar > 11 > Engine, A/T Controls — Hesitation/A/T Shift Issues
Technical Service Bulletin # 11-020 Date: 110310
Engine, A/T Controls — Hesitation/A/T Shift Issues
Classification: AT 11-004
Reference: ITB11-020
Date: March 10, 2011
2011 QX56; TRANSMISSION SHIFT ISSUES AND HESITATION ISSUES
APPLIED VEHICLES: 2011 QX56 (Z62)
IF YOU CONFIRM
Any of the following symptoms:
^ Gear hunting or excessive downshifting when using the Intelligent Cruise Control (ICC)
and/or
^ The feel of the transmission shifting from Neutral to Drive (may be described as «bump» feel from
the rear) while stopped with the transmission in
Drive
and/or
^ A slight hesitation when accelerating from a stop,
and/or
^ A slight vehicle shudder/vibration during light acceleration,
ACTIONS
1. Perform ECM reprogramming.
^ Refer to Step 3 under ECM reprogramming in the Service Procedure to confirm ECM
reprogramming applies and is needed for the vehicle you are working on.
2. Perform TCM reprogramming.
^ Refer to Step 3 under TCM reprogramming in the Service Procedure to confirm TCM
reprogramming applies and is needed for the vehicle you are working on.
3. If equipped with Intelligent Cruise Control (ICC) perform ICC reprogramming.
^ Refer to Step 3 under ICC reprogramming in the Service Procedure to confirm ICC
reprogramming applies and is needed for the vehicle you are working on.
4. Test drive the vehicle and confirm the incident is resolved.
IMPORTANT:
The purpose of ACTIONS (above) is to give you a quick idea of the work you will be performing.
You MUST closely follow the entire SERVICE PROCEDURE as it contains information that is
essential to successfully completing this repair.
Infiniti Qx56 Rwd Workshop Manual (V8-5.6L (VK56VD) (2011))
Infiniti Workshop Manuals > Transmission and Drivetrain > Automatic Transmission/Transaxle > Relays and Modules — A/T
> Control Module, A/T > Component Information > Technical Service Bulletins > Customer Interest for Control Module: >
11-020 > Mar > 11 > Engine, A/T Controls — Hesitation/A/T Shift Issues > Page 626
CLAIMS INFORMATION
Service Procedure
SERVICE PROCEDURE
ECM Reprogramming
1. Prepare the vehicle for the reprogramming procedure.
Reprogramming Caution
Infiniti Qx56 Rwd Workshop Manual (V8-5.6L (VK56VD) (2011))
Infiniti Workshop Manuals > Transmission and Drivetrain > Automatic Transmission/Transaxle > Relays and Modules — A/T
> Control Module, A/T > Component Information > Technical Service Bulletins > Customer Interest for Control Module: >
11-020 > Mar > 11 > Engine, A/T Controls — Hesitation/A/T Shift Issues > Page 627
2. Navigate C-III to the ECM Reprogramming screen shown in Figure 1.
^ Use the «Reprogramming / Programming» selection.
^ Do not use Direct Diagnosis > Reprogramming.
3. On your C-III screen, look at the Part Number column (see Figure 1 example):
^ If there is no Engine part number listed, then ECM reprogramming does not apply; go to TCM
reprogramming.
^ If an Engine Part Number is listed, write it on the Repair Order.
4. Compare the Part Number you wrote down to the numbers in the Current ECM P/N column in
Table A above.
^ If there is a match this reprogramming applies. Continue with the reprogramming procedure.
NOTE:
If there are two Engine lines (two ECM reprogramming options) on your C-III screen, use the one
that does not have the message «Caution! Use ONLY with ITBXX-XXX».
^ If there is not a match, this reprogramming does not apply; go to TCM reprogramming below.
Infiniti Qx56 Rwd Workshop Manual (V8-5.6L (VK56VD) (2011))
Infiniti Workshop Manuals > Transmission and Drivetrain > Automatic Transmission/Transaxle > Relays and Modules — A/T
> Control Module, A/T > Component Information > Technical Service Bulletins > Customer Interest for Control Module: >
11-020 > Mar > 11 > Engine, A/T Controls — Hesitation/A/T Shift Issues > Page 628
5. When ECM reprogramming is complete, the screen in Figure 2 displays.
NOTE:
If the screen in Figure 2 does NOT display (reprogramming does NOT complete).
6. Make sure to erase DTCs from all Systems.
^ During reprogramming DTCs will set in several systems and must be erased before TCM
reprogramming.
7. Go to TCM Reprogramming below.
TCM Reprogramming
1. Restart the C-III session by selecting the «Home» icon in the upper left corner of the C-III screen.
^ Make sure to erase DTCs from all systems.
^ TCM initialization is not needed for 7 speed A/T reprogramming.
Reprogramming Caution
Infiniti Qx56 Rwd Workshop Manual (V8-5.6L (VK56VD) (2011))
Infiniti Workshop Manuals > Transmission and Drivetrain > Automatic Transmission/Transaxle > Relays and Modules — A/T
> Control Module, A/T > Component Information > Technical Service Bulletins > Customer Interest for Control Module: >
11-020 > Mar > 11 > Engine, A/T Controls — Hesitation/A/T Shift Issues > Page 629
2. Navigate C-III to the reprogramming screen shown in Figure 1A example above.
NOTE:
^ Do not use the «Reprogramming / Programming» selection.
^ Select the Model and Model Year and then navigate to Direct Diagnosis > Reprogramming.
^ TCM initialization is not needed for 7 Speed A/T reprogramming.
3. On your C-III screen look for a Transmission Part Number in the Part Number column (see
Figure 1A example).
^ If there is no Transmission Part Number listed, this reprogramming does not apply; go to ICC
reprogramming.
^ If a Transmission Part Number is listed write it on the Repair Order.
4. Compare the P/N you wrote down to the numbers in the Current TCM P/N column in Table A-1
above.
^ If there is a match this reprogramming applies. Continue with the reprogramming procedure.
^ If there is not a match this reprogramming does not apply; go to ICC reprogramming below.
Infiniti Qx56 Rwd Workshop Manual (V8-5.6L (VK56VD) (2011))
Infiniti Workshop Manuals > Transmission and Drivetrain > Automatic Transmission/Transaxle > Relays and Modules — A/T
> Control Module, A/T > Component Information > Technical Service Bulletins > Customer Interest for Control Module: >
11-020 > Mar > 11 > Engine, A/T Controls — Hesitation/A/T Shift Issues > Page 630
5. If you have performed TCM reprogramming; when reprogramming is complete, the screen in
Figure 2A displays.
6. Erase DTCs in all systems.
^ During TCM reprogramming, DTCs will set in several systems and must be erased before ICC
reprogramming.
7. Go to ICC Reprogramming below.
ICC Reprogramming
1. Restart the C-III session by selecting the Home icon in the upper left corner of the C-III screen.
NOTE:
^ The steps for reprogramming the Intelligent Cruise Control (ICC) are the same as the steps for
reprogramming the TCM.
Reprogramming Caution
Infiniti Qx56 Rwd Workshop Manual (V8-5.6L (VK56VD) (2011))
Infiniti Workshop Manuals > Transmission and Drivetrain > Automatic Transmission/Transaxle > Relays and Modules — A/T
> Control Module, A/T > Component Information > Technical Service Bulletins > Customer Interest for Control Module: >
11-020 > Mar > 11 > Engine, A/T Controls — Hesitation/A/T Shift Issues > Page 631
2. Navigate C-III to the reprogramming screen shown in Figure 1B example above.
NOTE:
^ Do not use the Reprogramming / Programming selection.
^ Select the Model and Model Year and then navigate to Direct Diagnosis > Reprogramming.
3. On your C-III screen, look for an ICC/ADAS Part Number in the Part Number column (see Figure
1B example).
^ If there is no ICC/ADAS Part Number listed, this reprogramming is not needed.
^ If an ICC/ADAS Part Number is listed, write it on the Repair Order.
4. Compare the P/N you wrote down to the numbers in the Current ICC/ADAS P/N column in Table
A-2 above.
^ If there is a match, this reprogramming applies. Continue with the reprogramming procedure.
^ If there is not a match, this reprogramming is not needed.
Infiniti Qx56 Rwd Workshop Manual (V8-5.6L (VK56VD) (2011))
Infiniti Workshop Manuals > Transmission and Drivetrain > Automatic Transmission/Transaxle > Relays and Modules — A/T
> Control Module, A/T > Component Information > Technical Service Bulletins > Customer Interest for Control Module: >
11-020 > Mar > 11 > Engine, A/T Controls — Hesitation/A/T Shift Issues > Page 632
5. If you have performed ICC reprogramming; when reprogramming is complete the screen in
Figure 2B displays.
6. Erase DTCs in all systems.
^ During ICC reprogramming, DTCs will set in several systems and must be erased.
Infiniti Qx56 Rwd Workshop Manual (V8-5.6L (VK56VD) (2011))
Infiniti Workshop Manuals > Transmission and Drivetrain > Differential Assembly > Fluid — Differential > Component
Information > Specifications > Capacity Specifications
Fluid — Differential: Capacity Specifications
Rear Differential Fluid
Capacity ……………………………………………………………………………………………………………………………..
………………………………………………… 3 3/4 pt (1.75L)
Infiniti Qx56 Rwd Workshop Manual (V8-5.6L (VK56VD) (2011))
Infiniti Workshop Manuals > Transmission and Drivetrain > Differential Assembly > Fluid — Differential > Component
Information > Specifications > Capacity Specifications > Page 638
Fluid — Differential: Fluid Type Specifications
Rear Differential Fluid
Type ………………………………………………… Genuine NISSAN Differential Oil Synthetic 75W-90 or
API GL-5 Synthetic Gear Oil Viscosity SAE 75W-90
Infiniti Qx56 Rwd Workshop Manual (V8-5.6L (VK56VD) (2011))
Infiniti Workshop Manuals > Transmission and Drivetrain > Drive Axles, Bearings and Joints > Wheel Bearing > Component
Information > Technical Service Bulletins > Steering/Suspension — Wheel Bearing Collision Damage
Wheel Bearing: Technical Service Bulletins Steering/Suspension — Wheel Bearing Collision
Damage
Classification: FA10-007
Reference: ITB10-067
Date: October 21, 2010
WHEEL BEARING COLLISION DAMAGE
APPLIED VEHICLES: All Infiniti
SERVICE INFORMATION
Impacts to wheel bearings (such as a collision or other suspension damage) may create slight
indents in the bearing surfaces. These indents may not be visible but can cause bearing noise.
NOTE:
Hub/bearing replacement due to impact (collision or other suspension damage) is not a
warrantable repair.
If a vehicle has visible wheel or suspension damage due to impact (collision or other suspension
damage) it is recommended that the wheel bearing assembly be inspected as follows:
1. Remove the hub/bearing assembly from the vehicle.
2. Hold the hub/bearing assembly with both hands.
3. Rotate the hub/bearing assembly in both directions (clockwise and counterclockwise).
4. If any gritty or rough feeling is detected in the bearing replace it with a new one.
Infiniti Qx56 Rwd Workshop Manual (V8-5.6L (VK56VD) (2011))
Infiniti Workshop Manuals > Transmission and Drivetrain > Drive Axles, Bearings and Joints > Wheel Hub > Component
Information > Technical Service Bulletins > Steering/Suspension — Wheel Bearing Collision Damage
Wheel Hub: Technical Service Bulletins Steering/Suspension — Wheel Bearing Collision Damage
Classification: FA10-007
Reference: ITB10-067
Date: October 21, 2010
WHEEL BEARING COLLISION DAMAGE
APPLIED VEHICLES: All Infiniti
SERVICE INFORMATION
Impacts to wheel bearings (such as a collision or other suspension damage) may create slight
indents in the bearing surfaces. These indents may not be visible but can cause bearing noise.
NOTE:
Hub/bearing replacement due to impact (collision or other suspension damage) is not a
warrantable repair.
If a vehicle has visible wheel or suspension damage due to impact (collision or other suspension
damage) it is recommended that the wheel bearing assembly be inspected as follows:
1. Remove the hub/bearing assembly from the vehicle.
2. Hold the hub/bearing assembly with both hands.
3. Rotate the hub/bearing assembly in both directions (clockwise and counterclockwise).
4. If any gritty or rough feeling is detected in the bearing replace it with a new one.
Infiniti Qx56 Rwd Workshop Manual (V8-5.6L (VK56VD) (2011))
Infiniti Workshop Manuals > Transmission and Drivetrain > Relays and Modules — Transmission and Drivetrain > Relays and
Modules — A/T > Control Module, A/T > Component Information > Technical Service Bulletins > All Technical Service
Bulletins for Control Module: > 11-020 > Mar > 11 > Engine, A/T Controls — Hesitation/A/T Shift Issues
Technical Service Bulletin # 11-020 Date: 110310
Engine, A/T Controls — Hesitation/A/T Shift Issues
Classification: AT 11-004
Reference: ITB11-020
Date: March 10, 2011
2011 QX56; TRANSMISSION SHIFT ISSUES AND HESITATION ISSUES
APPLIED VEHICLES: 2011 QX56 (Z62)
IF YOU CONFIRM
Any of the following symptoms:
^ Gear hunting or excessive downshifting when using the Intelligent Cruise Control (ICC)
and/or
^ The feel of the transmission shifting from Neutral to Drive (may be described as «bump» feel from
the rear) while stopped with the transmission in
Drive
and/or
^ A slight hesitation when accelerating from a stop,
and/or
^ A slight vehicle shudder/vibration during light acceleration,
ACTIONS
1. Perform ECM reprogramming.
^ Refer to Step 3 under ECM reprogramming in the Service Procedure to confirm ECM
reprogramming applies and is needed for the vehicle you are working on.
2. Perform TCM reprogramming.
^ Refer to Step 3 under TCM reprogramming in the Service Procedure to confirm TCM
reprogramming applies and is needed for the vehicle you are working on.
3. If equipped with Intelligent Cruise Control (ICC) perform ICC reprogramming.
^ Refer to Step 3 under ICC reprogramming in the Service Procedure to confirm ICC
reprogramming applies and is needed for the vehicle you are working on.
4. Test drive the vehicle and confirm the incident is resolved.
IMPORTANT:
The purpose of ACTIONS (above) is to give you a quick idea of the work you will be performing.
You MUST closely follow the entire SERVICE PROCEDURE as it contains information that is
essential to successfully completing this repair.
Infiniti Qx56 Rwd Workshop Manual (V8-5.6L (VK56VD) (2011))
Infiniti Workshop Manuals > Transmission and Drivetrain > Relays and Modules — Transmission and Drivetrain > Relays and
Modules — A/T > Control Module, A/T > Component Information > Technical Service Bulletins > All Technical Service
Bulletins for Control Module: > 11-020 > Mar > 11 > Engine, A/T Controls — Hesitation/A/T Shift Issues > Page 658
CLAIMS INFORMATION
Service Procedure
SERVICE PROCEDURE
ECM Reprogramming
1. Prepare the vehicle for the reprogramming procedure.
Reprogramming Caution
Infiniti Qx56 Rwd Workshop Manual (V8-5.6L (VK56VD) (2011))
Infiniti Workshop Manuals > Transmission and Drivetrain > Relays and Modules — Transmission and Drivetrain > Relays and
Modules — A/T > Control Module, A/T > Component Information > Technical Service Bulletins > All Technical Service
Bulletins for Control Module: > 11-020 > Mar > 11 > Engine, A/T Controls — Hesitation/A/T Shift Issues > Page 659
2. Navigate C-III to the ECM Reprogramming screen shown in Figure 1.
^ Use the «Reprogramming / Programming» selection.
^ Do not use Direct Diagnosis > Reprogramming.
3. On your C-III screen, look at the Part Number column (see Figure 1 example):
^ If there is no Engine part number listed, then ECM reprogramming does not apply; go to TCM
reprogramming.
^ If an Engine Part Number is listed, write it on the Repair Order.
4. Compare the Part Number you wrote down to the numbers in the Current ECM P/N column in
Table A above.
^ If there is a match this reprogramming applies. Continue with the reprogramming procedure.
NOTE:
If there are two Engine lines (two ECM reprogramming options) on your C-III screen, use the one
that does not have the message «Caution! Use ONLY with ITBXX-XXX».
^ If there is not a match, this reprogramming does not apply; go to TCM reprogramming below.
Infiniti Qx56 Rwd Workshop Manual (V8-5.6L (VK56VD) (2011))
Infiniti Workshop Manuals > Transmission and Drivetrain > Relays and Modules — Transmission and Drivetrain > Relays and
Modules — A/T > Control Module, A/T > Component Information > Technical Service Bulletins > All Technical Service
Bulletins for Control Module: > 11-020 > Mar > 11 > Engine, A/T Controls — Hesitation/A/T Shift Issues > Page 660
5. When ECM reprogramming is complete, the screen in Figure 2 displays.
NOTE:
If the screen in Figure 2 does NOT display (reprogramming does NOT complete).
6. Make sure to erase DTCs from all Systems.
^ During reprogramming DTCs will set in several systems and must be erased before TCM
reprogramming.
7. Go to TCM Reprogramming below.
TCM Reprogramming
1. Restart the C-III session by selecting the «Home» icon in the upper left corner of the C-III screen.
^ Make sure to erase DTCs from all systems.
^ TCM initialization is not needed for 7 speed A/T reprogramming.
Reprogramming Caution
Infiniti Qx56 Rwd Workshop Manual (V8-5.6L (VK56VD) (2011))
Infiniti Workshop Manuals > Transmission and Drivetrain > Relays and Modules — Transmission and Drivetrain > Relays and
Modules — A/T > Control Module, A/T > Component Information > Technical Service Bulletins > All Technical Service
Bulletins for Control Module: > 11-020 > Mar > 11 > Engine, A/T Controls — Hesitation/A/T Shift Issues > Page 661
2. Navigate C-III to the reprogramming screen shown in Figure 1A example above.
NOTE:
^ Do not use the «Reprogramming / Programming» selection.
^ Select the Model and Model Year and then navigate to Direct Diagnosis > Reprogramming.
^ TCM initialization is not needed for 7 Speed A/T reprogramming.
3. On your C-III screen look for a Transmission Part Number in the Part Number column (see
Figure 1A example).
^ If there is no Transmission Part Number listed, this reprogramming does not apply; go to ICC
reprogramming.
^ If a Transmission Part Number is listed write it on the Repair Order.
4. Compare the P/N you wrote down to the numbers in the Current TCM P/N column in Table A-1
above.
^ If there is a match this reprogramming applies. Continue with the reprogramming procedure.
^ If there is not a match this reprogramming does not apply; go to ICC reprogramming below.
Infiniti Qx56 Rwd Workshop Manual (V8-5.6L (VK56VD) (2011))
Infiniti Workshop Manuals > Transmission and Drivetrain > Relays and Modules — Transmission and Drivetrain > Relays and
Modules — A/T > Control Module, A/T > Component Information > Technical Service Bulletins > All Technical Service
Bulletins for Control Module: > 11-020 > Mar > 11 > Engine, A/T Controls — Hesitation/A/T Shift Issues > Page 662
5. If you have performed TCM reprogramming; when reprogramming is complete, the screen in
Figure 2A displays.
6. Erase DTCs in all systems.
^ During TCM reprogramming, DTCs will set in several systems and must be erased before ICC
reprogramming.
7. Go to ICC Reprogramming below.
ICC Reprogramming
1. Restart the C-III session by selecting the Home icon in the upper left corner of the C-III screen.
NOTE:
^ The steps for reprogramming the Intelligent Cruise Control (ICC) are the same as the steps for
reprogramming the TCM.
Reprogramming Caution
Infiniti Qx56 Rwd Workshop Manual (V8-5.6L (VK56VD) (2011))
Infiniti Workshop Manuals > Transmission and Drivetrain > Relays and Modules — Transmission and Drivetrain > Relays and
Modules — A/T > Control Module, A/T > Component Information > Technical Service Bulletins > All Technical Service
Bulletins for Control Module: > 11-020 > Mar > 11 > Engine, A/T Controls — Hesitation/A/T Shift Issues > Page 663
2. Navigate C-III to the reprogramming screen shown in Figure 1B example above.
NOTE:
^ Do not use the Reprogramming / Programming selection.
^ Select the Model and Model Year and then navigate to Direct Diagnosis > Reprogramming.
3. On your C-III screen, look for an ICC/ADAS Part Number in the Part Number column (see Figure
1B example).
^ If there is no ICC/ADAS Part Number listed, this reprogramming is not needed.
^ If an ICC/ADAS Part Number is listed, write it on the Repair Order.
4. Compare the P/N you wrote down to the numbers in the Current ICC/ADAS P/N column in Table
A-2 above.
^ If there is a match, this reprogramming applies. Continue with the reprogramming procedure.
^ If there is not a match, this reprogramming is not needed.
Infiniti Qx56 Rwd Workshop Manual (V8-5.6L (VK56VD) (2011))
Infiniti Workshop Manuals > Transmission and Drivetrain > Relays and Modules — Transmission and Drivetrain > Relays and
Modules — A/T > Control Module, A/T > Component Information > Technical Service Bulletins > All Technical Service
Bulletins for Control Module: > 11-020 > Mar > 11 > Engine, A/T Controls — Hesitation/A/T Shift Issues > Page 664
5. If you have performed ICC reprogramming; when reprogramming is complete the screen in
Figure 2B displays.
6. Erase DTCs in all systems.
^ During ICC reprogramming, DTCs will set in several systems and must be erased.
Infiniti Qx56 Rwd Workshop Manual (V8-5.6L (VK56VD) (2011))
Infiniti Workshop Manuals > Transmission and Drivetrain > Relays and Modules — Transmission and Drivetrain > Relays and
Modules — A/T > Control Module, A/T > Component Information > Technical Service Bulletins > Customer Interest for
Control Module: > 11-020 > Mar > 11 > Engine, A/T Controls — Hesitation/A/T Shift Issues
Technical Service Bulletin # 11-020 Date: 110310
Engine, A/T Controls — Hesitation/A/T Shift Issues
Classification: AT 11-004
Reference: ITB11-020
Date: March 10, 2011
2011 QX56; TRANSMISSION SHIFT ISSUES AND HESITATION ISSUES
APPLIED VEHICLES: 2011 QX56 (Z62)
IF YOU CONFIRM
Any of the following symptoms:
^ Gear hunting or excessive downshifting when using the Intelligent Cruise Control (ICC)
and/or
^ The feel of the transmission shifting from Neutral to Drive (may be described as «bump» feel from
the rear) while stopped with the transmission in
Drive
and/or
^ A slight hesitation when accelerating from a stop,
and/or
^ A slight vehicle shudder/vibration during light acceleration,
ACTIONS
1. Perform ECM reprogramming.
^ Refer to Step 3 under ECM reprogramming in the Service Procedure to confirm ECM
reprogramming applies and is needed for the vehicle you are working on.
2. Perform TCM reprogramming.
^ Refer to Step 3 under TCM reprogramming in the Service Procedure to confirm TCM
reprogramming applies and is needed for the vehicle you are working on.
3. If equipped with Intelligent Cruise Control (ICC) perform ICC reprogramming.
^ Refer to Step 3 under ICC reprogramming in the Service Procedure to confirm ICC
reprogramming applies and is needed for the vehicle you are working on.
4. Test drive the vehicle and confirm the incident is resolved.
IMPORTANT:
The purpose of ACTIONS (above) is to give you a quick idea of the work you will be performing.
You MUST closely follow the entire SERVICE PROCEDURE as it contains information that is
essential to successfully completing this repair.
Infiniti Qx56 Rwd Workshop Manual (V8-5.6L (VK56VD) (2011))
Infiniti Workshop Manuals > Transmission and Drivetrain > Relays and Modules — Transmission and Drivetrain > Relays and
Modules — A/T > Control Module, A/T > Component Information > Technical Service Bulletins > Customer Interest for
Control Module: > 11-020 > Mar > 11 > Engine, A/T Controls — Hesitation/A/T Shift Issues > Page 670
CLAIMS INFORMATION
Service Procedure
SERVICE PROCEDURE
ECM Reprogramming
1. Prepare the vehicle for the reprogramming procedure.
Reprogramming Caution
Infiniti Qx56 Rwd Workshop Manual (V8-5.6L (VK56VD) (2011))
Infiniti Workshop Manuals > Transmission and Drivetrain > Relays and Modules — Transmission and Drivetrain > Relays and
Modules — A/T > Control Module, A/T > Component Information > Technical Service Bulletins > Customer Interest for
Control Module: > 11-020 > Mar > 11 > Engine, A/T Controls — Hesitation/A/T Shift Issues > Page 671
2. Navigate C-III to the ECM Reprogramming screen shown in Figure 1.
^ Use the «Reprogramming / Programming» selection.
^ Do not use Direct Diagnosis > Reprogramming.
3. On your C-III screen, look at the Part Number column (see Figure 1 example):
^ If there is no Engine part number listed, then ECM reprogramming does not apply; go to TCM
reprogramming.
^ If an Engine Part Number is listed, write it on the Repair Order.
4. Compare the Part Number you wrote down to the numbers in the Current ECM P/N column in
Table A above.
^ If there is a match this reprogramming applies. Continue with the reprogramming procedure.
NOTE:
If there are two Engine lines (two ECM reprogramming options) on your C-III screen, use the one
that does not have the message «Caution! Use ONLY with ITBXX-XXX».
^ If there is not a match, this reprogramming does not apply; go to TCM reprogramming below.
Infiniti Qx56 Rwd Workshop Manual (V8-5.6L (VK56VD) (2011))
Infiniti Workshop Manuals > Transmission and Drivetrain > Relays and Modules — Transmission and Drivetrain > Relays and
Modules — A/T > Control Module, A/T > Component Information > Technical Service Bulletins > Customer Interest for
Control Module: > 11-020 > Mar > 11 > Engine, A/T Controls — Hesitation/A/T Shift Issues > Page 672
5. When ECM reprogramming is complete, the screen in Figure 2 displays.
NOTE:
If the screen in Figure 2 does NOT display (reprogramming does NOT complete).
6. Make sure to erase DTCs from all Systems.
^ During reprogramming DTCs will set in several systems and must be erased before TCM
reprogramming.
7. Go to TCM Reprogramming below.
TCM Reprogramming
1. Restart the C-III session by selecting the «Home» icon in the upper left corner of the C-III screen.
^ Make sure to erase DTCs from all systems.
^ TCM initialization is not needed for 7 speed A/T reprogramming.
Reprogramming Caution
Infiniti Qx56 Rwd Workshop Manual (V8-5.6L (VK56VD) (2011))
Infiniti Workshop Manuals > Transmission and Drivetrain > Relays and Modules — Transmission and Drivetrain > Relays and
Modules — A/T > Control Module, A/T > Component Information > Technical Service Bulletins > Customer Interest for
Control Module: > 11-020 > Mar > 11 > Engine, A/T Controls — Hesitation/A/T Shift Issues > Page 673
2. Navigate C-III to the reprogramming screen shown in Figure 1A example above.
NOTE:
^ Do not use the «Reprogramming / Programming» selection.
^ Select the Model and Model Year and then navigate to Direct Diagnosis > Reprogramming.
^ TCM initialization is not needed for 7 Speed A/T reprogramming.
3. On your C-III screen look for a Transmission Part Number in the Part Number column (see
Figure 1A example).
^ If there is no Transmission Part Number listed, this reprogramming does not apply; go to ICC
reprogramming.
^ If a Transmission Part Number is listed write it on the Repair Order.
4. Compare the P/N you wrote down to the numbers in the Current TCM P/N column in Table A-1
above.
^ If there is a match this reprogramming applies. Continue with the reprogramming procedure.
^ If there is not a match this reprogramming does not apply; go to ICC reprogramming below.
Infiniti Qx56 Rwd Workshop Manual (V8-5.6L (VK56VD) (2011))
Infiniti Workshop Manuals > Transmission and Drivetrain > Relays and Modules — Transmission and Drivetrain > Relays and
Modules — A/T > Control Module, A/T > Component Information > Technical Service Bulletins > Customer Interest for
Control Module: > 11-020 > Mar > 11 > Engine, A/T Controls — Hesitation/A/T Shift Issues > Page 674
5. If you have performed TCM reprogramming; when reprogramming is complete, the screen in
Figure 2A displays.
6. Erase DTCs in all systems.
^ During TCM reprogramming, DTCs will set in several systems and must be erased before ICC
reprogramming.
7. Go to ICC Reprogramming below.
ICC Reprogramming
1. Restart the C-III session by selecting the Home icon in the upper left corner of the C-III screen.
NOTE:
^ The steps for reprogramming the Intelligent Cruise Control (ICC) are the same as the steps for
reprogramming the TCM.
Reprogramming Caution
Infiniti Qx56 Rwd Workshop Manual (V8-5.6L (VK56VD) (2011))
Infiniti Workshop Manuals > Transmission and Drivetrain > Relays and Modules — Transmission and Drivetrain > Relays and
Modules — A/T > Control Module, A/T > Component Information > Technical Service Bulletins > Customer Interest for
Control Module: > 11-020 > Mar > 11 > Engine, A/T Controls — Hesitation/A/T Shift Issues > Page 675
2. Navigate C-III to the reprogramming screen shown in Figure 1B example above.
NOTE:
^ Do not use the Reprogramming / Programming selection.
^ Select the Model and Model Year and then navigate to Direct Diagnosis > Reprogramming.
3. On your C-III screen, look for an ICC/ADAS Part Number in the Part Number column (see Figure
1B example).
^ If there is no ICC/ADAS Part Number listed, this reprogramming is not needed.
^ If an ICC/ADAS Part Number is listed, write it on the Repair Order.
4. Compare the P/N you wrote down to the numbers in the Current ICC/ADAS P/N column in Table
A-2 above.
^ If there is a match, this reprogramming applies. Continue with the reprogramming procedure.
^ If there is not a match, this reprogramming is not needed.
Infiniti Qx56 Rwd Workshop Manual (V8-5.6L (VK56VD) (2011))
Infiniti Workshop Manuals > Transmission and Drivetrain > Relays and Modules — Transmission and Drivetrain > Relays and
Modules — A/T > Control Module, A/T > Component Information > Technical Service Bulletins > Customer Interest for
Control Module: > 11-020 > Mar > 11 > Engine, A/T Controls — Hesitation/A/T Shift Issues > Page 676
5. If you have performed ICC reprogramming; when reprogramming is complete the screen in
Figure 2B displays.
6. Erase DTCs in all systems.
^ During ICC reprogramming, DTCs will set in several systems and must be erased.
Infiniti Qx56 Rwd Workshop Manual (V8-5.6L (VK56VD) (2011))
Infiniti Workshop Manuals > Transmission and Drivetrain > Transmission Control Systems > Relays and Modules Transmission and Drivetrain > Relays and Modules — A/T > Control Module, A/T > Component Information > Technical
Service Bulletins > All Technical Service Bulletins for Control Module: > 11-020 > Mar > 11 > Engine, A/T Controls Hesitation/A/T Shift Issues
Technical Service Bulletin # 11-020 Date: 110310
Engine, A/T Controls — Hesitation/A/T Shift Issues
Classification: AT 11-004
Reference: ITB11-020
Date: March 10, 2011
2011 QX56; TRANSMISSION SHIFT ISSUES AND HESITATION ISSUES
APPLIED VEHICLES: 2011 QX56 (Z62)
IF YOU CONFIRM
Any of the following symptoms:
^ Gear hunting or excessive downshifting when using the Intelligent Cruise Control (ICC)
and/or
^ The feel of the transmission shifting from Neutral to Drive (may be described as «bump» feel from
the rear) while stopped with the transmission in
Drive
and/or
^ A slight hesitation when accelerating from a stop,
and/or
^ A slight vehicle shudder/vibration during light acceleration,
ACTIONS
1. Perform ECM reprogramming.
^ Refer to Step 3 under ECM reprogramming in the Service Procedure to confirm ECM
reprogramming applies and is needed for the vehicle you are working on.
2. Perform TCM reprogramming.
^ Refer to Step 3 under TCM reprogramming in the Service Procedure to confirm TCM
reprogramming applies and is needed for the vehicle you are working on.
3. If equipped with Intelligent Cruise Control (ICC) perform ICC reprogramming.
^ Refer to Step 3 under ICC reprogramming in the Service Procedure to confirm ICC
reprogramming applies and is needed for the vehicle you are working on.
4. Test drive the vehicle and confirm the incident is resolved.
IMPORTANT:
The purpose of ACTIONS (above) is to give you a quick idea of the work you will be performing.
You MUST closely follow the entire SERVICE PROCEDURE as it contains information that is
essential to successfully completing this repair.
Infiniti Qx56 Rwd Workshop Manual (V8-5.6L (VK56VD) (2011))
Infiniti Workshop Manuals > Transmission and Drivetrain > Transmission Control Systems > Relays and Modules Transmission and Drivetrain > Relays and Modules — A/T > Control Module, A/T > Component Information > Technical
Service Bulletins > All Technical Service Bulletins for Control Module: > 11-020 > Mar > 11 > Engine, A/T Controls Hesitation/A/T Shift Issues > Page 688
CLAIMS INFORMATION
Service Procedure
SERVICE PROCEDURE
ECM Reprogramming
1. Prepare the vehicle for the reprogramming procedure.
Reprogramming Caution
Infiniti Qx56 Rwd Workshop Manual (V8-5.6L (VK56VD) (2011))
Infiniti Workshop Manuals > Transmission and Drivetrain > Transmission Control Systems > Relays and Modules Transmission and Drivetrain > Relays and Modules — A/T > Control Module, A/T > Component Information > Technical
Service Bulletins > All Technical Service Bulletins for Control Module: > 11-020 > Mar > 11 > Engine, A/T Controls Hesitation/A/T Shift Issues > Page 689
2. Navigate C-III to the ECM Reprogramming screen shown in Figure 1.
^ Use the «Reprogramming / Programming» selection.
^ Do not use Direct Diagnosis > Reprogramming.
3. On your C-III screen, look at the Part Number column (see Figure 1 example):
^ If there is no Engine part number listed, then ECM reprogramming does not apply; go to TCM
reprogramming.
^ If an Engine Part Number is listed, write it on the Repair Order.
4. Compare the Part Number you wrote down to the numbers in the Current ECM P/N column in
Table A above.
^ If there is a match this reprogramming applies. Continue with the reprogramming procedure.
NOTE:
If there are two Engine lines (two ECM reprogramming options) on your C-III screen, use the one
that does not have the message «Caution! Use ONLY with ITBXX-XXX».
^ If there is not a match, this reprogramming does not apply; go to TCM reprogramming below.
Infiniti Qx56 Rwd Workshop Manual (V8-5.6L (VK56VD) (2011))
Infiniti Workshop Manuals > Transmission and Drivetrain > Transmission Control Systems > Relays and Modules Transmission and Drivetrain > Relays and Modules — A/T > Control Module, A/T > Component Information > Technical
Service Bulletins > All Technical Service Bulletins for Control Module: > 11-020 > Mar > 11 > Engine, A/T Controls Hesitation/A/T Shift Issues > Page 690
5. When ECM reprogramming is complete, the screen in Figure 2 displays.
NOTE:
If the screen in Figure 2 does NOT display (reprogramming does NOT complete).
6. Make sure to erase DTCs from all Systems.
^ During reprogramming DTCs will set in several systems and must be erased before TCM
reprogramming.
7. Go to TCM Reprogramming below.
TCM Reprogramming
1. Restart the C-III session by selecting the «Home» icon in the upper left corner of the C-III screen.
^ Make sure to erase DTCs from all systems.
^ TCM initialization is not needed for 7 speed A/T reprogramming.
Reprogramming Caution
Infiniti Qx56 Rwd Workshop Manual (V8-5.6L (VK56VD) (2011))
Infiniti Workshop Manuals > Transmission and Drivetrain > Transmission Control Systems > Relays and Modules Transmission and Drivetrain > Relays and Modules — A/T > Control Module, A/T > Component Information > Technical
Service Bulletins > All Technical Service Bulletins for Control Module: > 11-020 > Mar > 11 > Engine, A/T Controls Hesitation/A/T Shift Issues > Page 691
2. Navigate C-III to the reprogramming screen shown in Figure 1A example above.
NOTE:
^ Do not use the «Reprogramming / Programming» selection.
^ Select the Model and Model Year and then navigate to Direct Diagnosis > Reprogramming.
^ TCM initialization is not needed for 7 Speed A/T reprogramming.
3. On your C-III screen look for a Transmission Part Number in the Part Number column (see
Figure 1A example).
^ If there is no Transmission Part Number listed, this reprogramming does not apply; go to ICC
reprogramming.
^ If a Transmission Part Number is listed write it on the Repair Order.
4. Compare the P/N you wrote down to the numbers in the Current TCM P/N column in Table A-1
above.
^ If there is a match this reprogramming applies. Continue with the reprogramming procedure.
^ If there is not a match this reprogramming does not apply; go to ICC reprogramming below.
Infiniti Qx56 Rwd Workshop Manual (V8-5.6L (VK56VD) (2011))
Infiniti Workshop Manuals > Transmission and Drivetrain > Transmission Control Systems > Relays and Modules Transmission and Drivetrain > Relays and Modules — A/T > Control Module, A/T > Component Information > Technical
Service Bulletins > All Technical Service Bulletins for Control Module: > 11-020 > Mar > 11 > Engine, A/T Controls Hesitation/A/T Shift Issues > Page 692
5. If you have performed TCM reprogramming; when reprogramming is complete, the screen in
Figure 2A displays.
6. Erase DTCs in all systems.
^ During TCM reprogramming, DTCs will set in several systems and must be erased before ICC
reprogramming.
7. Go to ICC Reprogramming below.
ICC Reprogramming
1. Restart the C-III session by selecting the Home icon in the upper left corner of the C-III screen.
NOTE:
^ The steps for reprogramming the Intelligent Cruise Control (ICC) are the same as the steps for
reprogramming the TCM.
Reprogramming Caution
Infiniti Qx56 Rwd Workshop Manual (V8-5.6L (VK56VD) (2011))
Infiniti Workshop Manuals > Transmission and Drivetrain > Transmission Control Systems > Relays and Modules Transmission and Drivetrain > Relays and Modules — A/T > Control Module, A/T > Component Information > Technical
Service Bulletins > All Technical Service Bulletins for Control Module: > 11-020 > Mar > 11 > Engine, A/T Controls Hesitation/A/T Shift Issues > Page 693
2. Navigate C-III to the reprogramming screen shown in Figure 1B example above.
NOTE:
^ Do not use the Reprogramming / Programming selection.
^ Select the Model and Model Year and then navigate to Direct Diagnosis > Reprogramming.
3. On your C-III screen, look for an ICC/ADAS Part Number in the Part Number column (see Figure
1B example).
^ If there is no ICC/ADAS Part Number listed, this reprogramming is not needed.
^ If an ICC/ADAS Part Number is listed, write it on the Repair Order.
4. Compare the P/N you wrote down to the numbers in the Current ICC/ADAS P/N column in Table
A-2 above.
^ If there is a match, this reprogramming applies. Continue with the reprogramming procedure.
^ If there is not a match, this reprogramming is not needed.
Infiniti Qx56 Rwd Workshop Manual (V8-5.6L (VK56VD) (2011))
Infiniti Workshop Manuals > Transmission and Drivetrain > Transmission Control Systems > Relays and Modules Transmission and Drivetrain > Relays and Modules — A/T > Control Module, A/T > Component Information > Technical
Service Bulletins > All Technical Service Bulletins for Control Module: > 11-020 > Mar > 11 > Engine, A/T Controls Hesitation/A/T Shift Issues > Page 694
5. If you have performed ICC reprogramming; when reprogramming is complete the screen in
Figure 2B displays.
6. Erase DTCs in all systems.
^ During ICC reprogramming, DTCs will set in several systems and must be erased.
Infiniti Qx56 Rwd Workshop Manual (V8-5.6L (VK56VD) (2011))
Infiniti Workshop Manuals > Transmission and Drivetrain > Transmission Control Systems > Relays and Modules Transmission and Drivetrain > Relays and Modules — A/T > Control Module, A/T > Component Information > Technical
Service Bulletins > Customer Interest for Control Module: > 11-020 > Mar > 11 > Engine, A/T Controls — Hesitation/A/T Shift
Issues
Technical Service Bulletin # 11-020 Date: 110310
Engine, A/T Controls — Hesitation/A/T Shift Issues
Classification: AT 11-004
Reference: ITB11-020
Date: March 10, 2011
2011 QX56; TRANSMISSION SHIFT ISSUES AND HESITATION ISSUES
APPLIED VEHICLES: 2011 QX56 (Z62)
IF YOU CONFIRM
Any of the following symptoms:
^ Gear hunting or excessive downshifting when using the Intelligent Cruise Control (ICC)
and/or
^ The feel of the transmission shifting from Neutral to Drive (may be described as «bump» feel from
the rear) while stopped with the transmission in
Drive
and/or
^ A slight hesitation when accelerating from a stop,
and/or
^ A slight vehicle shudder/vibration during light acceleration,
ACTIONS
1. Perform ECM reprogramming.
^ Refer to Step 3 under ECM reprogramming in the Service Procedure to confirm ECM
reprogramming applies and is needed for the vehicle you are working on.
2. Perform TCM reprogramming.
^ Refer to Step 3 under TCM reprogramming in the Service Procedure to confirm TCM
reprogramming applies and is needed for the vehicle you are working on.
3. If equipped with Intelligent Cruise Control (ICC) perform ICC reprogramming.
^ Refer to Step 3 under ICC reprogramming in the Service Procedure to confirm ICC
reprogramming applies and is needed for the vehicle you are working on.
4. Test drive the vehicle and confirm the incident is resolved.
IMPORTANT:
The purpose of ACTIONS (above) is to give you a quick idea of the work you will be performing.
You MUST closely follow the entire SERVICE PROCEDURE as it contains information that is
essential to successfully completing this repair.
Infiniti Qx56 Rwd Workshop Manual (V8-5.6L (VK56VD) (2011))
Infiniti Workshop Manuals > Transmission and Drivetrain > Transmission Control Systems > Relays and Modules Transmission and Drivetrain > Relays and Modules — A/T > Control Module, A/T > Component Information > Technical
Service Bulletins > Customer Interest for Control Module: > 11-020 > Mar > 11 > Engine, A/T Controls — Hesitation/A/T Shift
Issues > Page 700
CLAIMS INFORMATION
Service Procedure
SERVICE PROCEDURE
ECM Reprogramming
1. Prepare the vehicle for the reprogramming procedure.
Reprogramming Caution
Infiniti Qx56 Rwd Workshop Manual (V8-5.6L (VK56VD) (2011))
Infiniti Workshop Manuals > Transmission and Drivetrain > Transmission Control Systems > Relays and Modules Transmission and Drivetrain > Relays and Modules — A/T > Control Module, A/T > Component Information > Technical
Service Bulletins > Customer Interest for Control Module: > 11-020 > Mar > 11 > Engine, A/T Controls — Hesitation/A/T Shift
Issues > Page 701
2. Navigate C-III to the ECM Reprogramming screen shown in Figure 1.
^ Use the «Reprogramming / Programming» selection.
^ Do not use Direct Diagnosis > Reprogramming.
3. On your C-III screen, look at the Part Number column (see Figure 1 example):
^ If there is no Engine part number listed, then ECM reprogramming does not apply; go to TCM
reprogramming.
^ If an Engine Part Number is listed, write it on the Repair Order.
4. Compare the Part Number you wrote down to the numbers in the Current ECM P/N column in
Table A above.
^ If there is a match this reprogramming applies. Continue with the reprogramming procedure.
NOTE:
If there are two Engine lines (two ECM reprogramming options) on your C-III screen, use the one
that does not have the message «Caution! Use ONLY with ITBXX-XXX».
^ If there is not a match, this reprogramming does not apply; go to TCM reprogramming below.
Infiniti Qx56 Rwd Workshop Manual (V8-5.6L (VK56VD) (2011))
Infiniti Workshop Manuals > Transmission and Drivetrain > Transmission Control Systems > Relays and Modules Transmission and Drivetrain > Relays and Modules — A/T > Control Module, A/T > Component Information > Technical
Service Bulletins > Customer Interest for Control Module: > 11-020 > Mar > 11 > Engine, A/T Controls — Hesitation/A/T Shift
Issues > Page 702
5. When ECM reprogramming is complete, the screen in Figure 2 displays.
NOTE:
If the screen in Figure 2 does NOT display (reprogramming does NOT complete).
6. Make sure to erase DTCs from all Systems.
^ During reprogramming DTCs will set in several systems and must be erased before TCM
reprogramming.
7. Go to TCM Reprogramming below.
TCM Reprogramming
1. Restart the C-III session by selecting the «Home» icon in the upper left corner of the C-III screen.
^ Make sure to erase DTCs from all systems.
^ TCM initialization is not needed for 7 speed A/T reprogramming.
Reprogramming Caution
Infiniti Qx56 Rwd Workshop Manual (V8-5.6L (VK56VD) (2011))
Infiniti Workshop Manuals > Transmission and Drivetrain > Transmission Control Systems > Relays and Modules Transmission and Drivetrain > Relays and Modules — A/T > Control Module, A/T > Component Information > Technical
Service Bulletins > Customer Interest for Control Module: > 11-020 > Mar > 11 > Engine, A/T Controls — Hesitation/A/T Shift
Issues > Page 703
2. Navigate C-III to the reprogramming screen shown in Figure 1A example above.
NOTE:
^ Do not use the «Reprogramming / Programming» selection.
^ Select the Model and Model Year and then navigate to Direct Diagnosis > Reprogramming.
^ TCM initialization is not needed for 7 Speed A/T reprogramming.
3. On your C-III screen look for a Transmission Part Number in the Part Number column (see
Figure 1A example).
^ If there is no Transmission Part Number listed, this reprogramming does not apply; go to ICC
reprogramming.
^ If a Transmission Part Number is listed write it on the Repair Order.
4. Compare the P/N you wrote down to the numbers in the Current TCM P/N column in Table A-1
above.
^ If there is a match this reprogramming applies. Continue with the reprogramming procedure.
^ If there is not a match this reprogramming does not apply; go to ICC reprogramming below.
Infiniti Qx56 Rwd Workshop Manual (V8-5.6L (VK56VD) (2011))
Infiniti Workshop Manuals > Transmission and Drivetrain > Transmission Control Systems > Relays and Modules Transmission and Drivetrain > Relays and Modules — A/T > Control Module, A/T > Component Information > Technical
Service Bulletins > Customer Interest for Control Module: > 11-020 > Mar > 11 > Engine, A/T Controls — Hesitation/A/T Shift
Issues > Page 704
5. If you have performed TCM reprogramming; when reprogramming is complete, the screen in
Figure 2A displays.
6. Erase DTCs in all systems.
^ During TCM reprogramming, DTCs will set in several systems and must be erased before ICC
reprogramming.
7. Go to ICC Reprogramming below.
ICC Reprogramming
1. Restart the C-III session by selecting the Home icon in the upper left corner of the C-III screen.
NOTE:
^ The steps for reprogramming the Intelligent Cruise Control (ICC) are the same as the steps for
reprogramming the TCM.
Reprogramming Caution
Infiniti Qx56 Rwd Workshop Manual (V8-5.6L (VK56VD) (2011))
Infiniti Workshop Manuals > Transmission and Drivetrain > Transmission Control Systems > Relays and Modules Transmission and Drivetrain > Relays and Modules — A/T > Control Module, A/T > Component Information > Technical
Service Bulletins > Customer Interest for Control Module: > 11-020 > Mar > 11 > Engine, A/T Controls — Hesitation/A/T Shift
Issues > Page 705
2. Navigate C-III to the reprogramming screen shown in Figure 1B example above.
NOTE:
^ Do not use the Reprogramming / Programming selection.
^ Select the Model and Model Year and then navigate to Direct Diagnosis > Reprogramming.
3. On your C-III screen, look for an ICC/ADAS Part Number in the Part Number column (see Figure
1B example).
^ If there is no ICC/ADAS Part Number listed, this reprogramming is not needed.
^ If an ICC/ADAS Part Number is listed, write it on the Repair Order.
4. Compare the P/N you wrote down to the numbers in the Current ICC/ADAS P/N column in Table
A-2 above.
^ If there is a match, this reprogramming applies. Continue with the reprogramming procedure.
^ If there is not a match, this reprogramming is not needed.
Infiniti Qx56 Rwd Workshop Manual (V8-5.6L (VK56VD) (2011))
Infiniti Workshop Manuals > Transmission and Drivetrain > Transmission Control Systems > Relays and Modules Transmission and Drivetrain > Relays and Modules — A/T > Control Module, A/T > Component Information > Technical
Service Bulletins > Customer Interest for Control Module: > 11-020 > Mar > 11 > Engine, A/T Controls — Hesitation/A/T Shift
Issues > Page 706
5. If you have performed ICC reprogramming; when reprogramming is complete the screen in
Figure 2B displays.
6. Erase DTCs in all systems.
^ During ICC reprogramming, DTCs will set in several systems and must be erased.
Infiniti Qx56 Rwd Workshop Manual (V8-5.6L (VK56VD) (2011))
Infiniti Workshop Manuals > Brakes and Traction Control > Antilock Brakes / Traction Control Systems > Electronic Brake
Control Module > Component Information > Technical Service Bulletins > ABS/TCS — CAN Diagnostic Information
Electronic Brake Control Module: Technical Service Bulletins ABS/TCS — CAN Diagnostic
Information
Classification: BR10-012
Reference: ITB10-074
Date: December 15, 2010
ABS / VDC CAN DIAGNOSIS INFORMATION
APPLIED VEHICLES: All 2005 — 2011 Infiniti vehicles with ABS and/or VDC
SERVICE INFORMATION
When diagnosing a vehicle with an ABS or VDC / SLIP warning light on with DTCs stored in the
ABS / VDC actuator control unit perform DTC diagnosis first.
^ Do not replace the ABS / VDC actuator control unit without being supported by the DTC
diagnosis.
^ Do not erase DTCS before performing DTC diagnosis.
^ Always fully diagnose before performing any repairs.
When DTC U1000 (CAN COMM CIRCUIT) is the only DTC stored in the ABS / VDC actuator
control unit use the REPAIR FLOW CHART shown below. This will assist in proper diagnosis
results and repairs in addition to using diagnostic information in the Electronic Service Manual
(ESM).
^ If DTC U1000 is found stored in other systems refer to NTB10-066 and the applicable ESM.
^ If other DTCs are found stored in ABS / VDC along with U1000 follow the diagnosis steps for
those DTCs in the applicable ESM.
CLAIMS INFORMATION
Refer to the current Infiniti Warranty Flat Rate Manual and use the appropriate claims coding for
repairs performed.
Infiniti Qx56 Rwd Workshop Manual (V8-5.6L (VK56VD) (2011))
Infiniti Workshop Manuals > Brakes and Traction Control > Antilock Brakes / Traction Control Systems > Electronic Brake
Control Module > Component Information > Technical Service Bulletins > ABS/TCS — CAN Diagnostic Information > Page
713
Infiniti Qx56 Rwd Workshop Manual (V8-5.6L (VK56VD) (2011))
Infiniti Workshop Manuals > Brakes and Traction Control > Antilock Brakes / Traction Control Systems > Electronic Brake
Control Module > Component Information > Technical Service Bulletins > ABS/TCS — CAN Diagnostic Information > Page
714
Repair Flow Chart
Infiniti Qx56 Rwd Workshop Manual (V8-5.6L (VK56VD) (2011))
Infiniti Workshop Manuals > Brakes and Traction Control > Antilock Brakes / Traction Control Systems > Traction Control
Module > Component Information > Technical Service Bulletins > ABS/TCS — CAN Diagnostic Information
Traction Control Module: Technical Service Bulletins ABS/TCS — CAN Diagnostic Information
Classification: BR10-012
Reference: ITB10-074
Date: December 15, 2010
ABS / VDC CAN DIAGNOSIS INFORMATION
APPLIED VEHICLES: All 2005 — 2011 Infiniti vehicles with ABS and/or VDC
SERVICE INFORMATION
When diagnosing a vehicle with an ABS or VDC / SLIP warning light on with DTCs stored in the
ABS / VDC actuator control unit perform DTC diagnosis first.
^ Do not replace the ABS / VDC actuator control unit without being supported by the DTC
diagnosis.
^ Do not erase DTCS before performing DTC diagnosis.
^ Always fully diagnose before performing any repairs.
When DTC U1000 (CAN COMM CIRCUIT) is the only DTC stored in the ABS / VDC actuator
control unit use the REPAIR FLOW CHART shown below. This will assist in proper diagnosis
results and repairs in addition to using diagnostic information in the Electronic Service Manual
(ESM).
^ If DTC U1000 is found stored in other systems refer to NTB10-066 and the applicable ESM.
^ If other DTCs are found stored in ABS / VDC along with U1000 follow the diagnosis steps for
those DTCs in the applicable ESM.
CLAIMS INFORMATION
Refer to the current Infiniti Warranty Flat Rate Manual and use the appropriate claims coding for
repairs performed.
Infiniti Qx56 Rwd Workshop Manual (V8-5.6L (VK56VD) (2011))
Infiniti Workshop Manuals > Brakes and Traction Control > Antilock Brakes / Traction Control Systems > Traction Control
Module > Component Information > Technical Service Bulletins > ABS/TCS — CAN Diagnostic Information > Page 719
Infiniti Qx56 Rwd Workshop Manual (V8-5.6L (VK56VD) (2011))
Infiniti Workshop Manuals > Brakes and Traction Control > Antilock Brakes / Traction Control Systems > Traction Control
Module > Component Information > Technical Service Bulletins > ABS/TCS — CAN Diagnostic Information > Page 720
Repair Flow Chart
Infiniti Qx56 Rwd Workshop Manual (V8-5.6L (VK56VD) (2011))
Infiniti Workshop Manuals > Brakes and Traction Control > Antilock Brakes / Traction Control Systems > Wheel Speed
Sensor > Component Information > Technical Service Bulletins > ABS/TCS — Wheel Speed Sensor Diagnostics
Wheel Speed Sensor: Technical Service Bulletins ABS/TCS — Wheel Speed Sensor Diagnostics
Classification: BR10-008
Reference: ITB10-056
Date: August 24, 2010
INFINITI; ABS/VDC WHEEL SPEED SENSOR DIAGNOSIS
APPLIED VEHICLES: 2007-2011 Infiniti vehicles equipped with ABS/VDC
SERVICE INFORMATION
This bulletin is being released to assist in accurate diagnosis when DTC:
^ C1101-C1104 [Wheel Speed Sensor 1] And/or
^ C1105-C1108 [Wheel Speed Sensor 2] is stored in the related ECU.
See below for additional diagnostic information.
Use of CONSULT-III and/or Wheel Sensor Tester Essential Tool J-45741 is recommended for
more efficient diagnosis.
IMPORTANT:
> ALWAYS fully diagnose the code before performing any repairs.
> DO NOT replace a sensor based on DTC alone without confirming a specific issue.
To diagnose a potential wheel speed sensor incident these basic steps should be followed.
1. Check the codes from the control unit and determine whether there is a wheel speed sensor
DTC and which wheel it is from. Check the sensor outputs using CONSULT-III DATA MONITOR
where applicable.
2. Go to the sensor and rotor at issue. Check for damage debris contamination and the electrical
connection.
3. With key off, disconnect the sensor and check the connector for any damage, including
damaged terminal, terminal «push-out», female terminal «Spread-open», and any oxidation or dirt.
4. Check the wheel speed sensor output signal directly at the sensor. This is done with Wheel
Sensor Tester Essential Tool J-45741. Make sure the key is off before disconnecting any
connectors. While checking signal output move around the wires to see if movement produces an
interruption.
NOTE:
^ Use the Tester. DO NOT test a wheel speed sensor with a «continuity» (test) light.
^ A good result from the Tester will most likely remove any concern of an incident with the wheel
speed sensor itself.
5. Check continuity of circuits. Use the applicable Electronic Service Manual to find the wheel
speed sensor circuit being inspected at the control unit. Check pin to pin continuity from the control
unit connector to the wheel speed sensor connector-wire harness side.
CAUTION:
Do not damage the connectors.
After checking continuity on each individual circuit pin to pin:
^ Check continuity between the two separate wheel speed sensor circuits to ensure there is no
continuity across (between) the two separate circuits.
^ Check each circuit to ensure there is no continuity to ground.
The steps above are general diagnostic guidelines. Always consult the applicable Electronic
Service Manual for specific instructions on the diagnosis and repair of DTCs.
Infiniti Qx56 Rwd Workshop Manual (V8-5.6L (VK56VD) (2011))
Infiniti Workshop Manuals > Brakes and Traction Control > Relays and Modules — Brakes and Traction Control > Electronic
Brake Control Module > Component Information > Technical Service Bulletins > ABS/TCS — CAN Diagnostic Information
Electronic Brake Control Module: Technical Service Bulletins ABS/TCS — CAN Diagnostic
Information
Classification: BR10-012
Reference: ITB10-074
Date: December 15, 2010
ABS / VDC CAN DIAGNOSIS INFORMATION
APPLIED VEHICLES: All 2005 — 2011 Infiniti vehicles with ABS and/or VDC
SERVICE INFORMATION
When diagnosing a vehicle with an ABS or VDC / SLIP warning light on with DTCs stored in the
ABS / VDC actuator control unit perform DTC diagnosis first.
^ Do not replace the ABS / VDC actuator control unit without being supported by the DTC
diagnosis.
^ Do not erase DTCS before performing DTC diagnosis.
^ Always fully diagnose before performing any repairs.
When DTC U1000 (CAN COMM CIRCUIT) is the only DTC stored in the ABS / VDC actuator
control unit use the REPAIR FLOW CHART shown below. This will assist in proper diagnosis
results and repairs in addition to using diagnostic information in the Electronic Service Manual
(ESM).
^ If DTC U1000 is found stored in other systems refer to NTB10-066 and the applicable ESM.
^ If other DTCs are found stored in ABS / VDC along with U1000 follow the diagnosis steps for
those DTCs in the applicable ESM.
CLAIMS INFORMATION
Refer to the current Infiniti Warranty Flat Rate Manual and use the appropriate claims coding for
repairs performed.
Infiniti Qx56 Rwd Workshop Manual (V8-5.6L (VK56VD) (2011))
Infiniti Workshop Manuals > Brakes and Traction Control > Relays and Modules — Brakes and Traction Control > Electronic
Brake Control Module > Component Information > Technical Service Bulletins > ABS/TCS — CAN Diagnostic Information >
Page 730
Infiniti Qx56 Rwd Workshop Manual (V8-5.6L (VK56VD) (2011))
Infiniti Workshop Manuals > Brakes and Traction Control > Relays and Modules — Brakes and Traction Control > Electronic
Brake Control Module > Component Information > Technical Service Bulletins > ABS/TCS — CAN Diagnostic Information >
Page 731
Repair Flow Chart
Infiniti Qx56 Rwd Workshop Manual (V8-5.6L (VK56VD) (2011))
Infiniti Workshop Manuals > Brakes and Traction Control > Relays and Modules — Brakes and Traction Control > Traction
Control Module > Component Information > Technical Service Bulletins > ABS/TCS — CAN Diagnostic Information
Traction Control Module: Technical Service Bulletins ABS/TCS — CAN Diagnostic Information
Classification: BR10-012
Reference: ITB10-074
Date: December 15, 2010
ABS / VDC CAN DIAGNOSIS INFORMATION
APPLIED VEHICLES: All 2005 — 2011 Infiniti vehicles with ABS and/or VDC
SERVICE INFORMATION
When diagnosing a vehicle with an ABS or VDC / SLIP warning light on with DTCs stored in the
ABS / VDC actuator control unit perform DTC diagnosis first.
^ Do not replace the ABS / VDC actuator control unit without being supported by the DTC
diagnosis.
^ Do not erase DTCS before performing DTC diagnosis.
^ Always fully diagnose before performing any repairs.
When DTC U1000 (CAN COMM CIRCUIT) is the only DTC stored in the ABS / VDC actuator
control unit use the REPAIR FLOW CHART shown below. This will assist in proper diagnosis
results and repairs in addition to using diagnostic information in the Electronic Service Manual
(ESM).
^ If DTC U1000 is found stored in other systems refer to NTB10-066 and the applicable ESM.
^ If other DTCs are found stored in ABS / VDC along with U1000 follow the diagnosis steps for
those DTCs in the applicable ESM.
CLAIMS INFORMATION
Refer to the current Infiniti Warranty Flat Rate Manual and use the appropriate claims coding for
repairs performed.
Infiniti Qx56 Rwd Workshop Manual (V8-5.6L (VK56VD) (2011))
Infiniti Workshop Manuals > Brakes and Traction Control > Relays and Modules — Brakes and Traction Control > Traction
Control Module > Component Information > Technical Service Bulletins > ABS/TCS — CAN Diagnostic Information > Page
736
Infiniti Qx56 Rwd Workshop Manual (V8-5.6L (VK56VD) (2011))
Infiniti Workshop Manuals > Brakes and Traction Control > Relays and Modules — Brakes and Traction Control > Traction
Control Module > Component Information > Technical Service Bulletins > ABS/TCS — CAN Diagnostic Information > Page
737
Repair Flow Chart
Infiniti Qx56 Rwd Workshop Manual (V8-5.6L (VK56VD) (2011))
Infiniti Workshop Manuals > Brakes and Traction Control > Sensors and Switches — Brakes and Traction Control > Wheel
Speed Sensor > Component Information > Technical Service Bulletins > ABS/TCS — Wheel Speed Sensor Diagnostics
Wheel Speed Sensor: Technical Service Bulletins ABS/TCS — Wheel Speed Sensor Diagnostics
Classification: BR10-008
Reference: ITB10-056
Date: August 24, 2010
INFINITI; ABS/VDC WHEEL SPEED SENSOR DIAGNOSIS
APPLIED VEHICLES: 2007-2011 Infiniti vehicles equipped with ABS/VDC
SERVICE INFORMATION
This bulletin is being released to assist in accurate diagnosis when DTC:
^ C1101-C1104 [Wheel Speed Sensor 1] And/or
^ C1105-C1108 [Wheel Speed Sensor 2] is stored in the related ECU.
See below for additional diagnostic information.
Use of CONSULT-III and/or Wheel Sensor Tester Essential Tool J-45741 is recommended for
more efficient diagnosis.
IMPORTANT:
> ALWAYS fully diagnose the code before performing any repairs.
> DO NOT replace a sensor based on DTC alone without confirming a specific issue.
To diagnose a potential wheel speed sensor incident these basic steps should be followed.
1. Check the codes from the control unit and determine whether there is a wheel speed sensor
DTC and which wheel it is from. Check the sensor outputs using CONSULT-III DATA MONITOR
where applicable.
2. Go to the sensor and rotor at issue. Check for damage debris contamination and the electrical
connection.
3. With key off, disconnect the sensor and check the connector for any damage, including
damaged terminal, terminal «push-out», female terminal «Spread-open», and any oxidation or dirt.
4. Check the wheel speed sensor output signal directly at the sensor. This is done with Wheel
Sensor Tester Essential Tool J-45741. Make sure the key is off before disconnecting any
connectors. While checking signal output move around the wires to see if movement produces an
interruption.
NOTE:
^ Use the Tester. DO NOT test a wheel speed sensor with a «continuity» (test) light.
^ A good result from the Tester will most likely remove any concern of an incident with the wheel
speed sensor itself.
5. Check continuity of circuits. Use the applicable Electronic Service Manual to find the wheel
speed sensor circuit being inspected at the control unit. Check pin to pin continuity from the control
unit connector to the wheel speed sensor connector-wire harness side.
CAUTION:
Do not damage the connectors.
After checking continuity on each individual circuit pin to pin:
^ Check continuity between the two separate wheel speed sensor circuits to ensure there is no
continuity across (between) the two separate circuits.
^ Check each circuit to ensure there is no continuity to ground.
The steps above are general diagnostic guidelines. Always consult the applicable Electronic
Service Manual for specific instructions on the diagnosis and repair of DTCs.
Infiniti Qx56 Rwd Workshop Manual (V8-5.6L (VK56VD) (2011))
Infiniti Workshop Manuals > Starting and Charging > Starting System > Keyless Starting System > System Information >
Technical Service Bulletins > TPMS/Keyless Systems — Signal TECH II Diagnostic Tool
Keyless Starting System: Technical Service Bulletins TPMS/Keyless Systems — Signal TECH II
Diagnostic Tool
Classification: WT10-002A
Reference: ITB10-023A
Date: January 6, 2011
SIGNAL TECH II DIAGNOSTIC TOOL
This bulletin has been amended. Notes below APPLIED VEHICLES have been amended.
SERVICE INFORMATION has been amended. Please discard previous versions of this bulletin.
APPLIED VEHICLES: All Infiniti with Tire Pressure Monitor System (TPMS) Remote Keyless Entry
or Intelligent Key.
NOTE:
New software updates have been released. Please update Signal Tech II for the items listed below.
October 25, 2010:
^ Enhanced features
^ New Model compatibility
^ Support for the new TPMS sensor technology adopted February 28 2010. Refer to ITB10-050a.
November 23, 2010:
^ Infiniti G25 software patch
Failure to update Signal Tech II may lead to misdiagnosis of vehicles built after February 28, 2010.
The latest software is available on the CONSULT III PC at: ASIST> Specialty Tools> Signal Tech II
If you should encounter problems updating Signal Tech II contact Techmate.
Future updates will be released as needed. Check ASIST frequently for this information.
SERVICE INFORMATION
If service is required on a vehicle’s Tire Pressure Monitor System (TPMS) remote keyless entry or
Intelligent Key the Signal Tech II (special tool J-50190) can be used for diagnostics.
Signal Tech II will quickly:
^ Activate and display TPMS Sensor IDs
^ Display tire pressure reported by the TPMS sensor
^ Read TPMS DTCs and register TPMS IDs
^ Store and print reports for warrantable repairs
^ Check intelligent key relative signal strength
^ Test remote keyless entry relative signal strength
^ Confirm vehicle Intelligent Key antenna relative signal strength output
^ Read ENGINE DTCs
Other available information for Signal Tech II:
Infiniti Qx56 Rwd Workshop Manual (V8-5.6L (VK56VD) (2011))
Infiniti Workshop Manuals > Starting and Charging > Starting System > Keyless Starting System > System Information >
Technical Service Bulletins > TPMS/Keyless Systems — Signal TECH II Diagnostic Tool > Page 749
^ Signal Tech II Quick Start Guide: ASIST > Tools & Equipment> Tool & Equipment Web Page
^ Signal Tech II Users Guide: ASIST > Tools & Equipment> Tools & Equipment Web Page
^ Tool Flyer: ASIST > Tools & Equipment> Tools & Equipment Web Page> Infiniti Essential Tool
Flyers
^ Tech Talk Article: ASIST > Tech Support Info> TECH TALK / XTRA> Spring 2010 issue
Infiniti Qx56 Rwd Workshop Manual (V8-5.6L (VK56VD) (2011))
Infiniti Workshop Manuals > Steering and Suspension > Alignment > System Information > Technical Service Bulletins > All
Technical Service Bulletins for Alignment: > 04-021C > Apr > 11 > Steering/Suspension — Wheel Alignment Info.
Technical Service Bulletin # 04-021C Date: 110406
Steering/Suspension — Wheel Alignment Info.
Classification: WT04-005C
Reference: ITB04-021C
Date: April 6, 2011
WHEEL ALIGNMENT INFORMATION
This bulletin has been amended to correct some typographical errors in SERVICE INFORMATION.
No other changes have been made. Discard all previous versions of this bulletin.
APPLIED VEHICLES: All Infiniti
Warranty Claim Information:
In order to properly document any warranty alignment claim the following item MUST be attached
to the Repair Order:
^ A copy of the alignment machine printout showing the BEFORE and AFTER alignment readings.
IMPORTANT:
If you do not attach the above item to the Repair Order the claim may be denied (rejected or
charged back).
ALSO: A copy of the yearly alignment machine calibration certification must be held on file in the
Service Dept.
Service Information
SERVICE INFORMATION
^ When performing a wheel alignment it is important that you read and follow all of the instructions
supplied with your alignment equipment.
^ The information in this bulletin is not intended to be complete wheel alignment instructions.
^ Use the information in this bulletin as a supplement to the instructions for your equipment.
General Information and Recommendations
1. Four-Wheel Thrust Alignment should always be performed.
^ This type of alignment is recommended for all Infiniti vehicles.
^ The four-wheel thrust process ensures that the vehicle is properly aligned and helps ensure
proper «centering» of the steering wheel.
2. Use the right alignment machine.
^ You must use a quality alignment machine that will give accurate results when performing
alignment checks.
^ Refer to the Infiniti TECH-MATE Service Equipment Catalog for recommended alignment
equipment.
^ The alignment rack itself should be capable of accepting any Infiniti vehicle.
^ The rack should be checked to ensure that it is level.
3. Make sure the alignment machine is properly calibrated.
^ Your alignment equipment should be regularly calibrated in order to give accurate readings.
^ If any instrument that is part of the alignment machine is dropped or damaged calibration should
be checked immediately.
^ Check with the manufacturer of your specific equipment for their recommended
service/calibration schedule.
NOTE:
Infiniti Qx56 Rwd Workshop Manual (V8-5.6L (VK56VD) (2011))
Infiniti Workshop Manuals > Steering and Suspension > Alignment > System Information > Technical Service Bulletins > All
Technical Service Bulletins for Alignment: > 04-021C > Apr > 11 > Steering/Suspension — Wheel Alignment Info. > Page 759
In order to properly document any warranty alignment claim the following item MUST be attached
to the Repair Order:
A copy of the alignment machine printout showing the BEFORE and AFTER alignment readings.
IMPORTANT:
If you do not attach the above item to the Repair Order the claim may be denied (rejected or
charged back).
ALSO: A copy of the yearly alignment machine calibration certification must be held on file in the
Service Dept.
4. Make sure the «turn plates» and «slide plates» are in good working order:
^ The surface of the front turn plates must be level with (the same height as) the rack surface.
If height is not the same; have the equipment repaired before performing any alignments.
Infiniti Qx56 Rwd Workshop Manual (V8-5.6L (VK56VD) (2011))
Infiniti Workshop Manuals > Steering and Suspension > Alignment > System Information > Technical Service Bulletins > All
Technical Service Bulletins for Alignment: > 04-021C > Apr > 11 > Steering/Suspension — Wheel Alignment Info. > Page 760
^ Make sure the front turn plates:
> Do not wobble (no up/down movement).
> Operate (slide and turn) smoothly in all directions.
If there is any issue with the turn plate operation — have the equipment repaired before performing
any alignments.
^ Make sure the rear slide plates:
> Do not wobble (no up/down movement).
> Operate (slide) smoothly in all directions.
Infiniti Qx56 Rwd Workshop Manual (V8-5.6L (VK56VD) (2011))
Infiniti Workshop Manuals > Steering and Suspension > Alignment > System Information > Technical Service Bulletins > All
Technical Service Bulletins for Alignment: > 04-021C > Apr > 11 > Steering/Suspension — Wheel Alignment Info. > Page 761
If there is any issue with the slide plate operation — have the equipment repaired before performing
any alignments.
5. Make sure the lock pins for the front «turn plates» and rear «slide plates» are in place.
NOTE:
Lock pins should remain in place until caster sweep.
The Alignment Process
IMPORTANT:
Use only the alignment specifications listed in the appropriate Service Manual when adjusting the
alignment.
1. Make sure the vehicle is straight on the alignment rack.
^ Vehicle must be straight (in line) with the alignment rack before entering the rack as shown in
Figure 4.
^ Do not straighten the vehicle while on the rack (see Figure 5).
^ If the vehicle needs to be straightened exit the alignment rack straighten the vehicle and then
re-enter the rack.
^ Once the vehicle is straight on the rack do not turn/center the steering wheel-keep the front
wheels straight.
2. Position vehicle on the front turn plates as follows:
Infiniti Qx56 Rwd Workshop Manual (V8-5.6L (VK56VD) (2011))
Infiniti Workshop Manuals > Steering and Suspension > Alignment > System Information > Technical Service Bulletins > All
Technical Service Bulletins for Alignment: > 04-021C > Apr > 11 > Steering/Suspension — Wheel Alignment Info. > Page 762
^ Stop vehicle just behind the turn plates.
^ Center the turn plates to the tires.
Infiniti Qx56 Rwd Workshop Manual (V8-5.6L (VK56VD) (2011))
Infiniti Workshop Manuals > Steering and Suspension > Alignment > System Information > Technical Service Bulletins > All
Technical Service Bulletins for Alignment: > 04-021C > Apr > 11 > Steering/Suspension — Wheel Alignment Info. > Page 763
^ Move the vehicle onto the turn plates by turning/pushing the rear wheel.
DO NOT push/pull on the vehicle body.
^ Center the front wheels on the turn plates.
Infiniti Qx56 Rwd Workshop Manual (V8-5.6L (VK56VD) (2011))
Infiniti Workshop Manuals > Steering and Suspension > Alignment > System Information > Technical Service Bulletins > All
Technical Service Bulletins for Alignment: > 04-021C > Apr > 11 > Steering/Suspension — Wheel Alignment Info. > Page 764
^ Chock the left rear wheel.
Preliminary Checks:
3. Perform pre-alignment checks.
^ Tire condition (wear partial wear flaws etc.)
^ Road wheel condition (damage and deformation)
^ Tire pressure
^ Inspect for visible damage to any suspension components
^ Wheel bearing axial play
^ Ball joints of suspension arms
^ Shock absorber operation and visual check for oil leakage
^ Condition of axle and suspension (check for bushing cracks and slack)
^ Vehicle weight
> Empty — no cargo luggage or passengers
> Fuel level is full
> Engine coolant and lubricating oils at specified levels
> Spare tire, jack hand tools and floor mats in designated positions
NOTE:
Refer to the appropriate Service Manual for information about any of the above checks and
inspections.
4. Check the target mounts.
^ If there is any visual damage (bent worn cracked etc) have the equipment repaired before
performing any alignments.
Infiniti Qx56 Rwd Workshop Manual (V8-5.6L (VK56VD) (2011))
Infiniti Workshop Manuals > Steering and Suspension > Alignment > System Information > Technical Service Bulletins > All
Technical Service Bulletins for Alignment: > 04-021C > Apr > 11 > Steering/Suspension — Wheel Alignment Info. > Page 765
^ Make sure the target mounts are properly adjusted and configured (see Figure 11).
NOTE:
The target mount example shown in Figure 11 is for Hunter «camera type» alignment machines.
Follow the operation manual for your specific equipment.
Infiniti Qx56 Rwd Workshop Manual (V8-5.6L (VK56VD) (2011))
Infiniti Workshop Manuals > Steering and Suspension > Alignment > System Information > Technical Service Bulletins > All
Technical Service Bulletins for Alignment: > 04-021C > Apr > 11 > Steering/Suspension — Wheel Alignment Info. > Page 766
5. Make sure the targets are mounted correctly.
^ Mount the top claws first.
^ Claws must be flush against the wheel as shown in Figure 13.
Infiniti Qx56 Rwd Workshop Manual (V8-5.6L (VK56VD) (2011))
Infiniti Workshop Manuals > Steering and Suspension > Alignment > System Information > Technical Service Bulletins > All
Technical Service Bulletins for Alignment: > 04-021C > Apr > 11 > Steering/Suspension — Wheel Alignment Info. > Page 767
^ Target must be flush against the center support as shown in Figure 14.
^ Make sure the targets are positioned with the arrow UP or level.
IMPORTANT:
Once you have set the target position DO NOT reset it at anytime during the alignment process.
Infiniti Qx56 Rwd Workshop Manual (V8-5.6L (VK56VD) (2011))
Infiniti Workshop Manuals > Steering and Suspension > Alignment > System Information > Technical Service Bulletins > All
Technical Service Bulletins for Alignment: > 04-021C > Apr > 11 > Steering/Suspension — Wheel Alignment Info. > Page 768
6. Begin the alignment procedure.
^ Follow all of the instructions for your particular equipment.
^ Refer to the Service Manual for alignment specifications.
If your equipment requires «rolling compensation». follow these additional tips:
Infiniti Qx56 Rwd Workshop Manual (V8-5.6L (VK56VD) (2011))
Infiniti Workshop Manuals > Steering and Suspension > Alignment > System Information > Technical Service Bulletins > All
Technical Service Bulletins for Alignment: > 04-021C > Apr > 11 > Steering/Suspension — Wheel Alignment Info. > Page 769
^ DO NOT push or pull on the vehicle body.
IMPORTANT:
After performing «rolling compensation», DO NOT reset the target position.
When performing «caster sweep». follow these tips:
^ Apply the brakes as shown.
^ Start the engine to allow brake boost.
^ Turn the engine OFF.
Infiniti Qx56 Rwd Workshop Manual (V8-5.6L (VK56VD) (2011))
Infiniti Workshop Manuals > Steering and Suspension > Alignment > System Information > Technical Service Bulletins > All
Technical Service Bulletins for Alignment: > 04-021C > Apr > 11 > Steering/Suspension — Wheel Alignment Info. > Page 770
^ Remove all lock pins — front «turn plates» and rear «slide plates».
^ Make sure the bridge plate will not interfere with movement of the turn plate.
Put the bridge plate in the down position.
^ Perform caster sweep by turning the steering wheel from outside the vehicle.
Infiniti Qx56 Rwd Workshop Manual (V8-5.6L (VK56VD) (2011))
Infiniti Workshop Manuals > Steering and Suspension > Alignment > System Information > Technical Service Bulletins > All
Technical Service Bulletins for Alignment: > 04-021C > Apr > 11 > Steering/Suspension — Wheel Alignment Info. > Page 771
^ DO NOT push/pull on the tire to perform the caster sweep.
7. Make sure the steering wheel is centered when performing toe-in measurements and
adjustments.
NOTE:
If you are using a Hunter alignment machine equipped with the WinToe-(R) Alignment Adjustment
System:
^ There is no need to lock the steering wheel. The WinToe(R) system is not affected by steering
system movement during the adjustment process.
^ Bumping the tire or re-centering the steering wheel when adjusting «near frozen» tie rods is not
necessary. This makes the adjustment process faster
and easier.
^ WinToe(R) eliminates the effect of lash in the steering system.
If you are using a John Bean alignment machine equipped with EZ Toe:
^ There is no need to lock the steering wheel. The EZ Toe system is not affected by steering
system movement during the adjustment process.
^ This software routine is an improved method of setting front toe making it easier to obtain a
centered steering wheel.
^ With EZ Toe it is possible to adjust toe with the steering wheel turned at any angle left or right.
This is helpful when setting toe on engine wall
mounted rack and pinion units.
IMPORTANT:
If during the alignment process the vehicle was lifted off of the rack; after lowering, make sure to
jounce (bounce) the vehicle before confirming adjustments are correct.
After you have checked and adjusted vehicle alignment
8. Print the BEFORE and AFTER measurements and attach them to the Repair Order.
9. Road test the vehicle to make sure the steering wheel is «centered» when driving on a straight
flat road.
Infiniti Qx56 Rwd Workshop Manual (V8-5.6L (VK56VD) (2011))
Infiniti Workshop Manuals > Steering and Suspension > Alignment > System Information > Technical Service Bulletins > All
Technical Service Bulletins for Alignment: > 08-046C > Apr > 11 > Steering/Tires — Pull/Drift/Steering Wheel Off-Center
Alignment: All Technical Service Bulletins Steering/Tires — Pull/Drift/Steering Wheel Off-Center
Classification: ST08-002C
Reference: ITB08-046C
Date: April 5, 2011
DIAGNOSIS OF VEHICLE PULL (DRIFT) AND STEERING WHEEL OFF CENTER
This bulletin has been amended. Changes have been made throughout the complete bulletin.
Please discard previous versions of this bulletin.
APPLIED VEHICLES: All Infititi
SERVICE INFORMATION
If a customers reports their «vehicle pulls» or the «steering wheel is off-center» use the Diagnostic
Flow Chart below and the other information in this bulletin to diagnose and correct the issue
Diagnostic Flow Chart
Infiniti Qx56 Rwd Workshop Manual (V8-5.6L (VK56VD) (2011))
Infiniti Workshop Manuals > Steering and Suspension > Alignment > System Information > Technical Service Bulletins > All
Technical Service Bulletins for Alignment: > 08-046C > Apr > 11 > Steering/Tires — Pull/Drift/Steering Wheel Off-Center >
Page 776
Road Test
Determine if the vehicle has a pull or steering wheel off-center issue that requires repair.
IMPORTANT:
^ If the vehicle has any tire issues such as:
> Tires that are different sizes (except when specified from the factory)
> Significant difference in the amount of wear between any of the tires
> Any other tire irregularity or damage to any tire
Replace the tire(s) or use known good tires from another vehicle for all road tests and diagnostics
in this bulletin.
^ Make sure tire pressure is set to the correct specification.
1. Install the following measuring tools on the vehicle:
^ Steering Wheel Offset Gauge
^ Road Crown Gauge
NOTE:
Refer to Special Tools for a description of these tools and an explanation of their use.
2. Obtain a watch with a second hand (preferably a stopwatch) to use during the road test.
3. Take the vehicle for a road test and confirm the customers concern.
^ Select a flat road where the vehicle can be driven in a straight line at a preferred speed of 60
mph.
^ During the road test make sure the vehicle is pointing straight. Don’t worry about steering wheel
position during the road test.
NOTE:
^ If you adjusted the tire pressure or changed the tires before the road test the issue may have
been resolved.
^ If there are cross winds strong enough to affect the vehicle straight line movement then diagnosis
cannot be performed.
4. Determine the vehicles issue — refer to the definitions of «Pull» and Steering Wheel «Off-center»
below.
5. When the road test is completed remove the Road Crown Gauge; leave the Steering Wheel
Off-Set Gauge in place until the Service Procedure is complete.
6. Refer to the Flow Chart for the next step.
Other Service Information
Infiniti Qx56 Rwd Workshop Manual (V8-5.6L (VK56VD) (2011))
Infiniti Workshop Manuals > Steering and Suspension > Alignment > System Information > Technical Service Bulletins > All
Technical Service Bulletins for Alignment: > 08-046C > Apr > 11 > Steering/Tires — Pull/Drift/Steering Wheel Off-Center >
Page 777
Customers may report that their vehicle’s steering wheel is «Off-center» because the steering wheel
spokes are tilted to the left or right when the vehicle continues straight ahead on a straight flat road
(see example in Figure 1).
If a vehicle’s steering wheel spokes are slightly off center while driving straight it may be the normal
result of road crown. Most roads in the United States are built with a «crown» to help rain water
drain from the road surface. The slope of the road crown varies from place to place.
Vehicles have a natural tendency to drift to the low side of the crown. The greater the slope of the
crown the faster the vehicle will drift in that direction.
Tires and vehicles are designed to counteract the effect of typical road crown but may not fully
counteract the effect of a highly crowned road.
Some freeways slope to both the left and right from the center. When driving on a freeway that
slopes in both directions a vehicle may exhibit a small amount of drift to the left when driving in the
left lane and a small amount of drift to the right when driving in the right lane.
This bulletin does not address road crown issues because they are not vehicle related, although
the customer may incorrectly perceive them to be.
Description/Definition of Steering Wheel «Off-center» Condition
The steering wheel spokes are tilted to the left or right 2 mm or more (see example in Figure 2)
when driving straight ahead on a straight flat road.
^ When driving straight on a highly crowned road the steering wheel may be turned (off-center) to
counteract the affect of the road crown. When road
testing for an off-center condition the vehicle should be driven on a straight flat road.
^ Although the vehicle does not pull in either direction the customer may perceive that the vehicle
pulls because it will respond if he or she tries to bring
the steering wheel back to center. This condition can occur if the tie rod length is uneven (not
adjusted correctly) from side to side.
Description/Definition of a Vehicle «Pull» Condition
The vehicle consistently drifts to one side while driving at a constant speed on a straight flat road.
Infiniti Qx56 Rwd Workshop Manual (V8-5.6L (VK56VD) (2011))
Infiniti Workshop Manuals > Steering and Suspension > Alignment > System Information > Technical Service Bulletins > All
Technical Service Bulletins for Alignment: > 08-046C > Apr > 11 > Steering/Tires — Pull/Drift/Steering Wheel Off-Center >
Page 778
^ A vehicle is said to pull if it completes a lane change in less than 7 seconds (with no steering
correction from the driver) when driving at 60 MPH on a
road with less than 2 degrees of road crown slope. All four wheels must pass into the other lane
during this time (7 seconds).
Infiniti Qx56 Rwd Workshop Manual (V8-5.6L (VK56VD) (2011))
Infiniti Workshop Manuals > Steering and Suspension > Alignment > System Information > Technical Service Bulletins > All
Technical Service Bulletins for Alignment: > 08-046C > Apr > 11 > Steering/Tires — Pull/Drift/Steering Wheel Off-Center >
Page 779
SPECIAL TOOLS
Infiniti Qx56 Rwd Workshop Manual (V8-5.6L (VK56VD) (2011))
Infiniti Workshop Manuals > Steering and Suspension > Alignment > System Information > Technical Service Bulletins > By
Symptom: > 08-046C > Apr > 11 > Steering/Tires — Pull/Drift/Steering Wheel Off-Center
Alignment: By Symptom Steering/Tires — Pull/Drift/Steering Wheel Off-Center
Classification: ST08-002C
Reference: ITB08-046C
Date: April 5, 2011
DIAGNOSIS OF VEHICLE PULL (DRIFT) AND STEERING WHEEL OFF CENTER
This bulletin has been amended. Changes have been made throughout the complete bulletin.
Please discard previous versions of this bulletin.
APPLIED VEHICLES: All Infititi
SERVICE INFORMATION
If a customers reports their «vehicle pulls» or the «steering wheel is off-center» use the Diagnostic
Flow Chart below and the other information in this bulletin to diagnose and correct the issue
Diagnostic Flow Chart
Infiniti Qx56 Rwd Workshop Manual (V8-5.6L (VK56VD) (2011))
Infiniti Workshop Manuals > Steering and Suspension > Alignment > System Information > Technical Service Bulletins > By
Symptom: > 08-046C > Apr > 11 > Steering/Tires — Pull/Drift/Steering Wheel Off-Center > Page 785
Road Test
Determine if the vehicle has a pull or steering wheel off-center issue that requires repair.
IMPORTANT:
^ If the vehicle has any tire issues such as:
> Tires that are different sizes (except when specified from the factory)
> Significant difference in the amount of wear between any of the tires
> Any other tire irregularity or damage to any tire
Replace the tire(s) or use known good tires from another vehicle for all road tests and diagnostics
in this bulletin.
^ Make sure tire pressure is set to the correct specification.
1. Install the following measuring tools on the vehicle:
^ Steering Wheel Offset Gauge
^ Road Crown Gauge
NOTE:
Refer to Special Tools for a description of these tools and an explanation of their use.
2. Obtain a watch with a second hand (preferably a stopwatch) to use during the road test.
3. Take the vehicle for a road test and confirm the customers concern.
^ Select a flat road where the vehicle can be driven in a straight line at a preferred speed of 60
mph.
^ During the road test make sure the vehicle is pointing straight. Don’t worry about steering wheel
position during the road test.
NOTE:
^ If you adjusted the tire pressure or changed the tires before the road test the issue may have
been resolved.
^ If there are cross winds strong enough to affect the vehicle straight line movement then diagnosis
cannot be performed.
4. Determine the vehicles issue — refer to the definitions of «Pull» and Steering Wheel «Off-center»
below.
5. When the road test is completed remove the Road Crown Gauge; leave the Steering Wheel
Off-Set Gauge in place until the Service Procedure is complete.
6. Refer to the Flow Chart for the next step.
Other Service Information
Infiniti Qx56 Rwd Workshop Manual (V8-5.6L (VK56VD) (2011))
Infiniti Workshop Manuals > Steering and Suspension > Alignment > System Information > Technical Service Bulletins > By
Symptom: > 08-046C > Apr > 11 > Steering/Tires — Pull/Drift/Steering Wheel Off-Center > Page 786
Customers may report that their vehicle’s steering wheel is «Off-center» because the steering wheel
spokes are tilted to the left or right when the vehicle continues straight ahead on a straight flat road
(see example in Figure 1).
If a vehicle’s steering wheel spokes are slightly off center while driving straight it may be the normal
result of road crown. Most roads in the United States are built with a «crown» to help rain water
drain from the road surface. The slope of the road crown varies from place to place.
Vehicles have a natural tendency to drift to the low side of the crown. The greater the slope of the
crown the faster the vehicle will drift in that direction.
Tires and vehicles are designed to counteract the effect of typical road crown but may not fully
counteract the effect of a highly crowned road.
Some freeways slope to both the left and right from the center. When driving on a freeway that
slopes in both directions a vehicle may exhibit a small amount of drift to the left when driving in the
left lane and a small amount of drift to the right when driving in the right lane.
This bulletin does not address road crown issues because they are not vehicle related, although
the customer may incorrectly perceive them to be.
Description/Definition of Steering Wheel «Off-center» Condition
The steering wheel spokes are tilted to the left or right 2 mm or more (see example in Figure 2)
when driving straight ahead on a straight flat road.
^ When driving straight on a highly crowned road the steering wheel may be turned (off-center) to
counteract the affect of the road crown. When road
testing for an off-center condition the vehicle should be driven on a straight flat road.
^ Although the vehicle does not pull in either direction the customer may perceive that the vehicle
pulls because it will respond if he or she tries to bring
the steering wheel back to center. This condition can occur if the tie rod length is uneven (not
adjusted correctly) from side to side.
Description/Definition of a Vehicle «Pull» Condition
The vehicle consistently drifts to one side while driving at a constant speed on a straight flat road.
Infiniti Qx56 Rwd Workshop Manual (V8-5.6L (VK56VD) (2011))
Infiniti Workshop Manuals > Steering and Suspension > Alignment > System Information > Technical Service Bulletins > By
Symptom: > 08-046C > Apr > 11 > Steering/Tires — Pull/Drift/Steering Wheel Off-Center > Page 787
^ A vehicle is said to pull if it completes a lane change in less than 7 seconds (with no steering
correction from the driver) when driving at 60 MPH on a
road with less than 2 degrees of road crown slope. All four wheels must pass into the other lane
during this time (7 seconds).
Infiniti Qx56 Rwd Workshop Manual (V8-5.6L (VK56VD) (2011))
Infiniti Workshop Manuals > Steering and Suspension > Alignment > System Information > Technical Service Bulletins > By
Symptom: > 08-046C > Apr > 11 > Steering/Tires — Pull/Drift/Steering Wheel Off-Center > Page 788
SPECIAL TOOLS
Infiniti Qx56 Rwd Workshop Manual (V8-5.6L (VK56VD) (2011))
Infiniti Workshop Manuals > Steering and Suspension > Alignment > System Information > Technical Service Bulletins >
Customer Interest: > 08-046C > Apr > 11 > Steering/Tires — Pull/Drift/Steering Wheel Off-Center
Alignment: Customer Interest Steering/Tires — Pull/Drift/Steering Wheel Off-Center
Classification: ST08-002C
Reference: ITB08-046C
Date: April 5, 2011
DIAGNOSIS OF VEHICLE PULL (DRIFT) AND STEERING WHEEL OFF CENTER
This bulletin has been amended. Changes have been made throughout the complete bulletin.
Please discard previous versions of this bulletin.
APPLIED VEHICLES: All Infititi
SERVICE INFORMATION
If a customers reports their «vehicle pulls» or the «steering wheel is off-center» use the Diagnostic
Flow Chart below and the other information in this bulletin to diagnose and correct the issue
Diagnostic Flow Chart
Infiniti Qx56 Rwd Workshop Manual (V8-5.6L (VK56VD) (2011))
Infiniti Workshop Manuals > Steering and Suspension > Alignment > System Information > Technical Service Bulletins >
Customer Interest: > 08-046C > Apr > 11 > Steering/Tires — Pull/Drift/Steering Wheel Off-Center > Page 794
Road Test
Determine if the vehicle has a pull or steering wheel off-center issue that requires repair.
IMPORTANT:
^ If the vehicle has any tire issues such as:
> Tires that are different sizes (except when specified from the factory)
> Significant difference in the amount of wear between any of the tires
> Any other tire irregularity or damage to any tire
Replace the tire(s) or use known good tires from another vehicle for all road tests and diagnostics
in this bulletin.
^ Make sure tire pressure is set to the correct specification.
1. Install the following measuring tools on the vehicle:
^ Steering Wheel Offset Gauge
^ Road Crown Gauge
NOTE:
Refer to Special Tools for a description of these tools and an explanation of their use.
2. Obtain a watch with a second hand (preferably a stopwatch) to use during the road test.
3. Take the vehicle for a road test and confirm the customers concern.
^ Select a flat road where the vehicle can be driven in a straight line at a preferred speed of 60
mph.
^ During the road test make sure the vehicle is pointing straight. Don’t worry about steering wheel
position during the road test.
NOTE:
^ If you adjusted the tire pressure or changed the tires before the road test the issue may have
been resolved.
^ If there are cross winds strong enough to affect the vehicle straight line movement then diagnosis
cannot be performed.
4. Determine the vehicles issue — refer to the definitions of «Pull» and Steering Wheel «Off-center»
below.
5. When the road test is completed remove the Road Crown Gauge; leave the Steering Wheel
Off-Set Gauge in place until the Service Procedure is complete.
6. Refer to the Flow Chart for the next step.
Other Service Information
Infiniti Qx56 Rwd Workshop Manual (V8-5.6L (VK56VD) (2011))
Infiniti Workshop Manuals > Steering and Suspension > Alignment > System Information > Technical Service Bulletins >
Customer Interest: > 08-046C > Apr > 11 > Steering/Tires — Pull/Drift/Steering Wheel Off-Center > Page 795
Customers may report that their vehicle’s steering wheel is «Off-center» because the steering wheel
spokes are tilted to the left or right when the vehicle continues straight ahead on a straight flat road
(see example in Figure 1).
If a vehicle’s steering wheel spokes are slightly off center while driving straight it may be the normal
result of road crown. Most roads in the United States are built with a «crown» to help rain water
drain from the road surface. The slope of the road crown varies from place to place.
Vehicles have a natural tendency to drift to the low side of the crown. The greater the slope of the
crown the faster the vehicle will drift in that direction.
Tires and vehicles are designed to counteract the effect of typical road crown but may not fully
counteract the effect of a highly crowned road.
Some freeways slope to both the left and right from the center. When driving on a freeway that
slopes in both directions a vehicle may exhibit a small amount of drift to the left when driving in the
left lane and a small amount of drift to the right when driving in the right lane.
This bulletin does not address road crown issues because they are not vehicle related, although
the customer may incorrectly perceive them to be.
Description/Definition of Steering Wheel «Off-center» Condition
The steering wheel spokes are tilted to the left or right 2 mm or more (see example in Figure 2)
when driving straight ahead on a straight flat road.
^ When driving straight on a highly crowned road the steering wheel may be turned (off-center) to
counteract the affect of the road crown. When road
testing for an off-center condition the vehicle should be driven on a straight flat road.
^ Although the vehicle does not pull in either direction the customer may perceive that the vehicle
pulls because it will respond if he or she tries to bring
the steering wheel back to center. This condition can occur if the tie rod length is uneven (not
adjusted correctly) from side to side.
Description/Definition of a Vehicle «Pull» Condition
The vehicle consistently drifts to one side while driving at a constant speed on a straight flat road.
Infiniti Qx56 Rwd Workshop Manual (V8-5.6L (VK56VD) (2011))
Infiniti Workshop Manuals > Steering and Suspension > Alignment > System Information > Technical Service Bulletins >
Customer Interest: > 08-046C > Apr > 11 > Steering/Tires — Pull/Drift/Steering Wheel Off-Center > Page 796
^ A vehicle is said to pull if it completes a lane change in less than 7 seconds (with no steering
correction from the driver) when driving at 60 MPH on a
road with less than 2 degrees of road crown slope. All four wheels must pass into the other lane
during this time (7 seconds).
Infiniti Qx56 Rwd Workshop Manual (V8-5.6L (VK56VD) (2011))
Infiniti Workshop Manuals > Steering and Suspension > Alignment > System Information > Technical Service Bulletins >
Customer Interest: > 08-046C > Apr > 11 > Steering/Tires — Pull/Drift/Steering Wheel Off-Center > Page 797
SPECIAL TOOLS
Infiniti Qx56 Rwd Workshop Manual (V8-5.6L (VK56VD) (2011))
Infiniti Workshop Manuals > Steering and Suspension > Alignment > System Information > Technical Service Bulletins > All
Other Service Bulletins for Alignment: > 04-021C > Apr > 11 > Steering/Suspension — Wheel Alignment Info.
Technical Service Bulletin # 04-021C Date: 110406
Steering/Suspension — Wheel Alignment Info.
Classification: WT04-005C
Reference: ITB04-021C
Date: April 6, 2011
WHEEL ALIGNMENT INFORMATION
This bulletin has been amended to correct some typographical errors in SERVICE INFORMATION.
No other changes have been made. Discard all previous versions of this bulletin.
APPLIED VEHICLES: All Infiniti
Warranty Claim Information:
In order to properly document any warranty alignment claim the following item MUST be attached
to the Repair Order:
^ A copy of the alignment machine printout showing the BEFORE and AFTER alignment readings.
IMPORTANT:
If you do not attach the above item to the Repair Order the claim may be denied (rejected or
charged back).
ALSO: A copy of the yearly alignment machine calibration certification must be held on file in the
Service Dept.
Service Information
SERVICE INFORMATION
^ When performing a wheel alignment it is important that you read and follow all of the instructions
supplied with your alignment equipment.
^ The information in this bulletin is not intended to be complete wheel alignment instructions.
^ Use the information in this bulletin as a supplement to the instructions for your equipment.
General Information and Recommendations
1. Four-Wheel Thrust Alignment should always be performed.
^ This type of alignment is recommended for all Infiniti vehicles.
^ The four-wheel thrust process ensures that the vehicle is properly aligned and helps ensure
proper «centering» of the steering wheel.
2. Use the right alignment machine.
^ You must use a quality alignment machine that will give accurate results when performing
alignment checks.
^ Refer to the Infiniti TECH-MATE Service Equipment Catalog for recommended alignment
equipment.
^ The alignment rack itself should be capable of accepting any Infiniti vehicle.
^ The rack should be checked to ensure that it is level.
3. Make sure the alignment machine is properly calibrated.
^ Your alignment equipment should be regularly calibrated in order to give accurate readings.
^ If any instrument that is part of the alignment machine is dropped or damaged calibration should
be checked immediately.
^ Check with the manufacturer of your specific equipment for their recommended
service/calibration schedule.
NOTE:
Infiniti Qx56 Rwd Workshop Manual (V8-5.6L (VK56VD) (2011))
Infiniti Workshop Manuals > Steering and Suspension > Alignment > System Information > Technical Service Bulletins > All
Other Service Bulletins for Alignment: > 04-021C > Apr > 11 > Steering/Suspension — Wheel Alignment Info. > Page 803
In order to properly document any warranty alignment claim the following item MUST be attached
to the Repair Order:
A copy of the alignment machine printout showing the BEFORE and AFTER alignment readings.
IMPORTANT:
If you do not attach the above item to the Repair Order the claim may be denied (rejected or
charged back).
ALSO: A copy of the yearly alignment machine calibration certification must be held on file in the
Service Dept.
4. Make sure the «turn plates» and «slide plates» are in good working order:
^ The surface of the front turn plates must be level with (the same height as) the rack surface.
If height is not the same; have the equipment repaired before performing any alignments.
Infiniti Qx56 Rwd Workshop Manual (V8-5.6L (VK56VD) (2011))
Infiniti Workshop Manuals > Steering and Suspension > Alignment > System Information > Technical Service Bulletins > All
Other Service Bulletins for Alignment: > 04-021C > Apr > 11 > Steering/Suspension — Wheel Alignment Info. > Page 804
^ Make sure the front turn plates:
> Do not wobble (no up/down movement).
> Operate (slide and turn) smoothly in all directions.
If there is any issue with the turn plate operation — have the equipment repaired before performing
any alignments.
^ Make sure the rear slide plates:
> Do not wobble (no up/down movement).
> Operate (slide) smoothly in all directions.
Infiniti Qx56 Rwd Workshop Manual (V8-5.6L (VK56VD) (2011))
Infiniti Workshop Manuals > Steering and Suspension > Alignment > System Information > Technical Service Bulletins > All
Other Service Bulletins for Alignment: > 04-021C > Apr > 11 > Steering/Suspension — Wheel Alignment Info. > Page 805
If there is any issue with the slide plate operation — have the equipment repaired before performing
any alignments.
5. Make sure the lock pins for the front «turn plates» and rear «slide plates» are in place.
NOTE:
Lock pins should remain in place until caster sweep.
The Alignment Process
IMPORTANT:
Use only the alignment specifications listed in the appropriate Service Manual when adjusting the
alignment.
1. Make sure the vehicle is straight on the alignment rack.
^ Vehicle must be straight (in line) with the alignment rack before entering the rack as shown in
Figure 4.
^ Do not straighten the vehicle while on the rack (see Figure 5).
^ If the vehicle needs to be straightened exit the alignment rack straighten the vehicle and then
re-enter the rack.
^ Once the vehicle is straight on the rack do not turn/center the steering wheel-keep the front
wheels straight.
2. Position vehicle on the front turn plates as follows:
Infiniti Qx56 Rwd Workshop Manual (V8-5.6L (VK56VD) (2011))
Infiniti Workshop Manuals > Steering and Suspension > Alignment > System Information > Technical Service Bulletins > All
Other Service Bulletins for Alignment: > 04-021C > Apr > 11 > Steering/Suspension — Wheel Alignment Info. > Page 806
^ Stop vehicle just behind the turn plates.
^ Center the turn plates to the tires.
Infiniti Qx56 Rwd Workshop Manual (V8-5.6L (VK56VD) (2011))
Infiniti Workshop Manuals > Steering and Suspension > Alignment > System Information > Technical Service Bulletins > All
Other Service Bulletins for Alignment: > 04-021C > Apr > 11 > Steering/Suspension — Wheel Alignment Info. > Page 807
^ Move the vehicle onto the turn plates by turning/pushing the rear wheel.
DO NOT push/pull on the vehicle body.
^ Center the front wheels on the turn plates.
Infiniti Qx56 Rwd Workshop Manual (V8-5.6L (VK56VD) (2011))
Infiniti Workshop Manuals > Steering and Suspension > Alignment > System Information > Technical Service Bulletins > All
Other Service Bulletins for Alignment: > 04-021C > Apr > 11 > Steering/Suspension — Wheel Alignment Info. > Page 808
^ Chock the left rear wheel.
Preliminary Checks:
3. Perform pre-alignment checks.
^ Tire condition (wear partial wear flaws etc.)
^ Road wheel condition (damage and deformation)
^ Tire pressure
^ Inspect for visible damage to any suspension components
^ Wheel bearing axial play
^ Ball joints of suspension arms
^ Shock absorber operation and visual check for oil leakage
^ Condition of axle and suspension (check for bushing cracks and slack)
^ Vehicle weight
> Empty — no cargo luggage or passengers
> Fuel level is full
> Engine coolant and lubricating oils at specified levels
> Spare tire, jack hand tools and floor mats in designated positions
NOTE:
Refer to the appropriate Service Manual for information about any of the above checks and
inspections.
4. Check the target mounts.
^ If there is any visual damage (bent worn cracked etc) have the equipment repaired before
performing any alignments.
Infiniti Qx56 Rwd Workshop Manual (V8-5.6L (VK56VD) (2011))
Infiniti Workshop Manuals > Steering and Suspension > Alignment > System Information > Technical Service Bulletins > All
Other Service Bulletins for Alignment: > 04-021C > Apr > 11 > Steering/Suspension — Wheel Alignment Info. > Page 809
^ Make sure the target mounts are properly adjusted and configured (see Figure 11).
NOTE:
The target mount example shown in Figure 11 is for Hunter «camera type» alignment machines.
Follow the operation manual for your specific equipment.
Infiniti Qx56 Rwd Workshop Manual (V8-5.6L (VK56VD) (2011))
Infiniti Workshop Manuals > Steering and Suspension > Alignment > System Information > Technical Service Bulletins > All
Other Service Bulletins for Alignment: > 04-021C > Apr > 11 > Steering/Suspension — Wheel Alignment Info. > Page 810
5. Make sure the targets are mounted correctly.
^ Mount the top claws first.
^ Claws must be flush against the wheel as shown in Figure 13.
Infiniti Qx56 Rwd Workshop Manual (V8-5.6L (VK56VD) (2011))
Infiniti Workshop Manuals > Steering and Suspension > Alignment > System Information > Technical Service Bulletins > All
Other Service Bulletins for Alignment: > 04-021C > Apr > 11 > Steering/Suspension — Wheel Alignment Info. > Page 811
^ Target must be flush against the center support as shown in Figure 14.
^ Make sure the targets are positioned with the arrow UP or level.
IMPORTANT:
Once you have set the target position DO NOT reset it at anytime during the alignment process.
Infiniti Qx56 Rwd Workshop Manual (V8-5.6L (VK56VD) (2011))
Infiniti Workshop Manuals > Steering and Suspension > Alignment > System Information > Technical Service Bulletins > All
Other Service Bulletins for Alignment: > 04-021C > Apr > 11 > Steering/Suspension — Wheel Alignment Info. > Page 812
6. Begin the alignment procedure.
^ Follow all of the instructions for your particular equipment.
^ Refer to the Service Manual for alignment specifications.
If your equipment requires «rolling compensation». follow these additional tips:
Infiniti Qx56 Rwd Workshop Manual (V8-5.6L (VK56VD) (2011))
Infiniti Workshop Manuals > Steering and Suspension > Alignment > System Information > Technical Service Bulletins > All
Other Service Bulletins for Alignment: > 04-021C > Apr > 11 > Steering/Suspension — Wheel Alignment Info. > Page 813
^ DO NOT push or pull on the vehicle body.
IMPORTANT:
After performing «rolling compensation», DO NOT reset the target position.
When performing «caster sweep». follow these tips:
^ Apply the brakes as shown.
^ Start the engine to allow brake boost.
^ Turn the engine OFF.
Infiniti Qx56 Rwd Workshop Manual (V8-5.6L (VK56VD) (2011))
Infiniti Workshop Manuals > Steering and Suspension > Alignment > System Information > Technical Service Bulletins > All
Other Service Bulletins for Alignment: > 04-021C > Apr > 11 > Steering/Suspension — Wheel Alignment Info. > Page 814
^ Remove all lock pins — front «turn plates» and rear «slide plates».
^ Make sure the bridge plate will not interfere with movement of the turn plate.
Put the bridge plate in the down position.
^ Perform caster sweep by turning the steering wheel from outside the vehicle.
Infiniti Qx56 Rwd Workshop Manual (V8-5.6L (VK56VD) (2011))
Infiniti Workshop Manuals > Steering and Suspension > Alignment > System Information > Technical Service Bulletins > All
Other Service Bulletins for Alignment: > 04-021C > Apr > 11 > Steering/Suspension — Wheel Alignment Info. > Page 815
^ DO NOT push/pull on the tire to perform the caster sweep.
7. Make sure the steering wheel is centered when performing toe-in measurements and
adjustments.
NOTE:
If you are using a Hunter alignment machine equipped with the WinToe-(R) Alignment Adjustment
System:
^ There is no need to lock the steering wheel. The WinToe(R) system is not affected by steering
system movement during the adjustment process.
^ Bumping the tire or re-centering the steering wheel when adjusting «near frozen» tie rods is not
necessary. This makes the adjustment process faster
and easier.
^ WinToe(R) eliminates the effect of lash in the steering system.
If you are using a John Bean alignment machine equipped with EZ Toe:
^ There is no need to lock the steering wheel. The EZ Toe system is not affected by steering
system movement during the adjustment process.
^ This software routine is an improved method of setting front toe making it easier to obtain a
centered steering wheel.
^ With EZ Toe it is possible to adjust toe with the steering wheel turned at any angle left or right.
This is helpful when setting toe on engine wall
mounted rack and pinion units.
IMPORTANT:
If during the alignment process the vehicle was lifted off of the rack; after lowering, make sure to
jounce (bounce) the vehicle before confirming adjustments are correct.
After you have checked and adjusted vehicle alignment
8. Print the BEFORE and AFTER measurements and attach them to the Repair Order.
9. Road test the vehicle to make sure the steering wheel is «centered» when driving on a straight
flat road.
Infiniti Qx56 Rwd Workshop Manual (V8-5.6L (VK56VD) (2011))
Infiniti Workshop Manuals > Steering and Suspension > Alignment > System Information > Technical Service Bulletins > All
Other Service Bulletins for Alignment: > 04-021C > Apr > 11 > Steering/Suspension — Wheel Alignment Info. > Page 821
In order to properly document any warranty alignment claim the following item MUST be attached
to the Repair Order:
A copy of the alignment machine printout showing the BEFORE and AFTER alignment readings.
IMPORTANT:
If you do not attach the above item to the Repair Order the claim may be denied (rejected or
charged back).
ALSO: A copy of the yearly alignment machine calibration certification must be held on file in the
Service Dept.
4. Make sure the «turn plates» and «slide plates» are in good working order:
^ The surface of the front turn plates must be level with (the same height as) the rack surface.
If height is not the same; have the equipment repaired before performing any alignments.
Infiniti Qx56 Rwd Workshop Manual (V8-5.6L (VK56VD) (2011))
Infiniti Workshop Manuals > Steering and Suspension > Alignment > System Information > Technical Service Bulletins > All
Other Service Bulletins for Alignment: > 04-021C > Apr > 11 > Steering/Suspension — Wheel Alignment Info. > Page 822
^ Make sure the front turn plates:
> Do not wobble (no up/down movement).
> Operate (slide and turn) smoothly in all directions.
If there is any issue with the turn plate operation — have the equipment repaired before performing
any alignments.
^ Make sure the rear slide plates:
> Do not wobble (no up/down movement).
> Operate (slide) smoothly in all directions.
Infiniti Qx56 Rwd Workshop Manual (V8-5.6L (VK56VD) (2011))
Infiniti Workshop Manuals > Steering and Suspension > Alignment > System Information > Technical Service Bulletins > All
Other Service Bulletins for Alignment: > 04-021C > Apr > 11 > Steering/Suspension — Wheel Alignment Info. > Page 823
If there is any issue with the slide plate operation — have the equipment repaired before performing
any alignments.
5. Make sure the lock pins for the front «turn plates» and rear «slide plates» are in place.
NOTE:
Lock pins should remain in place until caster sweep.
The Alignment Process
IMPORTANT:
Use only the alignment specifications listed in the appropriate Service Manual when adjusting the
alignment.
1. Make sure the vehicle is straight on the alignment rack.
^ Vehicle must be straight (in line) with the alignment rack before entering the rack as shown in
Figure 4.
^ Do not straighten the vehicle while on the rack (see Figure 5).
^ If the vehicle needs to be straightened exit the alignment rack straighten the vehicle and then
re-enter the rack.
^ Once the vehicle is straight on the rack do not turn/center the steering wheel-keep the front
wheels straight.
2. Position vehicle on the front turn plates as follows:
Infiniti Qx56 Rwd Workshop Manual (V8-5.6L (VK56VD) (2011))
Infiniti Workshop Manuals > Steering and Suspension > Alignment > System Information > Technical Service Bulletins > All
Other Service Bulletins for Alignment: > 04-021C > Apr > 11 > Steering/Suspension — Wheel Alignment Info. > Page 824
^ Stop vehicle just behind the turn plates.
^ Center the turn plates to the tires.
Infiniti Qx56 Rwd Workshop Manual (V8-5.6L (VK56VD) (2011))
Infiniti Workshop Manuals > Steering and Suspension > Alignment > System Information > Technical Service Bulletins > All
Other Service Bulletins for Alignment: > 04-021C > Apr > 11 > Steering/Suspension — Wheel Alignment Info. > Page 825
^ Move the vehicle onto the turn plates by turning/pushing the rear wheel.
DO NOT push/pull on the vehicle body.
^ Center the front wheels on the turn plates.
Infiniti Qx56 Rwd Workshop Manual (V8-5.6L (VK56VD) (2011))
Infiniti Workshop Manuals > Steering and Suspension > Alignment > System Information > Technical Service Bulletins > All
Other Service Bulletins for Alignment: > 04-021C > Apr > 11 > Steering/Suspension — Wheel Alignment Info. > Page 826
^ Chock the left rear wheel.
Preliminary Checks:
3. Perform pre-alignment checks.
^ Tire condition (wear partial wear flaws etc.)
^ Road wheel condition (damage and deformation)
^ Tire pressure
^ Inspect for visible damage to any suspension components
^ Wheel bearing axial play
^ Ball joints of suspension arms
^ Shock absorber operation and visual check for oil leakage
^ Condition of axle and suspension (check for bushing cracks and slack)
^ Vehicle weight
> Empty — no cargo luggage or passengers
> Fuel level is full
> Engine coolant and lubricating oils at specified levels
> Spare tire, jack hand tools and floor mats in designated positions
NOTE:
Refer to the appropriate Service Manual for information about any of the above checks and
inspections.
4. Check the target mounts.
^ If there is any visual damage (bent worn cracked etc) have the equipment repaired before
performing any alignments.
Infiniti Qx56 Rwd Workshop Manual (V8-5.6L (VK56VD) (2011))
Infiniti Workshop Manuals > Steering and Suspension > Alignment > System Information > Technical Service Bulletins > All
Other Service Bulletins for Alignment: > 04-021C > Apr > 11 > Steering/Suspension — Wheel Alignment Info. > Page 827
^ Make sure the target mounts are properly adjusted and configured (see Figure 11).
NOTE:
The target mount example shown in Figure 11 is for Hunter «camera type» alignment machines.
Follow the operation manual for your specific equipment.
Infiniti Qx56 Rwd Workshop Manual (V8-5.6L (VK56VD) (2011))
Infiniti Workshop Manuals > Steering and Suspension > Alignment > System Information > Technical Service Bulletins > All
Other Service Bulletins for Alignment: > 04-021C > Apr > 11 > Steering/Suspension — Wheel Alignment Info. > Page 828
5. Make sure the targets are mounted correctly.
^ Mount the top claws first.
^ Claws must be flush against the wheel as shown in Figure 13.
Infiniti Qx56 Rwd Workshop Manual (V8-5.6L (VK56VD) (2011))
Infiniti Workshop Manuals > Steering and Suspension > Alignment > System Information > Technical Service Bulletins > All
Other Service Bulletins for Alignment: > 04-021C > Apr > 11 > Steering/Suspension — Wheel Alignment Info. > Page 829
^ Target must be flush against the center support as shown in Figure 14.
^ Make sure the targets are positioned with the arrow UP or level.
IMPORTANT:
Once you have set the target position DO NOT reset it at anytime during the alignment process.
Infiniti Qx56 Rwd Workshop Manual (V8-5.6L (VK56VD) (2011))
Infiniti Workshop Manuals > Steering and Suspension > Alignment > System Information > Technical Service Bulletins > All
Other Service Bulletins for Alignment: > 04-021C > Apr > 11 > Steering/Suspension — Wheel Alignment Info. > Page 830
6. Begin the alignment procedure.
^ Follow all of the instructions for your particular equipment.
^ Refer to the Service Manual for alignment specifications.
If your equipment requires «rolling compensation». follow these additional tips:
Infiniti Qx56 Rwd Workshop Manual (V8-5.6L (VK56VD) (2011))
Infiniti Workshop Manuals > Steering and Suspension > Alignment > System Information > Technical Service Bulletins > All
Other Service Bulletins for Alignment: > 04-021C > Apr > 11 > Steering/Suspension — Wheel Alignment Info. > Page 831
^ DO NOT push or pull on the vehicle body.
IMPORTANT:
After performing «rolling compensation», DO NOT reset the target position.
When performing «caster sweep». follow these tips:
^ Apply the brakes as shown.
^ Start the engine to allow brake boost.
^ Turn the engine OFF.
Infiniti Qx56 Rwd Workshop Manual (V8-5.6L (VK56VD) (2011))
Infiniti Workshop Manuals > Steering and Suspension > Alignment > System Information > Technical Service Bulletins > All
Other Service Bulletins for Alignment: > 04-021C > Apr > 11 > Steering/Suspension — Wheel Alignment Info. > Page 832
^ Remove all lock pins — front «turn plates» and rear «slide plates».
^ Make sure the bridge plate will not interfere with movement of the turn plate.
Put the bridge plate in the down position.
^ Perform caster sweep by turning the steering wheel from outside the vehicle.
Infiniti Qx56 Rwd Workshop Manual (V8-5.6L (VK56VD) (2011))
Infiniti Workshop Manuals > Steering and Suspension > Alignment > System Information > Technical Service Bulletins > All
Other Service Bulletins for Alignment: > 04-021C > Apr > 11 > Steering/Suspension — Wheel Alignment Info. > Page 833
^ DO NOT push/pull on the tire to perform the caster sweep.
7. Make sure the steering wheel is centered when performing toe-in measurements and
adjustments.
NOTE:
If you are using a Hunter alignment machine equipped with the WinToe-(R) Alignment Adjustment
System:
^ There is no need to lock the steering wheel. The WinToe(R) system is not affected by steering
system movement during the adjustment process.
^ Bumping the tire or re-centering the steering wheel when adjusting «near frozen» tie rods is not
necessary. This makes the adjustment process faster
and easier.
^ WinToe(R) eliminates the effect of lash in the steering system.
If you are using a John Bean alignment machine equipped with EZ Toe:
^ There is no need to lock the steering wheel. The EZ Toe system is not affected by steering
system movement during the adjustment process.
^ This software routine is an improved method of setting front toe making it easier to obtain a
centered steering wheel.
^ With EZ Toe it is possible to adjust toe with the steering wheel turned at any angle left or right.
This is helpful when setting toe on engine wall
mounted rack and pinion units.
IMPORTANT:
If during the alignment process the vehicle was lifted off of the rack; after lowering, make sure to
jounce (bounce) the vehicle before confirming adjustments are correct.
After you have checked and adjusted vehicle alignment
8. Print the BEFORE and AFTER measurements and attach them to the Repair Order.
9. Road test the vehicle to make sure the steering wheel is «centered» when driving on a straight
flat road.
Infiniti Qx56 Rwd Workshop Manual (V8-5.6L (VK56VD) (2011))
Infiniti Workshop Manuals > Steering and Suspension > Relays and Modules — Steering and Suspension > Relays and
Modules — Wheels and Tires > Tire Pressure Monitor Receiver / Transponder > Component Information > Technical Service
Bulletins > Tire Monitor System — Components Are Not Interchangeable
Tire Pressure Monitor Receiver / Transponder: Technical Service Bulletins Tire Monitor System Components Are Not Interchangeable
Classification: WT10-004a
Reference: ITB10-050a
Date: November 11 2010
TPMS COMPONENTS NOT INTERCHANGEABLE
This bulletin has been amended. Applied Vehicles, VINs, and Dates have been updated, and
changes have been made to the Service Information. Please discard previous versions.
APPLIED VEHICLES:
2010 — 2011 EX35 (J50)
2010 — 2011 FX35/FX50 (S51)
2010 — 2011 G37 Coupe Convertible and Sedan (CV36 HV36 and V36)
2010 M351M45 ~50)
2011 M37IM56~51)
2010 QX56 (JA60)
2011 QX56(Z62)
APPLIED DATES:
See Detail of Applied Dates and VINs at the end of this bulletin.
APPLIED VINs
See Detail of Applied Dates and VINs at the end of this bulletin.
SERVICE INFORMATION
^ Recent design changes have been made to the Tire Pressure Monitoring System (1PMS) sensor
receiver and control units (new style TPMS components).
^ These changes were applied as follows:
^ These changes do not affect the overall function of the TPMS.
^ These changes do affect the interchangeability of parts. For example:
> Full wheel assemblies (wheel and tire assemblies with TPMS) cannot be swapped between old
style sensor-equipped and new style sensor-equipped vehicles.
CAUTION:
^ New style and old style TPMS components are not compatible and cannot be interchanged.
^ Swapping of new style and old style components will cause the TPMS to stop operating correctly.
Infiniti Qx56 Rwd Workshop Manual (V8-5.6L (VK56VD) (2011))
Infiniti Workshop Manuals > Steering and Suspension > Relays and Modules — Steering and Suspension > Relays and
Modules — Wheels and Tires > Tire Pressure Monitor Receiver / Transponder > Component Information > Technical Service
Bulletins > Tire Monitor System — Components Are Not Interchangeable > Page 840
If further confirmation of the TPMS sensor part number is required review the part number of the
originally installed equipment before replacement.
To confirm the latest part numbers, always consult the appropriate parts catalog when replacing or
exchanging TPMS sensors, receivers, or control modules.
NOTE:
^ An update is now available for the Signal Tech II to support the new style TPMS components.
The update can be found in ASIST > INFO Tool Box > Signal Tech II.
^ For 2010 models built after February 28 2010 a Signal Tech II menu selection «2010.5» has been
added.
Detail of Applied Dates and VINs
Infiniti Qx56 Rwd Workshop Manual (V8-5.6L (VK56VD) (2011))
Infiniti Workshop Manuals > Steering and Suspension > Relays and Modules — Steering and Suspension > Relays and
Modules — Wheels and Tires > Tire Pressure Monitor Receiver / Transponder > Component Information > Technical Service
Bulletins > Tire Monitor System — Components Are Not Interchangeable > Page 841
Installation at the factory of the new style TPMS components began with the following VINs and
Dates:
NOTE:
All 2011 Infiniti vehicles are equipped with the new style TPMS components.
Disclaimer
Infiniti Qx56 Rwd Workshop Manual (V8-5.6L (VK56VD) (2011))
Infiniti Workshop Manuals > Steering and Suspension > Sensors and Switches — Steering and Suspension > Sensors and
Switches — Wheels and Tires > Tire Pressure Sensor > Component Information > Technical Service Bulletins > Tire Monitor
System — Components Are Not Interchangeable
Tire Pressure Sensor: Technical Service Bulletins Tire Monitor System — Components Are Not
Interchangeable
Classification: WT10-004a
Reference: ITB10-050a
Date: November 11 2010
TPMS COMPONENTS NOT INTERCHANGEABLE
This bulletin has been amended. Applied Vehicles, VINs, and Dates have been updated, and
changes have been made to the Service Information. Please discard previous versions.
APPLIED VEHICLES:
2010 — 2011 EX35 (J50)
2010 — 2011 FX35/FX50 (S51)
2010 — 2011 G37 Coupe Convertible and Sedan (CV36 HV36 and V36)
2010 M351M45 ~50)
2011 M37IM56~51)
2010 QX56 (JA60)
2011 QX56(Z62)
APPLIED DATES:
See Detail of Applied Dates and VINs at the end of this bulletin.
APPLIED VINs
See Detail of Applied Dates and VINs at the end of this bulletin.
SERVICE INFORMATION
^ Recent design changes have been made to the Tire Pressure Monitoring System (1PMS) sensor
receiver and control units (new style TPMS components).
^ These changes were applied as follows:
^ These changes do not affect the overall function of the TPMS.
^ These changes do affect the interchangeability of parts. For example:
> Full wheel assemblies (wheel and tire assemblies with TPMS) cannot be swapped between old
style sensor-equipped and new style sensor-equipped vehicles.
CAUTION:
^ New style and old style TPMS components are not compatible and cannot be interchanged.
^ Swapping of new style and old style components will cause the TPMS to stop operating correctly.
Infiniti Qx56 Rwd Workshop Manual (V8-5.6L (VK56VD) (2011))
Infiniti Workshop Manuals > Steering and Suspension > Sensors and Switches — Steering and Suspension > Sensors and
Switches — Wheels and Tires > Tire Pressure Sensor > Component Information > Technical Service Bulletins > Tire Monitor
System — Components Are Not Interchangeable > Page 848
If further confirmation of the TPMS sensor part number is required review the part number of the
originally installed equipment before replacement.
To confirm the latest part numbers, always consult the appropriate parts catalog when replacing or
exchanging TPMS sensors, receivers, or control modules.
NOTE:
^ An update is now available for the Signal Tech II to support the new style TPMS components.
The update can be found in ASIST > INFO Tool Box > Signal Tech II.
^ For 2010 models built after February 28 2010 a Signal Tech II menu selection «2010.5» has been
added.
Detail of Applied Dates and VINs
Infiniti Qx56 Rwd Workshop Manual (V8-5.6L (VK56VD) (2011))
Infiniti Workshop Manuals > Steering and Suspension > Sensors and Switches — Steering and Suspension > Sensors and
Switches — Wheels and Tires > Tire Pressure Sensor > Component Information > Technical Service Bulletins > Tire Monitor
System — Components Are Not Interchangeable > Page 849
Installation at the factory of the new style TPMS components began with the following VINs and
Dates:
NOTE:
All 2011 Infiniti vehicles are equipped with the new style TPMS components.
Disclaimer
Infiniti Qx56 Rwd Workshop Manual (V8-5.6L (VK56VD) (2011))
Infiniti Workshop Manuals > Steering and Suspension > Steering > Power Steering > Power Steering Fluid > Component
Information > Specifications
Power Steering Fluid: Specifications
Power Steering Fluid
Type …………………………………………………………………………………………………………………………………..
…………………. Genuine NISSAN PSF or equivalent*
* DEXRON VI type ATF may also be used.
Infiniti Qx56 Rwd Workshop Manual (V8-5.6L (VK56VD) (2011))
Infiniti Workshop Manuals > Steering and Suspension > Suspension > Wheel Bearing > Component Information > Technical
Service Bulletins > Steering/Suspension — Wheel Bearing Collision Damage
Wheel Bearing: Technical Service Bulletins Steering/Suspension — Wheel Bearing Collision
Damage
Classification: FA10-007
Reference: ITB10-067
Date: October 21, 2010
WHEEL BEARING COLLISION DAMAGE
APPLIED VEHICLES: All Infiniti
SERVICE INFORMATION
Impacts to wheel bearings (such as a collision or other suspension damage) may create slight
indents in the bearing surfaces. These indents may not be visible but can cause bearing noise.
NOTE:
Hub/bearing replacement due to impact (collision or other suspension damage) is not a
warrantable repair.
If a vehicle has visible wheel or suspension damage due to impact (collision or other suspension
damage) it is recommended that the wheel bearing assembly be inspected as follows:
1. Remove the hub/bearing assembly from the vehicle.
2. Hold the hub/bearing assembly with both hands.
3. Rotate the hub/bearing assembly in both directions (clockwise and counterclockwise).
4. If any gritty or rough feeling is detected in the bearing replace it with a new one.
Infiniti Qx56 Rwd Workshop Manual (V8-5.6L (VK56VD) (2011))
Infiniti Workshop Manuals > Steering and Suspension > Suspension > Wheel Hub > Component Information > Technical
Service Bulletins > Steering/Suspension — Wheel Bearing Collision Damage
Wheel Hub: Technical Service Bulletins Steering/Suspension — Wheel Bearing Collision Damage
Classification: FA10-007
Reference: ITB10-067
Date: October 21, 2010
WHEEL BEARING COLLISION DAMAGE
APPLIED VEHICLES: All Infiniti
SERVICE INFORMATION
Impacts to wheel bearings (such as a collision or other suspension damage) may create slight
indents in the bearing surfaces. These indents may not be visible but can cause bearing noise.
NOTE:
Hub/bearing replacement due to impact (collision or other suspension damage) is not a
warrantable repair.
If a vehicle has visible wheel or suspension damage due to impact (collision or other suspension
damage) it is recommended that the wheel bearing assembly be inspected as follows:
1. Remove the hub/bearing assembly from the vehicle.
2. Hold the hub/bearing assembly with both hands.
3. Rotate the hub/bearing assembly in both directions (clockwise and counterclockwise).
4. If any gritty or rough feeling is detected in the bearing replace it with a new one.
Infiniti Qx56 Rwd Workshop Manual (V8-5.6L (VK56VD) (2011))
Infiniti Workshop Manuals > Steering and Suspension > Wheels and Tires > Relays and Modules — Wheels and Tires > Tire
Pressure Monitor Receiver / Transponder > Component Information > Technical Service Bulletins > Tire Monitor System Components Are Not Interchangeable
Tire Pressure Monitor Receiver / Transponder: Technical Service Bulletins Tire Monitor System Components Are Not Interchangeable
Classification: WT10-004a
Reference: ITB10-050a
Date: November 11 2010
TPMS COMPONENTS NOT INTERCHANGEABLE
This bulletin has been amended. Applied Vehicles, VINs, and Dates have been updated, and
changes have been made to the Service Information. Please discard previous versions.
APPLIED VEHICLES:
2010 — 2011 EX35 (J50)
2010 — 2011 FX35/FX50 (S51)
2010 — 2011 G37 Coupe Convertible and Sedan (CV36 HV36 and V36)
2010 M351M45 ~50)
2011 M37IM56~51)
2010 QX56 (JA60)
2011 QX56(Z62)
APPLIED DATES:
See Detail of Applied Dates and VINs at the end of this bulletin.
APPLIED VINs
See Detail of Applied Dates and VINs at the end of this bulletin.
SERVICE INFORMATION
^ Recent design changes have been made to the Tire Pressure Monitoring System (1PMS) sensor
receiver and control units (new style TPMS components).
^ These changes were applied as follows:
^ These changes do not affect the overall function of the TPMS.
^ These changes do affect the interchangeability of parts. For example:
> Full wheel assemblies (wheel and tire assemblies with TPMS) cannot be swapped between old
style sensor-equipped and new style sensor-equipped vehicles.
CAUTION:
^ New style and old style TPMS components are not compatible and cannot be interchanged.
^ Swapping of new style and old style components will cause the TPMS to stop operating correctly.
Infiniti Qx56 Rwd Workshop Manual (V8-5.6L (VK56VD) (2011))
Infiniti Workshop Manuals > Steering and Suspension > Wheels and Tires > Relays and Modules — Wheels and Tires > Tire
Pressure Monitor Receiver / Transponder > Component Information > Technical Service Bulletins > Tire Monitor System Components Are Not Interchangeable > Page 870
If further confirmation of the TPMS sensor part number is required review the part number of the
originally installed equipment before replacement.
To confirm the latest part numbers, always consult the appropriate parts catalog when replacing or
exchanging TPMS sensors, receivers, or control modules.
NOTE:
^ An update is now available for the Signal Tech II to support the new style TPMS components.
The update can be found in ASIST > INFO Tool Box > Signal Tech II.
^ For 2010 models built after February 28 2010 a Signal Tech II menu selection «2010.5» has been
added.
Detail of Applied Dates and VINs
Infiniti Qx56 Rwd Workshop Manual (V8-5.6L (VK56VD) (2011))
Infiniti Workshop Manuals > Steering and Suspension > Wheels and Tires > Relays and Modules — Wheels and Tires > Tire
Pressure Monitor Receiver / Transponder > Component Information > Technical Service Bulletins > Tire Monitor System Components Are Not Interchangeable > Page 871
Installation at the factory of the new style TPMS components began with the following VINs and
Dates:
NOTE:
All 2011 Infiniti vehicles are equipped with the new style TPMS components.
Disclaimer
Infiniti Qx56 Rwd Workshop Manual (V8-5.6L (VK56VD) (2011))
Infiniti Workshop Manuals > Steering and Suspension > Wheels and Tires > Sensors and Switches — Wheels and Tires >
Tire Pressure Sensor > Component Information > Technical Service Bulletins > Tire Monitor System — Components Are Not
Interchangeable
Tire Pressure Sensor: Technical Service Bulletins Tire Monitor System — Components Are Not
Interchangeable
Classification: WT10-004a
Reference: ITB10-050a
Date: November 11 2010
TPMS COMPONENTS NOT INTERCHANGEABLE
This bulletin has been amended. Applied Vehicles, VINs, and Dates have been updated, and
changes have been made to the Service Information. Please discard previous versions.
APPLIED VEHICLES:
2010 — 2011 EX35 (J50)
2010 — 2011 FX35/FX50 (S51)
2010 — 2011 G37 Coupe Convertible and Sedan (CV36 HV36 and V36)
2010 M351M45 ~50)
2011 M37IM56~51)
2010 QX56 (JA60)
2011 QX56(Z62)
APPLIED DATES:
See Detail of Applied Dates and VINs at the end of this bulletin.
APPLIED VINs
See Detail of Applied Dates and VINs at the end of this bulletin.
SERVICE INFORMATION
^ Recent design changes have been made to the Tire Pressure Monitoring System (1PMS) sensor
receiver and control units (new style TPMS components).
^ These changes were applied as follows:
^ These changes do not affect the overall function of the TPMS.
^ These changes do affect the interchangeability of parts. For example:
> Full wheel assemblies (wheel and tire assemblies with TPMS) cannot be swapped between old
style sensor-equipped and new style sensor-equipped vehicles.
CAUTION:
^ New style and old style TPMS components are not compatible and cannot be interchanged.
^ Swapping of new style and old style components will cause the TPMS to stop operating correctly.
Infiniti Qx56 Rwd Workshop Manual (V8-5.6L (VK56VD) (2011))
Infiniti Workshop Manuals > Steering and Suspension > Wheels and Tires > Sensors and Switches — Wheels and Tires >
Tire Pressure Sensor > Component Information > Technical Service Bulletins > Tire Monitor System — Components Are Not
Interchangeable > Page 877
If further confirmation of the TPMS sensor part number is required review the part number of the
originally installed equipment before replacement.
To confirm the latest part numbers, always consult the appropriate parts catalog when replacing or
exchanging TPMS sensors, receivers, or control modules.
NOTE:
^ An update is now available for the Signal Tech II to support the new style TPMS components.
The update can be found in ASIST > INFO Tool Box > Signal Tech II.
^ For 2010 models built after February 28 2010 a Signal Tech II menu selection «2010.5» has been
added.
Detail of Applied Dates and VINs
Infiniti Qx56 Rwd Workshop Manual (V8-5.6L (VK56VD) (2011))
Infiniti Workshop Manuals > Steering and Suspension > Wheels and Tires > Sensors and Switches — Wheels and Tires >
Tire Pressure Sensor > Component Information > Technical Service Bulletins > Tire Monitor System — Components Are Not
Interchangeable > Page 878
Installation at the factory of the new style TPMS components began with the following VINs and
Dates:
NOTE:
All 2011 Infiniti vehicles are equipped with the new style TPMS components.
Disclaimer
Infiniti Qx56 Rwd Workshop Manual (V8-5.6L (VK56VD) (2011))
Infiniti Workshop Manuals > Steering and Suspension > Wheels and Tires > Tire Monitoring System > Tire Pressure Monitor
Receiver / Transponder > Component Information > Technical Service Bulletins > Tire Monitor System — Components Are
Not Interchangeable
Tire Pressure Monitor Receiver / Transponder: Technical Service Bulletins Tire Monitor System Components Are Not Interchangeable
Classification: WT10-004a
Reference: ITB10-050a
Date: November 11 2010
TPMS COMPONENTS NOT INTERCHANGEABLE
This bulletin has been amended. Applied Vehicles, VINs, and Dates have been updated, and
changes have been made to the Service Information. Please discard previous versions.
APPLIED VEHICLES:
2010 — 2011 EX35 (J50)
2010 — 2011 FX35/FX50 (S51)
2010 — 2011 G37 Coupe Convertible and Sedan (CV36 HV36 and V36)
2010 M351M45 ~50)
2011 M37IM56~51)
2010 QX56 (JA60)
2011 QX56(Z62)
APPLIED DATES:
See Detail of Applied Dates and VINs at the end of this bulletin.
APPLIED VINs
See Detail of Applied Dates and VINs at the end of this bulletin.
SERVICE INFORMATION
^ Recent design changes have been made to the Tire Pressure Monitoring System (1PMS) sensor
receiver and control units (new style TPMS components).
^ These changes were applied as follows:
^ These changes do not affect the overall function of the TPMS.
^ These changes do affect the interchangeability of parts. For example:
> Full wheel assemblies (wheel and tire assemblies with TPMS) cannot be swapped between old
style sensor-equipped and new style sensor-equipped vehicles.
CAUTION:
^ New style and old style TPMS components are not compatible and cannot be interchanged.
^ Swapping of new style and old style components will cause the TPMS to stop operating correctly.
Infiniti Qx56 Rwd Workshop Manual (V8-5.6L (VK56VD) (2011))
Infiniti Workshop Manuals > Steering and Suspension > Wheels and Tires > Tire Monitoring System > Tire Pressure Monitor
Receiver / Transponder > Component Information > Technical Service Bulletins > Tire Monitor System — Components Are
Not Interchangeable > Page 884
If further confirmation of the TPMS sensor part number is required review the part number of the
originally installed equipment before replacement.
To confirm the latest part numbers, always consult the appropriate parts catalog when replacing or
exchanging TPMS sensors, receivers, or control modules.
NOTE:
^ An update is now available for the Signal Tech II to support the new style TPMS components.
The update can be found in ASIST > INFO Tool Box > Signal Tech II.
^ For 2010 models built after February 28 2010 a Signal Tech II menu selection «2010.5» has been
added.
Detail of Applied Dates and VINs
Infiniti Qx56 Rwd Workshop Manual (V8-5.6L (VK56VD) (2011))
Infiniti Workshop Manuals > Steering and Suspension > Wheels and Tires > Tire Monitoring System > Tire Pressure Monitor
Receiver / Transponder > Component Information > Technical Service Bulletins > Tire Monitor System — Components Are
Not Interchangeable > Page 885
Installation at the factory of the new style TPMS components began with the following VINs and
Dates:
NOTE:
All 2011 Infiniti vehicles are equipped with the new style TPMS components.
Disclaimer
Infiniti Qx56 Rwd Workshop Manual (V8-5.6L (VK56VD) (2011))
Infiniti Workshop Manuals > Steering and Suspension > Wheels and Tires > Tire Monitoring System > Tire Pressure Sensor
> Component Information > Technical Service Bulletins > Tire Monitor System — Components Are Not Interchangeable
Tire Pressure Sensor: Technical Service Bulletins Tire Monitor System — Components Are Not
Interchangeable
Classification: WT10-004a
Reference: ITB10-050a
Date: November 11 2010
TPMS COMPONENTS NOT INTERCHANGEABLE
This bulletin has been amended. Applied Vehicles, VINs, and Dates have been updated, and
changes have been made to the Service Information. Please discard previous versions.
APPLIED VEHICLES:
2010 — 2011 EX35 (J50)
2010 — 2011 FX35/FX50 (S51)
2010 — 2011 G37 Coupe Convertible and Sedan (CV36 HV36 and V36)
2010 M351M45 ~50)
2011 M37IM56~51)
2010 QX56 (JA60)
2011 QX56(Z62)
APPLIED DATES:
See Detail of Applied Dates and VINs at the end of this bulletin.
APPLIED VINs
See Detail of Applied Dates and VINs at the end of this bulletin.
SERVICE INFORMATION
^ Recent design changes have been made to the Tire Pressure Monitoring System (1PMS) sensor
receiver and control units (new style TPMS components).
^ These changes were applied as follows:
^ These changes do not affect the overall function of the TPMS.
^ These changes do affect the interchangeability of parts. For example:
> Full wheel assemblies (wheel and tire assemblies with TPMS) cannot be swapped between old
style sensor-equipped and new style sensor-equipped vehicles.
CAUTION:
^ New style and old style TPMS components are not compatible and cannot be interchanged.
^ Swapping of new style and old style components will cause the TPMS to stop operating correctly.
Infiniti Qx56 Rwd Workshop Manual (V8-5.6L (VK56VD) (2011))
Infiniti Workshop Manuals > Steering and Suspension > Wheels and Tires > Tire Monitoring System > Tire Pressure Sensor
> Component Information > Technical Service Bulletins > Tire Monitor System — Components Are Not Interchangeable >
Page 890
If further confirmation of the TPMS sensor part number is required review the part number of the
originally installed equipment before replacement.
To confirm the latest part numbers, always consult the appropriate parts catalog when replacing or
exchanging TPMS sensors, receivers, or control modules.
NOTE:
^ An update is now available for the Signal Tech II to support the new style TPMS components.
The update can be found in ASIST > INFO Tool Box > Signal Tech II.
^ For 2010 models built after February 28 2010 a Signal Tech II menu selection «2010.5» has been
added.
Detail of Applied Dates and VINs
Infiniti Qx56 Rwd Workshop Manual (V8-5.6L (VK56VD) (2011))
Infiniti Workshop Manuals > Steering and Suspension > Wheels and Tires > Tire Monitoring System > Tire Pressure Sensor
> Component Information > Technical Service Bulletins > Tire Monitor System — Components Are Not Interchangeable >
Page 891
Installation at the factory of the new style TPMS components began with the following VINs and
Dates:
NOTE:
All 2011 Infiniti vehicles are equipped with the new style TPMS components.
Disclaimer
Infiniti Qx56 Rwd Workshop Manual (V8-5.6L (VK56VD) (2011))
Infiniti Workshop Manuals > Steering and Suspension > Wheels and Tires > Tires > Component Information > Technical
Service Bulletins > Tires — Mounting Information/Precautions
Technical Service Bulletin # 11-022 Date: 110321
Tires — Mounting Information/Precautions
Classification: WT 11-004
Reference: ITB11-022
Date: March 21, 2011
TIRE MOUNTING INFORMATION
APPLIED VEHICLES: All Infiniti
SERVICE INFORMATION
^ When mounting tires to wheels it is important that the tire bead is seated correctly.
^ A tire bead that is not seated correctly may cause a vehicle vibration.
^ High performance tires and tires with shorter sidewalls (low aspect tires) may require more care
to make sure the tire bead is seated correctly.
^ Follow the Tire Mounting Tips in this bulletin.
Tire Mounting Tips:
NOTE:
These tips are not intended to be a complete instruction for mounting tires to wheels. Make sure to
read and follow the instruction for your specific tire service equipment.
1. Clean the tire bead with an approved rubber cleaning fluid.
^ Rubber cleaning fluid is a locally sourced common product used in the tire service process.
2. Clean the wheel (flange and bead seat area), see Figure 2. Make sure to clean off all rust and
corrosion.
Infiniti Qx56 Rwd Workshop Manual (V8-5.6L (VK56VD) (2011))
Infiniti Workshop Manuals > Steering and Suspension > Wheels and Tires > Tires > Component Information > Technical
Service Bulletins > Tires — Mounting Information/Precautions > Page 896
3. Apply an approved tire lubricant to the tire and wheel in the areas shown in Figures 1 and 2.
^ Tire lubricant is a locally sourced common product used in the tire service process.
Tire:
^ Apply lube to the inner bead only, of both beads.
^ Do not apply lube to the flange area (outer bead area)
NOTE:
Too much tire lubricant may allow the tire to slip on the rim while driving. If this occurs, the tire may
become un-balanced.
Wheel:
^ Apply lube to the Safety Humps and Bead Sealing area.
^ Do not apply lube to the flange area.
4. Before inflating the tire:
^ If there are «match-mount» marks on the tire and rim, align the marks.
Infiniti Qx56 Rwd Workshop Manual (V8-5.6L (VK56VD) (2011))
Infiniti Workshop Manuals > Steering and Suspension > Wheels and Tires > Tires > Component Information > Technical
Service Bulletins > Tires — Mounting Information/Precautions > Page 897
^ Make sure the tire is evenly positioned on the lower safety humps.
5. WARNING: Do not exceed the tire manufactures recommended bead seating inflation pressure.
Generally this is 40psi.
If the bead does not seat with the appropriate pressure:
a. Break down the tire/rim assembly.
b. Re-apply lubricant as shown in Figures 1 and 2 above.
c. Remount the tire.
6. After inflating the tires inspect the bead area.
^ Make sure bead is seated uniformly (the same) around the entire circumference of the wheel.
NOTE:
Many tires have Aligning Rings that will help confirm the bead is uniformly seated.
If uniform; bead is seated correctly.
If not uniform;
1. Break down the tire/rim assembly.
2. Re-apply lubricant as shown in Figures 1 and 2.
3. Remount the tire.
Infiniti Qx56 Rwd Workshop Manual (V8-5.6L (VK56VD) (2011))
Infiniti Workshop Manuals > Steering and Suspension > Wheels and Tires > Tires > Component Information > Technical
Service Bulletins > Tires — Mounting Information/Precautions > Page 898
7. After the tire/wheel is balanced, apply an index mark to the tire at the location of the valve stem
(see Figure 6).
^ This index mark will allow you to tell if the tire has slipped on the rim (see Figure 7).
Tire to Rim Slippage:
^ Too much tire lubricant may allow the tire to slip on the rim while driving. If this occurs, the tire
may become un-balanced.
^ Overtime the tire lubricate will dry, eliminating the lubricant as a cause of tire slippage.
^ Some tire lubricants may require up to 24 hours to completely dry.
^ If slippage occurs, the tire/wheel will need to be re-balanced.
Infiniti Qx56 Rwd Workshop Manual (V8-5.6L (VK56VD) (2011))
Infiniti Workshop Manuals > Steering and Suspension > Wheels and Tires > Tires > Component Information > Technical
Service Bulletins > Tires — Mounting Information/Precautions > Page 899
Infiniti Qx56 Rwd Workshop Manual (V8-5.6L (VK56VD) (2011))
Infiniti Workshop Manuals > Steering and Suspension > Wheels and Tires > Tires > Component Information > Technical
Service Bulletins > Tires — Mounting Information/Precautions > Page 900
Tires: Technical Service Bulletins Tires — Preventing Tire Flat Spotting
Classification: WT11-002
Reference: ITB11-021
Date: March 10, 2011
NEW VEHICLE TIRE FLAT SPOTTING
APPLIED VEHICLES: New unsold Infiniti dealer in-stock units
SERVICE INFORMATION
Temporary tire Flat Spotting is common on New Dealer In-Stock vehicles that have not been
occasionally moved.
Flat Spotting can occur after the vehicle has been parked (not moved) for a few days or longer. In
most cases it is temporary. In extreme cases it can be permanent.
As instructed in the Assurance Products Resource Manual vehicles should be moved 12 inches in
one direction only every 30 days to prevent tire Flat Spotting.
New vehicle inventory vibration incidents related to storage Flat Spotting are not considered
warrantable repairs.
If tire Flat Spotting has occurred it can cause a vibration or shimmy condition that may be
noticeable for the first several miles of driving.
Factors that can influence Flat Spotting:
^ Long storage time without moving the vehicle may result in permanent flat spots.
^ High performance and high speed rated tires are more prone to flat spotting due to the internal
construction and nylon use in these tires.
^ Shorter sidewall tires do not absorb irregularities (flat spots) as well as taller sidewall tires.
^ In colder temperature tires are stiffer which increases the tendency to have flat spots and
increases the drive time needed to remove them.
Refer to the Service Procedure below if you have tires with Flat Spotting.
SERVICE PROCEDURE
^ It is important to remove any temporary Flat Spotting prior to performing tire balance, tire run out,
and/or tire road force checks.
^ If the Flat Spotting is not removed it can result in incorrect measurements.
^ Temporary flat spots will return to original (near uniform) condition after driving for approximately
15 miles at highway speeds.
1. Drive the vehicle at highway speeds until the vibration (Flat Spotting) is eliminated.
NOTE:
^ In most cases flat spot vibrations will be eliminated within 15 minutes (about 15 miles) of driving.
^ If the vehicle has been stored without moving for an extended time it may be necessary to drive
the vehicle up to 30 minutes (about 30 miles) at
highway speeds.
^ If the vibration goes away during the test drive no further action is required.
^ If the vibration is not completely eliminated during the test drive go to step 2.
2. Within 10 minutes after driving the vehicle lift the vehicle so there is no load on the tries.
3. Check the tire/wheel assemblies for balance run-out and road force variation. Correct as
necessary.
Infiniti Qx56 Rwd Workshop Manual (V8-5.6L (VK56VD) (2011))
Infiniti Workshop Manuals > Steering and Suspension > Wheels and Tires > Tires > Component Information > Technical
Service Bulletins > Tires — Mounting Information/Precautions > Page 901
Tires: Technical Service Bulletins Tire Monitor System — Tire Pressure Information
Classification: WT08-004B
Reference: ITB08-015B
Date: January 25, 2011
TIRE PRESSURE INFORMATION FOR VEHICLES WITH TPMS
This bulletin has been amended. Information has been updated on each page. Please discard
previous versions of this bulletin.
APPLIED VEHICLES: All Infiniti vehicles with Tire Pressure Monitor System (TPMS)
SERVICE INFORMATION
The Low Tire Pressure Warning Lamp will illuminate (steady not flashing) if the tire pressure is low
in any of the four road tires.
^ This is not an indication of a malfunction. Rather it is a signal to the driver that the tire pressure in
the vehicle must be adjusted.
Tire pressure must be adjusted/corrected at or above the pressure shown on the TIRE AND
LOADING INFORMATION label before the Low Tire Pressure Warning Light will go OFF.
^ Regular tire pressure maintenance such as described in this bulletin is not covered under the
warranty.
The air pressure inside a tire can change due to several factors such as:
^ Seasonal temperature change
^ Tire temperature change due to driving
^ Natural pressure loss over time
Compensate for the above temperature factors when adjusting and setting tire pressure.
Each vehicle is equipped from the factory with a TIRE AND LOADING INFORMATION label.
This label lists the COLD tire pressure setting for the original tires on the specific vehicle.
NOTE: Tires are considered COLD after the vehicle has been parked for 3 or more hours or driven
less than 1 mile at moderate speeds.
When setting / adjusting tire pressure, make sure to use an accurate tire pressure gauge.
Use the following information for reference:
Infiniti Qx56 Rwd Workshop Manual (V8-5.6L (VK56VD) (2011))
Infiniti Workshop Manuals > Steering and Suspension > Wheels and Tires > Tires > Component Information > Technical
Service Bulletins > Tires — Mounting Information/Precautions > Page 902
Temperature:
^ Tire pressure changes approximately 0.8 psi for every 10°F of temperature change. As
temperature decreases, pressure decreases.
^ Tire pressure may change 3 — 5 psi between a Cold reading and a reading taken just after the
vehicle has been driven for several miles.
^ Seasonal temperature change can result in tire pressure that is low enough to turn on the Low
Tire Pressure Warning Light.
Example 1 — Seasonal Temperature Change:
^ The temperature of the vehicle is 70°F after sitting in the shop.
^ Ambient temperature outside the shop is 30°F or will soon fall to 30°F due to seasonal change.
^ Recommended pressure on the TIRE AND LOADING INFORMATION label is 35 psi.
^ The tire pressure should be compensated an additional +3 psi and adjusted to 38 psi to avoid
dropping below the label value when the vehicle
experiences cooler ambient air temperature.
^ Compensation should also be used in the PDI process as needed.
Example 2 — WARM Tires:
^ A vehicle arrives to the dealer after being driven across town.
^ The WARM tire pressure reading is 32 psi.
^ Recommended COLD tire pressure on the TIRE AND LOADING INFORMATION label is 35 psi.
^ The tire pressure should be compensated an additional +3 psi and adjusted to 38 psi to avoid
dropping below the label value when the tires cool.
Natural tire pressure loss overtime:
^ Vehicle tire pressure can naturally decrease by approximately 1.0 — 1.5 psi per month. This will
vary due to seasonal temperature change.
^ After 6 to 8 months tire pressure may be low enough to turn ON the Low Tire Pressure Warning
Light.
High Altitude
^ At high altitude locations a standard tire pressure gauge may show the tire pressure higher than
the TPMS system. If the gauge reading is not
accounted for this could result in turning ON the Low Tire Pressure Warning Light.
Infiniti Qx56 Rwd Workshop Manual (V8-5.6L (VK56VD) (2011))
Infiniti Workshop Manuals > Steering and Suspension > Wheels and Tires > Tires > Component Information > Technical
Service Bulletins > Tires — Mounting Information/Precautions > Page 903
^ Standard tire pressure gauge readings increase about 1.0 psi for every 2,200 ft of altitude
increase above sea level (up to 10,000 ft). See Graph 3.
^ For example if the TIRE AND LOADING INFORMATION label reads 33 psi then at an elevation
of 5,280 ft, the cold inflation pressure using a
gauge should be increased 2.5 psi to 35.5 psi.»
NOTE:
In the above example, C-III, Signal Tech II, or the vehicle information display (if equipped) would
show a tire pressure of 33 psi. If needed use C-III or Signal Tech-II to confirm tire pressure.
NOTE:
^ After correcting the tire pressure the vehicle may need to be driven at speeds above 16 mph to
activate the TPMS and turn off the low tire pressure
warning light.
^ If pressure compensation for temperature is used, the pressure should be re-checked and
adjusted at a later time when the tires are cold.
^ If after turning the ignition ON, the TPMS light flashes for one minute and then turns solid, refer to
ITB10-023 or ITB09-050.
Infiniti Qx56 Rwd Workshop Manual (V8-5.6L (VK56VD) (2011))
Infiniti Workshop Manuals > Steering and Suspension > Wheels and Tires > Wheels > Component Information > Technical
Service Bulletins > Tires — Mounting Information/Precautions
Technical Service Bulletin # 11-022 Date: 110321
Tires — Mounting Information/Precautions
Classification: WT 11-004
Reference: ITB11-022
Date: March 21, 2011
TIRE MOUNTING INFORMATION
APPLIED VEHICLES: All Infiniti
SERVICE INFORMATION
^ When mounting tires to wheels it is important that the tire bead is seated correctly.
^ A tire bead that is not seated correctly may cause a vehicle vibration.
^ High performance tires and tires with shorter sidewalls (low aspect tires) may require more care
to make sure the tire bead is seated correctly.
^ Follow the Tire Mounting Tips in this bulletin.
Tire Mounting Tips:
NOTE:
These tips are not intended to be a complete instruction for mounting tires to wheels. Make sure to
read and follow the instruction for your specific tire service equipment.
1. Clean the tire bead with an approved rubber cleaning fluid.
^ Rubber cleaning fluid is a locally sourced common product used in the tire service process.
2. Clean the wheel (flange and bead seat area), see Figure 2. Make sure to clean off all rust and
corrosion.
Infiniti Qx56 Rwd Workshop Manual (V8-5.6L (VK56VD) (2011))
Infiniti Workshop Manuals > Steering and Suspension > Wheels and Tires > Wheels > Component Information > Technical
Service Bulletins > Tires — Mounting Information/Precautions > Page 908
3. Apply an approved tire lubricant to the tire and wheel in the areas shown in Figures 1 and 2.
^ Tire lubricant is a locally sourced common product used in the tire service process.
Tire:
^ Apply lube to the inner bead only, of both beads.
^ Do not apply lube to the flange area (outer bead area)
NOTE:
Too much tire lubricant may allow the tire to slip on the rim while driving. If this occurs, the tire may
become un-balanced.
Wheel:
^ Apply lube to the Safety Humps and Bead Sealing area.
^ Do not apply lube to the flange area.
4. Before inflating the tire:
^ If there are «match-mount» marks on the tire and rim, align the marks.
Infiniti Qx56 Rwd Workshop Manual (V8-5.6L (VK56VD) (2011))
Infiniti Workshop Manuals > Steering and Suspension > Wheels and Tires > Wheels > Component Information > Technical
Service Bulletins > Tires — Mounting Information/Precautions > Page 909
^ Make sure the tire is evenly positioned on the lower safety humps.
5. WARNING: Do not exceed the tire manufactures recommended bead seating inflation pressure.
Generally this is 40psi.
If the bead does not seat with the appropriate pressure:
a. Break down the tire/rim assembly.
b. Re-apply lubricant as shown in Figures 1 and 2 above.
c. Remount the tire.
6. After inflating the tires inspect the bead area.
^ Make sure bead is seated uniformly (the same) around the entire circumference of the wheel.
NOTE:
Many tires have Aligning Rings that will help confirm the bead is uniformly seated.
If uniform; bead is seated correctly.
If not uniform;
1. Break down the tire/rim assembly.
2. Re-apply lubricant as shown in Figures 1 and 2.
3. Remount the tire.
Infiniti Qx56 Rwd Workshop Manual (V8-5.6L (VK56VD) (2011))
Infiniti Workshop Manuals > Steering and Suspension > Wheels and Tires > Wheels > Component Information > Technical
Service Bulletins > Tires — Mounting Information/Precautions > Page 910
7. After the tire/wheel is balanced, apply an index mark to the tire at the location of the valve stem
(see Figure 6).
^ This index mark will allow you to tell if the tire has slipped on the rim (see Figure 7).
Tire to Rim Slippage:
^ Too much tire lubricant may allow the tire to slip on the rim while driving. If this occurs, the tire
may become un-balanced.
^ Overtime the tire lubricate will dry, eliminating the lubricant as a cause of tire slippage.
^ Some tire lubricants may require up to 24 hours to completely dry.
^ If slippage occurs, the tire/wheel will need to be re-balanced.
Infiniti Qx56 Rwd Workshop Manual (V8-5.6L (VK56VD) (2011))
Infiniti Workshop Manuals > Steering and Suspension > Wheels and Tires > Wheels > Component Information > Technical
Service Bulletins > Tires — Mounting Information/Precautions > Page 911
Infiniti Qx56 Rwd Workshop Manual (V8-5.6L (VK56VD) (2011))
Infiniti Workshop Manuals > Steering and Suspension > Wheels and Tires > Wheel Bearing > Component Information >
Technical Service Bulletins > Steering/Suspension — Wheel Bearing Collision Damage
Wheel Bearing: Technical Service Bulletins Steering/Suspension — Wheel Bearing Collision
Damage
Classification: FA10-007
Reference: ITB10-067
Date: October 21, 2010
WHEEL BEARING COLLISION DAMAGE
APPLIED VEHICLES: All Infiniti
SERVICE INFORMATION
Impacts to wheel bearings (such as a collision or other suspension damage) may create slight
indents in the bearing surfaces. These indents may not be visible but can cause bearing noise.
NOTE:
Hub/bearing replacement due to impact (collision or other suspension damage) is not a
warrantable repair.
If a vehicle has visible wheel or suspension damage due to impact (collision or other suspension
damage) it is recommended that the wheel bearing assembly be inspected as follows:
1. Remove the hub/bearing assembly from the vehicle.
2. Hold the hub/bearing assembly with both hands.
3. Rotate the hub/bearing assembly in both directions (clockwise and counterclockwise).
4. If any gritty or rough feeling is detected in the bearing replace it with a new one.
Infiniti Qx56 Rwd Workshop Manual (V8-5.6L (VK56VD) (2011))
Infiniti Workshop Manuals > Steering and Suspension > Wheels and Tires > Wheel Hub > Component Information >
Technical Service Bulletins > Steering/Suspension — Wheel Bearing Collision Damage
Wheel Hub: Technical Service Bulletins Steering/Suspension — Wheel Bearing Collision Damage
Classification: FA10-007
Reference: ITB10-067
Date: October 21, 2010
WHEEL BEARING COLLISION DAMAGE
APPLIED VEHICLES: All Infiniti
SERVICE INFORMATION
Impacts to wheel bearings (such as a collision or other suspension damage) may create slight
indents in the bearing surfaces. These indents may not be visible but can cause bearing noise.
NOTE:
Hub/bearing replacement due to impact (collision or other suspension damage) is not a
warrantable repair.
If a vehicle has visible wheel or suspension damage due to impact (collision or other suspension
damage) it is recommended that the wheel bearing assembly be inspected as follows:
1. Remove the hub/bearing assembly from the vehicle.
2. Hold the hub/bearing assembly with both hands.
3. Rotate the hub/bearing assembly in both directions (clockwise and counterclockwise).
4. If any gritty or rough feeling is detected in the bearing replace it with a new one.
Infiniti Qx56 Rwd Workshop Manual (V8-5.6L (VK56VD) (2011))
Infiniti Workshop Manuals > Accessories and Optional Equipment > Antitheft and Alarm Systems > Keyless Entry > Keyless
Starting System > System Information > Technical Service Bulletins > TPMS/Keyless Systems — Signal TECH II Diagnostic
Tool
Keyless Starting System: Technical Service Bulletins TPMS/Keyless Systems — Signal TECH II
Diagnostic Tool
Classification: WT10-002A
Reference: ITB10-023A
Date: January 6, 2011
SIGNAL TECH II DIAGNOSTIC TOOL
This bulletin has been amended. Notes below APPLIED VEHICLES have been amended.
SERVICE INFORMATION has been amended. Please discard previous versions of this bulletin.
APPLIED VEHICLES: All Infiniti with Tire Pressure Monitor System (TPMS) Remote Keyless Entry
or Intelligent Key.
NOTE:
New software updates have been released. Please update Signal Tech II for the items listed below.
October 25, 2010:
^ Enhanced features
^ New Model compatibility
^ Support for the new TPMS sensor technology adopted February 28 2010. Refer to ITB10-050a.
November 23, 2010:
^ Infiniti G25 software patch
Failure to update Signal Tech II may lead to misdiagnosis of vehicles built after February 28, 2010.
The latest software is available on the CONSULT III PC at: ASIST> Specialty Tools> Signal Tech II
If you should encounter problems updating Signal Tech II contact Techmate.
Future updates will be released as needed. Check ASIST frequently for this information.
SERVICE INFORMATION
If service is required on a vehicle’s Tire Pressure Monitor System (TPMS) remote keyless entry or
Intelligent Key the Signal Tech II (special tool J-50190) can be used for diagnostics.
Signal Tech II will quickly:
^ Activate and display TPMS Sensor IDs
^ Display tire pressure reported by the TPMS sensor
^ Read TPMS DTCs and register TPMS IDs
^ Store and print reports for warrantable repairs
^ Check intelligent key relative signal strength
^ Test remote keyless entry relative signal strength
^ Confirm vehicle Intelligent Key antenna relative signal strength output
^ Read ENGINE DTCs
Other available information for Signal Tech II:
Infiniti Qx56 Rwd Workshop Manual (V8-5.6L (VK56VD) (2011))
Infiniti Workshop Manuals > Accessories and Optional Equipment > Antitheft and Alarm Systems > Keyless Entry > Keyless
Starting System > System Information > Technical Service Bulletins > TPMS/Keyless Systems — Signal TECH II Diagnostic
Tool > Page 927
^ Signal Tech II Quick Start Guide: ASIST > Tools & Equipment> Tool & Equipment Web Page
^ Signal Tech II Users Guide: ASIST > Tools & Equipment> Tools & Equipment Web Page
^ Tool Flyer: ASIST > Tools & Equipment> Tools & Equipment Web Page> Infiniti Essential Tool
Flyers
^ Tech Talk Article: ASIST > Tech Support Info> TECH TALK / XTRA> Spring 2010 issue
Infiniti Qx56 Rwd Workshop Manual (V8-5.6L (VK56VD) (2011))
Infiniti Workshop Manuals > Accessories and Optional Equipment > Cellular Phone > Component Information > Technical
Service Bulletins > All Technical Service Bulletins for Cellular Phone: > 10-066B > Apr > 11 > Navigation/Bluetooth(R) Voice Recognition Issues
Cellular Phone: All Technical Service Bulletins Navigation/Bluetooth(R) — Voice Recognition Issues
Classification: EL10-042B
Reference: ITB10-066B
Date: April 20, 2011
NAVIGATION / BLUETOOTH / VOICE RECOGNITION FUNCTION ISSUES
This bulletin has been amended. Several items throughout the bulletin have been revised. Please
discard all previous versions.
APPLIED VEHICLES: 2010-2011 EX35 (J50) — with Navigation 2010-2011 FX35/FX50 (S51) — with
Navigation 2010-2011 G37 Coupe Convertible Sedan (C/H/V36) — with Navigation 2011 M37/M56
(Y51) — with Navigation 2011 QX56 (Z62) — with Navigation
APPLIED DATES: Vehicles built before May 1, 2011
IF YOU CONFIRM
One or more of the following is occurring on an Applied Vehicle:
^ Audio streaming via Bluetooth is «choppy» or «clipped».
^ «Calculating Route» takes an extended period of time (2-5 minutes) to complete.
^ «Could not find a route» displays when attempting to calculate a route.
^ Voice Recognition sequence takes too many steps.
^ Voice Recognition has difficulty recognizing voicetags.
^ The Navigation system reboots.
^ XM NavTraffic is slow to report.
^ «Handset Phonebook» access is slow.
^ When a hands-free call via Bluetooth is in progress and another call comes in («all waiting») there
is no function available to answer the incoming call.
NOTE:
The original specification for 2010 and some 2011 Applied Vehicles did not include the call waiting
feature. To ensure a high level of customer satisfaction Nissan has enhanced the Infotainment
system in many 2011 Applied Vehicles to add the call waiting feature. Nissan is making available
this same enhancement for all Applied Vehicles by offering the call waiting feature as part of the
Reprogramming Software DVD update listed in the Parts Information section.
^ Caller ID is not available when a hands-free call via Bluetooth is in progress and another call
comes in.
IMPORTANT:
The purpose of «ACTION» is to give you a quick idea of the work you will be performing. You MUST
closely follow the entire Service Procedure as it contains information that is essential to
successfully completing this repair.
ACTION
1. Perform steps 1-6 of Confirm Navigation Program Version in the Service Procedure to verify
whether or not this bulletin applies.
2. If this bulletin applies, load the Reprogramming Software DVD referenced in the Parts
Information section.
PARTS INFORMATION
Infiniti Qx56 Rwd Workshop Manual (V8-5.6L (VK56VD) (2011))
Infiniti Workshop Manuals > Accessories and Optional Equipment > Cellular Phone > Component Information > Technical
Service Bulletins > All Technical Service Bulletins for Cellular Phone: > 10-066B > Apr > 11 > Navigation/Bluetooth(R) Voice Recognition Issues > Page 936
^ Each dealer has been mailed one NTB10-125b/ITB10-066b Reprogramming Software DVD free
of charge from Clarion.
^ Should you require an additional NTB10-125b/ITB10-066b Reprogramming Software DVD due to
loss or damage it can be ordered free of charge by
contacting Clarion toll free at 1-800-347-8933.
^ Discard the previous version of this Reprogramming Software DVD (NTB10-125/ITB10-066).
CLAIMS INFORMATION
SERVICE PROCEDURE
NOTE:
This procedure will take 10-15 minutes with the ignition ON. Before starting make sure to attach a
battery charger to the vehicle battery and set it to a low charge rate (trickle charge).
Confirm Navigation Program Version
1. Set the parking brake.
2. Turn the ignition ON and keep the transmission in Park or Neutral.
^ The Navigation start-up screen should display.
^ If the Navigation start-up screen is not displayed: turn the ignition OFF, wait 10 seconds and then
turn the ignition ON again.
3. Wait more than 1 minute.
4. Press the «INFO» button on the switch panel.
5. Select Navigation Version on the display screen.
Infiniti Qx56 Rwd Workshop Manual (V8-5.6L (VK56VD) (2011))
Infiniti Workshop Manuals > Accessories and Optional Equipment > Cellular Phone > Component Information > Technical
Service Bulletins > All Technical Service Bulletins for Cellular Phone: > 10-066B > Apr > 11 > Navigation/Bluetooth(R) Voice Recognition Issues > Page 937
NOTE:
On some vehicles you will first need to select Others to find Navigation Version.
6. Check the Program Version.
If the Program Version is:
^ X1U62024 or lower
OR
^ X1U72001
….continue with Step 7 below.
If the Program Version is:
^ X1U62025 or higher — except X1U72001
….this bulletin does not apply. Refer to ASIST for further diagnostic information.
7. Check the Map Version.
^ If the Map Version is not 09.10 MAP No. 1 continue with the next section of the Service
Procedure («Load Reprogramming Software DVD»).
Infiniti Qx56 Rwd Workshop Manual (V8-5.6L (VK56VD) (2011))
Infiniti Workshop Manuals > Accessories and Optional Equipment > Cellular Phone > Component Information > Technical
Service Bulletins > All Technical Service Bulletins for Cellular Phone: > 10-066B > Apr > 11 > Navigation/Bluetooth(R) Voice Recognition Issues > Page 938
^ If the Map Version is 09.10 MAP No. 1 first perform the procedure in ITB10-031. Once complete
continue with the next section of the Service
Procedure («Load Reprogramming Software DVD»).
Load Reprogramming Software DVD
1. Make sure there is not a disc in the in-dash CD/DVD player.
2. Insert the Reprogramming Software DVD into the in-dash CD/DVD player slot.
IMPORTANT:
Once reprogramming has started:
^ Do not eject the DVD while it is loading.
^ Do not change the ignition position until the DVD has been loaded.
3. Wait for the program to load (a progress bar will display).
4. When the program has finished loading:
^ The Reprogramming Software DVD will automatically eject.
^ «Program loading is completed» will display.
5. The Navigation system will automatically restart.
6. Make sure the new program has loaded.
a. Press the «INFO» button on the switch panel.
b. Select Navigation Version on the display screen.
Infiniti Qx56 Rwd Workshop Manual (V8-5.6L (VK56VD) (2011))
Infiniti Workshop Manuals > Accessories and Optional Equipment > Cellular Phone > Component Information > Technical
Service Bulletins > All Technical Service Bulletins for Cellular Phone: > 10-066B > Apr > 11 > Navigation/Bluetooth(R) Voice Recognition Issues > Page 939
c. The Program Version should be X1U62025.
^ If the Program Version is not X1U62025 perform the Load Reprogramming Software DVD
procedure again.
7. The procedure is complete. Turn OFF the ignition.
Infiniti Qx56 Rwd Workshop Manual (V8-5.6L (VK56VD) (2011))
Infiniti Workshop Manuals > Accessories and Optional Equipment > Cellular Phone > Component Information > Technical
Service Bulletins > Customer Interest for Cellular Phone: > 10-066B > Apr > 11 > Navigation/Bluetooth(R) — Voice
Recognition Issues
Cellular Phone: Customer Interest Navigation/Bluetooth(R) — Voice Recognition Issues
Classification: EL10-042B
Reference: ITB10-066B
Date: April 20, 2011
NAVIGATION / BLUETOOTH / VOICE RECOGNITION FUNCTION ISSUES
This bulletin has been amended. Several items throughout the bulletin have been revised. Please
discard all previous versions.
APPLIED VEHICLES: 2010-2011 EX35 (J50) — with Navigation 2010-2011 FX35/FX50 (S51) — with
Navigation 2010-2011 G37 Coupe Convertible Sedan (C/H/V36) — with Navigation 2011 M37/M56
(Y51) — with Navigation 2011 QX56 (Z62) — with Navigation
APPLIED DATES: Vehicles built before May 1, 2011
IF YOU CONFIRM
One or more of the following is occurring on an Applied Vehicle:
^ Audio streaming via Bluetooth is «choppy» or «clipped».
^ «Calculating Route» takes an extended period of time (2-5 minutes) to complete.
^ «Could not find a route» displays when attempting to calculate a route.
^ Voice Recognition sequence takes too many steps.
^ Voice Recognition has difficulty recognizing voicetags.
^ The Navigation system reboots.
^ XM NavTraffic is slow to report.
^ «Handset Phonebook» access is slow.
^ When a hands-free call via Bluetooth is in progress and another call comes in («all waiting») there
is no function available to answer the incoming call.
NOTE:
The original specification for 2010 and some 2011 Applied Vehicles did not include the call waiting
feature. To ensure a high level of customer satisfaction Nissan has enhanced the Infotainment
system in many 2011 Applied Vehicles to add the call waiting feature. Nissan is making available
this same enhancement for all Applied Vehicles by offering the call waiting feature as part of the
Reprogramming Software DVD update listed in the Parts Information section.
^ Caller ID is not available when a hands-free call via Bluetooth is in progress and another call
comes in.
IMPORTANT:
The purpose of «ACTION» is to give you a quick idea of the work you will be performing. You MUST
closely follow the entire Service Procedure as it contains information that is essential to
successfully completing this repair.
ACTION
1. Perform steps 1-6 of Confirm Navigation Program Version in the Service Procedure to verify
whether or not this bulletin applies.
2. If this bulletin applies, load the Reprogramming Software DVD referenced in the Parts
Information section.
PARTS INFORMATION
Infiniti Qx56 Rwd Workshop Manual (V8-5.6L (VK56VD) (2011))
Infiniti Workshop Manuals > Accessories and Optional Equipment > Cellular Phone > Component Information > Technical
Service Bulletins > Customer Interest for Cellular Phone: > 10-066B > Apr > 11 > Navigation/Bluetooth(R) — Voice
Recognition Issues > Page 945
^ Each dealer has been mailed one NTB10-125b/ITB10-066b Reprogramming Software DVD free
of charge from Clarion.
^ Should you require an additional NTB10-125b/ITB10-066b Reprogramming Software DVD due to
loss or damage it can be ordered free of charge by
contacting Clarion toll free at 1-800-347-8933.
^ Discard the previous version of this Reprogramming Software DVD (NTB10-125/ITB10-066).
CLAIMS INFORMATION
SERVICE PROCEDURE
NOTE:
This procedure will take 10-15 minutes with the ignition ON. Before starting make sure to attach a
battery charger to the vehicle battery and set it to a low charge rate (trickle charge).
Confirm Navigation Program Version
1. Set the parking brake.
2. Turn the ignition ON and keep the transmission in Park or Neutral.
^ The Navigation start-up screen should display.
^ If the Navigation start-up screen is not displayed: turn the ignition OFF, wait 10 seconds and then
turn the ignition ON again.
3. Wait more than 1 minute.
4. Press the «INFO» button on the switch panel.
5. Select Navigation Version on the display screen.
Infiniti Qx56 Rwd Workshop Manual (V8-5.6L (VK56VD) (2011))
Infiniti Workshop Manuals > Accessories and Optional Equipment > Cellular Phone > Component Information > Technical
Service Bulletins > Customer Interest for Cellular Phone: > 10-066B > Apr > 11 > Navigation/Bluetooth(R) — Voice
Recognition Issues > Page 946
NOTE:
On some vehicles you will first need to select Others to find Navigation Version.
6. Check the Program Version.
If the Program Version is:
^ X1U62024 or lower
OR
^ X1U72001
….continue with Step 7 below.
If the Program Version is:
^ X1U62025 or higher — except X1U72001
….this bulletin does not apply. Refer to ASIST for further diagnostic information.
7. Check the Map Version.
^ If the Map Version is not 09.10 MAP No. 1 continue with the next section of the Service
Procedure («Load Reprogramming Software DVD»).
Infiniti Qx56 Rwd Workshop Manual (V8-5.6L (VK56VD) (2011))
Infiniti Workshop Manuals > Accessories and Optional Equipment > Cellular Phone > Component Information > Technical
Service Bulletins > Customer Interest for Cellular Phone: > 10-066B > Apr > 11 > Navigation/Bluetooth(R) — Voice
Recognition Issues > Page 947
^ If the Map Version is 09.10 MAP No. 1 first perform the procedure in ITB10-031. Once complete
continue with the next section of the Service
Procedure («Load Reprogramming Software DVD»).
Load Reprogramming Software DVD
1. Make sure there is not a disc in the in-dash CD/DVD player.
2. Insert the Reprogramming Software DVD into the in-dash CD/DVD player slot.
IMPORTANT:
Once reprogramming has started:
^ Do not eject the DVD while it is loading.
^ Do not change the ignition position until the DVD has been loaded.
3. Wait for the program to load (a progress bar will display).
4. When the program has finished loading:
^ The Reprogramming Software DVD will automatically eject.
^ «Program loading is completed» will display.
5. The Navigation system will automatically restart.
6. Make sure the new program has loaded.
a. Press the «INFO» button on the switch panel.
b. Select Navigation Version on the display screen.
Infiniti Qx56 Rwd Workshop Manual (V8-5.6L (VK56VD) (2011))
Infiniti Workshop Manuals > Accessories and Optional Equipment > Cellular Phone > Component Information > Technical
Service Bulletins > Customer Interest for Cellular Phone: > 10-066B > Apr > 11 > Navigation/Bluetooth(R) — Voice
Recognition Issues > Page 948
c. The Program Version should be X1U62025.
^ If the Program Version is not X1U62025 perform the Load Reprogramming Software DVD
procedure again.
7. The procedure is complete. Turn OFF the ignition.
Infiniti Qx56 Rwd Workshop Manual (V8-5.6L (VK56VD) (2011))
Infiniti Workshop Manuals > Accessories and Optional Equipment > Navigation System > Navigation Module > Component
Information > Technical Service Bulletins > All Technical Service Bulletins for Navigation Module: > 10-066B > Apr > 11 >
Navigation/Bluetooth(R) — Voice Recognition Issues
Navigation Module: All Technical Service Bulletins Navigation/Bluetooth(R) — Voice Recognition
Issues
Classification: EL10-042B
Reference: ITB10-066B
Date: April 20, 2011
NAVIGATION / BLUETOOTH / VOICE RECOGNITION FUNCTION ISSUES
This bulletin has been amended. Several items throughout the bulletin have been revised. Please
discard all previous versions.
APPLIED VEHICLES: 2010-2011 EX35 (J50) — with Navigation 2010-2011 FX35/FX50 (S51) — with
Navigation 2010-2011 G37 Coupe Convertible Sedan (C/H/V36) — with Navigation 2011 M37/M56
(Y51) — with Navigation 2011 QX56 (Z62) — with Navigation
APPLIED DATES: Vehicles built before May 1, 2011
IF YOU CONFIRM
One or more of the following is occurring on an Applied Vehicle:
^ Audio streaming via Bluetooth is «choppy» or «clipped».
^ «Calculating Route» takes an extended period of time (2-5 minutes) to complete.
^ «Could not find a route» displays when attempting to calculate a route.
^ Voice Recognition sequence takes too many steps.
^ Voice Recognition has difficulty recognizing voicetags.
^ The Navigation system reboots.
^ XM NavTraffic is slow to report.
^ «Handset Phonebook» access is slow.
^ When a hands-free call via Bluetooth is in progress and another call comes in («all waiting») there
is no function available to answer the incoming call.
NOTE:
The original specification for 2010 and some 2011 Applied Vehicles did not include the call waiting
feature. To ensure a high level of customer satisfaction Nissan has enhanced the Infotainment
system in many 2011 Applied Vehicles to add the call waiting feature. Nissan is making available
this same enhancement for all Applied Vehicles by offering the call waiting feature as part of the
Reprogramming Software DVD update listed in the Parts Information section.
^ Caller ID is not available when a hands-free call via Bluetooth is in progress and another call
comes in.
IMPORTANT:
The purpose of «ACTION» is to give you a quick idea of the work you will be performing. You MUST
closely follow the entire Service Procedure as it contains information that is essential to
successfully completing this repair.
ACTION
1. Perform steps 1-6 of Confirm Navigation Program Version in the Service Procedure to verify
whether or not this bulletin applies.
2. If this bulletin applies, load the Reprogramming Software DVD referenced in the Parts
Information section.
PARTS INFORMATION
Infiniti Qx56 Rwd Workshop Manual (V8-5.6L (VK56VD) (2011))
Infiniti Workshop Manuals > Accessories and Optional Equipment > Navigation System > Navigation Module > Component
Information > Technical Service Bulletins > All Technical Service Bulletins for Navigation Module: > 10-066B > Apr > 11 >
Navigation/Bluetooth(R) — Voice Recognition Issues > Page 958
^ Each dealer has been mailed one NTB10-125b/ITB10-066b Reprogramming Software DVD free
of charge from Clarion.
^ Should you require an additional NTB10-125b/ITB10-066b Reprogramming Software DVD due to
loss or damage it can be ordered free of charge by
contacting Clarion toll free at 1-800-347-8933.
^ Discard the previous version of this Reprogramming Software DVD (NTB10-125/ITB10-066).
CLAIMS INFORMATION
SERVICE PROCEDURE
NOTE:
This procedure will take 10-15 minutes with the ignition ON. Before starting make sure to attach a
battery charger to the vehicle battery and set it to a low charge rate (trickle charge).
Confirm Navigation Program Version
1. Set the parking brake.
2. Turn the ignition ON and keep the transmission in Park or Neutral.
^ The Navigation start-up screen should display.
^ If the Navigation start-up screen is not displayed: turn the ignition OFF, wait 10 seconds and then
turn the ignition ON again.
3. Wait more than 1 minute.
4. Press the «INFO» button on the switch panel.
5. Select Navigation Version on the display screen.
Infiniti Qx56 Rwd Workshop Manual (V8-5.6L (VK56VD) (2011))
Infiniti Workshop Manuals > Accessories and Optional Equipment > Navigation System > Navigation Module > Component
Information > Technical Service Bulletins > All Technical Service Bulletins for Navigation Module: > 10-066B > Apr > 11 >
Navigation/Bluetooth(R) — Voice Recognition Issues > Page 959
NOTE:
On some vehicles you will first need to select Others to find Navigation Version.
6. Check the Program Version.
If the Program Version is:
^ X1U62024 or lower
OR
^ X1U72001
….continue with Step 7 below.
If the Program Version is:
^ X1U62025 or higher — except X1U72001
….this bulletin does not apply. Refer to ASIST for further diagnostic information.
7. Check the Map Version.
^ If the Map Version is not 09.10 MAP No. 1 continue with the next section of the Service
Procedure («Load Reprogramming Software DVD»).
Infiniti Qx56 Rwd Workshop Manual (V8-5.6L (VK56VD) (2011))
Infiniti Workshop Manuals > Accessories and Optional Equipment > Navigation System > Navigation Module > Component
Information > Technical Service Bulletins > All Technical Service Bulletins for Navigation Module: > 10-066B > Apr > 11 >
Navigation/Bluetooth(R) — Voice Recognition Issues > Page 960
^ If the Map Version is 09.10 MAP No. 1 first perform the procedure in ITB10-031. Once complete
continue with the next section of the Service
Procedure («Load Reprogramming Software DVD»).
Load Reprogramming Software DVD
1. Make sure there is not a disc in the in-dash CD/DVD player.
2. Insert the Reprogramming Software DVD into the in-dash CD/DVD player slot.
IMPORTANT:
Once reprogramming has started:
^ Do not eject the DVD while it is loading.
^ Do not change the ignition position until the DVD has been loaded.
3. Wait for the program to load (a progress bar will display).
4. When the program has finished loading:
^ The Reprogramming Software DVD will automatically eject.
^ «Program loading is completed» will display.
5. The Navigation system will automatically restart.
6. Make sure the new program has loaded.
a. Press the «INFO» button on the switch panel.
b. Select Navigation Version on the display screen.
Infiniti Qx56 Rwd Workshop Manual (V8-5.6L (VK56VD) (2011))
Infiniti Workshop Manuals > Accessories and Optional Equipment > Navigation System > Navigation Module > Component
Information > Technical Service Bulletins > All Technical Service Bulletins for Navigation Module: > 10-066B > Apr > 11 >
Navigation/Bluetooth(R) — Voice Recognition Issues > Page 961
c. The Program Version should be X1U62025.
^ If the Program Version is not X1U62025 perform the Load Reprogramming Software DVD
procedure again.
7. The procedure is complete. Turn OFF the ignition.
Infiniti Qx56 Rwd Workshop Manual (V8-5.6L (VK56VD) (2011))
Infiniti Workshop Manuals > Accessories and Optional Equipment > Navigation System > Navigation Module > Component
Information > Technical Service Bulletins > All Technical Service Bulletins for Navigation Module: > 10-017A > Dec > 10 >
Navigation Radio — Configuration After Replacement
Navigation Module: All Technical Service Bulletins Navigation Radio — Configuration After
Replacement
Classification: EL10-009a
Reference: ITB0-017a
Date: December 1, 2010
AV CONTROL UNIT REPLACEMENT REQUIRES CONSULT-III CONFIGURATION
This bulletin has been amended. Several items have been revised. Please discard previous
versions.
APPLIED VEHICLES: 2010-2011 EX35 (J50) 2010-2011 FX35/FX50 (S51) 2010-2011 G37 Coupe
Convertible Sedan (C/H/V36) 2011 M37/M56 (Y51) 2011 QX56 (Z62)
SERVICE INFORMATION
If the AV Control Unit needs to be replaced on an Applied Vehicle for any reason follow the steps in
the Service Procedure to configure the Multi AV system.
NOTE:
The original AV Control Unit must be installed in the vehicle while performing part of this procedure.
DO NOT remove the original AV Control Unit until instructed.
SERVICE PROCEDURE
Before starting make sure your ASIST has been freshly synchronized and all CONSULT-III
upgrades have been installed.
Parts of the Procedure
1. Make sure the shift selector is in Park.
2. Connect the C-III VI to the vehicle.
3. Turn ON the ignition.
NOTE:
You may want to start the engine to keep the battery charged during this procedure.
4. Open/start ASIST on the C-III computer then select CONSULT Utilities > CONSULT III.
5. Perform the usual C-III start-up selections:
a. Wait for the Detecting VI/MI in progress message to clear.
Infiniti Qx56 Rwd Workshop Manual (V8-5.6L (VK56VD) (2011))
Infiniti Workshop Manuals > Accessories and Optional Equipment > Navigation System > Navigation Module > Component
Information > Technical Service Bulletins > All Technical Service Bulletins for Navigation Module: > 10-017A > Dec > 10 >
Navigation Radio — Configuration After Replacement > Page 966
b. Select the detected VI from the list.
c. Select Connect.
d. Wait for the Checking the firmware version message to clear.
e. Select the vehicle and model year.
f. Select Select.
g. Make sure the correct vehicle is displayed on the confirmation screen.
h. Select Confirm.
6. Select Repair.
7. Select EL Repair.
Infiniti Qx56 Rwd Workshop Manual (V8-5.6L (VK56VD) (2011))
Infiniti Workshop Manuals > Accessories and Optional Equipment > Navigation System > Navigation Module > Component
Information > Technical Service Bulletins > All Technical Service Bulletins for Navigation Module: > 10-017A > Dec > 10 >
Navigation Radio — Configuration After Replacement > Page 967
8. Select MULTI AV.
9. Select OK.
10. Select Configuration
11. Select OK.
Infiniti Qx56 Rwd Workshop Manual (V8-5.6L (VK56VD) (2011))
Infiniti Workshop Manuals > Accessories and Optional Equipment > Navigation System > Navigation Module > Component
Information > Technical Service Bulletins > All Technical Service Bulletins for Navigation Module: > 10-017A > Dec > 10 >
Navigation Radio — Configuration After Replacement > Page 968
^ It is OK to execute this function.
^ Perform only the tasks indicated in the next steps.
12. Select READ CONFIGURATION.
13. Select Next.
14. Write down the values shown on the C-III.
15. Select Save. Close C-Ill.
16. Replace the AV Control Unit as instructed in the appropriate Electronic Service Manual (ESM).
PART 2:
Write Configuration Using the Config File
Infiniti Qx56 Rwd Workshop Manual (V8-5.6L (VK56VD) (2011))
Infiniti Workshop Manuals > Accessories and Optional Equipment > Navigation System > Navigation Module > Component
Information > Technical Service Bulletins > All Technical Service Bulletins for Navigation Module: > 10-017A > Dec > 10 >
Navigation Radio — Configuration After Replacement > Page 969
17. Repeat steps 1-11.
18. Select WRITE CONFIGURATION — Config file.
19. Select Next.
After performing step 19
If an error message does not display:
^ Proceed to PART 5: Confirm Multi AV System Is Operational.
If an error message does display:
^ Proceed to PART 3: Perform Multi AV Initialization.
PART 3 (if needed):
Perform Multi AV Initialization
20. Leave ON C-III and the VI connected while performing Multi AV initialization.
21. Turn OFF the audio system.
NOTE:
The ignition should still be ON.
Infiniti Qx56 Rwd Workshop Manual (V8-5.6L (VK56VD) (2011))
Infiniti Workshop Manuals > Accessories and Optional Equipment > Navigation System > Navigation Module > Component
Information > Technical Service Bulletins > All Technical Service Bulletins for Navigation Module: > 10-017A > Dec > 10 >
Navigation Radio — Configuration After Replacement > Page 970
22. Put the AV system into Self Diagnostic Mode.
a. Press and hold the SETTING button.
b. While holding the SETTING button turn the volume control knob 40 clicks or more.
^ The volume control knob can be turned either direction.
^ When the system goes into the Self Diagnostic Menu the screen in Figure 11 will display.
23. Select Confirmation/Adjustment.
24. Select Initialize Settings.
NOTE:
Use the scroll arrow to find Initialize Settings.
Infiniti Qx56 Rwd Workshop Manual (V8-5.6L (VK56VD) (2011))
Infiniti Workshop Manuals > Accessories and Optional Equipment > Navigation System > Navigation Module > Component
Information > Technical Service Bulletins > All Technical Service Bulletins for Navigation Module: > 10-017A > Dec > 10 >
Navigation Radio — Configuration After Replacement > Page 971
25. Select Accessory Number Initialization.
26. Select Yes.
27. Select Yes.
28. The screen in Figure 16 will display while initializing.
Infiniti Qx56 Rwd Workshop Manual (V8-5.6L (VK56VD) (2011))
Infiniti Workshop Manuals > Accessories and Optional Equipment > Navigation System > Navigation Module > Component
Information > Technical Service Bulletins > All Technical Service Bulletins for Navigation Module: > 10-017A > Dec > 10 >
Navigation Radio — Configuration After Replacement > Page 972
29. The screen in Figure 17 will display when initializing is complete.
30. Reboot the Multi AV system as follows:
a. Turn OFF the ignition.
b. Wait 10 seconds.
c. Turn ON the ignition.
Proceed to PART 4: Write Configuration Using Manual Settings.
PART 4 Write Configuration Using Manual Settings
31. Select MULTI AV.
32. Select OK.
Infiniti Qx56 Rwd Workshop Manual (V8-5.6L (VK56VD) (2011))
Infiniti Workshop Manuals > Accessories and Optional Equipment > Navigation System > Navigation Module > Component
Information > Technical Service Bulletins > All Technical Service Bulletins for Navigation Module: > 10-017A > Dec > 10 >
Navigation Radio — Configuration After Replacement > Page 973
33. Select Configuration.
34. Select OK.
^ It is OK to execute this function.
^ Perform only the tasks indicated in the next steps.
35. Select WRITE CONFIGURATION — Manual setting.
Infiniti Qx56 Rwd Workshop Manual (V8-5.6L (VK56VD) (2011))
Infiniti Workshop Manuals > Accessories and Optional Equipment > Navigation System > Navigation Module > Component
Information > Technical Service Bulletins > All Technical Service Bulletins for Navigation Module: > 10-017A > Dec > 10 >
Navigation Radio — Configuration After Replacement > Page 974
36. Select Next.
37. Set the configuration values.
^ Use the values you wrote down in Step 14. DO NOT select ALL.
^ Use the menu arrow to view selections.
^ If no values are displayed proceed to step 38.
38. Select SETTING.
Infiniti Qx56 Rwd Workshop Manual (V8-5.6L (VK56VD) (2011))
Infiniti Workshop Manuals > Accessories and Optional Equipment > Navigation System > Navigation Module > Component
Information > Technical Service Bulletins > All Technical Service Bulletins for Navigation Module: > 10-017A > Dec > 10 >
Navigation Radio — Configuration After Replacement > Page 975
39. Select OK.
40. Press the BACK arrow 3 times to go to the screen in Figure 26.
41. Select Ecu Identification.
Infiniti Qx56 Rwd Workshop Manual (V8-5.6L (VK56VD) (2011))
Infiniti Workshop Manuals > Accessories and Optional Equipment > Navigation System > Navigation Module > Component
Information > Technical Service Bulletins > All Technical Service Bulletins for Navigation Module: > 10-017A > Dec > 10 >
Navigation Radio — Configuration After Replacement > Page 976
42. Confirm the ECU part number is displayed.
43. Close the C-III software and disconnect the VI from the vehicle.
PART 5:
Confirm Multi AV System Is Operational
44. Put your foot on the brake start the engine and move the shift selector to R (reverse).
45. If equipped make sure the rear view monitor is working correctly.
46. Put the shift selector back into Park.
47. Turn ON the radio.
48. Turn the volume knob and make sure the audio volume responds to movement of the knob.
Disclaimer
Infiniti Qx56 Rwd Workshop Manual (V8-5.6L (VK56VD) (2011))
Infiniti Workshop Manuals > Accessories and Optional Equipment > Navigation System > Navigation Module > Component
Information > Technical Service Bulletins > Customer Interest: > 10-066B > Apr > 11 > Navigation/Bluetooth(R) — Voice
Recognition Issues
Navigation Module: Customer Interest Navigation/Bluetooth(R) — Voice Recognition Issues
Classification: EL10-042B
Reference: ITB10-066B
Date: April 20, 2011
NAVIGATION / BLUETOOTH / VOICE RECOGNITION FUNCTION ISSUES
This bulletin has been amended. Several items throughout the bulletin have been revised. Please
discard all previous versions.
APPLIED VEHICLES: 2010-2011 EX35 (J50) — with Navigation 2010-2011 FX35/FX50 (S51) — with
Navigation 2010-2011 G37 Coupe Convertible Sedan (C/H/V36) — with Navigation 2011 M37/M56
(Y51) — with Navigation 2011 QX56 (Z62) — with Navigation
APPLIED DATES: Vehicles built before May 1, 2011
IF YOU CONFIRM
One or more of the following is occurring on an Applied Vehicle:
^ Audio streaming via Bluetooth is «choppy» or «clipped».
^ «Calculating Route» takes an extended period of time (2-5 minutes) to complete.
^ «Could not find a route» displays when attempting to calculate a route.
^ Voice Recognition sequence takes too many steps.
^ Voice Recognition has difficulty recognizing voicetags.
^ The Navigation system reboots.
^ XM NavTraffic is slow to report.
^ «Handset Phonebook» access is slow.
^ When a hands-free call via Bluetooth is in progress and another call comes in («all waiting») there
is no function available to answer the incoming call.
NOTE:
The original specification for 2010 and some 2011 Applied Vehicles did not include the call waiting
feature. To ensure a high level of customer satisfaction Nissan has enhanced the Infotainment
system in many 2011 Applied Vehicles to add the call waiting feature. Nissan is making available
this same enhancement for all Applied Vehicles by offering the call waiting feature as part of the
Reprogramming Software DVD update listed in the Parts Information section.
^ Caller ID is not available when a hands-free call via Bluetooth is in progress and another call
comes in.
IMPORTANT:
The purpose of «ACTION» is to give you a quick idea of the work you will be performing. You MUST
closely follow the entire Service Procedure as it contains information that is essential to
successfully completing this repair.
ACTION
1. Perform steps 1-6 of Confirm Navigation Program Version in the Service Procedure to verify
whether or not this bulletin applies.
2. If this bulletin applies, load the Reprogramming Software DVD referenced in the Parts
Information section.
PARTS INFORMATION
Infiniti Qx56 Rwd Workshop Manual (V8-5.6L (VK56VD) (2011))
Infiniti Workshop Manuals > Accessories and Optional Equipment > Navigation System > Navigation Module > Component
Information > Technical Service Bulletins > Customer Interest: > 10-066B > Apr > 11 > Navigation/Bluetooth(R) — Voice
Recognition Issues > Page 982
^ Each dealer has been mailed one NTB10-125b/ITB10-066b Reprogramming Software DVD free
of charge from Clarion.
^ Should you require an additional NTB10-125b/ITB10-066b Reprogramming Software DVD due to
loss or damage it can be ordered free of charge by
contacting Clarion toll free at 1-800-347-8933.
^ Discard the previous version of this Reprogramming Software DVD (NTB10-125/ITB10-066).
CLAIMS INFORMATION
SERVICE PROCEDURE
NOTE:
This procedure will take 10-15 minutes with the ignition ON. Before starting make sure to attach a
battery charger to the vehicle battery and set it to a low charge rate (trickle charge).
Confirm Navigation Program Version
1. Set the parking brake.
2. Turn the ignition ON and keep the transmission in Park or Neutral.
^ The Navigation start-up screen should display.
^ If the Navigation start-up screen is not displayed: turn the ignition OFF, wait 10 seconds and then
turn the ignition ON again.
3. Wait more than 1 minute.
4. Press the «INFO» button on the switch panel.
5. Select Navigation Version on the display screen.
Infiniti Qx56 Rwd Workshop Manual (V8-5.6L (VK56VD) (2011))
Infiniti Workshop Manuals > Accessories and Optional Equipment > Navigation System > Navigation Module > Component
Information > Technical Service Bulletins > Customer Interest: > 10-066B > Apr > 11 > Navigation/Bluetooth(R) — Voice
Recognition Issues > Page 983
NOTE:
On some vehicles you will first need to select Others to find Navigation Version.
6. Check the Program Version.
If the Program Version is:
^ X1U62024 or lower
OR
^ X1U72001
….continue with Step 7 below.
If the Program Version is:
^ X1U62025 or higher — except X1U72001
….this bulletin does not apply. Refer to ASIST for further diagnostic information.
7. Check the Map Version.
^ If the Map Version is not 09.10 MAP No. 1 continue with the next section of the Service
Procedure («Load Reprogramming Software DVD»).
Infiniti Qx56 Rwd Workshop Manual (V8-5.6L (VK56VD) (2011))
Infiniti Workshop Manuals > Accessories and Optional Equipment > Navigation System > Navigation Module > Component
Information > Technical Service Bulletins > Customer Interest: > 10-066B > Apr > 11 > Navigation/Bluetooth(R) — Voice
Recognition Issues > Page 984
^ If the Map Version is 09.10 MAP No. 1 first perform the procedure in ITB10-031. Once complete
continue with the next section of the Service
Procedure («Load Reprogramming Software DVD»).
Load Reprogramming Software DVD
1. Make sure there is not a disc in the in-dash CD/DVD player.
2. Insert the Reprogramming Software DVD into the in-dash CD/DVD player slot.
IMPORTANT:
Once reprogramming has started:
^ Do not eject the DVD while it is loading.
^ Do not change the ignition position until the DVD has been loaded.
3. Wait for the program to load (a progress bar will display).
4. When the program has finished loading:
^ The Reprogramming Software DVD will automatically eject.
^ «Program loading is completed» will display.
5. The Navigation system will automatically restart.
6. Make sure the new program has loaded.
a. Press the «INFO» button on the switch panel.
b. Select Navigation Version on the display screen.
Infiniti Qx56 Rwd Workshop Manual (V8-5.6L (VK56VD) (2011))
Infiniti Workshop Manuals > Accessories and Optional Equipment > Navigation System > Navigation Module > Component
Information > Technical Service Bulletins > Customer Interest: > 10-066B > Apr > 11 > Navigation/Bluetooth(R) — Voice
Recognition Issues > Page 985
c. The Program Version should be X1U62025.
^ If the Program Version is not X1U62025 perform the Load Reprogramming Software DVD
procedure again.
7. The procedure is complete. Turn OFF the ignition.
Infiniti Qx56 Rwd Workshop Manual (V8-5.6L (VK56VD) (2011))
Infiniti Workshop Manuals > Accessories and Optional Equipment > Navigation System > Navigation Module > Component
Information > Technical Service Bulletins > All Other Service Bulletins for Navigation Module: > 10-017A > Dec > 10 >
Navigation Radio — Configuration After Replacement
Navigation Module: All Technical Service Bulletins Navigation Radio — Configuration After
Replacement
Classification: EL10-009a
Reference: ITB0-017a
Date: December 1, 2010
AV CONTROL UNIT REPLACEMENT REQUIRES CONSULT-III CONFIGURATION
This bulletin has been amended. Several items have been revised. Please discard previous
versions.
APPLIED VEHICLES: 2010-2011 EX35 (J50) 2010-2011 FX35/FX50 (S51) 2010-2011 G37 Coupe
Convertible Sedan (C/H/V36) 2011 M37/M56 (Y51) 2011 QX56 (Z62)
SERVICE INFORMATION
If the AV Control Unit needs to be replaced on an Applied Vehicle for any reason follow the steps in
the Service Procedure to configure the Multi AV system.
NOTE:
The original AV Control Unit must be installed in the vehicle while performing part of this procedure.
DO NOT remove the original AV Control Unit until instructed.
SERVICE PROCEDURE
Before starting make sure your ASIST has been freshly synchronized and all CONSULT-III
upgrades have been installed.
Parts of the Procedure
1. Make sure the shift selector is in Park.
2. Connect the C-III VI to the vehicle.
3. Turn ON the ignition.
NOTE:
You may want to start the engine to keep the battery charged during this procedure.
4. Open/start ASIST on the C-III computer then select CONSULT Utilities > CONSULT III.
5. Perform the usual C-III start-up selections:
a. Wait for the Detecting VI/MI in progress message to clear.
Infiniti Qx56 Rwd Workshop Manual (V8-5.6L (VK56VD) (2011))
Infiniti Workshop Manuals > Accessories and Optional Equipment > Navigation System > Navigation Module > Component
Information > Technical Service Bulletins > All Other Service Bulletins for Navigation Module: > 10-017A > Dec > 10 >
Navigation Radio — Configuration After Replacement > Page 991
b. Select the detected VI from the list.
c. Select Connect.
d. Wait for the Checking the firmware version message to clear.
e. Select the vehicle and model year.
f. Select Select.
g. Make sure the correct vehicle is displayed on the confirmation screen.
h. Select Confirm.
6. Select Repair.
7. Select EL Repair.
Infiniti Qx56 Rwd Workshop Manual (V8-5.6L (VK56VD) (2011))
Infiniti Workshop Manuals > Accessories and Optional Equipment > Navigation System > Navigation Module > Component
Information > Technical Service Bulletins > All Other Service Bulletins for Navigation Module: > 10-017A > Dec > 10 >
Navigation Radio — Configuration After Replacement > Page 992
8. Select MULTI AV.
9. Select OK.
10. Select Configuration
11. Select OK.
Infiniti Qx56 Rwd Workshop Manual (V8-5.6L (VK56VD) (2011))
Infiniti Workshop Manuals > Accessories and Optional Equipment > Navigation System > Navigation Module > Component
Information > Technical Service Bulletins > All Other Service Bulletins for Navigation Module: > 10-017A > Dec > 10 >
Navigation Radio — Configuration After Replacement > Page 993
^ It is OK to execute this function.
^ Perform only the tasks indicated in the next steps.
12. Select READ CONFIGURATION.
13. Select Next.
14. Write down the values shown on the C-III.
15. Select Save. Close C-Ill.
16. Replace the AV Control Unit as instructed in the appropriate Electronic Service Manual (ESM).
PART 2:
Write Configuration Using the Config File
Infiniti Qx56 Rwd Workshop Manual (V8-5.6L (VK56VD) (2011))
Infiniti Workshop Manuals > Accessories and Optional Equipment > Navigation System > Navigation Module > Component
Information > Technical Service Bulletins > All Other Service Bulletins for Navigation Module: > 10-017A > Dec > 10 >
Navigation Radio — Configuration After Replacement > Page 994
17. Repeat steps 1-11.
18. Select WRITE CONFIGURATION — Config file.
19. Select Next.
After performing step 19
If an error message does not display:
^ Proceed to PART 5: Confirm Multi AV System Is Operational.
If an error message does display:
^ Proceed to PART 3: Perform Multi AV Initialization.
PART 3 (if needed):
Perform Multi AV Initialization
20. Leave ON C-III and the VI connected while performing Multi AV initialization.
21. Turn OFF the audio system.
NOTE:
The ignition should still be ON.
Infiniti Qx56 Rwd Workshop Manual (V8-5.6L (VK56VD) (2011))
Infiniti Workshop Manuals > Accessories and Optional Equipment > Navigation System > Navigation Module > Component
Information > Technical Service Bulletins > All Other Service Bulletins for Navigation Module: > 10-017A > Dec > 10 >
Navigation Radio — Configuration After Replacement > Page 995
22. Put the AV system into Self Diagnostic Mode.
a. Press and hold the SETTING button.
b. While holding the SETTING button turn the volume control knob 40 clicks or more.
^ The volume control knob can be turned either direction.
^ When the system goes into the Self Diagnostic Menu the screen in Figure 11 will display.
23. Select Confirmation/Adjustment.
24. Select Initialize Settings.
NOTE:
Use the scroll arrow to find Initialize Settings.
Infiniti Qx56 Rwd Workshop Manual (V8-5.6L (VK56VD) (2011))
Infiniti Workshop Manuals > Accessories and Optional Equipment > Navigation System > Navigation Module > Component
Information > Technical Service Bulletins > All Other Service Bulletins for Navigation Module: > 10-017A > Dec > 10 >
Navigation Radio — Configuration After Replacement > Page 996
25. Select Accessory Number Initialization.
26. Select Yes.
27. Select Yes.
28. The screen in Figure 16 will display while initializing.
Infiniti Qx56 Rwd Workshop Manual (V8-5.6L (VK56VD) (2011))
Infiniti Workshop Manuals > Accessories and Optional Equipment > Navigation System > Navigation Module > Component
Information > Technical Service Bulletins > All Other Service Bulletins for Navigation Module: > 10-017A > Dec > 10 >
Navigation Radio — Configuration After Replacement > Page 997
29. The screen in Figure 17 will display when initializing is complete.
30. Reboot the Multi AV system as follows:
a. Turn OFF the ignition.
b. Wait 10 seconds.
c. Turn ON the ignition.
Proceed to PART 4: Write Configuration Using Manual Settings.
PART 4 Write Configuration Using Manual Settings
31. Select MULTI AV.
32. Select OK.
Infiniti Qx56 Rwd Workshop Manual (V8-5.6L (VK56VD) (2011))
Infiniti Workshop Manuals > Accessories and Optional Equipment > Navigation System > Navigation Module > Component
Information > Technical Service Bulletins > All Other Service Bulletins for Navigation Module: > 10-017A > Dec > 10 >
Navigation Radio — Configuration After Replacement > Page 998
33. Select Configuration.
34. Select OK.
^ It is OK to execute this function.
^ Perform only the tasks indicated in the next steps.
35. Select WRITE CONFIGURATION — Manual setting.
Infiniti Qx56 Rwd Workshop Manual (V8-5.6L (VK56VD) (2011))
Infiniti Workshop Manuals > Accessories and Optional Equipment > Navigation System > Navigation Module > Component
Information > Technical Service Bulletins > All Other Service Bulletins for Navigation Module: > 10-017A > Dec > 10 >
Navigation Radio — Configuration After Replacement > Page 999
36. Select Next.
37. Set the configuration values.
^ Use the values you wrote down in Step 14. DO NOT select ALL.
^ Use the menu arrow to view selections.
^ If no values are displayed proceed to step 38.
38. Select SETTING.
Infiniti Qx56 Rwd Workshop Manual (V8-5.6L (VK56VD) (2011))
Infiniti Workshop Manuals > Accessories and Optional Equipment > Navigation System > Navigation Module > Component
Information > Technical Service Bulletins > All Other Service Bulletins for Navigation Module: > 10-017A > Dec > 10 >
Navigation Radio — Configuration After Replacement > Page 1000
39. Select OK.
40. Press the BACK arrow 3 times to go to the screen in Figure 26.
41. Select Ecu Identification.
Infiniti Qx56 Rwd Workshop Manual (V8-5.6L (VK56VD) (2011))
Infiniti Workshop Manuals > Accessories and Optional Equipment > Navigation System > Navigation Module > Component
Information > Technical Service Bulletins > All Other Service Bulletins for Navigation Module: > 10-017A > Dec > 10 >
Navigation Radio — Configuration After Replacement > Page 1001
42. Confirm the ECU part number is displayed.
43. Close the C-III software and disconnect the VI from the vehicle.
PART 5:
Confirm Multi AV System Is Operational
44. Put your foot on the brake start the engine and move the shift selector to R (reverse).
45. If equipped make sure the rear view monitor is working correctly.
46. Put the shift selector back into Park.
47. Turn ON the radio.
48. Turn the volume knob and make sure the audio volume responds to movement of the knob.
Disclaimer
Infiniti Qx56 Rwd Workshop Manual (V8-5.6L (VK56VD) (2011))
Infiniti Workshop Manuals > Accessories and Optional Equipment > Radio, Stereo, and Compact Disc > Component
Information > Technical Service Bulletins > Navigation Radio — Configuration After Replacement
Radio, Stereo, and Compact Disc: Technical Service Bulletins Navigation Radio — Configuration
After Replacement
Classification: EL10-009a
Reference: ITB0-017a
Date: December 1, 2010
AV CONTROL UNIT REPLACEMENT REQUIRES CONSULT-III CONFIGURATION
This bulletin has been amended. Several items have been revised. Please discard previous
versions.
APPLIED VEHICLES: 2010-2011 EX35 (J50) 2010-2011 FX35/FX50 (S51) 2010-2011 G37 Coupe
Convertible Sedan (C/H/V36) 2011 M37/M56 (Y51) 2011 QX56 (Z62)
SERVICE INFORMATION
If the AV Control Unit needs to be replaced on an Applied Vehicle for any reason follow the steps in
the Service Procedure to configure the Multi AV system.
NOTE:
The original AV Control Unit must be installed in the vehicle while performing part of this procedure.
DO NOT remove the original AV Control Unit until instructed.
SERVICE PROCEDURE
Before starting make sure your ASIST has been freshly synchronized and all CONSULT-III
upgrades have been installed.
Parts of the Procedure
1. Make sure the shift selector is in Park.
2. Connect the C-III VI to the vehicle.
3. Turn ON the ignition.
NOTE:
You may want to start the engine to keep the battery charged during this procedure.
4. Open/start ASIST on the C-III computer then select CONSULT Utilities > CONSULT III.
5. Perform the usual C-III start-up selections:
a. Wait for the Detecting VI/MI in progress message to clear.
Infiniti Qx56 Rwd Workshop Manual (V8-5.6L (VK56VD) (2011))
Infiniti Workshop Manuals > Accessories and Optional Equipment > Radio, Stereo, and Compact Disc > Component
Information > Technical Service Bulletins > Navigation Radio — Configuration After Replacement > Page 1006
b. Select the detected VI from the list.
c. Select Connect.
d. Wait for the Checking the firmware version message to clear.
e. Select the vehicle and model year.
f. Select Select.
g. Make sure the correct vehicle is displayed on the confirmation screen.
h. Select Confirm.
6. Select Repair.
7. Select EL Repair.
Infiniti Qx56 Rwd Workshop Manual (V8-5.6L (VK56VD) (2011))
Infiniti Workshop Manuals > Accessories and Optional Equipment > Radio, Stereo, and Compact Disc > Component
Information > Technical Service Bulletins > Navigation Radio — Configuration After Replacement > Page 1007
8. Select MULTI AV.
9. Select OK.
10. Select Configuration
11. Select OK.
Infiniti Qx56 Rwd Workshop Manual (V8-5.6L (VK56VD) (2011))
Infiniti Workshop Manuals > Accessories and Optional Equipment > Radio, Stereo, and Compact Disc > Component
Information > Technical Service Bulletins > Navigation Radio — Configuration After Replacement > Page 1008
^ It is OK to execute this function.
^ Perform only the tasks indicated in the next steps.
12. Select READ CONFIGURATION.
13. Select Next.
14. Write down the values shown on the C-III.
15. Select Save. Close C-Ill.
16. Replace the AV Control Unit as instructed in the appropriate Electronic Service Manual (ESM).
PART 2:
Write Configuration Using the Config File
Infiniti Qx56 Rwd Workshop Manual (V8-5.6L (VK56VD) (2011))
Infiniti Workshop Manuals > Accessories and Optional Equipment > Radio, Stereo, and Compact Disc > Component
Information > Technical Service Bulletins > Navigation Radio — Configuration After Replacement > Page 1009
17. Repeat steps 1-11.
18. Select WRITE CONFIGURATION — Config file.
19. Select Next.
After performing step 19
If an error message does not display:
^ Proceed to PART 5: Confirm Multi AV System Is Operational.
If an error message does display:
^ Proceed to PART 3: Perform Multi AV Initialization.
PART 3 (if needed):
Perform Multi AV Initialization
20. Leave ON C-III and the VI connected while performing Multi AV initialization.
21. Turn OFF the audio system.
NOTE:
The ignition should still be ON.
Infiniti Qx56 Rwd Workshop Manual (V8-5.6L (VK56VD) (2011))
Infiniti Workshop Manuals > Accessories and Optional Equipment > Radio, Stereo, and Compact Disc > Component
Information > Technical Service Bulletins > Navigation Radio — Configuration After Replacement > Page 1010
22. Put the AV system into Self Diagnostic Mode.
a. Press and hold the SETTING button.
b. While holding the SETTING button turn the volume control knob 40 clicks or more.
^ The volume control knob can be turned either direction.
^ When the system goes into the Self Diagnostic Menu the screen in Figure 11 will display.
23. Select Confirmation/Adjustment.
24. Select Initialize Settings.
NOTE:
Use the scroll arrow to find Initialize Settings.
Infiniti Qx56 Rwd Workshop Manual (V8-5.6L (VK56VD) (2011))
Infiniti Workshop Manuals > Accessories and Optional Equipment > Radio, Stereo, and Compact Disc > Component
Information > Technical Service Bulletins > Navigation Radio — Configuration After Replacement > Page 1011
25. Select Accessory Number Initialization.
26. Select Yes.
27. Select Yes.
28. The screen in Figure 16 will display while initializing.
Infiniti Qx56 Rwd Workshop Manual (V8-5.6L (VK56VD) (2011))
Infiniti Workshop Manuals > Accessories and Optional Equipment > Radio, Stereo, and Compact Disc > Component
Information > Technical Service Bulletins > Navigation Radio — Configuration After Replacement > Page 1012
29. The screen in Figure 17 will display when initializing is complete.
30. Reboot the Multi AV system as follows:
a. Turn OFF the ignition.
b. Wait 10 seconds.
c. Turn ON the ignition.
Proceed to PART 4: Write Configuration Using Manual Settings.
PART 4 Write Configuration Using Manual Settings
31. Select MULTI AV.
32. Select OK.
Infiniti Qx56 Rwd Workshop Manual (V8-5.6L (VK56VD) (2011))
Infiniti Workshop Manuals > Accessories and Optional Equipment > Radio, Stereo, and Compact Disc > Component
Information > Technical Service Bulletins > Navigation Radio — Configuration After Replacement > Page 1013
33. Select Configuration.
34. Select OK.
^ It is OK to execute this function.
^ Perform only the tasks indicated in the next steps.
35. Select WRITE CONFIGURATION — Manual setting.
Infiniti Qx56 Rwd Workshop Manual (V8-5.6L (VK56VD) (2011))
Infiniti Workshop Manuals > Accessories and Optional Equipment > Radio, Stereo, and Compact Disc > Component
Information > Technical Service Bulletins > Navigation Radio — Configuration After Replacement > Page 1014
36. Select Next.
37. Set the configuration values.
^ Use the values you wrote down in Step 14. DO NOT select ALL.
^ Use the menu arrow to view selections.
^ If no values are displayed proceed to step 38.
38. Select SETTING.
Infiniti Qx56 Rwd Workshop Manual (V8-5.6L (VK56VD) (2011))
Infiniti Workshop Manuals > Accessories and Optional Equipment > Radio, Stereo, and Compact Disc > Component
Information > Technical Service Bulletins > Navigation Radio — Configuration After Replacement > Page 1015
39. Select OK.
40. Press the BACK arrow 3 times to go to the screen in Figure 26.
41. Select Ecu Identification.
Infiniti Qx56 Rwd Workshop Manual (V8-5.6L (VK56VD) (2011))
Infiniti Workshop Manuals > Accessories and Optional Equipment > Radio, Stereo, and Compact Disc > Component
Information > Technical Service Bulletins > Navigation Radio — Configuration After Replacement > Page 1016
42. Confirm the ECU part number is displayed.
43. Close the C-III software and disconnect the VI from the vehicle.
PART 5:
Confirm Multi AV System Is Operational
44. Put your foot on the brake start the engine and move the shift selector to R (reverse).
45. If equipped make sure the rear view monitor is working correctly.
46. Put the shift selector back into Park.
47. Turn ON the radio.
48. Turn the volume knob and make sure the audio volume responds to movement of the knob.
Disclaimer
Infiniti Qx56 Rwd Workshop Manual (V8-5.6L (VK56VD) (2011))
Infiniti Workshop Manuals > Accessories and Optional Equipment > Relays and Modules — Accessories and Optional
Equipment > Navigation Module > Component Information > Technical Service Bulletins > All Technical Service Bulletins for
Navigation Module: > 10-066B > Apr > 11 > Navigation/Bluetooth(R) — Voice Recognition Issues
Navigation Module: All Technical Service Bulletins Navigation/Bluetooth(R) — Voice Recognition
Issues
Classification: EL10-042B
Reference: ITB10-066B
Date: April 20, 2011
NAVIGATION / BLUETOOTH / VOICE RECOGNITION FUNCTION ISSUES
This bulletin has been amended. Several items throughout the bulletin have been revised. Please
discard all previous versions.
APPLIED VEHICLES: 2010-2011 EX35 (J50) — with Navigation 2010-2011 FX35/FX50 (S51) — with
Navigation 2010-2011 G37 Coupe Convertible Sedan (C/H/V36) — with Navigation 2011 M37/M56
(Y51) — with Navigation 2011 QX56 (Z62) — with Navigation
APPLIED DATES: Vehicles built before May 1, 2011
IF YOU CONFIRM
One or more of the following is occurring on an Applied Vehicle:
^ Audio streaming via Bluetooth is «choppy» or «clipped».
^ «Calculating Route» takes an extended period of time (2-5 minutes) to complete.
^ «Could not find a route» displays when attempting to calculate a route.
^ Voice Recognition sequence takes too many steps.
^ Voice Recognition has difficulty recognizing voicetags.
^ The Navigation system reboots.
^ XM NavTraffic is slow to report.
^ «Handset Phonebook» access is slow.
^ When a hands-free call via Bluetooth is in progress and another call comes in («all waiting») there
is no function available to answer the incoming call.
NOTE:
The original specification for 2010 and some 2011 Applied Vehicles did not include the call waiting
feature. To ensure a high level of customer satisfaction Nissan has enhanced the Infotainment
system in many 2011 Applied Vehicles to add the call waiting feature. Nissan is making available
this same enhancement for all Applied Vehicles by offering the call waiting feature as part of the
Reprogramming Software DVD update listed in the Parts Information section.
^ Caller ID is not available when a hands-free call via Bluetooth is in progress and another call
comes in.
IMPORTANT:
The purpose of «ACTION» is to give you a quick idea of the work you will be performing. You MUST
closely follow the entire Service Procedure as it contains information that is essential to
successfully completing this repair.
ACTION
1. Perform steps 1-6 of Confirm Navigation Program Version in the Service Procedure to verify
whether or not this bulletin applies.
2. If this bulletin applies, load the Reprogramming Software DVD referenced in the Parts
Information section.
PARTS INFORMATION
Infiniti Qx56 Rwd Workshop Manual (V8-5.6L (VK56VD) (2011))
Infiniti Workshop Manuals > Accessories and Optional Equipment > Relays and Modules — Accessories and Optional
Equipment > Navigation Module > Component Information > Technical Service Bulletins > All Technical Service Bulletins for
Navigation Module: > 10-066B > Apr > 11 > Navigation/Bluetooth(R) — Voice Recognition Issues > Page 1026
^ Each dealer has been mailed one NTB10-125b/ITB10-066b Reprogramming Software DVD free
of charge from Clarion.
^ Should you require an additional NTB10-125b/ITB10-066b Reprogramming Software DVD due to
loss or damage it can be ordered free of charge by
contacting Clarion toll free at 1-800-347-8933.
^ Discard the previous version of this Reprogramming Software DVD (NTB10-125/ITB10-066).
CLAIMS INFORMATION
SERVICE PROCEDURE
NOTE:
This procedure will take 10-15 minutes with the ignition ON. Before starting make sure to attach a
battery charger to the vehicle battery and set it to a low charge rate (trickle charge).
Confirm Navigation Program Version
1. Set the parking brake.
2. Turn the ignition ON and keep the transmission in Park or Neutral.
^ The Navigation start-up screen should display.
^ If the Navigation start-up screen is not displayed: turn the ignition OFF, wait 10 seconds and then
turn the ignition ON again.
3. Wait more than 1 minute.
4. Press the «INFO» button on the switch panel.
5. Select Navigation Version on the display screen.
Infiniti Qx56 Rwd Workshop Manual (V8-5.6L (VK56VD) (2011))
Infiniti Workshop Manuals > Accessories and Optional Equipment > Relays and Modules — Accessories and Optional
Equipment > Navigation Module > Component Information > Technical Service Bulletins > All Technical Service Bulletins for
Navigation Module: > 10-066B > Apr > 11 > Navigation/Bluetooth(R) — Voice Recognition Issues > Page 1027
NOTE:
On some vehicles you will first need to select Others to find Navigation Version.
6. Check the Program Version.
If the Program Version is:
^ X1U62024 or lower
OR
^ X1U72001
….continue with Step 7 below.
If the Program Version is:
^ X1U62025 or higher — except X1U72001
….this bulletin does not apply. Refer to ASIST for further diagnostic information.
7. Check the Map Version.
^ If the Map Version is not 09.10 MAP No. 1 continue with the next section of the Service
Procedure («Load Reprogramming Software DVD»).
Infiniti Qx56 Rwd Workshop Manual (V8-5.6L (VK56VD) (2011))
Infiniti Workshop Manuals > Accessories and Optional Equipment > Relays and Modules — Accessories and Optional
Equipment > Navigation Module > Component Information > Technical Service Bulletins > All Technical Service Bulletins for
Navigation Module: > 10-066B > Apr > 11 > Navigation/Bluetooth(R) — Voice Recognition Issues > Page 1028
^ If the Map Version is 09.10 MAP No. 1 first perform the procedure in ITB10-031. Once complete
continue with the next section of the Service
Procedure («Load Reprogramming Software DVD»).
Load Reprogramming Software DVD
1. Make sure there is not a disc in the in-dash CD/DVD player.
2. Insert the Reprogramming Software DVD into the in-dash CD/DVD player slot.
IMPORTANT:
Once reprogramming has started:
^ Do not eject the DVD while it is loading.
^ Do not change the ignition position until the DVD has been loaded.
3. Wait for the program to load (a progress bar will display).
4. When the program has finished loading:
^ The Reprogramming Software DVD will automatically eject.
^ «Program loading is completed» will display.
5. The Navigation system will automatically restart.
6. Make sure the new program has loaded.
a. Press the «INFO» button on the switch panel.
b. Select Navigation Version on the display screen.
Infiniti Qx56 Rwd Workshop Manual (V8-5.6L (VK56VD) (2011))
Infiniti Workshop Manuals > Accessories and Optional Equipment > Relays and Modules — Accessories and Optional
Equipment > Navigation Module > Component Information > Technical Service Bulletins > All Technical Service Bulletins for
Navigation Module: > 10-066B > Apr > 11 > Navigation/Bluetooth(R) — Voice Recognition Issues > Page 1029
c. The Program Version should be X1U62025.
^ If the Program Version is not X1U62025 perform the Load Reprogramming Software DVD
procedure again.
7. The procedure is complete. Turn OFF the ignition.
Infiniti Qx56 Rwd Workshop Manual (V8-5.6L (VK56VD) (2011))
Infiniti Workshop Manuals > Accessories and Optional Equipment > Relays and Modules — Accessories and Optional
Equipment > Navigation Module > Component Information > Technical Service Bulletins > All Technical Service Bulletins for
Navigation Module: > 10-017A > Dec > 10 > Navigation Radio — Configuration After Replacement
Navigation Module: All Technical Service Bulletins Navigation Radio — Configuration After
Replacement
Classification: EL10-009a
Reference: ITB0-017a
Date: December 1, 2010
AV CONTROL UNIT REPLACEMENT REQUIRES CONSULT-III CONFIGURATION
This bulletin has been amended. Several items have been revised. Please discard previous
versions.
APPLIED VEHICLES: 2010-2011 EX35 (J50) 2010-2011 FX35/FX50 (S51) 2010-2011 G37 Coupe
Convertible Sedan (C/H/V36) 2011 M37/M56 (Y51) 2011 QX56 (Z62)
SERVICE INFORMATION
If the AV Control Unit needs to be replaced on an Applied Vehicle for any reason follow the steps in
the Service Procedure to configure the Multi AV system.
NOTE:
The original AV Control Unit must be installed in the vehicle while performing part of this procedure.
DO NOT remove the original AV Control Unit until instructed.
SERVICE PROCEDURE
Before starting make sure your ASIST has been freshly synchronized and all CONSULT-III
upgrades have been installed.
Parts of the Procedure
1. Make sure the shift selector is in Park.
2. Connect the C-III VI to the vehicle.
3. Turn ON the ignition.
NOTE:
You may want to start the engine to keep the battery charged during this procedure.
4. Open/start ASIST on the C-III computer then select CONSULT Utilities > CONSULT III.
5. Perform the usual C-III start-up selections:
a. Wait for the Detecting VI/MI in progress message to clear.
Infiniti Qx56 Rwd Workshop Manual (V8-5.6L (VK56VD) (2011))
Infiniti Workshop Manuals > Accessories and Optional Equipment > Relays and Modules — Accessories and Optional
Equipment > Navigation Module > Component Information > Technical Service Bulletins > All Technical Service Bulletins for
Navigation Module: > 10-017A > Dec > 10 > Navigation Radio — Configuration After Replacement > Page 1034
b. Select the detected VI from the list.
c. Select Connect.
d. Wait for the Checking the firmware version message to clear.
e. Select the vehicle and model year.
f. Select Select.
g. Make sure the correct vehicle is displayed on the confirmation screen.
h. Select Confirm.
6. Select Repair.
7. Select EL Repair.
Infiniti Qx56 Rwd Workshop Manual (V8-5.6L (VK56VD) (2011))
Infiniti Workshop Manuals > Accessories and Optional Equipment > Relays and Modules — Accessories and Optional
Equipment > Navigation Module > Component Information > Technical Service Bulletins > All Technical Service Bulletins for
Navigation Module: > 10-017A > Dec > 10 > Navigation Radio — Configuration After Replacement > Page 1035
8. Select MULTI AV.
9. Select OK.
10. Select Configuration
11. Select OK.
Infiniti Qx56 Rwd Workshop Manual (V8-5.6L (VK56VD) (2011))
Infiniti Workshop Manuals > Accessories and Optional Equipment > Relays and Modules — Accessories and Optional
Equipment > Navigation Module > Component Information > Technical Service Bulletins > All Technical Service Bulletins for
Navigation Module: > 10-017A > Dec > 10 > Navigation Radio — Configuration After Replacement > Page 1036
^ It is OK to execute this function.
^ Perform only the tasks indicated in the next steps.
12. Select READ CONFIGURATION.
13. Select Next.
14. Write down the values shown on the C-III.
15. Select Save. Close C-Ill.
16. Replace the AV Control Unit as instructed in the appropriate Electronic Service Manual (ESM).
PART 2:
Write Configuration Using the Config File
Infiniti Qx56 Rwd Workshop Manual (V8-5.6L (VK56VD) (2011))
Infiniti Workshop Manuals > Accessories and Optional Equipment > Relays and Modules — Accessories and Optional
Equipment > Navigation Module > Component Information > Technical Service Bulletins > All Technical Service Bulletins for
Navigation Module: > 10-017A > Dec > 10 > Navigation Radio — Configuration After Replacement > Page 1037
17. Repeat steps 1-11.
18. Select WRITE CONFIGURATION — Config file.
19. Select Next.
After performing step 19
If an error message does not display:
^ Proceed to PART 5: Confirm Multi AV System Is Operational.
If an error message does display:
^ Proceed to PART 3: Perform Multi AV Initialization.
PART 3 (if needed):
Perform Multi AV Initialization
20. Leave ON C-III and the VI connected while performing Multi AV initialization.
21. Turn OFF the audio system.
NOTE:
The ignition should still be ON.
Infiniti Qx56 Rwd Workshop Manual (V8-5.6L (VK56VD) (2011))
Infiniti Workshop Manuals > Accessories and Optional Equipment > Relays and Modules — Accessories and Optional
Equipment > Navigation Module > Component Information > Technical Service Bulletins > All Technical Service Bulletins for
Navigation Module: > 10-017A > Dec > 10 > Navigation Radio — Configuration After Replacement > Page 1038
22. Put the AV system into Self Diagnostic Mode.
a. Press and hold the SETTING button.
b. While holding the SETTING button turn the volume control knob 40 clicks or more.
^ The volume control knob can be turned either direction.
^ When the system goes into the Self Diagnostic Menu the screen in Figure 11 will display.
23. Select Confirmation/Adjustment.
24. Select Initialize Settings.
NOTE:
Use the scroll arrow to find Initialize Settings.
Infiniti Qx56 Rwd Workshop Manual (V8-5.6L (VK56VD) (2011))
Infiniti Workshop Manuals > Accessories and Optional Equipment > Relays and Modules — Accessories and Optional
Equipment > Navigation Module > Component Information > Technical Service Bulletins > All Technical Service Bulletins for
Navigation Module: > 10-017A > Dec > 10 > Navigation Radio — Configuration After Replacement > Page 1039
25. Select Accessory Number Initialization.
26. Select Yes.
27. Select Yes.
28. The screen in Figure 16 will display while initializing.
Infiniti Qx56 Rwd Workshop Manual (V8-5.6L (VK56VD) (2011))
Infiniti Workshop Manuals > Accessories and Optional Equipment > Relays and Modules — Accessories and Optional
Equipment > Navigation Module > Component Information > Technical Service Bulletins > All Technical Service Bulletins for
Navigation Module: > 10-017A > Dec > 10 > Navigation Radio — Configuration After Replacement > Page 1040
29. The screen in Figure 17 will display when initializing is complete.
30. Reboot the Multi AV system as follows:
a. Turn OFF the ignition.
b. Wait 10 seconds.
c. Turn ON the ignition.
Proceed to PART 4: Write Configuration Using Manual Settings.
PART 4 Write Configuration Using Manual Settings
31. Select MULTI AV.
32. Select OK.
Infiniti Qx56 Rwd Workshop Manual (V8-5.6L (VK56VD) (2011))
Infiniti Workshop Manuals > Accessories and Optional Equipment > Relays and Modules — Accessories and Optional
Equipment > Navigation Module > Component Information > Technical Service Bulletins > All Technical Service Bulletins for
Navigation Module: > 10-017A > Dec > 10 > Navigation Radio — Configuration After Replacement > Page 1041
33. Select Configuration.
34. Select OK.
^ It is OK to execute this function.
^ Perform only the tasks indicated in the next steps.
35. Select WRITE CONFIGURATION — Manual setting.
Infiniti Qx56 Rwd Workshop Manual (V8-5.6L (VK56VD) (2011))
Infiniti Workshop Manuals > Accessories and Optional Equipment > Relays and Modules — Accessories and Optional
Equipment > Navigation Module > Component Information > Technical Service Bulletins > All Technical Service Bulletins for
Navigation Module: > 10-017A > Dec > 10 > Navigation Radio — Configuration After Replacement > Page 1042
36. Select Next.
37. Set the configuration values.
^ Use the values you wrote down in Step 14. DO NOT select ALL.
^ Use the menu arrow to view selections.
^ If no values are displayed proceed to step 38.
38. Select SETTING.
Infiniti Qx56 Rwd Workshop Manual (V8-5.6L (VK56VD) (2011))
Infiniti Workshop Manuals > Accessories and Optional Equipment > Relays and Modules — Accessories and Optional
Equipment > Navigation Module > Component Information > Technical Service Bulletins > All Technical Service Bulletins for
Navigation Module: > 10-017A > Dec > 10 > Navigation Radio — Configuration After Replacement > Page 1043
39. Select OK.
40. Press the BACK arrow 3 times to go to the screen in Figure 26.
41. Select Ecu Identification.
Infiniti Qx56 Rwd Workshop Manual (V8-5.6L (VK56VD) (2011))
Infiniti Workshop Manuals > Accessories and Optional Equipment > Relays and Modules — Accessories and Optional
Equipment > Navigation Module > Component Information > Technical Service Bulletins > All Technical Service Bulletins for
Navigation Module: > 10-017A > Dec > 10 > Navigation Radio — Configuration After Replacement > Page 1044
42. Confirm the ECU part number is displayed.
43. Close the C-III software and disconnect the VI from the vehicle.
PART 5:
Confirm Multi AV System Is Operational
44. Put your foot on the brake start the engine and move the shift selector to R (reverse).
45. If equipped make sure the rear view monitor is working correctly.
46. Put the shift selector back into Park.
47. Turn ON the radio.
48. Turn the volume knob and make sure the audio volume responds to movement of the knob.
Disclaimer
Infiniti Qx56 Rwd Workshop Manual (V8-5.6L (VK56VD) (2011))
Infiniti Workshop Manuals > Accessories and Optional Equipment > Relays and Modules — Accessories and Optional
Equipment > Navigation Module > Component Information > Technical Service Bulletins > Customer Interest: > 10-066B >
Apr > 11 > Navigation/Bluetooth(R) — Voice Recognition Issues
Navigation Module: Customer Interest Navigation/Bluetooth(R) — Voice Recognition Issues
Classification: EL10-042B
Reference: ITB10-066B
Date: April 20, 2011
NAVIGATION / BLUETOOTH / VOICE RECOGNITION FUNCTION ISSUES
This bulletin has been amended. Several items throughout the bulletin have been revised. Please
discard all previous versions.
APPLIED VEHICLES: 2010-2011 EX35 (J50) — with Navigation 2010-2011 FX35/FX50 (S51) — with
Navigation 2010-2011 G37 Coupe Convertible Sedan (C/H/V36) — with Navigation 2011 M37/M56
(Y51) — with Navigation 2011 QX56 (Z62) — with Navigation
APPLIED DATES: Vehicles built before May 1, 2011
IF YOU CONFIRM
One or more of the following is occurring on an Applied Vehicle:
^ Audio streaming via Bluetooth is «choppy» or «clipped».
^ «Calculating Route» takes an extended period of time (2-5 minutes) to complete.
^ «Could not find a route» displays when attempting to calculate a route.
^ Voice Recognition sequence takes too many steps.
^ Voice Recognition has difficulty recognizing voicetags.
^ The Navigation system reboots.
^ XM NavTraffic is slow to report.
^ «Handset Phonebook» access is slow.
^ When a hands-free call via Bluetooth is in progress and another call comes in («all waiting») there
is no function available to answer the incoming call.
NOTE:
The original specification for 2010 and some 2011 Applied Vehicles did not include the call waiting
feature. To ensure a high level of customer satisfaction Nissan has enhanced the Infotainment
system in many 2011 Applied Vehicles to add the call waiting feature. Nissan is making available
this same enhancement for all Applied Vehicles by offering the call waiting feature as part of the
Reprogramming Software DVD update listed in the Parts Information section.
^ Caller ID is not available when a hands-free call via Bluetooth is in progress and another call
comes in.
IMPORTANT:
The purpose of «ACTION» is to give you a quick idea of the work you will be performing. You MUST
closely follow the entire Service Procedure as it contains information that is essential to
successfully completing this repair.
ACTION
1. Perform steps 1-6 of Confirm Navigation Program Version in the Service Procedure to verify
whether or not this bulletin applies.
2. If this bulletin applies, load the Reprogramming Software DVD referenced in the Parts
Information section.
PARTS INFORMATION
Infiniti Qx56 Rwd Workshop Manual (V8-5.6L (VK56VD) (2011))
Infiniti Workshop Manuals > Accessories and Optional Equipment > Relays and Modules — Accessories and Optional
Equipment > Navigation Module > Component Information > Technical Service Bulletins > Customer Interest: > 10-066B >
Apr > 11 > Navigation/Bluetooth(R) — Voice Recognition Issues > Page 1050
^ Each dealer has been mailed one NTB10-125b/ITB10-066b Reprogramming Software DVD free
of charge from Clarion.
^ Should you require an additional NTB10-125b/ITB10-066b Reprogramming Software DVD due to
loss or damage it can be ordered free of charge by
contacting Clarion toll free at 1-800-347-8933.
^ Discard the previous version of this Reprogramming Software DVD (NTB10-125/ITB10-066).
CLAIMS INFORMATION
SERVICE PROCEDURE
NOTE:
This procedure will take 10-15 minutes with the ignition ON. Before starting make sure to attach a
battery charger to the vehicle battery and set it to a low charge rate (trickle charge).
Confirm Navigation Program Version
1. Set the parking brake.
2. Turn the ignition ON and keep the transmission in Park or Neutral.
^ The Navigation start-up screen should display.
^ If the Navigation start-up screen is not displayed: turn the ignition OFF, wait 10 seconds and then
turn the ignition ON again.
3. Wait more than 1 minute.
4. Press the «INFO» button on the switch panel.
5. Select Navigation Version on the display screen.
Infiniti Qx56 Rwd Workshop Manual (V8-5.6L (VK56VD) (2011))
Infiniti Workshop Manuals > Accessories and Optional Equipment > Relays and Modules — Accessories and Optional
Equipment > Navigation Module > Component Information > Technical Service Bulletins > Customer Interest: > 10-066B >
Apr > 11 > Navigation/Bluetooth(R) — Voice Recognition Issues > Page 1051
NOTE:
On some vehicles you will first need to select Others to find Navigation Version.
6. Check the Program Version.
If the Program Version is:
^ X1U62024 or lower
OR
^ X1U72001
….continue with Step 7 below.
If the Program Version is:
^ X1U62025 or higher — except X1U72001
….this bulletin does not apply. Refer to ASIST for further diagnostic information.
7. Check the Map Version.
^ If the Map Version is not 09.10 MAP No. 1 continue with the next section of the Service
Procedure («Load Reprogramming Software DVD»).
Infiniti Qx56 Rwd Workshop Manual (V8-5.6L (VK56VD) (2011))
Infiniti Workshop Manuals > Accessories and Optional Equipment > Relays and Modules — Accessories and Optional
Equipment > Navigation Module > Component Information > Technical Service Bulletins > Customer Interest: > 10-066B >
Apr > 11 > Navigation/Bluetooth(R) — Voice Recognition Issues > Page 1052
^ If the Map Version is 09.10 MAP No. 1 first perform the procedure in ITB10-031. Once complete
continue with the next section of the Service
Procedure («Load Reprogramming Software DVD»).
Load Reprogramming Software DVD
1. Make sure there is not a disc in the in-dash CD/DVD player.
2. Insert the Reprogramming Software DVD into the in-dash CD/DVD player slot.
IMPORTANT:
Once reprogramming has started:
^ Do not eject the DVD while it is loading.
^ Do not change the ignition position until the DVD has been loaded.
3. Wait for the program to load (a progress bar will display).
4. When the program has finished loading:
^ The Reprogramming Software DVD will automatically eject.
^ «Program loading is completed» will display.
5. The Navigation system will automatically restart.
6. Make sure the new program has loaded.
a. Press the «INFO» button on the switch panel.
b. Select Navigation Version on the display screen.
Infiniti Qx56 Rwd Workshop Manual (V8-5.6L (VK56VD) (2011))
Infiniti Workshop Manuals > Accessories and Optional Equipment > Relays and Modules — Accessories and Optional
Equipment > Navigation Module > Component Information > Technical Service Bulletins > Customer Interest: > 10-066B >
Apr > 11 > Navigation/Bluetooth(R) — Voice Recognition Issues > Page 1053
c. The Program Version should be X1U62025.
^ If the Program Version is not X1U62025 perform the Load Reprogramming Software DVD
procedure again.
7. The procedure is complete. Turn OFF the ignition.
Infiniti Qx56 Rwd Workshop Manual (V8-5.6L (VK56VD) (2011))
Infiniti Workshop Manuals > Accessories and Optional Equipment > Relays and Modules — Accessories and Optional
Equipment > Navigation Module > Component Information > Technical Service Bulletins > All Other Service Bulletins for
Navigation Module: > 10-017A > Dec > 10 > Navigation Radio — Configuration After Replacement
Navigation Module: All Technical Service Bulletins Navigation Radio — Configuration After
Replacement
Classification: EL10-009a
Reference: ITB0-017a
Date: December 1, 2010
AV CONTROL UNIT REPLACEMENT REQUIRES CONSULT-III CONFIGURATION
This bulletin has been amended. Several items have been revised. Please discard previous
versions.
APPLIED VEHICLES: 2010-2011 EX35 (J50) 2010-2011 FX35/FX50 (S51) 2010-2011 G37 Coupe
Convertible Sedan (C/H/V36) 2011 M37/M56 (Y51) 2011 QX56 (Z62)
SERVICE INFORMATION
If the AV Control Unit needs to be replaced on an Applied Vehicle for any reason follow the steps in
the Service Procedure to configure the Multi AV system.
NOTE:
The original AV Control Unit must be installed in the vehicle while performing part of this procedure.
DO NOT remove the original AV Control Unit until instructed.
SERVICE PROCEDURE
Before starting make sure your ASIST has been freshly synchronized and all CONSULT-III
upgrades have been installed.
Parts of the Procedure
1. Make sure the shift selector is in Park.
2. Connect the C-III VI to the vehicle.
3. Turn ON the ignition.
NOTE:
You may want to start the engine to keep the battery charged during this procedure.
4. Open/start ASIST on the C-III computer then select CONSULT Utilities > CONSULT III.
5. Perform the usual C-III start-up selections:
a. Wait for the Detecting VI/MI in progress message to clear.
Infiniti Qx56 Rwd Workshop Manual (V8-5.6L (VK56VD) (2011))
Infiniti Workshop Manuals > Accessories and Optional Equipment > Relays and Modules — Accessories and Optional
Equipment > Navigation Module > Component Information > Technical Service Bulletins > All Other Service Bulletins for
Navigation Module: > 10-017A > Dec > 10 > Navigation Radio — Configuration After Replacement > Page 1059
b. Select the detected VI from the list.
c. Select Connect.
d. Wait for the Checking the firmware version message to clear.
e. Select the vehicle and model year.
f. Select Select.
g. Make sure the correct vehicle is displayed on the confirmation screen.
h. Select Confirm.
6. Select Repair.
7. Select EL Repair.
Infiniti Qx56 Rwd Workshop Manual (V8-5.6L (VK56VD) (2011))
Infiniti Workshop Manuals > Accessories and Optional Equipment > Relays and Modules — Accessories and Optional
Equipment > Navigation Module > Component Information > Technical Service Bulletins > All Other Service Bulletins for
Navigation Module: > 10-017A > Dec > 10 > Navigation Radio — Configuration After Replacement > Page 1060
8. Select MULTI AV.
9. Select OK.
10. Select Configuration
11. Select OK.
Infiniti Qx56 Rwd Workshop Manual (V8-5.6L (VK56VD) (2011))
Infiniti Workshop Manuals > Accessories and Optional Equipment > Relays and Modules — Accessories and Optional
Equipment > Navigation Module > Component Information > Technical Service Bulletins > All Other Service Bulletins for
Navigation Module: > 10-017A > Dec > 10 > Navigation Radio — Configuration After Replacement > Page 1061
^ It is OK to execute this function.
^ Perform only the tasks indicated in the next steps.
12. Select READ CONFIGURATION.
13. Select Next.
14. Write down the values shown on the C-III.
15. Select Save. Close C-Ill.
16. Replace the AV Control Unit as instructed in the appropriate Electronic Service Manual (ESM).
PART 2:
Write Configuration Using the Config File
Infiniti Qx56 Rwd Workshop Manual (V8-5.6L (VK56VD) (2011))
Infiniti Workshop Manuals > Accessories and Optional Equipment > Relays and Modules — Accessories and Optional
Equipment > Navigation Module > Component Information > Technical Service Bulletins > All Other Service Bulletins for
Navigation Module: > 10-017A > Dec > 10 > Navigation Radio — Configuration After Replacement > Page 1062
17. Repeat steps 1-11.
18. Select WRITE CONFIGURATION — Config file.
19. Select Next.
After performing step 19
If an error message does not display:
^ Proceed to PART 5: Confirm Multi AV System Is Operational.
If an error message does display:
^ Proceed to PART 3: Perform Multi AV Initialization.
PART 3 (if needed):
Perform Multi AV Initialization
20. Leave ON C-III and the VI connected while performing Multi AV initialization.
21. Turn OFF the audio system.
NOTE:
The ignition should still be ON.
Infiniti Qx56 Rwd Workshop Manual (V8-5.6L (VK56VD) (2011))
Infiniti Workshop Manuals > Accessories and Optional Equipment > Relays and Modules — Accessories and Optional
Equipment > Navigation Module > Component Information > Technical Service Bulletins > All Other Service Bulletins for
Navigation Module: > 10-017A > Dec > 10 > Navigation Radio — Configuration After Replacement > Page 1063
22. Put the AV system into Self Diagnostic Mode.
a. Press and hold the SETTING button.
b. While holding the SETTING button turn the volume control knob 40 clicks or more.
^ The volume control knob can be turned either direction.
^ When the system goes into the Self Diagnostic Menu the screen in Figure 11 will display.
23. Select Confirmation/Adjustment.
24. Select Initialize Settings.
NOTE:
Use the scroll arrow to find Initialize Settings.
Infiniti Qx56 Rwd Workshop Manual (V8-5.6L (VK56VD) (2011))
Infiniti Workshop Manuals > Accessories and Optional Equipment > Relays and Modules — Accessories and Optional
Equipment > Navigation Module > Component Information > Technical Service Bulletins > All Other Service Bulletins for
Navigation Module: > 10-017A > Dec > 10 > Navigation Radio — Configuration After Replacement > Page 1064
25. Select Accessory Number Initialization.
26. Select Yes.
27. Select Yes.
28. The screen in Figure 16 will display while initializing.
Infiniti Qx56 Rwd Workshop Manual (V8-5.6L (VK56VD) (2011))
Infiniti Workshop Manuals > Accessories and Optional Equipment > Relays and Modules — Accessories and Optional
Equipment > Navigation Module > Component Information > Technical Service Bulletins > All Other Service Bulletins for
Navigation Module: > 10-017A > Dec > 10 > Navigation Radio — Configuration After Replacement > Page 1065
29. The screen in Figure 17 will display when initializing is complete.
30. Reboot the Multi AV system as follows:
a. Turn OFF the ignition.
b. Wait 10 seconds.
c. Turn ON the ignition.
Proceed to PART 4: Write Configuration Using Manual Settings.
PART 4 Write Configuration Using Manual Settings
31. Select MULTI AV.
32. Select OK.
Infiniti Qx56 Rwd Workshop Manual (V8-5.6L (VK56VD) (2011))
Infiniti Workshop Manuals > Accessories and Optional Equipment > Relays and Modules — Accessories and Optional
Equipment > Navigation Module > Component Information > Technical Service Bulletins > All Other Service Bulletins for
Navigation Module: > 10-017A > Dec > 10 > Navigation Radio — Configuration After Replacement > Page 1066
33. Select Configuration.
34. Select OK.
^ It is OK to execute this function.
^ Perform only the tasks indicated in the next steps.
35. Select WRITE CONFIGURATION — Manual setting.
Infiniti Qx56 Rwd Workshop Manual (V8-5.6L (VK56VD) (2011))
Infiniti Workshop Manuals > Accessories and Optional Equipment > Relays and Modules — Accessories and Optional
Equipment > Navigation Module > Component Information > Technical Service Bulletins > All Other Service Bulletins for
Navigation Module: > 10-017A > Dec > 10 > Navigation Radio — Configuration After Replacement > Page 1067
36. Select Next.
37. Set the configuration values.
^ Use the values you wrote down in Step 14. DO NOT select ALL.
^ Use the menu arrow to view selections.
^ If no values are displayed proceed to step 38.
38. Select SETTING.
Infiniti Qx56 Rwd Workshop Manual (V8-5.6L (VK56VD) (2011))
Infiniti Workshop Manuals > Accessories and Optional Equipment > Relays and Modules — Accessories and Optional
Equipment > Navigation Module > Component Information > Technical Service Bulletins > All Other Service Bulletins for
Navigation Module: > 10-017A > Dec > 10 > Navigation Radio — Configuration After Replacement > Page 1068
39. Select OK.
40. Press the BACK arrow 3 times to go to the screen in Figure 26.
41. Select Ecu Identification.
Infiniti Qx56 Rwd Workshop Manual (V8-5.6L (VK56VD) (2011))
Infiniti Workshop Manuals > Accessories and Optional Equipment > Relays and Modules — Accessories and Optional
Equipment > Navigation Module > Component Information > Technical Service Bulletins > All Other Service Bulletins for
Navigation Module: > 10-017A > Dec > 10 > Navigation Radio — Configuration After Replacement > Page 1069
42. Confirm the ECU part number is displayed.
43. Close the C-III software and disconnect the VI from the vehicle.
PART 5:
Confirm Multi AV System Is Operational
44. Put your foot on the brake start the engine and move the shift selector to R (reverse).
45. If equipped make sure the rear view monitor is working correctly.
46. Put the shift selector back into Park.
47. Turn ON the radio.
48. Turn the volume knob and make sure the audio volume responds to movement of the knob.
Disclaimer
Infiniti Qx56 Rwd Workshop Manual (V8-5.6L (VK56VD) (2011))
Infiniti Workshop Manuals > Body and Frame > Body Control Systems > Body Control Module > Component Information >
Technical Service Bulletins > Antitheft System — NATS Security VBC Logic
Body Control Module: Technical Service Bulletins Antitheft System — NATS Security VBC Logic
Classification: EL10-029
Reference: ITB10-059
Date: September 10, 2010
NATS SECURITY — VBC LOGIC
APPLIED VEHICLE: 2009-2011 All Infiniti with NATS/Immobilizer System
SERVICE INFORMATION
All model year 2009 — 2011 Infiniti vehicles equipped with NATS/Immobilizer system have the new
VBC (Validate Before Crank) starter relay logic.
VBC (Validate Before Crank) Logic:
^ The BCM will make sure that a valid (registered) key is being used before engaging the starter
relay. If the key is not authenticated the starter will not
operate.
^ If the engine cranks the issue is not related to NATS. Do not replace NATS components (BCM
I-Key FOB Reader or RF Receiver). Refer to ASIST
for further diagnostic information as needed.
Infiniti Qx56 Rwd Workshop Manual (V8-5.6L (VK56VD) (2011))
Infiniti Workshop Manuals > Body and Frame > Interior Moulding / Trim > Scuff Plate > Component Information > Technical
Service Bulletins > Interior — Illuminated Kick Plate Installation Procedure
Scuff Plate: Technical Service Bulletins Interior — Illuminated Kick Plate Installation Procedure
Classification: BT10-025
Reference: ITB10-049
Date: July 30, 2010
2011 QX56; ILLUMINATED KICK PLATE INSTALLATION INSTRUCTIONS
APPLIED VEHICLES: 2011 QX56 (Z62)
INFORMATION
Installation instructions for the Illuminated Kick Plate have been revised.
Changes have been made to Step 5, Wiring Harness Installation.
NOTE:
The Kick Plate may not illuminate if the revised document is not carefully followed.
Installation Instructions
Infiniti Qx56 Rwd Workshop Manual (V8-5.6L (VK56VD) (2011))
Infiniti Workshop Manuals > Body and Frame > Interior Moulding / Trim > Scuff Plate > Component Information > Technical
Service Bulletins > Interior — Illuminated Kick Plate Installation Procedure > Page 1081
Parts/Tools Required
Infiniti Qx56 Rwd Workshop Manual (V8-5.6L (VK56VD) (2011))
Infiniti Workshop Manuals > Body and Frame > Interior Moulding / Trim > Scuff Plate > Component Information > Technical
Service Bulletins > Interior — Illuminated Kick Plate Installation Procedure > Page 1082
Infiniti Qx56 Rwd Workshop Manual (V8-5.6L (VK56VD) (2011))
Infiniti Workshop Manuals > Body and Frame > Interior Moulding / Trim > Scuff Plate > Component Information > Technical
Service Bulletins > Interior — Illuminated Kick Plate Installation Procedure > Page 1083
Caution/Wiring harness Routing/Steps 1 and 2
Infiniti Qx56 Rwd Workshop Manual (V8-5.6L (VK56VD) (2011))
Infiniti Workshop Manuals > Body and Frame > Interior Moulding / Trim > Scuff Plate > Component Information > Technical
Service Bulletins > Interior — Illuminated Kick Plate Installation Procedure > Page 1084
Infiniti Qx56 Rwd Workshop Manual (V8-5.6L (VK56VD) (2011))
Infiniti Workshop Manuals > Body and Frame > Interior Moulding / Trim > Scuff Plate > Component Information > Technical
Service Bulletins > Interior — Illuminated Kick Plate Installation Procedure > Page 1085
Infiniti Qx56 Rwd Workshop Manual (V8-5.6L (VK56VD) (2011))
Infiniti Workshop Manuals > Body and Frame > Interior Moulding / Trim > Scuff Plate > Component Information > Technical
Service Bulletins > Interior — Illuminated Kick Plate Installation Procedure > Page 1086
Infiniti Qx56 Rwd Workshop Manual (V8-5.6L (VK56VD) (2011))
Infiniti Workshop Manuals > Body and Frame > Interior Moulding / Trim > Scuff Plate > Component Information > Technical
Service Bulletins > Interior — Illuminated Kick Plate Installation Procedure > Page 1087
ERROR: stackunderflow
OFFENDING COMMAND: ~
STACK:
Infiniti Qx56 Rwd Workshop Manual (V8-5.6L (VK56VD) (2011))
Infiniti Workshop Manuals > Body and Frame > Locks > Keyless Entry > Keyless Starting System > System Information >
Technical Service Bulletins > TPMS/Keyless Systems — Signal TECH II Diagnostic Tool
Keyless Starting System: Technical Service Bulletins TPMS/Keyless Systems — Signal TECH II
Diagnostic Tool
Classification: WT10-002A
Reference: ITB10-023A
Date: January 6, 2011
SIGNAL TECH II DIAGNOSTIC TOOL
This bulletin has been amended. Notes below APPLIED VEHICLES have been amended.
SERVICE INFORMATION has been amended. Please discard previous versions of this bulletin.
APPLIED VEHICLES: All Infiniti with Tire Pressure Monitor System (TPMS) Remote Keyless Entry
or Intelligent Key.
NOTE:
New software updates have been released. Please update Signal Tech II for the items listed below.
October 25, 2010:
^ Enhanced features
^ New Model compatibility
^ Support for the new TPMS sensor technology adopted February 28 2010. Refer to ITB10-050a.
November 23, 2010:
^ Infiniti G25 software patch
Failure to update Signal Tech II may lead to misdiagnosis of vehicles built after February 28, 2010.
The latest software is available on the CONSULT III PC at: ASIST> Specialty Tools> Signal Tech II
If you should encounter problems updating Signal Tech II contact Techmate.
Future updates will be released as needed. Check ASIST frequently for this information.
SERVICE INFORMATION
If service is required on a vehicle’s Tire Pressure Monitor System (TPMS) remote keyless entry or
Intelligent Key the Signal Tech II (special tool J-50190) can be used for diagnostics.
Signal Tech II will quickly:
^ Activate and display TPMS Sensor IDs
^ Display tire pressure reported by the TPMS sensor
^ Read TPMS DTCs and register TPMS IDs
^ Store and print reports for warrantable repairs
^ Check intelligent key relative signal strength
^ Test remote keyless entry relative signal strength
^ Confirm vehicle Intelligent Key antenna relative signal strength output
^ Read ENGINE DTCs
Other available information for Signal Tech II:
Infiniti Qx56 Rwd Workshop Manual (V8-5.6L (VK56VD) (2011))
Infiniti Workshop Manuals > Body and Frame > Locks > Keyless Entry > Keyless Starting System > System Information >
Technical Service Bulletins > TPMS/Keyless Systems — Signal TECH II Diagnostic Tool > Page 1094
^ Signal Tech II Quick Start Guide: ASIST > Tools & Equipment> Tool & Equipment Web Page
^ Signal Tech II Users Guide: ASIST > Tools & Equipment> Tools & Equipment Web Page
^ Tool Flyer: ASIST > Tools & Equipment> Tools & Equipment Web Page> Infiniti Essential Tool
Flyers
^ Tech Talk Article: ASIST > Tech Support Info> TECH TALK / XTRA> Spring 2010 issue
Infiniti Qx56 Rwd Workshop Manual (V8-5.6L (VK56VD) (2011))
Infiniti Workshop Manuals > Body and Frame > Paint, Striping and Decals > Paint > System Information > Technical Service
Bulletins > All Technical Service Bulletins for Paint: > 99-043F > Feb > 11 > Paint — Paint Swells/Discolored Under Paint
Guard Film
Paint: All Technical Service Bulletins Paint — Paint Swells/Discolored Under Paint Guard Film
Classification: BT99-032F
Reference: ITB99-043F
Date: February 11, 2011
PAINT SWELL/STAIN/SPOT UNDER PAINT GUARD FILM
This bulletin has been amended. All current production models have been applied and the
company contact information has been updated. Please discard all previous versions.
APPLIED VEHICLES: All Infiniti Production Models with Paint Guard Film
SERVICE INFORMATION
NOTE:
Failure to follow the procedures in this bulletin may result in the denial of a warranty claim.
In an effort to protect the paint finish Paint Guard Film (PGF) is applied on many new Infiniti
vehicles.
Paint Guard Film is a temporary white plastic protective film that is applied by the factory to the
horizontal painted surfaces of the vehicle. The PGF protects the paint finish during vehicle handling
transportation and storage from harmful elements such as acid rain iron particles bird droppings
tree sap and other environmental contaminants.
NOTE: Paint Guard Film CANNOT remain on the vehicle for more than six months after the
vehicle’s manufacture date. PGF must be removed at the end of six months.
If an Infiniti vehicle exhibits swelling stains or spots on the paint finish (which appear milky or
whitish on dark colored vehicles and dark-shaded or coffee-colored on light colored vehicles)
immediately after the PGF is removed the cause may be moisture collection under pockets/creases
of the PGF. The paint may absorb moisture which may cause the affected paint finish area to
temporarily discolor.
The size of the swell stain or spot may range from a dime to a clinched fist and have an irregular
shape and possibly a slightly raised surface.
This incident may occur anywhere under the PGF but may be noted in particular to occur around
the windshield fluid nozzle (see Figure 1) and on the deck lid. In any case use the following service
procedure to correct the incident.
IMPORTANT:
If this condition occurs, do not rebuff or initially attempt to repaint the effected area. Perform the
following service Procedure first.
SERVICE PROCEDURE
Infiniti Qx56 Rwd Workshop Manual (V8-5.6L (VK56VD) (2011))
Infiniti Workshop Manuals > Body and Frame > Paint, Striping and Decals > Paint > System Information > Technical Service
Bulletins > All Technical Service Bulletins for Paint: > 99-043F > Feb > 11 > Paint — Paint Swells/Discolored Under Paint
Guard Film > Page 1104
Use one of the following procedures to remove the moisture from the effected area(s).
Place Vehicle in Sun Light (warm weather)
In warm weather place the vehicle in the sun light. The paint condition should disappear in a few
hours depending on the severity of the condition.
Place Vehicle Indoors (cold weather)
In cold weather place the vehicle indoors at a temperature of approximately 70°F. The paint
condition should disappear in about 8 to 12 hours depending on the severity of the condition.
Heat Lamp or Heat Gun
To speed up the recovery process of the condition use a portable infrared heat lamp or a heat gun.
Follow the Important Points listed below when using a heat lamp or a heat gun.
CAUTION:
Only an experienced paint technician who is familiar with paint temperature limitations should use a
heat lamp or heat gun. Also do not use a heat lamp or heat gun on painted plastic body
components (i.e. bumper covers spoilers etc.).
Important Points
^ The maximum total bulb wattage for the infrared heat lamp should not exceed 750 watts.
^ The heat gun wattage should be between 1200 and 1400 watts.
^ Maintain the heat lamp/heat gun distance so the painted surface temperature is between 175°
and 190°F (80° — 90°C). Affix a paper label thermometer
on the paint surface two inches away from the effected area (see Figure 2) to monitor the surface
temperature.
NOTE:
Paper label thermometers can be purchased from the company listed below.
^ Do not apply the heat gun for more than 5 minutes as permanent damage (i.e. bubbling burns
etc.) can occur to the paint.
^ Do not hold the heat gun closer than 12 inches from the paint surface. Also do not hold the heat
gun in one position rather move it continuously from
side to side to heat the affected area evenly.
^ Do not apply heat directly on to the paper label thermometer as this will give a false temperature
reading.
This repair is effective only if performed within a short time period after the PGF is removed from
the vehicle i.e. a few days in mild climates or within a week in colder climates. This repair will not
be effective beyond that time frame.
If the condition does not disappear after the above service procedures are performed the condition
may be permanent and the effected area may have to be re-painted.
Infiniti Qx56 Rwd Workshop Manual (V8-5.6L (VK56VD) (2011))
Infiniti Workshop Manuals > Body and Frame > Paint, Striping and Decals > Paint > System Information > Technical Service
Bulletins > All Technical Service Bulletins for Paint: > 99-043F > Feb > 11 > Paint — Paint Swells/Discolored Under Paint
Guard Film > Page 1105
Paper thermometers may be purchased from the company listed below.
NOTE:
Equivalent paper thermometers may be used and are available from other local suppliers.
TIP Temperature Products 340 W. Broad Street Burlington NJ 08016 Phone: 1-877-847-8367 Fax:
1-609-239-1911 www.tiptemp.com
P/N TLCSEN023 (non-reversible 10/pkg.) P/N TLCSEN006 (reversible 10/pkg.)
CLAIMS INFORMATION
If further repairs necessitating buffing or repainting are needed and paint inspection is required,
refer to Infiniti Warranty Bulletin IWB04-013 for the current paint approval process.
Infiniti Qx56 Rwd Workshop Manual (V8-5.6L (VK56VD) (2011))
Infiniti Workshop Manuals > Body and Frame > Paint, Striping and Decals > Paint > System Information > Technical Service
Bulletins > By Symptom for Paint: > 99-043F > Feb > 11 > Paint — Paint Swells/Discolored Under Paint Guard Film
Paint: By Symptom Paint — Paint Swells/Discolored Under Paint Guard Film
Classification: BT99-032F
Reference: ITB99-043F
Date: February 11, 2011
PAINT SWELL/STAIN/SPOT UNDER PAINT GUARD FILM
This bulletin has been amended. All current production models have been applied and the
company contact information has been updated. Please discard all previous versions.
APPLIED VEHICLES: All Infiniti Production Models with Paint Guard Film
SERVICE INFORMATION
NOTE:
Failure to follow the procedures in this bulletin may result in the denial of a warranty claim.
In an effort to protect the paint finish Paint Guard Film (PGF) is applied on many new Infiniti
vehicles.
Paint Guard Film is a temporary white plastic protective film that is applied by the factory to the
horizontal painted surfaces of the vehicle. The PGF protects the paint finish during vehicle handling
transportation and storage from harmful elements such as acid rain iron particles bird droppings
tree sap and other environmental contaminants.
NOTE: Paint Guard Film CANNOT remain on the vehicle for more than six months after the
vehicle’s manufacture date. PGF must be removed at the end of six months.
If an Infiniti vehicle exhibits swelling stains or spots on the paint finish (which appear milky or
whitish on dark colored vehicles and dark-shaded or coffee-colored on light colored vehicles)
immediately after the PGF is removed the cause may be moisture collection under pockets/creases
of the PGF. The paint may absorb moisture which may cause the affected paint finish area to
temporarily discolor.
The size of the swell stain or spot may range from a dime to a clinched fist and have an irregular
shape and possibly a slightly raised surface.
This incident may occur anywhere under the PGF but may be noted in particular to occur around
the windshield fluid nozzle (see Figure 1) and on the deck lid. In any case use the following service
procedure to correct the incident.
IMPORTANT:
If this condition occurs, do not rebuff or initially attempt to repaint the effected area. Perform the
following service Procedure first.
SERVICE PROCEDURE
Infiniti Qx56 Rwd Workshop Manual (V8-5.6L (VK56VD) (2011))
Infiniti Workshop Manuals > Body and Frame > Paint, Striping and Decals > Paint > System Information > Technical Service
Bulletins > By Symptom for Paint: > 99-043F > Feb > 11 > Paint — Paint Swells/Discolored Under Paint Guard Film > Page
1111
Use one of the following procedures to remove the moisture from the effected area(s).
Place Vehicle in Sun Light (warm weather)
In warm weather place the vehicle in the sun light. The paint condition should disappear in a few
hours depending on the severity of the condition.
Place Vehicle Indoors (cold weather)
In cold weather place the vehicle indoors at a temperature of approximately 70°F. The paint
condition should disappear in about 8 to 12 hours depending on the severity of the condition.
Heat Lamp or Heat Gun
To speed up the recovery process of the condition use a portable infrared heat lamp or a heat gun.
Follow the Important Points listed below when using a heat lamp or a heat gun.
CAUTION:
Only an experienced paint technician who is familiar with paint temperature limitations should use a
heat lamp or heat gun. Also do not use a heat lamp or heat gun on painted plastic body
components (i.e. bumper covers spoilers etc.).
Important Points
^ The maximum total bulb wattage for the infrared heat lamp should not exceed 750 watts.
^ The heat gun wattage should be between 1200 and 1400 watts.
^ Maintain the heat lamp/heat gun distance so the painted surface temperature is between 175°
and 190°F (80° — 90°C). Affix a paper label thermometer
on the paint surface two inches away from the effected area (see Figure 2) to monitor the surface
temperature.
NOTE:
Paper label thermometers can be purchased from the company listed below.
^ Do not apply the heat gun for more than 5 minutes as permanent damage (i.e. bubbling burns
etc.) can occur to the paint.
^ Do not hold the heat gun closer than 12 inches from the paint surface. Also do not hold the heat
gun in one position rather move it continuously from
side to side to heat the affected area evenly.
^ Do not apply heat directly on to the paper label thermometer as this will give a false temperature
reading.
This repair is effective only if performed within a short time period after the PGF is removed from
the vehicle i.e. a few days in mild climates or within a week in colder climates. This repair will not
be effective beyond that time frame.
If the condition does not disappear after the above service procedures are performed the condition
may be permanent and the effected area may have to be re-painted.
Infiniti Qx56 Rwd Workshop Manual (V8-5.6L (VK56VD) (2011))
Infiniti Workshop Manuals > Body and Frame > Paint, Striping and Decals > Paint > System Information > Technical Service
Bulletins > By Symptom for Paint: > 99-043F > Feb > 11 > Paint — Paint Swells/Discolored Under Paint Guard Film > Page
1112
Paper thermometers may be purchased from the company listed below.
NOTE:
Equivalent paper thermometers may be used and are available from other local suppliers.
TIP Temperature Products 340 W. Broad Street Burlington NJ 08016 Phone: 1-877-847-8367 Fax:
1-609-239-1911 www.tiptemp.com
P/N TLCSEN023 (non-reversible 10/pkg.) P/N TLCSEN006 (reversible 10/pkg.)
CLAIMS INFORMATION
If further repairs necessitating buffing or repainting are needed and paint inspection is required,
refer to Infiniti Warranty Bulletin IWB04-013 for the current paint approval process.
Infiniti Qx56 Rwd Workshop Manual (V8-5.6L (VK56VD) (2011))
Infiniti Workshop Manuals > Body and Frame > Paint, Striping and Decals > Paint > System Information > Technical Service
Bulletins > Customer Interest for Paint: > 99-043F > Feb > 11 > Paint — Paint Swells/Discolored Under Paint Guard Film
Paint: Customer Interest Paint — Paint Swells/Discolored Under Paint Guard Film
Classification: BT99-032F
Reference: ITB99-043F
Date: February 11, 2011
PAINT SWELL/STAIN/SPOT UNDER PAINT GUARD FILM
This bulletin has been amended. All current production models have been applied and the
company contact information has been updated. Please discard all previous versions.
APPLIED VEHICLES: All Infiniti Production Models with Paint Guard Film
SERVICE INFORMATION
NOTE:
Failure to follow the procedures in this bulletin may result in the denial of a warranty claim.
In an effort to protect the paint finish Paint Guard Film (PGF) is applied on many new Infiniti
vehicles.
Paint Guard Film is a temporary white plastic protective film that is applied by the factory to the
horizontal painted surfaces of the vehicle. The PGF protects the paint finish during vehicle handling
transportation and storage from harmful elements such as acid rain iron particles bird droppings
tree sap and other environmental contaminants.
NOTE: Paint Guard Film CANNOT remain on the vehicle for more than six months after the
vehicle’s manufacture date. PGF must be removed at the end of six months.
If an Infiniti vehicle exhibits swelling stains or spots on the paint finish (which appear milky or
whitish on dark colored vehicles and dark-shaded or coffee-colored on light colored vehicles)
immediately after the PGF is removed the cause may be moisture collection under pockets/creases
of the PGF. The paint may absorb moisture which may cause the affected paint finish area to
temporarily discolor.
The size of the swell stain or spot may range from a dime to a clinched fist and have an irregular
shape and possibly a slightly raised surface.
This incident may occur anywhere under the PGF but may be noted in particular to occur around
the windshield fluid nozzle (see Figure 1) and on the deck lid. In any case use the following service
procedure to correct the incident.
IMPORTANT:
If this condition occurs, do not rebuff or initially attempt to repaint the effected area. Perform the
following service Procedure first.
SERVICE PROCEDURE
Infiniti Qx56 Rwd Workshop Manual (V8-5.6L (VK56VD) (2011))
Infiniti Workshop Manuals > Body and Frame > Paint, Striping and Decals > Paint > System Information > Technical Service
Bulletins > Customer Interest for Paint: > 99-043F > Feb > 11 > Paint — Paint Swells/Discolored Under Paint Guard Film >
Page 1118
Use one of the following procedures to remove the moisture from the effected area(s).
Place Vehicle in Sun Light (warm weather)
In warm weather place the vehicle in the sun light. The paint condition should disappear in a few
hours depending on the severity of the condition.
Place Vehicle Indoors (cold weather)
In cold weather place the vehicle indoors at a temperature of approximately 70°F. The paint
condition should disappear in about 8 to 12 hours depending on the severity of the condition.
Heat Lamp or Heat Gun
To speed up the recovery process of the condition use a portable infrared heat lamp or a heat gun.
Follow the Important Points listed below when using a heat lamp or a heat gun.
CAUTION:
Only an experienced paint technician who is familiar with paint temperature limitations should use a
heat lamp or heat gun. Also do not use a heat lamp or heat gun on painted plastic body
components (i.e. bumper covers spoilers etc.).
Important Points
^ The maximum total bulb wattage for the infrared heat lamp should not exceed 750 watts.
^ The heat gun wattage should be between 1200 and 1400 watts.
^ Maintain the heat lamp/heat gun distance so the painted surface temperature is between 175°
and 190°F (80° — 90°C). Affix a paper label thermometer
on the paint surface two inches away from the effected area (see Figure 2) to monitor the surface
temperature.
NOTE:
Paper label thermometers can be purchased from the company listed below.
^ Do not apply the heat gun for more than 5 minutes as permanent damage (i.e. bubbling burns
etc.) can occur to the paint.
^ Do not hold the heat gun closer than 12 inches from the paint surface. Also do not hold the heat
gun in one position rather move it continuously from
side to side to heat the affected area evenly.
^ Do not apply heat directly on to the paper label thermometer as this will give a false temperature
reading.
This repair is effective only if performed within a short time period after the PGF is removed from
the vehicle i.e. a few days in mild climates or within a week in colder climates. This repair will not
be effective beyond that time frame.
If the condition does not disappear after the above service procedures are performed the condition
may be permanent and the effected area may have to be re-painted.
Infiniti Qx56 Rwd Workshop Manual (V8-5.6L (VK56VD) (2011))
Infiniti Workshop Manuals > Body and Frame > Paint, Striping and Decals > Paint > System Information > Technical Service
Bulletins > Customer Interest for Paint: > 99-043F > Feb > 11 > Paint — Paint Swells/Discolored Under Paint Guard Film >
Page 1119
Paper thermometers may be purchased from the company listed below.
NOTE:
Equivalent paper thermometers may be used and are available from other local suppliers.
TIP Temperature Products 340 W. Broad Street Burlington NJ 08016 Phone: 1-877-847-8367 Fax:
1-609-239-1911 www.tiptemp.com
P/N TLCSEN023 (non-reversible 10/pkg.) P/N TLCSEN006 (reversible 10/pkg.)
CLAIMS INFORMATION
If further repairs necessitating buffing or repainting are needed and paint inspection is required,
refer to Infiniti Warranty Bulletin IWB04-013 for the current paint approval process.
Infiniti Qx56 Rwd Workshop Manual (V8-5.6L (VK56VD) (2011))
Infiniti Workshop Manuals > Body and Frame > Unibody > Component Information > Diagrams
Unibody: Diagrams
BODY CONSTRUCTION
Body Construction
Infiniti Qx56 Rwd Workshop Manual (V8-5.6L (VK56VD) (2011))
Infiniti Workshop Manuals > Body and Frame > Unibody > Component Information > Diagrams > Page 1123
Infiniti Qx56 Rwd Workshop Manual (V8-5.6L (VK56VD) (2011))
Infiniti Workshop Manuals > Cruise Control > Cruise Control Module > Component Information > Technical Service Bulletins
> All Technical Service Bulletins for Cruise Control Module: > 11-020 > Mar > 11 > Engine, A/T Controls — Hesitation/A/T
Shift Issues
Technical Service Bulletin # 11-020 Date: 110310
Engine, A/T Controls — Hesitation/A/T Shift Issues
Classification: AT 11-004
Reference: ITB11-020
Date: March 10, 2011
2011 QX56; TRANSMISSION SHIFT ISSUES AND HESITATION ISSUES
APPLIED VEHICLES: 2011 QX56 (Z62)
IF YOU CONFIRM
Any of the following symptoms:
^ Gear hunting or excessive downshifting when using the Intelligent Cruise Control (ICC)
and/or
^ The feel of the transmission shifting from Neutral to Drive (may be described as «bump» feel from
the rear) while stopped with the transmission in
Drive
and/or
^ A slight hesitation when accelerating from a stop,
and/or
^ A slight vehicle shudder/vibration during light acceleration,
ACTIONS
1. Perform ECM reprogramming.
^ Refer to Step 3 under ECM reprogramming in the Service Procedure to confirm ECM
reprogramming applies and is needed for the vehicle you are working on.
2. Perform TCM reprogramming.
^ Refer to Step 3 under TCM reprogramming in the Service Procedure to confirm TCM
reprogramming applies and is needed for the vehicle you are working on.
3. If equipped with Intelligent Cruise Control (ICC) perform ICC reprogramming.
^ Refer to Step 3 under ICC reprogramming in the Service Procedure to confirm ICC
reprogramming applies and is needed for the vehicle you are working on.
4. Test drive the vehicle and confirm the incident is resolved.
IMPORTANT:
The purpose of ACTIONS (above) is to give you a quick idea of the work you will be performing.
You MUST closely follow the entire SERVICE PROCEDURE as it contains information that is
essential to successfully completing this repair.
Infiniti Qx56 Rwd Workshop Manual (V8-5.6L (VK56VD) (2011))
Infiniti Workshop Manuals > Cruise Control > Cruise Control Module > Component Information > Technical Service Bulletins
> All Technical Service Bulletins for Cruise Control Module: > 11-020 > Mar > 11 > Engine, A/T Controls — Hesitation/A/T
Shift Issues > Page 1133
CLAIMS INFORMATION
Service Procedure
SERVICE PROCEDURE
ECM Reprogramming
1. Prepare the vehicle for the reprogramming procedure.
Reprogramming Caution
Infiniti Qx56 Rwd Workshop Manual (V8-5.6L (VK56VD) (2011))
Infiniti Workshop Manuals > Cruise Control > Cruise Control Module > Component Information > Technical Service Bulletins
> All Technical Service Bulletins for Cruise Control Module: > 11-020 > Mar > 11 > Engine, A/T Controls — Hesitation/A/T
Shift Issues > Page 1134
2. Navigate C-III to the ECM Reprogramming screen shown in Figure 1.
^ Use the «Reprogramming / Programming» selection.
^ Do not use Direct Diagnosis > Reprogramming.
3. On your C-III screen, look at the Part Number column (see Figure 1 example):
^ If there is no Engine part number listed, then ECM reprogramming does not apply; go to TCM
reprogramming.
^ If an Engine Part Number is listed, write it on the Repair Order.
4. Compare the Part Number you wrote down to the numbers in the Current ECM P/N column in
Table A above.
^ If there is a match this reprogramming applies. Continue with the reprogramming procedure.
NOTE:
If there are two Engine lines (two ECM reprogramming options) on your C-III screen, use the one
that does not have the message «Caution! Use ONLY with ITBXX-XXX».
^ If there is not a match, this reprogramming does not apply; go to TCM reprogramming below.
Infiniti Qx56 Rwd Workshop Manual (V8-5.6L (VK56VD) (2011))
Infiniti Workshop Manuals > Cruise Control > Cruise Control Module > Component Information > Technical Service Bulletins
> All Technical Service Bulletins for Cruise Control Module: > 11-020 > Mar > 11 > Engine, A/T Controls — Hesitation/A/T
Shift Issues > Page 1135
5. When ECM reprogramming is complete, the screen in Figure 2 displays.
NOTE:
If the screen in Figure 2 does NOT display (reprogramming does NOT complete).
6. Make sure to erase DTCs from all Systems.
^ During reprogramming DTCs will set in several systems and must be erased before TCM
reprogramming.
7. Go to TCM Reprogramming below.
TCM Reprogramming
1. Restart the C-III session by selecting the «Home» icon in the upper left corner of the C-III screen.
^ Make sure to erase DTCs from all systems.
^ TCM initialization is not needed for 7 speed A/T reprogramming.
Reprogramming Caution
Infiniti Qx56 Rwd Workshop Manual (V8-5.6L (VK56VD) (2011))
Infiniti Workshop Manuals > Cruise Control > Cruise Control Module > Component Information > Technical Service Bulletins
> All Technical Service Bulletins for Cruise Control Module: > 11-020 > Mar > 11 > Engine, A/T Controls — Hesitation/A/T
Shift Issues > Page 1136
2. Navigate C-III to the reprogramming screen shown in Figure 1A example above.
NOTE:
^ Do not use the «Reprogramming / Programming» selection.
^ Select the Model and Model Year and then navigate to Direct Diagnosis > Reprogramming.
^ TCM initialization is not needed for 7 Speed A/T reprogramming.
3. On your C-III screen look for a Transmission Part Number in the Part Number column (see
Figure 1A example).
^ If there is no Transmission Part Number listed, this reprogramming does not apply; go to ICC
reprogramming.
^ If a Transmission Part Number is listed write it on the Repair Order.
4. Compare the P/N you wrote down to the numbers in the Current TCM P/N column in Table A-1
above.
^ If there is a match this reprogramming applies. Continue with the reprogramming procedure.
^ If there is not a match this reprogramming does not apply; go to ICC reprogramming below.
Infiniti Qx56 Rwd Workshop Manual (V8-5.6L (VK56VD) (2011))
Infiniti Workshop Manuals > Cruise Control > Cruise Control Module > Component Information > Technical Service Bulletins
> All Technical Service Bulletins for Cruise Control Module: > 11-020 > Mar > 11 > Engine, A/T Controls — Hesitation/A/T
Shift Issues > Page 1137
5. If you have performed TCM reprogramming; when reprogramming is complete, the screen in
Figure 2A displays.
6. Erase DTCs in all systems.
^ During TCM reprogramming, DTCs will set in several systems and must be erased before ICC
reprogramming.
7. Go to ICC Reprogramming below.
ICC Reprogramming
1. Restart the C-III session by selecting the Home icon in the upper left corner of the C-III screen.
NOTE:
^ The steps for reprogramming the Intelligent Cruise Control (ICC) are the same as the steps for
reprogramming the TCM.
Reprogramming Caution
Infiniti Qx56 Rwd Workshop Manual (V8-5.6L (VK56VD) (2011))
Infiniti Workshop Manuals > Cruise Control > Cruise Control Module > Component Information > Technical Service Bulletins
> All Technical Service Bulletins for Cruise Control Module: > 11-020 > Mar > 11 > Engine, A/T Controls — Hesitation/A/T
Shift Issues > Page 1138
2. Navigate C-III to the reprogramming screen shown in Figure 1B example above.
NOTE:
^ Do not use the Reprogramming / Programming selection.
^ Select the Model and Model Year and then navigate to Direct Diagnosis > Reprogramming.
3. On your C-III screen, look for an ICC/ADAS Part Number in the Part Number column (see Figure
1B example).
^ If there is no ICC/ADAS Part Number listed, this reprogramming is not needed.
^ If an ICC/ADAS Part Number is listed, write it on the Repair Order.
4. Compare the P/N you wrote down to the numbers in the Current ICC/ADAS P/N column in Table
A-2 above.
^ If there is a match, this reprogramming applies. Continue with the reprogramming procedure.
^ If there is not a match, this reprogramming is not needed.
Infiniti Qx56 Rwd Workshop Manual (V8-5.6L (VK56VD) (2011))
Infiniti Workshop Manuals > Cruise Control > Cruise Control Module > Component Information > Technical Service Bulletins
> All Technical Service Bulletins for Cruise Control Module: > 11-020 > Mar > 11 > Engine, A/T Controls — Hesitation/A/T
Shift Issues > Page 1139
5. If you have performed ICC reprogramming; when reprogramming is complete the screen in
Figure 2B displays.
6. Erase DTCs in all systems.
^ During ICC reprogramming, DTCs will set in several systems and must be erased.
Infiniti Qx56 Rwd Workshop Manual (V8-5.6L (VK56VD) (2011))
Infiniti Workshop Manuals > Cruise Control > Cruise Control Module > Component Information > Technical Service Bulletins
> Customer Interest for Cruise Control Module: > 11-020 > Mar > 11 > Engine, A/T Controls — Hesitation/A/T Shift Issues
Technical Service Bulletin # 11-020 Date: 110310
Engine, A/T Controls — Hesitation/A/T Shift Issues
Classification: AT 11-004
Reference: ITB11-020
Date: March 10, 2011
2011 QX56; TRANSMISSION SHIFT ISSUES AND HESITATION ISSUES
APPLIED VEHICLES: 2011 QX56 (Z62)
IF YOU CONFIRM
Any of the following symptoms:
^ Gear hunting or excessive downshifting when using the Intelligent Cruise Control (ICC)
and/or
^ The feel of the transmission shifting from Neutral to Drive (may be described as «bump» feel from
the rear) while stopped with the transmission in
Drive
and/or
^ A slight hesitation when accelerating from a stop,
and/or
^ A slight vehicle shudder/vibration during light acceleration,
ACTIONS
1. Perform ECM reprogramming.
^ Refer to Step 3 under ECM reprogramming in the Service Procedure to confirm ECM
reprogramming applies and is needed for the vehicle you are working on.
2. Perform TCM reprogramming.
^ Refer to Step 3 under TCM reprogramming in the Service Procedure to confirm TCM
reprogramming applies and is needed for the vehicle you are working on.
3. If equipped with Intelligent Cruise Control (ICC) perform ICC reprogramming.
^ Refer to Step 3 under ICC reprogramming in the Service Procedure to confirm ICC
reprogramming applies and is needed for the vehicle you are working on.
4. Test drive the vehicle and confirm the incident is resolved.
IMPORTANT:
The purpose of ACTIONS (above) is to give you a quick idea of the work you will be performing.
You MUST closely follow the entire SERVICE PROCEDURE as it contains information that is
essential to successfully completing this repair.
Infiniti Qx56 Rwd Workshop Manual (V8-5.6L (VK56VD) (2011))
Infiniti Workshop Manuals > Cruise Control > Cruise Control Module > Component Information > Technical Service Bulletins
> Customer Interest for Cruise Control Module: > 11-020 > Mar > 11 > Engine, A/T Controls — Hesitation/A/T Shift Issues >
Page 1145
CLAIMS INFORMATION
Service Procedure
SERVICE PROCEDURE
ECM Reprogramming
1. Prepare the vehicle for the reprogramming procedure.
Reprogramming Caution
Infiniti Qx56 Rwd Workshop Manual (V8-5.6L (VK56VD) (2011))
Infiniti Workshop Manuals > Cruise Control > Cruise Control Module > Component Information > Technical Service Bulletins
> Customer Interest for Cruise Control Module: > 11-020 > Mar > 11 > Engine, A/T Controls — Hesitation/A/T Shift Issues >
Page 1146
2. Navigate C-III to the ECM Reprogramming screen shown in Figure 1.
^ Use the «Reprogramming / Programming» selection.
^ Do not use Direct Diagnosis > Reprogramming.
3. On your C-III screen, look at the Part Number column (see Figure 1 example):
^ If there is no Engine part number listed, then ECM reprogramming does not apply; go to TCM
reprogramming.
^ If an Engine Part Number is listed, write it on the Repair Order.
4. Compare the Part Number you wrote down to the numbers in the Current ECM P/N column in
Table A above.
^ If there is a match this reprogramming applies. Continue with the reprogramming procedure.
NOTE:
If there are two Engine lines (two ECM reprogramming options) on your C-III screen, use the one
that does not have the message «Caution! Use ONLY with ITBXX-XXX».
^ If there is not a match, this reprogramming does not apply; go to TCM reprogramming below.
Infiniti Qx56 Rwd Workshop Manual (V8-5.6L (VK56VD) (2011))
Infiniti Workshop Manuals > Cruise Control > Cruise Control Module > Component Information > Technical Service Bulletins
> Customer Interest for Cruise Control Module: > 11-020 > Mar > 11 > Engine, A/T Controls — Hesitation/A/T Shift Issues >
Page 1147
5. When ECM reprogramming is complete, the screen in Figure 2 displays.
NOTE:
If the screen in Figure 2 does NOT display (reprogramming does NOT complete).
6. Make sure to erase DTCs from all Systems.
^ During reprogramming DTCs will set in several systems and must be erased before TCM
reprogramming.
7. Go to TCM Reprogramming below.
TCM Reprogramming
1. Restart the C-III session by selecting the «Home» icon in the upper left corner of the C-III screen.
^ Make sure to erase DTCs from all systems.
^ TCM initialization is not needed for 7 speed A/T reprogramming.
Reprogramming Caution
Infiniti Qx56 Rwd Workshop Manual (V8-5.6L (VK56VD) (2011))
Infiniti Workshop Manuals > Cruise Control > Cruise Control Module > Component Information > Technical Service Bulletins
> Customer Interest for Cruise Control Module: > 11-020 > Mar > 11 > Engine, A/T Controls — Hesitation/A/T Shift Issues >
Page 1148
2. Navigate C-III to the reprogramming screen shown in Figure 1A example above.
NOTE:
^ Do not use the «Reprogramming / Programming» selection.
^ Select the Model and Model Year and then navigate to Direct Diagnosis > Reprogramming.
^ TCM initialization is not needed for 7 Speed A/T reprogramming.
3. On your C-III screen look for a Transmission Part Number in the Part Number column (see
Figure 1A example).
^ If there is no Transmission Part Number listed, this reprogramming does not apply; go to ICC
reprogramming.
^ If a Transmission Part Number is listed write it on the Repair Order.
4. Compare the P/N you wrote down to the numbers in the Current TCM P/N column in Table A-1
above.
^ If there is a match this reprogramming applies. Continue with the reprogramming procedure.
^ If there is not a match this reprogramming does not apply; go to ICC reprogramming below.
Infiniti Qx56 Rwd Workshop Manual (V8-5.6L (VK56VD) (2011))
Infiniti Workshop Manuals > Cruise Control > Cruise Control Module > Component Information > Technical Service Bulletins
> Customer Interest for Cruise Control Module: > 11-020 > Mar > 11 > Engine, A/T Controls — Hesitation/A/T Shift Issues >
Page 1149
5. If you have performed TCM reprogramming; when reprogramming is complete, the screen in
Figure 2A displays.
6. Erase DTCs in all systems.
^ During TCM reprogramming, DTCs will set in several systems and must be erased before ICC
reprogramming.
7. Go to ICC Reprogramming below.
ICC Reprogramming
1. Restart the C-III session by selecting the Home icon in the upper left corner of the C-III screen.
NOTE:
^ The steps for reprogramming the Intelligent Cruise Control (ICC) are the same as the steps for
reprogramming the TCM.
Reprogramming Caution
Infiniti Qx56 Rwd Workshop Manual (V8-5.6L (VK56VD) (2011))
Infiniti Workshop Manuals > Cruise Control > Cruise Control Module > Component Information > Technical Service Bulletins
> Customer Interest for Cruise Control Module: > 11-020 > Mar > 11 > Engine, A/T Controls — Hesitation/A/T Shift Issues >
Page 1150
2. Navigate C-III to the reprogramming screen shown in Figure 1B example above.
NOTE:
^ Do not use the Reprogramming / Programming selection.
^ Select the Model and Model Year and then navigate to Direct Diagnosis > Reprogramming.
3. On your C-III screen, look for an ICC/ADAS Part Number in the Part Number column (see Figure
1B example).
^ If there is no ICC/ADAS Part Number listed, this reprogramming is not needed.
^ If an ICC/ADAS Part Number is listed, write it on the Repair Order.
4. Compare the P/N you wrote down to the numbers in the Current ICC/ADAS P/N column in Table
A-2 above.
^ If there is a match, this reprogramming applies. Continue with the reprogramming procedure.
^ If there is not a match, this reprogramming is not needed.
Infiniti Qx56 Rwd Workshop Manual (V8-5.6L (VK56VD) (2011))
Infiniti Workshop Manuals > Cruise Control > Cruise Control Module > Component Information > Technical Service Bulletins
> Customer Interest for Cruise Control Module: > 11-020 > Mar > 11 > Engine, A/T Controls — Hesitation/A/T Shift Issues >
Page 1151
5. If you have performed ICC reprogramming; when reprogramming is complete the screen in
Figure 2B displays.
6. Erase DTCs in all systems.
^ During ICC reprogramming, DTCs will set in several systems and must be erased.
Infiniti Qx56 Rwd Workshop Manual (V8-5.6L (VK56VD) (2011))
Infiniti Workshop Manuals > Cruise Control > Relays and Modules — Cruise Control > Cruise Control Module > Component
Information > Technical Service Bulletins > All Technical Service Bulletins for Cruise Control Module: > 11-020 > Mar > 11 >
Engine, A/T Controls — Hesitation/A/T Shift Issues
Technical Service Bulletin # 11-020 Date: 110310
Engine, A/T Controls — Hesitation/A/T Shift Issues
Classification: AT 11-004
Reference: ITB11-020
Date: March 10, 2011
2011 QX56; TRANSMISSION SHIFT ISSUES AND HESITATION ISSUES
APPLIED VEHICLES: 2011 QX56 (Z62)
IF YOU CONFIRM
Any of the following symptoms:
^ Gear hunting or excessive downshifting when using the Intelligent Cruise Control (ICC)
and/or
^ The feel of the transmission shifting from Neutral to Drive (may be described as «bump» feel from
the rear) while stopped with the transmission in
Drive
and/or
^ A slight hesitation when accelerating from a stop,
and/or
^ A slight vehicle shudder/vibration during light acceleration,
ACTIONS
1. Perform ECM reprogramming.
^ Refer to Step 3 under ECM reprogramming in the Service Procedure to confirm ECM
reprogramming applies and is needed for the vehicle you are working on.
2. Perform TCM reprogramming.
^ Refer to Step 3 under TCM reprogramming in the Service Procedure to confirm TCM
reprogramming applies and is needed for the vehicle you are working on.
3. If equipped with Intelligent Cruise Control (ICC) perform ICC reprogramming.
^ Refer to Step 3 under ICC reprogramming in the Service Procedure to confirm ICC
reprogramming applies and is needed for the vehicle you are working on.
4. Test drive the vehicle and confirm the incident is resolved.
IMPORTANT:
The purpose of ACTIONS (above) is to give you a quick idea of the work you will be performing.
You MUST closely follow the entire SERVICE PROCEDURE as it contains information that is
essential to successfully completing this repair.
Infiniti Qx56 Rwd Workshop Manual (V8-5.6L (VK56VD) (2011))
Infiniti Workshop Manuals > Cruise Control > Relays and Modules — Cruise Control > Cruise Control Module > Component
Information > Technical Service Bulletins > All Technical Service Bulletins for Cruise Control Module: > 11-020 > Mar > 11 >
Engine, A/T Controls — Hesitation/A/T Shift Issues > Page 1161
CLAIMS INFORMATION
Service Procedure
SERVICE PROCEDURE
ECM Reprogramming
1. Prepare the vehicle for the reprogramming procedure.
Reprogramming Caution
Infiniti Qx56 Rwd Workshop Manual (V8-5.6L (VK56VD) (2011))
Infiniti Workshop Manuals > Cruise Control > Relays and Modules — Cruise Control > Cruise Control Module > Component
Information > Technical Service Bulletins > All Technical Service Bulletins for Cruise Control Module: > 11-020 > Mar > 11 >
Engine, A/T Controls — Hesitation/A/T Shift Issues > Page 1162
2. Navigate C-III to the ECM Reprogramming screen shown in Figure 1.
^ Use the «Reprogramming / Programming» selection.
^ Do not use Direct Diagnosis > Reprogramming.
3. On your C-III screen, look at the Part Number column (see Figure 1 example):
^ If there is no Engine part number listed, then ECM reprogramming does not apply; go to TCM
reprogramming.
^ If an Engine Part Number is listed, write it on the Repair Order.
4. Compare the Part Number you wrote down to the numbers in the Current ECM P/N column in
Table A above.
^ If there is a match this reprogramming applies. Continue with the reprogramming procedure.
NOTE:
If there are two Engine lines (two ECM reprogramming options) on your C-III screen, use the one
that does not have the message «Caution! Use ONLY with ITBXX-XXX».
^ If there is not a match, this reprogramming does not apply; go to TCM reprogramming below.
Infiniti Qx56 Rwd Workshop Manual (V8-5.6L (VK56VD) (2011))
Infiniti Workshop Manuals > Cruise Control > Relays and Modules — Cruise Control > Cruise Control Module > Component
Information > Technical Service Bulletins > All Technical Service Bulletins for Cruise Control Module: > 11-020 > Mar > 11 >
Engine, A/T Controls — Hesitation/A/T Shift Issues > Page 1163
5. When ECM reprogramming is complete, the screen in Figure 2 displays.
NOTE:
If the screen in Figure 2 does NOT display (reprogramming does NOT complete).
6. Make sure to erase DTCs from all Systems.
^ During reprogramming DTCs will set in several systems and must be erased before TCM
reprogramming.
7. Go to TCM Reprogramming below.
TCM Reprogramming
1. Restart the C-III session by selecting the «Home» icon in the upper left corner of the C-III screen.
^ Make sure to erase DTCs from all systems.
^ TCM initialization is not needed for 7 speed A/T reprogramming.
Reprogramming Caution
Infiniti Qx56 Rwd Workshop Manual (V8-5.6L (VK56VD) (2011))
Infiniti Workshop Manuals > Cruise Control > Relays and Modules — Cruise Control > Cruise Control Module > Component
Information > Technical Service Bulletins > All Technical Service Bulletins for Cruise Control Module: > 11-020 > Mar > 11 >
Engine, A/T Controls — Hesitation/A/T Shift Issues > Page 1164
2. Navigate C-III to the reprogramming screen shown in Figure 1A example above.
NOTE:
^ Do not use the «Reprogramming / Programming» selection.
^ Select the Model and Model Year and then navigate to Direct Diagnosis > Reprogramming.
^ TCM initialization is not needed for 7 Speed A/T reprogramming.
3. On your C-III screen look for a Transmission Part Number in the Part Number column (see
Figure 1A example).
^ If there is no Transmission Part Number listed, this reprogramming does not apply; go to ICC
reprogramming.
^ If a Transmission Part Number is listed write it on the Repair Order.
4. Compare the P/N you wrote down to the numbers in the Current TCM P/N column in Table A-1
above.
^ If there is a match this reprogramming applies. Continue with the reprogramming procedure.
^ If there is not a match this reprogramming does not apply; go to ICC reprogramming below.
Infiniti Qx56 Rwd Workshop Manual (V8-5.6L (VK56VD) (2011))
Infiniti Workshop Manuals > Cruise Control > Relays and Modules — Cruise Control > Cruise Control Module > Component
Information > Technical Service Bulletins > All Technical Service Bulletins for Cruise Control Module: > 11-020 > Mar > 11 >
Engine, A/T Controls — Hesitation/A/T Shift Issues > Page 1165
5. If you have performed TCM reprogramming; when reprogramming is complete, the screen in
Figure 2A displays.
6. Erase DTCs in all systems.
^ During TCM reprogramming, DTCs will set in several systems and must be erased before ICC
reprogramming.
7. Go to ICC Reprogramming below.
ICC Reprogramming
1. Restart the C-III session by selecting the Home icon in the upper left corner of the C-III screen.
NOTE:
^ The steps for reprogramming the Intelligent Cruise Control (ICC) are the same as the steps for
reprogramming the TCM.
Reprogramming Caution
Infiniti Qx56 Rwd Workshop Manual (V8-5.6L (VK56VD) (2011))
Infiniti Workshop Manuals > Cruise Control > Relays and Modules — Cruise Control > Cruise Control Module > Component
Information > Technical Service Bulletins > All Technical Service Bulletins for Cruise Control Module: > 11-020 > Mar > 11 >
Engine, A/T Controls — Hesitation/A/T Shift Issues > Page 1166
2. Navigate C-III to the reprogramming screen shown in Figure 1B example above.
NOTE:
^ Do not use the Reprogramming / Programming selection.
^ Select the Model and Model Year and then navigate to Direct Diagnosis > Reprogramming.
3. On your C-III screen, look for an ICC/ADAS Part Number in the Part Number column (see Figure
1B example).
^ If there is no ICC/ADAS Part Number listed, this reprogramming is not needed.
^ If an ICC/ADAS Part Number is listed, write it on the Repair Order.
4. Compare the P/N you wrote down to the numbers in the Current ICC/ADAS P/N column in Table
A-2 above.
^ If there is a match, this reprogramming applies. Continue with the reprogramming procedure.
^ If there is not a match, this reprogramming is not needed.
Infiniti Qx56 Rwd Workshop Manual (V8-5.6L (VK56VD) (2011))
Infiniti Workshop Manuals > Cruise Control > Relays and Modules — Cruise Control > Cruise Control Module > Component
Information > Technical Service Bulletins > All Technical Service Bulletins for Cruise Control Module: > 11-020 > Mar > 11 >
Engine, A/T Controls — Hesitation/A/T Shift Issues > Page 1167
5. If you have performed ICC reprogramming; when reprogramming is complete the screen in
Figure 2B displays.
6. Erase DTCs in all systems.
^ During ICC reprogramming, DTCs will set in several systems and must be erased.
Infiniti Qx56 Rwd Workshop Manual (V8-5.6L (VK56VD) (2011))
Infiniti Workshop Manuals > Cruise Control > Relays and Modules — Cruise Control > Cruise Control Module > Component
Information > Technical Service Bulletins > Customer Interest for Cruise Control Module: > 11-020 > Mar > 11 > Engine, A/T
Controls — Hesitation/A/T Shift Issues
Technical Service Bulletin # 11-020 Date: 110310
Engine, A/T Controls — Hesitation/A/T Shift Issues
Classification: AT 11-004
Reference: ITB11-020
Date: March 10, 2011
2011 QX56; TRANSMISSION SHIFT ISSUES AND HESITATION ISSUES
APPLIED VEHICLES: 2011 QX56 (Z62)
IF YOU CONFIRM
Any of the following symptoms:
^ Gear hunting or excessive downshifting when using the Intelligent Cruise Control (ICC)
and/or
^ The feel of the transmission shifting from Neutral to Drive (may be described as «bump» feel from
the rear) while stopped with the transmission in
Drive
and/or
^ A slight hesitation when accelerating from a stop,
and/or
^ A slight vehicle shudder/vibration during light acceleration,
ACTIONS
1. Perform ECM reprogramming.
^ Refer to Step 3 under ECM reprogramming in the Service Procedure to confirm ECM
reprogramming applies and is needed for the vehicle you are working on.
2. Perform TCM reprogramming.
^ Refer to Step 3 under TCM reprogramming in the Service Procedure to confirm TCM
reprogramming applies and is needed for the vehicle you are working on.
3. If equipped with Intelligent Cruise Control (ICC) perform ICC reprogramming.
^ Refer to Step 3 under ICC reprogramming in the Service Procedure to confirm ICC
reprogramming applies and is needed for the vehicle you are working on.
4. Test drive the vehicle and confirm the incident is resolved.
IMPORTANT:
The purpose of ACTIONS (above) is to give you a quick idea of the work you will be performing.
You MUST closely follow the entire SERVICE PROCEDURE as it contains information that is
essential to successfully completing this repair.
Infiniti Qx56 Rwd Workshop Manual (V8-5.6L (VK56VD) (2011))
Infiniti Workshop Manuals > Cruise Control > Relays and Modules — Cruise Control > Cruise Control Module > Component
Information > Technical Service Bulletins > Customer Interest for Cruise Control Module: > 11-020 > Mar > 11 > Engine, A/T
Controls — Hesitation/A/T Shift Issues > Page 1173
CLAIMS INFORMATION
Service Procedure
SERVICE PROCEDURE
ECM Reprogramming
1. Prepare the vehicle for the reprogramming procedure.
Reprogramming Caution
Infiniti Qx56 Rwd Workshop Manual (V8-5.6L (VK56VD) (2011))
Infiniti Workshop Manuals > Cruise Control > Relays and Modules — Cruise Control > Cruise Control Module > Component
Information > Technical Service Bulletins > Customer Interest for Cruise Control Module: > 11-020 > Mar > 11 > Engine, A/T
Controls — Hesitation/A/T Shift Issues > Page 1174
2. Navigate C-III to the ECM Reprogramming screen shown in Figure 1.
^ Use the «Reprogramming / Programming» selection.
^ Do not use Direct Diagnosis > Reprogramming.
3. On your C-III screen, look at the Part Number column (see Figure 1 example):
^ If there is no Engine part number listed, then ECM reprogramming does not apply; go to TCM
reprogramming.
^ If an Engine Part Number is listed, write it on the Repair Order.
4. Compare the Part Number you wrote down to the numbers in the Current ECM P/N column in
Table A above.
^ If there is a match this reprogramming applies. Continue with the reprogramming procedure.
NOTE:
If there are two Engine lines (two ECM reprogramming options) on your C-III screen, use the one
that does not have the message «Caution! Use ONLY with ITBXX-XXX».
^ If there is not a match, this reprogramming does not apply; go to TCM reprogramming below.
Infiniti Qx56 Rwd Workshop Manual (V8-5.6L (VK56VD) (2011))
Infiniti Workshop Manuals > Cruise Control > Relays and Modules — Cruise Control > Cruise Control Module > Component
Information > Technical Service Bulletins > Customer Interest for Cruise Control Module: > 11-020 > Mar > 11 > Engine, A/T
Controls — Hesitation/A/T Shift Issues > Page 1175
5. When ECM reprogramming is complete, the screen in Figure 2 displays.
NOTE:
If the screen in Figure 2 does NOT display (reprogramming does NOT complete).
6. Make sure to erase DTCs from all Systems.
^ During reprogramming DTCs will set in several systems and must be erased before TCM
reprogramming.
7. Go to TCM Reprogramming below.
TCM Reprogramming
1. Restart the C-III session by selecting the «Home» icon in the upper left corner of the C-III screen.
^ Make sure to erase DTCs from all systems.
^ TCM initialization is not needed for 7 speed A/T reprogramming.
Reprogramming Caution
Infiniti Qx56 Rwd Workshop Manual (V8-5.6L (VK56VD) (2011))
Infiniti Workshop Manuals > Cruise Control > Relays and Modules — Cruise Control > Cruise Control Module > Component
Information > Technical Service Bulletins > Customer Interest for Cruise Control Module: > 11-020 > Mar > 11 > Engine, A/T
Controls — Hesitation/A/T Shift Issues > Page 1176
2. Navigate C-III to the reprogramming screen shown in Figure 1A example above.
NOTE:
^ Do not use the «Reprogramming / Programming» selection.
^ Select the Model and Model Year and then navigate to Direct Diagnosis > Reprogramming.
^ TCM initialization is not needed for 7 Speed A/T reprogramming.
3. On your C-III screen look for a Transmission Part Number in the Part Number column (see
Figure 1A example).
^ If there is no Transmission Part Number listed, this reprogramming does not apply; go to ICC
reprogramming.
^ If a Transmission Part Number is listed write it on the Repair Order.
4. Compare the P/N you wrote down to the numbers in the Current TCM P/N column in Table A-1
above.
^ If there is a match this reprogramming applies. Continue with the reprogramming procedure.
^ If there is not a match this reprogramming does not apply; go to ICC reprogramming below.
Infiniti Qx56 Rwd Workshop Manual (V8-5.6L (VK56VD) (2011))
Infiniti Workshop Manuals > Cruise Control > Relays and Modules — Cruise Control > Cruise Control Module > Component
Information > Technical Service Bulletins > Customer Interest for Cruise Control Module: > 11-020 > Mar > 11 > Engine, A/T
Controls — Hesitation/A/T Shift Issues > Page 1177
5. If you have performed TCM reprogramming; when reprogramming is complete, the screen in
Figure 2A displays.
6. Erase DTCs in all systems.
^ During TCM reprogramming, DTCs will set in several systems and must be erased before ICC
reprogramming.
7. Go to ICC Reprogramming below.
ICC Reprogramming
1. Restart the C-III session by selecting the Home icon in the upper left corner of the C-III screen.
NOTE:
^ The steps for reprogramming the Intelligent Cruise Control (ICC) are the same as the steps for
reprogramming the TCM.
Reprogramming Caution
Infiniti Qx56 Rwd Workshop Manual (V8-5.6L (VK56VD) (2011))
Infiniti Workshop Manuals > Cruise Control > Relays and Modules — Cruise Control > Cruise Control Module > Component
Information > Technical Service Bulletins > Customer Interest for Cruise Control Module: > 11-020 > Mar > 11 > Engine, A/T
Controls — Hesitation/A/T Shift Issues > Page 1178
2. Navigate C-III to the reprogramming screen shown in Figure 1B example above.
NOTE:
^ Do not use the Reprogramming / Programming selection.
^ Select the Model and Model Year and then navigate to Direct Diagnosis > Reprogramming.
3. On your C-III screen, look for an ICC/ADAS Part Number in the Part Number column (see Figure
1B example).
^ If there is no ICC/ADAS Part Number listed, this reprogramming is not needed.
^ If an ICC/ADAS Part Number is listed, write it on the Repair Order.
4. Compare the P/N you wrote down to the numbers in the Current ICC/ADAS P/N column in Table
A-2 above.
^ If there is a match, this reprogramming applies. Continue with the reprogramming procedure.
^ If there is not a match, this reprogramming is not needed.
Infiniti Qx56 Rwd Workshop Manual (V8-5.6L (VK56VD) (2011))
Infiniti Workshop Manuals > Cruise Control > Relays and Modules — Cruise Control > Cruise Control Module > Component
Information > Technical Service Bulletins > Customer Interest for Cruise Control Module: > 11-020 > Mar > 11 > Engine, A/T
Controls — Hesitation/A/T Shift Issues > Page 1179
5. If you have performed ICC reprogramming; when reprogramming is complete the screen in
Figure 2B displays.
6. Erase DTCs in all systems.
^ During ICC reprogramming, DTCs will set in several systems and must be erased.
Infiniti Qx56 Rwd Workshop Manual (V8-5.6L (VK56VD) (2011))
Infiniti Workshop Manuals > Instrument Panel, Gauges and Warning Indicators > Maintenance Required Lamp/Indicator >
Component Information > Service and Repair
Maintenance Required Lamp/Indicator: Service and Repair
Resetting The Distance For Changing The Engine Oil
Infiniti Qx56 Rwd Workshop Manual (V8-5.6L (VK56VD) (2011))
Infiniti Workshop Manuals > Instrument Panel, Gauges and Warning Indicators > Maintenance Required Lamp/Indicator >
Component Information > Service and Repair > Page 1184
Switches for the trip computer are located on the right side of the combination meter panel. To
operate the trip computer, push the switches as shown above.
When the ignition switch is pushed to the ON position, modes of the trip computer can be selected
by pushing switch A.
Switch A and switch B are used in the setting mode to select and decide a menu.
Push switch A to move to the warning check mode. Push switch B to select other menus.
There are 5 submenus under the maintenance menu.
Select the OIL submenu to set or reset the distance for changing the engine oil.
Infiniti Qx56 Rwd Workshop Manual (V8-5.6L (VK56VD) (2011))
Infiniti Workshop Manuals > Instrument Panel, Gauges and Warning Indicators > Tire Monitoring System > Tire Pressure
Monitor Receiver / Transponder > Component Information > Technical Service Bulletins > Tire Monitor System Components Are Not Interchangeable
Tire Pressure Monitor Receiver / Transponder: Technical Service Bulletins Tire Monitor System Components Are Not Interchangeable
Classification: WT10-004a
Reference: ITB10-050a
Date: November 11 2010
TPMS COMPONENTS NOT INTERCHANGEABLE
This bulletin has been amended. Applied Vehicles, VINs, and Dates have been updated, and
changes have been made to the Service Information. Please discard previous versions.
APPLIED VEHICLES:
2010 — 2011 EX35 (J50)
2010 — 2011 FX35/FX50 (S51)
2010 — 2011 G37 Coupe Convertible and Sedan (CV36 HV36 and V36)
2010 M351M45 ~50)
2011 M37IM56~51)
2010 QX56 (JA60)
2011 QX56(Z62)
APPLIED DATES:
See Detail of Applied Dates and VINs at the end of this bulletin.
APPLIED VINs
See Detail of Applied Dates and VINs at the end of this bulletin.
SERVICE INFORMATION
^ Recent design changes have been made to the Tire Pressure Monitoring System (1PMS) sensor
receiver and control units (new style TPMS components).
^ These changes were applied as follows:
^ These changes do not affect the overall function of the TPMS.
^ These changes do affect the interchangeability of parts. For example:
> Full wheel assemblies (wheel and tire assemblies with TPMS) cannot be swapped between old
style sensor-equipped and new style sensor-equipped vehicles.
CAUTION:
^ New style and old style TPMS components are not compatible and cannot be interchanged.
^ Swapping of new style and old style components will cause the TPMS to stop operating correctly.
Infiniti Qx56 Rwd Workshop Manual (V8-5.6L (VK56VD) (2011))
Infiniti Workshop Manuals > Instrument Panel, Gauges and Warning Indicators > Tire Monitoring System > Tire Pressure
Monitor Receiver / Transponder > Component Information > Technical Service Bulletins > Tire Monitor System Components Are Not Interchangeable > Page 1190
If further confirmation of the TPMS sensor part number is required review the part number of the
originally installed equipment before replacement.
To confirm the latest part numbers, always consult the appropriate parts catalog when replacing or
exchanging TPMS sensors, receivers, or control modules.
NOTE:
^ An update is now available for the Signal Tech II to support the new style TPMS components.
The update can be found in ASIST > INFO Tool Box > Signal Tech II.
^ For 2010 models built after February 28 2010 a Signal Tech II menu selection «2010.5» has been
added.
Detail of Applied Dates and VINs
Infiniti Qx56 Rwd Workshop Manual (V8-5.6L (VK56VD) (2011))
Infiniti Workshop Manuals > Instrument Panel, Gauges and Warning Indicators > Tire Monitoring System > Tire Pressure
Monitor Receiver / Transponder > Component Information > Technical Service Bulletins > Tire Monitor System Components Are Not Interchangeable > Page 1191
Installation at the factory of the new style TPMS components began with the following VINs and
Dates:
NOTE:
All 2011 Infiniti vehicles are equipped with the new style TPMS components.
Disclaimer
Infiniti Qx56 Rwd Workshop Manual (V8-5.6L (VK56VD) (2011))
Infiniti Workshop Manuals > Instrument Panel, Gauges and Warning Indicators > Tire Monitoring System > Tire Pressure
Sensor > Component Information > Technical Service Bulletins > Tire Monitor System — Components Are Not
Interchangeable
Tire Pressure Sensor: Technical Service Bulletins Tire Monitor System — Components Are Not
Interchangeable
Classification: WT10-004a
Reference: ITB10-050a
Date: November 11 2010
TPMS COMPONENTS NOT INTERCHANGEABLE
This bulletin has been amended. Applied Vehicles, VINs, and Dates have been updated, and
changes have been made to the Service Information. Please discard previous versions.
APPLIED VEHICLES:
2010 — 2011 EX35 (J50)
2010 — 2011 FX35/FX50 (S51)
2010 — 2011 G37 Coupe Convertible and Sedan (CV36 HV36 and V36)
2010 M351M45 ~50)
2011 M37IM56~51)
2010 QX56 (JA60)
2011 QX56(Z62)
APPLIED DATES:
See Detail of Applied Dates and VINs at the end of this bulletin.
APPLIED VINs
See Detail of Applied Dates and VINs at the end of this bulletin.
SERVICE INFORMATION
^ Recent design changes have been made to the Tire Pressure Monitoring System (1PMS) sensor
receiver and control units (new style TPMS components).
^ These changes were applied as follows:
^ These changes do not affect the overall function of the TPMS.
^ These changes do affect the interchangeability of parts. For example:
> Full wheel assemblies (wheel and tire assemblies with TPMS) cannot be swapped between old
style sensor-equipped and new style sensor-equipped vehicles.
CAUTION:
^ New style and old style TPMS components are not compatible and cannot be interchanged.
^ Swapping of new style and old style components will cause the TPMS to stop operating correctly.
Infiniti Qx56 Rwd Workshop Manual (V8-5.6L (VK56VD) (2011))
Infiniti Workshop Manuals > Instrument Panel, Gauges and Warning Indicators > Tire Monitoring System > Tire Pressure
Sensor > Component Information > Technical Service Bulletins > Tire Monitor System — Components Are Not
Interchangeable > Page 1196
If further confirmation of the TPMS sensor part number is required review the part number of the
originally installed equipment before replacement.
To confirm the latest part numbers, always consult the appropriate parts catalog when replacing or
exchanging TPMS sensors, receivers, or control modules.
NOTE:
^ An update is now available for the Signal Tech II to support the new style TPMS components.
The update can be found in ASIST > INFO Tool Box > Signal Tech II.
^ For 2010 models built after February 28 2010 a Signal Tech II menu selection «2010.5» has been
added.
Detail of Applied Dates and VINs
Infiniti Qx56 Rwd Workshop Manual (V8-5.6L (VK56VD) (2011))
Infiniti Workshop Manuals > Instrument Panel, Gauges and Warning Indicators > Tire Monitoring System > Tire Pressure
Sensor > Component Information > Technical Service Bulletins > Tire Monitor System — Components Are Not
Interchangeable > Page 1197
Installation at the factory of the new style TPMS components began with the following VINs and
Dates:
NOTE:
All 2011 Infiniti vehicles are equipped with the new style TPMS components.
Disclaimer
Infiniti Qx56 Rwd Workshop Manual (V8-5.6L (VK56VD) (2011))
Infiniti Workshop Manuals > Lighting and Horns > Headlamp > Headlamp Bulb > Component Information > Technical
Service Bulletins > Lighting — Xenon Headlamp Service Info.
Headlamp Bulb: Technical Service Bulletins Lighting — Xenon Headlamp Service Info.
Classification: EL10-022A
Reference: ITB10-027A
Date: June 29, 2010
XENON HEAD LAMP SERVICE
This bulletin has been amended. The Parts Information has been updated. Please discard previous
versions of this bulletin.
APPLIED VEHICLES: 2005 — 2011 Infiniti with xenon headlamps
IF YOU CONFIRM
A xenon headlamp is not functioning because of an issue inside the headlamp assembly (an
internal issue),
ACTION
Refer to the appropriate Service Manual, follow the diagnostic and repair information for xenon
headlamps.
NOTE:
^ In most cases, replacement of a bulb or HID control unit will solve the incident.
^ Do not replace the entire xenon headlamp assembly when a bulb or HID control unit is available
to solve the incident, if one should occur.
CLAIMS INFORMATION
^ Reference the current Nissan Flat Rate Manual and use the appropriate claims coding for the
repair performed.
^ For HID control unit replacement use Operation Code RJ36AA.
PARTS INFORMATION
Infiniti Qx56 Rwd Workshop Manual (V8-5.6L (VK56VD) (2011))
Infiniti Workshop Manuals > Lighting and Horns > Headlamp > Headlamp Bulb > Component Information > Technical
Service Bulletins > Lighting — Xenon Headlamp Service Info. > Page 1204
NOTE:
^ The HID control unit includes a starter (xenon bulb socket). For some models, the starter is not
replaceable. In this case, replace only the HID control
unit using the old starter.
^ Torque specification for the screw that holds the starter to the HID control unit is:
^ 1.3 — 1.7 Nm (0.13 — 0.17 k-gm, 12 — 15 in-lb)
Infiniti Qx56 Rwd Workshop Manual (V8-5.6L (VK56VD) (2011))
Infiniti Workshop Manuals > Lighting and Horns > Headlamp > Headlamp Control Module > Component Information >
Technical Service Bulletins > Lighting — Xenon Headlamp Service Info.
Headlamp Control Module: Technical Service Bulletins Lighting — Xenon Headlamp Service Info.
Classification: EL10-022A
Reference: ITB10-027A
Date: June 29, 2010
XENON HEAD LAMP SERVICE
This bulletin has been amended. The Parts Information has been updated. Please discard previous
versions of this bulletin.
APPLIED VEHICLES: 2005 — 2011 Infiniti with xenon headlamps
IF YOU CONFIRM
A xenon headlamp is not functioning because of an issue inside the headlamp assembly (an
internal issue),
ACTION
Refer to the appropriate Service Manual, follow the diagnostic and repair information for xenon
headlamps.
NOTE:
^ In most cases, replacement of a bulb or HID control unit will solve the incident.
^ Do not replace the entire xenon headlamp assembly when a bulb or HID control unit is available
to solve the incident, if one should occur.
CLAIMS INFORMATION
^ Reference the current Nissan Flat Rate Manual and use the appropriate claims coding for the
repair performed.
^ For HID control unit replacement use Operation Code RJ36AA.
PARTS INFORMATION
Infiniti Qx56 Rwd Workshop Manual (V8-5.6L (VK56VD) (2011))
Infiniti Workshop Manuals > Lighting and Horns > Headlamp > Headlamp Control Module > Component Information >
Technical Service Bulletins > Lighting — Xenon Headlamp Service Info. > Page 1209
NOTE:
^ The HID control unit includes a starter (xenon bulb socket). For some models, the starter is not
replaceable. In this case, replace only the HID control
unit using the old starter.
^ Torque specification for the screw that holds the starter to the HID control unit is:
^ 1.3 — 1.7 Nm (0.13 — 0.17 k-gm, 12 — 15 in-lb)
Infiniti Qx56 Rwd Workshop Manual (V8-5.6L (VK56VD) (2011))
Infiniti Workshop Manuals > Lighting and Horns > Relays and Modules — Lighting and Horns > Headlamp Control Module >
Component Information > Technical Service Bulletins > Lighting — Xenon Headlamp Service Info.
Headlamp Control Module: Technical Service Bulletins Lighting — Xenon Headlamp Service Info.
Classification: EL10-022A
Reference: ITB10-027A
Date: June 29, 2010
XENON HEAD LAMP SERVICE
This bulletin has been amended. The Parts Information has been updated. Please discard previous
versions of this bulletin.
APPLIED VEHICLES: 2005 — 2011 Infiniti with xenon headlamps
IF YOU CONFIRM
A xenon headlamp is not functioning because of an issue inside the headlamp assembly (an
internal issue),
ACTION
Refer to the appropriate Service Manual, follow the diagnostic and repair information for xenon
headlamps.
NOTE:
^ In most cases, replacement of a bulb or HID control unit will solve the incident.
^ Do not replace the entire xenon headlamp assembly when a bulb or HID control unit is available
to solve the incident, if one should occur.
CLAIMS INFORMATION
^ Reference the current Nissan Flat Rate Manual and use the appropriate claims coding for the
repair performed.
^ For HID control unit replacement use Operation Code RJ36AA.
PARTS INFORMATION