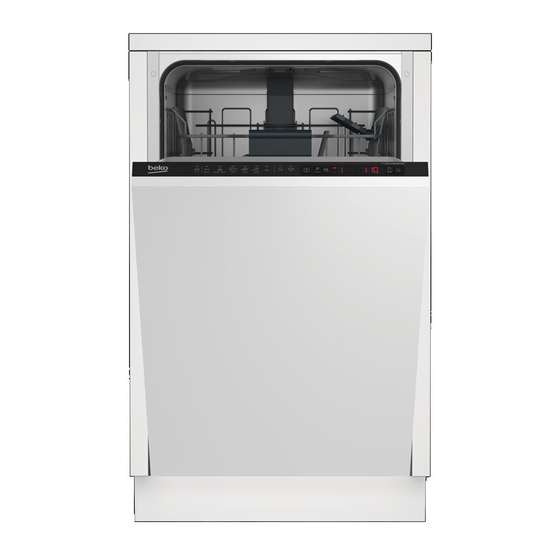
Cпецификация
| Модель | DIS26012 |
| Цвет | Серебристый |
| SAP код | 7635068335 |
| Код EAN | 8690842198472 |
| Размеры | |
|---|---|
| Высота |
81.8 см |
| Ширина |
44.8 см |
| Глубина |
55 см |
| Вес нетто |
29.5 кг |
| Глубина с открытой дверцей |
115 см |
| Рекомендованный вес навешиваемой двери |
2.5-5.5 кг |
| Высота ниши для встраивания |
82-87 см |
| Техническая характеристика | |
| Максимальная загрузка (комплекты посуды) | 10 |
| Количество программ | 6 |
| Температуры мытья |
35-40-50-65-70 °С |
| Сенсор загрязнения | + |
| Внутренняя подсветка | — |
| Защита стекла GlassCare | + |
| Тип сушки | Конденсационная |
| Дисплей |
LCD
|
| Блокировка от детей | — |
| Антибактериальная прокладка | — |
| Фильтр | Частично металлический |
| Индикатор отсутствия соли | + |
| Индикатор отсутствия ополаскивателя | + |
| Индикатор протечки | + |
| Система смягчения воды | + |
| Количество степеней мойки посуды | 2 |
| Световой индикатор на полу LedSpot | + |
| Инверторный двигатель ProSmart | — |
| Система интенсивного мытья Aquaintense | — |
| Система интенсивного мытья CornerIntense | — |
| Панель управления |
Кнопки
|
| Параметры | |
| Класс энергопотребления | A (-10%) |
| Расход электроэнергии |
0.83 кВт/ч |
| Расход воды |
10.5 л |
| Уровень шума |
48 дБ |
| Класс сушки | A |
| Автоматическое открытие дверцы после завершения работы | — |
| Очистка камеры | + |
| Оборудование | |
| Складные держатели для тарелок в верхней корзине | — |
| Полка для длинных приборов | — |
| Регулировка высоты верхней корзины | 3-х позиционная регулировка |
| Количество полок в верхней корзине |
2 шт |
| Складные держатели в нижней корзине | 2 |
| Третья корзина | — |
| Программы | |
| Самоочистка |
—
|
| Экономичная 50° | + |
| Автоматическая 40-65° | + |
| Интенсивная 70° | + |
| Quick&Shine | + |
| Мини 30′ 35° | + |
| Предварительная | + |
| AquaFlex | — |
| GlassCare 40° | — |
| Clean&Shine | — |
| Функции | |
| Половинная загрузка |
+
|
| Быстрая функция | — |
| Экстра Ополаскивание | — |
| Экстра Сушка | + |
| SideWash | — |
Гарантия
Гарантия на бытовую технику Beko составляет 2 года
Подробнее об условиях принятия в гарантийное обслуживание в разделе «Гарантия»
{
Tехнологии
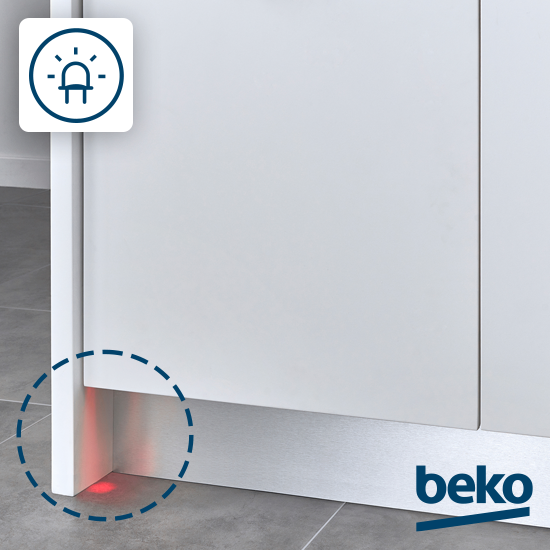
Световой индикатор на полу LedSpot
Включите любую программу и вернитесь к другим делам или отдыху – специальный световой индикатор на полу автоматически погаснет по ее завершению, не отвлекая вас раньше времени.

Защита от протечек WaterSafe
Защита от протечек. WaterSafe контролирует уровень воды в посудомоечной машине и в случае ее избытка прекращает подачу. Вы можете включать посудомоечную машину даже перед тем, как уйти из дома, и быть уверенными, что в ваше отсутствие машинка точно не затопит соседей.

Гарантия производителя 2 года
На всю продукцию Beko действует официальная гарантия в течение 24 месяцев с момента покупки. Выезд специалиста, диагностика и ремонт при наступлении гарантийного случая будет бесплатным.
Похожие товары

Данная инструкция на русском языке предназначена для посудомоечной машины
Beko DIS26012, описывает принцип работы и основные моменты эксплуатации устройства.
Производитель настойчиво рекомендует перед включением посудомоечной машины
внимательно изучить настоящую инструкцию.
Инструкция для посудомоечной машины
представлена в формате PDF. Все современные браузеры уже поддерживают данный формат и сложностей с открытием файла возникнуть не должно.
Но если открыть инструкцию все же не удается, то необходимо установить на компьютер программу для чтения PDF файлов, например, Acrobat Reader. Если у вас возникли сложности с открытием инструкции на смартфоне под управлением Android, нужно установить, например, Adobe Acrobat Reader.
Комментарии (0)
Комментарии про другие Посудомоечные машины
Другие Посудомоечные машины Beko
|
Код: 112881 Извините, товара сейчас нет в наличии
Бесплатная доставка
Извините, товара сейчас нет в наличии Сравнить Услуги:Установка и подключение посудомоечной машины Новости интернет-магазина «Лаукар»:28.03.2023 22.02.2023 13.02.2023 Дополнительная информация в категории Встраиваемая посудомоечная машина:Встраиваемые посудомоечные машины — разбираемся в терминах Таблица Авторизованных сервисных центров по брендам. Описание Инструкция Отзывы (0) В интернет-магазине бытовой техники «Лаукар» Вы можете скачать инструкцию к товару Встраиваемая посудомоечная машина BEKO DIS 26012 совершенно бесплатно. Все инструкции, представленные на сайте интернет-магазина бытовой техники «Лаукар», предоставляются производителем товара. Для того чтобы скачать инструкцию, Вам необходимо нажать на ссылку «скачать инструкцию», расположенную ниже, а в случае, если ссылки нет, Скачать инструкцию Смотреть инструкцию
Фирма-производитель оставляет за собой право на внесение изменений в конструкцию, дизайн и комплектацию товара: Встраиваемая посудомоечная машина BEKO DIS 26012. Пожалуйста, сверяйте информацию о товаре с информацией на |


Посмотреть инструкция для Beko DIS26012 бесплатно. Руководство относится к категории посудомоечные машины, 1 человек(а) дали ему среднюю оценку 8.6. Руководство доступно на следующих языках: русский. У вас есть вопрос о Beko DIS26012 или вам нужна помощь? Задайте свой вопрос здесь
Не можете найти ответ на свой вопрос в руководстве? Вы можете найти ответ на свой вопрос ниже, в разделе часто задаваемых вопросов о Beko DIS26012.
Что мне делать при появлении в посудомоечной машине неприятного запаха?
Следует ли предварительно ополаскивать посуду?
Сколько средства для мытья посуды следует использовать?
Как добавлять в посудомоечную машину соль?
Инструкция Beko DIS26012 доступно в русский?
Не нашли свой вопрос? Задайте свой вопрос здесь
- Manuals
- Brands
- Beko Manuals
- Dishwasher
- DIS26012
- User manual
-
Contents
-
Table of Contents
-
Troubleshooting
-
Bookmarks
Quick Links
Dishwasher
User’s Manual
DIS26012
EN
Document Number :
15 9205 0100_AA_BEKO_45E5_EN/ 02-07-18.(11:29)
Related Manuals for Beko DIS26012
Summary of Contents for Beko DIS26012
-
Page 1
Dishwasher User’s Manual DIS26012 Document Number : 15 9205 0100_AA_BEKO_45E5_EN/ 02-07-18.(11:29) -
Page 2
Please read this user manual first! Dear Customer, We hope that you get the best results from your product which has been manufactured with high quality and state-of-the-art technology. Therefore, please read this entire user manual and all other accompanying documents carefully before using the product and keep it as a reference for future use. -
Page 3
Dishwasher User’s Manual DIS26012 Document Number : 15 9205 0100_AA_BEKO_45E5_EN/ 02-07-18.(11:29) -
Page 4
Please read this user manual first! Dear Customer, We hope that you get the best results from your product which has been manufactured with high quality and state-of-the-art technology. Therefore, please read this entire user manual and all other accompanying documents carefully before using the product and keep it as a reference for future use. -
Page 5: Table Of Contents
CONTENTS 1 INSTRUCTIONS FOR SAFETY Collapsible upper basket wires ..24 Ceiling cutlery basket ……24 AND ENVIRONMENT General safety ……..4 5 OPERATING THE PRODUCT 25 Intended use ……….4 Keys …………26 Children’s safety ……..5 Function keys ……..26 Disposing of packaging material ..5 Preparing the machine……
-
Page 6: Instructions For Safety And Environment
instructions for safety and environment This section contains safety Never touch the plug with • instructions that will help to get wet hands! Never unplug by protected from risk of personal pulling on the cable, always injury or property damage. Failure pull out by grabbing the plug.
-
Page 7: Children’s Safety
instructions for safety and environment Children’s safety This appliance is intended • to be used in household and Electrical products are • similar applications such as: dangerous for the children. — Staff kitchen areas in shops, Keep children away from the offices and other working product when it is in use.
-
Page 8: Compliance With Weee Directive And Disposing Of The Waste Product
instructions for safety and environment Package information 1. Unplug the product before transporting it. Packaging materials of the 2. Remove water drainage and product are manufactured water supply connections. from recyclable materials in accordance with our National 3. Drain the remaining water in Environment Regulations.
-
Page 9: Dishwasher Overview
Dishwasher Overview 1. Upper basket 2. Upper impeller 3. Lower impeller 4. Silverware basket 5. Door 6. Rating Label 7. Control panel 8. Detergent dispenser 9. Lower basket 10. Filters 11. Salt reservoir lid 12. Upper basket rail 13. Upper cutlery basket (depends on model) 14.
-
Page 10: Fan Drying System
Dishwasher Technical specifications Compliance to standards and test data / EC declaration of conformity This product complies with the following EU directives; Development, production and sales stages of this product comply with the safety rules included in all pertaining European Community regulations. 2014/35/EU, 2014/30/EU, 93/68/EC, IEC 60436/DIN 44990, EN 50242 Power input 220-240 V, 50 Hz (see rating label)
-
Page 11: Installation
Installation Appropriate installation Refer to the nearest Authorised Service Agent for installation of your product. To location make the product ready for use, make sure Place the product on a solid and flat • that the electricity, tap water supply and floor that has sufficient load carrying water drainage systems are appropriate capacity! The product must be…
-
Page 12: Connection To The Drain
Installation Permitted water temperature: up the floor. A discharge hose longer than 4 to 25°C meters causes dirty washing. Attach the water discharge hose to the The dishwasher should be connected to drainpipe without bending it. Tightly fix cold water inlet. the water discharge hose to the drainpipe Do not use old or used water inlet in order to prevent any dislocation of the…
-
Page 13: Aquasafe
Installation Aquasafe+ The voltage and allowed fuse or breaker • protection are specified in the “Technical (depends on model) specifications” section. If the current The Aquasafe+ system protects against value of the fuse or breaker in the house water leaks that may occur at the hose is less than 16 Amps, have a qualified inlet.Water contact with the valve box of electrician install a 16 Amp fuse.
-
Page 14: Preparation Tips For Energy Saving
Preparation Tips for energy saving Adjusting the water softening system Following information will help you use the product in an ecological and energy- Cleaning, rinsing and drying performance of efficient manner. your dishwasher will increase when water Wipe away any coarse food remnants on softening system is adjusted properly.
-
Page 15
Preparation Remove the test Turn on the tap and Hold the test strip in Remove the test Wait for 1 minute. The test strip shows strip from the let the water run for the water for about strip from the water you the hardness packet. -
Page 16: Adding Salt
Preparation If the hardness level of the supply water It is recommended to use is above 90 °dF or if you are using well granule- or powder-formed water, then it is recommended to use water softening salts in the water purification devices and special filters.
-
Page 17: Detergent
Preparation Adding detergent You can put about 2 kg of softening salt into the salt Pay attention to the warnings reservoir. on the detergent packaging to get better washing and 5. Replace the lid and tighten it when the drying results. Contact the reservoir is full.
-
Page 18: Tablet Detergents
Preparation Tablet detergents In addition to the conventional tablet detergents, there are also commercially available detergent tablets that show water softening salt and/or rinse aid effect. Some types of these detergents contain special- purpose components such as glass and stainless steel protectors. These tablets show their effects up to a certain water 3.
-
Page 19: Rinse Aid
Preparation When you switch to powder 2. Fill the reservoir until “MAX” level. detergent from tablet detergent: Make sure that salt and rinse aid reservoirs are full. 2. Set the water hardness to the highest level and perform an empty run. 3.
-
Page 20: Items Not Suitable For Washing In The Dishwasher
Preparation Items not suitable for Place the hollowed dishes such as • bowls, glasses and pans upside down washing in the dishwasher in the dishwasher. Thus, accumulation Never wash dishes soiled by cigarette • of water in deep hollows is prevented. ash, candle remnants, polish, dyestuff, To prevent possible injuries, chemicals, etc.
-
Page 21
Preparation Suggestions for loading the dishwasher Improper Loading Of Dishware Lower basket Upper basket Dishwasher / User’s Manual 19 / 41 EN… -
Page 22: Cutlery Basket
Preparation Cutlery basket Collapsible lower basket tines (depends on model) Cutlery basket is designed to wash your (depends on model) dishes such as knife, fork, spoon, etc. in an Foldable tines (A) located at the lower efficient manner. basket of the machine are designed for Since the cutlery basket can be moved (A, an easier placement of large pieces such B), you can create more space while placing…
-
Page 23: Collapsible Lower Basket Tines
Preparation Bringing the tines to the horizontal position by holding them from the tips may cause them to bend. Therefore, it will be appropriate to bring the tines in the middle to horizontal or vertical position by holding them from their stems and pushing in the direction of arrow.
-
Page 24: Lower Basket Bottle Wire
Preparation Lower basket bottle wire (depends on model) The bottle wire is designed for easier washing of long pieces with wide mouths. You may take out the bottle wire from the basket when not in use by pulling it out from both sides (H).
-
Page 25: Adjusting The Height Of The Upper Basket
Preparation Adjusting the height of the To lower the basket, while it is in the uppermost position; upper basket Hold the upper basket wires with both (depends on model) hands, slightly lift up the basket and The upper basket height adjustment simultaneously push and release the mechanism has been designed for you to latches shown in the figure (B).
-
Page 26: Collapsible Upper Basket Wires
Preparation Collapsible upper basket Ceiling cutlery basket wires (depends on model) Ceiling cutlery basket is designed to wash (depends on model) your cutlery items such as forks, spoons You can use collapsible wires when you and etc. by placing them between the bars need a larger space for your dishes in the on the basket.
-
Page 27: Operating The Product
Operating the product On/Off key 2. Programme Selection / Programme Cancel (3 seconds) key 3. Function keys Half Load function Extra Drying Function 4. Programme indicator 5. Salt indicator Not in use 7. Start / Cancel indicator 8. Time Delay / Programme Time indicator 9.
-
Page 28: Keys
Operating the product Keys Programme selection On/Off key Press the On/Off button to turn on When you press On / Off key, indicator lights your machine. illuminate on the display for ON position. 2. Check the Salt and Rinse Aid indicators The lights turn off in OFF position.
-
Page 29
Operating the product Dishwasher / User’s Manual 27 / 41 EN… -
Page 30: Auxiliary Functions
Operating the product Auxiliary functions Changing Warning Sound Volume After switching your machine on, Washing programmes of your dishwasher press Time Delay and P / P+ keys are designed to obtain the best cleaning simultaneously. Keep them pressed effect, considering the type of the soiling, until the countdown 3, 2, 1 is completed soiling degree and properties of the dishes on the display.
-
Page 31: Scheduling The Washing Time
Operating the product Floor illumination 3. Turn off the machine with On/Off key Warning to show that machine is to save the changes. in washing phase Scheduling the washing (depends on the model) time Your machine reflects a light to the floor during the washing process.
-
Page 32: Starting The Programme
Operating the product To cancel the Time Delay function The machine will remain silent Open the door of the product Press and in pause mode for some time hold the Programme Selection / Programme in order to remove the water Cancel keys for 3 seconds.
-
Page 33: Adjusting The Amount Of Rinse Aid
Operating the product Open the door of the machine. Rinse Aid indicator ( ) 2. Press On/Off key to turn off your machine. Please check the rinse aid indicator on the 3. Close the tap. display to see whether there is adequate amount of rinse aid in the dishwasher or 4.
-
Page 34: Innerclean
Operating the product InnerClean This programme is recommended to be operated on each 1-2 months for machine cleaning and necessary hygiene. The programme should be operated while the machine is empty. In order to achieve an efficient result, it is recommended to use together with special machine cleaning agents.
-
Page 35: Maintenance And Cleaning
Maintenance and cleaning Cleaning the filters Service life of the product extends and frequently faced problems decrease if it is Clean the filters at least once a week in cleaned at regular intervals. order for the machine operates efficiently. Unplug the product and turn off Check if food residues are left on the filters.
-
Page 36: Cleaning The Hose Filter
Maintenance and cleaning Cleaning the hose filter Damages on the machine that may be caused by impurities coming from the urban supply water or your own water installation (such as sand, dirt, rust, etc.) can be prevented by means of the filter attached to the water inlet hose.
-
Page 37: Cleaning The Impellers
Maintenance and cleaning Cleaning the impellers Upper impeller Clean the impellers at least once a week in Check if the holes on the upper impeller (1) order for the machine operates efficiently. are clogged. If they are clogged, remove and clean the impeller. Turn its nut to left to Lower impeller remove the upper impeller.
-
Page 38: Troubleshooting
Troubleshooting Machine does not start. • Power cable is unplugged. >>> Check if the power cable is plugged in. • Fuse is blown. >>> Check the fuses in your house. • Water is cut. >>> Make sure that the water inlet tap is open. •…
-
Page 39
Troubleshooting • Rinse aid is not sufficient. >>> Check the rinse aid indicator and add rinse aid if necessary. Increase the rinse aid setting if there is enough amount of rinse aid in the machine. • Machine is unloaded right after the programme is over. >>> Do not unload your machine right after washing process is completed. -
Page 40
Troubleshooting the filling process. Run the prewash programme to remove the salt that spilled inside the machine. Since the salt granules that will remain under the lid will dissolve during prewash, causing the lid loosen, check the lid once again at the end of the programme. There is a different odour in the machine A new machine has a peculiar odour. -
Page 41
Troubleshooting Detergent remains in detergent dispenser. • Detergent dispenser was damp when adding detergent. >>> Make sure that the detergent dispenser is dried well prior to filling it with detergent. • Detergent is added long before the washing process. >>> Pay attention to add detergent shortly before start-up of the washing. -
Page 42
Troubleshooting A smear remains on glasses that resembles milk stain which can not be removed when wiped by hand. A bluish / rainbow appearance occurs when the glass is pointed to light. • Excessive rinse aid is used. >>>Lower rinse aid setting. Clean the spilled rinse aid when adding rinse aid.