Раздел: Встраиваемая техника
Тип: Встраиваемая Посудомоечная Машина 45 См
Характеристики, спецификации
Установка:
встраиваемая полностью
Класс электропотребления:
A
Тип управления:
электронное
Энергопотребление за цикл:
0.8 кВтч
Время мойки при обычной программе:
165 мин
Уровень шума при работе:
52 дБ
Сушка посуды:
конденсационная
Стандартные программы мойки:
обычная программа для повседневного мытья, интенсивная программа для сильнозагрязненной посуды, экспресс-программа (быстрый цикл)
Специальные программы:
«деликатная» программа для мытья хрупкой посуды, экономичная программа для слабозагрязненной посуды, режим предварительного замачивания, режим полоскания
Таймер отсрочки запуска:
есть, от 1до 24 часов
Защита от протечек:
есть, частичная (корпус)
Максимальная температура воды на входе:
60 °C
Автоматическая установка жесткости воды:
нет
Индикатор наличия соли, ополаскивателя:
есть / есть
Дополнительные принадлежности:
держатель для бокалов
Размеры (ШхГхВ):
44.5x54x82 см
Инструкция к Встраивающей Посудомоечной Машиной 45 См Whirlpool ADG 175
ADG 175
Для РФ:
Срок службы изделия 5 лет

1
2
6
Чтобы открыть
сд иньте защепку
B
7
6

миска(ср.)
миска(бол)
чашки
блюдца
десертная
стаканы
передняя
часть
тарелка
3553
1551
3553
3553
1561
3213
1 2 3456 7
3244
1244
2244
2214
1214
7274
9

2
1
3
открыть
- 1
- 2
Аннотации для Встраивающей Посудомоечной Машиной 45 См Whirlpool ADG 175 в формате PDF
Топ 10 инструкций
Другие инструкции

- Manuals
- Brands
- Whirlpool Manuals
- Dishwasher
- ADG 175
- Instruction manual
-
Contents
-
Table of Contents
-
Troubleshooting
-
Bookmarks
Quick Links
Related Manuals for Whirlpool ADG 175
Summary of Contents for Whirlpool ADG 175
-
Page 1
ADG 175… -
Page 2: Table Of Contents
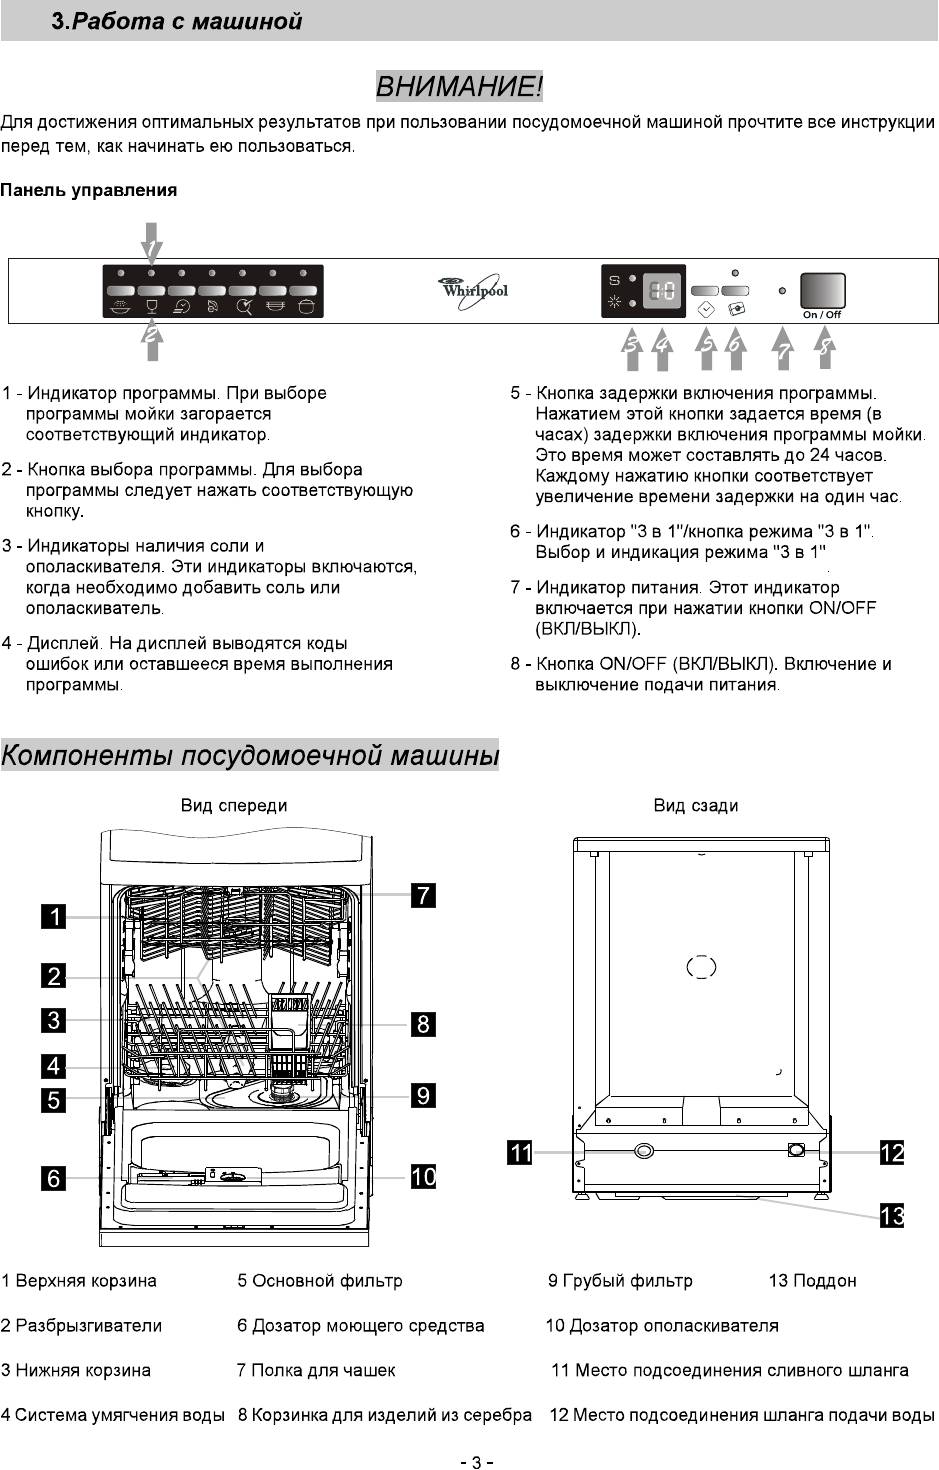
Dear Customer, Please carefully read this manual before using the dishwasher, it will help you to use and maintain the dishwasher properly. Keep it to refer to it at a later date. Control Panel………..3 Pass it on to any subsequent owner of the appliance. Dishwasher Features……..
-
Page 3
When using your dishwasher, follow the precautions listed below: This appliance must be grounded. In the event of a Improper connection of the equipment-grounding malfunction or breakdown, grounding will reduce conductor can result in the risk of an electric shock. the risk of anelectric shock by providing a path of Check with a qualified electrician or service least resistance of electric current. -
Page 4: Control Panel
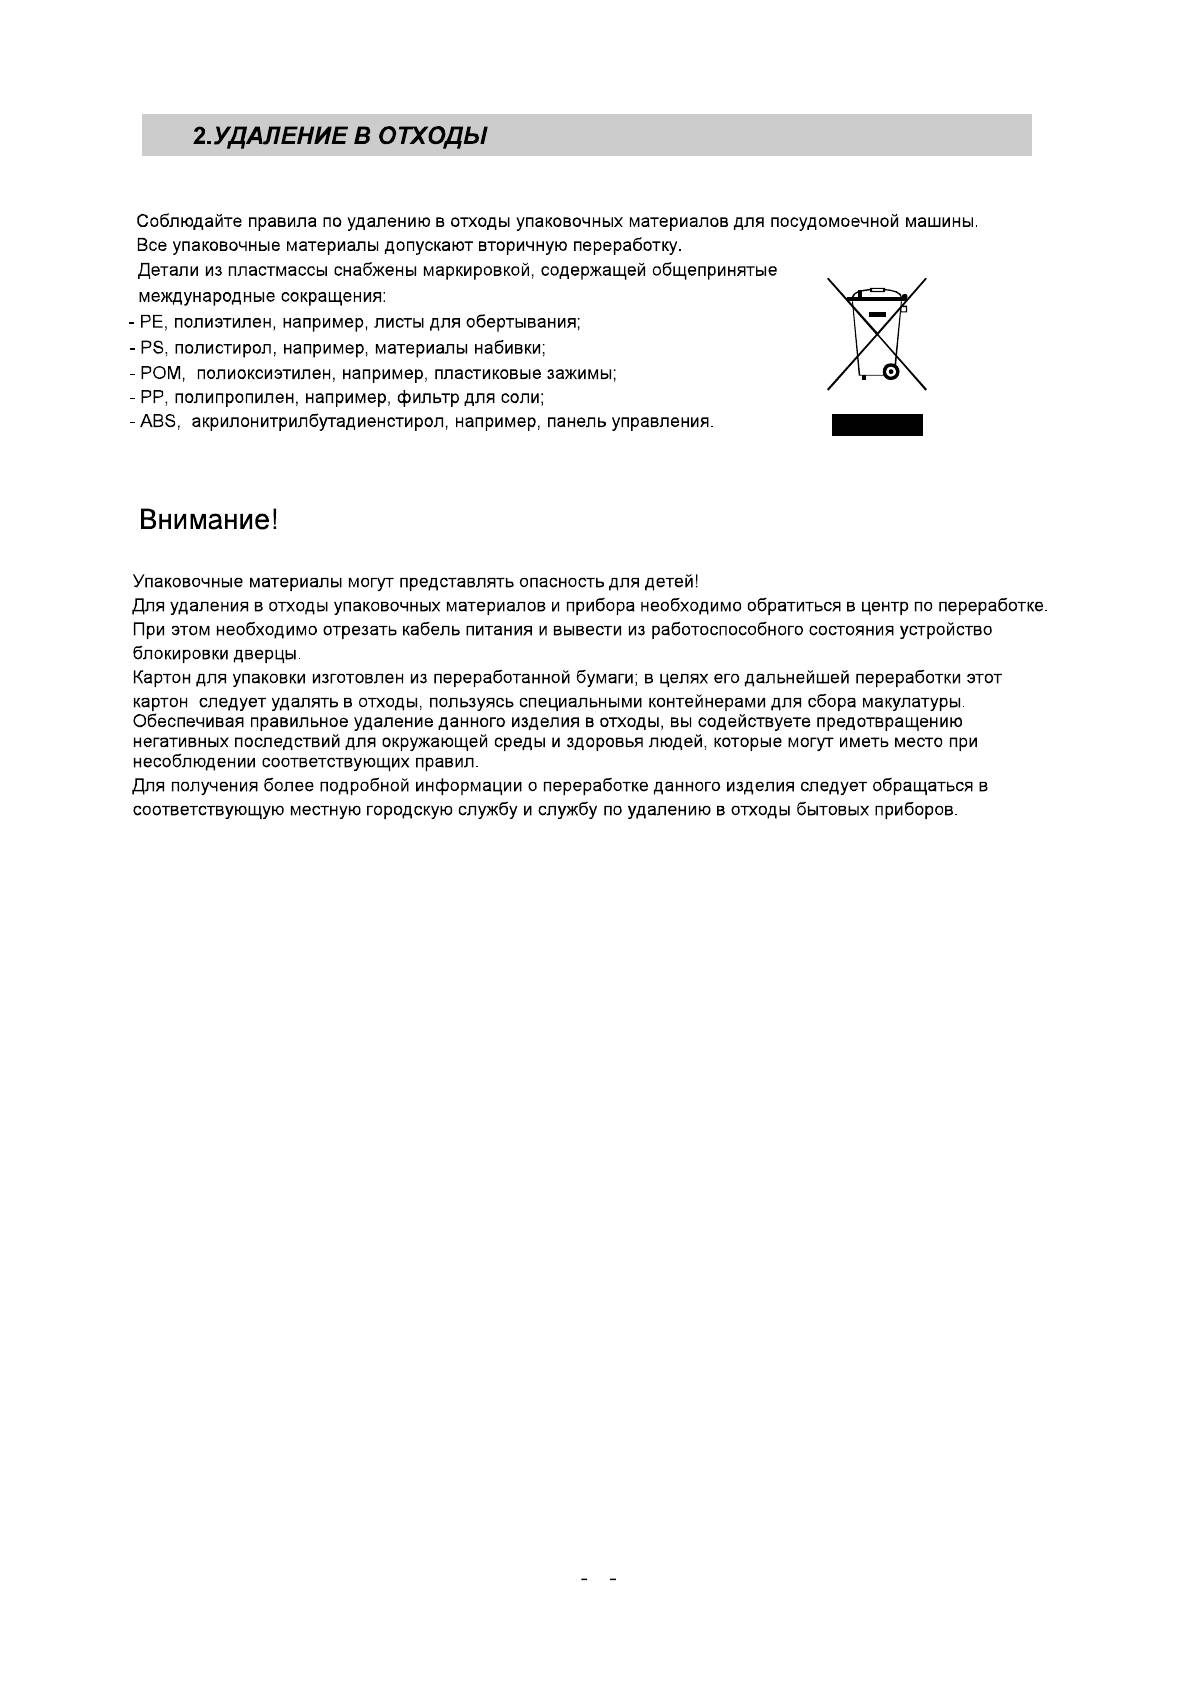
Dispo se of the dishwasher packaging material correctly. All pa ckaging materials ca n be recycled. Plastic parts are marked with the standard international abbreviations: for polyethylene, e .g. sheet wrapping material for polysty rene, e.g. padding material po lyoxymethylene, e.g. pla stic clips polypropylene, e.g.
-
Page 5: Dishwasher Features
To get the best performance from your dishwasher, read all operating instructions before using it for the first time. 3in1 indicator lig ht / 3in1 Program indicator light: when you select washing functions Button: To select and show 3in 1 program, the corr espond light will display.
-
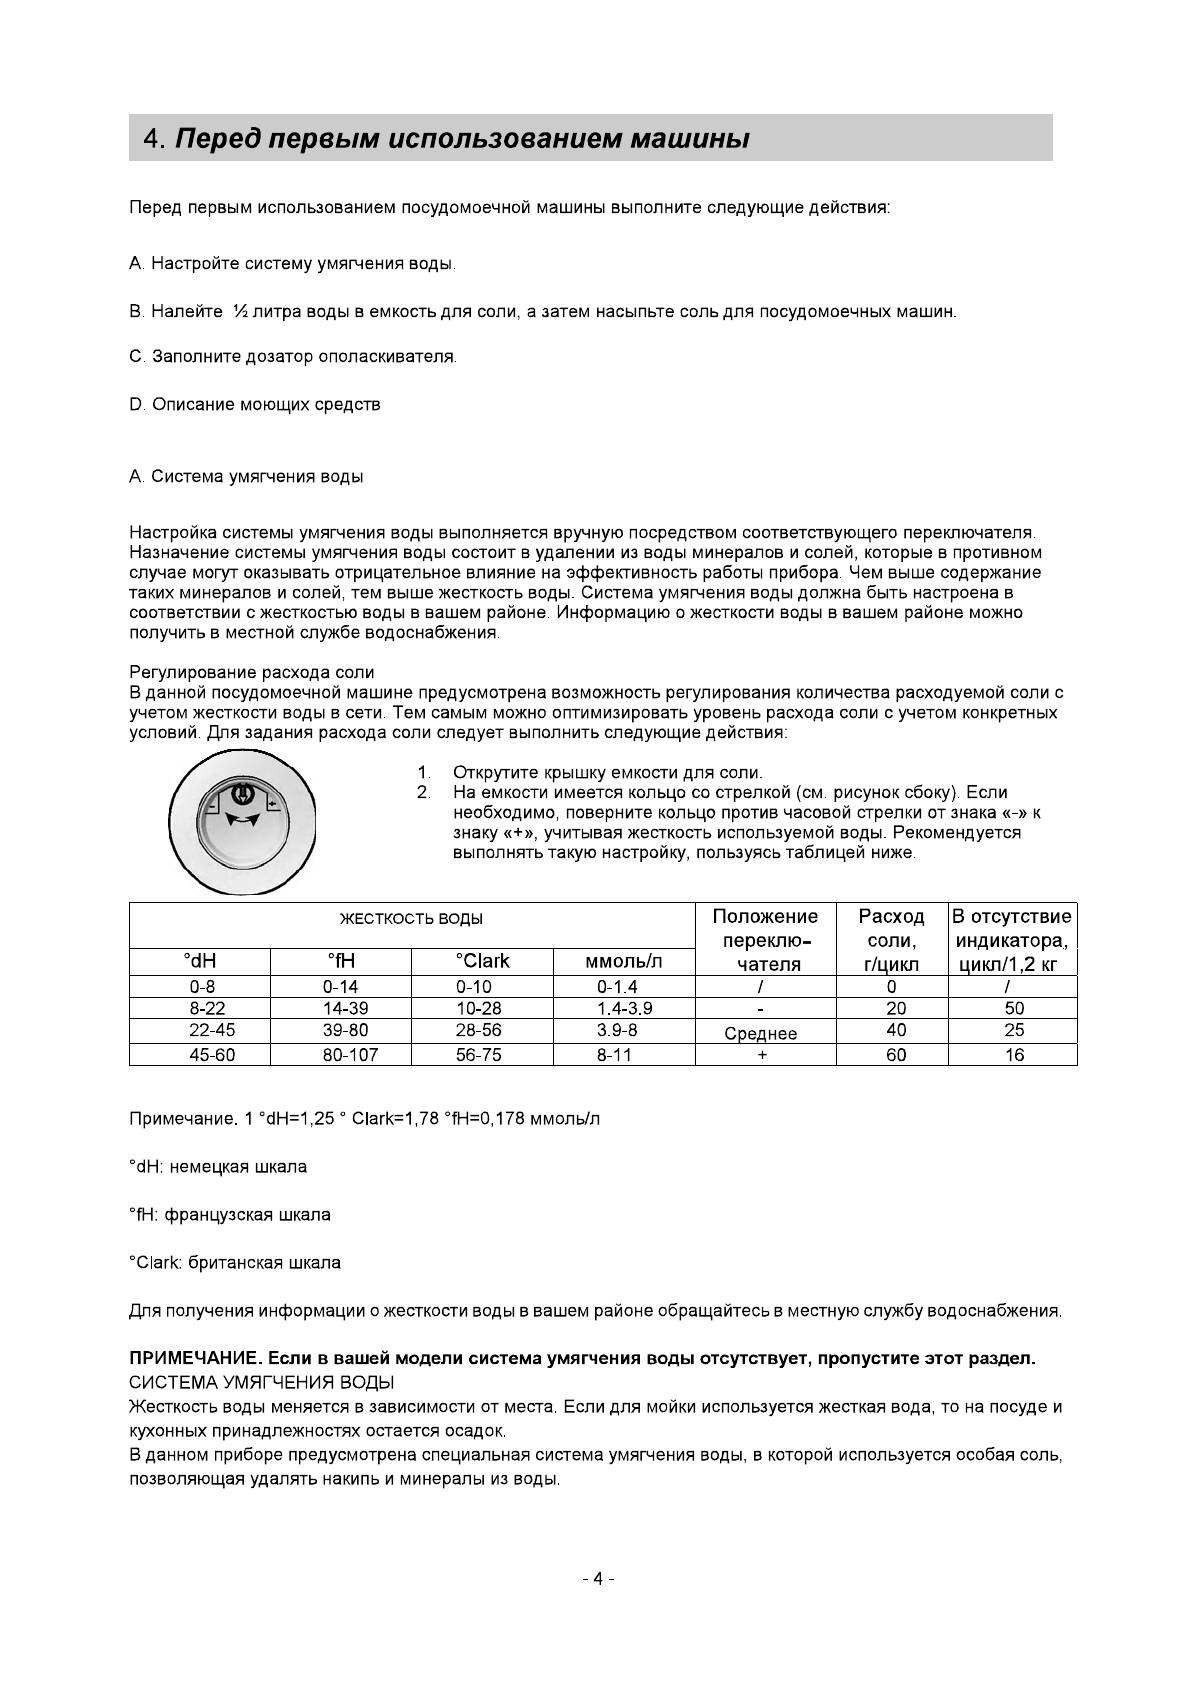
Page 6: A、Water Softener
Before using your dishwasher for the first time: A. Set the water softener / B. Pour 1 2 litre of water inside the salt container and then fill with d ishwash er salt C. Fill the rinse aid dispenser D. Fill in detergent A.
-
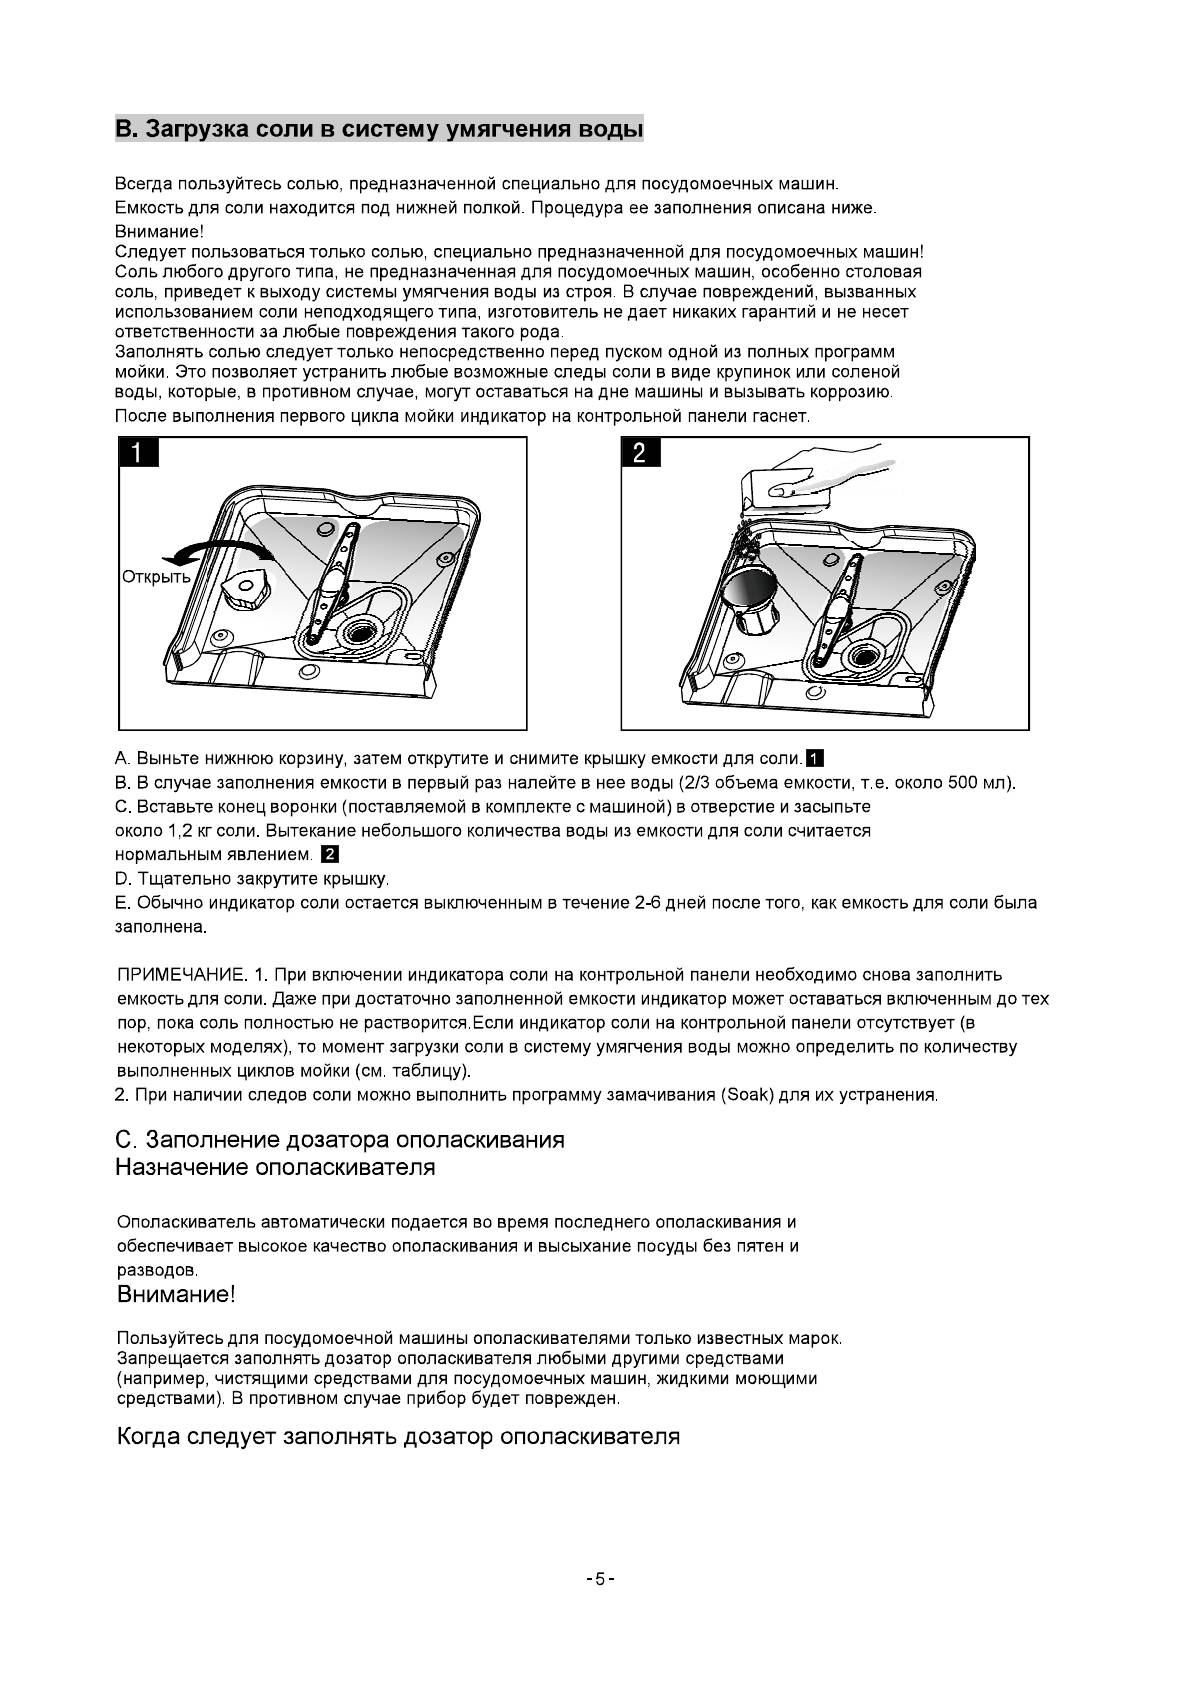
Page 7: B、Loading The Salt Into The Softener
B. Loading the Salt Into the Softener Always use the salt intended for use with dishwasher. The salt contain er is located beneath the lower basket and should be fill ed as explained in the following: Attention! Only use salt spe cif ically desi gne d for t he use i n dishwashers! Every other type of salt not speci fically de sig ned fo r the u se in a d ishwasher, espe cially table salt, will damage the w ater sof tener.
-
Page 8: D、Function Of Detergent
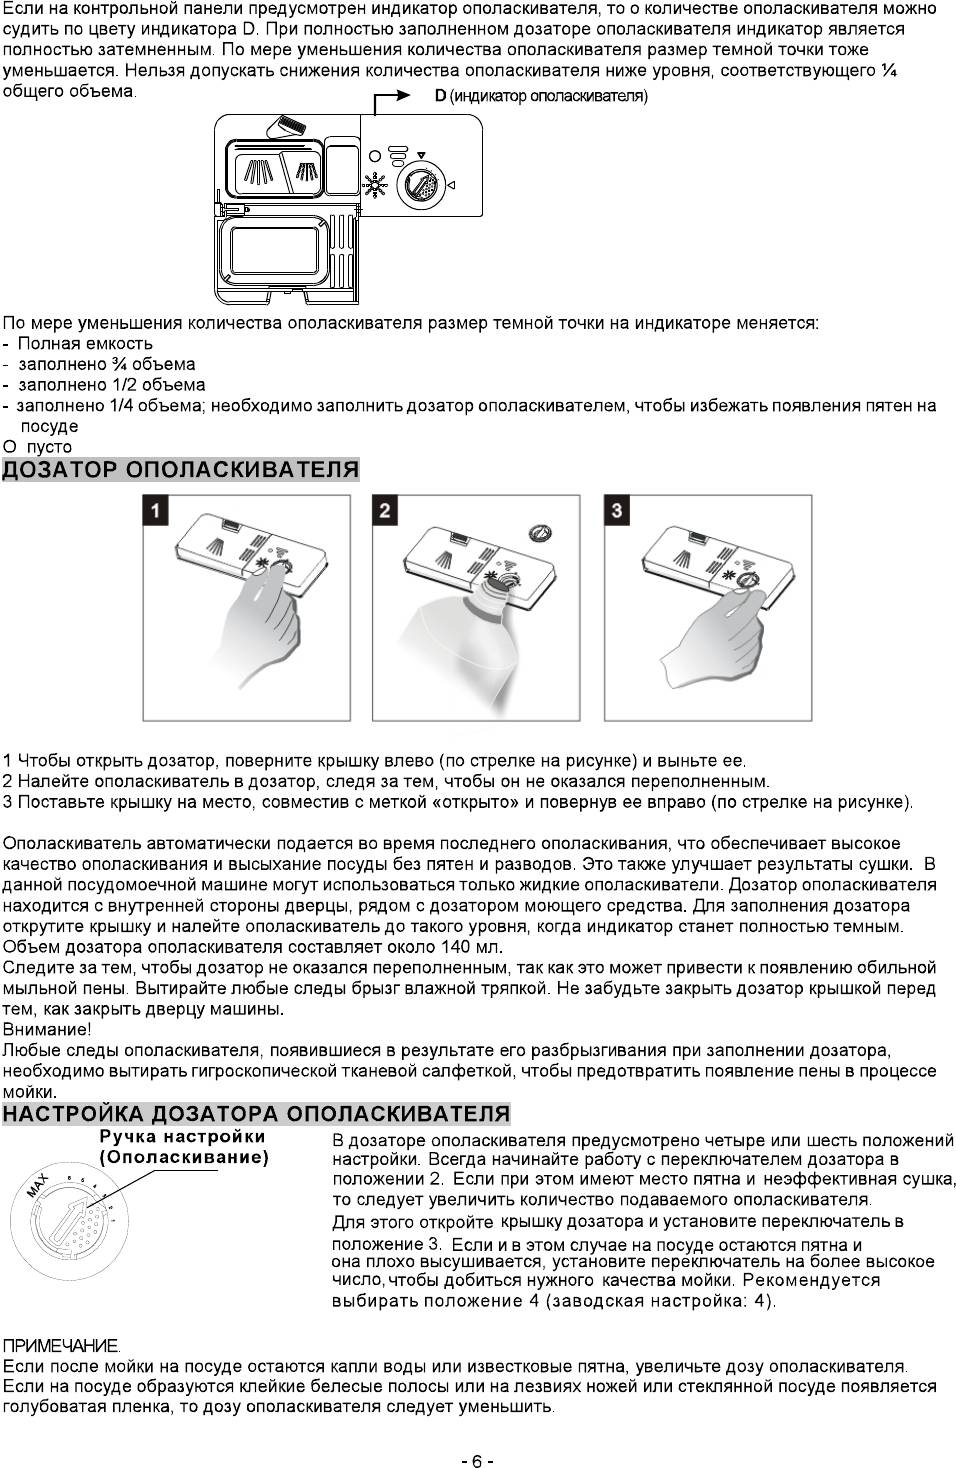
When to Refill the Rinse Aid Dispenser If there is no rinse-aid warning light in the control panel, you can estimate the amount from the colour » » of the optical level indicator C located next to the cap. When th e rinse-aid c ontainer is full, the whole indicator will be dark .As the rinse -aid diminishes, the size of the dark dot decreases.
-
Page 9: Concentrated Detergent
Normally new pulverised detergent is with out phosphate. Thus the water softener function of phosphate is not given. In this case we recommend to fill salt in the salt con taine r even when ° the hardness of water is only 6 dH. If dete rgents witho ut phosphate are used in the case of hard water often white spots appear on d ishes and glasses.
-
Page 10: How To Use The 3In1 Function
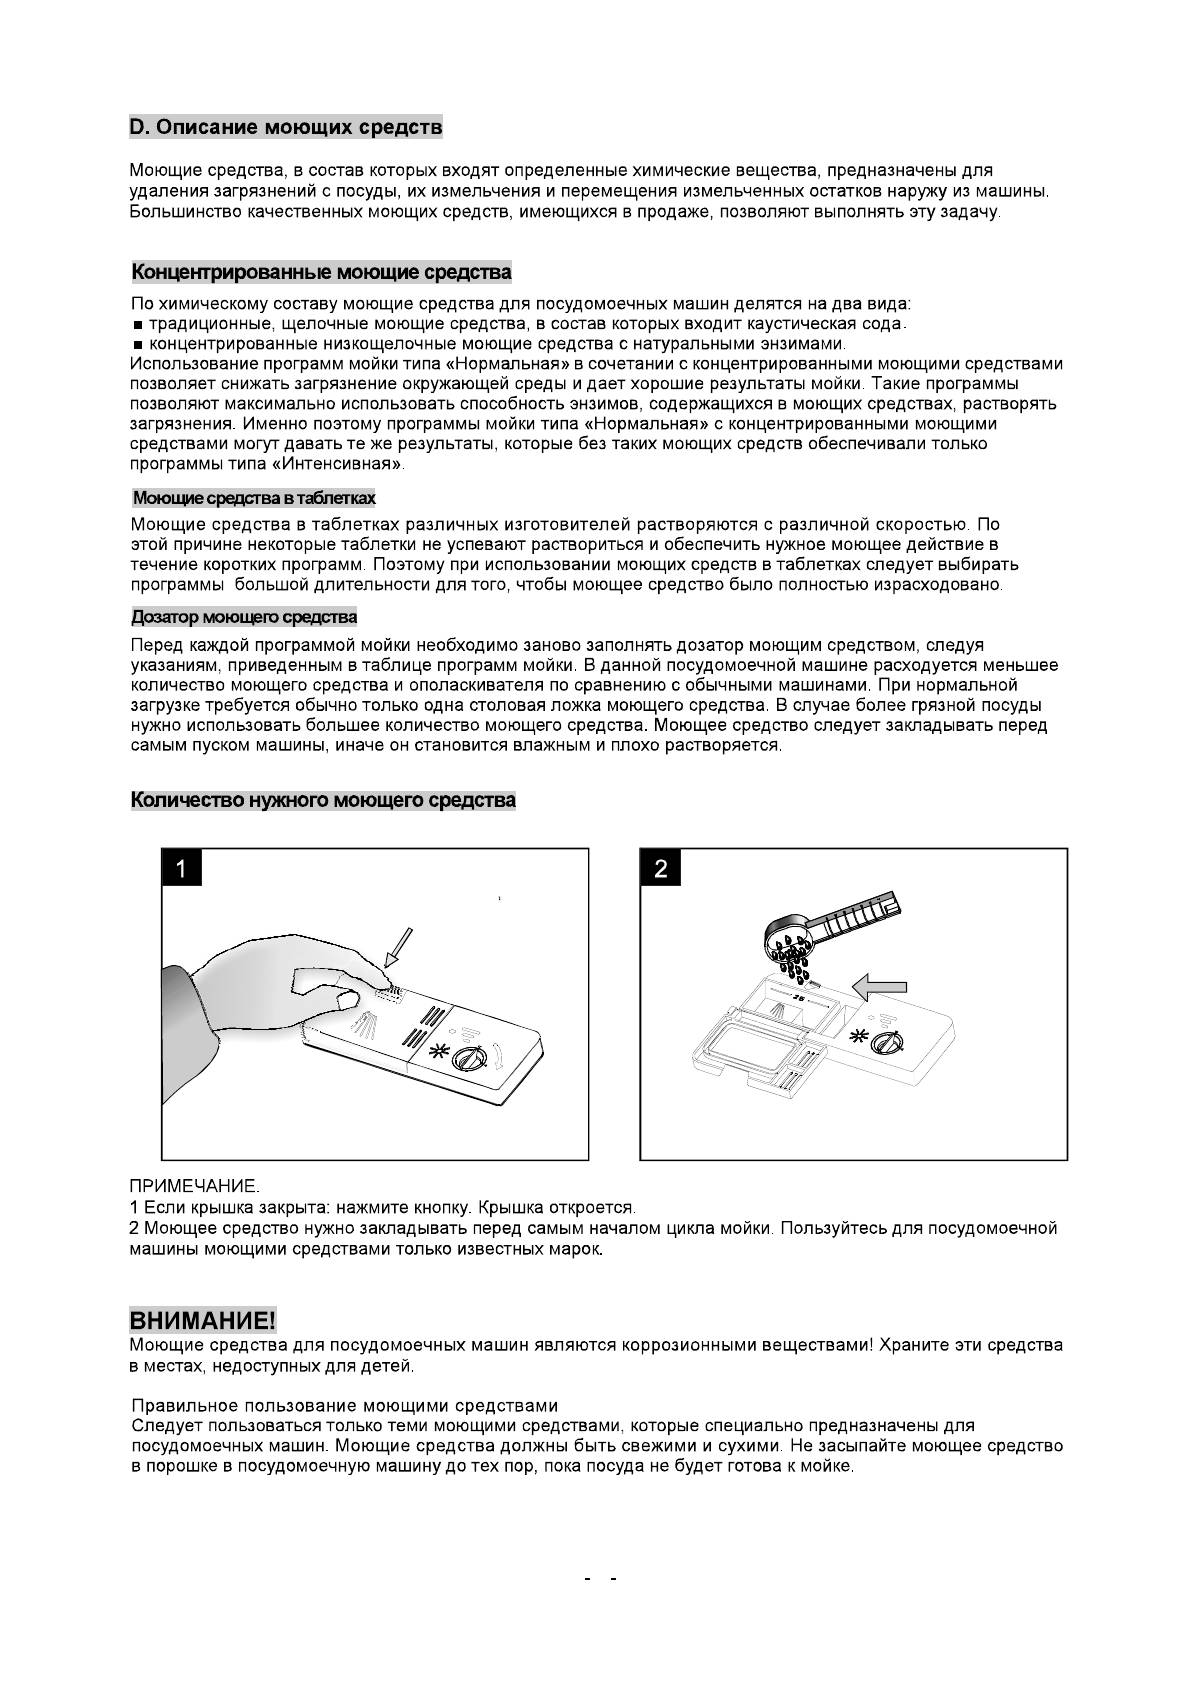
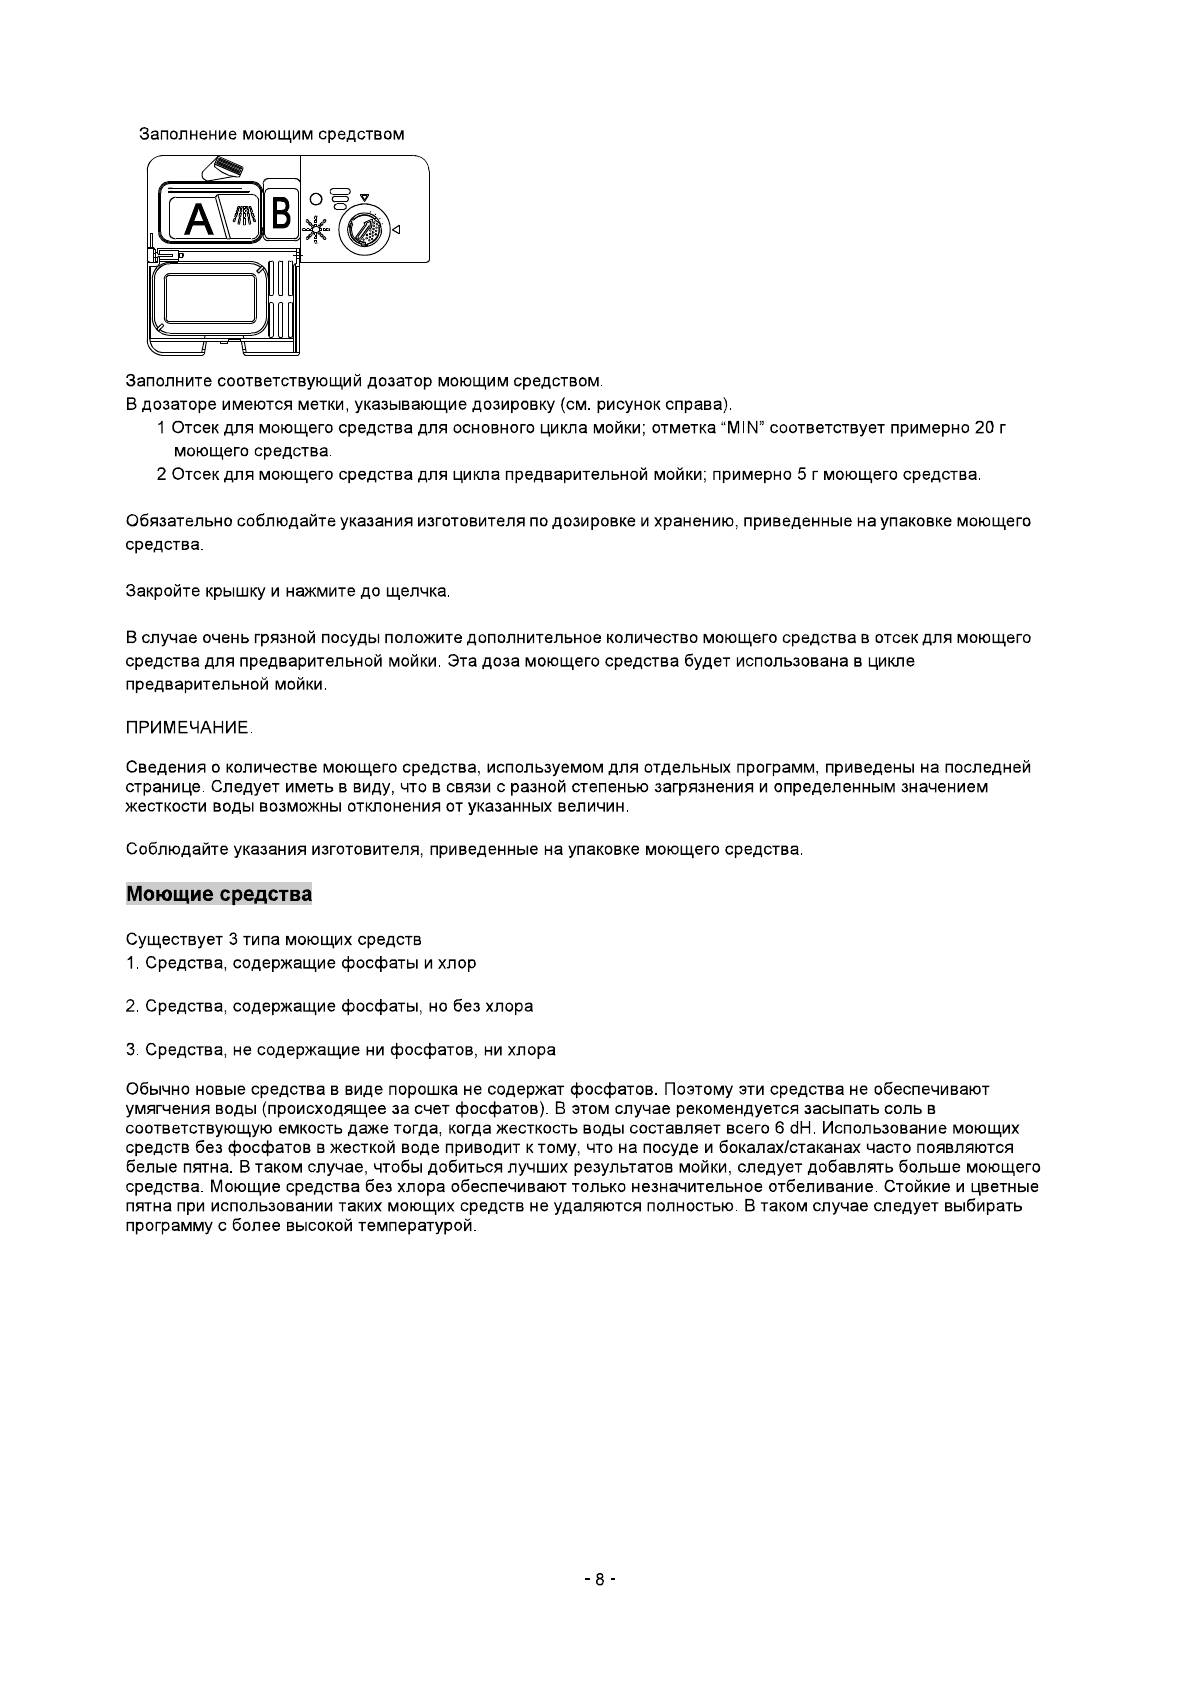
Fill in Detergent Fill the detergent dispenser with detergent. The marking indicate s the dosing levels , as illustrate d on the righ t: The place of main wash cycle deterg ent placed , “ ” MIN me ans approximately 20g of detergent. The place of pre-wash cycle deterge nt placed , approximately 5g o f detergent Plea se o bserve the manufacturers dosing and storage…
-
Page 11: Attention Before Or After Loading The Dishwasher Baskets
For best performance of the dishwasher, follow these loading guidelines. Features and appearance of baskets and cutlery baskets may vary from your model. Attention before or after Loading the Dishwasher Baskets Scrape off any large amounts of leftover food. Soften remnants of burnt food in pans. It is not necessary to rinse the dishes under running water.
-
Page 12: Loading The Lower Basket
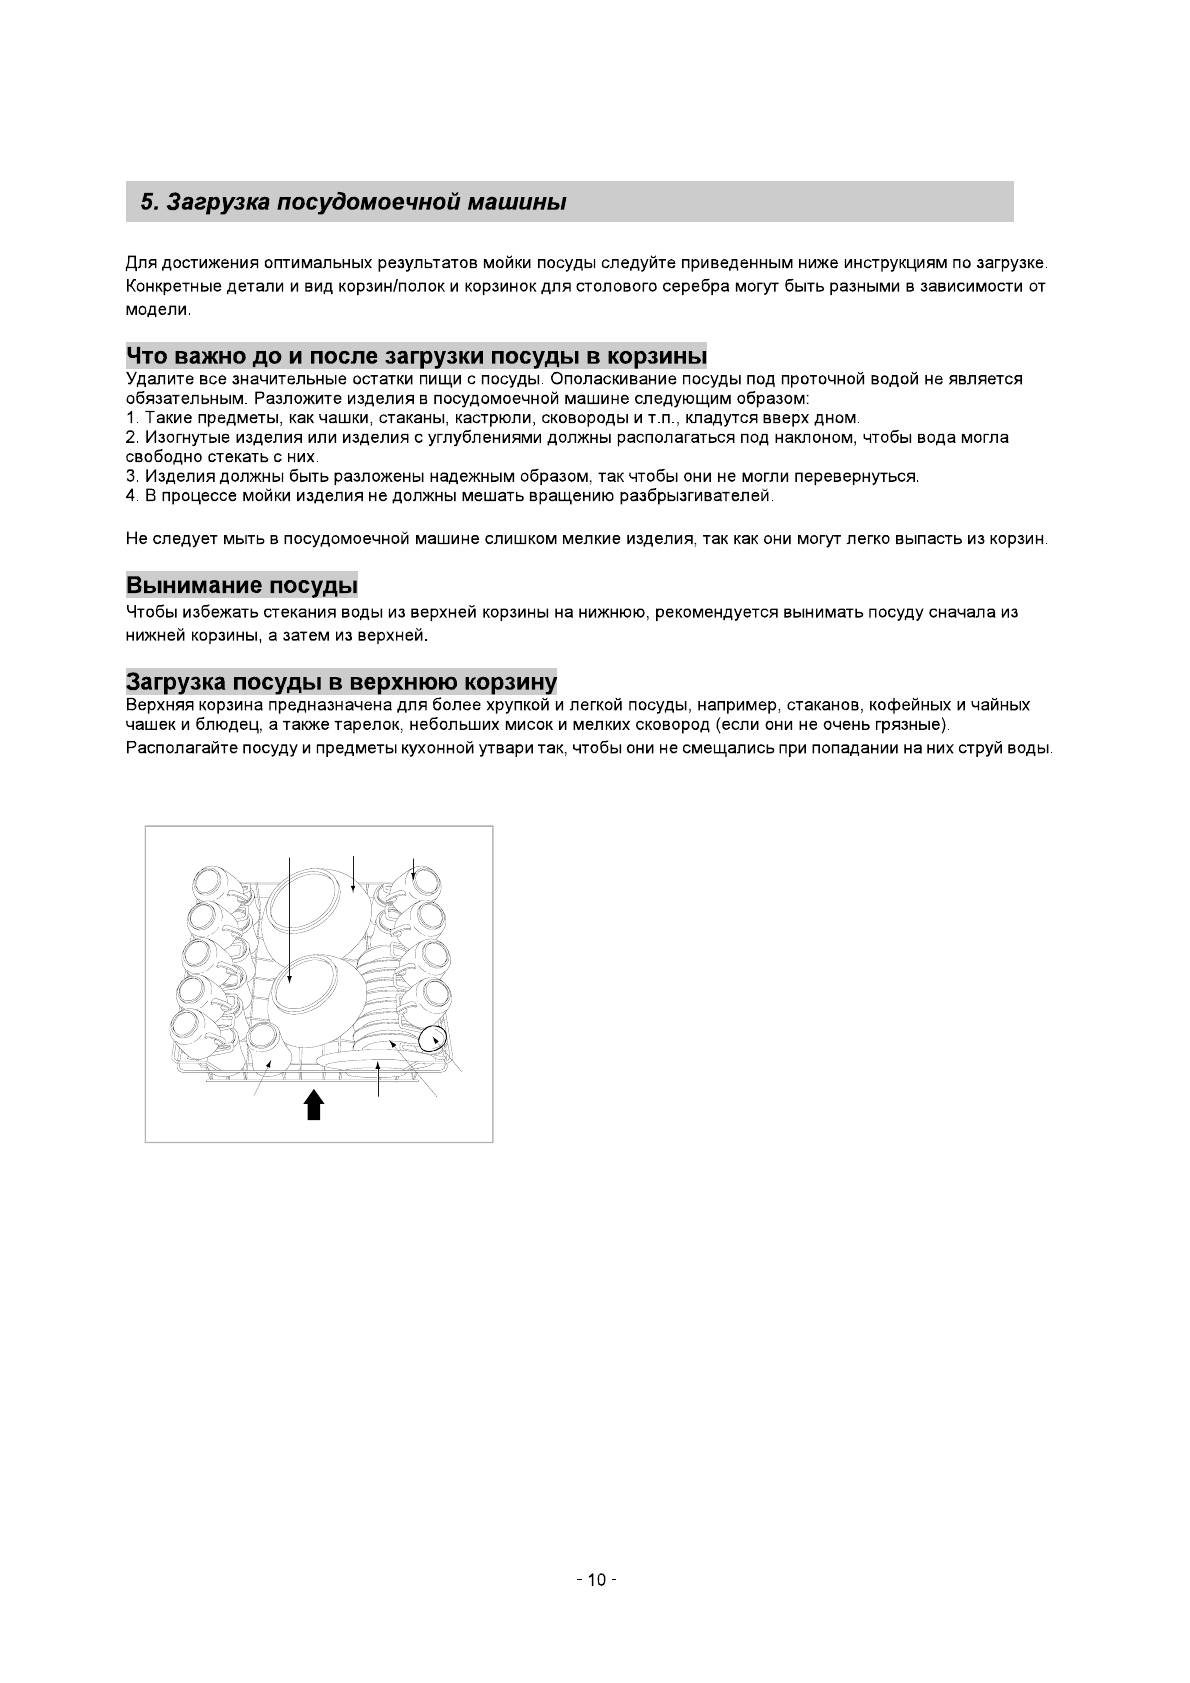
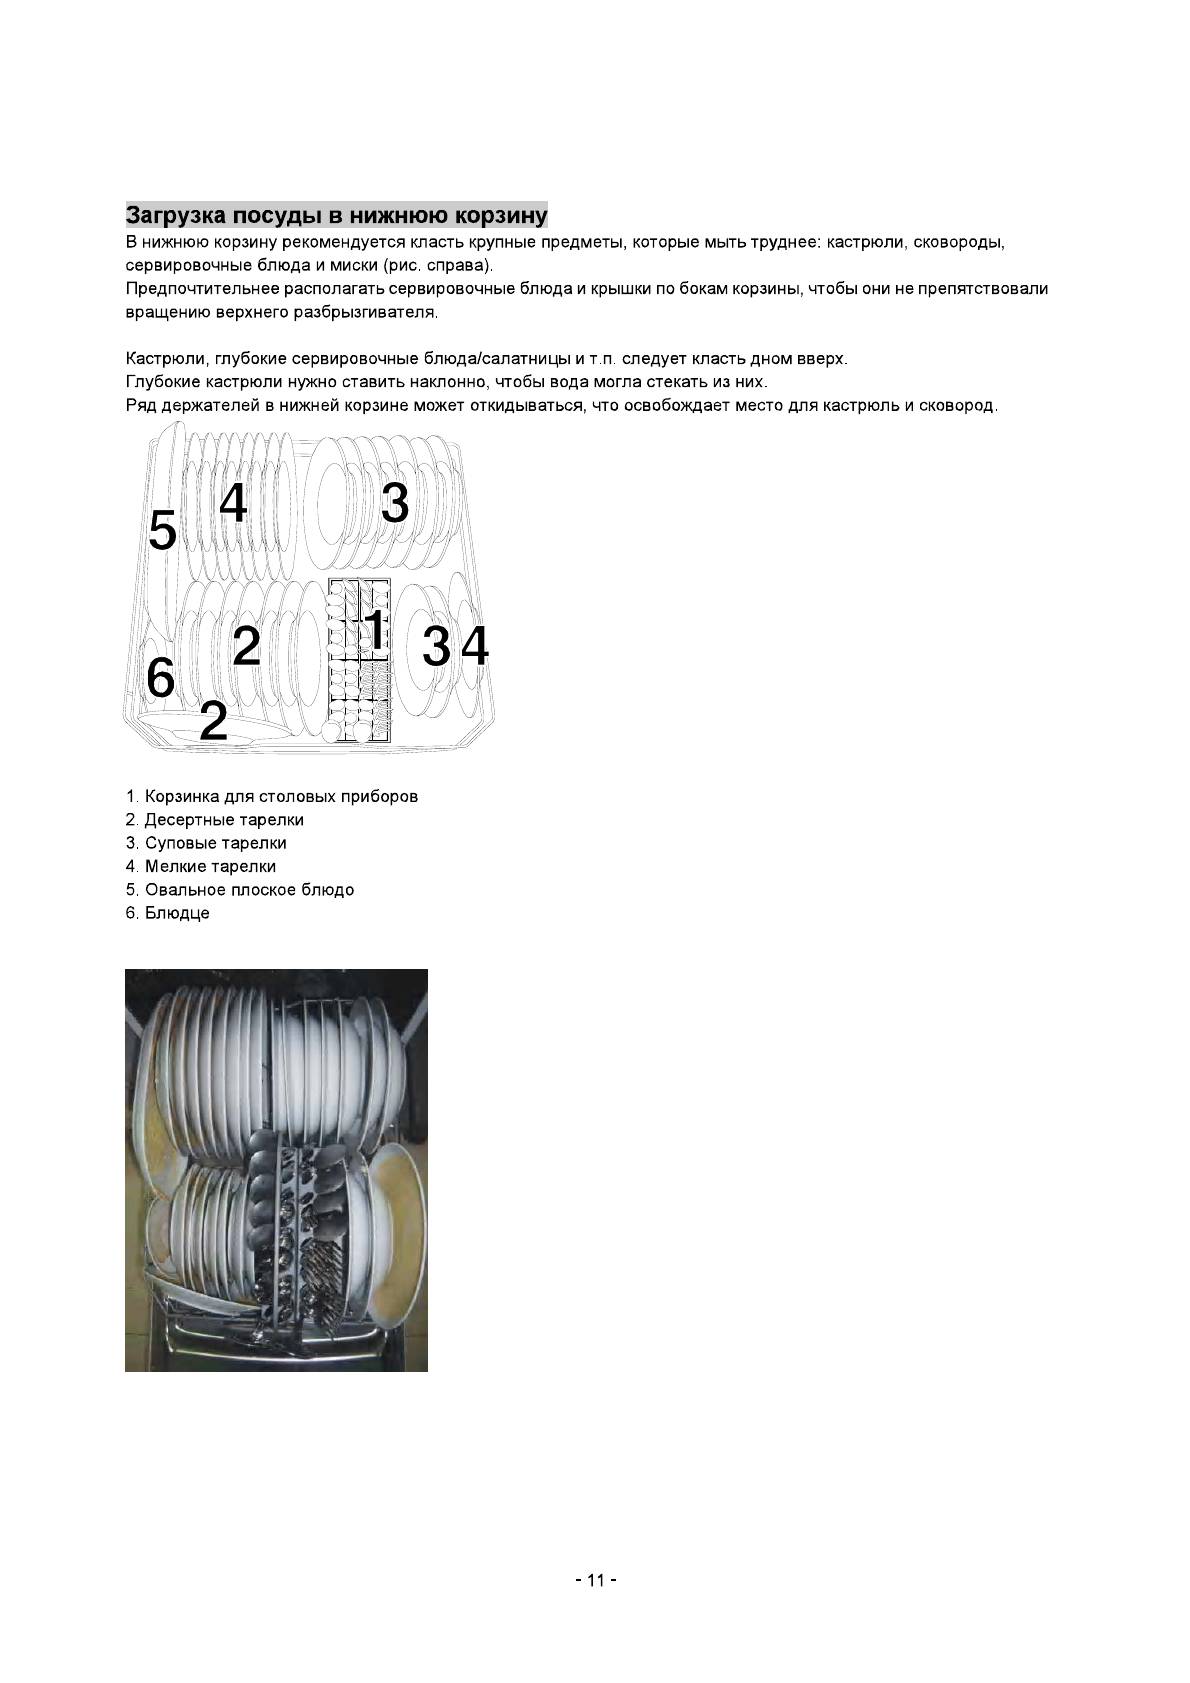
Loading the Lower Basket We recommend that you p lace large items which are most difficult to clean into the lower basket: pots, pans, lid s, serving dishes and bowls, as s hown in the figure to the right. It is preferable to place serving dishes and lids on the side of the racks in order to avoid blocking the ro tation of the top spray arm.
-
Page 13: Cutlery Basket
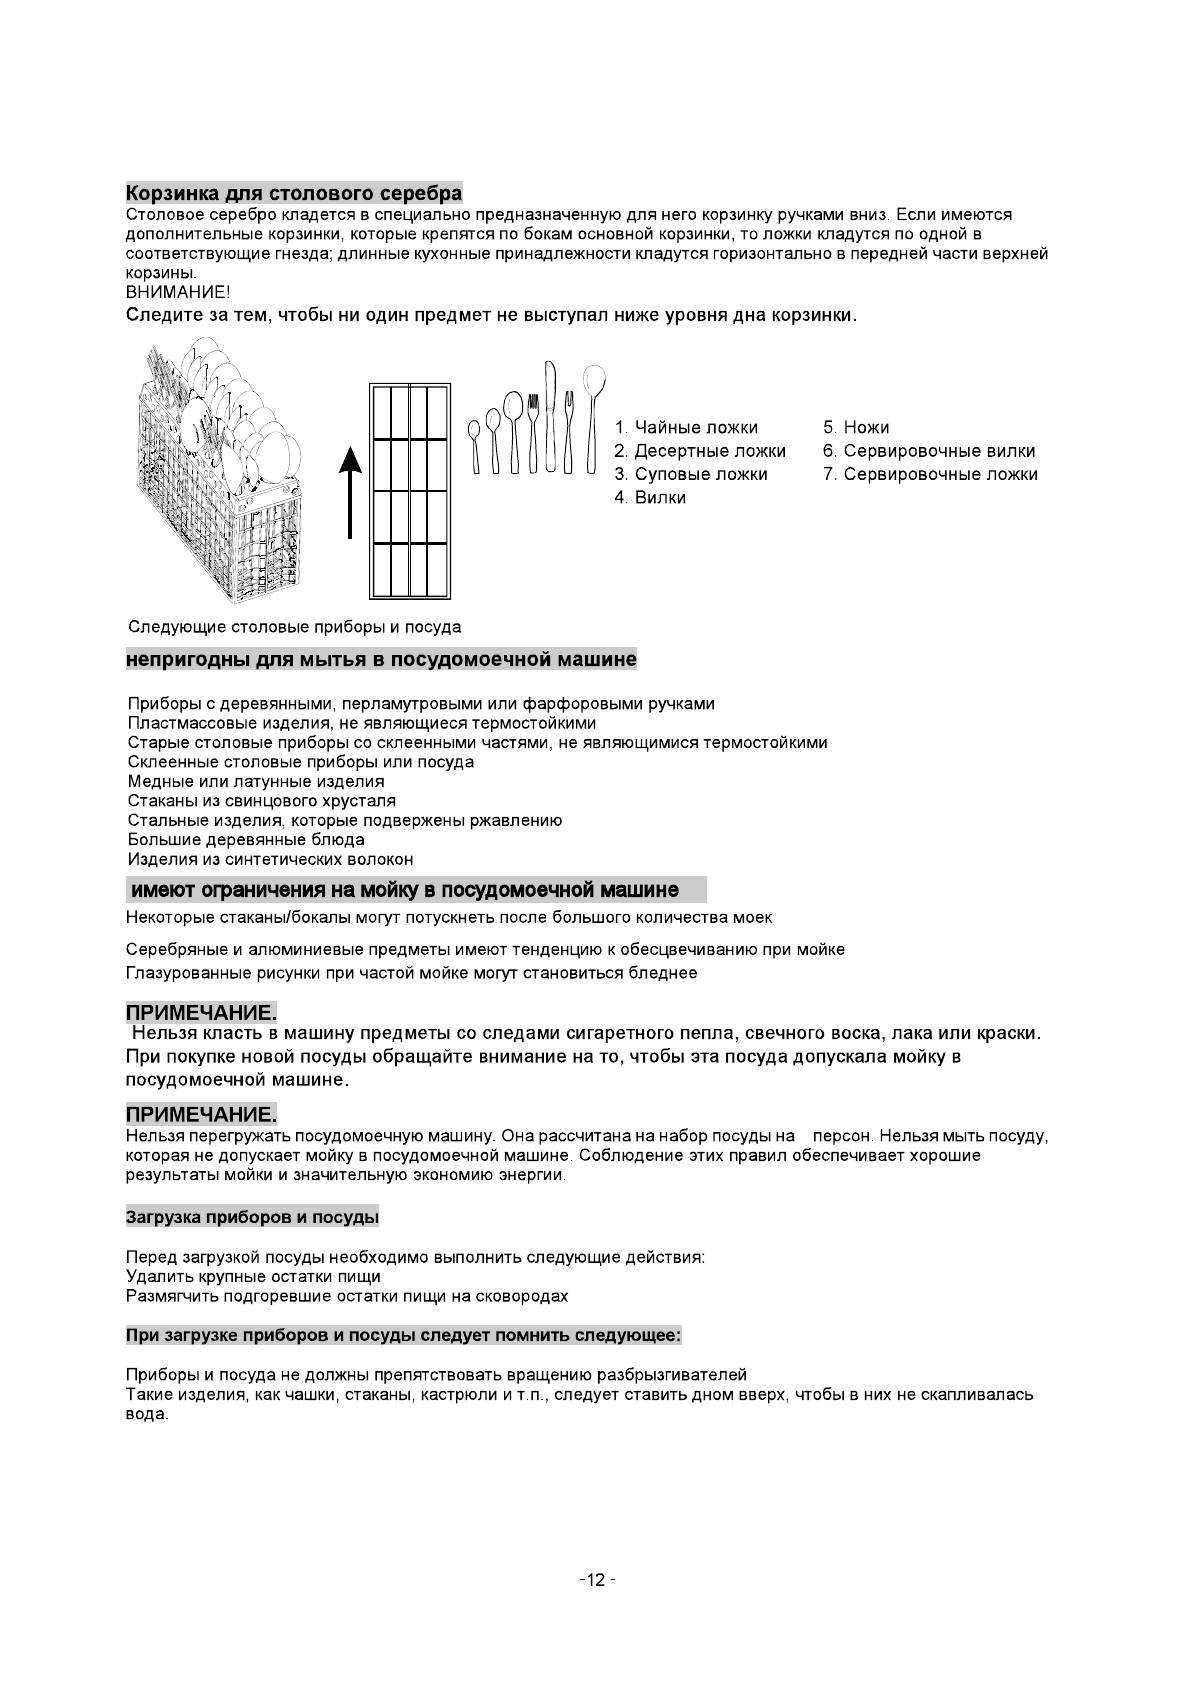
Cutlery Basket Cutlery should be placed in the cutlery basket with the handles at the bottom. If the rack has side baskets, the spoons should be loaded separately into the appropriate slots, especially long utensils should be placed in the horizontal position at the fron t of the uppe r basket as s hown in the picture.
-
Page 14: Wash Cycle Table
Meaning: need to fill rinse into the Rinse-Aid Dispenser. *En50242: This program is the test cycle, the rinse-aid dispenser setting is recommended to be set to position 6. ( ℃ ) Pre-wash 5 0 For the heaviest soiled loa ds, -wash ℃…
-
Page 15: Turning On The Appliance
Turning On the Appliance Starting a cycle wash Draw out the lower and up per basket, load the dish es a nd push them back. It is commended to lo ad the lower basket first, then the upper o ne (s ee the section e ntitled “…
-
Page 16: Filtering System
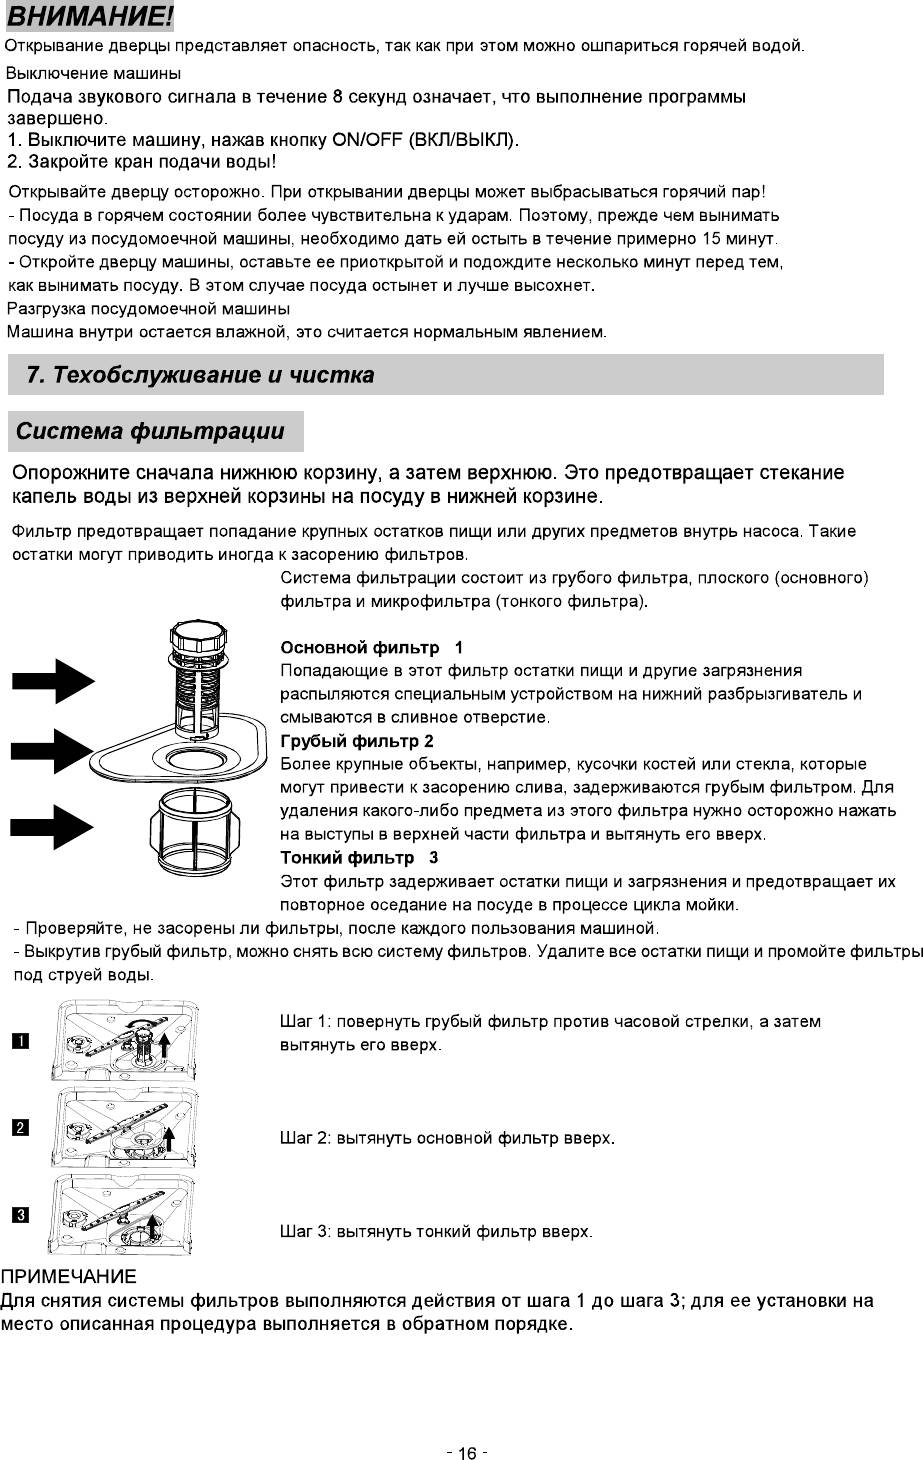
Filtering System The filter prevents larger remnants of food or other objects from getting inside the pum. The residues may block the filter, in this case they must be removed. The filter system consists of a coarse filter,a flat (Main filter) And a microfilter(Fine filter).
-
Page 17: Caring For The Dishwasher
Remarks: — Inspect the filters for blo cking a fter e very time the dishwa sher has been used. — By unscrewing the coarse filter, you can remove the filter system. Re move any foo d remna nts and clean the filters under running water. The entire filter assembly should be cleaned once a week.
-
Page 18: Installation Preparation
After Every Wash When not in Use for a LongTime It is recommend that you run a was h cy cle with the After every wash, turn off the water supply to the dishwasher empty an d the n remove the plug from the appliance and leave the door slightly open so that socket, turn off the wa ter supply and leave the door of moisture and odours are not trapped inside.
-
Page 19: Please Carefully Read The Installation Instruction
Please carefully read the installation instruction. ● Illustrations of cabinet dimensions and installation position of the dishwasher Preparations should b e made before moving the dishwasher to the installation place. Choose a place near the sink to facilitate the installation of inlet and drain hoses (see figure 1). If dishwasher is installed at the corner of the cabinet, there should be some sp ace (illustrated in figure 2) when the door is o pened.
-
Page 20
Install the hook on the aesthetic wooden panel and put the hook into the slot of the outer door of dishwasher(see figure 4a). After positioning of the panel , fix the panel onto the outer door by screws and bolts(See figure 4b) . Hop hook 【… -
Page 21: Tension Adjustment Of The Door Spring
● Tension adjustment of the door spring The door springs are set at the factory to the proper tension for the outer door. If aesthetic wooden panel are installed, you will have to adjust the door spring tension. Rotate the adjusting screw to drive the adjustor to strain or relax the steel cable(see figure 5).
-
Page 22: Dishwasher Installation Steps
● Dishwasher installation steps 1 Install the furniture door to the outer door of the dishwasher using the brackets provided. Refer to the template for positioning of the brackets. 2 Adjust the tension of the door springs by using an Allen key turning in a clockwise motion to tighten the left and right door springs.
-
Page 23
Dishwasher must be level for proper dish rack operation and wash performance. Place level on door and rack track inside the tub as shown to check that the dishwasher is level. level the dishwasher by adjusting the four leveling legs individually. When level the dishwasher, please pay attention not to let the dishwasher tip over. -
Page 24: Water Connection
Improper connection of the equipment earthing conductor can result in the risk of an electric shock. WARNING! for personal safety: Check with a qualified electrician or service representative if you are in doubt whether the DO NOT USE AN EXTENSION CORD OR AN ADAPTER PLUG WITH THIS APPLIANCE. appliance is properly earthed.
-
Page 25: Before Calling For Service
Before Calling for Service Fuse blown, or the Replace fuse or reset circuit breaker. Remove any other circuit breaker acted appliances sharing the same circuit with the dishwasher Power supply is not Make sure the dishwasher is turned on and the door is turned on closed securely.
-
Page 26: Error Codes
The dishes were not See notes in » Loading the Dishwasher Baskets «. loaded correctly. The programme was Select a more intensive programme. not powerful enough. See» Wash Cycle Table . » Not enough detergent Use more detergent, or change your detergent. was dispensed.
-
Page 27: Technical Information
Height : 820mm(adjustable+60mm) Width : 445mm Depth : 540mm Voltage connected Load : see rating label Water pressure: 0.04-1.0MPa Hot water connection : max 60 Power supply: see rating label Capacity: 9 Place settings…
-
Инструкции по эксплуатации
1

Whirlpool ADG 175 инструкция по эксплуатации
(31 страница)
- Языки:Русский
-
Тип:
PDF -
Размер:
6.65 MB -
Описание:
Посудомоечная машина
Просмотр
На NoDevice можно скачать инструкцию по эксплуатации для Whirlpool ADG 175. Руководство пользователя необходимо для ознакомления с правилами установки и эксплуатации Whirlpool ADG 175. Инструкции по использованию помогут правильно настроить Whirlpool ADG 175, исправить ошибки и выявить неполадки.
Страницы и текст этой инструкции
 Инструкция посудомоечной машины Whirlpool ADG 175
 Информация отображена на картинке
 Информация отображена на картинке
 Информация отображена на картинке
 Информация отображена на картинке
Как использовать наш сайт инструкций OnlineManuals.ru
Наша цель состоит в том, чтобы предоставить вам быстрый доступ к содержанию инструкции для посудомоечной машины Whirlpool ADG 175.
С помощью онлайн просмотра, Вы можете быстро просмотреть содержимое инструкции и найти решение проблемы с посудомоечной машины Whirlpool ADG 175.
Для Вашего удобства
Если листать руководство пользователя посудомоечной машины Whirlpool ADG 175 прямо на сайте, не очень удобно для Вас, есть два возможных решения:
• Просмотр в полноэкранном режиме — легко просмотреть руководство пользователя (без загрузки его на свой компьютер), Вы можете использовать режим полноэкранного просмотра.
Для просмотра инструкции пользователя посудомоечной машины Whirlpool ADG 175 на полном экране, используйте кнопку «Открыть в Pdf-viewer».
• Загрузка на компьютер — Вы можете также скачать Инструкция посудомоечной машины Whirlpool ADG 175 на свой компьютер и сохранить его в файлах.
Многие люди предпочитают читать документы не на экране, а в печатной версии.
Возможность печати руководства пользователя также была предусмотрена на нашем сайте,
и вы можете использовать ее, нажав на иконку «печать» в Pdf-viewer.
Нет необходимости печатать все руководство посудомоечной машины Whirlpool ADG 175, можно выбрать только нужные страницы инструкции.
Для ознакомления с инструкцией необходимо нажать на ссылку «ЗАГРУЗИТЬ», чтобы скачать pdf файл. Если есть кнопка «ПРОСМОТР», то можно просто посмотреть документ онлайн.
Для удобства, Вы можете сохранить данную страницу с файлом руководства по эксплуатации в свой список «избранное» прямо на сайте (доступно для зарегистрированных пользователей).
Смотрите инструкцию для похожих моделей:

Вы можете задать вопрос посетителям сайта по модели WHIRLPOOL ADG 175. Если Вы являетесь её пользователем, то пожалуйста оставьте, по возможности развёрнутый отзыв: