Contents
Introduction Back to top
Wrye Bash is a powerful mod management utility for games based on Bethesda’s Creation Engine. Its features include:
- A mod installation and conflict manager
- A plugin load order manager
- Increased mod compatibility
- Lifting of the 255 plugin limit through automatic merging of compatible mods
- .ini and settings files tweak management
- Screenshot management
- And many, many more
It currently supports the following games:
- Enderal: Forgotten Stories
- Enderal: Forgotten Stories: Special Edition
- Fallout 3 (Steam and Windows Store versions)
- Fallout 4 (Steam and Windows Store versions)
- Fallout 4 VR
- Fallout: New Vegas (Steam and Windows Store versions)
- Morrowind (very early support, Steam and Windows Store versions)
- Nehrim: At Fate’s Edge
- Oblivion (Steam and Windows Store versions)
- Skyrim
- Skyrim: Special Edition (Steam and Windows Store versions)
- Skyrim VR
Wrye Bash can appear daunting at first. To help make it more manageable, the documentation has been split into a few readmes that are targeted towards different usage requirements.
This readme covers only the most commonly used features, so that the average user can start using Wrye Bash without being overwhelmed. Information on the less commonly used features and more technical details of the features covered in this readme may be found in the Advanced Readme. Information on some of the syntaxes and file formats that Wrye Bash uses are found in the Technical Readme. Finally, Wrye Bash’s version history is stored in the Version History document.
Glossary Back to top
Modding for Creation Engine games has a wonderful history of confusing terminology. The list below details some terms commonly used when dealing with mods.
- The game is the game that Wrye Bash is managing, one of the ones listed above.
- Windows Store refers to a game installed with the Windows Store. This could also be referred to as a Game Pass, Xbox App, or Microsoft Store game.
- CTD is an acronym for Crash To Desktop. Used to describe the game crashing.
- DLC refers to any of the official downloadable content for the game.
- Mod refers to any unofficial user-made modification to the game.
- Mod author refers to a person that makes modifications to the game. It can also refer to those who are involved in the creation of utilities that are used by mod authors and/or users.
- ESM (case-sensitive) or ESM-flagged file refers to any file that the game treats as a master. For games before Fallout 4, the only thing that mattered was a flag inside the file called the ESM flag. For newer games, files with the extension
.esmare treated as masters too, whether they have the flag set or not. These load before all ESPs (see below). It is an acronym for Elder Scrolls Master. - .esm (case-sensitive) refers to files with the extension
.esm. See the ESM entry above for notes on how they behave in different games. - ESP (case-insensitive) refers to any file with a
.espextension. It is an acronym for Elder Scrolls Plugin. - ESL (case-sensitive) refers to any file with a flag called the ESL flag set. Files with the extension
.eslare treated as ESLs whether they have the flag or not. Only Fallout 4 and Skyrim: Special Edition currently support these. Certain restrictions apply as to which plugins can be ESL-flagged. They do not take up a regular load order slot, theoretically allowing up to 4096 plugins to be loaded. - .esl (case-sensitive) refers to files with the extension
.esl. These automatically receive the ESL and ESM flags. Only Fallout 4 and Skyrim: Special Edition currently support them. - ESU (case-insensitive) refers to any file with a
.esuextension. These are an unofficial type of plugin used by xEdit. It is an acronym for Elder Scrolls Update. - Plugin refers to any of the above file types.
- Master refers to any plugins that another plugin is dependent on to function. (It can also refer to an ESM file, as it used to be that only ESMs could be masters, until mod authors developed methods of using ESP files as masters too. The latter definition will not be used in this documentation.)
- The game’s master file refers to the ESM that must be loaded for the game to function. A short table showing the master file for each game follows:
- Conflicts occur when two different mods try to change the same game variable or resource, which could be anything from a specific object in game to a script or a texture. Conflicts can cause problems, including CTDs or save game corruption, but they are not inherently bad, and most modding is the result of purposeful conflicts.
- Resource Conflicts occur when two mods contain two different files that go in the same place, so one mod’s file overwrites the others’s file. This type of conflict can be managed by altering the install order of mods.
- Data Conflicts occur when two mod plugins alter the same game data. This type of conflict can be managed by altering the load order of plugins or creating patches.
- BSAs are Bethesda Softwork Archives, with
.bsa(All but Fallout 4) or.ba2(Fallout 4) file extensions. They can be used to store resource files such as textures and meshes. - ITMs are Identical To Master records, ie. data in a plugin for something that is identical to the data for that thing in the plugin’s master(s). Usually a type of unintended edit, known as a
dirty edit
, which can break the functionality of other mods that require the record in question to have a specific value, but which have that value overridden by an ITM record. - UDRs are Undeleted and Disabled References. Deleted References can cause crashes, and this can be avoided by first undeleting and then disabling them instead. A type of
dirty edit
. Note that this acronym does not refer to the deleted references themselves — it actually refers to their fixed counterparts. For example,Scan For UDRs
will scan for deleted references, not undeleted and disabled references, and BOSS/LOOT will report the UDR count for a plugin, which is actually the number of deleted references that can be fixed.
| Game | Master File |
|---|---|
| Enderal: Forgotten Stories | Skyrim.esm |
| Enderal: Forgotten Stories: Special Edition | Skyrim.esm |
| Fallout 3 | Fallout3.esm |
| Fallout 4 | Fallout4.esm |
| Fallout 4 VR | Fallout4.esm |
| Fallout: New Vegas | FalloutNV.esm |
| Morrowind | Morrowind.esm |
| Nehrim: At Fate’s Edge | Nehrim.esm |
| Oblivion | Oblivion.esm |
| Skyrim | Skyrim.esm |
| Skyrim: Special Edition | Skyrim.esm |
| Skyrim VR | Skyrim.esm |
This readme will also use the placeholder [Game]. Replace this with the game that you’re managing with Wrye Bash. Additional terminology specific to Wrye Bash’s functions will be introduced as required. Also, links that are followed by go to pages that are not part of the Wrye Bash documentation.
Installation Back to top
The simplest way to install Wrye Bash is using the installer, as it installs
Wrye Bash and its dependencies automatically. Note: If you
want to manage a Windows Store game (since the installer does not and
cannot support Windows Store games) or prefer to manually install Wrye Bash
for any other reason, read the instructions below.
Note: There are two versions of Wrye Bash available: the Python version and the Standalone version. Both are the same program, but the Standalone version has fewer dependencies and so is recommended for most people.
Windows Vista, 7, 8 & 10 users: Windows’ User Account Control feature may interfere with the running of Wrye Bash and other utilities. See the File Permissions section for solutions.
Manual Standalone Version Installation:
- Download and install the latest MSVC Redistributable (x64).
- You now have a choice:
- Extract the downloaded Wrye Bash archive into any folder.
- Extract the downloaded Wrye Bash archive into the game folder (e.g.
Oblivion
,Skyrim
orFallout
, depending on the game) so that the Mopy
directory appears in the game folder. - Run Wrye Bash by double-clicking
Wrye Bash.exe
in the new Mopy folder. If you chose the second option above, Wrye Bash will now open. However, you will have to repeat the procedure for each new game you install.
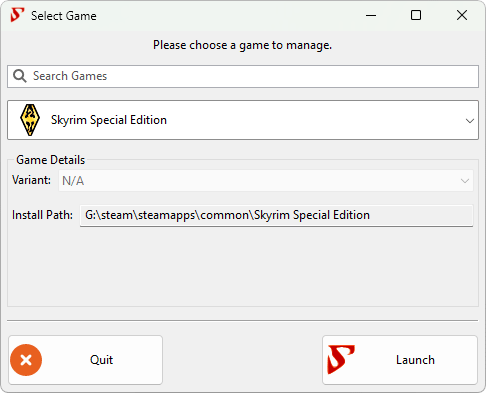
If you chose the first option, you will see a game select screen. Simply select one of the listed games to continue:
Manual Python Version Installation:
- Download and install all the required Python libraries and python itself.
See the Python Components section of the Advanced readme
for the list of included libraries and their versions. If you have previously installed Python and any Python libraries,
you may not need to install them again. - Download and install the latest MSVC Redistributable (x64).
- Extract the downloaded Wrye Bash archive into your game folder (e.g.
Oblivion
,Skyrim
orFallout
, depending on the game) so that the Mopy
directory appears by the game executable. See the
Alternative Install Locations if you wish to install to a different directory. - Navigate to the Mopy directory and run Wrye Bash by double-clicking
Wrye Bash Launcher.pyw
.
Uninstallation Back to top
The ease with which Wrye Bash can be removed is dependent on how much you use it to manage your modded game.
- If you use a Bashed Patch, you will need to remove any dependencies on it from your saves before uninstalling Wrye Bash in order to avoid in-game issues. This may be near-impossible to do, depending on what is in your Bashed Patch.
- If you use BAIN to manage your installed mods, you will need to ensure that you have an adequate alternative management system ready, as although uninstalling Wrye Bash will not uninstall your mods, you will no longer be able to use BAIN’s conflict resolution features.
- If you use any INI tweaks applied through Wrye Bash, you will need to make a note of which tweaks you have applied, as although uninstalling Wrye Bash will not undo your tweaks, you will no longer have any record of tweaks applied or default values.
- If you use the People tab, you will need to transfer your notes on people and record their karma outside of Wrye Bash.
If none of the above points apply to you, or once you have taken the necessary measures for the points that apply, you can uninstall Wrye Bash by either running the uninstaller, if you used the installer to install Wrye Bash, or delete the following files and folders if you installed it manually.
[Game]Mopy— If you’ve edited any localisation files in thel10nfolder that you want to keep, back them up.[Game]DataBash Patches— If you’ve exported any CSV files that you want to keep, back them up.[Game]DataBashTags— If you’ve manually created any tag files that you want to keep, back them up.[Game]DataDocs[Game]DataINI TweaksDocumentsMy Games[Game]— Only delete theBashProfiles.dat,BashProfiles.dat.bak,BashSettings.dat,BashSettings.dat.bak,Messages.dat,Messages.dat.bak,People.datandPeople.dat.bakfiles and theSavesBashfolder.[Game] Mods(in the same folder as [Game] for most games, inDocumentsWrye Bashfor Windows Store games) — TheBash Installersfolder stores the mods you’ve installed via BAIN.
Installing Mods Back to top
Overview Back to top


Wrye Bash mod installer are known as BAIN (BAsh INstallers), and are presented on the Installers Tab.
The first time the Installers tab is opened, a dialog will appear asking if BAIN should be initialized.
If you click Yes
, BAIN will be initialised, which can take some time.
After that, the information refresh performed when the Installers tab is opened is much faster.
BAIN’s primary function is to install mod packages. BAIN
Packages can be compressed archives (.zip,
.7z, .rar, .001, .tar) or uncompressed
directories. Uncompressed directories are called projects.
When we refer to projects and archives together we will also be using the
collective term packages or installers.
If BAIN is disabled, ie. if you clicked No
on the dialog that was displayed the first time you selected the Installers tab, it can be re-enabled by right clicking on a column header in the Installers tab and selecting Enabled.
Packages need to be placed in the Bash Installers directory which is created the first time Bash runs inside the "Game" Mods directory. This directory is by default
created on the same level as your game directory (that is, if your game exe is located in «C:GAMESTESIVOblivion», then by default Bash will create the «C:GAMESTESIVOblivion Mods»
directory on first run), but you can point Bash to create this «Game» Mods directory wherever you want (or point it to an existing one) via the sOblivionMods ini setting. Do
not however put it inside the game Data directory, as the game may well be confused and scan it adding to performance deterioration, mods thrashing.
To add an installer to Wrye Bash Installers, you can either manually copy and paste the zip to the Bash Installers Directory, or just drag and drop the zip onto the Installers tab.
Bash will scan the Bash Installers directory and pick up all subfolders and all archives — except for:
- folders or files that begin with
--will be skipped - a
Bain Converterssubdir of Bash Installers will be skipped - folders or files that begin with
bashwill be skipped - you may specify additional directories to be skipped via the
sSkippedBashInstallersDirsini setting
Now BAIN will try to classify the packages it detected in Bash Installers into its package formats — if it fails the package will display as unrecognized and will have to
be restructured.
BAIN-Compatible installer layout Back to top
When scanning an installer (package or project) BAIN follows some rules to
decide what’s in there and if it can be installed. BAIN will search for
specific directories and file extensions (bsa/ba2, ini, all plugin
extensions). All directory detection is case insensitive.
Directories BAIN is aware of, independent of the game, are:
| Wrye Bash Directory | Notes |
|---|---|
| bashtags | Its contents will be copied intoData/BashTags. |
| bash patches | BAIN will install files in this folder from packages, usually in the form of .csv files. |
| docs | Its contents will be copied into Data/Docs. |
| ini tweaks | INI tweaks inside this will be installed inData/INI Tweaks and appear on the INI Tab — donot include subfolders in ini tweaks. |
| screenshots | Its contents will be copied into Data/Docs. |
| screens | Its contents will be copied into Data/Docs. |
| ss | Its contents will be copied into Data/Docs. |
| Game Directories Supported For All Games | |
|
ini, meshes, music, sound, |
There are also game-specific directories:
| Game | Extra Game Directories |
|---|---|
| Morrowind | animation, bookart, distantland, fonts, icons, mwse, shaders, splash |
| Oblivion | _tejon, distantlod, facegen, fonts, menus, obse, pluggy, scripts, shaders, streamline, trees |
| Fallout 3 | config, distantlod, facegen, fonts, fose, menus, uio, scripts, shaders, trees |
| Fallout: New Vegas | config, distantlod, facegen, fonts, menus, nvse, uio, scripts, shaders, trees |
| Skyrim | asi, autobody, calientetools, dialogueviews, dyndolod, grass, interface, lodsettings, nemesis_engine, osa, scripts, seq, shadersfx, skse, skyproc patchers, strings, tools |
| Fallout 4 | f4se, interface, lodsettings, materials, mcm, misc, programs, scripts, seq, shadersfx, strings, tools, vis |
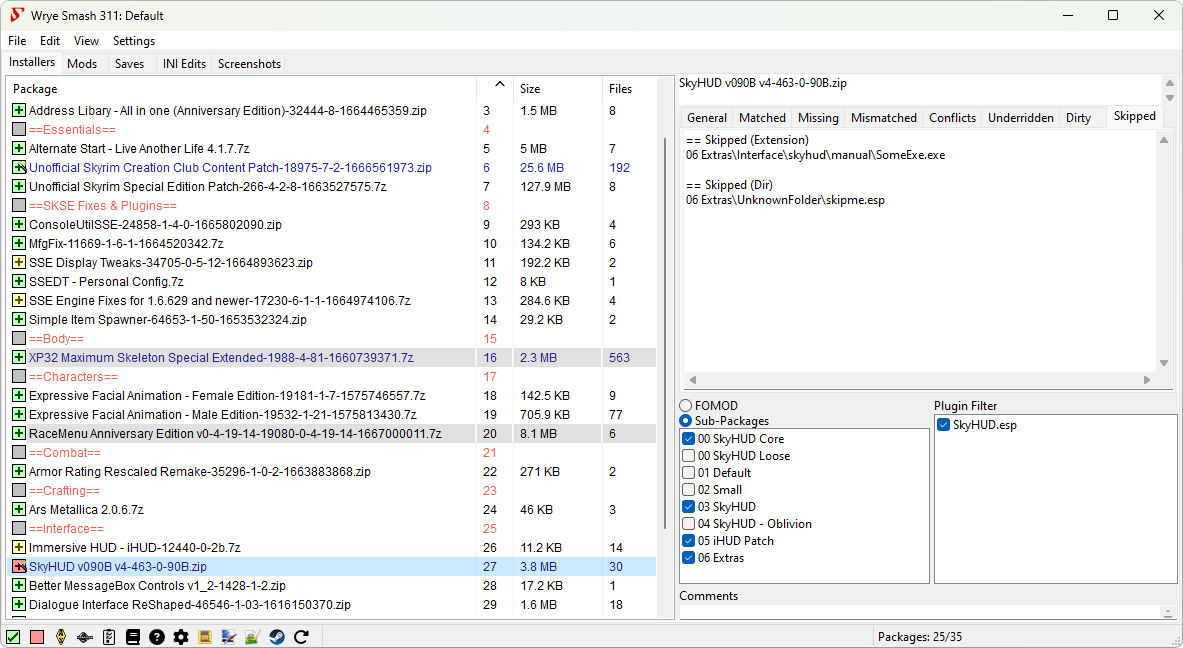
All these directories (either in the Global or Extra and Bonus Game directories) constitute the standard game directories for this game. If
Has Extra Directories is not on for the package, any other top level directory in the (sub)package
will be skipped (and their content listed in Skipped tab). There are also some directories and files that will be always skipped (for all the gory details see
Skipped Files).
There are, loosely speaking, three types of BAIN-compatible package structures:
| Structure | Description |
|---|---|
| Simple | Installer has .esp, .esm and/or .bsa files, and/or any of the standard game subdirectories at the top level of the package/project. |
| Complex | Installer has top-level subdirectories that each have a simple structure (as defined above). The top level subdirectories (known as subpackages) must NOT have the same name as any of the standard game directories for this game (like docs, or meshes). Otherwise BAIN thinks this is a simple package and will skip subpackages. Each top-level subdirectory will be treated as a sub-package, and can be independently activated or deactivated as desired. |
| Complex/Simple | A complex installer with only one top-level subdirectory. It is treated as a simple installer, starting at this top level subdirectory. Examples include mods packaged with a top-level Data directory. |
Restructuring Packages to be BAIN-Compatible Back to top
The easiest way to tell if a package needs manual converting to be compatible with BAIN is to try installing it. If it is listed in the Package list with a grey checkbox and name, then BAIN cannot install it. Due to BAIN’s flexibility, many mods are already packaged in ways that are compatible, but for those that are not, there are a few possible cases:
- The mod has a BCF. BCFs are special packages that tell BAIN how to restructure the mod to be compatible with BAIN without the user having to do any work.
- The mod is distributed as an OMOD (ie. has file extension
.omodor.fomod). These mods are intended for installation with the Oblivion Mod Manager or Nexus Mod Manager. Such mods usually have a non-OMOD download option: if one is available, download that instead as it is more likely to be compatible. Otherwise, OMOD files can be converted to Projects automatically by dragging and dropping them into the Installers tab. - The mod is distributed as an archive, or is a converted OMOD Project, but doesn’t have a folder structure that BAIN recognises. It will need manual restructuring.
- The mod is distributed as an executable (ie. has file extension
.exe). This is very rare, as mods do not require the complexity of executables, and the greater security risk executables represent makes their use unpopular. BAIN cannot install mods distributed in this way: often the only way to install them is to run the executable. You can often run the installer, installing to a dummy folder, and then repack theinstalled
files into a BAIN-compatible format.
If an archive has a BCF, it can be converted for installation with BAIN using the following instructions.
- Ensure that the BCF is installed in the correct location,
[Game] ModsBash InstallersBain Converters. Also ensure that the archive(s) it converts is/are in[Game] ModsBash Installers. - From the BAIN installers list, select the archive(s) to be converted (i.e., the
source
packages) and right click on the selected file(s) to bring up the context menu, and select Conversions to open the sub-menu. - Click on Apply to open a second sub-menu and select the BCF from it. There may be more than one BCF listed if multiple installed BCFs can convert the selected package(s).
An asterisk (‘*’) is added to the end of a BCF’s name for every archive it converts that isn’t selected. - Optionally choose a name for the converted archive(s).
- Once Wrye Bash has finished the conversion, the converted archive(s) will appear in the BAIN package list ready for install. You can now delete the original archive(s).
If a package is unrecognised by BAIN and has no associated BCF, its contents will have to be rearranged so that the structure matches one of the three types of BAIN-compatible package structures.
Installing/Uninstalling Via BAIN Back to top
Packages must first be placed in the [Game] ModsBash Installers directory. This can either be done via Windows Explorer, or by dragging and dropping the package into the Wrye Bash window when the Installers tab is open. If you drag and drop, you will be asked whether you want to copy the package or move it.
For the most part, you can simply right-click the package and select Install…,
which will automatically use wizards and FOMODs if they are present, and fall back to manual configuration
if they are not. If you want to learn more about each type of package and how to install and configure
their options manually, read on.
If a package contains a Wizard (ie. there is  overlaid on its checkbox):
- Right-click the package and select Manual Wizard. You can also choose to install using the Wizard’s default options by selecting Auto Wizard.
- If you chose Manual Wizard, navigate through the steps of the Wizard to install the package. Otherwise, you will be skipped to the Wizard finish screen.
- At the Wizard’s finish screen, click the
Finish
button to apply its selections.
If a package has an FOMOD wizard (i.e. there is an FOMOD radio button):
- Right-click the package and select Run FOMOD….
- Navigate through the steps and choose options.
- At the wizard’s finish screen, click the
Finish
button to apply its selections.
If a package has a Simple or a Complex/Simple structure:
- Select the package in the package list.
- Choose which plugins to install from it using the
Plugin Filter
box to the far right of the package list. Checked plugins will be installed, while unchecked plugins will be skipped. - Right-click the package and select Install….
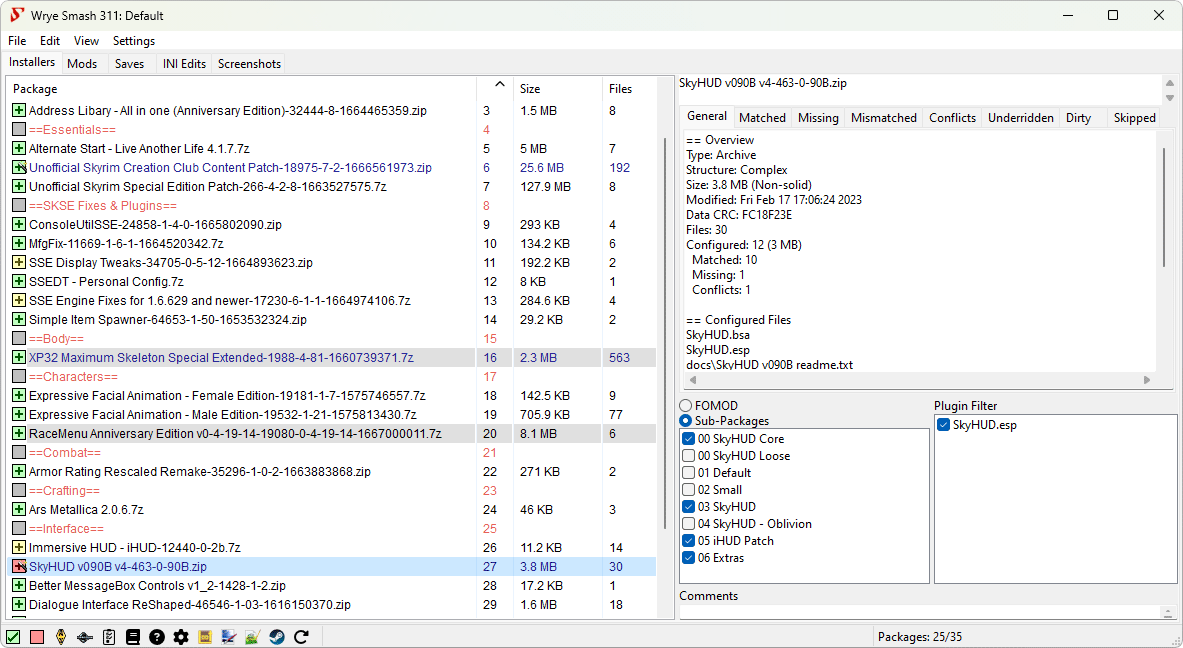
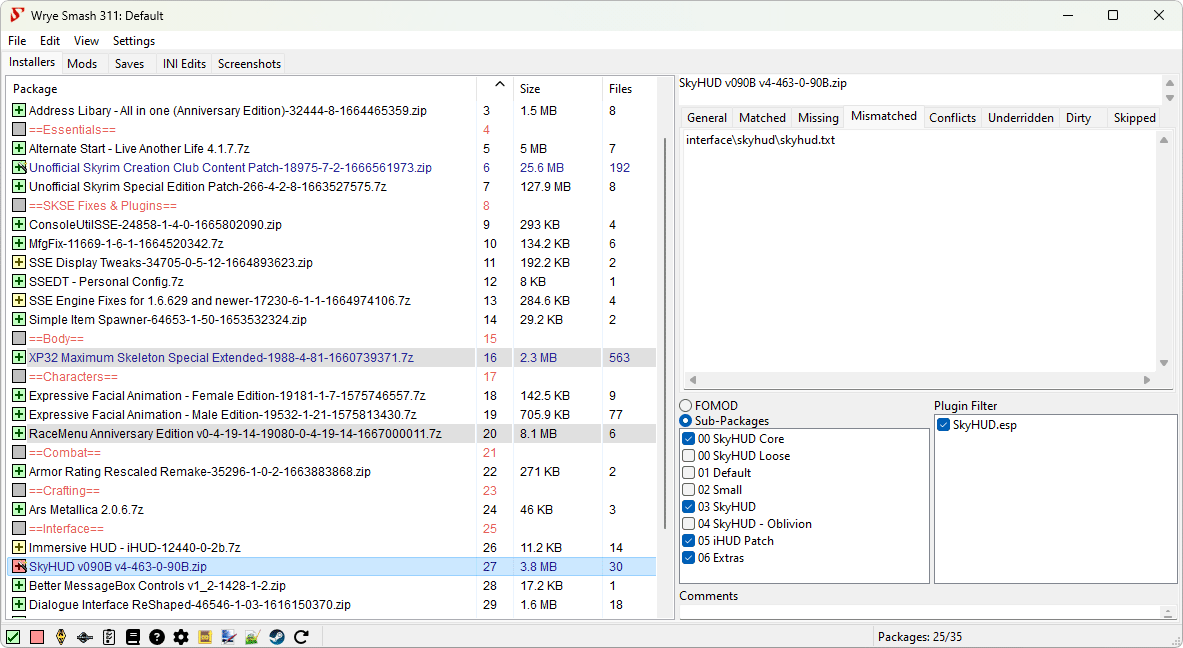
If a package has a Complex structure:
- Select the package in the package list.
- Choose which sub-packages to install from the
Sub-Package
box to the right of the package list. Checked sub-packages will be installed, while unchecked sub-packages will be skipped. - Choose which plugins to install from it using the
Plugin Filter
box to the far right of the package list. Checked plugins will be installed, while unchecked plugins will be skipped. - Right-click the package and select Install….
If you install a package then later change the sub-packages or plugin files selected, you can apply these changed by right-clicking the package in the list and selecting Anneal. A Wizard provides a scripted installation method that can be useful for more complex mods with many options.
When a package is installed, BAIN installs any files that appear to be documentation into the DataDocs folder. Any files that are simply named readme
(eg. readme.txt, readme.html, readme.doc) will be renamed according to the package name to prevent packages overwriting each other’s readmes.
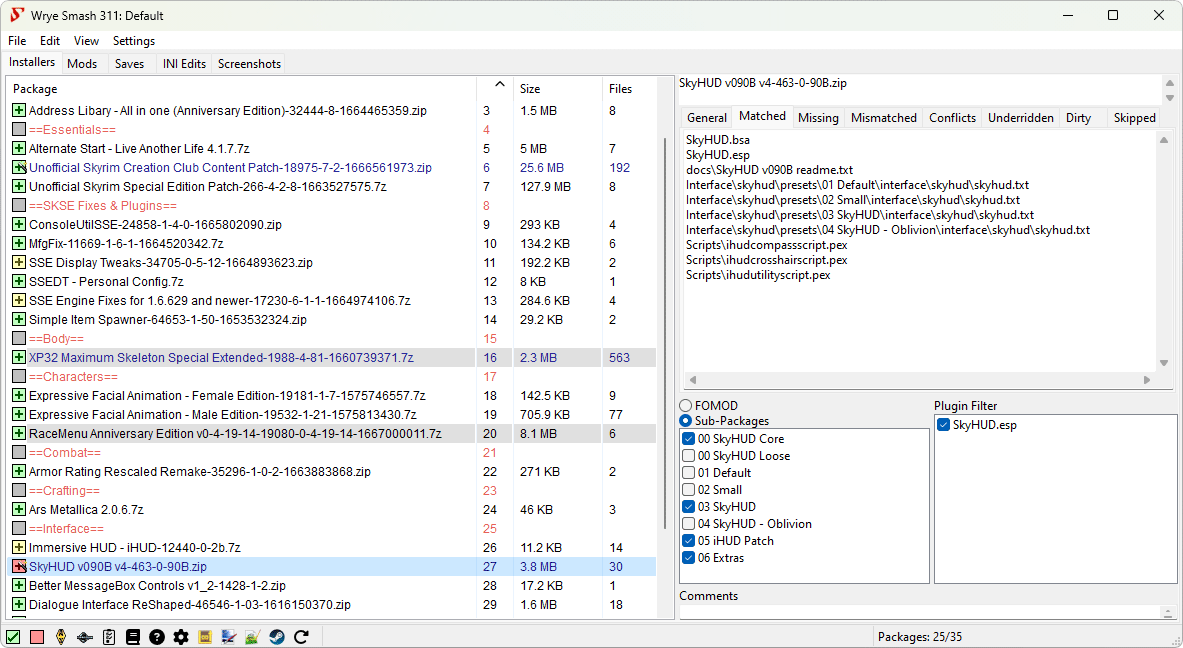
To uninstall any package from the Installers tab select the package
and right click on it, then select Uninstall.
This will uninstall
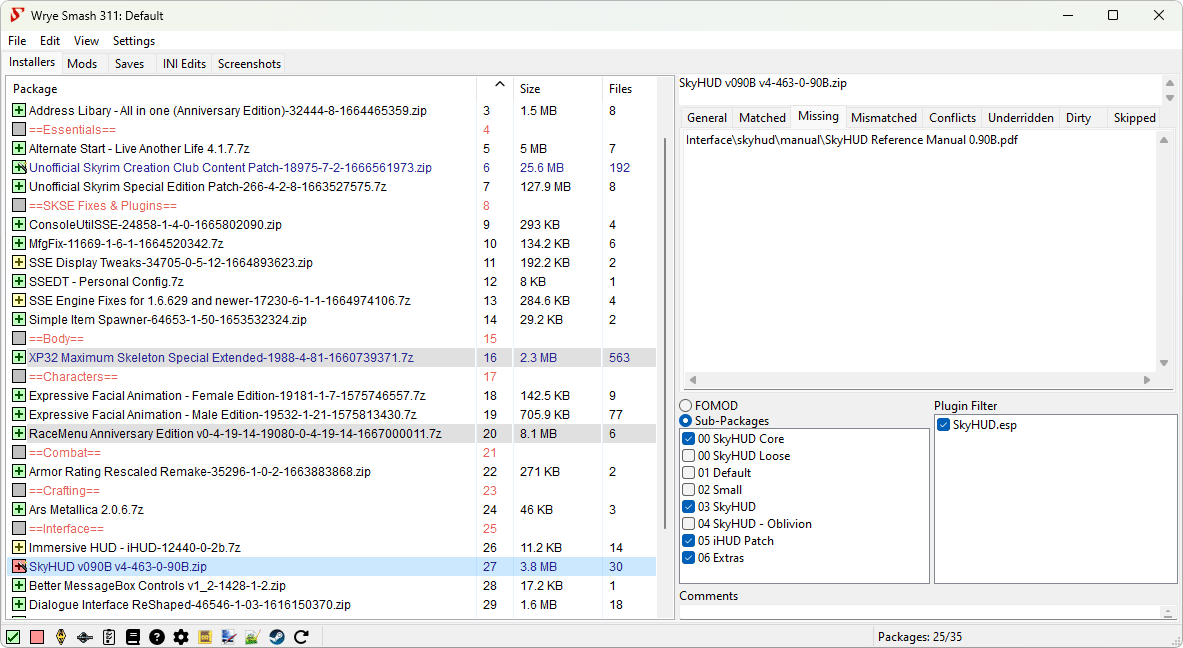
all Matched files. However, BAIN will not uninstall Mismatched files.
A Mismatched file is a file that has been altered after it was
installed. The reason BAIN does not uninstall Mismatched files is BAIN
has no way of tracking the source of the alteration if it was not
done through BAIN. For example, if the file was altered because it was
replaced by another mod that was installed manually,
then uninstallation of the Mismatched file may not be desirable. On
the other hand, if the file was altered because it was cleaned or
edited with TESxEdit, or because it was an ini file that was edited
with a text editor, then it may be desired to uninstall the Mismatched
file along with the package that it came from. Such files could be
deleted from the data folder manually, but there is an easy way to do
this through BAIN. Before uninstalling the mod, first select the
package and right click on it, then select
Install Configured. This will overwrite any
Mismatched files with the version of the file contained in the package, making
them Matched. Now select Uninstall and BAIN
will uninstall all installed files associated with this package.
You can also uninstall packages that BAIN hasn’t installed, which will
remove any installed files that match the ones in the package. This
is useful for cleaning out mods that were manually installed. Of course you
need to add the packages to BAIN first.
Uninstalling via BAIN respects the ownership of files,
ie. uninstalling a mod that contains files also installed by a mod
listed lower in the installation order will not uninstall the lower
mod’s files. See the next section, BAIN Package Order for more on
this. However, if the Auto-Anneal option is enabled (the default), then files
from other packages previously overridden by the uninstalled package’s
files will be automatically restored.
BAIN Package Order Back to top
The Install Order of packages in BAIN is important as this decides which package gets its files installed in the case of resource
conflicts.Packages may be listed in Install Order by left-clicking on the Order
column header. If two packages try to install the
same file, then the package installing later in the list will have its file overwrite the file of the package installing earlier in the
list. For example, files in a package in install order position 06, would overwrite conflicting files in a package at install order
position 04. Note that packages with a higher install order appear lower in the list of packages, and that may lead to confusion as
people refer to them as «lower».
The order of sub-packages within a package follow the same rules as packages. Checked sub-packages later (lower) in the sub-package list
will overwrite conflicting content from sub-packages earlier (higher in the list) than them.
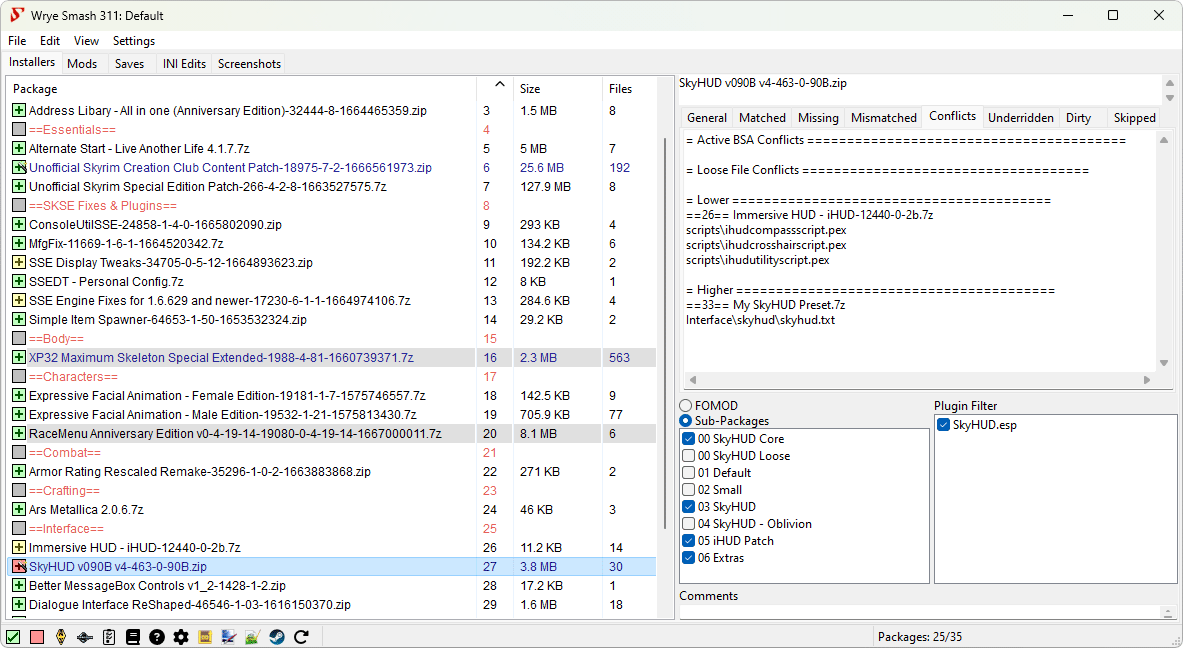
Package conflicts are detailed in the Conflicts
tab to the right of the package list when you select a package. This tab tells you
which packages have which files that conflict with files in your currently-selected package. It gives this information for packages in
the Install Order both earlier and later than the selected package in the package list.
BAIN allows you to easily adjust the conflict status of packages by moving their order around. This can be done by dragging and dropping
packages within the list, or by right-clicking packages and selecting the Move To… option. You can also
select multiple packages and move them, in which case they will be moved as a group, retaining their order relative to one another in
their new location. A third option is to select the package(s) and use Ctrl-Up or Ctrl-Down to move them up or down respectively.
What Symbols & Colours Mean Back to top
BAIN uses the colours of packages in the package list and the state of their checkboxes to convey information about their status to the user. A checkbox state may be combined with any checkbox or text colour, and the possible states and colours are described in the tables below.
Note: Installed packages are marked with a plus, eg. ![]() . Corrupt or incomplete packages are marked with a cross, eg.
. Corrupt or incomplete packages are marked with a cross, eg. ![]() . Packages that begin and end with
. Packages that begin and end with ==
, eg. ==Last==
, are marker packages. They don’t represent an archive or folder and so contain no files, but may be used to organise the package list.
| Checkbox Shape | Meaning |
|---|---|
| The package is a Project, ie. a directory rather than an archive. | |
| The package is an archive. |
| Checkbox Colour | Meaning |
|---|---|
| All the files in the package are installed as configured. | |
| Some or all of the files in the package are not installed as configured. | |
| All the package files are installed, but the .esp/.esm plugins are not identical (eg. another package has overwritten them with another version of the plugins). | |
| All the package files are installed, but some resource (ie. non-plugin) files are not identical (eg. another package has overwritten them with another version of the files) | |
| The package, as configured, has no files to install. This can happen for complex packages where none of the sub-packages are selected for installation. | |
| BAIN does not recognise the structure of this package so cannot install it. |
| Text Formatting | Meaning |
|---|---|
| Navy Blue | The package contains sub-packages. |
| Grey | BAIN does not recognise the structure of this package so cannot install it. |
| Orange Background | The install is dirty. This will occur for packages for which the configuration has been altered (either by altering active sub-packages and esmps, or by altering the package itself). This can be repaired by running Anneal or Anneal All. |
| Yellow Background | The package has «underrides» i.e. some of its installed files should be overridden by higher order packages. This may happen after reordering mods that have already been installed. It can be repaired by running Anneal or Anneal All. |
| Grey Background | Some files present in the package will not be installed. This can be due to having a complex structure only partially handled by BAIN, or having file types that BAIN skips. This can sometimes be fixed by telling BAIN that the package Has Extra Directories by ticking that option in the right-click menu. |
Useful Context Menu Commands Back to top
The following commands found in the package and column header context (ie. right-click) menus are often useful for many users.
| Column Header Context Menu | ||
|---|---|---|
| Command | Description | |
| Files.. | Open Folder… | Opens the Installers directory in Windows Explorer. |
| Unhide… | Opens a dialogue window allowing you to select which hidden packages to unhide. |
|
| Refresh Data | Re-scans the Data directory and all project directories. This is done once per run of Wrye Bash, when the Installers tab is first opened. If you manually alter the directories after that, you should run this command to update BAIN to reflect the changes. BAIN refreshes itself automatically if changes are made to packages in the Bash Installers directory. |
|
| New Marker… | Creates a marker for organising your packages. The ==prefix and suffix will be added for you. |
|
| List Packages… | Displays a list of projects and archives and copies the list to your clipboard. This is useful for posting your package order on forums, eg. when troubleshooting an install. |
|
| Uninstall All Packages | Uninstalls all the packages in the package list. |
|
| Clean Data | Removes files from the Data folder that are not from one of the following sources:
The files are not deleted, but moved to the |
|
| Anneal All | Installs any missing files for active installers and corrects all install order errors. |
|
| Global Skips | Skip **SE Plugins | All but Skyrim and Enderal: Forgotten Stories. If this is checked, files in the script extender plugins folder (e.g. DataOBSEPlugins for OBSE,DataSKSEPlugins for SKSE, etc.) will not beinstalled. |
| Skip SKSE/Script Dragon Plugins | Skyrim and Enderal: Forgotten Stories only. If this is checked, files in the DataSKSEPlugins or Dataasi folder willnot be installed. |
| Package Context Menu | ||
|---|---|---|
| Command | Description | |
| File.. | Open… | Opens the selected package(s) in the file system. |
| Rename… | Renames the selected package or marker. | |
| Duplicate… | Makes a duplicate of the selected package(s). | |
| Hide… | Hides the selected package in the list, and moves it to the[Game] Mods/Bash Mod Data/Hidden folder. |
|
| Delete | Deletes the selected package(s). Deleted packages are sent to the Recycling Bin, not permanently deleted. |
|
| Open at | Attempts to open the selected package’s page on the selected site. If Google is selected, performs a Google search for the package name. For the other three sites, this command assumes that the trailing digits in a package’s name is the package ID at the sites. If this assumption is wrong, a random page, or an error page, will be opened. |
|
| Open Readme | If BAIN detects a readme in the package, it will be opened. | |
| Anneal | Installs missing files and corrects install order errors according to the package configuration. |
|
| Install… | Installs the selected package, preferring a BAIN or FOMOD wizard if those are available (see options below). |
|
| Advanced Installation.. | Install Configured | Fully installs the package as configured except for files that would be overridden by later packages. |
| Wizard Installer.. | Manual Wizard… | Runs the Wizard for the package, if it has one. |
| Auto Wizard… | Runs the Wizard for the package, if it has one, selecting the default options. |
|
| FOMOD Installer.. | Run FOMOD… | Runs the FOMOD for the package, if it has one. |
| Uninstall | Uninstalls the package. If Auto-Anneal is active (the default) then files from earlier packages that were previously overridden will be installed as required. |
|
| Quick Refresh | Refreshes all info for the selected package(s). Since BAIN refreshes package information whenever Wrye Bash regains focus after losing it (ie. you select another program’s window, then switch back to Wrye Bash), this is only useful if a package has been changed and it has Don’t Refresh selected, or the Auto-Refresh Projects option is disabled. Note that scanning a project for changes takes much longer than scanning an archive for changes. |
|
| Package.. | Move To… | Moves the selected package(s) to the specified position. |
| List Structure… | Generates a list of the files and directories in a package. Useful for posting package structure on forums, eg. when troubleshooting an install. |
|
| Has Extra Directories | BAIN only recognises a limited set of subdirectories of the Data folder, and skips any unrecognised subdirectories. Checking this option will cause BAIN to install unrecognised subdirectories. |
|
| BAIN Conversions | Apply | Applies a BAIN Conversion File. |
Setting Up Load Order Back to top
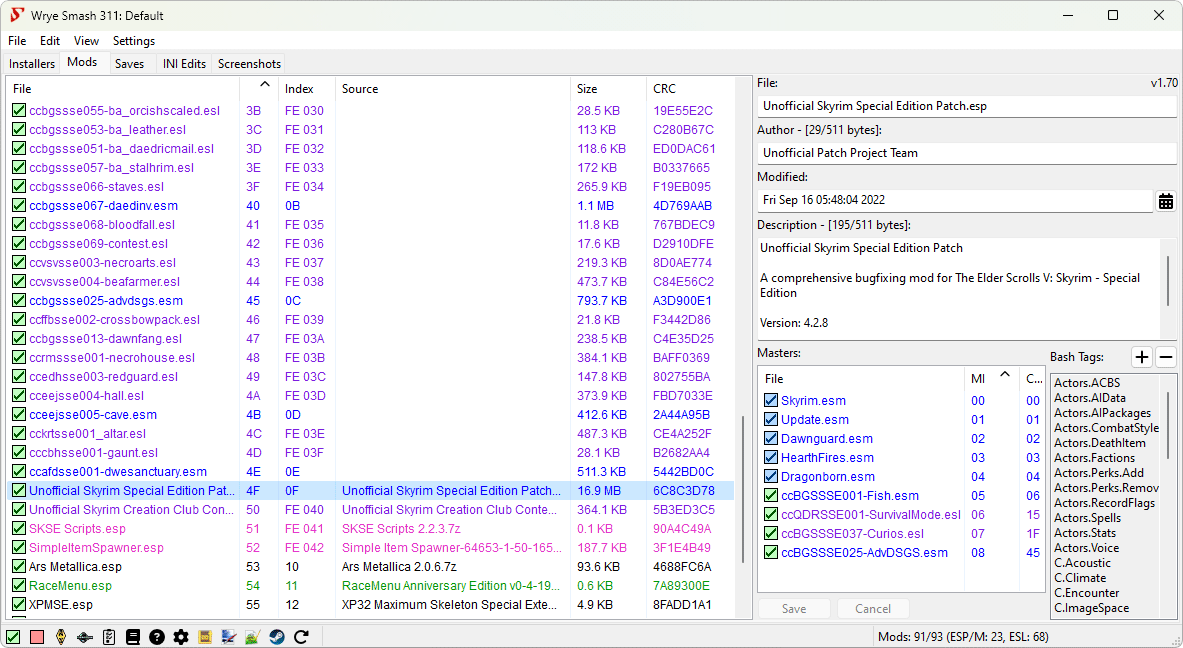
Overview Back to top
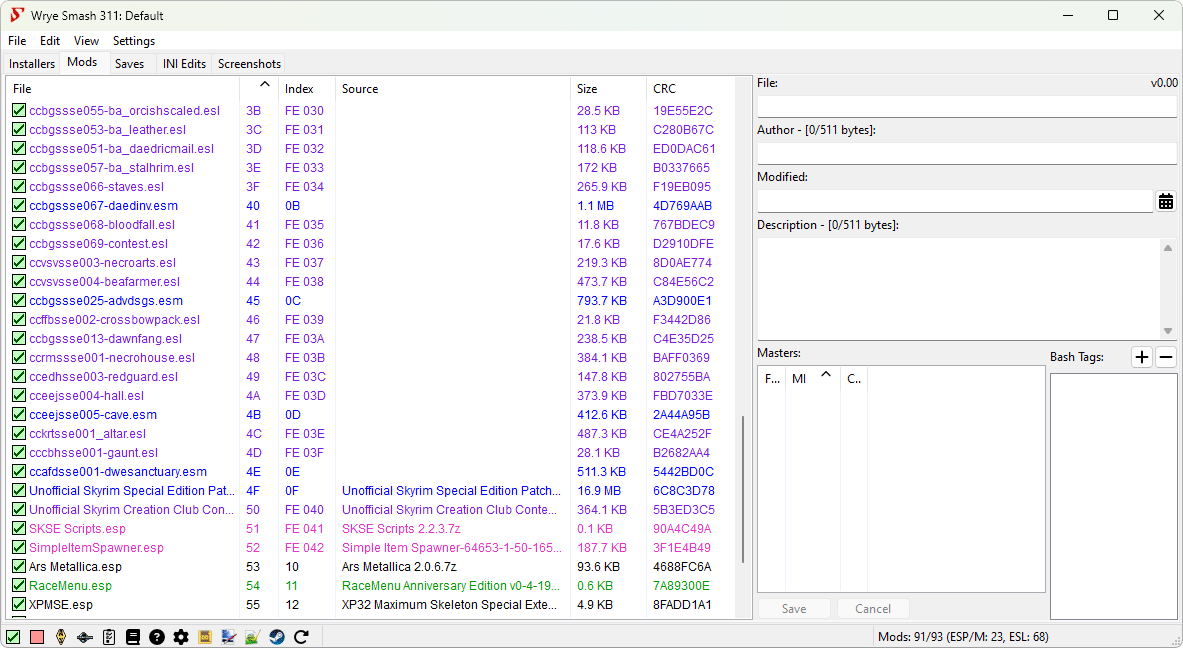
Wrye Bash displays your installed plugins in its Mods
tab. Your load order of active installed plugins, which Wrye Bash marks with a
ticked checkbox, is important as it decides what plugin ‘wins’ any conflict between plugins, with later loading plugins overriding those
that change the same thing. A mod loading later in the list will have a greater number in the Load Order column, and will «win»
if there’s a conflict with a mod loading earlier (which will have a lower number). Load order is not the same thing as BAIN install
order! Install order determines which package’s files overwrite other packages files when they conflict.
Although in general «Load Order» stands for the load order of the active plugins, all installed plugins have a load order assigned
to them. In Oblivion, Nehrim: At Fate’s Edge, Fallout 3 and Fallout: New Vegas this is based on the modification time of the plugin,
in Skyrim and Enderal: Forgotten Stories it is based on a text-file based standard the community agreed on,
while Fallout 4 and all later games dump all installed plugins in its plugins.txt, marking active ones with an asterisk (*).
Bash needs plugin load order even for inactive plugins to correctly merge inactive mods in the Bashed Patch, for instance.
Plugins may be activated by clicking their checkbox so that it is ticked, or by selecting a plugin or group of plugins and pressing the
space bar on your keyboard. Plugins may be deactivated by again clicking their checkbox or pressing the spacebar. If a group of selected
plugins contains a mix of active and inactive plugins, pressing the space bar once will activate them all, thereafter it will function as normal.
Some plugins are explicitly dependent on other plugins — they have these plugins as masters
. When a plugin is activated, its masters are also activated. Conversely, when a plugin upon which other plugins depend is deactivated, those plugins are also deactivated.
When setting the load order, make sure that Wrye Bash is displaying your plugins sorted by Load Order. Do so by clicking on the Load Order
column header near the top of the tab. You can also display the plugins sorted by other attributes by clicking on any of the other column headers. Clicking twice will reverse the display order for any column but Load Order. The load order of plugins is given in hexadecimal digits, from 00 to FE, which is 0 to 254 in decimal. (This number also forms the first two digits of a record’s Form ID.)
Note that you can only have a maximum of 255 plugins active at any one time, including your game’s master file.
Wrye Bash displays a plugin count in its status bar, to the right hand side, in the format Mods: [active]/[installed].
Generally speaking, if you end up with an invalid load order of some kind, Wrye Bash will automatically fix it upon booting or refreshing,
but a backup copy (with the .bak extension) will be made before doing so.
With the advent of ESL files, the load order system was modified.
The following list contains the most important facts you need to know about how Wrye Bash handles ESL files:
- .esl files implicitly receive the ESM flag, so they load among masters in the order of the plugins txt.
- .esl files implicitly recieve the ESL flag, so they are always treated as light plugins.
- ESPs with the ESL flag are also treated as light plugins.
- ESLs can surpass the 255 mod limit — Wrye Bash allows up to 4096, the theoretical limit,
but your game will likely give up long before that number is reached.
Creation Club ESL files (of the form cc*.esl) are read from the game’s .ccc file, if the game has Creation Club support.
For example, Skyrim: Special Edition uses [GAME]Skyrim.ccc, while Fallout 4 uses [GAME]Fallout4.ccc.
Just like the game’s masters, this load order is hardcoded, and so it cannot be changed — Wrye Bash will show an error message when an attempt is made.
Setting The Load Order Back to top
Setting up a correct load order that minimises detrimental conflicts that could cause issues in-game can be a difficult and time-consuming process. Effective load-ordering often requires a knowledge of what each plugin in your load order contains so that you can position the plugins to minimise these conflicts. For simple mods, the description in the mod’s readme will usually be sufficient to determine the records it contains, but to be sure a utility such as TES4Edit is required.
LOOT can be used to greatly simplify the process of setting the load order, as it can correctly position thousands of plugins automatically. However, you may still need to order some plugins manually.
Wrye Bash provides a number of ways for you to set up your load order:
- Alphabetical sorting by selecting a group of plugins and choosing File->Sort from the right-click menu.
- Moving plugins up or down the load order by selecting them and using Ctrl-Up or Ctrl-Down respectively. This also works with groups of plugins and preserves the group’s internal order.
- Dragging and dropping plugins will also change the load order if the plugins are being sorted by Load Order.
- Timestamp-based games only. Selecting a group of plugins and choosing File->Redate from the right-click menu. This will move the first plugin to the specified date/time and position the others at one minute intervals after it.
- Timestamp-based games only. Editing plugin modification dates in the right-hand details panel.
When running Wrye Bash, you can also lock your load order in place to prevent unintended changes to it by selecting the Lock Load Order
option in the column header right-click menu. Note that this will prevent other utilities from changing the load order, so uncheck this option if you use such a
utility to set your load order. If you use BOSS/LOOT to manage your load order and you also use Lock Load Order, ensure
BOSS Disable Lock Load Order is also enabled to allow BOSS/LOOT to function correctly.
Note that for Skyrim and later games Wrye Bash will automatically undo any changes to load order done made by the game’s launcher or any utility that does not follow the textfile-based
load order standard in order to maintain a fully coherent load order. This effectively means that unintended changes are prevented.

The Launch Using GUI
toggles the use of the command line interface for BOSS with the BOSS GUI. Giving quick and easy access to the additional features the GUI provides such as the Edit User Rules
option.
Undo and redo Load Order changes Back to top
Bash features a sophisticated undo/redo load order feature, comprising both load order changes of active or inactive
plugins and activating/de-activating plugins. Whether you activate a plugin, drag and drop it in another position, deactivate a
plugin (having its children deactivated too) etc, you can always hit Ctrl+Z while the list of mods has focus to undo
the operation or Ctrl+Y/Ctrl+Shift+Z to redo it. Bash keeps the load orders (meaning total load order of all installed plugins
and active state of the plugins) in its internal structures and will persist those on disc on shutting down,
in My Games<Game>BashLoadOrders.dat, so you can undo/redo on restarting Bash.
The undo/redo feature will try to preserve as many load orders as possible — so unlike undo/redo in other applications if you have an
initial load order state A then change it to B, then hit undo (so you are back on state A), then change it to C Bash will keep in its
internal structures the load order states A C B while most other applications would end up with A C. Undo/redo load order state is a
relatively new feature (available since 307) so it may have rough edges.
What Symbols & Colours Mean Back to top
Like in the Installers tab, Wrye Bash uses colour-coding and other formatting effects to convey information about the state of plugins.
The different types of formatting used and their meanings are explained here.
Many of these can be changed in the Color Configuration menu.
| Checkbox Type | Meaning |
|---|---|
| Plugin is active. | |
| Plugin is merged into an active Bashed Patch. | |
| Plugin is imported into an active Bashed Patch. | |
| Plugin is not active, merged or imported. |
| Checkbox Colours | Meaning |
|---|---|
| The plugin’s masters are all in exactly the same order as is specified in the plugin. | |
| The plugin’s masters are in the same order as is specified in the plugin, but their precise positions are different (ie. there are other mods between them). This is not an issue, and can be considered to be just as good as having a blue checkbox. | |
| Some of the plugin’s masters are in a different order than what is specified in the plugin. This will be handled automatically by the game, but may hint at an incorrect load order on either your or the mod author’s end. | |
| This plugin loads before one or more of its masters. This will either cause the game to crash or cause mods to load in unexpected ways and must be corrected. | |
| One or more of the plugin’s masters is missing. This will generally cause the game to crash on startup, and must be corrected. |
| Text Formatting | Meaning |
|---|---|
| Blue Text | A master — refer to ESM documentation at the start of this document for more information. |
| Green Text | A mergeable plugin (for games without ESL support) or one that can be ESL-flagged (for games with ESL support). |
| Pink Text | An ESL-flagged plugin. Only shown for games with ESL support. |
| Purple Text | An ESL-flagged plugin that is also a master. The color is a combination of the blue one for masters and the pink one for ESLs. |
| Yellow Text | A plugin that should not be merged (ie. tagged with NoMerge — only shown in games without ESL support). |
| Pink Background | Oblivion, Nehrim: At Fate’s Edge, Fallout 3 & Fallout: New Vegas only. A plugin that shares its modification date with another plugin. Not a problem unless both plugins are active. |
| Red Background | An active plugin that should remain deactivated (ie. tagged with Deactivate) or, for Oblivion, Nehrim: At Fate’s Edge, Fallout 3 & Fallout: New Vegas only,an active plugin that shares its modification date with another active plugin. This must be corrected so that they have different modification dates or else it may break your load order. |
| Light Orange Background | Morrowind only. In Morrowind, plugin files contain DATAsubrecords that store the size of the plugin’s masters when it was created. If a stored size does not match the one on disk, Wrye Bash will highlight the corresponding master in this color. Also used for plugins that have at least one such size-mismatched master. This is a very low priority warning and can almost certainly be ignored. |
| Grey Background | A ghosted plugin. |
| Slanted Text | A plugin that is recommended to be imported and deactivated (ie. tagged with Deactivate). |
| Underlined Text | A plugin identified as having dirty edits (Identical to Master, Deleted References, or otherwise necessary cleaning). |
Useful Context Menu Commands Back to top
The context menus for the column headers and plugins contain a large number of commands, most of which are unlikely to be of use to the average user so are not detailed here.
| Column Header Context Menu | ||
|---|---|---|
| Command | Description | |
| Files.. | New Bashed Patch… | Creates a new Bashed Patch plugin. Useful if you accidentally delete your current one or wish to have more than one. |
| List Mods | This lists the load order, including version information, activation status and major load order errors. It can be useful for debugging a broken load order. If the Shift key is held when this command is selected, the CRCs of plugins will also be displayed in the output. If the Ctrl key is held, then the versions of plugins will not be shown in the output. |
|
| List Bash Tags | This lists all the Bash Tags applied to the plugins in your load order, and where/how the Bash Tags were specified. It can be useful for debugging a broken load order. | |
| Auto-Ghost | The Oblivion game engine has a bug where it reads all the plugins in the Data folder, and this can affect performance when the number of plugins is around 300+. In Skyrim there is a different problem, namely if you have over 508 mod files in your data directory, the engine just plain refuses to load any of them, active or not (see here: Thrashing, thread #1, post #1). Auto-Ghosting adds a .ghostextension to all inactive plugins automatically to prevent the game engine reading them, and so helping to avoid the performance drop. When a ghosted plugin is activated, the .ghostextension is removed, allowing it to function as normal. Note that most other utilities will not recognise ghosted plugins, so there are options available for individual plugins to control which get ghosted. Bash displays a warning if a lot of mods and BSAs are detected that you can disable via the ini. |
|
| ESL-Flag Bashed Patches | Skyrim: Special Edition & Fallout 4 only. If enabled, then any built Bashed Patches will automatically be ESL-flagged, saving a load order slot. |
|
| Lock Load Order | This prevents other utilities from altering your load order. More accurately, it detects changes to your load order when Wrye Bash starts or is focused (i.e. on top of all other program windows) and reverses those changes. |
| Plugin Context Menu | |
|---|---|
| Command | Description |
| List Masters… | Outputs a list of the selected plugin’s masters. |
| List Bash Tags… | Outputs a BBCode-formatted list of all the Bash Tags applied to the selected plugin, and where/how the Bash Tags was specified. It can be useful for debugging a broken load order. |
| Create LOOT Entry… | Creates LOOT masterlist entries based on the tags you have applied to the selected plugin(s). Also tries to figure out the URL that the plugin came from based on the BAIN package it was installed from. |
| Copy Mod Info… | Outputs a report on the selected plugins(s) with the info from the currently displayed columns. |
| Don’t Ghost | Don’t ghost this plugin when it is inactive, even if Auto-Ghost is enabled. |
| Ghost | Ghost this plugin when it is inactive even if Auto-Ghost is disabled. |
| Rebuild Patch… | Rebuild the selected Bashed Patch using the Python patcher. |
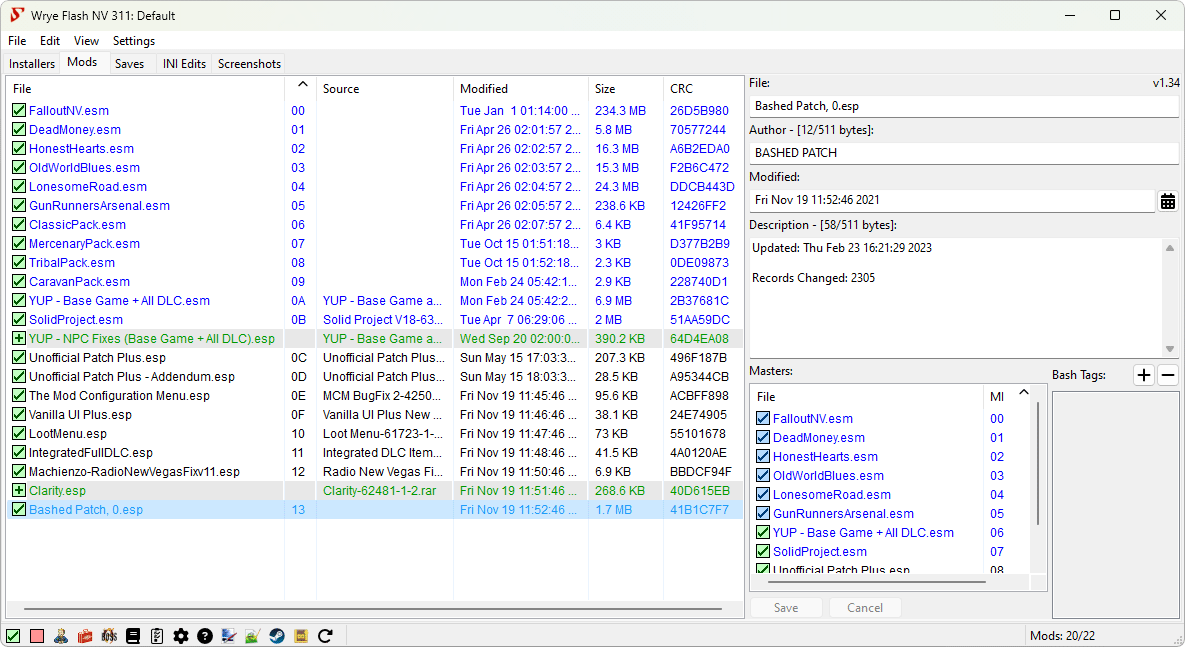
Setting Up A Bashed Patch Back to top
Overview Back to top
Bash Configuration Back to top
A Bashed Patch is created by Wrye Bash the first time you run it, with the plugin being called Bashed Patch, 0.esp
. It is configured using the plugin context menu command Rebuild Patch…. You should rebuild your Bashed Patch every time you change your load order, before playing the game. The Bashed Patch should be last in your load order, unless you have plugins that explicitly state that they must load last.
The configuration dialog consists of a list of major sections to the left, and the contents of the selected section to the right, with the build and save buttons at the bottom. The sections and their items have checkboxes: checking a section will include all its checked items in the Bashed Patch. Unchecked sections and items will not be included. Some sections don’t have any items, and so just need the section checkbox checked.
A short description of each section and some items is displayed near the
bottom of the window if the section/item is hovered over. Bolded items are
new since the last time the Bashed Patch was built, italicized items will
not run because they have no active sources (e.g. no mods to import). Wrye
Bash will usually do a good job auto-configuring most sections, but you may
want to alter options, especially in the Tweak section.
| Bashed Patch Configuration Buttons | |
|---|---|
| Button | Description |
| Build Patch | Builds your Bashed Patch with the current configuration. |
| Select All (next to section list) | Selects all the options/plugins in a section list. If an option has multiple possible values, the first value in the value list will be chosen. |
| Deselect All (next to section list) | Deselects all the options/plugins in a section list. |
| Select All (at bottom of window) | Selects all sections, and all the options/plugins in all sections. If an option has multiple possible values, the first value in the value list will be chosen. |
| Deselect All (at bottom of window) | Deselects all sections and all the options/plugins in all section list. |
| Revert To Default | Reverts your Bashed Patch to its default configuration. |
| Revert To Saved | Restores the last saved configuration of your Bashed Patch, undoing any changes since you last built it. |
| Export | Saves your Bashed Patch’s configuration into an external file for backup. |
| Import | Restores your Bashed Patch’s configuration from an exported patch configuration. |
Merging Plugins Back to top
Plugins that contain only certain types of data records can be merged into the Bashed Patch. This then allows these plugins to be deactivated, freeing up space in your load order.
If you’re merging plugins in, you do not need the plugins active to do so. In fact, trying to merge them in Bash will 1 — ask you to deactivate them
before hand, and 2 — deactivate them even if you refused that prompt after the Bashed Patch has been created.
So if you’re merging plugins, leave them inactive before building, then select to merge them in the Bashed Patch build dialog. Don’t worry,
all the algorithms for the rest of the patchers still work as you’d expect on plugins merged this way.
You should check the checkboxes of all the plugins listed in the Merge Patches
section, and ensure the section is checked too.
Do not remove merged mods from your Data folder. They will need to be present when you next rebuild your Bashed Patch.
Importing From Plugins Back to top
Plugins can be tagged with Bash Tags that tell Wrye Bash that they contain certain changes that should be preserved even if another mod also changes the same things. This is usually because the changes are important to the functionality of the mod. Wrye Bash then allows you to choose which plugins should have which types of changes preserved, by selecting from the various Import sections when building a Bashed Patch.
If a section’s description in the table below begins with Preserves
and two or more mods in its list change the same thing, then the later-loading plugin will override the other plugin(s). Otherwise changes are merged.
| Section | Description | When You Should Use It | Available For |
|---|---|---|---|
| Import Actors | Preserves changes made to actors (ie. NPCs and creatures) by the mods selected. |
Always, unless you are told otherwise by a mod’s readme. | All but Fallout 4 |
| Import Actors: AI Packages |
Merges the changes made to actor AI packages by all the mods selected. |
Always, unless you are told otherwise by a mod’s readme. | All but Fallout 4 |
| Import Actors: Faces | Preserves the changes made to NPC faces by the mods selected. |
The decision is entirely based on user preference. Choose whichever mods’ NPC faces you prefer. |
Oblivion, Nehrim: At Fate’s Edge, Fallout 3 & Fallout: New Vegas |
| Import Actors: Factions | Preserves the changes made to the factions an actor belongs to by the mods selected. |
Always, unless you are told otherwise by a mod’s readme. | All but Fallout 4 |
| Import Actors: Perks | Merges the changes made to the perk list of NPCs by the mods selected. |
Always, unless you are told otherwise by a mod’s readme. | Skyrim, Enderal: Forgotten Stories & Skyrim: Special Edition |
| Import Actors: Spells | Merges the changes made to the spells actors have by the mods selected. |
Always, unless you are told otherwise by a mod’s readme. | All but Fallout 4 |
| Import Cells | Preserves the changes made by the mods selected to cell settings such as lighting, climate, music, name, owner, water and more. |
Always, unless you are told otherwise by a mod’s readme. | All but Fallout 4 |
| Import Destructible | Preserves the changes made to the ability to destroy certain parts of the environment. |
Always, unless you are told otherwise by a mod’s readme. | All but Oblivion, Nehrim: At Fate’s Edge & Fallout 4 |
| Import Effect Stats | Preserves the changes made to the stats of magic / base effects. |
Always, unless you are told otherwise by a mod’s readme. | All but Fallout 4 |
| Import Enchantments | Preserves the changes made to the enchantments of items like armor, weapons, etc. |
Always, unless you are told otherwise by a mod’s readme. | All but Fallout 4. |
| Import Enchantment Stats | Preserves the changes made to the effect data of enchantments / object effects. |
Always, unless you are told otherwise by a mod’s readme. | All but Fallout 4 |
| Import Graphics | Preserves the changes made by the mods selected to various textures and models throughout the game. |
The decision is entirely based on user preference. Choose whichever mods’ graphics you prefer. |
All but Fallout 4 |
| Import Inventory | Merges the changes made to the items in an actor’s inventory by all the mods selected. |
Always, unless you are told otherwise by a mod’s readme. | All but Fallout 4 |
| Import Keywords | Preserves the changes made to the keywords attached to various things throughout the game by the mods selected. |
Always, unless you are told otherwise by a mod’s readme. | Skyrim, Enderal: Forgotten Stories & Skyrim: Special Edition |
| Import Names | Preserves the changes made to various names throughout the game by the mods selected. |
The decision is entirely based on user preference. Choose whichever mods’ names you prefer. |
All but Fallout 4 |
| Import Object Bounds | Preserves the changes made by the mods selected to the bounds of many types of objects throughout the world. |
Always, unless you are told otherwise by a mod’s readme. | All but Oblivion & Nehrim: At Fate’s Edge |
| Import Outfits | Merges the changes made to the items in NPC outfits by all the mods selected. |
Always, unless you are told otherwise by a mod’s readme. | Skyrim, Enderal: Forgotten Stories & Skyrim: Special Edition |
| Import Races | Preserves changes made by the mods selected to various race attributes such as height, eyes, hair and voice. |
Always, unless you are told otherwise by a mod’s readme. | Oblivion, Nehrim: At Fate’s Edge, Fallout 3 & Fallout: New Vegas |
| Import Races: Relations | Merges additions, changes and deletions to race-faction relations. |
Always, unless you are told otherwise by a mod’s readme. | Oblivion, Nehrim: At Fate’s Edge, Fallout 3 & Fallout: New Vegas |
| Import Races: Spells | Merges additions, changes and deletions to race abilities and spells. |
Always, unless you are told otherwise by a mod’s readme. | All but Fallout 3, Fallout: New Vegas and Fallout 4 |
| Import Relations | Merges additions, changes and deletions to faction relations. |
Always, unless you are told otherwise by a mod’s readme. | All but Fallout 4 |
| Import Roads | Preserves the changes made by the mods selected to the landscape’s roads. |
Always, unless you are told otherwise by a mod’s readme. | Oblivion & Nehrim: At Fate’s Edge |
| Import Scripts | Preserves the changes made by the mods selected to the scripts attached to things in the game. |
Always, unless you are told otherwise by a mod’s readme. | Oblivion, Nehrim: At Fate’s Edge, Fallout 3 & Fallout: New Vegas |
| Import Sounds | Preserves the changes made by the mods selected to various sounds in the game. |
The decision is entirely based on user preference. Choose whichever mods’ sounds you prefer. |
All but Fallout 4 |
| Import Spell Stats | Preserves the changes made by the mods selected to spells / actor effects in order to fix bugs or rebalance them. |
Always, unless you are told otherwise by a mod’s readme. There is an element of user preference, for instance if you are using several mods that overhaul spell stats. In such cases, choose whichever mods’ stats you prefer. |
All but Fallout 4 |
| Import Stats | Preserves the changes made by the mods selected to items in order to fix bugs or rebalance them. |
Always, unless you are told otherwise by a mod’s readme. There is an element of user preference, for instance if you are using several mods that overhaul spell stats. In such cases, choose whichever mods’ stats you prefer. |
All but Fallout 4 |
| Import Text | Preserves the changes made by the mods selected to various types of long-form text (e.g. text in a book, descriptions of armor, spells, weapons, etc.). |
Always, unless you are told otherwise by a mod’s readme. There is an element of user preference, for instance if you are using several mods that overhaul spell stats. In such cases, choose whichever mods’ stats you prefer. |
All but Fallout 4 |
| Import Weapon Modifications | Preserves the changes made by the mods selected to weapon modifications. |
Always, unless you are told otherwise by a mod’s readme. | Fallout: New Vegas |
Applying Tweaks Back to top
The Bashed Patch lets you independently tweak a large number of game
settings. Each tweak has a description that is visible when you select it.
Some tweaks have several possible values, with the current value given in
[square brackets] in the tweak name. Right-clicking these tweaks will
display a menu from which you can select a different value. The tweaks are
grouped into different sections:
| Section | Description | When You Should Use It | Available For |
|---|---|---|---|
| Tweak Actors | Allows you to change a number of the game’s settings relating to actors (i.e. NPCs). |
The decision is entirely based on user preference. | All but Fallout 4 |
| Tweak Assorted | Contains a set of miscellaneous tweaks to the game. | In Oblivion, the Bow Reach Fix and Nvidia Fog Fix are recommended for all users, as they fix bugs that may be uncovered by mods. Also in Oblivion, the DarNified Books option is recommended for users of DarNified UI. In Skyrim and games based on it, the Magic: Summoning Absorption Fix is recommended for all users as it fixes an issue that affects many mods. Beyond that, the decision is entirely based on user preference. |
All but Fallout 4 |
| Tweak Clothes | Contains a set of tweaks that change settings relating to the game’s clothing. |
The decision is entirely based on user preference. | Oblivion & Nehrim: At Fate’s Edge |
| Tweak Names | Contains a set of tweaks that change the names of things in the game. Most change the names to change how they are sorted in your inventory. |
The decision is entirely based on user preference. | All but Fallout 4 |
| Tweak Races | Contains a set of tweaks that alter race-related things (e.g. height, eyes, hairs, etc.). |
The decision is entirely based on user preference. | All but Fallout 4 |
| Tweak Settings | Contains a set of tweaks that change various global and non-global game settings. |
In Oblivion, the UOP Vampire Aging and Face Fix.esp tweak is recommended for all users. Beyond that, the decision is entirely based on user preference. |
All but Fallout 4 |
Other Bashed Patch Options Back to top
The Bashed Patch also gives you a number of other sections providing additional functionality besides the above merging, importing and tweaking. These options are described below.
| Section | Description | When You Should Use It | Available For |
|---|---|---|---|
| Alias Mod Names | Allows Wrye Bash to recognise some common renamings of plugins that are referenced in .csv data files that it imports as part of some Bashed Patch sections. Renamings should be listed in the text box for this section. The format is Old.esp =>. |
If you have renamed a plugin that is referenced in a CSV file you have selected in the Bashed Patch’s configuration. It is recommended that you refrain from renaming plugins, as it can break parts of Wrye Bash and other utilities. |
All but Fallout 4 |
| Replace Form IDs | Replaces a set of formIDs with another set of formIDs defined by a .csv file. |
If you use a mod that tells you to use it. | Oblivion & Nehrim: At Fate’s Edge |
| Cobl Catalogs | Updates Cobl’s ingredient and effect catalogs to take into account those added by mods you use. |
If you use Cobl (a.k.a. Common Oblivion). | Oblivion |
| Cobl Exhaustion | Updates greater powers added by the mods that are listed in the selected .csv file options so that they’re compatible with Cobl’s Exhaustion feature. |
If you use Cobl’s Exhaustion feature. | Oblivion |
| Contents Checker | Checks that leveled lists, outfits, recipes and inventories contain the correct types of entries, and removes any incorrect entries. |
Always. | All but Fallout 4 |
| Eye Checker | Filters eyes from races in order to fix the ‘googly eyes’ bug. |
Always. | Oblivion & Nehrim: At Fate’s Edge |
| Leveled Lists | Merges changes made to leveled lists by mods to increase compatibility between them. |
Always. If you don’t have any mods that alter leveled lists, the option won’t do anything, in which case it doesn’t hurt to have it enabled. |
All games |
| Morph Factions | Updates factions so that they are more likely to work with Wrye Morph. |
If you use Cobl and Wrye Morph. | Oblivion |
| NPC Checker | Assigns hair and eyes to NPCs that are otherwise missing them. |
Always. | Oblivion, Nehrim: At Fate’s Edge, Fallout 3 & Fallout: New Vegas |
| Race Checker | Sorts race hairs and eyes. Note that the output of this patcher will appear as an ITM in xEdit. It is not an ITM. Do not clean it. The xEdit team cannot fix this problem because of the number of mods that would show as conflicts if it were fixed. See this discussion with ElminsterAU, xEdit’s developer, from the xEdit discord. |
Always. | Oblivion, Nehrim: At Fate’s Edge, Fallout 3 & Fallout: New Vegas |
| SEWorld Tests | Fixes quests that aren’t suspended while your character is in the Shivering Isles. This doesn’t apply to mod-added quests, it only restores suspension to vanilla quests where mods have removed it. |
Always. If you don’t have Shivering Isles, the option won’t do anything, in which case it doesn’t hurt to have it enabled. |
Oblivion |
| Timescale Checker | Adjusts the wave period of grasses to match changes in the timescale. Note that this patcher is incompatible with plugins that change grass wave periods to match a different timescale. Uninstall such plugins before using it, as their functionality will otherwise be duplicated by this patcher. |
Always. Does nothing if you are not using a nonstandard timescale, in which case it doesn’t hurt to have it enabled. |
All but Fallout 4 |
Applying Ini File Edits Back to top
Overview Back to top
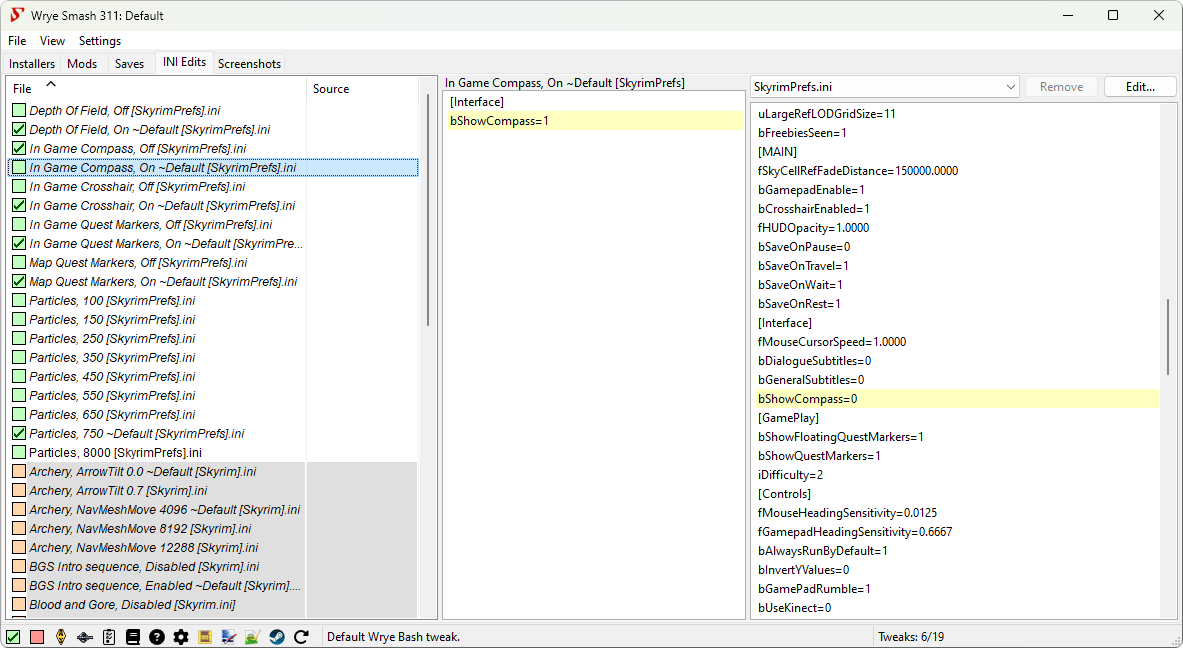
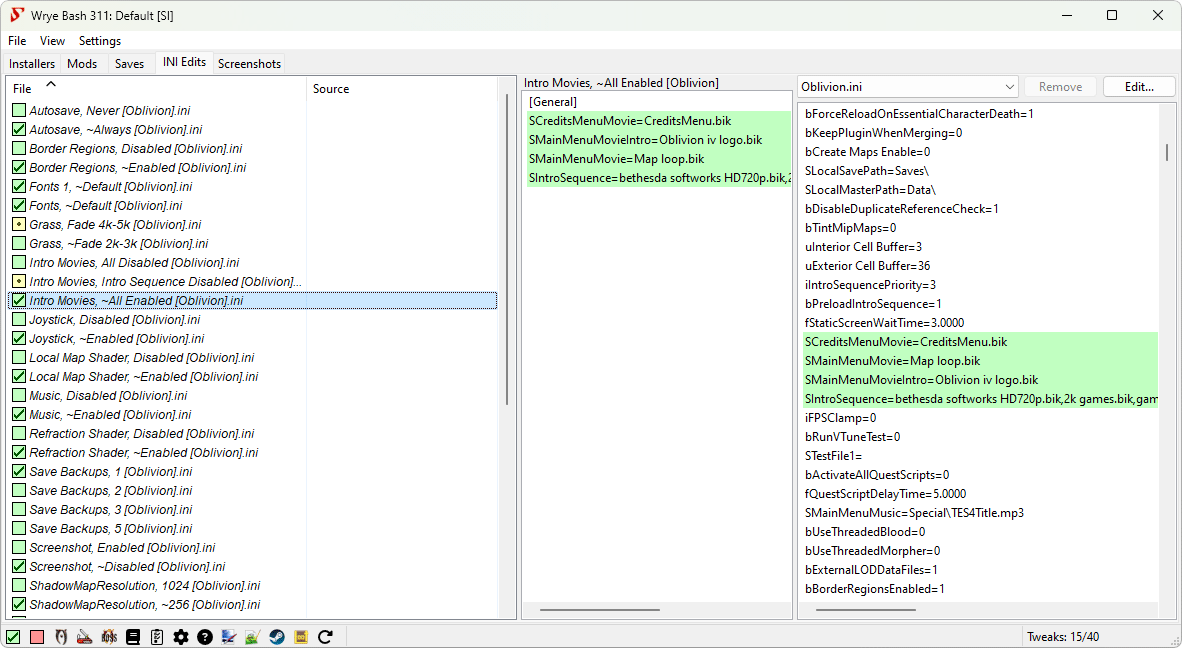
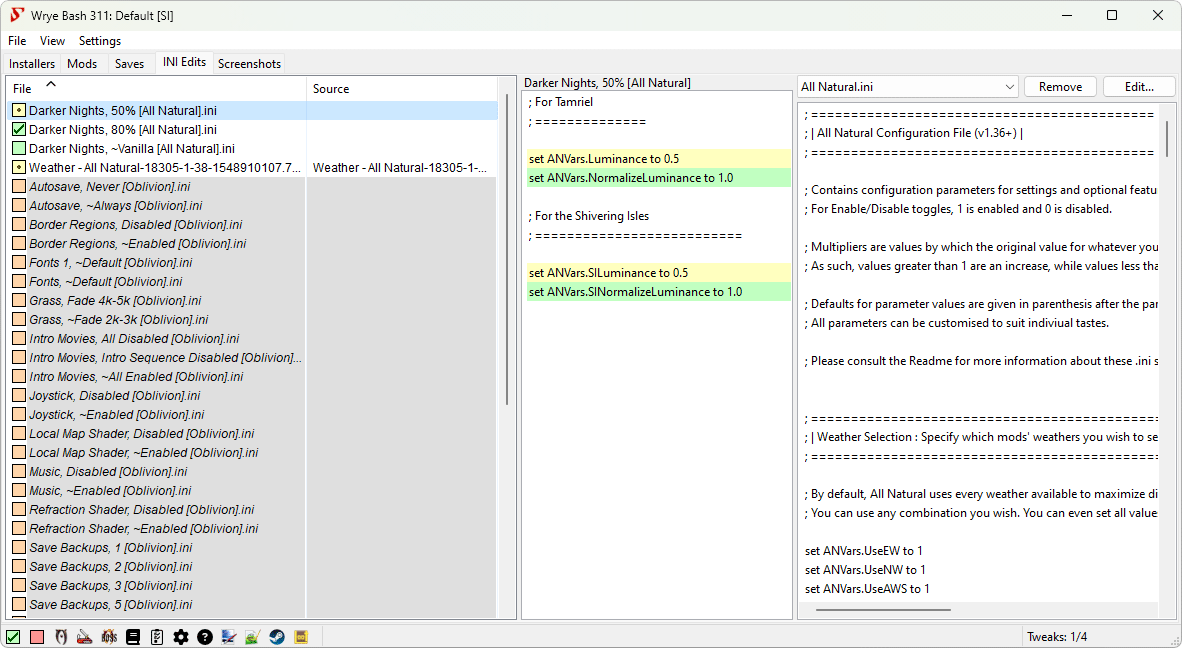
The Ini Edits tab allows the user to quickly apply edits to the games’s INI file (e.g. Oblivion.ini, Skyrim.ini, Fallout4Custom.ini, etc.) depending on your game, and mod-added ini files, including those containing scripts used to configure mods. Edits are applied from ini tweak files, which are just a text file that contains only the lines of the ini that you wish to change. Ini tweaks are stored in the DataINI Tweaks folder, and may be installed through BAIN or placed there manually.
The drop-down box allows you to select the current ini file. The Browse…
option in the drop-down box can be used to select an ini file not listed.
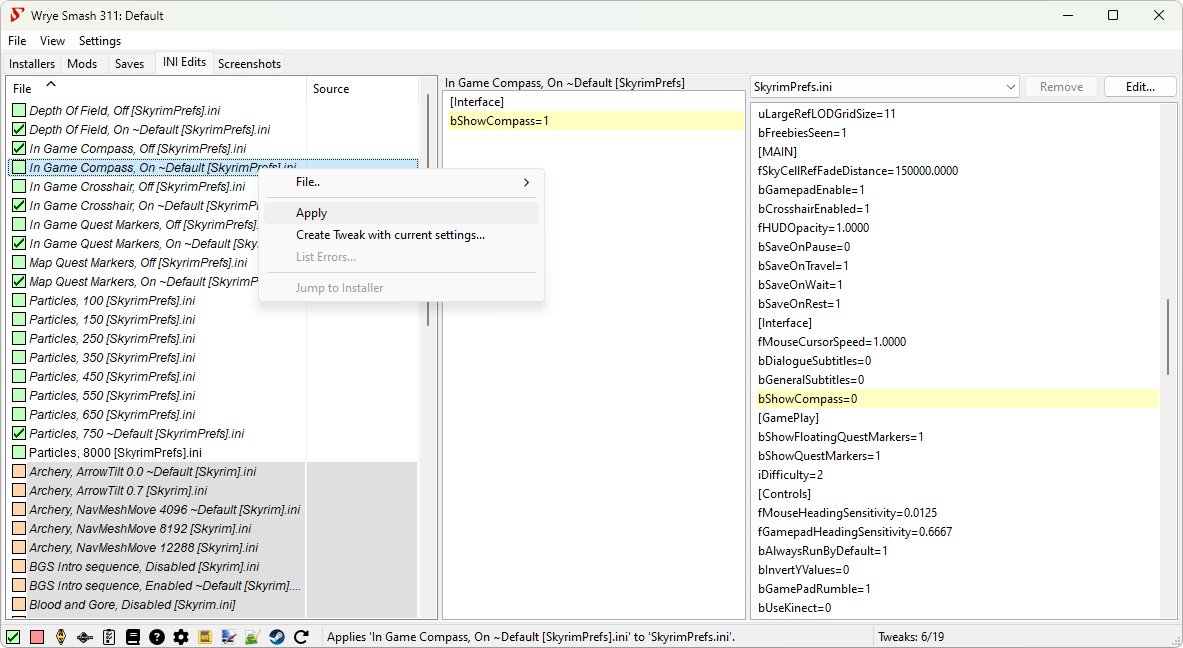
Selecting a tweak will display its contents in the middle column, and highlights the changes it applies to the current ini file in the right column. To apply a tweak, right click it and select Apply.
Warning: Incorrect INI settings in the game INI can cause bugs, CTDs or other damage to your game. Advanced settings in particular tend to be machine-specific and should not be casually copied from one computer to another.
What Symbols & Colours Mean Back to top
| Checkbox Style | Meaning |
|---|---|
 |
Some or all the variables the tweak sets do not exist in the current ini file. |
 |
The variable values in the current ini file do not match the values set by the tweak. |
 |
Some, but not all, of the variable values in the current ini file do not match the values set by the tweak. |
 |
Some, but not all, of the variable values in the current ini file do not match the values set by the tweak. The values that don’t match another tweak from the same installer. |
 |
Tweak is applied. |
| Text Formatting | Meaning |
|---|---|
| Orange Background | The specific heading or tweak is invalid for the current ini file. |
| Yellow Background | The specific variable value does not match the value in the current ini file. |
| Green Background | The specific variable value matches the value in the current ini file. |
Buttons & Context Menu Commands Back to top

| Tweak Context Menu | |
|---|---|
| Command | Description |
| Apply | Applies the tweak to the current ini file. |
| Create Tweak with current settings… | Creates a new tweak with the same settings as the selected tweak, but uses the values in the current ini file. |
| List Errors… | Lists invalid tweaks (for instance OBSE ini tweaks are invalid if current target ini is Oblivion ini), and also lists section headers and/or individual settings that are present in selected tweak(s) but are missing from the current target ini. These tweaks may be installed however — depending on Allow Tweaks with New Settings setting. |
| Open/Copy… | If the (single) selected item is a default Bash tweak this menu item copies it to theData/INI Tweaks folder, otherwise it opens the tweak with the default text editor for .ini files.
|
| Delete | Deletes the selected tweak(s). Deleted tweaks are sent to the Recycling Bin. Default (hardcoded) tweaks can’t be deleted. |
| Ini Edits Tab | |
|---|---|
| Button | Description |
| Remove | Removes the selected ini file from the drop-down selection box. This will not remove game default INI files. |
| Edit… | Opens the current ini file for editing in the default text editor. |
Launching Applications Back to top


At the bottom left of Bash’s main window you’ll find launch buttons for your game and other applications if they’re installed. You’ll also find a few toggle buttons and some Wrye Bash feature buttons. Each of the application buttons will be present if the corresponding application is present in the game install directory, or in their default install location if the application is not game-specific.
Clicking an application’s icon will launch it, and clicking a toggle button will change the state of the toggle. Clicking a Wrye Bash feature button will open that feature’s window.
Toggle Buttons Back to top
| Icon (On) | Icon (Off) | Toggles | Behaviour |
|---|---|---|---|
| Script Extender | When checked this will launch the game’s Script Extender when either the game or game’s editor (Construction Set or Creation Kit) buttons are clicked. If the LAA Launcher also launches the game’s Script Extender, then unchecking this toggle will also uncheck the LAA Launcher toggle. | ||
| LAA Launcher | When checked this will launch the LAA Launcher when the game button is clicked. If the LAA Launcher also launches the game’s Script Extender, checking this will also check the Script Extender toggle. | ||
| Auto-Quit | If checked this will cause Bash to quit when launching the game. This is useful if you’re concerned about memory usage. |
Game & Editor Launchers Back to top
The game and editor icons displayed will depend on which supported game you have Wrye Bash installed for. Using Wrye Bash’s game launcher opens the game itself, rather than the game’s launcher.
| Game | Editor | ||
|---|---|---|---|
| Enderal: Forgotten Stories | Skyrim Creation Kit | ||
| Enderal: Forgotten Stories: Special Edition | Skyrim: Special Edition Creation Kit | ||
| Fallout 3 | Garden of Eden Creation Kit | ||
| Fallout 4 | Fallout 4 Creation Kit | ||
| Fallout 4 VR | Fallout 4 Creation Kit | ||
| Fallout: New Vegas | Garden of Eden Creation Kit | ||
| Morrowind | Morrowind Construction Set | ||
| Nehrim: At Fate’s Edge | Oblivion Construction Set | ||
| Oblivion | Oblivion Construction Set | ||
| Skyrim | Skyrim Creation Kit | ||
| Skyrim: Special Edition | Skyrim: Special Edition Creation Kit | ||
| Skyrim VR | Skyrim: Special Edition Creation Kit |
Game-Specific Utilities Back to top
xEdit, xTrans and xView are just different modes of xEdit and will be available if the appropriate xEdit executable (e.g. Tes4Edit.exe) is available.
The xEdit launchers have extra options:
- Expert Mode — If checked, this option runs xEdit with the
-IKnowWhatImDoingargument,
activating more advanced functionality whenever xEdit is run from its launcher in the status bar. - Skip BSAs — If checked, this option runs xEdit with the
-skipbsaargument, which
skips loading BSAs. Faster, but some functionality in xEdit will be disabled when it’s run like
this.
Tes4Gecko & Oblivion Book Creator will be available if the windows path variable JAVA_HOME points to a valid
Java install (or the javaw.exe is present in WindowsSystem32) and their .jar file is present in Oblivion install directory
or for OBC in the data directory (you can override those default paths in bash.ini).
The BOSS launcher has some options if BOSS v2 is installed:
- Right-clicking the BOSS icon and selecting
BOSS Disable Lock Load Order
will cause Wrye Bash to temporarily disable Lock Load Order
when BOSS is run from its application launcher in the status bar, to allow BOSS to set the load order, re-enabling it after BOSS has finished running. It has no effect when BOSS
is run from outside Wrye Bash, or when Wrye Bash is managing Skyrim or a newer game. - Right-clicking the BOSS icon and selecting the
Launch using GUI
will cause Wrye Bash to launch BOSS’s GUI instead of its command line interface. - If R is pressed, it will do a level 1 revert (to the state just prior to the last sort).
- If Shift-R is pressed, it will do a level 2 revert (to the state just prior to the 2nd last sort).
- If S is pressed, it will run BOSS in its silent mode, so that the BOSS Log does not automatically open once it has finished running.
- If C is pressed, it will run BOSS with its Display File CRCs option enabled, so that plugin CRCs are displayed in the BOSS Log.
| Oblivion | Skyrim | ||
|---|---|---|---|
| Icon | Application | Icon | Application |
| BOSS | BOSS | ||
| LOOT | LOOT | ||
| TES4Edit | TES5Edit | ||
| TES4LODGen | TES5LODGen | ||
| BSA Commander | |||
| Interactive Map of Cyrodiil and Shivering Isles | |||
| Oblivion Book Creator | |||
| Oblivion Face Exchange Lite | |||
| Oblivion Mod Manager | |||
| Tabula | |||
| TES4Files | |||
| TES4Gecko | |||
| Insanity Sorrow’s Oblivion Launcher (offline) | |||
| Insanity Sorrow’s Oblivion Mod List Generator (offline) | |||
| Insanity Sorrow’s Random Name Generator (offline) | |||
| Insanity Sorrow’s Random NPC Generator (offline) | |||
| Insanity Sorrow’s Readme Generator (offline) |
Other Applications Back to top
| Model Tools | Texture Tools | Audio Tools | Misc | ||||
|---|---|---|---|---|---|---|---|
| Icon | Application | Icon | Application | Icon | Application | Icon | Application |
| Art of Illusion | AniFX (now icofx) | ABC Amber Audio Converter | Egg Translator | ||||
| AutoCad | Artweaver | Audacity | EVGA Precision | ||||
| Blender | CrazyBump | Switch | Fraps | ||||
| GMax | DDSConverter2 | FreeMind | |||||
| Maya | DeepPaint | Freeplane | |||||
| 3ds Max | Dogwaffle | Filezilla | |||||
| MilkShape 3D | FastStone Image Viewer | Logitech G11 Keyboard Profiler | |||||
| Mudbox | Genetica | Media Monkey | |||||
| Nifskope | Genetica Viewer | Notepad++ | |||||
| Sculptris | GIMP | RAD Video Tools | |||||
| Softimage Mod Tool | Krita | Steam | |||||
| SpeedTree | icoFX | WinMerge | |||||
| tree[d] | Inkscape | WinSnap | |||||
| Wings3D | Irfan View | ||||||
| NVIDIAMelody | |||||||
| Paint.NET | |||||||
| PaintShop Photo Pro | |||||||
| Photobie Design Studio | |||||||
| PhotoFiltre | |||||||
| PhotoScape | |||||||
| PhotoSEAM | |||||||
| Photoshop | |||||||
| Pixel Studio Pro | |||||||
| Pixia | |||||||
| TextureMaker | |||||||
| Twisted Brush | |||||||
| Windows Texture Viewer | |||||||
| xNormal | |||||||
| XnView |
Wrye Bash Feature Launchers Back to top
| Icon | Feature | Description |
|---|---|---|
| Doc Browser | Show the Doc Browser. (You can also view the doc browser by double clicking on any mod file in the Mods tab.) | |
| Plugin Checker | Show the Plugin Checker. | |
| Settings | Brings up the Settings Menu. | |
| Help | Show this help file in the default web browser. |
Manually adding tools to the Launcher Bar Back to top
To do this find and Right Click on a tools .exe file, and choose send to desktop
Copy this Icon from the desktop and paste it into the Mopy Apps folder ( The temporary desktop icon copy can now be deleted )
When you next run Wrye Bash the icon will be in the Launcher Bar, and you can Drag and drop the new icon to a desired position
Be careful not to use up all the available space and prevent tooltip messages appearing next to the Launcher Bar
Troubleshooting Back to top
Generating A Bug Dump Back to top
Wrye Bash writes debug information and error reports into a BashBugDump.log
file next to the Wrye Bash.exe file (or next to the
Wrye Bash Launcher.pyw file if using the Python version).
That log file will detail the cause of the problem that is stopping Wrye
Bash from starting. Read it and the rest of this section to see if the
problem is something you can fix yourself. If not, report it to an official
Wrye Bash thread for support.
File Permissions Back to top
If you are running Windows Vista or later, Wrye Bash (and other modding programs) may be prevented from working correctly by the UAC security feature. For Windows Store games, there are no workarounds to this, if you receive errors you must launch as as Administrator (workaround 4). There are four common workarounds to this problem:
- Install the game outside
Program Files
orProgram Files (x86)
. UAC prevents unauthorised edits to these folders, so by installing the game outside of them, you remove it from UAC’s reach, allowing you to use mods more easily. Steam users can move their Steam installation and games using these instructions. - Deactivate UAC. This can be done from the Control Panel, and will turn UAC off across the whole of your computer. It is up to you whether you feel that you have adequate security measures in place to do this without risk.
- Give yourself
Full Control
permissions over your game install folder. This will allow you to make any edits you desire while keeping UAC active and on guard for any edits made by programs you do not run, and also means that you do not need to reinstall your game to a new location. - Do nothing. Wrye Bash will detect if it needs to run as Administrator, and give you a dialog with a few options:
- Start Wrye Bash as Administrator: This will give Wrye Bash full Administrator Rights, allowing it to function fully with no further action, with one exception:
- You will not be able to drag and drop archives into the Installers window to move or copy those archives into BAIN. This is because non-Admin processes (explorer.exe) are not allowed to communicate with Admin processes (Wrye Bash) in this manner.
- Start normally. This will start Wrye Bash without Administrator Rights.
- Many actions that require Administrator Privileges will cause a UAC prompt to be shown. Commonly, these are:
- The first time Wrye Bash is started, approximately 4-6 times, depending on the number of directories Wrye Bash needs to create.
- When the Bashed Patch is rebuilt, 2 times, once for the Bashed Patch itself, once for the associated readme.
- Installing, Uninstalling, Annealing, and other operations in the Installers Tab that require modification of the game’s Data folder.
- On shutdown, you may be prompted multiple times when saving various .dat files to the Bash Installers and Bash Mod Data folders, if these folders are under UAC protection.
- A few actions are restricted:
- Saving files into the UAC protected area: Windows does not allow the Save File dialog to select a target within a UAC protected folder.
- Ghosting: Wrye Bash will not be able to un-ghost already ghosted mods. Wrye Bash will not ghost mods. Both of these require renaming mod files.
- Other actions that require Administrator Privileges may not have workarounds coded. Be warned, any errors you encounter while running as a non-Admin under a UAC protected directory will most likely not be fixed. Follow one of the alternate solutions to solve these errors.
- Many actions that require Administrator Privileges will cause a UAC prompt to be shown. Commonly, these are:
Launching Wrye Bash with some command line switches can avoid this dialog:
- —no-uac: Always start normally, without Administrator Privileges
- —uac: Always start as Administrator (if required)
- Start Wrye Bash as Administrator: This will give Wrye Bash full Administrator Rights, allowing it to function fully with no further action, with one exception:
For those that wish to take the third option and give themselves Full Control
permissions, here is a guide:
- Right-click the folder you wish to change the permissions for, and select
Properties
. - In
Properties
, select theSecurity
tab, and click theEdit…
button. A UAC prompt may appear, simply allow yourself to continue. - In the
Group or user names
box, select theUsers
option. - In the lower box, check the box opposite
Full Control
in theAllow
column. Press OK to exit. If a UAC prompt appears, allow the change. - In the
Properties
window, select OK to exit. You should now have Full Control permissions over your chosen folder.
If your game is a Windows Store game (Installed via the Windows Store or
Xbox App), then there are additional permissions to deal with:
- Wrye Bash will by default use a different writable location to store
your installers, as well as metadata about those installers: Your
My DocumentsWrye Bashfolder. - Wrye Bash may need to redate plugins and/or BSAs. Unfortunately, we
don’t currently have a way to do this in non-admin mode, so for these
operations you need to either run Wrye Bash as admin, or grantFull
as described above for the game folder. Specifically,
Control
Oblivion requires this on a regular basis to redate plugins for Load
Order configuraion. Later games do not usually need this, so they are
for the most part safe to run in non-admin mode and without changing
file permissions.
Backing Up & Restoring Settings Back to top
The easiest method is to just run the Backup Settings and/or Restore Settings commands, which are available in the Settings menu. These commands do not backup/restore any mod files or saves, just the Wrye Bash settings/data. When run, the commands ask you for the location you wish to back up to or restore from.
If you wish to manually back up your settings, the directories Wrye Bash stores files in are below.
| Directory | Contents |
|---|---|
| [Game]Mopy | Main Bash files. If you’re working on any localisation files in Mopyl10n you may want to back them up.
|
| [Game]DataBash Patches | Contains CSV files used by the import/export functions. Back up any CSV files you’ve exported and want to keep. |
| [Game]DataBashTags | Contains text files with Bash Tag overrides. Only needs backing up if you added any custom files (i.e. ones not installed through BAIN). |
| [Game]DataDocs | Contains mod readmes. Doesn’t need backing up. |
| [Game]DataINI Tweaks | Contains ini tweaks. Only needs backing up if you’ve added custom ini tweaks. |
| DocumentsMy Games[Game] | Contains Wrye Bash settings. It is important to back this up. |
| [Game] Mods (in the same folder as [Game]) | Contains BAIN packages and other Wrye Bash settings. it is important to back this up. |
How To Report Bugs Helpfully Back to top
Bugs should be reported in an official Wrye Bash thread (links can be found in the Contact section of this document). In order to best help you, the following information is required.
- Your Wrye Bash version. This includes whether it’s the Python or Standalone install, the version number and the SVN number (the latter only if using the SVN).
- The symptoms. Provide a step-by-step description of what you did, what you expected and what happened.
- What you see. Error messages are very helpful.
- Your version of Windows. If you’re using Windows with UAC enabled and you have your game in the default install directory, please resolve any permissions issues using one of the methods in the File Permissions section before reporting any bugs.
- Any modifications you have made to your bash.ini, if you are using one.
- If you’re having an issue with the Standalone version, make sure to uninstall any Python components on your computer and try again, as they can sometimes interfere.
- If the issue is related to the Bashed Patch, please include the following:
- Your load order. Get this by right clicking on a column header in the Mods tab, and selecting List Mods….
- Your Bash Tags. Get this by right clicking on a column header in the Mods tab, and selecting List Bash Tags….
- Your Bashed Patch config. Get this by right clicking on the Bashed Patch and selecting List Patch Config….
Known Bugs Back to top
Wrye Bash, being a complex program, has its share of bugs.
Visit our issue tracker for known bugs and enhancement requests.
Respect developer’s time — keep discussions there short, sweet and technical. No walls of text or forum chit chat.
Common Issues Back to top
| Issue | Cause | Solution |
|---|---|---|
| Can’t find bash.py | Wrye Bash is being run from the wrong directory. | Make sure you are generating the log from the Mopy directory. |
| Can’t Find User Directory | The PyWin32 Python module is not installed correctly. | Install the Wrye Python package correctly. |
| Can’t Find wxversion | Unknown | Uninstall then reinstall Python and wxPython (in that order). |
| No module named wx | You haven’t installed wxPython successfully or you haven’t installed it in the right place. | Install the Wrye Python package correctly. |
| The NTVDM CPU has encountered an illegal instruction. | This is a Python issue that causes the installation of PyWin32 (part of the Wrye Python bundle) to fail. | One workaround is to use the Standalone version of Wrye Bash. The alternative is to install it seperately, after installing Wrye Bash. |
| Wrye Bash will not start, and no Bug Dump can be generated | Wrye Bash is installed in a directory with unicode characters, and the Python interpreter has problems importing files in such directories. | Reinstall Wrye Bash to a directory without unicode characters. |
| File not found errors | Mapped paths and junction links can confuse Wrye Bash, leading to file not found errors. | Avoid using mapped paths and junction links for your game install. |
| Failed to retrieve known folder path | This is almost always caused by OneDrive taking control of your My Documents folder. |
Follow the directions found in this link and remove the Documents folder from OneDrive. |
| OSError: [Errno 22] Invalid argument | This is almost always caused by OneDrive taking control of your My Documents folder. |
Follow the directions found in this link and remove the Documents folder from OneDrive. |
Credits Back to top
Original Creator Back to top
 Wrye: Monkey God of Modding!

Current Maintainers Back to top
Authors and Contributors Back to top
- Badhair: OBSE cofile reading code, various optimizations etc.
- BeermotorWB: Installer directory refinement, new settings tweaks
- Daidalos: LOOT API updates, boot process refactoring
- DianaNites: Refactoring Export/Import links and argument parsing
- Ethatron: CBash updates
- FelesNoctis: Documentation editor for 307+, image updates
- fireundubh: Installer improvements and fixes
- GandaG: FOMOD support, Refactoring, build script reworks
- Haama: OBSE/Pluggy cosave definitions, various fixes & improvements
- jfpelland: Patcher updates, bug fixes, corrected GMST checks
- Kenneth M. Glassey: Several FOMOD fixes
- Leandor: CBash and CBashAPI updates
- Lord Nyriox: Expanded Oblivion.esm swapping support
- Lojack: Maintainer from 278-305: BAIN Wizards, Ini Edits tab, etc.
- Luna Nova: Initial Skyrim VR support.
- MacSplody: Patcher refinement, updating LOOT integration, cell handling
- myktaylor: Project management, Asynchronous installer tab, etc
- nephatrine: Initial Fallout 4 VR support.
- nycz: Initial de-wx’ing, LZ4 and SSE save handling, exception refactoring
- Ortham: Refactoring, initial integrations and updates of LOOT API, documentation, libloadorder and libbsa, and the rewritten documentation included in v297 to v306
- Pacific Morrowind: Maintainer from 268-296: New patchers, tags and export/import links, etc.
- Ralgor: Cell support and Import Cells
- Raziel23x: new tweaks etc.
- Sharlikran: Fallout 3/NV support, initial ESL support, save game/module header restructuring, form version recognition, patcher updates, heavyweight contender of the community
- sibir: Improved and added tweaks
- Warmfrost85: Improvements to Clean Data & Sync From Data
- Waruddar: Maintainer from 261-296: CBash, Bain Conversion Files (BCFs), etc.
- Valda: Assisted with Fallout 3/New Vegas support, including new patchers and tweaks


 nephatrine: Initial Fallout 4 VR support.


Additional Credits Back to top
- Translators
- Mod and Save File Gurus
-
Python Kings
- Guido van Rossum and many, many others.
- Special Thanks
-
Additional Thanks
- Alt3rn1ty: For Wrye Bash screenshot / UI images used in the documentation, corrections and suggestions, many INI tweaks for Skyrim, Fallout4 and Skyrim: Special Edition, and being an all-round bon oeuf.
- Arthmoor: All-round support of the project including pushing code snippets from anonymous contributors, assisting with issue tracking, and generally high activity in and around the project.
- ElminsterAU: Bug catching, technical suggestions.
- Kmacg94: Additional power exhaustion coverage.
- llde: Fixup for parsing archives that have attribute-less files.
- MatorTheEternal: Assisted with porting xEdit definitions in a format usable for Wrye Bash.
- Metallicow: Shiny new tool launcher icons, Graphics, Mooo, & the WizBAIN Editor.
- preacui: Existed.
- Sativarg: Proofreading.
- saebel: Caught and added a missing OBSE INI setting.
- Tom Supergan: Several well researched suggestions.
- To the testers/bug finders/helpful people on the forum when others have trouble: Arthmoor, Corepc, Daemondarque, TommyH, Surazal and many others.
- To those members of the community that contributed to the upkeep of Wrye Bash while its developers were absent (May/June 2012): Alt3rn1ty, Arthmoor, Daidalos, Ortham, Trira, and many others.
- Misc. Resources


Homage Credits Back to top
AKA ideas and stuff stolen from other people.
-
Names Files
- Flak: Flak’s Complete Names Project
- Bash Features
-
Tweaks
If you have a question/comment about Wrye Bash, it’s best to post it on the current Wrye Bash topic on the
AFK Mods forum.
License Back to top
Wrye Bash is released under Version 3 of the GNU General Public License or later. See the enclosed LICENSE.md file for license details, or visit the GNU Website for information on all their licenses.
Packaged Programs Back to top
Additionally, Wrye Bash comes packaged with the following programs:
- 7zip:
- Website: 7zip.org
- License: LGPL
- Usage: Wrye Bash uses 7z to pack and unpack archives.
- LZMA SDK:
- Website: 7zip.org
- License: Public Domain
- Usage: Wrye Bash uses lzma.exe from the SDK to unpack OBMM compressed data streams.
Advanced Readme Topics Back to top
This final section gives a brief summary of what may be found in the Advanced Readme. Some of the topics covered are:
- Installers:
- How to install Wrye Bash in any location.
- What the individual Python components required for the Python version are.
- BAIN:
- What the rest of the user interface of the Installers tab does.
- Which files BAIN skips by default, and how to tell if files have been skipped.
- How to install Script Extender plugins.
- How to edit OMOD Conversion Data using BAIN, for OMOD-Ready, BAIN compatible mods.
- How to create BAIN Conversion Files, and more about them.
- What the rest of the context menu commands do.
- Mods tab:
- Different ways to sort the listing of plugins in Wrye Bash.
- What the plugin details panel on the right-hand side of the Mods tab does.
- What CSV files are, and how Wrye Bash uses them.
- What the rest of the context menu commands do.
- Bashed Patch:
- How to view or edit the Bashed Patch outside of Wrye Bash.
- What Bash Tags are, what Tags exist, and when and how they can be used.
- What all the various Tweak… options are.
- What Merge Filtering is, and how and when to use it.
- What Item Interchange Mode is, and how and when to use it.
- What the default CSV files that Wrye Bash comes with are, and what they do when imported into the Bashed Patch.
- What the Leveled Lists patcher does, and how best to use it.
- The Saves tab:
- What the functionality of Saves tab is, and how it may be used.
- How to use save profiles.
- How to import faces from other savegames and mods.
- What all the context menu commands do, and what all the colours and symbols used mean.
- What the functionalities of the Screenshots and People tabs are, and how they may be used.
- How to customise which launchers are displayed, including adding your own new launchers.
- How to use Wrye Bash’s Settings menu to customise its general behaviour.
- How to use the Docs Browser to view mod readmes through Wrye Bash.
- What the Plugin Checker is and how to use it to detect issues with your installed mods and more.
- What Oblivion.esm swapping is, and how it can be used and why.
- What Wrye Bash’s keyboard shortcuts are.
- How to translate Wrye Bash into other languages.
The Advanced Readme is a more technical document aimed more towards mod authors and advanced users of Wrye Bash than the average user. If you find yourself wanting to know more, or not understanding why something in Wrye Bash behaves the way it does, then the answer you seek may be found in the Advanced Readme.
Один из самых ярких представителей игростроя, полностью поддерживающий пользовательские модификации, — компания Bethesda Game Studios, подарившая миру серию The Elder Scrolls.
Пятая часть серии, Skyrim, до сих пор остается весьма популярной среди игроков по всему миру, что является заслугой не только разработчиков, но и модостроителей. На сегодняшний день насчитывается более десяти тысяч дополнений различного функционала и сложности, а количество установленных аддонов у среднестатистического поклонника — около двухсот.
Появление такого количества модификаций рано или поздно должно было привести к созданию специальных программ по управлению дополнительным игровым контентом. Одна из таких утилит — Wrye Bash, обладающая богатым набором функций и настроек. Программа довольно сложна в освоении, но научиться пользоваться Wrye Bash как простым игрокам, так и энтузиастам однозначно стоит.
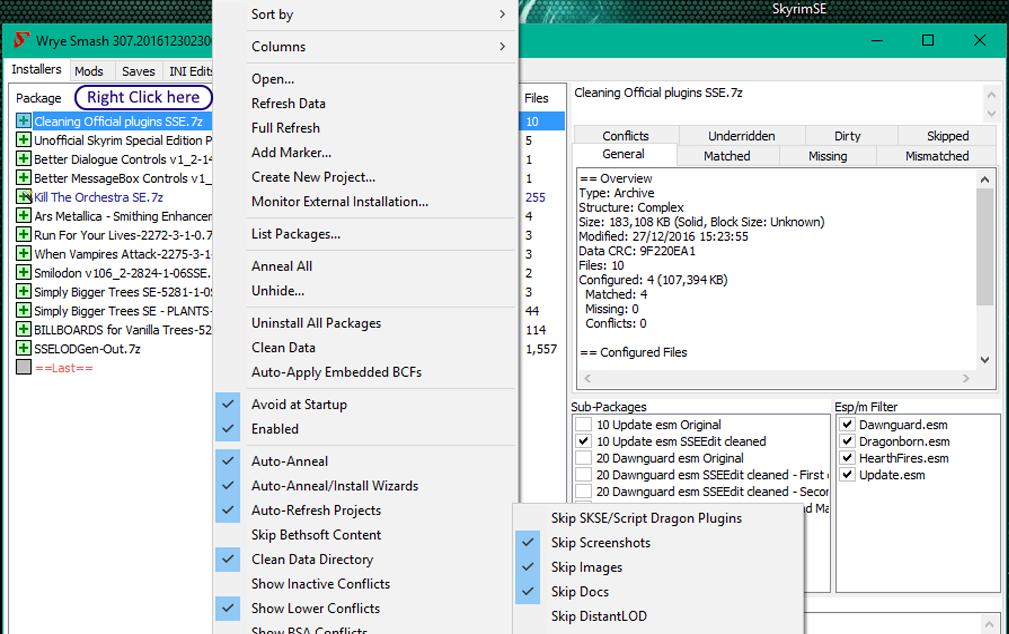
Возможности программы
Основное предназначение утилиты — полный контроль за процессом установки и удаления новых модификаций игры при аккуратном взаимодействии со скриптовой составляющей и сохранении оригинальных игровых файлов. Весьма полезная опция, позволяющая не захламлять папку Data тысячами файлов.
Дополнительный функционал программы:
- Работа с сохранениями — создание нескольких конфигураций с индивидуальными настройками и списком установленных дополнений. Учитывая, что максимально допустимое количество установленных в игру модификаций — 255, возможность создания собственного списка модов для каждого из сохранений/персонажей пригодится многим игрокам.
- Сортировка дополнений (изменение порядка загрузки). Немалая часть модификаций использует ресурсы игры (или других дополнений) и обращается при необходимости к месту хранилища этих файлов — так называемому мастер-файлу, который должен быть установлен и расположен выше в списке загрузок. При установке очередного мода с такими связями программа предупредит пользователя о необходимости скорректировать положение файла в списке.
- Объединение модификаций, редактирование левел-листов. В этом случае пользоваться Wrye Bash, как правило, имеет смысл для предотвращения конфликтных ситуаций, в результате которых файлы из дополнений «накладываются» друг на друга, либо при превышении лимита модов (например, объединение 10 видов оружия из разных дополнений в один esp-файл).
- Редактор конфигурационных файлов игры. Избавляет от необходимости переходить к этим файлам вручную. Может потребоваться при установке некоторых глобальных дополнений.
- Инструменты разработчика модификаций.
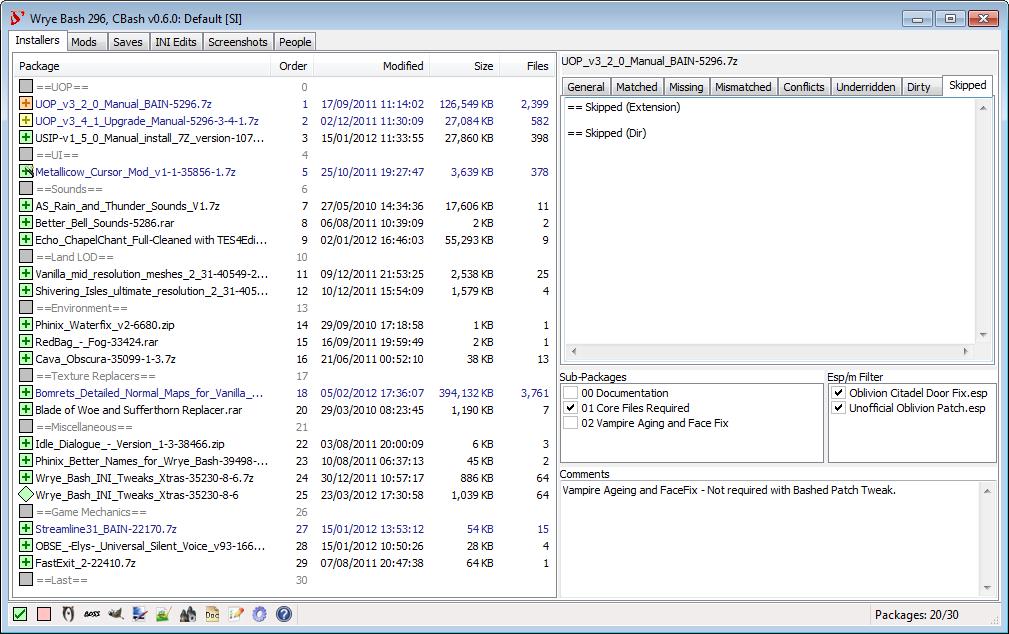
Как установить Wrye Bash
Программа бесплатна, поэтому находится в свободном доступе и может быть загружена с любого ресурса. Процесс установки выглядит так:
- Запустить загруженный установочный файл, кликнуть Next.
- Отметить игру, для которой устанавливается программа, другие пункты оставить без изменений.
- В качестве пути указать корневую директорию игры, кликнуть Next, следом — Install.
- Убедиться, что все сделано правильно: в корневой директории игры установщик создаст каталог Mopy, в директории Data — файл Bashed Patch 0.esp. Иногда программа его не создает, в этом случае необходимо принудительно скопировать туда Bashed Patch, Skyrim.esp из …MopytemplatesSkyrim, а затем переименовать в Bashed Patch, 0.esp.
- Запустить программу.
Элементы управления
Основное меню располагается в нижней части окна программы. Первая слева иконка отвечает за запуск игры в связке с расширителем скриптов (Skyrim Script Extender), следующая — за закрытие Wrye Bash при старте игры. Соответственно, на них можно поставить или убрать отметку. Клик по третьей иконке запускает игру.
Далее следуют иконки настроек, справки, запуска проверки и обозревателя документов. Остальные же кнопки пользователь может задавать сам. Как правило, сюда попадают необходимые мододелам и игрокам утилиты (Boss или Nexus Mod Manager например). Они могут появиться там при установке Wrye Bash (это зависит от их настроек), вручную же добавляются созданием ярлыка программы в директории …MopyApps.
Как пользоваться Wrye Bash
Освоить весь функционал программы получится далеко не сразу. Модостроителям даже придется изучать англоязычные инструкции. Wrye Bash для простых же игроков оказывается более доступен в использовании.
Основное окно программы разделено на две части. Слева — все установленные в игру модификации, расположенные в порядке загрузки (меняется этот порядок прямо здесь простым перетаскиванием либо с помощью соответствующих утилит). В этой же части окна отображается информация из других вкладок программы. В правой же части отображается подробная информация о компонентах игры.
Каждая из модификаций отмечена цветом: архивы esm — синим, обычные esp — черным, объединенные же модификации выделяются зеленым, а доступные к объединению — фиолетовым. Цвета ячеек каждой из модификаций несут другую информацию:
- Ячейка зеленого цвета сигнализирует о корректном расположении мода по отношению к мастер-файлу.
- Ячейка оранжевого цвета свидетельствует о нарушении порядка файлов, зафиксированного в аддоне. Следует иметь в виду, что зачастую требуемый порядок файлов никак не влияет на игру.
- Ячейка розового цвета означает отсутствие нужного мастер-файла либо некорректное его расположение.
- Чек марк в ячейке — установленная и активная модификация.
- + сигнализирует о том, что мод обработан баш-патчем.
- Точка — знак импорта.
- Чек марк отсутствует — аддон отключен.
Работа модификаций, обработанных с помощью патча (чаще всего речь идет об объединении нескольких модов в один), управляется файлом Bashed Patch, 0.esp. Этот файл всегда должен находиться в самом низу списка, что позволит избежать ошибок и конфликтов в игре.

Установка модов
Для установки аддонов в программе предусмотрена вкладка «Установщики». Изначально она пуста. Чтобы устанавливать моды, в Wrye Bash, как и в других утилитах, имеется специальная директория, созданная на этапе установки в том же каталоге, что и папка с игрой (…ModsBash Installers). Сюда нужно поместить все нужные архивы с дополнениями, после чего перезайти во вкладку. Программе потребуется определенное время, чтобы подгрузить все модификации.
Поддерживается как автоматическая установка (если модмейкер пожелал сделать свою модификацию соответствующей), так и ручная. При автоматической инсталляции пользоваться Wrye Bash, как правило, не сложно: нужно лишь кликнуть ПКМ на нужном архиве и затем щелкнуть «Мастер-установщик». В зависимости от сложности модификации будет предложено настроить варианты ее установки, следом нажать Apply. В ручном режиме нужно отметить интересующие аддоны, вызвать контекстное меню и нажать «Установить».
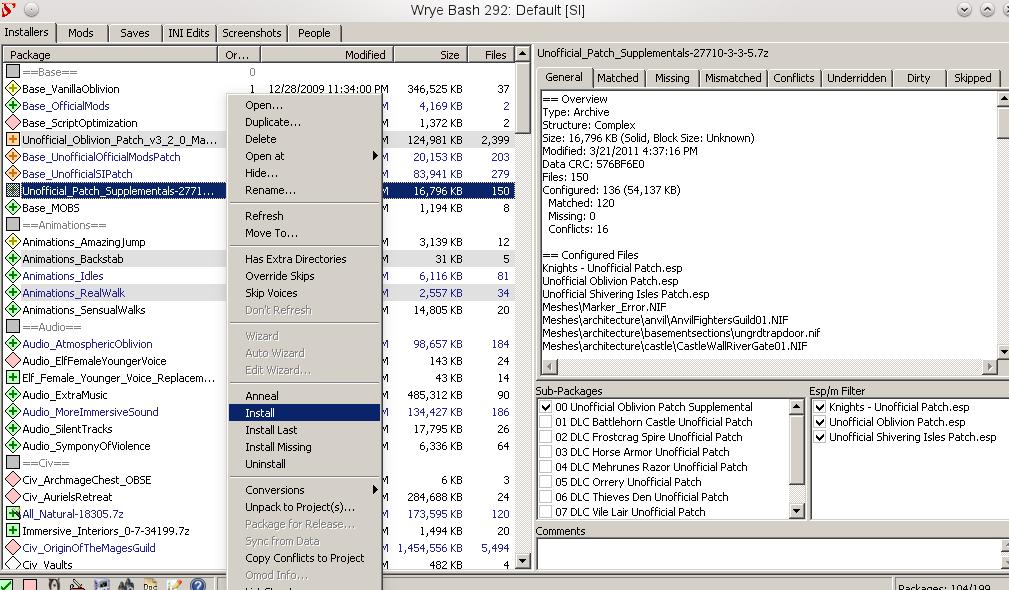
В тех случаях, когда архив имеет содержимое, программой не поддерживаемое (архив в архиве, например), он будет отмечен серым цветом. При этом можно попытаться модификацию все же инсталлировать, здесь же этот архив распаковав и запустив установку. Wrye Bash не сможет установить мод, только когда нарушена сама структура расположения файлов (не соответствует игровой).
Устанавливая дополнение, на цветовые обозначения также следует обращать внимание:
- Белый цвет — архив поддерживается программой, и мод можно устанавливать.
- Серый цвет — программа не может распознать файл.
- Зеленый цвет — программа фиксирует полное соответствие между своими настройками и файлами в игровом каталоге.
- Желтый цвет — файлы на месте, но имеются проблемы с совместимостью, либо зафиксировано изменение или замена одного или нескольких файлов мода после установки.
- Красный цвет — одного или нескольких файлов модификации в каталоге нет.
- Крестик на любом поле сигнализирует о повреждении архива.
Удаление модов
Для удаления аддона достаточно вызвать его контекстное меню и кликнуть «Деинсталлировать». Если файлы модификации были изменены другим дополнением, программа удалять их не будет.
From Step Mods | Change The Game
Jump to:navigation, search

Wrye Bash
A simplified guide to using Wrye Bash to maintain a modded Step setup
by: Step Modifications | Forum Topic
![]()
NOTE
Please be aware STEP now exclusively supports Mod Organizer for the STEP Guide and modding. As such, some of the information in the following Guide might be outdated since it is not being actively maintained on a regular basis. However, Wrye Bash can still be used for STEP but the Guide will no longer have instructions exclusively for Wrye Bash users as it did in the past.
Introduction[edit | edit source]
Wrye Nomenclature[edit | edit source]
Wrye was a prominent TES (The Elder Scrolls) enthusiast, modder and developer that created Wrye Bash as a tool to help other modders deal with the idiosyncrasies of modding for Oblivion (TES4). Wrye also later created an implementation that he called Wrye ‘Mash’ for Morrowind (TES3). Wrye Smash is simply Wrye ‘Bash’ implemented for Skyrim (TES5), so it IS Wrye Bash. For the sake of brevity and consistency, this guide will henceforth refer to Wrye Bash as ‘WB,’ and its analogues will likewise be referred to as ‘WS’ and ‘WM’ for Wrye Smash and Wrye Mash, respectively.
Purpose of This Guide[edit | edit source]
This guide assumes that the reader has reviewed the most updated relevant documentation now packaged with the WB program. If that is not the case, the authors strongly encourage a review of that documentation. Understanding—in a basic sense—what WB does and why it is useful are important concepts providing a context necessary for the reader to maximize the benefit of using this guide with respect to a fresh install of the most current major STEP release. Additionally, the guide will be modified and updated to reflect ongoing changes in each forthcoming major release of STEP. The novice WB user will likely find substantial value in following the guide as an actual working example of several sound techniques for implementing WB; nevertheless, much of the material covered in the following pages will be best understood with a baseline level of experience that exceeds “null” by at least a small margin, please familiarize yourself with the program before getting started.
Background — Basic Modding Principles[edit | edit source]
As with all TES games, modding Skyrim—in the most raw sense—can be accomplished by simply placing compatible files within the Steam/SteamApps/common/skyrim/Data/ directory (henceforth, referred to as “Data directory”). These files usually come packaged as a “mod” in an archive that facilitates simple decompression into the Data directory. Due to the vast number of mods and their incredible variety, the task of manual extraction and installation is a tedious process with lots of potential for error. Furthermore, it is difficult to “undo” what has been done, since it is difficult to keep track of the source of each file as the number of mods and files in the Data directory increases.
One must take care to read each mod’s documentation to understand exactly what it does and how it does it in at least a very general sense. Why? Because it is important to create a customized Skyrim that suits the tastes of the individual modder. Strictly defined, two mods are compatible if they do not attempt to alter the same game variable. Likewise, two mods that affect the same game variable are strictly defined as incompatible, which is more often termed a conflict. Said variable could be a mesh or a texture as well as a plugin or INI file. Even a game setting affected by a plugin while also being altered by an INI setting or a configuration script represents a conflict. Under the strict definitions of mod compatibility and conflict, many mods are incompatible and thus, have conflicts.
Fortunately, this is usually not really a problem, because most of the time, a conflict is inherently resolved by one mod “winning;” that is, one mod overwrites or overrides the other. For example, two particular versions of a texture file could attempt to occupy the same logical space in the Data/textures directory, in which case the second texture to be written to that space during installation will naturally overwrite the first. This is called a resource conflict. On the other hand, if one of those texture copies resides in a compressed BSA while the other exists as a “loose file,” then neither will physically overwrite the other upon installation, but rather one will override the other in-game upon execution of Skyrim. This is called a data conflict (also referred to as a load-order conflict).
The STEP Solution[edit | edit source]
One can spend hundreds of hours just searching for mods before actually getting down to the business of installing them. As mods increase in number and complexity and mod creators produce more and more mods that alter game play, interface and settings, the probability of game-crashing conflicts increases. The STEP project takes care of the heavy lifting associated with sifting through thousands of mods and selecting the ones that significantly enhance and improve the vanilla experience without detracting from it with as little cost as possible in terms of performance. Users are able to follow TheCompiler’s detailed, step-by-STEP manual-installation instructions and be confident that all components have been individually tested by the community and the results verified. STEP also facilitates customization by providing details of changes affected by each mod so that the user can choose to omit or change the order of STEP’s’. This cuts down on a vast amount of time and headache dealing with sampling, testing, troubleshooting, etc.
Limitations of STEP[edit | edit source]
Regardless of the huge time savings, efficiency boost and piece of mind that STEP offers, it is still a large manual process with many, well … steps. It can therefore take awhile, and problems can and will occur for many users with increasing frequency as mod numbers and complexity increase, so STEP will only go so far to reduce the job of maintaining a viable setup with each new mod or mod update. In order to allow better scalability of STEP as it evolves, it is necessary to simplify and condense the procedure into more manageable components. Mod managers help in this regard by keeping track of files installed and package installation order. In particular WB enables the most configurable interface for mod management, and is thus the recommended choice for installing, configuring and maintaining the STEP setup with each new alteration in the mod configuration.
Pre-installation[edit | edit source]
WB is not just simply a mod manager but much, much more. Like other mod managers, WB keeps track of mod packages as well as file sources and installation priority; however, WB goes far beyond this, some of which will be demonstrated throughout the rest of the guide.
Set Up Skyrim & Supporting Software[edit | edit source]
A much more comprehensive and in depth guide is available Skyrim Installation Guide.
Establish a Clean Skyrim Install[edit | edit source]
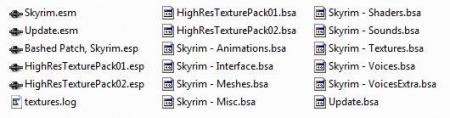
Figure 1: These are the only files that should appear in skyrim/.
A clean Skyrim install establishes a baseline from which to begin the STEP installation procedure. The simplest way to ensure a clean Skyrim install is to delete all loose files (not directories) from the skyrim/ directory (parent to Data directory), followed by cleaning out all files and directories from the Data directory (Figure 1).
Once complete, open the Steam Libraries view, right click on Skyrim and select [Properties]. Click on the [LOCAL FILES] tab, then click on [VERIFY INTEGRITY OF GAME CACHE…]. This will restore any missing files whilst avoiding the time-consuming and redundant download of the large files listed above. If there is any uncertainty, uninstall and then reinstall Skyrim from scratch to this point.
Install File-Compression Software[edit | edit source]
Almost any file-compression software can be used to view the contents of packages. 7-zip is favored by the authors, because it can produce dramatically smaller files than the other formats and it recognizes virtually every compression format. It’s also free, open-source, and supports most of the other common formats.
Install & Configure Wrye Bash[edit | edit source]
Install[edit | edit source]
- Download the Wrye Bash 306 (or current) installer from the Nexus.
- Tick [Skyrim] and [Standalone]. Installing the Python version is also valid, but that methodology will not be supported in future versions of this guide.
- Allow the installation of any dependencies if prompted.
-
- If the installer is having trouble finding Skyrim …
- Exit the installer, restart Steam, and run Skyrim from Steam. Doing this will create the necessary registry entries required for WB to find the installation directory.
- If the installer is having trouble finding Skyrim …
- That’s it. WB is now very simple to install and keep up to date using the auto updater in the settings menu.
Configure[edit | edit source]
If no previous backup of bash.ini is available, copy and then rename «bash_default.ini» to «bash.ini,» and place this alongside the former. The INI defines many useful things including where WB looks for installers. The following edits may be useful:
Under «[General]», uncomment the following lines and add in applicable paths (preferably to separate drives or directory locations other than skyrim/)
;sOblivionMods=../Skyrim Mods
;sBashModData=../Skyrim Mods/Bash Mod Data
;sInstallersData=../Skyrim Mods/Bash Installers/Bash
;sOblivionPath=G:/Steam/SteamApps/common/Skyrim
Read about the various options under [Settings] to determine if any of them may apply (recommend not changing these). To configure other applicable tools to be run via Wry Bash (from the bottom bar of the program window), uncomment pre-configured options under [Tools] and edit as appropriate for any of these applicable programs. Any custom program can be run from within WB by placing the shortcuts within the skyrim/Mopy/Apps/ directory. See the [General] section of a working bash.ini file as an example.
![]()
NOTE
The Python version allows execution of a debug batch file to ensure that everything is configured properly, all errors will be logged to «BashBugDump.log». Python-version users will also need to create a shortcut to «Wrye Bash Launcher.pyw» and move to a convenient location (like the Desktop or Quick Launch bar).
Install LOOT[edit | edit source]
Get LOOT and install according the the instructions provided. LOOT will be launched from Wrye Bash’s interface going forward.
Install Script Extenders[edit | edit source]
Using Wrye Bash[edit | edit source]
BAIN (aka, Installers Tab)[edit | edit source]
The WB installer, «BAIN» (BAsh INstaller), is represented by the Installers Tab. BAIN is one of the most powerful interfaces of WB, as it boasts many handy features that no other mod managers offers. Once all mod packages (package is the name Wrye Bash uses for the archive file or folder containing the files from the mod) are placed within the Bash Installers directory, they will be recognized from within the BAIN interface where they can be arranged singly or in groups in any order, renamed, list markers added, conflicts detected, packages unpacked, installer wizards can be built and much more.
BAIN informs the user of potential resource conflicts prior to installation and provides details concerning the conflicting resources, mods involved and the order numbers of the involved mods. This allows one to customize mod installation order to achieve the desired result. Perhaps even more importantly, BAIN keeps track of the mod-specific resource hierarchy, allowing simple installation and uninstallation of any combination of mod packages at any point in the installation hierarchy. This means that if a mod installed after a previously-installed conflicting mod is removed, then the assets from the overwritten mod will be re-installed automatically by default (this is the «Anneal» functionality of BAIN). Whats more, BAIN remembers the configuration on exit for the next WB session.
Bash (a.k.a. Mods Tab)[edit | edit source]
From within the Mods Tab, plugins can be managed using many handy tools including the infamous-yet-little-understood «Bashed Patch». The Bashed Patch takes elements from all loaded plugins (i.e., ESPs & ESMs) and merges them into a single plugin, which effectively «flattens» overlapping data conflicts and leveled lists into a single «layer,» reducing and de-duplicating disparate attributes and effectively resolving otherwise incompatible data conflicts. Think of mods as a series of transparent films containing layers with opaque bits of a complex graphic. When laid atop one another, each layer adds to the final composite and masks parts of underlying transparencies. Redundancies and conflicting components are effectively merged into an overall result that is a composite mod called the Bashed Patch. This allows otherwise incompatible plugins to coexist, and many mods are completely merged into the composite, thus effectively circumventing the 255 plugin limit, since byte references to completely mergeable mods are no longer required. BOSS is still required to maintain load order, and BOSS can be launched directly from WB.
Launch Wrye Bash for the First Time[edit | edit source]

Figure 2: Wrye Bash will open to the Mods Tab by default.
Launch Wrye Bash using the Start Menu shortcut, and WB will open to the Mods Tab, which is where plugins (ESMs & ESPs) are managed (Figure 2). Upon launch, WB creates Skyrim Mods/ beside skyrim/ by default; however, if bash.ini was customized as in the previous section, the Bash Installers folder structure is created at the custom location. This is the directory under which WB will look for mod packages (among other things); therefore, mod packages should be moved or downloaded directly to Skyrim Mods/Bash Installers/.
![]()
NOTE:
The application bar along the bottom of the WB window might show shortcuts to helper applications recognized by WB if those apps are already installed to their default locations.
Click the «Installers» tab. This should invoke a pop-up warning to «enable» Installers. If it does, click on «Yes» and it should load very quickly, as there is nothing yet in the package repository. If it does not prompt, right click the header bar of the Installers and make sure «Enabled» is checked. Then select «Full Refresh».
Adding a new package to BAIN is as easy as dropping a zip file into the bash installers directory. A full CRC scan of the package repository (Bash Installers/) is initiated every time the installers tab is selected, and any new mods found will be appended in alphabetical order and at the bottom of the load order in the package list. It should be noted that WB recognizes the contents of both extracted folders (called projects) and archives (called packages); however, it is strongly recommended that installers be kept in archive format as a standard practice, as this is not only a more efficient use of space, but it also prevents WB from calculating a CRC for each file in an unpacked project.Thus, projects can take a long time to scan. The archived package only counts as a single CRC.
BAIN Installers[edit | edit source]
Obtain the Mods[edit | edit source]
- Open a web browser and navigate to the STEP site on the Nexus, and download the latest STEP PDF link to the wiki guide (v2.2.1 at the time of this writing).

NOTE:
Yes, the wiki STEP Guide (SG) is right here, on THIS wiki, but we ask users to download the link from the Nexus site as a show of support for STEP on the Nexus. Feel free to endorse the project while visiting. Thanks!
- Once on the SG wiki, carefully read through and up to STEP 2, Mod Installation.
- Study the table legend for a moment, and then follow this section up to 2.D (Fixes).
- Download each mod from 2.D and move the archives into the Bash Installers/ directory.
- Click on the WB program title bar or task bar icon to bring it into focus. This will prompt a refresh of the Installers as the newly-added packages are scanned by BAIN, so allow a few minutes for this process to complete.
- Once BAIN finishes there are a couple of different ways to organize the installers such that the STEP install order is honored; however, it is recommended that packages be renamed according to the sections to which they belong and the two digit numeric order of appearance in the STEP Guide. This simplifies the task of properly ordering packages prior to installation (a VERY important requisite).
-
-
- A few examples of renaming would be by «Section/2-digit number/optionals by letter»: «J 01» | «J_01a» | «J01»
-
Once WB is set up correctly and the mod packages of interest are deposited into Bash Installers/, it is possible to evaluate which packages are or are not properly recognized by BAIN in order to proceed with installation. A few packages will need to be restructured in order to be properly recognized and installed by BAIN.
Package Structure & Interpretation[edit | edit source]
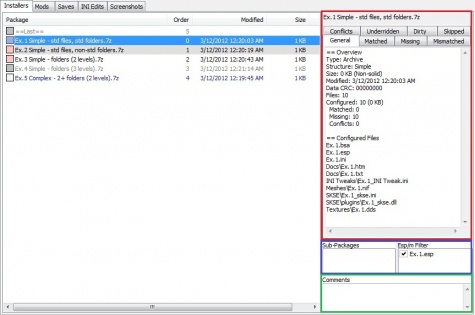
Figure 3: Introduction to BAIN. (L to R) Package Details, Sub-Packages/Plugins, Comments
The installers tab contains the package-management interface. Package management is a VERY important aspect of WB, and standards of Wrye BAsh INstaller (aka BAIN package or archive) structure represent the foundation of effectively using BAIN. Unfortunately, not all mod authors pack their mods in a BAIN-ready format, so it is important to understand how to convert to the proper structure. The good news is that BAIN has some flexibility, and usually can translate archives correctly. Packages preceded by a red (simple package), white (complex package) or gray (unrecognized) box are NOT installed (installed packages will have a plus [+] symbol inside the box). Before proceeding further, all packages must be made recognizable to BAIN (i.e., gray boxes and text must be eliminated). The following examples illustrate BAIN package interpretation and allude to some effective packing methods.
- Clicking on an archive will bring up details about the package in the upper right frame (red outline), as well as any sub-packages or plugins if present just below that (blue outline), followed by a convenient area to type in some comments about the package (green outline).
- A closer look at the package details of example packages 1-4 depicted in the package list of Figure 3 reveals further detail:
- Plugin filters and sub-packages can be seen just beneath the package details viewer (see blue outline in Figure 3). Any BAIN-ready package selected that contains an ESM or ESP will list them under «Esp/m Filter». Complex BAIN packages will also list the folder names alphanumerically under «Sup-Packages». Details in Figure 6 reference the Ex 1 and Ex 5 as in Figures 4 & 5.
![]()
NOTE:
In working with installer packages, it is useful to extract and repack large packages (i.e., > 500 MB packed) into non-solid archives. This format sacrifices a bit of compression ratio as a trade-off for a significant increase in extraction/compression speed, which can take a while for large packages containing many small files backed into a solid compression «block».
![]()
-
7-Zip Settings: Two-core processors
-
7-Zip Settings: Four-core processors
![]()
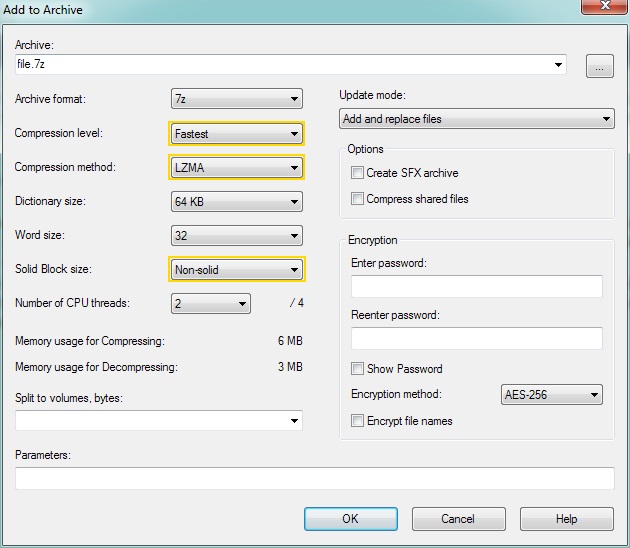
![]()

|
Figure 4: Package Details. |
||
| Ex 1. Standard files & folders. All files and directory structure are revealed. WB recognizes several typical Skyrim file types and folder names as well as folders installed by WB itself. | Ex 2. Standard files & folders with extra, non-standard folders. There is an extra directory in this archive that is not recognized by WB, because it does not follow a standard naming convention. | Ex 2. Standard files & folders with extra, non-standard folders (revealed). The files that were invisible to WB are detected if «Has Extra Directories» is ticked in the context menu (right click any package to bring up the context menu). |
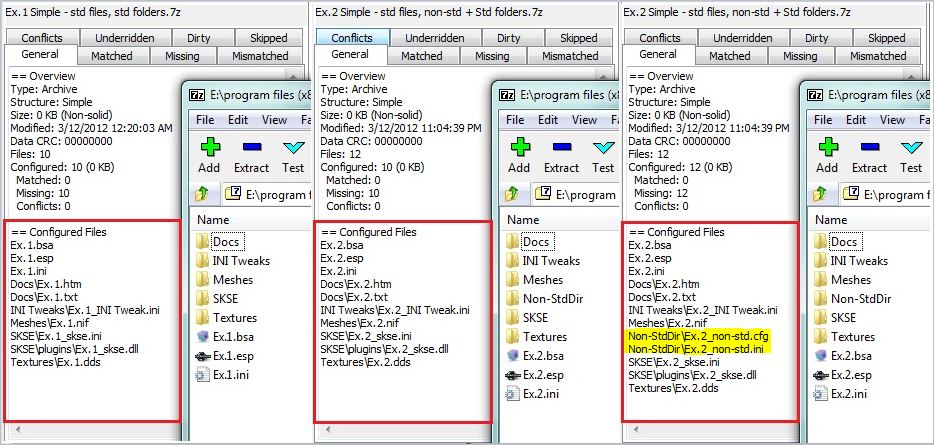
|
Figure 5: More Package Details. |
||
| Ex 3. Standard files & folders (2 levels). This reveals the exact same contents ad in Ex 1 previously; however, the directory structure includes another level represented by the Data directory. Many mods are packed this way, and WB understands them just fine and will install the package accordingly. | Ex 4. Standard files & folders (3 levels). This is exactly the same as Ex 3, but the Data directory is now beneath yet another parent directory. Unfortunately, WB stops looking for anything more than 2 folders deep at this time. Many mods come packed this way, and were not created by modders that are thoughtful of BAIN. This will need to be extracted and repack according to Ex 1 or Ex 3. | Ex 5. Two folders containing standard files & folders. All preceding examples have been of simple package structure. This is an example of a complex package structure. The contents of 00 Core are exactly the the same as in Ex 4, but there the ‘01 Optional’ folder containing options (note the file names in the example). Complex package structures allow an additional level of organization. |
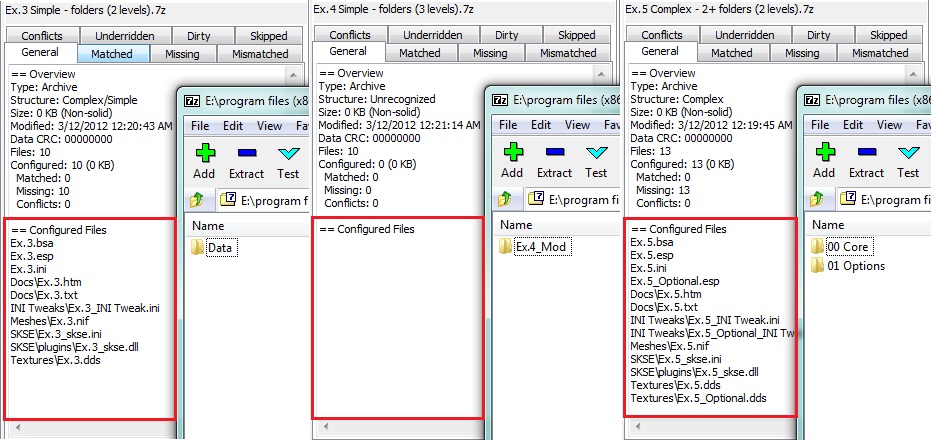
|
Figure 6: Complex BAIN packages, Sub-Packages and Plugins. |
|
| Ex 1. Standard files & folders. This is a simple BAIN archive containing a single plugin, which (unlike other files in the archive) must be selected prior to install. | Ex 5. Two folders containing standard files & folders. This is a complex BAIN archive; therefore, it contains two directories as listed in the «Sub-Packages» area, each of which contains recognized files and/or folders as listed in the package details above. As is indicated, selecting the 00 Core sub-package will direct BAIN to install those listed. Selecting also the 01 Options sub-package will add the highlighted optional files. Again, unlike other file types, plugins must be selected to flag specifically for install. |

Installing Mods[edit | edit source]
Package Order[edit | edit source]
![]()
Figure 7: BAIN column headers.
Like all tabs in WB, the installers tab has several header elements that can be right clicked to pull up a context menu of useful commands. Left clicking on a given header label will sort the list by that column (see Figure 7).

Figure 8: STEP-reorganized BAINs sorted by package name.
-
-
-
-
-
-
-
-
-
-
- Once the files have been downloaded, renamed and sorted by package, BAIN should resemble Figure 8.
-
-
NOTE:
The image in these figures may not reflect STEP in its current format, as they were created using STEP v2.2.5
-
- The «Order» column is of particular interest, as this column defines the installation hierarchy. Packages assigned to lower numbers are installed first; thus, files from lower-numbered packages will be overwritten by those from higher numbered packages where there is conflict. Likewise, sub-packages work the same way: those with lower numeric prefixes will appear in the list first and thus, will be installed first, and conflicting files will be overwritten by those with higher numbers (sub-packages are sorted alphanumerically).
- This guide will illustrate in detail how to set up STEP mods by focusing only on the initial texture mods. The same process may be used to set up all subsequent mods.
-
-
-
-
-
-
-
-
-
Set the Installation Order[edit | edit source]
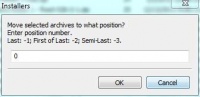
Figure 9: Adjusting installation order of single mods or mod groups.
Because installation order is critical to get the results expected in game, the packages must be ordered properly according to install order such that the desired assets overwrite their conflicting assets. This is done by sorting BAIN installers by the «Order» field. BAIN will handle every aspect of the hierarchy according to the preset install order, regardless of what packages are installed, saving the user a huge management headache and allowing the user to easily install/uninstall alternate conflicting assets.

Figure 10: Final STEP Textures/Graphics load order.
-
-
-
-
-
-
-
-
-
-
- Click on the «Packages» column header to sort by package name. This will organize the mods according to the STEP Guide sections (if the packages have been named according to the Guide Section codes).
- Multi-select the first (top) group of packages (Section D in this example), right click the highlighted selection, and select «Move To». Enter ‘0’ if it is not already entered and select [OK] (see Figure 9). The package list will not change, since BAIN is set to order by package name; however, the order numbers will change.
- Select Section E packages, and repeat the previous step, but this time, enter into the «Move To» dialogue the number equal to 1 + the highest Section D «Order» number. Repeat this process for all Section groups.
- Left click on the «»Order» header to sort by package order. The new sort should cause a slight change in the package list order, but only within groups. Check to be certain that packages are now both ordered by increasing «»Order» number as well as that the package name groups are also in order (this is the STEP default, aside from a few exceptions as indicated by the order presented in the STEP Guide). If they are not, simply right click on the misbehaving package, and «Move To» a position within its respective group and in that group’s Order» range.
- Once the installation order has been correctly set, the package list—when sorted on the [Order] column—should resemble Figure 10 (but for a few of the exceptions in the lower part of Section D).
-
-
-
-
-
-
-
-
-
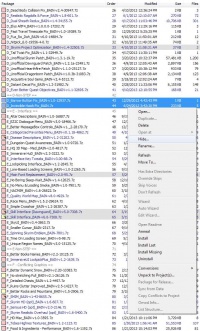
Figure 11: Hiding installers.
Package Installation[edit | edit source]
At this point, the mod packages are ready to install. Begin by confirming that no unexpected or undesirable conflicts exist. Before doing this, it will be useful to ‘hide’ the packages that should not or cannot be installed. Doing so prevents these packages from being included in the conflicts viewer.
- Select all of the obsolete packages, which should now be listed at the very end of the BAIN package list after the «==Last==» marker.
- Right click on one of the selected packages and select «Hide» from the context menu (confirm when prompted; see Figure 11).
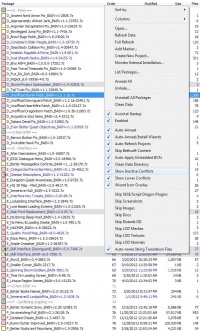
Figure 12: Show inactive conflicts
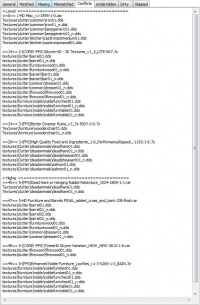
Figure 13: View conflicts
-
-
-
-
-
-
-
-
-
-
- Select one of the installers, and examine the package details in the upper right frame of the BAIN window.
- The [General] tab gives an overview of the files recognized in the package as well as some useful statistics.
- The [Matched] tab should be empty, and will only list files with paths if there is a currently-installed file in the Data directory identical to any of the files that BAIN recognizes in the selected package.
- The [Missing] tab should list all files in the package, since it is the exact reciprocal of the [Matched] tab.
- The [Conflicts] tab is of special interest, because it will reveal actual conflicts OR potential conflicts according to a setting in BAIN’s main context menu. If «Show Inactive Conflicts» is unchecked, the [Conflicts] tab should be empty, so ensure that this setting is ticked to reveal potential conflicts (Figure 12), as no packages have been installed to this point.
- Files and package «Order» numbers that will be overwritten will be listed first under the «=Lower===» heading, and those that will overwrite the currently-selected mod will be listed under the «=Higher===» heading (Figure 13). In-game, assets listed under «=Higher===» will appear in game, so verify that the conflicts will resolve as desired.
- [Underridden] and [Dirty] tabs list assets in the currently-selected installer that are not installed due to being either superseded by the assets of a mod installed upstream or due to a file mismatch for some other reason (e.g., if the file has been altered after installation), respectively. Both should always be empty.
- The [Skipped] tab lists any files/folders that are not recognized by BAIN as «install-able». For some cases, this can be rectified by ticking «Has Extra Directories» in BAIN’s main context menu. If not, the file will need to be restructured within the installer if it should be installed.
- Check to be certain that any packages that have a white box preceding the package name have sub-packages selected as indicated in the middle frame on the right side of BAIN. Likewise, be certain that all necessary ESP/M Filters are also selected.
- Once all packages have been verified and all necessary or optional adjustments made to the installers, ALL packages may be selected at once and installed by right clicking one of the selected packages and clicking on «Install». This can also by done for each individual package and in any order, since the hierarchy has already been defined. Depending on computer hardware, this process could take only a minute or more than 10 minutes.
- Uninstallation is done in the same manner as installation, and all of the same rules apply.
- Once installed, the boxes preceding package names will be either yellow or green, and each will have a ‘+’ symbol, which indicates that the package is installed. Yellow means that the package has some file installed, but others have been overwritten by higher-order packages. Green means that all files of the package are installed without any overrides (Figure 14).
- Select one of the installers, and examine the package details in the upper right frame of the BAIN window.
-
-
-
-
-
-
-
-
-
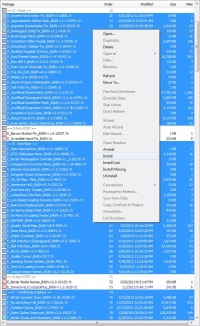
Figure 14: Installed mods & Overwrites: before install
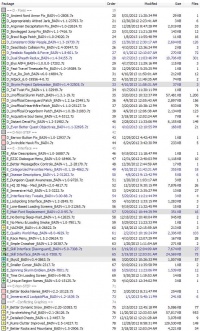
Figure 15: Installed mods & Overwrites: after install
-
-
-
-
-
-
-
-
-
-
- Infrequently, packages that are highlighted in yellow or orange have not been installed according to the defined hierarchy. This can easily be corrected by right clicking on the package and selecting «Install Missing»». Afterwards, right click the package again and click «Anneal» or «Anneal All» to tell BAIN to consider all packages in the install list. The «Anneal» function simply tells BAIN to refresh its assessment of the defined install hierarchy and reapply those rules to correct any unintended conflicts. It never hurts to use this function frequently, and «Auto Anneal» should always be ticked in BAIN’s main context menu to honor the install hierarchy.
- Be strategic about the order in which things are installed and uninstalled, as any yellow-boxed package with a ‘+’ symbol in it will need to be re-accessed by BAIN in order to install assets from higher-order mods that may be removed. If the overwritten package is very large (and ‘solid’), it will significantly delay the uninstall of a conflicting downstream package being removed, regardless of the size of the package being removed. Even if the package being removed is being updated, then a lot of time can be saved by first positioning and installing the update, thus effectively ‘blocking’ the large, overwritten file from being accessed, since it will no longer be required for conflict resolution.
- Use the approach described thus far for setting up BAIN installers and installing the rest of STEP.
-
-
-
-
-
-
-
-
-
Package Restructure[edit | edit source]
BAIN-Repack Unrecognized Packages[edit | edit source]
- Begin by navigating to Bash Installers/ and unpacking unrecognized packages into projects of same name in same location. Do the same for any packages that need modification according to STEP recommendations.
- Within each project, find the ReadMe and READ IT if available. If it is not, then navigate to the mod’s host site on the Nexus and scan the description. If there is still ambiguity, post a comment to the mod author asking that a ReadMe be provided (this should be a mandatory requirement!).
- Determine which files/folders are necessary for installation of the mod, and restructure the projects with reference to Figures 4 & 5 under the BAIN Installers tab.
- Even though BAIN will recognize up to two directory levels, it is best-practice to structure the archive with a single directory level as if the archive itself were the Data directory.
- If there are no conflicting options within the package, then it should be packed as simple. Otherwise, pack as complex, and label the sub-package directories such that the default precedes the optional version(s).
- Once the new directory restructure of the project is complete, re-pack the mod into an archive using the same name as the project, but with ‘BAIN’ added to the end of the file name, but BEFORE the numeric package ID#. DO NOT DELETE the original package.
![]()
NOTE:
If the «BAIN» tag is placed after the package ID# when renaming a package, the [Open at] option in the right-click menu will break. The [Open at] option allows one to open the package’s corresponding Nexus page in the default browser.
SIDEBAR: BAIN package restructure
EXAMPLE — Simple-package repack: 1-(CORE!)Accingite Vos — HQ Shields-225-1.
Rearrange the project (blue outline) into a ‘simple’ structure that BAIN will recognize (green outline). In this case, …
- the contents of 1-(CORE!)Accingite Vos — HQ Shields-225-1/Accingite Vos/Data/ should be moved up two directories to 1-(CORE!)Accingite Vos — HQ Shields-225-1/.
- Delete the now-empty Accingite Vos & Data folders.
- Re-pack as, for example, 1-(CORE!)Accingite Vos — HQ Shields_BAIN-225-1.7z.
- Once finished, move the new BAIN archive back up to Bash Installers/ and delete the source project (but DO NOT DELETE the original unrecognized source package).
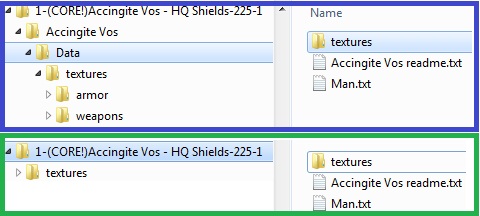
EXAMPLE — Complex-package repack: 3-(CORE!-FPS!)Skyrim Realistic Overhaul_1024-5400-1
This mod represents a good opportunity to produce a proper BAIN complex package using 3 separate input packages (low-res option, hi-res option, update). The desired result can be achieved in several ways, and the following is arguably the simplest. Starting with:
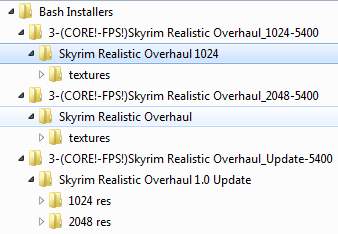
- Begin by renaming the top sub-folder of the low-res project from “Skyrim Update Overhaul 1024″ to simply «1024 res», and rename the top sub-folder of the hi-res project from «Skyrim Update Overhaul» to «2048 res».
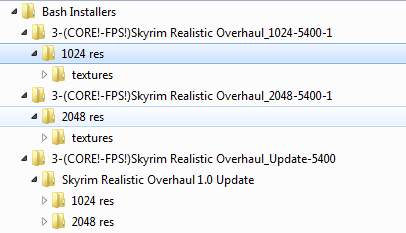
- Copy «2048 res» from the hi-res project into the low-res project along side «1024 res», and delete the hi-res project.
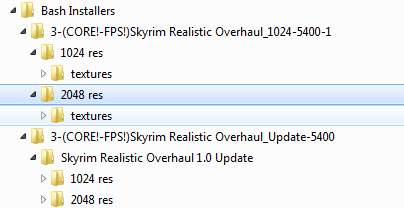
- Copy the «1024 res» and «2048 res» folders from the update into what used to be the low-res project and overwrite all when prompted.
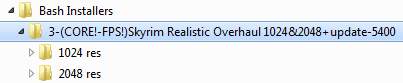
- Apply TheCompiler’s advice, by creating two new directories called «1024 res (not recommended)» & «2048 res (not recommended)»
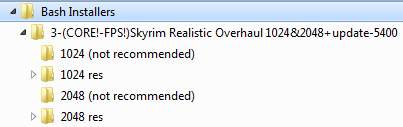
- Copy the textures folder from «1024 res» to «1024 res (not recommended)», and copy the textures folder from «2048 res» to «2048 res (not recommended)». Delete the update project.
- Finally, remove the textures/landscape/roads/ files indicated by TheCompiler from «1024 res» & «2048 res» and remove EVERYTHING BUT these files from “1024 res (not recommended)» & «2048 res (not recommended)» (i.e., the inverse).
- Optionally, add numeric prefixes to the sub-project names in compliance with standards for complex BAIN packages. This delineates conflicts.
- Optionally, it is recommended that any ReadMe files present be named accordingly and placed into a folder named «Docs» created beside each of the «Textures» folders within each sub-project.
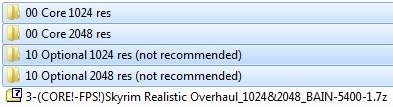
- The result is a complex BAIN package for SRO that includes all options for maximum customization. Archive the project into an aptly-named package and move to Bash Installers/.
- Delete the remaining project, but DO NOT DELETE the original three SRO packages!
Repeat this process for all remaining projects that need BAIN re-packing, TheCompiler’s advice modifications or whatever makes sense beyond that. This process is tedious, but it forces the mod user to become intimately familiar with a given mod, which will be useful later on.
Working With BCFs[edit | edit source]
BAIN «Package» Conversion Files[edit | edit source]
BCFs (BAIN Conversion Files) are very useful compressed instruction scripts that tell BAIN how to create BAIN-ready installers from BAIN-incompatible packages. Given that both source file(s) and converted BAIN version(s) exist, it is quite simple to create a BCF to make the task fast and easy for other downstream users.
![]()
NOTE:
A BCF requires the exact same input file that was used to generate the BCF itself in order to be used again to repeat the process. Therefore, it is mostly useful to mod creators or just plain considerate people 
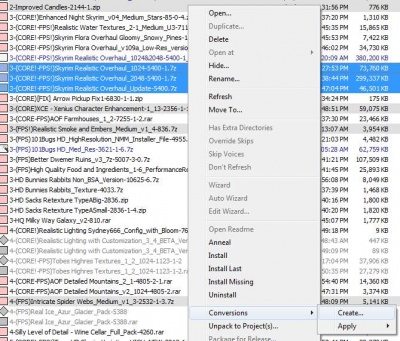
Figure 9: Selecting source files for creating a BCF.
Creating a BCF[edit | edit source]
- First, create the BAIN package manually from the unpacked source package(s). Refer to the second example in the previous section on «Package Restructure» using SRO.
- Place BOTH source package(s) and final BAIN-restructured package within Bash Installers/.
- In BAIN, select the package(s) that were used as the source(s) of the resulting BAIN file, and right click to bring up the context menu (see Figure 9). Select «Conversions» > «Create».
- Select the BAIN package created in #1 when prompted (e.g., the SRO example described previously).
- Select “OK” to the following pop-ups.
- The results will be summarized, and the new BCF will be created in Bash Installers/Converters/.
Once a BCF is created, there is less value to retaining the original non-BAIN source packages. It is recommended that these be separated from the actual installers by selecting each source package, right click, select «Move To», and enter in a -1. This will move them to the bottom of the installation list when packages are later sorted by «Order». … More on this later in the guide …
![]()
-
Figure 10: Create BCF dialogue (Pt 1).
-
Figure 11: Create BCF dialogue (Pt 2).
![]()
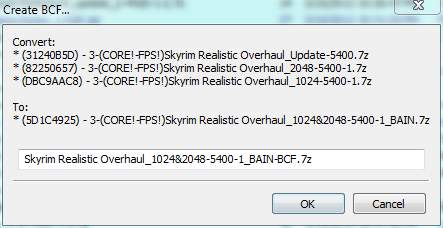
![]()
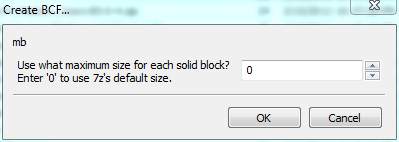
Applying a BCF[edit | edit source]
- Drop the mod into Bash Installers/ and the BCF.7z into Bash Installers/Bain Converters/
- Start WB and go to the Installers Tab (BAIN)
- Right-click on the mod (most likely at bottom of list)
- Select «Conversions» > «Apply» > BCF.7z
- Give the output BAIN package a name (accept the default)
- Right-click the new package (most likely at bottom of list)
- Select «Wizard», and follow the instructions
Mod Management[edit | edit source]
Using the WB Mods Tab[edit | edit source]
Setting the load order of the plugins[edit | edit source]
Now that the installation is finished and verifiable, move to the Mods tab to begin ordering your plugins according to the latest BOSS masterlist (or preferably use LOOT). No need to tick the plugins via the ‘Data Files’ menu via the Skyrim Launcher. WB will take care of that right here, simply tick every box, then click on the BOSS icon at the bottom left of the WB window. This will execute boss and potentially give you some recommendations or warnings and perhaps suggestions for ‘Bash Tags’ or that a mod can be marked as mergeable. For now, I will stop right here, as the complexities of plugin management are not relevant at this stage of STEP. The same is true for INI Edits and Saves tabs.
INI Tweaks[edit | edit source]
Nothing interesting here right now …
Official Documentation[edit | edit source]
The following documents are updates to the original WB documentation and will be updated with each official WB release moving forward. These guides will also support Skyrim users.
Currently maintained by Utumno and hosted on the GitHub documentation site. Current and future releases of WB will include this documentation.
The Mopy/Docs/ folder in the Wrye Bash distribution for Skyrim includes General Readme, Advanced Readme, Technical Readme, Version History. These are also available through the help command in Wrye Bash.
In addition to these, as pointed out on the Nexus documentation page for Wrye Bash, a useful unofficial guide is alt3rn1ty’s Wrye Bash Pictorial Guide for Oblivion.
Just to get you started with Wrye bash

by Alt3rn1ty

——————————————————————————
NOTE : This guide is now out of date — I dont have any Bethesda games installed anymore, and Wrye Bash has changed greatly since I last had it installed.
Anyone wishes to re-do this guide on a new page bringing it up to date .. Crack on 
——————————————————-After installing Wrye Bash, I recommend also installing LOOT — Wrye Bash and Load Ordering are essential.Download the pdf files (in the files tab) to view off-line at the same time as using Wrye Bash, and flip between the two — Requires a pdf reader, an open source variety here Sumatra PDF reader — does what you need a PDF reader to do.WBPG — Basics and Installers Intro pdf — Basics to get you up and running with Wrye Bash — The Intro to Installers section of this guide details using previously made Bain Friendly/Ready InstallersWBPG — Installers Advanced pdf — For a more in-depth look at BAINsWBPG — Installers Creation pdf — A little more advanced; Make your own BAINs
Installers Creation also requires the Wrye Bash INI Tweaks for DarkUI DarN Bain creation.Wrye Bash INI Tweaks Xtras — These are just INI Edits not included with Wrye Bash which you may find useful occasionally. Its also a simple BAIN, so to install them just throw this file in Bash Installers — Simples.
Installing INI Tweaks — Using INI TweaksWrye Bash Pictorial Guide Complete PNGs — This file contains All images in PNG format from all pdf’s; For those who may prefer to browse the guide using Windows Picture and Fax Viewer.
Hopefully, this will help some of you to get past the initial information overload barrier that is the Wrye Bash.html help file, and get on with modding/playing a far more stable game setup.
Translations
Wrye Bash Pictorial Guide — Simplified Chinese — Thanks to BlueSky404 from Bethsoft forum for putting the work into this.
If you dont have 7zip for creating BAINs … 7-zip
Also heres a few very helpful links …
Tomlongs excellent site … TESCOSI.
Tomlongs site is well worth having a good ramble through all the topics.
And Psymons guide and detailed instructions on …
Wrye Bash and BAIN installers
Hopefully, this will help some of you to get past the initial information overload barrier that is the Wrye Bash.html help file, and get on with modding/playing a far more stable game setup … Chow for now 
——————————————————————————
Links to ready made BAIN’s you can use out of the box
——————————————————————————
BethSoft Thread — << — Now closed.I understand Wrye Bash has been awkward to setup in the past but most problems are now resolved.
The new Wrye Bash Installer, can install just the Standalone version of Wrye Bash, or Python and Python Wrye Bash.
As for Mod installations — Read the mods readme/description, and approach them one at a time.
——————————————————————————
olympusgames, GMOD or ModDrop sites do not have permission, to upload or redistribute any of my files, images or descriptive content, past, present or future.
Of course there is nothing stopping anyone making their own guides
Paint.NET, G.I.M.P, and LibreOffice to export the PDF’s with bookmarks (Use Impress to do this part of the creation). 7zip comes in handy too.
For LibreOffice Impress, I have uploaded a resources file to get anyone started making PDF’s. These resource files are to be used as a template only.
This guide assumes you know how to install a program, how to locate a directory on your HD, how to move files and how to see file extensions, if needed. This is not a Windows tutorial.
Overview
Installing Wrye Bash: Installer or manually
Some Preparations before the first start
Installing OBSE
Some important things to know
Introduction to the installers tab
How to sort mods and why this is important
Installers details: What do colors and icons mean
Configuring a mod: Manually and with wizards
How to make a mod Wrye Bash/Bain friendly
Actually installing a mod: Just this one click
Incompatible mods: These won’t work with Wrye Bashs installers
General
Installation
First we want to make sure the game actually runs before we start any kind of modding. This will also set the required registry entries if you are using the Steam version.
This is also a good moment to mention that Oblivion should be installed outside the default programs directory of windows. Some people have trouble with user access control, some don’t, but why not be safe just in case?
For steam, that unfortunately requires either a second drive with a second library, or moving the whole library. It’s not possible to just move the one game somewhere else and start it outside of the default folder.
Installer
1) Download the latest Installer from here. Unpack it and run it. Check «Install for Oblivion» and «Wrye Bash [Standalone]«.
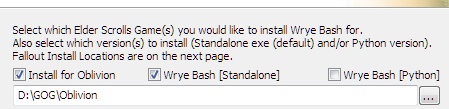
2) Don’t change the path. If the installer doesn’t automatically recognize where your Oblivion is installed, close the installer and launch Oblivion via OblivionLauncher.exe. This will set the registry info Wrye Bash needs to find Oblivion.
3) Wrye Bash is now installed in the «Mopy» directory in your Oblivion root directory.
4) The recently released GamePass/Windows Store version of Oblivion will not be detected by the installer. You need to manually install the Standalone Executable somewhere outside the game folder and use the -o method described below to start it.
I repeat, it’s not possible to install Wrye Bash into the game directory with those versions.
Standalone Executable
1) Download the Standalone Executable instead of the Installer. You will need 7-Zip to extract the archive and get to the installer — 7z is something similar to zip, and 7-zip can handle all 7z, zip and rar achives. Most Oblivion mods come in 7z format.
2) I still live in 2009 and place the Mopy folder from that download inside the Oblivion folder. If you do this, it will run and manage Oblivion automatically. You can also put the Mopy folder anywhere else, then it will ask which game to manage when you launch it, or pick the only installed, supported game if only one is installed.
3) You can also use the -o argument to tell Wrye Bash which game to manage. For this, you’d need to know how to create and edit a shortcut to Wrye Bash.exe. As simply dropping Mopy into the Oblivion folder for now is easier, I won’t be handling this here. The -o argument takes the full path to the directory the Oblivion.exe is in, for example -o «C:GamesOblivion»
Wrye Bash will check, in this order: the -o launch argument, the sOblivionPath ini setting, the location of the Mopy folder, and if none of those yield a result, check the registry for installed, supported games.
4) If you want to manage only one game, you can specify that in the ini, so it won’t ask all the time.
Python Version
Don’t.
Back to top
Preparations
1) If you run a non-english windows, you might want to go into the Mopy/Bash folder and rename the l10n folder to something like #l10n. This will remove the translation for now, because otherwise you might not find the right buttons when following the guide. If you want it back, just remove the # again.
2) Usually the directory where mods are stored is on one level with the Oblivion root directory. So if your Oblivion is installed to D:GamesOblivion, it will be D:GamesOblivion Mods. If you don’t want that, open the Mopy directory. There is a file called bash_default.ini. Make a copy of that and name it bash.ini, then open it. You then can set the value of sOblivionMods= to whatever path you like.
3) You can save and close the ini, or read the rest of it, if you want. I usually don’t bother changing anything else, except for the paths to certain tools, more of that later.
4) The reason why Wrye Bash doesn’t distribute a bash.ini is so it’s not overwritten if you update Wrye Bash.
Back to top
Installing OBSE
1) If you haven’t before, and plan to install any mods that require OBSE, install it now. Download it from here. The Community Version is under development again and will most likely get the occasional fix or feature. Make sure to download the file that is called OBSE[version number].zip.
2) Copy the contents of the archive (except for the directory src if it exists, though it doesn’t hurt if you do, you just don’t need it) into your Oblivion directory (not Data) where the Oblivion.exe is.
3) If you see no file Oblivion.exe because your file extensions are invisible, change that now. Usually you can turn file extensions on somewhere in Windows explorer, under options > view > uncheck «hide known file extensions». This might not be 100% accurate, because my Windows isn’t English. Some mods have the same file name for their esp, esm, bsa and ini file. It is crucial that you can see the difference.
4) OBSE itself and ENB + Presets are the only kind of mods that cannot be installed through Wrye Bash that I know of. Some others might need a bit of repackaging before they work.
Tools, of course, can also not be installed with Wrye Bash.
5) From now on you’ll be launching the game with obse_loader.exe if it’s retail or the GOG version. For Steam, launching it through Steam will automatically load OBSE.
6) Launch the game and test if OBSE works. Enter GetObseVersion into the ingame console. If there is no error, it works. If there is no output, or it outputs a version, it works. Only if there is an error that the command couldn’t be found, it doesn’t work.
Back to top
Important
1) I don’t think it’s as big of a problem as it was 10 years ago, but from time to time, when handling huge amounts of new mods and/or after you’ve configured a lot of things — just close Wrye Bash and open it again. If it ever crashes for some reason, there could be changes lost and you might have to redo them.
2) For example, if you install a mod and Wrye Bash crashes, it will forget the mod was installed. The files will still be there, but Wrye Bash won’t be aware that it installed them.
3) In general, you can find most menus by right clicking. Right clicking on the header of a column gives you general options, right clicking on a mod, installer or savegame gives you options for that object. If in doubt, right click.
4) Similarly, hovering over a lot of things gives you an explanation what it means in the status bar.

4) If you ever don’t see any of the windows I’m describing, try to pull them out. They might just be very small for whatever reason. This used to be true for the master list in the mods tab. The points where the mouse cursor turns into the arrows for this are a bit strange sometimes.

Please note: In the latest latest version, the masters and the bash tags windows are now side by side and should be visible without any problem.
5) If you’re coming from Skyrim, you’re probably wondering why I use Wrye Bash over Mod Organizer 2. Well first of all, MO2 has only recently be made to work well with Oblivion and OBSE on Steam. A lot of people that have been playing and modding Oblivion for years just couldn’t use it before, and a lot of mods come with BAIN wizards that have been unsupported for even longer and were just recently added.
Another good point is the fact that the Bashed Patch is a very important part of Oblivion modding. For Oblivion, it’s way more advanced than for other Bethesda games. So you will end up needing Wrye Bash anyway, and if you use MO2, you’ll just have to launch it through MO2. I personally don’t bother using 2 programs when one could do the trick.
Lastly, while other games may have a bunch of loose files in the data folder which could be overwritten by mods (which is no problem with MO2), Oblivion doesn’t have many loose files. Almost all Oblivion files are in BSA archives, there really isn’t much you can break by installing directly into the data directory.
The exception to that is mods that replace the video, music and shaders. Installing those mods will overwrite your vanilla stuff, making it impossible to remove them again unless you made a backup.
The official shaders can be downloaded on nexusmods. Most music mods don’t replace but add files and there are very few video replacers out there.
One famous mod that overwrites the vanilla shaders (strangely enough, last time I checked just with… vanilla shaders!) is Oblivion Reloaded Lite, which means after you uninstall it, it will take down those vanilla shaders and your game won’t launch anymore. So keep that in mind if messing with ORL.
Now I’m not saying you shouldn’t use MO2. If you are familiar with MO2, just use it, what’s the problem, no one is stopping you. (It works just fine. Unlike OBMM, NMM and Vortex. Those have issues.) It recently even got support for BAIN wizards (though I think it fails on wizards that include version checks) and the only mod I know of that causes problems is nvac, which isn’t needed anymore anyway. But you know what I’m not doing? I’m not writing a guide for it, because it’s not a program I use.
Back to top
Running Wrye Bash
1) You can now start Wrye Bash by clicking the Wrye Bash.exe in said Mopy directory.
2) Do so.
3) Now tenderly stroke the top of the window with your mouse cursor. It’s a good program and doesn’t deserve all the hate it gets. Too complicated, pff.
4) At the top you should have 5 tabs: Installers, Mods, Saves, INI Edits, Screenshots.

We will go from left to right.
Installers Tab
Activating
1) Click on the Installers tab. Wrye Bash should ask you if you want to activate it. Say yes. If, for some reason, you didn’t, right click on the header and make sure Enabled is checked.
2) Also make sure Avoid at Startup is checked, this will save you some nerves, and BSA redirection is on. (If you are using SkyBSA, you won’t need BSA redirection, but I don’t think it hurts, either).
Additionally, I recommend checking Auto-Refresh Projects and Wizard Icon Overlay. Those should be on by default anyway.

3) You can open the mod directory by right clicking on the header and selecting Open. This folder is where you drop your downloaded mods. A lot of mods should work out of the box — either because they are BAIN (BAsh INstallers) formatted or have a simple file structure. Move everything you want to install into that folder.
4) You can also just drag mods into the installers tab. Wrye Bash will ask you if you want to copy them or move them there.
This will not work if you launched Wrye Bash as admin.
5) Go back into Wrye Bash. It might need a while (maybe a long while, depending on the amount of mods) to scan them all, then provide you with a list. You can even drop .omod files in there, Wrye Bash will attempt to unpack them. Not all .omods have an easy to use file structure inside them, though.
The entries in this tab should be sorted by order.

Back to top
Sorting Mods
1) Installers order is priority order. Mods with a low number are basically installed first, mods with a higher number last. This only matters in one regard: If two mods have the same files (maybe a general texture replacer like qarls that touches all textures, and a small one that only changes Bravil architecture), you want to sort them in a way so the one you prefer is last. If a mod has a patch or an upgrade to a later version, that one must be installed after the mod it’s patching.
2) If you are following a mod list, I assume it’s safe to arrange the installers in the same order. Otherwise, your best friend is the conflicts window.
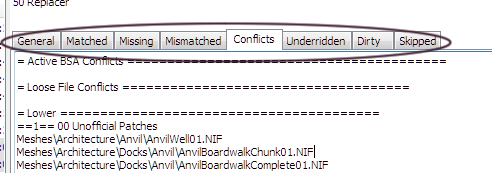
3) In the conflicts tab you can see which files conflict between mods. They are divided into lower conflicts (= this mods overwrites those) and higher conflicts (= this mod is overridden). Move the installer according to where you want it. The beautiful thing about Wrye Bash is that you can change it at any time. Notice some texture isn’t what you expected ingame? Find the installer, find the conflicts, move it after the one that’s overwriting this.
You can turn off the display of Inactive Conflicts (= mods that are not installed) and Lower Conflicts (= mods that are overwritten) by right clicking on the top column over the installers list. This might make it easier to spot conflicts.
4) A short explanation of the other tabs:
General is the contents of the mod, all the currently configured files that would be installed with it.
Matched is which files are installed and 100% identical.
Missing is which files are not installed, but should be according to current configuration.
Mismatched is which files are installed (same file name), but are different, either because they are overwritten by a later mod, or were hand changed.
Skipped lists files and directories that are not installed because Wrye Bash doesn’t recognize them. Some are silently skipped and not listed. The only affected culprit here is — once again — Oblivion Reloaded 9.x or higher and ORL 6 or higher, which comes with an OblivionReloaded.dll.config file which is silently skipped because .config files were used by NMM before. If you are installing any of those Oblivion Reloaded versions, manually copy that file into Data/OBSE/Plugins.
Lastly, Underridden and Dirty usually happens when you change the order of installers and can be fixed by right clicking on the mod and selecting Anneal. Except for curiosity while actually creating mods, I barely check those.
Back to top
Installer Details
1) Installers can have several colors or symbols that might be confusing at first, but allow to see the status of a mod at first glance.
Shape  Squares are archives (zip, rar, 7z).
 Diamonds are unpacked directories (also called «projects»).
 A + inside either icon means this mod was installed.
Icon Color
Red — Mod is not installed or files are missing
Orange — Mod is installed, but esp/esms don’t match
Yellow — Mod is installed, but some other files don’t match
Green — Mod is installed, files match 100%
White — Mod has Sub-Packages, but none are selected
Grey — Wrye Bash doesn’t recognize this structure and can’t install it
Background Color
Grey — Some files were skipped
Orange — The install is dirty. Can be fixed by right-clicking and selecting Anneal.
Yellow — The install has underrides. Can be fixed by right-clicking and selecting Anneal.
Both yellow and orange background color happen occasionally when moving packages around.
Text Color
Navy Blue — This is really hard to see. It means the package has sub-packages.
Grey — Wrye Bash doesn’t recognize this structure and can’t install it
Packages starting and ending with ==, for example == Replacers ==, are markers. You can create them by right clicking on the header, selecting Add Marker… and renaming them. They are only used for convenience, if you want to visibly group mods between two markers.
2) In general, every green, yellow and most orange icons are fine (orange usually happens if you cleaned a mod after installing or installed a patch on top of a main file). In case of patches, just make sure to really load the updated esp last, and you can also just uncheck the esp in the outdated packages so it all turns yellow again.
If the icon is grey or red, you need to look into it.
If a mod has a yellow or orange background, hit Anneal.
Back to top
Configuring a mod
Manually
1) Some installers have sub-packages and/or several esp/esms. You can select what to install on the right side by checking and unchecking boxes.
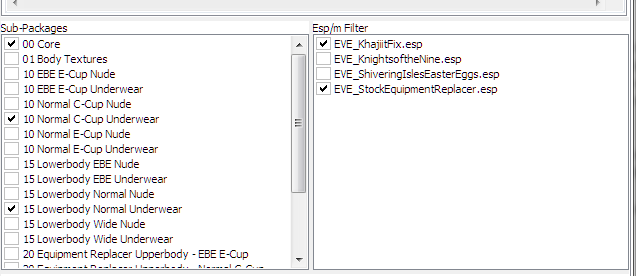
As you can see, I selected some of the sub-packages and some of the esps of this mod. This structure is commonly used for mods that have alternatives/different versions. To sort the sub-packages, they are usually named with a two digit number in front. 00 usually is the «core», meaning it must be installed. Other options are often grouped up, like here all the different cup sizes. If several options have the same number, it usually means you have to pick only one of those.
In this example, all the 10s are for the upper body, you have to chose between EBE and Normal, C-Cup and E-Cup, Nude or Underwear. There is no point in selecting more than one of the 10s.
2) Additionally, you can uncheck some esps, like patches for mods you don’t use.
Wizards
1) Some mods have a Wizard. They have a special Icon. 
2) In newer versions of Wrye Bash, selecting install will automatically start the wizard if one exists. It will guide you through the installation process. At the end, you have the choice to apply your selection, install the files or both.
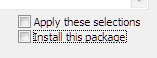
3) Any Ini Tweaks created by wizards should be auto applied in latest versions of Wrye Bash. It can’t hurt to switch to the Ini Tweaks tab and double check, though.
Back to top
Making a mod «Bain Friendly»
Some mods are not recognized by Wrye Bash. This is often the case with very old mods, from a time when there was no mod manager and no common structure, but also .omods and their ability to just have whatever file structure often cause this.
Method 1 — Manual
1) The probably easiest fix is if the mod files are just in a knee deep file path like «ModnameFilesMod NameData» or any other variant where a clear Data folder exists in the mod, but Wrye Bash is unable to find it. Just create a new folder inside your Bash Installers directory, give it a nice name, and make sure the file structure starts as if you were inside the Data folder: Inside the new folder should be the esp/esm and the directories meshes and textures etc (of course, only if that mod has all of that in the first place).
2) If the source is more complicated, do the same, but you might need to at least know a bit what you are doing. Fish for the files you want and place them in the right structure into the new directory. Sometimes/often those mods have instructions for manual installation. You can probably follow these, but, instead of moving them to the Data directory, you move them into your newly created folder.
3) There is a possibility that mods used complicated obmm scripts to install, which would make this process harder and probably be easier to use the next suggested method below, but to be honest, I can’t think of a single mod that does.
Method 2 — Monitor External Installation
1) If you right click on the top column in the installers tab of Wrye Bash, you can select an option called Monitor External Installation. Depending on your installation size, this will take a long time, so if you can do it manually, that’s probably preferred. If not, press that option.
2) A window will pop up, telling you to install your mod. You can now follow whatever install instructions to put the mod directly into your data folder, be it installing it with oblivion mod manager or as an exe file.
3) Once the mod is installed, hit OK on the popup in Wrye Bash. It will scan the folder again and then present you with a window of all the files it found that were added to the data folder. Press create project and add a name.
4) You can now probably remove it with whatever way you installed it with (for example, if it was an exe installer, I dislike having it left in my programs list), just so it’s a bit cleaner, then reinstall with the newly created Wrye Bash mod.
Back to top
Actually Installing Mods
You know when I said to occasionally close Wrye Bash and open it again? If you haven’t done so yet, now would be a splendid time to do so, so all your preparations and orders are saved.
Just Install
1) So now your mods are sorted and configured, right? Right. Right click on the mod. Select Install. Done.*
*If your mod has a wizard, it will now run.
2) You can install all mods at once, or one by one, or in batches. Installing many at once might take a long time. I personally wouldn’t install more than a few at a time.
3) If you change your package order after you’ve already installed a few, some might turn yellow or orange. If that happens, right click on them and use Anneal. Unless for some reason you are making changes to mod files in the Data folder, it should always be safe to use anneal after you’ve changed something.
4) Anneal will not correct changed esps, so if you’ve cleaned them, they will stay that way. The installer icon will turn orange, though.
5) You could grab all your cleaned esps once you’re done with everything, stuff them into a new folder in your installers directory, call it cleaned esps and move it to load last in BAIN. This will also keep them safe should you ever (accidentally or on purpose) replace them with an uncleaned version.
This will also keep cleaned DLCs safe that would be reset by verifying game data with steam.
6) If the mod contains any dlls (OBSE plugins), Wrye Bash will ask you if you trust them. Answering no is semi-permanent and will leave you unable to install that certain dll with Wrye Bash unless you reset some settings. To change which dlls you trust, click on the little cogwheel in the status bar and select the option Trusted Binaries. There you can move dlls from Untrusted to Trusted and back.
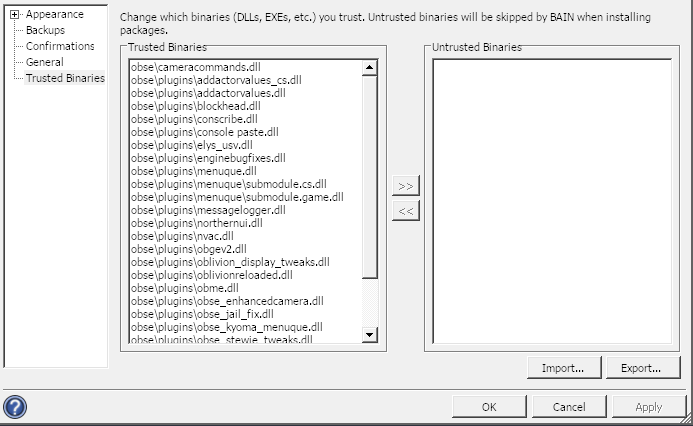
6) If you want to uninstall a mod, you might have guessed it: Right click on the mod and select Uninstall. If by uninstalling a mod the conflict status of any resources changes, Wrye Bash will handle it automatically.
7) Similarly to Anneal, Uninstall will not removed changed esp or ini files. I assume this is so you don’t lose your changes or configs.
Advanced Installation
1) Instead of just pressing Install, you can select Advanced Installation. This is useful if you changed a package after initially installing it. Say you installed it already, and now want to add an additional esp/subfolder that you had unchecked previously. You could select «Install Missing Files» to only install files that were not installed before.
Careful: This will not install files that have been installed before, even if they would be changed now in the new config.
2) If for some reason you don’t want to run the wizard, you can also manually make your selection like in any other mod and select Advanced Installation > Install Current.
3) Wizards also have the option here to run with default settings, as far as the the modder provided them, or to let you view the wizard script.
4.) Install Last will install the mod at the position of the ==Last== marker.
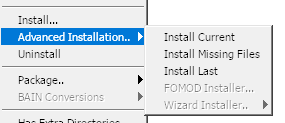
5) If you want to make changes to the archive itself, you can unpack it from Wrye Bash. Right click on the mod and select Package > Unpack to Project(s)…. A double click opens the archive or directory, so you can look inside, and, in the case of a directory, edit files directly.
6) If you cleaned any mods or made changes and want to preserve them, you can click on Package > Sync from Data. This will give you a list of changed files that you can pack into the mod file. This works on both, archives and directories.
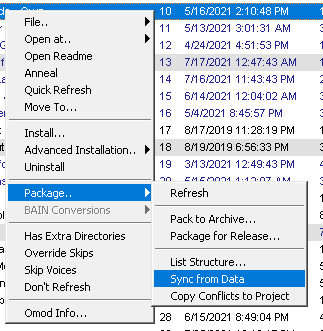
If you want to add cleaned esps back into the mod file they came from, or keep them all in a separate folder, is a matter of preference. I would suggest using one way or another to keep them safe, though.
Back to top
Mods that cannot be installed with Wrye Bash
There are a few mods that cannot be installed with Wrye Bash. They are few and far in between, as most mods I know of have alternatives, for example the famous DarNified UI has a BAIN friendly repackage here.
Realistic Leveling requires manually editing the ini, as it ships with placeholder values in its ini that would get set by the OBMM install script. However, I would suggest checking out Ultimate Leveling, which has a RL mode and is much more modern and should not carry the same bugs RL did.
The full package of QTP comes in 11 (eleven) .omods, but there is a BAIN friendly redimized version and in 2021 there are several other retexture packs available as well.
There are mods that directly edit the shader packages of Oblivion, a thing only OBMM could do. However, I don’t think most of them work well nowadays, and would be especially incompatible with ENB and Oblivion Reloaded, which most people use these days. I honestly would stay away from modifying the game shaders.
The only mod that I know of that just doesn’t work, at all is Horse Armor Revamped, which is a requirement for Universal Horse Armor. It has an elaborate, bsa extracting and mesh modifying script that no other tool can handle. But, to be fair, I also didn’t manage to install it with OBMM, lol.
Back to top
Edits:
2020-03-08: Added how to display file extensions. Added more methods to convert mods into bain friendly packages.Added a warning about shader and video mods.
2020-04-22: Added info about too small master list and about the restructuring of the menus.
2021-01-02: Added Advanced Installation, manual install of standalone executable, status bar.
2021-04-15: Added how to get rid of translations back, added info about the -o argument.
2021-05-13: Added info about the GamePass version.
2021-07-25: Too much to list. MO2/Sync from Data/Move steam library/much more.
Part 2 | Part 3
Описание
Файлы7
Скриншоты7
Видео1
Комментарии1237
Wrye Bash — Мощная утилита управления модами и сохранениями для игр Morrowind, Oblivion, Nehrim: At Fate’s Edge, Skyrim LE/SE, Enderal: Forgotten Stories LE/SE/AE, Fallout 3/4, New Vegas. Wrye Bash позволяет достаточно корректно инсталлировать/деинсталлировать в игру новые моды, причем наиболее полным образом удаляет из игры все «хвосты» от деинсталлированного мода. Инструкция по применению:Гравицапа
На заметку:
ОСТОРОЖНО! Много букв. Пишу данное руководство для неискушённого пользователя. Ибо продвинутые уже давно в ней разобрались сами, почитали справку (справка толковая, но объёмная и англоязычная). Неискушённому же пользователю весь функционал просто не нужен. Но если будут вопросы, не охваченные тут – постараюсь ответить. И самое главное – кто хочет разобраться и работать с программой, придётся дочитать это руководство до конца.
Возможности:
1. Wrye Bash позволяет достаточно корректно инсталлировать/деинсталлировать в игру новые моды, причем наиболее полным образом удаляет из игры все «хвосты» от деинсталлированного мода — возвращает к прежнему виду практически все перезаписываемые им меши и текстуры, а также удаляет БОЛЬШИНСТВО вносимых модом скриптов.
2. Позволяет редактировать порядок загрузки модов.
3. Дает возможность редактировать ini-файлы игры
4. Позволяет переименовывать и удалять сэйвы, а также создавать профили — фактически, отдельные папки, в которых хранятся сэйвы и основные настройки игры. Благодаря этому можно играть как одновременно за нескольких персонажей, так и нескольким игрокам за одним компом (и все это — со СВОИМ набором модов для каждого профиля!) — сохранения не будут «перехлестываться» и мешать друг другу.
5. Дает возможность создать специальный esp-файл, который называется bashed-патч. С помощью этого патча, помимо всего прочего, можно легко и просто, не прибегая к использованию каких-либо дополнительных модов, менять многие глобальные переменные игры, фактически, полностью перепахивая ее геймплей.
6. Позволяет работать с сейвами. Об этом ниже.
7. Ну, и еще, Wrye Bash может многое другое, в 99 случаях из 100 просто не нужное обычному игроку, зато нередко необходимое создателям, локализаторам и тестировщикам модов.
Требования:
Wrye Bash начиная с версии 309 не поддерживает 32-битные системы Windows, только 64-битные
Wrye Bash начиная с версии 310 не поддерживает Windows 7 (или более ранние версии).
— Установленный пакет Microsoft Visual C++ 2015-2019 x86 & x64 и выше
— Morrowind
— Oblivion (patch 1.2.0.416 и выше)
— Nehrim: At Fate’s Edge
— Skyrim LE (patch 1.9.32.0.8 и выше)
— Skyrim SE (patch 1.5.97.0.8 и выше)
— Skyrim АE (patch 1.6.353.0.8 и выше)
— Enderal: Forgotten Stories (patch 1.6.4.0 и выше)
— Enderal: Forgotten Stories SE (patch 2.0.8.2 и выше)
— Fallout 3 (patch 1.7.0.3 и выше)
— Fallout New Vegas (patch 1.4.0.525 и выше)
— Fallout 4 (patch 1.10.163.0 и выше)
Если ранее Вы использовали автоматический установщик через .exe файл от версии 306 до 309, то при установке версии 309 и выше, рекомендуется:
1.Запустить установщик последней версии
2.Снимите все галочки в окошке установки. Затем нажмите кнопку «Далее», пока установщик не закончит работу (Мы просто установили исправленный деинсталлятор).
3.Запустите исправленный деинсталлятор в папке %COMMONPROGRAMFILES(X86)%Wrye Bashuninstall.exe (также должен быть в меню Пуск — Все программы — Врай Баш)
4.Исправленный деинсталлятор правильно выполнит процедуру деинсталляции предыдущей версии.
5.Переустановить снова Врай Баш новой версии. Не беспокойтесь о том, чтоб Wrye bash удалится во время этой процедуры, ваши настройки все равно останутся на месте, а установленные моды / файлы останутся такими, какими они были.
* Вышеуказанная процедура для искоренения плохих записей реестра все предыдущие монтажники сидели, которые путают последующих установок. Для тех, кто использовал установщик перед и закончилась со странными дополнительных локаций вам не нужно ( и некорректно Удалить ) .. это решает эту проблему.
Автоматическая установка через установщик .exe:
По основной ссылке последняя версия 310
1. Запускаем Wrye Bash Setup.exe.
2. Жмём Next.
3. Ставим галочки Install for Skyrim и Wrye Bash [Standalone]. Галочку Wrye Bash [Python] НЕ ставить.
4. Место установки – корневая папка Skyrim или Fallout 4 или Skyrim SE. НЕ DATA, а корневая папка. У меня это так: (смотрите скриншот ниже)
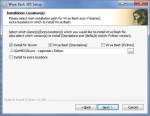
5. Жмём Next.
6. Жмём Install. Ждём. Готово
Ручная установка с уже распакованными файлами:
* Скачать архив утилиты «Standalone Executable» и распаковать из архива папку Mopy в любую пустую папку, например в папке с игрой создайте папку Programs и в неё распакуйте Mopy
* Скачать архив утилиты «Python Source» и так же распаковать из архива папку Mopy в то же место, куда распаковали основной архив, то есть соединить папки Mopy
* Запуститите Wrye Bash.exe
Теперь надо проверить правильность установки
— В папке с игрой должна появиться папка Mopy
— В папке, куда установлена игра, должна появиться папка Skyrim Mods или Fallout4 Mods или SkyrimSE Mods. (Если смотреть скрин выше, то в моём случае это папка GAMES)
— В папке DATA должен появиться файл Bashed Patch, 0.esp. Если его нет, то: идём в MopytemplatesSkyrim. Копируем оттуда файл Bashed Patch, Skyrim.esp в папку DATA. В папке DATA переименовываем его в Bashed Patch, 0.esp.
— Всё, готово. Запустить можно прогу из папки MopyWrye Bash.exe. Запускаем. При первом запуске может повисеть секунд 30 – ждём.
Настройки:
Тут хочу описать панель программ. Она может быть у всех разная
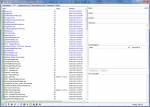
— Зелёный квадрат – включает/выключает загрузку SKSE вместе с игрой
— Розовый квадрат – если поставить галочку, то при запуске игры Wrye Bash будет закрываться.
— Третья кнопка – запуск игры.
Так же обязательно будут кнопки сканера модов на ошибки, браузер документов, настройки и справка. Но сюда удобно добавить кнопки сортировщиков например. Как сделать:
— Находим папку папка с игройMopyApps
— В эту папку скидываем ярлыки программ, которые хотите видеть на панельке. (на .exe файле желаемой программы ПКМ – создать ярлык. Этот ярлык переносите в папку).
Начиная с версии 304 можно сюда впихнуть абсолютно любые программы. Но ещё остался механизм от старых версий, когда некоторые программы хватаются автоматически (у них должна быть специальная библиотека).
Как пользоваться: (Тут будет по разделам. Кому что надо – тот прочтёт)
— Функция основная – работа с модами. И так, перед нами такое окно:

В левой панели все наши плагины в том порядке, в котором они у нас расставлены. Можем прямо в этом окне перетаскивать плагины куда нам захочется, если вдруг решим поменять местами.
— Синим текстом выделены .esm файлы
* Чёрным – esp. файлы
* Зелёным – объединённые плагины. Чуть позже о них.
* Фиолетовым – плагины с тегом NoMerge. Прочли просто для избежания вопросов и забыли.
— Следим внимательно за квадратиками
* Зелёный – плагин установлен верно ( ВНИМАНИЕ! Wrye Bash сам не сортирует плагины. Правильность установки он берёт исключительно из списка мастер файлов плагина!)
* Оранжевый – предупреждение, что вроде все мастер файлы для плагина есть, но, скорее всего, установлены не в том порядке, в котором указаны в плагине. Как узнать? Щёлкаем на плагине – справа будет вся информация о нём.
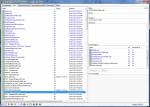
Вот в моём случае требования к мастер-файлам такие – сначала CCO. Потом SkyRe_Main. А у меня наоборот стоят.
Отсортировать вам помогут LOOT, BOSS или собственное мнение. Укажу лишь на то, что оранжевое предупреждение не всегда приводит к багам в игре. Иногда его вообще нельзя устранить.
А вот если квадратик розовый – вот тут уже точно что-то не заработает. Обычно это указывает на нехватку мастер-файлов. Тычем на проблемный плагин, смотрим список мастер файлов.
1.3. Галочка означает, что плагин подключен.
Плюсик – мод объединён в Bashed Patch (ниже об этом).
Точка – мод импортирован в Bashed Patch.
Пустой – мод не активен.
1.4. Ещё немного о сортировке. Особенно для любителей ставить моды кучно и вручную.
Часто пользователи имеют различные версии одного и того же мода, либо различные моды, выполняющие схожую функцию и несовместимые друг с другом. Взаимоисключающие группы могут быть использованы чтобы пометить эти моды, дабы вы случайно не активировали более одного файла. Когда активировано более одного мода из группы, все пересекающиеся файлы будут подсвечены оранжевым
Чтобы объявить такую группу, надо поставить в названии мода запятую. Часть имени мода до запятой определит все входящие в группу файлы (т.е. часть имени до запятой должна быть одинаковой).
Пример:
— «Drop Lit Torches in Combat» имеет файлы с различными вариантами настроек: обычный, B (Ярче), NM (без сообщений) и BNM (ярче + без сообщений).
— Переименуйте их в: «Combat Torch, A.esp» (обычный), «Combat Torch B,esp», «Combat Torch, NM.esp» и «Combat Torch, BNM.esp. В итоге у вас будет создана группа файлов «Combat Torch».
И если вы воткнёте две версии этого мода – баш вас предупредит оранжевым квадратом. Вообще, правилом хорошего тона считается делать вариативные моды уже с такими названиями, но увы не все так делают, чаще ставят тире.
1.5. По нажатию ПКМ на плагине доступно меню. Можете посмотреть что там интересного. Самое нужное – удаление плагина или его копирование.
1.6. Самое главное в этом разделе. Помните, в установке я писала про файл Bash Patch,0.esp? Так вот, при ЛЮБОМ методе сортировки он должен стоять ПОСЛЕДНИМ! Самым-самым. Зачем? О нём в отдельном разделе.
Установка модов с Wrye Bash
— У Wrye Bash есть неоспоримый плюс в установке плагинов – их можно удалять со всеми хвостами и файлами. Тут очень много возможностей для моддеров. Опишу установки для обычного игрока. И так – переходим на вкладку “Установщики”. Программа может зависнуть на несколько минут и после выдать пустое окно. Значит надо в неё эти установщики запихнуть.
* Идём в папку Skyrim ModsBash Installers. Она находится в той же папке, где стоит игра. ( из моего примера C:Games)
* Скидываем в эту папку архивы с модами, которые хотим поставить. Поддерживается 7z, rar, zip. Эти архивы я буду далее называть пакетами.
* Возвращаемся на вкладку “Установщики”. ВНИМАНИЕ! Чем больше файлов скинули в папку, тем дольше может подгружать.
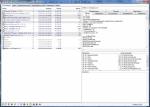
2.3.1 И так — устанавливаем пакеты
* Если на квадратике пакета есть волшебная палочка (архив содержит файл Wizard.txt):
— ПКМ на пакете. Выбираем “Мастер установщик”.
— появится диалог установщика, где можно выбрать пошаговые варианты установки.
— нажимаем APPLY и готово
2.3.2 Для всего остального:
— выбираем пакет, который хотим установить.
— в правом окне галочками выбираем – что хотим установить. В окнах “под-пакеты” и “фильтр esm/esp”
— ПКМ на пакете, выбираем “Установить”.
Если позже решите до-установить или переустановить какие-то части пакета – ПКМ, выбираем “нормализовать”.
2.3.3
— Если пакет выделен серым, это значит, что структура этого архива не поддерживается Wrye Bash. Установка только вручную
— Однако, если файл серый, но файлы в архиве всё же имеют сходную структуру размещения с игрой (например папки для установки были убраны в общую папку, то «баш» её уже не поймёт), то можно сделать так:
— два раза ЛКМ на пакете. Откроется архиватор.
— извлекаем нужные папки.
— в установщиках появится извлечённое в виде пакета, только не с квадратиком, а с ромбиком.
— дальше устанавливать как в 2.3.1 или 2.3.2, в зависимости от содержимого.
Цвета квадратиков при установке:
Зелёный – пакет полностью синхронизирован. Т.е. его содержимое находится в папке DATA.
Красный — некоторые файлы, входящие в состав пакета, в папке DATA отсутствуют.
Оранжевый — все файлы пакета находятся в DATA, но некоторые esp/esm-файлы не идентичны исходным в самом пакете ,т.е., например, был установлен патч / альтернативный вариант мода, либо просто пользователь изменил файлы после установки.
Жёлтый — все файлы пакета находятся в папке DATA, но некоторые файлы ресурсов (модели, текстуры и т.п.) не совпадают. Т.е., например, был установлен патч / альтернативный вариант мода, либо просто пользователь изменил файлы после установки или заменил их какими-то другими.
Белый – архив распознан и готов к установке.
Серый – архив не распознан и не может быть установлен.
Крест Х на любом квадрате – архив повреждён.
Примечание:
— Постаралась наиболее доступно описать возможности установок, без использования терминов и не отвлекаясь на редко встречаемые моменты. Будут вопросы – дополню.
— Что бы удалить мод – ПКМ на пакете, выбираем “Деинсталировать”. При этом уберутся ВСЕ файлы, относящиеся к пакету. Если файлы пакета были перезаписаны (пакет НЕ с зелёным квадратом), эти файлы система пропустит. Т.е. мод, который их перезаписал не поломается.
Файл Bashed Patch, 0.esp.
— Этот файл позволяет объединить многие плагины, свести левел-листы, настроить игру без некоторых модов.
— Когда определились с порядком загрузки плагинов – надо создать этот Bashed Patch, 0.esp. Если его нет в списке плагинов – см. раздел Установка. ПКМ на нём, выбираем “Создание патча”.
— Объединение патчей – если плагины можно объединить (имеет тег Merge), то они отобразятся справа. Поставив галочку, система их объединит в этом моде и отключит из списка загрузки ( см. раздел Работа с модами).
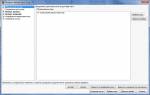
— Дальше идут разделы импортирования всяких данных. Лучше везде наставить галок – тогда будет обеспечена бОльшая совместимость плагинов. (выровнены лвл листы, названия одинаковыми будут и т.д.)
— Исправления параметров игры
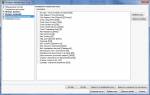
— Можно немного настроить параметры игры без использования сторонних модов.
— Жмём “Создание патча”, ждём, подключаем.
ВАЖНО!!!
Для каждой отдельно взятой игры, в настройках нужно менять кодировку (шестеренка слева внизу, настройки > кодировка плагинов > … ), например для создания башед патча для русской версии игры Skyrim LE с переведенными модами на русском, нужно выставлять кодировку 1251 (western european). Для игры Skyrim SE и Fallout 4, нужно выставлять кодировку UTF-8, иначе если оставить кодировку 1251 (western european), то при создании башед патча, в игре будут вместо русского текста кракозябры.
* Сообщают в комментариях что если так сделать с Skyrim LE то прога просто ломается, поэтому не знаю актуальна ли на данный момент эта инструкция или нет по изменению кодировок, вроде бы как с версии 305 это уже не нужно делать.
Далее опишу пару фишек к модом не относящихся.
Вкладка “Надстройки для INI” – можно поменять параметры в файле Skyrim.ini прям тут.
Вкладка “Сохранённые игры” – позволяет делать несколько полезных вещей.
Цвета квадратиков:
Цвет чекбокса отображает общее состояние файла сохранения (соответствие всех мастер-файлов подключенным модам):
• Фиолетовый: Идеальное
Мастер-файлы файла полностью совпадают с подключенными на данный момент модами
• Голубой: Хорошее
Сохранение совместимо с текущим набором плагинов. Возможно, подключены моды, не использовавшиеся при создании данного сохранения
• Зеленый: Хорошее, но мастер-файлы не совпадают с текущим набором подключенных модов
Для синхронизации списка модов с необходимыми мастер-файлами используйте команду Загрузить мастер-файлы
• Оранжевый: Порядок загрузки мастер-файлов сейва изменился
Skyrim и TES CS это воспримут нормально. Однако, если некоторые моды конфликтовали между собой, допустим, изменяя один и тот же предмет, то из-за изменившегося порядка загрузки конечные параметры данного предмета так же могут измениться
• Красный: Для файла сохранения отсутствуют мастер-файлы
Проверьте, подключены ли все нужные для этого сохранения моды
F.A.Q.:
В: Как посмотреть ID предмет из плагина в WB?
О: На плагине во вкладке “Моды” ПКМ –Детали. Выдаст ID всего, что есть по категориям.
В: Что такое ПКМ, ЛКМ?
О: Правая Кнопка Мыши, Левая Кнопка Мыши
В: Можно ли с помощью WB заставить плагин сделать…/изменить работу плагина/убрать из плагина/добавить в плагин и т.д.
О: Нет, нельзя. WB всего лишь программа, позволяющая оперировать пакетами-плагинами, просматривать их поверхностно, но для их изменений есть другие программы.
В: Я расставил порядок модов, активировал некоторые, вышел из WB, запустил игру через другой запускатор и порядок изменился. Что делать?
О: Запускать игру следует только из WB. Кнопка внизу. Иначе все эти запускаторы бьются за право расставить ваши моды и не видят друг друга. WB сам не расставляет, он берёт списки из файла, который программы и перетирают каждый раз.
В: Как должен выглядеть архив, что бы его полностью понимал WB?
О: В архиве должен быть 1 уровень вложения до-установочных файлов. Т.е. в архиве должна быть папка, а в ней файлы и папки, которые надо помещать в DATA игры. Самих же корневых папок может быть несколько.
В: Папка Fomod зачем?
О: Она для установки через NMM
В: В архиве много хлама – текстовых документов, скринов. Не хочу их ставить, вычищать руками?
О: Нет. ПКМ на заголовке столбца Пакет. Внизу выберите что пропускать. Тогда WB эти файлы устанавливать не будет
В: Хочу ставить пакеты с установщиком автоматическим. Где его взять, как сделать?
О: Если нет, то только писать самим. Синтаксис изложен в справке к WB. Знания английского – минимальные
В: Крякозябры в игре после создания bashed Patch. Вобще крякозябры где-либо после установки WB
О: WB старых версий плохо дружил с кириллицей. На 305 такое не наблюдается, но иногда проскакивает. Проверьте, есть ли в пути до установки WB или игры русские буквы. А так же имя учётной записи лучше иметь на английском. Если где-то встречаются русские буквы – лучше изменить. Если крякозябры в игре после создания патча – проверьте кодировку плагинов. Внизу WB кнопка настроек – кодировка плагинов. Должно стоять Русский
В: Где папка Skyrim ModsBash Installers? Впапке, куда установлена игра, её нет!
О: Запустите WB, она появится
В: Я только поместил архив в SkyrimModsBash Installers, а он уже красный в Установщиках
О: По-умолчанию, WB сразу производит оценку содержимого пакета. Красный – это отсутствие файлов пакета в DATA. Раз вы только поместили проект в папку, то файлы ещё не распаковывали – естественно в DATA их ещё нети WB предупреждает об этом. Справа при выборе пакета будет указана причина
В: Я поставил мод с помощью WB. Потом другой, который заменил файлы первого. Теперь я хочу удалить второй. Файлы первого будут на месте?
О: Да, WB вернёт файлы из 1 мода. Конфликтные файлы и моды, которым они принадлежат, можно посмотреть справа в Установщиках
В: Я поставил мод вручную/другой программой. Хочу его изменить/удалить с помощью WB
О: WB не знает о том, что мод уже установлен. Однако, если пакет лежит в правильной папке, он покажет в правом окне совпадения
В: В некоторых модах есть поддержка NMM. Хочу воспользоваться его установщиком, но хочу видеть пакет в Установщиках WB
О: При установке NMM укажите папку для модов SkyrimModsBash Installers
В: Я закинул архивы в папку Bash installers, но вкладка Установщиков пуста. Программа их не видит.
О: Возможно, эта опция отключена. Во вкладке Установщики ПКМ на заголовке столбца Пакеты — включено
Видео инструкцию по работе с Wrye Bash на русском от Валеры Благородного (Delirious) смотрите в секции ВИДЕО
Обновление:310 (релиз)
#638: Удален режим отладки [Infernio]
#607: Добавлена панель поиска для сведений о патчере (например, исходных модов или параметров настройки) [Infernio]
Обновление:310.beta1
#630: Исправлены вылеты в Oblivion с настройкой Irresponsible Creatures [Infernio]
#628: Улучшено удобство использования браузереых документов [Infernio]
#627: Реализованы последние несколько частей схемы FOMOD [Infernio]
#624: Добавлен показ внутриигровых индексов плагинов на вкладке «Сохранения» [Infernio]
#617: Добавлена поддержка FO3 и FNV в Windows Store [Infernio]
#616: Добавлена поддержка Skyrim Anniversary Edition [Infernio]
#610: Различные локальные настройки приводили к сбою WB при загрузке [Utumno]
#604: Исправлен сбой при разборе неверных мастер-листов LOOT [Infernio]
#603: Добавлена проверка XML-схемы в FOMOD при запуске установщиков модов с FOMOD [Infernio]
#601: Исправлено применение BCF, ранее не работало [Infernio]
#599: Добавлен патчер ‘Import Enchantments’ (Импорт чар) [Infernio]
#593: Добавлена возможность создавать проект BAIN из FOMOD [Infernio]
#460: Обновлен Python 3 [GandaG, Infernio, Utumno, lojack5]
#151: Портированы все патчеры в Skyrim [Infernio]
# 40: Улучшено обнаружение BAIN readme/docs [Infernio]
Внимание пользователям Windows 7, данная версия больше не поддерживает эту ОС.
Wrye Bash 310 — Installer (Автоматическая установка через .exe). Не поддерживет Windows 7, но поддерживает все что выше (34 mb)Сервер №1
Wrye Bash 310 — Standalone Executable (Ручная установка с уже распакованными файлами). Не поддерживет Windows 7, но поддерживает все что вышеСервер №2
Wrye Bash 310 — Python Source (Ручная установка файлов Python для Standalone Executable, для автоматического варианта не требуется). Не поддерживет Windows 7, но поддерживает все что вышеСервер №3
Wrye Bash 309.1 — Installer (Автоматическая установка через .exe). Поддерживет Windows 7 и вышеСервер №4
Wrye Bash 309.1 — Standalone Executable (Ручная установка с уже распакованными файлами). Поддерживет Windows 7 и вышеСервер №5
Wrye Bash 309.1 — Python Source (Ручная установка файлов Python для Standalone Executable, для автоматического варианта не требуется). Поддерживет Windows 7 и вышеСервер №6
Wrye Bash более ранних версий ниже чем 310/309 (промотайте список, выберите версию и жмите Assets, в этой вкладке будут скачивания)Сервер №7
Wrye Bash — многоцелевой мод-менеджер, для игр на движке Creation Engine от Bethesda . Wrye Bash имеет множество функций, некоторые из них:
- Установка модов и разрешение конфликтов между ними.
- Управление порядком загрузки плагинов (.esp/.esm/.esl).
- Менеджер скриншотов.
- INI-твики.
- Чистая установка и удаление модов, движке если между ними есть конфликты.
- Функция » Bashed Patch «, которая позволяет улучшить совместимость модов и настраивать некоторые их детали.
- Автоматическое определение плагинов, которые могут быть помечены как ESL и возможность снять и поставить этот флаг.
Поддержка Windows Store
Начиная с версии 309 Wrye Bash поддерживает версию SkyrimSE из Windows Store. Вам потребуется установить Standalone-вариант Wrye Bash для этого так как установщик не поддерживает работу с Windows Store.
Документация
- Общая документация, дополнительная документация, техническая информация, история версий (также находится в папке Mopy/Docs ).
- Иллюстрированная инструкция от alt3rn1ty (для Oblivion, инструкция для Skyrim в работе).
- Пример скрипта BAIN установщика от Metallicow.
- Руководство на tes.ag.ru.
Требования и установка
Просто используйте версию с установщиком и следуйте его инструкциям. Wrye Bash должен быть установлен в папку с игрой. Установщик сам попытается определить где установлена игра.
Skyrim s 000.3 Установка и настройка модов и игры Скайрим Wrye Bash
Для версии игры из Windows Store используйте Standalone вариант. Распакуйте архив в папку с игрой.
Вопросы задаем на форуме: тема на форуме.
Скачать файл Wrye Bash 310
Основные файлы
Wrye Bash 310 — Installer-6837-310-1658670517.zip
Wrye Bash 310 — Standalone Executable-6837-310-1658670545.7z
Архивные файлы
Wrye Bash 309.1 — Standalone Executable-6837-309-1-1623232467.7z
Wrye Bash 309.1 — Installer-6837-309-1-1623231993.zip
Обновлено до версии 307.beta2
Обновлено до версии 309.1.
Обновлено до версии 310
Мне нравится
Последние новости
Слух: Bethesda и Microsoft не могут договориться о дате релиза Starfield
Анонсирована новая глава Elder Scrolls Online — Nekrom
Комментарии
Сначала новые

А скайримская версия этой проги позволяет переносить лица персонажа из сохронялки? Раньше можно было.
Я такой возможности не увидел,но ценности данной проги это не уменьшает.Спасибо,забрал.

Еще нет полной функциональности, как у варианта для Обливиона, но все впереди. главное — известно что и как реализовывать!
Я уже не могу обойтись без него, поскольку регулярно переустанавливаю десятки модов.
народ помогите устоновить ! плиз =)

Народ помогите пожалуйста, не хочет запускаться wrye Bash всё делал по инструкции, устанавливал строго по дефолту. Искал в инете, проблема есть у некоторых ответа так и не нашёл. Подскажите если знаете заранее спасибо.
Установка модов Skyrim с помощью Wrye Bash
Текст ошибки.
Error! Unable to start Wrye Bash.
Please ensure Wrye Bash is correctly installed.
Traceback (most recent call last):
File «bashbash», line 347, in main
File «bashbosh», line 30478, in initBosh
File «bashbosh», line 30230, in initDirs
File «bashbosh», line 30152, in getPersonalPath
File «bashbosh», line 30152, in
UnicodeDecodeError: ‘ascii’ codec can’t decode byte 0xc0 in position 9: ordinal not in range(128)

А где же версия Stand Alone .
а все не надо он с моей 7виндовс несовместим
Неужто больше 255 или это для красного словца? Для обливиона 255 не хватало даже с объединенными esp. Точнее хватало, но после жесткого отбора и не с первого раза.
светлый эльф, что это за такой виндовс, с которой питон не совместим, а? :’D
Скайрим Скайримом, а мне интересно — что я буду делать без врай баша на обливион. Встает ведь только один врай баш — либо на скайрим, версия 295-5, либо на облу, версия 291. Как быть?
Кстати, проблема небольшая. Работает стабильно, но при переходе на вкладку установщики выдает ошибку. И установщики, конечно, не работают.
Извиняйте! Запускать надо не через ярлык Wrye Bash, а через ярлык Wrye Bash Launcher.
Поюзал Wrye Васh, не знаю как у кого, у меня он не создаёт патча — идёт полоска активности (создания ) патча, процес завершается, но в Bached патч галочка не появляется. Поставил галочку сам, поле квадратика зелёное. Запустил, при попытке фаст тревела — вылет. Вобщем — либо я что-то не так делаю, либо прога ещё сыровата. (В Обле у меня не было проблем с WB )

Ссылки обновите, плиз.
светлый эльф! У меня еа Windows 7 x64 пашет без проблем.
Уважаемая администрация вы как то с информацией можете помочь? Документацией, ну или ссылочку на Faq хоть кинте.
Ну, информацией делимся на форуме.
А твоя ошибка указывает на конфликт с кирилицей. и это странно, ведь в последней версии ее исправили!
В крайнем случае, просто используй только английский — для этого в папке Mopybashl10n удали файлы начинающиеся на «Russian».
Люди, подскажите пожалуйста как им пользоваться, как башед патч создать?
подскажите пожалуйста правильные работоспособные траектории для установки =) — а то на Скайрим не идет ( на облу не шло тож ) — win732bit лицуха ( Скайрима )
а все пошло норм =)

А имеет значение какая версия винды 7 — 32 или 64 бит ?
Да, конечно! В данном случае для Питона и его библиотек.
СУПЕР! Спасибо! Очень ждал!
стремно понаделает чего нибудь эта программа что и в игру то не зайдёшь там во время установки море подтверждений требуется все по английски и чем дальше тем не понятней какя то ошибка произошлла во время установки но при этом не прервалась установка потом если что понаделает удалится ли она

Пришлось попыхтеть с установочным архивом мода с нексуса, но вроде разобрался.
Главное, чтоб в списке Update.esm стояло сразу под Skyrim.esm. А то оно у меня само съехало вверх.

В ридми модов все написано.
Ребяяяят! архивы повреждены!
Сейчас скачал, проверил — все рабочее.
Да у него архиватор конца прошлого тысчячелетия небось))
Ан не) все, пардон, моя вина
Написано же обращаться на форум, и ссылка есть. Туда и идите.
Короче вчера 2 часа пытался понять почему не идет это чудо природы на вновь мною переустановленную систему и мои поиски возъимели место, так как я понял, что в Python некорректно работает с русским названием пользователя =( Поэтому если кто столкнулся вот с такой проблемой:
Traceback (most recent call last):
File «C:GamesSteamSteamAppscommonskyrimMopybashbasher.py», line 5028, in OnShowPage
self.GetPage(event.GetSelection()).OnShow()
File «C:GamesSteamSteamAppscommonskyrimMopybashbasher.py», line 3687, in OnShow
if data.refresh(progress,what,self.fullRefresh):
File «C:GamesSteamSteamAppscommonskyrimMopybashbosh.py», line 8498, in refresh
oblivionIni.setBsaRedirection(True)
File «C:GamesSteamSteamAppscommonskyrimMopybashbosh.py», line 3619, in setBsaRedirection
self.saveSetting(u’Archive’,u’sArchiveList’,sArchives)
File «C:GamesSteamSteamAppscommonskyrimMopybashbosh.py», line 3202, in saveSetting
self.saveSettings(ini_settings)
File «C:GamesSteamSteamAppscommonskyrimMopybashbosh.py», line 3590, in saveSettings
IniFile.saveSettings(self,settings,deleted_settings)
File «C:GamesSteamSteamAppscommonskyrimMopybashbosh.py», line 3222, in saveSettings
with self.path.temp.open(‘w’) as tmpFile:
File «C:GamesSteamSteamAppscommonskyrimMopybashbolt.py», line 1340, in open
os.makedirs(self._shead)
File «C:Python27libos.py», line 150, in makedirs
makedirs(head, mode)
File «C:Python27libos.py», line 150, in makedirs
makedirs(head, mode)
File «C:Python27libos.py», line 150, in makedirs
makedirs(head, mode)
File «C:Python27libos.py», line 157, in makedirs
mkdir(name, mode)
WindowsError: [Error 5] : u’C:Users’
при запуске «Установщики» в Wrye Bash знайте это из-за того что имя пользователя в системе ( а точнее папка где содержатся все данные в моем случае C:UsersВорон) должен быть на англ.языке. Так что либо создавайте нового пользователя либо не знаю как еще можно решить эту проблему =(
Я нашел способ намного проще чтобы русские имена пользователей не мешали работе программы «Установщики»
Иногда в меню Wrye Bash вместо нормального русского шрифта отображаются «крякозябры»
Что бы избавится от этого, небходимо в файле bolt.py WRYE BASH поменять кодировку на Windows-1251.
1.Открываем в блокноте bolt.py, должен быть в OblivionMopy
2.Нажимаем CTRL+F и ищем строку что ниже.
3.После знака равно заменяем iso-8859-1 на Windows-1251
4 сохраняем файл bolt.py
простите за наверное дурацкий вопрос — здесь предложено обсуждать тему на форуме, но войти под ником и паролем который работает в этом разделе я не смог. т.е. я от сюда переключаюсь на раздел форум от меня требуется вход и данный ник и пароль определяется как неверный, на форум нужна другая регистрация или какая-тщ другая причина? HELP.
Хм. У меня таже проблема(((
Кто не может войти на форум под своим акком — делайте там другой. Попроьуйте при этом юзать другой ящик чтобы точно не сбиться.
установил программу но модов 255 не видит. чо делать
А у тебя сколько их установлено, модов?
Еще одно достоинство этой проги: каким-то чудом запускает игру с сксе, даже когда инет отключили за неуплату и стим не хочет запускаться в автономном режиме.
Обновите файл! У людей уже 297.1, а тут только 295.5.
А мы типа не люди?)) Твой язык когда-нибудь удружит тебе, так что думай, чтоли, прежде чем писать)))))
Звиняйте. Скажу так: оказывается, уже есть версия 297.1, а я наивно пребываю в полной уверенности, что 295.5 самая последняя, поскольку здесь выложена только она.
Источник: tesall.ru

Один из самых ярких представителей игростроя, полностью поддерживающий пользовательские модификации, — компания Bethesda Game Studios, подарившая миру серию The Elder Scrolls.
Пятая часть серии, Skyrim, до сих пор остается весьма популярной среди игроков по всему миру, что является заслугой не только разработчиков, но и модостроителей. На сегодняшний день насчитывается более десяти тысяч дополнений различного функционала и сложности, а количество установленных аддонов у среднестатистического поклонника — около двухсот.
Появление такого количества модификаций рано или поздно должно было привести к созданию специальных программ по управлению дополнительным игровым контентом. Одна из таких утилит — Wrye Bash, обладающая богатым набором функций и настроек. Программа довольно сложна в освоении, но научиться пользоваться Wrye Bash как простым игрокам, так и энтузиастам однозначно стоит.
Возможности программы
Основное предназначение утилиты — полный контроль за процессом установки и удаления новых модификаций игры при аккуратном взаимодействии со скриптовой составляющей и сохранении оригинальных игровых файлов. Весьма полезная опция, позволяющая не захламлять папку Data тысячами файлов.
Дополнительный функционал программы:
- Работа с сохранениями — создание нескольких конфигураций с индивидуальными настройками и списком установленных дополнений. Учитывая, что максимально допустимое количество установленных в игру модификаций — 255, возможность создания собственного списка модов для каждого из сохранений/персонажей пригодится многим игрокам.
- Сортировка дополнений (изменение порядка загрузки). Немалая часть модификаций использует ресурсы игры (или других дополнений) и обращается при необходимости к месту хранилища этих файлов — так называемому мастер-файлу, который должен быть установлен и расположен выше в списке загрузок. При установке очередного мода с такими связями программа предупредит пользователя о необходимости скорректировать положение файла в списке.
- Объединение модификаций, редактирование левел-листов. В этом случае пользоваться Wrye Bash, как правило, имеет смысл для предотвращения конфликтных ситуаций, в результате которых файлы из дополнений «накладываются» друг на друга, либо при превышении лимита модов (например, объединение 10 видов оружия из разных дополнений в один esp-файл).
- Редактор конфигурационных файлов игры. Избавляет от необходимости переходить к этим файлам вручную. Может потребоваться при установке некоторых глобальных дополнений.
- Инструменты разработчика модификаций.
Как установить Wrye Bash
Программа бесплатна, поэтому находится в свободном доступе и может быть загружена с любого ресурса. Процесс установки выглядит так:
- Запустить загруженный установочный файл, кликнуть Next.
- Отметить игру, для которой устанавливается программа, другие пункты оставить без изменений.
- В качестве пути указать корневую директорию игры, кликнуть Next, следом — Install.
- Убедиться, что все сделано правильно: в корневой директории игры установщик создаст каталог Mopy, в директории Data — файл Bashed Patch 0.esp. Иногда программа его не создает, в этом случае необходимо принудительно скопировать туда Bashed Patch, Skyrim.esp из . MopytemplatesSkyrim, а затем переименовать в Bashed Patch, 0.esp.
- Запустить программу.
Элементы управления
Основное меню располагается в нижней части окна программы. Первая слева иконка отвечает за запуск игры в связке с расширителем скриптов (Skyrim Script Extender), следующая — за закрытие Wrye Bash при старте игры. Соответственно, на них можно поставить или убрать отметку. Клик по третьей иконке запускает игру.
Далее следуют иконки настроек, справки, запуска проверки и обозревателя документов. Остальные же кнопки пользователь может задавать сам. Как правило, сюда попадают необходимые мододелам и игрокам утилиты (Boss или Nexus Mod Manager например). Они могут появиться там при установке Wrye Bash (это зависит от их настроек), вручную же добавляются созданием ярлыка программы в директории . MopyApps.
Как пользоваться Wrye Bash
Освоить весь функционал программы получится далеко не сразу. Модостроителям даже придется изучать англоязычные инструкции. Wrye Bash для простых же игроков оказывается более доступен в использовании.
Основное окно программы разделено на две части. Слева — все установленные в игру модификации, расположенные в порядке загрузки (меняется этот порядок прямо здесь простым перетаскиванием либо с помощью соответствующих утилит). В этой же части окна отображается информация из других вкладок программы. В правой же части отображается подробная информация о компонентах игры.
Каждая из модификаций отмечена цветом: архивы esm — синим, обычные esp — черным, объединенные же модификации выделяются зеленым, а доступные к объединению — фиолетовым. Цвета ячеек каждой из модификаций несут другую информацию:
- Ячейка зеленого цвета сигнализирует о корректном расположении мода по отношению к мастер-файлу.
- Ячейка оранжевого цвета свидетельствует о нарушении порядка файлов, зафиксированного в аддоне. Следует иметь в виду, что зачастую требуемый порядок файлов никак не влияет на игру.
- Ячейка розового цвета означает отсутствие нужного мастер-файла либо некорректное его расположение.
- Чек марк в ячейке — установленная и активная модификация.
- + сигнализирует о том, что мод обработан баш-патчем.
- Точка — знак импорта.
- Чек марк отсутствует — аддон отключен.
Работа модификаций, обработанных с помощью патча (чаще всего речь идет об объединении нескольких модов в один), управляется файлом Bashed Patch, 0.esp. Этот файл всегда должен находиться в самом низу списка, что позволит избежать ошибок и конфликтов в игре.
Установка модов
Для установки аддонов в программе предусмотрена вкладка «Установщики». Изначально она пуста. Чтобы устанавливать моды, в Wrye Bash, как и в других утилитах, имеется специальная директория, созданная на этапе установки в том же каталоге, что и папка с игрой (. ModsBash Installers). Сюда нужно поместить все нужные архивы с дополнениями, после чего перезайти во вкладку. Программе потребуется определенное время, чтобы подгрузить все модификации.
Поддерживается как автоматическая установка (если модмейкер пожелал сделать свою модификацию соответствующей), так и ручная. При автоматической инсталляции пользоваться Wrye Bash, как правило, не сложно: нужно лишь кликнуть ПКМ на нужном архиве и затем щелкнуть «Мастер-установщик». В зависимости от сложности модификации будет предложено настроить варианты ее установки, следом нажать Apply. В ручном режиме нужно отметить интересующие аддоны, вызвать контекстное меню и нажать «Установить».
В тех случаях, когда архив имеет содержимое, программой не поддерживаемое (архив в архиве, например), он будет отмечен серым цветом. При этом можно попытаться модификацию все же инсталлировать, здесь же этот архив распаковав и запустив установку. Wrye Bash не сможет установить мод, только когда нарушена сама структура расположения файлов (не соответствует игровой).
Устанавливая дополнение, на цветовые обозначения также следует обращать внимание:
- Белый цвет — архив поддерживается программой, и мод можно устанавливать.
- Серый цвет — программа не может распознать файл.
- Зеленый цвет — программа фиксирует полное соответствие между своими настройками и файлами в игровом каталоге.
- Желтый цвет — файлы на месте, но имеются проблемы с совместимостью, либо зафиксировано изменение или замена одного или нескольких файлов мода после установки.
- Красный цвет — одного или нескольких файлов модификации в каталоге нет.
- Крестик на любом поле сигнализирует о повреждении архива.
Удаление модов
Для удаления аддона достаточно вызвать его контекстное меню и кликнуть «Деинсталлировать». Если файлы модификации были изменены другим дополнением, программа удалять их не будет.
Источник: fb.ru
Как пользоваться Wrye Bash: инструкция
Один из самых ярких представителей игростроя, полностью поддерживающий пользовательские модификации, — компания Bethesda Game Studios, подарившая миру серию The Elder Scrolls.
Пятая часть серии, Skyrim, до сих пор остается весьма популярной среди игроков по всему миру, что является заслугой не только разработчиков, но и модостроителей. На сегодняшний день насчитывается более десяти тысяч дополнений различного функционала и сложности, а количество установленных аддонов у среднестатистического поклонника — около двухсот.
Появление такого количества модификаций рано или поздно должно было привести к созданию специальных программ по управлению дополнительным игровым контентом. Одна из таких утилит — Wrye Bash, обладающая богатым набором функций и настроек. Программа довольно сложна в освоении, но научиться пользоваться Wrye Bash как простым игрокам, так и энтузиастам однозначно стоит.
Вам будет интересно: Графические редакторы для рисования: обзор, список лучших
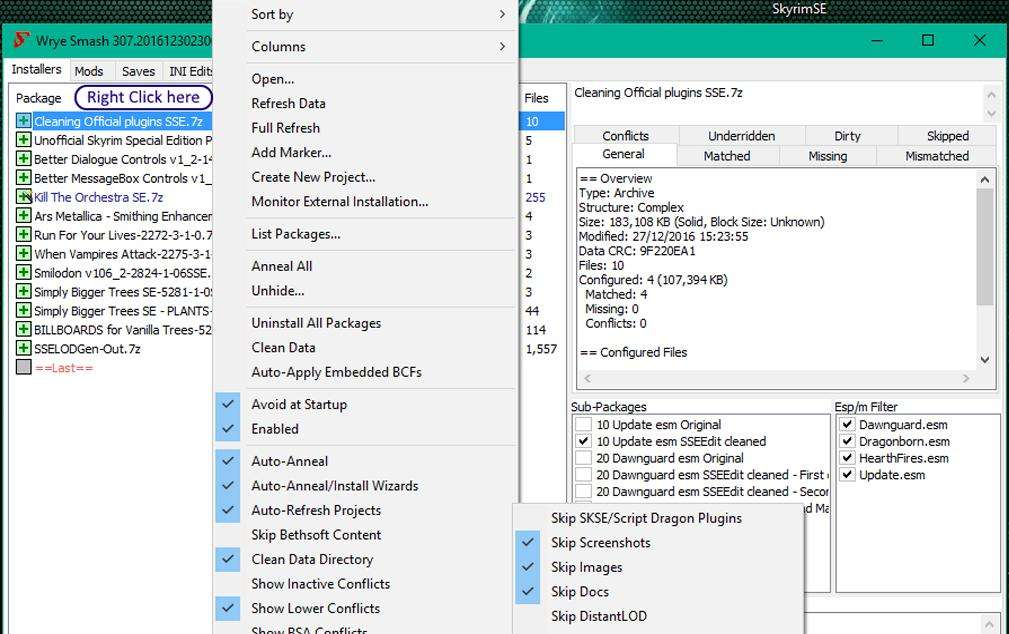
Возможности программы
Основное предназначение утилиты — полный контроль за процессом установки и удаления новых модификаций игры при аккуратном взаимодействии со скриптовой составляющей и сохранении оригинальных игровых файлов. Весьма полезная опция, позволяющая не захламлять папку Data тысячами файлов.
Дополнительный функционал программы:
Вам будет интересно: Как переводить страницу на русский в различных браузерах
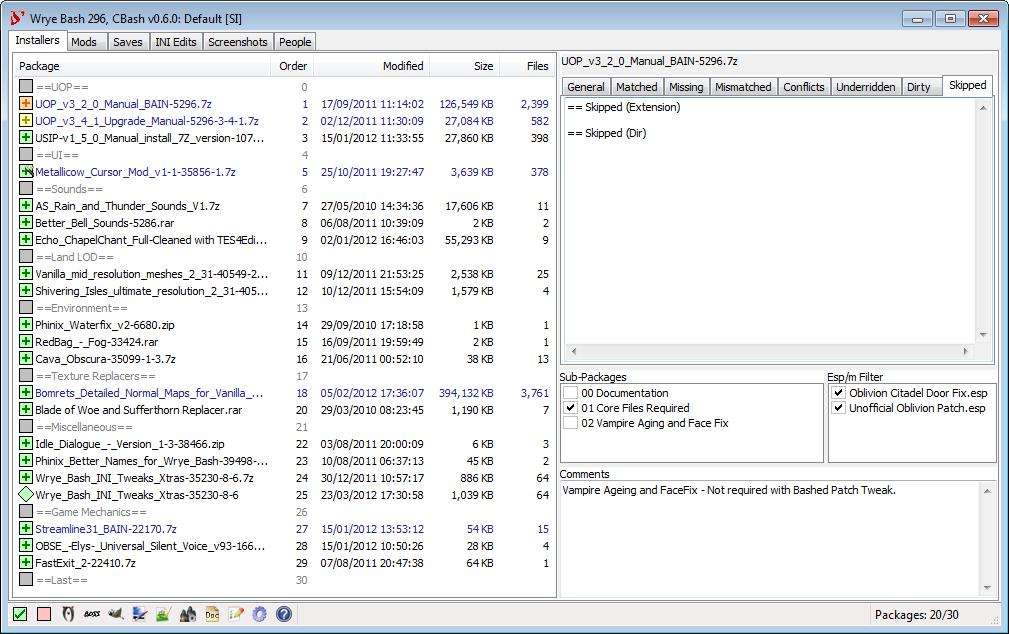
Как установить Wrye Bash
Программа бесплатна, поэтому находится в свободном доступе и может быть загружена с любого ресурса. Процесс установки выглядит так:
Элементы управления
Основное меню располагается в нижней части окна программы. Первая слева иконка отвечает за запуск игры в связке с расширителем скриптов (Skyrim Script Extender), следующая — за закрытие Wrye Bash при старте игры. Соответственно, на них можно поставить или убрать отметку. Клик по третьей иконке запускает игру.
Далее следуют иконки настроек, справки, запуска проверки и обозревателя документов. Остальные же кнопки пользователь может задавать сам. Как правило, сюда попадают необходимые мододелам и игрокам утилиты (Boss или Nexus Mod Manager например). Они могут появиться там при установке Wrye Bash (это зависит от их настроек), вручную же добавляются созданием ярлыка программы в директории . MopyApps.
Как пользоваться Wrye Bash
Освоить весь функционал программы получится далеко не сразу. Модостроителям даже придется изучать англоязычные инструкции. Wrye Bash для простых же игроков оказывается более доступен в использовании.
Основное окно программы разделено на две части. Слева — все установленные в игру модификации, расположенные в порядке загрузки (меняется этот порядок прямо здесь простым перетаскиванием либо с помощью соответствующих утилит). В этой же части окна отображается информация из других вкладок программы. В правой же части отображается подробная информация о компонентах игры.
Каждая из модификаций отмечена цветом: архивы esm — синим, обычные esp — черным, объединенные же модификации выделяются зеленым, а доступные к объединению — фиолетовым. Цвета ячеек каждой из модификаций несут другую информацию:
- Ячейка зеленого цвета сигнализирует о корректном расположении мода по отношению к мастер-файлу.
- Ячейка оранжевого цвета свидетельствует о нарушении порядка файлов, зафиксированного в аддоне. Следует иметь в виду, что зачастую требуемый порядок файлов никак не влияет на игру.
- Ячейка розового цвета означает отсутствие нужного мастер-файла либо некорректное его расположение.
- Чек марк в ячейке — установленная и активная модификация.
- + сигнализирует о том, что мод обработан баш-патчем.
- Точка — знак импорта.
- Чек марк отсутствует — аддон отключен.
Работа модификаций, обработанных с помощью патча (чаще всего речь идет об объединении нескольких модов в один), управляется файлом Bashed Patch, 0.esp. Этот файл всегда должен находиться в самом низу списка, что позволит избежать ошибок и конфликтов в игре.
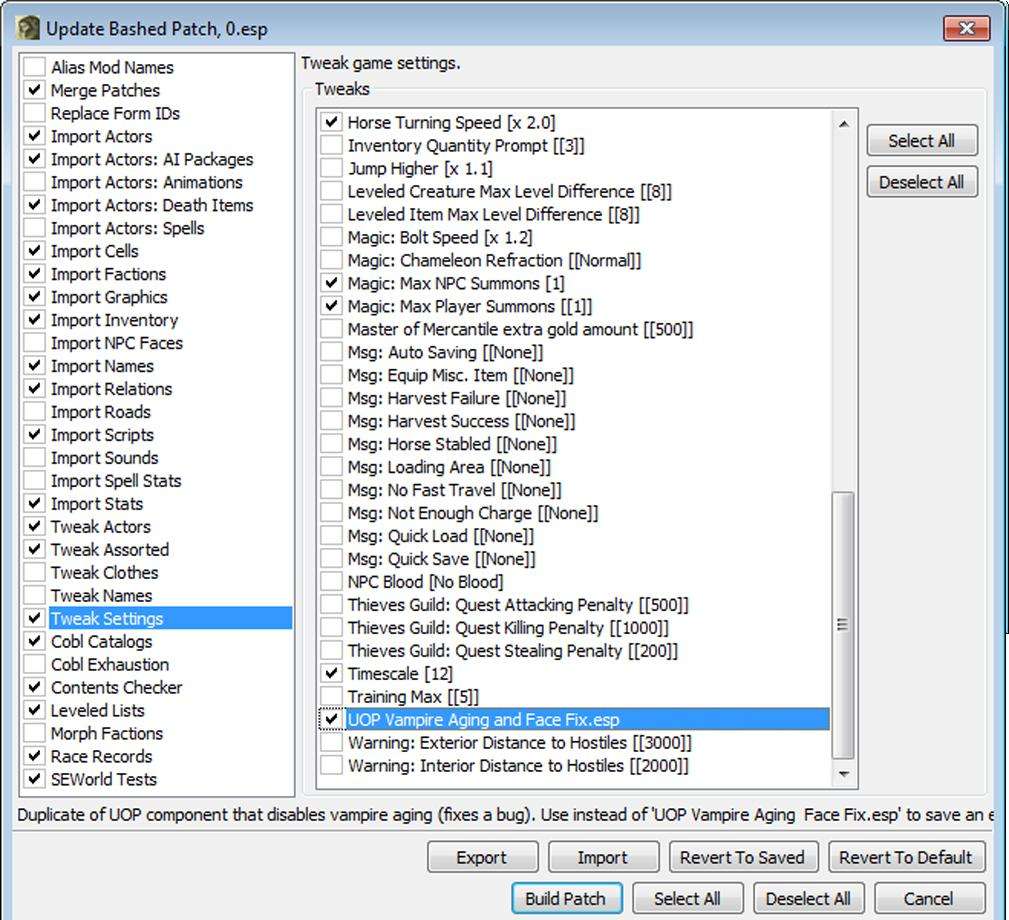
Установка модов
Для установки аддонов в программе предусмотрена вкладка «Установщики». Изначально она пуста. Чтобы устанавливать моды, в Wrye Bash, как и в других утилитах, имеется специальная директория, созданная на этапе установки в том же каталоге, что и папка с игрой (. ModsBash Installers). Сюда нужно поместить все нужные архивы с дополнениями, после чего перезайти во вкладку. Программе потребуется определенное время, чтобы подгрузить все модификации.
Поддерживается как автоматическая установка (если модмейкер пожелал сделать свою модификацию соответствующей), так и ручная. При автоматической инсталляции пользоваться Wrye Bash, как правило, не сложно: нужно лишь кликнуть ПКМ на нужном архиве и затем щелкнуть «Мастер-установщик». В зависимости от сложности модификации будет предложено настроить варианты ее установки, следом нажать Apply. В ручном режиме нужно отметить интересующие аддоны, вызвать контекстное меню и нажать «Установить».
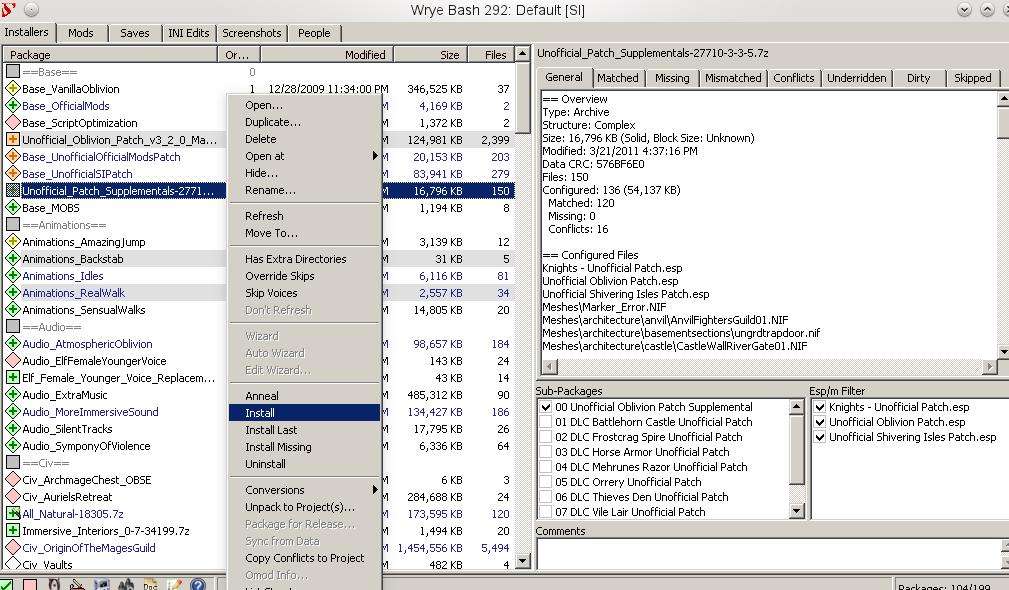
В тех случаях, когда архив имеет содержимое, программой не поддерживаемое (архив в архиве, например), он будет отмечен серым цветом. При этом можно попытаться модификацию все же инсталлировать, здесь же этот архив распаковав и запустив установку. Wrye Bash не сможет установить мод, только когда нарушена сама структура расположения файлов (не соответствует игровой).
Устанавливая дополнение, на цветовые обозначения также следует обращать внимание:
- Белый цвет — архив поддерживается программой, и мод можно устанавливать.
- Серый цвет — программа не может распознать файл.
- Зеленый цвет — программа фиксирует полное соответствие между своими настройками и файлами в игровом каталоге.
- Желтый цвет — файлы на месте, но имеются проблемы с совместимостью, либо зафиксировано изменение или замена одного или нескольких файлов мода после установки.
- Красный цвет — одного или нескольких файлов модификации в каталоге нет.
- Крестик на любом поле сигнализирует о повреждении архива.
Удаление модов
Для удаления аддона достаточно вызвать его контекстное меню и кликнуть «Деинсталлировать». Если файлы модификации были изменены другим дополнением, программа удалять их не будет.
Источник: abc-import.ru