Игры в материале

- Комментарии
- Форум
-
Новая Lords of the Fallen от польской CI Games выйдет без русского перевода
80
19.05.2023 13:38 от
Tigger -
Триллер Fort Solis с участием Роджера Кларка и Троя Бейкера стал главной темой июльского номера EDGE
6
19.05.2023 13:20 от
Tarkov-Vlad -
Microsoft продолжает думать над внедрением рекламы в игры для Xbox Series X|S и ПК
25
19.05.2023 13:02 от
darthbloodsfire -
Авторы The Callisto Protocol показали трейлер предпоследнего DLC — следующим выйдет сюжетное расширение
11
19.05.2023 12:56 от
Tarkov-Vlad -
Мощные консоли PlayStation 5 Pro и Xbox Series XL обязательно выйдут, считает глава Take-Two
45
19.05.2023 12:55 от
DreamEaglr
-
BioShock Infinite
3406
19.05.2023 13:04 от
cyrulnikTODD -
Повышение цен на игры
2937
19.05.2023 11:21 от
ALF_9010 -
The Legend of Zelda: Breath of the Wild
3539
19.05.2023 11:12 от
Greenfrogy -
Metal Gear Solid
179
19.05.2023 11:00 от
ALF_9010 -
Футбол
13592
19.05.2023 10:58 от
Shibito
Для тех, кто не играл в первый Xenoblade или вообще в любую из частей франшизы, эта игра может на первый взгляд напугать из-за множества наворотов. Однако этот гид должен помочь вам разобраться с некоторыми нюансами игрового процесса и сделать их более понятными. Здесь мы дадим вам советы о том, что нужно делать, и это позволит вам легче втянуться и просто получать удовольствие от игры.
Не бегите по сюжету
Хотя в игре и невероятный сюжет, и думаем, что многие игроки действительно хотят увидеть все, что он может предложить, как можно скорее, вам стоит уделить внимание и игровому процессу — в частности изучению мира. Не стоит рассчитывать на то, что вы сможете преодолеть все препятствия при помощи случайного или старого снаряжения. Чаще всего вам придётся быть готовым, так как игра не самая простая. Многие игроки торопятся увидеть следующий кусок сюжета и натыкаются на преграды, которые не могут преодолеть.
На самом деле, специально качаться в игре не надо. Просто уделяйте время на изучение мира. Берите побольше сайдквестов в городах и прочих поселениях и бегите детально смотреть локацию, открывая туман войны на большой карте. Пока вы изучаете мир, побочные задания будут выполняться сами по себе. Не забывайте сражаться с монстрами.
Конечно, в идеале изучить каждую карту, но ниже мы составили список моментов, где до и после стоило бы заниматься различными активностями игры:
- После воссоединения с Рейном в «Лаборатории по разработке оружия» (Weapon Dev. Lab).
- После атаки Мехона на Колонию 9 (Colony 9)
- После победы над Королевой Арахно (Arachno Queen)
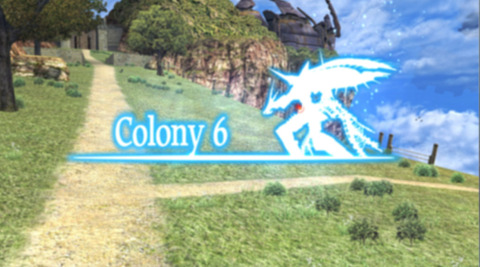
- Прежде чем отправится в Колонию 6 (Colony 6)
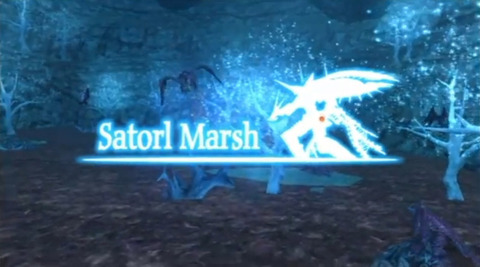
- Добравшись до светящегося обелиска (Glowing Obelisk) на болотах (Satorl Marsh).
- Перед/после начала «Древнего обряда» (The Ancient Ceremony)
- После вербовки Рики
- После победы над Leone Telethia
- После прохождения гробницы High Entia
- После прохождения Тюремного Острова (Prison Island)
- До/после посещения башни Ose
- Перед отъездом на поле Мехониса (Mechonis Field)
- После встречи с Ванеей
- После прохождения MC
Потребуется время, чтобы привыкнуть к боевой системе
На раннем этапе боевая система достаточно проста для понимания, но она будет становиться все более и более сложной, когда вы откроете больше персонажей и техник (Arts). Не бойтесь потратить время, чтобы лучше понять, как работают атаки каждого персонажа и сформировать стратегию. На вашем пути будет много мяса для тренировки.
Вам нужно знать, что некоторые атаки имеют реальный эффект только с определенной стороны. В Definitive Edition игра дает подсказки восклицательными знаками у навыков, которые следует использовать, если вы стоите в нужном месте относительно врага. Например, скилл Stream Edge Шулка ломает щиты врагам только спереди. Back Slash — наносит двойные повреждения сзади. Другие срабатывают только сбоку.
Если соединять удары разных героев в связки, то можно переворачивать и затормаживать врагов. Для этого смотрите описание навыков и соблюдаейте последовательность эффектов: Break -> Topple -> Daze. Например, это может быть такая цепочка: Stream Edge (Шулк) -> Wild Down (Рейн) -> Shaker Edge (Шулк).
Разные члены команды
Многие игроки чувствуют себя комфортно с «оригинальными» члена команды в лице Шулка, Рейна и Шарлы, и/или боятся попробовать других персонажей, которые присоединятся по мере продвижения по сюжету, и/или просто не могут привыкнуть к ним. Не бойтесь и просто меняйте Шарлу, как только такая возможность представится. Шарла, хоть и отличная подушка безопасности, но не самый эффективный персонаж. Если вас пугает всё новое, то мы дадим вам несколько пояснений, почему же стоит пользоваться и другими персонажами.
- Данбан — ловкий танк с более слабыми техниками и не такой сильной защитой, как у Рейна, но он может долго уклоняться от физических атак и гораздо сильнее. Основная стратегия при игре за него — использовать Gale Slash и продолжать атаку одним из трёх характерных для данного персонажа техник.
- Мелия — маг-призыватель. Ее основной стиль боя основан на использовании ее техник «Призыва» (Summon), а затем использования их в качестве патронов для ее артов «Talent Art«, «Elemental Discharge» (которым можно пользоваться даже тогда, когда он не заполнился). Она может стать одним из самых сильных персонажей в игре благодаря своему большому уровню эфира. Не забывайте использовать ее навык дублирования элементалей Summon Copy после призыва существа основным навыком.
- Рики — накладывает негативные статусы, а после применения техники «Say Sorry» наносит огромный урон, если враг был под дебафами. Может лечить отряд навыком «You Can Do It«, имеет отличную ауру «Hero Time«, которая случайным образом сильно повышает один параметр, не позволяя «напряжению» партии упасть, а скилл «Yoink!» позволяет ему красть характеристики, предметы и даже опыт у врагов.
- Седьмой персонаж — протеанин. Может быть как физическим, так и эфирным атакующим, а также ловким или ударостойким танком. У техник хорошие бонусные эффекты, такие как двойной урон и дебаффы.
Не бойтесь пробовать что-то новое и, возможно, вы найдете нового любимого персонажа, чтобы играть за него или иметь в команде.
Побочные задания и гриндинг
В отличие от оригинальной версии с Wii, где вам требовался детальный гайд, чтобы найти нужные предметы или монстров, в Definitive Edition появилась удобная система отслеживания миссий. На карте отображаются не только предметы, но и нужные монстры во время их появления в мире игры.
Берите базовые побочные задания сразу же, как они становятся доступны
Базовыми квестами стоит называть задания, которые дают обычные NPC без какой-то особой предыстории. Такие задания имеют подзаголовки «Monster Quest 1«, «Collection Quest 3«, «Challenge 2» и т.п.
Все эти задания можно легко выполнить, просто немного свернув с сюжетного пути. Поэтому, когда вы попадаете в новую локацию, рекомендуем вам брать все базовые квесты (которые вы можете найти) и идти изучать мир, навещая специальные отметки на карте.
Исследуйте
Игра вознаграждает вас очками опыта, очками техники и очками навыков за открытие новых особых мест и локаций по всему миру игры. В игре очень много интересных и секретных мест, которые стоит посетить. Придерживаясь только сюжетных и рандомных побочных заданий, вы никогда там не побываете. Старайтесь исследовать как можно больше, когда попадаете в новую зону.
Ловкость
Ловкость влияет на точность и уклонение. Так что если у вас низкая ловкость (Agility), то вы будете и попадать, и уклоняться реже. Имейте в виду, что это влияет только на физические атаки с разных сторон.
Ауры и баффы
Ауры и баффы — это пассивные эффекты в бою, которые длятся определенное время. Они работают очень похоже друг на друга, но имеют важные отличия, которые не совсем очевидны.
Ауры обычно (не всегда) дают один положительный эффект, но также и отрицательный, и они влияют только на персонажа, который их использует. Иконки таких техник (артов) окрашены в оранжевый цвет.
Баффы обычно дают положительные эффекты и могут повлиять на одного или всех персонажей в бою. Иконки окрашены в синий цвет, как и у поддержки.
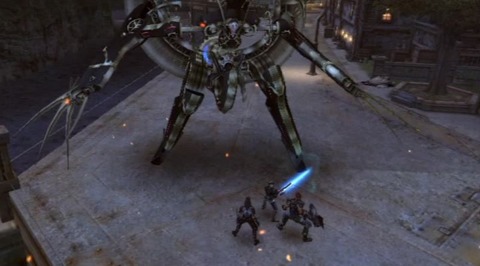
Щит Монадо
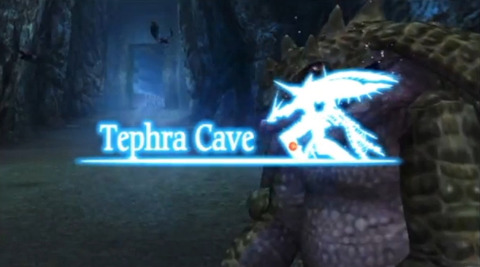
Monado Shield — это техника меча Монадо, которую Шулк изучит прямо перед боем с Королевой Арахно (Arachno Queen) в пещере Тефра (Tephra Cave). Цель этой техники — защитить команду от мощных техник (Talent Arts) врагов. То есть специальные атаки оппонентов могут быть заблокированы.
Но у сильных вражеских техник есть уровни (например, Arachno Crush I, Ultra Poison Stab III, Over Eater VI и так далее). Если уровень прокачки щита Монадо меньше уровня особой техники врага, то его защита не сработает. Поэтому, как только вы достигнете локации Satorl Marsh, вам стоит начать прокачивать его.
В этих локациях мы настоятельно рекомендуем прокачать уровень до следующих:
- Уровень III (3) — Satorl Marsh
- Уровень IV (4) — Valak Mountain
- Уровень VI (6) — Sword Valley
- Уровень VII (7) — Первая зона в конце игры
- Уровень IX (9) – Финальные бои
Не пытайтесь прокачать его как можно быстрее, потому что это связано с определёнными условиями, при которых проиходит повышение уровня.
Совет: Вы можете понять, какую особую технику использует противник, во время предвиденья Шулка по римским цифрам у названия навыка, который появляется рядом с таймером.
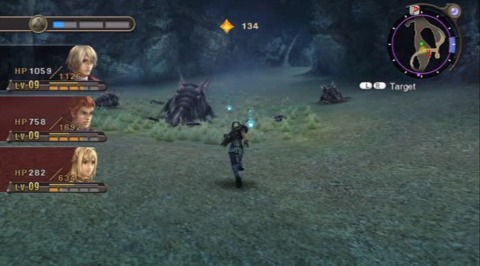
Убивайте уникальных монстров
Уникальные монстры — это более сильные версии обычных врагов с оригинальными именами и более мощными статами. Сражения с ними — одни из важнейших игровых элементов всей серии. Конечно, вы получаете с них больше EXP, AP и SP, но также с них всегда выпадает золотой сундук с сокровищами и монеты Affinity (после первого убийства данного противника).
Золотые сундуки содержат редкие материалы, оружие и доспехи (которые обычно включают в себя не экипируемые самоцветы), а также кристаллы. О монетах Affinity поговорим ниже.
Самоцветы
Самоцветы — это дополнительные предметы снаряжения, которые можно добавить к вашей броне и оружию. Они дают персонажам кучу различных эффектов, улучшая статы, увеличивая продолжительность эффектов, позволяют быстрее передвигаться по полю и так далее. Вы можете получить их, создав с помощью кристаллов у мастера самоцветов (Gem Man) в Колонии 9, выполняя побочные задания или заполняя коллектопедию.
Кроме того, рекомендуем сортировать их по параметру Атрибуты (Attributes).
Как пробежать мимо сильных монстров и не вступать с ними в бой
Если желанный предмет под охранной сильного монстра, то не отчаивайтесь. Вам не придётся сражаться с ним. Установите соответствующий самоцвет скрытности для определённых монстров, и вы сможете легко прокрасться мимо врагов без необходимости сражаться с ними.
Восстановите Колонию 6 хотя бы до 1 уровня
После того, как вы достигнете Sororal Statues в Satorl Marsh, а затем завершите побочное задание у главного входа в Колонию 6, вы получите возможность восстановить ныне разрушенное поселение. Однако вам придётся искать определённые предметы для этого и понадобится очень много денег. Делать это совсем необязательно. Но настоятельно рекомендуем восстановить жильё (Housing), торговлю (Commerce), природу (Nature) и особые (Special) категории колонии до 1 уровня. Это стоит сделать, даже если вы не планируете завершить игру на 100%.
Прокачав всё до 1 уровня, вы получите сверх-маленький реактор (Ultra Small Reactor). Если отдать его в мастерской самоцветов (Gem Man) в Колонии 9, то он создаст для вас мобильную эфирную печь. Благодаря ей вы сможете создавать самоцветы в любой точке мира, а не только в девятой колонии. Самоцветы очень полезны, а возможность делать их где угодно — очень заманчивая.
Обратите внимание на древо навыков
Навыки — это пассивные эффекты для боя, которые по большей части уникальны для каждого персонажа. Вы открываете их за очки навыков (Skill Points или SP), выбирая из древа навыков. SP вы получаете за победы в битвах и открытия новых зон и мест. Только одно дерево навыков может быть выбрано одновременно. Выбрав одно из древ, вы значительно улучшаете одну из характеристик.
Очень важно, уделить особое внимание тому, когда все 5 навыков на каждом древе будут максимально прокачены. Потому что в противном случае все те SP, которые вы получите потом, будут потрачены впустую.
Связь навыков
После победы над Королевой Арахно (Arachno Queen) у вас есть возможность связать навыки одного персонажа с другими. Оранжевые навыки активируются только тогда, когда персонаж, которому изначально принадлежит этот навык, также находится в команде. Синие же навыки всегда активны, если они связаны, несмотря ни на что. Единственные навыки, которые вообще не могут быть связаны, — это ромбовидные. И вы можете связать только до пяти навыков для каждого персонажа.
Есть также две вещи, которые следует учитывать, когда вы хотите связать больше навыков: близость членов команды и монеты Affinity.
Для того, чтобы связать больше навыков, вам нужно сначала развить близость между двумя персонажами. С желтым Affinity вы можете связать только одного персонажа одновременно. Вы сможете увеличить эту цифру до пяти персонажей с каждым новым уровнем Affinity.
Монеты Affinity вы получаете за прокачку уровня персонажа и, как уже упоминалось ранее, убийства уникальных монстров. Именно они определяют, какие навыки вы можете связать. По сути, это валюта для связывания навыков.
Близость команды
Командная близость (Party Affinity) — очень полезная вещь, о которой стоит помнить. Она позволяет проводить более длительные сеансы создания самоцветов, связывать больше вышеупомянутых навыков и увидеть больше сцен Heart-to-Hearts. Также это влияет на продолжительность цепных атак (Chain Attack).
Связь персонажей можно улучшить, сражаясь вместе с двумя персонажами, и получая Burst Affinity (рандомные моменты во время боя, когда вам нужно нажать на кнопку B), подбадривая и оживляя. Вы также можете улучшить данный параметр во время квестов, сцен Heart-to-Hearts и даря подарки персонажам.
Читайте также: Обзор Xenoblade Chronicles: Definitive Edition
Добавляйтесь в наш Telegram-канал по ссылке или ищите его вручную в поиске по названию gmradost. Там мы публикуем в том числе и то, что не попадает в новостную ленту. Также подписывайтесь на нас в Яндекс.Дзене, Twitter и VK. И не забывайте, что у нас появились тёмная тема и лента вместо плиток.

Xenoblade is a huge game with a plethora of side-quests and optional content. Our guide will help you through the main story, as well as provide a wealth of information relating to side quests, skills, collectibles, and more!
*I managed to wipe out the first page of the guide when adding new content, so updates will be listed from this point onwards!
Updates:
- May 8, 2012: We have cataloged nearly every quest in the game! Nearly…
- May 2, 2012: Added «Rebuilding Colony 6» to the primers section.
Walkthrough: Prologue
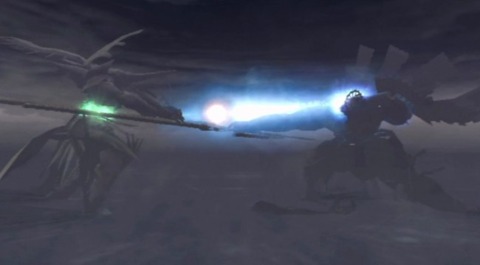
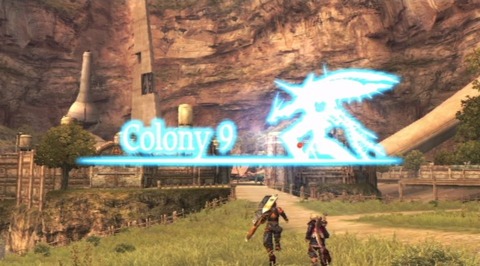
The game starts off during the battle between the Mechons and the Homs in Colony 9. You control Dunban, wielder the Monado, a sword bestowed to the people from Bionis ages ago.
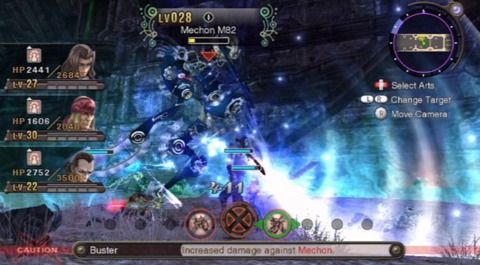
As the Mechon advance on your team, engage them in battle by targeting them with L or R. Once an enemy is targeted, your battle palette will open on the bottom of the screen. This is where you select which skills (Arts) to use during battle. As Dunban, you have three Arts to choose from: Enchant, Attack, and Buster. Quite simply, engage each Mechon as they appear, cast Enchant, and then follow up with the Buster attack.
When you aren’t using a skill, your character will auto attack the enemy every few seconds. Later in the game, landing auto attacks is required to recharge certain abilities known as Talent Arts. You must be within a reasonable range for your weapon in order to attack successfully. The green barrier surrounding the battle will only lift after the fight concludes. Once you’ve defeated a series of M63 and M69 Mechons, a large M82 will drop in front of your team. Follow the same methods to bring him down.
Walkthrough: Mechon Wreckage
The game continues one year after the events in the intro. You take control of a young man named Shulk, busy salvaging wares from the remnants of the prior year’s battle.
You gain control of him during battle and receive backup from Reyn, his good friend and your first team mate. When using your various Arts, there’s a cooldown time that you must endure before reusing an individual Art. Eventually, you can actually level up Arts, decreasing their cooldown time and increasing their effectiveness. Shulk’s Turn Strike is what’s referred to as a Talent Art. These Arts are specific to an individual character. As I mentioned earlier, the Turn Strike icon will refill every time an auto-attack hit connects.
Like the Krabble you just defeated, most enemies drop loot in the form of a chest. There are different grades of chests, differentiated by their appearance. The simpler wooden chests contain common items and materials while more ornate golden chests contain rare and unique items. Next, you’ll get a brief explanation of the Aggro system in the game. Essentially, the more damage a character deals to an individual enemy, the greater the chance is they’ll become the target. If a character is targeted due to increased Aggro, a red ring will appear around them.
Continue south, battling enemies and collecting loot while heading towards Colony 9. You won’t always have this luxury, but at the moment you can follow the arrow on the top of the screen to reach your next objective. You may notice small, blue orbs littering the landscape. These are known as Collectables and can be picked up by simply walking over them. By collecting one of every type of collectable in an area, you can fill out your Collectopedia to earn rewards in the form of Gems. Gems are accessories for weapons and other equipment that will boost particular stats. Pretty soon, you’ll get the ability to craft your own gems.
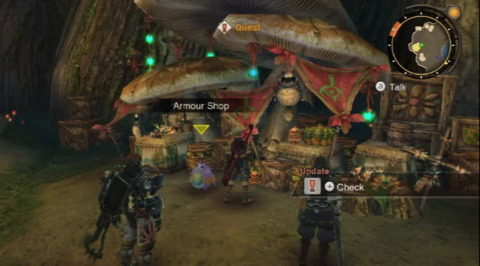
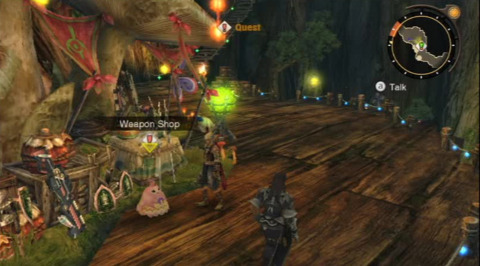
When you reach Colony 9, Reyn will depart for work at the military HQ. Check your inventory and equip any new items that you’ve acquired. Your new goal is to reach the Weapon Development Lab, but first, you should spend some time exploring the Colony. There is a lot to learn about the game here, as well as plenty of side-quests, available right from the start.
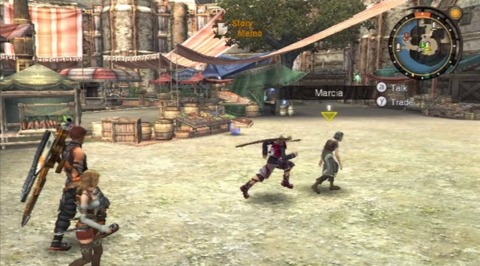
If you see a colonist with an exclamation point over their head, that’s your clue that they have a side-quest (or even quests in some cases) to offer. You might also notice that certain colonists have generic names, like «Colonist», while others are given unique names, such as «Rosemary». There are a few reasons that some of these NPCs are differentiated from the rest of the pack:
Trades
NPCs with unique names have items available for trade. You need to offer an item in return that is of equal or greater value. The benefit of this is you can find certain hard to locate collectables, which makes filling out the Collectopedia that much easier. Often, if you over trade by offering the NPC a more valuable item, you can get bonus items in return. The quality of the item is based on the difference and the individual’s preset selection of bonus items. Eventually, we’ll have a sub-guide featuring the individual NPCs and their trade requirements.
Affinity
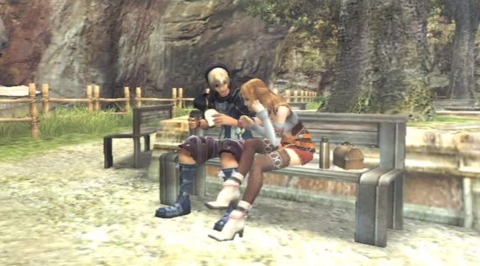
Every named NPC plays an important role in the society, local and abroad. Xenoblade weighs heavy on affinity between NPCs, Locations, and your individual team mates. Affinity controls the availability of side-quests primarily, but it also plays an important role in whats known as a «Heart-to-Heart» instances. These are character-development opportunities located throughout the world, noted on the map by an icon representing two hands, held together. These opportunities can only be realized when you meet the proper affinity requirements between the characters involved. For more information on Heart-to-Hearts, check out the sub-guide which contains the locations, requirements, and other info for each Heart-to-Heart in Xenoblade.
Side-Quests
Xenoblade features 480 side-quests. If completing that many side-quests is daunting to you, you should know it’s nothing compared to obtaining them. Quests are offered only if certain conditions are met. The NPC giving the quest must be present, which is determined by the time of day. In some cases they have affinity requirements as well, either between themselves and another NPC, or even between yourself and the particular town. This walkthrough will primarily focus on getting through the story, but our Quest sub-guide will contain info on finding these finicky NPCs, as well as the conditions required to pick up the particular quest.
At this point, Colony 9 is open for exploration. The only limiting factor is your current level; can’t explore that mountain if you can’t defeat the enemies on it. Feel free to try though, because dying results in your team respawning to the last major landmark you passed. Not a bad deal. Just don’t expect to traipse around, picking up collectables ahead of time. If an enemy is pursuing your team, you won’t be able to pick acquire them on the run.
When you’ve settled the itch to explore, head for the Military district, North from the commercial district. Simply follow the nav-arrow at the top of the screen. Once you arrive, you’re treated to a another healthy dose of story.
Walkthrough: Colony 9
When the cutscene concludes, you are left in control of Fiora, Dunban’s sister. At his suggestion, you have to find Shulk. Head towards the Residential District (west from the Military Dist.) and follow your goal marker to the area known as Outlook Park. When you arrive, you’ll learn a little more about Fiora, Shulk, and Dunban.
With that complete, head back to the Weapons Development Lab. After your arrival, you’ll eventually regain control of Reyn and Shulk. You’ll also get the chance to level up your Arts at this point. You should take the time to examine your Skill Trees at the moment as well. Skills boost certain stats or abilities and can be shared between characters, though sharing does have its limitations.
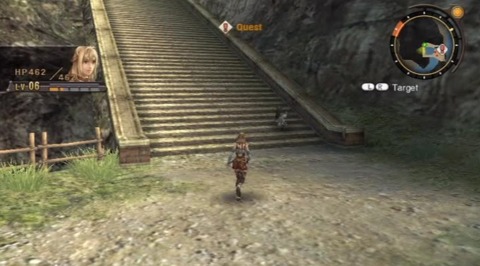
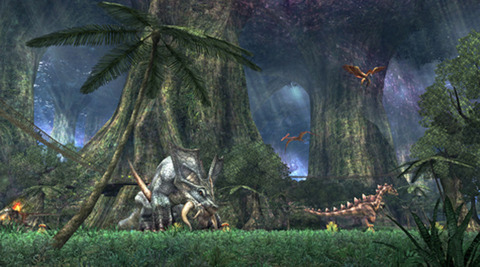
Tephra Hill / Tephra Cave
Your next goal is Tephra Hill. To get there, you need to take the alternate path back at the fork near the entrance of Colony 9. On your way, you’ll reach a point where the path bends northwest. There is a hill on the northern wall. Explore the hill a bit and you’ll see your first Unique Monster UM, Evil Rhangot. I advise that you avoid encountering the Rhangot for now, as it’s likely you’ll lose and respawn at the entrance to Colony 9. For more info on Unique Monsters, take a look at our handy sub-guide.
Continue down the path. Once you reach the Tephra Cave Entrance, Fiora will rejoin your party. Head into the cave, advancing towards the Ether reserves that lie in wait. As you make your way through the cave you’ll come across a pit (The Caterpile Nest) with three Eater Caterpile nearby. Approach with caution, as a large Cellar Bugworm will pop out of the center of the pit. Avoid it for now as best you can. It will likely be too strong for your team at the moment.
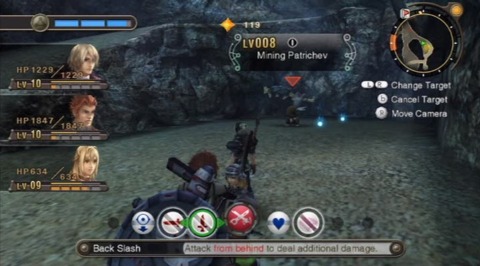
Outside the room are a few Singing Brogs. Don’t let their size fool you, they’re manageable. There’s a path that wraps around to the southeast, but it’s essentially just a shortcut to an earlier part of the cave. There is a UM waiting for you that should be easy to defeat with your team, so keep an eye out for the Mining Patrichev next to the ramp.
You should be close to the goal at this point. Head towards the flag on your map and you’ll enter the Mag Mell Ruins.
Mag Mell Ruins
After the cutscene, the game suggests that you travel to town to reequip your party, but it’s merely a suggestion. My suggestion is to carry on! Explore this floor of the ruins for a moment and you’ll see an inaccessible room along the northern wall. That’s all there’s to see for now. Head up the ramp and take a right when you reach the top. If you take a left, you’ll notice a flashing red beacon, but there’s nothing you can do to it or with it at this point.
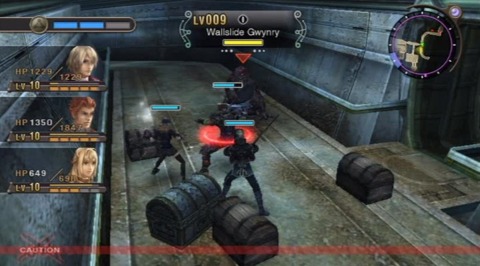
Head through the green doors and you’ll encounter a group of Mell Lizards. If you stick around to fight them, a Unique Monster (Wallslide Gwynry) will appear from the south to join the fray. He presents a bit of a challenge, but it’s certainly possible to defeat him. If you attempt to beat him and die, you’ll be sent back to the ruins, so it’s not terribly risky to give it a shot.
Walkthrough: Cylindar Hangar
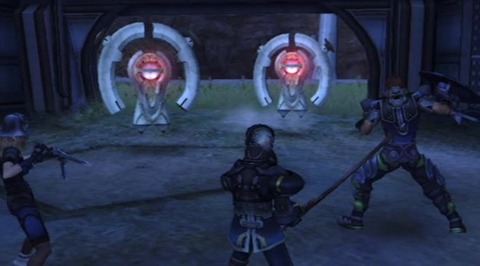
Continue north and you’ll reach the rear entrance of the cave/ruins. Once you exit, you’ll be just outside the Cylinder Hangar. Enter the hangar to trigger a cutscene. Afterwards, you’ll be confronted by two Ancient Machines. They’re relatively minor bosses. Employ the usual tactics to take them out.

When you regain control, you’ll have to head back to the Colony as quickly as possible. What better way to do that than to jump off a cliff. Seriously, just leap off and you’ll land safely in the water. From there, head to shore and return to the Colony. As you approach on land, you’ll get to see a cheerful cut-scene featuring the Mechon devouring colonists. Splendid!
Colony 9
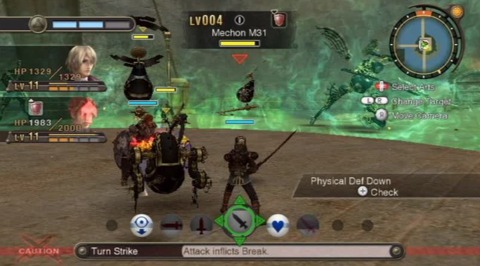
Engage the Mechon in battle, but heed this warning. You must inflict break and topple, before you can inflict damage beyond a single hit point. To accomplish this, use Shulk’s Turn Strike, and keep your fingers crossed that Reyn follows up with Wild Down shortly after. It helps to use Turn Strike right after you see Reyn use an Art, so his following action will (hopefully) be Wild Down before the Break debuff times out.
When you’ve defeated the M63 Mechon, run through the town engaging and avoiding the other Mechon as you see fit. Some of them will try to attack you, but if you’re swift enough, you can make it to the goal without having to face any Mechon. One good path to take would be the balcony, as there are less Mechon likely to attack you. When you get to the Military District, your path to the Monado has been cut off. The only way to reach the lab is through a secret path, located past the Residential District. Head that way.
You’ll face off against a couple M31 and M51. Make sure to command your party to focus on one target (using Rz + UP). After the fight, “you know who” arrives with “you know what”, to save Reyn. Work your way back through the Commercial District. When you get to the entrance bridge, Shulk will take up the Monado, and experience its secondary effects. When you gain control of him, auto-attack enough to charge your Monado Art, and use enchant to give your other party members the ability to damage Mechon with their common weapons. Follow up with the Buster Art as well, to deal massive damage.
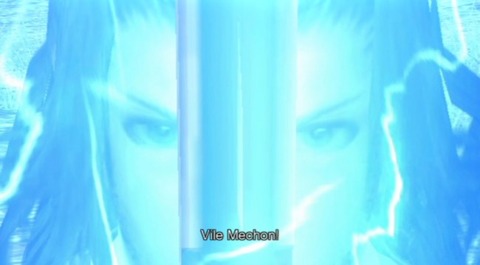
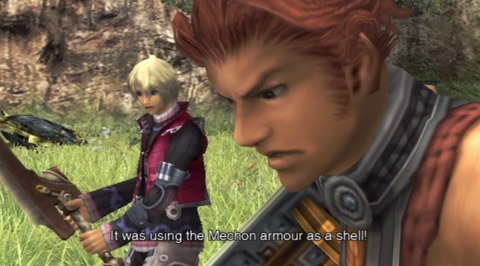
Make your way to the other side of the bridge and run along the shore towards your goal. Take the eventual left turn into the Residential District. As you battle the large Mechon, “Metal Face”, it’ll become clear right away that the Monado is incapable of damaging your enemy. Right about then, Fiora comes roaring onto the scene. The rest, you’ll have to see for yourself.
Let’s teach Metal Face a lesson!
Your crew will start with a full party gauge. As the mini-tutorial instructed, initiate a Chain Attack at the start of the battle. As Shulk, choose Stream Edge to inflict Break from the front of Metal Face. If you don’t have that Art yet, run to the back of Metal Face and use Turn Strike. Follow that up with Reyn’s Wild Down to inflict Topple. Finally, use Dunban’s Blossom Dance to deliver a combo attack. After each hit Dunban lands, get ready to hit the B button to continue the combo. Let Shulk land a few auto-attack blows after Dunban runs out of steam. You only have to deplete half of Metal Face’s health until he departs, leaving Colony 9 in partial ruin.
Your ultimate goal from now on is to hunt Metal Face down. He is your nemesis. You’ll start your search by heading to Colony 6 on the Bionis’ Knee, by way of Tephra Hill/Cave.
Walkthrough: Tephra Cavern
You need to make your way through Tephra Hill/Cave to reach the Mag Mell Ruins, and then continue through a new section of the cave to get to the Bionis’ knee. The enemies up to the cave are not worth the time it takes to fight them. The Wood Bunnits, Prom Skeeters, and Caterpiles only net you 1-5 EXP. You can take on the UM, Evil Rhangot, located at the bend in the hill, which you were likely too under-leveled to defeat earlier. The Monado and your increased levels give you the advantage this time around. There’s not much else to consider before entering the cave, so let’s do that.
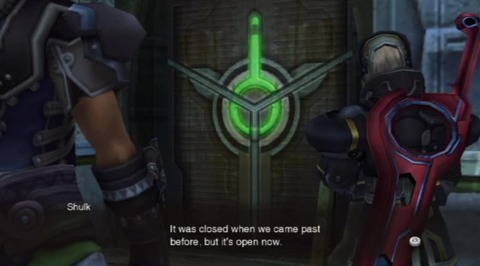
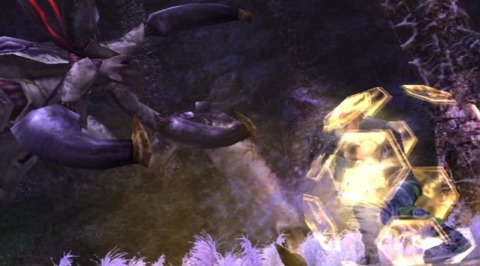
When you reach the ruins, head through the recently opened door to enter the Escape Pod Bay. Take note of the ether lamp nearby; they’ll guide you through the cave on your way to the Bionis’ Knee. Just past the Escape Pod Bay is the Tephra Cavern. Along the outer path is a Ice Ether Deposit, which you can mine for Crystals. Drop into the cavern and if you wish, battle some of the Desert Krabble, then take on the Noble Brog along the eastern wall. Follow the ether lamps towards the southern exit. You’ll come across a few Worker Arachno as your approach the next goal marker.
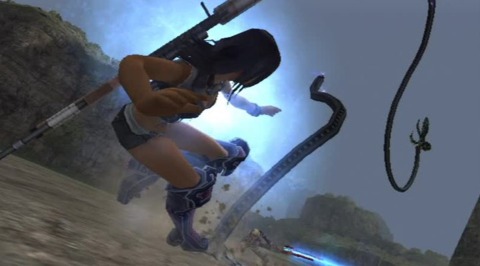
After defeating the Arachno, Reyn and Shulk will return the dead colonists nearby to the Bionis as a form of burial rite. Once you regain control of the duo, you’ll be in combat against roughly eight Worker Arachno and a Director Arachno. It’s not a difficult battle, but rather, a taste of things to come. Head west from there and you’ll come across an Arachno pit. Rather quickly, Reyn will get ambushed with webbing and hauled up into the ceiling and you’ll have to come to his rescue. Head for the southern exit.


You’ll enter Vilia Lake. Your goal is the pillar covered in vines just south from your position. (There is another quest related item to the north, the Lost Pendant.) There are some new enemies that you can take on, but avoid the Gluttenous Eugen for now; Shulk can’t defeat him solo. Before climbing up the vine, check out the waterfalls to the south. One of them veils a Water Ether Deposit ripe for mining. After that, climb up the vines and head northwest towards the exit. After a cut-scene, you’ll be thrust in to battle with the Arachno Queen.
The Monado & Visions of the Future
Thankfully, the Monado can provide visions of the possible future during battle, and tip you off to incoming attacks. Take note of the Vision Tag at the top of the screen during battle. It shows you the incoming attack, the intended target, and the result if you are unable to thwart the attack. You’ll also see a gauge reflecting the amount of time before the enemy will unleash their attack, so react/plan accordingly. Part of this planning includes “warning” your teammate(s) by standing nearby and pressing B.
Individual font colors reflect different types of incoming attacks: White > Talent Arts, Red > Physical Arts, Blue > Ether Arts
In order to block a Talent Art, the Shield Art is required. You also need to have a full segment of the PG charged at the time of the attack. The Shield Art must also be at the same level of the enemy’s Talent Art in order to be effective. For example, Arachno Crush I requires that Shulk’s Shield Art be at least at level 1.
Use Shulk’s Sweep Strike to damage as many Soldier Arachnos as possible. When the Monado is charged, use the Buster attack on the Queen. Remember; keep an eye out for her Talent Art (you’ll get quite a bit of warning) Make sure to heal Shulk or Reyn if their health dips below half, just in case you get overwhelmed.
With the Queen dispatched head northwest. Remove the webs blocking your path by simply pressing A. At the end of the path, you’ll exit the cave and get your first glimpse of the scale and grandeur of the Bionis and Mechonis, the two beings who comprise your «world».
Walkthrough: Bionis Leg
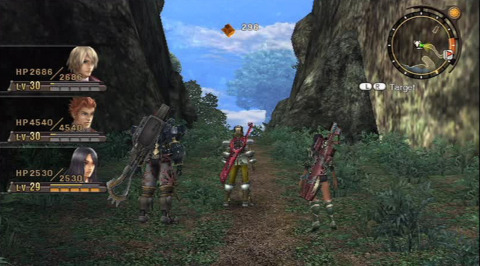
If Colony 9 was large, The Bionis Knee/Leg is enormous. If you want to get right back to the story, head southeast towards the smoking wreck in the distance. If you want to explore the land, you can cover quite a bit of ground. There are some extremely high level monsters throughout the wilderness, even in places where the standard enemy is roughly level 12-14. In most cases, you can avoid combat by staying out of their line of sight and allowing them to pass by.
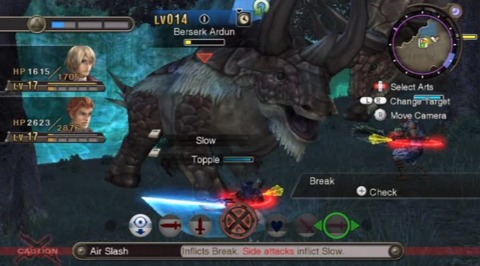
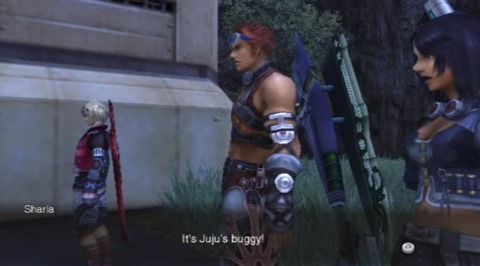
Shulk has a vision when he arrives at the wreck. The boy responsible for the vehicle seems to be in danger, somewhere near a body of water. Take off to the north in search of a water fall and a small lake along the edge of the map. You’ll have to face off against two level 14 Berserk Ardun. This fight is simple if you don’t make it too hard on yourself. Ignore the Monado’s secondary skills. Focus on one Ardun at a time and try to inflict Break. This will allow Reyn to Topple the Ardun so you can beat it into submission.
Once they’re done for, you need to escort Juju back to his home, a camp east of your location. To get there, head directly East from the Jabos Rock Rest Area, a landmark that should be on your map at this point. You’ll run into some cliff faces adjacent to a group of trees. Follow the bend in the mountains, heading south. From there, the camp will lie just ahead.
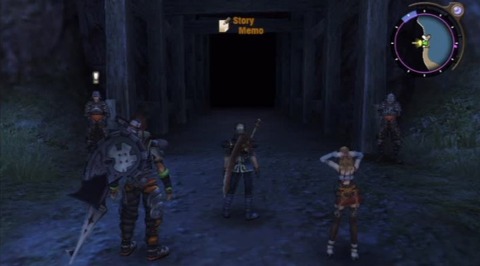
Refugee Camp
Head into the camp and talk to the refugees if you are looking for quests, or stock up on new equipment if you’ve got some cash burning a hole in your pocket, but also know that the Gaur Plain offers plenty of opportunities to pick up special and unique grade items from battle. When you’re ready to continue with the story, talk to Sharla to hear about the refugees escape from Colony 6.
Juju has run off again! Your goal is the bridge over Raquel Lake, located east from the camp. Make sure to stock up on new equipment. Sharla has two arts that will come in handy: Shield Bullet (Damage Immunity) and Cure Bullet (Debuff Immunity). Don’t take them for granted. Unless you take control of Sharla or issue direction to the whole team, you’ll have to wait for her to protect Shulk and Reyn.
Raquel Bridge
When you arrive at the bridge, endure the cutscene and consider the available paths before continuing. You can head northeast and use the Windy Cave, but the less lethal route might Raquel Road, located on the same side you approached the bridge from. There are a few Mechon to contend with on the road, but the Windy Cave is littered with level 75-ish enemies that can only be avoided. If you don’t want to risk restarting your trek, it’s advised you take Raquel Road.
The tentacled Mechon that captured Juju is waiting for you at the goal. He’s at level 18, so it’s advised to level up a bit if he’s over your head. A good way to do this is by taking on side quests or exploring the map, both of which can and will keep you busy for hours. Bionis’ Leg is massive.
Once you enter combat, the tactics required to win are fairly straight forward. First off, enchant Sharla and Reyn so they can actually inflict damage. Avoid using the Team Gauge to release a chain attack. Regardless of your efforts to enchant Reyn, or his ability to draw aggro, Shulk will likely be the primary target throughout the fight. It’s best to spend a little longer fighting the boss and reserve your team gauge for Shulk’s revival, should he need it.
This fight lasts two rounds, followed by a third. Use the same tactics for the second round and since the third cannot be “won”, just attack as you please until the game takes control. Once your team decides to pursue the Mechon, head southeast from its location to reach your next destination, Bask Cave. Cross the body of water near the southern end of the map to reach the entrance.
Walkthrough: Colony 6 / Ether Mines
You’ll exit the passage near the entrance to Colony 6. Starting from the Watchpoint Junction, your goal is to enter the Ether Mines, via the northwestern path around the bound south from the Junction. You can head for Colony 6 to the south, but the colony is in disarray and cannot be accessed at this time.

Head northwest to access the Splintered Path. Exploring the path will net you plenty of collectables, some of which can be used to complete quests for the Nopon outside Colony 6’s entrance. Take the elevator down to the path. Once you exit, you can see the entrance to the mine in the distance. Once you’ve explored the path to your liking, head into the mine.

Ether Mine
As you continue into the mine, you might notice a collectable sitting on a platform that’s out of your reach. To get there, hike up the inclined pipes on your left, and leap off the larger pipe branching off of it to reach the item. That’s all there’s to do here for now.
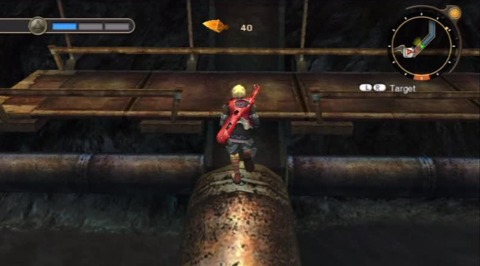
Head up the staircase to reach the Drainage Control Room, manned by a couple of Nopon. You can purchase items from the merchant, but most importantly, take the time to manage your arts and skills if you haven’t already.
The mines are a twisted maze of corridors. It’s not terribly hard to get to the goal, but there are lots of opportunities to mine ether deposits, nab collectables, and otherwise get turned around. The cave is littered with Mechon, so don’t forget to Enchant Reyn and Sharla at the start of each fight to move things along. There’s a path that heads far south, leading to a secret area, Glowmoss Lake. The main attraction here? For now, the most you’ll get out of visiting the lake is a sizable chunk of EXP. The UM in the area is likely too high level for your team at the moment, but there are a few collectables strewn about, if you’re on the hunt.
When you’ve satisfied your need for exploration, head for the goal at Test Pit 3. After the cutscene, take out the Mechon on the platform, and get ready to meet a new ally. After the introductions are made, it’s time to head deeper into the mine. There is a Heart-to-Heart location nearby, but not much else in the immediate vicinity.
Central Terminal
Head south and you’ll reach the Central Terminal. This is where navigation gets quite tricky. Though your goal is marked on the map, you’ll have to activate a device in order to use the elevator located at said goal.

For a point of reference, I’ll provide directions from that marker. Return up the path that led you there and take a right, heading northeast. Run up the small staircase and take another right when you reach the next fork in the path. Drop into the gap in the floor and turn right again, heading south this time. Take a quick left, and follow the path northeast until you reach Observation Point. Head down the staircase to your right, and activate the switch to open the gate that was previously locked. Backtrack to the goal and you’ll enter the Central Pit.
Walkthrough: Ether Mine / Central Pit
Welcome to the Central Pit. Take a ride on the elevator that’s north from your starting position. Run towards the machine in the middle of the pit and follow the trail clockwise, being careful to avoid the gigantic rotating fins along the way. Follow the first path you come across, breaking off towards the east. Take a left at the end of the bridge and take the next elevator (Personal Lift 2) down to the Central Pit — Level 2 .
Work your way down the slopes and back onto the large device in the middle of the pit. Head south, continuing clockwise, until you reach an elevator-platform. Hop on board when it’s heading up, and hop off on the next level. Take the path clockwise and ride the next elevator down a level. Run north, back towards the cliffs lining the pit. Head as far southeast from there as you can and you’ll find Personal Lift 3.
The trick to continuing from here is to ride the rotating fins, one by one, until you reach the other side of the pit. Your first stop is the northern platform. When you arrive, a level 24 M84 Mechon will drop down from the machine. Once he’s laid to waste, hop back on the fine towards the next platform where you’ll face off against two Mechon M84. Once they’re finished, go for the tunnel leading away from the pit. Before hopping on the elevator, check out arts, skills, and equipment; there’s a boss fight immediately after your upcoming elevator ride.
Boss: Xord, Level 25
The trick to defeating Xord is to utilize Chain Attacks to inflict Break; attempting to debuff him with Break any other way is destined to fail. It really helps if you can fill up the Party Gauge ahead of time. You can warp to an earlier part in the Mine if you’d like to do that. Otherwise, the weaker Mechon Xord summons make for excellent fodder in the race to recharge the Party Gauge, so have at ’em. You don’t need to deplete all of his health at the moment. Once he loses about a third, the fight will conclude…for now.
After the cutscene(s) head up the hill and get on the elevator. Continue through the tunnel and head up the stairs. You want to make your way towards the freight elevator to the south, by way of the large rotating fins. Once you try to activate the elevator, Xord will reappear to finish the fight, so prepare yourself.
Xord is much easier to defeat in his weakened state. Enchant your party and Break/Topple him as early as possible. He won’t summon any minor-Mechon, so you can focus on him the entire fight.
Walkthrough: Colony 6 / Satorl Marsh
After the battle with Xord, you’ll end up on the plains near colony 6. Dickson and Dunban join the fray as even more Mechon appear. You’ll take on a handful of powerful, common, Mechon, but they shouldn’t be too tough. From that point on, Dunban becomes a member of your squad.
Head southeast after the battle and continue along the cliffs. As you work your way around the mountain, you’ll know you’re in the right spot when you find the Misty Path landmark. This will take you to the Satorl Marsh, your first stop on the way towards the Bionis’ head.
Satorl Marsh
Your goal is marked on the map, but there’s plenty to explore if you’re in the mood. There are two Nopon merchants that will offer a handful of quests along the path to the goal. It might be a good idea to pick up a few quests and encounters; the closer to level 30 you are at this point, the better.
When you reach the final destination, you’ll find yourself at a landmark placed by the High Entia. You team will make camp for the night. When it’s time to continue, the path to the next goal is a bit unclear. Rather than head north, make sure you circle east, hugging the cliff-face towards your left. When you reach the large body of water to the south, cross over to the other side and use the hills to continue on.
Once you make it to the top of the hill, look out for the high level monsters roaming the area. Just stay out of their line of sight and you’ll be fine. Use the land bridge to reach the western path once you reach the Soter Ruins. Jump down into the water at the end of the path and head through the gap in the large gate.
In the middle of the platform ahead is a Nopon with a Story Quest marker overhead. Talk to him, and he’ll give you the quest needed to enter the Bionis (The Ancient Ceremony). In short, you have to collect four quest-collectables strewn about the map. Finding them is the easy part, but the hard part is defeating the monsters that protect them. We’ll start with the easiest and work our way around the map.
Head west from the Nopon who gave you the quest. There’s a cave that will take you to the first collectable. You’ll have to take on 3 level 27 Storm Vangs before you can grab the White Radiant collectable.
The next Ancient Offering is located northwest from the cave, atop a windy plateau. To get up the hill you’ll have to defeat two level 25 Detox Brogs. When you grab the Offering they’re guarding, you can see the two that are left in the distance. Check out your map and you’ll see that the Glowing Obelisk is likely closest landmark, depending on how much exploration you’ve done. Warp to the Obelisk and work your way southeast toward the Igna territory; an area guarded by lizard-men.
As you head up the hill (assuming you’re coming from the east), you’ll get ambushed by four Igna guards. After dealing with them, the offering awaits you to the left. Rather than run headlong for the Offering, approach from the south so you can grab it without having to battle the powerful Igna gaurd. Wait for his back to turn and you can sneak your way to the Offering.
The next Offering (collectable) is located in the middle of a poisonous swamp, and as such, comes with its own share of perils. When approaching the marsh, there are some Swamp Rahgouls swarming overhead. Take them out one by one before proceeding through the swamp. Running through the swamp causes damage to your team mates and will leave you vulnerable to the Brog guarding the Offering. Once the Coppice quadwings are taken care of, you can safely proceed towards the offering near the Brog.
You’ve done it! Keep in mind that once you drop off the quest items, you’ll have to deal wit ha minor boss fight. Now, warp to the Satoral Statues and drop your Offerings off at the altar. Here comes the boss!
The level 28 Satorl Guardian is difficult only if you are under-leveled, or you use up your party gauge for a chain attack. There’s a slight chance that you’ll have to revive a party member or two, so hold onto your gauge segments in case someone needs revivin’.
Once you’ve defeated the Guardian, the ceremony will be complete. An elevator will appear at the foot of the statue, but it’s non-operational. Head to the left and you’ll find some vines. Climb them, then continue to ascend the statue-face utilizing the form of the statue, and patches of vines, to reach the top, and ultimately, the Bionis’ Interior.
Bionis’ Interior
There’s not a whole lot to do at this point in the interior. Follow the path to the right, and hop in the water. Settle where there’s bubbles coming up from the bottom, and wait for the geyser to erupt, shooting you to the upper interior of the Bionis. Forge ahead and exit the Bionis. You’ll regain control of your team at the Makna Path.
Walkthrough: Makna Path / Forest
Head down the path in front of you and a cutscene will ensue. You’ll regain control of your team in a lush forest. There are a slew of new enemies here, hovering around level 28. This is the first time in the game that common enemies present a formidable challenge, especially in groups.
When you reach the Agni Tablet landmark, there’s a group of Nopons that provide opportunities to shop or pick up quests. It would be a good idea to descend the cliff nearby in order to reach the Lakeside Landmark. There is a Water Ether reserve there that will come into play very soon. Reaching the landmark now will allow you to warp there, rather than backtrack.
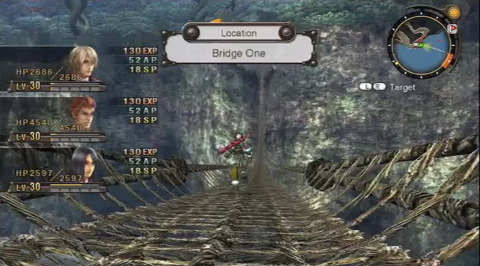
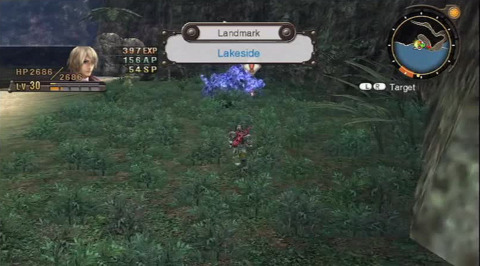
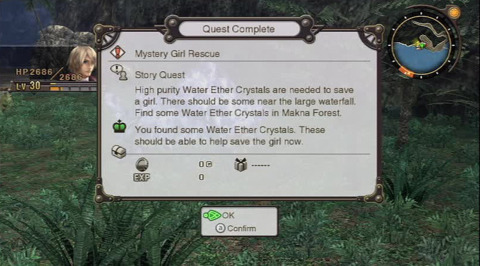
Crossing Bridge 1 is your next step. Continue northeast towards the goal and your team will discover an incapacitated girl. The team needs a potent ether source to revive her. Shulk will venture out on his own, but rather then walking all the way back, just open your map and skip to the Lakeside landmark. Nab the crystal when you get there to complete the «Mystery Girl Rescue» story quest.
You’ll also meet a curious fellow, and quickly get thrust into battle with three Puera Telethia. It’s not a difficult fight and it serves to introduce two new aspects to the battle system.
Aura / Purge Art
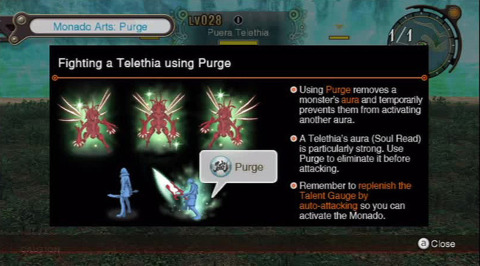
From here on out, certain enemies (usually Telethia), will posses an aura. Auras can bolster their defenses, grant status boosts, and induce the ability to inflict Spike Damage (more on that below). Using Shulk’s monado Art, Purge, will seal the aura temporarily, reducing the enemy’s advantage in battle.
Spike Damage
There’s nothing good about spike damage, that’s for sure. Many enemies posses the ability to inflict Spike Damage and it’s impact is not effected by status protection or defense capabilities. You’ll receive damage from some enemies by attacking them (the spike is a counter attack), attacking them when toppled, or even by simply getting too close.
Reyn will show up after the battle and take you back to the mysterious girl. Once she’s revived, you’ll learn a little bit about who she really is.
Melia’s her name, and she’s going to lead your team to the Nopon stronghold known as Frontier Village. Follow the marker at the top of the screen and you’ll have no problem finding the entrance. As you approach, there’s a few titans roaming the ground beneath the footbridges. No worries, luckily they have no interest in your team.
Walkthrough: Frontier Village
There are a lot of quests to undertake at frontier village. We will cover all of them in our upcoming side quest update.
For now, take the time to explore the nearly dozen levels of the village. There is quite a lot to see, including vendors that specialize in particular types of equipment. Once you’ve satisfied your need for exploration, follow the goal compass atop the screen to rejoin Melia.

Once you’ve spoken to her, return to the ground floor to meat the Nopon Hero, Riki. Don’t bother taking the stairs; you can actually leap from the balcony into the small pool in the middle of Central Plaza. Once you add Riki to your team, its time to get him some equipment. Grab his armor from the vendor on the ground floor, and his weapon from the vendor on the 2nd level.
It’s time to head out. The section of Makna Forest you’ll travel through is full of extremely high level monsters, peaking at lvl. 96. Stick to elevated bridges for now, and head south east. As you approach your goal, keep an eye out for dinosaurs on the ground level. You won’t have the safety of elevation anymore, so make sure you pass only when their back is turned.
You’ll get the chance to switch out party members as you head into battle. Make sure to include Melia. Her new art, Mind Blast, will most certainly come in handy. It’s also a great idea to charge up your talent arts and party gauge before heading into battle. The upcoming boss is level 36, and I suggest that you do your best to match his level.
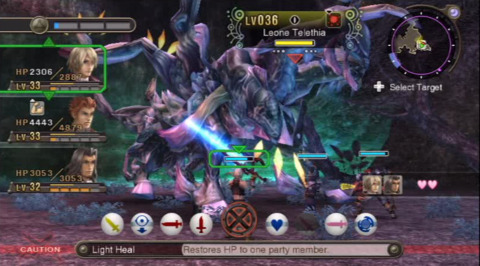
The key to winning against Leone is Shulk’s Purge ability. This will allow you to actually damage Leone. Sadly, if his Aura activates before you are able to disable it, then you face a two pronged challenge: Not only will you be unable to harm him, thus making it hard to fill your talent gauge, but your only resort will be Shulk’s Battle Soul art. This partially fills the talent gauge, but at the cost of half your current health. Sounds manageable, right? Only if Leone doesn’t use his Talent Drain art to completely deplete your gauge. This is why it’s very important to head into battle with the Monado ready to use, so you can stick him with Purge as soon and often as possible.
This is also a two part battle; you deplete half his health in the first round, then come back for the full monty in the second.

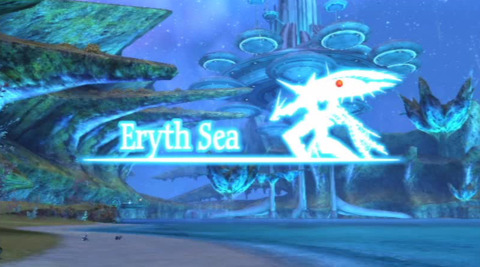
When the battles over, you’ll end up back in Frontier Village. Head to the 7th floor to find Melia. Once she’s agreed to continue with the crew, head for the top of the village.From there, you’ll be transported to the Eryth Sea; just talk to the Nopon hanging out on the stout dock by the water.
Walkthrough: Eryth Sea
Your goal is quite a distance away. For now, focus on grinding so you are at least level 36. There are plenty of common enemies that will give you between 200-500 XP, so it shouldn’t be too laborious.
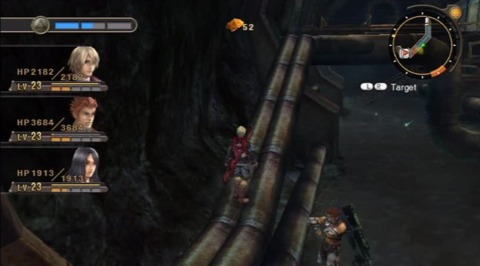
East from the starting landmark is a platform that will teleport you to Hovering Reef 1, which features a series of other transports. Check out your map (or the image below) for an idea of where the transport pads will take you. From Hovering Reef 1, the southeastern platform is your first stop.
That will take you to Hovering Reef 2. Again, take the southeast transport to continue towards your goal at the Center Gate landmark.
Alcamoth
You’ll be in control of Melia solo for a moment. Take her towards the easy to find goal, and you regain control of Shulk and crew after the cutscene with Melia and the High Entia royalty. There’s nowhere to go, so chit chat with each of your party members for now.
Eryth Sea
After a few more cutscenes, you are back in control of the usual gang, and your offer to assist the Entia is accepted. Return to the sea by transporting to the shore, and continuing to Hovering Reef 2. From there, take the southwest platform to Hovering Reef 3, and then the southern platform to Hovering Reef 4. Your contact is straight ahead. After discussing with him, take the transport behind the lighthouse to Reef 5, and then the southeastern transport to your goal.
You are going to face off against four, level 36 Kromar. It’s a difficult battle due to the Defensive Kromar’s ability to momentarily disable your arts. Stick with it, and reserve your party gauge for revivals, rather than chain attacks.
When the battle is over, talk to the nearby worker to complete the story quest. Once you regain control of your team, head back to Alcamoth.
Alcamoth
Your goal is at the whitewing palace. To get there, take the transport in the southeast corner of the great hall, right at the intersection. When you arrive in the chamber, speak with the attendent. When you’re ready to advance the story, agree to rest in the palace.
After Emperor Sorean address the citizens of Alcamoth, Melia will have to face a set of trials within the Entia Tomb. Before making your way to the tomb, the rest of the team will have to defeat a series of Entia scouts, guards, and wizards, in the Whitewing Palace chambers. Focus on a single Entia at a time and make sure to reserve your party gauge in case you need to revive a team mate.
Entia Tomb
When your team is ready, open your map and skip to the Center Gate landmark on the Eryth Sea map. Head east from the Center Gate(via transport pad). You’ll briefly have control over Melia, until she uses the verification device and enters the Tomb proper.
Walkthrough: Entia Tomb
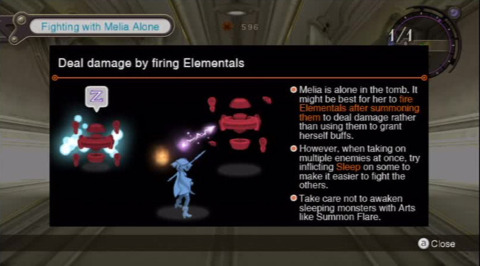
When you have control of Melia again, take note of the mini-tutorial. Since you’ll be fighthing alone, the information it provides in invaluable. The trick is to use an elemental art, then use her elemental discharge to use that elemental against the enemy, dealing greater damage than a stand alone attack. Though Melia’s talent gauge will appear greyed out, it’s definitely active.
After a few brief trial battles, you’ll regain control of the rest of the team. Be wary when exploring the tombs. Enemies generally aren’t visible until they are right on top of you, so if you try to run from a battle, it’s likely that you’ll just attract more enemies. It’s best to stand your ground and handle each encounter individually. As you follow the goal arrow, you’ll have the choice of heading through a long hall to the north, or a ring shaped room towards the east. Head east when you are done exploring. The circular room features a spiral-ramp that will take you to the lower level. Once there, the goal marker is in plain sight. You’ll come to a room with a huge orb in the middle. To get to the platform in the middle of the room, use the walls nearby to climb over to the bridge.
When you get there, you’ll face a lvl 36 hulk of a monster, Rufus Orluga. Keep a healer handy, and be wary of his ability to inflict your team with the Arts Seal debuff. Avoid using a Chain attack in the case you need to revive fallen team mates. This battle isn’t terribly difficult so long as you are on an even level, but it’s not uncommon for one of these guys to incapacitate a team mate.

As you head east towards the next goal, examine the chambers along the northern wall of the long hallway. There is a hidden passage that leads to an area known as the Secondary Treasury. You can obtain a valuable piece of headgear, but be warned, there’s a level 38 enemy guarding the treasure.
Continue forging eastward. You‘ll reach the tower of trials bridge at the end of the hallway. Climb the wall on your left to reach the platform above your current position. There’s another Orluga Rufus waiting for you, level 37 this time, and he’s got a companion as well. You know the drill. Take ‘em out.
Climb up the southeast wall once the path is clear. There’s a final Orluga waiting for you on the next level. Once he’s gone, head up the ramp along the north wall. You’re approaching a boss fight, so assess your arts, equipment, and, team.
The strategy for this fight is quite simple. The Telethia needs to have his aura broken using Shulk’s Purge Monado Art. Between purges, use Shulk as your secondary healer, and allow him to auto-attack so he can refill his Monado Talent Art gauge. Thankfully, if you neglect to ready the Monado’s powers in time, you can attack the female Entia. Switch your target to her so you can auto attack. While you won’t do much damage against her with the Monado, this will afford you the opportunity to recharge it’s abilities.
This is the one downside to the fight. You need Shulk to break the Telethia’s aura, but he won’t be able to do any damage during the second half of the battle with the Monado. If you are level 40 (or higher) you may not need Sharla’s healing skills during the fight (resorting to Shulk’s light heal) which means you can double up on the heavy hitters, namely Reyn and Dunban.
Skill Trees


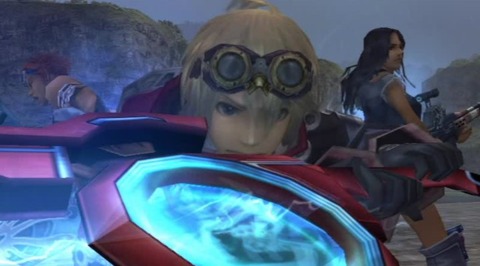
Shulk — Reyn — Sharla — Dunban — Melia — Riki — Fiora
— Shulk’s Skill Tree —
Humanity
| Skill Name | Description |
|---|---|
| Healing Wisdom | Healing Arts restore more HP. |
| Kind Encouragement | Restores HP to an encourages ally. |
| Friendship Heals | Heals the party slightly after a chain attack. |
| Cheer of a Friend | Causes Burst Affinity to fil more of the Party Gauge. |
| Chain of Friendship | Increases chance of a Chain Link |
Integrity
| Skill Name | Description |
|---|---|
| Medium Equipment | Allows Medium Weight Armor to be equipped. |
| Secret of Life | More HP is restored when reviving a party member. |
| Rewarding Work | Successfully completed quests award more EXP. |
| Resilient Warrior | Boosts physical defense and ether defense. |
| Ultimate Teamwork | Increases chain attack damage. |
Intuition
| Skill Name | Description |
|---|---|
| Battlecry | Allows Medium Weight Armor to be equipped. |
| Underdog | Agility Up buff at start of battle with higher level enemies. |
| Equipment Master | Reduces weight of equipment. |
| Fever Pitch | Increases chance of fever when gem crafting. |
| Element of Surprise | Improves Arts with Bonus Effects from behind. |
Bravery
| Skill Name | Description |
|---|---|
| Fate Evasion | Grants EXP when vision tags are destroyed. |
| Hero’s Privilege | Allows low value items to be offered when trading. |
| Lone Warrior | Grants Agility Up when a party member is incapacitated. |
| Ultimate Defense | Boosts physical and ether defense for the party |
| Glorious Future | Talent Gauge will be at max after a vision. |
Pessimism
| Skill Name | Description |
|---|---|
| Fight the Future | Extends time before a vision becomes a reality. |
| Stealth Warrior | Reduces aggro drawn from using Arts. |
| Epic Evasion | Increases chance of Burst Affinity after evasion. |
| Forced Mercy | Reduces aggro when damage is taken. |
| Immunization | Grants immunity to debuffs that reduce stats. |
Shulk — Reyn — Sharla — Dunban — Melia — Riki — Fiora
— Reyn’s Skill Tree —
Enthusiasm
| Skill Name | Description |
|---|---|
| Heavy Equipment | Allows heavy weight armor to be equipped. |
| Courageous Taunt | Increases aggro drawn by Mad Taunt. |
| Healing Inspiration | Restores HP to an encouraged ally. |
| Reckless Courage | Strength Up buff at start of battle with higher level enemies. |
| Heroic Taunt | Further increases aggro drawn by mad taunt. |
Spirit
| Skill Name | Description |
|---|---|
| Medium Equipment | Allows Medium Weight Armor to be equipped. |
| Mental Fortitude | Grants physical def up at start of battle with higher level enemies. |
| Unrelenting Spirit | Prevents incapacitation from lowering tension. |
| Feel the Heat | Increases tension when damage is taken. |
| Sheer Determination | Boosts physical defense when HP is at half. |
Diligence
| Skill Name | Description |
|---|---|
| Battlecry | Increases max HP. |
| Underdog | Agility Up buff at start of battle with higher level enemies. |
| Battle Character | Increase attack power of equipped weapon. |
| Spoils of War | Increases AP awarded in battle. |
| Wall of Muscle | Further increases max HP. |
Camaraderie
| Skill Name | Description |
|---|---|
| Ties of Friendship | Increases chance of a Chain Link. |
| Shoulder to Shoulder | Healsthe party after a chain attack. |
| Flying Start | Battle Start Affinity grants Haste bugg to the party. |
| Solitary Fight | Grants strength up when a party member is incapacitated. |
| Friends Forever | Boosts the affinity gained when encouraging an ally. |
Impatience
| Skill Name | Description |
|---|---|
| Ultimate Taunt | Boosts Mad Taunt’s effect on non-targeted enemies. |
| Melee Champion | Grants haste to the party when an enemy is defeated. |
| Rampage | Increases chance of a double attack. |
| Speed Strike | Grants haste buff when an attack misses. |
| Channelled Pain | Fills Talent Gauge when damage is taken. |
Shulk — Reyn — Sharla — Dunban — Melia — Riki — Fiora
— Sharla’s Skill Tree —
Perserverance
| Skill Name | Description |
|---|---|
| Firm Defense | Boosts physical defense. |
| Ether Expansion | Increases Ether |
| Solid Defense | Grants Physical Defense Up buff at start of battle. |
| Ether Unleashed | Increases ether when HP is at half. |
| Ultimate Sniper | Reduces the duration of Cool Off. |
Devotion
| Skill Name | Description |
|---|---|
| Medium Equipment | Allows Medium Weight Armor to be equipped. |
| Medical Knowledge | Greatly boosts power of Healing Arts in chain attacks. |
| Unrelenting Spirit | Extends range of long-distance arts. |
| Feel the Heat | Increases agility. |
| Sheer Determination | Reduces cooldown of Healing Arts. |
Confidence
| Skill Name | Description |
|---|---|
| Ether Assault | Increases damage dealt by ether Arts attacks. |
| Initial Endurance | Grants physical protect to party with Battle Start Affinity. |
| Middleweight Expert | Improves physical and ether defense of medium weight armor. . |
| Adrenaline | Increases tension when taking damage. |
| Heavy Equipment | Allows heavy weight armor to be equipped. |
Affection
| Skill Name | Description |
|---|---|
| Vote of Confidence | Improves Healing Arts after being warned of a vision. |
| Bedside Manner | Healing Arts restore more HP. |
| Hearty Cry | Heals the party slightly after a successful Burst Affinity. |
| Shield of Kindness | Grants Ether Protect buff with Battle Start Affinity. |
| Miracle of Love | Heals remaining party members when Incapacitated. |
Reliance
| Skill Name | Description |
|---|---|
| Memory of Gadolt | Improves Block Rate. |
| Vendetta | Increases chance of a counter-attack. |
| Decisive Follow-Up | Grants Ether Up buff when an ally defeats an enemy. |
| Revenge | Strength Up and Physical Def Up when an ally is Incapacitated. |
| Ether Explosion | Greatly increases ether. |
Shulk — Reyn — Sharla — Dunban — Melia — Riki — Fiora
— Dunban’s Skill Tree —
Wisdom
| Skill Name | Description |
|---|---|
| Spiritual Awakening | Greatly increases aggro when no armour is equipped. |
| Reckless Abandon | Increases agility when HP is at half. |
| Twin Swords | Increases chance of a double attack. |
| Natural Born Warrior | Reduces weight of equipment. |
| Inner Peace | Greatly increases agility with no armor equipped. |
Bravery
| Skill Name | Description |
|---|---|
| Medium Equipment | Allows Medium Weight Armor to be equipped. |
| Invincible Hero | In battle, boosts strength when HP is at max.. |
| Warrior’s Ambition | Increases tension after successful Battle Start Affinity. |
| Overwhelming | Increases aggro drawn when dealing damage. |
| Hero’s Valour | Grants HP Up buff at start of battle. |
Prudence
| Skill Name | Description |
|---|---|
| Sustained Spirit | Extends the duration of auras. |
| Steel Protection | Reduces the effects of Spike attacks. |
| Mind of the Warrior | Reduces depletion rate of Party Gauge outside of battle. |
| Lightweight Expert | Improves Physical and Ether Def. of light equipment. |
| Critical Drain | Restores HP when dealing a critical hit. |
Enthusiasm
| Skill Name | Description |
|---|---|
| Charge Acceleration | Grants Haste buff at start of battle. |
| Counter Rage | Increases chance of a counter-attack. |
| Ardent Strike | Increases tension gained after a critical hit. |
| Deadly Determination | Increases tension gained when using Arts. |
| Blazing Aura | Fills party gauge when activating an aura. |
Obstinance
| Skill Name | Description |
|---|---|
| Equipment Expert | Greatly reduces weight of equipment. |
| Gentleman’s Valour | grants HP Up buff at start of battle. |
| Heavy Equipment | Allows heavy weight armor to be equipped. |
| Body of Steel | Reduces physical damage taken. |
| Solid Foundation | Grants immunity to Blow-Down attacks. |
Shulk — Reyn — Sharla — Dunban — Melia — Riki — Fiora
— Melia’s Skill Tree —
Honesty
| Skill Name | Description |
|---|---|
| High Speed | Increases Agility. |
| Whisper of the Wind | Boosts wind damage. |
| Amplified Ether | Grants ether up buff at start of battle. |
| Electric Shock | Boosts electric damage. |
| Enlightenment | Increases accuracy of ether attacks. |
Serenity
| Skill Name | Description |
|---|---|
| Amplified Healing | Increases HP received from healing Arts. |
| Serenity of Water | Increases HP absorved from water-type Arts. |
| Mining Master | Increases chance of finding rare crystals from deposits. |
| Glistening Ice | Extends Chill duration when dealt to an enemy. |
| Ultimate Ether | Greatly increases ether. |
Reliability
| Skill Name | Description |
|---|---|
| Ether Awareness | Increases ether. |
| Playing with Poison | Extends poison duration when dealt to an enemy. |
| Power of the Moon | Increases strength during the night. |
| Unyielding Heart | Prevents reduction of accuracu when tension falls. |
| Ether Guard | Grants immunity to Ether down debuff. |
Passion
| Skill Name | Description |
|---|---|
| Nonchalant Heart | Reduces tension loss when en attack fails. |
| Awakening Strike | Boosts damage dealt to enemies suffering Sleep. |
| Telethia Killer | When an aura is actibe, increases damage dealt to Telethia. |
| Passion of Flame | Extends Blaze duration when dealt to an enemy. |
| Rejection of Evil | Greatly reduces the effects of Spike attacks. |
Reticence
| Skill Name | Description |
|---|---|
| Palace Guard | Improves block rate. |
| Heavyweight Expert | Improves ether defense the more heavy equipment is worn. |
| Unadorned Beauty | Strength, ether, agility and HP up if no gems are equipped. |
| Mental Barrier | Reduces damage taken from ether area attacks. |
| Arcane Aura | Reduces aggro drawn while an aura is active. |
Shulk — Reyn — Sharla — Dunban — Melia — Riki — Fiora
— Riki’s Skill Tree —
Innocence
| Skill Name | Description |
|---|---|
| Adventure Time! | Increases movement speed. |
| Learning all the Time! | Awards the same AP regardless of the participation in battle. |
| Explore Time! | Awards mroe EXP when discovering a landmark. |
| Make it all better! | Improves healing arts used on an ally with half HP. |
| Dream of Money | Improves chance of monsters dropping gold chests. |
Vivacity
| Skill Name | Description |
|---|---|
| Like Sun! | Increases strength during the day. |
| Friends Now! | Allows low-value items to be offered when trading. |
| Love Sun! | Reduces cooldown during the day. |
| Lucky Me! | Improves chance of monsters dripping silver chests. |
| Adore Sun! | Increases EXP awarded in battles during the day. |
Flexibility
| Skill Name | Description |
|---|---|
| Buy Stuff! | Allows items to be sold for a higher price. |
| Riki See, Riki Do | Awards the same EXP regardless of participation in battle. |
| AP for All! | Lets Riki steal AP with Yoink! and share it with the party. |
| Riki Strong | Grants immunity to Strength Down debuff. |
| EXP for All! | Lets Riki steal EXP with Yoink! and share it with the party. |
Heroism
| Skill Name | Description |
|---|---|
| Heavy Equipment | Allows heavy weight armor to be equipped. |
| Nutritious! | Greatly increases strength. |
| Kissy Kissy! | Halves the Party Gauge usage when reviving allies. |
| Ouchies! | Increases Spike damage dealt. |
| Cuddly Hero! | Increases resistance to all debuffs. |
Cowardice
| Skill Name | Description |
|---|---|
| Pretty Stars! | Increases strength during the night. |
| Watch Out! | Increases agility when HP is at half. |
| Amazing Stars! | Reduces cooldown during the night. |
| Bullseye! | Improves accuracy of back attacks. |
| Bestest Stars! | Increases EXP awarded in battles during the night. |
Shulk — Reyn — Sharla — Dunban — Melia — Riki — Fiora
— Fiora’s Skill Tree —
Daring
| Skill Name | Description |
|---|---|
| Battle Stance | Grants Strength Up buff at start of battle. |
| Opening Blow | Increases damage of the first strike of a battle. |
| Nimble Feet | Increases movement speed. |
| Physical Resiliance | Reduces physical damage taken. |
| Showdown Stance | All Stats Up buff at start of battle with higher-level monsters. |
Courage
| Skill Name | Description |
|---|---|
| Mechonis Equipment | Allows special armor from Mechonis to be equipped. |
| Desperate Daggers | Increases counter-attack rate when HP is at half. |
| Second Wind | Increases amount of HP restored when revived. |
| Ultimate Strike | Increases Damage of critical hits. |
| Unwavering Courage | Increases EXP awarded in battles during the day. |
Zeal
| Skill Name | Description |
|---|---|
| Desperate Defense | Increases block rate when HP is at half. |
| Swift Strike | Rarely grants Haste buff at start of battle. |
| Acceleration | Increases EXP awarded from battle. |
| Strength of Will | Reduces Ether damage taken. |
| Strong Links | Grants Haste buff to the party after Burst Affinity. |
Innocence
| Skill Name | Description |
|---|---|
| Maiden’s Power | Improves chain attack damage when in battle with Shulk. |
| Maiden’s Courage | Increases Arts damage if warned of a vision by Shulk. |
| Maiden’s Blessing | Restores HP when taking damage when in battle with Shulk. |
| Maiden’s Zeal | Prevents tension from becoming low if in battle with Shulk. |
| Maiden’s Miracle | Grants All Stats Up buff when encouraged by Shulk. |
Rashness
| Skill Name | Description |
|---|---|
| Vision Mode | Boosts next Arts damage when warned of a vision. |
| Ultimate Counter | Turns all counter-attacks into critical hits. |
| Vital Force | Dealing damage will occasionally max the Talent Gauge. |
| Critical Combo | Turns all double attacks into critical hits. |
| Explosion of Energy | Increases tension by one level when using Talent Arts. |
Heart-to-Heart Locations

Colony 9 — Tephra Cave — Bionis Leg — Ether Mine — Colony 6 — Satorl Marsh — Makna Forest — Frontier Village — Eryth Sea — Alcamoth — High Entia Tomb — Valak Mountain — Fallen Arm — Bionis’ Interior — Prison Island
When running through vast landscapes in Xenoblade, you’ll come across icons in the shape of two hands held together. These are known as heart-to-hearts, opportunities for two characters to engage in dialogue, giving you the opportunity to alter the affinity between them. Depending on your answers, this can go either way; good or bad.
Heart-to-Heart Locations, Colony 9
| Title | Participants | Req. Affinity | Landmark | Best Answers |
|---|---|---|---|---|
| Enduring Friendship | Shulk / Reyn | Green | Tephra Cave Entrance | 1,1 |
| Sunrise in the Park | Shulk / Fiora | Yellow | Outlook Park | 2,1 |
| Fiora’s Cooking | Reyn / Fiora | Green | Dunban’s House | 1,1 |
| Watching Over Them | Reyn / Dunban | Heart | Residential District | 1,2 |
| Overlooking the Colony | Reyn / Sharla | Purple | Agora Shore | 1,1 |
| Ancient Wreckage | Reyn / Melia | Purple | Cylindar Hangar | 2,1 |
| A Heropon’s Perspective | Sharla / Riki | Purple | Mechon Wreckage Site | 2,2 |
> Back to the top
Heart-to-Heart Locations, Tephra Cave
| Title | Participants | Req. Affinity | Landmark | Best Answers |
|---|---|---|---|---|
| The Legend of the Spider | Shulk / Reyn | Purple | Bone Corridor | 1,1 |
| A Scene Revisited | Reyn / Fiora | Heart | Kneecap Hill | 1,1 |
| Glowing in the Night | Dunban / Riki | Purple | Spring of Grief | 2,1 |
> Back to the top
Heart-to-Heart Locations, Bionis Leg

| Title | Participants | Req. Affinity | Landmark | Best Answers |
|---|---|---|---|---|
| Geography Lesson | Shulk / Dunban | Purple | Believer’s Paradise | 2,2 |
| What Visions May Bring | Shulk / Sharla | Green | Raguel Bridge | 1,2 |
| Heir to the Monado | Reyn / Dunban | Green | Refugee Camp (Exterior) | 2,2 |
| What’s on Reyn’s Mind | Reyn / Sharla | Green | Refugee Camp (Interior) | 2,1 |
| Revisiting the Past | Dunban / Sharla | Heart | Rho Oasis | 2,2 |
> Back to the top
Heart-to-Heart Locations, Ether Mine
| Title | Participants | Req. Affinity | Landmark | Best Answers |
|---|---|---|---|---|
| A Broken Watch | Shulk / Sharla | Purple | Mining Base | 1,1 |
| A wistful Glow | Reyn / Sharla | Heart | Central Terminal | 1,2 |
> Back to the top
Heart-to-Heart Locations, Colony 6
| Title | Participants | Req. Affinity | Landmark | Best Answers |
|---|---|---|---|---|
| Renewed Determination | Fiora / Dunban | Heart | Freight Road | 2,1 |
| Strength of Heart | Shulk / Dunban | Heart | Main Street | 2,2 |
| The Colony Reborn | Shulk / Sharla | Heart | Special Lvl. 5 Area | 2,2 |
| One Year On | Reyn / Dunban | Purple | Pod Depot | 1,2 |
| Recovery and Reflection | Fiora / Dunban | Purple | Hope Farm | 1,2 |
| Quiet Time | Fiora / Riki | Purple | Park | 1,2 |
| Dunban’s Right Arm | Dunban / Sharla | Purple | Hope Farm | 2,1 |
> Back to the top
Heart-to-Heart Locations, Satorl Marsh
| Title | Participants | Req. Affinity | Landmark | Best Answers |
|---|---|---|---|---|
| The Shimmering Marsh | Shulk / Dunban | Green | Zaldania Waterfall | 2,1 |
| High Entia History | Dunban / Melia | Purple | Sororal Statues | 1,2 |
| Atop the Crown Tree | Sharla / Riki | Heart | Crown Tree | 2,1 |
> Back to the top
Heart-to-Heart Locations, Makna Forest
| Title | Participants | Req. Affinity | Landmark | Best Answers |
|---|---|---|---|---|
| Fallen Brethren | Shulk / Melia | Green | Bridge 1 | 2,2 |
| Riki’s Crazy Crystal Plan | Reyn / Riki | Purple | Eks Watering Hole | 2,2 |
| No Boys Allowed | Sharla / Melia | Green | Sparkling Pool | 1,1 |
> Back to the top
Heart-to-Heart Locations, Frontier Village
| Title | Participants | Req. Affinity | Landmark | Best Answers |
|---|---|---|---|---|
| At the Pollen Works | Shulk / Riki | Green | Pollen Works | 2,1 |
| Reawakened Memories | Fiora / Sharla | Purple | Prophecy Hut | 1,2 |
| A Day Like Any Other | Fiora / Melia | Purple | Nopon tower | 2,1 |
| Life’s Hard for a Heropon | Dunban / Riki | Heart | Riki’s House | 2,2 |
| True Natures | Dunban / Melia | Green | Contemplation Terrace | 2,2 |
| A Mysterious Sanctuary | Riki / Melia | Green | Prophecy Hut | 2,2 |
> Back to the top
Heart-to-Heart Locations, Eryth Sea
| Title | Participants | Req. Affinity | Landmark | Best Answers |
|---|---|---|---|---|
| Fish Fly! Fish Fly! | Reyn / Riki | Green | Sleeping Dragon Isle | 1,2 |
| Riki Have Question | Fiora / Riki | Heart | Ether Plant | 2,1 |
| A Gift for a Loved One | Sharla / Dunban | Green | Ether Plant | 2,1 |
| Flowers of Eryth Sea | Sharla / Riki | Green | Hovering Reef 2 | 2,1 |
> Back to the top
Heart-to-Heart Locations, Alcamoth

| Title | Participants | Req. Affinity | Landmark | Best Answers |
|---|---|---|---|---|
| So close, Yet So Far | Shulk / Melia | Purple | Audience Chamber | 2,2 |
| A Breathtaking Sight | Reyn / Melia | Heart | Sky Terrace | 1,2 |
| Brother and Sister | Fiora / Dunban | Green | Fountain of Hope | 2,1 |
| The Forefathers | Fiora / Riki | Green | Great Hall | 1,2 |
| Melia’s Imperial Villa | Fiora / Melia | Green | Imperial Villa | 2,1 |
| Ancient Astrology | Sharla / Melia | Purple | Outer Ring, W. 1st Flr. | 2,2 |
> Back to the top
Heart-to-Heart Locations, Entia Tomb

| Title | Participants | Req. Affinity | Landmark | Best Answers |
|---|---|---|---|---|
| Hopes and Plans | Shulk / Melia | Heart | Hall of Trials | 2,1 |
| Echoes of Ancient Times | Reyn / Melia | Green | Valley of Emperors | 1,1 |
> Back to the top
Heart-to-Heart Locations, Valak Mountain

| Title | Participants | Req. Affinity | Landmark | Best Answers |
|---|---|---|---|---|
| A Snowy Hot Spring | Shulk / Riki | Purple | Jakt Geyser | 1,1 |
| First Sight of Snow | Reyn / Fiora | Purple | La Luz Church | 2,1 |
| In Ose Tower | Dunban / Riki | Green | Sealed Tower | 2,1 |
> Back to the top
Heart-to-Heart Locations, Fallen Arm
| Title | Participants | Req. Affinity | Landmark | Best Answers |
|---|---|---|---|---|
| Just Like Old Times | Shulk / Fiora | Purple | Silver Wreckage | 2,1 |
| Those Waiting For You | Shulk / Riki | Heart | Distant Fingertip | 2,1 |
| A Family of Two | Fiora / Dunban | Heart | Doctor’s Room | 1,1 |
| A Night-Time Chat | Fiora / Melia | Heart | Digit 1 | 1,2 |
| Overcoming the Pain | Fiora / Melia | Heart | Ether Light | 1,2 |
| Eternal Scars | Dunban / Melia | Heart | Black Wreckage | 2,2 |
| Camping Spot | Riki / Melia | Purple | Inlet Beach | 1,1 |
> Back to the top
Heart-to-Heart Locations, Bionis’ Interior
| Title | Participants | Req. Affinity | Landmark | Best Answers |
|---|---|---|---|---|
| Fiora’s Body | Fiora / Sharla | Heart | Spinal Nerve Tower | 2,1 |
| Kind Words | Riki / Melia | Heart | Terminal Nerve Tower | 1,2 |
> Back to the top
Heart-to-Heart Locations, Prison Island
| Title | Participants | Req. Affinity | Landmark | Best Answers |
|---|---|---|---|---|
| Before the Final Battle | Shulk / Fiora | Heart | Corridor of Silence | 2,1 |
| Journey’s End | Reyn / Riki | Heart | Empty Throne | 2,2 |
| Untold Feelings | Sharla / Melia | Heart | Gravina Bridge | 1,1 |
> Back to the top
Gems
Attribute Buff Gems
| Gem | Effect | Max. Effect | Slot Type | Element |
|---|---|---|---|---|
| Agility Up | Increases agility | 50 | Armor | Wind |
| Attack Plus | Increases maximum attack damage | 50% | Weapon | Earth |
| Attack Stability | Increases minimum attack damage | 50% | Weapon | Earth |
| Critical Up | Increases critical hit rate | 25% | Weapon | Earth |
| Ether Defense Up | Increases ether defense | 100 | Armor | Ice |
| Ether Up | Increases ether attack | 150 | Armor | Electric |
| Muscle Up | Increases physical defense | 100 | Armor | Earth |
| Strength Up | Increases physical strength | 150 | Armor | Fire |
Offensive Gems
| Gem | Max Effect | Element |
|---|---|---|
| Agility Down | 25% | Wind |
| Back Attack Up | 100% | Electric |
| Bleed Attack | 100% | Wind |
| Break | 25% | Wind |
| Cold Attack | 300 | Ice |
| Double Attack | 50% | Electric |
| Electric Attack | 500 | Electric |
| Electric Up | 100% | Electric |
| Ether Down | 25% | Earth |
| Fire Attack | 400 | Fire |
| Fire Up | 100% | Fire |
| First Attack Up | 150% | Electric |
| HP Steal | 200 | Water |
| Ice Up | 100% | Ice |
| Muscle Down | 25% | Fire |
| Paralyze | 25% | Electric |
| Poison Attack | 500 | Earth |
| Poison Up | 100% | Earth |
| Slow | 25% | Ice |
| *Spike | 250 | Fire |
| Stun Attack Up | 100% | Electric |
| Topple Attack Up | 100% | Wind |
*The Spike gem is the only one in this table that is equipped to armor, rather than a weapon.
Defensive Gems
| Gem | Max. Effect | Element |
|---|---|---|
| Aggro Down | 50% | Ice |
| Arts Resist | 100% | Wind |
| Bind Resist | 100% | Fire |
| Blaze Defense | 100% | Ice |
| Bleed Resist | 100% | Earth |
| Chill Defense | 100% | Fire |
| Daze Resist | 100% | Electric |
| Debuff Resist | 100% | Water |
| Divine Protect | 100% | Earth |
| Lock-On Resist | 100% | Ice |
| Paralyze Resist | 100% | Water |
| Pierce Resist | 100% | Electric |
| Poison Defense | 100% | Water |
| Sleep Resist | 100% | Fire |
| Slow Resist | 100% | Fire |
| Spike Resist | 100% | Water |
| Topple Resist | 100% | Wind |
Area Maps
Xenoblade features numerous, gigantic, landscapes. Sometimes the unknown is reason enough to explore, but it can also be quite daunting. We’re providing these uncovered maps so you can see what’s available, without risking precious time.

Colony 9 — Tephra Cave — Bionis Leg — Ether Mine — Colony 6 — Satorl Marsh — Bionis Interior — Makna Forest — Frontier Village — Eryth Sea — Alcamoth — High Entia Tomb — Prison Island — Valak Mountain — Sword Valley — Galahad Fortress — Fallen Arm — Mechonis Field — Central Factory — Agniratha — Mechonis Core — Prison Island (2nd Visit)
Under each heading is a map concealed within one of our handy spoiler containers. Just click the torquoise bar to reveal the map for the area listed in the heading above.
In case the preview image is too small, we’ve also provided links to larger format maps. Enjoy!
Colony 9
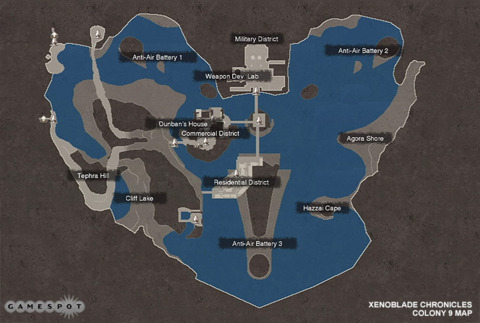
Click HERE for a larger version.
Tephra Cave
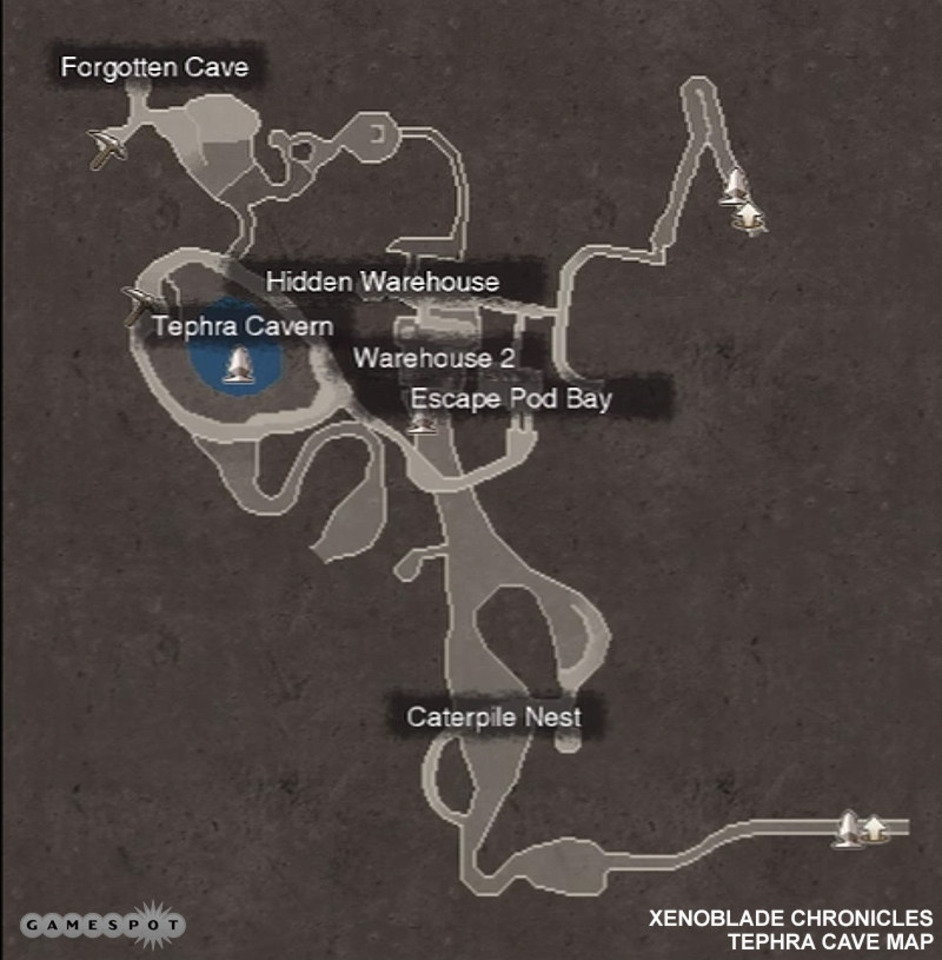
Click HERE for a larger version.
Bionis’ Leg
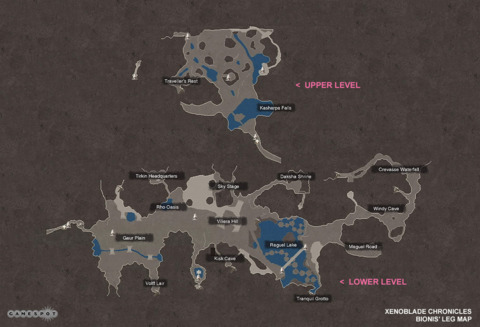
Click HERE for a larger version.
Ether Mine
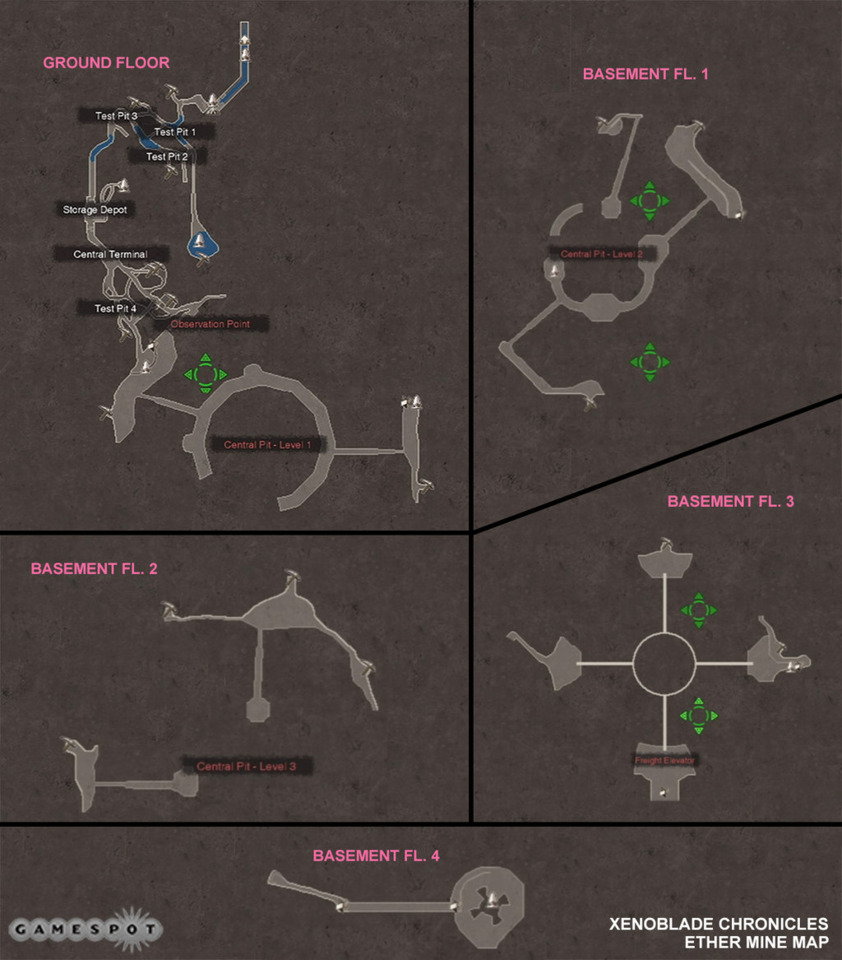
Click HERE for a larger version.
Colony 6
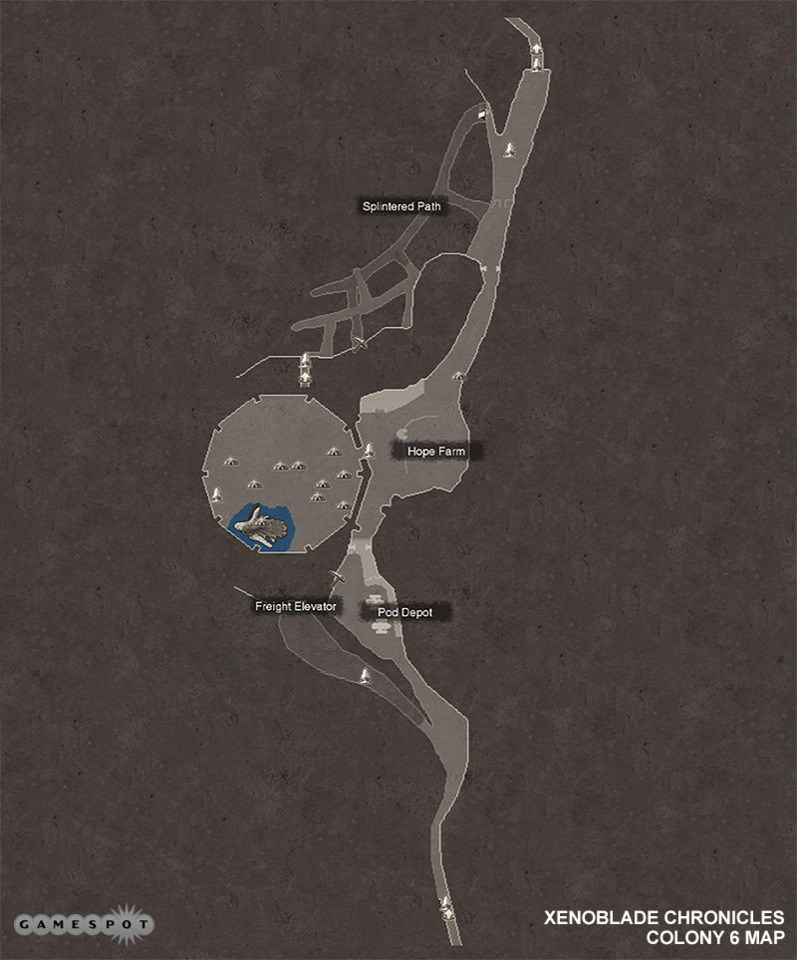
Click HERE for a larger version.
Satorl Marsh
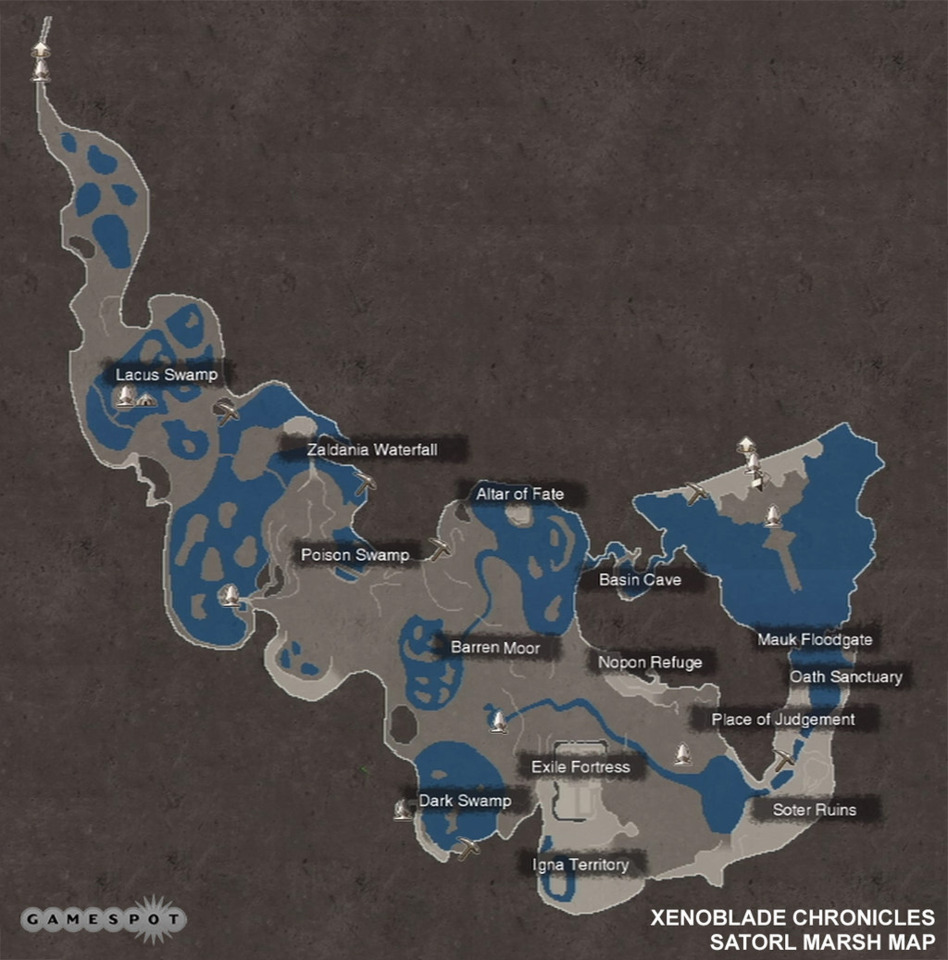
Click HERE for a larger version.
Bionis’ Interior
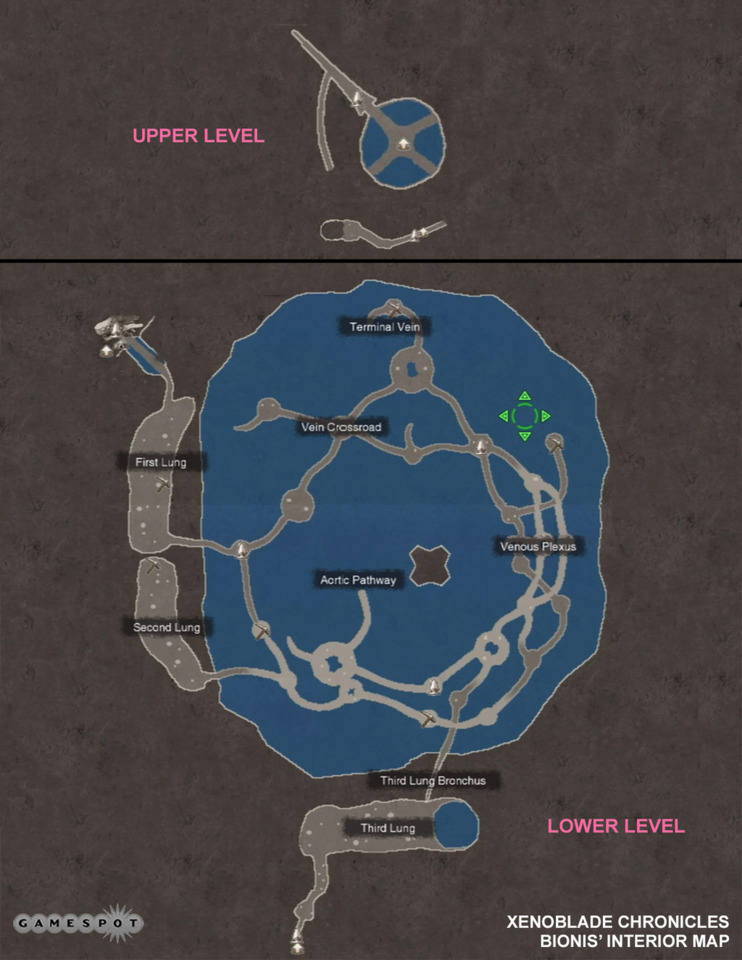
Click HERE for a larger version.
Makna Forest
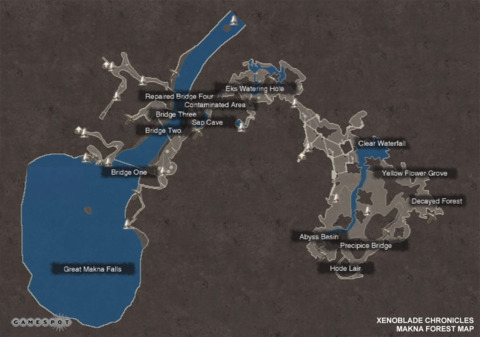
Click HERE for a larger version.
Frontier Village
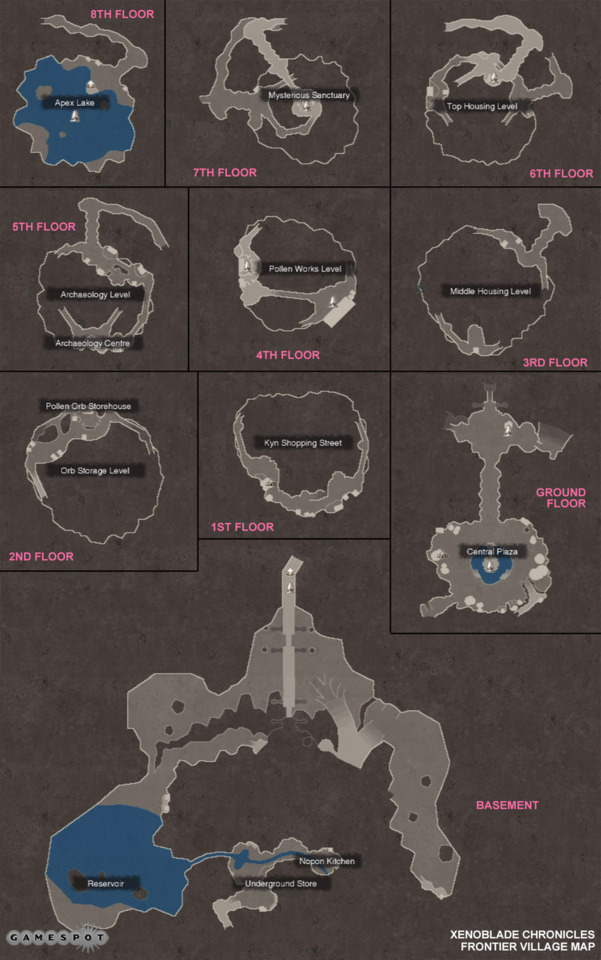
Click HERE for a larger version.
Eryth Sea
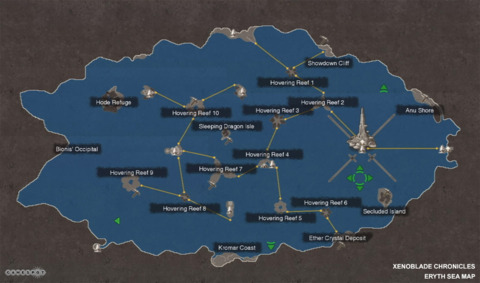
Click HERE for a larger version.
Alcamoth
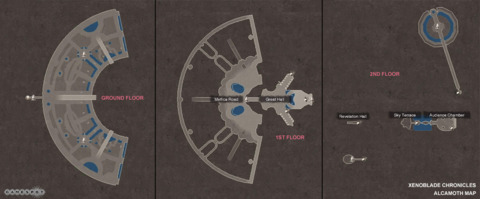
Click HERE for a larger version.
Entia Tomb
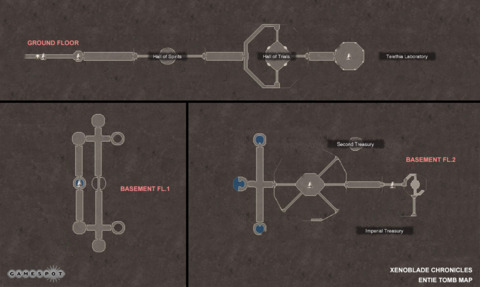
Click HERE for a larger version.
Prison Island
Click HERE for a larger version.
Valak Mountain
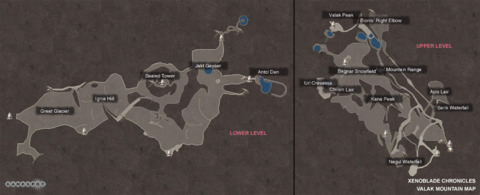
Click HERE for a larger version.
Sword Valley
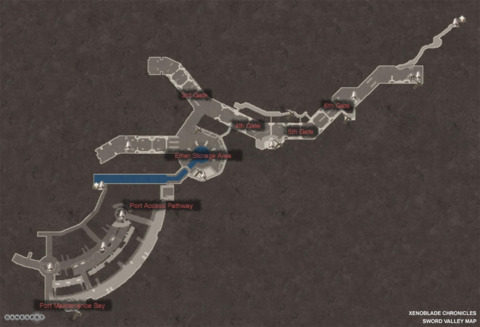
Click HERE for a larger version.
Galahad Fortress
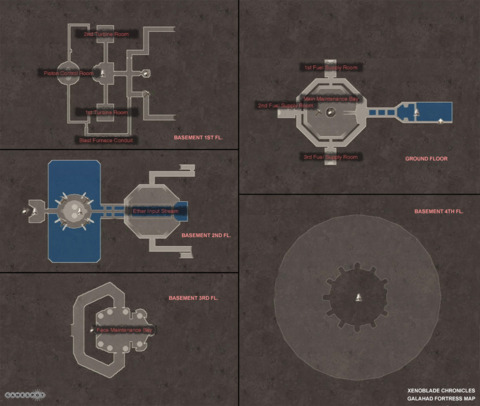
Click HERE for a larger version.
Fallen Arm
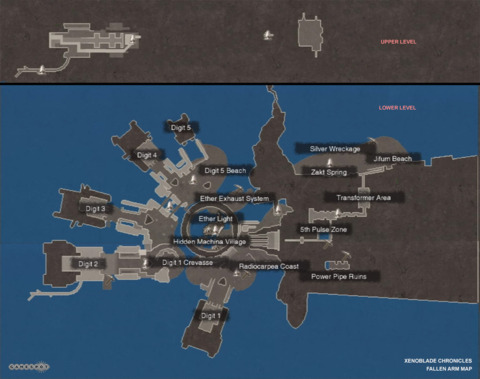
Click HERE for a larger version.
Mechonis Field
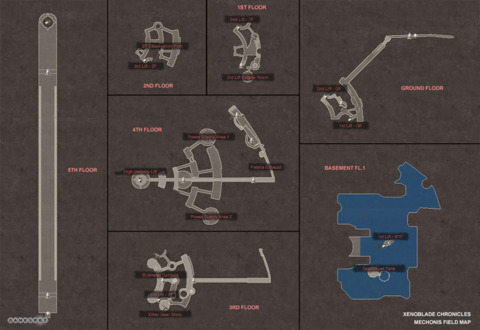
Click HERE for a larger version.
Central Factory
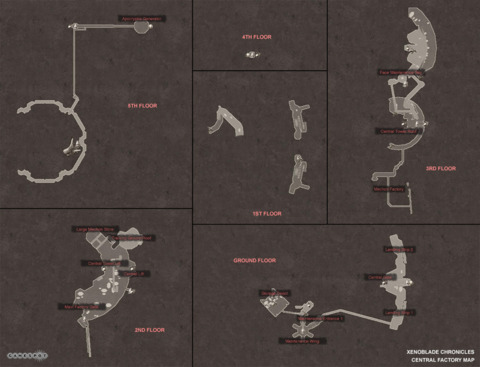
Click HERE for a larger version.
Agniratha
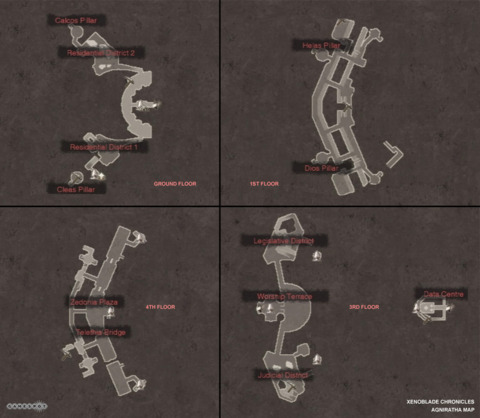
Click HERE for a larger version.
Mechonis Core
Click HERE for a larger version.
Prison Island 2nd Visit
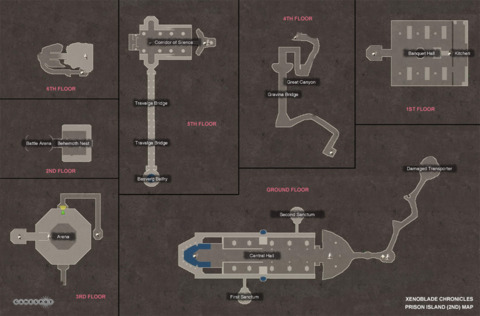
Click HERE for a larger version.
Rebuilding Colony 6
Colony 6 was left in disarray after a visit from the Mechonis, so it’s up to your team to return it to its former glory. Granted it’s an optional venture, but attempting to complete the reconstruction has it’s benefits:
— Additional side quests
— New merchants
— Chances to develop your affinity-tree
— Mine higher-level ether crystals (Colony 6, Ether Mine)
The tables below catalog the required items for each portion of the reconstruction (Housing, Commerce, Nature, and, Special). When you have the proper items, talk to Juju at Reconstruction HQ
Housing
| Item | Lvl. 1 Reqs. | Item Type | Location | Source |
|---|---|---|---|---|
| 9,000 Gold | ||||
| Spotted Volff Hide | 2 | Drop | Bionis’ Leg, Viliera Hill | Volff |
| Steel Silk | 2 | Collectable | Tephra Cave, Spring of Grief | — |
| Item | Lvl. 2 Reqs. | Item Type | Location | Source |
| 19,000 Gold | ||||
| Bunnia Scent Wood | 4 | Drop | Satorl Marsh, Glowing Obelisk | Bunnis |
| Fossil Monkey | 1 | Collectable | Makna Forest, Eks Watering Hole | — |
| Item | Lvl. 3 Reqs. | Item Type | Location | Source |
| 55,000 Gold | ||||
| Eks Iron Heart | 1 | Drop | Makna Forest, Eks Watering Hole | Eks |
| Sturdy Armor | 4 | Drop | Eryth Sea, Reef 1/3/8 | Andos |
| Oil Branch | 2 | Collectable | Eryth Sea | — |
| Item | Lvl. 4 Reqs. | Item Type | Location | Source |
| 120,000 Gold | ||||
| Ponio Hoof Seal | 5 | Drop | Fallen Arm, Giant Mechonis Debris | Ponio |
| Royal Volff Hide | 3 | Drop | Fallen Arm, Giant Mechonis Debris | Volff |
| Warning Lamp | 3 | Collectable | Fallen Arm | — |
| Retro Diode | 2 | Collectable | Mechonis Field | — |
| Item | Lvl. 5 Reqs. | Item Type | Location | Source |
| 300,000 Gold | ||||
| Vang Star Wing | 2 | Drop | Bionis’ Leg, Windy Cave | Vamps |
| Gogol Horn | 3 | Drop | Bionis’ Leg, Raquel Bridge | Sloth Gogol |
| Red Frontier | 2 | Collectable | Sword Valley | — |
| Black Styrene | 2 | Collectable | Central Factory | — |
| Rainbow Zirconium | 3 | Collectable | Colony 9 | — |
Commerce
| Item | Lv. 1 Reqs. | Item Type | Location | Source |
|---|---|---|---|---|
| 10,000 Gold | — | — | — | — |
| Igna Hide Jacket | 2 | Drop | Satorl Marsh, Igna Territory | Igna |
| Amblygon Turtle | 2 | Collectable | Colony 6, Hope Farm area | — |
| Item | Lv. 2 Reqs. | Item Type | Location | Source |
| 22,000 Gold | — | — | — | — |
| Hode Plank | 3 | Collectable | Makna Forest, Earth Nebula | — |
| Ready Coil | 2 | Collectable | Ether Mine | — |
| Item | Lv. 3 Reqs. | Item Type | Location | Source |
| 5,000 Gold | — | — | — | — |
| Shiny Kromar Hide | 3 | Drop | Eryth Sea | Kromar |
| Shiny Kromar Stone | 2 | Drop | Eryth Sea | Kromar |
| Blue Ladybird | 2 | Collectable | High Entia Tomb | — |
| Item | Lv. 4 Reqs. | Item Type | Location | Source |
| 100,000 Gold | — | — | — | — |
| Piranhax Fishmeal | 3 | Drop | Fallen Arm, Inlet coast | Piranhax |
| Silver Antol Fibre | 8 | Drop | Fallen Arm, 5th Pulse Zone | Antols |
| Sour Turnip | 3 | Collectable | Fallen Arm | — |
| Mossy Panel | 2 | Collectable | Mechonis Field | — |
| Item | Lv. 5 Reqs. | Item Type | Location | Source |
| 250,000 Gold | — | — | — | — |
| Ocean Elixir of Life | 1 | Collectable | Mechonis Core | — |
| Ancient Sardi Meat | 4 | Drop | Colony 9 | Throne Sardi |
| Art Core Coil | 2 | Collectable | Galahad Fortress | — |
| Fortune Feather | 1 | Collectable | Agniratha | — |
| Hill Fireflies | 4 | Collectable | Bionis Leg | — |
Nature
| Item | Lv. 1 Reqs. | Item Type | Location | Source |
|---|---|---|---|---|
| 5,000 Gold | — | — | — | — |
| Sharp Hox Spur | 2 | Drop | Bionis Leg | Hox |
| Dark Grape | 2 | Collectable | Tephra Cave, Caterpile Nest | — |
| Item | Lv. 2 Reqs. | Item Type | Location | Source |
| 18,000 Gold | — | — | — | — |
| Quadwing Bag | 2 | Drop | Satorl Marsh | Quadwing |
| Empress Beetle | 3 | Collectable | Frontier Village | — |
| Item | Lv. 3 Reqs. | Item Type | Location | Source |
| 40,000 Gold | — | — | — | — |
| Jagged Tail | 3 | Drop | Eryth Sea, Lafael Shore/Lighthouse | Hiln/Ansel |
| Despair Clover | 2 | Collectable | Eryth Sea, Lafael Shore | — |
| Ice Cabbage | 2 | Collectable | Valak Mountain, Befalger Pedestal | — |
| Item | Lv. 4 Reqs. | Item Type | Location | Source |
| 99,000 Gold | — | — | — | — |
| Caterpile Silk | 3 | Drop | Bionis Leg, Windy Cave | Royal Caterpile |
| Hox Daylight Spur | 3 | Drop | Bionis Leg, Raquel Lake | Hox |
| Oil Oyster | 2 | Collectable | Fallen Arm | — |
| White Plum | 3 | Collectable | Fallen Arm | — |
| Item | Lv. 5 Reqs. | Item Type | Location | Source |
| 280,000 Gold | — | — | — | — |
| Ardun Elder Beard | 3 | Drop | Bionis Leg, Rho Oasis | Magnus Ardun |
| Tokilos King Egg | 1 | Drop | Bionis Let, Zax Guidepost | Tokilos |
| Lewisia Silver | 2 | Collectable | Agniratha | — |
| Black Liver Bean | 2 | Collectable | Bionis Interior, 2nd Lung | — |
| Black Beetle | 2 | Collectable | Ether Mine | — |
Special
| Item | Lv. 1 Reqs. | Item Type | Location | Source |
|---|---|---|---|---|
| 8,000 Gold | — | — | — | — |
| Light Rain Element | 1 | Drop | Bionis Leg, Jabos Rest Area | Water Nebula |
| Kneecap Rock | 1 | Collectable | Tephra Cave, Mag Mel Ruins | — |
| Item | Lv. 2 Reqs. | Item Type | Location | Source |
| 25,000 Gold | — | — | — | — |
| Dust Element | 2 | Drop | Makna Forest, Sap Cave | Earth Nebula |
| Sea Berry | 3 | Collectable | Eryth Sea, Latael Coast | — |
| Item | Lv. 3 Reqs. | Item Type | Location | Source |
| 50,000 Gold | — | — | — | — |
| Squall Element | 2 | Drop | Eryth Sea, 4th Reef | Wind Nebula |
| Snow Element | 2 | Drop | Valak Mountain, Befalgar Pedestal | Snow Nebula |
| Lemonade Sky | 3 | Collectable | Makna Forest | — |
| Item | Lv. 4 Reqs. | Item Type | Location | Source |
| 130,000 Gold | — | — | — | — |
| Flexible Selua Cell | 3 | Drop | Bionis Interior | Largo Selua |
| Steel Selua Cell | 3 | Drop | Bionis Interior | Wool Selua |
| Rainbow Slug | 2 | Collectable | Fallen Arm, Digit 5 Beach | — |
| Azure Hollyhock | 2 | Collectable | Mechonis Field | — |
| Item | Lv. 5 Reqs. | Item Type | Location | Source |
| 400,000 Gold | — | — | — | — |
| Inferno Element | 2 | Drop | Prison Island, Kitchen | Fire Nebula |
| Bolt Element | 2 | Drop | Prison Island, Corridor of Silence | Thunder Nebula |
| Blue Light Amp | 3 | Collectable | Agniratha | — |
| Angel Engine X | 2 | Collectable | Central Factory | — |
| Rabbit Diode | 3 | Collectable | Tephra Cave | — |
Side Quests
There are 480 side quests in Xenoblade Chronicles. «Whoa» is probably what you’re thinking and we don’t blame you. In an effort to assist your side-questing ambitions, we’ve cataloged as many side quests as we could find, including the location and name of the person to get it from.
Similar to the Area Maps page, each area is contained within the cascading spoiler bar; just click on it to reveal the quests for the given area.
Colony 9 Side Quests
| Quest Name | Location | Quest Giver |
|---|---|---|
| Mementos of a Lost Son | Ether Light | Cheryl |
| The Key to a Long Life | Tranquil Square | Dionysis |
| A Curry Conundrum | Ether Light | Giorgio |
| Biscuits for a Grandson | Ether Light | Marcia |
| Birthday Shoes | Fortress Entrance | Kantz |
| Education-Minded Suzanna | Tranquil Square | Suzanna |
| Education-Crazy Suzanna | Tranquil Square | Suzanna |
| Flattened Flowers | Tranquil Square | Francoise |
| Lonely Niranira | Tranquil Square | Niranira |
| The Broken Watch | Ether Light | Desiree |
| The Old Soldier’s Test | Fortress Entrance | Jan |
| Romantic Notions of a Boy | Fortress Entrance | Monica |
| Romantic Notions of a Girl | Fortress Entrance | Monica |
| An Impoverished Critic | Ether Light | Leopold |
| Financial Planning | Ether Light | King Squeeze |
| Overworked and Underpaid | Ether Light | Giorgio |
| Out-of-Luck Giorgio | Ether Light | Giorgio |
| Pestering Paola | Ether Light | Giorgio |
| Paola and Narine | Tranquil Square | Narine |
| The Plan — Preparation | Ether Light | Sesame |
| The Plan — The Night Before | Ether Light | Sesame |
| The Plan — Execution | Ether Light | Sesame |
| A Young Captain’s Request | Fortress Entrance | Emmy Leater |
| A Young Captain’s Suffering | Fortress Entrance | Emmy Leater |
| A Young Captain’s Rise | Fortress Entrance | Emmy Leater |
| A Young Captain’s Challenge | Fortress Entrance | Emmy Leater |
| A Young Captain’s Revival | Fortress Entrance | Miller |
| A Young Captain’s Trust | Fortress Entrance | Miller |
| Pride and Courage | Tranquil Square | Lukas |
| Friendship Tokens | Tranquil Square | Moritz |
| A Big Brother’s Fight | Tranquil Square | Zukazu |
| A Little Brother’s Fight | Tranquil Square | Jiroque |
| A Place to Come Home to | Tranquil Square | Jiroque |
| Rocco’s Heartful Request | Ether Light | Rocco |
| Dean’s Shady Request | Fortress Entrance | Dean |
| Liliana’s Sincere Request | Ether Light | Liliana |
| Jackon’s Awakening | Tranquil Square | Jackson |
| Jackson the Poet | Tranquil Square | Jackson |
| Jackson the Cook | Tranquil Square | Jackson |
| Désirée’s Future | Ether Light | Désirée |
| Désirée’s Apology | Ether Light | Désirée |
| The Elite Captain’s Anguish | Fortress Entrance | Raoul |
| Getting to Know Minnie | Tranquil Square | Minnie |
| Getting to Know Dorothy | Ether Light | Dorothy |
| A Mysterious Light | Tranquil Square | Kenny Rohan |
| Out Like a Light? | Tranquil Square | Kenny Rohan |
| The Lost Pendant | Cylinder Hangar | Defence Force Soldier |
| Monster Quest 1 — Part 1 | Fortress Entrance | Defence Force Soldier |
| Monster Quest 1 — Part 2 | Fortress Entrance | Defence Force Soldier |
| Monster Quest 1 — Part 3 | Fortress Entrance | Defence Force Soldier |
| Monster Quest 2 — Part 1 | Fortress Entrance | Defence Force Soldier |
| Monster Quest 2 — Part 2 | Fortress Entrance | Defence Force Soldier |
| Monster Quest 2 — Part 3 | Fortress Entrance | Defence Force Soldier |
| Monster Quest 3 — Part 1 | Ether Light | Colony 9 Resident |
| Monster Quest 3 — Part 2 | Ether Light | Colony 9 Resident |
| Monster Quest 3 — Part 3 | Ether Light | Colony 9 Resident |
| Monster Quest 3 — Part 4 | Ether Light | Colony 9 Resident |
| Monster Quest 4 — Part 1 | Tephra Cave Entrance | Defence Force Soldier |
| Monster Quest 4 — Part 2 | Tephra Cave Entrance | Defence Force Soldier |
| Monster Quest 4 — Part 3 | Tephra Cave Entrance | Defence Force Soldier |
| Challenge 1 | Fortress Entrance | Defence Force Soldier |
| Challenge 2 | Ether Light | Colony 9 Resident |
| Challenge 3 | Fortress Entrance | Defence Force Soldier |
| Challenge 4 | Ether Light | Colony 9 Resident |
| Material Quest 1 | Fortress Entrance | Colony 9 Resident |
| Material Quest 2 | Ether Light | Colony 9 Resident |
| Material Quest 3 | Ether Light | Colony 9 Resident |
| Material Quest 4 | Tranquil Square | Colony 9 Resident |
| Collection Quest 1 | Ether Light | Colony 9 Resident |
| Collection Quest 2 | Ether Light | Colony 9 Resident |
| Collection Quest 3 | Tranquil Square | Colony 9 Resident |
| Collection Quest 4 | Tranquil Square | Colony 9 Resident |
| Search Quest 1 | Central Plaza | Colony 9 Resident |
| Search Quest 2 | Tranquil Square | Colony 9 Resident |
| Search Quest 3 | Gem Man’s Stall | Colony 9 Resident |
| Search Quest 4 | Tranquil Square | Colony 9 Resident |
| A Token of Friendship | Weapon Dev. Lab | Shulk |
| The Gem Man’s Invention | Gem Man’s Stall | The Gem Man |
| Delivering Food | Story Quest | Dunban |
Tephra Cave Side Quests
| Quest Name | Location | Quest Giver |
|---|---|---|
| Missing in Action | Mag Mell Ruins | Defence Force Soldier |
| Arachno Silk Fundraising | Mag Mell Ruins | Defence Force Soldier |
| A Thank You | Mag Mell Ruins | Defence Force Soldier |
| Clearing Obstructions | Mag Mell Ruins | Defence Force Soldier |
| The Book of Bafalgar | Bafalgar Tomb | Shura |
| The Blood of Bafalgar | Bafalgar Tomb | Shura |
| The Path of Bafalgar | Bafalgar Tomb | Shura |
| The Coffin of Bafalgar | Bafalgar Tomb | Shura |
| The Gratitude of Bafalgar | Bafalgar Tomb | Shura |
| Collection Quest 1 | Mag Mell Ruins | Defence Force Soldier |
| Collection Quest 2 | Mag Mell Ruins | Defence Force Soldier |
| Material Quest 1 | Mag Mell Ruins | Defence Force Soldier |
| Material Quest 2 | Mag Mell Ruins | Defence Force Soldier |
Bionis’ Leg Side Quests
| Quest Name | Location | Quest Giver |
|---|---|---|
| Emergency Treatment | Refugee Camp | Olga |
| Being a Good Grandfather | Refugee Camp | Satata |
| A Thoughtful Idea | Refugee Camp | Matryona |
| A Dash of Colour | Refugee Camp | Ewan |
| Imaginations Tempered | Refugee Camp | Matryona |
| Spirits Raised | Refugee Camp | Arda |
| Thieving Monsters | Refugee Camp | Gorman |
| The Greedy Monster | Refugee Camp | Satata |
| Save the Girl! | Refugee Camp | Surprise Quest |
| Earnest’s Fibs | Refugee Camp | Earnest |
| Earnest’s Mischief | Refugee Camp | Earnest |
| Earnest’s Solitude | Refugee Camp | Earnest |
| The Lost Nopon | Spiral Valley | Gerugu |
| With Much Gratitude | Spiral Valley | Batubatu |
| With Even more Gratitude | Spiral Valley | Gerugu |
| Legend of Mythical Empress | Spiral Valley | Gerugu |
| A Flower for a Rose | Refugee Camp | Dulland |
| Battling Brutes | Refugee Camp | Dulland |
| Supplies for Satorl | Refugee Camp | Elior |
| Monster Quest 1 — Part 1 | Ragrinar Canyon Path | Homs Traveller |
| Monster Quest 1 — Part 2 | Ragrinar Canyon Path | Homs Traveller |
| Monster Quest 1 — Part 3 | Ragrinar Canyon Path | Homs Traveller |
| Monster Quest 1 — Part 4 | Ragrinar Canyon Path | Homs Traveller |
| Monster Quest 2 | Refugee Camp | Refugee |
| Monster Quest 3 — Part 1 | Refugee Camp | Refugee |
| Monster Quest 3 — Part 2 | Refugee Camp | Refugee |
| Challenge 1 — Part 1 | Refugee Camp | Refugee |
| Challenge 1 — Part 2 | Refugee Camp | Refugee |
| Challenge 2 — Part 1 | Refugee Camp | Refugee |
| Challenge 2 — Part 2 | Refugee Camp | Refugee |
| Material Quest 1 | Refugee Camp | Refugee |
| Material Quest 2 | Refugee Camp | Refugee |
| Material Quest 3 | Refugee Camp | Refugee |
| Material Quest 4 | Refugee Camp | Refugee |
| Collection Quest 1 | Refugee Camp | Refugee |
| Collection Quest 2 | Refugee Camp | Refugee |
| Search Quest 1 | Refugee Camp | Refugee |
| Search Quest 2 | Refugee Camp | Refugee |
Satorl Marsh Side Quests
| Quest Name | Location | Quest Giver |
|---|---|---|
| Preventing Starvation | Glowing Obelisk | Zazadan |
| Zazadan in Danger | Glowing Obelisk | Zazadan |
| Zazadan Still in Danger | Glowing Obelisk | Zazadan |
| It’s All in the Mind | Glowing Obelisk | Zazadan |
| A Mysterious Delicacy | Glowing Obelisk | Zazadan |
| A Gift? | Glowing Obelisk | Zazadan |
| Gather Information | Nopon Refuge | Surprise Quest |
| Kacha’s Kidnapping | Nopon Merchant Camp | Bokoko |
| The Giants’ Key | Nopon Merchant Camp | Kacha |
| The Giants’ Treasure | Nopon Merchant Camp | Kacha |
| Making Camp | Nopon Merchant Camp | Bokoko |
| Monster Quest 1 | Nopon Merchant Camp | Nopon Merchant |
| Monster Quest 2 | Nopon Merchant Camp | Nopon Merchant |
| Monster Quest 3 | Nopon Merchant Camp | Nopon Merchant |
| Monster Quest 4 | Nopon Merchant Camp | Nopon Merchant |
| Challenge | Sororal Statues | High Entia Refugee |
| For a Friend | Sororal Statues | Rozeal |
| A Merciful End | Sororal Statues | Rozeal |
| A Release from Duty | Sororal Statues | Rozeal |
| The Imperial Ceremony | Sororal Statues | Scarlen |
| Imperial Ceremony Offerings | Sororal Statues | Scarlen |
| The Ancient Ceremony | Story Quest | |
| Ancient Ceremony Offerings | Story Quest |
Makna Forest Side Quests
| Quest Name | Location | Quest Giver |
|---|---|---|
| Legend of the Sage | Divine Sanctuary | Nopon Sage |
| Challenge of the Sage | Divine Sanctuary | Nopon Sage |
| Final Challenge of the Sage | Divine Sanctuary | Nopon Sage |
| Bridge Repair | Pod Landing Site | Nopon Researcher |
| Monster Quest 1 | Agni Tablet | Nopon Merchant |
| Monster Quest 2 | Agni Tablet | Nopon Merchant |
| Monster Quest 3 | Agni Tablet | Nopon Merchant |
| Monster Quest 4 | Agni Tablet | Nopon Merchant |
| Challenge | Agni Tablet | Nopon Merchant |
| Mystery Girl Rescue | Story Quest |
Frontier Village Side Quests
| Quest Name | Location | Quest Giver |
|---|---|---|
| Leku’s Food Crisis | Archaeology Level | Leku |
| Hunt for a Patron | Archaeology Level | Leku |
| Heropon’s Spirit | Archaeology Level | Kilaki |
| Beat Kilaki to it! | Archaeology Level | Leku |
| Popularity Premonition | Archaeology Level | Leku |
| Lousy Lizards | Archaeology Level | Modado |
| Making a Mixer | Pollen Works | Rono |
| Materials for a Mixer | Pollen Works | Rono |
| Decoration Makeover | Chief’s Residence | Pepa |
| Hunt for Bug-Loving Friend | Nopon Tower | Kokora |
| A Worried Bug-Lover | Nopon Tower | Deki |
| A Tormented Bug-Lover | Nopon Tower | Deki |
| Mushy Mushrooms | Sacred Altar | Kofuko |
| Medical Advancements | Sacred Altar | Medi |
| Let’s Make Fillings! | Sacred Altar | Yuka |
| World’s Strongest Flavour | Sacred Altar | Kofuko |
| Reversed Tastes | Sacred Altar | Kofuko |
| Sweet Seduction | Sacred Altar | Migaga |
| Ingredients for a Brew | Sacred Altar | Kofuko |
| Healing the Healer | Sacred Altar | Npa |
| Legendary Nopon Charm | Sacred Altar | Npa |
| Mislabelling Problem | Sacred Altar | Medi |
| Getting Bigger | Chief’s Residence | Dabidabi |
| Who is Bigger | Chief’s Residence | Dabidabi |
| Strange Noises from Below | Sacred Altar | Pipiki |
| Musical Genius | Sacred Altar | Tati |
| Things that Hum | Sacred Altar | Tati |
| Things that Rumble | Sacred Altar | Tati |
| Disinsectization | Sacred Altar | Rasha |
| Avenge a Mamapon’s Death | Sacred Altar | Rasha |
| Dadapon In Trouble | Archaeology Centre | Pachipa |
| It Definitely Exist! | Archaeology Centre | Pachipa |
| Even in the Chief’s Absence | Prophecy Hut | Miko |
| Bored Pelupelu | Prophecy Hut | Pelupelu |
| A Gift for Miko | Prophecy Hut | Pelupelu |
| Giant Attack! | Chief’s Residence | Lalapa |
| Kind Lupa’s Grampypon | Riki’s House | Lupa |
| Secret Elixir Ingredients | Riki’s House | Lupa |
| Mystery of Makna Ruins 1 | Riki’s House | Lupa |
| Mystery of Makna Ruins 2 | Riki’s House | Lupa |
| Mystery of Makna Ruins 3 | Riki’s House | Lupa |
| Mystery of Makna Ruins 4 | Riki’s House | Lupa |
| Honouring the Nopon Sage | Sacred Altar | Pipiki |
| Meeting the Nopon Sage | Sacred Altar | Pipiki |
| Fixing Time Mushrooms | Sacred Altar | Migaga |
| Restoring the Capital | Nopon Tower | Nelo |
| Restoring the Capital 2 | Nopon Tower | Nelo |
| Broken Ether Furnace | Kaleka | |
| Broken Ether Furnace 2 | Kaleka | |
| A Memento of Daddy | Atael | |
| Pollen Orb Ingredients | Pollen Orb Storehouse | Dobadoba |
| Secret Ingredient Hunt | Sacred Altar | Bana |
| Secret Innovation | Sacred Altar | Rasha |
| The Master’s Successor | Pollen Orb Storehouse | Dobadoba |
| Dangerous Ambition | Pollen Orb Storehouse | Cherri |
| Find the Kingpin | Pollen Works | Gadada |
| Adviser Hunt | Pollen Works | Gadada |
| Evidence Collection | Pollen Works | Gadada |
| Destroying the City Trade | Pollen Works | Gadada |
| Bana the Betrayer | Pollen Works | Gadada |
| Presents for Priceless Pupils | Pollen Orb Storehouse | Dobadoba |
| Safer Energy | Gadada | |
| Monster Quest 1 — Part 1 | Nopon Tower | Nopon Villager |
| Monster Quest 1 — Part 2 | Nopon Tower | Nopon Villager |
| Monster Quest 1 — Part 3 | Nopon Tower | Nopon Villager |
| Monster Quest 2 — Part 1 | Sacred Altar | Nopon Villager |
| Monster Quest 2 — Part 2 | Sacred Altar | Nopon Villager |
| Monster Quest 2 — Part 3 | Sacred Altar | Nopon Villager |
| Material Quest 1 | Nopon Tower | Nopon Villager |
| Material Quest 2 | Sacred Altar | Nopon Villager |
| Material Quest 3 | Riki’s House | Nopon Villager |
| Material Quest 4 | Prophecy Hut | Nopon Villager |
| Collection Quest 1 | Sacred Altar | Nopon Villager |
| Collection Quest 2 | Nopon Tower | Nopon Villager |
| Collection Quest 3 | Chief’s Residence | Nopon Villager |
| Collection Quest 4 | Contemplation Terrace | Nopon Villager |
| Search Quest 1 | Pollen Works | Nopon Villager |
| Search Quest 2 | Riki’s House | Nopon Villager |
| Search Quest 3 | Sacred Altar | Nopon Villager |
| An Errand for the Heropon | Story Quest |
Eryth Sea Side Quests
| Quest Name | Location | Quest Giver |
|---|---|---|
| Trouble at the Plant | Ether Plant | Jarack |
| Punish the Hodes | Ether Plant | Jarack |
| Mend the Plant | Ether Plant | Jarack |
| Hode Attack | Ether Plant | Jarack |
| Trouble at the Lighthouse | Syrath Lighthouse | Shalen |
| Investigating Satorl | Ether Plant | Miriall |
| Ancient High Entia Mystery | Ether Plant | Talia |
| The Missing Boy | Ether Plant | Miriall |
| The Only Thing I Can Do | Ether Plant | Vidian |
| Secret Research | Ether Plant | Teelan |
| Monster Quest 1 | Syrath Lighthouse | Lighthouse Keeper |
| Monster Quest 2 | Syrath Lighthouse | Lighthouse Keeper |
| Challenge | Syrath Lighthouse | Lighthouse Keeper |
| Collect Quest 1 | Syrath Lighthouse | Alcamoth Citizen |
| Collect Quest 2 | Syrath Lighthouse | Alcamoth Citizen |
| Save the Worker | Story Quest | |
| Path to Prison Island | Story Quest | |
| Sister Seals | Story Quest |
Alcamoth Side Quests
| Quest Name | Location | Quest Giver |
|---|---|---|
| The Deciphering Machine | Imperial Palace | Ruthan |
| A Necessary Upgrade | Imperial Palace | Naroth |
| Talia’s Research | Imperial Palace | Talia |
| Bring Back My Son! | Imperial Palace | Merisa |
| Teaching Materials | Imperial Palace | Mir’leiz |
| Brave Actions | Imperial Palace | Mir’leiz |
| Protect the Capital! | Ascension Hall | Lecrough |
| How Do They Feel? | Main Entrance | Scarlen |
| How Do I Feel? | Main Entrance | Scarlen |
| Together Forever | ||
| I Love You No Matter What | Main Entrance | Scarlen |
| A Friend in Need | Ascension Hall | Lecrough |
| Preparing for Adventure | Fountain of Eternity | Zain |
| Preparing for Adventure 2 | Fountain of Eternity | Kurralth |
| Preparing for Adventure 3 | Fountain of Eternity | Zain |
| Adventurers in Peril | Imperial Palace | Miriall |
| Building Bridges | Fountain of Eternity | Arielle |
| Starlight Seeker | Fountain of Eternity | Elior |
| Starlight Gazer | Fountain of Eternity | Elior |
| Back Pain | Ascension Hall | Galdo |
| Looking for Gold Bugs | Imperial Palace | Teelan |
| Losing the Taste for Alcohol | Fountain of Hope | Nelo |
| Looking for a Lost Son | Fountain of Hope | Vol’aren |
| Looking for a Lost Daughter | Fountain of Hope | Vol’aren |
| Going Out to Play | Main Entrance | Popipo |
| Getting a Member’s Card | Surprise Quest | |
| Vidian Rescue Operation | Surprise Quest | |
| Monster Quest 1 — Part 1 | Imperial Palace | Alcamoth Citizen |
| Monster Quest 1 — Part 2 | Imperial Palace | Alcamoth Citizen |
| Monster Quest 1 — Part 3 | Imperial Palace | Alcamoth Citizen |
| Monster Quest 2 — Part 1 | Imperial Palace | Alcamoth Imperial Guard |
| Monster Quest 2 — Part 2 | Imperial Palace | Alcamoth Imperial Guard |
| Monster Quest 2 — Part 3 | Imperial Palace | Alcamoth Imperial Guard |
| Monster Quest 3 — Part 1 | Imperial Palace | Alcamoth Citizen |
| Monster Quest 3 — Part 2 | Imperial Palace | Alcamoth Citizen |
| Monster Quest 3 — Part 3 | Imperial Palace | Alcamoth Citizen |
| Monster Quest 4 — Part 1 | Ascension Hall | Alcamoth Imperial Guard |
| Monster Quest 4 — Part 2 | Ascension Hall | Alcamoth Imperial Guard |
| Monster Quest 4 — Part 3 | Ascension Hall | Alcamoth Imperial Guard |
| Challenge 1 | Fountain of Hope | Alcamoth Citizen |
| Challenge 2 | Fountain of Eternity | Alcamoth Citizen |
| Challenge 3 | Ascension Hall | Alcamoth Imperial Guard |
| Challenge 4 | Fountain of Eternity | Alcamoth Citizen |
| Material Quest 1 | Main Entrance | Alcamoth Citizen |
| Material Quest 2 | Imperial Palace | Alcamoth Citizen |
| Material Quest 3 | Main Entrance | Alcamoth Imperial Guard |
| Material Quest 4 | Imperial Palace | Alcamoth Citizen |
| Collection Quest 1 | Imperial Palace | Alcamoth Citizen |
| Collection Quest 2 | Main Entrance | Alcamoth Citizen |
| Collection Quest 3 | Fountain of Hope | Alcamoth Citizen |
| Collection Quest 4 | Imperial Palace | Alcamoth Citizen |
| Search Quest 1 | Main Entrance | Alcamoth Citizen |
| Search Quest 2 | Fountain of Hope | Alcamoth Citizen |
| Search Quest 3 | Fountain of Eternity | Alcamoth Citizen |
| Search Quest 4 | Fountain of Hope | Alcamoth Citizen |
Valak Mountain Side Quests
| Quest Name | Location | Quest Giver |
|---|---|---|
| Chilkins and Antols | Nopon Camp | Nopon Researcher |
| Valak Mountain Research | Nopon Camp | Nopon Researcher |
| The Freezing Nopon | Hollow Bone | Nopon Researcher |
| Bad Timing | Bionis’ Wrist | Nopon Researcher |
| Chilkin Changes | Nopon Camp | Dakuku |
| The Balance of Power | Nopon Camp | Dakuku |
| The Missing Partner | Harict Chapel | Kurralth |
| The Final Giants’ Ruins | Harict Chapel | Zain |
| The Giants’ Treasures | Harict Chapel | Zain |
| Monster Quest 1 | Zokhed Pass | Nopon Merchant |
| Monster Quest 2 | Zokhed Pass | Nopon Merchant |
| Monster Quest 3 | Zokhed Pass | Nopon Merchant |
| Monster Quest 4 | Zokhed Pass | Nopon Merchant |
| The Magma Rock | Story Quest |
Sword Valley Side Quests
| Quest Name | Location | Quest Giver |
|---|---|---|
| The Magma Rock | Story Quest | |
| Secure Dolgan Outpost | Surprise Quest | |
| Secure Enalda Control Base | Surprise Quest | |
| 3rd Gate Front Line | Surprise Quest | |
| Secure the Radio Tower | Surprise Quest |
Galahad Fortress Side Quests
| Quest Name | Location | Quest Giver |
|---|---|---|
| Life Battle | Story Quest | |
| Supply Station Battle | Story Quest | |
| Turbine Battle | Story Quest | |
| Conviction | Story Quest |
Fallen Arm Side Quests
| Quest Name | Location | Quest Giver |
|---|---|---|
| Save the Machina! | Junks | Voltak |
| Eliminate the Threat | Junks | Voltak |
| Mysterious Noises | Junks | Prox |
| Protect the Village | Junks | Eleqa |
| Stop the Mechon Rampage! | Junks | Eleqa |
| Stunted Growth | Junks | Orkatix |
| Transmission Bypass | Junks | Orkatix |
| The Exhaust Pump | Junks | Orkatix |
| The Mini Reactor | Junks | Orkatix |
| The History of Mechonis | Junks | Zilex |
| The History of the Capital | Junks | Zilex |
| I Want to be a Homs! | Junks | Rakzet |
| Powerless | Junks | Rakzet |
| Power Up! | Junks | Rakzet |
| Fixing a Broken Door | Junks | Rizaka |
| The Wilted Flower | Junks | Rizaka |
| The Oath Sword | Junks | Karlos |
| Scheduled Inspection | Junks | Xekit |
| A Tough Battle | Junks | Kazat |
| A Weapon Just For Me | Junks | Kazat |
| Therapy | Junks | Eleqa |
| Mending Memories | Junks | Mixik |
| Resolution — Father | Junks | Kazat |
| Resolution — Mother | Junks | Qofaria |
| Food Delivery | Junks | Natalia |
| For My Loved One… | Digit 2 Plain | Zarkort |
| To My Loved One… | Digit 2 Plain | Zarkort |
| Reunion | Story Quest | |
| We Made It | Story Quest | |
| Treatment | Story Quest |
Mechonis Field Side Quests
| Quest Name | Location | Quest Giver |
|---|---|---|
| Best Boots | Machina Refuge | Bozatrox |
| Monster Quest | Machina Refuge | Garrisoned Troop |
| Challenge Quest 1 | Machina Refuge | Garrisoned Troop |
| Challenge Quest 2 | Machina Refuge | Garrisoned Troop |
| Aiming for the Top | Story Quest | |
| Get the 3rd Lift Moving | Story Quest | |
| Opening the Bulkhead | Story Quest | |
| The High-Velocity Lift | Story Quest | |
| Need Power! | GF — Storage Depot | Story Quest |
Central Factory Side Quests
| Quest Name | Location | Quest Giver |
|---|---|---|
| Eliminate the Backup! | Surprise Quest | |
| Daring Assault | Surprise Quest | |
| Roof Battle | 2F — Training Ground Roof | Surprise Quest |
| New Weapon | Ventillation Conduit | Junks Staff |
| To the Central Tower | Story Quest | |
| Maintenance Wing Escape | Story Quest | |
| Find a Path to the Top | Story Quest | |
| Materials for a Bomb | Story Quest | |
| The Central Tower Barrier | Story Quest |
Agniratha Side Quests
| Quest Name | Location | Quest Giver |
|---|---|---|
| Civil Protection 1 — 1 | Central Tower | Civil Protection Terminal |
| Civil Protection 1 — 2 | Central Tower | Civil Protection Terminal |
| Civil Protection 1 — 3 | Central Tower | Civil Protection Terminal |
| Civil Protection 2 — 1 | Central Tower | Civil Protection Terminal |
| Civil Protection 2 — 2 | Central Tower | Civil Protection Terminal |
| Civil Protection 2 — 3 | Central Tower | Civil Protection Terminal |
| Military Status 1 — 1 | Central Tower | Military Status Terminal |
| Military Status 1 — 2 | Central Tower | Military Status Terminal |
| Military Status 2 — 1 | Central Tower | Military Status Terminal |
| Military Status 2 — 2 | Central Tower | Military Status Terminal |
| Agniratha Beautification 1 | Central Tower | City Planning Terminal |
| Agniratha Beautification 2 | Central Tower | City Planning Terminal |
| Telethia Investigation 1 | Central Tower | Strategic Intel Terminal |
| Telethia Investigation 2 | Central Tower | Strategic Intel Terminal |
| Shrine Transport | Story Quest | |
| Pillar Verification Devices | Story Quest | |
| Save Bionis | Story Quest |
Prison Island Side Quests
| Quest Name | Location | Quest Giver |
|---|---|---|
| Chase Dickson | Story Quest | |
| Path to the Top | Story Quest |
The products discussed here were independently chosen by our editors.
GameSpot may get a share of the revenue if you buy anything featured on our site.
Got a news tip or want to contact us directly? Email news@gamespot.com
Xenoblade Chronicles , одна из самых глубоких JRPG на рынке, предлагает множество способов, с помощью которых члены группы могут стать сильнее. Будь то искусство и их улучшения, новое оборудование или просто повышение уровня; в игре всегда есть сильное чувство прогресса, с которым могут сравниться очень немногие игры (включая ее собственное продолжение).
СВЯЗАННЫЕ: Xenoblade Chronicles Definitive Edition: лучшие драгоценные камни и кто их надеть
Ветви навыков — одни из самых интересных, так как они дают уникальные способности и баффы, которые не могут дать другие. Их оптимизация имеет решающее значение для получения преимущества в крупных сражениях. По умолчанию у каждого персонажа есть три ветки навыков, но можно разблокировать еще две для каждого персонажа на протяжении всей игры, раскрывая их потенциал до предела. Четвертая ветвь навыков каждого персонажа может быть разблокирована на протяжении большей части истории, в то время как 5-я ветвь навыков требует достижения главы 16 в истории, чтобы разблокировать.
Шулк
Пессимизм

- Повышение характеристик: Защита эфира
- Боевой навык: Сразись с будущим
- Боевой навык: Воин-невидимка
- Боевой навык: Эпическое уклонение
- Боевой навык: Принудительное милосердие
- Боевой навык: Иммунизация
- Способ разблокировки: Завершите «Désirée Future»
Это многое говорит о Шалке.характер, что пессимизм не является его чертой по умолчанию. Эта ветка отлично подходит для снижения вражеской агрессии к Шалку, позволяя ему перемещаться по врагам и наносить им удары, где это необходимо, а также дает иммунитет к некоторым дебаффам.
Квест, чтобы разблокировать его, находится в Colony 9. Для этого требуется 4 с половиной звезды сродства с Colony 9 и для того, чтобы история продвинулась как минимум до Satorl Marsh. Повышение сродства к области — это просто вопрос разговоров с людьми и выполнения квестов. Поговорите с Дезире с Шалком в качестве лидера группы и послушайте их очень длинную историю. Они попросят вас сделать за них выбор, и в любом случае игроки откроют ветку пессимизма.
Храбрость

- Повышение характеристик: Шанс критического удара
- Боевой навык: Уклонение от судьбы
- Пассивное умение: Привилегия героя
- Боевой навык: Одинокий воин
- Боевой навык: Абсолютная защита
- Боевой навык: Славное будущее
- Способ разблокировки: Завершите задания «Доверие молодого капитана» или «Возрождение молодого капитана».
Последняя ветвь навыков Шалка имеет широкий спектр применения. Он обеспечивает пассивное повышение вероятности критического удара по мере того, как разблокируется больше навыков. Сами навыки очень разносторонние. Они увеличивают получение опыта, торговые бонусы, защиту, ловкость и заполнение шкалы талантов.
По мере того, как возрастает близость к Colony 9, откроются новые партии в квестовой линии молодого военного капитана Эмми Литер.Финал этих квестов будет зависеть от концовки, выбранной игроком в «Испытании молодого капитана». Один квест сложнее другого. В любом случае, поговорите с Миллером с Шалком во главе, как только будет достигнута связь 4 с половиной звезд с Колонией 9. Начавшийся квест будет называться «Доверие молодого капитана» или «Возрождение молодого капитана».
«Доверие молодого капитана» просто требует найти и поговорить с Эмми, которая находится на базе добычи эфирного рудника. «Возрождение молодого капитана» включает в себя раскрытие тайны происхождения отравленного клинка. Игроки должны собрать четыре ядовитых тыквы на болоте Саторл, поговорить с Эмми, Канцем и Раулем, чтобы услышать их истории, прежде чем вернуться к Миллеру и предъявить обвинение. Неважно, кого выберет игрок, результат тот же, но Канц — правильный ответ. Как только это будет сделано, откроется храбрость.
Рейн
Нетерпение

- Повышение характеристик: Скорость контратаки
- Боевой навык: Абсолютная насмешка
- Боевой навык: Чемпион ближнего боя
- Боевой навык: Неистовство
- Боевой навык: Скоростной удар
- Боевой навык: Направленная боль
- Метод разблокировки: Завершите «Cook-Off Showdown!»
Чрезвычайно мощная ветвь для любого пользователя Reyn, Нетерпение заключается в том, чтобы заставить Рейна наносить больше ударов. У него больше шансов контратаковать; Баффы на скорость, двойные атаки и быстрееНаполнение шкалы талантов. Когда эта ветка исчерпана, Рейн станет ураганом сильных атак.
Чтобы его разблокировать, необходимо пройти Cook-Off Showdown! квест. Это финал цепочки квестов, все с участием Cook-Off в Колонии 6. Убедитесь, что все квесты в этой цепочке выполнены, пусть Рейн является лидером группы, и у игроков есть доступ к Горе Валак. Поговорите с Макришем, когда близость к Колонии 6 составит 2 с половиной звезды, и Хоко попросит вас убить королей энтма на горе Валак, чтобы получить две ракушки с соевой пастой. Сделайте окончательный выбор в пользу Хоко, и нетерпеливость будет разблокирована.
Товарищество

- Повышение характеристик: Физическая защита
- Боевой навык: Узы дружбы
- Боевой навык: Плечом к плечу
- Боевой навык: Начало полета
- Боевой навык: Одиночный бой
- Боевой навык: Друзья навсегда
- Способ разблокировки: Завершите «Жетоны дружбы»
Как и в последней ветке Шалка, у Рейна есть множество бустов. Физическая защита значительно усиливается, что делает Рейн еще крупнее, чем раньше. Вдобавок ко всему, Рейн получает способность лечить группу после цепных атак, получает большую скорость и становится сильнее, когда члены группы получают нокаут.
Как только Колония 9 достигнет 4 с половиной звезд, пусть Рейн возглавит группу и поговорит с Морицем. Они пошлют игрока собрать немногоредкие ресурсы. Для этого игроки должны войти в высокоуровневую зону пещеры Тефра, которая до сих пор была заблокирована. Врагов 95 уровня необходимо победить, но как только это будет сделано, вернитесь в Мориц, и Камарадерис откроется.
Шарла
Опора

- Повышение характеристик: Защита эфира
- Пассивное умение: Воспоминания Гадольта
- Боевой навык: Вендетта
- Боевой навык: Решающее продолжение
- Боевой навык: Месть
- Пассивное умение: Эфирный взрыв
- Способ разблокировки: Завершите задание «Отомсти за смерть Мамапона».
Способности Шарлы как целительницы делают ее почти жизненно необходимой для участия в отряде на протяжении всей игры. Это дерево навыков гарантирует, что она сможет оставаться в бою как можно дольше. И ее физическая защита, и защита от эфира будут усилены, как и ее скорость блокирования и контратаки.
Как только будет достигнута 4-звездочная близость к Центральному Бионису, поставьте Шарлу впереди группы и поговорите с Рашей в Пограничной деревне. У нее будет несколько обязательных квестов, но, в конце концов, начнется квест «Отомсти за смерть Мамапона». Раша направит вас к Эритскому морю, где вы должны победить уникального врага Pillager Hode. Вернитесь в Frontier Village и покажите Клочок ткани Черри, и Reliance будет разблокирована.
Любовь

- Повышение характеристик: Максимум HP
- Боевой навык: Голос доверия
- Боевой навык: Поведение у постели больного
- Боевой навык: Сердечный крик
- Боевой навык: Щит доброты
- Боевой навык: Чудо любви
- Метод разблокировки: Завершить «Прекращение побега».
Последняя ветвь навыков Шарлы — это приложить все усилия для восстановления, насколько это возможно. Собственное HP Шарлы будет расти с этой веткой, и все навыки сами по себе увеличивают ее HP при исцелении и немного больше для увеличения защиты от эфира.
Чтобы получить эту ветку, необходимо пройти квестовую цепочку, которая немного отличается в зависимости от того, кого игрок приглашает в восстановленную Колонию 6. И En Argentis, и Zel Argentis могут быть приглашены, когда жилье достигнет уровня 5, но только одного из них, и того, что игрок выбирает тот, с которым он выполняет квестовую линию. Цепочка квестов в основном повторяется, но с немного разными людьми и локациями.
СВЯЗАННЫЕ: Вещи Xenoblade Chronicles Definitive Edition исправлены (и вещи, которые не были)
Чтобы начать цепочку заданий, поместите Шарлу в слот лидера группы после того, как игрок достигнет Главы 16. Затем пригласите Алексея или Пеппино в Колонию 6 (оба могут быть приглашены независимо от этой цепочки заданий), когда жилье достигнет 4-го уровня. Затем получите Колонию. 6 близких к 3 с половиной звездам и поговорите либо с Зелом, либо с Эном. Каждый квест в квестовой цепочке имеет немногоболее высокие требования к сходству, чем предыдущие. Как только это все будет сделано, Шарла откроет привязанность.
Данбан
Упорство

- Повышение характеристик: Физическая защита
- Пассивное умение: Эксперт по снаряжению
- Боевой навык: Джентльменская доблесть
- Пассивное умение: Тяжелое снаряжение
- Боевой навык: Стальное тело
- Боевой навык: Твердая основа
- Способ разблокировки: Завершите «Баланс сил».
Данбан — интересный боец, он действует как быстрый атакующий, который может вызывать агро и уклоняться от атак. Его самый большой недостаток — низкий запас здоровья, и эта ветка делает все возможное, чтобы его дополнить. Его физическая защита будет усилена, а вес оборудования будет уменьшен, что позволит ему носить более тяжелую броню, чтобы выдерживать более сильные удары.
Данбан должен быть первым, чтобы активировать этот квест. У него нет требований к близости. Тем не менее, есть предварительные квесты, которые включают спасение пойманного Нопона из-за стены льда в Горе Валак. В конце концов, этот Нопон, Дакуку, даст квест «Баланс сил». Это простой, но сложный квест, в котором нужно победить двух уникальных монстров. Как только варварский ситри и банкетный Вассаго будут убиты, вернитесь в Дакуку, и упорство откроется.
Энтузиазм

- Повышение характеристик: Сила
- Боевой навык: Ускорение рывка
- Боевой навык: Противодействие ярости
- Боевой навык: Пламенный удар
- Боевой навык: Смертельная решимость
- Боевой навык: Пылающая аура
- Способ разблокировки: Завершить «Задержанный рост».
Последняя ветка навыков Данбана разделена между сильными и частыми ударами и созданием группы. Сила увеличивается с этой веткой навыков, а пара навыков дает баффы скорости и увеличивает шанс контратаки. Остальные навыки направлены на создание напряженности и быстрое заполнение шкалы Party Gauge для цепных атак.
Чтобы начать требуемый квест, игрокам нужно будет продолжить рассказ до главы 16, после того как колония 6 будет атакована. Оказавшись там, назначьте Данбана лидером группы, убедитесь, что с Вроником в Деревне Скрытых Машин поговорили, а близость к Скрытой Деревне составляет 3 с половиной звезды. Поговорите с Orkatix, и появятся еще три квеста по сбору деталей от указанных мехонов для создания устройства. Как ни странно, как только это будет сделано, Шалк должен быть лидером группы при разговоре с Orkatix, чтобы завершить квест и разблокировать Энтузиазм.
Мелия
Сдержанность

- Повышение характеристик: Защита эфира
- Пассивное умение: Дворцовая стража
- Пассивное умение: Эксперт в тяжелом весе
- пассивное умение: неприкрашенная красота
- Боевой навык: Ментальный барьер
- Боевой навык: Чародейская аура
- Способ разблокировки: Завершите «Проблема на маяке».
Мелия может быть мощным атакующим на основе эфира, если ее правильно использовать, и ее способность вызывать статусные состояния очень полезна. Эта ветвь навыков усиливает ее ужасающие защитные способности. Защита от эфира, HP и скорость блока увеличены, а также включены способности для снижения агро.
СВЯЗАННЫЕ: Игры, в которые можно играть, если вам нравятся Xenoblade Chronicles
После завершения цепочки заданий Джаррака на Заводе Эфира в Эрит-Море, назначьте Мелию лидером группы и поговорите с Шален на вершине Маяка Сирата, также в Эрит-Море. Завершение квеста — это простой вопрос победы над тремя экидно гниения, которые появляются вокруг маяка ночью. Как только это будет сделано, поговорите с Шален, и Откроется Ретисенс.
Страсть

- Повышение характеристик: Эфир
- Боевой навык: Беспечное сердце
- Боевой навык: Пробуждающий удар
- Боевой навык: Убийца Телетии
- Боевой навык: Пламенная страсть
- Боевой навык: Отвержение зла
- Способ разблокировки: Завершите «Тайну Древней Высокой Энтии».
Последняя ветвь навыков Мелии предназначена для усиления дружественных статусных эффектов и ослабления вражеских. Эфир будет увеличиваться по мере роста ветки. Благодаря этим навыкам врагов, таких как Телетия, становится легче победить, а Шипы становятся менее опасными для группы.
Квестовую цепочку для этого можно запустить двумя разными способами. Начальные квесты доступны во время сюжета, пока группа направляется к гробнице High Entia. Однако, если они будут пропущены, по достижении главы 16 станет доступен другой маршрут. Мириалл на Эфирном заводе Эритского моря будет иметь два доступных квеста: «Пропавший мальчик» не является частью квестовой линии, но он должны быть приняты до того, как «Investigating Satorl» станет доступным.
Чтобы завершить «Исследование Саторла», сначала победите Догматика Гоголя 35 уровня в Саторл Болоте, затем поговорите с Талией, один раз в Болоте, а другой — на Заводе Эфира. После этого Мелия должна быть лидером группы, а Верхний Бионис должен иметь близость 2 с половиной звезды. Затем начнется «Тайна Древней Высокой Энтии». Квест будет указывать на статую на горе Валак. Взаимодействие с ним порождает монстра 97-99 уровня; однако его не нужно побеждать. Вместо этого игроки могут убежать и поговорить с Талией, чтобы завершить квест и разблокировать Страсть.
Рики
Трусость

- Повышение характеристик: Частота блоков
- Пассивное умение: Симпатичные звезды!
- Боевой навык: Осторожно!
- Боевой навык: Удивительные звезды!
- Боевой навык: Яблочко!
- Пассивное умение: Лучшие звезды!
- Метод разблокировки: Завершите задание «Все больше!»
Несмотря на то, что можно предположить из-за его небольшого роста, Рики в некоторой степени является самым живучим членом группы, и его бой сосредоточен на наложении статусных эффектов на врага. Несчастливо названная ветка Трусости, похоже, увеличивает его шансы не принимать удары и оставаться в битве. Повышение скорости блокировки и ловкости чрезвычайно полезно, и есть несколько навыков, которые делают атаки более мощными.
Как только в Центральном Бионисе будет достигнута близость в 3 с половиной звезды и у игрока появится доступ к Горе Валак, сделайте Рики лидером группы и поговорите с Дабидаби. Пока с Адиди говорили, квест «Становится больше!» начнет. Это немного сложный квест, и путь к успеху не всегда ясен.
Сначала поговорите с Адиди, который находится на северном берегу Водохранилища с 18:00 до 6:00. Затем возьмите пять челюстей Экидно. Чаще всего их добывают из Экидно в районе Эритского моря. Тем не менее, они доступны для обмена у пары NPC. Наконец, поговорите с Пуко, который будет у оружейного магазина в Frontier Village с 9:00 до 15:00. Это вызовет вопрос «Кто больше?» квест. Завершите это, поговорив с Адиди или Дабидаби, и Трусость будет разблокирована.
Героизм

- Повышение характеристик: Шанс критического удара
- Пассивное умение: Тяжелое снаряжение
- Пассивное умение: Питательный!
- Боевой навык: Кисси Кисси!
- Боевой навык: Ой!
- Боевой навык: Симпатичный герой!
- Способ разблокировки: Завершите «Последнее испытание мудреца».
Последняя ветвь Рики — еще одна обширная. Шанс критического попадания увеличивается по мере роста навыка. Первый навык позволяет Рики носить тяжелую броню, что делает его еще более крепким, чем раньше. Другие навыки увеличивают силу, увеличивают силу шипов, уменьшают использование Party Gauge и сопротивляются дебаффам.
Чтобы открыть эту ветку, необходимо выполнить длинную цепочку заданий, которая продлится от середины игры до почти самого конца. Первый квест можно начать, поговорив с Пипики в Пограничной деревне после того, как Рики присоединился к группе. Большая часть остальных квестов станет доступной после достижения Эритского моря, и все они сосредоточены вокруг Нопон-Мудреца.
Финал этой квестовой линии открывается, когда достигается глава 16, Рики становится лидером группы, а у Центрального Биониса есть близость в 3 с половиной звезды. Квест требует, чтобы игрок победил ненадежного монстра Резно 96-го уровня. Это сложно, но как только это будет сделано, откроется героизм.
Фиора
Опрометчивость

- Повышение характеристик: Скорость контратаки
- Боевой навык: Режим видения
- Боевой навык: Абсолютный счетчик
- Боевой навык: Жизненная сила
- Боевой навык: Критическое комбо
- Боевой навык: Взрыв энергии
- Способ разблокировки: Завершите «Клятвенный меч».
Фиора — персонаж, сосредоточенный на нападении. Они не так сильно бьют, как Шалк, но бьют намного быстрее и стараются объединить мощные атаки в цепочку. Эта ветвь навыков позволяет получить еще больше атак при большей мощности. Это увеличивает их скорость контратаки, а также их шанс критического удара и скорость шкалы талантов.
Чтобы разблокировать эту ветку, сначала выполните квестовую цепочку Ризики об их доме, поднимите сродство с Скрытой деревней до 2 звезд и получите доступ к Полям Мехониса. Затем, во главе с Фиорой, поговорите с Карлосом в Деревне Скрытых Машин. Они направят вас к руинам Power Pipe в Fallen Arm, где можно найти Oath Sword. Возьмите его и принесите Карлосу, чтобы открыть ветку Рашнесса.
Невинность

- Повышение характеристик: Защита эфира
- Боевой навык: Сила Девы
- Боевой навык: Девичья храбрость
- Боевой навык: Благословение Девы
- Боевой навык: Девичье рвение
- Боевой навык: Девичье чудо
- Способ разблокировки: Завершите «Битва с зверями».
Последнее дерево навыков Фиоры тематически уместно и довольно мило, так как все навыки требуют, чтобы она сражалась вместе с Шалком. Ее Эфирная Защита растет с этим навыком, а способности увеличивают ее урон от Искусств, восстановление HP, урон от Цепной Атаки и усиление всех характеристик; но только когда Шулк тоже в партии.
Эта короткая цепочка заданий может быть начата, как только будет достигнута глава 16 без каких-либо других требований. Поговорите с Dulland on Junks, который приземлился недалеко от Colony 6, и он даст квест «Securing Provisions». Завершение этого и следующего квеста «Цветок для розы» и финал цепочки заданий будут даны немедленно, если Фиора будет впереди. Квест «Битва с зверями», пожалуй, самый сложный во всей игре, поскольку он требует одновременной борьбы с двумя врагами 98-го уровня.
Вернитесь в Дулланд, как только это будет сделано, и невиновность Фиоры будет разблокирована.
СЛЕДУЮЩИЙ: JRPG, которые удивительны (после нескольких часов работы)
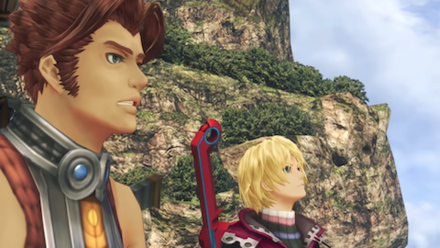
This is a guide to getting started in Xenoblade Chronicles: Definitive Edition for the Nintendo Switch. This guide will cover early game tips such as leveling, the battle system, equipment, and affinity, and team building!
List of Contents
- Early Game Tips
- Tutorials
- Leveling
- Exploring
- Side Quests
- Combat Tips
- Arts
- Aggro
- Chain Attack
- Team Building
- Team Composition
- Affinity
- Shops and Equipment
- Xenoblade Chronicles Definitive Edition Related Links
There are a few simple tips that will make playing Xenoblade Chronicles: Definitive Edition a whole lot more enjoyable for you. They are as follows:
- Read the in-game tutorials
- Level appropriately
- Explore new areas
- Accept every side quest
Xenoblade Chronicles is a vast game with a multitude of mechanics and techniques that should be understood in order to play the game as smoothly as possible. The first tip that any player should heed is to not skip on the tutorials, and re-read them as necessary to make sure you totally understand the game system.
While we at Game8 will do our best to help you along your journey with our own walkthroughs, there is a ton of information that can be picked up by just simply reading these!

How to Level Up Fast | Leveling Guide
Xenoblade Chronicles makes it very difficult to defeat enemies and bosses when you are underleveled. Being more than two levels below a boss can make them extremely hard, if not impossible to take out. The game allows you to naturally level quite a bit, but you may still find yourself underleveled from time to time. Which brings us to our next point.
One of the easiest ways to gain Exp is through simply arriving at new Locations. By opening up your map and checking out which sections of your current area haven’t been explored yet, you can easily travel there for free Exp. Finding a landmark will also allow you to fast travel to even more areas, in case you need to go back quickly later.
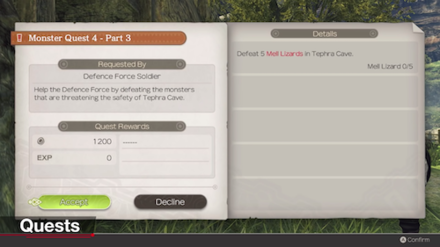
When you spot an NPC with a ‘!’ marker over their head, it means that they have a side quest for you to complete. Some NPCs even give multiple side quests, and you can talk to them repeatedly until the ‘!’ disappears to accept multiple quests at a time.
Since Side Quests will give you exp, money, and items as a reward, and there is no limit to the amount that you can take on at a time, you should accept every side quest you come across. Side Quests often involve defeating a certain number of monsters or collecting a certain number of items, and once you complete the objective, the quest will end without even having to go back to the requester. This means that you can accept a lot of side quests, then complete them as you play normally for easy exp and money.
Side Quest Guide | List of Side Quests
Xenoblade Chronicles features a unique battle system where your characters battle using auto attacks in realtime, and can use specials attacks known as Arts for extra damage and various effects. Your party consists of three members at a time, with each player having their own unique arts and battle role.
Here are a few tips to make combat easier.
- Use Arts to attack the appropriate enemy parts .
- Have a tank absorb Aggro so you can use Arts.
- Fill the Party Gauge quickly to unlease Chain Attacks and deal more damage.
Battle System and Combat Guide | How to Fight
In battle, the character you control will attack the enemy automatically, but you will have to select Arts when you want to use one. Arts can deal damage, restore HP to party members, cast buffs or debuffs, provide protection, and more! Each character’s Arts help define their role. However, only a certain number of Arts can be set to a character at a time, so you’ll want to choose the best ones for your party.
Your teammates will use their attacks and arts automatically, so other than selecting the ones that they have set, you cannot choose which Arts they use outside of a Chain Attack. Arts all have cooldown, which needs to recharge before you can use them again. Additonally, using Arts to attack the enemy rapidly will increase your Aggro, making you the target of your enemy.
Arts List and Guide

Aggro is a rather unique mechanic to Xenoblade Chronicles. Attacking a monster and using Arts on it will increase your Aggro, which is displayed by a red ring around the character. Whichever character has the red ring around them will be targeted by the enemy, meaning it will only attack that character, and it will constantly face their front.

Having a high Aggro is disadvantageous for less bulky characters, like Shulk, so the optimal battle style is to allow another character, a tank, to absorb your Aggro and endure the enemy’s attacks. Starting off, Reyn will fill the tank role for your party. Having him be the target of the enemy allows the character you control to unleash arts on the enemy and fill the Party Gauge.

Another important battle mechanic is the Party Gauge, which is filled each time an Art hits an enemy from the correct position, or by timing the B button press correctly when it appears. Using an Art like Shulk’s Back Slash from behind an enemy will deal extra damage and fill up part of the Party Gauge. Once this gauge completely fills up, your team can unleash a Chain Attack, a powerful attack where you get to choose the Arts used by each character in succession.

A Chain Attack attack starts by allowing you to use one Art from the character you control, then it will move to the character slotted second, then the one slotted third. If the affinity between party members is high enough, you may have a chance to extend the chain attack and continue using Arts on the opponent! Use Arts of the same color in succession to deal more damage, or use Arts that inflict status effects in a particular order (Break > Topple > Daze) to make easier work of the foes!
How to Chain Attack
Each party member in Xenoblade Chronicles will play a certain role. While Shulk will be essential to use for many parts of the game due to the powers of the Monado, the other characters should be selected to fill certain roles.
- Keep Shulk in your party, especially when fighting bosses and mechons, as well as a tank.
- Build affinity between characters to power up chain attacks.
- Visit shops to upgrade Arts and get better equipment
Best Party and Team Setup

As stated above, you will almost always want to have a tank in your party who can draw Aggro and endure the enemy’s wrath. Good candidates for this are Reyn and Dunban, who have skills that allow them to absorb the Aggro of the team. For the tank, high bulk (HP / Defense) is great, but high Agility stat is even better. A high Agility stat will allow your tank to evade many of the attacks that target them, so they can survive even longer, so give them low weight equipment and Agility Up gems.

Not surprisingly, Shulk, the game’s protagonist, will be essentially to your team for most of the game. With the Monado, he has the ability to damage mechons and enchant allies so they can damage them too. The Monado also gives Shulk abilities like Speed and Shield, which can be used to save allies from dying to strong enemy attacks. He will be a mainstay in your party for the majority of the game.
As for your third member, it comes down to preference. Sharla is great for healing the party and providing buffs, Melia can deal heavy Ether damage to enemies, and Riki can inflict several negative status effects on the enemy. Experiment with different team compositions and find out what you like!
Playable Characters
Affinity is a mechanic that displays the relationship between two characters. Having a higher affinity will lead to longer Chain Attacks, as well as better Gems when Gem Crafting, an additional Skill Link, and more optional cutscenes. Since Chain Attacks are the best way to deliver tons of damage to an enemy, having a high affinity between all party members you use is very beneficial
How to Raise Affinity | Affinity Farming Guide
Affinity through active party members can be raised by accepting/completing sidequests. It can also be raised in battle through unleashing Chain Attacks, helping out / reviving teammates, and through Burst Affinity, which is done by pressing the B button as the circle closes in on the rim that shows up on screen during battles.
The Heart to Heart cutscenes, which can only be triggered between two characters who have enough affinity, will also provide extra affinity if the correct answers are selected. Be sure and read these carefully, and choose the answer that you think your ally would more likely want to hear.
Heart-to-Heart Answers and Guide
Lastly, affinity can be raised by having one part member give collectables (blue lights found on the map) to another party member in the form of presents. Each item will add or subtract a certain amount of affinity for the character it is given too, so make sure to only give items that show one or more hearts. Picking up lots of collectables and gifting them is a very easy way to increase team affinity!
Presents Guide | How to Give Gifts
Like many RPGs, Xenoblade Chronicles features a ton of weapons and armor with varying stats, as well as Gemstones, which provide bonuses. As you progress, better equipment will become available, both through chests and shops, as well as by completing side quests. Make sure you check the stats of all of your equipment frequently, and keep your best equipment on your active members.
After upgrading your team’s equipment, sell off your old equipment to shops. You may have a hard time parting with it if you like hoarding equipment, but better equipment is on its way. Use the money to by new Arts books available at each store, again prioritizing the teammates you use most. This will let you upgrade your Arts to higher levels. If you have excess money, feel free to purchase any better equipment the shop may hold.
How to Farm Money
Xenoblade Chronicles Wiki Top Page
| Xenoblade Chronicles Links | |
|---|---|
| Story Walkthrough | Beginner’s Guide |
| Characters | Side Quests |
| Arts | Heart-to-Hearts |
| Gems | Time Attack |
| Colony 6 Reconstruction | News |
| Super Bosses | Extra Skill Trees |
| All Maps List | Message Boards |
 Источник: Nintendo
С сотнями подарков на выбор может быть непросто понять, повысит или понизит ли подарок Близость каждого персонажа. Если вы сделаете неправильный выбор, вы можете даже снизить сродство между членами вашей группы. К счастью, у нас в iMore есть все, что вам нужно знать о получении коллекционных предметов и подарков в Xenoblade Chronicles: Definitive Edition.
Какие подарки?
Источник: Nintendo
Подарки или предметы коллекционирования — это предметы, которые вы найдете по всему миру Bionis. Эти предметы будут отображаться как светящиеся шары, и их можно будет подобрать, пройдя через них. Хотя коллекционные предметы можно продавать, их реальная ценность заключается в обмене с различными NPC, которых вы встречаете, или в передаче их от одного члена вашей группы другому, чтобы повысить Близость между этими двумя персонажами.
Торговля
Источник: Nintendo
Когда вы встретите именованных NPC, вам будет предоставлена возможность торговать, помимо разговора с ними. У каждого NPC есть разные предметы, которыми они будут торговать, и их количество будет увеличиваться, когда вы повысите свою близость. Сделки всегда индивидуальны, и у вас должен быть предмет большей ценности, чем тот, за который вы хотите торговать. Существуют сотни именованных NPC, каждый в разное время дня, когда они активны, и несколько различных предметов для обмена. К счастью, вам не придется их отслеживать.
- Нажмите X , чтобы открыть главное меню.
Источник: Nintendo
- Используя левый джойстик или крестовину, прокрутите вниз до Affinity Chart.
-
Нажмите A , чтобы выбрать Affinity Chart.
Источник: Nintendo
- Используя левый джойстик или крестовину, наведите кружок на область, которую вы хотите проверить.
-
Нажмите A для выбора области.
Источник: Nintendo
- Используя левый джойстик или D-pad, прокрутите вниз до NPC, о котором вы хотите узнать больше.
-
Нажмите ZL для профиля персонажа.
Источник: Nintendo
- Нажмите ZR для списка обмена персонажа.
Источник: Nintendo
Каждый именованный NPC, с которым вы говорите, будет добавлен в список, а также появится в диаграмме родства: поселения. Хотя последнее полезно для просмотра связей между NPC, по списку легче ориентироваться. В профиле каждого персонажа вы найдете их общее местоположение, более конкретное обычное место и часы активности, а также менее полезную личную информацию. В торговом списке будут все предметы, которыми они будут торговать с их текущим уровнем близости. По мере того, как вы повышаете близость к NPC, они будут предлагать больше предметов для обмена.
Как обмениваться подарками
Обмен подарками между членами вашей группы — отличный способ повысить близость и наилучшее использование всех собранных вами предметов коллекционирования.
- Нажмите X , чтобы открыть главное меню.
Источник: Nintendo
- Используя левый джойстик или крестовину, прокрутите вниз до Affinity Chart.
-
Нажмите A , чтобы выбрать Affinity Chart.
Источник: Nintendo
- Нажмите A для выбора Affinity Chart: Party.
Источник: Nintendo
- Нажмите Y сделать подарок.
-
Используя левый джойстик или крестовину, поместите кружок над персонажем, которого хотите подарить.
Источник: Nintendo
- Нажмите A выбрать персонажа, который подарит подарок.
-
Используя левый джойстик, наведите кружок на персонажа, которому хотите получить подарок.
Источник: Nintendo
- Нажмите A выбрать персонажа, который получит подарок.
-
Нажмите A выбрать подарок.
Источник: Nintendo
- Вы также можете нажмите Y , чтобы выбрать категории или изменить способ сортировки ваших предметов коллекционирования. По мере того, как вы продвигаетесь в игре, это станет более полезным, поскольку есть сотни различных предметов.
Источник: Nintendo
Если вашему персонажу подарок понравился, в нем будет от одного до четырех розовых сердечек. Точно так же, если им не понравился подарок, будет от одного до четырех черных сердец. Как только персонаж получит подарок, рядом с этим предметом в списке появятся сердечки, поэтому даже если вы случайно дадите кому-то подарок, который ему не нравится, вы можете избежать этого снова.
Коллекционные предметы
Источник: Nintendo
Существует восемь типов предметов коллекционирования: овощи, фрукты, цветы, животные, жуки, природа, детали и странные предметы. Хотя некоторые персонажи предпочитают или не любят определенные типы (Шалк, например, не любит овощи), каждый отдельный предмет имеет разные очки для каждого из ваших игровых персонажей. В классах, которые не нравятся персонажу, будут даже те, которые приносят очки. Хотя коллекционных предметов предостаточно, некоторые из них найти намного легче, чем другие, а некоторые необходимы для выполнения заданий. Если вы израсходуете все имеющиеся у вас запасы редких предметов коллекционирования, на их повторный поиск может уйти много времени.
Торгуйте особенными предметами коллекционирования
В то время как большинство предметов коллекционирования можно найти или обменять, некоторые предметы можно получить только торгуя:
- Minute Mantis можно получить только торгуя с Соней в колонии 9.
- Жука любви можно получить только торгуя с Лупой в Пограничной деревне.
- Golden Cog можно получить только торгуя с Алексеем в Колонии 9 или Колонии 6.
- Двигатель ангела Y может быть получен только путем обмена с Ракзет в джонках Деревни Скрытых Машин.
- Громовой компас можно получить только торгуя с Джараком в Эритском море.
- Монету удачи можно получить только при торговле с Макришем в Колонии 6.
- Источник любви можно получить только торгуя с Джер’эллом в колонии 6.
Из них Love Source — лучший подарок, который вы можете подарить любому персонажу. Он зарабатывает 100 баллов по всем направлениям.
Вопросов?
У вас есть вопросы о коллекционировании и подарках в Бионисе? Оставьте нам комментарий ниже и обязательно ознакомьтесь с другими нашими руководствами по Xenoblade Chronicles: Definitive Edition, чтобы раскрыть секреты Монадо!

Пока запасы есть
Apple только что прекратила выпуск почти всех iMac Pro
Apple изменила список iMac Pro на своем веб-сайте, чтобы заявить, что он продается «пока имеются в наличии», и доступна только одна конфигурация. По слухам, в этом году Apple выпустит новый iMac Pro с мини-светодиодной подсветкой.