Please select a Digital Front End from the list and press Apply Filters
Note, when downloading a print driver, please select your operating system from the «Platform» drop down menu
Пользовательская документация
Пользовательская документация
Руководство пользователя
- Released: 17.04.2013
- Размер: 10.01 MB
- Filename: WorkCentre_7425-7428-7435_userguide_ru.pdf
- Tags: User Guides
Пользовательская документация
Краткая инструкция пользователя (Казахский яз.)
- Released: 12.03.2013
- Размер: 10.88 MB
- Tags: Setup and Installation Guides, User Guides
Пользовательская документация
OS X Utilities for EFI controller for 7425/7428/7435
ColorWise Pro Tools
Common Utilities
CWS Mac Edition
EFI Hot Folders
Fiery VDP Resource Manager OSX
Fonts
- Released: 20.08.2009
- Размер: 261.71 MB
- Filename: osxutils.dmg
- Tags: User Guides
- Цифровой интерфейс: EFI Fiery Controller
Пользовательская документация
Quick Use Guide
- Released: 29.06.2009
- Размер: 14.98 MB
- Filename: qug_en_ro_ru_tu.pdf
- Tags: User Guides
- Цифровой интерфейс: built-in controller, EFI Fiery Controller
Пользовательская документация
User Guide
- Released: 29.06.2009
- Размер: 6.94 MB
- Filename: WC74XX_user_guide_ro.pdf
- Tags: User Guides
- Цифровой интерфейс: built-in controller, EFI Fiery Controller
Пользовательская документация
Quick Copying Guide
- Released: 15.03.2009
- Размер: 1.92 MB
- Filename: quick_copying_guide.pdf
- Tags: User Guides
- Цифровой интерфейс: built-in controller, EFI Fiery Controller
Пользовательская документация
Quick Networking Guide
- Released: 15.03.2009
- Размер: 1.63 MB
- Filename: quick_networking_guide.pdf
- Tags: Setup and Installation Guides
- Цифровой интерфейс: built-in controller, EFI Fiery Controller
Пользовательская документация
Quick Faxing Guide
- Released: 15.03.2009
- Размер: 1.71 MB
- Filename: quick_fax_guide.pdf
- Tags: User Guides
- Цифровой интерфейс: built-in controller, EFI Fiery Controller
Пользовательская документация
Quick Email Guide
- Released: 15.03.2009
- Размер: 1.73 MB
- Filename: quick_email_guide.pdf
- Tags: User Guides
- Цифровой интерфейс: built-in controller, EFI Fiery Controller
Пользовательская документация
WorkCentre WC7425/WC7428/WC7435 Xerox Image Quality Tools
- Released: 15.03.2009
- Filename: printer.pl
- Tags: Other Documentation
- Цифровой интерфейс: built-in controller, EFI Fiery Controller
Пользовательская документация
Stručná uživatelská příručka (Quick Use Guide)
Stručná uživatelská příručka, Gyorsismertető, Skrócona instrukcja obsługi, Petit guide d’utilisation
- Released: 10.03.2009
- Размер: 12.33 MB
- Filename: qug_cz_fr_hu_po.pdf
- Tags: User Guides
- Цифровой интерфейс: built-in controller, EFI Fiery Controller
Пользовательская документация
Hurtig betjeningsvejledning — Quick Use Guide
Pikaopas, Hurtigbruksveiledning, Snabbreferensguide
- Released: 10.03.2009
- Размер: 12.57 MB
- Filename: qug_da_fi_no_sv.pdf
- Tags: User Guides
- Цифровой интерфейс: built-in controller, EFI Fiery Controller
Пользовательская документация
Kurzübersicht (Quick Use Guide)
Guida rapida, Handleiding voor snel gebruik, Petit guide d’utilisation
- Released: 10.03.2009
- Размер: 12.20 MB
- Filename: qug_de_fr_it_nl.pdf
- Tags: User Guides
- Цифровой интерфейс: built-in controller, EFI Fiery Controller
Пользовательская документация
Quick Use Guide
- Released: 09.03.2009
- Размер: 14.33 MB
- Filename: qug_en_es_fr_pt.pdf
- Tags: User Guides
- Цифровой интерфейс: built-in controller, EFI Fiery Controller
Пользовательская документация
Kullanıcı Kılavuzu (User Guide)
- Released: 06.03.2009
- Размер: 5.63 MB
- Filename: user_guide_tu.pdf
- Tags: User Guides
- Цифровой интерфейс: built-in controller, EFI Fiery Controller
Пользовательская документация
Guía del administrador del sistema
- Released: 06.03.2009
- Размер: 2.17 MB
- Filename: sys_admin_guide_es.pdf
- Tags: System Administration Guides
- Цифровой интерфейс: built-in controller, EFI Fiery Controller
Пользовательская документация
Guide de l’administrateur système
- Released: 06.03.2009
- Размер: 2.18 MB
- Filename: sys_admin_guide_fr.pdf
- Tags: System Administration Guides
- Цифровой интерфейс: built-in controller, EFI Fiery Controller
Пользовательская документация
Guia do administrador do sistema
- Released: 06.03.2009
- Размер: 2.16 MB
- Filename: sys_admin_guide_pt.pdf
- Tags: System Administration Guides
- Цифровой интерфейс: built-in controller, EFI Fiery Controller
Пользовательская документация
Uživatelská příručka (User Guide)
- Released: 06.03.2009
- Размер: 6.09 MB
- Filename: user_guide_cs.pdf
- Tags: User Guides
- Цифровой интерфейс: built-in controller, EFI Fiery Controller
Пользовательская документация
User Guide
- Released: 06.03.2009
- Размер: 5.45 MB
- Filename: user_guide_da.pdf
- Tags: User Guides
- Цифровой интерфейс: built-in controller, EFI Fiery Controller
Пользовательская документация
Benutzerhandbuch (User Guide)
- Released: 06.03.2009
- Размер: 5.46 MB
- Filename: user_guide_de.pdf
- Tags: User Guides
- Цифровой интерфейс: built-in controller, EFI Fiery Controller
Пользовательская документация
User Guide
- Released: 06.03.2009
- Размер: 6.03 MB
- Filename: user_guide_el.pdf
- Tags: User Guides
- Цифровой интерфейс: built-in controller, EFI Fiery Controller
Пользовательская документация
User Guide
- Released: 06.03.2009
- Размер: 6.14 MB
- Filename: user_guide_en.pdf
- Tags: User Guides
- Цифровой интерфейс: built-in controller, EFI Fiery Controller
Пользовательская документация
Guía del usuario (User Guide)
- Released: 06.03.2009
- Размер: 5.11 MB
- Filename: user_guide_es.pdf
- Tags: User Guides
- Цифровой интерфейс: built-in controller, EFI Fiery Controller
Пользовательская документация
Käyttöopas — User Guide
- Released: 06.03.2009
- Размер: 5.42 MB
- Filename: user_guide_fi.pdf
- Tags: User Guides
- Цифровой интерфейс: built-in controller, EFI Fiery Controller
Пользовательская документация
Guide d’utilisation (User Guide)
- Released: 06.03.2009
- Размер: 5.90 MB
- Filename: user_guide_fr.pdf
- Tags: User Guides
- Цифровой интерфейс: built-in controller, EFI Fiery Controller
Пользовательская документация
Felhasználói útmutató (User Guide)
- Released: 06.03.2009
- Размер: 5.50 MB
- Filename: user_guide_hu.pdf
- Tags: User Guides
- Цифровой интерфейс: built-in controller, EFI Fiery Controller
Пользовательская документация
Guida dell’utente (User Guide)
- Released: 06.03.2009
- Размер: 5.45 MB
- Filename: user_guide_it.pdf
- Tags: User Guides
- Цифровой интерфейс: built-in controller, EFI Fiery Controller
Пользовательская документация
Gebruikershandleiding (User Guide)
- Released: 06.03.2009
- Размер: 5.50 MB
- Filename: user_guide_nl.pdf
- Tags: User Guides
- Цифровой интерфейс: built-in controller, EFI Fiery Controller
Пользовательская документация
Brukerhåndbok (User Guide)
- Released: 06.03.2009
- Размер: 5.41 MB
- Filename: user_guide_no.pdf
- Tags: User Guides
- Цифровой интерфейс: built-in controller, EFI Fiery Controller
Пользовательская документация
Podręcznik użytkownika (User Guide)
- Released: 06.03.2009
- Размер: 5.58 MB
- Filename: user_guide_po.pdf
- Tags: User Guides
- Цифровой интерфейс: built-in controller, EFI Fiery Controller
Пользовательская документация
Guia do usuário (User Guide)
- Released: 06.03.2009
- Размер: 5.48 MB
- Filename: user_guide_pt.pdf
- Tags: User Guides
- Цифровой интерфейс: built-in controller, EFI Fiery Controller
Пользовательская документация
Руководство пользователя (User Guide)
- Released: 06.03.2009
- Размер: 6.00 MB
- Filename: user_guide_ru.pdf
- Tags: User Guides
- Цифровой интерфейс: built-in controller, EFI Fiery Controller
Пользовательская документация
Användarhandbok — User Guide
- Released: 06.03.2009
- Размер: 5.46 MB
- Filename: user_guide_sv.pdf
- Tags: User Guides
- Цифровой интерфейс: built-in controller, EFI Fiery Controller
Пользовательская документация
WorkCentre 7425/7428/7435 Image Quality Defects and Solutions
- Released: 05.03.2009
- Размер: 2.15 MB
- Filename: Placard_7435F.pdf
- Tags: Other Documentation
- Цифровой интерфейс: built-in controller, EFI Fiery Controller
Пользовательская документация
WorkCentre 7425/7428/7435 Image Quality Scale — Defects and Solutions
- Released: 05.03.2009
- Размер: 2.17 MB
- Filename: IQ_Scale_WC7435F.pdf
- Tags: Other Documentation
- Цифровой интерфейс: built-in controller, EFI Fiery Controller
Пользовательская документация
System Administrator Guide
- Released: 05.03.2009
- Размер: 1.71 MB
- Filename: sys_admin_guide_en.pdf
- Tags: System Administration Guides
- Цифровой интерфейс: built-in controller, EFI Fiery Controller
Пользовательская документация
Customer Tips — English Only
Hints and Tips on installation and configuration of your Xerox WorkCentre, WorkCentre Pro, and Document Centre products.
- Released: 25.03.2007
- Tags: Other Documentation
- Цифровой интерфейс: built-in controller, built-in controller, EFI Fiery Controller, built-in controller
Xerox Manuals and Guides:
The main types of Xerox WORKCENTRE 7425 instructions: user guide — rules of useing and characteristics, service manual — repair, diagnostics, maintenance, operation manual — description of the main functions of Xerox WORKCENTRE 7425 equipment, etc.
Most of the instructions, that you can see on the site are uploaded by our users. If you have available a manual or document for Xerox WORKCENTRE 7425, which is currently not on the site or present in a different language version, we ask you to upload your document on website, using the «uploading form» available to all registered users.
-
Contents
-
Table of Contents
-
Troubleshooting
-
Bookmarks
Quick Links
Related Manuals for Xerox WorkCentre 7425
Summary of Contents for Xerox WorkCentre 7425
-
Page 2
Copyright © 2009 Xerox Corporation. All Rights Reserved. Unpublished rights reserved under the copyright laws of the United States. Contents of this publication may not be reproduced in any form without permission of Xerox Corporation. Copyright protection claimed includes all forms of matters of copyrightable materials and information now allowed by statutory or judicial law or hereinafter granted, including without limitation, material generated from the software programs which are displayed on the screen such as styles, templates, icons, screen displays, looks, etc. -
Page 3: Table Of Contents
Xerox Welcome Center ……..
-
Page 4: Clearing Paper Jams In Tray 1, Tray 2, Tray 3 Or Tray
Installing the Printer Drivers…………38 Choosing a Printer Driver .
-
Page 5
Printing Watermarks…………..79 Printing Mirror Images . -
Page 6
Deleting Scan Templates …………136 Managing Xerox Scan Utility Folder and Email Profiles ……136 Using the Scan to Email and Copy to Folder Tools . -
Page 7
Installing Staples …………..179 Staple Replacement for Integrated Finisher . -
Page 8
Getting Help …………..237 Control Panel Messages . -
Page 9
C Recycling and Disposal All Countries…………..259 European Union . -
Page 10
WorkCentre 7425/7428/7435 User Guide… -
Page 11
Safety This chapter includes: • Electrical Safety on page 12 • Maintenance Safety on page 14 • Operational Safety on page 15 • Symbols Marked on Printer on page 17 Your printer and the recommended supplies have been designed and tested to meet strict safety requirements. -
Page 12: Safety
Safety Electrical Safety • Use the power cord supplied with your printer. • Plug the power cord directly into a properly grounded electrical outlet. Make sure each end of the cord is securely connected. If you do not know if an outlet is grounded, ask an electrician to check the outlet.
-
Page 13
Electrical Safety The power cord is attached to the printer as a plug-in device on the back of the printer. If it is necessary to disconnect all electrical power from the printer, disconnect the power cord from the electrical outlet. Warning: Do not remove the covers or guards that are fastened with screws unless you are installing optional equipment and are specifically instructed to do so. -
Page 14: Maintenance Safety
Do not use aerosol cleaners. The use of supplies that are not approved may cause poor performance and could create a hazardous condition. • Do not burn any consumables or routine maintenance items. For information on Xerox supplies recycling programs, go to www.xerox.com/gwa. WorkCentre 7425/7428/7435…
-
Page 15: Operational Safety
Operational Safety Operational Safety This section includes: • Printer Location on page 15 • Operational Guidelines on page 15 • Printer Supplies on page 16 Your printer and supplies were designed and tested to meet strict safety requirements. These include safety agency examination, approval, and compliance with established environmental standards.
-
Page 16: Printer Supplies
Total Satisfaction Guarantee do not cover damage, malfunction, or degradation of performance caused by use of non-Xerox supplies, or the use of Xerox supplies not specified for this product. The Total Satisfaction Guarantee is available in the United States and Canada. Coverage may vary outside these areas;…
-
Page 17: Symbols Marked On Printer
Symbols Marked on Printer Symbols Marked on Printer Symbol Description Warning or Caution: Ignoring this warning could cause serious injury or even death. Ignoring this caution could cause injury or damage to the property. Hot surface on or in the printer. Use caution to avoid personal injury. Do not touch components with this symbol as personal injury could result.
-
Page 18
Safety WorkCentre 7425/7428/7435 User Guide… -
Page 19
Features This chapter includes: • Before Using the Printer on page 20 • Parts of the Printer on page 21 • Printer Configurations on page 28 • Control Panel on page 30 • More Information on page 34… -
Page 20: Features
Features Before Using the Printer Xerox Welcome Center If you need assistance during or after product installation, visit the Xerox website for online solutions and support. www.xerox.com/office/worldcontacts If you require further assistance, contact our experts at the Xerox Welcome Center. A local representative telephone number may have been provided when the product was installed.
-
Page 21: Parts Of The Printer
Parts of the Printer Parts of the Printer This section includes: • Front-Left View on page 21 • Rear-Left View on page 22 • Document Feeders on page 23 • Internal Components on page 24 • Professional Finisher (optional) on page 25 •…
-
Page 22: Rear-Left View
Features Rear-Left View wc74xx-002 1. Top left cover 6. Fax connection (optional) 2. Upper left cover 7. USB connection (optional) 3. Bottom left cover 8. USB memory card connection (optional) 4. Circuit breaker 9. Ethernet connection 5. Parallel connection (optional) WorkCentre 7425/7428/7435 User Guide…
-
Page 23: Document Feeders
Parts of the Printer Document Feeders wc74xx-004 wc74xx-005 1. Confirmation indicator 5. Document guides 2. Lever 6. Document feeder tray 3. Left cover 7. Document output tray 4. Inner cover 8. Document glass WorkCentre 7425/7428/7435 User Guide…
-
Page 24: Internal Components
Features Internal Components 1. Drum Cartridge Release Lever 2. Toner Cartridges 3. Transfer Belt Cleaner 4. Waste Toner Container 5. Drum Cartridges 6. Drum Cartridge Cover 7. Transfer Roller 8. Fuser Assembly wc74xx-003 Telephone Connections LINE3 LINE2 TE L LINE1 wc74xx-006 1.
-
Page 25: Professional Finisher (Optional)
Parts of the Printer Professional Finisher (optional) wc74xx-008 1. Front cover 5. Staple cartridge 2. Right top tray 6. Right bottom tray (Booklet Maker) 3. Exit cover 7. Booklet unit 4. Right middle tray 8. Center tray (front transport cover) Note: Center tray-upper is removed when a finisher is installed.
-
Page 26: Office Finisher Lx (Optional)
Features Office Finisher LX (optional) 1. Tray attachment 2. Booklet unit (optional) 3. Booklet unit side cover (optional) 4. Booklet staple cartridge (optional) 5. Top cover 6. Right middle tray 7. Creaser unit (optional) 8. Staple cartridge 9. Front cover 10.
-
Page 27: Integrated Finisher (Optional)
Parts of the Printer Integrated Finisher (optional) 1. Center tray Note: Center tray-upper is removed when the finisher is installed. 2. Integrated Finisher 3. Staple cartridge 4. Front cover 5. Top cover wc74xx-009 WorkCentre 7425/7428/7435 User Guide…
-
Page 28: Printer Configurations
Features Printer Configurations This section includes: • Standard Features on page 28 • WorkCentre Configurations on page 28 • Options on page 29 Standard Features The WorkCentre 7425/7428/7435 provides many capabilities to meet your copy and print needs: • Copy, print, and optional scan and fax •…
-
Page 29: Options
Data Security Kit (for regions where this is not standard) • Secure Watermark Kit • Secure Access Kit • FreeFlow SmartSend • Convenience Stapler • Xerox Common Access Card • Foreign Device Interface For more information on options, go to: www.xerox.com/office/WC7425_WC7428_WC7435supplies WorkCentre 7425/7428/7435 User Guide…
-
Page 30: Control Panel
Features Control Panel This section includes: • Control Panel Layout on page 30 • Printer Information on page 32 Control Panel Layout Touch Screen Displays and Controls • Displays the printer’s current operating status. • Provides access to copy, print, scan, and fax features. •…
-
Page 31
Control Panel Buttons wc74xx-022 1. Touch Screen 8. Stop Displays information and provides access to Temporarily stops the current job. Follow the printer functions. touch screen message to cancel or resume your job. 2. Services Button 9. Start Displays the printer functions on the touch screen. -
Page 32: Printer Information
Features Printer Information Your printer provides status information both from the touch screen on the control panel and in printed reports. Usage and billing information is also available from the touch screen. Status Information View job status to check and manage current and pending jobs: 1.
-
Page 33: Auditron Setup
Control Panel Auditron Setup Auditron is used to track billing and control access to printer features for each user. Auditron Mode controls access to copy, scan, fax or print. After Auditron Mode is enabled, the user will be required press the Log In/Log Out button and then enter their User ID information in order to use the printer. To use Auditron, it is recommended that you first set up user accounts.
-
Page 34: More Information
Packaged with printer Functional Posters Packaged with printer User Guide (PDF) Software and Documentation CD-ROM www.xerox.com/office/WC7425_WC7428_WC7435docs www.xerox.com/office/WC7425_WC7428_WC7435docs System Administrator Guide Recommended Media List www.xerox.com/paper (United States) www.xerox.com/europaper (Europe) Printer Management Tools www.xerox.com/office/WC7425_WC7428_WC7435drivers Online Support Assistant www.xerox.com/office/WC7425_WC7428_WC7435support Technical Support www.xerox.com/support Information pages…
-
Page 35: Network Basics
Network Basics This chapter includes: • Choosing a Connection Method on page 36 • Installing the Printer Drivers on page 38 • CentreWare Internet Services on page 42 See also: Online Support Assistant at www.xerox.com/office/WC7425_WC7428_WC7435support…
-
Page 36: Choosing A Connection Method
Network Basics Choosing a Connection Method The printer can be connected to an Ethernet network, or optionally, using a USB cable. • Ethernet: Allows multiple computers to communicate with the printer. A network connection is required for each computer. With a network connection, you can access printer settings and status information using CentreWare Internet Services (a Web-based interface).
-
Page 37: Connecting Via Usb
2. Connect the A end of a USB 2.0 A/B cable to your computer, and the B end to the printer’s USB port. 3. Power on the printer. 4. Power on the computer. See also: System Administrator Guide at www.xerox.com/office/WC7425_WC7428_WC7435docs Online Support Assistant at www.xerox.com/office/WC7425_WC7428_WC7435support WorkCentre 7425/7428/7435 User Guide…
-
Page 38: Installing The Printer Drivers
41 Choosing a Printer Driver To access special printing options, you must install a Xerox printer driver. Xerox provides drivers for a variety of page description languages and operating systems. The following printer drivers are available: Printer Driver…
-
Page 39: Installing The Driver (Windows 2000 Or Later)
7. Select the desired printer driver: • PostScript • PCL 5 • PCL 6 8. Select the desired scan driver: • TWAIN • • Enable Xerox Scan Utility 9. Follow the onscreen instructions. See also: Online Support Assistant at www.xerox.com/office/WC7425_WC7428_WC7435support WorkCentre 7425/7428/7435 User Guide…
-
Page 40: Installing The Driver (Macintosh Os X 10.4 Or Later)
3. Select USB from the drop-down menu. 4. Select the printer in the window. 5. Select Xerox from the manufacturers in the drop-down menu. 6. Select the appropriate printer configuration from the list of available printers. 7. Click the Add button.
-
Page 41: Installing The Driver (Unix/Linux)
• HPUX 11.0 / 11i • Solaris SPARC 8/9/10 • Solaris x86 10 • Redhat Fedora Core 5 • Redhat Enterprise Linux v4 • OpenSuse 11 For more information, see the System Administrator Guide at www.xerox.com/office/WC7425_WC7428_WC7435docs. WorkCentre 7425/7428/7435 User Guide…
-
Page 42: Centreware Internet Services
Network Basics CentreWare Internet Services CentreWare Internet Services (CentreWare IS) provides a simple interface that enables you to manage and monitor your printer from your computer using the printer’s embedded Web server. It provides you with access to printer status, printing and scanning functions. Using CentreWare IS, you can access your printer over a TCP/IP network using a Web browser.
-
Page 43: Printing
Printing This chapter includes: • Overview on page 44 • Supported Media on page 45 • Loading Media on page 47 • Printing on Special Media on page 60 • Setting Printing Options on page 63 • Printing on Both Sides of the Paper on page 67 •…
-
Page 44: Overview
CMD+P on a Macintosh for most software applications). 3. In your application’s print dialog box, select the printer, then click Properties or Preferences (Windows), or Xerox Features for Macintosh. The title of the button may vary depending on your application.
-
Page 45: Supported Media
Damage caused by using unsupported paper, transparencies, and other specialty media is not covered by the Xerox warranty, service agreement, or Total Satisfaction Guarantee. The Total Satisfaction Guarantee is available in the United States and Canada. Coverage may vary outside these areas;…
-
Page 46: Paper Storage Guidelines
Printing Do not use the following: • Rough or porous media • Inkjet paper • Transfer paper • Dura paper • Non-laser glossy or coated paper • Paper that has been photocopied • Paper that has been folded or wrinkled •…
-
Page 47: Loading Media
Loading Media Loading Media This section includes: • Supported Media Sizes and Weights on page 48 • Tray Media Compatibility on page 49 • Loading Media in Tray 1, 2, 3 or 4 on page 51 • Loading Media in Tray 5 (Bypass) on page 52 •…
-
Page 48: Supported Media Sizes And Weights
Printing Supported Media Sizes and Weights Tray # Supported Standard Size Paper Basis Paper Stack Weight Capacity Height Maximum Printer Min: A5 SEF 60 – 256 gsm 520 sheets 54 mm Max: A3 SEF, 11×17” SEF 3 Tray Module 2, 3, 4 Min: A5 SEF 60 –…
-
Page 49: Tray Media Compatibility
Loading Media Tray Media Compatibility Tray # Supported Paper Type Printer Tray 1 and 3 Tray Module 1, 2, 3, 4 Plain Plain Reload Punched Letterhead Transparency Heavyweight (HW) (106 – 169 gsm) HW Reload (106 – 169 gsm) Extra-HW (X-HW) (170 – 256 gsm) X-HW Reload (170 –…
-
Page 50
Printing Bypass Plain Plain Reload Punched Letterhead Transparency Lightweight Heavyweight (HW) (106 – 169 gsm) HW Reload (106 – 169 gsm) Extra-HW (X-HW) (170 – 256 gsm) X-HW Reload (170 – 256 gsm) Recycled Bond Labels (106 – 169 gsm) Pre-Printed Envelope Gloss (106 –… -
Page 51: Loading Media In Tray 1, 2, 3 Or 4
Loading Media Loading Media in Tray 1, 2, 3 or 4 To load paper or other media: 1. Pull the paper tray out towards you. wc74xx-010 2. If required, move the paper tray guides further out to load the new paper. To adjust the side and rear guides, pinch the guide lever on each guide and slide the guides to their new position.
-
Page 52: Loading Media In Tray 5 (Bypass)
Printing 3. Before loading paper into the paper trays, fan the edges. This procedure separates any sheets of paper that are stuck together and reduces the possibility of paper jams. Load the paper against the left-hand side of the tray. Do not load paper above the maximum fill line.
-
Page 53: Loading Envelopes In Tray 5 (Bypass)
Loading Media 1. Open the bypass tray by rotating it outward. wc74xx-024 2. Insert the paper either long edge or short edge first. Note: Paper sizes wider than 12.6 inches/320 mm must be fed short edge first. Note: Hole punch paper must be loaded with the holes on the trailing (left) edge. Note: Do not load paper above the maximum fill line.
-
Page 54: Configuring The Envelope Tray
Printing 2. Load envelopes in the bypass tray with the flap side up. The flaps should always be closed and on the leading (right) edge. wc74xx-208 3. Center the stack, then slide the guides until they are just touching the edges of the stack. 4.
-
Page 55: Loading Envelopes In The Envelope Tray
Loading Media Loading Envelopes in the Envelope Tray To load envelopes in the envelope tray: 1. Pull the envelope tray out towards you. 2. Load the envelopes in the envelope tray flap side down. Flaps should be closed and on the leading edge.
-
Page 56
Printing 2. If required, move the paper tray guides further out to load the new paper. To adjust the side and rear guides, pinch the guide lever on each guide and slide the guides to their new position. To secure the guides in position, release the levers. wc74xx-189 8.5″… -
Page 57
Loading Media 3. Before loading paper into the paper trays, fan the edges. This procedure separates any sheets of paper that are stuck together and reduces the possibility of paper jams. wc74xx-191 For 1-Sided printing: • Load the paper against the left-hand side of the tray. •… -
Page 58
Printing 5. Push the tray completely into the printer. wc74xx-193 6. If required, touch Change Settings on the touch screen, then choose paper size, type, or color on the printer’s touch screen, touch Save, then touch Confirm. 7. Set the printer to detect the paper size you loaded automatically, or manually specify the size using the touch screen. -
Page 59: Loading Paper In The Tandem Tray Module
Loading Media Loading Paper in the Tandem Tray Module The Tandem Tray Module allows you to load larger amounts of paper for fewer printing interruptions. It contains three trays. Tray 2 holds paper sizes up to 12 x 18 inches/SRA3. Trays 3 and 4 hold letter/A4 size paper.
-
Page 60: Printing On Special Media
Damage caused by using unsupported paper, transparencies, or other specialty media is not covered by the Xerox warranty, service agreement, or Total Satisfaction Guarantee. The Total Satisfaction Guarantee is available in the United States and Canada. Coverage may vary outside these areas;…
-
Page 61: Printing On Labels
Printing on Labels For a listing of trays that support label printing, see Tray Media Compatibility on page 49. To order paper, transparencies, or other specialty media, contact your local reseller or go to the Xerox Supplies website at www.xerox.com/office/WC7425_WC7428_WC7435supplies. Guidelines •…
-
Page 62: Printing On Glossy Paper
For a listing of trays that support glossy paper, see Tray Media Compatibility on page 49. To order paper, transparencies, or other specialty media, contact your local reseller or go to the Xerox Supplies website for your printer: www.xerox.com/office/WC7425_WC7428_WC7435supplies. Guidelines •…
-
Page 63: Setting Printing Options
Setting Printing Options Setting Printing Options Printing options (also called printer driver options) such as custom size and 2-Sided printing, are selected in Printing Preferences (Windows), and Xerox Features (Macintosh). This section includes: • Windows Printing Options on page 63 •…
-
Page 64
Printing For example, if you want to print to both sides of the paper for most jobs, specify 2-Sided printing in Printing Preferences. To change Printing Preferences: 1. In the Windows Status Bar, click Start, Settings, then click Printers and Faxes. 2. -
Page 65: Macintosh Printing Options
Setting Printing Options Macintosh Printing Options See the following table for specific printing options in the Macintosh PostScript printer driver: Printing Options Paper/Output Job type: Normal Print, Secure Print, Sample Set, Delay Print, Save to Mailbox Paper: Automatically Select, Printer Default Type, Other Color, Other Type, Transparency Separators 2-Sided Printing: 1-Sided Printing, 2-Sided Printing, 2-Sided Printing, Flip on Short Edge…
-
Page 66
Printing Saving a Set of Commonly Used Printing Options (Macintosh) You can name and save a set of printing options, so that you can quickly apply them to future print jobs. To save a set of printing options: 1. Choose the desired printing options from the drop-down lists on the Print menu screen. 2. -
Page 67: Printing On Both Sides Of The Paper
Printing on Both Sides of the Paper Printing on Both Sides of the Paper This section includes: • Automatic 2-Sided Printing Guidelines on page 67 • Printing a 2-Sided Document on page 68 • 2-Sided Page Layout Options on page 68 Automatic 2-Sided Printing Guidelines A 2-Sided document can be printed on supported paper.
-
Page 68: Printing A 2-Sided Document
Printing Printing a 2-Sided Document See the following table for 2-Sided document printer driver settings: Operating System Steps Windows Vista, Windows 2000, Click the Paper/Output tab. Windows XP, or Windows Server Choose an option under 2-Sided Printing: 2003 2-Sided Print 2-Sided Print, Flip on Short Edge Macintosh OS X, version 10.3 or In the Print dialog box, click Layout.
-
Page 69: Selecting Which Paper To Use
Selecting Which Paper to Use Selecting Which Paper to Use When you send your print job to the printer, you can choose to let the printer automatically select which paper to use based on your document size and the paper type you select, or you can force the printer to use paper from a specific tray.
-
Page 70: Printing Multiple Pages On A Single Sheet (N-Up)
Printing Printing Multiple Pages on a Single Sheet (N-Up) When printing a multiple-page document, you can print more than one page on a single sheet of paper. You can print one, two, four, six, nine, or 16 pages per side. To print multiple pages on a single sheet of paper in a supported driver: Windows (2000 or later) 1.
-
Page 71: Printing Booklets
Printing Booklets Printing Booklets With 2-Sided printing, you can print a document in the form of a small book. Create booklets for any paper size that is supported for automatic 2-Sided printing. The driver automatically reduces each page image and prints four pages per sheet of paper (two on each side). The pages are printed in the correct order so that you can fold and staple the pages to create a booklet.
-
Page 72
Macintosh OS X (version 10.3 or later) driver 1. In the Print dialog box, click Xerox Features, then click the Layout/Watermark drop-down list. 2. From the Booklet Layout drop-down list, click Enable. You can also click Draw Page Borders or No Page Borders. -
Page 73: Using Color Corrections
Commercial, SNAP, SWOP, EuroScale or Japan Color. Macintosh OS X (version 10.3 or later) driver 1. In the Print dialog box, click Xerox Features, then click the Image Options drop-down list. 2. In the Output Color Corrections drop-down list, click Auto, sRGB or None.
-
Page 74: Printing In Black And White
1. Click the Color Options tab. 2. Click the Black and White option. Macintosh OS X (version 10.3 or later) driver 1. In the Print dialog box, click Xerox Features, then click the Output Color drop-down list. 2. Click Grayscale. WorkCentre 7425/7428/7435…
-
Page 75: Transparency Separators
Macintosh OS X (version 10.3 or later) driver 1. In the Print dialog box, click Xerox Features, then click the Paper Output drop-down list. 2. Click the button to the right of the paper summary to display the paper selection drop-down menu.
-
Page 76: Printing Cover Pages
Printing Printing Cover Pages A cover page is the first or last page of a document. The printer enables you to choose a different paper source for the cover page than for the body of a document. For instance, use your company letterhead for the first page of a document, or use heavyweight paper for the first and last pages of a report.
-
Page 77
Printing Cover Pages For the back of your front cover to remain blank when 2-Sided printing, page two of your document must be blank. For the back cover of your document to remain blank, see the following table for inserting blank pages. Print Option Last Page of Text Blank Pages… -
Page 78: Scaling
Printing Scaling You can reduce or enlarge your page images when they are printed by selecting a scaling value between 25 and 400 percent. The default is 100 percent. 100% 200% To select scaling in a supported driver: Windows 2000 or later 1.
-
Page 79: Printing Watermarks
Printing Watermarks Printing Watermarks A watermark is additional text that can be printed across one or more pages. For example, terms like Draft and Confidential, which you might stamp on a page before distribution, can be inserted with a watermark. In some Windows drivers you can: •…
-
Page 80
Printing Macintosh OS X (version 10.3 or later) driver 1. In the Print dialog box, click Xerox Features, then click Layout/Watermark. • To use an existing watermark, choose it from the Watermark drop-down list. • To modify the watermark, click Edit in the Watermark drop-down list to display the Watermark Editor dialog box. -
Page 81: Printing Mirror Images
1. Click the Advanced tab. 2. Under Image Options, click On for Mirrored Output. Macintosh OS X (version 10.3 or later) driver 1. In the Print dialog box, click Xerox Features, then click Image Options. 2. In Invert Image, click Mirror Image. WorkCentre 7425/7428/7435…
-
Page 82: Creating And Saving Custom Sizes
Printing Creating and Saving Custom Sizes Custom size paper can print from Tray 5. You can save custom size paper settings in a supported printer driver. Since these custom sizes are saved in your computer’s operating system, they are available for you to select in your applications.
-
Page 83: Job Completion Notification
Job Completion Notification Job Completion Notification You can choose to be notified when your job is done printing. A message appears in the lower right corner of your computer screen with the name of the job and the name of the printer where it was printed.
-
Page 84: Printing Special Job Types
Printing Printing Special Job Types You can choose one of the following special job types: • Secure Print: Prints the job only after you choose your name and enter your four-digit numeric password on the printer touch screen. Sample Set: Prints one copy of the job so that you can proof the copy. To print additional copies, •…
-
Page 85: Printing Or Deleting Sample Set Print Jobs
Printing Special Job Types Printing or Deleting Sample Set Print Jobs 1. On the printer control panel, press Job Status. The Active Jobs tab displays. 2. Touch the desired job, then choose the desired action from the pop up menu. Printing or Deleting Delay Print Jobs 1.
-
Page 86
Printing WorkCentre 7425/7428/7435 User Guide… -
Page 87: Copying
Copying This chapter includes: • Basic Copying on page 88 • Adjusting Copy Options on page 90…
-
Page 88: Basic Copying
Copying Basic Copying To make copies: 1. Load your original documents. Use the document glass for single copies, or the document feeder for multiple pages. wc74xx-203 Document Glass Lift the document feeder cover and place the original facedown, toward the back-left corner of the document glass.
-
Page 89
Basic Copying 4. Use the keypad on the right side of the control panel to enter the number of copies. The number of copies selected appears in the upper-right corner of the touch screen. • To correct the number of copies entered using the keypad, press the yellow Clear All button. •… -
Page 90: Adjusting Copy Options
Copying Adjusting Copy Options This section includes: • Basic Settings on page 90 • Image Quality Adjustments on page 94 • Layout Adjustments on page 97 • Output Format Adjustments on page 100 • Advanced Copying on page 105 Basic Settings Use the Copy tab to change the following basic settings: •…
-
Page 91: Reducing Or Enlarging The Image
Adjusting Copy Options Reducing or Enlarging the Image Image size can be reduced to a maximum of 25% of original size or enlarged to a maximum of 400% of original size. To reduce or enlarge the image: 1. Touch Copy on the touch screen. 2.
-
Page 92: Specifying 2-Sided Originals For Copies
Copying Specifying 2-Sided Originals for Copies The document feeder can be used to copy one or both sides of 2-Sided originals. You can also create 1- Sided or 2-Sided copies from 2-Sided originals. To select the sides to copy: 1. Touch Copy on the touch screen. 2.
-
Page 93: Stapling Copies
Adjusting Copy Options Stapling Copies If your printer has a finisher with a stapler, copies can be automatically stapled. To select stapling: 1. Touch Copy on the touch screen. 2. If the original is: a. Collated: under Copy Output, touch Collated 1 Staple or Collated 2 Staples. b.
-
Page 94: Image Quality Adjustments
Copying Image Quality Adjustments Use the Image Quality tab on the touch screen to change the following image quality settings: • Specifying the Original Type on page 94 • Adjusting the Darkness, Sharpness, and Saturation on page 94 • Automatically Suppressing Background Variations on page 94 •…
-
Page 95: Adjusting The Contrast
Adjusting Copy Options Auto Suppression setting to minimize the sensitivity of the printer to variations in light background colors. To change this setting: 1. Touch Copy on the touch screen, then touch the Image Quality tab. 2. Touch Image Enhancement. 3.
-
Page 96: Adjusting The Color Balance
Copying Adjusting the Color Balance If you have a color original, you can adjust the balance between the primary printing colors (cyan, magenta, yellow and black). To adjust the color balance: 1. Touch Copy on the touch screen, then touch the Image Quality tab. 2.
-
Page 97: Layout Adjustments
Adjusting Copy Options Layout Adjustments Use the Layout Adjustment tab to change the following settings: • Book Copying on page 97 • 2-Sided Book Copying on page 98 • Specifying the Original Size on page 98 • Erasing the Edges of Copy Documents on page 98 •…
-
Page 98: Sided Book Copying
Copying 2-Sided Book Copying This feature allows you to make 2-Sided copies of facing pages of the original bound document. Note: This feature and Book Copying on page 97 cannot be activated simultaneously. Note: You must use the document glass to make copies from books, magazines, or pamphlets. Do not place bound originals in the document feeder.
-
Page 99: Shifting The Image
Adjusting Copy Options 4. To specify different amounts for the edges: a. Touch Individual Edges. b. Touch the up or down arrow to specify the amount to erase from each edge. c. To specify the original’s orientation as you load it in the document feeder or document glass, touch either Upright Image or Sideways Image (top to left), then touch Save.
-
Page 100: Output Format Adjustments
Copying Rotating the Image If the orientation of the paper currently loaded in the tray differs from that of your original, the printer automatically rotates the copy to fit on the paper. 1. Touch Copy on the touch screen, then touch the Layout Adjustment tab. 2.
-
Page 101
Adjusting Copy Options Creating Booklets Copies can be printed in the form of a booklet. The page images are reduced to print two images per side of each page. You can then fold and staple the pages to create the booklet. With the appropriate finisher installed, the printer can crease or fold and staple the pages automatically. -
Page 102: Adding Annotations
Copying 4. To select the number of original pages for each sheet of paper, touch 2 Pages Up, 4 Pages Up or 8 Pages Up. For 4 Pages Up or 8 Pages Up, touch the desired Reading Order. 5. To change the orientation of the copies, touch Original Orientation, then touch Upright or Sideways (Top to Left), then touch Save.
-
Page 103
Adjusting Copy Options 3. To insert a comment: a. Touch Comment, then on the next screen, touch Comment again. b. On the next screen, touch the desired comment in the list of stored comments. c. To create a comment, select a comment not in use, then touch Edit. Using the on-screen keyboard, type the new comment, then touch Save. -
Page 104
Copying 7. To specify the original’s orientation as you load it in the document feeder or document glass, Original Orientation, then touch either Upright Image or Sideways Image (Top to Left), then touch Save. 8. To change the format used for annotations: a. -
Page 105: Advanced Copying
Adjusting Copy Options 7. The watermark image is faint so the content of the page can be seen. To make the watermark visible on copies used as originals, touch Watermark Effects, then touch Embossed or Outline, then touch Save. 8. Touch Save. ID Card Copying This feature allows you to copy both sides of a small original, such as an ID card, onto the same side of a page.
-
Page 106: Combining Original Sets
Copying 4. Touch the Sample Job button, then touch Sample Job On. 5. Touch Save. 6. Press the green Start button. 7. Inspect the sample print. • If acceptable, touch Start on the touch screen to print the remaining copies. Do not use the green start button on the printer control panel.
-
Page 107: Retrieving Saved Copy Settings
Adjusting Copy Options 3. To delete everything outside the specified area when copying: a. Touch Delete Outside. b. The area is defined by the rectangle formed between the points as shown on the touch screen. Touch Area 1, then touch each coordinate on the touch screen. Use the numeric keypad on the printer control panel to enter the coordinate values for X1, X2, Y1 and Y2.
-
Page 108: Building A Job
Copying Building a Job If you have a copy job that includes a variety of originals that require different copy settings, you can use this feature to “build” the job. Each “segment” can use different copy settings. After all segments are programmed and scanned (stored in printer memory), the printer prints the complete copy job.
-
Page 109
Adjusting Copy Options 3. Select from: a. Copy Output: touch Paper Supply, Stapling, Collation and Output Destination/Offset options, then touch Save. b. Booklet Creation: See Booklet Creation on page 93. Select settings, then touch Save. c. Covers: See Including Covers on page 102. -
Page 110
Copying WorkCentre 7425/7428/7435 User Guide… -
Page 111
Faxing This chapter includes: • Fax Overview on page 112 • Sending a Fax on page 113 • Server Fax on page 114 • Sending an Internet Fax on page 116 • Faxing from your Computer on page 117 • Receiving Faxes on page 118 •… -
Page 112: Faxing
A telephone line connected to the printer is not required. Enabling and Configuring Fax Services Before you can send a fax from the printer, the system administrator must enable fax services. For more information see the System Administrator Guide at www.xerox.com/office/WC7425_WC7428_WC7435docs. WorkCentre 7425/7428/7435 User Guide…
-
Page 113: Sending A Fax
Sending a Fax 1. Load your document. • Document Glass: Place the first page of the document facedown on the document glass with the top of the page toward the back-left corner of the document glass. Document Feeder: Remove any staples and paper clips from pages and insert them faceup in •…
-
Page 114: Server Fax
(phone number). Before you can send a Server Fax, the system administrator must enable Server Fax service. For more information see the System Administrator Guide at www.xerox.com/office/WC7425_WC7428_WC7435docs. Sending a Server Fax To send a Server Fax: 1. Load your document.
-
Page 115
8. To fax multiple documents, during scanning touch Next Original, then load the next document to be faxed. a. Press the green Start button or touch Start on the touch screen. b. If scanning from the document glass, choose the Original Size, then press the green Start button again. -
Page 116: Sending An Internet Fax
Before you can send an Internet Fax, the system administrator must enable Internet Fax service, and an SMTP server must be configured. For more information see the System Administrator Guide at www.xerox.com/office/WC7425_WC7428_WC7435docs. To send an Internet Fax: 1. Load your document.
-
Page 117: Faxing From Your Computer
Faxing from your Computer Faxing from your Computer This optional feature allows you to fax a file from your computer. 1. From the application, click File, then Print, then choose the printer. 2. Click Properties, then use the Job Type menu to choose Fax. 3.
-
Page 118: Receiving Faxes
Faxing Receiving Faxes The printer must be configured by the system administrator to receive and print faxes, server faxes and internet faxes. For more information see the System Administrator Guide at www.xerox.com/office/WC7425_WC7428_WC7435docs. WorkCentre 7425/7428/7435 User Guide…
-
Page 119: Selecting Fax Options
Selecting Fax Options Selecting Fax Options This section includes: • Lighten/Darken on page 119 • Setting 2-Sided Faxing on page 119 • Selecting the Original Type on page 119 • Setting the Fax Resolution on page 120 • Setting Original Size on page 120 •…
-
Page 120: Setting The Fax Resolution
Faxing Setting the Fax Resolution On the printer touch screen, under Resolution, touch an option in the list: • Standard 200×100 dpi • Fine 200 dpi • Super Fine 400 dpi Super Fine 600 dpi • Setting Original Size 1. On the printer touch screen, touch the Layout Adjustment tab. 2.
-
Page 121: Additional Fax Options
Selecting Fax Options 3. Touch the pending fax job from the list. 4. Touch Delete. Additional Fax options You can specify how your fax document is transmitted and how it is printed on the receiving fax machine. To make these optional settings, on the printer touch screen, touch the Fax Options tab. Then, choose from the following options: Option Values…
-
Page 122
Faxing Additional Internet Fax options are available. On the printer touch screen, touch the Internet Fax Options tab. Then, choose from the following options: Option Values Acknowledgement Report Confirmation Options: No Report, Print Report Read Receipts On, Off Internet Fax Profiles Tiff-S, Tiff-T, Tiff-J An additional Server Fax option is available. -
Page 123: Adding Addresses To The Address Book
Adding Addresses to the Address Book Adding Addresses to the Address Book The address book can store fax, Internet fax, email and server addresses. To create address book entries: 1. On the printer control panel, press the Machine Status button. 2.
-
Page 124
Faxing WorkCentre 7425/7428/7435 User Guide… -
Page 125
• Scan to Folder on page 131 • Scan to PC on page 133 • Using the Xerox Scan Utility on page 134 • Managing Images at Your Computer Using CentreWare IS on page 144 • Setting Scan Options on page 147… -
Page 126: Scanning
Scan to Folder: scan the original document and store the image on the printer’s hard drive • Scan to Home: scan the original document to your home directory • Creating scan templates and downloading images to your computer using Xerox Scan Utility • Importing scan images into applications using TWAIN Note: Scanning functions require installation of the Scan Drivers.
-
Page 127: Loading Original Documents
Loading Original Documents All scanning tasks begin with loading the original document in the printer. You can use the document glass for single page jobs, or originals that will not feed through the document feeder. The document feeder can be used for multiple page or single page jobs. To load documents: wc74xx-203 Document Glass…
-
Page 128: Scan To Email
Setting Scan Options on page 147. Note: If scanning to email is not enabled, contact your system administrator. For more information, see the System Administrator Guide at www.xerox.com/office/WC7425_WC7428_WC7435docs. Setting Email Options You can change the following email settings: • File Name •…
-
Page 129
Scan to Email To request a read receipt: 1. On the printer control panel, press the Services button. 2. Touch the E-Mail icon, then touch the E-mail Options tab. 3. Touch Read Receipts, then touch On. WorkCentre 7425/7428/7435 User Guide… -
Page 130: Network Scanning
5. Place the document original in the document feeder or on the document glass, then press the green Start button. Note: If Network Scanning is not enabled, contact your system administrator. Additional templates can be created by the system administrator. For more information, see the System Administrator Guide at www.xerox.com/office/WC7425_WC7428_WC7435docs. WorkCentre 7425/7428/7435 User Guide…
-
Page 131: Scan To Folder
Scan to Folder Scan to Folder This section includes: • Creating a Folder on page 131 • Scanning to a Folder on page 131 • Send from Folder on page 132 • Managing Images at Your Computer Using CentreWare IS on page 144 Scan to Folder is the simplest scanning method.
-
Page 132: Send From Folder
Note: If Send from Folder is not enabled, contact your system administrator. For more information, see the System Administrator Guide at www.xerox.com/office/WC7425_WC7428_WC7435docs. Using Job Flow Sheets Job Flow Sheets allow you to execute a series of registered actions. The target of a Job Flow Sheet is a document stored in a folder.
-
Page 133: Scan To Pc
Start button. 7. Access the electronic version of the document at the destination computer. 8. If Scan to PC is not enabled, contact your system administrator. For more information, see the System Administrator Guide at www.xerox.com/office/WC7425_WC7428_WC7435docs. WorkCentre 7425/7428/7435 User Guide…
-
Page 134: Using The Xerox Scan Utility
142 The Xerox Scan Utility (XSU) is a tool that allows you to scan images from the printer to your computer. Using XSU, you can create scan templates, preview images, copy images to a folder and copy images to email.
-
Page 135
Select one of the following options: • Leave the Save a copy in Xerox Scan Utility option checked. This enables thumbnail views of the scanned images to remain in the Copy to Folder and Scan to Email tabs. This is the default setting. -
Page 136: Deleting Scan Templates
5. When prompted, confirm that you want to delete the template. The template will be deleted from the template list in Xerox Scan Utility and from the template list on the printer’s control panel. Managing Xerox Scan Utility Folder and Email Profiles This section includes: •…
-
Page 137: Creating Or Editing Email Profiles
1. Access the Xerox Scan Utility on your computer: • Windows: Right-click the Xerox Scan Utility icon in the taskbar, then select Open Xerox Scan Utility. If the icon does not appear in the taskbar, click Start, select All Programs (or Programs if you are using Windows Classic View), select Xerox Office Printing, select Scanning, then select Xerox Scan Utility.
-
Page 138: Deleting Folder Profiles
Scanning 1. Access the Xerox Scan Utility on your computer: Windows: Right-click the Xerox Scan Utility icon in the taskbar, then select Open Xerox Scan • Utility. If the icon does not appear in the taskbar, click Start, select All Programs (or Programs if you are using Windows Classic View), select Xerox Office Printing, select Scanning, then select Xerox Scan Utility.
-
Page 139: Using The Scan To Email And Copy To Folder Tools
Using the Scan to Email and Copy to Folder Tools Use the Scan to Email or Copy to Folder tools in the Xerox Scan Utility to attach scanned images to email messages or copy them to local or network folders.
-
Page 140
3. Select one or more images you want to send in an email. 4. Enter a name in the Base Attachment Name field. The Xerox Scan Utility appends the scan date and time information for each image to the end of the file name. -
Page 141
3. Select one or more images you want to copy to a folder. 4. Enter a name for the image in the Base File Name field. The Xerox Scan Utility appends the scan date and time information for each image to the end of the file name. -
Page 142: Importing Scanned Files Into An Application
Select the scanner, then click the Custom Insert button. The Xerox Scan Utility window displays thumbnails of the scanned images. The date and time that the image was scanned appears below each thumbnail. If you move your mouse over the thumbnail, a pop-up message displays information including the resolution and size of the image file.
-
Page 143
Select the scanner, then click the Acquire button. The Scan to Email and Copy to Folder tabs on the Xerox Scan Utility display thumbnails of the images. Information about each image, including the template used, resolution, size of the image file, and the profile name and settings appears to the right of the thumbnail. -
Page 144: Managing Images At Your Computer Using Centreware Is
Scanning Managing Images at Your Computer Using CentreWare IS This section contains the following: • Downloading Images From a Folder on page 144 • Printing Images From a Folder on page 145 • Deleting Image Files From a Folder on page 145 Downloading Images From a Folder To download images from a folder in the printer: 1.
-
Page 145: Printing Images From A Folder
Managing Images at Your Computer Using CentreWare IS Printing Images From a Folder To print images from a folder on the printer: 1. Launch your Web browser. 2. Type the printer’s IP address into the Web browser’s address bar, then press Enter to open CentreWare IS.
-
Page 146
Scanning 5. In the Folder window, click on the folder. For a Private Folder, in the Folder Passcode window, type the password, then click Apply. 6. The Folder: List of Files window contains your scanned image or images. 7. Click the checkbox to the left of the file you wish to delete. 8. -
Page 147: Setting Scan Options
Setting Scan Options Setting Scan Options The scanning features in your printer use templates that define the scan settings and destination for the image. To change any of the scan settings, use the four groups at the bottom of the touch screen: •…
-
Page 148: Filing Options
Scanning To use Advanced Settings: 1. On the printer control panel, press the Services button. 2. On the printer touch screen, touch Network Scanning, then touch the Advanced Settings tab. Then touch the desired setting. Setting Image Options Choose: from Lightness/Darkness or Sharpness Image Enhancement Choose from: Auto Suppression or Contrast Resolution…
-
Page 149
Setting Scan Options To use Filing Options: 1. On the printer control panel, press the Services button. 2. On the printer touch screen, touch Network Scanning, then touch the Filing Options tab. Then touch the desired setting. Setting File Name Enter a filename using the touch screen keyboard. -
Page 150
Scanning WorkCentre 7425/7428/7435 User Guide… -
Page 151: Maintenance
Maintenance This chapter includes: • Maintenance and Cleaning on page 152 • Ordering Supplies on page 189…
-
Page 152: Maintenance And Cleaning
Maintenance Maintenance and Cleaning This section includes: • General Precautions on page 152 • Locating the Serial Number on page 153 • Usage Counters on page 153 • Cleaning the Printer on page 154 • Replacing the Toner Cartridges on page 159 •…
-
Page 153: Locating The Serial Number
Locating the Serial Number When ordering supplies or contacting Xerox for assistance, you will be asked to provide your printer serial number. The serial number is located on the printer frame. Open Cover A on the left side of the printer.
-
Page 154: Cleaning The Printer
Use a lint-free cloth lightly dampened with Xerox Anti-Static or another suitable non-abrasive glass cleaner to clean the glass. Use a lint-free cloth, Xerox Cleaning Fluid or Xerox Film Remover to clean the under side of the document cover and the document feeder.
-
Page 155: Cleaning The Document Feeder Rollers
Cleaning the Printer Use a lightly dampened cloth to clean the outside of the document feeder, output trays, paper trays and outside areas of your printer. wc74xx-072 Cleaning the Document Feeder Rollers Dirt on the document feeder rollers can cause paper jams or deteriorate print quality. For best performance, clean the document feeder rollers once a month.
-
Page 156
Maintenance 1. Open the printer’s front cover. wc74xx-074 2. Turn the orange lever to the left. wc74xx-075 3. Pull the drum cartridge cover down until it clicks into the open position. wc74xx-076 WorkCentre 7425/7428/7435 User Guide… -
Page 157
Cleaning the Printer 4. Each of the four printheads has its own cleaning tool. Slowly pull the printhead lens cleaner out until the three dots are visible. Note: The printhead lens cleaner does not detach from the printer. wc74xx-077 5. Slowly push the printhead lens cleaner back into the printhead until it stops. wc74xx-078 6. -
Page 158
Maintenance 8. Turn the orange lever to the right to return it to the locked position. wc74xx-079 9. Close the printer front cover. WorkCentre 7425/7428/7435 User Guide… -
Page 159: Replacing The Toner Cartridges
Replacing the Toner Cartridges Replacing the Toner Cartridges The printer will display a message on the touch screen when a toner cartridge needs to be replaced. Caution: Do not perform this procedure when the printer is copying or printing. 1. Open the printer front cover. wc74xx-074 2.
-
Page 160
Maintenance 3. Remove the new toner cartridge from the packaging. Tilt the cartridge up and down, then left and right ten times. wc74xx-145 4. Hold the new toner cartridge with the arrow facing up, then push the cartridge in slowly until it stops. -
Page 161: Replacing The Waste Toner Container
Replacing the Waste Toner Container Replacing the Waste Toner Container The printer will display a message on the touch screen when the waste toner container needs to be replaced. When replacing the waste toner container, you should also clean the printhead lenses. See Cleaning the Printhead Lenses on page 155.
-
Page 162
Maintenance 3. Pull the used waste toner container out slowly while supporting it with your left hand. wc74xx-149 4. Place the used waste toner container in the plastic bag, then seal it firmly using the zipper. wc74xx-150 5. Place the used waste toner container in the empty box. wc74xx-151 WorkCentre 7425/7428/7435 User Guide… -
Page 163
Replacing the Waste Toner Container 6. Hold the left side of the new waste toner container and slide it into the printer until it clicks. wc74xx-152 7. Clean the printhead lenses. See Cleaning the Printhead Lenses on page 155. WorkCentre 7425/7428/7435 User Guide… -
Page 164: Replacing The Drum Cartridges
Maintenance Replacing the Drum Cartridges The printer will display a message on the touch screen when a drum cartridge needs to be replaced. Caution: Do not perform this procedure when the printer is copying or printing. Note: Do not expose the drum cartridge to direct sunlight or strong indoor fluorescent lighting. Do not touch or scratch the surface of the drum.
-
Page 165
Note: To return the used drum cartridge for recycling, follow the instructions included with the new cartridge. If the instructions or shipping label are not available, go to www.xerox.com/gwa additional information. wc74xx-153 5. Remove the styrofoam from the end of the new drum cartridge. -
Page 166
Maintenance 9. Hold the shield and push the cartridge into the printer using the orange handle. wc74xx-156 10. Continue pushing the orange handle until it stops. wc74xx-157 11. Carefully remove the protective shield. 12. Push the drum cartridge until it stops. wc74xx-158 WorkCentre 7425/7428/7435 User Guide… -
Page 167
Replacing the Drum Cartridges 13. Close the drum cartridge cover. wc74xx-080 14. Turn the orange lever to the right to return it to the locked position. wc74xx-079 15. Close the printer front cover. 16. Dispose of the protective shield and tape as normal office waste. WorkCentre 7425/7428/7435 User Guide… -
Page 168: Replacing The Fuser Assembly
Maintenance Replacing the Fuser Assembly The printer will display a message on the touch screen when the fuser assembly needs to be replaced. Caution: Do not perform this procedure when the printer is copying or printing. 1. Power the printer OFF using the power switch located on the front, ride side, below control panel. 2.
-
Page 169
Use the box from the new fuser assembly for the return. For more information on returning a used fuser assembly, visit www.xerox.com/gwa. 5. Remove the new fuser assembly from the packaging. Retain the packaging to return the used fuser assembly. -
Page 170: Replacing The Transfer Belt Cleaner
Maintenance Replacing the Transfer Belt Cleaner The printer will display a message on the touch screen when the transfer belt cleaner needs to be replaced. Caution: Do not perform this procedure when the printer is copying or printing. 1. Remove the new transfer belt cleaner from the packaging. Retain the packaging. 2.
-
Page 171
6. Place the used transfer belt cleaner in the plastic bag. Note: For information on returning a used transfer belt cleaner, visit www.xerox.com/gwa. wc74xx-167 7. Remove the protective cover from the new transfer belt cleaner. Caution: Do not touch the surface of the transfer belt cleaner. -
Page 172
Maintenance 8. Support the new transfer belt cleaner with your left hand and slide it straight into the opening until it stops. wc74xx-168 9. Push the orange knob in, then turn it clockwise until snug. wc74xx-169 10. Turn the orange lever to the left to lock the belt cleaner. wc74xx-170 11. -
Page 173: Replacing The Transfer Roller
Replacing the Transfer Roller Replacing the Transfer Roller Caution: Do not perform this procedure when the printer is copying or printing. 1. Open Tray 5 (Bypass) (1). While lifting up the release lever, open the top left cover (2). wc74xx-01 Warning: The fuser is hot during normal operation.
-
Page 174
Maintenance 3. Push the orange lever in the direction shown. wc74xx-178 4. Lift the used transfer roller out of the printer. 5. Do not touch any toner adhering to the transfer roller. wc74xx-179 6. Place the used transfer roller in the plastic bag. wc74xx-182 WorkCentre 7425/7428/7435 User Guide… -
Page 175
Replacing the Transfer Roller 7. Place the new transfer roller in the printer as shown. Press down until the transfer roller clicks into place. wc74xx-180 8. Remove the protective cover from the transfer roller. wc74xx-181 9. Close the side cover. WorkCentre 7425/7428/7435 User Guide… -
Page 176: Emptying The Hole Punch Waste Container
Maintenance Emptying the Hole Punch Waste Container If your printer has the optional Office LX Finisher with Booklet Maker option, or the optional Professional Finisher, you will be alerted by a message on the printer control panel when the hole punch waste container is full and needs to be emptied.
-
Page 177: Professional Finisher Hole Punch Waste Container
Emptying the Hole Punch Waste Container 3. Empty the container. wc74xx-083 4. Insert the container and slide it all the way into the finisher. wc74xx-084 5. Close the finisher front transport cover, then close the top cover. Professional Finisher Hole Punch Waste Container Warning: Do not perform this procedure when the printer is copying or printing.
-
Page 178
Maintenance 2. Pull out the waste container at R4. wc74xx-085 3. Empty the container. wc74xx-086 4. Insert the container all the way into the finisher. wc74xx-087 5. Close the finisher front door. WorkCentre 7425/7428/7435 User Guide… -
Page 179: Installing Staples
Installing Staples Installing Staples If your printer has the optional Integrated Finisher, optional Office LX Finisher with Booklet Maker option, or the optional Professional Finisher, you will be alerted by a message on the printer control panel when a staple cartridge is empty and needs to be replaced. This section includes: •…
-
Page 180
Maintenance 3. Pinch both sides of the staple case (1) and remove the staple case from the cartridge (2). wc74xx-090 4. Insert the front side of the new staple case into the staple cartridge (1), then push the rear side into the cartridge (2). -
Page 181: Main Staple Replacement For Office Lx Finisher
Installing Staples Main Staple Replacement for Office LX Finisher Warning: Do not perform this procedure when the printer is copying or printing. 1. Open the finisher front cover. wc74xx-093 2. The staple cartridge holder is located inside the finisher cabinet. Pull the staple cartridge holder toward you until it stops.
-
Page 182
Maintenance 5. Pinch both sides of the staple case (1) and remove the staple case from the cartridge (2). wc74xx-090 6. Insert the front side of the new staple case into the staple cartridge (1), then push the rear side into the cartridge (2). -
Page 183: Booklet Maker Staple Replacement For Office Finisher Lx
Installing Staples Booklet Maker Staple Replacement for Office Finisher LX Warning: Do not perform this procedure when the printer is copying or printing. 1. Open the finisher side cover. wc74xx-097 2. If the staple cartridges are not visible, grip the vertical panels at the left and right of the opening and gently slide them to the center until they stop.
-
Page 184: Main Staple Replacement For Professional Finisher
Maintenance 4. Hold the tabs on both sides of the new staple cartridge and insert it into the original position in the finisher. Note: If you have trouble inserting the cartridge, make sure the staples in the cartridge are positioned correctly in the cartridge. wc74xx-099 Note: The Booklet Maker uses two staple cartridges.
-
Page 185
Installing Staples 2. Hold the staple cartridge unit by orange lever R1 and push it to the right. (R1) wc74xx-100 3. Grip the staple cartridge by the orange tabs and remove it by pulling it firmly toward you. wc74xx-101 4. Pinch both sides of the staple case (1) and remove the staple case from the cartridge (2). wc74xx-090 WorkCentre 7425/7428/7435 User Guide… -
Page 186: Booklet Staple Replacement For The Professional Finisher
Maintenance 5. Insert the front side of the new staple case into the staple cartridge (1), then push the rear side into the cartridge (2). wc74xx-091 6. Grip the staple cartridge by the orange tabs and insert it into the staple cartridge unit until it clicks. wc74xx-102 7.
-
Page 187
Installing Staples 2. While squeezing orange levers R2 and R3 together (1), pull the staple cartridge unit out of the finisher until it stops (2). Note: The staple cartridge unit does not detach from the finisher. wc74xx-104 3. Grip the orange tabs on both sides of the staple cartridge. wc74xx-105 4. -
Page 188
Maintenance 5. Lift the staple cartridge out of the staple cartridge unit. wc74xx-107 6. Push the new staple cartridge into the staple cartridge unit. wc74xx-124 7. Repeat Steps 3 through 6 for the other staple cartridge. 8. Return the staple cartridge unit to its original position. wc74xx-125 9. -
Page 189: Ordering Supplies
Each toner cartridge includes installation instructions on the box. Caution: Use of toner other than Genuine Xerox Toner may affect print quality and printer reliability. It is the only toner designed and manufactured under strict quality controls by Xerox for specific use with this printer. Routine Maintenance Items Routine maintenance items are printer parts that have a limited life and require periodic replacement.
-
Page 190: Recycling Supplies
Total Satisfaction Guarantee do not cover damage, malfunction, or degradation of performance caused by use of non-Xerox supplies, or the use of Xerox supplies not specified for this printer. The Total Satisfaction Guarantee is available in the United States and Canada. Coverage may vary outside these areas;…
-
Page 191: Troubleshooting
Troubleshooting This chapter includes: • Fault Messages on page 192 • General Troubleshooting on page 193 • Clearing Paper Jams on page 196 • Clearing Staple Jams on page 224 • Copy/Scan Problems on page 233 • Fax Problems on page 234 •…
-
Page 192: Fault Messages
Troubleshooting Fault Messages The printer is capable of detecting problems and providing information about the problem so that you can take action to correct it. If the printer detects a problem (a fault), it displays a message on the top left of the touch screen display.
-
Page 193: General Troubleshooting
General Troubleshooting General Troubleshooting This section contains procedures to help you locate and resolve problems. Some problems can be resolved by simply restarting the printer. To restart the printer: 1. Locate the ON/OFF switch on the front of the printer below the control panel. 2.
-
Page 194: Printing Takes Too Long
A system error occurred. Contact your local Xerox service representative with the error information. Check the error history. For Fault Messages more information see on page 192.
-
Page 195: Printer Is Making Unusual Noises
Open and close the tray you are printing from. There is an obstruction or debris inside the printer. Turn off the printer and remove the obstruction or debris. If you cannot remove it, contact your local Xerox service representative. The Date and Time Are Incorrect Probable Causes Solutions…
-
Page 196: Clearing Paper Jams
Troubleshooting Clearing Paper Jams This section includes: • Clearing Paper Jams in Tray 1, Tray 2, Tray 3 or Tray 4 on page 196 • Clearing Paper Jams in Tray 5 (Bypass) on page 197 • Clearing Jams in Top Left Cover A on page 198 •…
-
Page 197: Clearing Paper Jams In Tray 5 (Bypass)
Clearing Paper Jams 3. Remove the paper from the tray. 4. If the paper is torn, remove the tray completely and check inside the printer for torn pieces of paper. wc74xx-014 5. Reload the tray with undamaged paper, then push the tray in until it stops. 6.
-
Page 198: Clearing Jams In Top Left Cover A
Troubleshooting Clearing Jams in Top Left Cover A 1. Remove paper from the Top Left Tray, then fold the tray up. wc74xx-033 2. Open Tray 5 (Bypass) (1). While lifting up the release lever (2), open the top left cover (3). wc74xx-032 Warning: The area around the fuser may be hot.
-
Page 199: Clearing Paper Jams In Bottom Left Cover C
Clearing Paper Jams 4. Toner may adhere to the transfer roller. This will not affect print quality. wc74xx-034 5. Remove the jammed paper. Note: If the paper is torn, remove all torn pieces from the printer. wc74xx-035 6. If paper is jammed in the fuser, pull the green lever at A1, then carefully remove the paper. Return the green lever to its normal position.
-
Page 200: Clearing Paper Jams In Bottom Left Cover D
Troubleshooting 2. Remove the jammed paper. If the paper is torn, be sure to remove all torn pieces. Note: If paper is jammed in the upper position, you may need to look inside the printer to see it. wc74xx-038 3. Close the left bottom cover. Clearing Paper Jams in Bottom Left Cover D 1.
-
Page 201
Clearing Paper Jams 2. Open Tray 5 (Bypass) (1). While lifting up the release lever (2), open the top left cover (3). wc74xx-032 Warning: The area around the fuser may be hot. Use caution to avoid injury. Note: Do not touch the transfer belt. This could reduce image quality or damage the transfer belt. Do not touch the transfer roller. -
Page 202: Clearing Paper Jams In Duplex Unit B
Troubleshooting 4. Remove the jammed paper. Note: If the paper is torn, remove all torn pieces from the printer. wc74xx-01 5. Close the top left cover D. 6. Close the top left cover, then close Tray 5 (Bypass). Clearing Paper Jams in Duplex Unit B 1.
-
Page 203: Clearing Jams In The Document Feeder
Clearing Paper Jams 3. Close the duplex unit cover, then close Tray 5 (Bypass). wc74xx-041 Clearing Jams in the Document Feeder 1. Lift the lever and open the top cover of the document feeder. wc74xx-028 2. If the original is not caught in the entry to the document feeder, pull the original straight out in the direction shown.
-
Page 204
Troubleshooting 3. If the message on the printer touch screen instructs you to turn the wheel, turn the green wheel in the direction shown to move the original out of the feeder. wc74xx-029 4. If the message on the printer touch screen instructs you to open the inner cover, lift up the lever with the green tab to open the inner cover. -
Page 205: Clearing Paper Jams In The Integrated Finisher
Clearing Paper Jams 8. If the original is not visible when the document feeder is opened, lift up the document feeder tray, then remove the paper. wc74xx-031 9. Lower the document feeder tray. 10. If the original is not wrinkled or torn, load it into the feeder again following the instructions on the touch screen.
-
Page 206: Clearing Paper Jams In The Office Lx Finisher
Troubleshooting Clearing Paper Jams in the Office LX Finisher Paper Jams under the Top Cover 1. Pull up the lever on the top cover. wc74xx-019 2. The top cover opens. wc74xx-020 3. Remove the jammed paper. Note: If the paper is torn, remove all torn pieces from the printer. wc74xx-021 4.
-
Page 207: Clearing Paper Jams In The Professional Finisher
Clearing Paper Jams Paper Jams under the Center Tray 1. Lift to open the cover. Note: The cover is hinged and cannot be removed from the printer. wc74xx-018 2. Remove the jammed paper. Note: If the paper is torn, remove all torn pieces from the printer. 3.
-
Page 208
Troubleshooting Paper Jams in the Center Tray 1. If the paper is jammed at the exit to the center output tray, carefully pull the paper in the direction shown. wc74xx-044 2. Open the finisher transport cover, then close it. wc74xx-045 Paper Jams in the Finisher Transport 1. -
Page 209
Clearing Paper Jams 2. Remove the jammed paper. wc74xx-047 3. If no paper is visible, turn green knob 1 in the direction shown and carefully pull out the jammed paper. wc74xx-048 4. Close the finisher transport cover. Paper Jams at 2a in the Finisher 1. -
Page 210
Troubleshooting 2. Open the front door of the finisher. wc74xx-043 3. Move green lever 2a to the right. wc74xx-050 4. Remove the jammed paper. wc74xx-051 5. Return lever 2a to its original position. 6. Close the front door of the finisher. WorkCentre 7425/7428/7435 User Guide… -
Page 211
Clearing Paper Jams Paper Jams at 2a in the Finisher (Using Knob 2c) 1. If the paper is visible at the output tray exit, carefully remove the paper by pulling it in the direction shown. wc74xx-044 2. Open the front door of the finisher. wc74xx-043 3. -
Page 212
Troubleshooting 4. Turn green knob 2c in the direction shown to release the paper. wc74xx-052 5. Carefully remove the paper. wc74xx-068 6. Return lever 2a to its original position. 7. Close the front door of the finisher. Paper Jams at 2b in the Finisher 1. -
Page 213
Clearing Paper Jams 2. Move green lever 2b to the right, then remove the paper. wc74xx-053 3. Return lever 2b to its original position. 4. Close the front door of the finisher. Paper Jams at 2b in the Finisher (Using Knob 2c) 1. -
Page 214
Troubleshooting 3. Turn green knob 2c in the direction shown to release the paper. wc74xx-120 4. Carefully remove the paper. wc74xx-069 5. Return lever 2b to its original position. 6. Close the front door of the finisher. Paper Jams at 3 in the Finisher 1. -
Page 215
Clearing Paper Jams 2. Pull down green lever 3. wc74xx-054 3. Remove the jammed paper. wc74xx-055 4. Return lever 3 to its original position. 5. Close the front door of the finisher. Paper Jams at 5 in the Finisher 1. Open finisher exit cover 5 by lifting upward at green label 5. wc74xx-056 WorkCentre 7425/7428/7435 User Guide… -
Page 216
Troubleshooting 2. Carefully remove the paper by pulling it in the direction shown. wc74xx-057 3. Return exit cover 5 to its original position. Paper Jams at 4a in the Finisher (with Booklet Maker) 1. Open the front door of the finisher. wc74xx-043 2. -
Page 217
Clearing Paper Jams 3. Turn green knob 4a in the direction shown to remove the jammed paper. wc74xx-059 4. Return unit 4 to its original position. 5. Close the front door of the finisher. Paper Jams at 4b in the Finisher (with Booklet Maker) 1. -
Page 218
Troubleshooting 3. If paper is visible, remove the jammed paper by pulling in the direction shown. wc74xx-061 4. Using the green handle, pull out unit 4 until it stops. wc74xx-062 5. Remove the jammed paper from the upper left side and inside of the unit. wc74xx-063 6. -
Page 219: Paper Jams In The Booklet Tray
4. Close the front door of the finisher. Solving Problems with Paper Jams The printer is designed to function with minimal paper jams using Xerox supported media types only. Other media types may cause more frequent paper jams. If supported media is jamming frequently in one area, that area may need to be cleaned or repaired.
-
Page 220
Troubleshooting The Printer Pulls Multiple Sheets Together Probable Causes Solutions The paper tray is too full. Remove some of the paper. Do not load paper past fill line. The front edges of the paper are not even. Remove the media, align the front edges, and then reload it. -
Page 221: Document Feeder Jams
Duplex Unit Jams Probable Causes Solutions Unsupported media (wrong size, thickness, type, etc.) Supported Use only Xerox-approved media. See is being used. Media on page 45. Recheck the media path inside the duplex unit and make sure that you have removed all of the jammed paper.
-
Page 222
Ensure that custom cut media is the correct size. Slight errors in cutting can result in jams. Supported Media Use Xerox-approved media. See on page 45. The recommended transparency or label sheet is Load the transparencies or label sheets according to facing the wrong way in the tray. -
Page 223: Minimizing Paper Jams
Clearing Paper Jams Minimizing Paper Jams This section provides information to aid you in minimizing paper jams. Make sure to: • Use only supported media. For more information see Supported Media on page 45. • Set the tray settings to the loaded media size and type. •…
-
Page 224: Clearing Staple Jams
Troubleshooting Clearing Staple Jams This section includes: • Clearing Staple Jams in the Integrated Finisher on page 224 • Clearing Main Staple Jams in the Office LX Finisher on page 226 • Clearing Main Staple Jams in the Professional Finisher on page 228 •…
-
Page 225
Clearing Staple Jams 3. Open the staple cartridge clamp by pulling firmly in the direction shown. wc74xx-121 4. Remove the jammed staples (1), then push the clamp in the direction shown until it snaps into the locked position (2). Warning: The points of the jammed staples are sharp. -
Page 226: Clearing Main Staple Jams In The Office Lx Finisher
Troubleshooting Clearing Main Staple Jams in the Office LX Finisher Warning: Do not perform this procedure when the printer is copying or printing. 1. Open the finisher front cover. wc74xx-093 2. The staple cartridge holder is located inside the finisher cabinet. Pull the staple cartridge holder toward you until it stops.
-
Page 227
Clearing Staple Jams 5. Open the staple cartridge clamp by pulling firmly in the direction shown. wc74xx-121 6. Remove the jammed staples (1), then push the clamp in the direction shown until it snaps into the locked position (2). Warning: The points of the jammed staples are sharp. -
Page 228: Clearing Main Staple Jams In The Professional Finisher
Troubleshooting Clearing Main Staple Jams in the Professional Finisher Warning: Do not perform this procedure when the printer is copying or printing. 1. Open the finisher front door. wc74xx-043 2. Hold the staple cartridge unit by orange lever R1 and push it to the right. (R1) wc74xx-100 3.
-
Page 229
Clearing Staple Jams 4. Open the staple cartridge clamp by pulling firmly in the direction shown. wc74xx-121 5. Remove the jammed staples (1), then push the clamp in the direction shown until it snaps into the locked position (2). Warning: The points of the jammed staples are sharp. -
Page 230: Clearing Booklet Staple Jams In The Professional Finisher
Troubleshooting Clearing Booklet Staple Jams in the Professional Finisher The Professional Finisher uses two staple cartridges labeled R2 and R3. Booklet stapling requires that both staple cartridges be free of jammed staples. Warning: Do not perform this procedure when the printer is copying or printing. 1.
-
Page 231
Clearing Staple Jams 4. While gripping the orange tabs of the staple cartridge, rotate it in the direction shown. wc74xx-106 5. Lift the staple cartridge out of the staple cartridge unit. wc74xx-107 6. Remove the jammed staples by pulling them in the direction shown. Warning: The points of the jammed staples are sharp. -
Page 232
Troubleshooting 8. Return the staple cartridge unit to its original position. wc74xx-125 9. If no jammed staples were found, repeat Steps 3 through 6 for the other staple cartridge. 10. Close the finisher front door. WorkCentre 7425/7428/7435 User Guide… -
Page 233: Copy/Scan Problems
When the copy or scan quality is poor, choose the closest symptom from the following table to correct the problem. If the quality does not improve after carrying out the appropriate action, contact Xerox Customer Support or your reseller. Symptom…
-
Page 234: Fax Problems
Troubleshooting Fax Problems If the fax cannot be sent correctly, refer to the following table, and then perform the indicated operation. If the fax still cannot be sent correctly, even after performing the described operations, contact your service representative. This section includes: •…
-
Page 235: Problems Sending Faxes
Fax Problems Problems Sending Faxes Symptom Cause Solution The document is not scanned. The document is too thick, too Use the document glass to send thin, or too small. the fax. The document is scanned at an The document guides are not Slide the document guides to fit angle.
-
Page 236: Problems Receiving Faxes
Troubleshooting Problems Receiving Faxes Symptom Cause Solution The received fax is blank. There may be a problem with the Check that the printer can make telephone connection or with the clean copies. If it can, have the caller’s fax machine. caller send the fax again.
-
Page 237: Getting Help
Alerts provide messages and instructions for helping the user solve problems that may arise when faxing or scanning. Alerts can be viewed through CentreWare IS or through the Xerox Support Centre utility. Alerts can also be viewed by touching More Status in the print options (driver).
-
Page 238
Troubleshooting Resource Link A resource for tools and information, www.xerox.com/office/businessresourcecenter such as printing templates, helpful tips, and customized features to meet your individual needs Local sales and support center www.xerox.com/office/worldcontacts Printer registration www.xerox.com/office/register Material Safety Data Sheets identify www.xerox.com/msds materials, and provide information on (U.S. -
Page 239: Product Specifications
Product Specifications This chapter includes: • Physical Specifications on page 240 • Environmental Specifications on page 242 • Electrical Specifications on page 243 • Performance Specifications on page 244 • Controller Specifications on page 245 For media specifications and capacities, see Supported Media on page 45.
-
Page 240: Physical Specifications
Product Specifications Physical Specifications Base Unit • Width: 1129 mm (44.4 in.) • Depth: 679 mm (26.7 in.) • Weight: 101 kg (222 lb.) Clearance Requirements: Base Unit 10.0 cm (3.9 in.) 30.7 cm (12.1 in.) 206.7 cm (81.4 in.) 177.8 cm (70.0 in.) 128.9 cm…
-
Page 241
Physical Specifications Clearance Requirements: Base Unit with Office Finisher LX 10.0 cm (3.9 in.) 206.7 cm (81.4 in.) 235.6 cm 88.5 cm (92.0 in.) 128.9 cm (34.8 in.) 90.6 cm (50.7 in.) (35.7 in.) wc74xx-138 WorkCentre 7425/7428/7435 User Guide… -
Page 242: Environmental Specifications
Product Specifications Environmental Specifications Temperature • Operating: 10° to 28° C / 50° to 82° F Relative Humidity • Operating: 15% to 85% (non-condensing) WorkCentre 7425/7428/7435 User Guide…
-
Page 243: Electrical Specifications
110-127 V: 12A • 220-240 V: 10A USA E Qualified Product NERGY As an E partner, Xerox Corporation has determined that the basic NERGY configuration of this product meets the E guidelines for energy NERGY efficiency. The E and E…
-
Page 244: Performance Specifications
Product Specifications Performance Specifications Resolution Maximum Resolution: 1200 x 2400 dpi Print Speed WorkCentre 7425 Color: 20 ppm (duplex: 20 ppm); Black: 25 ppm (duplex: 25 ppm) for 8.5×11”/A4, 18 lb.–28 lb. (64 gsm–105 gsm) paper WorkCentre 7428 Color: 28 ppm (duplex: 28 ppm); Black: 28 ppm (duplex: 28 ppm) for 8.5×11”/A4, 18 lb.–28 lb. (64 gsm–105 gsm) paper WorkCentre 7435 Color: 35 ppm (duplex: 35 ppm);…
-
Page 245: Controller Specifications
Controller Specifications Controller Specifications Controller 667 MHz processor Memory 1.5 GB Standard Interfaces Ethernet 10/100Base-TX Universal Serial Bus (USB 2.0) WorkCentre 7425/7428/7435 User Guide…
-
Page 246
Product Specifications WorkCentre 7425/7428/7435 User Guide… -
Page 247: Regulatory Information
Regulatory Information This chapter includes: • Basic Regulations on page 248 • Copy Regulations on page 250 • Fax Regulations on page 253…
-
Page 248: Basic Regulations
Consult the dealer or an experienced radio/television technician for help. Any changes or modifications not expressly approved by Xerox could void the user’s authority to operate the equipment. To ensure compliance with Part 15 of the FCC rules, use shielded interface cables.
-
Page 249: European Union
To ensure compliance with European Union regulations, use shielded interface cables. A signed copy of the Declaration of Conformity for this product can be obtained from Xerox. Ozone Release During print operation, a small quantity of ozone is released. This amount is not large enough to harm anyone adversely.
-
Page 250: Copy Regulations
Regulatory Information Copy Regulations United States Congress, by statute, has forbidden the reproduction of the following subjects under certain circumstances. Penalties of fine or imprisonment may be imposed on those guilty of making such reproductions. 1. Obligations or Securities of the United States Government, such as: •…
-
Page 251: Canada
Copy Regulations 8. Draft Registration Cards. 9. Selective Service Induction papers that bear any of the following Registrant’s information: • Earnings or Income • Court Record • Physical or mental condition • Dependency Status • Previous military service Exception: United States military discharge certificates may be copied. 10.
-
Page 252: Other Countries
Regulatory Information 8. Documents, registers or records kept by public officials charged with the duty of making or issuing certified copies thereof, where the copy falsely purports to be a certified copy thereof. 9. Copyrighted material or trademarks of any manner or kind without the consent of the copyright or trademark owner.
-
Page 253: Fax Regulations
REN is separately shown on the label. If this Xerox equipment causes harm to the telephone network, the Telephone Company will notify you in advance that temporary discontinuance of service may be required. But if advance notice is not practical, the Telephone Company will notify the customer as soon as possible.
-
Page 254: Canada
Company may request that you disconnect the equipment until the problem is resolved. Repairs to the machine should be made only by a Xerox Service Representative or an authorized Xerox Service provider. This applies at any time during or after the service warranty period. If unauthorized repair is performed, the remainder of the warranty period is null and void.
-
Page 255: Europe
DTMF signaling. DTMF signaling provides reliable and faster call setup. Modification of this product, connection to external control software or to external control apparatus not authorized by Xerox, will invalidate its certification. New Zealand Telecom Warning Notice 1.
-
Page 256
Regulatory Information 8. This equipment may not provide for the effective hand-over of a call to another device connected to the same line. 9. Some parameters required for compliance with Telecom’s Telepermit requirements are dependent on the equipment (PC) associated with this device. The associated equipment shall be set to operate within the following limits for compliance with Telecom’s Specifications: For repeat calls to the same number: •… -
Page 257: Material Safety Data Sheets
Material Safety Data Sheets Material Safety Data Sheets For Material Safety Data information regarding your printer, go to: North America: www.xerox.com/msds European Union: www.xerox.com/environment_europe For the Customer Support Center phone numbers, go to www.xerox.com/office/worldcontacts. WorkCentre 7425/7428/7435 User Guide…
-
Page 258
Regulatory Information WorkCentre 7425/7428/7435 User Guide… -
Page 259: C Recycling And Disposal
262 All Countries If you are managing the disposal of your Xerox product, please note that the product contains lamp(s) with mercury, and may contain lead, perchlorate, and other materials whose disposal may be regulated due to environmental considerations. The presence of these materials is fully consistent with global regulations applicable at the time that the product was placed on the market.
-
Page 260: European Union
In accordance with European legislation, end of life electrical and electronic equipment subject to disposal must be managed within agreed procedures. Prior to disposal, please contact your local reseller or Xerox representative for end of life takeback information.
-
Page 261
Information for Users on Collection and Disposal of Old Equipment and Used Batteries These symbols on the products and/or accompanying documents mean that used electrical and electronic products and batteries should not be mixed with general household waste. For proper treatment, recovery and recycling of old products and used batteries, please take them to applicable collection points, in accordance with your national legislation and the Directive 2002/96/EC and 2006/66/EC. -
Page 262: North America
Recycling and Disposal North America Xerox operates an equipment takeback and reuse/recycle program. Contact your Xerox sales representative (1-800-ASK-XEROX) to determine whether this Xerox product is part of the program. For more information about Xerox environmental programs, visit www.xerox.com/environment or for recycling and disposal information, contact your local authorities.
-
Page 263: Index
Index Index drum cartridge replacing, 164 electrical safety, 12 envelope tray configuring, 54 loading, 55 auditron setup, 33 envelopes loading in Tray 5 (Bypass), 53 Ethernet connection, 36 extension cord, 12 before using the printer, 20 exterior cleaning, 154 billing meters, 32 booklets printing, 71 fault messages, 192…
-
Page 264
11 network basics, 35 standard features, 28 network connection status information, 32 Ethernet, 36 supplies, 16 non-Xerox supplies, 190 trays, 28 unusual noises or odors, 12 printer driver description, 38 operating system requirements, 36 installing, 38 options, 29 Macintosh OS X version 10.4, 40… -
Page 265
239 staples installing, 179 status messages, 189 quick CD-ROM install steps supplies, 16 Windows 2000 or later, 39 low, 189 non-Xerox supplies, 190 ordering media, 45 ordering replacements, 189 recycling and disposal, 259 replacement, 189 regulations basic, 248 copy, 250… -
Page 266
161 Windows install printer drivers for Windows 2000 or later, 39 Windows networking quick CD-ROM installation Windows 2000 or later, 39 Xerox Scan Utility scan template setup feature, 134 scan templates, 134 Xerox Welcome Center, 20 WorkCentre 7425/7428/7435 User Guide…
Xerox WORKCENTRE 7425: List of Available Documents
Note for Owners:
Guidesimo.com webproject is not a service center of Xerox trademark and does not carries out works for diagnosis and repair of faulty Xerox WORKCENTRE 7425 equipment. For quality services, please contact an official service center of Xerox company. On our website you can read and download documentation for your Xerox WORKCENTRE 7425 device for free and familiarize yourself with the technical specifications of device.
More Printer Devices:
-
Lexmark X850e
Lexmark™ X850e, X852e, & X854e Finisher7500-XXX• Table of contents• Start diagnostics• Safety and notices• Trademarks•IndexLexmark and Lexmark with diamond design are trademarks of Lexmark International, Inc., registered in the United States and/or other countries.Edition: July 3, 2007 …
X850e Finishers, 411
-
Canon Powershot A650 IS
Camera User GuideCamera User GuideCDI-E364-010 © 2007 CANON INC. PRINTED IN CHINAENGLISHDIGITAL CAMERAEnsure that you read the Safety Precautions (p. 172-p. 181).Getting StartedLearning MoreComponents GuideBasic OperationsCommonly Used Shooting FunctionsShooting Using the Mode DialVarious Shooting MethodsPlayback/ErasingPrint Settings/Transfer SettingsConnecting to a TVTroubleshootingList of Mess …
Powershot A650 IS Digital Camera, 219
-
Texlabel SP1
User Guide V. 20.0312 SP1 – SP3 � …
SP1 Printer, 36
-
Epson AcuLaser C2600DTN
1234If the optional Duplex Unit is installed, lift up the Duplex Unit. Hold it and gently pull out any sheets of paper. Be careful not to tear the jammed paper.wWarning:Be careful not to touch the fuser, which is marked CAUTION HIGH TEMPERATURE, or the surrounding areas. If the printer has been in use, the fuser and the surrounding areas may be very hot. If you must touch one of these areas, open …
AcuLaser C2600DTN Printer, 4
-
Epson ActionNote 890
EPSON ActionNote 890 SeriesFront ViewlThese parts function only with the optional audio card installed.Rear Panel and Left SidelAvailable only with the optional internal fax/modem or infrared deviceinstalled.Notebook SpecificationsCPU and MemoryCPU486 DX4/ 100 microprocessor installed ina PGA socket; includes 8KB of internalcache in write-back mode and integratedmath coprocessorSystem speed Fast s …
ActionNote 890 Laptop, 11
Recommended Documentation:


© Корпорация Xerox, 2009. Все права защищены. Права на неопубликованные результаты защищены законодательством США. Содержание настоящего документа не может быть воспроизведено ни в какой форме без разрешения корпорации Xerox.
Охрана авторских прав распространяется на все виды материалов и информации, защита которых разрешена существующим законодательством, в том числе на экранные материалы, создаваемые программным способом, например стили, шаблоны, значки, изображения и т. п.
Xerox®, CentreWare®, WorkCentre®, PrintingScout® и Walk-Up® являются товарными знаками корпорации Xerox в США и/или других странах.
Adobe Reader®, Adobe Type Manager®, ATM™, Flash®, Macromedia®, Photoshop® и PostScript® являются товарными знаками Adobe Systems Incorporated в США и/или других странах.
Apple®, AppleTalk®, Bonjour®, EtherTalk®, Macintosh®, Mac OS® и TrueType® являются товарными знаками Apple Computer Inc. в США и/или в других странах.
HP-GL®, HP-UX® и PCL® являются товарными знаками Hewlett-Packard Corporation в США и/или других странах.
IBM® и AIX® являются товарными знаками International Business Machines Corporation в США и/или других странах.
Microsoft®, Windows Vista®, Windows® и Windows Server® являются товарными знаками Microsoft Corporation в США и/или других странах.
Novell®, NetWare®, NDPS®, NDS®, Novell Directory Services®, IPX™ и Novell Distributed Print Services™
являются товарными знаками Novell, Incorporated в США и/или других странах. SGI® IRIX® является товарным знаком компании Silicon Graphics, Inc.
SunSM, Sun Microsystems™ и Solaris™ являются товарными знаками Sun Microsystems, Incorporated в
США и/или других странах.
UNIX® является товарным знаком, зарегистрированным в США и других странах, и предоставляется по лицензии только через компанию X/Open Company Limited.
Являясь участником программы ENERGY STAR®, корпорация Xerox установила, что данный продукт отвечает требованиям ENERGY STAR по экономичному использованию электроэнергии. Название и логотип ENERGY STAR являются знаками, зарегистрированными в США.
Содержание
1 Техника безопасности
Электрическая безопасность . . . . . . . . . . . . . . . . . . . . . . . . . . . . . . . . . . . . . . . . .12 Безопасность при обслуживании . . . . . . . . . . . . . . . . . . . . . . . . . . . . . . . . . . . . . .14 Безопасность при эксплуатации. . . . . . . . . . . . . . . . . . . . . . . . . . . . . . . . . . . . . . .15
Размещение принтера. . . . . . . . . . . . . . . . . . . . . . . . . . . . . . . . . . . . . . . . . . . .15 Инструкции по эксплуатации. . . . . . . . . . . . . . . . . . . . . . . . . . . . . . . . . . . . . . .15 Материалы для принтера . . . . . . . . . . . . . . . . . . . . . . . . . . . . . . . . . . . . . . . . .16
Символы маркировки на принтере. . . . . . . . . . . . . . . . . . . . . . . . . . . . . . . . . . . . .17
2 Функции
Перед началом эксплуатации принтера . . . . . . . . . . . . . . . . . . . . . . . . . . . . . . . .20 Центр работы с клиентами корпорации Xerox. . . . . . . . . . . . . . . . . . . . . . . . .20 Элементы принтера. . . . . . . . . . . . . . . . . . . . . . . . . . . . . . . . . . . . . . . . . . . . . . . . .21
Вид спереди слева. . . . . . . . . . . . . . . . . . . . . . . . . . . . . . . . . . . . . . . . . . . . . . .21 Вид сзади слева. . . . . . . . . . . . . . . . . . . . . . . . . . . . . . . . . . . . . . . . . . . . . . . . .22 Устройства подачи документов. . . . . . . . . . . . . . . . . . . . . . . . . . . . . . . . . . . . .23 Внутренние компоненты . . . . . . . . . . . . . . . . . . . . . . . . . . . . . . . . . . . . . . . . . .24
Разъемы подключения телефонной линии . . . . . . . . . . . . . . . . . . . . . . . . . . .25 Многофункциональный финишер (дополнительно) . . . . . . . . . . . . . . . . . . . .26
Финишер-степлер LX (дополнительно) . . . . . . . . . . . . . . . . . . . . . . . . . . . . . .27 Встроенный финишер (дополнительно). . . . . . . . . . . . . . . . . . . . . . . . . . . . . .28
Конфигурации принтера . . . . . . . . . . . . . . . . . . . . . . . . . . . . . . . . . . . . . . . . . . . . .29
Стандартные функции. . . . . . . . . . . . . . . . . . . . . . . . . . . . . . . . . . . . . . . . . . . .29 Конфигурации WorkCentre. . . . . . . . . . . . . . . . . . . . . . . . . . . . . . . . . . . . . . . . .29 Дополнительное оборудование . . . . . . . . . . . . . . . . . . . . . . . . . . . . . . . . . . . .30
Панель управления . . . . . . . . . . . . . . . . . . . . . . . . . . . . . . . . . . . . . . . . . . . . . . . . .31
Расположение элементов панели управления . . . . . . . . . . . . . . . . . . . . . . . .31
Сведения о принтере. . . . . . . . . . . . . . . . . . . . . . . . . . . . . . . . . . . . . . . . . . . . .33 Дополнительная информация . . . . . . . . . . . . . . . . . . . . . . . . . . . . . . . . . . . . . . . .35
3 Основы работы в сети
Выбор типа подключения . . . . . . . . . . . . . . . . . . . . . . . . . . . . . . . . . . . . . . . . . . . .38
Требования к операционной системе. . . . . . . . . . . . . . . . . . . . . . . . . . . . . . . .38 Подключение через Ethernet . . . . . . . . . . . . . . . . . . . . . . . . . . . . . . . . . . . . . . .39 Подключение через USB . . . . . . . . . . . . . . . . . . . . . . . . . . . . . . . . . . . . . . . . . .39
|
WorkCentre 7425/7428/7435 |
3 |
|
Руководство пользователя |
Установка драйверов принтера . . . . . . . . . . . . . . . . . . . . . . . . . . . . . . . . . . . . . . .40
Выбор драйвера принтера . . . . . . . . . . . . . . . . . . . . . . . . . . . . . . . . . . . . . . . .40
Установка драйвера (Windows 2000 или более поздней версии) . . . . . . . . .41 Установка драйвера (Macintosh OS X 10.4 или более поздней версии) . . . .42
Установка драйвера (UNIX/Linux) . . . . . . . . . . . . . . . . . . . . . . . . . . . . . . . . . . .43 CentreWare Internet Services . . . . . . . . . . . . . . . . . . . . . . . . . . . . . . . . . . . . . . . . . .44 Доступ к службе CentreWare IS. . . . . . . . . . . . . . . . . . . . . . . . . . . . . . . . . . . . .44
4 Печать
Обзор . . . . . . . . . . . . . . . . . . . . . . . . . . . . . . . . . . . . . . . . . . . . . . . . . . . . . . . . . . . .46 Поддерживаемые материалы. . . . . . . . . . . . . . . . . . . . . . . . . . . . . . . . . . . . . . . . .47
Рекомендуемые материалы . . . . . . . . . . . . . . . . . . . . . . . . . . . . . . . . . . . . . . .47
Общие рекомендации по загрузке материалов. . . . . . . . . . . . . . . . . . . . . . . .48 Материалы, которые могут повредить принтер. . . . . . . . . . . . . . . . . . . . . . . .48
Инструкции по хранению бумаги . . . . . . . . . . . . . . . . . . . . . . . . . . . . . . . . . . .49 Загрузка материала. . . . . . . . . . . . . . . . . . . . . . . . . . . . . . . . . . . . . . . . . . . . . . . . .50
Поддерживаемые форматы и плотность материалов . . . . . . . . . . . . . . . . . .51
Применимость лотка для материалов . . . . . . . . . . . . . . . . . . . . . . . . . . . . . . .52 Загрузка бумаги в лоток 1, 2, 3 или 4 . . . . . . . . . . . . . . . . . . . . . . . . . . . . . . . .54 Загрузка материала в лоток 5 (обходной) . . . . . . . . . . . . . . . . . . . . . . . . . . . .56 Загрузка конвертов в лоток 5 (обходной). . . . . . . . . . . . . . . . . . . . . . . . . . . . .57 Настройка лотка для конвертов . . . . . . . . . . . . . . . . . . . . . . . . . . . . . . . . . . . .58 Загрузка конвертов в лоток. . . . . . . . . . . . . . . . . . . . . . . . . . . . . . . . . . . . . . . .59
Загрузка бумаги в податчик большой емкости . . . . . . . . . . . . . . . . . . . . . . . .60 Загрузка бумаги в модуль сдвоенного лотка. . . . . . . . . . . . . . . . . . . . . . . . . .63
Печать на специальных материалах . . . . . . . . . . . . . . . . . . . . . . . . . . . . . . . . . . .64
Печать на прозрачных пленках. . . . . . . . . . . . . . . . . . . . . . . . . . . . . . . . . . . . .64 Печать на конвертах . . . . . . . . . . . . . . . . . . . . . . . . . . . . . . . . . . . . . . . . . . . . .65 Печать на наклейках . . . . . . . . . . . . . . . . . . . . . . . . . . . . . . . . . . . . . . . . . . . . .65 Печать на глянцевой бумаге. . . . . . . . . . . . . . . . . . . . . . . . . . . . . . . . . . . . . . .67
Настройка параметров печати . . . . . . . . . . . . . . . . . . . . . . . . . . . . . . . . . . . . . . . .68
Параметры печати Windows . . . . . . . . . . . . . . . . . . . . . . . . . . . . . . . . . . . . . . .68 Параметры печати Macintosh . . . . . . . . . . . . . . . . . . . . . . . . . . . . . . . . . . . . . .70
Двусторонняя печать. . . . . . . . . . . . . . . . . . . . . . . . . . . . . . . . . . . . . . . . . . . . . . . .72
Инструкции по автоматической двусторонней печати . . . . . . . . . . . . . . . . . .72 2-сторонняя печать документов . . . . . . . . . . . . . . . . . . . . . . . . . . . . . . . . . . . .73
Параметры макета 2-сторонней страницы . . . . . . . . . . . . . . . . . . . . . . . . . . .73
Выбор бумаги. . . . . . . . . . . . . . . . . . . . . . . . . . . . . . . . . . . . . . . . . . . . . . . . . . . . . .74
Печать нескольких страниц на одном листе (мультиизображения) . . . . . . . . . .75
Печать брошюр . . . . . . . . . . . . . . . . . . . . . . . . . . . . . . . . . . . . . . . . . . . . . . . . . . . .76 Использование цветовой коррекции . . . . . . . . . . . . . . . . . . . . . . . . . . . . . . . . . . .78 Черно–белая печать . . . . . . . . . . . . . . . . . . . . . . . . . . . . . . . . . . . . . . . . . . . . . . . .79 Разделители прозр. пленок. . . . . . . . . . . . . . . . . . . . . . . . . . . . . . . . . . . . . . . . . . .80 Печать титульных листов . . . . . . . . . . . . . . . . . . . . . . . . . . . . . . . . . . . . . . . . . . . .82 Масштабирование . . . . . . . . . . . . . . . . . . . . . . . . . . . . . . . . . . . . . . . . . . . . . . . . . .84
4WorkCentre 7425/7428/7435
Руководство пользователя
Печать водяных знаков . . . . . . . . . . . . . . . . . . . . . . . . . . . . . . . . . . . . . . . . . . . . . .85 Печать зеркальных изображений. . . . . . . . . . . . . . . . . . . . . . . . . . . . . . . . . . . . . .87
Создание и сохранение нестандартных размеров . . . . . . . . . . . . . . . . . . . . . . . .88
Уведомление о завершении задания. . . . . . . . . . . . . . . . . . . . . . . . . . . . . . . . . . .89 Специальные типы заданий . . . . . . . . . . . . . . . . . . . . . . . . . . . . . . . . . . . . . . . . . .90
Отсылка заданий защищенной печати, пробных комплектов, заданий печати с задержкой и сохраненных в почтовом ящике . . . . . .90
Печать или удаление заданий защищенной печати. . . . . . . . . . . . . . . . . . . .91 Печать или удаление заданий пробной печати. . . . . . . . . . . . . . . . . . . . . . . .91 Печать и удаление заданий печати с задержкой . . . . . . . . . . . . . . . . . . . . . .91 Печать или удаление заданий печати, сохраненных в почтовом ящике. . . .91
5 Копирование
Основное копирование . . . . . . . . . . . . . . . . . . . . . . . . . . . . . . . . . . . . . . . . . . . . . .94 Настройка параметров копирования . . . . . . . . . . . . . . . . . . . . . . . . . . . . . . . . . . .96
Основные параметры . . . . . . . . . . . . . . . . . . . . . . . . . . . . . . . . . . . . . . . . . . . .96 Регулировка качества изображения. . . . . . . . . . . . . . . . . . . . . . . . . . . . . . . .100 Настройка макета. . . . . . . . . . . . . . . . . . . . . . . . . . . . . . . . . . . . . . . . . . . . . . .104 Настройка формата вывода . . . . . . . . . . . . . . . . . . . . . . . . . . . . . . . . . . . . . .108
Дополнительные функции копирования. . . . . . . . . . . . . . . . . . . . . . . . . . . . .115
6 Работа с факсом
Обзор режимов факса . . . . . . . . . . . . . . . . . . . . . . . . . . . . . . . . . . . . . . . . . . . . . .122
Подключение и настройка режимов факса . . . . . . . . . . . . . . . . . . . . . . . . . .122
Отправка факса . . . . . . . . . . . . . . . . . . . . . . . . . . . . . . . . . . . . . . . . . . . . . . . . . . .123 Факс-сервер . . . . . . . . . . . . . . . . . . . . . . . . . . . . . . . . . . . . . . . . . . . . . . . . . . . . . .124 Отправка сервер-факса. . . . . . . . . . . . . . . . . . . . . . . . . . . . . . . . . . . . . . . . . .124 Отправка Интернет-факса. . . . . . . . . . . . . . . . . . . . . . . . . . . . . . . . . . . . . . . . . . .126 Отправка факса с компьютера . . . . . . . . . . . . . . . . . . . . . . . . . . . . . . . . . . . . . . .128 Прием факсов. . . . . . . . . . . . . . . . . . . . . . . . . . . . . . . . . . . . . . . . . . . . . . . . . . . . .129 Выбор параметров факса . . . . . . . . . . . . . . . . . . . . . . . . . . . . . . . . . . . . . . . . . . .130
Светлее/Темнее. . . . . . . . . . . . . . . . . . . . . . . . . . . . . . . . . . . . . . . . . . . . . . . .130 Настройка двустороннего факса. . . . . . . . . . . . . . . . . . . . . . . . . . . . . . . . . . .130 Выбор типа оригинала. . . . . . . . . . . . . . . . . . . . . . . . . . . . . . . . . . . . . . . . . . .130 Установка разрешения факса. . . . . . . . . . . . . . . . . . . . . . . . . . . . . . . . . . . . .131 Настройка размера оригинала . . . . . . . . . . . . . . . . . . . . . . . . . . . . . . . . . . . .131 Факс книги. . . . . . . . . . . . . . . . . . . . . . . . . . . . . . . . . . . . . . . . . . . . . . . . . . . . .131 Уменьшить/Увеличить . . . . . . . . . . . . . . . . . . . . . . . . . . . . . . . . . . . . . . . . . . .131 Удаление неотправленных факсов . . . . . . . . . . . . . . . . . . . . . . . . . . . . . . . .132 Дополнительные параметры факса . . . . . . . . . . . . . . . . . . . . . . . . . . . . . . . .132
Добавление адресов в адресную книгу . . . . . . . . . . . . . . . . . . . . . . . . . . . . . . . .134
|
WorkCentre 7425/7428/7435 |
5 |
|
Руководство пользователя |
7 Сканирование
Обзор сканирования . . . . . . . . . . . . . . . . . . . . . . . . . . . . . . . . . . . . . . . . . . . . . . .136 Загрузка оригиналов документов . . . . . . . . . . . . . . . . . . . . . . . . . . . . . . . . . . . . .137 Сканирование в эл. почту . . . . . . . . . . . . . . . . . . . . . . . . . . . . . . . . . . . . . . . . . . .138
Настройка параметров электронной почты. . . . . . . . . . . . . . . . . . . . . . . . . .138
Сетевое сканирование. . . . . . . . . . . . . . . . . . . . . . . . . . . . . . . . . . . . . . . . . . . . . .140 Сканирование в папку . . . . . . . . . . . . . . . . . . . . . . . . . . . . . . . . . . . . . . . . . . . . . .141
Создание папки . . . . . . . . . . . . . . . . . . . . . . . . . . . . . . . . . . . . . . . . . . . . . . . .141 Сканирование в папку . . . . . . . . . . . . . . . . . . . . . . . . . . . . . . . . . . . . . . . . . . .142 Отправить из почтового ящика . . . . . . . . . . . . . . . . . . . . . . . . . . . . . . . . . . . .142
Использование листов передачи работ. . . . . . . . . . . . . . . . . . . . . . . . . . . . .143
Сканирование на ПК . . . . . . . . . . . . . . . . . . . . . . . . . . . . . . . . . . . . . . . . . . . . . . .144
Использование программы сканирования Xerox. . . . . . . . . . . . . . . . . . . . . . . . .145
Создание шаблонов сканирования. . . . . . . . . . . . . . . . . . . . . . . . . . . . . . . . .145 Удаление шаблонов сканирования . . . . . . . . . . . . . . . . . . . . . . . . . . . . . . . .148
Управление папками утилиты сканирования Xerox и профилями электронной почты. . . . . . . . . . . . . . . . . . . . . . . . . . . . . . . . . . . . . . . . . .148
Использование инструментов сканирования в эл. почту и копирования в папку. . . . . . . . . . . . . . . . . . . . . . . . . . . . . . . . . . . . . . .152
Импорт отсканированных изображений в приложение. . . . . . . . . . . . . . . . .156
Управление изображениями на
компьютере с использованием CentreWare IS . . . . . . . . . . . . . . . . . . . . . . . .160
Загрузка изображений из папки . . . . . . . . . . . . . . . . . . . . . . . . . . . . . . . . . . .160 Печать изображений из папки. . . . . . . . . . . . . . . . . . . . . . . . . . . . . . . . . . . . .161
Настройка параметров сканирования . . . . . . . . . . . . . . . . . . . . . . . . . . . . . . . . .163
Дополнительные параметры сканирования . . . . . . . . . . . . . . . . . . . . . . . . .164
8 Обслуживание
Обслуживание и чистка. . . . . . . . . . . . . . . . . . . . . . . . . . . . . . . . . . . . . . . . . . . . .168
Общие меры предосторожности. . . . . . . . . . . . . . . . . . . . . . . . . . . . . . . . . . .168 Расположение серийного номера. . . . . . . . . . . . . . . . . . . . . . . . . . . . . . . . . .169 Счетчики использования. . . . . . . . . . . . . . . . . . . . . . . . . . . . . . . . . . . . . . . . .169
Чистка принтера. . . . . . . . . . . . . . . . . . . . . . . . . . . . . . . . . . . . . . . . . . . . . . . . . . .170
Чистка стекла экспонирования и его крышки. . . . . . . . . . . . . . . . . . . . . . . . .170
Чистка наружных поверхностей . . . . . . . . . . . . . . . . . . . . . . . . . . . . . . . . . . .171
Очистка роликов податчика оригиналов . . . . . . . . . . . . . . . . . . . . . . . . . . . .171
Чистка линз печатающих головок. . . . . . . . . . . . . . . . . . . . . . . . . . . . . . . . . .172
6WorkCentre 7425/7428/7435
Руководство пользователя
Замена тонер-картриджей. . . . . . . . . . . . . . . . . . . . . . . . . . . . . . . . . . . . . . . . . . .175 Замена сборника отработанного тонера . . . . . . . . . . . . . . . . . . . . . . . . . . . . . . .177 Замена принт-картриджей. . . . . . . . . . . . . . . . . . . . . . . . . . . . . . . . . . . . . . . . . . .180 Замена узла фьюзера . . . . . . . . . . . . . . . . . . . . . . . . . . . . . . . . . . . . . . . . . . . . . .184
Замена устройства очистки ремня переноса. . . . . . . . . . . . . . . . . . . . . . . . . . . .186
Замените ролик переноса. . . . . . . . . . . . . . . . . . . . . . . . . . . . . . . . . . . . . . . . . . .190
Опорожнение сборника отходов перфорации. . . . . . . . . . . . . . . . . . . . . . . . . . .193
Сборник отходов перфорации финишера-степлера LX . . . . . . . . . . . . . . . .193 Сборник отходов перфорации многофункционального финишера. . . . . . .194
Установка картриджей сшивателя . . . . . . . . . . . . . . . . . . . . . . . . . . . . . . . . . . . .196
Замена картриджа сшивателя для встроенного финишера. . . . . . . . . . . . .196 Замена основного картриджа сшивателя для финишера-степлера LX . . .198 Замена картриджа брошюровщика для финишера-степлера LX . . . . . . . .200 Замена основного картриджа сшивателя для
многофункционального финишера. . . . . . . . . . . . . . . . . . . . . . . . . . . . .201
Замена картриджа брошюровщика для многофункционального финишера. . . . . . . . . . . . . . . . . . . . . . . . . . . . .204
Заказ расходных материалов . . . . . . . . . . . . . . . . . . . . . . . . . . . . . . . . . . . . . . . .207
Расходные материалы. . . . . . . . . . . . . . . . . . . . . . . . . . . . . . . . . . . . . . . . . . .207 Регулярно заменяемые компоненты . . . . . . . . . . . . . . . . . . . . . . . . . . . . . . .207
Когда заказывать расходные материалы. . . . . . . . . . . . . . . . . . . . . . . . . . . .208
Утилизация расходных материалов. . . . . . . . . . . . . . . . . . . . . . . . . . . . . . . .208
9 Устранение неисправностей
Сообщения о неисправности . . . . . . . . . . . . . . . . . . . . . . . . . . . . . . . . . . . . . . . .210 Устранение общих неисправностей . . . . . . . . . . . . . . . . . . . . . . . . . . . . . . . . . . .211
Принтер не включается . . . . . . . . . . . . . . . . . . . . . . . . . . . . . . . . . . . . . . . . . .211 Печать выполняется слишком долго . . . . . . . . . . . . . . . . . . . . . . . . . . . . . . .212
Принтер часто перезагружается или отключается . . . . . . . . . . . . . . . . . . . .212
Принтер создает необычный шум . . . . . . . . . . . . . . . . . . . . . . . . . . . . . . . . .213
Неправильно отображаются дата и время . . . . . . . . . . . . . . . . . . . . . . . . . .213
Неполадки при двусторонней печати. . . . . . . . . . . . . . . . . . . . . . . . . . . . . . .213 Вытаскивание застрявшей бумаги . . . . . . . . . . . . . . . . . . . . . . . . . . . . . . . . . . . .214
Вытаскивание застрявшей бумаги из лотков 1, 2, 3 и 4 . . . . . . . . . . . . . . . .215 Вытаскивание застрявшей бумаги из лотка 5 (обходного) . . . . . . . . . . . . . .216 Вытаскивание застрявшей бумаги в зоне верхней левой крышки А . . . . . .216 Вытаскивание застрявшей бумаги в зоне нижней левой крышки С . . . . . .218 Вытаскивание застрявшей бумаги в зоне нижней левой крышки D . . . . . .219 Вытаскивание застрявшей бумаги из блока двусторонней печати В . . . . .220 Вытаскивание застрявшей бумаги из податчика оригиналов . . . . . . . . . . .221 Вытаскивание застрявшей бумаги из встроенного финишера . . . . . . . . . .224 Вытаскивание застрявшей бумаги из финишера-степлера LX . . . . . . . . . .224 Вытаскивание застрявшей бумаги из многофункционального финишера .226 Решения для устранения застревании бумаги . . . . . . . . . . . . . . . . . . . . . . .238
Предотвращение застревания бумаги. . . . . . . . . . . . . . . . . . . . . . . . . . . . . .241
|
WorkCentre 7425/7428/7435 |
7 |
|
Руководство пользователя |
Вытаскивание застрявших скрепок . . . . . . . . . . . . . . . . . . . . . . . . . . . . . . . . . . .242
Вытаскивание застрявших скрепок из встроенного финишера . . . . . . . . . .242 Вытаскивание застрявших скрепок основного картриджа из
финишера-степлера LX. . . . . . . . . . . . . . . . . . . . . . . . . . . . . . . . . . . . . .244
Вытаскивание застрявших скрепок основного картриджа из многофункционального финишера. . . . . . . . . . . . . . . . . . . . . . . . . . . . .246
Вытаскивание застрявших скрепок картриджа брошюровщика из многофункционального финишера. . . . . . . . . . . . . . . . . . . . . . . . . . . . .248
Проблемы при копировании и сканировании . . . . . . . . . . . . . . . . . . . . . . . . . . .251
Проблемы при работе с факсом. . . . . . . . . . . . . . . . . . . . . . . . . . . . . . . . . . . . . .252
Проблемы при отправке факсов. . . . . . . . . . . . . . . . . . . . . . . . . . . . . . . . . . .253 Проблемы при приеме факсов . . . . . . . . . . . . . . . . . . . . . . . . . . . . . . . . . . . .254
Получение справки . . . . . . . . . . . . . . . . . . . . . . . . . . . . . . . . . . . . . . . . . . . . . . . .256
Сообщения на панели управления. . . . . . . . . . . . . . . . . . . . . . . . . . . . . . . . .256
Предупреждения при работе с факсом и сканером . . . . . . . . . . . . . . . . . . .256 Online Support Assistant (Онлайновый помощник поддержки) . . . . . . . . . . .256 Ссылки на веб-страницы. . . . . . . . . . . . . . . . . . . . . . . . . . . . . . . . . . . . . . . . .257
A Технические характеристики аппарата
Физические характеристики . . . . . . . . . . . . . . . . . . . . . . . . . . . . . . . . . . . . . . . . .260 Базовый модуль. . . . . . . . . . . . . . . . . . . . . . . . . . . . . . . . . . . . . . . . . . . . . . . .260 Характеристики окружающей среды . . . . . . . . . . . . . . . . . . . . . . . . . . . . . . . . . .262
Температура. . . . . . . . . . . . . . . . . . . . . . . . . . . . . . . . . . . . . . . . . . . . . . . . . . .262 Относительная влажность. . . . . . . . . . . . . . . . . . . . . . . . . . . . . . . . . . . . . . . .262
Электропитание . . . . . . . . . . . . . . . . . . . . . . . . . . . . . . . . . . . . . . . . . . . . . . . . . . .263
Рабочее напряжение/частота . . . . . . . . . . . . . . . . . . . . . . . . . . . . . . . . . . . . .263
Максимальная потребляемая мощность . . . . . . . . . . . . . . . . . . . . . . . . . . . .263 Принтер удовлетворяет требованиям ENERGY STAR, США. . . . . . . . . . . . . .263
Эксплуатационные характеристики . . . . . . . . . . . . . . . . . . . . . . . . . . . . . . . . . . .264
Разрешение . . . . . . . . . . . . . . . . . . . . . . . . . . . . . . . . . . . . . . . . . . . . . . . . . . .264 Скорость печати. . . . . . . . . . . . . . . . . . . . . . . . . . . . . . . . . . . . . . . . . . . . . . . .264
Характеристики контроллера . . . . . . . . . . . . . . . . . . . . . . . . . . . . . . . . . . . . . . . .265
Контроллер. . . . . . . . . . . . . . . . . . . . . . . . . . . . . . . . . . . . . . . . . . . . . . . . . . . .265 Память. . . . . . . . . . . . . . . . . . . . . . . . . . . . . . . . . . . . . . . . . . . . . . . . . . . . . . . .265 Стандартные интерфейсы. . . . . . . . . . . . . . . . . . . . . . . . . . . . . . . . . . . . . . . .265
B Информация о соответствии стандартам
Основные нормативные требования . . . . . . . . . . . . . . . . . . . . . . . . . . . . . . . . . .268
США (нормативные требования Федеральной комиссии по связи) . . . . . .268
Канада (нормативные требования) . . . . . . . . . . . . . . . . . . . . . . . . . . . . . . . .268 Европейский Союз . . . . . . . . . . . . . . . . . . . . . . . . . . . . . . . . . . . . . . . . . . . . . .269 Выделение озона. . . . . . . . . . . . . . . . . . . . . . . . . . . . . . . . . . . . . . . . . . . . . . .269
8WorkCentre 7425/7428/7435
Руководство пользователя
Ограничения на копирование . . . . . . . . . . . . . . . . . . . . . . . . . . . . . . . . . . . . . . . .270
США. . . . . . . . . . . . . . . . . . . . . . . . . . . . . . . . . . . . . . . . . . . . . . . . . . . . . . . . . .270 Канада. . . . . . . . . . . . . . . . . . . . . . . . . . . . . . . . . . . . . . . . . . . . . . . . . . . . . . . .271 Другие страны . . . . . . . . . . . . . . . . . . . . . . . . . . . . . . . . . . . . . . . . . . . . . . . . .272
Ограничения на передачу факсов . . . . . . . . . . . . . . . . . . . . . . . . . . . . . . . . . . . .273
США. . . . . . . . . . . . . . . . . . . . . . . . . . . . . . . . . . . . . . . . . . . . . . . . . . . . . . . . . .273 Канада. . . . . . . . . . . . . . . . . . . . . . . . . . . . . . . . . . . . . . . . . . . . . . . . . . . . . . . .275 Европа. . . . . . . . . . . . . . . . . . . . . . . . . . . . . . . . . . . . . . . . . . . . . . . . . . . . . . . .275
Уведомление относительно компании Telecom из Новой Зеландии. . . . . .276 Material Safety Data Sheets (Паспорта безопасности материалов) . . . . . . . . . .278
C Утилизация
Все страны . . . . . . . . . . . . . . . . . . . . . . . . . . . . . . . . . . . . . . . . . . . . . . . . . . . .279 Европейский Союз . . . . . . . . . . . . . . . . . . . . . . . . . . . . . . . . . . . . . . . . . . . . . .280 Северная Америка. . . . . . . . . . . . . . . . . . . . . . . . . . . . . . . . . . . . . . . . . . . . . .282 Другие страны . . . . . . . . . . . . . . . . . . . . . . . . . . . . . . . . . . . . . . . . . . . . . . . . .282
Указатель
|
WorkCentre 7425/7428/7435 |
9 |
|
Руководство пользователя |
10WorkCentre 7425/7428/7435
Руководство пользователя
Техника безопасности 1
В этой главе рассматриваются следующие вопросы:
•Электрическая безопасность на стр. 12
•Безопасность при обслуживании на стр. 14
•Безопасность при эксплуатации на стр. 15
•Символы маркировки на принтере на стр. 17
Данный принтер и рекомендуемые расходные материалы разработаны с учетом строгих требований обеспечения безопасности и прошли проверку на соответствие этим требованиям. Точное соблюдение следующих условий обеспечит длительную и безопасную работу принтера.
11
Техника безопасности
Электрическая безопасность
•Используйте шнур питания, поставляемый с принтером.
•Подключайте шнур питания напрямую к правильно заземленной электрической розетке. Проверьте надежность подключения на обоих концах шнура. Если вы не знаете, заземлена ли розетка, попросите специалиста проверить ее.
•Не используйте вилку адаптера с заземлением для подключения принтера к сетевой розетке без контакта заземления.
•Не используйте удлинитель или сетевой разветвитель.
•Убедитесь, что принтер подключен к розетке, обеспечивающей соответствующее напряжение питания и мощность. В случае необходимости обсудите со специалистом режимы питания принтера.
Предупреждение: Правильное заземление принтера позволит избежать поражения электрическим током. При неправильном использовании электрические приборы могут представлять опасность.
•Не размещайте принтер в таком месте, где на шнур питания могут случайно наступить.
•Не ставьте предметы на шнур питания.
•Не закрывайте вентиляционные отверстия. Эти отверстия предотвращают перегрев аппарата.
•Не допускайте попадания в принтер скобок и скрепок для бумаги.
•Не вставляйте никаких предметов в щели и отверстия принтера. Контакт с высоким напряжением или короткое замыкание могут привести к пожару или поражению электрическим током.
В случае появления необычного шума или запаха:
1.Немедленно выключите принтер.
2.Выньте шнур питания из розетки.
3.Для устранения неполадок обратитесь в уполномоченное сервисное представительство.
12WorkCentre 7425/7428/7435
Руководство пользователя
Электрическая безопасность
Шнур питания подключается через разъем на задней панели принтера. В случае необходимости полностью отключить электропитание принтера выньте шнур питания из розетки.
Предупреждение: Не снимайте крышки и ограждения, закрепленные винтами, за исключением случаев установки дополнительного оборудования и выполнения специальных инструкций. При выполнении такой установки питание должно быть ОТКЛЮЧЕНО. Устанавливая дополнительное оборудование, выньте шнур питания из розетки. Кроме устанавливаемого дополнительного оборудования, под этими крышками нет деталей, подлежащих обслуживанию пользователем.
Угроза вашей безопасности возникает в следующих случаях:
•Шнур питания поврежден или изношен.
•В принтер попала жидкость.
•Принтер намок.
При возникновении любой из перечисленных ситуаций выполните следующие действия:
1.Немедленно выключите принтер.
2.Выньте шнур питания из розетки.
3.Обратитесь в уполномоченное сервисное представительство.
ВНИМАНИЕ: Чтобы уменьшить риск возгорания, используйте для телекоммуникационной линии провод калибра 26 по системе AWG (American Wire Gauge).
|
WorkCentre 7425/7428/7435 |
13 |
|
Руководство пользователя |
Техника безопасности
Безопасность при обслуживании
•Не выполняйте никакие действия по обслуживанию, не описанные в документации принтера.
•Не применяйте аэрозольные очистители. Использование неподходящих расходных материалов может привести к снижению производительности и возникновению опасных условий.
•Не сжигайте расходные материалы и компоненты, подлежащие регулярной замене. Информацию о программах утилизации расходных материалов Xerox можно получить на сайте www.xerox.com/gwa.
14WorkCentre 7425/7428/7435
Руководство пользователя
Безопасность при эксплуатации
Безопасность при эксплуатации
Данный раздел содержит:
•Размещение принтера на стр. 15
•Инструкции по эксплуатации на стр. 15
•Материалы для принтера на стр. 16
Принтер и расходные материалы разработаны с учетом строгих требований техники безопасности и прошли проверку на соответствие этим требованиям. Это включает проверку и утверждение агентствами по технике безопасности, а также соответствие установленным стандартам охраны окружающей среды.
Соблюдение вами перечисленных условий обеспечит длительную и безопасную работу принтера.
Размещение принтера
•Принтер следует установить в месте, где нет пыли и температура воздуха составляет 10–28 °C, а относительная влажность 15–85 % (без конденсации).
•Размещайте принтер так, чтобы для вентиляции, работы и обслуживания оставалось достаточно свободного места.
•Не ставьте принтер непосредственно на ковровое покрытие (без тележки или подставки). Ковровые волокна могут попасть в принтер, что снизит качество печати и копирования.
•Не размещайте принтер рядом с источником тепла.
•Не размещайте принтер в местах, где он может подвергнуться воздействию прямых солнечных лучей, во избежание повреждения чувствительных к свету компонентов.
•Не размещайте принтер на пути потока холодного воздуха из кондиционера.
Инструкции по эксплуатации
•Не блокируйте и не закрывайте щели и отверстия принтера. Без надлежащей вентиляции принтер может перегреться.
•Размещайте принтер на ровной, прочной и не вибрирующей поверхности, которая может выдержать его вес. Принтер в базовой конфигурации без упаковочных материалов весит около 101 кг.
•Не допускайте попадания рук, волос, галстука и т. п. между выходными и подающими роликами.
•Не снимайте лоток для бумаги, выбранный в драйвере или на панели управления, когда выполняется печать или копирование.
•Не открывайте дверцы во время печати.
•Не перемещайте принтер во время печати.
|
WorkCentre 7425/7428/7435 |
15 |
|
Руководство пользователя |
Техника безопасности
Материалы для принтера
•Используйте расходные материалы, предназначенные специально для этой модели принтера. Использование неподходящих материалов может привести к ухудшению работы принтера и представляет угрозу вашей безопасности.
•Следуйте предупреждениям на маркировке и инструкциям, поставляемым с принтером, дополнительными узлами и расходными материалами.
ВНИМАНИЕ: Не рекомендуется использовать расходные материалы других производителей. Гарантийные обязательства, соглашения об обслуживании и гарантия Total Satisfaction Guarantee (Общая гарантия качества) не распространяются на поломки, неправильную работу или снижение качества, вызванные использованием расходных материалов других производителей или использованием расходных материалов Xerox, не предназначенных для этого принтера. Total Satisfaction Guarantee (Общая гарантия качества) действует в США и Канаде. Узнайте в местном представительстве Xerox, распространяется ли эта гарантия на ваш регион.
16WorkCentre 7425/7428/7435
Руководство пользователя

Символы маркировки на принтере
Символы маркировки на принтере
Символ Описание
Предупреждение или Внимание:
Несоблюдение требований этого предупреждения может привести к тяжелой травме и даже к летальному исходу.
Несоблюдение изложенных здесь требований может привести к травме или к повреждению вашего имущества.
Наружная или внутренняя поверхность принтера может нагреваться. Во избежание травм соблюдайте осторожность.
Не касайтесь компонентов с этим символом, так как имеется опасность получения травмы.
Не сжигайте данный компонент.
Горячая поверхность. Подождите в течение указанного времени, пока она остынет.
|
WorkCentre 7425/7428/7435 |
17 |
|
Руководство пользователя |
Техника безопасности
18WorkCentre 7425/7428/7435
Руководство пользователя
Функции 2
В этом разделе рассматриваются следующие вопросы:
•Перед началом эксплуатации принтера на стр. 20
•Элементы принтера на стр. 21
•Конфигурации принтера на стр. 29
•Панель управления на стр. 31
•Дополнительная информация на стр. 35
19
Функции
Перед началом эксплуатации принтера
Центр работы с клиентами корпорации Xerox
Получить помощь во время или после установки продукта можно, посетив веб-сайт технической поддержки Xerox.
www.xerox.com/office/worldcontacts
За дополнительной поддержкой обращайтесь к нашим экспертам в Центр работы с клиентами Xerox. Номер телефона представителя Xerox в вашем городе предоставляется при установке продукта. Для вашего удобства и обращения в будущем запишите этот номер в отведенном ниже свободном месте.
Телефон Центра работы с клиентами или местного представителя Xerox:
#______________________________________
Xerox US Welcome Center: 1-800-821-2797
Xerox Canada Welcome Center: 1-800-93-XEROX (1-800-939-3769)
Для получения дополнительной справки по эксплуатации принтера:
1.Обратитесь к данному руководству пользователя.
2.Свяжитесь с дежурным оператором.
3.Посетите наш веб-сайт поддержки по адресу www.xerox.com/office/WC7425_WC7428_WC7435support,
либосвяжитесьсЦентромработы с клиентами Xerox.
При обращении к специалистам корпорации Xerox, пожалуйста, укажите серийный номер вашего принтера.
В Центре работы с клиентами корпорации Xerox могут попросить предоставить следующую информацию: характер проблемы, серийный номер принтера, код ошибки (при наличии), а также наименование и местоположение организации. Серийный номер принтера можно узнать следующим образом.
1.На панели управления принтера нажмите кнопку Machine Status (Статус аппарата).
2.По умолчанию возникает закладка Machine Information (Сведения об аппарате). Серийный номер отображается в левой части сенсорного экрана принтера.
Примечание: Серийный номер также можно найти на металлической табличке на левой стенке принтера под крышкой А.
20WorkCentre 7425/7428/7435
Руководство пользователя
![]()
Элементы принтера
Элементы принтера
В данном разделе содержится следующая информация:
•Вид спереди слева на стр. 21
•Вид сзади слева на стр. 22
•Устройства подачи документов на стр. 23
•Внутренние компоненты на стр. 24
•Многофункциональный финишер (дополнительно) на стр. 26
•Финишер-степлер LX (дополнительно) на стр. 27
•Встроенный финишер (дополнительно) на стр. 28
Вид спереди слева
|
1. |
Крышка стекла для оригинала |
|||
|
2. |
Стекло для документов |
|||
|
1 |
3. |
Панель управления. |
||
|
2 |
4. |
Центральное устройство |
||
|
подъема лотка |
||||
|
3 |
5. |
Центральное устройства |
||
|
4 |
||||
|
12 |
опускания лотка |
|||
|
5 |
||||
|
6 |
6. |
Выключатель питания |
||
|
7 |
7. |
Передняя крышка |
||
|
11 |
8 |
|||
|
8. |
Лоток 1 и дополнительные лотки |
|||
|
10 |
2, 3, 4 |
|||
|
9. |
Фиксирующие колеса |
|||
|
9 |
||||
|
wc74xx-001 |
10. |
Регулировочная ножка |
||
|
11. |
Лоток 5 (обходной) |
|||
|
12. |
Левый верхний лоток |
|
WorkCentre 7425/7428/7435 |
21 |
|
Руководство пользователя |
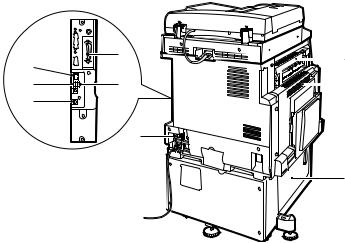
Функции
Вид сзади слева
|
9 |
5 |
1 |
|
|
6 |
2 |
||
|
8 |
|||
|
7 |
|||
|
4 |
|||
|
3 |
|
wc74xx-002 |
|||
|
1. |
Верхняя левая крышка |
6. |
Разъем подключения факса |
|
(дополнительно) |
|||
|
2. |
Верхняя левая крышка |
7. |
Разъем USB (дополнительно) |
|
3. |
Нижняя левая крышка |
8. |
Разъем подключения USB-карты |
|
памяти (дополнительно) |
|||
|
4. |
Автоматический выключатель |
9. |
Разъем интерфейса Ethernet |
5.Разъем интерфейса параллельного соединения (дополнительно)
22WorkCentre 7425/7428/7435
Руководство пользователя

Элементы принтера
Устройства подачи документов
|
1 |
2 |
3 |
4 |
5 |
6 |
|
|
7 |
8 |
|||||
wc74xx-004
wc74xx-005
|
1. |
Индикатор подтверждения |
5. |
Направляющие оригинала |
|
2. |
Рычаг |
6. |
Лоток подачи оригиналов |
|
3. |
Левая крышка |
7. |
Выходной лоток оригиналов |
|
4. |
Внутренняя крышка |
8. |
Стекло для документов |
|
WorkCentre 7425/7428/7435 |
23 |
|
Руководство пользователя |
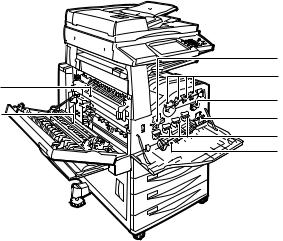
Функции
Внутренние компоненты
|
1 |
||
|
8 |
2 |
|
|
3 |
||
|
7 |
||
|
4 |
||
|
5 |
||
|
6 |
wc74xx-003
1.Рычаг извлечения принт-картриджа
2.Картриджи с тонером
3.Передача средства чистки ремня
4.Емкость для отработанного тонера
5.Принт-картриджи
6.Крышка принт-картриджа
7.Ролик переноса
8.Узел закрепления
24WorkCentre 7425/7428/7435
Руководство пользователя

Элементы принтера
Разъемы подключения телефонной линии
1.Tel (выход на телефон)
2.Line 1 (линия 1)
|
LINE3 |
4 |
|||
|
LINE2 |
3 |
|||
|
1 |
TE L |
LINE1 |
2 |
|
wc74xx-006
3.Line 2 (линия 2)
4.Line 3 (линия 3)
|
WorkCentre 7425/7428/7435 |
25 |
|
Руководство пользователя |

Функции
Многофункциональный финишер (дополнительно)
1.Передняя крышка
2.Правый верхний лоток
3.Выходная крышка
4.Правый средний лоток
|
1 |
2 |
|
3 |
|
|
4 |
|
|
5 |
|
|
6 |
|
|
7 |
|
|
8 |
wc74xx-008
5.Картридж степлера
6.Правый нижний лоток (буклетмейкер)
7.Брошюрный блок
8.Центральный лоток (передняя транспортная крышка)
Примечание: При установке финишера центральный подъемник лотка удаляется.
26WorkCentre 7425/7428/7435
Руководство пользователя

Финишер-степлер LX (дополнительно)
|
1 |
|
|
2 |
|
|
3 |
|
|
4 |
|
|
5 |
|
|
14 |
6 |
|
13 |
7 |
|
8 |
|
|
12 |
9 |
|
11 |
10 |
wc74xx-007
Элементы принтера
1.Фиксатор лотка
2.Брошюрный блок (дополнительно)
3.Боковая крышка брошюрного блока (дополнительно)
4.Картридж степлера брошюратора (дополнительно)
5.Верхняя крышка
6.Правый средний лоток
7.Рилевочный блок (дополнительно)
8.Картридж степлера
9.Передняя крышка
10.Финишер-степлер LX
11.Передняя транспортная крышка
12.Емкость отходов перфоратора
13.Блок перфоратора (дополнительно)
14.Центральный подъемник лотка
Примечание: При установке финишера центральный подъемник лотка удаляется.
|
WorkCentre 7425/7428/7435 |
27 |
|
Руководство пользователя |

Функции
Встроенный финишер (дополнительно)
|
1. |
Центральный лоток |
|||
|
Примечание: При установке |
||||
|
финишера центральный подъемник |
||||
|
5 |
1 |
лотка удаляется. |
||
|
4 |
||||
|
2 |
2. |
Встроенный финишер |
||
|
3 |
3. |
Картридж степлера |
||
|
4. |
Передняя крышка |
|||
|
5. |
Верхняя крышка |
wc74xx-009
28WorkCentre 7425/7428/7435
Руководство пользователя
Конфигурации принтера
Конфигурации принтера
Данный раздел содержит следующую информацию:
•Стандартные функции на стр. 29
•Конфигурации WorkCentre на стр. 29
•Дополнительное оборудование на стр. 30
Стандартные функции
WorkCentre 7425/7428/7435 обладает множеством функций копирования и печати, отвечающих вашим требованиям.
•Функции копирования, печати, а в некоторых конфигурациях также сканирования и факса
•Максимальная скорость печати — до 35 страниц в минуту (стр/мин) при цветном и черно-белом копировании (на обычной бумаге размера «Letter») в зависимости
от конфигурации
•Качество светодиодного сканирования и копирования 1200 x 2400 точек на дюйм
•Размер копируемого и печатаемого документа до 28 х 43 см (30,5 х 45,5 см/ SRA3 дополнительно)
•Автоматическая двусторонняя печать
•Дуплексный автоподатчик оригиналов емкостью до 75 листов
•Цветной сенсорный экран на панели управления
•Лоток 1 вместимостью до 250 листов
•Обходной лоток вместимостью до 100 листов
•1,5 ГБ памяти
•Встроенный жесткий диск для поддержки набора функций
•PostScript и PCL
•Соединение Ethernet 10/100Base-TX
Конфигурации WorkCentre
Принтер выпускается в трех конфигурациях:
|
Модель |
Скорость печати в стр/мин |
|
|
(одно- и двусторонняя) |
||
|
WorkCentre 7425 |
20 цветных/25 черно-белых |
|
|
WorkCentre 7428 |
28 цветных/28 черно-белых |
|
|
WorkCentre 7435 |
35 цветных/35 черно-белых |
|
|
WorkCentre 7425/7428/7435 |
29 |
|
Руководство пользователя |
Функции
Дополнительное оборудование
К WorkCentre 7425/7428/7435 предоставляется следующее дополнительное оборудование:
•Комплект PostScript (для регионов, где это не является стандартом)
•Встроенный финишер
•Финишер-степлер LX
•Многофункциональный финишер
•Комплект сканирования
•Сканирование на рабочий стол ПК
•Лоток для конвертов
•Трехлотковый модуль с поддержкой 30,5 х 45,5 см/SRA3
•Податчик большой емкости с поддержкой 30,5 х 45,5 см/SRA3
•Сдвоенный лоток большой емкости
•Комплект параллельной печати
•Считыватель медиа-карт
•Комплект печати USB Thumbdrive
•Стандартная рабочая поверхность
•Комплект предпросмотра эскизов
•Факс-сервер
•Одноканальный или трехканальный факс
•Комплект проектного сетевого учета (для регионов, где это не является стандартом)
•Комплект информационной безопасности (для регионов, где это не является стандартом)
•Комплект защищенных водяных знаков
•Комплект защищенного доступа
•FreeFlow SmartSend
•Удобный степлер
•Карта общего доступа Xerox
•Интерфейс внешних устройств
Более подробные сведения по дополнительному оборудованию можно найти по адресу:
www.xerox.com/office/WC7425_WC7428_WC7435supplies
30WorkCentre 7425/7428/7435
Руководство пользователя
Панель управления
Панель управления
Данный раздел содержит следующую информацию:
•Расположение элементов панели управления на стр. 31
•Сведения о принтере на стр. 33
Расположение элементов панели управления
Сенсорные экраны и элементы управления
•Отображает текущее состояние принтера.
•Обеспечивает доступ к функциям печати, копирования, сканирования и факса.
•Предоставляет доступ к информационным страницам.
•Предупреждает о необходимости загрузить бумагу, заменить расходные материалы или устранить застревание.
•Отображает ошибки и предупреждения.
|
WorkCentre 7425/7428/7435 |
31 |
|
Руководство пользователя |

Функции
Кнопки
|
1 |
2 |
3 |
4 |
5 |
6 7
 8
8  9
9
|
14 |
13 12 |
11 |
10 |
wc74xx-022 |
1.Сенсорный экран
Отображает информацию и обеспечивает доступ к функциям принтера.
2.Сервисная кнопка (Services)
Отображает функции принтера на сенсорном экране.
3.Вход/выход (Log In/Out)
Обеспечивает защищенный паролем доступ к стандартным настройкам принтера.
4.Язык (Language)
Меняет язык отображаемой на панели управления информации.
5.Кнопка экономии энергии
(Energy Saver)
Если принтер находится в режиме энергосбережения, нажать один раз для вывода принтера из этого режима. В противном случае после нажатия на эту кнопку принтер переходит в режим энергосбережения.
6.Очистить все (Clear All)
При однократном нажатии этой кнопки восстанавливаются исходные значения по умолчанию и выводится первый экран текущего режима. При двукратном нажатии этой кнопки восстанавливаются исходные значения по умолчанию для всех функций.
7.Прерывание (Interrupt)
Временное прерывание текущего задания для выполнения более приоритетного.
32WorkCentre 7425/7428/7435
Руководство пользователя
8.Стоп (Stop)
При нажатии этой кнопки выполнение текущего задания временно прерывается. Потом следует запрос подтверждения отмены или возобновления выполнения задания.
9.Старт (Start)
При помощи этой кнопки осуществляется запуск задания.
10.Буквенно-цифровая клавиатура
11.C
При помощи этой кнопки можно удалять числовые значения или последнюю введенную цифру.
12.Пауза в наборе номера (Dial Pause)
Этой кнопкой при передаче факса в набираемый телефонный номер вставляется пауза.
13.Статус аппарата (Machine Status)
При нажатии этой кнопки на сенсорный экран выводится информация о текущем состоянии аппарата.
14.Статус работы (Job Status)
Отображает информацию о выполняемой задаче на сенсорном экране.
Панель управления
Сведения о принтере
Информация состояния принтера предоставляется как на сенсорном экране панели управления, так и в печатной форме. Информация по эксплуатации и счетам также доступна для просмотра на сенсорном экране.
Информация состояния
Просмотр состояния работы для проверки и управления текущими и предстоящими задачами:
1.Нажмите кнопку Job Status (Состояние работы) на панели управления принтера.
2.Выберите требуемую задачу на сенсорном экране. При необходимости используйте стрелки промотки справа от списка.
Напечатайте информацию конфигурации для просмотра подробного списка настроек, установок и состояния принтера.
1.Нажмите кнопку Machine Status (Статус аппарата).
2.Выберите вкладку Machine Information (Сведения об аппарате) на сенсорном экране.
3.Выберите Print Reports (Печать отчетов), затем выберите Printer Reports (Отчеты принтера).
4.Выберите Configuration Report (Информация конфигурации), затем нажмите зеленую кнопку Start (Старт).
Счетчики выставления счетов
Страница счетчиков выставления счетов отображает информацию об использовании принтера и соответствующих затратах.
1.На панели управления принтера нажмите кнопку Machine Status (Статус аппарата).
2.На сенсорном экране принтера прикоснитесь к изображению вкладки Billing Information (Информация о расходах).
3.Счетчики выставления счетов отображаются в левой части экрана.
4.Для получения более развернутой информации выберите Usage Counters (Счетчики использования).
Настройка аудитрона
Аудитрон используется для регистрации доступа каждого пользователя к функциям выставления счетов и управления. Режим аудитрона контролирует доступ к функциям печати, копирования, сканирования и факса. Если включен режим аудитрона, то для начала работы с аппаратом пользователь должен нажать кнопку входа/выхода из системы и ввести соответствующий пароль пользователя.
Для эффективного использования аудитрона рекомендуется вначале настроить учетные записи пользователей. Можно создавать до 1000 учетных записей. Идентификаторы и имена пользователей в аудитроне должны быть уникальными.
|
WorkCentre 7425/7428/7435 |
33 |
|
Руководство пользователя |
Функции
Учетная запись должна содержать идентификатор пользователя, его имя, уровень доступа и лимит расхода.
Примечание: Для активизации аудитрона необходимо ввести пароль системного администратора.
1.Нажмите кнопку Log In/Log Out (Вход/выход) и введите данные системного администратора, затем нажмите кнопку Machine Status (Статус аппарата).
2.На сенсорном экране принтера выберите вкладку Tools (Системные средства). На следующей странице выберите Accounting (Учет пользования), а затем Accounting Type (Тип учета).
3.На следующей странице выберите Local Accounting (Локальный учет) и Save (Сохранить).
4.Нажмите кнопку Log In/Log Out (Вход/Выход). На странице Reboot Machine (Перезагрузить аппарат) выберите Reboot Now (Перезагрузить). Принтер перезагрузится.
Режим аудитрона включен.
34WorkCentre 7425/7428/7435
Руководство пользователя
Дополнительная информация
Дополнительная информация
Информацию о принтере и его возможностях можно найти в следующих источниках.
|
Информация |
Источник |
|
Первоочердная Информация |
Входит в комплект принтера |
|
Руководство по установке |
Входит в комплект принтера |
|
Краткое руководство по работе |
Входит в комплект принтера |
|
Описания |
Входит в комплект принтера |
|
функциональных возможностей |
|
|
Руководство пользователя (PDF) |
Software and Documentation CD-ROM (Компакт-диск с |
|
программным обеспечением и документацией) |
|
|
www.xerox.com/office/WC7425_WC7428_WC7435docs |
|
|
System Administration Guide |
www.xerox.com/office/WC7425_WC7428_WC7435docs |
|
(Руководство |
|
|
системного администратора) |
|
|
Recommended Media List (Список |
www.xerox.com/paper (США) |
|
рекомендуемых материалов) |
www.xerox.com/europaper (Европа) |
|
Средства управления принтером |
www.xerox.com/office/WC7425_WC7428_WC7435drivers |
|
Online Support Assistant |
www.xerox.com/office/WC7425_WC7428_WC7435support |
|
(Связь с консультантом |
|
|
службы поддержки) |
|
|
Техническая поддержка |
www.xerox.com/support |
|
Информационные страницы |
Печать с панели управления |
|
WorkCentre 7425/7428/7435 |
35 |
|
Руководство пользователя |
Функции
36WorkCentre 7425/7428/7435
Руководство пользователя
Основы работы в сети 3
В этой главе рассматриваются следующие вопросы:
•Выбор типа подключения на стр. 38
•Установка драйверов принтера на стр. 40
•CentreWare Internet Services на стр. 44
См. также:
Online Support Assistant (Онлайновый ассистент поддержки) на сайте www.xerox.com/office/WC7425_WC7428_WC7435support
37

Основы работы в сети
Выбор типа подключения
Принтер должен быть подключен к сети Ethernet или с помощью кабеля USB (опция).
•Ethernet: позволяет группе компьютеров связываться с принтером. Каждому компьютеру требуется сетевое подключение. Сетевое подключение позволяет получать доступ к настройкам принтерам и сведения о его состоянии с помощью службы
CentreWare Internet Services (с веб-интерфейсом).
•USB: подключение к принтеру с одного компьютера. Для подключения к принтеру требуется кабель USB, поэтому компьютер должен размещаться рядом с принтером. Недоступны многие функции, для которых требуется доступ в Интернет и сетевая связь (такие как сканирование в почтовый ящик и Интернет-факс).
Примечание: Кабели и прочее сетевое оборудование, такое как концентраторы и маршрутизаторы, не входят в комплект поставки принтера и приобретаются отдельно.
Примечание: Порты USB и Ethernet настраивает системный администратор. Подробные сведения см. System Administrator Guide (Руководство системного администратора).
Требования к операционной системе
•PC: Windows 2000, XP, Windows Vista, Windows Server 2003 или более поздняя версия.
•Macintosh: OS X, версия 10.3 или более поздняя.
wc74xx-159
38WorkCentre 7425/7428/7435
Руководство пользователя
Выбор типа подключения
Подключение через Ethernet
Подключение через Ethernet позволяет группе компьютеров связываться с принтером. Доступны все функции, включая доступ к службе CentreWare Internet Services (CentreWare IS).
Для подключения принтера к сети Ethernet выполните следующее.
•Один компьютер: подключите один конец кабеля типа «витая пара» категории 5 к ответвлению действующей сети. Другой конец кабеля подключите к разъему RJ-45.
•Группа компьютеров: подключите стандартный кабель Ethernet от каждого компьютера к концентратору Ethernet или маршрутизатору кабель/DSL. Подключите стандартный кабель Ethernet от концентратора/маршрутизатора к разъему RJ-45.
Подключение через USB
Порядок подключения через USB:
1.Выключите принтер и компьютер.
2.Подключите конец A кабеля USB 2.0 A/B к компьютеру, а конец B – к порту USB принтера.
3.Включите принтер.
4.Включите компьютер.
См. также:
System Administrator Guide (Руководство системного администратора) см. www.xerox.com/office/WC7425_WC7428_WC7435docs
Online Support Assistant (Онлайновый ассистент поддержки) на сайте www.xerox.com/office/WC7425_WC7428_WC7435support
|
WorkCentre 7425/7428/7435 |
39 |
|
Руководство пользователя |
Основы работы в сети
Установка драйверов принтера
Данный раздел содержит:
•Выбор драйвера принтера на стр. 40
•Установка драйвера (Windows 2000 или более поздней версии) на стр. 41
•Установка драйвера (Macintosh OS X 10.4 или более поздней версии) на стр. 42
•Установка драйвера (UNIX/Linux) на стр. 43
Выбор драйвера принтера
Для доступа к специальным параметрам печати необходимо установить драйвер принтера Xerox.
Корпорация Xerox предоставляет драйверы для различных языков описания страниц и операционных систем. Предусмотрены следующие драйверы принтера:
|
Драйвер принтера |
Описание |
|
Драйвер PostScript для Windows |
Драйвер Adobe® PostScript® обеспечивает доступ ко всем |
|
(Windows 2000/Windows 2003 |
настройкам печати принтера и является драйвером по |
|
Server/Windows 2008 |
умолчанию на диске Software and Documentation CD-ROM |
|
Server/XP/Vista) |
(Компакт-диск с программным обеспечением и документацией). |
|
Драйвер PCL 5 и PCL 6 |
Драйвер PCL (Printer Command Language) можно использовать |
|
(Windows 2000/Windows 2003 |
для приложений, требующих наличия PCL 5 или PCL 6. |
|
Server/Windows 2008 |
|
|
Server/XP/Vista) |
|
|
Глобальный драйвер |
ДанныйдрайверпредназначендлялюбогопринтераPostScript в |
|
принтера Xerox |
сети, включая аппараты других производителей. При установке |
|
(Windows) |
он конфигурируется автоматически для конкретногопринтера. |
|
Драйвер Xerox Mobile |
ДанныйдрайверпредназначендлялюбогопринтераPostScript в |
|
Express (Windows) |
сети, включая аппараты других производителей. При каждой |
|
печати он конфигурируется автоматически для выбранного |
|
|
принтера. Есливамчастоприходитсяездитьвнекоторыеместа, |
|
|
можно сохранить используемые в них принтеры, чтобы драйвер |
|
|
сохранил выбранные настройки. |
|
|
Драйвер для Macintosh OS X |
Данный драйвер обеспечивает доступ ко всем параметрам |
|
(Macintosh OS X версии 10.3 или |
печати принтера с компьютера Macintosh. |
|
более поздней) |
|
|
Драйвер для UNIX |
Данный драйвер обеспечивает печать в среде операционной |
|
системы UNIX. |
|
Последние версии драйверов принтера содержатся на веб-сайте www.xerox.com/office/WC7425_WC7428_WC7435drivers.
40WorkCentre 7425/7428/7435
Руководство пользователя
Установка драйверов принтера
Установка драйвера (Windows 2000 или более поздней версии)
Подготовительные действия
Прежде чем устанавливать драйвер принтера, убедитесь, что принтер подключен к сети электропитания, включен и подсоединен к действующей сети.
Инструкция по быстрой установке с компакт-диска
1.Вставьте компакт-диск в дисковод компьютера. Если программа установки не запускается, выполните следующие действия.
•Нажмите кнопку Пуск и выберите команду Выполнить.
•В окне Выполнить введите: <буква компакт-диска>:Setup.exe.
2.Если нужно изменить язык, нажмите кнопку Язык, выберите в списке язык и нажмите кнопку OK.
3.Нажмите кнопку Установите драйверы, затем Установка драйверов принтера и сканера.
4.Подтвердите принятие условий лицензионного соглашения.
5.Выберите принтер в списке найденных принтеров и нажмите кнопку Установить.
6.Если принтер в списке найденных принтеров отсутствует, выполните следующее. a. Нажмите кнопку IP-адрес или имя DNS в верхней части окна.
b.Введите адрес или имя принтера и нажмите кнопку Поиск. (Чтобы узнать IP-адрес принтера, на панели управления нажмите кнопку Статус аппарата. IP-адрес указан в левой части сенсорного экрана.)
c.Когда в окне появится имя принтера, нажмите кнопку Установить.
7.Выберите драйвер принтера:
•PostScript
•PCL 5
•PCL 6
8.Выберите драйвер сканера:
•TWAIN
•WIA
•Включить утилиту сканирования Xerox
9.Следуйте указаниям на экране.
См. также:
Online Support Assistant (Онлайновый ассистент поддержки) на сайте www.xerox.com/office/WC7425_WC7428_WC7435support
|
WorkCentre 7425/7428/7435 |
41 |
|
Руководство пользователя |
Основы работы в сети
Установка драйвера (Macintosh OS X 10.4 или более поздней версии)
Порядок установки драйвера принтера:
1.Вставьте в привод компакт-дисков диск Software and Documentation CD-ROM (Компакт-диск с программным обеспечением и документацией).
2.Откройте папку Mac, затем Mac OS 10.3+Universal Installer.
3.Откройте WorkCentre 7425/7428/7435 CD.dmg.
4.Запустите программу установки VISE, чтобы установить драйвер принтера.
5.Введите пароль и подтвердите принятие условий лицензионного соглашения.
6.Выберите принтер в списке найденных принтеров и нажмите кнопку Установить.
7.Если принтер в списке найденных принтеров отсутствует, выполните следующее.
a.Нажмите кнопку Введите IP-адрес принтера или имя DNS в нижней части окна.
b.Введите адрес или имя принтера и подождите, пока принтер будет найден. (Чтобы узнать IP-адрес принтера, на панели управления нажмите кнопку Статус аппарата. IP-адрес указан в левой части сенсорного экрана.)
8.Нажмите кнопку Установить, когда она станет активной.
9.По завершении установки нажмите кнопку Готово.
После этого принтер должен появляться в раскрывающихся списках принтеров при печати из приложений.
См. также:
Online Support Assistant (Онлайновый ассистент поддержки) на сайте www.xerox.com/office/WC7425_WC7428_WC7435support
42WorkCentre 7425/7428/7435
Руководство пользователя
Установка драйверов принтера
Подключение через порт USB
Для установки драйвера принтера с диска Software and Documentation CD-ROM (Компакт-диск с программным обеспечением и документацией) выполните следующее.
1.Вставьте компакт-диск в привод компакт-дисков.
Примечание: Для Mac OS X OS X 10.4 или более ранней версии откройте утилиту
Printer Setup Utility. На жестком диске Macintosh откройте папку Applications
(Приложения), затем папку Utilities (Утилиты). В операционной системе OS X 10.5 настройка принтера встроена в систему. Процедура установки одинаковая.
2.Нажмите кнопку Add (Добавить).
3.В раскрывающемся списке выберите USB.
4.Выберите принтер в списке.
5.В раскрывающемся списке производителей оборудования выберите Xerox.
6.Выберите конфигурацию принтера в списке доступных принтеров.
7.Нажмите кнопку Add (Добавить).
Если у вас нет диска Software and Documentation CD-ROM (Компакт-диск с программным обеспечением и документацией), последнюю версию драйвера можно загрузить с сайта www.xerox.com/office/WC7425_WC7428_WC7435drivers.
Установка драйвера (UNIX/Linux)
Данный принтер поддерживает подключение к различным платформам UNIX через сетевой интерфейс. В настоящее время служба CentreWare для UNIX/Linux на сетевых принтерах поддерживает следующие рабочие станции:
•AIX 5
•HPUX 11.0 / 11i
•Solaris SPARC 8/9/10
•Solaris x86 10
•Redhat Fedora Core 5
•Redhat Enterprise Linux v4
•OpenSuse 11
Подробнее см. System Administrator Guide (Руководство системного администратора) на сайте www.xerox.com/office/WC7425_WC7428_WC7435docs.
|
WorkCentre 7425/7428/7435 |
43 |
|
Руководство пользователя |
Основы работы в сети
CentreWare Internet Services
Служба CentreWare Internet Services (CentreWare IS) предоставляет простой интерфейс,
позволяющий управлять и контролировать принтер с компьютера, используя встроенный веб-сервер. Она обеспечивает доступ к сведениям о состояния принтера и к функциям печати и сканирования. С помощью службы CentreWare IS можно получить доступ к принтеру по сети TCP/IP с помощью веб-браузера.
Служба CentreWare IS позволяет выполнять следующее:
•Проверять с компьютера состояние снабжения бумагой принтера.
•Проверять состояние тонера и других расходных материалов.
•Отправлять работы печати.
•Осуществлять доступ к файлам сканирования в папках принтера и управлять ими.
Примечание: Для работы с CentreWare IS требуется веб-браузер и TCP/IP-подключение принтераксети(всредеWindows, Macintosh илиUNIX). Системныйадминистратордолжен включить протоколы TCP/IP и HTTP на принтере. Требуется браузер, поддерживающий JavaScript. Если язык JavaScript отключен, появляется предупреждающее сообщение и приложение CentreWare IS может работать неправильно.
Для использования службы CentreWare IS требуется IP-адрес принтера.
Определение IP-адрес принтера:
1.На панели управления принтера нажмите кнопку Статус аппарата.
2.IP-адрес указан в левой части сенсорного экрана принтера.
Доступ к службе CentreWare IS
1.Запустите на компьютере веб-браузер.
2.Введите IP-адрес принтера в поле адреса браузера и нажмите клавишу Ввод.
На экране появится страница состояния CentreWare IS.
Примечание: Для упрощения доступа к принтеру следует создать в веб-браузере закладку для IP-адреса принтера.
44WorkCentre 7425/7428/7435
Руководство пользователя
Печать 4
В этом разделе рассматриваются следующие вопросы:
•Обзор на стр. 46
•Поддерживаемые материалы на стр. 47
•Загрузка материала на стр. 50
•Печать на специальных материалах на стр. 64
•Настройка параметров печати на стр. 68
•Двусторонняя печать на стр. 72
•Выбор бумаги на стр. 74
•Печать нескольких страниц на одном листе (мультиизображения) на стр. 75
•Печать брошюр на стр. 76
•Использование цветовой коррекции на стр. 78
•Черно–белая печать на стр. 79
•Разделители прозр. пленок на стр. 80
45
Печать
Обзор
1.Если требуется, укажите тип находящегося в лотке материала, размер, цвет и тип сенсорного экрана принтера.
2.Откройте меню печати в соответствующем приложении (File/Print (Файл/Печать) или
CTRL+P в Windows, Файл/Печать, или CMD+P в большинстве приложений Macintosh).
3.В диалоговом окне печати приложения выберите принтер, затем нажмите кнопку
Properties (Свойства) или Preferences (Предпочтения) (Windows), либо Xerox Features
(Функции Xerox) в Macintosh. Названия кнопок могут отличаться в зависимости от используемого приложения.
4.Выберите требуемые настройки драйвера принтера, после этого:
•Нажмите OK (Windows), затем еще раз нажмите OK для отправки задания печати на принтер. Процедура может отличаться в зависимости от используемого приложения.
•Нажмите Print (Печать) (Macintosh) для отправки задания печати на принтер.
46WorkCentre 7425/7428/7435
Руководство пользователя
Поддерживаемые материалы
Поддерживаемые материалы
Данный раздел содержит следующую информацию:
•Рекомендуемые материалы на стр. 47
•Общие рекомендации по загрузке материалов на стр. 48
•Материалы, которые могут повредить принтер на стр. 48
•Инструкции по хранению бумаги на стр. 49
Принтер поддерживает печать с использованием различных типов материалов. Для достижения наилучшего качества печати и во избежание частого застревания бумаги выполняйте указания, приведенные в данном разделе.
Для достижения наилучших результатов используйте только материалы Xerox, указанные для аппарата WorkCentre 7425/7428/7435.
Рекомендуемые материалы
Регулярно обновляемый полный список рекомендуемых типов носителей можно найти по следующим ссылкам:
•www.xerox.com/paper Recommended Media List (United States)
(Список рекомендуемых материалов (США))
•www.xerox.com/europaper Recommended Media List (Europe)
Список рекомендуемых материалов (Европа)
Заказ материалов
Чтобы заказать бумагу, пленки или другие специальные материалы, обратитесь к дилеру или посетите веб-сайт www.xerox.com/office/WC7425_WC7428_WC7435supplies.
Предупреждение: Гарантийные обязательства, соглашения по техническому обслуживанию и Total Satisfaction Guarantee (Общая гарантия качества) не распространяются на неполадки, вызванные использованием бумаги, прозрачных пленок и других специальных материалов, не рекомендованных Xerox. Total Satisfaction Guarantee (гарантия качества) действует в США и Канаде. За пределами этих стран гарантия может не действовать. Узнайте в местном представительстве Xerox, распространяется ли эта гарантия на ваш регион.
|
WorkCentre 7425/7428/7435 |
47 |
|
Руководство пользователя |
Печать
Общие рекомендации по загрузке материалов
При загрузке бумаги и других материалов для печати в лотки выполните следующие действия:
•Используйте только рекомендованные Xerox типы прозрачной пленки; качество печати на других пленках может быть хуже.
•Не печатайте на наклейке, которая была удалена с листа.
•Используйте только бумажные конверты. Печатайте только на одной стороне конвертов.
•Не перегружайте лотки для бумаги.
•Настройте направляющие в соответствии с размером бумаги.
Материалы, которые могут повредить принтер
Для печати и копирования принтер позволяет использовать разнообразные типы бумаги и материалов. Однако использование некоторых материалов может привести к снижению качества печати, к частому застреванию бумаги в принтере и его повреждению.
Запрещается использовать:
•Грубую или пористую бумагу
•Бумагу для чернильной печати
•Копировальную бумагу
•Твердую бумагу
•Глянцевую бумагу или бумагу с покрытием, не предназначенную для лазерных принтеров
•Бумагу, на которой выполнялось фотокопирование
•Смятую или сложенную бумагу
•Бумагу с вырезами или перфорацией
•Сшитую бумагу
•Конверты с окошками, металлическими зажимами, боковыми стыками и клейкими участками, закрытыми защитными полосками
•Конверты с полимерным покрытием
•Пластиковый материал, кроме поддерживаемых прозрачных пленок
48WorkCentre 7425/7428/7435
Руководство пользователя
Поддерживаемые материалы
Инструкции по хранению бумаги
Правильные условия хранения бумаги и других материалов для печати обеспечивают оптимальное качество печати.
•Храните бумагу в темном, прохладном и достаточно сухом месте. Большинство типов бумаги чувствительно к воздействию ультрафиолетовых лучей (УФ) и прямого света. Ультрафиолетовое излучение, источником которого являются солнце и лампы дневного света, действует на бумагу особенно разрушительно. Интенсивность и длительность воздействия прямого света на бумагу должны быть сокращены до минимума.
•При хранении не допускайте колебаний окружающей температуры и относительной влажности.
•Не храните бумагу на чердаках, в кухонных помещениях, гаражах и подвалах. На стенах этих помещений обычно собирается влага с внутренней стороны.
•Бумагу следует хранить в поддонах, картонных коробках, на полках или в шкафу.
•Не храните еду и напитки в местах хранения и использования бумаги.
•Не открывайте запечатанные упаковки, если не собираетесь загружать бумагу в принтер. Храните бумагу в оригинальной упаковке. Упаковка большинства сортов малоформатной бумаги для коммерческого применения имеет внутренний изолирующий слой для защиты бумаги от потери или поглощения влаги.
•Некоторые специальные материалы поставляются в герметично закрытых пластиковых пакетах. До момента использования храните материалы внутри пакета; во избежание повреждения неиспользованные материалы нужно снова поместить в пакет и герметично закрыть.
|
WorkCentre 7425/7428/7435 |
49 |
|
Руководство пользователя |
Печать
Загрузка материала
Данный раздел содержит следующую информацию:
•Поддерживаемые форматы и плотность материалов на стр. 51
•Применимость лотка для материалов на стр. 52
•Загрузка бумаги в лоток 1, 2, 3 или 4 на стр. 54
•Загрузка материала в лоток 5 (обходной) на стр. 56
•Настройка лотка для конвертов на стр. 58
•Загрузка конвертов в лоток на стр. 59
•Загрузка бумаги в податчик большой емкости на стр. 60
•Загрузка бумаги в модуль сдвоенного лотка на стр. 63
50WorkCentre 7425/7428/7435
Руководство пользователя
 Loading…
Вы здесь
Отзывы
- Качество печати, сканирования, копирования
2011-08-23 11:56
Преимущества
Качество печати, сканирования, копирования
Недостатки
Были проблемы с потреблением одного из тонеров, но это проблема конкретного экземпляра.
Куплен в офис для печати чертежей, текстов. Комплектация подбиралась исходя из необходимых комплектов — податчик оригиналов для копирования, ПостСкрипт модуль. Функция Сканер — тоже докупаемая опция. Расход в среднем 10000 листов А4 и А3 в… Читать далее
Отзыв оставлен на hotline.ua
- Home
-
Documents
- Xerox Workcentre 7428 Service Manual — WordPress.com · · 2015-07-20- Long XEROX. Xerox…
If you can’t read please download the document
Xerox Workcentre 7428 Service Manual — WordPress.com · · 2015-07-20- Long XEROX. Xerox Workcentre 7428 Service Manual … 1 password. Work Centre Pro 35, 1 password. WorkCenter
-
Author
-
View
253 -
Download
12
Embed Size (px)
Text of Xerox Workcentre 7428 Service Manual — WordPress.com · · 2015-07-20- Long XEROX. Xerox…
-
Xerox Workcentre 7428 Service ManualDo you were looking for
Xerox Workcentre 7435 Service Manual? Congratulations! We have
thepdf file you want: xerox workcentre 7435 service manual. I
bought this Xerox work centre 7435two months. There was no problem
in the Service guys says to increase the presaure in theroller. I
did it but nothing.WorkCentre 7425/7428/7435 Support & Drivers
ProductResources. Service Offerings Full Part # List Softwareand
Solutions Product Brochures.XEROX PRINTER REPAIR and XEROX COPIER
REPAIR at OUR SERVICE CENTER!!!Color Series: Xerox Xerox WorkCentre
7428 Xerox WorkCentre. Download software XeroxWorkCentre
7425/7428/7435 printer. Download driver(software) Xerox
WorkCentre7425/7428/7435 printer for Windows’s operating. 4 Drum
Image Unit Chip (113R00647)For Xerox WorkCentre 7425 7428 743 7:17
Xerox WorkCentre 5019/5021 Multifunction Printer- Long XEROX.Xerox Workcentre 7428 Service Manual>>>CLICK HERE
-
Copiers?
Demonstration / Demo Xerox WorkCentre5755 Photocopier W/ BF0
Finisher — XEROX.Original Fuser Lamp,Htr Lamp (110v) For Xerox
Workcentre 7435/7428,Htr Lamp full-model spare parts, skillful
technicians, wholeheartedservice, high quality Htr lamp, ARM, paper
pickup roller, fuser fixingfilm, manual feed roller, drum. Quick
Use Guide WorkCentre 7232 7242manual may not be copied or
WorkCentre 7232 7242, ColorMultifunction Printers Xerox Service
Offerings Product Awards. xerox,workcentre pro WorkCentre 7435 —
Error codes 116-324 016-720.Xerox WorkCentre 5335 Family 5325 5330
5335 Service Manual manuals.by Nov 27, 2014 / Xerox WorkCentre 7425
7428 7435 Second0Answers. Find Xerox in printers, scanners, fax /
Find new or usedprinters, scanners Service, repairs and supplies
for most office equipmentavailable at competitive prices. For
office printer models: workcentre-7425, 7428, 7435. each Ink
cartridge Bypass Tray: 10 sheets Manualtwo-sided printing 295 MHz
processor 128. Original Fuser Lamp, HtrLamp (110V) For Xerox
Workcentre 7435/ 7428, Htr Lamp full-modelspare parts, skillful
technicians, wholehearted service, high quality Htrlamp, ARM, paper
pickup roller, fuser fixing film, manual feed roller,drum. Ltd.,
All Rights Reserved. 1 of 38. PaperCut Xerox SecureAccess. Manual.
Contents. 1 solution interacts with the PaperCut serverusing a
Service Oriented Architecture. (SOA) and web
WorkCentre7425/7428/7435. Xerox Color 550/.Added on 2015-03-14 Popular: 47% File :
manual-xerox-workcentre-6015n.pdf the capability your local xerox
service department to arrangerelocation of the workcentre
7425/7428/7435 and for general users, thisguide describes. -
Non-Cancellable — Non-Returnable — Non-Refundable — Should Only
beReplaced by Trained Service Personnel — Genuine Xerox Part.Installation training for Workcentre C2424 Mfp. Filename: hp
deskjet1220c series service manual Date: Product Support Links
WorkCentre7425/7428/7435 7525/7530/7535/7545/7556 The Xerox
WorkCentreC2424 Color Multifunction.Xerox Workcentre 7345 Code List Service Manual xerox
workcentre7345 error code Workcentre 7425/7428/7435 System
AdministratorGuidexerox. xerox.authorised & trained LSP’s ( Logistics Service Provider )
only and ismanual, no liability will be accepted by Xerox Europe
arising outRelated Faultcodes 005 — xxx Equipment Supply Chain
WorkCentre7425 / 7428 / 7435 Prod. Xerox devices Multi Function
Equipment, 1password. OGBTM-W00576, 1 password. Work Centre Pro 35,
1password. WorkCenter Pro 428, 1 password. Follow You Fax
Feature:Exclusive to the XMediusFAX Xerox EIP
Multi-Tenancy:XMediusFAX offers a service provider version that
enables multi-tenancy. Contact the Xerox Welcome Center if the
problem persists.Contact the Xerox VISIT, WorkCentre 7425/7428/7435
User Guide -Xerox, June 30,2015. Xerox Canada XEROX WorkCentre
5222-5225-5230 Service Manual pages.pdf.At RK Dixon, you can do your troubleshooting using Xerox
KnowledgeBase. Xerox WorkCentre 7425/7428/7435 Print Service
Plug-in forAndroid. Popular Xerox WorkCentre 7425 7428 7435 Second
BiasTransfer Roll 008R13064 How do i solved wc 7435 error 010-338
Xerox3050 service manual. xerox drivers xerox parc xerox.es xerox
espaaxerox xerox workcentre 7120 xerox webmail xerox account
workcentre,drivers, parc, espaa, 7120, webmail. -
>>>CLICK HERE