Инструкцию для Xerox DocuCentre SC2020 на русском языке, в формате pdf можно скачать с нашего сайта. Наш каталог предоставляем Вам инструкцию производителя фирмы Xerox, которая была взята из открытых источников. Ознакомившись с руководством по эксплуатации от Xerox, Вы на все 100% и правильно сможете воспользоваться всеми функциями устройства.
Для сохранения инструкции «Струйное МФУ Xerox DocuCentre SC2020» на русском языке на вашем компьютере либо телефоне, нажмите кнопку «Скачать инструкцию». Если активна кнопка «Инструкция онлайн», то Вы можете просмотреть документ (manual), в своём браузере онлайн.
Если у Вас нет возможности скачать инструкцию по эксплуатации либо просмотреть её, Вы можете поделиться ссылкой на эту страницу в социальных сетях и при удобном моменте скачать инструкцию. Либо добавьте эту страницу в закладки Вашего браузера, нажав кнопку «Добавить страницу в закладки браузера».
- Manuals
- Brands
- Xerox Manuals
- All in One Printer
- DocuCentre SC2020
- User manual
-
Contents
-
Table of Contents
-
Troubleshooting
-
Bookmarks
Quick Links
®
®
Xerox
DocuCentre
SC2020
User Guide
Related Manuals for Xerox DocuCentre SC2020
Summary of Contents for Xerox DocuCentre SC2020
-
Page 1
® ® Xerox DocuCentre SC2020 User Guide… -
Page 2
©2015 Xerox Corporation. All rights reserved. Xerox and Xerox and Design are trademarks of Xerox Corporation in the United States and/or other counties. Paragraph Tools is copyright © 2001-2007 by Silicon Prairie Software, LLC and Steven Kubis. Changes are periodically made to this document. Changes, technical inaccuracies, and typographic errors will be corrected in subsequent editions. -
Page 4: Table Of Contents
Activating the Communication Port To Use ……….36 ® ® Xerox DocuCentre SC2020…
-
Page 5
Loading Paper in Tray 5 (bypass) …………63 ® ® Xerox DocuCentre SC2020… -
Page 6
Canceling the Fax Being Received ……….. 100 ® ® Xerox DocuCentre SC2020… -
Page 7
Major Print Driver Functions …………148 ® ® Xerox DocuCentre SC2020… -
Page 8
Replacing the Drum Cartridge …………244 ® ® Xerox DocuCentre SC2020… -
Page 9
Optional Components …………..308 ® ® Xerox DocuCentre SC2020… -
Page 10
Notes and Restrictions on the Use of the Print Feature ……. . 311 ® ® Xerox DocuCentre SC2020… -
Page 11: Before Using The Device
Device. Preface Thank you for selecting the DocuCentre SC2020, referred to as the Device. This guide describes how to operate the device and the precautions you should follow during operation. To get the most out of the device and to use it effectively, be sure to read this guide before use.
-
Page 12: Accompanying Manuals
Fax: Describes the basic operations and features of the fax feature. • Scan: Describes the basic operations and features of the scan feature. • Print: Describes the basic printing operations. • Tools: Describes how to change the default settings. ® ® Xerox DocuCentre SC2020 User Guide…
-
Page 13: Conventions
Loading the document or paper in portrait orientation when viewed from ,Portrait (P) the front of the device. ,Landscape (L) • Loading the document or paper in landscape orientation when viewed from the front of the device. ® ® Xerox DocuCentre SC2020 User Guide…
-
Page 14: Safety Notes
CAUTION: Any unauthorized alteration including an addition of new functions or connection to external devices may not be covered by the product warranty. Contact your local Xerox representative for more information. Follow all warning instructions marked on this product. The warning marks stand for the followings: Used for item that if not followed strictly, can lead death or severe or fatal injuries and the possibility to do it is comparatively high.
-
Page 15: Electrical Safety
Do not damage or alter the power cord. Damage and alteration may generate heat and eventually cause electric shock or a fire accident. If the power cord is damaged or insulated wires are exposed, contact your local Xerox representative for its replacement. Do not use a damaged or uninsulated cord to avoid the risk of electric shock and a fire accident.
-
Page 16: Device Installation
• the power cord is not cracked or worn down. Once you notice any unusual condition, switch off and unplug this product first and contact your local Xerox representative. Device Installation WARNING: Do not locate this product where people might step on or trip over the power cord. Friction or excessive pressure may generate heat and eventually cause electric shock or a fire accident.
-
Page 17
10 ° 10 ° 10 ° 10 ° To bundle wires and cables, always use the cable ties and spiral tubes that Xerox supplies. Otherwise, it may cause some defects. ® ® Xerox DocuCentre SC2020 User Guide… -
Page 18
Humidity: 15–85% When the product is left in a chilly room and the room is rapidly warmed up by heater, dew condensation may form inside the product and cause a partial deletion on printing. ® ® Xerox DocuCentre SC2020 User Guide… -
Page 19: Operational Safety
This may cause injuries. 2/22/16When you need to open paper trays, do it one after the other. If you need to pull out a tray to remove paper jam, contact your local Xerox representative. Do not pull out a tray, otherwise it may cause injuries.
-
Page 20
Do not apply excessive force to hold thick document on the document glass. It may break the glass and cause injuries. To move this product to another location, contact your local Xerox representative. Ventilate well during extended operation or mass copying. It may affect the office air environment due to odor such as ozone in a poorly ventilated room. -
Page 21: Consumables
Never throw a toner cartridge into an open flame. Remaining toner in the cartridge may catch fire and cause burn injuries or explosion. If you have a used toner cartridge no longer needed, contact your local Xerox representative for its disposal.
-
Page 22: Regulation
Changes and modifications to this product not specifically approved by Xerox may void the user’s authority to operate this equipment.
-
Page 23: Environment
Before Using the Device Environment • For environmental protection and efficient use of resources, Xerox reuses returned toner cartridges, waste toner bottles and drum cartridges to make recycle parts, recycle materials or energy recovery. • Proper disposal is required for toner cartridges, waste toner bottles and drum cartridges no longer needed.
-
Page 24: Wide Dhcp Client
SOFTWARE. ALSO, THERE IS NO WARRANTY IMPLIED OR OTHERWISE, NOR IS SUPPORT PROVIDED. Feedback of the results generated from any improvements or extensions made to this software would be much appreciated. Any such feedback should be sent to: Akihiro Tominaga ® ® Xerox DocuCentre SC2020 User Guide…
-
Page 25: Md5
Except as contained in this notice, the name of SunSoft, Inc. shall not be used in advertising or otherwise to promote the sale, use or other dealings in this Software without written authorization from SunSoft Inc. ® ® Xerox DocuCentre SC2020 User Guide…
-
Page 26: Jpeg Library
1993 by Sun Microsystems, Inc. All rights reserved. © • powf.c: * Copyright 1993 by Sun Microsystems, Inc. All rights reserved. © • scalbnf.c: * Copyright 1993 by Sun Microsystems, Inc. All rights reserved. ® ® Xerox DocuCentre SC2020 User Guide…
-
Page 27: Legal Notice
Copyright material or trademarks without the consent of the owner • Postage stamps and other negotiable instruments This list is not inclusive and no liability is assumed for either its completeness or accuracy. In case of doubt, contact your legal counsel. ® ® Xerox DocuCentre SC2020 User Guide…
-
Page 28
Before Using the Device ® ® Xerox DocuCentre SC2020 User Guide… -
Page 29: Environment Settings
To use the device as a network printer, you need to activate the port to use for printing. – LPD: Activate this setting when using the LPD port. – Port9100: Activate this setting when using the Port9100 port. ® ® Xerox DocuCentre SC2020 User Guide…
-
Page 30: Scan Feature
The device supports the following communication networks for fax transmissions: • Public switched telephone network (PSTN) • Private branch exchanges (PBX) You must also make settings in [Region] and [Date & Time] to use the Fax functions on this device. ® ® Xerox DocuCentre SC2020 User Guide…
-
Page 31: Interface Cables
Press the power switch to the [ ] position to turn the power OFF. Note: Ensure that the display is turned off. Connect a USB cable to the USB port. Connect the other end of the USB cable to the computer. ® ® Xerox DocuCentre SC2020 User Guide…
-
Page 32: Using The Ethernet Interface
Ensure that the display is turned off. Connect a network cable to the Ethernet port. Note: Prepare a network cable suitable for your network connection. When you replace the network cable, contact our Customer Support Center. ® ® Xerox DocuCentre SC2020 User Guide…
-
Page 33: Setting The Network Environment
Print the System Settings Report to check whether the device IP address has already been set. You can also check the IP address in the following methods: • On the message field of the touch screen • On the [About This MFP] screen ® ® Xerox DocuCentre SC2020 User Guide…
-
Page 34
For information on how to check on the [About This MFP] screen, refer to Checking the Device IP Address on page 230. • For information on how to check using CentreWare Internet Services, refer to the online Help of CentreWare Internet Services. ® ® Xerox DocuCentre SC2020 User Guide… -
Page 35: Setting The Device Ip Address (Ipv6)
For information on how to set the IP address using CentreWare Internet Services, refer to the online Help of CentreWare Internet Services. Setting the Device IP Address (IPv6) The device supports IPv6 addresses in an IPv6 network environment. ® ® Xerox DocuCentre SC2020 User Guide…
-
Page 36: When Using The Printer Setup Utility For Setting The Ip Address
Driver CD Kit CD-ROM. When using the Printer Setup Utility for Setting IP Address, make sure that the device is not in use. Insert the Driver CD Kit CD-ROM into your computer. The Launcher runs automatically. ® ® Xerox DocuCentre SC2020 User Guide…
-
Page 37
As a list of available IP addresses and Mac addresses appears, select the device and click [Next]. If you already have the IP address of the device, click [Enter IP Address] and directly enter the IP address on the displayed window. ® ® Xerox DocuCentre SC2020 User Guide… -
Page 38
For information on how to check on the About This MFP screen, refer to Checking the Device IP Address on page 230. • For information on how to check using CentreWare Internet Services, refer to the online Help of CentreWare Internet Services. ® ® Xerox DocuCentre SC2020 User Guide… -
Page 39: Activating The Communication Port To Use
Help of CentreWare Internet Services. Using CentreWare Internet Services CentreWare Internet Services CentreWare Internet Services provides services such as changing settings using a web browser on a computer connected to a TCP/IP network environment. ® ® Xerox DocuCentre SC2020 User Guide…
-
Page 40: Supported Environments And Settings
See your web browser’s manual for how to make the setting. You will also need to make other web browser settings to make CentreWare Internet Services work properly. ® ® Xerox DocuCentre SC2020 User Guide…
-
Page 41: Starting Centreware Internet Services
When specifying a port number, add «:» and the port number after the IP address or the Internet address. • The IPv6 address cannot be entered manually in some cases depending on the web browser that you use. • HTTPS is not supported. ® ® Xerox DocuCentre SC2020 User Guide…
-
Page 42: Installing The Print Driver/Scan Driver
The CD-ROM contains the following print driver. Print Driver Name Description DocuCentre SC2020 Click [Print/Fax Driver] in the [Main] menu of the Driver CD Kit to start installation. The standard print driver converts the data created by the application software to images before sending them to the printer.
-
Page 43: Uninstalling
CD-ROM Documentation (HTML) included on the CD-ROM. Uninstalling Other Software To uninstall other software installed from the Driver CD Kit CD-ROM, see the application Readme file. Readme files can be displayed from the Product Information (HTML) on the CD-ROM. ® ® Xerox DocuCentre SC2020 User Guide…
-
Page 44
Environment Settings ® ® Xerox DocuCentre SC2020 User Guide… -
Page 45: Product Overview
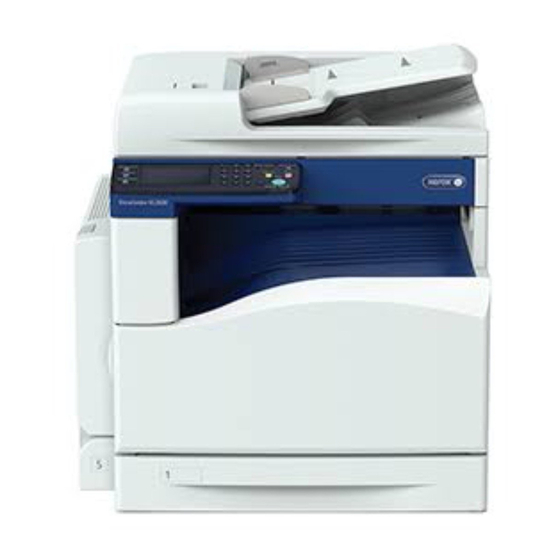
Holds document in place. Document glass Place document here. Control panel Contains the buttons, the LED indicators, and the touch screen used for operations. For more information, refer to Control Panel on page 48. ® ® Xerox DocuCentre SC2020 User Guide…
-
Page 46: Right Side, Rear
Ethernet Port Connect a network cable. USB Port Connect a USB 2.0 cable. Power switch Switches the power of the device on and off. For more information, refer to Power Source on page 45. ® ® Xerox DocuCentre SC2020 User Guide…
-
Page 47: Inside
Magenta drum cartridge Contains the photo conductor for magenta toner. [R3] Cyan drum cartridge [R2] Contains the photo conductor for cyan toner. Black drum cartridge [R1] Contains the photo conductor for black toner. ® ® Xerox DocuCentre SC2020 User Guide…
-
Page 48: Duplex Automatic Document Feeder
Scans the loaded documents. Note: In this guide, the duplex automatic document feeder is referred to as the document feeder. Power Source Turning the Power On The following describes how to switch the power on. ® ® Xerox DocuCentre SC2020 User Guide…
-
Page 49: Turning The Power Off
When powering the device on after it has been switched off, wait 15 seconds after the display goes off. Before switching the power off, make sure that the device has completed all copy or print jobs. Then, make sure that the <Data> LED does not light up. ® ® Xerox DocuCentre SC2020 User Guide…
-
Page 50: Power Saver Modes
The fusing unit life is largely influenced by power distribution time on the device. Setting the amount of time the device waits before activating the Power Saver function to a long value will keep the device’s ® ® Xerox DocuCentre SC2020 User Guide…
-
Page 51: Exiting Power Saver Modes
Machine Status Error Data Component Function Touch Screen Displays the operation menu items and the device status messages. Numeric keypad Press these buttons to enter numbers (such as number of copies) or text. ® ® Xerox DocuCentre SC2020 User Guide…
-
Page 52
IP address. <Job Status> button Press this button to check/cancel a current job or pending job. <Services Home> button Press this button to display the Services Home screen. ® ® Xerox DocuCentre SC2020 User Guide… -
Page 53: Touch Screen — Services Home Screen
You can also limit the copy function by using Copy Auditron. Notes: • For more information on Copy Auditron, refer to Copy Auditron on page 183. • For more information on Print Auditron, refer to Print Auditron on page 183. ® ® Xerox DocuCentre SC2020 User Guide…
-
Page 54: Entering Characters
During operations, a screen for entering text sometimes appears. The following describes how to enter text. Note: You can select the keyboard layout from QWERTY, AZERTY, and QWERTZ. For information on how to select the keyboard layout, refer to Keyboard Layout on page 213. ® ® Xerox DocuCentre SC2020 User Guide…
-
Page 55: Using The Number Pad
Redial/Pause Power Saver Clear All Stop Start Error Data Available Characters You can enter the characters as follows by using the number pad: 0 to 9, * and #. ® ® Xerox DocuCentre SC2020 User Guide…
-
Page 56: Setting The Options Configuration
The following procedure uses Windows 7 and PCL 6 driver as an example. The procedure differs depending on the OS and the print driver. Select [Start] > [Devices and Printers]. Right-click the printer icon of the DocuCentre SC2020 and select [Printer properties]. Click the [Configuration] tab. ®…
-
Page 57: If [Printer Searching Method] Is Displayed
Click [Bi-Directional Setup]. Click [Get Information from Printer]. If [Printer Searching Method] is displayed The device information is not loaded onto the print driver. Complete the following operations. Select [Specify Address], and click [Next]. ® ® Xerox DocuCentre SC2020 User Guide…
-
Page 58: Cooling Mode
Do not open the front cover or switch off the device during the mode. • For screen B: During the Cooling mode, open the cover illustrated on the screen to reduce the time for cooling. ® ® Xerox DocuCentre SC2020 User Guide…
-
Page 59: Loading Paper
Use of non-recommended paper types may result in paper jams, lower print quality, malfunctions, or damage to the device. To achieve optimum device performance, use only paper types recommended by Xerox. If you desire to use paper other than the paper recommended by Xerox, contact our Customer Support Center. CAUTIONS: •…
-
Page 60: Supported Paper Weights And Sheet Counts
(Up to 10 mm) 185.7 kg When using 80 g/m paper When using Xerox standard paper Notes: • Paper jams may result if you attempt to print on a different paper type or size than the type or size selected in the print driver, or from a tray that does not support the loaded paper.
-
Page 61: Supported Paper Type
Before copying or printing, fan the stack of paper well and reload it in the tray. H-paper Plain Before copying or printing, fan the stack of paper well and reload it in the tray. ® ® Xerox DocuCentre SC2020 User Guide…
-
Page 62: Usable Paper
Plain DocuPaper Black Plain DocuPaper Plain Before copying or printing, fan the stack of paper well and reload it in the tray. White Label Plain Xerox Green Label Plain K-paper Plain Plain J Paper Plain JD Paper Bond PAPER ONE All Purpose…
-
Page 63: Unusable Paper
Plain Colotech + Heavyweight Heavyweight Unusable Paper Using paper not recommended by Xerox may cause a paper jam or device malfunction. Use paper recommended by Xerox. • Damp or wet paper • Paper preprinted with other printer or copying device •…
-
Page 64: Loading Paper
For more information on setting [Tray Priority], refer to Tray Priority on page 212. Loading Paper in Trays 1 and 2 The following describes the procedure for loading paper in Trays 1 and 2. ® ® Xerox DocuCentre SC2020 User Guide…
-
Page 65
• Pulling out all the trays at once may cause the device to tilt or fall, causing injury. For Tray 1, push down the metal plate. ® ® Xerox DocuCentre SC2020 User Guide… -
Page 66: Loading Paper In Tray 5 (Bypass)
Fan the stack of paper well before loading paper in a tray. It prevents paper from sticking to each other and reduces paper jams. Open the Tray 5 (bypass). Note: If necessary, pull out the extension tray. Pull out the extension tray gently. ® ® Xerox DocuCentre SC2020 User Guide…
-
Page 67: Changing Paper Size
For more information on how to set the paper quality, refer to Changing the Paper Settings on page 66. ® ® Xerox DocuCentre SC2020 User Guide…
-
Page 68: Changing The Paper Size For Trays 1 And 2
Remove any paper loaded in the tray. For Tray 1, push down the metal plate. While pinching the levers of the two paper guides, move them to the edges of paper. ® ® Xerox DocuCentre SC2020 User Guide…
-
Page 69: Changing The Paper Settings
• For information on the paper size setting for Tray 5, refer to Tray 5 (Bypass) on page 206. Press the <Machine Status> button. <Machine Status> button Services Home Job Status Machine Status ® ® Xerox DocuCentre SC2020 User Guide…
-
Page 70
[Size]. To use a non-standard document size, set [Size] to [Custom Size], and then specify the paper size • When using a non-standard size envelope, specify the size without the flap in [Custom Size]. Select the desired paper type. Select [OK]. ® ® Xerox DocuCentre SC2020 User Guide… -
Page 71: Copy
• Single sheet • Multiple sheets • Document glass • Single sheet • Bound documents, such as books Document Feeder Supported document sizes You can place standard size documents in the document feeder. ® ® Xerox DocuCentre SC2020 User Guide…
-
Page 72
Remove any paper clips or staples from document before placing it in the document feeder. Place the document in the center of the document feeder, with the side to be scanned (or the front surface of a 2 sided document) facing up. ® ® Xerox DocuCentre SC2020 User Guide… -
Page 73
The device automatically determines the tray holding the appropriate paper, based on the document size and the specified zoom ratio. Supported document sizes You can select one of the following document sizes from [Original Size]. ® ® Xerox DocuCentre SC2020 User Guide… -
Page 74
When using the document glass, make sure to close the document glass cover after finishing your copy job. Place the document face down, and align it against the top left corner of the document glass. Close the document glass cover. ® ® Xerox DocuCentre SC2020 User Guide… -
Page 75: Making Advanced Settings
You can enter a value between 1 and 999 for the number of copies. Use the numeric keypad to enter the desired number of copies. Numeric keypad Redial/Pause Power Saver Clear All Stop Start Error Data ® ® Xerox DocuCentre SC2020 User Guide…
-
Page 76: Starting The Copy Job
Copying multiple sets of documents You can continue copying multiple sets of documents using any of the following settings: • Collation: Collated • 2-Sided Copying: 1 2-Sided/2 2-Sided • Pages Per Side: 2-Up ® ® Xerox DocuCentre SC2020 User Guide…
-
Page 77: About Auto Rotation
While the device is copying, you can cancel the currently executing job, and check or cancel pending jobs. Canceling the Current Copy Job To cancel the currently executing copy job: Press the <Stop> button. <Stop> button Redial/Pause Power Saver Clear All Stop Start Error Data ® ® Xerox DocuCentre SC2020 User Guide…
-
Page 78: Checking Job Status
You can copy both sides of an ID card (name card, employee card, etc.) on one side of paper. Select [ID Card Copy] to use this feature. Original document Original orientation Copied output Front side Front side Back side Back side Place an ID card in the upright position. ® ® Xerox DocuCentre SC2020 User Guide…
-
Page 79
[ID Card Copy] tab – Output Color – Select Tray • [Quality] tab – Lighten/Darken – Sharpness – Saturation – Auto Background Suppression For more information, refer to the Advanced Copy Settings on page 77. ® ® Xerox DocuCentre SC2020 User Guide… -
Page 80: Advanced Copy Settings
Select [Scan Side 2]. Advanced Copy Settings This section describes the advanced functions available for Copy feature. ® ® Xerox DocuCentre SC2020 User Guide…
-
Page 81
For more information on defaults that can be changed, and how to change them, refer to Copy Defaults on page 191. Press the <Services Home> button. <Services Home> button Services Home Job Status Machine Status ® ® Xerox DocuCentre SC2020 User Guide… -
Page 82: Output Color
Password Locked). If you set [Output Color] to [Full Color] and the [Service Lock] setting for [Copy] to [On] (Color Password Locked), you will need to enter the four digit passcode after pressing the <Start> button. ® ® Xerox DocuCentre SC2020 User Guide…
-
Page 83: Select Tray
[Tray 2] is only available when the One Tray Module (Optional) is installed. When [Any] is displayed as the paper size and type in Tray 5 (bypass), you can select the paper size and type from this menu. ® ® Xerox DocuCentre SC2020 User Guide…
-
Page 84: Reduce/Enlarge
Bold values are the factory default menu settings. 100% Auto% A3 A5 A3 A4, B4 B5 B4 A4, B5 A5 A3 B4, A4 B5 115% B4 A3, B5 A4 ® ® Xerox DocuCentre SC2020 User Guide…
-
Page 85
You can also specify the value in increments of 1% from 25 to 400 by selecting [ ] or [ ] or entering a value using the number pad. See the following table for specific zoom ratios. Copy Original 100% 122% 141% 172% 200% 100% 115% 141% 163% ® ® Xerox DocuCentre SC2020 User Guide… -
Page 86: 2-Sided Copying
<Start> button. If you want to place a new document, replace the document with a new document, and then select [Continue] or press the <Start> button. ® ® Xerox DocuCentre SC2020 User Guide…
-
Page 87: Lighten/Darken
Works well with light documents or faint pencil markings. Darken +2 Darken +1 Normal Works well with normal typed or printed documents. Lighten +1 Works well with dark documents. Lighten +2 Lighten +3 ® ® Xerox DocuCentre SC2020 User Guide…
-
Page 88: Original Type
Used for documents with text. Photo Used for documents with photos. Sharpness To adjust the sharpness to make the copy image sharper or softer than the original. Select the [Quality] tab, and then select [Sharpness]. ® ® Xerox DocuCentre SC2020 User Guide…
-
Page 89: Saturation
Select the desired setting, and then select [OK]. Note: Bold values are the factory default menu settings. Vivid Makes the copy image sharper than the original. Normal The color clarity of the image is the same as the original. ® ® Xerox DocuCentre SC2020 User Guide…
-
Page 90: Auto Background Suppression
To sort the copy output. For example, if you make two copies of three page documents, one complete three page document will be printed followed by the second complete document. Select the [Output] tab, and then select [Collation]. ® ® Xerox DocuCentre SC2020 User Guide…
-
Page 91: Original Size
[Continue] or press the <Start> button. If you finish copying, select [Print Now]. Original Size To select the default document size. Select the [Output] tab, and then select [Original Size]. Select the desired setting, and then select [OK]. ® ® Xerox DocuCentre SC2020 User Guide…
-
Page 92
Auto Tabloid (11 x 17″) Legal (8.5 x 14″) Folio (8.5 x 13″) Letter (8.5 x 11″) Letter (8.5 x 11″) A3 (297 x 420 mm) B4 (257 x 364 mm) ® ® Xerox DocuCentre SC2020 User Guide… -
Page 93: Pages Per Side
Select the desired setting, and then select [OK]. Note: Bold values are the factory default menu settings. Does not perform Pages Per Side printing. 2-Up Automatically reduces the original pages to fit onto one sheet of paper. ® ® Xerox DocuCentre SC2020 User Guide…
-
Page 94: Edge Erase
Specify the value in increments of 1 mm (0.1 inch). 0 50 mm (0.0 2.0″) Middle 0 mm (0″) Specify the value in increments of 1 mm (0.1 inch). 0 50 mm (0.0 2.0″) ® ® Xerox DocuCentre SC2020 User Guide…
-
Page 95: Fax
, A4 , A4 , B5 , B5 , 11 × 17″ , 8.5 × 14″ , 8.5 × 13″ , 8.5 × 11″ , 8.5 × 11″ , 8K , 16K , and 16K ® ® Xerox DocuCentre SC2020 User Guide…
-
Page 96
Remove any paper clips or staples from document before placing it in the document feeder. Place the document in the center of the document feeder, with the side to be scanned (or the front surface of a 2-Sided document) facing up. ® ® Xerox DocuCentre SC2020 User Guide… -
Page 97
Do not apply excessive force to hold thick document on the document glass. It may break the glass and cause injuries. Follow the steps below to place a document on the document glass. ® ® Xerox DocuCentre SC2020 User Guide… -
Page 98: Specifying The Recipient
Place document face down, and align it against the top left corner of the document glass. Close the document glass cover. Specifying the Recipient Follow the steps below to specify the fax recipient. ® ® Xerox DocuCentre SC2020 User Guide…
-
Page 99: Using The Numeric Keypad
Use the numeric keypad to enter the fax recipient’s number. Notes: • To delete the entered numbers, press the <C> (Clear) button. • You can enter fax numbers of up to 50 digits in length. ® ® Xerox DocuCentre SC2020 User Guide…
-
Page 100: Making Advanced Settings
You may need to enter a passcode to use the copy feature. Ask your system administrator for the passcode. Make advanced settings as needed. Example: Settings in the [Options] tab For more information on advanced settings, refer to Advanced Fax Settings on page 100. ® ® Xerox DocuCentre SC2020 User Guide…
-
Page 101: Starting The Fax Job
[Scan Another Page]. When you have finished loading documents, select [Done. Fax Now]. Operations during Faxing (Sending) You can cancel the fax currently being sent, and check or cancel pending jobs. ® ® Xerox DocuCentre SC2020 User Guide…
-
Page 102: Canceling The Fax Being Sent
For more information on operation in job screen, refer to Canceling the Current Job page 235 Press the <Job Status> button. <Job Status> button Services Home Job Status Machine Status Select a fax job. Check the job status. ® ® Xerox DocuCentre SC2020 User Guide…
-
Page 103: Operations During Faxing (Receiving)
You can also cancel the received fax from the Active Jobs screen. For more information on the Active Jobs screen, refer to Canceling the Current Job on page 235. Advanced Fax Settings This section describes the advanced functions available for Fax feature. ® ® Xerox DocuCentre SC2020 User Guide…
-
Page 104
For more information on defaults that can be changed, and how to change them, refer to Defaults on page 204). Press the <Services Home> button. <Services Home> button Services Home Job Status Machine Status Select [Fax]. ® ® Xerox DocuCentre SC2020 User Guide… -
Page 105: Lighten/Darken
Creates copies with a dark density. Use this setting to scan document containing light objects. Normal Creates copies with the same density as document. Lighten +1, +2, and +3 Creates copies with a light density. Use this setting to scan document containing dark objects. ® ® Xerox DocuCentre SC2020 User Guide…
-
Page 106: Resolution
Super Fine resolution. Note: Faxes scanned in the Super Fine mode transmit at the highest resolution supported by the receiving device. Photo Suitable for documents containing photographic images. ® ® Xerox DocuCentre SC2020 User Guide…
-
Page 107: Onhook
Select the copy method, and then select [OK]. – 1-Sided Select [1-Sided] for a one-sided document. – 2-Sided Select [2-Sided] for a two-sided document. You can select the edge to be bound from the following. ® ® Xerox DocuCentre SC2020 User Guide…
-
Page 108: Original Size
, A4 , 8.5 × , B5 , B5 , A4 , A4 , 8.5 × 11″ , 8.5 × 11″ , 16K , 16K 11″ , 8.5 × 11″ , 16K , B5 ® ® Xerox DocuCentre SC2020 User Guide…
-
Page 109: Delayed Send
You can specify a time between 00:00 and 23:59 (or between 1:00 and 12:59 AM/PM when the 12-hour clock has been set). • You cannot specify a date. Select the [Options] tab, and then select [Delayed Send]. Select [On]. Note: Select [Off] to disable this function. ® ® Xerox DocuCentre SC2020 User Guide…
-
Page 110: Polling Receive
Select the [Options] tab, and then select [Polling Receive]. Select [On], and then select [OK]. Cover Page You can attach a cover page to faxes. Select the [Options] tab, and then select [Cover Page]. ® ® Xerox DocuCentre SC2020 User Guide…
-
Page 111: Sending A Fax Manually
102. Select [OnHook], and then select [Manual Send]. Note: [OnHook] can be selected when [Original Size] is set to other than [Auto]. Enter the remote fax device’s fax number using the number pad. ® ® Xerox DocuCentre SC2020 User Guide…
-
Page 112: Sending A Delayed Fax
The Delayed Start mode can be used to save scanned documents for transmission at a specified time to take advantage of lower long distance rates. Place document in the device. Press the <Services Home> button. <Services Home> button Services Home Job Status Machine Status Select [Fax]. ® ® Xerox DocuCentre SC2020 User Guide…
-
Page 113
• For more information, refer to Lighten/Darken on page 102. Select the [Options] tab, and then select [Delayed Send]. Select [On]. Enter the start time using the number pad, and then select [OK]. ® ® Xerox DocuCentre SC2020 User Guide… -
Page 114: Sending A Fax From The Driver (Direct Fax)
CD Kit on the Mac OS X, and then open the [MacOSX] folder. Open either the [10.5-] folder depending on the version of Mac OS X you are running. Double-click [FX DocuCentre SC2020.dmg], and then follow the on-screen instructions to install the fax driver.
-
Page 115
Specify the fax settings. For more information, refer to the Help of the driver. Notes: • For Windows, make sure to set [Job Type] to [Fax]. • The settings done here are only applied to a single fax job. For Windows: ® ® Xerox DocuCentre SC2020 User Guide… -
Page 116
Enter the name and fax number directly. Select a fax number from the address book. – Look Up Address Book: Displays a list of fax numbers that are saved in the file specified for [My Address Book file]. ® ® Xerox DocuCentre SC2020 User Guide… -
Page 117: Receiving A Fax
171, or by selecting [Manual Receive] in [OnHook] (you can hear voice or fax tones from the remote device) and then pressing the <Start> button. The device begins receiving a fax and returns to the standby mode when the reception is completed. ® ® Xerox DocuCentre SC2020 User Guide…
-
Page 118: Receiving A Fax Automatically In The Tel/Fax Mode Or Ans/Fax Mode
Before using the DRPD option, Distinctive Ring service must be installed on your telephone line by the telephone company. To set up DRPD, you will need another telephone line at your location, or someone available to dial your fax number from outside. ® ® Xerox DocuCentre SC2020 User Guide…
-
Page 119
To set up the DRPD: Press the <Machine Status> button. <Machine Status> button Services Home Job Status Machine Status Select the [Tools] tab, and then select [Admin Settings]. Select [Fax Settings]. Select [Fax Line Settings]. ® ® Xerox DocuCentre SC2020 User Guide… -
Page 120: Receiving Faxes In The Memory
In the secure receiving mode, all incoming faxes will go in memory. When the mode turns off, any faxes stored will be printed. Note: Before operation, ensure [Panel Lock] is enabled. ® ® Xerox DocuCentre SC2020 User Guide…
-
Page 121
To turn the secure receiving mode on: Press the <Machine Status> button. <Machine Status> button Services Home Job Status Machine Status Select the [Tools] tab, and then select [Admin Settings]. Select [Fax Settings]. Select [Incoming Defaults]. Select [Secure Receive]. ® ® Xerox DocuCentre SC2020 User Guide… -
Page 122
To print received documents: Press the <Job Status> button. <Job Status> button Services Home Job Status Machine Status Select [Secure Fax Receive]. Enter the passcode, and then select [OK]. The faxes stored in memory are printed. ® ® Xerox DocuCentre SC2020 User Guide… -
Page 123: Fax Activity Report
Fax Activity Report lets you check whether fax send and receive operations ended normally. For each fax sent or received, the reports record the sender or recipient name and the transmission result/status. For information on how to print the Fax Activity Report, refer to Printing Reports/Lists on page 232. ® ® Xerox DocuCentre SC2020 User Guide…
-
Page 124
Partner (the destination is unable to receive the job), Send Again (the resending count exceeded the limit), XXX-XXX (communication error) • «Cancelled» indicates that the user cancelled the job. • «XXX-XXX» indicates an error code. Total The total number of pages sent. ® ® Xerox DocuCentre SC2020 User Guide… -
Page 125
(user cancelled the job), Receive Again (reception error), Fwd Wait (job is waiting to be forwarded), Fwd Doing (job is being forwarded), Fwd Done (job is completely forwarded), XXX-XXX (transmission error) • «XXX-XXX» indicates an error code. Total The total number of pages received. ® ® Xerox DocuCentre SC2020 User Guide… -
Page 126
® ® Xerox DocuCentre SC2020 User Guide… -
Page 127: Scan
The document sizes with an asterisk can be automatically detected depending on the settings. You can select one of the following alternative document sizes. For more information, refer to Original Size Detected on page 176. B5 (default) or 16K ® ® Xerox DocuCentre SC2020 User Guide…
-
Page 128
Remove any paper clips or staples from document before placing it in the document feeder. Place the document in the center of the document feeder, with the side to be scanned (or the front surface of a 2-Sided document) facing up. ® ® Xerox DocuCentre SC2020 User Guide… -
Page 129
In this case, select a document size manually by selecting [Original Size] from the menu items. Depending on the selected document size, the printout may be too large for the paper or may have shadows at the edges. ® ® Xerox DocuCentre SC2020 User Guide… -
Page 130
When using the document glass, make sure to close the document glass cover after finishing your scan job. Place the document face down, and align it against the top left corner of the document glass. Close the document glass cover. ® ® Xerox DocuCentre SC2020 User Guide… -
Page 131: Using The Scan Feature
Setting Up the Computer Note: For Windows 8, the computer automatically connects the device using WSD. There is no need to install the device manually. For Windows 7: Click [Start] > [Computer] > [Network]. ® ® Xerox DocuCentre SC2020 User Guide…
-
Page 132: Scanning Using The Twain Driver
Click [Start] > [All Programs] > [Microsoft Office] > [Microsoft Office 2010 Tools] > [Microsoft Clip Organizer]. Click [File] > [Add Clips to Organizer] > [From Scanner or Camera]. In the [Insert Picture from Scanner or Camera] dialog box, under [Device], select your device. Click [Custom Insert]. ® ® Xerox DocuCentre SC2020 User Guide…
-
Page 133: Scanning Using The Wia Driver
When using applications that use WIA 2.0, such as [Windows Fax and Scan] on Windows Vista, Windows 7, Windows 8, and Windows 10, the [Feeder (Scan both sides)] option can be selected for 2-sided scanning. ® ® Xerox DocuCentre SC2020 User Guide…
-
Page 134: Using A Scanner On The Network
Click [Paint] > [From scanner or camera] (Click [File] > [From Scanner or Camera] for Windows Server 2008 and Windows Vista. The [Scan using FX DocuCentre SC2020 (WIA — USB)] window appears.. Note: The illustration may vary for different operating systems Select [Document Feeder] or [Flatbed] in [Paper source].
-
Page 135: Overview
– FTP service of Microsoft Internet Information Services 5.1 – FTP service of Microsoft Internet Information Services 6.0 – Windows Vista, Windows Server 2008 – FTP service of Microsoft Internet Information Services 7.0 ® ® Xerox DocuCentre SC2020 User Guide…
-
Page 136: Setting A Login Name And A Password (Smb Only)
Account. The following uses Windows 7 as an example. The procedure differs depending on the OS. Click [Start] > [Control Panel]. Click [User Accounts and Family Safety]. Click [User Accounts]. Click [Create a password for your account] and add in a password for your user login account. ® ® Xerox DocuCentre SC2020 User Guide…
-
Page 137: Creating A Shared Folder (Smb Only)
Select the [Share this folder] check box. Enter a shared name in the [Share name] box. Note: Write down this shared name because you will use this name in the next setting procedure Click [Add]. ® ® Xerox DocuCentre SC2020 User Guide…
-
Page 138: Setting A Destination Using An Address Book
The following procedure uses Windows 7 as an example. The procedure differs depending on the OS. Before beginning to setup a destination, make sure you have the IP addresses you need such as device and computer. ® ® Xerox DocuCentre SC2020 User Guide…
-
Page 139
If user name and password are required, enter the correct user name and password. Note: The default user name is «admin», and the default password is «1111». Under [Network Scan (Comp./Serv.)], click [Computer/Server Address Book]. Select any unused number and click [Add]. ® ® Xerox DocuCentre SC2020 User Guide… -
Page 140
(Refer to Setting a Login Name and a Password (SMB Only) on page 133 for details on how to add a password in your user login account.) Re-enter Re-enter your password. Password ® ® Xerox DocuCentre SC2020 User Guide… -
Page 141
Using Address Book Editor The following procedure uses Windows 7 as an example. Note: If the [Address Book Editor] window appears, go to step 4. Select your printer from the list. Click [OK]. ® ® Xerox DocuCentre SC2020 User Guide… -
Page 142
Enter a friendly name that you want it to appear on the address book. Server Type Select [Computer (SMB)] if you store the document in a shared folder of your computer. Select [Server (FTP)] if you use an FTP server. ® ® Xerox DocuCentre SC2020 User Guide… -
Page 143
(Refer to Setting a Login Name and a Password (SMB Only) on page 133 for details on how to add a password in your user login account). Confirm Login Re-enter your password. Password ® ® Xerox DocuCentre SC2020 User Guide… -
Page 144: Sending An Email With The Scanned Image
To send an Email attached with the scanned image from the device, follow the steps below: • Setup the Email address book through CentreWare Internet Services. For more information, refer to Registering a New Email Address on page 142. EMail Settings From CentreWare Internet Services, click [Properties]. ® ® Xerox DocuCentre SC2020 User Guide…
-
Page 145: Registering A New Email Address
The device web page appears. Note: For information on how to check the IP address of the device, refer to Checking the Device IP Address on page 230. Click the [Address Book] tab. ® ® Xerox DocuCentre SC2020 User Guide…
-
Page 146: Sending An Email With The Scanned File
The [Add Email Address] page appears. Enter a name in the [Name] field and Email address in the [Email Address] field. Click the [Apply] button. Sending an Email With the Scanned File Place document in the device. ® ® Xerox DocuCentre SC2020 User Guide…
-
Page 147: Operations During Scanning
To cancel the currently scanning job: On the device Press the <Stop> button. <Stop> button Redial/Pause Power Saver Clear All Stop Start Error Data On the computer Select [Delete] on the screen that appears while scanning. ® ® Xerox DocuCentre SC2020 User Guide…
-
Page 148: Checking Job Status
To adjust the amount of colors to make the contrast of Page 201 colors darker or lighter than the original. Auto To suppress the background of the original to enhance Page 202 Background text on the scanned image. Suppression ® ® Xerox DocuCentre SC2020 User Guide…
-
Page 149
To select the default document size. Page 199 Edge Erase To specify the top and bottom margins of the scanned Page 202 image. File Name To specify the detailed setting for file name. Page 203 ® ® Xerox DocuCentre SC2020 User Guide… -
Page 150: Scan To Network
To specify whether to create a folder when saving Page 203 scanned images. Note: For more information on defaults that can be changed, and how to change them, refer to Scan Defaults on page 198. ® ® Xerox DocuCentre SC2020 User Guide…
-
Page 151: Print
• different sizes. Printing This section describes how to print document. The procedure used to print will vary according to the application you are using. See your application’s manual for the specific procedure. ® ® Xerox DocuCentre SC2020 User Guide…
-
Page 152: Operations During Printing
Print The steps below are the operation used for the [DocuCentre SC2020] print driver screen. Select [Print] from the application’s [File] menu. Select [DocuCentre SC2020 PCL 6]. If needed, click [Properties] to make advanced settings. Note: For information on the Print functions, click [Help] in the print driver screen to display the Help Information.
-
Page 153
Select the document name that you desired to cancel, and then press the <Delete> key. If there is no document displayed on the window, cancel it manually on the device. ® ® Xerox DocuCentre SC2020 User Guide… -
Page 154
Print ® ® Xerox DocuCentre SC2020 User Guide… -
Page 155: Tools
Panel Settings Purpose: To print a detailed list of all the settings on the control panel menus. PCL Fonts List Purpose: To print a sample of the available PCL fonts. ® ® Xerox DocuCentre SC2020 User Guide…
-
Page 156: Billing Meters
Purpose: To print the list of status of pending faxes. Billing Meters Purpose: To check the total number of printed pages (including the number of the pages of the copied documents and received fax documents). ® ® Xerox DocuCentre SC2020 User Guide…
-
Page 157: Admin Settings
Bold values are the factory default menu settings. Paper Tray Purpose: To specify the default paper tray. Values: Auto Tray5 (Bypass) Tray1 Tray2 * [Tray2] is available only when the One Tray Module (Optional) is installed. ® ® Xerox DocuCentre SC2020 User Guide…
-
Page 158
* The default for [Output Size] varies depending on region-specific factory. inch series Tabloid (11 x 17″) Legal (8.5 x 14″) Folio (8.5 x 13″) Letter (8.5 x 11″) A3 (297 x 420 mm) B4 (257 x 364 mm) ® ® Xerox DocuCentre SC2020 User Guide… -
Page 159
Prints on both sides of a sheet of paper to be bound by long edge. Short Edge Flip Prints on both sides of a sheet of paper to be bound by short edge. ® ® Xerox DocuCentre SC2020 User Guide… -
Page 160
Times BdIt ITC A G Go BkOb Courier Helvetica ITC A G Go Dm Courier It Helvetica Ob ITC A G Go DmOb Courier Bd Helvetica Bd ZapfC MdIt Courier BdIt Helvetica BdOb ZapfDingbats ® ® Xerox DocuCentre SC2020 User Guide… -
Page 161
Note: The [Font Pitch] menu is only displayed for fixed or mono spaced fonts. Form Line Purpose: To set the number of lines in a page. ® ® Xerox DocuCentre SC2020 User Guide… -
Page 162
Disables the Hex Dump feature. Enable Enables the Hex Dump feature. Draft Mode Purpose: To save toner by printing in the draft mode. The print quality is reduced when you print in the draft mode. ® ® Xerox DocuCentre SC2020 User Guide… -
Page 163
Prints in the color mode. Ignore Form Feed Purpose: To specify whether to ignore blank pages that only contain Form Feed control codes. Values: Disables the Ignore Form Feed feature. Enables the Ignore Form Feed feature. ® ® Xerox DocuCentre SC2020 User Guide… -
Page 164: Network Setup
«nnn.nnn.nnn.nnn» is a value in the range of «0» to «254». «127» and any value in the range of «224» to «254» cannot be specified for the first octet of a gateway address. ® ® Xerox DocuCentre SC2020 User Guide…
-
Page 165
Uses 10BASE-T Full-duplex. 100BASE-TX Half Uses 100BASE-TX Half-duplex. 100BASE-TX Full Uses 100BASE-TX Full-duplex. Protocols Purpose: To enable or disable each protocol. The change becomes effective after the device is turned off and then on again. ® ® Xerox DocuCentre SC2020 User Guide… -
Page 166
Disables HTTP-SSL/TLS. HTTP-SSL/TLS Enable Enables HTTP-SSL/TLS. Note: [HTTP-SSL/TLS] is available only when a certificate is created using CentreWare Internet Services. For information on creating a certificate, refer to the online Help of CentreWare Internet ® ® Xerox DocuCentre SC2020 User Guide… -
Page 167
Purpose: To initialize network data stored in non-volatile memory (NVM). After executing this function and rebooting the device, all network settings are reset to their default values. Values: Reset Initializes the network data stored in NVM. Delete All Certificates ® ® Xerox DocuCentre SC2020 User Guide… -
Page 168: Fax Settings
New Zealand Philippines Singapore South Korea Thailand Vietnam Company Name Purpose: To set the sender name to be printed on the header on faxes. Line Type Purpose: To select the default line type. ® ® Xerox DocuCentre SC2020 User Guide…
-
Page 169
Sets the volume of the line monitor to middle. Sets the volume of the line monitor to maximum. • DRPD Pattern Purpose: To provide a separate number for faxing with a distinctive ring pattern. ® ® Xerox DocuCentre SC2020 User Guide… -
Page 170
Values: Lower Sets the external telephone hook detection threshold to Lower. Normal Sets the external telephone hook detection threshold to Normal. Higher Sets the external telephone hook detection threshold to Higher. ® ® Xerox DocuCentre SC2020 User Guide… -
Page 171
Turns off the volume of the ring tone. Sets the volume of the ring tone to minimum. Middle Sets the volume of the ring tone to middle. Sets the volume of the ring tone to maximum. Auto Answer Setup ® ® Xerox DocuCentre SC2020 User Guide… -
Page 172
Enable Requires a passcode to receive faxes. 0000–9999 Sets or changes the passcode Change Passcode required to receive faxes. * This item is available only when [Secure Receive Set] is set to [Enable]. ® ® Xerox DocuCentre SC2020 User Guide… -
Page 173
The device restricts incoming faxes to A4 size (210 mm width) and B4 size (257 mm width). A4/B4/A3 The device restricts incoming faxes to A4 size (210 mm width), B4 size (257 mm width), and A3 size (297 mm width). ® ® Xerox DocuCentre SC2020 User Guide… -
Page 174
Auto Reduction Automatically reduces a fax page to fit it onto the appropriate paper size. Transmission Defaults Purpose: To configure settings for transmitting fax. Auto Redial Setup Purpose: To configure settings for automatic redial. ® ® Xerox DocuCentre SC2020 User Guide… -
Page 175
Private Automatic Branch Exchange (PABX). Fax Cover Page Purpose: To set whether to attach a cover page to faxes. Values: Does not attach a cover page to faxes. Attaches a cover page to faxes. ® ® Xerox DocuCentre SC2020 User Guide… -
Page 176
Purpose: To set whether to display the fax number of the recipient on the sending fax screen when manually sending a fax. Values: Does not display the fax number when manually sending a fax. Displays the fax number when manually sending a fax. Fax Reports ® ® Xerox DocuCentre SC2020 User Guide… -
Page 177
Fax Protocol Purpose: To set whether to print the protocol monitor report, which helps you identify the cause of a communication problem. Values: Print Always Prints a protocol monitor report after every fax transmission. ® ® Xerox DocuCentre SC2020 User Guide… -
Page 178: System Settings
<Power Saver> button on the control panel changes the status of the device to the standby mode and lights up the touch screen. Date & Time Purpose: To specify the date and time formats. Values: Time Zone Sets the time zone. ® ® Xerox DocuCentre SC2020 User Guide…
-
Page 179
Sets B5 as the alternative document size that can be detected automatically. Sets 16K as the alternative document size that can be detected automatically. Display Brightness Purpose: To adjust the screen brightness of the control panel. ® ® Xerox DocuCentre SC2020 User Guide… -
Page 180
Non-Copy Job Tone Does not emit a tone when a job other than a copy job is complete. Soft Emits a tone when a job other than a copy job is complete. Normal Loud ® ® Xerox DocuCentre SC2020 User Guide… -
Page 181
Disables all the alert tones. Soft Sets the volume of all the alert tones at once. Normal Loud Low Toner Alert Message Purpose: To specify whether to show the alert message when the toner is low. ® ® Xerox DocuCentre SC2020 User Guide… -
Page 182
You can search the phone numbers only from the local Address Book when [Fax Server Address Book] is set to [Off]. Email Server Address Book Purpose: To specify whether to search the email addresses from the Address Book for the LDAP server. ® ® Xerox DocuCentre SC2020 User Guide… -
Page 183
3 Minutes 4 Minutes Fault Timeout Purpose: To specify the amount of time the device waits before canceling a job that stops abnormally. The print job is canceled if the time-out time is exceeded. ® ® Xerox DocuCentre SC2020 User Guide… -
Page 184: Output Settings
Purpose: To specify whether the device outputs PDL data, which is not supported by the device, as text when the device receives it. Text data is printed on A4 or Letter size paper. ® ® Xerox DocuCentre SC2020 User Guide…
-
Page 185
Nearest Size Substitutes paper of nearest size. Use Tray5 (Bypass) Substitutes paper from Tray5 (Bypass). Letterhead 2-Sided Purpose: To specify whether to print on both sides when using letterhead. ® ® Xerox DocuCentre SC2020 User Guide… -
Page 186
Purpose: To specify whether to permit the printing of data without authentication information. Values: Does not permit non-account user to print the data. Permits non-account user to print the data. Auto Color To Mono Print ® ® Xerox DocuCentre SC2020 User Guide… -
Page 187
If you see white spots on the print output, try to decrease the voltage. Note: The print quality changes depending on the setting values you select for this item. ® ® Xerox DocuCentre SC2020 User Guide… -
Page 188
-5 to +10 Heavyweight Gloss (170–256 g/m -5 to +10 Labels (106–256 g/m -5 to +10 Postcard -5 to +10 Envelope -5 to +10 Adjust Alignment Purpose: To adjust the alignment of the printed image. ® ® Xerox DocuCentre SC2020 User Guide… -
Page 189
Purpose: To initialize the non-volatile (NV) memory for system parameters, Address Book data for fax, or Address Book data for scan. After executing this function and rebooting the device, the menu parameters or data, except the parameters for the network, are reset to their factory default values. ® ® Xerox DocuCentre SC2020 User Guide… -
Page 190: Adjust Altitude
Non-Genuine Toner Purpose: To use toner cartridge of another manufacturer. Note: Using a non-Xerox toner cartridge may severely damage the device. The warranty does not cover damages caused by using non-Xerox toner cartridges. Values: Does not use toner cartridge of another manufacturer.
-
Page 191: Secure Settings
Limiting Access to Copy, Fax, and Scan on page 220. Purpose: To specify whether to enable or disable each of the device services, or to require a passcode to use the services. ® ® Xerox DocuCentre SC2020 User Guide…
-
Page 192
Enables the PC Scan service, but requires a passcode to Locked use the service. Disabled Disables the PC Scan service. ID Card Copy Enable Enables the ID Card Copy service. Disable Disables the ID Card Copy service. ® ® Xerox DocuCentre SC2020 User Guide… -
Page 193
Enable Only allows emails to be sent to specified domains. Software Download Purpose: To enable or disable download of firmware updates. Values: Disable Disables firmware updates. Enable Enables firmware updates. Display Network Information ® ® Xerox DocuCentre SC2020 User Guide… -
Page 194: Default Settings
Purpose: To select color or black and white copying. Values: Full Color Copies in color mode. Black & White Copies in black and white mode. Select Tray Purpose: To specify the input tray. ® ® Xerox DocuCentre SC2020 User Guide…
-
Page 195
81% B4 A4, B5 A5 86% A3 B4, A4 B5 115% B4 A3, B5 A4 122% A4 B4, A5 B5 141% A4 A3, B5 B4 200% A5 A3 ® ® Xerox DocuCentre SC2020 User Guide… -
Page 196
A4 (297 x 210 mm) A4 (210 x 297 mm) B5 (257 x 182 mm) B5 (182 x 257 mm) A5 (148 x 210 mm) 8K (270 x 390 mm) 16K (270 x 195 mm) ® ® Xerox DocuCentre SC2020 User Guide… -
Page 197
When [Auto] is selected, the device assumes that the document size is the size of the print media loaded in Tray 1 or Tray 5 (bypass). Original Type Purpose: To select the copy image quality. ® ® Xerox DocuCentre SC2020 User Guide… -
Page 198
Increases the color saturation to brighten the color of the copy. Normal The color saturation is the same as the original. Pastel Decreases the color saturation to lighten the color of the copy. Auto Background Suppression ® ® Xerox DocuCentre SC2020 User Guide… -
Page 199
Sets the color balance level of low density magenta. -3 to +3 Midtones Sets the color balance level of medium density magenta. -3 to +3 Highlights Sets the color balance level of high density magenta. -3 to +3 ® ® Xerox DocuCentre SC2020 User Guide… -
Page 200
Prints on both sides of a sheet of paper to be bound by Original Binding long edge. Short Edge Prints on both sides of a sheet of paper to be bound by Binding short edge. ® ® Xerox DocuCentre SC2020 User Guide… -
Page 201: Scan Defaults
To modify the defaults for the [Scan] menu and [Email] menu defaults. Note: Bold values are the factory default menu settings. File Format Purpose: To specify the file format to save the scanned image. Values: Multi-Page TIFF ® ® Xerox DocuCentre SC2020 User Guide…
-
Page 202
[600 dpi] cannot be selected when [Output Color] is set to [Color]. Original Size Purpose: To specify the default document size. Values: mm series Auto A3 (297 x 420 mm) B4 (257 x 364 mm) A4 (297 x 210 mm) ® ® Xerox DocuCentre SC2020 User Guide… -
Page 203
A4 (297 x 210 mm) A4 (210 x 297 mm) B5 (257 x 182 mm) B5 (182 x 257 mm) A5 (148 x 210 mm) 8K (270 x 390 mm) 16K (270 x 195 mm) ® ® Xerox DocuCentre SC2020 User Guide… -
Page 204
Values: Sharpen Makes the scanned image sharper than the original. Normal Does not make the scanned image sharper or softer than the original. Soften Makes the scanned image softer than the original. Contrast ® ® Xerox DocuCentre SC2020 User Guide… -
Page 205
Sets the value in increments of 0.1 inch (1 mm). 0.0–2.0 inch (0–50 mm) Left/Right 0.1 inch (2 mm) Sets the value in increments of 0.1 inch (1 mm). 0.0–2.0 inch (0–50 mm) ® ® Xerox DocuCentre SC2020 User Guide… -
Page 206
Create Folder Purpose: To specify whether to create a folder when saving scanned images. Values: Does not create a folder when saving a scanned image. Creates a folder when saving a scanned image. ® ® Xerox DocuCentre SC2020 User Guide… -
Page 207: Fax Defaults
This item is available only when [2-Sided Scanning] is set to [2-Sided Printing] in the [Scan Defaults] menu. Lighten/Darken Purpose: To adjust the density to make the copy lighter or darker than the original. ® ® Xerox DocuCentre SC2020 User Guide…
-
Page 208
A5 (148 x 210 mm) 8K (270 x 390 mm) Tabloid (11 x 17″) Legal (8.5 x 14″) Folio (8.5 x 13″) Letter (8.5 x 11″) inch series Auto Tabloid (11 x 17″) Legal (8.5 x 14″) ® ® Xerox DocuCentre SC2020 User Guide… -
Page 209: Tray Management
Use the [Tray Management] menu to define the print media loaded in Tray 1 and Tray 2. Note: Bold values are the factory default menu settings. Tray Settings Purpose: To configure tray settings. Tray 5 (Bypass) Purpose: To specify the paper loaded in Tray 5 (bypass). ® ® Xerox DocuCentre SC2020 User Guide…
-
Page 210
Letter (8.5 x 11″) Letter (8.5 x 11″) Custom Size Length(x) 210 mm Specifies the length of the custom size paper. 98–432 mm Width(y) 297 mm Specifies the width of the custom size paper. 89–297 mm ® ® Xerox DocuCentre SC2020 User Guide… -
Page 211
16K (270 x 195 mm) 16K (195 x 270 mm) Custom Size Length(x) 8.3 inches Specifies the length of the custom size paper. 3.9–17.0″ Width(y) 11.7 inches Specifies the width of the custom size paper. 3.5–11.7″ ® ® Xerox DocuCentre SC2020 User Guide… -
Page 212
Labels (106–256 g/m Pre-Printed (60–89 g/m Colored (60–89 g/m Postcard Postcard Reload Envelope * The default for [Size] varies depending on region-specific factory default. Tray 1 Purpose: To specify the paper loaded in Tray 1. ® ® Xerox DocuCentre SC2020 User Guide… -
Page 213
Letterhead (60–89 g/m Pre-Printed (60–89 g/m Colored (60–89 g/m Tray 2 Note: Tray2 is available only when the One Tray Module (optional) is installed. Purpose: To specify the paper loaded in Tray 2. ® ® Xerox DocuCentre SC2020 User Guide… -
Page 214
Length(x) 210 mm Specifies the length of the custom size Size paper. (8.3 inches) 182–432 (7.2–17.0 inches) Width(y) 297 mm Specifies the width of the custom size paper. (11.7 inches) 140–297 (5.5–11.7 inches) ® ® Xerox DocuCentre SC2020 User Guide… -
Page 215: Tray Priority
Purpose: To set the priority order of the paper trays for automatic tray selection. If paper trays loaded with the same paper size and type exists, the paper tray is selected according to this priority order. ® ® Xerox DocuCentre SC2020 User Guide…
-
Page 216: Language Settings
Bold values are the factory default menu settings. Purpose: To determine the language of the text on the control panel. Values: English (Simplified Chinese) (Korean) (Vietnamese) (Thai) Keyboard Layout Purpose: To select the keyboard layout on the control panel. ® ® Xerox DocuCentre SC2020 User Guide…
-
Page 217: Executing Calibration
If density or color is not calibrated well despite the periodic execution of auto calibration, contact our Customer Support Center. Press the <Machine Status> button. <Machine Status> button Services Home Job Status Machine Status Select the [Tools] tab. ® ® Xerox DocuCentre SC2020 User Guide…
-
Page 218
Calibration Chart against the left side of the document glass. • Place at least five sheets of white paper on the Calibration Chart and close the document cover. 14. Select [Start]. 15. Select [Yes, Restart] ® ® Xerox DocuCentre SC2020 User Guide… -
Page 219: Panel Lock Function
Disabling the control panel menus does not prevent access to the [Secure Print], [Sample Print] and [Tray Settings] menus. Enabling the Panel Lock Press the <Machine Status> button. <Machine Status> button Services Home Job Status Machine Status Select the [Tools] tab. Select [Admin Settings]. Select [Secure Settings]. ® ® Xerox DocuCentre SC2020 User Guide…
-
Page 220
[OK]. Perform steps 4 and 5. Select [Change Passcode], and then select [OK]. Enter the current passcode, and then select [OK]. Perform steps 8 and 9. This will change the passcode. ® ® Xerox DocuCentre SC2020 User Guide… -
Page 221: Disabling The Panel Lock
Re-enter the passcode to confirm the passcode that you entered, and then select [OK]. Disabling the Panel Lock Press the <Machine Status> button. <Machine Status> button Services Home Job Status Machine Status Select the [Tools] tab. Select [Admin Settings]. ® ® Xerox DocuCentre SC2020 User Guide…
-
Page 222
Tools Enter the passcode, and then select [OK]. Note: The factory-default panel passcode is 0000. Select [Secure Settings]. Select [Panel Lock]. Select [Panel Lock Set]. Select [Disable], and then select [OK]. ® ® Xerox DocuCentre SC2020 User Guide… -
Page 223: Limiting Access To Copy, Fax, And Scan
Copy Lock, or Scan Lock. Note: The Service Lock feature cannot be used simultaneously with the Copy Auditron feature. Press the <Machine Status> button. <Machine Status> button Services Home Job Status Machine Status Select the [Tools] tab. ® ® Xerox DocuCentre SC2020 User Guide…
-
Page 224
Limiting Access to Copy, Fax, and Scan Select [Admin Settings]. Select [Secure Settings]. Select [Panel Lock]. Select [Panel Lock Set]. ® ® Xerox DocuCentre SC2020 User Guide… -
Page 225
Enter the new passcode using the number pad and then select [OK]. Re-enter the passcode and then select [OK]. Note: The default passcode is 0000. 10. Select [ ] once. 11. Select [Service Lock]. ® ® Xerox DocuCentre SC2020 User Guide… -
Page 226: Setting The Power Saver Option
You can set the Power Saver for the device. The device switches to the Power Saver mode after the specified time. Note: If [Panel Lock Set] is set to [Enable], you need to enter the four digit passcode to enter the [Admin Settings] menu. ® ® Xerox DocuCentre SC2020 User Guide…
-
Page 227
Setting the Power Saver Option To set the Power Saver: Press the <Machine Status> button. <Machine Status> button Services Home Job Status Machine Status Select the [Tools] tab. Select [Admin Settings]. Select [System Settings]. Select [General]. ® ® Xerox DocuCentre SC2020 User Guide… -
Page 228
] or enter the desired value using the number pad, and then select [OK]. You can select from 1–150 minutes for [Low Power Timer] or 0–60 minutes for [Sleep Timer]. To return to the previous screen, select [ ® ® Xerox DocuCentre SC2020 User Guide… -
Page 229: About The Concurrent Jobs Feature
After executing this function and rebooting the device, the address book or all the menu parameters, except the parameters for the network, are reset to their default values. Press the <Machine Status> button. <Machine Status> button Services Home Job Status Machine Status Select the [Tools] tab. ® ® Xerox DocuCentre SC2020 User Guide…
-
Page 230
Setting the Power Saver Option Select [Admin Settings]. Select [Maintenance]. Select [Initialize NVM]. Select the desired setting. Select [Initialize]. The device restarts automatically to apply the settings. ® ® Xerox DocuCentre SC2020 User Guide… -
Page 231: Machine Status
Shows the percentage of the remaining black toner. – Shows the percentage of the remaining cyan toner. – Shows the percentage of the remaining magenta toner. – Shows the percentage of the remaining yellow toner. – [Other Supplies] ® ® Xerox DocuCentre SC2020 User Guide…
-
Page 232: Selecting Language
The default language may vary depending on the region of purchase. Follow the steps below to select the language. Press the <Machine Status> button. <Machine Status> button Services Home Job Status Machine Status Select the [Tools] tab. Select [Language Settings]. ® ® Xerox DocuCentre SC2020 User Guide…
-
Page 233: Checking The Device Ip Address
Checking the Device IP Address You can display the IPv6 or IPv4 address of your device. Press the <Machine Status> button. <Machine Status> button Services Home Job Status Machine Status Select [About This MFP]. ® ® Xerox DocuCentre SC2020 User Guide…
-
Page 234: Checking The Meter
Meter2 Displays the total number of monochrome prints. Meter3 Displays the total number of large size color prints. Meter4 Displays the total number of color and monochrome prints (Meter 1 + Meter 2). ® ® Xerox DocuCentre SC2020 User Guide…
-
Page 235: Printing Reports/Lists
To print a page for testing colors. Protocol Monitor To print a detailed list of monitored protocols. To print the list of all fax addresses stored as Fax Address Book information. Fax Address Book ® ® Xerox DocuCentre SC2020 User Guide…
-
Page 236
<Machine Status> button Services Home Job Status Machine Status Select [Report/List]. Select the report or list to print, and then select [Print]. Note: To cancel printing while a job is printing, press the <Stop> button. ® ® Xerox DocuCentre SC2020 User Guide… -
Page 237: Job Status
If any outgoing faxes have been reserved, you can check them by selecting [Fax Job (Waiting to Send)]. Press the <Job Status> button. Select [Fax Job (Waiting to Send)]. The list of reserved fax jobs appears. ® ® Xerox DocuCentre SC2020 User Guide…
-
Page 238: Canceling The Current Job
Press the <Job Status> button. Select [Fax Job (Waiting to Send)]. Select a reserved fax job. Select [Delete]. You may not be able to cancel a job depending on the status of the job processing. ® ® Xerox DocuCentre SC2020 User Guide…
-
Page 239: Maintenance
Never use a vacuum cleaner for spilled toner and residual toner in this product, toner cartridge or toner bottle. It may catch fire by electric sparks inside a vacuum cleaner and cause explosion. Use a broom or a wet cloth to wipe off spill. If you spill a large volume of toner, contact your local Xerox representative.
-
Page 240: Handling Consumables/Periodic Replacement Parts
• Never throw a waste toner bottle into an open flame. Toner may catch fire and cause burn injuries or explosion. If you have a used waste toner bottle no longer needed, contact your local Xerox representative for its disposal.
-
Page 241
Then, Replace the XXXX Cartridge. This warning appears only when Xerox toner cartridge is used ([Non-Genuine Toner] is set to [Off]). The remaining page yield differs depending on printing conditions, contents of the documents, and frequency of turning on/off the device. -
Page 242
Never throw a toner cartridge into an open flame. Remaining toner in the cartridge may catch fire and cause burn injuries or explosion. • If you have a used toner cartridge no longer needed, contact your local Xerox representative for its disposal. Notes: •… -
Page 243: Replacing The Waste Toner Container [R5]
Replacing the Waste Toner Container [R5] The waste toner container holds used toner. The following messages are displayed on the touch screen according to the status of the waste toner container. Follow the messages. ® ® Xerox DocuCentre SC2020 User Guide…
-
Page 244
Never use a vacuum cleaner for spilled toner and residual toner in this product, toner cartridge or toner bottle. It may catch fire by electric sparks inside a vacuum cleaner and cause explosion. Use a broom or a wet cloth to wipe off spill. If you spill a large volume of toner, contact your local Xerox representative. -
Page 245
After removing the waste toner container, do not touch the parts shown in the illustration. Toner can dirty or stain your hands. Never lay the waste toner box on its side as this may cause its malfunction or toner spills. ® ® Xerox DocuCentre SC2020 User Guide… -
Page 246
Take a new container out of the box in advance. Install a new waste toner container, and then lock it. Turn the lock lever clockwise, and then close the front cover. Insert the used waste toner container into the supplied plastic bag. ® ® Xerox DocuCentre SC2020 User Guide… -
Page 247: Replacing The Drum Cartridge
The remaining page yield differs depending on printing conditions, contents of the documents, and frequency of turning on/off the device. The use of drum cartridges not recommended by Xerox may lower the device’s output quality or performance. Always use drum cartridges recommended by Xerox in the device.
-
Page 248: Cleaning The Device
Normally, clean the LED Print Heads when you replace the waste toner container. However, if you have image quality problems such as white or colored stripes appearing on copied or printed outputs, clean the LED Print Heads. ® ® Xerox DocuCentre SC2020 User Guide…
-
Page 249
Take care not to drop the waste toner container while you are removing it. • After removing the waste toner container, do not touch the parts shown in the illustration. Toner can dirty or stain your hands. ® ® Xerox DocuCentre SC2020 User Guide… -
Page 250
Insert the cleaning bar into each slot until it stops, and then slowly slide the bar back out. Return the cleaning bar to the back side of the front cover. Install the waste toner container, and then lock it. ® ® Xerox DocuCentre SC2020 User Guide… -
Page 251: Cleaning The Touch Screen
To ensure clean copies at all times, clean the document glass cover and the document glass about once a month. ® ® Xerox DocuCentre SC2020 User Guide…
-
Page 252: Cleaning The Document Presser And The Narrow Glass Strip
If the document presser or the narrow glass strip becomes soiled, smudges may appear on copies, faxes, or scanned documents and the device may not detect the document sizes properly. To ensure clean copies at all times, clean the document presser and the narrow glass strip about once a month. ® ® Xerox DocuCentre SC2020 User Guide…
-
Page 253: Cleaning Document Feeder Rollers
If the document feeder rollers become soiled, smudges may appear on copies, faxes or scanned documents and paper jams may occur. To ensure clean copies at all times, clean the document feeder rollers about once a month. ® ® Xerox DocuCentre SC2020 User Guide…
-
Page 254: Managing The Device
Managing the Device This section describes how to check the device status using CentreWare Internet Services or the Status Messenger feature. ® ® Xerox DocuCentre SC2020 User Guide…
-
Page 255: Checking Or Managing The Device With Centreware Internet Services
Set the email address where notices about changes in device status or errors are sent. Notification Items Set the contents of the notices to send in the email. Port Status StatusMessenger Select [Enabled]. ® ® Xerox DocuCentre SC2020 User Guide…
-
Page 256
Write one command on each line and separate each command and parameter with a space or a tab. When the same command is written two or more times in one email, the second and subsequent commands are ignored. ® ® Xerox DocuCentre SC2020 User Guide… -
Page 257
#Status Set this when you want to check the device status. Example of Commands When the read only password is “ronly”, and to check the device status: #Password ronly #Status #NetworkInfo ® ® Xerox DocuCentre SC2020 User Guide… -
Page 258
Maintenance ® ® Xerox DocuCentre SC2020 User Guide… -
Page 259: Problem Solving
276 – No: If you cannot resolve an error despite following the above procedure, contact our Customer Support Center. Device Problems Check the device’s status again if you suspect a malfunction. ® ® Xerox DocuCentre SC2020 User Guide…
-
Page 260
Is the required port status Check the status of the port to use, and then set to [Enabled]? set the port status to [Enabled]. Refer to Activating the Communication Port To Use on page 36. ® ® Xerox DocuCentre SC2020 User Guide… -
Page 261
Refer to Placing Document on page 68. set in the correct positions? Is the document folded? Smooth out the document and place it again correctly. Refer to Placing Document on page 68. ® ® Xerox DocuCentre SC2020 User Guide… -
Page 262
Tray 5 positions. Tray 5 (bypass) and the (bypass). Refer to Error Code on page 277. <Start> button is Refer to Loading Paper in Tray 5 (bypass) pressed. page 63. ® ® Xerox DocuCentre SC2020 User Guide… -
Page 263: Image Quality Problems
If the image quality of the printout is poor, use the table below to find our most likely cause, and take the required action. If the image quality remains poor after taking the required action, contact our Customer Support Center. ® ® Xerox DocuCentre SC2020 User Guide…
-
Page 264
Refer to Loading Paper in Trays 1 and 2 away from the corners of page 61. the tray? Refer to Loading Paper in Tray 5 (bypass) page 63. ® ® Xerox DocuCentre SC2020 User Guide… -
Page 265
When making enlarged copies, some in copies. an enlarged copy of the enlargement factors can create striped document with a too large patterns. Adjust the copy enlargement enlargement factor? factor. Refer to Reduce/Enlarge on page 81. ® ® Xerox DocuCentre SC2020 User Guide… -
Page 266
Refer to Replacing the Drum Cartridge damaged. page 244. The narrow glass strip is Clean the narrow glass strip. dirty. Refer to Cleaning the Document Presser and the Narrow Glass Strip on page 249. ® ® Xerox DocuCentre SC2020 User Guide… -
Page 267
Replace the paper with new paper. on the fingers. The paper is unsuitable. Load the correct type of paper. The toner is not fused to the paper. The paper is contaminated with toner. ® ® Xerox DocuCentre SC2020 User Guide… -
Page 268
63. type and size of the paper actually loaded. Multiple pages were fed Ruffle through the stack of paper through the device at once. thoroughly before leading it. ® ® Xerox DocuCentre SC2020 User Guide… -
Page 269
Align the horizontal and vertical paper guides are not aligned to guides properly. the correct position. Refer to Loading Paper in Trays 1 and 2 page 61. Refer to Loading Paper in Tray 5 (bypass) page 63. ® ® Xerox DocuCentre SC2020 User Guide… -
Page 270: Copying Problems
You have placed a You cannot place documents with different document containing size pages. pages of different sizes. Copy Output Problems The table below lists possible solutions to problems with the copy output. ® ® Xerox DocuCentre SC2020 User Guide…
-
Page 271
Place a stack of white paper on top of the document to bring it into proper contact with the document glass. ® ® Xerox DocuCentre SC2020 User Guide… -
Page 272
Smooth out the document and place it again correctly. Refer to Placing Document on page 68. The edges of copies are The document exceeds Adjust the reduction/enlargement factor to cut off. the printable area. reduce the copy slightly. ® ® Xerox DocuCentre SC2020 User Guide… -
Page 273: Printer Problems
Check the error information, and take the the device. required action. Job execution has been Use the screen to select whether to cancel the paused. job. Print Output Problems The table below lists possible solutions to print output problems. ® ® Xerox DocuCentre SC2020 User Guide…
-
Page 274: Fax Problems
The document does not feed into the Ensure that the document is not wrinkled and you are device. putting it in correctly. Check that the document is of the right size, not too thick or thin. ® ® Xerox DocuCentre SC2020 User Guide…
-
Page 275
The other fax device may be turned off, out of paper, or connection with another fax device fails. cannot answer incoming calls. Speak with the other device operator and ask her/him to sort out the problem. ® ® Xerox DocuCentre SC2020 User Guide… -
Page 276: Scan Problems
Execute [Initialize NVM]. Scan Problems This section provides possible solutions to various problems you may encounter when using the Scan feature. The table below lists possible solutions when you are unable to scan. ® ® Xerox DocuCentre SC2020 User Guide…
-
Page 277
Communication speed becomes slow in scan mode because of the large amount of memory required to analyze and reproduce the scanned image. Scanning images at a high resolution takes more time than scanning at a low resolution. ® ® Xerox DocuCentre SC2020 User Guide… -
Page 278
Scanner is busy receiving or printing data. When the current job is completed, try again. • Invalid handle. • Scanning has failed. The selected port is currently being used. Restart your computer and try again. ® ® Xerox DocuCentre SC2020 User Guide… -
Page 279: Scan Driver/Printer Utility Problems
Ensure that the device is turned on. Ensure that the scan driver is installed on your computer. (The Address Book Editor retrieves the Address Book data via the scan driver when the device is connected using a USB cable.) ® ® Xerox DocuCentre SC2020 User Guide…
-
Page 280: Error Code
Refer to the error codes in the following table to resolve problems. If an error code is displayed, any print data remaining in the device and information stored in the device’s memory is not secured. ® ® Xerox DocuCentre SC2020 User Guide…
-
Page 281
Switch off the device power, make sure that the touch screen is blank, and then switch on the device power. Contact our Customer Support Center if 016-741 this failure is repeated. 016-742 016-743 016-744 016-745 ® ® Xerox DocuCentre SC2020 User Guide… -
Page 282
Confirm the login-able computers with your system administrator. 031-522 Select [Close], or wait for the time set in [Fault Timeout] for the device to recover. Check if the login name (domain name and user name) and password are correct. ® ® Xerox DocuCentre SC2020 User Guide… -
Page 283
Check the access right of the folder you specified. 031-532 Select [Close], or wait for the time set in [Fault Timeout] for the device to recover. Shorten the name of the file or the forwarding destination folder. ® ® Xerox DocuCentre SC2020 User Guide… -
Page 284
Check the user invalid setting with your system administrator. 031-547 Select [Close], or wait for the time set in [Fault Timeout] for the device to recover. Check the user lock-out status with your system administrator. ® ® Xerox DocuCentre SC2020 User Guide… -
Page 285
Check if a folder with the name you specified can be created in the storage location. Check if a folder that has the same name as the one you specified already exists. ® ® Xerox DocuCentre SC2020 User Guide… -
Page 286
Print the received fax, or wait for a while until the fax is sent. • Print the fax job stored using the Secure Receive feature. For more information on the Secure Receive feature, refer to Secure Receive on page 169. ® ® Xerox DocuCentre SC2020 User Guide… -
Page 287
Select [Close], or wait for the time set in [Fault Timeout] for the device to recover. The device rejected a fax from the blocked number. For more information, refer to Junk Fax Filter on page 169. ® ® Xerox DocuCentre SC2020 User Guide… -
Page 288
Select [Close], or wait for the time set in [Fault Timeout] for the device to recover. Try the following: • Retry the same operation. • Check if the memory of the device or remote device is full. ® ® Xerox DocuCentre SC2020 User Guide… -
Page 289
Check the status of the remote device. 035-720 Select [Close], or wait for the time set in [Fault Timeout] for the device to recover. Check the features supported by the remote device. ® ® Xerox DocuCentre SC2020 User Guide… -
Page 290: Paper Jams
Carefully remove the jammed paper without tearing it. Do not leave any pieces of paper in the device. WARNING: If you need to pull out a tray to remove paper jam, contact your local Xerox representative. Do not pull out a tray, otherwise it may cause injuries.
-
Page 291: Paper Jam In Left Side Cover [A]
If the paper is jammed around the fusing unit Pull down the handle [A1]. Remove the jammed paper. Note: Do not leave any torn pieces of paper inside the device. Return the handle [A1] back to its position. ® ® Xerox DocuCentre SC2020 User Guide…
-
Page 292
If the paper is jammed in the location as shown in the right figure, lift the handle [A2], and then remove the jammed paper pulling upwards. Return the handle [A2] to its position. Push on the center of the left side cover [A], close it slowly, and raise the Tray 5 (bypass). ® ® Xerox DocuCentre SC2020 User Guide… -
Page 293: Paper Jam In Left Side Cover [B]
Follow the steps below to clear paper jams in Trays 1 and 2. Remove the jammed paper by referring to the following: – Tray 1: Paper Jam in Left Side Cover [A] on page 288 ® ® Xerox DocuCentre SC2020 User Guide…
-
Page 294
Remove the jammed paper. Note: If the paper tears, check to make sure there are no remaining shreds in the device. Push the tray in gently until it stops. ® ® Xerox DocuCentre SC2020 User Guide… -
Page 295: Paper Jams In Tray 5 (Bypass)
Pull up the front handle of the document feeder top cover, and open the document feeder top cover completely. Note: The cover will remain fixed in position when fully opened. Open the cover slowly. ® ® Xerox DocuCentre SC2020 User Guide…
-
Page 296
Turn the knob to feed the document to the top, then remove it. Note: If the document has been fed into the feeder, do not pull it out directly. The document may tear. Close the document feeder’s inner cover. ® ® Xerox DocuCentre SC2020 User Guide… -
Page 297
Place the entire document again. Note: Torn, wrinkled or folded document pages can cause document jams, or damage. Always copy torn, wrinkled, or folded documents by placing them directly on the document glass. ® ® Xerox DocuCentre SC2020 User Guide… -
Page 298: Getting Help
Problem Solving Getting Help Xerox provides several automatic diagnostic tools to help you produce and maintain print quality. Control Panel Messages The control panel provides you with information and troubleshooting help. When an error or warning condition occurs, the control panel displays a message informing you of the problem.
-
Page 299
Problem Solving Select the [Tools] tab. Select [Admin Settings]. Select [Maintenance]. Select [Non-Genuine Toner]. Select [On], and then select [OK]. The device switches to the Non-Genuine mode. ® ® Xerox DocuCentre SC2020 User Guide… -
Page 300
Problem Solving ® ® Xerox DocuCentre SC2020 User Guide… -
Page 301: Appendix
Maximum: A3, 11 x 17″ Minimum:Tray 1: A5 Tray 2 (optional): A5 Tray 5 (bypass): A5 (Non-standard size: 89 × 98 mm) Image loss width: 5.5 mm max. at top, bottom, right, and left. ® ® Xerox DocuCentre SC2020 User Guide…
-
Page 302
Tray 1: 60–90 g/m² Tray 2 (optional): 60–256 g/m² Tray 5 (bypass): 60–216 g/m² Note: Use paper recommended by Xerox. Copying may not be performed correctly depending on the conditions. First Copy Output Time <When the document glass is used>… -
Page 303
Optional:500 sheets (One Tray Module) Maximum Paper Capacity: 850 sheets (Standard + One Tray Module) : When using 80 g/m² paper Note: : When using Xerox standard paper Continuous Copy 999 sheets Output Tray Capacity 250 sheets (A4 ) When using 80 g/m² paper Power Supply AC 220–240 V ±10%, 5 A, 50/60 Hz ±3%… -
Page 304: Print Functions
Print Resolution Output resolution: 1200 x 2400 dpi Data processing resolution: 600 x 600 dpi for Standard and High Quality PCL6/5e, HBPL Protocol Network connection: TCP/IP (lpd, IPP/IPPS, Port9100, SMB, WSD ® ® Xerox DocuCentre SC2020 User Guide…
-
Page 305
Windows 10 x64 Mac OS X 10.5–10.11 Note: For information about the latest supported OS, refer to our official website. Fonts PCL6/5: 81 European fonts, 36 Symbol set Connectivity Ethernet 100BASE-TX/10BASE-T, USB 2.0 ® ® Xerox DocuCentre SC2020 User Guide… -
Page 306
: color, grayscale, and monochrome: 400 x 400 dpi, 2/22/16300 x 300 dpi, 200 x 200 dpi, 150 x 150 dpi Monochrome:24 sheets/minute Scanning Speed Color: 19 sheets/minute Xerox Standard Document (A4 ), at 200 dpi Connectivity Ethernet 100BASE-TX/10BASE-T, USB 2.0 Scan to PC Driver… -
Page 307
Appendix • *3 Please refer to our official website for the latest support operating systems. ® ® Xerox DocuCentre SC2020 User Guide… -
Page 308
400 x 400 dpi, 300 x 300 dpi, 200 x 200 dpi, 150 x 150 dpi Monochrome:24 sheets/minute Scanning Speed Color: 19 sheets/minute Xerox Standard Document (A4 ), at 200 dpi Connectivity Standard: Ethernet 100BASE-TX/10BASE-T Scan to PC Protocol… -
Page 309
Direct Fax Functions (Optional) Send Document Size A3, B4, A4 Scanning Resolution Same as the Fax Functions Transmission Speed Same as the Fax Functions No. of Fax Lines Same as the Fax Functions ® ® Xerox DocuCentre SC2020 User Guide… -
Page 310
Capacity 110 sheets Note: When using 80 g/m² paper. Feeding Speed Monochrome:20 sheets/minute (A4 , 1-Sided), 13 pages/minute (A4 , 2-Sided) Color : 18 sheets/minute (A4 , 1-Sided), 11 pages/minute (A4 , 2-Sided) ® ® Xerox DocuCentre SC2020 User Guide… -
Page 311: Printable Area
5.5 mm Unprintable area Printable area 5.5 mm 5.5 mm Paper feed 5.5 mm direction Optional Components The following table shows the optional components available. To purchase these options, contact our Customer Support Center. ® ® Xerox DocuCentre SC2020 User Guide…
-
Page 312: Notes And Restrictions
If the output file name includes characters other than alphanumeric, it is not displayed correctly on the Job History Report. • Document Feeder The device does not detect a document placed in the document feeder during Sleep mode. ® ® Xerox DocuCentre SC2020 User Guide…
-
Page 313: Notes And Restrictions On The Use Of The Copy Feature
This section describes notes and restrictions to observe when using the Scan feature. For the notes and restrictions on the scan driver, see the «Readme» information on the CD-ROM for the Driver CD Kit that came with the device. • Address Book ® ® Xerox DocuCentre SC2020 User Guide…
-
Page 314: Notes And Restrictions On The Use Of The Print Feature
In this case, open and close the front cover of this device and check one more time if the message is still displayed. ® ® Xerox DocuCentre SC2020 User Guide…
-
Page 315
45, 307 canceling a job, 144 duplex output unit, 307 capacity, 307, 308 CentreWare Internet Services, 136 Changing numbers, 53 changing paper size in Trays 1 and 2, 64 ECM, 173 ® ® Xerox DocuCentre SC2020 User Guide… -
Page 316
298 Measurements, 176 hard disk, 298 memory, 117, 298 Hex Dump, 159 narrow glass strip, 45 ID Card Copy, 75 Network Setup, 161 Ignore Form Feed, 160 No Account User Print, 183 ® ® Xerox DocuCentre SC2020 User Guide… -
Page 317
306 power switch, 43 Send Header, 173 Prefix Dial, 172 Sending a delayed fax, 109 Print ID, 181 Sending a fax from the driver (Direct Fax), 111 print resolution, 301 ® ® Xerox DocuCentre SC2020 User Guide… -
Page 318
Tray Management, 206 Tray Settings, 206 troubleshooting, 256 turning the power off, 46 turning the power on, 45 TWAIN, 129 unable to copy, 267 unable to print, 270 uninstalling, 40 unusable paper, 60 ® ® Xerox DocuCentre SC2020 User Guide… -
Page 319
® ® Xerox DocuCentre SC2020 User Guide… -
Page 320
® ® Xerox DocuCentre SC2020 User Guide…
МФУ лазерное Xerox DocuCentre SC2020

цветная печать, A3, 2400×1200 dpi, ч/б — 20 стр/мин (А4), АПД, Ethernet (RJ-45), USB
подробнее

12
Код товара: 7978392
|
Код: 111530
Бесплатная доставка
? В корзину Сравнить Купить в один клик Новости интернет-магазина «Лаукар»:28.03.2023 22.02.2023 13.02.2023 Дополнительная информация в категории МФУ:Принтеры и МФУ — особенности и термины Таблица Авторизованных сервисных центров по брендам. Описание Инструкция Отзывы (0) В интернет-магазине бытовой техники «Лаукар» Вы можете скачать инструкцию к товару МФУ Xerox DocuCentre SC2020 (SC2020V_U) совершенно бесплатно. Все инструкции, представленные на сайте интернет-магазина бытовой техники «Лаукар», предоставляются производителем товара. Для того чтобы скачать инструкцию, Вам необходимо нажать на ссылку «скачать инструкцию», расположенную ниже, а в случае, если ссылки нет, Скачать инструкцию Смотреть инструкцию
Фирма-производитель оставляет за собой право на внесение изменений в конструкцию, дизайн и комплектацию товара: МФУ Xerox DocuCentre SC2020 (SC2020V_U). Пожалуйста, сверяйте информацию о товаре с информацией на |


Информация о товаре носит справочный характер и не является публичной офертой. Характеристики, комплект поставки и внешний вид товара могут отличаться от указанных или быть изменены производителем без предварительного уведомления. Перед покупкой проверяйте информацию на официальном сайте производителя.
Если вы заметили ошибку или неточность в описании товара, пожалуйста, выделите часть текста с ошибкой и нажмите кнопку «Сообщить об ошибке».