| Название | Русский | English |
|---|---|---|
| PSR-SX900/PSR-SX700 Owner’s Manual | — |
[8MB] |
| PSR-SX900/PSR-SX700 Owner’s Manual |
[8.2MB] |
[8MB] |
| PSR-SX900/PSR-SX700 Reference Manual | — |
[8.6MB] |
| PSR-SX900/PSR-SX700 Reference Manual |
[25.5MB] |
[8.6MB] |
| PSR-SX900/PSR-SX700 Data List | — |
[1011KB] |
| PSR-SX900/PSR-SX700 Pre-installed Expansion Contents List | — |
[73KB] |
| PSR-SX900 firmware installation guide | — |
[67KB] |
| Smart Device Connection Manual for Android | — |
[121KB] |
| Smart Device Connection Manual for iOS (iPhone/iPad Connection Manual) | — |
[4.5MB] |
| PSR-SX900/PSR-SX700 Owner’s Manual (TEXT) | — |
[182KB] |
| PSR-SX900/PSR-SX700 Reference Manual (TEXT) | — |
[154KB] |
| Audio Phraser Installation Guide | — |
[282KB] |
| Audio Phraser Owner’s Manual | — |
[1.4MB] |
| Yamaha Expansion Manager Installation Guide | — |
[49KB] |
| Yamaha Expansion Manager Owner’s Manual | — |
[1.1MB] |
Для ознакомления с инструкцией необходимо нажать на ссылку «ЗАГРУЗИТЬ», чтобы скачать pdf файл. Если есть кнопка «ПРОСМОТР», то можно просто посмотреть документ онлайн.
Для удобства, Вы можете сохранить данную страницу с файлом руководства по эксплуатации в свой список «избранное» прямо на сайте (доступно для зарегистрированных пользователей).
Смотрите инструкцию для похожих моделей:

Вы можете задать вопрос посетителям сайта по модели YAMAHA PSR-SX900. Если Вы являетесь её пользователем, то пожалуйста оставьте, по возможности развёрнутый отзыв:
- Manuals
- Brands
- Yamaha Manuals
- Musical Instrument
- PSR-SX900
- Reference manual
-
Contents
-
Table of Contents
-
Bookmarks
Related Manuals for Yamaha PSR-SX900
Summary of Contents for Yamaha PSR-SX900
-
Page 1
Digital Workstation Reference Manual This Reference Manual explains advanced features of the PSR-SX900/SX700. Please read the Owner’s Manual first, before reading this Reference Manual. -
Page 2: Table Of Contents
Turning Each Channel of the Style On/Off ………………….11 Style Playback Related Settings ……………………12 Adjusting the Tempo ……………………….13 Recording a Chord Sequence when Style Playback is stopped (Chord Looper) (PSR-SX900) …..14 Saving and Calling up Your Custom Chord Sequences (Chord Looper) (PSR-SX900) ………15 Creating/Editing Styles (Style Creator)………………….18 Voices Voice Part Setup Display……………………..32…
-
Page 3
Note that all display examples shown in this manual are in English. • Even though the example screens and illustrations pertain to the PSR-SX900, the usage is the same for the PSR-SX700. • The displays are taken from the PSR-SX900, and are in English. -
Page 4: Function List
For confirming the current Voice settings, and making Voice-related settings such Voice Part Setup as Effects. Determines which jack is used to output each part and each drum & percussion Line Out (PSR-SX900) instrument. Score For displaying the music notation (score) of the current MIDI Song.
-
Page 5
Determines the Touch Response of the keyboard and Joystick-related settings. For installing Expansion Packs for adding extra contents downloaded from the Expansion website or created on your own by using the Yamaha Expansion Manager, or restoring the pre-installed Expansion Contents. MIDI For making MIDI-related settings. -
Page 6: Styles
Setting…………………………..12 • Change Behavior ……………………….13 Adjusting the Tempo……………………….13 Recording a Chord Sequence when Style Playback is stopped (Chord Looper) (PSR-SX900) ….14 Saving and Calling up Your Custom Chord Sequences (Chord Looper) (PSR-SX900) ……15 • Memorizing the Recorded Chord Looper Data …………………15…
-
Page 7: Registering Files To The Favorite Tab
(File) to call up the “File Edit” window. Touch [Favorite] to call up the display for selecting the files. Select the files which you want to remove from the Favorite tab. Touch [Clear] to actually remove the files from the Favorite tab. PSR-SX900/SX700 Reference Manual…
-
Page 8: Changing The Chord Fingering Type
ACMP is turned on or the Left part is turned on. For information on which notes to press for each chord, refer to the Data List (Chord Types Recognized in the Fingered Mode) down- loadable from Yamaha Manual Library, or use the Chord Tutor function as described in the next section.
-
Page 9: Chord Types Recognized In The Fingered Mode
C7(b9) Seventh add flatted thirteenth [7(b13)] 1+3+5+b6+b7 C7(b13) Seventh sharp ninth [7(#9)] 1+#2+3+(5)+b7 C7(#9) Suspended fourth [sus4] 1+4+5 Csus4 One plus two plus five [sus2] 1+2+5 Csus2 cancel 1+b2+2 Cancel • Notes in parentheses can be omitted. PSR-SX900/SX700 Reference Manual…
-
Page 10: Using The Chord Tutor Function
• Although this function shows how to play a chord only in case of “Fingered,” the indication is useful also when a type other than “Single Finger” is selected. • Depending on the chord, some notes will be omitted. PSR-SX900/SX700 Reference Manual…
-
Page 11: Turning Each Channel Of The Style On/Off
Touch the instrument icon below the desired channel to call up the Voice Selection display, then select the desired Voice. NOTE (PSR-SX900) The Voice of the Audio part of the Audio Style cannot be changed. NOTE You can save the settings here to Registration Memory. For details, refer to the Owner’s Manual.
-
Page 12: Style Playback Related Settings
This conveniently resets Style playback control to normal, letting you release the keys and still have the Style play. In other words, if you release the keys more quickly than the time set here, the Synchro Stop function works. PSR-SX900/SX700 Reference Manual…
-
Page 13: Adjusting The Tempo
Data dial, the [DEC]/[INC] buttons or the TEMPO [-]/[+] buttons. NOTE (PSR-SX900) When you select an Audio Style (page 6), the upper limit of the tempo will be shown below the tempo value in this way: Audio: ** max. The Audio part is muted if the tempo is over the upper limit.
-
Page 14: Recording A Chord Sequence When Style Playback Is Stopped (Chord Looper) (Psr-Sx900)
You can also stop recording by pressing the CHORD LOOPER [REC/STOP] button. In this case, only the recording stops, while Style playback will continue. NOTICE The latest chord sequence data you recorded is maintained unless you turn the power off or select a Chord Looper Memory number which contains data. If you want to save the data, see page PSR-SX900/SX700 Reference Manual…
-
Page 15: Saving And Calling Up Your Custom Chord Sequences (Chord Looper) (Psr-Sx900)
The data is memorized, and the content of the memorized data is shown on the corresponding area. NOTICE If you turn the power off at this point, the Memory will be cleared. To save the memorized data as a file, see pages and 17. PSR-SX900/SX700 Reference Manual…
-
Page 16: Saving The Recorded Data As A Bank File
Bank. Touch the Chord Looper Memory number you wish to use first. NOTE Touch [On/Off] to turn it on here, if you want to start automatic Style playback from the beginning of your performance. NEXT PAGE PSR-SX900/SX700 Reference Manual…
-
Page 17: Editing The Chord Looper Bank (Export, Import, Clear)
The file name is entered automatically, but you can rename it when saving. As necessary, touch (Save) to save the edited Chord Looper Bank as a new file. NOTICE If you select a Chord Looper Bank file before saving the edited data, the data will be lost. PSR-SX900/SX700 Reference Manual…
-
Page 18: Creating/Editing Styles (Style Creator)
Phrase 2 Recording or copying from another Style (PSR-SX900) Limitations on the Audio part: • If you select an Audio Style as starting data, the Audio part will be used as is. The Audio part cannot be deleted, edited or created from scratch.
-
Page 19: Basic Procedure For Creating A Style
[Execute] to actually enter the changes. NOTE (PSR-SX900) If an Audio Style is selected as starting data, changing the pattern length deletes the corresponding Audio part. • Set the overall parameters such as “Tempo” and “Time Signature.” The settings here commonly applies to all Sections.
-
Page 20: Realtime Recording
Recording Rhythm Channels 1–2 (PSR-SX900) If you select an Audio Style as starting data: Playback of the Audio part can be turned on or off, but it cannot be edited or deleted. Note that the rhythm pattern of this part will be used in the new Style you intend to create. If you want to create a rhythm phrase in addition to the Audio part, follow the steps below.
-
Page 21
NOTE (PSR-SX900) If you selected an Audio Style as starting data, turn the Audio part on or off by touching the [Audio] channel. As soon as loop playback returns to the first beat in the first measure, start playing the rhythm pattern to be recorded. -
Page 22
Root and Chord type. Keep in mind that when you change the Source Chord from the default CM7 to another chord, the chord notes and recommended notes will also change. For details, refer to page NEXT PAGE PSR-SX900/SX700 Reference Manual… -
Page 23: Step Recording
System Exclusive data can be edited (delete, copy or move). NOTE (PSR-SX900) If you select an Audio Style as starting data, the Audio part will be used as is. The Audio part cannot be deleted, edited or created from scratch. PSR-SX900/SX700 Reference Manual…
-
Page 24: Assembly-Assigning The Source Pattern To Each Channel
NOTE • (PSR-SX900) An Audio part cannot be copied from another Style. If you want to use a specific Audio part, make sure to select the corresponding Audio Style before call- ing up the Style Creator display.
-
Page 25
This function lets you remove specific events from the selected channel. NOTICE The edited Style will be lost if you change to another Style or turn off the power to the instrument without carrying out the Save operation (step 7 page 19). PSR-SX900/SX700 Reference Manual… -
Page 26: Sff Edit-Making Style File Format Settings
The parameters shown above can be set in the “SFF Edit” display. NOTE (PSR-SX900) If you select an Audio Style as starting data, the Audio part will be used as is. The Audio part cannot be deleted, edited or created from scratch. PSR-SX900/SX700 Reference Manual…
-
Page 27
When NTR is set to Root Fixed, the transposition table used does not do any note conversion. When NTR is set to Root Trans, the table used only converts the notes by maintaining the pitch relationship between notes. PSR-SX900/SX700 Reference Manual… -
Page 28
Since the Rhythm channels should not be affected by Chord change, make sure to make the following settings. • NTR = Root Fixed • NTT = Bypass • NTT Bass = Off With the above settings, the “Source Root” and “Source Chord” parameters are changed to “Play Root” and “Play Chord,” respectively. PSR-SX900/SX700 Reference Manual… -
Page 29
NOTICE The edited Style will be lost if you change to another Style or turn off the power to the instrument without carrying out the Save operation (step 7 page 19). PSR-SX900/SX700 Reference Manual… -
Page 30: Editing The Rhythm Part Of A Style (Drum Setup)
Determines how quickly the sound reaches its sustain level (a slightly lower level than max- imum). The higher the value, the quicker the decay. Decay 2 Determines how quickly the sound decays to silence after the key is released. The higher the value, the quicker the decay. NEXT PAGE PSR-SX900/SX700 Reference Manual…
-
Page 31
Press the [EXIT] button to close the “Drum Setup” window. NOTICE The edited Style will be lost if you change to another Style or turn off the power to the instrument with- out carrying out the Save opera- tion (step 7 on page 19). PSR-SX900/SX700 Reference Manual… -
Page 32: Voices
The Voice Part Setup display is called up by pressing via [MENU] [Voice Part Setup], and provides easy-to- understand indication of the current settings of each keyboard part, and lets you make important settings for the Voices, including EQ and effects. PSR-SX900/SX700 Reference Manual…
-
Page 33
If you want to store the settings on the Voice Part Setup display, use the Registration Memory. Press the [MEMORY] button in the REGISTRATION MEMORY section, then checkmark “Voice” and press one of the REGISTRATION MEMORY [1]–[8] buttons to register the Voice settings. PSR-SX900/SX700 Reference Manual… -
Page 34: Voice Selection Display-Related Settings
The numbers displayed here start from “1.” Accordingly the actual MIDI program change numbers are one lower, since that number system starts from “0.” NOTE The [Voice Edit], [Mixer] and [Voice Setting] menus are the same as those in the Menu display called up via the [MENU] button. PSR-SX900/SX700 Reference Manual…
-
Page 35: Voice Types (Characteristics)
(Up) at the bottom right of the Voice Selection display (when Preset is selected), and then select page 2. This folder con- tains previous Yamaha keyboards’ Voices (such as the PSR-S series) for data compatibility with other models. PSR-SX900/SX700 Reference Manual…
-
Page 36: Registering Files To The Favorite Tab
Selects the percussion instrument for the sound triggered when the [RESET/TAP TEMPO] button is pressed. Style Section Reset Determines whether “reset” the playback position of the Style section when tapping the [RESET/ TAP TEMPO] button during playback of the Style. PSR-SX900/SX700 Reference Manual…
-
Page 37: Keyboard/Joystick-Related Settings
• Hard 2: Requires strong playing to produce high volume. Best for players with a heavy touch. Fixed Velocity Determines the fixed volume level when the Touch Response is set to off. The volume of the key- board parts without checkmarks stays fixed regardless of your playing strength. PSR-SX900/SX700 Reference Manual…
-
Page 38: Making The Joystick Settings
Pitch Bend Range Determines the pitch bend range for each keyboard part which is affected by moving the joystick in a horizontal direction. The range is from “0” to “12” with each step corresponding to one semitone. PSR-SX900/SX700 Reference Manual…
-
Page 39: Keyboard Part-Related Settings (Voice Setting)
Turns the Arpeggio Hold function on or off. When this is set to “On”, turning the [HARMONY/ ARPEGGIO] button on makes Arpeggio playback continue even after the note has been released. To stop playback, press the [HARMONY/ARPEGGIO] button again. PSR-SX900/SX700 Reference Manual…
-
Page 40: Transposing The Pitch In Semitones
You can also transpose the pitch by using the TRANSPOSE [-]/[+] buttons. NOTE The pitch of an Audio Song is adjusted via the Pitch Shift function. Refer to the Owner’s Manual. NOTE Transpose is not applied to the Drum Kits and SFX Kits Voice. PSR-SX900/SX700 Reference Manual…
-
Page 41: Fine Tuning The Pitch Of The Entire Instrument (Master Tune)
Fine Tuning the Pitch of the Entire Instrument (Master Tune) You can fine-tune the pitch of the entire instrument in 0.2 Hz steps—useful when you play the PSR-SX900/SX700 along with other instruments or CD music. Note that the Tune function does not affect the Drum Kit or SFX Kit Voices and Audio Songs.
-
Page 42: Selecting Or Creating A Temperament From The Preset Types (Main Scale)
If you want to store the Scale Tune (Main Scale) settings, use the Registration Memory. Press the [MEMORY] button in the REGISTRATION MEMORY section, then checkmark “Scale Tune” and press one of the REGISTRATION MEMORY [1]–[8] buttons to register the Scale Tune settings. PSR-SX900/SX700 Reference Manual…
-
Page 43: Creating And Using A Temperament Temporarily (Sub Scale)
You can enable/disable the Sub Scale setting and make the Sub Scale setting quickly, using the function “Scale Tune Quick Setting,” which can be assigned to the assign- able buttons or foot pedals. For details, see page 116. PSR-SX900/SX700 Reference Manual…
-
Page 44: Making Detailed Settings For Harmony/Arpeggio
Voice Edit display (page 47), the volume does not change. Speed This parameter is only available when the “Echo” category (Echo, Tremolo, or Trill) is selected. It determines the speed of the Echo, Tremolo, and Trill effects. NEXT PAGE PSR-SX900/SX700 Reference Manual…
-
Page 45
(above the set value). NOTE The settings for the Arpeggio Quantize function and the Arpeggio Hold function can be made on the display called up via [MENU] [Voice Setting] [Arpeggio] (page 39). PSR-SX900/SX700 Reference Manual… -
Page 46: Editing Voices (Voice Edit)
Voice Edit display. Although usually these settings are automatically called up carry out the Save operation. when a Voice is selected, you can also disable this feature by making appropriate set- tings in the “Voice Set Filter” display. Refer to page 39, for details. PSR-SX900/SX700 Reference Manual…
-
Page 47: Editable Parameters In The Voice Edit Display
Determines the portamento time (pitch transition time) when the edited Voice is set to Time “Mono” above. NOTE Portamento is a function that creates a smooth transition in pitch from the first note played on the keyboard to the next. PSR-SX900/SX700 Reference Manual…
-
Page 48
Cutoff (pitch) “passed” by the filter. range Resonance Determines the emphasis given to the cutoff fre- Volume quency (resonance), set in Cutoff above (see dia- Resonance gram). Higher values result in a more pronounced effect. Frequency (pitch) PSR-SX900/SX700 Reference Manual… -
Page 49
106) for details. Depth Adjusts the Insertion Effect depth. Reverb Depth Adjusts the Reverb depth. Chorus Depth Adjusts the Chorus depth. Determines the Frequency and Gain of the EQ bands. For information about EQ, refer to page 103. PSR-SX900/SX700 Reference Manual… -
Page 50: Editing Organ Flutes Voices (Voice Edit)
Affects both the attack and release (page 49) portion of the sound, increasing or decreasing the response time of the initial swell and release, based on the Footage controls. The higher the value, the slower the swell and release. NEXT PAGE PSR-SX900/SX700 Reference Manual…
-
Page 51
Or, press one of the PART SELECT but- tons to select the part to which the desired Voice is assigned, confirm the Voice name at the top of the Voice Edit display, make the edits as desired, and then carry out the Save operation. PSR-SX900/SX700 Reference Manual… -
Page 52: Multi Pads
If you want to create a new Multi Pad in an empty new Bank, this step is unnecessary. Call up the operation display via [MENU] [M.Pad Creator] [MIDI Multi Pad Record- ing]. 10 11 NEXT PAGE PSR-SX900/SX700 Reference Manual…
-
Page 53
Pad data as a Bank containing a set of four Pads. The edited Multi Pad data will be lost if you select another Multi Pad Bank or turn off the power to the instrument without carrying out the Save operation. PSR-SX900/SX700 Reference Manual… -
Page 54: Creating A Multi Pad With Audio Files (Multi Pad Creator-Audio Link Multi Pad)
If an Audio Link Multi Pad has been selected when you call up the Audio Link Multi Pad display, the links made for the selected Pad appear. In order to create a new Pad, make sure to touch [New]. Otherwise, you are simply re-selecting the link in the selected Pad. Touch to select the desired Pad. The Audio File Selection display appears. NEXT PAGE PSR-SX900/SX700 Reference Manual…
-
Page 55: Playing The Audio Link Multi Pads
Pad, the Pad already in playback will not stop. • Off: Only one Pad will be played back at once. Playback is exclusive, so if you start playback of another Pad, the Pad already in playback will stop. PSR-SX900/SX700 Reference Manual…
-
Page 56: Editing Multi Pads
Press the [EXIT] button to call up the confirmation window, touch [Save] to call up the User drive, and then touch [Save here] to carry out the Save operation. For details, refer to “Basic Operations” in the Owner’s Manual. PSR-SX900/SX700 Reference Manual…
-
Page 57: Song Playback
Touch the desired Song names to add the selected Song(s) to the Song List. For selecting from Audio Songs, touch [Audio]. For selecting from MIDI Songs, touch [MIDI]. If you want to add all Songs in the selected folder, touch [Select All]. NEXT PAGE PSR-SX900/SX700 Reference Manual…
-
Page 58: Using Repeat Playback Mode
(All Repeat): All Songs in the selected Song List play back repeatedly. (Single Repeat): Only the selected Song plays back repeatedly. • Turning (Shuffle) on shuffles the order of the Songs in the selected Song List. Turning it off resets to the original order. PSR-SX900/SX700 Reference Manual…
-
Page 59: Editing Music Notation (Score) Settings
Turns playback on or off for the Right Hand Part, to which you can assign the desired channel on the Song Setting display (page 66). Guide Turns the Guide function on or off. For details, refer to page PSR-SX900/SX700 Reference Manual…
-
Page 60: View Setting
The root note is indicated as Do. For example, in the key of G major the root note of “Sol” would be indicated as “Do.” As with “Fixed Do,” the indication differs depending on the selected language. PSR-SX900/SX700 Reference Manual…
-
Page 61: Displaying Lyrics And Setting Up The Display
2) Lyrics in the MP3 file with the LYRICSBEGIN tag. 3) Lyrics in the MP3 file with the SLT/SYLT tag. 4) Lyrics in the MP3 file with the ULT/USLT tag. 5) Text file (*.txt) with the same name of the MP3 file in the same folder. PSR-SX900/SX700 Reference Manual…
-
Page 62: Displaying Text And Setting Up The Display
NOTE If the text is garbled or unreadable, you can probably remedy this by changing the System Language setting on the display called up via [MENU] [Utility] [System]. PSR-SX900/SX700 Reference Manual…
-
Page 63: Using The Auto Accompaniment Features With Midi Song Playback
(page 60) allows you to see the chord information. NOTE When the Song playback is stopped, Style playback is also stopped at the same The Style Retrigger function (page 119) time. cannot be used during Song playback. PSR-SX900/SX700 Reference Manual…
-
Page 64: Turning Each Channel Of A Midi Song On/Off
You can also turn the channels on/off on the Mixer display. To change the Voice for each channel: Touch the instrument icon below the desired channel to call up the Voice Selection display, and then select the desired Voice. PSR-SX900/SX700 Reference Manual…
-
Page 65: Song Playback Related Settings
Even though the PSR-SX900/SX700 does not have these lamps, you can use the same function by following the indications in the displayed notation with the Song Score function.
-
Page 66: Part Ch
Determines whether or not playback of a Style stops when MIDI Song playback is stopped. Multi Pad Synchro Stop Determines whether or not the repeat playback of a Multi Pad stops when MIDI Song playback is stopped. PSR-SX900/SX700 Reference Manual…
-
Page 67: Midi Song Recording/Editing
Chord 2 Step Recording: Channel 14 After inputting the Chord change/Section change events, touch [Expand] to actually Channel 15 Phrase 1 record the note data to MIDI channels 9–16. Channel 16 Phrase 2 System Exclusive Lyrics PSR-SX900/SX700 Reference Manual…
-
Page 68
• Entering the Recording mode resets the MIDI Song selection in the Song Playback display and a MIDI Song cannot be selected. • The Style Retrigger function (page 119) cannot be used when you are overdubbing to existing data. PSR-SX900/SX700 Reference Manual… -
Page 69: Recording Each Channel Individually (Realtime Recording)
4, then press the [EXIT] button to exit from the Recording mode. If you want to turn the other channels on or off while recording, touch the channel number of the desired channel. NEXT PAGE PSR-SX900/SX700 Reference Manual…
-
Page 70
Record your performance to another Channel by repeating steps 3–6. Touch (Save) to save the recorded performance. NOTICE The recorded Song will be lost if you change to another Song or you turn the power off without car- rying out the Save operation. PSR-SX900/SX700 Reference Manual… -
Page 71: Re-Recording A Specific Section-Punch In/Out (Realtime Recording)
Pedal Punch In/Out function is set to “On.” NOTE Pedal Punch In/Out operation may be reversed depending on the particular pedal you’ve connected to the instrument. To remedy this, try changing the pedal polarity (page 111). NEXT PAGE PSR-SX900/SX700 Reference Manual…
-
Page 72
Punch In At=003 Punch Out At=006 Previously recorded data Newly recorded data Deleted data *1 To avoid overwriting measures 1–2, start recording from measure 3. *2 To stop recording, touch [] (Rec) at the end of measure 5. PSR-SX900/SX700 Reference Manual… -
Page 73: Recording Panel Setups To A Song
Touch [Execute] to record the data, and then touch [Close]. Touch (Save) to carry out the Save operation. NOTICE The edited Song data will be lost if you select another Song or turn off the power to the instrument without carrying out the Save operation. PSR-SX900/SX700 Reference Manual…
-
Page 74: Editing Channel Events Of Existing Song Data
The Undo function only has one level; only the previous operation can be undone. Touch (Save) to carry out the Save operation. NOTICE The edited Song data will be lost if you select another Song or turn the power to the instrument off without carrying out the Save operation. PSR-SX900/SX700 Reference Manual…
-
Page 75
You can delete the data of the specified channel in the Song. Touch [Delete] and turn it on for the desired channel whose data you wish to delete, and then touch [Execute] to actually delete the data. PSR-SX900/SX700 Reference Manual… -
Page 76
NOTE If you want to listen to the data as currently edited, play it back before touching [Execute]. Touching [Execute] transposes the pitch, and also resets the value to 0 allowing you to further transpose, if necessary. PSR-SX900/SX700 Reference Manual… -
Page 77: Step Recording/Editing Songs (Step Edit)
Rec] then refer to page Touch (Save) to save the created Song. NOTICE The created Song data will be lost if you select another Song or turn off the power to the instrument without carrying out the Save operation. PSR-SX900/SX700 Reference Manual…
-
Page 78
Select one of three types, then select (turn on) one of the note indica- tions with which the next note is input. If you touch the selected note indication (which is turned on) again, a rest will be input with the corresponding length. Delete Deletes the selected data. PSR-SX900/SX700 Reference Manual… -
Page 79
Enter the next notes with staccato. Touch [Length] to select “40% (Staccato).” Touch the quarter-note length ( ) to turn it on. Play the keys E3 and F3 in order. The first measure has been completed. NEXT PAGE PSR-SX900/SX700 Reference Manual… -
Page 80
While holding the keys G3 and C4, touch half-note ( ). After touching half-note ( ), release the keys. The second measure has been completed. Touch [] (Stop) to return to the top of the Song, then listen to the newly entered Song by touching [>/o] (Play/Pause). PSR-SX900/SX700 Reference Manual… -
Page 81
77. With [Step Rec] turned on at the bottom left of the display, you can input the Chord/Section Change events for Style playback one by one. NOTE (PSR-SX900) The Audio part of an Audio Style cannot be recorded. Control Names and Functions Event List Indicates events such as Chord and Section changes which have been input. -
Page 82
MIDI Multi Recording display. Accordingly, make sure to execute the Expand function after you fin- ish inputting. If you have not finished inputting, save the Song to maintain the recorded events then continue inputting additional events as desired in the future. PSR-SX900/SX700 Reference Manual… -
Page 83
Note that the keyboard of this instrument does not feature Aftertouch. When the Editing Target is set to “SysEx”: ScBar (Score Start Determines the top measure number as the starting point of the Song data. Bar) PSR-SX900/SX700 Reference Manual… -
Page 84
After turning this on, use the Cursor buttons (u) on the display to select multiple events. Cut/Copy/Paste Use these when you want to copy or move the selected events. Insert Adds a new event. Delete Deletes the selected events. Cancel Cancels editing and restores the original value. PSR-SX900/SX700 Reference Manual… -
Page 85
However, with sequence software on a computer, you can create new Markers and assign appropriate names to them. By naming Markers in this way, you can easily distinguish between Loop End Markers and Jump Markers in the Event List. PSR-SX900/SX700 Reference Manual… -
Page 86: Registration Memory
Refer to the Data List (Parameter Chart) on the website for details on which parameters belong to the Freeze group. Set the Registration Freeze to “On.” NOTE The Registration Freeze function can also be turned on/off by pressing the [FREEZE] button. PSR-SX900/SX700 Reference Manual…
-
Page 87: Calling Up Registration Memory Numbers In Order (Registration Sequence)
Moves the cursor. NOTE If you want to move the cursor directly to an already entered number, touch the desired number. Replace Replaces the number of the cursor location with the currently selected Registration Memory number. NEXT PAGE PSR-SX900/SX700 Reference Manual…
-
Page 88
(Save) to call up the File Selection display, then save NOTICE the sequence program as a Registration Memory Bank file. Settings in the Registration Sequence display will be lost if you select another Registration Bank without carrying out the Save operation. PSR-SX900/SX700 Reference Manual… -
Page 89: Searching For A Registration Memory Bank File
Select the desired Registration Memory Bank file from the search result. Touching [OK] closes the result display and calls up the selected Bank from the result. Touching [Cancel] closes the result display and returns to the previously selected Bank. PSR-SX900/SX700 Reference Manual…
-
Page 90
If you have already added any tags to another Registration Memory Bank file, existing tags appear in the list, and can be selected by entering checkmarks. It may take some time for the list to be shown. Touch (Save) to register the tag information to the Registration Memory Bank file. PSR-SX900/SX700 Reference Manual… -
Page 91: Playlist
Importing Music Finder Records to the Playlist By importing Music Finder Records used on previous Yamaha keyboards (such as the PSR-S975/S775), you can use the Records on the Playlist of the PSR-SX900/SX700, just like using the Music Finder function on those other instruments.
-
Page 92
Music Finder data. Searching for Records Since Music Finder data is saved to Registration Memory, you can search for Records on the Registration Bank Selection display. The keyword and genre of the Music Finder are saved as tag information. PSR-SX900/SX700 Reference Manual… -
Page 93: Microphone
Turns the microphone/guitar sound on or off. When set to On, the microphone/guitar sound will be input On/Off to the instrument. NOTE (PSR-SX900) The setting here is equivalent to that in the Vocal Harmony display (page 96). Vocal/Talk/ When you sing into the microphone for your performance, set this to “Vocal.” When you talk normally or Guitar Switch need to make announcements between songs of your performance, set this to “Talk.”…
-
Page 94
Adjusts the input volume of the microphone/guitar sound. The input level is shown at the right. Adjustment NOTE (PSR-SX900) The setting here when “Vocal” is selected is equivalent to that in the Vocal Harmony display (page 96). 3 Band EQ EQ (Equalizer) is a processor that divides the frequency spectrum into multiple bands which can be boosted or cut as required to tailor the overall frequency response. -
Page 95
If you want to save the microphone/guitar settings to a USB flash drive, save as a User Effect file. To do this, on the display called up via [MENU] [Utility] [Factory Reset/Backup] page 2/2, touch [Save] of “User Effect” to carry out the Save operation (page 133). PSR-SX900/SX700 Reference Manual… -
Page 96: Editing The Vocal Harmony Type (Vocal Harmony) (Psr-Sx900)
Editing the Vocal Harmony Type (Vocal Harmony) (PSR-SX900) By editing the parameters of the preset Vocal Harmony type, you can create your original Vocal Harmony type. The operation display can be called up via [MENU] [Vocal Harmony]. Touch the Vocal Harmony name to call up the Vocal Harmony Selection display.
-
Page 97
Raising this value increases the volume of the Vocal Harmony and decreases that of the lead vocal. When this is set to L<H63 (L: Lead Vocal, H: Vocal Harmony), only the Vocal Harmony is output; when it is set to L63>H, only the lead vocal is output. NEXT PAGE PSR-SX900/SX700 Reference Manual… -
Page 98
When the Harmony mode is set to “Vocoder” or “Vocoder-Mono” • Transpose Mode: Determines the amount by which the harmony parts are transposed. A setting of “0” results in no transposition, while the “Auto” setting results in automatic transposition. NEXT PAGE PSR-SX900/SX700 Reference Manual… -
Page 99
USB flash drive, save as a User Effect file. To do this, on the dis- play called up via [MENU] [Utility] [Factory Reset/Backup] page 2/2, touch [Save] of “User Effect” to carry out the Save operation (page 133). PSR-SX900/SX700 Reference Manual… -
Page 100: Editing The Synth Vocoder Types (Vocal Harmony) (Psr-Sx900)
Editing the Synth Vocoder Types (Vocal Harmony) (PSR-SX900) By editing the parameters of the preset Synth Vocoder type, you can create your original Synth Vocoder type. The operation display can be called up via [MENU] [Vocal Harmony]. Touch the Vocal Harmony name to call up the Vocal Harmony Selection display.
-
Page 101
USB flash drive, save as a User Effect file. To do this, on the dis- play called up via [MENU] [Utility] [Factory Reset/Backup] page 2/2, touch [Save] of “User Effect” to carry out the Save operation (page 133). PSR-SX900/SX700 Reference Manual… -
Page 102: Mixer
48) for each part. This can be used in combination with the “Cutoff” parameter to add further character to the sound. Cutoff Determines the brightness of the sound for each part by adjusting the cutoff frequency (page 48). PSR-SX900/SX700 Reference Manual…
-
Page 103: Editing Eq Parameters (Eq)
Master EQ cannot be applied to an Audio Song, the audio input via the AUX IN jack, or the metronome sound. Gain Bandwidth (also called “Shape” or “Q”) Frequency 8 bands (default) → 80Hz 250Hz 500Hz 630Hz 800Hz 1.0kHz 4.0kHz 8.0kHz PSR-SX900/SX700 Reference Manual…
-
Page 104
USB flash drive, save as a User Effect file. To do this, from the dis- play called up via [MENU] [Utility] [Factory Reset/Backup] page 2/2, touch [Save] of “User Effect” to carry out the Save operation (page 133). PSR-SX900/SX700 Reference Manual… -
Page 105: Editing Effect Parameters (Effect)
(page 107). • Insertion Effect 1–8 (PSR-SX900), 1–5 (PSR-SX700): These Effects are applied only to a specific part. For each of these Effects, select an Effect type specifically for the desired part (for example, Distortion, which would be applied only to the Guitar part).
-
Page 106: Editing And Saving The Effect Settings
Effect type will be shown here. Select the Effect Category and Type. On the PSR-SX900, you can adjust the parameter values using the controllers shown on the display. Touch [Detail] to call up the Effect Parameter display to make NOTE additional settings.
-
Page 107: Editing Effect Parameters (Chorus/Reverb)
“Master” tab is selected at the top of the Mixer display. Determines the stereo position of each part (channel). Volume Determines the level of each part or channel, giving you fine control over the balance of all the parts. PSR-SX900/SX700 Reference Manual…
-
Page 108: Editing Master Compressor Settings (Compressor)
It may be easier to hear the changes when used in combination with “Compression” and “Output.” Output Determines the output level. The indication “GR” shows the Gain Reduction (compressed level) while “Output” shows the output level accord- ing to the instrument sound in real time. NEXT PAGE PSR-SX900/SX700 Reference Manual…
-
Page 109
User Effect file. To do this, from the display called up via [MENU] [Utility] [Factory Reset/ Backup] page 2/2, touch [Save] of “User Effect” to carry out the Save oper- ation (page 133). PSR-SX900/SX700 Reference Manual… -
Page 110: Block Diagram
Part EQ Var. Style Rhythm 1 Part EQ Style Phrase 2 Part EQ Multi Pad Part EQ Audio Link Multi Pad Vocal Ins. 5 Setting Guitar Setting Talk Setting Audio Song Aux In Audio Wireless LAN Audio PSR-SX900/SX700 Reference Manual…
-
Page 111: Controller Function Settings
When you press one of the ASSIGNABLE buttons, the pop-up window displaying the assigned function status is shown. You can also set the pop-up window to be hidden. To do so, touch (Menu) on the Assignable display, and then set the “Popup Window” to Off. PSR-SX900/SX700 Reference Manual…
-
Page 112
Organ Flutes, and only some of the Super Articulation Voices, even if the function has been assigned to the Foot Pedals. Portamento Time* Controls the Portamento Time parameter of each keyboard part by using a foot controller. For details on Portamento Time, see page page PSR-SX900/SX700 Reference Manual… -
Page 113
Live Control. Chord Chord Looper On/ Same as the CHORD LOOPER [ON/OFF] button. Looper Off (PSR-SX900) Chord Looper Rec/ Same as the CHORD LOOPER [REC/STOP] button. Stop (PSR-SX900) PSR-SX900/SX700 Reference Manual… -
Page 114
Same as the MULTI PAD CONTROL [STOP] button. Song Song MIDI Play/ Same as the SONG MIDI [ ] (PLAY/PAUSE) button. Pause Song MIDI Previous Same as the SONG MIDI [ ] (PREV) button. PSR-SX900/SX700 Reference Manual… -
Page 115
Turns the Insertion Effects (page 105) on or off. Metronome On/Off Turns the metronome on or off. Tempo +/- Same as the TEMPO [+]/[-] buttons. Reset/Tap Tempo Same as the [RESET/TAP TEMPO] button. PSR-SX900/SX700 Reference Manual… -
Page 116
When you select the percussion instrument by pressing a key on the keyboard, the velocity with which you press the key determines the percussion volume. Voice Guide On/Off Turns the Voice Guide function on or off (page 131). No Assign No function is assigned. PSR-SX900/SX700 Reference Manual… -
Page 117: Editing The Assign Types Of The Live Control Knobs (Live Control)
If you want to reset the value of the function assigned to each knob individually, press the [ASSIGN] button or rotate the knob to call up the Live Control pop-up win- dow, and then touch [Reset] on the desired function indication. PSR-SX900/SX700 Reference Manual…
-
Page 118
Determines the range of the pitch change in octave for the selected keyboard parts. Pitch Bend Range Determines the pitch bend range (page 38) for the selected keyboard parts. Portamento Time Determines the portamento time (page 39) for the selected keyboard parts. PSR-SX900/SX700 Reference Manual… -
Page 119
Adjusts the Vocal Harmony Effect depth applied to the Lead note. For details, refer (PSR-SX900) to Effect “Lead” on page Overall Master Tempo Changes the tempo of the currently selected Style or Song. The available tempo range differs depending on the selected Style/Song. No Assign No function is assigned. PSR-SX900/SX700 Reference Manual… -
Page 120: Midi Settings
If you have already created an original MIDI template and saved it to User memory (in steps 2 and 3 below), you can also select that template from User memory. For details on the pre-programmed MIDI templates, see page 121. NEXT PAGE PSR-SX900/SX700 Reference Manual…
-
Page 121
This template lets you play/control the chord root in Style playback with a MIDI pedal unit. MIDI Pedal2 This template lets you play the bass part for Style playback by using a MIDI pedal unit. MIDI OFF No MIDI signals are sent or received. PSR-SX900/SX700 Reference Manual… -
Page 122: System-Midi System Settings
Determines whether MIDI chord exclusive data (Chord Detect: root and type) are transmitted Exclusive (On) or not (Off) from this instrument. Message Receive Determines whether MIDI chord exclusive data (Chord Detect: root and type) are recognized (On) or not (Off) by this instrument. PSR-SX900/SX700 Reference Manual…
-
Page 123: Transmit-Midi Transmit Channel Settings
The following MIDI messages can be set on the Transmit/Receive display. • Note (Note events) ……..page 83 • CC (Control Change) ……..page 83 • PC (Program Change) ……..page 83 • PB (Pitch Bend) ……….. page 83 • AT (After Touch)………. page 83 PSR-SX900/SX700 Reference Manual…
-
Page 124: Receive-Midi Receive Channel Settings
MIDI [OUT] terminal [USB TO HOST] terminal Wireless Wireless LAN Port handling USB1 USB2 Merge MIDI/USB1/WLAN USB2 MIDI/USB/WLAN 01–16 01–16 01–16 NOTE The USB wireless LAN adaptor (sold separately) may not be available depending on your area. PSR-SX900/SX700 Reference Manual…
-
Page 125: On Bass Note-Setting The Bass Note For Style Playback Via Midi
When several channels are simultaneously set to on, the chord type is detected from merged MIDI data received over the channels. Touch the desired channel number to enter the checkmark. Touch the same location again to remove the checkmark. PSR-SX900/SX700 Reference Manual…
-
Page 126: Network Settings
………………….. 128 Wireless LAN Settings By using a USB wireless LAN adaptor (sold separately), you can connect the PSR-SX900/SX700 with an iPhone/iPad via a wireless network. For general operating instructions, refer to the “Smart Device Connection Manual for iOS” on the website.
-
Page 127
Strong Weak When the PSR-SX900/SX700 is in infrastructure mode and the network is set, the wireless LAN is automatically re- connected only in the following cases. • When turning on the instrument • While the Wireless LAN display is shown •… -
Page 128: Making The Time Settings
Turns daylight-saving time on or off. Time When the PSR-SX900/SX700 is in infrastructure mode (in wireless LAN settings), the connection status is shown at the top of the display, the same as in the Wireless LAN display. PSR-SX900/SX700 Reference Manual…
-
Page 129: Utility
It also explains data reset functions and storage media control, such as disk formatting. The operation display can be called up via [MENU] [Utility]. Speaker/Connectivity (PSR-SX900), Speaker (PSR-SX700) Speaker Determines how the sound is output to the speaker of this instrument.
-
Page 130: Touch Screen/Display
The Format operation deletes any previously existing data. Make sure that the User drive or the USB flash drive you are formatting does not con- tain important data. Proceed with caution, especially when connecting multiple USB flash drives. PSR-SX900/SX700 Reference Manual…
-
Page 131: System
Sub2 on the Line Out display. To use Voice Guide, you need to download the Voice Guide (audio) file from the Yamaha website, and save it to USB flash drive, which you then connect to this instrument. For information on using Voice Guide, refer to the Voice Guide Tutorial Manual (simple text file).
-
Page 132: Factory Reset/Backup
On page 2/2, you can back up all data saved in the User drive (except Expansion Voices/Styles) and all settings of the instrument to a USB flash drive as a single file named “PSR-SX900.bup” or “PSR-SX700.bup.” Before calling up the display, you need to make all desired settings on the instrument.
-
Page 133
103) • User Master Compressor types (page 108) • (PSR-SX900) User Vocal Harmony/Synth Vocoder types (pages 96, 100) • User microphone settings (page Select the desired destination to save the Setup file, then touch [Save Here]. Assign the name if necessary, then touch [OK] to save the file. -
Page 134: Expansion Pack Related Operations
“Pack Installation file.” Only one Pack Installation file can be installed to the instrument at a time. If you want to install multiple Expansion Packs, bundle the packs together on your computer by using the “Yamaha Expansion Manager”…
-
Page 135: Saving The Instrument Info File To A Usb Flash Drive
Saving the Instrument Info File to a USB Flash Drive If you use the “Yamaha Expansion Manager” software to manage the Pack data, you may need to retrieve the Instrument Info file from the instrument as described below. For information on how to use the software, refer to the accompanying manual.
-
Page 136: Connections
Selecting the Output Destination of Each Sound (Line Out) (PSR-SX900)……. 136 Selecting the Output Destination of Each Sound (Line Out) (PSR-SX900) You can assign any desired part or drum/percussion instrument sound to any of the LINE OUT jacks, for independent output.
-
Page 137
This is automatically checked, when “Main” is checked. The selected part/drum instruments will be output from the AUX OUTPUT jacks. Additional information about a specific part As for the “Metronome” part, this includes not only the Metronome sound (page 36), but also the Touch Screen sound (page 130). PSR-SX900/SX700 Reference Manual… -
Page 138: Index
Keyboard……….37 Chord Detect ……..125 Play Root/Chord ……..27 Chord Fingering Type……. 8 Playback Setting (Song) ……65 Chord Looper (PSR-SX900)….. 14, 15 Playback Setting (Style) ……12 Chord Match ……….. 53 Playlist ………… 91 Language ……….131 Chord Tutor ……….10 Poly………..
-
Page 139
Style Creator……….. 18 Style Section Reset …….. 36 Style Setting ……….. 12 Sub Scale ……… 41, 43 Synchro Stop Window ……12 Synth Vocoder (PSR-SX900) ….100 System……….131 System Effect ……. 105, 107 System Exclusive Message….122 Tag (Registration Memory)….. 90 Tap Tempo ……….
-
manualzz.com
- Entertainment & hobby
- Musical instruments
- Synthesizer
Инструкции и Руководства для Yamaha PSR-SX900.
Мы нашли 11
инструкции доступные для бесплатного скачивания:
Reference manual, Инструкция по применению, Инструкция по установке, Руководство пользователя, Техническая спецификация
Yamaha PSR-SX900/PSR-SX700 Owner’s Manual
Бренд:
Yamaha
Размер:
8 MB
Страниц:
136
Язык(и):
Чешский, Датский, Немецкий, Английский, Испанский, Финский, Французский, Венгерский, Индонезийский, Итальянский, Корейский, Голландский, no, Польский, Португальский, Румынский, Русский, Шведский, Турецкий, Вьетнамский, zh
Открыть в новой вкладке

Yamaha PSR-SX900/PSR-SX700 Reference Manual
Бренд:
Yamaha
Размер:
8 MB
Страниц:
139
Язык(и):
Чешский, Датский, Немецкий, Английский, Испанский, Финский, Французский, Венгерский, Индонезийский, Итальянский, Корейский, Голландский, no, Польский, Португальский, Румынский, Русский, Шведский, Турецкий, Вьетнамский, zh
Оглавление
-
6
Style Types (Characteristics)
-
7
Registering Files to the Favorite Tab
-
8
Changing the Chord Fingering Type
-
9
Chord Types Recognized in the Fingered Mode
-
10
Using the Chord Tutor Function
-
11
Turning Each Channel of the Style On/Off
-
12
Style Playback Related Settings
-
13
Adjusting the Tempo
-
14
Recording a Chord Sequence when Style Playback is stopped (Chord Looper) (PSR-SX900)
-
15
Saving and Calling up Your Custom Chord Sequences (Chord Looper) (PSR-SX900)
-
18
Creating/Editing Styles (Style Creator)
-
32
Voice Part Setup Display
-
34
Voice Selection Display-related Settings
-
35
Voice Types (Characteristics)
-
36
Registering Files to the Favorite Tab
-
36
Metronome Settings
-
37
Keyboard/Joystick-related Settings
-
39
Keyboard Part-related Settings (Voice Setting)
-
40
Transposing the Pitch in Semitones
-
41
Fine Tuning the Pitch of the Entire Instrument (Master Tune)
-
41
Selecting or Creating a Temperament (Scale Tune)
-
44
Making Detailed Settings for Harmony/Arpeggio
-
46
Editing Voices (Voice Edit)
-
50
Editing Organ Flutes Voices (Voice Edit)
-
52
Creating a Multi Pad via MIDI (Multi Pad Creator—MIDI Multi Pad Recording)
-
54
Creating a Multi Pad with Audio files (Multi Pad Creator—Audio Link Multi Pad)
-
56
Editing Multi Pads
-
57
Creating a Song List for Playback
-
58
Using Repeat Playback Mode
-
59
Editing Music Notation (Score) Settings
-
61
Displaying Lyrics and Setting Up the Display
-
62
Displaying Text and Setting Up the Display
-
63
Using the Auto Accompaniment Features with MIDI Song Playback
-
64
Turning Each Channel of a MIDI Song On/Off
-
65
Song Playback Related Settings
-
67
Overview of MIDI Song Recording
-
69
Recording Each Channel Individually (Realtime Recording)
-
71
Re-recording a Specific Section—Punch In/Out (Realtime Recording)
-
73
Recording Panel Setups to a Song
-
74
Editing Channel Events of Existing Song Data
-
77
Step Recording/Editing Songs (Step Edit)
-
86
Disabling Recall of Specific Items (Registration Freeze)
-
87
Calling Up Registration Memory Numbers in Order (Registration Sequence)
-
89
Searching for a Registration Memory Bank File
-
91
Importing Music Finder Records to the Playlist
-
93
Making the Microphone or Guitar Settings (Mic Setting)
-
96
Editing the Vocal Harmony Type (Vocal Harmony) (PSR-SX900)
-
100
Editing the Synth Vocoder Types (Vocal Harmony) (PSR-SX900)
-
102
Editing Filter Parameters (Filter)
-
103
Editing EQ Parameters (EQ)
-
105
Editing Effect Parameters (Effect)
-
107
Editing Effect Parameters (Chorus/Reverb)
-
107
Editing Pan/Volume Settings (Pan/Volume)
-
108
Editing Master Compressor Settings (Compressor)
-
110
Block Diagram
-
111
Assigning Specific Functions to the Pedals and Panel Buttons (Assignable)
-
117
Editing the Assign Types of the Live Control Knobs (Live Control)
-
120
Basic Procedure for MIDI Settings
-
122
System—MIDI System Settings
-
123
Transmit—MIDI Transmit Channel Settings
-
124
Receive—MIDI Receive Channel Settings
-
125
On Bass Note—Setting the Bass Note for Style Playback via MIDI
-
125
Chord Detect—Settings for Chords used in Style Playback via MIDI
-
126
Wireless LAN Settings
-
128
Making the Time Settings
-
129
Speaker/Connectivity (PSR-SX900), Speaker (PSR-SX700)
-
130
Touch Screen/Display
-
130
Parameter Lock
-
130
Storage—Formatting the Drive
-
131
System
-
132
Factory Reset/Backup
-
134
Installing Expansion Pack Data from a USB Flash Drive
-
135
Saving the Instrument Info File to a USB Flash Drive
-
135
Restoring the Pre-installed Expansion Contents
-
136
Selecting the Output Destination of Each Sound (Line Out) (PSR-SX900)
Открыть в новой вкладке
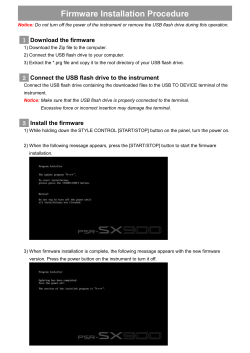
Yamaha PSR-SX900 firmware installation guide
Бренд:
Yamaha
Размер:
65 KB
Страниц:
2
Язык(и):
Чешский, Датский, Немецкий, Английский, Испанский, Финский, Французский, Венгерский, Индонезийский, Итальянский, Корейский, Голландский, no, Польский, Португальский, Румынский, Русский, Шведский, Турецкий, Вьетнамский, zh
Открыть в новой вкладке

Yamaha PSR-SX900/PSR-SX700 Data List
Бренд:
Yamaha
Размер:
1010 KB
Страниц:
122
Язык(и):
Чешский, Датский, Немецкий, Английский, Испанский, Финский, Французский, Венгерский, Индонезийский, Итальянский, Корейский, Голландский, no, Польский, Португальский, Румынский, Русский, Шведский, Турецкий, Вьетнамский, zh
Открыть в новой вкладке

Yamaha PSR-SX900/PSR-SX700 Pre-installed Expansion Contents List
Бренд:
Yamaha
Размер:
72 KB
Страниц:
3
Язык(и):
Чешский, Датский, Немецкий, Английский, Испанский, Финский, Французский, Венгерский, Итальянский, Корейский, Голландский, no, Польский, Португальский, Румынский, Русский, Шведский, Турецкий, zh
Открыть в новой вкладке
Yamaha PSR-SX900/PSR-SX700 Owner’s Manual
Бренд:
Yamaha
Категория:
Synthesizer
Размер:
8 MB
Страниц:
136
Язык(и):
Чешский, Датский, Немецкий, Английский, Испанский, Финский, Французский, Венгерский, Индонезийский, Итальянский, Корейский, Голландский, no, Польский, Португальский, Румынский, Русский, Шведский, Турецкий, Вьетнамский, zh
Открыть в новой вкладке
Yamaha PSR-SX900/PSR-SX700 Reference Manual
Бренд:
Yamaha
Категория:
Synthesizer
Размер:
8 MB
Страниц:
139
Язык(и):
Чешский, Датский, Немецкий, Английский, Испанский, Финский, Французский, Венгерский, Индонезийский, Итальянский, Корейский, Голландский, no, Польский, Португальский, Румынский, Русский, Шведский, Турецкий, Вьетнамский, zh
Открыть в новой вкладке


U.R.G., Pro Audio & Digital Musical Instrument Division, Yamaha Corporation
Printed in EU
704XXX.X-01
2007 Yamaha Corporation
LBB0
Yamaha Home Keyboards Home Page (English only)
http://music.yamaha.com/homekeyboard
Yamaha Manual Library
http://www.yamaha.co.jp/manual/
RU
км
д
йЗйСлнЗй ий
гъбйЗД
нЦгь
PSR-S900/S700
к м д й З й С л н З й и й г ъ б й З Д н Ц г ь
DIC 435
Уважаемые форумчане!
Мы стараемся сделать форум не только содержательным, но и удобным для поиска информации.
Давайте вместе будем содержать его в информационной чистоте и порядке!
Это не сложно, необходимо придерживаться лишь нескольких простых правил…
1. Перед тем, как что-то писать на форуме, сформулируйте свои мысли — посмотрите на заголовок темы, которую вы открыли, и если при этом ваши умозаключения не совпадают с названием темы — поищите наиболее подходящую тему или раздел.
2. Старайтесь группировать свои мысли в одно сообщение, не надо писать по одной фразе по принципу «лучше сорок раз по разу, чем один раз сорок раз». При этом, если у вас много мыслей или вопросов разного характера, не задавайте их в одной теме. Поищите для каждой отдельной мысли необходимую тему и напишите там. При этом НЕ ДУБЛИРУЙТЕ одно и тоже сообщение в разных темах!
3. Предварительно пролистайте форум хотя бы «О г л а в л е н и е», поищите там подходящие темы в разделах, и когда вы точно поймете, что подходящей темы или раздела на форуме нет, не бойтесь создать новую! При этом название темы должно бы лаконичным и отражать суть возникшего вопроса. При написании сообщений используйте пунктуацию, если с этим проблема — хотя бы разделяйте фразы абзацами. Пишите так, чтобы было понятно другим…
4. Если вы хотите выразить благодарность человеку, написав при этом что-то вроде «Спасибо тебе Вася за совет… сейчас буду изучать!», и не сообщая какой-либо полезной для других участников информации, воспользуйтесь кнопкой «СПАСИБО» внизу сообщения человека, который вам помог. Таким же образом вы можете выразить свою симпатию какому либо сообщению…
5. Итак, запоминаем некоторые важные моменты:
- – свои контактные данные и немного об себе — пишите в теме по контактам в «курилке»;
- – покупка-продажа частного характера и обсуждение интернет-торговли в своем разделе;
- – модели ваших синтезаторов и оборудования, их достоинства и недостатки обсуждаются в разделе «А какой синтезатор у вас…»;
- – ваше творчество, cover-версии и авторские произведения — в разделе «творчество»;
- – для стилей есть свой отдельный раздел:
- Спрашиваем или выкладываем стили — в темах по стилям (для разных синтезаторов есть свои темы). При этом первая часть (Part 1) темы по стилям для синтезаторов Yamaha уже содержит в себе богатый архив стилей и ссылок, откуда вы запросто можете пополнить свою коллекцию, спрашиваем интересующее вас во второй части темы (Part 2).
Для вопросов по созданию и редактированию стилей также существуют отдельные темы;
- – аналогично МИДИ-файлы и их коллекции — в теме по миди;
- – пакеты расширений, тембра, мультипэды, ОТС, совместная работа синтезатора и компьютера, поиск нот, азы музыкальной грамоты и проч… — для этого всего также имеются свои разделы и соответствующие темы;
- – файлы небольшого объема (до 200 кб) со стилями и миди, полезные информационные картинки, а так же небольшие архивы, вы можете смело прикреплять к сообщениям (имя файла должно быть набрано латиницей)…;
- – более весящие файлы (более 200 кб) mp3, wav, архивы, коллекции, картинки не несущие полезной информации и уже имеющиеся в интернете, аудио-видео…, размещаем на сторонних хранилищах (яндеск-диск, ютуб, savepic.su), а здесь даем на них ссылки;
- – подписывайте свои ссылки в сообщении, указав что вы там разместили;
- При этом вы должны понимать следующее — УДАЛИВ из своего хранилища ФАЙЛ — его ССЫЛКА становится БЕСПОЛЕЗНОЙ и скорее всего, ваше сообщение будет полностью нами тоже удалено со страниц форума! Ни в коем случае не стоит поступать подобным образом!!! Старайтесь сохранять материалы, ссылки на которые вы публикуете на форуме;
- – свои аватарки перед загрузкой предварительно делайте небольшими по размеру;
- – избегайте «оверквотинга» (избыточного цитирования) — не надо городить трехэтажные цитаты, со полными сообщениями и вложениями. Также не надо цитировать, если ваш ответ следует прямо за вопросом. Научитесь редактировать чужие цитаты, оставляя только краткую суть цитаты. Используйте цитирование только для связки сообщений, которые разорваны логически;
- – если вы хотите уточнить-спросить-предложить что-либо «не для всех», а кому-то лично, не стоит писать об этом в общей теме, вроде «обращайся ко мне» и давать свои контакты. Там где больше двух — говорят вслух. Или делитесь со всеми этой информацией или пишите в личные сообщения (ЛС) «тет-а-тет»;
- – также, если ваши мысли ушли далеко от тематики форума и вы хотите ими поделиться — «перекурите» в «курилке»
 хоть Минздрав и предупреждает — наша «курилка» вашему здоровью не повредит! У нас также есть группа «вконтакте», интерактивный чат на чатоводе и скайп-группа — там у нас бывает многолюдно!
6. Не ленитесь поискать нужную вам информацию. Все зависит от вашего желания и стремления. Если у вас нет оных, вам уже никто не поможет! Перед тем как задать вопрос по работе вашего инструмента, изучите «Руководство пользователя» хотя бы первых три-пять страниц — это будет огромным прорывом к познанию неизведанного!  Используйте встроенный поиск на сайте!
7. Не ругайтесь между собой и нецензурно, не выясняйте на страницах форума отношений — в крайнем случае используйте для этого личные сообщения, да и… Лучше вообще не ругайтесь — мы не для этого здесь собрались. Да и нервные клетки не восстанавливаются!
Высказывайте свое мнение в вежливой форме! Не нужно «с пеной у рта» доказывать свою правоту, пытаясь унизить несогласного с вами оппонента, тем более, что все мы, по своей человеческой природе, склонны к заблуждениям.
Администратор и Модератор — полноправные участники форума, и также могут иметь свою точку зрения на обсуждаемые на форуме темы!
8. Ознакомиться с некоторыми нюансами по работе с сайтом, внести какие-то предложения, пожелания, замечания, а так же, если вы вдруг обнаружили неточности или ошибки — пишите в «Раздел предложений» в соответствующие темы. Мы стараемся для вас и сделаем всё, что в наших силах. Так же, если есть необходимость что-то подправить в ваших сообщениях — обращайтесь к Администратору или Модератору. Злостные нарушители этих несложных «Правил» будут ограничены в действиях на форуме и сайте.
Уважайте себя и других, цените свое и чужое время,
оставайтесь логичными и человечными в своих поступках и действиях.
Будьте доброжелательны и вам ответят тем же!
Скрыть подробную информацию…
инструкцияYamaha PSR-SX900

FR
EN
English
Français
Owner’s Manual
Mode d’emploi
Digital Workstation
Clavier Arrangeur Professionnel
Thank you for purchasing this Yamaha Digital Workstation!
This electric keyboard for professional entertainers not only has a wide selection of Voices and versatile functions
but also gives you the potential of expanding content for the instrument.
We recommend that you read this manual carefully so that you can fully take advantage of the advanced and
convenient functions of the instrument. We also recommend that you keep this manual in a safe and handy place
for future reference.
Before using the instrument, be sure to read “PRECAUTIONS” on pages 5–6.
Merci d’avoir choisi ce Clavier Arrangeur Professionnel Yamaha !
Ce clavier électrique destiné aux professionnels dispose d’une large sélection de sonorités et de fonctions
polyvalentes et offre un potentiel considérable pour l’élargissement des contenus de l’instrument.
Nous vous conseillons de lire attentivement ce mode d’emploi afin de tirer pleinement profit des fonctions
avancées et très utiles de votre instrument. Nous vous recommandons également de garder ce manuel à portée
de main pour toute référence ultérieure.
Avant d’utiliser l’instrument, lisez attentivement la section « PRÉCAUTIONS D’USAGE » aux pages 5 et 6.

- Описание PSR-SX900
- Характеристики PSR-SX900
- Инструкции
- Отзывы PSR-SX900
- Похожие
- Аксессуары
Домашний синтезатор Yamaha PSR-SX900
» />
Цифровая рабочая станция Yamaha PSR-SX900
Поднимите свои выступления на совершенно новый уровень с помощью PSR-SX. Модель PSR-SX900 пришла на замену популярнейшей серии PSR-S — это новое поколение цифровой рабочей станции с невиданным ранее качеством звука, дизайном и удобством использования. Эти инструменты будут вдохновлять вас, позволят улучшить музыкальные навыки и принесут вам огромное удовольствие.
Характеристики:
- 1337 тембра, включая 252 тембра с суперартикуляцией Super Articulation и 24 тембра «органных флейт» Organ Flutes. 56 наборов ударных/спецэффектов.
- 525 стилей, включая 463 Pro стиля, 46 Session стилей, 10 DJ стилей и 6 Free Play стилей.
- Предустановленные пакеты расширений
- Эффекты Real Distortion и Real Reverb с интуитивным управлением
- 1 ГБ встроенной памяти для данных расширения
- 4 ГБ внутренней памяти
- Размер файлов MIDI-композиций: до 3 МБ на файл
- Джойстик, клавиатура FSB, выход на сабвуфер и динамики для создания широкого звукового поля позволят проводить впечатляющие живые выступления
- Интуитивно понятное и быстрое управление с помощью 7-дюймового цветного сенсорного дисплея и назначаемых функций
- Функция зацикливания аккордов
- Вход для микрофона/гитары, который можно использовать во время исполнения вокальных партий или в ходе совместных выступлений с другими исполнителями
- Список воспроизведения и регистрационная память для быстрой и простой настройки
- Система гармонизации вокала (Vocal Harmony) и функцией синтезирующего вокодера (Synth Vocoder)
- Запись аудио (WAV/MP3)
- Возможность добавления новых тембров и стилей с помощью программы Yamaha Expansion Manager
- 2 разъема USB TO DEVICE
- Возможность подключения внешнего дисплея
- Передача аудио по Bluetooth *доступность этой функции зависит от страны
Yamaha PSR-SX900 характеристики товара
| Производитель | Yamaha |
| Серия | PSR |
| Цвет | Черный |
| Количество клавиш | 61 клавиша (5 октав) |
| Размер клавиш | Полноразмерные |
| Жесткость клавиш | Полувзвешенная |
| Число октав | Пятиоктавная |
| Вход для микрофона | Да |
| Количество тембров | 1337 |
| Дисплей | Есть |
| MIDI разъем | MIDI IN/OUT |
| USB разъем | USB type A + B |
| Тип пианино | Сценические |
| Уровень владения | Профессиональный |
| Автоаккомпанемент | Да |
| Беспроводное соединение | Bluetooth |
| Рабочее расположение | Стационарное |
| Цвет клавиш | Белый |
| Разъем правой педали | Да |
| Страна | Индонезия |
Yamaha PSR-SX900 инструкция на русском языке
На этот товар еще нет инструкций
Отзывы на Yamaha PSR-SX900
На этот товар еще нет отзывов.
Похожие товары на Yamaha PSR-SX900

Домашний синтезатор СT-X5000
-
Количество клавиш
61 клавиша (5 октав) -
Размер клавиш
Полноразмерные -
Жесткость клавиш
Полувзвешенная -
Полифония
64 -
Количество тембров
800

Домашний синтезатор СT-X3000
-
Количество клавиш
61 клавиша (5 октав) -
Размер клавиш
Полноразмерные -
Жесткость клавиш
Невзвешенная -
Полифония
64 -
Количество тембров
800

Домашний синтезатор M331
-
Количество клавиш
61 клавиша (5 октав) -
Размер клавиш
Полноразмерные -
Жесткость клавиш
Невзвешенная -
Полифония
128 -
Количество тембров
633

Домашний синтезатор CT-X800
-
Количество клавиш
61 клавиша (5 октав) -
Размер клавиш
Полноразмерные -
Жесткость клавиш
Невзвешенная -
Полифония
48 -
Количество тембров
600

Домашний синтезатор M361
-
Количество клавиш
61 клавиша (5 октав) -
Размер клавиш
Полноразмерные -
Жесткость клавиш
Невзвешенная -
Полифония
128 -
Количество тембров
653

Домашний синтезатор CT-S200BK
-
Количество клавиш
61 клавиша (5 октав) -
Размер клавиш
Полноразмерные -
Жесткость клавиш
Невзвешенная -
Полифония
48 -
Количество тембров
400

Домашний синтезатор CT-S200RD
-
Количество клавиш
61 клавиша (5 октав) -
Размер клавиш
Полноразмерные -
Жесткость клавиш
Невзвешенная -
Полифония
48 -
Количество тембров
400
Аксессуары и сопутствующие товары для Yamaha PSR-SX900
Товары бренда Yamaha

Yamaha PSR-EW410
-
Количество клавиш
76 клавиш (6 октав) -
Размер клавиш
Полноразмерные -
Жесткость клавиш
Невзвешенная -
Полифония
48 -
Количество тембров
758

Yamaha PSR-S650
-
Количество клавиш
61 клавиша (5 октав) -
Полифония
64 -
Количество тембров
864

Yamaha PSR-E463
-
Количество клавиш
61 клавиша (5 октав) -
Размер клавиш
Полноразмерные -
Жесткость клавиш
Невзвешенная -
Полифония
48 -
Количество тембров
758
Ваш регион доставки
- Москва
- Волгоград
- Воронеж
- Екатеринбург
- Казань
- Краснодар
- Красноярск
- Нижний Новгород
- Новосибирск
- Омск
- Пермь
- Ростов-на-Дону
- Санкт-Петербург
- Самара
- Уфа
- Челябинск
- Абакан
- Алушта
- Альметьевск
- Анапа
- Ангарск
- Арзамас
- Армавир
- Архангельск
- Астрахань
- Ачинск
- Балаково
- Балашиха
- Барнаул
- Бахчисарай
- Белгород
- Бийск
- Биробиджан
- Благовещенск
- Братск
- Брянск
- Бузулук
- Великий Новгород
- Видное
- Владивосток
- Владикавказ
- Владимир
- Волгодонск
- Волжский
- Вологда
- Воскресенск
- Выборг
- Гатчина
- Геленджик
- Горно-Алтайск
- Грозный
- Джанкой
- Дзержинск
- Дмитров
- Долгопрудный
- Домодедово
- Дубна
- Евпатория
- Егорьевск
- Жуковский
- Зеленоград
- Златоуст
- Иваново
- Ижевск
- Иркутск
- Йошкар-Ола
- Калининград
- Калуга
- Кашира
- Кемерово
- Керчь
- Кингисепп
- Киров
- Клин
- Коломна
- Комсомольск-на-Амуре
- Королев
- Кострома
- Красногорск
- Курган
- Курск
- Кызыл
- Липецк
- Лобня
- Люберцы
- Магадан
- Магнитогорск
- Майкоп
- Махачкала
- Междуреченск
- Мурманск
- Мытищи
- Набережные Челны
- Надым
- Назрань
- Нальчик
- Наро-Фоминск
- Нерюнгри
- Нефтеюганск
- Нижневартовск
- Нижнекамск
- Нижний Тагил
- Новокузнецк
- Новороссийск
- Новый Уренгой
- Ногинск
- Норильск
- Ноябрьск
- Обнинск
- Одинцово
- Орел
- Оренбург
- Орехово-Зуево
- Орск
- Пенза
- Петрозаводск
- Петропавловск-Камчатский
- Подольск
- Прокопьевск
- Псков
- Пушкино
- Раменское
- Реутов
- Рубцовск
- Рыбинск
- Рязань
- Саки
- Салехард
- Саранск
- Саратов
- Севастополь
- Северодвинск
- Сергиев Посад
- Серпухов
- Симферополь
- Смоленск
- Солнечногорск
- Сочи
- Ставрополь
- Старый Оскол
- Стерлитамак
- Ступино
- Судак
- Сургут
- Сыктывкар
- Таганрог
- Тамбов
- Тверь
- Тольятти
- Томск
- Троицк
- Туапсе
- Тула
- Тюмень
- Улан-Удэ
- Ульяновск
- Уссурийск
- Усть-Илимск
- Усть-Кут
- Ухта
- Феодосия
- Фрязино
- Хабаровск
- Ханты-Мансийск
- Химки
- Чебоксары
- Череповец
- Черкесск
- Чехов
- Чита
- Щелково
- Электросталь
- Элиста
- Энгельс
- Южно-Сахалинск
- Якутск
- Ялта
- Ярославль