Инструкция и руководство для
Yamaha RX-V465  на русском на английском


125 страниц подробных инструкций и пользовательских руководств по эксплуатации
 10:46
10:46
Обзор AV ресиверов Yamaha RX-V381 и Yamaha RX-V481
 03:01
03:01
PROBANDO AMPLIFICADOR YAMAHA RX V465
 03:28
03:28
Yamaha RX-V465 Receiver Unboxing
 23:49
23:49
Yamaha RX-V467 review tested on JBL E80
 02:02
02:02
Yamaha RX-V465 5.1 HDMI Home Theater Surround Receiver
 02:31
02:31
probando teatro en casa yamaha rx-v465 (sin subwoofer)
 04:44
04:44
AV-ресивер YAMAHA RX-V475
 00:38
00:38
How to Factory Reset Yamaha RX-V465 5.1 HDMI Home Theater Surround Receiver
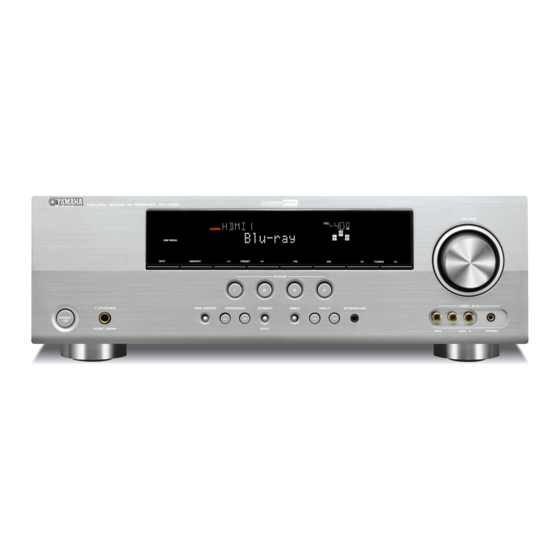
RX-V465
AV Receiver
OWNER’S MANUAL
F

English, Caution: read this before operating your unit, Caution-i
Страница 2
- Изображение
- Текст
Caution-i
En
1
To assure the finest performance, please read this manual
carefully. Keep it in a safe place for future reference.
2
Install this sound system in a well ventilated, cool, dry, clean
place – away from direct sunlight, heat sources, vibration,
dust, moisture, and/or cold. Allow ventilation space of at least
30 cm on the top, 20 cm on the left and right, and 20 cm on
the back of this unit.
3
Locate this unit away from other electrical appliances, motors,
or transformers to avoid humming sounds.
4
Do not expose this unit to sudden temperature changes from
cold to hot, and do not locate this unit in an environment with
high humidity (i.e. a room with a humidifier) to prevent
condensation inside this unit, which may cause an electrical
shock, fire, damage to this unit, and/or personal injury.
5
Avoid installing this unit where foreign objects may fall onto
this unit and/or this unit may be exposed to liquid dripping or
splashing. On the top of this unit, do not place:
–
Other components, as they may cause damage and/or
discoloration on the surface of this unit.
–
Burning objects (i.e. candles), as they may cause fire,
damage to this unit, and/or personal injury.
–
Containers with liquid in them, as they may fall and liquid
may cause electrical shock to the user and/or damage to
this unit.
6
Do not cover this unit with a newspaper, tablecloth, curtain,
etc. in order not to obstruct heat radiation. If the temperature
inside this unit rises, it may cause fire, damage to this unit,
and/or personal injury.
7
Do not plug in this unit to a wall outlet until all connections
are complete.
8
Do not operate this unit upside-down. It may overheat,
possibly causing damage.
9
Do not use force on switches, knobs and/or cords.
10 When disconnecting the power cable from the wall outlet,
grasp the plug; do not pull the cable.
11 Do not clean this unit with chemical solvents; this might
damage the finish. Use a clean, dry cloth.
12 Only voltage specified on this unit must be used. Using this
unit with a higher voltage than specified is dangerous and may
cause fire, damage to this unit, and/or personal injury. Yamaha
will not be held responsible for any damage resulting from use
of this unit with a voltage other than specified.
13 To prevent damage by lightning, keep the power cord and
outdoor antennas disconnected from a wall outlet or the unit
during a lightning storm.
14 Do not attempt to modify or fix this unit. Contact qualified
Yamaha service personnel when any service is needed. The
cabinet should never be opened for any reasons.
15 When not planning to use this unit for long periods of time
(i.e. vacation), disconnect the AC power plug from the wall
outlet.
16 Install this unit near the AC outlet and where the AC power
plug can be reached easily.
17 Be sure to read the “Troubleshooting” section on common
operating errors before concluding that this unit is faulty.
18 Before moving this unit, press ASTANDBY/ON to set this
unit in the standby mode, and disconnect the AC power plug
from the wall outlet.
19 VOLTAGE SELECTOR (Asia and General models only)
The VOLTAGE SELECTOR on the rear panel of this unit
must be set for your local main voltage BEFORE plugging
into the AC wall outlet. Voltages are:
…….AC 110/120/220/230–240 V, 50/60 Hz (General model)
…………………….. AC 220/230–240 V, 50/60 Hz (Asia model)
20 The batteries shall not be exposed to excessive heat such as
sunshine, fire or like.
21 Excessive sound pressure from earphones and headphones can
cause hearing loss.
22 When replacing the batteries, be sure to use batteries of the
same type. Danger of explosion may happen if batteries are
incorrectly replaced.
■ For U.K. customers
If the socket outlets in the home are not suitable for the
plug supplied with this appliance, it should be cut off and
an appropriate 3 pin plug fitted. For details, refer to the
instructions described below.
The plug severed from the mains lead must be destroyed, as a
plug with bared flexible cord is hazardous if engaged in a live
socket outlet.
■ Special Instructions for U.K. Model
Caution: Read this before operating your unit.
WARNING
TO REDUCE THE RISK OF FIRE OR ELECTRIC
SHOCK, DO NOT EXPOSE THIS UNIT TO RAIN
OR MOISTURE.
As long as this unit is connected to the AC wall outlet,
it is not disconnected from the AC power source even
if you turn off this unit by ASTANDBY/ON. In this
state, this unit is designed to consume a very small
quantity of power.
Note
IMPORTANT
THE WIRES IN MAINS LEAD ARE COLOURED IN
ACCORDANCE WITH THE FOLLOWING CODE:
Blue: NEUTRAL
Brown: LIVE
As the colours of the wires in the mains lead of this apparatus
may not correspond with the coloured markings identifying
the terminals in your plug, proceed as follows:
The wire which is coloured BLUE must be connected to the
terminal which is marked with the letter N or coloured
BLACK. The wire which is coloured BROWN must be
connected to the terminal which is marked with the letter L or
coloured RED.
Making sure that neither core is connected to the earth
terminal of the three pin plug.

En English INTR ODUCTION APPENDIX PRE P ARA T ION BA S IC O…
Страница 3
- Изображение
- Текст

2
En
INTRODUCTION
■ Built-in 5-channel power amplifier
• Minimum RMS output power (1 kHz, 0.9% THD, 6
Ω)
• FRONT L/R: 105 W + 105 W
• CENTER: 105 W
• SURROUND L/R: 105 W + 105 W
■ Speaker/Preout outputs
• Speaker jacks (5-channel), preout output jacks
(surround back L/R, subwoofer)
■ Input/Output terminals
Input terminals
• HDMI input x 4
• Audio/Visual input
[Audio] Digital input (coaxial) x 2, digital input
(optical) x 2, analog input x 2
[Video] Component video x 2, composite video x 4
• Audio input (analog) x 2
• Dock input x 1
• V-AUX input
[Audio] Analog x 1, stereo mini jack x 1
[Video] Composite video x 1
Output terminals
• Monitor output
[Audio/Video] HDMI x 1
[Video] Component video x 1, composite video x 1
• Audio/Visual output
[Audio] Analog x 1
[Video] Composite video x 1
• Audio output
Analog x 1
■ Proprietary Yamaha technology for the
creation of sound fields
• CINEMA DSP
• Compressed Music Enhancer mode
• Virtual CINEMA DSP
• SILENT CINEMA
■ Digital audio decoders
• Dolby TrueHD, Dolby Digital Plus
• DTS-HD Master Audio, DTS-HD High Resolution
Audio, DTS Express
• Dolby Digital, Dolby Digital EX
• DTS, DTS 96/24, DTS-ES Matrix 6.1,
DTS-ES Discrete 6.1
• Dolby Pro Logic, Dolby Pro Logic II,
Dolby Pro Logic IIx
• DTS NEO:6
• DSD
■ Sophisticated FM/AM tuner
• 40-station random and direct preset tuning
• Automatic preset tuning
• Radio Data System tuning
■ HDMI™
(High-Definition Multimedia Interface)
• HDMI interface for standard, enhanced or high-
definition video as well as multi-channel digital audio
– Automatic audio and video synchronization (lip sync)
information capability
– Deep Color video signal (30/36 bit) transmission
capability
– “x.v.Color” video signal transmission capability
– High refresh rate and high resolution video signals
capability
– High definition digital audio format signals capability
■ DOCK terminal
• DOCK terminal to connect a Yamaha iPod universal
dock (such as YDS-11, sold separately) or Bluetooth
wireless audio receiver (such as YBA-10, sold
separately)
■ Automatic speaker setup features
• “YPAO” (Yamaha Parametric Room Acoustic
Optimizer) for automatically optimizing speaker
outputs suitable for listening environments
■ Other features
• 192-kHz/24-bit D/A converter
• Direct mode for pure hi-fi sound for all sources
• Adaptive dynamic range controlling capability
• Scene function that allows you to change input sources
and sound field programs with one key
• Sleep timer
Features

About this manual, Supplied accessories, About this manual supplied accessories
Страница 5
- Изображение
- Текст
3
En
English
INTR
ODUCTION
AD
DITIONAL
INFORMA
T
ION
APPENDIX
PRE
P
ARA
T
ION
BA
S
IC
OPERA
T
ION
AD
V
ANCED
OPERA
T
ION
Manufactured under license from Dolby Laboratories.
Dolby, Pro Logic and the double-D symbol are trademarks of Dolby
Laboratories.
Manufactured under license under U.S. Patent No’s:
5,451,942;5,956,674;5,974,380;5,978,762;6,226,616;6,487,535 &
other U.S. and worldwide patents issued & pending. DTS is a
registered trademark and the DTS logos, Symbol, DTS-HD and DTS-
HD Master Audio are trademark of DTS, Inc. © 1996-2007 DTS, Inc.
All Rights Reserved.
iPod™
“iPod” is a trademark of Apple Inc., registered in the U.S. and other
countries.
Bluetooth™
Bluetooth is a registered trademark of Bluetooth SIG and is used by
Yamaha in accordance with a license agreement.
“HDMI,” the “HDMI” logo and “High-Definition Multimedia
Interface” are trademarks, or registered trademarks of HDMI
Licensing LLC.
x.v.Color™
“x.v.Color” is a trademark of Sony Corporation.
“SILENT CINEMA” is a trademark of Yamaha Corporation.
Check that you received all of the following parts.
• Remote control
• Batteries (2) (AAA, R03, UM-4)
• Optimizer microphone
• AM loop antenna
• Indoor FM antenna
About this manual
• y indicates a tip for your operation.
• Some operations can be performed by using either the keys on the front panel or the ones on the remote control. In case the key names differ between
the front panel and the remote control, the key name on the remote control is given in parentheses.
• This manual is printed prior to production. Design and specifications are subject to change in part as a result of improvements, etc. In case of
differences between the manual and product, the product has priority.
• “ASTANDBY/ON” or “gHDMI 1” (example) indicates the name of the parts on the front panel or the remote control. Refer to the attached sheet
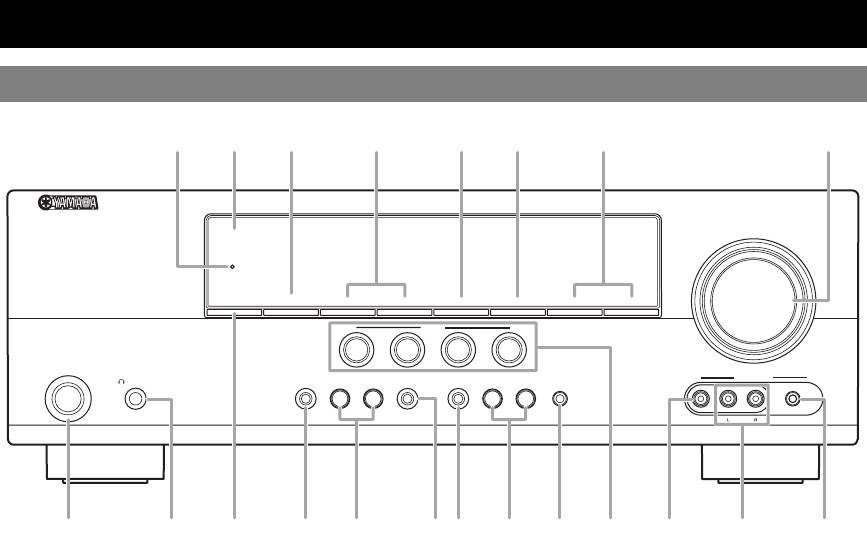
or “Part names and functions” on page 4 for the information about each position of the parts.
•
☞ indicates the page describing the related information.
Supplied accessories

4
En
A
STANDBY/ON
Switches this unit between standby and on (see page 17).
B
PHONES jack
For plugging headphones (see page 22).
C
INFO
Changes information display screens on the front panel display
(see page 23).
D
MEMORY
Registers FM/AM stations as preset stations (see page 29).
E
PRESET l / h
Selects an FM/AM preset station (see page 29).
F
FM
Sets the FM/AM tuner band to FM (see page 28).
G
AM
Sets the FM/AM tuner band to AM (see page 28).
H
TUNING l / h
Changes FM/AM tuner frequencies (see page 28).
I
SCENE
Switches between linked sets of input sources and sound field
programs (see page 21).
J
TONE CONTROL
Adjusts high-frequency/low-frequency output of speakers/
headphones (see page 22).
K
PROGRAM l / h
Changes sound field programs (see page 24).
L
STRAIGHT
Changes a sound field program to straight decoding mode
(see page 27).
M
DIRECT
Changes a sound field program to direct mode (see page 22).
N
INPUT l / h
Selects an input source (see page 21).
O
OPTIMIZER MIC jack
For connecting the supplied optimizer microphone and adjusting
output characteristics of speakers (see page 18).
P
VOLUME control
Controls the volume of this unit (see page 21).
Q
VIDEO (VIDEO AUX) jack
For connecting the video output cable of a camcorder or game
console (see page 16).
R
AUDIO L/R (VIDEO AUX) jack
For connecting the audio output cable of a camcorder or game
console (see page 16).
S
PORTABLE (VIDEO AUX) jack
For connecting the audio output cable of a portable music player
(see page 16).
T
Front panel display
Displays information on this unit (see page 6).
U
HDMI THROUGH
Lights up during pass-through output of an HDMI signal input
to this unit while this unit is on standby (see page 44).
Part names and functions
Front panel
PHONES
SILENT CINEMA
TONE CONTROL
PROGRAM
STRAIGHT
INPUT
OPTIMIZER MIC
VIDEO
AUDIO
PORTABLE
THROUGH
VIDEO AUX
VOLUME
HDMI
EFFECT
l
h
l
h
BD/DVD
TV
CD
RADIO
SCENE
INFO
MEMORY
PRESET
l
h
l
h
TUNING
FM
AM
STANDBY
/ON
DIRECT
A
T
D
G
J
M
C
O
K
N
U
P
F
E
H
I
R
B
L
Q
S

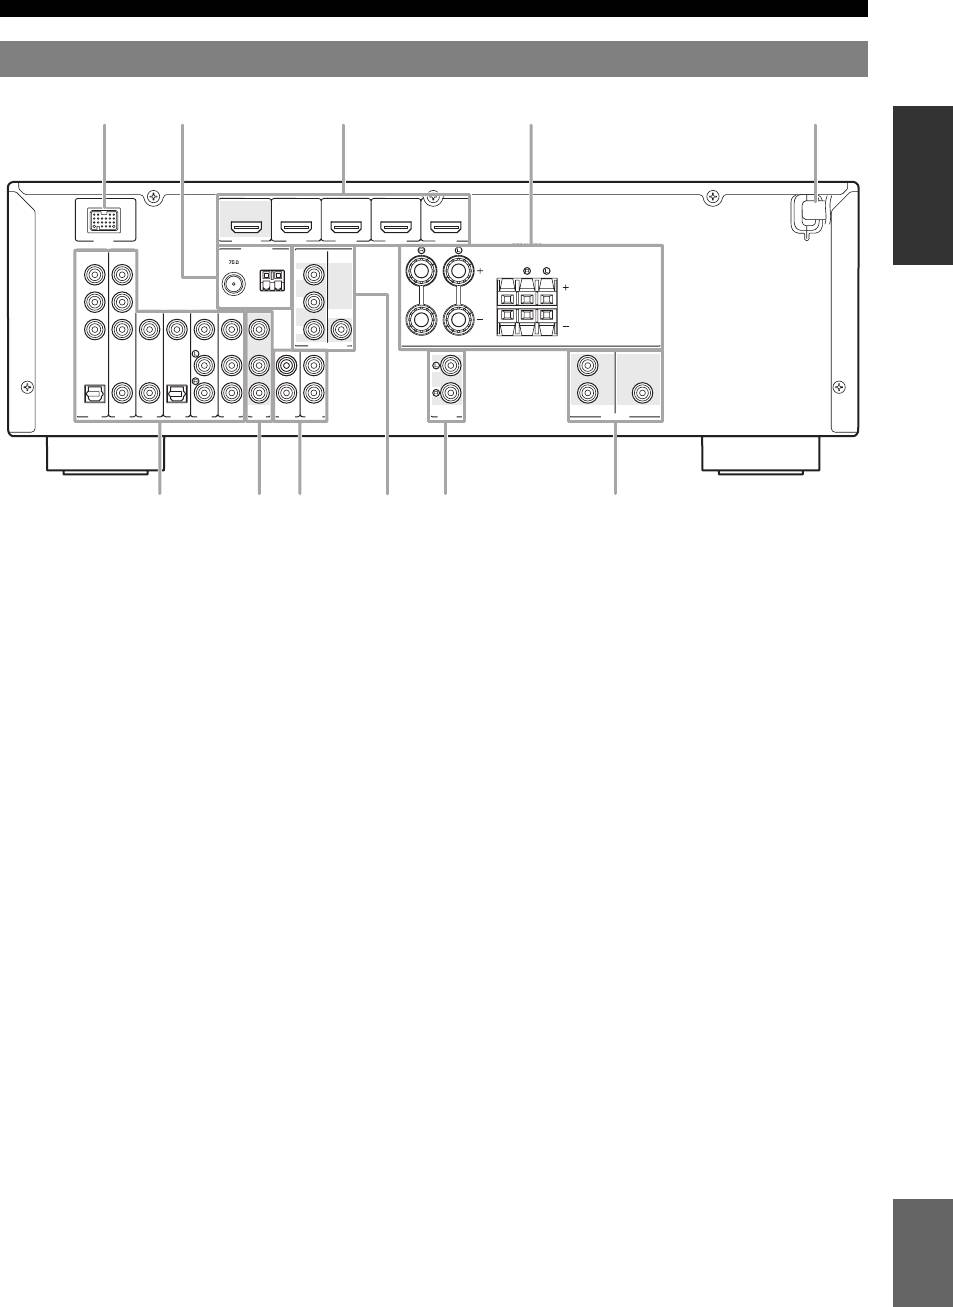
Rear panel, Adock terminal, Bhdmi out/hdmi 1-4
Cantenna jack, Dspeakers terminal, Eav 1-6, Fav out, Gaudio 1/2, Hmonitor out, Iaudio out
- Изображение
- Текст
5
En
Part names and functions
English
INTR
ODUCTION
AD
DITIONAL
INFORMA
T
ION
APPENDIX
PRE
P
ARA
T
ION
BA
S
IC
OPERA
T
ION
AD
V
ANCED
OPERA
T
ION
a
DOCK terminal
For connecting an optional Yamaha iPod universal dock (YDS-
11) or Bluetooth wireless audio receiver (YBA-10)
(see page 16).
b
HDMI OUT/HDMI 1-4
For connecting an HDMI-compatible video monitor or external
components for HDMI inputs 1-4 (see page 15).
c
ANTENNA jack
For connecting supplied FM and AM antennas (see page 17).
d
SPEAKERS terminal
For connecting front right and left, center and surround speakers
(see page 11).
e
AV 1-6
For connecting external components for audio/visual inputs 1-6
(see page 15).
f
AV OUT
Outputs audio/visual signals from a selected analog input source
to an external component (see page 16).
g
AUDIO 1/2
For connecting external components for audio inputs 1-2
(see page 16).
h
MONITOR OUT
Outputs visual signals from this unit to a video monitor, such as
a TV (see page 14).
i
AUDIO OUT
Outputs audio signals from a selected analog input source to an
external component (see page 16).
j
PRE OUT
Outputs the surround back L/R channel signals and subwoofer
channel signals. For connecting an external amplifier or
subwoofer (see page 11).
k
Power Cable
For connecting this cable to an AC wall outlet (see page 17).
Rear panel
ANTENNA
UNBAL.
FM
GND AM
P
R
P
B
Y
COMPONENT
VIDEO
DOCK
VIDEO
P
R
P
B
Y
OPTICAL
( TV )
AV 1
AV 2
COAXIAL
AV 3
(CD)
COAXIAL
OPTICAL
AV 4
AV 5
AV
OUT
AUDIO1
AUDIO2
VIDEO
HDMI
HDMI 1
(BD/DVD)
HDMI 2
HDMI 3
HDMI 4
OUT
AV 6
VIDEO
MONITOR OUT
AUDIO
OUT
SPEAKERS
FRONT
CENTER
SURROUND
COMPONENT
PRE OUT
SUBWOOFER
SURROUND BACK
a
b
c
e
f
g
i
j
k
d
h

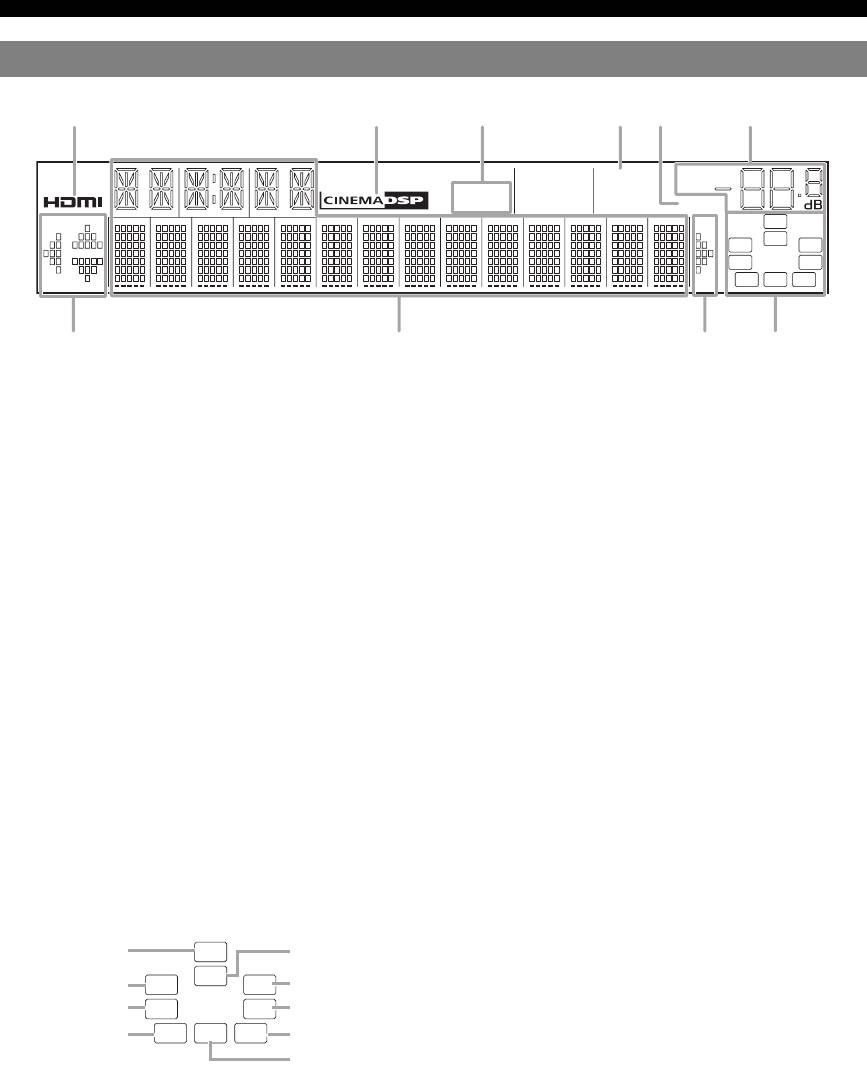
6
En
Part names and functions
a
HDMI indicator
Lights up during normal communication when HDMI is
selected as an input source.
b
CINEMA DSP indicator
Lights up when a sound field program that uses CINEMA DSP
is selected.
c
Tuner indicator
Lights up while receiving a radio broadcast signal from an FM/
AM station (see page 28).
d
SLEEP indicator
Lights up when the sleep timer is activated (see page 22).
e
VOLUME indicator
Displays volume levels.
f
MUTE indicator
Flashes when audio is muted.
g
Cursor indicators
Light up if corresponding cursors on the remote control are
available for operations.
h
Multi information display
Displays menu items and settings for the current operation.
i
Speaker indicators
Indicate speaker terminals or the PRE OUT jack from which
signals are currently output.
Front panel display
STEREO
SLEEP
VOL.
TUNED
SW
C
L
R
SL
SR
SBL
SB
SBR
MUTE
a
b
c
d
e
f
g
h
i
g
SW
C
L
R
SL
SR
SBL
SB
SBR
Subwoofer
Front L
Surround L
Surround back L
Center
Front R
Surround R
Surround back R
Surround back

7
En
Part names and functions
English
INTR
ODUCTION
AD
DITIONAL
INFORMA
T
ION
APPENDIX
PRE
P
ARA
T
ION
BA
S
IC
OPERA
T
ION
AD
V
ANCED
OPERA
T
ION
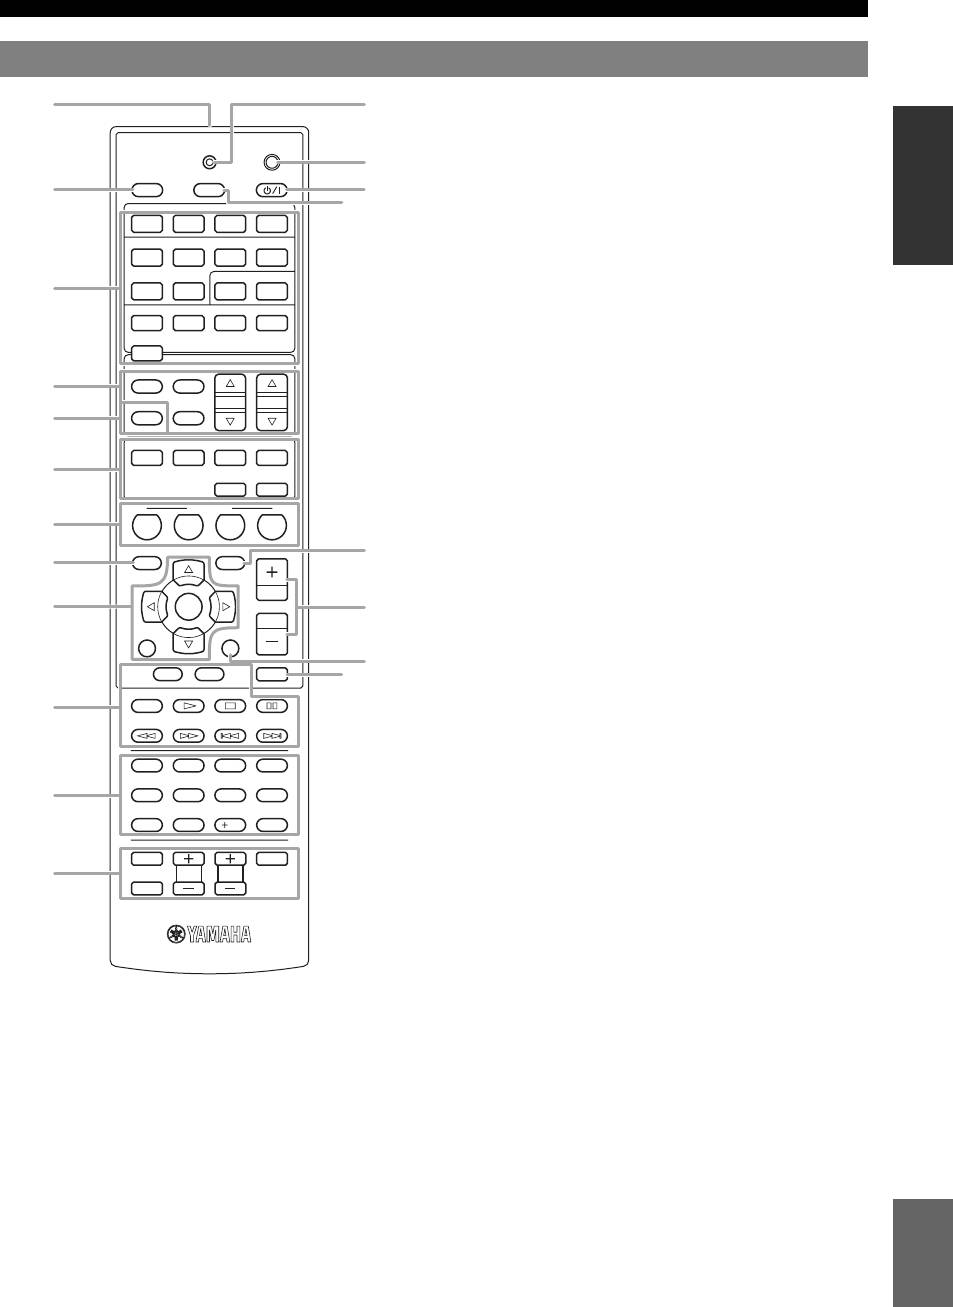
a
Remote control signal transmitter
Transmits infrared signals.
b
TRANSMIT
Lights up when a signal is output from the remote control.
c
CODE SET
Sets remote control codes for external component operations
(see page 46).
d
SOURCE POWER
Switches an external component on and off.
e
SLEEP
Switches the sleep timer operations (see page 22).
f
POWER
Switches this unit on and standby.
g
Input selection keys
h
Tuner keys
i
INFO
Changes the information shown on the front panel display
(see page 23).
j
Sound selection keys
Selects sound field programs (see pages 22 and 24).
k
SCENE
Switches between linked sets of input sources and sound field
programs (see page 21).
l
SETUP
Displays the setup menu (see page 41).
m
OPTION
Displays the option menu (see page 35).
n
Cursors k / n / l / h/ENTER/RETURN
o
VOLUME +/–
Adjust the volume of this unit (see page 21).
p
DISPLAY
Changes the operation mode of the iPod connected to the
Yamaha iPod universal dock (see page 32).
q
MUTE
Turns the mute function of the sound output on and off
(see page 22).
r
External component operation keys
Operate recording, playback etc. of external components
(see page 46).
s
Numeric keys
Enter numbers.
t
TV control keys
Operate a monitor such as a TV or projector.
Remote control
POWER
1
2
3
4
1
2
5
6
1
2
3
4
7
8
5
6
9
0
10
1
2
3
4
POWER
SOURCE
V-AUX
[ A ]
[ B ]
DOCK
TUNER
FM
MOVIE
BD
DVD
TOP
MENU
MUSIC
SCENE
TV
CD
OPTION
SETUP
RETURN
REC
ENT
POWER
TV
TV VOL
INPUT
MUTE
TV CH
ENTER
VOLUME
DISPLAY
MUTE
MENU
RADIO
STEREO
ENHANCER SUR. DECODE
DIRECT
STRAIGHT
INFO
MEMORY
AM
PRESET
SLEEP
HDMI
AV
AUDIO
TRANSMIT
CODE SET
TUNING
a
d
e
f
g
h
j
k
l
m
o
p
q
r
s
t
b
c
n
i
HDMI 1-4
Selects HDMI inputs 1 through 4.
AV 1-6
Selects AV inputs 1 through 6.
AUDIO 1/2
Selects AUDIO inputs 1 and 2.
V-AUX
Selects the V-AUX jack on the front
panel of this unit.
[A]/[B]
To control external components using
the rExternal component
operation keys separately from
operations of this unit (see page 46).
DOCK
Selects a Yamaha iPod universal dock/
Bluetooth wireless audio receiver
connected to the DOCK terminal.
TUNER
Selects the FM/AM tuner.
FM
Switches a band between FM and AM.
AM
MEMORY
Presets radio stations.
PRESET k / n
Selects a preset station.
TUNING k / n
Changes tuning frequencies.
Cursors k / n / l / h
Select menu items displayed on the
front panel display or change
settings.
ENTER
Confirms a selected item.
RETURN
Returns to the previous screen or
ends the menu screen.

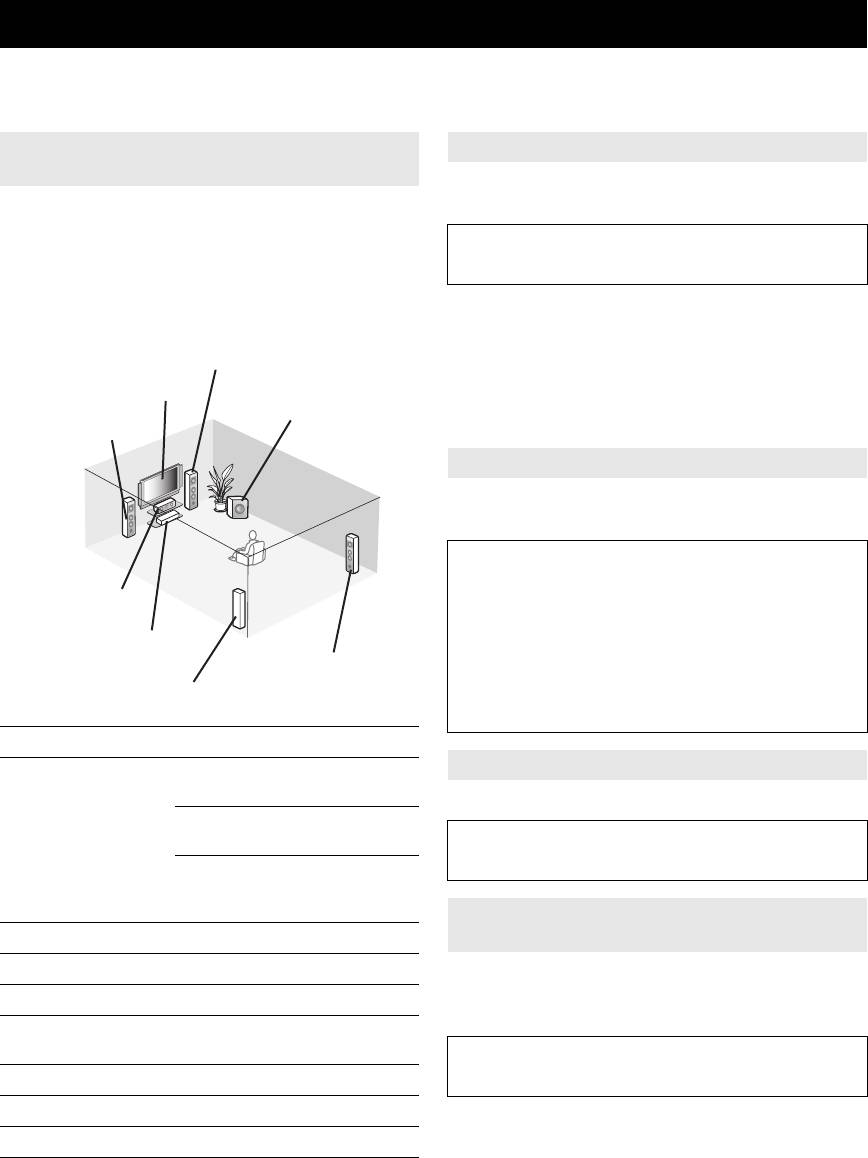
Quick start guide, Step 1: prepare items for setup, Step 2: set up your speakers
Step 3: connect your components, Step 4: turn on the power, Step 5: select the input source and start playback
- Изображение
- Текст
8
En
When you use this product for the first time, perform setup following the steps below. See the related pages for details on
operations and settings.
Prepare speakers, DVD player, cables, and other items
necessary for setup.
For example, prepare the following items for setting up a
5.1-channel sound system.
y
• Prepare two speakers (for front). The priority of the requirement of other
speakers is as follows:
1 Two surround speakers
2 One center speaker
• For surround back speakers, prepare speakers with a another amplifier
connected.
• If your video monitor is a CRT, we recommend that you use magnetically
shielded speakers.
Place your speakers in the room and connect them to this
unit.
y
• This unit has a YPAO (Yamaha Parametric Room Acoustic Optimizer)
that automatically optimizes this unit based on room acoustic
characteristics (audio characteristics of the speakers, speaker positions,
and room acoustics, etc.).
You can enjoy good balanced sound without special knowledge by using
the YPAO technology (see page 18).
Connect your TV, DVD player, or other components.
Connect the power cable and turn on this unit.
Select the component connected in the step 3 as an input
source and start playback.
y
• This unit supports the SCENE function that changes the input source and
sound field program at one time. Four scenes are preset for different
purposes for Blu-ray disc, DVD and CD, and you can select from a scene
from those just by pressing a remote control key. See page 21 for details.
Quick start guide
Step 1: Prepare items for setup
Requirements
qty.
Speakers
Front speaker
2
Center speaker
1
Surround speaker
2
Active subwoofer
1
Speaker cable
5
Subwoofer cable
1
Reproduction component such as DVD player
1
Video monitor such as TV
1
Video cable or HDMI cable
2
Audio cable
2
Front right speaker
Subwoofer
Surround left speaker
Surround right speaker
Front left speaker
Video monitor
Center speaker
Components
(such as DVD player)
Step 2: Set up your speakers
• Placing speakers
☞P. 10
• Connecting speakers
☞P. 11
Step 3: Connect your components
• Connecting a TV monitor or projector
☞P. 14
• Connecting other components
☞P. 15
• Connecting a Yamaha iPod universal dock or
Bluetooth wireless audio receiver
☞P. 16
• Connecting the FM and AM antennas
☞P. 17
Step 4: Turn on the power
• Connecting the power cable
☞P. 17
• Turning this unit on and off
☞P. 17
Step 5: Select the input source and start
playback
• Basic procedure
☞P. 21
• Selecting sound field programs
☞P. 24

Комментарии
-
Contents
-
Table of Contents
-
Troubleshooting
-
Bookmarks
Quick Links
U
RX-V465
AV Receiver
OWNER’S MANUAL
Related Manuals for Yamaha RX-V465
Summary of Contents for Yamaha RX-V465
-
Page 1
RX-V465 AV Receiver OWNER’S MANUAL… -
Page 3: Important Safety Instructions
This product, when installed as indicated in the instructions contained in this manual, meets FCC requirements. Modifications not expressly approved by Yamaha may void your authority, granted by the FCC, to use the product. 2 IMPORTANT: When connecting this product to accessories and/or another product use only high quality shielded cables.
-
Page 4
12 Only voltage specified on this unit must be used. Using this unit with a higher voltage than specified is dangerous and may cause fire, damage to this unit, and/or personal injury. Yamaha will not be held responsible for any damage resulting from use of this unit with a voltage other than specified. -
Page 5: Table Of Contents
Information on jacks and cable plugs … 13 Connecting a TV monitor or projector … 14 Connecting other components … 15 Connecting a Yamaha iPod universal dock or Bluetooth™ wireless audio receiver… 16 Using the VIDEO AUX jacks on the front panel … 16 Connecting the FM and AM antennas …
-
Page 6: Introduction
– High refresh rate and high resolution video signals capability – High definition digital audio format signals capability ■ DOCK terminal • DOCK terminal to connect a Yamaha iPod universal dock (such as YDS-11, sold separately) or Bluetooth wireless audio receiver (such as YBA-10, sold separately) ■…
-
Page 7: About This Manual
“HDMI,” the “HDMI” logo and “High-Definition Multimedia Interface” are trademarks, or registered trademarks of HDMI Licensing LLC. x.v.Color™ “x.v.Color” is a trademark of Sony Corporation. “SILENT CINEMA” is a trademark of Yamaha Corporation. “SILENT CINEMA” is a trademark of Yamaha Corporation. Supplied accessories…
-
Page 8: Part Names And Functions
Front panel HDMI THROUGH INFO PHONES STANDBY SILENT CINEMA STANDBY/ON Switches this unit between standby and on (see page 17). PHONES jack For plugging headphones (see page 22). INFO Changes information display screens on the front panel display (see page 23). MEMORY Registers FM/AM stations as preset stations (see page 29).
-
Page 9: Rear Panel
AV 3 AV 4 AV 5 AV 6 DOCK terminal For connecting an optional Yamaha iPod universal dock (YDS- 11) or Bluetooth wireless audio receiver (YBA-10) (see page 16). HDMI OUT/HDMI 1-4 For connecting an HDMI-compatible video monitor or external components for HDMI inputs 1-4 (see page 15).
-
Page 10: Front Panel Display
Part names and functions Front panel display HDMI indicator Lights up during normal communication when HDMI is selected as an input source. CINEMA DSP indicator Lights up when a sound field program that uses CINEMA DSP is selected. Tuner indicator Lights up while receiving a radio broadcast signal from an FM/ AM station (see page 28).
-
Page 11: Remote Control
Adjust the volume of this unit (see page 21). DISPLAY Changes the operation mode of the iPod connected to the Yamaha iPod universal dock (see page 30). MUTE Turns the mute function of the sound output on and off (see page 22).
-
Page 12: Quick Start Guide
Place your speakers in the room and connect them to this unit. • Placing speakers • Connecting speakers • This unit has a YPAO (Yamaha Parametric Room Acoustic Optimizer) that automatically optimizes this unit based on room acoustic Subwoofer characteristics (audio characteristics of the speakers, speaker positions, and room acoustics, etc.).
-
Page 13: Preparation
PREPARATION Preparing remote control Installing batteries in the remote control Take off the battery compartment cover. Insert the two supplied batteries (AAA, R03, UM-4) according to the polarity markings (+ and –) on the inside of the battery compartment. Snap the battery compartment cover back into place.
-
Page 14: Connections
(LFE) sounds included in Dolby Digital and DTS signals. Use a subwoofer with a built-in amplifier, such as the Yamaha Active Servo Processing Subwoofer System. Place it exterior to the front left and right speakers facing slightly inward to reduce reflections…
-
Page 15: Connecting Speakers
To obtain the balanced sound during playback, set the speaker output characteristics in advance using the Yamaha Parametric Room Acoustic Optimize (YPAO, see page 18) or “Speaker Setup” of the setup menu (see page 39).
-
Page 16: Connecting The Speaker Cable
Connections Connecting the speaker cable Caution • A speaker cable is a pair of insulated cables running side by side in general. One of the cables is colored differently or striped to indicate a polarity. Connect one end of the colored/striped cable to the “+” (red) terminal of this unit and the other end to that of your speaker, and connect one end of the other cable to the “–”…
-
Page 17: Information On Jacks And Cable Plugs
Information on jacks and cable plugs This unit has the following input and output jacks. Use jacks and cables appropriate for components that you are connecting. ■ Audio jacks Jack and cables Description AUDIO jacks To transmit conventional analog left and right audio signals. Use (white) stereo pin cables.
-
Page 18: Connecting A Tv Monitor Or Projector
Connections Connecting a TV monitor or projector Connect a video monitor such as a TV or projector to an output terminal of this unit. You can select one of the following three types according to the input signal format supported by the video monitor. Note •…
-
Page 19: Connecting Other Components
Composite output • Input sources in parentheses are recommended to connect to the respective jacks. If your Yamaha component has the Remote in/out terminal, you can switch the input source to that component with a single key operation using the SCENE function (see page 21).
-
Page 20: Connecting A Yamaha Ipod Universal Dock Or Bluetooth™ Wireless Audio Receiver
Bluetooth™ wireless audio receiver This unit has the DOCK jack, to which you can connect a Yamaha iPod universal dock (YDS-11, sold separately) or a Bluetooth wireless audio receiver (YBA-10, sold separately). You can play an iPod or a Bluetooth component with this unit by connecting it to the DOCK jack.
-
Page 21: Connecting The Fm And Am Antennas
• Position the AM loop antenna away from this unit. • If you cannot get good reception, we recommend that you use an outdoor antenna. For more details, consult the nearest authorized Yamaha dealer or service center. • Always use the AM loop antenna even when the outdoor antenna is connected.
-
Page 22: Optimizing The Speaker Setting For Your Listening Room (Ypao)
Optimizing the speaker setting for your listening room (YPAO) This unit has a Yamaha Parametric Acoustic Optimizer (YPAO). With the YPAO, this unit automatically adjusts the output characteristics of your speakers based on speaker position, speaker performance, and the acoustic characteristics of the room.
-
Page 23
To select a sound character for adjustment, press nCursor k to select “EQ” and then press nCursor l / h. If this unit does not work when you press nCursor, press lSETUP once and then operate this unit. EQ;;;;;Natural This unit has a parametric equalizer that adjusts the output levels for each frequency range. -
Page 24: When An Error Message Is Displayed During Measurement
Optimizing the speaker setting for your listening room (YPAO) When an error message is displayed during measurement Select “Retry” or “Exit” using nCursor l / h and then press nENTER. Retry Performs “Auto Setup” again. Exit Terminates the measurement and “Auto Setup.” •…
-
Page 25: Basic Operation
BASIC OPERATION Basic procedure Turn on external components (TV, DVD player, etc.) connected to this unit. Press NINPUT l / h (or gInput selection keys) to select an input source. The name of the selected input source is displayed for a few seconds.
-
Page 26: Muting Audio Output Temporarily (Mute)
Playback Press gInput selection keys on the remote control for the input source whose remote control code was registered in step 1 for about 3 seconds while pressing down kSCENE key whose assignment you want to change. The external component can now be controlled remotely just by selecting a scene.
-
Page 27: Displaying Input Signal Information
Displaying input signal information You can display information on audio/video signals input to this unit for each input source. Select the desired input source, and press mOPTION. The option menu for the selected input source is displayed (see page 33). Press nCursor k / n to select “Signal Info,”…
-
Page 28: Enjoy The Sound Field Programs
Enjoy the sound field programs This unit is also equipped with a Yamaha digital sound field processing (DSP) chip. You can enjoy multi-channel sounds for almost all input sources using various sound field programs stored on the chip and a variety of surround decoders.
-
Page 29
Program Drama This sound field features stable reverberations that match a wide range of movie genres from serious dramas to musicals and comedies. The reverberations are modest but offer an optimum 3D feeling, reproducing effects tones and background music softly but cubically around clear words and center positioning in a way that does not fatigue the listener even after long hours of viewing. -
Page 30
Enjoy the sound field programs For Multi-channel stereo reproduction Program 7ch Stereo Use this program to output sound from all speakers. When you play back multi-channel sources, this unit downmixes the source to 2 channels, and then outputs the sound from all speakers. This program creates a larger sound field and is ideal for background music at parties, etc. -
Page 31: Enjoying Unprocessed Input Sources (Straight Decoding Mode)
Enjoying unprocessed input sources (Straight decoding mode) In straight decoding mode, sounds are reproduced without sound field effect. 2-channel stereo sources are output from only the front left and right speakers. Multi-channel input sources are decoded straight into the appropriate channels and multi-channel sounds are reproduced without a sound field effect.
-
Page 32: Fm/Am Tuning
The FM/AM tuner of this unit provides the following two modes for tuning. ■ Frequency tuning mode (Auto tuning / Manual tuning) You can tune in to a desired FM/AM station by searching or specifying its frequency. ■ Preset tuning mode (Preset tuning) You can preset the frequencies of FM/AM stations by registering them to specific numbers, and later just select those numbers to tune in.
-
Page 33
During the automatic station preset, the upper area of the screen changes as follows: READY → SEARCH → MEMORY each time a station is registered. When registration is complete, “FINISH” appears and the option menu screen automatically reappears. When you press mOPTION on the remote control, the screen returns to the original state. -
Page 34: Using Ipod
• Some features may not be compatible depending on the model or the software version of your iPod. • Some features may not be available depending on the model of Yamaha iPod universal dock. The following sections describe the procedure when using the YDS-11.
-
Page 35
Shuffle/repeat playback You can use a special playback function such as shuffle playback and repeat playback by setting the option menu. Press pDISPLAY to switch to menu browse mode while “DOCK” is selected as the input source. The option menu can be displayed only in menu browse mode. -
Page 36: Using Bluetooth™ Components
Using Bluetooth™ components You can connect a Yamaha Bluetooth wireless audio receiver (such as YBA-10, sold separately) to the DOCK terminal of this unit and enjoy the music contents stored in your Bluetooth component (such as a portable music player) without wiring between this unit and the Bluetooth component.
-
Page 37: Advanced Operation
ADVANCED OPERATION Setting the option menu for each input source (OPTION menu) This unit has an OPTION menu of frequently used menu items for input sources compatible with this unit. The procedure for setting the OPTION menu items is described below. Select an input source using NINPUT l / h (or gInput selection keys).
-
Page 38
Setting the option menu for each input source (OPTION menu) ■ Decoder Mode Input source: HDMI1-4, AV1-4 Auto*/DTS Choices: Selects DTS digital audio signals for reproduction. Auto Automatically selects audio input signals. Selects DTS signals only. Other input signals are not reproduced. ■… -
Page 39: Auto Preset
■ Auto Preset Input source: TUNER Automatically detects radio stations in the FM frequency band and registers them as preset stations (see page 28). ■ Clear Preset Input source: TUNER Clears the preset stations (see page 29). ■ Shuffle Input source: iPod (DOCK) Off*/Songs/Albums Choices: Changes the shuffle playback style (see page 31).
-
Page 40: Editing Surround Decoders/Sound Field Programs
Editing surround decoders/sound field programs Selecting a decoder used with a sound field program When using sound field programs for movies or TV programs (except for Mono Movie), you can select a surround decoder to be used with the sound field program after setting the parameters from the following decoders.
-
Page 41
■ Straight Enhancer/7ch Enhancer only EFCT LVL Choices: High*/Low Adjusts the Compressed Music Enhancer effect level. When the high-frequency signals of the source is emphasized too much, set the effect level to “Low.” To reduce the effect, set this parameter to “Low.” To increase the effect, set it to “High.”… -
Page 42: Operating Various Settings For This Unit (Setup Menu)
Operating various settings for this unit (Setup menu) You can call the setup menu using the remote control and change the settings of various menus. You can change the following settings in the setup menu. For details, read “Basic operation of the setup menu” first, and see the respective pages.
-
Page 43: Basic Operation Of The Setup Menu
Basic operation of the setup menu Press lSETUP on the remote control. The setup menu screen appears. Select a menu using nCursor k / n, and press nENTER. Items of the selected menu are displayed. For example, the following screen appears when you select “Function Setup.”…
-
Page 44
Operating various settings for this unit (Setup menu) Low-frequency components of other channel signals Front Parameter Subwoofer speakers Both SWFR Front Not output Outputs low-frequency components of the front left and right channels and the channel of speaker, the size of which is set to “Small.”… -
Page 45: 2 Lipsync
■ B)Level Adjustable range: -10.0dB to +10.0dB (0.5 dB step) Defaults: “FL/FR/SW” 0dB* “C/SL/SR/SBL/SBR” -1.0dB Separately adjusts volume of each speaker so that the sounds form speakers are at the same volume at the listening position. Items to be displayed vary depending on the number of speakers connected.
-
Page 46: Standby
Operating various settings for this unit (Setup menu) Auto Adjustable range: 0 to 240ms (1 ms step) Enables manual fine adjustment of the correction time when “HDMI Auto” is set to “On.” Manual Adjustable range: 0* to 240ms (1 ms step) Manually adjusts the correction time.
-
Page 47: Dsp Parameter
■ MaxVol Adjustable range: -30.0dB to +15.0dB/+16.5dB* (5.0 dB step) Sets the maximum volume level so that the volume will not be accidentally increased. For example, you can adjust the volume between –80.0 dB and –5.0 dB when you set this parameter to “–5.0dB.”…
-
Page 48: Controlling Other Components With The Remote Control
“List of remote control codes” at the end of this manual. ■ Default remote control code settings Input source Category Manufacturer [HDMI1] Blu-ray Disc Yamaha [HDMI2] — — [HDMI3] — — [HDMI4] — —…
-
Page 49: Advanced Setup
Setting a remote control ID Two IDs are provided for the remote control of this unit. If another Yamaha amplifier is in the same room, setting a different remote control ID to this unit prevents unwanted operation of the other amplifier.
-
Page 50: Appendix
Refer to the table below when this unit does not function properly. If the problem you are experiencing is not listed below or if the instruction below does not help, turn off this unit, disconnect the power cable, and contact the nearest authorized Yamaha dealer or service center. General…
-
Page 51
Problem No picture. An appropriate video input is not selected on the monitor. The composite output terminals are used to output a component video signal, or the COMPONENT VIDEO jacks are used to output a composite video signal. Non-standard video signals are input. The sound suddenly The protection circuitry has been activated goes off. -
Page 52
Troubleshooting Problem No sound is heard “Bass Out” of “A)Config” in “Speaker from the subwoofer. Setup” of the setup menu (Speaker Setup→Manual Setup→A)Config) is set to “Front” when a Dolby Digital, DTS or AAC signal is being played. “Bass Out” of “A)Config” in “Speaker Setup”… -
Page 53: Hdmi
Problem The picture is The video software is copy-protected. disturbed. This unit suddenly The internal temperature becomes too enters the standby high and the overheat protection circuitry mode. has been activated. HDMI Problem No picture or sound. The number of the connected HDMI components is over the limit.
-
Page 54: Remote Control
SETUP menu operation: press the key applicable for the current menu operation again. Cause Turn off this unit and reconnect the Yamaha iPod universal dock to the DOCK terminal of this unit. Remove your iPod in the Yamaha iPod universal dock and then place it back in the dock.
-
Page 55: Bluetooth
• Warning message “W-2” or “W-3” indicates that the adjusted settings may not be optimal. • Depending on the speakers, warning message “W-1” may appears even if the speaker connections are correct. • If error message “E-10” occurs repeatedly, contact a qualified Yamaha service center. Before Auto Setup…
-
Page 56
Check whether the microphone is properly placed. Check whether the speakers are properly placed and connected. The optimizer microphone or OPTIMIZER MIC jack may be defective. Contact the nearest Yamaha dealer or service center. Run “Auto Setup” again. Run “Auto Setup” again. -
Page 57: Glossary
■ Audio and video synchronization (lip sync) Lip sync, an abbreviation for lip synchronization, is a technical term that involves both a problem and a capability of maintaining audio and video signals synchronized during post-production and transmission. Whereas the audio and video latency requires complex end-user adjustments, HDMI version 1.3 incorporates an automatic audio and video syncing capability that allows devices to perform this synchronization automatically and accurately without user interaction.
-
Page 58: Dts Digital Surround
HDMI (High-Definition Multimedia Interface) is the first industry- supported, uncompressed, all-digital audio/video interface. Providing an interface between any source (such as a set-top box or AV receiver) and an audio/video monitor (such as a digital television), HDMI supports standard, enhanced or high-definition video as well as multi- channel digital audio using a single cable.
-
Page 59: Sound Field Program Information
Based on a wealth of actually measured data, Yamaha CINEMA DSP provides the audiovisual experience of a movie theater in the listening room of your own home by using the Yamaha original sound field technology combined with various digital audio systems.
-
Page 60: Specifications
AUDIO SECTION • Minimum RMS Output Power for Front, Center, Surround, Surround back [U.S.A. and Canada models] 1 kHz, 0.9% THD, 8 Ω … 105 W [Other models] 1 kHz, 0.9% THD, 6 Ω … 105 W • Dynamic Power (IHF) [U.S.A.
-
Page 61: Index
AV OUT, rear panel …5 ■ B)Level, speaker setup …41 Basic operation, setup menu …39 Bass Out, A)Config, speaker setup …39 Bluetooth component playback …32 Bluetooth wireless audio receiver connection …16 Bluetooth, troubleshooting …51 ■ C)Distance, speaker setup …41 C.Image, decoder parameter …37 Cellar Club, sound field program …25…
-
Page 62
Index SCENE, remote control … 7 Sci-Fi, sound field program … 24 Selecting SCENE … 21 Setting remote control code … 44 Set-top box connection … 15 Setup menu … 38 Setup menu basic operation … 39 SETUP, remote control … 7 Shuffle playback, iPod … -
Page 63: List Of Remote Control Codes
List of remote control codes Ausind Autovox A.R. Systems 0274 Acme 0260 Aventura Acura 0261, 0273 0259 Axion Admiral 0100, 0224, 0257, Baird 0258, 0259, 0264, Bang & Olufsen 0265 Basic Line Advent 0204 Adventura 0107 Bastide Adyson 0260, 0327, 0328 Baur Agashi 0327, 0328…
-
Page 64
Fujitsu Siemens 0425, 0426, 0427, Hinari 0428, 0429 Funai 0033, 0034, 0035, 0036, 0037, 0097, Hisawa 0104, 0105, 0225, Hisense 0259 Hitachi Futuretech 0104, 0225 Galaxi 0269, 0274 Galaxis 0243, 0274 Gateway 0163, 0226, 0227 0261, 0266, 0273 0069, 0071, 0072, 0073, 0077, 0090, 0099, 0102, 0106, 0112, 0131… -
Page 65
Neckermann 0243, 0257, 0260, 0264, 0268, 0269, 0271, 0274, 0328 0268, 0271, 0274 Net-TV 0226 Neufunk 0273, 0274 New Tech 0261, 0268 New World 0262 NewTech 0273, 0274, 0328 Nicamagic 0260, 0327 Nikkai 0259, 0260, 0262, 0268, 0271, 0273, 0274, 0327, 0328 Nikko 0072, 0077, 0096 Nobliko… -
Page 66
0272, 0274, 0335 Thorn 0271, 0274 0072, 0077, 0090 TNCi 0076 Wincom Tokai 0268, 0274, 0328 Xrypton Tokyo 0260, 0327 Yamaha Tomashi 0270 Toshiba 0027, 0043, 0053, 0054, 0061, 0062, 0063, 0064, 0065, Yamishi 0122, 0123, 0124, Yokan 0128, 0130, 0132, Yoko… -
Page 67
Videon 1074 Videosonic 1020 Viewsonic 1066 Voodoo 1066 Wards 1020, 1021, 1022, 1023 Weltblick 1077 XR-1000 1022, 1023 Yamaha 1018, 1019 Yamishi 1079, 1090 Yokan 1079, 1090 Yoko 1076, 1077, 1079, 1090 Zenith 1032 ZT Group 1066 4Kus 2097 Accurian… -
Page 68
ATACOM 2318 Enzer Audiovox 2111, 2199 Epson Avious 2317 2313 Finlux Axion 2171 Fintec Bang & Olufsen 2210 Fisher Baze 2317 Funai 2318 Gateway Bellagio 2313 Best Buy 2309 Gericom Blaupunkt 2209 Blue Parade 2207 Giec Boghe 2300 Global Solutions Brainwave 2312 Global Sphere 2305… -
Page 69
Xlogic Sonic Blue 2215 Sontech 2316 Xoro Sony 2005, 2006, 2007, Yamada 2020, 2021, 2022, Yamaha 2023, 2024, 2025, 2069, 2072, 2073, 2085, 2086, 2087, 2091, 2092, 2093, Yamakawa 2102, 2128, 2129, Yukai 2130, 2249, 2250, Zenith 2323, 2334, 2335,… -
Page 70
Viewmaster 3045 Condor Vision 3045 Connexions Visiopass 3051, 3054, 3055 Conrad Vortex View 3045 Wittenberg 3048 Conrad Electronic 4137, 4139 Zenith 3035, 3040, 3046 Contec Zentek 3044 Coolsat Cosat Sattelite Coship AB Sat 4138, 4139 Crown AccessHD 4058 Daeryung 4142 Daewoo 4138 Akai… -
Page 71
4074, 4088, 4090, 4074, 4089, 4100 4131, 4133 4141 Zenith 4052, 4057, 4145 4102 Zodiac 4086 4086 4084 4090 Yamaha 5000, 5013 4094 CD Recoder 4071, 4072, 4073, 4092, 4103, 4116, Yamaha 5001 4117, 4134, 4135, 4136 4140 Yamaha 5002, 5003, 5004… -
Page 72
© 2009 Yamaha Corporation All rights reserved. Printed in China WQ95630…

ВВЕДЕНИЕ
Описание
■ Встроенный 5-канальный усилитель
• Dolby Pro Logic, Dolby Pro Logic II, Dolby Pro
мощности
Logic IIx
• Минимальная среднеквадратичная выходная
• DTS NEO:6
мощность RMS (1 кГц, 0,9% THD, 6Ω)
• DSD
• FRONT L/R: 105 Вт + 105 Вт
■ Усовершенствованный тюнер FM/AM
• CENTER: 105 Вт
• Произвольная настройка и прямая
• SURROUND L/R: 105 Вт + 105 Вт
предустановка 40 радиостанций
■ Выходные гнезда для колонок/
• Автоматическая предустановка
предварительного выхода
• Настройка системы радиоданных
• Гнезда колонок (5-канальные), гнезда
■ HDMI™
предварительного выхода (правая/левая
(High-Definition Multimedia Interface)
тыловые колонки окружающего звучания,
• Интерфейс HDMI для стандартных,
сабвуфер)
усовершенствованных видеосигналов или
■ Входные/выходные терминалы
сигналов высокой четкости, а также для
многоканальных цифровых аудиосигналов
Входные терминалы
– Поддержка автоматической синхронизации
• Вход HDMI x 4
аудио и видео (синхронизация изображения и
• Аудио/видеовход
речевых сигналов)
[Audio] Цифровой вход (коаксиальный) x 2,
– Поддержка передачи видеосигналов Deep
цифровой вход (оптический) x 2, аналоговый
Color (30/36 бит)
вход x 2
– “x.v.Color” поддержка передачи
[Video] Компонентное видео x 2, композитное
видеосигналов
видео x 4
– Поддержка высокой частоты регенерации и
• Аудиовход (аналоговый) x 2
видеосигналов высокого разрешения
• Вход док-станции x 1
– Поддержка сигналов цифрового
• Вход V-AUX
аудиоформата высокой четкости
[Audio] Аналоговый x 1, стерео минигнездо x 1
[Video] Композитное видео x 1
■ Терминал DOCK
• Терминал DOCK для подключения
Выходные терминалы
универсальной док-станции Yamaha iPod
• Выход на монитор
(например, YDS-11, продается отдельно) или
[Audio/Video] HDMI x 1
беспроводного Bluetooth-приемника
[Video] Компонентное видео x 1, композитное
аудиосигнала (например, YBA-10, продается
видео x 1
отдельно)
• Аудио/видеовыход
[Audio] Аналоговый x 1
■ Функции автоматической настройки
[Video] Композитное видео x 1
колонок
• Аудиовыход
• “YPAO” (Yamaha Parametric Room Acoustic
Аналоговый x 1
Optimizer) для автоматической оптимизации
выходной мощности колонок в соответствии со
■ Собственная технология компании
средой прослушивания
Yamaha для создания звуковых полей
• CINEMA DSP
■ Другие функции
• Режим Compressed Music Enhancer
• 192-кГц/24-битовый цифро-аналоговый
• Virtual CINEMA DSP
преобразователь
• SILENT CINEMA
• Режим Direct для высокоточного звучания всех
источников
■ Цифровые аудиодекодеры
• Функция управления настраиваемым
• Dolby TrueHD, Dolby Digital Plus
динамическим диапазоном
• DTS-HD Master Audio, DTS-HD High Resolution
• Функция Scene, которая позволяет с помощью
Audio, DTS Express
одной клавиши изменять источники входного
• Dolby Digital, Dolby Digital EX
сигнала и программы звукового поля
• DTS, DTS 96/24, DTS-ES Matrix 6.1, DTS-ES
• Таймер сна
Discrete 6.1
2 Ru

О данном руководстве
• Символ y используется для обозначения рекомендации по управлению.
• Некоторые операции могут выполняться с использованием клавиш на передней панели или на пульте ДУ. В случае, если названия
клавиш на передней панели не совпадают с названиями клавиш на пульте ДУ, название клавиши на пульте ДУ приводится в
скобках.
ВВЕДЕНИЕ
• Данное руководство отпечатано до начала производства. Дизайн и технические характеристики могут частично измениться в
результате усовершенствования и т.д. В случае расхождений между руководством и аппаратом, приоритет отдается аппарату.
• “ASTANDBY/ON” или “gHDMI 1” (пример) используется для обозначения названий элементов на передней панели или на
пульте ДУ. Информация о расположении элементов приведена на прилагаемом листе или в разделе “Названия компонентов и их
функции” на стр. 4.
• ☞ используется для обозначения страницы, на которой приведена относящаяся к данному пункту информация.
Bluetooth™
Bluetooth является зарегистрированной торговой маркой
ÏÎÄÃÎÒÎÂÊÀ
Bluetooth SIG и используется компанией Yamaha в
Изготовлено по лицензии компании Dolby Laboratories.
соответствии с лицензионным соглашением.
Dolby, Pro Logic и символ в виде двух букв D являются
торговыми марками компании Dolby Laboratories.
“HDMI”, логотип “HDMI” и “High-Definition Multimedia
Interface” являются торговыми марками или
Произведено по лицензии согласно Патентам США №:
зарегистрированными торговыми марками компании HDMI
5,451,942;5,956,674;5,974,380;5,978,762;6,226,616;6,487,535 и
Licensing LLC.
ÎÏÅÐÀÖÈÈ
ÎÑÍÎÂÍÛÅ
другим выпущенным и ожидающим выпуска патентам США
x.v.Color™
и мировым патентам. DTS является зарегистрированной
“x.v.Color” является торговой маркой корпорации Sony
торговой маркой, а логотипы DTS, Символ, DTS-HD и DTS-
Corporation.
HD Master Audio являются торговыми марками компании
DTS, Inc. © 1996-2007 DTS, Inc. Все права защищены.
iPod™
ÄÎÏÎËÍÈÒÅËÜÍÛÅ
“iPod” является торговой маркой компании Apple Inc.,
“SILENT CINEMA” является торговой маркой корпорации
ÎÏÅÐÀÖÈÈ
зарегистрированной в США и других странах.
Yamaha Corporation.
Поставляемые принадлежности
Убедитесь в наличии всех перечисленных ниже деталей.
• Пульт ДУ
• Батарейки (2) (AAA, R03, UM-4)
ÄÎÏÎËÍÈÒÅËÜÍÀß
• Микрофон оптимизатора
ÈÍÔÎÐÌÀÖÈß ÏÐÈËÎÆÅÍÈÅ
• Рамочная АМ-антенна
• Комнатная FМ-антенна
Русский
3 Ru
Названия компонентов и их функции
Передняя панель
VOLUME
HDMI
THROUGH
INFO
MEMORY
l
PRESET
h
FM
AM
l
TUNING
h
SCENE
BD/DVD
TV
CD
RADIO
PHONES
TONE
CONTROL
PROGRAM
STRAIGHT
DIRECT
INPUT
OPTIMIZER
MIC
VIDEO
AUX
STANDBY
/ON
l
h
l
h
SILENT
CINEMA
EFFECT
VIDEO
AUDIO
PORTABLE
A
A STANDBY/ON
M DIRECT
Переключение данного аппарата между режимами
Переключение режима программы звукового поля в
ожидания и включения (см. стр. 17).
прямой режим (см. стр. 22).
B PHONES гнездо
N INPUT l / h
Подключение наушников (см. стр. 22).
Выбор источника входного сигнала (см. стр. 21).
C INFO
O OPTIMIZER MIC гнездо
Изменение экранной индикации на дисплее передней
Подключение к поставляемому микрофону
панели (см. стр. 23).
оптимизатора и настройка выходных характеристик
колонок (см. стр. 18).
D MEMORY
Сохранение FM/AM-станций в качестве
P Регулятор VOLUME
предустановленных станций (см. стр. 29).
Управление громкостью данного аппарата (см. стр. 21).
E PRESET l / h
Q VIDEO (VIDEO AUX) гнездо
Выбор предустановленной FM/AM-станции
Подключение выходного видеокабеля видеокамеры
(см. стр. 29).
или игровой приставки (см. стр. 16).
F FM
R AUDIO L/R (VIDEO AUX) гнездо
Установка диапазона FM/AM-тюнера в положение FM
Подключение выходного аудиокабеля видеокамеры
(см. стр. 28).
или игровой приставки (см. стр. 16).
G AM
S PORTABLE (VIDEO AUX) гнездо
Установка диапазона FM/AM-тюнера в положение AM
Подключение выходного аудиокабеля портативного
(см. стр. 28).
музыкального плеера (см. стр. 16).
H TUNING l / h
T Дисплей передней панели
Изменение частот FM/AM-тюнера (см. стр. 28).
Отображение информации на данном устройстве
(см. стр. 6).
I SCENE
Переключение между связанными комплектами
U HDMI THROUGH
источников входного сигнала и программ звукового
Загорается во время сквозного вывода сигнала HDMI,
поля (см. стр. 21).
подаваемого на данный аппарат, когда он находится в
режиме ожидания (см. стр. 44).
J TONE CONTROL
Регулировка выходной мощности высоких/низких
частот колонок/наушников (см. стр. 22).
K PROGRAM l / h
Изменение программ звукового поля (см. стр. 24).
L STRAIGHT
Переключение режима программы звукового поля в
режим прямого декодирования (см. стр. 27).
4 Ru
T D G
J MC OK N
U PFE H
I RBLQS
Названия компонентов и их функции
Задняя панель
ВВЕДЕНИЕ
(
BD/DVD
)
DOCK
HDMI
OUT
HDMI 1
HDMI 2 HDMI 3
HDMI 4
ANTENNA
SPEAKERS
COMPONENT
COMPONENT
FRONT
VIDEO
VIDEO
UNBAL.
CENTER
SURROUND
PR
PR
PB
FM
GND
AM
PB
ÏÎÄÃÎÒÎÂÊÀ
VIDEO
VIDEO
Y
Y
MONITOR OUT
OPTICAL
COAXIAL
COAXIAL
OPTICAL
(
TV
)
(
CD
)
AV
AUDIO
SURROUND BACK
SUBWOOFER
A
V
1
AV 2
AV 3
AV 4
AV 5
AV 6
OUT
AUDI O1
AUDI O2
OUT
PRE OUT
ÎÏÅÐÀÖÈÈ
ÎÑÍÎÂÍÛÅ
a DOCK терминал
k Силовой кабель
Для подключения дополнительной универсальной док-
Для подключения данного кабеля к настенной розетке
станции Yamaha iPod (YDS-11) или беспроводного
переменного тока (см. стр. 17).
Bluetooth-приемника (YBA-10) (см. стр. 16).
ÄÎÏÎËÍÈÒÅËÜÍÛÅ
b HDMI OUT/HDMI 1-4
Для подключения HDMI-совместимого видеомонитора
ÎÏÅÐÀÖÈÈ
или внешних компонентов к входам HDMI 1-4
(см. стр. 15).
c ANTENNA гнездо
Для подключения к поставляемым антеннам FM и AM
(см. стр. 17).
d SPEAKERS терминал
Для подключения правой и левой фронтальных
ÄÎÏÎËÍÈÒÅËÜÍÀß
колонок, центральной колонки и колонок
ÈÍÔÎÐÌÀÖÈß ÏÐÈËÎÆÅÍÈÅ
окружающего звучания (см. стр. 11).
e AV 1— 6
Для подключения внешних компонентов к аудио/
видеовходам 1-6 (см. стр. 15).
f AV O UT
Вывод аудио/видеосигналов с выбранного источника
аналогового сигнала на внешний компонент
(см. стр. 16).
g AUDIO 1/2
Для подключения внешних компонентов к аудиовходам
1—2 (см. стр. 16).
h MONITOR OUT
Вывод видеосигналов с данного аппарата на
видеомонитор, например, на телевизор (см. стр. 14).
i AUDIO OUT
Вывод аудиосигналов с выбранного источника
аналогового сигнала на внешний компонент
(см. стр. 16).
j PRE OUT
Вывод сигналов правого/левого канала окружающего
Русский
звучания и сигналов канала сабвуфера. Для
подключения внешнего усилителя или сабвуфера
(см. стр. 11).
5 Ru
abc
efg i j
kd
h
Названия компонентов и их функции
Дисплей передней панели
SLEEP
VOL.
STEREO
TUNED
MUTE
SW
C
LR
SL SR
SBL SB SBR
a HDMI индикатор
Загорается во время нормального обмена данными в
случае выбора HDMI в качестве источника входного
сигнала.
b CINEMA DSP индикатор
Загорается в случае выбора программы звукового
поля, использующей функцию CINEMA DSP.
c Индикатор тюнера
Загорается во время приема сигнала радиотрансляции
FM/AM-станции (см. стр. 28).
d SLEEP индикатор
Загорается при включенном таймере сна (см. стр. 22).
e VOLUME индикатор
Отображение уровней громкости.
f MUTE индикатор
Мигает во время приглушения аудиосигнала.
g Индикаторы курсора
Загораются, если соответствующие курсоры на пульте
ДУ доступны для управления.
h Многофункциональный информационный
дисплей
Отображение пунктов меню и настроек для текущей
процедуры.
i Индикаторы колонок
Отображение терминалов колонки или гнезда PRE
OUT, через которое в данный момент выводятся
сигналы.
6 Ru
abcdef
gh ig
Сабвуфер
Центральная
SW
Фронт левый
C
LR
Фронт правый
Тыл левый
SL SR
Тыл правый
Тылового
Тылового окружающего
SBL SB SBR
окружающего
звучания правый
звучания левый
Тылового
окружающего
звучания
Названия компонентов и их функции
Пульт ДУ
g Клавиши выбора входа
ВВЕДЕНИЕ
TRANSMIT
CODE SET
POWER
POWER
SOURCE
SLEEP
HDMI
1234
AV
1234
AUDIO
1256
ÏÎÄÃÎÒÎÂÊÀ
V-AU X
[ A ] [ B ] DOCK
TUNER
FM
AM
PRESET
TUNING
INFO
MEMORY
h Клавиши тюнера
ENHANCER SUR. DECODE
MOVIE
MUSIC
STEREO
DIRECTSTRAIGHT
ÎÏÅÐÀÖÈÈ
ÎÑÍÎÂÍÛÅ
SCENE
BD
DVD
TV
CD
RADIO
OPTIONSETUP
i INFO
Изменение информации, отображаемой на дисплее
передней панели (см. стр. 23).
ENTER
VOLUME
ÄÎÏÎËÍÈÒÅËÜÍÛÅ
j Клавиши выбора звука
RETURN
DISPLAY
Выбор программ звукового поля (см. стр. 22 и 24).
ÎÏÅÐÀÖÈÈ
TOP
k SCENE
MENU
MENU
MUTE
Переключение между связанными комплектами источников
REC
входного сигнала и программ звукового поля (см. стр. 21).
l SETUP
Отображение setup menu (см. стр. 41).
1234
m OPTION
ÄÎÏÎËÍÈÒÅËÜÍÀß
7856
Отображение меню опций (см. стр. 35).
ÈÍÔÎÐÌÀÖÈß ÏÐÈËÎÆÅÍÈÅ
n Ку рсор ы k / n / l / h/ENTER/RETURN
90
10
ENT
TV
INPUT
POWER
TV VOL
TV CH
MUTE
a Передатчик сигнала ДУ
o VOLUME +/–
Передача инфракрасных сигналов.
Настройка громкости данного аппарата (см. стр. 21).
b TRANSMIT
p DISPLAY
Загорается во время передачи сигнала с пульта ДУ.
Изменение режима работы iPod, подключенного к
универсальной док-станции Yamaha iPod (см. стр. 32).
c CODE SET
q MUTE
Установка кодов ДУ для управления внешним
компонентом (см. стр. 46).
Включение и выключение функции приглушения
выводимого звука (см. стр. 22).
d SOURCE POWER
r Клавиши управления внешними компонентами
Включение и выключение внешнего компонента.
Управление записью, воспроизведением и другими
e SLEEP
функциями внешних компонентов (см. стр. 46).
Управление работой таймера сна (см. стр. 22).
Русский
s Цифровые клавиши
f POWER
Ввод чисел.
Включение данного аппарата и переключение его в
t Клавиши управления телевизором
режим ожидания.
Управление монитором, например, телевизором или
проектором.
7 Ru
a
b
HDMI 1-4
Выбор входов HDMI 1 — 4.
AV 1— 6
Выбор AV-входов 1-6.
AUDIO 1/2
Выбор входов AUDIO 1 и 2.
c
V-AUX
Выбор гнезда V-AUX на передней
d
f
панели данного аппарата.
e
[A]/[B]
Управление внешними компонентами с
помощью
r
Клавиши управления
внешними компонентами
отдельно от операций данного аппарата
g
(см. стр. 46).
DOCK
Выбор универсальной док-станции
Yamaha iPod /беспроводного
Bluetooth-приемника аудиосигнала,
h
подключенного к терминалу DOCK.
TUNER
Выбор FM/AM-тюнера.
i
FM
Переключение между режимами FM
j
AM
и AM.
MEMORY
Предустановка радиостанций.
PRESET k / n
Выбор предустановленной станции.
k
TUNING k / n
Изменение частот настройки.
m
l
n
o
p
q
r
s
Курсо ры k / n / l / h
Выбор пунктов меню,
отображаемых на дисплее
t
передней панели или
изменение настроек.
ENTER
Подтверждение выбранного пункта.
RETURN
Возврат к предыдущему экрану
или завершение экрана меню.
Краткое руководство пользователя
При использовании данного аппарата в первый раз, выполните установку, следуя приведенным ниже
пошаговым инструкциям. Подробная информация по управлению и установкам приведена на смежных
страницах.
Шаг 1: Подготовьте компоненты к
Шаг 2: Установите колонки
установке
Расположите колонки в комнате и подключите их
Подготовьте колонки, DVD-проигрыватель,
к аппарату.
кабели и другие необходимые для установки
• Размещение колонок ☞с. 10
компоненты.
• Подключение колонок ☞с. 11
Например, для установки 5.1-канальной
аудиосистемы подготовьте следующие
y
компоненты.
• Данный аппарат оснащен технологией YPAO (Yamaha
Parametric Room Acoustic Optimizer), которая выполняет
Фронтальная правая колонка
автоматическую оптимизацию работы данного аппарата на
основе акустических характеристик (аудиохарактеристик
Видеомонитор
колонок, положения колонок, акустики комнаты и т.п.).
С помощью технологии YPAO можно наслаждаться хорошо
Сабвуфер
Фронтальная левая
сбалансированным звуком, не обладая при этом специальными
колонка
знаниями (см. стр. 18).
Шаг 3: Подключите компоненты
Подключите телевизор, DVD-проигрыватель или
другие компоненты.
• Подключение ТВ-монитора или
проектора ☞с. 14
Центральная
• Подключение других компонентов ☞с. 15
колонка
• Подключение универсальной
Компоненты (например,
док-станции Yamaha iPod или
DVD-проигрыватель)
Правая колонка окружающего
беспроводного Bluetooth-приемника
звучания
Левая колонка окружающего звучания
аудиосигнала ☞с. 16
• Подключение FM- и AM-антенн ☞с. 17
Необходимые элементы к-во
Шаг 4: Включите питание
Колонки Фронтальная
2
колонка
Подключите силовой кабель и включите аппарат.
Центральная
1
колонка
• Подключение силового кабеля ☞с. 17
• Включение и выключение аппарата ☞с. 17
Колонка
2
окружающего
звучания
Шаг 5: Выбор источник входного
Активный сабвуфер 1
сигнала и начните воспроизведение
Кабель колонки 5
Выберите компонент, подключенный в шаге 3, в
Кабель сабвуфера 1
качестве источника входного сигнала и начните
воспроизведение.
Компонент для воспроизведения, например
1
DVD-проигрыватель
• Основная процедура ☞с. 21
Видеомонитор, например, телевизор 1
• Выбор программ звукового поля ☞с. 24
Видеокабель или кабель HDMI 2
y
• Данный аппарат поддерживает функцию SCENE, которая
Аудиокабель 2
позволяет одновременно изменять источник входного сигнала
и программу звукового поля. Для различных целей
y
предустановлены четыре сцены для дисков Blu-ray, DVD и CD,
• Подготовьте две колонки (для фронтального звука).
и выбор одной из этих сцен можно осуществлять, просто
Приоритет других колонок следующий:
нажимая клавишу пульта ДУ. См. стр. 21 для получения
1 Две колонки окружающего звучания
подробной информации.
2 Одна центральная колонка
• В случае использования тыловых колонок окружающего звука
подготовьте колонки, подключенные к другому усилителю.
• Если видеомонитор имеет электронно-лучевую трубку,
рекомендуется использовать колонки с магнитным экраном.
8 Ru
Для ознакомления с инструкцией необходимо нажать на ссылку «ЗАГРУЗИТЬ», чтобы скачать pdf файл. Если есть кнопка «ПРОСМОТР», то можно просто посмотреть документ онлайн.
Для удобства, Вы можете сохранить данную страницу с файлом руководства по эксплуатации в свой список «избранное» прямо на сайте (доступно для зарегистрированных пользователей).
Смотрите инструкцию для похожих моделей:

Вы можете задать вопрос посетителям сайта по модели YAMAHA RX-V465. Если Вы являетесь её пользователем, то пожалуйста оставьте, по возможности развёрнутый отзыв:
Усилители Yamaha RX-V465 — инструкция пользователя по применению, эксплуатации и установке на русском языке. Мы надеемся, она поможет вам решить возникшие у вас вопросы при эксплуатации техники.
Вы можете скачать инструкцию к Yamaha RX-V465 по ссылке ниже, если не хотите ждать загрузки. Если остались вопросы, задайте их в комментариях после инструкции.
«Загружаем инструкцию», означает, что нужно подождать пока файл загрузится и можно будет его читать онлайн. Некоторые инструкции очень большие и время их появления зависит от вашей скорости интернета.
Полезные видео
Остались вопросы?
Не нашли свой ответ в руководстве или возникли другие проблемы? Задайте свой вопрос в форме ниже с подробным описанием вашей ситуации, чтобы другие люди и специалисты смогли дать на него ответ. Если вы знаете как решить проблему другого человека, пожалуйста, подскажите ему

Часто задаваемые вопросы

Как посмотреть инструкцию к Yamaha RX-V465?
Необходимо подождать полной загрузки инструкции в сером окне на данной странице или скачать кликнув по специальной кнопке.
Руководство на русском языке?
Все наши руководства представлены на русском языке или схематично, поэтому вы без труда сможете разобраться с вашей моделью
Как можно распечатать инструкцию?
Скачайте ее по специальной кнопке над формой чтения на ваше устройства и отправьте на печать.