Как использовать приложение?
Вы можете использовать приложение для view живое видео и фотографировать.
Как изменить имя камеры?
Нажмите «Камера» в верхней части экрана, после чего вы сможете отредактировать имя камеры.
Как удалить устройство?
Пожалуйста, нажмите «Камера» в верхней части экрана, затем вы можете выбрать устройство и нажать «Удалить», чтобы удалить его.
Что мне делать, если я забыл свой пароль?
Пожалуйста, нажмите «Забыли пароль» на странице входа и введите свой адрес электронной почты, после чего вы получите электронное письмо со ссылкой для сброса пароля.
Что делать, если я не могу войти?
Проверьте, подключен ли ваш телефон к сети Wi-Fi 2.4G, и повторите попытку. Если у вас по-прежнему возникают проблемы со входом в систему, перезагрузите телефон и повторите попытку. Если у вас по-прежнему возникают проблемы со входом в систему после перезагрузки телефона, обратитесь в наш центр обслуживания клиентов по адресу service@ycc365.com.
Предупреждение: file_put_contents(gpt_tmp/87416): не удалось открыть поток: на устройстве не осталось места /mnt/volume_nyc3_01/import-admin/faq.php на линии 55
![]()
www.ycc365plus.com

Достаньте видеоняню из коробки. В комплекте с видеоняней вы увидите адаптер, шнур микро USB, крепления и инструкцию.
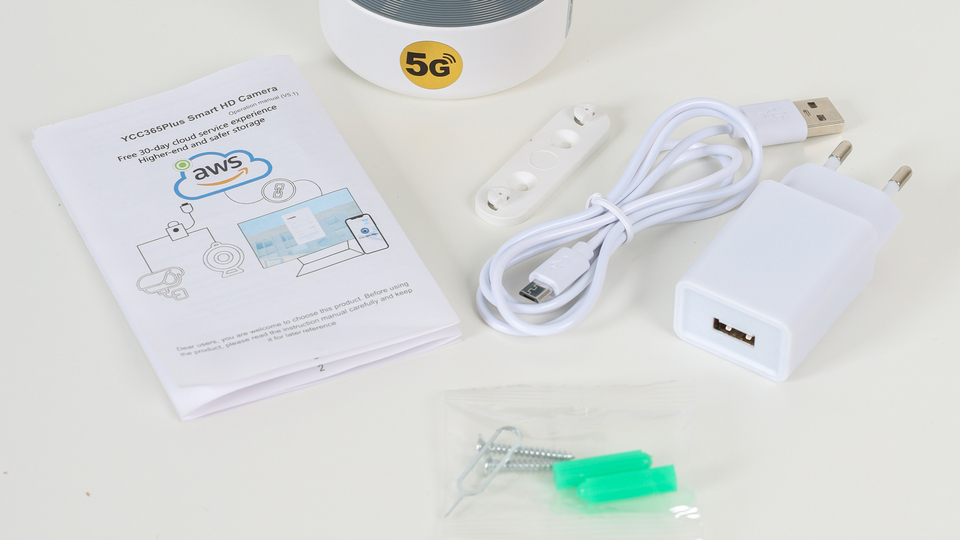
Подсоедините видеоняню через шнур micro USB к адаптеру и включите в розетку. Вы почувствуете небольшую вибрацию камеры и услышите приветствие.
Как скачать приложение
-
Найдите «YCC365 Plus» в Apple Store или магазине приложений для Android, Google Play и загрузите.
-
Отсканируйте QR-код и загрузите.
Возьмите бумажную инструкцию из комплекта и отсканируйте телефоном QR-код из нее, для этого необходимо включить камеру вашего телефона и навести на QR код. У вас откроется ссылка на скачивание приложения. Загрузите его на телефон, далее необходимо зайти в скаченное приложение. Смахивайте слайды влево, на последнем слайде будет кнопка «Войти», нажмите.
Как подключить камеру, добавить устройство
Зарегистрировать аккаунт
-
Когда вы используете это приложение в первый раз, вам необходимо использовать свой адрес электронной почты для регистрации учетной записи, нажать «Зарегистрироваться» и установить пароль в соответствии с этой процедурой или выбрать «Долгий вход с номером мобильного телефона».
-
Если вы забыли свой пароль, вы можете сбросить его, просто нажав «Забыли пароль» на странице входа.
-
Пароль должен состоять не менее чем из 6 знаков и не более чем из 26 знаков, он должен быть комбинацией букв и цифр.
-
Если появилось окно с просьбой ввести графический проверочный код, необходимо ввести код с картинки. Вам на почту поступит письмо с подтверждением адреса электронной почты, откройте его и пройдите по ссылке, указанной в письме. Если письмо не поступило, проверьте папки СПАМ и НЕЖЕЛАТЕЛЬНАЯ ПОЧТА, возможно письмо попало туда.
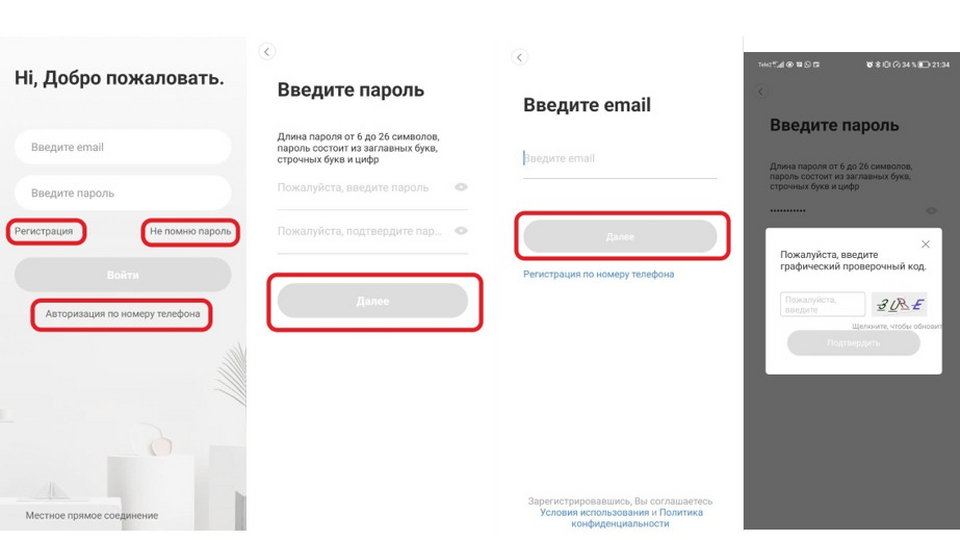
Регистрация номера мобильного телефона поддерживается только в некоторых регионах. Пожалуйста, используйте электронную почту для регистрации в других областях.
Подключите камеру
Версия Wi-Fi 5G поддерживает двухдиапазонный Wi-Fi роутер (частоты 2,4 ГГц и 5 ГГц).
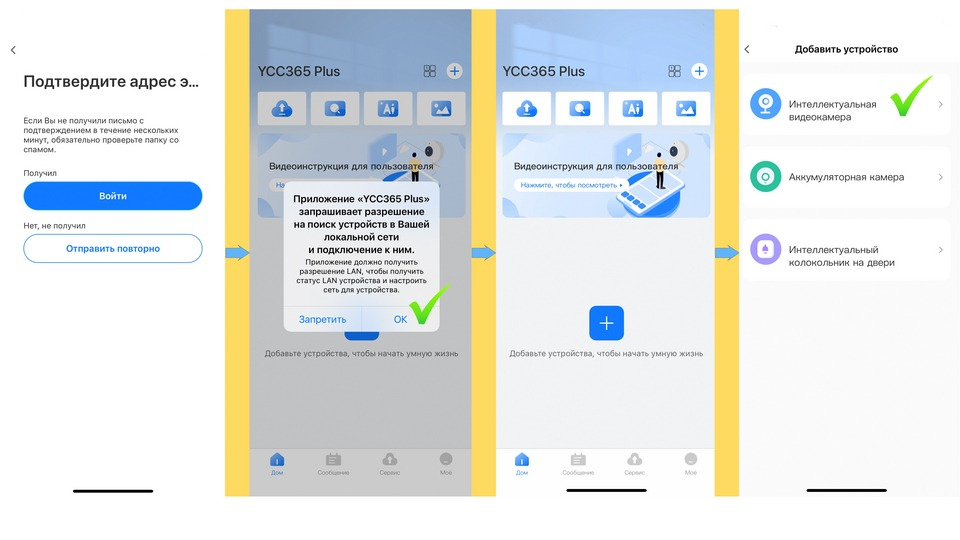
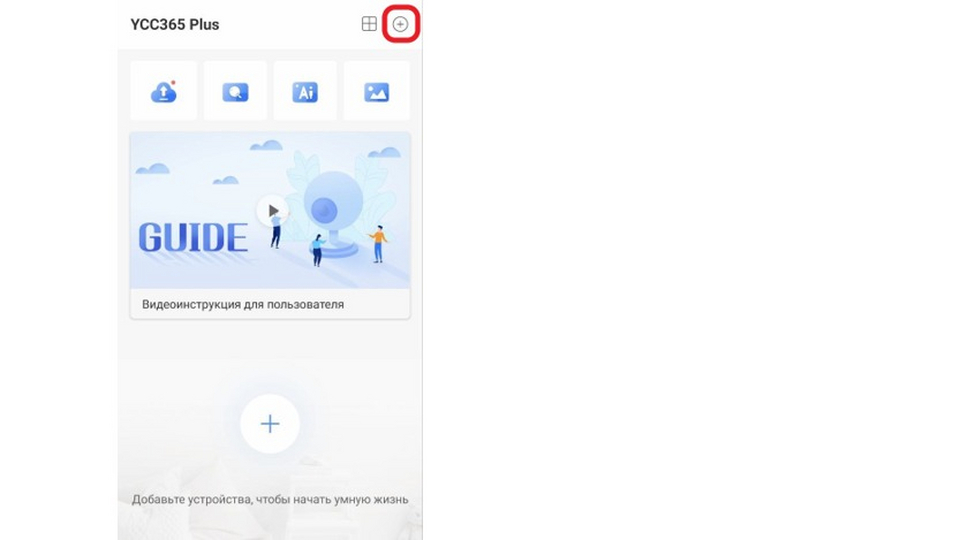
Возвращаемся в приложение. Нажмите на кнопку «Войти». При запросе приложения дать разрешение на поиск устройств в вашей локальной сети и подключению к ним, нажмите «ОК» Далее нажмите на кнопку «Добавить устройство», из списка устройств выберите «Интеллектуальная видеокамера».
Чтобы добавить устройство видеоняню воспользуйтесь двумя способами добавления:
1. Добавление путем «Отсканируйте код, чтобы добавить»
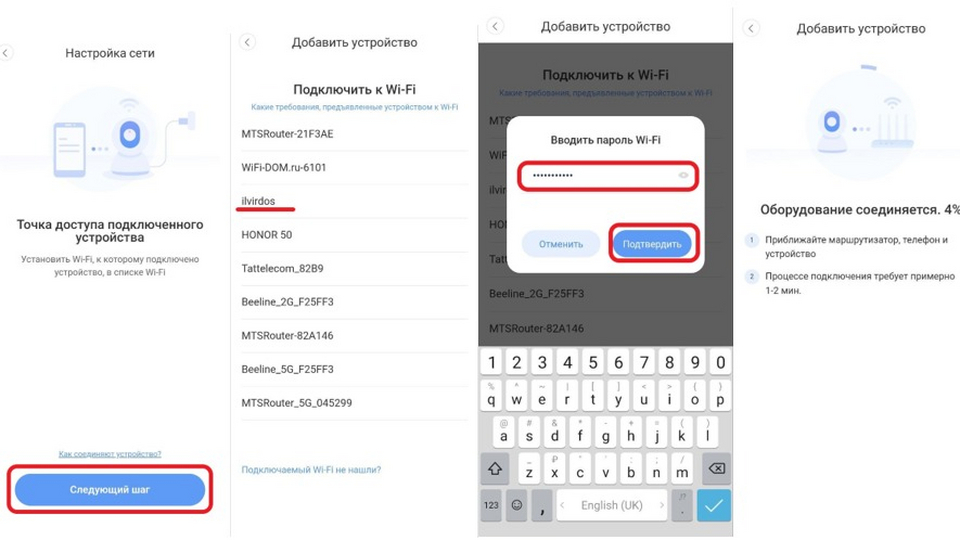
Выберите «Отсканируйте код, чтобы добавить», в открывшемся окне установите отметку «Устройство включено» и нажмите «Следующий шаг». Доступ на использование вашей геопозиции вы выбираете на ваше усмотрение Однократно, При использовании, Запретить, для подключения Wi-Fi выберите вашу сеть Wi-Fi и введите пароль. Для дальнейшего ускорения подключения к сети вы можете установить отметку «Запомнить пароль».
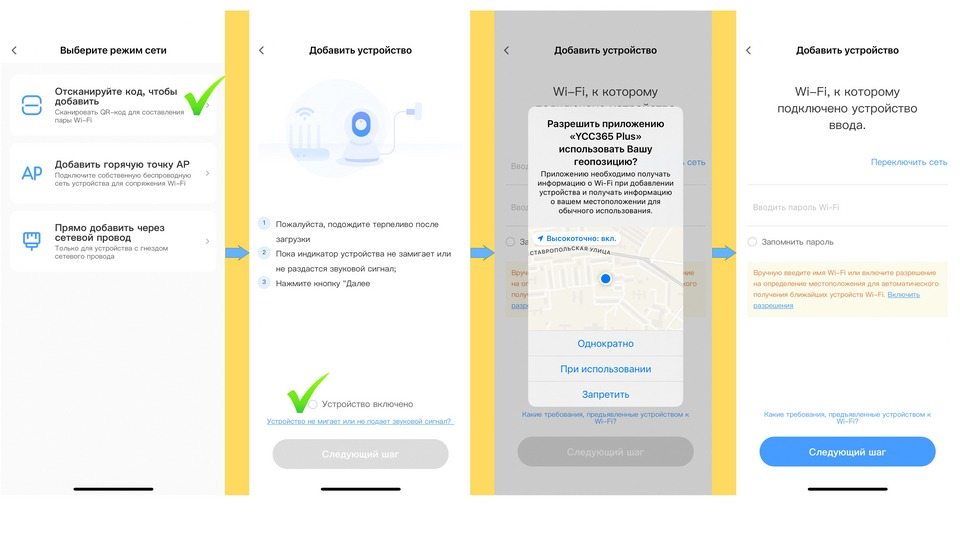
Далее вы нажмете «Следующий шаг» и начинаете сканировать QR-код
Чтобы добавить устройство, направьте QR-код на объектив видеоняни и постепенно отдаляйте до расстояния 15-20 см, когда видеоняня считает QR-код, вы услышите характерный звук (сигнал), нажмите на «Вы слышите тон или мигает», далее начнется подключение. Если всё сделано правильно, то вы услышите приветственное сообщение от видеоняни. В открывшемся окне можете указать название устройства и нажмите «Следующий шаг».
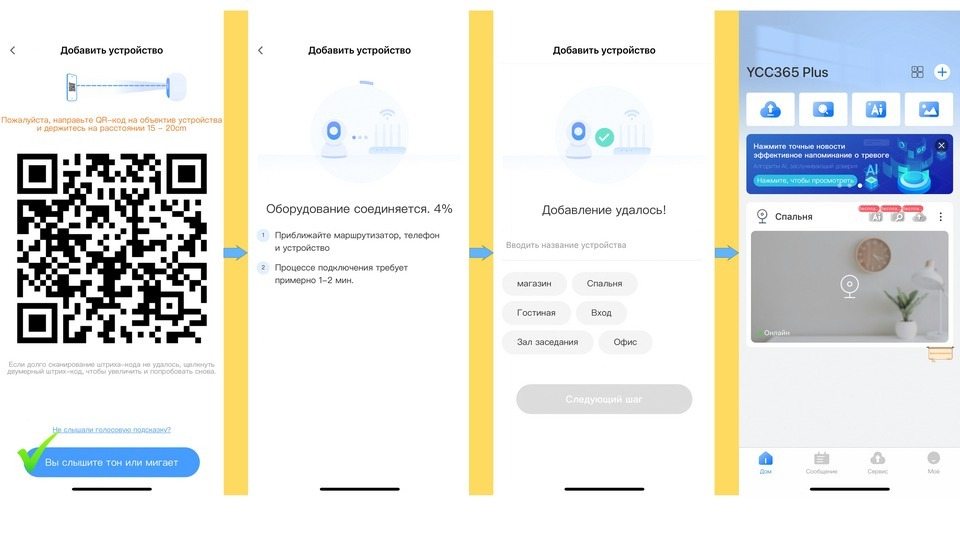
Поздравляем! Видеоняня готова к работе!
ВНИМАНИЕ! Если при подключении видеоняни первым способом у вас возникли проблемы (камера уходит в режим ожидания и не подключается, либо при закрытии приложения камера перестает функционировать), необходимо перезагрузить устройство, нажав на кнопку сброса «reset» и подключить камеру вторым способом через «Добавление точки доступа АР».
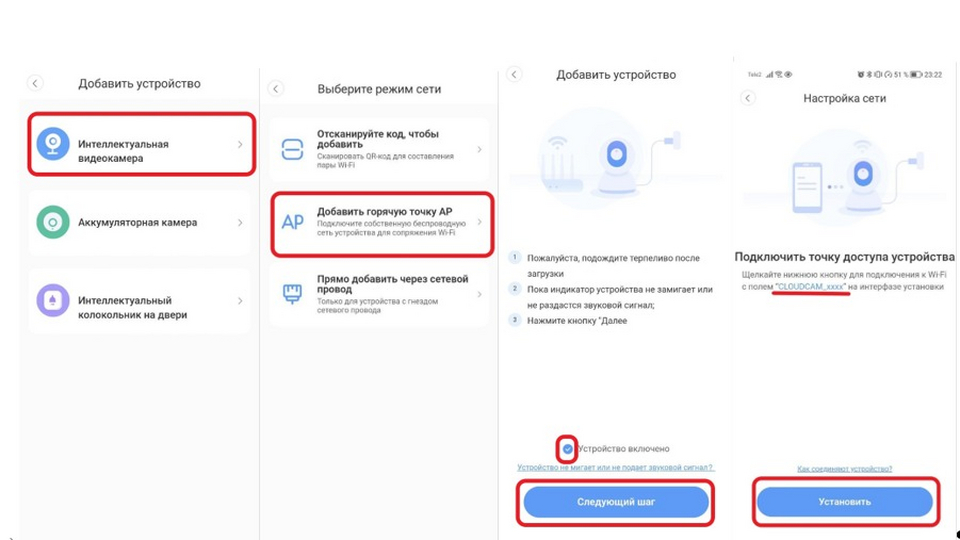
2. Добавление путем «Добавление точки доступа АР»
-
Нажмите кнопку в правом верхнем углу на главной странице приложения.
-
Выберите «Добавить горячую точку АР», подключите питание к камере, терпеливо дождитесь, пока индикатор устройства не начнет мигать или не услышит звуковой сигнал, затем в открывшемся окне установите отметку «Устройство включено» и нажмите «Следующий шаг».
-
Если вы не видите никаких подсказок, попробуйте перезагрузить устройство, найдите кнопку сброса «reset«, нажмите и удерживайте не менее 5 секунд, затем после запроса нажмите «Следующий шаг».
-
перейдите в список Wi-Fi и подключите Wi-Fi в синем поле «CLOUDCAM_XXXX». Выберите Wi-Fi, который соответствует префиксу, и подключитесь. Далее вернитесь в приложение после успешного подключения, нажав на стрелку в верхнем левом углу.
-
После успешного подключения устройства нажмите «Следующий шаг», выберите свой маршрутизатор Wi-Fi, в примере выбран маршрутизатор Wi-Fi с наименованием ilvirdos, введите пароль Wi-Fi, нажмите «Подтвердить», добавление выполнено успешно, затем вы можете в открывшемся окне указать название устройства и нажмите «Следующий шаг».
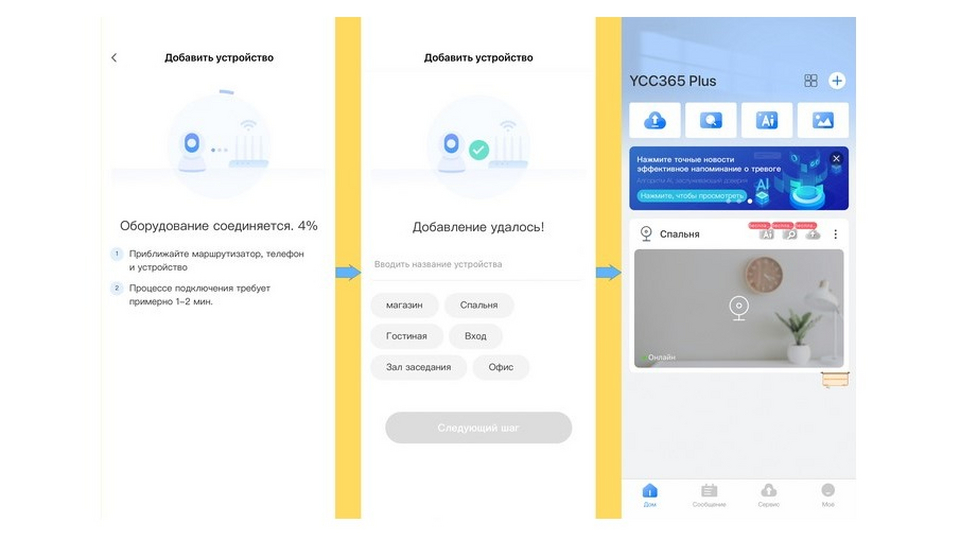
Поздравляем! Видеоняня готова к работе!

Menu
Adecuado para YCC365 PLUS, PIXPLUS, EYEPLUS APP
- Manual
How To Download APP
- Search “YCC365 Plus”in Apple Store or Android app store and download.
- Scan the QR code and download.
How to Connect Camera Add Device
Register an account
- When you use this app at the first time, you need to use your email to register an account, click”Sign Up”and set a password according this procedure,or choose Long in with mobile phone mumber.
- If you forget your password, you can reset your password, just click “Forgot password” on the login page.
- Password should be at least 6 characters and not longer than 26 characters,It should be a combination of letters and numbers.


Only support mobile phone number registration in some regions. Please use email to register in other areas.
Connect the camera
Note: Camera only supports 2.4G WIFI before adding devices, make sure your router is 2.4G
WIFI, and your phone is connected to 2.4G Wi-Fi.
Scan code to add
- Please make your phone connect to the Wi-Fi.
- Select your own 2.4GWi-Fi and enter your password.(5G network is not supported).
- Scan the camera lens toward the QR code of the phone,(Align the QR code with camera lens at a distance of 10-20cm)Hear a voice prompt,Click”When you hear a beep or a green linght”after hearing the beep, Keep the camera cas close as possible to the router, The connection process takes about 1-2minutes,after you will hear welcome to use camera.


Addition by connection to network cable (Only support Lan port device)
- Click the button in the upper right comer on the app homepage.
- Choose the device type intelligent camera,choose the addition by connecting to network cable.
- Plug in the power to the camera,Device network port is connected to the network cable Scan device body QR code,put the QR code on the device body into the box and scan it.
- Please wait patiently ,The connection process takes about 1-2minutes,after you will hear welcome to use camera.

Addition of AP hotspot
- Click the button in the upper right comer on the app homepage.
- Choose the Addition of AP hotspot,Plug in the power to the camera,Wait patienty for the device light to blink or hear a tone,Click Next when done.
- If you don’t see any tips,try resetting your device,Find the reset button,Long press for at least 5s,click next after prompted.
- please go to the Wi-Fi list and connect the Wi-Fi in the blue field “CLOUDCAM_XXXX” Select the Wi-Fi that matches the prefix and connect Return to APP after successful connection.
- After connecting the device successfully click next,Choose your router Wi-Fi,Enter Wi-Fi password,Click confirm,Addition is successful,then your can preview the screen.

AP Direct mode (special)
- Open the YCC365plus app to enter the login interface, click “Local login” .
- Click the button in the upper right “+” on the app homepage.
- Click “AP networked device preview” and Click “Next” .
- Go to Setting Network click your phone connect to “CLOUDCAM_XXXX” network.
- Network setting set the Wi-Fi has been connected with this device and Click “Next” .
- Enter user Name: admin Password: 12345 Click “Next”, then your can preview the screen.

Function introduction
Real-time preview interface

PTZ/ Preset
- PTZ
By sliding steering wheel or sliding the screen on the live preview can control the camera’s rotation .
1、Turn off camera.
2、PTZ reset .
3、Click the presets icon to enter the preset management interface.
4、Light.
5、Shere family .
Picture for reference Since different cameras have different functions, the actual display interface shall prevail
Video playback
A: Select “View Playback” at the bottom right corner of the live interface to view the playback video of the camera.
B: Switch playback path, you can choose to watch cloud playback/memory card playback.
Preferences
Click ” Set icon ” in the preview screen check the parameter menu
Picture for reference
Since different cameras have different functions, the actual display interface shall prevail
Split screen to watch(Only for multiple equipment under the same account)
- Click on the split screen button to realize simultaneous preview of multiple devices
- Note: More than two machines, with split screen function.


How to use a camera on a computer
- Lon ln ycc365plus.com
-
Enter your account number and password,click to Login
Frequently asked questions
Can’t add the device?
- A、Please make sure the camera has been reset, Press the Reset button until hear the prompt tone.
- B、Only support 2.4GHZ Wi-Fi, if your Wi-Fi router is 5GHZ, please switch to 2.4/5GHZ dual mode.
- C、Please turn on the GPS service before adding the device on the Android mobil phone , After installation is complete, you will be asked to turn on GPS service when you use the app at the first time, if you choose not to turn on the GPS service, please uninstall and reinstall the app again.
- D、Please confirm the camera wasn’t binding by the other account.
- There are four voice prompts in the progress.
- 1)“Please configure camera by AP hotspot or scanning code”.
- 2)Select your Wi-Fi and login with your password, after the device makes a noise like “beep”you will hear this “Please wait for Wi-Fi connecting”.
- 3)“Please wait for internet connecting”after getting the Internet ip address.
- 4)“Internet connected welcome to use cloud camera”.
- A、If you can’t go to the second step, please check your Wi-Fi channel is not hidden, and the Wi-Fi router can’t be so far from the camera, If this way doesn’t work, please scan the QR code to add the camera.
- B、If you can’t go to the third step, please reduce the number of the Wi-Fi users, and delete the special characters of your Wi-Fi password.
- C、If you can’t go to the forth step, please try again, if it still doesn’t work, please contact the seller.
Why does it Intermittent video recording ?
- The size of the video file is limited,Once the video size close to the critical value, the video file will be created and the next video will continue to be recorded, there is a interval but so short.
Why does the camera is disconnected?
- Please check Wi-Fi or whether the power switch is normal,If it’s normal,Please Restart camera,Or delete the camera in the APP and Please reconnect the camera.
How to add family email account ?
- Comer on the App homepage,Click Settings to choose a shared device,Add family Email.
How many people access an account at the same time?
-
There is no limit to the number of people who can access the account,But the same camera can support 3 peoples to view the same time.
Cannot recognize TF card?
-
Please check whether the TF card meets the quality requirements.If the Wi-Fi signal is poor, it may be that the card cannot be read.
After the cloud service expires, the recording timeline is blank.
- After the cloud service expires, the video cannot be replayed. If there is no TF card in the camera, the video cannot be recorded.
- If the TF card can always work, but the video file disappeared, please check the “Check TF card” status.
- If it is normal in the application but no video has been recorded, please format the TF card. If it still cannot be used, please replace it with a new TF card and try again.
Cannot read the wireless network name after connecting to the iphone
- First,IOS and Android devices need to enable location permissions.
- Connect the iPhone to the Wi-Fi network through configuration, and then add the camera, which can automatically read the network name.
Why can’t I switch to another account to configure the camera WIFI?
-
The camera can only be bound to one account, and other accounts can only be viewed through the sharing mechanism, If other accounts need to reconfigure the camera, please use the APP in the delete camera first.
How to connect my camera to other Wi-Fi?
-
Two ways:
A: When you need to change to another Wi-Fi without moving the location.
B:When the camera is replaced and no other WIFI can be found,please try resetting your
device,in the app homepage will prompt “device offline”, click “Troubleshooting”, reset the
camera, and then add WIFI again. Parameter setting >> Network information >> Select Wi-Fi.
No technical service is provided here. Please contact the vendor for your video camera issues. Thank you very much!
YCC365 PLUS, PIXPLUS, EYEPLUS
@2018-2023 ycc365plus.com
This manual contains all the contents of YCC365 PLUS, how to add it, how to set up the functions of YCC365 PLUS cameras, etc. continuously updated.
This guide applies to YCC365 and YCC365 PLUS cameras.
YCC365 PLUS APP download
YCC365 PLUS supports Android and iPhone, you can download it from google play or app store.
Register your account and login
Log In Open the app, and log in with your YCC365 PLUS. If you don’t have an account, create one first.
YCC365 Plus camera has three connection methods, you can choose any one of them.
Scan code to add
Camera pair with Wi-Fi by scanning QR code on the mobile phone.
1. Click the ‘+’ icon, select Intelligent camera > Scan code to add

2. Connect the YCC365 Plus camera to the power supply, then wait for the camera to start, when the camera issues a voice prompt, click Next.
(If the camera does not support voice intercom, please check the indicator)
Note
If the camera does not issue a voice prompt, please reset the camera.

3. Enter your wifi password, and make sure your wifi name and password are correct, then click Next.
It is recommended to connect 2.4G wifi, some cameras only support 2.4G wifi, and 2.4G wifi distance is far.

4. Let the camera scan the displayed QR code, when the camera makes a ticking sound, it means the scan is successful, please click You hear a tone or the indicator light. (Did not hear the voice prompt?)

5. Wait for the camera to connect to the wifi, about 1-2 two minutes. After successful connection, set a name and you can start using it.

Addition of AP hotspot
Connect the camera own wireless network to pair WI-FI.
1. Select Addition of AP hotspot, connect the camera to the power source, and wait for the camera to boot up, when the camera issues a voice prompt, click Next.
(If the camera does not support voice intercom, please check the indicator)

2. Click Go to Setting, connect your phone to the ‘CLOUDCAM_XXX‘ wifi, then go back to YCC365 PLUS and click Next.

3. Select your wifi and enter your wifi password, then click Confirm

4. Wait for the camera to connect to the wifi, about 1-2 two minutes. After successful connection, set a name and you can start using it.

Addition of Network cable
Only applicable for the device with the network cable socket
1. Connect the camera to the router with a network cable and connect it to the power supply, then wait for the camera to boot up and when it beeps, click Next.

2. Scan the QR code on the camera, which is usually on the bottom of the camera. The camera will be added after scanning.

Local connection to YCC365 PLUS Camera
Local connection You can use the YCC365 PLUS camera without internet connection.
1. In the Login or Mine screen, click Local direct connection.

2. Click ‘+’, select your camera, click Next.

3. Click Go To Setting, connect to CLOUDCAM_XXXX wifi, then return to YCC365 PLUS APP.

4. Enter the username and password of the camera to complete the connection.
Default username: admin , password: 12345

Camera Function Setting
You can share the camera to your family or friends.
1. Click the camera to enter the video screen, then select Share

2. Click ‘Add family member‘, then set a name and enter your family or friend’s YCC365 account to share.

Recording Settings
The camera needs a memory card to record video, please insert the memory card first.
Insert the memory card when the camera is off, otherwise the camera may not recognize the memory card.
1. Click the Settings icon > Memory card management
The camera recognizes the memory card will show the setting options, the default is Alarm recording, the camera will record only when motion is detected.

2. Click Recording mode to select the recording mode.
Select Continuous recording, the camera will be 24 hours continuous recording.

View Camera Recording
Click Playback and select Card playback. You can then view the video saved on the memory card.
The blue time indicates that there is video at the current time.

Mobile tracking settings
Open Intelligent tracking, the camera will follow the movement of the object.
![]()
PTZ Settings
You can save the camera’s moving position, so that the camera can quickly move to the specified location.
Click Save to save the current location, then enter the Presets page, you can see the saved location, click the picture The camera will automatically move to the specified location.

How to reset YCC365 PLUS camera?
When the YCC365 PLUS camera is offline, or change the wifi, you can reset the camera, after reset will be restored to factory settings.
Steps to reset the camera:
Step 1
Make sure the camera is powered on, then find the reset button of YCC365 PLUS camera.
The reset button is usually on the bottom, head, and back of the camera.
Step 2
Press and hold the reset button for about 5 seconds, the camera emits a ‘reset success’ voice prompt, it means the reset is successful.
Step 3
The camera will restart after the reset, and then you can start connecting the camera.
How to download Micro SD card video to my phone?
Method 1:
1. Click on ‘Card playback’ to view the video, select the time you want to save, then click on the ‘![]() ‘ icon, it will start recording, click once more ‘
‘ icon, it will start recording, click once more ‘![]() ‘ to save the video to your phone.
‘ to save the video to your phone.

2. You can find the saved video in Mine > Album page, click ‘Share’ to save it to your phone album.

Method 2:
If you need to save videos quickly and completely, you need to use Micro SD Card Reader to connect your phone.
To avoid video corruption, please remove the memory card when the camera is turned off.
FAQ
Did not hear the voice prompt?
- Ensure that the power supply of the device has been connected.
- Please tear off the protective film and use the QR code to configure the network
- Ensure that the distance between QR code and the device is 6-8 inches.
- Replace the other connection methods
What sd card does YCC365 PLUS camera support?
YCC365 PLUS camera supports Micro SD Card, minimum 8GB, class10 memory card.
We recommend using a SanDisk or Samsung Micro SD Card.
Can YCC365 PLUS add multiple cameras?
You can add more than one YCC365 PLUS camera, you need to connect them one by one, you can’t connect more than one camera at the same time.
Forgot your YCC365 PLUS camera password?
You need to reset the camera, after reset it will revert to the default password 12345
Why can’t I control the rotation of YCC365 PLUS camera?
Unable to control the camera rotation, usually a hardware problem, we recommend contacting your camera seller.
Why does the YCC365 PLUS camera pause the video after 15 minutes?
The camera live video will automatically pause after 15 minutes of viewing, the cloud storage is 30 minutes to pause the video.
You can click ‘Split View’ to view the camera, currently this way you can watch all the time and will not automatically pause the video.
You can find the Split View button on the top right corner of Home.
What is the hotspot wifi name of YCC365 PLUS camera?
wifi name: CLOUDCAM_XXXXXXXXXX, no password.
ИНСТРУКЦИИ ПО ПОДКЛЮЧЕНИЮ КАМЕР К ПРИЛОЖЕНИЯМ
V380Pro

Уличная камера видеонаблюдения 4G LS Vision

Домашняя беспроводная камера видеонаблюдения H5 LS Vision

Уличная камера видеонаблюдения Y165 LS Vision

YCC365

Беспроводная поворотная IP Wi-Fi камера H360 LS Vision

Yoosee

Уличная камера видеонаблюдения Y165 LS Vision
HDWiFiCamPro

Мини камера видеонаблюдения М10 LS Vision

Мини камера видеонаблюдения М11 LS Vision

Hisee SE

Уличная камера видеонаблюдения Y165 LS Vision
Уличная камера видеонаблюдения Y167 LS Vision

Yi lot

Уличная камера видеонаблюдения Y165 LS Vision
Уличная камера видеонаблюдения Y167 LS Vision

Подключение уличной G4 LS Vision камеры к приложению V380 Pro
Прежде чем начать настройку приложения, вставьте сим-карту в выключенную камеру
(камера не поддерживает мобильного оператора Теле-2)
Шаг 1

Скачайте приложение V380Pro. Для этого отсканируйте qr-код с упаковки или найдите в строке поиска Google Play или App Store
Шаг 2


Зарегистрируйтесь с помощью электронной почты
Шаг 3
В приложении нажните “+” в правом верхнем углу.
Затем выберите “камера с SIM”.


Шаг 4
Отсканируйте QR-код на корпусе камеры


Шаг 5
Дождитесь завершения загрузки. Камера готова к использованию
Шаг 6
Если камера после включения не сделала тестовые обороты, зажмите кнопку reset на 10 секунд.
Подключение уличной камеры Y165 LS Vision к приложению V380 Pro
Прежде чем начать настройку приложения, вставьте сим-карту в выключенную камеру
Шаг 1
Скачайте приложение V380Pro. Для этого отсканируйте qr-код с упаковки или найдите в строке поиска Google Play или App Store.
Шаг 2
Зарегистрируйтесь с помощью электронной почты
Шаг 3
В приложении нажните “+” в правом верхнем углу.
Шаг 4
Отсканируйте QR-код на камере.

Шаг 5
Нажмите “Добавить камеру с помощью Wifi”

Шаг 6
Подключитесь к точке доступа

Шаг 7
Введите логин и пароль от Wi-Fi

Шаг 8
Перейдите в настройки своего Wi-Fi и выберите камеру (обычно имя камеры начинается на MV…)

Шаг 9
Наведите на камеру QR код / в настройках Wi-Fi выберите название камеры.
Дождитесь завершения загрузки. Готово! Вы можете управлять камерой.
Шаг 10
Если камера после включения не сделала тестовые повороты, зажмите кнопку reset на 10 секунд
Подключение домашней беспроводной камеры H5 LS Vision к приложению V380 Pro
Прежде чем начать настройку приложения, вставьте сим-карту в выключенную камеру
Шаг 1
Скачайте приложение V380Pro. Для этого отсканируйте qr-код с упаковки или найдите в строке поиска Google Play или App Store.
Шаг 2
Зарегистрируйтесь с помощью электронной почты
Шаг 3
В приложении нажните “+” в правом верхнем углу.
Шаг 4
Отсканируйте QR-код на камере.
Шаг 5
Нажмите “Добавить камеру с помощью Wifi”
Шаг 6
Подключитесь к точке доступа
Шаг 7
Введите логин и пароль от Wi-Fi
Шаг 8
Перейдите в настройки своего Wi-Fi и выберите камеру (обычно имя камеры начинается на MV…)
Шаг 9
Наведите на камеру QR код / в настройках Wi-Fi выберите название камеры.
Дождитесь завершения загрузки. Готово! Вы можете управлять камерой.
Шаг 10
Если камера после включения не сделала тестовые повороты, зажмите кнопку reset на 10 секунд

Подключение мини камеры видеонаблюдения М11 к приложению HDWiFiCamPro
Шаг 1

Скачайте приложение HDWifiCamPro. Для этого отсканируйте qr-код с упаковки или найдите в строке поиска Google Play или App Store
Шаг 2

Нажмите “+” в правом верхнем углу.
Шаг 3

Нажмите “Добавить камеру с помощью Wifi”
Шаг 4

Введите логин и пароль от своего WiFi
Шаг 5

Перейдите в настройки WiFi и выберите название камеры. Оно имеет вид “DGK-XXX-XXX” или “DBG-XXX-XXX”
Шаг 6
Вернитесь обратно в приложение. Камера подключена
Шаг 7
Если камера не подключается, сбросьте её до заводских настроек. Для этого зажмите кнопку MODE на 5 секунд.
Подключение мини камеры видеонаблюдения М10 к приложению HDWiFiCamPro
Шаг 1
Скачайте приложение HDWifiCamPro. Для этого отсканируйте qr-код с упаковки или найдите в строке поиска Google Play или App Store
Шаг 2
Нажмите “+” в правом верхнем углу.
Шаг 3
Нажмите “Добавить камеру с помощью Wifi”
Шаг 4
Введите логин и пароль от своего WiFi
Шаг 5
Перейдите в настройки WiFi и выберите название камеры. Оно имеет вид “DGK-XXX-XXX” или “DBG-XXX-XXX”
Шаг 6
Вернитесь обратно в приложение. Камера подключена
Шаг 7
Если камера не подключается, сбросьте её до заводских настроек. Для этого зажмите кнопку MODE на 5 секунд.
Видеоинструкция. Подключение мини камеры видеонаблюдения М10 к приложению HDWiFiCamPro

Подключение уличной камеры Y165 LS Vision к приложению Yoosee
Шаг 1

Скачайте приложение Yoosee . Для этого отсканируйте qr-код с упаковки или найдите в строке поиска Google Play или App Store. Зарегистрируйтесь с помощью электронной почты.
Шаг 2

Нажмите “+” в правом верхнем углу
Шаг 3

Нажмите “добавить точку доступа”
Шаг 4

Перейдите в настройки Wi-Fi и выберите камеру (как правило название камеры начинается на «GW _XXX», где «XXX» относится к идентификационному номеру камеры)
Шаг 5

После завершения загрузки вы сможете управлять камерой через приложение
Шаг 6
Если камера после включения не сделала тестовые повороты, зажмите на 10 секунд кнопку reset

Подключение уличной камеры Y165 LS Vision к приложению Hisee SE
Шаг 1

Скачайте приложение Hisee SE . Для этого отсканируйте qr-код с упаковки или найдите в строке поиска Google Play или App Store. Зарегистрируйтесь с помощью электронной почты.
Шаг 2

Нажмите “+” в правом верхнем углу
Шаг 3

Выберите пункт “интеллектуальная камера”
Шаг 4

Выберите пункт “отсканировать код”
Шаг 5

Введите логин и пароль от своего Wi-Fi
Шаг 6

Наведите на камеру QR код
Шаг 9
После завершения загрузки вы сможете управлять камерой через приложение
Дождитесь завершения загрузки. Готово! Вы можете управлять камерой.

Шаг 10
Если камера после включения не сделала тестовые повороты, зажмите кнопку reset на 10 секунд
Подключение уличной камеры Y167 LS Vision к приложению Hisee SE
Шаг 1
Скачайте приложение Hisee SE . Для этого отсканируйте qr-код с упаковки или найдите в строке поиска Google Play или App Store. Зарегистрируйтесь с помощью электронной почты.
Шаг 2
Нажмите “+” в правом верхнем углу
Шаг 3
Выберите пункт “интеллектуальная камера”
Шаг 4
Выберите пункт “отсканировать код”
Шаг 5
Введите логин и пароль от своего Wi-Fi
Шаг 6
Наведите на камеру QR код
Шаг 9
После завершения загрузки вы сможете управлять камерой через приложение
Дождитесь завершения загрузки. Готово! Вы можете управлять камерой.
Шаг 10
Если камера после включения не сделала тестовые повороты, зажмите кнопку reset на 10 секунд

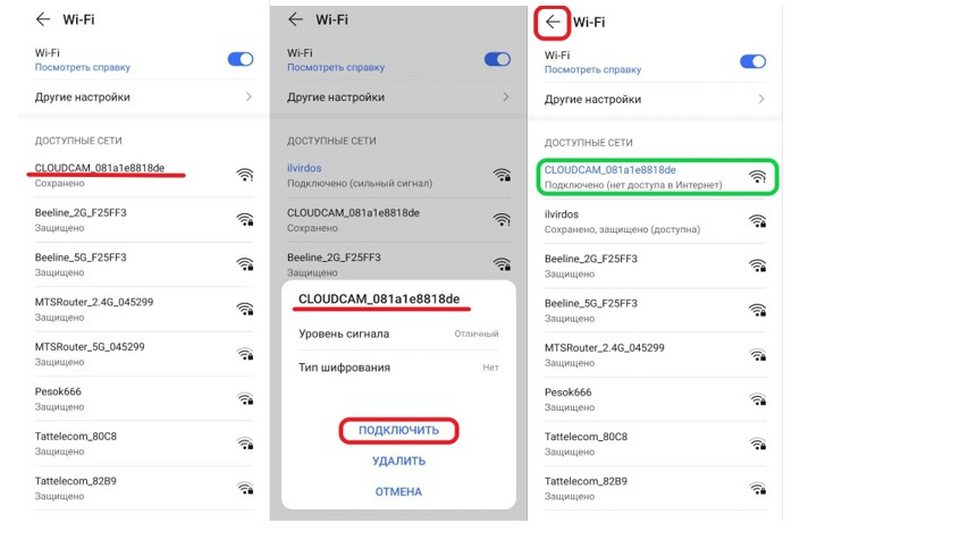
Подключение беспроводной Wi-Fi камеры к приложению YCC365 Plus
Шаг 1

Скачайте приложение YCC365 Plus. Для этого отсканируйте qr-код с упаковки или найдите в строке поиска Google Play или App Store. Зарегистрируйтесь с помощью электронной почты.
Шаг 2

В приложении выберите “Интеллектуальная камера”
Шаг 3

Затем выберите “Добавить горячую точку АР”
Шаг 4
Поставьте галочку “Устройство включено”
Шаг 5

Необходимо подключить точку доступа. Нажмите “Установить” и вы перебросит в настройки Wi-Fi.
Шаг 6

В настройках Wi-Fi выберите название камеры (оно всегда будет начитаться на CLOUDCAM…). После того как Вы выбрали камеру, необходимо вернуться обратно в приложение.
Шаг 7

После того, как вы перешли в приложение введите пароль от своего Wi-Fi. Если камера не находит его автоматически, нажмите внизу на кнопку “Подключаемый Wi-Fi не нашли?”, затем необходимо ввести вручную логин и пароль.
Шаг 8

Подождите пару минут, когда камера подключиться. После завершения загрузки вы сможете управлять камерой через приложение.
Шаг 9
Если камера после включения не сделала тестовые повороты, зажмите кнопку reset на 10 секунд
Шаг 7
Если камера после подключения не сделала тестовые повороты зажмите кнопку reset на 10 секунд.

Подключение уличной камеры Y165 LS Vision к приложению Yi lot
Шаг 1

Скачайте приложение Yi lot . Для этого отсканируйте qr-код с упаковки или найдите в строке поиска Google Play или App Store. Зарегистрируйтесь с помощью электронной почты.
Шаг 2

Нажмите “+” в правом верхнем углу
Шаг 3

Подключите камеру с помощью Wi-Fi
Шаг 4

Введите логин и пароль от своего Wi-Fi
Шаг 5

Наведите на камеру QR код
Шаг 6
Дождитесь завершения загрузки. Готово! Вы можете управлять камерой через приложение.
Шаг 7
Если камера после подключения не сделала тестовые повороты зажмите кнопку reset на 10 секунд.
Подключение уличной камеры Y167 LS Vision к приложению Yi lot
Шаг 1
Скачайте приложение Yi lot . Для этого отсканируйте qr-код с упаковки или найдите в строке поиска Google Play или App Store. Зарегистрируйтесь с помощью электронной почты.
Шаг 2
Нажмите “+” в правом верхнем углу
Шаг 3
Подключите камеру с помощью Wi-Fi
Шаг 4
Введите логин и пароль от своего Wi-Fi
Шаг 5
Наведите на камеру QR код
Шаг 6
Дождитесь завершения загрузки. Готово! Вы можете управлять камерой через приложение.
Шаг 7
Если камера после подключения не сделала тестовые повороты зажмите кнопку reset на 10 секунд.