
- Информационный экран
- Световой индикатор (мигает при звонках и в беззвучном режиме)
- Софт-клавиши. Меняют свои значения для управления в пунктах меню. На главном экране являются «быстрыми» клавишами для часто используемых функций. Могут быть перепрограммированы через WEB-интерфейс телефона.
- Клавиши для перемещения по меню.
- Клавиша доступа к голосовой почте.
- Клавиша переключения между трубкой и гарнитурой.
- Отключение микрофона.
- Клавиша перевода звонков. (Call Transfer).
- Клавиша включения спикера (динамика)
- Клавиша повторного звонка на последние набранные номера.
- Клавиши регулировки громкости. Регулируют громкость звонка в спокойном состоянии и громкость звука при разговоре.
- Клавиши набора.
- Динамик громкой связи
- Фиксатор трубки при вертикальном расположении аппарата.
- Рычаг отбоя.
Функции телефона.
Исходящий звонок. Снимите трубку, наберите номер. Вызов начнется через 3 секунды. Либо нажмите {Вызов} (Рис. п.3) или # (клавиши набора) или ✔(Рис. п.4) Исходящий звонок через гарнитуру или по громкой связи осуществляется так же, только вначале нужно нажать соответствующую клавишу (Рис. п.6 или Рис. п.9). Входящие вызовы. В организации три входящие линии с номерами +7(495)626-23-52, +7(495)626-24-52 и +7(495)626-24-62. Будьте внимательны! Случайное нажатие на клавишу DND под дисплеем приводит к отключению звонков поступающего вызова. Проверьте: при нажатой клавише DND, в правом верхнем углу дисплея появляется квадрат с вписанными буквами DND. При звонке на номер +7(495)626-23-52 после информационного сообщения автосекретаря, звонок переключается на диспетчерскую службу, на номера 100, 101 или 102. При звонке на номер +7(495)626-24-52 после звукового приветствия можно набрать внутрений номер сотрудника (в цифровом формате набора) или 0 для соединения с помощью секретаря. При вызове на номер +7(495)626-24-62 соединение с сотрудником происходит с помощью секретаря. Для приема входящего звонка достаточно поднять трубку или нажать соответствующую клавишу: Гарнитура (Рис. п.6) или Громкая связь (Рис. п.9).
Повторный набор номера. Нажмите клавишу повторного набора номера (Рис. п.10) и при помощи клавиш перемещения по меню выберите нужный номер (Рис. п.4). После чего нажмите {Вызов} (Рис. п.3) Или дважды нажмите клавишу повторного набора для вызова последнего набранного номера.
Трансфер (Перевод вызова)
Слепой трансфер Во время разговора нажмите клавишу перевода звонка (Рис. п.8). Наберите номер, на который нужно перевести звонок. Еще раз нажмите клавишу перевода звонка и повесьте трубку.
Полуавтоматический трансфер. Во время разговора нажмите клавишу перевода звонка (Рис. п.8). Наберите номер, на который нужно перевести звонок, затем нажмите # для вызова абонента. Нажмите клавишу перевода звонка, когда услышите гудки дозвона.
Сопроводительный трансфер. Во время разговора нажмите клавишу перевода звонка (Рис. п.8). Наберите номер, на который нужно перевести звонок, затем нажмите # для вызова абонента. Дождитесь ответа и предупредите о переводе звонка, затем нажмите клавишу перевода.
Переадресация вызова
Для включения переадресации на заданный номер выполните следующие действия.
- Нажмите {Меню} (Рис. п.3) и выберете ФункцииПереключить вызов.
- Клавишами навигации выберете тип переадресации:
Всегда: переадресация всех вызовов Когда занято: переадресация при занятом телефоне Нет ответа: переадресация если нет ответа в течении заданного времени
- Выбираем Открытие (при помощи клавиш Влево и Вправо (Рис. п.4)
- Нажимаем клавишу Вниз (Рис. п.4) и в поле Номер вводим абонента для переадресации
- Если выбрано условие переадресации Нет ответа то еще раз нажимаем Вниз и вводим время ожидания ответа.
- Нажимаем {Сохр} (Рис. п.3)
Условия переадресации можно комбинировать. Для отключения режима переадресации проделываем обратные действия.
Режим конференции
Во время активного разговора нажмите клавишу {Конф} (Рис. п.3). Затем наберите номер абонента которого хотите присоединить к разговору и нажмите {Вызов} (Рис. п.3). Дождитесь ответа и еще раз нажмите {Конф}. Проделайте это необходимое количество раз.
Для завершения конференц-звонка достаточно просто положить трубку.
Перехват вызова
Для перехвата вызова существует код АТС *04. Для осуществления перехвата необходимо снять трубку на своем телефоне, набрать код *04 и номер звонящаего аппарата, например *0412346
В современном мире всё больше компаний предпочитают использовать для офисных производственных нужд IP-телефонию вместо «традиционных» аналоговых телефонных сетей. Одним из наиболее зарекомендовавших себя производителей на сегодняшний день является Yealink. IP-телефоны Yealink отличаются хорошим соотношением цены и качества, поэтому заслуженно относится к наиболее часто выбираемым VoIP-решениям.
Вариации модели SIP T19 E2
- Yealink SIP-T19 E2 — стандартный функционал модели без поддержки питания по PoE;
- Yealink SIP-T19P E2 — модель с индексом P поддерживает получения питания по PoE (поставляется с блоком или без блока питания).
Модель поставляется в следующей комплектации:
- непосредственно сам SIP-телефон;
- телефонная трубка;
- провод для подключения трубки;
- Ethernet-кабель;
- подставка;
- адаптер питания;
- краткое руководство и гарантийный талон.
В руководстве описаны все основные вопросы, которые могут возникнуть при установке и эксплуатации телефона.

Сборка и установка Yealink SIP T19 E2
Начать установку телефона следует с прикрепления к нему подставки (если вы устанавливаете его на стол). Большим преимуществом является возможность как установки телефона на столе, так и его крепления на стену (в этом случае подставка не нужна). Если вы размещаете телефон на столе, то подставка придаёт ему удобный угол наклона, при котором хорошо видна информация на дисплее и комфортно нажимать на кнопки.

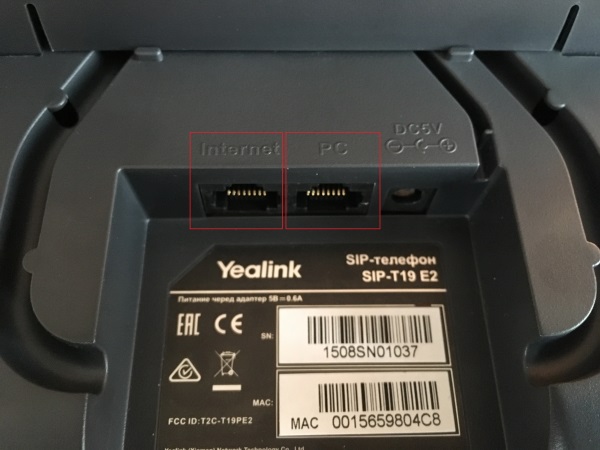
Затем подключаем трубку или гарнитуру (можно подключить одновременно и то, и другое), соответствующие два разъёма RJ9 (4P4C) расположены на левой стороне телефона в его нижней части. Кстати, возможность использовать как телефонную трубку, так и гарнитуру является ещё одним преимуществом SIP-T19P E2.

Следующим шагом будет подключение сети и питания. На задней стороне телефона в его нижней части расположены 2 разъёма RJ-45 – «Internet» и «PC», а также разъём для подключения адаптера питания.
Yealink SIP-T19P E2 поддерживает технологию PoE, поэтому если для работы в локальной сети вы используете коммутатор с поддержкой данной технологии, то адаптер питания вам не понадобится, т.к. телефон будет получать питание будет получать по сетевому UTP-кабелю.
Телефонный аппарат подключается к локальной сети через LAN-порт с надписью «Internet», а компьютер подключается к телефону через LAN-порт «PC». Это очень удобно, если к рабочему месту пользователя подведён только один сетевой кабель, поскольку таким образом к локальной сети оказываются подключёнными одновременно IP-телефон и ПК. Стоит только учитывать, что скорость портов IP-телефона Yealink SIP-T19P E2 составляет 100 Мбит/с, чего вполне достаточно для IP-телефонии, но если у вас гигабитная локальная сеть и вы хотите, чтобы на компьютере сеть работала со скоростью 1 Гбит/с, то нужно будет подключить ПК к сети отдельным сетевым кабелем.

Базовая настройка Yealink SIP-T19 E2
Далее нужно выполнить настройку IP-телефона. Для SIP-T19P E2 по умолчанию предусмотрен режим автоматического получения сетевых настроек от DHCP-сервера, но при желании все настройки можно выполнить вручную.
Оптимально действовать следующим образом. Смотрим IP-адрес телефона на дисплее (нажать клавишу «OK» – галочка, и на экране появится адрес) и вводим его в командную строку браузера для настройки с помощью веб-интерфейса.


Далее вводим логин/пароль (по умолчанию – admin/admin), переходим во вкладку «Аккаунт» и выставляем в соответствующих полях необходимые значения:
- в поле «Активная линия» – значение «Выбрано»;
- в поле «Лейбл» – любое слово или число, которое будет отображаться на дисплее телефона пользователя;
- в поле «Отображаемое имя» – любое слово или число, которое будет отображаться на дисплее телефона вызываемого абонента внутри сети АТС;
- в поле «Имя регистрации» – значение, выданное системным администратором;
- в поле «ID пользователя» – значение, выданное системным администратором;
- в поле «Пароль» – значение, выданное системным администратором;
- в поле «Адрес SIP-сервера» – локальный IP-адрес офисной IP-АТС и порт сервера (тоже выдаётся системным администратором).

После этого телефон готов к совершению и приёму звонков.
Правила набора на телефоне Yealink SIP T19 E2
Что касается использования телефона, то следует отметить некоторые его возможности. Например, если вы часто совершаете звонки на городские номера, то для того, чтобы каждый раз не набирать год города, можно его прописать. Для этого нужно зайти в веб-интерфейс, выбрать вкладку «Настройки», зайти в раздел «Правила набора», нажать там на вкладку «Код города» и ввести код и длину набираемых номеров.

Настройка экранных кнопок DSS
Также стоит обратить внимание, что некоторые кнопки аппарата являются настраиваемыми через веб-интерфейс во вкладке «DSS».

В целом, IP-телефон Yealink SIP-T19P E2 обладает достаточно большим количеством настроек. При этом для полноценной работы сотрудников, как правило, достаточно выполнить действия, описанные выше.
Резюме
Компания Yealink в очередной раз доказала, что качественные IP-телефоны могут быть недорогими, удобными и простыми в эксплуатации. Модель SIP-T19P E2 станет отличным выбором для малого и среднего бизнеса, сочетая надёжность, передовые технические решения и стильный дизайн.
IP-телефоны Yealink на рынке Казахстана появились в начале с 2013-го года.
За долгий период присутствия на рынке, бренд Yealink зарекомендовал себя только с положительной стороны. Линейка телефонов Yealink по праву заслужила признание покупателей.
Младшие модели линейки — Yealink SIP-T19 E2, а также модель Yealink SIP-T19P E2 сняты с произвоства в 2020-м году. Кстати, индекс «P» в названии ip-телефонов Yealink обозначает, что модель снабжена возможностью подачи питания через Ethernet-кабель (технология PoE, для которой необходимы специальные PoE-коммутаторы). Других отличий нет.
Не смотря, что T19 уже не производится, за годы было их продано большое колчество в Казахстане и по сегодняшний день модель можно считать актуальной.
Как настроить IP-телефон Yealink SIP-T19 E2?
В большинстве случаев, IP-телефоны устанавливаются в офис с учетом, того, что они будет подключен к офисной IP-АТС.
Нужно отметить, что все телефоны Yealink для удобства и экономии эксплуатации комплектуются двумя LAN-портами: «Internet» и «PC». Такое сочетание позволяет подключать одно рабочее место «Компьютер-телефон» через одну розетку локальной сети. Телефон подключается в электрическую сеть и в локальную сеть в LAN-порт с надписью «Internet», а компьютер подключается к телефону в LAN-порт «PC».
Телефон включен в электрическую сеть, подключен к локальной сети и к компьютеру.
Кстати,
К нам поступают звонки с вопросом «Что будет если подать высокое напряжение на телефон Yealink SIP-T19 E2?». Отвечаем: Производитель комплектует телефон блоком питания с выходом (питанием для телефона) 5В, 0.6А. Увеличение вольтажа, равно как и амперности, могут негативно отразиться на работе телефонного аппарата вплоть до полного выхода из строя. Поэтому, если у вас по каким-то причинам перегорел блок питания, обратитесь к официальному продавцу Yealink и купите оригинальный блок питания, не используйте аналоги с отличающимися параметрами тока.
Далее следует узнать IP-адрес, который был присвоен телефону по DHCP. Для этого на телефоне нужно нажать клавишу «OK»— галочка и на экране появится значение адреса.
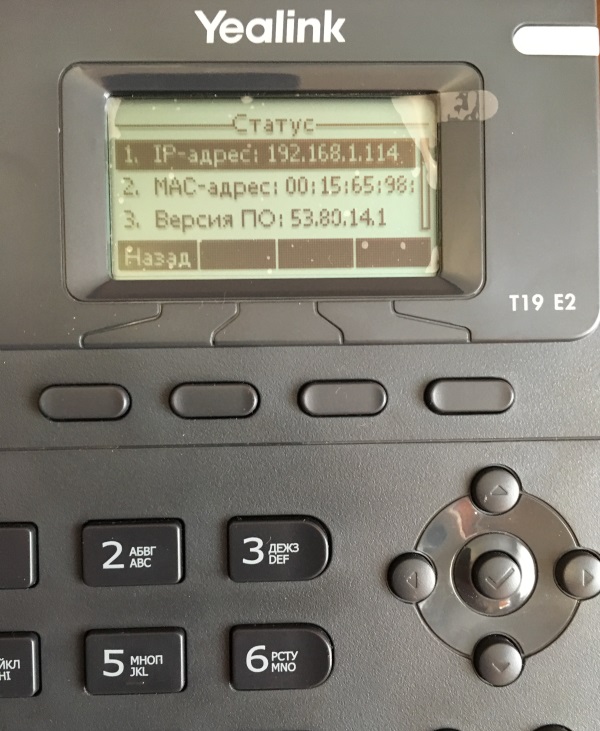
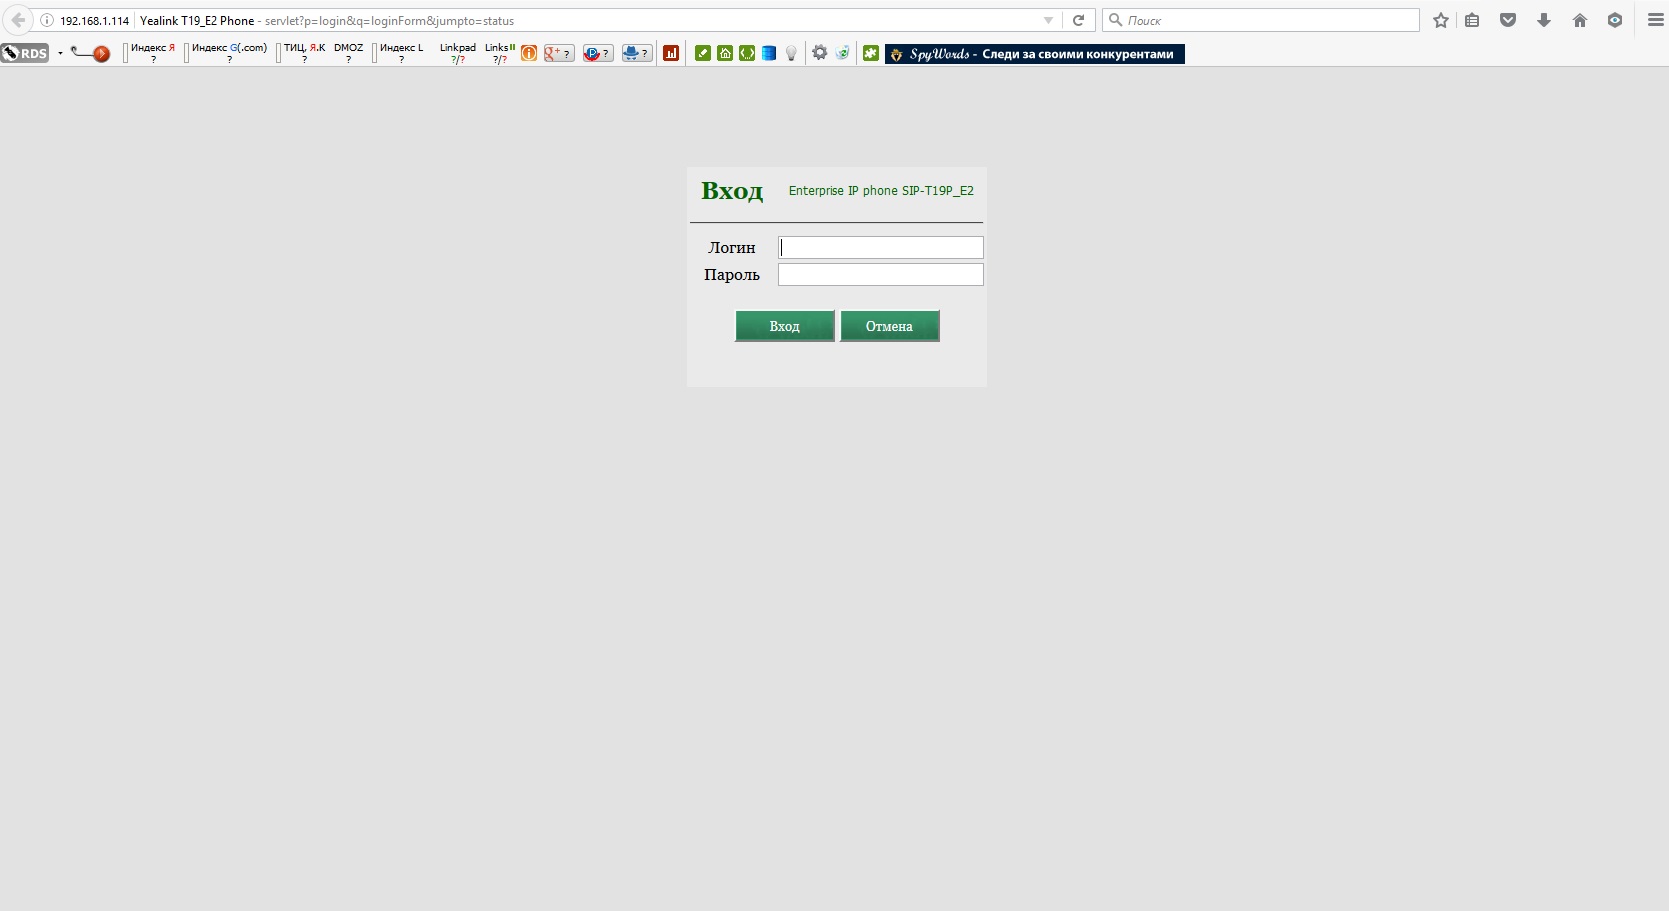
Следующим шагом необходимо открыть любой интернте-браузер и в командной строке ввести ip-адрес (в нашем случае — это http://192.168.1.114) и нажать Enter.
Если вы сделали всё правильно, то загрузиться веб-интерфейс телефона с предложением ввести логин и пароль (по умолчанию на телефонах Yealink T19 — admin, admin).
В открывшемся окне, необходимо выбрать вкладку «Аккаунт» и далее ввести в поля необходимые значения:
- в поле «Аккаунт» — название подключения;
- в поле «Лейбл»— любое слово, которое будет отображаться на мониторе телефона;
- в поле «Отображаемое имя»— любое слово, которое будет отображаться на мониторе телефона вызываемого абонента внутри сети АТС;
- в поле «Имя регистрации»— значение, выданное системным администратором;
- в поле «Пароль»— значение, выданное системным администратором;
- в поле «Адрес SIP-сервера»— локальный IP-адрес офисной IP-АТС и порт сервера (тоже выдается системным администратором).

Далее необходимо нажать «Сохранить» и дождаться обновления страницы. Если всё правильно было сделано, то статус регистрации поменяется на«Зарегистрировано».
В некоторых случаях необходимо подкорректировать настройки голосовых кодеков. Для этого нужно открыть вкладку «Кодеки» и выбрать используемые кодеки, как на рисунке ниже. После выбора кодеков также нажать «Сохранить».

Всё, после этого ваш телефон готов к продуктивной работе.
Возможные ошибки при настройке Yealink SIP T19 E2
В процессе настройки IP-телефона допущенные ошибки не позволят ему зарегисрировать учётную запись SIP-аккаунта и телефон не сможет совершать исходящие звонки и принимать
Наиболее частные ошибки в настройках телефона:
- Телефон «не видит» SIP-сервера. Эта ошибка может возникнуть при неправильном вводе адреса сервера регистрации, а также при отсутствии доступа к интернету у телефона. Внимательно проверяйте адрес, а также настройки сети;
- Неправильно введённые учётные данные. При вводе значий login/password внимательно вводите символы. Обращайте внимание на регистры букв.
Как обновить прошивку IP-телефона Yealink SIP-T19 E2
В некоторых случаях может потребоваться обновление программного обеспечения (прошивки) вашего телефонного аппарата. Обновление прошивки может быть связано со следующими случаями:
- Обновление в виду выхода новой прошивки. В обновлённых прошивках, как правило, присутствуют исправление ошибок, которые были замечены в старой версии ПО. В результате обновления телефон может работать стабильнее и быстрее. Также с обновлением могут быть «зактыры» уязвимости и backdoor’ы;
- Руссификация меню и интерфейса телефона. Некоторые телефонные аппараты могут попасть на местный рынок напрямую от производителя. Как правило, в таких телефонах русский язык отсутствует, а весь интерфейс отображается только на английском языке. Это может приносить некоторое неудобство в пользовании и в таком случае также целесообразно произвести обновление ПО Yealink SIP-T19 E2.
Процедура и этапы обноления внутреннего программного обеспечения Yealink SIP-T19 E2
Перед обновлением ПО вам необходимо скачать на свой компьютер его последнюю версию — Программное обеспечение для Yealink SIP-T19(P) E2 (53.84.14.1).
Далее по инструкции (см. выше) необходимо зайти в веб-интерфейс телефона.
У вас откроется интерфейс телефона, где вы можете приступить к обновлению ПО. Для этого необходимо в верхнем менб выбрать пункт «Settings» и в левом блоке меню выбрать пункт «Upgrade». Далее необходимо нажать на кнопку «Обзор» и выбрать файл прошивки, который вы скачали раннее. После нажмите на кнопку «Upgrade»

После нажатия «Upgrade» телефон начнет обновление программного обеспечения. Это займёт некоторое время.
ВАЖНО
В процессе обновления программного обеспечения категорически запрещается нажимать кнопки на телефоне, обновлять окно браузера или отключать телефонный аппарат от электрической сети. В случае какого-то сбоя, телефон может выйти из строя и для его реанимации потребуется обратиться в сервисный центр.
После перепрошивки, телефон обновится и в новой прошивке потребуется изменить настройки языка. Для этого нужно снова пройти в веб-интерфейс и выбрать в верхнем меню вкладку «Settings», далее в левом меню нажать на пункт «Settings». После этого изменить язык интерфейса на Русский.

После выбора русского языка обязательно необходимо подтвердить выбор нажав на кнопку «Confirm».
Всё! Ваш телефон обновлён и теперь весь интерфейс будет на русском языке. Приятного пользования.
- Manuals
- Brands
- Yealink Manuals
- IP Phone
- SIP-T19 E2 T4 Series
- User manual
-
Contents
-
Table of Contents
-
Bookmarks
Quick Links
Related Manuals for Yealink SIP-T19 E2
Summary of Contents for Yealink SIP-T19 E2
-
Page 2: Declaration Of Conformity
Copyright Copyright © 2016 YEALINK(XIAMEN) NETWORK TECHNOLOGY CO., LTD Copyright © 2016 Yealink(Xiamen) Network Technology CO., LTD. All rights reserved. No parts of this publication may be reproduced or transmitted in any form or by any means, electronic or mechanical, photocopying, recording, or otherwise, for any purpose, without the express written permission of Yealink(Xiamen) Network Technology CO., LTD.
-
Page 3: Class B Digital Device Or Peripheral
Do not dispose of WEEE as unsorted municipal waste and have to collect such WEEE separately. Customer Feedback We are striving to improve our documentation quality and we appreciate your feedback. Email your opinions and comments to DocsFeedback@yealink.com.
-
Page 4: Gnu Gpl Information
Yealink SIP-T19(P) E2 IP phone firmware contains third-party software under the GNU General Public License (GPL). Yealink uses software under the specific terms of the GPL. Please refer to the GPL for the exact terms and conditions of the license.
-
Page 5: About This Guide
About This Guide About This Guide Thank you for choosing the SIP-T19 E2/SIP-T19P E2 (hereinafter referred to as SIP-T19(P) E2) IP phone, exquisitely designed to provide business telephony features, such as Call Hold, Call Transfer, Multicast Paging and Conference over an IP network. The difference between the SIP-T19 E2 and SIP-T19P E2 IP phones is that only SIP-T19P E2 supports PoE.
-
Page 6: Changes For Release 81, Guide Version 81.10
User Guide for the SIP-T19(P) E2 IP Phone Major updates have occurred to the following sections: Intercom on page Multicast Paging on page Changes for Release 81, Guide Version 81.10 The following sections are new: Key Tone on page …
-
Page 7: Table Of Contents
Table of Contents Table of Contents About This Guide …………….v In This Guide …………………………..v Summary of Changes ……………………….. v Changes for Release 81, Guide Version 81.20 ………………v Changes for Release 81, Guide Version 81.15 ………………v Changes for Release 81, Guide Version 81.10 ………………vi Changes for Release 80, Guide Version 80.95 ………………
-
Page 8
User Guide for the SIP-T19(P) E2 IP Phone Time & Date ………………………….. 22 Administrator Password ……………………..24 Key As Send ………………………….. 25 Phone Lock …………………………..25 Audio Settings ………………………….. 28 Volume ……………………………. 28 Ring Tones …………………………..29 Key Tone …………………………..31 Contact Management ………………………. -
Page 9: Table Of Contents
Table of Contents Call Hold/Resume …………………………75 Do Not Disturb (DND) ……………………….76 Call Forward …………………………..78 Static Forwarding ………………………… 78 Dynamic Forwarding ……………………….81 Call Transfer…………………………..81 Blind Transfer …………………………82 Semi-attended Transfer……………………..84 Attended Transfer ……………………….. 84 Call Waiting …………………………..85 Conference …………………………..
-
Page 10
User Guide for the SIP-T19(P) E2 IP Phone Service Agreements ……………………….127 Limitations of Liability ……………………….127 Safety Instructions ………………………… 127 Appendix………………129 Appendix A — Time Zones ……………………..129 Appendix B – Menu Structure ……………………131 Index ………………. 133… -
Page 11: Overview
Overview Overview This chapter provides the overview of the SIP-T19(P) E2 IP phone. Topics include: Hardware Component Instructions Icon Instructions LED Instructions User Interfaces Documentations If you require additional information or assistance with your new phone, contact your system administrator.
-
Page 12
For more information on how to adjust ⑭ Hookswitch Tab Yealink Wall Mount Quick the hookswitch tab, refer to Installation Guide for Yealink IP Phones • Picking up the handset from the handset cradle, the hookswitch bounces and the phone connects to the line. ⑮ Hookswitch •… -
Page 13: Icon Instructions
Overview Icon Instructions Feature Status Icons Icons appearing on the status bar are described in the following table: Icons Description Network is unavailable The private line registers successfully Register failed Registering The shared/bridged line registers successfully Hands-free speakerphone mode Handset mode Headset mode Voice Mail Text Message…
-
Page 14: Other Icons
User Guide for the SIP-T19(P) E2 IP Phone Icons Description Call Forward The ACD state is available The ACD state is unavailable and x The ACD state is Wrap up Log out of the ACD system Other Icons Icon indicator (associated with call history) Icons Description Missed Calls…
-
Page 15: User Interfaces
Overview LED Status Description Slowly flashing yellow (1s) The phone receives a voice mail or text message. The phone is powered off. The phone is idle. The phone is busy. The call is placed on hold or is held. The call is muted. Note The above introduces the default LED status.
-
Page 16
User Guide for the SIP-T19(P) E2 IP Phone Enter the IP address (e.g., http://192.168.0.10 or 192.168.0.10 for IPv4; http://[2005:1:1:1:215:65ff:fe64:6e0a] or [2005:1:1:1:215:65ff:fe64:6e0a] for IPv6) in the address bar of a web browser on your PC. The default administrator user name and password are both “admin”… -
Page 17
Overview Options Phone User Interface Web User Interface —Emergency Number —Live Dialpad —Hotline √ Basic Call Features —Recent Call In Dialing —Auto Answer √ —Auto Redial √ —Call Completion √ —ReCall —Do Not Disturb (DND) √ √ —Call Forward √ —Call Transfer √… -
Page 18: Documentations
Basic call features and Quick Start Guide phone customizations On the website English/Chinese Phone/Web user interface settings User Guide Basic call features and On the website English/Chinese advanced phone features You can also download the latest documentations online: Note http://support.yealink.com/documentFront/forwardToDocumentDetailPage?documentId=78.
-
Page 19: Getting Started
Getting Started Getting Started This chapter provides basic installation instructions and information for obtaining the best performance with the SIP-T19(P) E2 IP phone. Topics include: Packaging Contents Phone Installation Phone Initialization Phone Status Basic Network Settings …
-
Page 20: Optional Accessories
User Guide for the SIP-T19(P) E2 IP Phone Phone Stand Handset & Handset Cord Ethernet Cable Quick Start Guide Check the list before installation. If you find anything missing, contact your system administrator. Optional Accessories The following items are optional accessories for your SIP-T19(P) E2 IP phone. You need to purchase them separately if required.
-
Page 21: Phone Installation
Power Adapter (5.5mm DC plug) Headset Note We recommend that you use the accessories provided or approved by Yealink. The use of unapproved third-party accessories may result in reduced performance. Phone Installation If your phone is already installed, proceed to Phone Initialization on page 14.
-
Page 22
Connect the network and power You have two options for power and network connections. Your system administrator will advise you which one to use. AC power Power over Ethernet (PoE) Note PoE is not applicable to the SIP-T19 E2 IP phone. -
Page 23: Power Over Ethernet
Note The IP phone should be used with Yealink original power adapter (5V/600mA) only. The use of the third-party power adapter may cause the damage to the phone. Power over Ethernet With the included or a regular Ethernet cable, the SIP-T19P E2 IP phone can be powered from a PoE-compliant switch or hub.
-
Page 24: Phone Initialization
User Guide for the SIP-T19(P) E2 IP Phone Phone Initialization After your phone is powered on, the system boots up and performs the following steps: Automatic Phone Initialization The phone finishes the initialization by loading the saved configuration. The LCD screen displays “Welcome Initializing…please wait”…
-
Page 25: Basic Network Settings
Getting Started (e.g., “http://192.168.0.10” for IPv4 or “http://[2005:1:1:1:215:65ff:fe64:6e0a]” for IPv6). Enter the user name (admin) and password (admin) in the login page. Click Confirm to login. The phone status is displayed on the first page of the web user interface. configured as IPv4 &…
-
Page 26
User Guide for the SIP-T19(P) E2 IP Phone Press to select IPv4, IPv6 or IPv4 & IPv6 from the IP Mode field. Press the Save soft key to accept the change or the Back soft key to cancel. You can configure a static IPv4 address for the IP phone. Before configuring it, make sure that the IP mode is configured as IPv4 or IPv4 &… -
Page 27: Registration
Getting Started Enter the desired value in the IP Address, IPv6 IP Prefix, Default Gateway, Pri.DNS and Sec.DNS field respectively. Press the Save soft key to accept the change or the Back soft key to cancel. Note The wrong network settings may result in inaccessibility of your phone and may also have an impact on your network performance.
-
Page 28: Input Mode
User Guide for the SIP-T19(P) E2 IP Phone ABC or 123 input mode. You can change the following input modes to enter data and edit fields on your phone. When your phone keypad matches the input mode, you can press the keypad repeatedly to view the character (or number) options and stop to select.
-
Page 29
Getting Started To enter or edit data: Do one of the following: If you want to Then you can Press a keypad key one or more times (depending what input mode you’re in) to enter the characters that is displayed on the keypad key. You can press the abc soft key one or more times to switch among uppercase (ABC soft key), numeric (123 soft key), alphanumeric (2aB soft… -
Page 30
User Guide for the SIP-T19(P) E2 IP Phone If you want to Then you can *.,?!-()@/:_;+&%=<>£$¥ ¤ []{}~^¡ ¿ § #»|. If it is in the numeric (123 soft key) input mode, it will provide the following special characters: .*:/@[]. Press to position the cursor to the right of the text you want to delete, and then press… -
Page 31: Customizing Your Phone
Customizing Your Phone Customizing Your Phone You can customize your SIP-T19(P) E2 IP phone by personally configuring certain settings, for example, contrast, language and time & date. You can add contacts to the phone’s local directory manually or from call history. You can also personalize different ring tones for different callers.
-
Page 32: Language
User Guide for the SIP-T19(P) E2 IP Phone Language The default language of the phone user interface is English. If the language of your web browser is not supported by the phone, the web user interface will use English by default. You can change the language for the phone user interface and the web user interface respectively.
-
Page 33
Customizing Your Phone from the Time Zone field. The default time zone is “+8”. Enter the domain name or IP address of SNTP server in the NTP Server1 and NTP Server2 field respectively. Press , or the Switch soft key to select the desired value from the Daylight Saving field. -
Page 34: Administrator Password
User Guide for the SIP-T19(P) E2 IP Phone Press , or the Switch soft key to select the desired time format (12 Hour or 24 Hour) from the Time Format field. Press , or the Switch soft key to select the desired date format from the Date Format field.
-
Page 35: Key As Send
Customizing Your Phone Enter the current password in the Old PWD field. Enter the new password in the New PWD field. Re-enter the new password in the Confirm PWD field. Press the Save soft key to accept the change or the Back soft key to cancel. Administrator password is configurable via web user interface at the path Security->Password.
-
Page 36
User Guide for the SIP-T19(P) E2 IP Phone Speakerphone key. You are only allowed to dial emergency numbers, reject incoming calls by pressing the Reject soft key, answer incoming calls by lifting the handset, pressing the Speakerphone key, the HEADSET key, the key, or the Answer soft key, and end the call by hanging up the handset, pressing the Speakerphone key or the EndCall soft key. -
Page 37
Customizing Your Phone When the phone is locked, the LCD screen prompts “Phone locked.” and displays the icon To change the phone unlock PIN via phone user interface: Press Menu->Settings->Basic Settings->Change PIN. Enter the desired value in the Old PIN, New PIN and Confirm PIN field respectively. Press the Save soft key to accept the change or the Back soft key to cancel. -
Page 38: Audio Settings
User Guide for the SIP-T19(P) E2 IP Phone You can long press or wait for a period of time (if configured) to lock the phone again. You can also unlock the phone by administrator password. When you enter the administrator Note password to unlock the phone, the phone will turn to the Change PIN screen.
-
Page 39: Ring Tones
Customizing Your Phone When the phone is ringing: Press to adjust the ringer volume. You can also press to adjust the ringer volume when selecting a ring tone. For more information, refer to Ring Tones on page 29. Note If ringer volume is adjusted to minimum, the icon will appear on the LCD screen.
-
Page 40
User Guide for the SIP-T19(P) E2 IP Phone A ring tone for the phone is configurable via web user interface at the path Settings->Preference->Ring Type. To select a ring tone for the account via phone user interface: Press Menu->Settings->Basic Settings->Sound->Ring Tones. Press to select the desired account and then press the Enter soft key. -
Page 41: Key Tone
Customizing Your Phone You can only delete the custom ring tone by clicking Del when selecting the desired custom ring tone in the Ring Type field. Note The priority of ring tone for an incoming call on the phone is as follows: Contact ring tone (refer to Adding Contacts) >Group ring tone (refer to…
-
Page 42
User Guide for the SIP-T19(P) E2 IP Phone To configure the list(s) to access for the Dir soft key via web user interface: Click on Directory->Setting. In the Directory block, select the desired list from the Disabled column and then click The selected list appears in the Enabled column. -
Page 43: Local Directory
Customizing Your Phone If there is only one list in the , press the Dir soft key to enter this list directly. directory Note If the remote phone book and LDAP are not configured in advance, you cannot see remote phone book and LDAP lists on the phone user interface.
-
Page 44: Editing Groups
User Guide for the SIP-T19(P) E2 IP Phone If Auto is selected, this group will use the ring tone according to the priority: Contact ring tone (refer to Adding Contacts) >Account ring tone (refer to Ring Tones) >Phone ring tone (refer to Ring Tones).
-
Page 45
Customizing Your Phone Press to scroll through the group information and then edit. Press the Save soft key to accept change or the Back soft key to cancel. Deleting Groups To delete a group from the local directory: Press the Dir soft key. The IP phone enters the local directory directly as there is only Local Directory enabled in the directory by default. -
Page 46: Adding Contacts
User Guide for the SIP-T19(P) E2 IP Phone Adding Contacts You can add contacts to the local directory in the following ways: Manually From call history From a remote phone book Adding Contacts Manually To add a contact to the local directory manually: Press the Dir soft key.
-
Page 47: Editing Contacts
Customizing Your Phone Press the Add soft key to accept the change or the Back soft key to cancel. If the contact has existed in the directory, the LCD screen will prompt “Contact name existed!”. Note Adding Contacts from Call History To add a contact to the local directory from the call history: Press the History soft key.
-
Page 48: Deleting Contacts
User Guide for the SIP-T19(P) E2 IP Phone The IP phone enters the local directory directly as there is only Local Directory enabled in the directory by default. If Local Directory is removed from the directory (refer to Directory on page , press Menu->Directory->Local Directory to enter the local directory.
-
Page 49: Placing Calls To Contacts
Customizing Your Phone Press the Option soft key, and then select Delete. The LCD screen prompts the following warning: Press the OK soft key to confirm the deletion or the Cancel soft key to cancel. You can also delete all contacts by pressing the Option soft key, and then select Delete All. Placing Calls to Contacts To place a call to a contact from the local directory: Press the Dir soft key.
-
Page 50
User Guide for the SIP-T19(P) E2 IP Phone The IP phone enters the local directory directly as there is only Local Directory enabled in the directory by default. If Local Directory is removed from the directory refer to Directory on page , press Menu->Directory->Local Directory to enter the local directory. -
Page 51
Customizing Your Phone Click Import XML to import the contact list. The web user interface prompts “The original contact will be covered, continue?”. Click OK to complete importing the contact list. To import a CSV file of contact list via web user interface: Click on Directory->Local Directory. -
Page 52: Blacklist
User Guide for the SIP-T19(P) E2 IP Phone At least one item should be selected to be imported into the local directory. Click Import to complete importing the contact list. To export a contact list via web user interface: Click on Directory->Local Directory. Click Export XML (or Export CSV).
-
Page 53: Remote Phone Book
Customizing Your Phone Press the Add soft key to accept the change or the Back soft key to cancel. To add a contact to the blacklist directory from the local directory: Press the Dir soft key. The IP phone enters the local directory directly as there is only Local Directory enabled in the directory by default.
-
Page 54
User Guide for the SIP-T19(P) E2 IP Phone Configuring an Access URL To configure an access URL for a remote phone book via web user interface: Click on Directory->Remote Phone Book. Enter the access URL in the Remote URL field. Enter the name in the Display Name field. -
Page 55: Call History Management
Customizing Your Phone To configure incoming/outgoing call lookup and update time interval via web user interface: Click on Directory->Remote Phone Book. Select Enabled from the pull-down list of Incoming/Outgoing Call Lookup. Enter the desired refresh period in the Update Time Interval(Seconds) field. The default value is 21600.
-
Page 56: Placing A Call From History Records
User Guide for the SIP-T19(P) E2 IP Phone The detailed information of the entry appears on the LCD screen. Placing a Call from History Records To place a call from the call history list: Press the History soft key. Press to switch among All Calls, Missed Calls, Placed Calls, Received Calls and Forwarded Calls.
-
Page 57: Disabling History Record
Customizing Your Phone Press the OK soft key. The LCD screen prompts «Delete all the call records?». Press the OK soft key to confirm the deletion or the Cancel soft key to cancel. Disabling History Record To disable history record via phone user interface: Press Menu->Features->History Setting.
-
Page 58: System Customizations
User Guide for the SIP-T19(P) E2 IP Phone The LCD screen will display search results in the adjusted order. Click Confirm to accept the change. Search source list in dialing is configurable via web user interface only. Note To search for a contact in the enabled search source lists: Pick up the handset or press the Speakerphone key.
-
Page 59: Headset Use
Customizing Your Phone To upload a custom logo via web user interface: Click on Features->General Information. Select Custom logo from the pull-down list of Use Logo. Click Browse to locate the logo file from your local system. Click Upload to upload the file. custom logo, you can click Delete item will appear after you upload a Delete to delete the…
-
Page 60: Headset Prior
User Guide for the SIP-T19(P) E2 IP Phone headset automatically. Enter the desired number and then press the Send soft key, the phone will then place a call using the headset automatically. For more information on using the headset to place a call, refer to Placing Calls on page 65.
-
Page 61: Programable Keys
Customizing Your Phone Dual Headset You can use two headsets when enabling dual headset. To use this feature, you must physically connect headsets to the headset jack and handset jack respectively. Once the phone connects to a call, the headset connected to the headset jack will have full-duplex capabilities, while the one connected to the handset jack will only be able to listen.
-
Page 62
User Guide for the SIP-T19(P) E2 IP Phone Select the desired key type from the Type field. (Optional.) Select the desired history from the History field. This option is only applicable to history feature. (Optional.) Enter the string that will appear on the LCD screen in the Label field. (Optional.) Enter the corresponding value in the Value field. -
Page 63
Customizing Your Phone Direct Pickup Group Pickup Prefix Local Directory Local Group XML Directory XML Group XML Browser LDAP New SMS Zero Touch Phone Lock Directory For the features not listed above, refer to Basic Call Features on page… -
Page 64
User Guide for the SIP-T19(P) E2 IP Phone Label (key label displayed on the LCD screen) Usage: Press the Group Pickup key on your phone when a phone number in the group receives an incoming call. The call is answered on your phone. Prefix You can use this key feature to add a specified prefix number before the dialed number. -
Page 65
Customizing Your Phone Type (XML Group) Dependencies: Line (the remote group you want to access if the remote phone book is configured) Label (key label displayed on the LCD screen) Usage: Press the XML Group key to access the remote group specified in the Line field. XML Browser You can use this key feature to access an XML browser quickly. -
Page 66: Account Registration
User Guide for the SIP-T19(P) E2 IP Phone Zero Touch You can use this key feature to configure auto provision and network parameters quickly. Type (Zero Touch) Dependencies: Label (key label displayed on the LCD screen) Usage: Press the Zero Touch key to access the zero touch screen. Press the OK soft key in a few seconds.
-
Page 67: Dial Plan
Customizing Your Phone Press , or the Switch soft key to select Enabled from the Activation field. Enter the desired value in Label, Display Name, Register Name, User Name, Password and SIP Server1/2 field respectively. Contact your system administrator for more information.
-
Page 68: Replace Rule
User Guide for the SIP-T19(P) E2 IP Phone Numeric ranges are allowed within the brackets: Digit “-” Digit. Example: “[5-7]” would match the number”5”, ”6”or ”7”. The square brackets «[]» can be used as a placeholder for a single character which matches any of a set of characters.
-
Page 69: Dial Now
Customizing Your Phone Enter the string (e.g., 1234) in the Replace field. Click Add to add the replace rule. When you enter the number “1” using the keypad and then press the Send soft key, the phone will dial out “1234” instead. To edit a replace rule via web user interface: Click on Settings->Dial Plan->Replace Rule.
-
Page 70
User Guide for the SIP-T19(P) E2 IP Phone Enter the desired value (e.g., 1xx) in the Rule field. Click Add to add the dial now rule. When you enter the number “123” using the keypad, the phone will dial out “123” automatically without pressing any key. -
Page 71: Area Code
Customizing Your Phone The default value is “1”. Click Confirm to accept the change. Time out for dial now rule is configurable via web user interface only. Note Area Code Area codes are also known as Numbering Plan Areas (NPAs). They usually indicate geographical areas in a country.
-
Page 72: Emergency Number
User Guide for the SIP-T19(P) E2 IP Phone Click Confirm to accept the change. Note The default value of minimum and maximum length is 1 and 15 respectively. Area code is configurable via web user interface only. Block Out You can block some specific numbers (up to 10) from being dialed on your phone. When you dial a block out number on your phone, the dialing will fail and the LCD screen will prompt «Forbidden Number».
-
Page 73: Live Dialpad
Customizing Your Phone You can specify the emergency telephone numbers on the IP phone for contacting the emergency services in an emergency situation. You can dial these numbers when the phone is locked. For more information on phone lock, refer to Phone Lock on page 25.
-
Page 74: Hotline
User Guide for the SIP-T19(P) E2 IP Phone The default delay time is 4 seconds. Click Confirm to accept the change. Live dialpad is configurable via web user interface only. Note Hotline You can dial a hotline number immediately upon lifting the handset or pressing the Speakerphone key.
-
Page 75: Basic Call Features
Basic Call Features Basic Call Features The SIP-T19(P) E2 IP phone is designed to be easily used like a regular phone on a public switched telephone network (PSTN). You can place calls, answer calls, transfer a call to someone else, or conduct a conference call. This chapter provides basic operating instructions for the SIP-T19(P) E2 IP phone.
-
Page 76
User Guide for the SIP-T19(P) E2 IP Phone Using the speakerphone Using the headset You can also dial the number first, and then choose the way you want to speak to the other party. You can also search and dial a contact from call history, local directory or remote phone book. For more information, refer to Contact Management on page… -
Page 77: Answering Calls
Basic Call Features To place a call using the headset: With the optional headset connected, press to activate the headset mode. Enter the desired number using the keypad. Press , or the Send soft key. To permanently use the headset mode, refer to Headset Prior on page 50.
-
Page 78: Ending Calls
User Guide for the SIP-T19(P) E2 IP Phone To answer a call using the handset: Pick up the handset. To answer a call using the hands-free speakerphone mode: Do one of the following: Press With the handset on-hook and the headset mode deactivated, press the Answer soft key. To answer a call using the headset: Do one of the following: Press…
-
Page 79: Recent Call In Dialing
Basic Call Features Press to select the desired entry from the placed calls list, and then press or the Send soft key. Recent Call In Dialing To view the placed calls list when the phone is on the dialing screen, you should enable recent call in dialing in advance.
-
Page 80: Auto Answer
User Guide for the SIP-T19(P) E2 IP Phone You can also enter a few continuous characters of the contact name or continuous numbers of the contact number (office, mobile or other number) to search from placed calls list. Auto Answer You can use auto answer feature to automatically answer an incoming call.
-
Page 81
Basic Call Features You can also configure the number of auto redial attempts and the time to wait between redial attempts. To configure auto redial via phone user interface: Press Menu->Features->Auto Redial. Press , or the Switch soft key to select Enabled from the Auto Redial field. Enter the desired time (in seconds) in the Redial Interval field. -
Page 82: Call Completion
User Guide for the SIP-T19(P) E2 IP Phone Call Completion You can use call completion to notify the caller who failed to reach a desired party when the party becomes available to receive a call. To configure call completion via phone user interface: Press Menu->Features->Call Completion.
-
Page 83: Recall
Basic Call Features ReCall You can press a recall key to place a call back to the last incoming call. To configure a recall key via web user interface: Click on Dsskey->Programable Key. Select the desired programable key. Select ReCall from the pull-down list of Type. (Optional.) Enter the string that will appear on the LCD screen in the Label field.
-
Page 84: Mute A Call
User Guide for the SIP-T19(P) E2 IP Phone Mute a Call To mute a call: Press during an active call. The LCD screen indicates that the call is now muted. To un-mute a call: Press again to un-mute the call. Mute While Dialing To mute the microphone while dialing: Press…
-
Page 85: Call Hold/Resume
Basic Call Features To mute the microphone on any screen: Press on any screen (e.g., ringing, dialing, talking or idle screen). The icon appears on the status bar. To un-mute the microphone on any screen: Press again on any screen. The icon disappears from the status bar.
-
Page 86: Do Not Disturb (Dnd)
User Guide for the SIP-T19(P) E2 IP Phone If more than one call is placed on hold, a numbered prompt appears on the LCD screen, for example “1/2”, indicating that this is the first call out of two calls. Do Not Disturb (DND) You can use DND to reject incoming calls automatically on the phone.
-
Page 87
Basic Call Features The icon will appear on the status bar. Note When DND and busy forward are enabled at the same time, calls will be sent to the configured destination number. For more information on busy forward, refer to Call Forward on page 77. -
Page 88: Call Forward
User Guide for the SIP-T19(P) E2 IP Phone To disable DND via phone user interface: Press the DND soft key when the phone is idle. Call Forward You can configure your phone to forward incoming calls to another party (static forwarding). You can also forward calls while your phone is ringing (dynamic forwarding).
-
Page 89
Basic Call Features If you select Busy Forward: Press , or the Switch soft key to select Enabled from the Busy Forward field. Enter the destination number you want to forward incoming calls to when the phone is busy in the Forward to field. (Optional.) Enter the busy forward on code or off code respectively in the On Code or Off Code field. -
Page 90
User Guide for the SIP-T19(P) E2 IP Phone Call forward is configurable via web user interface at the path Features->Forward&DND. You can also enter the SIP URI or IP address in the Forward to field. For more information on Note using the SIP URI or IP address, refer to Placing Calls on page 65. -
Page 91: Dynamic Forwarding
Basic Call Features Press the Save soft key to accept the change. Dynamic Forwarding You can manually forward a call to another number while your phone rings. To forward an incoming call to another party: When the phone is ringing, press the FWD soft key. Enter the number you want to forward the incoming call to.
-
Page 92: Blind Transfer
User Guide for the SIP-T19(P) E2 IP Phone Select Enabled from the pull-down list of Allow Trans Exist Call. Click Confirm to accept the change. Blind Transfer To perform a blind transfer during a call: Press or the Tran soft key during a call. You can do one of the following: Enter the number you want to transfer the call to.
-
Page 93
Basic Call Features Directory on page for more information). Press or the Send soft key to complete the transfer. Press the Dir soft key, and then select Remote Phone Book. Select the desired group and search for the contact (Directory should be configured in advance. Refer to Directory on page Remote Phone Book… -
Page 94: Semi-Attended Transfer
User Guide for the SIP-T19(P) E2 IP Phone information). Press or the Send soft key to complete the transfer. Press or the Tran soft key to complete call transfer. Then the call is connected to the number to which you are transferring. Semi-attended Transfer To perform a semi-attended transfer: Press…
-
Page 95: Call Waiting
Basic Call Features Press the Dir soft key, and then select Local Directory. Select the desired group and search for the contact (Directory should be configured in advance. Refer to Directory on page for more information). Press or the Send soft key to dial out. Press the Dir soft key, and then select History.
-
Page 96: Conference
User Guide for the SIP-T19(P) E2 IP Phone Press the Save soft key to accept the change or the Back soft key to cancel. Call waiting is configurable via web user interface at the path Features->General Information. Note If on code or off code is not configured, the call waiting may not take effect. It depends on your server.
-
Page 97: Network Conference
Basic Call Features During the conference call, you can do the following actions: Press the Hold soft key to place the conference on hold. Press the Split soft key to split the conference call into two individual calls on hold. Press the Manage soft key, and then press to select the desired party: Press the FarMute soft key to mute the party.
-
Page 98: Call Park
User Guide for the SIP-T19(P) E2 IP Phone Enter the conference URI (e.g., conference@example.com) in the Conference URI field. Click Confirm to accept the change. To set up a network conference call: Place a call to the first party. Press the NewCall soft key to place a new call. The active call is placed on hold.
-
Page 99: Fac Mode
Basic Call Features pressing the Retrieve soft key. If the parked call is not retrieved within a period of time defined by the system, the phone performing call park will receive the call back. Note Call park is not available on all servers. Contact your system administrator for more information. The IP phone supports call park feature under the following modes: FAC mode: park the call to the local extension or a desired extension through dialing the …
-
Page 100
User Guide for the SIP-T19(P) E2 IP Phone Click Confirm to accept the change. If the Park or Retrieve soft key doesn’t appear on the LCD screen, please select Disabled from Note the pull-down list of Custom Softkey via web user interface at path Settings->Softkey Layout. -
Page 101: Transfer Mode
Basic Call Features To retrieve a parked call in FAC mode: Do one of the following: If the park retrieve code is not configured, dial the park retrieve code (e.g., *88). If the park retrieve code is configured, press the Retrieve soft key on the dialing screen.
-
Page 102: Call Pickup
User Guide for the SIP-T19(P) E2 IP Phone Click Confirm to accept the change. If the Park or Retrieve soft key doesn’t appear on the LCD screen, please select Disabled from Note the pull-down list of Custom Softkey via web user interface at path Settings->Softkey Layout.
-
Page 103: Directed Call Pickup
Basic Call Features You can pick up an incoming call by using the DPickup/GPickup soft key. To use call pickup, you need to configure the call pickup code beforehand on a global or per-line basis via web user interface. If there are many incoming calls at the same time, pressing the GPickup soft key on the phone Note will pick up the call that rings first.
-
Page 104: Group Call Pickup
User Guide for the SIP-T19(P) E2 IP Phone Enter the directed call pickup code in the Directed Call Pickup Code field. Click Confirm to accept the change. To pick up a call directly: Pick up the handset or press the Speakerphone key (You may need to press the More soft key to see the DPickup soft key).
-
Page 105
Basic Call Features Select Enabled from the pull-down list of Group Call Pickup. Enter the group call pickup code in the Group Call Pickup Code field. Click Confirm to accept the change. To configure the group call pickup code on a per-line basis via web user interface: Click on Account->Advanced. -
Page 106: Anonymous Call
User Guide for the SIP-T19(P) E2 IP Phone The GPickup soft key appears on the LCD screen. Press the GPickup soft key on your phone when a phone in the group receives an incoming call. The call is answered on your phone. The directed call pickup code and group call pickup code are predefined on the system server.
-
Page 107: Anonymous Call Rejection
Basic Call Features (Optional.) Enter the anonymous call on code in the On Code field. (Optional.) Enter the anonymous call off code in the Off Code field. Press the Save soft key to accept the change or the Back soft key to cancel. Anonymous call is configurable via web user interface at the path Account->Basic.
-
Page 108
User Guide for the SIP-T19(P) E2 IP Phone (Optional.) Enter the anonymous call rejection off code in the Off Code field. Press the Save soft key to accept the change or the Back soft key to cancel. Anonymous call rejection is configurable via web user interface at the path Account->Basic. -
Page 109: Advanced Phone Features
Advanced Phone Features Advanced Phone Features This chapter provides operating instructions for the advanced features of the SIP-T19(P) E2 IP phone. Topics include: Hot Desking Intercom Multicast Paging Music on Hold (MoH) Shared Call Appearance (SCA) …
-
Page 110
User Guide for the SIP-T19(P) E2 IP Phone Select Hot Desking from the pull-down list of Type. (Optional.) Enter the string that will appear on the LCD screen in the Label field. Label is configurable only when customizing SoftKey (1-4). Click Confirm to accept the change. -
Page 111: Intercom
Advanced Phone Features Intercom Intercom is a useful feature in an office environment to quickly connect with the operator or the secretary. You can press the intercom key to automatically connect with a preconfigured target extension for outgoing intercom calls, and the target extension will automatically answer incoming intercom calls by default.
-
Page 112
User Guide for the SIP-T19(P) E2 IP Phone placed on hold. Intercom features you need to know: Intercom Feature Description Enable or disable the IP phone to answer an incoming Intercom Allow intercom call. Enable or disable the IP phone’s microphone for intercom Intercom Mute calls. -
Page 113: Using Intercom
SIP signaling. You can specify up to 31 multicast listening addresses. Yealink IP phone supports the following 31 channels: 0: It is the default channel. This channel is for compatibility with the Yealink IP phones running firmware version 80 or prior and third-party devices.
-
Page 114
User Guide for the SIP-T19(P) E2 IP Phone Select the desired programable key. Select Paging from the pull-down list of Type. Enter the multicast IP address and port number (e.g., 224.5.6.20:10008) in the Value field. The valid multicast IP addresses range from 224.0.0.0 to 239.255.255.255. (Optional.) Enter the string that will appear on the LCD screen in the Label field. -
Page 115
Advanced Phone Features Click Confirm to accept the change. To configure paging list via phone user interface: Press the paging list key when the phone is idle. If the paging list key is not configured, you can also press Menu->Features->Paging List to enter the paging list. -
Page 116: Receiving Rtp Stream
User Guide for the SIP-T19(P) E2 IP Phone The LCD screen prompts “Delete selected paging group?”. Press the OK soft key to accept the change or the Cancel soft key to cancel. If you want to delete all paging groups, you can press the Del All soft key. Receiving RTP Stream You can configure the phone to receive a Real Time Transport Protocol (RTP) stream from the pre-configured multicast address(es) without involving SIP signaling.
-
Page 117: Using Multicast Paging
Advanced Phone Features To configure multicast listening addresses via web user interface: Click on Directory->Multicast IP. Select the desired value from the pull-down list of Paging Barge. Select the desired value from the pull-down list of Paging Priority Active. Enter the multicast IP address(es) and port number (e.g., 224.5.6.20:10008) which the phone listens to for incoming RTP multicast in the Listening Address field.
-
Page 118
User Guide for the SIP-T19(P) E2 IP Phone The following figure shows a multicast RTP session on the phone: You can do the following: To place the current multicast RTP session on hold, press the Hold soft key. The sender’s phone places the multicast RTP session on hold and receiver’s phone releases the session. -
Page 119: Music On Hold (Moh)
Advanced Phone Features Music on Hold (MoH) Music on hold (MoH) is the business practice of playing recorded music to fill the silence that would be heard by the party placed on hold. To use this feature, you should specify a SIP URI pointing to a Music on Hold Server account.
-
Page 120: Configuring Sca Feature On The Ip Phone
User Guide for the SIP-T19(P) E2 IP Phone phones at the same time. The shared line is indicated by a different line icon. In the following figure, the registered line is shared: If two phones share a line, an incoming call to this extension will cause both phones to ring simultaneously.
-
Page 121
Advanced Phone Features To configure the shared line settings on phone A via web user interface: Register the account 4603. Click on Advanced, and then select Shared Call Appearance from the pull-down list of Shared Line. Click Confirm to accept the change. -
Page 122
User Guide for the SIP-T19(P) E2 IP Phone To configure the shared line settings on phone B via web user interface: Register the alternate account 4603_1. (Enter the primary account 4603 in the Register Name field.) Click on Advanced, and then select Shared Call Appearance from the pull-down list of Shared Line. -
Page 123: Using Sca Feature On The Ip Phone
Advanced Phone Features Using SCA Feature on the IP Phone This section provides you with detailed information on using the SIP-T19(P) E2 IP phone in a SCA scenario. You can do the following using SIP-T19(P) E2 IP phone in a SCA scenario: Placing calls …
-
Page 124: Bridged Line Appearance (Bla)
An incoming call arrives on the shared line when there is an active call on phone A. You can answer the incoming call on either phone A or phone B. The LCD screen of phone A displays the information of the incoming call (e.g., “Incoming call: 4604 Yealink”). Note Make sure call waiting feature is enabled on phone A.
-
Page 125: Configuring Bla Feature On The Ip Phone
Advanced Phone Features should be pre-configured on the server and one of them is specified as a BLA number. BLA depends on support from a SIP server. In the following figure, the registered line is shared: Any IP phone can be used to originate or receive calls on the bridged line. An incoming call to the BLA number can be presented to multiple phones in the group simultaneously.
-
Page 126
User Guide for the SIP-T19(P) E2 IP Phone To register an account and configure BLA feature on phone A via web user interface: Register the account 14019833020. Click on Advanced, and then select Draft BLA from the pull-down list of Shared Line. Enter the desired number in the BLA Number field. -
Page 127
Advanced Phone Features To register an account and configure BLA feature on phone B via web user interface: Register the account 10462190020. Click on Advanced, and then select Draft BLA from the pull-down list of Shared Line. Enter the desired number in the BLA Number field. Click Confirm to accept the change. -
Page 128: Using Bla Feature On The Ip Phone
User Guide for the SIP-T19(P) E2 IP Phone Using BLA Feature on the IP Phone This section provides you with detailed information on using the SIP-T19(P) E2 IP phone in a BLA scenario. You can do the following using SIP-T19(P) E2 IP phone in a BLA scenario: Placing calls …
-
Page 129: Messages
Advanced Phone Features Placing a Call on Hold To place a call on hold: Press the Hold soft key on phone A when party A and party C are talking. The bridged line call is placed on hold. Retrieving a Held Call If there is a held call between phone A and phone C, you can retrieve a held call on phone A.
-
Page 130
User Guide for the SIP-T19(P) E2 IP Phone To read a text message: Press Menu->Message->Text Message->Inbox. Select the desired message and then press the View soft key. Note If the phone prompts receiving new text messages, you can also press the View soft key to read the new messages directly. -
Page 131: Voice Mail
Advanced Phone Features Check the From and To fields, and then press the Send soft key. To delete a text message: Press Menu->Message->Text Message->Inbox (Sentbox, Outbox or Draftbox). Select the desired message and then press the Delete soft key. Select Delete to delete the desired message, then press the OK soft key. The LCD screen prompts “Delete the selected message?”.
-
Page 132
User Guide for the SIP-T19(P) E2 IP Phone If the voice mail pop-up message box disappears, it won’t pop up again unless the user receives a new voice mail or the user re-registers the account that has unread voice mail(s). You can configure the phone not to display the pop-up prompt, contact your system Note administrator for more information. -
Page 133: Message Waiting Indicator (Mwi)
Advanced Phone Features The LCD screen displays the amount of new and old voice mails. Press the Connect soft key to listen to voice mails. Message Waiting Indicator (MWI) The SIP-T19(P) E2 IP phone supports MWI when receiving a new voice message. If someone leaves you a voice mail, you will receive a message waiting indicator.
-
Page 134
User Guide for the SIP-T19(P) E2 IP Phone Select Enabled from the pull-down list of Subscribe for MWI field. Enter the period time in the MWI Subscription Period(Seconds) field. Click Confirm to accept the change. The IP phone will subscribe to the account number for MWI service by default. To enable subscribe MWI to voice mail via web user interface: Click on Account->Advanced. -
Page 135
Advanced Phone Features The IP phone will subscribe to the voice mail number for MWI service using Subscribe MWI To Voice Mail. Note MWI subscription is configurable via web user interface only. -
Page 136
User Guide for the SIP-T19(P) E2 IP Phone… -
Page 137: Regulatory Notices
Without prior written consent, no organization or individual is permitted to make any change to the structure or the safety design of the device. Yealink is under no circumstance liable to consequences or legal issues caused by such changes.
-
Page 138
User Guide for the SIP-T19(P) E2 IP Phone Keep at least 10 cm between the device and the closest object for heat dissipation. Do not place the device on or near any inflammable or fire-vulnerable object, such as rubber-made materials. Keep the device away from any heat source or bare fire, such as a candle or an … -
Page 139: Appendix
Appendix Appendix Appendix A — Time Zones Time Zone Time Zone Name Samoa United States-Hawaii-Aleutian, United States-Alaska-Aleutian -9:30 French Polynesia United States-Alaska Time Canada(Vancouver,Whitehorse), Mexico(Tijuana,Mexicali), United States-Pacific Time Canada(Edmonton,Calgary), Mexico(Mazatlan,Chihuahua), United States-MST no DST, United States-Mountain Time Canada-Manitoba(Winnipeg), Chile(Easter Islands), Mexico(Mexico City,Acapulco), United States-Central Time Bahamas(Nassau), Canada(Montreal,Ottawa,Quebec), Cuba(Havana), United States-Eastern Time…
-
Page 140
User Guide for the SIP-T19(P) E2 IP Phone Time Zone Time Zone Name Japan(Tokyo), Korea(Seoul), Russia(Yakutsk,Chita) +9:30 Australia(Adelaide), Australia(Darwin) Australia(Brisbane), Australia(Hobart), Australia(Sydney,Melboume,Canberra), Russia(Vladivostok) +10:30 Australia(Lord Howe Islands) New Caledonia(Noumea), Russia(Srednekolymsk Time) +11:30 Norfolk Island New Zealand(Wellington,Auckland), Russia(Kamchatka Time) +12:45 New Zealand(Chatham Islands) Tonga(Nukualofa) +13:30 Chatham Islands… -
Page 141: Appendix B — Menu Structure
Appendix Appendix B – Menu Structure…
-
Page 142
User Guide for the SIP-T19(P) E2 IP Phone… -
Page 143: Index
Index Index Declaration of Conformity About This Guide Deleting Contacts Accessing the Remote Phone Book Deleting Groups Account Registration Deleting History Records Adding a Contact to the Local Dial Now Directory/Blacklist Dial Plan Adding Contacts Directory Adding Groups Disabling History Record Administrator password Do Not Disturb (DND) Advanced Phone Features…
-
Page 144
User Guide for the SIP-T19(P) E2 IP Phone Sending RTP Stream Service Agreements Language Shared Call Appearance (SCA) LED Instructions Short Message Service (SMS) Limitation of Liability Static Forwarding Live Dialpad Summary of Changes Local Conference System Customizations Local Directory Logo Customization Table of Contents Time &…
В данной статье рассмотрим IP-телефон Yealink T19_E2. Вход в web-интерфейс Для того, чтобы попасть на web-интерфейс телефона, нужно знать его IP-адрес. После этого введём IP-адрес в адресную строку в браузере. Попадём на форму авторизации web-интерфейса. Логин и пароль по умолчания admin / admin. Factory Reset Рассмотрим несколько способов, как можно вернуть телефон к заводским настройкам. […]


В
данной статье рассмотрим IP-телефон
Yealink T19_E2.
Вход в web-интерфейс
Для того, чтобы попасть на web-интерфейс телефона, нужно знать его IP-адрес.
Чтобы узнать IP-адрес на телефонах модели Yealink, нажмём кнопку «Ок». На экране появится информация о сетевом подключении телефона.
После этого введём IP-адрес в адресную строку в
браузере. Попадём на форму авторизации web-интерфейса.
Логин и пароль по умолчания admin / admin.

Factory Reset
Рассмотрим несколько
способов, как можно вернуть телефон к заводским настройкам.
При сбросе телефона к заводским настройкам вся информация с него будет удалена.
1 способ (аппаратный)
Если логин или пароль были
забыты и не записаны, достаточно сделать сброс настроек. Для этого длительное
время (около 10 секунд) удерживаем кнопку «ОК» на телефоне. После того, как на
экране увидим вопрос о том, точно ли мы хотим сбросить телефон на заводские
настройки, подтверждаем свой выбор.
2 способ (из web-интерфейса)
Если данные для входа
известны, но телефон всё равно нужно вернуть к заводским настройкам, перейдём
на вкладку Обновление ПО (Настройки -> Обновление ПО).
Нажмём Reset to Factory
и подтвердим сброс настроек.
Также на данной вкладке
производится прошивка телефонного аппарата.
Обновление прошивки
Для обновления прошивки на телефонном аппарате перейдём на официальный сайт Yealink и скачаем прошивку. Для данной модели также можно воспользоваться ссылкой.

Скачивание прошивки с неизвестного источника может привести к неработоспособности телефонного аппарата.
Переходим в web-интерфейс телефона на
вкладку Обновление ПО (Настройки -> Обновление ПО).
Далее
на телефоне в поле Обновление ПО выбираем файл с прошивкой и
нажимаем на кнопку Обновление ПО.

Настройки сети
Для того, чтобы указать
сетевые настройки телефона, переходим на вкладку Сеть -> Основные.
Для начала необходимо выбрать режим (IPv4/IPv6). Далее переходим к
настройкам режимов. Рассмотрим поля для заполнения:
DHCP – отмечаем, если автоматически получаем настройки от DHCP-сервера;
Статический IP-адрес – отмечаем, если используем статический IP-адрес. Здесь необходимо прописать сам IP-адрес, маску подсети, шлюз, а также IP-адрес основного и дополнительного сервера DNS;
PPPoE – отмечаем, если используем PPPoE. Необходимо указать логин и пароль, полученные от провайдера.

Вкладка Статус
После
того, как авторизовались на web-интерфейсе
телефона, видим вкладку Статус. Она носит информативный характер. Содержит в
себе информацию о версии ПО и сборке, подключению телефона к локальной сети,
общую информацию о телефоне (его MAC-адрес,
состояние подключения и режим порта PC), а также информацию об
аккаунтах телефона.

Регистрация аккаунта
Для
регистрации учётной записи SIP-перейдём
на вкладку Аккаунт (Аккаунт -> Аккаунт). Здесь нужно
заполнить следующие поля:
Аккаунт – активация или деактивация настраиваемого аккаунта. По умолчанию, статус аккаунта «Отключено».
Лейбл – имя, которое должно отображаться на дисплее телефона.
Отображаемое имя – имя, которое должно отображаться на экране у того, кому будем звонить.
Имя регистрации, имя пользователя – указываем внутренний номер абонента.
Пароль – прописываем пароль от учётной записи SIP для данного внутреннего номера.
Транспорт – выбираем протокол для передачи пакетов (UDP, TCP, TLS, DNS-NAPTR).
NAT – Выбираем STUN, если используется STUN-сервер, и прописываем адрес данного сервера в поле STUN-сервер. По умолчанию отключен.
Переходим
к настройке сервера регистрации.
Адрес SIP-сервера – необходимо указать IP-адрес сервера Asterisk, на который регистрируем телефон.
Период регистрации – прописываем интервал перерегистраций на сервере (в секундах). По умолчанию 1 час.
Количество запросов – указываем количество запросов на перерегистрацию на сервере Asterisk. По умолчанию таких запросов 3.
Данный
телефон позволяет указать до 2х серверов регистрации. Настройки второго сервера
регистрации идентичны первому. Работает следующим образом: при недоступности
первого сервера регистрация внутреннего номера будет производиться на второй.

Настройка кодеков
Перейдём
на вкладку Кодеки (Аккаунт -> Кодеки). Здесь
настраиваются аудиокодеки (для каждого аккаунта отдельно). В столбце «Неиспользуемые»
находятся все кодеки. Кодеки, которые будем использовать, переносим в столбец «Используемые».
Узнать,
какие кодеки используются на сервере телефонии можно во FreePBX на
вкладке Asterisk
SIP
Settings
(Settings
-> Asterisk
SIP
Settings).


Расширенные
настройки аккаунта
Перейдём
в расширенные настройки аккаунта (Аккаунт -> Расширенные).
Здесь выставим тип DTMF-нажатий.
DTMF Type – тип DTMF. Указываем используемый DTMF (по умолчанию RFC2833).

Настройка
времени и даты
Настроить
время и дату можно двумя способами: автоматически и вручную. Для этого
переходим во вкладку Время и дата (Настройки -> Время
и Дата).
Рассмотрим
поля для заполнения.
Время от DHCP-сервера –
активация или деактивация данной функции. Если включено, то время будет
автоматически синхронизировано с DHCP-сервером.
Так же здесь настраивается часовой пояс, NTP-сервера, период синхронизации и прочие настройки. Можно настроить автоматический переход на летнее время. Для этого необходимо выбрать способ перехода (по дате или по неделе), обозначить дату начала и дату окончания перехода. Можно выбрать формат, в котором будут отображаться дата и время.
