-
Contents
-
Table of Contents
-
Troubleshooting
-
Bookmarks
Quick Links
User’s Guide
NAS Series
Model: NAS326, NAS520, NAS540, and NAS542
Personal Cloud Storage
Default Login Details
Ways to Find Your
NAS
Web Address
User Name
Password
Copyright © 2016 Zyxel Communications Corporation
FindMe
NAS Starter Utility
http://(NAS Server Name)
http://(NAS IP Address)
admin
1234
Version 5.2 Edition 1, 12/2016
Related Manuals for ZyXEL Communications NAS326
Summary of Contents for ZyXEL Communications NAS326
-
Page 1
User’s Guide NAS Series Model: NAS326, NAS520, NAS540, and NAS542 Personal Cloud Storage Default Login Details Version 5.2 Edition 1, 12/2016 Ways to Find Your FindMe NAS Starter Utility Web Address http://(NAS Server Name) http://(NAS IP Address) User Name admin… -
Page 2: Related Documentation
IMPORTANT! READ CAREFULLY BEFORE USE. KEEP THIS GUIDE FOR FUTURE REFERENCE. This is a User’s Guide for a series of products. Not all products support all firmware features. Screenshots and graphics in this book may differ slightly from your product due to differences in your product firmware or your computer operating system.
-
Page 3: Table Of Contents
Contents Overview Contents Overview Get to Know Your NAS ……………………. 12 Find and Access Your NAS ……………………17 Web Configurator ……………………..26 Video Tutorials ……………………….37 Storage Manager ……………………..41 Control Panel: Overview ……………………102 Control Panel: Privilege and Sharing ………………..105 Control Panel: Network ……………………
-
Page 4: Table Of Contents
Table of Contents Table of Contents Contents Overview ……………………..3 Table of Contents ……………………..4 Chapter 1 Get to Know Your NAS……………………12 1.1 Overview ……………………….12 1.2 LEDs …………………………13 1.3 Hard Disks ……………………….14 1.4 SD Card ……………………….14 1.5 Power Button ……………………… 14 1.6 COPY/SYNC Button ……………………
-
Page 5
Table of Contents 4.4 Back up files to the NAS using Windows File History …………..39 4.5 Restore a backup using Windows File History …………….40 4.6 Remotely access files on the NAS using WebDAV …………..40 Chapter 5 Storage Manager……………………..41 5.1 Overview ………………………. -
Page 6
Table of Contents 7.5.1 Share and Folder Names ………………..121 7.5.2 Shared Folders Screen ………………….. 121 7.5.3 Add a Share ……………………. 123 7.5.4 Edit a Share …………………….. 127 7.5.5 Shared Folder Information ………………..128 7.5.6 Recycle Bin Screen ………………….129 Chapter 8 Control Panel: Network ……………………130 8.1 Overview ………………………. -
Page 7
Table of Contents Chapter 10 Control Panel: Service ……………………159 10.1 Overview ……………………….. 159 10.2 What You Can Do ……………………159 10.3 What You Need to Know ………………….159 10.4 Media Server Screens ………………….160 10.4.1 Media Server Share Publish Screen …………….161 10.5 iTunes Server Screen …………………… -
Page 8
Table of Contents 11.6 Technical Reference ……………………189 11.6.1 Log Classes ……………………190 11.6.2 Log Severity Levels ………………….190 11.6.3 Log Messages ……………………190 Chapter 12 Status Center ……………………….197 12.1 Overview ……………………….. 197 12.1.1 System Information ………………….197 12.1.2 Network ……………………..198 Chapter 13 App Center and Packages………………….200 13.1 About Packages ……………………. -
Page 9
Table of Contents 14.3.1 Add a Download Task …………………. 235 14.3.2 Configure General Download Settings …………….236 14.3.3 Configure the P2P Download Settings …………….238 14.3.4 Configure the IP Filter Settings ………………240 14.3.5 Configure the Email notifications Settings …………..241 14.3.6 Select Files to Download ……………….. -
Page 10
Table of Contents Chapter 17 File Browser, Photo, Music & Video ………………..288 17.1 Overview ……………………….. 288 17.2 File Browser ……………………..288 17.3 Photo ……………………….290 17.3.1 Exif and Google Maps (Photos) ………………293 17.3.2 Slideshow (Photos) ………………….294 17.4 Music ……………………….294 17.4.1 Now Playing (Music) …………………. -
Page 11
Table of Contents 20.8 Storage ……………………….326 20.9 Firmware ……………………….327 20.10 File Transfer ……………………..327 20.11 Networking ……………………..328 20.12 Some Features’ Screens Do Not Display …………….328 20.13 Media Server Functions ………………….329 20.14 Download Service Functions ………………..331 20.15 Web Publishing …………………….. -
Page 12: Get To Know Your Nas
H A P T E R Get to Know Your NAS 1.1 Overview This User’s Guide covers the following models: NAS326, NAS520, NAS540, and NAS542. Table 1 NAS Series Comparison Table FEATURES NAS326 NAS520 NAS540 NAS542 RAM Size 512 MB DDR III…
-
Page 13: Leds
Chapter 1 Get to Know Your NAS Figure 1 Example of the NAS in a Home Network Above is the NAS in a home network. Users back up and share data on the NAS. The media player (A) plays the NAS’s media files on the TV. A USB hard drive (B) provides extra storage space and files are copied directly from the USB mass storage device to the NAS.
-
Page 14: Hard Disks
Chapter 1 Get to Know Your NAS Table 2 LEDs (continued) COLOR STATUS DESCRIPTION HDD1/2 White The hard disk drive is connected properly to the NAS. This LED stays on white when the hard disk drive is in hibernation if you do not enable sleeping HDD LED blinking.
-
Page 15: Copy/Sync Button
Chapter 1 Get to Know Your NAS Power On • Press the power button for one second to turn on the NAS. When the system is on and ready, you will hear one beep. Power Off Figure 2 Using the Power Button to Turn Off the NAS Press 1 Beep 2 Beeps…
-
Page 16
Chapter 1 Get to Know Your NAS • Press the RESET button until you hear two beeps. After the second beep, continue pressing the button for five more seconds, then release it. You will hear three quick beeps after you release the button. This resets the NAS to the factory default configuration. -
Page 17: Find And Access Your Nas
H A P T E R Find and Access Your NAS 2.1 Overview Use FindMe or the NAS Starter Utility to find and access the NAS and the files on it. The NAS Starter Utility supports Windows XP, Windows Vista, Windows 7, and Windows 8. Click Help to open a Web Help page about the NAS Starter Utility screens.
-
Page 18
Chapter 2 Find and Access Your NAS Figure 6 Congratulations Figure 7 FindMe Welcome Screen Press the Copy button on the front of your NAS within 5 minutes. Figure 8 Press the Copy Button Click Admin Page to connect to the NAS login screen. NAS Series User’s Guide… -
Page 19: Nas Starter Utility
Chapter 2 Find and Access Your NAS Figure 9 Click Admin Page Button Use the default username “admin” and password “1234” to log in. See Chapter 3 on page 26 for more on the web desktop. Figure 10 NAS Login Screen 2.3 NAS Starter Utility •…
-
Page 20
Chapter 2 Find and Access Your NAS Figure 11 NAS Starter Utility Desktop Icon Figure 12 NAS Starter Utility Windows System Tray Icon The first time you open the NAS Starter Utility the discovery screen appears as follows. Figure 13 NAS Seeker The following table describes the labels in this screen. -
Page 21: Main Nas Starter Utility Screen
Chapter 2 Find and Access Your NAS 2.3.2 Main NAS Starter Utility Screen The main NAS Starter Utility screen displays after you select an NAS in the NAS Seeker screen. Figure 14 NAS Starter Utility Main Screen The following table describes the labels in this screen. Table 4 NAS Starter Utility Main Screen LABEL DESCRIPTION…
-
Page 22: Directory Of The Nas
Chapter 2 Find and Access Your NAS Table 4 NAS Starter Utility Main Screen (continued) LABEL DESCRIPTION Shared Folder Click this to log into the NAS’s file directory in Windows Explorer. myZyxelCloud Click this to go to mycloud.zyxel.com to set up a free DDNS hostname for the NAS so you can connect to it easily from the Internet.
-
Page 23: Configure System Settings
Chapter 2 Find and Access Your NAS Figure 17 Login Select a share on the NAS and the drive letter on your computer to which you want to map it. The shares that each user can select to map depends on the user’s permissions. For example, if share1 is private to user1, then only user1 is allowed to map share1.
-
Page 24
Chapter 2 Find and Access Your NAS Figure 19 NAS Starter Utility > Configuration > System Setting The following table describes the labels in this screen. Table 5 NAS Starter Utility > Configuration > System Setting LABEL DESCRIPTION Server Name Specify a name to uniquely identify the NAS on your network. -
Page 25
Chapter 2 Find and Access Your NAS Table 5 NAS Starter Utility > Configuration > System Setting (continued) LABEL DESCRIPTION Use from DHCP Domain Name System (DNS) is for mapping a domain name to its corresponding IP address server and vice versa. Select this if the NAS is automatically given DNS information from the ISP or a DHCP server in your network. -
Page 26: Web Configurator
3.2 Access the NAS Web Configurator This guide uses the NAS326 screens as an example. The screens may vary slightly for different models. Make sure your NAS is properly connected and that your computer is in the same subnet as the NAS (refer to the Quick Start Guide or the appendices).
-
Page 27
Chapter 3 Web Configurator Figure 21 NAS Login Screen Make sure you have a backup of any existing data in the hard disk before installing it in the NAS. Creating a volume formats the hard disk and deletes all data in the process. You should see a screen asking you to change your password (highly recommended) as shown next. -
Page 28
Chapter 3 Web Configurator Figure 24 Create Volume If you choose Existing on disk group, you will go to the screens below after clicking Next. NAS Series User’s Guide… -
Page 29
Chapter 3 Web Configurator Figure 25 Existing on Disk Group If this is the first time the NAS has created a volume, it needs to reboot after the volume is created. Click Yes to reboot or No to go to the Desktop. NAS Series User’s Guide… -
Page 30: Desktop
Chapter 3 Web Configurator Figure 26 Reboot 3.3 Desktop The Desktop screen displays after you log in. Hover your mouse over the heading bar icons to display their names. NAS Series User’s Guide…
-
Page 31
Chapter 3 Web Configurator Figure 27 Desktop (Administrator) Status Zone Figure 28 Desktop (User) NAS Series User’s Guide… -
Page 32
Chapter 3 Web Configurator Note: The Web Configurator session automatically times out if left idle for 15 minutes. Simply log back into the NAS if this happens to you. Desktop — click this to minimize all windows so you can see the desktop. Click it again to restore the windows to their previous state. -
Page 33: Status Zone
Chapter 3 Web Configurator 3.3.1 Status Zone The Status Zone displays icons for various features you can access. Table 6 Status Zone Icons ICON DESCRIPTION Click System Status to open the Status Center screen. System Status displays the health state of the NAS.
-
Page 34: Group Icons
Chapter 3 Web Configurator Figure 29 Switch between Desktop Pages 3.3.3 Group Icons You can drag one icon to another one and make them a group as shown below. NAS Series User’s Guide…
-
Page 35
Chapter 3 Web Configurator Figure 30 Group Icons After the group is created, the default group name is “NewGroup”. You can click the icon to change the group name. In the following example, the group name is changed to Media. Figure 31 Change the Group Name You can also move the group to another page by right-clicking the icon as shown next. -
Page 36: Move Icons
Chapter 3 Web Configurator Figure 32 Move the Group Location 3.3.4 Move Icons You can move an icon to another page by right-clicking the icon as shown next. Figure 33 Move the Icon Location NAS Series User’s Guide…
-
Page 37: Video Tutorials
H A P T E R Video Tutorials 4.1 Overview Click Video Tutorial on the Desktop to go to www.youtube.com to view Zyxel’s youtube videos, which show you how to use the NAS. This chapter provides information about the following tutorials. •…
-
Page 38
Chapter 4 Video Tutorials After enabling Time Machine on the NAS, follow the steps below to set up Time Machine on your Mac to use your NAS for backup. You can also see https://www.youtube.com/watch?v=nzpZNJuEsUs&index=2&list=PL- 69xFi03dP9zQn8gHGcVwf-X6ShkNU27 for the related Zyxel youtube video. Click Apple >… -
Page 39: Back Up Files To The Nas Using Windows File History
Chapter 4 Video Tutorials When prompted for the username and password of share01, enter the login information for an existing user account with write access permission on share01 (for information on configuring user accounts and shares see Chapter 7 on page 105).
-
Page 40: Restore A Backup Using Windows File History
Chapter 4 Video Tutorials https://www.youtube.com/watch?v=xt1XdMAZisU&list=PL-69xFi03dP9zQn8gHGcVwf- X6ShkNU27&index=3 for how to use File History in Windows 10 to back up files from a computer to the NAS. 4.5 Restore a backup using Windows File History If you used Windows File History to back up files from your computer to the NAS, File History also allows you to restore the backup.
-
Page 41: Storage Manager
H A P T E R Storage Manager 5.1 Overview This chapter displays the status of both internal and external storage, and introduces how to configure disk groups, volumes, and iSCSI functions. After you log in with an administrator account, click Storage Manager on the Desktop to go to the following screens in a new window.
-
Page 42
Chapter 5 Storage Manager The following table describes the labels in this screen. Table 7 Storage Manager > Overview > Internal Volumes LABEL DESCRIPTION Storage The circular icon displays the overall health state of the NAS. A green circle with a check mark indicates healthy. An orange circle with an exclamation mark indicates attention. -
Page 43: External Volumes Screen
Chapter 5 Storage Manager 5.2.2 External Volumes Screen Figure 35 Storage Manager > Overview > External Volumes The following table describes the labels in this screen. Table 8 Storage Manager > Overview > External Volumes LABEL DESCRIPTION Volume Details include the currently used percentage of the volume. Used — green on the circle represents the volume’s percentage of used capacity in a healthy state.
-
Page 44: Raid Types
Chapter 5 Storage Manager • External volumes (built on the external storage devices attached to the NAS) Internal Volumes Table 9 Internal Volumes OPTION DESCRIPTION Volume Allocates all the available space to the volume. Provides better performance. Volume on Disk Allows you to create multiple volumes on a disk group.
-
Page 45: Volume Screens
Chapter 5 Storage Manager Change RAID Type You can change the following RAID types without losing stored data. This can help you manage your storage capacity as you add more disks. Table 11 Internal Volumes RAID TYPE WHAT YOU CAN CHANGE IT TO Basic RAID 1 RAID 1…
-
Page 46
Chapter 5 Storage Manager Figure 36 Internal Storage Volume The following table describes the labels in this screen. Table 13 Storage Manager > Internal Storage > Volume LABEL DESCRIPTION Volume Use this section to configure and manage volumes built on hard disks directly. Create Click this to format internal hard disks and create a new volume. -
Page 47
Chapter 5 Storage Manager Table 13 Storage Manager > Internal Storage > Volume (continued) LABEL DESCRIPTION Delete Click Delete to remove the selected volume. A pop-up screen displays. Type «DELETE» in the text box and click Delete to remove it. Note: If you delete a volume, all data in the volume disks is erased. -
Page 48
Chapter 5 Storage Manager Table 13 Storage Manager > Internal Storage > Volume (continued) LABEL DESCRIPTION Status This field shows whether the volume is normal, degraded, crashed, Creating, Deleting, Expanding, Repairing or Changing the RAID type. Normal: A green circle represents a healthy volume. Degraded: An orange circle represents a degraded RAID 1 volume. -
Page 49
Chapter 5 Storage Manager Table 13 Storage Manager > Internal Storage > Volume (continued) LABEL DESCRIPTION Delete Click Delete to remove the selected volume. A pop-up screen displays. Type «DELETE» in the text box and click Delete to remove it. Note: If you delete a volume, all data in the volume disks is erased. -
Page 50
Chapter 5 Storage Manager Note: Create a volume on a disk group instead if you want to have multiple volumes on a disk. See Section 5.3.1.7 on page 62 for more information. Moreover, the maximum size for one volume is 16TB. Step 1 Select Disks and RAID Type Figure 37 Create Volume: Select Disks and RAID Type The following table describes the labels in this screen. -
Page 51
Chapter 5 Storage Manager Table 14 Create Volume: Select Disks and RAID Type (continued) LABEL DESCRIPTION 2. Choose a Select a RAID type from the drop-down list box. The corresponding space allocations of RAID type available size, data protection area, and wasted size display. Use Basic with one disk. -
Page 52
Chapter 5 Storage Manager The following table describes the labels in this screen. Table 15 Create Volume: Summary LABEL DESCRIPTION Disk Selected This field displays the hard disks you have selected. RAID Type This field displays the type of RAID on which the volume will be built. Volume Type This field displays the type of the volume, Single volume on RAID (no disk group). -
Page 53
Chapter 5 Storage Manager The following table describes the labels in this screen. Table 16 Manage Volume LABEL DESCRIPTION Repair RAID Select this to repair a degraded RAID volume. Expand the Select this to add one or more disks to a JBOD, RAID 1 or RAID 5 volume. You can add a disk to volume by increase an array’s capacity or to use as a hot-spare (standby). -
Page 54
Chapter 5 Storage Manager Step 1 Select Disks Figure 41 Manage Volume (Repair RAID): Select Disks The following table describes the labels in this screen. Table 17 Manage Volume (Repair RAID): Select Disks LABEL DESCRIPTION This shows the name of the volume you have selected. Status This field displays the status of the volume. -
Page 55
Chapter 5 Storage Manager Table 17 Manage Volume (Repair RAID): Select Disks (continued) LABEL DESCRIPTION Next Click Next to go to the next step. Cancel Click Cancel to close the screen without saving any settings. Step 2 Summary Use this screen to review the settings you configured in the last step. Figure 42 Manage Volume (Repair RAID): Summary The following table describes the labels in this screen. -
Page 56
Chapter 5 Storage Manager Figure 43 Manage Volume (Expand the volume by adding disk(s)) Step 1 Select Disks Figure 44 Manage Volume (Expand the volume by adding disk(s)): Select Disks The following table describes the labels in this screen. Table 19 Manage Volume (Expand the volume by adding disk(s)): Select Disks LABEL DESCRIPTION This shows the name of the volume you have selected. -
Page 57
Chapter 5 Storage Manager Table 19 Manage Volume (Expand the volume by adding disk(s)): Select Disks (continued) LABEL DESCRIPTION Status This field displays the status of the disk. Disk Name This field displays the name of the disk. Size This field displays the total capacity of the disk. Model Name This field displays the model of the disk. -
Page 58
Chapter 5 Storage Manager Table 20 Manage Volume (Expand the volume by adding disk(s)): Summary (continued) LABEL DESCRIPTION Disk Selected This field displays the hard disks you have selected. Volume This field displays the total available size of the volume. Capacity Back Click Back to go to the previous step. -
Page 59
Chapter 5 Storage Manager Figure 47 Manage Volume (Expand the volume with unallocated disk space) The following table describes the labels in this screen. Table 21 Manage Volume (Expand the volume with unallocated disk space) LABEL DESCRIPTION Action This field displays for what the configuration is. Volume Name This field displays the name of the volume. -
Page 60
Chapter 5 Storage Manager Figure 48 Manage Volume (Change RAID Type) Step 1 Select Disks and RAID Type Figure 49 Manage Volume (Change RAID Type): Select Disks and RAID Type NAS Series User’s Guide… -
Page 61
Chapter 5 Storage Manager The following table describes the labels in this screen. Table 22 Manage Volume (Change RAID Type): Select Disks and RAID Type LABEL DESCRIPTION This shows the name of the volume you have selected. Status This field displays the status of the volume. RAID Type This field displays the type of RAID on which the volume is built. -
Page 62
Chapter 5 Storage Manager Step 2 Summary Figure 50 Manage Volume (Change RAID Type): Summary The following table describes the labels in this screen. Table 23 Manage Volume (Change RAID Type): Summary LABEL DESCRIPTION Action This field displays for what the configuration is. Volume Name This field displays the name of the volume. -
Page 63
Chapter 5 Storage Manager Figure 51 Create a Volume on an Existing Disk Group Step 1 Create Volume Figure 52 Create a Volume on an Existing Disk Group: Create Volume NAS Series User’s Guide… -
Page 64
Chapter 5 Storage Manager The following table describes the labels in this screen. Table 24 Create a Volume on Disk Group: Create Volume LABEL DESCRIPTION Disk group information Name This field displays the name of the disk group. Unallocated capacity This field displays the percentage of the available size, the size in use, and total size of the disk group. -
Page 65
Chapter 5 Storage Manager Table 25 Create a Volume on Disk Group: Summary (continued) LABEL DESCRIPTION Back Click Back to go to the previous screen. Apply Click Apply to save the settings. Cancel Click Cancel to close the screen without saving any settings. 5.3.1.9 Create a Volume on a New Disk Group Select New disk group to create a disk group and then a volume on the disk group. -
Page 66
Chapter 5 Storage Manager Step 1 Select Disks and RAID Type Figure 55 Create Volume on a New Disk Group: Select Disks and RAID Type The following table describes the labels in this screen. Table 26 Create Volume on Disk Group: Select Disks and RAID Type LABEL DESCRIPTION Select disks… -
Page 67
Chapter 5 Storage Manager Table 26 Create Volume on Disk Group: Select Disks and RAID Type (continued) LABEL DESCRIPTION Choose a RAID Select a RAID type from the drop-down list box. The corresponding space allocations of type available size, data protection area, and wasted size display. Use Basic with one disk. -
Page 68
Chapter 5 Storage Manager The following table describes the labels in this screen. Table 27 Create Volume on Disk Group: Create Volume LABEL DESCRIPTION Step 2. Create Volume Disk group information Name This field displays the name of the disk group. Unallocated capacity This field displays the percentage of the available size, the size in used, and total size of the disk group. -
Page 69
Chapter 5 Storage Manager Table 28 Create Volume on Disk Group: Summary (continued) LABEL DESCRIPTION Volume Type This field displays the type of the volume, Multiple volumes on RAID (Disk Group X) where Disk Group X is the disk group’s name. Volume Name This field displays the name of the volume. -
Page 70: Disk Group Screens
Chapter 5 Storage Manager 5.3.2 Disk Group Screens Use the Disk Group screen to configure and manage disk groups. Click Storage Manager > Internal Storage > Disk Group screen to open the screen as shown. Figure 59 Disk Group The following table describes the labels in this screen. Table 30 Disk Group LABEL DESCRIPTION…
-
Page 71
Chapter 5 Storage Manager Table 30 Disk Group (continued) LABEL DESCRIPTION Status This field shows the status of the hot-spare disk. This field shows the name of the disk group and whether it is normal, degraded, crashed, Creating, Deleting, Expanding, Repairing or Changing the RAID type. Normal: A green circle represents a healthy volume. -
Page 72
Chapter 5 Storage Manager Step 1 Select Disks and RAID Type Figure 60 Create Disk Group: Select Disks and RAID Type The following table describes the labels in this screen. Table 31 Create Disk Group: Select Disks and RAID Type LABEL DESCRIPTION Select disks… -
Page 73
Chapter 5 Storage Manager Table 31 Create Disk Group: Select Disks and RAID Type (continued) LABEL DESCRIPTION Choose a RAID Select a RAID type from the drop-down list box. The corresponding space allocations of type available size, data protection area, and wasted size display. Use Basic with one disk. -
Page 74: Hard Disk Screens
Chapter 5 Storage Manager The following table describes the labels in this screen. Table 32 Create Disk Group: Summary LABEL DESCRIPTION Disk Selected This field displays the hard disk(s) on which the RAID array will be built. RAID Type This field displays the type of RAID on which the volume will be built. Volume Type This field displays the type of the volume, Multiple volumes on RAID (Disk Group X) where Disk Group X is the disk group’s name.
-
Page 75
Chapter 5 Storage Manager 5.3.3.1 S.M.A.R.T Use the S.M.A.R.T screens to view hard disk health indicators. Self Monitoring, Analysis, and Reporting Technology (S.M.A.R.T) detects and reports the reliability of hard disks using standard indicators (called “attributes”), to help you anticipate possible disk failures. Note: The available S.M.A.R.T information varies from one hard disk vendor to another. -
Page 76: Smart Info
Chapter 5 Storage Manager The following table describes the labels in this screen. Table 34 S.M.A.R.T Overview LABEL DESCRIPTION This shows the current status of the hard disk (a green circle with a check mark indicates healthy). This shows the overall health of the hard disk based on S.M.A.R.T diagnostics. This shows the temperature of the hard disk in degrees celsius ( C) and fahrenheit ( Status…
-
Page 77
Chapter 5 Storage Manager Figure 64 S.M.A.R.T Info The following table describes the labels in this screen. Table 35 S.M.A.R.T Info LABEL DESCRIPTION This is the identification number used to tag a hard disk attribute. This is standard across all S.M.A.R.T-enabled storage devices. However it depends on the storage vendor which attributes it will allow S.M.A.R.T to diagnose. -
Page 78
Chapter 5 Storage Manager Table 35 S.M.A.R.T Info LABEL DESCRIPTION Updated This indicates when the hard drive updates the value for this attribute. • Always means the hard drive updates this attribute during normal operation and during offline activities. • Offline means the hard drive only updates this attribute when no one is accessing the hard drive. -
Page 79
Chapter 5 Storage Manager Table 36 S.M.A.R.T. Attributes (continued) ATTRIBUTE BETTER DESCRIPTION NAME Spin Retry Count This is the total number of spin start retry attempts. This is the number of attempts to spin up to fully operational speed the hard drive has made when the first attempt did not succeed. -
Page 80: Iscsi
Chapter 5 Storage Manager Table 36 S.M.A.R.T. Attributes (continued) ATTRIBUTE BETTER DESCRIPTION NAME Flying Height This is the height of the hard drive’s read/write heads above the disk surface. Spin High Current This is the quantity of high current used to spin up the drive. Spin Buzz This is the number of buzz routines to spin up the drive.
-
Page 81: Iscsi Luns Screens
Chapter 5 Storage Manager The configuration steps are as follows: Create an iSCSI LUN Volume for the iSCSI target in NAS1. Configure NAS1 as an iSCSI target. Figure 65 iSCSI Connection Example NAS1 VOL1 5.4.1 iSCSI LUNs Screens This section enables you to create, up-map, and delete LUN volumes, as well as display the volumes’ information.
-
Page 82
Chapter 5 Storage Manager The following table describes the labels in this screen. Table 37 Storage Manager > iSCSI > iSCSI LUNs LABEL DESCRIPTION Create Click this to create a new LUN on a volume. See more details on Section 5.4.1.1 on page Un-map Click this to open the following screen where you can up-map the LUN from the iSCSI target. -
Page 83
Chapter 5 Storage Manager Table 37 Storage Manager > iSCSI > iSCSI LUNs (continued) LABEL DESCRIPTION Delete Click this to open the following screen where you can delete an existing LUN. Key in DELETE and click Delete to remove an existing LUN. Click Cancel to close this screen. Info Click this item to check detailed information about the LUN. -
Page 84
Chapter 5 Storage Manager Step 1 Set up LUN Properties Figure 67 Creating a New LUN: Set up LUN Properties The following table describes the labels in these screens. Table 38 Create a New LUN: Set up LUN Properties LABEL DESCRIPTION Name Type a LUN name in this field. -
Page 85: Iscsi Targets Screens
Chapter 5 Storage Manager Figure 68 Creating a New LUN: Summary The following table describes the labels in these screens. Table 39 Create a New LUN: Summary LABEL DESCRIPTION Name Displays the name of the LUN. Location Displays the name of the volume the LUN is located in. Capacity Displays the size of the LUN.
-
Page 86
Chapter 5 Storage Manager Figure 69 Storage Manager > iSCSI > iSCSI Targets The following table describes the labels in these screens. Table 40 Storage Manager > iSCSI > iSCSI Targets LABEL DESCRIPTION Create Click this to create a new iSCSI target. See more details on Section 5.4.2.1 on page Edit… -
Page 87
Maximum send segment bytes — Displays the maximum data segment length in bytes that the iSCSI target can send. This feature is for the NAS326 only. Mapped iSCSI Luns — Displays the LUNs mapped with the target. -
Page 88
Chapter 5 Storage Manager Step 1 Set up Target Properties Figure 70 Creating a new Target: Set up Target Properties The following table describes the labels in these screens. Table 41 Create a New Target: Set up Target Properties LABEL DESCRIPTION Name Enter the name of your iSCSI target. -
Page 89
Chapter 5 Storage Manager Table 41 Create a New Target: Set up Target Properties (continued) LABEL DESCRIPTION Allowed initiator The allowed initiator name is in the iSCSI Qualified Name (IQN) format. (IQN) To check the initiator name, open the iSCSI Initiator program on your computer. Select the Configuration tab and you can see the initiator name as shown in the following screen. -
Page 90
Chapter 5 Storage Manager Table 41 Create a New Target: Set up Target Properties (continued) LABEL DESCRIPTION Enable mutual Mutual CHAP is a two-way authentication between the iSCSI initiator and the target. If the CHAP initiator has configured CHAP authentication, the target must enter the secret that’s set up by the initiator when attempting connection. -
Page 91
Chapter 5 Storage Manager The following table describes the labels in these screens. Table 42 Create a New Target: Map iSCSI LUNs LABEL DESCRIPTION Status Displays the status of the iSCSI LUN(s). LUN Name Displays the LUN name. Capacity Displays the size of the iSCSI LUN(s). Back Click Back to go to the previous step. -
Page 92
Chapter 5 Storage Manager Table 43 Create a New Target: Summary (continued) LABEL DESCRIPTION Apply Click Apply to save the settings. Cancel Click Cancel to close the screen without saving any settings. 5.4.2.2 Edit a Created Target You can edit iSCSI target settings such as allowed initiator (IQN), CHAP, and CRC checksum after you create a target. -
Page 93
Chapter 5 Storage Manager Table 44 Storage Manager > iSCSI > iSCSI Targets > Edit > Properties (continued) LABEL DESCRIPTION CHAP Username — The user name is for the initiator to authenticate the initiator when attempting connection. Password — The password is for the target to authenticate the initiator when attempting connection. -
Page 94
Chapter 5 Storage Manager The following table describes the labels in these screens. Table 45 Storage Manager > iSCSI > iSCSI Targets > Edit > Map iSCSI LUNs LABEL DESCRIPTION Status Displays the status of the iSCSI LUN. LUN Name Displays the iSCSI LUN name. -
Page 95: External Storage
Maximum send Select the maximum send segments allowed in bytes. segment bytes Four options are applied: 262144, 65536, 9182, 4092. Note: This feature is for the NAS326 only. Apply Click Apply to save your changes. Cancel Click Cancel to close the screen without saving any settings.
-
Page 96
Chapter 5 Storage Manager The following table describes the labels in this screen. Table 47 Storage Manager > External Storage LABEL DESCRIPTION Format Click this to format the connected USB disk. Section 5.5.3 on page 97 for more information. Edit Click this to modify the volume name. -
Page 97: Format The External Volume
Chapter 5 Storage Manager Table 47 Storage Manager > External Storage (continued) LABEL DESCRIPTION Capacity This field shows total disk size, the percentage of the volume being used and the percentage that is available. If the status is Unsupported, the capacity displays “Unknown”. If the status is Unformatted, the capacity displays “—”.
-
Page 98: Technical Reference
Chapter 5 Storage Manager 5.6 Technical Reference This section contains background on JBOD and the RAID levels used on the NAS. JBOD • Minimum number of disks: 1 • Total capacity: Sum of the member disks • Advantages: Maximum storage capacity, especially for disks of mixed sizes. Flexibility (you can add disks to the JBOD •…
-
Page 99
Chapter 5 Storage Manager RAID 0 capacity is the size of the sum of the capacities of the disks in the RAID 0. For example, if you have four disks of sizes 1 TB, 2 TB, 3 TB and 2 TB respectively in one RAID 0 array, then the maximum capacity is 8 TB. -
Page 100
Chapter 5 Storage Manager the array is the capacity of the smallest drive (1TB, 1TB, 2TB, 2TB) * (Number of disks — 2) = 1TB * (4-2) = 2TB. The remaining space (2 TB) is unused. Table 52 RAID 6 RAID 6 DISK 1 DISK 2… -
Page 101: Raid And Data Protection
Chapter 5 Storage Manager stripped across three disks (A1 to A3 in the first strip for example) with parity information (AP) on the fourth disk. Table 54 RAID 5 DISK 1 DISK 2 DISK 3 DISK 4 The capacity of a RAID 5 array is the smallest disk in the RAID set multiplied by one less than the number of disks in the RAID set.
-
Page 102: Control Panel: Overview
H A P T E R Control Panel: Overview 6.1 Overview This chapter discusses the Control Panel screens. Use the Control Panel screens to configure administrator settings. The Control Panel icon displays on the Desktop when you log in with an administrator account.
-
Page 103
Chapter 6 Control Panel: Overview Figure 78 Control Panel > Overview The following table describes the labels in this screen. Table 55 Control Panel > Overview LABEL DESCRIPTION Privilege and Sharing Users Use this section to display and manage a list of user accounts created on the NAS. Groups Use this section to display and manage a list of groups created on the NAS. -
Page 104
Chapter 6 Control Panel: Overview Table 55 Control Panel > Overview (continued) LABEL DESCRIPTION System Server Name Use this section to specify the NAS’s server and workgroup names. Date/Time Use this section to set up date/time and choose a time zone for the NAS. FW Upgrade Use this section to upgrade the NAS firmware. -
Page 105: Control Panel: Privilege And Sharing
H A P T E R Control Panel: Privilege and Sharing 7.1 Overview This chapter introduces the Control Panel > Privilege and Sharing screens. 7.2 What You Can Do • Use the Users screens (Section 7.3 on page 105) to display and manage a list of user accounts created on the NAS.
-
Page 106: User Icons
Chapter 7 Control Panel: Privilege and Sharing User Icons The following table describes the user icons. Table 56 User Icons ICON DESCRIPTION This icon is for an administrator account. This icon is for a user account. This icon is for a myZyxelCloud account. Usernames Enter a username from one to 32 characters.
-
Page 107: Users Screen
Chapter 7 Control Panel: Privilege and Sharing pc-guest If you give the pc-guest user read-only access or full access to files in a share. The share becomes a public share. Everyone on the network can use Windows Explorer to access a public share without a login user name and password.
-
Page 108: Add An Account
Chapter 7 Control Panel: Privilege and Sharing Table 57 Control Panel > Privilege and Sharing > Users (continued) LABEL DESCRIPTION Username This field displays the username of each account. Description This field displays the description of each account. 7.3.2 Add an Account Use this screen to create a NAS user account with NAS access password.
-
Page 109
Chapter 7 Control Panel: Privilege and Sharing Table 58 Control Panel > Privilege and Sharing > Users > Add a User: General Settings (continued) LABEL DESCRIPTION Next Click this to go to the next step. Cancel Click this to return to the previous screen without saving. Step 2 Groups Figure 81 Control Panel >… -
Page 110
Chapter 7 Control Panel: Privilege and Sharing Step 3 Shared Folder Access Figure 82 Control Panel > Privilege and Sharing > Users > Add a User: Shared Folder Access The following table describes the labels in this screen. Table 60 Control Panel > Privilege and Sharing > Users > Add a User: Shared Folder Access LABEL DESCRIPTION Shared Folder… -
Page 111
Chapter 7 Control Panel: Privilege and Sharing Step 4 Quota Figure 83 Control Panel > Privilege and Sharing > Users > Add a User: Quota The following table describes the labels in this screen. Table 61 Control Panel > Privilege and Sharing > Users > Add a User: Quota LABEL DESCRIPTION Volume Name… -
Page 112: Edit An Account
Chapter 7 Control Panel: Privilege and Sharing Step 5 Summary Figure 84 Control Panel > Privilege and Sharing > Users > Add a User: Summary Use this screen to view your account settings. Click Back to return to the previous step. Click Apply to save your changes.
-
Page 113: User Info
Chapter 7 Control Panel: Privilege and Sharing Click General Settings, Groups, Shared Folder Access or Quota to edit the account settings. Refer to Section 7.3.2 on page 108 for more information on the screens. Click Apply to save your changes. Click Cancel to return to the previous screen without saving.
-
Page 114: Groups
Chapter 7 Control Panel: Privilege and Sharing 7.4 Groups Use the Groups screens to create and manage groups. You can assign users to groups and grant individual groups access rights to specific shares. Group Names Enter a group name from 1 to 32 characters. The first character must be alphabetical (case insensitive, [A-Z a-z]);…
-
Page 115: Add A Group
Chapter 7 Control Panel: Privilege and Sharing Figure 87 Control Panel > Privilege and Sharing > Groups The following table describes the labels in this screen. Table 63 Control Panel > Privilege and Sharing > Groups LABEL DESCRIPTION Add Group Click this to open a screen where you can configure a new group.
-
Page 116
Chapter 7 Control Panel: Privilege and Sharing Step 1 General Settings Figure 88 Control Panel > Privilege and Sharing > Groups > Add a Group: General Settings The following table describes the labels in this screen. Table 64 Control Panel > Privilege and Sharing > Groups > Add a Group: General Settings LABEL DESCRIPTION Group Name… -
Page 117
Chapter 7 Control Panel: Privilege and Sharing Step 2 Members Figure 89 Control Panel > Privilege and Sharing > Groups > Add a Group: Members The following table describes the labels in this screen. Table 65 Control Panel > Privilege and Sharing > Groups > Add a Group: Members LABEL DESCRIPTION Type… -
Page 118
Chapter 7 Control Panel: Privilege and Sharing Step 3 Shared Folder Access Figure 90 Control Panel > Privilege and Sharing > Groups > Add a Group: Shared Folder Access The following table describes the labels in this screen. Table 66 Control Panel > Privilege and Sharing > Groups > Add a Group: Shared Folder Access LABEL DESCRIPTION Shared Folder… -
Page 119: Edit A Group
Chapter 7 Control Panel: Privilege and Sharing Step 4 Summary Figure 91 Control Panel > Privilege and Sharing > Groups > Add a Group: Summary Use this screen to view your group settings. Click Back to return to the previous step. Click Apply to save your changes.
-
Page 120: Group Information
Chapter 7 Control Panel: Privilege and Sharing Click General Settings, Members, or Shared Folder Access to edit the group settings. Refer to Section 7.4.2 on page 115 for more information on the screens. Click Apply to save your changes. Click Cancel to return to the previous screen without saving.
-
Page 121: Shared Folders
Chapter 7 Control Panel: Privilege and Sharing 7.5 Shared Folders A share is a set of access permissions mapped to a specific folder on a volume. It is equivalent to the Windows concept of a shared folder. You can map a share to a network drive for easy and familiar file transfer for Windows users.
-
Page 122
Chapter 7 Control Panel: Privilege and Sharing Figure 94 Control Panel > Privilege and Sharing > Shared Folders The following table describes the labels in this screen. Table 68 Control Panel > Privilege and Sharing > Shared Folders LABEL DESCRIPTION Add Share Click this to create a new share. -
Page 123: Add A Share
Chapter 7 Control Panel: Privilege and Sharing Table 68 Control Panel > Privilege and Sharing > Shared Folders (continued) LABEL DESCRIPTION Type This field displays the type icons. represents built-in or user-created or predefined shares on the internal hard drives. Predefined shares include music, video, and photo, always exist as long as there is a volume.
-
Page 124
Chapter 7 Control Panel: Privilege and Sharing Table 69 Control Panel > Privilege and Sharing > Shared Folders > Add Share: General Settings LABEL DESCRIPTION Location You should have already created volumes (a single accessible storage area with a single file system) on the NAS. -
Page 125
Chapter 7 Control Panel: Privilege and Sharing Table 70 Control Panel > Privilege and Sharing > Shared Folders > Add Share: Shared Folder Access LABEL DESCRIPTION No Access Click the check box to block access (users/groups cannot read, modify, nor execute) to all files contained within this share. -
Page 126
Chapter 7 Control Panel: Privilege and Sharing Table 71 Control Panel > Privilege and Sharing > Shared Folders > Add Share: Shared Folder Publishing LABEL DESCRIPTION Publish to Web This option is available when you enable the Web Publish (Section 10.8 on page 168). -
Page 127: Edit A Share
Chapter 7 Control Panel: Privilege and Sharing Figure 99 Control Panel > Privilege and Sharing > Shared Folders > Add Share: Summary: Access Right Click Back to return to the previous step. Click Apply to save your changes. Click Cancel to return to the previous screen without saving.
-
Page 128: Shared Folder Information
Chapter 7 Control Panel: Privilege and Sharing Click General Settings, Shared Folder Access or Shared Folder Publishing to edit the share settings. Refer Section 7.5.3 on page 123 for more information on the screens. Click Apply to save your changes. Click Cancel to return to the previous screen without saving.
-
Page 129: Recycle Bin Screen
Chapter 7 Control Panel: Privilege and Sharing 7.5.6 Recycle Bin Screen Use this screen to periodically clean up items in all recycle bins. Recycle Bins Recycle bins in the NAS help users recover accidentally deleted files or folders in the shares. When you delete an item, a recycle folder is created within the share to hold the deleted item.
-
Page 130: Control Panel: Network
H A P T E R Control Panel: Network 8.1 Overview This chapter discusses the Control Panel > Network screens. Use the Network screens to configure network settings. 8.2 What You Can Do • Use the TCP/IP screens (Section 8.4 on page 131) to configure the NAS’s TCP/IP network connection settings such as the IP addresses.
-
Page 131: Tcp/Ip Screens
Chapter 8 Control Panel: Network 8.4 TCP/IP Screens Use the TCP/IP screens to have the NAS use a dynamic or static IP address, to configure its subnet mask, default gateway, PPPoE and DNS servers, and to test the network connection. 8.4.1 Configure General TCP/IP Settings Click Control Panel >…
-
Page 132: Configure Network Interface
Chapter 8 Control Panel: Network Table 74 Control Panel > Network > TCP/IP > General Settings (continued) LABEL DESCRIPTION Apply Click this to save your TCP/IP configurations. After you click Apply, the NAS restarts. Wait until you see the Login screen or until the NAS fully boots and then use the NAS Starter Utility to rediscover it.
-
Page 133
Chapter 8 Control Panel: Network The following table describes the labels in this screen. Table 75 Control Panel > Network > TCP/IP > Network Interface LABEL DESCRIPTION Create This button is available only on the NAS which has multiple Ethernet ports. Click it to open the following screen to set up a port trunking. -
Page 134
Chapter 8 Control Panel: Network Figure 106 Creating a Port Trunking The following table describes the labels in this screen. Table 76 Control Panel > Network > TCP/IP > Network Interface > Create LABEL DESCRIPTION Automatically Select this option to have the interface get IP address information automatically. If no IP address information is assigned, the NAS uses Auto-IP to assign itself an IP address and subnet mask. -
Page 135
Chapter 8 Control Panel: Network Figure 107 Control Panel > Network > TCP/IP > Network Interface > LAN1: IPv4 The following table describes the labels in this screen. Table 77 Control Panel > Network > TCP/IP > Network Interface > LAN1: IPv4 LABEL DESCRIPTION Automatically… -
Page 136
Chapter 8 Control Panel: Network Figure 108 Control Panel > Network > TCP/IP > Network Interface > LAN1: IPv6 The following table describes the labels in this screen. Table 78 Control Panel > Network > TCP/IP > Network Interface > LAN1: IPv6 LABEL DESCRIPTION Configure IPv6… -
Page 137: Configure Web Configurator
Chapter 8 Control Panel: Network Figure 109 Control Panel > Network > TCP/IP > Network Interface > PPPoE The following table describes the labels in this screen. Table 79 Control Panel > Network > TCP/IP > Network Interface > PPPoE LABEL DESCRIPTION Enable PPPoE to…
-
Page 138: Configure Network Diagnosis
Chapter 8 Control Panel: Network Figure 110 Control Panel > Network > TCP/IP > Web Configurator The following table describes the labels in this screen. Table 80 Control Panel > Network > TCP/IP > Web Configurator LABEL DESCRIPTION HTTP connection Port Number Specify the port number of HTTP connection.
-
Page 139: Upnp Port Mapping Screens
Chapter 8 Control Panel: Network Figure 111 Control Panel > Network > TCP/IP > Network Diagnosis The following table describes the labels in this screen. Table 81 Control Panel > Network > TCP/IP > Network Diagnosis LABEL DESCRIPTION Host Select a specific host to perform the diagnosis. Ping Click this to test the network connection.
-
Page 140: Upnp And The Nas’s Ip Address
Chapter 8 Control Panel: Network In the above example, UPnP creates a firewall rule and NAT port forwarding mapping to send FTP traffic (using TCP port number 21) from the public IP address a.b.c.d to the NAS’s private IP address of 192.168.1.20.
-
Page 141: Upnp And Security
Chapter 8 Control Panel: Network 8.5.2 UPnP and Security UPnP’s automated nature makes it easier to use than manually configuring firewall and NAT rules, but it is also less secure. Using UPnP may make your network more susceptible to snooping and hacking attacks.
-
Page 142: Configure Upnp Port Mapping
Chapter 8 Control Panel: Network Figure 115 Network > UPnP Port Mapping > UPnP Router The following table describes the labels in this screen. Table 82 Network > UPnP Port Mapping > UPnP Router LABEL DESCRIPTION Status This displays whether a UPnP router is found. IP address This displays the IP address of the UPnP router.
-
Page 143
Chapter 8 Control Panel: Network Figure 116 Network > UPnP Port Mapping > UPnP Port Mapping The following table describes the labels in this screen. Table 83 Network > UPnP Port Mapping > UPnP Port Mapping LABEL DESCRIPTION Click this to add a service and create a port mapping rule. See more details on Section 8.5.5.1 on page 144. -
Page 144
Chapter 8 Control Panel: Network Table 83 Network > UPnP Port Mapping > UPnP Port Mapping (continued) LABEL DESCRIPTION WAN Port When you enable one of the NAS’s services, specify the port number (1~65,535) Internet uses need to use to connect to the Internet gateway’s WAN port in order to access the service on the NAS. -
Page 145: Terminal Screen
Chapter 8 Control Panel: Network Note: The default of the WAN port for the newly created service displays -1. Specify the port number from 1 to 65,535, or you cannot access that service from the Internet. 8.6 Terminal Screen Use this screen to enable or disable Telnet and SSH (Secure SHell) access to the NAS. Telnet or SSH access lets you use line commands to configure the NAS.
-
Page 146: Dydns Screen
Chapter 8 Control Panel: Network Figure 117 Control Panel > Network > Terminal The following table describes the labels in this screen. Table 84 Control Panel > Network > Terminal LABEL DESCRIPTION Enable Telnet Select this to enable Telnet access to the NAS. Clear it to not allow Telnet access to the NAS. Service To use Telnet, log in as “admin”…
-
Page 147
Chapter 8 Control Panel: Network Figure 118 Control Panel > Network > DyDNS The following table describes the labels in this screen. Table 85 Control Panel > Network > DyDNS LABEL DESCRIPTION Enable DyDNS Select this to use dynamic DNS. You need to have registered a dynamic DNS account with a service provider such as www.dyndns.org. -
Page 148: Control Panel: System
H A P T E R Control Panel: System 9.1 Overview This chapter gives an overview of the various features included in the system screens. 9.2 What You Can Do • Use the Server Name screen (Section 9.4 on page 149) to specify the NAS’s server and workgroup names.
-
Page 149: Server Name Screen
Chapter 9 Control Panel: System 9.4 Server Name Screen Click Control Panel > System > Server Name to open the following screen. Use this screen to configure your CIFS settings. In this screen you can set your server name and specify if your NAS is a part of a workgroup.
-
Page 150: Date/Time Screen
Chapter 9 Control Panel: System 9.5 Date/Time Screen Use this screen to select a time zone and a time server from which your NAS can get the time and date. This time is then used in NAS logs and alerts. 9.5.1 Configure Date/Time Click the Control Panel >…
-
Page 151: Configure Daylight Saving Time
Chapter 9 Control Panel: System Table 87 Control Panel > System > Date/Time (continued) LABEL DESCRIPTION Date/time This field displays the last updated date and time from the time server or the last date and time configured manually. When you set Date/time setting to Manually, enter the new date and time in this field and then click Apply.
-
Page 152: Fw Upgrade Screens
Chapter 9 Control Panel: System The following table describes the labels in this screen. Table 88 Control Panel > System > Date/Time > Daylight Saving Time LABEL DESCRIPTION Enable daylight Select this option to use daylight saving time. saving Auto daylight Select this option to have the NAS automatically retrieve Daylight Saving Time settings from saving the Internet.
-
Page 153: Manual Firmware Upgrade
Chapter 9 Control Panel: System Figure 122 Control Panel > System > FW Upgrade > Latest Firmware Check The following table describes the labels in this screen. Table 89 Control Panel > System > FW Upgrade > Latest Firmware Check LABEL DESCRIPTION Model Name…
-
Page 154: Ssl Screens
Chapter 9 Control Panel: System Figure 123 Control Panel > System > FW Upgrade > Manual Firmware Upgrade The following table describes the labels in this screen. Table 90 Control Panel > System> FW Upgrade > Manual Firmware Upgrade LABEL DESCRIPTION Browse Click this to find the file on your computer.
-
Page 155: Modify The Existing Certificate
Chapter 9 Control Panel: System Figure 124 Control Panel > System > SSL > Install System CA 9.7.2 Modify the Existing Certificate Click Control Panel > System > SSL > Modify the Existing Certificate to show the following screen. Click Edit, then follow the on-screen instructions for creating a public key certificate signed by the NAS as the local certificate authority.
-
Page 156: Create A Certificate
Chapter 9 Control Panel: System Figure 125 Control Panel > System > SSL > Modify the Existing Certificate 9.7.3 Create a Certificate Click Control Panel > System > SSL > Create Certificate to show the following screen. Click Create, then follow the on-screen instructions to install a certificate that has been authorized by a third-party certificate authority.
-
Page 157
Chapter 9 Control Panel: System Figure 126 Control Panel > System > SSL > Create a Certificate Edit or Create a Certificate When you click the Edit button in the SSL > Modify the Existing Certificate screen, a screen opens to allow you to make adjustments to the NAS’s public key certificate. -
Page 158
Chapter 9 Control Panel: System Figure 127 Maintenance > SSL > Create or Edit a Certificate The following table describes the labels in this screen. Table 91 Maintenance > SSL > Create or Edit a Certificate LABEL DESCRIPTION Common Name This name describes the certificate’s origin, either in the form of an IP address or a domain name. -
Page 159: Control Panel: Service
H A P T E R Control Panel: Service 10.1 Overview This chapter discusses the features in the Service screens. The NAS contains various applications for file sharing. 10.2 What You Can Do • Use the Media Server screens (Section 10.4 on page 160) to share files with media clients.
-
Page 160: Media Server Screens
Chapter 10 Control Panel: Service Figure 128 FTP Client Example Media Server The media server feature lets anyone on your network play video, music, and photos from the NAS (without having to copy them to another computer). The NAS can function as a DLNA-compliant media server and/or an iTunes server.
-
Page 161: Media Server Share Publish Screen
Chapter 10 Control Panel: Service Click Control Panel > Service > Media Server to open the following screen. Use this screen to view the media server’s status and rebuild the media server database. Figure 129 Control Panel > Service > Media Server > Media Server The following table describes the labels in this screen.
-
Page 162: Itunes Server Screen
Chapter 10 Control Panel: Service Figure 130 Control Panel > Service > Media Server > Share Publish The following table describes the labels in this screen. Table 93 Control Panel > Service > Media Server > Share Publish LABEL DESCRIPTION All Publish Select this to have the media server share a share’s media files with media clients.
-
Page 163: Ftp Screens
Chapter 10 Control Panel: Service Figure 131 Control Panel > Service > iTunes Server The following table describes the labels in this screen. Table 94 Control Panel > Service > iTunes Server LABEL DESCRIPTION Enable iTunes Check this to let anyone on your network use iTunes to play music files in the published shares. Server Apply Click this to save your changes.
-
Page 164: Transfer Settings
Chapter 10 Control Panel: Service Figure 132 Control Panel > Service > FTP > General Settings The following table describes the labels in this screen. Table 95 Control Panel > Service > FTP > General Settings LABEL DESCRIPTION Enable FTP You can use FTP to send files to the NAS or get files from the NAS.
-
Page 165
Chapter 10 Control Panel: Service Figure 133 Control Panel > Service > FTP > Transfer Settings The following table describes the labels in this screen. Table 96 Control Panel > Service > FTP > Transfer Settings LABEL DESCRIPTION Port range for data Select to Use the default port range. -
Page 166: Character Set
Chapter 10 Control Panel: Service 10.6.3 Character Set Click Control Panel > Service > FTP > Character Set to open the following screen. Figure 134 Control Panel > Service > FTP > Character Set The following table describes the labels in this screen. Table 97 Control Panel >…
-
Page 167: How To Use Netdrive With The Nas
Chapter 10 Control Panel: Service Figure 135 Control Panel > Service > WebDAV The following table describes the labels in this screen. Table 98 Control Panel > Service > WebDAV LABEL DESCRIPTION Enable WebDAV Select this to allow remote users to work with files stored on the NAS. Edit the access privileges in Privilege and Sharing >…
-
Page 168: Web Publishing Screens
Chapter 10 Control Panel: Service Figure 136 NetDrive Example Name the drive and specify the URL of the share to access. Select SSL if the NAS forces HTTPs use. Specify your user name and password for accessing the share on the NAS. Figure 137 NetDrive Add Drive 10.8 Web Publishing Screens Use this screen to turn web publishing on or off and select shares to publish.
-
Page 169: Share Publish
Chapter 10 Control Panel: Service Figure 138 Control Panel > Service > Web Publishing > Status The following table describes the labels in this screen. Table 99 Control Panel > Service > Web Publishing > Status LABEL DESCRIPTION Enable Web Select this option to turn on web publishing to let people access files in the published shares Publishing using a web browser, without having to log into the Web Configurator.
-
Page 170: How To Configure Web Publishing
Chapter 10 Control Panel: Service Figure 139 Control Panel > Service > Web Publishing > Share Publish The following table describes the labels in this screen. Table 100 Control Panel > Service > Web Publishing > Share Publish LABEL DESCRIPTION Publish Select the share(s) to publish for web browser access.
-
Page 171
Chapter 10 Control Panel: Service Figure 140 Control Panel > Service > Web Publishing > Status (Example) Figure 141 Control Panel > Service > Web Publishing > Share Publish (Example) Now open your web browser and type in the address of the NAS’s FamilyPhotos web page. In this example, the NAS’s IP address is 192.168.1.57, and the name of the web-published share is FamilyPhotos. -
Page 172: Print Server Screen
Chapter 10 Control Panel: Service Figure 142 Browsing to an NAS Share Example • Click a file’s link to open the file. • Right-click a file’s link and select Save Target As.. to save a copy of the file. • Click a label in the heading row to sort the files by that criteria. •…
-
Page 173: Print Server Edit
Chapter 10 Control Panel: Service The following table describes the labels in this screen. Table 101 Control Panel > Service > Print Server LABEL DESCRIPTION Edit Select a printer and click this to change the name the NAS uses for the printer. Delete Select a printer and click this to remove a printer from the NAS’s printer list.
-
Page 174
Chapter 10 Control Panel: Service Note: You may need to configure any firewalls between the NAS and the syslog clients in order to let the syslog traffic go to the NAS. Click Control Panel > Service > Syslog Server to open the following screen. Figure 145 Control Panel >… -
Page 175: Technical Reference
Chapter 10 Control Panel: Service Table 103 Control Panel > Service > Syslog Server (continued) LABEL DESCRIPTION Path Use this if you want to further specify a folder within the share. This field displays the share folder’s path. Type the location of the folder using forward slashes as branch separators or use Browse to find or create a folder on the NAS.
-
Page 176: Web Publishing
Chapter 10 Control Panel: Service • Publish shares to let others play the contained media files. • The media server is a convenient way to share files you download. • Hardware-based media players can also play the files. See Supported Media Server Content Formats on page 335 for the supported multimedia file formats.
-
Page 177: Printer Sharing
Chapter 10 Control Panel: Service Accessing Web-published Shares from the Internet You need to use a public address to access the NAS’s web-published shares from the Internet. If your NAS uses a private IP address, you may need to use the public IP address of your Internet gateway and configure NAT or port forwarding on your Internet gateway and possibly firewall rules in order to let people access the NAS’s web-published shares from the Internet.
-
Page 178: Control Panel: Maintenance
H A P T E R Control Panel: Maintenance 11.1 Overview This chapter discusses the Maintenance screens. The Maintenance screens allow you to manage system configurations. 11.2 What You Can Do • Use the Power screen (Section 11.3 on page 178) to configure power settings for the NAS, including power saving, UPS, power on/off after power failure, power on/off schedule, and Wake on LAN.
-
Page 179
Chapter 11 Control Panel: Maintenance Figure 148 Control Panel > Maintenance > Power > Power Management The following table describes the labels in this screen. Table 104 Control Panel > Maintenance > Power > Power Management LABEL DESCRIPTION Power Management Turn off hard Enter the number of minutes to wait when the NAS is idle before spinning the hard disks down to disk(s) -
Page 180: Power On/Off Schedule
Chapter 11 Control Panel: Maintenance Table 104 Control Panel > Maintenance > Power > Power Management (continued) LABEL DESCRIPTION Keep Former Select this option to have the NAS automatically restart only if it was operating when the power Status failed. The NAS remains off if it was already off when the power failed. Always Power Select this option to keep the NAS operating as much of the time as possible.
-
Page 181: Add The Power Control Schedule
Chapter 11 Control Panel: Maintenance Table 105 Control Panel > Maintenance > Power > Power On/Off Schedule (continued) LABEL DESCRIPTION This table lists the power on, power off, and reboot schedules. For example, you could have one schedule to turn the NAS on every morning, at 8:00, another schedule to turn it off every evening at 18:00, and a third schedule to have it reboot every Friday at 14:00.
-
Page 182: Log Screen
Chapter 11 Control Panel: Maintenance Table 106 Control Panel > Maintenance > Power > Power On/Off Schedule: Add (continued) LABEL DESCRIPTION Execute Time Enter the time, day, and/or day of the month as appropriate for this power control schedule (hh:mm) entry.
-
Page 183: Log Report Configuration Screen
Chapter 11 Control Panel: Maintenance Figure 151 Control Panel > Service > Maintenance > Log The following table describes the labels in this screen. Table 107 Control Panel > Service > Maintenance > Log LABEL DESCRIPTION Refresh Click this to update the log display. Purge all Logs Click this to erase all logs from the NAS.
-
Page 184: Email Setting
Chapter 11 Control Panel: Maintenance • Use the Syslog Server Setting screen (Section 11.4.4 on page 185) to enable the syslog server and select the categories to include in the log report. 11.4.2 Email Setting You can enable and configure e-mail alerts from the NAS. In the Log Report Configuration screen, click the Email Setting tab to open the following screen.
-
Page 185: Report Setting
Chapter 11 Control Panel: Maintenance 11.4.3 Report Setting You can have the NAS email you alerts and reports. In the Log Report Configuration screen, click the Report Setting tab to open the following screen. Figure 153 Control Panel > Service > Maintenance > Log > Report Config: Report Setting The following table describes the labels in this screen.
-
Page 186: Configuration Backup Screens
Chapter 11 Control Panel: Maintenance Figure 154 Control Panel > Service > Maintenance > Log > Report Config: Syslog Server Setting The following table describes the labels in this screen. Table 110 Control Panel > Service > Maintenance > Log > Report Config: Syslog Server Setting LABEL DESCRIPTION Enable Syslog…
-
Page 187: Configuration Restore
Chapter 11 Control Panel: Maintenance Figure 155 Control Panel > Service > Maintenance > Configuration Backup 11.5.2 Configuration Restore Click Control Panel > Service > Maintenance > Configuration Backup > Configuration Restore to open the following screen. Restore Configuration allows you to upload a new or previously saved configuration file from your computer to your NAS.
-
Page 188: Factory Reset
Chapter 11 Control Panel: Maintenance Figure 156 Control Panel > Service > Maintenance > Configuration Backup > Configuration Restore Click Browse to locate a previously-saved configuration file. Then click Restore to load the previously- saved configuration file to the NAS. This replaces your current NAS configuration settings with the settings in the previously-saved configuration file.
-
Page 189: Technical Reference
Chapter 11 Control Panel: Maintenance Figure 157 Control Panel > Service > Maintenance > Configuration Backup > Factory Reset Click Restore Factory Defaults to clear all user-entered configuration information and return the NAS to its factory defaults. A warning screen appears asking you to confirm. Enter “FACTORY” and click OK to continue or click Cancel to quit.
-
Page 190: Log Classes
Chapter 11 Control Panel: Maintenance 11.6.1 Log Classes The following table shows information on log classes. Table 111 Log Classes DESCRIPTION CATEGORY Users This log class shows information on user access to the NAS. Shares This log class shows information on shares being created or deleted. Services This log class shows information on the operation of the NAS’s built-in services.
-
Page 191
Chapter 11 Control Panel: Maintenance Table 113 Log Messages (continued) CLASS SEVERITY MESSAGE Copy/Sync Button ERROR [USB Sync] Failed at %s: It is a Folder in Internal Volume. But It is not a Folder in USB. Copy/Sync Button ERROR [USB Sync] Failed at %s: It is a Folder in USB. But It is not a Folder in Internal Volume. -
Page 192
Chapter 11 Control Panel: Maintenance Table 113 Log Messages (continued) CLASS SEVERITY MESSAGE Download Service INFO Download service suspend %s because of no data income detected or to limit max download slot Download Service INFO Download service add comment %s to %s by user Download Service INFO Download service set min upload/download ratio to %d%… -
Page 193
Chapter 11 Control Panel: Maintenance Table 113 Log Messages (continued) CLASS SEVERITY MESSAGE Services INFO HTTP management port has changed to %s Services INFO Clock timezone is set to GMT%s Services INFO Clock timezone is set to default Services INFO Clock daylight saving is enabled Services INFO… -
Page 194
Chapter 11 Control Panel: Maintenance Table 113 Log Messages (continued) CLASS SEVERITY MESSAGE storage Info Create raidType [Volume1]: SUCCESS storage error Create raidType [Volume1]: FAILED storage Info Create raidType [Disk group 1]: SUCCESS storage error Create raidType [Disk group 1]: FAILED storage Info Create Internal Volume [Volume1] (Size=512MB): SUCCESS… -
Page 195
Chapter 11 Control Panel: Maintenance Table 113 Log Messages (continued) CLASS SEVERITY MESSAGE System NOTICE Hostname is set to ‘%s’. System NOTICE System description is changed. System NOTICE System description is empty now. System NOTICE DNS server setting is changed System NOTICE DNS server address is changed to be given from DHCP server… -
Page 196
Chapter 11 Control Panel: Maintenance Table 113 Log Messages (continued) CLASS SEVERITY MESSAGE Power INFO Job [%s] is finished successfully Management Power INFO Job [%s] is pending because other job is running Management Power INFO Job [%s] is canceled by user Management Power INFO… -
Page 197: Status Center
H A P T E R Status Center 12.1 Overview Status Center displays the system information or network connection status. You can also click the System Status icon from the Status Zone (see Section 3.3.1 on page 33) to open the Status Center screen. 12.1.1 System Information In the Desktop screen, click Status Center to display System Information for detailed NAS status information.
-
Page 198: Network
Chapter 12 Status Center Table 114 Status Center > System Information (continued) LABEL DESCRIPTION Firmware Version This is the NAS firmware version. MAC Address This displays the NAS’s unique physical hardware address (MAC) for the LAN Ethernet port. You need the MAC address to register the product at myZyxel.com. Customer support may also request it for troubleshooting purposes.
-
Page 199
Chapter 12 Status Center The following table describes the labels in this screen. Table 115 Status Center > Network LABEL DESCRIPTION Type Displays the type of the user account. User Displays the user name. WAN/LAN Displays whether the connection is from the WAN or the LAN. Service Name Displays the service name. -
Page 200: App Center And Packages
H A P T E R App Center and Packages 13.1 About Packages Packages extend the functions of your NAS. Your NAS supports various packages that let you do more. The App Center screen includes a list of packages to add. This chapter also describes the screens for features you can add to the NAS by installing packages.
-
Page 201: App Center Screens
Chapter 13 App Center and Packages • Memopal — Use this to back up files on the NAS to your Memopal online backup and storage account. Section 13.9 on page 227. • ownCloud — Use this to store, synchronize, and share files, photos, calendars, and more with computers and mobile devices using an ownCloud client.
-
Page 202: Installed Applications
Chapter 13 App Center and Packages 13.2.1 Installed Applications Use this screen to view the applications that you have installed in the NAS. Click App Center > My Apps > Installed on the Desktop to open the following screen. The Enable/Disable button is only for non built-in packages and available only if you have previously installed the package.
-
Page 203: Application Update
Chapter 13 App Center and Packages Figure 162 App Center > My Apps > Installed: Package Information The following table describes the labels in this screen. Table 116 App Center > My Apps > Installed: Package Information LABEL DESCRIPTION The left side shows the screenshots of the application web configurator. It also shows the name, version number and a brief description of the application at the right side.
-
Page 204: Browse All Apps
Chapter 13 App Center and Packages You can upgrade an application at a time, or click Update All to upgrade all the previously installed applications to the latest version. Figure 163 App Center > My Apps > Update 13.2.3 Browse All Apps This screen shows a list of packages supported by the NAS.
-
Page 205: Dropboxclient
Chapter 13 App Center and Packages Figure 164 App Center > Browse > All Apps 13.3 DropboxClient Use DropboxClient to synchronize NAS local shared folders and your Dropbox accounts. You need to assocate a shared folder and user account with your Dropbox account before the NAS can copy or synchronize files between the folder and the associated Dropbox account.
-
Page 206: Configure Account Setting
Chapter 13 App Center and Packages Figure 165 DropboxClient 13.3.1 Configure Account Setting Click DropboxClient > Account Setting to open the following screen. Use this screen to associate the NAS shared folder and account with a Dropbox account. Figure 166 DropboxClient > Account Setting NAS Series User’s Guide…
-
Page 207: How To Associate Nas Share/Account With Dropbox Account
Chapter 13 App Center and Packages The following table describes the labels in this screen. Table 117 DropboxClient > Account Setting LABEL DESCRIPTION Linked Account This displays the e-mail address of the owner of the Dropbox account the NAS is configured to use.
-
Page 208
Chapter 13 App Center and Packages Step1 Local Sync Folder Use this screen to specify the folder on the NAS to synchronize with Dropbox for the local user. Figure 167 DropboxClient > Account Setting > Add: Step1 Local Sync Folder The following table describes the labels in this screen. -
Page 209
Chapter 13 App Center and Packages Step2 Binding User Use this screen to select the local NAS user account to link with Dropbox. Click Next to continue. Figure 168 DropboxClient > Account Setting > Add: Step2 Binding User Step3 Authorization Click the link in this screen to get the authorization code from Dropbox. -
Page 210
Chapter 13 App Center and Packages The user must sign into the Dropbox account. You may need to sign out of Dropbox’s services first if another user account is already signed in. Click Allow when the following screen displays to allow access to the files in your Dropbox. NAS Series User’s Guide… -
Page 211: Configure Update Period
Chapter 13 App Center and Packages Copy the code and paste it into the field in the Web Configurator screen. Click Apply to have the NAS connect to Dropbox and complete the authorization. In the DropboxClient > Account Setting screen, select the Enable DropboxClient option and click Apply to start synchronizing your files with Dropbox.
-
Page 212: Googledriveclient
Chapter 13 App Center and Packages The following table describes the labels in this screen. Table 119 DropboxClient > Update Period LABEL DESCRIPTION Update Period Specify how frequently the NAS synchronizes the local sync folders and the linked Dropbox accounts. The range is 1 to 4320 minutes (3 days). Apply Click this to save your changes.
-
Page 213
Chapter 13 App Center and Packages Figure 171 GoogleDriveClient > Account Setting The following table describes the labels in this screen. Table 120 GoogleDriveClient > Account Setting LABEL DESCRIPTION Linked Account This displays the e-mail address of the owner of the Google account the NAS is configured to use. -
Page 214: How To Link Nas Account, Share And Google Account
Chapter 13 App Center and Packages Table 120 GoogleDriveClient > Account Setting (continued) LABEL DESCRIPTION Status This shows the current status of the GoogleDrive feature for the selected Google account. • Disabled — The GoogleDrive feature is turned off. During this state you can use the other sections of this screen to add or delete linked accounts or enable Google Drive.
-
Page 215
Chapter 13 App Center and Packages Figure 172 GoogleDriveClient > Account Setting > Add: Step1 Local Sync Folder The following table describes the labels in this screen. Table 121 GoogleDriveClient > Account Setting > Add: Step1 Local Sync Folder LABEL DESCRIPTION Share The name of a share on the NAS containing the folder the NAS synchronizes with Google… -
Page 216
Chapter 13 App Center and Packages Figure 173 GoogleDriveClient > Account Setting > Add: Step2 Binding User Step3 Authorization Click the link in this screen to get the authorization code from Google. Figure 174 GoogleDriveClient > Account Setting > Add: Step3 Authentication NAS Series User’s Guide… -
Page 217: Configure Update Period
Chapter 13 App Center and Packages The user must sign into the Google account. You may need to sign out of Google’s services first if another user account is already signed in. Click Allow when the following screen displays to allow access to the files in your Google Drive. Copy the code and paste it into the field in the Web Configurator screen.
-
Page 218: Nfs
Chapter 13 App Center and Packages Figure 175 GoogleDriveClient > Update Period The following table describes the labels in this screen. Table 122 GoogleDriveClient > Update Period LABEL DESCRIPTION Update Period Specify how frequently the NAS synchronizes the local sync folders and the linked Google Drive accounts.
-
Page 219
Chapter 13 App Center and Packages Figure 176 NFS The following table describes the labels in this screen. Table 123 NFS LABEL DESCRIPTION Enable Click this to employ NFS in your NAS. Disable Click this to stop using NFS. This makes all NFS shares unavailable. Add NFS Share Click this to add an NFS share. -
Page 220: Add/Edit Nfs Share
Chapter 13 App Center and Packages Figure 177 Delete an NFS Share 13.5.1 Add/Edit NFS Share Use this screen to add or edit an NFS share. Note: Some attributes of the NFS share cannot be edited. Click Add NFS Share or Edit NFS Share in the NFS screen to open the following screen. Step 1 General Settings Use this screen to set the NFS share name and location.
-
Page 221
Chapter 13 App Center and Packages Table 124 NFS: Add/Edit: Step 1 General Settings (continued) LABEL DESCRIPTION Volume Name Select the volume where the folder you want to add as an NFS share is located. Full Path This shows the location of the NFS share in the NAS. The NFS server assigns this path to the share folder you input. -
Page 222: Nfs Session
Chapter 13 App Center and Packages Table 125 NFS: Add/Edit: Step 2 Shared Folder Access (continued) LABEL DESCRIPTION Next Click this to go to the next screen. Cancel Click this to close the screen without saving. Step 3 Summary This screen is not available when you are editing an existing NFS share. Use this screen to review the settings you configured.
-
Page 223: Php-Mysql-Phpmyadmin
Chapter 13 App Center and Packages Figure 181 NFS: NFS Session The following table describes the labels in this screen. Table 126 NFS: NFS Session LABEL DESCRIPTION NFS Share Path This shows the location of the share in the NAS. IP Address This shows the IP address of the user accessing the NFS share.
-
Page 224: Tftp
Chapter 13 App Center and Packages Figure 182 PHP-MySQL-phpMyAdmin The following table describes the labels in this screen. Table 127 PHP-MySQL-phpMyAdmin LABEL DESCRIPTION Get Started Click this to access and log into phpMyAdmin to manage your databases. Enter ‘root’ as the username and ‘1234’ as the password to log in. Reset MySQL Database If you change and forget your password, you will need to use this button.
-
Page 225
Chapter 13 App Center and Packages Figure 183 TFTP The following table describes the labels in this screen. Table 128 TFTP LABEL DESCRIPTION Enable TFTP Server Select this to have the NAS accept log files from TFTP clients. Clear it to stop the NAS from accepting log files from TFTP clients. -
Page 226: Pyload
Chapter 13 App Center and Packages 13.8 pyLoad Use this screen to configure the NAS so you can use pyLoad to manage your downloads, including those from one-click hosting sites. Click pyLoad on the Desktop or the Launch button in the App Center screen to open the following screen.
-
Page 227: Memopal
Chapter 13 App Center and Packages 13.9 Memopal Install the Memopal package to back up folders of files on the NAS to your Memopal online backup and storage account. Note: Deleting files from your Memopal account’s online backup set does not delete the files from the NAS, just as deleting a file from the NAS does not delete a backup copy in your Memopal account’s online backup set.
-
Page 228: Memopal Settings
Chapter 13 App Center and Packages The following table describes the labels in this screen. Table 130 Memopal > Status LABEL DESCRIPTION Status This shows the status of the Memopal application’s interaction with the Memopal server. Disabled: The NAS Memopal application is turned off. Starting: The backup job is initializing and the NAS is getting ready to back up.
-
Page 229
Chapter 13 App Center and Packages Figure 186 Memopal > Settings The following table describes the labels in this screen. Table 131 Memopal > Settings LABEL DESCRIPTION Enable Memopal Select this to back up files to your Memopal account. The rest of the configuration fields display. -
Page 230: Owncloud
Chapter 13 App Center and Packages Table 131 Memopal > Settings (continued) LABEL DESCRIPTION Path This field displays the share folder’s path. Identify the folder to back up to the Memopal server. Use Browse to find or create a folder on the NAS or type the location of the folder using forward slashes as branch separators.
-
Page 231
Chapter 13 App Center and Packages Note: Get ownCloud desktop clients from owncloud.org and ownCloud mobile apps from Google Play or the Apple App Store. NAS Series User’s Guide… -
Page 232: Download Service
H A P T E R Download Service 14.1 Overview This chapter discusses the features in the Download Service screens. Use the Download Service screen to download files from the Internet. 14.2 What You Need to Know Download Service The NAS’s download service downloads files from the Internet directly to the NAS. You do not have to download to your computer and then copy to the NAS.
-
Page 233
Chapter 14 Download Service Figure 187 Download Service > Download Service The following table describes the labels in this screen. Table 132 Download Service > Download Service LABEL DESCRIPTION Enable Download Use this option to turn the download service off or on. If you turn off the service, all downloads Service are paused. -
Page 234
Chapter 14 Download Service Table 132 Download Service > Download Service (continued) LABEL DESCRIPTION Completed Click this to see the list of files that the NAS has finished downloading. The Location column shows where a downloaded file is saved on the NAS. Click on the location link to open the share browser and access the file. -
Page 235: Add A Download Task
Chapter 14 Download Service Table 132 Download Service > Download Service (continued) LABEL DESCRIPTION Priority This is the download’s priority on the NAS. Select Auto to have the NAS automatically determine the task’s priority. Select High to have the NAS download this file before the other files.
-
Page 236: Configure General Download Settings
Chapter 14 Download Service The following table describes the labels in this screen. Table 133 Download Service > Download Service > Add LABEL DESCRIPTION Paste the URL or magnet link of the file you want to download into this field. The URL can be for an HTTP, FTP, or P2P download.
-
Page 237
Chapter 14 Download Service Figure 189 Download Service > Download Service > Preferences > General Settings NAS Series User’s Guide… -
Page 238: Configure The P2P Download Settings
Chapter 14 Download Service The following table describes the labels in this screen. Table 134 Download Service > Download Service > Preferences > General Settings LABEL DESCRIPTION Put incomplete Set the default folder location where you “Put incomplete downloads in” and “Move downloads in/ complete downloads to”: Move completed…
-
Page 239
Chapter 14 Download Service Figure 190 Download Service > Download Service > Preferences > P2P download The following table describes the labels in this screen. Table 135 Download Service > Download Service > Preferences > P2P download LABEL DESCRIPTION Port Number Assign a port number for P2P downloads. -
Page 240: Configure The Ip Filter Settings
Chapter 14 Download Service Table 135 Download Service > Download Service > Preferences > P2P download (continued) LABEL DESCRIPTION Keep Sharing While With P2P download, the NAS starts sharing a file while you are downloading it. Set how long to continue sharing a file after the NAS finishes the download. Select Upload/Download Ratio to keep sharing a file until the NAS has uploaded a specific percent compared to the download.
-
Page 241: Configure The Email Notifications Settings
Chapter 14 Download Service The following table describes the labels in this screen. Table 136 Download Service > Download Service > Preferences > IP Filter LABEL DESCRIPTION Enable IP Filter Click this to enable or disable IP filtering for P2P downloads. Update IP Filter Select this option and enter a URL to use an online IP filter table.
-
Page 242: Select Files To Download
Chapter 14 Download Service Click Apply to save your changes. Click Reset to restore your previously saved settings. Click Cancel to return to the previous screen without saving. 14.3.6 Select Files to Download Select an item in the Download Service > Download Service screen’s list and click Select Files to open the following screen.
-
Page 243
Chapter 14 Download Service Figure 194 Download Service > Download Service > Task Info The following table describes the labels in this screen. Table 138 Download Service > Download Service > Task Info LABEL DESCRIPTION Status This is the current status of the task. Name This is the name of the task. -
Page 244: Download Notify Screen
Chapter 14 Download Service Table 138 Download Service > Download Service > Task Info (continued) LABEL DESCRIPTION Health This field displays how many full copies of the file are available for this task. The NAS can download a file with a higher health value more efficiently. If the health value is less than 1 (0.65 for example), there is no full copy of the file, and the NAS may not be able to complete downloading the file.
-
Page 245: Technical Reference
Chapter 14 Download Service The following table describes the labels in this screen. Table 139 Download Service > Download Notify LABEL DESCRIPTION Enable Select this to keep track of downloaded files on the NAS. Download Notify At the time of writing, the NAS supports RSS 2.0 feeds. Click this to get and subscribe to the NAS channel feed.
-
Page 246: P2P Download Security
Chapter 14 Download Service After your P2P download and sharing are finished, you can go to the incoming folder within the destination share or folder and delete the .torrent file if you need to free up hard disk space. 14.5.2 P2P Download Security When you download using P2P, you reveal your IP address.
-
Page 247
Chapter 14 Download Service Figure 197 Firewall Blocking Incoming P2P Download Requests Incoming BitTorrent requests blocked Outgoing BitTorrent requests allowed Corresponding BitTorrent reply allowed To speed up P2P download file transfers, configure your firewall’s port forwarding to send incoming TCP port 9090 and UDP port 9089 connections to the NAS. -
Page 248: Upload Manager
H A P T E R Upload Manager 15.1 Overview This chapter discusses the features in the Upload Manager screens. The auto upload feature uploads media files stored in the NAS to the Flickr and/or YouTube sharing websites or uploads files stored in the NAS to FTP servers. Besides web publishing and media server, auto upload is another convenient way to share media files with your friends and family.
-
Page 249: Flickr/Youtube Screen
Chapter 15 Upload Manager 15.4 Flickr/YouTube Screen Use this screen to upload photos and videos to your Flickr and YouTube accounts. Click Upload Manager > Flickr/YouTube to open the following screen. Figure 199 Upload Manager > Flickr/YouTube The following table describes the labels in this screen. Table 140 Upload Manager >…
-
Page 250
Chapter 15 Upload Manager Figure 200 Linking NAS to Flickr The web browser opens the Yahoo! Flickr login page. Enter your Yahoo account’s information and click Sign In. Figure 201 Yahoo! Flickr Login Page The following page displays asking for your authorization. Click NEXT to go to the next page. Figure 202 Flickr Authorization NAS Series User’s Guide… -
Page 251
Chapter 15 Upload Manager Click OK, I’LL AUTHORIZE IT to establish a link between the NAS and your Flickr account. Figure 203 Flickr Authorization A confirmation page displays indicating successful authorization. Return to the NAS web configurator. Click Get Ready in the following screen to complete the authorization process. Figure 204 Confirming Flickr Authorization Once the NAS is associated with your Flickr account, you can configure auto upload settings in the following screens. -
Page 252
Chapter 15 Upload Manager Folder Selection Figure 205 Upload Manager > Flickr/YouTube > Config (Flickr): Folder Selection NAS Series User’s Guide… -
Page 253
Chapter 15 Upload Manager The following table describes the labels in this screen. Table 141 Upload Manager > Flickr/YouTube > Config (Flickr): Folder Selection LABEL DESCRIPTION Click this to set a folder that contains files you want the NAS to automatically upload. •… -
Page 254
Chapter 15 Upload Manager General Settings Figure 206 Upload Manager > Flickr/YouTube > Config (Flickr): General Settings The following table describes the labels in this screen. Table 142 Upload Manager > Flickr/YouTube > Config (Flickr): General Settings LABEL DESCRIPTION Grace Period N Specify how long the NAS should wait when you add a new file for auto upload. -
Page 255: Configure The Youtube Settings
Chapter 15 Upload Manager 15.4.2 Configure the YouTube Settings In the Upload Manager > Flickr/YouTube screen, select YouTube from the list and then click the Config button. Note: Your YouTube account must be associated with a Google account. Get a Google account and use it to log into YouTube. You can then merge the existing YouTube account to your Google account.
-
Page 256
Chapter 15 Upload Manager The following table describes the labels in this screen. Table 143 Upload Manager > Flickr/YouTube > Config (YouTube): Folder Selection LABEL DESCRIPTION Click this to set a folder that contains files you want the NAS to automatically upload. •… -
Page 257: Ftp Uploadr Screen
Chapter 15 Upload Manager General Settings Figure 209 Upload Manager > Flickr/YouTube > Config (YouTube): General Settings The following table describes the labels in this screen. Table 144 Upload Manager > Flickr/YouTube > Config (YouTube): General Settings LABEL DESCRIPTION Grace Period N Specify how long the NAS should wait when you add a new file for auto upload.
-
Page 258
Chapter 15 Upload Manager Figure 210 Upload Manager > FTP Uploadr The following table describes the labels in this screen. Table 145 Upload Manager > FTP Uploadr LABEL DESCRIPTION Enable FTP Uploadr Click this to enable or disable the FTP Uploadr. When you disable the FTP Uploadr, a screen opens requesting confirmation. -
Page 259: Add Or Edit An Ftp Server Entry
Chapter 15 Upload Manager 15.5.1 Add or Edit an FTP Server Entry Use this screen to add or edit an FTP server entry for auto upload. In the FTP Uploadr screen, click the Add Server or Edit Server button to open the following screen. Figure 211 Upload Manager >…
-
Page 260
Chapter 15 Upload Manager Folder Watch List Figure 212 Upload Manager > FTP Uploadr > Preferences: Folder Watch List NAS Series User’s Guide… -
Page 261
Chapter 15 Upload Manager The following table describes the labels in this screen. Table 147 Upload Manager > FTP Uploadr > Preferences: Folder Watch List LABEL DESCRIPTION Click this to set a folder that contains files you want the NAS to automatically upload. •… -
Page 262
Chapter 15 Upload Manager General Settings Figure 213 Upload Manager > FTP Uploadr > Preferences: General Settings The following table describes the labels in this screen. Table 148 Upload Manager > FTP Uploadr > Preferences: General Settings LABEL DESCRIPTION Grace Period Grace Period Specify how long the NAS should wait when you add a new file for auto upload. -
Page 263: Backup Planner
H A P T E R Backup Planner 16.1 About Backups Backup before you need it. The NAS’s multiple backup methods make it easy to follow the 3-2-1 backup rule: • At least 3 copies of data • Stored on at least 2 different media •…
-
Page 264: Synchronize Files
Chapter 16 Backup Planner • Use Memopal (Section 13.9 on page 227) to back up files on the NAS to your Memopal online backup and storage account. 16.1.5 Synchronize Files Besides backups, the NAS also provides pure synchronization solutions. Note: Synchronization is not backup. When you delete a file in one location, synchronization deletes it in the other location.
-
Page 265
Chapter 16 Backup Planner Figure 214 Backup Planner > Backup > Backup The following table describes the labels in this screen. Table 149 Backup Planner > Backup > Backup LABEL DESCRIPTION Add Job Click this to create and customize a backup job. Edit Job Select a backup job in the list and click this to make some changes to it. -
Page 266: Add A New Backup Job
Chapter 16 Backup Planner 16.3.1 Add a new backup job Click Add Job in the Backup Planner > Backup > Backup screen to create a backup job. Step 1 Properties Use this screen to specify the job information, backup type and purge policy. Figure 215 Backup Planner >…
-
Page 267
Chapter 16 Backup Planner Table 150 Backup Planner > Backup: Add Job Step 1 Properties (continued) LABEL DESCRIPTION Type Choose the backup type the NAS implements for the backup job. Archive — This is a backup of the source folder in an archive format. Once you backup your files in the target folder, you cannot access the files individually unless you have the extracting tool used by the NAS. -
Page 268
Chapter 16 Backup Planner Figure 216 Backup Planner > Backup: Add Job Step 2 Source The following table describes the labels in this screen. Table 151 Backup Planner > Backup: Add Job Step 2 Source LABEL DESCRIPTION Source Select an (internal) volume and the folders and files to back up using this tree interface. Click to browse through folders, sub-folders and files. -
Page 269
Chapter 16 Backup Planner Step 3 Destination Use this screen to set where you want the backup to be stored. Figure 217 Backup Planner > Backup: Add Job Step 3 Destination The following table describes the labels in this screen. Table 152 Backup Planner >… -
Page 270
Chapter 16 Backup Planner Table 152 Backup Planner > Backup: Add Job Step 3 Destination (continued) LABEL DESCRIPTION Remote Select this to back up to another device. For Archive: The remote device can be another NAS in the network. Fill in the following fields in order to be able to access it. -
Page 271
Chapter 16 Backup Planner Figure 218 Backup Planner > Backup: Add Job Step 4 Schedule and Options The following table describes the labels in this screen. Table 153 Backup Planner > Backup: Add Job Step 4 Schedule and Options LABEL DESCRIPTION Schedule Frequency… -
Page 272: Edit Job Screens
Chapter 16 Backup Planner Table 153 Backup Planner > Backup: Add Job Step 4 Schedule and Options LABEL DESCRIPTION Enable data Select this option if you want the NAS to compress the files for your backup. Otherwise, clear it. compression In an Archive backup, compression is a method of packing computing files in a way that saves hard disk space.
-
Page 273
Chapter 16 Backup Planner Select a backup job from the list in the Backup Planner > Backup screen and click Edit Job to open the Edit Job screen. Edit Job: Properties Click the Properties tab to open the following screen. Figure 220 Backup Planner >… -
Page 274
Chapter 16 Backup Planner Edit Job: Source and Destination Click the Source and Destination tab to open the following screen. This screen is read-only. It shows the path of the source folder for backup and on which volume (whether internal or external) the backup files are stored. -
Page 275
Chapter 16 Backup Planner Figure 222 Backup Planner > Backup > Edit Job: Schedule and Options The following table describes the labels in this screen. Table 155 Backup Planner > Backup > Edit Job: Schedule and Options LABEL DESCRIPTION Schedule Frequency Select from Hourly, Daily, Weekly and Monthly backup intervals. -
Page 276: Restore Screens
Chapter 16 Backup Planner Table 155 Backup Planner > Backup > Edit Job: Schedule and Options (continued) LABEL DESCRIPTION Data compression This field is read-only and shows whether the backup employs compression. Compression reduces the size of the file that you want to back up. Backup is then faster, but restoring may be slower, so if backup space is not a concern and recovery speed is, then turn off compression.
-
Page 277
Chapter 16 Backup Planner Figure 224 Backup Planner > Backup > Restore Restore Job: Step 1 Source If you set the NAS to restore a backup based on the pre-configured backup job in the previous screen, the following screen displays. Select a backup job’s name from the list and the time point at which the backup job was done. -
Page 278
Chapter 16 Backup Planner Figure 226 Backup Planner > Backup > Restore Job: Step 1 Source: Enter Password (Backup Job) If you set the NAS to restore a backup based on the selected backup file(s) in the previous screen, the following screen displays. -
Page 279
Chapter 16 Backup Planner Figure 229 Backup Planner > Backup > Restore Job: Step 2 Folders/Files to Restore Restore Job: Step 3 Destination Select the location in the NAS where you want to restore your backup. If you set the NAS to restore a backup based on the pre-configured backup job, you can either select Original to restore the files to their original location in the NAS, or select Other location and choose a folder where you want to place the restored files. -
Page 280
Chapter 16 Backup Planner Figure 230 Backup Planner > Backup > Restore Job: Step 3 Destination (Backup Job) Figure 231 Backup Planner > Backup > Restore Job: Step 3 Destination (Backup File) Restore Job: Step 4 Summary Use this screen to review the settings you configured. Click Apply to save your settings. Otherwise, click Back to return to the previous screen, or click Cancel to close the screen without saving. -
Page 281
Chapter 16 Backup Planner Figure 232 Backup Planner > Backup > Restore Job: Step 4 Summary The restore progress and result display in the Restore screen. The related information will disappear right after the specified backup is restored successfully. Figure 233 Backup Planner > Backup > Restore: Result NAS Series User’s Guide… -
Page 282: Copy/Sync Button Screens
Chapter 16 Backup Planner 16.4 Copy/Sync Button Screens The Copy/Sync button on the front panel allows you to copy or synchronize files between a connected USB or SD device and the NAS. Use the Backup Planner > Copy/Sync Button screen to configure the copy/sync settings.
-
Page 283: Sync Settings
Chapter 16 Backup Planner Table 156 Backup Planner > Copy/Sync Button > Copy Settings (continued) LABEL DESCRIPTION Backup Target Select a share in which to save the backup files. Note: The NAS will not create a new folder to store the backup files. It is recommended to create a specific share (such as “backup”) for backup purposes.
-
Page 284: How To Copy Files
Chapter 16 Backup Planner Table 157 Backup Planner > Copy/Sync Button > Sync Settings (continued) LABEL DESCRIPTION Backup Files to be Select this option to save the files that will be replaced by the source files. Replaced or Removed Backup Target Select a share in which to save the backup files.
-
Page 285: How To Synchronize Files
Chapter 16 Backup Planner 16.4.4 How to Synchronize Files Synchronization makes the contents on the target device identical to the ones on the source device. You can synchronize files from a USB device to the NAS or from the NAS to a USB device. In addition, you may also synchronize files in both directions simultaneously.
-
Page 286: Time Machine Screen
Chapter 16 Backup Planner The following figure illustrates how synchronization works when you synchronize files in both directions simultaneously. Figure 238 Synchronizing Files Example 2 Before Sync (new) (new) After Sync (new) (new) (new) (new) A on the USB device and B on the NAS are modified more recently. •…
-
Page 287
Chapter 16 Backup Planner Figure 239 Backup Planner > Time Machine The following table describes the labels in this screen. Table 158 Backup Planner > Time Machine LABEL DESCRIPTION Enable Time Select this to allow Macs to use Time Machine to back up to the NAS. Clear it to turn off Machine Time Machine support. -
Page 288: File Browser, Photo, Music & Video
H A P T E R File Browser, Photo, Music & Video 17.1 Overview This chapter introduces the File Browser, Photo, Music, and Video screens for sharing media files. It also describes the Playzone Settings and Application Zone screens which are only available with user accounts.
-
Page 289
Chapter 17 File Browser, Photo, Music & Video Figure 240 File Browser The following table describes the labels in this screen. Table 159 File Browser LABEL DESCRIPTION Create New Click this to open the following screen where you can create a new folder within the share. Folder Specify a name to identify the folder. -
Page 290: Photo
Chapter 17 File Browser, Photo, Music & Video Table 159 File Browser (continued) LABEL DESCRIPTION Upload Click this to open the following screen where you can add files to the share. Use the Browse button to locate your file/s and click Apply to upload the file. Click Cancel to close this screen.
-
Page 291
Chapter 17 File Browser, Photo, Music & Video Figure 241 Photo (Thumbnail) NAS Series User’s Guide… -
Page 292
Chapter 17 File Browser, Photo, Music & Video Figure 242 Photo (List) The following table describes the labels in this screen. Table 160 Photo Screen LABEL DESCRIPTION Zyxel The path of the current view. Click an underlined link to go to that location in the path. Music, Photo, or Video indicates the category of files. -
Page 293: Exif And Google Maps (Photos)
Chapter 17 File Browser, Photo, Music & Video 17.3.1 Exif and Google Maps (Photos) Double-click a photo file to display it. Thumbnails of all photos in the view display across the bottom of the screen. Click a photo’s EXIF button to display or hide the photo’s Exchangeable image file format (Exif) data.
-
Page 294: Slideshow (Photos)
Chapter 17 File Browser, Photo, Music & Video 17.3.2 Slideshow (Photos) In a Photo menu click the SlideShow button to display the menu’s files as a slideshow. Move your cursor over the slideshow’s screen to display full screen, previous, pause, and next buttons for controlling the slideshow.
-
Page 295
Chapter 17 File Browser, Photo, Music & Video Figure 246 Music (Thumbnail) Figure 247 Music (List) NAS Series User’s Guide… -
Page 296: Now Playing (Music)
Chapter 17 File Browser, Photo, Music & Video This table describes common labels in the Playzone media server screens. Not every item displays in every screen. Table 161 Music Screen LABEL DESCRIPTION Zyxel The path of the current view. Click an underlined link to go to that location in the path. Music, Photo, or Video indicates the category of files.
-
Page 297
Chapter 17 File Browser, Photo, Music & Video Figure 249 Video (Thumbnail) Figure 250 Video (List) NAS Series User’s Guide… -
Page 298: Playzone Settings
Chapter 17 File Browser, Photo, Music & Video The following table describes the labels in this screen. Table 162 Video Screen LABEL DESCRIPTION Zyxel The path of the current view. Click an underlined link to go to that location in the path. Music, Photo, or Video indicates the category of files.
-
Page 299: Application Zone
Chapter 17 File Browser, Photo, Music & Video The following table describes the labels in this screen. Table 163 Playzone Settings LABEL DESCRIPTION This field displays “Installed” if you already have Windows Media Player installed or a link for installing it if you do not already have it installed. Double Click Behavior Select Replace current playlist and start to play to have double clicking a song cause the Setting…
-
Page 300: Access Your Cloud Remotely Via Myzyxelcloud And Zyxel Drive App
H A P T E R Access Your Cloud Remotely via myZyxelCloud and Zyxel Drive App Use the NAS to set up your own secure personal cloud. Keep your videos, photos, music, and files safely at home and under your control. Access, share, and stream files from anywhere using your PC, Mac computer, and mobile devices.
-
Page 301: Pair Your Nas
Chapter 18 Access Your Cloud Remotely via myZyxelCloud and Zyxel Drive App The following table describes the labels in this screen. Table 165 Desktop > myZyxelCloud LABEL DESCRIPTION Get Started Click this to go to mycloud.zyxel.com to create a myZyxelcloud account and configure remote access services.
-
Page 302
Chapter 18 Access Your Cloud Remotely via myZyxelCloud and Zyxel Drive App Figure 254 myZyxelCloud > Search Devices Step 2 Pairing When the following Pairing screen displays, click Confirm to pair with your NAS. Figure 255 myZyxelCloud > Pairing NAS Series User’s Guide… -
Page 303: Ddns Setup
Chapter 18 Access Your Cloud Remotely via myZyxelCloud and Zyxel Drive App When the NAS is successfully paired, the screen displays as shown next. Figure 256 myZyxelCloud > Pairing: Successfully Paired 18.1.3 DDNS Setup Use the free DDNS service to get a domain name mapped to the NAS’s IP address. With DDNS, you can use the domain name to remotely access the NAS’s Web Configurator through the Internet.
-
Page 304: Nas Information
Chapter 18 Access Your Cloud Remotely via myZyxelCloud and Zyxel Drive App Figure 257 myZyxelCloud > DDNS Setting 18.1.4 NAS Information After setting up your NAS’s host name, the My Devices screen appears. Use this screen to view the NAS’s information.
-
Page 305: Upnp Setup
Chapter 18 Access Your Cloud Remotely via myZyxelCloud and Zyxel Drive App 18.1.5 UPnP Setup Use this screen configure the UPnP settings your Internet gateway uses to allow access from the WAN (Internet) to services on the NAS. You can also set which port Internet users need to use in order to access a specific service on the NAS.
-
Page 306: Zyxel Drive Welcome
Chapter 18 Access Your Cloud Remotely via myZyxelCloud and Zyxel Drive App 18.2.1 Zyxel Drive Welcome Community Sharing — Send invitation links to friends and family to conveniently share selected NAS folders. DirectConnect — Privately and securely access your NAS content from anywhere. Figure 260 Zyxel Drive Welcome 18.2.2 NAS and File List My own NAS — Access and share files from your own NAS.
-
Page 307: Uploading And Media Streaming
Chapter 18 Access Your Cloud Remotely via myZyxelCloud and Zyxel Drive App Figure 261 NAS and File List 18.2.3 Uploading and Media Streaming Use Zyxel Drive to upload photos and videos from your mobile device to the NAS. You can also stream videos and music stored on the NAS.
-
Page 308: Instant Upload
Chapter 18 Access Your Cloud Remotely via myZyxelCloud and Zyxel Drive App Figure 262 Uploading and Media Streaming 18.2.4 Instant Upload Intant Upload allows you to back up all of the photos and videos on your mobile device to the NAS immediately.
-
Page 309
Chapter 18 Access Your Cloud Remotely via myZyxelCloud and Zyxel Drive App Figure 263 Zyxel Drive: Home > Settings Android Figure 264 Zyxel Drive: Enable Instant Upload Android NAS Series User’s Guide… -
Page 310
Chapter 18 Access Your Cloud Remotely via myZyxelCloud and Zyxel Drive App Figure 265 Zyxel Drive: Select the NAS to which you want to upload photos and videos Android Figure 266 Zyxel Drive: All photos and videos on the phone are copied to the NAS Android NAS Series User’s Guide… -
Page 311
Chapter 18 Access Your Cloud Remotely via myZyxelCloud and Zyxel Drive App Figure 267 Zyxel Drive: Files are backed up to the “Photo Backup” folder in the NAS Android NAS Series User’s Guide… -
Page 312: Play Media Files On Tvs Using Zcloud App
H A P T E R Play Media Files on TVs Using zCloud App Zyxel zCloud app lets you play your favorite multimedia files on the NAS on your big screen TV. Use TV streaming devices such as Apple TV, Google Chromecast, Roku 3, and Amazon Fire TV; or play files directly on smart TVs like those from Samsung, LG and Sony.
-
Page 313: Zcloud Tv Streaming
Chapter 19 Play Media Files on TVs Using zCloud App Figure 269 zCloud Main Menus Find a NAS — use your NAS’s IP address and your user name and password to connect to it. NASxxx — access the NAS’s default photo, music, and video shares. You can play, download, upload and manage files.
-
Page 314
Chapter 19 Play Media Files on TVs Using zCloud App Go to the NAS’s published media files and tap the Remote Player icon to display a list of players that you can use to play the files on your TV. NAS Series User’s Guide… -
Page 315: Zcloud Instant Upload
Chapter 19 Play Media Files on TVs Using zCloud App When you finish viewing the NAS’s media files you can press your mobile device’s menu button to get the option to log out from the NAS (Logout). 19.3 zCloud Instant Upload Tap Settings and then turn on Instant Upload to upload music, photo, or video files from your mobile device to the NAS.
-
Page 316
Chapter 19 Play Media Files on TVs Using zCloud App For example, if you selected Photo, select the folder containing the photos you want to upload to the NAS. NAS Series User’s Guide… -
Page 317
Chapter 19 Play Media Files on TVs Using zCloud App NAS Series User’s Guide… -
Page 318: Troubleshooting
H A P T E R Troubleshooting 20.1 Troubleshooting Overview This chapter offers some suggestions to solve problems you might encounter. The potential problems are divided into the following categories. • Power, Hardware, Connections, and LEDs • NAS Starter Utility •…
-
Page 319
Chapter 20 Troubleshooting • If the problem continues, contact the vendor. An HDD LED is off. The HDD LED is off when the NAS cannot detect a hard drive in the drive bay. Replace or install a hard drive. See Installing or replacing a hard disk. -
Page 320: Nas Starter Utility
Chapter 20 Troubleshooting • If the problem continues, contact the vendor. Table 2 on page 13 for a description of NAS LEDs. The NAS turns off or reboots by itself. Check the Control Panel > Maintenance > Power > Power Management screen. This is where you configure power settings for the NAS, including power saving, UPS, power on/off during power failure and power on/off schedule.
-
Page 321: Nas Login And Access
Chapter 20 Troubleshooting The NAS Starter Utility discovered my NAS but the status is always unreachable, even though I can access it. You may need to add the NAS Starter Utility to your software firewall’s allow list or lower your software firewall or anti-virus scanner’s security level.
-
Page 322: Enabling Scripting Of Safe Activex Controls
Chapter 20 Troubleshooting • If you are trying to log in directly by typing the server name into your web browser’s address field, make sure you are using the correct server name as the web site address. • The default server name is ‘NAS’ followed by the number of your model (‘NAS540’ for example). If you have changed the server name, use the new one.
-
Page 323
Chapter 20 Troubleshooting Figure 270 Internet Options: Security Click the Custom Level… button. Under Script ActiveX controls marked safe for scripting, make sure that Enable is selected (the default). Click OK to close the window. Figure 271 Security Settings — Script Safe ActiveX Controls I can see the login screen, but I cannot log in to the NAS. -
Page 324: I Cannot Access The Nas
Chapter 20 Troubleshooting • Make sure you have entered the username and password correctly. The default username is admin, and the default password is 1234. These fields are case-sensitive, so make sure [Caps Lock] is not on. • Turn the NAS off and on. •…
-
Page 325: Users Cannot Access The Nas
Chapter 20 Troubleshooting 20.6 Users Cannot Access the NAS A local user cannot access a share. • Check that the NAS is turned on and connected to the network. The local user should try to ping the NAS or use the NAS Starter Utility to discover it. •…
-
Page 326: External Usb Drives
Chapter 20 Troubleshooting A user can access a share but cannot access individual folders or files within the share. • Check the read/write permissions associated with the share’s specific files and/or folders. Account names added to the list are linked to the files and folders that they are allowed to access, along with what kinds of actions they are allowed to perform with those files and folders (delete, move, rename, and so on).
-
Page 327: Firmware
Chapter 20 Troubleshooting 20.9 Firmware I want to know the firmware version on the NAS. Go to the Status Center screen. The Firmware Version field shows you the current firmware version running. 20.10 File Transfer I want to transfer my file(s) from my local computer or storage device to the NAS. •…
-
Page 328: Networking
Chapter 20 Troubleshooting 20.11 Networking I want to control who can access my folder(s)/file(s). • If you are an administrator, you can configure a user’s access rights. Use the Shared Folders screens (Section 7.5 on page 121) to do this. •…
-
Page 329: Media Server Functions
Chapter 20 Troubleshooting 20.13 Media Server Functions I set the media server function to publish a folder, but some of the files in the folder do not display in the list on the media client. Files with formats that are not supported on the media server may not display in the list. See page 335 the file formats that the media server supports.
-
Page 330
Chapter 20 Troubleshooting Figure 272 iTunes Eject Button Then click the NAS’s link to reconnect. Figure 273 iTunes Reconnected Another way to get the NAS’s iTunes server function to scan the published media server folders for files is to go to Control Panel > Service > iTunes Server and disable and re-enable the iTunes server option. If you uploaded many files, it may take awhile for the NAS to find and list all of them. -
Page 331: Download Service Functions
Chapter 20 Troubleshooting If you are connecting through a NAT router, make sure that TCP port 3689 and UDP port 5353 are open for traffic on both the server and the client and all points in between (especially the NAT router). If your router includes a firewall, make sure it also allows TCP port 3689 and UDP port 5353 traffic.
-
Page 332: Auto Upload
Chapter 20 Troubleshooting • Make sure the firewall’s public IP address is static or that the firewall uses a Dynamic Domain Name (DDNS). • Web publishing uses TCP protocol and the port number you specify. Make sure there is not another service using TCP protocol with the same port number.
-
Page 333: App Center
Chapter 20 Troubleshooting If the log message displays “filename is queued”, the file may still be waiting for auto upload. Check the grace period setting in the service’s Configuration screen. You can set a smaller grace period to shorten the queue time. If you cannot find any log messages about the file: •…
-
Page 334: Google Drive
Chapter 20 Troubleshooting • Check that enough space is available on the external disk. If there isn’t you may need to purge older backups or delete other files on the backup USB disk or NAS. • If you are using the Backup screen (Section 16.3 on page 264): •…
-
Page 335: Appendix A Product Specifications
P P E N D I X Product Specifications See also Chapter 1 on page 12 for a general overview of the key features. Supported Media Server Content Formats The following describes the details about the files that the NAS media server can publish. •…
-
Page 336: Appendix B Customer Support
• Brief description of the problem and the steps you took to solve it. Corporate Headquarters (Worldwide) Taiwan • Zyxel Communications Corporation • http://www.zyxel.com Asia China • Zyxel Communications (Shanghai) Corp. Zyxel Communications (Beijing) Corp. Zyxel Communications (Tianjin) Corp. • http://www.zyxel.cn India • Zyxel Technology India Pvt Ltd • http://www.zyxel.in Kazakhstan •…
-
Page 337
• Zyxel Singapore Pte Ltd. • http://www.zyxel.com.sg Taiwan • Zyxel Communications Corporation • http://www.zyxel.com/tw/zh/ Thailand • Zyxel Thailand Co., Ltd • http://www.zyxel.co.th Vietnam • Zyxel Communications Corporation-Vietnam Office • http://www.zyxel.com/vn/vi Europe Austria • Zyxel Deutschland GmbH • http://www.zyxel.de Belarus • Zyxel BY • http://www.zyxel.by… -
Page 338
Appendix B Customer Support Belgium • Zyxel Communications B.V. • http://www.zyxel.com/be/nl/ • http://www.zyxel.com/be/fr/ Bulgaria • Zyxel България • http://www.zyxel.com/bg/bg/ Czech Republic • Zyxel Communications Czech s.r.o • http://www.zyxel.cz Denmark • Zyxel Communications A/S • http://www.zyxel.dk Estonia • Zyxel Estonia • http://www.zyxel.com/ee/et/ Finland •… -
Page 339
• Zyxel Communications Poland • http://www.zyxel.pl Romania • Zyxel Romania • http://www.zyxel.com/ro/ro Russia • Zyxel Russia • http://www.zyxel.ru Slovakia • Zyxel Communications Czech s.r.o. organizacna zlozka • http://www.zyxel.sk Spain • Zyxel Communications ES Ltd • http://www.zyxel.es Sweden • Zyxel Communications • http://www.zyxel.se Switzerland •… -
Page 340
Appendix B Customer Support • http://www.zyxel.ch/ Turkey • Zyxel Turkey A.S. • http://www.zyxel.com.tr • Zyxel Communications UK Ltd. • http://www.zyxel.co.uk Ukraine • Zyxel Ukraine • http://www.ua.zyxel.com Latin America Argentina • Zyxel Communication Corporation • http://www.zyxel.com/ec/es/ Brazil • Zyxel Communications Brasil Ltda. -
Page 341
Appendix B Customer Support North America • Zyxel Communications, Inc. — North America Headquarters • http://www.zyxel.com/us/en/ Oceania Australia • Zyxel Communications Corporation • http://www.zyxel.com/au/en/ Africa South Africa • Nology (Pty) Ltd. • http://www.zyxel.co.za NCC User’s Guide… -
Page 342: Appendix C Legal Information
The contents of this publication may not be reproduced in any part or as a whole, transcribed, stored in a retrieval system, translated into any language, or transmitted in any form or by any means, electronic, mechanical, magnetic, optical, chemical, photocopying, manual, or otherwise, without the prior written permission of Zyxel Communications Corporation. Published by Zyxel Communications Corporation. All rights reserved.
-
Page 343
Appendix C Legal Information List of national codes COUNTRY ISO 3166 2 LETTER CODE COUNTRY ISO 3166 2 LETTER CODE Austria Liechtenstein Belgium Lithuania Bulgaria Luxembourg Croatia Malta Cyprus Netherlands Czech Republic Norway Denmark Poland Estonia Portugal Finland Romania France Serbia Germany Slovakia… -
Page 344
Appendix C Legal Information Die folgende Symbol bedeutet, dass Ihr Produkt und/oder seine Batterie gemäß den örtlichen Bestimmungen getrennt vom Hausmüll entsorgt werden muss. Wenden Sie sich an eine Recyclingstation, wenn dieses Produkt das Ende seiner Lebensdauer erreicht hat. Zum Zeitpunkt der Entsorgung wird die getrennte Sammlung von Produkt und/oder seiner Batterie dazu beitragen, natürliche Ressourcen zu sparen und die Umwelt und die menschliche Gesundheit zu schützen. -
Page 345
Appendix C Legal Information Environmental Product Declaration NAS Series User’s Guide… -
Page 346
Appendix C Legal Information 台灣 安全警告 — 為了您的安全,請先閱讀以下警告及指示 : • 請勿將此產品接近水、火焰或放置在高溫的環境。 • 避免設備接觸任何液體 — 切勿讓設備接觸水、雨水、高濕度、污水腐蝕性的液體或其他水份。 • 灰塵及污物 — 切勿接觸灰塵、污物、沙土、食物或其他不合適的材料。 • 雷雨天氣時,不要安裝,使用或維修此設備。有遭受電擊的風險。 • 切勿重摔或撞擊設備,並勿使用不正確的電源變壓器。 • 若接上不正確的電源變壓器會有爆炸的風險。 • 請勿隨意更換產品內的電池。 • 如果更換不正確之電池型式,會有爆炸的風險,請依製造商說明書處理使用過之電池。 • 請將廢電池丟棄在適當的電器或電子設備回收處。 • 請勿將設備解體。 • 請勿阻礙設備的散熱孔,空氣對流不足將會造成設備損害。 • 請插在正確的電壓供給插座 ( 如 : 北美 / 台灣電壓 110V AC,歐洲是 230V AC)。 •… -
Page 347
North American products. Trademarks ZyNOS (Zyxel Network Operating System) and ZON (Zyxel One Network) are registered trademarks of Zyxel Communications, Inc. Other trademarks mentioned in this publication are used for identification purposes only and may be properties of their respective owners. -
Page 348: Index
Index Index port number authorization Flickr 249, 250 access rights YouTube Flickr auto upload YouTube Flickr/YouTube activation activation download service authorization 249, 255 Flickr/YouTube configuration 253, 254, 255 FTP Uploadr FTP Uploadr activation recycle bins bandwidth limit web publishing configuration adding channels server entry Amazon Fire TV…
-
Page 349
Index print server preferences recycle bins URL, download service YouTube downloading files contact information duplexing control panel 102, 130 COPY/SYNC button 15, 282 configuration 282, 283 example synchronization Exchangeable image file format, see Exif copyright Exif temperature usage creating groups 115, 116, 117, 118 shares 122, 127… -
Page 350
Index lag, time 24, 150 Google Chromecast latitude Google Drive login Google Maps logs longitude grace period 254, 257, 262 groups adding 115, 116, 117, 118 editing 116, 117, 118 names maintenance backup settings 186, 187, 188 logs power management failure hot spare resume… -
Page 351
Index TCP/IP data protection RAID 0 RAID 10 RAID 5 RAID 5 spare rebuild media server database one-way incremental backup recycle bins online backup activation configuration 122, 128, 129 registration product reset 15, 186, 187, 188 restoring P2P download by backup files IP filtering 240, 241 protection… -
Page 352
Index folder creation zone 24, 150 names Time Machine recycle bins 122, 128, 129 159, 248 activation torrent files 236, 245 configuration health status info-hash uploading files trackers smart TVs trademarks Transport Layer Security, see TLS certificate troubleshooting editing domain user status domain user share access shares… -
Page 353
Index video category, YouTube video playback volume RAID 1 volumes status warranty note web configurator login web publishing 160, 168, 176 activation example port number troubleshooting workgroup name YouTube access rights activation authorization configuration grace period video category zCloud Zyxel Drive NAS Series User’s Guide…
На чтение 11 мин Просмотров 5.2к.

Максим aka WisH
Высшее образование по специальности «Информационные системы». Опыт работы системным администратором — 5 лет.
Задать вопрос
Сегодня поговорим про сетевые хранилища данных или NAS. Они используются в локальных сетях для того, чтобы записывать туда какие-то данные, скачивать их оттуда, настраивать прямую загрузку и все такое.
Например, вы можете дома поставить такое хранилище, записать туда фильмов в хорошем качестве, а потом смотреть с любого устройства, подключенного к сети. Позволяет лучше организовать управление своими данными. Сегодня поговорим про Zyxel NAS326, который является одним из недорогих и доступных хранилищ на рынке.
Содержание
- Обзор характеристик Zyxel NAS326
- Настройка сетевого хранилища
- Первоначальные манипуляции
- Настройка удаленного доступа через интернет
- Доступ с помощью мобильного приложения
- Пароли в NAS326
- Сброс устройства
- Отзывы пользователей
Обзор характеристик Zyxel NAS326
Для проверки характеристик сравним Zyxel nas32- eu0101f с подобными моделями, которые находятся примерно в том же ценовом диапазоне. Наши характеристики будут в первом столбце, следующая модель чуть дешевле, а последняя немного дороже.
Итоговая спецификация следующая:
| Характеристики | Zyxel NAS326 | WD My Cloud Home | Synology Disk Station DS118 | |
| Процессор | Модель | Marvell Armada 380 | Realtek RTD1295PB-CG | Realtek RTD1296PB-CG |
| Частота | 1300 МГц | 1400 МГц | 1400 МГц | |
| Количество ядер | 2 | 4 | 4 | |
| Оперативная память | 512 Мб | 1024 МБ | 1024 МБ | |
| Количество накопителей в комплекте | 0 | 1 | 0 | |
| Всего отсеков для накопителей | 2 | 1 | 1 | |
| Максимальный объем одного диска | 16 Тб | 4 Тб | 12 Тб | |
| Интерфейс диска | SATA II | SATA | SATA | |
| Форм-фактор | 3.5″ или 2.5″ | 3.5″ | 3.5″ или 2.5″ | |
| Поддерживаемые уровни RAID | RAID 0, RAID 1, JBOD | нет | Basic | |
| Количество интернет портов | 1 | 1 | 1 | |
| Скорость интернета | 1 Гбит | 1 Гбит | 1 Гбит | |
| Наличие Wi-Fi | нет | нет | нет | |
| USB | Количество | 3 | 1 | 2 |
| Тип | USB 2.0 x 1, USB 3.2 Gen 1 x 2 | USB 3.2 Gen 1 x 1 | USB 3.2 Gen 1 x 2 | |
| Блок питания | Мощность | 28 Вт | 7 Вт | 9.4 Вт |
| Система охлаждения | есть | нет | есть |
Также он обладает следующими возможностями:
- Медиа-сервера (Медиа-сервер Twonky с DLNA 1.5 и UPnP AV, Сервер iTunes, Медиа-сервер Logitech);
- Веб-сервисы (WebDAV, FTP сервер, phpMyAdmin/MySQL/PHP, RSS-клиент и сервер, Принт-сервер (CIFS), Поддержка удаленного доступа (DyDNS));
- Управление сетевыми приложениями (Управление пользователями и группами, Управление пакетами для установки приложений);
- Сетевая безопасность (Поддержка HTTPS и FTPES (FTP через TLS/SSL), Зашифрованная удаленная репликация NAS-NAS, Зашифрованное резервное копирование NAS на внешний диск);
- Управляет данными, может проводить автоматическую загрузку/выгрузку и резервное копирование.
Проводить сравнение по этим пунктам нет смысла. В чем-то они похожи, в чем-то отличаются. Если не знать, для какой конкретно цели вы берете хранилище, то важную информацию можно пропустить. Лучше самостоятельно перед покупкой посмотрите на сайте подробные характеристики, чтобы точно знать, что ваше устройство умеет.
Из плюсов стоит отметить, что он 2х дисковый, а также наличие вентиляторов, выполняющих роль системы охлаждения.
Их недостатков имеется высокое энергопотребление, чуть меньший объем оперативной памяти, а также отсутствие дисков в комплекте.
В общем, получается система, которую вы сможете собрать под свои нужды. Диски поставите те по объему, которые требуется для работы в данный момент, можно не переплачивать за объем. Возможность создать рейд из двух дисков позволит обезопасить ваши данные от повреждения.
Настройка сетевого хранилища
Перед началом использования лучше ознакомиться с инструкцией, идущей в комплекте поставки. Сложного здесь ничего не будет, так что справиться с установкой параметров получится легко. Из инструкции вам нужно узнать способы включения и отключение, что значит звуковая и цветовая индикация, чтобы понимать, какие ошибки вам выдает устройство.

После прочтения инструкции выберите место для установки устройства. Учтите, что оно потребляет приличное количество энергии, а значит греется. Наличие вентилятора не решит эту проблему, если поставить девайс в неправильное место.
Не устанавливайте у батареи и на солнце, черный корпус хорошо впитывает тепло. Не ставьте в угол и пыльные места, вентилятору нужно откуда-то брать воздух и куда-то его выдувать.
Остальные советы стандартные для всей техники: не должно быть влажно, избегайте натяжения проводов, постарайтесь подключить к розетке через фильтр напряжения или источник бесперебойного питания.
Последний совет актуален в тех домах, где часто пропадает электричество. Пару экстренных выключений NAS переживет спокойно, но если это будет происходить часто, то данные свои можно будет потерять.
Первоначальные манипуляции
Дисков в комплекте нет, так что вам нужно их купить и установить. Учитывайте, что интерфейс там стоит SATA II, так что жесткие диски с лучшими характеристиками брать смысла нет. После покупки их потребуется установить. Несильно надавите на центр правого края и потяните руку влево. Должна открыться крышка, под которой и находится отсек с дисками.

Теперь нажмите снизу на рычажок и потяните один из салазок на себя. Они должны легко достаться. На них закрепите винтами ваш жесткий диск, проверьте, чтобы он не шатался и сидел крепко.
На всякий случай скажу, что устанавливать диск следует наклейкой вверх. То есть, в той части салазок, что есть небольшая решетка, у вас будет находиться нижняя часть диска, на которой видна плата. Сверху же вы должны суметь спокойно рассмотреть заводскую наклейку со всеми характеристиками.

Вставьте салазки также, как и доставали их из устройства. Рычажок должен защелкнуться, чтобы крепко удерживать их внутри. Также поступите со вторым слотом под диск, если собираетесь его устанавливать. Закройте крышу и поместите устройство в предназначенное для него место, подключив к локальной сети и воткнув в розетку.
Для подключения с компьютера используйте FindMe или NAS StarterUtility. В первом случае введите в адресную строку браузера https://findme.zyxel.com, подождите загрузки окна, в котором кликните по «Find NAS». Дождитесь окончания процедуры и введите логин с паролем. Стандартно стоят admin/1234.
NAS StarterUtility – это программа, которая делает то же самое, только нет необходимости пользоваться браузером. Скачайте ей, запустите, подождите пока она найдет сетевое хранилище и подключитесь к нему.

После первого входа потребуется сменить пароль по умолчанию, так что введите новый. Теперь создайте том, если это первый вход в хранилище и диск новый. Здесь есть всего одна кнопка, так что жмите её. В следующем окне выберите размер создаваемого тома и дождитесь окончания операции. Теперь вы попадаете на рабочий стол.
Иногда может потребоваться запуск мастера инициализации, это делается через NAS StarterUtility. Это требуется редко, потому что устройство сразу готово к работе. Подключение с компьютера лучше делать через WebDAV, чтобы хранители отображались в качестве сетевого диска. Можно обратиться и напрямую по адресу, чтобы получать доступ как в локальной сети.
Настройка удаленного доступа через интернет
Откройте окно с настройками. В нижней части нажмите на mycloud.zyxel.com. Вас перекинет на соответствующую страницу в интернете.

Здесь придется зарегистрироваться. Это официальный сайт компании, так что вводите свои данные без опасений. Обычно там достаточно ввести почту и учетные данные, кому будет принадлежать учетная запись.
После регистрации и входа в личный кабинет щелкайте Search Devices, чтобы найти ваш NAS в списке устройств и затем кнопку the Pair NAS with account. Кнопка LocateNAS пригодится при наличии нескольких хранилищ в сети. При нажатии на неё будет мигать индикатор на выбранном хранилище, так что вы сможете проверить, что подключаете.

В следующем окне кликните Confirm для подтверждения связывания аккаунта и устройства. Вас переведет в новое окно, в котором вы сможете скачать приложения для телефона.

Щелкните по DDNS Setting, это позволит открыть окно с назначением адреса. Вы сможете сделать это и позже в списке устройств, нажав там на DDNS Setup. Задайте здесь в первом окошке то имя, по которому хотите получать доступ. Оно должно быть уникальным, так что потребуется время для подбора подходящего значения.

Теперь вы сможете получать доступ не только с устройств внутри сети, но и из интернета. Этот адрес позволит подключить устройства через WebDAV, через приложение или прямым запросом.
Доступ с помощью мобильного приложения
После регистрации вы можете зайти на страницу http://zyxel.to/zdrive и там перейти по ссылкам для вашего устройства. После загрузки приложения вам потребуется ввести в приложении на смартфоне данные от аккаунта. Теперь вам станет доступно приложение, которое, в некотором смысле повторяет меню компьютера, но и отличается от него.

В верхней части окна вам доступны ваши устройства, подключенные к аккаунту. Нажмите на них и перейдите к списку расшаренных папок. В нижней части доступны те папки, к которым вам дали доступ на других устройствах.
Настроек здесь не так уж и много, а доступ к папкам осуществляется привычным для смартфонов образом. Остается привыкнуть к интерфейсу. Если возникнут какие-то проблемы, то обращайтесь к инструкции, там подробно расписано значение каждой кнопки.
Пароли в NAS326
Фактически вы будете использовать две учетные записи: одна потребуется для доступа непосредственно к устройству из локальной сети. Здесь нужно ввести логин и пароль от устройства, после этого станет доступна возможность настройки. Стандартное сочетание admin/1234. Смена пароля происходит при первом входе в устройство.
Второй пароль от вашего аккаунта на сайте разработчика. Он потребуется для привязки новых устройств, создания имен и настройки доступа из интернета к ним.
Для одиночного пользователя больше ничего не потребуется. Если же вы планируете давать доступ разным людям и вам их надо как-то ограничить, то добро пожаловать в раздел Control Panel – Overview. Здесь создайте аккаунты для разных пользователей и с разными правами. Можно создать группы с правами доступа в определенные папки и уже в них добавлять пользователей.
Настройка доступа по объему тянет на отдельную статью, так что подробно разбирать не будем. Если вы хотите создать пару пользователей для семьи, то для этого хватит инструкции. Если же вы хотите заниматься администрированием облачного сервиса с доступом посторонних людей, то явно знаете, как это сделать.
Сброс устройства
Кнопка RESET на задней панели устройства предназначена для восстановления настроек NAS по умолчанию. Нажмите и держите её. Отпустите после первого сигнала, чтобы поменять адрес устройства и пароль на нем. Если же хотите сбросить до заводских настроек, то держите до третьего сигнала. Это около 5-7 секунд. Потом проведите новую полную настройку.

Даже после полного сброса все данные на дисках останутся на месте. Потеряете только сами настройки групп и пользователей, которые проводили на NAS.
Отзывы пользователей
Отзывы пользователей, в целом, положительные.
2 диска;
Большой объем диска;
Возможность создать рейд;
Наличие охлаждения;
Большое количество новых USB-разъемов для подключения внешних дисков;
Низкая цена.
Большое энергопотребление;
Шум вентилятора;
Отсутствие диска в комплекте.
Это хорошее устройство для домашнего использования или для использования в небольшом офисе. Оно может обеспечить достаточно большой объем сохраняемой информации, возможность создания резервных копий, а также доступа из интернета. Для активного использования с большими объемами данных следует купить хорошие диски, а также обеспечить охлаждение устройства.
Центр загрузки
Поиск по модели
Не знаете как найти модель? Нажмите сюда.
| Model | Material | Version | OS | Language | Release Date | Download | Checksum |
|---|---|---|---|---|---|---|---|
| NAS326 | Firmware | V5.21(AAZF.12)C0 | English | августа 26, 2022 | Download File
|
||
| NAS326 | User’s Guide | V5.21_Ed4 | English | августа 11, 2022 | Download File
|
||
| NAS326 | Datasheet | 6 | English | июля 04, 2022 | Download File | ||
| NAS326 | Declaration NAS326, DoC, CE |
006.214-01-00591 | English | июня 09, 2022 | Download File | ||
| NAS326 | Battery Document | 1 | English | июня 21, 2021 | Download File | ||
| NAS326 | Firmware | V5.21(AAZF.10)C0 | English | апреля 28, 2021 | Download File
|
||
| NAS326 | Certification NAS326, Regulation Certificates for EMC, CE Certificate/ Regulation Report |
002.351-01-00518 | English | марта 17, 2021 | Download File | ||
| NAS326 | Firmware | V5.21(AAZF.9)C0 | English | июля 15, 2020 | Download File
|
||
| NAS326 | Certification NAS326, Regulation Certificates for Safety, CE-LVD Certificate/ Regulation Report |
002.351-02-00347 | English | апреля 13, 2020 | Download File | ||
| NAS326 | Certification NAS326, Regulation Certificates for EMC, FCC Certificate/ Regulation Report |
002.351-01-00517 | English | марта 10, 2020 | Download File
|
||
| NAS326 | Declaration NAS326, DoC, Taiwan RoHS |
001.214-01-00801 | Chinese | января 25, 2018 | Download File | ||
| NAS326 | Quick Start Guide | 003 | Multiple languages | августа 16, 2016 | Download File |
![]()
Руководство пользователя
NAS Series
Модели: NAS326, NAS520, NAS540 и NAS542
Персональное облачное хранилище
|
Настройки по умолчанию |
Версия 5.21 Редакция 2, 03/2018 |
|
|
Как найти мою |
FindMe |
|
|
NAS |
NAS Starter Utility |
|
|
Адрес в Web |
http://(Имя сервера NAS) |
|
|
http://(IP-адрес NAS) |
||
|
Имя пользователя |
admin |
|
|
Пароль |
1234 |
Copyright © 2018 Zyxel Communications Corporation

ВНИМАНИЕ!
ВНИМАТЕЛЬНО ПРОЧИТАЙТЕ ЭТО РУКОВОДСТВО ДО НАЧАЛА ИСПОЛЬЗОВАНИЯ
УСТРОЙСТВА.
СОХРАНИТЕ ЭТО РУКОВОДСТВО – ЭТА ИНФОРМАЦИЯ МОЖЕТ ПОНАДОБИТЬСЯ
В БУУЩЕМ ДЛЯ ИСПОЛЬЗОВАНИЯ УСТРОЙСТВА.
Это «Руководство пользователя» относится к серии продуктов. Не все продукты могут поддерживать все функции микрокода.
Скриншоты и иллюстрации для вашего продукта могут немногоотличаться от приведенных в этой книге из—за отличий
микрокода вашего продукта илиоперационной системы вашего компьютера.Мы предпринимаем все усилия чтобы обеспечить точность информации этогоруководства.
Дополнительная документация
•Quick Start Guide («Краткое руководство поподготовке к эксплуатации»)
Вэтом кратком руководстве Quick Start Guide объясняется, как подключить NAS и подготовить ее к работе.
•Онлайновая справка Web Configurator
Щелкните пиктограмму Help на любом экране чтобы получить справку о настройках, которые можно задать на этом экране, и
дополнительную информацию.
Получение онлайновой поддержки
Посетите web-страницу технической поддержки наших продуктов http://www.zyxel.com/support/support_landing.shtml, где можно найти
информацию по следующим темам:
•Zyxel Support Center (центр поддержкиZyxel)- прошивки, программное обеспечение, ответы на вопросы (FAQ), информация о
применении продуктов и другие файлы поддержкидля устройств Zyxel.
•Downloads (Файлы для загрузки) – здесь можно загрузить прошивку, программное обеспечение, драйверы и другие файлы поддержки для устройств Zyxel.
•Knowledge Base (База знаний) – статьи о применении продуктов, FAQ и сообщения пользователей об опыте работы с продуктами Zyxel.
•Warranty Information (Информация о гарантии) — Zyxel гарантирует первоначальному конечного пользователю (покупателю), что в
продукте нет дефектов материалов или изготовления в течение определенного периода времени (Гарантийный период), начиная с даты приобретения. Гарантийный период может отличаться в разных регионах.
•Product Registration (регистрация продукта)- здесь можно зарегистрировать ваш продукт Zyxel чтобы получить последние версии драйверов и прошивки.
Руководство пользователя NAS Series
2

Краткое содержание
Краткое содержание
|
Первое знакомство с NAS ……………………………………………………………………………………………………….. |
12 |
|
Поиск вашей NAS и доступ к ней …………………………………………………………………………………………….. |
17 |
|
Web Configurator ……………………………………………………………………………………………………………………. |
25 |
|
Видеоинструкции …………………………………………………………………………………………………………………… |
36 |
|
Storage Manager …………………………………………………………………………………………………………………….. |
40 |
|
Control Panel: Overview ………………………………………………………………………………………………………….. |
101 |
|
Control Panel: Privilege and Sharing ………………………………………………………………………………………….. |
104 |
|
Control Panel: Network ……………………………………………………………………………………………………………. |
129 |
|
Control Panel: System ……………………………………………………………………………………………………………… |
147 |
|
Control Panel: Service ……………………………………………………………………………………………………………… |
158 |
|
Control Panel: Maintenance (обслуживание) ……………………………………………………………………………. |
177 |
|
Status Center ………………………………………………………………………………………………………………………….. |
196 |
|
App Center и пакеты приложений …………………………………………………………………………………………… |
199 |
|
Download Service ……………………………………………………………………………………………………………………. |
236 |
|
Upload Manager …………………………………………………………………………………………………………………….. |
252 |
|
Backup Planner ……………………………………………………………………………………………………………………….. |
267 |
|
File Browser, Photo, Music и Video …………………………………………………………………………………………… |
292 |
|
Удаленный доступ к вашему облаку с помощью myZyxelCloud и Zyxel Drive …………………………….. |
304 |
|
Просмотр мультимедийных файлов на телевизоре с помощью zCloud ……………………………………. |
316 |
|
Устранение неисправностей ………………………………………………………………………………………………….. |
322 |
Руководство пользователя NAS Series
3

Содержание
Содержание
|
Краткое содержание ……………………………………………………………………………………………………………………………………………….. |
3 |
|
|
Содержание………………………………………………………………………………………………………………………………………………………………. |
4 |
|
|
Глава 1 |
||
|
Первое знакомство с NAS…………………………………………………………………………………………………………………………………………. |
12 |
|
|
1.1 |
Обзор .12 |
|
|
1.2 |
Светодиоды ……………………………………………………………………………………………………………………………………………. |
13 |
|
1.3 |
Жесткие диски ………………………………………………………………………………………………………………………………………… |
14 |
|
1.4 |
SD-карточка ……………………………………………………………………………………………………………………………………………. |
14 |
|
1.5 |
Кнопка выключения питания …………………………………………………………………………………………………………………… |
14 |
|
1.6 |
Кнопка COPY/SYNC…………………………………………………………………………………………………………………………………… |
15 |
|
1.7 |
Кнопка RESET ………………………………………………………………………………………………………………………………………….. |
15 |
|
Глава 2 |
||
|
Поиск вашей NAS и доступ к ней …………………………………………………………………………………………………………………………….. |
17 |
|
|
2.1 |
Обзор ……………………………………………………………………………………………………………………………………………………… |
17 |
|
2.2 FindMe …………………………………………………………………………………………………………………………………………………… |
17 |
|
|
2.3 |
NAS Starter Utility ……………………………………………………………………………………………………………………………………. |
. 18 |
|
2.3.1 Экран NAS Seeker Screen ………………………………………………………………………………………………………………….. |
18 |
|
|
2.3.2 Главный экран NAS Starter Utility……………………………………………………………………………………………………… |
19 |
|
|
2.3.3 Дерево каталогов NAS …………………………………………………………………………………………………………………….. |
21 |
|
|
2.3.4 Network Drive (сетевой диск) …………………………………………………………………………………………………………… |
21 |
|
|
2.3.5 Конфигурирование настроек системы System Settings ……………………………………………………………………… |
22 |
|
|
Глава 3 |
||
|
Web Configurator ……………………………………………………………………………………………………………………………………………………… |
25 |
|
|
3.1 |
Обзор ……………………………………………………………………………………………………………………………………………………… |
25 |
|
3.2 |
Доступ к Web Configurator вашей NAS 25 |
|
|
3.3 |
Desktop (Рабочий стол) …………………………………………………………………………………………………………………………… |
29 |
|
3.3.1 Status Zone ……………………………………………………………………………………………………………………………………. |
32 |
|
|
3.3.2 Переключение между страницами Рабочего стола . 32 |
||
|
3.3.3 Пиктограммы групп…………………………………………………………………………………………………………………………. |
33 |
|
|
3.3.4 Перемещение пиктограммы……………………………………………………………………………………………………………. |
35 |
|
|
Глава 4 |
||
|
Видеоинструкции ………………………………………………………………………………………………………………………………………………………… |
36 |
|
|
4.1 |
Обзор ……………………………………………………………………………………………………………………………………………………… |
36 |
|
4.2 |
Создание тома и копирование файлов с помощью Windows Explorer……………………………………………………….. |
36 |
|
4.3 |
Включение Time Machine на NAS и вашем компьютере Mac …………………………………………………………………….. |
36 |
|
Руководство пользователя NAS Series |
4

|
Содержание |
||
|
4.4 |
Резервное копирование файлов на NAS с помощью Windows File History …………………………………………………. |
38 |
|
4.5 |
Восстановление файловс помощью Windows File History…………………………………………………………………………. |
39 |
|
4.6 |
Удаленный доступ к файлам NAS с помощью WebDAV …………………………………………………………………………….. |
39 |
|
Глава 5 |
||
|
Storage Manager ……………………………………………………………………………………………………………………………………………………….. |
40 |
|
|
5.1 |
Обзор ……………………………………………………………………………………………………………………………………………………… |
40 |
|
5.2 Storage Manager Overview ……………………………………………………………………………………………………………………….. |
40 |
|
|
5.2.1 Экран Internal Volumes …………………………………………………………………………………………………………………. |
40 |
|
|
5.2.2 Экран ExternalVolumes…………………………………………………………………………………………………………………. |
42 |
|
|
5.3 |
Internal Storage (внутренние ресурсы хранения) ………………………………………………………………………………………. |
42 |
|
5.3.1 Экран Volume………………………………………………………………………………………………………………………………….. |
44 |
|
|
5.3.2 Экран Disk Group …………………………………………………………………………………………………………………………….. |
69 |
|
|
5.3.3 Экран Hard Disk……………………………………………………………………………………………………………………………….. |
73 |
|
|
5.4 iSCSI ……………………………………………………………………………………………………………………………………………………….. |
79 |
|
|
5.4.1 Экран iSCSI LUNs ……………………………………………………………………………………………………………………………… |
80 |
|
|
5.4.2 Экран iSCSI Targets…………………………………………………………………………………………………………………………… |
84 |
|
|
5.5 |
External Storage (внешнее хранение) ………………………………………………………………………………………………………….. |
94 |
|
5.5.1 Что нужно знать ……………………………………………………………………………………………………………………………… |
94 |
|
|
5.5.2 Экран ExternalStorage Screens …………………………………………………………………………………………………………. |
94 |
|
|
5.5.3 Форматирование внешнего тома…………………………………………………………………………………………………….. |
96 |
|
|
5.6 |
Техническая информация ……………………………………………………………………………………………………………………….. |
. 97 |
|
Глава 6 |
||
|
Control Panel: Overview ……………………………………………………………………………………………………………………………………………… |
101 |
|
|
6.1 |
Обзор ……………………………………………………………………………………………………………………………………………………… |
. 101 |
|
6.2 |
Control Panel Overview ……………………………………………………………………………………………………………………………. |
101 |
|
Глава 7 |
||
|
Control Panel: Privilege and Sharing .104 |
||
|
7.1 |
Обзор ……………………………………………………………………………………………………………………………………………………… |
. 104 |
|
7.2 |
Что можно сделать………………………………………………………………………………………………………………………………….. |
104 |
|
7.3 |
Users (Пользователи) ………………………………………………………………………………………………………………………………. |
104 |
|
7.3.1 Экран Users …………………………………………………………………………………………………………………………………….. |
106 |
|
|
7.3.2 Add an Account (добавление учетной записи) ………………………………………………………………………………….. |
107 |
|
|
7.3.3 Edit an Account (редактировании учетной записи)…………………………………………………………………………….. |
111 |
|
|
7.3.4 User Info (информация о пользователе) …………………………………………………………………………………………… |
112 |
|
|
7.4 Groups (имена групп) ………………………………………………………………………………………………………………………………. |
113 |
|
|
7.4.1 Экран Groups ………………………………………………………………………………………………………………………………….. |
113 |
|
|
7.4.2 Add a Group (добавление группы) ……………………………………………………………………………………………………. |
114 |
|
|
7.4.3 Edit a Group(редактирование группы)………………………………………………………………………………………………. |
118 |
|
|
7.4.4 Group Information (информация о группе) ……………………………………………………………………………………….. |
119 |
|
|
7.5 |
Shared Folders (общие папки) ………………………………………………………………………………………………………………….. |
120 |
|
Руководство пользователя NAS Series |
5

|
Содержание |
||
|
7.5.1 Имена общих папок Share и папок Folder………………………………………………………………………………………………. |
120 |
|
|
7.5.2 Экран Shared Folders …………………………………………………………………………………………………………………………….. |
120 |
|
|
7.5.3 Add a Share (добавление общей папки)…………………………………………………………………………………………………. |
122 |
|
|
7.5.4 Edit a Share. (редактирование общей папки) …………………………………………………………………………………………. |
126 |
|
|
7.5.5 Shared Folder Information (информация о общей папке) ………………………………………………………………………… |
127 |
|
|
7.5.6 Экран Recycle Bin………………………………………………………………………………………………………………………………….. |
128 |
|
|
Глава 8 |
||
|
Control Panel: Network …………………………………………………………………………………………………………………………………………………….. |
129 |
|
|
8.1 |
Обзор ……………………………………………………………………………………………………………………………………………………………… |
129 |
|
8.2 |
Что можно сделать …………………………………………………………………………………………………………………………………………. |
129 |
|
8.3 |
Что нужно знать………………………………………………………………………………………………………………………………………………. |
129 |
|
8.4 |
Экран TCP/IP . . ……………………………………………………………………………………………………………………………………………….. |
130 |
|
8.4.1 Конфигурирование General TCP/IP Settings …………………………………………………………………………………………… |
130 |
|
|
8.4.2 Конфигурирование Network Interface……………………………………………………………………………………………………. |
131 |
|
|
8.4.3 Конфигурирование Web Configurator . ………………………………………………………………………………………………….. |
136 |
|
|
8.4.4 Конфигурирование Network Diagnosis …………………………………………………………………………………………………… |
137 |
|
|
8.5 |
Экран UPnP Port Mapping Screens ……………………………………………………………………………………………………………………. |
138 |
|
8.5.1 UPnP и IP-адрес NAS …………………………………………………………………………………………………………………………….. |
139 |
|
|
8.5.2 UPnP и безопасность ……………………………………………………………………………………………………………………………. |
140 |
|
|
8.5.3 Сервисы NAS и UPnP …………………………………………………………………………………………………………………………….. |
140 |
|
|
8.5.4 Конфигурирование маршрутизатора UPnP ……………………………………………………………………………………………. |
140 |
|
|
8.5.5 Конфигурирование UPnP Port Mapping …………………………………………………………………………………………………. |
141 |
|
|
8.6 |
Экран Terminal………………………………………………………………………………………………………………………………………………… |
144 |
|
8.7 |
Экран DyDNS …………………………………………………………………………………………………………………………………………………… |
145 |
|
Глава 9 |
||
|
Control Panel: System………………………………………………………………………………………………………………………………………………………… |
.147 |
|
|
9.1 |
Обзор ……………………………………………………………………………………………………………………………………………………………… |
. 147 |
|
9.2 |
Что можно сделать …………………………………………………………………………………………………………………………………………. |
147 |
|
9.3 |
Что нужно знать ……………………………………………………………………………………………………………………………………………… |
147 |
|
9.4 |
Экран Server Name ………………………………………………………………………………………………………………………………………….. |
148 |
|
9.5 |
Экран Date/Time Screen ………………………………………………………………………………………………………………………………….. |
. 149 |
|
9.5.1 Configure Date/Time (Конфигурирование даты и времени) ……………………………………………………………………….. |
149 |
|
|
9.5.2 Конфигурирование Daylight Saving Time (перехода на летнее время ………………………………………………………… |
150 |
|
|
9.6 |
Экран FW Upgrade(обновление прошивки)………………………………………………………………………………………………………. |
151 |
|
9.6.1 Latest Firmware Check ……………………………………………………………………………………………………………………………… |
151 |
|
|
9.6.2 Manual Firmware Upgrade (обновление прошивки вручную) ……………………………………………………………………. |
152 |
|
|
9.7 |
Экран SSL ……………………………………………………………………………………………………………………………………………………….. |
. 153 |
|
9.7.1 InstallSystem CA ……………………………………………………………………………………………………………………………………… |
. 153 |
|
|
9.7.2 Modify the Existing Certificate (модификация существующего сертификата) ……………………………………………… |
154 |
|
|
9.7.3 Create a Certificate (создание сертификата) ……………………………………………………………………………………………… |
155 |
|
|
Руководство пользователя NAS Series |
6

|
Содержание |
||
|
Глава 10 |
||
|
Control Panel: Service ………………………………………………………………………………………………………………………………………………… |
158 |
|
|
10.1 |
Обзор ……………………………………………………………………………………………………………………………………………………. |
. 158 |
|
10.2 |
Что можно сделать ……………………………………………………………………………………………………………………………….. |
158 |
|
10.3 |
Что нужно знать ……………………………………………………………………………………………………………………………………. |
. 158 |
|
10.4 |
Экран MediaServer ……………………………………………………………………………………………………………………………….. |
159 |
|
10.4.1 Экран Media Server Share Publish……………………………………………………………………………………………………. |
160 |
|
|
10.5 |
Экран iTunesServer ……………………………………………………………………………………………………………………………….. |
161 |
|
10.6 |
Экран FTP………………………………………………………………………………………………………………………………………………. |
162 |
|
10.6.1 General Settings (общие настройки) ……………………………………………………………………………………………….. |
162 |
|
|
10.6.2 Transfer Settings (настройки передачи файлов) . …………………………………………………………………………….. |
163 |
|
|
10.6.3 Character Set (кодировка) ………………………………………………………………………………………………………………. |
165 |
|
|
10.7 |
Экран WebDAV………………………………………………………………………………………………………………………………………. |
. 165 |
|
10.7.1 Как использовать NetDrive с NAS 166 |
||
|
10.8 |
Экран Web Publishing …………………………………………………………………………………………………………………………….. |
. 167 |
|
10.8.1 Status ……………………………………………………………………………………………………………………………………………. |
167 |
|
|
10.8.2 Share Publish …………………………………………………………………………………………………………………………………. |
168 |
|
|
10.8.3 Как сконфигурировать Web Publishing . 169 |
||
|
10.9 |
Экран Print Server………………………………………………………………………………………………………………………………….. |
. 171 |
|
10.9.1 Редактирование Print Server ………………………………………………………………………………………………………….. |
172 |
|
|
10.10 Экран Syslog Server………………………………………………………………………………………………………………………………. |
172 |
|
|
10.11 Техническая информация ……………………………………………………………………………………………………………………. |
. 174 |
|
|
10.11.1 Совместное использование мультимедийных файлов в вашей сети……………………………………………… |
174 |
|
|
10.11.2 Web Publishing ……………………………………………………………………………………………………………………………. |
175 |
|
|
10.11.3 Совместное использование принтеров176 |
||
|
Глава 11 |
||
|
Control Panel: Maintenance (обслуживание).177 |
||
|
11.1 |
Обзор ……………………………………………………………………………………………………………………………………………………. |
. 177 |
|
11.2 What You Can Do …………………………………………………………………………………………………………………………………… |
177 |
|
|
11.3 |
Экран Power………………………………………………………………………………………………………………………………………….. |
177 |
|
11.3.1 Power Management ………………………………………………………………………………………………………………………. |
177 |
|
|
11.3.2 Power On/Off Schedule (расписание включения/отключения) …………………………………………………………. |
179 |
|
|
11.3.3 Add the Power Control Schedule ……………………………………………………………………………………………………… |
180 |
|
|
11.4 |
Экран Log………………………………………………………………………………………………………………………………………………. |
.181 |
|
11.4.1 Экран Log Report Configuration ………………………………………………………………………………………………………. |
182 |
|
|
11.4.2 Email Setting …………………………………………………………………………………………………………………………………. |
183 |
|
|
11.4.3 Report Setting ……………………………………………………………………………………………………………………………….. |
184 |
|
|
11.4.4 Syslog Server Setting ………………………………………………………………………………………………………………………. |
184 |
|
|
11.5 |
Экран Configuration Backup ………………………………………………………………………………………………………………………. |
185 |
|
11.5.1 Configuration Backup ……………………………………………………………………………………………………………………… |
185 |
|
|
11.5.2 Configuration Restore …………………………………………………………………………………………………………………….. |
186 |
|
|
11.5.3 Factory Reset ………………………………………………………………………………………………………………………………….. |
187 |
|
|
Руководство пользователя NAS Series |
7

|
Содержание |
|
|
11.6 Техническая информация …………………………………………………………………………………………………………………………… |
188 |
|
11.6.1 Классы логов ……………………………………………………………………………………………………………………………………… |
189 |
|
11.6.2 Уровни важности лога …………………………………………………………………………………………………………………………. |
189 |
|
11.6.3 Сообщения логов………………………………………………………………………………………………………………………………… |
189 |
|
Глава 12 |
|
|
Status Center ………………………………………………………………………………………………………………………………………………………………….. |
196 |
|
12.1 Обзор …………………………………………………………………………………………………………………………………………………………. |
196 |
|
12.1.1 System Information ……………………………………………………………………………………………………………………………… |
196 |
|
12.1.2 Network ……………………………………………………………………………………………………………………………………………… |
197 |
|
Глава 13 |
|
|
App Center и пакеты приложений………………………………………………………………………………………………………………………………… |
199 |
|
13.1 Информация о пакетах приложений……………………………………………………………………………………………………………. |
199 |
|
13.1.1 Доступные пакеты ……………………………………………………………………………………………………………………………… |
199 |
|
13.2 Экраны App Center ……………………………………………………………………………………………………………………………………… |
. 200 |
|
13.2.1 Installed Applications (инсталлированные приложения) ……………………………………………………………………….. |
201 |
|
13.2.2 Application Update (Обновление приложения) …………………………………………………………………………………….. |
203 |
|
13.2.3 Browse All Apps (просмотр списка всех приложений)……………………………………………………………………………. |
204 |
|
13.3 AuroraSyncBackup ………………………………………………………………………………………………………………………………………. |
. 205 |
|
13.3.1 Как проверить резервные копии видео……………………………………………………………………………………………….. |
207 |
|
13.4 DropboxClient …………………………………………………………………………………………………………………………………………….. |
. 208 |
|
13.4.1 Configure Account Setting (конфигурирование учетной записи) …………………………………………………………….. |
209 |
|
13.4.2 Как связать общую папку/учетную запись NAS с учетной записью Dropbox…………………………………………… |
211 |
|
13.4.3 Configure Update Period (настройка периодичности обновления) ………………………………………………………… |
215 |
|
13.5 GoogleDriveClient ……………………………………………………………………………………………………………………………………….. |
216 |
|
13.5.1 Configure Account Setting (конфигурирование учетной записи) …………………………………………………………….. |
216 |
|
13.5.2 Как связать общую папку/учетную запись NAS с учетной записью Google…………………………………………….. |
218 |
|
13.5.3 Configure Update Period (настройка периодичности обновления) ………………………………………………………… |
221 |
|
13.6 NFS …………………………………………………………………………………………………………………………………………………………….. |
222 |
|
13.6.1 Add/Edit NFS Share (добавление/удаление общей па пки NFS) ……………………………………………………………… |
224 |
|
13.6.2 NFS Session (сессия NFS) ……………………………………………………………………………………………………………………… |
. 226 |
|
13.7 PHP-MySQL-phpMyAdmin ……………………………………………………………………………………………………………………………. |
.227 |
|
13.8 TFTP ……………………………………………………………………………………………………………………………………………………………. |
228 |
|
13.9 pyLoad ……………………………………………………………………………………………………………………………………………………….. |
.230 |
|
13.10 Memopal ………………………………………………………………………………………………………………………………………………….. |
231 |
|
13.10.1 Memopal Status ………………………………………………………………………………………………………………………………… |
231 |
|
13.10.2 Memopal Settings (настройки Memopal) …………………………………………………………………………………………….. |
232 |
|
13.11 ownCloud …………………………………………………………………………………………………………………………………………………. |
234 |
|
Глава 14 |
|
|
Download Service (сервис загрузки) …………………………………………………………………………………………………………………………….. |
236 |
|
14.1 Обзор …………………………………………………………………………………………………………………………………………………………. |
236 |
|
Руководство пользователя NAS Series |
8

|
Содержание |
||
|
14.2 |
Что нужно знать …………………………………………………………………………………………………………………………………….. |
236 |
|
14.3 |
Экран Download Service………………………………………………………………………………………………………………………….. |
236 |
|
14.3.1 Add a Download Task (добавление задания резервного копирования)…………………………………………….. |
239 |
|
|
14.3.2 Настройка основных параметров загрузки …………………………………………………………………………………….. |
240 |
|
|
14.3.3 Настройка параметровзагрузки P2P ………………………………………………………………………………………………. |
242 |
|
|
14.3.4 Настройка фильтра IP…………………………………………………………………………………………………………………….. |
244 |
|
|
14.3.5 Настройка оповещений по Ema il …………………………………………………………………………………………………… |
245 |
|
|
14.3.6 Выбор файлов для загрузки …………………………………………………………………………………………………………… |
246 |
|
|
14.3.7 Отображение информации о задании……………………………………………………………………………………………. |
246 |
|
|
14.4 |
Экран Download Notify (оповещения о загрузке) ………………………………………………………………………………………. |
248 |
|
14.5 |
Техническая информация ………………………………………………………………………………………………………………………… |
249 |
|
14.5.1 Download Service ……………………………………………………………………………………………………………………………. |
249 |
|
|
14.5.2 Безопасность загрузок P2P 250 |
||
|
Глава 15 |
||
|
Upload Manager …………………………………………………………………………………………………………………………………………………………… |
252 |
|
|
15.1 |
Обзор ………………………………………………………………………………………………………………………………………………………. |
252 |
|
15.2 |
Что можно сделать ………………………………………………………………………………………………………………………………….. |
252 |
|
15.3 |
Что нужно знать ………………………………………………………………………………………………………………………………………. |
252 |
|
15.4 |
Экран Flickr/YouTube………………………………………………………………………………………………………………………………… |
253 |
|
15.4.1 Настройка Flickr…………………………………………………………………………………………………………………………….. |
253 |
|
|
15.4.2 Настройка YouTube ……………………………………………………………………………………………………………………….. |
259 |
|
|
15.5 |
Экран FTP Uploadr ………………………………………………………………………………………………………………………………….. |
261 |
|
15.5.1 Добавление или редактирование записи о FTP—сервере ………………………………………………………………… |
263 |
|
|
15.5.2 Экран FTP Uploadr Preferences ……………………………………………………………………………………………………….. |
263 |
|
|
Глава 16 |
||
|
Backup Planner ……………………………………………………………………………………………………………………………………………………………….. |
267 |
|
|
16.1 |
Резервное копирование ……………………………………………………………………………………………………………………………….. |
267 |
|
16.1.1 Управление USB—устройством и резервным копированием на USB—диск………………………………………………. |
267 |
|
|
16.1.2 Удаленное резервное копирование ……………………………………………………………………………………………………. |
267 |
|
|
16.1.3 Резервное копирование внутри NAS……………………………………………………………………………………………………. |
267 |
|
|
16.1.4 Резервное копирование в облако……………………………………………………………………………………………………….. |
267 |
|
|
16.1.5 Синхронизация файлов ………………………………………………………………………………………………………………………. |
268 |
|
|
16.2 |
Что можно сделать ……………………………………………………………………………………………………………………………………….. |
268 |
|
16.3 |
Экраны Backup………………………………………………………………………………………………………………………………………………. |
268 |
|
16.3.1 Добавление нового задания резервного копирования ………………………………………………………………………… |
270 |
|
|
16.3.2 Экран Edit Job …………………………………………………………………………………………………………………………………….. |
276 |
|
|
16.3.3 Экран Restore……………………………………………………………………………………………………………………………………… |
280 |
|
|
16.4 |
Экраны Copy/Sync Button ………………………………………………………………………………………………………………………………. |
286 |
|
16.4.1 Настройка копирования ……………………………………………………………………………………………………………………… |
286 |
|
|
16.4.2 Настройка синхронизации…………………………………………………………………………………………………………………… |
287 |
|
|
16.4.3 Как копировать файлы ……………………………………………………………………………………………………………………….. |
288 |
|
|
Руководство пользователя NAS Series |
9

|
Содержание |
||
|
16.4.4 Как синхронизировать файлы……………………………………………………………………………………………………… |
289 |
|
|
16.5 |
Экран Time Machine ……………………………………………………………………………………………………………………………… |
290 |
|
Глава 17 |
||
|
File Browser, Photo, Music и Video …………………………………………………………………………………………………………………………… |
292 |
|
|
17.1 |
Обзор ……………………………………………………………………………………………………………………………………………………. |
292 |
|
17.2 |
File Browser …………………………………………………………………………………………………………………………………………… |
292 |
|
17.3 Photo ……………………………………………………………………………………………………………………………………………………. |
294 |
|
|
17.3.1 Exif и Google Maps (Photos) 297 |
||
|
17.3.2 Слайд—шоу (Photos) ……………………………………………………………………………………………………………………. |
298 |
|
|
17.4 Music ……………………………………………………………………………………………………………………………………………………. |
298 |
|
|
17.4.1 Now Playing (Music) ……………………………………………………………………………………………………………………… |
300 |
|
|
17.5 Video ……………………………………………………………………………………………………………………………………………………. |
300 |
|
|
17.6 |
Настройки Playzone ………………………………………………………………………………………………………………………………. |
302 |
|
17.7 |
Application Zone ……………………………………………………………………………………………………………………………………. |
303 |
|
Глава 18 |
||
|
Доступ к вашему облаку с помощью myZyxelCloud и Zyxel Drive App …………………………………………………………………. |
304 |
|
|
18.1 |
Сервис myZyxelCloud …………………………………………………………………………………………………………………………….. |
304 |
|
18.1.1 Экран myZyxelCloud …………………………………………………………………………………………………………………….. |
304 |
|
|
18.1.2 Связывание NAS с учетной записью …………………………………………………………………………………………….. |
305 |
|
|
18.1.3 Настройка DDNS ………………………………………………………………………………………………………………………….. |
307 |
|
|
18.1.4 Информация о NAS ……………………………………………………………………………………………………………………… |
308 |
|
|
18.1.5 UPnP Setup ………………………………………………………………………………………………………………………………….. |
309 |
|
|
18.2 |
Zyxel Drive …………………………………………………………………………………………………………………………………………….. |
309 |
|
18.2.1 Zyxel Drive Welcome …………………………………………………………………………………………………………………… |
310 |
|
|
18.2.2 NAS List и File List…………………………………………………………………………………………………………………………. |
310 |
|
|
18.2.3 Загрузка и потоковое воспроизведение мультимедиа. 311 |
||
|
18.2.4 Instant Upload ……………………………………………………………………………………………………………………………… |
312 |
|
|
Глава 19 |
||
|
Просмотр мультимедийных файлов на телевизоре с помощью zCloud ……………………………………………………………… |
316 |
|
|
19.1 |
Использование zCloud …………………………………………………………………………………………………………………………… |
. 316 |
|
19.2 zCloud TV Streaming ………………………………………………………………………………………………………………………………. |
317 |
|
|
19.3 zCloud Instant Upload …………………………………………………………………………………………………………………………….. |
. 319 |
|
|
Глава 20 |
||
|
Устранение неисправностей…………………………………………………………………………………………………………………………………….. |
322 |
|
|
20.1 |
Устранение неисправностей – обзор ……………………………………………………………………………………………………… |
322 |
|
20.2 |
Питание, оборудование, подключение и светодиоды ……………………………………………………………………………. |
322 |
|
20.3 |
NAS Starter Utility ………………………………………………………………………………………………………………………………….. |
324 |
|
20.4 |
Login и доступ к NAS ………………………………………………………………………………………………………………………………. |
.325 |
|
20.4.1 Включение поддержки скриптов безопасных элементовуправления Active …………………………………… |
326 |
|
|
Руководство пользователя NAS Series |
10
![]()
|
Содержание |
|||
|
20.5 |
Нет доступа к NAS………………………………………………………………………………………………………………………………….. |
328 |
|
|
20.6 |
У пользователей нет доступа к NAS ……………………………………………………………………………………………………….. |
. 329 |
|
|
20.7 |
Внешние USB—диски ………………………………………………………………………………………………………………………………. |
330 |
|
|
20.8 |
Хранение ……………………………………………………………………………………………………………………………………………… |
330 |
|
|
20.9 |
Прошивка ……………………………………………………………………………………………………………………………………………… |
331 |
|
|
20.10 |
Передача файлов ………………………………………………………………………………………………………………………………… |
331 |
|
|
20.11 |
Проблемы сети ……………………………………………………………………………………………………………………………………. |
332 |
|
|
20.12 |
На экране отображаются не все функции. 332 |
||
|
20.13 |
Функции медиа —сервера ……………………………………………………………………………………………………………………… |
333 |
|
|
20.14 |
Функции сервиса загрузки …………………………………………………………………………………………………………………… |
. 335 |
|
|
20.15 |
Web Publishing ……………………………………………………………………………………………………………………………………. |
335 |
|
|
20.16 Auto Upload ………………………………………………………………………………………………………………………………………… |
336 |
||
|
20.17 App Center ………………………………………………………………………………………………………………………………………….. |
. 337 |
||
|
20.18 |
Резервное копирование………………………………………………………………………………………………………………………. |
. 337 |
|
|
20.19 |
Google Drive ………………………………………………………………………………………………………………………………………… |
. 338 |
|
|
Приложение A Спецификация продукта ………………………………………………………………………………………………………………… |
339 |
Руководство пользователя NAS Series
11

Глава 1
Первое знакомство с NAS
1.1 Обзор
|
Это руководство пользователя моделей NAS326, NAS520, NAS540 и NAS542. |
||||
|
Таблица 1 Сравнительная таблица моделей NAS Series |
||||
|
ХАРАКТЕРИСТИКА |
NAS326 |
NAS520 |
NAS540 |
NAS542 |
|
Размер оперативной памяти |
512 Мбайт DDR III |
1 Гбайт DDR III |
1 Гбайт DDR III |
1 Гбайт DDR III |
|
Число отсеков для жестких дисков |
2 |
2 |
4 |
4 |
|
Поддерживаемые типы RAID |
RAID0 |
RAID0 |
RAID0 |
RAID0 |
|
RAID1 |
RAID1 |
RAID1 |
RAID1 |
|
|
JBOD |
JBOD |
RAID5 |
RAID5 |
|
|
BASIC |
BASIC |
RAID6 |
RAID6 |
|
|
RAID10 |
RAID10 |
|||
|
JBOD |
JBOD |
|||
|
BASIC |
BASIC |
|||
|
Число портов Ethernet |
1 |
2 |
2 |
2 |
|
Поддержка Port Trunking |
Нет |
Да |
Да |
Да |
|
Число портов USB |
2 (USB3.0) |
3 (USB3.0) |
3 (USB3.0) |
3 (USB3.0) |
|
1 (USB2.0) |
||||
|
Число слотов для SD |
N/A |
1 |
1 |
1 |
Используйте NAS как ваше личное облако, с помощью которогоможно:
•Сразу начать использовать Zyxel NAS с помощью FindMe — Zyxel FindMe найдет NAS в вашей домашней сети и уже через 15 секунд
вы сможете управлять этим устройством. Для этого необязательно инсталлировать утилиту NAS.
•Получить удаленный доступ к файлам, которые хранятся на NAS, и предоставлять доступ к ним для других пользователейс
помощью мобильного приложения Zyxel Drive.
•Создать общее хранилище в облаке для пользователей, у которых нет своего NAS. Вы можете создать общуюпапку на NAS и
открыть ее для своих друзей и родных с помощьюмобильного приложения Zyxel Drive. Для доступа к этой папке нужно только инсталлировать Zyxel Drive на своем смартфоне или планшете.
•Защитить ваши данные от выхода из строя одного из дисков NAS – С помощью технологии RAID 1 содержимое одногодиска
NAS клонируется на другойдиск NAS. Еслиосновной диск выйдет из строя илив нем возникнет сбой, то данные можно будет
восстановить со второго диска.
• Использовать утилиту для настольных компьютеров ПК Zyxel NSM (NAS Station Management) 5.2 с удобным графическим
интерфейсом и набором мощных функций, упрощающихработу с NAS. Эта утилита поддерживает многооконный режим, что
позволяет одновременнозапускать несколько задач.
•Проверить состояние NAS когда вы далеко от дома. Даже еслиу вас несколько Zyxel NAS, установленныхв разных местах, с
помощь Web-портала myZyxelcloud вы сможете дистанционно проверить состояние каждого устройства.
•Выводить мультимедиа на экран телевизора – вы сможете смотреть мультимедийные файлы, записанные на вашем NAS, на
большом экране. С помощью приложения Zyxel zCloud можно воспроизводить вашивидео, музыку и фото на телевизоре с большим экраном, пользуясь приставками Apple TV, Google Chromecast, Roku 3 и Amazon Fire TV, либо напрямую на смарт— телевизоры от Samsung и LG.
Руководство пользователя NAS Series
12
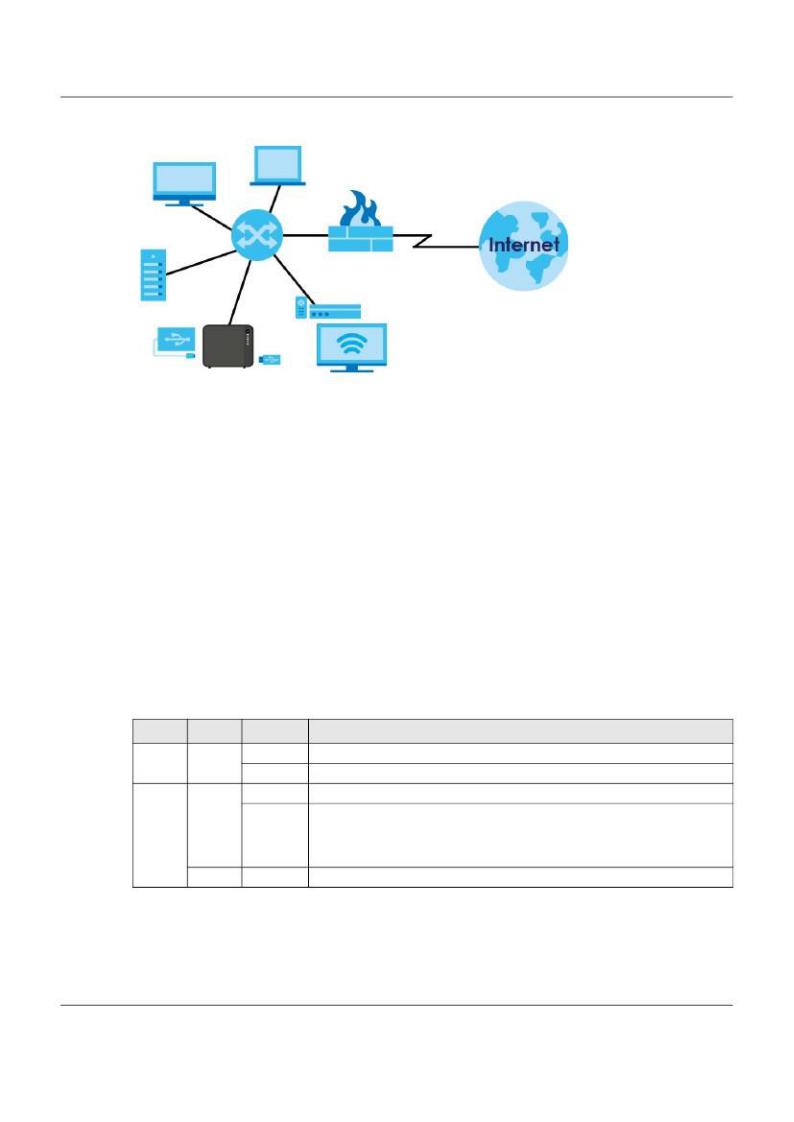
Глава 1 Первое знакомство с NAS
Иллюстрация 1 Пример использования NAS в домашнейсети
A
B
NAS
На Иллюстрации1 показан пример использование NAS в домашней сети. Пользователи копируют на NAS своиданные и открывают
доступ к ним для других пользователей. Мультимедиа—плеер (A) воспроизводит мультимедийные файлы с NAS на телевизоре. Внешний жесткий USB-диск(B) обеспечивает дополнительнуюемкость и файлы напрямую копируются с негона NAS.
Для защиты от кибератака из Интернета нужно поместить NAS за межсетевым экраном и/или устройства IDP (Intrusion Detection and Prevention).
В «Кратком руководстве по подготовке к эксплуатации» объясняется, как подключить оборудование и установить/извлечь жесткие
диски в/из дисковые корзины NAS.
Примечание: Перед установкой или извлечением внутреннего жесткого диска необходимо выключить и
отключить NAS.
1.2
Светодиоды
В следующей таблице дается описание светодиодов NAS.
|
Таблица 2 Светодиоды |
|||
|
Светодиод |
Цвет |
Состояние |
Описание |
|
POWER |
Белый |
Вкл |
NAS включен и на него подается питание либо он начинает работу. |
|
Не горит |
NAS выключен. |
||
|
SYSTEM |
Белый |
Вкл |
NAS запущен работает в нормальном режиме. |
|
Мигает |
NAS запускается либо обновляется его прошивка. |
||
|
Примечание: Во время обновления прошивки NAS нельзя выключать устройство иначе |
|||
|
прошивка не будет работать. |
|||
|
Красный |
Вкл |
. |
|
|
В NAS возникла системная ошибка. |
Руководство пользователя NAS Series
13
|
Глава 1 Первое знакомство с NAS |
|||
|
Таблица 2 Светодиоды (продолжение) |
|||
|
Светодиод |
Цвет |
Состояние |
Описание |
|
HDD1/2 |
Белый |
Горит |
Жесткий диск правильно подключен к NAS. Этот светодиод будет белым если жесткий диск переведен |
|
в состояние гибернации если только вы не включили для него мигание при спящем диске. |
|||
|
Мигает |
NAS записывает данные на жесткий диск. |
||
|
Медленно |
Включено мигание для спящего диска и жесткий диск переведен в состояние гибернации. |
||
|
мигает |
|||
|
Красный |
Горит |
NAS обнаружил ошибку жесткого диска (например, дефектный сектор). NAS автоматически пытается |
|
|
восстановить дефектный сектор, но светодиод будет красным вплоть до перезагрузки NAS. |
|||
|
Не горит |
NAS не обнаружил жесткий диск в отсеке для дисков либо этот светодиод выключен. |
||
|
USB |
Белый |
Горит |
К NAS подключено USB-устройство. |
|
Не горит |
К NAS не подключено USB-устройство либо NAS не обнаружил соединения по USB. |
||
|
COPY |
Белый |
Горит |
USB-диск либо SD-карточка подключен к NAS и NAS готов скопировать данные с этого устройства. |
|
Мигает |
NAS копирует или синхронизирует файлы либо подключается к учетном записи myZyxelcloud. |
||
|
Красный |
Горит |
Не удалось скопировать или синхронизировать файлы с/на USB-диск или SD-карточку. |
|
|
Не горит |
Нет подключенного USB-диска или SD-карточки. |
||
|
LAN / |
Зеленый |
Горит |
NAS подключен к сети 10/100 Mbps Ethernet. |
|
LAN1 / |
Мигает |
Идет пересылка пакетов по 100M LAN. |
|
|
LAN2 |
|||
|
Не горит |
NAS не подключен к сети 10/100 Mbps Ethernet. |
||
|
Желтый |
Горит |
NAS подключен к сети 1000 Mbps Ethernet. |
|
|
Мигает |
Идет пересылка пакетов по 1000 M LAN. |
||
|
Не горит |
NAS не подключен к сети 1000 Mbps Ethernet. |
1.3 Жесткие диски
В NAS есть отсеки для установки внутренних жесткихдисков, предназначенные для жесткихдисков SATA (Serial Advanced Technology
Attachment).
Эти жесткие диски SATA функционируют как внутренние тома либо тома SATA. Любойвнешний жесткий диск, подключенный к порту USB, считается внешним томом либо томом USB.
1.4SD-карточка
Вслот SD на передней панелиустройства можно вставить карточку SDXC емкостью до 128 Гбайт. Для копирования и синхронизации
данных с SD-карточкинужно использовать кнопку COPY/SYNC (см. see Раздел 1.6 на стр. 15).
1.5Кнопка выключения питания POWER
С помощью этой кнопки на передней панели NAS можновключить или выключить устройство.
Руководство пользователя NAS Series
14

Глава 1 Первое знакомство с NAS
Включение питания
• Для включения питания нужно отжать кнопку Power на одну секунду. После того, как устройство запустится и будет готово к
работе, вы услышите один звуковойсигнал.
Выключение питания
Иллюстрация 2 Выключение NAS кнопкойPower
|
Нажать |
1 звуковой |
2 звуковых |
||
|
3 секунды |
сигнал |
Еще 2 |
сигнала |
|
|
секунды |
||||
|
Отпустите кнопку если |
Отпустите кнопку |
|||
|
нужно завершить работу |
для выключения |
|||
|
программного обеспечения |
оборудования |
•Чтобы завершить работу программного обеспечения NAS нужно нажать кнопку Power пока вы не услышите один звуковой
сигнал (примерночерез 3 секунды) и затем отпустить кнопку.
•Для мгновенного выключения оборудования NAS без выполнения обычного процесса завершения работы ПО, нужно нажать
кнопку и дождаться второго звуковогосигнала (примерно через 5 секунды) и затем отпустить кнопку.
1.6Кнопка COPY/SYNC
Кнопка COPY/SYNC на передней панели предназначена для копирования и синхронизации файлов между NAS и
подключенным к нему USB-диском или SD-карточкой. В Разделе 16.4 на стр. 286 описывается настройка кнопки copy/sync.
1.7 Кнопка RESET
Кнопка RESET на задней панели устройства предназначена для восстановления настроек NAS поумолчанию.
|
Иллюстрация 3 Кнопка RESET |
||
|
Нажать |
1 звуковой |
2 звуковых |
|
сигнал |
сигнала Еще 5 секунд |
|
Отпустите кнопку для |
Отпустите кнопку для |
|
|
сброса IP-адреса и |
||
|
сброса всех настроек |
||
|
пароля |
||
• Нажмите кнопку RESET и дождитесь одного звукового сигнала (примерно через 2 секунды), затем отпустите кнопку, после чего
вы услышите второй звуковой сигнал.
В результате IP-адрес и пароль NAS будут сброшены в настройки по умолчанию.
Руководство пользователя NAS Series
15

Глава 1 Первое знакомство с NAS
• Нажмите кнопку RESET и дождитесь двух звуковых сигналов. После второго звукового сигнала нужна удерживать кнопку еще 5
секунд и отпустите ее. Вы услышите три коротких сигнала после высвобождения кнопки.
В результате будут восстановлены настройки NAS поумолчанию, включая IP-адрес, пароль, учетные записи, группы. Все
настройки конфигурации NAS, которые вы изменили, будут потеряны.
Этот сброс параметров НЕ повлияет на настройкитома и на данные, которые хранятся на NAS.
Рекомендуем вам периодическикопировать файл конфигурациина ваш компьютеров (см. Раздел 11.5 на стр. 185, где объясняется, как
выполнять резервное копирование файла конфигурации NAS). Эта резервная копия поможет восстановить конфигурацию NAS есликто—то сбросит его в заводские настройкипо умолчанию.
Примечание: NAS следует установить в запираемом помещении, куда не могут попасть посторонние.
Для обнаружения NAS нужно закрыть и заново запустить NAS StarterUtility, потому что NAS автоматически заново собирает
информацию о IP-адресе, поэтому IP-адрес может измениться. Если IP-адрес не назначен, то NAS использует Auto-IP для
назначения себе IP-адреса и маски подсети. Например, можно напрямую подключить NAS к вашему компьютеру, и если компьютер настроенна автоматическое получение IP-адреса, то компьютер и NAS выберут свои IP-адреса и тогда смогут обмениваться пакетами.
Руководство пользователя NAS Series
16
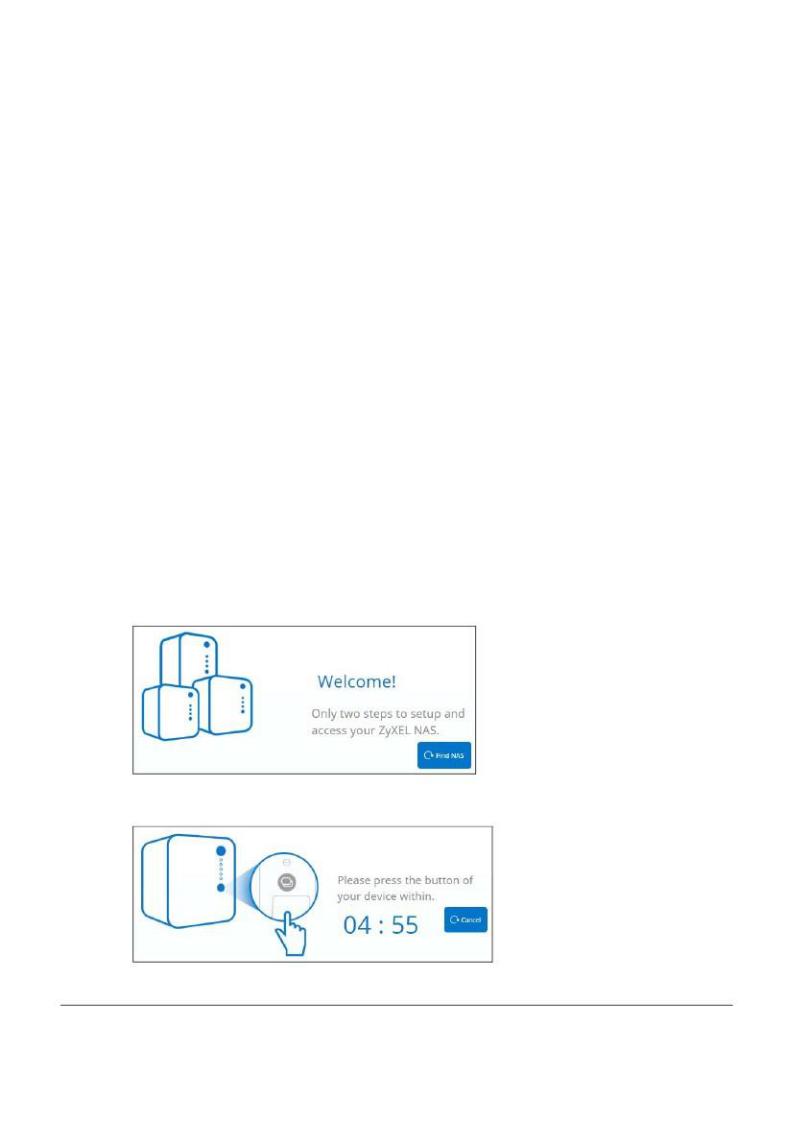
Глава 2
Поиск вашей NAS и доступ к ней
2.1 Обзор
Для поиска NAS и доступа к хранящимся на нем файлах используйте утилиты FindMe или NAS StarterUtility.
Утилита NAS Starter Utility поддерживает Windows XP, Windows Vista, Windows 7 и Windows 8. Щелкните Help чтобы перейти на
Web-страницу со справкойо экранах NAS StarterUtility.
Примечание: При инсталляции этой версии NAS Starter Utility будут деинсталлиророваны предыдущие
версии утилиты.
Примечание: Аппаратные соединения NAS описаны в «Краткая инструкция по подготовке к
эксплуатации».
2.2 FindMe
1Убедитесь, что NAS и ваш компьютер подключены к коммутаторуили маршрутизатору, у которого есть доступ к Интернету.
2Запустите web-браузер и введите в адресной строке «https://findme.zyxel.com».
3Щелкните Find NAS для поиска вашей NAS.
Иллюстрация 4 Поиск NAS
4Не позднее чем через 5 минут нужно нажать кнопку Copy на NAS.
Иллюстрация 5 Нажать кнопку Copy
5 Теперь ваша NAS обнаружена. Щелкните Admin Page чтобы открыть экран входа в систему.
Руководство пользователя NAS Series
17
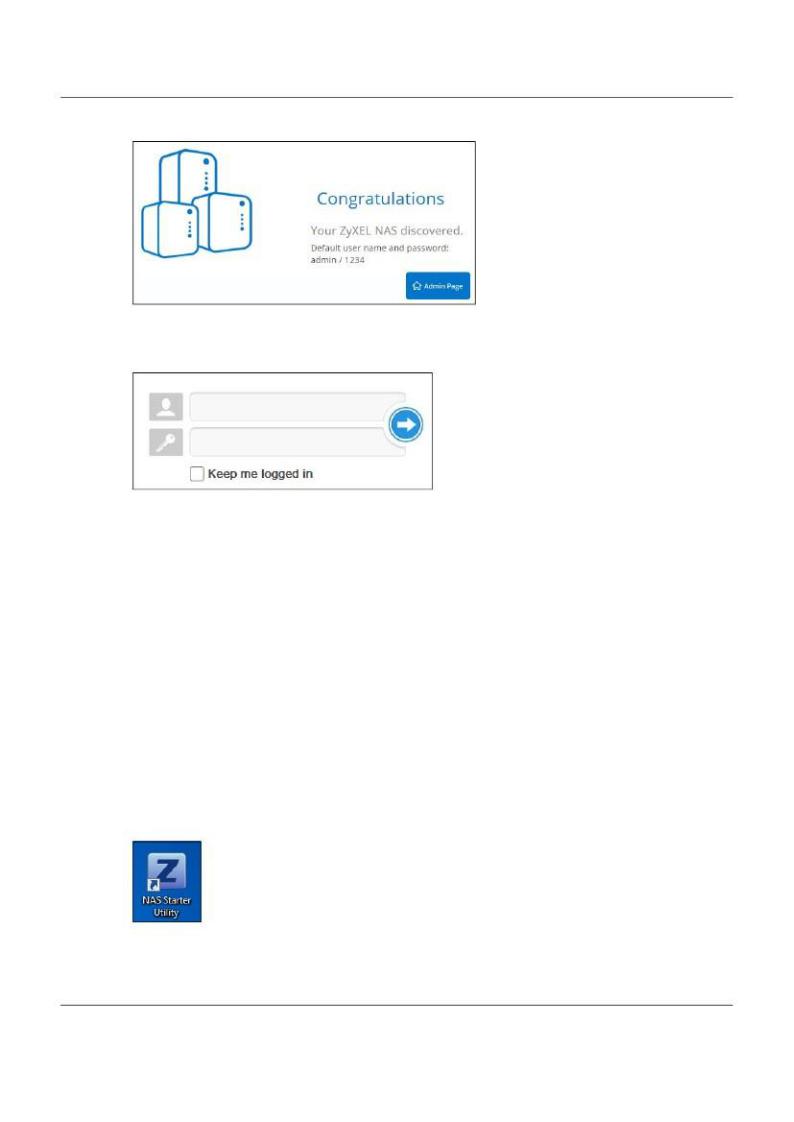
Глава 2 Поиск вашей NAS и доступ к ней
Иллюстрация 6 Congratulations (Позравляем!)
6Используйте имя пользователя по умолчанию “admin” и пароль “1234” для входа в систему. См. Глава 3 на стр. page 25 , где объясняется,
как можно настроить конфигурацию с помощью web-интерфейса на ПК.
Иллюстрация 7 Экран NAS Login
2.3NAS Starter Utility
•После запуска утилиты NAS Starter Utility она начинает рассылать пакеты с запросами (request). Каждый NAS, у которого
есть программа—агент NAS Starter Utility Agent, всегда слушает сеть и отвечает на запросы от NAS StarterUtility, посылая ей в ответ пакеты с информацией о своем имени хоста, IP-адресе и т.п.
•Если вы планируете использовать в своей сети несколько NAS, то присвойте каждому уникальное имя Server Name, что
поможет легкоидентифицировать каждый NAS на экранах NAS Starter Utility.
2.3.1 Экран NAS Seeker
На этом экране можно увидеть все NAS, которые есть в вашей сети. Имя NAS ServerName. Поумолчаниюэто ‘NAS’, за
которой идет номер модели (например, ‘NAS540’). См. Раздел 2.3.5 на стр. 22, где описано, как можно изменить это имя.
Щелкните пиктограмму StarterUtility на Рабочем столе или области уведомлений Windows для запуска утилиты NAS Starter Utility. Ее также можно запустить, щелкнув Start > Programs > Zyxel > NAS Starter Utility.
Иллюстрация 8 Пиктограмма NAS Starter Utility для ПК
Руководство пользователя NAS Series
18
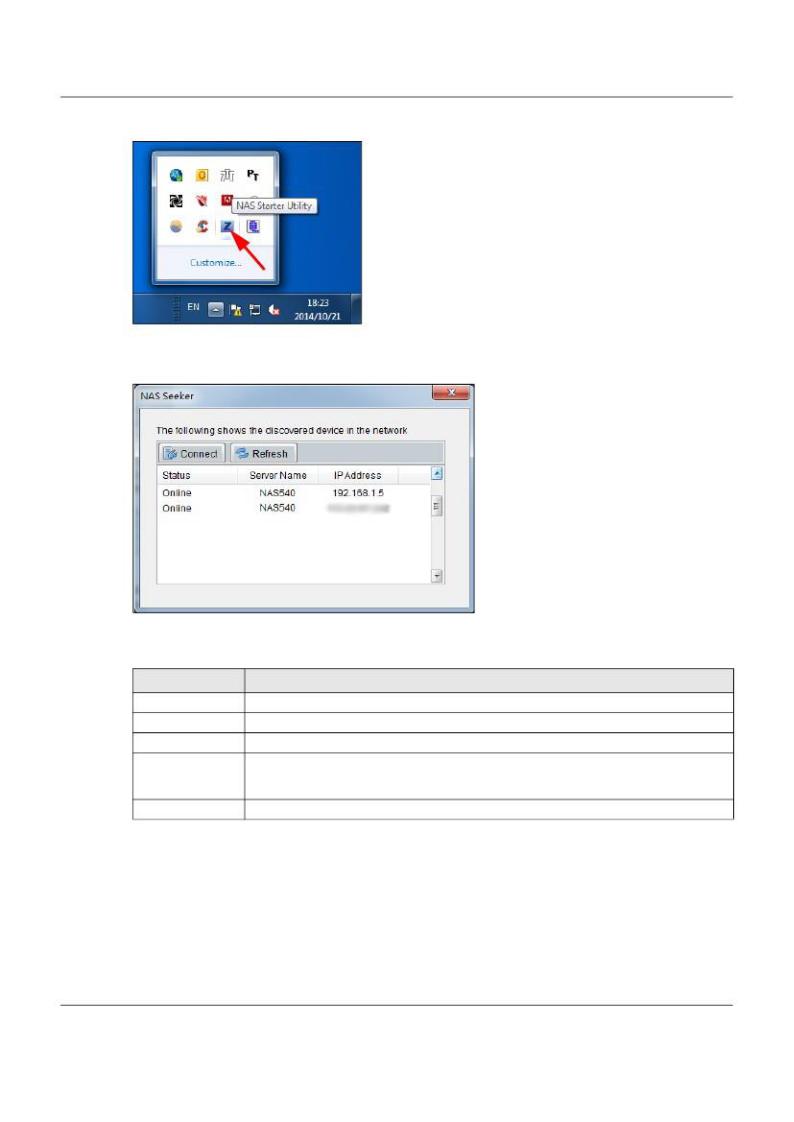
Глава 2 Поиск вашей NAS и доступ к ней
Иллюстрация 9 NAS Starter Utility в областиуведомлений Windows
При первом запуске NAS Starter Utilityэкран обнаружения выглядит так:
Иллюстрация 10 NAS Seeker
В следующей таблице объясняется, что означают меткиэтого экрана.
|
Таблица 3 NAS Seeker |
|
|
МЕТКА |
ОПИСАНИЕ |
|
Connect |
Выберите NAS и щелкните ее чтобы соединиться с ней. |
|
Refresh |
Обновление экрана (в NAS Starter Utility не предусмотрено автоматическое обновление экрана). |
|
Status |
Статус NAS может быть Online, Unreachable, Configuring либо Config Failed. |
|
Server Name |
Это имя сервера, которое вы задали для NAS. Если в вашей сети есть несколько NAS, то им надо дать разные имена. |
|
IP Address |
Текущий IP-адрес NAS. |
2.3.2 Главный экран NAS Starter Utility
Главный экранNAS Starter Utility выводится после выбора NAS на экране NAS Seeker.
Руководство пользователя NAS Series
19
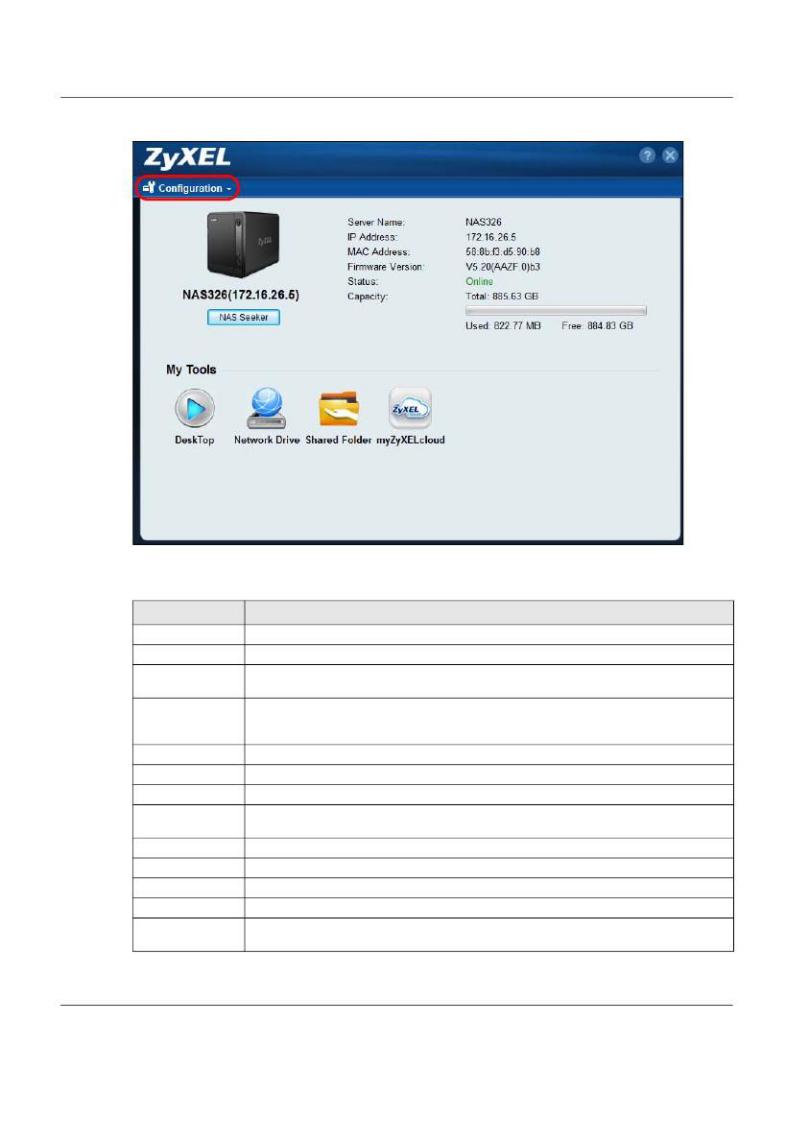
Глава 2 Поиск вашей NAS и доступ к ней
Иллюстрация 11 Главный экран NAS Starter Utility
В следующей таблице объясняется, что означают меткиэтого экрана.
Таблица 4 Главный экран NAS StarterUtility
|
МЕТКА |
ОПИСАНИЕ |
|
? |
Вызов справки утилиты. |
|
Configuration |
Переход к настройкам конфигурации системы (см. Раздел 2.3.5 на стр. 22). |
|
NAS Seeker |
Переход к экрану NAS Seeker (см. Раздел 2.3.1 на стр. 18) для поиска разных NAS в вашей сети и подключения к ним. |
|
Server Name |
Это имя сервера, которое вы задали для NAS. Если в вашей сети есть несколько NAS, то им надо дать разные имена. |
|
IP Address |
Текущий IP-адрес NAS. |
|
MAC Address |
Уникальный физический адрес оборудования NAS (MAC). |
|
Firmware Version |
Версия прошивки, которую сейчас использует NAS. |
|
Status |
Статус NAS может быть Online, Uninitialized, Unreachable, Configuring либо Config Failed. |
|
Capacity |
Общая емкость, использованная и свободная емкость NAS. |
|
DeskTop |
Переход к экрану входа в Web Configurator (см. Раздел 3.2 на стр. 25). |
|
Network Drive |
Щелкните эту метку чтобы добавить NAS как сетевой диск в Windows Explorer вашего компьютера. |
|
Shared Folder |
Щелкните эту метку чтобы открыть дерево каталогов NAS в Windows Explorer. |
|
myZyxelCloud |
Щелкните эту метку для перехода в mycloud.zyxel.com для настройки бесплатного DDNS hostname для вашего NAS |
|
чтобы к нему можно было легко подключиться через Интернет. |
Руководство пользователя NAS Series
20
![]()
Глава 2 Поиск вашей NAS и доступ к ней
2.3.3 Дерево каталогов NAS
Щелкните SharedFolder в главном экране NAS StarterUtility чтобы открыть дерево каталогов NAS в Windows Explorer. Введите имя администратора и пароль и затем щелкните Login.
Иллюстрация 12 Login
Утилита откроет дерево каталогов NAS в Windows Explorer.
Иллюстрация 13 Дерево каталогов
2.3.4 Network Drive (сетевой диск)
Щелкните Network Drive в главном экране NAS Starter Utility чтобы добавить NAS как сетевой диск в Windows Explorer вашего
компьютера.
Введите имя администратора и пароль и затем щелкните Login чтобы добавить общие папки, к которым у вас есть доступ, как сетевые
диски. В противном случае выберите Guest и затем щелкните Login чтобы добавить открытые общие папкиNAS как сетевые диски.
Руководство пользователя NAS Series
21

Глава 2 Поиск вашей NAS и доступ к ней
Иллюстрация 14 Login
Выберите общую папкуNAS и букву для обозначения сетевого диска компьютера, которому должна соответствовать эта
папка (возможности выбора зависят от прав пользователя). Например, если общая папка share1 принадлежит пользователю user1, то только user1 может ставить ей в соответствие сетевой диск.В таблице отображаются общие папки NAS, для которых уже есть соответствующие буквы, обозначающие сетевые диски вашего компьютера.После щелчка повы Apply увидите этот новый диск в Windows Explorer (My Computer) и сможете обращаться к нему и использовать его точно также, как внутренние диски вашего компьютера.
Иллюстрация 15 Network Drive (сетевой диск)
2.3.5 Конфигурирование настроек системы System Settings
С помощью этих экранов можно менять имя сервера NAS, часовой пояс, PPPoE, IP-адрес, маску подсети, шлюз по
умолчанию и настройки DNS.
Для отображения следующего экрана нужно на главном экране утилиты щелкнуть Configuration > System Setting.
Руководство пользователя NAS Series
22
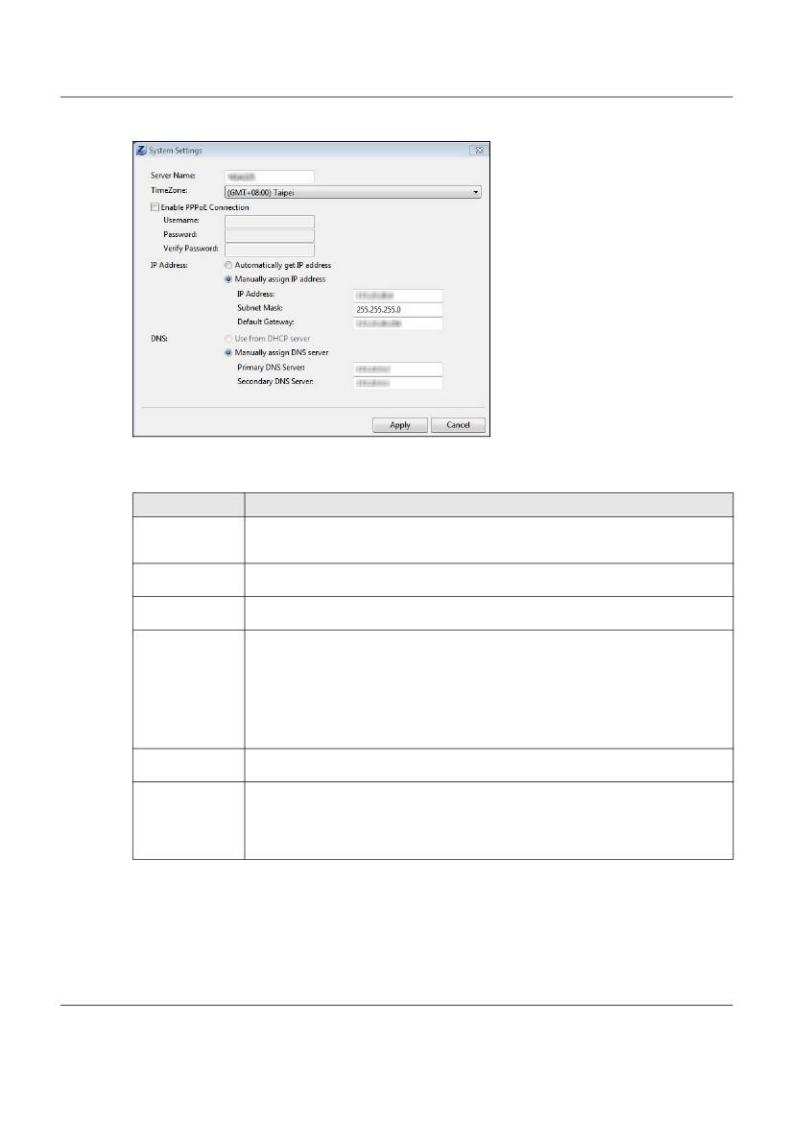
Глава 2 Поиск вашей NAS и доступ к ней
Иллюстрация 16 NAS Starter Utility > Configuration > System Setting
В следующей таблице объясняется, что означают меткиэтого экрана.
Таблица 5 NAS Starter Utility > Configuration > SystemSetting
|
Метка |
Описание |
|
Server Name |
Введите уникальное имя для идентификации NAS в вашей сети. Имя может быть длиной до 15 букв и цифр; также в |
|
имени можно использовать тире (кроме последнего символа). Имя должно начинаться с буквы (a-z). Регистр букв |
|
|
учитывается. |
|
|
Time Zone |
Выберите свой часовой пояс. Нужно указать разницу во времени между вашим часовым поясом и Greenwich Mean Time |
|
(GMT). |
|
|
Enable PPPoE |
Выберите эту опцию если для подключения к Интернету нужно ввести имя пользователя и пароль. Введите имя |
|
Connection |
пользователя и пароль. |
|
IP Address |
Эта опция предназначена для конфигурирования IP-адреса интерфейса LAN, через который вы |
|
подключаетесь к NAS. |
|
|
Если интерфейсы LAN сконфигурированы как stand-alone, то это поле определяет IP-адрес интерфейса, который |
|
|
находится в той же подсети, что и ваш компьютер. В этом поле задается конфигурация LAN1 если оба интерфейса LAN |
|
|
находятся в той же подсети, что и ваш компьютер. |
|
|
Если с помощью экранов конфигурирования администратора настроить интерфейсы LAN на link aggregation, то в |
|
|
этом поле будет настраиваться конфигурация IP-адреса, который совместно используют оба интерфейса LAN. |
|
|
Automatically get |
Поставьте галочку в этом поле для автоматического назначения NAS IP-адреса от Интернет—провайдера (ISP) или |
|
IP address |
DHCP-сервера в вашей сети. |
|
Manually assign IP |
Выберите эту опцию если нужно назначить NAS постоянные IP-адрес, маску подсети и шлюз по умолчанию. |
|
address |
|
|
Примечание: Нельзя назначать NAS IP-адрес, который уже используется в вашей сети, – это приведет к |
|
|
конфликту IP-адресов и недоступности NAS. |
Руководство пользователя NAS Series
23

|
Глава 2 Поиск вашей NAS и доступ к ней |
|
|
Таблица 5 NAS Starter Utility > Configuration > SystemSetting (продолжение) |
|
|
Метка |
Описание |
|
Use from DHCP |
Domain Name System (DNS) обеспечивает соответствие между именем домена и IP-адресом. |
|
server |
Выберите эту опцию если NAS автоматически получает информацию DNS от Интернет—провайдера |
|
(ISP) или DHCP-сервера в вашей сети. |
|
|
DNS |
Domain Name System (DNS) обеспечивает соответствие между именем домена и IP-адресом. |
Выберите Use from DHCP server если NAS автоматически получает информацию DNS от Интернет—провайдера (ISP)
или DHCP-сервера в вашей сети.
Выберите Manually assign DNS server если вы получили определенный IP-адрес (адреса) DNS-сервера (серверов).
Введите Primary DNS и Secondary DNS Server в соответствующие поля.
Руководство пользователя NAS Series
24

Глава 3
Web Configurator
3.1Обзор
Вэтой части объясняется, как получить доступ к web-конфигуратору NAS и дается обзорегоэкранов.Web-конфигуратор – это интерфейс
управления на базе HTML, позволяющий с помощью Интернет—браузера можно легко настроить NAS и управлять им.
Используйте Internet Explorer 11.0.9, Mozilla Firefox 31.0, Safari 5.1.7, Google Chrome 37.0.2 или более поздние версии этих браузеров.
Рекомендуется использовать экран с разрешением не меньше 1440 x 900 пикселов.
Для использования web-конфигуратора потребуется разрешить:
•Всплывающие окна Web-браузера вашего компьютера. По умолчанию всплывающие окна браузера заблокированы в Windows XP SP (Service Pack) 2.
•JavaScript (включен поумолчанию).
3.2Доступ к Web Configurator вашей NAS
Ниже показаны примеры экранов NAS326.Экраны других моделей NAS могут несколько отличаться.
1Убедитесь, что ваш NAS правильно подключен и находится в той же подсети, что и вашкомпьютер
(см. «Краткую инструкцию поподготовке к эксплуатации»).
Откройте web-браузер и введите имя сервера NAS. По умолчанию это имя состоит из “nas” и номера модели
(например, “nas326”). Задайте имя сервера вашего NAS, используя экран Control Panel > System > ServerName (Раздел 9.4 на стр. 148) либоэкран SystemSetting (Раздел 2.3.5 на стр. 22) утилиты NAS Starter Utility.
Иллюстрация 17 NAS URL
2По умолчанию имя пользователя “admin” и пароль “1234”. Введите ваши имя пользователя и пароль. В Главе 7 на стр. 104
объясняется, какможно создать учетные записи других пользователей. Есливы вошли как admin и остаетесь в системе, то
ваш компьютер долженбыть защищенот неавторизованногодоступа. Щелкните стрелочкудля входа в систему. При входе с учетном записьюдругого пользователя (не администратора) вы попадете на другой экран Desktop (Раздел 3.3 на стр. 29).
Руководство пользователя NAS Series
25
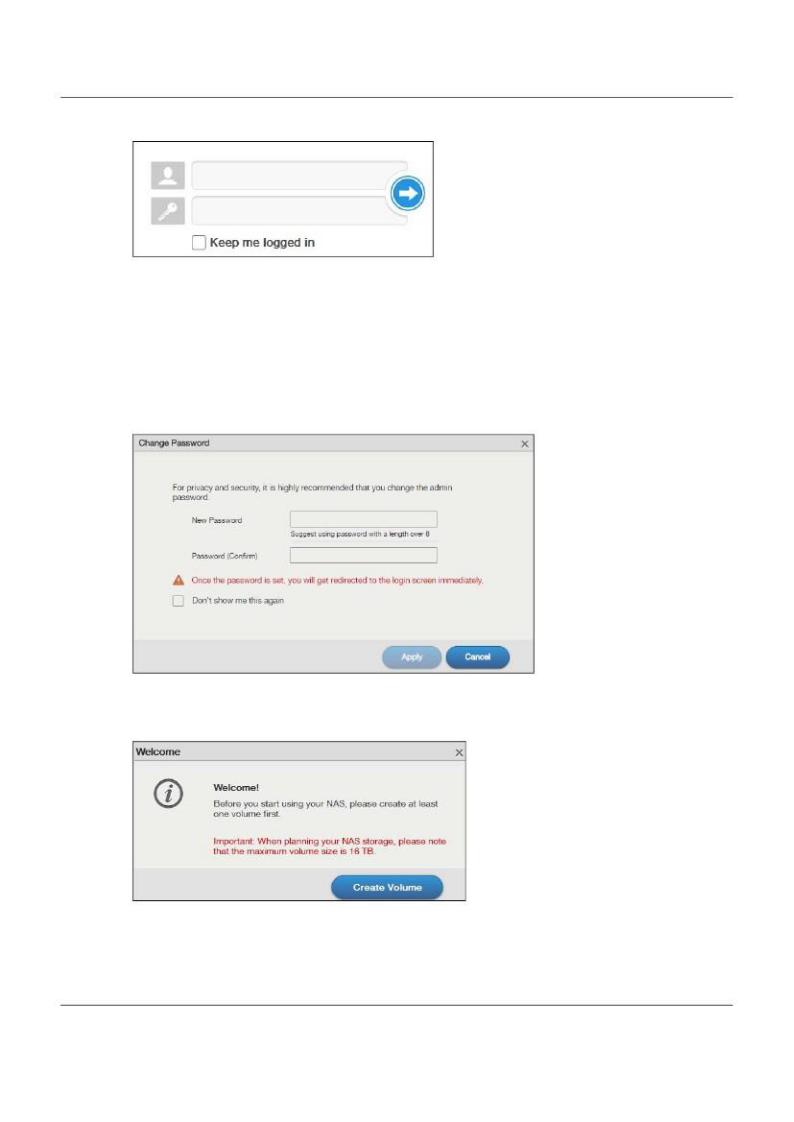
Глава 3 Web Configurator
Иллюстрация 18 ЭкранNAS Login
Если у вас на жестком диске, который вы собираетесь установить в NAS, записаны
какие-то данные, то обязательно сделайте для них резервную копию. При форматировании диска в NAS для создания тома все эти данные будут потеряны.
3На следующем экране будет приглашение поменять ваш пароль (настоятельнорекомендуем сделать это).
Введите новый пароль в поле New Password и затем повторно введите его для подтверждения в поле Password (Confirm). Если вы сейчас не хотите изменить пароль, то щелкните Cancel. Для сохранения измененийна NAS щелкните
Apply.
Иллюстрация 19 Экран изменения пароля по умолчанию Change Password
4Этот экран показывает, что вы еще не создалитом. Щелкните Create Volume to для создания тома либо x to чтобы закрыть
этот экран и перейти к Рабочему столу (Раздел 3.3 на стр. 29).
Иллюстрация 20 Экран Welcome
5Щелкните Create single volume on RAID для простой настройкитома (см. Раздел 5.3.1.1 на стр. 48).
Если надо создать несколько томов, то щелкните Create Multiple volumes on disk group (см. Раздел 5.3.1.7 на стр. 61).
Руководство пользователя NAS Series
26
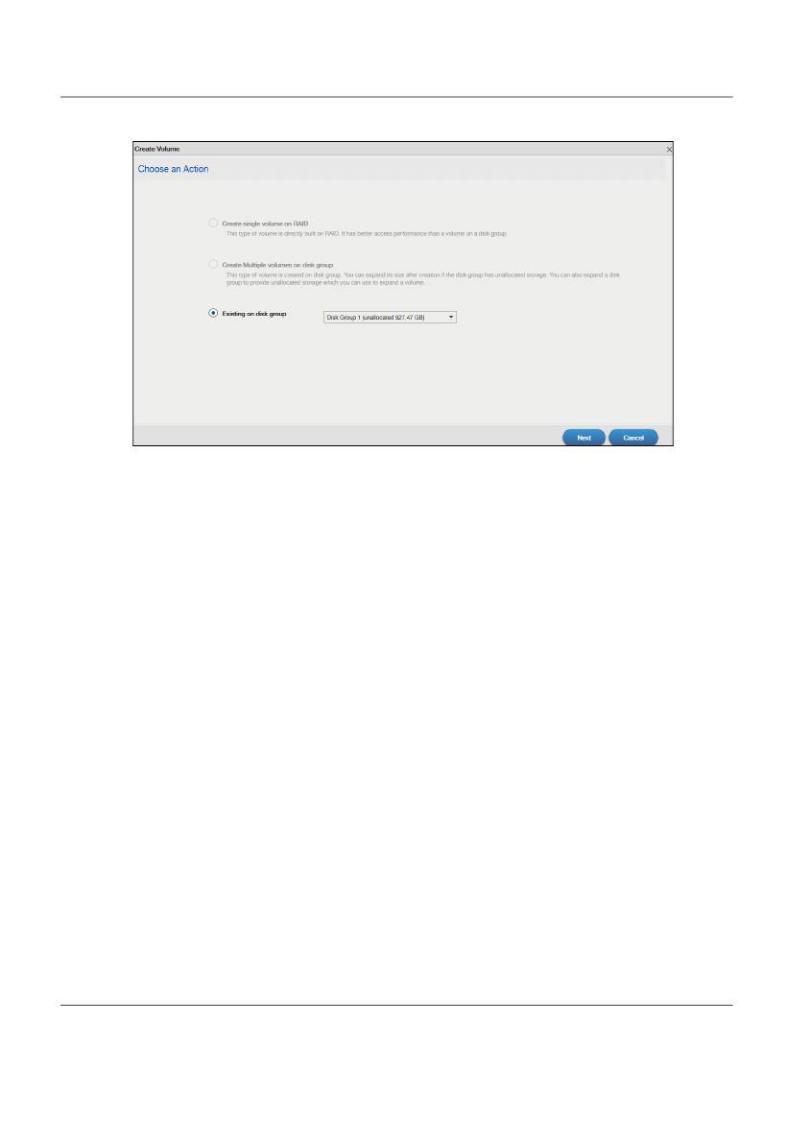
Глава 3 Web Configurator
Иллюстрация 21 Create Volume
Если выбрать Existing on disk group и щелкнуть Next, то вы перейдете на следующий экран.
Руководство пользователя NAS Series
27
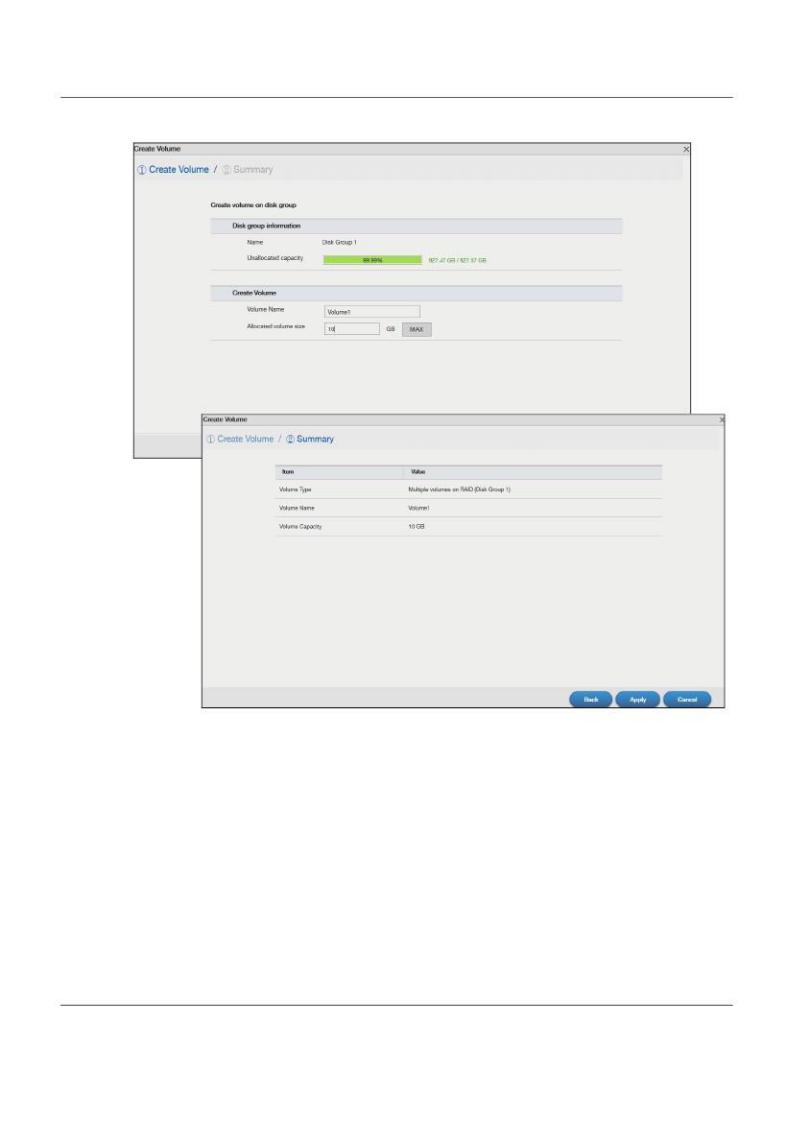
Глава 3 Web Configurator
Иллюстрация 22 Existing on Disk Group
Если раньше вы не создавали том на NAS, то нужно будет егоперезагрузить после создания тома. Щелкните Yes для
перезагрузки или No для перехода к Рабочему столу.
Руководство пользователя NAS Series
28
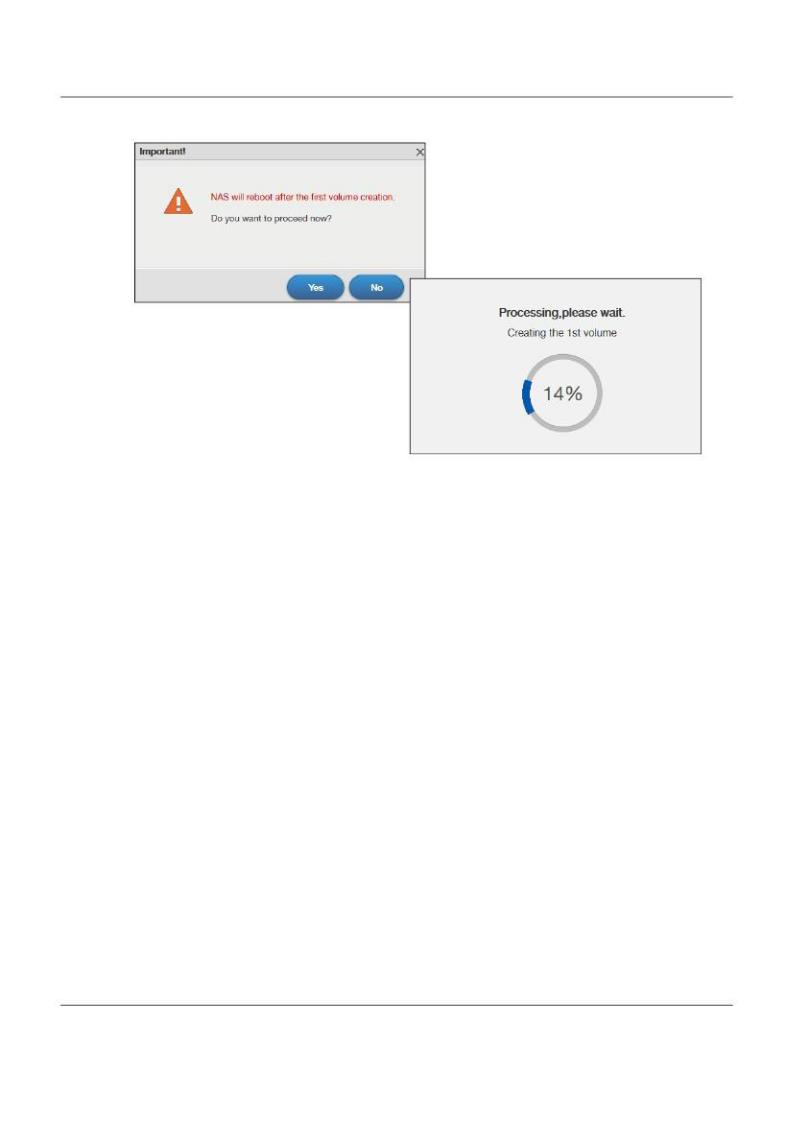
Глава 3 Web Configurator
Иллюстрация 23 Перезагрузка
3.3 Desktop (Рабочий стол)
Экран Desktop (Рабочий стол) открывается после входа в систему. Если провести мышкой поверх пиктограммы на этом
экране, то высветится ее имя.
Руководство пользователя NAS Series
29
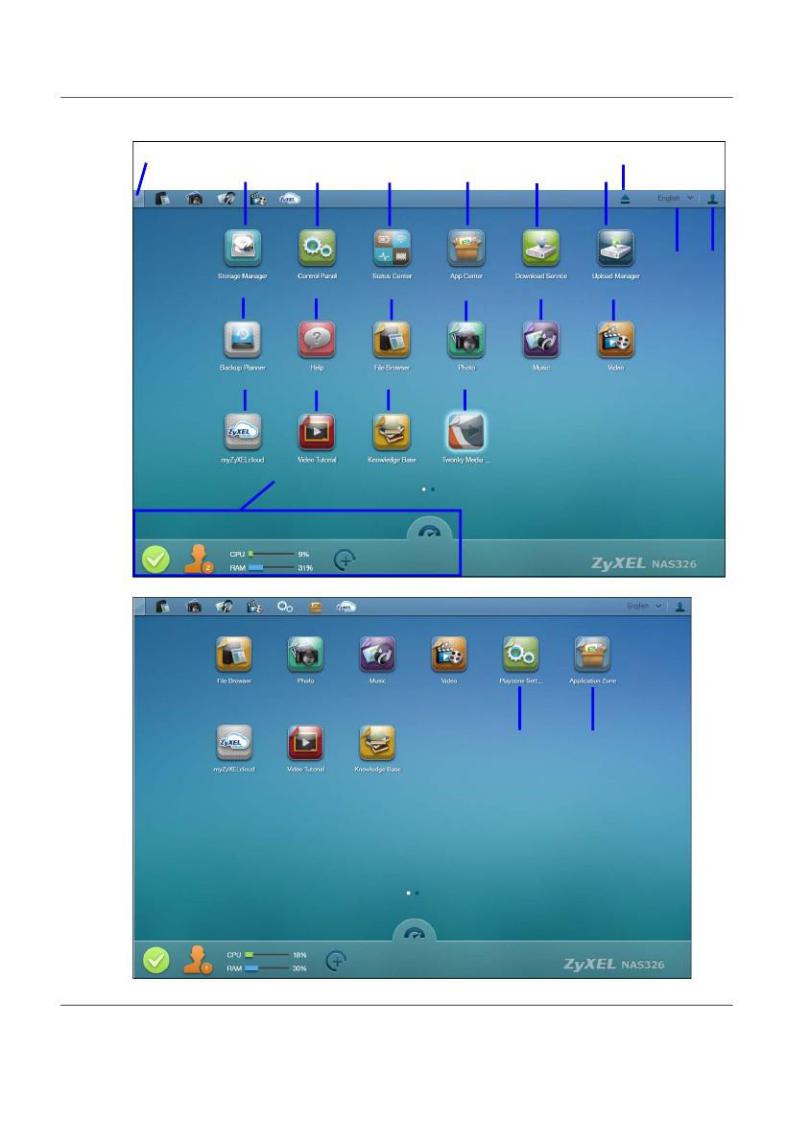
|
Глава 3 Web Configurator |
||||||
|
Иллюстрация 24 Desktop (Administrator) |
||||||
|
1 |
18 |
|||||
|
2 |
3 |
4 |
5 |
6 |
7 |
|
|
19 |
20 |
|||||
|
8 |
9 |
10 |
11 |
12 |
13 |
|
|
14 |
15 |
16 |
17 |
|||
|
Status Zone |
Иллюстрация 25 Desktop (пользователь)
21 22
Руководство пользователя NAS Series
30
![]()
Глава 3 Web Configurator
Примечание: Сессия Web Configurator автоматически завершается после 15 минут бездействия, после чего для
продолжения нужно снова зайти в систему.
1Desktop – щелкните чтобы свернуть все окна и отобразить Рабочий стол. При повторном щелчке все окна восстанавливаются.
2Storage Manager — щелкните для перехода к экранам конфигурирования хранения, где отображается состояние внутренних и
внешних дисков и можно сконфигурировать группу дисков, тома и функции iSCSI.
3Control Panel – щелкните для перехода к экранам панели управления, где можно задать права пользователя, настройкисети,
системы, мультимедийныхсервисов и обслуживания.
4Status Center – щелкните для просмотра системной информации NAS или состояния сетевого соединения.
5App Center – щелкните, чтобы найти, инсталлировать и обновить приложения, которые поставляются с NAS.
6Download Service — щелкните чтобы задать настройки загрузки и просмотреть подробную информацию о загрузке.
7Upload Manager — щелкните чтобы загрузить файлы на FTP-серверы, на ваши учетные записи Flickr и YouTube.
8Backup Planner — щелкните чтобы настроить план резервного копирования, восстановить данные по резервным копиям,
сконфигурировать настройкикопирования и синхронизациии включить поддержку Time Machine.
9Help — щелкните чтобы отобразить встроеннуюсистему справочных экранов NAS.
10File Browser — щелкните чтобы просмотреть файлы в дереве папок.
11Photo — щелкните чтобы просмотреть фотографии в общих папках, где публикуются фото.
12Music — щелкните чтобы просмотреть и воспроизвестифайлы с музыкой в общих папках, где публикуются музыкальные записи.
13Video — щелкните чтобы просмотреть и воспроизвести видеофайлы в общих папках, где публикуется видео.
14myZyxelCloud — щелкните чтобы открыть экрандля настройки сервиса myZyxelCloud.
15Video Tutorial — щелкните чтобы посмотреть видео Zyxel с YouTube с инструкциями по использованию NAS.
16Knowledge Base — щелкните чтобы перейти на web-сайт поддержки Zyxel, где можно найти статьи о применениипродуктов, FAQ и
рассказы пользователей об использованиипродуктов.
17Twonky Media Player — щелкните чтобы открыть экраны конфигурации медиа—сервера Twonkyи просмотреть егосостояние либо
изменить его настройки.
18Eject NAS External Drives — щелкните чтобы извлечь подключенный внешний том.
19Language – отображает текущий язык интерфейса NAS. Выберите тот язык, который вы хотите использовать при
конфигурированииWeb Configurator.
20User — щелкните чтобы выполнить перезапуск, выключение, выход из системы и изменение пароля вашей учетной
записи пользователя.
21Playzone Settings — щелкните чтобы открыть в новой вкладке экран конфигурацииPlayzone.
22Application Zone — щелкните чтобы открыть в новой вкладке Application Zone.
Руководство пользователя NAS Series
31

Глава 3 Web Configurator
3.3.1Status Zone
Взоне Status Zone отображаются пиктограммы различных функций, которые вы можете использовать.
Таблица 6 Пиктограммы Status Zone
ICON Описание
Щелкните System Status чтобы перейти к экрану Status Center, на котором отображается состояние NAS. Зеленый кружок с
галочкой означает нормальное состояние.
User Type обозначает текущее число web-сессий. Подробную информацию можно вывести, щелкнув Status Center >
Network.
CPU отображает текущую загрузку (в процентах) процессорной мощности NAS. RAM отображает текущее использование (в
процентах) оперативной памяти NAS. Подробную информацию можно вывести, щелкнув Status Center > System Information.
Щелкните эту кнопку чтобы выбрать виджеты, которые выводятся на панели состояния.
Выберите виджеты, которые выводятся на панели состояния, либо сбросьте галочку у тех виджетов, которые не нужно
выводить на панели состояния. Щелкните OK для сохранения изменений либо Cancel для выхода из этого экрана без сохранения изменений.
Щелкните чтобы скрыть или показать строку состояния.
3.3.2 Переключение между страницами Рабочего стола
Щелкните кнопку для перехода между несколькими страницами Рабочегостола. Белая точка обозначает текущую страницу.
Одновременно можно открыть пять страниц Рабочего стола.
Руководство пользователя NAS Series
32

Глава 3 Web Configurator
Иллюстрация 26 Переключение между страницами Desktop
3.3.3 Пиктограммы групп
Можно перетащить одну пиктограмму к другой и объединить их в группу как показано на следующей
иллюстрации.
Руководство пользователя NAS Series
33

Глава 3 Web Configurator
Иллюстрация 27 Пиктограмма группы
Новая группа получает название по умолчанию “NewGroup”. Можно изменить это имя, щелкнув пиктограмму (в следующем примере имя
группы изменено на Media.
Иллюстрация 28 Изменение имени группы
Группу также можно переместить на другую страницу, щелкнув ее пиктограмму правойкнопкой мыши (см. следующую
иллюстрацию.
Руководство пользователя NAS Series
34

Глава 3 Web Configurator
Иллюстрация 29 Перемещение группы на другуюстраницу
3.3.4 Перемещение пиктограммы
Пиктограмму можно переместить на другуюстраницу, щелкнув ее правой кнопкоймыши (см. следующуюиллюстрацию).
Иллюстрация 30 Перемещение пиктограммы
Руководство пользователя NAS Series
35

Глава 4
Видеоинструкции
4.1 Обзор
Для перехода к размещенным на www.youtube.com видеоинструкциям Zyxel по использованию NAS нужно щелкнуть Video Tutorial
на Рабочем столе. В этой главе дается информация по следующим видеоинструкциям:
•Создание тома и копирование файлов с помощью Windows Explorer (стр. 36)
•Включение Time Machine на NAS и вашем компьютере Mac (стр. 36)
•Резервное копирование файлов на NAS с помощью Windows File History (стр. 38)
•Восстановление файлов с помощью Windows File History (стр. 39)
•Удаленныйдоступ к файлам NAS с помощью WebDAV (стр. 39)
Примечание: Экраны и графика этих видеоинструкций могут немного отличаться от вашего продукта из—за
различий прошивки продукта или операционной системы вашего компьютера.
4.2 Создание тома и копирование файлов с помощью Windows Explorer
После того, как вы нашли NAS и вошли в систему, нужно создать том, чтобы можнобыло использовать NAS. Затем можно будет копировать
файлы на NAS с вашего компьютера с помощью Windows Explorer.
Если у вас на жестком диске, который вы собираетесь установить в NAS, записаны какие—то
данные, то обязательно сделайте для них резервную копию. При форматировании диска в NAS для создания тома все эти данные будут потеряны.
См. видео Zyxel на YouTube https://www.youtube.com/watch?v=_-WeIgHdxwA&index=1&list=PL-69xFi03dP9zQn8gHGcVwf-X6ShkNU27.
4.3 Включение Time Machine на NAS и вашем компьютере Mac
Time Machine – это система резервного копирования в Mac OS X. Она автоматически создает резервные копии для всех данных вашегоMac
в том числе фото, музыку, видео, документы, приложения и настройки. Эта видеоинструкция поможет вам включить Time Machine на OS X чтобы использовать ваш NAS как том для резервногокопирования.
С помощью экрана Backup Planner > Time Machine (Раздел 16.5 на стр. 290) можно включить или отключить поддержки Time Machine и назначить папку для хранения резервныхкопий Time Machine.
Руководство пользователя NAS Series
36

|
Глава 4 Видеоинструкции |
|
|
После включения поддержкиTime Machine на NAS нужно выполнить следующие шаги для настройки Time Machine на вашем Mac |
|
|
для использования NAS для записи резервных копий. |
|
|
Соответствующая видеоинструкция Zyxel размещена на YouTube по адресу |
|
|
https://www.youtube.com/watch?v=nzpZNJuEsUs&index=2&list=PL-69xFi03dP9zQn8gHGcVwf-X6ShkNU27. |
|
|
1 |
Щелкните Apple > System Preferences, затем перейдите в System и выберите Time Machine. |
|
2 |
Переведите Time Machine в ON, затем щелкните Change Disk. |
3Выберите ту общую папку на NAS, которую вы назначили как диск для резервного копирования backup disk (в данном примере это share01),
затем щелкните Use for Backup.
Руководство пользователя NAS Series
37

Глава 4 Видеоинструкции
4Когда появится приглашение ввести имя пользователя и пароль для share01, введите эти данные для учетнойзаписи
пользователя, у которого есть права записи для share01 (о конфигурировании учетнойзаписи пользователя и общих папок см. Глава 7 на стр. 104). В данном примере имя пользователя и пароль — user1/12345. Затем щелкните Connect.
5Time Machine начнет резервное копирование файлов с share01 через 120 секунд. Есливы хотите сразу запустить резервное копирование, то
щелкните пиктограмму Time Machine и выберите Back Up Now.
|
6 |
На экране отображается процесс резервного копирования. |
7Для завершения процесса резервного копирования щелкните пиктограмму Time Machine и выберите Stop Backing Up, затем переведите
Time Machine в OFF.
4.4Резервное копирование файлов на NAS с помощью Windows File
History
File History – это стандартная утилита Windows, которая используется начиная с версии Windows 8. Можно настроить File History на вашем компьютере Windows на автоматическое резервное копирование файлов с этого компьютера на NAS.
Руководство пользователя NAS Series
38

Глава 4 Видеоинструкции
В видеоинструкции
https://www.youtube.com/watch?v=xt1XdMAZisU&list=PL-69xFi03dP9zQn8gHGcVwf-X6ShkNU27&index=3 объясняется, как в
Windows 10 с помощью File History записать на NAS резервные копии файлов компьютера.
4.5 Восстановление файлов с помощью Windows File History
Если вы с помощью Windows File History записали на NAS резервные копиифайлов вашего компьютера, то с помощью File History можно восстановить файлы по этим резервным копиям.
В видеоинструкции https://www.youtube.com/watch?v=xt1XdMAZisU&list=PL-69xFi03dP9zQn8gHGcVwf-X6ShkNU27&index=3
объясняется, какв Windows 10 с помощьюFile History восстановить файлы по записанным на NAS резервным копиям.
4.6 Удаленный доступ к файлам NAS с помощью WebDAV
Если ваш компьютер не подключен к локальнойсети, к которойподключен NAS, то с помощьюклиентской программы,
поддерживающей WebDAV, можноудаленноредактировать хранящиеся на NAS файлы и управлять ими.
В этом примере нужно:
1Щелкнуть Control Panel > Service > WebDAV чтобы включить WebDAV на вашем NAS (См. Раздел 10.7 на стр. 165).
2Щелкните пиктограмму myZyxelcloud на Рабочем столе чтобы создать учетную запись myZyxelcloud в https://mycloud.zyxel.com.
3Свяжите NAS с учетной записью myZyxelcloud.
4Задайте имя бесплатного хоста DDNSдля NAS, по которому можно будет подключиться к NAS через Интернет.
5Задайте настройки UPnP port mapping для доступа из WAN (Интернета) к WebDAV-сервисам NAS.
6Инсталлируйте на компьютере, с которого вы хотите получить удаленным доступ к файлам NAS, клиентскую программу,
поддерживающую (например, NetDrive).
Видеоинструкция Zyxel на YouTube: https://www.youtube.com/watch?v=Z9oxXx1rZAA&index=5&list=PL-69xFi03dP9zQn8gHGcVwf-X6ShkNU27.
Руководство пользователя NAS Series
39

Глава 5 Storage Manager
5.1Обзор
Вэтой главе описаны экраны, на которых отображается состояние внутренних и внешних дисков и объясняется, как
сконфигурировать группы дисков, тома и функции iSCSI. После того, как вы зашли в систему как администратор, щелкните Storage Manager на Рабочемстоле для перехода к следующим экранам в новом окне.
5.2Overview Storage Manager
Щелкните Storage Manager на Рабочем столе для отображения состояние внутренних и внешнихдисков и объясняется и
конфигурирования группы дисков, томов и функций iSCSI.
Экран Storage Manager Overview отображает статус, текущуюконфигурацию хранения, использование внутреннихтомов и
емкости внешних томов.
5.2.1 Экран Internal Volumes
Иллюстрация 31 Storage Manager> Overview > Internal Volumes
Руководство пользователя NAS Series
40
![]()
Глава 5 Storage Manager
В следующей таблице объясняется, что означают меткиэтого экрана.
Таблица 7 Storage Manager > Overview> Internal Volumes
|
Метка |
Описание |
|
Storage |
Кружок отображает общее состояние NAS. |
|
Зеленый кружок с галочкой означает нормальное состояние. |
|
|
Оранжевый кружок с восклицательным знаком говорит о том, что NAS требует внимания – произошла |
|
|
деградация тома либо группы дисков. Щелкните Repair для устранения проблемы. |
|
|
Красный кружок с восклицательным знаком означает опасность – вышел из строя том или группа дисков |
|
|
и невозможно восстановить том. |
|
|
Volume on RAID |
В этом разделе отображается использование емкости каждого тома RAID. У этих томов выше скорость |
|
доступа, чем у групп дисков, но у него нельзя менять размер. |
|
|
Здесь отображается подробная информация о проценте использования емкости тома. |
|
|
Shared Folder (Normal) — зеленый цвет обозначает процент емкости тома в нормальном состоянии. |
|
|
LUN (Normal) – синий цвет обозначает процент использованной емкости iSCSI LUN. |
|
|
Degraded – оранжевый цвет обозначает процент деградированной емкости тома. Деградация означает, что |
|
|
один или несколько дисков неисправны, но если заменить этот диск (диски), то можно восстановить том. |
|
|
Crashed/Full – красный цвет обозначает вышедший из строя том, который нельзя восстановить. Полностью |
|
|
красная окружность означает, что том полностью заполнен. |
|
|
Available – серый цвет обозначает свободную емкость тома. |
|
|
В этом разделе отображается процент использованной емкости тома и его общая емкость. |
|
|
Volume on Disk Group |
В этом разделе отображается использование емкости каждого тома в группе дисков. Если у группы дисков |
|
есть свободная емкость, то ее можно выделить тому для увеличения его размера. Также можно расширить |
|
|
группу дисков добавлением жесткого диска. |
Руководство пользователя NAS Series
41

Глава 5 Storage Manager
5.2.2 Экран External Volumes
Иллюстрация 32 Storage Manager> Overview > External Volumes
В следующей таблице объясняется, что означают меткиэтого экрана.
Таблица 8 Storage Manager > Overview> External Volumes
|
Метка |
Описание |
|
Volume |
Подробная информация о проценте использованной емкости тома. |
|
Used – зеленый цвет обозначает процент емкости тома в нормальном состоянии. |
|
|
Full – красный цвет обозначает полностью заполненный том. |
|
|
Unformatted – розовый цвет обозначает подключенный и неформатированный USB-диск, на котором нет |
|
|
файловой системы. |
|
|
Unsupported – фиолетовый цвет обозначает подключенный USB-диск, использующий файловую систему, |
|
|
которую не поддерживает NAS. |
|
|
Available — серый цвет обозначает свободную емкость тома. |
Вэтом разделе отображается процент использованной емкости тома и его общая емкость.
5.3Internal Storage (внутренние ресурсы хранения)
Том — это базовое пространство хранения на NAS. Для хранения данных на NAS нужносоздать хотя бы один том. NAS поддерживает
следующие типы томов:
• Внутренние (Internal) тома (созданные на внутреннихдисках NAS)
Руководство пользователя NAS Series
42

Глава 5 Storage Manager
• Внешние (External) тома (созданные на подключенных к NAS внешних накопителях)
Внутренние тома
Таблица 9 Внутренние тома
|
Опция |
Описание |
|
Том |
Выделяет тому все доступное пространство. |
|
Обеспечивает быстрый доступ к данным. |
|
|
Том из группы дисков |
Можно создать несколько томов на группе дисков. |
|
Размер тома можно менять. |
Типы RAID
Ниже описаны разные типы RAID.
Примечание: RAID 5, RAID 6, RAID 10 и опция hot spare (диск горячего резерва) применяются только в NAS с 4
отсеками для дисков.
|
Таблица 10 Типы RAID |
|||||
|
Тип |
Число |
Сколько дисков |
Описание |
Емкость |
|
|
RAID |
дисков |
может выйти из строя |
|||
|
Basic |
1 |
0 |
Если только 1 диск, то используется Basic. Нет защиты от сбоев. |
1 x (емкость диска) |
|
|
JBOD |
2-4 |
0 |
JBOD можно использовать для максимальной емкости с 2 и |
сумма емкости дисков |
|
|
более дисками. Это просто группа диска без защиты от сбоев. |
|||||
|
RAID 0 |
2-4 |
0 |
RAID 0 можно использовать для максимальной скорости с 2 и |
сумма емкости дисков |
|
|
более дисками. Нет защиты от сбоев. |
|||||
|
RAID 1 |
2-4 |
(Число дисков) -1 |
RAID 1 создает на одном диске точную копию другого. Этот |
Емкость самого |
|
|
тип RAID используется с 2 или 4 дисками для зеркалирования |
маленького диска. |
||||
|
первичных данных на другом диске. |
|||||
|
Можно добавить диск hot spare к 2-дисковому RAID 1. |
|||||
|
RAID 5 |
3-4 |
1 |
RAID 5 используется с 3 или 4 дисками и обеспечивает |
(Число дисков – 1) x |
|
|
сочетание производительности и эффективности |
(емкость самого |
||||
|
использования емкости дисков с отказоустойчивостью. |
маленького диска) |
||||
|
Можно добавить диск hot spare к 3—дисковому RAID 5. |
|||||
|
RAID 6 |
4 |
2 |
RAID 6 используется с 4 дисками и обеспечивает более |
(Число дисков – 2) x |
|
|
надежную защиту от сбоя диска. |
(емкость самого |
||||
|
маленького диска) |
|||||
|
RAID 10 |
4 |
1 диск в каждой группе |
RAID 10 используется с 4 дисками и работает быстрее, чем |
(Число дисков – 2) x |
|
|
RAID 1 |
RAID 6, хотя защита от отказа диска у него несколько хуже. |
||||
|
(емкость самого |
|||||
маленького диска)
Ремонт томов или группы дисков
Если выйдет из строя жесткий диск из RAID 1 с hot spare или a RAID 5 с hot spare, то NAS автоматическизаново создаст с помощью
диска hot spare том или группу дисков. Затем можно заменить неисправный диск и добавить новый диск как hot spare.
Выход из строя диск в a RAID 1, RAID 5, RAID 6 или RAID 10 приводит к деградации тома илигруппы дисков. Замените неисправный диск и
с помощью ссылки Repair экрана Internal Storage восстановите том.
Руководство пользователя NAS Series
43

Глава 5 Storage Manager
Изменение типа RAID
Следующие типы RAID можно менять при добавлении в NAS дисков для расширения емкости без риска потери хранящихся на NAS
данных.
|
Таблица 11 Внутренние тома |
|
|
Тип RAID |
На какой тип RAID можно изменять |
|
Basic |
RAID 1 |
|
RAID 1 |
RAID 1 с hot spare либо RAID 5 |
|
RAID 5 |
RAID 5 с hot spare либо RAID 6 |
Расширение томов или группы дисков
По мере рост объемов данных можно расширить емкость тома илигруппы дисков без риска потери хранящихся данных.
Таблица 12 Расширение томов или группы дисков
|
Способ |
Описание |
|
|
расширения |
||
|
Выделение |
Можно выделить тому дополнительную емкость если в той же дисковой группе есть неиспользованная емкость. |
|
|
неиспользуемого |
||
|
дискового пространства |
||
|
Добавление дисков |
Можно добавить один или несколько дисков в JBOD, RAID 1 или RAID 5. |
|
|
У нового диска емкость должна быть не меньше, чем у самого маленького диска группы. |
||
|
Замена дисков на |
Можно заменить диски в RAID 1, RAID 5 и RAID 6 на диски большей емкости. |
|
|
новые большей |
||
|
емкости |
Заменять нужно по одному диску. |
|
|
Сначала в нужно заменить самый маленький диск группы. |
||
|
После замена диска нужно восстановить том с помощью ссылки Manage экрана Internal Storage. |
||
|
Дождитесь завершения восстановления тома и только потом начинайте замену другого диска. |
5.3.1 Экраны Volume
Используйте экран Volume для конфигурирования и управления внутренними томами. Для перехода к этому экрану щелкните
Volume на экране Internal Storage (см. ниже).
Руководство пользователя NAS Series
44

Глава 5 Storage Manager
Иллюстрация 33 Internal Storage Volume
В следующей таблице объясняется, что означают меткиэтого экрана.
Таблица 13 Storage Manager> Internal Storage > Volume
Метка Описание
Volume
Этот раздел для конфигурирования и управления томами, которые построены на самих жестких дисках.
|
Create |
Форматирование внутреннего жесткого диска и создания нового тома. Все данные, записанные на диске (дисках) |
|
будут потеряны. |
Примечание: Эта кнопка не работает когда NAS создает или удаляет RAID или меняет еготип для
любого тома или группы дисков.
Если все установленные диски используются другими томами или группами дисков, то вы выведется
всплывающее окно. В этом случае нужно установить еще один диск в NAS если в устройстве есть свободный
отсек для дисков либо для освобождения емкости удалить ненужные тома или группу дисков. Щелкните OK чтобы закрыть этот экран.
|
Manage |
Выберите том и щелкните Manage чтобы редактировать, восстановить или расширить том. |
|
Примечание: Эта кнопка работает толькопри восстановлении и расширении RAID или изменении его |
|
|
типа. |
Руководство пользователя NAS Series
45

|
Глава 5 Storage Manager |
|
|
Таблица 13 Storage Manager> Internal Storage > Volume (продолжение) |
|
|
Метка |
Описание |
|
Delete |
Выберите Delete чтобы удалить выбранный том. Во всплывающем окне нужно ввести «DELETE» и щелкнуть Delete |
|
чтобы убрать его. |
|
Примечание: При удалении тома будут потеряны все его данные. |
|
|
Add Hot Spare |
Выберите том RAID 1 или RAID 5 и щелкните Add Hot Spare для добавления другого диска как hot-spare |
|
(диск горячего резерва) в RAID-массив. Откроется всплывающее окно. |
|
Выберите из раскрывающегося списка диск и щелкните Apply. |
|
|
Типы RAID описаны в Таблице 10 на стр. 43. |
|
|
Примечание: Емкость нового диска должна быть не меньше, чем у самого большого диска в массиве |
|
|
RAID 1 или RAID 5. |
|
|
Remove Hot Spare |
Выберите том RAID 1 или RAID 5 и щелкните Remove Hot Spare для удаления из RAID-массива диска горячего резерва. |
Руководство пользователя NAS Series
46

|
Глава 5 Storage Manager |
|
|
Таблица 13 Storage Manager> Internal Storage > Volume (продолжение) |
|
|
Метка |
Описание |
|
Status |
В этом поле отображается состояние тома (Normal, Degraded, Crashed, Creating, Deleting, |
|
Expanding, Repairing либо Changing (изменение типа RAID). |
|
|
Normal: Зеленый цвет обозначает нормальное состояние тома. |
|
|
Degraded: Оранжевый цвет обозначает деградировавший том RAID 1. |
|
|
Crashed: Красный цвет обозначает неисправный том. |
|
|
Для следующих статусов отображается процент завершения процесса: |
|
|
Creating: Создание тома NAS. |
|
|
Deleting: Удаление тома NAS. |
|
|
Expanding: Расширение тома NAS. Для тома RAID 1 также отображается процесс синхронизации содержимого дисков |
|
|
и оставшееся время. |
|
|
Repairing: Восстановление тома NAS. Для тома RAID 1 также отображается процесс синхронизации содержимого |
|
|
дисков и оставшееся время. |
|
|
Changing: Изменение типа RAID тома NAS. Для тома RAID 1 также отображается процесс синхронизации |
|
|
содержимого дисков и оставшееся время. |
|
|
Volume Name |
Имя тома. Список томов можно сортировать по алфавиту, щелкнув стрелочку в заголовке таблицы. |
|
RAID Type |
Тип RAID (Basic, RAID 0/1/5/6/10 или JBOD), который использует том. |
|
Usage |
Процент использованной и свободной емкости и общий размер диска. |
|
Hot Spare |
Имя диска горячего резерва (только для томов RAID 1 или RAID 5). |
Тома в группе дисков (Volume on Disk Group)
Раздел для конфигурирования и управления томами в группе дисков.
|
Create |
Форматирование внутреннего жесткого диска и создания нового тома. Все данные, записанные на диске (дисках) |
|
будут потерян. |
|
Примечание: Эта кнопка не работает когда NAS создает или удаляет том или группу дисков либо |
|
|
меняет тип RAID. |
|
|
Edit |
Щелкните Edit чтобы расширить емкость выбранного тома. |
Руководство пользователя NAS Series
47

|
Глава 5 Storage Manager |
|
|
Таблица 13 Storage Manager> Internal Storage > Volume (продолжение) |
|
|
Метка |
Описание |
|
Delete |
Щелкните Delete чтобы удалить выбранный том. Во всплывающем окне нужно ввести «DELETE» и щелкнуть Delete |
|
чтобы убрать его |
.
|
Примечание: При удалении тома все его данные будут потеряны. |
|
|
Примечание: При удаление тома в группе дисков сама группу дисков не удаляется. Для ее удаления нужно |
|
|
щелкнуть Internal Storage > Disk Group. |
|
|
Disk Group X |
В этом поле отображаются имя группы дисков, процент свободной и использованной емкости группы дисков и |
|
ее общий размер. |
|
|
Status |
В этом поле отображается состояние тома (Normal, Degraded, Crashed, Creating, Deleting, |
|
Expanding, Repairing либо Changing (изменение типа RAID). |
|
|
Normal: Зеленый цвет обозначает нормальное состояние тома. |
|
|
Degraded: Оранжевый цвет обозначает деградировавший том RAID 1. |
|
|
Crashed: Красный цвет обозначает неисправный том. |
|
|
Для следующих статусов отображается процент завершения процесса: |
|
|
Creating: Создание тома NAS. |
|
|
Deleting: Удаление тома NAS. |
|
|
Expanding: Расширение тома NAS. Для тома RAID 1 также отображается процесс синхронизации содержимого дисков и |
|
|
оставшееся время. |
|
|
Repairing: Восстановление тома NAS. Для тома RAID 1 также отображается процесс синхронизации содержимого |
|
|
дисков и оставшееся время. |
|
|
Changing: Изменение типа RAID тома NAS. Для тома RAID 1 также отображается процесс синхронизации содержимого |
|
|
дисков и оставшееся время. |
|
|
Volume Name |
Имя тома. Список томов можно сортировать по алфавиту, щелкнув стрелочку в заголовке таблицы. |
|
File System |
Файловая система, которую использует том. В настоящее время ваш NAS использует файловую систему EXT4 для |
|
внутренних томов. |
|
|
Usage |
Процент использованной и свободной емкости и общий размер диска. |
5.3.1.1 Create Volume (создание тома)
Экран Create Volume предназначен для конфигурирования тома непосредственно на диске/RAID, что обеспечивает более высокую
скорость доступа. Для открытия этого экрана нужно щелкнуть Create в разделе Volume из Storage Manager > Internal Storage > Volume.
Руководство пользователя NAS Series
48

Глава 5 Storage Manager
Примечание: Если нужно создать на диске несколько томов, то создайте том в группе дисков (см. Раздел 5.3.1.7 на
стр. 61). Максимальный размер одного тома – 16 Тбайт.
Шаг 1 Выбор дисков и типа RAID
Иллюстрация 34 Create Volume: Выбор дисков и типа RAID
В следующей таблице объясняется, что означают меткиэтого экрана.
Таблица 14 Create Volume: Выбор дисков и типа RAID
Метка Описание
1.Select disks Таблица со списком все доступных дисков и графическая схема их установки в отсеки NAS.
|
Выберите один или несколько дисков, на которых нужно создать том, поставив галочку в соответствующей колонке. Если |
|
|
поставить галочку в ячейке в заголовке таблицы, то будут выбраны все доступные диски. |
|
|
Disk Name |
Имя жесткого диска. |
|
Size |
Общий размер диска. |
|
Model Name |
Модель жесткого диска. |
Руководство пользователя NAS Series
49

|
Глава 5 Storage Manager |
|
|
Таблица 14 Create Volume: Выбор дисков и типа RAID (продолжение) |
|
|
Метка |
Описание |
|
2. Choose a |
Выберите тип RAID из раскрывающегося списка. Ниже списка отображаются доступная емкость (available size), размеры |
|
RAID type |
зоны защиты данных (data protection area) и зоны, которую нельзя использовать (wasted). |
|
Выберите Basic если у вас только 1 диск. |
|
|
Выберите JBOD если у вас два и более диска и требуется максимум емкости. |
|
|
Выберите RAID 0 если у вас два или четыре диска и требуется максимум скорости. |
|
|
Выберите RAID 1 если у вас два и более диска и нужно зеркалировать первичные данные на другой диск (диски) и |
|
|
обеспечить высокую производительность. |
|
|
Выберите RAID 5 если у вас два и более диска и требуется обеспечить сочетание производительности и эффективности |
|
|
использования емкости дисков с отказоустойчивостью. |
|
|
Выберите RAID 6 с четырьмя дисками для более надежной защиты от сбоя диска. |
|
|
Выберите RAID 10 с четырьмя дисками для более высокой производительности, чем у RAID 6, но с несколько менее |
|
|
надежной защитой. |
|
|
См. Таблица 10 на стр. 43 или Раздел 5.6 на стр. 97. |
|
|
Примечание: Для экономии емкости дисков в RAID 1, 5, 6 и 10 нужно использовать дискиодинаковой |
|
|
емкости. |
|
|
Next |
Щелкните Next для перехода к следующему шагу. |
|
Cancel |
Щелкните Cancel для закрытия экрана без сохранения изменений в настройках. |
Шаг 2 Summary (сводка)
Иллюстрация 35 Create Volume: Summary
Руководство пользователя NAS Series
50
 Loading…
ZyXEL NAS326 2-Bay Personal Cloud Storage Guida Rapida
Бренд:
ZyXEL
Категория:
Mixer/food processor accessories
Размер:
14 MB
Страниц:
48
Язык(и):
Датский, Английский, Финский, Итальянский, Голландский, Румынский, Русский, Словенский, Шведский, Тайский, Турецкий
Открыть в новой вкладке